

Page 1
ThinkPad 560Z
This guide provides information for setting up your computer for the first time.
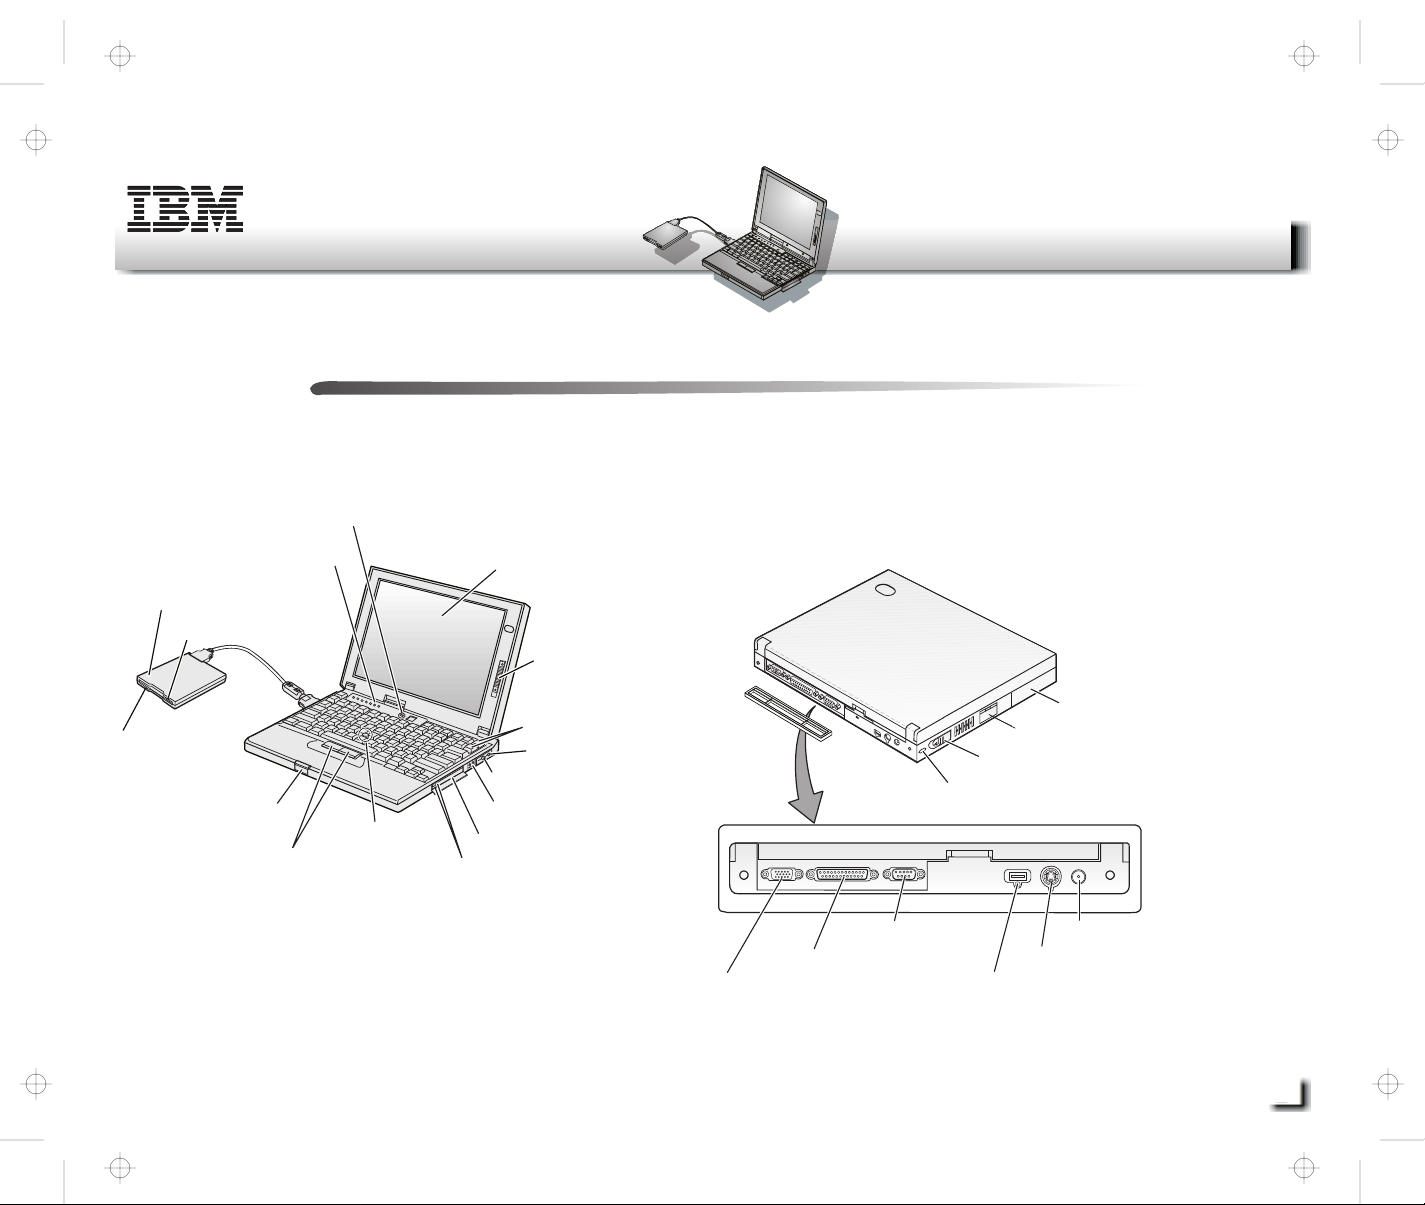
Front View (with external diskette drive)
Built-in microphone
Indicators
External diskette drive
Diskette eject button
Diskette drive
in-use indicator
LCD button
TrackPoint
Click buttons
Liquid crystal display (LCD)
Brightness control
Volume control
Headphone jack
Microphone/line-in jack
Infrared port
PC Card slots
PC Card eject buttons
Setup Guide
27L2615
Rear View
Hard disk drive
External diskette drive connector
Power switch
Security keyhole
Title: C79FOMST CreationDate: 06/21/98 14:58:06
Copyright IBM Corporation 1998
Serial connector
Parallel connector
External monitor connector
Power jack
External input device connector
Universal serial bus (USB) connector
1
Page 2
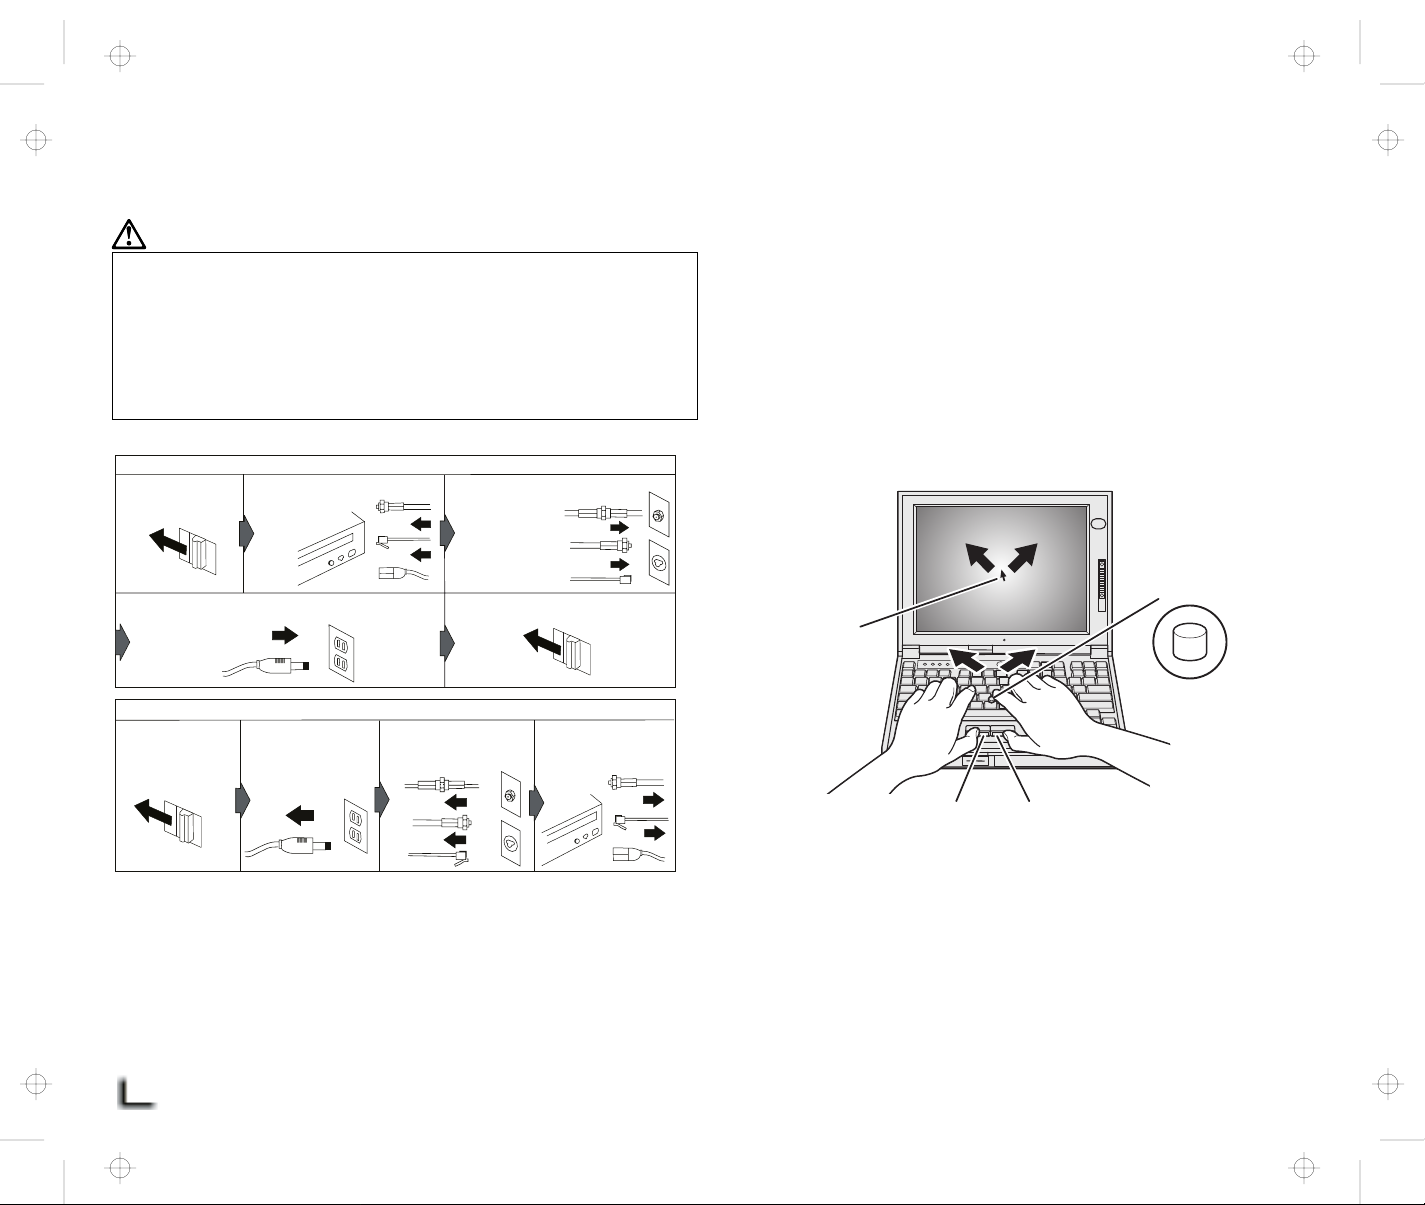
Electrical Safety
Using the TrackPoint
DANGER
Electrical current from power, telephone, and
communication cable is hazardous. To avoid shock
hazard, connect and disconnect cables as shown below
when installing, moving, or opening the covers of the
product or attached devices. The 3-pin power cord must
be used with a proper outlet.
To Connect
Turn everything
OFF.
Attach the power cord to an outlet.
Attach all cables
to devices.
Attach the signal cables
to receptacles.
Turn the device ON.
To Disconnect
Turn everything
OFF.
First, remove
the power cord
from the outlet.
Remove signal cables
from receptacles.
Remove all cables
from devices.
The TrackPoint is a unique device for moving the cursor on the screen.
You can perform all mouse operations with the TrackPoint. The left and
right buttons function like the left and right buttons on a mouse.
To move the cursor, use the red-topped stick at the center of the
keyboard. Press gently with your left or right index finger in the
direction you want to move the cursor. To select and drag an object,
press and hold one of the buttons with either thumb as required by your
software.
Click means to press the left button once. Double-click means to
press the left button twice within 1 second.
Stick
Cursor
Note: In the U.K., by law:
The telephone line cable must be connected after the
power cord.
The power cord must be disconnected after the telephone
line cable.
Title: C79FOMST CreationDate: 06/21/98 14:58:06
2
Left click button
For more information about the TrackPoint, see the
Right click button
User's Reference
.
Page 3

Setting Up Your Computer
You are now ready to assemble and start your computer.
1
Connect the external diskette drive.
a) Open the cover on the external diskette drive
connector.
b) Attach the cable to the external diskette drive, and
then to the external diskette drive connector on the
side of the computer. Press the sides of the
connector 1 as you connect it to the devices 2 .
External diskette drive
External diskette drive connector
2
1
3
Connect the AC Adapter to the computer's power jack (at
the rear of the computer) in the order shown.
1
3
3
2
4
Open the liquid crystal display (LCD).
Press the LCD button 1 and open the LCD 2 . Then
position the LCD so that it is convenient for viewing.
2
1
2
If you want to connect a printer to your computer, open the
connector cover. Connect one end of the printer cable to
the parallel connector and the other end to your printer.
Then power on the printer.
Title: C79FOMST CreationDate: 06/21/98 14:58:06
Copyright IBM Corporation 1998
1
2
1
1
5
Power on the computer.
a) Push and release the power switch 1 . The power
switch automatically snaps back to its original position.
b) Adjust the brightness of the display with the brightness
control 2 .
1
2
3
Page 4

Note: To power off the computer without shutting it down, hold
the power switch at least 1.5 seconds.
Customizing Your Computer for
Windows 98
To register from the Windows 98 or Windows NT desktop, do the
following:
1
Double-click on Register.
2
Follow the instructions on the screen to complete the
registration.
(If you want to register your computer later, follow the
same procedure.)
If your computer uses another operating system, go to the
following Web site to complete registration:
http://www.pc.ibm.com/register
After you complete the Windows 98 setup by following the
instructions on the screen, the ThinkPad Customization Center
icon is on your Windows 98 desktop. To help you customize
your computer for your specific needs, we have provided a
collection of setup wizards known as
Center
.
To start the ThinkPad Customization Center, double-click on the
ThinkPad Customization Center icon. The ThinkPad
Customization Center is launched into the browser, Internet
Explorer (Version 4.0 or later). Follow the instructions on the
screen.
Registering Your Computer
After setting up your computer, take a few moments to complete
the ThinkPad registration. The information you provide will help
IBM to serve you better in the future.
Title: C79FOMST CreationDate: 06/21/98 14:58:06
4
ThinkPad Customization
Getting More Information
If you want to learn more about your computer and its options,
see the following:
ThinkPad 560Z User's Reference Online User's Guide
Getting familiar with your
computer
Extending the features of your
computer
Protecting your computer
Solving computer problems
Getting service
Features and specifications
Note: To start the
cursor to Programs and ThinkPad 560; then click on
Guide
.
Online User's Guide
Using your computer outside
your home country
Using the audio feature
Using your computer with a
battery pack
Using your computer with a PC
Card
Frequently asked questions
Installing software
Using system management
Using PS2 commands
, click on Start and move the
ThinkPad 560 User's
 Loading...