

Page 1

Please check out our eBay auctions for more great
deals on Factory Service Manuals:
Page 2

1
Page 3

Page 4

iii
Page 5

Note
Before using this information and the product it supports, be sure to read the general information under “Notices”
on page 153.
First Edition (August 1997)
The following paragraph does not apply to the United Kingdom or any country where such provisions are
inconsistent with local law:
INTERNATIONAL BUSINESS MACHINES CORPORATION PROVIDES THIS PUBLICATION “AS IS” WITHOUT ANY
WARRANTY OF ANY KIND, EITHER EXPRESS OR IMPLIED, INCLUDING, BUT NOT LIMITED TO, THE LIMITED
WARRANTIES OF MERCHANTABILITY OR FITNESS FOR A PARTICULAR PURPOSE. Some states do not allow
disclaimers or express or implied warranties in certain transactions; therefore, this statement may not apply to you.
This publication could include technical inaccuracies or typographical errors. Changes are periodically made to the
information herein; these changes will be incorporated in new editions of the publication. IBM may make
improvements or changes in the products or the programs described in this publication at any time.
Requests for technical information about IBM products should be made to your IBM Authorized Dealer or your IBM
Marketing Representative.
Copyright International Business Machines Corporation 1997. All rights reserved. Note to US Government
Users – Documentation related to restricted rights – Use, duplication or disclosure is subject to restrictions set forth in
GSA ADP Schedule Contract with IBM Corp.
Page 6

Thank You for Selecting
an IBM ThinkPad 560X Computer
The thin and light IBM ThinkPad 560X computer
is designed to be convenient
for your mobile computing needs.
We hope you enjoy its fast processing power,
brilliant and colorful TFT LCD display,
audio capabilities, and infrared communication.
v
Page 7

Functional Highlights
Ultra portability
The slim 1.9 kilogram computer has excellently portability, especially
when you are traveling. The computer can assist you in your
business anytime and anywhere.
High-speed processor
The Intel MMX Pentium processor enables high-speed data
processing and advanced performance.
Large-capacity Hard Disk Drive
The 2.5-inch 4.0 GB* hard disk drive can respond to a wide variety of
your business demands.
Large SVGA color LCD
The 12.1-inch TFT (thin-film transistor) display offers 256,144 colors
at 800-by-600 resolution.
Lithium-Ion battery pack
The large-capacity lithium-ion battery pack further extends the
operating time of the computer, further contributing to ultra portability.
Audio
The audio feature supports the following:
Wave audio recording and playback of up to 16 bits, stereo, and
44 KHz sampling.
DOS games using the Sound Blaster** interface.
PC Card Support
The computer provides two PC Card slots that accept a 16-bit PC
Card, CardBus Card, and Zoomed Video Card.
*
Gigabyte, one billion (10 ) bytes.
vi IBM ThinkPad 560X User's Guide
Page 8
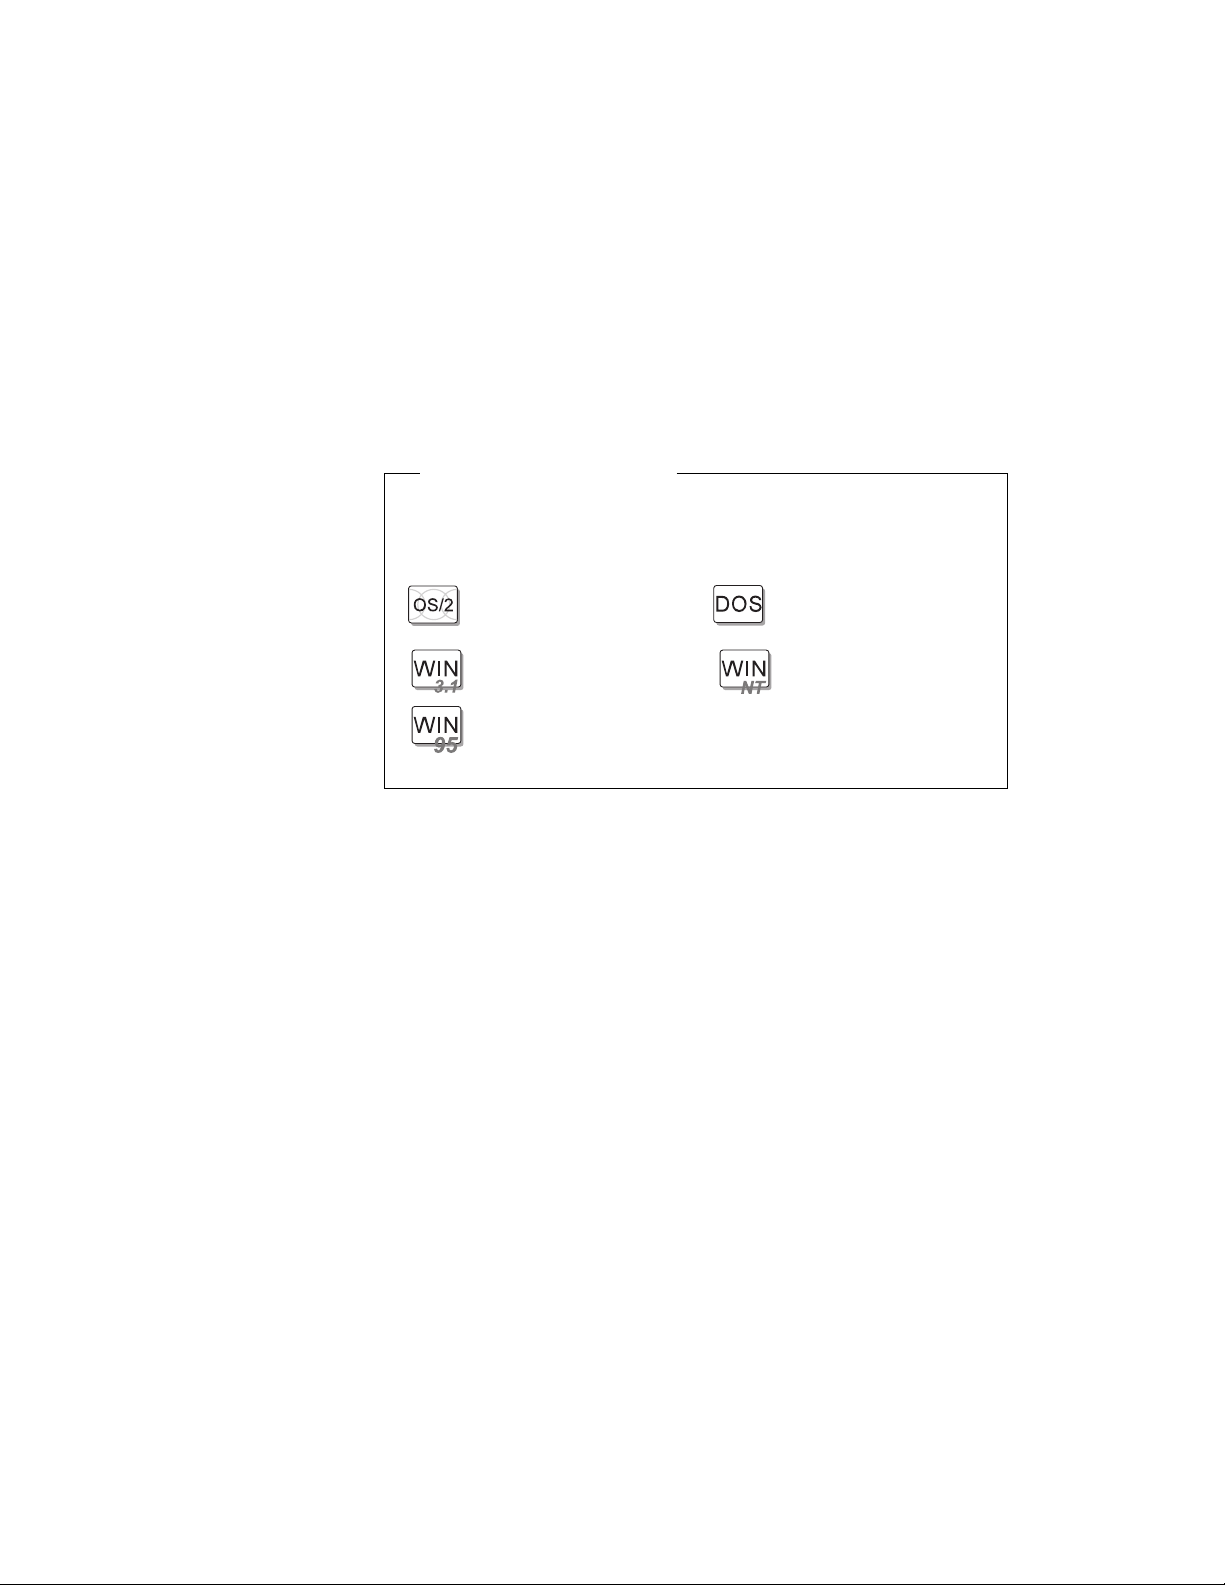
Icons Used in This Book
For procedures or information unique to the operating system
installed in your computer:
Information for IBM
Operating System/2
(OS/2) users.
Information for Microsoft
Windows 3.11 users.
Information for Microsoft
Windows 95 users.
Information for IBM DOS
users.
Information for Microsoft
Windows NT users.
vii
Page 9

Safety Information
DANGER
Do not disassemble, incinerate, or short-circuit the
rechargeable battery pack. Do not put it in trash that is
disposed of in landfills. Dispose of it as required by
local ordinances or regulations. In the United States,
call IBM at 1-800-IBM-4333 for information on disposal.
CAUTION:
The lithium battery (IBM P/N 12J1695 UL-recognized
component—File No. MH12210) can be replaced only by your
dealer or an IBM service representative. It contains lithium and
can explode if not properly used, handled, or disposed of. Do
not: (1) throw or immerse into water, (2) heat to more than
100°C (212°F), or (3) repair or disassemble. Dispose of it as
required by local ordinances or regulations.
CAUTION:
The fluorescent lamp in the liquid crystal display (LCD) contains
mercury. Do not put it in trash that is disposed of in landfills.
Dispose of it as required by local ordinances or regulations.
The LCD is made of glass, and rough handling or dropping the
computer can cause the LCD to break. If the LCD breaks and
the internal fluid gets into your eyes or on your hands,
immediately wash the affected areas with water for at least 15
minutes; then get medical care if any symptoms are present
after washing.
IBM ThinkPad 560X User's Guide
viii
Page 10

ix
Page 11

x IBM ThinkPad 560X User's Guide
Page 12

Contents
Functional Highlights . . . . . . . . . . . . . . . . . . . . . . . . . . vi
Safety Information . . . . . . . . . . . . . . . . . . . . . . . . . . viii
Chapter 1. Getting Familiar with Your Computer ....... 1
Identifying the Hardware Features .................. 2
System-Status Indicators . . . . . . . . . . . . . . . . . . . . . . . 6
ThinkPad Features . . . . . . . . . . . . . . . . . . . . . . . . . . . 8
Attaching the External Diskette Drive ............... 8
Keyboard Functions . . . . . . . . . . . . . . . . . . . . . . . . 10
ThinkPad Utilities . . . . . . . . . . . . . . . . . . . . . . . . . 15
Online Book . . . . . . . . . . . . . . . . . . . . . . . . . . . . 25
Backing Up Your System ...................... 26
Recovery CD (Windows 95 Only) ................ 26
Diskette Factory . . . . . . . . . . . . . . . . . . . . . . . . . . 26
Keeping Your Computer from Being Damaged .......... 26
Chapter 2. Using Battery Power ................. 28
Using the Battery Pack ....................... 29
Charging the Battery Pack .................... 29
Monitoring the Battery Status .................. 29
Saving Battery Power ........................ 33
Using the Power-Saving Modes ................. 33
Customizing the Power Management .............. 38
Considerations When Using a Power Management Mode .. 40
Using Other Battery Saving Methods .............. 45
Replacing the Battery Pack ..................... 46
Chapter 3. Protecting Your Computer ............. 49
Using Passwords . . . . . . . . . . . . . . . . . . . . . . . . . . . 50
Entering a Password ....................... 50
Setting a Password ........................ 51
Changing and Removing a Password ............. 54
Using the Personalization Editor .................. 60
Using Locks . . . . . . . . . . . . . . . . . . . . . . . . . . . . . . 64
Chapter 4. Using the Advanced Features of Your ThinkPad 65
Increasing Memory . . . . . . . . . . . . . . . . . . . . . . . . . . 66
Installing the Memory Option .................. 66
Using an External Pointing Device ................. 70
Disabling the TrackPoint III ................... 74
Copyright IBM Corp. 1997 xi
Page 13

Switching between the LCD and an External Monitor ...... 75
Attaching the Monitor ....................... 75
Using SVGA Video Mode .................... 79
Using a PC Card ........................... 81
Installing the PC Card ...................... 82
Installing the PC Card Modem .................. 87
Using CardWorks** . . . . . . . . . . . . . . . . . . . . . . . . 90
Using the Audio Features ...................... 98
Using the 3D Sound Retrieval System (SRS) Function ... 99
Using Infrared Communication ................... 101
Chapter 5. Solving Computer Problems ............ 103
Frequently Asked Questions .................... 104
Hints, Tips, and Limitations ..................... 105
Troubleshooting Guide . . . . . . . . . . . . . . . . . . . . . . . . 106
Troubleshooting Charts . . . . . . . . . . . . . . . . . . . . . . . 107
Error Codes or Screen Messages ................ 108
No Error Codes or Screen Messages ............. 112
Input Problems . . . . . . . . . . . . . . . . . . . . . . . . . . 113
Suspend or Hibernation Problems ............... 114
LCD Problems . . . . . . . . . . . . . . . . . . . . . . . . . . . 117
Indicator Problems . . . . . . . . . . . . . . . . . . . . . . . . 118
Battery Problems . . . . . . . . . . . . . . . . . . . . . . . . . 118
Infrared Communication Problems ............... 119
A Universal Serial Bus (USB) Problem ............. 120
PC Card Problems ........................ 120
Printer Problems . . . . . . . . . . . . . . . . . . . . . . . . . . 122
External Monitor Problems .................... 122
Other Option Problems ...................... 124
Software Problems . . . . . . . . . . . . . . . . . . . . . . . . 125
Other Problems . . . . . . . . . . . . . . . . . . . . . . . . . . 125
Testing Your Computer ....................... 126
Recovering Lost or Damaged Software .............. 128
Using the Diskette Factory .................... 128
Using the Recovery CD (Windows 95 Only) .......... 130
Chapter 6. Getting Service . . . . . . . . . . . . . . . . . . . . 131
Information on Your ThinkPad ................... 132
Option List . . . . . . . . . . . . . . . . . . . . . . . . . . . . . 132
Identification Numbers . . . . . . . . . . . . . . . . . . . . . . 132
xii IBM ThinkPad 560X User's Guide
Page 14

Problem Recording Sheet .................... 133
HelpWare Customer Support and Service ........... 134
Help by Telephone ........................ 134
ThinkPad EasyServ . . . . . . . . . . . . . . . . . . . . . . . . 135
Getting Help around the World ................. 135
Fax Information . . . . . . . . . . . . . . . . . . . . . . . . . . 135
Electronic Support Services ................... 136
Purchasing Additional Services ................... 137
Enhanced PC Support Line ................... 137
Client Support Line ........................ 138
Network and Server Support Line ................ 138
Ordering Support Line Services ................. 138
Warranty and Repair Services .................. 139
Obtaining IBM Operating System Updates ............ 140
Getting Update Diskettes ..................... 140
Ordering Publications . . . . . . . . . . . . . . . . . . . . . . . 140
Appendix A. Features and Specifications ........... 141
Features . . . . . . . . . . . . . . . . . . . . . . . . . . . . . . . . 141
Specifications . . . . . . . . . . . . . . . . . . . . . . . . . . . . . 143
IBM Power Cords ........................... 144
Appendix B. Ergonomics Information . . . . . . . . . . . . . 147
Appendix C. Product Warranties and Notices ........ 149
Notices . . . . . . . . . . . . . . . . . . . . . . . . . . . . . . . . . 153
Trademarks . . . . . . . . . . . . . . . . . . . . . . . . . . . . 153
Electronic Emission Notice ..................... 154
Glossary . . . . . . . . . . . . . . . . . . . . . . . . . . . . . . . 156
Index . . . . . . . . . . . . . . . . . . . . . . . . . . . . . . . . . . 160
Contents xiii
Page 15

xiv IBM ThinkPad 560X User's Guide
Page 16
Chapter 1. Getting Familiar with Your Computer
This chapter provides basic information about your computer.
Identifying the Hardware Features .................. 2
System-Status Indicators . . . . . . . . . . . . . . . . . . . . . . . 6
ThinkPad Features . . . . . . . . . . . . . . . . . . . . . . . . . . . 8
Attaching the External Diskette Drive ............... 8
Keyboard Functions . . . . . . . . . . . . . . . . . . . . . . . . 10
TrackPoint III . . . . . . . . . . . . . . . . . . . . . . . . . . 10
Fn Key Function ........................ 12
Numeric Keypad . . . . . . . . . . . . . . . . . . . . . . . . 14
ThinkPad Utilities . . . . . . . . . . . . . . . . . . . . . . . . . 15
ThinkPad Configuration Program .............. 15
Easy-Setup . . . . . . . . . . . . . . . . . . . . . . . . . . . 21
Online Book . . . . . . . . . . . . . . . . . . . . . . . . . . . . 25
Backing Up Your System ...................... 26
Recovery CD (Windows 95 Only) ................ 26
Diskette Factory . . . . . . . . . . . . . . . . . . . . . . . . . . 26
Keeping Your Computer from Being Damaged .......... 26
Copyright IBM Corp. 1997 1
Page 17
Getting Familiar with Your Computer
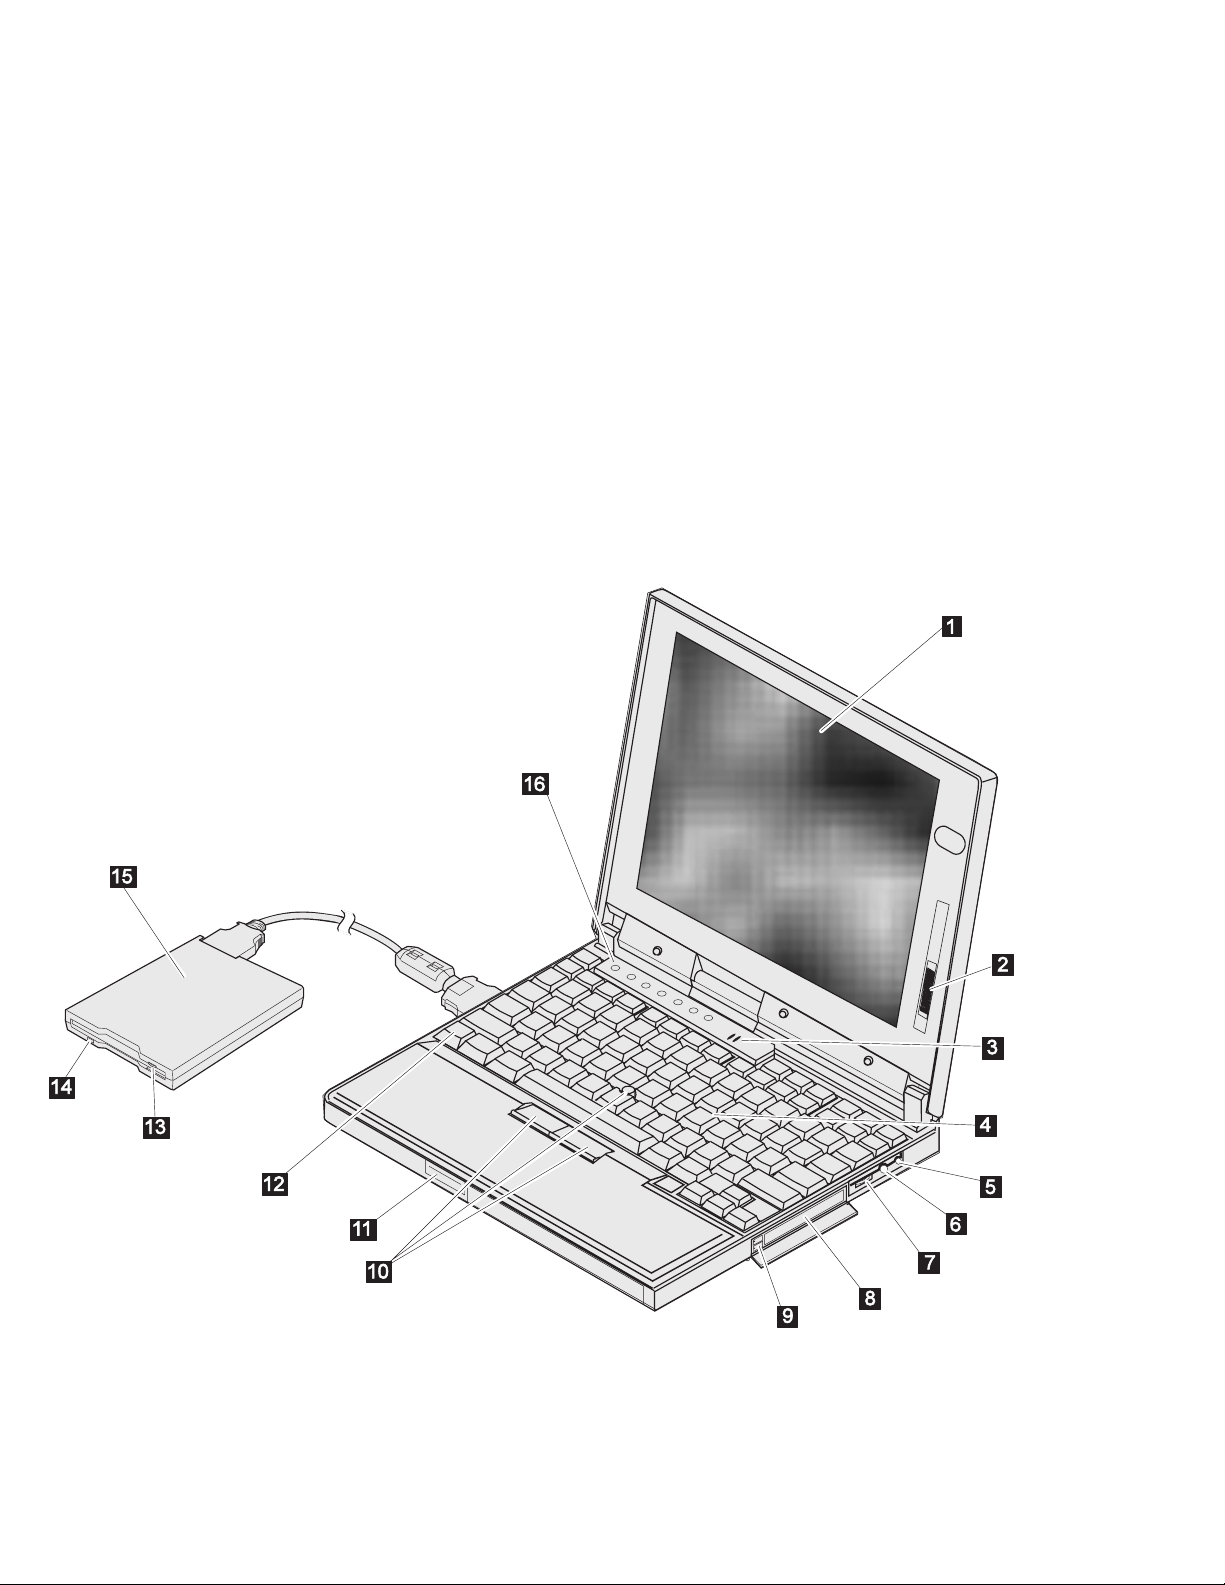
Identifying the Hardware Features
Front View
2 IBM ThinkPad 560X User's Guide
Page 18

Getting Familiar with Your Computer
1 The color LCD screen
displays computer output.
2 The brightness control
moves up or down to
adjust the brightness of the
display.
3 The built-in microphone
captures sound and voice
when it is used with an
application program
capable of handling audio.
4 The keyboard is used to
enter data into the
computer. (To use the
numeric keypad on the
keyboard, see page 14.)
5 The headphone jack, a
inch (3.5-mm) diameter
jack, is where you connect
a stereo headphone or
external speakers.
6 The microphone/line-in
jack, a inch (3.5-mm)
diameter jack, is where you
connect a stereo
microphone or an external
audio device.
7 The volume control
adjusts the sound level for
the built-in speaker.
8 The PC Card slots accept
PC Cards.
9 The PC Card eject
buttons eject the PC Card
from the PC Card slot.
1 The TrackPoint III is a
built-in pointing device that
provides a function similar
to that of a mouse.
11 The LCD latch opens the
LCD when pressed.
12 The Fn key is used with
the function keys to
activate the Fn key
functions.
13 The diskette-eject button
ejects the diskette from the
diskette drive.
14 The diskette drive in use
indicator is on when data
is read or written to a
diskette.
15 The external diskette
drive
16 The indicator panel
consists of the
system-status indicators
and their associated
symbols.
Chapter 1. Getting Familiar with Your Computer 3
Page 19
Getting Familiar with Your Computer
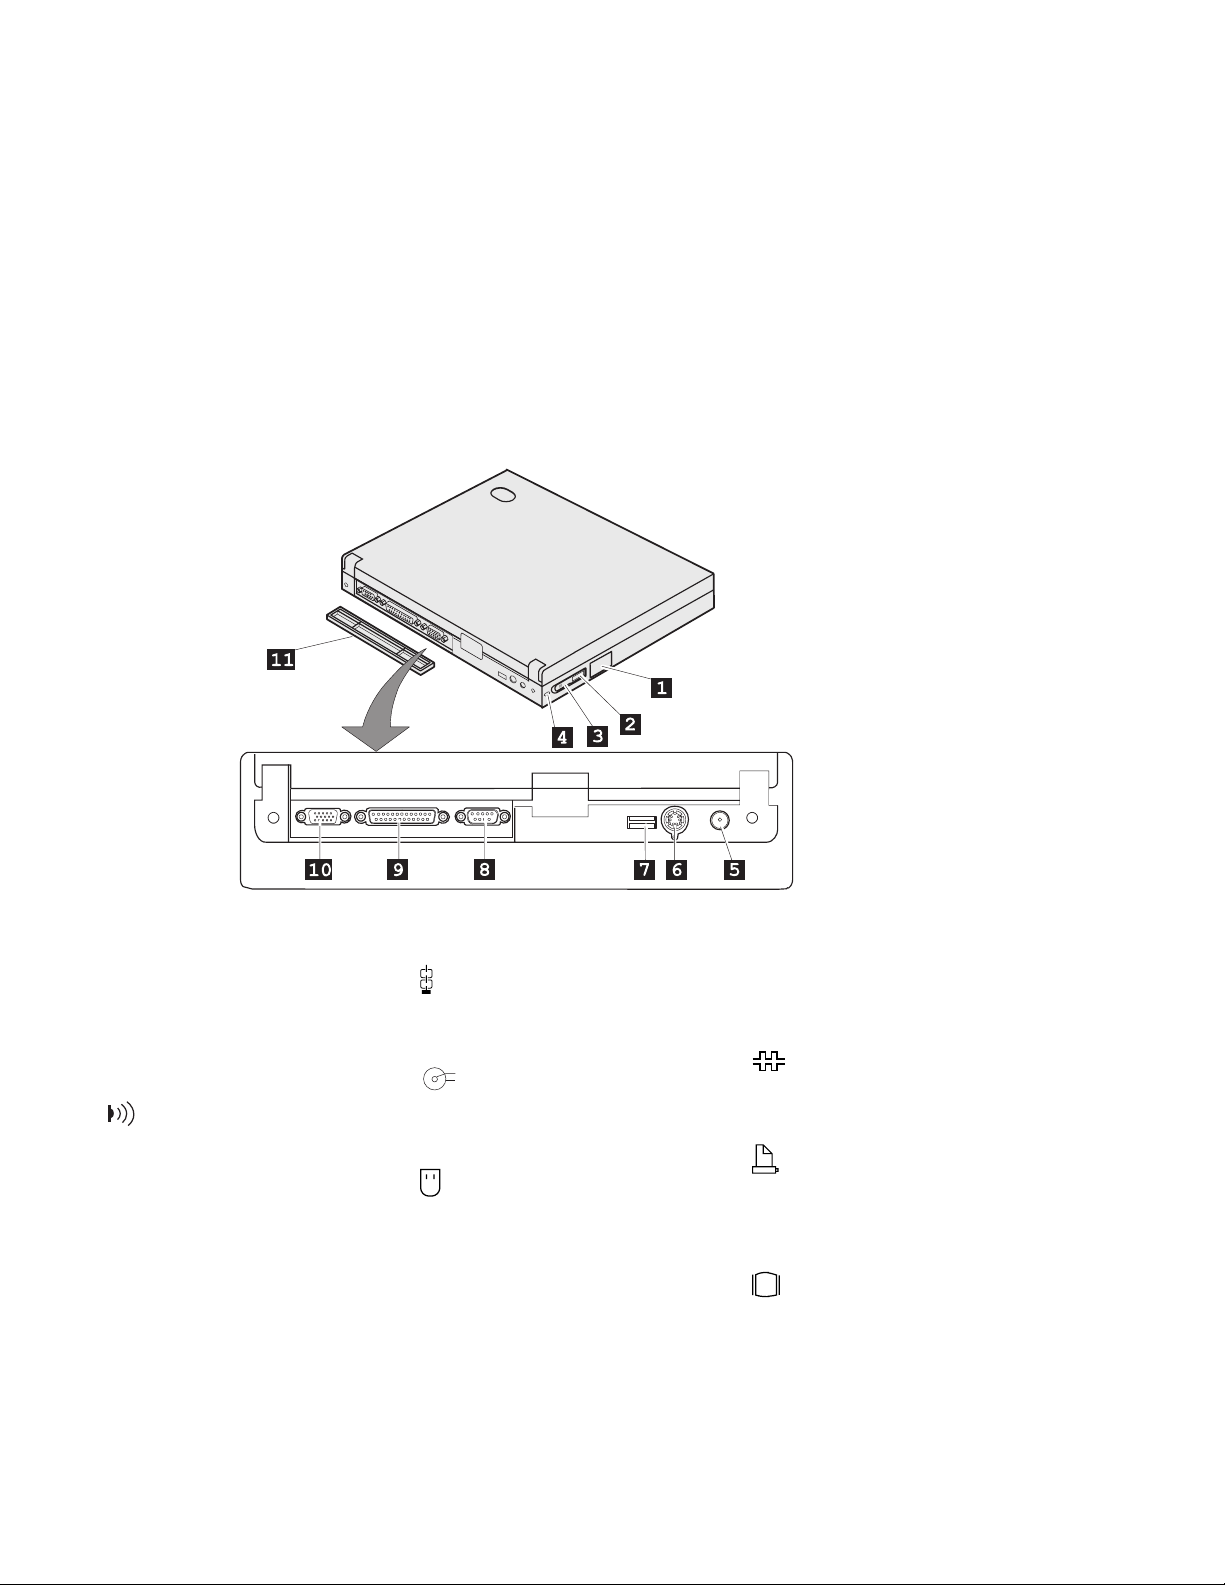
Rear View
1 The
external-diskette-drive
connector is where you
connect the cable of the
external diskette drive.
2
The infrared port on
the power switch allows the
computer to communicate
with other devices that
have infrared data-transfer
capability.
3 The power switch turns
the computer on and off.
4
The security keyhole is
used with a mechanical
lock.
5
The power jack is
++
--
where the AC Adapter
cable is connected.
6
The
external-input-device
connector is used to
attach a mouse, external
keyboard, or external
numeric keypad to the
computer.
7 The Universal Serial Bus
(USB) port is where the
USB cable is connected.
8
The serial connector
is where you connect a
9-pin, serial-device cable.
9
The parallel
connector is where you
connect a parallel-printer
signal cable.
1
The external-monitor
connector is where you
attach the external monitor.
11 The connector cover is
removable.
IBM ThinkPad 560X User's Guide
4
Page 20
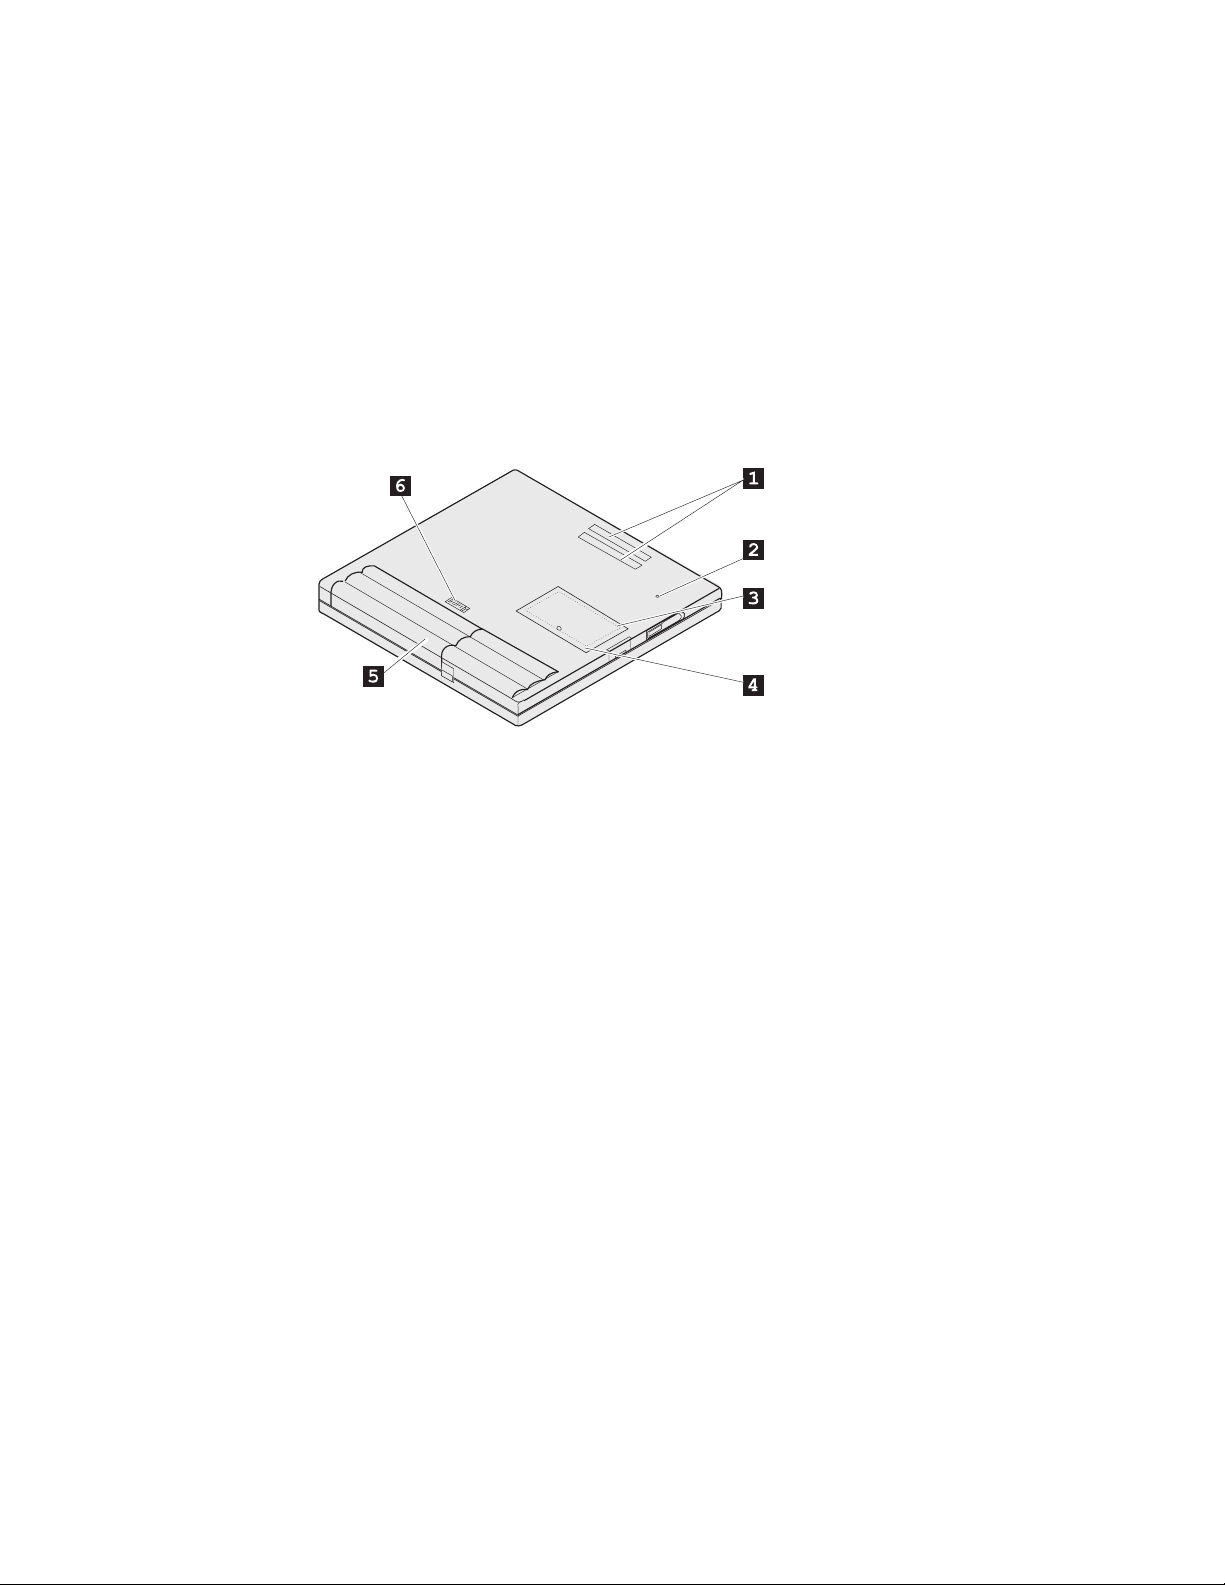
Bottom View (with Battery Installed)
Getting Familiar with Your Computer
1 The expansion connector
is where you attach a port
replicator (available as an
option).
2 The power shutdown
switch is used to turn the
computer off when an
application locks up or the
computer will not accept
any input. Use the tip of a
pen to press this switch.
3 The memory slot accepts
a dual inline memory
module (DIMM) option.
4 The memory-slot cover
covers the memory slot.
5 The battery pack is a
built-in power source for
the computer.
6 The battery-pack latch
locks or releases the
battery pack.
Chapter 1. Getting Familiar with Your Computer 5
Page 21
Getting Familiar with Your Computer
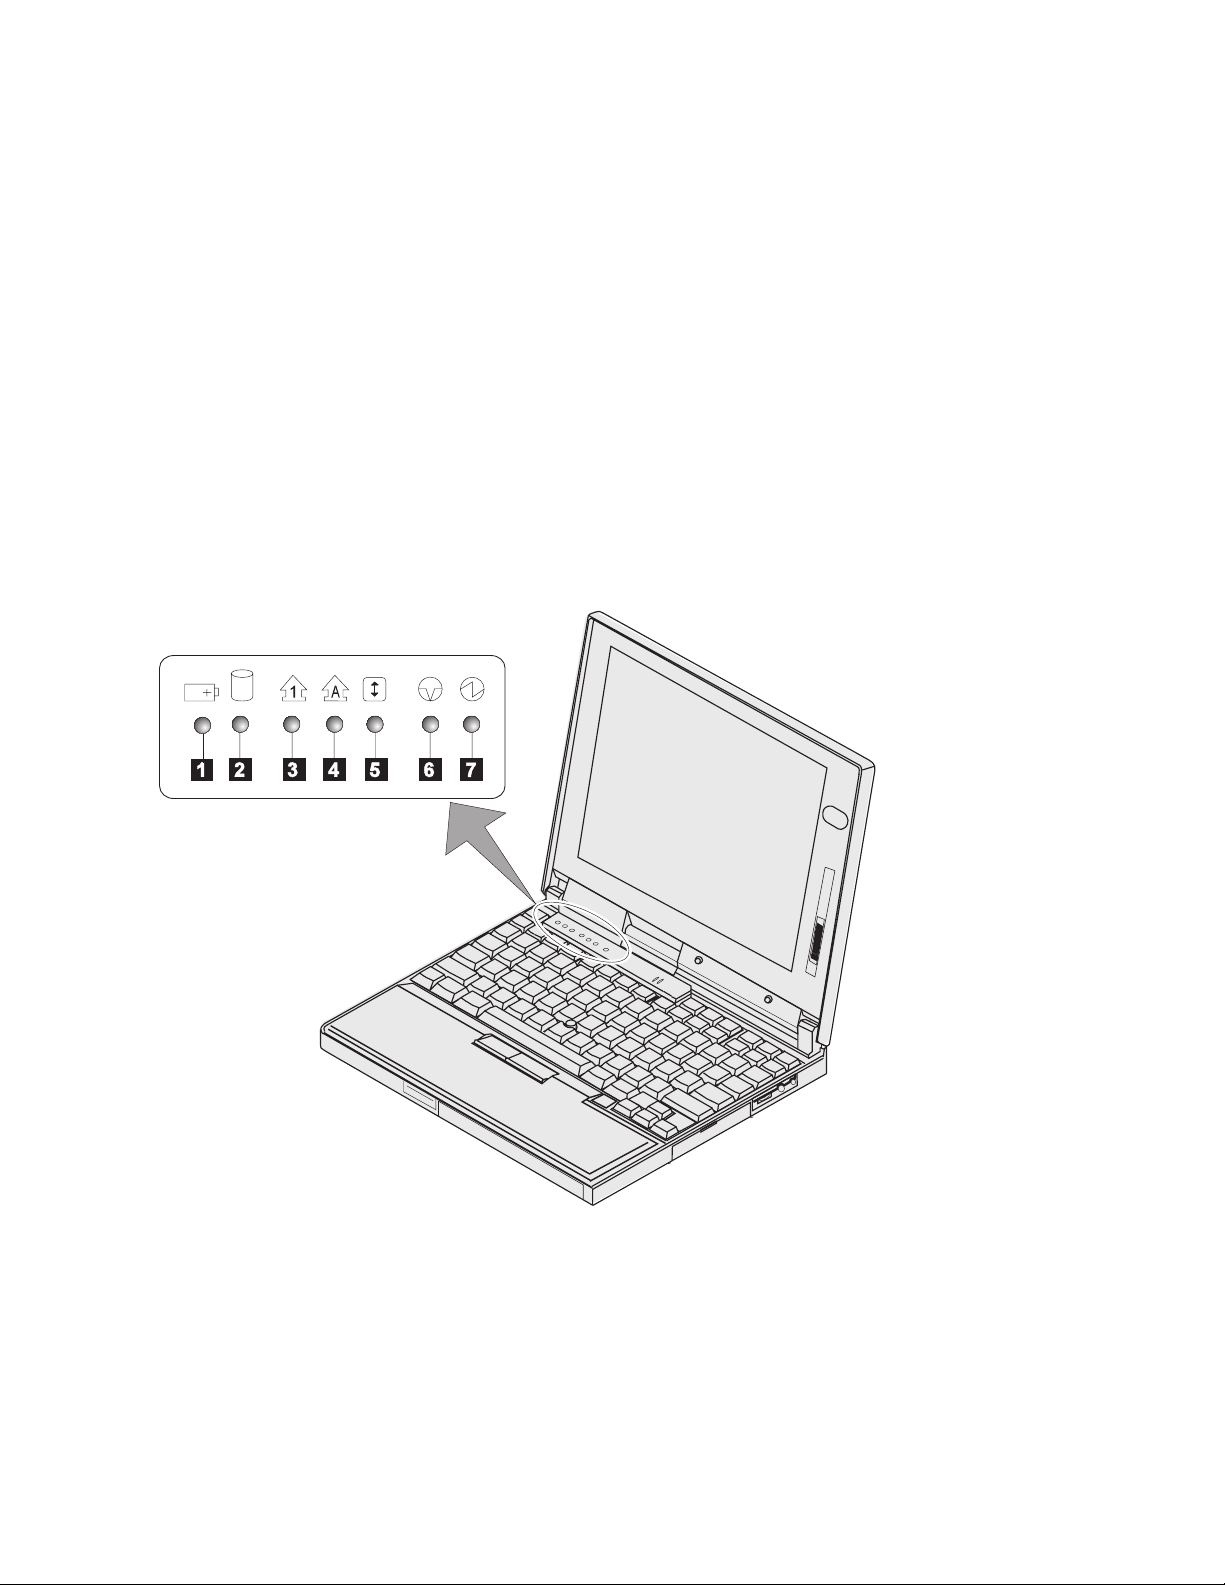
System-Status Indicators
The system-status indicators on the computer show the current
status of your computer by their on or off states and colors (green,
yellow, and orange). Each indicator is identified with a symbol. The
following shows the location and the meaning of each icon:
6 IBM ThinkPad 560X User's Guide
Page 22
Getting Familiar with Your Computer
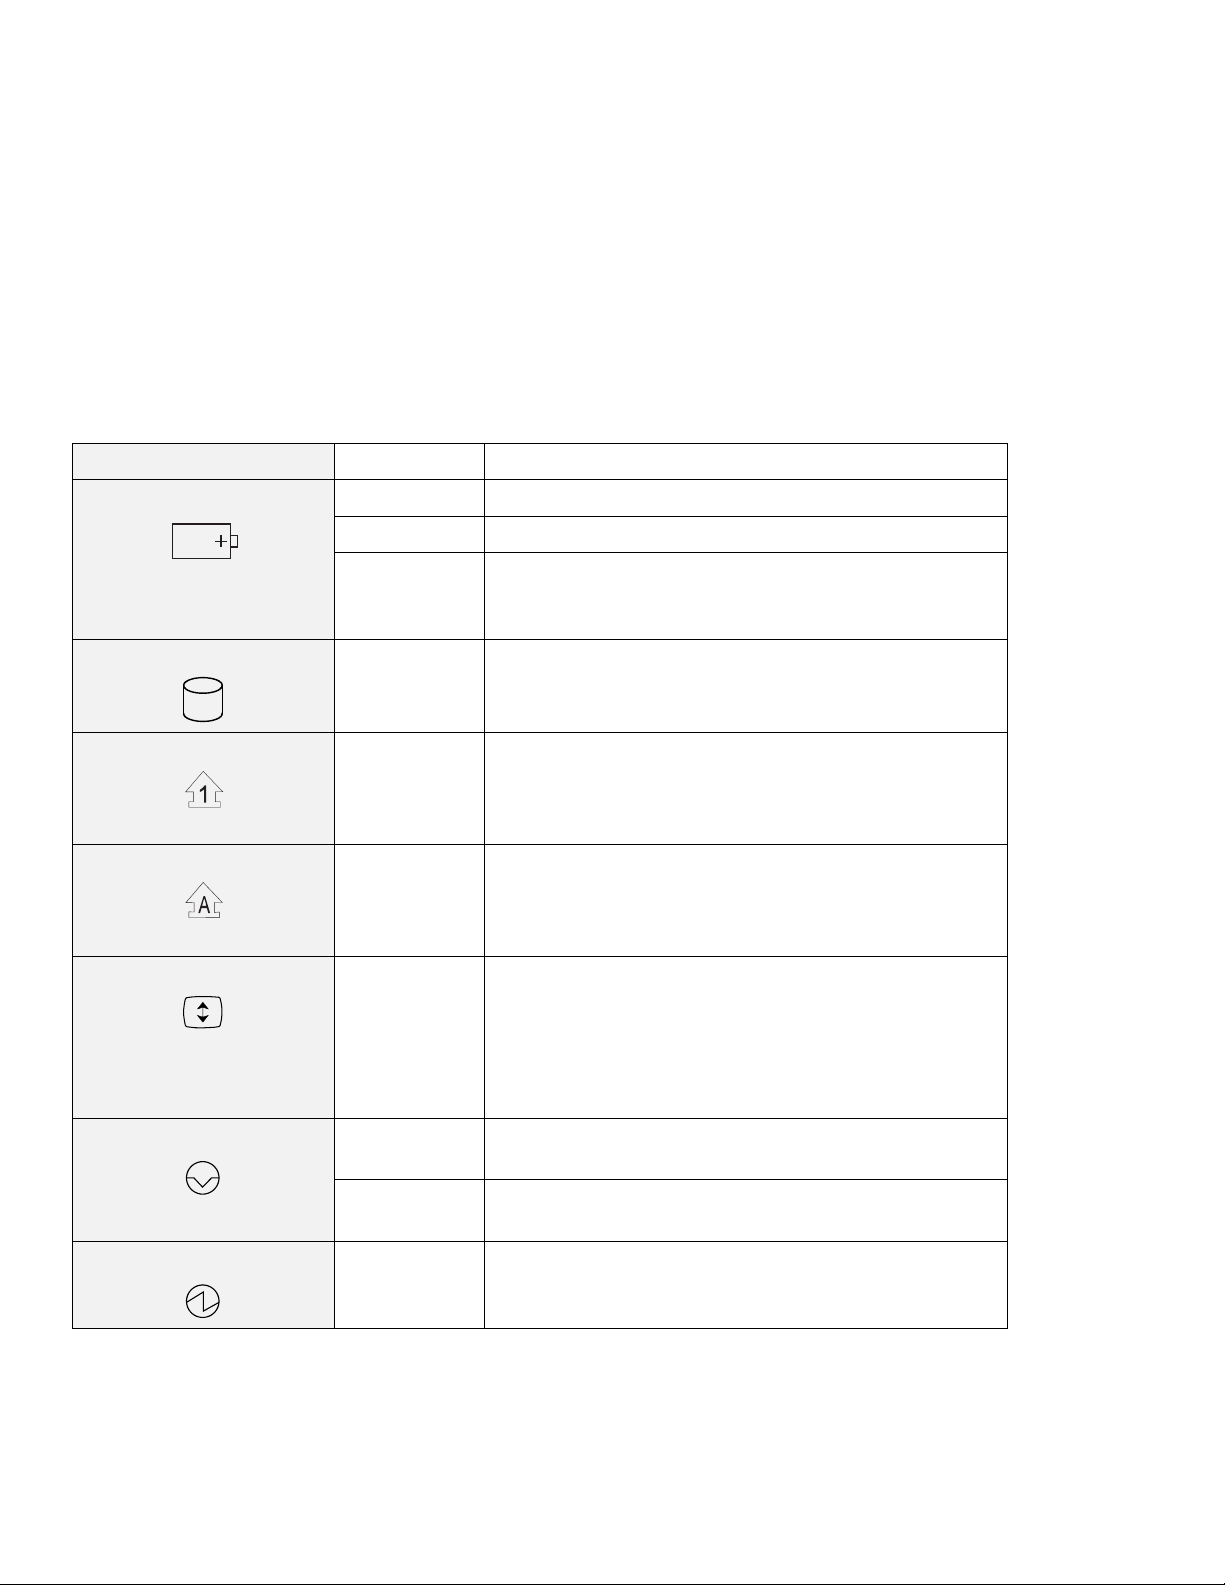
Symbol Color Meaning
1 Battery Green Enough battery power remains for operation.
Orange The battery pack is being charged.
Blinking
orange
The battery pack needs charging. If the indicator
starts blinking orange, the computer beeps three
times.
2 Hard disk in use Orange Data is being read from or written to the hard disk.
Do not enter suspend mode or turn off the computer
when this indicator is on.
3 Numeric lock Green The numeric keypad on the keyboard is enabled. You
enable or disable the keypad by pressing and holding
the Shift key, and pressing the NumLk key. For
details, see “Numeric Keypad” on page 14.
4 Caps lock Green The Caps Lock mode is enabled. All alphabetic
characters (A–Z) are entered in capital letters without
using the Shift key. You enable or disable the Caps
Lock mode by pressing the Caps Lock key.
5 Scroll lock Green Scroll Lock mode is enabled. The Arrow keys can be
used as screen-scroll function keys. The cursor
cannot be moved with the Arrow keys.
application programs support this function.
Not all
You
enable or disable Scroll Lock mode by pressing the
ScrLk key.
6 Suspend mode Green The computer is in suspend mode. (See page 33 for
details.)
Blinking
green
The computer is entering suspend mode or
hibernation mode, or is resuming normal operation.
7 Power on Green Indicates that the computer is operational. This
indicator is on when the computer is on and not in
suspend mode.
Chapter 1. Getting Familiar with Your Computer 7
Page 23
Getting Familiar with Your Computer
ThinkPad Features
Your ThinkPad Model 560X computer features a diskette drive that is
attached externally. Your computer also has unique keyboard
functions and utility programs for easy configuration. This section
describes the following features:
Keyboard
ThinkPad utilities
Online book
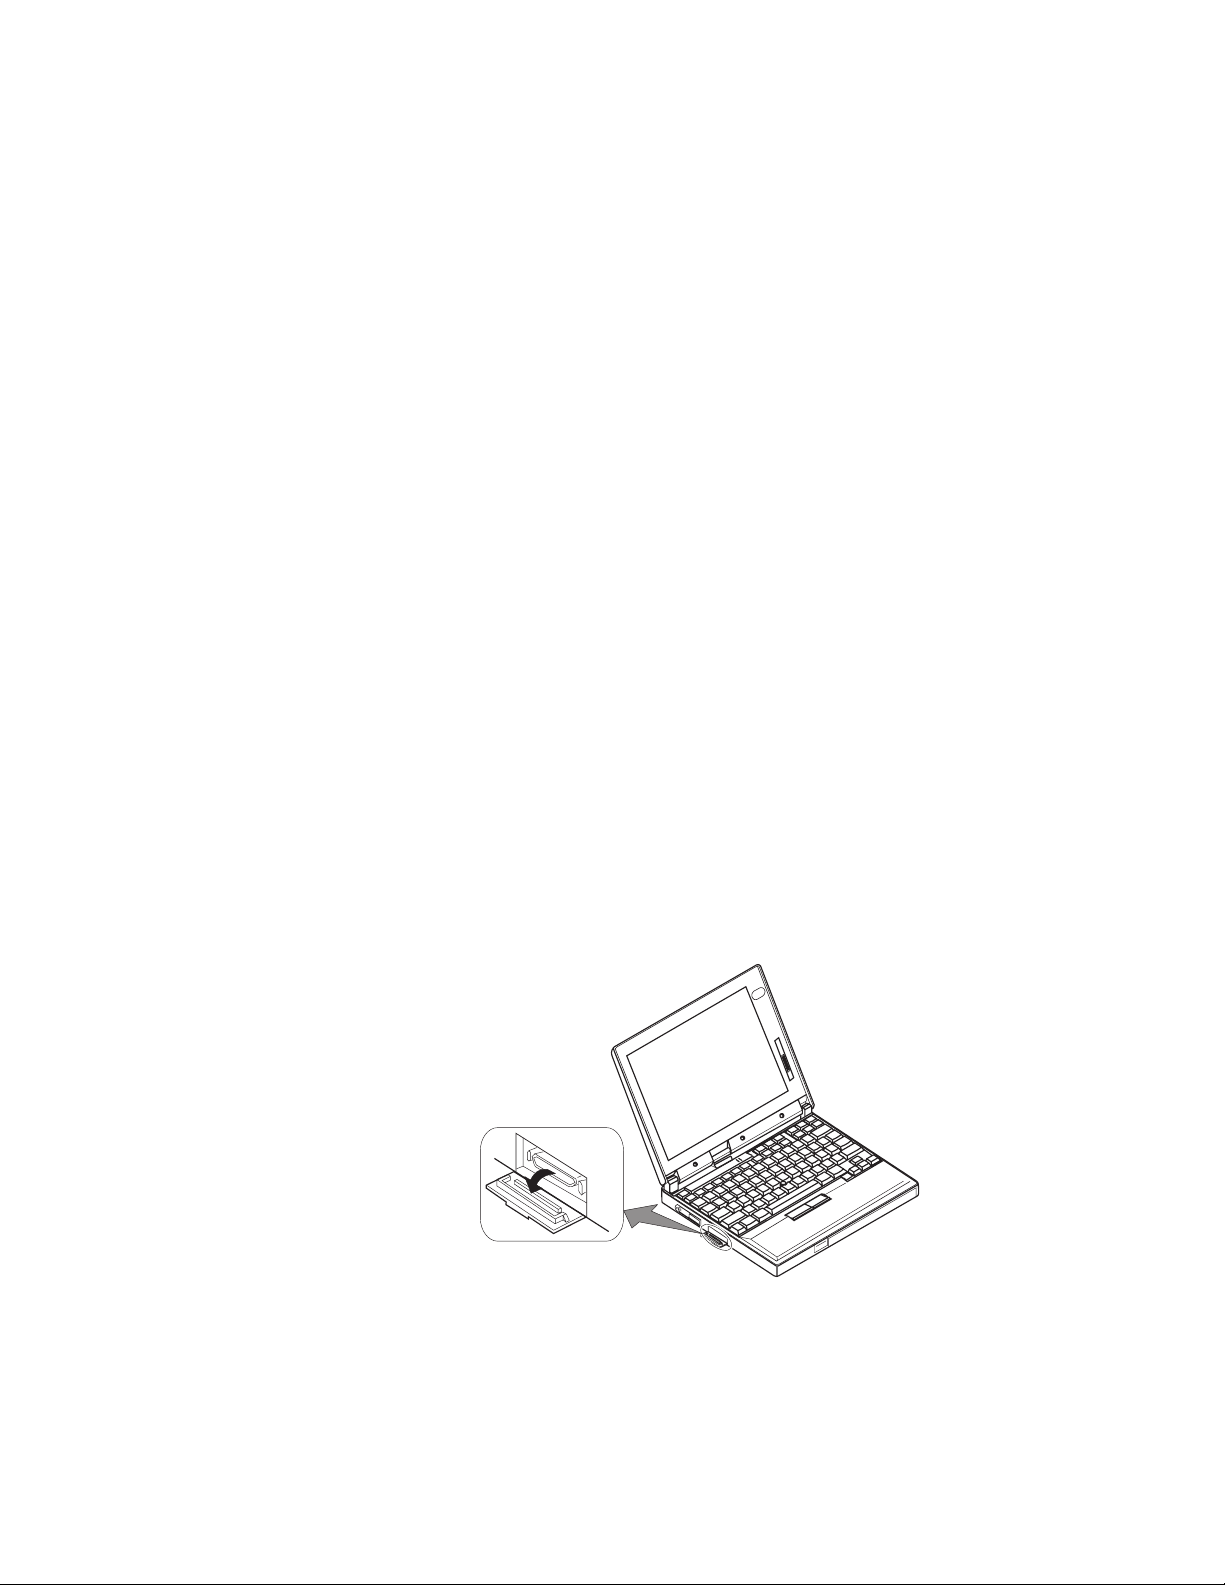
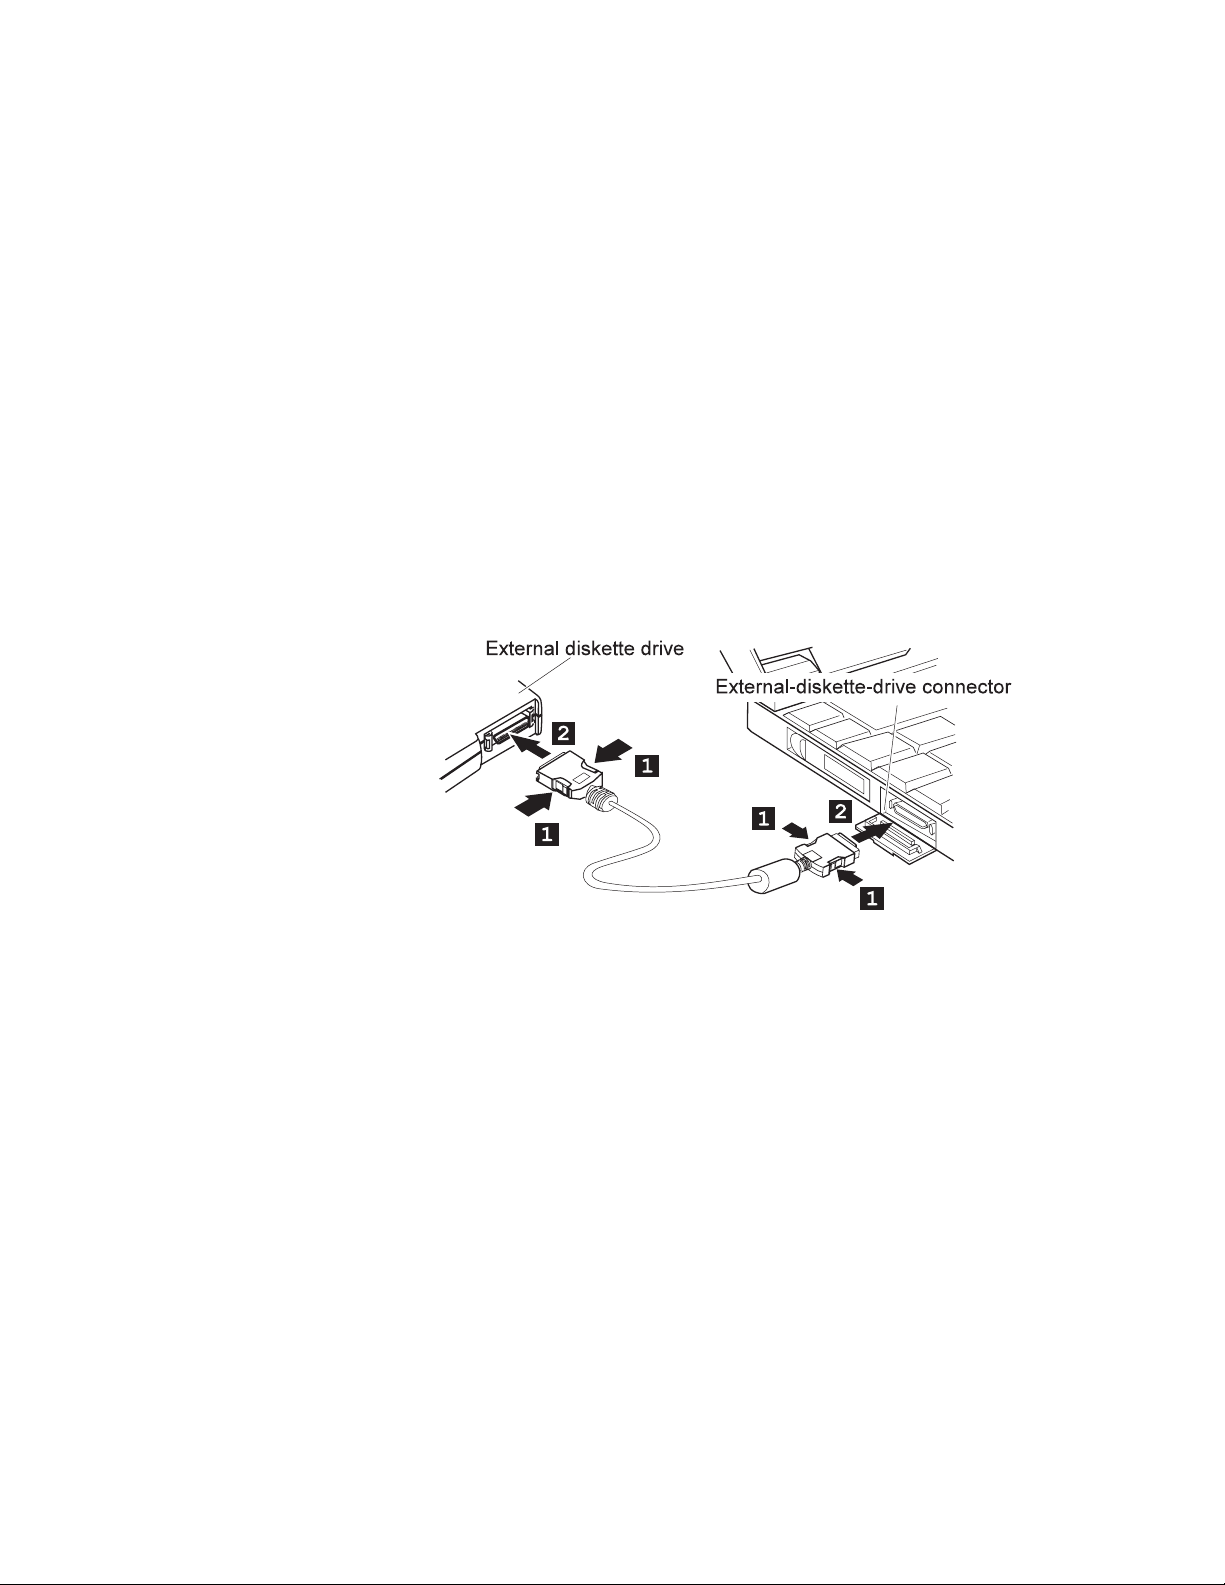
Attaching the External Diskette Drive
1
External diskette drive
Turn off the computer.
Make sure you turn off the computer. Otherwise, the computer
will not recognize the external diskette drive when computer
power is turned on.
2
Open the cover on the external-diskette-drive connector.
8 IBM ThinkPad 560X User's Guide
Page 24
Getting Familiar with Your Computer
3
Attach the cable to the external diskette drive; then to the
external-diskette-drive connector on the side of the
computer.
Press the sides of the connector 1 as you connect it to the
devices 2 .
4
Turn on the computer.
Chapter 1. Getting Familiar with Your Computer 9
Page 25
Getting Familiar with Your Computer
Keyboard Functions
Your ThinkPad computer's keyboard has the following functions:
TrackPoint III
Numeric Keypad
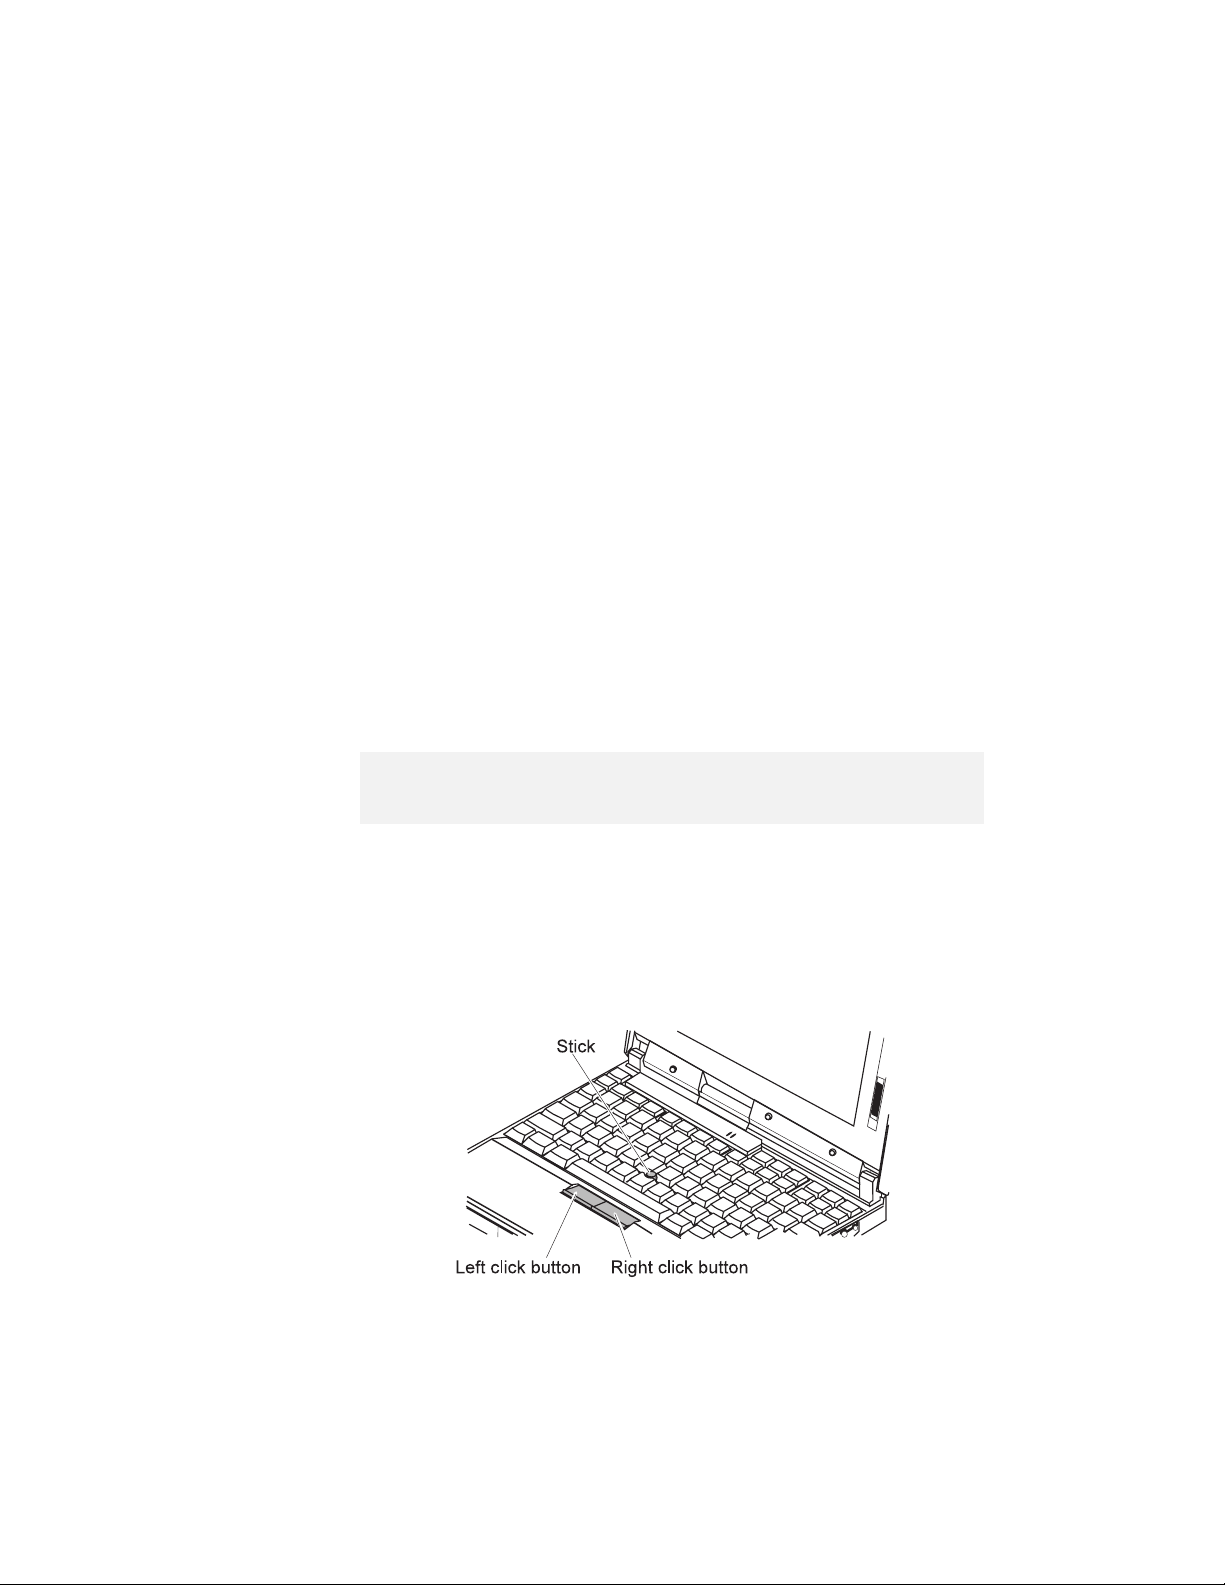
TrackPoint III
The keyboard contains a unique cursor-pointing device called the
TrackPoint III
single process you can perform without moving your fingers from
their typing position.
Note:
No other software is required for the TrackPoint III; it works with the PS/2
mouse driver.
The TrackPoint III consists of a stick on the keyboard and a pair of
click buttons below the keyboard. Movement of the pointer on the
screen is controlled by the amount of pressure you apply to the
nonslip cap on the stick in any direction parallel to the keyboard; the
stick itself does
corresponds to the applying pressure you apply to the stick. The
function of the click buttons depends on the software you are using.
Fn key Function
. Pointing, selecting, and dragging all become part of a
not
move. The speed at which the pointer moves
10 IBM ThinkPad 560X User's Guide
Page 26

Getting Familiar with Your Computer
If you are not familiar with using the TrackPoint III, these instructions
will help you get started:
1
Place your hands in the typing position and press gently
on the stick with either index finger in the direction you
want the pointer to move.
Pressing the stick away from you moves the pointer up the
screen; pressing it toward you moves the pointer down the
screen. You can also move the pointer side to side by
pressing sideways.
Note:
The pointer may drift. This is not a defect. Do not use the TrackPoint
III until the pointer stops moving.
2
Press the click buttons with either thumb to select and
drag as required by your software, as with any other
pointing device.
Chapter 1. Getting Familiar with Your Computer 11
Page 27
Getting Familiar with Your Computer
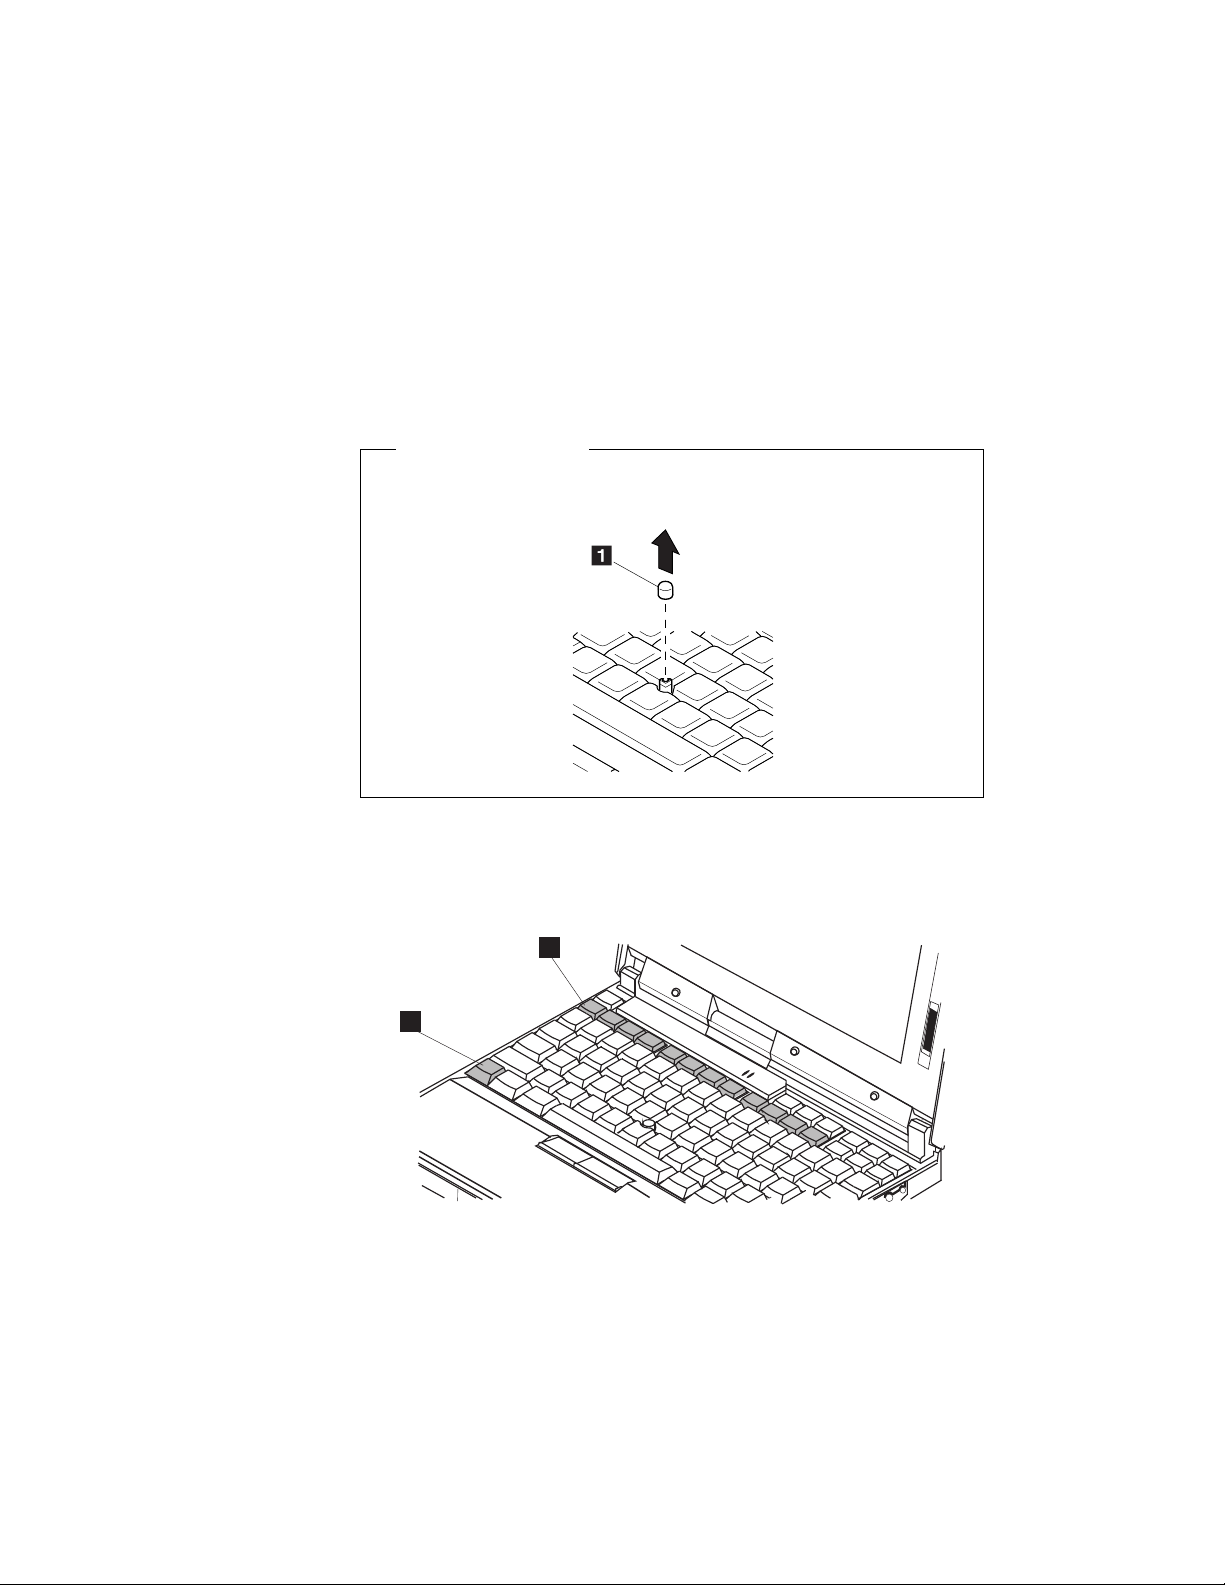
The cap 1 on the end of the TrackPoint III is removable. You
can replace it with one of the spares shipped with your computer.
Fn Key Function
The Fn key function allows you to change operational features
instantly. When you use the following functions, press and hold the
Fn key 1 ; then press the appropriate function key 2 (F1 to F12).
Changing the Cap
2
1
12 IBM ThinkPad 560X User's Guide
Page 28
Key
Combination
Fn
F2
+
(Only for OS/2
or Windows
users)
Fn
F3
+
Getting Familiar with Your Computer
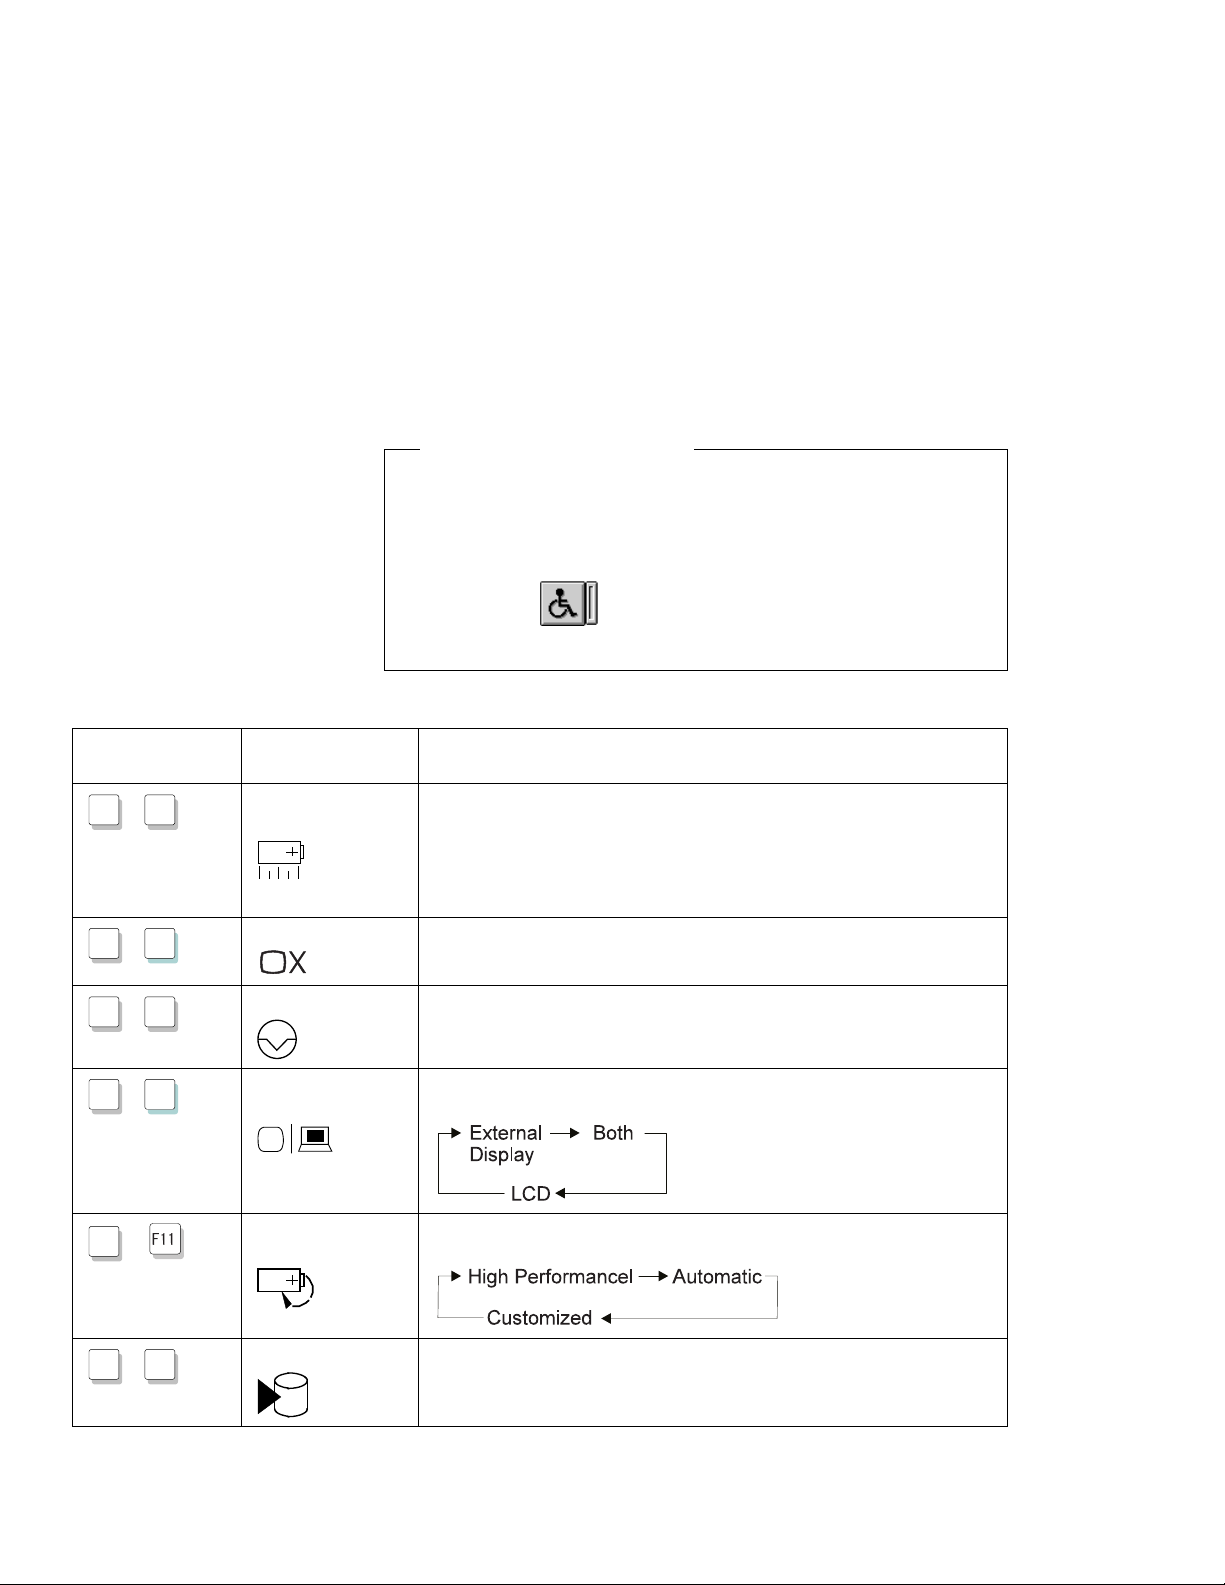
The Fn Key Lock Function
You can set up your computer so that you need to press Fn only
once to get the same effect as when you press and hold Fn.
With this setup, after you press a function key in the top row, Fn
returns to its normal state. Set up the Fn key this way, select the
Accessibility ( ) button in the ThinkPad Configuration
program window, or type PS2 FNS E at the command prompt.
Function keys not shown in the following table have no function.
Feature Meaning
Fuel-Gauge
display on or off
Standby mode The computer enters standby mode. For more information about
The Fuel-Gauge program must be activated before you can use this
key combination.
If you press this key combination, the window for the battery power
status appears or disappears. You can set parameters for power
status in the window.
this mode, see “Using the Power-Saving Modes” on page 33.
Fn
F4
+
Fn
F7
+
Fn
+
F12
Fn
+
Chapter 1. Getting Familiar with Your Computer 13
Suspend mode The computer enters suspend mode. For more information about
this mode, see “Using the Power-Saving Modes” on page 33.
LCD/external
monitor switching
Power mode
switching
Computer output is displayed in the following order when an
external monitor is attached.
During battery-power operation, the power mode changes as
follows:
Hibernation mode The computer enters hibernation mode. See “Using the
Power-Saving Modes” on page 33 for more information.
Page 29
Getting Familiar with Your Computer
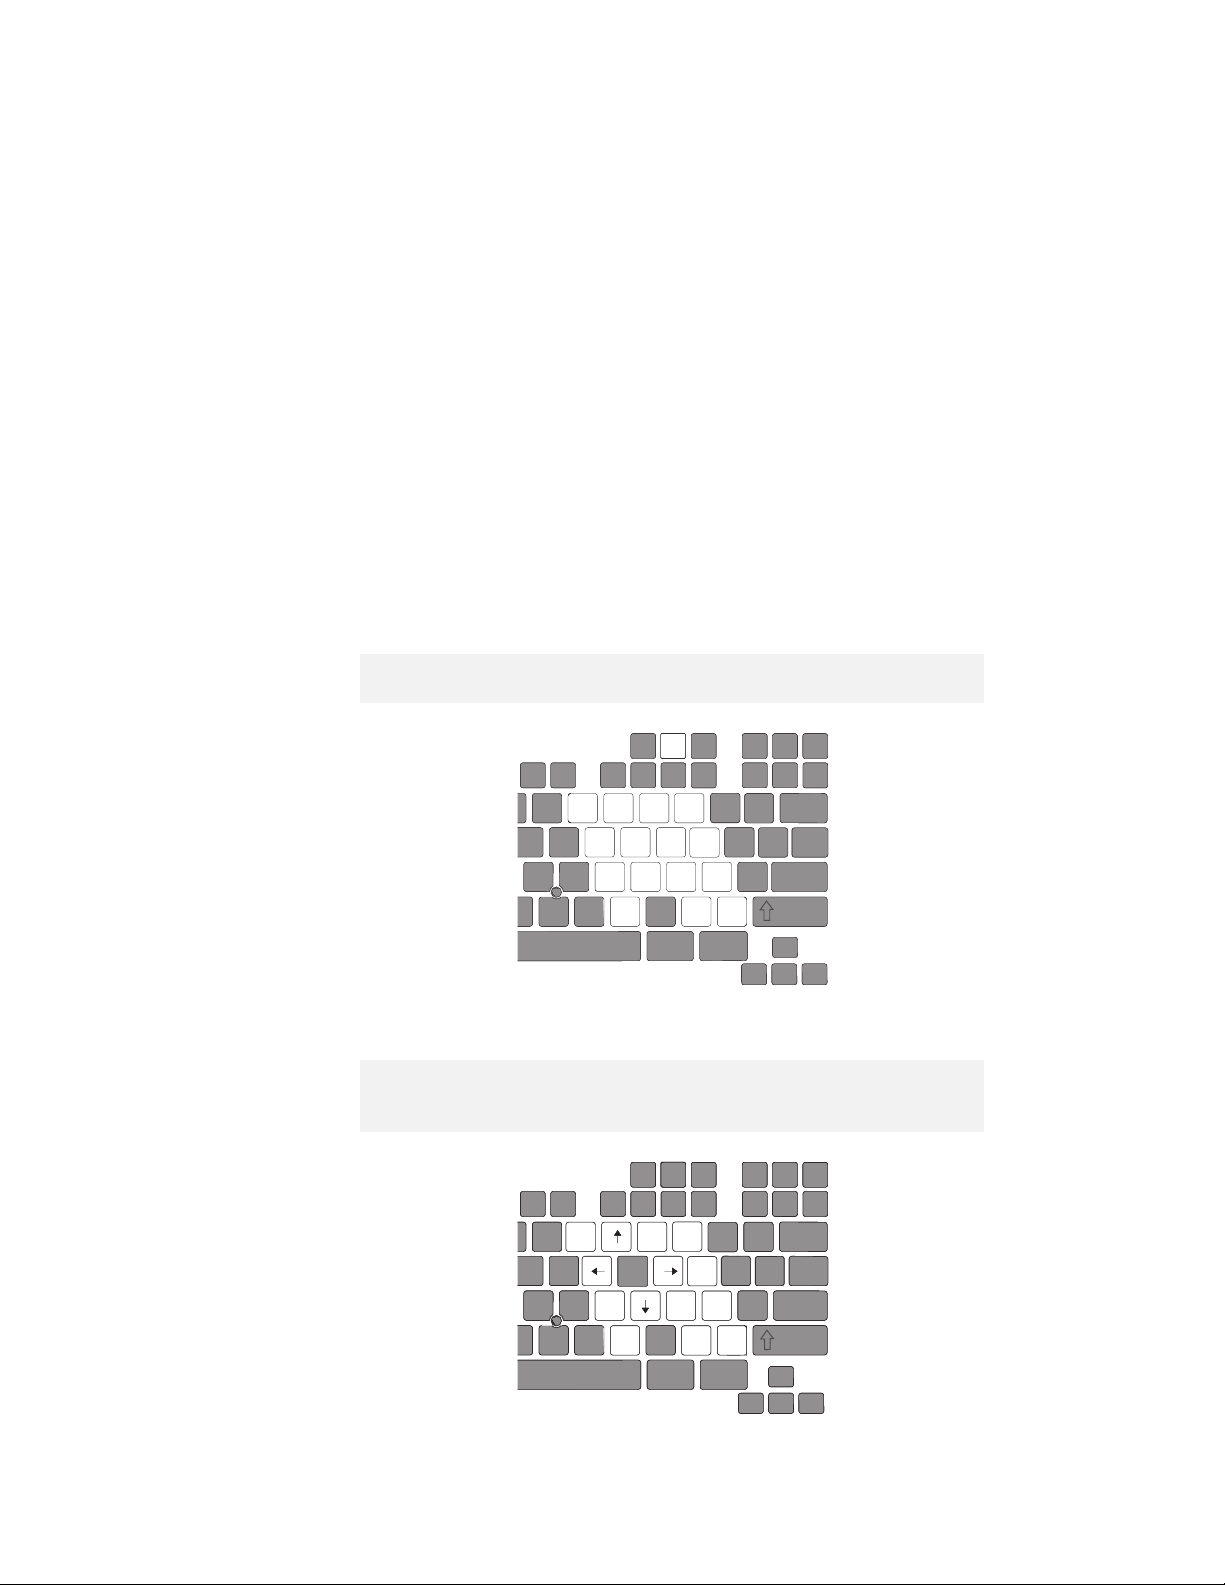
Numeric Keypad
The keyboard has some keys that, when enabled, work as if they
were a 10-key numeric keypad. (The numeric keypad on the
keyboard is not active when the external keyboard or the external
numeric keypad is attached to the computer.)
To enable or disable the numeric keypad, press and hold Shift and
then press NumLk.
Note:
The functions of the numeric keypad are printed on the front of the keys.
F8 F9 F10
6
77
Y
44 55 66
11 22 33
H
N
88 99
00
NumLk
F11 F12
//
*
..
<
Alt Ctrl
_
{
"
--
++
Shift
When the numeric keypad is enabled, press and hold Shift to
temporarily use the cursor- and screen-control keys.
Note:
The functions of the cursor- and screen-control keys are not printed on the
keys.
NumLk
F8 F9 F10
HomeHome
6
Y
EndEnd
H
N
F11 F12
PgUpPgUp
//
PgDnPgDn
<
Alt Ctrl
_
*
{
"
--
DelDelInsIns
++
Shift
14 IBM ThinkPad 560X User's Guide
Page 30

ThinkPad Utilities
Your ThinkPad computer has the following utility programs for easy
configuration:
Easy-Setup
This section summarizes these utilities.
ThinkPad Configuration Program
The ThinkPad Configuration program allows you to set up and
customize the computer's built-in devices to your needs, for example,
you can enable or disable a port, switch between your computer's
LCD and an external monitor, and set the power management mode.
This section describes how to start the ThinkPad Configuration
program.
For Windows 95:
Getting Familiar with Your Computer
ThinkPad Configuration program
To start the ThinkPad Configuration program for Windows 95:
1
Click on Start.
2
Move the cursor on Programs, ThinkPad; then click on
ThinkPad Configuration.
The following window appears:
Chapter 1. Getting Familiar with Your Computer 15
Page 31

Getting Familiar with Your Computer
1 The Power Mode buttons
Click on one of these buttons to set the power mode to high
performance mode, automatic mode, or customized mode.
2 The Display Device buttons
Click on one of these buttons to set the display output type to
the LCD, external monitor, or both. When making a
presentation, you can click on the presentation button to disable
any system timers, such as the LCD turn-off timer or the power
management mode timers.
3 The Help button displays online help.
4 The View Angle buttons
Click on the front view or rear view buttons to display the
hardware feature locations.
5 The Device buttons
Click on the button of your choice from the window.
When the device is enabled, the red indicator next to the button
is lit. Otherwise, it stays off.
Only the top portion of the window is displayed if you click on the
triangular minimize button in the top-right corner.
16
IBM ThinkPad 560X User's Guide
Page 32
Getting Familiar with Your Computer
For Windows NT:
To start the ThinkPad Configuration program for Windows NT:
1
Click on Start.
2
Move the cursor on Programs, ThinkPad; then click on
ThinkPad Configuration.
For Windows 3.11:
Double-click on ThinkPad Configuration icon.
For OS/2:
To start the ThinkPad Configuration program for OS/2:
1
Double-click on the ThinkPad Configuration folder.
2
Double-click on ThinkPad Configuration.
The following window appears:
Chapter 1. Getting Familiar with Your Computer 17
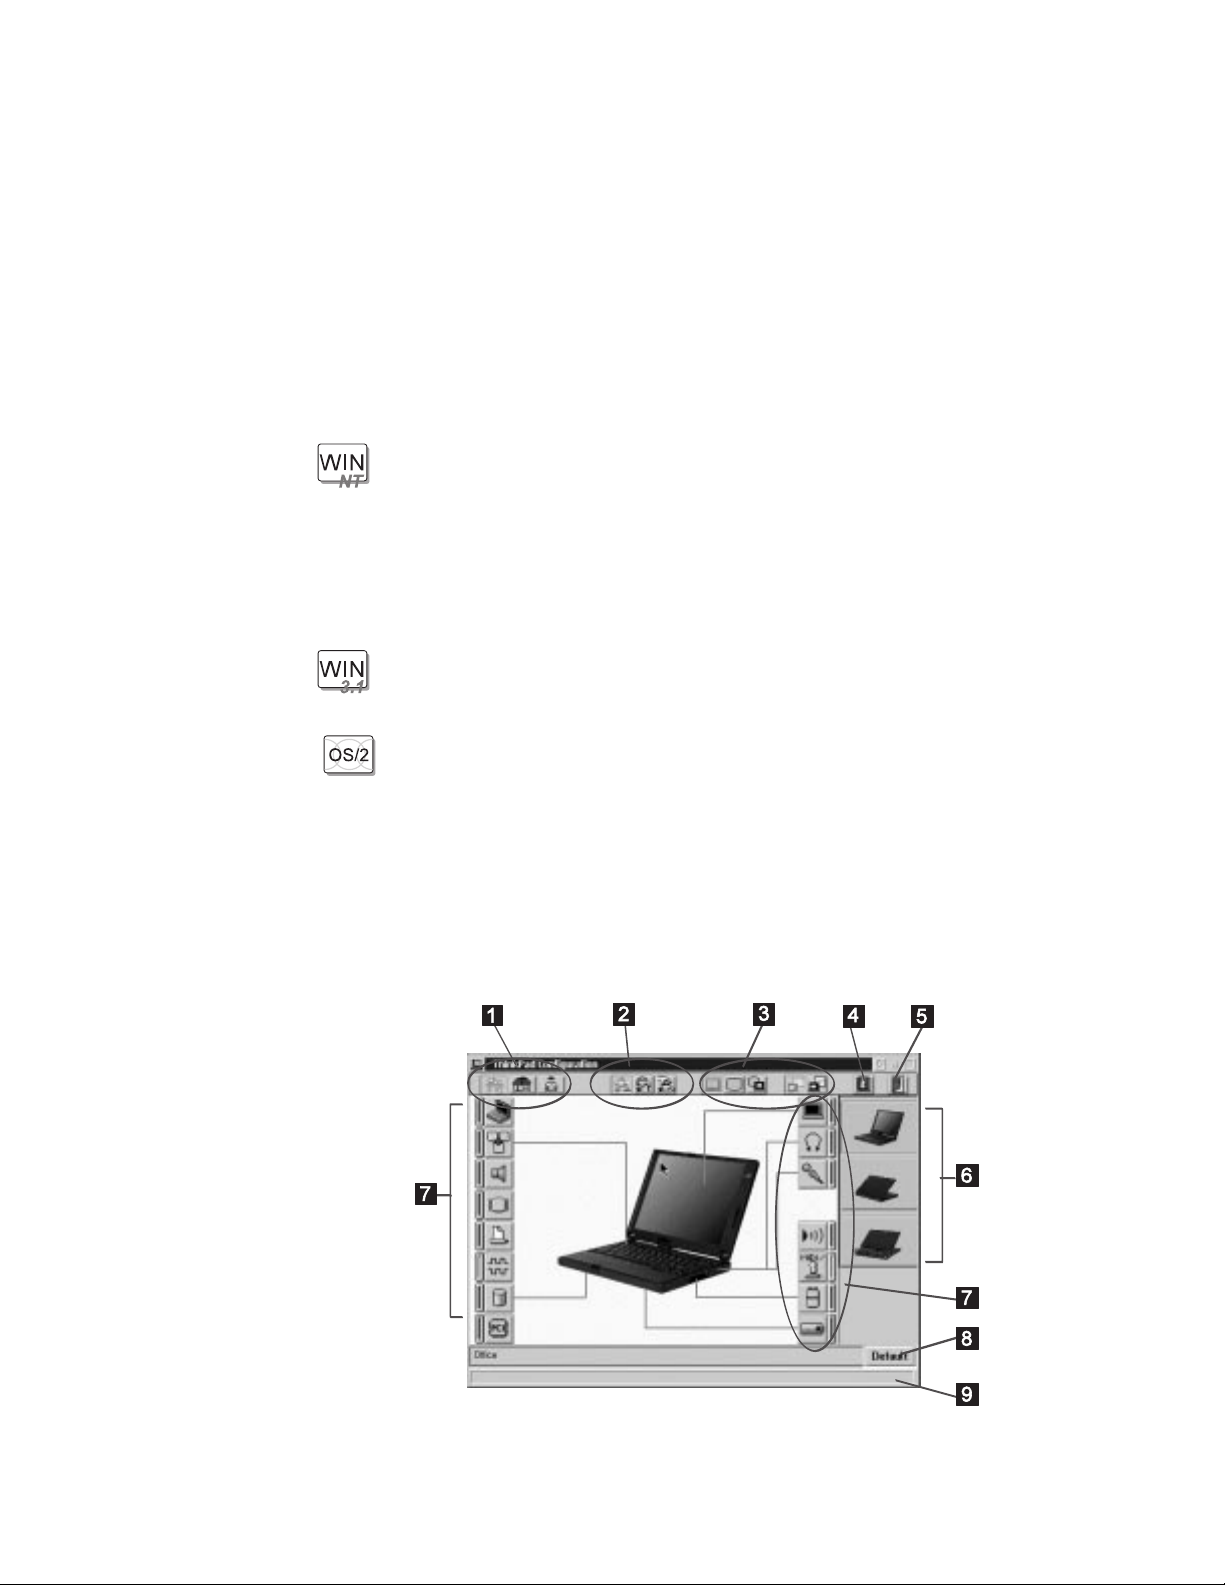
Page 33

Getting Familiar with Your Computer
1 The One-Touch Setup buttons
2 The Power Mode buttons
3 The Display Device buttons
4 The Help button displays online help.
5 The Exit button
6 The View Angle buttons
Click on one of these buttons to set the system configuration.
Click on one of these buttons to set the power mode to high
performance mode, automatic mode, or customized mode.
Click on one of these buttons to set the display output type to
the LCD, external monitor, or both. When making a
presentation, you can click on the presentation button to disable
any system timers, such as the LCD turn-off timer or the power
management mode timers.
Click on this button to save the changes made and to exit the
ThinkPad Configuration window.
Click on the front view or rear view buttons to display the
hardware feature locations.
7 The Device buttons
Click on the button of your choice from the window; then set the
options for that device from the window that appears.
If the device is enabled, the red indicator next to the button is
lit. Otherwise, it stays off.
8 The Default button
Click on this button to set the default values for each option and
to cancel the changes you just made.
9 The Status bar
The device name and its status appears in the status bar when
you place the cursor on a device button.
Only the top portion of the window is displayed when you click on the
triangular minimize button in the top-right corner.
18
IBM ThinkPad 560X User's Guide
Page 34

Getting Familiar with Your Computer
For DOS:
You can use the ThinkPad Configuration program from the DOS
prompt. To start the program, do the following:
1
Click on Start; then the DOS Prompt icon.
The DOS prompt window appears.
2
Type PS2 ? at the c:ThinkPad> prompt.
The “ThinkPad Configuration” online help window appears:
C:\>PS2 ?
(C) Copyright IBM Corp. 1993,1995. All rights reserved.
US Government Users Restricted Rights - Use, duplication
or disclosure restricted by GSA ADP Schedule Contract
with IBM Corp.
Command Syntax: PS2 [Parameter1] [Parameter2] [Parameter3]
Following are available [Parameter1].
For the complete command syntax,
type ‘PS2 ? [Parameter]’.
1.Power Management related
PMode, SErial, DDC, CARD,
Chapter 1. Getting Familiar with Your Computer 19
Page 35

Getting Familiar with Your Computer
3
@Echo Off
Rem SAMPLE:Set the parameters to provide maximum power utilization.
Rem =============================================================
PS2 PMode Custom DC > Nul
PS2 LCd 3 > Nul
PS2 DISK 3 > Nul
PS2 POwer 5 > Nul
PS2 SPeed Fixed MIN > Nul
PS2 STandby 3 > Nul
PS2 IR OFf > Nul
PS2 SErial OFf > Nul
Select an item from the menu and follow the instructions
on the screen to set the features.
You can also create a batch file like the one shown to match
your operating environment. The following sample batch file
sets a longer battery operating time.
20 IBM ThinkPad 560X User's Guide
Page 36
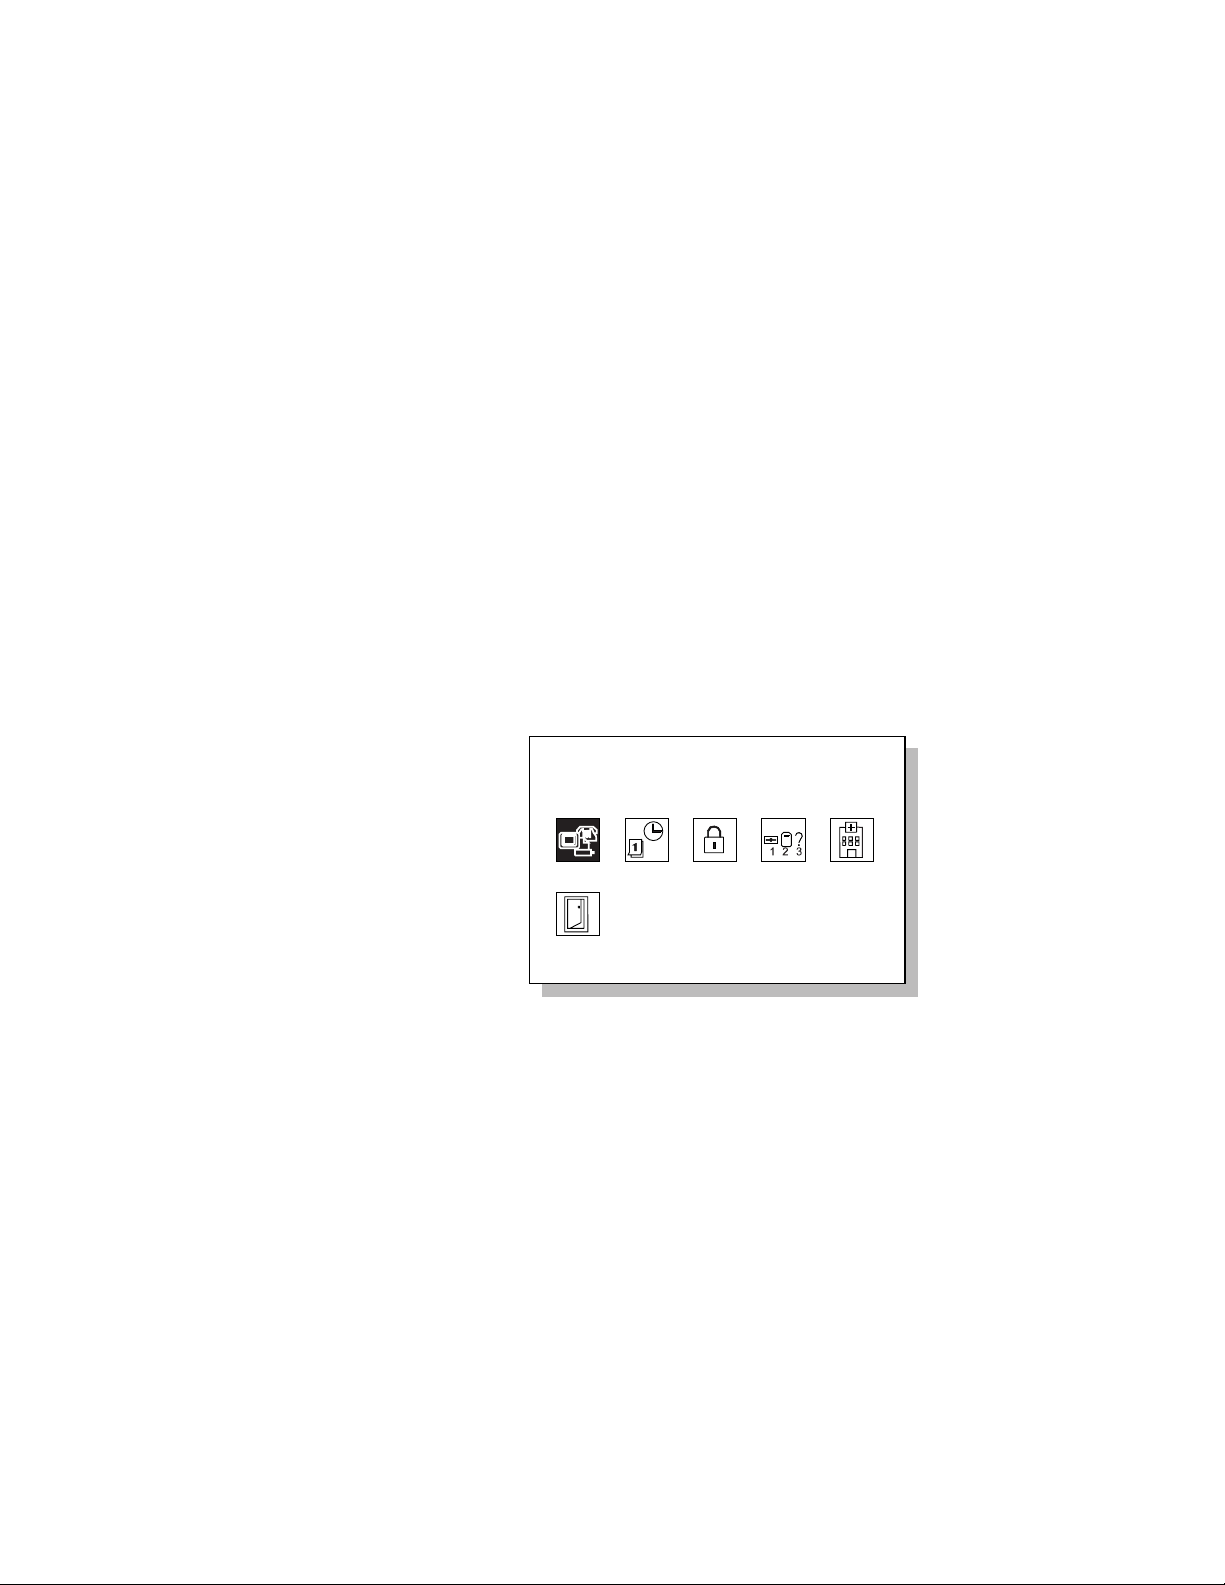
Easy-Setup
Getting Familiar with Your Computer
Your computer provides a user-friendly program called
Easy-Setup
,
which allows you to select various setup parameters. You should
run this program before you start using your computer. Follow these
steps to start the program:
1
Turn off the computer, and remove any diskette from the
diskette drive.
2
Press and hold F1; then turn on the computer. Hold F1
until the “Easy-Setup” menu appears:
Easy-Setup
Config
Restart
3
Move to an icon you want to change, using the arrow
Date/Time
Password
BIOS part number,..Date
System-unit serial number
System board serial number
Microprocessor
Start up
nnnnnnn
nnnnnnnnnnnnnnnn
nnnnnnnnnnn
Pentium( )Process
**
Test
12/31/96
keys or the TrackPoint III, and click on the icon.
A submenu is displayed.
4
Change the items you wish to change.
5
Click on Exit to exit to the submenu.
6
Click on Restart to exit to the “Easy-Setup” menu.
Your computer restart.
Chapter 1. Getting Familiar with Your Computer 21
Page 37
Getting Familiar with Your Computer
You can change the color of the “Easy-Setup” menu by pressing
the Ctrl+PgUp keys or by pressing the Ctrl+PgDn keys.
To return to the original color, press the Ctrl+Home keys.
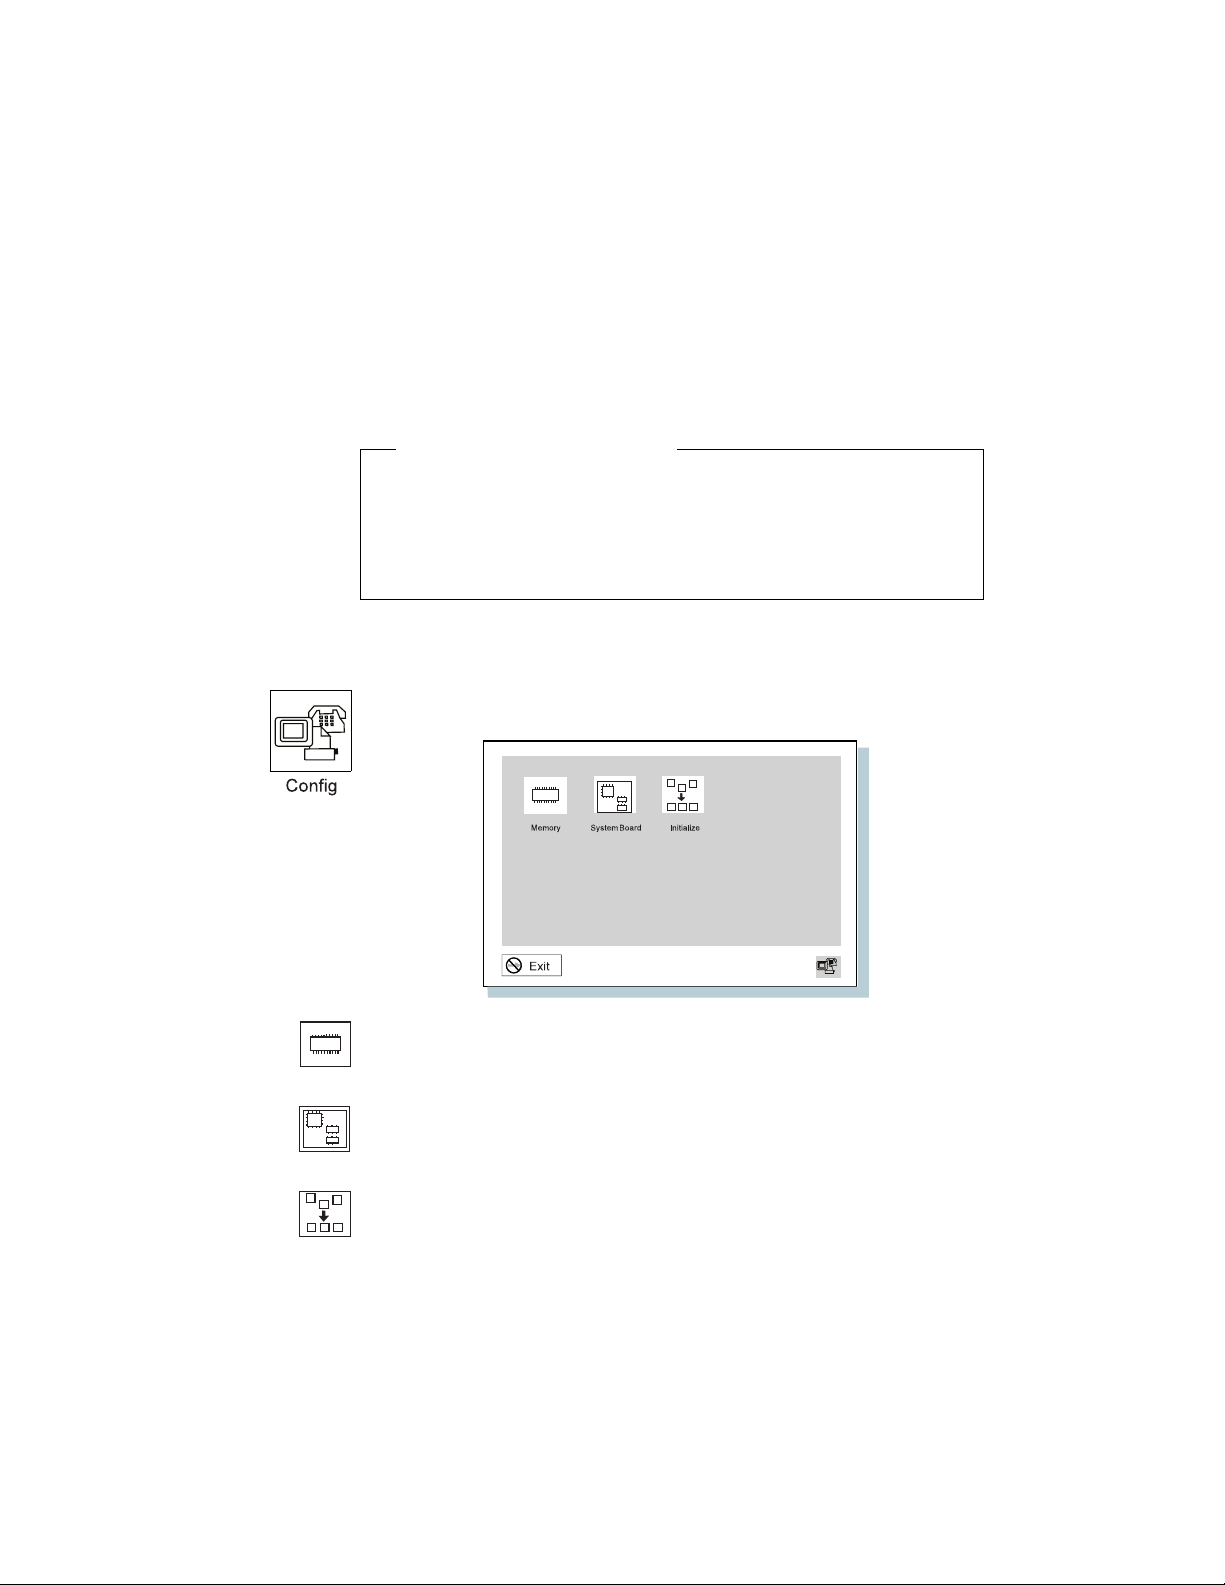
Easy-Setup Menus
Pressing the Config button displays the following “Config” submenu.
It shows information about the installed memory and system board.
Changing the Screen Color
The Memory button shows the amount of memory installed and
available.
The System Board button provides information on the system board
installed.
Initialize sets all device settings to the default values.
IBM ThinkPad 560X User's Guide
22
Page 38
Getting Familiar with Your Computer
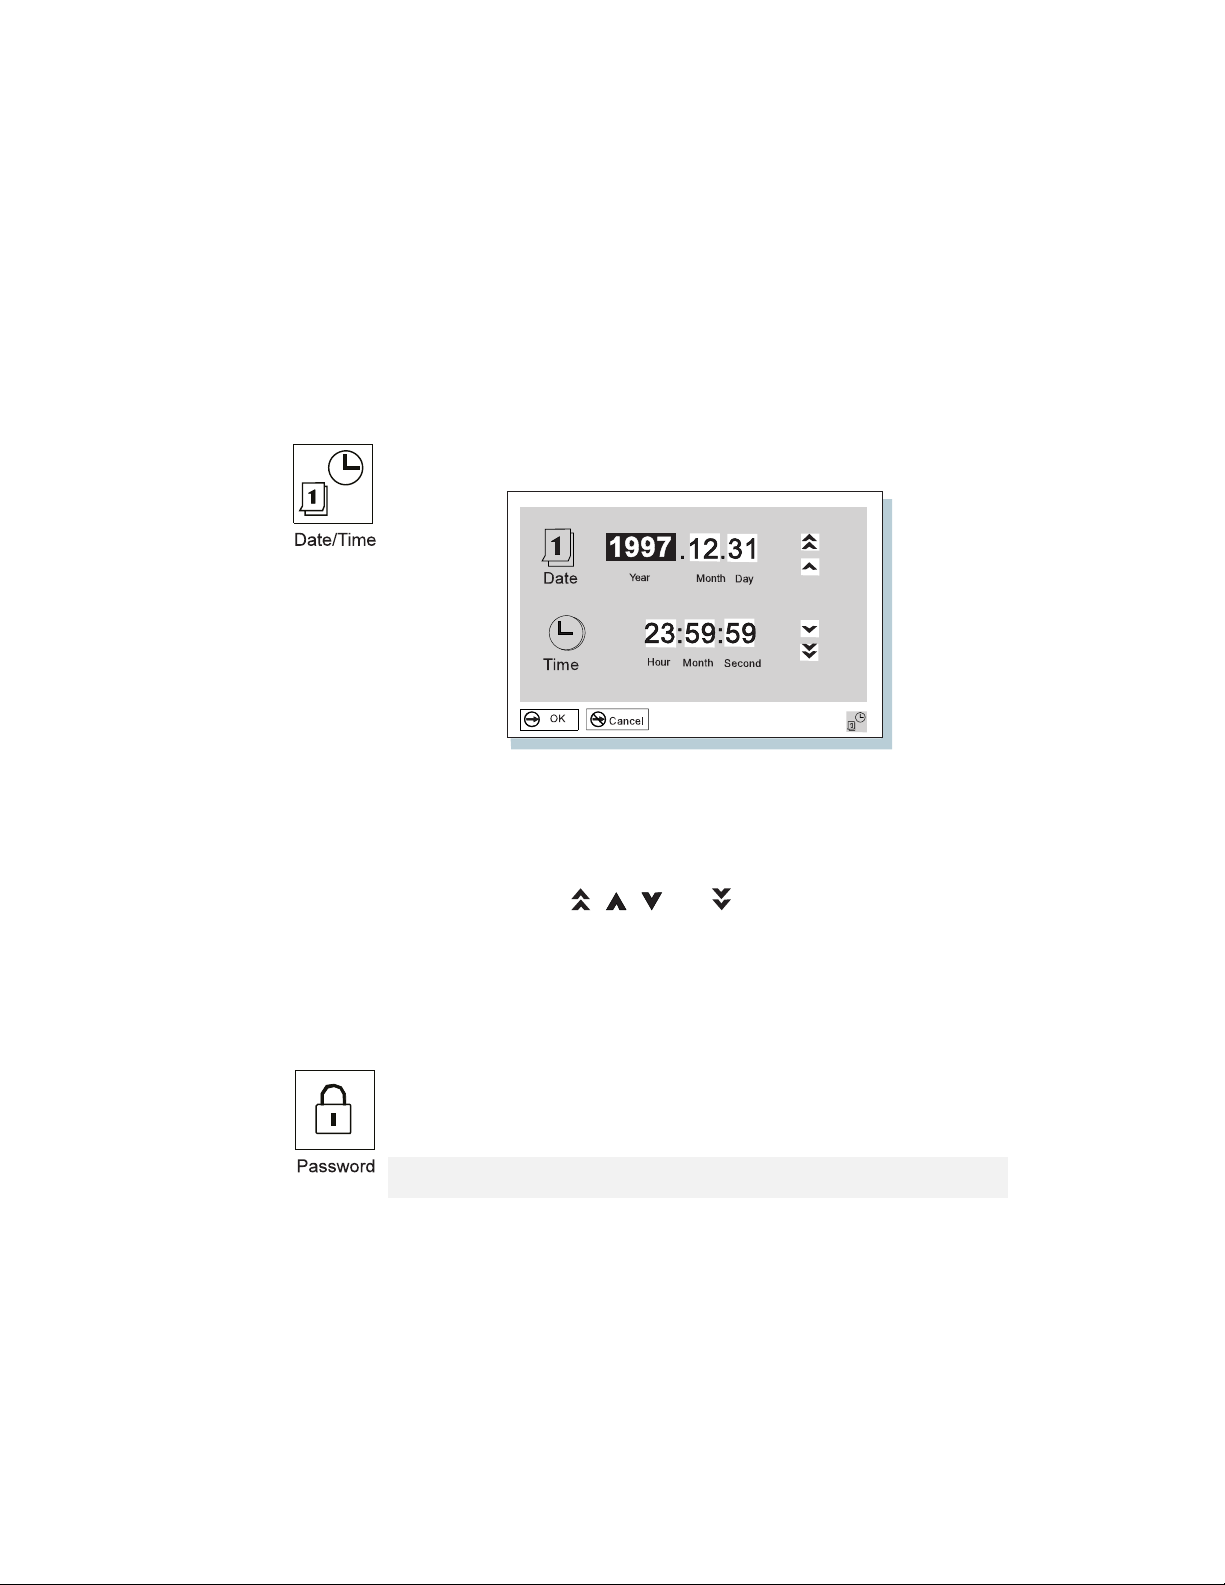
Pressing the Date/Time button displays the following “Date and
Time” submenu. It is used to set the current date and time.
To change the date and time, do the following:
1
Move the cursor to any field (Year, Month, Day, Hour,
Minute, or Second) and place the pointer on any of the
arrow icons (
, , , or ) to adjust the date and
time.
Clicking on the double-arrow icon scrolls the numbers faster.
2
Click on OK to save the changes or on Cancel to cancel
them.
Pressing the Password button displays the “Password” submenu. It
is used to set the power-on password, hard disk password, and
supervisor password. Go to “Using Passwords” on page 50.
Note: An open lock icon shows that a password has not been set yet.
Chapter 1. Getting Familiar with Your Computer 23
Page 39

Getting Familiar with Your Computer
Pressing the Start up button displays the “Start up” submenu. It is
used to change the startup sequence of your computer.
You can change the startup sequence of the drives in your
computer. For example, if you have different operating systems on
different replaceable hard disk drives or PC cards, you can have the
system boot up from one of these devices.
You must be extremely careful not to specify a wrong device
during a copy, save, or a format operation after you change your
startup sequence. If you specify a wrong device, your data and
programs might be erased or overwritten.
To change the startup sequence, do the following:
Attention
1
Reset the current startup sequence by moving the cursor
to the Reset icon; and click on it.
The sequence is reset, and all available device icons appear
at the bottom of the screen.
2
Select the first device you want for the startup sequence;
then click on it.
Repeat this step to set the other devices for the startup
sequence. You can set up to four devices.
3
Click on OK or press Enter to save the changes.
24 IBM ThinkPad 560X User's Guide
Page 40
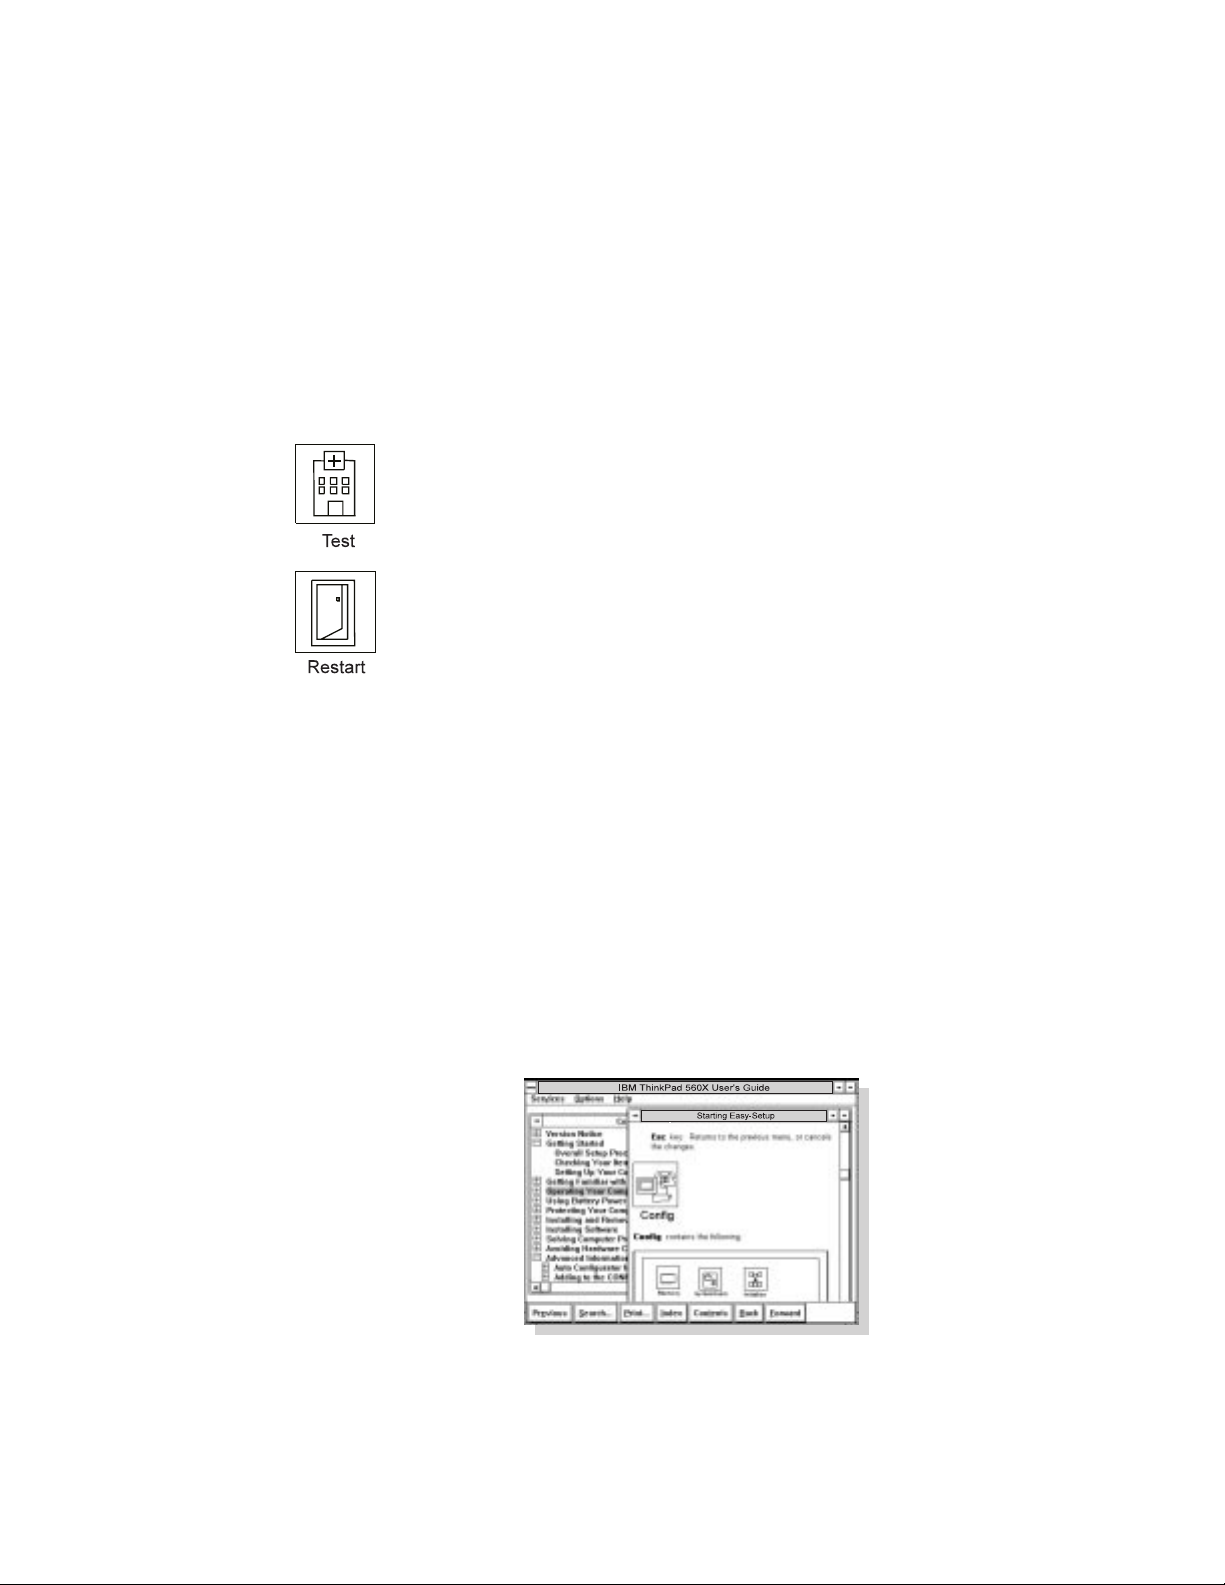
Online Book
Getting Familiar with Your Computer
Pressing the Test button displays the “Test” submenu. It is used to
run diagnostic tests on your computer to check for hardware errors.
Go to “Testing Your Computer” on page 126.
Pressing the Restart button ends the Easy-Setup program and
restarts the computer.
Your ThinkPad computer has an online book containing the following
advanced information:
Using PC Card
Resolving system resource conflicts
Solving computer problems
Installing software
To start the online book, double-click on ThinkPad Information;
then ThinkPad 560X Online Book.
The online book appears. Go to the section you want, and make a
printout if necessary.
Chapter 1. Getting Familiar with Your Computer 25
Page 41

Getting Familiar with Your Computer
Backing Up Your System
To back up your system or reinstall the operating system, your
ThinkPad computer has the following features:
Recovery CD
Diskette Factory program
Recovery CD (Windows 95 Only)
If you accidentally erase your hard disk, you can use the Recovery
CD to restore the contents of the preloaded hard disk to what it was
at the time of purchase. (Refer to “Using the Recovery CD
(Windows 95 Only)” on page 130.)
Diskette Factory
With the Diskette Factory program, you can create the utility and
device driver diskettes for Windows 95, Windows NT, Windows 3.11,
DOS, or OS/2. (Refer to “Using the Diskette Factory” on page 128.)
Keeping Your Computer from Being Damaged
Your computer is a delicate device that requires careful handling. To
keep it from being damaged, keep these precautions in mind:
Do not force the LCD to open flat.
Do not allow your computer to be subject to any physical shock.
Do not place anything heavy on your computer.
Do not pour liquid onto your computer.
Keep the computer at least 13 cm (5 in.) away from any
electrical appliance that generates a strong magnetic field, such
as a motor, magnet, TV, refrigerator, or large audio speakers.
Use your computer only when temperatures are between 5°C to
35°C (41°F to 95°F). When operating with diskettes, use your
computer only between 10°C to 35°C (50°F to 95°F)
Do not disassemble the computer.
Do not scratch, twist, hit, or push the LCD surface.
If you will not be using the computer for a long period of time,
the battery pack and keep it in a cool place.
Insert diskettes straight into the external diskette drive. Inserting
them at an angle can damage the front of the drive.
26
IBM ThinkPad 560X User's Guide
Page 42

Getting Familiar with Your Computer
Do not place more than one diskette label on a diskette. Two or
more labels can cause a label to tear apart inside the external
diskette drive and damage the drive.
Occasionally clean your computer as follows:
Use a soft cloth moistened with nonalkaline detergent to wipe the
exterior of the computer.
Gently wipe the LCD with a dry, soft cloth. Do not use alcohol or
detergent.
Carrying the Computer
When carrying your computer, you need not power it off.
When carrying it a short time, put the computer in suspend
mode.
When carrying it a long time, put the computer in hibernation
mode.
There is an optional carrying bag for your ThinkPad 560X
computer.
Chapter 1. Getting Familiar with Your Computer 27
Page 43

Chapter 2. Using Battery Power
This chapter describes battery pack operations.
Using the Battery Pack ....................... 29
Charging the Battery Pack .................... 29
Monitoring the Battery Status .................. 29
Using the Battery Status Indicator .............. 30
Using the Fuel-Gauge Program ............... 32
Saving Battery Power ........................ 33
Using the Power-Saving Modes ................. 33
Customizing the Power Management .............. 38
Setting the Suspend Timer .................. 38
Enabling Hibernation Mode .................. 39
Considerations When Using a Power Management Mode .. 40
Considerations for Suspend Mode .............. 40
Considerations for Hibernation Mode ............ 42
Notes for Reinstalling or Installing the Operating System 43
Using Other Battery Saving Methods .............. 45
Replacing the Battery Pack ..................... 46
28 Copyright IBM Corp. 1997
Page 44

Using the Battery Pack
This section describes how to charge your battery pack, display its
status. or replace it.
Charging the Battery Pack
You can charge the battery pack when the AC Adapter is connected
to the computer and the battery pack is installed. You must charge
the battery pack in any of the following conditions:
Notes:
1. Before you charge the battery pack, ensure that its temperature is at
2. If the battery pack has not been used for a long time, it will not be fully
Using Battery Power
If you purchase a new battery pack.
If the battery status indicator starts blinking
If the battery pack has not been used for a long time.
least 10°C (50°F).
charged with only a single charging. You will have to completely
discharge it; then recharge it three to six times to maximize battery
operating time.
Monitoring the Battery Status
You can monitor the battery status through the battery status
indicator and the Fuel-Gauge program.
Chapter 2. Using Battery Power 29
Page 45

Using Battery Power
Using the Battery Status Indicator
The battery status indicator shows the current status of the battery
pack (only when the battery is installed).
Compare the battery status indicator with the following table to
determine the condition of your battery.
Status Condition
Green Enough power remains for operation.
Orange The battery pack is being charged.
Blinking
orange
Off The battery pack is not installed.
The battery pack needs charging. If the indicator
starts blinking orange, the computer beeps three
times.
The computer is turned off or is in suspend mode
when the AC Adapter is not connected.
30 IBM ThinkPad 560X User's Guide
Page 46

Using Battery Power
Attention
You should take corrective actions when the battery status
indicator is
blinking orange
, and your computer sounds three
consecutive beeps. (If your computer enters suspend mode
because of a low-battery condition, data in memory might be
lost.)
Immediately connect the AC Adapter to the computer
.
Then take either of the following actions:
To continue your work with AC Adapter, press the Fn key.
or:
To continue your work with a fully charged battery pack, do
the following:
1.
Replace the battery pack with a fully charged one. (See
“Replacing the Battery Pack” on page 46.)
2.
Press the Fn key.
3.
Disconnect the AC Adapter from the computer.
If you do not take corrective actions within about 30 seconds, the
computer will enter suspend mode.
Do not leave the computer in this condition for an extended
time. Data in memory will be lost.
Chapter 2. Using Battery Power 31
Page 47

Using Battery Power
Using the Fuel-Gauge Program
Using the Fuel-Gauge program, you can display the battery status
and power mode (High performance, Automatic, or Customized).
You also can select suspend or hibernation mode.
To start the Fuel-Gauge program, click on the Fuel-Gauge icon in
the ThinkPad Configuration window. The following window appears:
Notes:
1. The “Current Power Mode” icon depends on the power mode.
2. The “Power Source” icon depends on the power source. (
AC Adapter and
3. The “Duration of Remaining Power” does not appear when the AC
Adapter is connected.
is for battery pack.)
is for the
You can minimize the window to an icon by clicking on on the
status bar of the window. You can toggle between the Fuel-Gauge
window and the icon by pressing the Fn+F2 key combination.
32 IBM ThinkPad 560X User's Guide
Page 48

Saving Battery Power
Your battery pack should be useful for approximately 3 years or 300
charge-discharge cycles. The number of years or charge-discharge
cycles may vary depending on how efficiently you use your
computer. This section describes the following:
Using the Power-Saving Modes
Your ThinkPad computer has three power management modes to
save power. You can use your computer under battery power for a
considerable length of time by using these power management
modes:
Using Battery Power
How to use the power management modes.
How to use other battery saving methods.
CAUTION
It is not recommended to enter suspend or hibernation mode
when your computer is working the following applications:
Playing or recording audio
Playing a movie
Playing a game
Other multimedia application
Stop these application before entering suspend or hibernation
mode.
Chapter 2. Using Battery Power 33
Page 49

Using Battery Power
Standby Mode
In standby mode, the LCD turns off. Also, if a power-saving
monitor (Energy Star Monitor) is in use when the computer
enters standby mode, the computer activates the monitor's
low-power mode.
Your computer enters this mode by default when there is
inactivity on your computer for a set duration of time. You can
also enter this mode by pressing the Fn+F3 keys.
To return to normal operation, press any key or move the
TrackPoint.
Suspend Mode
In this mode, your computer stops all tasks and stores all data in
memory. You can enter suspend mode by:
– Pressing the Fn+F4 keys
– Closing the cover
– Selecting the Suspend button (
program
) in the Fuel-Gauge
34
IBM ThinkPad 560X User's Guide
Page 50

Using Battery Power
RediSafe
To prevent loss of data during suspend mode when the
battery is critically low, the ThinkPad has a RediSafe
function. Once you set this function, the hibernation file is
activated each time the computer enters suspend mode, and
is ready to enter hibernation mode from suspend mode
whenever the battery is low.
Set RediSafe as following:
Windows 95:
1.
Start the ThinkPad Configuration program.
2.
Click on Power Management button ( ).
3.
Select Hibernation tab.
4.
Enable hibernation mode if it is disabled.
a)
Click on the Enable Hibernation.. button.
b)
Click on Create Now; then Close.
5.
Select RediSafe.
6.
Click on OK.
Windows NT, Windows 3.11, or OS/2:
1.
Start the ThinkPad Configuration program.
2.
Click on Power Management button ( ).
3.
Select Suspend/Hibernation/Resume Options button
( ).
4.
Enable the hibernation if it is disabled.
a)
Click on the Enable Hibernation.. button.
b)
Click on OK.
5.
Select RediSafe.
6.
Click on OK.
Chapter 2. Using Battery Power 35
Page 51

Using Battery Power
Hibernation Mode
In this mode, your computer stops all tasks and stores all data in
the hard disk; then it powers off. You should set your computer
to this mode when you want to maintain the present operating
condition until the next day, for instance.
To use this mode, you have to create a hibernation file with the
ThinkPad Configuration program. (See “Enabling Hibernation
Mode” on page 39.)
For Windows NT Users
You cannot create a hibernation file in a Windows NT system
that uses the NTFS format, the Windows NT default. If you
want to use hibernation mode, you should reinstall Windows
NT with FAT format.
You can set hibernation mode by doing any of the following:
– Pressing the Fn+F12 keys.
– Selecting the Hibernation button (
) in the Fuel-Gauge
program.
Notes:
1. You cannot enter hibernation mode when you are using the
communication network.
2. Hibernation mode might be terminated if you connect your computer to a
port replicator or if you use a particular PC Card.
36 IBM ThinkPad 560X User's Guide
Page 52
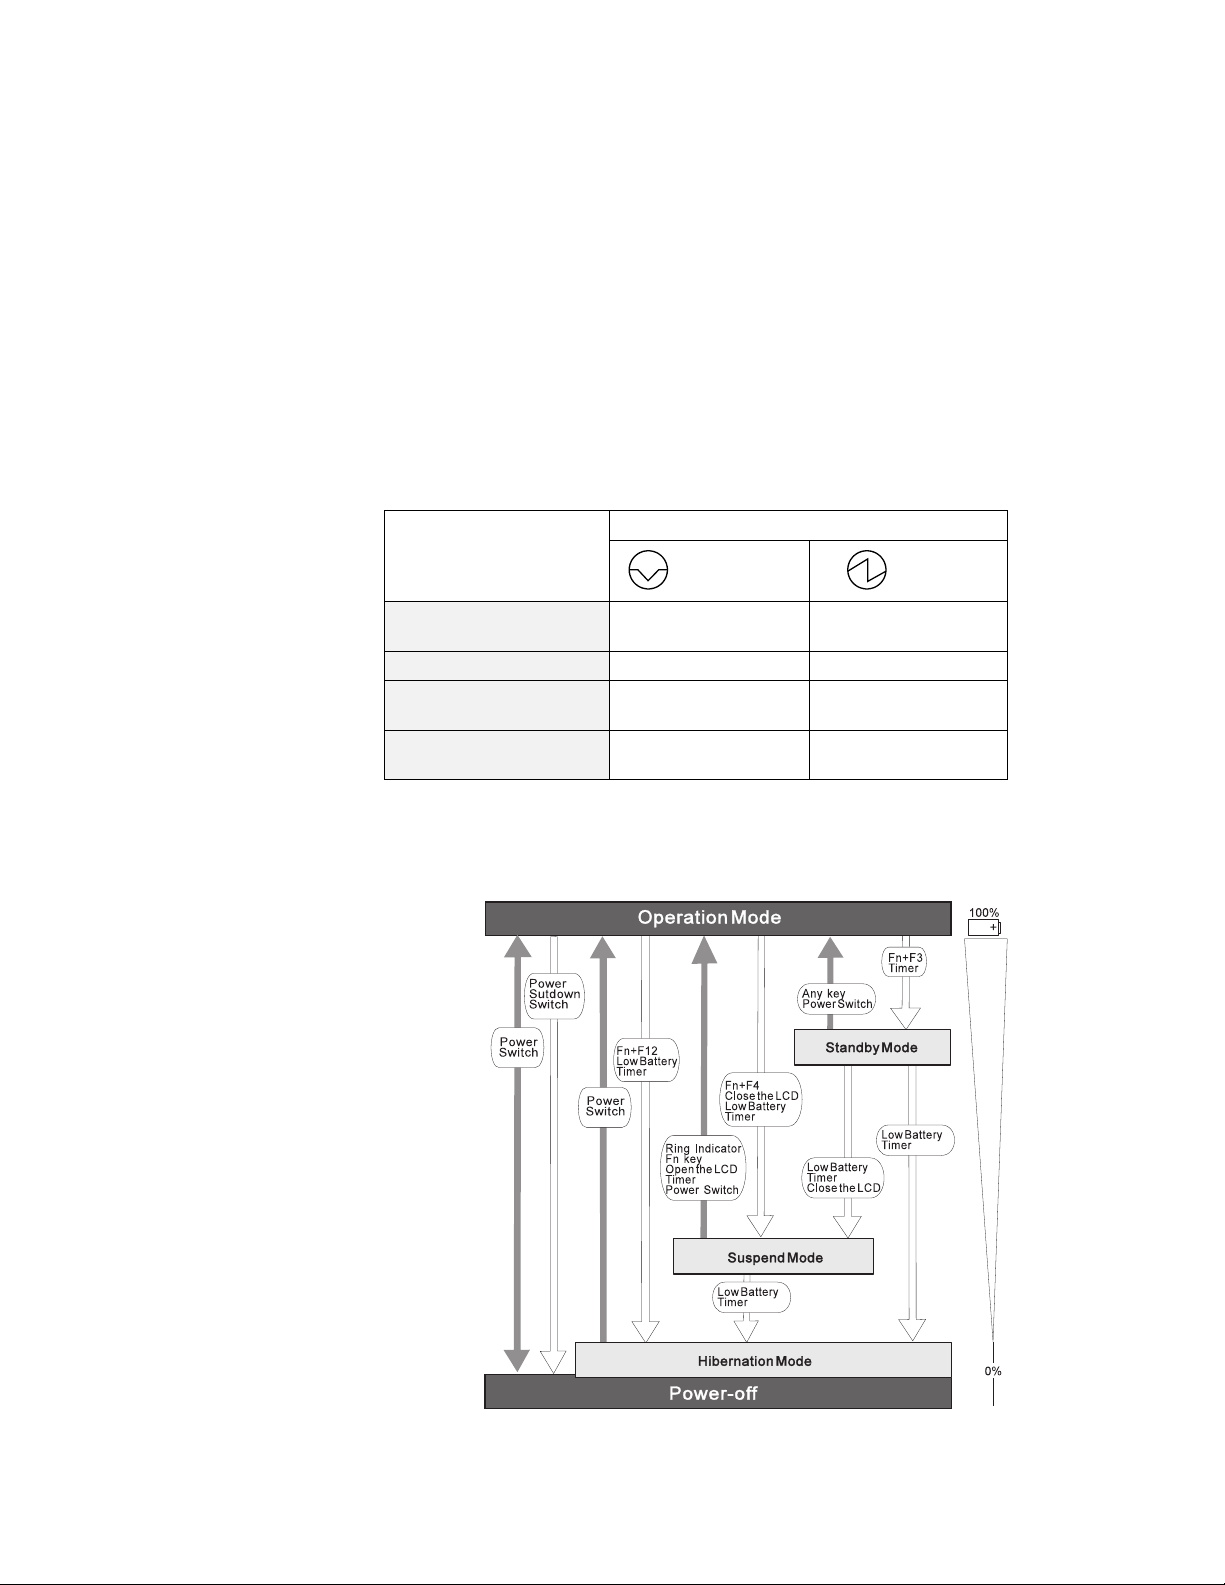
Using Battery Power
The following table shows how the indicator behaves in each power
management mode:
Indicator
Current Status
Suspend Mode Power-On
Normal operation
or standby mode
Suspend mode Green Off
Entering or resuming from
suspend mode
Power off or
hibernation mode
Off Green
Blinking green Off
Off Off
The following figure shows the relationship between different power
management modes, how to switch between them and battery power
consumption:
Chapter 2. Using Battery Power 37
Page 53

Using Battery Power
Customizing the Power Management
This section describes how to customize the power management.
Use the power management mode appropriate to your operation.
Setting the Suspend Timer
To set the suspend timer, do the following:
For Windows 95:
1
Start the ThinkPad Configuration program.
2
Click on the Power Management ( ) button.
The “Power Properties” window appears.
3
Select the Power Mode tab.
The “Power Mode” window appears.
4
Select Customized.
The bottom gray portion is displayed in black, and you can
specify the timeout value in minutes in the Suspend Timer
box.
5
Click on OK.
For Windows NT, Windows 3.11, or OS/2:
1
Start the ThinkPad Configuration program.
2
Click on the Power Management ( ) button.
Three buttons appear on the right.
3
Click on the Power Mode Settings ( ) button.
The “Power Mode Settings” window appears.
4
Specify the timeout value in minutes in the Suspend
Timer box.
5
Click on OK.
38 IBM ThinkPad 560X User's Guide
Page 54

Enabling Hibernation Mode
To enable hibernation mode, do the following:
For Windows 95:
1
Start the ThinkPad Configuration program.
2
Click on the Power Management ( ) button.
The “Power Properties” window appears.
3
Select the Hibernation tab.
The “Hibernation” subwindow appears.
4
Click on Enable Hibernation. (If you have already
created a hibernation file, this button appears in gray and
you cannot click on it.)
The “Enable Hibernation” subwindow appears.
Using Battery Power
5
Click on Create Now.
6
Click on Close; then OK.
For Windows NT, Windows 3.11, or OS/2:
1
Start the ThinkPad Configuration program.
2
Click on the Power Management ( ) button.
3
Click on the Suspend/Resume Options ( ) button.
The “Suspend/Resume Options” window appears.
4
Click on the Enable Hibernation.. button.
5
Click on OK.
Chapter 2. Using Battery Power 39
Page 55

Using Battery Power
Considerations When Using a Power Management Mode
When you use a power management mode, you need to consider a
few points, especially if you are using the network.
Considerations for Suspend Mode
Consider the following before using suspend mode:
The computer can enter suspend mode when used with the
following operating systems:
– DOS Version 7.0
– OS/2 Warp Version 4
– Microsoft Windows Version 3.11 with DOS Version 7.0
– Microsoft Windows 95
– Microsoft Windows NT 4.0
Important
If you use Windows Version 3.11, ensure that Advanced
Power Management (APM) is installed according to the
instructions in page 44.
Attached devices, such as a printer or serial device, stop running
when the computer enters suspend mode. When you resume
normal operation, the output might differ from what you expect,
because the device might be reset or lose its configuration
settings.
Sometimes you might want to use the computer with the LCD
closed —for example, when an external monitor and keyboard
are used. In such a case, turn on the computer with the LCD
closed or use the ThinkPad Configuration program to set the
computer to not enter suspend mode when the LCD is closed.
If the computer resumes normal operation by reaching the
ThinkPad Configuration timer setting or because of an incoming
call, only a blank screen is displayed. To display a power-on
password prompt, press any key or move your pointing device.
If the computer is powered with ac power and is using one of the
following IBM PC Cards, it enters
– IBM 3270 Emulation Credit Card Adapter
– IBM Token-Ring 16/4 Credit Card Adapter
40
IBM ThinkPad 560X User's Guide
standby mode
:
Page 56

Using Battery Power
– IBM Credit Card Adapter for Ethernet
– IBM 5250 Emulation Credit Card Adapter
If other PC Cards are used and the computer enters suspend
mode, all application programs stop. Communication also stops
for communication PC Cards not in the preceding list. For some
PC Cards, power to the PC Cards might also turn off.
If the computer is powered with battery power, the computer
turns power off to the PC Card, and communication stops for
communication PC Cards, so the duration of suspend mode is
longer.
If communication for a PC Card is not reestablished after
resuming normal operation, remove and then reinstall the PC
Card before restarting the system or application program. For
other kinds of PC Cards, if the PC Card or computer does not
operate, restart the application or computer.
If the computer is using one of the following IBM modem cards
and detects an incoming call while in suspend mode, the
computer automatically resumes normal operation:
– IBM 28.8/14.4 Data/FAX Modem
– IBM PCMCIA Data/FAX Modem
– IBM High Speed PCMCIA Data/FAX Modem
– IBM Microelectronics 2.4/9.6 Data/FAX Modem
– IBM Microelectronics 14.4/14.4 Data/FAX Modem
– IBM Wireless Modem for ARDIS
– IBM Wireless Modem for Mobitex
– IBM Wireless Modem for Cellular/CDPD
While a communication link is active, the computer does not
enter suspend mode.
Chapter 2. Using Battery Power 41
Page 57

Using Battery Power
Note:
You must set the Resume on incoming call option in the ThinkPad
Configuration program so the computer automatically resumes normal
operation.
For Windows 95:
1.
Click on the Battery ( ) button.
2.
Click on the Suspend/Resume options tab.
3.
Select the Resume on incoming call option.
For Windows NT, Windows 3.11, or OS/2:
1.
Click on the Battery ( ) button.
2.
Click on the Suspend/Hibernation/Resume options ( ) button;
then select the Resume on incoming call option.
For DOS: Enter PS2 RI E
Considerations for Hibernation Mode
Consider the following before using hibernation mode:
Do not run any tasks while the hibernation file is being created.
The computer uses battery power to enter hibernation mode.
Therefore, it reserves some battery power when it is set to enter
hibernation mode when a low-battery condition occurs. This can
cause the battery operating time to be shorter than the time
publicly stated.
Do not add or remove memory during hibernation mode. If you
do, the computer resumes from hibernation mode without
recognizing the changed memory size. To ensure that the
computer recognizes the correct memory size, shut down; then
restart your operating system.
If the computer is powered with battery power, the computer
turns power off to the PC Card when entering hibernation mode.
When resuming normal operation, if the PC Card or computer
does not operate, restart the application or computer.
42
IBM ThinkPad 560X User's Guide
Page 58

Using Battery Power
If the computer is powered with ac power, it does not enter
hibernation mode if it is using one of the following IBM PC
Cards:
– IBM 28.8/14.4 Data/FAX Modem
– IBM PCMCIA Data/FAX Modem
– IBM High Speed PCMCIA Data/FAX Modem
– IBM 3270 Emulation Credit Card Adapter
– IBM Token-Ring 16/4 Credit Card Adapter
– IBM Credit Card Adapter for Ethernet
– IBM 5250 Emulation Credit Card Adapter
– IBM Microelectronics 2.4/9.6 Data/FAX Modem
– IBM Microelectronics 14.4/14.4 Data/FAX Modem
– IBM Wireless Modem for ARDIS
– IBM Wireless Modem for Mobitex
– IBM Wireless Modem for Cellular/CDPD
This prevents possible problems from occurring with
communication application programs after the computer returns
to normal operation.
Note:
If the communication links are still not reestablished, remove and then
reinstall the PC Card before restarting the system or application program.
Notes for Reinstalling or Installing the Operating System
When you install an operating system, install it with Advanced Power
Management (APM). Also install the ThinkPad Configuration
program with the Utility Diskette to use power management mode.
Note: To install the software, see the online book.
If you are using Windows 95 or OS/2,
in your computer.
APM is automatically installed
Chapter 2. Using Battery Power 43
Page 59

Using Battery Power
If you are using DOS,
APM is automatically installed in your
computer. To verify that the computer has installed APM correctly,
type power at the command prompt and press Enter. If a screen
similar to the following appears, APM is successfully installed.
Power Management Status
---------------------- Setting = ADV: REG
CPU: idle 32% of time.
AC Line Status : OFFLINE
Battery status : High
If not, add the following line to your CONFIG.SYS file, using a text
editor such as the DOS Editor:
DEVICE=C:\DOS\POWER.EXE
If you are using Windows 3.11
, follow these instructions to check
and install APM for Windows:
1
Start the computer.
Make sure that the current directory is Windows (usually
C:\WINDOWS>).
2
Type SETUP at the command prompt and press Enter.
The following appears:
Windows Setup
===============
If your computer or network appears on the Hardware Compatibility List
with an asterisk next to it, press F1 before continuing.
System Information
Computer: MS-DOS System
Display: MagicGraph128XD 8 ×6 256 small font
Mouse: Microsoft, or IBM PS/2
If MS-DOS System with APM appears for the item Computer:,
APM is already installed. Press F3 to exit the setup.
44
IBM ThinkPad 560X User's Guide
Page 60

Using Battery Power
3
Using the Arrow keys (↑ , ↓ ), position the highlighted
cursor over MS-DOS System and press Enter.
4
Position the highlighted cursor over MS-DOS System
with APM and press Enter.
5
Verify that the item Computer has changed to
MS-DOS System with APM on the screen. If not, return
to step 3.
Windows Setup
===============
If your computer or network appears on the Hardware Compatibility List
with an asterisk next to it, press F1 before continuing.
System Information
Computer: MS-DOS System with APM
Display: MagicGraph128XD 8 ×6 256 small font
Mouse: Microsoft, or IBM PS/2
6
Press Enter to install APM.
7
Restart the system to make APM effective.
Using Other Battery Saving Methods
Another battery-saving method is to decrease the LCD brightness.
You can use the ThinkPad Configuration program to decrease the
brightness of the LCD by clicking on the LCD (
selecting Normal for Brightness (battery operation) in the window
that appears.
Chapter 2. Using Battery Power 45
) button and
Page 61

Using Battery Power
Replacing the Battery Pack
To replace the battery pack, do as follows:
1
Power off your computer or connect the AC Adapter.
2
Close the LCD and turn the computer over.
46 IBM ThinkPad 560X User's Guide
Page 62

Using Battery Power
3
Slide the battery pack latch 1 ; then slide the battery
pack toward the front of the computer and remove the
battery pack.
4
Align the guides on the fully charged spare 1 with the
guides on the computer 2 ; then slide the battery pack
into the computer.
Fully press the battery pack into the computer. When it is fully
installed, the battery pack latch 3 automatically locks into
place.
Chapter 2. Using Battery Power 47
Page 63

Using Battery Power
5
Turn the computer over again; then open the LCD.
You have finished replacing the battery pack.
Note: You can replace the battery when the computer is in hibernation
mode. When you use the PC Card, the computer might not be able
to enter hibernation mode. If this happens, power off the computer.
48 IBM ThinkPad 560X User's Guide
Page 64
Chapter 3. Protecting Your Computer
This chapter provides information about how to protect your
computer from theft or unauthorized use. It also describes how to
display your personal information, such as your name or address, on
the password prompt screen.
Using Passwords . . . . . . . . . . . . . . . . . . . . . . . . . . . 50
Entering a Password ....................... 50
Setting a Password ........................ 51
Changing and Removing a Password ............. 54
For a Power-On Password or HDD Password ....... 54
For a Supervisor Password .................. 56
Using the Personalization Editor .................. 60
Using Locks . . . . . . . . . . . . . . . . . . . . . . . . . . . . . . 64
Copyright IBM Corp. 1997 49
Page 65

Protecting Your Computer
Using Passwords
Entering a Password
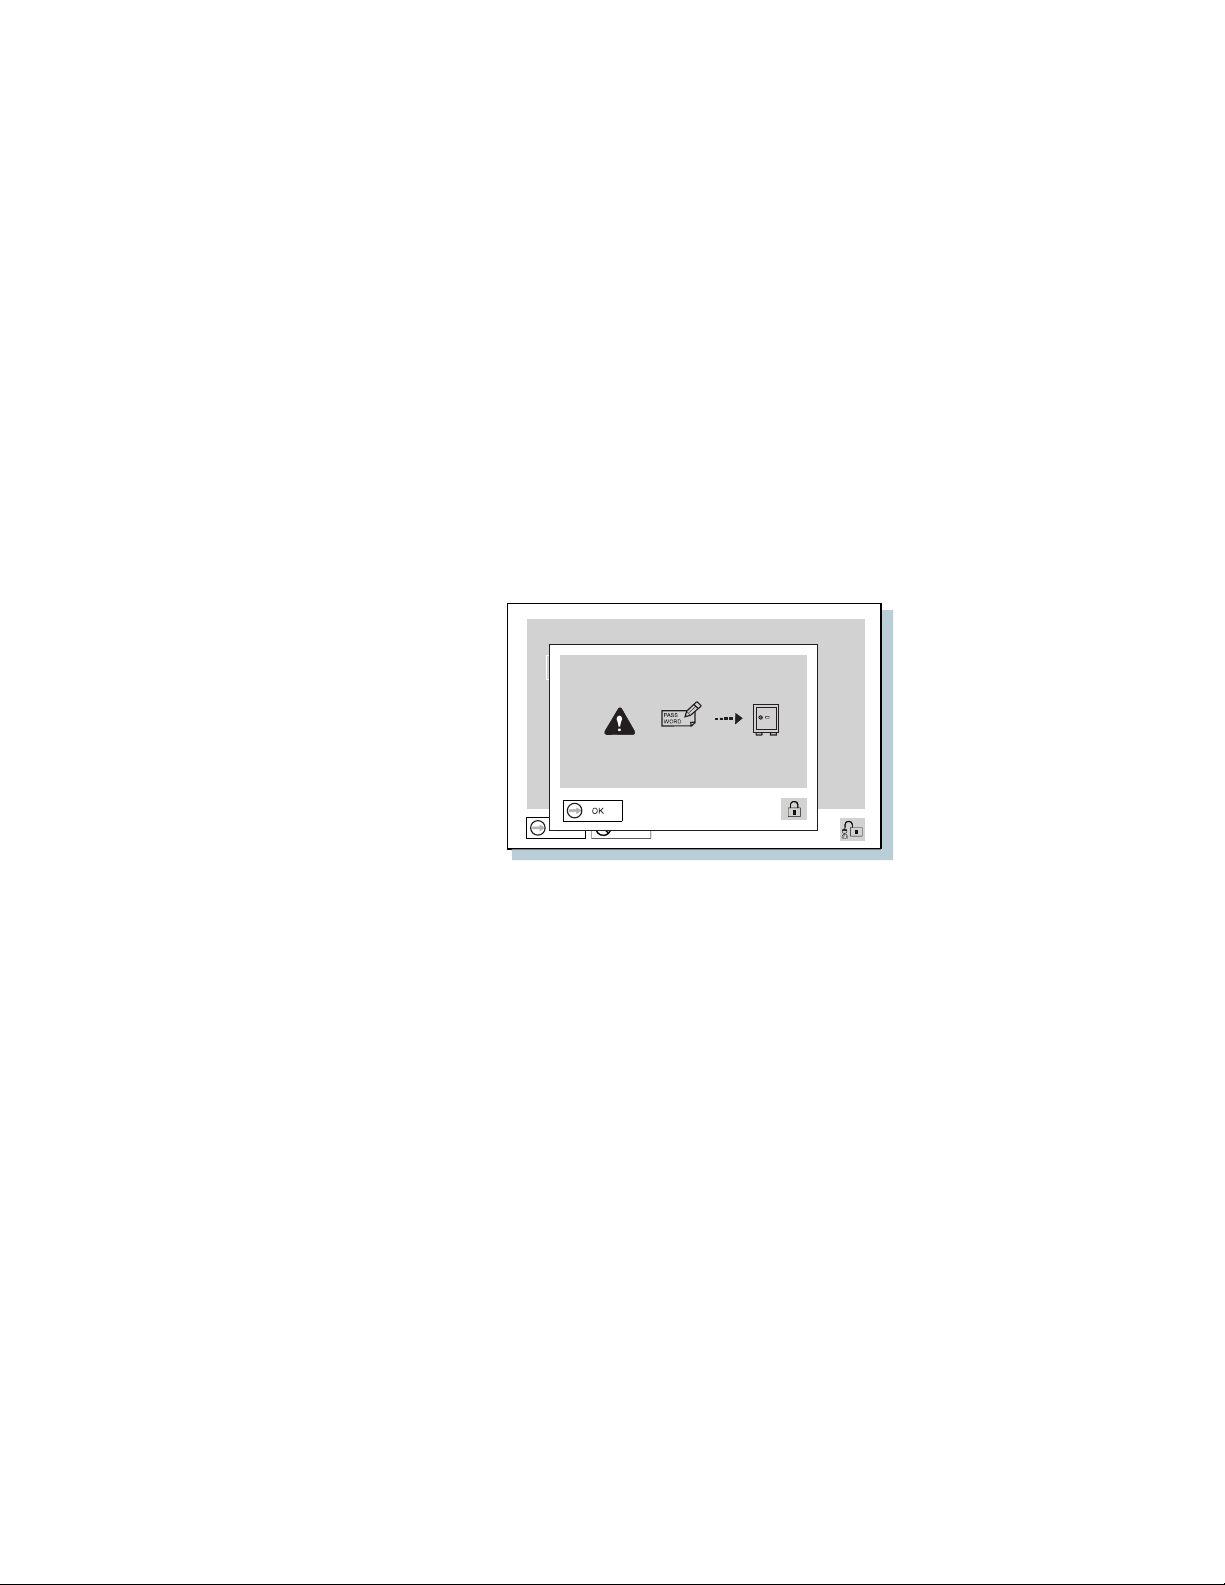
The password-setting feature prevents your computer from being
used by others. Once you set a password, a prompt appears on the
screen each time you turn on the computer. You must enter your
password at the prompt. You will not be able to use the computer
unless you type the correct password. You can set the following
passwords on your computer:
The power-on password protects your computer from being
used by unauthorized persons.
The hard disk password protects the data on your hard disk
from being accessed by unauthorized persons.
The supervisor password protects the system information
stored in Easy-Setup and also makes your computer
tamper-resistant.
Once you set a password, a password prompt appears at the top left
corner of the screen. This prompt appears each time you turn on
your computer or when your computer returns from suspend mode to
normal operation.
However, a password prompt is not displayed if the computer returns
to normal operation by a preset timer or an incoming call on the
modem, in which case you will have to display it by pressing a key or
moving the pointing device.
To enter a password, do the following:
1
Type your password.
The symbol appears each time you press a key. Don't hold
down a key too long, since the same character will be entered
continuously.
2
Press the Enter key.
An OK appears if you enter the correct password, and an X
appears if you enter the wrong password. If you fail to enter
the correct password in three tries, you must turn off the
computer, wait 5 seconds, and then turn it on again and retry.
IBM ThinkPad 560X User's Guide
50
Page 66
Setting a Password
To set a password, do the following:
1
2
Protecting Your Computer
Start Easy-Setup.
a)
Press and hold F1; then turn on the computer.
b)
Hold F1 until the “Easy-Setup” menu appears.
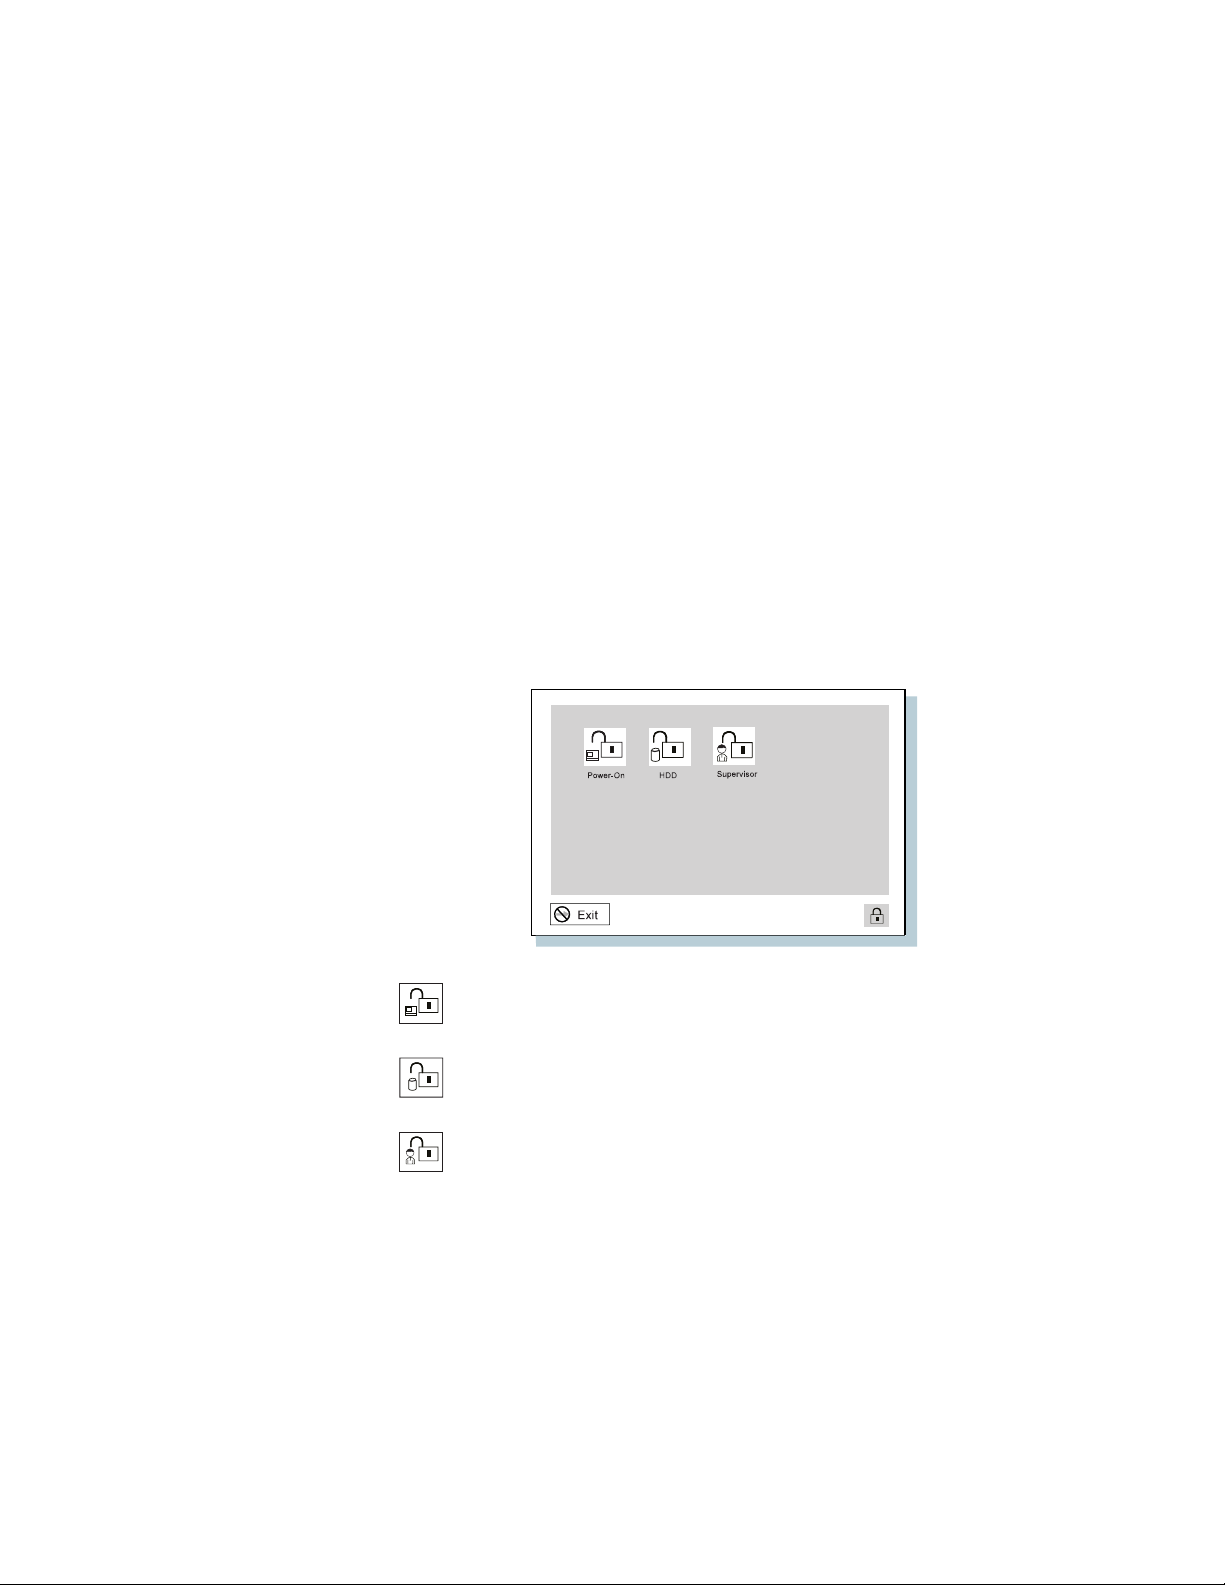
Click on Password in the “Easy-Setup” menu. The
“Password” submenu appears:
Selecting this icon displays a submenu for setting the
power-on password.
Selecting this icon displays a submenu for setting the
hard disk drive (HDD) password.
Selecting this icon displays a submenu for setting the
supervisor password.
Note: An unlocked keylock icon indicates a password that is
not yet set.
3
Click on the type of password you want to set:
Power-On, HDD, or Supervisor.
Chapter 3. Protecting Your Computer 51
Page 67
Protecting Your Computer
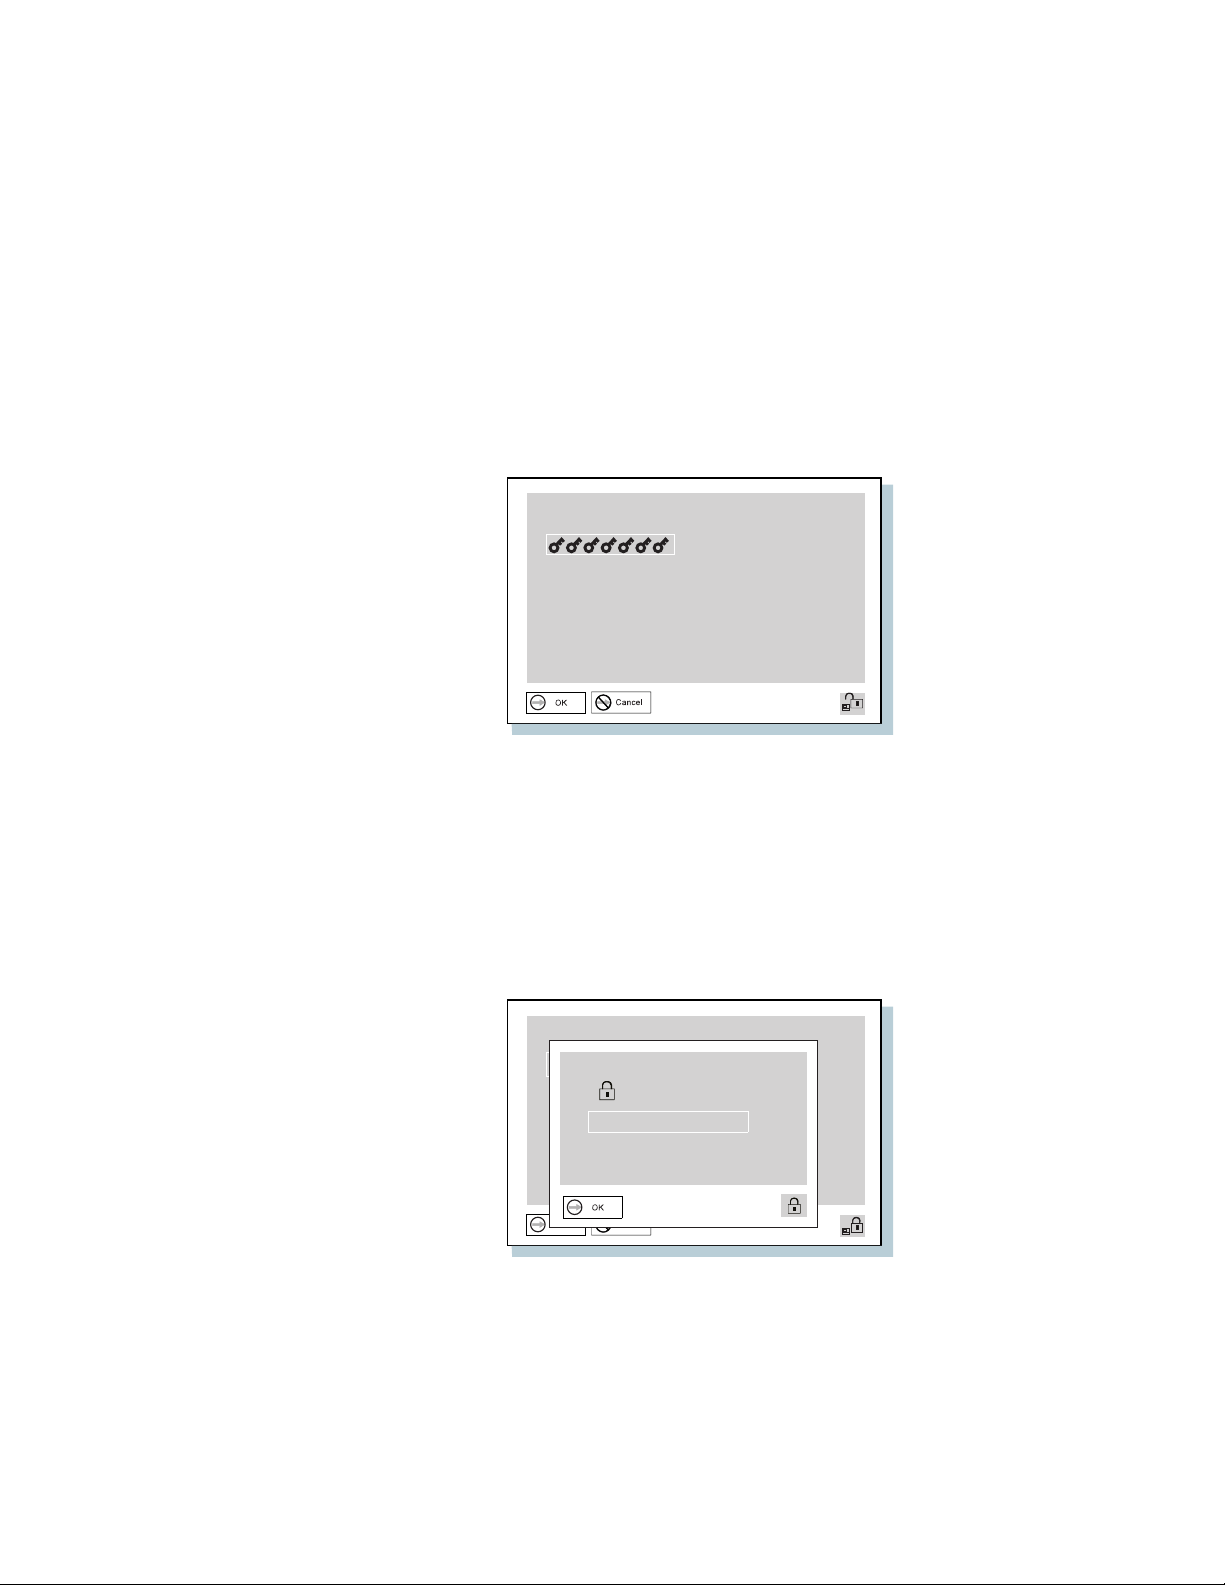
4
Type your desired appropriate password.
Note: You can type a maximum of 7 random characters using
a combination of letters (A to Z) and numbers (0 to 9).
Uppercase and lowercase letters (for example, A and a)
are treated as the same characters.
If you type a wrong character, use the Backspace key
to erase it and then type the correct one.
5
Press Enter. The “Password Confirmation” submenu
appears:
52 IBM ThinkPad 560X User's Guide
Page 68
Protecting Your Computer
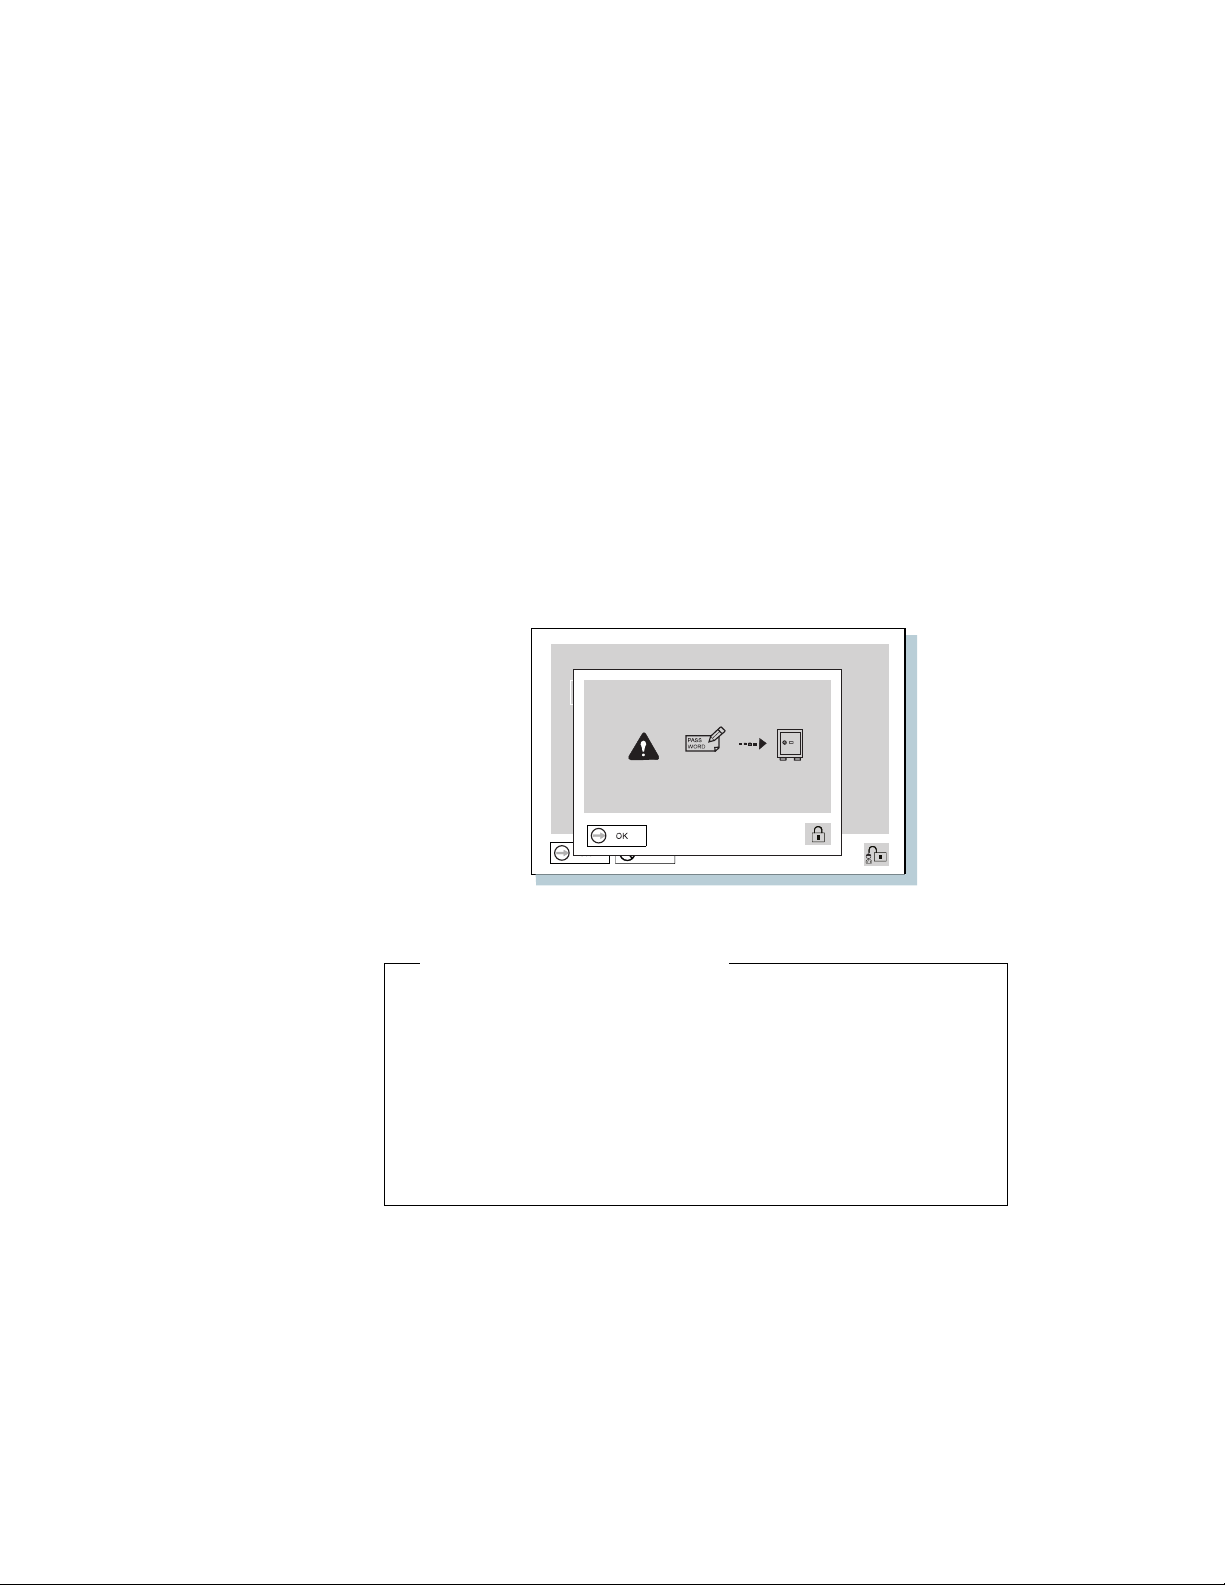
6
Type your password again to verify it; then press Enter
again.
Note: The following submenu appears if you are setting the
hard disk or the supervisor password, reminding you to
write down the password on a piece of paper and to
keep it in a safe place.
Your password is set.
Do Not Forget Your Password
If you forget your hard disk or supervisor password, there is no
way to reset your password or recover data from the hard
disk. You have to take your computer to an IBM authorized
reseller or an IBM marketing representative to have the hard disk
or the system board replaced. Proof of purchase is required, and
an additional charge might be required for the service. Neither
an IBM authorized reseller nor IBM marketing representative can
make the hard disk drive usable.
Chapter 3. Protecting Your Computer 53
Page 69

Protecting Your Computer
Changing and Removing a Password
For a Power-On Password or HDD Password
This security feature prevents someone from removing a password
and using your computer. To remove a password, do the following:
1
Turn off the computer and wait at least 5 seconds; then
turn on the computer.
The password prompt appears.
To change the password, go to the next step.
To remove the password, go to step 5 on page 55.
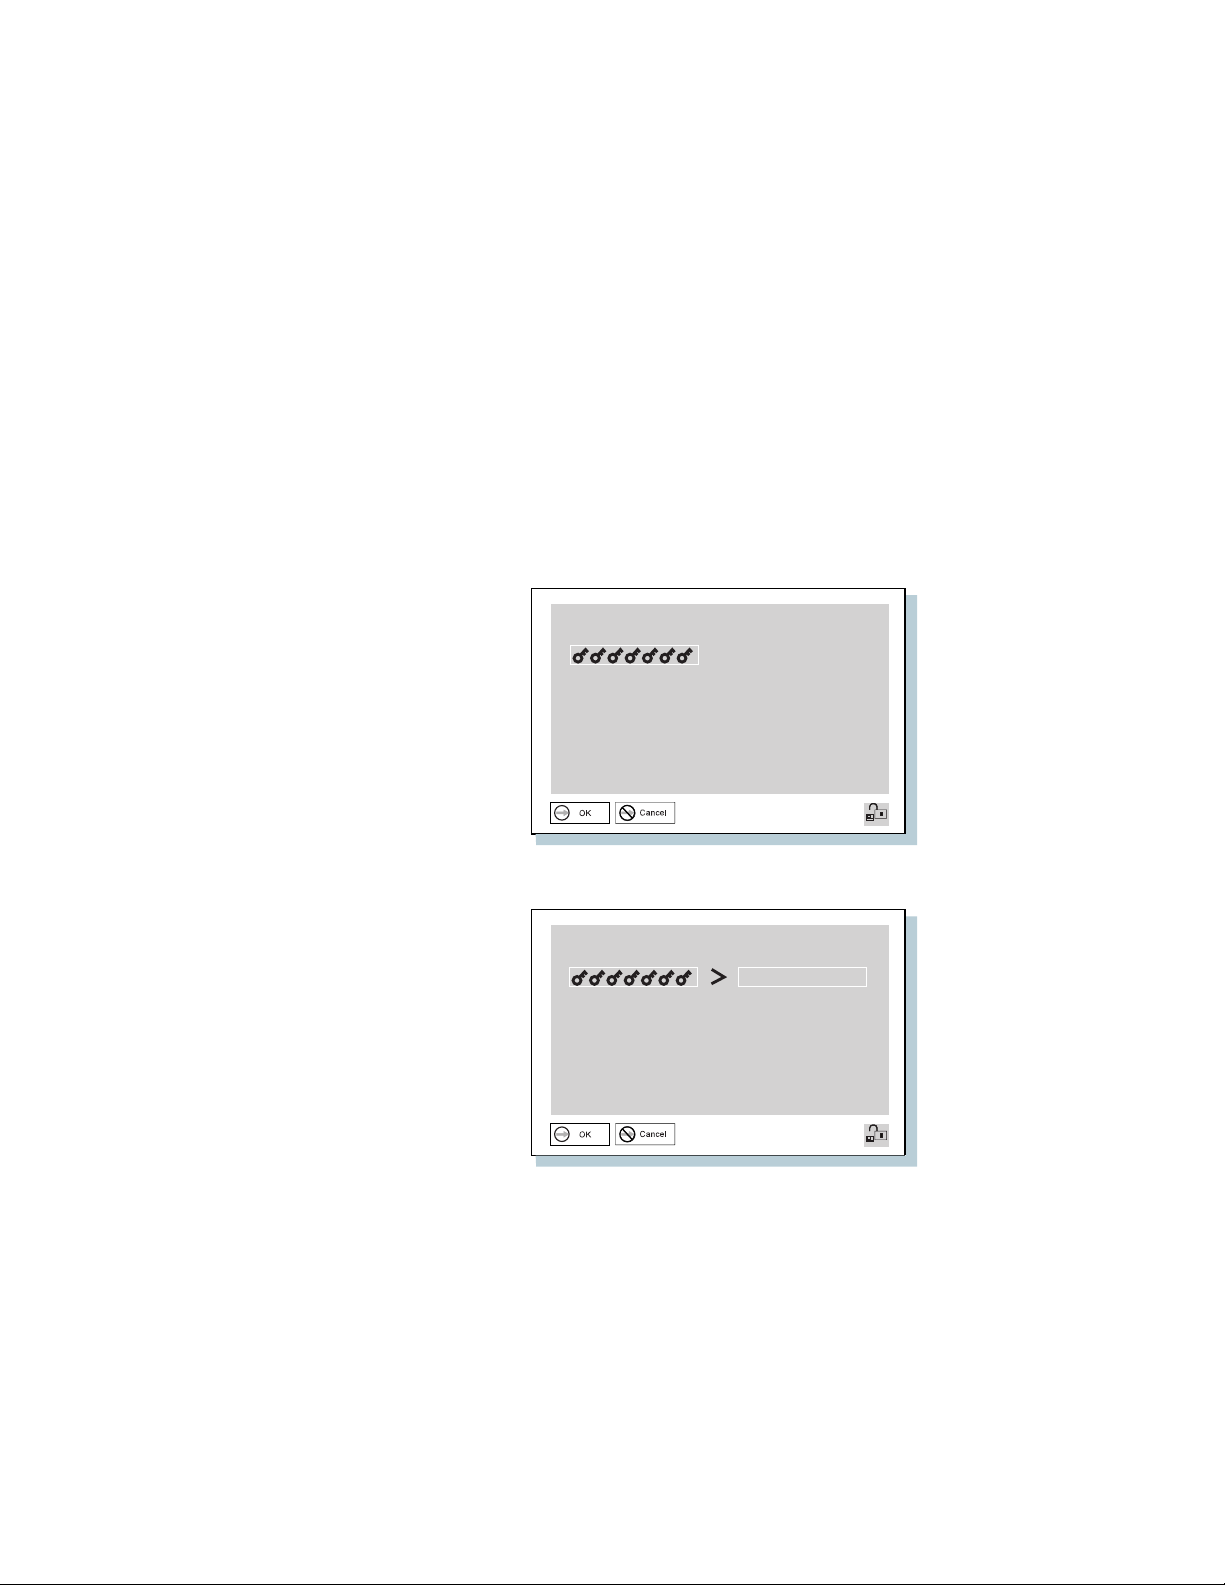
2
Type your current password and press the Spacebar.
3
To change the password, type the new password; then
press the Spacebar.
54 IBM ThinkPad 560X User's Guide
Page 70

Protecting Your Computer
4
Type the new password again to verify it; then press
Enter.
The following submenu appears and system starts.
Note: Write down the password on a piece of paper and keep
it in a safe place.
You have changed your password. Skip the remaining steps.
5
Type your current password and press the Spacebar.
Chapter 3. Protecting Your Computer 55
Page 71

Protecting Your Computer
For a Supervisor Password
6
Press Enter.
The following submenu appears and system starts.
You have removed your password.
1
Start Easy-Setup.
a)
Press and hold F1; then turn on the computer.
b)
Hold F1 until the password prompt appears.
2
Enter the supervisor password.
The “Easy-Setup” menu appears.
3
Select Password on the menu.
56 IBM ThinkPad 560X User's Guide
Page 72
Protecting Your Computer
4
Select Supervisor.
To change the password, go to the next step.
To remove the password, go to step 10 on page 58.
5
Enter the current password and press the Spacebar.
6
Type the new password; then press the Spacebar.
Chapter 3. Protecting Your Computer 57
Page 73
Protecting Your Computer
7
Type the new password again to verify it; then press
Enter.
Note: The following submenu appears and reminding you to
write down the password on a piece of paper and keep
it in a safe place.
8
Press Enter again.
9
Click on Exit; then Restart.
The supervisor password has been changed. Your computer
restarts. Skip the remaining steps.
10
Enter the current password and press the Spacebar.
11
Press Enter.
12
Click on Exit.
13
Select Restart.
The supervisor password has been removed. Your computer
restarts.
IBM ThinkPad 560X User's Guide
58
Page 74

Protecting Your Computer
Power-on Password with Supervisor Authority
You can remove a power on password (even if you don't know it)
if you know the supervisor password.
1.
Power on the computer by pressing F1.
The password prompt appears.
2.
Enter the supervisor password. The “Easy-Setup” menu
appears.
3.
Select Password on the menu.
4.
Select Power on on the menu.
5.
Type the supervisor password; then press Spacebar.
6.
Press Enter. The “Password Confirmation” submenu
appears:
7.
Press Enter again.
8.
Click on Exit; then select Restart. Your computer restarts.
The power-on password has been removed.
Chapter 3. Protecting Your Computer 59
Page 75

Protecting Your Computer
Using the Personalization Editor
With the Personalization Editor, you can display such personal
information as your name and address on the screen each time you
power on your computer. This feature helps you to identify your
computer when identical computers are being used in your location,
or to deter theft.
A personalized password-prompt screen consists of two parts: the
personal data area
1 and the
background bitmap area
2 .
ThinkPad
ThinkPad
ThinkPad
ThinkPad
ThinkPad
John Smith
IBM Corporation
123-456-789
1234-56 Big Road, New York
If you find this computer,
please contact the above address.
ThinkPad
ThinkPad
ThinkPad
ThinkPad
ThinkPad
ThinkPad
ThinkPad
60 IBM ThinkPad 560X User's Guide
Page 76

Protecting Your Computer
To register your name, address, and company on the Personalization
Editor, do the following:
Note: To display this information, the power-on password must already
have been set.
1
Turn on the computer.
2
Make a backup copy of the DOS, Personalization Utility
Diskette using your operating system's diskcopy
command.
3
Insert the backup copy of the DOS, Personalization Utility
Diskette into the diskette drive.
4
Open the Personalization Editor
a)
Click on Start.
b)
Move the cursor to Programs, ThinkPad: then click on
Personalization Editor.
The following window appears:
Personalization Editor
Personal Data Background Preview
Help
Chapter 3. Protecting Your Computer 61
Exit
Page 77

Protecting Your Computer
5
Click on Personal Data and type in the necessary
information into the boxes.
If you want to create the background bitmap, do as follows,
otherwise, go to step 10.
6
Select Background in the “Personalization Editor”
window.
Windows Paintbrush automatically opens.
7
Draw an image or color the background.
Your bitmap size must be 160 by 100 pels. To change the
size, select Open and then Image Attribute. Specify a Width
of 160, Height of 100, and set Unit to pels.
8
Select File and save Save As to save the and name
your drawing as a 16-color bitmap file on the backup
copy of the DOS, Personalization Utility Diskette.
Note: For preview the actual full-size of the screen, select Preview.
9
Press Enter to return the previous window.
10
Turn off the computer.
62 IBM ThinkPad 560X User's Guide
Page 78

Protecting Your Computer
11
Insert the backup copy of the DOS, Personalization Utility
Diskette into the diskette drive; then turn on the
computer.
12
Select Update personalization data at the menu
window; then follow the instruction on the window.
Your data will be copied from DOS, Personalization Utility
Diskette and stored in the nonvolatile memory in the computer.
13
After the data is stored, turn off the computer.
14
Set your password if you have not set yet.
Click on Help for more information.
The information that you typed in will be displayed the next time you
power on.
Delete a Personalization Screen
To delete a personalization screen from the password-prompt
screen as follows:
1.
Turn off the computer.
2.
Insert the backup copy of the DOS, Personalization Utility
Diskette into the diskette drive; then turn on the computer.
3.
Select Delete personalization data from the menu; then
follow the instructions on the screen.
4.
After the data is updated, restart the computer.
Chapter 3. Protecting Your Computer 63
Page 79

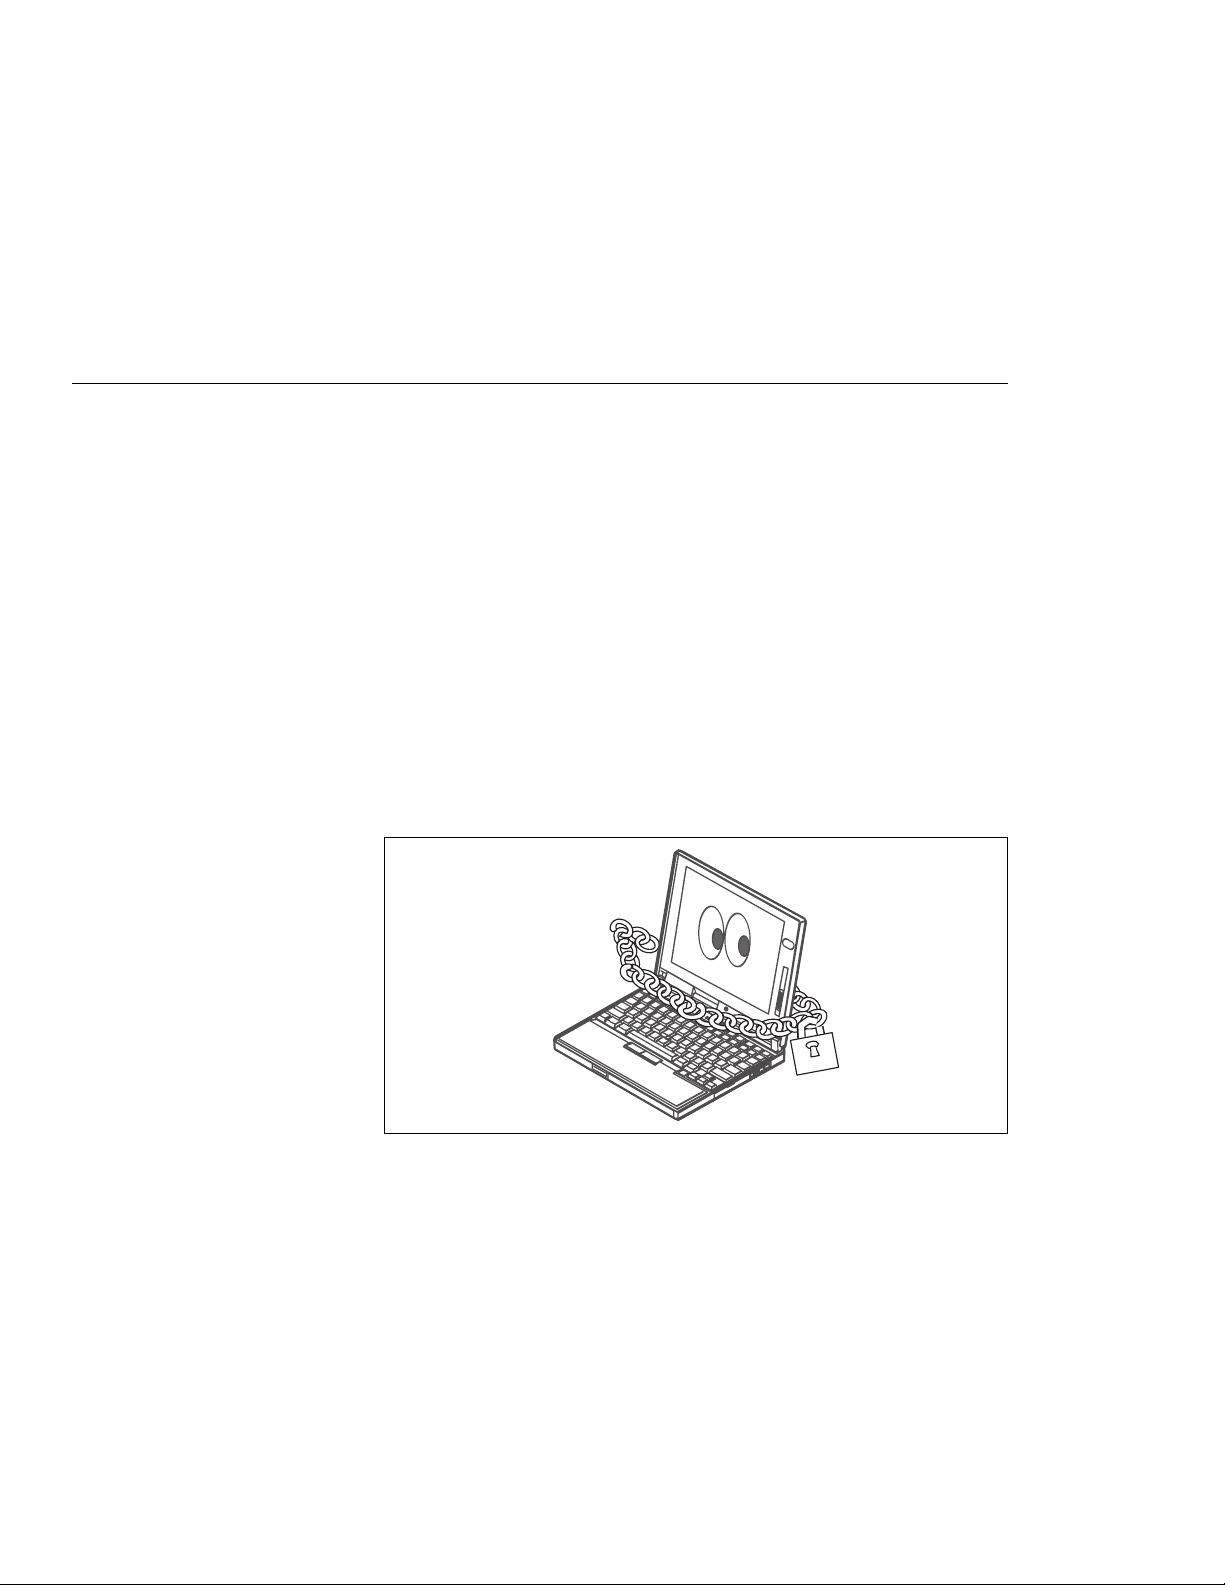
Protecting Your Computer
Using Locks
You can attach a mechanical lock to your computer, to prevent it
from being removed without your permission.
To attach a lock, do the following:
Attach a mechanical lock to the keyhole 1 on the rear of
the computer; then secure the chain on the lock to a
secure stationary object.
Note: You are responsible for evaluating, selecting, and implementing the
locking devices and security features. IBM makes no comments,
judgments, or warranties about the function, quality, or performance
of locking devices and security features.
64 IBM ThinkPad 560X User's Guide
Page 80
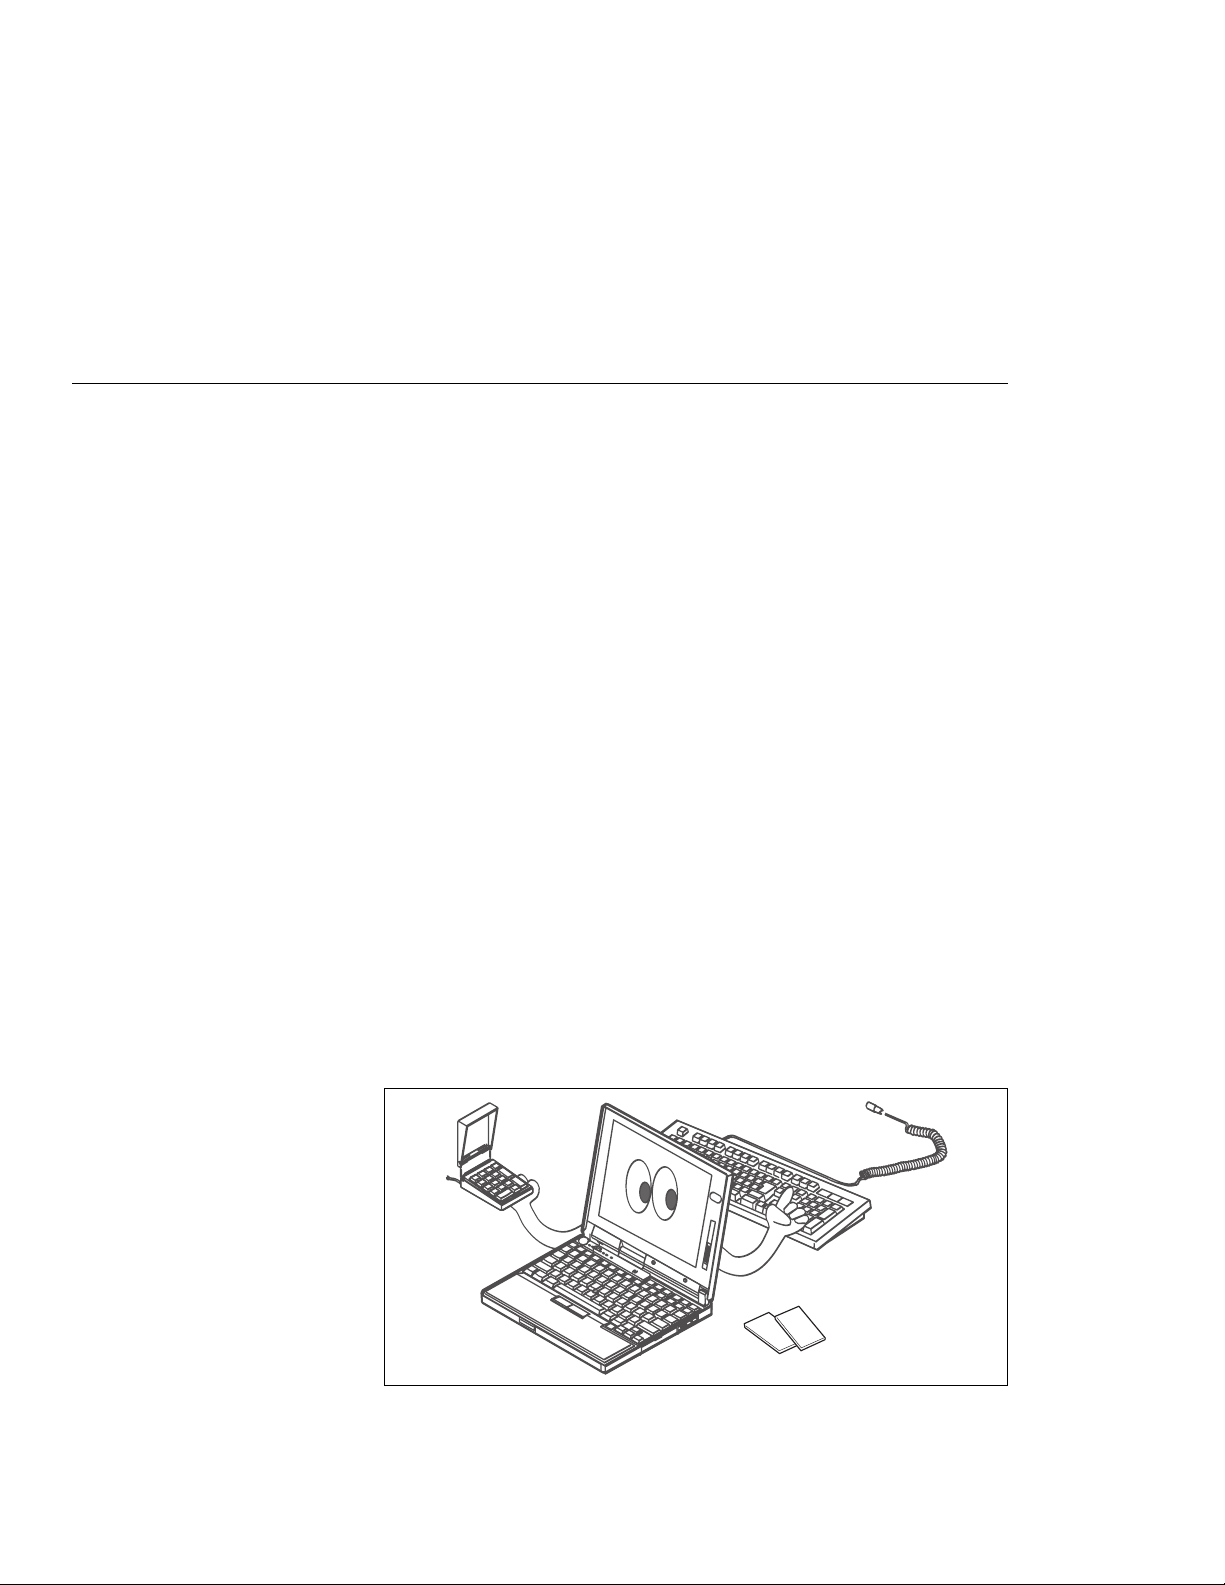
Chapter 4. Using the Advanced Features of Your ThinkPad
This chapter provides information about how to attach external
devices or to increase memory.
Increasing Memory . . . . . . . . . . . . . . . . . . . . . . . . . . 66
Installing the Memory Option .................. 66
Using an External Pointing Device ................. 70
Disabling the TrackPoint III ................... 74
Switching between the LCD and an External Monitor ...... 75
Attaching the Monitor ....................... 75
Using SVGA Video Mode .................... 79
Using a PC Card ........................... 81
Installing the PC Card ...................... 82
Installing the PC Card Device Driver ............ 85
Installing the PC Card Modem .................. 87
Using CardWorks** . . . . . . . . . . . . . . . . . . . . . . . . 90
Wizard Button . . . . . . . . . . . . . . . . . . . . . . . . . 91
PC Card Properties Window ................. 92
Stop . . . . . . . . . . . . . . . . . . . . . . . . . . . . . . . 95
Slot Management . . . . . . . . . . . . . . . . . . . . . . . 97
Help . . . . . . . . . . . . . . . . . . . . . . . . . . . . . . . 97
Using the Audio Features ...................... 98
Using the 3D Sound Retrieval System (SRS) Function ... 99
Using Infrared Communication ................... 101
Copyright IBM Corp. 1997 65
Page 81

Using Advanced Features of Your ThinkPad
Increasing Memory
Increasing memory capacity is an effective way to make programs
run faster. You can increase the amount of memory in your
computer by installing a dual inline memory module (DIMM),
available as an option.
Different capacities of DIMM (up to 64 MB) are available. You can
install a DIMM directly in the memory slot on the bottom of the
computer. Your computer memory capacity can be expanded up to
96 MB (32 MB base memory and a 64 MB DIMM option).
Installing the Memory Option
1
Turn off the computer; then remove the battery pack,
disconnect the AC Adapter and all cables from the
computer.
2
Turn the computer over.
3
Remove the screw on the memory slot cover.
66 IBM ThinkPad 560X User's Guide
Page 82
Using Advanced Features of Your ThinkPad
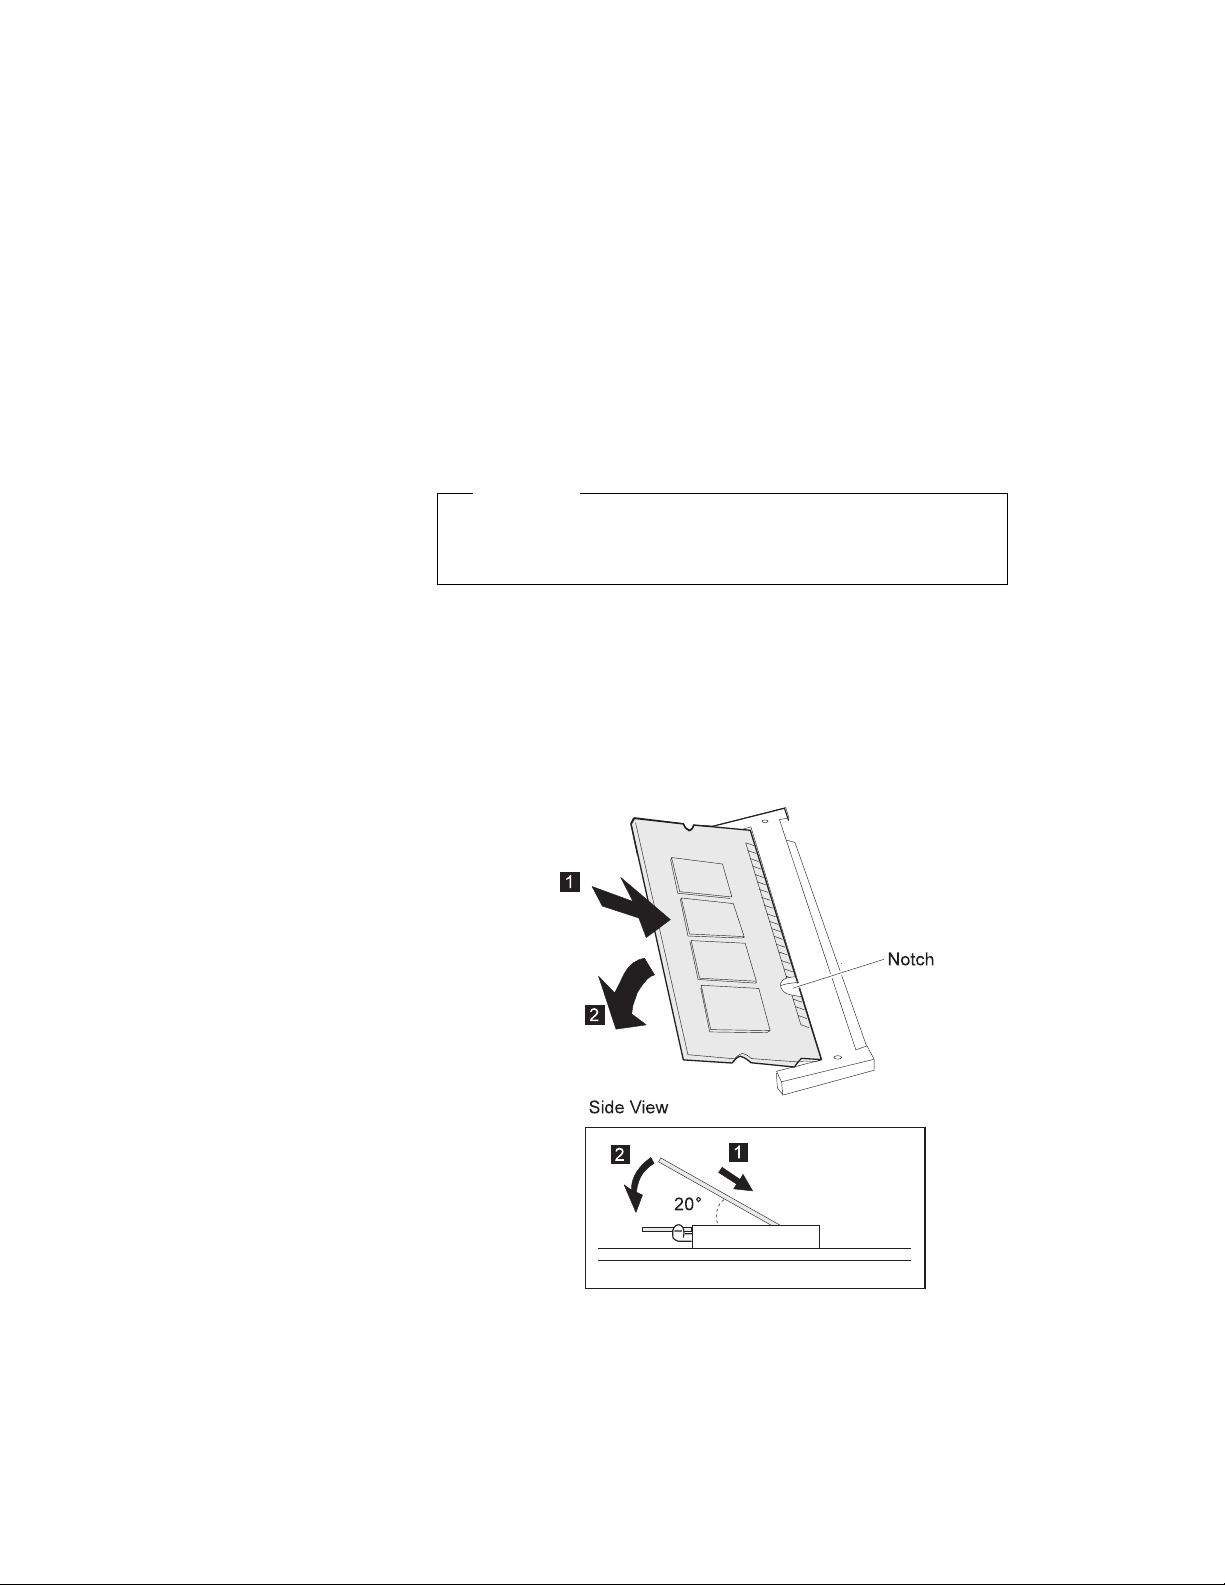
4
Install the DIMM into the memory slot.
Attention
To avoid damaging the DIMM, do not touch its contact
edge.
a
Find the notch on the side of the DIMM.
b
With the notched end of the DIMM toward the right side
of the socket, insert the DIMM, at an angle of
approximately 20°, into the socket; then press it firmly
1 .
c
Pivot the DIMM until it snaps into place 2 .
Chapter 4. Using the Advanced Features of Your ThinkPad 67
Page 83
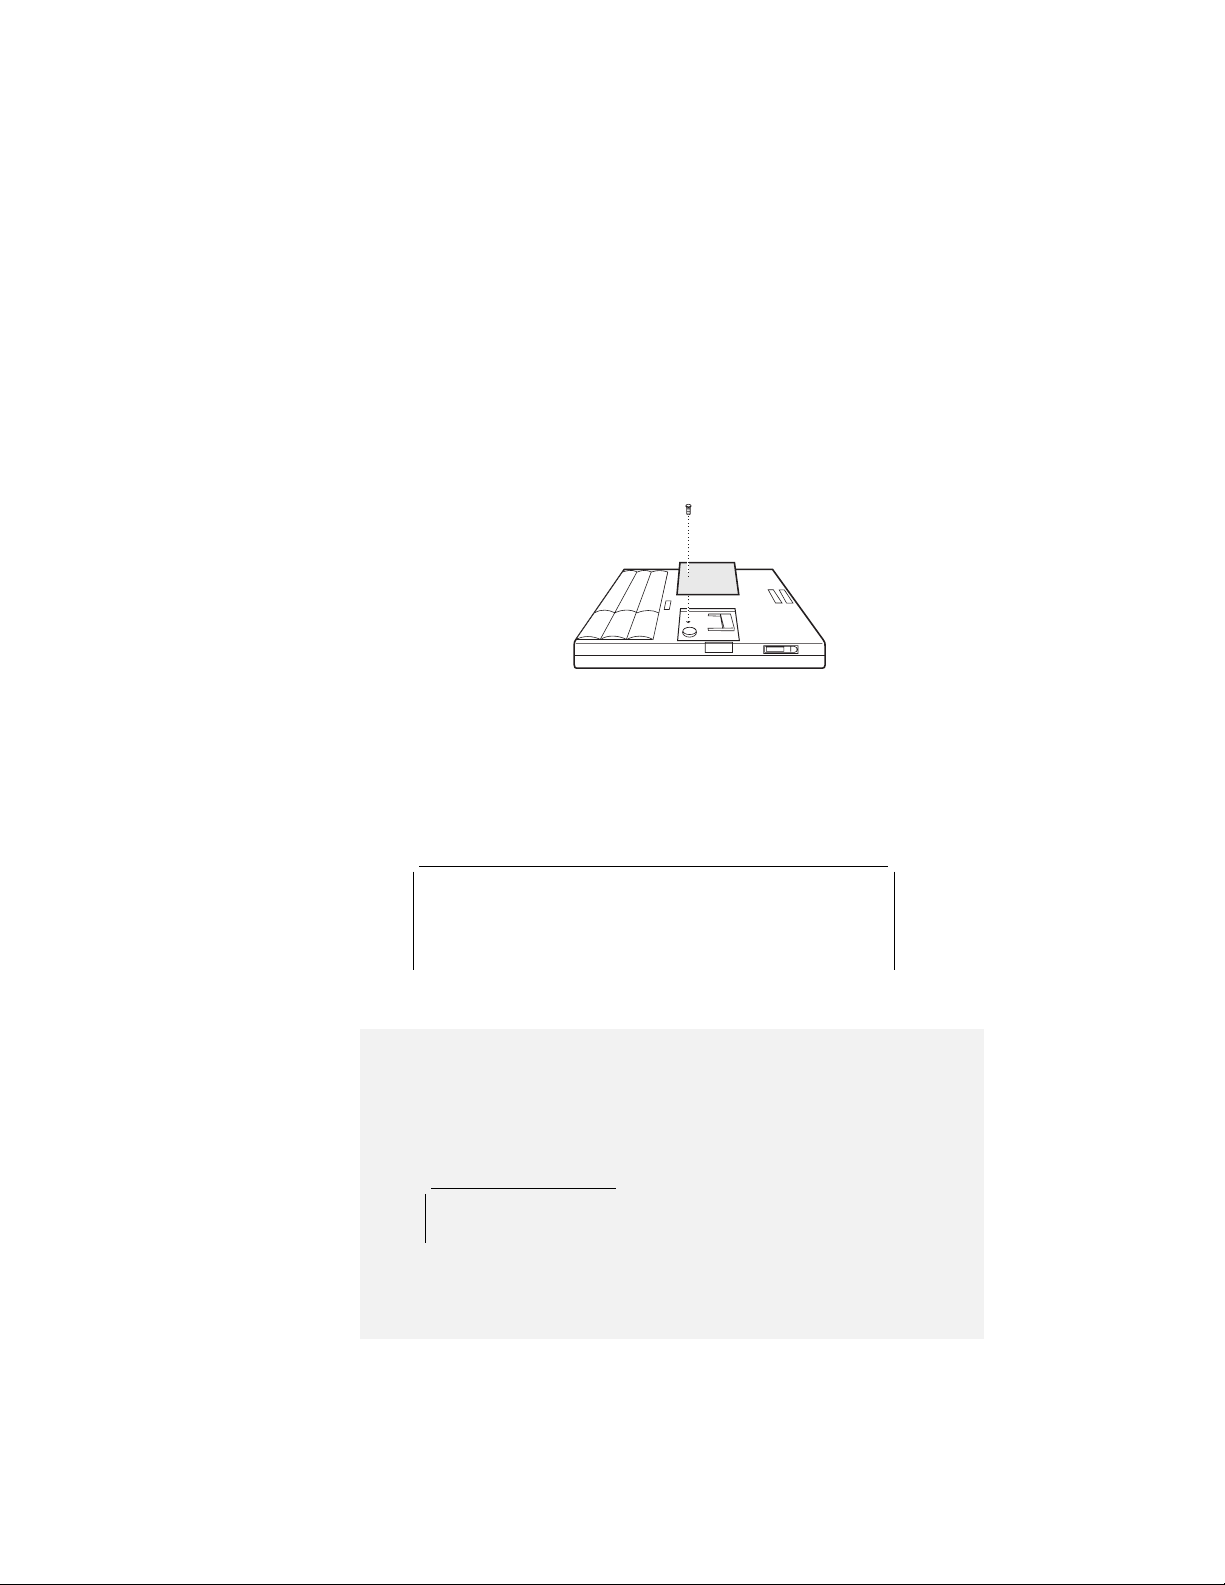
Using Advanced Features of Your ThinkPad
5
Place the memory slot cover over the memory slot; then
install the screw back into its place.
6
Turn the computer over again and confirm that the new
memory size appears at the upper left corner of the
screen.
For example, if you install the 32 MB DIMM you should see the
following:
6496 KB OK
You have finished installing the DIMM. Reconnect all cables.
Notes:
1. For the following status, turn off the computer and go to page 66 to
reinstall the DIMM and do the memory test with Easy-Setup (see page
25).
If a 21 error code appears under the memory count.
48576 KB OK
2 1
If the total memory size is not the same as the value you calculated.
2. If you changed the memory installed in the computer, you need to create
a new hibernation file.
68 IBM ThinkPad 560X User's Guide
Page 84
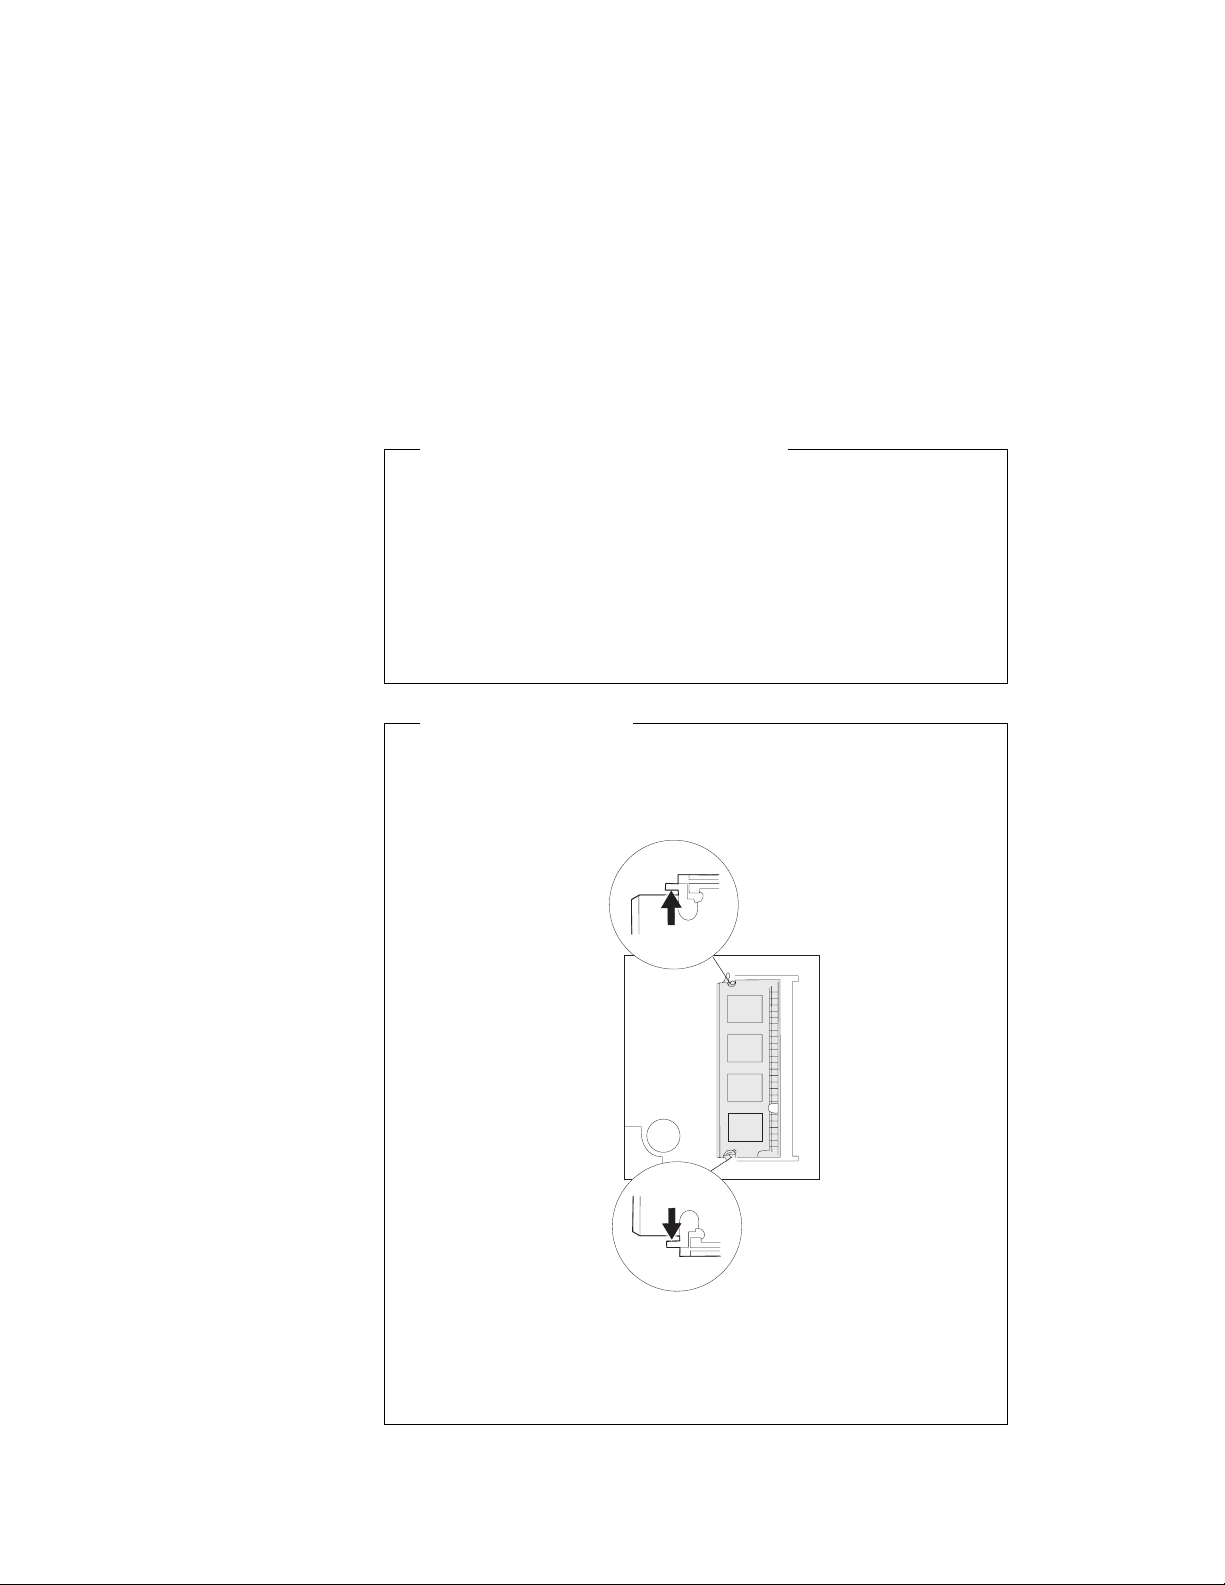
Using Advanced Features of Your ThinkPad
How to Calculate Total Memory Size
Calculate your total memory size in kilobytes (KB) by adding the
DIMM memory size to the base memory size (32192 KB).
For example, if you installed a 32 MB DIMM, calculate the total
memory size as follows.
Note: 1MB=1024KB
[32(MB) x 1 24(KB)/(MB)] + 32192(KB) = 6496 (KB)
Removing the DIMM
1.
Remove the screw and memory slot cover.
2.
Press out on the latches on both edges of the socket at the
same time.
3.
Remove the DIMM.
Be sure to save the DIMM for future use.
4.
Replace the memory slot cover; then replace the screw.
Chapter 4. Using the Advanced Features of Your ThinkPad 69
Page 85
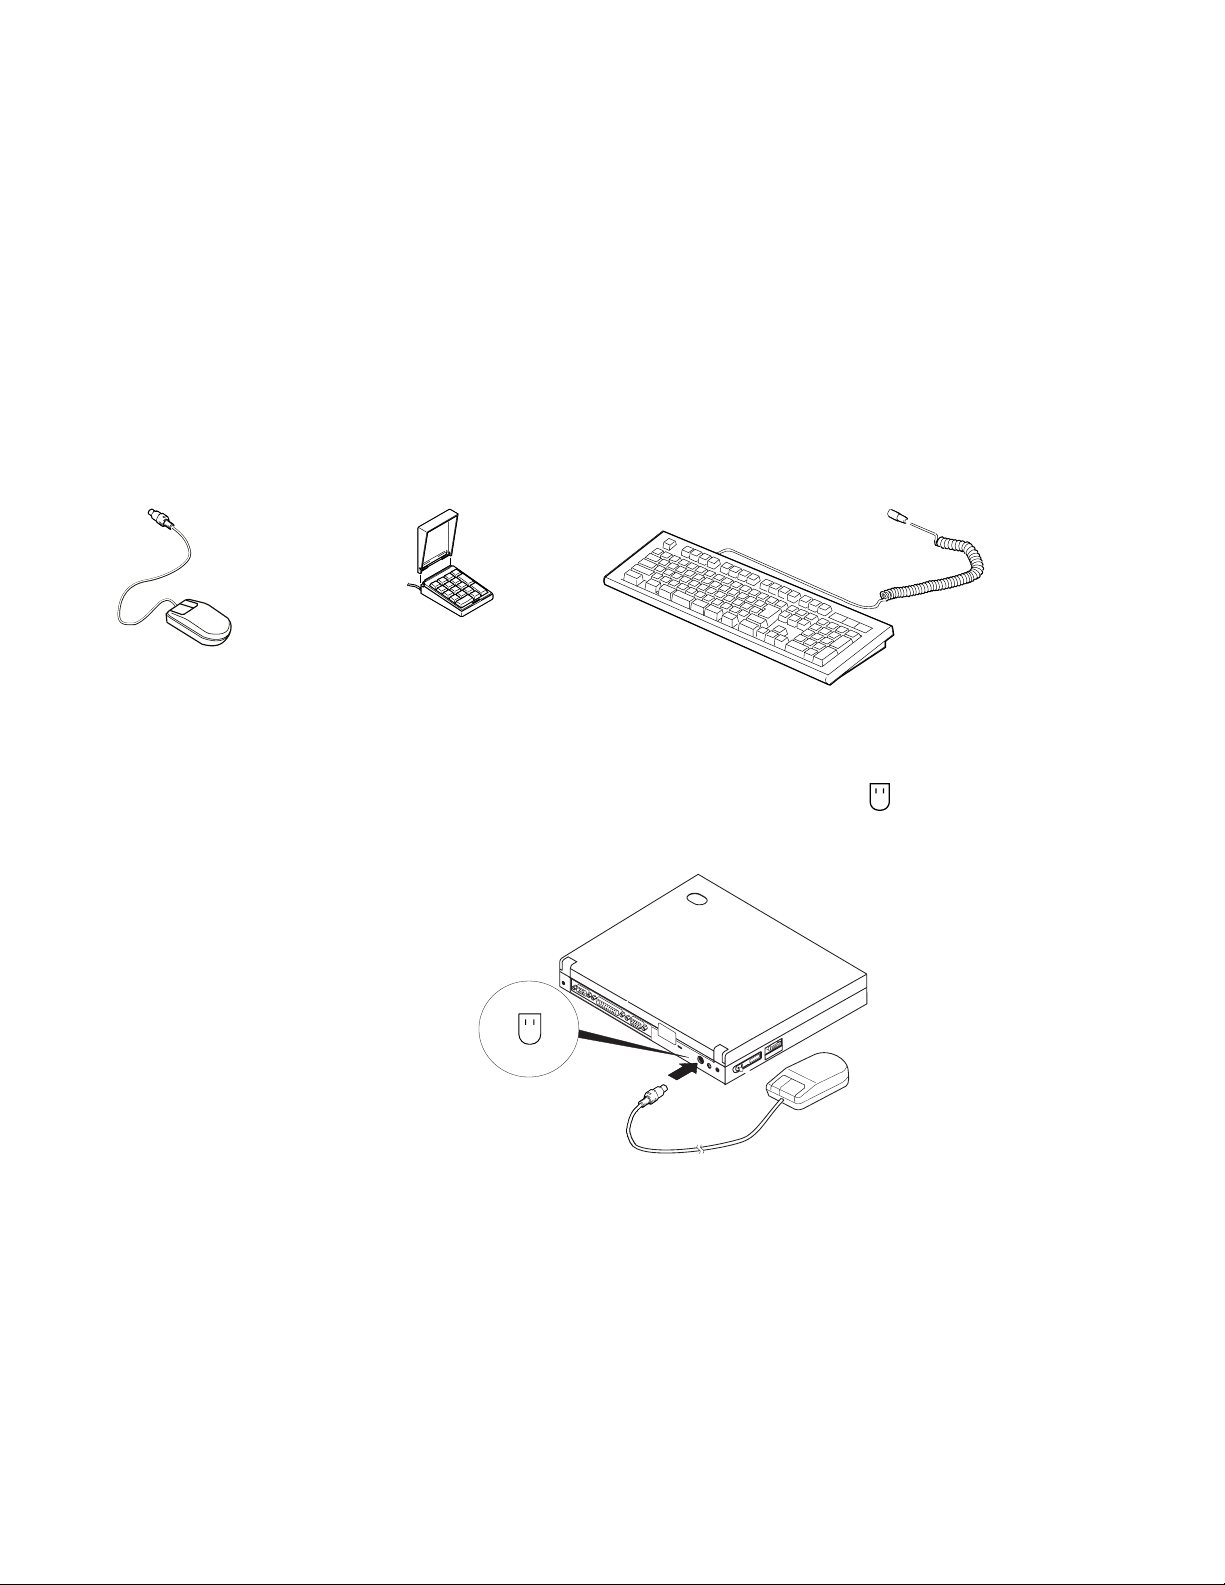
Using Advanced Features of Your ThinkPad
Using an External Pointing Device
Numeric keypad
Mouse
You can attach an external numeric keypad, a mouse, or an external
External keyboard
keyboard directly to the external-input-device connector (
rear of the computer.
) on the
70 IBM ThinkPad 560X User's Guide
Page 86
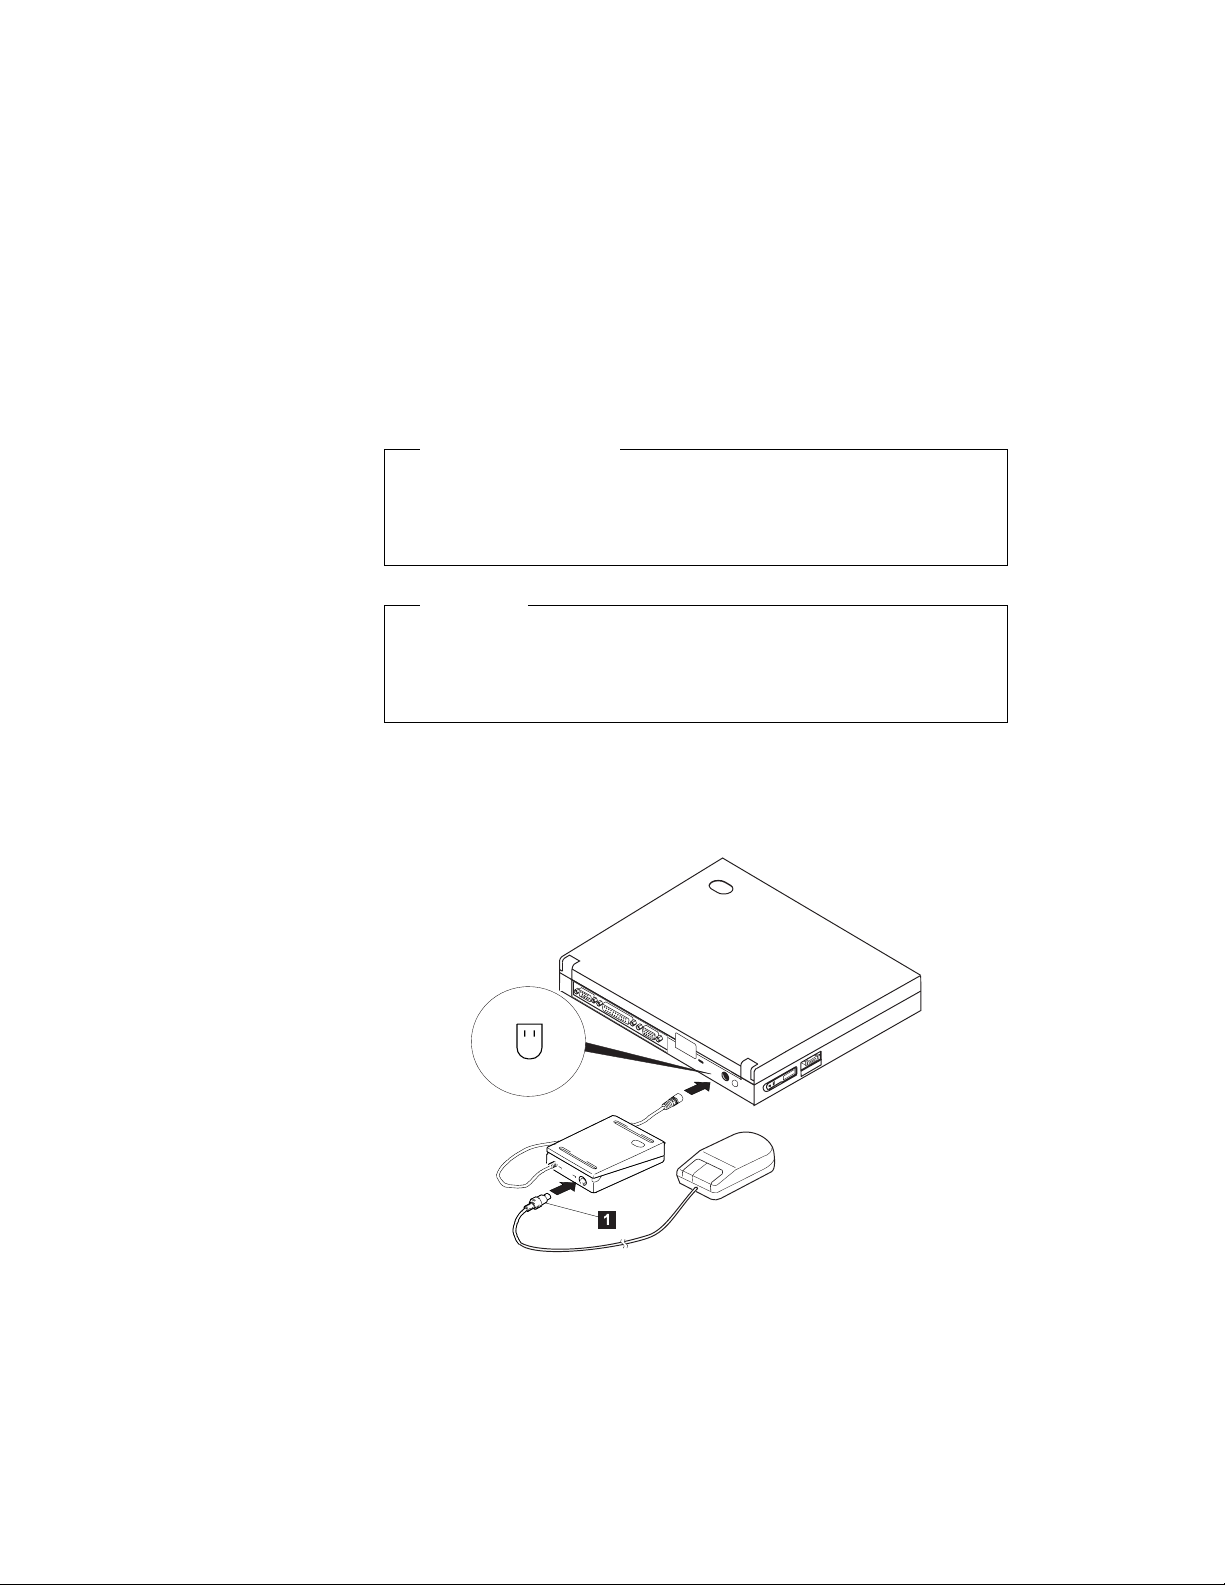
Using Advanced Features of Your ThinkPad
Attaching a Mouse
You can use both the IBM PS/2 Miniature Mouse and TrackPoint
III as the pointing device. For other mouse types, see the
following attention note.
Attention
When you connect a mouse other than an IBM PS/2 Miniature
Mouse, turn off the computer. Then go to “Disabling the
TrackPoint III” on page 74.
If you want to use the external numeric keypad and mouse at the
same time, first connect the keypad cable to the computer; then
connect the mouse cable 1 to the connector at the rear of the
keypad.
Chapter 4. Using the Advanced Features of Your ThinkPad 71
Page 87
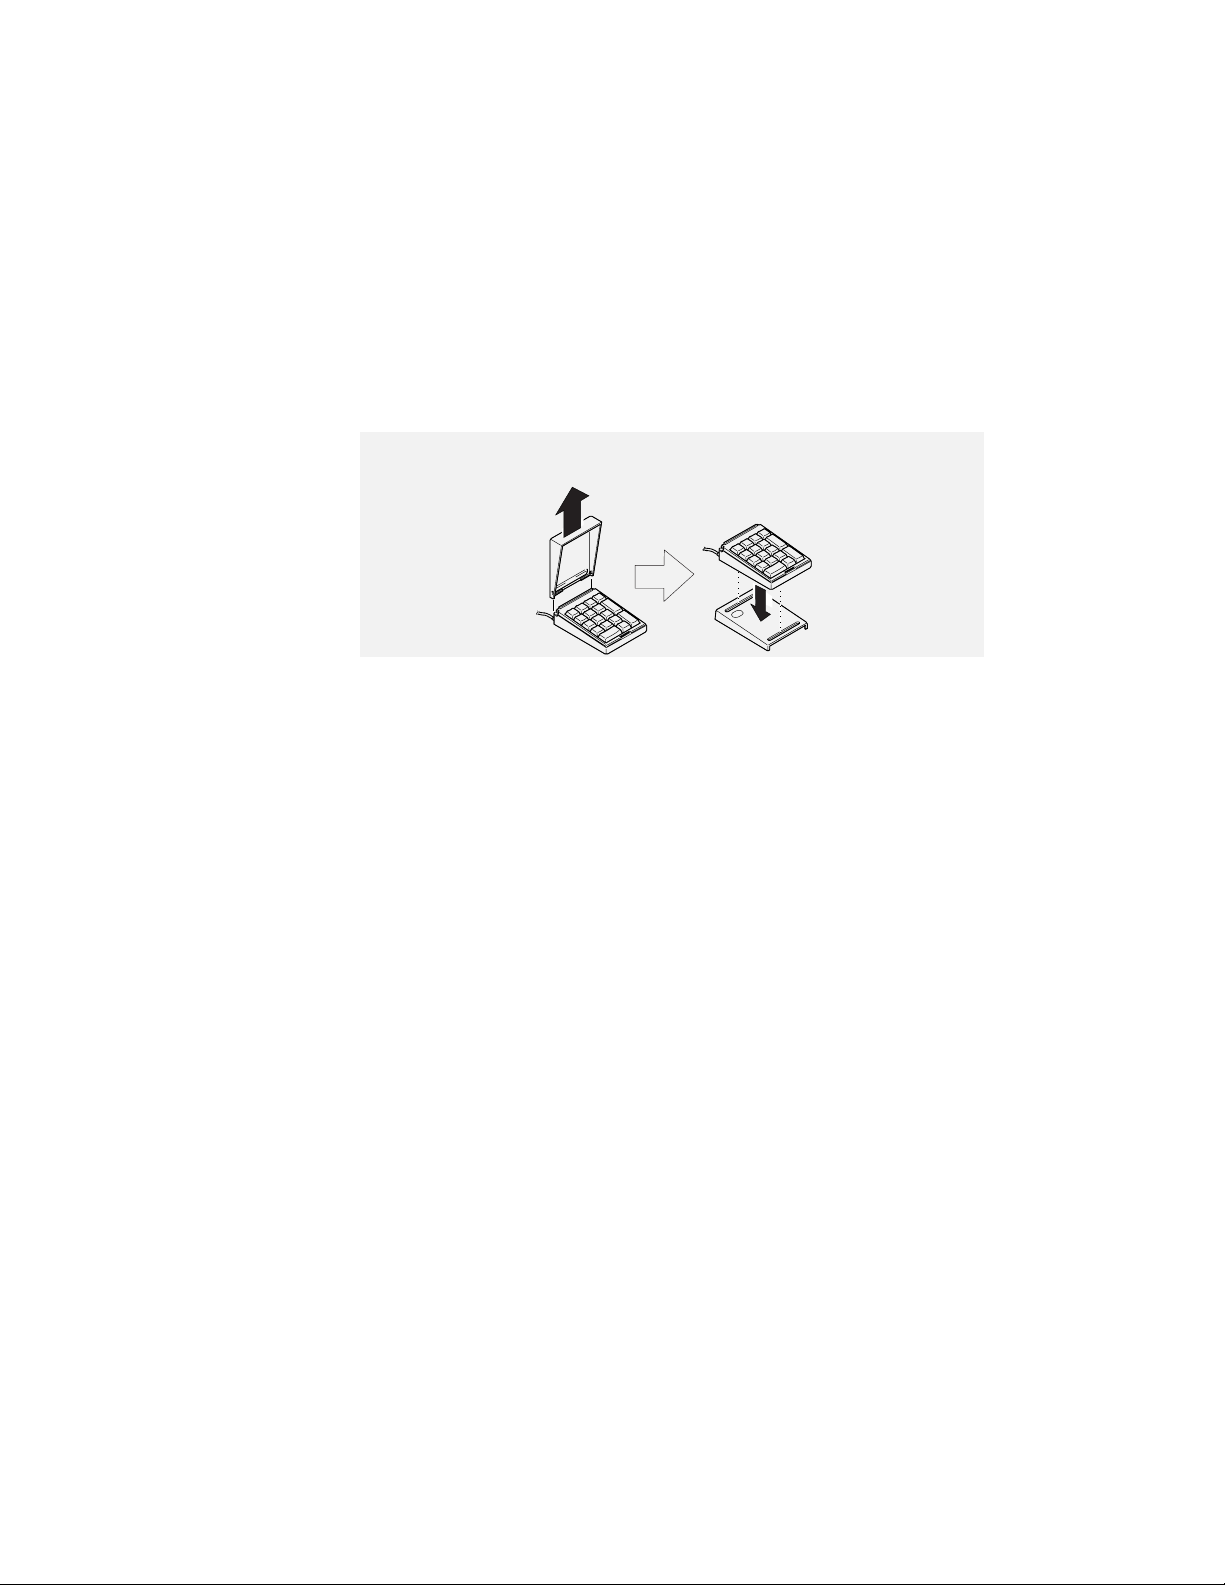
Using Advanced Features of Your ThinkPad
Note:
You can remove the keypad cover and use it as a stand for the keypad.
You can connect an external keyboard to your computer through the
keyboard/mouse cable (available separately as an option).
not work if it is connected directly to the computer.
When the external keyboard is attached, the following keys are not
available:
Numeric keypad on the computer keyboard
External numeric keypad
Instead, use the numeric keypad on the external keyboard.
It will
72 IBM ThinkPad 560X User's Guide
Page 88
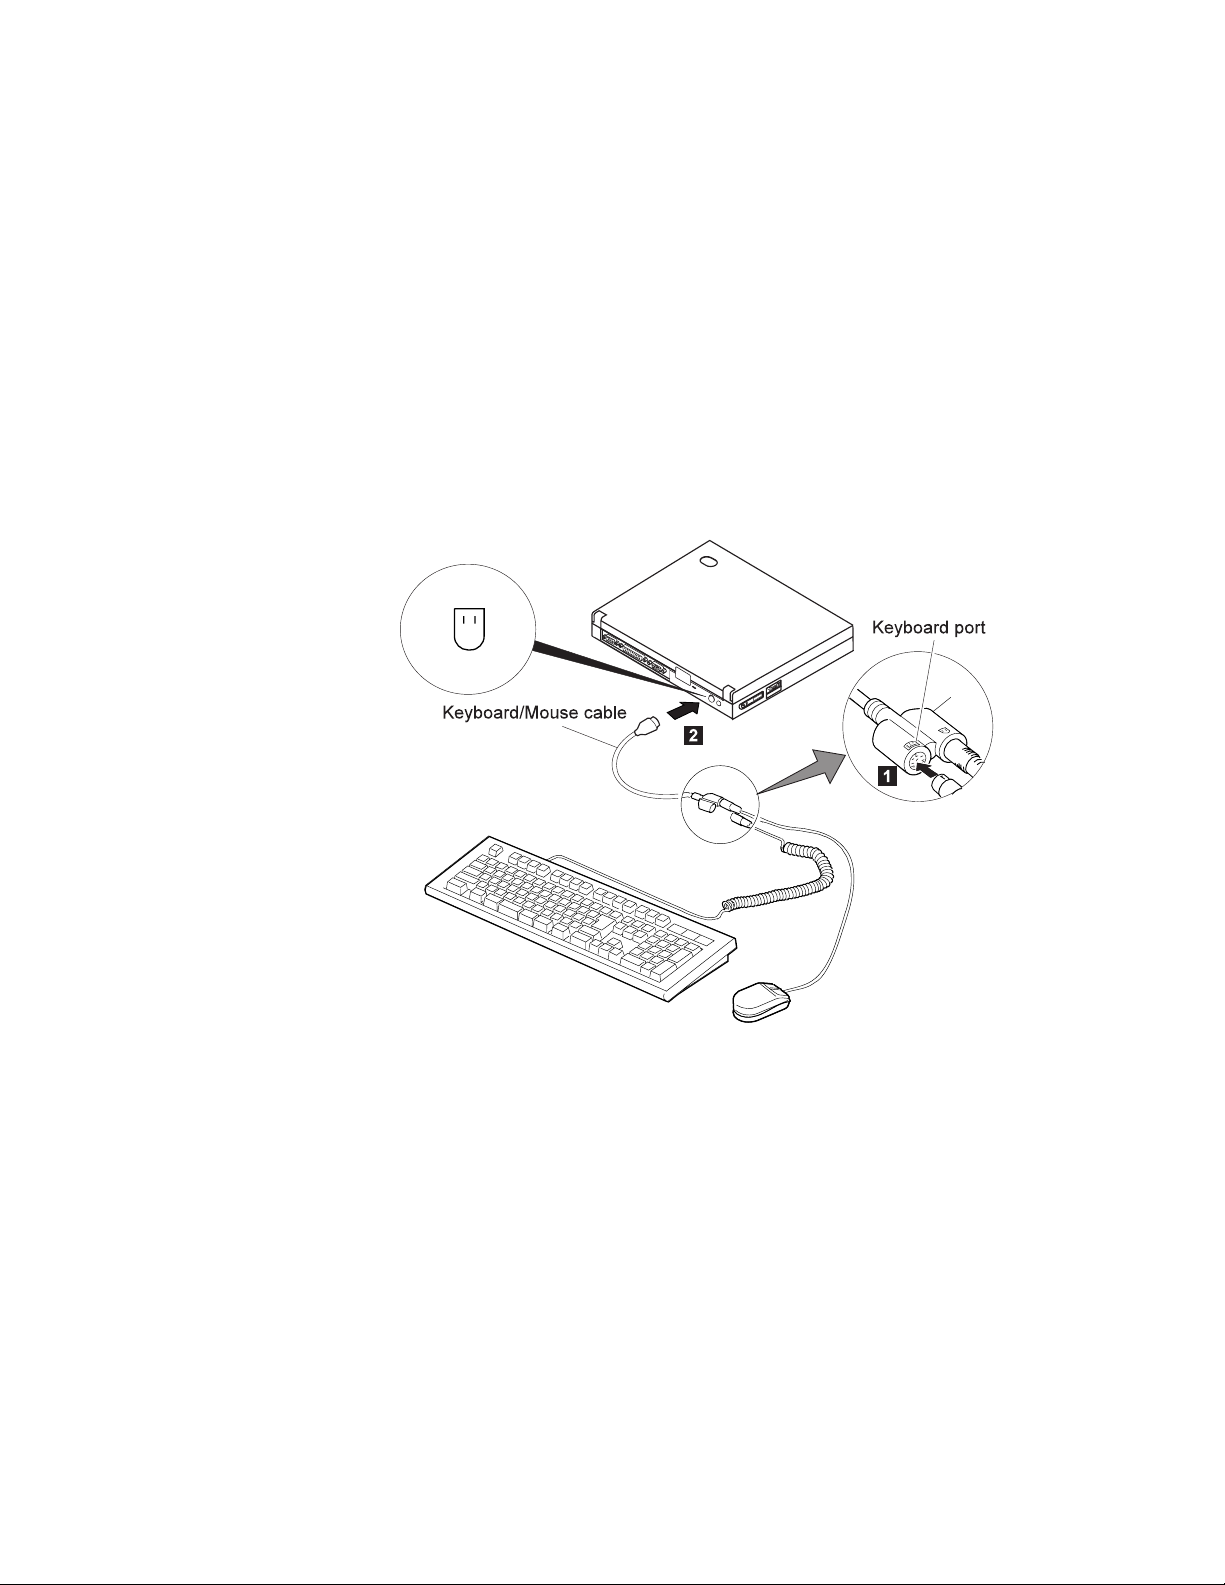
Using Advanced Features of Your ThinkPad
When you attach the external keyboard, turn off the computer, attach
the keyboard to the keyboard port of the keyboard/mouse cable 1 ,
and then attach the keyboard/mouse cable to the computer 2 .
Chapter 4. Using the Advanced Features of Your ThinkPad 73
Page 89

Using Advanced Features of Your ThinkPad
Disabling the TrackPoint III
A serial mouse connected to the serial port or a device that is not
compatible with the PS/2 Mouse can be connected to the
external-input-device connector. Some mouse types require the
TrackPoint III to be disabled before you can use them.
To disable the TrackPoint III:
For Windows 95:
1
Start the ThinkPad Configuration program.
2
Click on the TrackPoint ( ) button.
3
Click on Disable for the TrackPoint.
These changes become effective when computer power is
turned off and then on again.
For Windows NT, Windows 3.11, and OS/2:
1
Start the ThinkPad Configuration program.
2
Click on the Keyboard/Pointing Device ( ) button.
3
Click on Disable for the TrackPoint.
These changes become effective when computer power is
turned off and then on again.
Using the IBM ThinkPad Space Saver Keyboard
When using the IBM ThinkPad Space Saver Keyboard,
install the device driver supplied with the Space Saver Keyboard.
When the Space Saver Keyboard is used, the device driver on
the computer's utility diskette automatically enables or disables
the TrackPoint III of the computer when power is turned on.
do not
74 IBM ThinkPad 560X User's Guide
Page 90

Using Advanced Features of Your ThinkPad
Switching between the LCD and an External Monitor
This section provides information about using the computer LCD and
an external monitor. It also provides considerations when using DOS
applications. The computer LCD output with SVGA (800-by-600
resolution) video mode and 256K colors.
When you attach an external monitor that supports resolution higher
than VGA mode, you can get a maximum of 1024-by-768 video
resolution.
Attaching the Monitor
The following summarizes how to attach an external monitor:
1
Turn off the computer.
2
Connect the external monitor to the external monitor
connector (
it to an electrical outlet.
3
Turn on the external monitor and the computer.
4
Start the ThinkPad Configuration program.
5
Change the display output type by clicking on the Both
) button or the External Display ( ) button.
(
Note: If you select the Both button, do not attach an external monitor that
supports only VGA mode (640-by-480 resolution). Otherwise, the
external monitor screen is scrambled and the output is not displayed,
or the screen might be damaged. Use External Display instead.
) on the rear of the computer; then connect
Chapter 4. Using the Advanced Features of Your ThinkPad 75
Page 91

Using Advanced Features of Your ThinkPad
6
Set your monitor type and display device driver as
follows.
If you are attaching an SVGA monitor, refer to “Using SVGA
Video Mode” on page 79 for information on the supported color
depth or resolution.
a)
Click on the Display ( or
b)
Click on the Advanced Properties.. button.
You can select your display type from the monitor list, or
click on a new resolution or refresh rate.
Note: Refer to the specifications for your external monitor to determine its
supported resolutions and refresh rates.
7
Restart the computer to make the changes effective.
) button.
76 IBM ThinkPad 560X User's Guide
Page 92

Using Advanced Features of Your ThinkPad
CAUTION
It is not recommended to
change the LCD type while a
moving picture is being
drawn, for example, playing a
movie or a game. Stop the
application before changing
the LCD type.
Changing the LCD Type
You can change the display output type with ThinkPad
Configuration program. Select one of the following display
output types:
LCD ( ):
The computer output is displayed only on the
LCD of the computer.
External Display ( ):
The computer output is displayed
only on the attached external monitor.
If no external monitor is attached to the computer and the
display output type is set to
External Display
, the output is
displayed on the LCD.
Both ( ):
The computer output is displayed on both the
LCD and the external monitor.
You can also change the display output type as follows:
Using the Fn key function:
Press and hold the Fn key; then press the F7 key. The
output is displayed sequentially as follows:
External Both
Display
LCD
Using PS2 Command:
For DOS, use the PS2 Command to change the display
output type.
– Type PS2 SC BOTH to display information on both the LCD
and external monitor.
– Type PS2 SC External Display to display information on
the external monitor.
– Type PS2 SC LCD to display information on the LCD.
Chapter 4. Using the Advanced Features of Your ThinkPad 77
Page 93

Using Advanced Features of Your ThinkPad
Important
If you are using OS/2 Warp, do not use System in the System
Setup folder to change the resolution or color depth. Use the
ThinkPad Configuration program to configure the monitor.
Do not disconnect the external monitor while the computer
is in suspend mode or hibernation mode. If no external
monitor is attached when the computer resumes, the LCD
remains blank and the output is not displayed. This
restriction does not depend on the resolution value.
Virtual Screen Function
The
virtual screen
Configuration program. It is used to display a part of the
high-resolution screen image that is produced by your computer.
Other parts can be seen by moving the screen with the
TrackPoint III or other pointing device. The virtual screen can be
disabled on Windows 3.11 with ThinkPad Configuration program.
In this case, restart your computer to make screen size fit the
display.
function is available with the ThinkPad
78 IBM ThinkPad 560X User's Guide
Page 94

Using Advanced Features of Your ThinkPad
Considerations for DOS Screen on the LCD
When you use a DOS application that supports only VGA mode
(640-by-480 resolution) with your computer, the screen image
might appear smaller than the display size, as shown:
640 x 480
This is to maintain compatibility with DOS applications. To
expand the screen image to the same size as the actual screen,
you can use the
screen expansion
function. You can expand the
screen image by clicking on the Display button ( ) in the
ThinkPad Configuration program or by entering the PS2 HVEXP ON
command. However, the image may look slightly distorted.
Using SVGA Video Mode
Your ThinkPad 560X computer has an LCD that supports an SVGA
video mode with 800x600 resolution. You can also display
information in higher resolutions by attaching an external monitor that
supports higher resolutions. The following table shows the various
display modes (resolution and color depth) available with your
computer or external monitor. Use this table to set the display output
(LCD, External Display, or Both).
Note:
When installing an operating system, you must install the display
driver supplied with the computer to use SVGA mode.
Chapter 4. Using the Advanced Features of Your ThinkPad 79
Page 95

Using Advanced Features of Your ThinkPad
Displaying output on the LCD or both on the LCD and monitor
(LCD or Both)
Resolution Supported Color Depth
640x480 16; 256; 65,536; and 16,777,216
800x600 256; 65,536; and 16,777,216
1024x768
(virtual screen) 256 and 65,536
Displaying output on the monitor (External Display)
Resolution
640x480
800x600
1024x768
Supported Color
Depth
256
65,536
256
16,777,216
256
65,536
Frame Rate
60 Hz, 75 Hz, or 85 Hz16,777,216
60 Hz, 75 Hz, or 85 Hz65,536
60 Hz, 70 Hz, or 75 Hz
80 IBM ThinkPad 560X User's Guide
Page 96

Using a PC Card
Using Advanced Features of Your ThinkPad
This section describes how to insert a PC Card.
Your computer has two PC Card slots (upper slot and lower slot) and
supports the following types of cards:
PC Card (Type I, Type II, and Type III)
CardBus
Zoomed Video (ZV)
You can insert a
can insert cards in both slots), or a single
lower slot.
Type I
or
Type II
PC Card one in either slot (you
Type III
PC Card in the
Chapter 4. Using the Advanced Features of Your ThinkPad 81
Page 97
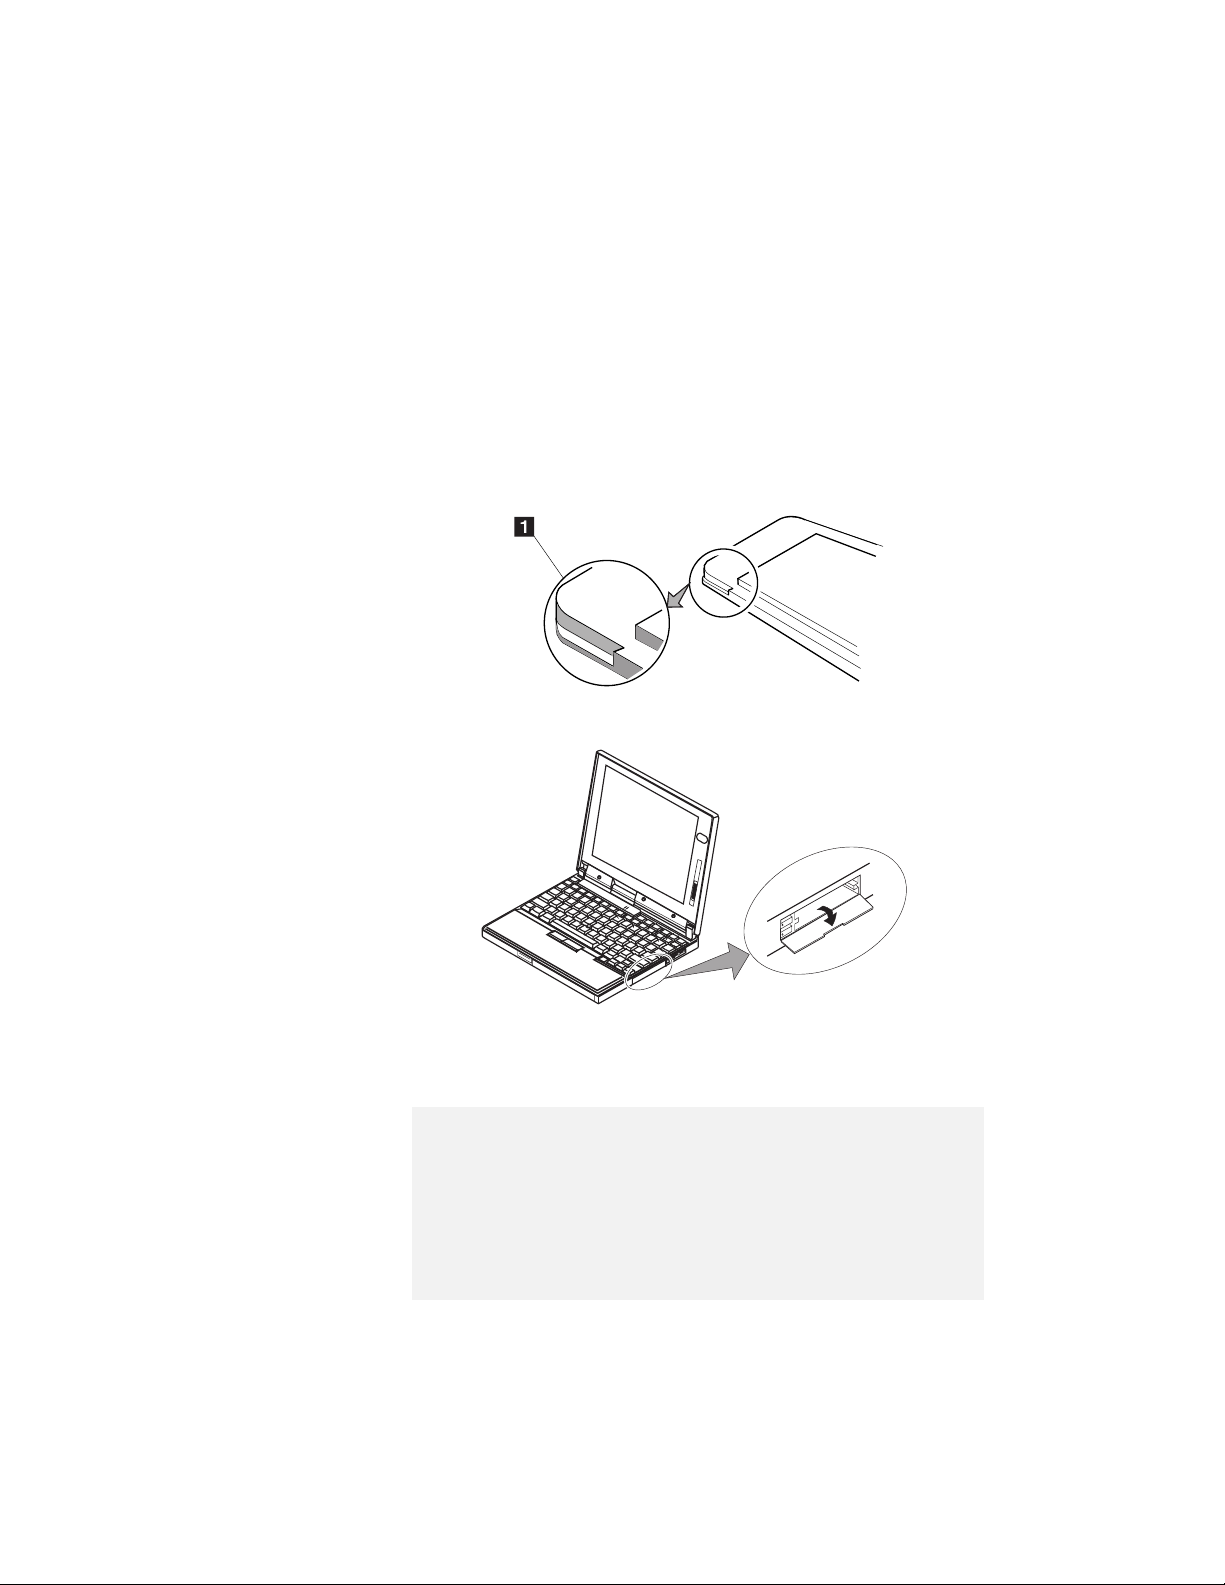
Using Advanced Features of Your ThinkPad
Installing the PC Card
1
Find the notched edge 1 of the PC Card as shown.
2
Open the the PC Card slot cover.
3
Insert the PC Card into the appropriate slot according to
your PC Card type.
Note:
If you are using a PC Card with a XJACK
the upper slot.
If you are using a Type I or Type II PC Card, insert it into either
the upper slot or the lower slot.
If you are using a Type III PC Card, insert the card into the lower
slot.
82 IBM ThinkPad 560X User's Guide
**
connector, insert it into
Page 98
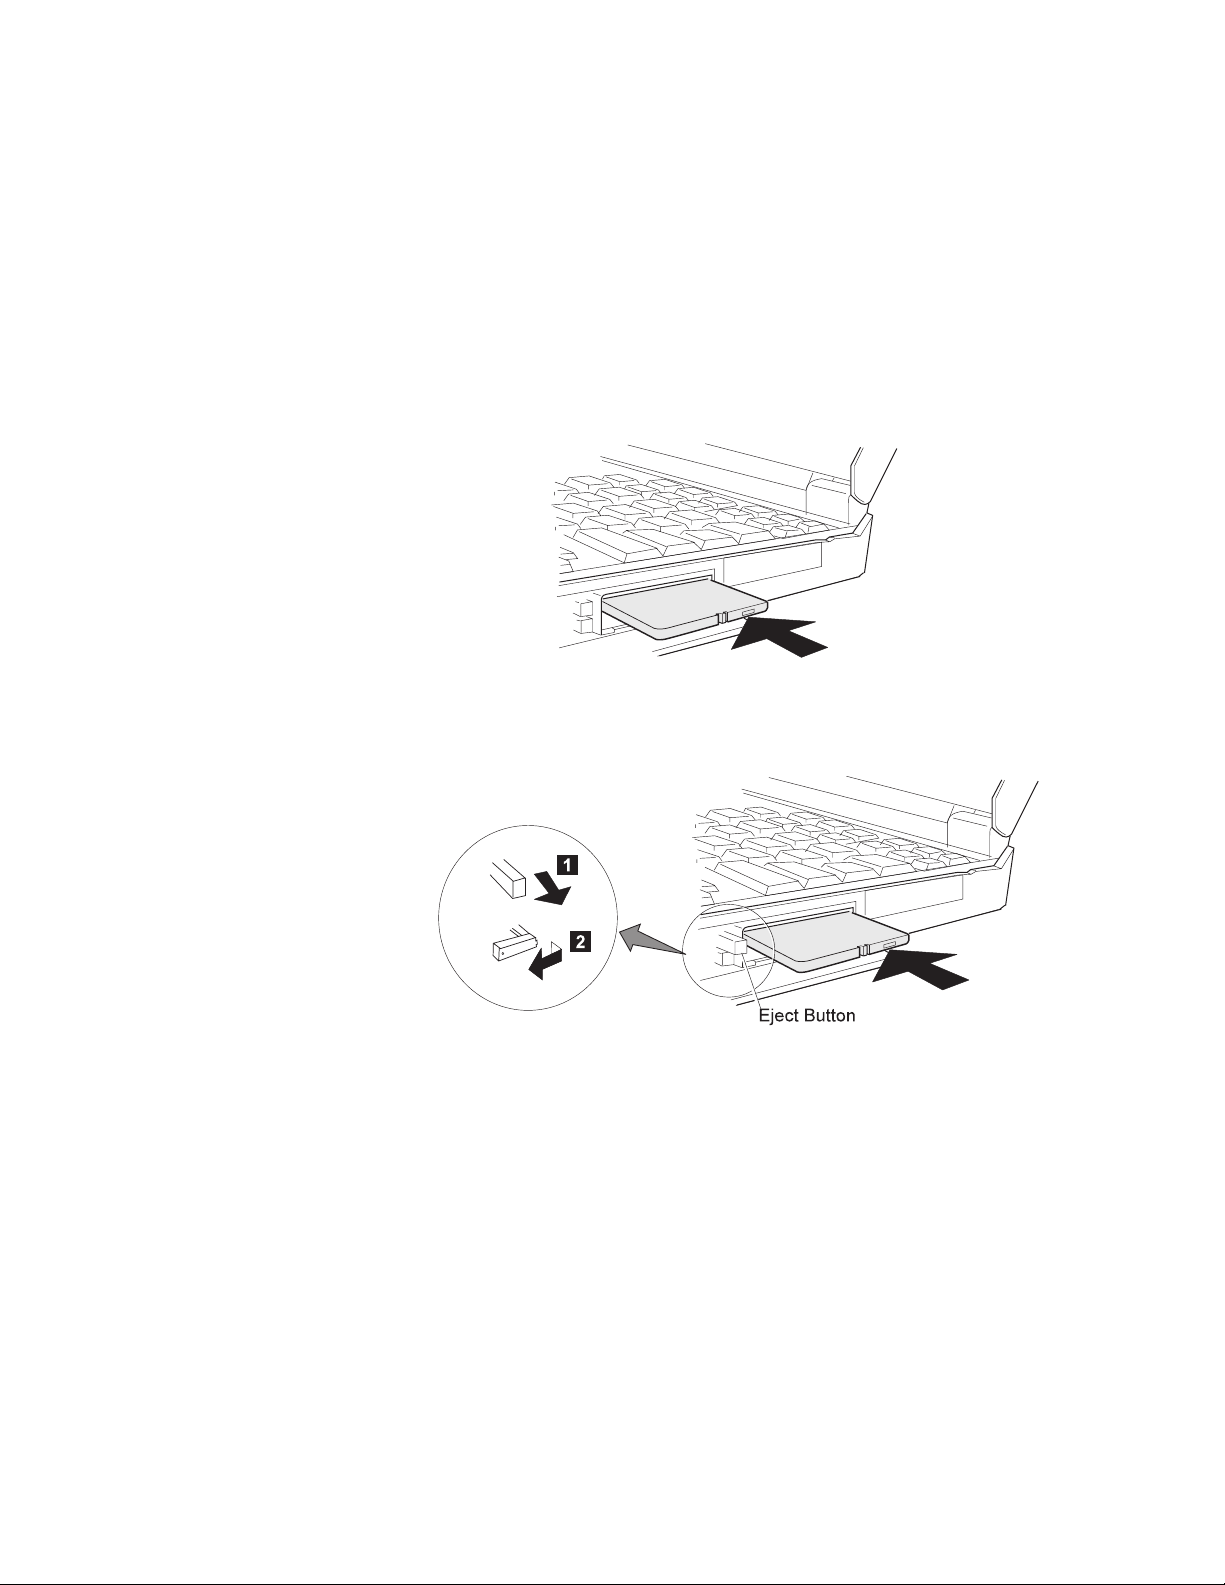
Using Advanced Features of Your ThinkPad
4
Press the PC Card firmly into the connector until the eject
button pops out. Then, pull the eject button out slightly
1 and fold it to the left. 2 .
Chapter 4. Using the Advanced Features of Your ThinkPad 83
Page 99
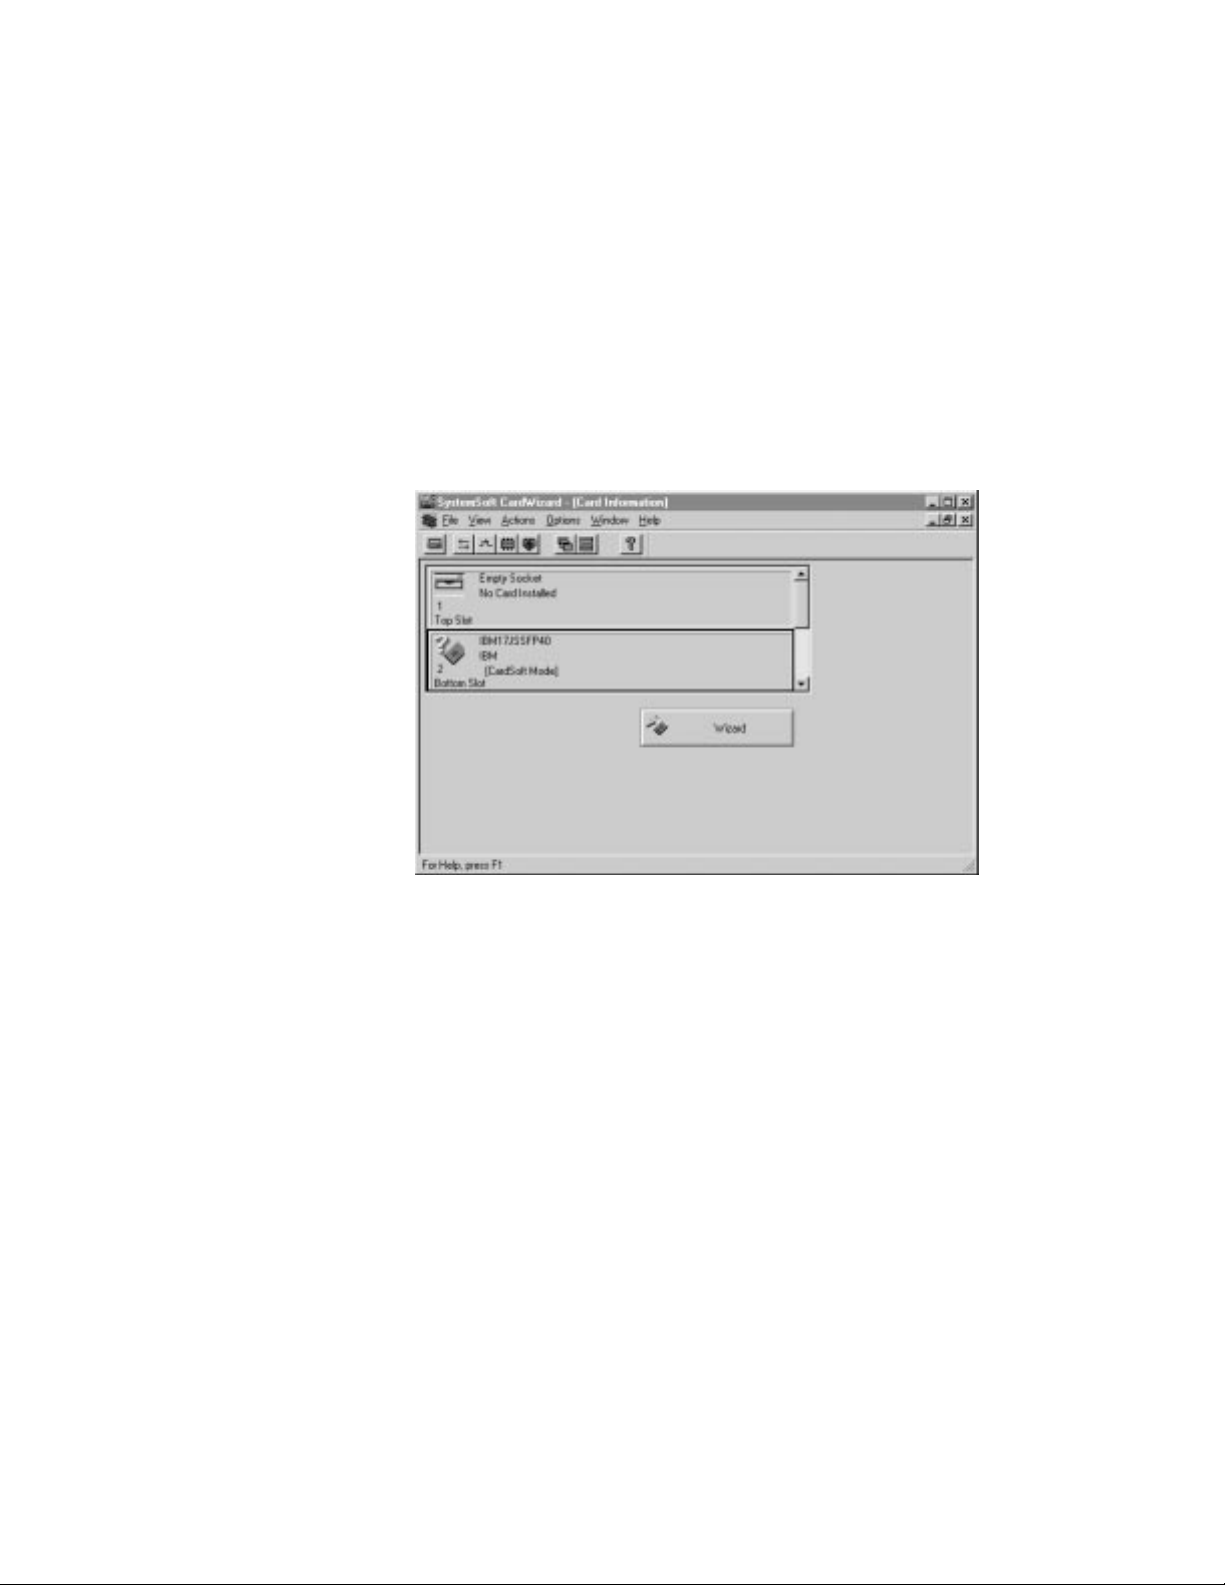
Using Advanced Features of Your ThinkPad
The following CardWizard** information panel pops up and
informs you about the new card.
You have completed to setup the PC Card. You can use the
PC Card.
When you install the PC Card modem, “Location Information”
windows appears. Go to “Installing the PC Card Modem” on
page 87.
84
IBM ThinkPad 560X User's Guide
Page 100
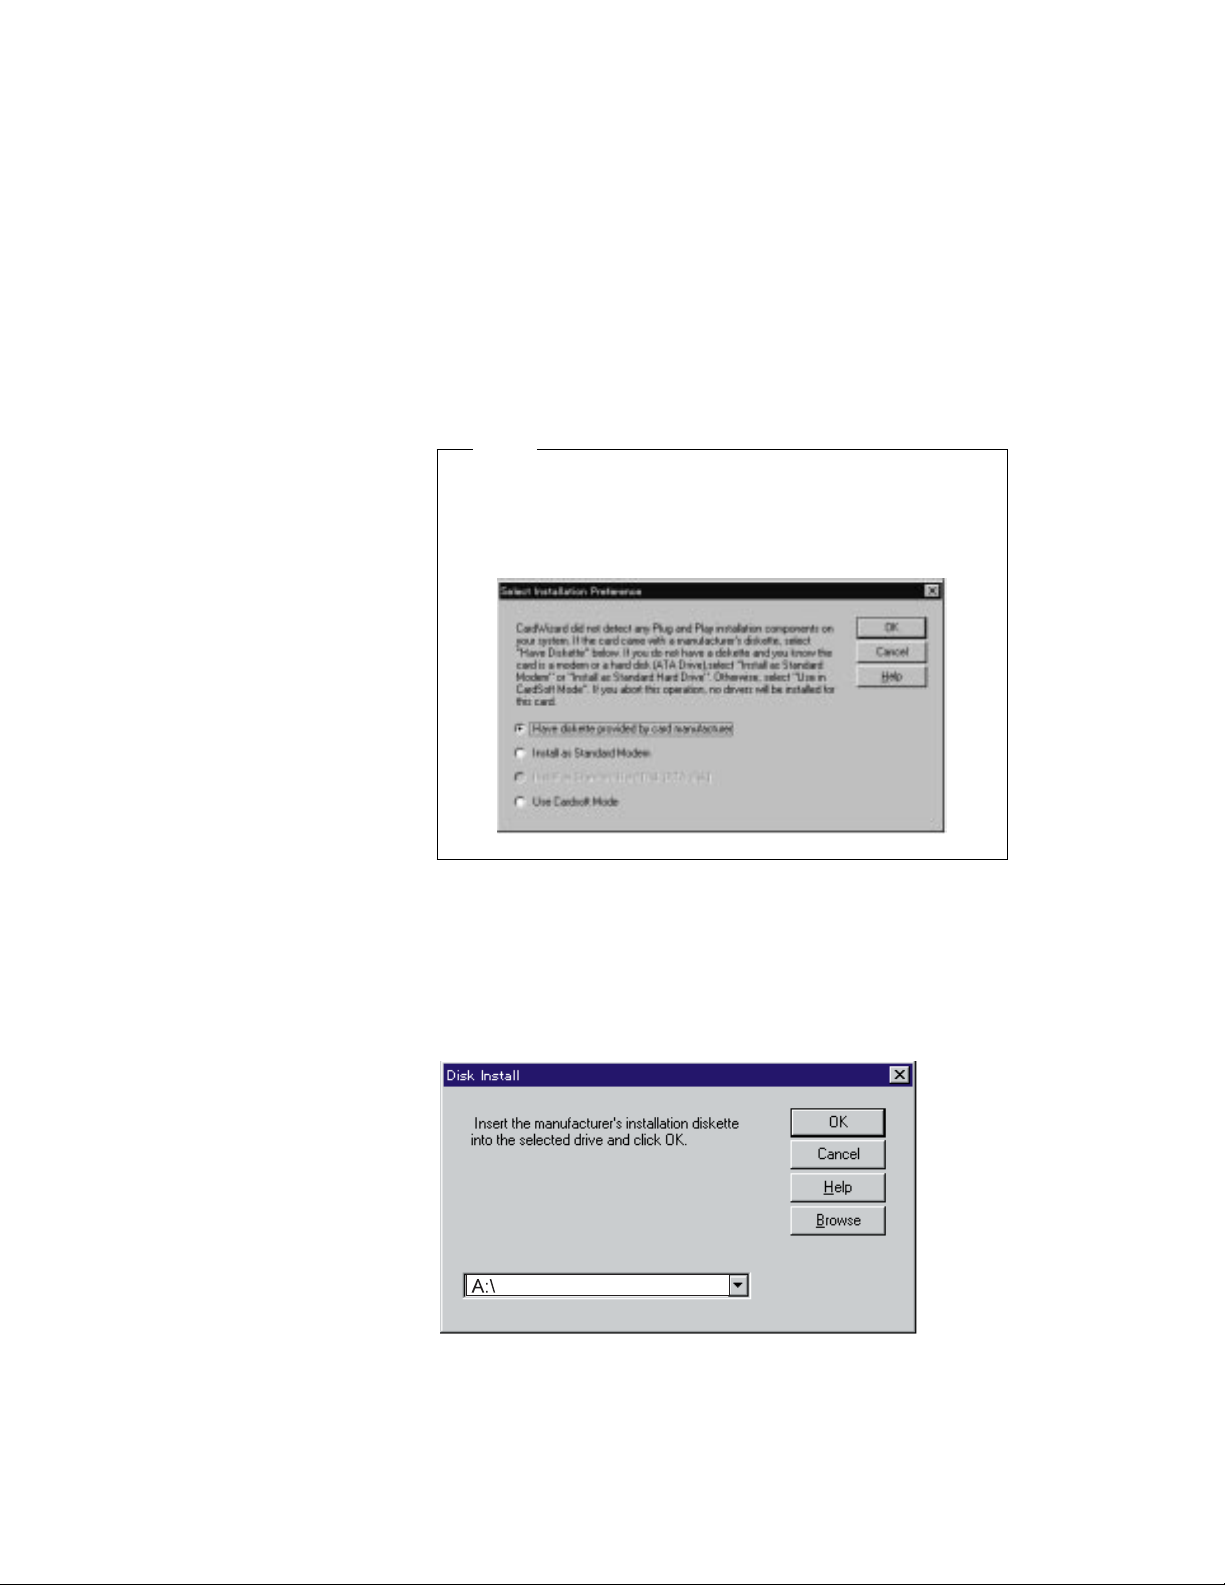
Using Advanced Features of Your ThinkPad
Note
When the CardWizard does not have the device driver of
the PC Card, the following “Select Installation Preference”
window appears and you have to install the PC Card device
driver. Go to “Installing the PC Card Device Driver .”
Installing the PC Card Device Driver
Install the device driver as follows:
1
Click on OK in the “Select Installation Preference”
window.
The following window appears.
2
Insert the device driver (or option) diskette for the PC
Card into the diskette drive.
Chapter 4. Using the Advanced Features of Your ThinkPad 85
 Loading...