

Page 1

SAFENET/400
REFERENCE GUIDE
Version 8.50
2008 MP Associates of Westchester, Inc.
Page 2

How to contact us
Direct all inquiries to:
Kisco Information Systems
89 Church Street
Saranac Lake, New York 12983
Phone: (518) 897-5002
Fax: (518) 897-5003
SafeNet/400 Website: http://www.kisco.com/safenet
SafeNet/400 Support Website: http://www.kisco.com/safenet/support
Visit the SafeNet/400 Web Site at HTTP://WWW.KISCO.COM/SAFENET
Page 3

TABLE OF CONTENTS
CHAPTER 1 - SETTING UP USERS..................................................................................... 1.1
SETTING THE USER LOGGING LEVELS ......................................................................................... 1.2
SAFENET ADMINISTRATOR.......................................................................................................... 1.3
SUPER TRUSTED USER CONTROL................................................................................................ 1.4
ENTERING USER SECURITY LEVELS............................................................................................. 1.5
ENTERING USER AUTHORITIES TO OBJECTS ................................................................................ 1.7
ENTERING USER AUTHORITIES TO SQL STATEMENTS ................................................................ 1.12
ENTERING USER AUTHORITIES TO FTP STATEMENTS ................................................................ 1.14
NTERING LONG PATH NAMES ................................................................................................. 1.19
E
C
OPYING AN EXISTING USER TO SET UP A NEW USER IN SAFENET/400...................................... 1.21
COPYING AN EXISTING USER TO SET UP A NEW USER IN SAFENET/400...................................... 1.21
REMOVING A USER FROM SAFENET/400................................................................................... 1.21
MAINTAIN ALL SECURITY FOR A USER........................................................................................ 1.22
SETTING UP TIME OF DAY CONTROLS ....................................................................................... 1.23
CHAPTER 2 - SETTING UP SERVERS................................................................................2.1
RECOMMENDED SERVER SETTINGS ............................................................................................. 2.6
ENTERING SERVER FUNCTION SECURITY LEVELS......................................................................... 2.9
CUSTOMER EXIT PROGRAMS..................................................................................................... 2.11
CHAPTER 3 - TELNET, TCP/IP ADDRESS CONTROLS................................................. 3.1
SETTING UP TELNET................................................................................................................. 3.1
SETTING UP TCP/IP ADDRESS CONTROLS .................................................................................. 3.6
CHAPTER 4 - SETTING UP FTP........................................................................................ 4.1
SETTING UP FOR ANONYMOUS FTP........................................................................................ 4.5
ETTING UP FOR NORMAL USER IDS AND FTP SERVERS.............................................................. 4.7
S
CHAPTER 5 - DHCP CONTROLS AND REPORTING......................................................5.1
CURRENT DHCP ACTIVITY ........................................................................................................ 5.3
M
AINTAINING MAC ADDRESSES.................................................................................................5.5
FIXED IP ADDRESSES................................................................................................................. 5.6
URGING EXPIRED DHCP LEASE INFORMATION ........................................................................ 5.7
P
P
ING CHECKER.......................................................................................................................... 5.8
CHAPTER 6 - REPORTS......................................................................................................... 6.1
SETUP REPORTS......................................................................................................................... 6.2
SAGE REPORTS ........................................................................................................................ 6.3
U
Page 4

CHAPTER 7 - TESTING YOUR SECURITY SETTINGS .................................................. 7.1
TESTING SAFENET/400 SETTINGS BASED ON YOUR HISTORICAL DATA WITH THE ON-LINE
TRANSACTION TESTER
................................................................................................................. 7.2
BATCH TRANSACTION TEST REVIEW/REPORT – SECURITY REPORT BY USER ................................. 7.6
RECOMMENDED APPROACH TO TESTING...................................................................................... 7.9
PCREVIEW............................................................................................................................ 7.10
CHAPTER 8 - BACKUPS AND PURGES.............................................................................. 8.1
LOG FILE PURGE........................................................................................................................ 8.1
AUTOMATING THE LOG FILE PURGE ............................................................................................ 8.4
AUTOMATING THE ONE STEP SECURITY REPORT ......................................................................... 8.4
AUTOMATING AND RUNNING THE SECURITY REPORT AND THE LOG FILE PURGE TOGETHER......... 8.5
DAILY BACKUP PROCEDURE....................................................................................................... 8.7
CHAPTER 9 - DE-ACTIVATING AND REMOVING SAFENET/400............................... 9.1
DE-ACTIVATING SAFENET/400 ................................................................................................... 9.1
REMOVING SAFENET/400 FROM YOUR SYSTEM............................................................................ 9.3
CHAPTER 10 - PROBLEM DETERMINATION............................................................... 10.1
ERROR MESSAGE RECEIVED ON THE SYSTEM I5......................................................................... 10.1
ERROR MESSAGE RECEIVED ON THE CLIENT.............................................................................10.3
EXAMPLES OF CLIENT ERROR MESSAGES.................................................................................. 10.7
ERROR CODES WHICH APPEAR IN THE LOG...............................................................................10.9
ADDITIONAL TROUBLESHOOTING TIPS .................................................................................... 10.11
CHAPTER 11 - SPECIAL SAFENET/400 CONSIDERATIONS ...................................... 11.1
RESETTING LEVEL 5 WITHIN SAFENET/400 ............................................................................... 11.1
RE-POWER DOWN PROGRAM POINT ....................................................................................... 11.3
P
USING AUTOMATIC ALERT NOTIFICATION ................................................................................. 11.4
PROFILE SWAPPING ................................................................................................................. 11.6
J
OURNALING SAFENET/400 SECURITY FILES ............................................................................ 11.8
FILES CONTAINED IN SAFENET/400.......................................................................................... 11.9
SAFENET/400 COMMANDS.....................................................................................................11.11
CHAPTER 12 - SERVER FUNCTION DESCRIPTIONS..................................................12.1
ORIGINAL SERVERS .................................................................................................................. 12.2
OPTIMIZED SERVERS .............................................................................................................. 12.13
Page 5

SafeNet/400
Reference Guide
Chapter 1 - SETTING UP USERS
Navigating through the screens
You can perform each of the steps outlined in this chapter by using the corresponding option on
the SafeNet/400 Main Menu. However, if you are setting up a new user, when you are finished
with one screen you can use F9 to advance to the next without returning to the main menu. If
you want to skip a step, you can cancel and return to the SafeNet/400 Main Menu
Group Profiles
If you have an unlimited user license for SafeNet/400, Group Profiles are available. If so, you
may use F7 to toggle between the group profile settings and the user profile settings.
F8 will display all the user profiles within the group.
.
SafeNet/400 Reference Guide
Copyright 2008 MP Associates of Westchester, Inc.
V8.50 - May 2008
1.1
Page 6

Setting the User Logging Levels
The valid logging levels are:
Logging Level A Log all transactions
Logging Level R Log only rejected requests
Logging Level N No logging
As you set up your user logging levels, please keep in mind the following:
If you set the logging level on the Server Function (WRKSRV) to NO LOGGING or
REJECTIONS, the Server Function (WRKSRV) setting will override the individual user
logging level.
If you set the logging level on the Server Function to ALL, the individual user logging level
will override the Server Function logging level.
To make sure you are logging transactions correctly, we recommend that when you initially set
up SafeNet/400 you set the Server Functions to log ALL and set the User to Server logging levels
to either ALL or REJECTIONS.
Then, after you have had some experience with checking the logs and interpreting the results,
you may want to make changes for specific user and server combinations.
An example of this might include certain "trusted" user profiles. If you trust the user in question
and are concerned about the size and amount of logging activity, you might choose to only
record rejected transactions for that user.
Another example might be a known client server application that is clearly defined and does not
need to be monitored. For these applications you might choose to stop logging altogether. We
have found several fax applications that fall into this category. They generate a large number of
entries that are really not needed for your purposes in controlling access security.
SafeNet/400 Reference Guide
Copyright 2008 MP Associates of Westchester, Inc.
1.2
V8.50 - May 2008
Page 7

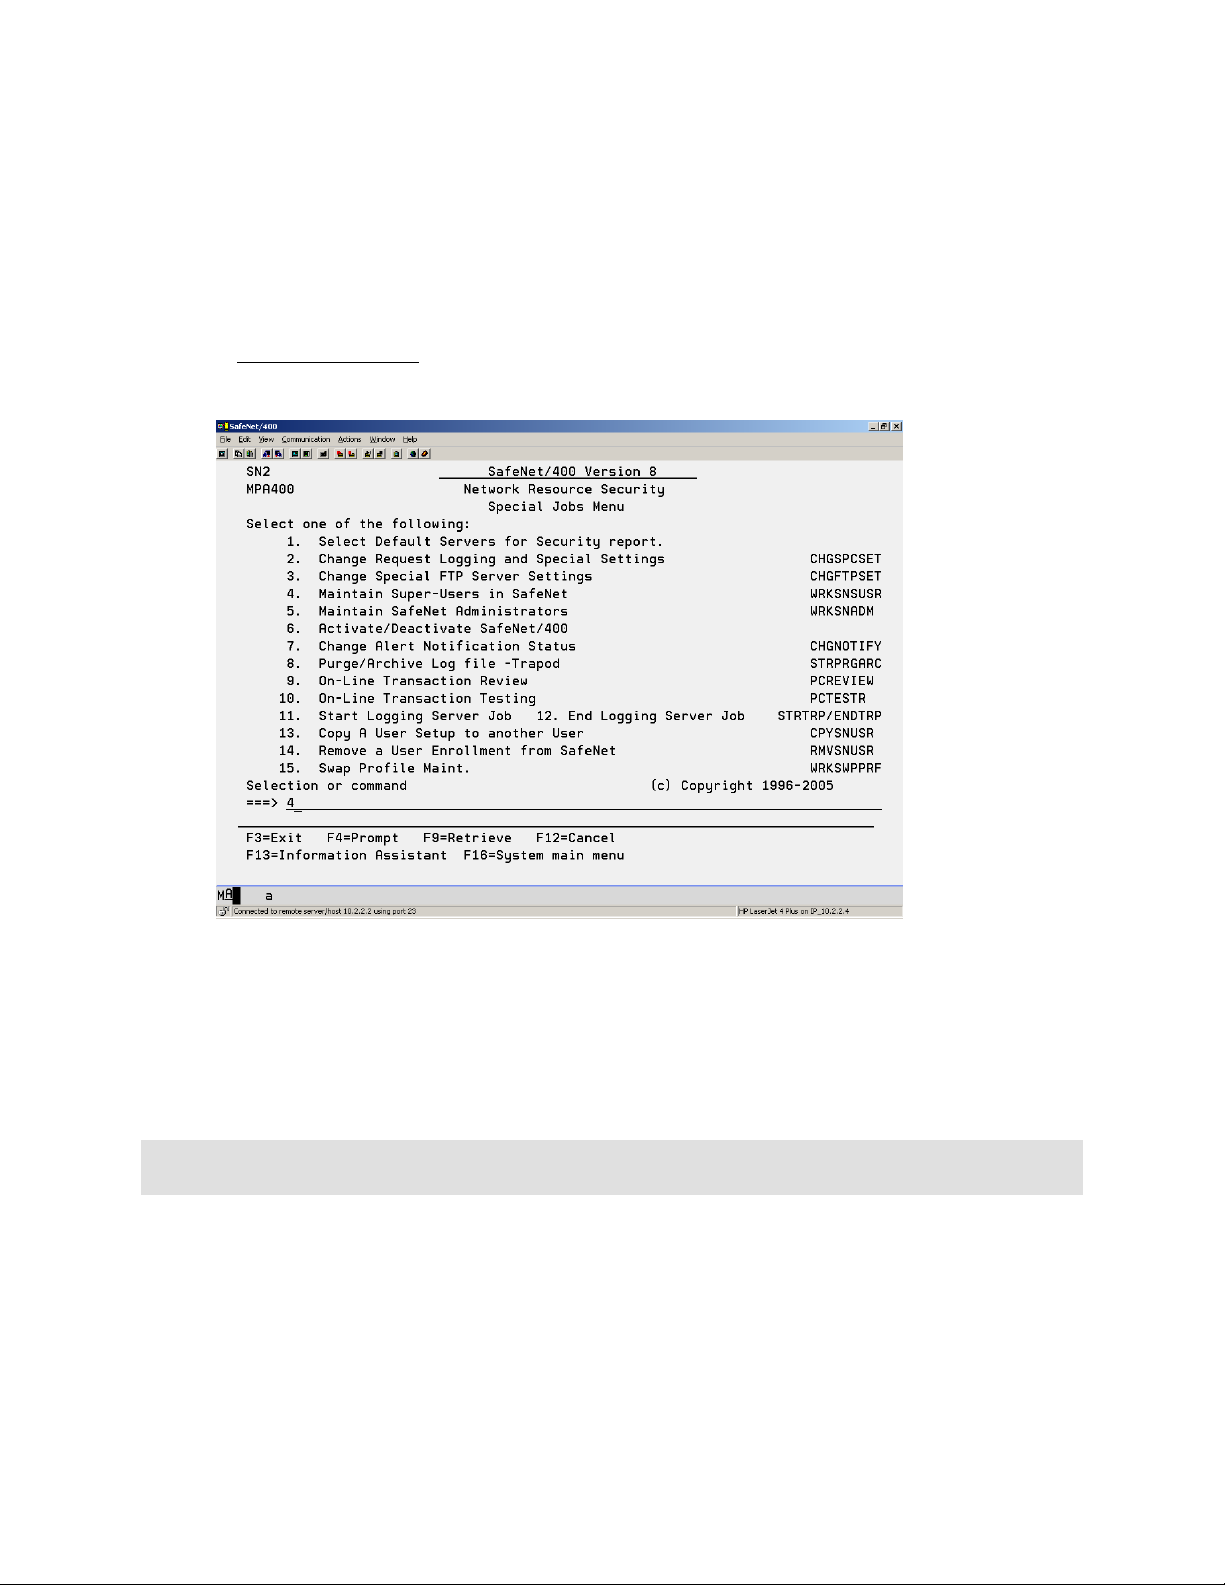
SafeNet Administrator
You can set up a SafeNet/400 Administrator, or ‘Super Admin’ from the SafeNet/400 Special
Jobs Menu or by using the WRKSNADM command. This can also be found on the Special Jobs
Menu, Option 5 – Maintain SafeNet Administrators.
The WRKSNADM command can be executed by a user with *SECADM or *SECOFR
authority.
A user profile must be set up as a SafeNet/400 ‘Super Admin’ to perform the following:
Activate or deactivate SafeNet/400
Change/copy/remove the IBM-supplied Q profiles settings in SafeNet/400
Use the WRKSRV, CHGSPCSET, CHGFTPSET commands
A regular SafeNet/400 user or administrator does not have authority to the above functions.
Unless specifically changed, QSECOFR is ALWAYS a SafeNet/400 Super Admin. User profile
SAFENET is a Super Admin; this status can be changed or removed to suit your purposes.
SafeNet/400 Reference Guide
Copyright 2008 MP Associates of Westchester, Inc.
V8.50 - May 2008
1.3
Page 8
Super Trusted User Control
Under special circumstances it may be necessary to have a user that should not be checked
through all the SafeNet/400 security routines. Transactions from these users can bypass the
traditional SafeNet/400 security routines; you can choose to simply log them or not log them.
From the Special Jobs Menu select Option 4 – Maintain Super-Users in SafeNet.
You can turn logging on or off for Super Trusted Users by using the CHGSPCSET command
and changing the LOGUSER parameter to *YES or *NO.
Note: This should only be used under conditions when you want NONE of the specified users
transactions to be checked through SafeNet/400 security routines.
SafeNet/400 Reference Guide
Copyright 2008 MP Associates of Westchester, Inc.
1.4
V8.50 - May 2008
Page 9
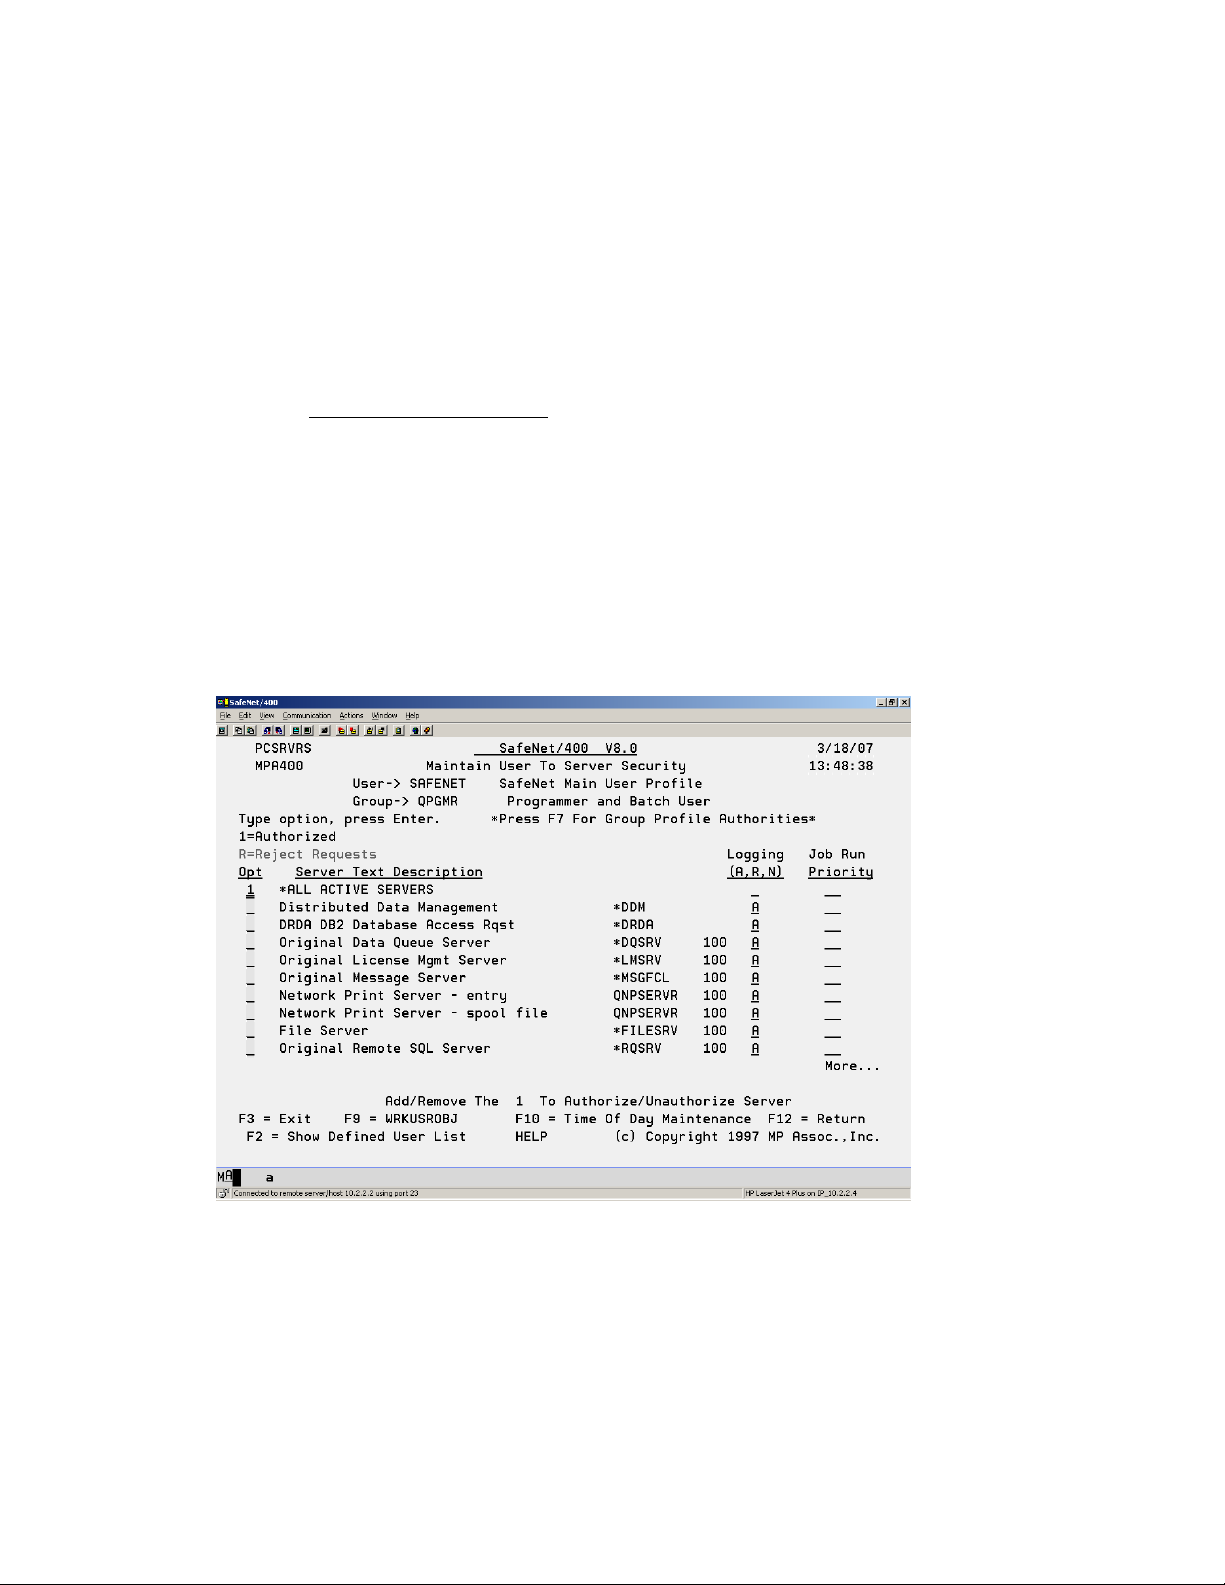
Entering User Security Levels
If you plan on setting any of the Server Functions to Level 3 or Level 4, and anticipate doing
anything other than simply logging all requests, the first step in configuring SafeNet/400 is to
give the users authority to any Server Functions they require.
1. From the SafeNet/400 Main Menu select Option 2 - Work with User to Server
Security or use WRKUSRSRV command
The Work User to Server Security Enter User Profile screen appears.
2. Type the user profile you will be setting up, or *PUBLIC, then ENTER.
If you would like a list of all user profiles on the system, press F4 or type *ALL.
To see a list of users already defined within SafeNet/400 type *ALLDFN.
The Maintain User to Server Security screen appears.
A list of all the servers is displayed.
3. If you would like to see the list of all users who have been defined within SafeNet/400,
press F2.
SafeNet/400 Reference Guide
Copyright 2008 MP Associates of Westchester, Inc.
V8.50 - May 2008
1.5
Page 10

Type 1 in the Option column in front of each server this user will have access to.
If they will have access to all the server functions, select
*ALL ACTIVE SERVERS
To remove access to a particular server, remove the ‘1’ and leave the Option column
blank for that server.
4. Enter the Logging Level for each server.
A = All
R = Rejections only
N = No logging
When you have finished setting up servers for this user, press ENTER.
5. Enter the Job Run Priority for each server. Do this if you choose to override OS/400 job
priority defaults.
The job priority will be set when the user accesses this server. Valid job priorities are 00
(the default) through 99. A value of 00 indicates no change to the default job priority.
6. Press F9 to continue to the next step - setting up user authorities to objects.
SafeNet/400 Reference Guide
Copyright 2008 MP Associates of Westchester, Inc.
1.6
V8.50 - May 2008
Page 11
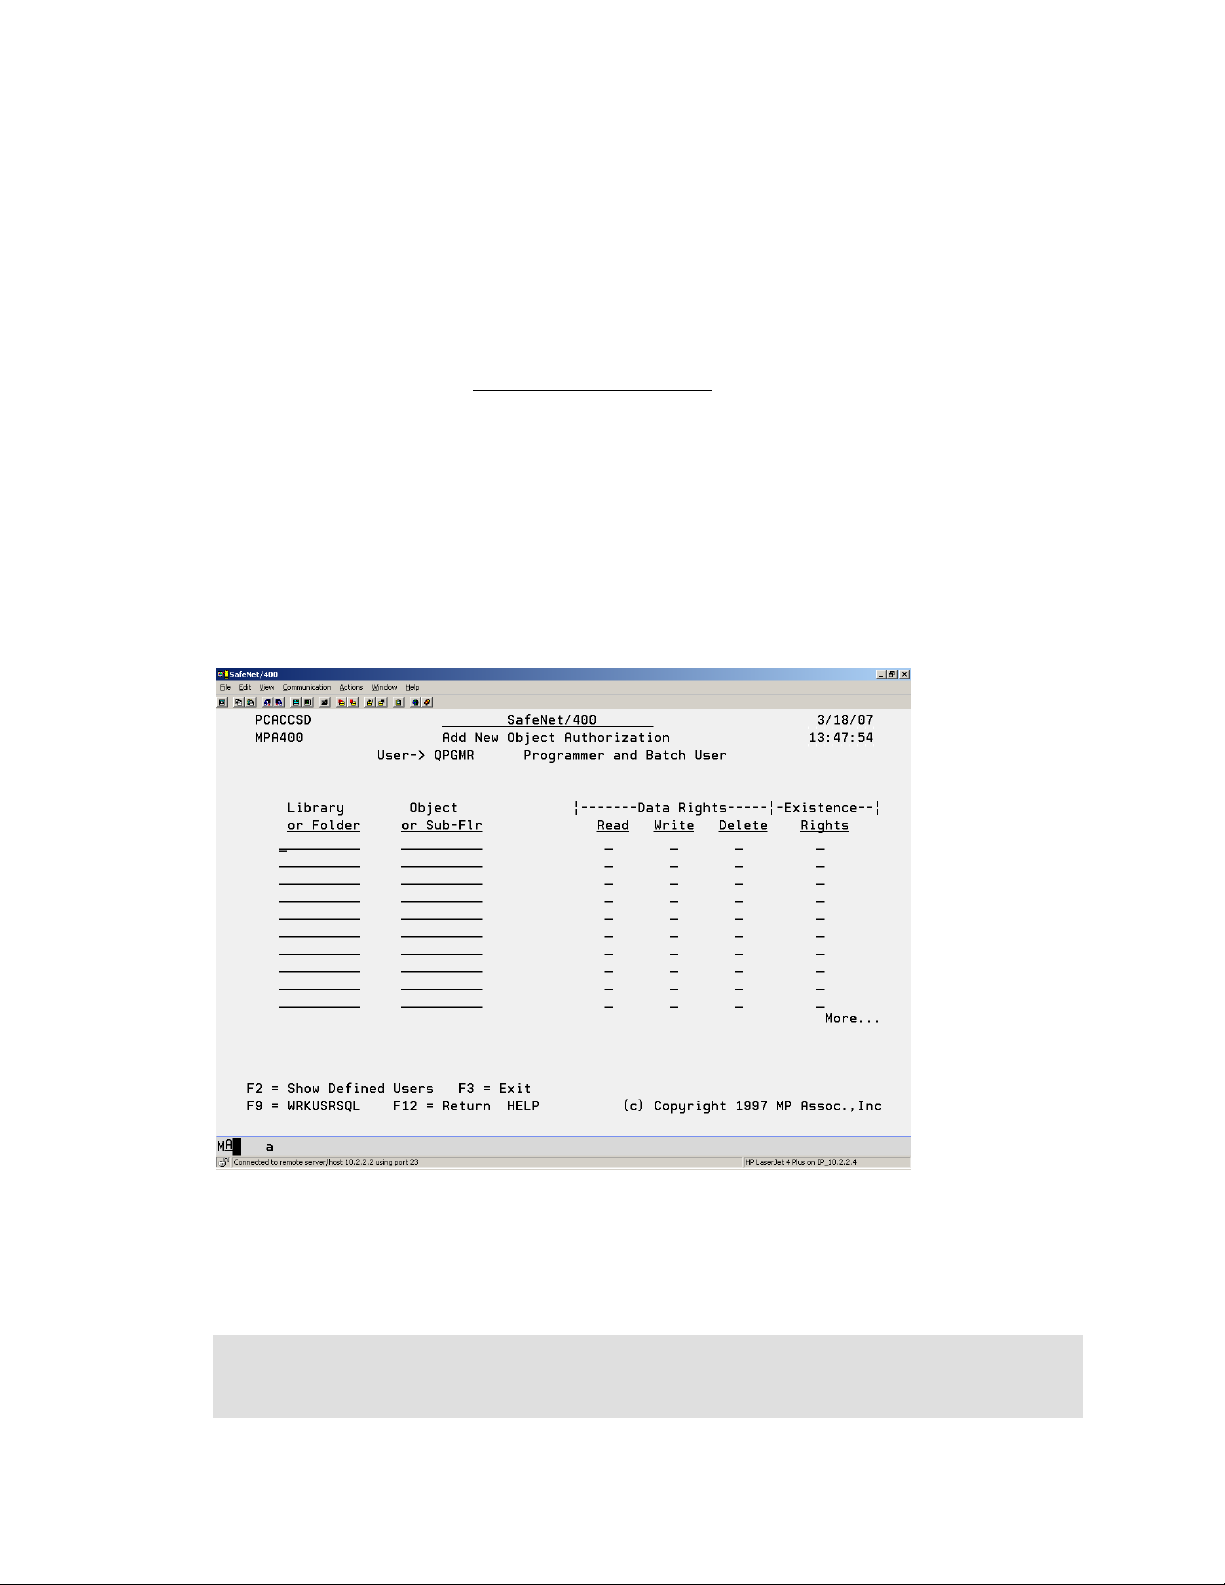
Entering User Authorities to Objects
Once you have given the user access to the servers, the next step is to enter the level of authority
the user has to objects on the System i5 if you plan on setting any of the servers to Level 4.
1. If you used F9 from the previous screen, skip to Step 4.
2. If you are currently on the SafeNet/400 Main Menu
, select Option 3 - Work with User
to Object Level Security or use WRKUSROBJ command
The Work User to Object Security screen is displayed.
3. Type the user profile name, the Group or *PUBLIC, then ENTER.
To list all of the user profiles on the system, press F4 or type *ALL.
To see a list of users already defined within SafeNet/400 type *ALLDFN.
The Add New Object Authorization screen appears.
If you would like to see the list of all users who have been defined within SafeNet/400,
press F2.
Note: If this user has already been set up in SafeNet/400, the Maintain Authorized
Objects by User screen is displayed. Press F6 to add new objects and authorities
for this user.
SafeNet/400 Reference Guide
Copyright 2008 MP Associates of Westchester, Inc.
V8.50 - May 2008
1.7
Page 12

4. In the Library or Folder column, enter the name of the library or folder, then TAB to
the Object or Sub-Flr column and type in the name of the object or sub-folder.
Note: Allowed entries for Library or Folder
*ALLLIB
*ALLFLR
Specific library name
When setting up a library, you must enter the complete library name. Generic library
names are not allowed.
Allowed entries for Object
*ALL
Specific object
Generic data/program or System i5 object name followed by * (FIL*)
NOT ALLOWED for object
Long file or folder names - 10 position maximum (names over 10 are
truncated)
Generic sub-folder names (FOLD*)
Generic folder content names
NOT ALLOWED for library
Long folder names
Generic folder names
Generic library names
*ALL
If granting rights to multiple objects in one library, you must list the library name
multiple times or use a generic object name. For example:
LIBRARY OBJECT
QUSRSYS PAY1
QUSRSYS PROJECT
QUSRSYS PRT*
SafeNet/400 Reference Guide
Copyright 2008 MP Associates of Westchester, Inc.
1.8
V8.50 - May 2008
Page 13

5. For Data Rights, type an X under the appropriate level of authority. Place an X for each
data right that applies.
6. For Existence Rights, type an X if this user will be able to create, delete or move an
object.
To assign EXCLUSIONS to objects and/or libraries, give the user no rights by leaving
the Data Rights and Existence Rights columns blank.
7. Repeat these steps for each object or group of objects for this user profile.
PageDown to the next screen if you need more lines.
ENTER when you have finished keying in all necessary objects and rights.
The Maintain Authorized Objects by User screen is refreshed and all the information you
just entered is displayed.
Press F9 to continue to the next step - setting up user authorities to SQL statements.
Reminder:
If you have already entered objects for a particular user, and you are updating their user
to object level security, a list of existing object authorities will be displayed. To add
more, press F6. To delete an existing entry, type 4 in the Option column, then ENTER.
SafeNet/400 Reference Guide
Copyright 2008 MP Associates of Westchester, Inc.
V8.50 - May 2008
1.9
Page 14
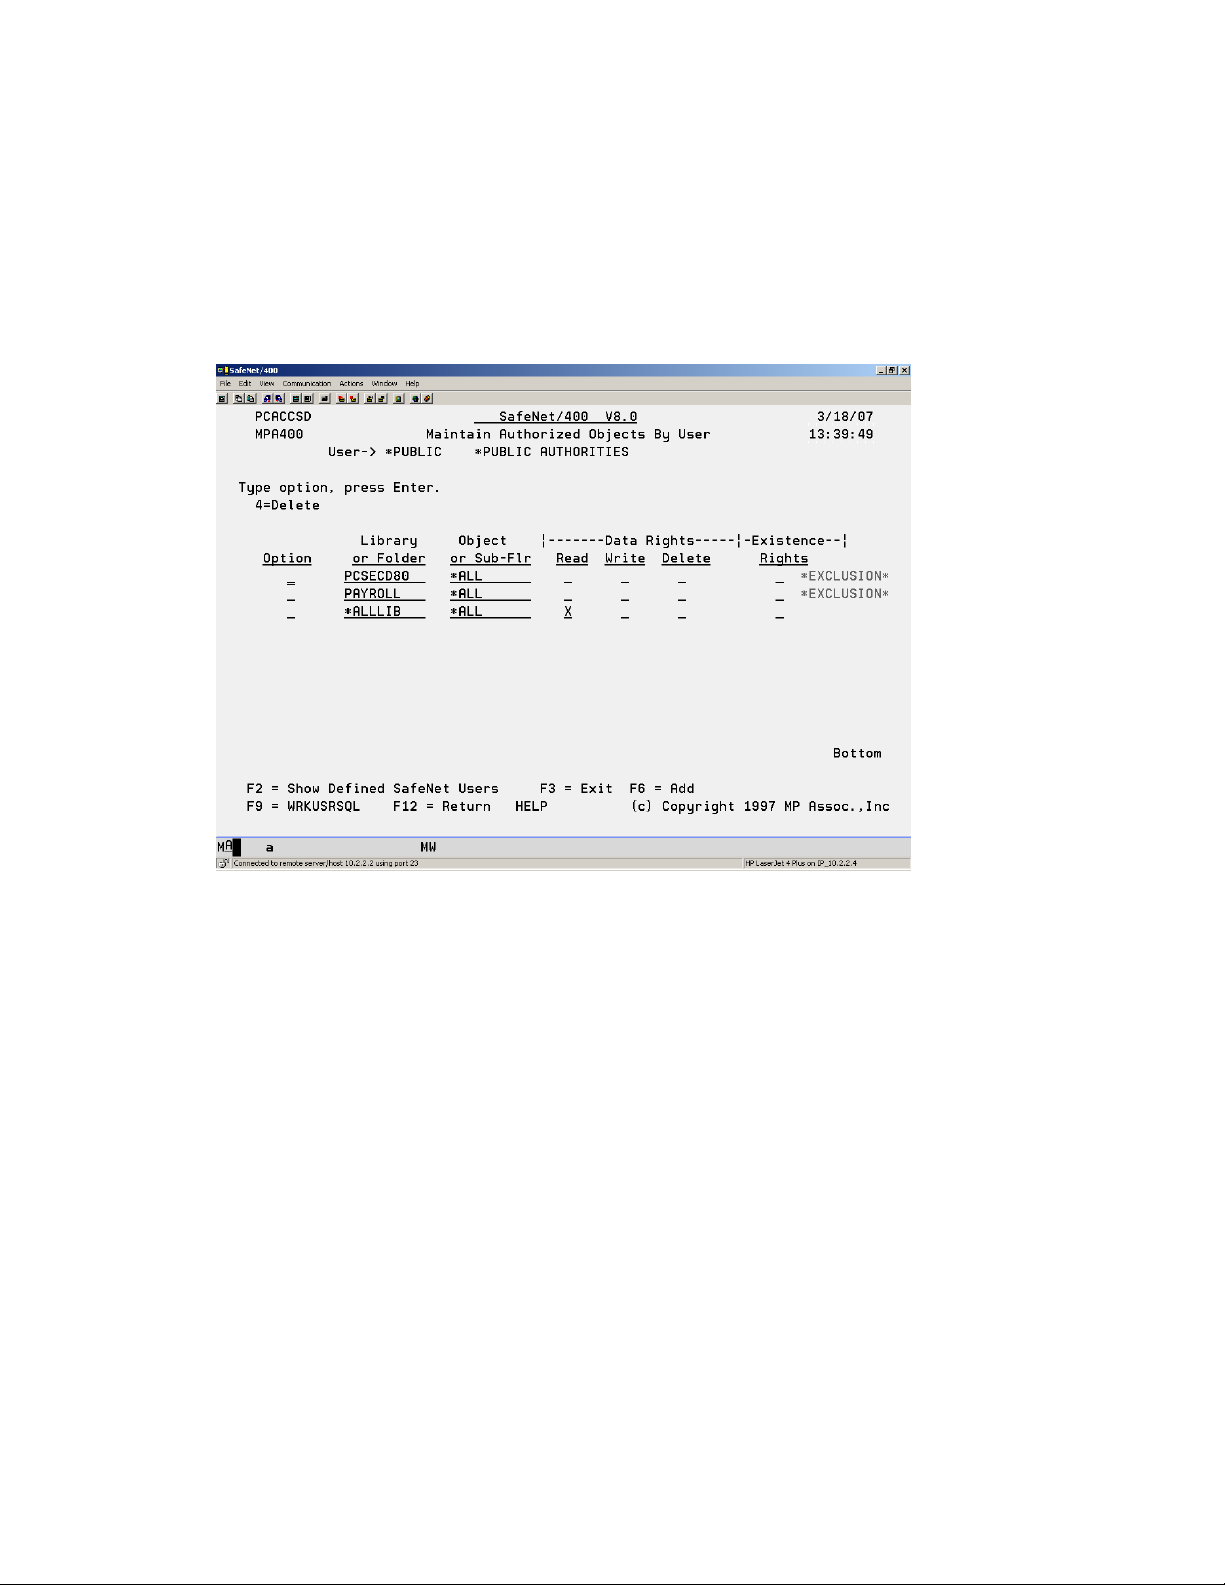
Exclusions
To give all users read access to all objects in all libraries, but exclude them from any objects in
the PAYROLL library, give *PUBLIC READ authority to the library and exclude *PUBLIC
from the PAYROLL library.
SafeNet/400 Reference Guide
Copyright 2008 MP Associates of Westchester, Inc.
1.10
V8.50 - May 2008
Page 15
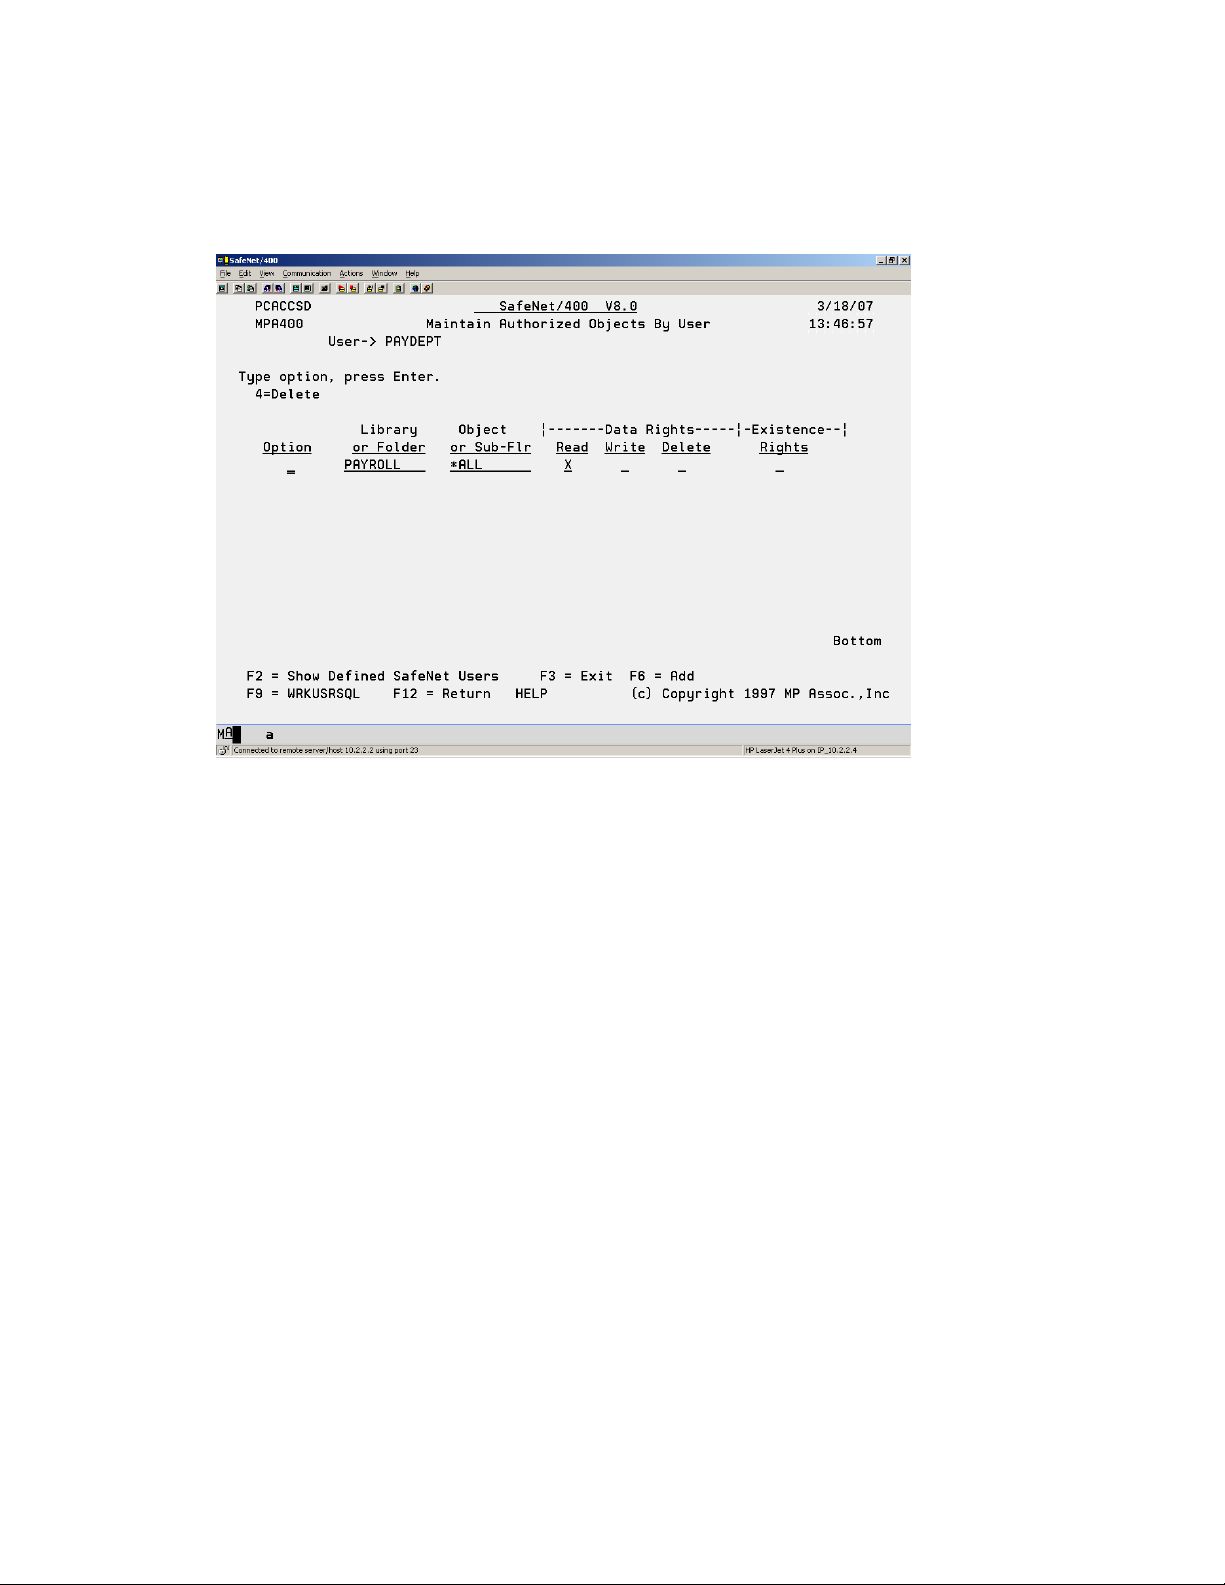
If the PAYDEPT profile needs to use objects in the PAYROLL library, grant user profile
PAYDEPT READ authority to the PAYROLL library.
This individual authority overrides the *PUBLIC authority.
SafeNet/400 Reference Guide
Copyright 2008 MP Associates of Westchester, Inc.
V8.50 - May 2008
1.11
Page 16
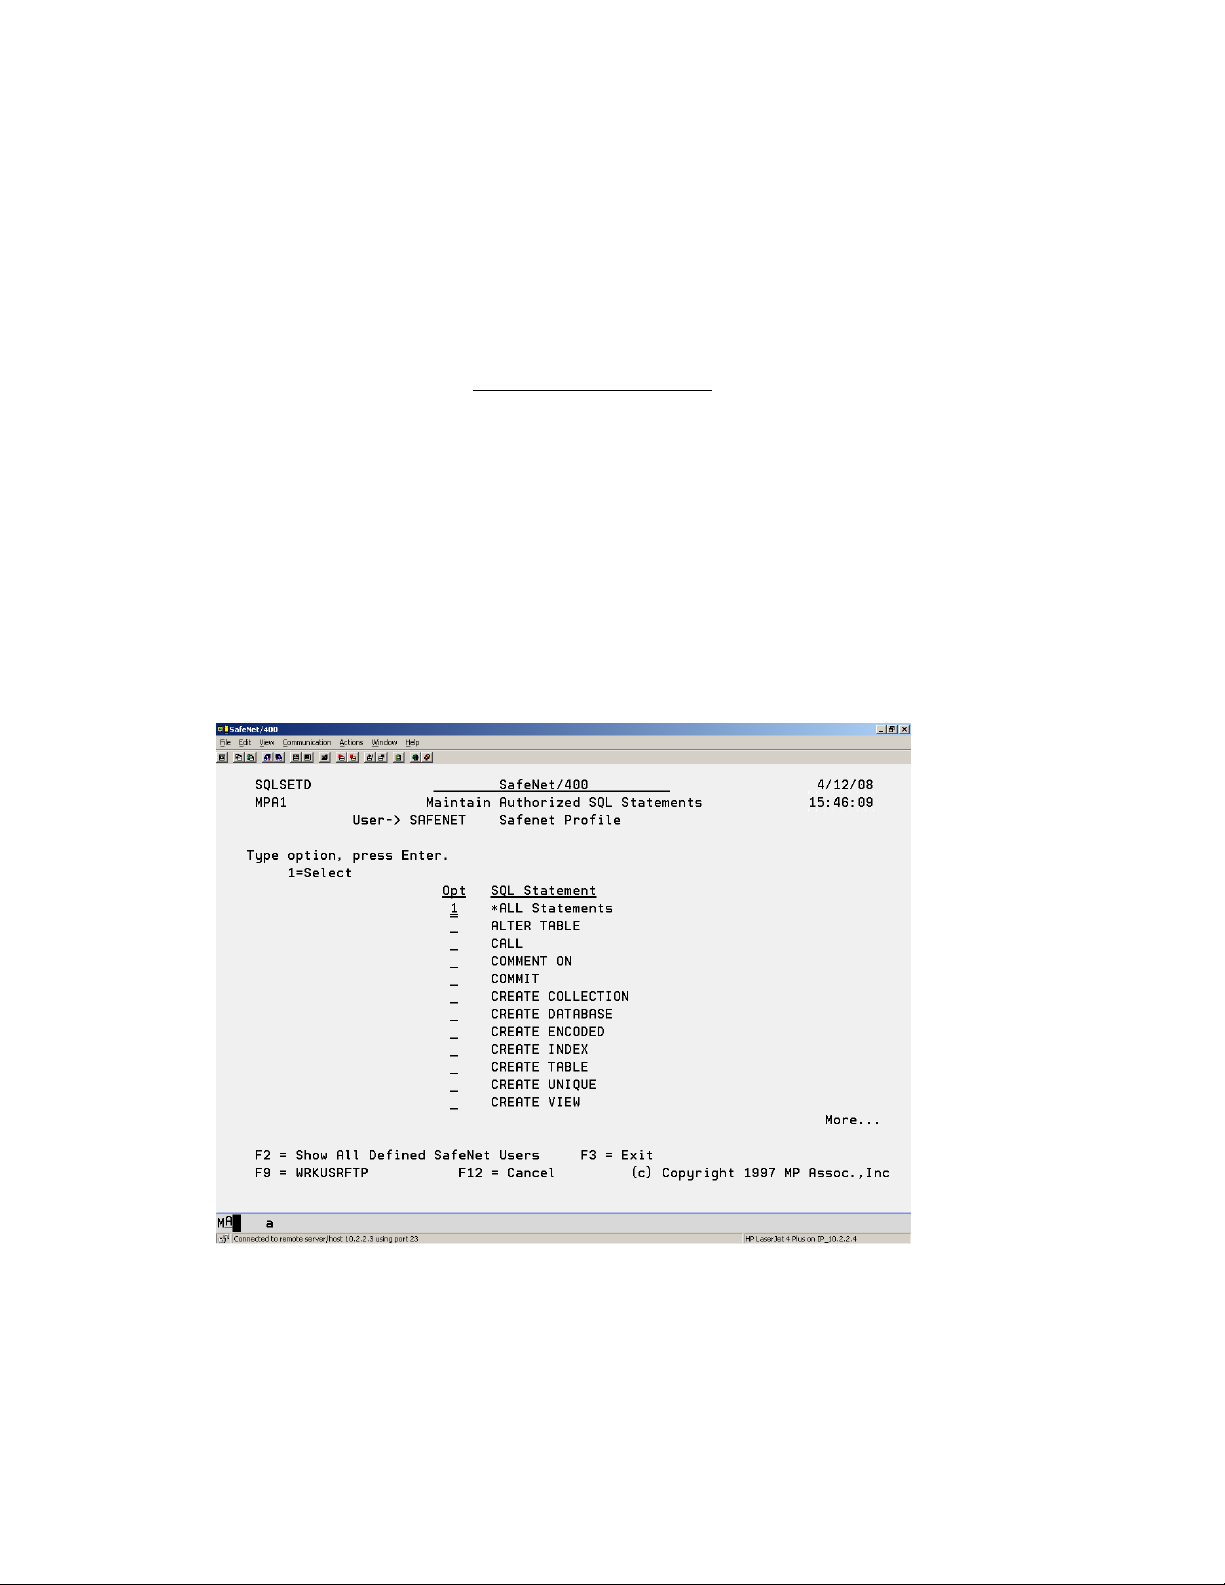
Entering User Authorities to SQL Statements
If you are going to set the SQL servers to Level 4 only, the next step is to authorize users to the
SQL Statements they may need.
1. If you used F9 from the previous screen, skip to Step 4.
2. If you are currently on the SafeNet/400 Main Menu
, select Option 4 - Work with User
to SQL Statement Security or use WRKUSRSQL command
The Work User to SQL Statements screen is displayed.
3. Type the user profile, the Group or *PUBLIC, then ENTER.
If you would like a list of all user profiles on the system, press F4 or type *ALL.
To see a list of users already defined within SafeNet/400 type *ALLDFN.
The Maintain Authorized SQL Statements screen appears.
4. Type 1 in front of each SQL statement that this user is permitted to use.
Selecting *ALL Statements authorizes the use to all SQL statements
To remove authorization to a selection, remove the 1.
SafeNet/400 Reference Guide
Copyright 2008 MP Associates of Westchester, Inc.
1.12
V8.50 - May 2008
Page 17

If you would like to see the list of all users who have been defined within SafeNet/400,
press F2.
5. When finished making all your selections, ENTER.
6. Press F9 to advance to the next step - setting up user authorities to FTP statements.
SafeNet/400 Reference Guide
Copyright 2008 MP Associates of Westchester, Inc.
V8.50 - May 2008
1.13
Page 18
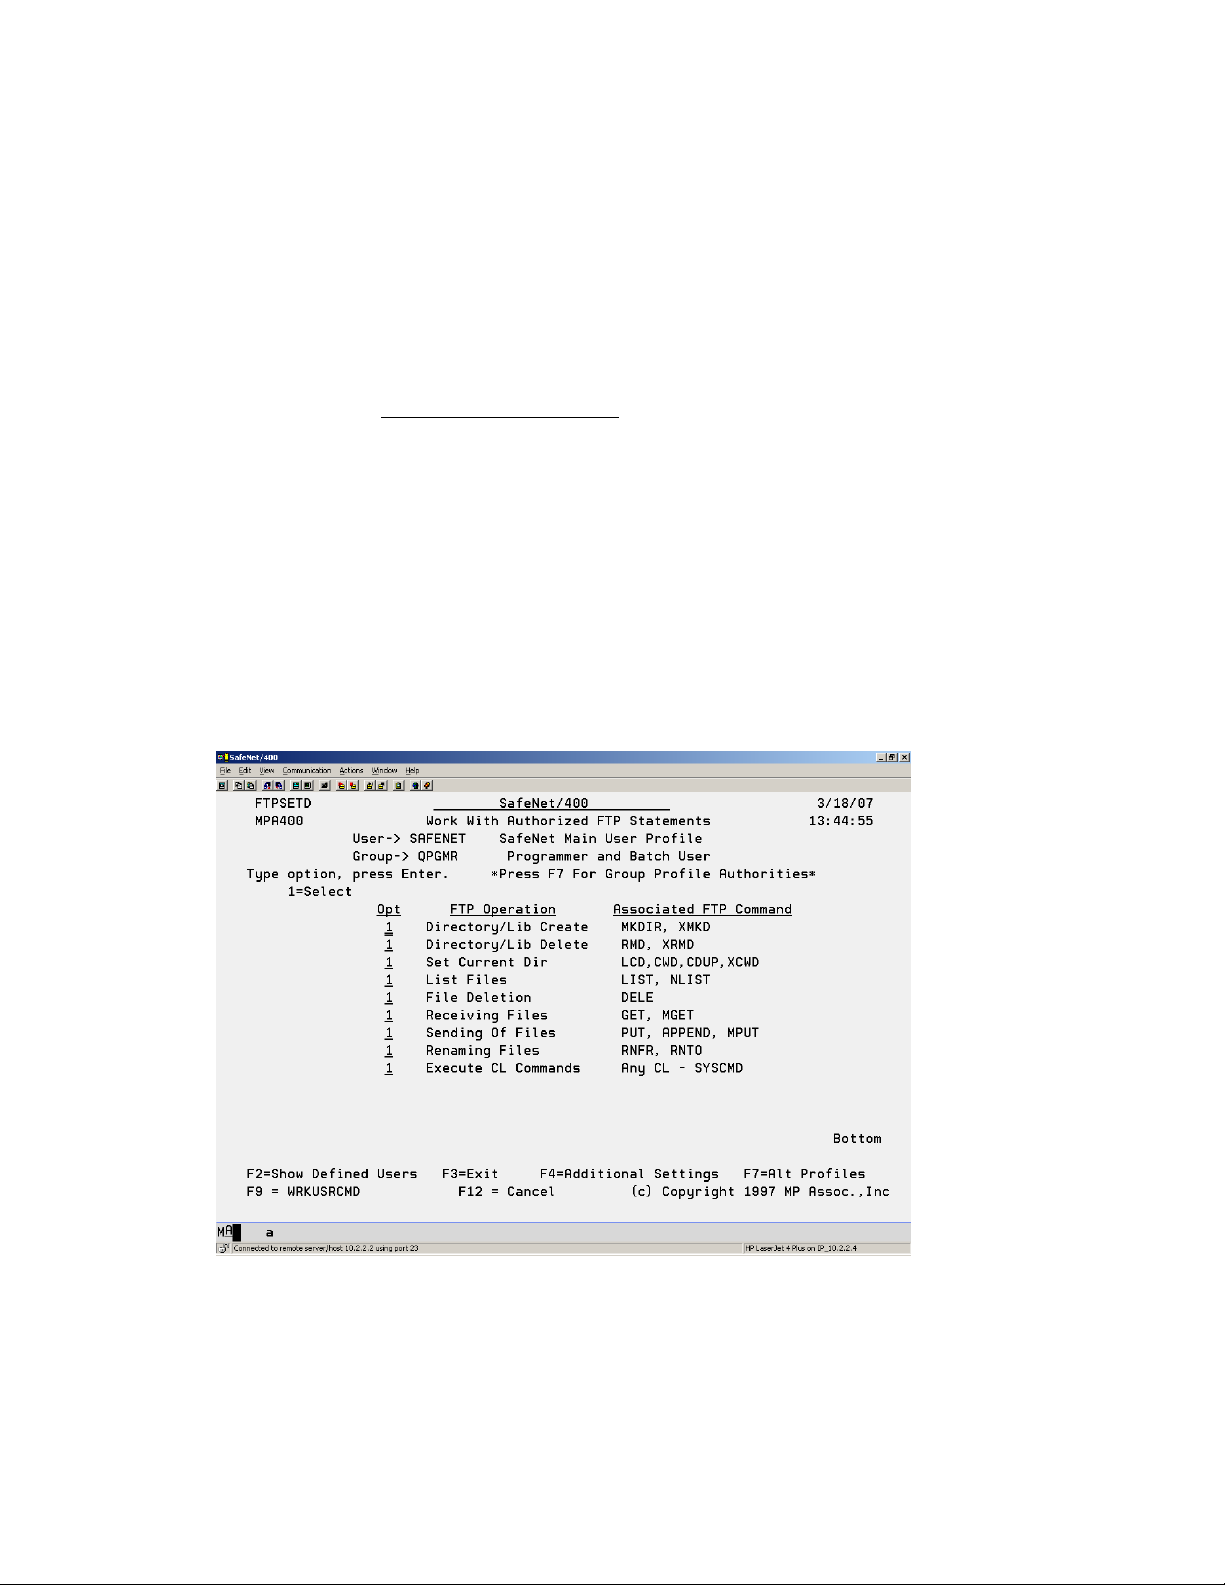
Entering User Authorities to FTP Statements
Next you must authorize users to the FTP Statements they may need if you are going to set the
FTP Server or FTP Client to Level 4.
1. If you used F9 from the previous screen, continue with Step 4.
2. If you are on the SafeNet/400 Main Menu, select Option 5 - Work with User to FTP
Statement Security or use WRKUSRFTP command
The Work User to FTP Statements, Enter User ID screen is displayed.
3. Type the user profile or *PUBLIC then ENTER.
If you would like a list of all user profiles on the system, press F4 or type *ALL.
To see a list of users already defined within SafeNet/400 type *ALLDFN.
The Work with Authorized FTP Statements screen appears.
4. Type 1 in front of each FTP statement that this user is permitted to use.
To remove authorization to a statement, remove the 1.
SafeNet/400 Reference Guide
Copyright 2008 MP Associates of Westchester, Inc.
1.14
V8.50 - May 2008
Page 19
If you would like to see the list of all users who have been defined within SafeNet/400,
press F2.
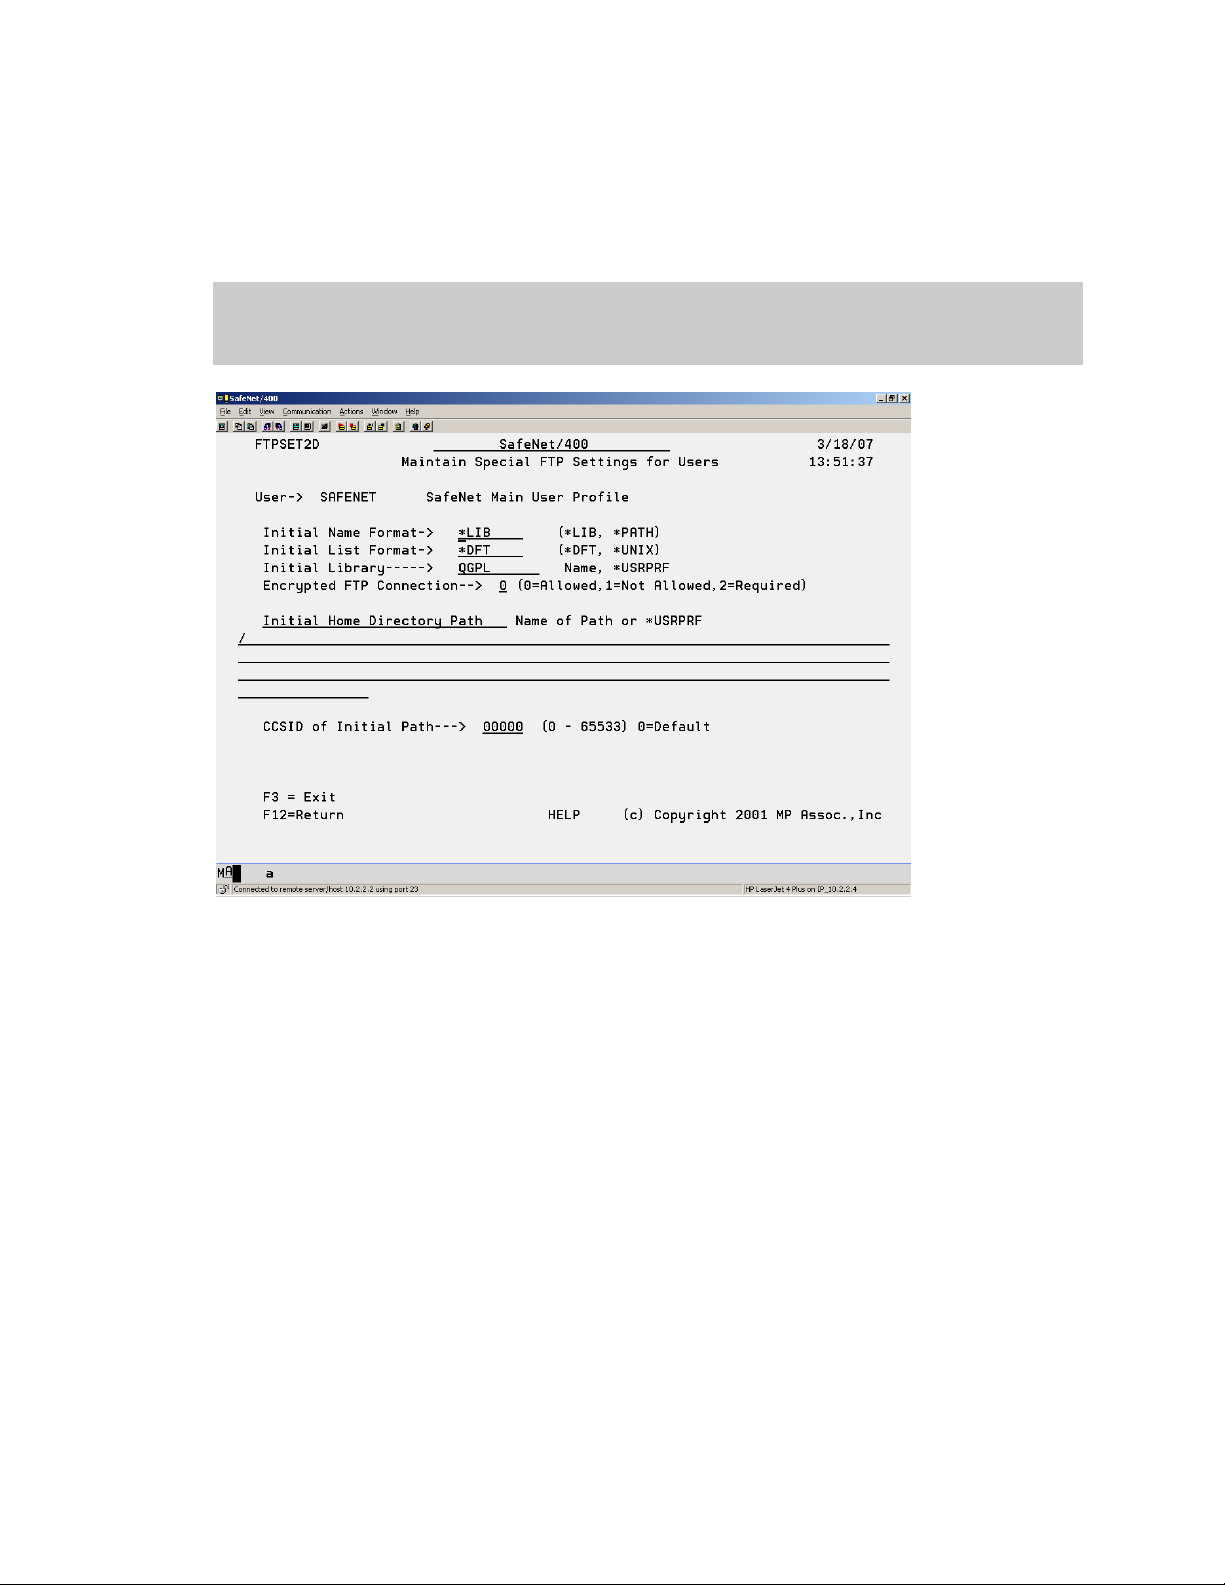
5. Press F4 to display the Maintain Special FTP Settings for Users screen
Note: Special FTP settings for a user are allowed only when your system is at OS/400
V5R1 or higher. If you are at a previous operating system level, these settings
have no effect.
For this user, the initial Name Format and List Format will override the s ettings
established by the OS/400 Change FTP Server Attributes command (CHGFTPA).
Select the parameters as follows:
Encrypted
For SSL connections this should be set to 0 or 2
For regular or non-SSL connections, leave this set to 0 or 1
PATH
This field is in effect only when Name Format is set to *UNIX. The field should point to
an actual IFS directory on the System i5.
SafeNet/400 Reference Guide
Copyright 2008 MP Associates of Westchester, Inc.
V8.50 - May 2008
1.15
Page 20

Name Format
*LIB indicates that the user sees standard Library/Object OS/400 style names
*PATH displays PC or *UNIX style file and directory names.
List Format
*DFT user sees standard OS/400 CHGFTPA server settings
*UNIX user sees UNIX style directory listings
6. When finished making all your selections, ENTER.
7. Press F9 to continue to the next step - setting up user authorities to CL commands.
Important Note:
When the FTP Client point is set to Level 4, only the GET and PUT FTP sub-commands are
required. The other commands, when using the FTP Client, are for the TARGET SYSTEM
ONLY (sent to/run on the target system).
When authorizing users to the GET/PUT sub-commands, the assumed object authority is
reversed from authorities required for the FTP Server point and the same objects.
See the following examples.
Using FTP Client:
Sending an object to a remote system
An FTP PUT of object ABC in an FTP Client session requires *READ authority to object
ABC on the local machine.
Get an object from a remote system
An FTP GET of object ABC in an FTP Client session requires *OBJMGT authority to
the object ABC on the local machine.
Using FTP Server:
Send an object to local system
An FTP PUT of object ABC in an FTP Server session requires *OBJMGT authority to
the object ABC on the LOCAL machine.
Get an object from the local system
An FTP GET of object ABC in an FTP Server session requires *READ authority to the
object ABC on the LOCAL machine.
SafeNet/400 Reference Guide
Copyright 2008 MP Associates of Westchester, Inc.
1.16
V8.50 - May 2008
Page 21
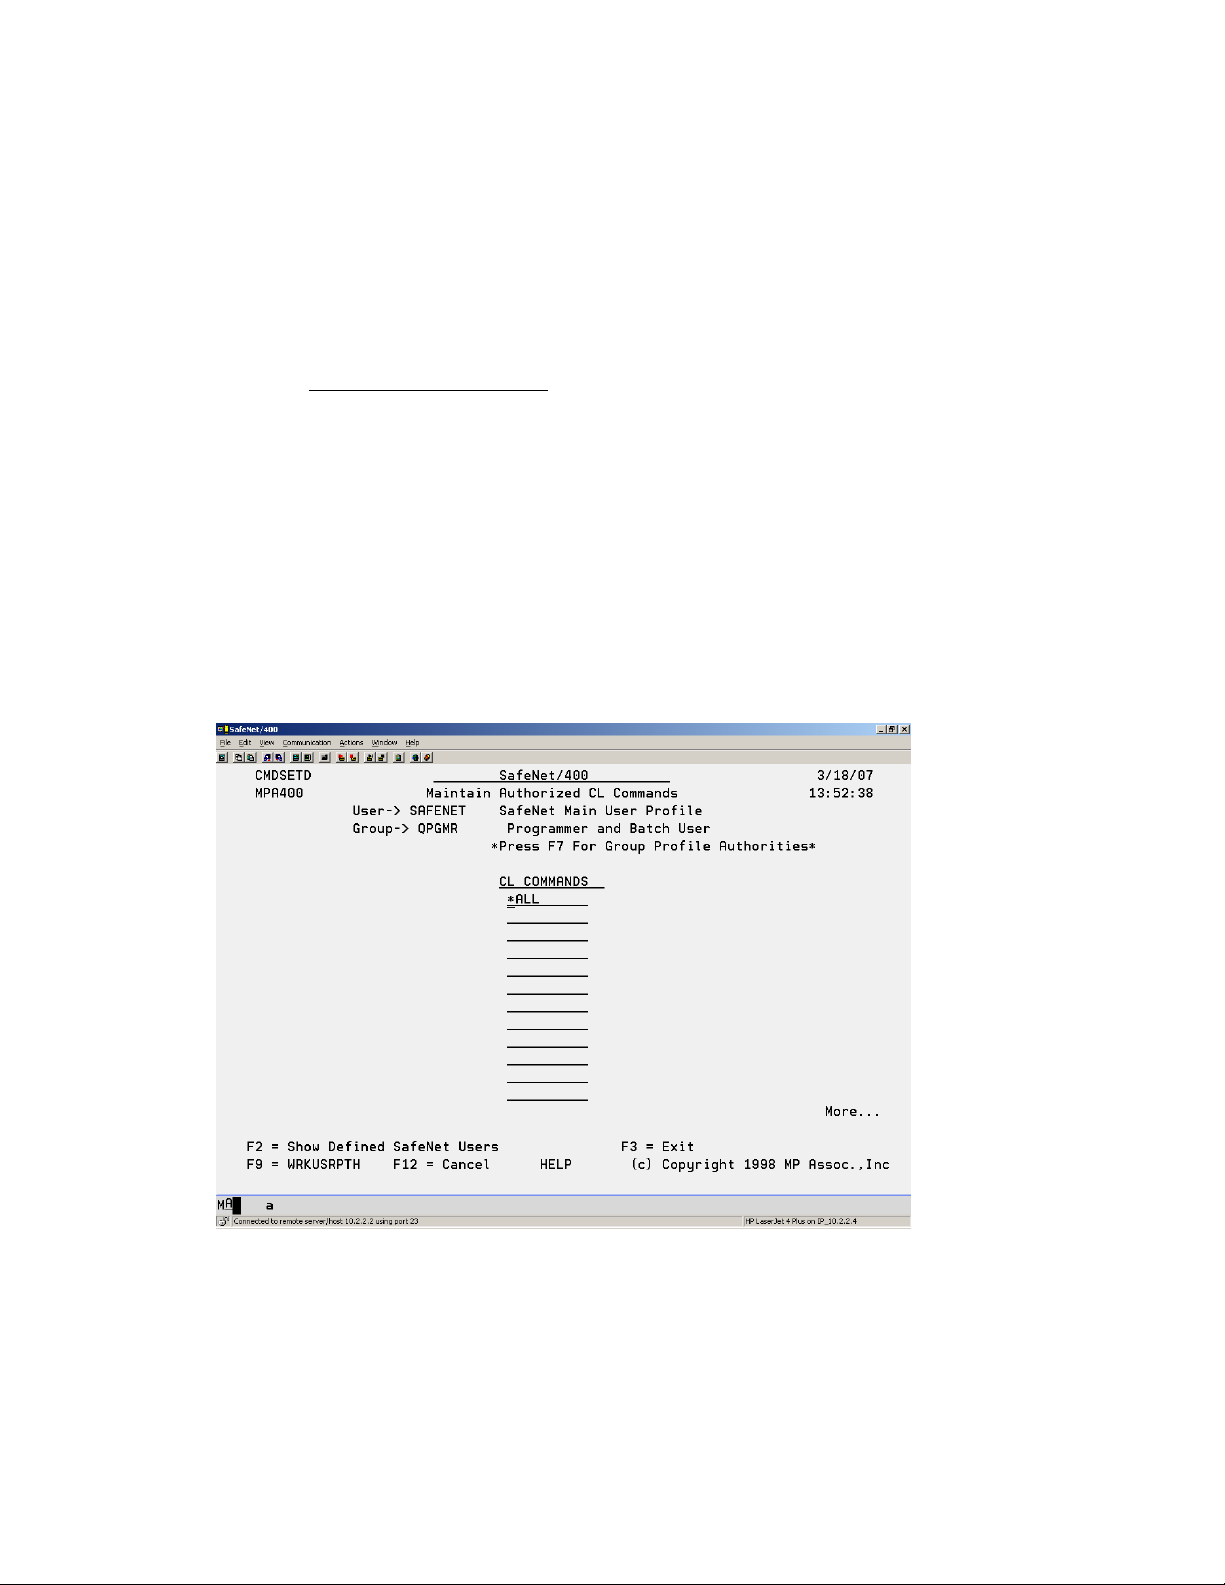
Entering User Authorities to CL Commands
Next, if you plan on setting the FTP, DDM or Remote Command Servers to Level 4, you must
authorize users to the CL commands they may need.
1. If you used F9 from the previous screen, continue with Step 4.
2. From the SafeNet/400 Main Menu
, select Option 6 - Work with User to CL Command
Security or use WRKUSRCMD command
The Work User to CL Commands, Enter User ID screen is displayed.
3. Type the user profile or *PUBLIC then ENTER.
If you would like a list of all user profiles on the system, press F4 or type *ALL.
To see a list of users already defined within SafeNet/400 type *ALLDFN.
The Maintain Authorized CL Commands screen appears.
4. Type each CL command that this user is permitted to use.
If you want the user to have access to all CL commands, type *ALL in the first available
space.
SafeNet/400 Reference Guide
Copyright 2008 MP Associates of Westchester, Inc.
V8.50 - May 2008
1.17
Page 22

To remove authorization to a command, FIELD EXIT through the line to blank it out.
If you would like to see the list of all users who have been defined within SafeNet/400,
press F2.
5. When finished typing all the required CL commands for this user, press ENTER.
6. Press F9 to continue with setting up path names.
SafeNet/400 Reference Guide
Copyright 2008 MP Associates of Westchester, Inc.
1.18
V8.50 - May 2008
Page 23
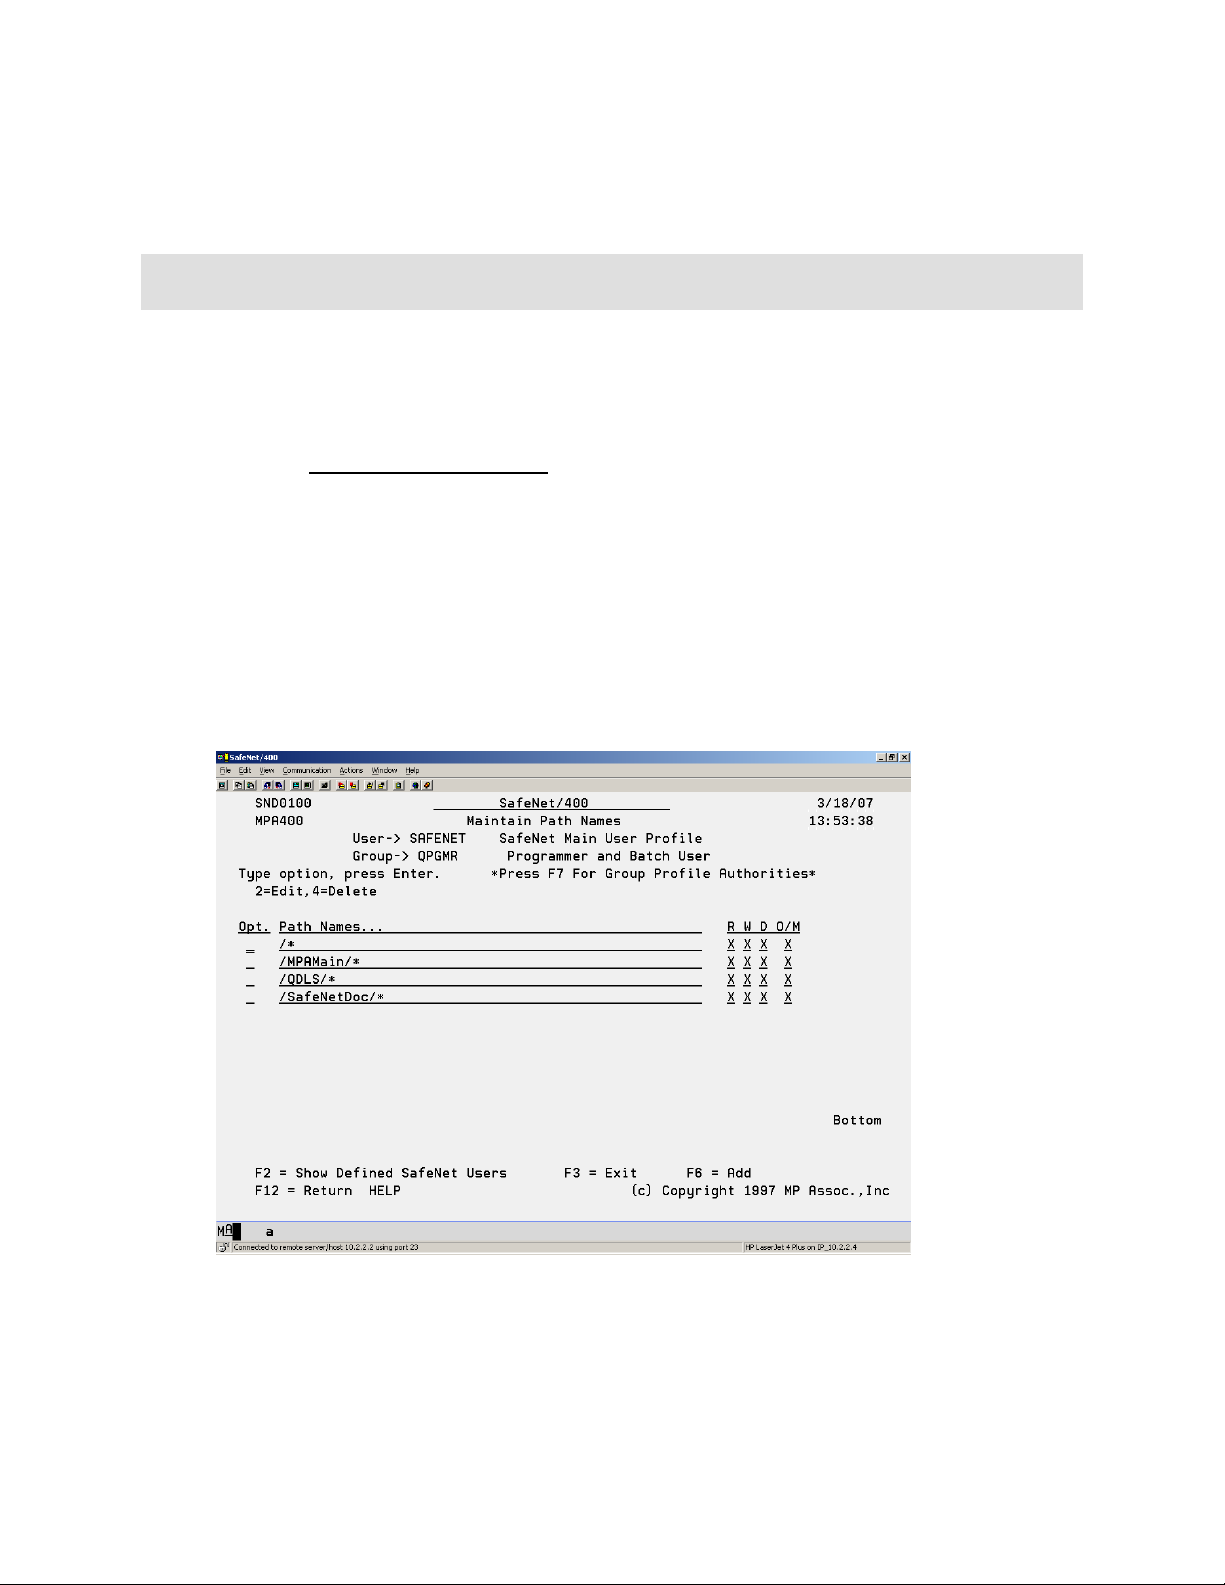
Entering Long Path Names
The default SafeNet/400 setting is to use long path names.
If you choose to not use long path name support, you must first change the SafeNet/400 default
setting. Use the CHGSPCSET command to set the PATHL parameter to *SHORT.
Follow these steps to authorize the user to the paths.
1. If you used F9 from the previous screen, continue with Step 4.
2. From the SafeNet/400 Main Menu, select Option 7 - Work with User to Long Path
Names or use WRKUSRPTH command
The Work with User to Path Names, Enter User ID screen is displayed.
3. Type the user profile or *PUBLIC then ENTER.
If you would like a list of all user profiles on the system, press F4 or type *ALL.
To see a list of users already defined within SafeNet/400 type *ALLDFN.
The Maintain Path Names screen appears.
If you would like to see the list of all users who have been defined within SafeNet/400,
press F2.
SafeNet/400 Reference Guide
Copyright 2008 MP Associates of Westchester, Inc.
V8.50 - May 2008
1.19
Page 24

4. Enter the paths that the user is authorized to.
Paths can be entered up to 256 positions in length, although only the first 60 positions are
shown on the display. To enter and/or view a path over 60 positions long, enter 2 in the
option column.
Use /* to give authority to all folders/paths
End the path with * to allow access to all items in subfolders.
5. When finished typing all the paths for this user, press ENTER.
SafeNet/400 Reference Guide
Copyright 2008 MP Associates of Westchester, Inc.
1.20
V8.50 - May 2008
Page 25

Copying an Existing User to Set Up a New User in SafeNet/400
This will allow you to copy the authorities and settings from one user to another within
SafeNet/400. The new user profile must already exist in OS/400.
1. From the Special Jobs Menu, select Option 13 – Copy a User Setup to Another User or
use the CPYSNUSR command.
The Copy SafeNet User/Authorities screen is displayed.
2. Type the user profile you are copying from, then the new profile(s) to add.
3. When finished entering all the new profiles, press ENTER.
This will set up the new profile in SafeNet/400 and return you to the Special Jobs Menu.
Removing a User from SafeNet/400
This option allows you to remove a user’s authorities and settings from SafeNet/400.
1. From the Special Jobs Menu select Option 14 – Remove a User Enrollment from
SafeNet or use the RMVSNUSR command
The Remove Users from SafeNet screen appears.
2. Type the user profile(s) to remove, then press ENTER.
This will remove the user from SafeNet/400 and return you to the Special Jobs Menu.
SafeNet/400 Reference Guide
Copyright 2008 MP Associates of Westchester, Inc.
V8.50 - May 2008
1.21
Page 26
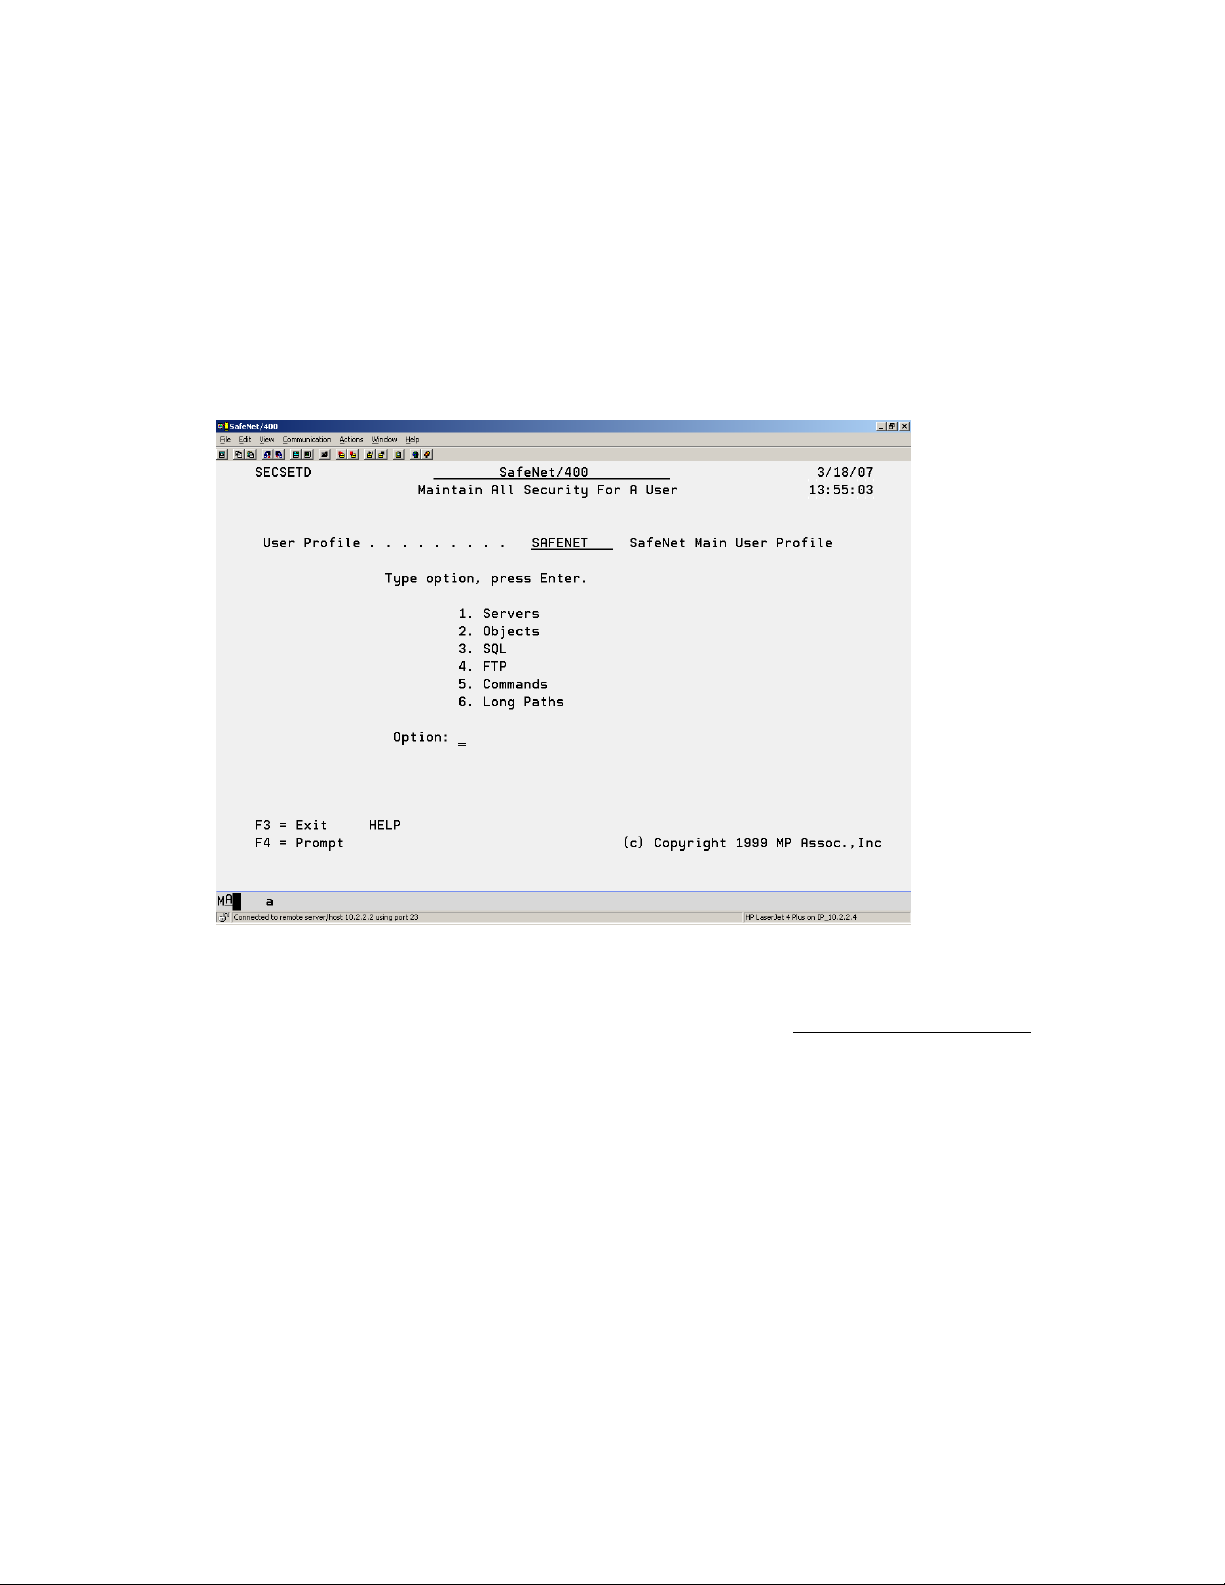
Maintain all Security for a User
The WRKUSRSEC command, which is not found on any of the SafeNet/400 menus, gives you
the ability to perform security maintenance for an individual user without entering several
different commands.
When you use the WRKUSRSEC command you will be presented with the Maintain All
Security for a User screen.
From this screen you can select which of the control files you wish to update for this particular
user, without entering any additional commands or returning to the SafeNet/400 Main Menu
.
Within each of the applications, you can use F9 to advance to the next maintenance screen.
SafeNet/400 Reference Guide
Copyright 2008 MP Associates of Westchester, Inc.
1.22
V8.50 - May 2008
Page 27

Setting up Time of Day Controls
If you want to exclude users from server functions based on the day of the week or the time of
day, use Time of Day controls.
SafeNet/400 checks authority in the following sequence:
Is the authorized to at this time?
User Specific Server
*ALL Servers
Group Specific Server
*ALL Servers
Supplemental Group Specific Server
*ALL Servers
*PUBLIC *Specific Server
*ALL Servers
SafeNet/400 checks until all the tests are passed or until an exclusion rule is encountered.
Note: In Version 8, Time of Day controls are handled differently than in previous releases of
SafeNet/400. With Version 8, TOD controls are activated at the server level. Use the
WRKSRV command to turn on Time of Day checking on the appropriate servers.
SafeNet/400 Reference Guide
Copyright 2008 MP Associates of Westchester, Inc.
V8.50 - May 2008
1.23
Page 28
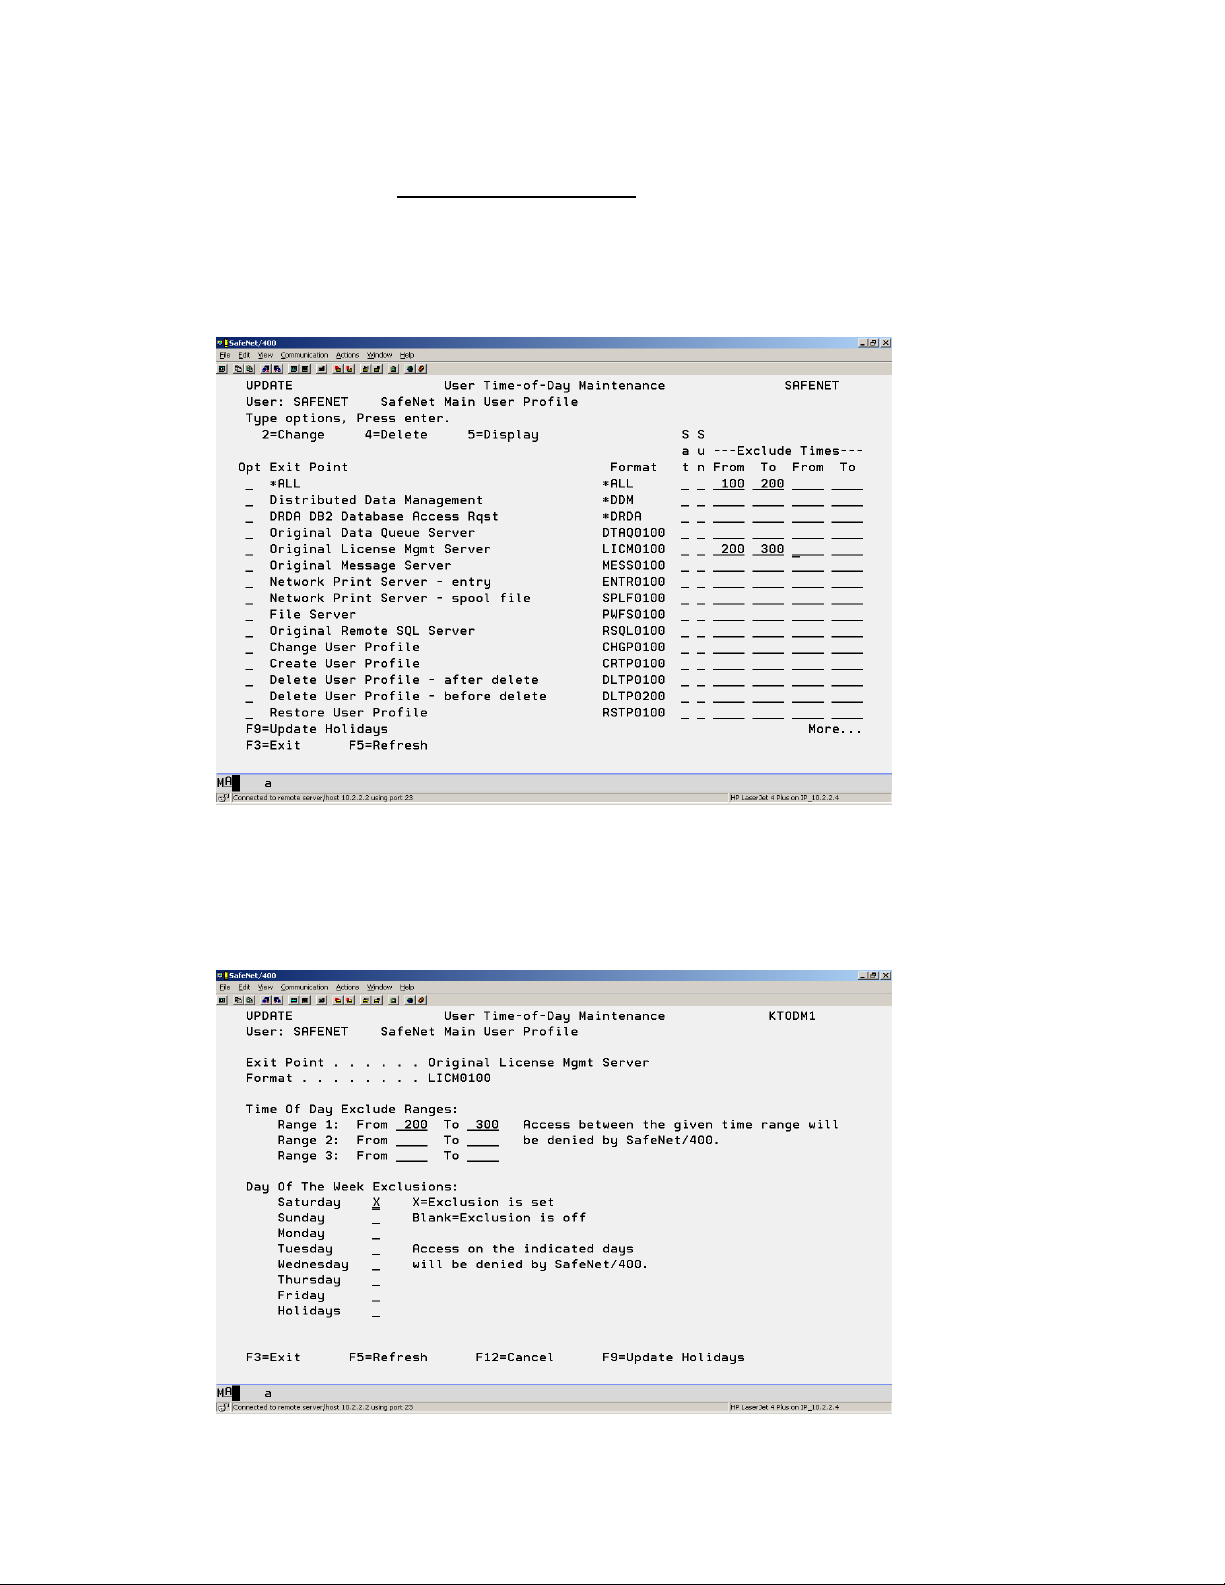
To set up the Time of Day controls for a specific user, use Option 2 – Work with User to
Server Security from the SafeNet/400 Main Menu or the WRKUSRSRV command.
Type the user profile, ENTER and then press F10.
The User Time-of-Day Maintenance screen appears.
To exclude the user from all servers during the same days of the week and time of day, type 2 –
Change in front of *ALL.
To select individual servers, type 2 in front of the servers you want to change
SafeNet/400 Reference Guide
Copyright 2008 MP Associates of Westchester, Inc.
1.24
V8.50 - May 2008
Page 29
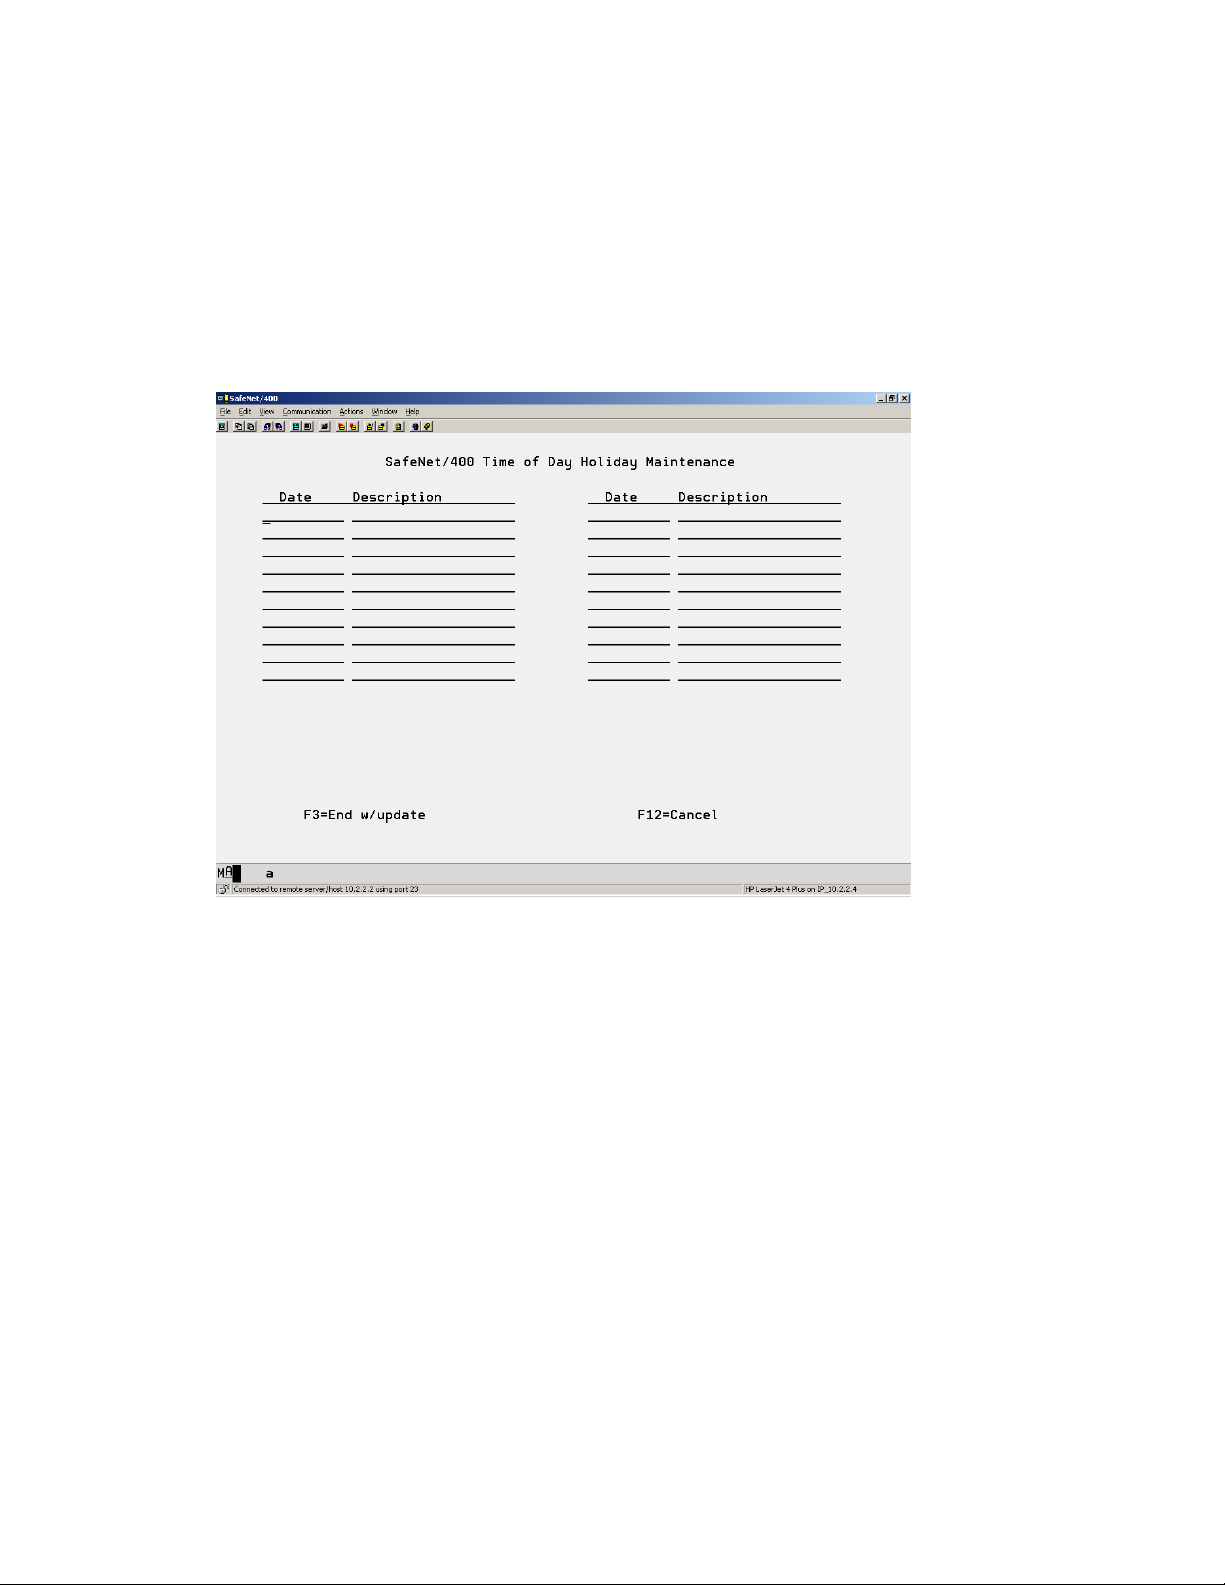
You can define up to three time ranges and can select which days to exclude by typing X in front
of the day.
You can also define holidays that will be used to control Time of Day access.
Press F9 to display the Time of Day Holiday Maintenance screen.
Type the dates and descriptions of your holidays.
Press ENTER.
SafeNet/400 Reference Guide
Copyright 2008 MP Associates of Westchester, Inc.
V8.50 - May 2008
1.25
Page 30

SafeNet/400 Reference Guide
Copyright 2008 MP Associates of Westchester, Inc.
1.26
V8.50 - May 2008
Page 31

Chapter 2 - SETTING UP SERVERS
The final step in configuring SafeNet/400 is to enter the Security Level settings for all the server
functions.
Important: If you do this step first and restrict access to the server functions prior to setting
up user rights, you may disrupt network requests until the users’ authority table
setup is completed. Setting up the Current Level on the servers should be
considered the LAST STEP during the setup process.
Typically use the Future Server Settings for initial setup and testing. When you are ready to
activate SafeNet/400 settings, flip the current and future settings using the WRKSRV command,
F22.
SafeNet/400 Reference Guide
Copyright 2008 MP Associates of Westchester, Inc.
V8.50 - May 2008
2.1
Page 32

SafeNet/400 Server Function Security Levels
Level 1:
IBM default
Unlimited access, all requests accepted
Requests can be logged, reporting available
Performance impact - none
Level 2:
No access at all, all requests for server are rejected
Requests can be logged, reporting available
Performance impact - not a consideration
Level 3:
Access granted on a user-by-user basis to the server
Requests can be logged, reporting available
Performance impact – minimal
TELNET requires use of the TCP/IP control table
Level 4:
Access granted on a user to server and object and command basis
Requests can be logged, reporting available
Performance impact – higher
Level 4 requires authority to the server function and additionally requires table
entries for proper authorization to individual or generic objects and/or folders by
user profile. Data rights such as read/write and object management rights can be
assigned on an individual basis.
Level 4 on the DDM, FTP or Remote Command/Program Call Server requires
setting up authorities to CL commands.
For DDM, FTP or Remote Command/Program Call Server, all commands are
restricted.
SafeNet/400 Reference Guide
Copyright 2008 MP Associates of Westchester, Inc.
2.2
V8.50 - May 2008
Page 33

Level 5:
This indicates that SafeNet/400 does not recognize a program assigned to the exit
point or has detected a user-defined program assigned. (Use WRKREGINF
command to review existing exit point programs.)
Not supported
Cannot be changed via SafeNet/400, use WRKREGINF command
See Appendix A, 'Special Technical Considerations'
On the following pages you will find these levels grouped together to make it easier for you to
decide the appropriate level of security required for each server function.
SafeNet/400 Reference Guide
Copyright 2008 MP Associates of Westchester, Inc.
V8.50 - May 2008
2.3
Page 34

Setting the Server Function Logging Levels
The valid logging levels are:
Logging Level A Log all transactions
Logging Level R Log only rejected requests
Logging Level N No logging
As you set up your Server Function logging levels, please remember the following:
If you set the logging level on the Server Function to NO LOGGING or REJECTIONS, the
Server Function setting will override the individual user logging level.
If you set the logging level on the Server Function to ALL, the individual user logging level
will override the Server Function logging level.
To make sure you are logging transactions correctly, we recommend that when you initially set
up SafeNet/400 you set the Server Functions to log ALL and set the individual user logging
levels to either ALL or REJECTIONS.
Then, after you have had some experience with checking the logs and interpreting the results,
you may want to make changes for specific user and server combinations.
SafeNet/400 Reference Guide
Copyright 2008 MP Associates of Westchester, Inc.
2.4
V8.50 - May 2008
Page 35

Basic Server Security - Supported by all Servers
Level 1 - IBM Default
Level 2 - No access to server
Intermediate Server Security - Supported by all Servers
Level 3 - Users must be authorized to the server
Special
Level 3 - *TELNET - controls signon by IP address
Advanced Server Security - Supported by Specific Servers
Level 4 - The user must be authorized to the server, the objects requested, the FTP Op or
SQL Op, CL commands or long path to be used.
Supported by the following servers:
Distributed Data Management Server
Original Data Queue Server
Network Printer Server - Spool file requests
Integrated File Server
Original Remote SQL Server
Original File Transfer Function Server
Original Virtual Print Server
Database Server - Data base access
Database Server - SQL access
Data Queue Server
Remote Command/Program Call Server
FTP Server Request Validation
FTP Client Request Validation
REXEC Server request Validation
Showcase Strategy** Server
SafeNet/400 Reference Guide
Copyright 2008 MP Associates of Westchester, Inc.
V8.50 - May 2008
2.5
Page 36

Recommended Server Settings
Server Description
Recommended Setting
Central Server - client management Level 1, Log None
Central Server - conversion map Level 1, Log None
Central Server - license management Level 1, Log None
Database Server - entry Level 3, Log All- Limit user access
Database Server - data base access - 100 Level 4, Log All - Limit user and object access
Database Server - data base access - 200 Level 4, Log All - Limit user and object access
Database Server - object information - 100 Level 3, Log All - Limit user access
Database Server - object information - 200 Level 3, Log All - Limit user access
Database Server - SQL access - 100 Level 4, Log All - Limit user, object and SQL
statement access
Database Server - SQL access – 200 Level 4, Log All - Limit user, object and SQL
statement access
Data Queue Server Level 1, Log None
SafeNet/400 Reference Guide
Copyright 2008 MP Associates of Westchester, Inc.
2.6
V8.50 - May 2008
Page 37

Server Description Recommended Setting
Distributed Data Management Level 3, Log All - Limit user access
or
Level 4, Log All - Limit users to specific objects
and commands
DHCP Level 1, Log None
DRDA DB2 Database Access Request Level 3, Log All - Limit user
File Server Level 4, Log All - Limit user and object access
FTP Client Server Level 4, Log All - Limit user access & target connection
by IP Address
FTP Logon Server Level 3, Log All - Limit user access
FTP Server Validation Level 4, Log All - Limit user, source IP address, object,
FTP sub-commands
Network Print Server - entry Level 1, Log None
Network Print Server - spool file Level 1, Log None
Original Data Queue Server Level 1, Log None
Original File Transfer Function Level 4, Log All - Limit user and object access
Original License Mgmt Server Level 1, Log None
SafeNet/400 Reference Guide
Copyright 2008 MP Associates of Westchester, Inc.
V8.50 - May 2008
2.7
Page 38

Server Description Recommended Setting
Original Message Server Level 1, Log None
Original Remote SQL Server Level 4, Log All - Limit user access to objects
and SQL statements
Original Virtual Print Server Level 1, Log None
PWRDWNSYS Level 1, Log All – Log all requests
Remote Command/Program Call Level 4, Log All - Limit user and object access
and commands
REXEC Logon Level 3, Log All - Limit user access
REXEC Server Request Validation Level 4, Log All - Limit user, Source IP address
TELNET Logon Level 1, Log None
or
TELNET Logoff
TFTP Logon Level 1, Log None
User Profile Points Level 1, Log All - Log all requests
TCP Signon Server Level 1, Log None
Showcase Strategy** Server Level 4, Log All – Limit User,Object, Log all
SafeNet/400 Reference Guide
Copyright 2008 MP Associates of Westchester, Inc.
2.8
V8.50 - May 2008
Page 39

Entering Server Function Security Levels
1. From the SafeNet/400 Main Menu
select Option 1 - Work with Server Security
Settings or use WRKSRV command
The Maintain Server Security screen is displayed.
2. Enter the level of security and the logging level that is required for each server
description in the Current columns.
The Future column lets you enter a setting for each server based on what you think the
setting will be in the future. This makes it possible to use your historical transactions
against both current and future server levels for testing purposes.
Enter a ‘Y” in the TOD column to control individual server functions based on time of
day.
When you change the TOD value it becomes effective immediately. Make sure you have
used the Time of Day setup function, accessed via F10 within the WRKUSRSRV
command, before you change this value on the server function.
Note: The server functions are listed on multiple screens. PageDown to ensure you enter a level
for all the servers.
SafeNet/400 Reference Guide
Copyright 2008 MP Associates of Westchester, Inc.
V8.50 - May 2008
2.9
Page 40

3. When you have finished entering information for all the servers, press ENTER.
The screen is refreshed and any changes you made are reflected in the Current columns.
SafeNet/400 Reference Guide
Copyright 2008 MP Associates of Westchester, Inc.
2.10
V8.50 - May 2008
Page 41

Customer Exit Programs
If you would like to use your own programs over these server exit points, F18 on the Maintain
Server Security screen gives you the ability to do so.
SafeNet/400 will look to see if there is a customer-written program to call. If there is, it calls the
program, passing two parameters, a one-byte status code, plus the rest of the data string from the
client. The customer exit program is always processed BEFORE the SafeNet/400 checks are
done.
Your custom exit program can do whatever you want. When it returns to SafeNet/400, if the
status code has been changed to indicate any type of rejection, SafeNet/400 stops and logs the
request, and returns a rejection to the client.
If the exit program does not change the status code, the request will go through the normal
SafeNet/400 checking process.
The string that is passed is limited to 4,000 characters, as defined by IBM. Examples of these
strings can be found in the TRAPOD file and the appropriate IBM manuals.
SafeNet/400 Reference Guide
Copyright 2008 MP Associates of Westchester, Inc.
V8.50 - May 2008
2.11
Page 42

SafeNet/400 Reference Guide
Copyright 2008 MP Associates of Westchester, Inc.
2.12
V8.50 - May 2008
Page 43

Chapter 3 - TELNET, TCP/IP ADDRESS CONTROLS
Setting up TELNET
TELNET control features are supported only when the server is set to Level 3. You may use
some or all of the features available with the TELNET server point:
Control access by IP address
Allow auto-signon (bypass signon)
Restrict IP address to use specific device names (enhanced TELNET clients only)
Restrict access based on the password type sent (none, clear or encrypted)
SafeNet/400 Reference Guide
Copyright 2008 MP Associates of Westchester, Inc.
V8.50 - May 2008
3.1
Page 44

Controlling TELNET Access by IP Address
1. Set the TELNET server to Level 3 using the WRKSRV command.
2. From the SafeNet/400 Main Menu, select Option 7 – Work with TCP/IP Address
Security or use the WRKTCPIPA command and enter *TELNET as the server to
control
3. Enter the IP address in dotted decimal format (i.e., 10.2.2.2)
Use wild card options if desired (10.2.2.x)
4. Enter A or R to accept or reject the request
Restricting Access to Specific Device Names
1. Set the TELNET server to Level 3 using the WRKSRV command
2. Use the WRKTCPIPA command to enter the correct IP address, then enter the
device name to use for this IP address.
You may also use a generic device name by putting an * at the end of the name. If you
use a generic name, up to 99 will be used.
For example:
An entry of AP* would allow devices to be used as AP01 through AP99. The login
process through TELNET will select the next available device name.
SafeNet/400 Reference Guide
Copyright 2008 MP Associates of Westchester, Inc.
3.2
V8.50 - May 2008
Page 45

Setting the Required Password Type
This field must be set if the TELNET Server is set to Level 3. You must enter the appropriate
setting for ALL TELNET IP address controls. As of OS/400 V4R2, only a setting of 0 or 1 is
available. A setting of 2, although allowed here for encrypted passwords, is only available in
V5R1 of OS/400.
Valid settings are:
0 – No password was received or validated
1 – A clear text password was received and validated
2 – An encrypted password was received (SSL TELNET only in V5R1)
For normal TN5250 (TELNET support is VT100) you must set this to 0, since non-enhanced
TELNET clients do not support this feature.
For iSeries Access for Windows TELNET, you can use a setting of 1. However, certain
iSeries Access for Windows clients do not support this, so you MUST test this at your
location.
A setting of 0 will always allow the client to connect.
SafeNet/400 Reference Guide
Copyright 2008 MP Associates of Westchester, Inc.
V8.50 - May 2008
3.3
Page 46

Allow Auto Signon
1. Use the WRKSRV command to set the TELNET server to Level 3
2. Use the WRKTCPIPA *TELNET command to enter the IP address allowed for auto
signon
3. Enter the password type (0 or 1 is required)
4. Enter a Y to allow auto signon
5. Use the WRKSIGNON command to enter the IP address, the user profile, library,
program or menu that the client will automatically be signed on to.
For iSeries Access for Windows, you must set the TN5250 session parameters on the client setup
to bypass signon (see the ISeries Access for Windows Setup Guide). This is required if you set
the password type to 1 in the WRKTCPIPA setting.
For non-iSeries Access for Windows clients (named TELNET VT100 clients) you cannot use a
password type of 1, only 0 is supported.
Important: If you intend to allow auto signon, please test this thoroughly, since it could
present a security exposure.
SafeNet/400 Reference Guide
Copyright 2008 MP Associates of Westchester, Inc.
3.4
V8.50 - May 2008
Page 47

Logging of TELNET Sessions
Under normal signon conditions (no auto signon allowed), each request for a TELNET session is
logged into the transaction history file (TRAPOD) by IP address, and a user name of QSYS.
QSYS is used because no user profile is associated with the actual TELNET session start request.
Each logoff is also recorded by IP address with a user of QSYS.
If you use the auto signon feature, the request will be logged with the associated user set up in
the Auto Signon Control file. Each logoff of a TELNET will also record the transaction with the
user profile that was automatically signed on.
When *TELNETON is set to Level 3, only devices with IP addresses already registered will
be permitted access to the TELNET server.
Changing the security level of the TELNET server functions takes effect immediately.
SafeNet/400 Reference Guide
Copyright 2008 MP Associates of Westchester, Inc.
V8.50 - May 2008
3.5
Page 48

Setting up TCP/IP Address Controls
SafeNet/400 allows you to specify which client IP addresses are either accepted or rejected by
the Telnet and the FTP Servers.
Turning on TCP/IP Address Checking
To set-up and turn on TCP/IP address checking for the FTP Server and Rexec Server
1. Type WRKTCPIPA *FTPSERVER then ENTER
2. Add the IP addresses to the Control Table
3. Type CHGFTPSET then press F4
4. Change Server Source limit by IP Address? to *YES then ENTER
5. Use WRKSRV command and set the *FTPSERVER and/or *REXEC Server exit
point to level 3 or 4.
To set-up and turn on TCP/IP address checking for the FTP Client:
1. Type WRKTCPIPA *FTPCLIENT then ENTER
2. Add the IP addresses to the Control Table
3. Type CHGFTPSET then press F4
4. Change Client Target limit by IP Address? to *YES then ENTER
5. Use WRKSRV command and set the *FTPCLIENT exit point to level 3 or 4.
To set-up and turn on TCP/IP address checking for TELNET:
1. Type WRKTCPIPA *TELNET then ENTER
2. Add the IP addresses to the Control Table
3. Type WRKSRV
4. Change the *TELNETON point to Level 3
SafeNet/400 Reference Guide
Copyright 2008 MP Associates of Westchester, Inc.
3.6
V8.50 - May 2008
Page 49

Setting up TCP/IP Address Control Table
1. Use SafeNet/400 Main Menu
Option 7 or the WRKTCPIPA command
2. In IP Addresses for Server enter *FTPSERVER, *FTPCLIENT or *TELNET for the
proper control table.
3. Type the addresses to accept or reject. A indicates Accept; R indicates Reject.
Example 1:
Accept/
Address Reject
10.2.2.X A
10.2.2.5 R
In this example any address from 10.2.2.1 through 10.2.2.255 will be accepted, with the
exception of 10.2.2.5, which will be rejected.
Example 2:
Accept/
Address Reject
10.2.2.1XX A
10.2.2.14X R
In this example all clients with addresses from 10.2.2.100 through 199 will be accepted,
with the exception of clients addressed 10.2.2.140 through 10.2.2.149, which will be
rejected.
To print the control table, select Option 6 - Print TCP/IP Address Control Listing on the
SafeNet/400 Reports Menu.
SafeNet/400 Reference Guide
Copyright 2008 MP Associates of Westchester, Inc.
V8.50 - May 2008
3.7
Page 50

SafeNet/400 Reference Guide
Copyright 2008 MP Associates of Westchester, Inc.
3.8
V8.50 - May 2008
Page 51

Chapter 4 - SETTING UP FTP
Anonymous FTP Logon
To set up for Anonymous Logon, you must fill in the special FTP settings, and set the FTP
Logon Server to Level 3 and the FTP Server Validation to Level 4.
Follow these steps for FTP:
1. From the SafeNet/400 Main Menu select Option 10 - Go to Special Jobs Menu
2. From the Special Jobs Menu
select Option 3 - Change Special FTP Server Settings or
use CHGFTPSET command along with F4
The Change SafeNet FTP Settings screen is displayed.
Press F9 to see all parameters.
Here you will find the special parameters to control login access to the FTP Servers from
both Anonymous and regular user IDs.
SafeNet/400 Reference Guide
Copyright 2008 MP Associates of Westchester, Inc.
V8.50 - May 2008
4.1
Page 52

Set the parameters for CHGFTPSET command as follows. The default value is highlighted in
bold.
Parameter Screen Selections Value Description
RLOGON Allow Normal
USERID FTP
Logon
*YES
*NO
This parameter is used to determine whether
or not you want regular OS/400 user Ids to be
able to sign on through the FTP server. If you
want only anonymous logons, set this to *NO
and FTP for anonymous logons to *YES.
If you say *NO to this option (allow normal
System i5 user profiles to log on) then only
anonymous logons will be allowed/disallowed
based on the other parameters. Regular
OS/400 user IDs will not be accepted for FTP
logons.
IPCTL Server Source
limit by IP Add?
*YES
*NO
To validate source IP addresses against a
SafeNet/400 control table.
Use WRKTCPIPA *FTPSERVER
IPCTLC Client Target limit
by IP Add?
*YES
*NO
To validate Target IP addresses against a
SafeNet/400 control table.
Use WRKTCPIPA *FTPCLIENT
ALOGON Allow Anonymous
FTP Logon
*YES
*NO
If you want users to be able to login with the
user ID of Anonymous, enter *YES. If you
don’t want a user to use the FTP Logon User
as Anonymous, leave this field *NO.
ALIBR Anonymous User
Libname
Library
When you allow anonymous logons, you must
restrict those FTP users to a specific library.
For security purposes, enter it here AND
grant the user profile for anonymous logons
object rights to this library or group of objects
within this library from the SafeNet/400 Main
Menu, Option 3. For the ANONYMOUS
user profile under OS/400, make the ‘Current
Library’ this library name.
Also grant the anonymous user ID authority
to the FTP server on the Main Menu,
Option
2. Add the user to the valid FTP statements
from the Main Menu,
Option 5.
SafeNet/400 Reference Guide
Copyright 2008 MP Associates of Westchester, Inc.
V8.50 - May 2008
4.2
Page 53

GUEST Allow Anonymous
GUEST Password
EMAIL Allow E-mail
Address for
Password
AUSRPRF Profile for
*YES
*NO
*YES
*NO
profilename
Anonymous
Logons
To allow Anonymous user logins with the
password of GUEST, enter *YES here. You
can choose GUEST or use an E-mail address.
Note: If you select GUEST, the System i5
still prompts an anonymous user for
their E-mail address. SafeNet/400,
however, will only allow GUEST as
the password.
If you allow an anonymous user to accept an
E-Mail address, SafeNet/400 will scan the
address entered for an embedded “@” (at
sign) for validation, and record the address in
the log request file for reporting
If you allow anonymous logons, you must
specify a valid, pre-existing user profile to
run anonymous user logons in OS/400 when
the anonymous user logs on under FTP. In
other words, a user would FTP to a System i5
FTP site running SafeNet/400, and that FTP
site would prompt for a user name. The user
keys ‘ANONYMOUS’ and the System i5
prompts for a password. The user then keys in
a valid E-mail address and the System i5
starts a job assigned to the user ID you have
specified here. The System i5 job is initiated
using this profile and all its associated
authorities.
Enter the ANONYMOUS profile here, and if
you want to assign a password to the profile
enter that here also. It is highly
recommended that you leave this as
*NONE, *NONE. If you enter a password
here, or use a profile other than
ANONYMOUS, you leave a potential
security exposure.
Important: When using SafeNet/400 and
allowing for Anonymous, it is strongly
recommended that you create an OS/400
user profile called ‘ANONYMOUS’ with a
SafeNet/400 Reference Guide
Copyright 2008 MP Associates of Westchester, Inc.
V8.50 - May 2008
4.3
Page 54

APWD Password for
pword
Above Profile
password of *NONE and *USER for the
profile type. If you do this, no one can use
this profile to sign on since the password is
set to *NONE.
Enter the password to be used with the profile
in parameter AUSRPRF for Anonymous FTP.
SafeNet/400 Reference Guide
Copyright 2008 MP Associates of Westchester, Inc.
V8.50 - May 2008
4.4
Page 55

Setting up for ANONYMOUS FTP
Example
1. Create a user profile on the System i5 called ANONYMOUS, with password *NONE and
user class *USER, and set the Current Library.
2. From the Special Jobs Menu, select Option 3 - Change Special FTP Server Settings or
use CHGFTPSET command along with F4
3. Set the parameters as follows:
If you want to allow OS/400 users other than ANONYMOUS to log in through FTP
server set parameter RLOGON to*YES
Enter ALOGON(*YES) to allow ANONYMOUS
Enter the library name to which the user is restricted in parameter ALIBR
Enter the type of password you want the user to enter - E-mail or Guest, or both
Enter the OS/400 user profile in parameter AUSRPRF that was created in Step 1
above (ANONYMOUS)
Enter password for the ANONYMOUS user profile in APWD parameter
4. Press ENTER
5. Return to the SafeNet/400 Main Menu
6. Select Option 1 - Work with Server Security Settings or use WRKSRV command
7. Locate the FTP Logon Server point
8. Change the FTP Logon Server to Level 3
9. Change the FTP Server Validation point to Level 4. If you want to allow for anonymous
logons, you MUST
set this to Level 4
10. From the SafeNet/400 Main Menu
, select Option 2 -Work with User to Server Security
or use WRKUSRSRV command
11. Grant the ANONYMOUS user profile authority to the FTP Logon and FTP Server Request
Validation server points.
12. From the SafeNet/400 Main Menu, select Option 3 - Work with User to Object Level
Security or use WRKUSROBJ command
13. Grant the ANONYMOUS user authority to the library entered in step 3 above (Current
Library), and specifically to any objects within the library. Or, enter *ALL for all object
and then assign the required data rights.
SafeNet/400 Reference Guide
Copyright 2008 MP Associates of Westchester, Inc.
V8.50 - May 2008
4.5
Page 56

If using long path support, use the WRKUSRPTH command to enter the correct path or
paths for ANONYMOUS.
14. Select Option 5 - Work with User to FTP Statement Security or use the WRKUSRFTP
command to grant the ANONYMOUS user ID authority to specific FTP commands. Use
the additional FTP settings if required or if you want the ANONYMOUS profile initial path
to be an IFS directory.
SafeNet/400 Reference Guide
Copyright 2008 MP Associates of Westchester, Inc.
V8.50 - May 2008
4.6
Page 57

Setting up for Normal User IDs and FTP Servers
Example
1. From the Special Jobs Menu select Option 3 - Change Special FTP Security Settings
or use CHGFTPSET command
2. On the FTP Security Settings screen, set Allow normal user IDs to log on the FTP to
*YES or use RLOGON (*YES) parameter
3. Return to the SafeNet/400 Main Menu and select the following options:
Select Option 1 - Work with Server Security Settings or use WRKSRV command
Locate the FTP Logon, FTP Client and/or FTP Server points. These must be set to
Level 1, 3, 4. (If you set these to Level 1, you can skip the rest of these steps.)
Select Option 2 - Work with User to Server Security or use WRKUSRSRV
command
The user ID must be authorized to the FTP Logon server and one of the following:
*FTP Client – if an OS/400 user will be FTP-ing OUT from your iSeries
*FTP Server – if an OS/400 user will be FTP-ing INTO your iSeries
Select Option 3 - Work with User to Object Level Security or use WRKUSROBJ
command
Authorize the user ID to their own current library as specified in the OS/400 user
profile. Enter this library in User to Object Security
Authorize the user ID to any other library or object. Enter these in User to Object
Security
Select Option 5 - Work with User to FTP Statement Security or use
WRKUSRFTP command
Authorize the user ID to the FTP statements they will use. Use F4 for additional user
settings if required.
Select Option 6 - Work with User to CL Command Security
Authorize the user to the CL commands they will issue through the FTP Server
SafeNet/400 Reference Guide
Copyright 2008 MP Associates of Westchester, Inc.
V8.50 - May 2008
4.7
Page 58

SafeNet/400 Reference Guide
Copyright 2008 MP Associates of Westchester, Inc.
V8.50 - May 2008
4.8
Page 59

Chapter 5 - DHCP Controls and Reporting
Dynamic Host Configuration Protocol
DHCP allows clients to obtain IP network configuration, including an IP address, from a central
DHCP server. DHCP servers control whether the addresses they provide to clients are allocated
permanently or leased for a specific period of time. When the server allocates a leased license,
the client must periodically check with the server to re-validate the address and renew the lease.
The DHCP client and server programs handle address allocation, leasing and lease renewal.
If you are using DHCP on your System i5 this gives you a way to control it. If you are not using
DHCP, you can still use these options to review other activity.
To use the System i5 as a DHCP server, refer to the relevant OS/400 manual and/or Operations
Navigator.
SafeNet/400 Reference Guide
Copyright 2008 MP Associates of Westchester, Inc.
V8.50 - May 2008
5.1
Page 60

Working with DHCP
DHCP functions are performed from the DHCP Control and Reports Menu.
From the SafeNet/400 Main Menu select Option 13 – Go To DHCP Menu
The DHCP Control and Reports Menu appears.
The DHCP functions provide the ability to maintain MAC addresses and device names, set IP
addresses and ping IP addresses.
From the DHCP Control and Reports Menu
you can also run reports for active and expired
leases, MAC names and IP address lists.
SafeNet/400 Reference Guide
Copyright 2008 MP Associates of Westchester, Inc.
5.2
V8.50 - May 2008
Page 61

Current DHCP Activity
To see current status, from the DHCP menu
select Option 1 – Display Current DHCP Activity
This screen displays bind and release information
Use function keys to switch views:
F2 switches between the Currently Active DHCP Addresses Bound and Expired or
Released DHCP Addresses screen
The Expired or Released addresses list contains information gathered since the last time
the list was purged.
F7 switches between MAC addresses and the assigned names
You will notice that the devices with fixed IP addresses do not change as you toggle
between the two displays.
F4 puts you in edit mode and allows you to revise the assigned names
SafeNet/400 Reference Guide
Copyright 2008 MP Associates of Westchester, Inc.
V8.50 - May 2008
5.3
Page 62

Move your cursor to the name you want to change in the Editable Names column. Press
ENTER to record the change.
To use this function make sure you are looking at the Currently Active DHCP Addresses
Bound screen. Use F2 if necessary to switch.
F5 pings the addresses
This will ping all the IP addresses that are displayed. The responses will flash at the
bottom of the screen. When the process has completed, you will see a Ping Status column
indicating the results of the pings.
If you are looking at the active addresses, you will ping those. If you are looking at
expired or released addresses, all of those will be pinged.
Be aware that pinging the expired or released addresses can take a very long time
depending on the last time the list was purged.
The number of packets and time to wait are controlled by two data areas: PINGPKTS
and PINGTIME in PCSECDTA.
The default is one packet and one second wait. You can change these data areas
manually if required.
SafeNet/400 Reference Guide
Copyright 2008 MP Associates of Westchester, Inc.
5.4
V8.50 - May 2008
Page 63

Maintaining MAC Addresses
From the DHCP menu
select Option 5 – Manually Maintain MAC Addresses to User Names
This operates as a standard OS/400 DFU program.
Press F9 to use insert mode when editing
Press F23 to delete the MAC address and name
SafeNet/400 Reference Guide
Copyright 2008 MP Associates of Westchester, Inc.
V8.50 - May 2008
5.5
Page 64

Fixed IP Addresses
To assign IP addresses to devices, from the DHCP Menu
select Option 6 – Manually Maintain
Permanent, Static IP Addressed Devices or use the SNDHCPPR command
Even if you are not using DHCP on your System i5, you can use this option to do PING checks
for network troubleshooting.
If you enter a DHCP IP address you will receive an error message. This is for fixed IP addresses
only.
SafeNet/400 Reference Guide
Copyright 2008 MP Associates of Westchester, Inc.
5.6
V8.50 - May 2008
Page 65

Purging Expired DHCP Lease Information
The Expired or Released DHCP address information is cumulative and will remain in the system
until you purge it.
From the DHCP Menu select Option 8 – Run Purge of Expired DHCP Lease Information
Enter the date and time to purge through. When you ENTER the log of expired DHCP leases
will be cleared.
SafeNet/400 Reference Guide
Copyright 2008 MP Associates of Westchester, Inc.
V8.50 - May 2008
5.7
Page 66

Ping Checker
You can use this option to ping a single IP address or a range of addresses.
From the DHCP Menu select Option 10 – IP Address Range Ping Checker
Enter the range of IP addresses that you want to ping.
Press ENTER and you will begin to see replies flash on the bottom of the screen.
When all the IP addresses have been pinged the Status column will display the results of the
pings.
SafeNet/400 Reference Guide
Copyright 2008 MP Associates of Westchester, Inc.
5.8
V8.50 - May 2008
Page 67

Chapter 6 - REPORTS
SafeNet/400 reports are grouped into two categories:
Setup Reports provide information on server settings, user authorities to servers and to data,
etc.
Analysis Reports provide data on SafeNet/400 usage - the who, what, where and when
information you need to manage your system.
Analysis reports have been enhanced to include the ability to select specific dates and/or
users, including summaries by group profile. You can choose to print the reports or create an
OUTFILE of the selected records in a readable format to use for your own ad-hoc reporting.
You can also use the analysis reports to take advantage of the Auto-enrollment feature of
SafeNet/400. See the SafeNet/400 Implementation Guide for more information.
SafeNet/400 Reference Guide
Copyright 2008 MP Associates of Westchester, Inc.
V8.50 - May 2008
6.1
Page 68

Setup Reports
These reports are accessed through the SafeNet/400 Main Menu,
Reports Menu (GO SN3 command)
1. Server Status
Prints each Server Function and its security level setting
2. User to Server Security Listing
Lists users and the Server Functions they are authorized to
3. User to Object Security Listing
Lists users, the libraries and objects they have authority to and the rights the users have to
the objects.
4. User to SQL Statement Listing
Lists all users and the SQL statements they are authorized to use
5. User to FTP Statement Listing
Lists all users and the FTP statements they are authorized to use
6. TCP/IP Address Control Listing
Lists the TCP/IP address controls for Workstation Gateway and FTP servers.
7. User to CL Command Listing
Lists users and the CL commands they are authorized to use
8. User to Long Path Security Listing
Lists users and long path names they are authorized to use
Option 11 – Go to Setup
SafeNet/400 Reference Guide
Copyright 2008 MP Associates of Westchester, Inc.
6.2
V8.50 - May 2008
Page 69

Usage Reports
These reports are accessed through the SafeNet/400 Main Menu, Option 12 – Go to Analysis
Reports Menu (GO SN4 command).
Menu SN4 options 2 through 7 also give you the ability to run auto-enrollment reports and
perform the auto-enrollment process.
1. Security Report by User (Also Batch Transaction Test Report)
Lists each request by user, the Server Functions they are requesting, the server’s security
level setting, and whether the request was accepted or rejected.
Can also be used as a test report to recheck all historical transactions against current and
future SafeNet/400 settings.
Allows “what if” testing of all historical transactions against current and future contro l
file settings to see if further set up is required.
2. User to Server Usage Report
Using historical transactions, lists each server a user has accessed
3. User to Object Usage Report
Using historical transactions, lists each LIB/OBJ a user has accessed and the type of
access, i.e., READ, WRITE, DELETE.
4. User to SQL Usage Report
From historical transactions, lists each SQL operation performed by each user.
5. User to FTP Usage Report
From historical transactions, lists each FTP operation performed by each user.
6. User to CL Command Usage Report
Using historical transactions, lists each CL command issued by each user.
7. User to IFS Path Usage Report
Using historical transactions, lists each path accessed by each user.
SafeNet/400 Reference Guide
Copyright 2008 MP Associates of Westchester, Inc.
V8.50 - May 2008
6.3
Page 70

SafeNet/400 Reference Guide
Copyright 2008 MP Associates of Westchester, Inc.
6.4
V8.50 - May 2008
Page 71

Chapter 7 - TESTING YOUR SECURITY SETTINGS
Once you have planned your server function Security Level settings, SafeNet/400 gives you a
method to test the settings to make sure they will provide the level of security you anticipate. It
acts as a “what-if” tool to verify the effect your settings will have before you actually turn on
access control.
If you have been logging network requests with SafeNet/400 you can, at any time, run each
historical record through the security checking routines and receive a result of ‘ACCEPTED’ or
‘REJECTED’ based on current and future SafeNet/400 settings.
This allows you to make changes to the server function Security Level, the user-to-server
settings, or data rights authorities, and using previously logged requests, tell immediately if your
settings will give the desired response to the clients.
To test your collected transactions use:
On-line Transaction Tester (PCTESTR) – the preferred method
Security Report by User in test mode (Menu SN4, Option 1)
SafeNet/400 Reference Guide
Copyright 2008 MP Associates of Westchester, Inc.
V8.50 - May 2008
7.1
Page 72

Testing SafeNet/400 settings based on your historical data with the on-line
transaction tester
This is the preferred method if you would like immediate feedback.
1. From the SafeNet/400 Main Menu select Option 10 - Go to Special Jobs/Setup Menu or
use GO SN2 command)
2. Select Option 10 - On-Line Transaction Testing or use PCTESTR command
The On-Line Transaction Testing screen will appear.
If you want, you may enter a beginning date and time, or the user or server ID, then enter
the desired security level to test against your logged transactions.
If you do not enter a date and time, you will be shown requests beginning with the first
available record in the file.
SafeNet/400 Reference Guide
Copyright 2008 MP Associates of Westchester, Inc.
7.2
V8.50 - May 2008
Page 73

3. In the Security Levels to Check field:
Type C (Current) to test transactions with your present SafeNet/400 Server Security
Levels
Type H (Historical) to review the actual status received when the transaction was logged;
no new ‘re-testing’ is performed.
Type F (Future) to test transactions with your future Server Security Levels. This will
test each selected transaction against the future security setting to determine if your
security control files are set up correctly.
Type 2, 3 or 4 for other levels
If you want to test your Time-of-Day controls, type Y in Time of Day Check.
If you want to see only rejected requests, type Y in Show only Rejections.
Important: If you elect to display only rejections, be advised that this may seriously impact
interactive performance. Consider using the Batch Transaction Test Report as an
alternative.
SafeNet/400 Reference Guide
Copyright 2008 MP Associates of Westchester, Inc.
V8.50 - May 2008
7.3
Page 74

4. When you press ENTER and a transaction that meets your selection criteria is found, the On-
Line Transaction Testing Mode screen is displayed.
This describes:
The Requested Security Level setting to check
The current Security Level for the server
The maximum security level setting for this server
The user making the request
The group profile related to the user
The date and time of the request
The OS/400 server job name the request came from
The format
The server function receiving the request
Data used, if any
Whether the request was accepted or rejected, and the reason for the rejection
If it is displayed as a valid function key, you can press F10 to view even more
detail.
SafeNet/400 Reference Guide
Copyright 2008 MP Associates of Westchester, Inc.
7.4
V8.50 - May 2008
Page 75

Additional command keys are shown when rejections are displayed. These
additional command keys will allow you to work directly with the appropriate
user setting based on the rejection code.
5. You can roll up or down to scroll backward and forward, or you can press ENTER to scroll
forward to the next record in the logging file.
At any time you can press F12 to return and enter a new starting date and time, server or
user, or change the Security Level to check.
Note: Use this tool to develop and test your initial security settings prior to putting them into
production. You can go back and change the different SafeNet/400 parameters to see
how they affect each transaction.
Use the additional command keys shown in rejections to immediately make changes to
user settings.
SafeNet/400 Reference Guide
Copyright 2008 MP Associates of Westchester, Inc.
V8.50 - May 2008
7.5
Page 76

Batch Transaction Test Review/Report – Security Report by User
You can use this batch report to test all the historical transactions through current and future
control file settings.
With this report you can make changes to control files, then re-run all the historical transactions
back through a security check process to determine if further security set up is required.
If you want to see the same servers each time you run this security report, you can customize it
by using Special Jobs Menu Option 1 - Select Default Servers for Security Report. This option
lets you select the specific servers you are interested in, then makes them the default each time
you run the report.
Run this report from Menu SN4, the Network Transaction Analysis Reports Menu Option 1 -
Print Security Report by User or use the PRTSECRPT command.
Use F9 to display all parameters
On the Print Security Report screen fill in the following:
1. Decide if you wish to print all transactions or only those that were rejected.
Enter Y for only rejections (the default) or N to print all transactions
Printing only rejections will reduce the size of the output report
SafeNet/400 Reference Guide
Copyright 2008 MP Associates of Westchester, Inc.
7.6
V8.50 - May 2008
Page 77

2. Select the servers to include in the report
*ALL - all servers
*DEFAULT - based on servers that were selected on Menu SN2, Option 1 - Select
Default Servers for Security Report
*SELECT - displays a list of servers to choose from
3. Select your preferred Sort Type
*USRDAT - by user, then by date within user
*USRSRV - by user, then by server within user
*SRVUSR - by server, then by user within server
4. Select the correct Security Level Check value
H = Historical Review only
Show status at actual time of client request
C = Check all transactions against current server settings
F = Check all transactions against the Future server settings
5. Decide if you want to test the time of day controls
Enter Y or N for the Test Time of Day parameter
6. Select these optional parameters
Enter a start date and time or accept the default value
Enter an ending date and time or accept the default value
Enter a specific user ID or *ALL
SafeNet/400 Reference Guide
Copyright 2008 MP Associates of Westchester, Inc.
V8.50 - May 2008
7.7
Page 78

Page Down if you would like to print the report to an output file.
When you have finished making your selections, ENTER to submit the report to batch.
SafeNet/400 Reference Guide
Copyright 2008 MP Associates of Westchester, Inc.
7.8
V8.50 - May 2008
Page 79

Recommended approach to testing
A recommended approach to using the On-Line Transaction Testing program is:
1. Set all of the important server functions to Security Level 1, Log All. This will log all
requests without affecting any users. Set your Future Server settings or use the preloaded recommended values.
Turn off logging on the non-critical servers to limit logging.
2. Collect your requests and print out the Security Report by User from the Network
Transaction Analysis Reports Menu. Select Historical Review.
3. Set up your User to Server and User to Object, SQL, FTP, CL, etc. tables if you wish to
go to Security Level 4.
4. You can use several tools provided with SafeNet/400 to test your security settings. Use
the Security Report by User or the on-line version, PCTESTR. These can be run to test
the collected transactions against the current or future server settings. (Use Future
Setting)
5. Use ‘Show only Rejections’ on PCTESTR and ‘Print only Rejections’ on the batch
report. If your settings are correct for the Security Levels being tested, you should receive
messages only for transactions that would be rejected.
If any of the requests are rejected, check the message description and make the
appropriate corrections to the SafeNet/400 settings. Try the transaction again.
Note: If you request Level 4, you may only get a security check to Level 3 since some servers
support only up to Level 3. This is noted on each record in the On-Line Transaction
Testing as “Level Requested”, “Level Checked” and “Max Level”.
SafeNet/400 Reference Guide
Copyright 2008 MP Associates of Westchester, Inc.
V8.50 - May 2008
7.9
Page 80

PCREVIEW
Use the PCREVIEW command or Option 9 - On-Line Transaction Review from the
SafeNet/400 Special Jobs Menu to review each transaction logged by SafeNet/400.
This displays the historical transactions only. No testing can be performed using this tool.
1. Type PCREVIEW and press ENTER.
The Network On-Line Transaction Review screen is displayed and the HELP key is
active.
2. Using the fields at the top of the screen, you can select only the records you wish displayed.
You can select by user, server, status, from and to date.
For example, to review only rejections for today:
Type R in the Status field
By default, today’s date is entered for you
3. To obtain additional information about a particular record, type a 1 next to the record and
press ENTER.
SafeNet/400 Reference Guide
Copyright 2008 MP Associates of Westchester, Inc.
7.10
V8.50 - May 2008
Page 81

The On-Line Transaction Review Mode screen is displayed, supplying more detailed
information about the specific transaction.
You can use the ROLL UP/ROLL DOWN keys to scroll through the sequential transactions or
press ENTER to return to the PCREVIEW sub-file screen.
If you selected only a specific user or server to be displayed in PCREVIEW, you will find that
only those records meeting the selection criteria will be displayed as you scroll through the file
with the on-line transaction test program.
SafeNet/400 Reference Guide
Copyright 2008 MP Associates of Westchester, Inc.
V8.50 - May 2008
7.11
Page 82

SafeNet/400 Reference Guide
Copyright 2008 MP Associates of Westchester, Inc.
7.12
V8.50 - May 2008
Page 83

Chapter 8 - BACKUPS AND PURGES
Log file Purge
When SafeNet/400 is logging client requests, the information is kept in the TRAPOD file in
library PCSECDTA. At times this file may grow to a considerable size. This function deletes
the records in the TRAPOD file.
There are two ways to purge the TRAPOD file:
1. Standard purge using retention days or purge-through date
2. Archive TRAPOD records and generate a report
This allows you to specify the number of days to retain records or a purge-through date, and
provides the capability to archive the records to an alternate file and member. You can also
print a report listing either all of the purged records or only those records that were
rejections.
SafeNet/400 Reference Guide
Copyright 2008 MP Associates of Westchester, Inc.
V8.50 - May 2008
8.1
Page 84

To perform a standard purge
1. Backup the TRAPOD file to tape, if desired. You will need to issue the ENDTRP
command BEFORE beginning the backup.
2. Select Option 8 from the Special Jobs Menu or use the STRPRG command.
3. Enter the number of days to retain information in the TRAPOD file or enter the date to
purge through. The default is to retain the information for thirty days.
4. You can direct the processing of the purge to a specific job queue.
If you leave the default value of *JOBD, then the default job queue for your job will be
used.
If you choose to use a different job queue, you can enter the name here. You must have
the job queue’s library name in your job’s library list when you use this option.
5. If you ended logging prior to performing a backup, issue the STRTRP command to
restart logging.
You can use the following command instead of the menu option:
STRPRG DAYS(060)
This will purge the TRAPOD file and retain 60 days of data. The number of days must be
entered as three characters, i.e., 020 for 20 days.
SafeNet/400 Reference Guide
Copyright 2008 MP Associates of Westchester, Inc.
8.2
V8.50 - May 2008
Page 85

To purge the log and archive the records
1. Select Option 8 from the Special Jobs Menu or use the STRPRGARC command.
2. Enter the number of days to retain information in the TRAPOD file or enter the date to
purge through. The default is to retain the information for thirty days.
3. Make sure Archive purged records is set to *YES
4. Set Print purged records and Only print rejections to whichever option you wish
5. Use F10 to display Additional Parameters
6. Select *YES or *NO for Remove deleted records
*YES requires that transaction logging be turned off
You can use the following command instead of the menu option:
STRPRGARC DAYS(060) ARC(*YES) PRT(*YES) PRTR(*NO) RMVDEL(*NO)
This will purge the TRAPOD file and retain 60 days of data; archive the records; print a report
listing all records, not just rejections.
All archived records are transferred to a file named TRAPARCW in PCSECDTA. Each time the
archive command is run, a new file member is added to this file. It is recommended that for
auditing purposes you save the archive file to tape, then remove the members.
SafeNet/400 Reference Guide
Copyright 2008 MP Associates of Westchester, Inc.
V8.50 - May 2008
8.3
Page 86

Automating the log file purge
To automatically purge the log file, archive the purged records and generate the transaction
report, use the following command or add it to the system job scheduler:
SBMJOB CMD(PCSECLIB/STRPRGARC DAYS(XXX) JOB(SECPRG)
XXX is the number of days to retain records (060 = 60 days retention)
Automating the One Step Security Report
To automatically run the security report without purging or archiving any records, use the
following command:
PRTSECRPT
There are no parameters for this command
To submit this command to batch type:
SBMJOB CMD(PCSECLIB/PRTSECRPT)
For additional selection criteria for this report, use menu SN4, the Network Transaction Analysis
Reports menu, Option 1 - Print Security Report by User.
SafeNet/400 Reference Guide
Copyright 2008 MP Associates of Westchester, Inc.
8.4
V8.50 - May 2008
Page 87

Automating and Running the Security Report and the Log File Purge Together
Use this method to automate both the SafeNet/400 Security Report and the Log File Purge.
For this example, the purge is being done on Mondays and Thursdays. You may use any
schedule you wish; however, make sure your purge is retaining enough days for reporting
purposes.
Each of these commands provides parameters to print either only rejections or all transactions.
Review these parameters and change as required.
Monday
1. Run purge and retain 5 days, print report of all rejected, purged records
STRPRGARC DAYS(005)
2. Run security report - it will print rejections for the last 5 days (Thursday through
Monday)
PRTSECRPT
Thursday
1. Run purge and retain 4 days, print purged rejected records
STRPRGARC DAYS(004)
2. Run security report - it will print rejections for the last 4 days (Monday through
Thursday)
PRTSECRPT
SafeNet/400 Reference Guide
Copyright 2008 MP Associates of Westchester, Inc.
V8.50 - May 2008
8.5
Page 88

This example runs the Log File Purge and retains only 1 day of data in the file.
Saturday
1. Run security report and see entire contents of log
PRTSECRPT
2. Run purge and retain 1 day
STRPRGARC DAYS(001)
Note: It is a good idea to run these commands back-to-back and at off-peak hours to minimize
performance impact.
SafeNet/400 Reference Guide
Copyright 2008 MP Associates of Westchester, Inc.
8.6
V8.50 - May 2008
Page 89

Daily Backup Procedure
Modify your daily backup procedure to follow these guidelines:
1. Enter command CHGSPCSET LOGALL(*NO)
This prevents SafeNet/400 from attempting to log requests
2. Issue the ENDTRP command within SafeNet/400
This will end the transaction logging program and subsystem
3. Perform your normal backup steps
4. CHGSPCSET LOGALL(*YES) to begin logging
5. Issue the STRTRP command to re-start the transaction logging subsystem and program
Remember to include the SafeNet/400 data library, PCSECDTA in your daily backup procedure.
SafeNet/400 Reference Guide
Copyright 2008 MP Associates of Westchester, Inc.
V8.50 - May 2008
8.7
Page 90

SafeNet/400 Reference Guide
Copyright 2008 MP Associates of Westchester, Inc.
8.8
V8.50 - May 2008
Page 91

Chapter 9 - DE-ACTIVATING AND REMOVING SAFENET/400
You must be signed on as a Super Admin in SafeNet/400 to perform any Activate/De-Activate
processes. See ‘SafeNet Administrator’ in Chapter One of this guide.
De-activating SafeNet/400
Under some circumstances you may want to de-activate SafeNet/400. It may be necessary when
troubleshooting network problems to make sure they are not being caused by an application such
as SafeNet/400, or when you need to remove SafeNet/400 from your system.
If after you have de-activated SafeNet/400 you still have problems with network requests or
connections, you may want to IPL your System i5 or ENDSBS *ALL to uncover any autostart
jobs or other IPL-initiated OS/400 activities that may still be allocating SafeNet/400 objects and
programs. This is not required if you do not need to de-allocate all the SafeNet/400 programs.
Once you have been successful in isolating your network problem, you can re-activate
SafeNet/400.
Before de-activating
Optionally, rather than de-activating SafeNet/400 you can remove one or more exit points if
required.
For example, if you have a problem with the *FILESRV server function use the WRKREGINF
command to:
1. Locate the OS/400 exit point for the *FILESRV server function
2. Remove the SafeNet/400 exit program
3. Stop and restart the file server
This will prevent the OS/400 file server job from using SafeNet/400 but continue to protect the
other server jobs in OS/400 with SafeNet/400. This way you can eliminate a performance
problem or OS/400 problem from one server but continue to protect your other access points
with SafeNet/400.
SafeNet/400 Reference Guide
Copyright 2008 MP Associates of Westchester, Inc.
V8.50 - May 2008
9.1
Page 92

To activate or de-activate SafeNet/400:
Remember, you must be a SafeNet/400 Super Admin to perform this step.
1. From the Special Jobs Menu select Option 6 - Activate/De-Activate SafeNet/400
The Server Activation Control screen is displayed, indicating the current setting.
2. Press F5 to change the setting and return to the Special Jobs Menu
.
3. After performing these steps, end all subsystems then restart them to maintain security
integrity.
4. Try your network request again. If SafeNet/400 is active, and your request is not
successful, review your request log and correct the problem based on the error code on
the report.
SafeNet/400 Reference Guide
Copyright 2008 MP Associates of Westchester, Inc.
9.2
V8.50 - May 2008
Page 93

Removing SafeNet/400 from your system
If it becomes necessary to completely remove SafeNet/400 from your System i5, follow these
steps.
1. Sign on to the System i5 as QSECOFR or SAFENET.
2. De-activate SafeNet/400.
Follow the instructions on the previous pages to de-activate the program.
3. IPL the System i5.
4. Delete library PCSECLIB and PCSECDTA
5. Delete the SAFENET authorization list from your system
SafeNet/400 is now completely removed from your system.
SafeNet/400 Reference Guide
Copyright 2008 MP Associates of Westchester, Inc.
V8.50 - May 2008
9.3
Page 94

SafeNet/400 Reference Guide
Copyright 2008 MP Associates of Westchester, Inc.
9.4
V8.50 - May 2008
Page 95

Chapter 10 - PROBLEM DETERMINATION
If SafeNet/400 is not working properly, there are a few general things to check.
Error Message Received on the System i5
1. Did you perform an IPL after the initial SafeNet/400 installation?
It is necessary to IPL your System i5 after completing the installation steps. If you do not
IPL your system, you will experience unpredictable results.
Recovery: IPL your system then try SafeNet/400 again.
2. Is the PTF level on your System i5 current?
Compare your PTF level with SafeNet/400 required levels.
Recovery: Install the latest cumulative PTF package if necessary.
3. Is your client application current on service packs or fixes?
Check to make sure you have the most recent level of fixes for your client.
Recovery: Apply latest service pack or fix package
4. Is this the first time you are using this client application?
If this is the first time you are using this particular application, it may be that your server
functions are not set up properly.
Recovery: Check SafeNet/400 request logs for errors and correct. Use on-line testing
program to verify your settings are correct.
SafeNet/400 Reference Guide
Copyright 2008 MP Associates of Westchester, Inc.
V8.50 - May 2008
10.1
Page 96

5. Have you made changes to server function Security Levels or user authority tables?
If a particular request was working, and now it is not, make sure you have not
inadvertently disabled a server function or revoked authorities from a user.
Recovery: Double check changes against the request log, use the on-line transaction
program to test your authority settings.
SafeNet/400 Reference Guide
Copyright 2008 MP Associates of Westchester, Inc.
10.2
V8.50 - May 2008
Page 97

Error Message Received on the Client
If you receive an error message indicating a problem with a client or a communications request,
or an exit program rejection and SafeNet/400 is active:
Check the request log for a ‘REJECTED’ response
1. Use the date and time along with the user ID to find the request that was rejected. Use
PCREVIEW or check the Security Report.
2. When you find the request that was rejected, the log will indicate the reason for the
rejection. You will find a list of error codes and their descriptions at the end of this
chapter.
3. If you need to make changes to authorities you can test your changes with the on-line
transaction program before you implement them. See Chapter 7 in this guide, ‘Testing
your Security Settings.’
If the request does not appear in the log or the Review screen
These steps should help you determine if the problem is network related, client related or
SafeNet/400 related.
1. Try the same request with a user ID that has rights to all servers and has all object and all
folder authority. User profile QSECOFR is set up with all rights in SafeNet/400 by
default.
2. Check the log file for the request and response.
3. Make changes to authorities if necessary.
4. Try the request again with the original client or with the on-line transaction program.
5. Try a different client or user ID.
SafeNet/400 Reference Guide
Copyright 2008 MP Associates of Westchester, Inc.
V8.50 - May 2008
10.3
Page 98

If you are unsure that SafeNet/400 is the source of the problem
1. Reset the Security Level in SafeNet/400 by following these directions:
From the SafeNet/400 Main Menu
select Option 1 – Work with Server Security
Settings or use WRKSRV command
If you know which server function the request is using, change the server’s Security
Level to 1. If you cannot determine which server function the request is attempting to
access, set all the servers to Security Level 1.
Try the client request again
If the request is successful, change the server (or servers) back to the original Security
Level, Logging Level All. This will log all the client requests.
2. Try the client request again.
If the request is successful, run the request log report and review the client request.
If the request is rejected, check PCREVIEW to view the actual transaction.
Make the required authority table changes. Test your changes with the on-line
transaction program.
Try the client request again and review the logs again.
SafeNet/400 Reference Guide
Copyright 2008 MP Associates of Westchester, Inc.
10.4
V8.50 - May 2008
Page 99

If you receive a message on the System i5 about a SafeNet/400 or PCSECLIB program, or you
still cannot resolve a client error or client application error, check to see if the system was IPL'd
since you:
Initially installed SafeNet/400
Applied PTFs to SafeNet/400
If not, you must IPL your system for the changes to take effect.
SafeNet/400 Reference Guide
Copyright 2008 MP Associates of Westchester, Inc.
V8.50 - May 2008
10.5
Page 100

If you still cannot resolve the problem
1. Check all the joblogs for the jobs in the subsystems:
QSYSWRK
QSERVER
2. You may have to change the QDFTJOBD job description to capture the joblogs of certain
jobs initiated by client requests.
CHGJOBD QDFTJOBD LOGLVL(4 00 *SECLVL) LOGCLPGM(*YES)
Note: Remember to change this back to its default when you have resolved the problem or
you may generate an excessive number of joblogs.
CHGJOBD QDFTJOBD LOGLVL(4 00 *NOLIST) LOGCLPGM(*NO)
3. End then start both subsystems:
QSYSWRK
QSERVER
4. Try the client request again
5. Check for joblogs and errors
6. You may have to end and re-start QSYSWRK and QSERVER to force joblog creation.
Also try ENDTCPSVR *ALL, ENDHOSTSVR *ALL; then STRTCP and
STRHOSTSVR *ALL.
To determine if the problem is with the server or a client, try this process with another client
application that may access the same server.
SafeNet/400 Reference Guide
Copyright 2008 MP Associates of Westchester, Inc.
10.6
V8.50 - May 2008
 Loading...