

Page 1

IBM Network Color Printer:
Operator’s Guide
S544-5361-01
Quick Start
Task Where to Look
Requesting service
Ordering features and supplies
Choosing paper
Storing paper
Handling transparencies
Loading paper
Loading transparencies
Replacing a toner cartridge
Diagnosing problems
Clearing paper jams
page xiii
page 1–4
page 2–2
page 2–5
page 2–6
page 3–2
page 3–9
page 5–4
page 6–2
page 6–3
Page 2

NOTE
Before using this information and the product it supports, be sure to read the general information under
“Notices” on page vii.
Second Edition (Jun e 1996)
This edition applies to th e
IBM Network Color Printer:Operator’s Guide
.
This publ ic at ion may con ta in references to, or inform ation abo ut , IB M products (m achines or
programs ) or service s tha t are not annou nc ed in your country. Such referen ce s o r informatio n m ust
not be construed to mean that IBM intend s to announce such IBM product, p rogramming, or se rvices
in your country.
Information contained in this publication is subject to change from time to time. Changes will be
reflected in future rev is ions.
You may se nd your com m ents by facsim ile to 1-800 -524-1519, by e-mail to
print_pubs@vnet.ibm.com
Department 582 Building 004M
IBM Printing Systems Company
Information Development
PO Box 1900
Boulder, CO, USA 80301-9817
, or by mail t o:
IBM may us e or distribute any of the inf ormation yo u s upply in any w ay it believes su it able without
incurring any obliga t ion whateve r. You may of course, continue to use t he informat ion you supply .
Copyright International Business Machines Corporation 1996. All rights reserved.
Note to U.S. Government Users— Documentation related to restricted rights—Use, duplication, or disclosure is subject to
restrictio ns set forth in GSA ADP Schedule Contract with IBM Corp.
Page 3

Table of Contents
Table of Contents. . . . . . . . . . . . . . . . . . . . . . . . . . . . . . . . . . . . . . . . . . . . . . . . . . . . . . . . . . . .iii
Notices . . . . . . . . . . . . . . . . . . . . . . . . . . . . . . . . . . . . . . . . . . . . . . . . . . . . . . . . . . . . . . . . . . . vii
Trademarks . . . . . . . . . . . . . . . . . . . . . . . . . . . . . . . . . . . . . . . . . . . . . . . vii
Communications Statements . . . . . . . . . . . . . . . . . . . . . . . . . . . . . . . . . viii
Preface . . . . . . . . . . . . . . . . . . . . . . . . . . . . . . . . . . . . . . . . . . . . . . . . . . . . . . . . . . . . . . . . . . . .xi
Audience. . . . . . . . . . . . . . . . . . . . . . . . . . . . . . . . . . . . . . . . . . . . . . . . . . xi
Organization and Contents of this Publication . . . . . . . . . . . . . . . . . . . . . xi
Terminology . . . . . . . . . . . . . . . . . . . . . . . . . . . . . . . . . . . . . . . . . . . . . . .xii
Safety Notices . . . . . . . . . . . . . . . . . . . . . . . . . . . . . . . . . . . . . . . . . . . . . xii
Safety Precautions. . . . . . . . . . . . . . . . . . . . . . . . . . . . . . . . . . . . . . . . . .xii
Related Publications. . . . . . . . . . . . . . . . . . . . . . . . . . . . . . . . . . . . . . . . xiii
Requesting Service . . . . . . . . . . . . . . . . . . . . . . . . . . . . . . . . . . . . . . . . xiii
Chapter 1. Welcome to the IBM Network Color Printer. . . . . . . . . . . . . . . . . . . . . . . . . 1–1
Introducing the Printer . . . . . . . . . . . . . . . . . . . . . . . . . . . . . . . . . . . . . 1–2
General De s c ript ion . . . . . . . . . . . . . . . . . . . . . . . . . . . . . . . . . . . . . 1 –2
Highlights . . . . . . . . . . . . . . . . . . . . . . . . . . . . . . . . . . . . . . . . . . . . . 1–2
Optional Features. . . . . . . . . . . . . . . . . . . . . . . . . . . . . . . . . . . . . . . 1 –3
Ordering Supplies. . . . . . . . . . . . . . . . . . . . . . . . . . . . . . . . . . . . . . . . . 1–4
Identifying Printer Parts and Controls. . . . . . . . . . . . . . . . . . . . . . . . . . 1–6
Front and Right Sides. . . . . . . . . . . . . . . . . . . . . . . . . . . . . . . . . . . . 1–6
Back and Left Sides . . . . . . . . . . . . . . . . . . . . . . . . . . . . . . . . . . . . . 1–9
Inside the Front Door . . . . . . . . . . . . . . . . . . . . . . . . . . . . . . . . . . . 1–10
Identifying Parts on the Density Control Panel. . . . . . . . . . . . . . . . . . 1–12
Turning th e Printer On and Off . . . . . . . . . . . . . . . . . . . . . . . . . . . . . . 1–13
Turning th e Printer On . . . . . . . . . . . . . . . . . . . . . . . . . . . . . . . . . . 1–13
Turning th e Printer Off . . . . . . . . . . . . . . . . . . . . . . . . . . . . . . . . . . 1–13
Resetting the Printer. . . . . . . . . . . . . . . . . . . . . . . . . . . . . . . . . . . . 1–14
Copyright IBM Corp. 1996 iii
Page 4

Chapter 2. Choosing and Storing Paper and Transparencies . . . . . . . . . . . . . . . . . . . 2–1
Choosing Paper . . . . . . . . . . . . . . . . . . . . . . . . . . . . . . . . . . . . . . . . . . 2–2
Paper You Should Use. . . . . . . . . . . . . . . . . . . . . . . . . . . . . . . . . . . 2–2
Paper You Should Not Use . . . . . . . . . . . . . . . . . . . . . . . . . . . . . . . 2–2
Understanding the Printable Ar ea on a Page. . . . . . . . . . . . . . . . . . . . 2–4
Handling and Storin g Paper and T ransparen c ies . . . . . . . . . . . . . . . . 2–5
Handling and Storin g Paper . . . . . . . . . . . . . . . . . . . . . . . . . . . . . . . 2–5
Handling and Storin g Printouts. . . . . . . . . . . . . . . . . . . . . . . . . . . . . 2–5
Handling T ranspare nc ies . . . . . . . . . . . . . . . . . . . . . . . . . . . . . . . . . 2–6
Chapter 3. Loading Paper and Transparencies . . . . . . . . . . . . . . . . . . . . . . . . . . . . . . . 3–1
Loading Paper . . . . . . . . . . . . . . . . . . . . . . . . . . . . . . . . . . . . . . . . . . . 3–2
Loading Paper in Tray 1 and Tray 2. . . . . . . . . . . . . . . . . . . . . . . . . 3–2
Loading Paper in the Au x iliary Tray . . . . . . . . . . . . . . . . . . . . . . . . . 3–6
Choosing the Paper Output Tray . . . . . . . . . . . . . . . . . . . . . . . . . . . . 3–13
Using the Side Output Tray . . . . . . . . . . . . . . . . . . . . . . . . . . . . . . 3–13
Using the Top Output Tray. . . . . . . . . . . . . . . . . . . . . . . . . . . . . . . 3–15
Chapter 4. Using the Operator Panel . . . . . . . . . . . . . . . . . . . . . . . . . . . . . . . . . . . . . . . 4–1
Identifying Each Part of the Operator Panel. . . . . . . . . . . . . . . . . . . . . 4–2
Lights. . . . . . . . . . . . . . . . . . . . . . . . . . . . . . . . . . . . . . . . . . . . . . . . 4 –2
Online Push Button and Light. . . . . . . . . . . . . . . . . . . . . . . . . . . . . . 4 –2
Cancel Push Button . . . . . . . . . . . . . . . . . . . . . . . . . . . . . . . . . . . . . 4–3
Display Panel . . . . . . . . . . . . . . . . . . . . . . . . . . . . . . . . . . . . . . . . . . 4 –3
Control Push Buttons . . . . . . . . . . . . . . . . . . . . . . . . . . . . . . . . . . . . 4–3
Paper Source Lights . . . . . . . . . . . . . . . . . . . . . . . . . . . . . . . . . . . . . 4 –4
Cancelin g a Print Job . . . . . . . . . . . . . . . . . . . . . . . . . . . . . . . . . . . . . . 4–5
Understanding the Menus . . . . . . . . . . . . . . . . . . . . . . . . . . . . . . . . . . 4 –6
Navigating the Menus. . . . . . . . . . . . . . . . . . . . . . . . . . . . . . . . . . . . 4–7
Choosing a Menu Setting. . . . . . . . . . . . . . . . . . . . . . . . . . . . . . . . . 4–7
Using the Online Menu (Print Pages Menu) . . . . . . . . . . . . . . . . . . . . . 4–8
Printing the Help Map. . . . . . . . . . . . . . . . . . . . . . . . . . . . . . . . . . . . 4–9
Printing a Job Log. . . . . . . . . . . . . . . . . . . . . . . . . . . . . . . . . . . . . . . 4–9
Printing a Configuration Page. . . . . . . . . . . . . . . . . . . . . . . . . . . . . . 4–9
Printing a Test Page. . . . . . . . . . . . . . . . . . . . . . . . . . . . . . . . . . . . 4–10
Printing th e C olor Pages . . . . . . . . . . . . . . . . . . . . . . . . . . . . . . . . . 4–10
Printing the Font Page . . . . . . . . . . . . . . . . . . . . . . . . . . . . . . . . . . 4–10
Using the Offline Menus. . . . . . . . . . . . . . . . . . . . . . . . . . . . . . . . . . . 4–11
Entering a Password . . . . . . . . . . . . . . . . . . . . . . . . . . . . . . . . . . . . . 4–13
Deleting a Password. . . . . . . . . . . . . . . . . . . . . . . . . . . . . . . . . . . . 4–13
Changing a Password . . . . . . . . . . . . . . . . . . . . . . . . . . . . . . . . . . 4–13
Using the Printer Setup Menu . . . . . . . . . . . . . . . . . . . . . . . . . . . . . . 4–14
Choosing the Paper Source . . . . . . . . . . . . . . . . . . . . . . . . . . . . . . 4–14
Choosing the Paper Size . . . . . . . . . . . . . . . . . . . . . . . . . . . . . . . . 4–15
Choosing the Color Mode. . . . . . . . . . . . . . . . . . . . . . . . . . . . . . . . 4–16
Choosing to Print a Cover Page. . . . . . . . . . . . . . . . . . . . . . . . . . . 4–16
Choosing to Print When There Is a PostScript Error . . . . . . . . . . . 4–17
Choosing to Print a Start Page. . . . . . . . . . . . . . . . . . . . . . . . . . . . 4–18
Using the System Setup Menu. . . . . . . . . . . . . . . . . . . . . . . . . . . . . . 4–19
Setting the Printer Name . . . . . . . . . . . . . . . . . . . . . . . . . . . . . . . . 4–20
Setting the Time and Date . . . . . . . . . . . . . . . . . . . . . . . . . . . . . . . 4–20
Changing the Password. . . . . . . . . . . . . . . . . . . . . . . . . . . . . . . . . 4–21
iv IBM Network Color Printer Operator’s Guide
Page 5

Setting the Power Savings Mode . . . . . . . . . . . . . . . . . . . . . . . . . . 4–23
Using the Language Menu. . . . . . . . . . . . . . . . . . . . . . . . . . . . . . . . . 4–24
Changing the Language. . . . . . . . . . . . . . . . . . . . . . . . . . . . . . . . . 4–24
Language Menu Settings . . . . . . . . . . . . . . . . . . . . . . . . . . . . . . . . 4–24
Chapter 5. Replacing Supplies . . . . . . . . . . . . . . . . . . . . . . . . . . . . . . . . . . . . . . . . . . . . 5–1
Storing and Handlin g T oner Cartridges . . . . . . . . . . . . . . . . . . . . . . . . 5–2
Ordering Supplies. . . . . . . . . . . . . . . . . . . . . . . . . . . . . . . . . . . . . . . . . 5–3
Replacing Toner Cartridges . . . . . . . . . . . . . . . . . . . . . . . . . . . . . . . . . 5–4
Removing the Old Cartridge. . . . . . . . . . . . . . . . . . . . . . . . . . . . . . . 5–5
Installing a New Cartridge . . . . . . . . . . . . . . . . . . . . . . . . . . . . . . . . 5–8
Recyclin g t he U s ed Toner Cartridge . . . . . . . . . . . . . . . . . . . . . . . 5–13
Replacing the Used Toner Bottle . . . . . . . . . . . . . . . . . . . . . . . . . . . . 5–14
Replacing the Fuser Oil Bottle . . . . . . . . . . . . . . . . . . . . . . . . . . . . . . 5–16
Removing the Old Fus er Oil Bottle. . . . . . . . . . . . . . . . . . . . . . . . . 5– 16
Installing t he New Fuser Oil Bottle . . . . . . . . . . . . . . . . . . . . . . . . . 5–17
Replacing the Fuser. . . . . . . . . . . . . . . . . . . . . . . . . . . . . . . . . . . . . . 5–19
Preparing the Fuser and Work Area. . . . . . . . . . . . . . . . . . . . . . . . 5–19
Unpacking the New Fuser . . . . . . . . . . . . . . . . . . . . . . . . . . . . . . . 5–20
Removing the Fuser Oil from the Printer . . . . . . . . . . . . . . . . . . . . 5–21
Removing the Fuser Access Door . . . . . . . . . . . . . . . . . . . . . . . . . 5–24
Removing the Used Fuser . . . . . . . . . . . . . . . . . . . . . . . . . . . . . . . 5–26
Installing t he New Fuser. . . . . . . . . . . . . . . . . . . . . . . . . . . . . . . . . 5–27
Replacing the Fuser Access Door . . . . . . . . . . . . . . . . . . . . . . . . . 5–29
Filling the Ne w F us er Unit with F us er Oil . . . . . . . . . . . . . . . . . . . . 5– 30
Printing Test Pages . . . . . . . . . . . . . . . . . . . . . . . . . . . . . . . . . . . . 5–31
Replacing the Photoconductor Drum Cartridge . . . . . . . . . . . . . . . . . 5–33
Locating th e Orange Photoconductor Drum Shield . . . . . . . . . . . . 5–33
Removing the Old Photoconductor Drum Cartridge. . . . . . . . . . . . 5–33
Installing a New Phot oc onductor D rum Cartrid ge . . . . . . . . . . . . . 5–35
Recycling the Photoconductor Drum Cartridge . . . . . . . . . . . . . . . 5–38
Cleaning the Separation Corona Wire . . . . . . . . . . . . . . . . . . . . . . 5–39
Chapter 6. Diagnosing Printer Problems . . . . . . . . . . . . . . . . . . . . . . . . . . . . . . . . . . . . 6–1
Common Printer Problems. . . . . . . . . . . . . . . . . . . . . . . . . . . . . . . . . . 6–2
Clearing Paper Jams . . . . . . . . . . . . . . . . . . . . . . . . . . . . . . . . . . . . . . 6–3
Clearing a Paper Jam in Area 1 (Tr ans f er Drum Area) . . . . . . . . . . 6–4
Clearing a Paper Jam in Area 2 (Fuser Area) . . . . . . . . . . . . . . . . . 6–6
Clearing a Paper Jam in Area 3 (Paper Feede r Area) . . . . . . . . . . . 6 –9
Clearing a Paper Jam in the Tray 2 Paper Feede r. . . . . . . . . . . . . 6–12
Correcting Print Quality Problems . . . . . . . . . . . . . . . . . . . . . . . . . . . 6–13
Adjusting the Side Registration on Tray 2 Printouts. . . . . . . . . . . . . . 6–20
Adjustin g th e C olor Densit y . . . . . . . . . . . . . . . . . . . . . . . . . . . . . . . . 6–22
Printing Test Prints from the Density Control Panel. . . . . . . . . . . . . . 6–24
Setting the Separation Corona Mode. . . . . . . . . . . . . . . . . . . . . . . . . 6–26
Chapter 7. Understanding Operator Messages . . . . . . . . . . . . . . . . . . . . . . . . . . . . . . . 7–1
Understanding POST Error Messages. . . . . . . . . . . . . . . . . . . . . . . . . 7–2
Function of POST Error Messages. . . . . . . . . . . . . . . . . . . . . . . . . . 7 –2
Table of POST Error Messages . . . . . . . . . . . . . . . . . . . . . . . . . . . . 7–2
Understanding Operator Messages . . . . . . . . . . . . . . . . . . . . . . . . . . . 7–5
Understanding Warning Messages . . . . . . . . . . . . . . . . . . . . . . . . . 7–5
v
Page 6

Understanding Status Messages . . . . . . . . . . . . . . . . . . . . . . . . . . . 7–7
Understanding Operator Error Messages. . . . . . . . . . . . . . . . . . . . . 7–8
Chapter 8. Maintaining the Printer . . . . . . . . . . . . . . . . . . . . . . . . . . . . . . . . . . . . . . . . . 8–1
Cleaning the Outside of the Printer . . . . . . . . . . . . . . . . . . . . . . . . . . . 8–2
Cleaning the Paper Path . . . . . . . . . . . . . . . . . . . . . . . . . . . . . . . . . . . 8 –3
Cleaning the Paper Feeder Area . . . . . . . . . . . . . . . . . . . . . . . . . . . 8–3
Cleaning the Transfer Drum. . . . . . . . . . . . . . . . . . . . . . . . . . . . . . . 8 –3
Cleaning the Separation Corona Wire . . . . . . . . . . . . . . . . . . . . . . . 8 –3
Cleaning the Window of the Density Detection Sensor . . . . . . . . . . 8–4
Cleaning t he Fuser Ro llers. . . . . . . . . . . . . . . . . . . . . . . . . . . . . . . . 8 –5
Replacing the Air and Ozone Filters. . . . . . . . . . . . . . . . . . . . . . . . . . . 8 –6
Replacing the Separation Corona Unit. . . . . . . . . . . . . . . . . . . . . . . . 8–10
Replacing the Transfer Drum Cleaning Assembly . . . . . . . . . . . . . . . 8–12
Appendix A. Help Map . . . . . . . . . . . . . . . . . . . . . . . . . . . . . . . . . . . . . . . . . . . . Appendix A–1
Appendix B. Supplies Replacement Log. . . . . . . . . . . . . . . . . . . . . . . . . . . . . Appendix B–1
Appendix C. Wiring Diagrams. . . . . . . . . . . . . . . . . . . . . . . . . . . . . . . . . . . . . . Appendix C–1
Acronyms and Abbreviations. . . . . . . . . . . . . . . . . . . . . . . . . . . . . . . . . . . . . . . . . . . . . . . . X–1
Glossary . . . . . . . . . . . . . . . . . . . . . . . . . . . . . . . . . . . . . . . . . . . . . . . . . . . . . . . . . . . . . . . . . X–3
Index . . . . . . . . . . . . . . . . . . . . . . . . . . . . . . . . . . . . . . . . . . . . . . . . . . . . . . . . . . . . . . . . . . . X–15
vi IBM Network Color Printer Operator’s Guide
Page 7

Notices
References in this publication to IBM products, programs, or services do
not imply that IBM intends to make these available in all countries in which
IBM operates. Any reference to an IBM licensed product, program, or
service is n ot int ended to sta t e or imply that only IBM’s product, program,
or service m ay be used. Any f unctionally equivalen t p roduct, prog ram, or
service th at does not infri nge any of IBM’s intellec tual property rights m ay
be used ins t ead of the IBM product. E v aluation an d v erif ic ation of
operation in conjunction with other products, except those expressly
designated by IBM, is the user’s responsibility.
Any perfo rm ance data c ontained in th is publication w as obtained in a
controlle d environment based on the use of sp ec if ic data. The re sults that
may be obtained in oth er operatin g environments may va ry s ignificantly .
Users of this publication should verify the app lic able data in their specif ic
environm ent. There fo re, such data does not co ns t it ut e a perform ance
guarantee or warran t y .
IBM may h av e patents or pending pat ent applications coverin g s ubject
matter in th is publication. T he furnishing of this pub lic at ion does no t g iv e
you any license to these patents . Y ou can send lic ense inqu iries, in
writing, to th e IB M C orporatio n, IB M D irec t or of Licen s ing, 208 Harbor
Drive, Sta m f ord, Connec t ic ut , Un it ed States, 06904.
Trademarks
The following terms are t rademarks of th e I BM Corporation in th e U nit ed
States or ot her countries or both:
AIX AIX/6000 IBM OS/2 Personal System/2 PS/2 RISC System/6000 WIN-OS/2
The following terms are t rademarks or registe red trademarks of other
compan ies :
Acrobat Adobe Systems Inc.
Adobe Adobe Systems Inc.
Adobe logo Adobe Systems Inc.
Adobe Separator Adobe Systems Inc.
Agfa Agfa Division, Miles Inc.
Copyright IBM Corp. 1996 Notices vii
Page 8

Apple Apple Computer Inc.
Apple logo Apple Computer Inc.
AppleTalk Apple Computer Inc.
ATM (Adobe Type Manager) Adobe Systems Inc.
AXIS AXIS Communication, Inc.
EPS (Encapsulated PostScript) Altsys Corporation
Ethernet Xerox Corporation
EtherTalk Applice Computer, Inc.
Fiery Electronics for Imaging Inc.
Fiery driven Electronics for Imaging Inc.
Fiery XJ Electronics for Imaging Inc.
Fiery logo Electronics for Imaging Inc.
IPX (Internetwork Packet Exchange) Novell Inc.
ITC Advant Garde Gothic International Typeface Corp.
ITC Bookman International Typeface Corp.
ITC Zapf Chancery International Typeface Corp.
ITC Zapf Dingbat International Typeface Corp.
Macintosh Apple Computer Inc.
Microsoft Microsoft Corp.
Mylar E. I. du Pont de Nemours & Co., Inc.
Netware Nov el l Inc.
Novell Novell Inc.
Pagemaker Adobe Systems Inc.
PANTONE Pantone Co.
PostScript Adobe Systems, Inc.
Quark XPress Quark Inc.
QuickDraw Apple Computer Co.
TrueType Apple Computer Co.
Univers Linotype AG and Subsidiaries
UNIX X/Open Company Limited
Windows Microsoft Corp.
Communications Statements
Federal Communication Notices Commission (FCC) Statement
NOTE: This equi pment has been tested a nd found to comply with the li mi ts for
a Class B digital device, pursuant to Part 15 of the FCC Rules. These limits
are designed to provide reason able protect ion agains t h arm f ul interference in
a resident ial installati on. T his equipment gener at es , us es , and can radiate
radio frequency energy and, if n ot ins t alled and use d in accordance with the
instructio ns , m ay c ause harmf ul interferenc e to radio com munica t ions.
However, th ere is no gua rantee that in t erf erence w ill not occur in a particular
installation. If this equ ipment does c ause harmf ul interference to radio or
television reception, which can be determ ined by turning the eq uipment off
and on, the us er is encouraged to try to c orrect the interferenc e by one or
more of the f ollowing measures:
• Reorient or relocate th e rec eiving an te nna.
viii IBM Network Color Printer Operator’s Guide
Page 9

• In c rease the se paration be tween the eq uipment and receiver.
• Connect the equipment into an outlet on a circuit different from that to which
the receiver is connec t ed.
• Consult an IBM authoriz ed dealer or service re presentati v e fo r help.
Properly s hielded and grounded cables and connect ors (I BM partn um ber
68X394 9 or it s equivalen t for PC paralle l) m ust be used in order to me et FCC
emission limits. Proper cables and conne c to rs are availabl e f rom I BM
authoriz ed dealers. IB M is not respons ible for any radio or telev is ion
interference caused by using other than recommended cables and connectors
or by unauthorized changes or modifications to this equipment. Unauthorized
changes or m odificatio ns c ould void the us er’s authority to oper at e t he
equipment.
This device complies with Part 15 of the FCC Rules. Operation is subject to
the following two con dit ions: (1) this device ma y not ca us e harmfu l
interfere nc e, and (2) this device must ac c ept any inter ference re c eiv ed,
including interferenc e that may c ause undesired operat ion.
European Union (EU) Electromagnetic Conformity Statement:
This prod uc t is in co nf ormity with the protect ion requirem ents of EU C ouncil
Directive 89/ 336/EEC on the appr ox im ation of the laws of the M ember Stat es
relating to electromag netic compatibility. IBM cannot ac c ept respons ibility for
any failure to sa t is fy t he protection requirements re s ult ing from a nonrecommended modification of the product, including the fitting of non-IBM
option car ds .
EU Conformity Statement: This product has been tested and found to c om ply
with the limits for Class B Information Technology Equipment according to
CISPR 22/ European s t andard EN 55022. The lim it s fo r C las s B equipme nt
were derived for typical environments to provide reasonable protection against
interfere nc e w it h licensed c om municat ion devices .
German Conformi ty Statemen t:
Dieses Gerät erfüllt die Bedingungen der EN
55022 Kla s s e B.
Industry Canada Compliance Statement: This Cla s s B digital appa rat us meets
the requirements of t he C anadian I nt erf erence-causing eq uipment
regulations.
Cet appar eil numériq ue de la classe B respecte toutes les exigences du
Régleme nt s ur le matèriel brouiller du C anada.
Japanese VCCI Class 2 ITE Statement:
Notices ix
Page 10

x IBM Network Color Printer Operator’s Guide
Page 11

Preface
This publication te lls yo u how to per form tasks such as loading paper, loading
transparencies, removing paper jams, changing paper size, and other similar
tasks.
Audience
This publi c at ion is intended for a key op erator who m aintains th e printer and
orders su pplies, and fo r all users who replace supplies and who submit print
jobs to this printer.
Organization and Contents of this Publication
This publication includes the following chapters:
• Chapter 1 , “Welcome to the I BM N et w ork Color Print er, ” t ells y ou about the
printer’s features and parts. This chapter also lists supplies that you can
order for th e printer and tells you ho w to tu rn t he printer on and off.
• Chapter 2, “Choosing and Storing Paper and Transparencies,” tells you what
paper to us e in the printer and how to s to re and handle paper and
transpar encies.
• Chapter 3, “Loading Paper and Transparencies,” tells you how to load paper
into the printe r, how to choose the tray for output , and how to know when to
add pape r.
• Chapter 4 , “Us ing the Op erator Pane l, ” te lls y ou how the operator pan el
works and how to use menus on the display panel.
• Chapter 5, “Replacing Supplies,” tells you how to replace the printer’s toner
cartridge , the us ed toner bo ttle, the fuser oil bottle, t he f us er, and the
photoco nductor drum c artridge. It als o tells you how to store and handle
toner cartridges.
• Chapter 6, “Diagnosing Printer Problems,” helps you diagnose problems you
may have w hen using the printer. It t ells y ou how to cle ar paper jam s a nd
correct the quality of the printouts. This chapter also explain s how to adjust
the left margin of tray 2 and the color density of the printouts and how to set
the separ at ion corona mode.
• Chapter 7, “Understanding Operator Messages,” lists the messages that yo u
may see on the display panel, tells you the reason for the message, and tells
you what to do. M essages on t he display panel tell yo u t he printer’s s ta t us
and alert yo u t o upcoming problem s. I f the printer ha s a n error during
operation, you see a n error messa ge on the display pane l.
• Chapter 8, “Maintaining the Printer,” tells you how to clean the printer and do
routine maintenance tasks. Regular cleaning and maintenance (as needed)
and caref ul handling of th e printer keep the printer and print quality in th e
best condit ion.
• This publication includes a list of abbreviations , a glossary, and an index .
Preface xi
Page 12

Terminology
Safety Notices
Common Phrases
This guide ref ers t o th e IB M N et w ork Color Print er as the prin te r. Additionall y ,
the Netwo rk Print Server f eature is ref erred to as the NP S.
Paper Input an d Output Receptacles
Input receptacles are called trays, such as tray 1, tray 2, and auxiliary tray.
Output re ce pt acles are ca lled output t ray s .
There are 3 levels of saf et y not ic es:
DANGER calls attention to a situation that is potentially extremely hazardous
•
to people.
CAUTION calls attention to a situation that is potentially hazardous to people.
•
Attention calls attention to th e possibility of damage to a program, device,
•
system, o r dat a. Attention notices are loc ated throughout this publicatio n,
but are not lis te d here.
• Translations of the safety notices used in this library are found in
Network Co lor Printer: Safety Info rm at ion,
shipped w it h t he printer an d is provided wit h t he maintenance
docume nt at ion.
Safety Precautions
Electrical Safety
This printer is inspected and listed by recognized national testing laboratories,
such as Un derwriters Laboratorie s , Inc. (U L) in the U.S.A. and Ca nadian
Standards Association (CSA) in C anada. List ing of a product by a national
testing laboratory indicates that the produc t is des igned and m anufactured in
accordance with national requirements intended to minimize safety hazards.
IBM equipment meets a very high standard of safety in design and
manufacture. Remember, however, that this product operates under
condition s of high electric al potentials and heat gen eration, bot h of which are
functionally necessary.
Because th e paper and t oner used in the printer can burn, you s hould take
normal precautions to prevent fire. These precautions include common-sense
measure s , suc h as keeping potentially combu s ti ble materials (f or examp le,
curtains and chemic als ) away from t he printer, providing a dequate ventilation
and cooling, limiting unattended operatio n, and having trained pers onnel
available and assigned to the printer.
IBM
G544-5352. This publication is
xii IBM Network Color Printer Operator’s Guide
Page 13

Laser Safety
This printer complies w it h t he performance stand ards set th e by U . S. F ood
and Drug Administration for a Class 1 Laser Product. This means that the
printer belongs to a class of laser products that does not produce hazardous
laser radiat ion in a custo m er access area. This clas s if ic ation was
accomplis hed by pro vi ding the neces s ary protec ti v e housing an d s c anning
safegua rds t o ensure that las er radiatio n is inaccessible or within C las s 1
limits.
There are v arious tool-operated m ac hine covers t hat should be m oved,
removed, or replaced only by trained service personnel. There are no operator
controls or adjustments associated with the laser.
No operat or m aintenan c e is required to ke ep the produ c t in co m pliance as a
Class 1 Laser Product. No adjustments that affect laser operation or power
are accessible to the operator.
Note: See
languag e t ranslations regarding las er safety.
Disposal of Materials
This printer m ay contain ma te rials, either a s com ponents or supplies, tha t are
regulated by governm ent agen c ies fo r disposal. Dispose of a ll s uc h it ems in
accorda nc e w it h y our govern m ental agen c ies regulatio ns .
Related Publications
The following public at ions are included in hardcopy with t his printer:
IBM Network Color Printer: Adm inistrator’s Guide,
•
IBM Network Color Printer: Operator’s G uide,
•
IBM Network Color Printer: Quic k Print Guide,
•
IBM Network Color Printer: Installation and Relocation Guide,
•
IBM Network Color Printer: Saf et y Inf ormation,
•
IBM Network Color Printer: User’s Guide,
•
The above publications are also available in Adobe Acrobat Reader format on
IBM Network Color Printer:Customer CD-ROM
the
You can vie w th es e publications using Adobe Acr obat Reader, which is
included on the CD-ROM. The
Adobe Acrobat Reader and the softcopy documentation onto your system.
IBM Network Color Printer: Safety Information
S544-53 64
S544-53 61
softcopy only
G544-53 52
S544-53 63
shipped with this printer.
User’ s Gu ide
contains instructions for installing
for national
G544-5362
If you wish to purchase additional co pies of the publications , please cont ac t
your IBM s erv ic e represe nt at iv e or authorized servic e dealer.
Requesting Service
To reques t se rv ic e on your IBM N et w ork C olor Printe r in t he U.S. or C anada,
call 1-800-358-6661. Service is av ailable from 9 a.m. to 9 p.m . EST. To
request service in oth er countries , ca ll y our count ry Ca ll C enter.
Preface xiii
Page 14

• Yo u m ay c all for servic e free of cha rge during th e printer’s wa rranty period.
• Yo u c an obtain s erv ic e after the wa rranty period has expired if you sign a
service co nt ract agreem ent with an aut horized serv ic e provide r.
• Yo u also can o bt ain service on a billable-per-call basis after the warranty
period ha s e x pired.
• Ple as e have yo ur s ervice con tr ac t inf ormation av ailable whe n y ou call.
xiv IBM Network Color Printer Operator’s Guide
Page 15

Chapter 1. Welcome to the IBM Network Color Printer
This chapt er te lls yo u about the printer’s feature s and parts. This chapter also
lists supplies that you ca n order for the printer and te lls y ou how to turn th e
printer on and off.
This chapter covers the following topics:
Introducing the Printer . . . . . . . . . . . . . . . . . . . . . . . . . . . . . . . . . . . . . 1–2
General De s c ript ion . . . . . . . . . . . . . . . . . . . . . . . . . . . . . . . . . . . . . 1 –2
Highlights . . . . . . . . . . . . . . . . . . . . . . . . . . . . . . . . . . . . . . . . . . . . . 1–2
Optional Features. . . . . . . . . . . . . . . . . . . . . . . . . . . . . . . . . . . . . . . 1 –3
Ordering Supplies. . . . . . . . . . . . . . . . . . . . . . . . . . . . . . . . . . . . . . . . . 1–4
Identifying Printer Parts and Controls. . . . . . . . . . . . . . . . . . . . . . . . . . 1–6
Front and Right Sides. . . . . . . . . . . . . . . . . . . . . . . . . . . . . . . . . . . . 1–6
Back and Left Sides . . . . . . . . . . . . . . . . . . . . . . . . . . . . . . . . . . . . . 1–9
Inside the Front Door . . . . . . . . . . . . . . . . . . . . . . . . . . . . . . . . . . . 1–10
Identifying Parts on the Density Control Panel. . . . . . . . . . . . . . . . . . 1–12
Identifying Parts on the Density Control Panel. . . . . . . . . . . . . . . . . . 1–12
Turning th e Printer On and Off . . . . . . . . . . . . . . . . . . . . . . . . . . . . . . 1–13
Turning th e Printer On . . . . . . . . . . . . . . . . . . . . . . . . . . . . . . . . . . 1–13
Turning th e Printer Off . . . . . . . . . . . . . . . . . . . . . . . . . . . . . . . . . . 1–13
Resetting the Printer. . . . . . . . . . . . . . . . . . . . . . . . . . . . . . . . . . . . 1–14
Copyright IBM Corp. 1996 Chapter 1. Welcome to t he IBM Network Color Printer 1–1
Page 16

Introducing the Printer
This section gives yo u a general ov erv iew of the pr int er, including highlig ht s
and optional features .
General Description
The IBM Ne t w ork C olor Printe r is a m idrange wo rk group print er. It c an
produce s ingle-side d black and w hit e prints at a rate of up to 12 im pressions
per minute (IPM) and full-color prints at a rate of up to 3 IPM. The printer has a
cyan-magenta-yellow-bla ck (C M YK), full-c olor laser pr oc es s or that print s 1 6
gray level s p er c olor. The printer prints Pos t Script job s in W indows,
Macintosh, and UNIX environments.
Highlights
Some of the highlight s of the printer are:
• Toner cartridges
The printe r us es 4 separat e color toner c artridges (c y an, magent a, y ellow,
and black) . When a toner cart ridge is used up, yo u ca n replace it with a new
one of the same color.
• Flexible color range
The 4 color to ner cartridges offer out put in full col or, a s ingle color o nly
(monocolor), or true black (using the black toner cartridge).
• High resolution
The printer has a print resolution of 600 × 600 dots pe r inc h, wh ic h res ults in
laser-sharp output in full color.
• High print speed
The printe r delivers up t o 3 pages per minute in full c olor or up to 12 pages
per minut e in m onocolor (black only).
• Flexible paper handling
The unive rs al paper cass ette in tray 1 ac c epts letter, l egal, A4, and J I S B5
paper size s . It ca n hold approx im ately 250 s heets (at 80 g/m2) of plain
paper. Th e auxiliary tra y ac c epts transparencies as w ell as plain pa per. To
increase th e v olume of paper, you can add an option al tray 2 paper feeder.
Note: This pr int er does only s im plex (single-side) pr int ing. Duplex printing is
not availa ble.
1–2 IBM Network Color Printer Operator’s Guide
Page 17

Optional Features
The printe r has severa l opt ional features. See the following section s fo r m ore
on these features. Contact your I BM marketing repres entative or authorized
service dealer for information about the following optional features and how to
order them.
Optional Tray 2 Paper Feeder (Feature Code 4501)
This featu re includes a paper feed er unit, a univ ers al paper ca s sette, and 2
locking pi ns to fa s te n t he paper fee der unit to the printer body . Th e universal
paper cas s et t e ac c epts letter, legal, A4, and J I S B5 paper siz es. It can ho ld
approxim at ely 250 sheets (at 80 g/m
Universal Paper Cassette (Feature Code 4513)
2
) of plain paper.
You can buy an additional universal paper cassette that holds letter, legal, A4,
and JIS B5 paper. You can load only plain paper fr om 64 to 90 g /m
2
into a
paper cassette, and the maximum capacity is approximately 250 sheets at 80
2
g/m
.
Printer Sta nd (Feature Code 3050)
The printer stand is designed to hold the weight of the printer. It has a storage
area underneath for supplies, locking casters for easy movement, and leveling
feet for unev en floor surf ac es.
Memory Upgrades
The standard printe r c onf iguration inc ludes 16MB of memor y . A ny printer can
be upgrad ed to 32MB or 48MB (max im um).
• Feature Code 4316 consists of four 4MB SIMMs.
• Feature Code 4332 consists of four 8MB SIMMs.
For further informati on about inst alling the mem ory upgra des, see th e
Installation and Relocation Guide
.
Chapter 1. Welcome to the IBM Network Color Printer 1–3
Page 18
Ordering Supplies
This section lists the supplies you can order for the printer and gives you the
telephone number yo u s hould use when ordering supplie s .
To order su pplies for the printer, call 1 -888-IBM-PRINT in the U.S. an d
Canada. You may also contact your IBM marketing representative for
information about h ow t o order supp lies .
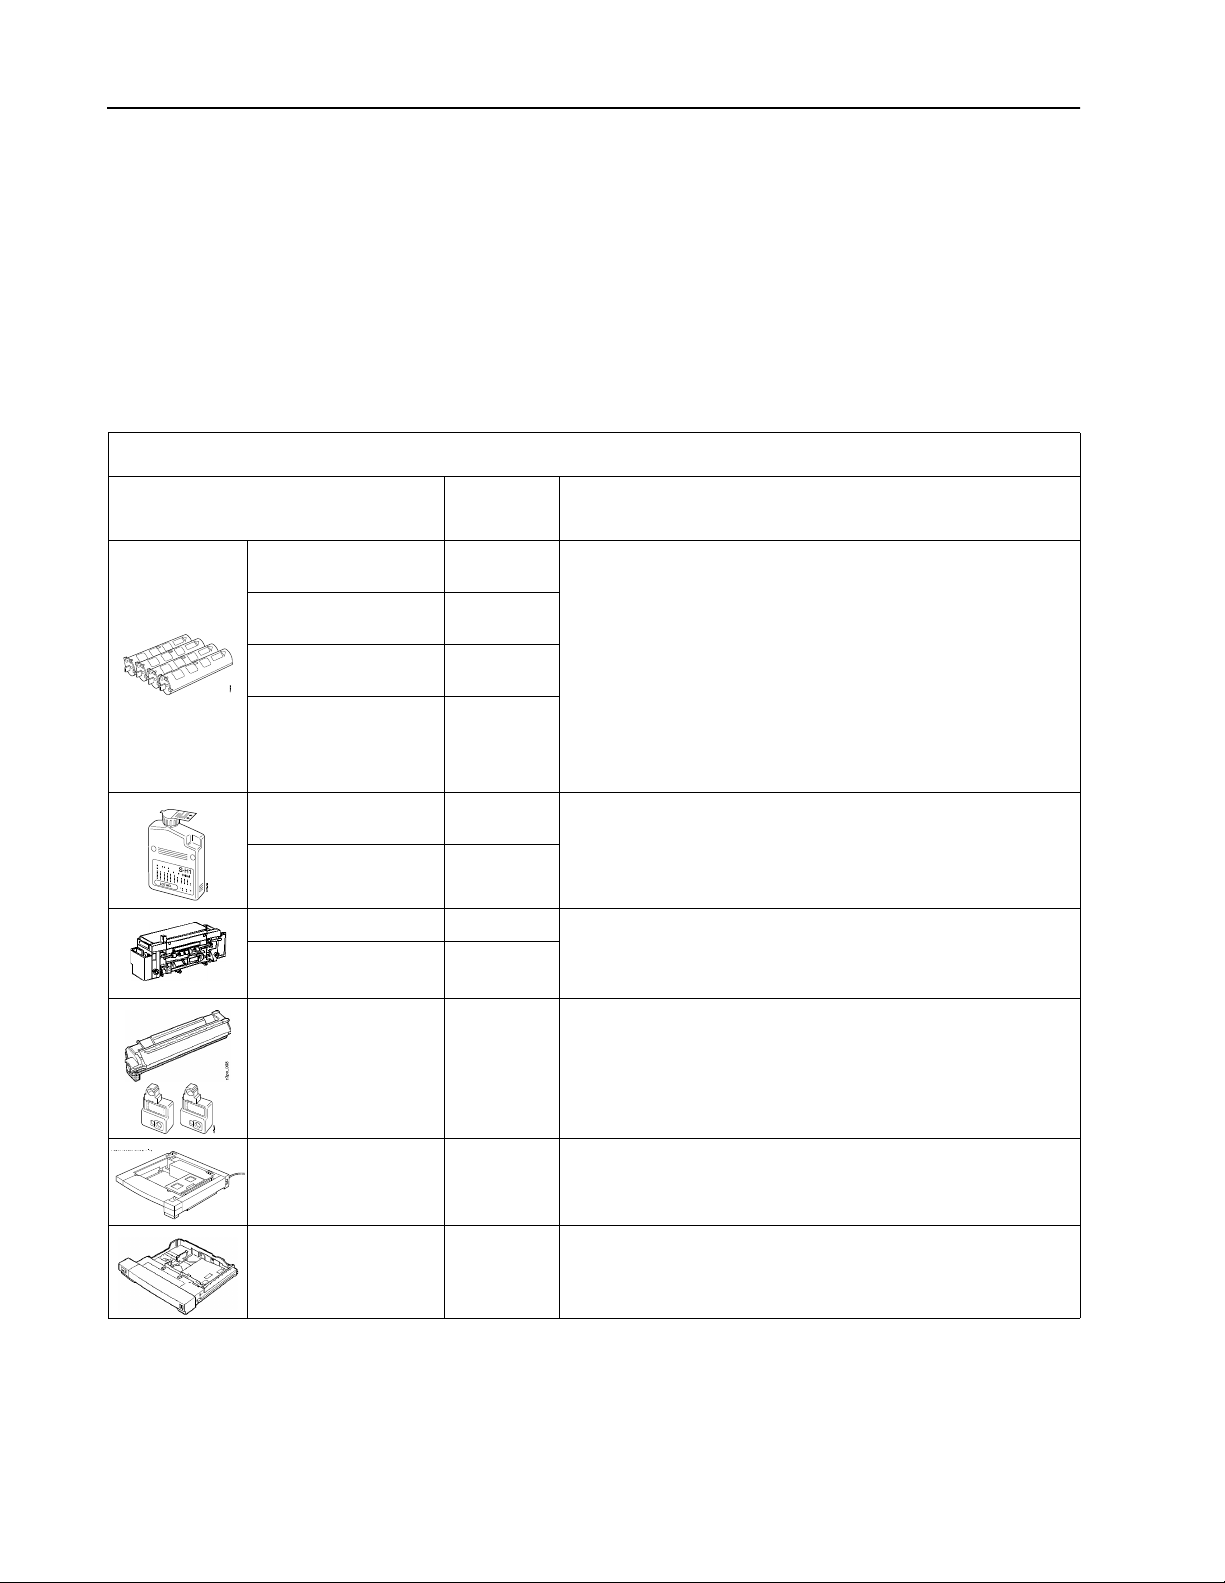
The following table lists the supplies you can order for the printer.
Supplies
Item
Magenta Toner
Cartridge
Black Toner
Cartridge
Cyan Toner
Cartridge
Yellow Ton er
Cartridge
Fuser Oil Bottle in
Single Box
20 Unit Boxed
Fuser Oil Bottles
Fuser—110 V 63H3776 The fuser uses pressure and heat to bond the toner to
Fuser—220 V 63H3779
Photoconductor
Drum Cartridge Kit
Part
Number
63H2041 IBM recommends that you use only IBM color toner
cartridges designed for this printer. You need 4 color
63H2050
63H2051
63H2052
63H2043 Fuser oil is used in the fusing process. Fuser oil keeps
63H2044
63H2042 The photoconductor drum cartridge kit contains the
toner cartridges: cyan, magenta, yellow, and black. You
get 1 cartridge in each box.
Each color toner cartridge typically lasts approximately
4,000 prints of A4- or letter-size paper (when printing at
4% to 5% toner coverage). The actual cartridge life,
however, depends on how much toner you use for each
print. The more toner of 1 color that you use, the shorter
that cartridge’s life becomes. For details, see “Replacing
Toner Cartridges” on page 5–4.
the toner on the paper and prevents it from getting on
the fuser rollers. You can order fuser oil 1 bottle at a time
or in 20-bottle packages.
the paper.
following items: a photoconductor drum cartridge, an
orange protective shield, and 2 used toner bottles. When
you replace the photoconductor drum cartridge, always
replace the used toner bottle as well. This bottle collects
the excess toner during printing.
Description
Optional Paper
Feeder
Universal Cassette 63H2006 The universal cassette holds letter-, legal-, A4-, and JIS
63H2004 The optional paper feeder comes with a universal
1–4 IBM Network Color Printer Operator’s Guide
cassette and 2 locking pins to fasten it to the printer
body.
B5-size paper. You can load only plain paper from 64 to
90 g/m
capacity is approximately 250 sheets at 80 g/m
2
into a paper cassette, and the maximum
2
.
Page 19
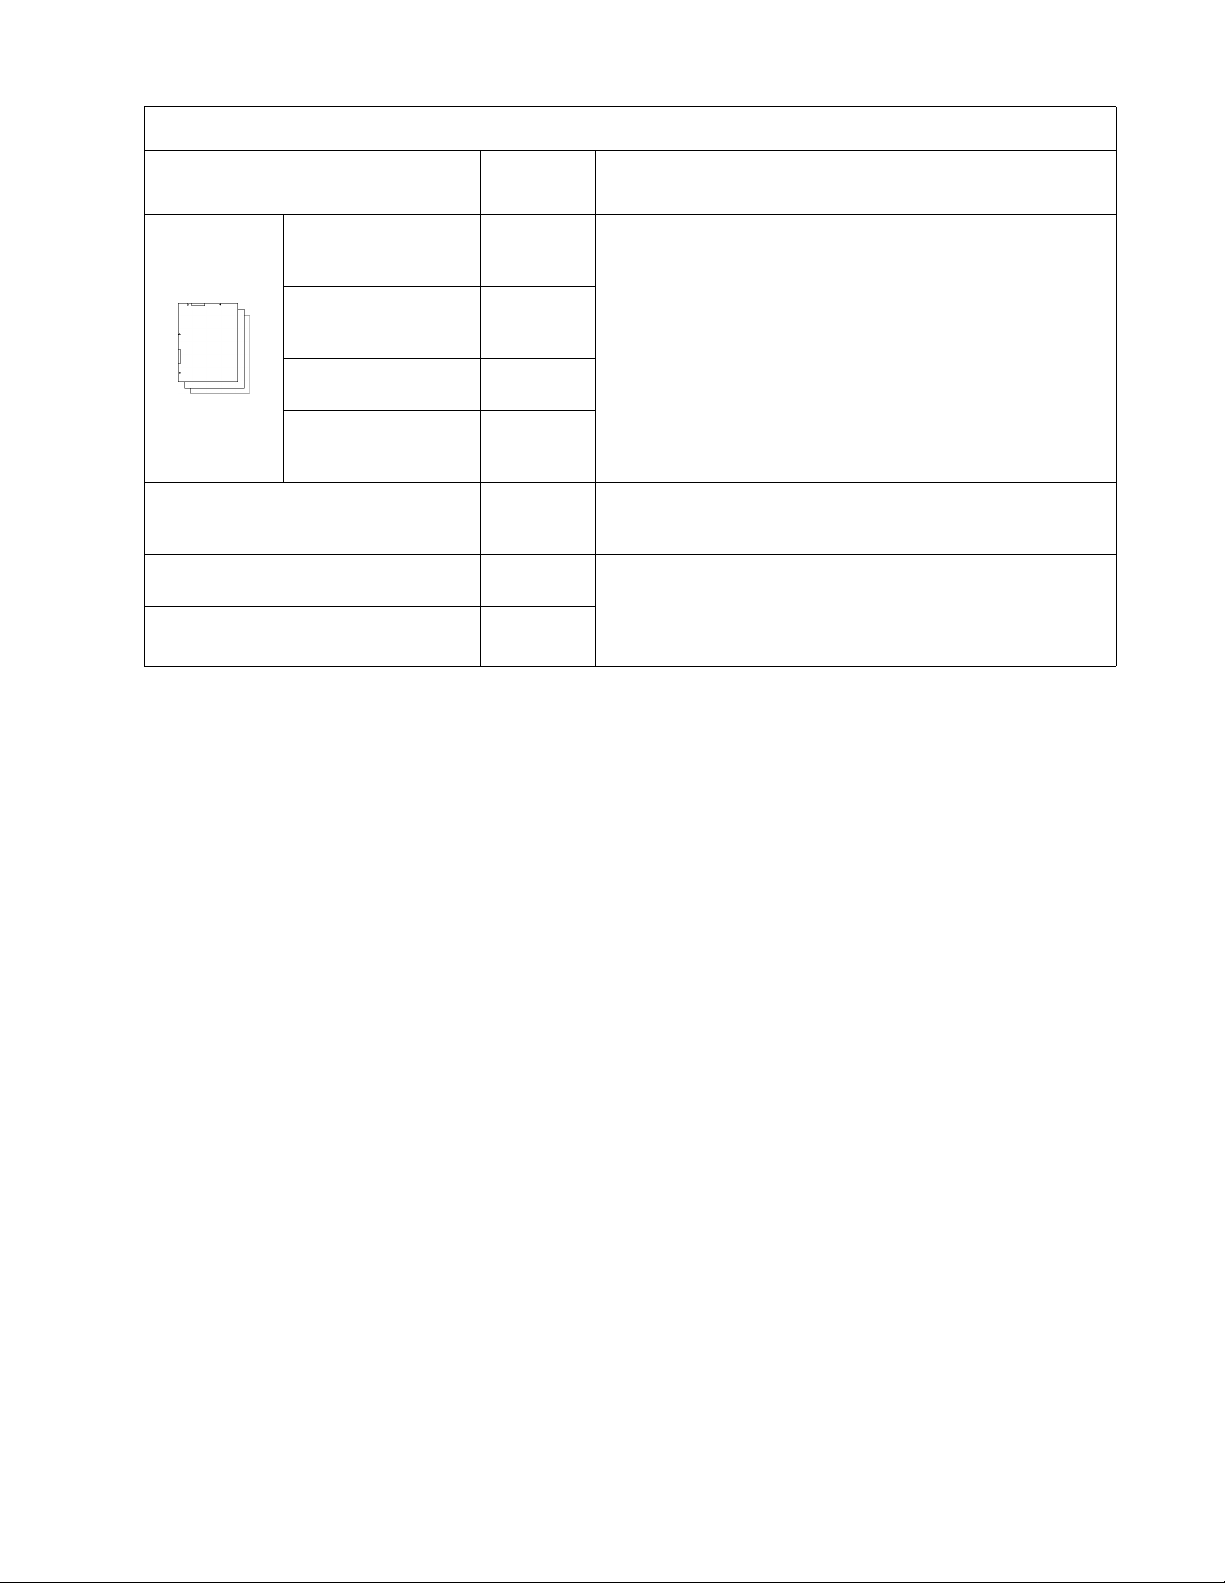
Supplies
Item
Transparencies—
50-Sheet Letter
Pack
Transparencies—
Ten 50-Sheet
Letter Packs
Transparencies—
50-Sheet A4 Pack
Transparencies—
Ten 50-Sheet A4
Packs
Relocation Kit 52H0799 The relocation kit contains the packaging, boxing, and
60 000-Page Usage Kit (for low
voltage 110 V)
60 000-Page Usage Kit (for high
voltage 220 V)
Part
Number
63H2046 IBM recommends that you use only IBM transparencies
for the best printing results.
63H2047
63H2048
63H2049
instructions that you need to safely move the printer a
substantial distance.
63H1980 The 60 000-page usage kit is installed by the operator
63H1981
and is needed after approximately 60 000 pages have
been printed. It contains the following items: air filter,
ozone filter, transfer drum cleaning assembly, separation
corona unit, and fuser.
Description
Chapter 1. Welcome to the IBM Network Color Printer 1–5
Page 20
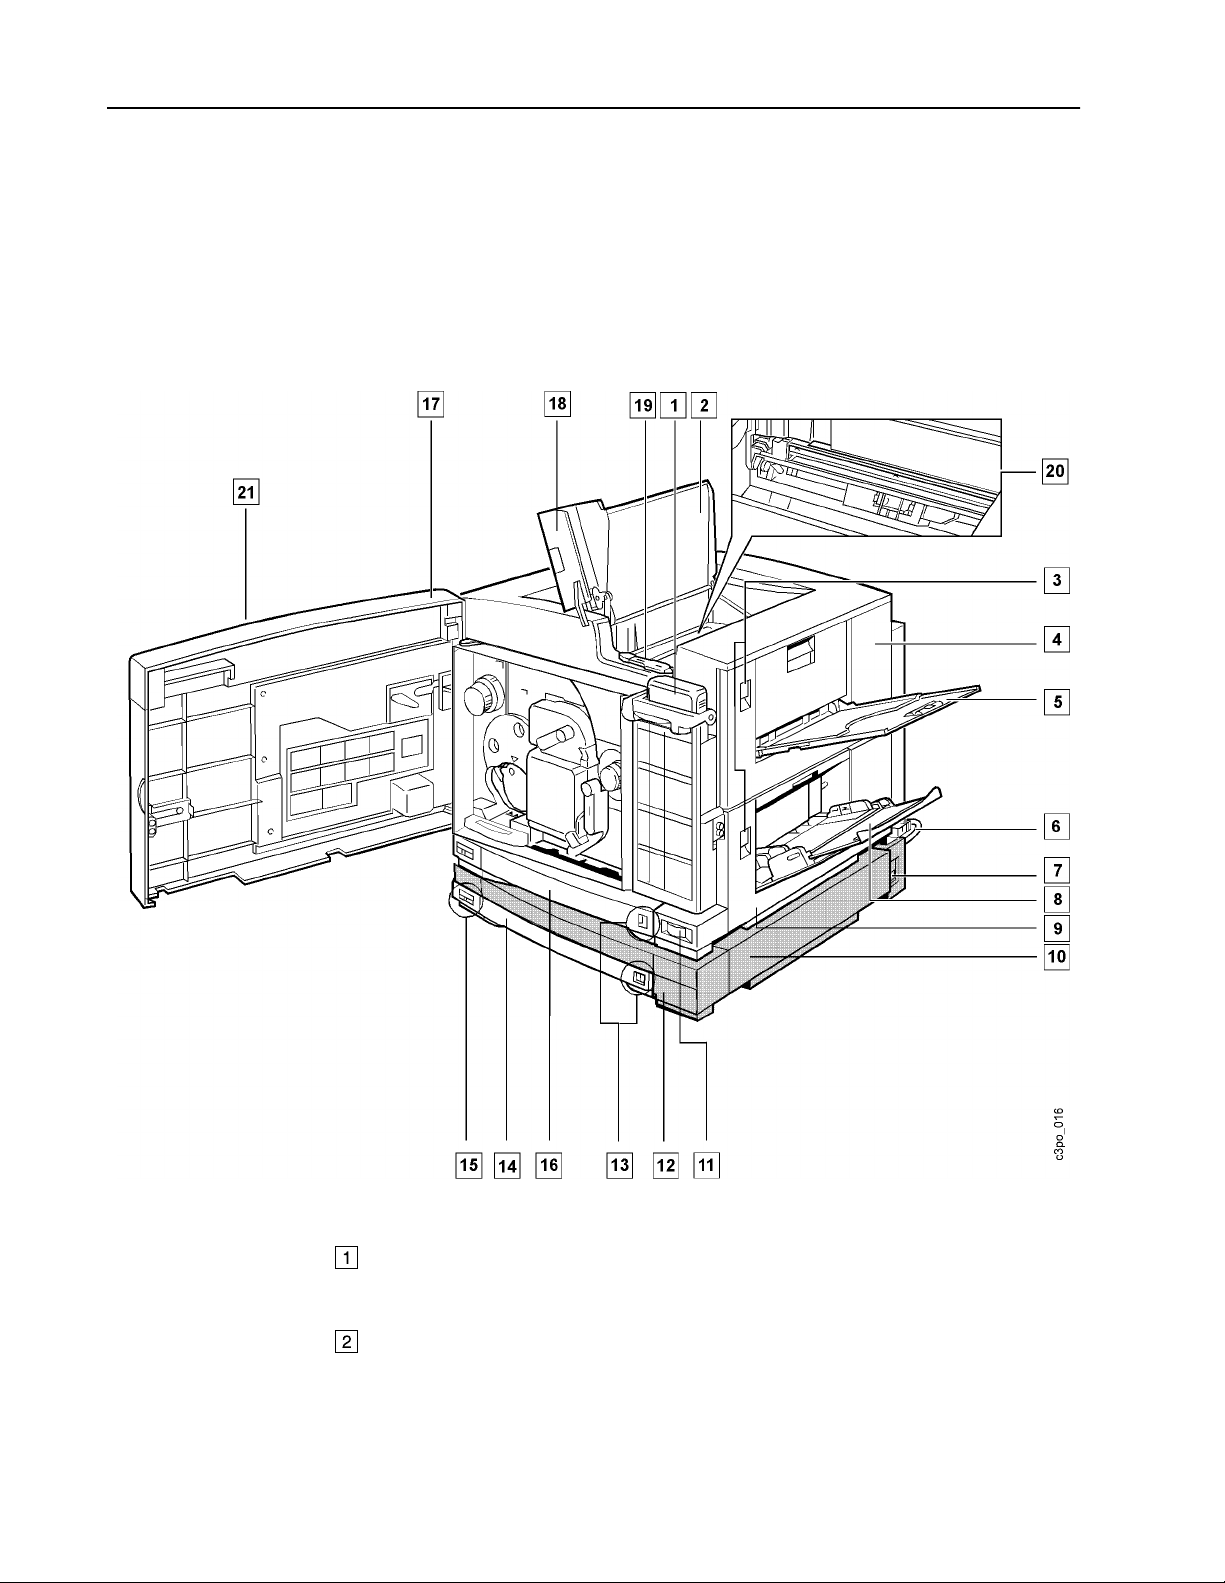
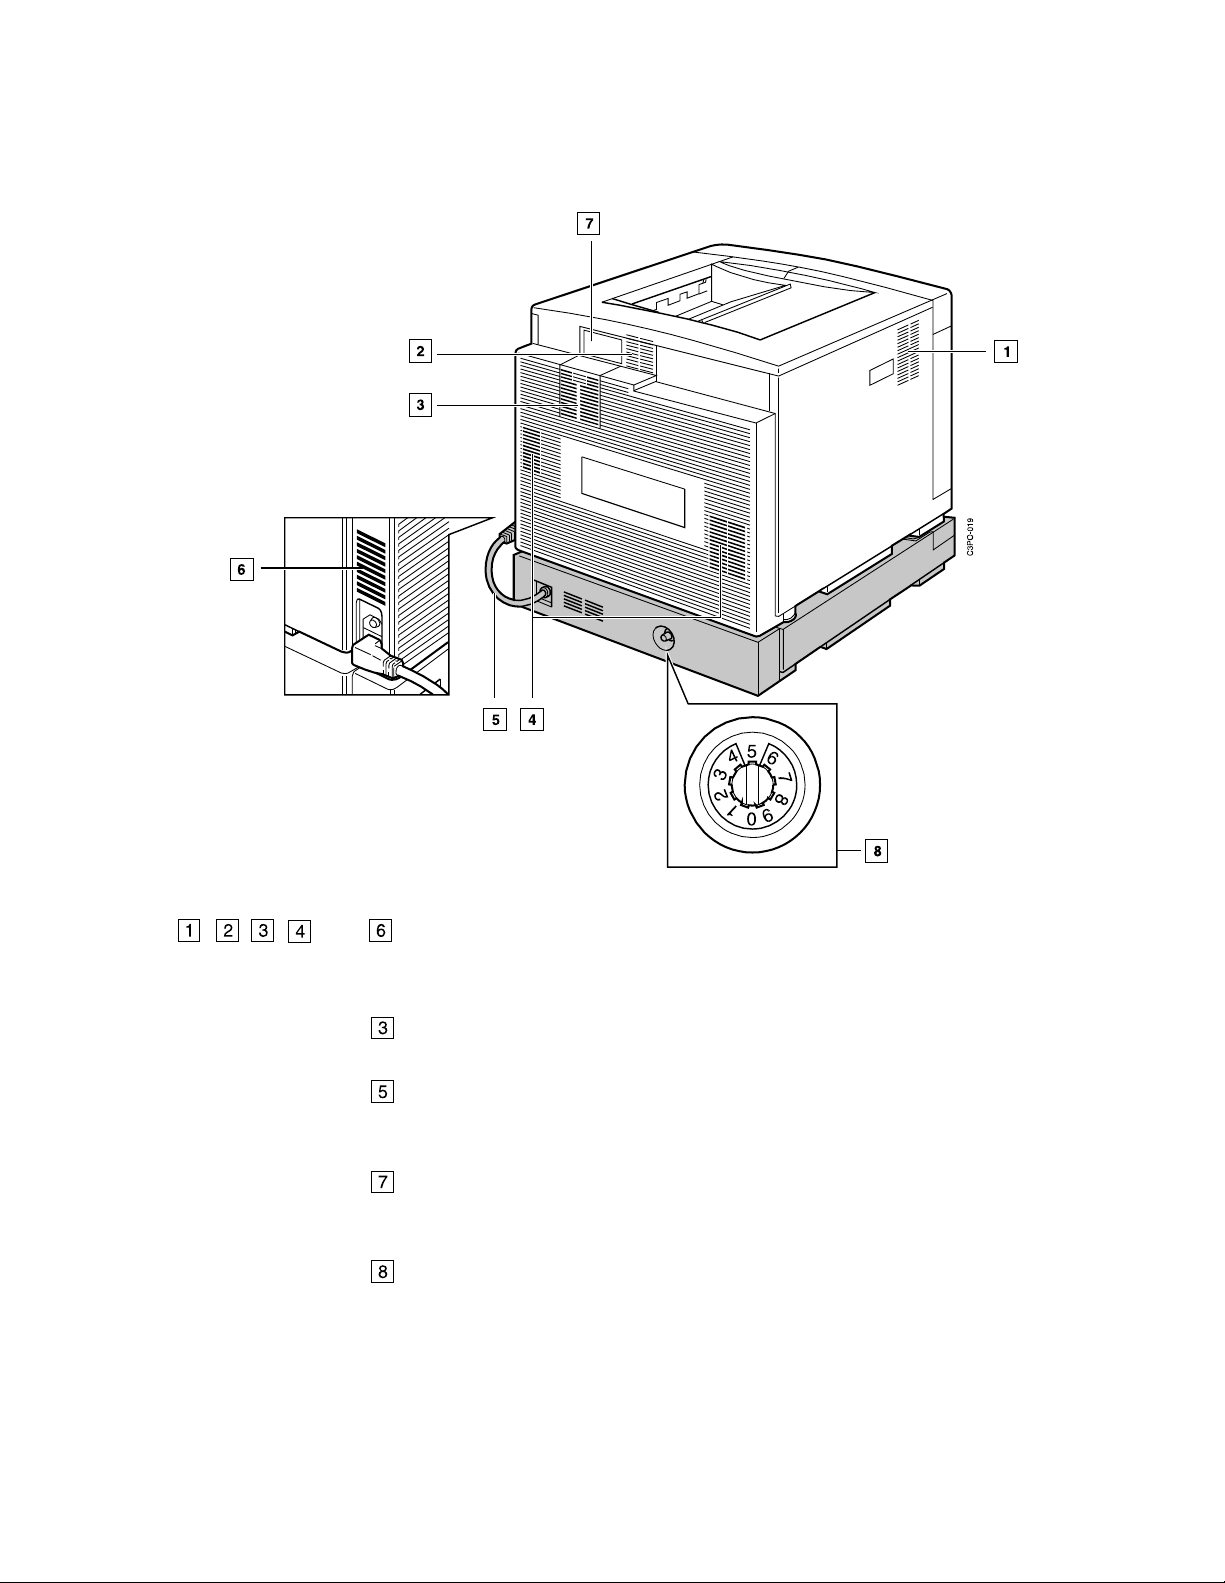
Identifying Printer Parts and Controls
This section helps you identify e ac h part of the pr int er. The illus trations th at
follow show t he printer’s parts and co nt rols and w hat they are u se d f or.
Front and Right Sides
Shown below are the parts of the printer that yo u ac c es s f rom t he front an d
right sides.
Fuser oil bottle (cover open)
The fuser oil bottle supplies the fuser oil that is applied to the fuser rollers
during the printing pr oc ess.
Top cover (open)
When opened, the to p c ov er gives you ac c es s t o th e t ransfer drum area
so that you ca n remove jam m ed paper or replace the s eparation c orona
unit.
1–6 IBM Network Color Printer Operator’s Guide
Page 21

Release latches
The releas e latches re lease the catc hes on the fu s er access a nd feeder
access doors so that you can do maintenance tasks or clear paper jams.
Fuser access door (closed)
When opened, this door gives you access to the paper output area so that
you can remove jamm ed paper and replace th e fu s er.
Side output tray (faceup) (open)
When opened, the side output tray receives printouts faceup. When the
side output tray is closed, the top output tray receives printouts facedown.
The side ou t put tray hold s a pproximat ely 20 sheets o f pl ain paper a t
2
80 g/m
.
Route power cable (on optional paper feeder unit) (shown installed)
This cable connects the power outlet on the optional paper feeder unit with
the powe r rec eptacle on t he printer bo dy .
Power receptacle (on paper feeder unit)
The printer power cord plugs in here and then connects to a power source
(100–12 0 V ac or 220–2 40 V ac depe nding on the vo lt age model of t he
printer pac k age).
Auxiliary tray (open)
2
This tray ho lds approximately 100 s heets of plai n paper at 80 g /m
or 20
transpar encies.
Feeder access door
Opening th is door gives you ac c es s to th e paper feed er area so tha t yo u
can remove jammed paper, do maintenance tasks, or replace the transfe r
drum clea ning unit.
Feeder access door (on tray 2 paper feeder) (closed)
Opening this door gives you access to the tray 2 paper feeder area so that
you can remove jamm ed paper.
Power sw i tch
Optional tray 2 paper feeder
This paper feeder holds a universal paper cassette.
Paper amount indicator
This show s th e paper level . When the blu e bar has com pletely
disappeared, it is tim e to add paper to the tray.
Tray 2 universal paper cassette (optional)
This cassette holds approximately 250 sheets of letter-, legal-, A4-, or JIS
2
B5-size p aper at 80 g/m
.
Paper size indicator
This shows you the paper size loaded in the paper cassette.
Tray 1 universal paper cassette
This tray ho lds approximately 250 sh eets of lette r-, l egal-, A4-, or J IS B5-
2
size pape r at 80 g/m
.
Front door (open)
When opened, this d oor gives you ac c es s to th e inside of the printer so
that you ca n replace supplies, cle ar paper jam s, and do main t enance
tasks.
Chapter 1. Welcome to the IBM Network Color Printer 1–7
Page 22
Top output tray (facedown) (open)
This tray ho lds approximately 100 s heets of plai n paper at 80 g /m2.
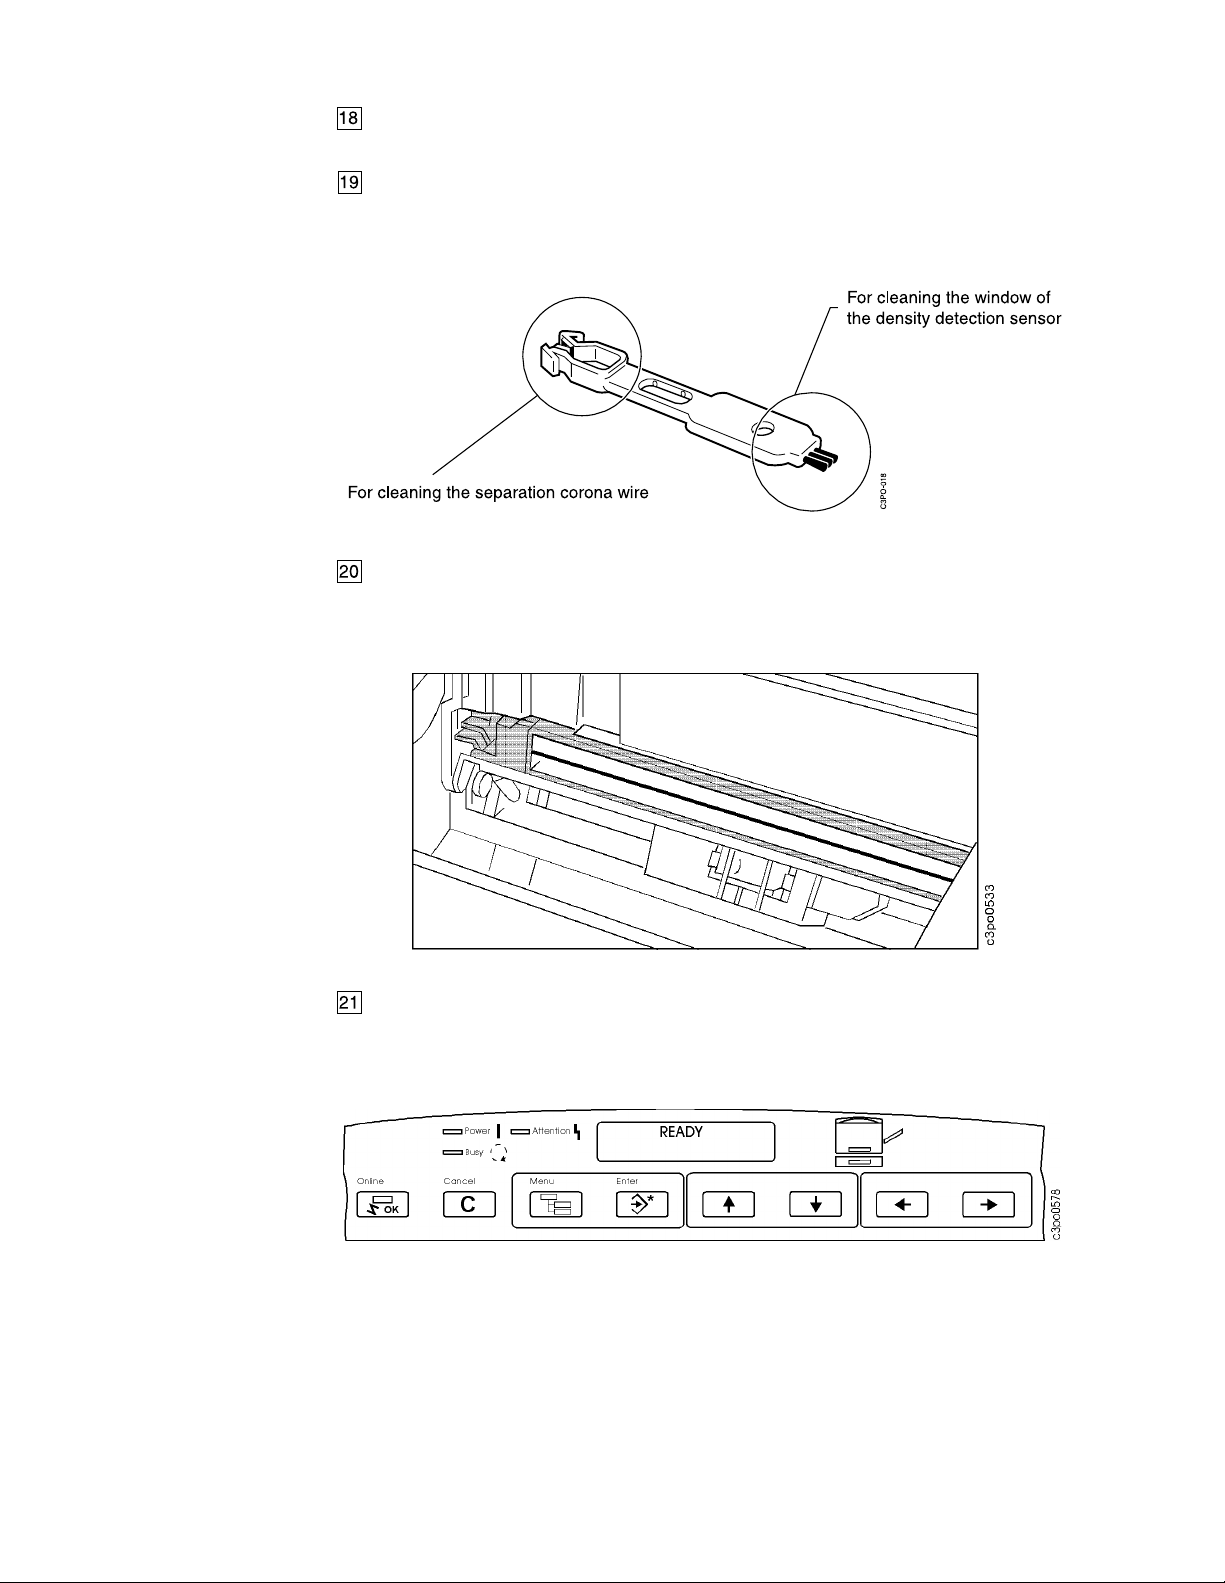
Wire cleaner (stored inside the printer)
The wire cleaner is used to clean th e s eparation co rona wire (in side the
separati on c orona unit ) and the window of the de ns it y det ection sen s or.
The wire cleaner look s lik e th is :
Separation corona unit
The sepa rat ion corona unit helps sep arate the printout from t he
photoco nductor drum c artridge du ring the printing process. The wire is
cleaned w it h t he wire cleaner that is sto red inside the printer.
Operator panel
The operator panel is on the outside of the printer’s front door. It has lights
and push buttons that are used to co nt rol the printer and to indicate the
printer’s status.
1–8 IBM Network Color Printer Operator’s Guide
Page 23
Back and Left Sides
Shown below are the parts of the printer that yo u ac c es s f rom t he back and
left sides o f the printer.
and
Air ventilation slots
These slots prevent overheating and ensure that the printer works reliably.
Do not block t hese air vent ilat ion slots.
Air filter holder
This holder contains the air filter and gives you access to the carbon filter.
Route power cable (on optional paper feeder unit)
This cable connects the power outlet on the optional paper feeder unit with
the powe r rec eptacle on t he printer bo dy .
Density control panel
This panel adjusts the color density (see “Identifyin g Parts on the Density
Control P anel” on page 1–12).
Side registration adjustment dial
This dial adjusts the left margin width of the tray 2 paper feeder.
Chapter 1. Welcome to the IBM Network Color Printer 1–9
Page 24
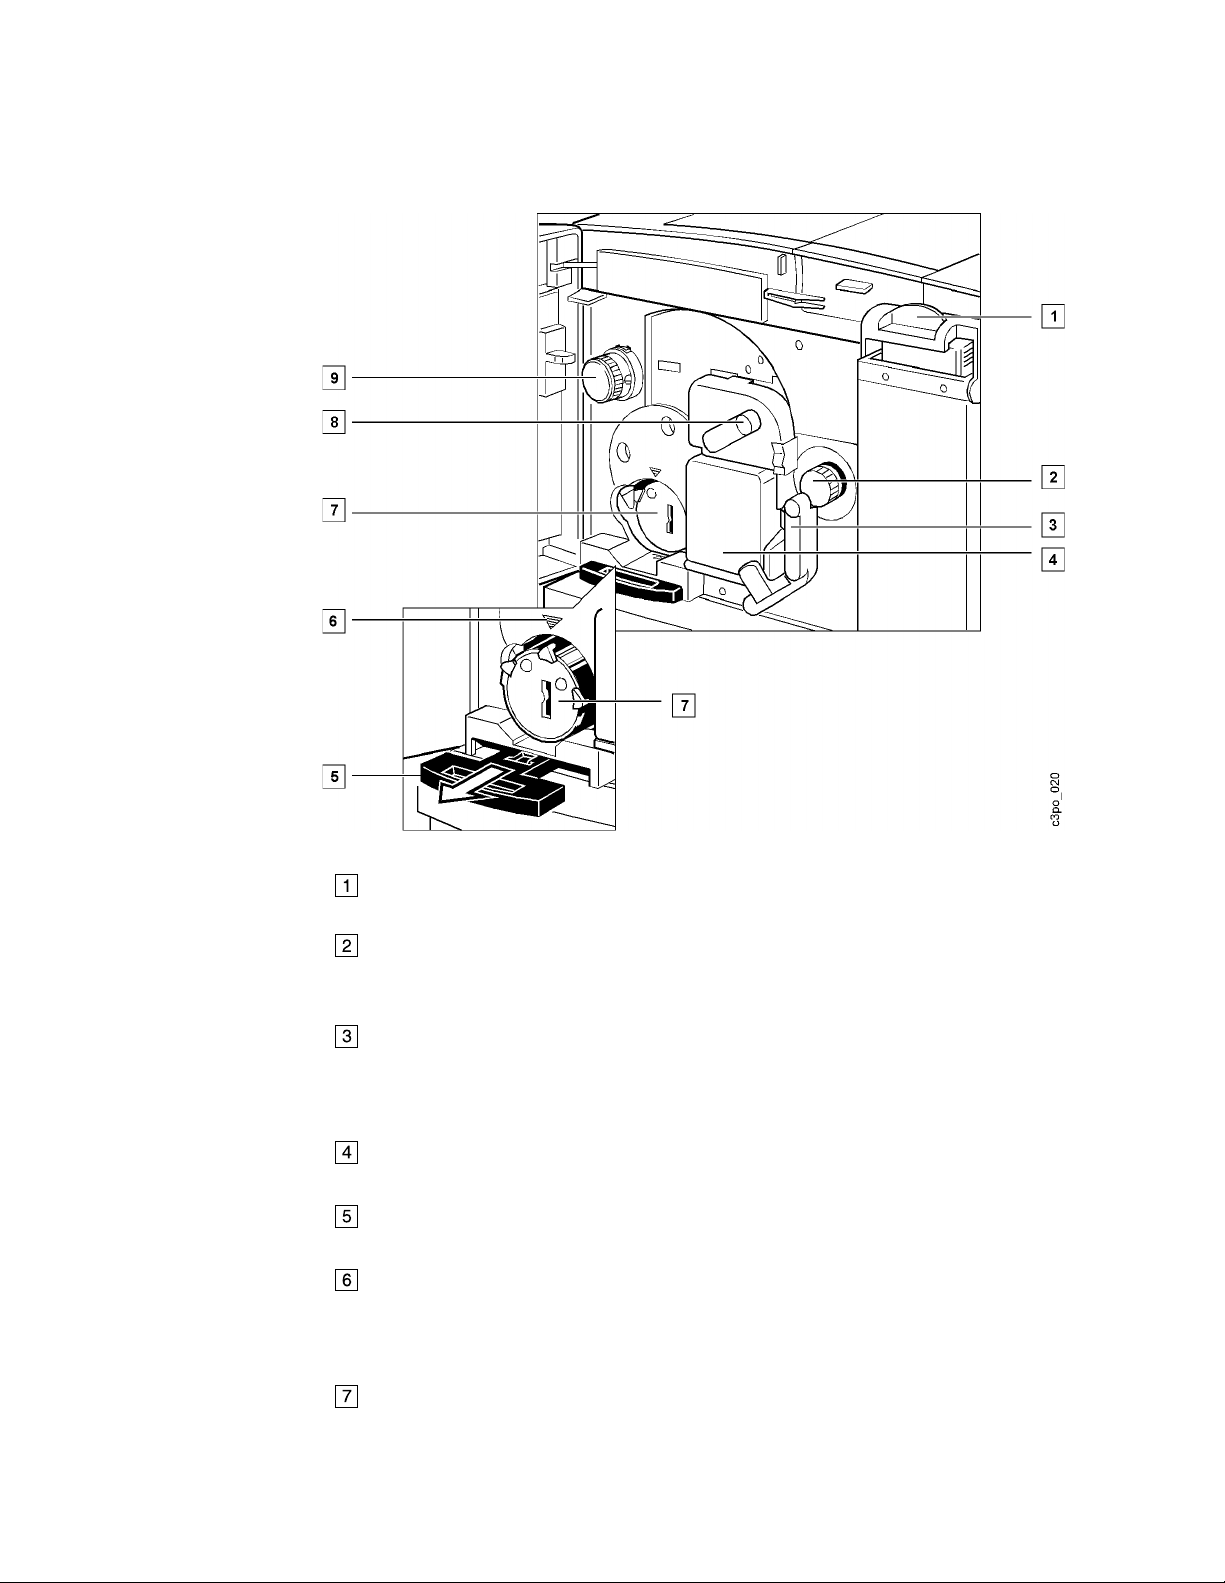
Inside the Front Door
Shown below are the parts of the printer that are inside the front door of th e
printer.
Fuser oil bottle cover (closed)
When closed, this cover locks the fuser oil bottle securely to the printer.
Transfer drum knob
When turned, this knob rotates the transfer drum so that you can remove
jammed paper (the rele as e handle m us t be down).
Release handle
This hand le unlocks the used toner bottle, the photoconductor drum
cartridge , and the transfer drum so th at y ou can clea r paper jams or do
maintenance tasks.
Used toner bottle
This bottle rec eives exces s t oner not fuse d during the print cycle.
Eject handle
When pulled, this handle ejects a toner cartridge so that you can replace it.
Toner cartridge position mark
This mark helps you align a toner cart ridge. When you ins ert a t oner
cartridge, you align the arrow on the toner cartridge label with the position
mark.
Toner cartridges in turret
Each tone r c art ridge contains a color of t oner (cyan, ma genta, yell ow , or
black) that is applied to the printout.
1–10 IBM Network Color Printer Operator’s Guide
Page 25
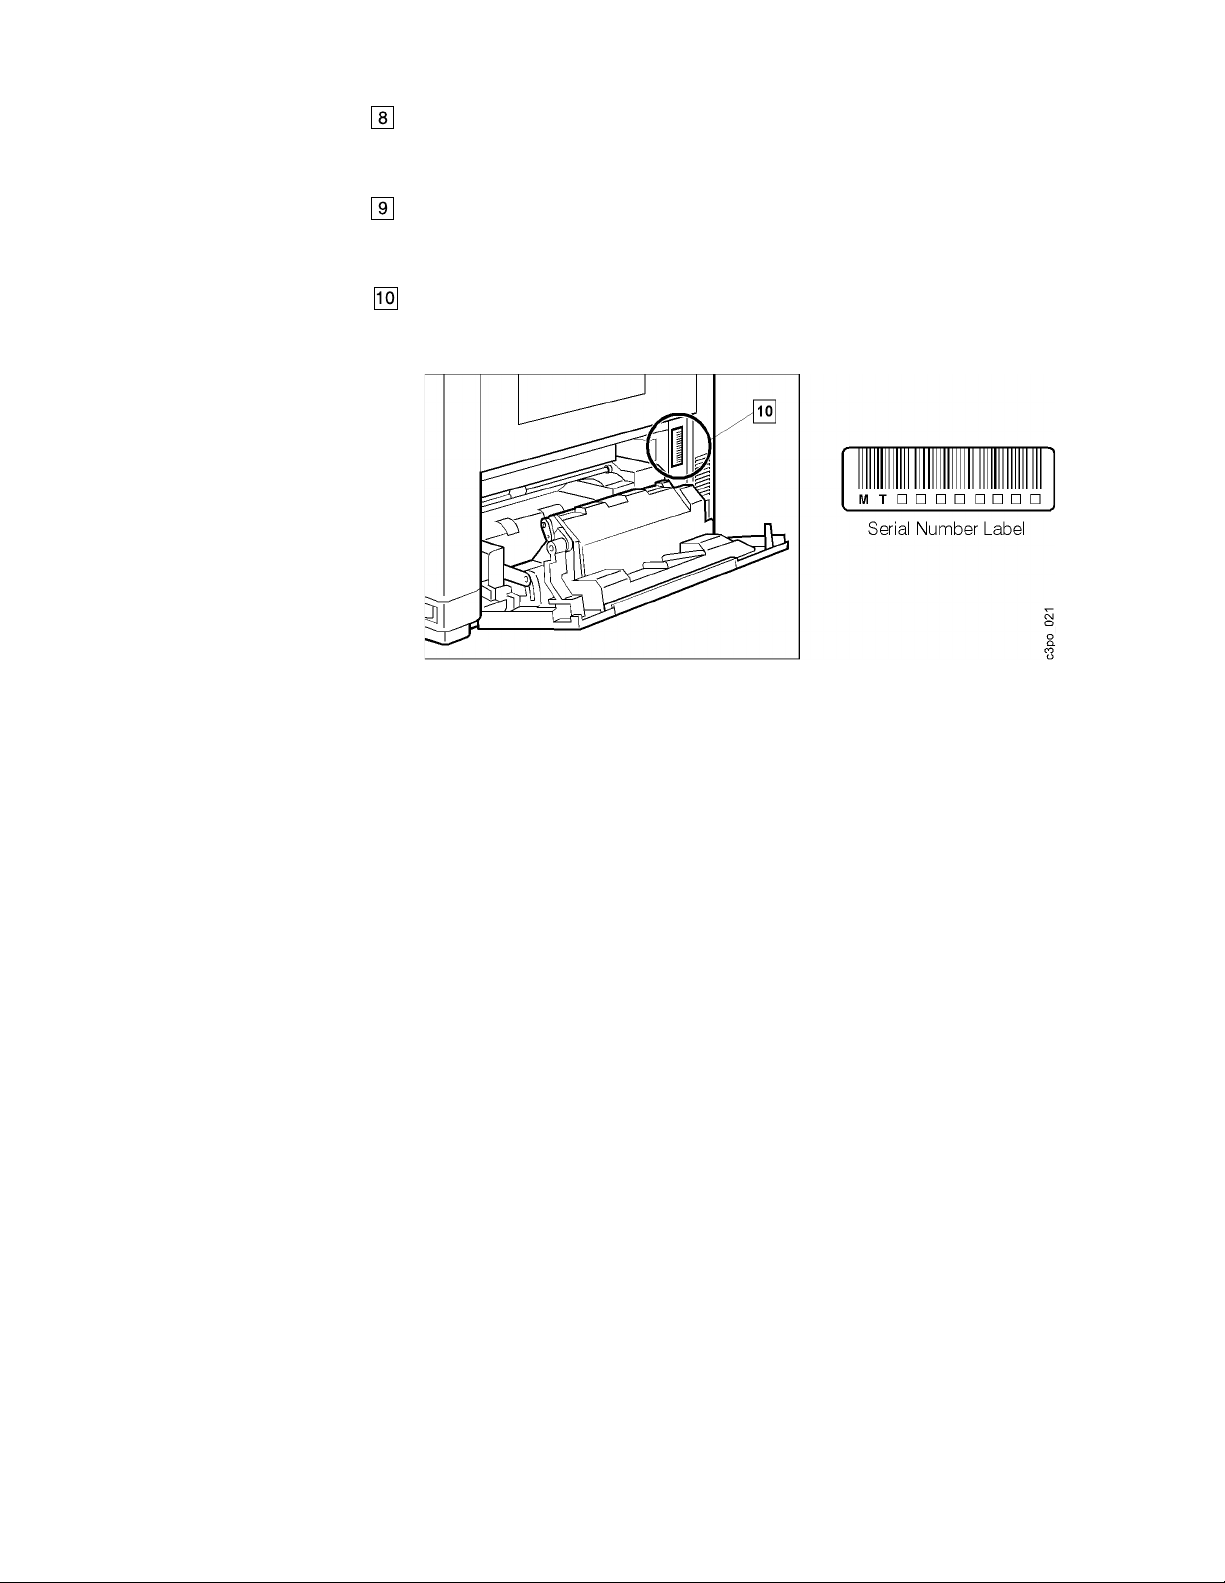
Photoconductor drum cartridge door handle
When rais ed, this hand le opens the photoconductor d rum cartridg e door
so that you ca n install or replace a photoconduct or drum cart ridge.
Turret rotation knob
When pushed and turned, this knob rotates the turret so that you can
replace th e t oner cartridge.
Serial number label (see below)
The seria l num ber label identifies the printer. You see th e s erial numbe r
label when you open th e fe eder acces s door. Do not remove th is label.
Chapter 1. Welcome to the IBM Networ k Color Printer 1–11
Page 26
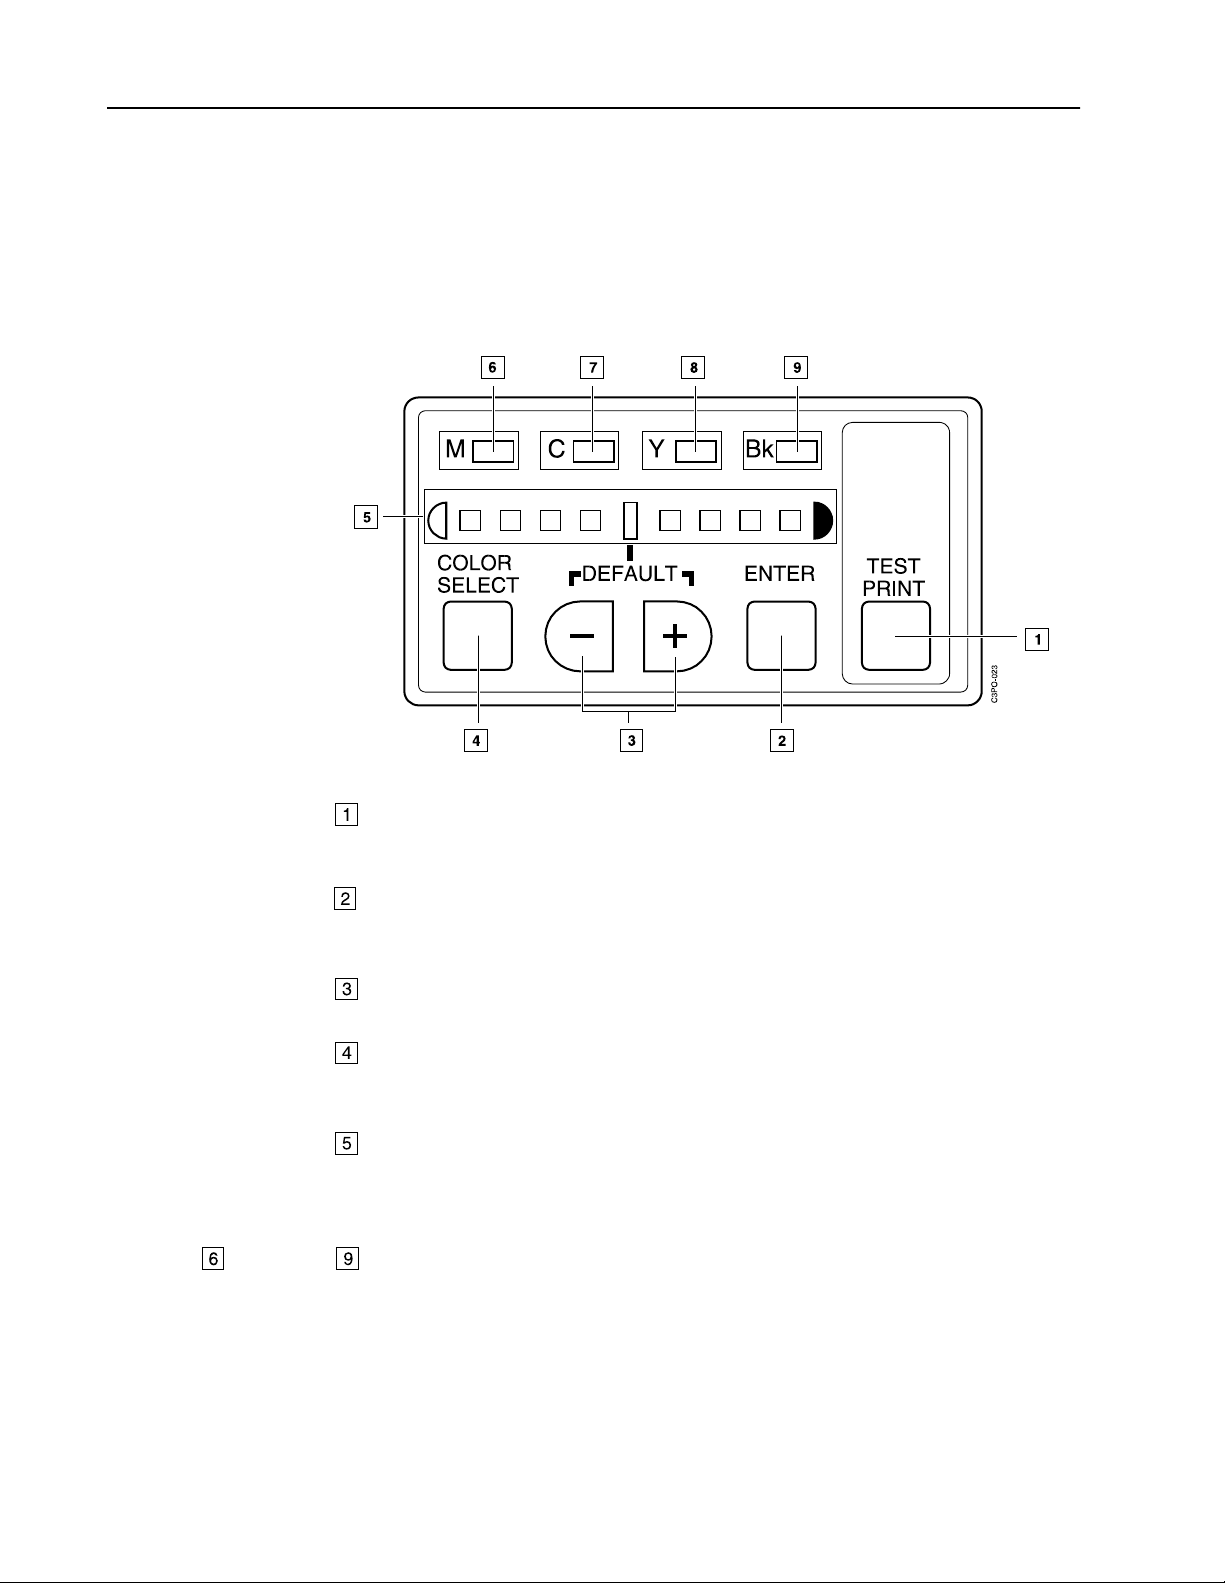
Identifying Parts on the Density Control Panel
This section helps you identify e ac h part of the de ns it y c ont rol panel.
You rarely will need to use the density control panel. See “Adjusting the Color
Density” on page 6–22 f or s ome task-s pecific information.
The dens ity c ontrol pan el is on the back o f the printer. Shown belo w are the
parts of the density cont rol panel.
through
TEST PRINT push button
Press the TEST PRINT push butt on to pr int a test pat ter n th at ca n be used
to check the result of a de ns it y c hange.
ENTER push button
Press the ENTER push button to accept the density value that is currently
defined.
–/+ push buttons
Press these push buttons to choose a density setting or a test pattern.
COLOR SELECT push button
Press the COLOR SELECT push button to choose a color for density
change.
Density gauge
The density gauge shows you the density of the test pattern’s color. (The
light that is lit shows you the current level.) The default density is indicated
on the gauge.
Color Lights (M, C, Y, Bk)
Each light tu rns green whe n y ou choose th e c olor next to it fo r density
change.
1–12 IBM Network Color Printer Operator’s Guide
Page 27
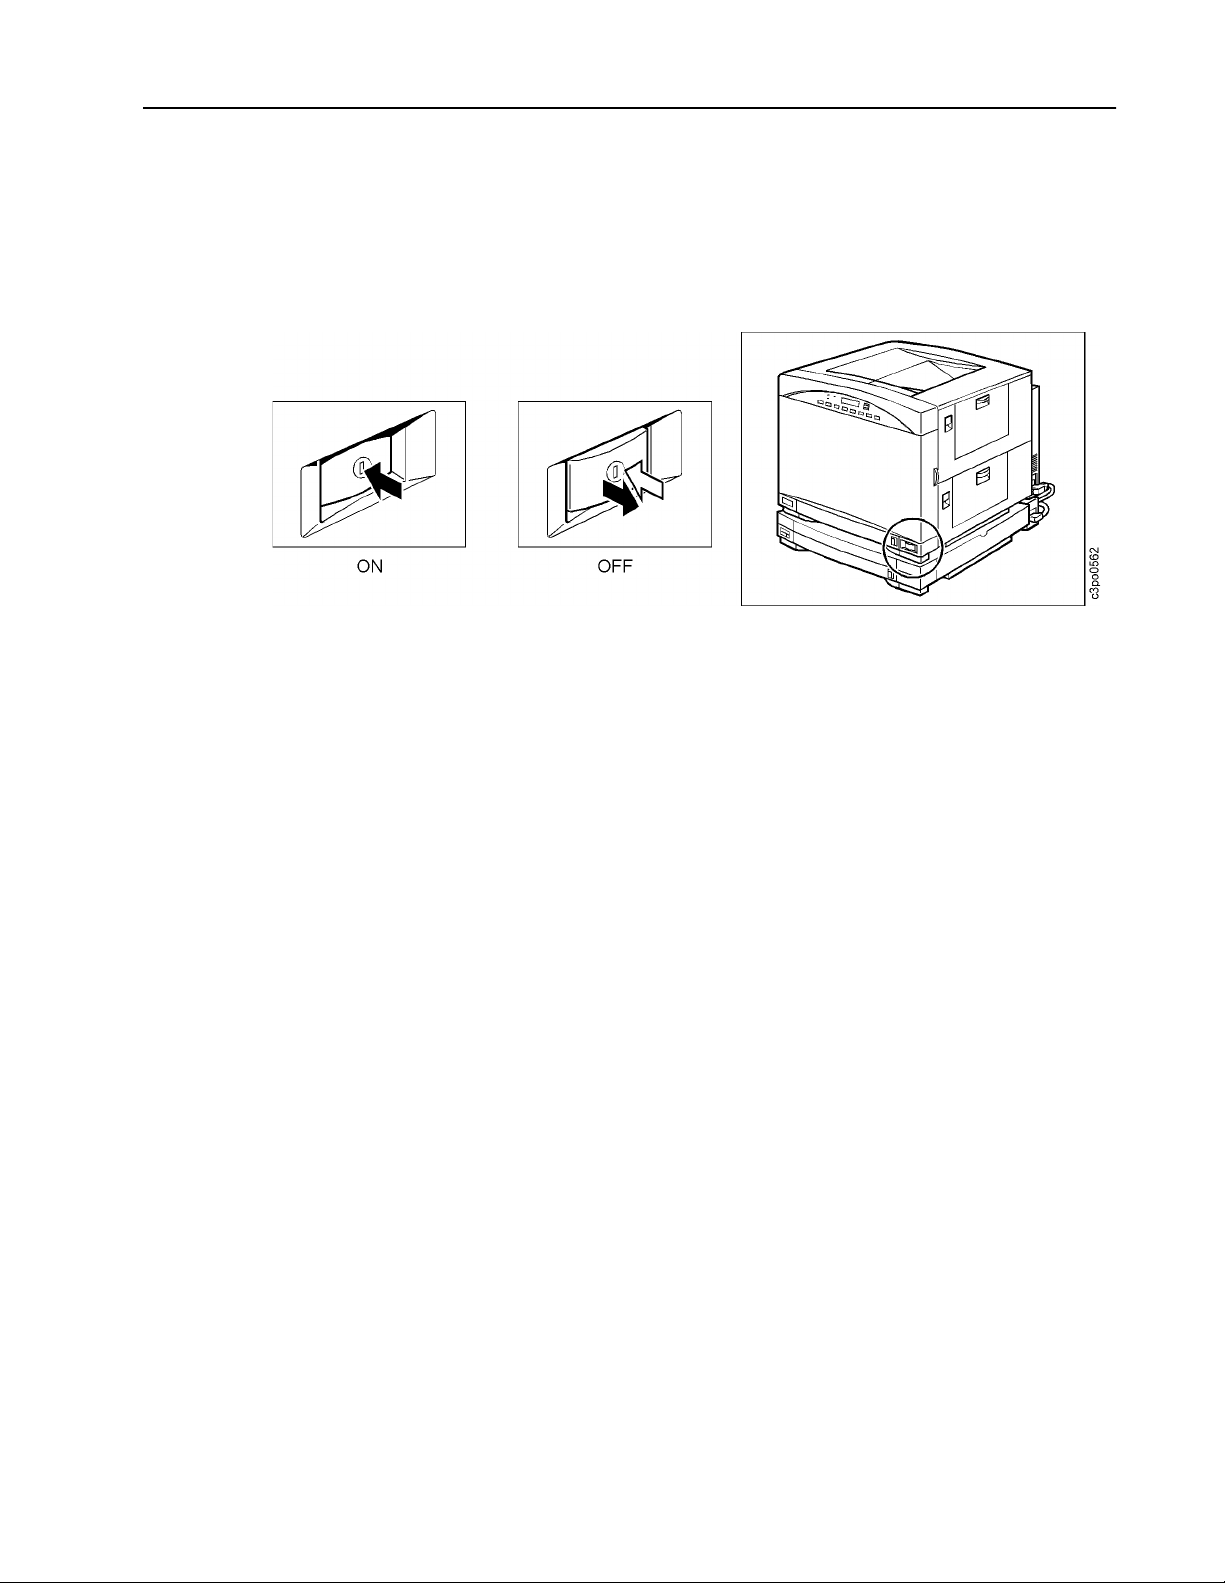
Turning the Printer On and Off
This section tells you how to turn the printer on and off. When you turn the
printer and its connect ed devices on or off, follow t he procedu re below.
Attention:
Never turn the printer on without a fuser oil bottle and a used toner bottle installed.
Turning the Printer On
Use the fol low ing proce dure to turn on power to the printer.
1. Turn on any device s connected t o t he printer (suc h as a SCSI h ard drive
or CD ROM).
2. Press the power switch to turn on the printer (the switch remains pressed).
3. Turn on the host computer.
Note: If you see an error messa ge after you turn on the pr int er, see
Turning the Printer Off
Attention:
Never turn off the printer while it is printing. If power to the printer is accidentally lost,
open the paper jam clearance areas (see “Clearing Paper Jams” on page 6–3) and
remove any paper left inside before turning on the printer again.
Use the fol low ing proce dure to turn of f po w er to the prin t er.
1. Turn off the host computer.
2. Turn off any device s connected t o t he printer (suc h as a SCS I hard drive
or CD ROM).
“Understanding POST Error Messages” on page 7–2 to learn what
to do.
3. Press the power sw it ch to tu rn off the printer (the switc h is released).
Chapter 1. Welcome to the IBM Networ k Color Printer 1–13
Page 28

Resetting the Printer
Use the fol low ing proced ure to reset the printer.
1. Turn off th e printer.
2. Wait 5 sec onds or more before you turn the p rinter on aga in.
3. Turn on th e printer.
1–14 IBM Network Color Printer Operator’s Guide
Page 29

Chapter 2. Choosing and Storing Paper and
Transparencies
This chapt er tells you what paper to use in the printer and how to store and
handle pa per and tran s parencies.
This chapter covers the following topics:
Choosing Paper . . . . . . . . . . . . . . . . . . . . . . . . . . . . . . . . . . . . . . . . . . 2–2
Paper You Should Use. . . . . . . . . . . . . . . . . . . . . . . . . . . . . . . . . . . 2–2
Paper You Should Not Use . . . . . . . . . . . . . . . . . . . . . . . . . . . . . . . 2–2
Understanding the Printable Ar ea on a Page. . . . . . . . . . . . . . . . . . . . 2–4
Handling and Storin g Paper and T ransparen c ies. . . . . . . . . . . . . . . . . 2 –5
Handling and Storin g Paper . . . . . . . . . . . . . . . . . . . . . . . . . . . . . . . 2–5
Handling and Storin g Printouts. . . . . . . . . . . . . . . . . . . . . . . . . . . . . 2–5
Handling T ranspare nc ies . . . . . . . . . . . . . . . . . . . . . . . . . . . . . . . . . 2 –6
Copyright IBM Corp. 1996 Chapt er 2. Choosing and Storing Paper and Tra nsparencies 2–1
Page 30

Choosing Paper
This section gives yo u th e s pecifications for paper you
you
should not
use in the printer. Using a good quality of pape r ensures th e
should
best print quality, prevents paper jams, and reduces the amount of
mainten anc e needed.
Note: Not all p rint m edia can be us ed in this pri nt er. Always prin t a fe w pages
before you buy a large quantity of paper. IBM recommends that you use
IBM paper for the best printing results. Envelopes and labels are not
recommended.
Paper You Should Use
The following table g iv es y ou s pecifications for paper you should use in the
printer.
Paper Specifications
Source Paper Size Weight Capacity
2
Up to a 25-mm stack
height (approximately
250 sheets of 80 g/m
paper)
2
Up to a 10-mm stack
height (approximately
100 sheets of 80 g/m
paper)
Approximately 20
sheets
Tray 1 or tray
2
Auxiliary tray
Plain
Plain
Transparencies
216 × 356 mm to 184 × 267 mm
Letter (8.5 × 11 inches)
Legal (8.5 × 14 inches)
A4 (210 × 297 mm)
JIS B5 (182 × 257 mm)
216 × 356 mm to 184 × 267 mm
Letter (8.5
Legal (8.5 × 14 inches)
A4 (210 × 297 mm)
JIS B5 (182 × 257 mm)
Letter (8.5 × 11 inches)
A4 (210 × 297 mm)
× 11 inches)
60 to 90 g/m
60 to 105 g/m
use and paper
2
2
Paper You Should Not Use
This section lists the kinds of paper that you should not use in the printer.
Do not use paper that easily causes paper ja m s . E xamples are:
• Labels
• En v elopes
• Pa per that is to o t hic k or t oo thin
• W et paper
• Highly textu red or rough paper
• Curled, creased, or damaged paper
• Nonrectangular pap er s uch as aerograms
• Pa per with cutouts or per fo rat ions such as 3-hole-punc hed paper
• Pa per with an i rregular sha pe
• Pa per with wrin k les or rips
• Paper with special coating
2–2 IBM Network Color Printer Operator’s Guide
Page 31

During the fusing process, paper is exposed to high temperatures. Do not use
paper that is af fe c te d by high temperatures . Ex am ples are:
• Thermal paper
• Pa per whose s urf ac e cannot hold the toner at high tem perature
• Preprinted paper containing ink that deteriorates at hig h te m peratures (f or
example , in v oic es and prep rinted form s )
• Ad hesive paper
Attention:
Paper that changes or deteriorates at high temperatures can damage this printer.
Check preprinted paper and coated paper to make sure that it meets the heatcompatib ilit y specifications before print ing on it.
Do not use paper that c ould damag e t he printer. Ex amples are:
• Carbon paper
• Pa per with sta ples, ribbons , ta pe, or other m at erial stuck t o it
• Pa per on which one side is already printed
Chapter 2. Choosing and Storing Paper and Transparencies 2–3
Page 32

Understanding the Printable Area on a Page
This section shows you the area of a p age on which you can print.
The shad ed part of the figure below sh ow s y ou the printable area on a sheet
of paper or t ransparen c y. T he table that fo llows the fig ure gives yo u t he
measure m ents for the border width of differen t siz es of paper.
Direction of Feed
Letter, legal, A4, and J I S B5 (mm) 10.0 5.0 5.0 5.0
Letter, legal, A4, and J I S B5 (inches) 0.4 0.2 0.2 0.2
2–4 IBM Network Color Printer Operator’s Guide
Border Width
Size
ABCD
Page 33

Handling and Storing Paper and Transparencies
This section tells you how to handle paper, store it, store printouts, and handle
transparencies for the best print quality.
Handling and Storing Paper
Paper that y ou handle and store cor rec t ly is in th e best shape for printing.
Follow these guidelines for handling and storing paper.
• Store unused paper in it s wr apping to pro t ec t th e paper against humid ity.
• Do not store t he paper direc t ly on the floor. The floor is us ually humid.
• If t he storage place is hum id, us e a specially designed st orage box for t he
paper.
• Store pape r on a flat surfac e t o prevent it from curling.
• Do not stack the paper too high. Doing so may make it curl.
• Do not expo se th e paper to dir ec t su nlight or a humid environ m ent.
• If you move the paper to a place with a different temperature, leave the paper
there for 24 hours before using it. Otherwise, the paper m ay c url or wrinkle.
• Mak e sure tha t the paper meets th e printer’s s pec if ic ations (se e “C hoosing
Paper” on page 2–2) and that it has been in the printer environment f or at
least 24 ho urs before you us e it. This is especially im portant if you are in a
climate wi th high humidi ty.
Handling and Storing Printouts
Follow these guidelines for handling and storing color printouts.
• The color on a printout hardly fades under normal room light. But if you plan
to keep the c olor printou t s for more th an 2 years, pu t them in a bind er.
(Sometimes the color appears to change when, in fact, it is a color change
in the paper it s elf.)
• Do not store color printouts together with polyvinyl chloride (PVC) materials,
such as clea r holders. Th e to ner may mel t, ca us ing the pap er and the PVC
materials to stick together.
• Us e only nonsolv ent glues t o glue color printouts together.
• So lv ents in glue m ay dis s olve the ton er. Before us ing a glue, tes t it on
unwante d printouts .
• Be fore inser tin g any color printout bet w een printou ts, m ak e sure the pages
are comp let ely dry. If they are not dry, the ink may c aus e the toner t o m elt.
• Store color printouts flat. If they are folded or wrinkled, the toner may come
off.
• Store color printouts a t no rm al temperature. Hig h te m perature causes the
toner to melt and the colors to mix.
Chapter 2. Choosing and Storing Paper and Transparencies 2–5
Page 34

Handling Transparencies
IBM recom m ends that you use IBM tra ns parencie s for the best p rint ing
quality. Follow these guidelines for handling transparencies:
• Us e I BM c olor transparencies only with IB M c olor printers. T hese
transpar encies are des igned exclusively for c olor laser p rint ers.
• Pick up each prin t ed t ranspare nc y as soon as it co m es out of the prin te r t o
prevent the next sheet from jamming.
• Mak e sure no f us er oil gets on a t ransparen c y. Printing on a tr ans parency
that has fu se r oil on it may result in poor p rint quality.
• W hen you tap t he transparencies to a vo id multiple fe eds, be care f ul not to
scratch the films or lea v e fi ngerprints on the print s ides. (If you loo k at a
transpar ency with its w hit e marker pos it ioned on th e upper right sid e, th e
side facing away from y ou is the print si de.)
• This printer ac c epts short-edge feed (S EF) feed only .
• Avoid high temperatures and high humidity. Be sure to store any remaining
transpar encies in the ir protective bags.
2–6 IBM Network Color Printer Operator’s Guide
Page 35

Chapter 3. Loading Paper and Transparencies
This chapt er tells you ho w to load paper int o t he printer, how to choos e the
tray for out put , and how to kn ow w hen to add pa per.
This chapter covers the following topics:
Loading Paper . . . . . . . . . . . . . . . . . . . . . . . . . . . . . . . . . . . . . . . . . . . 3–2
Loading Paper in Tray 1 and Tray 2. . . . . . . . . . . . . . . . . . . . . . . . . 3–2
Loading Paper in the Au x iliary Tray . . . . . . . . . . . . . . . . . . . . . . . . . 3–6
Choosing the Paper Output Tray . . . . . . . . . . . . . . . . . . . . . . . . . . . . 3–13
Using the Side Output Tray . . . . . . . . . . . . . . . . . . . . . . . . . . . . . . 3–13
Using the Top Output Tray . . . . . . . . . . . . . . . . . . . . . . . . . . . . . . . 3–15
Copyright IBM Corp. 1996 Chapter 3. Loading Pape r and Transparencies 3–1
Page 36

Loading Paper
This section tells you how to load paper in tray 1, tray 2, and the auxiliary tray.
Follow thes e guidelines when yo u load paper:
• Mak e sure tha t the paper meets th e printer’s s pec if ic ations (se e “C hoosing
Paper” on page 2–2) and that it has been in the printer environment f or at
least 24 hou rs bef ore you use it. (This is especially importa nt if you are in a
climate wi th high humidi ty. )
• Do not load transparencies in tray 1 or tray 2. Use the auxiliary tray instead.
Loading Paper in Tray 1 and Tray 2
Tray 1 and tra y 2 ca n each hold approximat ely 250 sheets of plain paper (at
80 g/m
Tray 1 and tra y 2 eac h have a pa per amount indicator th at sh ow s y ou how
much pap er remains. Th e blue bar on th e paper amo unt indicat or gradua lly
goes out o f view as paper runs out. W hen the blu e bar has com pletely
disappeared, it is tim e to ref ill the tray.
2
). Paper si z es yo u c an use are le tter, legal, A4, and JIS B5.
3–2 IBM Network Color Printer Operator’s Guide
Page 37

Use the fol low ing proce dure to load pa per into either tray 1 or tra y 2 .
1. Push up the handle on the underside of the tray and pull out the tray (tray 1
is shown here).
2. Press the release b ut t on and slide the paper-w idt h guide to the size of
paper to be loaded. Re lease the but t on to lock the guide in plac e. W here
you set the paper-width guide determines how the printer knows what size
of paper is in t he tray. Mak e s ure that the pa per-width-guide sett ing
matches the size of paper to be loaded.
Note: If there is paper in the tray already, you must remove it before adjusting
the paper-w idth guide .
3. Lift the paper-lengt h guide sligh t ly and slide it to s elect the pap er length
that you w ant. Relea se th e guide to lock it in place.
Chapter 3. Loading Paper and Transparencies 3–3
Page 38

4. Set the paper-size indicator on the front of the tray to match the paper size
you loaded (for exam ple, LTR for letter-size paper). This helps you and
others id entify the size of paper in the tray.
5. Load the paper.
a. Fan out small stacks of paper to lessen the chance of f eeding problems.
b. Put the tra y on a flat surfac e. T hen load a stac k of paper into the tray
with the print side facing up and the bottom edge going first into the tray.
Note: For the best print quality, put the print side (as marked on the paper
wrapper) f ac e up.
3–4 IBM Network Color Printer Operator’s Guide
Page 39

c. M ak e sure the paper stack does not go above the paper-limi t mark.
6. Press down on the paper so that it is anchored under the 2 retaining clips.
7. Align the t ray so that it lin es up with the ra ils i ns ide the pape r f eeder.
Chapter 3. Loading Paper and Transparencies 3–5
Page 40

8. Press the handle on the underside of the tray upward and slide the tray all
the way int o the paper fe eder until the t ray s naps into plac e.
The tray is now ready to supply paper.
Loading Paper in the Auxiliary Tray
The auxili ary t ray holds appr ox im ately 100 s heets of pap er at 80 g/m2. You
can use lett er, legal, A4, or J I S B5-size paper and letter- and A4-s iz e
transparencies. You can close the tray when it is not in use, making the printer
very compact.
Opening the Auxiliary Tray
Use the fol low ing proced ure to open the auxiliary tra y .
1. Pull on the latch to ope n t he auxiliary t ray .
2. Pull out th e ex t ension tray and then gen t ly press down to lock it.
3–6 IBM Network Color Printer Operator’s Guide
Page 41

Loading Paper in the Auxiliary Tray
Note: Make su re t hat the paper meets th e printer’s s pec if ic ations (se e
“Choosin g Paper” on page 2–2) and that it has been in the p rinter
environm ent for at least 24 hours be fo re y ou use it. (This is es pecially
importan t if you are in a climate with hig h humidity.)
Use the fol low ing proce dure to load pa per in the auxiliary tray.
1. Adjust the paper guides to the p aper size you w ant.
2. Tap a stac k of paper on a flat s urf ace to align it s edges.
3. Insert the paper stack as far as it can go into the printer. Make sure that the
print sid e fa c es down and the top of the pa ge goes into t he printer firs t .
Chapter 3. Loading Paper and Transparencies 3–7
Page 42

4. Check th at t he paper stac k does not go above the paper-limit m ark .
Avoid pres s ing or applyi ng excessiv e f orc e to the aux iliary tray.
The auxili ary t ray is now ready to su pply paper .
Follow thes e guidelines for loading paper.
1. Load the auxiliary tr ay w it h only one siz e of paper at a time.
2. Add pap er t o t he auxiliary t ray only when it is co m pletely emp t y.
Otherwise, you may cause the paper to feed incorrectly or to jam.
3. If printouts come out of the printer curled, you may be able to correct
the problem by reve rs ing the pape r s ta c k in th e auxiliary tr ay s o t hat
the bottom of the stack faces up.
4. Avoid se t tin g t he paper guides so tigh tl y that the paper stack be nds.
5. Avoid se t tin g t he paper guides so loos ely t hat the paper stack is not
evenly aligned.
3–8 IBM Network Color Printer Operator’s Guide
Page 43

6. Avoid setting the paper guides so loosely that there is space between
the guides and the paper.
7. Align the paper in the tr ay so th at it is s t raight.
Loading Transparencies in the Auxiliary Tray
Load trans parencie s o nly in the auxiliary tray. You c an load approximately 20
sheets at a time.
IBM recom m ends that you use only I BM t ransparen c ies f or t he best print
quality. For ordering details, see “Ordering Supplies” on page 1–4, or contact
your IBM s erv ic e represe nt at iv e or authorized servic e dealer.
Remember that you ca n us e only lette r- or A4-size tr ansparencies in this
printer.
Transparencies have the following positioning markers to help you insert them
correctly.
Chapter 3. Loading Paper and Transparencies 3–9
Page 44

When you load transparencies, position each sheet so that the white
positioning marker (triangle) is on the upper right side. In this position, the print
side is the bac k s ide.
Use the fol low ing proced ure to load transparen c ies .
1. Adjust the paper guides to accept transp arencies (let t er or A4 size ).
2. With the w hite positio ning marker on the uppe r right side, t ap a stack of
transparencies on a flat surface to align its edges. When you tap, try to hold
the edges of the transparencies and do not touch the print sides.
3–10 IBM Network Color Printer Operator’s Guide
Page 45

3. Before you load the transparencies, fan out small stacks of th em to lesse n
the chance of feeding problems. Be careful not to scratch the transparency
or leave f ingerprints on the print s ides.
4. Positio n each sheet so th at th e w hite positio ning marker is on the up per
right sid e and push it as fa r as it ca n go into the printer.
5. Check th at y ou have not gone above th e paper limit m ark.
The auxili ary t ray is now ready to su pply transparencie s .
Chapter 3. Loading Paper and Transparencies 3 –11
Page 46

Closing the Auxiliary Tray
Use the fol low ing proced ure to close the auxiliary tra y .
1. Lift the end of the extension tray slightly and push it into the auxiliary tray.
2. Close the auxiliary t ray .
3–12 IBM Network Color Printer Operator’s Guide
Page 47

Choosing the Paper Output Tray
The printer has two methods of delivering paper. Which one you use depends
on the paper type, the s iz e of t he document, or if you wa nt y our docum ent
collated. T his section t ells y ou how to use th e s ide output tr ay and the top
output tray .
Using the Side Output Tray
If the side output tray is open, printouts are delivered faceup into the tray. Use
this delivery method fo r normal prin ting and wh en you print on heavy-w eight
paper. In contrast, if the side output tray is closed, printouts are delivered
facedown into the top output tray (see “Using th e T op Output Tr ay ” on page
3–15).
The side ou t put tray can hold 20 shee ts of paper.
Note: When y ou print trans parencie s in t o t he s ide output t ray , be s ure to
remove e ac h s heet as it is deliv ered into the tray. This les s ens the
chance o f curling and jam s .
Opening the Side Output Tray
Use the fol low ing proce dure to open the s ide output tra y .
1. Lift the latch to open the side output tray and pull the tray down.
Chapter 3. Loading Paper and Transparencies 3 –13
Page 48

2. Pull on the extensio n t ray grip to pull ou t the tray.
Closing the Side Output Tray
Use the fol low ing proced ure to close the s ide output tra y .
1. Push in th e ex t ension tray .
2. Close the side output tray until it sn aps into plac e.
3–14 IBM Network Color Printer Operator’s Guide
Page 49

Using the Top Output Tray
If you want t o direct printo ut s int o t he top output t ray , c los e the side out put
tray. Printouts then come into the top output tray facedown and stacked in
order. This is handy when you want to collate your documents. Also, if you
print large jobs, use the top output tr ay because it ho lds up to 100 s heets of
paper at 80 g/ m
2
.
Chapter 3. Loading Paper and Transparencies 3 –15
Page 50

3–16 IBM Network Color Printer Operator’s Guide
Page 51

Chapter 4. Using the Operator Panel
This chapter tells you how the operator panel works and how to use menus on
the displa y panel.
This chapter covers the following topics:
Identifying Each Part of the Operator Panel. . . . . . . . . . . . . . . . . . . . . 4–2
Lights . . . . . . . . . . . . . . . . . . . . . . . . . . . . . . . . . . . . . . . . . . . . . . . . 4 –2
Online Push Button and Light. . . . . . . . . . . . . . . . . . . . . . . . . . . . . . 4–2
Cancel Push Button . . . . . . . . . . . . . . . . . . . . . . . . . . . . . . . . . . . . . 4–3
Display Panel . . . . . . . . . . . . . . . . . . . . . . . . . . . . . . . . . . . . . . . . . . 4 –3
Control Push Buttons . . . . . . . . . . . . . . . . . . . . . . . . . . . . . . . . . . . . 4–3
Paper Source Lights. . . . . . . . . . . . . . . . . . . . . . . . . . . . . . . . . . . . . 4–4
Cancelin g a Print Job . . . . . . . . . . . . . . . . . . . . . . . . . . . . . . . . . . . . . . 4–5
Understanding the Menus . . . . . . . . . . . . . . . . . . . . . . . . . . . . . . . . . . 4 –6
Navigating the Menus. . . . . . . . . . . . . . . . . . . . . . . . . . . . . . . . . . . . 4–7
Choosing a Menu Setting . . . . . . . . . . . . . . . . . . . . . . . . . . . . . . . . . 4–7
Using the Online Menu (Print Pages Menu). . . . . . . . . . . . . . . . . . . . . 4–8
Printing the Help Map. . . . . . . . . . . . . . . . . . . . . . . . . . . . . . . . . . . . 4–9
Printing a Job Log . . . . . . . . . . . . . . . . . . . . . . . . . . . . . . . . . . . . . . . 4–9
Printing a Configuration Page. . . . . . . . . . . . . . . . . . . . . . . . . . . . . . 4–9
Printing a Test Page. . . . . . . . . . . . . . . . . . . . . . . . . . . . . . . . . . . . 4–10
Printing th e C olor Pages. . . . . . . . . . . . . . . . . . . . . . . . . . . . . . . . . 4–10
Printing the Font Page . . . . . . . . . . . . . . . . . . . . . . . . . . . . . . . . . . 4–10
Using the Offline Menus. . . . . . . . . . . . . . . . . . . . . . . . . . . . . . . . . . . 4–11
Entering a Password . . . . . . . . . . . . . . . . . . . . . . . . . . . . . . . . . . . . . 4–13
Using the Printer Setup Menu . . . . . . . . . . . . . . . . . . . . . . . . . . . . . . 4–14
Choosing the Paper Source . . . . . . . . . . . . . . . . . . . . . . . . . . . . . . 4–14
Choosing the Paper Size . . . . . . . . . . . . . . . . . . . . . . . . . . . . . . . . 4–15
Choosing the Color Mode. . . . . . . . . . . . . . . . . . . . . . . . . . . . . . . . 4–16
Choosing to Print a Cover Page. . . . . . . . . . . . . . . . . . . . . . . . . . . 4–16
Choosing to Print When There Is a PostScript Error . . . . . . . . . . . 4–17
Choosing to Print a Start Page. . . . . . . . . . . . . . . . . . . . . . . . . . . . 4–18
Using the System Setup Menu. . . . . . . . . . . . . . . . . . . . . . . . . . . . . . 4–19
Setting the Printer Name . . . . . . . . . . . . . . . . . . . . . . . . . . . . . . . . 4–20
Setting the Time and Date . . . . . . . . . . . . . . . . . . . . . . . . . . . . . . . 4–20
Changing the Password . . . . . . . . . . . . . . . . . . . . . . . . . . . . . . . . . 4–21
Setting the Power Savings Mode . . . . . . . . . . . . . . . . . . . . . . . . . . 4–23
Using the Language Menu. . . . . . . . . . . . . . . . . . . . . . . . . . . . . . . . . 4–24
Changing the Language. . . . . . . . . . . . . . . . . . . . . . . . . . . . . . . . . 4–24
Language Menu Settings . . . . . . . . . . . . . . . . . . . . . . . . . . . . . . . . 4–24
Copyright IBM Corp. 1996 Chapter 4. Using the Operator Panel 4–1
Page 52

Identifying Each Part of the Operator Panel
This section identifies the part s of th e operator pan el. U se the light s and push
buttons on the opera to r panel to cont rol the print er and to lear n it s stat us.
Following is an illustration of the operator panel and a description of each of its
parts.
through
Lights
Power
The Power light is green. W hen it is lit, the printer is on.
Busy
The Busy light is green. When it is lit, the printer is processing or printing
a job.
Attention
The Attention light is yellow. It flashes to alert you to an error or warning
condition.
Online Push Button and Light
Press the Online push butto n t o t ak e t he printer on line or offline. Online
means that the printer is communicating with the network. Offline means that
the printe r is not c om m unicating w it h the netwo rk .
When you ta k e t he printer off line,
• A jo b t hat is printing fin is hes printing before the printer goe s of fl ine.
• A jo b t hat is s pooling to a qu eue finishes s pooling bef ore the print er goes
offline.
• The printer does not accept jobs to be s pooled or printed.
Press the Online push butto n t o t ak e t he printer on line again.
Chapter 4. Using the Operato r Panel 4–2
Page 53

The Online light shows the status of the printer. This table tells you what each
kind of Online light mean s .
Light What it means
Solid green The printer is processing or printing a job or communicating
Flashing green The printer is preparing to go offline.
Off The printer is offline or is starting up.
Cancel Push Button
Press the Cancel push button to stop pri nt ing the current job. If no job is
printing, pres s ing the Cancel push b ut t on deletes th e oldest job fro m t he
printer’s queue.
Display Panel
The displa y panel tells yo u about the status of the printer, sho w s me nu
information, and en ables you to view and edi t in fo rm ation to con f igure the
printer.
with a remote computer (for example, through the printer
Spooler utility).
through
You can see three types of messages on the display panel: error messages,
status messages, and warning messages. See Chapter 7, “Understanding
Operator M essages ,” fo r a descriptio n of each of thes e messag e types.
Control Push Buttons
Menu
Press the Menu push button to see menus on the display panel.
This table shows you the relationship between the online/offline status and
the funct ion of the Menu push button.
When you are... Press the Menu push button to...
Online Access the Print Pages menu
Offline and not in any menu Enter the Setup menu
Offline at the top level of a menu Exit the Setup menu
Inside a menu, displaying an item Go up 1 level in the menu structure
4–3 IBM Network Color Printer Operator’s Guide
Page 54

Enter
Use the Enter push bu t to n as s hown in the fo llowing table.
When you... Press the Enter push button to...
See the Attention light flash but
there is no error message on the
display panel
See warning messages on the
display panel
See a Setup menu Choose the menu on line 2 of the display
See a menu setting Make that setting the current one. The
See 1 or more warning messages
See the current status message
panel and access the next level of menus
current setting has an asterisk (*) in
column 1 of the display. When you exit the
Setup menu, answer YES to the SAVE
CHANGES message to save that setting.
Menu Scrolling
These arr ow s are called the Menu Scrolling push buttons in this
publicati on. Use the Menu Scrolling push buttons to scroll through a
menu and t he settings in a menu. Th e up push butt on (↑) shows the
previous menu or setting; the down push button (↓) shows the next menu
or setting.
If you see a warning message with a (+) in the rightmost column of the
display, you also can use these push buttons to display additional warning
messages.
Cursor Position
These arr ow s are called the Cursor Position pus h buttons in this
publicati on. Use the Cursor Position push buttons to enter text and
numbers fo r s om e menu set ti ngs (s uch as a pas s w ord or a nume ric
setting). Th e right push button (→) moves the cursor one position to the
right. The lef t push button (←) moves th e c urs or one pos it ion to the left.
Paper Source Lights
The paper source lights show whether the paper is coming from tray 1, tray 2,
or the auxil iary t ray.
Chapter 4. Using the Operato r Panel 4–4
Page 55

Canceling a Print Job
This section tells you how t o c ancel a print job.
Press the Cancel push button to cance l th e job that is currently print ing. If no
job is printin g, Cancel removes the job being proc es s ed (the olde s t jo b). You
must be online for Cancel to work.
4–5 IBM Network Color Printer Operator’s Guide
Page 56

Understanding the Menus
This section tells you how to navigate and choose from the menus you see on
the displa y panel. The me nu groups, m enus, and it em s in a menu are shown
in the table below.
Menu Group Menu Item
ONLINE PRINT PAGES
LANGUAGE
HELP MAP
JOB LOG
CONF IGURATION
TEST PAGE
COLOR PAGES
ERROR LOG
FUSER TEST PAGE
FONT PAGE
ENGLISH (default)
FRANÇAIS
DEUTSCH
ITALIANO
ESPAÑOL
PORTUGUES
NEDERLANDS
NORSK
SVENSKA
DANSK
SUOMI
OFFLINE
RUN SETUP
PRINTER SETUP
QUEUE SETUP
CLEAR LOG/QUEUES
SYSTEM SETUP
NETWORK SETUP
PRINTER SETUP
QUEUE SETUP
CLEAR LOG/QUEUES
SYSTEM SETUP
NETWORK SETUP
PAPER SOURCE
PAPER SIZE
COLOR M O DE
PRINT COVER PAGE
PRINT TO PSERROR
PRINT START PAGE
This menu is used by the system
administrator. See the
Guide
.
This menu is used by the system
administrator. See the
Guide
.
PRINTER NAME
DATE
SYSTEM TIME
CHANGE PASSWO RD
POWER SVNGS
This menu is used by the system
administrator. See the
Guide
.
Administrator’s
Administrator’s
Administrator’s
Chapter 4. Using the Operato r Panel 4–6
Page 57

Navigating the Menus
Use the fol low ing proced ure to navigate the men us .
1. Choos e th e online or of fli ne m enu group by toggling the Online push
button between online and offline. Use the table below to find the menu you
want.
Menu Group Menu Where to Find an Explanation
ONLINE P RI NT PAGES
OFFLINE
2. Press the Menu push button.
3. Press the Menu Scrolling push buttons (↑↓) to scroll through the items. If
you con tin ue to hold do w n a Menu Scrolling push button, th e s c rolling
speeds up.
4. When you see the item you want, pre ss the Enter push button to go to the
next menu level.
5. Choose a menu setting (see “Choosing a Menu Setting” on page 4–7) and
press the Enter push bu t to n. You see the next item, if any .
Choosing a Menu Setting
To choose a menu set ti ng, do one of the f ollowing:
1. Choos e fr om t he settings y ou see on the dis play pane l. A n example is
when yo u us e the Menu Scrolling push button s (↑↓) to show you YES or
NO and then you press the Enter push button to choose the setting that you
see on th e dis play pane l.
2. Enter a setting 1 charact er at a time (such as a password or print er name).
See “Using the Online Menu (Print Pages
Menu)” on page 4–8.
RUN SETUP See “Using the Offline Menus” on page 4–11.
LANGUAGE See “Using the Language Menu” on page 4–24.
a. Use the Menu Scrolling push buttons (↑↓) to choose the first
alphanu m eric charac te r y ou want on the s ec ond line of the display
panel. You can use ca pit al letters, small lette rs , a nd numeral s.
b. Use the right Cursor Position push button (→) to advance the cursor
to the next character position.
If you need to correct a charact er in a prev ious char ac t er position, use
the left Cursor Position push button (←) to move the cursor to the
position you want to correct.
c. Repeat step a and step b for each character you want.
d. When you finish, press the Enter push button.
4–7 IBM Network Color Print er Operator’s Guide
Page 58

Using the Online Menu (Print Pages Menu)
The online menu consists of the Print Pages menu. The Print Pages menu
allows you to print information stored in the printer to help solve problems and
to see the printer’s con f iguration.
The Help Map and the configuration page give you valuable information about
using the printer. Print these pages and keep them near the printer.
If you need t o c all for service, m ak e sure tha t yo u have a conf iguration pa ge
available t o help you tell t he service re presentat iv e about the printer.
Accessing the Print Pages Menu
Use the fol low ing proce dure to access t he Print Pag es m enu.
1. Check th at th e printer is online (t he Online light is on). If the printer is not
online, press the Online push button.
2. Check that the Attention light is not on. If it is, see Chapter 7 ,
“Unders t anding Operator Mes s ages,” and ta k e appropr iat e action.
3. Press the Menu push button. You see PRINT PAGES on the first line of the
display panel.
Print Pages Menu
This table shows you the items in the Print Pages menu and tells you where to
find an exp lanation of each item.
Print Pages Menu
Item Where to Find an Explanation
HELP MAP Prints a Help Map. See “Printing the Help Map” on page 4–9.
JOB LOG Prints a Job Log. See “Printing a Job Log” on page 4–9.
CONFIGURATION P rin ts a configuration page. See “Printing a Configuration
Page” on page 4–9.
TEST PAGE Prints a test page. See “Printing a Test Page” on page 4–10.
COLOR PAGES Prints the color pages. See “Printing the Color Pages” on
page 4–10.
FONT PAGE Prints a font page. See “Printing the Font Page” on page
4–10.
ERROR LOG
FUSER TEST PAGE
These are diagnostic printouts that service personnel may
ask you to print.
Chapter 4. Using the Operato r Panel 4–8
Page 59

Printing the Help Map
Use the fol low ing proced ure to print th e H elp Map. Th is m ap t ells you ab out
the operator panel, push buttons, and panel lights and lists all the menus.
1. Go to the Print Pages menu (see “Accessing the Print Pages Menu” on
page 4– 8).
2. When you choose the Print Pages menu, you see HEL P MA P on the second
line of the dis play panel .
3. Press the Enter push butto n. Several mes s ages appe ar on the display
panel that tell you what the print er is doing until the Help Map is printed.
4. Yo u s ee READY when the print job is f inis hed.
Printing a Job Log
Use the fol low ing proced ure to print a job log of the las t 4 0 jobs. The lo g
includes inf ormation su c h as us er name, document nam e, time and date
printed, a nd number o f pa ges printed f or each job.
1. Go to the Print Pages menu (see “Accessing the Print Pages Menu” on
page 4– 8).
2. Use the Menu Scrolling push buttons (↑↓) to scroll throug h th e Print
Pages menu until you see JOB LOG on the second line of the display panel.
3. Press the Enter push butto n. Several mes s ages appe ar on the display
panel that tell you what the print er is doing until the Job Log is printed.
4. Yo u s ee READY when the print job is f inis hed.
Printing a Configuration Page
Use the fol low ing proced ure to print a c onf iguration page listing th e c urrent
server an d printer conf iguration. T his page shows y ou the settings for the
Printer, Q ueue, Job Log, and Net w ork Setup me nus (see “Of fl ine Menus” on
page 4–1 1) and shows yo u t he total print co unt.
1. Go to the Print Pages menu (see “Accessing the Print Pages Menu” on
page 4– 8).
2. Use the Menu Scrolling push buttons (↑↓) to scroll throug h th e Print
Pages menu until you see CONFIGURATION on the second line of the display
panel .
3. Press the Enter push butto n. Several mes s ages appe ar on the display
panel that tell you what the print er is doing until the configuration pag e is
printed.
4. Yo u s ee READY when the print job is f inis hed.
4–9 IBM Network Color Printer Operator’s Guide
Page 60

Printing a Test Page
Use the fol low ing proce dure to print a te s t p age. This pa ge s hows you
samples of c olor and gray s c ale that you can use to det erm ine whether or not
you are print ing correct ly fr om an applica tio n. T he test page also show s y ou
the printe r name, print er m odel, color m ode, print c ount, calibra t ion, memory
multiplie r se t ti ng, c olor-rendering dictionary, and date and ti m e printed.
1. Go to the Print Pages menu (see “Accessing the Print Pages Menu” on
page 4– 8).
2. Use the Menu Scrolling push buttons (↑↓) to scroll throug h th e Print
Pages m enu until you s ee TEST PAGE on the second line of the display
panel.
3. Press the Enter push button. Several messages appear on the display
panel that tell you what the print er is doing until the test page is p rinted.
4. Yo u s ee READY when the print job is f inis hed.
Printing the Color Pages
Use the following procedure to print the color pages. These pages display the
RGB, CMYK, and Pantone colors available from the printer. Use these pages
to help you ch oose colors w hen working w it h illustratio n and deskto p
publishing software applications.
1. Go to the Print Pages menu (see “Accessing the Print Pages Menu” on
page 4– 8).
2. Use the Menu Scrolling push buttons (↑↓) to scroll throug h th e Print
Pages m enu until you see COLOR PAGES on the second line of the display
panel.
3. Press the Enter push button. Several messages appear on the display
panel that tell you what the printer is doing until the color pages are printed.
4. Yo u s ee READY when the print job is f inis hed.
Printing the Font Page
Use the fol low ing proce dure to print th e f ont page. This page shows th e
PostScript fonts tha t a re resident in t he printer.
1. Go to the Print Pages menu (see “Accessing the Print Pages Menu” on
page 4– 8).
2. Use the Menu Scrolling push buttons (↑↓) to scroll throug h th e Print
Pages m enu until you s ee FONT PAGE on the se c ond line of the dis play
panel.
3. Press the Enter push button. Several messages appear on the display
panel that tell you what the print er is doing until the font page is printed.
4. Yo u s ee READY when the print job is f inis hed.
Chapter 4. Using the Operator Panel 4–10
Page 61

Using the Offline Menus
Use the offline menu group to define the printer’s default se ttings. From t he
offline menu group, ch oose the Run Setup or Language m enu. From the s e
menus, access menus such as Printer Setup or System Setup. (See the table
in “Unders t anding the Menus” on p age 4–6.)
Because some of the offline menus are for your system administrator to use,
they are cov ered in the
Note: If your system administ rator has assig ned a password for th e Run Set up
menus, yo u need that password to u s e th e m enus.
Offline Menus
This table shows you the menus you can access from the offline menu group
and explains how to use them.
Menu Item Function
PRINTER SETUP
QUEUE SETUP
JOB LOG SETUP
RUN SETUP
CLEAR LOG/QUEUES
SYSTEM SETUP
NETWORK SETUP
EXIT SETUP
LANGUAGE
Choice of languages
Adminis t rat or’s Guide
Offline Menus
Use to specify the way print jobs are
managed on the printer, such as
setting the paper size or printing a
start page. See “Using the Printer
Setup Menu” on page 4–14.
Use to enable or disable print queues
and to specify how or if print jobs are
queued. See the
Guide
Use to specify whether or not the Job
Log should print automatically and be
cleared automatically. See the
Administrator’s Guide
information.
Use to erase the Job Log and any
jobs stored in the printer queues. See
the
informatio n.
Use to specify the printer system
settings, such as time, date, and
printer name. See “Using the System
Setup Menu” on page 4–19.
Use to activate and configure network
systems that transfer jobs to the
printer. See the
for more information.
Use to exit the setup menus and save
any changes that you made.
Use to choose the language of the
text on the display panel. See
“Changing the Language” on page
4–24.
.
Administrator’s
for more information.
for more
Administrator’s Guide
Administrator’s Guide
for mo r e
4–11 IBM Network Color Printer Operator’s Guide
Page 62

Accessing the Offline Menus
Use the fol low ing proce dure to access t he offline me nus.
not
1. Check th at th e printer is offline (t he Online light is
not offline, press the O nline push butto n.
Note: If the printer is communicating with a utility when you take it offline,
the printe r rem ains in an “o ffline pending” state un t il th e ut ility is
disengaged.
2. Press the Menu push button. You see SELECT FUNCTION on the first line of
the disp lay panel.
3. Use the Menu Scrolling push buttons (↑↓) to scroll through the items until
you see the one you want. Press the Enter push button to select the item
that you want.
For more in fo rm ation on the menus, see the table under “Und erstand ing the
Menus” on page 4–6.
on). If the printer is
Chapter 4. Using the Operator Panel 4–12
Page 63

Entering a Password
If your system administrator has assigned a password for the Run Setup
menus, us e t he following procedu re t o enter that p assword.
1. When a password is re quired, you s ee ENTER PASSWORD on the display
panel. Use the Menu Scrolling push buttons (↑↓) to set the first
alphanumeric character of the password on the second lin e of the display
panel.
2. Use the right Cursor Position push button (→) to advance the curso r to
the next character position.
3. Repeat step 1 and st ep 2 for each ch aracter in th e password .
4. When you finish entering the password, press the Enter push button.
a. If you entered the right password, you see PRINTER SETUP on the
second lin e of t he display panel.
b. If you entered a wrong password, you see PASSWORD INCORRECT on the
display panel. Press the Enter push button. You see TRY AGAIN on line
1. Press th e En ter push button and repeat step 1 through step 4.
Deleting a Password
If you forget the password or no longer want to use one, use the following
procedure to delete the password.
1. Turn off th e printer.
2. Turn on th e printer.
3. Watch closely to see the message PRESS MENU FOR SETUP on the display
panel. When you see the message, press the up and down Menu
Scrolling push buttons (↑↓)
4. You see on the display panel DELETING SETTINGS... and PLEASE WAIT,
STARTING UP. Whe n t he printer com pletes its startup procedure, you m ay
access th e of f line menus to s et a new password (see “Changing th e
Password” on page 4–21) or return to a READY state.
Changing a Password
See “Changing the Password” on page 4–21 for information about how to
change a password .
at the same time
.
4–13 IBM Network Color Printer Operator’s Guide
Page 64

Using the Printer Setup Menu
Use this menu to set commonly used printer specifications such as paper size
and pape r so urce.
Accessing the Printer Setup Menu
Use the fol low ing proce dure to access t he Printer Se t up m enu.
1. Check th at th e printer is offline (t he Online light is
not offline, press the O nline push butto n.
2. Press the Menu push button. You see SELECT FUNCTION on the first line of
the disp lay panel and RUN SETUP on the seco nd line.
3. Press the Enter push button. If your system administrator has set a
password for the Run Setup menu, y ou must enter that password now. See
“Entering a Passw ord” on page 4–13 to lear n how to do this.
4. Yo u s ee SETUP MENU on the firs t li ne of the display panel and PRINTER
SETUP on the second line.
5. Press the Enter push button. PRI NTER SETUP moves to the first line of the
display panel, and you see PAPER SOURCE on the s ec ond line.
Printer Setup Menu
This table shows you the items on the Printer Setup menu and tells you where
to find an explanation of eac h item.
not
on). If the printer is
Item Where to Find an Explanation
PAPER SOURCE See “Choosing the Paper Source” on page 4–14.
PAPER SIZE See “Choosing the Paper Size” on page 4–15.
COLOR MODE See “Choosing the Color Mode” on page 4–16.
PRINT COVER PAGE See “Choosing to Print a Cover Page” on page 4–16.
PRINT TO PSERROR See “Choosing to Print When There Is a PostScript Error” on
PRINT START PAGE See “Choosing to Print a Start Page” on page 4–18.
Choosing the Paper Source
Note: The se tting you ch oose here is us ed only for jobs that do n ot sp ec if y a
paper source.
Use the following procedure to choose the paper source that feeds the printer.
1. Go to the Printer Setup menu (see “Accessing the Printer Setup Menu” on
page 4– 14).
2. When you choose the Printer Setup menu, you see PAPER SOURCE on the
second line of the disp lay panel.
3. Press the Enter push button. PAPER SOURCE moves up to the firs t line of
the disp lay panel and yo u s ee TRAY 1 on the second line of the display
panel.
Printer Setup Menu Items
page 4–17.
Chapter 4. Using the Operator Panel 4–14
Page 65

4. Use the Menu Scrolling push buttons (↑↓) to scroll t hrough the available
settings, TRAY 1, TRAY 2, AUXILIARY TRAY, or AUTO SELECT. If you choose
AUTO SELECT and if tra y 1 or t ray 2 runs out of paper, the print er feeds
paper from the othe r tr ay (t ray 1 or tray 2) tha t m atches the paper size in
the tray th at ran out. TRAY 1 is the default.
5. When yo u s ee the setting you want , p res s t he E n ter push button.
6. Press the Menu push button 3 times . You see EXIT SETUP on the f irs t line
of the display panel and the default setting, NO, on the seco nd line.
7. Press the down Menu Scrolling pus h but ton (↓ ) to see YES on the second
line.
8. Press the Enter push button. You see SAVE CHANGES on the first line of the
display panel and the def ault setting, YES, on the second line. Press the
Enter push button to save the changes.
Choosing the Paper Size
Note: The se tting you ch oose here is us ed only for jobs that do n ot sp ec if y a
paper size .
Use the fol low ing proced ure to choos e t he size of pap er t o print on.
1. Go to the Printer Setup menu (see “Accessing the Printer Setup Menu” on
page 4– 14).
2. Use the Menu Scrolling push buttons (↑↓) to scroll through the items until
you see PAPER SIZE on the second line of the dis play pane l.
3. Press the Enter push button. PAPER SIZE moves up to the first line of the
display panel and you see LETTER on the second line of the display panel.
4. Use the Menu Scrolling push buttons (↑↓) to scroll t hrough the available
settings . You can choos e to print on the following paper s iz es :
– English paper sizes (LETTER [8.5 x 11 inch] or LEGAL [8.5 x 14 inch])
– metric (ISO) paper sizes (A4 [210 x 297 mm] or JIS B5 [182 x 2 77 mm]) .
The default paper size is LETTER. For transparencies, yo u can choose only
LETTER or A4.
5. When yo u s ee the setting you want , p res s t he E n ter push button.
6. Press the Menu push button 3 times . You see EXIT SETUP on the f irs t line
of the display panel and the default setting, NO, on the seco nd line.
7. Press the down Menu Scrolling pus h but ton (↓ ) to see YES on the second
line.
8. Press the Enter push button. You see SAVE CHANGES on the first line of the
display panel and the def ault setting, YES, on the second line. Press the
Enter push button to save the changes.
4–15 IBM Network Color Printer Operator’s Guide
Page 66

Choosing the Color Mode
Note: The se tting you ch oose here is us ed only for jobs that do n ot sp ec if y a
color mod e.
Use the fol low ing proce dure to choos e w hether to print color or grayscale
images.
1. Go to the Printer Setup menu (see “Accessing the Printer Setup Menu” on
page 4– 14).
2. Use the Menu Scrolling push buttons (↑↓) to scroll through the items until
you see COLOR MODE on the sec ond line of the display p anel.
3. Press the Enter push button. COLOR MODE moves up to the first line of the
display panel and yo u s ee CMYK on the second line of the dis play pane l.
4. Use the Menu Scrolling push buttons (↑↓) to scroll t hrough the av ailable
settings, CMYK or GRAYSCALE. CMYK is the default.
5. When yo u s ee the setting you want , p res s t he E n ter push button.
6. Press the Menu push button 3 times . You see EXIT SETUP on the f irs t line
of the display panel and the default setting, NO, on the seco nd line.
7. Press the down Menu Scrolling pus h but ton (↓ ) to see YES on the second
line.
8. Press the Enter push button. You see SAVE CHANGES on the first line of the
display panel and the def ault setting, YES, on the second line. Press the
Enter push button to save the changes.
Choosing to Print a Cover Page
Use the following procedure to choose whether or not the printer prints a cover
page. If yo u c hoose to print a c ov er page, ea c h print job is prec eded by a jo b
summary page that shows the name of the user who sent the job, the
document name, the printer name, the time the job was printed, the number of
pages print ed, and the s t at us of th e job.
1. Go to the Printer Setup menu (see “Accessing the Printer Setup Menu” on
page 4– 14).
2. Use the Menu Scrolling push buttons (↑↓) to scroll through the items until
you see PRINT COVER PAGE on the sec ond line of the display panel.
3. Press the En ter push button. PRINT COVER PAGE moves up to the first line
of the display panel and you see NO on the second line of the display panel.
4. Use the Menu Scrolling push buttons (↑↓) to scroll t hrough the av ailable
settings, YES and NO. NO is the def ault to sav e printing tim e and paper.
Note: If you set this and the PRINT TO PSERROR setting to YES, wh en th ere
is a PostSc ript error, the error messa ge is printe d on the cover
page.
5. When yo u s ee the setting you want , p res s t he E n ter push button.
Chapter 4. Using the Operator Panel 4–16
Page 67

6. Press the Menu push button 3 times . You see EXIT SETUP on the f irs t line
of the display panel and the default setting, NO, on the seco nd line.
7. Press the down Menu Scrolling pus h but ton (↓ ) to see YES on the second
line.
8. Press the Enter push button. You see SAVE CHANGES on the first line of the
display panel and the def ault setting, YES, on the second line. Press the
Enter push button to save the changes.
Choosing to Print When There Is a PostScript Error
Use the fol low ing proced ure to choos e w hether or no t th e printer prin ts t he
available portion of a print job when there is a PostScript error.
1. Go to the Printer Setup menu (see “Accessing the Printer Setup Menu” on
page 4– 14).
2. Use the Menu Scrolling push buttons (↑↓) to scroll through the items until
you see PRINT TO PSERROR on the second line of the displ ay panel.
3. Press the En ter push button. PRINT TO PSERROR moves up to the first line
of the display panel and you see NO on the second line of the display panel.
4. Use the M enu Scrolli ng push butto ns (↑↓) to s c roll through th e av ailable
settings, YES and NO. Choose YES to print the portion of the job processed
before th e error. Choose NO to cancel printing w hen there is a PostScript
error. NO is the default.
Notes:
1. If you have trouble printing a PostScript job, consider setting PRINT TO
PSERROR to YES. This allows yo u to se e w here the job s to pped and
the PostScript error near the la st page prin t ed.
2. If you print large PostSc ript jobs, cons ider setting PRINT TO PSERROR
to NO. A large PostScript job might stop after 2/3 of the job is finished
and tie up the printer.
3. If you set both the PRINT TO PSERROR and the PRINT COVER PAGE
settings to YES, the Po stScript err or m es s age is printed on the cover
page as the job status.
5. When yo u s ee the setting you want , p res s t he E n ter push button.
6. Press the Menu push button 3 times . You see EXIT SETUP on the f irs t line
of the display panel and the default setting, NO, on the seco nd line.
7. Press the down Menu Scrolling pus h but ton (↓ ) to see YES on the second
line.
8. Press the Enter push button. You see SAVE CHANGES on the first line of the
display panel and the def ault setting, YES, on the second line. Press the
Enter push button to save the changes.
4–17 IBM Network Color Printer Operator’s Guide
Page 68

Choosing to Print a Start Page
Use the following procedure to choose whether or not the printer prints a start
page when you turn the power on. The start page shows the curren t date, last
calibratio n date, colo r m ode and print er mode, am ount of memory install ed in
the printe r, net w ork protoco ls enabled, a nd c onnecti ons enable d.
1. Go to the Printer Setup menu (see “Accessing the Printer Setup Menu” on
page 4– 14).
2. Use the Menu Scrolling push buttons (↑↓) to scroll through the items until
you see PRINT START PAGE on the second line of th e display panel.
3. Press the Enter push button. PRI NT START PAGE moves up to the first line
of the display panel and you see YES on the second line of the display panel
4. Use the Menu Scrolling push buttons (↑↓) to scroll t hrough the av ailable
settings, YES and NO. YES is the default.
5. When yo u s ee the setting you want , p res s t he E n ter push button.
6. Press the Menu push button 3 times . You see EXIT SETUP on the f irs t line
of the display panel and the default setting, NO, on the seco nd line.
7. Press the down Menu Scrolling pus h but ton (↓ ) to see YES on the second
line.
8. Press the Enter push button. You see SAVE CHANGES on the first line of the
display panel and the def ault setting, YES, on the second line. Press the
Enter push button to save the changes.
Chapter 4. Using the Operator Panel 4–18
Page 69

Using the System Setup Menu
Use the System Setup menu to change the printer name, date, and system
time and to set or change the password and the Power Savings mode. The
following se c ti ons tell you ho w to us e t he System Setup menu.
Accessing the System Setup Menu
Use the fol low ing proced ure to access t he System Setup menu.
1. Check th at th e printer is offline (t he Online light is
not offline, press the O nline push butto n.
2. Press the Menu push button. You see SELECT FUNCTION on the first line of
the disp lay panel and RUN SETUP on the seco nd line.
3. Press the Enter push button. If your system admin is trator has assigned a
password for the Run Setup menu, enter that password now. See
“Entering a Passw ord” on page 4–13.
4. Press the Enter push button. You see SETUP MENU on the first line of the
display panel and PRINTER SETUP on the second line.
5. Use the Menu Scrolling push buttons (↑↓) to scroll throug h th e m enus
until you see SYSTEM SETUP.
6. Press the Enter push button. SYSTEM SETUP moves t o t he first line of th e
display panel, and you see PRINTER NAME on the second line.
not
on). If the printer is
You are no w in t he System Set up menu. R ead the follow ing sectio ns to learn
how to use this menu.
System Setup Menu
This table shows you the items on the System Setup menu and tells you
where to find an expla nat ion of each it em .
System Setup Menu Items
Item Where to Find an Explanatio n
PRINTER NAM E Change the printer name. See “Setting the Printer
Name” on page 4–20.
DATE (format) Change the current date. See “Setting the Time and
Date” on page 4–20.
SYSTEM TIME Change the current time. See “Setting the Time and
Date” on page 4–20.
CHANGE PASSWORD Set or change the password for the printer. See
“Changing the Password” on page 4–21.
POWER SVNGS Set or change the amount of time that the printer
remains idle before changing to a low power
consumption mode (Energy Star). See “Setting the
Power Savings Mode” on page 4–23.
4–19 IBM Network Color Printer Operator’s Guide
Page 70

Setting the Printer Name
Use the fol low ing proced ure to change the name by which the printer is
identified on the network. Choose a name that clearly identifies the printer to
users, such as IBM 43 03 Color. The default nam e is IB Mnetc olor.
1. Access the System Setup menu (see “Accessing the System Setup
Menu” on page 4–19). You see PRINTER NAME on the second line of the
display panel.
2. Press the En ter push button. PRINTER NAME moves up to the first line
of the display panel and you see the cur rent printer nam e on the second
line. Ent er t he new printer name as f ollows:
a. Use the Menu Scrolling push buttons (↑↓) to change the first
alphanu m eric charac te r of th e printer name on the s ec ond line of the
display pa nel.
b. Use the right Cursor Position push bu tto n (→ ) to advance the cursor
to the next character position.
c. Repeat step 1 and step 2 for each character in the printer name.
d. When you finish entering the prin t er name, pres s th e E n ter push
button.
3. Press the Menu push button 3 times. You see EXIT SETUP on the first line
of the display panel and the default setting, NO, on the seco nd line.
4. Press the down Menu Scrolling push button (↓ ) to see YES on the
second line.
5. Press the Enter push button. You see SAVE CHANGES on the first line of
the disp lay panel and th e default sett ing, YES, on the second line. Pr es s
the Enter push button to save the changes.
Setting the Time and Date
Use the fol low ing proced ure to change the current time and d at e.
1. Access the System Setup menu (see “Accessing the System Setup
Menu” on page 4–19).
2. Use the Menu Scrolling push buttons (↑↓) to scroll throug h th e it ems
until you see DATE on the second line of the displa y panel.
3. Press the Enter push button. DATE moves up to the first line of the display
panel an d y ou see the dat e t hat is stored in the printer’s clock on t he
second line. Enter the new date, using the MM/DD/YY (month/day/year)
format (or the forma t that applies in your language), a s follows:
a. Use the Menu Scrolling push buttons ( ↑↓) to change the first number
of the date on the secon d line of the dis play panel.
b. Use the right Cursor Position push bu tto n (→ ) to advance the cursor
to the next n um ber position.
c. Repeat step 1 and step 2 for each number in the date.
4. Press the Enter push button. You see the next menu, SYSTEM TIME, on
the second line of the display panel.
4–20 IBM Network Color Printer Operator’s Guide
Page 71

5. Press the Enter push button. SYSTEM TIME moves up to the first line of the
display panel and you see the system time that is stored on the printer’s
clock on the second line. Enter the new time, based on the 24-hour clock,
in the form HH:MM (hours:minutes) as follows:
a. Use the Menu Scrolling push buttons ( ↑↓) to change the first number
of the time o n t he s econd line of th e dis play pane l.
b. Use the right Cursor Position push bu tto n (→ ) to advance the cursor
to the next n um ber position.
c. Repeat step 1 and step 2 for each number in the time.
6. Press the Menu push button 3 times. You see EXIT SETUP on the first line
of the display panel and the default setting, NO, on the seco nd line.
7. Press the down Menu Scrolling push button (↓ ) to see YES on the
second line.
8. Press the Enter push button. You see SAVE CHANGES on the first line of
the disp lay panel and th e default sett ing, YES, on the second line. Pr es s
the Enter push button to save the changes.
Changing the Password
The Change Password menu item enables you to set or change the
password for the printer. When a password is required, only som eone who
knows the password can use the Run Setup function to change the printer
settings. In most cases, only the key operator knows the password.
When the printer is first set up, no password exists. If y ou want a passwor d to
be used, you must defin e it usin g this menu. I f you di d not create a password,
no one is required to en te r a password to us e t he Run Setup menu.
Use the Change Password function based on who should have access to the
Setup menu. Access to the Setup menu enables you to choose commonly
used print er s ettings suc h as paper ty pe.
Remember that if you use the Change Password function to assign a
password,
Use the fol low ing proce dure to set or change a pas s w ord.
1. Access the System Setup menu (see “Accessing the System Setup
Menu” on page 4–19).
2. Use the Menu Scrolling push buttons (↑↓) to scroll throug h th e it ems
until you see CHANGE PASSWORD on the second line of th e display panel.
3. Press the Enter push button. CHANGE PASSWORD moves up to the first line
of the display panel and you see NO on the second line. NO is the default.
4. Press the down Menu Scrolling push button (↓ ) to display YES on the
second line of the disp lay panel. Pre s s the Enter push button.
users who do not know the password cannot use the Setup menu
.
Chapter 4. Using the Operator Panel 4–21
Page 72

5. Yo u s ee NEW PASSWORD on the fi rs t lin e of the display panel . En t er t he
new password as follows. The password can be any combination of
letters and numbers up to 20 characters.
a. Use the Menu Scrolling push buttons (↑↓) to change the first
alphanu m eric charac te r of th e password on the secon d line of the
display pa nel.
b. Use the right Cursor Position push bu tto n (→ ) to advance the cursor
to the next character position.
c. Repeat step 1 and step 2 for each character in the password.
d. When you finish entering the password, press the Enter push button.
6. Yo u s ee VERIFY PASSWORD on the fi rs t lin e of the display panel . Repeat
step 5.
7. If the pas sword you en t ered in step 6 matche s th e one you entered in
step 5, you see PASSWORD CHANGED on the display panel. If not, proceed
to step 8 .
a. Press the Menu push button 3 times. You see EXIT SETUP on the first
line of the display panel and the default setting, NO, on the second line.
b. Press th e down Menu Scrolling push button (↓) to see YES on the
second line.
c. Press the Enter push button. You see SAVE CHANGES on the first line
of the display panel an d t he default se t tin g, YES, on the second line.
Press the Enter push button to save the changes.
8. If the password you entered in step 6 does not match the one you entered
in step 5, you see PASSWORD INCORRECT on the display panel. Press the
Enter push butto n. You s ee TRY AGAI N on the first line of the display panel.
Press the Enter push bu t to n and repeat s te p 6.
The new password is effective until you change it again.
4–22 IBM Network Color Printer Operator’s Guide
Page 73

Setting the Power Savings Mode
Use the fol low ing proce dure to set or change the P ow er Saving s mode. The
Power Savings mode allows you to set the amount of time that the printer
remains idle before it ch anges to a low power cons um ption mode (Energ y
Star). You ca n s et a t im e from 15–120 minutes in increments of 15 m inutes.
1. Access the System Setup menu (see “Accessing the System Setup
Menu” on page 4–19).
2. Use the Menu Scrolling push buttons (↑↓) to scroll throug h th e it ems
until you see POWER SVNGS (M) on the second line of the display panel.
3. Press the Enter push button. POWER SVNGS moves up to the first line of
the disp lay panel and yo u s ee the current setting on the secon d line.
4. Use the Menu Scrolling push buttons (↑↓) to scroll through the available
settings until you see the one that you want. 120 is the default. Press the
Enter push button.
5. Press the Menu push button 3 times. You see EXIT SETUP on the first line
of the display panel and the default setting, NO, on the seco nd line.
6. Press the down Menu Scrolling push button (↓ ) to see YES on the
second line.
7. Press the Enter push button. You see SAVE CHANGES on the first line of
the disp lay panel and th e default sett ing, YES, on the second line. Pr es s
the Enter push button to save the changes.
Chapter 4. Using the Operator Panel 4–23
Page 74

Using the Language Menu
Use the Lang uage me nu to cha nge the langua ge tha t y ou see on the display
panel.
Changing the Language
Use the fol low ing proced ure to change the langu age.
1. Check that the printer is offline (the Online light is
not offline, press the O nline push butto n.
2. Press the Menu push button. You see SELECT FUNCTION on the first line
of the display panel and RUN SETUP on the second line .
3. Press the down Menu Scroll ing push but t on (↓). You see LANGUAGE on
the second line of the display panel.
4. Press the Enter push button. LANGUAGE moves up to the first line of the
display panel and yo u s ee the langu age setting ENGLISH on the second
line. ENGLISH is the def ault setting.
5. Use the Menu Scrolling push buttons (↑↓) to scroll throug h th e lis t of
languages until you find the one you want.
6. Press the Enter push button to choose the language. See the Language
Menu Set t ings table below for a list of th e available se t tin gs .
not
on). If the printer is
7. Press the Menu push button to exit Run Setup.
Language Menu Settings
This table lists the languages that you can choose from the Language menu.
ENGLISH (default)
FRANÇAIS
DEUTSCH
ITALIA NO
ESPAÑOL
PORTUGUES
NEDERLANDS
NORSK
SVENSKA
DANSK
SUOMI
Language Menu Settings
4–24 IBM Network Color Printer Operator’s Guide
Page 75

Chapter 5. Replacing Supplies
This chapt er tells you ho w to replace the printer’s ton er cartridg e, t he used
toner bottle, the fuser oil bottle, the fuser, and the photoconduct or drum
cartridge . It als o t ells you how to store and handle toner cartridges .
This chapter covers the following topics:
Storing and Handlin g T oner Cartridges . . . . . . . . . . . . . . . . . . . . . . . . 5 –2
Replacing Toner Cartridges . . . . . . . . . . . . . . . . . . . . . . . . . . . . . . . . . 5–4
Removing the Old Cartridge. . . . . . . . . . . . . . . . . . . . . . . . . . . . . . . 5–5
Installing a New Cartridge . . . . . . . . . . . . . . . . . . . . . . . . . . . . . . . . 5–8
Recyclin g t he U s ed Toner Cartridge . . . . . . . . . . . . . . . . . . . . . . . 5–13
Replacing the Used Toner Bottle . . . . . . . . . . . . . . . . . . . . . . . . . . . . 5–14
Replacing the Fuser Oil Bottle . . . . . . . . . . . . . . . . . . . . . . . . . . . . . . 5–16
Removing the Old Fus er Oil Bottle. . . . . . . . . . . . . . . . . . . . . . . . . 5– 16
Installing t he New Fuser Oil Bottle . . . . . . . . . . . . . . . . . . . . . . . . . 5–17
Replacing the Fuser. . . . . . . . . . . . . . . . . . . . . . . . . . . . . . . . . . . . . . 5–19
Preparing the Fuser and Work Area. . . . . . . . . . . . . . . . . . . . . . . . 5–19
Unpacking the New Fuser . . . . . . . . . . . . . . . . . . . . . . . . . . . . . . . 5–20
Removing the Fuser Oil from the Printer . . . . . . . . . . . . . . . . . . . . 5–21
Removing the Fuser Access Door . . . . . . . . . . . . . . . . . . . . . . . . . 5–24
Removing the Used Fuser . . . . . . . . . . . . . . . . . . . . . . . . . . . . . . . 5–26
Installing t he New Fuser. . . . . . . . . . . . . . . . . . . . . . . . . . . . . . . . . 5–27
Replacing the Fuser Access Door . . . . . . . . . . . . . . . . . . . . . . . . . 5–29
Filling the Ne w F us er Unit with F us er Oil . . . . . . . . . . . . . . . . . . . . 5– 30
Printing Test Pages . . . . . . . . . . . . . . . . . . . . . . . . . . . . . . . . . . . . 5–31
Replacing the Photoconductor Drum Cartridge . . . . . . . . . . . . . . . . . 5–33
Locating th e Orange Photoconductor Drum Shield . . . . . . . . . . . . 5–33
Removing the Old Photoconductor Drum Cartridge. . . . . . . . . . . . 5–33
Installing a New Phot oc onductor D rum Cartrid ge . . . . . . . . . . . . . 5–35
Recycling the Photoconductor Drum Cartridge . . . . . . . . . . . . . . . 5–38
Cleaning the Separation Corona Wire . . . . . . . . . . . . . . . . . . . . . . 5–39
Copyright IBM Corp. 1996 Chapter 5. Replacing Supplies 5–1
Page 76

Storing and Handling Toner Cartridges
This section tells you how t o s t ore and handle toner cart ridges. Fo llow t hese
instructions:
• To av oid temporary probl em s c aused by moisture, a llow enough time for
toner cartridges to stabilize in the printer’s environment.
• Do not unseal or remove a toner cartridge from its protective package until it
has reach ed room tem perature (1 –2 hours).
• Do not store t he c artridges w here they are exposed t o direct sunl ight.
• Do not store t he c artridges at high temperature or hi gh humidity , o r w here
the temperature or hu m idity can change abruptly.
• Store the toner cartridges horizontally in a cool, dry place away from sunlight.
The maximum storage temperature is 30°C (86°F). The maximum storage
humidity is 80% without condensation.
• Do not store t he c artridges in s alty air or wh ere there are co rrosive gas es
such as aerosol spray.
• Rem ove the cartridges f rom t he printer when you mov e the printer. Put the
cartridge s in th eir original protective bags to avo id ex posure to light.
• Do not try to disassemb le t he cartridges .
• IB M rec ommends th at you us e only genuine IBM to ner cartridges designed
for this print er.
<2-13> CAUTION:
<2-9> CAUTION:
• The printer uses the rectangular, transparent windows at the top and bottom
of a toner cart ridge to detect the toner level. When you ha ndle a toner
cartridge, do not touch or scratch the windows. If you do, the toner-level
detection mechanism may not work correctly.
• Be sure to replace a used toner cartridge with a cartridge of the same color.
Never insert a toner cartridge if its color does not match the color markers on
the turret. If yo u do, you ma y h av e problems printing.
Do not dispose of toner or toner con t ainers in fire. Disp ose of these in
accordance with local regul ations.
This printer may contain materials, either components or consumable supplies,
that are regulated for disposal . Dispo se of all items in accord ance with local
regulations.
5–2 IBM Network Color Printer Operator’s Guide
Page 77

Ordering Supplies
To order su pplies for the printer, call 1-888-IBM-PRINT in the U.S. and
Canada. You may also contact your IBM marketing representative for
information about h ow t o order supp lies .
Chapter 5. Replacing Supplies 5–3
Page 78

Replacing Toner Cartridges
This section guides yo u t hrough the following pr oc edures:
• Rem oving an o ld t oner cartr idge from the printer
• In s t alling a new on e
• Rec y c ling the used one
Follow thes e instructions when y ou replace a ton er cartrid ge:
• W hen you loa d a t oner cartridge, make sure its color m at c hes the color
markers on the printer. T he printer uses 4 color to ner cartrid ges: cyan,
magenta, yellow, and black. Each color cartridge has its ow n holder in the
printer’s turret.
<2-13> CAUTION:
• Be sure to insert the cartridges correctly or you may damage the printer. Pull
the eject handle only when the color markers are fully visible Otherwise, the
toner cartridge cann ot pop out and thi s may damage the handle.
• Do not touch the sensing windows on the top and bottom of the cartridge.
Do not dispose of toner or toner con t ainers in fire. Disp ose of these in
accordance with local regul ations.
5–4 IBM Network Color Printer Operator’s Guide
Page 79

Removing the Old Cartridge
Use the following procedure to remove the old toner cartridge from the printer.
Attention:
Be careful when you handle toner cartridges. The used toner cartridges have no seal
so some toner may spill.
1. Open the front door.
2. Find the tu rret rotation kn ob.
Chapter 5. Replacing Supplies 5–5
Page 80

3. Use the turret rotation knob as follows: a. Push the knob in [1] and turn it clockwise about the distance between
arrow [1] and arrow [2] .
b. Release th e k nob [2].
c. Turn the knob clockwise [3].
d. When the turret is pos iti oned to relea s e a c artridge, th e k nob moves
outward [4] and locks.
e. When the color markers on the toner cartridge match the color markers
on the turre t , the toner cart ridge is pos it ioned for removal.
4. Make sure that the turret rotation knob is locked and that the color markers
are fully vis ible. Pull the eject handle to release the toner c artridge.
5–6 IBM Network Color Printer Operator’s Guide
Page 81

5. Slide the cartridge out.
6. Hold the cartridge by the end with the opening seal to avoid getting your
hands dirty and insert the cartridge into the pr otective bag that came with
the new cartridge.
7. Dispose of the toner cartridge according to local regulations (see
“Recycling the Used Toner Cartridge” on page 5–13). Do not shake the
used cartridge. The toner might leak.
Chapter 5. Replacing Supplies 5–7
Page 82

Installing a New Cartridge
Use the fol low ing proced ure to instal l a new toner ca rt ridge in the printer.
1. Find the turret rotation knob and the turre t color markers in the illus t ration
below.
Because the printing process requires that the colors be applied in a
specific order, the plac ement of ea c h c olor toner cartridge in the turret is
importa nt . If y ou operate the printer wit h a toner ca rt ridge inserted in the
wrong order, you wi ll damage the printer. Th e f igure below sh ow s t he
arrang em ent of the 4 color toner cart ridges rela t iv e t o each other in t he
turret.
2. The figu re below show s t he c orrect alignment of a toner cartridge in the
turret. W hen you insert a toner cartridge, m ak e sure that the 2 c olor
marker s on t he toner cart ridge line up w it h t he 2 markers o n t he turret.
5–8 IBM Network Color Printer Operator’s Guide
Page 83

3. The turret rotation knob turns the turret so that you can insert the correct
color toner cartridge. Before you insert a toner cartridge, turn the knob and
notice the opening in the turret . Us e t he turret rot at ion knob as fo llows:
a. Push the knob in [1] and turn it clockwise about the distance between
arrow [1] and arrow [2].
b. Release th e k nob [2].
c. Turn the knob clockwise [3]. Notice the rotation of the color markers in
the turret opening.
d. When the turret is pos iti oned to acce pt a c art ridge, the k nob moves
outward [4] and locks. T he color mark ers on the tur ret are fully visible.
Attention:
When you handle a toner cartridge, do not touch the sensing window on the top and
the bottom of the cartridge.
4. Remove a new toner cartridge from its protective bag.
Chapter 5. Replacing Supplies 5–9
Page 84

5. Hold the cartridge as shown below. Do not hold the cartridge so tightly that
the tabs on the end of t he c artridge contact your hand. Pressing the ta bs
can part ially open the c ov er of the dev eloping cylinder and damage the
printer. Slowly move each end up and down five or six times to distribute
the tone r. (D o not do this wit h a used or an u ns ealed toner cartridge.)
6. Remove the 2 protective tapes from the toner cartridge.
7. To remove the sealing tape, put the toner cartridge on a level surface. Hold
the cartridge with one hand and s lowly pull th e orange tab out w it h t he
other hand. Pull the orange tab straight out to av oid breakin g t he tape.
5–10 IBM Network Color Printer Operator’s Guide
Page 85

Attention:
Do not install a toner cartridge into the printer unless its developing cylinder cover is
latched closed.
8. On the ot her end of the c art ridge there is a small tab and an arrow [1 ].
Make sure that the tab [3] is fully seated in the notch [4]. D o one of the
followin g:
– If the tab is fully seated, go to step 9 .
– If the tab is not fu lly s eated, hold t he cartridge and use a pulling mo tio n
with your othe r hand to rotate the d ev eloping cover in the directio n of the
arrow [2]. The tab [3] must be fully seated in the notch [4] before you install
the toner cartridge.
Chapter 5. Replacing Supplies 5–11
Page 86

Attention:
Make sure that you insert the toner cartridge that matches the color markers in the
turret opening.
9. Hold the to ner cartridge with the arr ow [ 2] up and poin t ing toward th e
printer. Using the arrow [1] on the printer’s frame as a guide, slide the toner
cartridge into the printer until it locks in place. You may have to push firmly
on the ca rt ridge to lock it int o place.
10. When th e t oner cartridge is locked in place, the surfaces [ 1] and [2] are
even.
11. After you install the ca rt ridge, turn th e tu rret rotation knob to th e next
cartridg e t o m ake sure th at th e c art ridge you ju s t in s talled is correctly
seated .
12. Close the front door.
13. Print a co nf iguration p age (see “Pri nt ing a Configuration Page” on page
4–9) and note the print count th at it reports. Record thi s information on your
Supplie s R eplacement Log, show n in Appendix B.
5–12 IBM Network Color Printer Operator’s Guide
Page 87

Recycling the Used Toner Cartridge
Use the following procedure to recycle the used toner cartridge.
1. Find the box that the new toner cartridge came in and the Clean Earth
Campa ign instruction sheet and shippin g label provi ded inside the box.
2. Put the used toner cart ridge in the foil bag that the new c artridge c am e in.
3. Put the used toner cartridge in the box that the new cart ridge came in.
4. Seal the box.
5. Stick the pre-addres s ed shipping label on the bo x and ship the box
accord ing to the Clea n Earth Cam paign instruc t ion sheet.
Chapter 5. Replacing Supplies 5–13
Page 88

Replacing the Used Toner Bottle
This section tells you how to replace the used toner bottle. When you see the
REPLACE USED TONER BOTTLE message on the display panel, use the following
procedure to replace the used to ner bottle.
1. Open the front door.
2. Push down on the release handle.
3. Open the photoconductor drum cover.
5–14 IBM Network Color Printer Operator’s Guide
Page 89

4. Remove the used to ner bottle.
5. Seal the us ed toner bo t tle .
<2-13> CAUTION:
6. With the opening in the bottle facing the printer, attach the new used toner
bottle [1] to th e photoconductor drum c artridge.
7. Lower th e photoconductor drum cover [ 2] to th e c los ed position.
8. Raise the release h andle [3] to the operatin g position.
9. Close the front door.
Do not dispose of toner or toner con t ainers in fire. Disp ose of these in
accordance with local regul ations.
Chapter 5. Replacing Supplies 5–15
Page 90

Replacing the Fuser Oil Bottle
This section tells you how to replace the fuser oil bottle. Fuser oil is used in the
final stage of the printi ng process. When the oil level is low o r w hen you see
the FUSER OIL LOW message on the dis play panel , re place the fuser oil bottle
with a new one using the instructions that follow.
<2-4> CAUTION:
If spilled, fuser oil causes hazardo us su rfaces; pre vent anyone from entering
the area until the surface is clean.
Attention:
Do not use the printer without a fuser oil bottle installed. If you do, you may damage
the printer.
Removing the Old Fuser Oil Bottle
Use the fol low ing proced ure to remov e t he old fuser oil bottle.
1. Open the front door.
2. Lower the fuser oil bottle cover [1]. Lift the oil bottle [2] from the oil bottle
holder and put a towel under the bottle to prevent drops of oil from spilling
on the flo or.
5–16 IBM Network Color Printer Operator’s Guide
Page 91

Installing the New Fuse r Oil Bottle
Use the fol low ing proce dure to instal l th e new fuser oi l bot t le.
Attention:
Do not shake the fus er oil bo ttle. Oil c an s pill ou t .
1. Peel off the seal from th e new fuser o il bot t le.
2. Turn the oil bottle upsid e down. Hold th e oil bottle with it s label facing out
and put th e bottle in the oil bottle holder.
Chapter 5. Replacing Supplies 5–17
Page 92

3. Align the bottle with t he bottle holder. Firmly push down [ 1] on the bottle
until it locks into place.
4. Raise the fuser oil bot t le c ov er [2].
5. Close the front door.
6. Print a configuration page (s ee “Printing a C onfigurat ion Page” on page
4–9) and note the print count th at it reports. Record thi s information on your
Supplie s R eplacement Log, show n in Appendix B.
5–18 IBM Network Color Printer Operator’s Guide
Page 93

Replacing the Fuser
This section shows you how to
• Prepare the fu s er and work area before beginning
• Rem ove the u nused oil from t he printer oil bot t le holder (fuser oil-supp ly )
• Rem ove the u s ed f us er
• In s t all a new fuser
• Ret urn the unused oil and add a new bo ttle of oil to the pr int er
You do not replace the fuser often. It is designed to fuse approximately 60000
prints, depending on your application. You can print a configuration page (see
“Printing a C onfigura tio n Page” on page 4–9) to se e t he print count .
<2-9> CAUTION:
This printer may contain materials, either components or consumable supplies,
that are regulated for disposal . Dispo se of all items in accord ance with local
regulations.
Preparing the Fuser and Work Area
Use the fol low ing proce dure to prepa re t he fuser and t he work area before
starting to replace the fu s er.
1. Turn off th e printer. Th is allows the pri nt er t o c ool down.
2. Check th at y ou have the fo llowing item s bef ore you rep lac e the fuser:
– Oil removal t ool (shippe d w it h t he printer)
– Oil recycle b ot tl e (s hipped with t he printer)
– Flat-blade s c rewdriver
– Absorben t tow els
Oil Removal Tool Oil Recycle Bottle Screwdriver
Chapter 5. Replacing Supplies 5–19
Page 94

3. Choos e a level work a rea on which t o put the used fu se r, the new fus er,
and the fuser oil. Put absorbent towels under the front of the printer and on
the work area in case a f ew drops of fuser oil spill. Keep towels av ailable
in case you need to clean your tools.
4. Make sure that the p rint er is stable. I f the printer is on the print er s t and,
make sure that the casters underneath the stand are locked.
Unpacking the New Fuser
Use the fol low ing proced ure to unpa ck t he new fuse r fr om t he s hipping b ox .
1. Open the top of the box.
2. Remove the 2 top foam shipping blocks.
3. Use the green hand holds to remo v e th e fus er from the box. Put the fuser
on the abs orbent tow els in the work ar ea.
4. Save the box so that it can be used for disposal of the old fuser.
5–20 IBM Network Color Printer Operator’s Guide
Page 95

Removing the Fuser Oil from the Printer
Use the fol low ing proce dure to remov e t he fuser oil fro m th e printer.
<2-6> CAUTION:
High temperature; Switch off pri nter po wer and al low at least 15 minutes for
parts in this area to cool before handling.
1. Open the fuser acces s door on the upper right side of the print er.
<2-4> CAUTION:
If spilled, fuser oil causes hazardo us su rfaces. Prevent anyone from entering
the area until the surface is clean.
2. Lower the fuser oil bottle cover [1]. Lift the oil bottle [2] from the oil bottle
holder and put a towel under the bottle to prevent drops of oil from spilling
on the flo or.
Attention:
Do not put the fuser oil bottle or the oil recycle bottle on top of the printer while
recycling oil.
3. Wipe off any excess oil on the bottl e and put the bot t le upright in a sa f e
place in the work area.
Chapter 5. Replacing Supplies 5–21
Page 96

4. Open the oil recycle bottle and remove the inner seal.
5. Put the oil recycle bottle on a towel on a level surface near the printer.
6. Use the oil removal tool to remove the fuser oil from the oil bottle holder as
follows:
a. Push the top of the oil removal tool all the way down. Insert the pointed
end of the o il rem oval tool int o t he oil supply in the oil bott le holder.
Release th e pressure on t he oil removal tool and a llow t he oil to flow
into it.
b. Be carefu l not t o s pill any oil. Take the oil rem oval tool out of t he oil
bottle holder and insert the pointed end of the tool into the oil recycle
bottle. Pus h t he top of the tool down an d f orc e the oil into t he recycle
bottle.
c. R epeat step a and step b until you have removed m ost of the oil from
the oil bottle holder.
5–22 IBM Network Color Printer Operator’s Guide
Page 97

7. Use the fu s er jam-rele as e lever to pum p t he remainin g oil from the fus er
into the oil bottle holder. You will need to pump the lever approximately 50
times.
8. Repeat step 6 and step 7 three or four times until you have removed most
of the oil from the fuser.
9. Replace the inner seal (see page 5–22) on the oil re c ycle bottle and cap
the bottle.
10. Clean the oil removal tool with a towel and store it in the box in which it was
shipped.
Chapter 5. Replacing Supplies 5–23
Page 98

Removing the Fuser Access Door
Use the fol low ing proced ure to remov e t he fuser access door from the print er.
Attention:
When you release the fuser access door strap, the door is free to swing down and
may fall to the floor. Hold the door when you release the door strap.
1. Open the feeder acc es s door on the low er right sid e of th e printer.
2. The strap of the fuser access door is attached to the upper locking tab on
the print er f rame. Rele as e t he strap this w ay :
a. Push the u pper locking t ab down [1 ] .
b. Pull the tab o ut of th e printer fram e [2].
c. Lif t th e t ab up and ou t of the printer frame [3].
5–24 IBM Network Color Printer Operator’s Guide
Page 99

3. Slide the fuser access door to the left and rotate it down until the tab on the
right piv ot aligns with the c utout in the right bracket [ 1] . S lide the door to
the left again and out of the brackets.
Chapter 5. Replacing Supplies 5–25
Page 100

Removing the Used Fuser
Use the fol low ing proced ure to remov e t he used fuse r f rom t he printer.
1. Loosen the 2 fuser screws that hold the fuser to the printer frame. These
screws do not come out of the fu ser. Th e f user is not yet free. It is h eld by
the fuser s lide plate.
2. Use the 2 black pull knobs on t he fuser to carefully pull t he f us er and the
fuser slide plate out approximately 25 cm (10 inches) until th e f us er slide
plate stops moving. The fuser slide plate continues to support the fuser.
3. Use the green fuser handholds to remove the fuser from the printer and put
it on the ab s orbent towe ls in t he work area.
5–26 IBM Network Color Printer Operator’s Guide
 Loading...