

Page 1

RS/6000 SP
SP Switch Service Guide
IBM
GA22-7443-04
Page 2

Page 3

RS/6000 SP
SP Switch Service Guide
IBM
GA22-7443-04
Page 4

Note!
Before using this information and the product it supports, read the information in “Safety and environmental notices” on
page ix and “Notices” on page A-1.
Fifth Edition (April 2002)
This book replaces GA22-7443-03.
IBM welcomes your comments. A form for readers’ comments may be provided at the back of this publication or you
may address your comments to the following address:
International Business Machines Corporation
Department 55JA, Mail Station P384
2455 South Road
Poughkeepsie, NY 12601-5400
United States of America
FAX (United States & Canada): 1+845+432-9405
FAX (Other Countries):
Your International Access Code+1+845+432-9405
IBMLink (United States customers only): IBMUSM10(MHVRCFS)
Internet e-mail: mhvrcfs@us.ibm.com
If you would like a reply, be sure to include your name, address, telephone number, or FAX number.
Make sure to include the following in your comment or note:
v Title and order number of this book
v Page number or topic related to your comment
When you send information to IBM, you grant IBM a nonexclusive right to use or distribute the information in any
way it believes appropriate without incurring any obligation to you.
© Copyright International Business Machines Corporation 1999, 2002. All rights reserved.
US Government Users Restricted Rights – Use, duplication or disclosure restricted by GSA ADP Schedule Contract
with IBM Corp.
Page 5

Contents
Figures ....................................v
Tables ....................................vii
Safety and environmental notices ..........................ix
Safety notices ..................................ix
Danger notices.................................ix
Caution notices ................................xi
Laser safety information .............................xiii
Environmental notices...............................xiii
Product recycling and disposal ..........................xiii
About this book ................................xv
Who should use this book .............................xv
Related information ................................xv
How to send your comments ............................xvi
Summary of changes ..............................xvii
GA22-7443-04 .................................xvii
GA22-7443-03 .................................xvii
GA22-7443-02 .................................xvii
GA22-7443-01 .................................xvii
GA22-7443-00 .................................xvii
Chapter 1. Maintenance Analysis Procedures (MAPs)..................1-1
SP Switch MAPs ................................1-1
SP Switch description and problem determination (MAP 0590) ..............1-1
SP Switch environment (MAP 0600) ........................1-5
SP Switch power (MAP 0610) ..........................1-13
SP Switch function (MAP 0620) .........................1-17
Chapter 2. Locations ..............................2-1
Naming standard for RS/6000 SP components .....................2-1
Format structure ...............................2-1
Location diagrams of the RS/6000 SP components....................2-2
Front and rear views of RS/6000 SP frame......................2-3
Frame locations ................................2-6
Switch assembly locations ............................2-8
Connector details ...............................2-9
Cable routing.................................2-9
Cable routing in a multi-switch frame (F/C 2030/1)...................2-11
Switch data cables ..............................2-13
Chapter 3. Service procedures ..........................3-1
Personal ESD requirements ............................3-1
Tools and files overview ..............................3-1
Using the css.snap script .............................3-3
Switch supervisor self-test .............................3-4
Verification tests using Perspectives .........................3-4
Node supervisor verification ...........................3-4
Frame supervisor verification ...........................3-5
Switch supervisor verification ...........................3-5
Selecting appropriate switch clocks..........................3-6
© Copyright IBM Corp. 1999, 2002 iii
Page 6

Selecting the switch clock source .........................3-6
Determining the correct switch clock source .....................3-6
Removing and restoring switch resources .......................3-7
Removing a switch assembly from the active configuration ................3-7
Restoring a switch assembly to the active configuration .................3-8
Viewing switch partitions ............................3-8
Service position procedures ............................3-9
Placing a switch assembly into service position ....................3-9
Replacing a switch assembly from service position ...................3-9
Resetting the clock and bootlist after servicing a node...................3-9
Installing firmware updates on SP nodes .......................3-10
Installing adapter microcode packages ........................3-10
Running diagnostics on a switch port ........................3-12
Chapter 4. FRU removals and replacements .....................4-1
Handling static-sensitive devices ..........................4-1
Procedures for switch assemblies ..........................4-2
Removing the switch assembly ..........................4-2
Replacing the switch assembly ..........................4-2
Removing the switch fans ............................4-3
Replacing the switch fans ............................4-3
Removing the switch front chassis cable.......................4-3
Replacing the switch front chassis cable.......................4-4
Removing the switch supervisor card ........................4-4
Replacing the switch supervisor card ........................4-5
Removing the switch inner chassis cable ......................4-5
Replacing the switch inner chassis cable ......................4-6
Removing the switch power cards .........................4-6
Replacing the switch power cards .........................4-7
Chapter 5. Parts catalog .............................5-1
SPS, SPS-8 Switch assembly (feature) (view 1) .....................5-2
SPS, SPS-8 Switch assembly (feature) (view 2) .....................5-4
SPS, SPS-8 Switch assembly (feature) (view 3) .....................5-6
Switch cables (feature) ..............................5-8
Multi-switch frame (F/C 2030/1) ..........................5-10
Notices ...................................A-1
Trademarks ..................................A-1
Electronic emissions notices ............................A-2
Federal Communications Commission (FCC) statement .................A-2
European Union (EU) statement..........................A-2
United Kingdom telecommunications safety requirements ................A-2
Industry Canada compliance statement .......................A-2
For installations in Japan: ............................A-3
Electromagnetic interference (EMI) statement - Taiwan .................A-3
Radio protection for Germany ..........................A-3
Index ....................................X-1
iv RS/6000 SP: SP Switch Service Guide
Page 7

Figures
1-1. SP Switch high-level diagram.........................1-2
1-2. SP Switch wrap plugs ...........................1-4
1-3. SP Switch inner chassis and front chassis cables .................1-8
2-1. Front view of frame locations .........................2-3
2-2. Front view of multi-switch frame locations ....................2-4
2-3. Front view of 49-inch frame locations ......................2-5
2-4. Rear view of frame locations .........................2-6
2-5. SPS/SPS-8 assembly............................2-8
2-6. RS/6000 SP connector details (as seen at receiving ends, not at cable ends) .......2-9
2-7. Frame cabling routing path in rear of RS/6000 SP frame — 1.93 m frame ........2-10
2-8. Frame cabling routing path in rear of RS/6000 SP frame — 2.01 m frame ........2-10
2-9. Frame cable routing paths in rear of RS/6000 SP multi-switch frame (F/C 2030/1) — 1.93 m
frame .................................2-12
2-10. Frame cable routing paths in rear of RS/6000 SP multi-switch frame (F/C 2030/1) — 2.01 m
frame .................................2-12
4-1. Handling an anti-static device.........................4-1
4-2. Removing the SP Switch fans ........................4-3
4-3. Removing the SP Switch fan control cable ....................4-4
4-4. Removing the SP Switch supervisor card ....................4-5
4-5. Removing the SP Switch inner chassis cable ...................4-6
4-6. Removing the SP Switch power supply cards ...................4-7
© Copyright IBM Corp. 1999, 2002 v
Page 8

vi RS/6000 SP: SP Switch Service Guide
Page 9

Tables
1-1. Switch problem diagnostics .........................1-4
1-2. Environmental messages for switches .....................1-5
1-3. Switch connector resistance values ......................1-6
1-4. Fan failure diagnostics ...........................1-8
1-5. Inner chassis cable continuity ........................1-16
1-6. Front chassis cable continuity ........................1-16
1-7. SP Switch error conditions .........................1-19
1-8. Problem messages from the out.top file ....................1-22
1-9. Service Request Number (SRN) table for SP Switch adapters ............1-24
1-10. Switch problem priority listing ........................1-26
2-1. External cable routing ...........................2-11
2-2. SPS Switch data cable chart ........................2-13
2-3. SPS-8 Switch data cable chart ........................2-13
3-1. Service procedure tools ...........................3-2
3-2. Setup output files .............................3-2
3-3. Tuning output files .............................3-2
3-4. Setting switch clock sources .........................3-7
5-1. SPS, SPS-8 Switch assembly (feature) (view 1) ..................5-3
5-2. SPS, SPS-8 Switch assembly (feature) (view 2) ..................5-5
5-3. SPS, SPS-8 Switch assembly (feature) (view 3) ..................5-7
5-4. Switch cables (feature) ...........................5-8
5-5. Multi-switch frame (F/C 2030/1) .......................5-11
© Copyright IBM Corp. 1999, 2002 vii
Page 10

viii RS/6000 SP: SP Switch Service Guide
Page 11

Safety and environmental notices
For general information concerning safety, refer to
S229-8124. For a copy of the publication, contact your IBM account representative or the IBM branch
office serving your locality.
Electrical Safety for IBM Customer Engineers
,
Safety notices
The following is a list of all safety notices (in English only) pertaining to SP hardware maintenance tasks
from this and other RS/6000 SP hardware publications. Translations of each of the safety notices into
other languages are included in
DANGER notices warn you of conditions or procedures that can result in death or severe personal
injury.
CAUTION notices warn you of conditions or procedures that can cause personal injury that is neither
lethal nor extremely hazardous.
Each notice contains a reference number (
other languages.
RS/6000 SP: Safety Information
SPSFXXXX
) which you can use to help find a specific notice in
.
Danger notices
DANGER
Do not attempt to open the covers of the power supply. Power supplies are not serviceable and
are to be replaced as a unit. (
SPSFD001
)
DANGER
An electrical outlet that is not correctly wired could place hazardous voltage on metal parts of
the system or the devices that attach to the system. It is the responsibility of the customer to
ensure that the outlet is correctly wired and grounded to prevent an electrical shock.
Before installing or removing signal cables, ensure that the power cables for the system unit
and all attached devices are unplugged.
When adding or removing any additional devices to or from the system, ensure that the power
cables for those devices are unplugged before the signal cables are connected. If possible,
disconnect all power cables from the existing system before you add a device.
Use one hand, when possible, to connect or disconnect signal cables to prevent a possible
shock from touching two surfaces with different electrical potentials.
During an electrical storm, do not connect cables for display stations, printers, telephones, or
station protectors for communications lines. (
DANGER
In the U.S., Canada, and Japan, this product has a 4-wire power cable with a 4-prong plug. Use
this power cable with a correctly grounded power receptacle to prevent possible electric shock.
SPSFD003
(
)
SPSFD002
)
© Copyright IBM Corp. 1999, 2002 ix
Page 12
DANGER
Before you connect the power cable of this product to ac power, verify that the power receptacle
is correctly grounded and has the correct voltage. (
DANGER
During an electrical storm, do not connect or disconnect any cable that has a conductive outer
surface or a conductive connector. (
DANGER
Switch off power and unplug the machine power cable from the power receptacle, before
removing or installing any part that is connected to primary power. (
DANGER
To prevent possible electrical shock during machine installation, relocation, or reconfiguration,
connect the primary power cable only after connecting all electrical signal cables. (
DANGER
SPSFD005
SPSFD004
)
)
SPSFD006
)
SPSFD007
)
High voltage present. Perform ″Lockout safety procedures″ to remove primary power to the
frame. (
DANGER
High voltage present. Perform ″Lockout safety procedures″ to remove primary power to the
frame (and high-voltage transformer if present). (
DANGER
High voltage present at test points. Use high voltage test probes. (
DANGER
High energy present. Do not short 48V to frame or 48VRtn. Shorting will result in system outage
and possible physical injury. (
DANGER
If a unique power module fails, all LEDs will be off. The high voltage LED will be off even though
the high voltage is still present. (
SPSFD008
)
SPSFD011
SPSFD012
SPSFD009
)
)
)
SPSFD010
)
x RS/6000 SP: SP Switch Service Guide
Page 13

DANGER
The remaining steps of the procedure contain measurements that are taken with power on.
Remember that hazardous voltages are present. (
DANGER
The frame main circuit breaker and the controller must not be switched on again now.
Before disconnecting the power cables from the power receptacles, ensure that the customer’s
branch distribution circuit breakers (customer power source circuit breakers) are Off and tagged
with DO NOT OPERATE tags, S229-0237. Refer to “Lockout safety procedures” in
System Service Guide
DANGER
Before connecting ac power cabless to electrical outlets, ensure that:
v The customer’s branch distribution circuit breakers (customer power source circuit breakers)
are off and tagged with DO NOT OPERATE tags, S229-0237 (or national language equivalent).
v The activities in ″Performing the Customer 50/60 Hz Power Receptacle Safety Check″ have
been performed on all customer power source outlets and cable connectors. (
, before proceeding. (
SPSFD014
SPSFD013
)
)
RS/6000 SP:
SPSFD015
)
DANGER
Ensure that the customer’s branch distribution circuit breakers (customer power source circuit
breakers) to the ac power outlets are off and tagged with DO NOT OPERATE tags, S229-0237 (or
national language equivalent). (
DANGER
Both the SEPBU power chassis and the PDU 48 V dc power chassis are field replaceable units
(FRUs) which contain NO serviceable parts; they are labeled as such. Do not attempt to isolate
or repair these components, since doing so may result in severe injury or even death.
SPSFD017
(
)
SPSFD016
)
Caution notices
CAUTION:
The weight of the PDU assembly, 48 V dc power chassis, and the SEPBU power chassis is greater
than 18 Kg (40 lbs). Be careful when removing or installing. Remove all 48 V dc power supplies
from the power chassis before removing or installing the power chassis. (
CAUTION:
SPSFC001
)
The unit weight exceeds 18 Kg (40 lbs) and requires two service personnel to lift. (
Safety and environmental notices xi
SPSFC002
)
Page 14

CAUTION:
The covers are to be closed at all times except for service by trained service personnel.
SPSFC003
(
CAUTION:
When the unit is being serviced, the covers should not be left off or opened while the machine is
running unattended. (
CAUTION:
Due to weight of each thin node (under 18 Kg [40 lbs]), use care when removing and replacing thin
nodes above shoulder height. (
CAUTION:
)
SPSFC004
)
SPSFC005
)
The wide node weight may exceed 32 Kg (70.5 lbs). (
CAUTION:
Do not open more than one wide node or switch assembly drawer at a time. (
CAUTION:
Make sure the stability foot and wheel chocks are installed on the frame. These are required to
maintain frame balance and position during service operations. (
CAUTION:
Outer edges of chassis may be sharp. Care must be taken when removing and installing chassis.
SPSFC009
(
CAUTION:
The ground strip may have sharp edges. (
CAUTION:
Do not remove wide nodes or switch assemblies from the mounting slides. Caution must be
observed when working with mounting slides to prevent pinched fingers or accidental release of
the unit. (
)
SPSFC011
SPSFC010
)
SPSFC006
)
)
SPSFC008
SPSFC007
)
)
CAUTION:
Do not remove the drawer case mounting screws at the bottom of both sides. (
CAUTION:
Once the latch is released, push the drawer closed. Do not pull, as the drawer may disengage from
the rails, creating a safety hazard. (
CAUTION:
Due to the weight of each wide node, use care when sliding and closing wide processor nodes
above shoulder height. (
SPSFC014
SPSFC013
)
)
SPSFC012
)
xii RS/6000 SP: SP Switch Service Guide
Page 15

CAUTION:
v When moving frames into position, team members should work together. Using one person on
each corner of the frame can prevent strain.
v In raised floor installations, mechanically safe moldings should be installed around floor
cutouts. Extreme caution should be used when moving frames during installation or removal
because of the proximity of floor cutouts to casters. (
CAUTION:
When using step ladder or step stool, be sure that the work surface is level and the step ladder or
step stool is in good working order. (
CAUTION:
Portable ladders present a serious safety hazard if not used properly. Follow these general
guidelines:
v Make sure the ladder is firm and steady, and has no defective rungs or braces.
v Work only on a level surface.
v Never use a metal ladder near electrical power lines.
v Never overreach. Instead, move the ladder.
Be as careful on a short ladder as on a 30-foot extension ladder. False security can lead to
carelessness and falls which can cause painful injuries. (
SPSFC016
)
SPSFC015
SPSFC017
)
)
CAUTION:
All IBM laser modules are designed so that there is never any human access to laser radiation
above a class 1 level during normal operation, user maintenance, or prescribed service conditions.
Data processing environments can contain equipment transmitting on system links with laser
modules that operate at greater than class 1 power levels. For this reason, never look into the end
of an optical fiber cable or open receptacle. Only trained service personnel should perform the
inspection or repair of optical fiber cable assemblies and receptacles. (
SPSFC018
)
Laser safety information
The RS/6000 SP might contain certain communication adaptors, such as ESCON or FDDI, which are fiber
optic based and use lasers.
Laser Compliance
All lasers are certified in the U.S. to conform to the requirements of DHHS 21 CFR Subchapter J for class
1 laser products. Outside the U.S., they are certified to be in compliance with the IEC 825 (first edition
1984) as a class 1 laser product. Consult the label on each part for laser certification numbers and
approval information.
Environmental notices
Product recycling and disposal
This product contains materials such as circuit boards, cables, electromagnetic compatibility gaskets, and
connectors which might contain lead and copper/beryllium alloys that require special handling and disposal
at end of life. Before this unit is disposed of, these materials must be removed and recycled or discarded
according to applicable regulations. IBM offers product return programs in several countries. You can find
country-specific instructions at www.ibm.com/ibm/environment/products/prp.phtml.
Safety and environmental notices xiii
Page 16

This product might contain nickel-cadmium or lithium batteries in communication adapters. The batteries
must be recycled or disposed of properly. Recycling facilities might not be available in your area. In the
United States, IBM has established a collection process for reuse, recycling, or proper disposal of used
sealed lead-acid, nickel-cadmium and nickel metal hydride batteries and battery packs from IBM
equipment. For information on proper disposal of batteries in this product, please contact IBM at
1-800-426-4333. For information on disposal of batteries outside the United States, contact your local
waste disposal or recycling facility.
xiv RS/6000 SP: SP Switch Service Guide
Page 17

About this book
This book is part of the RS/6000®SP™hardware service library and applies to the RS/6000 SP Switch.
Use this book to assist you in performing the following tasks:
v Identify field replaceable unit (FRU) locations
v Isolate RS/6000 SP failures using Maintenance Analysis Procedures (MAPs)
v Perform diagnostic service procedures
v Perform removal and replacement procedures
v Identify FRUs and their corresponding part numbers
If you are attempting to isolate an SP system failure, use the Maintenance Analysis Procedures (MAPs)
beginning with the Start MAP in
complete RS/6000 SP hardware service library, see “Related information”.
RS/6000 SP: System Service Guide
Who should use this book
This book is intended for RS/6000 SP product-trained service personnel.
Related information
The following books make up the complete RS/6000 SP hardware service library:
v
RS/6000 SP: Safety Information
national languages, which are compiled from all the book in the library.
v
RS/6000 SP: Installation and Relocation
maintenance agreement and qualification procedures, frame and component identification information.
RS/6000 SP: System Service Guide
v
Start MAP, and MAPs and parts catalog for the frames and power subsystems. Use this book to begin a
diagnostic procedure to isolate a problem to a specific major component of the SP system.
RS/6000 SP: SP Switch Service Guide
v
v
RS/6000 SP: SP Switch2 Service Guide
information specific to the SP Switch2.
RS/6000 SP: Uniprocessor Thin and Wide Node Service Guide
v
MAPs, and parts catalog information specific to all uniprocessor-type nodes.
v
RS/6000 SP: 604 and 604e SMP High Node Service Guide
and parts catalog information specific to these nodes.
RS/6000 SP: SMP Thin and Wide Node Service Guide
v
parts catalog information specific to these nodes.
v
RS/6000 SP: POWER3 SMP High Node Service Guide
parts catalog information specific to this node.
, GA22-7467. Safety notices, in English and translated into other
, GA22-7441. Installation and relocation procedures,
, GA22-7442. General SP system service procedures, the system
, GA22-7443 (this book).
, GA22-7444. Service procedures, MAPs, and parts catalog
, GA22-7446. Service procedures, MAPs,
, GA22-7447. Service procedures, MAPs, and
, GA22-7448. Service procedures, MAPs, and
(GA22-7442). For a listing of the
, GA22-7445. Service procedures,
This book and other RS/6000 SP hardware and software documentation are available both on-line and, for
some books, in printed form from the following sources:
v The Web site at http://www.ibm.com/servers/eserver/pseries/library/sp_books/index.html
v The Resource Center on the PSSP product media
v Printed and CD-ROM versions (which can be ordered from IBM)
For more information on these sources and an extensive listing of RS/6000 SP related publications, see
the bibliography in
© Copyright IBM Corp. 1999, 2002 xv
RS/6000 SP: Installation and Relocation
.
Page 18

How to send your comments
Your feedback is important in helping to provide the most accurate and highest quality information. If you
have any comments about this book or any other RS/6000 SP documentation:
v Send your comments by e-mail to mhvrcfs@us.ibm.com. Be sure to include the name of the book, the
order number of the book, and, if applicable, the specific location of the text you are commenting on (for
example, a page number or table number).
v Fill out one of the forms at the back of this book and return it by mail, by fax, or by giving it to an IBM
representative.
®
xvi RS/6000 SP: SP Switch Service Guide
Page 19

Summary of changes
GA22-7443-04
This edition contains replaces GA22-7443-03 and any update versions made to that level and makes them
obsolete. This edition contains minor changes and fixes to softcopy cross-book links.
GA22-7443-03
This edition contains replaces GA22-7443-02 and any update versions made to that level and makes them
obsolete. This edition contains minor changes and fixes to softcopy cross-book links.
GA22-7443-02
This edition contains replaces GA22-7443-01 and any update versions made to that level and makes them
obsolete. This edition contains minor changes and corrections throughout the book.
GA22-7443-01
This edition replaces GA22-7443-00 and makes it obsolete.
Added cross-book links for reference links between this publication and the other RS/6000 SP hardware
publications. These links assist navigating between documents, in the softcopy environment, when using
the Adobe Acrobat Reader.
GA22-7443-00
First edition of the restructured RS/6000 SP hardware service library. This publication, along with the other
SP service publications (see “Related information” on page xv), replaces The Maintenance Information
Manuals Volumes 1–4 (GA22-7375, GA22-7376, GA22-7377, and GA22-7378) and makes them obsolete.
© Copyright IBM Corp. 1999, 2002 xvii
Page 20

xviii RS/6000 SP: SP Switch Service Guide
Page 21

Chapter 1. Maintenance Analysis Procedures (MAPs)
This chapter provides information for identifying problems and guides you to the most likely failed Field
Replaceable Unit (FRU). The MAPs then refer you to the FRU Removal/Replacement procedures for the
corrective action.
v “SP Switch description and problem determination (MAP 0590)”
v “SP Switch environment (MAP 0600)” on page 1-5
v “SP Switch power (MAP 0610)” on page 1-13
v “SP Switch function (MAP 0620)” on page 1-17
SP Switch MAPs
SP Switch description and problem determination (MAP 0590)
Purpose of this MAP
This MAP describes the physical characteristics of each switch type and provides a table (Table 1-1 on
page 1-4) containing diagnostic information.
Each switch network has the following components:
v Switch adapter cards (one per processor node)
v SP Switch
v Switch internal data cables
v Switch power cable
v Switch wrap plugs (male 77G0818 and female 46H9688 for SPS). Refer to Figure 1-2 on page 1-4 for
views of the wrap plug.
v Switch external data cables (multi-frame only)
Attention:
1. Switch data plug/jack connector pins are easily bent. Check for bent pins on male plugs or bent pin
guides on female jacks if a cable is difficult to plug. Problems with bent pins or pin guides can
propagate to new plugs/jacks if not corrected first.
2. All connected SP Switches must be running from the same master clock. If the SP Switches have not
been set properly, all processor nodes in a logical frame will be uninitialized. Refer to “Selecting
appropriate switch clocks” on page 3-6 for these procedures.
Refer to Figure 1-1 on page 1-2 for a high-level view of the RS/6000 SP Switch.
Switch connection types
Standard node
Processor nodes in 9076 SP frames are attached to the SP Switches with switch cables.
Dependent node
Switch adapter resides outside of the 9076 SP frame. Each dependent node is a single SP
Switch Router Adapter in the 9077 Switch Router. There can be several dependent nodes in
each SP Switch Router.
Switch-to-switch
Connections between SP Switches.
SP Switch types
SPS All clocks are distributed through data cables. External clock inputs are selected from J3, J4,
or J5.
© Copyright IBM Corp. 1999, 2002 1-1
Page 22
Switch description and problem determination (MAP 0590)
FRUs include: Fans, circuit breaker/LED card, switch supervisor card, switch power card(s),
inner chassis cable, front chassis cable, complete assembly.
SPS-8 There are only 8 ports. All clocks are distributed through data cables.
FRUs include: Fans, circuit breaker/LED card, switch supervisor card, switch power card(s),
inner chassis cable, front chassis cable, complete assembly.
(On external bulkhead)
----
----
J33
J34J1
J2
----
----
(On planar)
----
----
----
----
----
----
----
----
----
----
----
----
----
----
----
----
----
----
----
----
----
----
J4
----
----
----
----
----
----
----
----
----
----
----
----
----
----
----
----
----
----
----
----
----
----
J31
J32 J3
Switch planar
J1 J2
P1
Supervisor
bus card
+48Vdc
P2
+12Vdc
J35
J34 J33
+5Vdc -5Vdc +5Vdc -5Vdc
Switch power
supply 2
Switch
supervisor
Switch power
supply 1
card
P6
P5
P4
P3
P1
Inner
chassis
cable
Cup
guide
P9
Green Yellow CB
P8
P7
LEDs
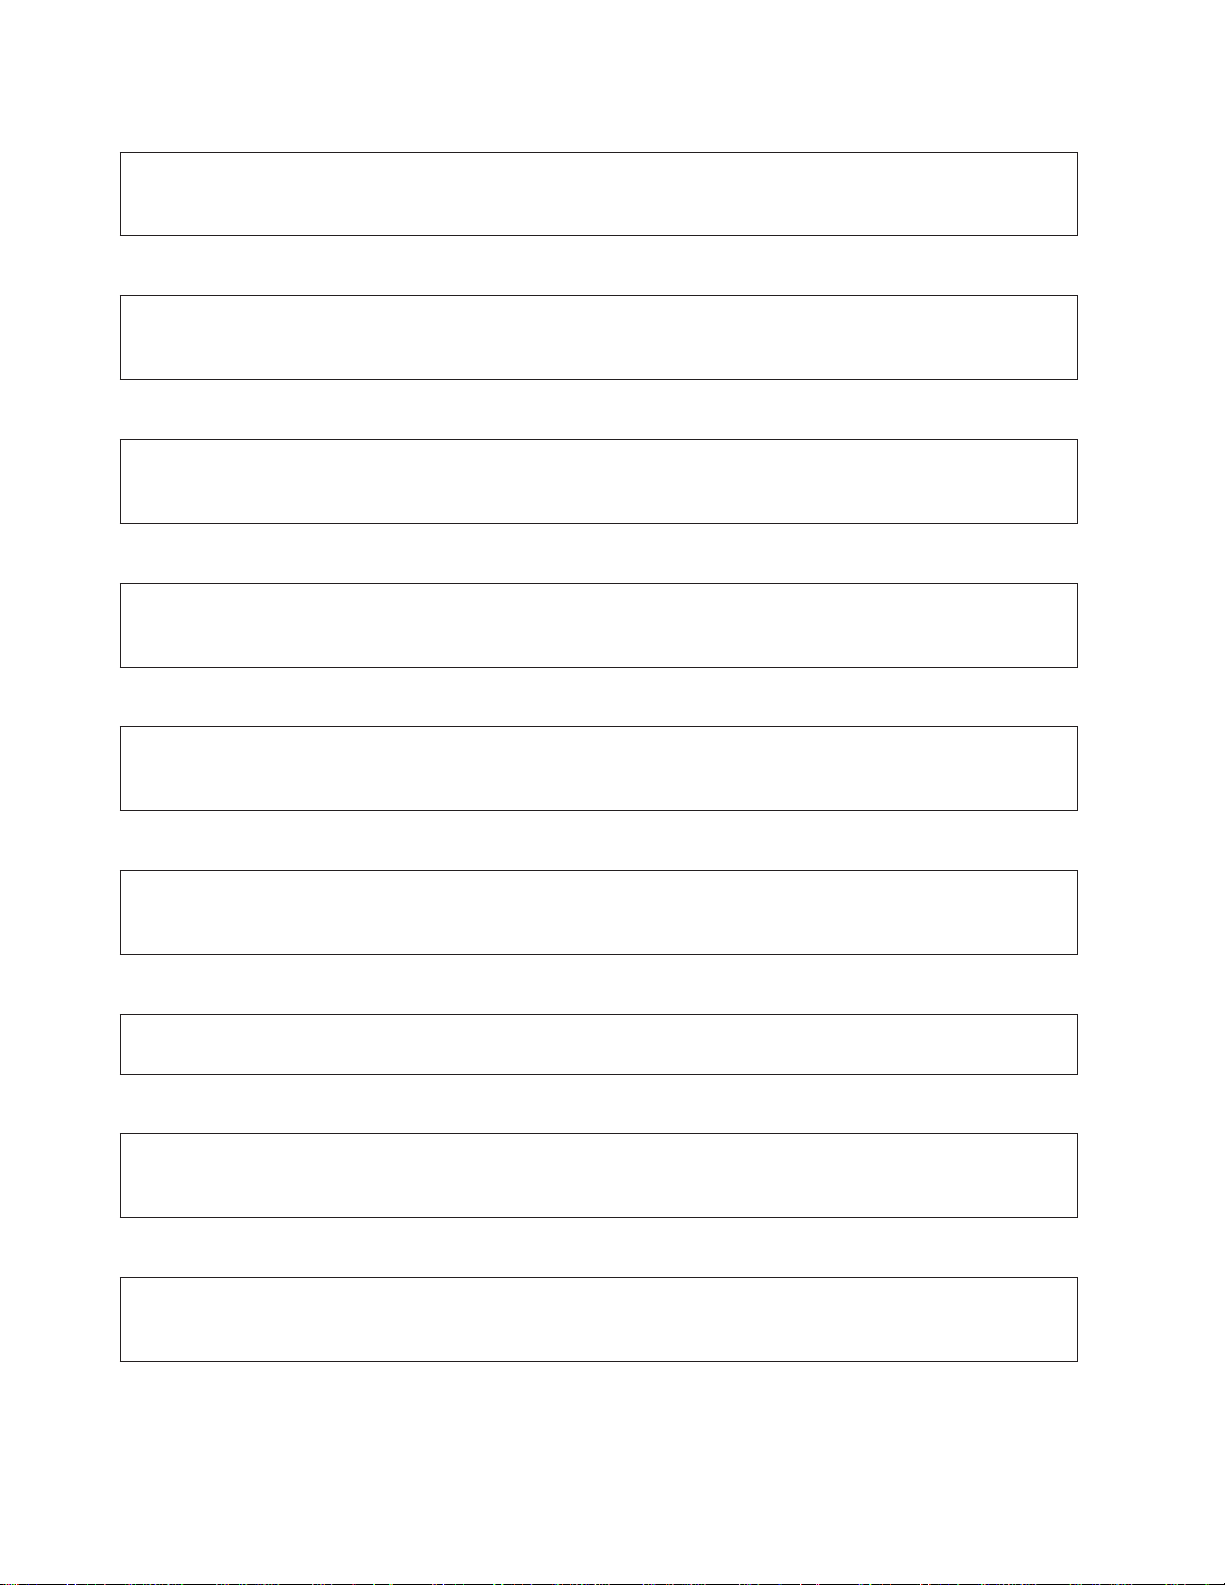
Figure 1-1. SP Switch high-level diagram
RS/6000 SP: SP Switch Service Guide
1-2
P6
Fan
5
P5
Fan
4
P4
Fan
3
P3
Fan
2
Front
chassis
cable
P2
Fan
1
Page 23

Switch description and problem determination (MAP 0590)
There are two LEDs on the front of each SP Switch. For quick reference, their definitions are as follows:
Environment (Yellow)
Off No environmental problems detected by switch supervisor card.
On Warning of environmental condition out of nominal range. Preventative Maintenance should
be scheduled for this switch.
Flashing
Serious environmental condition detected; power shut off.
Power (Green)
Off No 48 V dc power available at the SP Switch.
Flashing
Power available at the SP Switch, but switch logic is Off.
On Power available at the SP Switch, and logic is On.
Note: Refer to “Service position procedures” on page 3-9 for placing or removing the SP Switch into or
from service position.
Step 0590-001
Read the following warning and then follow steps to ensure continuity of customer’s jobs in the queue.
Attention: Servicing a processor node or SP Switch will interrupt customer usage of the processor node
and the remainder of the switch network. If the switch feature must be replaced in a multi-frame system,
refer to “Removing and restoring switch resources” on page 3-7, for information on isolating the SP Switch.
Attention: It is possible that the customer has modified switch cabling from standard configurations;
therefore, be careful about relying on node and frame information. Any connector jack numbers will be
correct regardless of the customer’s cable configuration, so you may trace the cabling from the jack
number if necessary.
1. Have customer complete all active parallel jobs or jobs using switch interface (for example, tape B/U
ADSM), then remove the switch feature from the active configuration. Refer to “Removing and
restoring switch resources” on page 3-7, for these procedures.
2. Check for system monitor errors indicating environmental problems with the switch feature. These can
be viewed by issuing the appropriate command from the control workstation:
v errpt -a -N sphwlog | pg (For SSP code levels 1.02 and higher)
v Refer to the ″Starting a service call (MAP 0100)″ in
information on the pg command
Note: In a frame with processor nodes, entries for the switch will refer to “node17” or “slot17”. In a
multi-switch frame, switches will be listed as even slot addresses.
3. Determine the SP Switch type (see page 1-1)
4. Refer to Table 1-1 on page 1-4 for a prioritized list of conditions. Find the first condition that describes
your problem, then perform the associated action.
RS/6000 SP: System Service Guide
for more
Chapter 1. Maintenance Analysis Procedures (MAPs) 1-3
Page 24
Switch description and problem determination (MAP 0590)
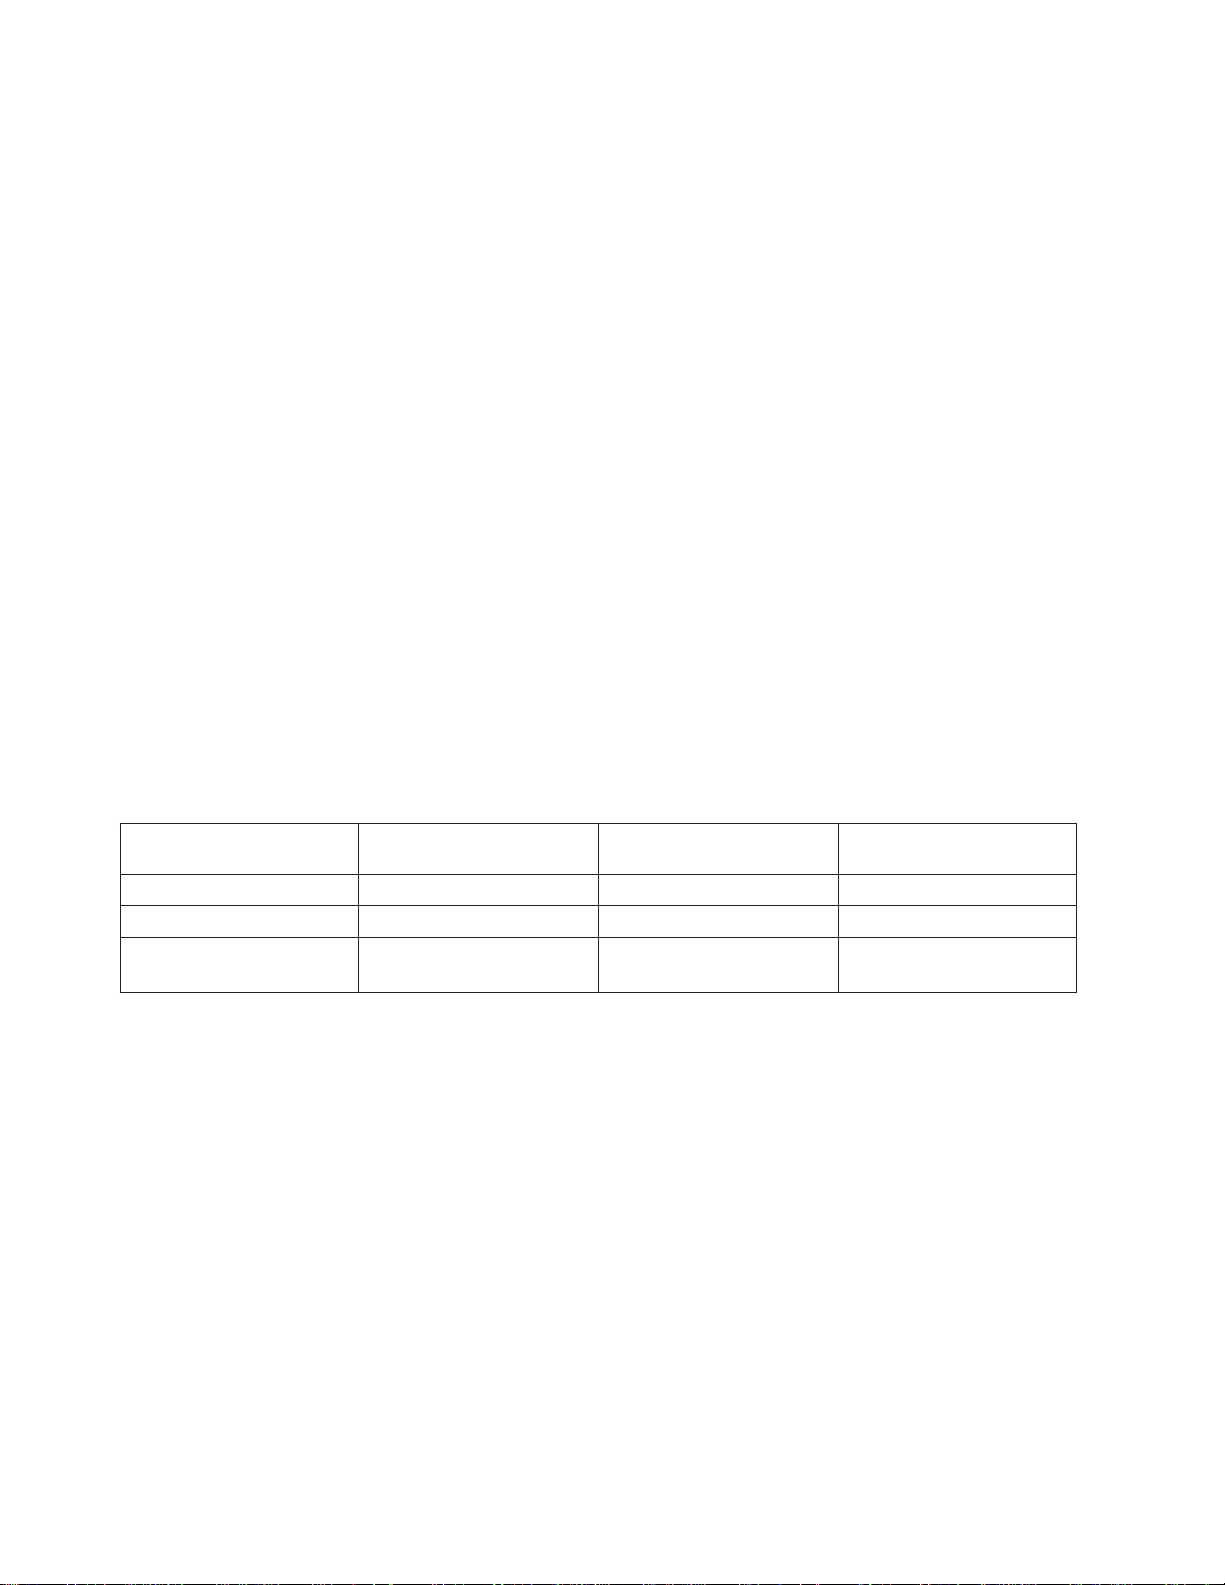
Table 1-1. Switch problem diagnostics
Priority Message or condition Action
1
(1 of 3)
2
(2 of 3)
3
(3 of 3)
Notes:
1. out.top is located in the primary node. To find the primary node, issue:
Eprimary
2. Verify that the file has a valid (recent) time stamp using:
ls -l
Environmental problems
v Errpt: “Failure...”
v Log: “Shutdown: Voltage...”
v Log: “Shutdown: Fan...”
v Log: “Shutdown: Temperature...”
v Errpt: “Warning...”
v Log: “Warning:...”
v Environment (Yellow) LED- on or flashing
Power problem
v (Power) Green LED- off or flashing
v Switch has no power
v All voltages at zero
Switch function problem
v Error(s) in /var/adm/SPlogs/css/out.top (see
note)
v Problem(s) with switch_responds
v Problem(s) returned from errpt -a -N Worm
v Problem(s) detected by CE/customer.
Go to “SP Switch environment (MAP 0600)”
on page 1-5.
Go to “SP Switch power (MAP 0610)” on
page 1-13.
Go to “SP Switch function (MAP 0620)” on
page 1-17.
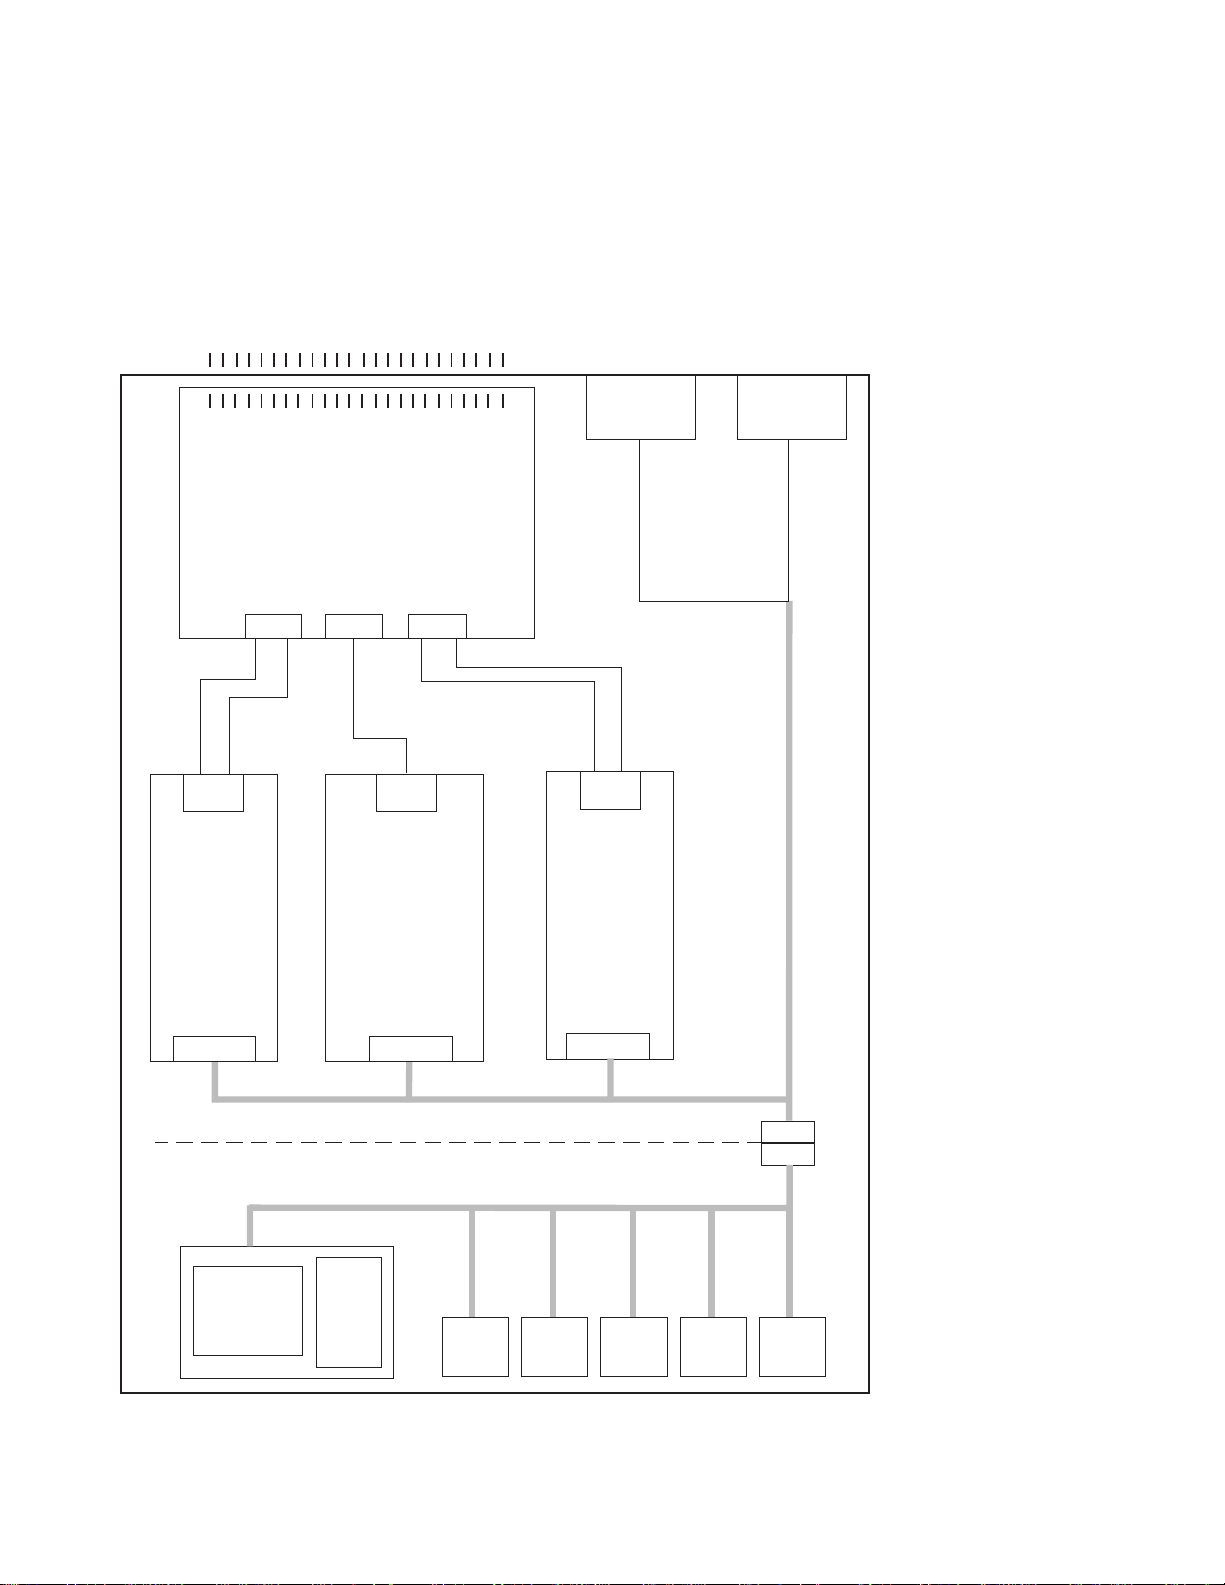
P/N 46H9688
P/N 77G0818
Female wrap plug Male wrap plug
Figure 1-2. SP Switch wrap plugs
Notes:
1. SPS advanced diagnostics use the 10 meter data cable provided by the SPS feature bill of material.
2. Advanced cable wrap tests will not run successfully for 15- and 20-meter SPS data cables. If 15- or
20-meter data cables are used, swap/change the suspected cable.
RS/6000 SP: SP Switch Service Guide
1-4
Page 25
SP Switch environment (MAP 0600)
SP Switch environment (MAP 0600)
Purpose of this MAP
This MAP provides diagnostic information for switch problems that are related to the operating
environment.
Note: Refer to “Service position procedures” on page 3-9 for placing a switch into the service position or
for removing the switch from the service position.
Step 0600-001
You have arrived at this MAP from Table 1-1 on page 1-4.
1. Perspectives reports “Warning”, “Shutdown”, or “Failure” message associated with SP Switch.
2. Does message indicate “Shutdown” or “Failure”?
v If yes, go to “Step 0600-003”.
v No, the message indicates a “Warning”, go to “Step 0600-002”.
Step 0600-002
You received a switch environment “Warning”.
1. Does this same message occur on other SP Switches or on any processor nodes mounted in the
same frame as the switch?
v If yes, call the next level of support.
v If no, verify that the customer is not experiencing problems with this SP Switch.
– If no problems are being experienced, or this is an N+1 fan or power supply failure, then no
immediate service is required, and service can be deferred until a later date.
are
– If problems
0600-001” and treating this message as a “Shutdown” or “Failure” message.
being experienced, service can be performed now by returning to “Step
Step 0600-003
A Perspectives message indicates a “Shutdown” or “Failure”. This means that a serious environmental
condition has been detected in the SP Switch.
Note: If service action has just been completed on this SP Switch, check for loose cables or shorted
conditions in this component.
1. Based on the text of the message, use the information in Table 1-2 to continue service:
Table 1-2. Environmental messages for switches
Condition Action
“...P48OK...” Go to “SP Switch power (MAP 0610)” on page 1-13.
“...shutdownP5...”
“...shutdownP12...”
“...shutdownN5...”
“...fanfail...” Go to “Step 0600-011”on page 1-7.
“...shutdownTemp...” Go to “Step 0600-013” on page 1-9.
“...PS1Fail...”
“...PS2Fail...”
“...P33High...”
“...P33Low...”
“...voltP33Range...”
“...PSFuseGood...”
Go to “Step 0600-004” on page 1-6.
Go to “Step 0600-018” on page 1-10.
Chapter 1. Maintenance Analysis Procedures (MAPs) 1-5
Page 26
SP Switch environment (MAP 0600)
Step 0600-004
Perspectives indicated a shutdown condition and Table 1-2 on page 1-5 directed you to this step.
1. One or more of the following conditions exist:
v Voltage out of range: +5 V “shutdownP5”
v Voltage out of range: +12 V “shutdownP12”
v Voltage out of range: −5 V “shutdownN5”
2. Have the customer remove the SP Switch from the active configuration and power off the SP Switch.
3. Put the switch into service position. Refer to “Service position procedures” on page 3-9.
4. Check the following hardware items:
v Cable conditions at switch supervisor card S00-SP-J102
v Cable conditions at power supply S00-PC-P4 and S00-PC-P6.
v Cable conditions of wires, especially the inner chassis cable.
5. Leave the cable disconnected at the switch power card.
6. Does the switch supervisor control cable appear to be okay?
v If yes, go to “Step 0600-005”.
v If the switch supervisor control cable (S00-SP-P102) appears to have a problem, go to “Step
0600-011” on page 1-7. Refer to Priority 4 and replace the cable.
Step 0600-005
After placing the switch into the service position, you performed some basic inspections and found that the
switch supervisor control cable (S00-SP-P102) appears to be okay.
1. Disconnect S00-PC-P4 and S00-PC-P4 at the power supply.
2. Using a digital multimeter, measure resistance between the appropriate pins.
3. Compare results with values in Table 1-3:
Table 1-3. Switch connector resistance values
Measure from
Voltage
+5 V Pin 1 Pin 2 (black) 1K - 5M
+12 V Pin 3 Pin 2 (black) 1K - 5M
−5 V Pin 5
(positive lead)
Pin 7
To GND
(negative lead)
Pin 2 (black)
Pin 2 (black)
Acceptable range
(in ohms)
2-20
2-20
4. Is the measured resistance in the acceptable range?
v If yes, go to “Step 0600-009” on page 1-7.
v If no, go to “Step 0600-006”.
Step 0600-006
The resistance value you measured in Table 1-3 was not within an acceptable range.
1. Replace the inner chassis cable.
2. Repeat resistance measurement from “Step 0600-005”.
3. Is the measured resistance in the acceptable range?
v If yes, go to “Step 0600-017” on page 1-10 to verify fix.
v If no, go to “Step 0600-007”.
Step 0600-007
You disconnected S00-CL-P5 at the switch clock card but the measured resistance was still outside the
acceptable range.
1. Replace the front chassis cable.
2. Repeat resistance measurement from “Step 0600-005”.
RS/6000 SP: SP Switch Service Guide
1-6
Page 27

SP Switch environment (MAP 0600)
3. Is the measured resistance now within the acceptable range?
v If yes, go to “Step 0600-017” on page 1-10 to verify fix.
v If no, go to “Step 0600-008”.
Step 0600-008
You replaced the inner chassis cable and the front chassis cable but the measured resistance is still
outside of the acceptable range.
1. This indicates that there is still a problem.
2. Replace the switch supervisor card.
3. Go to “Step 0600-017” on page 1-10 to verify fix.
Step 0600-009
You have voltage shutdown condition, the supervisor control cable appears to be okay, and the resistance
value you measured in Table 1-3 on page 1-6 was within an acceptable range. Based on these symptoms,
“Step 0600-005” on page 1-6 directed you to this location.
1. Reconnect cable S00-PC-P4 at switch power supply 1.
2. Repeat resistance measurement from “Step 0600-005” on page 1-6.
3. Is the measured resistance within the acceptable range?
v If yes, replace switch power supply 1 and the switch supervisor card.
a. Go to “Step 0600-017” on page 1-10 to verify fix.
v If no, go to “Step 0600-010”.
Step 0600-010
With cable S00-PC-P4 reconnected at the switch power supply 1, the measured resistance values were
still outside the acceptable range.
1. Reconnect cable S00-PC-P6 at switch power supply 2.
2. Repeat resistance measurement from “Step 0600-005” on page 1-6.
3. Is the measured resistance within the acceptable range?
v If yes, replace switch power supply 2.
a. Go to “Step 0600-017” on page 1-10 to verify fix.
v If no, the problem is in the switch supervisor card.
a. Go to “Step 0600-011”, Priority 3.
Step 0600-011
You arrived at this step because you received a “...fanfail...” message or you found a problem with the
switch supervisor control cable (S00-SP-P102).
1. One or more of the following conditions exist:
v Warning Fan: “fanwarning1”, “fanwarning2”, ..., “fanwarning5”
v Shutdown Fan: “fanfail1”, “fanfail2”, ..., “fanfail5”
2. Have customer remove the SP Switch from the active configuration and power off the SP Switch.
3. Set switch circuit breaker to the Off position.
4. Unplug cables connected to J1 and J2 at the rear of the SP Switch.
5. Remove the front panel assembly from the inner chassis.
6. Use Table 1-4 on page 1-8 to reseat or replace components:
Chapter 1. Maintenance Analysis Procedures (MAPs) 1-7
Page 28
SP Switch environment (MAP 0600)
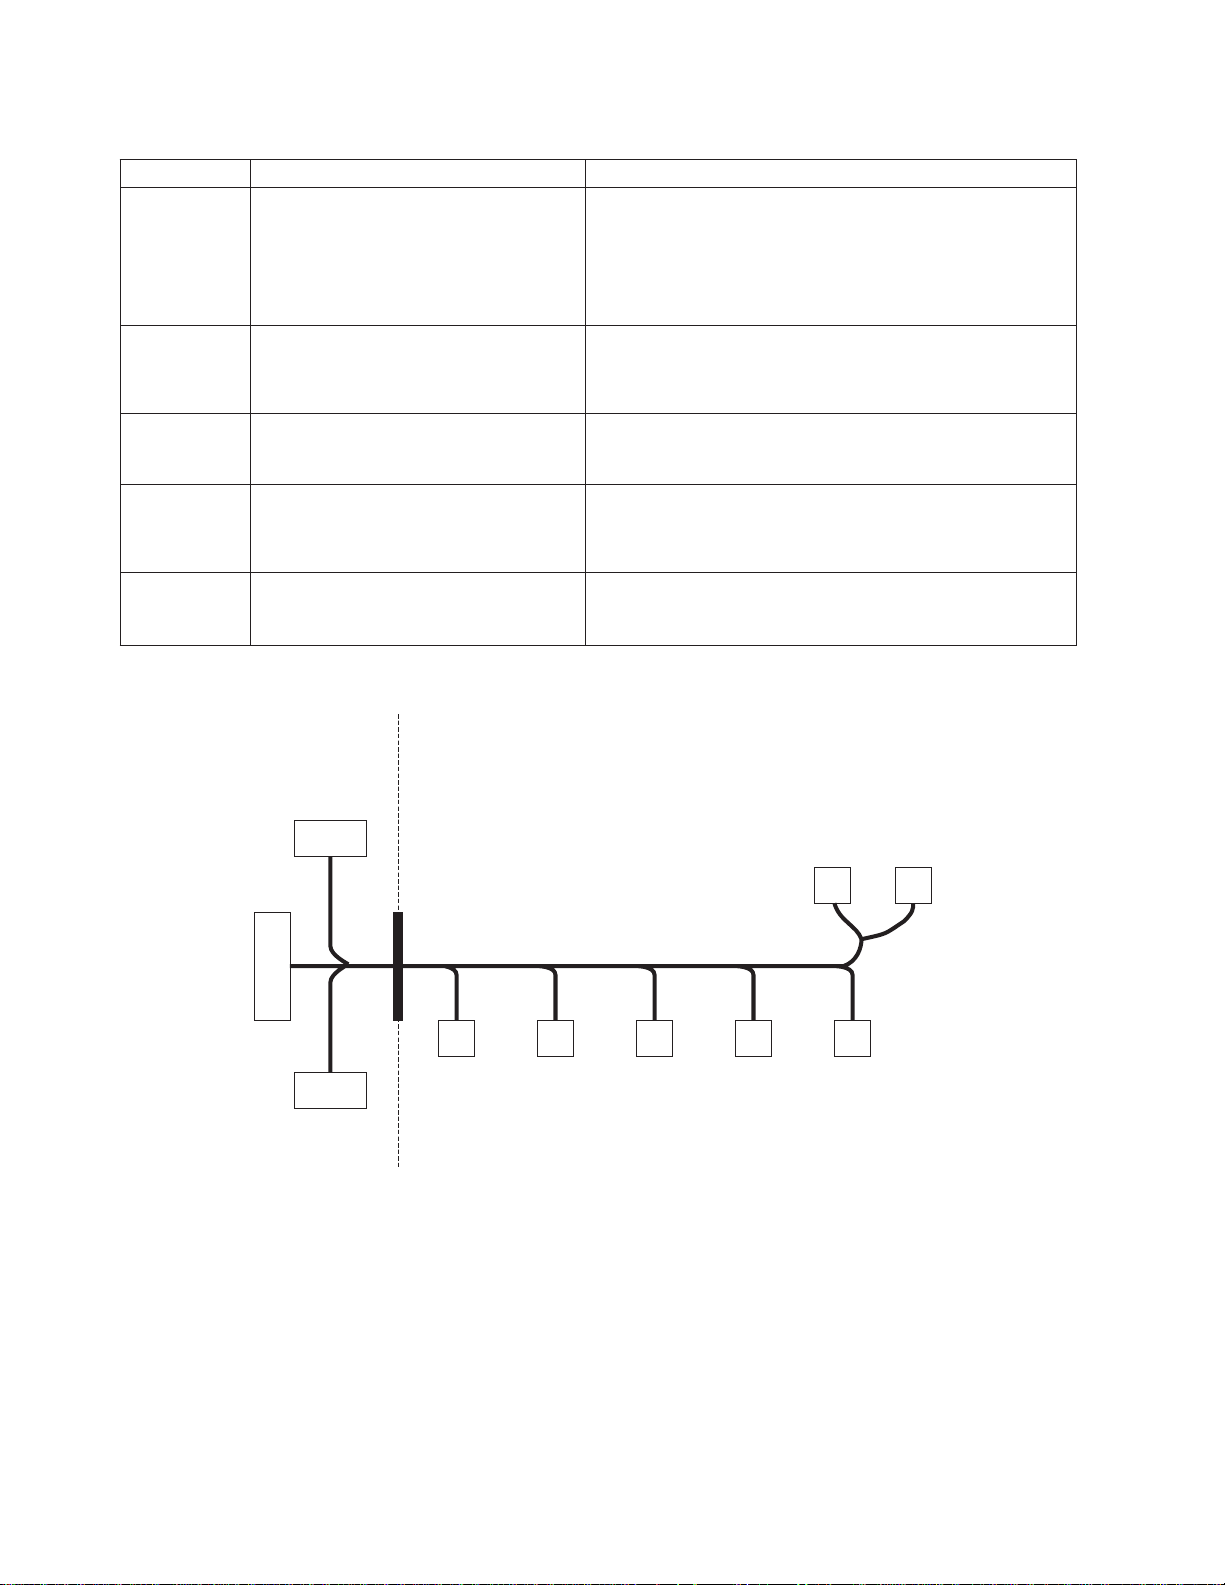
Table 1-4. Fan failure diagnostics
Priority Component Action
1
(1 of 5)
2
(2 of 5)
3
(3 of 5)
4
(4 of 5)
5
(5 of 5)
Fan 1, 2, 3, 4 or 5
Fan 1, 2, 3, 4 or 5
Switch supervisor card
Switch supervisor control cable
All replaced Call next level of support.
a. Check specified fans for blockages or loose cable
connections.
b. Fix any obvious problems and continue at “Step
0600-012”.
c. If you do not find any problems, continue at Priority 2.
a. Replace fans as described in Chapter 4, “FRU
removals and replacements” on page 4-1.
b. Continue at “Step 0600-012”.
a. Replace the card.
b. Continue at “Step 0600-012”.
a. Replace the cable. Refer to Figure 1-3, for cable
connections.
b. Continue at “Step 0600-012”.
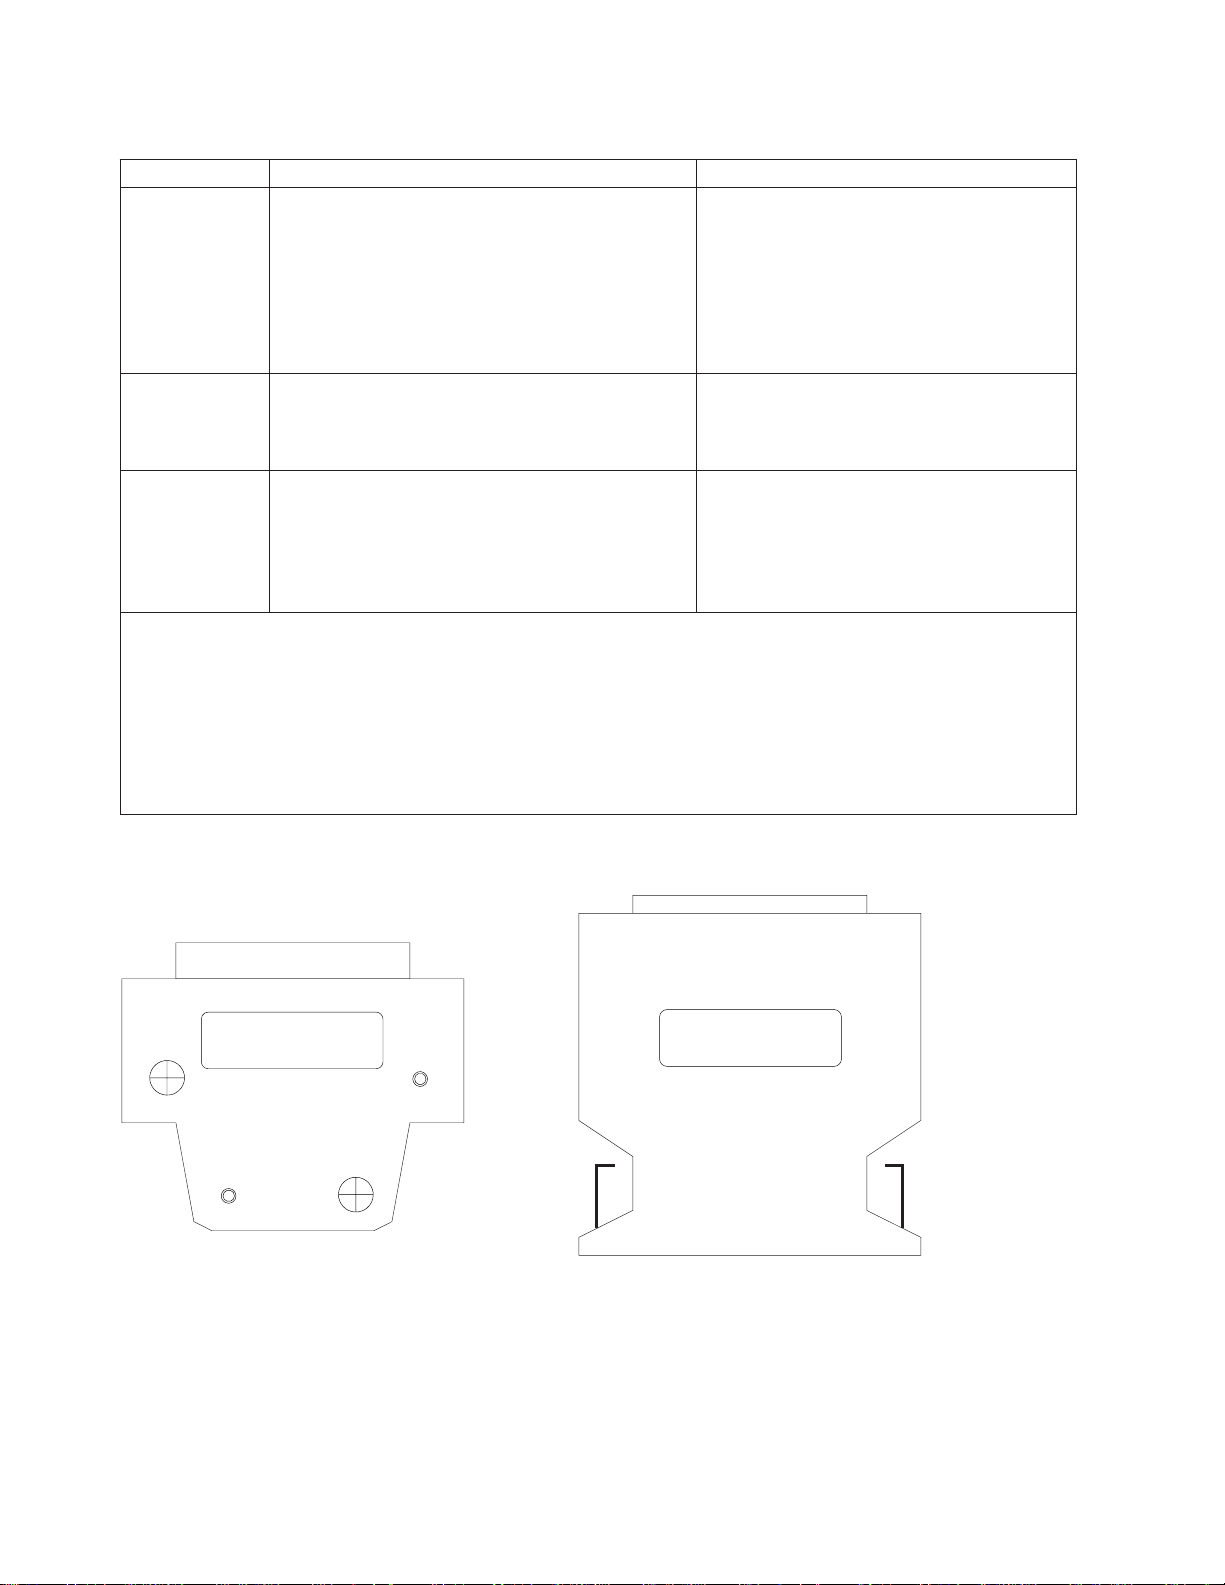
Front Chassis CableInner Chassis Cable
P4 (Power Card)
2 x 1
P5
(Switch SV Card)
2 x 20
P6 (Power Card)
2 x 1
P1P3
P2 (Fan 1)
2 x 2
P3 (Fan 2)
2 x 2
P4 (Fan 3)
2 x 2
P7, P8 (CB) P9 (LED)
P5 (Fan 4)
2 x 2
P6 (Fan 5)
2 x 2
Figure 1-3. SP Switch inner chassis and front chassis cables
Step 0600-012
You performed the recommended action in Table 1-4.
1. Component replaced or reseated.
2. Reconnect all cables inside the SP Switch.
3. Install front panel assembly and reinstall front retaining screws (see “Service position procedures” on
page 3-9).
4. Connect only power (J1) and supervisor (J2) cables at the rear of the SP Switch.
5. Put the SP Switch’s circuit breaker into the On (‘1’) position.
RS/6000 SP: SP Switch Service Guide
1-8
Page 29

SP Switch environment (MAP 0600)
6. Check the Environmental (yellow) LED for an ON or FLASHING condition.
7. Is the Environmental (yellow) LED ON or FLASHING?
v If the Environmental LED is on or flashing:
a. Put the SP Switch’s circuit breaker into the Off (‘0’) position.
b. Return to “Step 0600-011” on page 1-7 and continue service with the next highest priority.
v If the Environmental LED is not on or flashing:
a. You have resolved the problem.
b. Go to “Step 0600-017” on page 1-10 to verify fix.
Step 0600-013
Perspectives indicated a shutdown temperature condition and Table 1-2 on page 1-5 directed you to this
step.
Temperature is out of specified range; however, no serious electrical current or fan speed problems have
been detected.
1. Check for airflow blockage at air intakes and exhaust of the SP Switch and system frame. Also, check
air temperatures around the frame, looking for sources of abnormally high temperatures (above 40C or
104F).
2. Is there an obvious airflow blockage or abnormally high temperature source near air intakes?
v If yes, go to “Step 0600-016”.
v If no, go to “Step 0600-014”.
Step 0600-014
You have an over temperature condition but you did not find an obvious airflow blockage or abnormally
high temperature source near air intakes. This indicates that there is a problem in the switch supervisor
card.
1. Have the customer remove the switch from the active configuration and power off the SP Switch.
2. Set the circuit breaker to the Off position. Unplug cables connected to J1 and J2 at rear of the SP
Switch.
3. Remove the front panel assembly from the inner chassis.
4. Replace the switch supervisor card.
5. Perform “Switch supervisor self-test” on page 3-4.
6. Does the card pass self-test?
v If yes, go to “Step 0600-015”.
v If the card does not pass self-test, check the cable connections to the switch supervisor card. If no
obvious problems are found, call next level of support.
Step 0600-015
The switch supervisor card passed the self-test.
1. Check Environmental (yellow) LED for ON or FLASHING condition.
2. Is the Environmental (yellow) LED ON or FLASHING?
v If the Environmental LED is on or flashing, check the cable connections to the switch supervisor
card. If no obvious problems are found, call next level of support.
v If the Environmental LED is not on or flashing:
a. You have resolved the problem.
b. Go to “Step 0600-017” on page 1-10 to verify fix.
Step 0600-016
You found an obvious airflow blockage or abnormally high temperature source near air intakes.
1. Have customer remove the switch from the active configuration and power off the SP Switch.
Chapter 1. Maintenance Analysis Procedures (MAPs) 1-9
Page 30

SP Switch environment (MAP 0600)
2. Remove blockage.
3. If required, put the switch into service position (refer to “Service position procedures” on page 3-9).
4. With all cables replugged and Environmental (yellow) LED OFF, power on the SP Switch.
5. Go to “Step 0600-017” to verify fix.
Step 0600-017
You have repaired or replaced a component.
1. If necessary, reinstall SP Switch cover.
2. If required, take the switch out of the service position (refer to “Service position procedures” on
page 3-9).
3. If necessary, reconnect all cables at the rear of the SP Switch.
4. Put the SP Switch’s circuit breaker into the On (‘1’) position.
5. Go to “Step 0620-043” on page 1-36.
Step 0600-018
Perspectives gave you a “Shutdown”, or “Failure” message and Table 1-2 on page 1-5 directed you to this
step.
1. One or more of the following conditions exist:
v “...P33Low...”
v “...P33High...”
v “...Pvolt33Range...”
v “...PS1Fail...”
v “...PS2Fail...”
v “...PSFuseGood...”
2. Have the customer remove the SP Switch from the active configuration and power off the SP Switch.
3. Switch off the circuit breaker.
4. Unplug cables connected to J1 and J2 at rear of the SP Switch.
5. Remove the front panel assembly from the inner chassis.
6. Put the switch into service position (refer to “Service position procedures” on page 3-9).
7. What problem type is given in the condition?
v If the condition states that you have a P33 type problem (P33Low, P33High, or voltP33Range), go
to “Step 0600-019”.
v If the condition states that you have a PSxFail or PSxFuseGood problem, go to “Step 0600-023” on
page 1-11.
Step 0600-019
The condition states that you have a P33 type problem (P33Low, P33High, or voltP33Range).
1. Check cable conditions at switch supervisor card S00-SC-P5
2. Check cable conditions at switch power supply S00-PC-P4 and S00-PC-P6.
3. Do the inner chassis cables appear to be okay?
v If the inner chassis cables appear to be okay and the condition is P33low or voltP33Range,goto
“Step 0600-020”.
v If the inner chassis cables appear to be okay and the condition is P33High, go to “Step 0600-027”
on page 1-12.
v If the inner chassis cables do not appear to be okay, go to “Step 0600-011” on page 1-7, Priority 4
and replace the cables.
Step 0600-020
You have a P33low or voltP33Range condition and the inner chassis cables appear to be okay.
1. Disconnect connectors S00-PC-P4, S00-PC-P6 at the power cards and S00-PC-P5 at the supervisor
card.
1-10
RS/6000 SP: SP Switch Service Guide
Page 31

SP Switch environment (MAP 0600)
2. Remove the switch supervisor card (refer to “Removing the switch supervisor card” on page 4-4).
3. Using a digital multimeter, measure resistance at the planar connection for the supervisor card,
between pins 12A and 12B.
v The resistance should be in a range of 4 to 20 ohms.
4. Is the measured resistance in the acceptable range?
v If yes:
a. Replace supervisor card as described in “Replacing the switch supervisor card” on page 4-5.
b. Go to “Step 0600-017” on page 1-10.
v If no, go to “Step 0600-021”.
Step 0600-021
With connectors S00-PC-P4, S00-PC-P6 disconnected, the measured resistance between pins 12A and
12B is outside the specified range.
1. Remove power supply card PS1 (refer to “Removing the switch power cards” on page 4-6.
2. Repeat the resistance measurement from “Step 0600-020” on page 1-10.
3. Is the measured resistance in the acceptable range?
v If yes:
a. Replace the power supply card (refer to “Replacing the switch power cards” on page 4-7.
b. Go to “Step 0600-017” on page 1-10.
v If no, go to “Step 0600-022”.
Step 0600-022
Connectors S00-PC-P4 and S00-PC-P6 are disconnected and you removed power supply card PS1 but
the measured resistance between pins 12A and 12B is still outside the specified range.
1. If this is the first time through this step:
a. Remove power supply card PS2
b. Go to “Step 0600-020” on page 1-10 and repeat the resistance measurement
2. If you have already been through this step:
a. Replace the switch assembly. Go to “Step 0600-017” on page 1-10.
Step 0600-023
You arrived at this location from “Step 0600-018” on page 1-10 where you found a condition state reporting
a PSxFail or PSxFuseGood problem.
1. If you have a PSFuseGood problem, go to “Step 0600-027” on page 1-12.
2. If you have a PS1Fail problem, go to “Step 0600-025” on page 1-12.
3. If you have a PS2Fail problem, go to “Step 0600-024”.
Step 0600-024
You have a PS2Fail problem.
1. Replace power supply card PS2.
2. Reinstall the SPS front panel assembly, being careful to align the guide pins on the P1 to the inner
chassis cup guide.
3. Replug the power cable (J1) and supervisor cable (J2) to the rear of the assembly.
4. Put the circuit breaker in the On (‘1’) position.
5. Does the PS2Fail condition still exist?
v If yes, go to “Step 0600-026” on page 1-12.
v If no, go to “Step 0600-017” on page 1-10.
Chapter 1. Maintenance Analysis Procedures (MAPs) 1-11
Page 32

SP Switch environment (MAP 0600)
Step 0600-025
You have a PS1Fail problem
1. Replace power supply card PS1.
2. Reinstall the SPS front panel assembly, being careful to align the guide pins on the P1 to the inner
chassis cup guide.
3. Replug the power cable (J1) and supervisor cable (J2) to the rear of the assembly.
4. Put the circuit breaker in the On (‘1’) position.
5. Does the PS1Fail condition still exist?
v If yes, go to “Step 0600-026”.
v If no, go to “Step 0600-017” on page 1-10.
Step 0600-026
After replacing the power supply card you still have a PSxFail condition.
1. Put the circuit breaker in the Off (‘0’) position.
2. Remove the power cable (J1) and supervisor cable (J2) from the rear of the SP Switch.
3. Remove the front panel assembly.
4. Replace the supervisor card.
5. Reinstall the SPS front panel assembly, being careful to align the guide pins on the P1 to the inner
chassis cup guide.
6. Replug the power cable (J1) and supervisor cable (J2) to the rear of the assembly.
7. Put the circuit breaker in the On (‘1’) position.
8. Does the PSxFail condition still exist?
v If yes:
a. Replace the SP Switch inner chassis assembly.
b. Go to “Step 0600-017” on page 1-10.
v If no, go to “Step 0600-017” on page 1-10.
Step 0600-027
You have a PSFuseGood problem.
1. Remove power supply PS1 (refer to “Removing the switch power cards” on page 4-6).
2. Reinstall the SPS front panel assembly, being careful to align the guide pins on the P1 connector to
the inner chassis.
3. Replug the power cable (J1) and supervisor cable (J2) at the rear of the assembly.
4. Put the circuit breaker in the On (‘1’) position.
5. Does the failure condition still exist?
v If yes, go to “Step 0600-029” on page 1-13.
v If no, go to “Step 0600-028”.
Step 0600-028
You have a PSFuseGood problem that went away when you removed power supply PS1.
1. Put the circuit breaker in the Off (‘0’) position.
2. Remove power cable (J1) and supervisor cable (J2) from the rear of the SP Switch.
3. Remove the front panel assembly.
4. Replace power supply PS1.
5. Take the switch out of the service position (refer to “Service position procedures” on page 3-9).
6. Go to “Step 0600-017” on page 1-10.
1-12
RS/6000 SP: SP Switch Service Guide
Page 33

SP Switch environment (MAP 0600)
Step 0600-029
You have a PSFuseGood problem that did not go away when you removed power supply PS1.
1. Put the circuit breaker in the Off (‘0’) position.
2. Remove power cable (J1) and supervisor cable (J2) from the rear of the SP Switch.
3. Remove the front panel assembly.
4. Replug power supply PS1 and remove power supply PS2.
5. Reinstall the SPS front panel assembly, being careful to align the guide pins on the P1 connector to
the inner chassis.
6. Replug the power cable (J1) and supervisor cable (J2) at the rear of the assembly.
7. Put the circuit breaker in the On (‘1’) position.
8. Does the failure condition still exist?
v If yes, go to “Step 0600-031”.
v If no, go to “Step 0600-030”.
Step 0600-030
You have a PSFuseGood problem that went away when you removed power supply PS2.
1. Put the circuit breaker in the Off (‘0’) position.
2. Remove power cable (J1) and supervisor cable (J2) from the rear of the SP Switch.
3. Remove the front panel assembly.
4. Replace power supply PS2.
5. Take the switch out of the service position (refer to “Service position procedures” on page 3-9).
6. Go to “Step 0600-017” on page 1-10.
Step 0600-031
You have a PSFuseGood problem that did not go away when you removed power supply PS2.
1. Put the circuit breaker in the Off (‘0’) position.
2. Remove power cable (J1) and supervisor cable (J2) from the rear of the SP Switch.
3. Remove the front panel assembly.
4. Replug power supply PS2 and replace the switch supervisor card.
5. Reinstall the SPS front panel assembly, being careful to align the guide pins on the P1 connector to
the inner chassis.
6. Replug the power cable (J1) and supervisor cable (J2) at the rear of the assembly.
7. Put the circuit breaker in the On (‘1’) position.
8. Does the failure condition still exist?
v If yes:
a. Replace the SP switch inner chassis assembly.
b. Go to “Step 0600-017” on page 1-10.
v If no, go to “Step 0600-017” on page 1-10.
SP Switch power (MAP 0610)
Purpose of this MAP
This MAP provides diagnostic information for problems related to the SP Switch power supply.
Note: Refer to “Service position procedures” on page 3-9 for placing the switch into the service position or
removing it from the service position.
Chapter 1. Maintenance Analysis Procedures (MAPs) 1-13
Page 34

SP Switch power (MAP 0610)
Step 0610-001
A message in Perspectives indicated that you have a power problem and Table 1-1 on page 1-4 or
Table 1-2 on page 1-5 directed you to this MAP.
1. From a Perspectives window on the control workstation or by looking at the SP Switch, check the
Power (green) LED for this SP Switch.
2. The definition of the Power (green) LED is as follows:
Power (Green)
Off No 48 V dc power available at the SP Switch.
Flashing
Power available at the SP Switch, but switch logic is Off.
On Power available at the SP Switch, and logic is On.
3. Is Power (green) LED Off?
v If yes, go to “Step 0610-004”.
v If no, go to “Step 0610-002”.
Step 0610-002
You found the switch Power (green) LED was lit. This indicates that the SP Switch is getting 48 V dc
power.
1. Is Power (green) LED flashing?
v If yes, go to “Step 0610-003”.
v If the Power LED is lit and it is not flashing:
a. This indicates that you do not have a power supply problem.
b. Verify that you have the proper SP Switch, then restart “SP Switch description and problem
determination (MAP 0590)” on page 1-1.
c. If this is the proper SP Switch, call the next level of support.
Step 0610-003
The Power LED is lit and it is flashing.
1. This indicates that the SP Switch is getting power.
2. Power up switch logic from the virtual front panel on the control workstation.
3. Does Power (green) LED light and stay lit?
v If yes, the switch logic is getting power.
a. Go to “SP Switch function (MAP 0620)” on page 1-17 and refer to “Step 0620-043” on
page 1-36.
v If the Power LED does not stay lit, the SP Switch is not responding to the command.
a. Go to ″Frame supervisor not responding (MAP 0110)″ in
RS/6000 SP: System Service Guide
.
Step 0610-004
From either a Perspectives window or by looking at the SP Switch, you determined that the Power (green)
LED is Off.
1. Check the SP Switch’s circuit breaker.
2. Put this circuit breaker in the On (‘1’) position if it is not already in that position.
3. Does the circuit breaker go (trip) to the Off (‘0’) position?
v If yes, go to “Step 0610-005” on page 1-15.
v If no, go to “Step 0610-006” on page 1-15.
1-14
RS/6000 SP: SP Switch Service Guide
Page 35

SP Switch power (MAP 0610)
Step 0610-005
When you put the circuit breaker into the On (‘1’) position, the circuit breaker tripped into the Off (‘0’)
position.
1. Have the customer remove the SP Switch from the active configuration and power off the SP Switch.
2. Put the switch into service position (refer to “Service position procedures” on page 3-9).
3. Go to “Step 0610-010” on page 1-16
Step 0610-006
When you put the circuit breaker into the On (‘1’) position, the circuit breaker stayed in the On (‘1’)
position.
1. From the control workstation or SP Switch, check Power (green) LED for this switch.
2. Is the Power (green) LED lit?
v If the Power (green) LED is not lit, go to “Step 0610-007”.
v If the Power (green) LED is lit:
a. You have resolved the SP Switch problem.
b. Go to “SP Switch function (MAP 0620)” on page 1-17 and refer to “Step 0620-043” on
page 1-36.
Step 0610-007
The Power (green) LED is not lit.
1. Check processor nodes or SP Switches on any other dc power harness for any that are powered on.
2. Ensure that the other processor node or SP Switch has its circuit breaker in the On (‘1’) position.
3. Check the Power (green) LED for an On or Flashing condition.
4. Processor nodes and SP Switches receive 48-volt power from one of five power harnesses. The sets
are as follows:
PDU-BH-P1: Frame slots 1, 2, 3, 4
PDU-BH-P2: Frame slots 5, 6, 7, 8
PDU-BH-P3: Frame slots 9, 10, 11, 12
PDU-BH-P4: Frame slots 13, 14, 15, 16
PDU-BH-P5: Frame slot 17
5. Is the Power (green) LED on other processor nodes or SP Switches On or Flashing?
v If yes, go to “Step 0610-008”.
v If no, go to ″Main power (MAP 0450)″ in
RS/6000 SP: System Service Guide
.
Step 0610-008
You found that the Power (green) LED on other processor nodes or switch assemblies is On or Flashing
1. If there is only one SP Switch on the dc power harness, skip the next item and answer “Yes” to the
question below.
2. Check all other SP Switches on the same dc power harness as the failing SP Switch and look for the
same symptom.
v Look for the circuit breaker on but the Power (green) LED is not lit.
3. Is this the only SP Switch showing this symptom?
v If yes, go to “Step 0610-009”.
v If no, you have a problem with 48 V dc power distribution.
a. Go to ″Open in 48 V dc distribution (MAP 0560)″ in
RS/6000 SP: System Service Guide
.
Step 0610-009
Only one SP Switch is showing the circuit breaker on but the Power (green) LED is not lit.
1. Check cable connections at the frame power unit (see “Step 0610-007”) and at the SP Switch
bulkhead (BH-J1) for good connections.
2. Are the connections good?
Chapter 1. Maintenance Analysis Procedures (MAPs) 1-15
Page 36

SP Switch power (MAP 0610)
v If yes:
a. Have the customer remove the SP Switch from the active configuration and power off the SP
Switch.
b. Go to “Step 0610-010”.
v If no:
a. Fix any cable connection problems.
b. Return to “Step 0610-006” on page 1-15.
Step 0610-010
You have an SP type switch that is either tripping the circuit breaker to the Off position or the circuit
breaker is on but the Power (green) LED is not lit.
1. Turn off the circuit breaker.
2. Unplug cables connected to J1 and J2 at rear of the SP Switch.
3. Remove the front panel assembly from the inner chassis.
4. Unplug inner chassis cable from the switch power cards S00-PC-P4, S00-PC-P6 and the switch
supervisor card S00-SP-P5.
5. Using a digital multimeter, check for inner chassis cable continuity from the switch tailgate and the
connectors in Table 1-5:
Table 1-5. Inner chassis cable continuity
From To
S00-BH_J1 pin 5&9 P6 pin 2
S00-BH-J1 pin 5&9 P4 pin 2
S00-BH-J1 pin 1&6 P3 pin 16
P3 pin 17 p6 pin 1
P3 pin 17 p4 pin 1
6. On the fan assembly, with circuit breaker in the On (‘1’) position, check for front chassis cable
continuity between the connectors in Table 1-6:
Table 1-6. Front chassis cable continuity
From To
P1 pin 17 P1 pin 16
7. Is there continuity?
v If you have continuity on all cables, go to “Step 0610-013” on page 1-17.
v If you do not have continuity on an inner chassis cable, go to “Step 0610-011”.
v If you do not have continuity on an front chassis cable, go to “Step 0610-012”.
Step 0610-011
An inner chassis cable failed the continuity test.
1. Replace inner chassis cable.
2. Return to “Step 0610-004” on page 1-14 to verify the replacement cable.
Step 0610-012
An front chassis cable failed the continuity test.
1. Ensure that the circuit breaker is in the On (‘1’) position.
2. Check for continuity between the tabs of the circuit breaker.
3. Is there continuity?
v If yes:
1-16
RS/6000 SP: SP Switch Service Guide
Page 37

SP Switch power (MAP 0610)
a. Replace the front chassis cable.
b. Return to “Step 0610-004” on page 1-14 to verify the replacement cable.
v If no:
a. Replace the circuit breaker.
b. Return to “Step 0610-004” on page 1-14 to verify the replacement breaker.
Step 0610-013
You have continuity on all cables.
1. If this is the first time through this step, replace the supervisor card.
v Return to “Step 0610-004” on page 1-14 to verify the replacement breaker.
v Refer to “Replacing the switch supervisor card” on page 4-5.
2. If this is the second time through this step, replace the switch inner chassis.
v Return to “Step 0610-004” on page 1-14 to verify the replacement breaker.
v Refer to “Procedures for switch assemblies” on page 4-2.
3. If you have already replaced the supervisor card and the inner chassis, go to ″Open in 48 V dc
distribution (MAP 0560)″ in
RS/6000 SP: System Service Guide
.
SP Switch function (MAP 0620)
Purpose of this MAP
This MAP provides diagnostic information for problems related to the SP Switch function.
Notes:
1. Refer to “Appendix A” in
cables. Logical frame to physical frame translation information can also be found in this appendix.
2. Refer to “Service position procedures” on page 3-9 for placing or removing the switch into or from
service position.
RS/6000 SP: Installation and Relocation
for frame-to-frame or switch-to-switch
Step 0620-001
A message in Perspectives indicated that you have a switch function problem and Table 1-1 on page 1-4
directed you to this MAP.
Note: If out.top does not match the physical switch configuration, run Eannotator. (Refer to
System Support Programs for AIX: Installation and Migration Guide
1. To complete the following procedures, you will need to have primary node root access. (Customer may
enter root password when required.)
2. If either of the following two conditions is true:
v Estart has not been run by the customer
v The CE has already replaced components that might affect the switch.
then from the control workstation of the “primary” processor node, enter:
Estart
, GA22-7347.
Parallel
You should receive a message indicating successful initialization at the primary node. If you receive
any other message, consult the “Diagnosing High Performance Switch Problems” section of
IBM
Parallel System Support Programs for AIX: Diagnosis Guide
3. Determine the primary node number. From an AIX®window on the control workstation, enter:
Eprimary
4. Determine the host name for this node by checking “reliable_hostname” for the node number with the
command:
Chapter 1. Maintenance Analysis Procedures (MAPs) 1-17
Page 38

SP Switch function (MAP 0620)
splstdata -n | pg
5. From the system file server, log into “primary” processor node as root using the telnet command:
telnet
6. Check errpt -a -N Worm | pg for any switch related problems. If any errors are listed, use the error
information, with this MAP, to help isolate the problem.
7. Check the functional state of the switch in the out.top file by issuing the following command on the
“primary” processor node:
pg /var/adm/SPlogs/css/out.top
Notes:
a. Verify that the timestamp on the out.top file is current (using ls -l /var/adm/SPlogs/css/out.top).
b. Refer to ″Starting a service call (MAP 0100)″ in
8. Problems are indicated at the end of a text line by the following sequence:
Examples of error messages:
9. Does /var/adm/SPlogs/css/out.top file report any problems?
v If yes, use the SPS Error Conditions table (Table 1-7 on page 1-19) to continue service.
v If no, go to “Step 0620-002”.
PrimaryNodename
on using the pg command.
−# ErrorMessage
-1 uninitialized
-3 R: faulty link from VOP
RS/6000 SP: System Service Guide
for information
Step 0620-002
No functional problems found.
1. Have you replaced any components or fixed problems?
v If yes:
a. You have resolved the switch problem.
b. Go to ″End of call (MAP 0650)″ in
v If no, go to “Step 0620-003”.
RS/6000 SP: System Service Guide
Step 0620-003
You did not find any functional problems and you did not fix or replace anything.
1. Did Estart command start okay?
v If yes, call the next level of support.
v If no:
a. Consult the “Diagnosing Switch Problems” section of
b. Return to “Step 0620-001” on page 1-17.
IBM RS/6000 SP: PSSP Diagnosis Guide
.
.
1-18
RS/6000 SP: SP Switch Service Guide
Page 39

Table 1-7. SP Switch error conditions
Error # Message/condition Description and action
2
(SPS)
1
(SPS)
0
(SPS)
Initialized Description: Initialization detected a wrapped port where a
processor node or dependent node was expected (this may
result from isolation procedures), or else a disconnected cable.
Action:
1. If this is an unexpected condition, check cabling against
the configuration file var/adm/SPlogs/css/out.top.
2. If the processor node or dependent node can be
reconnected, remove the wrap plug and connect the data
cable between the switch assembly and the processor node
or dependent node.
3. If the processor node or dependent node is to be
permanently removed, have the customer update the
switch topology.
4. Repeat “Step 0620-001” on page 1-17 for next problem or
go to “Step 0620-043” on page 1-36 to verify fix.
Link status: Operational Description: Link status is operational.
Action: Repeat “Step 0620-001” on page 1-17 for next problem
or go to “Step 0620-043” on page 1-36 to verify fix.
Uninitialized Description: Switch adapter has not been initialized. Processor
node may not recognize adapter due to hardware failure or bad
software configuration.
SP Switch function (MAP 0620)
−1
(SPS)
−2
(SPS)
Action:
1. If there are any other errors in the
/var/adm/SPlogs/css/out.top file, address those errors first.
Note: If the problem is on all nodes in the frame, check for
any hardware problems with the SP Switch. Also check for
switch-to-switch problems on all jacks of the SP Switch.
2. If all the nodes are uninitialized except for the primary node,
verify that the primary node is connected to the correct port.
3. Have customer verify that the correct switch software is
installed and running on this node. rc.switch or
css_restart_node starts the
fault_service_Worm_RTG_SP daemon and the
fs_monitor daemon.
4. Log into processor node and enter:
lscfg | grep css
5. If you get no result, try swapping in another switch
adapter. Repeat step 3. If you get a result, the problem is
probably resolved; repeat “Step 0620-001” on page 1-17 for
next problem or go to “Step 0620-043” on page 1-36 to
verify fix.
6. The problem is probably the SP Switch. Go to “Step
0620-004” on page 1-21.
Device status: Device not
responding
Link status: Link as been removed
from network, other stage faulty
Link status: Wrap plug is installed Description: Initialization detected a wrap plug or cable rather
Description: Possible hardware problem.
Action: Go to “Step 0620-004” on page 1-21.
than the expected cabling.
Action: Repeat “Step 0620-001” on page 1-17 for next problem
or go to “Step 0620-043” on page 1-36 to verify fix.
Chapter 1. Maintenance Analysis Procedures (MAPs) 1-19
Page 40

SP Switch function (MAP 0620)
Table 1-7. SP Switch error conditions (continued)
Error # Message/condition Description and action
−3
(SPS)
−4
(SPS)
−5
(SPS)
−6
(SPS)
−7
(SPS)
Device status: Device has been
removed from network because of a
bad signature
Link status: Not operational
Device status: Device has been
removed from network, faulty
Link status: Link has been removed
from network or miswired, faulty
Send packet from local node failed Description: Possible hardware problem.
Device status: Device has been
removed from network, no
AUTOJOIN
Link status: Link has been removed
from network, no AUTOJOIN
Device status: Device has been
removed from network for not
responding
Description: Possible hardware problem.
Action: Go to “Step 0620-004” on page 1-21.
Description: Switch network not wired as specified in switch
topology or problem with connection between switch and
device.
Note: You may get this error number for a jack which could
connect to a node, but instead has a wrap plug. In this case,
this message is a warning only and can be ignored.
Action:
1. Check this connection against the actual hardware cabling.
2. If the cabling does not match, correct the cabling
problem, then go to step 5 below.
3. Check the processor node’s hostname and switch node
number against the configuration using the command:
splstdata -s | pg
SDRGetObjects DependentNode
4. If this occurs on all nodes of a frame, check for a
logical-to-physical frame number mismatch.
5. If there is a mismatch, have the customer update the
configuration, or you can correct the cabling, as appropriate.
6. Go to “Step 0620-004” on page 1-21.
Action: Go to “Step 0620-004” on page 1-21.
Description: AUTOJOIN was not selected for node during
removal.
Action:
1. If there is an obvious problem, like node powered off or
disconnected, fix that problem first. Then issue Eunfence
for this processor node or dependent node.
2. If problem was resolved, repeat “Step 0620-001” on
page 1-17 for next problem or go to “Step 0620-043” on
page 1-36 to verify fix.
3. If problem was not resolved, go to “Step 0620-004” on
page 1-21.
Description: Possible hardware problem.
Action: Go to “Step 0620-004” on page 1-21.
1-20
Link status: Link has been removed
from network, fenced
RS/6000 SP: SP Switch Service Guide
Page 41

Table 1-7. SP Switch error conditions (continued)
Error # Message/condition Description and action
−8
(SPS)
−9
(SPS)
Device status: Device has been
removed from network because of a
miswire
Link status: Link has been removed
from network, probable miswire
Device status: Destination not
reachable
Link status: Link has been removed
from network, not connected
Description: Initialization of this link detected a different switch
node number than the one expected.
Action:
1. Check this connection against the actual hardware cabling.
2. If the cabling does not match, correct the cabling
problem, then go to step 5.
3. Check the node’s hostname (or IP address) and switch
node number against the configuration using the command:
splstdata -s | pg
(standard node)
SDRGetObjects DependentAdapter
(dependent node)
4. If this occurs on all nodes of a frame, check for a
logical-to-physical frame number mismatch.
5. Have the customer update the configuration, or you can
correct the cabling, as appropriate.
6. Repeat “Step 0620-001” on page 1-17 for next problem or
go to “Step 0620-043” on page 1-36 to verify fix.
Description: Possible hardware problem.
Action: Go to “Step 0620-004”.
SP Switch function (MAP 0620)
Step 0620-004
You were directed here by an Error Condition listed in Table 1-7 on page 1-19 which lists functional
problems reported in /var/adm/SPlogs/css/out.top file. This file lists all switch data connections with
comment lines indicating the various types.
1. Check the entire /var/adm/SPlogs/css/out.top file for errors before proceeding to the prioritized table.
2. Use the following prioritized table to service problems reported in the /var/adm/SPlogs/css/out.top
file. The messages are from comment lines preceding the error.
Notes:
a. Be aware that wrap plugs or terminators used in the following steps can potentially fail; therefore,
be sure that a diagnostic wrap plug or terminator is not faulty before performing major
replacements.
b. Where applicable, frame and SP Switch jack numbers are indicated on each line of the out.top file.
(Refer to “Format structure” on page 2-1 for more information on the nomenclature.)
For example:
L01-S00-BH-J18
identifies Logical frame 1, S00-BH-J18
E02-S00-BH-J18
identifies Physical frame 2, S00-BH-J18
L03-N01
identifies Logical frame 3, Node 1
E02-N04
identifies Physical frame 2, Node 4
S01-S02-BH-J3
identifies Multi-switch frame 1, slot 2, BH-J3
Chapter 1. Maintenance Analysis Procedures (MAPs) 1-21
Page 42

SP Switch function (MAP 0620)
Refer to notes at beginning of “SP Switch function (MAP 0620)” on page 1-17 for more information
on cable connections and logical-to-physical frame translations.
c. Be aware that for logical frames consisting of two physical frames, all out.top even-numbered
nodes represent nodes physically located in the expansion frame (F/C 1010) but at the next lower
slot number. For example, L01-N04 (logical frame 1, node 4) could be physically located at
E02-N03 (physical frame 2, slot 3).
Table 1-8. Problem messages from the out.top file
Priority Message/condition Action
1
(1 of 5)
2
(2 of 5)
3
(3 of 5)
4
(4 of 5)
5
(5 of 5)
v “On board connections...” Go to “Step 0620-041” on page 1-35 to replace the
switch assembly.
v “Primary node connection...”
v “Node connections...” on same switch
as primary node
v “Wrapped ports”
v “frame # to frame #”
v “switch # to switch #”
v “Switch connections...”
v “Node connections...” not on same
switch as primary node.
v All problems in
/var/adm/SPlogs/css/out.top file have
been addressed.
v If this is a standard node, go to “Step 0620-005” to
check “primary” or “secondary” processor node
connection.
v If this is a dependent node (connection to router), go
to ″Dependent node (MAP 0630)″ in
System Service Guide
Go to “Step 0620-021” on page 1-29 to check the
wrapped port or external switch connection.
v If this is a standard node, go to “Step 0620-005” to
check “secondary” processor node connection.
v If this is a dependent node (connection to router), go
to ″Dependent node (MAP 0630)″ in
System Service Guide
Go to “Step 0620-043” on page 1-36.
.
.
RS/6000 SP:
RS/6000 SP:
Step 0620-005
The /var/adm/SPlogs/css/out.top file indicates a problem with a “Primary node” or “Secondary node”
connection.
1. Open frame rear cover and check the cable connection from the indicated SP Switch jack to the
processor node.
2. Is there a cable connected to the indicated jack on the SP Switch?
v If yes, go to “Step 0620-008” on page 1-23.
v If no, go to “Step 0620-006”.
Step 0620-006
No cable connected at the indicated jack on the SP Switch (refer to the tables in “Switch data cables” on
page 2-13).
1. Should there be a cable connecting the indicated jack to a processor node?
v If yes:
a. Connect a switch data cable from this jack to the proper processor node.
b. Go to “Step 0620-043” on page 1-36.
v If no, go to “Step 0620-007”.
Step 0620-007
A switch cable is not required on the indicated jack.
1-22
RS/6000 SP: SP Switch Service Guide
Page 43

SP Switch function (MAP 0620)
1. Make sure a wrap plug is properly installed on the connector. Refer to Figure 1-2 on page 1-4 for views
of the switch wrap plugs.
2. Have customer check (and update if necessary) the switch configuration file appropriately before
continuing:
v For code level 1.02 and higher, use the Etopology command.
3. Did you just correct a problem with a wrap plug or correct the switch configuration?
v If yes, go to “Step 0620-043” on page 1-36.
v If no, go to “Step 0620-041” on page 1-35 to service or replace the switch assembly.
Step 0620-008
You have a switch cable connected to the indicated jack on the SP Switch.
1. Check cable connection at SP Switch and processor node.
2. Does the cable appear to be fully connected at the SP Switch and the processor node?
v If yes, go to “Step 0620-009”.
v If no:
a. Fix the cable connection problem.
b. Go to “Step 0620-043” on page 1-36.
Step 0620-009
The cable appears to be fully connected at both the SP Switch and at the processor node.
1. From the front of the RS/6000 SP frame or from the control workstation, check the Power (green) LED
on the processor node to make sure it is lit.
2. Is the Power (green) LED lit, indicating the processor node is powered on?
v If yes, go to “Step 0620-011”.
v If no, go to “Step 0620-010”.
Step 0620-010
The processor must be powered on for the switch to recognize the port.
1. Power on this processor node, and check the Power (green) LED.
2. Does the Power (green) LED stay lit, indicating the processor node is powered on?
v If yes, go to “Step 0620-043” on page 1-36.
v If no:
a. The processor node has a power problem.
b. Go to ″Processor node diagnostics and descriptions (MAP 0130)″ in
Service Guide
to fix problem.
RS/6000 SP: System
Step 0620-011
The Power (green) LED is lit, indicating the processor node is powered on.
1. Run advanced diagnostics in service mode on device “css0” on this processor node and its associated
switch port.
v Refer to ″Running diagnostics in a processor node″ in
“Running diagnostics on a switch port” on page 3-12.
Notes:
a. Advanced cable wrap tests will not run successfully for 15- and 20-meter SPS data cables. If 15- or
20-meter data cables are used, swap or change the suspected cable.
b. Advanced “css0” diagnostics will require a male and a female wrap plug to perform the card wrap
and cable wrap tests. When testing the SPS adapter, cable part number 46H9699 will also be
required to perform card diagnostics. This cable is part of the SPS feature bill of materials.
c. If unable to run diagnostics, reseat or replace the card.
2. Do you get a Service Request Number (SRN) from “css0” diagnostics?
RS/6000 SP: System Service Guide
and
Chapter 1. Maintenance Analysis Procedures (MAPs) 1-23
Page 44

SP Switch function (MAP 0620)
v If yes:
a. An SRN was obtained from diagnostics.
b. Use the following SRN table (Table 1-9) to continue service.
c. After using Table 1-9, go to “Step 0620-012” on page 1-26.
v If no:
a. The diagnostics did not detect a problem, therefore the problem is in SP Switch.
b. Go to “Step 0620-041” on page 1-35.
Table 1-9. Service Request Number (SRN) table for SP Switch adapters
SRN
Service Request Number
762-200
through
762-299
762-2A0
through
762-2A9
762-300
through
762-399
762-400
through
762-499
762-500
through
762-599
762-600
through
762-699
762-700
through
762-799
762-800
through
762-899
762-900
through
762-999
762-Ax3
(See note)
762-Ax4
(See note)
763-1xx
(See note)
source Failing component(s) Description
D 762-100
through
762-199SPS adapter
software
system or I/O planar
D external clock
SPS adapter
(wrap plug)
D SPS adapter Problem detected with internal
D SPS adapter
system or I/O planar
D SPS adapter
software
D SPS adapter SRAM test failed.
D SPS adapter Microprocessor test failed.
D SPS adapter Interrupt test failed.
D SPS adapter FIFO test failed.
D SPS adapter
I/O planar
data cable
D SPS adapter
(terminator)
D SPS data cable
(wrap plug)
D SPS MX adapter
software
system or I/O planar
Problem detected with device or
device data corrupted. You may
need to reinstall “ssp.css” code.
Problem detected with external
clock.
clock.
Problem detected with POS
registers.
TBIC test failed.
DMA engine test failed.
Card wrap test failed.
Cable wrap test failed.
Problem detected with a device
or device data corrupted.
Note: You may need to reinstall
ssp.css software.
1-24
RS/6000 SP: SP Switch Service Guide
Page 45

SP Switch function (MAP 0620)
Table 1-9. Service Request Number (SRN) table for SP Switch adapters (continued)
SRN
Service Request Number
763-200
through
763-299
(except 763-282)
763-282 D switch cable Adapter is good but switch cable
763-2A0
through
763-2A9
source Failing component(s) Description
D ext clock
SPS MX adapter
wrap plug
D SPS MX adapter Problem detected with the
Problem detected with the
external clock (SP switch).
is not attached.
internal clock.
763-3xx
(See note)
763-4xx
(See note)
763-5xx
(See note)
763-6xx
(See note)
763-7xx
(See note)
763-8xx
(See note)
763-9xx
(See note)
763-Ax3
(See note)
763-Ax4
(See note)
763-xx2
(See note)
763-xx3 D SPS MX Adapter Bad adapter.
763-xx4 D SPS MX Adapter
764-1xx
(See note)
764-200
through
764-299
(except 764-282)
764-282 D switch cable Adapter is good but switch cable
D SPS MX adapter
system or I/O planar
D SPS MX adapter
software
D SPS MX adapter SRAM test failed.
D SPS MX adapter Microprocessor test failed.
D SPS MX adapter Interrupt test failed.
D SPS MX adapter FIFO test failed.
D SPS MX adapter
switch cable
system or I/O planar
D SPS MX adapter
(terminator)
D switch cable
(wrap plug)
D SPS MX adapter Bad adapter (except SRN
Switch Cable
D SP System Attachment Adapter
software
system or I/O planar
D ext clock
SP System Attachment Adapter
wrap plug
Problem detected with POS
registers.
TBIC test failed.
DMA engine test failed.
Card wrap test failed.
Cable wrap test failed.
763-282).
Bad switch cable.
Problem detected with a device
or device data corrupted.
Note: You may need to reinstall
ssp.css software.
Problem detected with the
external clock (SP switch).
is not attached.
Chapter 1. Maintenance Analysis Procedures (MAPs) 1-25
Page 46

SP Switch function (MAP 0620)
Table 1-9. Service Request Number (SRN) table for SP Switch adapters (continued)
SRN
Service Request Number
764-2A0
through
764-2A9
source Failing component(s) Description
D SP System Attachment Adapter Problem detected with the
internal clock.
764-3xx
(See note)
764-4xx
(See note)
764-5xx
(See note)
764-6xx
(See note)
764-7xx
(See note)
764-8xx
(See note)
764-9xx
(See note)
764-Ax3
(See note)
764-Ax4
(See note)
764-xx2
(See note)
764-xx3 D SP System Attachment Adapter Bad adapter.
764-xx4 D SP System Attachment Adapter
80x-762 D Software
Note:
D SP System Attachment Adapter
system or I/O planar
D SP System Attachment Adapter
software
D SP System Attachment Adapter SRAM test failed.
D SP System Attachment Adapter Microprocessor test failed.
D SP System Attachment Adapter Interrupt test failed.
D SP System Attachment Adapter FIFO test failed.
D SP System Attachment Adapter
switch cable
system or I/O planar
D SP System Attachment Adapter
(terminator)
D switch cable
(wrap plug)
D SP System Attachment Adapter Bad adapter (except SRN
Switch Cable
SPS Adapter
Problem detected with POS
registers.
TBIC test failed.
DMA engine test failed.
Card wrap test failed.
Cable wrap test failed.
764-282).
Bad switch cable.
Error occurred while running the
diagnostics.
An ‘x’ in an SRN indicates a “don’t care” digit.
Step 0620-012
An SRN was obtained and Table 1-9 on page 1-24 was used to determine the list of possible failing
components.
1. From the list of possible failing components, use the following prioritized table (Table 1-10 on
page 1-27) to perform service.
1-26
RS/6000 SP: SP Switch Service Guide
Page 47

Table 1-10. Switch problem priority listing
Priority Failing component Action
1
(1 of 7)
2
(2 of 7)
3
(3 of 7)
4
(4 of 7)
5
(5 of 7)
6
(6 of 7)
7
Software a. Have customer verify that the software is configured
External clock a. Check to see if a switch clock cable is connected at
Data cable a. Reseat switch data cable at switch adapter of this
SPS Adapter
SP System Attachment
Adapter
System or I/O planar a. Run advanced diagnostics on the “Base System” or
Wrap plug or
Terminator
All components replaced. Call next level of support.
SP Switch function (MAP 0620)
and operating correctly for this processor
node/system.
b. If no problem is found, continue with next highest
priority item in the list for this SRN.
c. Otherwise, power off this processor node and continue
service at “Step 0620-017” on page 1-28.
switch adapter of this processor node.
b. If clock cable exists, reseat switch clock cable;
otherwise reseat switch data cable.
c. Run advanced diagnostics on the device “css0” and its
associated switch port.
d. If diagnostics fail with the previous SRN, check at
least one other processor node for indication of a
clock problem. If necessary, run advanced diagnostics
on this other node, using the device “css0” and its
associated switch port.
e. If more than one node has a clock problem, go to
“Step 0620-013” on page 1-28.
f. Replace the switch clock cable or switch data cable
that was just reseated in step 2 above.
g. Continue service at “Step 0620-018” on page 1-28.
processor node.
b. Run advanced diagnostics on the device “css0” and
its associated switch port.
c. If diagnostics fail with the previous SRN, replace
switch data cable.
d. Continue service at “Step 0620-018” on page 1-28.
a. Replace the switch adapter card on this processor
node.
b. Reconnect all cables to the processor node.
c. Continue service at “Step 0620-018” on page 1-28.
Note: Before disconnecting cables or performing service
actions on an SP-Attached Server, perform ″Decoupling
and coupling code for SP-Attached Servers″ in
SP: System Service Guide
I/O planar. If a problem is detected, use SRN to
service.
b. Replace the system or I/O planar on this processor
node. Make sure to reinstall all parts and cables.
c. Reconnect all cables to the processor node.
d. Continue service at “Step 0620-018” on page 1-28.
Check the wrap plug or terminator again to make sure
that it is not at fault.
.
RS/6000
(7 of 7)
Chapter 1. Maintenance Analysis Procedures (MAPs) 1-27
Page 48

SP Switch function (MAP 0620)
Step 0620-013
An SRN listed in Table 1-9 on page 1-24 indicated that you have a switch clock problem and Priority 2 in
Table 1-10 on page 1-27 directed you to this step.
1. Check the switch clock selections on the “problem” switches .
2. Do the clock settings on the “problem” SP Switches appear to be okay?
v If yes, go to “Step 0620-014”.
v If no
a. Change the clock selections on the appropriate switches (refer to “Selecting appropriate switch
clocks” on page 3-6).
b. Go to “Step 0620-043” on page 1-36 to verify fix.
Step 0620-014
The clock settings on the “problem” SP Switches appear to be okay.
1. Is an external clock selected?
v If yes, go to “Step 0620-016”.
v If no, go to “Step 0620-015”.
Step 0620-015
An external clock is not selected. This indicates that you have a defective master clock card.
1. Is this the only switch in this system?
v If yes:
a. Replace the switch assembly.
b. Go to “Step 0620-043” on page 1-36 to verify fix.
v If this is not the only switch in this system, go to “Step 0620-016”.
Step 0620-016
The system you are working on either has an external clock or the system uses more than one switch.
1. Have the customer select an alternate clock (via the Eclock command.
2. Issue the Estart command.
3. Does the switch run?
v If yes, go to “Step 0620-018”.
v If no:
a. Replace the switch assembly.
b. Go to “Step 0620-043” on page 1-36 to verify fix.
Step 0620-017
An SRN listed in Table 1-9 on page 1-24 indicated that you have a software problem and Priority 1 in
Table 1-10 on page 1-27 directed you to this step.
1. From the node front panel on the control workstation, put the node in the SERVICE mode.
2. Power-on this processor node.
3. Go to “Step 0620-018”.
Step 0620-018
At this point, you must run the advanced diagnostics in service mode on the device “css0” and its
associated switch port.
1. Did you get an SRN from the diagnostics?
v If yes, go to “Step 0620-020” on page 1-29.
v If no, go to “Step 0620-019” on page 1-29.
1-28
RS/6000 SP: SP Switch Service Guide
Page 49

SP Switch function (MAP 0620)
Step 0620-019
Since the diagnostics did not return an SRN, no problem was detected.
1. Have you just reseated, repaired, or replaced a component?
v If yes, go to “Step 0620-043” on page 1-36 to verify fix.
v If no:
a. Problem is in the SP Switch.
b. Go to “Step 0620-041” on page 1-35 to service or replace switch assembly.
Step 0620-020
The advanced diagnostics returned an SRN indicating that the diagnostics detected a problem.
1. Is this SRN the same as the previous SRN?
v If yes, go to “Step 0620-011” on page 1-23 to perform service on the next highest priority component
in the list for this SRN.
v If no, go to “Step 0620-012” on page 1-26 to service the new SRN.
Step 0620-021
An error message in the /var/adm/SPlogs/css/out.top file indicated that you either have an external
switch connection problem or a problem with a wrapped port. Priority 3 in Table 1-8 on page 1-22 directed
you to this step.
1. Check the specified jacks at the rear of the SP Switches for an obvious problem such as a loose
connection.
2. Pay special attention to cables that may have been moved recently.
3. Do connections appear to be okay?
v If yes, go to “Step 0620-022”.
v If no:
a. Fix the obvious connection problem.
b. Go to “Step 0620-043” on page 1-36 to verify fix.
Step 0620-022
The /var/adm/SPlogs/css/out.top file indicated a switch problem and all connection appeared to be okay.
Note: Be aware that in large systems, connections for SP Switches not in the multi-switch frame are
usually scattered throughout the out.top file.
1. If this is a multi-frame system, check the indicated jacks against the wiring charts for multi-frame
switch systems.
2. Is this a multi-frame system with problems reported on all switch data cables from one or more
switches?
v If yes:
a. The problem may be caused by clocking or grounding between frames.
b. Go to “Step 0620-024” on page 1-30.
v If no, go to “Step 0620-023”.
Step 0620-023
Some but not all switch data cables appear to be having problems.
1. Depending on whether the problem is a wrapped port or a switch-to-switch connection, perform one
of the following steps:
v wrapped port (wrap plug installed): Remove the existing wrap plug. Install a different wrap plug on
the jacks indicated.
v switch-to-switch connection: Disconnect the switch data cable from both ports indicated. Install
wrap plugs on the jacks indicated.
Chapter 1. Maintenance Analysis Procedures (MAPs) 1-29
Page 50

SP Switch function (MAP 0620)
Note: When unplugging the two ends of the suspect cable, check /var/adm/SPlogs/css/out.top to
verify only two (2) ports were lost. If four (4) ports were lost, then two cables were swapped
across that switch to switch connection. Connect the cables correctly and check
/var/adm/SPlogs/css/out.top for any other errors.
2. If this is a switch-to-switch connection, have customer update the switch configuration file
appropriately (to show wrap plugs) before continuing:
v For code level 1.02 and higher, use the Etopology command.
3. Make sure processor nodes that were put in “Service” mode are returned to “Normal” mode. Make
sure all processor nodes are IPLed completely.
4. Have customer verify that the switch code is running on all processor nodes.
5. From the control workstation of the “primary” processor node, type Estart followed by ENTER.
6. Check /var/adm/SPlogs/css/out.top file for problems regarding the jacks indicated.
7. Does out.top file show a problem on any jacks indicated?
v If yes:
a. Problem is in the SP Switch which is still reporting a problem.
b. Go to “Step 0620-041” on page 1-35 to service or replace the switch assembly.
v If no:
a. If this is a switch-to-switch connection, remove both wrap plugs from the SP Switches.
b. Replace the frame-to-frame switch data cable that was disconnected before.
c. Go to “Step 0620-043” on page 1-36 to verify fix.
Step 0620-024
Problem reported with all switch data cables from one or more frames. This may be caused by a clocking
or grounding problem between frames.
Note: The “master-clock” switch indicates the switch which is supplying the master clock for the
system—the master clock will have the clock input multiplexor set to “internal clock” (0). A
“problem” switch indicates any switch which is experiencing problems.
1. Check the switch clock selections on the “problem” switches (refer to “Selecting appropriate switch
clocks” on page 3-6).
2. Do the clock settings on the “problem” SP Switches appear to be okay?
v If yes, go to “Step 0620-025”.
v If no:
a. Change the clock selections on the appropriate switches (refer to “Selecting appropriate switch
clocks” on page 3-6).
b. Go to “Step 0620-043” on page 1-36 to verify fix.
Step 0620-025
The clock settings on the “problem” SP Switches appear to be okay.
1. Is the problem switch in a frame with processor nodes?
2.
v If yes, go to “Step 0620-032” on page 1-32.
v If no, go to “Step 0620-026”.
Step 0620-026
Problem switch is in a switch frame (contains switches only, no processor nodes).
1. From Perspectives on the control workstation, open the Switch Front Panel window for this switch.
2. Check the clock selection to see if it is set to Internal or to one of the following external clocks:
v For SP switch types: “Jack3”, “Jack4”, or “Jack5”.
3. Is the clock selection set to one of the External clocks?
1-30
RS/6000 SP: SP Switch Service Guide
Page 51

SP Switch function (MAP 0620)
v If yes, go to “Step 0620-027”.
v If no:
a. The problem switch is providing the master clock for the system.
b. Have customer use the Eclock command to select a different master clock for the system.
c. Go to “Step 0620-043” on page 1-36 to verify fix.
Step 0620-027
The clock selection is set to one of the External clocks.
1. Select a different external clock for this SP Switch.
2. From the control workstation of the primary node reinitialize the switch by entering:
Estart
3. Check /var/adm/SPlogs/css/out.top file to see if problems are still reported on all data cables
connected to this SP Switch.
4. Have some of the problems reported on data cables connected to this switch assembly been resolved?
v If yes, go to “Step 0620-029”.
v If no, go to “Step 0620-028”.
Step 0620-028
None of the problems reported on data cables connected to this SP Switch been resolved by selecting a
different external clock. This indicates a probable problem with switch clock card or switch planar in this
SP Switch.
1. Replace the clock card in this SP Switch.
2. Make sure to reconnect all cables connected to the clock card.
3. Reconnect cables S00-BH-J1, S00-BH-J2, S00-BH-J3, S00-BH-J5, and S00-BH-J7 at tailgate of this
SP Switch.
4. Set the switch clock selection on this SP Switch to the original (correct) setting.
5. From the control workstation of the primary node reinitialize the switch by entering:
Estart
6. Check /var/adm/SPlogs/css/out.top file to see if problems are still reported on all data cables
connected to this SP Switch.
7. Are there still problems reported on all data cables connected to this SP Switch?
v If yes:
a. You have a problem with switch planar.
b. Go to “Step 0620-041” on page 1-35 to replace switch assembly.
v If no:
a. Clock problem resolved for this SP Switch.
b. Go to “Step 0620-042” on page 1-35.
Step 0620-029
Some of the problems reported on data cables connected to this SP Switch been resolved by selecting a
different external clock. This indicates a probable problem with the original external clock source.
1. Based on the original external clock selection, locate the frame which was sourcing the switch clock.
2. Locate a “test” processor node in this frame which can be used for service.
3. Disconnect the switch data cable for this processor node at the tailgate of the SP Switch.
4. Using the switch cabling list, locate the switch data cable at the frame containing the processor node.
One of the following cables sources the clock to the failing SP Switch:
v S00-BH-J3
v S00-BH-J5
v S00-BH-J7
Chapter 1. Maintenance Analysis Procedures (MAPs) 1-31
Page 52

SP Switch function (MAP 0620)
v S00-BH-J9
5. Disconnect the switch data cable at the tailgate of the frame containing the processor node.
6. Connect the end of the processor node data cable to the jack.
7. Run advanced diagnostics on “css0” on the “test” processor node and its associated switch port.
v Do not perform the cable wrap test.
v Refer to ″Running diagnostics in a processor node″ in
8. Look for an SRN indicating a clock problem (such as “External clock”).
9. Do the “css0” diagnostics fail with an indication of a clock problem?
v If yes, go to “Step 0620-031”.
v If no, go to “Step 0620-030”.
RS/6000 SP: System Service Guide
.
Step 0620-030
The “css0” diagnostics do not fail with an indication of a clock problem. This indicates that the problem is
either in a cable or in the reported SP Switch.
1. Replace switch data cable that originally supplied the switch clock to the failing SP Switch.
2. Set the switch clock selection on this SP Switch to the original (correct) setting.
3. From the control workstation of the primary node reinitialize the switch by entering:
Estart
4. Check /var/adm/SPlogs/css/out.top file to see if problems are still reported on all data cables
connected to this SP Switch.
5. Are there still problems reported on all data cables connected to this SP Switch?
v If yes:
a. You have isolated the clock problem to the reported SP Switch.
b. Return to “Step 0620-028” on page 1-31.
v If no:
a. Clock problem resolved for this SP Switch.
b. Go to “Step 0620-042” on page 1-35.
Step 0620-031
The “css0” diagnostics fail with an indication of a clock problem. This indicates that there is a problem with
switch clock source SP Switch.
1. Replace clock card in the clock source SP Switch.
2. Make sure to reconnect all cables connected to the clock card.
3. Set the switch clock selection on this SP Switch to the original (correct) setting.
4. Return to “Step 0620-028” on page 1-31.
Step 0620-032
The clock settings on the problem switch appear to be okay and the problem switch is mounted in a frame
that also contains processor nodes.
1. Check the ground straps connected to the “problem” frames.
v Ground straps are connected at bolts near the cable escapes inside the bottom rear of each frame.
v For a view of a ground strap connection, refer to
2. Do all ground straps connecting the frames make adequate contact at both ends?
v If yes, go to “Step 0620-033” on page 1-33.
v If no:
a. Fix or replace ground strap between the frames.
b. Go to “Step 0620-043” on page 1-36.
RS/6000 SP: Installation and Relocation
.
1-32
RS/6000 SP: SP Switch Service Guide
Page 53

SP Switch function (MAP 0620)
Step 0620-033
All ground straps connecting the frames make adequate contact at both ends.
1. Disconnect clock source data cable at S00-BH-J3, J5, J7, or J9, then reconnect to SP Switch. (This is
done to eliminate clocking noise from cable.)
2. Find a processor node in the “problem” frame which is usable for service. This will be used as the
“test” processor node.
3. Run advanced diagnostics on “css0” on the “test” processor node and its associated switch port.
v Do not perform cable wrap test.
v Refer to ″Running diagnostics in a processor node″ in
4. Look for an SRN indicating a clock problem, such as “External clock” being listed as one of the failing
components.
Note: Do not exit from diagnostics at this time, as it may be used in the following steps.
5. Do the “css0” diagnostics fail with an indication of a clock problem?
v If yes, go to “Step 0620-036” on page 1-34.
v If the diagnostics did not fail with an indication of a clock problem:
a. If this the first time at this step, go to “Step 0620-034”.
b. If this the second time through this step, go to “Step 0620-043” on page 1-36 to verify fix.
RS/6000 SP: System Service Guide
.
Step 0620-034
The first time you went through “Step 0620-033”, the diagnostics did not fail with an indication of a clock
problem.
1. Disconnect the switch data cable corresponding to the selected clock at the SP Switch.
2. Run advanced diagnostics on “css0” on the “test” processor node and its associated switch port.
v Do not perform cable wrap test.
v Refer to ″Running diagnostics in a processor node″ in
3. Look for an SRN indicating a clock problem, such as “External clock” being listed as one of the failing
components.
RS/6000 SP: System Service Guide
.
Note: Do not exit from diagnostics at this time, as it may be used in the following steps.
4. Do the “css0” diagnostics fail with an indication of a clock problem?
v If yes:
a. Problem is not in the SP Switch.
b. Replace the switch data cable corresponding to the selected clock, reconnecting it at both SP
Switches.
c. Go to “Step 0620-040” on page 1-35.
v If no, go to “Step 0620-035”.
Step 0620-035
The “css0” diagnostics did not fail with an indication of a clock problem. This indicates that the problem is
related to the clock selection in this SP Switch.
1. Replace the clock card in this SP Switch.
v Make sure to connect all cables connected to the clock card.
2. Reinstall only the two switch data cables which are not selected and the switch data cable to the “test”
processor node.
v Do not connect the remaining switch data cables at this time.
3. Reconnect cables S00-BH-P1 and S00-BH-P2 at the rear of the SP Switch.
4. Put the SP Switch’s circuit breaker into the On (‘1’) position.
Chapter 1. Maintenance Analysis Procedures (MAPs) 1-33
Page 54

SP Switch function (MAP 0620)
5. Set the switch clock selections on the “problem” switches (refer to “Selecting appropriate switch clocks”
on page 3-6).
6. Run advanced diagnostics on “css0” on the “test” processor node and its associated switch port.
v Do not perform cable wrap test.
v Refer to ″Running diagnostics in a processor node″ in
7. Look for an SRN indicating a clock problem, such as “External clock” being listed as one of the failing
components.
Note: Do not exit from diagnostics at this time, as it may be used in the following steps.
8. Do the “css0” diagnostics fail with an indication of a clock problem?
v If yes, the clock problem is resolved. Go to “Step 0620-043” on page 1-36 to verify fix.
v If no, go to “Step 0620-041” on page 1-35 to replace the problem switch assembly.
RS/6000 SP: System Service Guide
.
Step 0620-036
The “css0” diagnostics failed at “Step 0620-033” on page 1-33 and indicated a clock problem.
1. Record current clock setting for the switch (internal/external).
2. From the control workstation, select the internal clock for this switch assembly.
3. Run advanced diagnostics on “css0” on the “test” processor node and its associated switch port.
v Do not perform cable wrap test.
v Refer to ″Running diagnostics in a processor node″ in
4. Look for an SRN indicating a clock problem, such as “External clock” being listed as one of the failing
components.
5. Do the “css0” diagnostics fail with indication of a clock problem?
v If yes, go to “Step 0620-037”.
v If no, go to “Step 0620-037”.
RS/6000 SP: System Service Guide
.
Step 0620-037
You have run the “css0” diagnostics.
1. At the SP Switch, check the data cable interposer (if present) and the switch data cable corresponding
to the original external clock selection for any obvious problem such as a loose cable connection or
swapped cables.
2. Determine which connection is the other end of the switch data cable checked in the step above.
v Refer to Appendix A in
3. Check the switch data cable at the other SP Switch for any obvious problem such as a loose cable
connection or swapped cables.
4. Do the switch data cables and any data cable interposers appear to be okay?
v If yes, go to “Step 0620-038”.
v If no:
a. Fix the obvious cable connection problem.
b. Go to “Step 0620-043” on page 1-36 to verify fix.
RS/6000 SP: Installation and Relocation
.
Step 0620-038
The switch data cables and the data cable interposers appear to be okay.
1. Swap the data cable with another one at S00-BH-J3, S00-BH-J4, or S00-BH-J5.
2. To provide a good clock, swap the switch data cable at the switch assembly with another one.
3. Reset the clock setting to that recorded in “Step 0620-036”.
4. Run advanced diagnostics on “css0” on the “test” processor node and its associated switch port.
v Do not perform cable wrap test.
v Refer to ″Running diagnostics in a processor node″ in
RS/6000 SP: System Service Guide
.
1-34
RS/6000 SP: SP Switch Service Guide
Page 55

SP Switch function (MAP 0620)
5. Look for an SRN indicating a clock problem, such as “External clock” being listed as one of the failing
components.
6. Do the “css0” diagnostics fail with indication of a clock problem?
v If yes:
a. Problem is the clock selection in this SP Switch.
b. Return to “Step 0620-035” on page 1-33.
v If no, go to “Step 0620-039”.
Step 0620-039
The “css0” diagnostics did not fail. This indicates that the problem is not in this SP Switch.
1. Return all cables to their original positions.
2. Return to “Step 0620-034” on page 1-33.
Step 0620-040
The clock settings on the problem switch appear to be okay and the problem switch is mounted in a frame
that also contains processor nodes. The ground straps appeared to be okay so you set up a test
processor node and went through the “css0” advanced diagnostics. The diagnostics passed on the first run
through so you disconnected the switch data cable and ran the diagnostics a second time. On the second
run, the diagnostics failed. This indicated that the problem was not in the SP Switch.
1. Make certain that you replaced the switch data cable corresponding to the selected clock at both SP
Switches.
2. Run advanced diagnostics on “css0” on the “test” processor node and its associated switch port.
v Do not perform cable wrap test.
v Refer to ″Running diagnostics in a processor node″ in
3. Look for an SRN indicating a clock problem, such as “External clock” being listed as one of the failing
components.
4. Do the “css0” diagnostics fail with indication of a clock problem?
v If yes, go to “Step 0620-041”.
– Replace the “master-clock” SP Switch.
v If no:
a. Interframe clock problem resolved.
b. Go to “Step 0620-043” on page 1-36 to verify fix.
RS/6000 SP: System Service Guide
.
Step 0620-041
You have determined that there is a problem in the SP Switch and that you need to replace the switch
assembly.
1. Put the SP Switch’s circuit breaker into the Off (‘0’) position.
2. Disconnect all switch data cables (also clock cables and data cable interposers, if present) from the
bulkhead of the switch assembly.
3. Replace the switch inner chassis.
4. Replace the switch planar.
5. Reinstall all cables inside the switch assembly.
6. Reinstall the top cover.
7. Reinstall the switch assembly.
8. Go to “Step 0620-042”.
Step 0620-042
You have replaced switch components and need to complete a final check before verifying the fix.
1. Be careful to reconnect all cables according to the appropriate wiring chart or labels, and put wrap
plugs on any unused data ports (S00-BH-J3 through S00-BH-J34).
Chapter 1. Maintenance Analysis Procedures (MAPs) 1-35
Page 56

SP Switch function (MAP 0620)
2. Put the SP Switch’s circuit breaker into the On (‘1’) position.
3. Go to “Step 0620-043” to verify fix.
Step 0620-043
You have replaced switch components and need to verify that the problem has been fixed.
1. Make sure any processor node(s) that was put in SERVICE mode is returned to NORMAL mode.
Make sure all processor node(s) are IPLed completely in NORMAL mode.
2. If any processor nodes that lost switch clocks before or during service (due to unplugging node
data/clock cable, loss of clock at the SP Switch connected to processor nodes, or so on), you will need
to include them in the following command. From the control workstation, enter:
dsh -w
OR, if all processor nodes have lost switch clocks, enter:
dsh -a /usr/lpp/ssp/css/css_restart_node
nodelist
/usr/lpp/ssp/css/css_restart_node
where
Example:
Attention: Issuing this command on processor nodes that did
unpredictable results, possibly requiring reIPL.
3. Have customer verify that the switch code is running on all processor nodes OR from the control
workstation, enter:
4. Check /var/adm/SPlogs/css/out.top file.
5. Go to “Step 0620-001” on page 1-17 to verify that there are no other switch problems.
nodelist
dsh -w fr2n03,fr2n04,fr3n01 /usr/lpp/ssp/css/css_restart_node
Estart
is a list of node names separated by commas.
not
lose a clock may cause
1-36
RS/6000 SP: SP Switch Service Guide
Page 57

Chapter 2. Locations
Naming standard for RS/6000 SP components .....................2-1
Format structure ...............................2-1
Example of format structure ..........................2-1
Frame (WWW) ...............................2-1
Major assembly (XXX) ............................2-2
Sub-assembly (YY) .............................2-2
Connection location (ZZZZ) ..........................2-2
Examples for using complete levels of nomenclature .................2-2
Location diagrams of the RS/6000 SP components....................2-2
Front and rear views of RS/6000 SP frame......................2-3
Frame locations ................................2-6
Frame (FRA) ................................2-6
Switch assembly locations ............................2-8
Connector details ...............................2-9
Cable routing.................................2-9
Cable routing in a multi-switch frame (F/C 2030/1)...................2-11
Switch data cables ..............................2-13
SPS data cables ..............................2-13
SPS-8 data cables .............................2-13
Naming standard for RS/6000 SP components
The purpose of this section is to define a naming standard for all components in the RS/6000 SP system.
This standard provides a consistent, logical naming convention system necessary for documentation
including details, assembly drawings, schematics, manufacturing documents, service documents, and
customer publications.
Format structure
The RS/6000 SP system is structured in a modular fashion with different levels of assembly which can be
independently described. These levels are:
1. System level
2. Frame level
3. Major assembly level (e.g. processor node).
4. Sub-Assembly level (e.g. cards, fan assembly).
The format structure is used to individually identify any connection location at any level in the assembly.
The main use of this format is to describe connector, cabling, and schematic locations shown in tables and
diagrams throughout this manual.
Example of format structure
Format: FRAME(WWW) - MAJOR ASSEMBLY(XXX) - SUBASSEMBLY(YY) - CONNECTOR NUMBER (ZZZZ)
Frame (WWW)
v 1st character is the frame type:
– E for RS/6000 SP frame
– L for logical RS/6000 SP frame (used for models 30X and 40X)
– S for multi-switch frame
– C for control workstation
– Z for another frame such as a server
v 2nd and 3rd characters are the frame number:
– 00 for any/all frames (designates location inside any/all frames)
© Copyright IBM Corp. 1999, 2002 2-1
Page 58

– 01 - 99 for frames 1-99 (specific to that frame)
Notes:
1. E01 designates RS/6000 SP physical frame 1
2. L00 designates any/all RS/6000 SP logical frames
3. S00 designates any/all RS/6000 SP multi-switch frames
4. For locations inside a frame, the Frame (WWW) and/or Major Assembly (XXX) strings may be omitted,
making the format YY-ZZZ
Major assembly (XXX)
v 1st character is the major assembly type (all three characters if the assembly occurs only once in a
frame):
– N for processor node assembly
– S for switch assembly
– PDU for power distribution unit assembly
– ADC for ac/dc Converter assembly
– FRA for frame
v 2nd and 3rd characters are the major assembly number:
– 00 for any/all major assemblies (designates location inside any/all major assemblies)
– 01 - 99 for major assembly 1-99 (specific to that major assembly)
Sub-assembly (YY)
1st and 2nd characters are the assembly designation inside the major assembly. (This string may be
omitted in some cases.)
Refer to the lists of two-character designations associated with each major assembly throughout this
chapter.
Example: SC denotes a switch card.
Connection location (ZZZZ)
v 1st character is the connection type:
– P for plug (cable side)
– J for jack (card/component side)
– G for chassis ground connection
v 2nd, 3rd, and 4th characters are number identifiers. Leading zeroes may be omitted.
Example: P102 is plug 102
Examples for using complete levels of nomenclature
To describe the jack 23 on the switch assembly bulkhead in the second RS/6000 SP frame in a four-frame
configuration, designate as:
E02-S01-BH-J23
To describe plug 1 on the power card of the any switch assembly of any RS/6000 SP frame in any size
system configuration, designate as:
E00-S00-PC-P1 or just PC-P1
Location diagrams of the RS/6000 SP components
See Figure 2-1 on page 2-3, Figure 2-2 on page 2-4, and Figure 2-4 on page 2-6, in the pages that follow,
for views of the RS/6000 SP frame locations. Refer to the diagrams included in this section for specific
views and cabling of the main component sections in the RS/6000 SP frame.
2-2 RS/6000 SP: SP Switch Service Guide
Page 59

Front and rear views of RS/6000 SP frame
Figure 2-1 shows a front view of the RS/6000 SP frame locations. “Frame (FRA)” on page 2-6 describes
the assembly designations for the RS/6000 SP frame.
Figure 2-1. Front view of frame locations. See notes below.
Figure notes:
1. Wide processor nodes take up an entire shelf position (two thin processor node slots). They are
identified by the odd numbered position.
2. In a F/C 2030/1 frame, switch assemblies take up an entire shelf partition. (They are identified by the
even-numbered position.)
3. Processor node slots are numbered up to N16.
4. A High node or SMP High node takes up 2 shelf positions (slots). It is identified by the least odd
number position of the occupied slots.
5. Frames equipped with the SP Redundant Power Supply must have four power modules (books)
installed in the SEPBU.
Chapter 2. Locations 2-3
Page 60

Figure 2-2 shows a front view of the RS/6000 SP multi-switch frame.
SP Switch Frame Locations - Front View
Switch Asm S16
Switch Asm S14
Switch Asm S12
Switch Asm S10
Switch Asm S8
Switch Asm S6
Switch Asm S4
Switch Asm S2
Main Power
Switch with
LED
Left Skirt
48 V Pow er
Modules
A
(Front Cover and Skirt, and Air Filter Removed)
BC
Right Skirt
Figure 2-2. Front view of multi-switch frame locations
Figure 2-3 on page 2-5 shows a front view of the Model 3AX (49-inch) frame.
2-4 RS/6000 SP: SP Switch Service Guide
Page 61

Figure 2-3. Front view of 49-inch frame locations. See notes below.
Figure notes:
1. Wide processor nodes take up an entire shelf position (two thin processor node slots). They are
identified by the odd numbered position.
2. In a F/C 2030/1 frame, switch assemblies take up an entire shelf partition. (They are identified by the
even-numbered position.)
3. Processor node slots are numbered up to N8.
4. The single-phase SEPBU power unit must have a power module in position “D” (right-most slot). For
N+1 operation, a power module may be installed in position “C” (next to slot “D”).
5. There are no skirts on the 49-inch frame.
6. A High node or SMP High node takes up 2 shelf positions (slots). It is identified by the least odd
number position of the occupied slots.
7. The switch assembly is not available in the 1.4 m frame.
Figure 2-4 on page 2-6 shows a rear view of the RS/6000 SP frame locations.
Chapter 2. Locations 2-5
Page 62

Figure 2-4. Rear view of frame locations
Note: See notes under Figure 2-1 on page 2-3 for processor node/switch assembly numbering.
Frame locations
Figure 2-1 on page 2-3 shows a front view of the RS/6000 SP frame locations, with numbered processor
nodes, and the three phase SEPBU.
Frame (FRA)
This list shows the designations specifically for the RS/6000 SP frame:
G1: Right-hand rear ground
G2: Left-hand rear ground
G3: PDU ac ground
G4: PDU dc ground
G5: Input cable ground
2-6 RS/6000 SP: SP Switch Service Guide
Page 63

G6: Front door ground
G7: Rear door ground
G8: Ground
SW: Power-on switch
LD: LED card
FC: Front cover
RC: Rear cover
Example: E01-FRA-G1
Chapter 2. Locations 2-7
Page 64

Switch assembly locations
J1 J2
Supervisor Bus Card
Switch Planar
Power
Supply 2
P6 P4
Fan 5
CB & LED Card
Air Baffle
Supervisor
Card
P5
Fan 4 Fan 3
Fan 2 Fan 1
Power
Supply 1
Figure 2-5. SPS/SPS-8 assembly
2-8 RS/6000 SP: SP Switch Service Guide
Page 65

Connector details
Figure 2-6 shows RS/6000 SP component connector details.
Figure 2-6. RS/6000 SP connector details (as seen at receiving ends, not at cable ends)
Cable routing
Figure 2-7 on page 2-10 and Figure 2-8 on page 2-10 show back views of the RS/6000 SP frame, showing
the horizontal and vertical paths of cable routing from connector-to-connector, with the depth amplified on
the drawing.
Chapter 2. Locations 2-9
Page 66

Note: When attaching exterior and interior cables to a POWER3 SMP High Node allow for enough cable
for a 2-foot service loop for node movement into service position.
Figure 2-7. Frame cabling routing path in rear of RS/6000 SP frame — 1.93 m frame
Figure 2-8. Frame cabling routing path in rear of RS/6000 SP frame — 2.01 m frame
Note: For a multi-switch frame (F/C 2030/1), refer to Figure 2-7.
2-10 RS/6000 SP: SP Switch Service Guide
Page 67

Table 2-1 shows external cable routing in a RS/6000 SP frame populated with 16 processor nodes. (Refer
to “Cable routing” on page 2-9 to see the routing paths.)
Table 2-1. External cable routing
Frame
Slot Number
(Node)
1 1800 (71) E3 E1 V4 H3
2 1500 (59) E3 E1 V4 H3
3 1680 (66) E3 E2 V5 H4
4 1980 (78) E3 E2 V5 H4
5 2160 (85) E3 E1 V3 H5
6 1850 (73) E3 E1 V3 H5
7 2030 (80) E3 E2 V6 H6
8 2340 (92) E3 E2 V6 H6
9 2510 (99) E3 E1 V2 H7
10 2210 (87) E3 E1 V2 H7
11 2390 (94) E3 E2 V7 H8
12 2690 (106) E3 E2 V7 H8
13 2870 (113) E3 E1 V1 H9
14 2570 (101) E3 E1 V1 H9
15 2740 (108) E3 E2 V8 H10
16 3050 (120) E3 E2 V8 H10
Cable Budget
millimeters (inches)
Entrance (New
Style)
Frame Entrance
(Old Style)
Vertical Routing
(Old Style)
Horizontal
Routing (Old
Style)
Cable routing in a multi-switch frame (F/C 2030/1)
Figure 2-9 on page 2-12 and Figure 2-10 on page 2-12 show back views of the RS/6000 SP multi-switch
frame with frame extension, showing the horizontal and vertical paths of cable routing from
connector-to-connector. The depths has been amplified on the drawing.
Note: W1 consists of vertical raceways V1-V4.
W5 consists of vertical raceways V5-V8.
Chapter 2. Locations 2-11
Page 68

Figure 2-9. Frame cable routing paths in rear of RS/6000 SP multi-switch frame (F/C 2030/1) — 1.93 m frame
Figure 2-10. Frame cable routing paths in rear of RS/6000 SP multi-switch frame (F/C 2030/1) — 2.01 m frame
2-12 RS/6000 SP: SP Switch Service Guide
Page 69

Switch data cables
SPS data cables
Table 2-2 describes the attachment locations and routing for the internal SPS Switch data cables:
Table 2-2. SPS Switch data cable chart
Cable Part
Number
46H9710 E00-S00-BH-J7 E00-N01-BH-PA
46H9711 E00-S00-BH-J8 E00-N02-BH-PA
46H9712 E00-S00-BH-J26 E00-N03-BH-PA
46H9713 E00-S00-BH-J25 E00-N04-BH-PA
46H9714 E00-S00-BH-J9 E00-N05-BH-PA
46H9715 E00-S00-BH-J10 E00-N06-BH-PA
46H9716 E00-S00-BH-J24 E00-N07-BH-PA
46H9717 E00-S00-BH-J23 E00-N08-BH-PA
46H9718 E00-S00-BH-J31 E00-N09-BH-PA
46H9719 E00-S00-BH-J32 E00-N10-BH-PA
46H9720 E00-S00-BH-J18 E00-N11-BH-PA
46H9721 E00-S00-BH-J17 E00-N12-BH-PA
46H9722 E00-S00-BH-J33 E00-N13-BH-PA
46H9723 E00-S00-BH-J34 E00-N14-BH-PA
46H9724 E00-S00-BH-J16 E00-N15-BH-PA
46H9725 E00-S00-BH-J15 E00-N16-BH-PA
Note: “PA” refers to connector on SPS adapter.
Plug from
Location
Plug to
Location
Note: For external frame-to-frame cable locations, see
RS/6000 SP: Installation and Relocation
.
SPS-8 data cables
Table 2-3 describes the attachment locations and routing for the internal SPS-8 Switch data cables:
Table 2-3. SPS-8 Switch data cable chart
Cable Part
Number
46G9690 E00-S00-BH-J7 E00-N01-BH-PA
46G9691 E00-S00-BH-J8 E00-N02-BH-PA
46G9692 E00-S00-BH-J26 E00-N03-BH-PA
46G9693 E00-S00-BH-J25 E00-N04-BH-PA
46G9694 E00-S00-BH-J9 E00-N05-BH-PA
46G9695 E00-S00-BH-J10 E00-N06-BH-PA
46G9696 E00-S00-BH-J24 E00-N07-BH-PA
46G9697 E00-S00-BH-J23 E00-N08-BH-PA
Note: PA refers to connector on SPS adapter.
Plug from
Location
Plug to
Location
Chapter 2. Locations 2-13
Page 70

2-14 RS/6000 SP: SP Switch Service Guide
Page 71

Chapter 3. Service procedures
Personal ESD requirements ............................3-1
Tools and files overview ..............................3-1
Using the css.snap script .............................3-3
Switch supervisor self-test .............................3-4
Verification tests using Perspectives .........................3-4
Node supervisor verification ...........................3-4
Frame supervisor verification ...........................3-5
Switch supervisor verification ...........................3-5
Selecting appropriate switch clocks..........................3-6
Selecting the switch clock source .........................3-6
Determining the correct switch clock source .....................3-6
Removing and restoring switch resources .......................3-7
Removing a switch assembly from the active configuration ................3-7
Restoring a switch assembly to the active configuration .................3-8
Viewing switch partitions ............................3-8
Fencing nodes ...............................3-8
Unfencing nodes ..............................3-8
Service position procedures ............................3-9
Placing a switch assembly into service position ....................3-9
Replacing a switch assembly from service position ...................3-9
Resetting the clock and bootlist after servicing a node...................3-9
Installing firmware updates on SP nodes .......................3-10
Installing adapter microcode packages ........................3-10
Running diagnostics on a switch port ........................3-12
Personal ESD requirements
The processor uses FRUs that are known to be sensitive to electrostatic discharge (ESD). To prevent ESD
damage to FRUs or to prevent system failures, observe the following procedures:
v Keep the FRU in its original static-dissipative shipping container until the FRU is ready to be installed in
the system. Move the static-dissipative container near the location where the FRU is to be installed
(within ESD wrist strap distance). If the FRU must be put down for any reason, first place it in its
static-dissipative container or place it on the static-dissipative mat.
v Open only the covers that are necessary to complete the task. Any time a cover is open the service
representative and all people in the area must be ESD-safe. If power is switched on, or if removing or
exchanging any FRU, always use the ESD kit (part 93F2649).
1. Put on the ESD wrist strap.
2. Attach the ESD cable to the wrist strap.
3. Attach the ESD mat to the wrist strap, if required.
4. Attach the insulated clip to the ESD cable.
5. Attach the insulated clip to the frame holes labeled ESD. If the frame holes are not available, use a
grounding point on the frame.
Tools and files overview
The following three tables provide an overview of the tools, setup files, and tuning files used in the service
procedures.
© Copyright IBM Corp. 1999, 2002 3-1
Page 72

Table 3-1. Service procedure tools
Utility (see note) Runs on Description
fault_service_Worm_RTG All nodes Monitors the switch for faults. It restarts the switch if a
fault is detected.
fs_monitor All nodes Monitors the adapter for interrupts that have not been
serviced. This is required because of a hardware
oversight in MSMU, in which there is a window in time
that causes it to hold interrupts and then forget to
introduce them.
rc.switch All nodes Starts the daemons and IP configuration tools.
Estart Primary or
Control Node
Estart_sw Primary or
Control Node
Eprimary All nodes Sets a node as the primary node.
Eprotocol All nodes Stores switch protocol information in the System Data
Eclock Primary or
Control Node
ifconfig All nodes This sets up the IP interface to the switch.
Note: Unless otherwise noted, the directory for these utilities is /usr/lpp/ssp/css.
Tunes the switch and puts it into run phase. Also, kicks
off the route table generator and distributes the routes to
the nodes, by placing them in the etc/SP directory on
the control node.
This is the primary-node command to start the RS/6000
SP High Performance Switch. Estart_sw is called by
Estart. It is useful to note that the time-out variable
(LIMIT) for the Estart process is located in this file. This
may have to adjusted for systems that take longer to
tune than in other systems.
Repository for a node or a series of nodes. Also
retrieves a topology files out of the SDR.
Controls the clock source for each switch board within
an SP cluster.
Table 3-2. Setup output files
File (see note) Location Description
rc.switch.log All nodes Logs all information on the last run of rc.switch. It will
indicate if this is a primary or secondary node, the
associated switch chip information, and IP address
information.
rc.switch.log.previous All nodes A copy the previous run of rc.switch.
expected.top.no_comments All nodes Used by rc.switch to more easily parse out chip
connection information.
fs_daemon_print.file All nodes A log of the daemon.
fs_monitor.log All nodes A log of the monitor daemon.
css.snap All nodes Log files created by the switch support code.
Note: The directory for these utilities is /var/adm/SPlogs/css.
Table 3-3. Tuning output files
File (see note) Location Description
daemon.stdout Primary Keeps a detailed account of the tuning process initiated by the
Estart command. It includes data from every tuning operation
since the current daemon on the primary node was initiated.
daemon.results Primary A record of how many nodes were initialized.
3-2 RS/6000 SP: SP Switch Service Guide
Page 73

Table 3-3. Tuning output files (continued)
File (see note) Location Description
daemon.stderr Primary A record of which nodes were not initialized.
out.top Primary Reports errors from the last tuning procedure. It begins as a
copy of the topology file and errors are indicated to the right of
each entry.
out.top.old Primary A copy of out.top from the previous run.
router.log Primary The router log file generated by the route table generator after
initialization.
router.log.
Note: Unless otherwise noted, the directory for these utilities is /var/adm/SPlogs/css.
x
All nodes The route information for a particular nodex.
Using the css.snap script
The css.snap script collects log files created by switch support code (device driver, worm, fault-service,
diagnostic tests) into a single package.
Attention: css.snap uses a number of undocumented utilities to collect information. Some of these, like
read_regs and the tbXdump routines, can be destructive when used on a running system. After using
css.snap to collect diagnostic information, it’s best to run /usr/lpp/ssp/css/rc.switch in order to
reset/reload the switch adapter and eliminate residual effects of these utilities. This procedure should be
used only under the direction of the IBM Support Center.
Note: css.snap is located in the /usr/lpp/ssp/css directory.
Under normal circumstances, it will collect the following:
cable_miswire
cable_miswire.old
core (fault service daemon dump file)
css.snap.log
css_dump.out
daemon.stderr
daemon.stdout
dtbx.trace
dtbx.failed.trace
errpt.out (most recent ’errpt -a’ and ’errpt’ entries)
flt
fs_daemon_print.file
fs_dump.out
netstat.out (current ’netstat -I css0’ and ’netstat -m’)
out.top
rc.switch.log
regs.out
router.log
scan_out.log
scan_save.log
tb_dump.out
vdidl.out
worm.trace
Chapter 3. Service procedures 3-3
Page 74

The files ending in .out are produced by running the appropriate command to dump internal (in memory)
trace information or dump data to a file. The completed output file will be found in
/var/adm/SPlogs/css/css.snap.[date-time]tar.Z.
css.snap avoids flooding /var by following these rules:
v If less than 10% of /var is free, css.snap exits.
v If the CSS portion of /var is more than 30% of the total space in /var, css.snap erases old snap files
until the CSS share sinks below 30%. If successful, css.snap proceeds. If not, it exits.
css.snap is called automatically from the fault-service daemon when certain serious errors are detected. It
can also be issued from the command line by service personnel when a switch or adapter related problem
is indicated.
Switch supervisor self-test
The following procedures will help you perform self-test on the switch supervisor cards. Upon completion
of this test, return to the procedure that sent you here.
1. Power off switch assembly from the circuit breaker on the front of the unit.
2. Detach supervisor harness from connector at back of the unit. Detaching the supervisor harness
removes the 12 volt power from the supervisor card.
3. Reinsert the supervisor harness to perform the supervisor card self-test.
4. Check green and yellow LEDs on front of the unit.
This self-test should indicate one of the following conditions for the processor node:
Self-test Conditions
Pass sequence
a. Both LEDs light (about 10 seconds)
b. Green LED stays lit, while yellow LED goes off (about two seconds)
c. Green LED stays lit, while yellow LED flashes node address
d. Both LEDs turn off (about two seconds)
e. Both LEDs light (about one second)
Fail conditions
v Green and Yellow LEDs never light
v Yellow LED flashes wrong address
Verification tests using Perspectives
This section gives you the basic information needed to check the supervisor cards on a single node,
frame, or switch.
Node supervisor verification
From the Hardware Perspectives window:
1. The Hardware Perspective should open with a node pane displayed. If it does not, or if you would like
to open an additional node pane:
a. Click the ″Add Pane″ icon on the tool bar
v The Add Pane dialog box opens
b. From the ″Pane Type″ pull down, select ″Nodes″
c. Select your choice of adding the pane to the current window or to a new window
d. If desired, enter a new pane title
e. Click ″OK″ to open the pane and close the dialog box
3-4 RS/6000 SP: SP Switch Service Guide
Page 75

2. In the Node pane, click the icon of the node you want to verify
3. Click the ″Notebook″ icon on the tool bar
v When the Notebook window opens, make certain that the ″Node Status″ tab is selected
4. The ″Node failure:″ attribute displays the status of the node supervisor
v ″No″ displayed in a green box indicates that the node supervisor has not failed and the supervisor
is responding
v ″Yes″ displayed in a red box indicates that the node supervisor has failed and it is not responding
Note: Clicking ″Help″ in the Notebook window’s lower right corner displays attribute descriptions.
Frame supervisor verification
From the Hardware Perspectives window:
1. Unless you have saved display settings, the Hardware Perspective does not open with a frame pane
displayed. To open a frame pane:
a. Click the ″Add Pane″ icon on the tool bar
v The Add Pane dialog box opens
b. From the ″Pane Type″ pull down, select ″Frames and Switches″
c. Select your choice of adding the pane to the current window or to a new window
d. If desired, enter a new pane title
e. Click ″OK″ to open the pane and close the dialog box
v You may repeat these steps to add additional frame panes
2. In the Frame and Switch pane, click the icon of the frame you want to verify
3. Click the ″Notebook″ icon on the tool bar
v When the Notebook window opens, make certain that the ″Frame Status″ tab is selected
4. The ″Controller responds:″ attribute displays the status of the frame supervisor
v ″OK″ displayed in a green box indicates that the frame supervisor is responding
v ″No response″ displayed in a red box indicates that the frame supervisor is not responding
Note: Clicking ″Help″ in the Notebook window’s lower right corner displays attribute descriptions.
Switch supervisor verification
From the Hardware Perspectives window:
1. Unless you have saved display settings, the Hardware Perspective does not open with a switch pane
displayed. To open a switch pane:
a. Click the ″Add Pane″ icon on the tool bar
v The Add Pane dialog box opens
b. From the ″Pane Type″ pull down, select ″Frames and Switches″
c. Select your choice of adding the pane to the current window or to a new window
d. If desired, enter a new pane title
e. Click ″OK″ to open the pane and close the dialog box
v You may repeat these steps to add additional switch panes
2. In the Frame and Switch pane, click the icon of the switch you want to verify
v A switch icon is displayed next to the frame icon only if a switch is installed in the frame
3. Click the ″Notebook″ icon on the tool bar
v When the Notebook window opens, make certain that the ″Switch Status″ tab is selected
4. The ″Node failure:″ attribute displays the status of the switch supervisor.
v ″No″ displayed in a green box indicates that the switch supervisor has not failed and the
supervisor is responding to communication from the frame supervisor.
Chapter 3. Service procedures 3-5
Page 76

v ″Yes″ displayed in a red box indicates that the switch supervisor has failed and it is not
responding to the frame supervisor.
Note: Clicking ″Help″ in the Notebook window’s lower right corner displays attribute descriptions.
Selecting appropriate switch clocks
The following procedure describes how to select a clock source for a switch assembly, followed by an
explanation on how to determine which clock source to use on each assembly.
Attention: Changing switch clocks will interrupt use of the switch feature; therefore, switch clocks should
be reselected only due to a component failure or scheduled service of part of the machine. Even
momentary interruption of the switch clocks (which occurs when reselecting switch clocks), might require
recovery step(s) to bring all the processor nodes on-line. In this case, use of all processor nodes in the
frame or frame(s) might be interrupted during the recovery procedure.
Selecting the switch clock source
1. Manual method for any SP system:
From an AIX window, enter:
spmon -G -m i framex
spmon -G -m 1 framex
spmon -G -m 2 framex
spmon -G -m 3 framex
2. Topology file method:
a. From an AIX window, enter:
Eclock
(The display will tell you the current clock topology.)
b. To select an alternate clock topology, enter:
Eclock -a
Refer to
file name to use.
filename
IBM RS/6000 SP: Command and Technical Reference
for more information on the correct
Determining the correct switch clock source
All switch assemblies in the system must run off the same clock source. The following procedure
describes how to determine the correct clock settings for each switch assembly based on standard cabling
configurations:
1. Determine the number of logical frames in the system.
2. Determine which clock choice to use for the system.
3. Locate the appropriate box in Table 3-4 on page 3-7, using the number of logical frames and the
master clock choice.
4. Based on information in this box, set the switch clock source for each logical frame.
L
xx
- represents the logical frame number
xx
- represents a multi-switch frame
S
ior0, 1, 2,or3 indicates the appropriate clock setting for that logical frame:
ior0 Internal Clock (SPS)
3-6 RS/6000 SP: SP Switch Service Guide
Page 77

1 Input 1 (BH-J3 for SPS)
2 Input 2 (BH-J4 for SPS)
3 Input 3 (BH-J5 for SPS)
Table 3-4. Setting switch clock sources
Number of Logical
Model
30x 1-4 L01-S00 = i
30x 5 L01-S00 = i
40x 4-8 S01-S02=i
Note: On an 8-port switch, the clock always equals 0. See samples in /etc/SP.
Frames
123
L02-S00 = 1
L03-S00 = 1
L04-S00 = 1
L02-S00 = 1
L03-S00 = 1
L04-S00 = 1
L05-S00 = 2
All others = 1
Master Clock Choice
L01-S00 = 1
L02-S00 = i
L03-S00 = 2
L04-S00 = 2
L01-S00 = 1
L02-S00 = i
L03-S00 = 3
L04-S00 = 2
L05-S00 = 2
S01-S06=i
All others = 2
Removing and restoring switch resources
L01-S00 = 2
L02-S00 = 2
L03-S00 = i
L04-S00 = 3
L01-S00 = 2
L02-S00 = 3
L03-S00 = i
L04-S00 = 3
L05-S00 = 3
S01-S10=i
All others = 3
This procedure can be performed to allow customer to use a switch feature while extended service actions
are performed on an individual frame of a multi-frame system with the switch feature.
DO NOT PERFORM this procedure unless the required service operation will take the switch out of the
switch configuration for a minimum of two hours (for example, a part must be ordered or a switch
assembly or frame must be repeatedly powered on/off) and/or the customer specifically requests it.
Care should be taken to understand the consequences on any partitions that might be sharing switch
resources. See “Viewing switch partitions” on page 3-8.
Attention: This procedure is intended to allow the customer to use the switch feature during extended
repair action. The customer must stop all parallel jobs prior to starting the repair. Once the repair is
complete, the customer must stop all parallel jobs again to reconfigure the switch to include the resource
again. If the service action is expected to be complete in a short period of time (for example, two hours or
less), this additional interruption of all parallel jobs will probably cost the customer more time than was
saved by use of the switch feature during that short period.
Removing a switch assembly from the active configuration
1. Identify the switch which is to be removed from the active configuration for an extended period of time.
Display the clock selection for this switch assembly and record it for later use. See “Selecting
appropriate switch clocks” on page 3-6.
2. If the primary processor node (usually in Frame 1) is connected to the switch identified in step
1, the customer must select an available processor node to be the new primary processor node. The
primary node is set by the Eprimary command. Refer to
more information.
3. If the master clock selected for the switch is from the switch assembly identified in Step 1, the
customer must select a new master clock. Refer to “Selecting appropriate switch clocks” on page 3-6.
4. Have customer stop all current parallel jobs and suspend all parallel jobs on the job queue.
5. Put circuit breaker at the front of switch assembly in the Off (‘0’) position.
IBM RS/6000 SP: Administration Guide
for
Chapter 3. Service procedures 3-7
Page 78

6. The customer can re-initialize the switch using the Estart command. The frame and processor nodes
which were removed in this procedure will appear in the out.top file with error messages; however, the
remainder of the switch resources are now available for customer use.
7. If switch re-initialization was successful, the customer can start running parallel jobs again.
8. Return to MAPs to continue service action(s).
Restoring a switch assembly to the active configuration
1. Identify the switch assembly which is to be restored to the active configuration.
2. Have customer stop all current parallel jobs and suspend all parallel jobs on the job queue.
3. Make sure that the circuit breaker at the front of the switch assembly in the Off (‘0’) position.
4. Connect all cables to the switch assembly. Pay attention to the labels on the cables.
5. Put the circuit breaker at the front of the switch assembly in the On (‘1’) position.
6. Use switch front panel or the Eclock command to select the appropriate clock input for this switch
assembly. For SSP code level 1.02 and higher, use the Eclock -r command.
7. If the primary processor node was changed during the isolation procedure, the customer can change
the primary processor node back to the original selection; however, this is NOT required. The primary
node is set by the Eprimary command. Refer to
information.
8. If the master clock was changed during the isolation procedure, the customer can select the
clocks on all other switches; however, this is not suggested. (The previous clock selection for this
switch assembly was recorded for possible use. See “Selecting appropriate switch clocks” on
page 3-6.)
9. The customer can re-initialize the switch using the Estart command. Cables connected to the switch
assembly and processor nodes which were restored in this procedure should appear in the out.top
file without any error messages.
10. If switch re-initialization was successful, the customer can start running parallel jobs again.
11. Return to MAPs to continue service action(s).
IBM RS/6000 SP: Administration Guide
, for more
Viewing switch partitions
Open the System Monitor window and click on the “View“ option to display any partitions.
With switch partitioning, the nodes are grouped under a partition name. Partitioning allows the SP to have
different software levels installed, and to isolate groups of nodes from each other. The Estart command,
fault service, and applications see only a single partition.
Fencing nodes
1. Click on “View” to select one of the partitions, then click on “SP” to display an options menu.
2. Click on “Global Controls” to display the frame(s) and node(s) in this partition.
3. Click on the node you want to fence, then click on the “Shutdown” option. Now click on the “Do
Command” option to display options.
4. Click on “Fence” and then click on “Shutdown” to shutdown the node.
Note: Selecting “Enable Autojoin” during this sequence will automatically place the node back into the
operations of the partition on successful power on of the Node. It is suggested that “Autojoin”
not
be selected at any time when performing a service action.
Unfencing nodes
1. If necessary, follow the first 2 steps under “Fencing Nodes” above.
2. Ensure that the node is selected.
3. Click on “On” and then click on “Do Command”. This will power on the node and run power-on
diagnostics.
4. Click on “Unfence” and then click on “Do Command” to place the node into operation in the partition.
3-8 RS/6000 SP: SP Switch Service Guide
Page 79

Efence of primary and primary backup nodes
By design, Efence of primary and primary backup nodes is not allowed.
If you attempt to fence either of these nodes, you will get the following responses:
Efence: 0028-147 Node number designates the Primary Node.
Efence: 0028-166 Node number designates the Primary Backup Node.
You should assign a new primary or primary backup node and initiate a restart to be able to remove
these nodes from the network for service.
Service position procedures
Note: When preparing to place processor node(s) and/or switch assembly(s) into service position, ensure
that the customer has removed the processor node(s) and/or switch assembly(s) from the active
configuration.
Placing a switch assembly into service position
1. Set circuit breaker in the Off (‘0’) position.
2. Remove power (J1) and supervisor (J2) cables from rear of switch assembly.
3. Remove the four screws from the front of the switch assembly.
4. Remove the SPS front panel assembly from the inner chassis by pulling at the side of the front panel
assembly.
5. If the inner chassis or supervisor power cable need to be replaced:
a. Detach all cables from the rear of the switch assembly, noting where the external frame cables and
wrap plugs are attached.
b. Remove the inner chassis from the outer chassis sleeve by pushing on the inner chassis from the
rear of the switch assembly.
Replacing a switch assembly from service position
1. If the inner chassis or supervisor power cable needed to be replaced:
a. Replace the inner chassis into the outer chassis sleeve.
b. Reattach all cables to the rear of the switch assembly.
2. Reinstall the SPS front panel assembly into the inner chassis, being careful to align the guide pins of
the P1 connector to the inner chassis weld. Then apply light even pressure at the sides of the front
panel assembly.
3. Reinstall the four screws into the front of the switch assembly.
4. Reattach power (J1) and supervisor (J2) cables to the rear of switch assembly.
5. Set circuit breaker in the On (‘1’) position.
Resetting the clock and bootlist after servicing a node
When servicing a node, the node becomes disconnected from its power source for a period of time. Since
nodes normally do not have a real battery, the NVRAM will loose it’s memory when disconnected from
power for about 10 minutes (sometimes less). This will cause the date to be reset to January 1, 1970, and
the bootlist to be cleared. This can cause some problems with booting.
It is highly recommended to reset the clock and bootlist before booting the node. This is done as follows:
1. Before powering down the node to be serviced, display the current bootlist:
a. Run diagnostics (diag)
b. Choose the “Service Aids” panel
c. Choose the “Display/Alter Bootlist” panel
Chapter 3. Service procedures 3-9
Page 80

d. Choose “Normal Mode”
e. Choose “Display Current Bootlist”
This will display the current bootlist.
2. Power down the node, service it, and hook it back into the frame.
3. On the control workstation, run spbootins to set the node to boot in maintenance mode. For
example, if it is node 12 of frame 2, enter:
spbootins -r maintenance 2 12 1
4. On the control workstation, netboot the node:
a. From the SP Perspectives Launch Pad, select ″Hardware Perspectives″
b. Click on the processor node (or nodes) you are going to boot from a network
c. Click on “Actions” button on the tool bar
d. Verify the nodes selected, then click on the ″Apply″ button
e. IPL from network device begins
Note: If Packets Received always shows “00000”, there is a network or configuration problem.
5. When this boots, a console window will pop up on your display. Follow the prompts:
a. “Start Maintenance Mode for System Recovery”
b. “Access a Root Volume Group”
c. “Continue”
d. Choose correct disk from the list
e. Access this volume group and start a shell
6. In the maintenance shell, set the date command. For example, to set the date to August 3, 1995, do
″date 0803123095″
7. In the maintenance shell, set the boot list.
a. Run diagnostics (diag)
b. Choose the “Service Aids” panel
c. Choose the “Display/Alter Bootlist” panel
d. Choose “Normal Mode”
e. Choose “Alter Current Bootlist”
f. Set the bootlist the way it was before the node was serviced
8. Close the console window
9. On the control workstation, set the node to boot from disk. For example:
spbootins -r disk 2 12 1
10. On the control workstation, use Perspectives to power off the node and then power it back on.
The node will now boot from the device that you specified in step 7 with the correct time.
Installing firmware updates on SP nodes
Firmware updates (for example, IPL ROS updates for SP nodes), are available at
http://www.rs6000.ibm.com/support/micro/download.html. Alternatively, you can search AIXTOOLS for
the latest versions of the firmware updates. (for example, look for P2SC_IPL on AIXTOOLS for the latest
version of IPL ROS on SP Nodes.)
Follow the instructions in the README file within the package.
Installing adapter microcode packages
Certain adapters are shipped with an adapter firmware diskette. For factory configured systems, the
microcode is installed on the SP nodes. However for field installations the adapter firmware must be
installed.
This adapter firmware must be installed on the SP nodes along with the adapter. The following procedure
outlines the adapter microcode installation. Updates are periodically made to microcode and your service
representative can search AIXTOOLS for the latest version of Adapter Microcode.
3-10 RS/6000 SP: SP Switch Service Guide
Page 81

The following 3 adapters require functional microcode to be installed:
Adapter Package
ESCON
BLKMUX S/370
FDDI Adapters Features 2723, 2724, 2725, 2726 FDDI
®
Control Unit Adapters Feature 2756 ESCON
™
Control Unit Feature 2755 BLKMUX
These adapters might need updating to the latest level in their FLASH EPROM:
Adapter Package
SSA Adapters Features 6214, 6216, 6217, 7133 Drives SSAFLASH
SCSI Adapters Features 2412, 2415, 2416 ECA192
Note: The ECA192 instructions differ from the above and are included with the ECA192 Package.
Note: This procedure is similar to that used for performing software updates (PTF’s) to SP nodes. You
can Refer to “Performing Software Maintenance” in
Installation and Migration Guide
, GA22-7347, for a general idea of how to perform the installation.
Parallel System Support Programs for AIX:
1. Locate the diskette (either shipped with your adapter or obtained from the TOOLS disk.
2. Copy the adapter microcode to a temporary directory on the control workstation:
a. Insert the diskette in the control workstation diskette drive
b. Log on as
root
.
c. Select a name in a temporary directory to store the microcode image such as “/tmp/microcode” or
“/tmp/escon”
d.
bffcreate -l -d /dev/fd0
This will list the contents of the diskette. Record the package name results (for example,
escon.cuu). This will be useful if you decide to store other adapter microcode in the same directory.
e.
bffcreate -t /tmp/microcode -d /dev/fd0 all
This will copy the data to the designated directory and update a table of contents file (.toc)
3. NFS Export that directory to the nodes:
exportfs -i /tmp/microcode
4. Either use the dsh command to control one or more nodes directly from the control workstation, or
telnet to each individual node. (Commands in following steps would be executes as in the example, but
without the “dsh” prefix)
Note: Refer to
IBM RS/6000 SP: Administration Guide
for help on using dsh.
5.
dsh -a "umount /mnt"
6.
dsh -a "mount <control wks>:/tmp/microcode /mnt"
7.
dsh -a "installp -qacXd /mnt all"
The “all” can be replaced by the individual microcode package as recorded earlier.
8.
dsh -a "umount /mnt"
9.
exportfs -u /tmp/microcode
Chapter 3. Service procedures 3-11
Page 82

To complete the microcode update, it is usually necessary to remove and then replace the device from the
configuration. The most reliable method to do this is to reboot the node. Some adapters can actually
require a power off cycle to complete the microcode update. Others can be updated simply by running
cfgmgr.
Note: During microcode download for SSA adapters, there is a possibility that the download process could
result in an error. When an unrecoverable error (loss of power) occurs during the download process
the adapter can be left with no microcode. If this happens, repeat the microcode download. If
unsuccessful, replace the adapter.
7133 Disks can also be updated, however the method varies, depending upon which disks are attached. If
they are 4.5 GB or 9.1 GB ″Scorpion″ disks, and the AIX version is either 4.1.5 or 4.2.1, then run dsh
"ssadload -u" to update the disks. Other disks will be updated by a cfgmgr or reboot cycle.
Running diagnostics on a switch port
Before running diagnostic tests on a switch to diagnose node to switch problems, you must identify the
port number. For example:
Bulkhead jack 6 on switch 17 frame 1 is identified as E01-S17-BH-J6
To run the test from the control workstation for this example the syntax of the command is:
/usr/lpp/ssp/bin/spd/wrap_test -j E01-S17-BH-J6
3-12 RS/6000 SP: SP Switch Service Guide
Page 83

Chapter 4. FRU removals and replacements
Handling static-sensitive devices ..........................4-1
Procedures for switch assemblies ..........................4-2
Removing the switch assembly ..........................4-2
Replacing the switch assembly ..........................4-2
Removing the switch fans ............................4-3
Replacing the switch fans ............................4-3
Removing the switch front chassis cable.......................4-3
Replacing the switch front chassis cable.......................4-4
Removing the switch supervisor card ........................4-4
Replacing the switch supervisor card ........................4-5
Removing the switch inner chassis cable ......................4-5
Replacing the switch inner chassis cable ......................4-6
Removing the switch power cards .........................4-6
Replacing the switch power cards .........................4-7
Attention: Components in the frame are susceptible to damage from static discharge. Always use an
ESD wristband when working inside frame covers. (See “Personal ESD requirements” on page 3-1 for
more details.) Do not touch the pins or circuitry on these components.
This chapter describes the removal and replacement of RS/6000 SP product-specific Field Replaceable
Unit (FRU) components.
Handling static-sensitive devices
Attention: Adapters, planars, disk drives, supervisor cards and memory cards are sensitive to static
electricity discharge. These devices are wrapped in antistatic bags or containers to prevent this damage.
Perform the following procedures to prevent damage to these devices:
1. Do not remove the device from the antistatic bag or container until you are ready to install the device
in the system unit.
2. You must wear an ESD wristband while installing or removing any static-sensitive devices.
3. With the device still in its antistatic bag, touch it to a metal frame of the system.
4. Grasp cards and boards by the edges. Hold drives by the frame. Avoid touching the solder joints and
pins.
5. Handle the devices carefully in order to prevent permanent damage.
Antistatic bag
Figure 4-1. Handling an anti-static device
© Copyright IBM Corp. 1999, 2002 4-1
Page 84

Procedures for switch assemblies
CAUTION:
The unit weight exceeds 18 Kg (40 lbs) and requires two service personnel to lift.
Attention: Components in the frame are susceptible to damage from static discharge. Always use an
ESD wristband when working inside frame covers. (See “Personal ESD requirements” on page 3-1 for
more details.) Do not touch the pins or circuitry on these components.
Note
There are different levels of the switch assembly hardware. The following lists indicate serviceable
FRUs for each level of switch assembly:
SPS Fans, circuit breaker, LED card, switch supervisor card, switch power card(s), fan assembly
cable, supervisor/power cable, complete assembly.
SPS-8 Fans, circuit breaker, LED card, switch supervisor card, switch power card(s), fan assembly
cable, supervisor/power cable, complete assembly.
(SPSFC002)
Removing the switch assembly
Perform these procedures to remove the switch assembly:
1. Ensure that the switch is offline (shutdown) from the control workstation and powered off from the
control workstation.
Attention: Removing power from one switch assembly may affect other switch assemblies and
processor nodes attached to it.
2. Turn the power switch on the switch assembly to Off (‘0’).
3. Detach all cables from rear of switch assembly noting where external frame cables are attached. If
wrap plugs are installed, remove them and save for the new switch.
4. If this is a switch drawer (in multi-switch frame F/C 2030/1) and you are replacing the switch assembly,
remove the two screws at the rear of the switch assembly.
5. Remove four screws from front of switch assembly and slide switch assembly out of the front of the
frame.
6. Remove the front chassis and then remove the inner chassis from the outer chassis sleeve.
7. Return to the procedure that directed you here.
Replacing the switch assembly
Perform these procedures to replace the switch assembly:
1. Replace the inner chassis into the outer chassis sleeve and then replace the front chassis.
2. If wrap plugs are installed, they can be plugged on the new switch.
3. Slide switch through the front of the frame and reinstall four screws that hold the switch to the frame.
4. If this is a switch drawer (in F/C 2030/1) and you are reinstalling the switch assembly, reinstall the two
screws at the rear of the switch assembly.
5. Reattach all cables to rear of switch assembly.
6. Turn the power switch on the switch assembly to On (‘1’).
7. Refer to “Restoring a switch assembly to the active configuration” on page 3-8.
8. Return to the procedure that directed you here.
4-2 RS/6000 SP: SP Switch Service Guide
Page 85

Removing the switch fans
Note: Refer to “Handling static-sensitive devices” on page 4-1 before removing or installing ESD sensitive
devices.
Perform these procedures to remove a fan from an SP Switch assembly:
1. Perform “Placing a switch assembly into service position” on page 3-9 to place the switch assembly
into the service position.
2. Remove the top cover of the switch assembly by removing the screws.
3. Locate the fan.
4. Push shock mounts toward center of fan.
5. Pull fan out of the fan bracket. Keep the shock mounts for mounting the new fan.
6. Disconnect fan cable from supervisor control cable.
Replacing the switch fans
Perform these procedures to replace a fan in an SP Switch assembly:
1. Transfer shock mounts from the old fan to the new fan.
2. Using another fan as an example, route the fan cable and orient the fan with airflow indicator pointing
toward the rear of the switch assembly.
3. Mount fan in the fan bracket by pulling the shock mounts through the holes in the fan bracket.
4. Push shock mounts outward to lock in place.
5. Reconnect fan cable to the supervisor control cable.
6. Reinstall top cover of switch assembly and reinstall all screws.
7. Perform “Replacing a switch assembly from service position” on page 3-9 to remove the switch
assembly from the service position.
Switch
Fans
5
4
3
2
1
Figure 4-2. Removing the SP Switch fans
Removing the switch front chassis cable
Note: Refer to “Handling static-sensitive devices” on page 4-1 before removing or installing ESD sensitive
devices.
Chapter 4. FRU removals and replacements 4-3
Page 86

Perform these procedures to remove the fan control cable from an SP Switch assembly:
1. Perform “Placing a switch assembly into service position” on page 3-9 to place the switch assembly
into the service position.
2. Unplug connectors P7, P8 and P9. Remove cable by unhooking retaining material along raceway, and
unplugging the Fan connectors P2, P3, P4, P5 and P6. Using fingertip pressure, remove connector P1
by removing screws. Retain these screws for new cable installation.
3. Remove cable by unhooking retaining material along raceway.
Switch front
chassis cable
5
4
3
Air flow
2
1
Figure 4-3. Removing the SP Switch fan control cable
Replacing the switch front chassis cable
Perform these procedures to replace the fan control cable in an SP Switch assembly:
1. Using fingertip pressure attach connector P1 with screws retained in the removal procedure. Route
cable along raceway, hooking retaining material where needed and plugging Fan connectors P2, P3,
P4, P5 and P6. Plug connectors P7, P8 and P9.
2. Perform “Replacing a switch assembly from service position” on page 3-9 to remove the switch
assembly from the service position.
Removing the switch supervisor card
Note: Refer to “Handling static-sensitive devices” on page 4-1 before removing or installing ESD sensitive
devices.
Attention: The hexhead retaining screws requirea4mmsocket.
Perform these procedures to remove the supervisor card from an SP Switch assembly:
1. Perform “Placing a switch assembly into service position” on page 3-9 to place the switch assembly
into the service position.
2. Unplug connector P5.
3. Rotate card thumb locks outward to unseat card.
4. Remove supervisor card.
4-4 RS/6000 SP: SP Switch Service Guide
Page 87

Replacing the switch supervisor card
Perform these procedures to replace the supervisor card in an SP Switch assembly:
1. Insert supervisor card.
2. Rotate card thumb locks inward to seat card.
3. Plug connector P5.
4. Perform “Replacing a switch assembly from service position” on page 3-9 to remove the switch
assembly from the service position.
Switch
Supervisor
Card
Figure 4-4. Removing the SP Switch supervisor card
Removing the switch inner chassis cable
Note: Refer to “Handling static-sensitive devices” on page 4-1 before removing or installing ESD sensitive
devices.
Perform these procedures to remove the supervisor power cable from an SP Switch assembly:
1. Perform “Placing a switch assembly into service position” on page 3-9 to place the switch assembly
into the service position.
2. Remove screws from connector P1 at the rear of the switch assembly, and retain them for new cable
installation. Remove cable by unhooking retaining material along raceway. Unplug connectors P3, P4,
P5 and P6.
Chapter 4. FRU removals and replacements 4-5
Page 88

Figure 4-5. Removing the SP Switch inner chassis cable
Replacing the switch inner chassis cable
Perform these procedures to replace the supervisor power cable from an SP Switch assembly:
1. Plug connectors P3, P4, P5 and P6. Route cable along the raceway, hooking retaining material where
needed. Attach P1 connector to the rear of the switch assembly with screws retained in the removal
procedure.
2. Perform “Replacing a switch assembly from service position” on page 3-9 to remove the switch
assembly from the service position.
Removing the switch power cards
Note: Refer to “Handling static-sensitive devices” on page 4-1 before removing or installing ESD sensitive
devices.
Attention: The hexhead retaining screws requirea4mmsocket.
Perform these procedures to remove the switch power cards from an SP Switch assembly:
1. Perform “Placing a switch assembly into service position” on page 3-9 to place the switch assembly
into the service position.
2. Unplug connector P4 (PS1) or P6 (PS2).
3. Rotate card thumb locks outward to unseat card.
4-6 RS/6000 SP: SP Switch Service Guide
Page 89

4. Remove power supply card.
Replacing the switch power cards
Perform these procedures to replace the switch power cards) in an SP Switch assembly:
1. Insert power supply card.
2. Rotate card thumb locks inward to seat card.
3. Plug connector P4 (PS1) or P6 (PS2).
4. Perform “Replacing a switch assembly from service position” on page 3-9 to remove the switch
assembly from the service position.
2
1
Switch
Power
Supply
Cards
Figure 4-6. Removing the SP Switch power supply cards
Chapter 4. FRU removals and replacements 4-7
Page 90

4-8 RS/6000 SP: SP Switch Service Guide
Page 91

Chapter 5. Parts catalog
SPS, SPS-8 Switch assembly (feature) (view 1) .....................5-2
SPS, SPS-8 Switch assembly (feature) (view 2) .....................5-4
SPS, SPS-8 Switch assembly (feature) (view 3) .....................5-6
Switch cables (feature) ..............................5-8
Multi-switch frame (F/C 2030/1) ..........................5-10
This chapter presents the Parts Catalog, listing all RS/6000 SP Switch parts and FRUs, with
corresponding figures containing indexed descriptions.
© Copyright IBM Corp. 1999, 2002 5-1
Page 92

SPS, SPS-8 Switch assembly (feature) (view 1)
5-2 RS/6000 SP: SP Switch Service Guide
Page 93

Table 5-1. SPS, SPS-8 Switch assembly (feature) (view 1)
Assembly
Part number Units Description
index
SPS Switch assembly (reference only)
SPS-8 Switch assembly (reference only)
1 26H7255 1 Front chassis assembly
2 77G0961 1 Card, power
3 46H9305 1 Card, switch supervisor
4 26H7212 2 Screw, hex Hd M4 x 6
5 26H7395 1 Fan assembly
6 84X4841 2 Nut, hex M4
7 46G5686 1 Cable, power
8 46H9730 1 Chassis, outer
77G0818 1 Wrap, SPS (not shown)
46H9220 1 Wrap, SPS-8 (not shown)
Chapter 5. Parts catalog 5-3
Page 94

SPS, SPS-8 Switch assembly (feature) (view 2)
5-4 RS/6000 SP: SP Switch Service Guide
Page 95

Table 5-2. SPS, SPS-8 Switch assembly (feature) (view 2)
Assembly
Part number Units Description
index
SPS Switch assembly (reference only)
SPS-8 Switch assembly (reference only)
1 11P0655 1 Inner chassis assembly SPS (includes all assembly in shaded
area)
1 11P0656 1 Inner chassis assembly SPS-8 (includes all assembly in shaded
area)
2 1624766 1 Screw, 6 mm
3 26H7389 1 Cable, inner chassis
4 46H9305 1 Card, switch supervisor
5 77G0961 1 Card, power
Chapter 5. Parts catalog 5-5
Page 96

SPS, SPS-8 Switch assembly (feature) (view 3)
1
2
8
7
3
4
6
Air flow
5
5-6 RS/6000 SP: SP Switch Service Guide
Page 97

Table 5-3. SPS, SPS-8 Switch assembly (feature) (view 3)
Assembly
Part number Units Description
index
SPS switch assembly (reference only)
SPS-8 switch assembly (reference only)
1 26H7391 1 Cable, front chassis
2 32G1547 1 Screw, hex M4 x 5
3 46H9778 2 Cup guide (2.01 m, order kit)
3 77G1079 2 Pin guide (2.01 m, order kit)
3 46H9778 2 Cup guide (new style)
3 46H9779 2 Pin guide (new style)
3 51H9428 2 Kit, cup and pin guide (new style)
4 81F7977 20 Mount, fan shock
5 26H7395 1 Fan assembly
6 26H7255 1 Chassis weld, front
7 31G9309 1 Circuit breaker
8 67G4985 1 Card, LED
Chapter 5. Parts catalog 5-7
Page 98

Switch cables (feature)
Table 5-4. Switch cables (feature)
Assembly
index
Part number Units Description
11J6091 AR Cable, Switch data node 01 - (1345 mm)
11J6092 AR Cable, Switch data node 02 - ( 1040 mm)
11J6093 AR Cable, Switch data node 03 - ( 1320 mm)
11J6094 AR Cable, Switch data node 04 - (1400 mm)
11J6095 AR Cable, Switch data node 05 - (1675 mm)
11J6096 AR Cable, Switch data node 06 - (1370 mm)
11J6097 AR Cable, Switch data node 07 - (1700 mm)
11J6098 AR Cable, Switch data node 08 - (1780 mm)
11J6099 AR Cable, Switch data node 09 - (1780 mm)
11J6100 AR Cable, Switch data node 10 - (1855 mm)
11J6101 AR Cable, Switch data node 11 - (2110 mm)
11J6102 AR Cable, Switch data node 12 - (1805 mm)
11J6103 AR Cable, Switch data node 13 - (2110 mm)
11J6104 AR Cable, Switch data node 14 - (2165 mm)
11J6105 AR Cable, Switch data node 15 - (2165 mm)
11J6106 AR Cable, Switch data node 16 - (2310 mm)
11P0006 AR Cable, Switch data node xx - (2615 mm)
11J3975 AR Cable, Switch data node 01 - (1030 mm)
11J3976 AR Cable, Switch data node 02 - (1640 mm)
11J3977 AR Cable, Switch data node 03 - (1800 mm)
11J3978 AR Cable, Switch data node 04 - (2200 mm)
11J3979 AR Cable, Switch data node 05 - (2210 mm)
11J3980 AR Cable, Switch data node 06 - (2340 mm)
11J3981 AR Cable, Switch data node 07 - (2060 mm)
11J3982 AR Cable, Switch data node 08 - (2260 mm)
11P0006 AR Cable, Switch data node xx - (2615 mm)
46G5686 AR Cable, Switch power
46H9698 AR Cable,S-Sexternal 5 m
46H9699 AR Cable,S-Sexternal 10 m
46H9700 AR Cable,S-Sexternal 15 m
46H9701 AR Cable,S-Sexternal 20 m
SP Switch data cables (SPS)
SP Switch Data Cables (SPS-8)
SP Switch External Cables (SPS - SPS-8)
5-8 RS/6000 SP: SP Switch Service Guide
Page 99

Chapter 5. Parts catalog 5-9
Page 100

Multi-switch frame (F/C 2030/1)
5-10 RS/6000 SP: SP Switch Service Guide
 Loading...