

Page 1

HPSS
Management
Guide
High Performance Storage System
Release 7.3
November 2009 (Revision 1.0)
HPSS Management Guide November 2009
Release 7.3 (Revision 1.0) 1
Page 2

© Copyright (C) 1992, 2009 International Business Machines Corporation, The Regents of the University of
California, Los Alamos National Security, LLC, Lawrence Livermore National Security, LLC, Sandia Corporation,
and UT-Battelle.
All rights reserved.
Portions of this work were produced by Lawrence Livermore National Security, LLC, Lawrence Livermore National
Laboratory (LLNL) under Contract No. DE-AC52-07NA27344 with the U.S. Department of Energy (DOE); by the
University of California, Lawrence Berkeley National Laboratory (LBNL) under Contract No. DE-AC0205CH11231 with DOE; by Los Alamos National Security, LLC, Los Alamos National Laboratory (LANL) under
Contract No. DE-AC52-06NA25396 with DOE; by Sandia Corporation, Sandia National Laboratories (SNL) under
Contract No. DE-AC04-94AL85000 with DOE; and by UT-Battelle, Oak Ridge National Laboratory (ORNL) under
Contract No. DE-AC05-00OR22725 with DOE. The U.S. Government has certain reserved rights under its prime
contracts with the Laboratories.
DISCLAIMER
Portions of this software were sponsored by an agency of the United States Government. Neither the United States,
DOE, The Regents of the University of California, Los Alamos National Security, LLC, Lawrence Livermore
National Security, LLC, Sandia Corporation, UT-Battelle, nor any of their employees, makes any warranty, express
or implied, or assumes any liability or responsibility for the accuracy, completeness, or usefulness of any
information, apparatus, product, or process disclosed, or represents that its use would not infringe privately owned
rights.
Printed in the United States of America.
HPSS Release 7.3
November 2009 (Revision 1.0)
High Performance Storage System is a trademark of International Business Machines Corporation.
IBM is a registered trademark of International Business Machines Corporation.
IBM, DB2, DB2 Universal Database, AIX, RISC/6000, pSeries, and xSeries are trademarks or registered trademarks
of International Business Machines Corporation.
UNIX is a registered trademark of the Open Group.
Linux is a registered trademark of Linus Torvalds in the United States and other countries.
Kerberos is a trademark of the Massachusetts Institute of Technology.
Java is a registered trademark of Sun Microsystems, Incorporated in the United States and other countries.
ACSLS is a trademark of Sun Microsystems, Incorporated.
Microsoft Windows is a registered trademark of Microsoft Corporation.
NFS, Network File System, and ACSLS are trademarks of Sun Microsystems, Inc.
DST is a trademark of Ampex Systems Corporation.
Other brands and product names appearing herein may be trademarks or registered trademarks of third parties.
HPSS Management Guide November 2009
Release 7.3 (Revision 1.0) 2
Page 3

Table of Contents
Chapter 1. HPSS 7.1 Configuration Overview.....................................................................................15
1.1. Introduction...................................................................................................................................15
1.2. Starting the SSM GUI for the First Time.......................................................................................15
1.3. HPSS Configuration Roadmap (New HPSS Sites)........................................................................15
1.4. Initial HPSS Startup Roadmap (All Sites).....................................................................................16
1.5. Additional Configuration Roadmap (All Sites).............................................................................17
1.6. Verification Checklists (All Sites).................................................................................................17
1.6.1. Configuration Checklists.........................................................................................................................17
1.6.2. Operational Checklists.............................................................................................................................19
1.6.3. Performance Checklist.............................................................................................................................20
Chapter 2. Security and System Access................................................................................................21
2.1. Security Services...........................................................................................................................21
2.1.1. Security Services Configuration..............................................................................................................21
2.1.2. Security Mechanisms...............................................................................................................................22
2.1.2.1. UNIX...............................................................................................................................................22
2.1.2.2. Kerberos 5.......................................................................................................................................22
2.1.2.3. LDAP..............................................................................................................................................23
2.1.2.3.1. LDAP Administrative Tasks..................................................................................................23
2.2. HPSS Server Security ACLs..........................................................................................................25
2.3. SSM User Security........................................................................................................................26
2.4. Location Policy..............................................................................................................................26
2.4.1. Configuring/Updating a Location Policy.................................................................................................27
2.4.2. Location Policy Configuration Window..................................................................................................27
2.4.3. Deleting a Location Policy......................................................................................................................28
2.5. Restricting user access to HPSS. ..................................................................................................28
2.5.1. Restricted Users Window........................................................................................................................29
Chapter 3. Using SSM............................................................................................................................31
3.1. The SSM System Manager............................................................................................................31
3.1.1. Starting the SSM System Manager..........................................................................................................31
3.1.2. Tuning the System Manager RPC Thread Pool and Request Queue Sizes.............................................31
3.1.3. Labeling the System Manager RPC Program Number ...........................................................................32
3.2. Quick Startup of hpssgui...............................................................................................................33
3.3. Configuration and Startup of hpssgui and hpssadm.......................................................................34
3.3.1. Configuring the System Manager Authentication for SSM Clients.........................................................35
3.3.2. Creating the SSM User Accounts............................................................................................................35
3.3.2.1. The hpssuser Utility........................................................................................................................35
3.3.2.2. SSM User Authorization.................................................................................................................36
3.3.2.3. User Keytabs (For Use with hpssadm Only)...................................................................................37
3.3.2.3.1. Keytabs for Kerberos Authentication: hpss_krb5_keytab......................................................38
3.3.2.3.2. Keytabs for UNIX Authentication: hpss_unix_keytab...........................................................38
3.3.3. SSM Configuration File...........................................................................................................................39
HPSS Management Guide November 2009
Release 7.3 (Revision 1.0) 3
Page 4

3.3.3.1. login.conf........................................................................................................................................41
3.3.3.2. krb5.conf (For Use with Kerberos Authentication Only)................................................................41
3.3.4. SSM Help Files (Optional)......................................................................................................................42
3.3.5. SSM Desktop Client Packaging...............................................................................................................42
3.3.5.1. Automatic SSM Client Packaging and Installation.........................................................................43
3.3.5.2. Manual SSM Client Packaging and Installation..............................................................................43
3.3.6. Using SSM Through a Firewall...............................................................................................................44
3.3.6.1. The Firewall Problem......................................................................................................................44
3.3.6.2. Solutions for Operating Through a Firewall..................................................................................45
3.3.6.3. Example: Using hpssgui Through a Firewall..................................................................................45
3.4. Multiple SSM Sessions..................................................................................................................47
3.5. SSM Window Conventions...........................................................................................................47
3.6. Common Window Elements..........................................................................................................50
3.7. Help Menu Overview....................................................................................................................52
3.8. Monitor, Operations and Configure Menus Overview...................................................................53
3.8.1. Monitor Menu..........................................................................................................................................53
3.8.2. Operations Menu.....................................................................................................................................54
3.8.3. Configure Menu.......................................................................................................................................55
3.9. SSM Specific Windows.................................................................................................................56
3.9.1. HPSS Login.............................................................................................................................................56
3.9.2. About HPSS.............................................................................................................................................58
3.9.3. HPSS Health and Status...........................................................................................................................58
3.9.3.1. SM Server Connection Status Indicator .........................................................................................59
3.9.3.2. HPSS Status....................................................................................................................................60
3.9.3.3. HPSS Statistics................................................................................................................................61
3.9.3.4. Menu Tree.......................................................................................................................................62
3.9.3.5. File Menu........................................................................................................................................62
3.9.3.6. View Menu......................................................................................................................................62
3.9.4. SSM Information Windows.....................................................................................................................63
3.9.4.1. System Manager Statistics Window................................................................................................63
3.9.4.2. User Session Information Window.................................................................................................67
3.10. SSM List Preferences..................................................................................................................69
Chapter 4. Global & Subsystem Configuration...................................................................................72
4.1. Global Configuration Window......................................................................................................72
4.2. Storage Subsystems ......................................................................................................................74
4.2.1. Subsystems List Window.........................................................................................................................74
4.2.2. Creating a New Storage Subsystem.........................................................................................................76
4.2.3. Storage Subsystem Configuration Window.............................................................................................76
4.2.3.1. Create Storage Subsystem Metadata...............................................................................................79
4.2.3.2. Create Storage Subsystem Configuration........................................................................................79
4.2.3.3. Create Storage Subsystem Servers..................................................................................................80
4.2.3.4. Assign a Gatekeeper if Required.....................................................................................................80
4.2.3.5. Assign Storage Resources to the Storage Subsystem......................................................................80
4.2.3.6. Create Storage Subsystem Fileset and Junction..............................................................................80
4.2.3.7. Migration and Purge Policy Overrides............................................................................................81
4.2.3.8. Storage Class Threshold Overrides.................................................................................................81
HPSS Management Guide November 2009
Release 7.3 (Revision 1.0) 4
Page 5

4.2.4. Modifying a Storage Subsystem..............................................................................................................81
4.2.5. Deleting a Storage Subsystem..................................................................................................................81
Chapter 5. HPSS Servers.......................................................................................................................83
5.1. Server List.....................................................................................................................................83
5.1. Server Configuration.....................................................................................................................87
5.1.1. Common Server Configuration................................................................................................................89
5.1.1.1. Basic Controls.................................................................................................................................89
5.1.1.1. Execution Controls..........................................................................................................................90
5.1.1.2. Interface Controls............................................................................................................................92
5.1.1.1. Security Controls.............................................................................................................................92
5.1.1.1. Audit Policy....................................................................................................................................94
5.1.1.1. Log Policy.......................................................................................................................................95
5.1.1. Core Server Specific Configuration.........................................................................................................96
5.1.1.1. Additional Core Server Configuration............................................................................................97
5.1.2. Gatekeeper Specific Configuration..........................................................................................................98
5.1.3. Location Server Additional Configuration..............................................................................................99
5.1.4. Log Client Specific Configuration.........................................................................................................100
5.1.1. Log Daemon Specific Configuration.....................................................................................................101
5.1.2. Migration/Purge Server (MPS) Specific Configuration........................................................................101
5.1.3. Mover Specific Configuration...............................................................................................................102
5.1.3.1. Mover Specific Configuration Window........................................................................................102
5.1.3.1. Additional Mover Configuration...................................................................................................104
5.1.3.1.1. /etc/services, /etc/inetd.conf, and /etc/xinetd.d.....................................................................104
5.1.3.1.2. The Mover Encryption Key Files.........................................................................................105
5.1.3.1.3. /var/hpss/etc Files Required for Remote Mover...................................................................106
5.1.3.1.1. System Configuration Parameters on IRIX, Solaris, and Linux...........................................106
5.1.3.1.1. Setting Up Remote Movers with mkhpss.............................................................................108
5.1.3.1.2. Mover Configuration to Support Local File Transfer..........................................................108
5.1.1. Physical Volume Repository (PVR) Specific Configuration.................................................................109
5.1.1.1. Operator PVR Specific Configuration Window............................................................................110
5.1.1.1. 3494 PVR Specific Configuration................................................................................................111
5.1.1.1.1. 3494 PVR Specific Configuration Window.........................................................................111
5.1.1.1.1. 3494 PVR Additional Information.......................................................................................112
5.1.1.2. AML PVR Specific Configuration................................................................................................113
5.1.1.2.1. AML PVR Specific Configuration Window........................................................................113
5.1.1.2.1. AML PVR Additional Information......................................................................................115
5.1.1.1. LTO PVR Specific Configuration.................................................................................................116
5.1.1.1.1. LTO PVR Specific Configuration Window.........................................................................116
5.1.1.1.1. LTO PVR Additional Information.......................................................................................118
5.1.1.2. SCSI PVR Specific Configuration Window.................................................................................118
5.1.1.1. STK PVR Specific Configuration Window..................................................................................120
5.1.1.1.1. STK PVR Additional Information........................................................................................121
5.1.1. Deleting a Server Configuration............................................................................................................123
5.1. Monitoring Server Information....................................................................................................125
5.1.1. Basic Server Information.......................................................................................................................125
5.1.1. Specific Server Information...................................................................................................................127
5.1.1.1. Core Server Information Window.................................................................................................127
5.1.1.1. Gatekeeper Information Window.................................................................................................130
5.1.1.1. Location Server Information Window..........................................................................................132
HPSS Management Guide November 2009
Release 7.3 (Revision 1.0) 5
Page 6

5.1.1.2. Migration/Purge Server Information Window..............................................................................133
5.1.1.3. Mover Information Window.........................................................................................................133
5.1.1.1. Physical Volume Library (PVL) Information Window.................................................................134
5.1.1.2. Physical Volume Repository (PVR) Information Windows.........................................................135
5.1.1.2.1. Operator PVR Information Window....................................................................................135
5.1.1.2.1. 3494 PVR Information Window..........................................................................................136
5.1.1.2.1. AML PVR Information Window..........................................................................................138
5.1.1.2.1. LTO PVR Information Window...........................................................................................139
5.1.1.2.1. SCSI PVR Information Window..........................................................................................141
5.1.1.2.1. STK PVR Information Window...........................................................................................143
5.1. Real-Time Monitoring (RTM).....................................................................................................144
5.1.1. RTM Summary List...............................................................................................................................145
5.1.2. RTM Detail............................................................................................................................................146
5.2. Starting HPSS..............................................................................................................................149
5.2.1. Starting HPSS Prerequisite Software.....................................................................................................149
5.2.2. Starting HPSS Servers...........................................................................................................................149
5.2.2.1. Starting the Startup Daemons .......................................................................................................149
5.2.2.2. Starting SSM.................................................................................................................................150
5.2.2.3. Starting Other HPSS Servers........................................................................................................150
5.2.2.4. Automatic Server Restart..............................................................................................................151
5.1. Stopping HPSS............................................................................................................................151
5.1.1. Shutting Down an HPSS Server............................................................................................................151
5.1.2. Shutting Down All HPSS Servers..........................................................................................................152
5.1.3. Halting an HPSS Server.........................................................................................................................152
5.1.4. Shutting Down the SSM Server.............................................................................................................152
5.1.5. Shutting Down the Startup Daemon......................................................................................................153
5.1.6. Stopping the Prerequisite Software........................................................................................................153
5.2. Server Repair and Reinitialization...............................................................................................153
5.2.1. Repairing an HPSS Server.....................................................................................................................153
5.2.2. Reinitializing a Server...........................................................................................................................154
5.1. Forcing an SSM Connection........................................................................................................156
Chapter 6. Storage Configuration.......................................................................................................157
6.1. Storage Classes ...........................................................................................................................157
6.1.1. Configured Storage Classes Window....................................................................................................157
6.1.2. Disk Storage Class Configuration..........................................................................................................158
6.1.3. Tape Storage Class Configuration.........................................................................................................162
6.1.4. Storage Class Subsystem Thresholds.....................................................................................................166
6.1.4.1. Disk Storage Subsystem-Specific Thresholds...............................................................................166
6.1.4.2. Tape Storage Subsystem-Specific Thresholds..............................................................................168
6.1.5. Changing a Storage Class Definition.....................................................................................................169
6.1.6. Deleting a Storage Class Definition.......................................................................................................170
6.2. Storage Hierarchies .....................................................................................................................170
6.2.1. Hierarchies Window..............................................................................................................................170
6.2.2. Storage Hierarchy Configuration Window............................................................................................172
6.2.3. Changing a Storage Hierarchy Definition..............................................................................................173
HPSS Management Guide November 2009
Release 7.3 (Revision 1.0) 6
Page 7

6.2.4. Deleting a Storage Hierarchy Definition...............................................................................................173
6.3. Classes of Service........................................................................................................................174
6.3.1. Classes of Service Window...................................................................................................................174
6.3.2. Class of Service Configuration Window...............................................................................................175
6.3.3. Changing a Class of Service Definition.................................................................................................178
6.3.4. Deleting a Class of Service Definition...................................................................................................179
6.3.5. Changing a File's Class of Service.........................................................................................................180
6.3.6. Canceling a Class of Service Change Request.......................................................................................180
6.4. Migration Policies.......................................................................................................................180
6.4.1. Migration Policies Window...................................................................................................................180
6.4.2. Migration Policy Configuration.............................................................................................................182
6.4.2.1. Disk Migration Policy Configuration............................................................................................182
6.4.2.2. Tape Migration Policy Configuration...........................................................................................185
6.4.2.3. Changing a Migration Policy........................................................................................................188
6.4.2.4. Deleting a Migration Policy..........................................................................................................188
6.5. Purge Policies..............................................................................................................................189
6.5.1. Purge Policies Window..........................................................................................................................189
6.5.2. Purge Policy Configuration...................................................................................................................190
6.5.3. Changing a Purge Policy........................................................................................................................192
6.5.4. Deleting a Purge Policy.........................................................................................................................193
6.6. File Families ...............................................................................................................................193
6.6.1. File Family Configuration......................................................................................................................194
6.6.2. Changing a File Family..........................................................................................................................194
6.6.3. Deleting a File Family...........................................................................................................................194
Chapter 7. Device and Drive Management ........................................................................................196
7.1. Configure a New Device & Drive................................................................................................196
7.1.1. Devices and Drives Window.................................................................................................................202
7.1.2. Enable Variable Block Sizes for Tape Devices.....................................................................................207
7.1.3. Changing a Drive's Configuration..........................................................................................................207
7.1.4. Deleting a Drive's Configuration...........................................................................................................208
7.2. Monitoring Devices and Drives...................................................................................................209
7.2.1. Mover Device Information Window......................................................................................................209
7.2.2. PVL Drive Information Window...........................................................................................................214
7.3. Drive Pools..................................................................................................................................218
7.3.1. Tape Drive Configuration......................................................................................................................219
7.3.2. Client Application Tape Read Requests................................................................................................219
7.3.3. Drive Pool Considerations.....................................................................................................................219
7.4. Changing Device and Drive State................................................................................................220
7.4.1. Unlocking a Drive..................................................................................................................................220
7.4.2. Locking a Drive.....................................................................................................................................220
7.4.3. Repairing the State of a Device or Drive...............................................................................................221
7.4.4. Resetting Drive Statistics.......................................................................................................................221
Chapter 8. Volume and Storage Management...................................................................................223
HPSS Management Guide November 2009
Release 7.3 (Revision 1.0) 7
Page 8

8.1. Adding Storage Space..................................................................................................................223
8.1.1. Importing Volumes into HPSS .............................................................................................................223
8.1.1.1. Import Tape Volumes Window.....................................................................................................225
8.1.1.2. Selecting Import Type for Tape Cartridges..................................................................................229
8.1.1.3. Import Disk Volumes Window.....................................................................................................230
8.1.1.4. Selecting Import Type for Disk Volumes.....................................................................................234
8.1.2. Creating Storage Resources...................................................................................................................234
8.1.2.1. Create Tape Resources Window...................................................................................................235
8.1.2.2. Create Disk Resources Window....................................................................................................237
8.2. Removing Storage Space.............................................................................................................240
8.2.1. Deleting Storage Resources...................................................................................................................240
8.2.1.1. Rules for Deleting Resources........................................................................................................241
8.2.1.2. Delete Resources Window............................................................................................................241
8.2.2. Exporting Volumes from HPSS.............................................................................................................243
8.2.2.1. Rules for Exporting Volumes........................................................................................................244
8.2.2.2. Export Volumes Window..............................................................................................................244
8.3. Monitoring Storage Space...........................................................................................................247
8.3.1. Active Storage Classes Window............................................................................................................248
8.3.2. MPS Disk Storage Class Information....................................................................................................251
8.3.3. MPS Tape Storage Class Information...................................................................................................256
8.4. Dealing with a Space Shortage....................................................................................................258
8.4.1. Forcing Migration..................................................................................................................................259
8.4.2. Forcing Purge.........................................................................................................................................259
8.4.3. Repacking and Reclaiming Volumes.....................................................................................................259
8.4.3.1. Repack Virtual Volumes Window................................................................................................260
8.4.3.2. Reclaim Virtual Volumes Window...............................................................................................262
8.5. Volume Management...................................................................................................................263
8.5.1. Lookup Cartridges & Volumes Window...............................................................................................263
8.5.2. PVL Volume Information Window.......................................................................................................264
8.5.3. PVR Cartridge Information Window.....................................................................................................265
8.5.4. Core Server Volume and Segment Windows........................................................................................269
8.5.4.1. Core Server Disk Volume Information Window..........................................................................269
8.5.4.2. Core Server Tape Volume Information Window..........................................................................273
8.5.5. Changing Core Server Volume Condition.............................................................................................278
8.5.6. Moving PVR Cartridges to Another PVR.............................................................................................280
8.5.6.1. Move Cartridges Window.............................................................................................................280
8.6. Monitoring and Managing Volume Mounts................................................................................283
8.6.1. PVL Job Queue Window ......................................................................................................................284
8.6.2. PVL Request Information Window.......................................................................................................286
8.6.3. Canceling Queued PVL Requests .........................................................................................................288
8.6.4. Tape Check-In Requests Window.........................................................................................................288
8.6.5. Tape Mount Requests Window..............................................................................................................289
8.6.6. Administrative Tape Dismounts............................................................................................................291
8.7. New Storage Technology Insertion..............................................................................................291
Chapter 9. Logging and Status...........................................................................................................294
HPSS Management Guide November 2009
Release 7.3 (Revision 1.0) 8
Page 9

9.1. Logging Overview.......................................................................................................................294
9.2. Log Policies.................................................................................................................................295
9.2.1. Creating a Log Policy............................................................................................................................295
9.2.2. Logging Policies Window......................................................................................................................296
9.2.2.1. Logging Policy Configuration Window.......................................................................................297
9.2.3. Changing a Log Policy...........................................................................................................................298
9.2.4. Deleting a Log Policy............................................................................................................................299
9.3. Managing the Central Log...........................................................................................................299
9.3.1. Configuring Central Log Options..........................................................................................................299
9.3.2. Viewing the Central Log (Delogging)...................................................................................................300
9.4. Log Files Information..................................................................................................................300
9.5. Managing Local Logging.............................................................................................................301
9.5.1. Configuring Local Logging Options......................................................................................................302
9.5.2. Viewing the Local Log..........................................................................................................................302
9.6. Managing SSM Alarms and Events ............................................................................................302
9.6.1. Alarms and Events Window..................................................................................................................302
9.6.2. Alarm/Event Information.......................................................................................................................303
9.6.3. Diagnosing HPSS Problems with Alarms and Events...........................................................................305
9.6.4. Controlling SSM Log Message Handling.............................................................................................305
9.6.4.1. Controlling the System Manager Log Message Cache.................................................................305
9.6.4.2. Controlling Log Messages Displayed by hpssgui and hpssadm....................................................306
Chapter 10. Filesets and Junctions......................................................................................................308
10.1. Filesets & Junctions List............................................................................................................308
10.2. Creating an HPSS Fileset...........................................................................................................310
10.2.1. Create Fileset Window.........................................................................................................................310
10.3. Managing Existing Filesets........................................................................................................312
10.3.1. Core Server Fileset Information Window............................................................................................312
10.4. Deleting Filesets........................................................................................................................314
10.5. Creating a Junction....................................................................................................................315
10.5.1. Create Junction Window......................................................................................................................315
10.6. Deleting a Junction....................................................................................................................316
Chapter 11. Files, Directories and Objects by SOID.........................................................................317
11.1. Files & Directories Window......................................................................................................317
11.1.1. File/Directory Information Window....................................................................................................318
11.2. Objects by SOID Window.........................................................................................................322
Chapter 12. Tape Aggregation............................................................................................................323
12.1. Overview of Tape Aggregation..................................................................................................323
12.2. Tape Aggregation Performance Considerations........................................................................323
12.3. Configuring Tape Aggregation..................................................................................................323
Chapter 13. User Accounts and Accounting.......................................................................................325
HPSS Management Guide November 2009
Release 7.3 (Revision 1.0) 9
Page 10

13.1. Managing HPSS Users...............................................................................................................325
13.1.1. Adding HPSS Users.............................................................................................................................325
13.1.1.1. Add All User ID Types...............................................................................................................325
13.1.1.2. Add a UNIX User ID..................................................................................................................326
13.1.1.3. Add a Kerberos User ID.............................................................................................................327
13.1.1.4. Add an LDAP User ID................................................................................................................327
13.1.1.5. Add an FTP User ID...................................................................................................................327
13.1.1.6. Add an SSM User ID..................................................................................................................328
13.1.2. Deleting HPSS Users...........................................................................................................................328
13.1.3. Listing HPSS Users.............................................................................................................................329
13.1.4. Create an SSM Client Package............................................................................................................329
13.2. Accounting................................................................................................................................330
13.2.1. Accounting Policy Window.................................................................................................................330
13.2.2. Accounting Reports and Status............................................................................................................332
13.2.2.1. Generating an Accounting Report...............................................................................................332
13.2.2.2. Accounting Status Window.........................................................................................................332
13.2.2.3. Interpreting the Accounting Report.............................................................................................333
13.2.3. Accounting Procedures........................................................................................................................335
13.2.3.1. Site Defined Accounting Configuration Files and Procedures...................................................336
13.2.3.1.1. Site Defined Account Maps...............................................................................................336
13.2.3.1.2. Site Defined Account Apportionment Table......................................................................337
13.2.3.1.3. Maintaining Site Defined Accounting Files.......................................................................337
13.2.3.2. Accounting Intervals and Charges..............................................................................................338
Chapter 14. User Interfaces.................................................................................................................339
14.1. Client API Configuration ..........................................................................................................339
14.2. FTP/PFTP Daemon Configuration............................................................................................341
14.3. HPSS VFS Interface Configuration ..........................................................................................345
14.3.1. HPSS VFS Interface Overview............................................................................................................345
14.3.2. Supported Linux Versions...................................................................................................................346
14.3.3. Installation and Configuration of VFS.................................................................................................346
14.3.3.1. Extracting from HPSS Source Tree............................................................................................346
14.3.3.2. Compiling/Building.....................................................................................................................347
14.3.3.3. Modifying the Kernel..................................................................................................................347
14.3.3.4. Client API – Pre-Requisite..........................................................................................................348
14.3.3.5. Other System Configuration Details...........................................................................................350
14.4. Mounting VFS Filesystems.......................................................................................................351
14.4.1. Mounting via the Command Line........................................................................................................351
14.4.2. Mounting via the ‘/etc/fstab’ File.........................................................................................................351
14.4.3. Mount Options.....................................................................................................................................352
14.4.4. Un-mounting an HPSS Filesystem.......................................................................................................354
14.4.5. Linux ‘proc’ Filesystem Statistics........................................................................................................354
14.5. Additional VFS Notes...............................................................................................................355
14.5.1. Building an RPM Package...................................................................................................................355
Chapter 15. Backup and Recovery......................................................................................................356
15.1. HPSS Metadata Backup and Recovery......................................................................................356
15.1.1. HPSS Administrator Responsibilities for DB2....................................................................................356
HPSS Management Guide November 2009
Release 7.3 (Revision 1.0) 10
Page 11

15.1.2. Overview of the DB2 Backup Process................................................................................................357
15.1.2.1. Configuring DB2 for Online Backup..........................................................................................358
15.1.3. Overview of the DB2 Recovery Process.............................................................................................359
15.2. HPSS System Environmental Backup........................................................................................359
15.2.1. HPSS Filesystem Backup....................................................................................................................359
15.2.2. Operating System Backup....................................................................................................................360
15.2.3. Kerberos Backup ................................................................................................................................360
15.3. HPSS User Data Recovery.........................................................................................................360
15.3.1. Recovering HPSS Files from Damaged HPSS Volumes.....................................................................360
15.3.1.1. Recover Partially Damaged Disk or Tape Volume.....................................................................362
15.3.1.1.1. With Secondary Copies......................................................................................................362
15.3.1.1.2. Without Secondary Copies.................................................................................................363
15.3.1.2. Cleanup Totally Damaged Disk or Tape.....................................................................................364
15.4. DB2 Monitoring........................................................................................................................365
15.5. DB2 Space Shortage..................................................................................................................365
15.5.1. DMS Table Spaces..............................................................................................................................366
15.5.2. SMS Table Spaces...............................................................................................................................366
Chapter 16. Management Tools..........................................................................................................368
16.1. Utility Overview........................................................................................................................368
16.1.1. Fileset and Junction Management........................................................................................................368
16.1.2. Tape Management...............................................................................................................................368
16.1.3. System Info..........................................................................................................................................368
16.1.4. System Management............................................................................................................................369
16.1.5. User Interfaces.....................................................................................................................................370
16.1.6. Testing/Debugging...............................................................................................................................370
16.1.7. Unsupported Tools..............................................................................................................................370
Appendix A. Glossary of Terms and Acronyms.................................................................................373
Appendix B. References.......................................................................................................................385
Appendix C. Developer Acknowledgments.........................................................................................387
HPSS Management Guide November 2009
Release 7.3 (Revision 1.0) 11
Page 12

List of Tables
Table 1. SSM General Options..............................................................................................................39
Table 2. HPSSGUI Specific Options.....................................................................................................40
Table 3. HPSSADM Specific Options...................................................................................................40
Table 4. Mover TCP Pathname Options.............................................................................................103
Table 1. IRIX System Parameters.......................................................................................................107
Table 2. Solaris System Parameters....................................................................................................107
Table 3. Linux System Parameters......................................................................................................108
Table 1. Auto Restart Count Values...................................................................................................151
Table 1. Server Reinitialization Behavior...........................................................................................154
Table 2. Recommended Settings for Tape Devices............................................................................201
Table 3. Tape Import Types.................................................................................................................229
Table 4. Disk Import Types.................................................................................................................234
Table 5. Banner Keywords..................................................................................................................344
Table 5. HPSS VFS Interface Mount Options....................................................................................352
HPSS Management Guide November 2009
Release 7.3 (Revision 1.0) 12
Page 13

Preface
Who Should Read This Book
The HPSS Management Guide is intended as a resource for HPSS administrators. For those performing the initial
configuration for a new HPSS system, Chapter 1 provides a configuration roadmap. For both new systems and those
upgraded from a previous release, Chapter 1 provides a configuration, operational, and performance checklist which
should be consulted before bringing the system into production. The remaining chapters contain the details for
configuring, reconfiguring, monitoring, and managing an HPSS system.
Conventions Used in This Book
Example commands that should be typed at a command line will be proceeded by a percent sign (‘%’) and be
presented in a boldface courier font:
% sample command
Any text preceded by a pound sign (‘#’) should be considered comment lines:
# This is a comment
Angle brackets (‘<>’) denote a required argument for a command:
% sample command <argument>
Square brackets (‘[]’) denote an optional argument for a command:
% sample command [optional argument]
Vertical bars (‘|’) denote different choices within an argument:
% sample command <argument1 | argument2>
A byte is an eight bit data octet. A kilobyte, KB, is 1024 bytes (2
10
bytes). A megabyte, MB, is 1048576
bytes (220 bytes). A gigabyte, GB, is 1073741824 bytes (230 bytes), a terabyte, TB, is 1099511627776
bytes (240 bytes), and a petabyte, PB, is 1125899906842624 bytes (250 bytes).
HPSS Management Guide November 2009
Release 7.3 (Revision 1.0) 13
Page 14

HPSS Management Guide November 2009
Release 7.3 (Revision 1.0) 14
Page 15

Chapter 1. HPSS 7.1 Configuration Overview
1.1. Introduction
This chapter defines the high-level steps necessary to configure, start, and verify correct operation of a
new 7.1 HPSS system, whether that system is created from scratch or created by conversion from a 6.2
HPSS system.
To create or modify the HPSS configuration, we recommend that the administrator first be familiar with
the information described in the HPSS Installation Guide, Chapter 2: HPSS Basics and Chapter 3: HPSS
Planning.
Before performing the procedures described in this chapter, be certain that the appropriate system
preparation steps have been performed. See the HPSS Installation Guide, Chapter 4: System Preparation
for more information. For a system created from scratch, be certain that the HPSS installation and
infrastructure configuration have been completed. See the HPSS Installation Guide, Chapter 5: HPSS
Installation and Infrastructure Configuration for more information. To convert from a 6.2 system, see
the HPSS Conversion Guide for HPSS release 7.1.
1.2. Starting the SSM GUI for the First Time
The HPSS system is ready to be configured using SSM once the HPSS software is installed on the node
and the HPSS infrastructure components are configured. In order to start the SSM GUI you must first
start all infrastructure components and the SSM System Manager as follows:
% /opt/hpss/bin/rc.hpss -m start
Next you will need to add an SSM Admin user. To do this you will need to invoke the hpssuser utility as
follows:
% /opt/hpss/bin/hpssuser -add hpss -<unix|krb> -ssm
The above commands must be done as root!
Once the SSM Admin user has been created, you can invoke the SSM GUI as follows (for hpssgui.pl
options, see the hpssgui man page):
% /opt/hpss/bin/hpssgui.pl
Note: This command may be done as an HPSS user.
When the SSM GUI is running you can begin to configure the rest of HPSS (servers, devices, etc) as
described in the following sections. For more information on SSM, see Chapter 3: Using SSM on page
31.
1.3. HPSS Configuration Roadmap (New HPSS Sites)
The following steps summarize the configuration of an HPSS system when creating the 7.1system from
scratch (not upgrading from a previous release). It is important that the steps be performed in the order
HPSS Management Guide November 2009
Release 7.3 (Revision 1.0) 15
Page 16

listed. Each step is required unless otherwise indicated. Each step is discussed in more detail in the
referenced section.
1. Configure storage subsystems (Section 4.2.2: Creating a New Storage Subsystem on page 76)
Subsystems can be configured only partially at this time. The Gatekeeper, Default COS, and
Allowed COS fields will be updated in a later step.
2. Configure HPSS storage policies
· Accounting Policy (Section 13.2.1: on page 330)
· Log Policies (Section 9.2: Log Policies on page 295)
· Location Policy (Section 2.4: Location Policy on page 26)
· Migration Policies (Section 6.4: Migration Policies on page 180)
· Purge Policies (Section 6.5: Purge Policies on page 189)
3. Configure HPSS storage characteristics
· Storage Classes (Section 6.1.1: Configured Storage Classes on page 157)
· Storage Hierarchies (Section 6.2: Storage Hierarchies on page 170)
· Classes of Service (Section 6.3: Classes of Service on page 174)
4. Configure HPSS servers (Section 5.1: Server Configuration on page 87)
5. Create global configuration (Section 4.1: Global Configuration Window on page 72)
6. Configure MVR devices and PVL drives (Section 7.1: Configure a New Device & Drive on page
196)
7. Configure file families, if used (Section 6.6: File Families on page 193)
8. Update storage subsystem configurations with Gatekeeper and COS information (Section 4.2.4:
Modifying a Storage Subsystem on page 81 and Section 4.2.3:Storage Subsystem Configuration
Window on page 76)
9. Create the endpoint map (Section 5.1.3: Location Server Additional Configuration on page 99).
1.4. Initial HPSS Startup Roadmap (All Sites)
This section provides instructions for starting the HPSS servers and performing post-startup
configuration. For sites which are converting from 6.2, only step 1 may be necessary. For sites
configuring a new 7.1 system from scratch, all steps are necessary:
1. Start the HPSS servers (Section 5.2.2: Starting HPSS Servers on page 149)
2. Unlock the PVL drives (Section 7.4.2: Locking a Drive on page 220)
3. Create HPSS storage space:
A. Import volumes into HPSS (Section 8.1.1: Importing Volumes into HPSS on page 223)
HPSS Management Guide November 2009
Release 7.3 (Revision 1.0) 16
Page 17

B. Create storage resources (Section 8.1.2: Creating Storage Resources on page 234)
4. Create additional HPSS Users (Section 13.1.1: Adding HPSS Users on page 325)
5. Create Filesets and Junctions (Section 10.1: Filesets & Junctions List on page 308 and Section
10.5: Creating a Junction on page 315)
6. Create HPSS /log Directory
If log archiving is enabled, using an HPSS namespace tool such as scrub or ftp, create the /log
directory in HPSS. This directory must be owned by hpsslog and have permissions rwxr-xr-x.
The /log directory can be created by the root user using ftp as follows:
% ftp <node> <HPSS Port> # login as root user
ftp> mkdir /log
ftp> quote site chown hpsslog /log
ftp> quote site chmod 755 /log
1.5. Additional Configuration Roadmap (All Sites)
This section provides a high level roadmap for additional HPSS configuration.
1. Configure HPSS User Interfaces (Chapter 14: User Interfaces on page 339)
2. Set up Backup for DB2 and Other Infrastructure (Chapter 15: Backup and Recovery on page 356)
3. Set up High Availability, if desired (HPSS Installation Guide, Chapter 3: HPSS Planning)
4. Optionally configure support for both authentication mechanisms (HPSS Installation Guide,
Section 5.9: Supporting Both Unix and Kerberos Authentication for SSM)
1.6. Verification Checklists (All Sites)
This section provides a number of checklists regarding configuration, operational and performance
issues.
1.6.1. Configuration Checklists
After HPSS is running, the administrator should use the following checklists to verify that HPSS was
configured or converted correctly:
Global Configuration
• Verify that a Default Class of Service has been selected.
• Verify that a Root Core Server has been selected.
Storage Subsystem Configuration
• Verify that a Default Class of Service has been selected if desired.
• Verify that a Gatekeeper has been selected if gatekeeping or account validation is required.
• Verify that the COS Name list has been filled in correctly.
HPSS Management Guide November 2009
Release 7.3 (Revision 1.0) 17
Page 18

• Verify that a Core Server and Migration Purge Server have been configured for each storage
subsystem.
• Verify that each storage subsystem is accessible by using lsjunctions and ensuring that there is at
least one junction to the Root fileset of each subsystem. (The root fileset for a given subsystem
can be found in the specific configuration for the subsystem’s Core Server)
Servers
• Verify that all required HPSS servers are configured and running.
• Verify that all servers are configured with the intended level of logging, whether using their
server specific policies or the default policy. Also, verify that all Core Server and Mover log
policies have the DEBUG flag turned on to aid in the diagnostics of any future problems.
Devices and Drives
• Verify that all devices/drives are configured and each is assigned to an appropriate PVR/Mover.
• For tape devices, verify that the “Locate Support” option is enabled if supported.
• For tape devices, verify that the “NO-DELAY” option is enabled if supported by the device.
• For disk devices, verify that the “Bytes on Device” and “Starting Offset” values are correct.
• Verify that all configured drives are unlocked.
Storage Classes
• Verify that all storage classes are defined and each has sufficient free storage space.
• Verify that each storage class that will be migrated and purged is configured with the appropriate
migration and purge policy.
• Verify that no storage class at the lowest level in a hierarchy is configured with a migration or
purge policy.
• To support repack and recover of tape volumes, verify that the stripe width of each tape storage
class is less than half of the number of available drives of the appropriate drive type.
Storage Hierarchies
• Verify that all storage hierarchies are defined.
Classes of Service (COS)
• Verify that all classes of service are defined.
• Verify that each COS is associated with the appropriate storage hierarchy.
• Verify that the COS is configured to use the characteristics of the hierarchy and the underlying
storage classes. In addition, verify that the classes of service have the correct Minimum File Size
and Maximum File Size values. If these sizes overlap, the file placement may be indeterminate
when the user creates a file using the size hints. For classes of services which are not to be used as
part of standard file placement, set their Force Selection flag to ON so that they will only be
HPSS Management Guide November 2009
Release 7.3 (Revision 1.0) 18
Page 19

chosen if specified by their COS ID.
• Verify that classes of service with multiple copies have the Retry Stage Failures from
Secondary Copy flag enabled.
File Families, Filesets, and Junctions
• Verify that file families and filesets are created according to the site’s requirements.
• Verify that each fileset is associated with the appropriate file family and/or COS.
• Verify that each fileset has an associated junction.
User Interfaces
• Verify that the desired HPSS user interfaces (FTP, PFTP, Client API, etc.) are configured
(Chapter 14 : User Interfaces on page 339).
1.6.2. Operational Checklists
The administrator should follow these checklists to ensure that HPSS is operating properly.
Configured user interfaces
• Create files of various sizes on each defined COS.
• Verify that the files are created in the expected storage class with acceptable transfer rates.
• If necessary, redefine the associated storage class definition to enhance the throughput
performance.
• The characteristics fields (Transfer Rate, Latency, etc.) in the storage class and class of service
definition should be updated to reflect actual performance results.
• After the files are created on the correct storage class, verify that the files are created with correct
file ownerships and permissions.
• Verify that other file operations (delete, chmod, copy, etc.) work.
• If accounting is configured, verify that the files are created with the correct accounting indices.
• If file families, filesets and junctions are configured, verify that they work as intended.
Devices and Drives
• Ensure that each drive mounts, reads, and writes.
Storage Management
• Verify that migration and purge operations work as intended.
• Start Migration and Purge operations manually to verify that files are migrated and purged
correctly.
• Verify that files can be accessed after being migrated/purged.
HPSS Management Guide November 2009
Release 7.3 (Revision 1.0) 19
Page 20

• Monitor free space from the top level storage class in each hierarchy to verify that the migration
and purge policy are maintaining adequate free space.
1.6.3. Performance Checklist
Measure data transfer rates in each COS for:
• Client writes to disk
• Migration from disk to tape
• Staging from tape to disk
• Client reads from disk
Transfer rates should be close to the speed of the underlying hardware. The actual hardware speeds can
be obtained from their specifications and by testing directly from the operating system (e.g., using dd to
read and write to each device). Keep in mind that transfer performance can be limited by factors external
to HPSS. For example, HPSS file read performance may be limited by the performance of the UNIX file
system writing the file rather than limits inside HPSS.
HPSS Management Guide November 2009
Release 7.3 (Revision 1.0) 20
Page 21

Chapter 2. Security and System Access
2.1. Security Services
As of release 6.2, HPSS no longer uses DCE security services. The new approach to security divides
services into two APIs, known as mechanisms, each of which has multiple implementations.
Configuration files control which implementation of each mechanism is used in the security realm
(analogous to a DCE cell) for an HPSS system. Security mechanisms are implemented in shared object
libraries and are described to HPSS by a configuration file. HPSS programs that need to use the
mechanism dynamically link the library to the program when the program starts.
The first type of mechanism is the authentication mechanism. This API is used to acquire credentials
and to verify the credentials of clients. Authentication verifies that a client really is who he claims to be.
The second type of mechanism is the authorization mechanism. Once a client's identity has been
verified, this API is used to obtain the authorization details associated with the client such as uid, gid,
group membership, etc., that are used to determine the privileges accorded to the client and the resources
to which it has access.
2.1.1. Security Services Configuration
Ordinarily, the configuration files that control HPSS's access to security services are set up either by the
installation tool, mkhpss, or by the metadata conversion tools. This section is provided purely for
reference. Each of the files below is stored by default in /var/hpss/etc.
• auth.conf, authz.conf
These files define which shared libraries provide implementations of the authentication and
authorization mechanisms, respectively. They are plain text files that have the same format. Each
line is either a comment beginning with # or consists of two fields separated by whitespace: the
path to a shared library and the name of the function used to initialize the security interface.
• site.conf
This file defines security realm options. This is a plain text file in which each line is a comment
beginning with # or is made up of the following fields, separated by whitespace:
<siteName> <realmName> <realmID> <authzMech> <authzURL>
· <siteName> - the name of the local security site. This is usually just the realm name in
lowercase.
· <realmName> - the name of the local security realm. If using Kerberos authentication, this is
the name of the Kerberos realm. For UNIX authentication, it can be any non-empty string. By
convention, it is usually the fully qualified hostname.
· <realmID> - the numeric identifier of the local security realm. If using Kerberos
authentication and this is a preexisting site going through conversion, this value is the same as
the DCE cross cell ID which is a unique number assigned to each site. A new site setting up a
new HPSS system will need to contact an HPSS support representative to obtain a unique
value.
· <authzMech> - the name of the authorization mechanism to be used by this HPSS system.
HPSS Management Guide November 2009
Release 7.3 (Revision 1.0) 21
Page 22

This can be "unix" or "ldap".
· <authzURL> - a string used by the authorization mechanism to locate the security data for
this realm. This should be "unix" for UNIX authorization, and for LDAP it should be an
LDAP URL used to locate the entry for the security realm in an LDAP directory.
2.1.2. Security Mechanisms
HPSS 7.1 supports UNIX and Kerberos mechanisms for authentication. It supports LDAP and UNIX
mechanisms for authorization.
2.1.2.1. UNIX
UNIX-based mechanisms are provided both for authentication and authorization. These can draw either
from the actual UNIX user and group information on the current host or from a separately maintained set
of files used only by HPSS. This behavior is controlled by the setting of the variable
HPSS_UNIX_USE_SYSTEM_COMMANDS in /var/hpss/etc/env.conf. If this variable is set to any nonempty value other than FALSE, the actual UNIX user and group data will be used. Otherwise, local files
created and maintained by the following HPSS utilities will be used. Consult the man pages for each
utility for details of its use.
• hpss_unix_keytab - used to define "keytab" files that can be used to acquire credentials
recognized by the UNIX authentication mechanism.
• hpss_unix_user - used to manage users in the HPSS password file (/var/hpss/etc/passwd).
• hpss_unix_group - used to manage users in the HPSS groups file (/var/hpss/etc/group).
• hpss_unix_passwd - used to change passwords of users in the HPSS password file.
• hpss_unix_keygen - used to create a key file containing a hexadecimal key. The key is used
during UNIX authentication to encrypt keytab passwords. The encryption provides an extra layer
of protection against forged passwords.
Keep in mind that the user and group databases must be kept synchronized across all nodes in an HPSS
system. If using the actual UNIX information, this can be accomplished using a service such as NIS. If
using the HPSS local files, these must manually be kept in synchronization across HPSS nodes.
2.1.2.2. Kerberos 5
The capability to use MIT Kerberos authentication is provided in HPSS 7.1, however, IBM
Service Agreements for HPSS do not provide support for problem isolation nor fixing defects
(Level 2 and Level 3 support) in MIT Kerberos. Kerberos maintenance/support must be siteprovided.
Kerberos 5 is an option for the authentication mechanism. When this option is used, the local realm
name is taken to be the name of a Kerberos realm. The Kerberos security services are used to obtain and
verify credentials.
HPSS Management Guide November 2009
Release 7.3 (Revision 1.0) 22
Page 23

2.1.2.3. LDAP
LDAP authorization is not supported by IBM Service Agreements. The following information
is provided for sites planning to use LDAP authorization with HPSS 7.1 as a site supported
feature.
An option for the authorization mechanism is to store HPSS security information in an LDAP directory.
LDAP (Lightweight Directory Access Protocol) is a standard for providing directory services over a
TCP/IP network. A server supporting the LDAP protocol provides a hierarchical view of a centralized
repository of data and provides clients with sophisticated search options. The LDAP software supported
by the HPSS LDAP authorization mechanism is IBM Tivoli Directory Server (Kerberos plug-in available
for AIX only) and OpenLDAP (Kerberos plug-in available for AIX and Linux). One advantage of using
the LDAP mechanism over the UNIX mechanism is that LDAP provides a central repository of
information that is used by all HPSS nodes; it doesn't have to be manually kept in sync.
The rest of this section deals with how to accomplish various administrative tasks if the LDAP
authorization mechanism is used.
2.1.2.3.1. LDAP Administrative Tasks
Working with Principals
• Creating a principal
A principal is an entity with credentials, like a user or a server. The most straightforward way to
create a new principal is to use the -add and -ldap options of the hpssuser utility. The utility will
prompt for any needed information and will drive the hpss_ldap_admin utility to create a new
principal entry in the LDAP server. To create a new principal directly with the
hpss_ldap_admin utility, use the following command at the prompt:
princ create -uid <uid> -name <name> -gid <gid> -home <home>
-shell <shell> [-uuid <uuid>]
If no UUID is supplied, one will be generated.
• Deleting a principal
Likewise, use the -del and -ldap options of the hpssuser utility to delete the named principal from
the LDAP server. To delete a named principal directly with the hpss_ldap_admin utility, use the
following command at the prompt:
princ delete [-uid <uid>] [-name <name>] [-gid <gid>]
[-uuid <uuid>]
You may supply any of the arguments listed. This command will delete any principal entries in
the LDAP information that have the indicated attributes.
Working with Groups
• Creating a group
HPSS Management Guide November 2009
Release 7.3 (Revision 1.0) 23
Page 24

To create a new group, use the following command at the hpss_ldap_admin prompt:
group create -gid <gid> -name <name> [-uuid <uuid>]
If no UUID is supplied, one will be generated.
• Deleting a group
To delete a group, use the following command at the hpss_ldap_admin prompt:
group delete [-gid <gid>] [-name <name>] [-uuid <uuid>]
You may supply any of the arguments listed. This command will delete any group entries in the
LDAP information that have the indicated attributes.
• Adding a member to a group
To add a principal to a group, use the following command at the hpss_ldap_admin prompt:
group add <principal> [-gid <gid>] [-name <name>] [-uuid <uuid>]
You may supply any of the arguments listed to select the group to which the named principal will
be added.
• Removing a member from a group
To remove a principal from a group, use the following command at the hpss_ldap_admin
prompt:
group remove <principal> [-gid <gid>] [-name <name>]
[-uuid <uuid>]
You may supply any of the arguments listed to select the group from which the named principal
will be removed.
Working with Trusted Foreign Realms
• Creating a trusted foreign realm
To add an entry for a trusted foreign realm, use the following hpss_ldap_admin command:
trealm create -id <realmID> -mech <mechanism> -name <realmName>
-url <url>
The arguments are as follows
· -id - the numeric realm ID for the foreign realm
· -mech - a string identifying the authorization mechanism in use at the foreign realm, such as
"unix" or "ldap"
· -name - the name of the foreign realm, e.g. "SOMEREALM.SOMEDOMAIN.COM"
· -url - the URL of the security mechanism of the foreign realm. This only matters if the
foreign realm is using LDAP as its authorization mechanism. If so, this must be the LDAP
URL of the main entry for the security realm in the foreign LDAP server. This should be
HPSS Management Guide November 2009
Release 7.3 (Revision 1.0) 24
Page 25

obtained from the foreign site's administrator. An example would be:
"ldap://theirldapserver.foreign.com/cn=FOREIGNREALM.FOREIGN.COM"
• Deleting a trusted foreign realm
To delete an entry for a trusted foreign realm, use the following hpss_ldap_admin command:
trealm delete [-id <realmID>] [-name <realmName>]
Any of the arguments listed can be supplied to select the trusted realm entry that will be deleted.
2.2. HPSS Server Security ACLs
Beginning with release 6.2, HPSS uses a table of access control information stored in the DB2
configuration database to control access to HPSS servers. This is the AUTHZACL table. HPSS
software uses the configured authentication mechanism (e.g. Kerberos) to determine a caller's identity via
credentials provided by the caller, then uses the configured authorization mechanism to retrieve the
details of the caller that determine the access granted. Once the identity and authorization information
have been obtained, each HPSS server grants or denies the caller's request based on the access control list
information stored in the database.
The default ACLs for each type of server are as follows:
Core Server:
r—-c--- user ${HPSS_PRINCIPAL_FTPD}
rw—c--- user ${HPSS_PRINCIPAL_DMG}
rw-c-dt user ${HPSS_PRINCIPAL_MPS}
r--c--- user ${HPSS_PRINCIPAL_NFSD}
rw-c-d- user ${HPSS_PRINCIPAL_SSM}
r--c--- user ${HPSS_PRINCIPAL_FS}
------t any_other
Gatekeeper:
rw----- user ${HPSS_PRINCIPAL_CORE}
rw-c--- user ${HPSS_PRINCIPAL_SSM}
r-----t any_other
Location Server:
r--c--t user ${HPSS_PRINCIPAL_SSM}
r-----t any_other
Mover:
rw-c--t user ${HPSS_PRINCIPAL_SSM}
r-----t any_other
PVL:
rw---dt user ${HPSS_PRINCIPAL_CORE}
HPSS Management Guide November 2009
Release 7.3 (Revision 1.0) 25
Page 26

rw---dt user ${HPSS_PRINCIPAL_PVR}
rw-c-dt user ${HPSS_PRINCIPAL_SSM}
------t any_other
PVR:
rw---dt user ${HPSS_PRINCIPAL_PVL}
rw-c--t user ${HPSS_PRINCIPAL_SSM}
------t any_other
SSM:
rwxcidt user ${HPSS_PRINCIPAL_ADM_USER}
------t any_other
All other types:
rw-c-dt user ${HPSS_PRINCIPAL_SSM}
------t any_other
In most cases, the ACLs created by default for new servers should be adequate. In normal operation, the
only ACL that has to be altered is the one for the SSM client interface. This is handled automatically by
the -ssm option of the hpssuser utility. If, for some reason, an ACL should need to be modified in some
other way, the hpss_server_acl utility can be used. See the hpss_server_acl man page for more
information.
2.3. SSM User Security
SSM supports two types of users, administrators and operators:
• admin. This security level is normally assigned to an HPSS administrator. Administrators may
open all SSM windows and perform all control functions provided by SSM.
• operator. This security level is normally assigned to an HPSS operator. Operators may open
most SSM windows and can perform all SSM control functions except for HPSS configuration.
Security is applied both at the window level and the field level. A user must have permission to open a
window to do anything with it at all. If the user does succeed in opening a window, all items on that
window may be viewed. Field level security then determines whether the user can modify fields, push
buttons, or otherwise modify the window.
The security level of an SSM user is determined by his entry in the access control information table in
the HPSS configuration database. The initial security level for a user is assigned when the SSM user is
created by hpssuser. Security levels may be viewed and modified with the hpss_server_acl utility.
See also Section 3.3.2.2: SSM User Authorization on page 36.
2.4. Location Policy
All Location servers in an HPSS installation share a Location Policy. The Location Policy is used by the
Location Servers to determine how and how often information should be updated. In general, most of the
default values for the policy can be used without change.
HPSS Management Guide November 2009
Release 7.3 (Revision 1.0) 26
Page 27
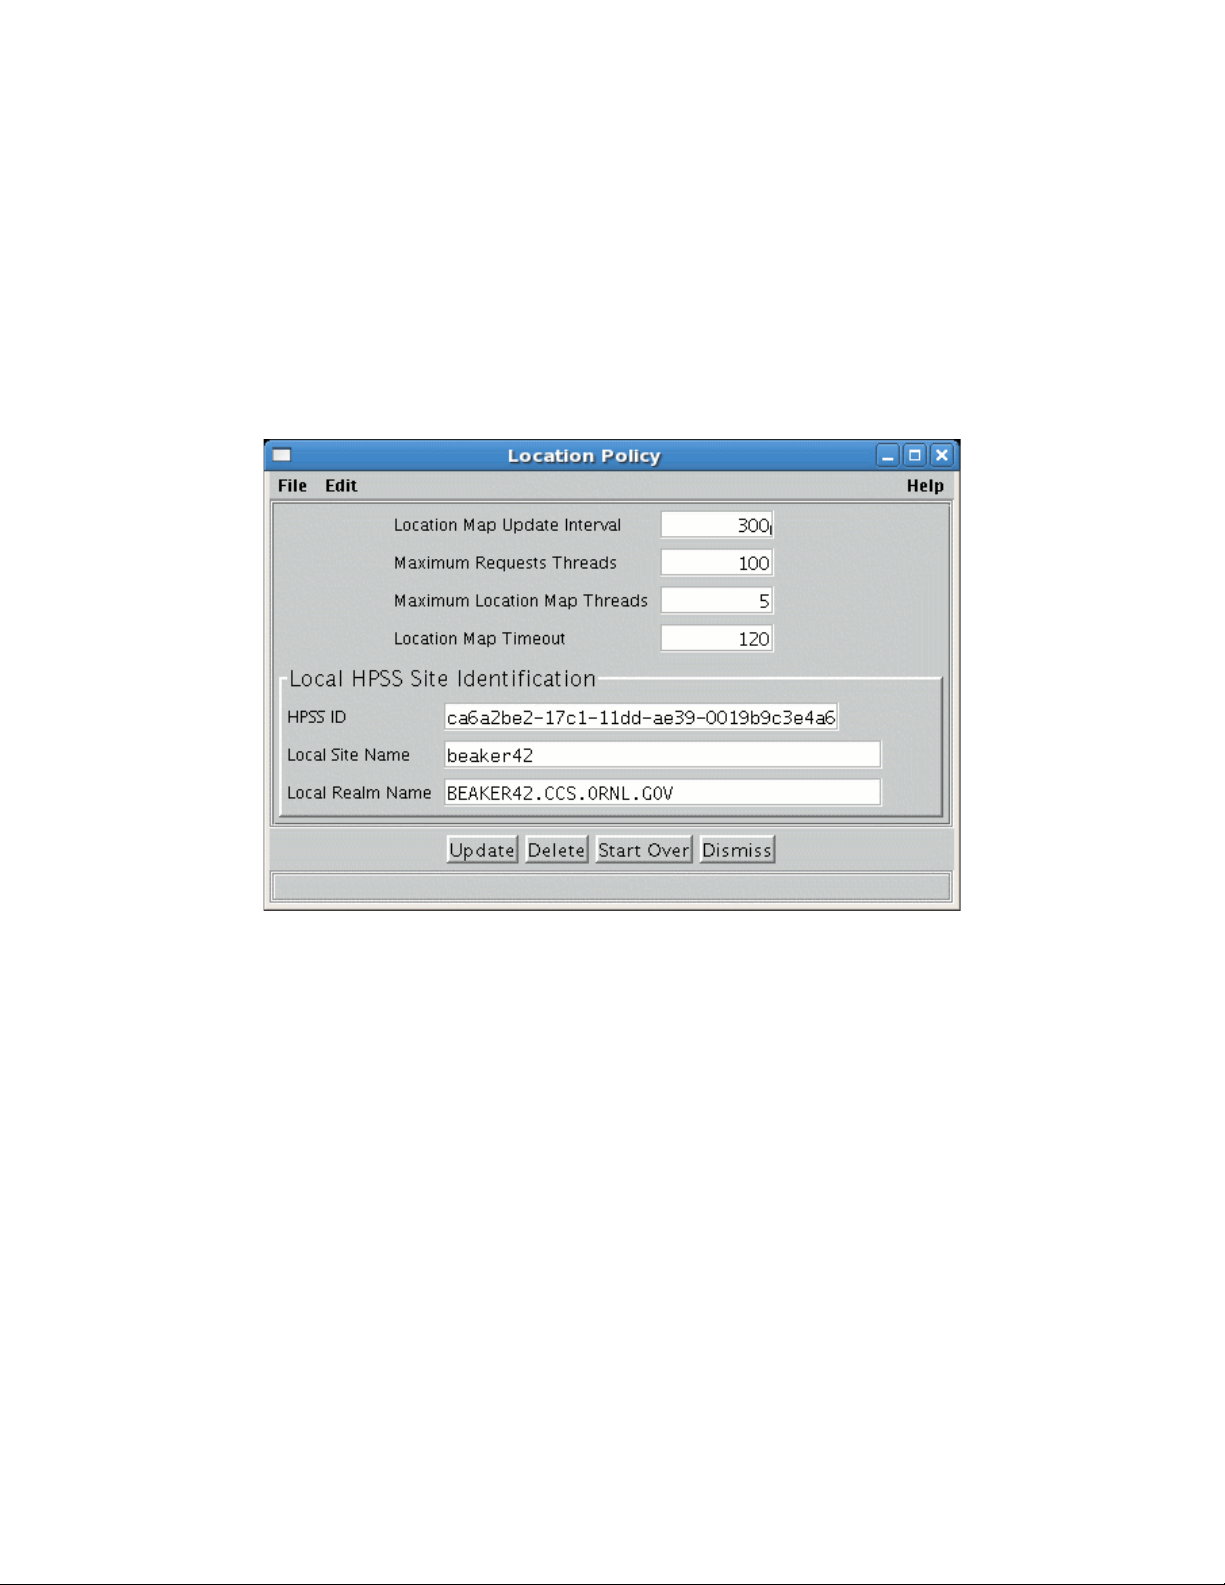
2.4.1. Configuring/Updating a Location Policy
The Location Policy can be created and updated using the Location Policy window. If the Location
Policy does not exist, the fields will be displayed with default values for a new policy. Otherwise, the
configured policy will be displayed.
Once a Location Policy is created or updated, it will not be in effect until all local Location Servers are
restarted or reinitialized. The Reinitialize button on the Servers window can be used to reinitialize a
running Location Server.
2.4.2. Location Policy Configuration Window
This window allows you to manage the location policy, which is used by HPSS Location Servers. Only
one location policy is permitted per HPSS installation.
Once a location policy is created or updated, it will not take effect until all local Location Servers are
started or reinitialized. The Reinitialize button on the Servers list window (Section 5.1: Server List on
page 83) can be used to reinitialize a running Location Server.
Field Descriptions
Location Map Update Interval. Interval in seconds that the Location Server rereads the location map.
Advice - If this value is set too low, a load will be put on the database while reading configuration
metadata. If set too high, new servers will not be registered in a timely manner. Set this value higher if
timeouts are occurring during Location Server communications.
If you have multiple Location Servers, you should consider increasing the update interval since each
Location Server obtains information independently and will increase the overall system load.
HPSS Management Guide November 2009
Release 7.3 (Revision 1.0) 27
Page 28

Maximum Request Threads. The maximum number of concurrent client requests allowed.
Advice - If the Location Server is reporting heavy loads, increase this number. If this number is above
300, consider replicating the Location Server on a different machine. Note if this value is changed, the
general configuration thread value (Thread Pool Size) should be adjusted so that its value is always
larger than the Maximum Request Threads. See Section 5.1.1.2: Interface Controls on page 92.
Maximum Request Threads should not normally exceed (Maximum Location Map Threads + 400).
This is not enforced. If you need more threads than this to handle the load, consider configuring an
additional Location Server.
Maximum Location Map Threads. The maximum number of threads allocated to contact other
Location Servers concurrently.
Advice - The actual number of Location Map threads used is Maximum Location Map Threads or the
number of other HPSS installations to contact, whichever is smaller. This value does not need to be
changed unless the system is experiencing timeout problems contacting other Location Servers.
Location Map Timeout. The maximum amount of time in seconds to wait for a Location Server to
return a location map.
Advice - This value should be changed only if the system is experiencing very long delays while
contacting another Location Server.
Local HPSS Site Identification:
HPSS ID. The UUID for this HPSS installation.
Local Site Name. The descriptive name of the HPSS installation.
Advice - Pick a name to uniquely describe the HPSS system.
Local Realm Name. The name where the realm containing Location Server path information should be
stored.
Advice - All clients will need to know this group name since it is used by them when initializing to
contact the Location Server. If the default is not used, ensure that the associated environment variable
for this field is changed accordingly for all HPSS interfaces.
2.4.3. Deleting a Location Policy
The Location Policy can be deleted using the Location Policy window. Since only one Location Policy
may be defined in a system, and it must exist for the system to run, it is better to simply update the policy
rather than delete and recreate it. See Section 2.4.2: Location Policy Configuration Window on page 27
for more details.
2.5. Restricting user access to HPSS.
System administrators may deny access to HPSS to specific users by including that user in a
configuration file that is read by the HPSS Core Server. This file is read by the Core Server at start up
time and also read again when the SSM Administrator presses the Reload List button on the Restricted
Users window or whenever the Core Server receives a REINIT request. Any user in this file is denied
the usage of the HPSS system completely. To set up this file, you must do the following:
HPSS Management Guide November 2009
Release 7.3 (Revision 1.0) 28
Page 29
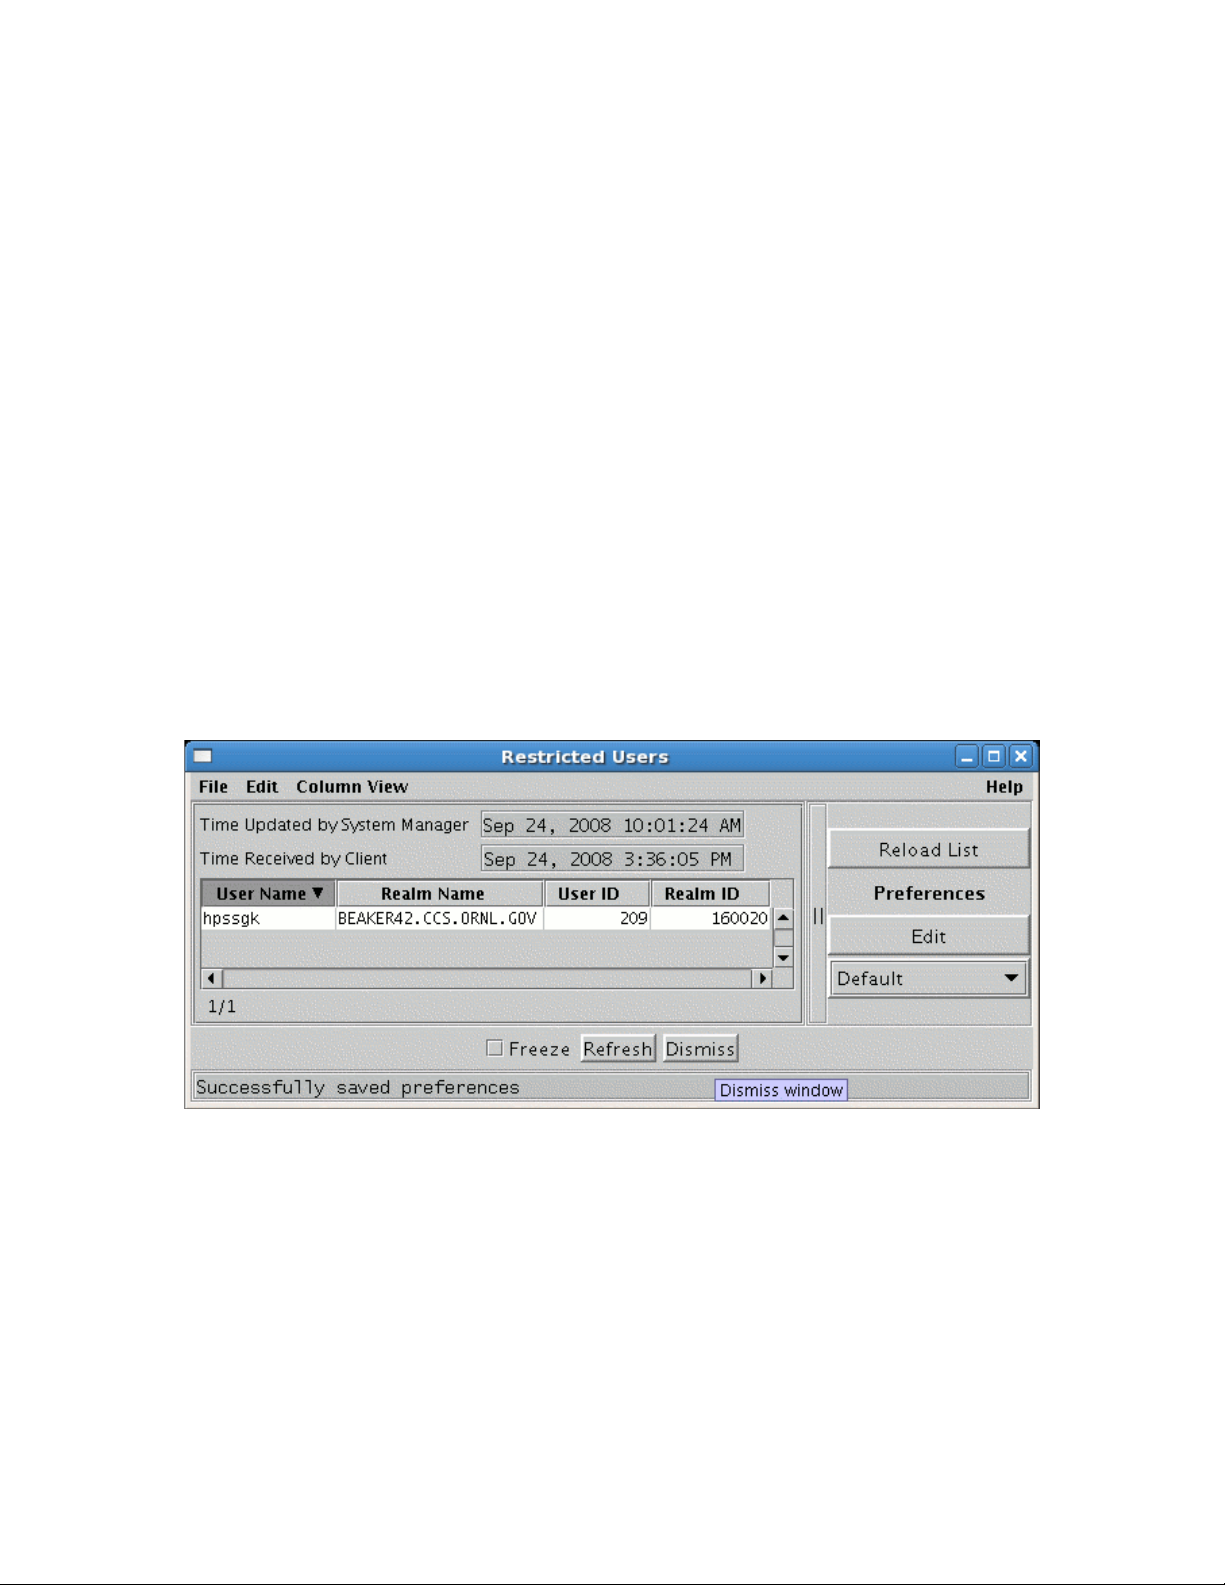
1. Add the HPSS_RESTRICTED_USER_FILE environment variable to /var/hpss/etc/env.conf. Set
the value of this variable to the name of the file that will contain the list of restricted users.
For example:
HPSS_RESTRICTED_USER_FILE=/var/hpss/etc/restricted_users
2. Edit the file and add the name of the user to the file. The name should be in the form:
name@realm
The realm is not required if the user is local to the HPSS realm. For example:
dsmith@lanl.gov
3. You may put comment lines in the file by beginning the line with a “#”.
4. In order for the file to become effective, restart the Core Server, press the Reload List button on
the Restricted Users SSM window or REINIT the Core Server.
NOTE: The file should be configured on the system where the root Core Server is running; this
is the Core Server associated with the Root Name Server. Additionally, if running with multiple
storage subsystems on different machines, be sure to configure the
HPSS_RESTRICTED_USER_FILE on each machine where a Core Server runs.
2.5.1. Restricted Users Window
This window lists all the root Core Server users restricted from HPSS access. To open the window, from
the HPSS Health and Status window select the Configure menu, and from there select the Restricted
Users menu item.
HPSS Management Guide November 2009
Release 7.3 (Revision 1.0) 29
Page 30

Field Descriptions
Restricted Users list
This is the main portion of the window which displays various information about each restricted user.
User Name. The name of the user that is restricted from HPSS access.
Realm Name. The name of the HPSS realm that encompasses the restricted user.
User ID. The identifier number of the restricted user.
Realm ID. The identifier number which identifies the realm which encompasses the restricted
user.
Buttons
Reload List. Issues a request to each Core Server to re-read the restricted user configuration file.
HPSS Management Guide November 2009
Release 7.3 (Revision 1.0) 30
Page 31

Chapter 3. Using SSM
3.1. The SSM System Manager
3.1.1. Starting the SSM System Manager
Before starting the SSM System Manager (SM), review the SM key environment variables described in
the HPSS Installation Guide, Section 3.7.10: Storage System Management. If the default values are not
desired, override them using the hpss_set_env utility. See the hpss_set_env man page for more
information.
To start the SM, invoke the rc.hpss script as follows:
% su % /opt/hpss/bin/rc.hpss -m start
3.1.2. Tuning the System Manager RPC Thread Pool and Request Queue Sizes
Tuning the System Manager RPC Thread Pool and Request Queue sizes can improve the performance of
both the System Manager and its clients (hpssgui and hpssadm). It is not necessary, however, to do the
tuning when bringing up SSM for the first time. In fact, it can be helpful to postpone the tuning until
after the site has a chance to learn its own SSM usage patterns.
The System Manager client interface RPC thread pool size is defined in the Thread Pool Size field on
the Interface Controls tab of the System Manager's Core Server Configuration window (Section 5.1.1.2:
Interface Controls on page 92). This is the maximum number of RPCs that can be active at any one time
for the client interface (i.e. all the hpssgui and hpssadm clients). For the server RPC interface
(connections to the SSM System Manager from other HPSS servers), this value is determined by the
HPSS_SM_SRV_TPOOL_SIZE environment variable.
The System Manager client interface RPC request queue size is defined in the Request Queue Size field
on the Interface Controls tab of the System Manager's Core Server Configuration window (Section
5.1.1.2: Interface Controls on page 92). This is the maximum number of RPC requests from hpssgui and
hpssadm clients which can be queued and waiting to become active. For the server RPC interface this
value is determined by the HPSS_SM_SRV_QUEUE_SIZE environment variable.
Ideally, if the site runs many clients, the client interface RPC thread pool size should be as large as
possible; the default is 100. Testing this value at 300 showed the System Manager memory size more
than doubled on AIX from around 32MB to over 70MB. The larger RPC thread pool size makes the
System Manager much more responsive to the many clients but also requires it to use more memory.
Experimentation shows that leaving the client interface RPC thread pool size at 100 and leaving the
client interface RPC request queue size at its default (600) works pretty well for up to about 40 clients.
During further experimentation, setting the client interface RPC request queue size to 1000 resulted in
very little effect on memory usage; with 40 clients connected, the client interface RPC request queue
used never went above about 500, but the client interface RPC thread pool was constantly filled.
Avoid allowing the client interface RPC thread pool to become full. When this happens, new RPCs will
be put into the client interface RPC request queue to wait for a free thread from the thread pool. This
makes the client response appear slow, because each RPC request is having to wait its turn in the queue.
HPSS Management Guide November 2009
Release 7.3 (Revision 1.0) 31
Page 32

To help mitigate this, when the thread pool is full, the System Manager notifies all the threads in the
thread pool that are waiting on list updates to return to the client as if they just timed out as normal. This
could be as many as 15 threads per client that are awakened and told to return, which makes those
threads free to do other work.
If the client interface RPC thread pool is still full (as it could be if, for example, there were 15 threads in
the client interface RPC request queue that took over the 15 that were just released), then the System
Manager sets the wait time for the new RPCs to 1 second rather than whatever the client requested. This
way the RPC won't try to hang around too long.
Realize that once the System Manager gets in this mode (constantly having a full client interface RPC
thread pool and having to cut short the thread wait times), the System Manager starts working hard and
the CPU usage will start to increase. If you close some windows and/or some clients things should start
to stabilize again.
You can see whether the System Manager client interface RPC thread pool has ever been full by looking
at the Maximum Active/Queued RPCs field in the Client column of the RPC Interface Information
group in the System Manager Statistics window (Section 3.9.4.1: System Manager Statistics Window on
page 63). If this number is greater than or equal to the corresponding client interface's Thread Pool Size
(default 100), then the thread pool was full at some time during the System Manager execution (although
it may not be full currently).
To tell whether the thread pool is currently full, look at the number of Queued RPCs. If Queued RPCs is
0 then the thread pool is not full at the moment.
If Active RPCs is equal to Thread Pool Size then the thread pool for the interface is currently full.
Active RPCs should never be greater than Thread Pool Size. When it reaches Thread Pool Size then the
new RPCs will be queued and Queued RPCs become greater than 0.
When the thread pool gets full, the System Manager tries harder to clear them out before accepting new
ones, so one hopes that if the thread pool fills up, it doesn't stay full for long.
If the site runs with low refresh rates and more than 40 clients, the recommendation is to set the client
interface RPC thread pool size to 150 or 200 and the client interface RPC request queue size to 1000 in
the System Manager Server Configuration window (Section 5.1.1.2: Interface Controls on page 92).
Otherwise, the default values should work well.
3.1.3. Labeling the System Manager RPC Program Number
Labeling the System Manager RPC program number is not required but can be a useful debugging aid.
The SSM System Manager registers with the RPC portmapper at initialization. As part of this
registration, it tells the portmapper its RPC program number. Each HPSS server configuration contains
the server's RPC program number. To find the System Manager's program number, open the Servers
window, select the SSM System Manager, and click the Configure button to open the SSM System
Manager Configuration window. The System Manager's RPC program number is in the Program
Number field on the Execution Controls tab of this window.
The rpcinfo utility with the -p option will list all registered programs, their RPC program numbers, and
the port on which they are currently listening for RPCs. When diagnosing SSM problems, it can be
useful to run the rpcinfo program and search for the System Manager RPC program number in the
output, to see whether the System Manager has successfully initialized its rpc interface and to see which
HPSS Management Guide November 2009
Release 7.3 (Revision 1.0) 32
Page 33

port hpssgui and hpssadm clients must access to reach the System Manager.
This task can be made a bit easier if the System Manager RPC program number is labeled in the
portmapper. To do this, add a line for the System Manager in the /etc/rpc file specifying the program
number and a convenient rpc service name such as “hpss_ssm” (note that names may not contain
embedded spaces). Then this service name will show up in the rpcinfo output.
The format of the /etc/rpc file differs slightly across platforms. See the platform specific man pages for
the rpc file for details. The rpcinfo utility is typically found in either /usr/bin (AIX) or /usr/sbin (Linux).
3.2. Quick Startup of hpssgui
We recommend that hpssgui sessions be invoked from the user's desktop computer instead of on the
HPSS server machine. hpssgui is an application designed to run in the Java environment on the user's
desktop computer and to communicate with the remote SSM System Manager. If hpssgui is executed on
the remote System Manager host, it must run through an X windows session and it may run very slowly
in that environment. This is a limitation of Java and networks.
We recognize the value of using the remote X functionality as a quick way to get SSM running, but once
your system is up, it is highly recommended that you configure local desktop SSM hpssgui clients for all
HPSS administrators and operators. Local desktop hpssgui configuration is detailed in Section 3.3:
Configuration and Startup of hpssgui and hpssadm below.
Following are steps for quickly configuring and starting an SSM GUI client:
1. Use the hpssuser utility to create an SSM user with admin authority. See Section 3.3.2.1: The
hpssuser Utility on page 35 and the hpssuser man page for more information.
2. On Linux systems, set the JAVA_BIN environment variable to point to the Java runtime binary
directory. Set the variable in the environment override file, usually /var/hpss/etc/env.conf. It is
usually set to something like /usr/java5/bin. The default setting of $JAVA_BIN is /usr/java5/bin
which is the usual location of the java binary directory.
3. The mkhpss utility generates the ssm.conf SSM configuration text file when configuring the SM.
See the HPSS Installation Guide, Section 5.3: Install HPSS/DB2 and Configure HPSS
Infrastructure for more details. Verify the existence of the $HPSS_PATH_SSM/ssm.conf file.
4. Start the hpssgui script:
% /opt/hpss/bin/hpssgui.pl
· Note that the -m option can be used to specify the desired SSM configuration file to be used.
When this option is not specified, hpssgui.pl looks for the ssm.conf configuration file in the
current directory, then in the directory defined by the HPSS_PATH_SSM environment
variable (usually /var/hpss/ssm). If the script doesn't find a configuration file in either
directory, it will use default values to start the client.
· Note that the -d (debug) and -S (log file name) options can be used to capture all levels of
hpssgui logging in a text file. Bear in mind, however, that this can generate significant
amounts of log data. (See the hpssgui man page.)
HPSS Management Guide November 2009
Release 7.3 (Revision 1.0) 33
Page 34

· When you have decided on the hpssgui command line that is best for your installation, it will
probably be useful to put the command in a shell script for the convenience of all SSM
Administrators and Operators. For example, create a file called “gui” and put the following
in it:
/opt/hpss/bin/hpssgui.pl \
-m /my_directory/my_ssm.conf \
-d \
-S /tmp/hpssguiSessionLog.$(whoami)
Please refer to the hpssgui man page for an extensive list of command line options. For
example, some sites prefer to set the date format to a USA military format using the -D
“kk:mm:ss dd-MMM-yyyy” option. Additionally, Section 3.3.3: SSM Configuration File below
provides a table of variables you can set in the SSM configuration file instead of using command
line options; this section also covers all the various files that the hpssgui script uses.
3.3. Configuration and Startup of hpssgui and hpssadm
This section describes in detail the procedures for configuring SSM and creating an SSM user account
with the proper permissions to start up an hpssgui or hpssadm session. It also explains how to install
the SSM client on the user's desktop (the recommended configuration for hpssgui) and how to deal with
special situations such as firewalls.
In the discussion that follows, authentication ensures that a user is who they claim to be relative to the
system. Authorization defines the user's rights and permissions within the system.
Like other components of HPSS, SSM authenticates its users by using either Kerberos or UNIX. Users
of the hpssgui and hpssadm utilities are authenticated to SSM by either a Kerberos principal and a
password or by a UNIX username and a password. The System Manager must be configured to use the
appropriate authentication and a Kerberos principal or UNIX user account must be created for each SSM
user.
Unlike other components of HPSS, SSM does not use LDAP or UNIX to authorize its users. SSM users
are authenticated based on their entries in the HPSS DB2 AUTHZACL table. Through this table, SSM
supports two levels of SSM client authorization:
admin This security level is normally assigned to an HPSS administrator. The admin
user can view all SSM windows and perform all control functions provided by
SSM.
operator This security level is normally assigned to an HPSS operator. The operator user
can view most SSM windows and perform all SSM control functions except for
changing the HPSS configuration.
Configuration of an SSM user requires that:
1. The System Manager is configured to accept the desired authentication mechanism.
2. The proper user accounts are created:
• UNIX or Kerberos accounts are created for the user authentication.
HPSS Management Guide November 2009
Release 7.3 (Revision 1.0) 34
Page 35

• The proper authorization entries for the user are created in the AUTHZACL table.
3. The proper SSM configuration files are created and installed.
See Section 3.3.1: Configuring the System Manager Authentication for SSM Clients, Section 3.3.2:
Creating the SSM User Accounts, and Section 3.3.3: SSM Configuration File for the procedures for these
tasks.
See Section 3.3.4: SSM Help Files (Optiona on page 42, for instructions on installing the SSM help
package.
See Section 3.3.5: SSM Desktop Client Packaging on page 42, for instructions for installing hpssgui or
hpssadm on the user's desktop.
See Section 3.3.6: Using SSM Through a Firewall on page 44 for advice about using hpssgui or
hpssadm through a network firewall.
3.3.1. Configuring the System Manager Authentication for SSM Clients
The System Manager is configured initially by mkhpss for new HPSS systems or by the conversion
utilities for upgraded HPSS systems to use the proper authentication mechanism.
If it is necessary later to modify the authentication mechanism for hpssgui or hpssadm users, or to add
an additional mechanism, bring up the Servers window, select the System Manager, and press the
Configure button. On the System Manager Configuration window, select the Interface Controls tab. For
the SSM Client Interface, make certain the checkbox for the desired Authentication Mechanism, KRB5
or UNIX, is selected. Both mechanisms may be enabled if desired.
Next, select the Security Controls tab. If Kerberos authentication is desired, make certain one of the
Authentication Service Configurations is set to use a Mechanism of KRB5, an Authenticator Type of
Keytab, and a valid keytab file name for Authenticator (default is /var/hpss/etc/hpss.keytab). If UNIX
authentication is desired, make certain one of the Authentication Service Configurations is set to use a
Mechanism of UNIX, an Authenticator Type of None, and no Authenticator.
To remove an authentication mechanism from the System Manager, so that no SSM user may be
authenticated using that mechanism, reverse the above process. Unselect the mechanism to be removed
from the SSM Client Interface on the Interface Controls tab. On the Security Controls tab, change the
Mechanism and Authenticator Type fields of the mechanism to be removed to Not Configured, and
change its Authenticator to blank.
See Section 5.1.1.2: Interface Controls on page 92, and Section 5.1.1.1: Security Controls on page 92, for
more information.
3.3.2. Creating the SSM User Accounts
3.3.2.1. The hpssuser Utility
The hpssuser utility is the preferred method for creating, modifying or deleting SSM users. It creates the
necessary UNIX or Kerberos accounts. It creates an entry in the AUTHZACL table for the user with the
proper authorization.
The following is an example of using the hpssuser utility to provide administrative access to SSM to
user 'john'. In this example, the user already has either a UNIX or Kerberos account.
HPSS Management Guide November 2009
Release 7.3 (Revision 1.0) 35
Page 36

% /opt/hpss/bin/hpssuser -add john -ssm
[ adding ssm user ]
1) admin
2) operator
Choose SSM security level
(type a number or RETURN to cancel):
> 1
[ ssm user added : admin ]
After SSM users are added, removed, or modified, the System Manager will automatically discover the
change when the user attempts to login. See the hpssuser man page for details.
Removing an SSM user or modifying an SSM user's security level won't take effect until that user
attempts to start a new session. This means that if an SSM user is removed, any existing SSM
sessions for that user will continue to work; access won't be denied until the SSM user attempts
to start a new SSM session. Likewise, if the SSM user's security level is changed, any existing
sessions for that user will continue to work at the old security level; the new security level access
won't be recognized until the SSM user starts a new SSM session).
3.3.2.2. SSM User Authorization
SSM user authorization is set properly by the hpssuser utility with no further modification required. This
section explains how the authorization levels are stored internally and how they may be viewed for
debugging or modified.
The SSM admin and operator security authorization levels are defined in the AUTHZACL table in the
HPSS DB2 database. Each SSM user must have an entry in this table. The permissions supported in the
table are:
• r – read
• w – write
• x – execute
• c – control
• i – insert
• d – delete
• t – test
SSM administrators must be granted all permissions: rwxcidt. SSM operators must be granted
r—c—t permissions. All other permission combinations are not recognized by the SSM server and will
be treated as no permissions at all.
The AUTHZACL table may be viewed or updated with the hpss_server_acl utility. The hpssuser
utility program creates and deletes SSM user entries in the AUTHZACL table using the hpss_server_acl
utility. Normally, there is no need to invoke the hpss_server_acl utility directly because it is invoked by
the hpssuser utility. However, it is a useful tool for examining and modifying the authorization table.
HPSS Management Guide November 2009
Release 7.3 (Revision 1.0) 36
Page 37

Access to the hpss_server_acl program, hpssuser program, to the HPSS DB2 database, and to
all HPSS utility programs should be closely guarded. If an operator had permission to run these
tools, he could modify the type of authority granted to anyone by SSM. Note that access to the
database by many of these tools is controlled by the permissions on the /var/hpss/etc/mm.keytab
file.
Here is an example of using the hpss_server_acl utility to set up a client's permissions to be used when
communicating with the SSM server. Note that the default command should be used only when creating
the acl for the first time, as it removes any previous entries for that server and resets all the server's
entries to the default values:
% /opt/hpss/bin/hpss_server_acl
hsa> acl -t SSM -T ssmclient
hsa> show
hsa> default # Note: ONLY if creating acl for the first time
hsa> add user <username> <permissions>
hsa> show
hsa> quit
If the acl already exists, this command sequence gives user 'bill' operator access:
% /opt/hpss/bin/hpss_server_acl
hsa> acl -t SSM -T ssmclient
hsa> show
hsa> add user bill r--c--t
hsa> show
hsa> quit
Removing an SSM user or modifying an SSM user's security level won't take effect until that user
attempts to start a new session. This means that if an SSM user is removed, any existing SSM
sessions for that user will continue to work; access won't be denied until the SSM user attempts
to start a new SSM session. Likewise, if the SSM user's security level is changed, any existing
sessions for that user will continue to work at the old security level; the new security level access
won't be recognized until the SSM user starts a new SSM session).
3.3.2.3. User Keytabs (For Use with hpssadm Only)
A keytab is a file containing a user name and an encrypted password. The keytab file can be used by a
utility program to perform authentication without human interaction or the need to store a password in
plain text. Only the hpssadm utility supports access to SSM with a keytab. Each user who will run the
hpssadm utility will need access to a keytab. It is recommended that one keytab file per user be created
rather than one keytab containing multiple users.
Each keytab file should be readable only by the user for whom it was created. Each host from which the
hpssadm utility is executed must be secure enough to ensure that the user's keytab file cannot be
compromised. An illicit process which gained access to a Kerberos keytab file could gain the user's
credentials anywhere in the Kerberos realm; one which gained access to a UNIX keytab file could gain
the user's credentials at least on the System Manager host.
HPSS Management Guide November 2009
Release 7.3 (Revision 1.0) 37
Page 38

Keytabs are created for the user by the hpssuser utility when the krb5keytab or unixkeytab
authentication type is specified. Keytabs may also be created manually with the hpss_krb5_keytab or
hpss_unix_keytab utility, as described below.
3.3.2.3.1. Keytabs for Kerberos Authentication: hpss_krb5_keytab
The hpss_krb5_keytab utility may be used to generate a keytab with Kerberos authentication in the
form usable by the hpssadm program. See the hpss_krb5_keytab man page for details.
The Kerberos keytab is interpreted by the KDC of the Kerberos realm specified by the hpssadm utility
(see the -k and -u options on the hpssadm man page). This must be the same Kerberos realm as that
used by the System Manager. This means the hpss_krb5_keytab utility must be executed on a host in
the same realm as the System Manager.
This example for a user named “joe” on host "pegasus" creates a Kerberos keytab file named
“keytab.joe.pegasus”:
% /opt/hpss/bin/hpss_krb5_keytab
HPSS_ROOT is not set; using /opt/hpss
KRB5_INSTALL_PATH is not set; using /krb5
password:
Your keytab is stored at /tmp/keytab.joe.pegasus
Note that under AIX, hpss_krb5_keytab will not write to an NFS-mounted filesystem. That's why the
utility insists on writing the keytab file in /tmp. Once the keytab is generated, it can be copied and used
elsewhere, but care should be taken to keep it secure.
3.3.2.3.2. Keytabs for UNIX Authentication: hpss_unix_keytab
The hpss_unix_keytab utility may be used to generate a keytab with UNIX authentication in the form
usable by the hpssadm program. See the hpss_unix_keytab man page for details.
The UNIX keytab is interpreted on the host on which the System Manager runs, not the host on which the
hpssadm client utility runs. The encrypted password in the keytab must match the encrypted password
in the password file on the System Manager host. Therefore, the hpss_unix_keytab utility must be
executed on the host on which the System Manager runs.
The hpss_unix_keytab utility must be able to read the user's encrypted password from the password file.
If system password files are being used, this means the utility must be executed as root.
This example for a user named “joe” creates a UNIX keytab file named “joe.keytab.unix”:
% /opt/hpss/bin/hpss_unix_keytab -f joe.keytab.unix add joe
This command copies the encrypted password from the password file into the keytab.
Do not use the -r option of the hpss_unix_keytab utility; this places a random password into the keytab
file. Do not use the -p option to specify the password; this encrypts the password specified on the
command line using a different salt than what was used in the password file, so that the result will not
match.
HPSS Management Guide November 2009
Release 7.3 (Revision 1.0) 38
Page 39

3.3.3. SSM Configuration File
The hpssgui and hpssadm scripts use the SSM configuration file, ssm.conf for configuration.
The mkhpss utility will create the SSM configuration file for the security mechanism supported by SSM.
The mkhpss utility will store the generated ssm.conf at $HPSS_PATH_SSM; the default location is /var/
hpss/ssm. The configuration file will contain host and site specific variables that the hpssgui and
hpssadm script will read. The variables contain information about:
• SSM hostname
• SSM RPC number
• SSM RPC protection level
• SSM security mechanism
• SSM UNIX Realm [only if using UNIX authentication]
If any of these configuration parameters are modified, the ssm.conf file must be updated and redistributed
from the server machine to all of the SSM client machines.
Users can also use their SSM configuration file to manage SSM client parameters instead of using the
command line options. The hpssgui and hpssadm scripts can be directed to use an alternate SSM
configuration file with the -m option. The default SSM configuration file contains comments describing
each of the available parameters that may be set along with any associated environment variable and
command line option. The following table documents these variables and the corresponding command
line options:
Table 1. SSM General Options
File Option Command Line
Option
HPSS_SSM_ALARM_RATE -A Alarm refresh rate
LOGIN_CONFIG -C Full path to login.conf file
HPSS_SSM_DATE_FORMAT -D Date format pattern
HPSS_SSM_ALARMS_GET -G Number of alarms requested per poll
HPSS_SSM_LIST_RATE -L
How long hpssgui/hpssadm waits
between polling for lists
HPSS_SSM_ALARMS_DISPLAY -N Max number of alarms displayed by
hpssgui
HPSS_SSM_CLASSPATH -P Full path to hpss.jar file
LOG_FILE -S Full path for session log file
HPSS_SSM_WAIT_TIME -W How long SM waits before returning if
object is unchanged
HPSS_SSM_CNTRY_CODE -c Country code, internationalization
HPSS_SSM_DEBUG -d Debug flag
Functionality
HPSS Management Guide November 2009
Release 7.3 (Revision 1.0) 39
Page 40

File Option Command Line
Option
HPSS_SSM_SM_HOST_NAME -h System manager hostname
HPSS_SSM_USER_PREF_PATH -i Path to ssm preferences
JAVA_BIN -j Path to java bin directory
KRB5_CONFIG -k Full path to krb5.conf file
HPSS_SSM_LANG_CODE -l Language code, internationalization
SSM_CONFIG -m Full path to SSM configuration file
HPSS_SSM_SM_PORT_NUM -n port number
OR
RPC number:program number
HPSS_SSM_CLIENT_IP -p Client IP address
HPSS_SSM_RPC_PROT_LEVEL -r RPC protection level
HPSS_SSM_SEC_MECH -s Security mechanism
HPSS_SSM_UNIX_REALM -u UNIX Realm
Functionality
Table 2. HPSSGUI Specific Options
File Option Command Line
Option
HPSSGUI_LOOK_AND_FEEL -F Look and feel
HPSSGUI_MO_RATE -M How long hpssgui waits between polling
for managed objects
HPSSGUI_METAL_THEME -T Theme file, for look and feel
HPSSGUI_METAL_BG -b Background color
HPSS_SSM_HELP_FILES_PATH -f Path to help files
HPSS_SSM_HELP_URL_TYPE -g Help path URL type
Functionality
Table 3. HPSSADM Specific Options
File Option Command Line
Option
HPSSADM_USER_NAME -U
HPSSADM_AUTHENTICATOR -a Authenticator (keytab path name)
HPSSADM_BATCH_MODE -b Batch mode flag
User name for hpssadm
Functionality
HPSS Management Guide November 2009
Release 7.3 (Revision 1.0) 40
Page 41

File Option Command Line
Option
HPSS_AUTHEN_TYPE -t Authenticator type
Information on tuning client polling rates for optimal performance is available in the hpssadm and
hpssgui man pages.
Options are specified, in precedence order, by 1) the command line, 2) the user's environment (see the
man pages for environment variable names), 3) the SSM configuration file, or 4) internal default values.
Functionality
3.3.3.1. login.conf
The login.conf file is a login configuration file that specifies the security authentication required for the
hpssgui and hpssadm programs. A copy of the login.conf file is included in the hpss.jar file and should
require no site customization. However, a template for the file is provided in /opt/hpss/config/templates/
login.conf.template should the site need to customize the security mecahnisms.
Please see the /opt/hpss/config/templates/login.conf.template file for details.
3.3.3.2. krb5.conf (For Use with Kerberos Authentication Only)
The krb5.conf file is the Kerberos configuration file which allows the client to authenticate to the
Kerberos realm. This file is only required if Kerberos authentication is used. The Kerberos installation
process generates a default Kerberos configuration file in /etc/krb5.conf.
The following is an example of this file. Realm names, host names, etc. must be customized to operate
properly in the user's site environment.
krb5.conf:
[logging]
default = FILE:/var/hpss/log/krb5libs.log
kdc = FILE:/var/hpss/log/krb5kdc.log
admin_server = FILE:/var/hpss/log/kadmind.log
[libdefaults]
ticket_lifetime = 24000
default_realm = EXAMPLE.COM
default_keytab_name = /etc/v5srvtab
default_tkt_enctypes = des-cbc-crc
default_tgs_enctypes = des-cbc-crc
[realms]
EXAMPLE.COM = {
kdc = example.com:88
admin_server = example.com:749
}
[domain_realm]
example.com = EXAMPLE.COM
HPSS Management Guide November 2009
Release 7.3 (Revision 1.0) 41
Page 42

Note that having encryption types other than "des-cbc-crc" first on the "default_tkt_enctypes" and
"default_tgs_enctypes" lines can cause authentication failures. Specifically, keytab files generated by the
HPSS utility programs will use the first encryption type and only "des-cbc-crc" is known to work in all
cases. Other encryption types are known to fail for some OSs and Java implementations. Also, when kinit
is used with a keytab file, it only checks the first encryption type listed on the default lines in krb5.conf.
If the keytab was generated with a different encryption type, the authentication will fail.
3.3.4. SSM Help Files (Optional)
The SSM Help Files are an HTML version of the HPSS Management Guide. Individual sections of this
guide are available from the Help menus on the SSM windows.
To access help windows from the hpssgui, the Help Files must be accessible from each client machine.
We recommend storing these files in a file system shared by the clients so that they don't need to be
installed on every SSM client machine. By default, the hpssgui script looks for the help files in
$HPSS_HELP_FILES_PATH. The default location is /var/hpss/doc and can be overridden by using the f option.
Help files are distributed with HPSS or can be downloaded from the HPSS web site. They should be
installed in the $HPSS_HELP_FILES_PATH location and/or the path specified by the -f option. Refer to
the HPSS Installation Guide, Section 5.5 HPSS Documentation & Manual Page Setup for instructions on
how to install the help files. See the hpssgui man page for more details.
3.3.5. SSM Desktop Client Packaging
A full installation of HPSS is not needed on machines used only for executing hpssgui or hpssadm.
These machines, referred to here as "SSM client machines", only require the proper version of Java plus
a subset of HPSS components.
It is strongly recommended that a desktop configuration be created and installed for each hpssgui user.
The hpssgui program may run very slowly if it is executed on the System Manager machine and
displayed back to the user's desktop via remote X.
There is no advantage to executing the hpssadm program on the desktop machine. It will perform just as
well when executed remotely as on the desktop. In fact, it is recommended that hpssadm be executed on
the System Manager machine rather than on the user's desktop since this simplifies the dissemination and
protection of the user keytabs. Instructions are included here, however, for packaging the hpssadm for
sites who have a need to execute it on the desktop.
If the SSM code on the System Manager machine is recompiled , or the System Manager is reconfigured,
the client package will no longer work as then it is possible for the hpss.jar file to be out of sync with the
System Manager code. Since each client will have its own copy of the hpss.jar file the hpss.jar file
should be redistributed to each client. This can be done by redistributing the entire SSM client
package or by just redistributing the hpss.jar file.
Section 3.3.5.1: Automatic SSM Client Packaging and Installation, describes how to use the hpssuser
utility to package these components. Section 3.3.5.2: Manual SSM Client Packaging and Installation,
describes how to select and package the components manually.
HPSS Management Guide November 2009
Release 7.3 (Revision 1.0) 42
Page 43

3.3.5.1. Automatic SSM Client Packaging and Installation
The hpssuser utility provides a mechanism for packaging all the necessary client files required to
execute the hpssgui program on the user's desktop host. Refer to the hpssuser man page for more
information on generating an SSM Client Package. These files may also be copied manually; see Section
3.3.5.2: Manual SSM Client Packaging and Installation, for a list of the required files.
This example creates an SSM Client Package named “ssmclient.tar”:
%/opt/hpss/bin/hpssuser -ssmclientpkg ssmclient.tar
[ packaging ssm client ]
[ creating ssmclient.tar ]
hpssgui.pl
hpssgui.vbs
hpss.jar
krb5.conf
ssm.conf
[ packaged ssm client in ssmclient.tar ]
Once the SSM Client Package has been generated simply FTP the tar file over to the client node and then
extract the member files to the desired location.
3.3.5.2. Manual SSM Client Packaging and Installation
This section describes the manual installation of the necessary client files required to execute the hpssgui
or hpssadm program on the user's desktop host. The hpssuser utility also provides a mechanism for
packaging these files automatically; see Section 3.3.5.1: Automatic SSM Client Packaging and
Installation.
The desktop machine requires the proper version of Java and the following HPSS files, which should be
copied from the host on which the SSM System Manager executes:
• scripts: hpssgui.pl, hpssgui.vbs, hpssadm.pl, or hpssadm.vbs
• hpss.jar
• ssm.conf
• krb5.conf [if using Kerberos authentication]
• user keytab [if using hpssadm]
• help files [optional]
These are the default locations of these files on the SSM System Manager host, from which they may be
copied:
startup scripts /opt/hpss/bin
hpss.jar /opt/hpss/bin
ssm.conf /var/hpss/ssm
krb5.conf /etc/krb5.conf
keytab file /var/hpss/ssm/keytab.USERNAME
help files /var/hpss/doc
HPSS Management Guide November 2009
Release 7.3 (Revision 1.0) 43
Page 44

These files may be installed in any location on the SSM client machines. The user must have at least
read access to the files.
The SSM startup scripts hpssgui.pl, hpssgui.vbs, hpssadm.pl, and hpssadm.vbs provide the user with a
command line mechanism for starting the SSM client. The hpssgui.pl script is a Perl script for starting
the SSM Graphical User Interface and the hpssadm.pl script is a Perl script for starting the SSM
Command Line User Interface. These scripts work on AIX, Linux, or Windows platforms so long as Perl
is installed on the host. The hpssgui.vbs script is a Visual Basic script for starting the Graphical User
Interface and the hpssadm.vbs script is a Visual Basic Script for starting the SSM Command Line User
Interface. These scripts work only on Windows platforms.
These scripts depend on the ability to read the other files in the package. See the hpssgui and hpssadm
man pages for details.
The hpss.jar file contains the hpssadm and hpssgui program files. This is stored on the server machine
under $HPSS_PATH_BIN; the default location is /opt/hpss/bin. If the SSM source code on the server
machine is recompiled, the hpss.jar file must be redistributed to all of the SSM client machines.
The keytab is used only by the hpssadm program. See Section 3.3.2.3: User Keytabs (For Use with
hpssadm Only) on page 37, for details.
See Section 3.3.4: SSM Help Files (Optiona on page 42, for a description of the Help Files.
A writable directory is required for hpssgui or hpssadm session logs, if these are desired. The session
log is an ASCII file that stores messages generated by the hpssadm or hpssgui programs. By default, the
hpssgui/hpssadm scripts do not create session logs, but it is strongly encouraged that this capability be
enabled by using the -S <location> option when running the script. The recommended location is /tmp
on UNIX-like systems or c:\tmp on Windows systems. See the hpssgui and hpssadm man pages for
more information on creating a session log. Having the session log available helps when debugging
problems with the SSM client applications. It is the first thing that the SSM developers will ask for when
someone is having problems with the hpssgui and/or hpssadm.
3.3.6. Using SSM Through a Firewall
3.3.6.1. The Firewall Problem
hpssgui and hpssadm require the use of several network ports which may be blocked if the client and
System Manager are on opposite sides of a network firewall. Up to three ports may be affected:
• hpssgui and hpssadm must be able to access the port upon which the System Manager listens
for requests.
• If the System Manager follows the default behavior of letting the portmapper select this port,
then hpssgui and hpssadm also need access to port 111 in order to ask the portmapper where
the System Manager is listening.
• If Kerberos authentication is used, then hpssgui and hpssadm additionally need access to
port 88 to communicate with the KDC.
HPSS Management Guide November 2009
Release 7.3 (Revision 1.0) 44
Page 45

3.3.6.2. Solutions for Operating Through a Firewall
SSM can operate through a firewall in three different ways:
• The hpssgui and hpssadm can use ports exempted by the network administrator as firewall
exceptions. See the -n option described in the hpssgui and hpssadm man pages.
• The hpssgui and hpssadm can contact the System Manager across a Virtual Private Network
connection (VPN). See the -p and -h options described in the hpssgui and hpssadm man
pages.
• The hpssgui and hpssadm can contact the System Manager across an ssh tunnel. See the
instructions for tunneling in the hpssgui man page.
The firewall exception is the simplest of these. However, security organizations are not always willing to
grant exceptions.
The vpn option is usually simple and transparent regardless of how many ports are needed, but requires
the site to support vpn. The site must also allow the vpn users access to the ports listed in Section
3.3.6.1 The Firewall Problem on page 44; not all sites do.
The ssh tunneling option has the advantage that it can be used almost anywhere at no cost. It has the
disadvantage that the tunnel essentially creates its own firewall exception. Some security organizations
would rather know about any applications coming through the firewall and what ports they are using
rather than have users create exceptions themselves without the awareness of security personnel. A
second disadvantage of tunneling is that if a particular client machine is compromised, any tunnels open
on that client could also be compromised. The client machine may become a point of vulnerability and
access to the other machines behind the firewall. A third disadvantage is that tunneling can be complex
to set up, requiring slight or significant variations at every site.
The firewall and tunneling options both benefit from reducing the number of ports required:
• The need for port 111 can be eliminated by making the System Manager listen on a fixed port.
To do this, set the HPSS_SSM_SERVER_LISTEN_PORT environment variable to the
desired port and restart the System Manager. Then use the -n option with the hpssgui and
hpssadm startup scripts to specify this port.
• The need for port 88 can be eliminated only by avoiding Kerberos and using UNIX
authentication.
• There is no way to eliminate the need for the port on which the System Manager listens.
3.3.6.3. Example: Using hpssgui Through a Firewall
Here is an example of how a particular site set up their hpssgui SSM client sessions using krb5
authentication outside a firewall. Many of the items are site specific so modifications will need to be
made to suit each site's specific needs. Where this procedure would differ for a site using Unix
authentication, the Unix instructions are also included.
At this site, vpn users were not allowed access to all the ports listed in Section 3.3.6.1 The Firewall
Problem on page 44 so they had to use a combination of vpn and ssh tunneling.
• Create a directory on the client machine to hold the SSM client files. It is recommended that
a separate directory be created for each server hostname that the client will contact.
HPSS Management Guide November 2009
Release 7.3 (Revision 1.0) 45
Page 46

• Verify that the proper version of Java is installed. Add the Java bin directory to the user's
$PATH, or use the -j switch in the hpssgui script, or set JAVA_BIN in the user's ssm.conf
file. Java can be downloaded from http://www.java.com.
• Obtain files from the server machine:
• Obtain the preferred hpssgui script for the client system from /opt/hpss/bin on the server
machine and place it in the directory created on the client machine (see Section 3.3.5: SSM
Desktop Client Packaging on page 42). There are several script options. Only one version
of the script is needed:
• hpssgui.pl which is written in Perl and can be used on any system that has Perl
installed. This is true for any major UNIX operating systems as well as MacOS. For
Windows users, Perl must be installed to use this version of the script. Users can easily
obtain this from the web. A good Perl distribution for Windows is available at
http:/www.activestate.com.
• hpssgui.vbs is a Visual Basic Script version for Windows users. This version requires
no prerequisite software.
• Obtain the ssm.conf file from /var/hpss/ssm on the server machine and place it in the
directory where the hpssgui script resides. Alternately, specify the file to the hpssgui
script with the -m option, if desired.
• Obtain the hpss.jar file from /opt/hpss/bin on the server machine and place it in the
directory where the hpssgui script resides. If FTP is used to copy the file, make sure the
copy is done in binary mode. If the file is installed in a different directory, specify it to the
hpssgui script with the -P option, or by using configuration file settings or the appropriate
environment variable (see the hpssgui man page).
• If Kerberos authentication is used, be sure to get the krb5.conf file that resides on the SSM
server. This file should be located at /etc/krb5.conf. Place this file on the client machine in
the directory where the hpssgui script resides. Alternately, specify this file to the hpssgui
script with the -k option. Verify that UDP port 88 on the SSM Server machine is accessible; if
not, then hpssgui will fail.
• To get access to ports inside the firewall, we can use a vpn connection or one or more ssh
tunnels.
• Using a vpn connection will make it appear that we are inside the firewall. In this case, no
tunnels are needed. If the firewall does not permit ssh connections, ssh tunnels cannot be
used. Set up the vpn connection on the client machine.
• If using one or more ssh tunnels is preferred, on the SSM server machine, set the
HPSS_SSM_SERVER_LISTEN_PORT environment variable to a specific port (e.g.
49999). Restart the System Manager so that it will recognize this variable.
On the client machine, set up an ssh tunnel where 49999 corresponds to the
HPSS_SSM_SERVER_LISTEN_PORT, the user name is joe and the SSM Server
machine is "example.com".
% ssh -N -f -L 49999:localhost:49999 joe@example.com
HPSS Management Guide November 2009
Release 7.3 (Revision 1.0) 46
Page 47

If access through the firewall is needed for other ports (eg., the Kerberos kdc), set up a separate
tunnel for each port the firewall does not allow through.
• On the client machine, run the GUI:
• For Kerberos authentication:
% hpssgui.pl -S hpssgui.sessionlog -k krb5.conf -n 49999 -h
localhost
• For UNIX authentication:
% hpssgui.pl -S hpssgui.sessionlog -s unix -u example.com -n
49999 -h localhost
The HPSS Login window should open on the client machine for the user to log in. If it doesn't, then retry
the last step, running the GUI, using the -d option for debug output and the -S option to log output to a
session log file. This file will provide some information about what is going wrong.
3.4. Multiple SSM Sessions
Multiple concurrent sessions of the graphical user interface and/or command line utility can be executed
by the same user with no special modifications. Each session should specify a unique session log file.
3.5. SSM Window Conventions
This section lists conventions used by SSM and Java, on which SSM is based. The following list does not
cover all features of all windows; it only describes the most important points.
• Lists may be sorted by any column. Click on the column header of the desired column to sort the
list by the items in that column. The column header will become highlighted and will display an
up or down arrow to indicate the direction of the sort. Click the column header a second time to
change the direction of the sort.
• List tables have a field that shows the number of displayed and total items in the list in the format
X/Y where X is the number of items displayed and Y is the total number of items in the list. The
field is left justified under the table. The X and Y values will differ if preferences are set to filter
some items out of the list.
• The button panel to the right of the list can be hidden or displayed by clicking the tall, thin button
between the list and button panel labeled '||'. If the button is pressed when the panel is displayed,
the button panel will hide, allowing more space for the list. The button panel may be re-displayed
by pressing the '||' button again.
• Colors and fonts are used consistently from window to window. They may differ from platform to
platform because the default Java Look and Feel settings vary between platforms.
The hpssgui script accepts the following flag parameters in order to control the graphical user
interface's look and feel:
· -F "Look and Feel"
• Valid values: windows, mac, motif, metal, gtk. Select the Look and Feel that is
HPSS Management Guide November 2009
Release 7.3 (Revision 1.0) 47
Page 48

applicable to the platform on which the graphical user interface is running.
Custom Look and Feels are also available at http://www.javootoo.com
· -b "background color"
• The only Look and Feel that supports color settings and themes is the metal Look
and Feel. The color may be set by using the color name or hexadecimal
Red/Green/Blue value. Here are some examples:
• Name Hexadecimal value
• red 0xff0000
• green 0x00ff00
• blue 0x0000ff
• cyan 0x00ffff
• yellow 0xffff00
• magenta 0xff00ff
· -T "theme file"
• The theme setting is only applicable when used with the metal Look and Feel.
There are eight color parameters that can be used to customize the look of HPSS
windows: three primary colors, three secondary colors, black and white. The
color settings may be stored in a theme file using the following syntax:
• hpss.ssm.ssmuser.hpssgui.CustomMetalTheme.primary1=COLOR
• hpss.ssm.ssmuser.hpssgui.CustomMetalTheme.primary2=COLOR
• hpss.ssm.ssmuser.hpssgui.CustomMetalTheme.primary3=COLOR
• hpss.ssm.ssmuser.hpssgui.CustomMetalTheme.secondary1=COLOR
• hpss.ssm.ssmuser.hpssgui.CustomMetalTheme.secondary2=COLOR
• hpss.ssm.ssmuser.hpssgui.CustomMetalTheme.secondary3=COLOR
• hpss.ssm.ssmuser.hpssgui.CustomMetalTheme.black=COLOR
• hpss.ssm.ssmuser.hpssgui.CustomMetalTheme.white=COLOR
• COLOR should be specified using the color name or Red/Green/Blue
hexadecimal value (see the example under the -b flag above).
• If the theme file location is not specified on the command line, the default value
used is ${HOME}/hpss-ssm-prefs/DefaultTheme.
• Buttons may be “disabled” when the current state of the window does not allow an operation to be
performed. In this state, a button is visible but its label text is grayed out and clicking it has no
effect. The disabled state occurs when the operation is not supported for the selected item or the
SSM user does not have sufficient authority to perform the operation
• A “text” field is any field which displays alphanumeric text or numeric data. This does not
HPSS Management Guide November 2009
Release 7.3 (Revision 1.0) 48
Page 49

include “static” text painted on the window background or labels on things like buttons. Text
fields may appear as single or multiple lines and they may be “enterable” (the displayed data can
be altered) or “non-enterable” (the displayed data cannot be changed directly).
• Non-enterable text fields have gray backgrounds. A particular field may be enterable under one
circumstance but non-enterable under another; for example, a server configuration window's
Server ID field is enterable during server creation but may not be changed when modifying a preexisting configuration record. Additionally, a field is non-enterable when the user does not have
sufficient authority to modify the field.
• Enterable text fields have white backgrounds. In most cases, when data in the current field is
modified and the field loses focus (the cursor leaves the field), a floppy disk icon will be
displayed next to the field to give a visual cue that the field has been changed and that the changes
have not been saved. When all changes are made, the user can submit the modifications by
pressing one of the window’s operation buttons.
• Some enterable text fields are wider than they appear. As typing proceeds and the cursor reaches
the right-most edge of the field, the text automatically scrolls to the left and allows further data
entry until the actual size of the field has been reached. Scroll back and forth within the field
using the left and right cursor keys to view the contents.
• Some text fields which accept integer values can also accept numeric abbreviations such as “KB”,
“MB”, “GB”, “TB”, or “XB” to specify kilobytes, megabytes, gigabytes, terabytes, or exabytes,
respectively. Character case is ignored. For example, entering "1024" will yield the same results
as entering "1kb". The entered value must fall with the acceptable numeric ranges for the
specified field.
• Some text fields which accept integer values can accept the values in decimal, octal, or
hexadecimal form. For these fields, values which begin with an 'x' or '0x' will be interpreted as
hexadecimal and values which begin with a zero '0' (but not '0x') will be interpreted as octal. All
other values will be interpreted as decimal.
• A combo box is a non-enterable text field inside a button-like box with a small arrow on the right
side. Clicking on the box will pop up a list of items. Selecting a list item will replace the
displayed contents of the combo box's text field. Alternately, the list can be dismissed by clicking
the mouse anywhere outside of the popup list and the displayed contents will remain unchanged.
• A checkbox is a field containing a box graphic followed by a label. The box may be hollow, ¨,
indicating that the item is not selected. It may be filled in, ■, or contain a check mark, þ,
indicating that the item is selected. Clicking on an enterable check box toggles the state of the
selected item. When the state of a check box cannot be modified, it will appear gray in color.
• A radio button is a field containing a circle followed by a label. The circle may be hollow, ¡,
indicating that the item is not selected or may have a solid interior, =, indicating that the item is
selected. Radio buttons are displayed in groups of two or more items. Only one item within the
group can be selected; selecting one button in a group will cause all other buttons in the group to
become unselected. When the state of the radio buttons cannot be modified, they will appear gray
in color.
• An enterable field containing a cursor is said to have “input focus”. If an enterable text field has
input focus, typing on the keyboard will enter characters into the field.
HPSS Management Guide November 2009
Release 7.3 (Revision 1.0) 49
Page 50

• Select/cut/copy/paste operations can be performed on enterable text fields; on non-enterable
fields, only select and copy operations can be performed.
• In some cases, modifying a field value or pressing a button causes the action to be performed
immediately. A confirmation window will pop up to inform the user that all changes made to the
data window will be processed if the user wishes to continue. If the user selects ‘No’ on the
confirmation window, the request will not be processed and any field modifications to the
window will continue to be displayed. Some examples are changes to the Administrative State
field, pressing the Gatekeeper's Read Site Policy button, and selecting an entry from the MPS
Storage Class Information Control combo box.
3.6. Common Window Elements
Certain SSM buttons and toggle boxes have the same behavior on all SSM windows. Descriptions for
these common elements are given below and are not repeated for each window:
• Time Created by System Manager field - The last time the System Manager created the
structure for this window.
• Time Updated by System Manager field - The last time the System Manager updated the data
for this window.
• Time Received by Client field - The last time the SSM client received an update for this window
from the System Manager.
• Dismiss button - Closes the current SSM window.
• Add button – The Add button is displayed on configuration windows when a new configuration
record is being created. After the configuration fields are appropriately completed, click the Add
button to save the data and create the new record. When the Add operation is not permitted, the
Add button will not be displayed or will appear gray in color.
• Update button – The Update button is displayed on configuration windows when an existing
record is being modified. After the configuration's fields have been modified, click the Update
button to save the modifications. When the update operation is not permitted, the Update button
will not be displayed or will appear gray in color.
• Delete button – The Delete button is displayed on configuration windows of existing records.
Click the Delete button only when the current record is no longer needed and any dependent
records have also been deleted. When the Delete operation is not permitted, the Delete button
will not be displayed or will appear gray in color.
• Start Over button - Resets the current values in a configuration window to the values used when
the window was first opened.
• Start New button - Replace the contents of the current configuration window with a new
configuration of the same type as the one being viewed. The new configuration’s initial values
will contain defaults.
• Clone (partial) button - Replace the contents of the current window with a new configuration
using some of the current configuration’s field values.
• Clone (full) button - Replace the contents of the current window with a new configuration using
HPSS Management Guide November 2009
Release 7.3 (Revision 1.0) 50
Page 51

all of the current configuration’s field values.
• Freeze - A checkbox that, while checked, suspends the automatic updates made to an SSM
window. This allows reviewing information at the frozen point in time. Unchecking the checkbox
will reactivate normal update behavior.
• Refresh button - Requests an immediate update of the displayed information. This can be useful
if the user does not wish to wait for an automatic update to occur.
• Preferences button and combo box:
• Preferences Edit button - Clicking the Edit button opens a configuration window from
which certain display characteristics of the parent window can be modified and saved in a
preference record. New preference records can be created by saving the preference record
with a new name.
• Preferences combo box - Click on the Preference combo box to view a list of available
preference records used to control the information displayed on the window. The preference
record can be modified by either selecting another preference record or by modifying the
current preference record. See the Edit button description above.
• Status Bar - A non-enterable text field along the bottom of all SSM data windows. Status lines
display messages concerning the state of the window and the progress of operations started from
the window. To view status messages that are longer than the length of the status bar, either stretch
the window horizontally or mouse-over the status message to see the full text displayed as a tool
tip. Alternately, the user can view status messages in the session log file. When the status bar has
had messages written to it, the most recent messages can be viewed in the status bar's tooltip. If
there are status messages to view, rolling the mouse over the status bar without clicking gives a
tooltip that says, "Click mouse in status bar to view messages". If there are no status messages then
the tooltip says, "No status messages". This message stays up for about 4 seconds or until the user
moves the mouse out of the status bar area. To view up to the last 30 messages that have been
written to the status bar, click on the status bar. The tooltip that results will show up to the last 30
messages and will remain visible for 10 minutes or until the mouse is moved out of the status bar.
• File menu - All SSM data windows have the File menu. The File menu consists of menu options
for controlling the window's location, the user's session, and printing. The File menu offers the
following options: Cascade, Page Setup, Print, Close All or Close, Logoff, and Exit. The
Cascade, Close All, Logoff, and Exit menu options are only available on the HPSS Health and
Status window.
• Page Setup - SSM uses Java's print facility to create a dialog box enabling the user to enter
directions to be sent to the printer. The Page Setup dialog box can be used to specify print
media, page orientation, and margin characteristics. The Page Setup dialog box can also be
accessed via the Print dialog box (see below). The Page Setup menu item is available on all
SSM windows.
• Print - The Print dialog box is used to set printing options. The print options that are available
are platform dependent and therefore may vary. Some print options that can be configured
include selecting a printer, setting page size and margins, and specifying the number of copies
and pages to print. The Print menu item is available on all SSM windows.
• Close - The Close menu option is used to close the currently selected window. The Close
HPSS Management Guide November 2009
Release 7.3 (Revision 1.0) 51
Page 52

menu item is available on all SSM windows.
• Edit menu - The Edit Menu is located on all SSM data windows. From each Edit Menu, the user
can access Cut, Copy and Paste functions which enable the user to remove data from text fields or
transfer data among them. Editable text fields can be updated. Non-editable text fields can be
copied, but not changed. Field labels cannot be copied.
Most windowing systems provide keyboard shortcuts for the Cut, Copy, and Paste commands. A
typical set of keyboard shortcuts is Ctrl-C for Copy, Ctrl-X for Cut, and Ctrl-V for Paste, but
details may vary from system to system. Cut or Copied text can be Pasted into other applications
using the keyboard shortcuts.
• To delete data from a text field - Highlight the characters to be removed and select Cut.
• To move data from one field to another - Highlight the characters to be moved and select Cut.
Then position the cursor where the data should be placed and select Paste.
• To copy data from one field to another - Highlight the characters to be copied and select Copy.
Then position the cursor where the data should be placed and select Paste.
• Column View menu – The Column View menu only appears on SSM windows that display an
SSM table. An entry for each column in the table appears in the drop down list along with a
corresponding checkbox. If the checkbox is selected, then the column will appear in the window's
table; otherwise the column will be hidden. Clicking on the checkbox will toggle the hidden or
viewable state of the column.
• Help menu - All SSM windows have a Help menu. See Section 3.7: Help Menu Overview below
for detailed information on SSM help.
3.7. Help Menu Overview
The Help Menu provides access to online help that is pertinent to the window being displayed. The Help
menu is available on all SSM data windows but is not available on informational windows such as error
messages and confirmation windows. After selecting Help, the menu will expand to list the help topics
that are available for the current window. Selection of a window-related help topic will open an HTML
file and jump to the corresponding topic section. Selection of the HPSS Management Guide on a help
menu will take the user to the table of contents of the Management Guide.
The HPSS Management Guide , along with Chapter 1 of the HPSS Error Manual, is the main source for
diagnosing and solving problems.
In order to access SSM Help , the help files must be installed and accessible to the graphical user
interface. For information on obtaining and installing the SSM Help files, see the HPSS Installation
Guide section 5.1.2: Software Installation Packages.
The SSM Help facility uses two environment variables, HPSS_HELP_URL_TYPE and
HPSS_HELP_FILES_PATH, to determine the location of the SSM Help files. The
HPSS_HELP_URL_TYPE environment variable specifies the type of URL to aid the browser in locating
the help files. Valid URL types are 'https:', 'http:', or 'file:'. The default value for the
HPSS_HELP_URL_TYPE is 'file:'. The HPSS_HELP_FILES_PATH environment variable specifies the
location of the installation directory for the SSM Help files. The SSM Help files must exist in HTML
format for the graphical user interface to display them. The default value for the
HPSS_HELP_FILES_PATH environment variable is '/var/hpss/doc'. The values of these environment
HPSS Management Guide November 2009
Release 7.3 (Revision 1.0) 52
Page 53

variables may be overridden.
3.8. Monitor, Operations and Configure Menus Overview
The Monitor, Operations and Configure menus are used by the System Manager to monitor, control and
configure HPSS. They are available only from the HPSS Health and Status window. This section
provides a brief description on each submenu option listed under the Monitor, Operations and Configure
menus. See related sections for more detailed information on the window that gets opened after selecting
the menu option.
3.8.1. Monitor Menu
The Monitor menu contains submenu items that are commonly used by the System Administrator to
monitor the status of HPSS. The menu is organized with the submenu items that open SSM list windows
at the top and the submenu items that open other window types at the bottom.
Alarms & Events. Opens the Alarms and Events window which displays HPSS alarm and event
messages. Detailed information on each alarm or event can be viewed by selecting an entry from the list
and pressing the Alarm/Event Info button.
Devices & Drives. Opens the Devices and Drives window which displays information on all configured
Mover devices and PVL drives. Devices and Drives may be created, deleted, viewed, locked, unlocked,
dismounted and mark repaired from this window.
PVL Jobs. Opens the PVL Job Queue window which displays all active PVL jobs. Use this window to
get more detailed information on a job or to cancel a job.
Servers. Opens the Servers window which displays information on all configured HPSS servers. This
window can also be used to perform server related operations such as configuration, startup, shutdown,
and viewing server status.
Storage Classes, Active. Opens the Active Storage Classes list window which displays information for
all storage classes which have been assigned to a Migration Purge Server and assigned storage resources.
Migration, purge, repack and reclaim operations can be initiated from this window. This window also
provides access to information for each storage class such as the managed object information,
configuration record, migration policy and purge policy. The Migration Purge Server must be running in
order for its storage classes to be active and show up in this list.
RTM Summary. Opens the RTM Summary List window which displays summary information for the
active Real-Time Monitor (RTM) records. RTM records are maintained by the Core, Gatekeeper and
Mover components of HPSS.
Filesets & Junctions. Opens the Filesets & Junctions List window which displays information for the
filesets and junctions that are configured in the HPSS system. Filesets and junctions can be created and
deleted and details for filesets can viewed from this window.
Tape Requests. This submenu lists the different tape request list window types.
• Check-In. Opens the Check-In Requests window which displays all current requests for tape
check-ins.
• Mount. Opens the Mount Requests window which displays all current requests for tape
mounts.
HPSS Management Guide November 2009
Release 7.3 (Revision 1.0) 53
Page 54

Accounting Status. Opens the Subsystem list window where the Accounting Status and Start
Accounting buttons can be found.
Log Files Information. Opens the Log Files Information window to display information for the HPSS
log files such as the log file's size and state.
Lookup HPSS Objects. This submenu lists the type of objects which can be looked up by specifying the
object's identifying information.
• Cartridges & Volumes. Opens the Lookup Cartridges and Volumes window allowing
identification of a cartridge or volume by name. A choice can then be made between viewing
PVL volume information, PVR cartridge information, or Core Server volume information for
the specified cartridge or volume.
• Files & Directories. Opens the Lookup Files and Directories window into which a pathname
can be entered. The pathname can identify a file, directory or junction. From this window,
click the Show File/Directory button to display detailed information about the file, directory
or junction.
• Objects by SOID. Opens the Lookup Object by SOID window where an HPSS object can be
specified by entering its HPSS Storage Object ID (HPSS SOID). This window provides
access to bitfile and virtual volume information.
SSM Information. This submenu lists the options available for viewing statistics for the System
Manager and the user client session.
• System Manager Statistics. Opens the SSM System Manager Statistics window to view
statistics for the System Manager such as the number of RPC calls, notifications and
messages that were processed.
• User Session Information. Opens the User Session Information window to display the user's
login name, authority and statistics regarding the user's session.
3.8.2. Operations Menu
Accounting Report. Opens the Subsystems list window where a subsystem can be highlighted and the
Start Accounting button can be selected to obtain an accounting report.
Drive Dismount. Opens the Devices and Drives list window where the Dismount Drive button is
located.
PVL Job Cancellation. Opens the PVL Job Queue window from which PVL jobs may be selected and
canceled.
Resources. This submenu lists the operations that can be performed on disk and tape cartridges and
volumes.
• Import Disk Volumes. Opens the Import Disk Volumes window where a list of disk volume
labels can be entered and an import request can be submitted.
• Import Tape Volumes. Opens the Import Tape Volumes window where a list of tape volume
labels can be entered and an import request can be submitted.
• Create Disk Resources. Opens the Create Disk Resources window where a list of disk
HPSS Management Guide November 2009
Release 7.3 (Revision 1.0) 54
Page 55

volume labels can be entered and a request to add the disks to a storage class can be
submitted.
• Create Tape Resources. Opens the Create Tape Resources window where a list of tape
volume labels can be entered and a request to add the tapes to a storage class can be
submitted.
• Delete Resources. Opens the Delete Resources window allowing deletion of existing tape or
disk storage resources.
• Export Volumes. Opens the Export Volumes window which exports tape cartridges and disk
volumes, making them unavailable to HPSS.
• Move Cartridges. Opens the Move Cartridges To New PVR window allowing ownership of
tape cartridges to be transferred between PVRs.
• Migrate/Purge Data. Opens the Active Storage Classes window. From this window, a
storage class may be highlighted and a migration or purge can be started by selecting the
corresponding button.
• Repack/Reclaim Tapes. Opens the Active Storage Classes window where a storage class
may be highlighted and the Repack Volumes or Reclaim Volumes button selected to
perform the operation.
Ping System Manager. Selecting this submenu option tests the connectivity between the GUI and the
System Manager. If the ping is successful, nothing will happen. If the ping is unsuccessful, an error
message will be displayed.
Shutdown. This submenu provides a quick way to send a shutdown request to any server other than the
Startup Daemon. If you want to shutdown a particular server or set of servers, use the Shutdown or
Force Halt buttons on the Servers list window. The System Manager cannot be shutdown via the
Servers list window. The Startup Daemon cannot be shutdown at all using SSM.
• All Non-SSM Servers – Selecting this option sends a shutdown command to all servers other
than the System Manager and Startup Daemon. Note that some servers may take a few
minutes to shutdown. To restart the servers, select the servers in the Servers list window and
press the Start button.
• System Manager – Selecting this option sends a shutdown command to only the System
Manager.
3.8.3. Configure Menu
It is recommended that the System Administrator configure an HPSS system traversing the
Configure menu in top down order since some configuration items have a dependency on others.
Subsystems. Opens the Subsystems list window where a list of all configured subsystems can be viewed,
new subsystems can be configured or existing subsystems can be deleted. Additionally, from the
Subsystems list window, accounting statistics can be viewed and reports can be generated.
Policies. This submenu lists the policy types that can be configured for HPSS.
• Accounting. Opens the Accounting Policy window allowing configuration and management
HPSS Management Guide November 2009
Release 7.3 (Revision 1.0) 55
Page 56

of the accounting policy. Only one accounting policy is allowed.
• Location. Opens the Location Policy window allowing configuration and management of the
location policy. Only one location policy is allowed.
• Logging. Opens the Logging Policies list window allowing configuration and management of
the logging policies.
• Migration. Open the Migration Policies list window allowing configuration and
management of the migration policies.
• Purge. Opens the Purge Policies list window allowing configuration and management of the
purge policies.
Storage Space. This submenu lists the storage space configurations required for HPSS. Classes of
Service contain a Hierarchy, and Hierarchies are made up of a list of Storage Classes.
• Storage Classes. Opens the Configured Storage Classes list window allowing configuration
and management of storage classes.
• Hierarchies. Opens the Hierarchies list window allowing configuration and management of
storage hierarchies.
• Classes of Service. Opens the Class of Service list window allowing configuration and
management of the classes of service.
Servers. Opens the Servers list window, which will facilitate server configuration and management.
Global. Opens the Global Configuration window allowing the configuration and management of the
HPSS global configuration record. Only one global configuration is allowed.
Devices & Drives. Opens the Devices and Drives list window allowing configuration and management
of devices and drives for use with HPSS.
File Families. Opens the File Families list window allowing the configuration and management of file
families.
Restricted Users. Opens the Restricted Users list window, which will facilitate HPSS user access
management.
List Preferences. This submenu contains an entry for each SSM list window. A preference record can
be created or the default preference record can be modified to allow the user to customize each SSM list
window's data view by using filtering methods. See Section 3.10: SSM List Preferences on page 69 for
more information.
3.9. SSM Specific Windows
This section describes the HPSS Login window, the HPSS Health and Status window, and the SSM
information windows.
3.9.1. HPSS Login
HPSS Management Guide November 2009
Release 7.3 (Revision 1.0) 56
Page 57

The HPSS Login window appears after starting the hpssgui script. The user must supply a valid HPSS
user name and password in order to access SSM and monitor HPSS.
If a login attempt is unsuccessful, review the user session log for an indication of the problem. See the
hpssadm or hpssgui man pages for more information about the user session log.
Field Descriptions
User ID. Enter a valid user ID here.
Password. Enter the password for the user ID.
OK. Attempt to contact the System Manager and authenticate the user. If the attempt is successful, the
HPSS Health and Status widow will open. Otherwise, an error message will be displayed in the status
bar.
Exit. Close the HPSS Login window and terminate the hpssgui client session.
If the System Manager and SSM Client versions do not match then the following window will be
displayed after the user logs in;
The user may choose to continue logging in or to exit. However, as the dialog says, running with
HPSS Management Guide November 2009
Release 7.3 (Revision 1.0) 57
Page 58

mismatched versions may cause compatibility problems.
3.9.2. About HPSS
The About HPSS window displays version information and a portion of the HPSS copyright statement.
The About HPSS window is accessible by selecting the Help menu's “About HPSS” submenu from any of
the hpssgui windows.
The HPSS System Name and System Manager Version are not displayed when the About HPSS window
is requested from the HPSS Login window. These two pieces of information are not available until the
user actually logs into the System Manager.
Differences in the System Manager and SSM Client versions may indicate that the client and/or System
Manager code should be updated.
3.9.3. HPSS Health and Status
HPSS Management Guide November 2009
Release 7.3 (Revision 1.0) 58
Page 59

When a user successfully connects to the System Manager through the Login window, the HPSS Health
and Status window replaces the Login window on the screen. The HPSS Health and Status window will
remain on the screen until the user exits or logs out. It provides the main menu and displays information
about the overall status of HPSS .
The HPSS Health and Status window is composed of several high-level components, each of which is
discussed in its own section below.
3.9.3.1. SM Server Connection Status Indicator
The SM connection status indicator is located in the bottom right corner of the status bar. When the SM
HPSS Management Guide November 2009
Release 7.3 (Revision 1.0) 59
Page 60

icon is red, the client’s connection to the System Manager is lost; when it is green, the connection is
active.
3.9.3.2. HPSS Status
On the upper section of the HPSS Health and Status window are four status fields that represent the
aggregate status of the HPSS system. These fields are:
Servers. Displays the most severe status reported to SSM by any HPSS server.
Devices and Drives. Displays the most severe status as reported to SSM for any configured Mover
device or PVL drive.
Storage Class Thresholds. Displays the most severe status reported by the MPS for the Active Storage
Class space usage. SSM assumes that all thresholds are “OK” until it receives contrary information.
PVR Cartridge Thresholds. Displays the most severe status of cartridge usage reported by any
configured PVR. SSM assumes that all thresholds are “OK” until it receives contrary information.
For the Servers and Devices and Drives fields, possible status values in increasing order of severity are:
• Normal - No problem reported.
• Unknown - SSM cannot determine the true status due to communication problems or other
difficulties.
• Suspect - There may or may not be a problem.
• Minor - A problem has been encountered by the server or device, but it does not significantly
affect the HPSS operation.
• Major - A problem has been encountered by the server or device that may degrade HPSS
operation.
• Critical - A problem has been encountered by the server or device that may disrupt HPSS
operation until the problem is resolved.
For the Storage Class Thresholds field, the possible status values are:
• OK - No problem reported.
• Warning - A threshold has been reported as crossing its warning limit.
• Critical - A threshold has been reported as crossing its critical limit.
• Stale - Migration Purge Server is down or SSM has not received an update from the MPS.
For the PVR Cartridge Thresholds field, the possible status values are:
• OK - No problem reported.
• Warning - A threshold has been reported as crossing its warning limit.
• Critical - A threshold has been reported as crossing its critical limit.
• Unknown or Stale - PVR is down or SSM has not received an update from the PVR.
As problems are resolved or returned to normal, the status fields will automatically reflect the changes.
HPSS Management Guide November 2009
Release 7.3 (Revision 1.0) 60
Page 61

In addition to the text which describes the status, these fields are displayed with colored icons. The icon
color depicts that status as follows:
• Red - Major and Critical problems
• Magenta – Minor problems
• Yellow - Unknown, Stale, Suspect, and Warning problems
• Green - Normal, no problem
Click on the button to the right of the status icon to get more details.
For Servers, Devices and Drives, and Storage Class Thresholds the button will open the corresponding
SSM list window in sick list mode. Once this window is open, use it to get detailed status information on
the sick entries, assuming the HPSS Servers are still healthy enough to respond to SSM requests.
See Section 3.10: SSM List Preferences on page 69 for more information on the sick list mode.
For PVR Cartridge Thresholds the button will display a message dialog with information about the PVRs
that have cartridge threshold issues. This message dialog will look like the following;
The status section of the HPSS Health and Status window can be hidden from view by selecting the
View menu item and unchecking the HPSS Status checkbox.
3.9.3.3. HPSS Statistics
The HPSS Statistics fields are located in the middle section of the HPSS Health and Status window and
display the number of bytes moved, bytes used, data transfers, and current PVL jobs in the system. The
number of bytes moved and number of data transfers indicate the data accumulated by the Movers since
startup or data reset.
HPSS Management Guide November 2009
Release 7.3 (Revision 1.0) 61
Page 62

HPSS Statistics fields show general trends in HPSS operations; the numbers are not all-inclusive. Some
values may fluctuate up and down as servers are started or shut down. Some values, such as Bytes
Moved, can be reset to zero in individual Movers and by SSM users.
Bytes Moved. Total bytes moved as reported by all running Movers.
Bytes Used. Total bytes stored on all disk and tape volumes as reported by all running Core Servers.
Data Transfers. Total data transfers as reported by all running Movers.
PVL Jobs. Total jobs reported by the PVL.
The statistics section of the HPSS Health and Status window can be hidden from view by selecting the
View menu item and unchecking the HPSS Statistics checkbox.
3.9.3.4. Menu Tree
The Menu Tree section of the HPSS Health and Status window displays a tree structure that mirrors the
structure of the Monitor, Operations and Configure menus. The menu tree can be fully expanded so that
the user can view all the menu options for monitoring, configuring or operating HPSS. Selecting a leaf
of the menu tree results in the same response as selecting the same item from the HPSS Health and
Status menu bar. The user can also choose to expand only those branches of the menu tree in which he
is interested. The collapsed and expanded state of the branches on the menu tree can be toggled by
clicking on the branch icons.
The Menu Tree can be hidden from view by selecting the View menu item and unchecking the Menu
Tree checkbox.
3.9.3.5. File Menu
All SSM data windows have the File menu. See Section 3.6: Common Window Elements on page 50 for
a description of the File Menu options that appear on all SSM data windows. The following File menu
options are unique to the HPSS Health and Status window:
• Cascade – Select the Cascade menu option to rearrange the SSM windows, placing them on the
screen starting in the upper left-hand corner and cascading downward toward the lower righthand corner of the user's desktop. When the cascading has been completed, the HPSS Health
and Status window will be centered on the screen and brought to the foreground.
• Close All - Select Close All to close all SSM windows except the HPSS Health and Status
window. To close the HPSS Health and Status window, the user must select Logoff or Exit.
• Logoff - Select Logoff to exit the SSM session and close all SSM windows. The hpssgui script
will continue to be active and will still use the same user's session log. The HPSS Login
window will appear. The user can login again to reconnect to the System Manager.
• Exit - Select Exit to exit the SSM session and close all SSM windows. The hpssgui script will
terminate and the user's session log will be closed. The user must rerun the hpssgui script to
access the HPSS Login window and reconnect to the System Manager.
3.9.3.6. View Menu
The View Menu is only available on the HPSS Health and Status window. The View Menu offers the
HPSS Management Guide November 2009
Release 7.3 (Revision 1.0) 62
Page 63

user the ability to hide or display elements of the HPSS Health and Status window in order to optimize
the viewable area. Under the View Menu there is a menu item and checkbox for each window element
that can be hidden. If the box contains a check mark then the corresponding section of the HPSS Health
and Status window that displays this element will be visible. If the checkbox is empty, then the element
is hidden from the window view. Clicking on the checkbox will toggle the visible state of the window
element.
HPSS Status. Toggle the HPSS Status menu option to hide or view the HPSS Status section of the
HPSS Health and Status window.
HPSS Statistics. Toggle the HPSS Statistics menu option to hide or view the HPSS Statistics section of
the HPSS Health and Status window.
Menu Tree. Toggle the Menu Tree menu option to hide or view the Menu Tree section of the HPSS
Health and Status window.
3.9.4. SSM Information Windows
These windows describe the System Manager and the user's hpssgui session.
3.9.4.1. System Manager Statistics Window
This window displays the statistics about the number of RPC calls, notifications and messages that the
System Manager has processed since its Start Time. While the window is open, the statistics are updated
at timed intervals. The information in this window is intended for use in analyzing System Manager
performance or in troubleshooting. It is of limited use in everyday production situations.
To open the window, from the HPSS Health and Status window Monitor menu select SSM Information,
and from its submenu select System Manager Statistics.
HPSS Management Guide November 2009
Release 7.3 (Revision 1.0) 63
Page 64

Field Descriptions
Start Time. The time the System Manager was started.
Uptime. The elapsed clock time since the System Manager was started.
HPSS Management Guide November 2009
Release 7.3 (Revision 1.0) 64
Page 65

CPU Time. The amount of CPU time that the System Manager has consumed.
Memory Usage. The amount of memory that the System Manager is currently occupying.
Process ID. The process id of the System Manager.
Hostname. The name of the host where the System Manager is running.
RPC Calls to Servers. The number of RPCs the System Manager has made to other HPSS servers.
RPC Interface Information. Information about the server and client RPC interfaces. The server
interface is used by other HPSS servers to contact the System Manager. The client interface is used by
the hpssgui and hpssadm programs to contact the System Manager. There are 2 columns of data, one for
the server interface and one for the client interface. Not all fields are available for both interfaces. The
fields include:
• Status. Current status of the thread pool and request queue of the RPC interface. The Status can
be:
• OK – The number of Active RPCs is less than the Thread Pool Size. There are enough
threads in the thread pool to handle all current RPCs with spare ones left over.
• Warning – The number of Active RPCs is greater than the Thread Pool Size. The number
of Queued RPCs is less than 90% of the Request Queue Size. There aren't enough threads to
handle all the current RPCs and some are having to wait in the queue, but the queue is big
enough to hold all the waiters.
• Critical – The number of Queued RPCs is greater than or equal to 90% of the Request
Queue Size. There aren't enough threads to handle all the current RPCs, some are having to
wait in the queue, and the queue is getting dangerously close to overflowing, at which point
any new RPCs will be rejected.
• Thread Pool Size. The maximum number of RPCs that can be active at any one time. For the
server RPC interface this value is determined by the HPSS_SM_SRV_TPOOL_SIZE
environment variable. For the client RPC interface this value is determined by the Thread Pool
Size field defined on the Core Server Configuration window. Refer to Section 5.1.1.2: Error:
Reference source not found on page 92.
• Request Queue Size. The maximum number of RPC requests that can be queued and waiting to
become active. For the server RPC interface this value is determined by the
HPSS_SM_SRV_QUEUE_SIZE environment variable. For the client RPC interface this value
is determined by the Request Queue Size field on the Core Server Configuration window. Refer
to Section 5.1.1.2: Error: Reference source not found on page 92.
• Active RPCs. The number of RPCs that are currently active. To be active an RPC must have been
assigned to a thread in the thread pool.
• Queued RPCs. The number of RPCs that are waiting in the request queue to be assigned to a
thread in the thread pool.
• Maximum Active/Queued RPCs. The maximum number of RPC requests that were active (in
the thread pool) or queued (in the request queue) at the same time. This value can be used to help
tune the Thread Pool Size and Request Queue Size for the RPC interface. If the Maximum
Active/Queued RPCs is greater than the Thread Pool Size you might consider increasing the
HPSS Management Guide November 2009
Release 7.3 (Revision 1.0) 65
Page 66

Thread Pool Size and/or Request Queue Size to help with the System Manager performance.
However, increasing these 2 parameters could cause the System Manager to require more
memory.
• Data Change Notifications. The number of data change notifications received from servers.
(Server RPC Interface only).
• Unsolicited Notifications. The number of notifications which the System Manager received from
other HPSS servers but which it did not request from them. (Server RPC Interface only).
• Log Messages. The number of log message notifications processed. (Server RPC Interface only).
• Tape Check-In Messages. The number of tape check-in request notifications received. (Server
RPC Interface only).
• Tape Mount Messages. The number of tape mount request notifications received. (Server RPC
Interface only).
• Total RPCs. Total number of RPCs processed by the RPC interface.
Client Connection Information. Information about clients that have connected to the System Manager.
• Maximum Connections. The maximum number of client connections that the System Manager
was handling at any one time. Each client can have multiple connections. The default connections
per client is 2. Each client can specify the number of connections using the
-Dhpss.ssm.SMConnections Java command line option.
• Current Connection Count. The number of client connections currently being handled by the
System Manager.
• Current Client Count. The number of clients currently connected to the System Manager. This
will be the number of entries in the Client List (below) with an In Use state.
• Client List. The list of clients connected to the System Manager. The entries that appear in the
client list will be for (up to) the last 64 (SSM_CLIENT_MAX) clients that have connected to the
System Manager.
• ID. Slot identifier.
• State. Clients displayed in the client list can have one of two states: In Use and Free.
• In Use. The clients that are currently connected to the System Manager.
• Free. The clients that were once connected but are no longer connected (active).
Once the client list contains SSM_CLIENT_MAX In Use and/or Free entries, then the oldest Free
slot (the client that has been disconnected the longest) is given to the next client. Once all the slots
are In Use, then the client table is full; no new clients can connect until one of the In Use slots
becomes Free after a client disconnects.
• User Auth. The client user's authorization level: admin or operator. See Section 3.3:
Configuration and Startup of hpssgui and hpssadm on page 34 for more details.
• Principal. The user's principal name.
HPSS Management Guide November 2009
Release 7.3 (Revision 1.0) 66
Page 67

• Hostname. The name of the host where the client is running.
• Connections. The number of RPC connections this client has to the System Manager.
• Start Time. The time that the client connected to the System Manager.
• Connect Time. The elapsed time since the client connected to the System Manager.
• Idle Time. The elapsed time since the System Manager received an RPC from the client.
• Cred Refreshes. The number of times the principal's credentials have been refreshed since
the client has been connected to the System Manager.
• RPC Calls. The number of RPCs that the client has made to the System Manager.
• RPC Waits. The number of RPCs that the client has currently “waiting” in the System
Manager. These are the RPCs which are active and connected to the System Manager but
which have not yet completed.
• Client UUID. The UUID for the client.
3.9.4.2. User Session Information Window
The User Session Information window displays memory and network statistics for the current SSM user
session. The window is updated in timed intervals as data changes.
To open the window, from the HPSS Health and Status window Monitor menu select SSM Information,
and from its submenu select User Session Information.
HPSS Management Guide November 2009
Release 7.3 (Revision 1.0) 67
Page 68

Field Descriptions
User Login Name. The name that the user entered as the User ID when logging into HPSS.
User Authority. The authority level that the user has in order to perform operations in SSM. This can be
admin or operator.
Login Time. The time that the user logged into SSM.
Total Session Time. The amount of time that the user has had the graphical user interface running.
Total Time Connected to System Manager. The amount of time that the user has been connected to the
System Manager. This is the time that has elapsed since the login was successful.
Time of Last Successful RPC Call. The time that the last RPC call was made to the System Manager
which completed successfully.
RPC Calls Succeeded. The number of successful RPC calls made by this user session.
RPC Calls Failed. The number of unsuccessful RPC calls made by this user session.
Free Memory. Amount of free memory available in the hpssgui program.
Total Memory. Amount of total memory available in the hpssgui program.
HPSS Management Guide November 2009
Release 7.3 (Revision 1.0) 68
Page 69

Percent Memory Free. The ratio of free memory to total memory in the hpssgui process.
Total Windows Opened During This Session. The number of windows created during the current user
session.
3.10. SSM List Preferences
When a user logs into SSM, the System Manager reads the saved preferences file and loads them into the
SSM Session, if they exist.
Each SSM list type has a Default preferences record. The Default preferences configuration is set so that
the more commonly used columns are displayed. The following lists have a preferences record:
• Alarms & Events
• Classes of Service
• Devices & Drives
• File Families
• Filesets & Junctions
• Hierarchies
• Logging Policies
• Migration Policies
• Purge Policies
• PVL Jobs
• Restricted Users
• RTM Summary
• Servers
• SM Clients
• Storage Classes, Active
• Storage Classes, Configured
• Subsystems
• Tape Check-Ins
• Tape Mounts
The Servers, Devices and Drives, and Active Storage Classes list windows also have Sick preferences
which display all items with abnormal status.
Default preferences can be modified but cannot be deleted. Sick preferences may not be modified or
deleted.
Preferences are saved on the client node in the directory specified by the “configuration path” hpssgui
command line argument ("-i"). This option can also be set using the environment variable
HPSS Management Guide November 2009
Release 7.3 (Revision 1.0) 69
Page 70

HPSSGUI_USER_CFG_PATH or the configuration file entry HPSS_SSM_USER_PREF_PATH. If this
option is not specified, the default value is <client node>:<user.home>/hpss-ssm-prefs. The user must
have permissions to create the preferences file in the directory.
Preferences windows contain filters for controlling the data displayed in the list window. Columns in the
list window can be rearranged and resized by dragging columns and column borders on the list window
itself. Data in the list can be sorted ascending or descending based on any column in the list by clicking
in that column's header. Such changes are kept up to date in the preferences file transparent to the user,
without the need to click on a Save button.
Columns can be hidden or redisplayed through the Column View menu on each list window.
The Tape Mount Requests and Tape Check-In Requests windows have Auto Popup checkboxes. The
states of these checkboxes, as well as those in the View Menu of the HPSS Health and Status window are
stored in the preferences file transparent to the user.
If a user's preferences file becomes obsolete, the current version of the user interface software will
convert the old preferences to the current format.
Checkbox Filters
Checkbox filters apply to columns that have a limited set of display values. The checkbox filters are
grouped by column name and contain a checkbox for each allowed value. If the checkbox is selected then
all rows containing the value will be displayed on the corresponding SSM list window. At least one
checkbox filter must be selected in each group.
Text Filters
Columns that can be filtered by their text content are listed in the Text Filters section of the preference
window. Users can control which rows are displayed by entering a Java regular expression into one or
more of the Text Filter fields. If the Text Filter field is blank then no filtering on the field will occur.
The preference window will verify that the text entered is a valid Java regular expression before allowing
the user to save the preferences.
For example, if the list contains storage class names as follows
SClass_4-way_Disk
SClass_4-way_Tape
Sclass_4-way_Archive
Sclass_Disk
entering a Java regular expression of “.*4-way.*” would result in the “Sclass_Disk” entry to be filtered
out of the display.
For a complete description on how to use regular expressions in Java, please refer to the following web
page; http://java.sun.com/j2se/1.5.0/docs/api/java/util/regex/Pattern.html.
Button Options
Save as ... Save the current preference settings to a new named preference. A popup window will be
displayed so that the new name can be entered.
HPSS Management Guide November 2009
Release 7.3 (Revision 1.0) 70
Page 71

Save. Save the current preference settings to the preferences file using the same preference name.
Delete. Delete the currently displayed preference settings from the preferences file. Sick and Default
preference settings cannot be deleted.
Reload. Reread the preference settings from the preferences file.
Apply. Apply the current preference configuration to the parent SSM list window. Pressing Apply does
not save the changes to the preferences file. To save the preference settings, press the Save or Save as ...
button. The Apply button is only available when the Preferences window is accessed via its parent SSM
List window (i.e., it is not available when the Preferences window is accessed from the Configure menu).
Show List. Brings the window to which these preferences apply to the foreground. The Show List button
is only available when the Preferences window is accessed via its parent SSM List window.
Dismiss. Close the window.
To modify an existing preference configuration, select the Preference Name from the drop down list and
press the Reload button. Modify the configuration then press the Save button. To create a new
Preference configuration, open an existing configuration, make the modifications, press the Save as ...
button then enter a unique value for the new preference name and press the OK button.
HPSS Management Guide November 2009
Release 7.3 (Revision 1.0) 71
Page 72

Chapter 4. Global & Subsystem Configuration
This chapter discusses two levels of system configuration: global and storage subsystem. The global
configuration applies to the entire HPSS installation while subsystem configurations apply only to
servers and resources allocated to storage subsystems.
For new HPSS systems, it is recommended that the first step of configuration be the partial definition of
subsystems. The subsystems should be defined at this point except for their Gatekeeper and Default COS
information. The Global Configuration should be created after Server configuration is complete. Last
of all, the subsystem configuration is completed by adding the definitions of the Gatekeeper and Default
COS. See Section 1.3: HPSS Configuration Roadmap (New HPSS Sites) on page 1.3.
4.1. Global Configuration Window
HPSS Management Guide November 2009
Release 7.3 (Revision 1.0) 72
Page 73

This window allows you to manage the HPSS global configuration record. Only one such record is
permitted per HPSS installation. To open the window, on the Health and Status window select the
Configure menu, and from there the Global menu item.
Field Descriptions
System Name. An ASCII text string representing the name for this HPSS system.
Root Core Server. The name of the Core Server which manages the root fileset (“/”) in the HPSS
namespace.
Advice - The root Core Server should be selected with care. Once it is chosen it cannot be changed as
long as the chosen server exists. If the root Core Server must be changed, the current root Core Server
will have to be deleted before SSM will allow another root Core Server to be selected.
Default Class of Service. The name of the default Class of Service (COS). Core Servers will store new
files in this COS when the HPSS client does not specify a COS or provide hints on the creation request.
This default can be overridden by each storage subsystem.
Advice - If the COS chosen for the Default Class of Service is deleted, be sure to change the Default
Class of Service before deleting the COS.
If disk is used as the Default COS, it should be defined so that a large range of files sizes can be handled For this
reason it may be reasonable to set the default COS to a tape COS.
Default Logging Policy. The name of the default logging policy. This policy will be used for all servers
that do not have a specific log policy configured.
Advice - Care should be taken to choose a descriptive name (such as “DEFAULT LOG POLICY”) which
is unlikely to conflict with the name of a real HPSS server. Once this new policy is created, it may be
selected as the Default Log Policy.
Alternately, you may skip this step until after one or more server specific log policies are created. Then a
Default Log Policy can be chosen from one of the server specific log policies.
Metadata Space Warning Threshold. Provides a default value for the metadata warning threshold.
When the space used in any DB2 tablespace exceeds this percentage, the Core Server will issue a
periodic warning message. This value can be overridden for each storage class on a storage subsystem
basis (see Section 4.2.1: Subsystems List Window on page 74 for more information).
Metadata Space Critical Threshold. Provides a default value for the metadata critical threshold. When
the space used in any DB2 tablespace exceeds this percentage, the Core Server will issue a periodic
critical alarm. This value can be overridden for each storage class on a storage subsystem basis (see
Section 4.2.1: Subsystems List Window on page 74 for more information).
Metadata Space Monitor Interval. The Core Server will check metadata usage statistics at the
indicated interval, specified in seconds. The minimum value for this field is 1800 seconds (30 minutes).
A value of 0 will turn off metadata space monitoring. This field may be overridden on the Storage
Subsystem configuration.
DB Log Monitor Interval. The Core Server will check consistency of Database Logs and Backup Logs
at the indicated interval, specified in seconds. The logs are consistent if both primary and backup log
directories exist and contain log files with the same names. The minimum value for this field is 300
seconds (5 minutes). A value of 0 will turn off DB Log monitoring. This field may be overridden on the
HPSS Management Guide November 2009
Release 7.3 (Revision 1.0) 73
Page 74

Storage Subsystem configuration.
Root User ID. The UID of the user who has root access privileges to the HPSS namespace. This only
applies if the Root Is Superuser flag is set.
COS Change Stream Count. The number of background threads that run in the Core Server to process
Class of Service change requests. This field may be overridden on the Storage Subsystem configuration.
Global Flags:
Root Is Superuser. If checked, root privileges are enabled for the UID specified in the Root User ID
field. If the box is not checked, the UID specified in the Root User ID field will not have root privileges.
Root access privileges grant the specified user the same access rights to each namespace object as the
object’s owner.
Can change UID to self if has Control Perm. If checked, then when a user has control access to an
object, the user can take over ownership of the object by changing the UID of the object to the UID
associated with the user.
Can change UID if has Delete Perm on Security ACL. If checked, then when a user is listed with
delete permission in the security ACL of the CORE server that owns the object, the user can change the
UID of the object to any valid UID.
Object names can contain unprintable characters. If checked, then users of the HPSS system may
create objects (e.g., files, directories, etc.) with names containing unprintable characters as viewed
through the 7 bit ASCII character set. If this option is off, any attempt to name an object using
unprintable characters will be disallowed. The range of printable characters is 0x20 (blank) through 0x7E
(tilde) in the 7 bit ASCII character set.
4.2. Storage Subsystems
Every HPSS system consists of at least one subsystem. This chapter provides instructions and supporting
information for creating, modifying, and deleting them.
For a conceptual overview of subsystems, refer to the HPSS Installation Guide, specifically Storage
Subsystems in Sections 2.2.7 and 2.3.3.
4.2.1. Subsystems List Window
HPSS Management Guide November 2009
Release 7.3 (Revision 1.0) 74
Page 75

This window lists all the subsystems in the HPSS system and provides the ability to manage these
subsystems. To open the window, from the Health and Status window select the Configure menu, and
from there select the Subsystems menu item.
To create a new subsystem, click on the Create New button. To configure an existing subsystem, select it
from the list and click on the Configure button. When creating or configuring a subsystem, the Storage
Subsystem Configuration window will appear.
To delete an existing subsystem, select it from the list and click on the Delete button.
Field Descriptions
Subsystem List table columns. For details on the columns listed for each subsystem, refer to Section
4.2.3: Storage Subsystem Configuration Window on page 76.
Administration Buttons
Accounting Status - Opens the Accounting Status window which displays the status and statistics from
the last accounting run. See Section 13.2.2.1: Generating an Accounting Report on page 332 for more
information. You must first select a configured subsystem by clicking on the subsystem entry from the
list of displayed subsystems.
Start Accounting - Start the Accounting utility to generate an accounting report. See the Accounting
Status window for updates from the utility. You must first select a subsystem by clicking on the
subsystem entry from the list of displayed subsystems.
Configuration Buttons
Create New - Create a new storage subsystem definition by opening a Storage Subsystem window
containing default values for a new subsystem.
Configure - Open the selected subsystem configuration for editing. This button is disabled unless a
HPSS Management Guide November 2009
Release 7.3 (Revision 1.0) 75
Page 76

subsystem is selected in the list.
Delete - Delete the selected subsystem(s). This button is disabled unless a subsystem is selected in the
list.
Always contact HPSS customer support before deleting a subsystem definition. An improperly
deleted subsystem can cause serious problems for an HPSS system. Refer to Section 4.2.5
Deleting a Storage Subsystem on Page 81.
Related Information
HPSS Installation Guide, Section 2.2.7: Storage Subsystems and Section 2.3.3: HPSS Storage
Subsystems
Section 13.2.2.1: Generating an Accounting Report on page 332
4.2.2. Creating a New Storage Subsystem
The steps detailed in the following sections should be followed to create a new storage subsystem within
an HPSS system. These steps are:
1. Create the Storage Subsystem Metadata (Section 4.2.3.1: Create Storage Subsystem Metadata
on page 79)
2. Create the Storage Subsystem Configuration (Section 4.2.3.2: Create Storage Subsystem
Configuration on page 79)
3. Create the Storage Subsystem Servers (Section 4.2.3.3: Create Storage Subsystem Servers on
page 80)
4. Assign a Gatekeeper to the subsystem, if required (Section 4.2.3.4: Assign a Gatekeeper if
Required on page 80)
5. Assign Storage Resources to the Storage Subsystem (Section 4.2.3.5: Assign Storage Resources
to the Storage Subsystem on page 80)
6. Create the Storage Subsystem Fileset and Junction (Section 4.2.3.6: Create Storage Subsystem
Fileset and Junction on page 80)
7. Configure Migration and Purge Policy Overrides (Section 4.2.3.7: Migration and Purge Policy
Overrides on page 81)
8. Configure Storage Class Threshold Overrides (Section 4.2.3.8: Storage Class Threshold
Overrides on page 81)
4.2.3. Storage Subsystem Configuration Window
HPSS Management Guide November 2009
Release 7.3 (Revision 1.0) 76
Page 77

This window allows an administrator to manage the configuration of a storage subsystem.
The Add button is only displayed during the creation of a new configuration. The Update button is
displayed when an existing configuration is being modified.
To open this window for creation of a new subsystem, click the Create New button on the Subsystems
window. To open this window for an existing subsystem, select the subsystem from the Subsystems
window and click the Configure button.
Field Descriptions
Subsystem ID. A unique, positive integer ID for the storage subsystem. This field may only be set at
create time. The default value is the last configured subsystem ID number plus 1. The default subsystem
ID can be overwritten but if the new number already exists, an attempt to save the configuration will fail.
Default Class of Service. This value overrides the Global Default Class of Service specified on the
Global Configuration window. This default Class of Service applies to this storage subsystem only. The
default value is “None”.
Advice - HPSS Core Servers use a default Class of Service to store newly-created files when the HPSS
HPSS Management Guide November 2009
Release 7.3 (Revision 1.0) 77
Page 78

user does not specify a COS or any hints with the creation request. The global configuration specifies a
default COS for an entire HPSS installation. Selecting a COS on the storage subsystem configuration
window allows the global value to be overridden for a particular subsystem.
If the field is blank, the global default COS will be used. If no Classes of Service are configured, this
value can be updated after the Classes of Service are in place.
Subsystem Name. The descriptive name of the storage subsystem. This field may be set only when the
storage subsystem is created. The name should be unique and informative. It can contain a character
string up to 31 bytes long. The default value is “Subsystem #<ID>”.
Database Name. The name of the database to be used to store the metadata for the storage subsystem.
Gatekeeper. The default value is “None”.
Advice - If an appropriate Gatekeeper has not yet been configured, simply leave this configuration entry
blank. It can be updated after the Gatekeeper is in place.
Allowed COS list. A list of Classes of Service that can be used by this subsystem. To allow a COS to be
used by this subsystem, the corresponding checkbox must be selected in the Allow column of the list. At
least one COS must always be selected. The user will not be permitted to de-select the COS defined to
be the Default Class of Service. If this subsystem configuration does not have a Default Class of Service
defined, then the COS chosen as the Global Configuration’s Default Class of Service cannot be deselected.
Note that a newly created COS will not appear in the selection list until the Core Server and
Migration Purge Server associated with the subsystem have been recycled. When new Classes of
Service are added, the initial allowed state for that COS is determined by the current setting for
the other Classes of Service. If all previous Classes of Service were allowed, the new COS will
be allowed. Otherwise, the new COS will be disallowed.
Advice - By default, the servers in a subsystem are able to use any configured COS. This table allows an
administrator to prevent a subsystem from using particular Classes of Service.
When a new Class of Service is added to a system, it will automatically be enabled for all subsystems
which have no disabled Classes of Service. It will be disabled in all other subsystems. If this is not the
desired configuration, the COS will have to be allowed/disallowed for each subsystem individually.
Disallowing all Classes of Service in a subsystem is not permitted.
Metadata Space Warning Threshold. The Core Server in this subsystem will issue a warning alarm
periodically and set its Opstate to Major when the percentage of used space in any DB2 tablespace in this
subsystem’s database exceeds this value.
Metadata Space Critical Threshold. The Core Server in this subsystem will issue a critical alarm
periodically and set its Opstate to Critical when the percentage of used space in any DB2 tablespace in
this subsystem’s database exceeds this value.
Metadata Space Monitor Interval. The Core Server for this subsystem will check the metadata usage
statistics at the indicated interval, specified in seconds. If a value of 0 is specified, the Global
Configuration setting will be used for this storage subsystem. The minimum value for this field is 1800
seconds (30 minutes).
HPSS Management Guide November 2009
Release 7.3 (Revision 1.0) 78
Page 79

DB Log Monitor Interval. The Core Server will check consistency of Database Logs and Backup Logs
at the indicated interval, specified in seconds. The logs are consistent if both primary and backup log
directories exist and contain log files with the same names. The minimum value for this field is 300
seconds (5 minutes). A value of 0 will turn off DB Log monitoring. This field may be overridden on the
Storage Subsystem configuration.
COS Change Stream Count. The number of background threads that run in the Core Server to process
Class of Service change requests. If a value of 0 is specified, the Global Configuration setting will be
used for this storage subsystem.
4.2.3.1. Create Storage Subsystem Metadata
Before creating the subsystem metadata, you must have created the subsystem database that will be used
by the subsystem and have created appropriate tablespaces for the database.
You should review and perform the steps in the following sections in the HPSS Installation Guide before
allocating metadata space for the new subsystem:
• 2.3.3 HPSS Storage Subsystems
• 3.5.2 HPSS Infrastructure Storage Space
• 3.5.3 HPSS Filesystems
• 3.5.4 HPSS Metadata Space
• 5.3.2 Install and Configure HPSS – Secondary Subsystem Machine
4.2.3.2. Create Storage Subsystem Configuration
Use the following steps to create a storage subsystem configuration:
1. Decide on a unique descriptive name for the new storage subsystem. SSM will automatically
choose the name “Subsystem #N”, where N is the subsystem ID selected by SSM. The name of
the new storage subsystem may be changed by the administrator at subsystem configuration time
only.
2. From the Health and Status window, select Configure/Subsystems from the menu. You will then
be presented a window that lists currently configured subsystems. Select the Create New button to
bring up another window to configure the new subsystem.
3. Enter the name you have chosen for the subsystem in the Subsystem Name field and enter the ID
of the subsystem in the subsystem ID field. Enter the name of the database you have chosen to
contain the tables for this subsystem in the Database Name field.
4. Decide which Classes of Service are to be supported by the new storage subsystem. SSM will
automatically select all Classes of Service to be supported, but the administrator can modify these
choices at any time. Also decide on a default Class of Service for this storage subsystem. By
default SSM leaves this field blank, which means that the default Class of Service specified in the
global configuration will apply to the new storage subsystem as well. The administrator may
choose to override the global value by using the subsystem configuration value at any time.
5. Decide whether gatekeeping or account validation are needed for this storage subsystem. If either
is required, a Gatekeeper will need to be configured for this storage subsystem. If the required
HPSS Management Guide November 2009
Release 7.3 (Revision 1.0) 79
Page 80

Gatekeeper is already configured, simply add it to your storage subsystem's configuration.
However, if it is not yet configured, it will be necessary to wait until Section 4.2.3.4: Assign a
Gatekeeper if Required on page 80 to add the Gatekeeper.
6. Set the metadata space thresholds and the update interval. Typical values are 75 for warning, 90
for critical and 300 to have the metadata space usage checked every 300 seconds.
7. Set the DB Log Monitor Interval. Minimum value is 300 seconds, typical value is 1800 seconds.
8. Press the Add button to store the configuration.
4.2.3.3. Create Storage Subsystem Servers
The new storage subsystem must contain a single Core Server. If migration and purge services will be
needed then a Migration Purge Server is also required. See the following sections for instructions on
configuring these new servers:
• Section 5.1: Server Configuration on page 87
• Section 5.1.1: Core Server Specific Configuration on page 96
• Section 5.1.2: Migration/Purge Server (MPS) Specific Configuration on page 101
On each server's basic configuration window, be sure to assign the server to the new storage subsystem.
4.2.3.4. Assign a Gatekeeper if Required
If gatekeeping or account validation are needed and an appropriate Gatekeeper is not already configured,
a new Gatekeeper will be required. See the HPSS Installation Guide, Section 3.7.3: Gatekeeper, Section
5.1.2: Gatekeeper Specific Configuration on page 98 for instructions on configuring the Gatekeeper.
Be sure to assign this Gatekeeper to the appropriate storage subsystem by choosing it from the
Gatekeeper selection list on the appropriate Storage Subsystem Configuration window.
4.2.3.5. Assign Storage Resources to the Storage Subsystem
Storage resources are tied to a storage subsystem through storage classes. To determine which storage
classes belong to a particular subsystem, look up the configuration for each Class of Service available to
the storage subsystem. Each Class of Service is tied to one storage hierarchy which is in turn tied to some
number of storage classes. Storage resources must then be assigned to the storage classes which are used
in the referenced hierarchies. See Section 8.1.2: Creating Storage Resources on page 234 for details.
4.2.3.6. Create Storage Subsystem Fileset and Junction
The HPSS namespace consists of filesets that are connected by junctions. The top (root directory) of the
HPSS namespace is the RootOfRoots fileset managed by the Root Core Server. The rest of the
namespace is built by pasting filesets together using junctions.
Since each subsystem has its own Core Server, it also has its own root fileset. This fileset needs to be
connected to the HPSS namespace in order for files to be stored in the new subsystem. This is
accomplished by creating a junction from the HPSS namespace to the root fileset of the new subsystem.
See Chapter 10: Filesets and Junctions for more information.
HPSS Management Guide November 2009
Release 7.3 (Revision 1.0) 80
Page 81

4.2.3.7. Migration and Purge Policy Overrides
The migration and purge policies contain two elements, the basic policy and the storage subsystem
specific policies. This can be seen on the Migration Policy and Purge Policy windows. If a given
migration or purge policy does not contain any subsystem specific policies, then the basic policy applies
across all storage subsystems and no other configuration is needed. If it is desired for migration or purge
to behave differently than specified in the basic policy in a given storage subsystem, then a storage
subsystem specific policy should be created for that subsystem. A subsystem specific policy allows some
or all of the values in the basic policy to be overridden for the given storage subsystem. See Section
6.4.2: Migration Policy Configuration on page 182 and Section 6.5.2: Purge Policy Configuration on
page 190 for more information.
4.2.3.8. Storage Class Threshold Overrides
The warning and critical thresholds given on the Storage Class Configuration window apply across all
storage subsystems unless specified otherwise. The Subsystem Thresholds button on the Configured
Storage Class list window allows the default thresholds to be overridden for specified storage
subsystems. See Section 6.1.1: Configured Storage Classes Window on page 157 for more information.
4.2.4. Modifying a Storage Subsystem
If modifications are made to an existing Storage Subsystem configuration, the Core Server and the
Migration Purge Server for the subsystem must be recycled.
4.2.5. Deleting a Storage Subsystem
Always contact HPSS customer support before deleting a subsystem definition. An improperly
deleted subsystem can cause serious problems for an HPSS system.
It is critical that no files or directories exist within a storage subsystem before it is deleted. It is
important to verify that all of the DB2 metadata tables associated with the storage subsystem
being deleted are empty.
To verify that all files have been removed from the subsystem, perform the following steps:
1. Run the dump_acct_sum utility on the subsystem. Be sure to specify the subsystem ID with the
-s option as this utility defaults to subsystem 1. The output from the utility should indicate that 0
files exist in the subsystem.
2. As a second verification do the following:
A. Run the db2 command line utility program.
B. Connect to the subsystem database (e.g., connect to subsys1).
C. Set the schema (e.g., set schema hpss).
D. Issue the following SQL command:
db2> select count(*) from bitfile
The result of the command should indicate 0 rows in this table.
HPSS Management Guide November 2009
Release 7.3 (Revision 1.0) 81
Page 82

E. Issue the following SQL command:
db2> select count(*) from nsobject
The result of the command should indicate 2 rows in this table.
3. If any of these checks gives an unexpected result, do not delete the subsystem. Contact HPSS
customer support.
When deleting an existing storage subsystem, it is critical that all of the different configuration
metadata entries described in section 4.2.3: Storage Subsystem Configuration Window on page
76 for the storage subsystem be deleted. If this is not done, configuration metadata entries
associated with the subsystem will become orphaned when the subsystem configuration itself is
deleted. This situation is difficult to correct after the subsystem is deleted.
Once it has been verified that the storage subsystem contains no files or directories, deleting the
subsystem may be accomplished by reversing the steps used to create the subsystem. These steps are
listed in the order which they should be performed below. For information on each step, see the
corresponding instructions under Section 4.2.2: Creating a New Storage Subsystem on page 76.
1. Delete all storage resources assigned to the subsystem's Core Server. See Section 8.2.1: Deleting
Storage Resources on page 240.
2. Delete all filesets and junctions used to link the storage subsystem into the HPSS name space. See
Section 10.6: Deleting a Junction on page 316.
3. Delete all storage class subsystem-specific thresholds associated with the storage subsystem being
deleted. This is done by setting these thresholds back to the storage class “default” thresholds.
4. Delete all subsystem-specific migration and purge policy entries associated with the storage
subsystem being deleted. See Section 6.4.2.4: Deleting a Migration Policy on page 188 and
Section 6.5.4: Deleting a Purge Policy on page 193 for more information.
5. Delete all Core Servers, Migration Purge Server and DMAP Gateway Server residing within the
storage subsystem being deleted. See Section 5.1.1: Deleting a Server Configuration on page 123.
6. Delete the subsystem configuration.
7. Remove the database associated with the subsystem.
HPSS Management Guide November 2009
Release 7.3 (Revision 1.0) 82
Page 83

Chapter 5. HPSS Servers
Most HPSS Server administration is performed from the SSM graphical user interface Servers list
window. Each HPSS server has an entry in this list.
5.1. Server List
This window facilitates management of the configured HPSS servers. From this window, an HPSS server
can be started, shut down, halted, reinitialized, and notified of repair. Once a server is up and running,
SSM monitors and reports the server state and status. Information on running servers may also be viewed
and updated via this window.
If multiple entries are selected in the server list when a server operation is invoked, the operation will be
applied to all selected servers (although some servers don't support all operations).
The server entries displayed on the window can be sorted by each column category. To sort the server
entries by status, for example, click on the Status column title. The actual display can vary greatly by the
setting of window preferences. The Column View menu item can be used to select which columns of the
table are visible, and Preferences can be used to further refine and filter which servers are visible.
Preferences can also be saved and automatically reloaded by SSM when new sessions are started (see
Section 3.10: SSM List Preferences on page 69 for more information).
At times, the server list may update quite frequently with new Status or Opstate information. If you select
either of these columns for sorting, servers are likely to change their positions in the list rapidly.
Sometimes this makes the list hard to use, in which case you should consider selecting a more static
column for sorting or check the Freeze button to keep the list from updating.
Field Descriptions
Server List.
This is the main portion of the window which displays various information about each server.
ID. A unique numerical value assigned by SSM when each server starts. This value can change
each time SSM is restarted. In the default preferences, this column is not shown.
Status. The server execution and connection status as determined by SSM. The reported status
will be one of the following:
• Connected - Server is up and running and communicating normally with SSM.
• Up/Unconnected - Server is up and running (according to the Startup Daemon) but SSM
cannot connect to it. Server cannot be completely controlled and monitored through SSM.
• Down - Server is down. SSM can be used to start the server.
• Indeterminate - The server’s state cannot be determined by SSM and the Startup Daemon
is either not running or not connected to SSM.
• Check Config - SSM detected an incomplete or inconsistent configuration for the server.
HPSS Management Guide November 2009
Release 7.3 (Revision 1.0) 83
Page 84

The server’s configuration should be carefully reviewed to ensure that it is correct and
complete. Check the Alarms and Events window and the HPSS log file to view SSM
alarm messages related to configuration problems. This situation can be caused by:
• A DB2 record required by the server is missing or inaccessible.
• The principal name configured for the server does not match the
HPSS_PRINCIPAL_* environment variable for the server's type.
• Not Executable - The server is configured as non-executable. (Note: the server could still
be running. It may have been started outside the control of SSM, or it may have been
running when its executable flag was changed.) SSM will not monitor the server’s status.
• Deleted - The server configuration has been deleted. (Note: deleted servers will be
removed from the list when SSM is restarted.) In the default preferences, this Status type
is filtered off.
In addition to the above status values, the Status field also reports the transient status for the
server as the result of the user request on the server as follows:
• Starting... - The server is being started.
• Stopping... - The server is being shut down gracefully.
• Halting... - The server is being forcibly halted.
• Reiniting... - The server is reinitializing.
• Connecting... - SSM is trying to establish a connection to the server.
• Repairing... - The server is repairing its states and statuses.
A server that is configured to execute and is running should have a Connected status. If its status
is anything other than Connected (excluding the transient status values), one of the following
actions should be taken:
• If the server status is Up/Unconnected - Monitor the server status closely for a few
minutes. SSM will periodically try to establish a connection with the server. The Force
Connect button can be used to speed this process.
• If the server status is Down - Use the Start button to start the server. The Startup Daemon
will ensure that only one instance of the server is running.
• If the server status is Indeterminate - Verify whether the server is running using an
operating system command such as "ps". If the server is not running, start it. If the server
is running, ensure that the Startup Daemon configured for the same node is running and
has a connection to SSM. If the Startup Daemon is not running, start it using the
/opt/hpss/bin/rc.hpss script on the appropriate node. Otherwise, use the Force Connect
button to establish the connections for the server and the Startup Daemon. If this does not
correct the server’s status, review the Alarms and Events window to search for problems
that the server and SSM may have reported. In addition, review the HPSS logs for the
server’s and SSM’s log messages to help determine the problems.
SSM will periodically poll the servers’ execution and connection status and update the Status
fields when there are any changes. The rate of these updates will depend on the client's refresh
HPSS Management Guide November 2009
Release 7.3 (Revision 1.0) 84
Page 85

rate (see the hpssgui/hpssadm man pages for more details).
If a server is configured as executable but is not running, SSM will treat it as an error.
Therefore, if a server is not intended to run for an extended period, its Executable flag should be
unchecked. SSM will stop monitoring the server and will not report the server-not-running
condition as a critical error. This will also help reduce the work load for SSM.
Type. Indicates the type of the server in acronym form. Possible values include CORE, GK,
LOGC, LOGD, LS, MPS, MOVER, PVL, various PVR values, SSMSM, and SUD. See the
glossary for the meanings of these acronyms.
Subtype. Indicates the subtype of the server, sometimes in acronym form. Not all servers have
subtypes. Possible values (particularly PVR subtypes) include SCSI, STK, 3494, Operator,
AML, and 3584 LTO. See the glossary for the meanings of these acronyms.
Subsystem. The name of the storage subsystem to which the server is assigned. Only servers of
type Core and MPS should have a subsystem name. For all other server types this column should
be blank.
Op State. The operational state of the server as reported by the server itself:
• Enabled - The server is operating normally.
• Disabled - The server is not operational, usually due to a shutdown/halt request.
• Suspect - The server may have a problem.
• Minor - The server encountered a problem that does not seriously affect the HPSS
operation.
• Major - The server encountered a problem that may seriously impact the overall HPSS
operation.
• Broken - The server encountered a critical error and shut itself down.
• Unknown- The server's state is unknown to SSM. SSM should be able to obtain an
Operational State for the server but cannot because SSM cannot communicate with it, and
the server has not set its state to Disabled or Broken. The server may or may not be
running. The reason may simply be that the server is marked executable but is not
running.
• Invalid - SSM has obtained an Operational State from the server, but its value is not
recognized as a valid one. This may indicate a bug in the server or a communications
problem which is garbling data.
• None - The server does not have an Operational State (because the server is not
executable, for example), or its Operational State is, by design, unobtainable.
SSM will periodically poll the server’s operational state and update the Op State field in the
Servers window when there are any changes. The rate of the polling is controlled by the SSM
client list refresh rate (see the hpssgui/hpssadm man pages).
Server Name. The descriptive name of the server.
Host. The name of the host on which the server is running.
HPSS Management Guide November 2009
Release 7.3 (Revision 1.0) 85
Page 86

Execute Host. The Execute Hostname field from the server's basic configuration record. This
field is intended to specify the hostname on which the server is supposed to run; however, no
checking is done to verify if the server is actually running on the specified host. This field is only
used by the SSM to locate the Startup Daemon that manages this server. The field displayed must
match exactly the Execute Hostname field specified in the configuration record of the startup
daemon that is to manage this server.
UUID. The universal unique identifier for the server. In the default preferences, this column is
not shown.
Administration Buttons.
This group of buttons allows you to perform administrative operations on the selected servers. All of the
buttons are disabled unless one or more servers are selected and the operation is applicable to at least one
of the selected servers.
After pressing one of these buttons, you will usually be prompted to confirm your request before it is
carried out. If you make an obviously invalid request, such as asking to start a server which is not
executable, SSM will tell you about it, but otherwise no harm is done. You could, for example, select a
range of servers and ask to start them all, knowing that some of the selected servers are already running.
Those that are not running will be started, but nothing will be done to those that are already running.
The status bar at the bottom of the window displays a message when the requested operation has begun.
For information on the success or failure of the operation, monitor the Status and Op State columns for
the server.
Start – Start the selected servers. The System Manager will notify the Startup Daemon to start
the selected servers.
Reinitialize – Send a “reinitialize” command to the selected servers. Note that not all HPSS
servers support reinitialization. If a server does not support reinitialization, the button will not be
sensitive.
Mark Repaired – Clear displayed error status in the selected servers. Sometimes server states
such as the Operational State will continue to indicate an error condition after the cause of the
error has been fixed. If so, you can use the Mark Repaired button to clear its error states. Note
that this does not do anything in hardware or software to actually repair an error; it just asks the
server to clear its error condition. If you mark a server repaired when it still has a problem, the
error states will be cleared but may quickly return.
Shutdown – Command the selected servers to shutdown. This command should be the first you
use to shutdown servers. After issuing this command, wait a minute or two for the server to
complete the shutdown process. Some servers shutdown very quickly after receiving the
command, others, particularly the Core Server, may require two minutes or more to shutdown.
During this time the server is attempting to finish work it has started, while rejecting new work.
Be patient; watch the Alarm and Events window for messages indicating the server has
terminated.
Force Halt – Command the selected servers to stop immediately. This should be done only if a
shutdown request has failed to stop the servers, or if the intention is to shut servers down as
quickly as possible. This request will cause a SIGKILL signal to be sent to the selected servers if
all other shutdown methods have failed. This command is meant to be used as a last resort if a
HPSS Management Guide November 2009
Release 7.3 (Revision 1.0) 86
Page 87

server hangs up or otherwise won't respond to the Shutdown command.
Force Connect - Request the System Manager to immediately attempt to connect to the selected
servers. The System Manager routinely attempts to connect to any unconnected servers; using
this button will simply cause the next attempt to occur right away, instead of after the normal
retry delay.
Information Buttons.
These buttons allow you to open information windows for servers. They will be sensitive only when the
selected server supports a particular information window.
Since the requested information is obtained by calling the selected server, the server must normally have
a Connected status for the request to succeed.
Basic Info - Opens the Basic Server Information window for the selected server.
Specific Info - Opens the type-specific server information window for the selected server.
Configuration Buttons.
These buttons allow you to start server configuration tasks.
Create New - Allows an administrator to configure a new server by selecting a server type and
then filling in a new server configuration. This control is actually not a button, but a pulldown
list, allowing the administrator to select the type of new server to be created. It is always enabled.
Configure - Opens the configuration window(s) for the selected server(s).
Delete - Deletes the selected server(s) from the system. A confirmation dialog will appear to
confirm the action. Before deleting a server, see the warnings and considerations in Section
5.1.1: Deleting a Server Configuration on page 123.
5.1. Server Configuration
The following HPSS servers should be configured. A Gatekeeper server is required only if the site
wishes to do gatekeeping or account validation. See the HPSS Installation Guide, section 2.3.2: HPSS
Servers for a description of the purpose of each server:
• Core Server
• Migration/Purge Server
• Gatekeeper (optional)
• Location Server
• Log Client
• Log Daemon
• Physical Volume Library
• Physical Volume Repository
• Mover
HPSS Management Guide November 2009
Release 7.3 (Revision 1.0) 87
Page 88

• Storage System Manager
• Startup Daemon (on each host where an HPSS server will be executing)
The fields of the Server Configuration window are divided into the following sections. The Basic
Controls section is at the top of the window and the other sections are on individual tabs:
• Basic Controls. Server identification and type information.
• Execution Controls. Information required to properly control the server's execution.
• Interface Controls. Information required for communication between the server and other HPSS
servers and clients.
• Security Controls. Security settings.
• Audit Policy. Object event audit settings.
• Log Policy. Information for controlling the types of log messages generated by the server.
• Specific. Server type-specific settings (only for some server types).
The server specific configuration section contains configuration parameters specific to a particular server
type. Not every type of server has a specific configuration section. The following types of servers have a
server specific configuration section in the Server Configuration window:
• Core Server
• Gatekeeper
• Log Client
• Log Daemon
• Migration/Purge Server
• Mover
• Physical Volume Repository
Although the Location Server does not have a server specific configuration section in the Server
Configuration window, there are additional configuration steps outside SSM necessary whenever a
Location Server is added or modified.
Details about the specific configuration section and the additional configuration required for each of
these server types are described in:
● Section 5.1.1: Core Server Specific Configuration on page 96
● Section 5.1.2: Gatekeeper Specific Configuration on page 98
● Section 5.1.3: Location Server Additional Configuration on page 99
● Section 5.1.4: Log Client Specific Configuration on page 100
● Section 5.1.1: Log Daemon Specific Configuration on page 101
● Section 5.1.2: Migration/Purge Server (MPS) Specific Configuration on page 101
HPSS Management Guide November 2009
Release 7.3 (Revision 1.0) 88
Page 89

● Section 5.1.3: Mover Specific Configuration on page 102
● Section 5.1.1: Physical Volume Repository (PVR) Specific Configuration on page 109
● Details about all of the other sections on this window, which apply to all server types, are
described in Section 5.1.1: Common Server Configuration.
To view the Server Configuration window for an existing server, bring up the Servers list window and
select the desired server. Then click the Configure button to bring up the configuration window for that
server.
To modify a server configuration, bring up the server's configuration window, modify the desired fields,
and click the Update button. Some configuration fields may be set by the administrator only at server
creation time. These fields will be editable/settable when creating new servers, but will become displayonly fields (not editable or settable) when looking at existing configurations. For the modified
configuration data to be recognized by the server, the server must be reinitialized (if supported) or
restarted.
There are two ways to create a new server:
1. To create a new server using standard defaults as a starting point, open the Servers list
window, click Create New and select a server type. This opens a Server Configuration
window with default values for the selected server type. Make the desired customizations to
the window and click the Add button.
2. To create a new server that has attributes similar to those of an existing server, select the
existing server, click Configure and then select Clone (partial). This opens a Server
Configuration window with some default values copied from the existing server. Make the
desired customizations to the window and click the Add button.
There are two ways to delete a server. Before deleting a server, see the warnings and considerations in
Section 5.1.1: Deleting a Server Configuration on page 123. Then, to delete the server:
1. From the Servers list window, select the server and click the Delete button, or
2. Bring up the Server Configuration window and click the Delete button.
In both cases you will be prompted to confirm the deletion of the server.
5.1.1. Common Server Configuration
These sections of the Server Configuration window are common to all servers.
5.1.1.1. Basic Controls
The Basic Controls section of the Server Configuration window is common to all servers. In the example
window above, the server displayed is a Core Server.
HPSS Management Guide November 2009
Release 7.3 (Revision 1.0) 89
Page 90

Field Descriptions
Server Name. A unique descriptive name given to the server. Ensure that the Server Name is unique. A
server’s descriptive name should be meaningful to local site administrators and operators, in contrast to
the server’s corresponding UUID, which has meaning for HPSS. For HPSS systems with multiple
subsystems it is very helpful to append the subsystem ID to the Server Name of subsystem-specific
servers. For instance, “Core Server 1” for the Core Server in subsystem 1.
Before modifying this field, check whether this server is using the default log policy or its own custom
log policy (see Section 5.1.1.1: Log Policy on page 95). If the server is using its own custom log policy,
modify it to use the default log policy. Skipping this step will cause an extraneous log policy to remain in
the system.
Server ID. A UUID that identifies a server to HPSS. A unique value is automatically generated and
displayed for new servers. While you are permitted to modify this field by hand, such a practice is not
recommended because of the danger that you could type in a UUID which is not unique within the entire
HPSS realm. This field may only be modified in Add mode.
Server Type. The type of the HPSS Server.
Server Subtype. The subtype of the selected server. This field is only used by the PVR servers to specify
the type of PVR (e.g. STK).
Storage Subsystem. Name of the HPSS Storage Subsystem to which this server is assigned. This field is
required for the Core Server and Migration/Purge Server. For all other servers this field is not displayed.
The following rules apply to this field:
• The Storage Subsystem Configuration must exist before configuring Core Servers or
Migration/Purge Servers.
• Core Servers and Migration/Purge Servers must have a valid storage subsystem set in this field
before SSM will allow the server configuration to be created.
• No more than one Core Server and one Migration/Purge Server can be assigned to any one
subsystem.
• This field can only be modified in Add mode.
5.1.1.1. Execution Controls
The Execution Controls section of the Server Configuration window is common to all servers. In the
example window above, the server displayed is a Core Server.
Field Descriptions
Execute Pathname. The UNIX file system path name to a server’s executable image file. This file must
reside on the node specified by Execute Hostname. Use the full UNIX path name; otherwise, the Startup
Daemon will try to start the file out of the current working directory of the Startup Daemon.
HPSS Management Guide November 2009
Release 7.3 (Revision 1.0) 90
Page 91

Execute Hostname. This is the hostname of the node on which the server will execute. It must match the
Execute Hostname of the Startup Daemon that is to manage this server. For most servers, setting this
field is straightforward, but for remote Movers, this indicates the node on which the Mover
administrative interface process runs (not the node where the remote Mover process runs). Note that if
the Execute Hostname is changed, it is likely that the RPC program number will change as well. If the
server affected is the System Manager, the SSM configuration file, ssm.conf, must be regenerated or
edited.
Program Number. The RPC program number. This value must be unique within the node in which the
server runs. The administrator cannot override the default program number value when creating or
modifying a server configuration.
Version Number. The RPC version number. The administrator can not override the default version
number value when creating or modifying a server configuration.
UNIX Username. The UNIX user name under which the server will run. The name must be registered in
the local UNIX authentication database (e.g., /etc/passwd) or the HPSS local password file. The Startup
Daemon will use this user ID when starting the server. If there is no such user, the Startup Daemon will
not be able to start the server.
Minimum Database Connections. This field is no longer used and will be deleted in a future version of
HPSS. Database connections are managed dynamically and the number of database connections a server
uses is based on the activity of the server. Some servers use the database only when they start and never
again. Database connections used by such servers are eventually closed so that the server uses no
connections at all. If the server should need a connection at some later time, one will be created.
Creating database connections is a fairly low overhead activity, while maintaining unused connections is
a relatively high overhead activity, so the system tries to keep unused connections at a minimum.
Maximum Database Connections. The meaning of this field has changed in HPSS 7.1. Servers are
allocated database connections dynamically, using as many as are needed to perform the work at hand.
Servers will create additional database connections up to Maximum Database Connections without
delay, on demand. Once this number of connections exist, requests for additional connections will be
delayed for a short period of time to give the server a chance to reuse an existing connection. If an
existing connection does not become available within this time limit, a new connection will be created
and processing will resume. The server's internal value for Maximum Database Connections is
adjusted up to this new value to reflect the larger dynamic workload.
As described above, if the workload subsides, unused database connections will eventually be closed and
the server will run with the number of connections that is appropriate to the workload.
Since this setting is actually dynamic, it may be removed in a future version of HPSS.
Auto Restart Count. Maximum number of automatic restarts allowed per hour. See Section 5.2.2.4:
Automatic Server Restart on page 151 for more details.
Executable. A flag that indicates whether an HPSS server can be executed by SSM.
Auto Startup. A flag that indicates whether SSM should attempt to start the server upon startup of SSM.
The Startup Daemon must be started before SSM for this option to work.
HPSS Management Guide November 2009
Release 7.3 (Revision 1.0) 91
Page 92

5.1.1.2. Interface Controls
The Interface Controls section of the Server Configuration window is common to all servers. In the
example window above, the server displayed is a Core Server.
Field Descriptions
Maximum Connections. The maximum number of clients that this server can service at one time. This
value should be set based on the anticipated number of concurrent clients. Too large a value may slow
down the system. Too small a value will mean that some clients are not able to connect.
Thread Pool Size. The number of threads this server spawns to handle client requests. If necessary, the
default values can be changed when defining servers. Too large a value may consume server memory for
no purpose. Too small a value could mean that some client connections don't get serviced in a timely
manner. The Thread Pool Size should be equal to or larger than the value used for Maximum
Connections.
Request Queue Size. The maximum number of requests that can be queued waiting for request threads.
If the workload increases so that this value is exceeded, requests will be rejected by the server rather than
queued for processing. A value of zero means to use the default queue size of 20.
Note: See Section 3.1.2: Tuning the System Manager RPC Thread Pool and Request Queue Sizes on page
31 for information on tuning the RPC thread pool and request queue sizes for the System Manager.
Interfaces. The information required for the server to communicate with other HPSS servers and clients
over the HPSS RPC network interface. Each server type is configured with one or more interfaces. With
the exception of the Authentication Mechanisms, the administrator cannot override the default values for
each interface when creating or modifying a server configuration. Each interface consists of the
following fields:
Interface Name. The descriptive name of the interface.
Interface Id. The UUID that identifies this interface.
Interface Version. The interface version number.
Authentication Mechanisms. The authentication mechanisms from which the interface will
accept credentials. One or both of the mechanisms can be checked (at least one should be
checked or that interface will be unusable). Each interface supports the following authentication
mechanisms:
• KRB5 - indicates that the interface will support Kerberos 5 authentication
• UNIX - indicates that the interface will support UNIX authentication
5.1.1.1. Security Controls
The Security Controls fields define the settings for authenticated communication between the server and
other HPSS servers and clients.
HPSS Management Guide November 2009
Release 7.3 (Revision 1.0) 92
Page 93

The Security Controls section of the Server Configuration window is common to all servers. In the
example window above, the server displayed is a Core Server.
Field Descriptions
Principal Name. The name of the principal the server will use to authenticate.
Protection Level. The level of protection that will be provided for communication with peer
applications. The higher the level of protection, the more encryption and overhead required in
communications with peers. The levels, from lowest to highest, are as follows:
• Connect - Performs authentication only when the client establishes a connection with the server.
• Packet - Ensures that all data received is from the expected client.
• Packet Integrity - Verifies that none of the data transferred between client and server has been
modified.
• Packet Privacy - Verifies that none of the data transferred between client and server has been
modified and also encrypts the data transferred between client and server.
Authentication Service Configuration. Each server can support up to two Authentication Services. The
following fields are used to define each authentication service configured for a server.
Mechanism. The authentication mechanism to use when passing identity information in
communications to HPSS components.
• KRB5 - indicates that the server will useKerberos 5 authentication.
• UNIX - indicates that the server will use UNIX authentication.
• Not Configured - indicates that an authentication service has not been configured for this
slot. At least one of the authentication service slots must be configured.
Authenticator Type. The type of authenticator specified in the Authenticator field. The types
are:
• Not Configured – indicates that an authenticator has not been configured for this slot. If a
mechanism is specified, an authenticator type must also be specified.
• None – indicates no authenticator is supplied for this mechanism. This is appropriate for
UNIX authentication if no keytab is used. The server's credentials will be its current
UNIX identity.
• Keytab - indicates that the authenticator is the path to a keytab file. For Kerberos
authentication this is a keytab file created with Kerberos utilities. For UNIX
authentication this is a keytab file created with the hpss_unix_keytab utility. See its man
page for details. Each server can have its own keytab file, or all the servers can share a
single keytab file. It is recommended that one keytab file be used for all of the servers on
any given host.
HPSS Management Guide November 2009
Release 7.3 (Revision 1.0) 93
Page 94

Authenticator. The argument passed to the authentication mechanism indicated by the
Authenticator Type configuration variable and used to validate communications. If it is a
keytab, the server must have read access to the keytab file. Other access permissions should not
be set on this file or security can be breached. For the Not Configured or None values of the
Authenticator Type, this field can be left blank.
5.1.1.1. Audit Policy
HPSS security provides a log for certain security related events such as a change in an object's
permissions, a change in an object's owner, a change of an object's name, a failed attempt to access an
object, and several others (see Field Descriptions below for a complete list). A server's Audit Policy
controls which of these events trigger log messages. It can be configured from the Audit Policy tab of the
Server Configuration window. It is possible to request that only failures or both successes and failures be
logged.
For each audit event type, selecting Failure causes only failures to be logged, selecting Total logs every
audit event of that type, and selecting neither causes nothing to be logged. Selecting both has the same
effect as selecting Total.
Currently the only server which generates security object event records other than AUTH is the Core
Server.
For more information on auditing, see the HPSS Installation Guide, Section 3.9.4.5: Security Audit.
The Audit Policy section of the Server Configuration window is common to all servers. In the example
window above, the server displayed is a Core Server.
Field Descriptions
• AUTH. Authentication events.
• CHMOD. Core Server object permission events.
• CHOWN. Core Server object owner events.
• CREATE. Core Server creation events.
• LINK. Core Server hard link creation events.
• MKDIR. Core Server directory creation events.
• OPEN. Core Server bitfile open events.
• RENAME. Core Server object rename events.
• RMDIR. Core Server directory remove events.
• UNLINK. Core Server object delete events.
HPSS Management Guide November 2009
Release 7.3 (Revision 1.0) 94
Page 95

• UTIME. Core Server bitfile time modified events.
• ACL_SET. Core Server access control list modification events.
• CHBFID. Core Server change bitfile identifier events.
• BFSETATTRS. Core Server set bitfile attribute events.
5.1.1.1. Log Policy
The server Log Policy may also be accessed from the Logging Policies window.
It is not necessary to define a log policy for every server. If no server-specific log policy is defined for
the server, the server will use the System Default Logging policy. In this case, the Log Policy tab on the
Server Configuration window will display the values from the System Default Logging Policy.
Note that in order for modifications to the log policy to take effect, the appropriate server must be
reinitialized. In most cases, the server which must be reinitialized is the Log Client which executes on
the same host as the server whose log policy was changed. The only exception is for Movers; when the
log policy of a Mover is modified, that Mover itself must be reinitialized in order for the log policy
changes to take effect.
See Section 9.2: Log Policies on page 295 for a description of the Logging Policies window, for detailed
definitions of each log message type, and for information on the System Default Logging Policy.
The Log Policy section of the Server Configuration window is common to all servers. In the example
window above, the server displayed is a Core Server.
Field Descriptions
Record Types to Log. These log message types will be sent to the log subsystem by this server.
• ALARM. If selected, Alarm messages generated by the server are sent to the log. It is strongly
recommended that this always be ON.
• EVENT. If selected, Event messages generated by the server are sent to the log. It is
recommended that this always be ON.
• REQUEST. If selected, Request messages generated by the server are sent to the log. Request
messages can easily flood the log on a busy system, so in many cases, this log type should be OFF.
• SECURITY. If selected, Security messages generated by the server are sent to the log. Security
log messages are usually relatively few in number, so this log type should be ON.
• ACCOUNTING. If selected, Accounting messages generated by the server are sent to the log.
• DEBUG. If selected, Debug messages generated by the server are sent to the log. It is
recommended that this be ON, particularly in the Core Server and Mover. Debug messages are
only generated when an error occurs and they can be very helpful in determining the cause of the
error.
HPSS Management Guide November 2009
Release 7.3 (Revision 1.0) 95
Page 96

• TRACE. If selected, Trace messages generated by the server are sent to the log. It is
recommended that this be OFF for all servers except the Mover. These messages give detailed
information about program flow and are generally of interest only to the server developer. In
normal operation, logging Trace messages can flood the log with very low level information. In
particular, it is important to avoid TRACE for the SSM System Manager Log Policy.
• STATUS. If selected, Status messages generated by the server are sent to the log.
Record Types for SSM. These log message types will be sent to the Alarms and Events window.
• SSM ALARM. If selected, Alarm messages generated by the server are sent to SSM. It is strongly
recommended that this always be ON.
• SSM EVENT. If selected, Event messages generated by the server are sent to SSM. It is
recommended that this always be ON.
• SSM STATUS. If selected, Status messages generated by the server are sent to SSM. It is
recommended that this always be ON.
Associated Button Descriptions
Use Default Log Policy. This button is used to configure the server to use the System Default Logging
Policy. The System Default Logging Policy is defined on the Global Configuration Window. Refer to
Section 4.1: Global Configuration Window on page 72.
If no server-specific log policy is defined for the server, the server uses the System Default Logging
Policy and this button is inactive. The values from the System Default Logging Policy are displayed in
this window.
To define a server-specific log policy, alter the fields in this window as desired and press the Add button.
A new log policy will be created for this server and the Use Default Log Policy button will become
active. The new log policy will also be added to the Logging Policies list window.
To remove the server-specific log policy, press the Use Default Log Policy button. The button will
become inactive again and the values of the System Default Logging Policy will be displayed in the
window. The server-specific log policy will be deleted from the system and from the Logging Policies
window.
To modify the server-specific log policy, alter the fields in this window as desired and press the Update
button.
5.1.1. Core Server Specific Configuration
A separate Core Server must be configured for each storage subsystem.
The Specific tab of the Core Server Configuration window allows you to view and update the typespecific configuration for the Core Server.
HPSS Management Guide November 2009
Release 7.3 (Revision 1.0) 96
Page 97

COS Change Retry Limit, Tape Dismount Delay, Tape Handoff Delay, PVL Max Connection Wait,
Fragment Trim Limit and Fragment Smallest Block can be changed in the Core Server while the
server is running by changing the value on this screen, updating the metadata, then re-initializing the
appropriate Core Server. The Core Server re-reads the metadata and changes its internal settings. The
changes take effect the next time the settings are used by the server. See Section 5.2.2: Reinitializing a
Server on page 154 for more information.
Changes made to the rest of the settings on this screen take effect the next time the server is started.
Field Descriptions
Root Fileset Name. Core Servers can create and support multiple filesets, but an initial fileset is
required for each Core Server. The Root Fileset Name designates which of these filesets will be used by
the Core Server to resolve the pathname “/” in the subsystem. Other filesets served by this Core Server,
or from other Core Servers in the HPSS system may be joined to this fileset by junctions.
Root Fileset ID. The Fileset ID of the fileset named in Root Fileset Name.
Maximum Open Bitfiles. The maximum number of bitfiles that can be open simultaneously.
Maximum Active I/O Requests. The maximum number of simultaneous I/O requests allowed.
Maximum Active Copy Requests. The maximum number of simultaneous copy requests allowed.
COS Change Retry Limit. This is the maximum number of attempts that will be made to change the
class of service of a file. If set to 0, COS change will continue to be attempted until it is successful. If a
positive value is provided, the COS change request will be dropped after it has failed the configured
number of times.
Tape Dismount Delay (seconds). The amount of time, in seconds, a mounted tape volume will remain
idle before being dismounted by the Core Server. Larger values may reduce undesirable tape
dismount/remount events, at the expense of lower tape drive utilization.
Tape Handoff Delay (seconds). The amount of time, in seconds, a mounted tape will be held in a
client's session before become eligible to be handed off to another client that wishes to use the tape.
PVL Max Connection Wait (seconds). The amount of time, in seconds, the Core Server will wait to
connect to the PVL before declaring an error in pending PVL jobs.
Fragment Trim Limit (clusters). Fragment Trim Limit sets the lower limit of the number of clusters
that will be trimmed from a disk segment extent, when the extent turns out to be longer than the needed
length. Larger values tend to reduce disk fragmentation, but at the expense of increased slack space.
Fragment Smallest Block. Fragment Smallest Block sets the boundary used to determine where to
remove excess clusters from allocations that have excess space. The smallest block returned to the free
space map from the excess space at the end of an extent will be this size or larger.
COS Copy to disk. If ON, all copy operations associated with COS changes should be directed to disk
if the hierarchy has a disk storage class at its top level. If OFF, COS changes are not automatically
copied to the disk level. If there is a tape level in the hierarchy, they will go there instead.
5.1.1.1. Additional Core Server Configuration
Certain aspects of the operation of the Core Server can be controlled by setting environment variables.
HPSS Management Guide November 2009
Release 7.3 (Revision 1.0) 97
Page 98

The server uses built-in default values for these settings, but if the environment variables can be found in
the server's environment, the server uses those values. The following is a list of the names of the
variables and the aspects of the server's operation they control. Since the environment is common to all
sub-systems, all Core Servers in an HPSS installation are subject to these values.
HPSS_MAX_NUM_OPEN_FILES_FOR_AGGR – Adjusts the maximum number of files that may be
open by the Core Server when it is assembling migration file aggregates. If this variable is not present in
the environment, the server's default value is 20000.
HPSS_SPEC_USER_LIST_LENGTH – Adjusts the length of the Core Server's internal list of users
who have delete only permission in AUTHZACL table. If this variable is not present in the environment,
the server's default value is 8.
HPSS_RESTRICTED_USER_FILE – Contains the pathname of a file that contains the list of
restricted users. If this variable is not present in the environment, the server does not implement this
feature.
HPSS_CORE_REPACK_OUTPUT – Enables or disables the repack output segregation feature. If this
environment variable is not present in the environment, or has the value “on”, files moved from one tape
virtual volume to another by repack will be written to tapes that contain only files written by the repack.
If this environment variable has the value “off”, files moved from one tape virtual volume to another by
repack may mixed on output tapes with files written by the migration subsystem, or directly to tape by
users.
HPSS_CORE_SEG_CACHE_IDLE_TIME – Adjusts the time, in seconds, a disk or tape storage
segment can remain idle in the Core Server's in-memory cache before being purged. If this variable is not
present in the environment, the server's default value is 60 seconds.
HPSS_CORE_TAPE_CACHE_IDLE_TIME – Adjusts the time, in seconds, a tape's in-memory cache
entries can remain idle before being purged. This value controls the tape storage map, VV and PV
caches. If this variable is not present in the environment, the server's default value is 300.
HPSS_CORE_LARGE_SEG_THRESHOLD – Controls the way tape storage space is allocated when
large tape storage segments are “repacked” from one tape virtual volume to another. The value of this
environment variable is a time, measured in seconds. If the segment to be moved would take longer to
move than this time threshold, then the segment is moved to a tape VV that apparently has sufficient free
space. If the segment will take less time to move than this threshold, then the segment is moved to any
available tape, subject to the rules defined by HPSS_CORE_REPACK_OUTPUT. The server's default
value is 30 seconds. The server uses the Transfer Rate information from the Storage Class when
estimating the time a segment will take to move.
5.1.2. Gatekeeper Specific Configuration
To use a Gatekeeper for Gatekeeping Services the Gatekeeper must be configured into one or more
Storage Subsystems (see Section 4.2.3: Storage Subsystem Configuration Window on page 76). To
associate a Gatekeeper with a storage subsystem, the Gatekeeper must be selected on the Storage
Subsystem Configuration window.
To use the Gatekeeper for Account Validation Services, Account Validation must be enabled in the
Accounting Policy (see Section 13.2: Accounting on page 330). If Account Validation is configured to be
ON, then at least one Gatekeeper must be configured even if the site does not wish to do gatekeeping. In
this case, the Gatekeeper will only be used for validating accounts. Otherwise a Gatekeeper may be used
HPSS Management Guide November 2009
Release 7.3 (Revision 1.0) 98
Page 99

for both gatekeeping and account validation. If multiple Gatekeepers are configured, then any Gatekeeper
may be contacted for account validation requests.
Note: If a Gatekeeper is configured, then it will either need to be running or marked non-executable for
HPSS Client API requests to succeed in the Core Server (even if no Gatekeeping nor Account Validation
is occurring); this is due to the HPSS Client API performing internal accounting initialization.
For a detailed description of the Gatekeeper, please refer to the HPSS Installation Guide, Section 3.7.3:
Gatekeeper.
Field Descriptions
Default Wait Time. The number of seconds the client must wait before retrying a request. This value
must be greater than zero and is used if the Gatekeeping Site Interface returns a wait time of zero for the
create, open, or stage request being retried.
Site Policy Pathname (UNIX). The contents of this file will be defined by the site and should be
coordinated with the Gatekeeping Site Interface . For example, a site may want to define the types of
requests being monitored, the maximum number of opens per user, and/or a path name to a log file. The
Site Policy Pathname will be passed to the gk_site_Init routine upon Gatekeeper startup. If a site wishes
to make use of the Site Policy Pathname file, then the site will need to add code to the Gatekeeping Site
Interface library to read the Site Policy Pathname file and interpret the data accordingly. Refer to the
HPSS Programmer's Reference, Chapter 4: Site Interfaces for details on the site's interface library.
5.1.3. Location Server Additional Configuration
The Location Server does not have a specific server configuration in the Server Configuration window.
However, some additional configuration outside SSM is required whenever a Location Server is added or
modified. Each client application which accesses HPSS must first contact the Location Server using the
Location Servers's RPC endpoints, which must be listed in the /var/hpss/etc/ep.conf file to be available to
client applications. The hpss_bld_ep utility reads the Location Server configuration and creates the
ep.conf file. Refer to the HPSS Installation Guide, Appendix F: /var/hpss files for more information on
the ep.conf file.
The hpss_bld_ep utility must only run on the HPSS root subsystem machine. To invoke the utility:
% /opt/hpss/config/hpss_bld_ep -v -f /var/hpss/etc/ep.conf -r
<Unix/LDAP Realm Name> -c <schema name> -d <DB2 configuration
database> add
For example:
% /opt/hpss/config/hpss_bld_ep -v -f /var/hpss/etc/ep.conf -r
hpss.acme.com -c hpss -d cfg add
HPSS Management Guide November 2009
Release 7.3 (Revision 1.0) 99
Page 100

5.1.4. Log Client Specific Configuration
This window controls the local log settings that will be in effect for the node on which this Log Client
runs.
Field Description
Client Port. The port number for communication between the Log Client and the HPSS Servers. The
default value is 8101. Ensure that the specified port is not being used by other applications. The port
number must be a different number than the Daemon Port used by the Log Daemon.
Maximum Local Log Size. The maximum size in bytes of the local log file. Once this size is reached,
the log will be reused in a wraparound fashion. The default value is 5,242,880 (5 MB). The local log is
not archived.
Local Logfile (UNIX). The fully qualified path name of the local log file. The default value is
/var/hpss/log/local.log. If Local Logfile is specified in the Log Messages To field, those messages sent
to this instance of the Log Client will be formatted and written to the designated file name. The specified
file name will contain formatted messages only from HPSS applications running on the node on which
this instance of the Log Client is running. This option is provided as a convenience feature. All HPSS
messages will be written to a central log if Log Daemon is specified in the Log Messages To field.
Log Messages To. If neither Local Logfile nor Syslog is specified, no local logging will occur. If Log
Daemon is not specified, messages from HPSS processes on the same node as this Log Client will not be
written to the central log. The Syslog option should be used with care since the syslog file will grow
without bound until it is deleted/truncated, or until the file system runs out of space. The following check
boxes describe where the log messages will go.
• Log Daemon. If checked, messages are forwarded to the HPSS Log Daemon to be recorded
in a central logfile.
• Local Logfile. If checked, messages are formatted and recorded in a local log file. This
should not be checked if Stdout is also checked.
• Syslog. If checked, messages are formatted and sent to the host's syslog daemon.
• Stdout. If checked, messages are formatted and sent to the Log Client's standard output. This
should not be checked if Local Logfile is also checked.
HPSS Management Guide November 2009
Release 7.3 (Revision 1.0) 100
 Loading...