

Page 1

IBM E400 PROJECTOR
User’s Guide
Page 2

Page 3

IBM E400 PROJECTOR
User’s Guide
Page 4

©
Opomba: Before using this information and the product it supports, read the information in
Dodatek D, “Service and Support”, na strani D-1 and Dodatek E, “IBM Statement of Limited
Warranty - Z125-4753-07 - 11/2002”, na strani E-1
Second Edition (February 2004)
Copyright International Business Machines Corporation 2004. Vse pravice pridržane.
Page 5

CD
na
©
Kazalo
Safety information . . . . . . . . . .v
General safety information . . . . . . vii
Service . . . . . . . . . . . . . . . . vii
Power cords and power adapters . . . . . . . . vii
Extension cords and related devices . . . . . . . vii
Plugs and outlets . . . . . . . . . . . . . viii
Batteries . . . . . . . . . . . . . . . viii
Heat and product ventilation . . . . . . . . . viii
and DVD drive safety . . . . . . . . . . .ix
Registering your option . . . . . . . .xi
Predgovor . . . . . . . . . . . . . xiii
Poglavje 1. Uvod . . . . . . . . . . 1-1
Poglavje 2. Nastavitev projektorja . . . 2-1
Zagon in zaustavljanje projektorja . . . . . . . . 2-1
Regulacija višine projektorja . . . . . . . . . 2-2
Namestitev projektorja . . . . . . . . . . . 2-2
Regulacija zooma, izostritve in širokega zgornjega ali
spodnjega dela slike . . . . . . . . . . . . 2-3
Nastavitev glasnosti . . . . . . . . . . . . 2-4
Poglavje 5. Nastavitve menija prikaza
platnu . . . . . . . . . . . . . 5-1
Krmarjenje po prikazu na platnu . . . . . . . . 5-1
Nastavitev jezika prikaza na platnu . . . . . . 5-1
Meni Quality (Kakovost) . . . . . . . . . 5-1
Meni Properties (Lastnosti) . . . . . . . . . 5-4
Meni Options (Možnosti) . . . . . . . . . 5-5
Meni Setup (Nastavitev) . . . . . . . . . . 5-6
Meni Information (Informacije) . . . . . . . 5-7
Dodatek A. Vzdrževanje . . . . . . . A-1
Čiščenje objektiva . . . . . . . . . . . . A-1
Zamenjava projekcijske žarnice . . . . . . . . A-1
Ponastavitev časovnika žarnice . . . . . . . . A-3
Uporaba varnostne reže . . . . . . . . . . . A-3
Dodatek B. Odpravljanje težav . . . . B-1
Lučke na projektorju . . . . . . . . . . . . B-2
Dodatek C. Specifikacije . . . . . . . C-1
Dodatek D. Service and Support . . . D-1
Online technical support . . . . . . . . . . D-1
Telephone technical support . . . . . . . . . D-1
Poglavje 3. Povezovanje naprav in
projektorja . . . . . . . . . . . . . 3-1
Priključevanje naprav . . . . . . . . . . . 3-1
Poglavje 4. Uporaba funkcij projektorja 4-1
Uporaba daljinskega upravljalnika . . . . . . . . 4-1
Vstavljanje baterij v daljinski upravljalnik . . . . . 4-2
Doseg delovanja . . . . . . . . . . . . . 4-3
Gumbi na projektorju in daljinskem upravljalniku . . . 4-3
Dodatek E. IBM Statement of Limited
Warranty - Z125-4753-07 - 11/2002 . . . E-1
Part 2 - Country-unique Terms . . . . . . . . E-4
Part 3 - Warranty Information . . . . . . . . E-14
Dodatek F. Notices . . . . . . . . . F-1
Trademarks . . . . . . . . . . . . . . F-2
Electronic emission notices . . . . . . . . . . F-2
Federal Communications Commission (FCC) statement F-2
Copyright IBM Corp. 2004
iii
Page 6

iv
IBM E400 PROJECTOR: User’s Guide
Page 7
©
Safety information
Before installing this product, read the Safety Information.
Antes de instalar este produto, leia as Informações de Segurança.
Pred instalací tohoto produktu si prectete prírucku bezpecnostních instrukcí.
Læs sikkerhedsforskrifterne, før du installerer dette produkt.
Ennen kuin asennat tämän tuotteen, lue turvaohjeet kohdasta Safety Information.
Avant d’installer ce produit, lisez les consignes de sécurité.
Vor der Installation dieses Produkts die Sicherheitshinweise lesen.
Prima di installare questo prodotto, leggere le Informazioni sulla Sicurezza.
Lees voordat u dit product installeert eerst de veiligheidsvoorschriften.
Les sikkerhetsinformasjonen (Safety Information) før du installerer dette produktet.
Copyright IBM Corp. 2004
Antes de instalar este produto, leia as Informações sobre Segurança.
Antes de instalar este producto lea la información de seguridad.
v
Page 8

vi
Läs säkerhetsinformationen innan du installerar den här produkten.
IBM E400 PROJECTOR: User’s Guide
Page 9

Do
Do
Do
©
General safety information
Always observe the following precautions to reduce the risk of injury and property damage.
Service
not attempt to service a product yourself unless instructed to do so by the IBM Support
Center. Use only an IBM authorized service provider who is approved to repair your
particular product.
Note: Some parts can be upgraded or replaced by the customer. These parts are referred to as
Customer Replaceable Units, or CRUs. IBM expressly identifies CRUs as such, and provides
documentation with instructions when it is appropriate for customers to replace those parts.
You must closely follow all instructions when performing such replacements. Always make
sure that the power is turned off and that the product is unplugged from any power source
before you attempt the replacement. If you have any questions or concerns, contact the IBM
Support Center.
Power cords and power adapters
Use only the power cords and power adapters supplied by the product manufacturer.
Never wrap a power cord around the power adapter or other object. Doing so can stress the
cord in ways that can cause the cord to fray, crack or crimp. This can present a safety hazard.
Always route power cords so that they will not be walked on, tripped over, or pinched by
objects.
Protect the cord and power adapters from liquids. For instance, do not leave your cord or
power adapter near sinks, tubs, toilets, or on floors that are cleaned with liquid cleansers.
Liquids can cause a short circuit, particularly if the cord or power adapter has been stressed by
misuse. Liquids can also cause gradual corrosion of the power cord terminals and/or the
connector terminals on the adapter which can eventually result in overheating.
Always connect power cords and signal cables in the correct order and ensure that all power
cord connectors are securely and completely plugged into receptacles.
not use any power adapter that shows corrosion at the ac input pins and/or shows signs of
overheating (such as deformed plastic) at the ac input or anywhere on the power adapter.
not use any power cords where the electrical contacts on either end show signs of
corrosion or overheating or where the power cord appears to have been damaged in any way.
Extension cords and related devices
Ensure that extension cords, surge protectors, uninterruptible power supplies, and power strips
that you use are rated to handle the electrical requirements of the product. Never overload
these devices. If power strips are used, the load should not exceed the power strip input rating.
Consult an electrician for more information if you have questions about power loads, power
requirements, and input ratings.
Copyright IBM Corp. 2004
vii
Page 10

If a
be
Do
Be
by
of
v Do
Plugs and outlets
replacement.
Some products are equipped with a three-pronged plug. This plug fits only into a grounded
electrical outlet. This is a safety feature. Do not defeat this safety feature by trying to insert it
into a non-grounded outlet. If you cannot insert the plug into the outlet, contact an electrician
for an approved outlet adapter or to replace the outlet with one that enables this safety feature.
Never overload an electrical outlet. The overall system load should not exceed 80 percent of
the branch circuit rating. Consult an electrician for more information if you have questions
about power loads and branch circuit ratings.
close to the equipment. Do not fully extend power cords in a way that will stress the cords.
receptacle (power outlet) that you intend to use with your computer equipment appears to
damaged or corroded, do not use the outlet until it is replaced by a qualified electrician.
not bend or modify the plug. If the plug is damaged, contact the manufacturer to obtain a
sure that the power outlet you are using is properly wired, easily accessible, and located
Batteries
Connect and disconnect the equipment from the electrical outlet carefully
All IBM personal computers contain a non-rechargeable coin cell battery to provide power to
the system clock. In addition many mobile products such as Thinkpad notebook PCs utilize a
rechargeable battery pack to provide system power when in portable mode. Batteries supplied
IBM for use with your product have been tested for compatibility and should only be
replaced with IBM approved parts.
Never attempt to open or service any battery. Do not crush, puncture, or incinerate batteries or
short circuit the metal contacts. Do not expose the battery to water or other liquids. Only
recharge the battery pack strictly according to instructions included in the product
documentation.
Battery abuse or mishandling can cause the battery to overheat, which can cause gasses or
flame to “vent” from the battery pack or coin cell. If your battery is damaged, or if you notice
any discharge from your battery or the buildup of foreign materials on the battery leads, stop
using the battery and obtain a replacement from the battery manufacturer.
Batteries can degrade when they are left unused for long periods of time. For some
rechargeable batteries (particularly Lithium Ion batteries), leaving a battery unused in a
discharged state could increase the risk of a battery short circuit, which could shorten the life
the battery and can also pose a safety hazard. Do not let rechargeable Lithium-Ion batteries
completely discharge or store these batteries in a discharged state.
Heat and product ventilation
Computers generate heat when turned on and when batteries are charging. Notebook PCs can
generate a significant amount of heat due to their compact size. Always follow these basic
precautions:
not leave the base of your computer in contact with your lap or any part of your body
for an extended period when the computer is functioning or when the battery is charging.
Your computer produces some heat during normal operation. Extended contact with the
body could cause discomfort or, potentially, a skin burn.
viii
IBM E400 PROJECTOR: User’s Guide
Page 11

Do
v
CD
v
v
v
v Do
v
v
not operate your computer or charge the battery near flammable materials or in
explosive environments.
Ventilation slots, fans and/or heat sinks are provided with the product for safety, comfort,
and reliable operation. These features might inadvertently become blocked by placing the
product on a bed, sofa, carpet, or other flexible surface. Never block, cover or disable these
features.
CD and DVD drive safety
and DVD drives spin discs at a high speed. If a CD or DVD is cracked or otherwise
physically damaged, it is possible for the disc to break apart or even shatter when the CD
drive is in use. To protect against possible injury due to this situation, and to reduce the risk of
damage to your machine, do the following:
Always store CD/DVD discs in their original packaging
Always store CD/DVD discs out of direct sunlight and away from direct heat sources
Remove CD/DVD discs from the computer when not in use
not bend or flex CD/DVD discs, or force them into the computer or their packaging
Check CD/DVD discs for cracks before each use. Do not use cracked or damaged discs
General safety information
ix
Page 12

x
IBM E400 PROJECTOR: User’s Guide
Page 13

as
©
Registering your option
Thank you for purchasing this IBM
®
product. Please take a few moments to register your
product and provide us with information that will help IBM to better serve you in the future.
Your feedback is valuable to us in developing products and services that are important to you,
well as in developing better ways to communicate with you. Register your option on the
IBM Web site at
http://www.ibm.com/pc/register/
IBM will send you information and updates on your registered product unless you indicate on
the Web site questionnaire that you do not want to receive further information.
Copyright IBM Corp. 2004
xi
Page 14

xii
IBM E400 PROJECTOR: User’s Guide
Page 15

in ga je
©
Predgovor
Projektor IBM E400 je primeren tako za poslovne predstavitve kot tudi za domače razvedrilo
mogoče enostavno priključiti, uporabljati in vzdrževati.
Poleg teh navodil za uporabo paket vsebuje tudi naslednje:
Copyright IBM Corp. 2004
1 Projektor z ohišjem žarnice in pokrovom objektiva
2 Daljinski upravljalnik
3 Dve AAA bateriji
4 USB kabel
5 Kabel S-video
6 Video kabel (DVI-DB15) za VGA
7 Avdio kabel (Mini vtičnica za RCA)
8 Napajalni kabel
9 Kabel za kompozitni video
10 CD plošča (za namestitev) z navodili za uporabo
11 Vodnik za hiter začetek v več jezikih
12 Torbica za prenašanje
xiii
Page 16

Za
v
v Ne
v
se
v
Če katerega izmed zgoraj navedenih predmetov ni oziroma je poškodovan, se obrnite na
prodajalca.
Opomba: Shranite potrdilo o nakupu; potrebovali ga boste pri servisnem popravilu.
informacije o izbirni dodatni opremi za projektor obiščite http://www.ibm.com.
Opozorilo:
Projektorja ne uporabljajte v prašnem okolju.
blokirajte prezračevalnih odprtin projektorja.
Preden projektor namestite v torbico, pustite napajalni kabel vklopljen za 2 do 5 minut, da
projektor ohladi na sobno temperaturo. Če projektor namestite v torbico prezgodaj po
izklopu napajanja, se lahko pregreje, kar skrajša življenjsko dobo žarnice.
Poskrbite, da ste namestili pokrov objektiva in projektor namestili v torbico, da tako
preprečite poškodovanje objektiva.
xiv
IBM E400 PROJECTOR: User’s Guide
Page 17
©
Poglavje 1. Uvod
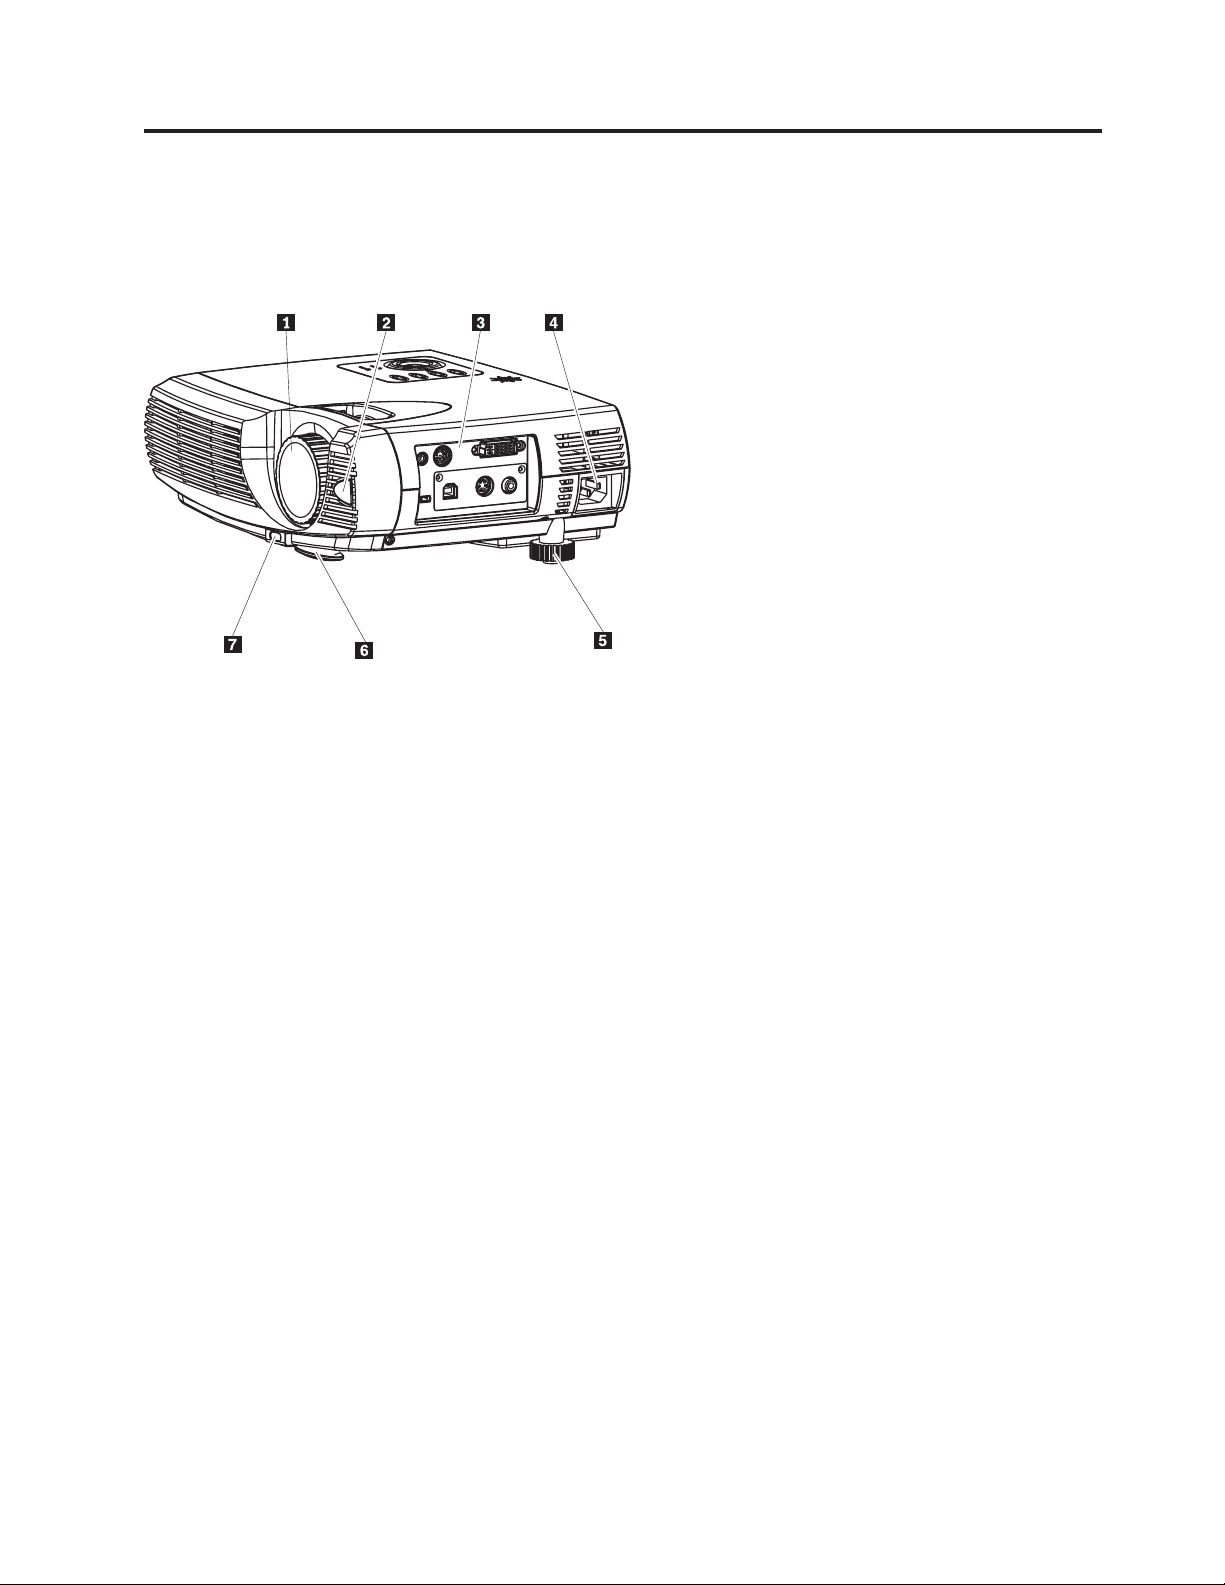
Spodnje slike prikazujejo funkcije projektorja.
Slika 1-1. Pogled na projektor s sprednje desne strani
1 Objektiv/izostritev
2 IR sprejemnik
3 Konektorji
4 Konektor za napajalni kabel
5 Podstavek za izravnavo
6 Podstavek za dvigovanje
7 Gumb za regulacijo podstavka za dvigovanje
Copyright IBM Corp. 2004
1-1
Page 18
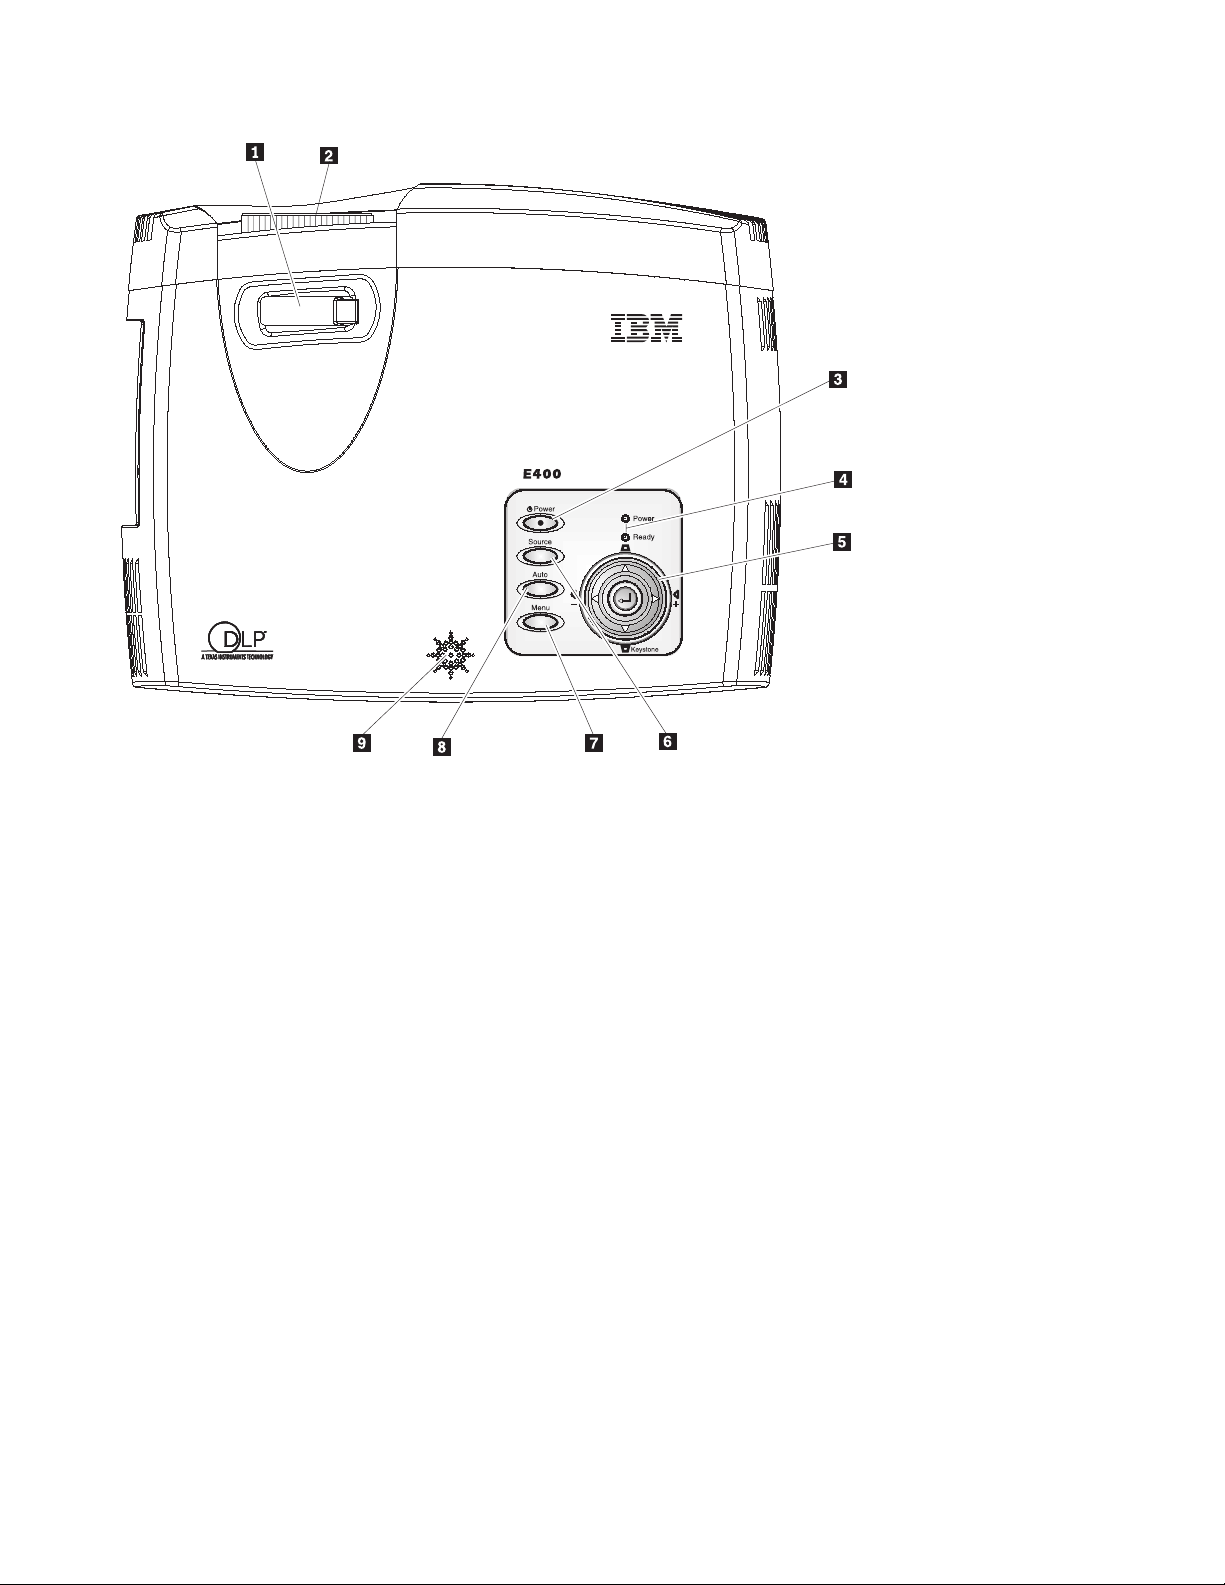
Slika 1-2. Pogled na projektor od zgoraj
1 Zoom
2 Izostritev
3 Power (Vklop)
4 Lučke stanja sistema
5 Kontrolni gumbi
6 Gumb Source (Vir)
7 Gumb Menu (Meni)
8 Gumb Auto (Samodejno)
9 Zvočnik
1-2
IBM E400 PROJECTOR: User’s Guide
Page 19
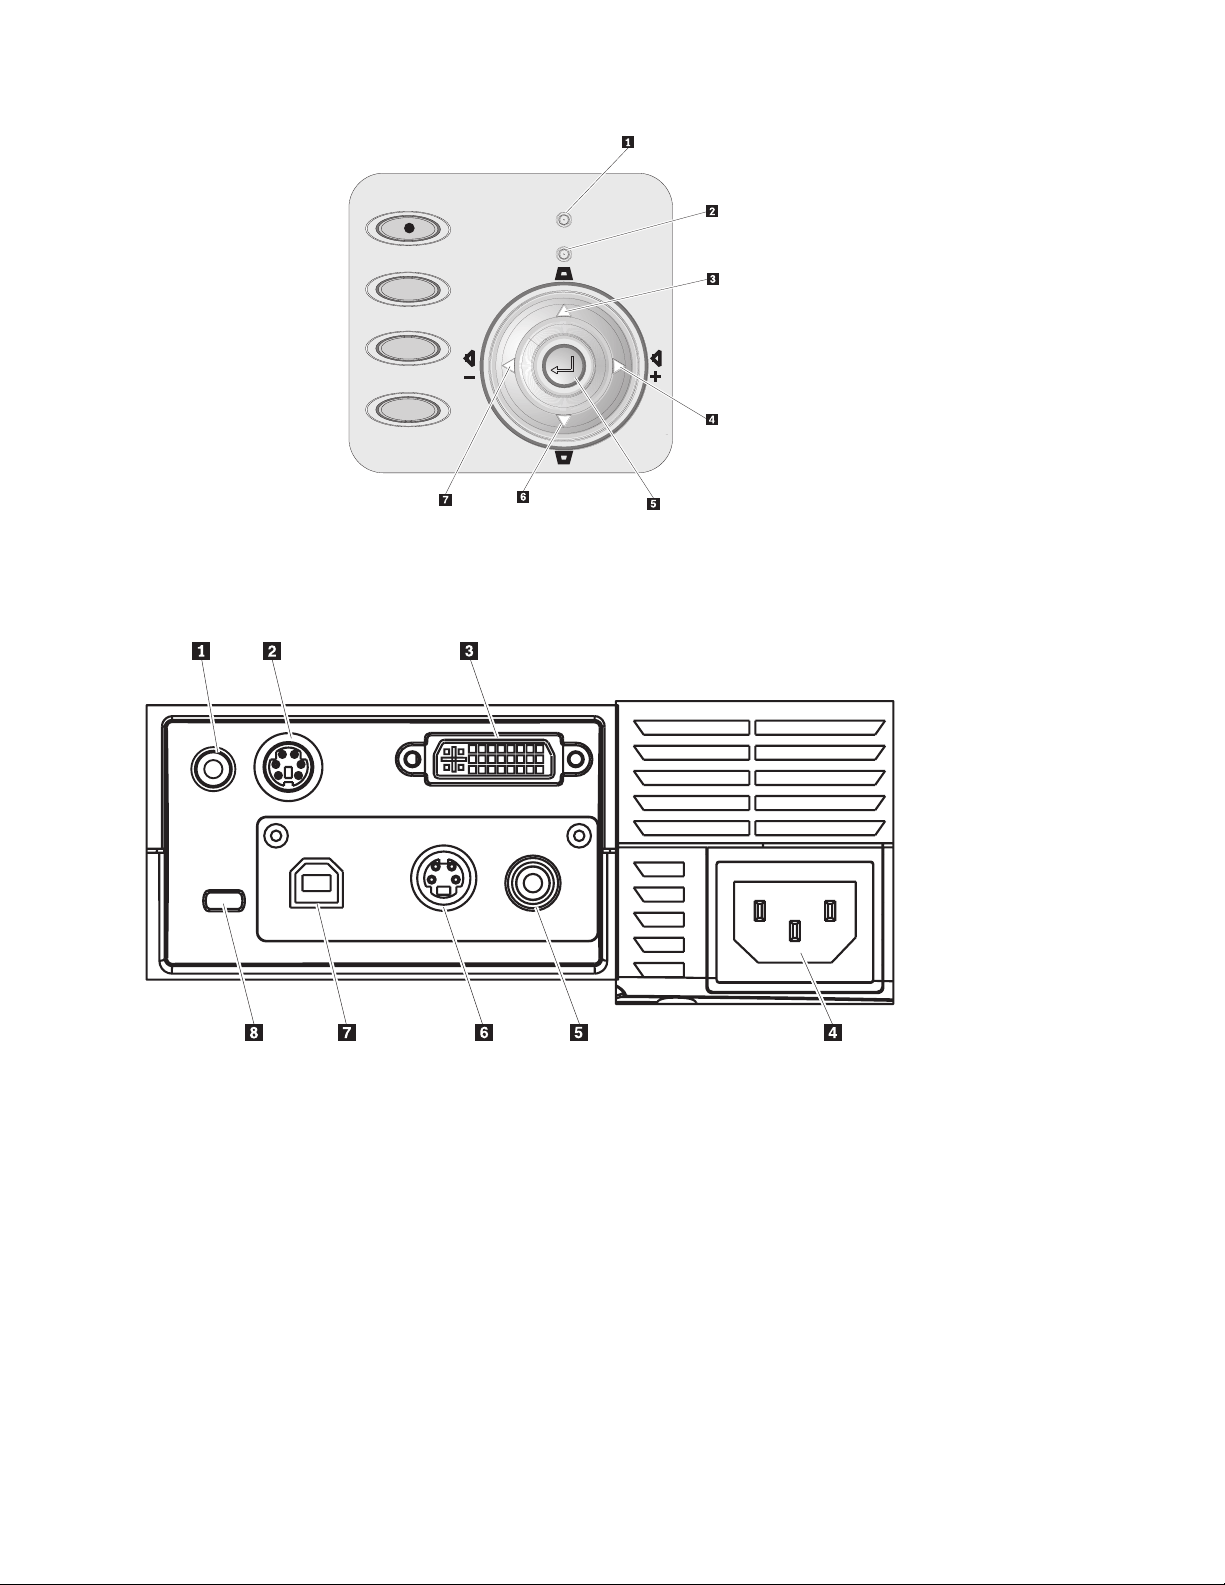
1 Power (Napajanje) (lučka)
2 Ready (Pripravljeno) (lučka)
3 Keystone/gumb navzgor
4 Glasnost/gumb desno
5 Gumb Enter
6 Keystone/gumb navzdol
7 Glasnost/gumb levo
Slika 1-3. Pogled od zgoraj na kontrolne
gumbe in lučke projektorja
Slika 1-4. Konektorji
1 Avdio vhod
2 RS-232
3 DVI-I
4 AC vtičnica
5 Kompozitni video
6 S-video
7 USB
8 Varnostna reža
Poglavje 1. Uvod
1-3
Page 20
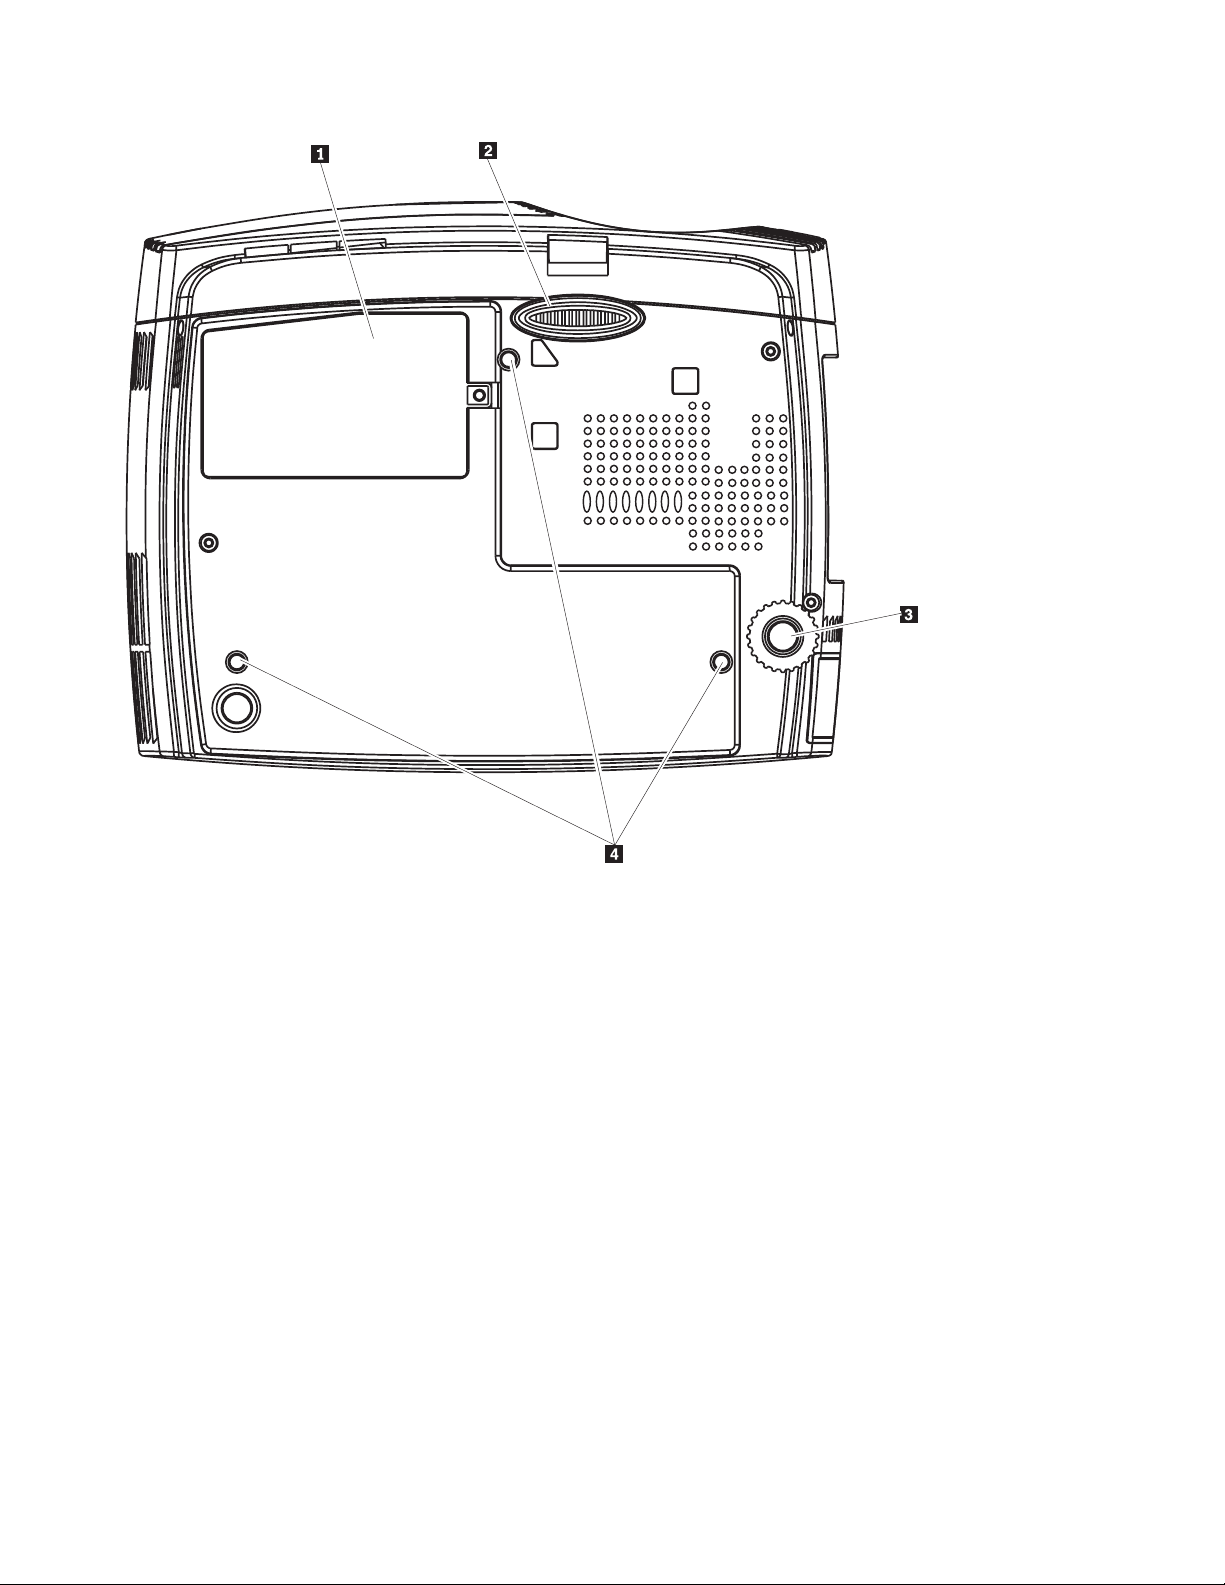
Slika 1-5. Pogled na projektor od spodaj
1 Pokrov projekcijske žarnice
2 Podstavek za dvigovanje
3 Podstavek za izravnavo
4 Odprtine za namestitev na strop
1-4
IBM E400 PROJECTOR: User’s Guide
Page 21
To
1.
2.
3.
4.
5.
za
6. Če je
7. Za
©
Poglavje 2. Nastavitev projektorja
poglavje vsebuje informacije o zaganjanju in zaustavljanju projektorja, izravnavi in
nastavitvi višine projektorja, nastavitvi zooma, izostritve, širokega zgornjega ali spodnjega
dela slike ter informacije o nastavitvi glasnosti.
Opozorilo: Preden projektor premaknete, poskrbite, da ste ga zaustavili po običajnem
postopku in izklopili iz glavnega vira napajanja.
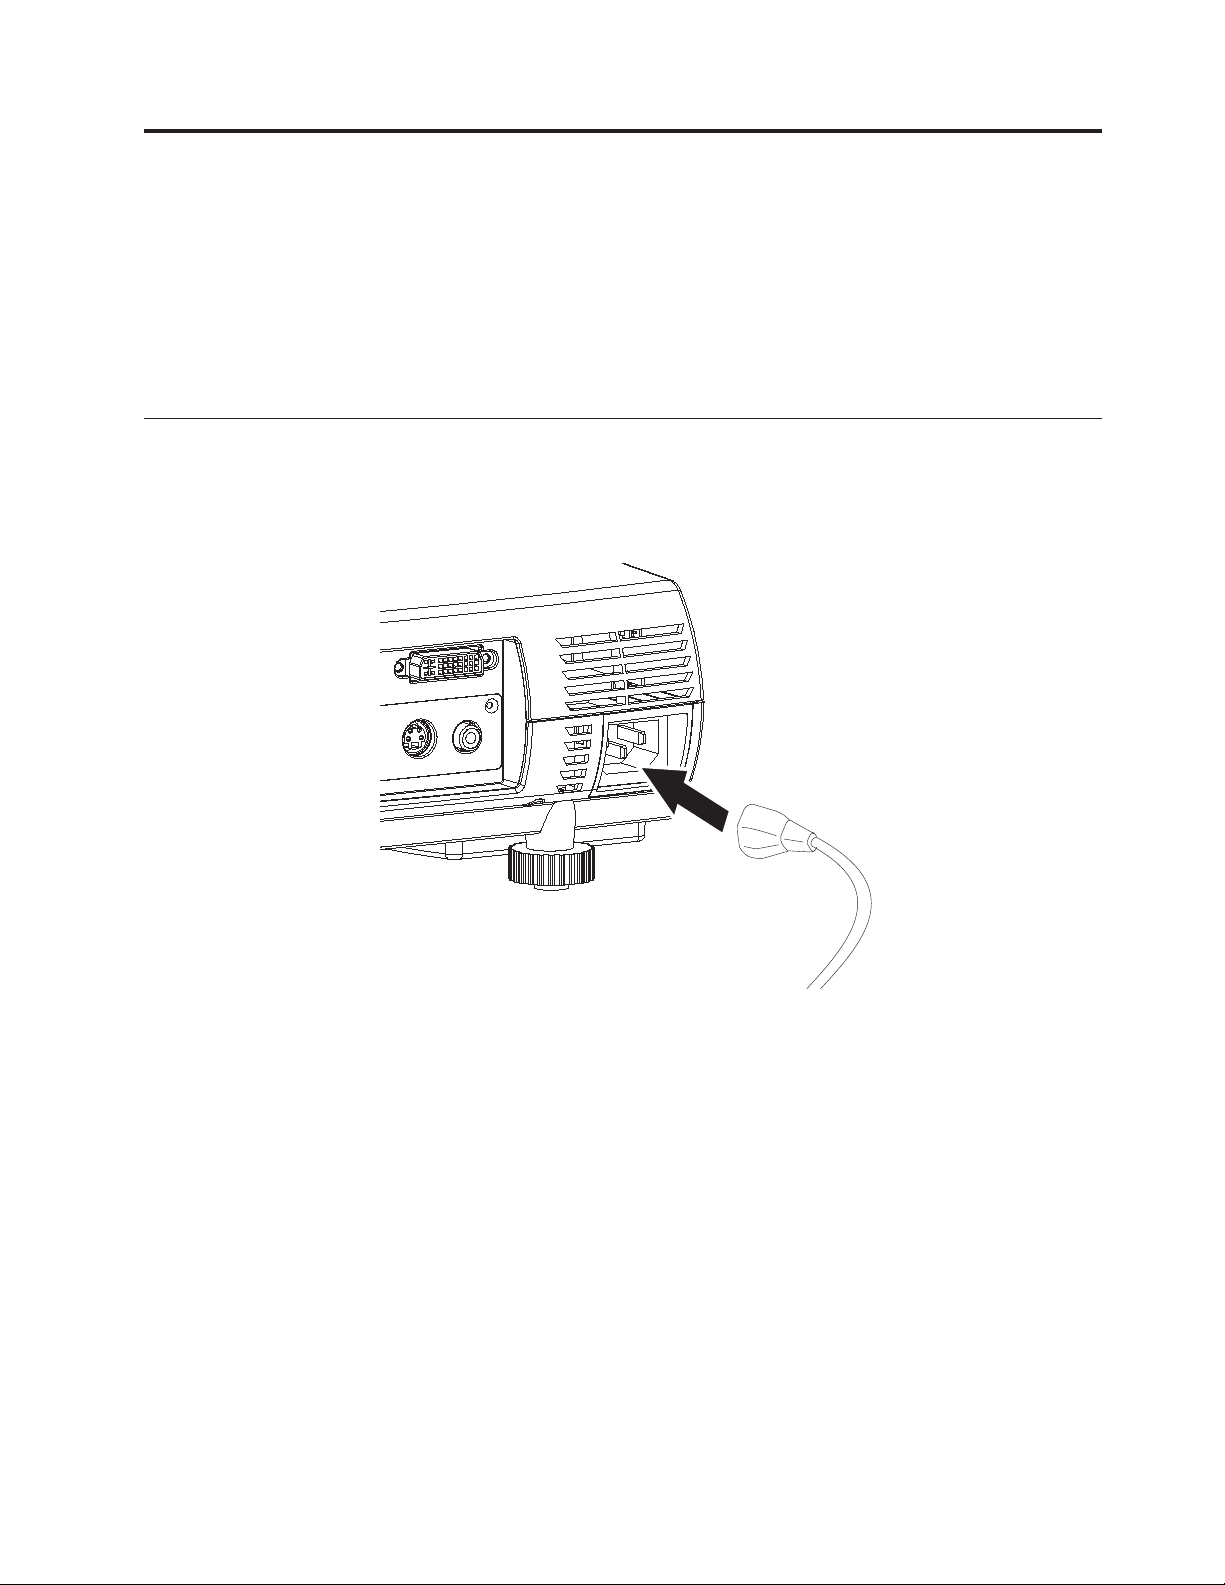
Zagon in zaustavljanje projektorja
Pri zagonu in zaustavljanju projektorja upoštevajte spodnje korake.
Napajalni kabel priključite na projektor, kot je prikazano spodaj. Drugi konec vključite v
stensko vtičnico. Lučki napajanja in pripravljenosti žarnice zasvetita.
Copyright IBM Corp. 2004
Odstranite pokrov objektiva.
Povežite z vhodno napravo.
Vklopite priključene naprave.
Poskrbite, da lučka pripravljenosti žarnice sveti jantarno, nato pritisnite gumb Power
(Vklop), da vključite projektor.
Pojavi se uvodni zaslon projektorja, zaznajo se priključene naprave. Če je priključena
naprava računalnik IBM ThinkPad, na tipkovnici računalnika pritisnite Fn + F7, da izhod
prikaz preklopite na projektor. Pri osebnih računalnikih drugih proizvajalcev si za
ustrezne bližnjične tipke za spreminjanje izhoda za prikaz oglejte navodila za njihovo
uporabo.
Opozorilo: Ko je žarnica prižgana, ne glejte neposredno v projekcijski objektiv. Močna
svetloba lahko poškoduje vaše oči.
priključenih več vhodnih naprav, za preklop med njimi pritiskajte gumb Source
(Vir).
izklop projektorja pritisnite gumb Power (Vklop). Projektor se pripravi na zaustavitev,
prikaže se sporočilo ″Wait a moment please...″ (Počakajte trenutek...).
2-1
Page 22
Ko se
2 do 5
v
Če
1. Če
2. Če
3. Če
Če
v
8.
pojavi sporočilo ″Power off?/Press Power again″ (Izklop?/Ponovno pritisnite Power
(Vklop)), pritisnite gumb Power (Vklop). Projektor se izklopi.
Opomba:
Preden projektor namestite v torbico, pustite napajalni kabel vklopljen za najmanj
minut, da se projektor ohladi na sobno temperaturo. Če projektor namestite
torbico prezgodaj po izklopu napajanja, se lahko pregreje.
Opozorilo: Preden projektor premaknete, poskrbite, da ste ga zaustavili po običajnem
postopku in izklopili iz glavnega vira napajanja.
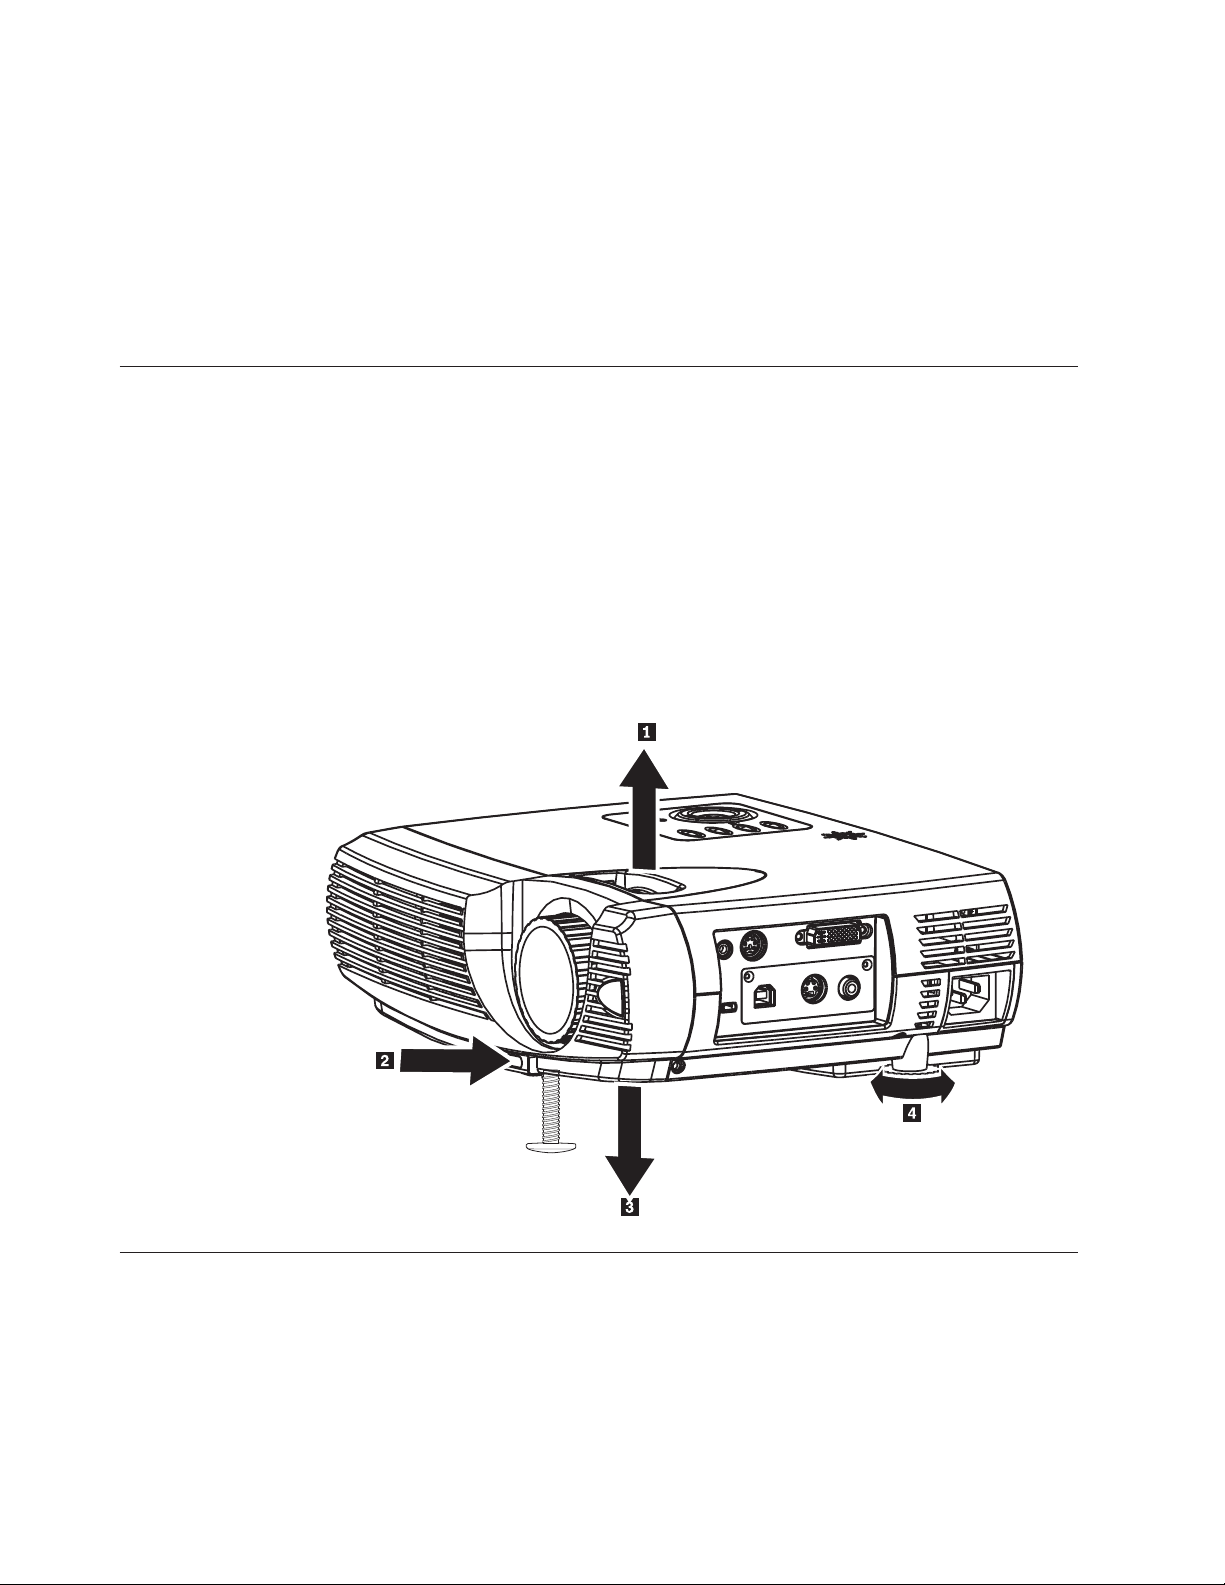
Regulacija višine projektorja
želite prilagoditi višino projektorja, upoštevajte naslednji postopek:
želite povišati višino projektorja, ga dvignite, kot prikazuje 1, in pritisnite gumbe
podstavka za dvigovanje, kot prikazuje 2. Spusti se podstavek za dvigovanje, kot
prikazuje 3.
želite znižati višino projektorja, pritisnite gumb podstavka za dvigovanje, kot
prikazuje 2, in pritisnite navzdol na vrhnji del projektorja.
želite izravnati projektor, obračajte podstavek za izravnavo, kot prikazuje 4.
Namestitev projektorja
želite določiti ustrezno mesto za namestitev projektorja, upoštevajte velikost in obliko
platna, lokacijo električnih vtičnic in razdaljo med projektorjem in ostalo opremo. Sledi nekaj
splošnih smernic:
Projektor namestite na ravno površino pod pravim kotom glede na platno. Projektor mora
biti od projekcijskega platna oddaljen najmanj 1,5 m.
2-2
IBM E400 PROJECTOR: User’s Guide
Page 23

od
v
1. Za
v
Projektor namestite do 2,7 m od vira napajanja in do 1,8 m od video naprave (razen če
kupite podaljške). Da zagotovite ustrezen dostop do kablov, projektor namestite vsaj 15 cm
stene in drugih predmetov.
Projektor namestite na želeni razdalji od platna. Velikost projicirane slike je odvisna od
razdalje med objektivom projektorja in platnom, nastavitve zooma in video formata.
Slika 2-1.
Tabela 2-1.
Razdalja med sredino
Diagonalna velikost
platna
(m/in.)
1 1,10/43,3
2 1,47/57,8
3 1,76/69,3
4 2,06/81,1
5 2,35/92,5
6 2,65/104,3
7 2,94/115,7
8 3,23/127,2
Širina slike
(m/ft)
,88/2,88
1,17/3,83
1,4/4,59
1,64/5,38
1,87/6,13
2,11/6,92
2,34/7,67
2,57/8,43
Višina slike
(m/ft)
,66/2,16
,88/2,88
1,1/3,6
1,23/4,03
1,41/4,62
1,58/5,18
1,76/5,77
1,94/6,36
objektiva in spodnjim
delom slike
(m/ft)
1,5/4,92
2/6,56
2,4/7,87
2,8/9,18
3,2/10,5
3,6/11,81
4/13,12
4,4/14,4
Regulacija zooma, izostritve in širokega zgornjega ali spodnjega dela slike
Pri reguliranju slike upoštevajte naslednje korake.
izostritev projicirane slike uporabite regulator za izostritev slike na projektorju, kot
prikazuje 1.
Poglavje 2. Nastavitev projektorja
2-3
Page 24

Če
3. Če
Na
Če
1. Na
2. Za
3. Če
4. Če
2.
želite spremeniti velikost projicirane slike in velikost platna, uporabite regulator za
nastavitev zooma slike na projektorju, kot prikazuje 2.
želite odpraviti učinek trapeznih stranic slike (širok zgornji ali spodnji del slike),
uporabite gumbe Keystone (prikazani spodaj).
Nastavitev glasnosti
želite nastaviti glasnost, sledite spodnjim korakom.
prikazu na platnu se prikaže regulator za nastavitev glasnosti.
nastavitev glasnosti na projektorju in daljinskem upravljalniku.
upravljalniku). Oglejte si 3 na zgornji sliki.
Volume +/-.
prikazu se pojavi regulator za širok zgornji ali spodnji del slike.
projektorju ali daljinskem upravljalniku pritisnite gumbe Volume (Glasnost) +/-. Na
nastavitev stopnje uporabite gumbe Volume +/-. Spodaj so prikazani gumbi za
želite izklopiti zvok, pritisnite gumb Mute (Nemo) (samo na daljinskem
želite vklopiti zvok, na projektorju ali daljinskem upravljalniku pritisnite gumbe
2-4
IBM E400 PROJECTOR: User’s Guide
Page 25

To
©
Poglavje 3. Povezovanje naprav in projektorja
poglavje vsebuje informacije o priključevanju naprav na projektor E400.
Priključevanje naprav
Projektor je mogoče hkrati povezati z računalnikom in video napravo. Oglejte si uporabniški
priročnik naprave, ki jo želite priključiti, saj mora naprava imeti ustrezen izhodni konektor.
1 Avdio vhod
2 RS-232
3 DVI-I
4 Kompozitni video
5 S-video
6 USB
Copyright IBM Corp. 2004
3-1
Page 26

3-2
IBM E400 PROJECTOR: User’s Guide
Page 27

To
Da
©
Poglavje 4. Uporaba funkcij projektorja
poglavje vsebuje informacije o uporabi daljinskega upravljalnika, gumbov za avdio,
gumbov tipkovnice in drugih funkcij projektorja.
Uporaba daljinskega upravljalnika
Daljinski upravljalnik uporablja dve priloženi AAA bateriji. Postopek njune namestitve je
preprost - s hrbtne strani daljinskega upravljalnika odstranite pokrovček, poravnajte + in konca baterij, potisnite ju na mesto in pokrovček namestite nazaj.
POZOR:
zmanjšate nevarnost poškodovanja oči, ne glejte neposredno v lasersko svetlobo
daljinskega upravljalnika in laserske svetlobe ne usmerjajte v oči drugih ljudi. V
daljinski upravljalnik je vgrajen laser razreda II, ki oddaja žarke.
Daljinski upravljalnik je prikazan na spodnji sliki.
1 Laser
2 IR oddajnik
3 Lučka stanja
4 Samodejno
5 Prazno
6 Enter
7 Drsnik navzgor
8 Drsnik desno
9 Drsna ploščica
10 Širši zgornji del slike
11 Širši spodnji del slike
12 Nemo
13 Desna miškina tipka
14 Leva miškina tipka
15 Znižanje glasnosti
16 Drsnik navzdol
17 Zvišanje glasnosti
18 Drsnik levo
19 Meni
20 Zamrznitev
21 Vir
22 Vklop
Copyright IBM Corp. 2004
4-1
Page 28

Ob
1.
2.
3.
v
v
v Če
Vstavljanje baterij v daljinski upravljalnik
prvi uporabi daljinskega upravljalnika vanj vstavite priloženi bateriji. Pri vstavljanju novih
baterij v daljinski upravljalnik upoštevajte spodaj navedene korake.
Odstranite pokrov predela za baterije - potisnite ga v smeri puščice, kot je prikazano.
Vstavite priloženi bateriji, pri tem bodite pozorni na polarnost (+/-), kot je prikazano.
4-2
IBM E400 PROJECTOR: User’s Guide
Pokrov namestite nazaj, kot je prikazano.
Opomba:
Uporabljajte le AAA alkalne baterije.
Rabljene baterije odlagajte v skladu s predpisi lokalne uprave.
daljinskega upravljalnika dlje časa ne nameravate uporabljati, odstranite
baterije.
Page 29

10 m in 30 °
Doseg delovanja
Daljinski upravljalnik uporablja za upravljanje projektorja infrardeči prenos. Daljinskega
upravljalnika ni treba usmeriti neposredno proti projektorju; daljinec deluje znotraj polmera
nad ali pod višino projektorja. Če se projektor ne odziva na daljinski
upravljalnik, se malo približajte.
Opomba: Daljinec lahko usmerite tudi na projicirano sliko.
Gumbi na projektorju in daljinskem upravljalniku
Projektor je mogoče upravljati z daljinskim upravljalnikom ali gumbi na vrhnji strani
projektorja. Vse postopke je mogoče izvesti z daljinskim upravljalnikom. Spodnja slika
prikazuje ustrezne gumbe na daljinskem upravljalniku in projektorju.
1 Vklop
2 Vir
3 Samodejno
4 Meni
5 Znižanje glasnosti/Gumb levo
6 Širok spodnji del slike/Gumb navzdol
7 Enter
8 Zvišanje glasnosti/Gumb desno
9 Širok zgornji del slike/Gumb navzgor
Poglavje 4. Uporaba funkcij projektorja
4-3
Page 30

4-4
IBM E400 PROJECTOR: User’s Guide
Page 31

Ta
Za
1.
2.
3.
4. Za
5. Če
Za
1.
©
Poglavje 5. Nastavitve menija prikaza na platnu
projektor ima prikaz na platnu (OSD), ki omogoča prilagajanje slike in spreminjanje
različnih nastavitev.
Opomba: Za dostop do OSD morate imeti prikaz na platnu.
Krmarjenje po prikazu na platnu
krmarjenje po prikazu na platnu in izvajanje sprememb lahko uporabljate daljinski
upravljalnik ali gumbe na vrhnjem delu projektorja. V naslednjih odstavkih so prikazane
možnosti menija na prikazu na platnu.
Nastavitev jezika prikaza na platnu
Med branjem tega razdelka je koristno, če opazujete tudi meni prikaza na platnu. Preden
nadaljujete, s spodnjim postopkom nastavite svoj jezik prikaza na platnu.
Pritisnite gumb Meni. Pojavi se glavni meni.
Pritiskajte smerni gumb levo/desno, da označite Language (Jezik).
Meni Quality (Kakovost)
Copyright IBM Corp. 2004
Pritiskajte smerni gumb navzgor/navzdol, dokler ne označite želenega jezika.
izbiro jezika pritisnite gumb Enter.
želite zapreti prikaz na platnu, dvakrat pritisnite gumb Meni.
dostop do menija Quality (Kakovost) sledite spodnjim korakom.
Pritisnite gumb Meni, da odprete meni prikaza na platnu.
5-1
Page 32

3.
V
Za
50
Za
50
Za
3
Za
Za
50
2.
Pritiskajte smerni gumb levo/desno, da se pomaknete na meni Quality (Kakovost).
Pritiskajte smerni gumb navzgor/navzdol, da se pomikate navzgor in navzdol po meniju
Quality (Kakovost).
naslednji preglednici so navedene možnosti, ki jih vidite v meniju Quality (Kakovost), in
privzete nastavitve.
Element
Brightness (Svetlost)
Contrast (Kontrast)
Sharpness (Ostrina)
Color Temperature (Barvna
temperatura)
Color Saturation (Nasičenost
barv)
Opis
nastavitev svetlosti pritisnite
smerni gumb levo/desno.
Razpon: 0 do 100
nastavitev kontrasta pritisnite
smerni gumb levo/desno.
Razpon: 0 do 100
nastavitev ostrine prikaza
pritisnite smerni gumb
levo/desno.
Razpon: 1 do 5
nastavitev barvne temperature
pritisnite smerni gumb
levo/desno.
Razpon: Cool/Normal/Warm
(Hladno/Običajno/Toplo)
nastavitev nasičenosti videa
pritisnite smerni gumb
levo/desno.
Privzeto
Običajno
5-2
IBM E400 PROJECTOR: User’s Guide
Nastavitev Nasičenost barv je
aktivna le, ko je vhodni vir
Video/SVideo/YPbPr
Razpon: 0 do 100
Page 33

Za
50
Za
PC
PC
Za
Ni na
Element
Color Tint (Barvni odtenki)
Gamma
Color Space (Barvni prostor)
Opis
nastavitev barvnih odtenkov
videa pritisnite smerni gumb
levo/desno.
Nastavitev Barvni odtenki je
aktivna le, ko je vhodni vir
Video/S-video/YPbPr
Razpon: 0 do 100
nastavitev gama popravkov
prikaza pritisnite smerni gumb
levo/desno.
Vhod Gama Svetlost
2,2
MAC
Video
1,8
2,4
Grafikon
Črnobelo 2,4
2,2
Visoka
Visoka
Nizka
Nizka
Visoka
nastavitev barvnega prostora
pritisnite smerni gumb
levo/desno.
Privzeto
Auto (Samodejno)
Cancel (Prekliči)
Razpon: Auto (Samodejno),
RGB, YpbPr YCbCr
Ponastavitev vseh nastavitev
elementa Quality (Kakovost) na
privzeto vrednost
voljo
Poglavje 5. Nastavitve menija prikaza na platnu
5-3
Page 34

Za
1.
2.
3.
V
Za
50
Za
50
Če
0
Ni na
Meni Properties (Lastnosti)
dostop do menija Properties (Lastnosti) sledite spodnjim korakom.
Pritisnite gumb Meni, da odprete meni prikaza na platnu.
Pritiskajte smerni gumb levo/desno, da se pomaknete v meni Properties (Lastnosti).
Pritisnite smerni gumb navzgor/navzdol, da se premaknete navzgor in navzdol po meniju
Properties (Lastnosti).
naslednji preglednici so navedene možnosti, ki jih vidite v meniju Properties (Lastnosti), in
privzete nastavitve.
Element
Horizontal Position (Vodoraven
položaj)
Vertical Position (Navpičen
položaj)
Keystone (Širok zgornji ali
spodnji del slike)
Aspect Ratio (Razmerje stranic) Če želite preklopiti med
Cancel (Prekliči)
Opis
pomikanje slike levo ali
desno pritisnite smerni gumb
levo/desno.
Razpon: 0 do 100
pomikanje slike navzgor ali
navzdol pritisnite smerni gumb
levo/desno.
Razpon: 0 do 100
želite odpraviti popačenje
projicirane slike, pritisnite
smerni gumb levo/desno.
Razpon: -50 do 50
standardnim formatom 4:3 in
formatom visokoločljive TV
(HDTV) 16:9, pritisnite smerni
gumb levo/desno.
Ponastavi nastavitvi Keystone in
Razmerje stranic na privzete
vrednosti.
Privzeto
4:3
voljo
5-4
IBM E400 PROJECTOR: User’s Guide
Page 35

Za
1.
2.
3.
V
Za
Če
Če
Za
4
Meni Options (Možnosti)
dostop do menija Options (Možnosti) sledite naslednjim korakom.
Pritisnite gumb Meni, da odprete meni prikaza na platnu.
Pritiskajte smerni gumb levo/desno, da se pomaknete na meni Options (Možnosti).
Pritisnite smerni gumb navzgor/navzdol, da se pomikate navzgor in navzdol po meniju
Options (Možnosti).
naslednji preglednici so navedene možnosti, ki jih vidite v meniju Options (Možnosti), in
privzete nastavitve.
Element
Blank Screen (Prazno platno)
Auto Source (Samodejni vir)
Auto Power Off (Samodejni
izklop)
Opis
izbiro barve ozadja praznega
platna pritisnite smerni gumb
levo/desno.
Razpon: Black (Črno), Red
(Rdeče), Green (Zeleno), Blue
(Modro), White (Belo)
želite omogočiti ali
onemogočiti samodejno zaznavo
vira, pritisnite smerni gumb
levo/desno.
Razpon: On/Off (Vklop/izklop)
želite omogočiti ali
onemogočiti samodejni izklop
žarnice po 10 minutah
nedejavnosti, pritisnite smerni
gumb levo/desno.
Privzeto
Blue (Modro)
Vklop
Izklop
Volume (Glasnost)
Razpon: On/Off (Vklop/izklop)
nastavitev glasnosti pritisnite
smerni gumb levo/desno.
Razpon: 0 do 8
Poglavje 5. Nastavitve menija prikaza na platnu
5-5
Page 36

15
Za
Ni na
Za
1.
2.
3.
V
Element
Menu Position (Položaj menija) Da določite položaj prikaza na
Menu Display (Prikaz menija) Če želite določiti zakasnitev
Translucent Menu (Prozoren
meni)
Cancel (Prekliči)
Meni Setup (Nastavitev)
dostop do menija Setup (Nastavitev) sledite spodnjim korakom.
Pritisnite gumb Meni, da odprete meni prikaza na platnu.
Pritiskajte smerni gumb levo/desno, da se pomaknete na meni Setup (Nastavitev).
Opis
platnu, pritiskajte smerni gumb
levo/desno.
Razpon: Left (Levo), Right
(Desno), Center (Sredina), Down
(Navzdol), Up (Navzgor)
časovne omejitve prikaza na
platnu, pritisnite smerni gumb
levo/desno.
Razpon: 10 do 20 sekund
nastavitev prozornosti prikaza
menija pritisnite smerni gumb
levo/desno.
Razpon: On/Off (Vklop/izklop)
Ponastavitev vseh elementov
zaslona Možnosti na privzete
vrednosti.
Privzeto
Center (Sredina)
Izklop
voljo
5-6
IBM E400 PROJECTOR: User’s Guide
Pritisnite smerni gumb navzgor/navzdol, da se pomikate navzgor in navzdol po meniju
Setup (Nastavitev).
naslednji preglednici so navedene možnosti, ki jih vidite v meniju Setup (Nastavitev), in
privzete nastavitve.
Page 37

Za
Če
S
v
v
v
v
Za
Za
ko je
Ni na
Za
1.
Element
Video Type (Vrsta videa)
Video Automatic Grain Control
(AGC)
Projection (Projekcija)
Frequency (Frekvenca)
Opis
izbiro video standarda
pritisnite smerni gumb
levo/desno.
Nastavitev Vrsta videa je aktivna
le, ko je vhodni vir Video ali
S-video
Razpon: Auto (Samodejno),
NTSC, PAL, SECAM
želite omogočiti ali
onemogočiti funkcijo AGC za
video vir, pritisnite smerni gumb
levo/desno.
Nastavitev AGC za video je
aktivna le, ko je vhodni vir
Video ali S-video
Razpon: On/Off (Vklop/izklop)
pritiskanjem na smerni gumb
levo/desno lahko izbirate med
štirimi načini projekcije:
Namestitev na mizo, pred
platnom
Namestitev na mizo, za
platnom
Namestitev na strop, pred
platnom
Namestitev na strop, za
platnom
nastavitev ure vzorčenja A/D
pritisnite smerni gumb
levo/desno.
Privzeto
Auto (Samodejno)
Vklop
Namestitev na mizo, pred
platnom
Samodejno zaznano
Nastavitev Frekvenca je aktivna
le, ko je vhodni vir analogni
RGB.
Razpon: 0 do 100
Tracking (Sledenje)
nastavitev števila vzorčenja
A/D pritisnite smerni gumb
levo/desno.
Nastavitev Sledenje je aktivna le,
Razpon: 0 do 100
Cancel (Prekliči)
Ponastavi nastavitve Vrsta videa,
AGC za video in Projekcija na
privzete vrednosti.
Meni Information (Informacije)
dostop do menija Information (Informacije) sledite spodnjim korakom.
Pritisnite gumb Meni, da odprete meni prikaza na platnu.
vhodni vir analogni RGB.
Poglavje 5. Nastavitve menija prikaza na platnu
Samodejno zaznano
voljo
5-7
Page 38

3.
V
Če
v
v
Po
2.
Pritiskajte smerni gumb levo/desno, da se pomaknete na meni Information (Informacije).
Pritisnite smerni gumb navzgor/navzdol, da se pomikate navzgor in navzdol po meniju
Information (Informacije).
naslednji preglednici so navedene možnosti, ki jih vidite v meniju Information
(Informacije), in kratek opis.
Element
Video Information (Informacije o videu)
Active Source (Aktiven vir)
Software Version (Različica programske opreme) Informacije o različicah programske opreme.
Lamp Hours (Ure žarnice)
Lamp Mode (Način žarnice)
Lamp Hour Reset (Ponastavitev ur žarnice)
Opis
Prikaže ločljivost in frekvenco osveževanja
priključene video naprave.
Informacije o aktivnem viru
Število ur uporabe žarnice
želite izbrati način žarnice, pritisnite smerni
gumb levo/desno:
Normal (Običajno)
Eco (Varčevalno)
zamenjavi žarnice je treba ta element
ponastaviti.
5-8
IBM E400 PROJECTOR: User’s Guide
Page 39

To
1. Na
2.
1.
2.
©
Dodatek A. Vzdrževanje
poglavje vsebuje informacije o vzdrževanju projektorja.
Čiščenje objektiva
Objektiv očistite po naslednjem postopku:
mehko in suho krpo nanesite čistilo za objektiv (ki ni jedko).
Opomba: Ne uporabite prekomerne količine čistila, čistila ne nanašajte neposredno na
objektiv. Jedka čistila, topila ali druge ostre kemikalije lahko na objektivu
povzročijo praske.
Objektiv rahlo obrišite s čistilno krpo s krožnimi gibi. Če ne nameravate takoj uporabiti
projektorja, namestite nazaj pokrov objektiva.
Zamenjava projekcijske žarnice
Uporabite samo nadomestno žarnico, ki je istega tipa in iste moči, kot originalna žarnica. Za
informacije se obrnite na IBM-ovega zastopnika ali obiščite www.ibm.com/pc.
Opomba: Izključite projektor, izklopite napajalni kabel in pustite projektor, da se hladi
najmanj 1 uro, preden začnete z menjavo žarnice.
Žarnico projektorja zamenjajte po naslednjem postopku:
Odvijte vijak na pokrovu predela za žarnico, kot je prikazano.
Odstranite pokrov predela za žarnico, kot je prikazano.
Copyright IBM Corp. 2004
A-1
Page 40

4.
5.
6.
3.
Odstranite dva vijaka iz modula žarnice, kot je prikazano.
Dvignite ročaj modula, kot je prikazano.
Močno povlecite ročaj modula, da modul odstranite, kot je prikazano.
Nov modul žarnice namestite v obratnem vrstnem redu korakov od 5 do 1.
A-2
IBM E400 PROJECTOR: User’s Guide
Page 41

Ko
1.
2.
3.
4.
5.
na
za
Opozorilo: Ta izdelek vsebuje žarnico Metal Arc, ki vsebuje živo srebro. Znebite se je po
lokalnih uredbah in predpisih.
ZDA omejujejo ali prepovedujejo odlaganje nekaterih ali vseh žarnic, ki vsebujejo živo
srebro, v smeri odstranjevanja komunalnih odpadkov. Za dodatne informacije o obratih za
reciklažo in specifičnih državnih zahtevah glede odlaganja obiščite www.lamprecycle.org.
Uporabniki v Connecticutu pokličite Northeast Lamp Recycling na brezplačno številko
1-888-657-5267 za naročilo kompleta, ki vključuje škatlo za žarnico, trak in nalepko za
povratno pošiljanje.
Ponastavitev časovnika žarnice
ste žarnico zamenjali, je treba časovnik žarnice ponastaviti na nič. Sledite naslednjim
korakom.
Pritisnite gumb Menu (Meni), da odprete glavni meni.
Pritisnite smerni gumb levo/desno, da se pomaknete na meni Information (Informacije).
Pritisnite smerni gumb navzgor/navzdol, da se pomaknete navzdol na Lamp Hour Reset
(Ponastavitev ur žarnice).
Pritisnite gumb Enter. Pojavi se zaslon s sporočilom.
Smerne gumbe pritiskajte v naslednjem vrstnem redu: navzdol, navzgor, levo, desno.
Znova se prikaže meni Information (Informacije), ki prikazuje ure žarnice, ponastavljene
nič.
Opozorilo: Življenjska doba žarnice je merilo za zmanjšanje svetilnosti, in ne specifikacija
čas, ki je potreben, da žarnica preneha svetiti. Življenjska doba žarnice je definirana kot
čas, ki je potreben, da se nominalna svetilnost več kot 50 % žarnic vzorčne serije zmanjša za
približno 50 % lumnov za določeno žarnico. Če je npr. življenjska doba vaše žarnice 2000 ur
svetenja, se bo svetilnost žarnice zmanjšala za 50 % na približno 550 lumnov.
Uporaba varnostne reže
Projektor ima varnostno režo. Za navodila o njeni uporabi si oglejte priložene informacije.
Dodatek A. Vzdrževanje
A-3
Page 42

A-4
IBM E400 PROJECTOR: User’s Guide
Page 43

V
je
Na
v
v
v
v
v
v
v
v Za
v
v Da
V
Iz
v
v
v
v Če
v
v
©
Dodatek B. Odpravljanje težav
naslednji preglednici so navedene informacije o odpravljanju težav s projektorjem. V
določenih primerih je navedenih več rešitev. Rešitve uporabite v navedenem vrstnem redu. Ko
težava odpravljena, lahko preskočite dodatne rešitve.
Tabela B-1. Odpravljanje težav
Težava
platnu se ne pojavi slika.
Slika je zamegljena.
Slika je širša na zgornji ali spodnji
strani (trapezni učinek).
Slika je obrnjena.
Slika je črtasta.
Slika je medla in brez kontrasta.
Barva projicirane slike se ne ujema z
izvirno sliko.
projektorja ne prihaja svetloba.
Rešitev
Preverite nastavitve na notesniku ali namiznem osebnem
računalniku
Izklopite vso opremo in jo zaženite v pravilnem vrstnem
redu.
Prilagodite izostritev na projektorju.
Pritisnite gumb Auto (Samodejno) na daljinskem
upravljalniku ali projektorju.
Poskrbite, da je razdalja med projektorjem in platnom
znotraj določenega razpona 10 metrov.
Preverite, ali je objektiv projektorja čist.
Projektor namestite tako, da je njegova lega čimbolj
pravokotna glede na platno.
odpravo težave uporabite gumb Keystone na daljinskem
upravljalniku ali projektorju.
Preverite nastavitev Projection (Projekcija) v meniju Setup
(Nastavitev) na prikazu na platnu.
Nastavitvi Frequency (Frekvenca) in Tracking (Sledenje) v
meniju Setup na prikazu na platnu nastavite na privzete
vrednosti.
preverite, ali težave ne povzroča grafična kartica
priključenega osebnega računalnika, projektor priključite na
drug računalnik.
glavnem meniju na prikazu na platnu prilagodite nastavitev
Contrast.
Prilagodite nastavitvi Color Temp. (Barvna temperatura) in
Gamma v meniju ColorMgr na prikazu na platnu.
Preverite, ali je napajalni kabel čvrsto priključen.
Preverite, ali je vir napajanja brezhiben - nanj priključite
drugo električno napravo.
Projektor ponovno zaženite v pravilnem vrstnem redu in
preverite, ali lučka za napajanje sveti zeleno.
ste nedavno zamenjali žarnico, poskusite ponastaviti
kontakte žarnice.
Zamenjajte modul žarnice.
Staro žarnico namestite nazaj v projektor in projektor
pošljite v popravilo.
Copyright IBM Corp. 2004
B-1
Page 44

v
v
v
v
v
v
v
v
v
v
Ni
v
v
v
v
v
v
v
v
1
2
3
3
4
5
Tabela B-1. Odpravljanje težav (nadaljevanje)
Težava
Žarnica ugasne.
Rešitev
Nenavaden vzpon napetosti lahko povzroči, da se žarnica
izklopi. Dvakrat pritisnite gumb Power (Vklop), da
izklopite projektor. Ko lučka pripravljenosti žarnice sveti,
pritisnite gumb Power (Vklop).
Zamenjajte modul žarnice.
Staro žarnico namestite nazaj v projektor in projektor
pošljite v popravilo.
Projektor se ne odziva na daljinski
upravljalnik.
Daljinski upravljalnik usmerite v smeri senzorjev za
upravljalnik na projektorju.
Poskrbite, da pot med daljinskim upravljalnikom in
senzorjem ni ovirana.
Ugasnite vse fluorescentne luči v prostoru.
Preverite polarnost baterije.
Zamenjajte baterije.
Izklopite druge infrardeče naprave v bližini.
Daljinski upravljalnik pošljite v popravilo.
zvoka
Nastavite glasnost na daljinskem upravljalniku.
Nastavite glasnost avdio vira.
Preverite povezavo avdio kabla.
Avdio izhod vira preskusite z drugimi zvočniki.
Projektor pošljite v popravilo.
Zvok je popačen.
Preverite povezavo avdio kabla.
Avdio izhod vira preskusite z drugimi zvočniki.
Projektor pošljite v popravilo.
Lučke na projektorju
Lučka na vrhu projektorja nakazuje stanje projektorja in vam je v pomoč pri odpravljanju
težav. Med ciklusi utripanja so dvosekundni premori. Za dodatne podrobnosti o lučki in
napakah projektorja se obrnite na IBM-ovega zastopnika.
Tabela B-2. Sporočila o napakah lučke pripravljenosti žarnice
Število utripov lučke pripravljenosti
žarnice
Utripanje
Tabela B-3. Sporočila o napakah lučke napajanja
Število utripov lučke napajanja
B-2
IBM E400 PROJECTOR: User’s Guide
Razlaga
Žarnica ni pripravljena - ne pritisnite gumba za vklop.
Napaka ventilatorja 2 žarnice
Napaka ventilatorja 1 pihala
Napaka ventilatorja 1 balasta
Razlaga
Pregrevanje sistema
Napaka sistemskega vmesnika
Napaka žarnice
Page 45

6
je
7
8
Tabela B-3. Sporočila o napakah lučke napajanja (nadaljevanje)
Število utripov lučke napajanja
Razlaga
Napaka ventilatorja. Da ugotovite, na katerem ventilatorju
prišlo do napake, preverite lučko pripravljenosti žarnice.
Pokrov žarnice je odprt
Napaka gonilnika DLP.
Dodatek B. Odpravljanje težav
B-3
Page 46

B-4
IBM E400 PROJECTOR: User’s Guide
Page 47

5 ° do 35 °C
5 % do 90 %
5 % do 95 %
©
Dodatek C. Specifikacije
Spodaj so navedene specifikacije za projektor IBM E400.
Temperatura
(delovanje)
(mirovanje)
Višina (delovanje)
Višina (mirovanje)
Vlažnost (delovanje)
Vlažnost (mirovanje)
Dimenzije (Š x G x V)
Teža
Optika (razpon izostritve)
Tip žarnice
Napajalne zahteve
Stropni nosilec
(41 ° do 95 °F) na morski višini
-10 ° do 60 °C (14 ° do 140 °F)
3048 m (0 do 10.000 ft)
12.192 m (0 do 40.000 ft)
relativne vlažnosti, nekondenzne
relativne vlažnosti, nekondenzne
280 x 205 x 97 mm (11,02 x 8,07 x 3,82 in.)
2,09 kg razpakiran
1,5 do 7 m (4,9 do 23 ft)
VIP 200W
100 - 240 V AC; 50 - 60 Hz; 2,8 A
Stropni nosilec, preizkušen in popisan s strani UL, z nosilnostjo
15,5 kg
Copyright IBM Corp. 2004
C-1
Page 48

C-2
IBM E400 PROJECTOR: User’s Guide
Page 49

of
is
To
v
v
v
v
v
v
v
If
©
Dodatek D. Service and Support
The following information describes the technical support that is available for your product,
during the warranty period or throughout the life of the product. Refer to your IBM Statement
Limited Warranty for a full explanation of IBM warranty terms.
Online technical support
Online technical support is available during the life of your product through the Personal
Computing Support Web site at www.ibm.com/pc/support.
During the warranty period, assistance for replacement or exchange of defective components
available. In addition, if your IBM option is installed in an IBM computer, you might be
entitled to service at your location. Your technical support representative can help you
determine the best alternative.
Telephone technical support
Installation and configuration support through the IBM Support Center will be withdrawn or
made available for a fee, at IBM’s discretion, 90 days after the option has been withdrawn
from marketing. Additional support offerings, including step-by-step installation assistance,
are available for a nominal fee.
assist the technical support representative, have available as much of the following
information as possible:
Option name
Option number
Proof of purchase
Computer manufacturer, model, serial number (if IBM), and manual
Exact wording of the error message (if any)
Description of the problem
Hardware and software configuration information for your system
possible, be at your computer. Your technical support representative might want to walk
If
you through the problem during the call.
For the support telephone number and support hours by country, refer to the following table.
the number for your country or region is not listed, contact your IBM reseller or IBM
marketing representative. Response time may vary depending on the number and nature of the
calls received.
Copyright IBM Corp. 2004
Phone numbers are subject to change without notice. For the latest phone number list, go to
www.ibm.com/pc/support and click Support Phone List.
Country or Region
Argentina
Australia
Austria
Telephone Number
0800-666-0011
1300-130-426
01-24592-5901
Country or Region
Malaysia
Mexico
Netherlands
Telephone Number
03-7727-7800
001-866-434-2080
020-514-5770
D-1
Page 50

66 81 11 00
45 20 82 00
02 38 55 74 50
Country or Region
Belgium
Bolivia
Brazil
Canada
Chile
China (PRC)
China (Hong Kong
S.A.R.)
Columbia
Denmark
Ecuador
Finland
France
Germany
Indonesia
Ireland
Italy
Japan
Telephone Number
Dutch 02-210-9820
French 02-210-9800
0800-0189
55-11-3889-8986
1-800-565-3344
Toronto 416-383-3344
800-224-488
800-810-1818
852-2825-7799
980-912-3021
1-800-426911 (option
#4)
09-459 69 60
07032-1549 201
021-523-8535
01-815-9202
02-7031-6101
Consumer customers
0120-887-870
Country or Region
New Zealand
Norway
Peru
Philippines
Portugal
Russia
Singapore
Spain
Sweden
Switzerland
Taiwan
Thailand
Turkey
United Kingdom
United States
Uruguay
Venezuela
Telephone Number
0800-446-149
0-800-50-866
632-995-2225
21-791 51 47
095-940-2000
1800-840-9911
91-662 49 16
08-477 4420
058-333-09-00
886-2-2725-9799
66-2-273-4000
00-800-446-32-041
0-1475-555 055
1-800-426-7378
000-411-005-6649
0-800-100-2011
Luxembourg
Business customers
0120-887-874
298-977 5063
Vietnam
848-8295-160
D-2
IBM E400 PROJECTOR: User’s Guide
Page 51

on
is
v
v
v
v
©
Dodatek E. IBM Statement of Limited Warranty - Z125-4753-07 11/2002
Part 1 - General Terms
This Statement of Limited Warranty includes Part 1 - General Terms, Part 2 - Country-unique
Terms, and Part 3 - Warranty Information. The terms of Part 2 replace or modify those of
Part 1. The warranties provided by IBM in this Statement of Limited Warranty apply only to
Machines you purchase for your use, and not for resale. The term ″Machine″ means an IBM
machine, its features, conversions, upgrades, elements, or accessories, or any combination of
them. The term ″Machine″ does not include any software programs, whether pre-loaded with
the Machine, installed subsequently or otherwise. Nothing in this Statement of Limited
Warranty affects any statutory rights of consumers that cannot be waived or limited by
contract.
What this Warranty Covers
IBM warrants that each Machine 1) is free from defects in materials and workmanship and 2)
conforms to IBM’s Official Published Specifications (″Specifications″) which are available
request. The warranty period for the Machine starts on the original Date of Installation and
specified in Part 3 - Warranty Information. The date on your invoice or sales receipt is the
Date of Installation unless IBM or your reseller informs you otherwise. Many features,
conversions, or upgrades involve the removal of parts and their return to IBM. A part that
replaces a removed part will assume the warranty service status of the removed part. Unless
IBM specifies otherwise, these warranties apply only in the country or region in which you
purchased the Machine.
THESE WARRANTIES ARE YOUR EXCLUSIVE WARRANTIES AND REPLACE
ALL OTHER WARRANTIES OR CONDITIONS, EXPRESS OR IMPLIED,
INCLUDING, BUT NOT LIMITED TO, THE IMPLIED WARRANTIES OR
CONDITIONS OF MERCHANTABILITY AND FITNESS FOR A PARTICULAR
PURPOSE. SOME STATES OR JURISDICTIONS DO NOT ALLOW THE
EXCLUSION OF EXPRESS OR IMPLIED WARRANTIES, SO THE ABOVE
EXCLUSION MAY NOT APPLY TO YOU. IN THAT EVENT, SUCH WARRANTIES
ARE LIMITED IN DURATION TO THE WARRANTY PERIOD. NO WARRANTIES
APPLY AFTER THAT PERIOD. SOME STATES OR JURISDICTIONS DO NOT
ALLOW LIMITATIONS ON HOW LONG AN IMPLIED WARRANTY LASTS, SO
THE ABOVE LIMITATION MAY NOT APPLY TO YOU.
What this Warranty Does not Cover
Copyright IBM Corp. 2004
This warranty does not cover the following:
any software programs, whether pre-loaded or shipped with the Machine, or installed
subsequently;
failure resulting from misuse (including but not limited to use of any Machine capacity or
capability, other than that authorized by IBM in writing), accident, modification, unsuitable
physical or operating environment, or improper maintenance by you;
failure caused by a product for which IBM is not responsible; and
any non-IBM products, including those that IBM may procure and provide with or
integrate into an IBM Machine at your request.
E-1
Page 52

If
If
If
it
The warranty is voided by removal or alteration of identification labels on the Machine or its
parts.
IBM does not warrant uninterrupted or error-free operation of a Machine.
Any technical or other support provided for a Machine under warranty, such as assistance via
telephone with ″how-to″ questions and those regarding Machine set-up and installation, is
provided WITHOUT WARRANTIES OF ANY KIND.
How to Obtain Warranty Service
the Machine does not function as warranted during the warranty period, contact IBM or
your reseller to obtain warranty service. If you do not register the Machine with IBM, you
may be required to present proof of purchase as evidence of your entitlement to warranty
service.
What IBM Will Do to Correct Problems
When you call for service, you must follow the problem determination and resolution
procedures that IBM specifies. A technician will attempt to make an initial diagnosis of your
problem and help you resolve it over the telephone.
The type of warranty service applicable to your Machine is specified in Part 3 - Warranty
Information.
You are responsible for downloading and installing designated Machine Code (microcode,
basic input/output system code (called ″BIOS″), utility programs, device drivers, and
diagnostics delivered with an IBM Machine) and other software updates from an IBM Internet
Web site or from other electronic media, and following the instructions that IBM provides.
your problem can be resolved with a Customer Replaceable Unit (″CRU″) (e.g., keyboard,
mouse, speaker, memory, hard disk drive and other easily replaceable parts), IBM will ship
these parts to you for replacement by you.
the Machine does not function as warranted during the warranty period and your problem
cannot be resolved over the telephone, through your application of Machine Code or software
updates, or with a CRU, IBM or your reseller, if approved by IBM to provide warranty
service, will either, at its discretion, 1) repair it to make it function as warranted, or 2) replace
with one that is at least functionally equivalent. If IBM is unable to do either, you may
return the Machine to your place of purchase and your money will be refunded.
IBM or your reseller will also manage and install selected engineering changes that apply to
the Machine.
Exchange of a Machine or Part
When the warranty service involves the exchange of a Machine or part, the item IBM or your
reseller replaces becomes its property and the replacement becomes yours. You represent that
all removed items are genuine and unaltered. The replacement may not be new, but will be in
good working order and at least functionally equivalent to the item replaced. The replacement
assumes the warranty service status of the replaced item.
E-2
IBM E400 PROJECTOR: User’s Guide
Your Additional Responsibilities
Before IBM or your reseller exchanges a Machine or part, you agree to remove all features,
parts, options, alterations, and attachments not under warranty service.
Page 53

1.
2.
3.
a.
b.
c.
d.
or an
of
1.
2.
1)
OR
You also agree to:
ensure that the Machine is free of any legal obligations or restrictions that prevent its
exchange;
obtain authorization from the owner to have IBM or your reseller service a Machine that
you do not own; and
where applicable, before service is provided:
follow the service request procedures that IBM or your reseller provides;
backup or secure all programs, data, and funds contained in the Machine;
IBM or your reseller with sufficient, free, and safe access to your facilities to permit
IBM to fulfill its obligations; and
inform IBM or your reseller of changes in the Machine’s location.
4.
(a) ensure all information about identified or identifiable individuals (Personal Data) is
deleted from the Machine (to the extent technically possible), (b) allow IBM, your reseller
IBM supplier to process on your behalf any remaining Personal Data as IBM or your
reseller considers necessary to fulfill its obligations under this Statement of Limited
Warranty (which may include shipping the Machine for such processing to other IBM
service locations around the world), and (c) ensure that such processing complies with any
laws applicable to such Personal Data.
Limitation
Liability
IBM is responsible for loss of, or damage to, your Machine only while it is 1) in IBM’s
possession or 2) in transit in those cases where IBM is responsible for the transportation
charges.
Neither IBM nor your reseller are responsible for any of your confidential, proprietary or
personal information contained in a Machine which you return to IBM for any reason. You
should remove all such information from the Machine prior to its return.
Circumstances may arise where, because of a default on IBM’s part or other liability, you are
entitled to recover damages from IBM. In each such instance, regardless of the basis on which
you are entitled to claim damages from IBM (including fundamental breach, negligence,
misrepresentation, or other contract or tort claim), except for any liability that cannot be
waived or limited by applicable laws, IBM is liable for no more than
damages for bodily injury (including death) and damage to real property and tangible
personal property; and
the amount of any other actual direct damages, up to the charges (if recurring, 12 months’
charges apply) for the Machine that is subject of the claim. For purposes of this item, the
term ″Machine″ includes Machine Code and Licensed Internal Code (″LIC″).
limit also applies to IBM’s suppliers and your reseller. It is the maximum for which
This
IBM, its suppliers, and your reseller are collectively responsible.
UNDER NO CIRCUMSTANCES IS IBM, ITS SUPPLIERS OR RESELLERS LIABLE
FOR ANY OF THE FOLLOWING EVEN IF INFORMED OF THEIR POSSIBILITY:
THIRD PARTY CLAIMS AGAINST YOU FOR DAMAGES (OTHER THAN
THOSE UNDER THE FIRST ITEM LISTED ABOVE); 2) LOSS OF, OR DAMAGE
TO, DATA; 3) SPECIAL, INCIDENTAL, OR INDIRECT DAMAGES OR FOR ANY
ECONOMIC CONSEQUENTIAL DAMAGES; OR 4) LOST PROFITS, BUSINESS
REVENUE, GOODWILL OR ANTICIPATED SAVINGS. SOME STATES OR
JURISDICTIONS DO NOT ALLOW THE EXCLUSION OR LIMITATION OF
INCIDENTAL OR CONSEQUENTIAL DAMAGES, SO THE ABOVE LIMITATION
EXCLUSION MAY NOT APPLY TO YOU. SOME STATES OR JURISDICTIONS
Dodatek E. IBM Statement of Limited Warranty - Z125-4753-07 - 11/2002
E-3
Page 54

In
To
1.
DO NOT ALLOW LIMITATIONS ON HOW LONG AN IMPLIED WARRANTY
LASTS, SO THE ABOVE LIMITATION MAY NOT APPLY TO YOU.
Governing Law
Both you and IBM consent to the application of the laws of the country in which you acquired
the Machine to govern, interpret, and enforce all of your and IBM’s rights, duties, and
obligations arising from, or relating in any manner to, the subject matter of this Statement of
Limited Warranty, without regard to conflict of law principles.
THESE WARRANTIES GIVE YOU SPECIFIC LEGAL RIGHTS AND YOU MAY
ALSO HAVE OTHER RIGHTS WHICH VARY FROM STATE TO STATE OR
JURISDICTION TO JURISDICTION.
Jurisdiction
All of our rights, duties, and obligations are subject to the courts of the country in which you
acquired the Machine.
Part 2 - Country-unique Terms
AMERICAS
ARGENTINA
Governing Law: The following is added after the first sentence:
Any litigation arising from this Statement of Limited Warranty will be settled exclusively by
the Ordinary Commercial Court of the city of Buenos Aires.
BRAZIL
Governing Law: The following is added after the first sentence:
litigation arising from this Statement of Limited Warranty will be settled exclusively by
Any
the court of Rio de Janeiro, RJ.
Peru
Limitation of Liability: The following is added at the end of this section:
accordance with Article 1328 of the Peruvian Civil Code the limitations and exclusions
specified in this section will not apply to damages caused by IBM’s willful misconduct
(″dolo″) or gross negligence (″culpa inexcusable″).
E-4
IBM E400 PROJECTOR: User’s Guide
NORTH AMERICA
How to Obtain Warranty Service: The following is added to this Section:
obtain warranty service from IBM in Canada or the United States, call 1-800-IBM-SERV
(426-7378).
CANADA
Limitation of Liability: The following replaces item 1 of this section:
damages for bodily injury (including death) or physical harm to real property and tangible
personal property caused by IBM’s negligence; and
Page 55

or
or
of
If
Governing Law: The following replaces “laws of the country in which you acquired the
Machine” in the first sentence:
laws in the Province of Ontario.
UNITED STATES
Governing Law: The following replaces “laws of the country in which you acquired the
Machine” in the first sentence:
laws of the State of New York.
ASIA PACIFIC
AUSTRALIA
What this Warranty Covers: The following paragraph is added to this Section:
The warranties specified in this Section are in addition to any rights you may have under the
Trade Practices Act 1974 or other similar legislation and are only limited to the extent
permitted by the applicable legislation.
Limitation of Liability: The following is added to this Section:
Where IBM is in breach of a condition or warranty implied by the Trade Practices Act 1974
other similar legislation, IBM’s liability is limited to the repair or replacement of the goods
the supply of equivalent goods. Where that condition or warranty relates to right to sell,
quiet possession or clear title, or the goods are of a kind ordinarily acquired for personal,
domestic or household use or consumption, then none of the limitations in this paragraph
apply.
Governing Law: The following replaces “laws of the country in which you acquired the
Machine” in the first sentence:
laws of the State or Territory.
CAMBODIA, LAOS, AND VIETNAM
Governing Law: The following replaces “laws of the country in which you acquired the
Machine” in the first sentence:
laws
the State of New York, United States of America.
CAMBODIA, INDONESIA, LAOS, AND VIETNAM
Arbitration: The following is added under this heading:
Disputes arising out of or in connection with this Statement of Limited Warranty shall be
finally settled by arbitration which shall be held in Singapore in accordance with the
Arbitration Rules of Singapore International Arbitration Center (″SIAC Rules″) then in effect.
The arbitration award shall be final and binding for the parties without appeal and shall be in
writing and set forth the findings of fact and the conclusions of law.
The number of arbitrators shall be three, with each side to the dispute being entitled to appoint
one arbitrator. The two arbitrators appointed by the parties shall appoint a third arbitrator who
shall act as chairman of the proceedings. Vacancies in the post of chairman shall be filled by
the president of the SIAC. Other vacancies shall be filled by the respective nominating party.
Proceedings shall continue from the stage they were at when the vacancy occurred.
one of the parties refuses or otherwise fails to appoint an arbitrator within 30 days of the
date the other party appoints its, the first appointed arbitrator shall be the sole arbitrator,
provided that the arbitrator was validly and properly appointed.
Dodatek E. IBM Statement of Limited Warranty - Z125-4753-07 - 11/2002
E-5
Page 56

1.
2. as to
If
us in
All proceedings shall be conducted, including all documents presented in such proceedings, in
the English language. The English language version of this Statement of Limited Warranty
prevails over any other language version.
HONG KONG S.A.R. OF CHINA AND MACAU S.A.R. OF CHINA
Governing Law: The following replaces “laws of the country in which you acquired the
Machine” in the first sentence:
laws of Hong Kong Special Administrative Region of China.
INDIA
Limitation of Liability: The following replaces items 1 and 2 of this Section:
liability for bodily injury (including death) or damage to real property and tangible
personal property will be limited to that caused by IBM’s negligence; and
any other actual damage arising in any situation involving nonperformance by IBM
pursuant to, or in any way related to the subject of this Statement of Limited Warranty,,
the charge paid by you for the individual Machine that is the subject of the claim. For
purposes of this item, the term ″Machine″ includes Machine Code and Licensed Internal
Code (″LIC″).
Arbitration:
The following is added under this heading:
Disputes arising out of or in connection with this Statement of Limited Warranty shall be
finally settled by arbitration which shall be held in Bangalore, India in accordance with the
laws of India then in effect. The arbitration award shall be final and binding for the parties
without appeal and shall be in writing and set forth the findings of fact and the conclusions of
law.
The number of arbitrators shall be three, with each side to the dispute being entitled to appoint
one arbitrator. The two arbitrators appointed by the parties shall appoint a third arbitrator who
shall act as chairman of the proceedings. Vacancies in the post of chairman shall be filled by
the president of the Bar Council of India. Other vacancies shall be filled by the respective
nominating party. Proceedings shall continue from the stage they were at when the vacancy
occurred.
one of the parties refuses or otherwise fails to appoint an arbitrator within 30 days of the
date the other party appoints its, the first appointed arbitrator shall be the sole arbitrator,
provided that the arbitrator was validly and properly appointed.
All proceedings shall be conducted, including all documents presented in such proceedings, in
the English language. The English language version of this Statement of Limited Warranty
prevails over any other language version.
JAPAN
E-6
IBM E400 PROJECTOR: User’s Guide
Governing Law: The following sentence is added to this section:
doubts concerning this Statement of Limited Warranty will be initially resolved between
Any
good faith and in accordance with the principle of mutual trust.
MALAYSIA
Limitation of Liability: The word ″SPECIAL″ in item 3 of the fifth paragraph is deleted.
NEW ZEALAND
Page 57

by
If
What this Warranty Covers: The following paragraph is added to this section:
The warranties specified in this section are in addition to any rights you may have under the
Consumer Guarantees Act 1993 or other legislation which cannot be excluded or limited. The
Consumer Guarantees Act 1993 will not apply in respect of any goods which IBM provides, if
you require the goods for the purposes of a business as defined in that Act.
Limitation of Liability: The following is added to this section:
Where Machines are not acquired for the purposes of a business as defined in the Consumer
Guarantees Act 1993, the limitations in this section are subject to the limitations in that Act.
PEOPLE’S REPUBLIC OF CHINA (PRC)
Governing Law: The following replaces ″laws of the country in which you acquired the
Machine″ in the first sentence:
laws of the State of New York, United States of America (except when local law requires
otherwise).
PHILIPPINES
Limitation of Liability: Item 3 in the fifth paragraph is replaced by the following:
SPECIAL (INCLUDING NOMINAL AND EXEMPLARY DAMAGES), MORAL,
INCIDENTAL, OR INDIRECT DAMAGES FOR ANY ECONOMIC
CONSEQUENTIAL DAMAGES; OR
Arbitration: The following is added under this heading
Disputes arising out of or in connection with this Statement of Limited Warranty shall be
finally settled by arbitration which shall be held in Metro Manila, Philippines in accordance
with the laws of the Philippines then in effect. The arbitration award shall be final and binding
for the parties without appeal and shall be in writing and set forth the findings of fact and the
conclusions of law.
The number of arbitrators shall be three, with each side to the dispute being entitled to appoint
one arbitrator. The two arbitrators appointed by the parties shall appoint a third arbitrator who
shall act as chairman of the proceedings. Vacancies in the post of chairman shall be filled by
the president of the Philippine Dispute Resolution Center, Inc. Other vacancies shall be filled
the respective nominating party. Proceedings shall continue from the stage they were at
when the vacancy occurred.
one of the parties refuses or otherwise fails to appoint an arbitrator within 30 days of the
date the other party appoints its, the first appointed arbitrator shall be the sole arbitrator,
provided that the arbitrator was validly and properly appointed.
All proceedings shall be conducted, including all documents presented in such proceedings, in
the English language. The English language version of this Statement of Limited Warranty
prevails over any other language version.
SINGAPORE
Limitation of Liability: The words ″SPECIAL″ and ″ECONOMIC″ in item 3 in the fifth
paragraph are deleted.
EUROPE, MIDDLE EAST, AFRICA (EMEA)
Dodatek E. IBM Statement of Limited Warranty - Z125-4753-07 - 11/2002
E-7
Page 58

an
If
1)
THE FOLLOWING TERMS APPLY TO ALL EMEA COUNTRIES:
The terms of this Statement of Limited Warranty apply to Machines purchased from IBM or
IBM reseller.
How to Obtain Warranty Service: If you purchase a Machine in Austria, Belgium, Cyprus,
Denmark, Estonia, Finland, France, Germany, Greece, Iceland, Ireland, Italy, Latvia,
Liechtenstein, Lithuania, Luxembourg, Monaco, Netherlands, Norway, Portugal, Spain, San
Marino, Sweden, Switzerland, United Kingdom or Vatican State, you may obtain warranty
service for that Machine in any of those countries from either (1) an IBM reseller approved to
perform warranty service or (2) from IBM, provided the Machine has been announced and
made available by IBM in the country in which you wish to obtain service. If you purchased a
Personal Computer Machine in Albania, Armenia, Belarus, Bosnia and Herzegovina,
Bulgaria, Croatia, Czech Republic, Georgia, Hungary, Kazakhstan, Kyrgyzstan, Federal
Republic of Yugoslavia, Former Yugoslav Republic of Macedonia (FYROM), Moldova,
Poland, Romania, Russia, Slovak Republic, Slovenia, or Ukraine, you may obtain warranty
service for that Machine in any of those countries from either (1) an IBM reseller approved to
perform warranty service or (2) from IBM.
you purchase a Machine in a Middle Eastern or African country, you may obtain warranty
service for that Machine from the IBM entity within the country of purchase, if that IBM
entity provides warranty service in that country, or from an IBM reseller, approved by IBM to
perform warranty service on that Machine in that country. Warranty service in Africa is
available within 50 kilometers of an IBM approved service provider. You are responsible for
transportation costs for Machines located outside 50 kilometers of an IBM approved service
provider.
Add the following paragraph in Western Europe (Austria, Belgium, Cyprus, Denmark,
Finland, France, Germany, Greece, Iceland, Ireland, Italy, Liechtenstein, Luxembourg,
Monaco, Netherlands, Norway, Portugal, Spain, San Marino, Sweden, Switzerland, United
Kingdom, Vatican State):
The warranty for Machines acquired in Western Europe shall be valid and applicable in all
Western Europe countries provided the Machines have been announced and made available in
such countries.
Governing Law:
The phrase ″the laws of the country in which you acquired the Machine″ is replaced by:
″the laws of Austria″ in Albania, Armenia, Azerbaijan, Belarus, Bosnia-Herzegovina,
Bulgaria, Croatia, Georgia, Hungary, Kazakhstan, Kyrgyzstan, FYR Macedonia,
Moldova, Poland, Romania, Russia, Slovakia, Slovenia, Tajikistan, Turkmenistan,
Ukraine, Uzbekistan, and FR Yugoslavia; 2) ″the laws of France″ in Algeria, Benin,
Burkina Faso, Cameroon, Cape Verde, Central African Republic, Chad, Comoros,
Congo Republic, Djibouti, Democratic Republic of Congo, Equatorial Guinea, French
Guiana, French Polynesia, Gabon, Gambia, Guinea, Guinea-Bissau, Ivory Coast,
Lebanon, Madagascar, Mali, Mauritania, Mauritius, Mayotte, Morocco, New Caledonia,
Niger, Reunion, Senegal, Seychelles, Togo, Tunisia, Vanuatu, and Wallis & Futuna; 3)
″the laws of Finland″ in Estonia, Latvia, and Lithuania; 4) ″the laws of England″ in
Angola, Bahrain, Botswana, Burundi, Egypt, Eritrea, Ethiopia, Ghana, Jordan, Kenya,
Kuwait, Liberia, Malawi, Malta, Mozambique, Nigeria, Oman, Pakistan, Qatar,
Rwanda, Sao Tome, Saudi Arabia, Sierra Leone, Somalia, Tanzania, Uganda, United
Arab Emirates, the United Kingdom, West Bank/Gaza, Yemen, Zambia, and Zimbabwe;
and 5) ″the laws of South Africa″ in South Africa, Namibia, Lesotho and Swaziland.
E-8
IBM E400 PROJECTOR: User’s Guide
Jurisdiction: The following exceptions are added to this section:
Page 59

of
be
of or in
of
In
to
to
In
1) In Austria the choice of jurisdiction for all disputes arising out of this Statement of Limited
Warranty and relating thereto, including its existence, will be the competent court of law in
Vienna, Austria (Inner-City); 2) in Angola, Bahrain, Botswana, Burundi, Egypt, Eritrea,
Ethiopia, Ghana, Jordan, Kenya, Kuwait, Liberia, Malawi, Malta, Mozambique,
Nigeria, Oman, Pakistan, Qatar, Rwanda, Sao Tome, Saudi Arabia, Sierra Leone,
Somalia, Tanzania, Uganda, United Arab Emirates, West Bank/Gaza, Yemen, Zambia,
and Zimbabwe all disputes arising out of this Statement of Limited Warranty or related to its
execution, including summary proceedings, will be submitted to the exclusive jurisdiction of
the English courts; 3) in Belgium and Luxembourg, all disputes arising out of this Statement
Limited Warranty or related to its interpretation or its execution, the law, and the courts of
the capital city, of the country of your registered office and/or commercial site location only
are competent; 4) in France, Algeria, Benin, Burkina Faso, Cameroon, Cape Verde,
Central African Republic, Chad, Comoros, Congo Republic, Djibouti, Democratic
Republic of Congo, Equatorial Guinea, French Guiana, French Polynesia, Gabon,
Gambia, Guinea, Guinea-Bissau, Ivory Coast, Lebanon, Madagascar, Mali, Mauritania,
Mauritius, Mayotte, Morocco, New Caledonia, Niger, Reunion, Senegal, Seychelles,
Togo, Tunisia, Vanuatu, and Wallis & Futuna all disputes arising out of this Statement of
Limited Warranty or related to its violation or execution, including summary proceedings, will
settled exclusively by the Commercial Court of Paris; 5) in Russia, all disputes arising out
relation to the interpretation, the violation, the termination, the nullity of the execution
this Statement of Limited Warranty shall be settled by Arbitration Court of Moscow; 6) in
South Africa, Namibia, Lesotho and Swaziland, both of us agree to submit all disputes
relating to this Statement of Limited Warranty to the jurisdiction of the High Court in
Johannesburg; 7) in Turkey all disputes arising out of or in connection with this Statement of
Limited Warranty shall be resolved by the Istanbul Central (Sultanahmet) Courts and
Execution Directorates of Istanbul, the Republic of Turkey; 8) in each of the following
specified countries, any legal claim arising out of this Statement of Limited Warranty will be
brought before, and settled exclusively by, the competent court of a) Athens for Greece, b)
Tel Aviv-Jaffa for Israel, c) Milan for Italy, d) Lisbon for Portugal, and e) Madrid for Spain;
and 9) in the United Kingdom, both of us agree to submit all disputes relating to this
Statement of Limited Warranty to the jurisdiction of the English courts.
Arbitration: The following is added under this heading:
Albania, Armenia, Azerbaijan, Belarus, Bosnia-Herzegovina, Bulgaria, Croatia,
Georgia, Hungary, Kazakhstan, Kyrgyzstan, FYR Macedonia, Moldova, Poland,
Romania, Russia, Slovakia, Slovenia, Tajikistan, Turkmenistan, Ukraine, Uzbekistan,
and FR Yugoslavia all disputes arising out of this Statement of Limited Warranty or related
its violation, termination or nullity will be finally settled under the Rules of Arbitration and
Conciliation of the International Arbitral Center of the Federal Economic Chamber in Vienna
(Vienna Rules) by three arbitrators appointed in accordance with these rules. The arbitration
will be held in Vienna, Austria, and the official language of the proceedings will be English.
The decision of the arbitrators will be final and binding upon both parties. Therefore, pursuant
paragraph 598 (2) of the Austrian Code of Civil Procedure, the parties expressly waive the
application of paragraph 595 (1) figure 7 of the Code. IBM may, however, institute
proceedings in a competent court in the country of installation.
Estonia, Latvia and Lithuania all disputes arising in connection with this Statement of
Limited Warranty will be finally settled in arbitration that will be held in Helsinki, Finland in
accordance with the arbitration laws of Finland then in effect. Each party will appoint one
arbitrator. The arbitrators will then jointly appoint the chairman. If arbitrators cannot agree on
the chairman, then the Central Chamber of Commerce in Helsinki will appoint the chairman.
EUROPEAN UNION (EU)
THE FOLLOWING TERMS APPLY TO ALL EU COUNTRIES:
Dodatek E. IBM Statement of Limited Warranty - Z125-4753-07 - 11/2002
E-9
Page 60

To
PO
1.
as an
is at
2.
1.
Consumers have legal rights under applicable national legislation governing the sale of
consumer goods. Such rights are not affected by the warranties provided in this Statement of
Limited Warranty.
How to Obtain Warranty Service: The following is added to this section:
obtain warranty service from IBM in EU countries, see the telephone listing in Part 3 -
Warranty Information.
You may contact IBM at the following address:
IBM Warranty & Service Quality Dept.
Box 30
Spango Valley
Greenock
Scotland PA 16 OAH
AUSTRIA, DENMARK, FINLAND, GREECE, ITALY, NETHERLANDS,
PORTUGAL, SPAIN, SWEDEN AND SWITZERLAND
Limitation of Liability: The following replaces the terms of this section in its entirety:
Except as otherwise provided by mandatory law:
IBM’s liability for any damages and losses that may arise as a consequence of the
fulfillment of its obligations under or in connection with this Statement of Limited
Warranty or due to any other cause related to this Statement of Limited Warranty is
limited to the compensation of only those damages and losses proved and actually arising
immediate and direct consequence of the non-fulfillment of such obligations (if IBM
fault) or of such cause, for a maximum amount equal to the charges you paid for the
Machine. For purposes of this item, the term ″Machine″ includes Machine Code and
Licensed Internal Code (″LIC″).
The above limitation shall not apply to damages for bodily injuries (including death) and
damages to real property and tangible personal property for which IBM is legally liable.
UNDER NO CIRCUMSTANCES IS IBM, ITS SUPPLIERS OR RESELLERS
LIABLE FOR ANY OF THE FOLLOWING, EVEN IF INFORMED OF THEIR
POSSIBILITY: 1) LOSS OF, OR DAMAGE TO, DATA; 2) INCIDENTAL OR
INDIRECT DAMAGES, OR FOR ANY ECONOMIC CONSEQUENTIAL
DAMAGES; 3) LOST PROFITS, EVEN IF THEY ARISE AS AN IMMEDIATE
CONSEQUENCE OF THE EVENT THAT GENERATED THE DAMAGES; OR 4)
LOSS OF BUSINESS, REVENUE, GOODWILL, OR ANTICIPATED SAVINGS.
E-10
FRANCE AND BELGIUM
Limitation of Liability: The following replaces the terms of this section in its entirety:
Except as otherwise provided by mandatory law:
IBM’s liability for any damages and losses that may arise as a consequence of the
fulfillment of its obligations under or in connection with this Statement of Limited
Warranty is limited to the compensation of only those damages and losses proved and
actually arising as an immediate and direct consequence of the non-fulfillment of such
obligations (if IBM is at fault), for a maximum amount equal to the charges you paid for
IBM E400 PROJECTOR: User’s Guide
Page 61

2.
of
at
to
as to
the Machine that has caused the damages. For purposes of this item, the term ″Machine″
includes Machine Code and Licensed Internal Code (″LIC″).
The above limitation shall not apply to damages for bodily injuries (including death) and
damages to real property and tangible personal property for which IBM is legally liable.
UNDER NO CIRCUMSTANCES IS IBM, ITS SUPPLIERS OR RESELLERS
LIABLE FOR ANY OF THE FOLLOWING, EVEN IF INFORMED OF THEIR
POSSIBILITY: 1) LOSS OF, OR DAMAGE TO, DATA; 2) INCIDENTAL OR
INDIRECT DAMAGES, OR FOR ANY ECONOMIC CONSEQUENTIAL
DAMAGES; 3) LOST PROFITS, EVEN IF THEY ARISE AS AN IMMEDIATE
CONSEQUENCE OF THE EVENT THAT GENERATED THE DAMAGES; OR 4)
LOSS OF BUSINESS, REVENUE, GOODWILL, OR ANTICIPATED SAVINGS.
THE FOLLOWING TERMS APPLY TO THE COUNTRY SPECIFIED:
AUSTRIA
What this Warranty Covers: The following replaces the first sentence of the first paragraph
this section:
The warranty for an IBM Machine covers the functionality of the Machine for its normal use
and the Machine’s conformity to its Specifications.
The following paragraphs are added to this Section:
The minimum warranty period for Machines is 12 months from the date of delivery.. The
limitation period for consumers in action for breach of warranty is the statutory period as a
minimum. In case IBM or your reseller is unable to repair an IBM Machine, you can
alternatively ask for a partial refund as far as justified by the reduced value of the unrepaired
Machine or ask for a cancellation of the respective agreement for such Machine and get your
money refunded.
The second paragraph does not apply.
What IBM Will Do to Correct Problems: The following is added to this section:
During the warranty period, transportation for delivery of the failing Machine to IBM will be
IBM’s expense.
Limitation of Liability: The following paragraph is added to this section:
The limitations and exclusions specified in the Statement of Limited Warranty will not apply
damages caused by IBM with fraud or gross negligence and for express warranty.
The following sentence is added to the end of item 2:
IBM’s liability under this item is limited to the violation of essential contractual terms in
cases of ordinary negligence.
EGYPT
Limitation of Liability: The following replaces item 2 in this section:
any other actual direct damages, IBM’s liability will be limited to the total amount you
paid for the Machine that is the subject of the claim. For purposes of this item, the term
“Machine” includes Machine Code and Licensed Internal Code (LIC).
Applicability of suppliers and resellers (unchanged).
Dodatek E. IBM Statement of Limited Warranty - Z125-4753-07 - 11/2002
E-11
Page 62

of
at
to
FRANCE
Limitation of Liability: The following replaces the second sentence of the first paragraph of
this section:
such instances, regardless of the basis on which you are entitled to claim damages from
In
IBM, IBM is liable for no more than: (items 1 and 2 unchanged).
GERMANY
What this Warranty Covers: The following replaces the first sentence of the first paragraph
this section:
The warranty for an IBM Machine covers the functionality of the Machine for its normal use
and the Machine’s conformity to its Specifications.
The following paragraphs are added to this section:
The minimum warranty period for Machines is twelve months. In case IBM or your reseller is
unable to repair an IBM Machine, you can alternatively ask for a partial refund as far as
justified by the reduced value of the unrepaired Machine or ask for a cancellation of the
respective agreement for such Machine and get your money refunded.
The second paragraph does not apply.
What IBM Will Do to Correct Problems: The following is added to this section:
During the warranty period, transportation for delivery of the failing Machine to IBM will be
IBM’s expense.
Limitation of Liability: The following paragraph is added to this section:
The limitations and exclusions specified in the Statement of Limited Warranty will not apply
damages caused by IBM with fraud or gross negligence and for express warranty.
The following sentence is added to the end of item 2:
IBM’s liability under this item is limited to the violation of essential contractual terms in
cases of ordinary negligence.
HUNGARY
Limitation of Liability: The following is added at the end of this section:
The limitation and exclusion specified herein shall not apply to liability for a breach of
contract damaging life, physical well-being, or health that has been caused intentionally, by
gross negligence, or by a criminal act.
E-12
The parties accept the limitations of liability as valid provisions and state that the Section
314.(2) of the Hungarian Civil Code applies as the acquisition price as well as other
advantages arising out of the present Statement of Limited Warranty balance this limitation of
liability.
IRELAND
What this Warranty Covers: The following is added to this section:
Except as expressly provided in these terms and conditions, all statutory conditions, including
IBM E400 PROJECTOR: User’s Guide
Page 63

1.
of
2.
3.
of
1.
2.
3.
all warranties implied, but without prejudice to the generality of the foregoing all warranties
implied by the Sale of Goods Act 1893 or the Sale of Goods and Supply of Services Act 1980
are hereby excluded.
Limitation of Liability: The following replaces the terms of this section in its entirety:
For the purposes of this section, a ″Default″ means any act, statement, omission, or
negligence on the part of IBM in connection with, or in relation to, the subject matter of this
Statement of Limited Warranty in respect of which IBM is legally liable to you, whether in
contract or tort. A number of Defaults which together result in, or contribute to, substantially
the same loss or damage will be treated as one Default occurring on the date of occurrence of
the last such Default.
Circumstances may arise where, because of a Default, you are entitled to recover damages
from IBM.
This section sets out the extent of IBM’s liability and your sole remedy.
IBM will accept unlimited liability for death or personal injury caused by the negligence
IBM.
Subject always to the Items for Which IBM is Not Liable below, IBM will accept
unlimited liability for physical damage to your tangible property resulting from the
negligence of IBM.
Except as provided in items 1 and 2 above, IBM’s entire liability for actual damages for
any one Default will not in any event exceed the greater of 1) EUR 125,000, or 2) 125%
the amount you paid for the Machine directly relating to the Default.
for Which IBM is Not Liable
Items
Save with respect to any liability referred to in item 1 above, under no circumstances is IBM,
its suppliers or resellers liable for any of the following, even if IBM or they were informed of
the possibility of such losses:
loss of, or damage to, data;
special, indirect, or consequential loss; or
loss of profits, business, revenue, goodwill, or anticipated savings.
SLOVAKIA
Limitation of Liability: The following is added to the end of the last paragraph:
The limitations apply to the extent they are not prohibited under §§ 373-386 of the Slovak
Commercial Code.
SOUTH AFRICA, NAMIBIA, BOTSWANA, LESOTHO AND SWAZILAND
Limitation of Liability: The following is added to this section:
IBM’s entire liability to you for actual damages arising in all situations involving
nonperformance by IBM in respect of the subject matter of this Statement of Warranty will be
limited to the charge paid by you for the individual Machine that is the subject of your claim
from IBM.
UNITED KINGDOM
Limitation of Liability: The following replaces the terms of this section in its entirety:
Dodatek E. IBM Statement of Limited Warranty - Z125-4753-07 - 11/2002
E-13
Page 64

1.
a.
b.
of
3.
as
to
or
1.
2.
3.
3
1, 4
For the purposes of this section, a ″Default″ means any act, statement, omission, or
negligence on the part of IBM in connection with, or in relation to, the subject matter of this
Statement of Limited Warranty in respect of which IBM is legally liable to you, whether in
contract or tort. A number of Defaults which together result in, or contribute to, substantially
the same loss or damage will be treated as one Default.
Circumstances may arise where, because of a Default, you are entitled to recover damages
from IBM.
This section sets out the extent of IBM’s liability and your sole remedy.
IBM will accept unlimited liability for:
death or personal injury caused by the negligence of IBM; and
any breach of its obligations implied by Section 12 of the Sale of Goods Act 1979 or
Section 2 of the Supply of Goods and Services Act 1982, or any statutory
modification or re-enactment of either such Section.
2.
IBM will accept unlimited liability, subject always to the Items for Which IBM is Not
Liable below, for physical damage to your tangible property resulting from the negligence
IBM.
IBM’s entire liability for actual damages for any one Default will not in any event, except
provided in items 1 and 2 above, exceed the greater of 1) Pounds Sterling 75,000, or 2)
125% of the total purchase price payable or the charges for the Machine directly relating
the Default.
limits also apply to IBM’s suppliers and resellers. They state the maximum for which
These
IBM and such suppliers and resellers are collectively responsible.
Items for Which IBM is Not Liable
Save with respect to any liability referred to in item 1 above, under no circumstances is IBM
any of its suppliers or resellers liable for any of the following, even if IBM or they were
informed of the possibility of such losses:
loss of, or damage to, data:
special, indirect, or consequential loss; or
loss of profits, business, revenue, goodwill, or anticipated savings.
Part 3 - Warranty Information
This Part 3 provides information regarding the warranty applicable to your Machine,
including the warranty period and type of warranty service IBM provides.
Warranty Period
The warranty period may vary by country or region and is specified in the table below.
NOTE: ″Region″ means either Hong Kong or Macau Special Administrative Region of China.
E400 PROJECTOR
E-14
Country or Region of Purchase Warranty Period
Worldwide
IBM E400 PROJECTOR: User’s Guide
Type of Warranty Service
years
Page 65

3
1, 4 A
A
If
1.
2.
3.
4.
E400 PROJECTOR LAMP
Country or Region of Purchase Warranty Period
Worldwide
months
Type of Warranty Service
warranty period of 3 years on parts and 3 years on labor means that IBM provides warranty
service without charge for parts and labor during the 3 year warranty period.
warranty period of 3 months on parts and 3 months on labor means that IBM provides
warranty service without charge for parts and labor during the 3 month warranty period.
Types of Warranty Service
required, IBM provides repair or exchange service depending on the type of warranty
service specified for your Machine in the above table and as described below. Warranty
service may be provided by your reseller if approved by IBM to perform warranty service.
Scheduling of service will depend upon the time of your call and is subject to parts
availability. Service levels are response time objectives and are not guaranteed. The specified
level of warranty service may not be available in all worldwide locations, additional charges
may apply outside IBM’s normal service area, contact your local IBM representative or your
reseller for country and location specific information.
Customer Replaceable Unit (″CRU″) Service
IBM will ship CRU parts to you for your replacement. If IBM instructs you to return the
replaced CRU, you are responsible for returning it to IBM in accordance with IBM’s
instructions. If you do not return the defective CRU, if IBM so instructs, within 30 days of
your receipt of the replacement CRU, IBM may charge you for the replacement.
On-site Service
IBM or your reseller will either repair or exchange the failing Machine at your location and
verify its operation. You must provide suitable working area to allow disassembly and
reassembly of the IBM Machine. The area must be clean, well lit and suitable for the purpose.
For some Machines, certain repairs may require sending the Machine to an IBM service
center.
Courier or Depot Service
1
You will disconnect the failing Machine for collection arranged by IBM. IBM will provide
you with a shipping container for you to return your Machine to a designated service center. A
courier will pick up your Machine and deliver it to the designated service center. Following its
repair or exchange, IBM will arrange the return delivery of the Machine to your location. You
are responsible for its installation and verification.
Customer Carry-In or Mail-In Service
You will deliver or mail as IBM specifies (prepaid unless IBM specifies otherwise) the failing
Machine suitably packaged to a location IBM designates. After IBM has repaired or
exchanged the Machine, IBM will make it available for your collection or, for Mail-in
Service, IBM will return it to you at IBM’s expense, unless IBM specifies otherwise. You are
responsible for the subsequent installation and verification of the Machine.
1. This type of service is called ThinkPad EasyServ or EasyServ in some countries.
Dodatek E. IBM Statement of Limited Warranty - Z125-4753-07 - 11/2002
E-15
Page 66

To
66 81 11 00
45 20 82 00
02 38 55 74 50
The IBM Machine Warranty worldwide web site at
http://www.ibm.com/servers/support/machine_warranties/ provides a worldwide overview of
IBM’s Limited Warranty for Machines, a Glossary of IBM definitions, Frequently Asked
Questions (FAQs) and Support by Product (Machine) with links to Product Support pages.
The IBM Statement of Limited Warranty is also available on this site in 29 languages.
obtain warranty service contact IBM or your IBM reseller. In Canada or the United States,
call 1-800-IBM-SERV (426-7378). For other countries, see the telephone numbers below.
Phone numbers are subject to change without notice. For the latest phone number list, go to
www.ibm.com/pc/support and click Support Phone List.
Country or Region
Argentina
Australia
Austria
Belgium
Bolivia
Brazil
Canada
Chile
China (PRC)
China (Hong Kong
S.A.R.)
Columbia
Denmark
Ecuador
Finland
France
Germany
Indonesia
Ireland
Italy
Japan
Telephone Number
0800-666-0011
1300-130-426
01-24592-5901
Dutch 02-210-9820
French 02-210-9800
0800-0189
55-11-3889-8986
1-800-565-3344
Toronto 416-383-3344
800-224-488
800-810-1818
852-2825-7799
980-912-3021
1-800-426911 (option
#4)
09-459 69 60
07032-1549 201
021-523-8535
01-815-9202
02-7031-6101
Consumer customers
0120-887-870
Country or Region
Malaysia
Mexico
Netherlands
New Zealand
Norway
Peru
Philippines
Portugal
Russia
Singapore
Spain
Sweden
Switzerland
Taiwan
Thailand
Turkey
United Kingdom
United States
Uruguay
Venezuela
Telephone Number
03-7727-7800
001-866-434-2080
020-514-5770
0800-446-149
0-800-50-866
632-995-2225
21-791 51 47
095-940-2000
1800-840-9911
91-662 49 16
08-477 4420
058-333-09-00
886-2-2725-9799
66-2-273-4000
00-800-446-32-041
0-1475-555 055
1-800-426-7378
000-411-005-6649
0-800-100-2011
E-16
Luxembourg
IBM E400 PROJECTOR: User’s Guide
Business customers
0120-887-874
298-977 5063
Vietnam
848-8295-160
Page 67

OR
or
of
©
Dodatek F. Notices
IBM may not offer the products, services, or features discussed in this document in all
countries. Consult your local IBM representative for information on the products and services
currently available in your area. Any reference to an IBM product, program, or service is not
intended to state or imply that only that IBM product, program, or service may be used. Any
functionally equivalent product, program, or service that does not infringe any IBM
intellectual property right may be used instead. However, it is the user’s responsibility to
evaluate and verify the operation of any non-IBM product, program, or service.
IBM may have patents or pending patent applications covering subject matter described in
this document. The furnishing of this document does not give you any license to these patents.
You can send license inquiries, in writing, to:
IBM Director of Licensing
IBM Corporation
North Castle Drive
Armonk, NY 10504-1785
U.S.A.
INTERNATIONAL
BUSINESS MACHINES CORPORATION PROVIDES THIS
PUBLICATION “AS IS” WITHOUT WARRANTY OF ANY KIND, EITHER EXPRESS
IMPLIED, INCLUDING, BUT NOT LIMITED TO, THE IMPLIED WARRANTIES OF
NON-INFRINGEMENT, MERCHANTABILITY OR FITNESS FOR A PARTICULAR
PURPOSE. Some jurisdictions do not allow disclaimer of express or implied warranties in
certain transactions, therefore, this statement may not apply to you.
This information could include technical inaccuracies or typographical errors. Changes are
periodically made to the information herein; these changes will be incorporated in new
editions of the publication. IBM may make improvements and/or changes in the product(s)
and/or the program(s) described in this publication at any time without notice.
The products described in this document are not intended for use in implantation or other life
support applications where malfunction may result in injury or death to persons. The
information contained in this document does not affect or change IBM product specifications
warranties. Nothing in this document shall operate as an express or implied license or
indemnity under the intellectual property rights of IBM or third parties. All information
contained in this document was obtained in specific environments and is presented as an
illustration. The result obtained in other operating environments may vary.
IBM may use or distribute any of the information you supply in any way it believes
appropriate without incurring any obligation to you.
Any references in this publication to non-IBM Web sites are provided for convenience only
and do not in any manner serve as an endorsement of those Web sites. The materials at those
Web sites are not part of the materials for this IBM product, and use of those Web sites is at
your own risk.
Copyright IBM Corp. 2004
Any performance data contained herein was determined in a controlled environment.
Therefore, the result obtained in other operating environments may vary significantly. Some
measurements may have been made on development-level systems and there is no guarantee
that these measurements will be the same on generally available systems. Furthermore, some
measurements may have been estimated through extrapolation. Actual results may vary. Users
this document should verify the applicable data for their specific environment.
F-1
Page 68

v
v
v
is
v
Trademarks
The following terms are trademarks of International Business Machines Corporation in the
United States, other countries, or both:
IBM
IBM logo
ThinkPad
Microsoft, Windows, and Windows NT are trademarks of Microsoft Corporation in the
United States, other countries, or both.
Other company, product, or service names may be trademarks or service marks of others.
Electronic emission notices
IBM E400 PROJECTOR
Federal Communications Commission (FCC) statement
Note: This equipment has been tested and found to comply with the limits for a Class B
digital device, pursuant to Part 15 of the FCC Rules. These limits are designed to provide
reasonable protection against harmful interference in a residential installation. This equipment
generates, uses, and can radiate radio frequency energy and, if not installed and used in
accordance with the instructions, may cause harmful interference to radio communications.
However, there is no guarantee that interference will not occur in a particular installation. If
this equipment does cause harmful interference to radio or television reception, which can be
determined by turning the equipment off and on, the user is encouraged to try to correct the
interference by one or more of the following measures:
Reorient or relocate the receiving antenna.
Increase the separation between the equipment and receiver.
Connect the equipment into an outlet on a circuit different from that to which the receiver
connected.
Consult an IBM authorized dealer or service representative for help.
Properly shielded and grounded cables and connectors must be used in order to meet FCC
emission limits. Proper cables and connectors are available from IBM authorized dealers.
IBM is not responsible for any radio or television interference caused by using other than
recommended cables and connectors or by unauthorized changes or modifications to this
equipment. Unauthorized changes or modifications could void the user’s authority to operate
the equipment.
This device complies with Part 15 of the FCC Rules. Operation is subject to the following two
conditions: (1) this device may not cause harmful interference, and (2) this device must accept
any interference received, including interference that may cause undesired operation.
F-2
IBM E400 PROJECTOR: User’s Guide
Responsible party:
International Business Machines Corporation
New Orchard Road
Armonk, NY 10504
Telephone: 1-919-543-2193
Page 69

EN
Um
Tested To Comply
With FCC Standards
FOR HOME OR OFFICE USE
Industry Canada Class B emission compliance statement
This Class B digital apparatus complies with Canadian ICES-003.
Avis de conformite a la reglementation d’Industrie Canada
Cet appareil numérique de la classe B est conforme à la norme NMB-003 du Canada.
Deutsche EMV-Direktive (electromagnetische Verträglichkeit)
Zulassungbescheinigunglaut dem Deutschen Gesetz über die elektromagnetische
Verträglichkeit von Geräten (EMVG) vom 30. August 1995 (bzw. der EMC EG Richtlinie
89/336):
Dieses Gerät ist berechtigt in Übereinstimmungmit dem Deutschen EMVG das
EG-Konformitätszeichen - CE - zu führen. Verantwortlich für die Konformitätserklärung nach
Paragraph 5 des EMVG ist die:
IBM Deutschland Informationssysteme GmbH, 70548 Stuttgart.
Informationen in Hinsicht EMVG Paragraph 3 Abs. (2) 2:
Das Gerät erfüllt die Schutzanforderungen nach EN 55024:1998 und EN 55022:1998 Klasse B.
55022 Hinweis:
“Wird dieses Gerät in einer industriellen Umgebung betrieben (wie in EN 55022:B
festgetlegt), dann kann es dabei eventuell gestört werden. In solch einem FA11 ist der
Abstand bzw. die Abschirmungzu der industriellen Störquelle zu vergröβern.”
Anmerkung:
die Einhaltung des EMVG sicherzustellen sind die Geräte, wie in den IBM Handbüchern
angegeben, zu installieren und zu betreiben.
European Union - emission directive
This product is in conformity with the protection requirements of EU Council Directive
89/336/ECC on the approximation of the laws of the Member States relating to
electromagnetic compatibility.
IBM can not accept responsibility for any failure to satisfy the protection requirements
resulting from a non-recommended modification of the product, including the fitting of
non-IBM option cards.
This product has been tested and found to comply with the limits for Class B Information
Technology Equipment according to European Standard EN 55022. The limits for Class B
equipment were derived for typical residential environments to provide reasonable protection
against interference with licensed communication devices.
Dodatek F. Notices
F-3
Page 70

Ce
de
Ce
Le
Union Européenne - Directive Conformité électromagnétique
produit est conforme aux exigences de protection de la Directive 89/336/EEC du Conseil
l’UE sur le rapprochement des lois des États membres en matière de compatibilité
électromagnétique.
IBM ne peut accepter aucune responsabilité pour le manquement aux exigences de protection
résultant d’une modification non recommandée du produit, y compris l’installation de cartes
autres que les cartes IBM.
produit a été testé et il satisfait les conditions de l’équipement informatique de Classe B en
vertu de Standard européen EN 55022. Les conditions pour l’équipement de Classe B ont été
définies en fonction d’un contexte résidentiel ordinaire afin de fournir une protection
raisonnable contre l’interférence d’appareils de communication autorisés.
Unione Europea - Directiva EMC (Conformidad électromagnética)
Este producto satisface los requisitos de protección del Consejo de la UE, Directiva
89/336/CEE en lo que a la legislatura de los Estados Miembros sobre compatibilidad
electromagnética se refiere.
IBM no puede aceptar responsabilidad alguna si este producto deja de satisfacer dichos
requisitos de protección como resultado de una modificación no recomendada del producto,
incluyendo el ajuste de tarjetas de opción que no sean IBM.
Este producto ha sido probado y satisface los límites para Equipos Informáticos Clase B de
conformidad con el Estándar Europeo EN 55022. Los límites para los equipos de Clase B se
han establecido para entornos residenciales típicos a fin de proporcionar una protección
razonable contra las interferencias con dispositivos de comunicación licenciados.
Union Europea - Normativa EMC
Questo prodotto è conforme alle normative di protezione ai sensi della Direttiva del Consiglio
dell’Unione Europea 89/336/CEE sull’armonizzazione legislativa degli stati membri in
materia di compatibilità elettromagnetica.
IBM non accetta responsabilità alcuna per la mancata conformità alle normative di protezione
dovuta a modifiche non consigliate al prodotto, compresa l’installazione di schede e
componenti di marca diversa da IBM.
prove effettuate sul presente prodotto hanno accertato che esso rientra nei limiti stabiliti
per le le apparecchiature di informatica Classe B ai sensi del Norma Europea EN 55022. I
limiti delle apparecchiature della Classe B sono stati stabiliti al fine di fornire ragionevole
protezione da interferenze mediante dispositivi di comunicazione in concessione in ambienti
residenziali tipici.
F-4
IBM E400 PROJECTOR: User’s Guide
Page 71

Japanese statement of compliance for products less than or equal to 20 A per phase
Dodatek F. Notices
F-5
Page 72

F-6
IBM E400 PROJECTOR: User’s Guide
Page 73

Page 74

Številka dela: 73P2776
Natisnjeno na Danskem
(1P) P/N: 73P2776
 Loading...