

Ibiza DJM150BT-VHF Instruction Manual [nl]

USB STEREO MIXER
TABLE DE MIXAGE STEREO USB
USB STEREOMISCHPULT
MIXER STEREO USB
MESA DE MISTURA STEREO
USB STEREO MIKSER
USB STEREO MENGPANEEL
MIKSER STEREO Z USB
Ref.: DJM150BT-VHF
USER MANUAL
MANUEL D’UTILISATION
BEDIENUNGSANLEITUNG
MANUAL DE INSTRUÇÕES
MANUAL DE UTILIZARE
NAVODILA ZA UPORABO
HANDLEIDING
MANUAL DE USUARIO
INSTRUKCJA OBSŁUGI
©Copyright LOTRONIC 2016 DJM150BT-VHF 1
©Copyright LOTRONIC 2016 DJM150BT-VHF 2
CAUTION
GB
SAFETY RECOMMENDATIONS
MAGNETIC FIELD
CAUTION! Do not locate sensitive high gain equipment such as preamplifiers or tape decks directly above or below
the unit. This unit has a strong magnetic field which can induce hum into unshielded devices that are located nearby.
The field has strongest spots just above and below the unit. Locate the amplifier at the bottom of the rack and the
preamplifier or other sensitive equipment at the top.
RISK OF ELECTRIC SHOCK
DO NOT OPEN
To prevent electric shock, do not remove top or bottom covers.
No user serviceable parts inside.
Refer servicing to qualified servicing personnel.
Disconnect power cord before removing back panel cover to access gain switch.
No naked flame sources, such as lighted candles, should be placed on the apparatus
The unit should only be used in moderate climates
This unit should be cleaned only with a dry cloth. Avoid solvents or other cleaning detergents
A minimum distance of 0.5m around the unit must be kept to ensure sufficient ventilation and avoid
overheating
WARNING! To reduce the risk of electric shock, do not expose this equipment to rain or moisture!
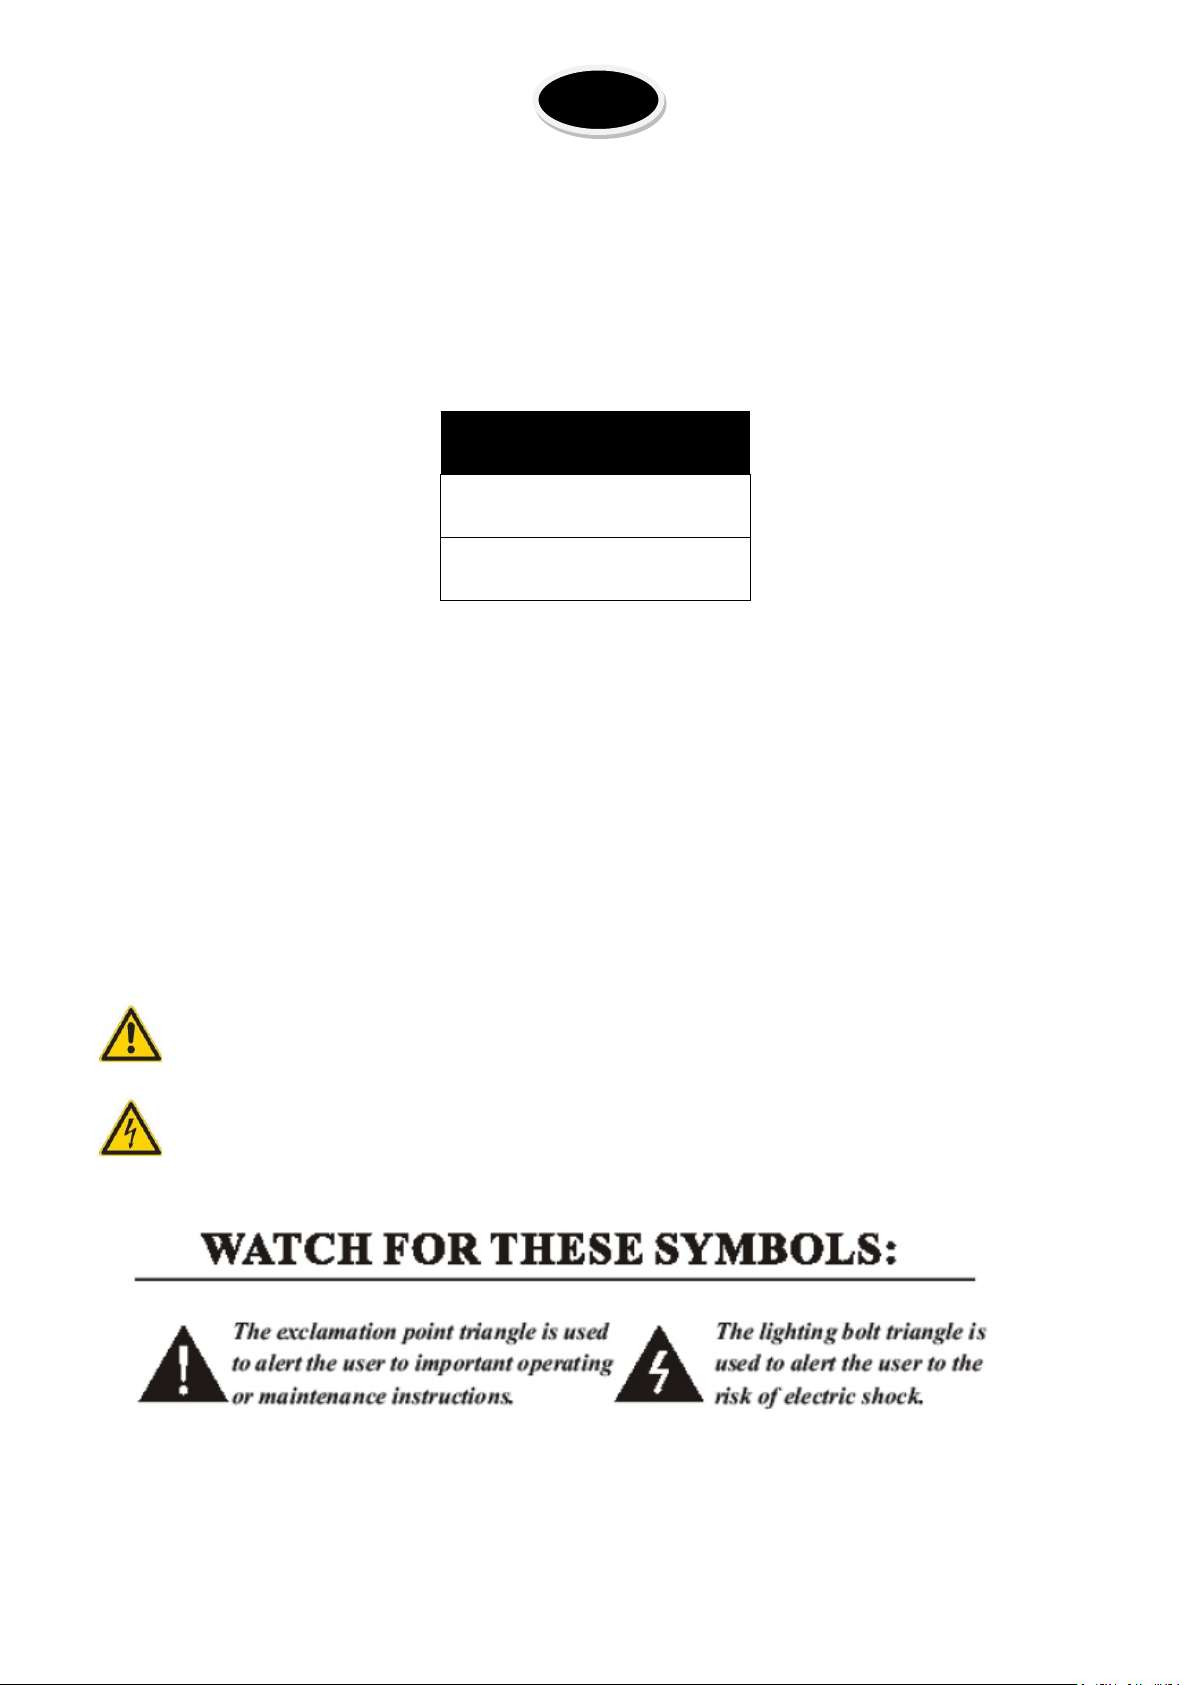
The exclamation point triangle is used to alert the user to important operating or maintenance instructions
The lightning bolt triangle is used to alert the user to the risk of electric shock
©Copyright LOTRONIC 2016 DJM150BT-VHF 3

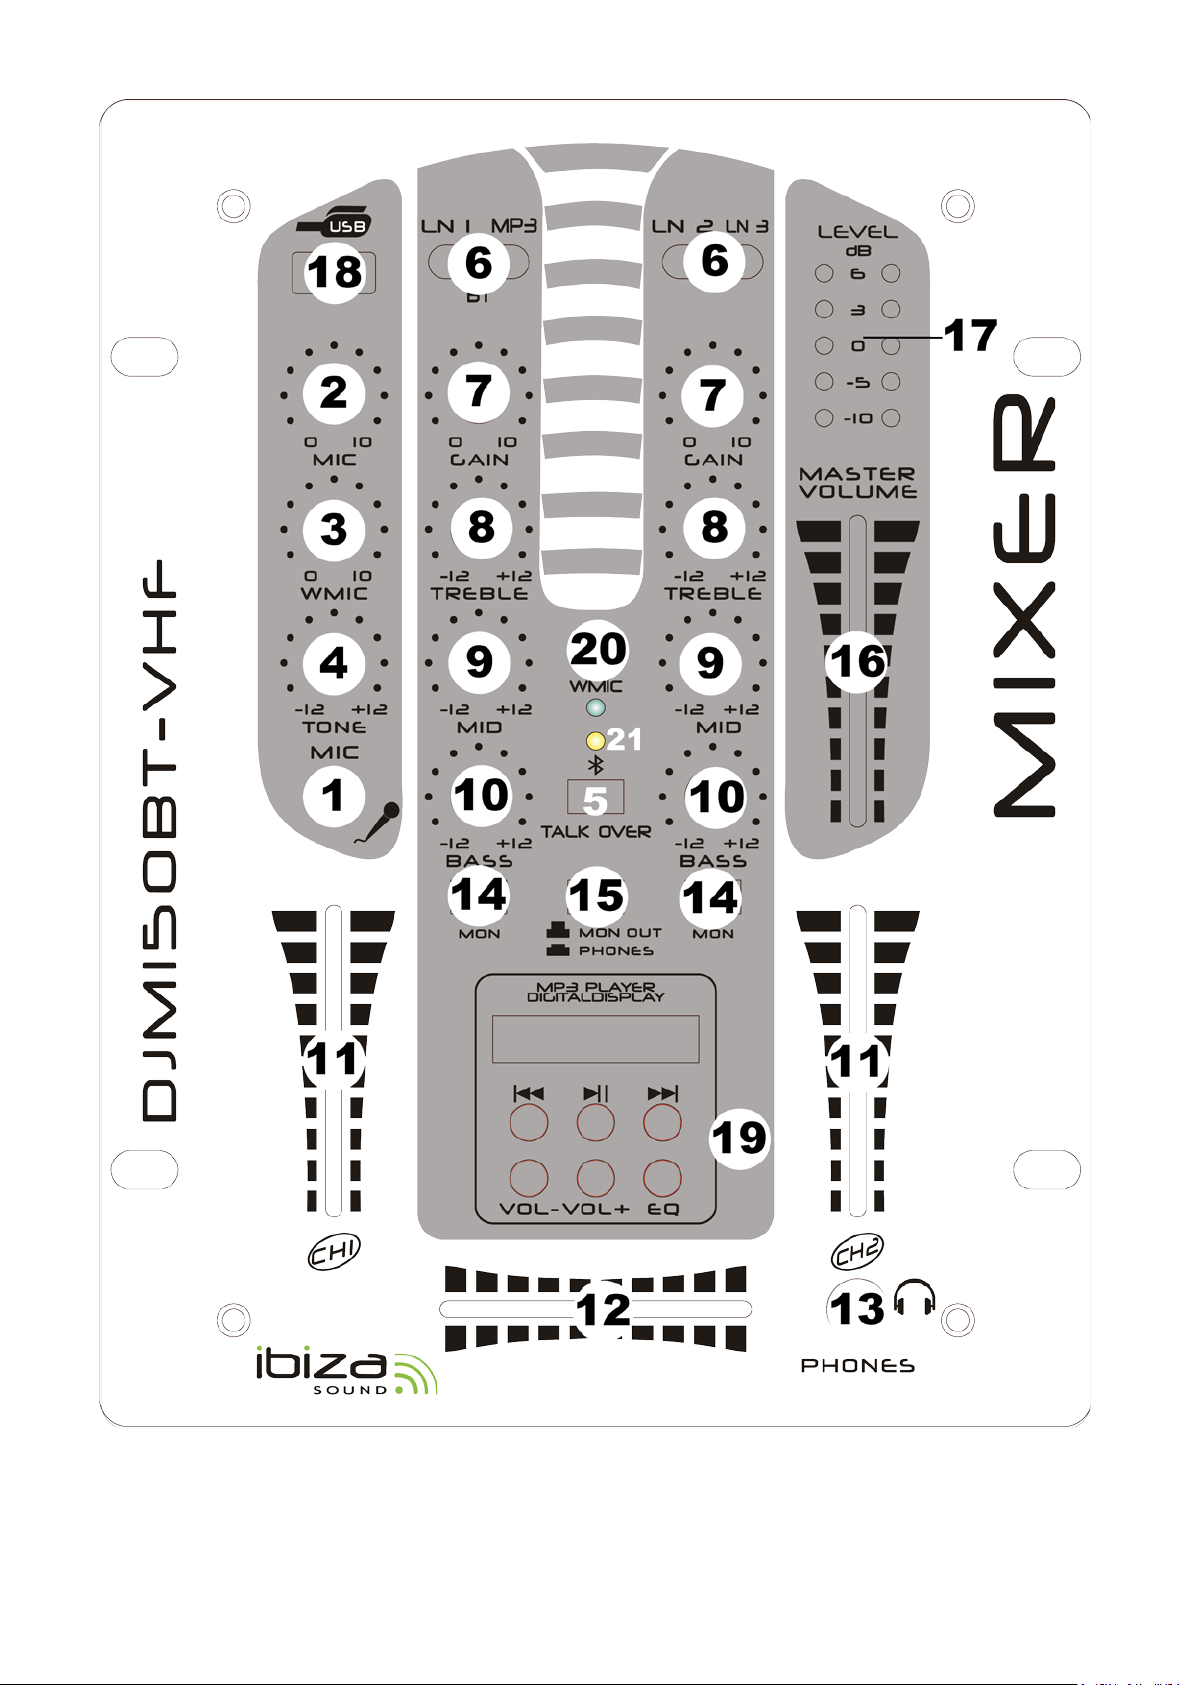
Controls
1. Mic 1 Socket
Connect your microphone with 1/4” jack plug here.
2. MIC Level Control
With this knob, you can adjust the microphone volume
3. WIRELESS MIC Level control
Adjusts the volume of the wireless microphone.
4. MIC Tone control
Adjusts the tone of the microphone.
5. Talkover Button
Press this button if you want to use your microphone. When the button is pressed, all other signal sources
will be attenuated by 14dB, so that the microphone can be clearly heard. In the OFF position, all signals
returns to their original level.
6. Line/BT/MP3 Switch
Use this switch to select the input to be sent to the individual channel.
7. Gain Control
Use this knob to set the level of input channel.
8. Treble Control
Used to increase or lower the HIGHS of the input channel.
9. Middle Control
Used to increase or lower the MIDS of the input channel.
10. Bass Control
Used to increase or lower the LOWS of the input channel
11. Channel Fader
Used to adjust the level of each channel.
12. Crossfader
Mixes the signals of one channel with another. If the crossfader is in the center position. Both channels can
be heard.
13. Headphone Socket
Connect your headphone with impedance between 8 and 600 Ohms to this connector.
14. Cue Button
Use this button in order to select the channel(s) to be monitored by headphones.
15. PHONE/MON OUT Button
Press this button to select phones out or monitor out.
16. Master Control
Adjust the level of the master-output.
17. Master Level Display
The LED display shows the level of the left and right master output
18. USB STICK SOCKET
USB stick input.
19. USB CONTROLS
USB player transport controls
a: |<< : Use this button to re-start the track or to select the previous track.
b: Play/Pause: Each time you press this button, the operation changes from play to pause or from pause to play.
c: >>|: Use this button to select the next track.
©Copyright LOTRONIC 2016 DJM150BT-VHF 4
d: VOL-: Use this button to control level down.
e: VOL+(28): Use this button to
f: EQ(29):Allow you to select the effect.
g: LED DISPLAY(30):
Display to MP3's information.
control level UP.
20. WIRELESS MIC SIGNAL LED
Lights up when a signal is received from the wireless microphone
21. BLUETOOTH LED: It displays the Bluetooth operating status. W hen you turn on the power, the Bluetooth
LED is flashing slowly which means that it is ready to connect to a Bluetooth device. If no connection is found
after 1 minute, le LED goes out and enters into standby mode. If the Bluetooth connection is made with a
player, the light flashes slowly, about 2-3 seconds f licker onc e. At this po int you c an use the b luetoot h pla yer
playing music can hear the music of the corresponding channel.
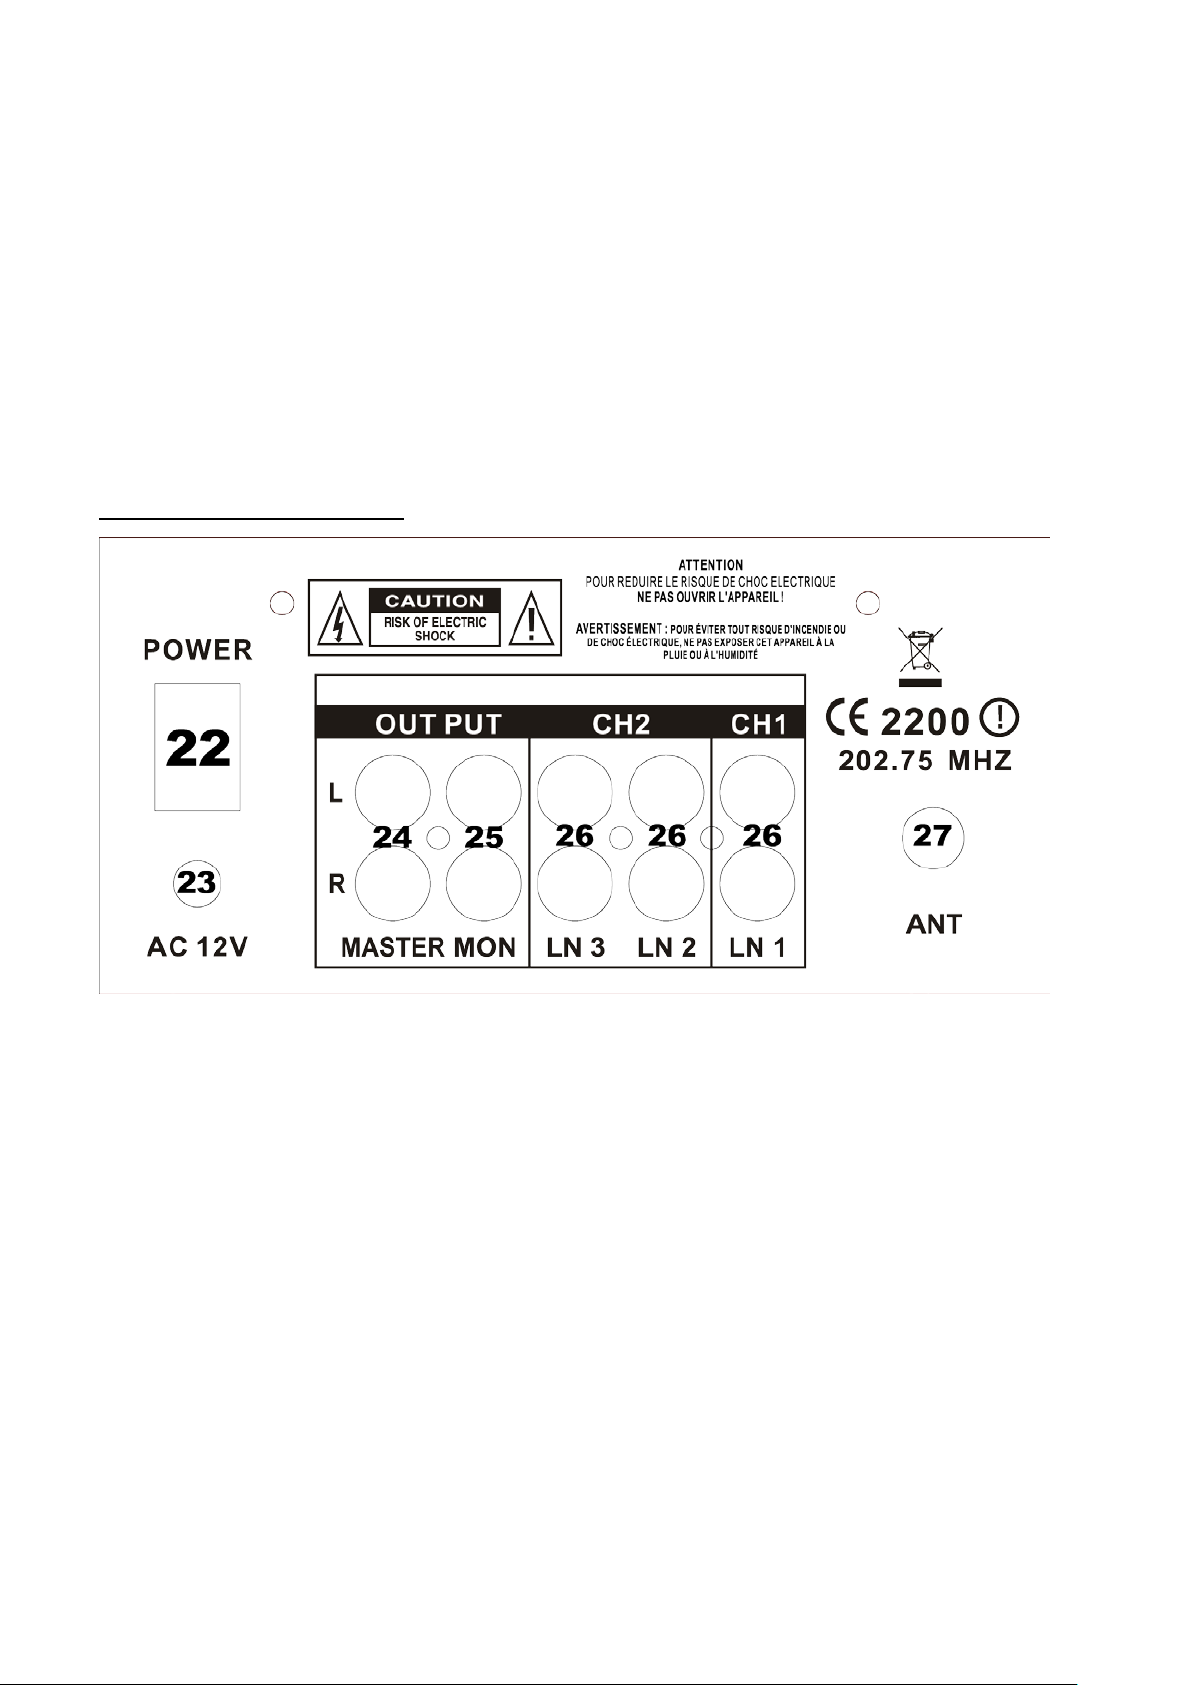
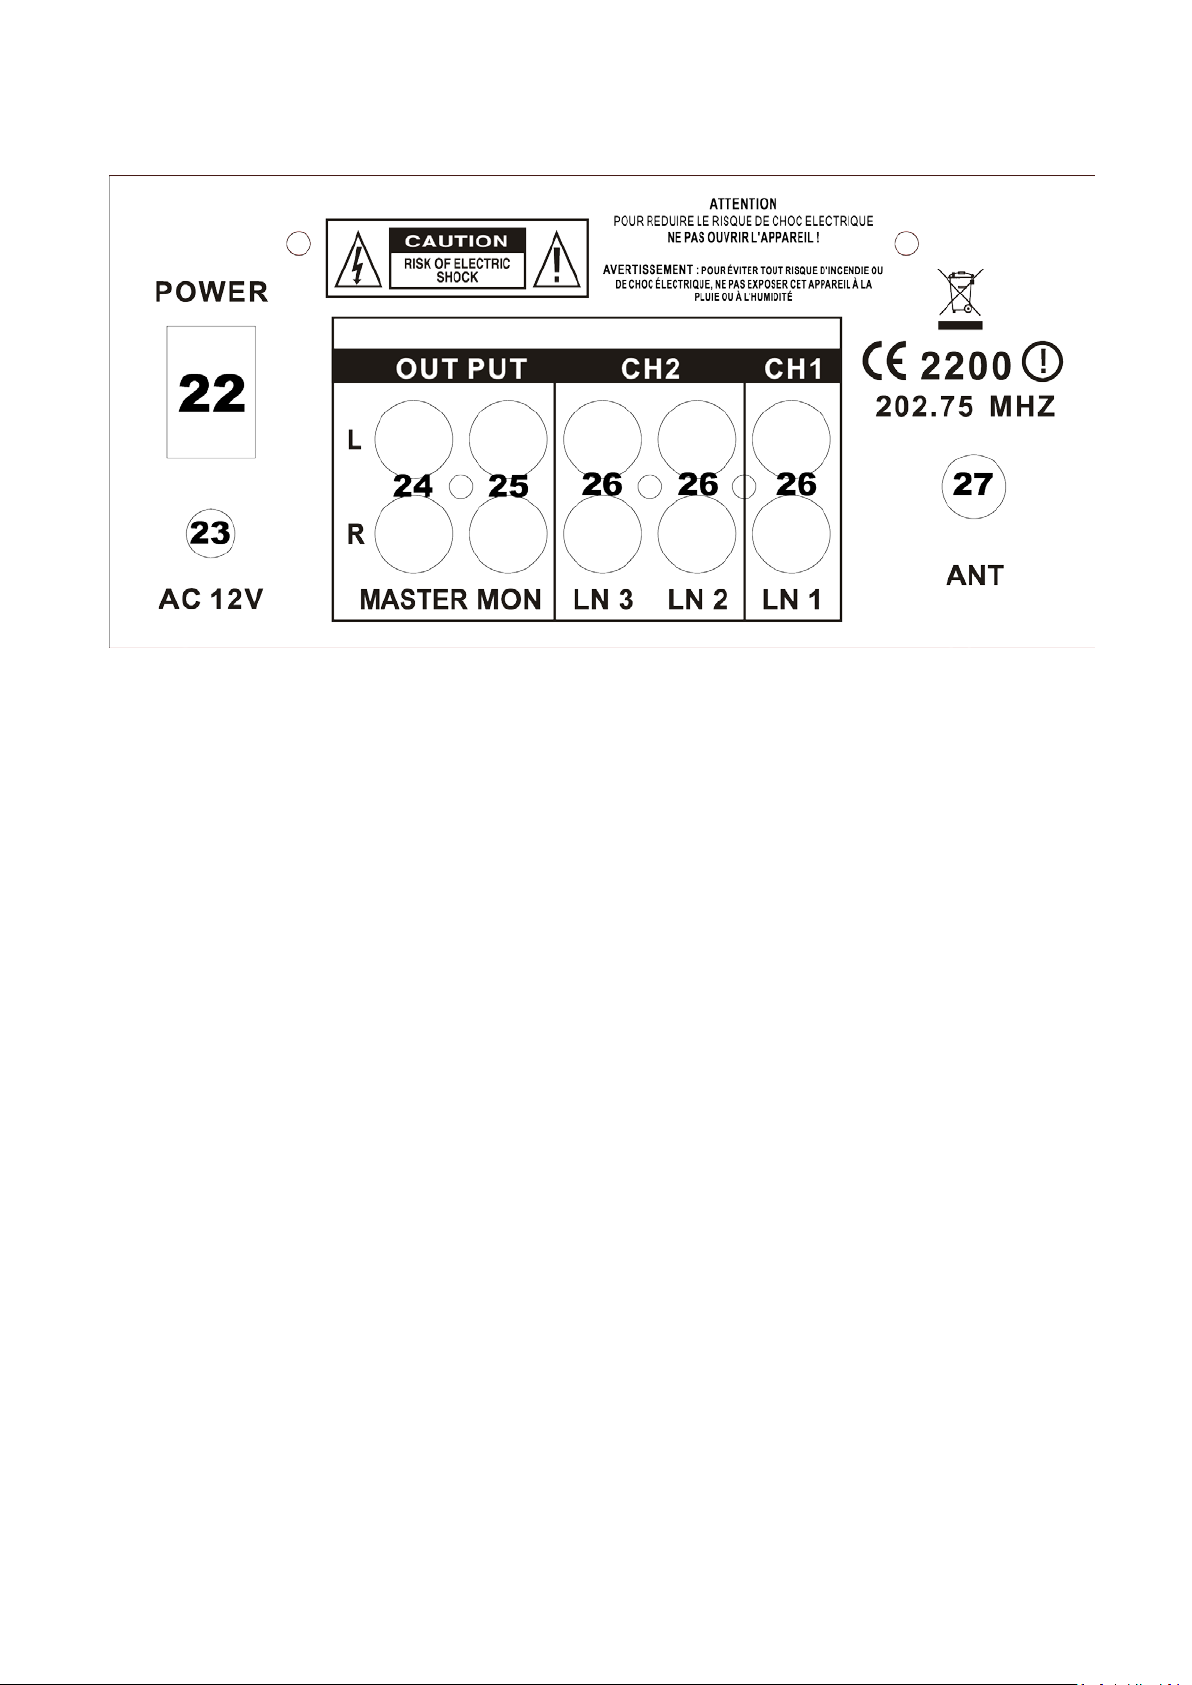
BACK PANEL DESCRIPTION
22. Power Switch
Press down the button to turn on this unit. The LED will illuminate when the power is on.
23. AC Connection
This unit comes with a 12V AC adapter. Plug into the 12V AC jack before plugging it into a proper power
source.
24. Master Output
Master output connects to the main amplifier (DJ final mix after crossfader section), accepts RCA jacks。
25. MON Output
To connect your AUX unit. These jacks are RCA types. Which are suitable for connection of a recording
device. Its level is not influenced by the master/channel control.
26. Line Inputs Sockets
These inputs, for ch1-ch2 and accept RCA-plug connectors.
27. VHF Antenna
Extend fully to receive the VHF signal from the wireless microphone
©Copyright LOTRONIC 2016 DJM150BT-VHF 5

BLUETOOTH PAIRING PROCEDURE
Set the selector switch of channel 1 to BT (center position). Set your Bluetooth device (e.g. mobile phone) to
Bluetooth connection mode. Switch the mixer on. The BLUETOOTH LED will flash slowly. Select “BLUETOOTH”
among the found devices on your mobile phone. You can now play music via CHANNEL1 of the mixer.
WIRELESS MICROPHONE
• Open the battery com partment on the micr ophone via a screwdriver. Insert a 1.5V b attery (included) with t he
correct polarity into the battery compartment. Close the battery compartment and tighten the screws.
• Slide the switch (“ON/OFF”) upwards to the ON position, the LED below the switch should light and the LED on
the main unit should also light to indicate that carrier signals are being received.
• If the “LOW – BATT” LED on the microphone lights, change the battery.
• Avoid “feedback” (howling or screaming s ound through th e speaker) by keeping the m icrophone at a s ensible
distance from the speaker and pointing it away from the speaker so that it doesn’t hear its own output.
• When not in use, s w itch t he w irel es s microphone off. If you wil l n ot us e t he microphone for an ex ten ded pe r iod
of time, remove the battery.
SPECIFICATIONS
INPUTS:
Microphone ........................................................................................................................... 3mV / 2.2 kΩ
Line ..................................................................................................................................... 150mV / 47 kΩ
OUTPUTS:
Main .................................................................................................................................. 0 dB / 1V 600Ω
MON .................................................................................................................................. 0 dB / 1V 600Ω
PHONE ..................................................................................................................................... 300mW/16 -32Ω
Tone Control
Treble.....................................................................................................................................+12dB/-12dB
Middle ...................................................................................................................................+12dB/-12dB
Bass .......................................................................................................................................+12dB/-12dB
GENERAL:
Frequency response ..................................................................................................... 20Hz∼20 kHz ±2dB
Distortion ....................................................................................................................................... <0.02%
S/N Ratio ....................................................................................................................... better than 70 dB
Electric products must not be put into household waste. Please bring them to a recycling centre. Ask your local authorities
or your dealer about the way to proceed.
©Copyright LOTRONIC 2016 DJM150BT-VHF 6
ATTENTION
F
CONSIGNES DE SECURITE
CHAMP MAGNETIQUE
ATTENTION! Ne pas placer des appareils sensibles tels que des préamplificateurs ou lecteurs de cassettes
directement au-dessus ou en dessous de l’appareil. L’amplificateur possède un champ magnétique puissant qui peut
provoquer des interférences dans des appareils non blindés qui se trouvent à proximité. Les points les plus forts se
trouvent en-dessous et au-dessus de l’appareil. Placez l’amplificateur en bas du rack et le préamplificateur et autres
appareils sensibles au-dessus.
RISQUE DE CHOC ELECTRIQUE
NE PAS OUVRIR
Afin d’éviter un choc électrique, ne pas retirer le couvercle supérieur ou inférieur. Le boîtier ne contient pas de
pièces remplaçables par l’utilisateur. Toutes les réparations doivent être effectuées par du personnel qualifié.
Débranchez le cordon d’alimentation avant d’ouvrir le panneau arrière pour accéder au contrôle de gain.
Il convient de conserver une distance minimale de 0.5m autour de l'appareil pour une ventilation suffisante
Ne pas poser de récipients remplis de liquide tel qu’un vase sur l’appareil
Aucune source de chaleur ou de flamme nue, telle que des bougies allumées, ne doit être placé sur l'appareil.
L’appareil est conçu pour une utilisation dans des climats modérés.
AVERTISSEMENT! Afin de réduire le risque de choc électrique, ne pas exposer cet appareil à l’humidité ou à la pluie !
Le triangle avec le point d’exclamation attire l’attention de l’utilisateur sur des instructions d’utilisation ou
de maintenance importantes.
L’éclair dans le triangle attire l’attention de l’utilisateur sur un risque de choc électrique
Réglages
1. Fiche Mic 1
Branchez un microphone muni d’une fiche Jack 6.35mm.
2. Contrôle de niveau micro
Réglage du volume micro
3. Contrôle de niveau du micro VHF
Réglage de volume du microphone sans fil
4. MIC TONE
Réglage de la tonalité du microphone.
©Copyright LOTRONIC 2016 DJM150BT-VHF 7

5. Bouton Talkover
Appuyez sur ce bouton lorsque vous voulez utiliser le microphone. Lorsque cette touche est enfoncée,
toutes les autres sources seront atténuées de 14dB de façon à bien entendre le microphone. En position
OFF, toutes les sources reviennent à leur niveau d’origine.
6. Commutateur Line/BLUETOOTH/MP3
Sélectionnez la source d’entrée que vous voulez envoyer dans le canal.
7. Contrôle de gain
Règle le niveau du canal d’entrée
8. Contrôle des aigus
Augmente ou diminue les hautes fréquences du canal d’entrée.
9. Contrôle des médiums
Augmente ou diminue les moyennes fréquences du canal d’entrée.
10. Contrôle des graves
Augmente ou diminue les basses fréquences du canal d’entrée.
11. Fader canal
Règle le niveau de chaque canal
12. Crossfader
Mélange les signaux de deux canaux. En position centrale, les deux canaux sont audibles.
13. Fiche pour casque
Branchez un microphone d’une impédance comprise entre 8 et 600 Ohms.
14. Bouton Cue
Sélectionnez le ou les canaux à pré-écouter dans le casque
15. Bouton PHONE/MON OUT
Appuyer pour sélectionner la sortie casque ou monitor.
16. Contrôle général
Règle le niveau de la sortie générale.
17. Affichage du niveau général
L’afficheur à LED indique le niveau de la sortie générale gauche et droite
18. FICHE USB
Entrée pour la clé USB.
19. Contrôles USB
Commandes du lecteur USB
a: |<< : Retour au début du titre en cours ou sélection du titre précédent.
b: Play/Pause: Bascule entre lecture et pause
c: >>|: Sélection du titre suivant.
d: VOL-: Baisse le volume
e: VOL+(28): Augmente le volume
f: EQ(29): Sélection d’un effet
g: AFFICHEUR A LED(30):
Affiche les informations MP3
20. Voyant du signal du microphone sans fil
S’allume en présence d’un signal du microphone sans fil
21. LED BLUETOOTH:
Lorsque vous mettez la table de mixage sous tension, le LED clignote lentement pour indiquer qu’elle est
prête à la connexion. En l’absence d’une connexion Bluetooth, elle s’éteint. Si la table de mixage est
connectée à un lecteur, la LED clignote lentement et s’éteint ensuite. Vous pouvez maintenant écouter
de la musique sur le canal 1.
©Copyright LOTRONIC 2016 DJM150BT-VHF 8
DESCRIPTION DE L’ARRIERE
22. Interrupteur M/A
Enfoncez le bouton pour mettre l’appareil sous tension. La LED s’allume lorsque la table de mixage est sous
tension.
23. Branchement sur le secteur
Cet appareil est livré avec un adaptateur 12Vac. Branchez l’adaptateur sur la fiche 12Vac avant de le
connecter sur une prise secteur.
24. Sortie générale
Branchez la sortie générale sur l’amplificateur principal (mix final du DJ post-crossfader) au moyen de fiches
RCA.
25. Sortie MON
Branchement de votre appareil AUX par fiches RCA. Convient au branchement d’un appareil enregistreur.
Son niveau n’est pas influencé par le contrôle général/canal.
26. Fiches d’entrée Line
Ces entrées RCA desservent les canaux 1 & 2.
27. Antenne VHF
Sortez l’antenne afin d’optimiser la réception du signal VHF du microphone sans fil.
PROCEDURE D’APPAIRAGE
Mettez le sélecteur d’entrée du canal 1 sur BT (position centrale). Réglez votre source Bluetooth (p. ex. votre
téléphone) sur la recherche d’appareils Bluetooth. Mettez la table de mixage sous tension. La LED BLUETOOTH
clignote lentement. Sélectionnez « BLUETOOTH » parmi les appareils trouvés. Maintenant vous pouvez mixer
votre source Bluetooth sur le canal 1.
MICROPHONE VHF
• Ouvrez le compartiment à pile au moyen d’un tournevis. Insérez une pile 1,5V (fournie) en respectant la
polarité indiquée dans le compartiment. Fermez le compartiment et serrez les vis.
• Poussez le commutateur (“ON/OFF”) vers le haut sur la position ON. Le voyant en-dessous du commutateur
ainsi que celui sur l’enceinte doivent s’allumer pour indiquer que les signaux sont transmis.
©Copyright LOTRONIC 2016 DJM150BT-VHF 9
• Changez la pile lorsque le voyant “LOW – BATT” s’allume sur le microphone.
VORSICHT
D
• Pour éviter l’effet Larsen (hurlement strident sortant du haut-parleur), gardez le microphone à une distance
raisonnable de l’enceinte et ne le dirigez pas sur le haut-parleur afin qu’il ne capte pas son propre son.
• Eteignez le microphone lorsqu’il n’est pas en service. En cas d’une non-utilisation prolongée, retirez la pile.
CARACTERISTIQUES TECHNIQUES
ENTREES:
Microphone ........................................................................................................................... 3mV / 2.2 kΩ
Ligne ................................................................................................................................... 150mV / 47 kΩ
SORTIES:
Générale ............................................................................................................................ 0 dB / 1V 600Ω
MON .................................................................................................................................. 0 dB / 1V 600Ω
PHONE ..................................................................................................................................... 300mW/16-32Ω
Contrôles de tonalité
Aigus ......................................................................................................................................+12dB/-12dB
Médiums ...............................................................................................................................+12dB/-12dB
Graves ....................................................................................................................................+12dB/-12dB
GENERAL:
Bande passante ............................................................................................................ 20Hz∼20 kHz ±2dB
Distorsion ....................................................................................................................................... <0.02%
Rapport S/B ................................................................................................................. meilleur que 70 dB
NOTE IMPORTANTE : Les produits électriques ne doivent pas être mis au rebut avec les ordures ménagères.
Veuillez les faire recycler à un point de collecte spécialisé. Consultez les autorités locales ou votre revendeur sur
la façon de les recycler.
SICHERHEITSVORSCHRIFTEN
MAGNETFELD
VORSICHT ! Keine empfindlichen Geräte wie Vorverstärker oder Kassettenrekorder auf oder unter den Verstärker stellen.
Der Verstärker besitzt ein starkes Magnetfeld, das bei nicht abgeschirmten Geräten Brummgeräusche verursacht. Die
stärksten Punkte befinden sich auf und unter dem Gerät. Wenn Sie den Verstärker in ein Geräterack einbauen, installieren
Sie ihn ganz unten im Rack und alle anderen Geräte darüber.
©Copyright LOTRONIC 2016 DJM150BT-VHF 10
STROMSCHLAGGEFAHR
NICHT ÖFFNEN

Um Stromschlag zu vermeiden, nicht das Gehäuse öffnen. Es enthält keine vom Benutzer auswechselbaren Teile.
Reparaturen dürfen nur von Fachpersonal ausgeführt werden. Netzkabel abziehen, bevor Sie die Rückwand öffnen,
um Zugang zum Gain Regler zu bekommen.
WARNUNG! Um Stromschlag zu vermeiden, das Gerät vor Regen und Feuchtigkeit schützen!
Das Dreieck mit dem Ausrufezeichen lenkt die Aufmerksamkeit des Benutzers auf wichtige Bedienungsund Wartungshinweise
Der Blitz im Dreieck lenkt die Aufmerksamkeit des Benutzers auf ein Stromschlagrisiko
Regler
1. Mic 1 Buchse
Zum Anschluss eines Mikrofons mit 6,35mm Klinkenstecker.
2. MIC Pegelregler
Zum Einstellen der Mikrofonlautstärke
3. WIRELESS MIC Pegelregler
Stellt die lautstärke des Funkmikrofons ein.
4. MIC Tone Regler
Mikrofonklangregler
5. Talkover Taste
Diese Taste drücken, wenn Sie das Mikrofon benutzen möchten. Wenn die Taste gedrückt ist, wird der
Pegel aller anderen Quellen um 14dB gedämpft, um die Mikrofonansage deutlich hören zu können. In der
OFF Stellung kehren alle Signale wieder zu ihrem ursprünglichen Pegel zurück.
6. Line/Bluetooth/MP3 Schalter
Wahlschalter für die Eingangsquelle des Kanals
7. Gain Regler
Regelt den Eingangspegel des Kanals.
8. Treble Regler
Stellt die HOHEN Frequenzen des Eingangskanals ein.
9. Middle Regler
Stellt die MITTLEREN Frequenzen des Eingangskanals ein.
10. Bass Regler
Stellt die TIEFEN Frequenzen des Eingangskanals ein
11. Kanalfader
Stellt den Pegel jedes Kanals ein.
12. Crossfader
Mischt die Signale der beiden Kanäle. In der mittleren Stellung sind beide Kanäle gleichzeitig hörbar.
13. Kopfhörerbuchse
Zum Anschluss eines Kopfhörers mit 8 bis 600 Ohm Impedanz.
14. Cue Taste
Wählt den oder die Kanäle, die im Kopfhörer vorgehört werden sollen.
15. PHONE/MON OUT Taste
Mit dieser Taste den Kopfhörer- oder Monitorausgang wählen
©Copyright LOTRONIC 2016 DJM150BT-VHF 11
 Loading...