

OWNER'S MANUAL
Operation
Maintenance
Specifications
All information in this Owner's Manual is current at the time of publication. However, HYUNDAI reserves the right to make changes at any time
so that our policy of continual product improvement may be carried out.
This manual applies to all models of this vehicle and includes descriptions and explanations of optional as well as standard equipment.
As a result, you may find material in this manual that does not apply to
your specific vehicle.
Please note that some models are equipped with Right-Hand Drive
(RHD). The explanations and illustrations for some operations in RHD
models are opposite of those written in this manual.

F2
Your HYUNDAI should not be modified in any way. Such modifications may adversely affect
the performance, safety or durability of your HYUNDAI and may, in addition, violate conditions of the limited warranties covering the vehicle. Certain modifications may also be in violation of regulations established by the Department of Transportation and other government
agencies in your country.
Your vehicle is equipped with electronic components. It is possible for an improperly
installed/adjusted two-way radio or cellular telephone to adversely affect electronic systems.
For this reason, we recommend that you carefully follow the radio manufacturer's instructions
or consult your HYUNDAI dealer for precautionary measures or special instructions if you
choose to install one of these devices.
CAUTION: MODIFICATIONS TO YOUR HYUNDAI
TWO-WAY RADIO OR CELLULAR TELEPHONE INSTALLATION
F3
This manual includes information titled as DANGER, WARNING, CAUTION and NOTICE.
These titles indicate the following:
SAFETY AND VEHICLE DAMAGE WARNING
DANGER indicates a hazardous situation which, if not avoided, will result
in death or serious injury.
DANGER
WARNING indicates a hazardous situation which, if not avoided, could
result in death or serious injury.
CAUTION indicates a hazardous situation which, if not avoided, could result
in minor or moderate injury.
CAUTION
NOTICE indicates a situation which, if not
avoided, could result in vehicle damage.
NOTICE
WARNING

F4
FOREWORD
Congratulations, and thank you for choosing HYUNDAI.We are pleased to welcome you to the growing number of distinguished people who drive HYUNDAIS.We are very proud of the advanced engineering and high-quality construction
of each HYUNDAI we build.
Your Owner’s Manual will introduce you to the features and operation of your new HYUNDAI. To become familiar with
your new HYUNDAI, so that you can fully enjoy it, read this Owner’s Manual carefully before driving your new vehicle.
This manual contains important safety information and instructions intended to familiarize you with your vehicle’s controls and safety features so you can safely operate your vehicle.
This manual also contains information on maintenance designed to enhance safe operation of the vehicle. It is recommended that all service and maintenance on your car be performed by an authorized HYUNDAI dealer.HYUNDAI dealers are prepared to provide high-quality service, maintenance and any other assistance that may be required.
This Owner’s Manual should be considered a permanent part of your vehicle, and should be kept in the vehicle so you
can refer to it at any time.The manual should stay with the vehicle if you sell it to provide the next owner with important
operating, safety and maintenance information.
HYUNDAI MOTOR COMPANY
Copyright 2018 HYUNDAI Motor Company. All rights reserved. No part of this publication may be reproduced, stored
in any retrieval system or transmitted in any form or by any means without the prior written permission of HYUNDAI
Motor Company.
Severe vehicle damage may result from the use of poor quality lubricants that do not meet HYUNDAI specifications.You must always use high quality lubricants that meet the specifications listed on Page 8-6 in the
Vehicle Specifications chapter of the Owner's Manual.
CAUTION

We want to help you get the greatest
possible driving pleasure from your
vehicle. Your Owner’s Manual can
assist you in many ways. We strongly recommend that you read the
entire manual. In order to minimize
the chance of death or injury, you
must read the WARNING and CAUTION sections in the manual.
Illustrations complement the words
in this manual to best explain how to
enjoy your vehicle. By reading your
manual, you will learn about features, important safety information,
and driving tips under various road
conditions.
The general layout of the manual is
provided in the Table of Contents.
Use the index when looking for a
specific area or subject; it has an
alphabetical listing of all information
in your manual.
Sections: This manual has eight
chapters plus an index. Each chapter
begins with a brief list of contents so
you can tell at a glance if that section
has the information you want.
Your safety, and the safety of others,
is very important. This Owner's
Manual provides you with many safety precautions and operating procedures. This information alerts you to
potential hazards that may hurt you
or others, as well as damage to your
vehicle.
Safety messages found on vehicle
labels and in this manual describe
these hazards and what to do to
avoid or reduce the risks.
Warnings and instructions contained
in this manual are for your safety.
Failure to follow safety warnings and
instructions can lead to serious injury
or death.
Throughout this manual DANGER,
WARNING, CAUTION, NOTICE and
the SAFETY ALERT SYMBOL will
be used.
This is the safety alert symbol. It is used to alert you to
potential physical injury hazards. Obey all safety messages that follow this symbol
to avoid possible injury or
death. The safety alert symbol precedes the signal words
DANGER, WARNING and
CAUTION.
HOW TO USE THIS MANUAL
SAFETY MESSAGES
F5
Introduction
DANGER indicates a hazardous
situation which, if not avoided,
will result in death or serious
injury.
DANGER
WARNING indicates a hazardous
situation which, if not avoided,
could result in death or serious
injury.
WARNING

F6
Introduction
NOTICE indicates a situation
which, if not avoided, could result
in vehicle damage.
• This vehicle should not be modified. Modification of your vehicle
could affect its performance, safety
or durability and may even violate
governmental safety and vehicle
regulations.
In addition, damage or performance problems resulting from any
modification may not be covered
under warranty.
• If you use unauthorized electronic
devices, it may cause the vehicle to
operate abnormally, wire damage,
battery discharge and fire. For your
safety, do not use unauthorized
electronic devices.
HYUNDAI promotes an environmentally sound treatment for end of life
vehicles and offers to take back your
HYUNDAI end of life vehicles in
accordance with the European Union
(EU) End of Life Vehicles Directive.
You can get detailed information
from your national HYUNDAI homepage.
NOTICE
CAUTION indicates a hazardous
situation which, if not avoided,
could result in minor or moderate injury.
CAUTION
VEHICLE MODIFICATIONS
RETURNING USED VEHICLES
(FOR EUROPE)

1
2
3
4
5
6
7
8
I
Your vehicle at a glance
Safety system of your vehicle
Convenient features of your vehicle
Multimedia System
Driving your vehicle
What to do in an emergency
Maintenance
Specifications & Consumer information
Index
TABLE OF CONTENTS

Electric Vehicle System Overview
Electric Vehicle ........................................................H3
Characteristics of Electric Vehicles......................H3
Battery Information ................................................H3
Main Components of Electric Vehicle..................H4
High Voltage Battery (lithium-ion polymer)........H5
High Voltage Battery Warmer System .................H6
Nearby Stations .......................................................H7
Energy Information .................................................H8
Battery information............................................................H8
Energy consumption .........................................................H8
Charge Management...............................................H9
Charging and climate..........................................................H9
Charging location..............................................................H10
Charging limit .....................................................................H11
ECO Driving ............................................................H11
CO2 reduction ....................................................................H11
Driving history ...................................................................H12
EV Settings .............................................................H12
Winter mode.......................................................................H12
Warning...............................................................................H13
EV route ..............................................................................H13
Charging Information............................................H14
Charging Time Information ..................................H14
Charging Types ......................................................H15
Charging Status .....................................................H16
Charging Connector AUTO/ LOCK Mode...........H18
When the Charging Connector Is Locked...................H18
Scheduled Charging(if equipped)........................H19
Charging Precautions............................................H20
AC Charge...............................................................H22
How to Connect AC Charger..........................................H22
Checking Charging Status...............................................H25
How to Disconnect AC Charger.....................................H26
Unlock Charging Connector in Emergency ................H27
DC Charge ..............................................................H28
How to Connect DC Charger..........................................H28
Checking Charging Status...............................................H30
How to Disconnect DC Charger.....................................H31
Trickle Charge ........................................................H32
How to Set the Charge Level of the
Portable Charger...............................................................H32
How to Connect Portable Charger
(ICCB: In-Cable Control Box)..........................................H33
Checking Charging Status...............................................H36
Charging Status Indicator Lamp for
Portable Charger...............................................................H38
How to Disconnect Portable Charger
(ICCB: In-Cable Control Box)..........................................H41
Unlock Charging Connector in Emergency ................H42
Precautions for Portable Charger
(ICCB: In-Cable Control Box)..........................................H42

Action to be taken when charging
stops abruptly ........................................................H44
How to Start the Vehicle......................................H45
How to Stop the Vehicle.......................................H46
Virtual Engine Sound System ..............................H46
Distance to Empty .................................................H47
When destination is not set...........................................H47
When destination is set...................................................H48
Tips for Improving Distance to Empty ...............H48
Power/Charge Gauge............................................H49
State of charge (SOC) gauge for high
voltage battery ......................................................H49
Warning and Indicator Lights
(related to electric vehicle) .................................H50
Ready Indicator ................................................................H50
Service Warning Light .....................................................H50
This warning light illuminates :......................................H50
Power Down Warning Light ...........................................H51
Charging Indicator Light..................................................H51
High Voltage Battery Level Warning Light.................H51
Regenerative Brake Warning Light..............................H52
LCD Display Messages..........................................H52
Shift to P to charge .........................................................H52
Remaining time ..................................................................H52
Unplug vehicle to start....................................................H53
Charging door open .........................................................H53
Charging stopped. Check the AC/DC charger ...........H53
Charging stopped. Check the cable connection........H54
Check regenerative brakes /
Stop vehicle and check brakes .....................................H54
Low battery........................................................................H55
Charge immediately. Power limited ..............................H55
Low outside temp. may limit power output.
Charge EV battery/ Low battery temperature.
Power limited .....................................................................H55
Battery overheated! Stop safely ..................................H56
Power limited .....................................................................H56
Stop safely and check power .....................................H57
Check virtual engine sound system .............................H57
Check electric vehicle system .......................................H58
Energy flow ...........................................................H58
Vehicle Stop........................................................................H58
EV Propulsion ....................................................................H59
Regeneration......................................................................H59
Aux. Battery Saver+ .............................................H59
Mode ....................................................................................H60
System Setting...................................................................H60
LCD Display Message.......................................................H61
Utility Mode............................................................H61
System Setting and Activation ......................................H62
System Deactivation.........................................................H62
If an Accident Occurs ...........................................H63
Other Precautions for Electric Vehicle ..............H65
Service Interlock Connector ................................H65
Service Plug ...........................................................H65

H3
Electric Vehicle
An electric vehicle is driven using a
battery and an electric motor. While
general vehicles use an internal
combustion engine and gasoline as
fuel, electric vehicles use electrical
energy that is charged inside the
high voltage battery. As a result,
electric vehicles are eco-friendly in
that they do not require fuel and do
not emit exhaust gases.
Characteristics of Electric
Vehicles
1.It is driven using the electrical
energy that is charged inside the
high voltage battery. This method
prevents air pollution since fuel,
like gasoline, is not required,
negating the emission of exhaust
gases.
2.A high performance motor is used
in the vehicle as well. Compared to
standard, internal combustion
engine vehicles, engine noise and
vibrations are much more minimal
when driving.
3.When decelerating or driving
downhill, regenerative braking is
utilized to charge the high voltage
battery. This minimizes energy loss
and increases the distance to
empty.
4.When the battery charge is not sufficient, AC charge, DC charge and
trickle charge are available. (Refer
to “Charge Types for Electric
Vehicle” for details.)
Information
What does regenerative braking do?
It uses an electric motor when deceler-
ating and braking and transforms
kinetic energy to electrical energy in
order to charge the high voltage battery. (Torque is applied in the opposite
direction when decelerating to generate braking force and electric energy.)
Battery Information
• The vehicle is composed of a high
voltage battery that drives the
motor and air-conditioner, and an
auxiliary battery (12 V) that drives
the lamps, wipers, and audio system.
• The auxiliary battery is automatically charged when the vehicle is in
the ready ( ) mode or the high
voltage battery is being charged.
i
ELECTRIC VEHICLE
H4
MAIN COMPONENTS OF ELECTRIC VEHICLE
• Do not intentionally remove or
disassemble high voltage
components and high voltage
battery connectors and wires.
Also, be careful not to damage high voltage components
and the high voltage battery. It
may cause serious injury and
significantly impact the performance and durability of the
vehicle.
• When inspection and mainte-
nance is required for high
voltage components and the
high voltage battery, we recommend that you contact an
authorized HYUNDAI dealer.
WARNING
Main Components of Electric Vehicle
• On-Board Charger (OBC) : A device that charges the high voltage battery
by converting AC power of the power grid to DC power.
• Inverter : Transforms direct current into alternate current to supply power
to the motor, and transforms alternate current into direct current to charge
the high voltage battery.
• LDC : Transforms power from the high voltage battery to low voltage (12 V)
to supply power to the vehicle (DC-DC).
• Motor : Uses electrical energy stored inside the high voltage battery to
drive the vehicle (functions like an engine in a standard vehicle).
• Reduction gear : Delivers rotational force of the motor to the tires at
appropriate speeds and torque.
• High voltage battery (lithium-ion polymer) : Stores and supplies power
necessary for the electric vehicle to operate (12 V auxiliary battery provides
power to the vehicle features such as lights and wipers).
❈ OBC : On-Board Charger
❈ LDC : Low Voltage DC-DC Converter

H5
High Voltage Battery
(lithium-ion polymer)
• The charge amount of the high
voltage battery may gradually
decrease when the vehicle is not
driving.
• The battery capacity of the high
voltage battery may decrease
when the vehicle is stored in
high/low temperatures.
• Distance to empty may vary
depending on the driving conditions, even if the charge amount is
the same. The high voltage battery
may expend more energy when
driving at high-speed or uphill.
These actions may reduce the distance to empty.
• The high voltage battery is used
when using the air-conditioner /
heater. This may reduce the distance to empty. Make sure to set
moderate temperatures when
using the air-conditioner/heater.
• Natural degradation may occur
with the high voltage battery
depending on the number of years
the vehicle is used. This may
reduce the distance to empty.
• When the charge capacity and distance to empty keep falling, we
recommend that you contact an
authorized HYUNDAI dealer for
inspection and maintenance.
• If the vehicle will not be in use for
an extended period of time, charge
the high voltage battery once every
three months to prevent it from discharging. Also, if the charge
amount is not enough, immediately
charge to full and store the vehicle.
• AC charge is recommended to
keep the high voltage battery in
optimal condition.
If the high voltage battery charge
amount is below 20%, you can
keep the high voltage battery performance in optimal condition if
you charge the high voltage battery
to 100%. (Once a month or more is
recommended.)
H6
High Voltage Battery Warmer
System
The high voltage battery warmer
system prevents reduction of battery
output when battery temperature is
low. If the charging connector is connected, the warmer system automatically operate according to the battery temperature.
Charging time may shorten compare
to vehicles without the high voltage
battery warmer system. But, electricity charge may increase because of
high voltage battery warmer system
operation.
• Make sure to use a designated
charger when charging the
high voltage battery. Using different types of chargers may
have a serious impact on vehicle durability.
• Make sure that the high volt-
age battery charger gauge
does not reach ''L (Low) or 0".
If the vehicle is kept at ''L (Low)
or 0" for a long period, it may
damage the high voltage battery and the high voltage battery may have to be replaced
depending on the level of
degradation.
• If the vehicle is in a collision,
we recommend that you contact an authorized HYUNDAI
dealer to inspect whether the
high voltage battery is still
connected.
CAUTION
The high voltage battery warmer
system operates when the charging connector is connected to
the vehicle.
However, the high voltage
warmer system may not operate
when battery temperature drops
below -35°C (-31°F).
CAUTION
MAIN COMPONENTS OF ELECTRIC VEHICLE (CONT.)
H7
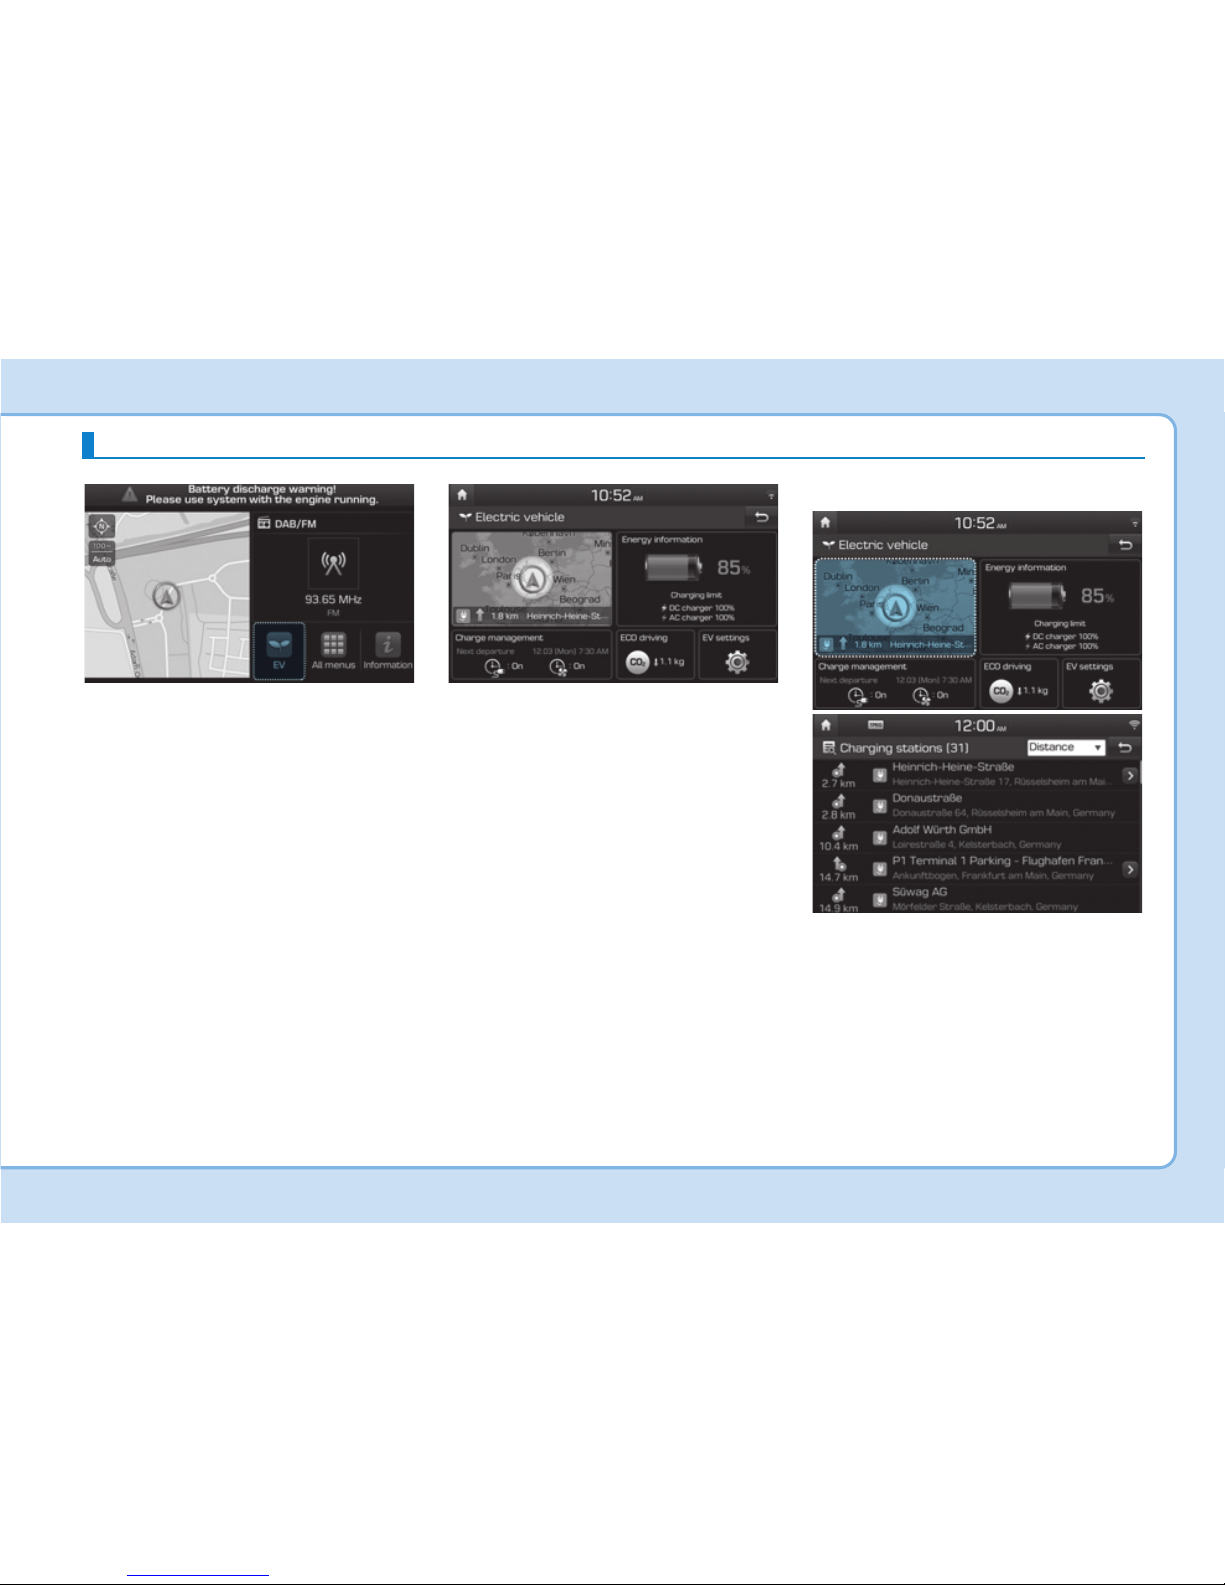
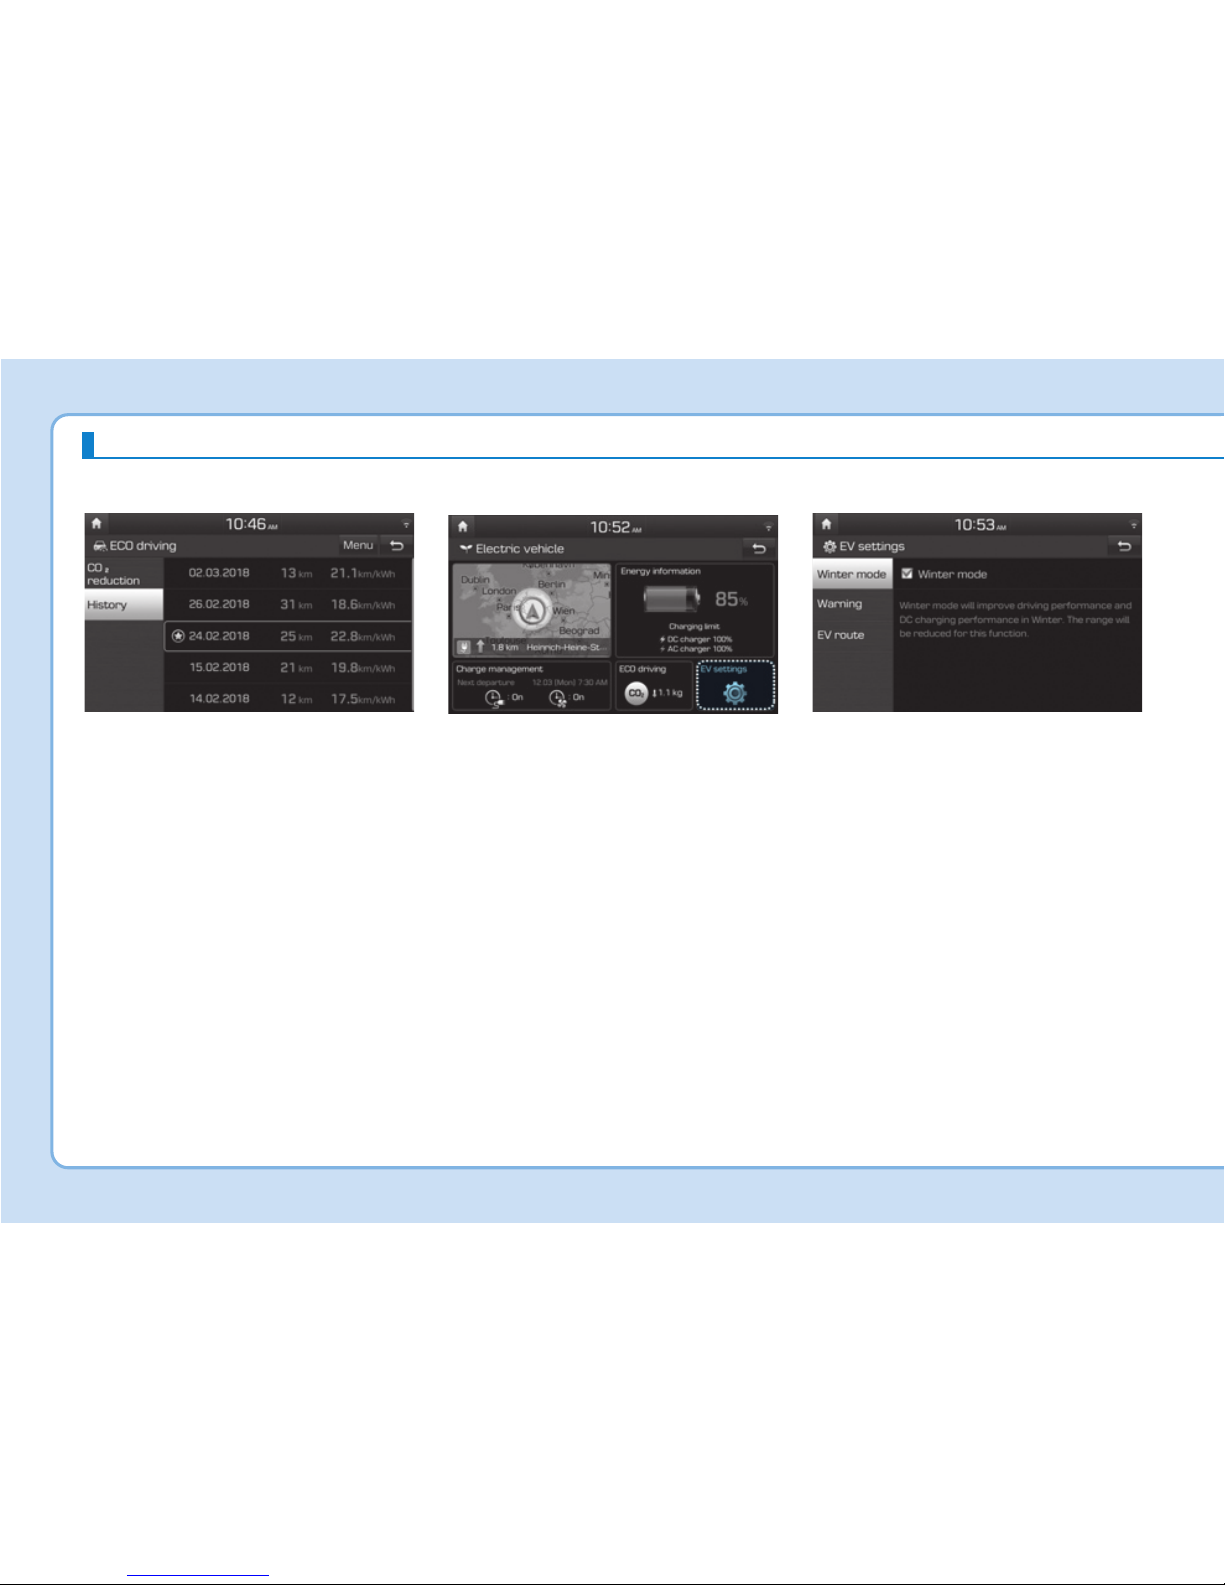
If you select the "EV" menu at the
home screen you can enter EV
mode.
For details on EV Mode, refer to the
Multimedia manual that is provided
separately.
The EV mode has a total of 5 menus,
Nearby station, Energy information,
Charge management, ECO driving
and EV settings.
❈ EV mode menu may vary depend-
ing on which functions are applicable to your vehicle.
Nearby Stations
Select ‘EV → Map → Charging stations’ on the screen. Stations around
the current location are searched.
Select a station to see detail information of the station.
EV MODE
H8
EV MODE (CONT.)
Energy Information
Select ‘EV → Energy information’ on
the screen.
You can check battery information
and energy consumption.
Battery information
You can check the reachable range,
total battery power remaining, and
expected charging time for each
charge type.
• The distance to empty is calculated based on the real-time fuel efficiency while driving. The distance
may change if the driving pattern
changes.
• The distance to empty may vary
according to the change of the
driving pattern even if the same
target battery charge level is set.
Energy consumption
You can check the current energy
consumption for each system of the
vehicle.
➀ ‘Driving’ shows the total power and
energy consumption of the driving
motor’s driving energy and regenerative energy.
➁ ‘Climate’ shows the power and
energy consumption which are
used by the heater or air conditioner.
➂ ‘Electronics’ shows the power and
energy consumption which are
used by the vehicle systems
including the cluster, infotainment
system (speaker and navigation),
headlamp, vehicle control unit,
etc.

H9
➃ ‘Battery care’ shows the momen-
tary power and energy consumption which are used when:
• Operating the winter mode to
increase the battery temperature
during winter to improve the driving performance.
• Cooling down the battery temperature during summer to prevent
over temperature of the battery.
Charge Management
Select ‘EV → Charge management’
on the screen. You can set the date
and time of when to charge the battery, climate control temperature,
location-based charging options and
other various functions.
Charging and climate
You can set the date and time of
when to charge the battery and the
climate control temperature. Also,
you may select the time to start
charging using the off-peak time setting.
H10
EV MODE (CONT.)
Departure time
1. Set anticipated departure time for
scheduled charging and target
temperature.
2. Select the day of the week to activate scheduled charging and target
temperature for departure time.
Target temperature settings
1. Set target temperature.
Off-peak time settings
1. If selected, starts charging only on
the designated off-peak time If
deselected, starts charging only
on the scheduled time
2. Set the most inexpensive time to
complete charging
3. • Off-peak tariffs priorised: If
selected, starts charging at offpeak time (may keep on charging
pass off-peak time to charge
100%)
• Off-peak tariffs only: If selected,
charges only within off-peak time
(may not charge 100%)
Charging location
If location-based charging is selected, scheduled charging and target
temperature will be activated at the
location the driver has set. Also, the
charging current can be selected
when charged with AC charger.
❈ Scheduled charging function must
be turned on to activate when
location-based charging is selected.
H11
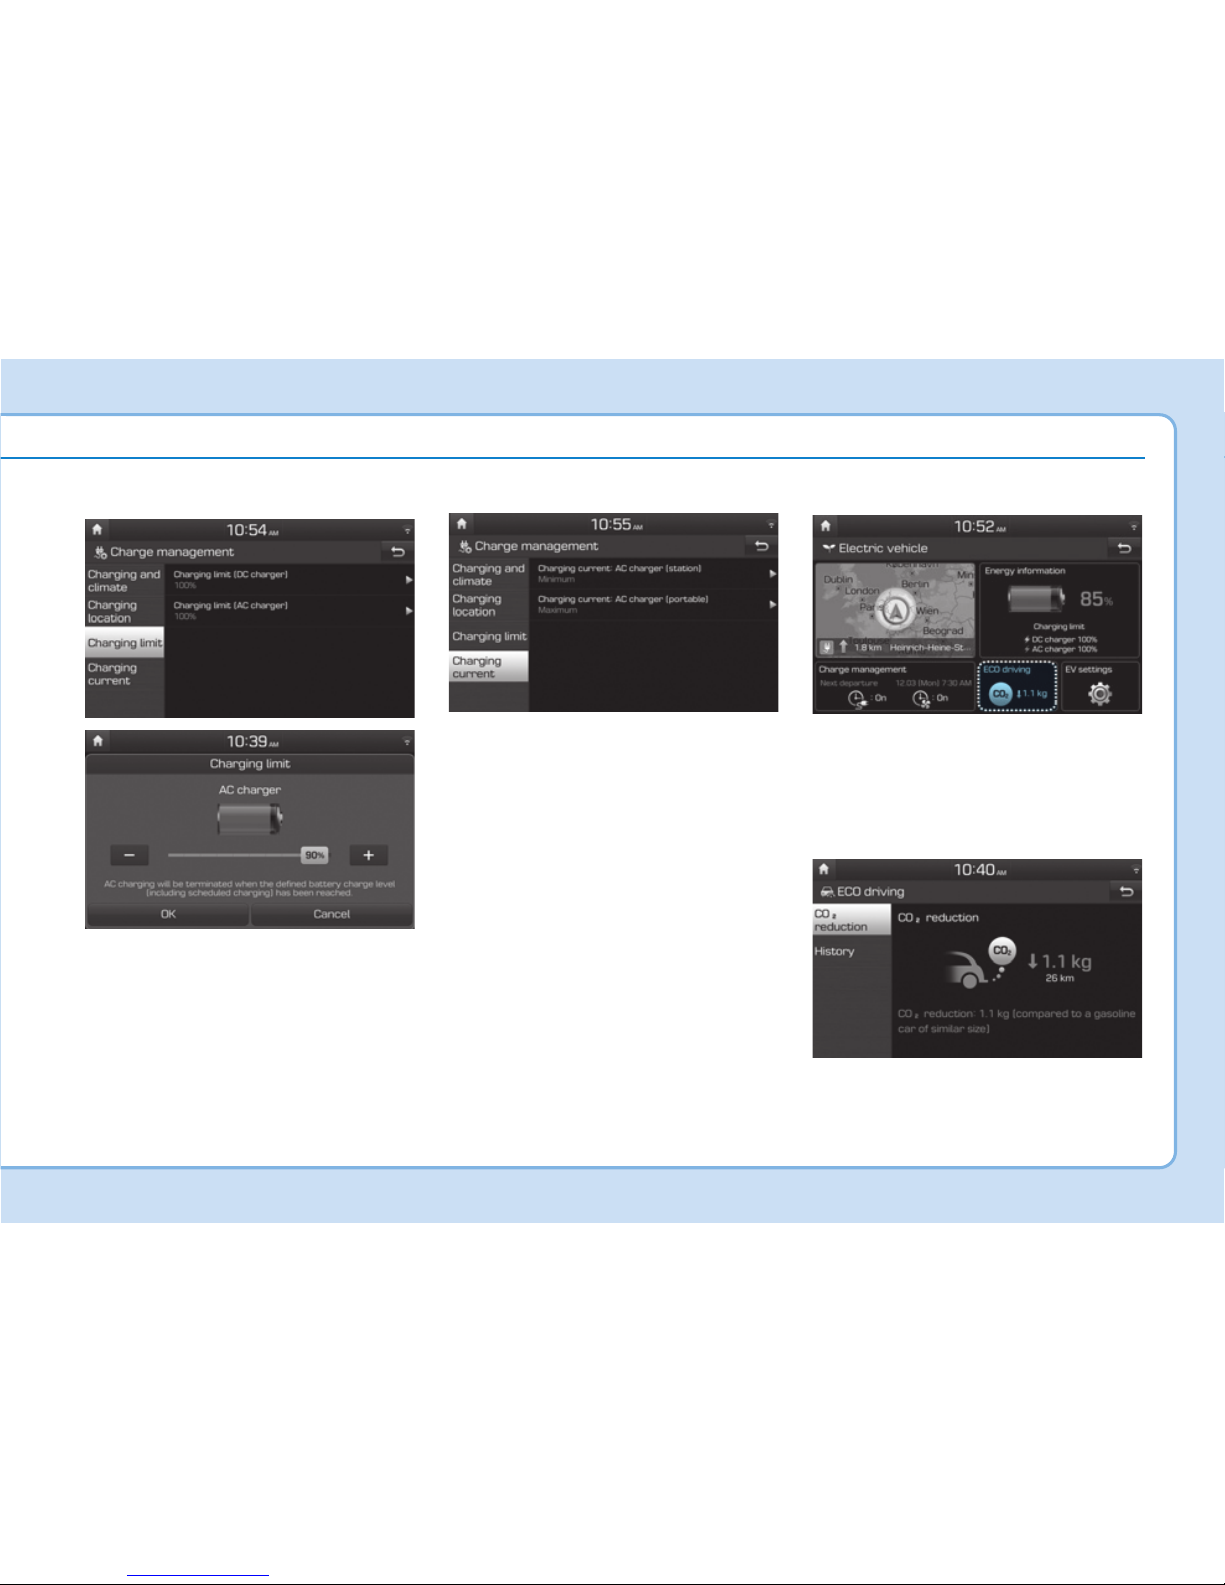
Charging limit
• The target battery charge level can
be selected when charged with AC
charger or DC charger
• The charging level can be changed
by 10%.
• If the target battery charge level is
lower than the high voltage battery
charge level, the battery will not be
charged.
Charging current
• You can adjust the charging current for an AC charger. Select an
appropriate charging current for
the charger used.
• If the charging process does not
start or abruptly stops in the middle, re-select another proper current and re-try charging the vehicle.
• Charging time varies depending on
which charging current is selected
ECO Driving
Select ‘EV → ECO Driving’ on the
screen. You can check the CO2
reduction and ECO driving history.
CO2 reduction
You can check CO2 reduction information compared to the gasoline
vehicle of similar size.
H12
Driving history
You can check the date, driving distance and the energy efficient rating
of the previous driving trips.The date
with the highest energy efficient driving is marked with a star shaped
icon.
EV Settings
Select ‘EV → ECO settings’ on the
screen.You can set the Winter mode,
Warning and EV route functions.
Winter mode
You can select or deselect the Winter
mode.
The Winter mode is efficient during
the winter time when the high voltage
battery temperature is low.
This mode is recommended to
improve driving and DC charging
performances during winter by raising the battery temperature to an
adequate level.
However, the driving distance may
be reduced as the energy is required
to increase battery temperature.
EV MODE (CONT.)
H13
Also, if the battery temperature is low
during driving or when scheduled air
conditioner/heater is activated, this
mode is operated to improve driving
performance.
However, the mode is not operated
to ensure driving distance when the
battery level is low.
❈ This mode is available for the vehi-
cles equipped with the battery
heater.
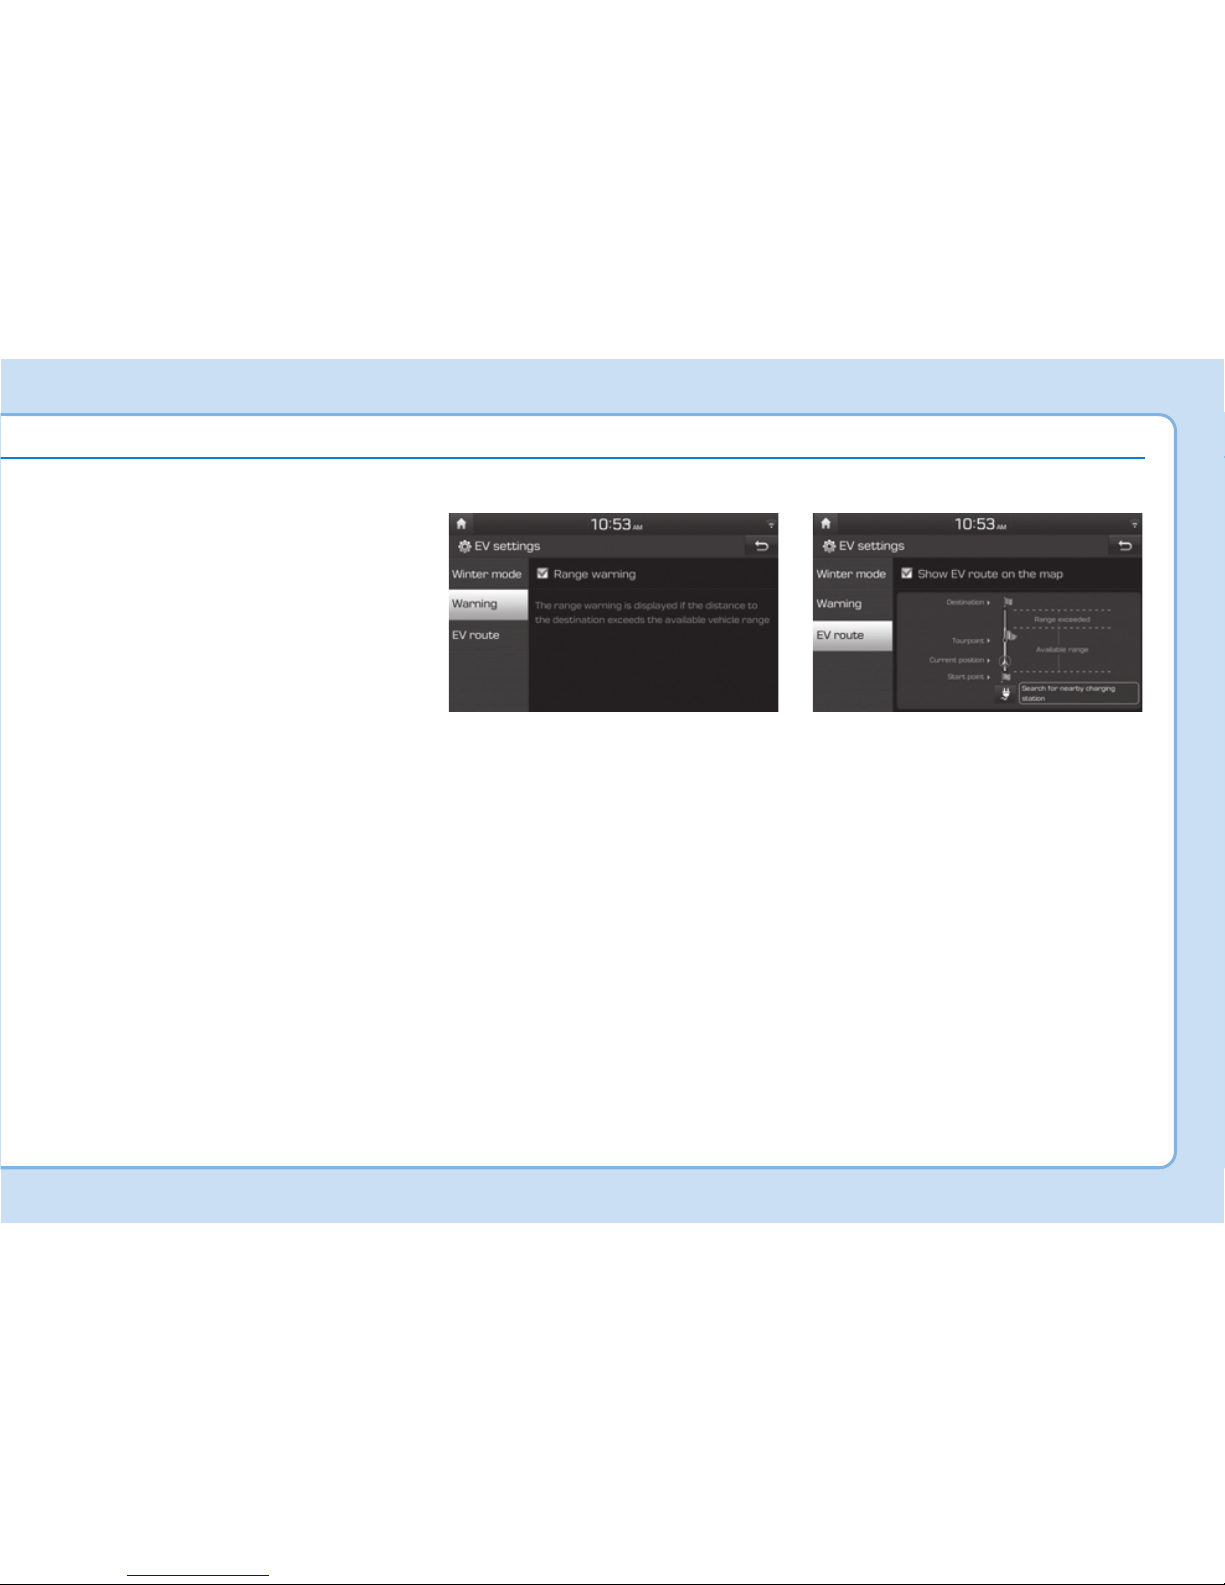
Warning
You can select or deselect the Range
Warning.
- Range Warning : If the destination
set in the navigation cannot be
reached with the remaining battery,
a warning message is displayed.
EV route
If EV route is selected, EV related
information will show on the route.
You can check the distance the vehicle can be driven with the current
battery amount along the route. An
icon is also indicated so the driver is
able to search for nearby charging
stations.

H14
Charging Information
• AC Charge :
The electric vehicle is charged by
plugging into a AC charger installed
in your home or a public charging
station. (For further details, refer to
the 'AC Charge'.)
• DC Charge :
You can charge at high speeds at
public charging stations. Refer to
the respective company's manual
that is provided for each DC charger type.
Battery performance and durability
can deteriorate if the DC charger is
used constantly.
Use of DC charge should be minimized in order to help prolong high
voltage battery life.
• Trickle Charge :
The Electric vehicle can be charged
by using household electricity. The
electrical outlet in your home must
comply with regulations and can
safely accommodate the Voltage /
Current (Amps) / Power (Watts) ratings specified on the portable
charge.
Charging Time Information
CHARGE TYPES FOR ELECTRIC VEHICLE
Charging type Economical battery type Extended battery type
AC charge
Takes approx. 6 hours 10
minutes at room temperature
when charged to 100%.
Takes approx. 9 hours 35
minutes at room temperature
when charged to 100%.
DC charge
100 kW
charger
Takes about 54 minutes at
room temperature when
charged to 80%. Can be
charged to 100%.
Takes about 54 minutes at
room temperature when
charged to 80%. Can be
charged to 100%.
50 kW
charger
Takes about 57 minutes at
room temperature when
charged to 80%. Can be
charged to 100%.
Takes about 75 minutes at
room temperature when
charged to 80%. Can be
charged to 100%.
Trickle charge
Takes approx. 19 hours at
room temperature when
charged to 100%.
Takes approx. 31 hours at
room temperature when
charged to 100%.
Information
Depending on the condition and durability of the high voltage battery, charger
specifications, and ambient temperature, the time required for charging the
high voltage battery may vary.
i
H15
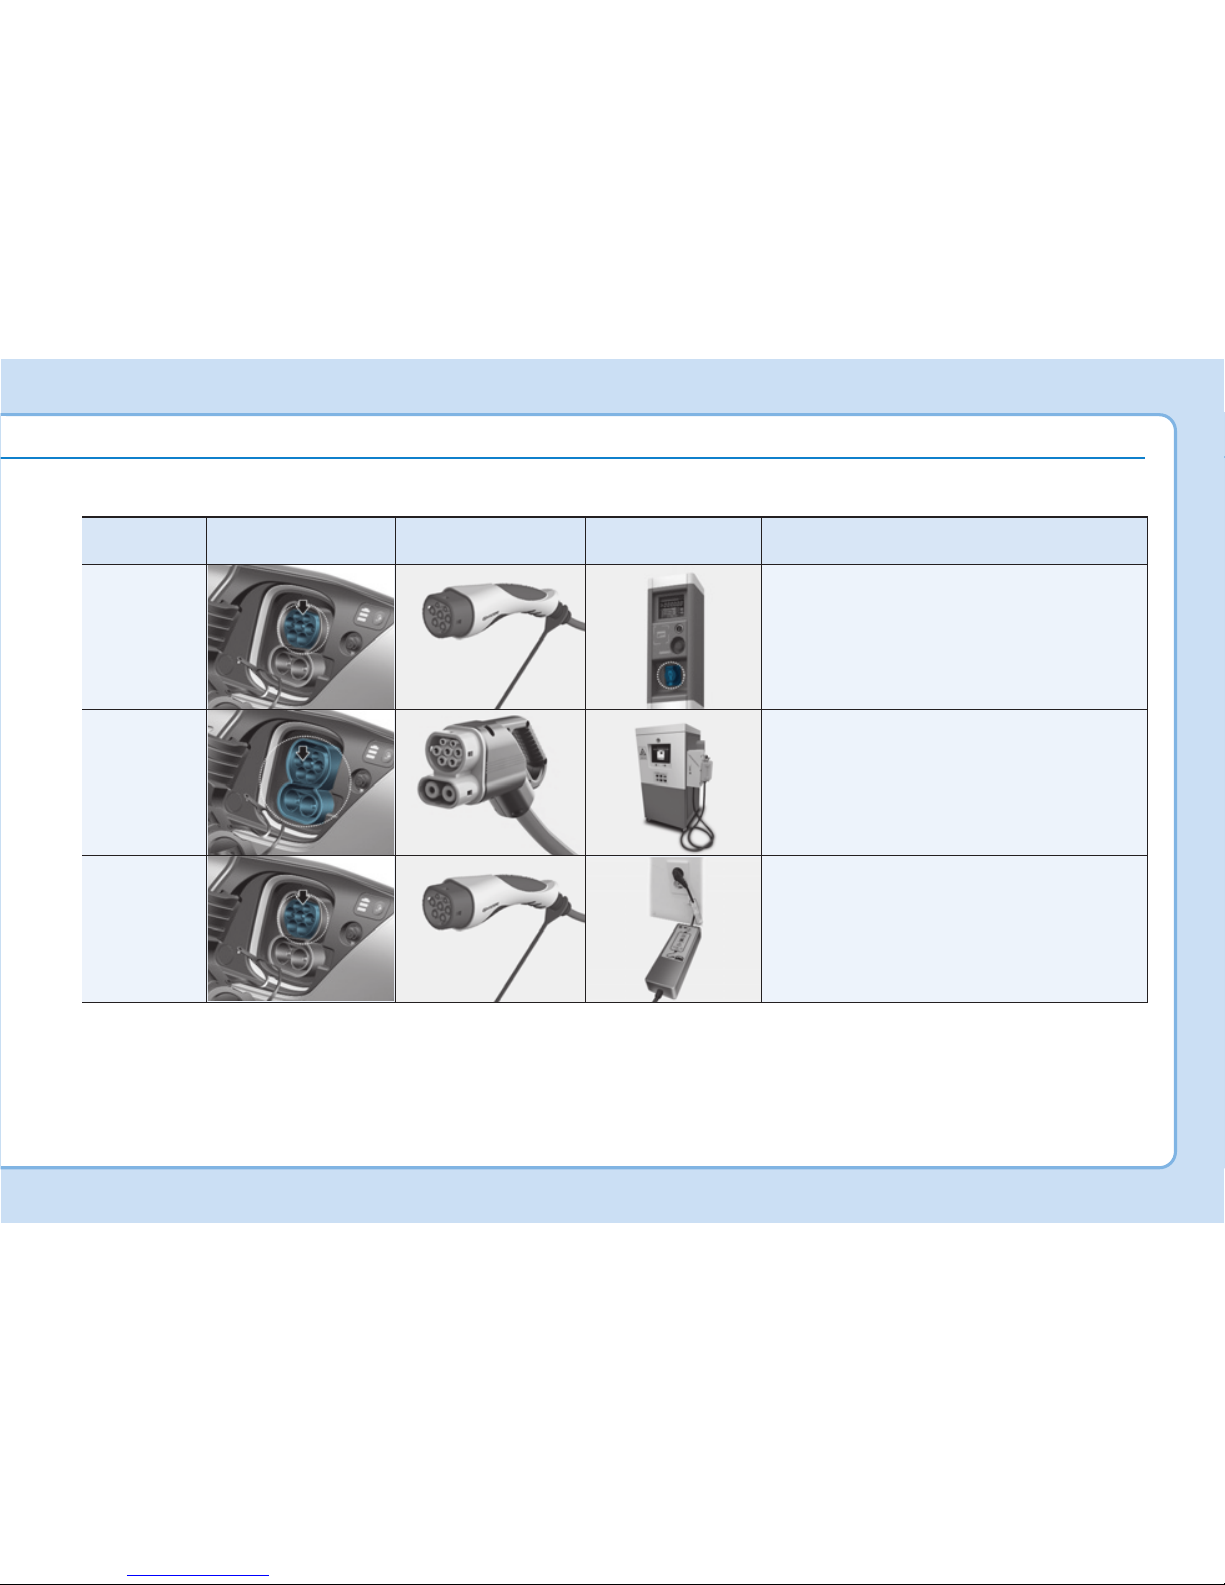
Charging Types
Category
Charging inlet
(Vehicle)
Charging connector Charging outlet How to charge
AC Charge
Use AC charger installed in homes or
public charging station
DC Charge
Use the DC charger at public charging
station
Trickle
Charge
Use household current
• Depending on the condition and durability of the high voltage battery, charger specifications, and ambient
temperature, the time required for charging the high voltage battery may vary.
• Actual charger image and charging method may vary in accordance with the charger manufacturer.
OAEEQ016078L
OOSEVQ018003L
OOSEVQ018004L
OOSEVQ018003L
OAEEQ016022L
OAEEQ016023
OAEEQ016024
OLFP0Q5007K
OAEEQ016078L
H16
Charging Status
When charging the high voltage battery, the charge level can be checked
from outside the vehicle.
CHARGE INDICATOR LAMP FOR ELECTRIC VEHICLE
OOSEVQ018005L
Lamp status Details
Charging door open (charging standby)
white ON
Charging
green ON
Scheduled charging set
green blink
Charging error
(charging system malfunction)
red blink
Charging 12 V auxiliary battery or scheduled
air conditioner/heater is operating
yellow ON
➀
Charging status

H17
Lamp status
Details
Before charging
(illuminate)
While charging
(blink)
High voltage battery level
very low
yellow yellow
High voltage battery level low
green green
High voltage battery level
middle
green green
High voltage battery level high
green green
Lamp status Details
High voltage electricity flowing (Charging 12
V auxiliary battery or scheduled air conditioner/heater is operating)
Lamp status Details
Scheduled charging deactivation button
Press to charge immediately.
➁
Charging level
➂
High voltage warning
➃
Immediate charging
H18
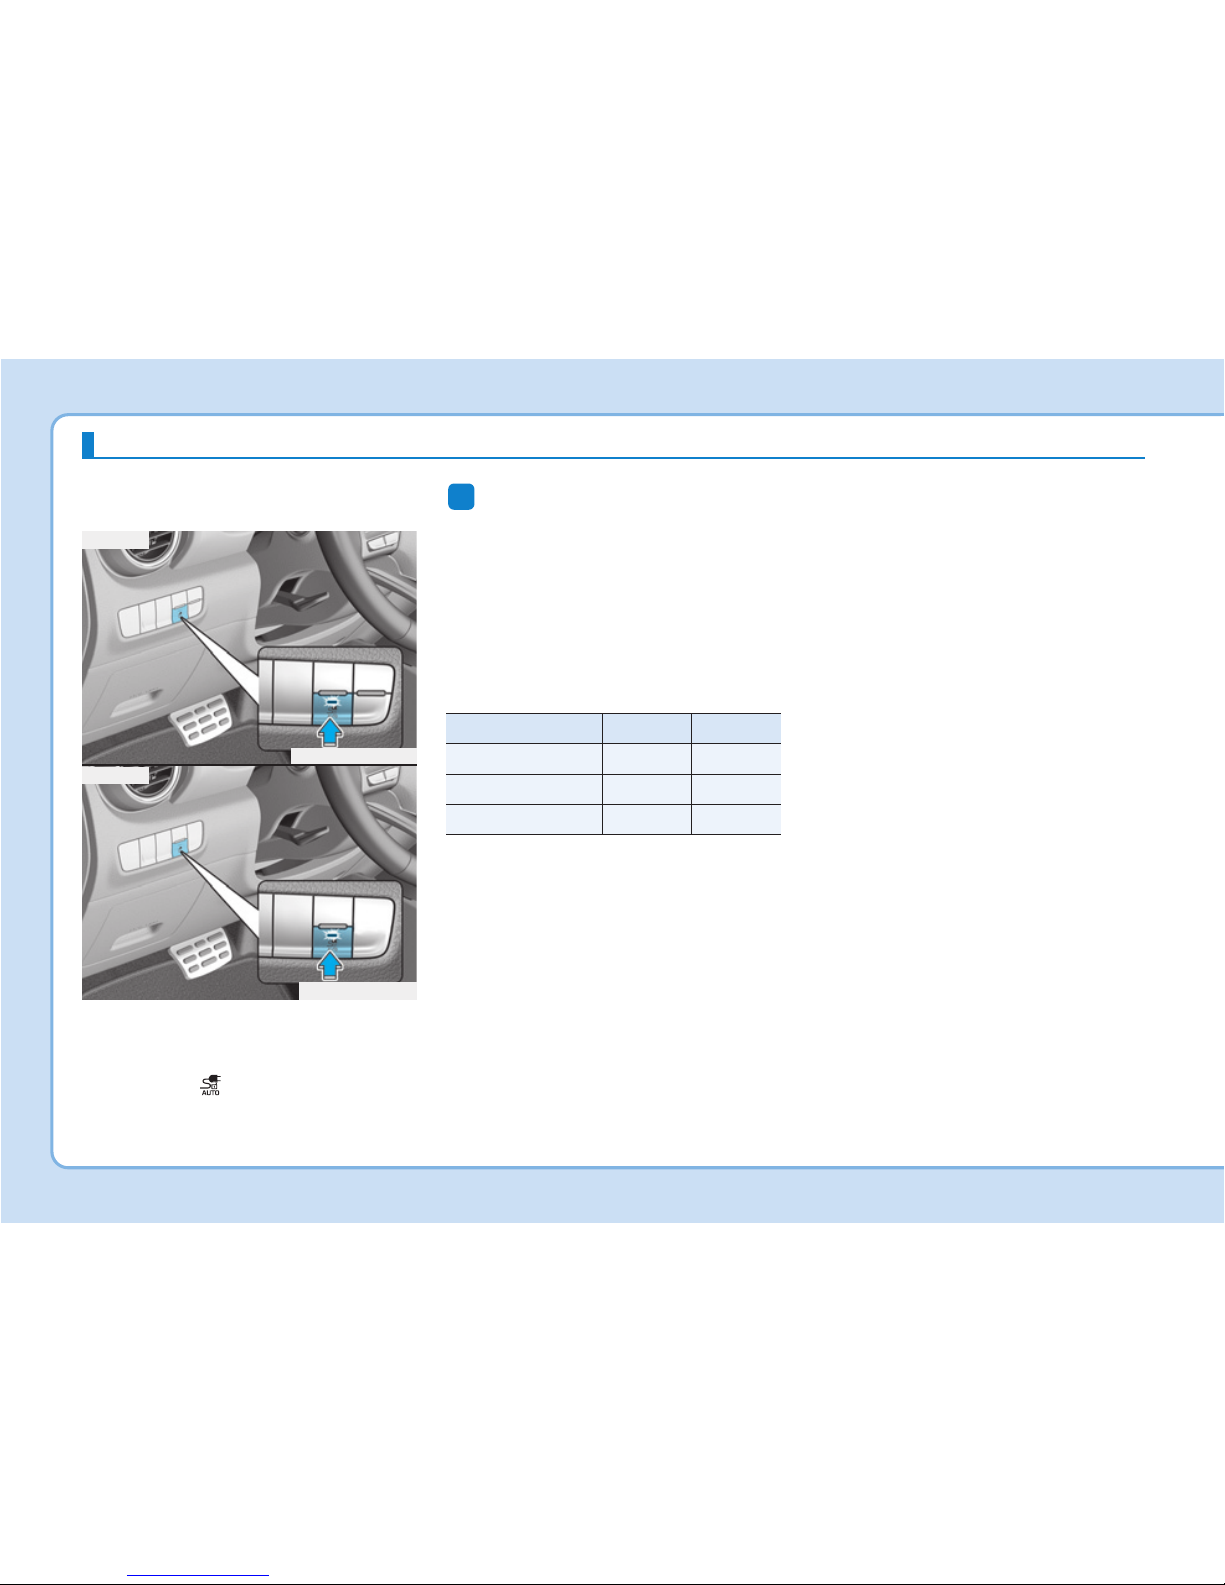
CHARGING CONNECTOR LOCK
Charging Connector AUTO/
LOCK Mode
You may select when the charging
connector can be locked and
unlocked in the charging inlet.
Press the button to change
between AUTO mode and LOCK
mode.
Information
The charging inlet is locked during
the DC charge regardless of
AUTO/LOCK mode. After charging is
complete the locked charging inlet is
unlocked.
When the Charging Connector
Is Locked
• LOCK mode (button indicator off) :
The connector locks when the
charging connector is plugged into
the charging inlet. The connector is
locked until all doors are unlocked
by the driver. This mode can be
used to prevent charging cable
theft.
- If the charging connector is
unlocked when all doors are
unlocked, but the charging cable
is not disconnected within 15 seconds, the connector will be automatically locked again.
- If the charging connector is
unlocked when all doors are
unlocked, but all doors are locked
again, immediately, the connector
will be automatically locked
again.
• AUTO mode (button indicator on) :
The connector locks when charg-
ing starts. The connector unlocks
when charging is complete. This
mode can be used when charging
in a public charging station.
i
OOSEVQ018006L
■ Type A
OOSEVQ018006
LOCK AUTO
Before charging O X
While charging O O
Finished charging O X
■ Type B
H19
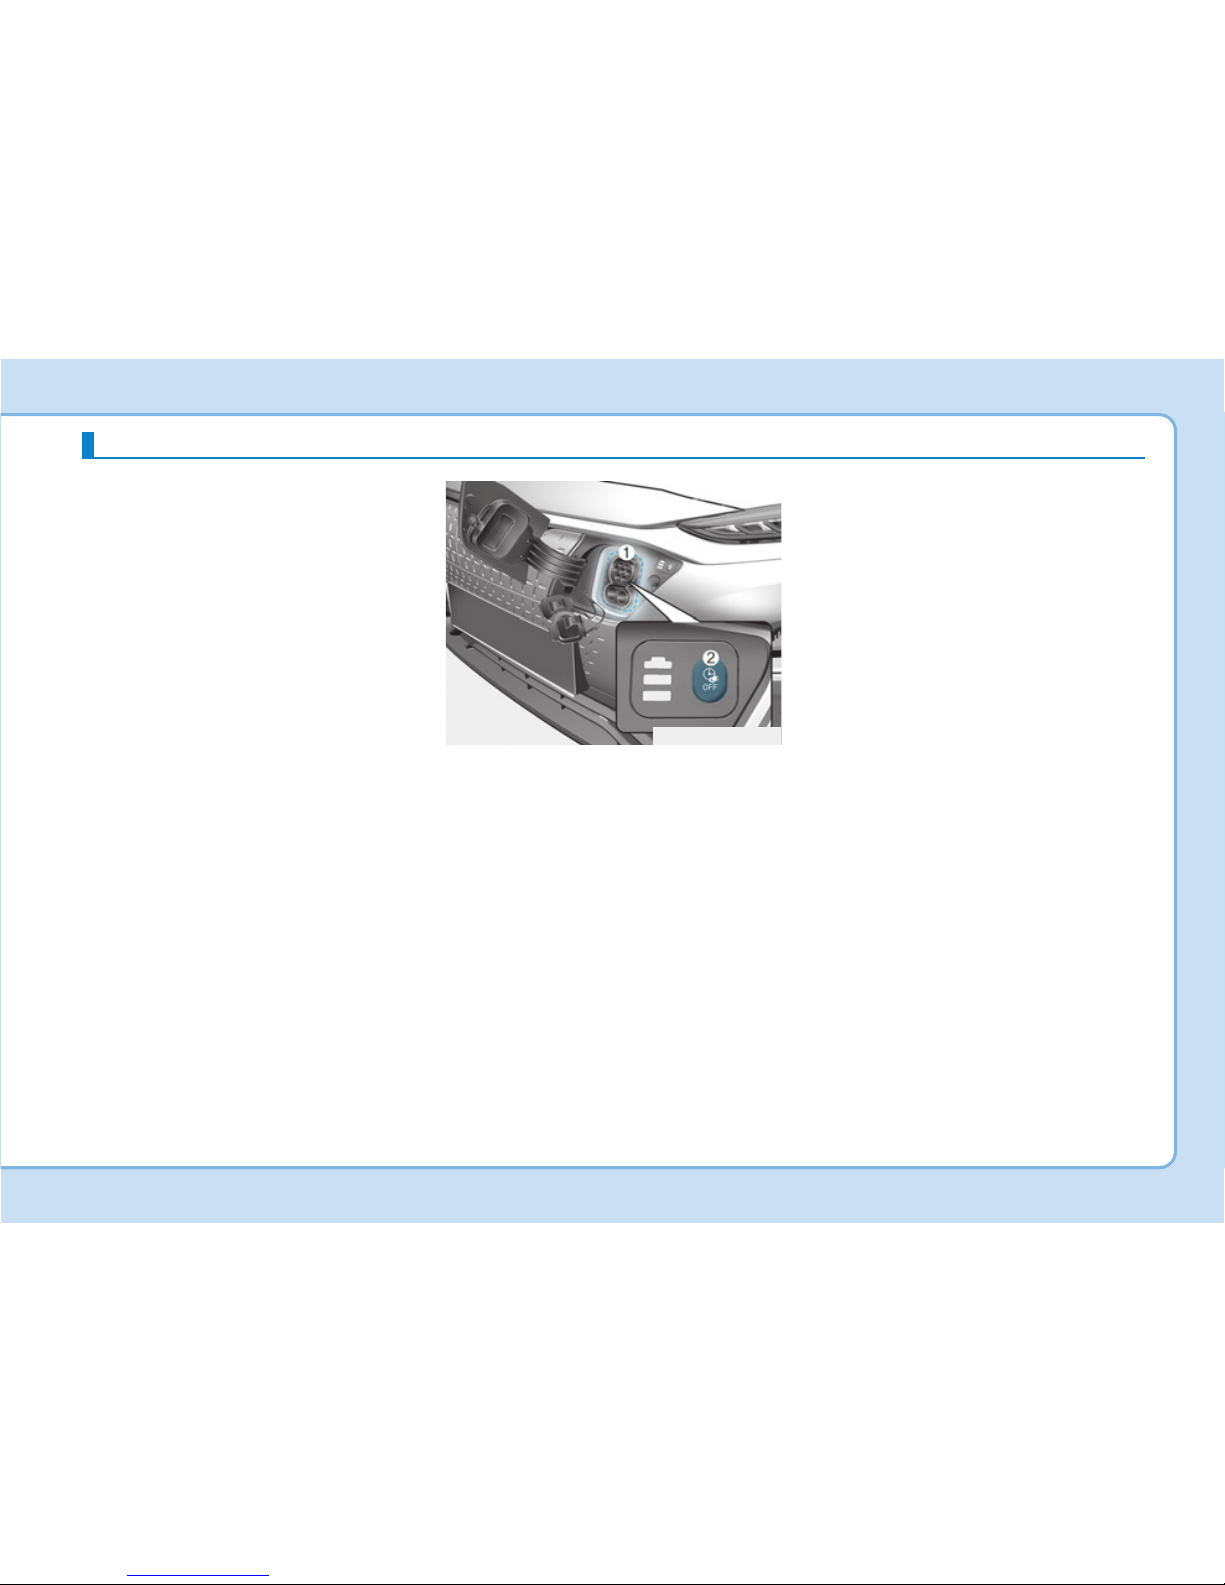
Scheduled Charging
(if equipped)
• You can set-up a charging schedule for your vehicle using the Audio
or Navigation screen or Blue Link
application.
Refer to the Multimedia manual or
the Blue Link manual for detailed
information about setting scheduled charging.
• Scheduled charging can only be
done when using a AC charger or
the portable charger (ICCB: InCable Control Box).
• When scheduled charging is set
and the AC charger or the portable
charger (ICCB: In-Cable Control
Box) is connected for charging, the
indicator lamp blinks in green (1)
for 3 minutes to indicate that
scheduled charging is set.
• When scheduled charging is set,
charging is not initiated immediately when the AC charger or portable
charger (ICCB: In-Cable Control
Box) is connected. When immediate charging is required, use the
Audio or Navigation screen to
deactivate the scheduled charge
setting or press schedule charging
deactivation button (2) for 3 seconds.
• If you press the scheduled charging deactivation button (2) to
immediately charge the battery,
charging must be initiated 3 minutes after the charging cable has
been connected.
When you press the scheduled
charging deactivation button (2) for
immediate charging, the scheduled
charge setting is not completely
deactivated. If you need to completely deactivate the scheduled
charge setting, use the Audio or
Navigation screen to finalize the
deactivation.
Refer to "AC Charge (Station) or
Trickle Charge" for details about connecting the AC charger and the
portable charger (ICCB: In-Cable
Control Box).
OOSEVQ018007L
SCHEDULED CHARGING
H20
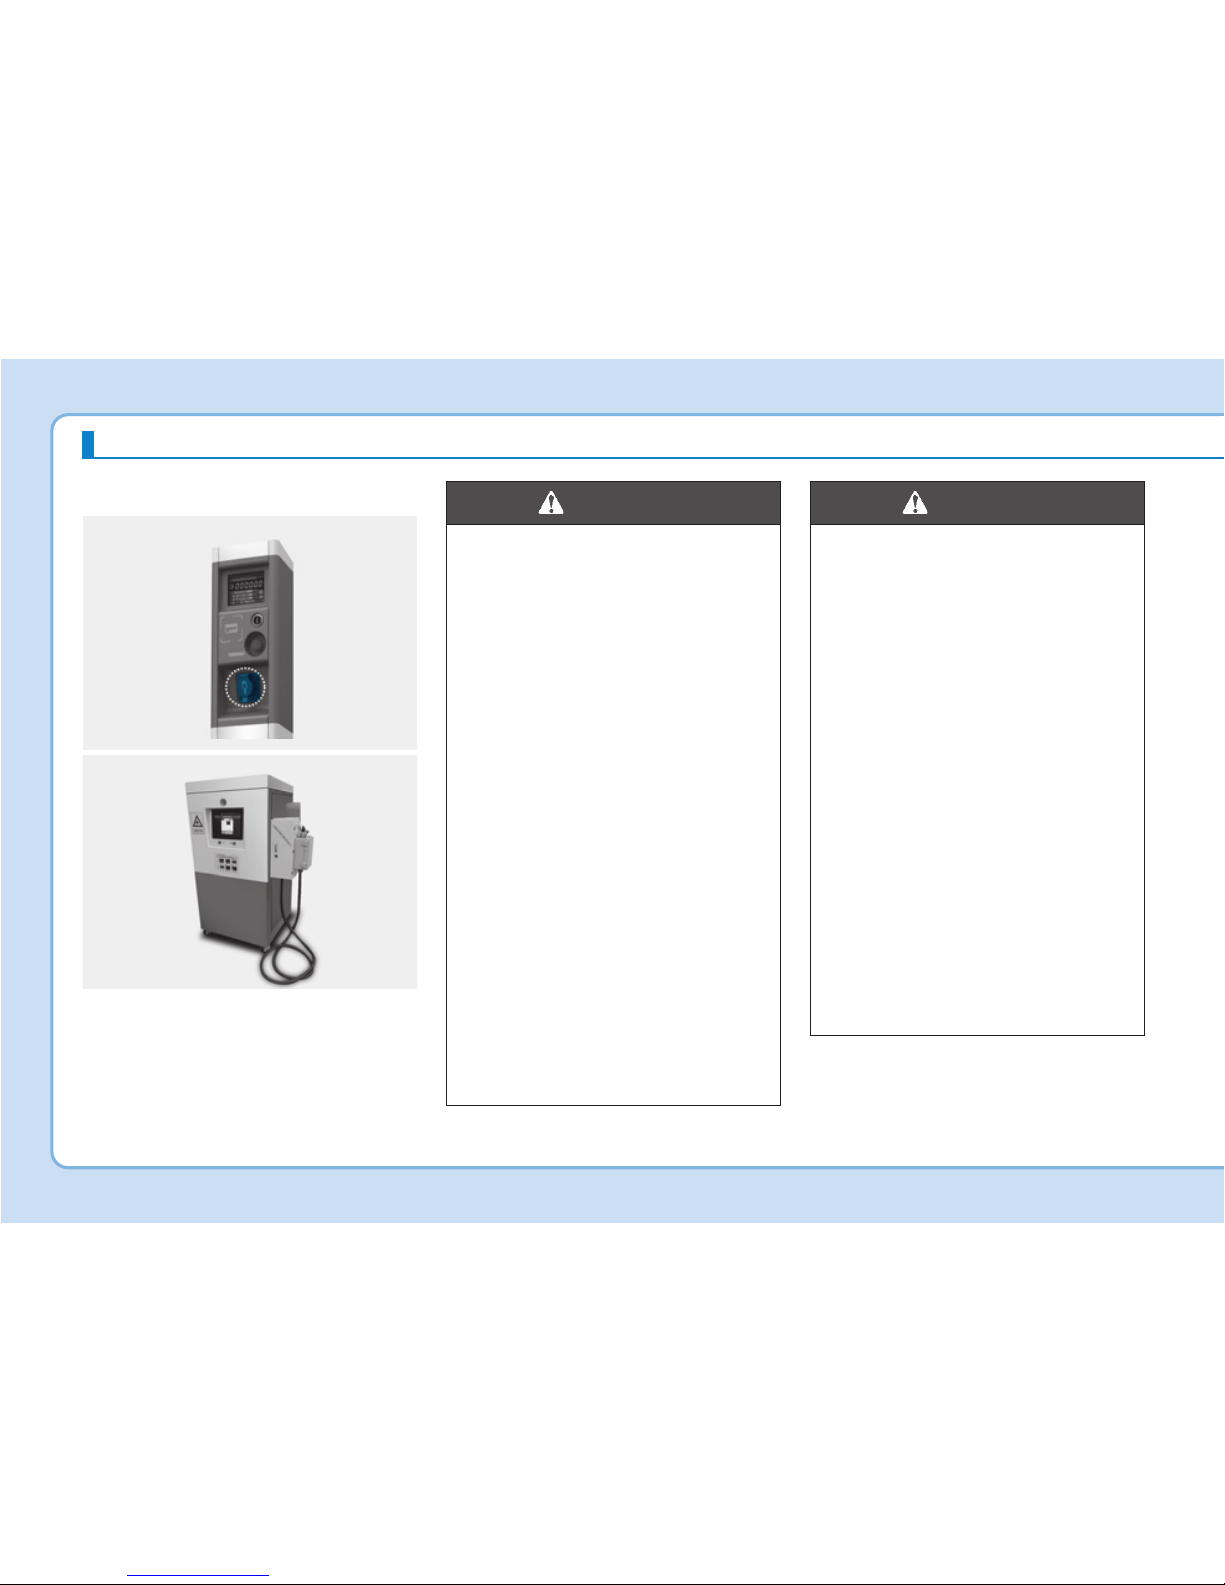
Charging Precautions
Actual charger image and charging method may vary in accordance with the charger manufacturer.
• Electromagnetic waves that
are generated from the charger can seriously impact medical electric devices such as
an implantable cardiac pacemaker.
When using medical electric
devices such as an implantable
cardiac pacemaker, make sure
to ask the medical team and
manufacturer whether charging your electric vehicle will
impact the operation of the
medical electric devices such
as an implantable cardiac
pacemaker.
• Check to make sure there is
no water or dust on the charging cable connector and plug
before connecting to the
charger and charging inlet.
Connecting while there is
water or dust on the charging
cable connector and plug may
cause a fire or electric shock.
WARNING
• Be careful not to touch the
charging connector, charging
plug, and the charging inlet
when connecting the cable to
the charger and the charging
inlet on the vehicle.
• Comply with the following in
order to prevent electrical
shock when charging:
- Use a waterproof charger.
- Be careful when touching
the charging connector and
charging plug with your
hands wet, or when standing
in water or snow while connecting the charging cable.
- Be careful when there is
lightning.
- Be careful when the charg-
ing connector and plug is
wet.
WARNING
PRECAUTIONS FOR CHARGING ELECTRIC VEHICLE
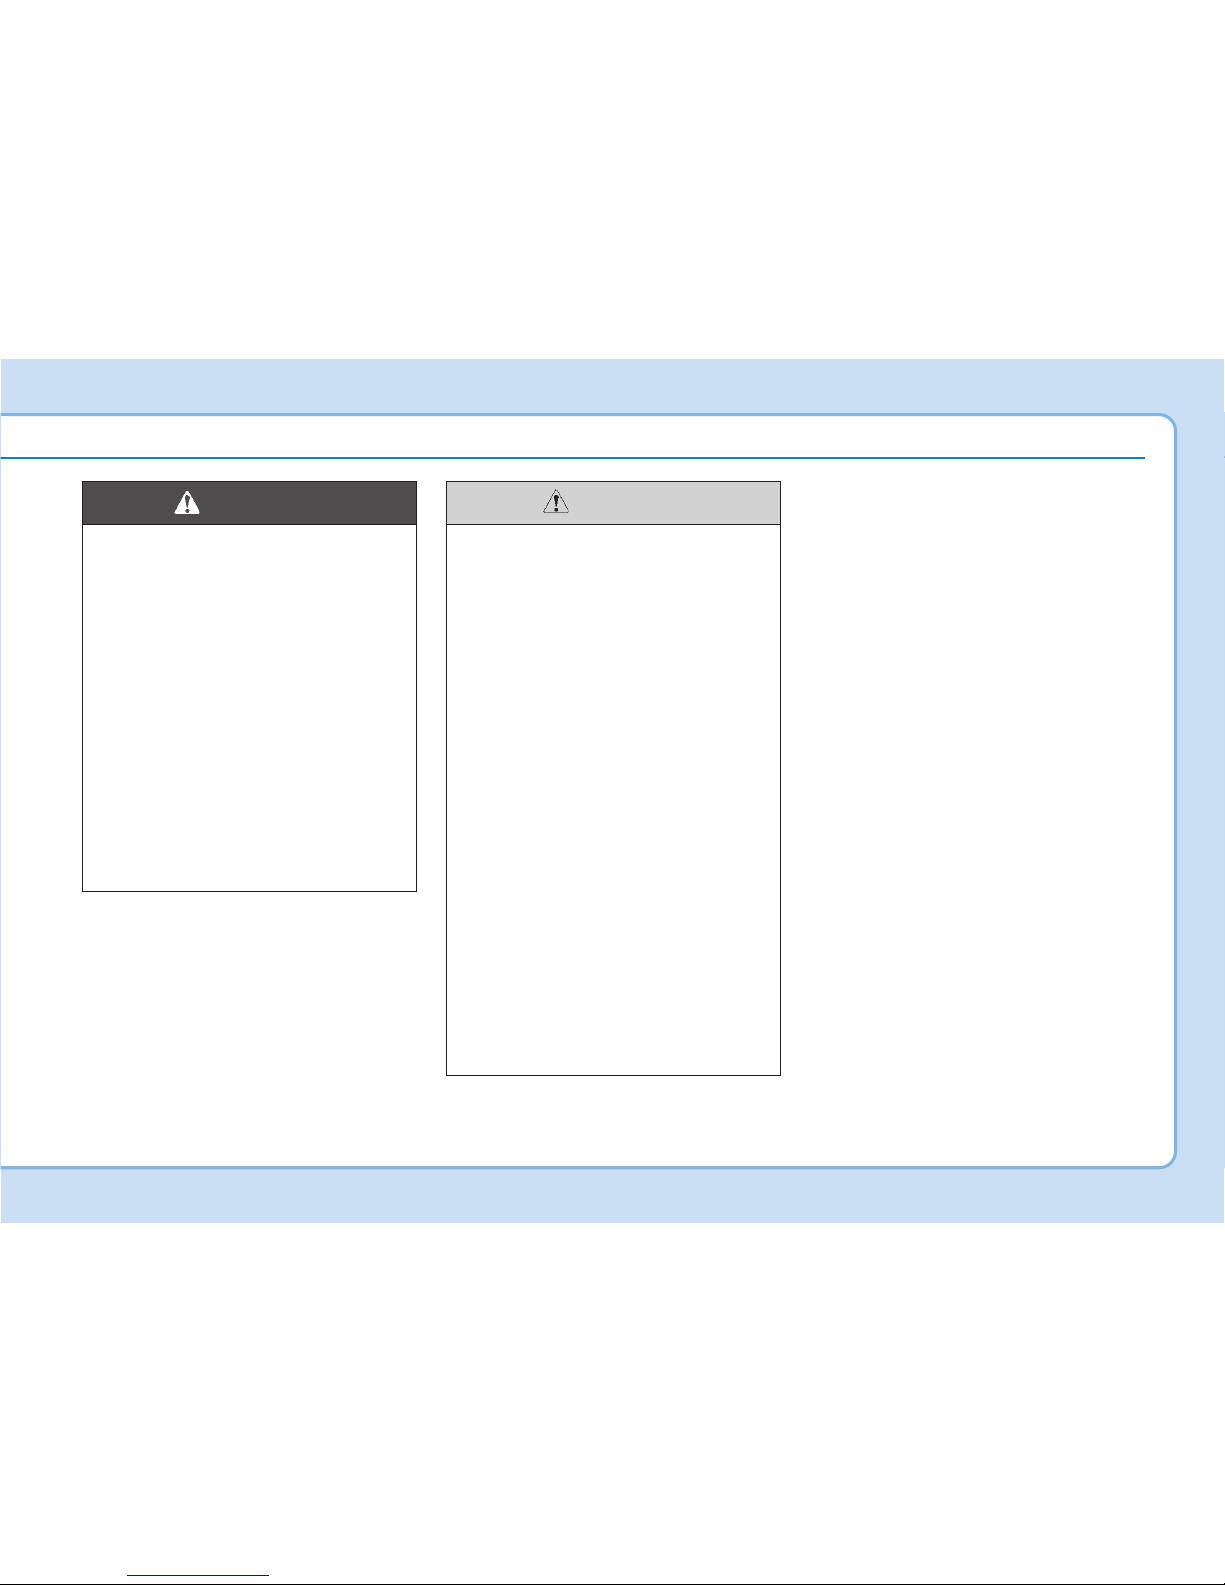
OLFP0Q5007K
■ AC Charger
OAEEQ016023
■ DC Charger
H21
• Immediately stop charging
when you find abnormal
symptoms (odor, smoke).
• Replace the charging cable if
the cable coating is damaged
to prevent electrical shock.
• When connecting or removing
the charging cable, make sure
to hold the charging connector handle and charging plug.
If you pull the cable itself
(without using the handle), the
internal wires may disconnect
or get damaged.This may lead
to electric shock or fire.
WARNING
• Always keep the charging con-
nector and charging plug in
clean and dry condition. Be
sure to keep the charging
cable in a condition where
there is no water or moisture.
• Make sure to use the designat-
ed charger for charging the
electric vehicle. Using any
other charger may cause failure.
• Before charging the battery,
turn the vehicle OFF.
• When the vehicle is switched
OFF while charging, the cooling fan inside the motor compartment may automatically
operate. Do not touch the cooling fan while charging.
• Be careful not to drop the
charging connector. The
charging connector can be
damaged.
CAUTION
H22
AC Charge
Actual charger image and charging method may vary in accordance with the charger manufacturer.
How to Connect AC Charger
1.Depress the brake pedal and apply
the parking brake.
2.Turn OFF all switches, shift to P
(Park), and turn OFF the vehicle.
If charging is initiated without the
gear in P (Park), the charging will
start after the gear is automatically
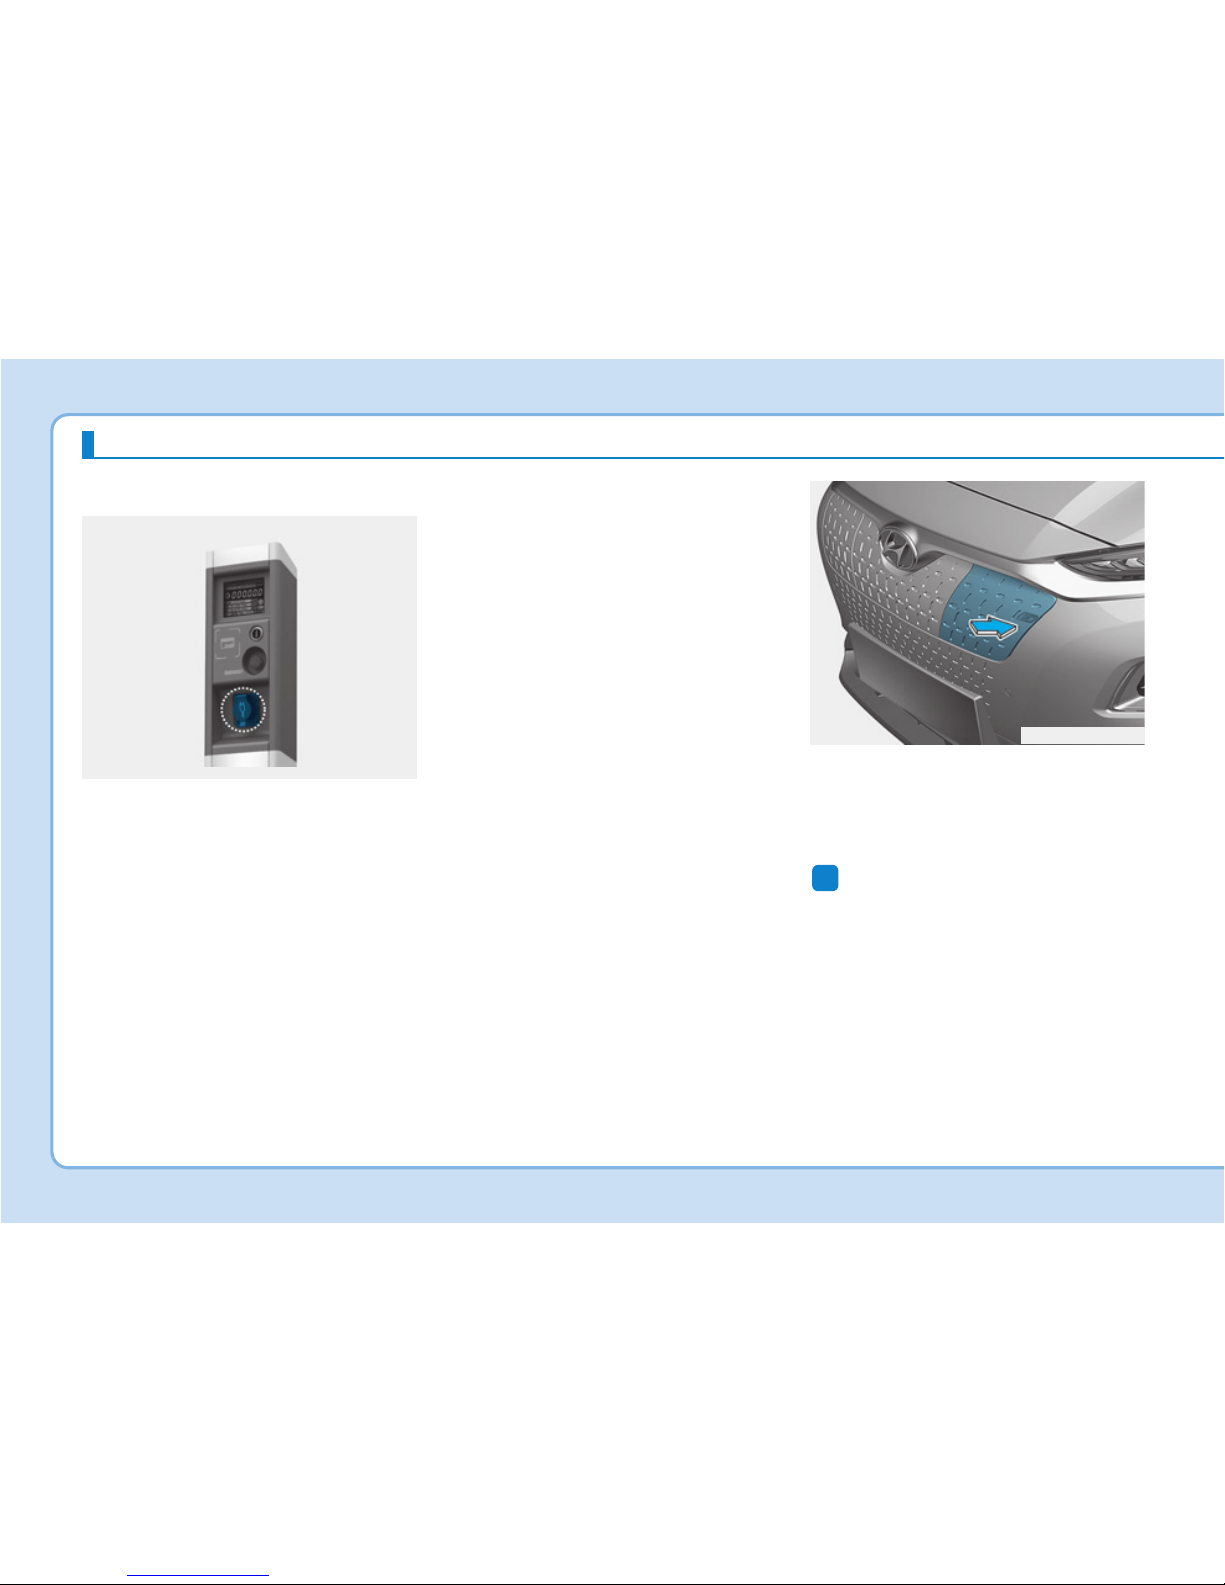
shifted to P (Park).
3. Push the charging door where the
icon is located to open. The charging door opens only when the door
is unlocked.
Information
If you cannot open the charging door
due to freezing weather, tap lightly or
remove any ice near the charging
door. Do not try to forcibly open the
charging door.
i
CHARGING ELECTRIC VEHICLE (AC CHARGE)
OLFP0Q5007K
■ AC Charger
OOSEVQ018008L

H23
4. Remove the charging inlet cover
(1).
5. Check if there is dust on the
charging connector and charging
inlet.
6. Hold the charging connector handle and connect it to the vehicle
charging inlet. Push the connector
all the way in. If the charging connector and charging terminal are
not connected properly, this may
cause a fire.
Information
Charging connector AUTO/LOCK
mode
The charging connector is locked in
the inlet at a different period according to which mode is selected.
• LOCK mode : The connector locks
when the charging connector is
plugged into the charging inlet.
• AUTO mode : The connector locks
when charging starts.
For more details, refer to “Charging
Connector AUTO/ LOCK Mode” in
this chapter.
7. Connect the charging plug to the
electric outlet at a AC charging
station to start charging.
i
OOSEVQ018009
OLFP0Q5007K
■ AC Charger
 Loading...