

Page 1
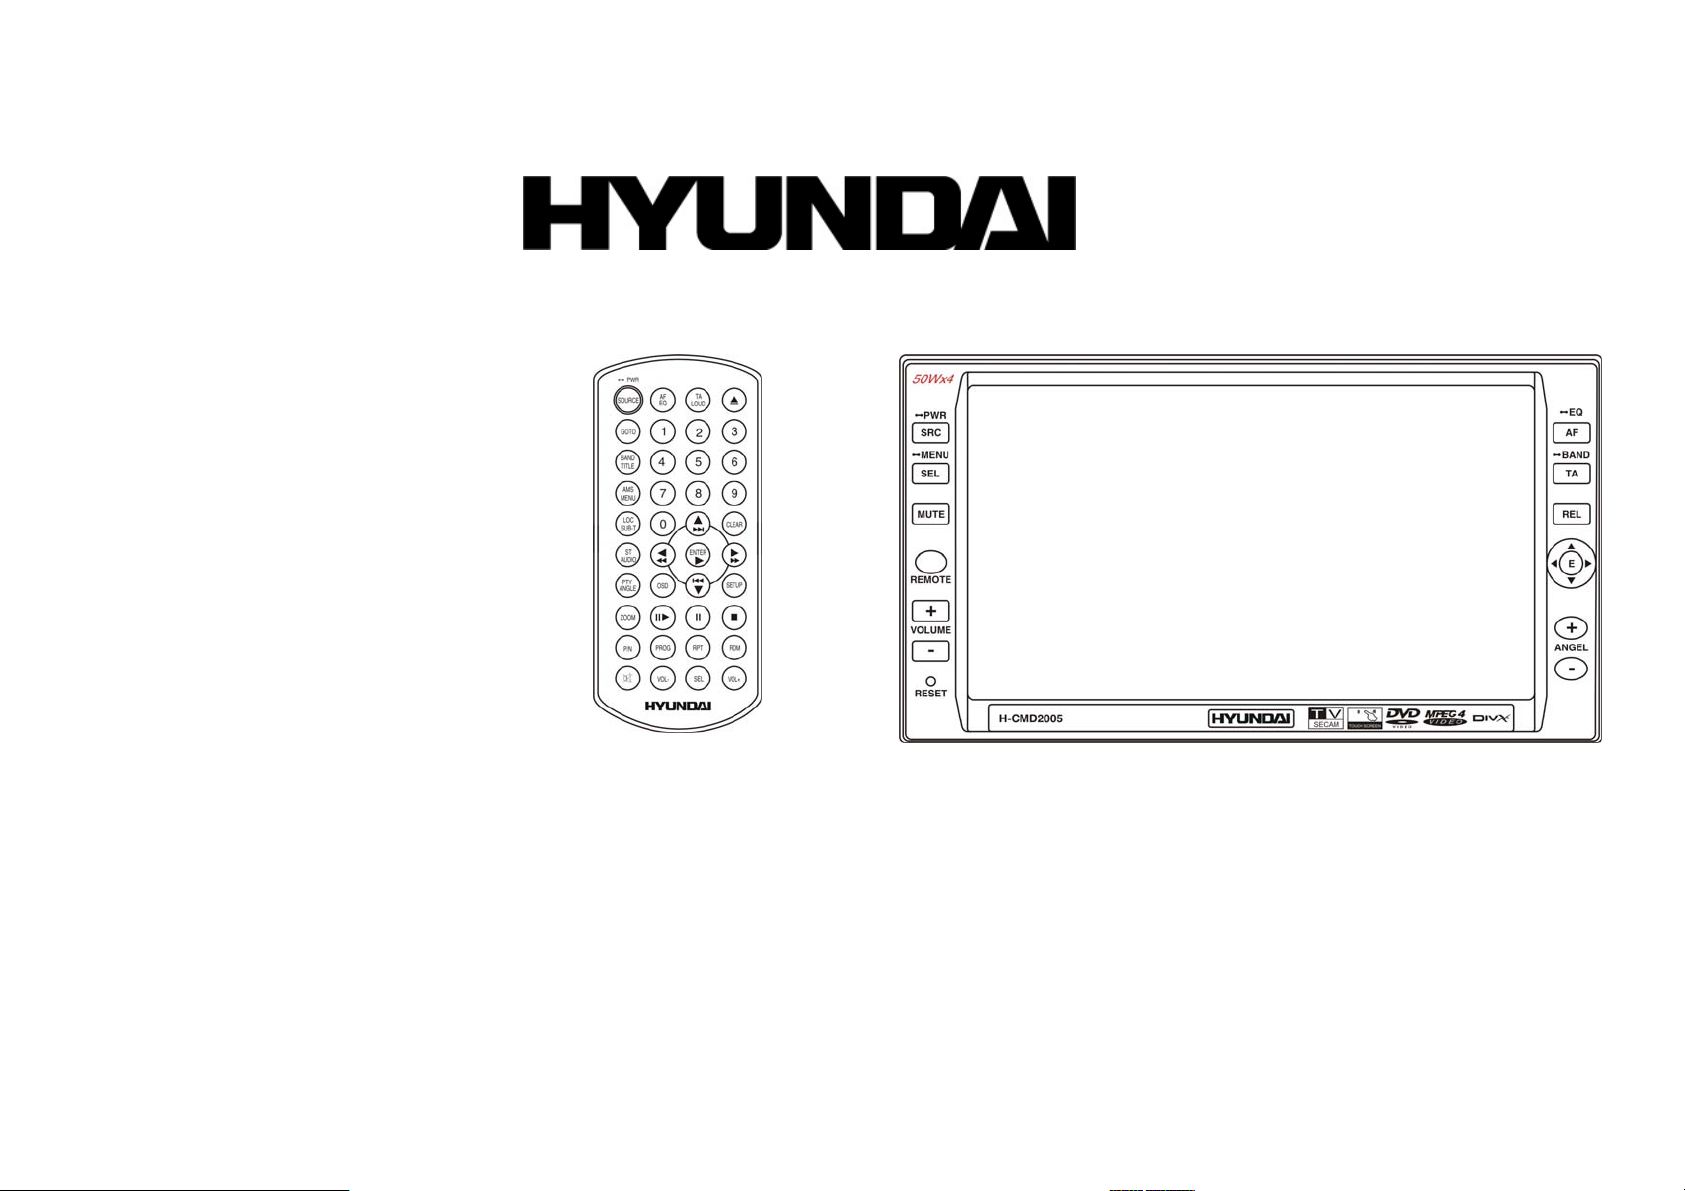
H-CMD2005
2 DIN DVD/CD/MP3 RECEIVER WITH BUILT-IN 6.5” TFT DISPLAY
Instruction manual
МУЛЬТИМЕДИЙНЫЙ DVD/CD/MP3-РЕСИВЕР 2 DIN СО ВСТРОЕННЫМ 6.5” TFT-
ДИСПЛЕЕМ
Руководство по эксплуатации
Page 2

Dear customer!
Thank you for purchasing our product. For safety, it is strongly recommended to read this manual carefully
before connecting, operating and/or adjusting the product and keep the manual for reference in the future.
Table of contents
Table of contents..................................................................................................................................................... 2
Important safeguards ..............................................................................................................................................4
Accessories ............................................................................................................................................................. 5
Installation/connection............................................................................................................................................ 6
Electrical Connection.......................................................................................................................................8
Unit controls ...........................................................................................................................................................9
Front panel.......................................................................................................................................................9
Inner panel ..................................................................................................................................................... 10
Remote control............................................................................................................................................... 11
Changing the battery...................................................................................................................................... 13
General operations ................................................................................................................................................14
Main menu ............................................................................................................................................................ 17
Digital tuner operations ........................................................................................................................................22
RDS Setup .....................................................................................................................................................25
Disc operations .....................................................................................................................................................27
DVD operations.............................................................................................................................................28
VCD/CD operations ...................................................................................................................................... 36
MP4 Disc operations ..................................................................................................................................... 40
MP3/SD operations........................................................................................................................................ 42
MP3 overview................................................................................................................................................ 44
AUX/TV operations (optional).............................................................................................................................45
2
Page 3

Handling and cleaning discs ................................................................................................................................. 47
Troubleshooting guide .......................................................................................................................................... 48
Specification ......................................................................................................................................................... 49
3
Page 4

Important safeguards
• Using the device at temperature below -10ºС may cause the breakage of the device.
Before using, please, heat up the passenger compartment to the recommended temperature!
• Read carefully through this manual to familiarize yourself with this high-quality car stereo system.
• Disconnect the vehicle's negative battery terminal while mounting and connecting the unit.
• When replacing the fuse, be sure to use one with an identical amperage rating. Using a fuse with a higher
amperage rating may cause serious damage to the unit.
• DO NOT attempt to disassemble the unit. Laser beams from the optical pickup are dangerous to the eyes.
• Make sure that pins or other foreign objects do not get inside the unit; they may cause malfunctions, or
create safety hazards such as electrical shock or laser beam exposure.
• If you have parked the car for a long time in hot or cold weather, wait until the temperature in the car
becomes normal before operating the unit.
• DO NOT open covers and do not repair yourself. Consult the dealer or an experienced technician for help.
• Make sure you disconnect the power supply and aerial if you will not be using the system for a long period
or during a thunderstorm.
• Make sure you disconnect the power supply if the system appears to be working incorrectly, is making an
unusual sound, has a strange smell, has smoke emitting from it or liquids have got inside it. Have a
qualified technician check the system.
• The unit is designed for negative terminal of the battery, which is connected to the vehicle metal. Please
confirm it before installation.
• Do not allow the speaker wires to be shorted together when the unit is switched on. Otherwise it may
overload or burn out the power amplifier.
• Install the unit horizontally. Install the unit more than 30 degree vertically may result in worse
performance.
• Do not block the cooling fan exit to ensure sufficient heating dissipation of this unit, failure to do this
may result in damage to this unit.
4
Page 5
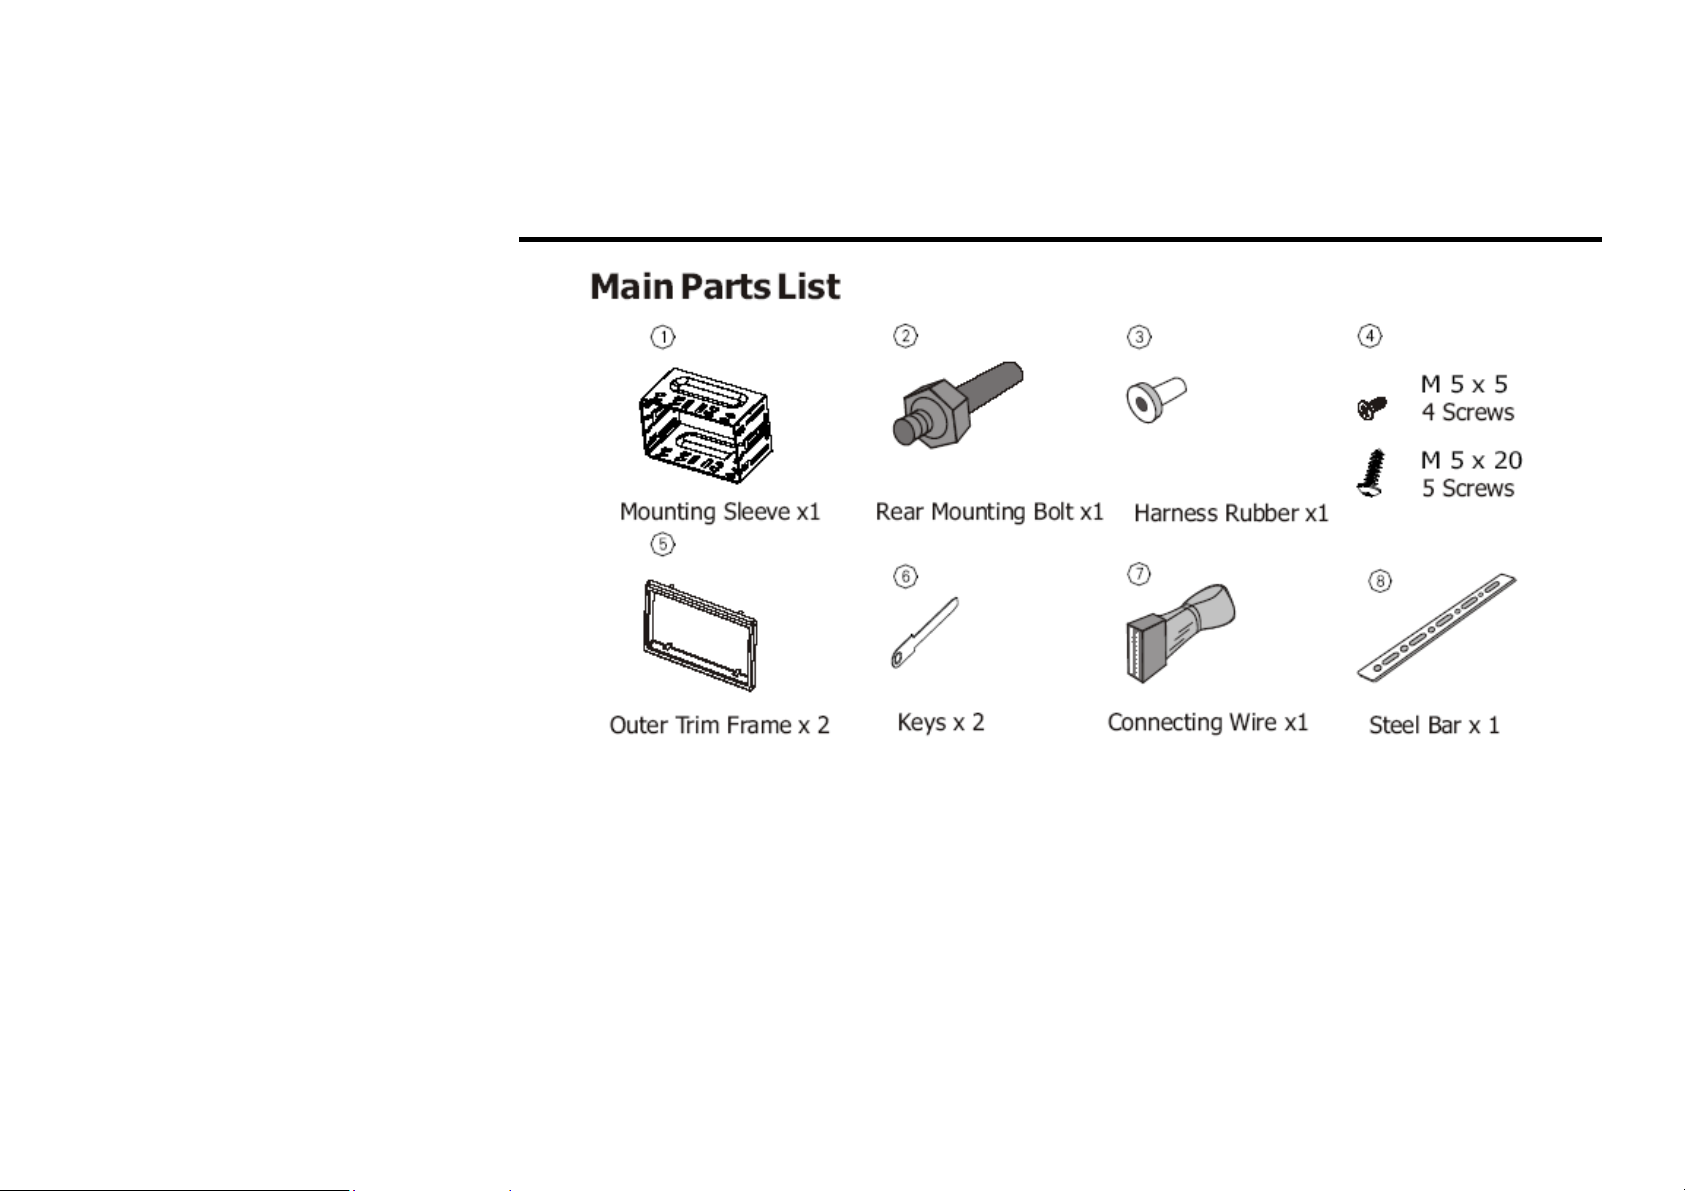
Accessories
5
Page 6
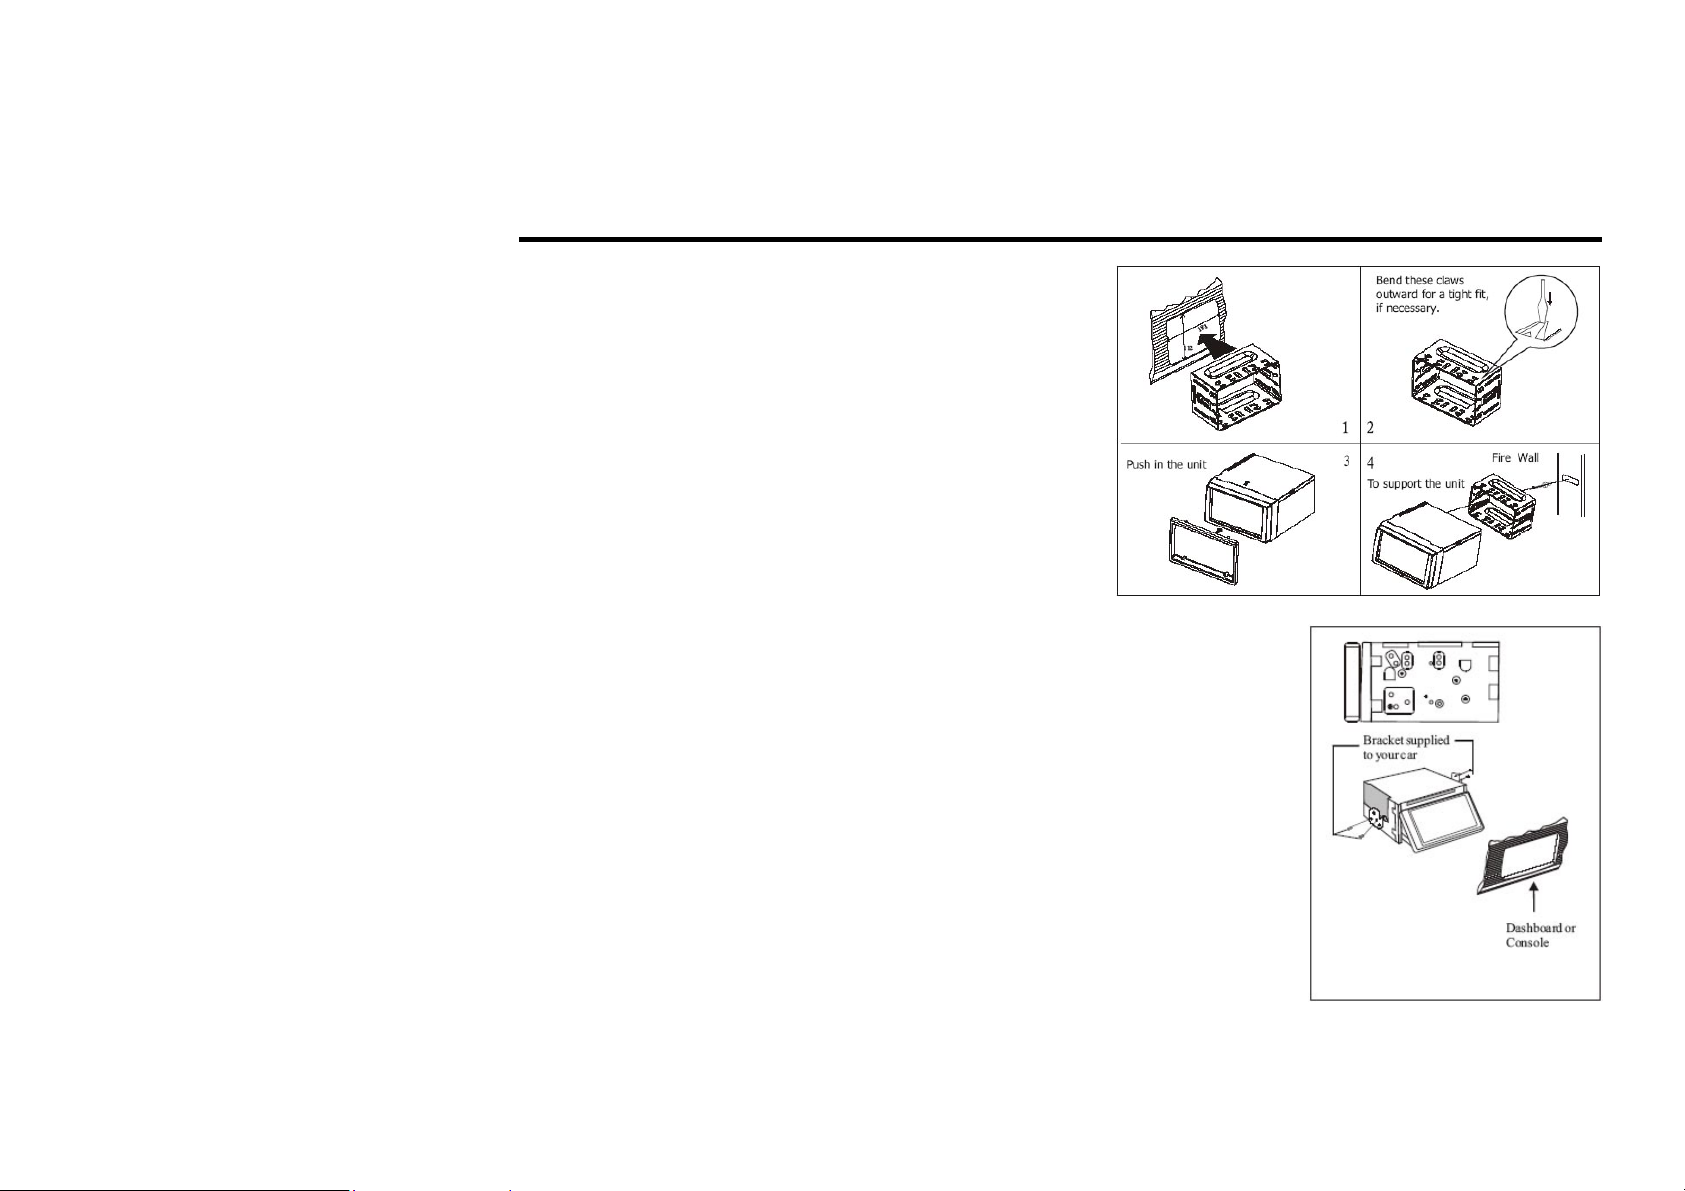
Installation/connection
Installation method 1: DIN Front-mount
Installation method 2:
Installation using the screw holes at the sides of the unit.
Select a position where the screw holes of the mounting bracket supplied with
the car and the screw holes of the main unit become aligned (are fitted), and
tighten the screws (see at 2 places on each side). And then fasten them to the
car.
6
Page 7
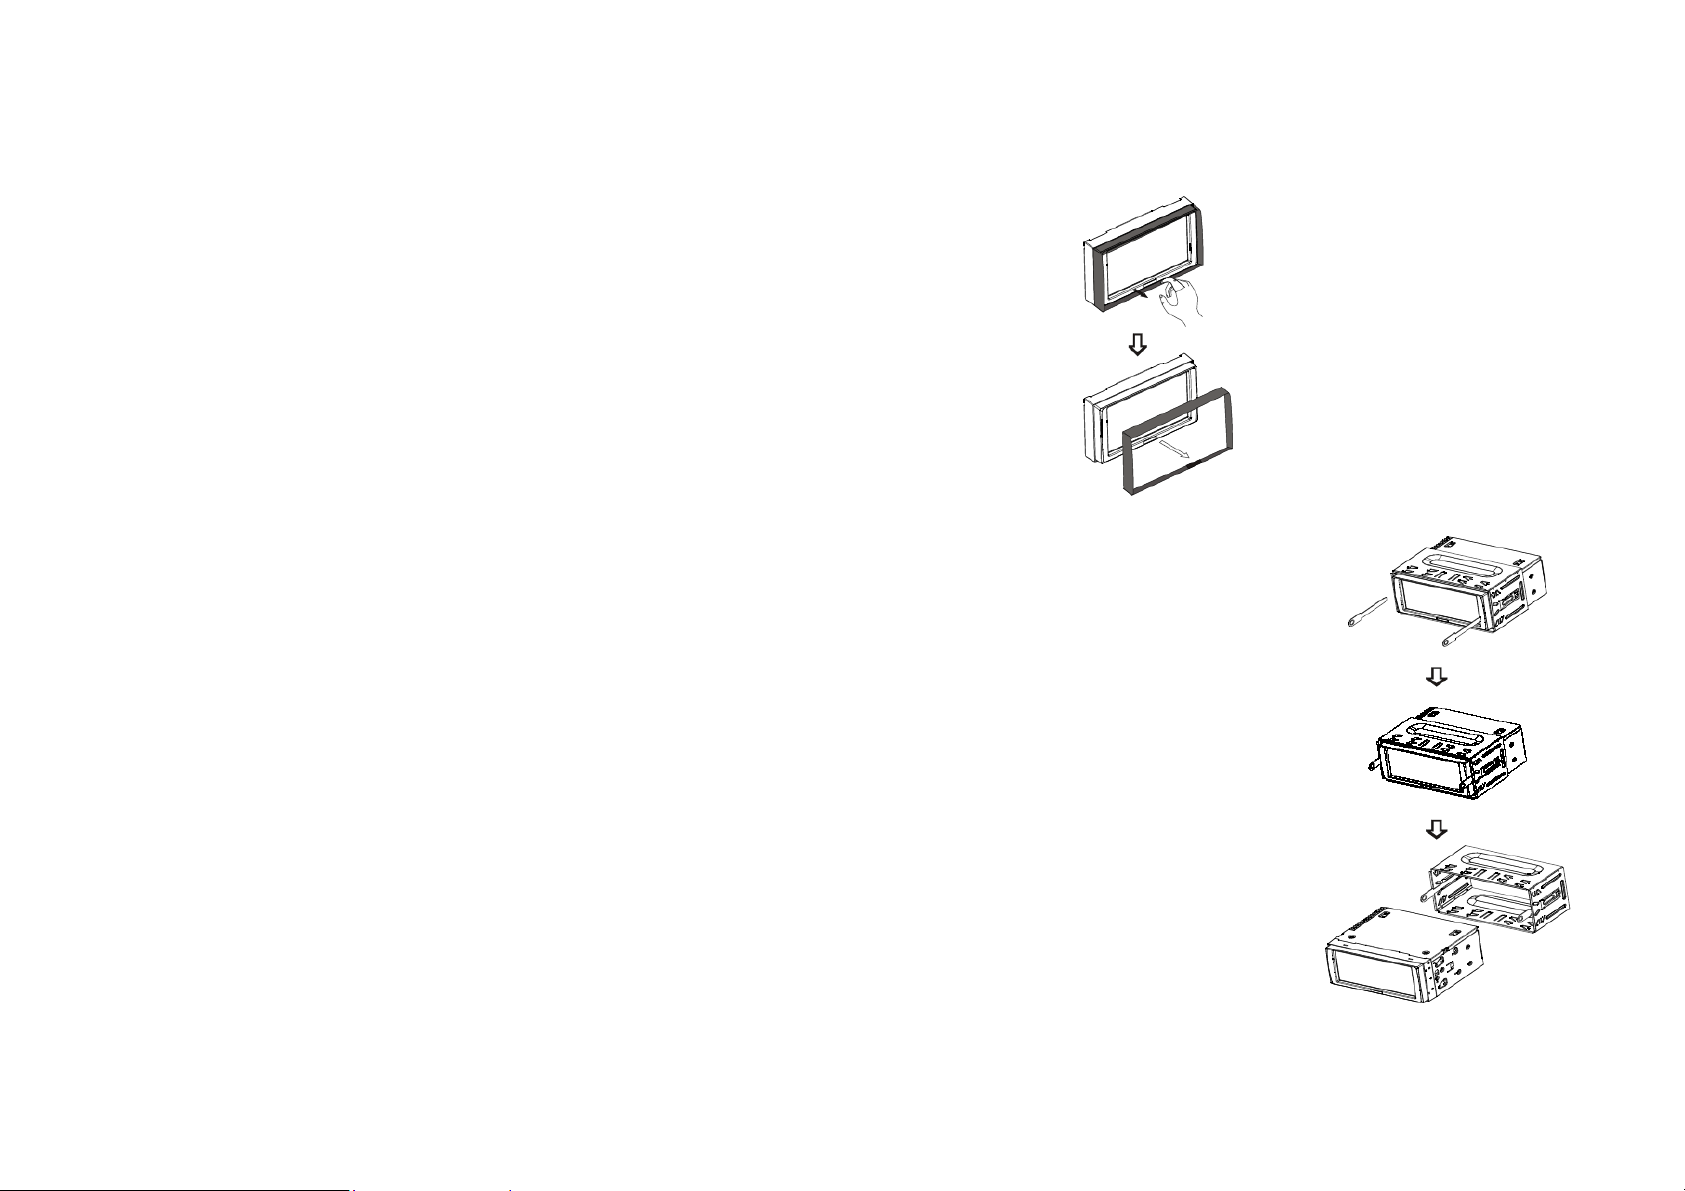
Detach the unit
Detach the front panel before disassembling the unit.
1. Take out the Outer trim frame.
2. Insert the keys supplied to the unit at both sides of the unit until they click.
Pulling the keys makes it possible to remove the unit from the dashboard.
7
Page 8
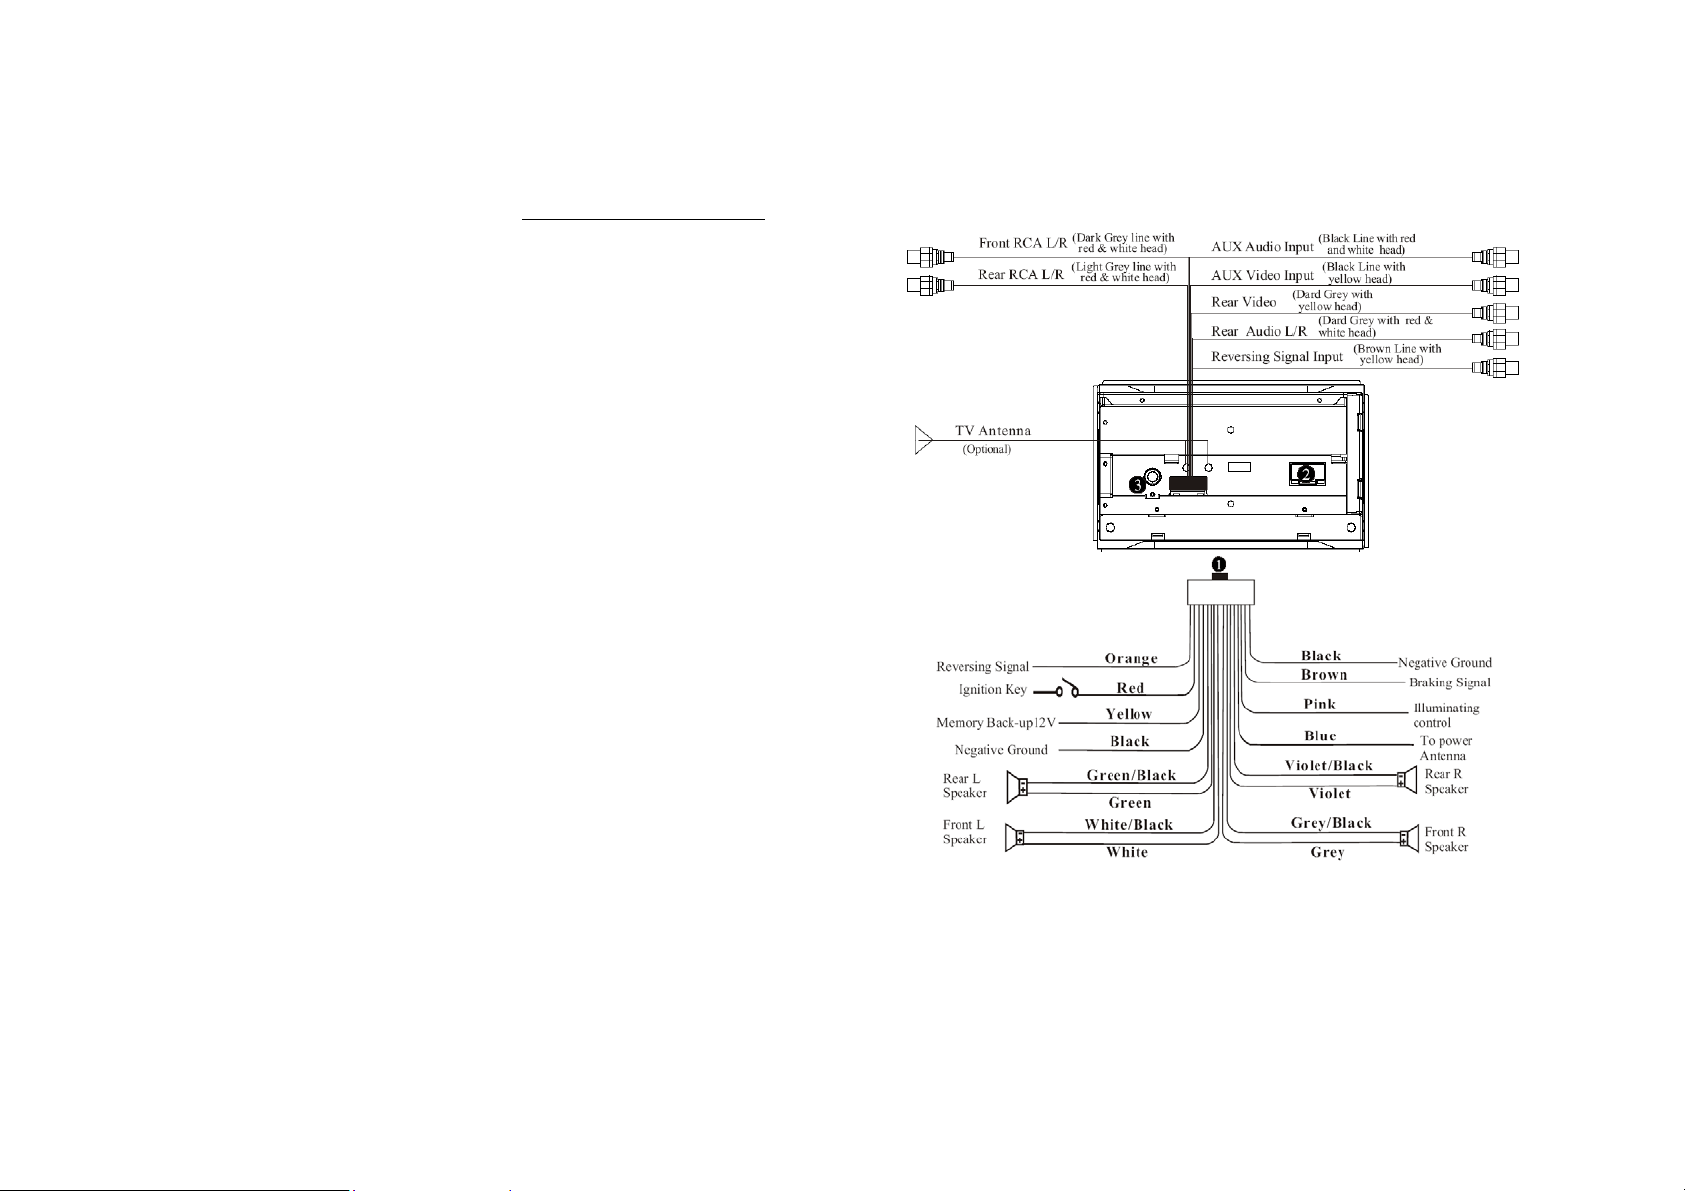
Electrical Connection
1. Output plug
2. Output socket
3. Tuner reception
Note: The brown wire is connected with brake signal; for safety, the programs can be seen on the monitor after
braking the car, but the menu and RCA outputs are free of it. If you do not want to use this function, connect it
with the negative pole. Do not connect the pink wire to the battery, otherwise it will use up the power of
battery.
8
Page 9

Unit controls
Front panel
1. SRC/PWR button
During waiting mode, briefly press it to turn on
the unit; during working status, briefly press it
to select radio mode or playback mode, hold and
press it to turn the unit on or off.
2. SEL/MENU button
Briefly press it to select the function; keep
pressing it to display the main menu.
3. MUTE button
Briefly press it to mute; keep pressing it to switch to the night mode.
4. REMOTE Infrared Sensor
5. VOLUME+/ VOLUME-
Press VOLUME+/VOLUME- to increase or decrease the volume, and press them to adjust functions of the
SEL button.
6. RESET button
Press it to restore the unit to initial status.
7. Touchable TFT display
8. AF/EQ button
Briefly press it to select the different frequency; press and hold it to select the corresponding preset modes
to adjust the sound quality.
9. TA/BAND button
9
Page 10
Briefly press it to activate the traffic alarm function; press and hold it to select the bands.
10. REL button
Press it to slide down the front panel, then you can insert or eject a disc or a SD card.
11. Cursor buttons
Left/Right/Up/Down/F.REW/F.F/Next track/Previous Track;
12. ANGLE+/ANGLE- Button
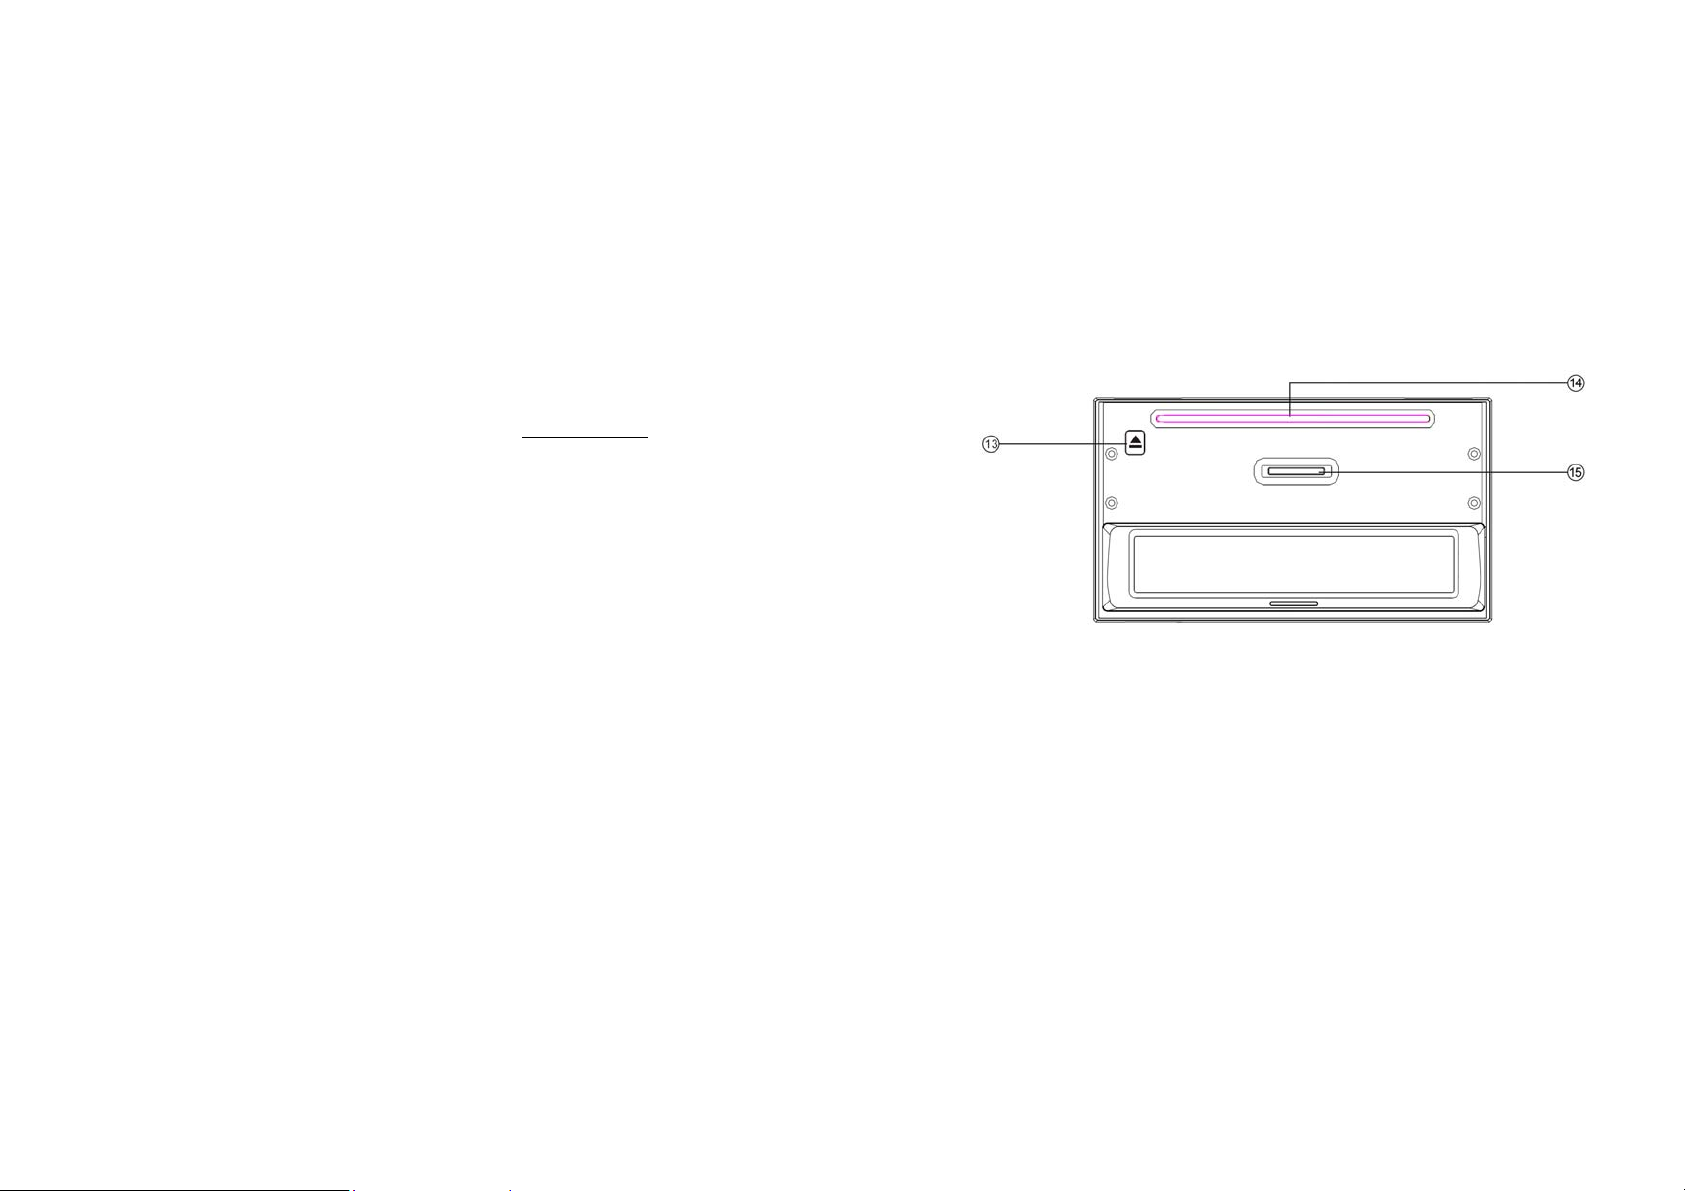
Inner panel
13. Eject button
Press it to eject a disc.
14. Disc Loading Slot
Press REL first before you load the disc.
15. SD Card Slot
10
Page 11
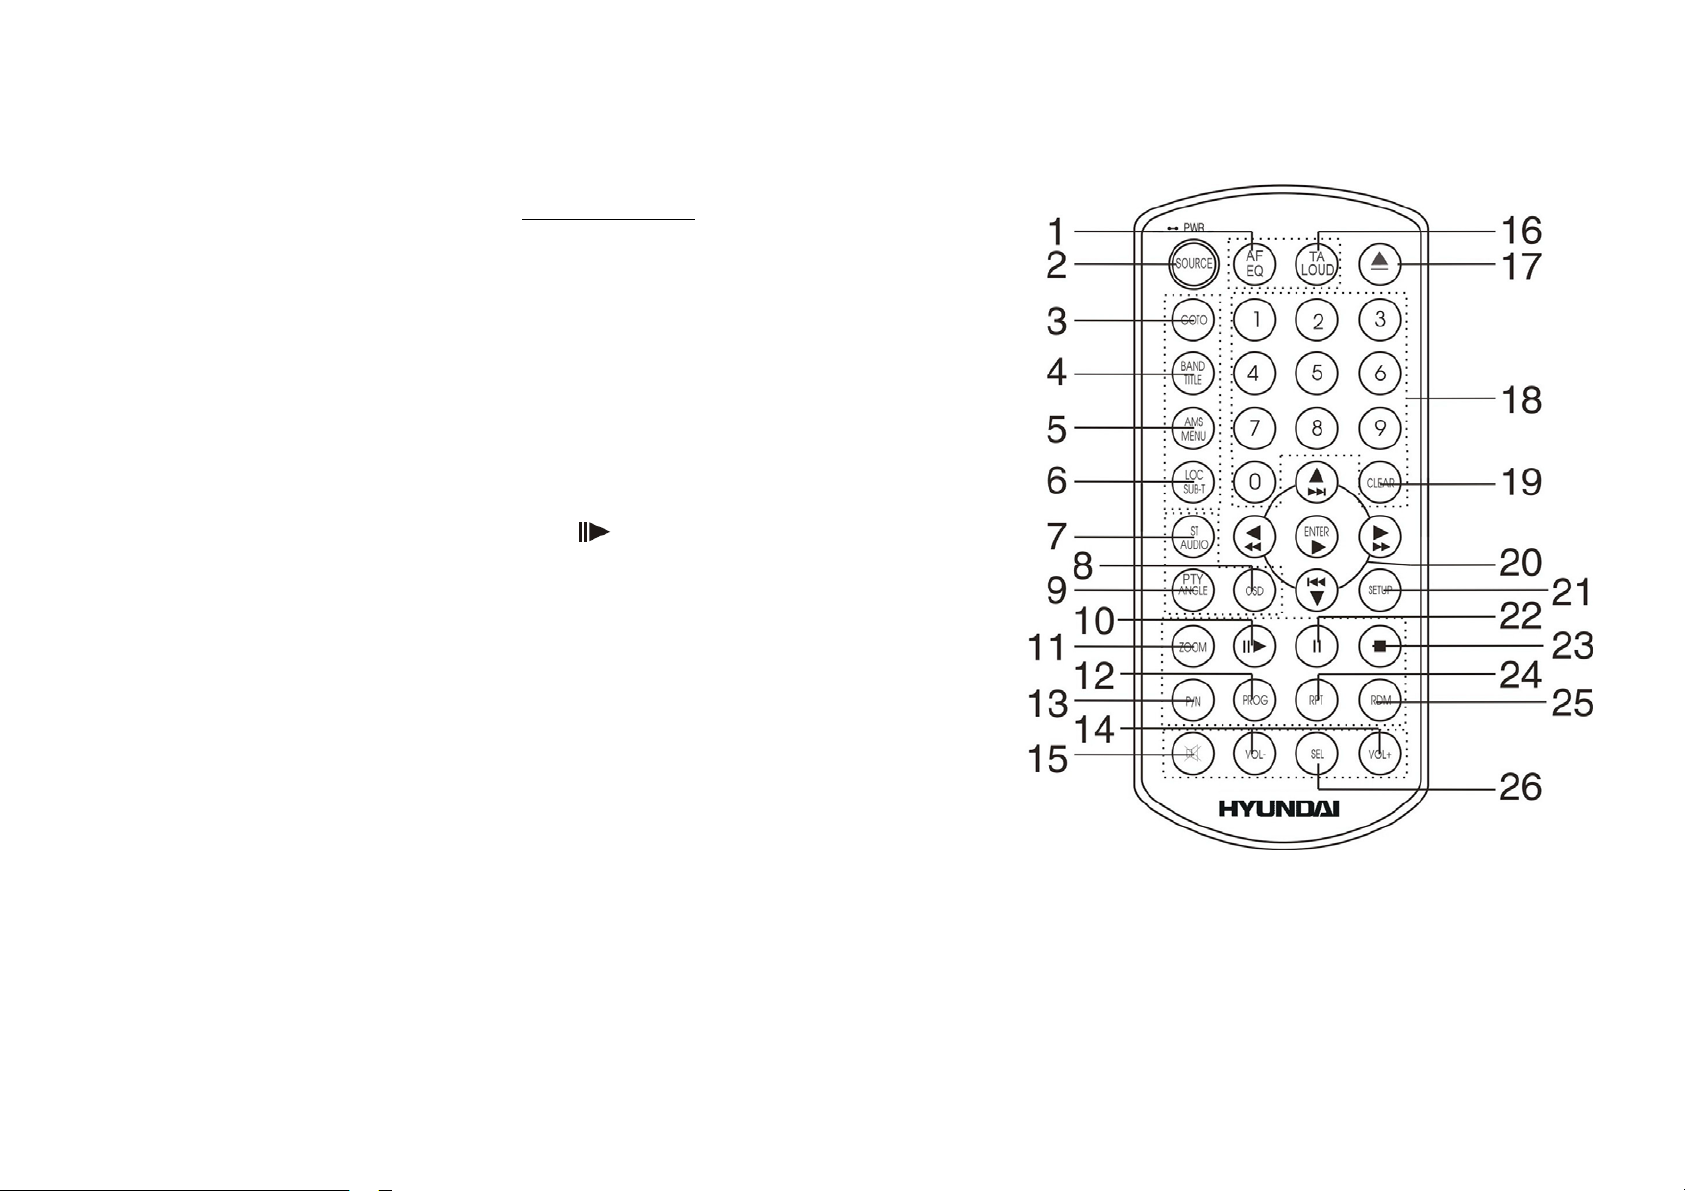
Remote control
1. AF/EQ button
2. SOURCE button
3. GOTO button
4. BND/TITLE button
5. AMS/MENU button
6. LOC/SUB-T button
7. ST/AUDIO button
8. OSD button
9. PTY/ANGLE button
10. SLOW button
11. ZOOM button
12. PROG button
13. P/N button
14. VOL +/ VOL- buttons
15. MUTE button
16. TA/ LOUD button
17. EJECT button
18. 0~9 NUMBER buttons
19. CLEAR button
20. ENTER button / CURSOR ///
buttons / / FAST REWIND/ FAST
FORWARD
BUTTONS / / PREVIOUS/ NEXT TRACK BUTTONS
21. SETUP button
11
Page 12

22. PAUSE button
23. STOP button
24. RPT button
25. RDM button
26. SEL button
12
Page 13

Changing the battery
1. Press the catch and at the same time pull out the battery tray (pic. 1).
2. Insert the 1 lithium battery, type CR2025 (3V) battery with the stamped (+)
mark facing upward. Insert the battery tray into the remote control (pic.2).
Warning:
• Store the battery where children cannot reach. If a child accidentally swallows the battery, consult a doctor
immediately.
• Do not recharge, short, disassemble or heat the battery or dispose it in a fire.
• Do not expose or bring into contact the battery with other metallic materials. Doing this may cause the
battery to give off heat, crack or start a fire.
• When throwing away or saving the battery, wrap it in tape and insulate; otherwise, the battery may give off
heat, crack or start a fire.
Pic. 1 Pic. 2
13
Page 14

General operations
Reset the Unit
Operating the unit for the first time or after replacing the car battery, you must reset the unit. Remove the front
panel at first, and then press RESET button on the unit with a pointed object, (such as a ballpoint pen) to set the
unit to initial state.
Note: When some errors occur on the display, you can also press RESET button to resume to normal, and it
will erase the clock setting and some memorized functions. This function can only be operated by the head unit.
Turning the Unit On/Off
Press SOURCE button on the RC or SRC/PWR button on the unit to turn on the unit, press it again, the unit is
still in the waiting status. After inserting a disc, the unit will automatically start playing. Keep pressing it more
than 2 seconds to turn off the unit completely.
Note: During playback mode, the unit will play automatically after inserting a disc.
Setting the Sound Characteristics
Repeatedly press SEL button on the RC or SEL/MENU button on the unit to select the desired mode in the
following order: BALAN => FADE => BASS => TREBL => VOLUME. After selecting the desired mode, you
can adjust the current level by pressing VOL buttons on the RC or on the unit.
EQ Setting
While listening to the popular music, classic music or rock music, you can select the corresponding preset
modes to adjust the sound quality perfectly by using AF/EQ button on the RC or on the unit. Repeatedly keep
pressing the button to choose the following modes in turn: POP => CLAS => ROCK => OFF. The default
setting is OFF.
14
Page 15

Volume Control
Press VOL+/VOL- button on the RC or on the unit to increase/decrease the sound level.
Turning Loudness On/Off
Briefly press TA/LOUD button on the RC to activate loud function. You can press this button to increase the
low frequency, which can improve sensitivity for your ears. Keep pressing it again to quit this function.
Eject a Disc
Press EJECT button on the RC or on the unit to eject or insert a disc.
Open the Monitor
Press REL button on the unit to slant the monitor, press and hold it again, the monitor will return to initial state.
Angle Setting
Press ANGLE+/- buttons on the unit to adjust the best position of the monitor.
Mute Function
Press MUTE button on the RC or on the unit to turn off the sound. The corresponding icon appears on the TFT.
Press it again to resume the previous volume level.
Night Mode
Press and hold MUTE button to enter the night mode, press it again to switch to the normal mode. This function
is operated by the head unit only.
15
Page 16

Insert an SD Card
Press REL button after turning the unit on, then insert an SD card into SD slot when the TFT is slanted, and the
contents of the card will be played.
Clear
After inputting something wrong, press CLEAR button to clear it.
Mode Selector
Repeatedly press SOURCE button on the RC or the SRC/PWR button on the unit to select radio mode, TV
mode or playback mode.
Infrared Sensor
Reception of the remote control signal.
16
Page 17
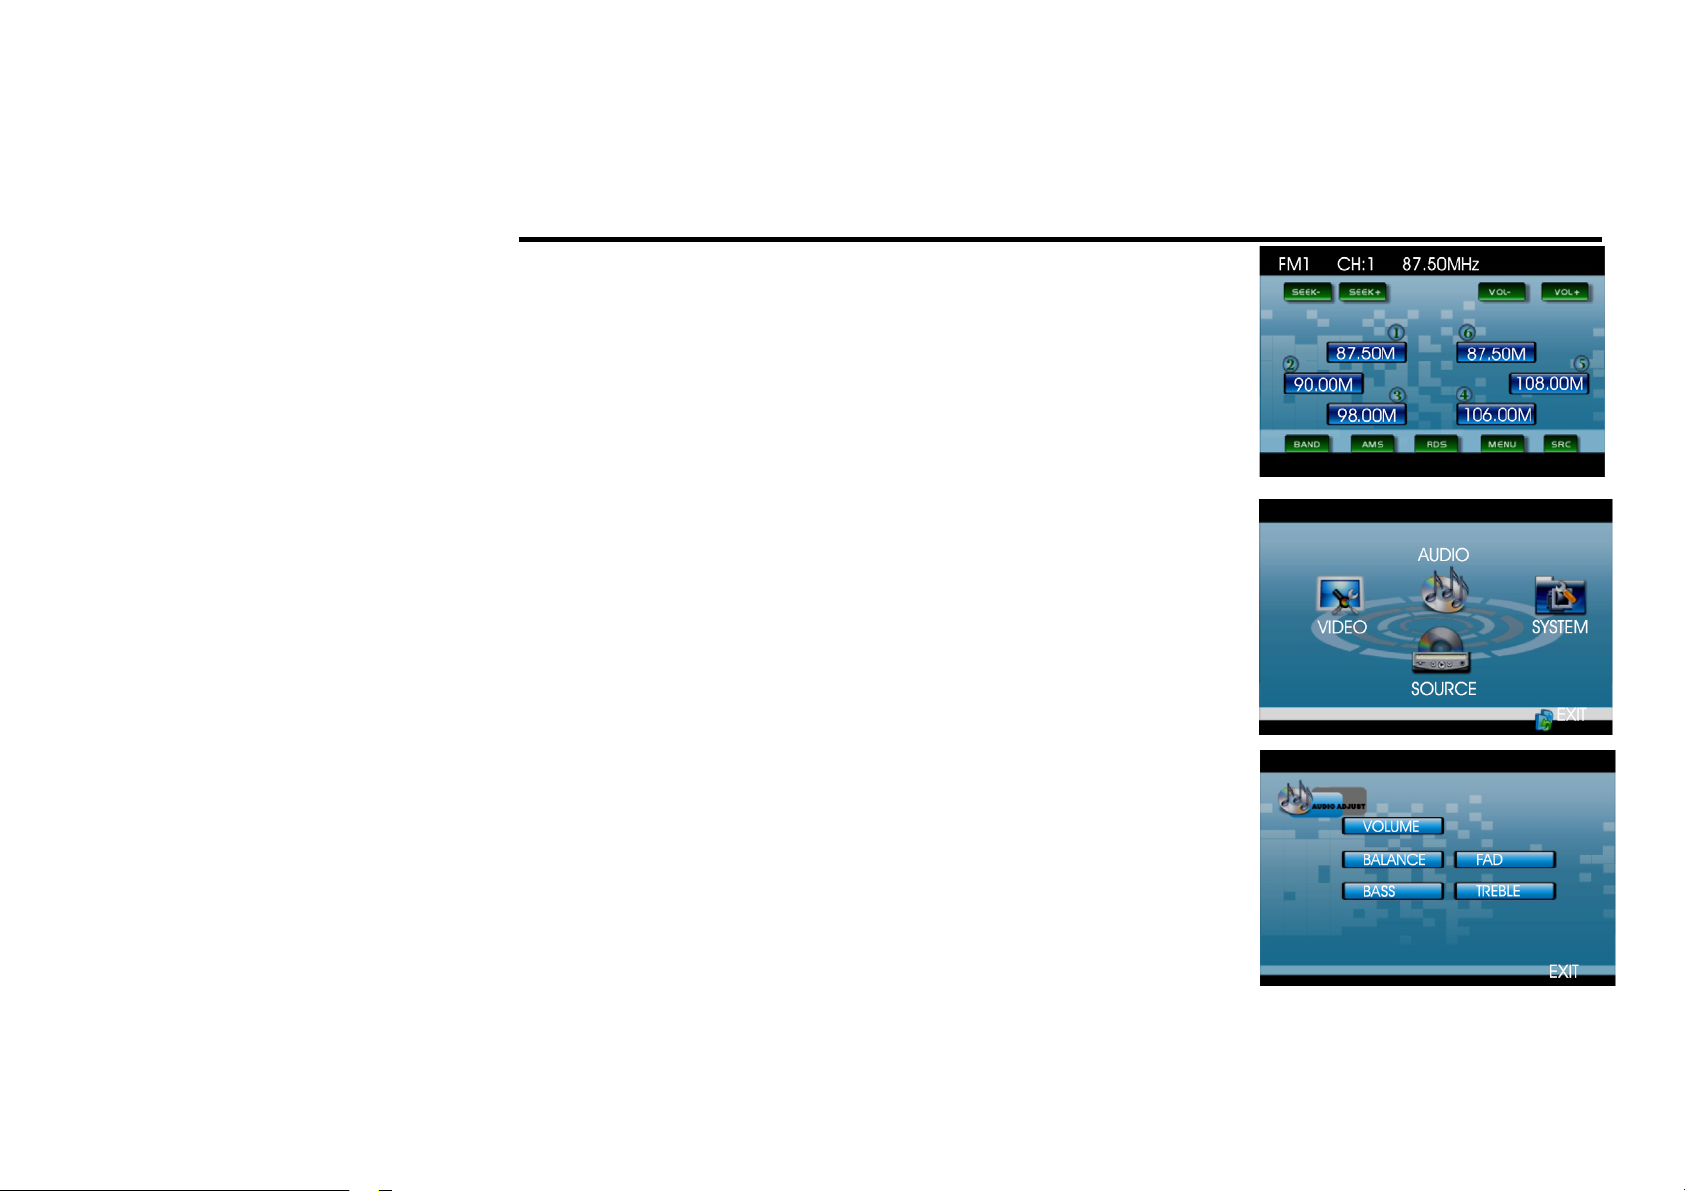
Main menu
Note: This unit can be operated by touching the screen buttons. Thus you
can select the menus and change the parameters.
When the unit is on, the monitor will display main menu.
Press and hold SETUP button on the RC or SEL/MENU on the head unit,
or press MENU on the monitor to enter the menu.
This menu includes AUDIO, VIDEO, SOURCE, SYSTEM, EXIT. Press
them on the monitor to set the desired status.
Audio Adjust
You can adjust VOLUME, BALANCE, FAD, BASS, TREBLE.
For example, press FAD, the setting menu will appear.
17
Page 18
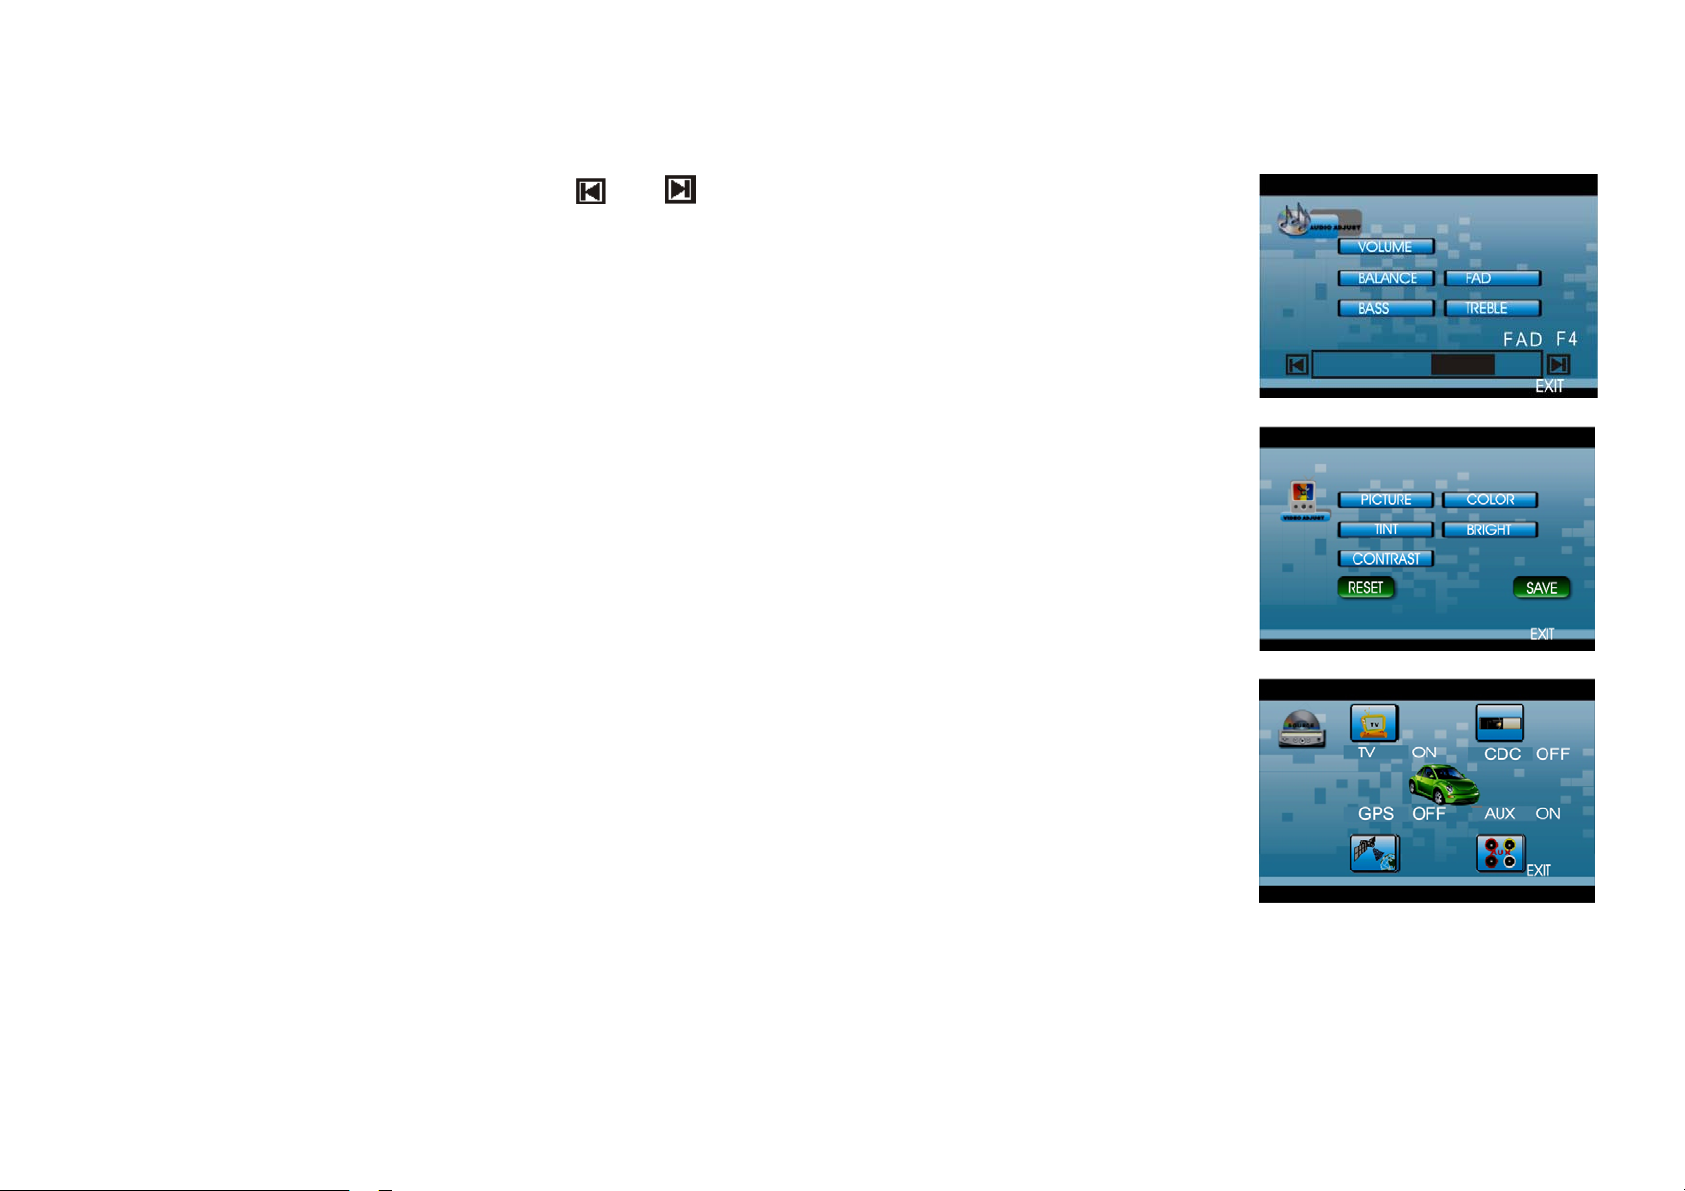
Press and buttons to adjust the desired FAD level, press EXIT to
exit this menu.
Note: When adjusting the other options perform the same operation.
Video Adjust
In this menu you can adjust CONTRAST, COLOR, TINT, BRIGHT,
PICTURE.
Source Adjust
You can adjust TV, CDC, GPS and AUX to ON or OFF, press the
corresponding button to set. If one of them was set OFF, that function is
not available.
18
Page 19

System Adjust
In this menu you can adjust CLOCK SYS (clock system), KEY BEEP,
MONI FLEX (monitor flex), REVER POLA (reverse polarity),
SUBWOOFER, AMS FULLUP, LOCAL AREA, LOCAL, GOTO FREQ,
RT SCROLL, TA VOLUME, REGION, ADJ SCREEN, CLOCK ADJ.
Note: Press arrow buttons at the right side of the screen to display the next
or previous menu.
Clock System
Press CLOCK SYSTEM in the monitor to set 12 HOUR or 24 HOUR in this menu.
Key Beep
In this menu you can adjust KEY BEEP, press it and select ON or OFF, the default setting is ON, it means
when you press the buttons, they are sounded.
Monitor Flex
In this menu you can adjust MONITOR FLEX, press it on the monitor and select MANUAL or AUTO, the
default setting is AUTO, it means that when you turn the unit on the monitor will take a default position.
Rever Pola (Reverse Polarity)
You can reverse the polarity in this menu. The signal is +12V when you back a car, please press BATTERY in
the monitor; if the signal is 0 V, please press GROUND.
Subwoofer
In this menu you can adjust SUBWOOFER settings, press it and select ON or OFF, the default setting is ON.
19
Page 20

AMS Fullup
In this menu you can set the modes of AMS. When the setup is ON, the presettable stations are full, new one’s
are not allowed. When you select OFF, it will search continually.
Local Area
You can select EUROPE, USA, to search the stations quickly in your current area. You can select OIRT to
receive stations quickly.
Local
In this menu you can search the LOCAL stations, when selected ON, the strong signal local stations can be
received, when selected OFF, the week signal out-of-town stations may be received.
Goto Freq
Selecting ON, you can use GOTO button on the RC to select a station’s frequency directly in radio mode.
RT Scroll
You can select SLOW, NORMAL or FAST scroll speed according to your preferences.
TA Volume
You can select LOW, NORMAL or HIGH TA volume according to your preferences.
Region
To set the AF searching region, the default setting is ON. You can also set it to OFF.
20
Page 21

Adj Screen
Press ADJ SCREEN to display the above menu, there are a square button at the top left corner and a tip: please
press the button. Press the square button at place 1, then the button will move to place 2, press it at place 2, it
will move to place 3, then place 4, press SAVE at last.
Clock Adjust
Press CLOCK ADJ to adjust the time.
21
Page 22
Digital tuner operations
Mode selecting
Press the SRC/PWR button on the unit or SOURCE button on the RC repeatedly to switch to RADIO mode.
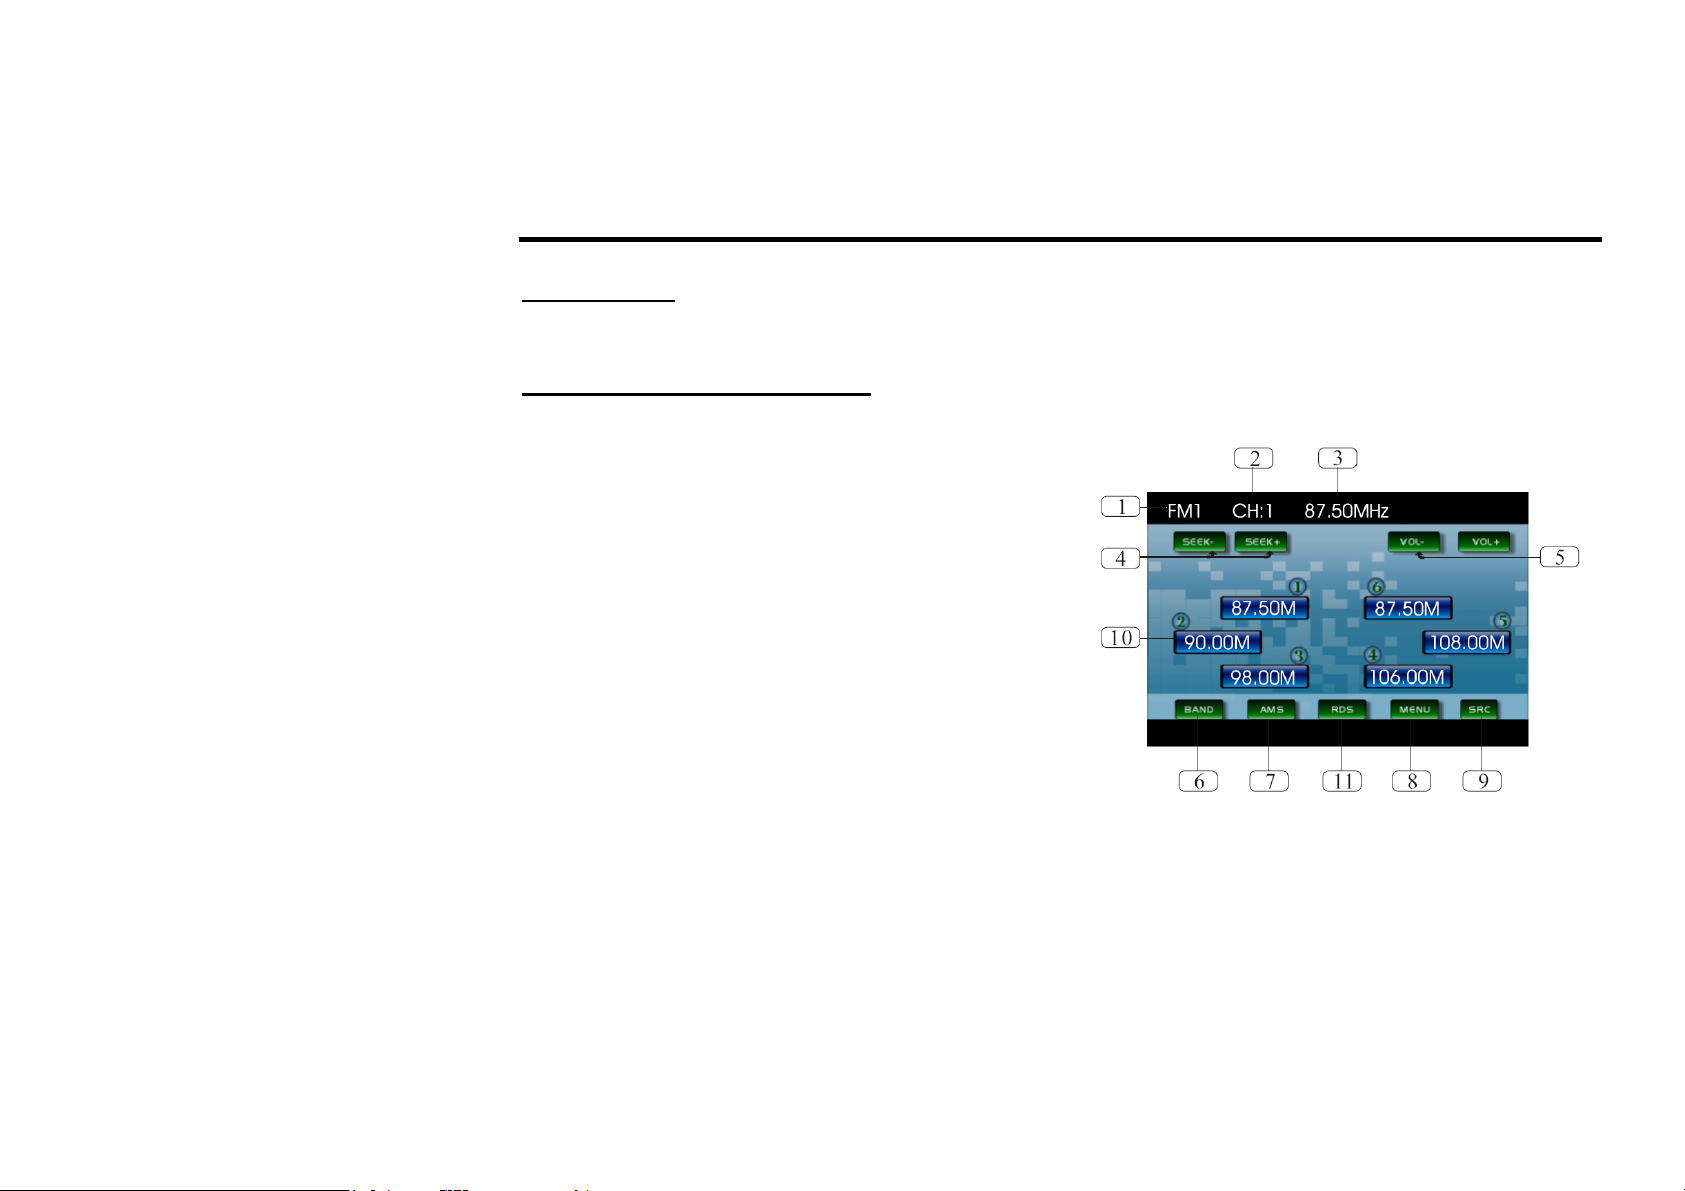
User interface (UI) of Radio mode
When the unit is switched to Radio mode, the following user interface will be displayed on the display:
1. Band indicator. Shows which band the radio is tuned
to.
2. Preset number indicator. Shows what preset has been
selected.
3. Frequency indicator. Shows which frequency the
tuner is tuned to.
4. SEEK+/SEEK-. Briefly press to tune by the
presettable range, hold and press to tune
automatically.
5. VOL+/VOL- . To increase or decrease the volume.
6. BAND. To select bands.
7. AMS. Briefly press to scan the current station, hold and press to tune automatically.
8. MENU. Press to set the main menu.
9. SRC. Press to select the signal source.
10. The 6 stations of the current band. Briefly press to select station, press and hold to save the current station
to one of the 6 stations.
11. RDS. Press it to enter RDS SETUP.
22
Page 23

Band selection
Press the BND/TITLE button on the RC or on the touch screen to switch to the bands in the following order:
FM1 - FM2 - FM3 - AM1 - AM2 (for two bands); FM1 - FM2 - FM3 - MW - LW (for three bands).
Manual/automatic tuning
• Manual tuning: Press / buttons on the RC repeatedly to select a station upward or downward step by
step.
• Automatic tuning: Press and hold for more than 3 seconds / buttons on the RC or cursor buttons on
the head unit to start automatic seeking for an available radio station downward or upward. After being
found the station will be played.
DX/LOC Selector
During radio mode, press LOC/SUB-T button on the RC to select strong or weak station reception. LOC
appears on the display and only local stations are available. When you turn it off both distance and local
stations can be received.
Note: The function is invalid in AM tuning.
Selecting the Stored Station
During radio mode, press / buttons on the RC or correspondent cursor buttons on the unit to select the
stored station upward/downward.
MO/ST Selector
During radio mode, you can press ST/AUDIO button on the RC to select mono mode or stereo mode. Stereo
reception is on when MONO disappears on the display. It is switched to mono mode when MONO appears.
Note: The function is available only in FM tuning.
23
Page 24

Scanning/Memorizing Stations Automatically
During radio mode, you can press AMS/MENU button on the RC or AMS button on the monitor to scan each
stored station for 5 seconds respectively which stored with number buttons (1 – 6).
You can press the corresponding Number Buttons, AMS/MENU button on the RC or AMS button on the
monitor when your desired station is on. And it starts playing that station.
When you press and hold AMS/MENU button on the RC or AMS button on the monitor for more than 2
seconds, it will activate automatically memory-storing function. The tuner automatically selects a station and
stores it by any one of the number buttons (1 – 6).
To store the station press and hold number button for more than 2 seconds when listening.
Note: The unit can be stored up to 6 stations for each band.
On Screen Display
During radio mode, keep pressing OSD button on the RC to display the current mode.
Goto FREQ
Press GOTO button, and the monitor shows FREQ. Then press number buttons to input the valid frequency.
24
Page 25
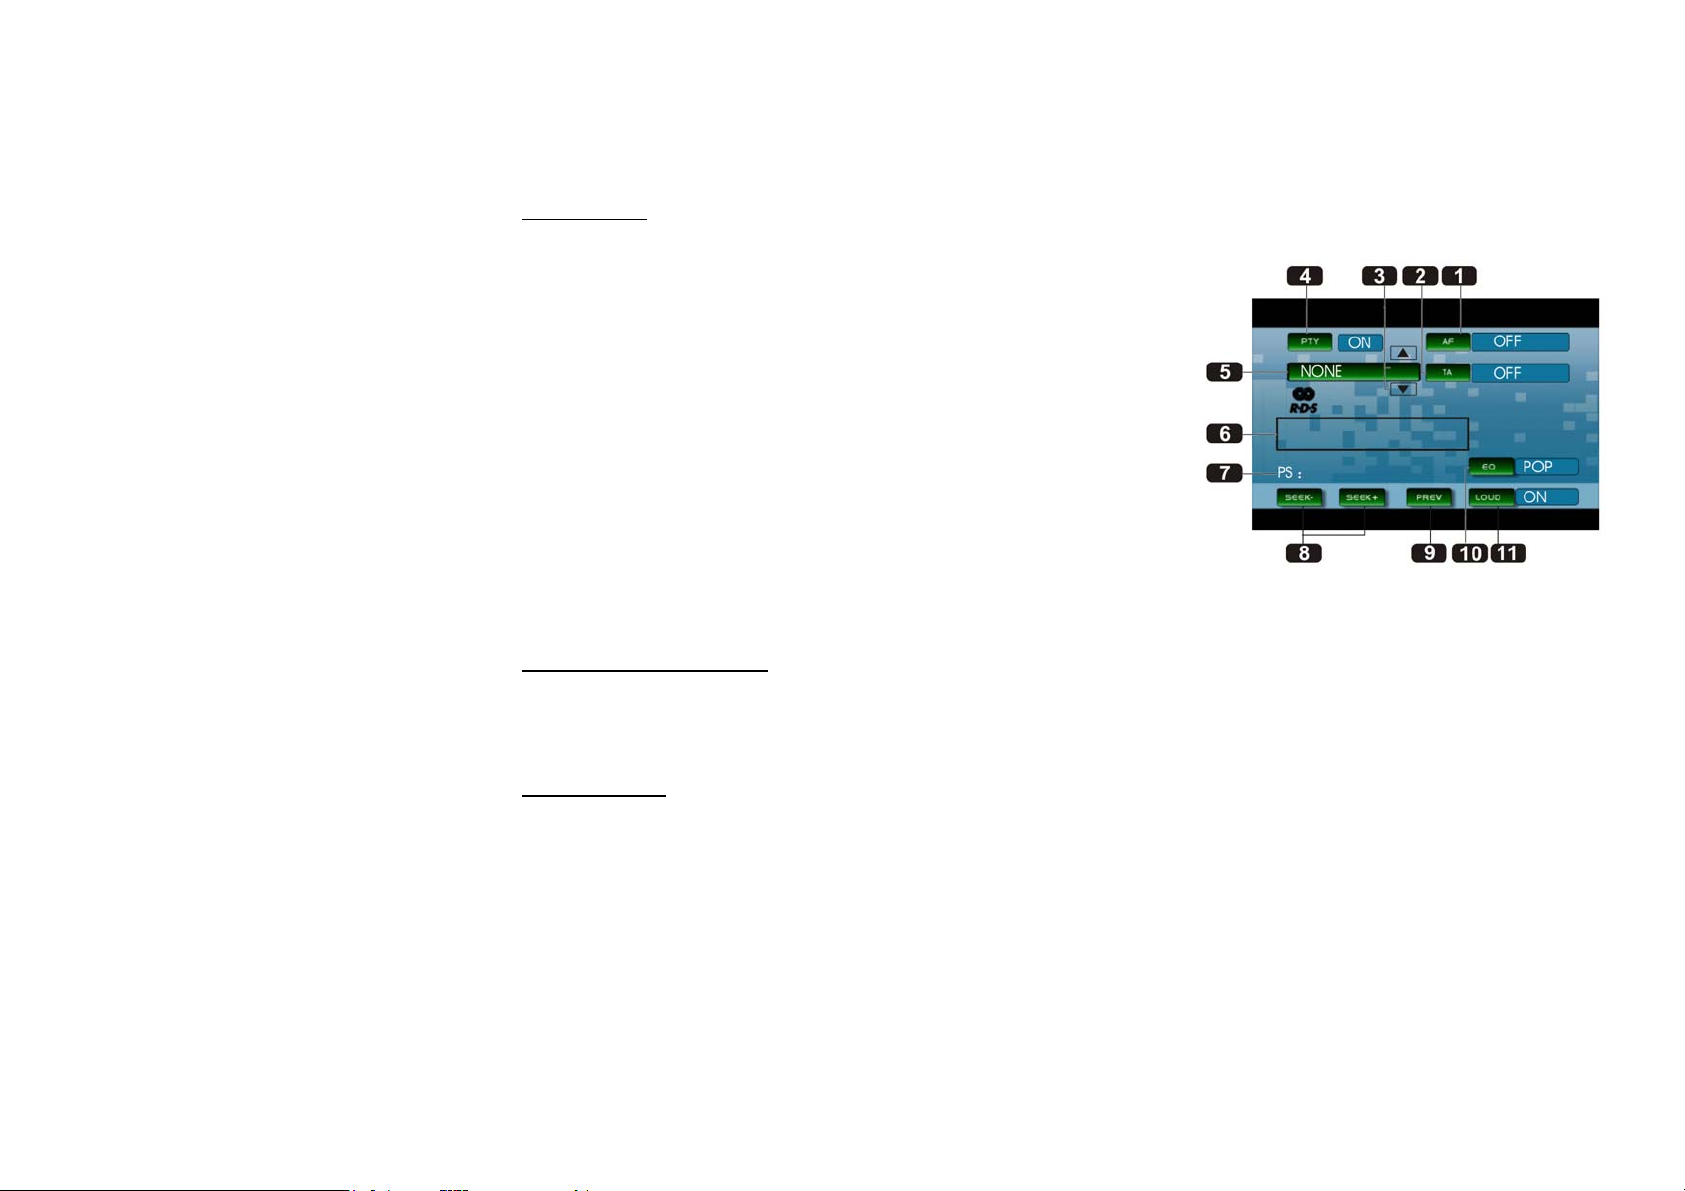
RDS Setup
1. AF. Press it to activate AF function.
2. ТА. Press it to activate TA function.
3. /. Press it to select PTY code.
4. PTY. Press it to activate PTY function.
5. During PTY ON, press this button to search the playing track type.
6. Displays the RADIO TEXT of the RDS station.
7. PS: Display the current RDS station programs information.
8. SEEK+/SEEK- . Press it to tune automatically.
9. PREV. Press it to turn to “listening to the radio”.
10. EQ. Press it to select the corresponding preset modes to adjust the
sound quality.
11. LOUD. Press it to activate the LOUD function.
Alternative Frequencies
Briefly press AF/EQ button to activate the auto searching station function. When AF is on, the RDS signal is
week or there is no it at all, it will be found in the presetted frequencies and the whole bands.
Traffic Alarm
Briefly press TA/LOUD button activate the traffic alarm function. When AF is on, the TA displays on TFT, or
else, if there is no TP information, the mode will search TP station automatically.
The TA is green when it is played by a station, if not, it is white. When TA is playing, the volume will be
adjusted to a TA level automatically. When other modes are activated (such as DVD, AUX), if a TA program is
played the mode will skip to the RDS mode automatically. It will resume to the primary mode after the TA is
over.
25
Page 26

Program Type
Briefly press PTY/ANGLE button on the RC or PTY button on the monitor to activate PTY function.
When PTY is on, PTY ON appears on the monitor, you can press UP/DOWN to select the program type, and
then press
PTY CODE to search the special program. And the monitor displays PTY SEARCH. If PTY is off, PTY OFF
appears on the monitor, the searching is stopped.
Note: RDS service availability varies with areas. Please understand if RDS service is not available in you area,
the following service is not available, either. To activate this function enter RDS Menu by pressing TA/LOUD
button on the RC.
26
Page 27

Disc operations
Discs for playback
• This unit can play disc types: DVD/DVD±R/DVD±RW/CD/CD-R/CD-RW.
• Compatible with formats: DVD/SVCD/VCD/MP3/WMA/HDCD/CDDA/MPEG4(DivX)/Picture-
CD/JPEG.
• The following file types are supported:
Audio files: MP3 (*.mp3)
WMA (*.wma)
Video files: MP4 (*.avi, DIVX3.11/4.0/5.0/6.0 and XVID)
MPEG 2(*.vob)
MPEG 1(*.dat)
Picture file: JPEG (*.jpg)
• ISO 9660 or ISO 9660 +Joliet format - Max. 30 characters
• Max. Track number is 448
• Max. nested directory is 8 levels
• The max. album number is 99
• The max. length of each track is 99 minutes 59 seconds
• Supported sampling frequency for MP3 disc: 8 KHz – 48 KHz (44.1 KHz preferably)
• Supported bit-rates of MP3 disc are: 32 - 320 kbps (128 kbps preferably).
• Following formats are NOT supported *.ACC, *.DLF, *.M3U, *.PLS, MP3 PRO, files with DRM.
• Open session discs are NOT supported.
Note: Before performing any disc operations turn on the power of the unit.
27
Page 28

DVD operations
Glossary
PBC (Play Back Control)
Play Back Control is a menu recorded on the disc with SVCD or VCD2.0 format. For the discs contained PBC,
it can playback interactive software with the menu displayed on TV. And if the disc contains still images, it can
playback high definition of still image.
Title
The title is the important part of DVD disc. The memory volume of the disc is rather big, that makes possible to
record several films on one disc. For example, if a disc contains three films, they may be divided into Title 1,
Title 2 and Title 3. You can easy use the functions of looking-for.
Chapter
A title can be divided into several blocks, so that every block can be operated as a unit, the unit is called
chapter. The chapter contains a unit at least.
Track
It is the biggest component of VCD. Generally, every song of karaoke disc is a track.
28
Page 29
Playing a DVD
Insert a DVD disc into the disc slot, the unit will automatically switch on, if a DVD disc is loaded, press
ENTER button to start the playback. To eject a DVD press EJECT button on the unit, on the RC.
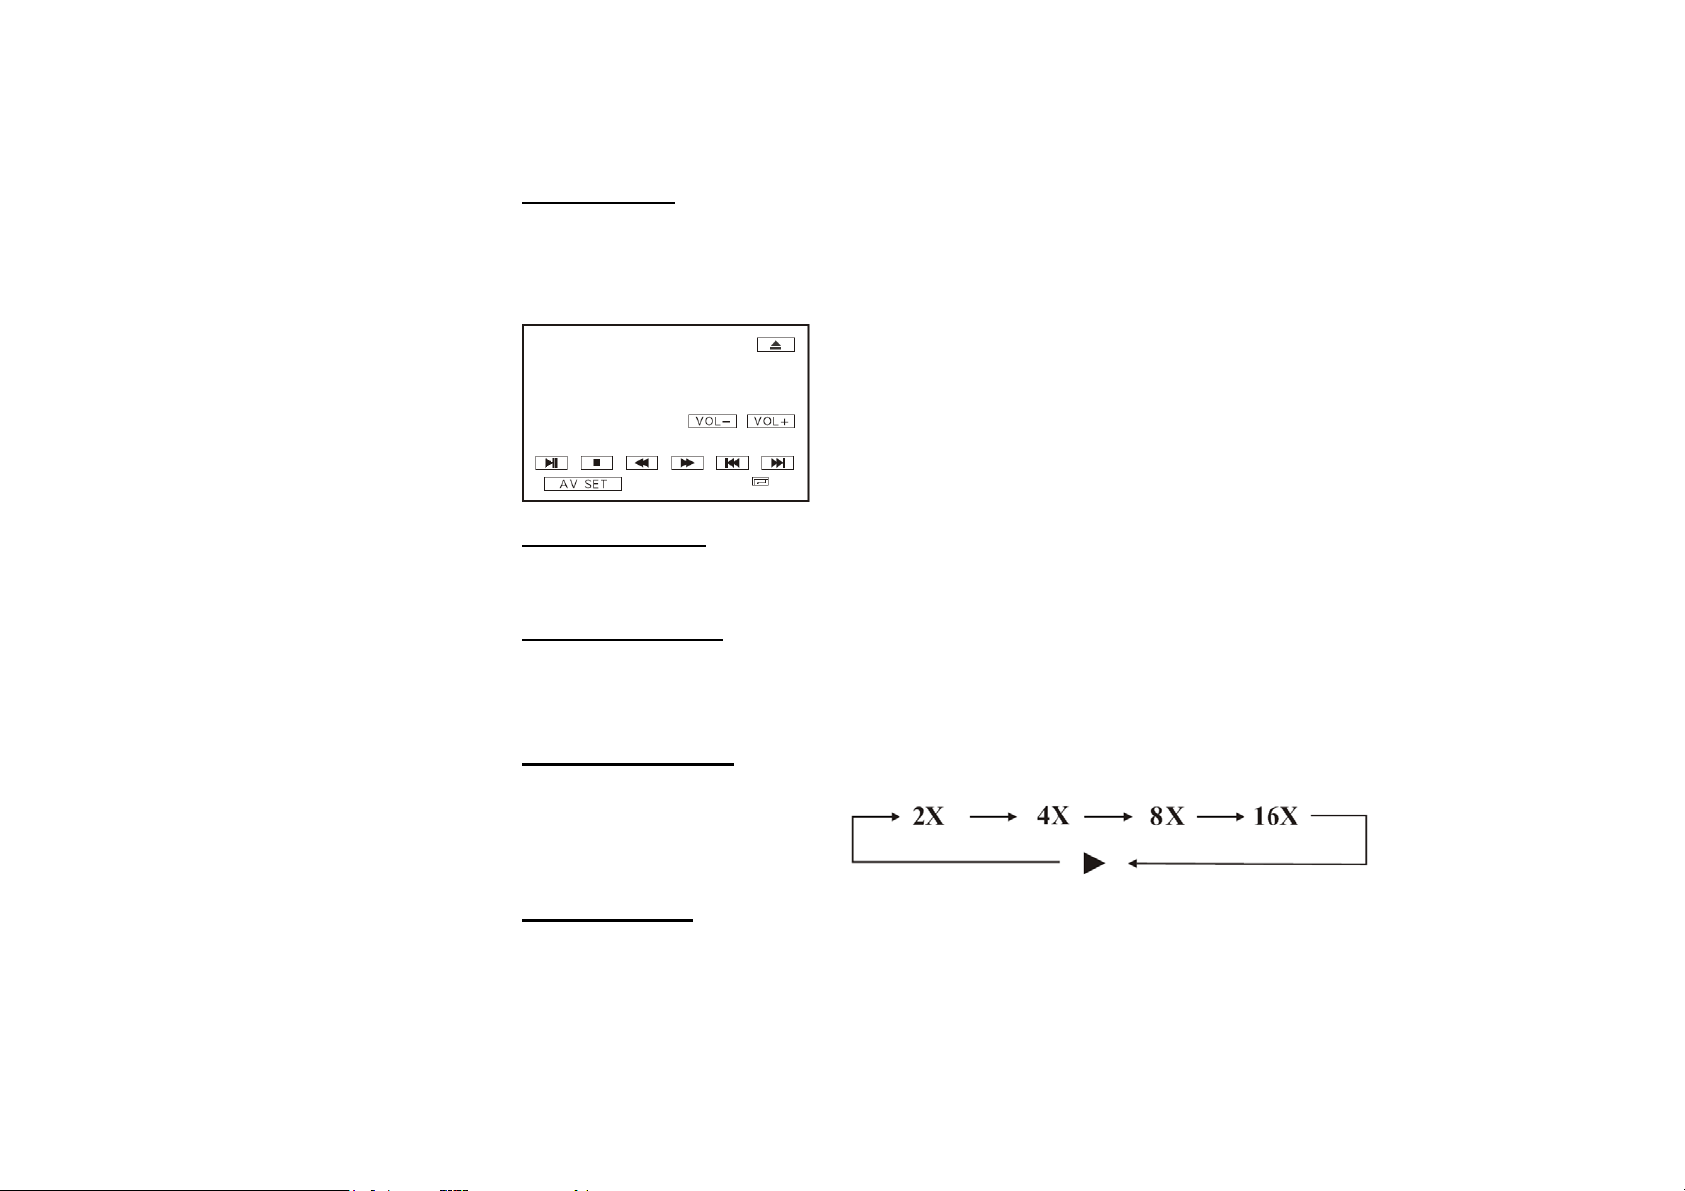
Touch the screen at any place when DVD mode is on and the monitor will display the menu as follows:
Along with buttons of the RC and the unit you can use touch buttons of this
menu to perform some of the following operations.
Stop the playback
Press STOP button, then press ENTER or PAUSE button on the RC or on the monitor to resume playing.
Previous/next track
Press / buttons on the RC or on the monitor, / cursor buttons on the unit to play the previous/next
track.
Fast rewind/forward
Press / buttons on RC or on the monitor, / cursor buttons on the unit to perform fast rewind or fast
forward.
Number Buttons
Press one of the number buttons (0-9) to select a track, it will be played automatically.
29
Page 30

Repeat Playing
Press RPT button on the RC to perform replaying function as followings:
System Switch
During playback mode, Press P/N button on the RC to set the TV standard to PAL or NTSC or AUTO system.
Slow motion playback
Press button to slow forward or slow backward.
Changing the size of the picture
Press ZOOM button to increase the picture in size. Each pressing increases the size until the maximum size is
reached.
On Screen Display
Briefly press OSD button and the display will show:
Title elapsed => Title remain => Chapter elapsed => Chapter remain => Display off =>.
Press and hold OSD button to display the current setup.
DVD Playback Setting
Press GOTO button to set the playing time: title/chapter/audio/subtitle/angle/tt time/ch time/repeat/time disp.
Press / buttons to select the options, press ENTER to set the status. Then press Number Buttons or /
buttons to set the current status. Press GOTO button to exit.
30
Page 31

Changing the viewing angle (Multi-angle)
With DVDs featuring multi-angle (scenes shot from multiple angles) recordings, you can press PTY/ANGLE
button to switch among viewing angles during playback.
Notes:
• The mark on a DVD's package indicates that it supports multi-angle scenes.
• Number 3 in the mark indicates the number of angles from which scenes were shot.
• The function is invalid if ANGLE button is pressed during fast forward/reverse or pause.
Changing audio language (Multi-audio)
DVDs can support audio playback with different language. Press ST/AUDIO button to switch between
language and audio systems during playback.
For example: AUDIO 1 => AUDIO 2 => AUDIO 3.
Note: This function is only valid with DVDs featuring multi-audio recordings.
Changing the subtitle language (Multi-subtitle)
If your DVD supports multi-subtitle recordings press LOC/SUB-T during playback to switch between subtitle
languages.
For example: Subtitles 1 — Subtitles 2 — Subtitles OFF
Note: This function is only valid with DVDs featuring multi-subtitle recordings.
MENU function
1. Press AMS/MENU button to enter the root menu, all of the chapters will appear on the TFT. You can
press ENTER button or number buttons to select your desired chapter.
2. Press BND/TITLE button to enter the title menu, all of the titles will appear on the TFT. You can press
ENTER button or number buttons to select your desired title.
31
Page 32

DVD Setup menu
1. Press SETUP button on the RC to enter the setup menu.
2. Use the / buttons to choose the setup page: General page, Dolby Digital setup, Preference page, Exit.
3. Press the button to enter the setup page selected.
4. Use / buttons to select the option you want to adjust.
5. Press button to enter the adjustment list. Use the / buttons to select the adjustment and press
ENTER button or MENU button on the unit to confirm.
6. To return to setup page list press the button in the options list.
7. Press SETUP button again to quit the setup page.
General setup page
• TV DISPLAY
Normal/PS: When the unit connects to the normal TV set, the wide-screen
image shows on the full screen, but some part is cut off (4:3).
Normal/LB: When the unit connects to the normal TV set, the wide-screen
image shows and black bars appear on the top and bottom of screen (4:3).
Wide: Use this item when the unit is connected with the wide screen (16:9) TV set.
• ANGLE MARK
It will show the angle mark when playing DVD disc with multi-angle view if selecting On.
• OSD LANG
Select on-screen display language.
• CAPTIONS
This function doesn't work when the disc without caption. The default setup is On.
• SCREEN SAVER
32
Page 33

If the Screen saver is set On and the unit is switched on without a disc playing for 3 minutes, a moving picture
appears on the TFT.
Dolby digital setup
• DUAL MONO
Choose the mode of the audio output:
Stereo: choose this setting, when 5.1-channel sound playing, two channels of
signals will be output from the left and right soundtrack; when 2-channel sound
playing, stereo signal will be output.
L. Mono: the signal will be output from the left speaker.
R. Mono: the signal will be output from the right speaker.
Mix-mono: the signal from one channel will be output from left and right speakers.
• DYNAMIC
If adjusting to FULL, the audio signal peak value will be the minimum. While adjusting to OFF - maximum.
Use the / button to move the scroll and adjust the dynamic range.
Preference setup
• TV TYPE
This unit is suitable for all kinds of TV systems. You can select one of the PAL,
NTSC or AUTO.
Auto: the TV system is auto switched according to the disc system.
NTSC: this system is used in USA, Taiwan, Japan etc.
PAL: this system is used in China, Europe, Hong Kong etc.
• AUDIO, SUBTITLE, DISC MENU
33
Page 34

Set the desired languages for all the settings. If a setting is supported by disc content, it will work. Otherwise
the disc default value works. You also can press the ST/AUDIO button on the RC to select the audio language.
Press the LOC/SUB-T button on the RC to select the subtitle language.
• PARENTAL
The control level is for parental to control playing content and protect your children from violence and erotic.
The disc, the level of which is higher than the setting level can not be played.
Set the control level:
(1) with the least limits when playing.
(8) with the most limits when playing.
Original setting: OFF.
Note: The rating can be selected only under the Password unlocked status, and the limits can be worked only
under the password locked status.
• PASSWORD
The password option is initialized as locked, and you cannot set the ratings limit
or change the password. In order to make the Parental feature works, the
password mode must be turned on. If you want to set the ratings limit, you will
need to enter the default password, which is 8888, then press ENTER to confirm.
To change the password, enter the Password change submenu. Use the cursor
buttons to select the desired field. In the Old password field insert the old
password or 8888 (if you forget the old one). If you change the password, the
default password 8888 will be void.
In New password field insert the new password.
Insert it again in Confirm password field.
Press ENTER to save the new password.
• DEFAULT
Reset to the initial factory setups.
34
Page 35

Exit
Select the Exit page to exit the Setup menu.
35
Page 36

VCD/CD operations
Along with buttons of the RC and the unit you can use touch buttons of this
menu to perform some of the following operations.
Playing a VCD/CD
Insert a VCD/CD disc into the disc slot, the unit will automatically switch on, if a disc is loaded, press
SOURCE button to start the playback.
To eject a VCD/CD press EJECT button.
Previous/next track
Press / buttons on the RC or on the monitor, / cursor buttons on the unit to play the previous/next
track.
Repeat Playing
Repeatedly press RPT button to perform replaying function, first press it to replay the current track, press it
again resume normal playback.
Playing Tracks at Random
Press RDM button on the RC to play any track at random under the directory which you select. Press it again to
return to normal playing.
36
Page 37

Number Buttons
Press one of number buttons (0-9) to play a track you want.
Stop Playback
Press STOP button, then press ENTER or PAUSE button on the RC or on the monitor to resume playing.
Pause the Playback
Press PAUSE button on the RC or on the monitor to switch between play and pause.
Fast rewind/forward
Press / buttons on RC or on the monitor, / cursor buttons on the unit to perform fast rewind or fast
forward.
System Switch
Press P/N button on the RC to set the TV standard to PAL or NTSC or AUTO system.
Slow motion playback
Press button to slow the playback.
Changing the size of the picture
Press ZOOM button to increase the picture in size. Each pressing increases the size until the maximum size is
reached.
37
Page 38

On Screen Display
Briefly press OSD button and the display will show:
Single elapsed => Single remain => Total elapsed => Total remain => OFF.
Press and hold OSD button on the RC to display the current setup.
Setting the Playback Time
During CD playback, press GOTO button, there will be track : — : — on the display.
Enter your desired track for playback using number buttons.
Press cursor button, disk time appears on the TFT, also enter your desired time of the playback using number
buttons.
During VCD mode, press cursor button to set the playing time: track/disc time/track time/repeat/time disp.
Press / cursor buttons to select the options, press ENTER to set the status. Then press number buttons or
/ cursor buttons to set the current status. Press GOTO to exit the menu.
Selecting Channel
Repeatedly press ST/AUDIO button to select the following channels:
PBC Selector
During VCD mode, press BND/TITLE button, the PBC playback starts and the menu of entire disc appears on
TFT. And then you can select your desired track using cursor or number buttons. When a track is playing, you
can press SEL/MENU button on the unit to return to the video file menu, if you would like to select others. To
cancel PBC playing, press BND/TITLE button again.
Note: This function is only available if discs support PBC version 2.0 or above.
38
Page 39

Program Playing
During VCD/CD mode, press PROG button, the monitor displays the program menu. Press number buttons to
select the track number and then press cursor buttons to move the cursor to START, press ENTER button to
start program playing; move the cursor to EXIT and press ENTER button to exit the program playing. Move the
cursor to and press ENTER button to go to the last page; move the cursor to and press ENTER button to
go to the next page. During this process, press STOP button or press PROG button to cancel the program
playing.
Notes on creating your own CD-R or CD-RW containing MP3 files:
• To enjoy high quality sound, we recommend converting to MP3 files with a sampling frequency of 44.1
kHz and a fixed bit rate o f 128 kbps.
• DO NOT store more than 448 MP3 files per disc.
• For ISO 9660 - compliant format, the maximum allowable depth of nested folders is 8, including the root
directory (folder).
• When CD-R disc is used, playback is possible only for discs, which have been finalized.
• Make sure that when MP3 CD-R or CD-RW is burned that it is formatted as a data disc and NOT as an
audio disc.
• You should not write non-MP3 files or unneeded folders along with MP3 files on the disc otherwise it
takes a long time until the unit starts to play MP3 files.
• With some CD-R or CD-RW media, data may not be properly written depending on its manufacturing
quality. In this case, data may not be reproduced correctly. High quality CD-R or CD-RW disc is
recommended.
• Up to 16 characters are displayed for the name of an Album or a Track. ID3TAG version 1.x is required.
• Note that the unit may not play Tracks in the order that you wrote them to the disc.
39
Page 40

MP4 Disc operations
Playing tracks
Insert an MP4 (AVI, MPEG4) disc into the disc slot, the unit will automatically switch on, if a disc is loaded,
press SOURCE button to start the playback.
Number buttons
You can select any tracks directly using number buttons (0-9). The track you selected will be played
automatically.
Stop the playback
During MP4 (AVI, MPEG4) playback, press STOP button to pause playing, then press PAUSE button to play
from the beginning of the disc.
Playing tracks at random
Press RDM button on the RC to play any track at random under the directory, which you select. Press it again
to return to normal playing.
Pause the Playback
During MP4 (AVI, MPEG4) playback, press PAUSE button to suspend the playback. Press it again to resume
the normal playback.
Repeat Playing
During MP4 (AVI, MPEG4) playback, press RPT button to choose replaying function, first press it to replay
the current track, press it again to cancel this function.
40
Page 41

On Screen Display
Briefly press OSD button the display shows:
Press and hold OSD button on the RC to display the current setup.
Setting the Playback Time
Press GOTO button, and the monitor will show: —-:-—,enter your desired time of the playback using number
buttons. and press ENTER to set the status. Press GOTO button one more time, and the monitor will show: -—
:—-:—-, enter your desired time, then press ENTER.
Previous/next track
Press / buttons on the RC or on the monitor, / cursor buttons on the unit to play the previous/next
track.
Fast rewind/forward
Press / buttons on RC or on the monitor, / cursor buttons on the unit to perform fast rewind or fast
forward.
Changing the size of the picture
Press ZOOM button to increase the picture in size. Each pressing increases the size until the maximum size is
reached.
41
Page 42

MP3/SD operations
Along with buttons of the RC and the unit you can use touch buttons of this
menu to perform some of the following operations.
Playing an MP3/SD
Insert an MP3 disc into the disc slot, the unit will automatically switch on, if an MP3 disc is loaded, press
SOURCE to start the playback. During MP3/SD playback, the track information displays on TFT. When
playing a disc included PIC file or SD card, press STOP button, then press / to select the option.
Note: Press EJECT button to eject the disc. During other mode insert the SD card and its contents will be
played.
Previous/next track
Press / buttons on the RC or on the unit to play the previous/next track.
Repeat Playing
Press RPT button to replay the current track, press it again to resume the normal playback.
Number buttons
Press one of number buttons (0-9) to select a track you want.
Stop Playing
Press STOP button to stop the playback.
42
Page 43

Selecting the MP3/SD Track
Press GOTO button and the monitor will show: ---. Then press Number Buttons to enter the Mp3 track number
and press then ENTER button to play; secondly press GOTO button, and the monitor will shows: --:--, now
enter the desired number to play the current track at this point. If there are some mistakes, press CLEAR button
to clear them.
Pause the Playback
During MР3 playback, press PAUSE button to switch between play and pause.
Fast rewind/forward
Press / buttons on RC or / cursor buttons on the unit to perform fast rewind or fast forward.
Playing tracks at random
Press RDM button on the RC to play any track at random under the directory, which you select. Press it again
to return to normal playing.
Eject the SD card
Push SD card to exit it.
43
Page 44

MP3 overview
• MP3 is short for MPEG Audio Layer 3 and refers to an audio compression technology standard.
• This product allows playback of MP3 files on DVD-R/-RW, DVD+R/+RW, CD-ROM, CD-R/-RW discs.
• The unit can read MP3 files written in the format compliant with ISO 9660. However it does not support
the MP3 data written by the method of packet write.
• The unit can not read an MP3 file that has a file extension other than “.mp3”.
• If you play a non- MP3 file that has the “.mp3” extension, you may hear some noise.
• In this manual, we refer to what are called “MP3 file” and “folder” in PC terminology as “track” and
“album”, respectively.
• Maximum number of directory level is 8, including the root directory. Maximum number of files and
folders per disc is 448.
• The unit may not play tracks in the order of Track numbers.
• The unit plays only the audio tracks if a disc contains both audio tracks and MP3 files.
• When playing a disc of 8 kbps or “VBR”, the elapsed playing time in the display window will not be
correct and also the intro play may not function properly. “VBR”: Variable Bit Rate.
44
Page 45

AUX/TV operations (optional)
Press SRC button to switch to AUX mode.
Along with buttons of the RC and the unit you can use touch
buttons of this menu to perform some of the following operations.
TV touch screen menu
Press SRC button to switch to the TV mode.
1. Station selector. To select 1 to 10 stations, touch the number in
the monitor to select 1-9 stations directly. Press -- at first, then
press the corresponding number button to select more than 10-
30.
2. CH-/CH+ . To select the station upward or downward by steps.
3. VOL+/VOL- . To regulate the volume.
4. STEP. To adjust clearer image.
5. ANT. Press it to select the left or right antenna.
6. SETUP. The following menu:
45
Page 46

You can adjust the following items:
SOUND: M/N, B/G, D/K.
BAND: V-l, V-H, UHF
MODE: SECAM/NTSC/PAL
7. Mode selector
8. Preset stations. To show all of stations in item 1.
9. Frequency. To show the TV frequency.
TV Station Selection
Press number buttons or / buttons on the RC to select the TV stations, press 1 to 9 number buttons to select
the stations directly; press GOTO button to select more than 10 stations, then press the corresponding number.
Frequency Searching
Keep pressing / buttons on the RC or / cursor buttons on the unit to select the frequency upwards and
downwards.
Seek station automatically
Press AMS/MENU button to seek stations automatically.
46
Page 47

Handling and cleaning discs
• Dirty, scratched or warped discs may cause skip ping or noise.
• Handle the disc only by the edges. To keep clean do not touch its surface.
• Discs should be stored in their cases after use to avoid scratches.
• Do not expose discs to direct sunlight, high humidity, high temperature or dust.
• Prolonged exposure to extreme temperature can wrap the disc (such as leaving the discs in your car during
summertime).
• Do not stick or write anything on either side of disc. Sharp writing instruments, or the inks used in some
felt-tip pens, may damage its surface.
• Do not touch the unlabeled side. Do not attach any seal, label or data protection sheet to either side of a
disc.
Cleaning
Cleaning the cabinet
Wipe with a soft cloth. If the cabinet is very dampen (not dropping wet) the cloth with a weak solution of soapy
water, and then wipe clean.
Cleaning discs
Fingerprints should be carefully wiped from the surface of disc with a soft cloth. Unlike conventional records,
compact discs have no grooves to collect dust and macroscopic dirt, so gently wiping them with a soft cloth
should remove must panicles. Wipe in a straight motion from the center to the edge.
Never use thinner benzine, record cleaner or anti static spray on a compact disc. Such chemicals can damage its
plastic surface.
47
Page 48

Troubleshooting guide
Symptom
No power.
Disc cannot be loaded. Presence of disc inside the player. Remove the disc in the player then put a
Disc cannot be read. Inserting the disc in upside down.
No sound. Volume is in minimum.
Cause Solution
The car ignition is not on.
The fuse is blown.
Compact disc is extremely dirty or
defective.
Temperature inside the car is too
high.
Wiring is not properly connected.
If the power supply is properly
connected to the car accessory switch
the ignition key to “ACC”.
Replace the fuse.
new upward.
Insert the compact disc with the label
facing upward.
Clean the disc or try to play a new one.
Cool off until the ambient temperature
returns to normal.
Adjust volume to a desired level.
Check wiring connection.
The operation buttons do not
work.
Sound skips. The disc is extremely dirty or
The radio does not work.
The radio station automatic
selection does not work.
The built-in microcomputer is not
operating properly due to noise.
Front panel is not properly fix into
its place.
defective.
The antenna cable is not
connected.
The signals are too weak.
48
Press the RESET button.
Reinstall the front panel.
Clean the compact disc/try to play a new
one.
Insert the antenna cable firmly.
Select a station manually.
Page 49

Specification
General
Power supply: 14.4 V DC
Maximum power output: 50 W x 4 channels
Compatible disk types: DVD/DVD±R/DVD±RW/CD/CD-R/CD-RW
Compatible formats: DVD/SVCD/VCD/MP3/WMA/HDCD/CDDA/MPEG4(DivX)/Picture-CD/JPEG
Dimensions/weight: D x W x H: 172 x 178 x 100 mm / 2.6 kg
ESP function: 40 sec. for Audio CD, 120 sec. for MP3
TFT display
Screen size: 6.5 inches
Resolution: 480 x 234
Aspect ratio: 16:9
Contrast ratio: 300:1
Brightness: 350 cd/m2
Color system PAL/AUTO/NTSC
FM Stereo Radio
Frequency range: 65.0 – 74.0/87.5 – 108.0 MHz
Usable sensitivity: 10 dB µV
Preset memory stations: 18
AM section
Frequency range: 522 kHz - 1620 kHz
Preset memory stations: 12
TV Tuner
Signal System AUTO/PAL/NTSC
Tuning Range 48.25 – 863.25 (MHz)
Specifications are subject to change without notice. Mass and dimension are approximate.
49
Page 50

Уважаемый покупатель!
Благодарим Вас за покупку нашего изделия. Для обеспечения безопасности рекомендуется тщательно
изучить настоящее руководство перед подключением, эксплуатацией и/или регулировкой изделия и
сохранять руководство для использования в будущем.
Содержание
Содержание ......................................................................................................................................................... 50
Меры предосторожности ................................................................................................................................... 52
Комплект поставки ............................................................................................................................................. 53
Установка/подключение .................................................................................................................................... 54
Электрические соединения......................................................................................................................... 56
Элементы управления ........................................................................................................................................ 57
Передняя панель .......................................................................................................................................... 57
Внутренняя панель ...................................................................................................................................... 58
Пульт дистанционного управления (ПДУ)................................................................................................ 59
Замена батарей ............................................................................................................................................. 61
Основные операции............................................................................................................................................ 62
Главное меню...................................................................................................................................................... 65
Операции с радио................................................................................................................................................ 70
Настройка RDS ............................................................................................................................................73
Операции с дисками ........................................................................................................................................... 75
Операции с DVD.......................................................................................................................................... 76
Операции с VCD/CD дисками .................................................................................................................... 85
Операции с MP4 дисками ........................................................................................................................... 90
Операции с МР3 дисками ........................................................................................................................... 92
Операции с AUX/ТВ тюнером (опция)............................................................................................................. 95
Обращение с дисками......................................................................................................................................... 97
50
Page 51

Руководство по устранению неисправностей .................................................................................................. 99
Технические характеристики........................................................................................................................... 101
51
Page 52

Меры предосторожности
• Использование данного устройства при температуре ниже -10ºС может привести к поломке. Перед
использованием предварительно прогрейте салон автомобиля до рекомендованной температуры.
• Тщательно изучите настоящую инструкцию, чтобы ознакомиться с аудиосистемой.
• При установке и подключении изделия отключите отрицательную клемму аккумулятора
автомобиля.
• При замене предохранителя, убедитесь, что вы устанавливаете предохранитель с тем же
номиналом. Используя предохранитель с повышенным значением тока, можно причинить
значительные повреждения изделию.
• Не пытайтесь разбирать изделие. Лазерные лучи, исходящие из блока оптической головки
считывания информации с компакт-диска, опасны для глаз.
• Убедитесь, что шпильки или другие посторонние предметы не попали внутрь изделия. Они могут
вызвать сбои в работе или стать причиной опасности, возгорания или поражения лазерным лучом.
• Если вы ставите автомобиль на стоянку на длительное время в жаркое или холодное время года,
подождите, пока температура в автомобиле не станет нормальной, перед тем как включать изделие.
• НЕ открывайте крышки и не проводите ремонт самостоятельно. Обратитесь к дилеру или
квалифицированному персоналу
• Убедитесь, вы отключаете источник питания и антенну, если вы не будете пользоваться системой в
течение длительного времени или во время грозы.
• Убедитесь, что вы отключаете источник питания, если обнаружена неправильная работа системы,
система издает необычные звуки, запах, выделяет дым или внутрь ее попала жидкость. Проведите
квалифицированный технический осмотр системы.
• Прибор разработан так, чтобы отрицательный вывод аккумулятора был подключен к корпусу
транспортного средства. Пожалуйста, убедитесь в этом перед установкой.
• Не позволяйте проводам динамиков касаться друг друга или корпуса автомобиля после включении
прибора. В противном случае, может быть перегружен или выйти из строя усилитель.
52
Page 53

Комплект поставки
1. Крепежный кожух 1 шт. 2. Задний крепежный болт 1 шт. 3. Резиновый 4. Болт М5х5 - 4 шт.
предохранитель 1 шт. Болт М5х20 – 5 шт.
5. Съемная рамка 1 шт. 6. Ключи 2 шт. 7. Соединительный 8. Стальная планка 1 шт.
кабель 1 шт.
53
Page 54

Установка/подключение
Способ установки 1: Фронтальная установка
Способ установки 2:
Установка с помощью отверстий по бокам устройства.
Выберите положение, в котором отверстия кронштейна и отверстия в
головном устройстве находятся на одном уровне, и с помощью болтов
прикрутите их к кузову автомобиля.
54
Page 55

Отсоединение устройства
Перед отсоединением устройства снимите переднюю панель.
1. Извлеките съемную рамку.
2. Вставьте ключи, входящие в комплект, в отверстия по бокам устройства.
Для извлечения устройства из приборной панели потяните за ключи.
55
Page 56

Электрические соединения
1. Штекер
2. Розетка
3. Прием сигнала
Примечание: Коричневый провод
подключается к сигналу тормоза. В
целях безопасности после парковки
автомобиля возможен просмотр
программ на мониторе, но меню и
разъемы RCA свободны. Если Вы не
хотите использовать эту функцию,
выполните подсоединение к
отрицательному заземлению. Не
подсоединяйте розовый провод к
аккумулятору, иначе питание
аккумулятора будет расходоваться.
56
Page 57

Элементы управления
Передняя панель
1. Кнопка SRC/PWR
В режиме ожидания нажмите кнопку для
включения устройства. В рабочем режиме
нажмите для выбора режима радио или
воспроизведения. Нажмите и удерживайте,
чтобы выключить устройство.
2. Кнопка SEL/MENU
Нажмите кнопку для выбора функции. Нажмите повторно для отображения главного меню.
3. Кнопка MUTE
Нажмите для отключения звука. Нажмите повторно для включения ночного режима.
4. Инфракрасный сенсор для приема сигнала ПДУ
5. Кнопки VOLUME+/ VOLUME-
Нажимайте для регулирования уровня громкости. Нажимайте для выбора функций кнопки SEL.
6. Кнопка RESET. Нажмите, чтобы установить исходные настройки устройства.
7. Сенсорный TFT дисплей.
8. Кнопка AF/EQ
Нажмите для выбора нужной частоты. Нажмите и удерживайте, чтобы выбрать соответствующие
настойки для регулирования качества звука.
9. Кнопка TA/BAND
Нажмите, чтобы активировать функцию ТА; нажмите и удерживайте для выбора диапазонов.
10. Кнопка REL
57
Page 58

Нажмите для открытия передней панели. После этого Вы можете вставить диск или SD карту.
11. Кнопки курсора ///////;
12. Кнопки ANGLE+/ANGLE-
Внутренняя панель
13. Кнопка EJECT. Нажмите для извлечения
диска
14. Слот для загрузки дисков
Перед загрузкой диска нажмите кнопку REL.
15. Слот для SD карты.
58
Page 59

Пульт дистанционного управления (ПДУ)
1. Кнопка AF/EQ
2. Кнопка SOURCE
3. Кнопка GOTO
4. Кнопка BND/TITLE
5. Кнопка AMS/MENU
6. Кнопка LOC/SUB-T
7. Кнопка ST/AUDIO
8. Кнопка OSD
9. Кнопка PTY/ANGLE
10. Кнопка SLOW
11. Кнопка ZOOM
12. Кнопка PROG
13. Кнопка P/N
14. Кнопки VOL +/ VOL-
15. Кнопка MUTE
16. Кнопка TA/LOUD
17. Кнопка EJECT
18. Кнопка 0-9 NUMBER
19. Кнопка CLEAR
20. Кнопка ENTER / Кнопки курсора
/// / / кнопки FAST REWIND/
FAST FORWARD / / кнопки
PREVIOUS/NEXT
21. Кнопка SETUP
59
Page 60

22. Кнопка PAUSE
23. Кнопка STOP
24. Кнопка RPT
25. Кнопка RDM
26. Кнопка SEL
60
Page 61

Замена батарей
1. Откройте отсек для батарей в направлении, указанном стрелкой.
2. Замените старую батарею на новую (CR 2025 3V), соблюдая
полярность. Установите отсек для батарей в корпус пульта.
Примечание:
• Не позволяйте детям играть с батареями.
• Неправильное использование батарей может стать причиной перегрева и разрушения корпуса, что в
свою очередь ведет к пожару.
• Утечка батарей может сделать причиной повреждения пульта управления (Срок работы батарей – 6
месяцев при эксплуатации в обычных условиях при комнатной температуре).
• Не закорачивайте батареи. Не бросайте батареи в огонь.
61
Page 62

Основные операции
Сброс всех настроек устройства
Включая устройство в первый раз или после замены батареи, Вы должны переустановить его. Откройте
переднюю панель, нажмите кнопку RESET на головном устройстве острым предметом (например,
шариковой ручкой); будут установлены заводские настройки.
Примечание: При нарушении функционирования дисплея Вы можете нажать кнопку RESET для сброса
пользовательских настроек. Данную операцию можно выполнить только на головном устройстве.
Включение/выключение устройства
Нажмите кнопку SOURCE на ПДУ или кнопку SRC/PWR на головном устройстве, чтобы включить
устройство. При повторном нажатии устройство будет находиться в режиме ожидания. Когда Вы
вставите диск, устройство автоматически начнет его воспроизведение. Нажмите и удерживайте 2
секунды эту кнопку для полного выключения устройства.
Примечание: В режиме воспроизведения устройство автоматически начнет воспроизведение диска
после его загрузки в слот.
Регулировка настроек аудио
Нажимайте на кнопку SEL на ПДУ или регулятор громкости на головном устройстве, чтобы выбрать
нужный режим в следующем порядке: BALAN => FADE => BASS => TREBL => VOLUME.
После выбора нужного режима нажимайте кнопки VOL+/VOL- на ПДУ или на головном устройстве,
чтобы настроить каждую опцию.
Настройка эквалайзера
При прослушивании классической, рок или поп музыки Вы можете выбрать соответствующие
предустановленные режимы для настройки нужного качества звука с помощью кнопки AF/EQ.
Несколько раз нажмите кнопку AF/EQ для переключения между режимами в следующем порядке: POP –
62
Page 63

CLAS – ROCK – EQ OFF. Ус т ано в ка по умолчанию – OFF.
Регулирование громкости
Для регулирования уровня громкости нажмите кнопку VOL+/VOL- на ПДУ или на головном
устройстве.
Настройка тонкомпенсации (LOUD)
Нажмите на кнопку TA/LOUD на ПДУ, чтобы включить функцию LOUD. Качество звучания улучшится
за счет повышения низких частот. Нажмите кнопку еще раз, чтобы отключить функцию.
Извлечение диска
Нажмите кнопку EJECT на ПДУ или на головном устройстве, чтобы извлечь или вставить диск в
устройство.
Открытие монитора
Нажмите кнопку REL на головном устройстве, чтобы открыть монитор. Нажмите и удерживайте эту
кнопку для возвращения монитора в исходное положение.
Регулирование угла монитора
Используйте кнопку ANGLE+/- для регулирования оптимального положения монитора.
Выключение звука
Нажмите кнопку MUTE на ПДУ или на головном устройстве для отключения звука. На дисплее
отобразится соответствующий символ. Для включения звука на текущем уровне громкости повторно
нажмите кнопку MUTE.
Ночной режим
Нажмите и удерживайте кнопку REL для активации ночного режима. Нажмите эту кнопку повторно для
переключения в нормальный режим.
63
Page 64

SD карта
Нажмите кнопку REL после включения устройства, затем, после открытия дисплея, вставьте SD карту в
слот, начнется воспроизведение содержимого карты.
Удаление
При вводе неверной информации нажмите кнопку CLEAR на ПДУ для удаления этой информации.
Выбор режима работы
Нажимайте на кнопку SOURCE на ПДУ или кнопку SRC/PWR на головном устройстве, чтобы выбрать
режим радио, режим ТВ или режим воспроизведения.
Инфракрасный сенсор
На передней панели головного устройства имеется инфракрасный сенсор, реагирующий на сигнал ПДУ.
64
Page 65

Главное меню
Примечание: Данным устройством можно управлять путем нажатия
сенсорных кнопок непосредственно на дисплее. Таким образом Вы
можете выбирать меню и изменять различные параметры.
Кода устройство включено, на мониторе отобразится меню.
Нажмите и удерживайте кнопку SETUP на ПДУ или кнопку
SEL/MENU на головном устройстве или нажмите кнопку MENU на
сенсорном мониторе, чтобы войти в меню.
В данное меню входят следующие подменю: AUDIO, VIDEO,
SOURCE, SYSTEM, EXIT. Для выбора и настройки нужного
подменю нажмите на него на экране.
AUDIO (настройка аудио)
При выборе AUDIO на мониторе отобразится соответствующее
подменю, в котором Вы можете отрегулировать параметры VOLUME
(громкость), BALANCE (баланс), FAD, BASS (низкие частоты) и
TREBLE (высокие частоты).
65
Page 66

Например, нажмите кнопку FAD на экране для отображения меню
настройки этого параметра.
Нажмите кнопки и , чтобы установить нужный уровень FAD,
затем нажмите кнопку EXIT, чтобы выйти из подменю.
Примечание: Для выбора и настройки других параметров
проделайте те же операции.
VIDEO (настройка видео)
В данном меню Вы можете настроить следующие параметры:
CONTRAST (контрастность), COLOR (цвет), TINT (оттенок),
BRIGHT (яркость) и PICTURE (изображение).
3. SOURCE (настройка источника)
Вы можете установить источник сигнала TV, CDC, GPS и AUX на
ON (вкл) или OFF (выкл) путем нажатия соответствующей кнопки.
При выборе OFF функция отключается.
66
Page 67

4. SYSTEM (настройка системы)
В данном меню вы можете настроить параметры CLOCK SYS, KEY
BEEP, MONI FLEX, REVER POLA, SUBWOOFER, AMS FULLUP,
LOCAL AREA, LOCAL, GOTO FREQ, RT SCROLL, TA VOLUME,
REGION, ADJ SCREEN и CLOCK ADJ.
Примечание: нажимайте кнопки со стрелками с правой стороны
сенсорного экрана для отображения предыдущего или следующего
меню.
CLOCK SYS (режим часов)
Нажмите кнопку CLOCK SYSTEM на мониторе для переключения на 12-часовой или 24-часовой режим
отображения времени.
KEY BEEP (звуковой сигнал)
В данном
кнопку на экране, чтобы установить ON (вкл) или OFF (выкл); установка по умолчанию - ON, при
нажатии кнопок они будут издавать звуковой сигнал.
MONI FLEX (наклон монитора)
В данном меню Вы можете настроить наклон монитора. Нажмите на мониторе соответствующую
кнопку и выберите MANUAL (вручную) или AUTO (авто). Установка по умолчанию – AUTO; при
включении устройства монитор примет предустановленное положение.
меню Вы можете настроить звуковой сигнал при нажатии кнопок; нажмите соответствующую
67
Page 68

REVER POLA (обратная полярность)
В данном меню Вы можете изменять полярность. При движении на автомобиле задним ходом значение
сигнала равно +12 V, нажмите кнопку BATTERY на дисплее. Если значение сигнала равно 0 V,
нажмите кнопку GROUND на дисплее.
SUBWOOFER (сабвуфер)
В данном меню Вы можете настроить параметры сабвуфера; нажмите на экране соответствующую
кнопку и установите ON или OFF;
AMS (Настройка режимов AMS)
В данном меню Вы можете настроить режимы AMS. При выборе ON (вкл) набор предустановленных
станций полный, и добавление новых станций невозможно. Выберите OFF (выкл) для продолжения
поиска.
LOCAL AREA (местная зона)
Вы можете выбрать EUROPE, USA для быстрого поиска станций в текущей зоне, а также можно
выбрать OIRT для быстрого приема станций.
LOCAL (местные)
В данном меню Вы можете осуществить поиск местных радиостанций; при выборе ON (вкл) устройство
будет принимать местные радиостанции с сильным сигналом; при выборе OFF (выкл) будут
приниматься иногородние радиостанции со слабым сигналом.
GOTO FREQ (выбор частоты)
При выборе ON (вкл), Вы можете использовать кнопку GOTO на ПДУ для выбора частоты
радиостанции непосредственно в режиме радио.
установка по умолчанию - ON.
68
Page 69

RT Scroll (Скорость RT)
Вы можете выбрать следующие скорости: SLOW (медленно), NORMAL (норма) или FAST (быстро).
TA Volume (Громкость ТА)
Вы можете выбрать следующие уровни громкости: LOW (тихо), NORMAL (норма) или HIGH (громко).
Region (Регион)
Чтобы установить регион поиска AF, установка по умолчанию ON (вкл).
ADJ SCREEN (калибровка экрана)
Нажмите кнопку ADJ SCREEN для отображения вышеуказанного меню. В левом верхнем углу дисплея
расположена
Нажмите квадратную кнопку в позиции 1, кнопка переместится в позицию 2. Нажмите ее в позиции 2,
кнопка переместится в позицию 3 и т.д. (всего 4 позиции). После выполнения этих операций нажмите
SAVE.
CLOCK ADJ (установка времени)
Нажмите кнопку CLOCK ADJ для установки времени.
квадратная кнопка и надпись: please press the button («Пожалуйста, нажмите кнопку»).
69
Page 70

Операции с радио
Выбор режима
Нажимайте кнопку SRC/PWR на устройстве или кнопку SOURCE на ПДУ для переключения на режим
радио.
Пользовательский интерфейс режима радио
Когда устройство находится в режиме радио, на дисплее будет отображен следующий интерфейс:
1. Индикатор диапазона. Отображает диапазон, на
который настроено устройство.
2. Индикатор предустановок. Отображает выбранный
предустановленный параметр.
3. Индикатор частоты. Отображает частоту, на
которую настроено устройство.
4. SEEK+/SEEK-. Нажмите для осуществления
настройки в предустановленном диапазоне;
нажмите и удерживайте для автоматической
настройки.
5. VOL+/VOL-. Увеличение/уменьшение уровня
громкости.
6. BAND. Переключение диапазонов.
7. AMS. Нажмите для сканирования текущей станции; нажмите и удерживайте для автоматической
настройки.
8. MENU. Нажмите, чтобы войти в главное меню.
9. SRC. Нажмите эту кнопку для выбора источника сигнала.
70
Page 71

10. 6 станций текущего диапазона. Нажмите, чтобы выбрать станцию; нажмите и удерживайте, чтобы
сохранить текущую станцию на одном из 6 каналов.
11. RDS. Нажмите, чтобы войти в меню RDS SETUP.
Переключение диапазонов.
В режиме радио нажимайте кнопку BND/TITLE на ПДУ или соответствующую кнопку на дисплее для
переключения диапазонов в следующем порядке: FM1 - FM2 - FM3 - AM1 - AM2 (для двух диапазонов);
FM1 - FM2 - FM3 - MW - LW (для трех диапазонов).
Ручной/автоматический поиск каналов
• Ручной поиск каналов: Нажимайте кнопки / на ПДУ для переключения станций вниз или
вверх по диапазону.
• Автоматический поиск каналов: Нажмите и удерживайте более 3 секунд кнопки / на ПДУ,
кнопки курсора / на передней панели, устройство выполнит автоматический поиск станций в
направлении к низшей или высшей частоте диапазона соответственно и при обнаружении станции
начнет ее вещание.
Переключение DX/LOC
В режиме радио нажмите кнопку LOC/SUB-T на ПДУ, чтобы выбрать прием станции с сильным или
слабым сигналом. На дисплее появится надпись LOC; устройство будет принимать только местные
радиостанции. При отключении этого режима устройство будет принимать как местные, так и
удаленный радиостанции.
Примечание: Эта функция недоступна в режиме AM.
Выбор сохраненной станции
В режиме радио, нажмите кнопки / курсора на ПДУ или на устройстве для переключения между
сохраненными станциями в направлении к низшей или высшей частоте диапазона.
71
Page 72

Переключение MO/ST
В режиме радио нажмите кнопку ST/AUDIO на ПДУ для переключения между моно и стерео
режимами. При переключении на моно режим появляется надпись MONO. При активном режиме стерео
эта надпись исчезает с дисплея.
Примечание: Данная функция доступна только в режиме FM.
Автоматическое сканирование/запоминание станций
В режиме радио нажмите кнопку AMS/MENU на ПДУ или кнопку AMS на дисплее; устройство будет в
течение 5 секунд сканировать каждую станцию, сохраненную под цифровыми кнопками (1 – 6).
Вы можете нажать соответствующую цифровую кнопку, кнопку AMS/MENU на ПДУ или кнопку AMS
на дисплее, когда сканируется нужная станция. Устройство начнет вещать эту станцию.
При нажатии и удерживании более 2 секунд кнопки AMS/MENU на ПДУ или кнопки AMS на мониторе,
автоматически активируется функция автосохранения. Устройство автоматически находит и сохраняет
станцию под одной из цифровых кнопок (1 – 6).
Для сохранения станции нажмите и удерживайте более 2 секунд цифровую кнопку при прослушивании
станции.
Примечание: Устройство может сохранить до 6 станций в каждом диапазоне.
Отображение на дисплее
В режиме радио нажмите кнопку OSD на ПДУ или кнопку DISP на передней панели для отображения
текущего режима.
Перейти к частоте
Нажмите кнопку GOTO, на дисплее отобразится надпись FREQ.Нажимайте цифровые кнопки, чтобы
ввести номер нужной частоты.
72
Page 73

Настройка RDS
1. AF – нажмите для активации функции AF.
2. ТА – нажмите для активации функции TA.
3. / – Нажмите для выбора кода PTY.
4. PTY – нажмите для активации функции PTY.
5. При включении функции PTY нажмите эту кнопку для
поиска типа воспроизводимого трека.
6. Отображение радио текста станции RDS.
7. PS – отображение информации текущей станции RDS.
8. SEEK+/SEEK- - нажмите для автоматического поиска
каналов.
9. PREV – нажмите для переключения на прослушивание радио.
10. EQ – нажмите, чтобы выбрать соответствующий предустановленный режим, чтобы настроить
качество звука.
11. LOUD – нажмите для активации функции LOUD.
Альтернативные частоты
Нажмите кнопку AF/EQ для активации функции автопоиска станций. При включении режима AF
сигнал RDS слабый или отсутствует; будет осуществлен его поиск по предустановленным частотам и
по всему диапазону.
Функция Traffic Alarm
Нажмите кнопку TA/LOUD для активации функции Traffic alarm. При включении функции AF, «TA»
отображается на дисплее. Если информация TP отсутствует, устройство выполнит автоматический
поиск TP-станции.
73
Page 74

Надпись «TA» зеленого цвета при приеме сигнала станции; при отсутствии сигнала она белая.
При отображении информации TA уровень громкости будет автоматически настроен на уровень,
поддерживаемый режимом ТА.
При включении других режимов (напр., DVD, AUX), если отображается информация TA, режим
автоматически переключится на RDS. Устройство автоматически вернется к предыдущему режиму,
когда отображение ТА закончится.
Тип программы
Нажмите кнопку PTY/ANGLE на ПДУ или кнопку PTY на дисплее для активации функции PTY.
При включении функции PTY, на дисплее появится надпись PTY ON; Вы можете использовать кнопки
UP/DOWN для выбора типа программы, затем нажмите кнопку PTY CODE для поиска конкретной
программы. На дисплее отобразится надпись PTY SEARCH. Если функция PTY отключена, на дисплее
появится надпись PTY OFF, поиск прекратится.
Примечание: Наличие услуги RDS зависит от зоны. Если услуга RDS недоступна в Вашей зоне,
соответствующая функция устройства работать не будет. Для включения этой функции войдите в меню
RDS с помощью кнопки TA/LOUD на ПДУ.
74
Page 75

Операции с дисками
Диски для воспроизведения
• Это устройство может воспроизводить следующие типы цифровых дисков:
DVD/DVD±R/DVD±RW/CD/CD-R/CD-RW.
• Совместимо с форматами: DVD/SVCD/VCD/MP3/WMA/HDCD/CDDA/MPEG4(DivX)/Picture-
CD/JPEG.
• Поддерживаются следующие типы файлов:
Аудио файлы: MP3 (*.mp3)
WMA (*.wma)
Видео файлы: MP4 (*.avi, DIVX3.11/4.0/5.0/6.0 and XVID)
MPEG 2(*.vob)
MPEG 1(*.dat)
Файлы с изображениями: JPEG (*.jpg)
• ISO 9660 или ISO 9660 + формат Joliet - максимум 30 знаков.
• Максимальное число треков – 448.
• Максимальное число вложений - 8 уровней.
• Максимальное число альбомов – 99.
• Максимальная длина каждого трека - 99 минут 59 секунд.
• Поддерживаемая частота дискретизации для MP3 диска: от 8 кГц до 48 кГц (предпочтительно 44,1
кГц).
• Поддерживаемые скорости цифрового потока МP3 диска: 32 - 320 Кб/сек (предпочтительно 128
Кб/сек).
• НЕ ПОДДЕРЖИВАЮТСЯ следующие форматы: *.ACC, *.DLF, *.M3U, *.PLS, MP3 PRO, файлы с
DRM.
• Диски с открытой сессией записи НЕ ПОДДЕРЖИВАЮТСЯ.
Примечание: Перед выполнением операций с дисками отключите питание устройства.
75
Page 76

Операции с DVD
Термины, относящиеся к дискам
Функция PBC
Во время воспроизведения диска SVCD или VCD на экране может быть отображено меню содержимого
диска, которое мы называем функцией контроля воспроизведения или функцией РВС.
Заголовок
Обычно изображение или музыка, записанная на DVD-диски, делится на несколько частей, каждая из
которых называется «заголовок».
Раздел
Минимальный фрагмент изображения или музыки на DVD-диске в пределах композиции, обычно одна
композиция состоит из одного и более разделов, которые для облегчения поиска пронумерованы. Но на
некоторых дисках разделы могут отсутствовать.
Трек
Часть изображения или музыки на диске SVCD, VCD или CD. Для облегчения поиска все треки
пронумерованы.
76
Page 77

Воспроизведение DVD
Вставьте DVD диск в слот для дисков, устройство автоматически включится. При загрузке DVD диска
нажмите кнопку ENTER для начала воспроизведения. Для извлечения диска нажмите кнопку EJECT на
головном устройстве или на ПДУ.
Наряду с кнопками ПДУ и головного устройства Вы можете использовать
сенсорные кнопки для выполнения некоторых операций.
Остановка воспроизведения
При воспроизведении DVD нажмите кнопу STOP. Затем нажмите кнопку ENTER или PAUSE на ПДУ
или на дисплее для возобновления воспроизведения.
Быстрый выбор трека
При воспроизведении DVD нажмите кнопки / на ПДУ или кнопки / на головном устройстве
для перехода к предыдущему или следующему треку.
Ускоренное воспроизведение в прямом или обратном направлении
Нажмите кнопки / на ПДУ или на дисплее, или кнопки / на головном устройстве для
ускоренного воспроизведения в прямом или обратном направлении. При каждом нажатии скорость
воспроизведения изменяется в следующем порядке:
77
Page 78

Цифровые кнопки
Нажмите одну из цифровых кнопок (0-9) для выбора трека; воспроизведение трека начнется
автоматически.
Повторное воспроизведение
При воспроизведении нажмите кнопку RPT на ПДУ для повторного воспроизведения; режимы повтора
изменяются в следующем порядке:
Переключение системы
В режиме воспроизведения нажмите кнопку P/N на ПДУ, чтобы установить систему ТВ на PAL, NTSC
или AUTO.
Замедленное воспроизведение
Нажмите кнопку для изменения скорости замедленного воспроизведения в следующем порядке:
Изменение размера изображения
В режиме DVD нажмите кнопку ZOOM для увеличения размера изображения. При каждом нажатии
размер увеличивается в следующем порядке:
78
Page 79

Отображение информации на дисплее
Нажмите кнопку OSD для отображения на дисплее следующей информации:
Закон. титр => Заголовок осталось => Раздел воспроизведено => Раздел осталось => Дисплей выкл.
Нажмите и удерживайте кнопку OSD на ПДУ для отображения текущих настроек.
Настройки воспроизведения DVD
Нажмите кнопку GOTO, чтобы установить время воспроизведения: раздел/глава/устан.
аудио/субтитры/выбор угла/время ТТ/время кан./повтор/время дисп. Используйте кнопки / для
выбора нужной опции, нажмите кнопку ENTER для подтверждения выбора. Затем с помощью
цифровых кнопок или кнопок / установите значение параметра. Для выхода нажмите кнопку
GOTO.
Изменение угла камеры (Функция Multi-angle)
Если DVD диск поддерживает функцию multi-angle (сцены и эпизоды сняты с разных ракурсов),
нажмите кнопку ANGLE для переключения угла камеры при воспроизведении.
Примечание: Символ на упаковке DVD диска указывает на то, что диск поддерживает функцию
multi-angle. Цифра 3 на символе означает количество ракурсов, в которых возможен просмотр сцены.
Данная функция не работает, если Вы нажимаете кнопку ANGLE во время ускоренного
воспроизведения или паузы.
Изменение языка аудио (Функция Multi-audio)
Некоторые DVD диски поддерживают воспроизведение звукового ряда на нескольких языках. Нажмите
кнопку AUDIO для переключения языка и аудио системы при воспроизведении.
AUDIO 1 => AUDIO 2 => AUDIO 3.
79
Page 80

Примечание: Эта функция доступна только с дисками, поддерживающими multi-audio.
Изменение языка субтитров (Функция Multi-subtitle)
Если DVD диск поддерживает субтитры на нескольких языках, нажмите кнопку SUB-T при
воспроизведении для переключения между языками субтитров.
Например: Subtitles 1 — Subtitles 2 — Subtitles OFF
Примечание: Эта функция доступна только с дисками, поддерживающими multi-subtitle.
Функция MENU
1. В режиме DVD нажмите кнопку AMS/MENU, чтобы войти в корневое меню; на дисплее
отобразятся все главы. Для выбора нужной главы используйте кнопку ENTER или цифровые
кнопки.
2. В режиме DVD нажмите кнопку BAND/TITLE, чтобы войти в меню раздела; на дисплее
отобразятся все разделы. Используйте кнопку ENTER или цифровые кнопки для выбора нужного
раздела.
80
Page 81

Меню настройки DVD
1. Нажмите на кнопку SETUP на пульте ДУ, чтобы войти в меню настройки системы.
2. С помощью кнопок / выберите страницу: Главная страница, Установка DOLBY,
Дополнительные настройки, Выход.
3. Нажмите кнопку для перехода на выбранную страницу.
4. Используйте кнопки / для выбора опций, которые вы хотите настроить.
5. Нажмите для перехода к списку настроек. С помощью кнопок / выберите настройку и
нажмите ENTER или для подтверждения и возврата к списку опций.
6. Для возврата к меню настройки нажмите кнопку .
7. Нажмите кнопку SETUP повторно для выхода из меню настроек.
Главная страница
• ДИСПЛЕЙ
Формат 4:3 PS: Когда домашний кинотеатр подключен к обычному
телевизору, широкоэкранное изображение воспроизводится на всем
экране, но часть его обрезается.
Формат 4:3 LB: Когда домашний кинотеатр подключен к обычному
телевизору, широкоэкранное изображение воспроизводится так, что
сверху и снизу появляются черные полосы.
Широкий: Используйте этот пункт, если домашний кинотеатр подключен к широкоэкранному
телевизору.
• УГОЛ
Некоторые фильмы на DVD дисках могут быть записаны с различными углами съемки – объект, сцена
снимается под разными углами камеры.
81
Page 82

Если режим включен, при воспроизведении DVD диска, записанного под разными углами камеры, на
экране отображается значок угла камеры.
• ЯЗЫК МЕНЮ
Выберите язык экранного меню.
• ЗАГОЛОВКИ
Эта функция не работает, если диск не имеет заголовков. Если функция заголовка выключена, нажмите
кнопку SUBTITLE на пульте ДУ для включения функции. Установка по умолчанию - ВКЛ.
• СКРИНСЕЙВЕР
Если функция СКРИНСЕЙВЕРА включена, плеер включен и диск не воспроизводится в течение
нескольких минут, то на экране появляется движущаяся заставка.
Установка DOLBY
• ДВОЙНОЙ МОНО
Выберите канал аудио сигнала:
Наст. cтерео: выберите эту настройку, если хотите воспроизвести 5,1-
канальный звук, при этом сигнал будет выходить из левого и правого
динамиков.
Моно лев.: сигнал будет выходить только из левого динамика.
Моно прав.: сигнал будет выходить только из правого динамика.
Смеш. моно: моно сигнал воспроизводится через оба динамика.
• ДИНАМИЧЕСКИЙ ДИАПАЗОН
При выборе пункта FULL аудио сигнал будет минимальным.
При выборе OFF (ВЫКЛ.) аудио сигнал будет максимальным.
При помощи кнопок / настройте динамический диапазон.
82
Page 83

Дополнительные настройки
• РЕЖИМ ТВ
Ваш плеер подходит для всех разновидностей телевизионных систем.
PAL: эта система используется в Китае, Европе, Гонконге и пр.
NTSC: эта система используется в США, Тайване, Японии и пр.
Авто: система ТВ автоматически переключается в соответствии с
системой, в которой записан диск.
• УСТАНОВКИ ЯЗЫКА АУДИО, СУБТИТРОВ, МЕНЮ ДИСКА
Эти параметры могут быть изначально установлены в соответствии с Вашими предпочтениями. Если
установленные Вами параметры поддерживаются содержанием диска, то воспроизведение будет
происходить с учетом Ваших настроек.
Иначе будут использоваться установки диска, заданные по умолчанию.
Вы также можете изменить язык аудио нажатием кнопки ST/AUDIO на пульте ДУ, язык субтитров –
нажатием кнопки LOC/SUB-T на ПДУ.
• РОДИТЕЛЬСКИЙ
Эта функция предназначена для контроля родителями содержимого дисков при их воспроизведении и
защищает Ваших детей от сцен насилия и эротики. Диск, уровень которого выше, чем установленный с
помощью данной функции, не будет воспроизведен.
Если установлен ПАРОЛЬ, при выборе уровня родительского контроля, введите его в специальное поле.
Выберите уровень контроля:
1 - Максимальный контроль.
8 - Минимальный контроль.
По умолчанию контроль выключен.
• ИЗМЕНЕНИЕ ПАРОЛЯ
83
Page 84

Функция пароля по умолчанию включена, и Вы не можете установить
ограничения или изменить пароль. Для того, чтобы воспользоваться
функцией «Родительский контроль», нужно ввести пароль (по
умолчанию 8888), затем нажать на кнопку ENTER. Для того, чтобы
изменить пароль, при помощи кнопок курсора выберите пункт «Смена
пароля».
Сначала введите старый пароль или 8888 (если забыли
введите новый пароль, чтобы подтвердить настройку. После изменения пароля заводской пароль по
умолчанию (8888) не будет функционировать.
Нажмите на кнопку ENTER, чтобы сохранить новый пароль.
• ПО УМОЛЧАНИЮ
Возвращает функциям фабричные настройки.
Выход
Выберите страницу ВЫХОД, чтобы выйти из меню настройки системы.
старый), затем новый (4 символа). Затем еще раз
84
Page 85

Операции с VCD/CD дисками
Наряду с кнопками ПДУ и головного устройства Вы можете использовать
сенсорные кнопки для выполнения некоторых операций.
Воспроизведение VCD/CD дисков
Вставьте диск в слот для дисков; устройство автоматически включится. При загрузке диска нажмите
кнопку SOURCE для начала воспроизведения.
Чтобы извлечь VCD/CD диск, нажмите кнопку EJECT.
Предыдущий/следующий трек
Используйте кнопки / на ПДУ или на дисплее, или кнопки / на головном устройстве для
воспроизведения предыдущего/следующего трека.
Повторное воспроизведение
Нажимайте кнопку RPT для повторного воспроизведения; при первом нажатии устройство повторит
текущий трек, при повторном нажатии вернется к нормальному режиму воспроизведения.
Воспроизведение треков в произвольном порядке
Нажмите кнопку RDM на ПДУ для воспроизведения треков текущего каталога в произвольном порядке.
Нажмите кнопку повторно, чтобы вернуться к нормальному режиму воспроизведения.
85
Page 86

Цифровые кнопки
Нажмите одну из цифровых кнопок (0-9) для воспроизведения нужного трека.
Остановка воспроизведения
Нажмите кнопку STOP. Для возобновления воспроизведения нажмите кнопку ENTER или PAUSE на
ПДУ или на дисплее.
Временная приостановка воспроизведения
Нажмите кнопку PAUSE на ПДУ или на дисплее для временной приостановки (паузы) или
возобновления воспроизведения.
Ускоренное воспроизведение в прямом или обратном направлении
Нажмите кнопки / на ПДУ или на дисплее, или кнопки / на головном устройстве для
ускоренного воспроизведения в обоих направлениях. Скорость воспроизведения изменяется в
следующем порядке:
Переключение системы
Нажмите кнопку P/N на ПДУ, чтобы установить систему ТВ на PAL, NTSC или AUTO.
Замедленное воспроизведение
86
Page 87

Нажмите кнопку
следующем порядке:
Изменение размера изображения
Нажмите кнопку ZOOM для увеличения размера изображения. При каждом нажатии размер
увеличивается в следующем порядке:
Отображение информации на дисплее
Нажмите кнопку OSD для отображения на дисплее следующей информации:
Воспроизведено => Осталось => Всего воспроизведено => Всего осталось => Дисплей выкл.
Нажмите и удерживайте кнопку OSD на ПДУ или кнопку DISP на головном устройстве для
отображения текущих настроек.
Установка времени воспроизведения
При воспроизведении диска нажмите кнопку GOTO; на дисплее отобразится надпись «дорож»: —-:—- .
С помощью цифровых кнопок введите нужное время воспроизведения.
Нажмите кнопку курсора , на дисплее отобразится надпись «время диск», с помощью цифровых
кнопок введите нужное время воспроизведения.
В режиме VСD нажмите кнопку курсора , чтобы установить время воспроизведения: дорож/время
диск/время дорож/повтор/время дисп. Используйте кнопки / для выбора нужной опции, нажмите
для замедленного воспроизведения. Скорость воспроизведения изменяется в
87
Page 88

кнопку ENTER для подтверждения выбора. Затем с помощью цифровых кнопок или кнопок /
установите значение параметра. Для выхода нажмите кнопку GOTO.
Выбор канала
В режиме VCD нажимайте кнопку ST/AUDIO для выбора следующих каналов:
Переключение PBC
В режиме VCD, нажмите кнопку BND/TITLE, активируется режим PBC и на экране телевизора
отображается полное меню диска. Вы можете выбрать нужный трек с помощью кнопок курсора или
цифровых кнопок. Во время воспроизведения трека Вы можете нажать кнопку SEL/MENU, чтобы
вернуться в меню видео файла, если Вы хотите выбрать другой файл. Для отключения режима PBC
повторно нажмите кнопку SEL/TITLE.
Примечание: Данная функция доступна только с дисками, поддерживающими версию PBC 2.0 или
выше.
Воспроизведение в запрограммированном порядке
В режиме VCD/CD нажмите кнопку PROG; на дисплее отобразится меню программирования.
Используйте цифровые кнопки, чтобы выбрать номер трека, затем с помощью кнопок курсора
установите курсор на ПУСК. Нажмите кнопку ENTER для запуска воспроизведения в
запрограммированном порядке. Чтобы выйти из режима запрограммированного воспроизведения,
установите курсор на ВЫХОД и нажмите кнопку ENTER. Для перехода к последней странице
установите курсор на символ и нажмите кнопку ENTER; для перехода к следующей странице
88
Page 89

установите курсор на символ и нажмите кнопку ENTER. При выполнении этих операций нажмите
кнопку STOP или PROG для выхода из режима запрограммированного воспроизведения.
Замечание по созданию собственных CD-R или CD-RW, содержащих файлы MP3
• Для получения высокого качества звука мы рекомендуем преобразовывать файлы МР3 с эталонной
частотой 44,1 кГц и фиксированным битрейтом 128 кбит/сек. НЕ сохраняйте более 256 файлов МР3
на диске.
• Для формата, совместимого с ISO 9660, максимально допустимая глубина вложенных папок
равняется 8, включая корневую директорию (папку).
• При использовании диска CD-R воспроизведение возможно только для дисков, которые были
закончены. Убедитесь, что при записи MP3 CD-R или CD-RW были отформатированы как диски
данных, а НЕ как аудио диски.
• Вы не должны записывать не-МР3 файлы или ненужные папки вместе с файлами МР3 на диск, в
противном случае потребуется много времени, пока изделие начнет воспроизводить файлы МР3.
• На некоторых CD-R или CD-RW данные могут не быть записаны надлежащим образом в
зависимости от качества их производства. В этом случае данные могут быть воспроизведены не
надлежащим образом. Рекомендуются диски CD-R или CD-RW высокого качества.
• Имя альбома или композиции может содержать до 16 символов. Необходима версия 1.х ID3TAG.
• Помните, что изделие может не воспроизводить треки в том порядке, в котором они записаны на
диске.
89
Page 90

Операции с MP4 дисками
Воспроизведение
Вставьте диск в формате MP4 (AVI, MPEG4) в слот для дисков; устройство автоматически включится.
При загрузке диска нажмите кнопку SOURCE для запуска воспроизведения.
Цифровые кнопки
Вы можете выбрать нужный трек с помощью цифровых кнопок (0-9). Воспроизведение выбранного
трека начнется автоматически.
Остановка воспроизведения
При воспроизведении MP4 (AVI, MPEG4) диска нажмите кнопку STOP для остановки воспроизведения.
Для запуска воспроизведения с начала диска нажмите кнопку PAUSE.
Воспроизведение в произвольном порядке
Нажмите кнопку RDM на ПДУ для воспроизведения треков папки в произвольном порядке. Для
возврата к нормальному режиму воспроизведения нажмите эту кнопку повторно.
Временная остановка (пауза) воспроизведения
При воспроизведении диска MP4 (AVI, MPEG4) нажмите кнопку PAUSE для временной приостановки
воспроизведения. Нажмите кнопку повторно для возобновления воспроизведения.
Повторное воспроизведение
При воспроизведении диска MP4 (AVI, MPEG4) нажмите кнопку RPT для повторного воспроизведения.
при первом нажатии устройство повторит текущий трек, при повторном нажатии вернется к
нормальному режиму воспроизведения.
90
Page 91

Отображение информации на дисплее
Нажмите кнопку OSD для отображения на дисплее следующей информации: истекшее время трека –
оставшееся время диска – выкл.
Нажмите и удерживайте кнопку OSD на ПДУ для отображения текущих настроек.
Установка времени воспроизведения
При воспроизведении диска нажмите кнопку GOTO; на дисплее отобразится —-:—- .
С помощью цифровых кнопок введите нужное время воспроизведения, затем нажмите кнопку ENTER
для подтверждения выбора. Нажмите повторно кнопку GOTO, на дисплее отобразится -—:—-:—-,
введите нужное время, затем нажмите кнопку ENTER.
Предыдущий/следующий трек
Используйте кнопки / на ПДУ или на дисплее, или кнопки / на головном устройстве для
воспроизведения предыдущего/следующего трека.
Ускоренное воспроизведение в прямом или обратном направлении
Нажмите кнопки / на ПДУ или на дисплее, или кнопки / на головном устройстве для
ускоренного воспроизведения в обоих направлениях. Скорость воспроизведения изменяется в
следующем порядке:
Изменение размера изображения
Нажмите кнопку ZOOM для увеличения размера изображения. При каждом нажатии размер
увеличивается в следующем порядке:
91
Page 92

Операции с МР3 дисками
Наряду с кнопками ПДУ и головного устройства Вы можете использовать
сенсорные кнопки для выполнения некоторых операций.
Воспроизведение MP3 дисков/SD карт
Вставьте диск в слот для дисков; устройство автоматически включится. При загрузке диска нажмите
кнопку SOURCE для начала воспроизведения. При воспроизведении MP3 диска/SD карты на экране
телевизора отобразится информация о треке. При воспроизведении диска/карты, содержащей файл с
изображением, нажмите кнопу STOP, затем с помощью кнопок /выберите опцию.
Примечание: Чтобы извлечь диск, нажмите кнопку EJECT. В других режимах воспроизведение
содержимого SD карты будет воспроизводиться автоматически после того, как она будет вставлена в
слот.
Предыдущий/следующий трек
Используйте кнопки / на ПДУ для воспроизведения предыдущего/следующего трека.
Повторное воспроизведение
Нажмите кнопку RPT для повторного воспроизведения; при повторном нажатии вернется к
нормальному режиму воспроизведения.
Цифровые кнопки
Нажмите одну из цифровых кнопок (0-9) для выбора нужного трека.
92
Page 93

Остановка воспроизведения
Нажмите кнопку STOP, чтобы остановить воспроизведение.
Выбор трека MP3
При воспроизведении диска нажмите кнопку GOTO; на дисплее отобразится —-:—- .
С помощью цифровых кнопок введите номер трека MР3 и нажмите кнопку ENTER для запуска
воспроизведения; нажмите повторно кнопку GOTO, на дисплее отобразится --:--. Введите время трека
для воспроизведения трека с заданного момента. В случае ввода неверных данных нажмите кнопку
CLEAR для их удаления.
Временная остановка (пауза) воспроизведения
При воспроизведении диска MP3 нажмите кнопку PAUSE для временной приостановки
воспроизведения. Нажмите кнопку повторно для возобновления воспроизведения.
Ускоренное воспроизведение в прямом или обратном направлении
Нажмите кнопки / на ПДУ или кнопки / на головном устройстве для ускоренного
воспроизведения в обоих направлениях. Скорость воспроизведения изменяется в следующем порядке:
Отображение информации на дисплее
Нажмите и удерживайте кнопку OSD на ПДУ или кнопку DISP на головном устройстве для
отображения текущих настроек.
Извлечение SD карты
Надавите на SD карту для ее извлечения из устройства.
93
Page 94

Обзор формата MP3
• МР3 это краткое обозначение аудио слоя MPEG 3 и относится к стандарту технологии сжатия
звука.
• Данное изделие позволяет воспроизводить файлы МР3 на дисках DVD-R/-RW, DVD+R/+RW, CD-
ROM, CD-R/-RW.
• Устройство может считывать файлы МР3, записанные в формате, соответствующем стандарту ISO
9660. Однако оно не поддерживает данные МР3, записанные методом пакетной записи.
• Изделие не может считывать файлы МР3, которые имеют расширение файла, отличающееся от
“.mp3”.
• Если вы воспроизводите не МР3 файл, который имеет расширение “.mp3”, вы можете слышать
некоторые шумы.
• В данном руководстве мы рассматриваем файлы, называемые “файлами MP3” и “папкой”, а в
технологии PC “треком” и “альбомом” соответственно.
• Максимальное количество уровней директории равно 8, включая корневую директорию.
Максимальное количество файлов и папок на диске 448.
• Устройство может не воспроизводить дорожки в последовательном порядке.
• Устройство воспроизводит только аудио треки, если диск содержит как аудио треки, так и файлы
МР3.
• При воспроизведении диска 8 килобит или VBR, истекшее время воспроизведения в окне дисплея
будет неправильным, а также ознакомительное воспроизведение может не действовать надлежащим
образом. VBR: Переменная скорость передачи битов.
94
Page 95

Операции с AUX/ТВ тюнером (опция)
Нажмите кнопку SRC для переключения в режим AUX.
Наряду с кнопками ПДУ и головного устройства Вы можете
использовать сенсорные кнопки для выполнения некоторых
операций.
Сенсорное меню ТВ тюнера
Нажмите кнопку SRC для переключения в режим ТВ.
1. Переключение каналов. Для выбора каналов 1 – 10
нажимайте сенсорные цифровые кнопки на дисплее. Для
выбора каналов 10 – 30 нажмите -- , затем нужную
комбинацию цифровых кнопок.
2. CH-/CH+ . Для выбора станции вверх или вниз по
диапазону.
3. VOL+/VOL- . Регулирование уровня громкости.
4. STEP. Настройка изображения.
5. ANT. Выбор правой или левой антенны.
6. SETUP. Отображение следующего меню:
95
Page 96

Вы можете отрегулировать следующие пункты:
SOUND (звук): M/N, B/G, D/K.
BAND (диапазон): V-l, V-H, UHF
MODE (режим): SECAM/NTSC/PAL
7. Переключение режимов.
8. Сохраненные каналы. Отображение всех каналов.
9. Частота. Отображение частоты канала.
Выбор ТВ канала
Нажимайте цифровые кнопки на ПДУ или на дисплее, или нажимайте кнопки / на ПДУ для выбора
ТВ станций; нажимайте кнопки 1-9 для выбора конкретной станции; нажмите кнопку GOTO, чтобы
выбрать станции под номером более 10, затем наберите соответствующий номер.
Поиск частоты
Нажимайте кнопки / на ПДУ или кнопки / на головном устройстве, чтобы выбрать нужную
частоту вверх или вниз по диапазону.
Автоматический поиск канала
Нажмите кнопку AMS/MENU для автоматического поиска каналов.
96
Page 97

Обращение с дисками
• Грязные, поцарапанные или погнутые диски могут вызвать искажение звука
или шумы
• Держите диск только за края. Чтобы обеспечить чистоту, не прикасайтесь к
его поверхности.
• Диски должны храниться в их чехлах после использования, чтобы не поцарапать их поверхность.
• Не подвергайте диски действию прямого солнечного света, повышенной влажности, повышенным
температурам или действию пыли.
• Продолжительное влияние предельных температур может изогнуть диск (например, пребывание
дисков в автомобиле в летнее время).
• Не царапайте и не пишите что-либо на любой стороне диска. Острые пишущие инструменты или
чернила, используемые в них, могут повредить поверхность диска.
• Не оставляйте никаких следов на рабочей стороне диска. Не прикрепляйте этикетки или стикеры к
любой стороне диска.
Чистка и уход
Чистка корпуса
Протирайте мягкой тканью. Если корпус очень загрязнен (не мочите его), используйте мягкую ткань.
Чистка дисков
Отпечатки пальцев должны быть тщательно стерты с поверхности диска
мягкой тканью. В отличие от обычных пластинок, компакт-диски не имеют
канавок для сбора пыли и микроскопических частиц грязи, поэтому их
можно легко отчистить мягкой тканью. Вытирайте прямолинейным
движением от центра к краю.
97
Page 98

Никогда не используйте растворитель, бензин, очиститель пластинок или антистатический аэрозоль для
чистки дисков. Такие химические вещества могут повредить его пластиковые поверхности.
98
Page 99

Руководство по устранению неисправностей
Неисправность Причина Решение
Зажигание машины не включено.
Нет питания
Невозможно загрузить
диск
Диск не считывается Диск установлен верхней стороной вниз.
Нет звука
Не действуют
функциональные ключи
Звук пропадает
Радио не работает. Антенный кабель не подключен. Вставьте антенный кабель
Сгорел предохранитель.
В плеер установлен диск. Удалите диск из плеера, затем
Компакт диск загрязнен или имеет
дефект.
Температура внутри машины очень
высокая.
Звук установлен на минимум.
Кабель подключен неправильно.
Встроенный микрокомпьютер не
работает надлежащим образом из-за
шумов.
Передняя панель не установлена на свое
место.
Компакт диск загрязнен или имеет
дефект.
Если источник питания
подключен к выключателю
машины правильно, установите
ключ зажигания в положение
«АСС».
Замените предохранитель.
установите новый.
Установите компакт диск
стороной с этикеткой вверх.
Очистите диск или установите
новый.
Подождите пока температура не
станет нормальной.
Отрегулируйте звук до нужного
уровня.
Проверьте подключение кабеля.
Нажмите кнопку RESET.
Повторно установите переднею
панель.
Очистите диск или установите
новый.
99
Page 100

Не работает
автоматический выбор
радиостанции
Сигналы слишком слабы. надежно.
Выберите станцию вручную.
100
 Loading...