

2TENE07
UVO SYSTEM USER'S MANUAL

PART 1 GETTING STARTED
Controls and Features
Control Panel
1
2
3
4
5
13
※
No
will be shown if the exterior Amplifier feature is not supported.
6 7
1
DISC EJECT
Ejects the inserted disc.
2
FM/AM
Turns on FM/AM mode. Each press of the
FM/AM
12
key will change the band in the
order of FM → AM → FM.
3
11
10
9
8
SAT
Turns on SIRIUSTM mode.
4
MEDIA
Turns on MEDIA mode. Each press of the
MEDIA
key will change the mode in the
order of CD → USB/iPod
→
AUX → BT Audio → PANDORA → CD.
5
POWER/VOLUME
®
/zune
®
→
JUKEBOX
Push : Turns Power On/Off.
Dial : Turns Volume Up/Down.
6
∨ SEEK/TRACK
∧
Short (under 0.8 seconds)
In FM/AM mode, automatically searches
and plays the previous or next frequency.
1-2 PART 1. GETTING STARTED

In SIRIUSTM mode, automatically searches
and plays the previous or next channel.
In MEDIA mode (CD, MP3, USB, iPod
®
zune
, BT AUDIO), plays the previous or
next track, song, or file. In PANDORA
Radio, PANDORA Radio skip (Seek up).
In JUKEBOX mode, plays the previous or
next track.
Long (over 0.8 seconds)
In FM/AM mode, quickly moves through
the frequencies when the button is pressed
and held. Once released, automatically
searches and plays the previous or next
frequency.
In SIRIUS
TM
mode, quickly moves to the
previous or next channel.
In MEDIA mode (CD, MP3, USB, iPod
®
zune
, BT AUDIO), REW/FF the current
track, song, or file.
In JUKEBOX mode, REW/FF the current
track.
7
∨
CATEGORY ∧
In SIRIUSTM mode, moves to the previous or
®
,
next SIRIUS
8
TUNE
TM
category.
In FM/AM mode, turn the knob to manually
10
PHONE
Displays Bluetooth® wireless technology
Phone mode.
11
eServices
Displays UVO eServices mode.
GETTING STARTED
search for frequencies.
In SIRIUS
TM
mode, turn the knob to
manually search for channels. Press the
12
DISP
Turns off the screen.
knob to receive the selected channel.
®
13
In MEDIA mode (CD, MP3, USB, iPod
®
zune
), turn the knob to manually search for
the previous or next track, song, or file.
RESET
,
Reset the system to be used if system is
acting abnormally.
Press the knob to receive the selected
track, song, or file. In PANDORA Radio,
searches PANDORA Radio stations.
In JUKEBOX mode, turn the knob to
®
manually search for the previous or next
,
track. Press the knob to receive the
selected track.
9
SETUP
Displays SETUP mode.
PART 1. GETTING STARTED 1-3

PART 1 GETTING STARTED
Steering Wheel
2
6 7
1
∨ SEEK/TRACK
∧
Short (under 0.8 seconds)
In FM/AM mode, automatically searches
and plays the previous or next preset
frequency.
In SIRIUS
TM
mode, automatically searches
and plays the previous or next preset
channel.
34
In MEDIA mode (CD, MP3, USB, iPod
®
zune
, BT AUDIO), plays the previous or
®
,
next track, song, or file. In PANDORA
1
Radio, PANDORA Radio skip (Seek up).
In JUKEBOX mode, plays the previous or
next track.
5
Long (over 0.8 seconds)
In FM/AM mode, quickly moves through
the frequencies when the button is pressed
and held. Once released, automatically
searches and plays the previous or next
frequency.
In SIRIUS
TM
mode, quickly moves to the
previous or next channel.
In MEDIA mode (CD, MP3, USB, iPod
®
zune
, BT AUDIO), REW/FF the current
®
,
1-4 PART 1. GETTING STARTED

track, song, or file.
In JUKEBOX mode, REW/FF the current
track.
2
+ VOLUME -
Turns Volume Up/Down.
3
MODE
Short (under 0.8 seconds)
Changes the mode. Each pre ss will
modes in the order of FM
TM
SIRIUS
→ CD → USB/iPod®/zune®
→
change
AM
JUKEBOX → AUX → BT Audio →
PANDORA → FM.
→
→
If system is speaking, interrupts speaking
and enters listening mode.
Long (over 0.8 seconds)
If Voice recognition is on, turns off Voice
recognition.
6
SEND (Bluetooth® wireless technology
Phone)
Pressing this key will receive an incoming
call. If the Audio is on, the Bluetooth
wireless technology phone screen will be
displayed.
When a SMS message is received, reads
back message.
GETTING STARTED
®
Long (over 0.8 seconds)
While the system is off, turn the system on.
While the system is on, turn off the system.
4
MUTE
Mutes the sound.
5
Voice Command
Short (under 0.8 seconds)
If Voice recognition is off, turns on Voice
recognition.
7
END (Bluetooth® wireless technology
Phone)
Pressing this key will reject an incoming
call. If pressed during a call, the current call
will be ended.
When a SMS message is received, ignores
message.
PART 1. GETTING STARTED 1-5
PART 1 GETTING STARTED
Basic Features
System Power
1. Turning System Power On
1. Turn on the ignition.
2. While the system is off, press the
POWER/VOL
knob to turn the system on.
3. The system will automatically restore the
most recently played mode. For example,
pressing the
POWER/VOL
knob will turn on
the system and display FM radio mode if
FM mode had been the last operated
mode prior to turning off the system.
4. You can also turn the system on by
pressing the
FM/AM, SAT
and
MEDIA
keys.
Note
●
Pressing any one of the
MEDIA
and
keys will turn on the system
and display the last mode corresponding to
each key. For example, pressing the
key while a CD or other media source is
loaded, will turn on the system and display
CD mode if the last operated MEDIA mode
prior to turning off the system had been CD
mode.
2. Turning System Power Off
1. While the system is on, press the
POWER/VOL
knob to turn off the system.
FM/AM, SAT
MEDIA
Note
●
If the system power was on when the ignition
was turned off, the system will turn back on
automatically. Conversely, if the system
power was off when the ignition was turned
off, the system will remain off.
●
If the battery voltage is low, the audio may
take a prolonged time to boot upon turning
on the vehicle.
,
1-6 PART 1. GETTING STARTED

Select Display Language
The UVO system allows you to select the
preferred display language for maximum
convenience and system usability. The system
provides you with options of three languages English, French (Canadian) and Spanish. The
default language is English.
1. Press the
SETUP
key on the control panel.
Main
2. Press the
3. Press the
button.
English
button next to the
Language menu.
4. Select the desired language.
5. The system will reboot and automatically
restore the most recent mode in the new
language.
Resetting and Initializing
UVO system
1. Resetting the system
If the system is behaving abnormally, press the
reset button to reset the system.
1. Use a ball-point pen or similar object to
press the
2. The system will reboot and automatically
restore the most recent mode.
Caution
●
The reset button should only be used in case of
system malfunction. Never use the reset key while
the system is operating normally as it may cause
damage to the system.
●
If you wish to reset while the system is operating
normally, turn the power off first then reset.
RESET
key.
GETTING STARTED
PART 1. GETTING STARTED 1-7
PART 1 GETTING STARTED
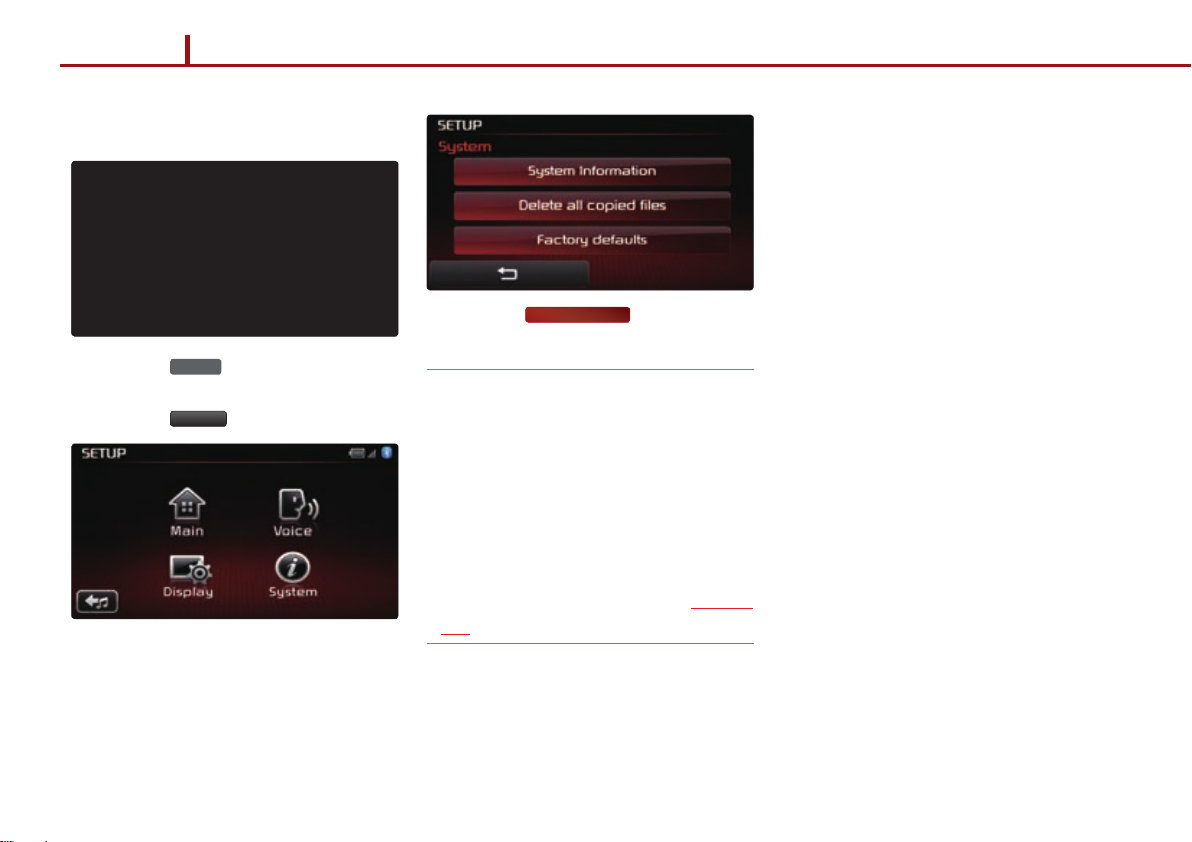
2. Initializing the system
1. Press the
2. Press the
SETUP
key on the control panel.
System
button.
1-8 PART 1. GETTING STARTED
3. Press the
Factory defaults
button.
Note
●
Initializing the system will erase all Phone
settings, and other changes which you have
made to the system.
●
Some songs in the USB or CD may be
misrecognized during the indexing process.
If such problems persist, reset the device
using the Factory Defaults button in
SETUP>System.
●
For updating the system, visit http://www.kia.
com
Sound and Display Settings
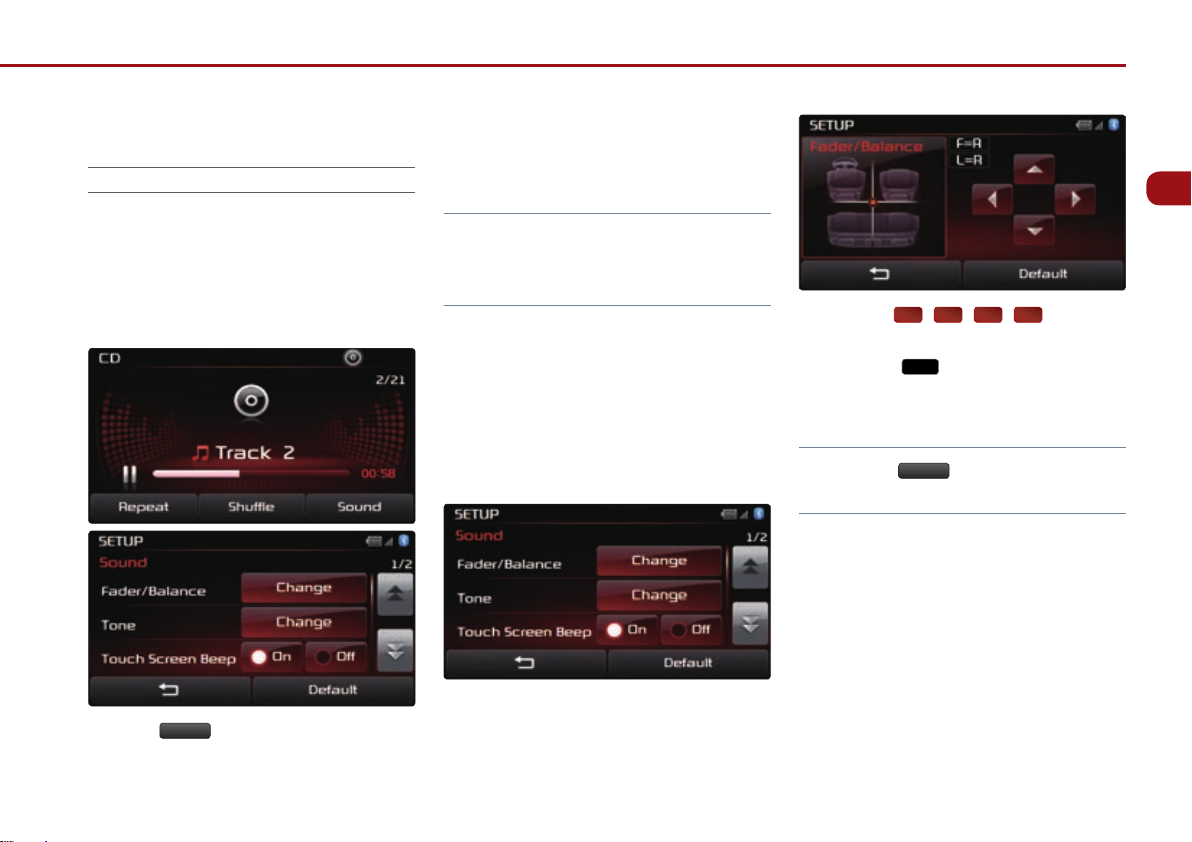
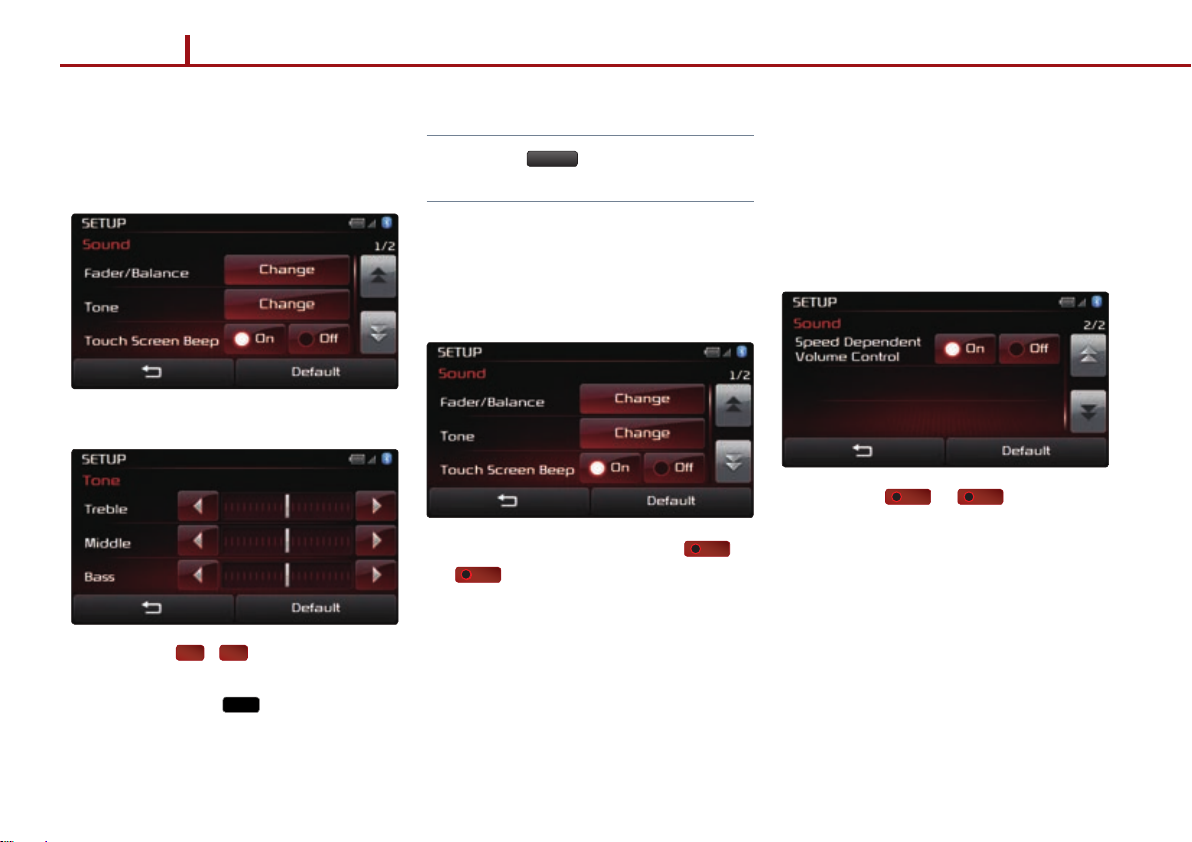
Sound Settings
Sound settings can be adjusted from any audio
mode. The system allows you to optimize
various sound settings to add convenience
when listening to the system.
Press the
each audio mode (FM/AM, SIRIUS
Sound
button on the main screen of
TM
, MEDIA,
PANDORA Radio, JUKEBOX) to enter Sound
Setup.
Note
●
Changes are saved as they are made. In
other words, once you change a setting, the
new setting will become saved.
1. FADER/BALANCE
Fader/Balance allows you to adjust the position
of sound within the vehicle. For instance,
adjusting the sound so that it is closer to the
driver-side seat will proportionally lower the
volume in the passenger-side and rear seats.
1. Press the Fader/Balance setting button.
2. Use the ▲, ▼, ◀, ▶ buttons to
make adjustments to the sound position.
3. Press the
button to return to Sound
Setup.
Note
●
Press the
default setting.
Default
button to restore the
GETTING STARTED
PART 1. GETTING STARTED 1-9
PART 1 GETTING STARTED
2. TONE
Tone allows you to make changes to the
Treble, Middle and Bass settings.
1. Press the Tone setting button.
2. Use the
◀, ▶
buttons to make
adjustments to the Treble, Middle and
Bass. Press the
button to return to
Sound Setup.
Note
●Press the
default setting.
3. Touch Screen Beep
Touch Screen Beep allows you to turn on/off
the beep that sounds when you touch the
screen.
1. In Sound Setup, press the
Off
Beep menu to turn the feature on or off.
Default
button to restore the
On
or
button next to the Touch Screen
4. Speed Dependent Volume Control
Speed Dependent Volume Control allows you
to automatically control the volume according
to the speed of the vehicle. This feature will
gradually increase the volume as speed
increases to offset outside noise.
1. Press the
On
or
Off
button next to
the Speed Dependent Volume Control
menu to turn the feature on or off.
1-10 PART 1. GETTING STARTED

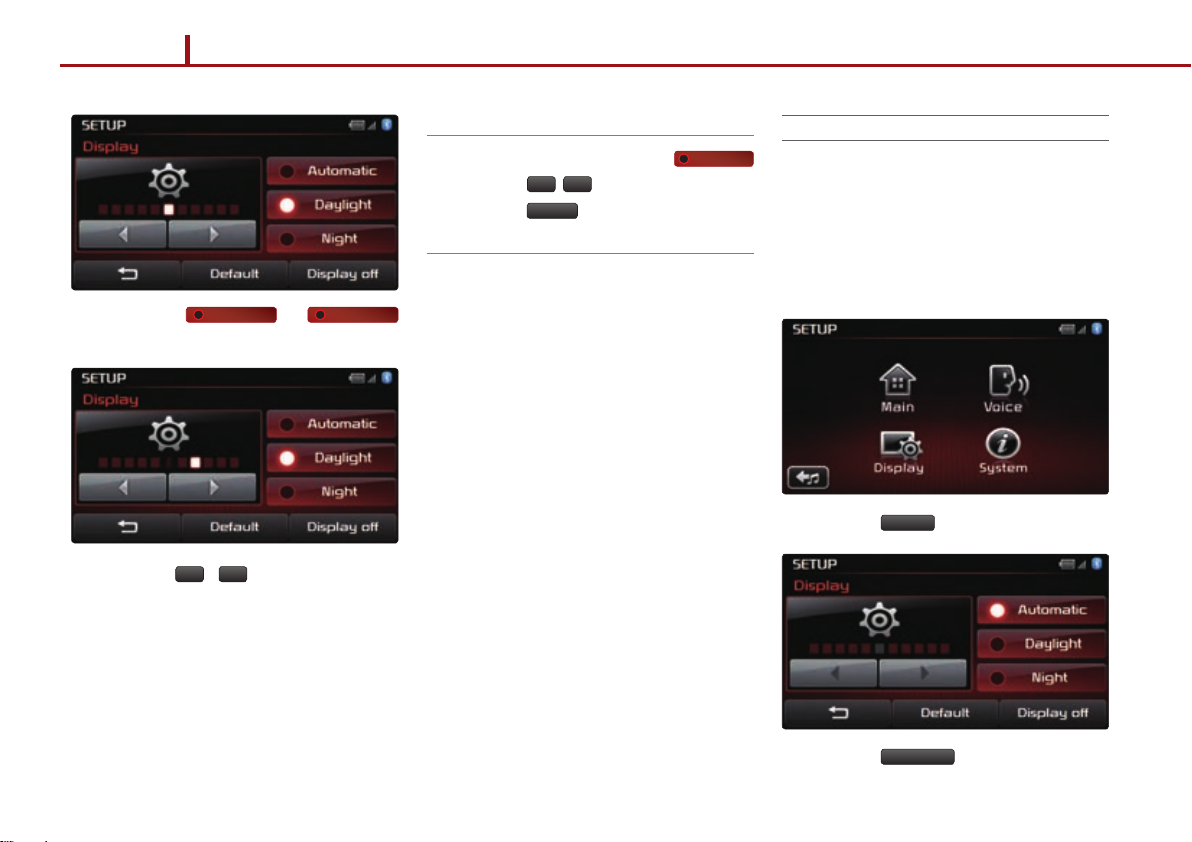
Display Settings
The various Display setup options offered
within the UVO system allow you to change
display settings according to your personal
preference.
Note
●
Changes are saved as they are made. In
other words, once you change a setting, the
new setting will become saved.
1. Setting Brightness
The UVO system allows you to control the
screen brightness automatically and manually.
2. Press the
Automatic
button.
GETTING STARTED
1. Press the
2. Press the
Setup mode.
SETUP
key on the control panel.
Display
button to enter Display
●
Automatic Brightness Control
When the Display brightness is set to
automatic, the brightness will be controlled
automatically by assessing the amount of
ambient light.
1. Press the
Display
button.
●
Manual Brightness Control
1. Press the
Display
button.
PART 1. GETTING STARTED 1-11
PART 1 GETTING STARTED
2. Press the
Daylight
or
buttons.
3. Use the
◀, ▶
buttons to make
adjustments to the display brightness.
Night
Note
●
When Brightness control is set to
, the manual ◀,
●
Press the
default setting.
▶
Default
button to restore the
Automatic
buttons are not active.
Turning Display On and Off
This feature turns off the display, allowing you
to listen only to the audio. It is a useful feature
when you are driving at night and wish to
eliminate glare from the display. Even when
the display is off, audio will still be played.
1. Press the
Display
button.
1-12 PART 1. GETTING STARTED
2. Press the
Display off
button.

3. Press any key on the control panel or
steering wheel controller to turn the display
back on.
Note
●
Touching any place on the screen will also
turn on the display.
GETTING STARTED
PART 1. GETTING STARTED 1-13
PART 2 AUDIO FEATURES
FM/AM MODE
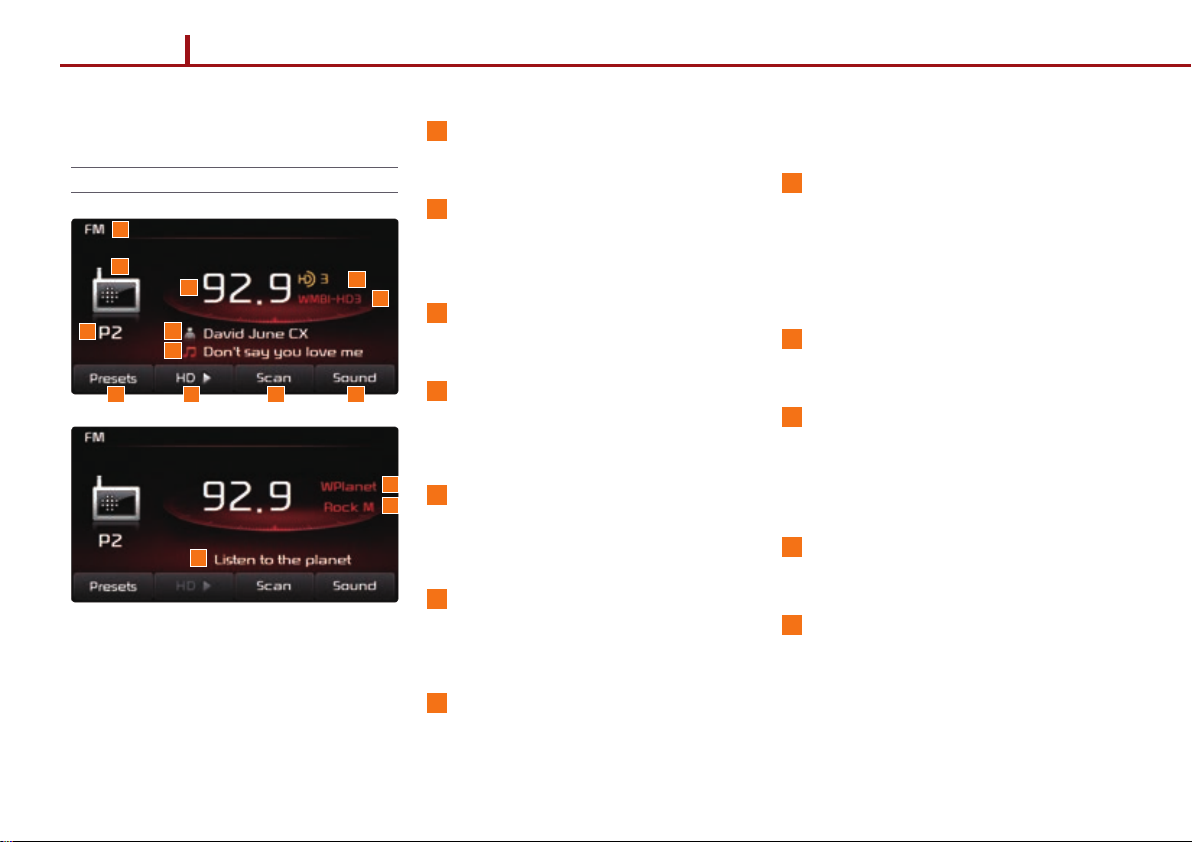
FM/AM Mode Screens and Features
1
8
2
9 7
3
14
15
10
6
12
11
1
Mode display
Displays the FM /AM mode.
2
PRESET indicator
If l istening to a preset, d isplays the preset
number.
13
3
Frequency
Displays the current frequency.
4
Program Type
If d ata i s bei ng tra nsm itt ed, di spl ays th e
program type.
5
5
4
Program Service Name
If d ata i s bei ng tra nsm itt ed, di spl ays th e
program service name.
6
Radio text
If dat a is being transmi tted, displays rad io
text information.
7
HD RadioTM (Optional)
Changes HD RadioTM
stations
B ecom es ac tiv e when an H D Rad io
broadcast is being received.
8
Radio Icon
Wh en pre sse d whi le lis ten ing to R DS or
HD Radio(Optional) stations, displays informatio n about the c urrent st ation (frequ ency,
station, artist, title).
9
Presets
Enters Preset list screen.
10
Scan
Sc ans all f requen cies an d plays on ly fre-
quencies with high quality reception for 5
se
conds each.
11
Sound
Enters Sound Setup.
12
HD RadioTM Station Channel Number
(Optional)
Di splays t he chan nel num ber for th e cur-
rent HD Radio
TM
station.
.
TM
2-2 PART 2. AUDIO FEATURES

13
SEEK
TRACK
∧
SEEK
∨
TRACK
SEEK
TRACK
∧
SEEK
∨
TRACK
HD RadioTM Station name (Optional)
D isp lay s the n ame of t he HD R adi oTM
Station.
14
Artist name (Optional)
Displays the artist name.
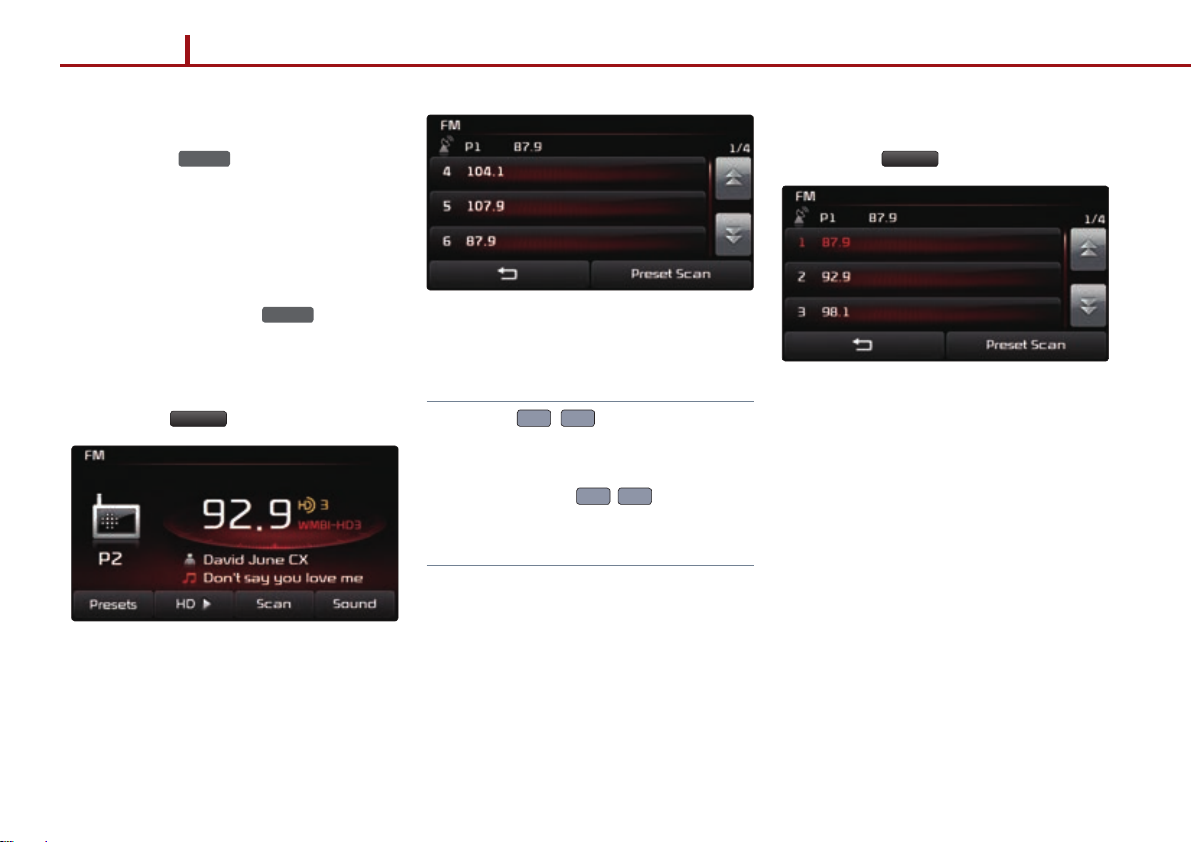
Listening to the FM/AM radio
1. Selecting a broadcast frequency
The U VO syst em pr ovid es you w ith v ario us
ways to search for radio broadcasts. There are
3 ways to se lect ra dio bro adcas ts- sel ectin g
through SEEK, selecting through manual
search, and selecting through presets.
AUDIO FEAT URE S
15
Song Title (Optional)
Displays the title name.
1. Press the
FM/AM
key o n the c ont rol
pan el. The m ost re cent ly play ed FM/AM
radio band will automatically begin
playing.
2. Press the
FM/AM
key t o swi tc h to th e
desired radio band.
Note
●
Each pr ess of the
the band in the order of FM → AM → FM.
●
Even wh en the sys tem powe r is off, pr ess
FM/AM
the
key to turn on the most r ec entl y
played FM/AM mode.
●
The RDS (Rad io Data Syste m) operates in
are as wit h FM st atio ns bro adca sti ng RDS
signals.
FM/AM
key will change
●
Selecting through SEEK
Pre ss the
or
keys o n the
co nt rol p ane l fo r und er 0 .8 se co nd s. As
SEEK operates, t he previous or nex t radio
broa dcast s with hi gh qual ity rec eptio n will
automatically be searched and played.
Note
●
While SEEK is oper ati n g, p r e s s i ng the same
SEEK
∧
∨
the o ppo site key w ill op erat e SEEK in t he
reverse direction.
●
Press and hol d the
(over 0.8 seconds) to quick ly move through
the frequen cies while the b utton is pres sed
an d hel d. On ce re le ase d, th e sys tem wi ll
automati cally searc h and play the prev ious
or next frequency .
key will terminate SEEK. Pres sin g
TRACK
or
PART 2. AUDIO FEATURES 2-3
keys
PART 2 AUDIO FEATURES
●
Selecting through manual search
1. Turn the
panel in clockwise or counter-clockwise
di rec tio n. Ea ch c lic k wil l inc rea se or
de crea se th e freq uen cy by 1 st ep (FM :
0.2MHz, AM: 10kHz).
2. Whe n you find t he desi red rad io broad
cast, stop t urning the
ten to the selected frequency.
kn ob on t he co ntr ol
TUNE
TUNE
-
knob to lis -
2. Se lec t the de sire d pres et and pr ess th e
button to start listening.
1. Select the desired radio broadcast.
2. Press the
Presets
button.
●
Selecting through preset
1. Press the
Presets
button.
2-4 PART 2. AUDIO FEATURES
Note
●
Pres s the ∧, ∨ keys (und er 0.8 se conds) on the steeri ng whee l contro ller to fli p
rough the presets sequentially.
th
●
Press and hold the ∧, ∨ keys (over 0.8
second s) on the steerin g wheel c ontroll er to
operate SEEK.
2. Storing presets
Presets are a way for you to save your favorite
ra dio b ro ad cas ts . Up to 12 p re set s ca n be
saved in FM mode wh ile up to 6 frequenci es
can be saved in AM mode.
3. From t he preset list , press and hol d (over
0.8 second s) the preset numb er button to
which you wish to save.
4. The current r adio broadc ast will automat i
ca ll y be sa ved t o th e pre se t num be r. A
be
ep will signi fy that the pre set has been
saved if the beep is set to ON in the sound
settings.
-
3. Scanning FM/AM broadcast
frequencies
Radio br oadcas ts can be sc anned to co nveniently fin d radio broadc asts with high qu ality
re
ception. Ea ch r ad io br oad c a st wi ll b e played
for 5 secon ds. Thi s feature is pa rt icul arly us e
ful when traveling in ne w a reas.
4. Preset Scan
Pres et sc an wil l scan p rese ts in th e curr ent
band (FM -12 presets , AM- 6 presets)in
seq uenti al orde r. Each pre set wil l be playe d
for 5 seconds.
-
5. Listening to HD RadioTM Stations
(Optional)
HD RadioTM Technology is a digital radio technology us ed by AM and FM radio stati ons to
tr
ansmit audi o and data via a digi tal signal in
conjunction with their analog signals.
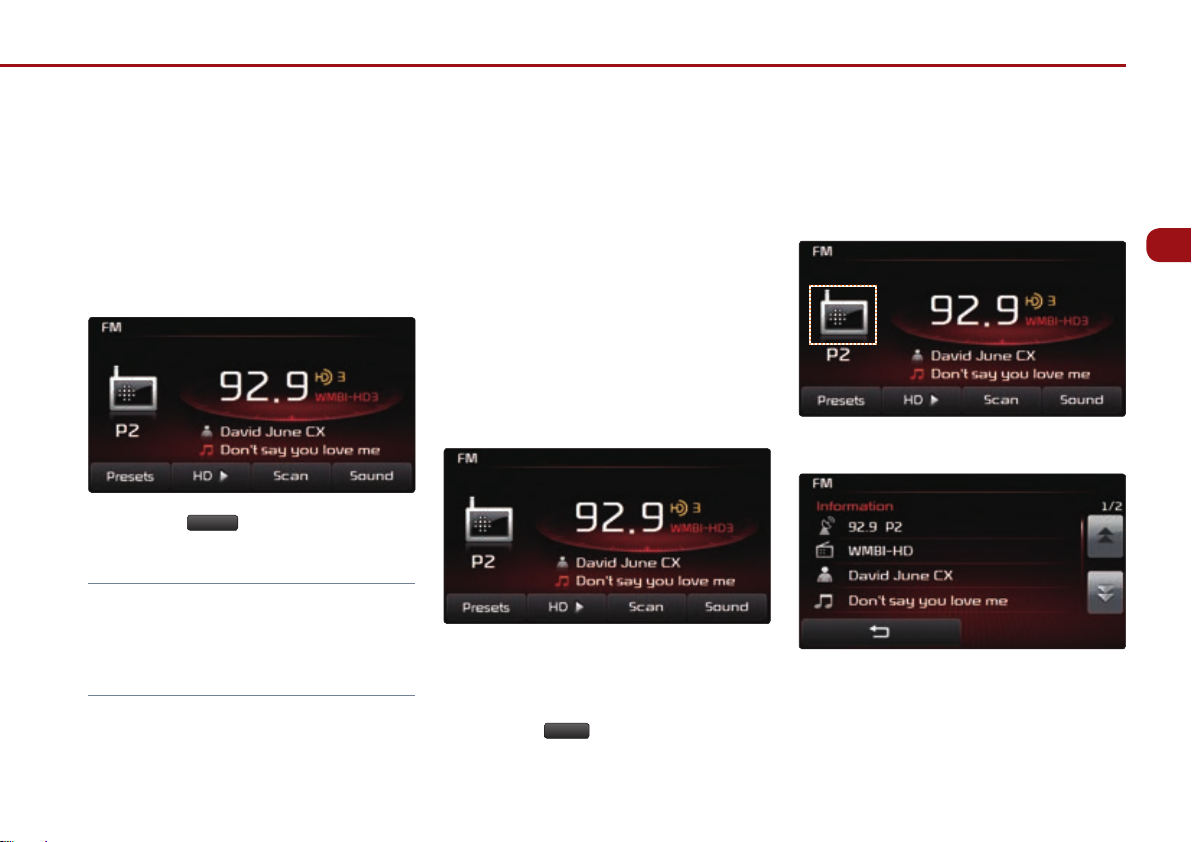
6. Viewing FM/AM Station information
When listening to an HD RadioTM st ati on or
RDS radio station, you will be able to view station information.
1
Press the Radio icon.
.
AUDIO FEAT URE S
1.
Press the
Scan
button.
Note
●
When scanning has completed an entire
revo lutio n, the sc an fun ctio n will te rmina te
automatica lly and the previou sly played fre
quency will be restored.
1. While listening to the radio, the HD Radio
icon will b ecome di splayed if rece iving an
HD Radio
2. Press the
ferent HD Radio
TM
broadcast.
▶
HD
button to c h a nge to a dif-
TM
station.
TM
2. Infor mation about the c urrent station (fre
quency, station, artist, title) will be
di
played.
s
PART 2. AUDIO FEATURES 2-5
-
PART 2 AUDIO FEATURES
SEEK
TRACK
∧
SEEK
∨
TRACK
SEEK
TRACK
∧
SEEK
∨
TRACK
SIRIUSTM MODE
SIRIUSTM Mode Screen and Features
1
6
2
3
1
Mode display
11
12
7 8 9 10
D isp lay s th e cur re nt mo de a s SIRIUSTM
mode.
2
Channel number
Displays the current channel number.
3
PRESET indicator
If l istening to a preset, d isplays the preset
number.
4
Category name
Displays the category name.
4
5
5
Channel name
Displays the channel name.
6
SIRIuSTM Icon
Whe n pressed, disp lays information abo ut
the curre nt channel (art ist, title, co mposer
and other information).
7
Presets
Enters Preset list screen.
8
List
Displays the channel or category list.
9
Search
Displays the channel search screen.
10
Sound
Enters Sound Setup.
11
Artist
Displays the artist name.
12
Title
Displays the title.
Listening to the SIRIUSTM radio
Pre ss t he
The m ost re cent ly pla yed SIRIUS
will automatically begin playing.
Note
●
Even when the system power is off, pressing
the
SAT
played SIRIUS
1. Selecting a SIRIuSTM channel
●
Selecting through SEEK
Pr ess t he
control pa nel for under 0.8 s econds. As SEEK
operates, the p rev i o u s o r next SIRIUS
nel will automatically be searched and played.
Note
●
Press and hold t he
(over 0.8 s econ ds) to qui ckly m ove thro ugh
the channe ls while th e button i s presse d and
held. Onc e r el e as e d , t he sys te m wi l l auto m atic ally s ear ch an d play t he pr evio us or n ext
c
nel.
han
key o n the c on tro l pan el .
SAT
TM
channel
key will turn on the most recently
TM
channel.
or
key s on t he
or
TM
chan-
keys
2-6 PART 2. AUDIO FEATURES

●
Selecting through manual search
1. Turn the
knob on th e co ntro l pan el
TUNE
in cl ock wis e or co unter- clo ck wise d ire cti on. E ach c li ck wi ll di sp lay t he co rre sponding channel information.
2.
When you find the desired SIRIUS
nel, press th e
knob to liste n to the
TUNE
selected channel.
TM
chan-
●
Selecting through preset
●
Selecting through channel search
AUDIO FEAT URE S
1.Press the
Presets
button.
2. Se lec t the de sire d pres et and pr ess th e
button to start listening.
Note
●
Press t he ∧, ∨ keys (unde r 0.8 sec onds) on the steer ing whe el cont rolle r to flip
rough the presets sequentially.
th
1. Press the
Search
button. The channel
search screen will be displayed.
2. Input the desired channel number and
press the
press the
Done
button. To delete entries,
Delete
button.
Note
●
If y ou in put a n um ber w her e th ere i s no
Done
channel, the
inactive.
button will become
PART 2. AUDIO FEATURES 2-7

PART 2 AUDIO FEATURES
●
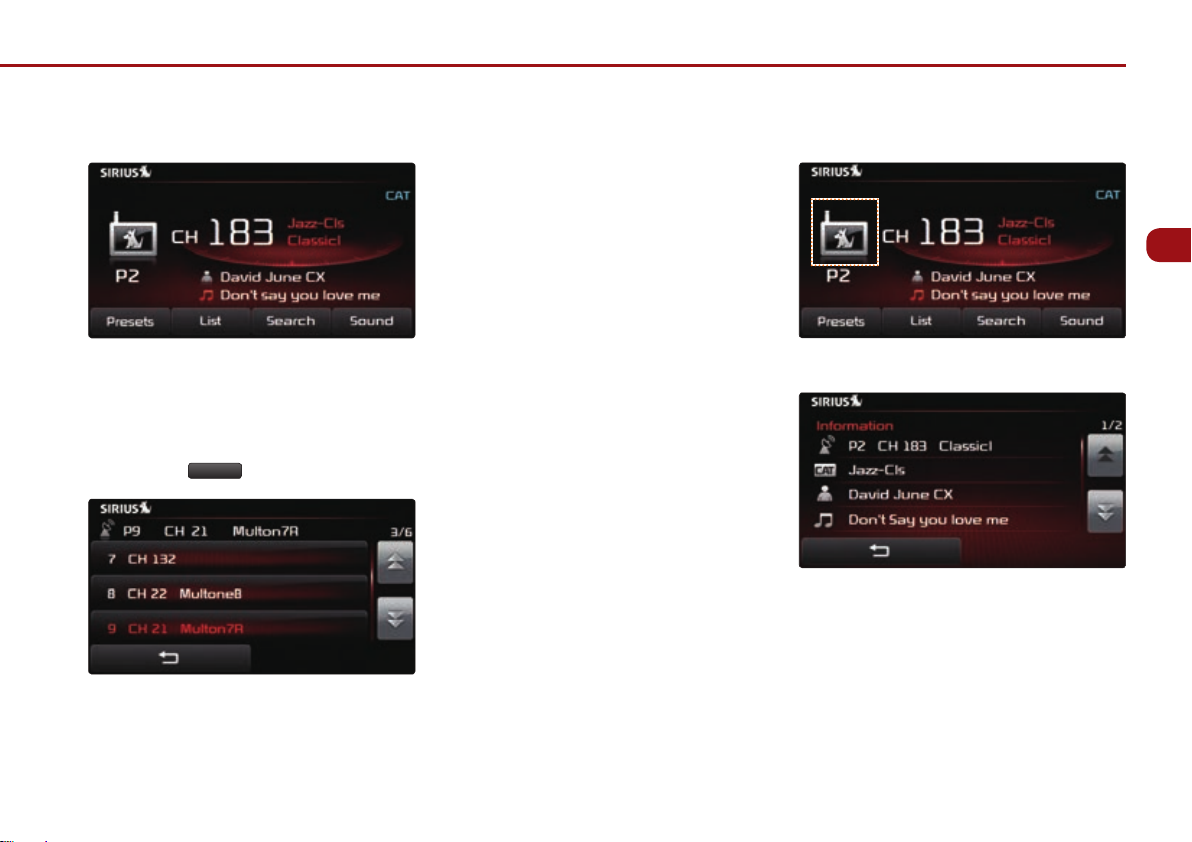
Selecting through SIRIuSTM category list
1. Press the
List
button.
2. using Skip
1. Press the
List
button.
3. Se lec t th e cha nne ls yo u wi sh to s kip .
Whe n sel ecte d, an
wil l be di spla yed
next to the selected channel.
2. Select the desired channel to start listenin g or pr ess t he
Category List
button to
display the channels in the selected
category.
2-8 PART 2. AUDIO FEATURES
2. Press the
Skip Setting
button.
3. Storing presets
4. The current r adio broadc ast will automat ical ly be save d to the pr esent n umber. A
b
ep will signi fy that the pre set has been
e
saved if the beep is set to ON in the sound
settings.
4. Viewing SIRIuSTM channel information
AUDIO FEAT URE S
Presets are a way for you to save your favorite
TM
SIRIUS
saved in SIRIUS
chann els. Up to 18 prese ts can be
TM
mode.
1. Select the desired SIRIUS
Presets
2. Press the
button.
TM
channel.
3. From t he preset list , press and hol d (over
0.8 second s) the preset numb er button to
which you wish to save.
1. Press the SIRIUSTM icon.
2. In for mat io n abo ut t he cu rre nt ch an nel
(channel, category, artist, title) will be
displayed.
PART 2. AUDIO FEATURES 2-9
PART 2 AUDIO FEATURES
MEDIA MODE
Th e MED IA mo de w ith in yo ur U VO sys tem
offe rs a variet y of media m odes whi ch allow
you conve nience and e ase in oper ating your
sy ste m. Me di a mod e in clu de s a var iet y of
mo de s, su ch a s aud io C D, MP 3 CD, U SB,
®
iPod
, zune®, BT audio, Aux and PANDORA.
The f eature s list ed bel ow desc ribe c omm on
features whic h you will encoun ter when oper
ating Audio CD, MP3 CD, USB, iPod
and JUKEBOX modes.
®
, zune®,
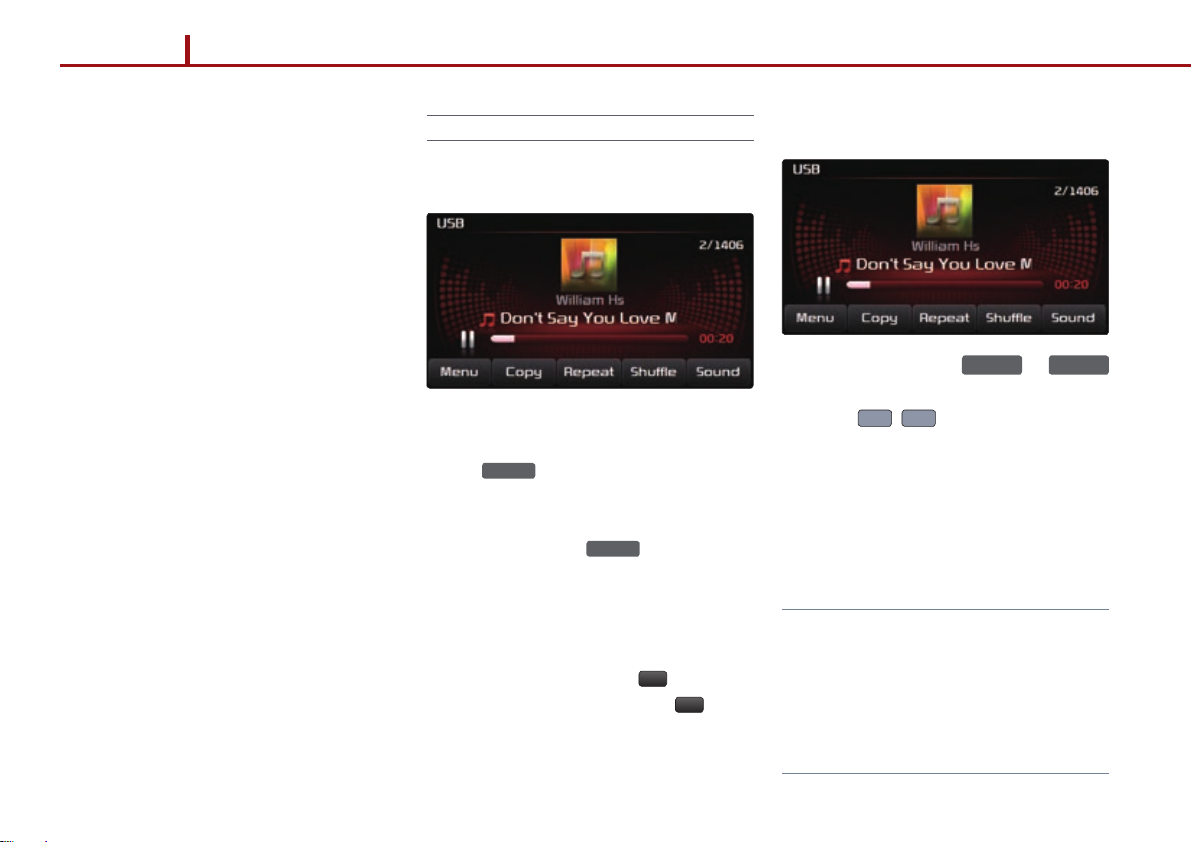
Common Features
●
Play/Pause
-
1. Insert or connect the desired media (Audio
CD, MP3 CD, USB, iPod
the
key on the contro l panel if t he
MEDIA
desired m edia has already b een inserte d
or connected.
2. Each pres s of the
th e mod e in t he or der o f CD → USB/
®
iPod
/zune® → JUKEBOX → AUX → BT
Audio → Pandora
3. When a desired media is playing and you
wish to pause, pres s the
to the progres s bar. Press the
to restart the song.
®
, zune®) or press
key will change
MEDIA
→ CD.
ll
button nex t
▶
button
●
REW/FF
SEEK
1. Pre ss a nd ho ld t he
TRACK
or
∨
TRACK
∧
keys (over 0.8 seconds) on the co ntro l pan el
∧
or the
, ∨ keys (over 0. 8 secon ds)
on the steering wheel controller.
2. T he so ng wi ll re win d or fa st- for war d at a
rate 2 0 time s faster t han no rmal w hile t he
key is being held.
3. R ele ase t he ke y to pl ay fr om th e cur ren t
position.
Note
●
If you rewind to the be ginnin g of the cur rent
so ng , the c ur ren t so ng wi ll a uto mat ic al ly
begin playing.
●
If you fast-for ward to the end of th e current
song, the nex t song wil l automatic ally beg in
playing.
SEEK
2-10 PART 2. AUDIO FEATURES
●
Jump
1. You can jump to dif ferent po ints in a son g
by touc hing th e posit ion on th e progr ess
bar.
●
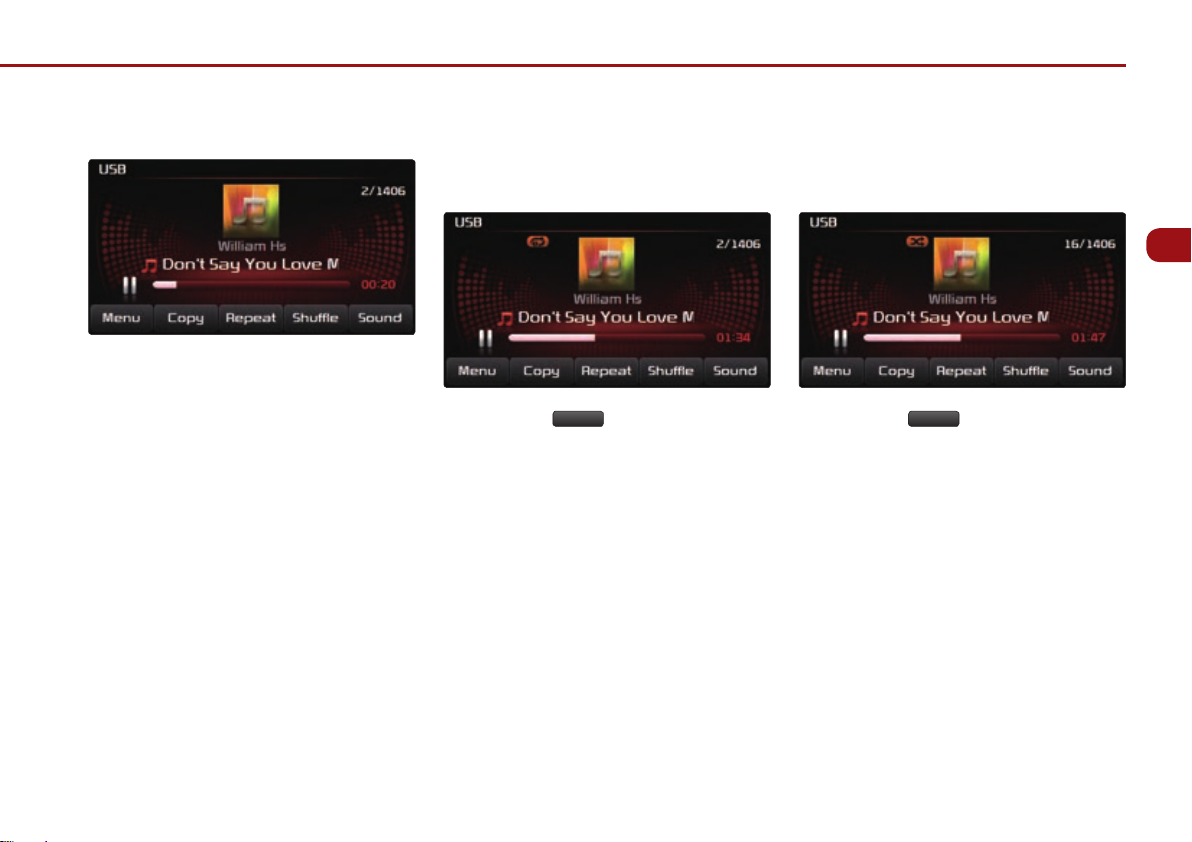
using Repeat
The r epea t sett ing c an be us ed to re peat
the song that is currently playing.
1. Press the
Repeat
bu tt on. T he 'R ep eat '
icon will be displayed.
2. Press o nce to turn on the Rep eat setting
and again to turn off.
●
using Shuffle
The Shuf fle setting c an be used to play all
song in the current mode randomly.
1. Press the
Shuffle
button. The 'Shuffle'
icon will be displayed.
2. Press o nce to turn on the Sh uffle sett ing
and again to turn off.
AUDIO FEAT URE S
PART 2. AUDIO FEATURES 2-11
PART 2 AUDIO FEATURES
AUDIO CD MODE
Cautions upon handling Audio CDs
Precautions upon handling discs
● Sto re di s c s wi th in t hei r inte nd ed c a se s to
prevent scratches.
●
Never use heart-shaped, octagonshaped or any oth er abnormally sh aped
discs.
●
Never expose disc s to direct sun light for
pro lon ged p erio ds of t ime. S uch ex posure may lead to disc deformation.
●
Never c lean with solvent s, such as antist ati c spr ays , cle ane rs, b enz ene, o r
th
inners.
●
D ust, scr atche s, and oth er forei gn substan ces may c ause po pping s ounds a s
wel
l as sound deterioration.
●
Neve r place pap er on either s ide of the
disc or write on disc surfaces.
●
Clean fin gerpr ints an d dust of f the si gnal
sur face (co ated sid e) of the dis c with a
soft cloth.
●
C opy -pr ote ct ed CD s, su ch a s S- typ e
CD s may n ot op era te pr op erl y in th e
system.
●
Data CDs are not supported by the system.
For safe and efficient operation
● Never d isassembl e the CD Player(CDP)
for rep air purp oses. C ontact y our plac e
of purchase i n case of malfun ction. (Full
servi ce assi stanc e will not be prov ided if
the user disassembles the device. )
●
Never use water to clean the system.
●
Use caution not to introduce foreign sub-
stances into the disc slot.
● T h e sy s te m m ay not operate in extr e m e ly
ho t or co ld t em per atu re s. ( The o pe rational temperature range is:
14℉ ~ 149℉).
● Ste am may conde nse on the fib er optic
lens due to rai n, wet condition s, or heat
caused by system operation.
●
N ever c le an th e sys tem w ith c he mic al
so lve nt s. Al way s use a c le an an d dr y
cloth.
1. Supported disc format
● The d isc types sup ported by this dev ice
are as shown below.
Disc format Disc media Format
CD CD CD-DA
CD-R MP3
CD-RW WMA
CD-ROM
CD-TEXT
Disc Size 5inch (12.7cm)
Disc Format Audio Format
CD LPCM
MP3 MPEG1, Layer3
MPEG2, Layer3
MPEG2.5
WMA Ver. 9
2-12 PART 2. AUDIO FEATURES

●
C D- R or CD -R W DIS C bur ne d wit h a
bulk CD without quality guarantees may
not be recognized by the device.
●
Insert ing an abnorma l disc may result in
faulty operation.
2. Disc/content format and compatibility
Ordinary disc compatibility
●
Th is sy ste m ha s bee n de si gne d to be
compatib le with sof tware bear ing the fol lowing logo marks.
●
CD-R/RW discs (Audio CD and MP3 CD)
created with CD-writing devices or persona l compu ters may not opera te
p
perly.
ro
Special formats or special features
regarding software
CD-R/RW Compatibility
●
This system ope rates as a CD -RO M and
suppor ts CD-R an d CD-RW dis cs in CD
audio or MP3 CD format.
●
CD -R /R W dis cs b urn ed a s aud io CD s
wh ic h hav e not b ee n fin al ize d are n ot
suppor ted by th e devi ce. However, some
inform ation, suc h as play time, may st ill
be displayed.
PC-created DISC compatibility
●
Wh en bu rn ing a d isc w it h a per so nal
computer, even discs compatib le with the
formats described above may not oper
at e pro per ly d ue to s of twa re s ett in gs
wi
th in th e bur nin g app li cat ion . In su ch
cases, contact the software developer.
●
Additional information regarding compatibility c an be found on the CD -R/ RW software disc box.
●
DVD-R/RW discs are not supported by the device.
Compressed audio compatibi lity
This system p lays audio files com pressed
by M PEG -1 audi o st rea m lay er 3(M P3)
usi ng 32, 4 4.1 an d 48k Hz fixed b it rate s.
Incompatible files are not supported.
●
Variable bit rate files may operate, but the
play time infor mation may not be properly
displayed.
●
Physical formats of CD: Model 1, Model 2
XA format 1.
●
This system onl y sup por t s tra cks w ith f ile
extension of ".MP3" or ".WMA".
●
This s ystem doe s not sup port mu ltise s-
AUDIO FEAT URE S
sion discs.
●
This system sup por ts a ma ximum of 25 6
fold ers and m aximu m 512 file s. Folde rs
-
and fil es which exc eed this li mit will not
be supported.
●
The re are va rio us bit r ates w hich c an be
encod ed onto MP3 fi les. This sy stem has
been desig ned to be comp atible with vari
ou s bit r ate s. Aud io w hic h has b een
en
cod ed at 128k bps wi ll sou nd sim ilar t o
CD a udi o so un d qua li ty. A lth ou gh t his
device supports low bit rate MP3 files, such
files may result in a low quality sound.
●
Fo r sta bl e ope rat io n, th e us e of fi les i n
95kbps~192kbps bit rate range a n d 44.1kHz
sampling frequency is recommended.
●
Fo r Mixe d CDs ( MP3 +CD -DA ), onl y
CD -DA f ile s will be r eco gni zed a nd
supported.
PART 2. AUDIO FEATURES 2-13
PART 2 AUDIO FEATURES
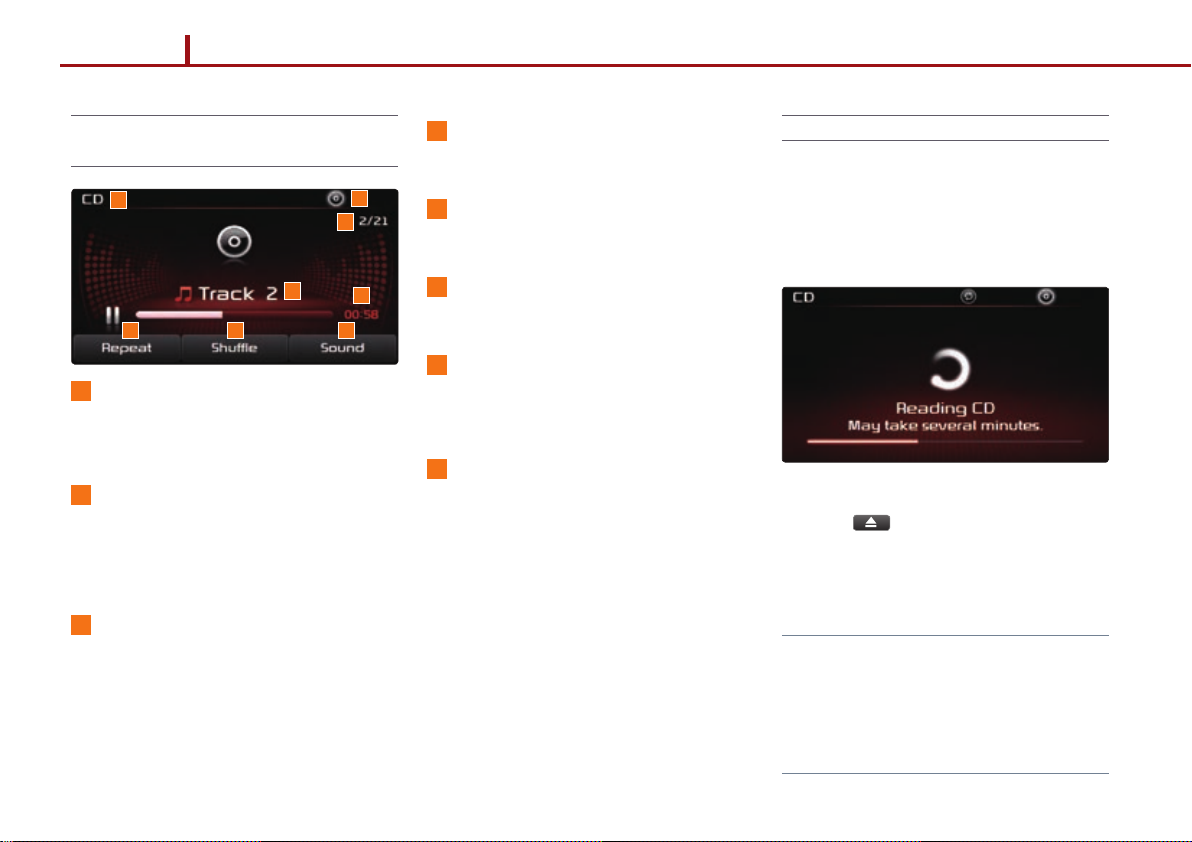
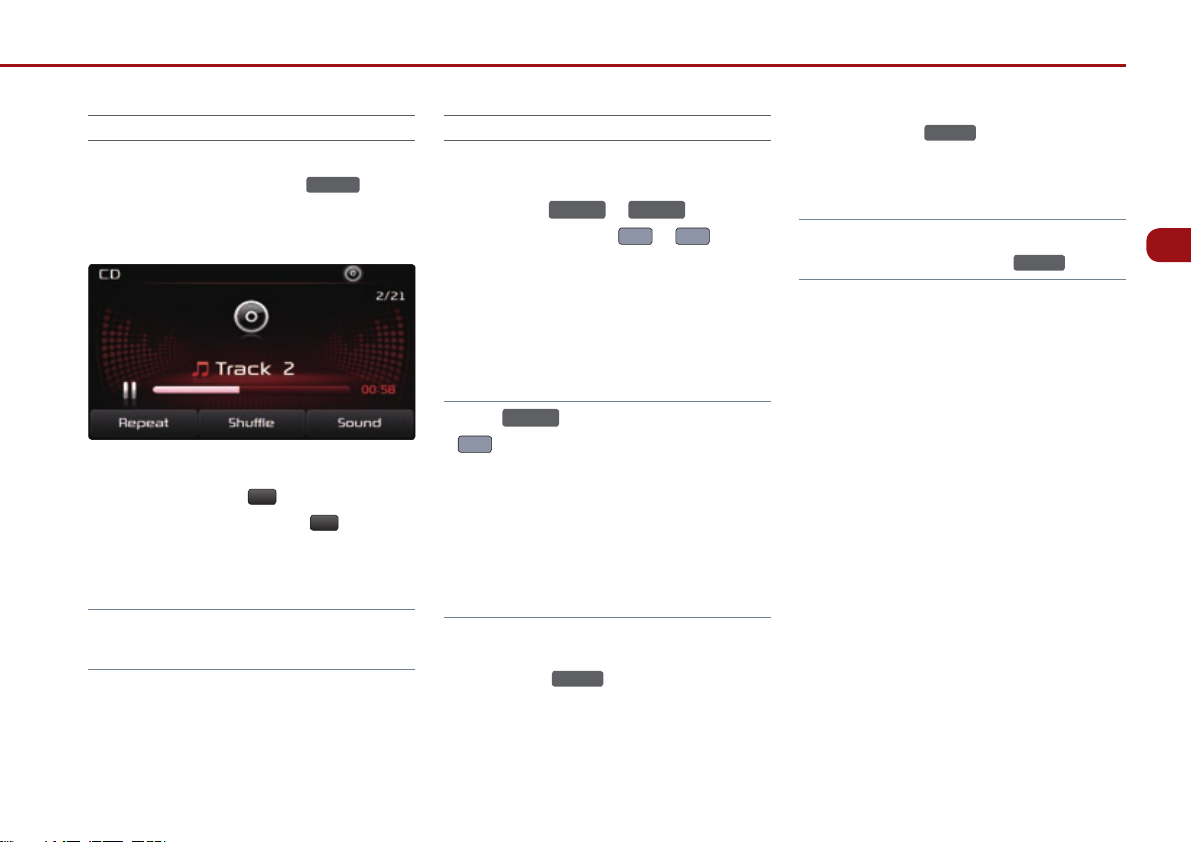
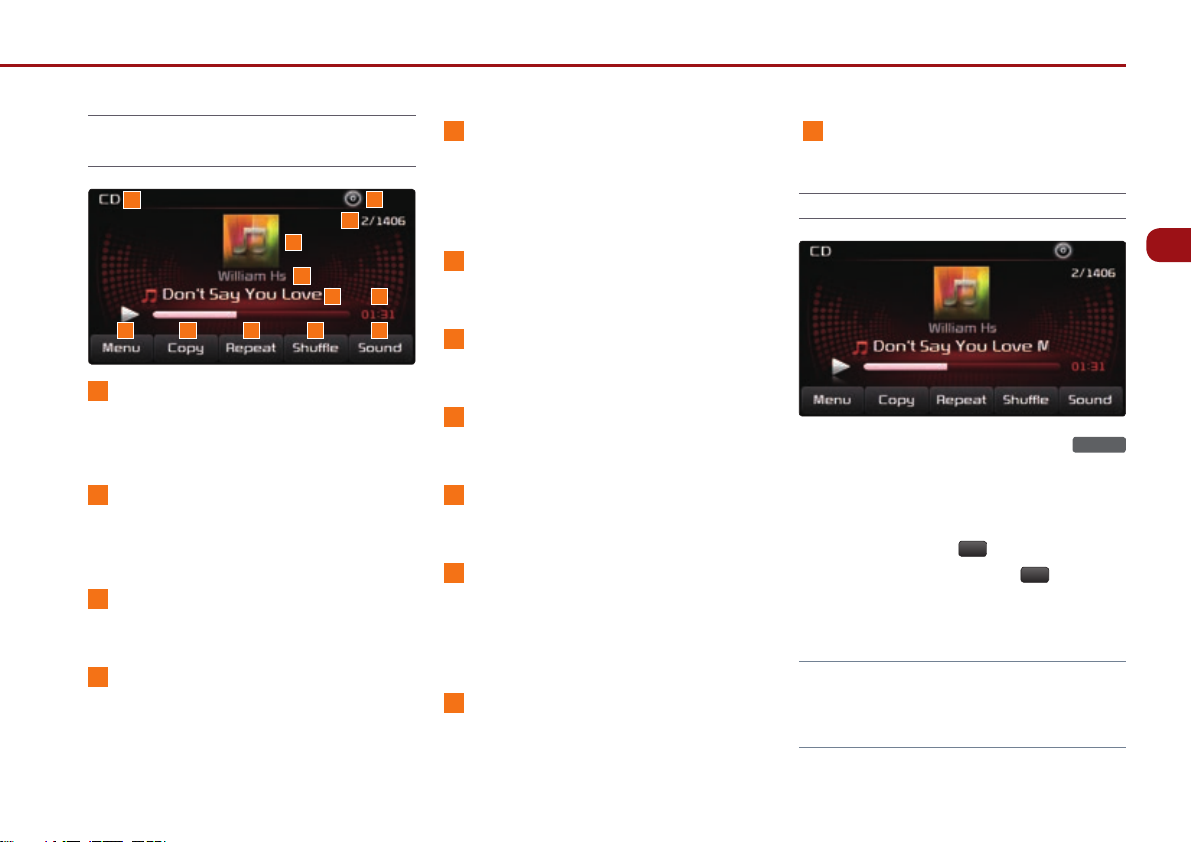
AUDIO CD Mode Screen and
Features
1
5
2 3 4
1
Mode Display
D is play s tha t the c urr ent m ode i s CD
mode.
2
Repeat
If Repeat is op erati ng, t he c urre nt tra ck w ill
be re pea ted an d the c orr esp ondi ng ic on
will be displayed.
3
Shuffle
If Shuffle is operating, the tracks will be
played in random order and the
corresponding icon will be displayed.
8
7
6
4
Sound
Enters Sound Setup.
5
Track Number
Displays the track number
6
Play Time
Displays the play time.
7
Current/Total Track Number
Dis p lays t h e c ur r e nt t r ack number and to t a l
number of tracks on CD.
8
DISC indicator
Displays that a DISC has been inserted.
Inserting/Ejecting a Disc
1. Inserting a Disc
Ins ert the dis c in to th e sl ot . Th e d is c wi ll b eg in
pl ayin g auto matic all y after i t has bee n
inserted.
2. Ejecting a Disc
Press the button.
Th e dis c wi ll im me dia tel y be st op ped a nd
ejected.
Note
●
If th e disc i s str addl ed on th e slot w ith out
removing for ap proximate ly 10 second s, the
disc will be re-inserted autom atically into th e
disc player. In such case s, the disc will not
begin playing automatically.
2-14 PART 2. AUDIO FEATURES
Listening to an Audio CD
SEEK
TRACK
∧
SEEK
∨
TRACK
SEEK
∨
TRACK
1. In ser t a CD or pre ss th e
th e con tr ol pa nel i f th e CD ha s alr ead y
been inserted.
2. When a t rack is pl aying and yo u wish to
pau se, pre ss the
but ton ne xt to th e
ll
pr ogr es s bar. Pr ess t he
restart the track.
Note
●
When playing a CD-TEXT, the title and art i s t
will also be displayed.
MEDIA
▶
button to
key on
Selecting a CD track
1. Selecting through Track up/Down
1. Press the
control pa nel or the
the s teeri ng whe el con trol ler to pl ay the
desired track.
2. T he p rev iou s or ne xt tr ac k wil l beg in
playing.
Note
●
If th e
∨
key o n the s teer ing w hee l co ntro lle r
are pressed and released after the track has
played for more than 3 s eco nds, t he sta rt o f
th e cur ren t tra ck wi ll be gin p lay ing. I f th e
track has be en playing for less th an 3 sec
on ds , the s tar t of t he p rev iou s tr ack w ill
be
gin playing.
2. Selecting through manual search
1. Turn the
pan el in cl ock wise o r coun ter-c loc kwi se
direc tion. Eac h click wil l display inf orma
tion about the selected track.
or
keys on the
∧
or ∨ keys on
key on t he Cont rol pan el or
kn ob on t he co ntr ol
TUNE
2. Press the
knob to play th e
TUNE
selected track.
Note
●
The current tr ack wi ll cont inue playi ng even as
you search tracks through the
-
-
TUNE
knob.
AUDIO FEAT URE S
PART 2. AUDIO FEATURES 2-15

PART 2 AUDIO FEATURES
MP3 CD MODE
Cautions upon handling MP3 CD
1. Precautions upon handling discs
●
Ac ce pta bl e sta nd ard : MPEG1 A UDI O
LAYER 3
●
Acceptable sampling frequency: 32, 44.1,
48 (KHz)
●
Acc epta ble bi t rate: 32 , 40, 48 , 56, 64 ,
80, 96, 112, 128, 160, 192, 224, 256, 320
(kbps)
●
Recomme nd ed bi t rate & refer enc e sa mpling frequency: sampling frequency
96
, 128, 192 kbps fixed bit rate /44.1KHz
2. ID3 tag
●
Th is dev ic e sup por ts ID 3v1.0 , ID3 v1.1,
ID3v2.2, ID3v2.3, and ID3v2.4 ID3 tags.
3. Supported media
●
The MP3 medi a suppor ted by t he devic e
are CD-ROM and USB.
4. Supported media formats
●
Thi s devic e sup port s ISO9 660 LE VEL1
and LEVEL2. D etailed s pecifi cation i s as
below.
●
Maximum directory layers: 8 layers
●
Ma xi mu m fol de r len gt h: 64 B yt es , fil e
name length: 64 Bytes
●
Ma ximum n umber o f fold ers whi ch can
be s tor ed on to on e di sc: 25 6 fo lde rs
(including ROOT directory)
●
Maxi mum number o f files whic h can be
stored onto one disc: 512 files
5. Precautions upon burning MP3 files
●
The u se of ISO 9 660 L EVEL 2 JU LIET
fo rma t is r eco mm end ed w he n bur nin g
MP3 file s. Burning in ot her formats may
abnormally display the file names.
●
It is possib le to display up to 32 c haracters for file a nd folder names i n case of
UN
IC ODE , and u p to 64 c har ac ter s in
case of ASCII.
●
The full length of the artist name and the
song title c an be disp layed by using the
scroll function.
6. Precaution
●
Use an M P3 bit rat e which i s less t han
128 kbps . The sou nd quali ty can not be
guaranteed for MP3s exceeding
128kbps.
2-16 PART 2. AUDIO FEATURES
MP3 CD Mode Screen and
Features
1
10
8
5
Shuffle
I f Shu ffl e is op era tin g, th e son gs wi ll be
12
11
79
pl aye d in ra ndo m or der a nd th e cor re sponding icon will be displayed.
6
Sound
Enters Sound Setup.
12DISC indicator
Displays that a DISC has been inserted.
Listening to an MP3 CD
AUDIO FEAT URE S
2 3 4 5 6
1
Mode Display
Dis plays that the c urrent mod e is MP3 CD
mode.
2
Menu
Dis plays the cat egories a nd song list s for
the MP3 CD.
3
Copy
Copies current song into JUKEBO X.
4
Repeat
If Repeat is op er ating , th e cur rent s on g wil l
be re pea ted an d the c orre spo ndi ng ic on
will be displayed.
7
Play Time
Displays the play time.
8
Artist name
Displays the artist name.
9
Song Title
Displays the song title.
10
Album Art Icon
Whe n pressed, disp lays information abo ut
th e cur ren t so ng (ar ti st, t itl e, al bum a nd
other information).
11
Current/Total Track Number
Dis p lays t h e c ur r e nt t r ack number and to t a l
number of tracks on the current playing list.
1. In se rt a n MP3 C D or p res s th e
MEDIA
key o n th e co ntr ol p ane l if t he CD h as
already been inserted.
2. When a s ong is play ing and you w ish to
pau se, pre ss the
pr ogr es s bar. Pr ess t he
but ton ne xt to th e
ll
▶
button to
restart the song.
Note
●
Fo r som e med ia f orm ats , the s yst em ma y
require tim e for media i ndexing. I n the cas e of
MP3 CDs, the system may take 1.5sec / song.
PART 2. AUDIO FEATURES 2-17
PART 2 AUDIO FEATURES
SEEK
TRACK
∧
SEEK
∨
TRACK
SEEK
∨
TRACK
Selecting an MP3 CD song
1. Selecting through song up/Down
1. Press the
control pa nel or the
the s teeri ng whe el con trol ler to pl ay the
desired track or song.
Note
●
If t he
∨
key on t he ste erin g whe el con trol ler is
pr ess ed an d rel eas ed af te r the s ong h as
playe d for mor e than 3 se cond s, the st art of
the current s ong will b egin pl aying. If the s ong
has been playi ng for less tha n 3 second s, the
start of the previous song will begin playing.
2. Selecting through manual search
1. Turn the
pan el in cl ock wise o r coun ter-c loc kwi se
direc tion. Eac h click wil l display inf orma
tion about the selected song.
2.
Press the
selected song.
or
key o n th e Con tr ol pa nel o r
kn ob on t he co ntr ol
TUNE
knob to play the
TUNE
keys on the
∧
or ∨ keys on
3. Selecting from MP3 list
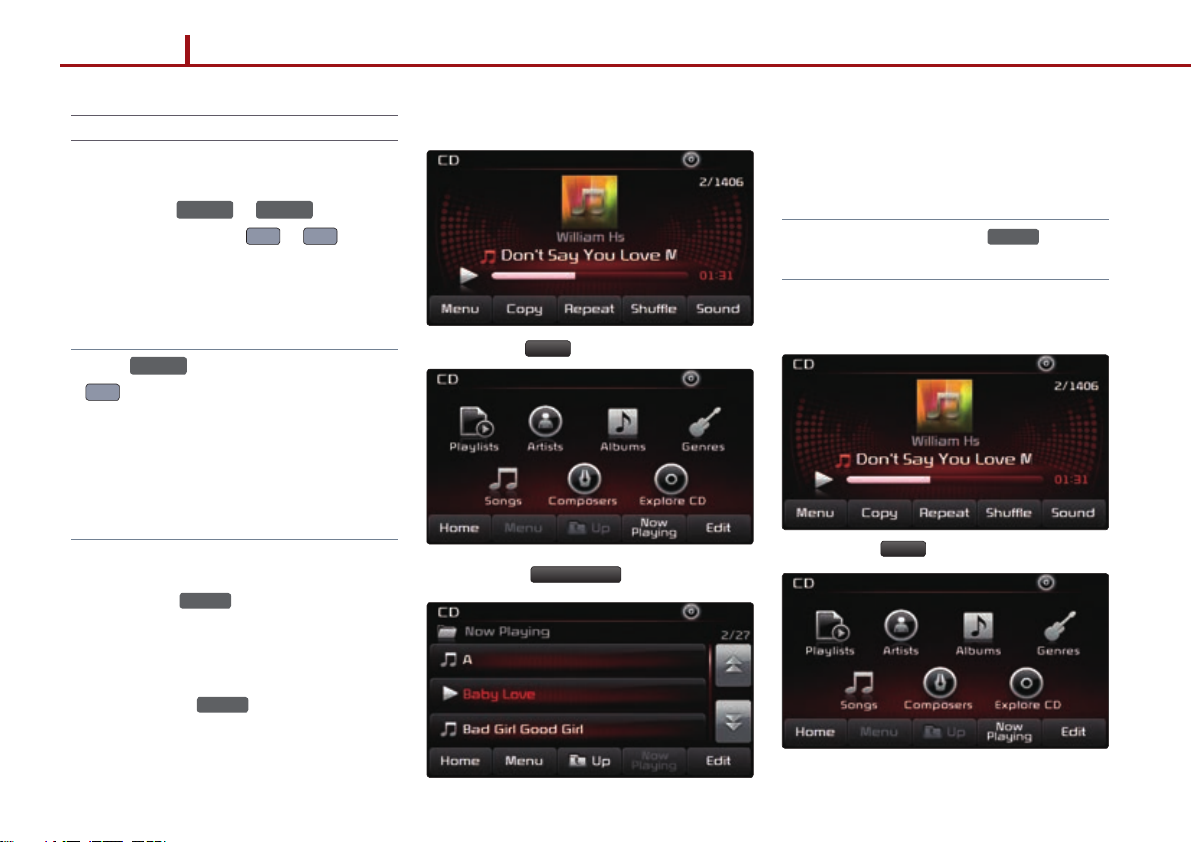
1.Press the
2. Press the
Menu
Now Playing
-
button.
button.
3. Press the name of t he song fro m the list .
The song will automatically start playing.
Note
●
In the MP3 l ist scree n, the
also be used to select songs.
4. By Artists, Albums, Genres, Songs,
Composers
1. Press the
Menu
button.
TUNE
knob c an
2-18 PART 2. AUDIO FEATURES
2. Ch oose th e categ ory t hroug h whic h you
 Loading...