


Workshop manual
ZTH
English

Svenska – 31

WORKSHOP MANUAL
RIDE-ON LAWN MOWER
ZTH
Contents |
|
Contents .................................................................. |
1 |
Safety Instructions ................................................. |
3 |
General Instructions............................................. |
3 |
Special Instructions.............................................. |
3 |
Explanation of Symbols ........................................ |
5 |
Tools ....................................................................... |
6 |
Technical Data ........................................................ |
7 |
Delivery and Dealer Service ................................ |
11 |
Pre-delivery Service........................................... |
11 |
After the First 8 Hours........................................ |
12 |
25 Hour Service ................................................. |
12 |
50 Hour Service ................................................. |
12 |
100 Hour Service ............................................... |
13 |
300 Hour Service ............................................... |
13 |
At Least Once a Year......................................... |
14 |
Maintenance Schedule ...................................... |
15 |
Delivery Servicing ................................................ |
19 |
To our Dealers ................................................... |
19 |
Removing the Mower from its Packaging .......... |
19 |
Delivery Service ................................................. |
20 |
Test Running...................................................... |
24 |
Administration .................................................... |
24 |
Design and Function ............................................ |
25 |
General .............................................................. |
25 |
Mower Identification ........................................... |
25 |
Engine................................................................ |
27 |
Drive and Control ............................................... |
27 |
Brakes................................................................ |
27 |
Mower Deck ....................................................... |
28 |
Repairs .................................................................. |
29 |
Engine................................................................ |
29 |
Adjusting the Throttle Wire................................. |
31 |
Checking and Adjusting the Choke Wire ........... |
32 |
Fuel tank ............................................................ |
33 |
Adjusting Motion Control Lever Linkages .......... |
34 |
Adjusting Motion Control Lever Spring-back...... |
34 |
Adjusting the Park Brake ................................... |
34 |
Mower Deck ....................................................... |
35 |
Spindle Blade Bearings..................................... |
36 |
Sharpening and Balancing Blades..................... |
37 |
Setting the Mower Deck .................................... |
38 |
Deck Belt............................................................ |
38 |
Hydraulic Pump Belt .......................................... |
40 |
Front Wheel Bearings ........................................ |
41 |
Electrical System ................................................ |
43 |
Troubleshooting ................................................ |
43 |
Wiring Assembly ............................................... |
43 |
Battery............................................................... |
46 |
Fuses ................................................................ |
46 |
Relays ............................................................... |
47 |
Starter Motor Contactor..................................... |
47 |
Ignition and Start Switch ................................... |
48 |
Hour Meter ........................................................ |
48 |
Blade Switch ..................................................... |
49 |
Mower Deck Clutch ........................................... |
49 |
Motion Control Switches ................................... |
50 |
Park Brake Interlock Switch .............................. |
51 |
Welding ............................................................. |
52 |
Hydraulic System ................................................ |
53 |
Hydraulics Hygiene ........................................... |
53 |
Hydraulic Oils .................................................... |
54 |
Correct Oil Leaks .............................................. |
54 |
Keep Hydraulic Oil Clean .................................. |
54 |
Work Methods ................................................... |
54 |
ZTH Hydraulic System ...................................... |
55 |
Hydraulic Tank .................................................. |
56 |
The Cooler for the Hydraulic System ................ |
57 |
Hydraulic Filter .................................................. |
57 |
Hydraulic Lines.................................................. |
57 |
Hydraulic Pump................................................. |
58 |
Hydraulic Motors ............................................... |
60 |
Troubleshooting .................................................. |
61 |
Engine ............................................................... |
61 |
Wiring Harness.................................................. |
61 |
Clutch ................................................................ |
63 |
Hydraulic Pump................................................. |
66 |
English-1
English-2

SAFETY INSTRUCTIONS
Safety Instructions
General Instructions
This workshop manual has been written for users who have a good understanding of the repair and servicing of ride-on mowers.
The workshop where the ride-on mower is repaired must have have all the safety systems demanded by local regulations.
No one is to attempt to repair the ride-on mower without having first read and understood the contents of this manual.
The ride-on mower has been safety tested. Safety approval applies only when the ride on-mower uses parts or equipment supplied or recommended by Husqvarna Turf Care.
Special Instructions
The fuel used in the ride-on mower is hazardous if used incorrectly. Pay particular attention to the following:
•The fuel and the fumes it gives off are toxic.
•Eye and skin complaints can result from incorrect exposure.
•Breathing difficulties can result from incorrect exposure.
•The fuel and fumes are highly flammable.
When using compressed air, users must not direct the air stream towards themselves or any other person. Air may penetrate the blood stream and cause life-threatening damage.
Use hearing protectors when test driving.
After test driving, do not touch the muffler before it has cooled down (danger of burns). This especially applies if the ride-on mower has a catalytic converter. If consumed, the lining on and in the catalytic converter element can damage health. Wear protective gloves whenever working on the catalytic converter or the silencer.
With the engine running, many engine and drive system components become hot and may cause burns if touched. Do not touch such components before they have cooled down.
When draining oil from a hot engine or hot hydraulic system, be aware that the oil can be hot enough to cause burns. Wear protective glasses whenever there is a risk of splashing.
The mower blades are sharp. To avoid cuts, always wear protective gloves when handling the blades.
Wear protective glasses when working with springs. Springs can detach from their mounts and fly with great force into unprotected eyes.
Use the right tools for each job. Check all tools before using them and repair or replace as necessary.
English-3

SAFETY REGULATIONS
Keep the workplace clean and tidy. Ensure that illumination is good, that tools which are not being used are stored appropriately and that all waste (scrap, swarf, etc.) is immediately placed in the appropriate container. Pay particular attention to keeping the floor clean so that there is no risk of slipping or tripping.
Be extremely careful when handling battery acid. Severe burns may result if the acid touches the skin. If acid is spilt on the skin, drench immediately with running water.
Always wear protective glasses when handling battery acid. Blindness may result if acid gets into the eyes. If there is an accident, take immediate action and contact a doctor as soon as possible.
Be careful when working on the battery. Explosive gas is formed in the battery. Never handle the battery when smoking or in the vicinity of naked flames or sparks (the battery may explode and cause severe injuries).
During certain maintenance and service operations, it is required that the mower be rendered incapable of starting. This is to prevent injury to those working on or standing near the mower.
Hydrostatic braking may be lost if there is a failure in the hydrostatic drive.
Certain solvents and cleaning agents are flammable. Do not use them whenever there is a less dangerous alternative. Never use flammable solvents in areas where there is a risk of ignition. Dispose of used cleaning agents in sealed containers.
Respect the environment. Ensure that all solvents, waste oil and used oil filters are handled in an environment-friendly way. Observe all local regulations on the environment. A Husqvarna workshop must look clean at all times!
In this workshop manual, “warning boxes” containing further safety instructions will be found next to certain work instructions. Observe these safety instructions, they are there for your protection.
In this workshop manual, all locators (“right”, “left”, etc.) are judged as viewed from behind the forwardfacing mower (i.e. as if standing directly behind the mower when it is ready to drive forwards).
English-4

EXPLANATION OF SYMBOLS
Explanation of Symbols
The symbols below are used on the mower and in this manual. Study them carefully and be aware of what they mean.
WARNING!
Xxxxxxx xxxx xxxxxxxx xxx x. xxxx xxxxxx xx.
Is used in this manual to make the user aware that there is a danger of personal injury, especially if the special instructions are not followed.
IMPORTANT INFORMATION Xxxxxxx xxxx xxxxxxxx xxx x xxxx xxxxxx xx.
Is used in this manual to make the user aware that there is a danger of material damage, especially if the special instructions are not followed. It is also used where it is judged that there is a danger of incorrect handling or incorrect assembly/fitting.
Reverse |
Neutral |
Fast |
Slow |
Choke |
Fuel |
Warning! |
Park brake |
CE conformity |
Warning! Rotating blades, |
Do not touch rotating |
|
|
marking |
stand clear of the chute. |
parts. |
Battery acid is corrosive, explosive and |
Do not stand here. |
Max. sound emission. |
|
flammable. |
|||
|
|||
|
Use ear protectors. |
||
|
|
English-5

TOOLS
Tools
The mower’s special design means that most repair and maintenance work can be carried out using standard tools.
Servicing of engines and hydraulic pumps requires special tools. These are listed in the service manuals of the individual manufacturers.
The mower (engine excluded) has mainly UNC or UNF screw/bolt/nut threads. Certain nuts have special stiffy threads for securing. It is vital that exactly the right size tools (i.e. imperial measurement) are used on these.
Those working on the mower must have ready access to socket wrench sets and open end wrenches of the following sizes:
•3/8"
•7/16"
•1/2"
•9/16"
•5/8"
•11/16"
•3/4"
The following are also required:
•Torque wrenches, 12 Nm - 110 Nm.
•15/16" socket for torque tightening of blade bolts.
•7/8" open end wrench or combination wrench for torque tightening of hydraulic lines.
•A set of small, imperial measurement, Allen keys.
WARNING!
If metric or other unsuitable tools are used, there is a danger that they will slip and cause personal injury. They may also damage the surfaces of the nut or bolt in such a way that tools can no longer get a firm grip.
English-6

TECHNICAL DATA
Technical Data
Model
Model part number Engine (spec. number) Cylinder diameter Cylinder stroke Cylinder volume Power
Engine RPM
Idle RPM
Spark plugs (2)
Oil capacity, engine (total) Engine weight
Cutting width
Blade length
Tightening torque, blade bolt Cutting height
Blade engagement
Slip torque, clutch
Clutch coil resistance
Supply voltage clutch
Tightening torque, clutch bolt Blade tip speed
Anti-scalp rollers
Tightening torque, bolt for mower deck pulley
Hydrostatic drive
Tightening torque, pipe couplings
Hydraulic pumps (2)
ZTH5223
968 99 91 60
Kawasaki (FH680V-AS15)
75.2mm (2.96 in.) 76 mm (2.99 in.) 675 cc (41.19 cu.in.) 23 hp
2,950 RPM
1,550 RPM NGK BPR4ES
1.8litres (3.8 US pints)
40.5kg (89.3 lbs) 1321 mm (52 in.)
457.2mm (18 in.)
122 Nm (90 ft/lb)
Adjustable 38 mm (1.5") to 152 mm (6") in 64 mm (0.25") increments
Warner Mag-Stop
Electromagnetic clutch
271 Nm (200 ft/lb)
1.74 - 1.93 ohms at 23°C (68°F)
12 - 14 V
67 Nm (50 ft/lb)
4,704 m/min. 6, adjustable 61 Nm (45 ft/lb)
Dual Hydro-gear pumps and Parker/Ross Wheel drive motors
41 Nm (30 ft/lb)
Hydro Gear BDP 10A 404
ZTH6125
Kawasaki (FH721V-AS04)
75.2mm (2.96 in.) 76 mm (2.99 in.) 675 cc (41.19 cu.in.) 25 hp
2,950 RPM
1,550 RPM NGK BRR1550
1.8litres (3.8 US pints)
41.2kg (90.8 lbs) 1549 mm (61 in.)
533.4mm (21 in.)
122 Nm (90 ft/lb)
Adjustable 38 mm (1.5") to 152 mm (6") in 64 mm (0.25") increments
Warner Mag-Stop
Electromagnetic clutch
271 Nm (200 ft/lb)
1.74 - 1.93 ohms at 23°C (68°F)
12 - 14 V
67 Nm (50 ft/lb)
4,541 m/min 6, adjustable
61 Nm (45 ft/lb)
Dual Hydro-gear pumps and Parker/Ross Wheel drive motors
41 Nm (30 ft/lb)
Hydro Gear BDP 10A 404
English-7

TECHNICAL DATA
Model |
ZTH5223 |
ZTH6125 |
Displacement |
10.2 cc/r (0.623 cu. in./rev) |
10.2 cc/r (0.623 cu. in./rev) |
Nominal working pressure |
70 bars (1000 PSI) |
70 bars (1000 PSI) |
Max. hydraulic pressure |
145 bars (2,100 PSI) |
145 bars (2,100 PSI) |
Max. hydraulic oil temp |
110°C (230°F) |
110°C (230°F) |
Weight, hydraulic pump |
3.6 kg (8 lbs) |
3.6 kg (8 lbs) |
Hydraulic motors (2) |
Parker Ross |
Parker Ross |
Tightening torque, wheel motor |
122 Nm (90 ft/lb) |
122 Nm (90 ft/lb) |
hub nut |
|
|
Hydraulic oil |
1.9 litres (2 qt.), 15W-50 |
1.9 litres (2 qt.), 15W-50 |
|
Synthetic |
Synthetic |
Hydraulic oil cooler |
Yes |
Yes |
Speed forward |
Variable, max. 12.9 km/h |
Variable, max. 12.9 km/h |
|
(8 mph) |
(8 mph) |
Speed reverse |
Variable, max. 3.23 km/h |
Variable, max. 3.23 km/h |
|
(2 mph) |
(2 mph) |
Rear tires |
Carlisle 24" X 12.00 - 12 Tubeless |
Carlisle 24" X 12.00 - 12 Tubless |
|
Turf Master |
Turf Master |
Tightening torque, lug nuts |
100 Nm (75 ft/lb) |
100 Nm (75 ft/lb) |
Front tires |
Carlisle 13" X 5.00 - 6 Tubeless |
Carlisle 13" X 5.00 - 6 Tubeless |
Electrical system |
12 V with 15 A charging system |
12 V with 15 A charging system |
Fuel capacity |
44 litres (11.4 US Gal.), 22 litres/ |
44 litres (11.4 US Gal.), 22 litres/ |
|
tank |
tank |
Seat |
Adjustable, high-back seat with |
Adjustable, high-back seat with |
|
armrests |
armrests |
Overall length |
2057 mm (81 in.) |
2057 mm (81 in.) |
Overall width (chute up) |
1346 mm (53 in.) |
1575 mm (62 in.) |
Overall width (chute down) |
1600 mm (63 in.) |
1829 mm (72 in.) |
Overall height |
1073 mm (42.25 in.) |
1073 mm (42.25 in.) |
Weight |
464.5 kg (1024 lbs.) |
464.5 kg (1024 lbs.) |
Tightening torque, standard |
|
|
bolts |
|
|
1/4" |
12 Nm (9 ft/lb) |
12 Nm (9 ft/lb) |
5/16" |
25 Nm (18 ft/lb) |
25 Nm (18 ft/lb) |
3/8" |
44 Nm (33 ft/lb) |
44 Nm (33 ft/lb) |
English-8
TECHNICAL DATA
Model |
ZTH5223 |
ZTH6125 |
7/16" |
70 Nm (52 ft/lb) |
70 Nm (52 ft/lb) |
1/2" |
110 Nm (80 ft/lb) |
110 Nm (80 ft/lb) |
Accessories |
|
|
BioClip adapter |
Optional |
Optional |
Foot controlled mower deck lift |
Optional |
Optional |
Deluxe seat |
Optional |
Optional |
English-9

TECHNICAL DATA
English-10

DELIVERY AND DEALER SERVICE
Delivery and Dealer Service
Pre-delivery Service
1.Charge the battery.
2.Mount the rear tires.
3.Check and adjust the tire pressure in all tires. All tires should be1 bar (15 PSI).
4.Fit the motion control levers in the normal position.
5.Connect the rod to the seat stop.
6.Connect the contactor to the cable for the seat’s safety switch.
7.Fit the armrests to the seat’s back support.
8.Check that the engine has the right quantity of oil.
9.Check that the hydraulic tank has the right quantity of oil.
10.Adjust the position of the motion control levers.
11.Fuel the mower and open the gas valve.
12.Connect exhaust fume extraction.
13.Start the engine.
14.Vent the hydraulic system.
15. .Check that there is drive to both wheels
16.Check mower deck settings.
17.Check:
The park brake safety switch. The seat safety switch.
The motion control lever safety switches. Correct park brake operation.
Forward drive. Reverse drive. Blade engagement.
18.Check the idling speed (1,550 ±50 rpm).
19.Check max. engine speed (2,800 ±75 rpm).
English-11

DELIVERY AND DEALER SERVICE
20.Inform the customer of the:
Necessity and advantages of following the maintenance schedules.
Necessity and advantages of having the mower inspected every 300 hours.
The effect on resale value of regular servicing and a fully stamped service book.
The use of BioClip.
21.Complete the sales certificate, etc.
After the First 8 Hours
Change the motor oil.
25 Hour Service
1.Check the fuel pump air filter.
2.Check the oil level in the hydraulic system.
3.Check tire pressure.
4.Lubricate the mower deck’s belt tensioner.
5.Lubricate the hydraulic pump’s belt tensioner.
6.Check/clean the engine’s cold air intake.
7.Clean the air cleaner’s pre-filter (Oilfoam).
50 Hour Service
1.Carry out a 25 hour service.
2.Clean/change the air cleaner’s filter cartridge (paper filter). Perfom more reqularly in dusty operating conditions.
3.Lubricate the bearings of the front wheels.
4.Lubricate the shafts of the motion control levers.
5.Lubricate the mower deck struts.
6.Lubricate the cutting height regulator.
7.Check/adjust the park brake.
English-12

DELIVERY AND DEALER SERVICE
100 Hour Service
1.Carry out a 25 hour service.
2.Carry out a 50 hour service.
3.Change the engine oil.
4.Check if the hydraulic oil needs changing (every 300 hours).
5.Check if the engine’s oil filter needs changing (every 200 hours).
6.Clean/change the spark plugs.
7.Change the fuel filter in the fuel line.
8.Clean the engine and transmission cooling fins.
9.Clean and check if the air filter’s paper cartridge needs changing (every 200 hours).
300 Hour Service
1.Inspect the machine. Reach agreement with the customer on what additional work is to be carried out.
2.Carry out a 25 hour service.
3.Carry out a 50 hour service.
4.Carry out a 100 hour service.
5.Change the oil and the filter in the hydraulic system.
6.Clean the combustion chamber and grind the valve seats.
7.Check the play in the engine valves.
8.Change the air cleaner’s pre-filter (Oilfoam).
English-13

DELIVERY AND DEALER SERVICE
At Least Once a Year
1.Clean the engine’s cold air intake (25 hours).
2.Change the air cleaner’s pre-filter (Oilfoam).
3.Change the paper cartridge in the air filter (200 hours).
4.Change the engine oil (100 hours).
5.Change the engine’s oil filter (200 hours).
6.Change the oil and the filter in the hydraulic system.
7.Check/adjust the cutting height regulator.
8.Check/adjust the park brake (50 hours).
9.Clean/change the spark plugs (100 hours).
10.Change the fuel filter in the fuel line (100 hours).
11.Clean the cooling fins (100 tim).
12.Check the play in the engine valves (300 hours).
13.A 300 hour service to be carried out by an authorized workshop.
English-14

DELIVERY AND DEALER SERVICE
Maintenance Schedule
The table below lists the maintenance required by the ride-on mower. Several of the points not covered in this workshop manual will be found in the Operating Instructions.
|
|
Daily |
Weekly |
At |
Maintenance intervals |
||||
|
|
|
|
|
least |
|
in hours |
||
|
|
|
|
|
once |
|
|
|
|
Maintenance |
Page |
Pre- |
After |
|
25 |
50 |
100 |
300 |
|
|
a |
||||||||
|
|
use |
use |
|
|
|
|
|
|
|
|
|
year |
|
|
|
|
||
|
|
|
|
|
|
|
|
|
|
|
|
|
|
|
|
|
|
|
|
Check for fuel and oil leaks. |
- |
|
|
|
|
|
|
|
|
Check the park brake. |
- |
● |
|
|
|
|
|
|
|
Check engine oil level (every fueling). |
21 |
● |
|
|
|
|
|
|
|
Check the fuel pump air filter. |
- |
|
|
|
|
▼ |
|
|
|
Check the safety systems. |
- |
▼ |
|
|
|
|
|
|
|
Check/clean the engine’s cold air intake. |
- |
|
▼ |
|
|
|
|
|
|
Check the mower deck. |
38 |
|
● |
|
|
|
|
|
|
Check fasteners (bolts, nuts, etc.). |
- |
|
|
|
|
|
|
|
|
Start engine and blades; check for abnormal |
- |
|
|
|
|
|
|
|
|
noise. |
|
|
|
|
|
|
|
|
|
Clean the underside of the mower deck. |
- |
|
▼ |
|
|
|
|
|
|
Check hydraulic system oil level. |
22 |
|
|
|
|
● |
|
|
|
Check the condition of belts, pulleys, etc. |
38 |
|
● |
|
|
|
|
|
|
Check for any damage. |
- |
|
|
|
|
|
|
|
|
Check tire pressure. |
20 |
|
|
|
|
● |
|
|
|
Clean thoroughly around the engine. |
- |
|
|
|
|
|
|
|
|
Clean thoroughly around the hydraulic system. |
53 |
|
● |
|
|
|
|
|
|
Clean thoroughly around belts, pulleys, etc. |
- |
|
|
|
|
|
|
|
|
Lubricate mower deck belt tensioner. |
- |
|
|
|
|
▼ |
|
|
|
Lubricate belt tensioner for hydraulic pumps. |
- |
|
|
|
|
▼ |
|
|
|
Lubricate all wires. |
- |
|
|
▼ |
|
|
|
|
|
Lubricate driver’s seat mechanisms. |
- |
|
|
▼ |
|
|
|
|
|
Lubricate the throttle control. |
- |
|
|
▼ |
|
|
|
|
|
Clean the engine’s cold air intake. |
- |
|
|
|
▼ |
▼ |
|
|
|
Lubricate mower deck links. |
- |
|
|
|
|
|
|
|
|
Lubricate front wheel mounts (every 200 hours). |
- |
|
|
|
|
|
|
▼ |
|
Lubricate front wheel bearings. |
- |
|
|
|
|
|
▼ |
|
|
Lubricate the shafts of the motion control levers. |
- |
|
|
|
|
|
▼ |
|
|
Lubricate mower deck struts. |
- |
|
|
|
|
|
▼ |
|
|
Lubricate the mower deck’s height regulator. |
- |
|
|
|
|
|
▼ |
|
|
|
|
|
|
|
|
|
|
|
|
English-15

DELIVERY AND DEALER SERVICE
|
|
Daily |
Weekly |
At |
Maintenance intervals |
|
|
|
|
|
|
least |
in hours |
|
|
|
|
|
once |
|
Maintenance |
Page Pre- |
After |
|
25 50 100 300 |
||
|
a |
|||||
|
|
use |
use |
|
|
|
|
|
|
year |
|
||
|
|
|
|
|
|
|
|
|
|
|
|
|
|
Check/adjust the cutting height regulator. |
38 |
|
|
|
● |
|
Clean the air cleaner’s pre-filter (Oil-foam). |
- |
|
|
|
▼ |
▼ |
Clean the air cleaner’s filter 2) (paper filter). |
- |
|
|
|
▼ |
▼ |
Change the motor oil 1) . |
22 |
|
|
|
● |
● |
Change the hydraulic oil (every 300 hours). |
56 |
|
|
|
● |
● |
Change the engine’s oil filter (every 200 hours). |
- |
|
|
|
▼ |
▼ |
Clean/change the spark plugs. |
- |
|
|
|
|
|
Change the fuel filter in the fuel line. |
- |
|
|
|
▼ |
▼ |
Clean the cooling fins. |
- |
|
|
|
|
|
Check the play in the engine valves 4) . |
- |
|
|
|
|
|
Change the air cleaner’s pre-filter (Oil-foam). |
- |
|
|
|
▼ |
▼ |
Change air filter (paper filter) 2) (every 200 hours). |
- |
|
|
|
▼ |
▼ |
Carry out a 300 hour service 4) . |
13 |
|
|
|
● |
● |
Check/adjust the park brake. |
34 |
|
|
|
● |
● |
1) First change after 8 hours. With heavy operating conditions or high ambient temperature, change every 50 hours. 2) In dusty conditions, clean and change more frequently. 3) Where the mower is in daily use, lubrication must be carried out twice a week. 4) To be carried out by an authorized workshop.
● = Covered in this workshop manual.
= Not coverd in this workshop manual or the Operating Instructions.
▼ = Covered in the Operating Instructions.
WARNING!
Service procedures may only be carried out on the motor or mower deck when:
• The motor has been switched off.
•The ignition key has ben removed.
•The ignition cables have been removed from the spark plugs.
•The park brake has been applied.
•The mower deck has been disengaged.
English-16

DELIVERY AND DEALER SERVICE
Service Records
Remember to enter all service work in the Service Log at the back of the Operating Instructions. Record details of any major repairs.
Enter the meter reading and date. Stamp and sign the stamp field.
In your customer register, make a note of the work that has been carried out.
English-17

DELIVERY AND DEALER SERVICE
English-18
DELIVERY SERVICING
Delivery Servicing
To our Dealers
The quality of delivery servicing is vital to aftersales success. It is in everyone’s interest that the aftermarket operates smoothly:
•The customer will be satisfied with his/her mower and know who he/she can contact for help with any problems.
•You will gain a regular customer who recommends you and your company to others.
•Together we will strengthen our brand and take joint responsibility for our products and customers.
Complete all the paperwork meticulously.
Fill in warranty and delivery documents, etc. and ensure that the customer receives the right operating instructions for his/her mower.
Keep a register of customers and their mowers (with serial numbers, etc.). The information contained in the customer register is invaluable for marketing and when ordering spare parts.
When supplying a mower, you should also give the customer all information necessary for the safe operation and care of the machine. Pay particular attention to informing the customer about:
•Safety instructions.
•Mower controls.
•Checking oil levels and the oil to be used when topping-up.
•The first oil change after the running-in period.
•The necessity and advantages of observing the maintenance schedules and regularly returning the mower for servicing.
•What type of fuel to use.
• Ways of achieving the best results with the mower. The use of BioClip.
•The accessories available for his/her mower.
•Warranty conditions.
•Your company and the person to be contacted if there are any problems.
Removing the Mower from its Packaging
Mowers are normally delivered from the factory in special packaging - a wooden crate with a solid bottom.
WARNING!
Handle the transport crate carefully. Keep the goods as level as possible.
Use long pallet forks.
8011-549 |
Mower on its delivery baseplate
English-19
DELIVERY SERVICING
The baseplate itself stands on a pallet and the whole assembly can be handled using a standard forklift truck. To keep the goods as level as possible, two people should assist the truck driver. Driving and lifting must both be performed with care.
Remove the upper part of the crate from the wooden baseplate.
The mower (rear wheels not fitted) is secured to the baseplate by plastic straps and wooden blocks. Certain components that are to be fitted to the mower, or handed to the purchaser on delivery, are wrapped separately in plastic bags.
Remove the plastic sheeting covering the mower.
When unpacking the mower, check that there is no transport damage. Any damage is to be reported to the transport company in the normal way.
The packaging is not to be returned.
Delivery Service
1.Charge the battery. The mower is normally delivered with a charged battery topped-up with electrolyte.
2.Raise the rear of the mower until it is clear of the baseplate and the rear
wheels can rotate freely. Hold firmly in position using blocks or jack stands.
3. With the valves facing outwards, fit the rear wheels. Fit and tighten the wheel nuts on the wheel bolts.
4.Check and adjust the pressure in all the
tires. The recommended pressure is 1
bar (15 PSI).
8011-503
Fitting the rear wheels
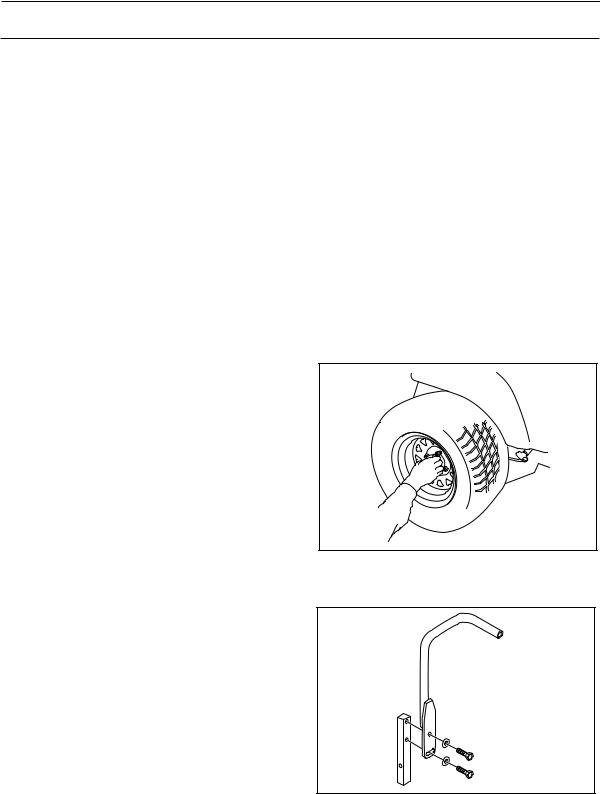
5.On both motion control levers, remove
the lower bolts and loosen the upper bolts. Swing the levers to the upright position. Hand tighten the lower bolts in the rectangular holes. The levers are adjusted at a later stage.
6.Push the levers out into their neutral
slots.
8011-502
Lever mount
English-20
 Loading...