

Page 1

Gasoline containing up to 10% ethanol (E10) is acceptable for use in this machine. The use of any gasoline exceeding 10% ethanol (E10) will void the product warranty.
Esta máquina puede utilizar gasolina con un contenido
de hasta el 10% de etanol (E10). El uso de una gasolina
que supere el 10% de etanol (E10) anulará la garantía
del producto. the product warranty.
585 94 88-26
Operator’s Manual
Manual de Operario
YTH24V48
Please read the operator's manual carefully and make sure
you understand the instructions before using the machine.
Por favor lea cuidadosamente y comprenda
estas intrucciones antes de usar esta maquina.
English/Spanish
Page 2
SAFETY RULES
Safe Operation Practices for Ride-On Mowers
DANGER: THIS CUTTING MACHINE IS CAPABLE OF AMPUTATING HANDS AND FEET AND THROW ING OBJECTS. FAILURE
TO OBSERVE THE FOLLOWING SAFETY INSTRUCTIONS COULD RESULT IN SERIOUS INJURY OR DEATH.
WARNING: In order to prevent ac ci den tal
starting when setting up, trans port ing,
ad just ing or making repairs, al ways dis con nect spark plug wire and place wire where
it can not contact spark plug.
WARNING: Do not coast down a hill in neutral, you may lose control of the tractor.
WARNING: Tow only the attachments that
are rec om mend ed by and comply with
spec i fi ca tions of the man u fac tur er of your
tractor. Use common sense when towing.
Operate only at the low est possible speed
when on a slope. Too heavy of a load, while
on a slope, is dan ger ous. Tires can lose
trac tion with the ground and cause you to
lose control of your tractor.
WARNING
Engine exhaust, some of its con stit u ents, and cer tain
vehicle com po nents contain or emit chem i cals
known to the State of Cal i for nia to cause can cer
and birth de fects or oth er re pro duc tive harm.
WARNING
Battery posts, terminals and related ac ces so ries
contain lead and lead compounds, chem i cals known
to the State of Cal i for nia to cause can cer and birth
defects or oth er re pro duc tive harm. Wash hands
after handling.
I. GENERAL OPERATION
• Read, understand, and follow all instructions on the machine and in the manual before starting.
• Do not put hands or feet near rotating parts or under the
machine. Keep clear of the discharge opening at all times.
• Only allow responsible adults, who are familiar with the
in struc tions, to operate the machine.
• Clear the area of objects such as rocks, toys, wire, etc.,
which could be picked up and thrown by the blades.
• Ensure the area is clear of bystanders before operating.
Stop machine if anyone enters the area.
• Never carry passengers.
• Do not mow in reverse unless absolutely necessary.
Always look down and behind before and while back ing.
• Never direct discharged material toward anyone. Avoid
discharging material against a wall or obstruction. Material
may ricochet back toward the operator. Stop the blades
when crossing gravel surfaces.
• Do not operate machine without the entire grass catcher, discharge chute, or other safety devices in place and working.
• Slow down before turning.
• Never leave a running machine unattended. Always turn
off blades, set parking brake, stop engine, and remove
keys before dismounting.
• Disengage blades when not mowing. Shut off engine
and wait for all parts to come to a complete stop before
cleaning the machine, removing the grass catcher, or
unclogging the discharge chute.
• Operate machine only in daylight or good artificial light.
• Do not operate the machine while under the influence of
alcohol or drugs.
• Watch for traffic when operating near or crossing road ways.
• Use extra care when loading or unloading the machine
into a trailer or truck.
• Always wear eye protection when operating machine.
• Data indicates that operators, age 60 years and above,
are involved in a large percentage of riding mower-related
injuries. These operators should evaluate their ability to
operate the riding mower safely enough to protect them selves and others from serious injury.
• Follow the manufacturer's recommendation for wheel
weights or counterweights.
• Keep machine free of grass, leaves or other debris build-up
which can touch hot exhaust / engine parts and burn. Do
not allow the mower deck to plow leaves or other debris
which can cause build-up to occur. Clean any oil or fuel
spillage before operating or storing the machine. Allow
machine to cool before storage.
II. SLOPE OPERATION
Slopes are a major factor related to loss of control and tipover accidents, which can result in severe injury or death.
Operation on all slopes requires extra caution. If you cannot
back up the slope or if you feel uneasy on it, do not mow it.
• Mow up and down slopes, not across.
• Watch for holes, ruts, bumps, rocks, or other hidden objects. Uneven terrain could overturn the machine. Tall
grass can hide obstacles.
• Choose a low ground speed so that you will not have to
stop or shift while on the slope.
• Do not mow on wet grass. Tires may lose traction.
Always keep the machine in gear when going down slopes.
Do not shift to neutral and coast downhill.
• Avoid starting, stopping, or turning on a slope. If the tires
lose traction, disengage the blades and proceed slowly
straight down the slope.
• Keep all movement on the slopes slow and gradual. Do
not make sudden changes in speed or direction, which
could cause the
• Use extra care while operating machine with grass catchers or other at tach ments; they can affect the stability of
the machine. Do no use on steep slopes.
• Do not try to stabilize the machine by putting your foot
on the ground.
• Do not m
machine could suddenly roll over if a wheel is over the edge
or if the edge caves in.
ow near drop-offs, ditches, or embankments. The
machine to roll over.
2
Page 3
SAFETY RULES
Safe Operation Practices for Ride-On Mowers
III. CHILDREN
WARNING. CHILDREN CAN BE INJURED BY
THIS EQUIPMENT. The American Academy
of Pediatrics recommends that children be a
minimum of 12 year of age before operating
a pedestrian controlled lawn mower and a
minimum of 16 years of age before operating
a riding lawn mower.
Tragic accidents can occur if the operator is not alert to the
presence of children. Children are often attracted to the machine and the mowing activity. Never assume that children
will remain where you last saw them.
• Keep children out of the mowing area and in the watchful
care of a responsible adult other than the operator.
• Be alert and turn machine off if a child enters the area.
• Before and while backing, look behind and down for small
children.
• Never carry children, even with the blades shut off. They
may fall off and be seriously injured or interfere with safe
machine operation. Children who have been given rides
in the past may suddenly appear in the mowing area for
another ride and be run over or backed over by the machine.
• Never allow children to operate the machine.
• Use extra care when approaching blind corners, shrubs,
trees, or other objects that may block your view of a child.
• If fuel is spilled on clothing, change clothing immediately.
• Never overfill fuel tank. Replace gas cap and tighten
securely.
GENERAL SERVICE
• Never operate machine in a closed area.
• Keep all nuts and bolts tight to ensure the equipment is
in safe working condition.
• Never tamper with safety devices. Check their proper
operation regularly.
• Keep machine free of grass, leaves, or other debris buildup. Clean oil or fuel spillage and remove any fuel-soaked
debris. Allow machine to cool before storing.
• If you strike a foreign object, stop and inspect the machine.
Repair, if necessary, before restarting.
• Never make any adjustments or repairs with the engine
run ning.
• Check grass catcher components and the discharge chute
frequently and replace with manufacturer's recommended
parts, when necessary.
• Mower blades are sharp. Wrap the blade or wear gloves,
and use extra caution when servicing them.
• Check brake operation frequently. Adjust and service as
required.
• Maintain or replace safety and instruction labels, as necessary.
IV. TOWING
• Tow only with a machine that has a hitch designed for
towing. Do not attach towed equipment except at the hitch
point.
• Follow the manufacturer's recommendation for weight
limits for towed equipment and towing on slopes.
• Never allow children or others in or on towed equipment.
• On slopes, the weight of the towed equipment may cause
loss of traction and loss of control.
• Travel slowly and allow extra distance to stop.
V. SERVICE
SAFE HANDLING OF GASOLINE
To avoid personal injury or property damage, use extreme
care in handling gasoline. Gasoline is extremely flammable
and the vapors are explosive.
• Extinguish all cigarettes, cigars, pipes, and other sources
of ignition.
• Use only approved gasoline container.
• Never remove gas cap or add fuel with the engine running.
Allow engine to cool before refueling.
• Never fuel the machine indoors.
• Never store the machine or fuel container where there
is an open flame, spark, or pilot light such as on a water
heater or other appliances.
• Never fill containers inside a vehicle or on a truck or
trailer bed with plastic liner. Always place containers on
the ground away from your vehicle when filling.
• Remove gas-powered equipment from the truck or trailer
and refuel it on the ground. If this is not possible, then
refuel such equipment with a portable container, rather
than from a gasoline dispenser nozzle.
• Keep the nozzle in contact with the rim of the fuel tank or
container opening at all times until fueling is complete.
Do not use a nozzle lock-open device.
• Ensure the area is clear of bystanders before operating.
Stop machine if anyone enters the area.
• Never carry passengers.
• Do not mow in reverse unless absolutely necessary.
Al ways look down and behind before and while backing.
• Never carry children, even with the blades shut off. They
may fall off and be seriously injured or interfere with safe
machine operation. Children who have been given rides
in the past may suddenly appear in the mowing area
for another ride and be run over or backed over by the
machine.
• Keep children out of the mowing area and in the watchful
care of a responsible adult other than the operator.
• Be alert and turn machine off if a child enters the area.
• Before and while backing, look behind and down for small
children.
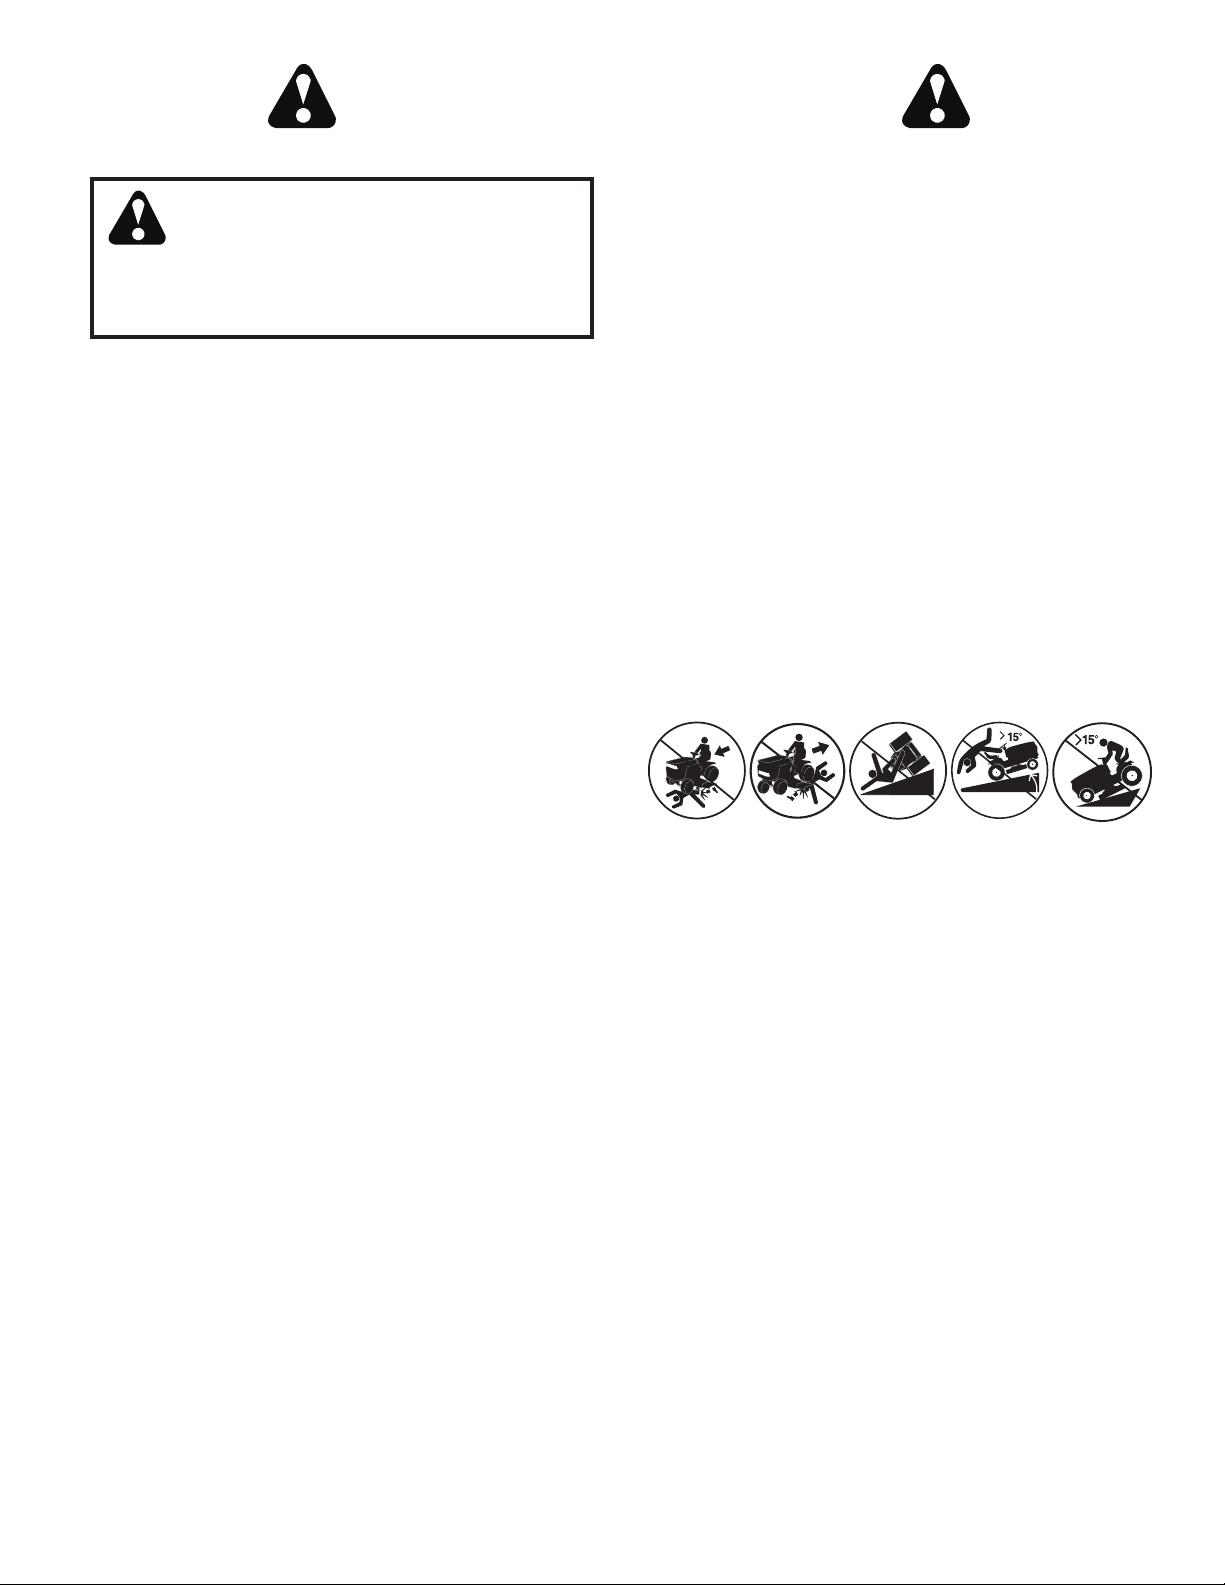
• Mow up and down slopes (15° Max), not across.
• Choose a low ground speed so that you will not have to
stop or shift while on the slope.
• Avoid starting, stopping, or turning on a slope. If the tires
lose traction, disengage the blades and proceed slowly
straight down the slope.
• If machine stops while going uphill, disengage blades,
shift into reverse and back down slowly.
• Do not turn on slopes unless necessary, and then, turn
slowly and gradually downhill, if possible.
• When loading or unloading this machine, do not exceed
the maximum recommended operation angle of 15°.
3
Page 4

PRODUCT SPECIFICATIONS
Gasoline Capacity
and type:
Oil Type:
(API: SG-SL)
Oil Capacity: w/Filter:
Spark Plug: Champion RC12YC
Charging System: 16 AMPS @ 3600 RPM
Battery: Amp/Hr:
Blade Bolt Torque: 45-55 FT. LBS. (62-75 Nm)
3.0 Gallons (11.36 L)
Unleaded Regular
SAE 30 (above 32°F/0°C)
SAE 5W30 (above 32°F/0°C)
64 oz. (1.96 L)
w/o Filter:
Gap: .030"(.76 mm)
Min. CCA:
Case Size:
60 oz. (1.77 L)
28
230
U1R
CONGRATULATIONS on your purchase of a new tractor.
It has been designed, engineered and manu fac tured to
give you the best possible dependability and performance.
Should you experience any problem you cannot easily
remedy, please contact your nearest authorized service
center/department. We have com pe tent, well-trained tech ni cians and the proper tools to ser vice or repair this tractor.
Please read and retain this manual. The instructions will
enable you to assemble and maintain your tractor prop erly.
Always observe the “SAFETY RULES”.
CUSTOMER RESPONSIBILITIES
• Read and observe the safety rules.
• Follow a regular schedule in maintaining, caring for
and using your tractor.
• Follow the instructions under “Maintenance” and “Stor age” sec tions of this manual.
• Wear proper Personal Protective Equipment (PPE)
while operating this machine, including (at a minimum)
sturdy footwear, eye protection, and hearing protection.
Do not mow in shorts and/or, open toed footwear.
• Always let someone know you are outside mowing.
WARNING: This tractor is equipped with an internal com bus tion engine and should not be used on or near any un im proved forest-covered, brush-covered or grass-cov ered
land unless the engine’s exhaust system is equipped with
a spark arrester meeting applicable local or state laws (if
any). If a spark arrester is used, it should be maintained
in effective working order by the operator.
A spark arrester for the muffler is available through your
nearest authorized service center/department.
In the state of California the above is required by law
(Section 4442 of the California Public Resources Code).
Other states may have similar laws. Federal laws apply
on federal lands.
TABLE OF CONTENTS
SAFETY RULES .........................................................2-3
PRODUCT SPECIFICATIONS ....................................... 4
CUSTOMER RESPONSIBILITIES ................................. 4
ASSEMBLY ................................................................. 5-6
OPERATION .............................................................7-13
MAINTENANCE SCHEDULE ...................................... 14
MAINTENANCE ..................................................... 14-18
SERVICE AND AD JUST MENTS ............................ 19-25
STORAGE .................................................................... 26
TROU BLE SHOOT ING ............................................ 27-28
WARRANTY ............................................................30-33
ESPAÑOL ....................................................................34
4
Page 5
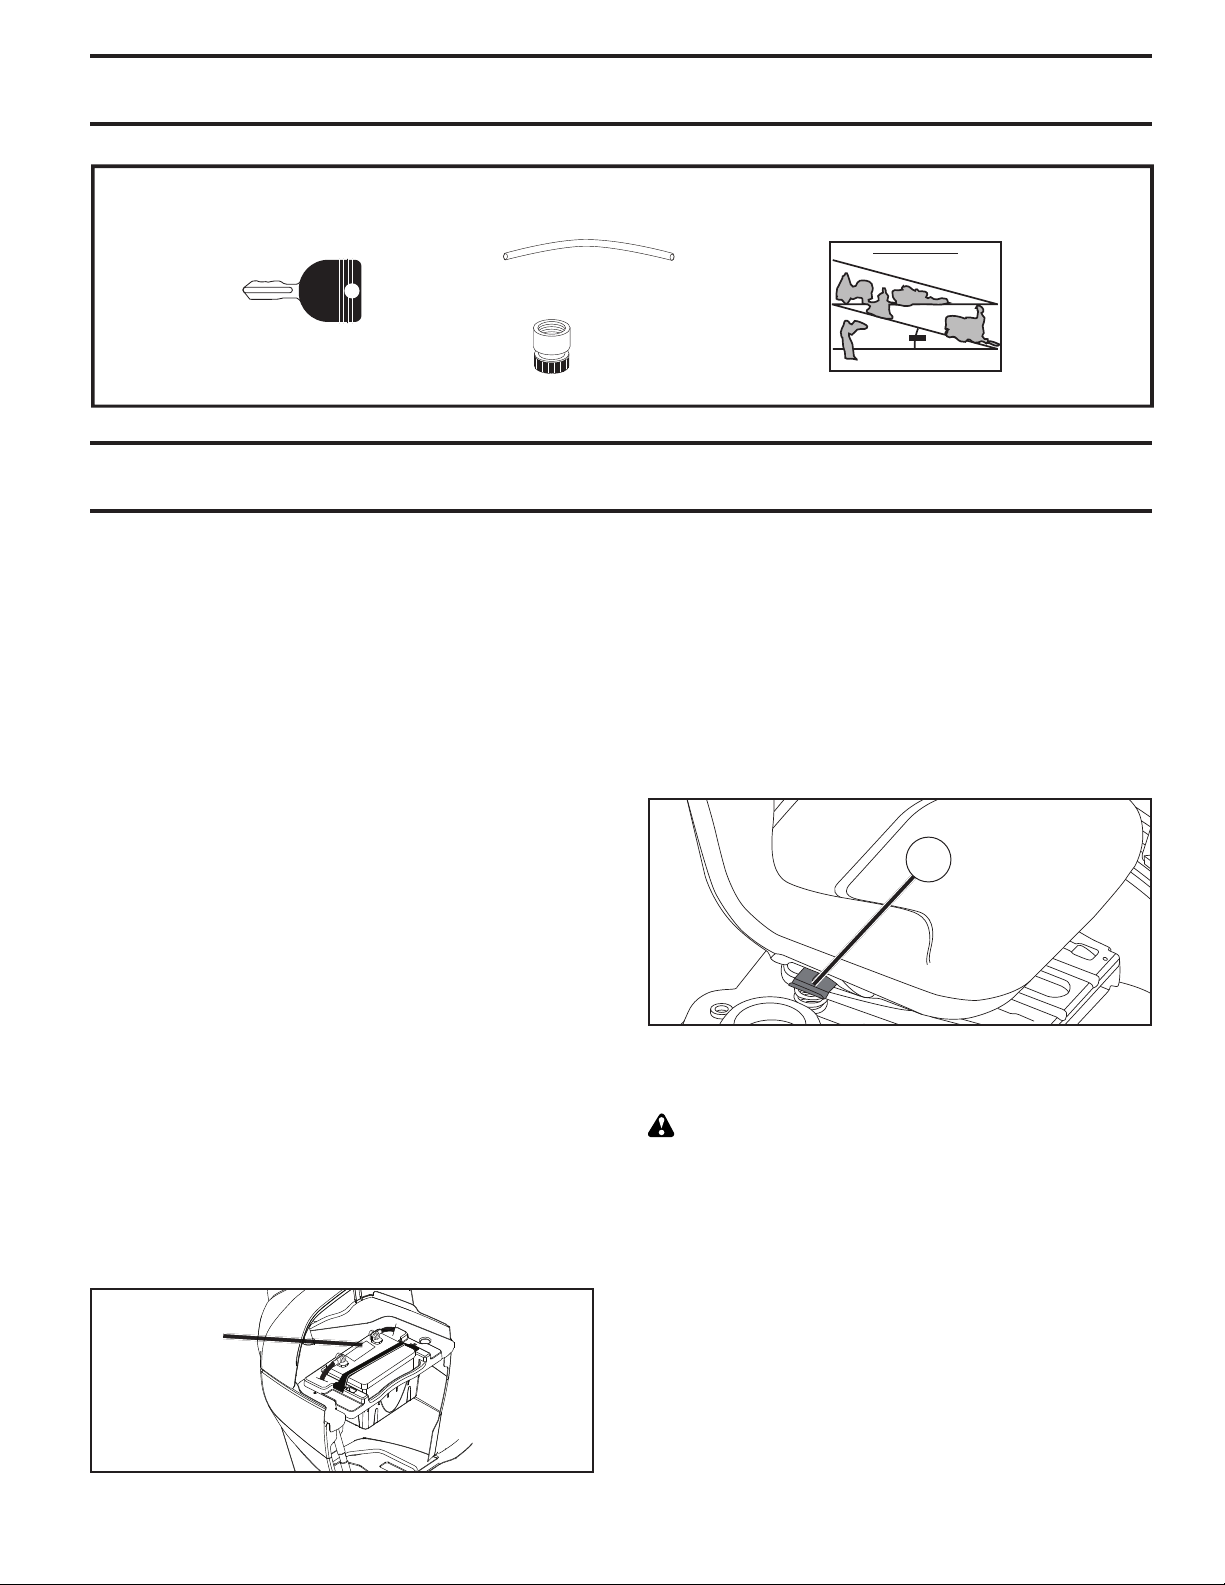
Keys
UNASSEMBLED PARTS
Slope Sheet
(1) Oil Drain Tube
Key(s)
(1) Quick
Connect
ASSEMBLY
Your new tractor has been assembled at the factory with the exception of those parts left unassembled for shipping purposes.
TOOLS REQUIRED FOR ASSEMBLY
A socket wrench set will make assembly easier. Stan dard
wrench sizes are listed.
(1) 1/2" wrench Tire pressure gauge
(2) 7/16" wrenches Utility knife Pliers
When right or left hand is mentioned in this man ual, it means
when you are in the operating po si tion (seated be hind the
steer ing wheel).
TO REMOVE TRACTOR FROM CARTON
UNPACK CARTON
• Remove all accessible loose parts and parts cartons
from carton.
• Cut along dotted lines on all four panels of carton.
Remove end panels and lay side panels flat.
• Check for any additional loose parts or cartons and
remove.
• For battery and battery cable installation see "REPLACING BATTERY" in the "Service and Adjustments"
section in this manual.
ADJUST SEAT (See Fig. 2)
• Sit in seat.
• Lift up adjustment lever (A) and slide seat until a comfortable position is reached which allows you to press
clutch/brake pedal all the way down.
• Release lever to lock seat in position.
A
BEFORE REMOVING TRACTOR FROM
SKID
TO CHECK BATTERY (See Fig. 1)
• Lift hood to raised position.
NOTE: If this battery is put into service after month and
year indicated on label (label is located between terminals)
charge battery for minimum of one hour at 6-10 amps.
(See "BATTERY" in Maintenance section of this manual
for charging instructions).
LABEL
Fig. 1
Fig. 2
NOTE: You may now roll your tractor off the skid. Follow the
instructions below to remove the tractor from the skid.
WARNING: Before start ing, read, un der stand and fol low
all in struc tions in the Op er a tion section of this man u al. Be
sure tractor is in a well-ventilated area. Be sure the area in
front of tractor is clear of other peo ple and objects.
TO ROLL TRACTOR OFF SKID (See Op er a tion
section for location and function of con trols)
• Raise attachment lift lever to its highest po si tion.
• Release parking brake by de press ing clutch/brake ped al.
• Place freewheel control in "trans mis sion dis en gaged"
position (See “TO TRANS PORT” in the Op er a tion
section of this manual).
• Roll tractor forward off skid.
• Remove banding holding the deflector shield up against
tractor.
Continue with the instructions that follow.
5
Page 6

ASSEMBLY
CHECK TIRE PRESSURE
The tires on your tractor were overinflated at the factory
for shipping purposes. Correct tire pressure is important
for best cutting performance.
• Reduce tire pressure to PSI shown on tires.
CHECK DECK LEVELNESS
For best cutting results, mower housing should be properly leveled. See “TO LEVEL MOWER HOUSING” in the
Service and Adjustments section of this manual.
✓CHECKLIST
BEFORE YOU OPERATE YOUR NEW TRAC TOR, WE
WISH TO ASSURE THAT YOU RECEIVE THE BEST
PERFORMANCE AND SATISFACTION FROM THIS
QUALITY PRODUCT.
PLEASE REVIEW THE FOLLOWING CHECKLIST:
✓ All assembly instructions have been com plet ed.
✓ No remaining loose parts in carton.
CHECK FOR PROPER POSITION OF ALL
BELTS
See the figures that are shown for replacing motion and
mower blade drive belts in the Service and Adjustments
sec tion of this manual. Verify that the belts are routed
cor rect ly.
CHECK BRAKE SYSTEM
After you learn how to operate your tractor, check to see that
the brake is operating properly. See “TO CHECK BRAKE”
in the Service and Adjustments section of this manual.
✓ Battery is properly prepared and charged.
✓ Seat is adjusted comfortably and tightened securely.
✓ All tires are properly inflated. (For shipping purposes,
the tires were overinflated at the factory).
✓ Be sure mower deck is properly leveled side-to-side/
front-to-rear for best cutting results. (Tires must be
properly inflated for leveling).
✓ Check mower and drive belts. Be sure they are routed
properly around pulleys and inside all belt keepers.
✓ Check wiring. See that all connections are still secure
and wires are properly clamped.
✓ Before driving tractor, be sure free wheel control is in
“transmission engaged” position (see “TO TRANS PORT” in the Operation section of this man u al).
WHILE LEARNING HOW TO USE YOUR TRACTOR, PAY
EXTRA ATTENTION TO THE FOLLOWING IMPORTANT
ITEMS:
✓ Engine oil is at proper level.
✓ Fuel tank is filled with fresh, clean, regular unleaded
gasoline.
✓ Become familiar with all controls, their location and
function. Operate them before you start the engine.
✓ Be sure brake system is in safe operating condition.
✓ Be sure Operator Presence System and Reverse Op-
eration System (ROS) are working properly (See the
Operation and Maintenance sections in this manual).
✓ It is important to purge the transmission before op er at-
ing your tractor for the first time. Follow proper starting and transmission purging instructions (See “TO
START EN GINE” and “PURGE TRANSMISSION” in
the Op er a tion section of this manual).
6
Page 7

OPERATION
These symbols may appear on your tractor or in literature supplied with the product. Learn and understand their meaning.
ENGINE OFF
ATTACHMENT
CLUTCH DISENGAGED
OPERATION
SYSTEM (ROS)
ATTACHMENT
CLUTCH ENGAGED
FAST SLOWREVERSE NEUTRAL HIGH LOW
REVERSE FORWARDFUEL BATTERY REVERSE
DANGER, KEEP HANDS
AND FEET AWAY
COLD WEATHER
STARTING
POSITION
MOWER HEIGHTENGINE ON ENGINE START MOWER LIFTLIGHTS ON PARKING BRAKE
CRUISE CONTROL
KEEP AREA CLEAR SLOPE HAZARDS
(SEE SAFETY RULES SECTION)
IGNITION SWITCH
CLUTCH/BRAKE
15
PEDAL
15
FREE WHEEL
(Automatic Models only)
Failure to follow instructions
could result in serious injury or
death. The safety alert symbol
is used to identify safety information about hazards which can
result in death, serious injury
and/or property damage.
DANGER indicates a hazard which, if not avoided,
will result in death or serious injury.
WARNING indicates a hazard which, if not avoided,
could result in death or serious injury.
CAUTION indicates a hazard which, if not avoided,
might result in minor or moderate injury.
CAUTION when used without the alert symbol,
indicates a situation that could result in damage
to the tractor and/or engine.
HOT SURFACES indicates a hazard which,
if not avoided, could result in death, serious injury
and/or property damage.
FIRE indicates a hazard which, if not avoided,
could result in death, serious injury and/or
property damage.
7
Page 8
OPERATION
KNOW YOUR TRACTOR
READ THIS MANUAL AND SAFETY RULES BEFORE OPERATING YOUR TRACTOR
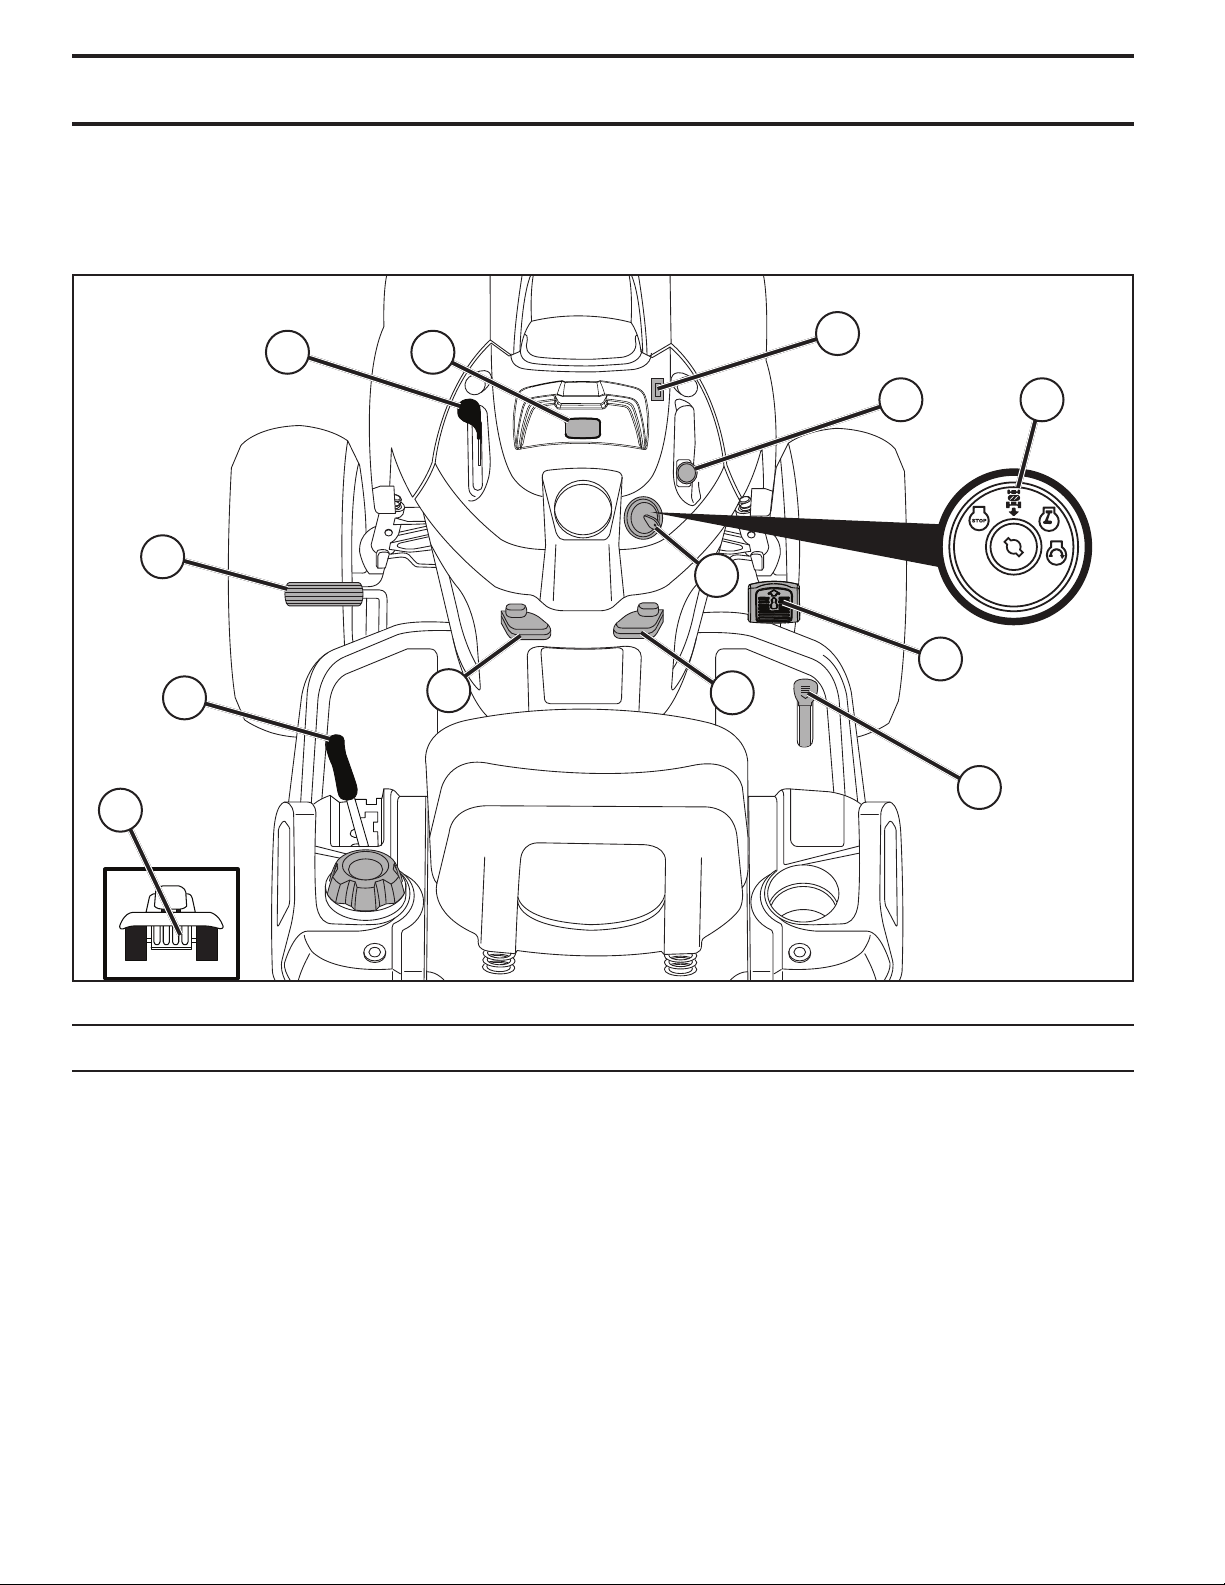
Compare the illustrations with your tractor to familiarize yourself with the locations of various controls and ad just ments.
Save this manual for future reference.
M
B
A
D P
C
H
E
G
F
K
J
L
Our tractors conform to the applicable safety standards of the American National Standards Institute.
(A) ATTACHMENT LIFT LEVER - Used to raise and lower
the mower or other attachments mounted to your trac tor.
(B) BRAKE PEDAL - Used for brak ing the tractor and
start ing the engine.
(C) PARKING BRAKE - Locks clutch/brake pedal into
the brake position.
(D) THROTTLE CONTROL - Used for starting and controlling engine speed.
(E) ATTACHMENT CLUTCH SWITCH - Used to engage
the mow er blades, or other at tach ments mounted to your
tractor.
(F) IGNITION SWITCH - Used for starting and stopping
the engine.
(G) REVERSE OPERATION SYSTEM (ROS) "ON"
POSITION - Allows operation of mower or other powered
attachment while in reverse.
Fig. 3
(H) LIGHT SWITCH - Turns the headlights on and off.
(J) CRUISE CONTROL LEVER - Used to set forward
movement of tractor at desired speed without holding the
forward drive pedal.
(K) FORWARD DRIVE PEDAL - Used for forward movement of tractor.
(L) REVERSE DRIVE PEDAL - Used for reverse movement of tractor.
(M) FREEWHEEL CONTROL - Disengages transmission
for pushing or slowly tow ing the trac tor with the engine off.
(P) SERVICE REMINDER/HOUR METER - Indicates when
service is required for the engine and mower.
8
Page 9
OPERATION
The operation of any tractor can result in foreign objects thrown into the eyes, which can
result in severe eye dam age. Always wear safety glass es or eye shields while operating
your tractor or per form ing any ad just ments or repairs. We rec om mend standard safety
glasses or a wide vision safety mask worn over spectacles.
HOW TO USE YOUR TRAC TOR
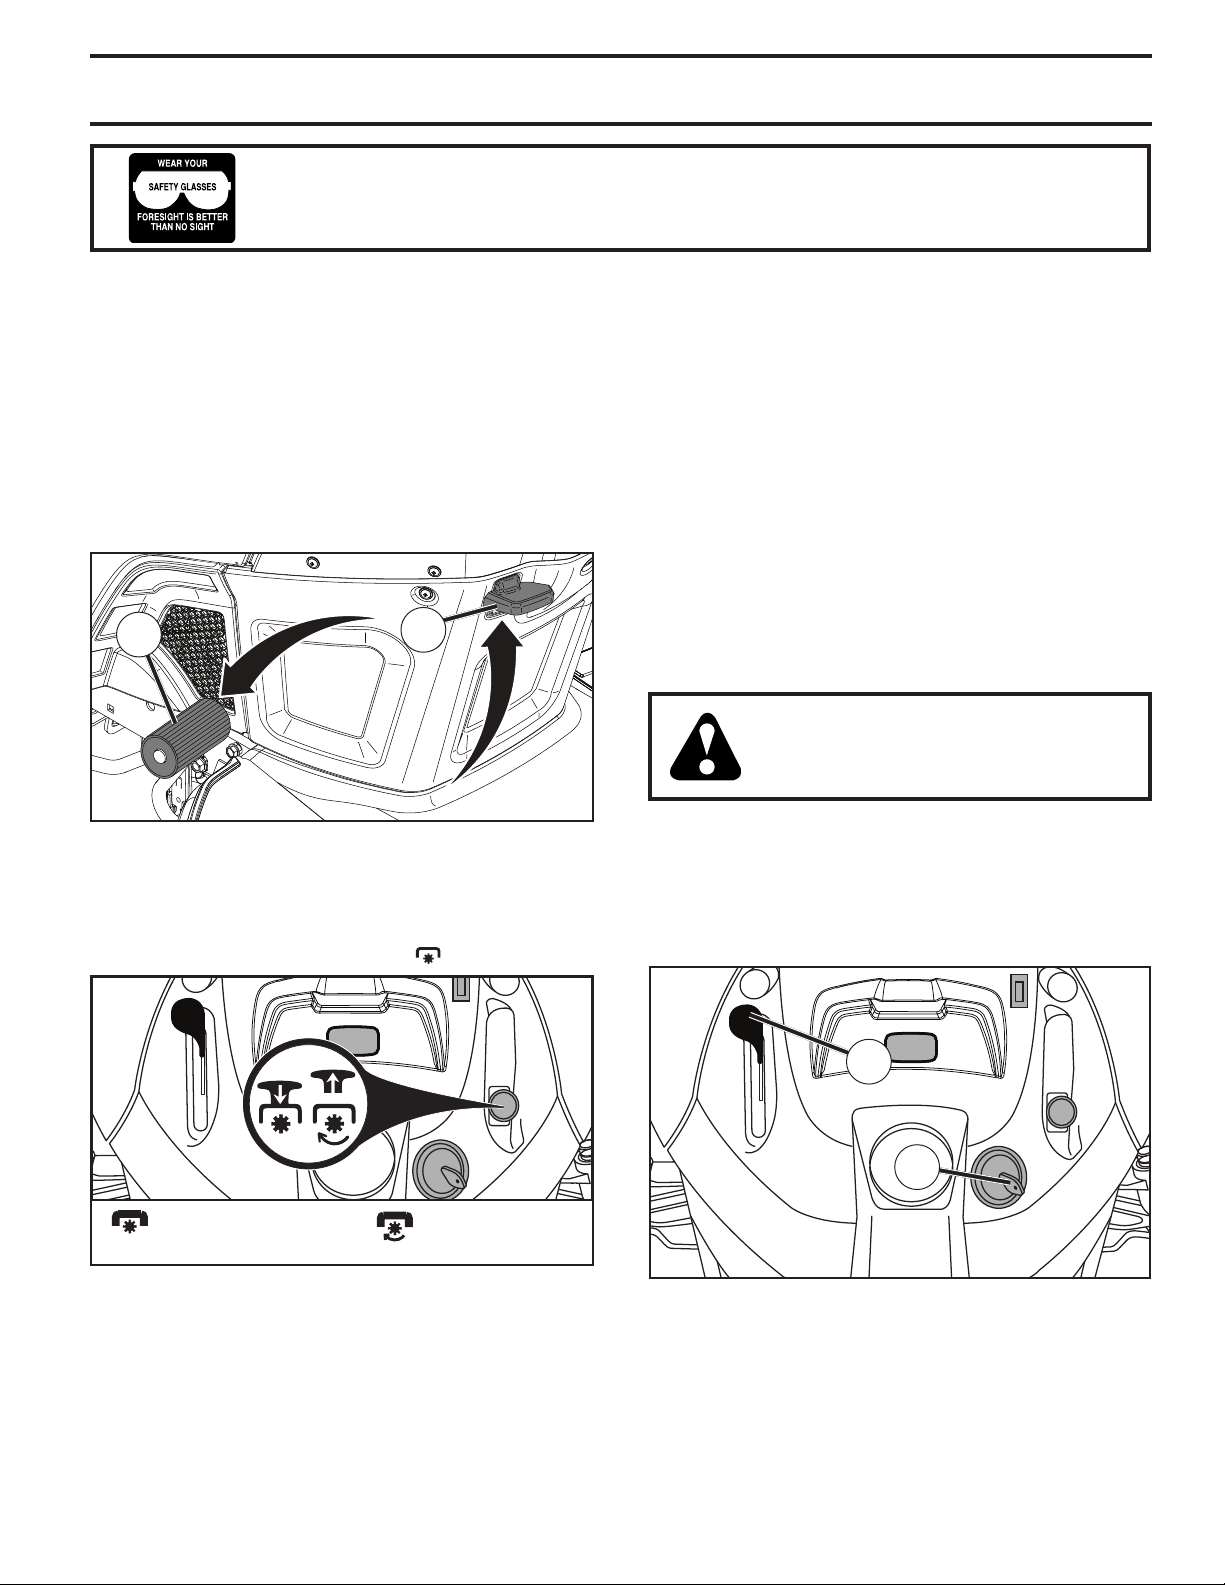
TO SET PARKING BRAKE (See Fig. 4)
Your tractor is equipped with an operator presence sens ing switch. When engine is running, any attempt by the
op er a tor to leave the seat without first setting the parking
brake will shut off the engine.
• Depress brake pedal (B) all the way down and hold.
• Pull parking brake lever (C) up and hold, re lease pres sure from brake pedal (B), then release parking brake
lever. Pedal should re main in brake position. Make
sure parking brake will hold tractor secure.
B
Fig. 4
STOPPING (See Fig. 5)
MOWER BLADES -
• To stop mower blades, place attachment clutch control
in the “DIS EN GAGED” position ( ).
C
ENGINE -
• Move throttle control (D) between half and full speed
(fast) position.
NOTE: Failure to move throttle control between half and full
speed (fast) position, before stop ping may cause engine
to “backfire”.
• Turn ignition key (F) to “STOP” position and remove key.
Always remove key when leaving tractor to prevent
un author ized use.
• Never use the cold weather starting position to stop
the engine.
IMPORTANT: LEAVING THE IGNITION SWITCH IN ANY
POSITION OTHER THAN "STOP" WILL CAUSE THE BATTERY
TO BE DIS CHARGED, (DEAD).
NOTE: Under certain conditions when tractor is standing
idle with the engine running, hot en gine exhaust gases may
cause “browning” of grass. To eliminate this possibility, al ways stop engine when stopping tractor on grass areas.
CAUTION: Always stop tractor com plete ly, as described above, and set
parking brake before leav ing the op er a tor's position.
TO USE THROTTLE CONTROL (D) (See Fig. 6)
Always operate engine at full speed (fast).
• Operating engine at less than full speed (fast) reduces
the engine's operating efficiency.
• Full speed (fast) of fers the best mower per for mance.
( ) ATTACHMENT
CLUTCH CONTROL
“DIS EN GAGED”
GROUND DRIVE -
• To stop ground drive, depress brake pedal into full
“BRAKE” position.
IMPORTANT: FORWARD AND REVERSE DRIVE PEDALS
RETURN TO NEUTRAL POSITION WHEN NOT DEPRESSED.
( ) ATTACHMENT
CLUTCH CONTROL
“ENGAGED”
Fig. 5
D
F
Fig. 6
9
Page 10
OPERATION
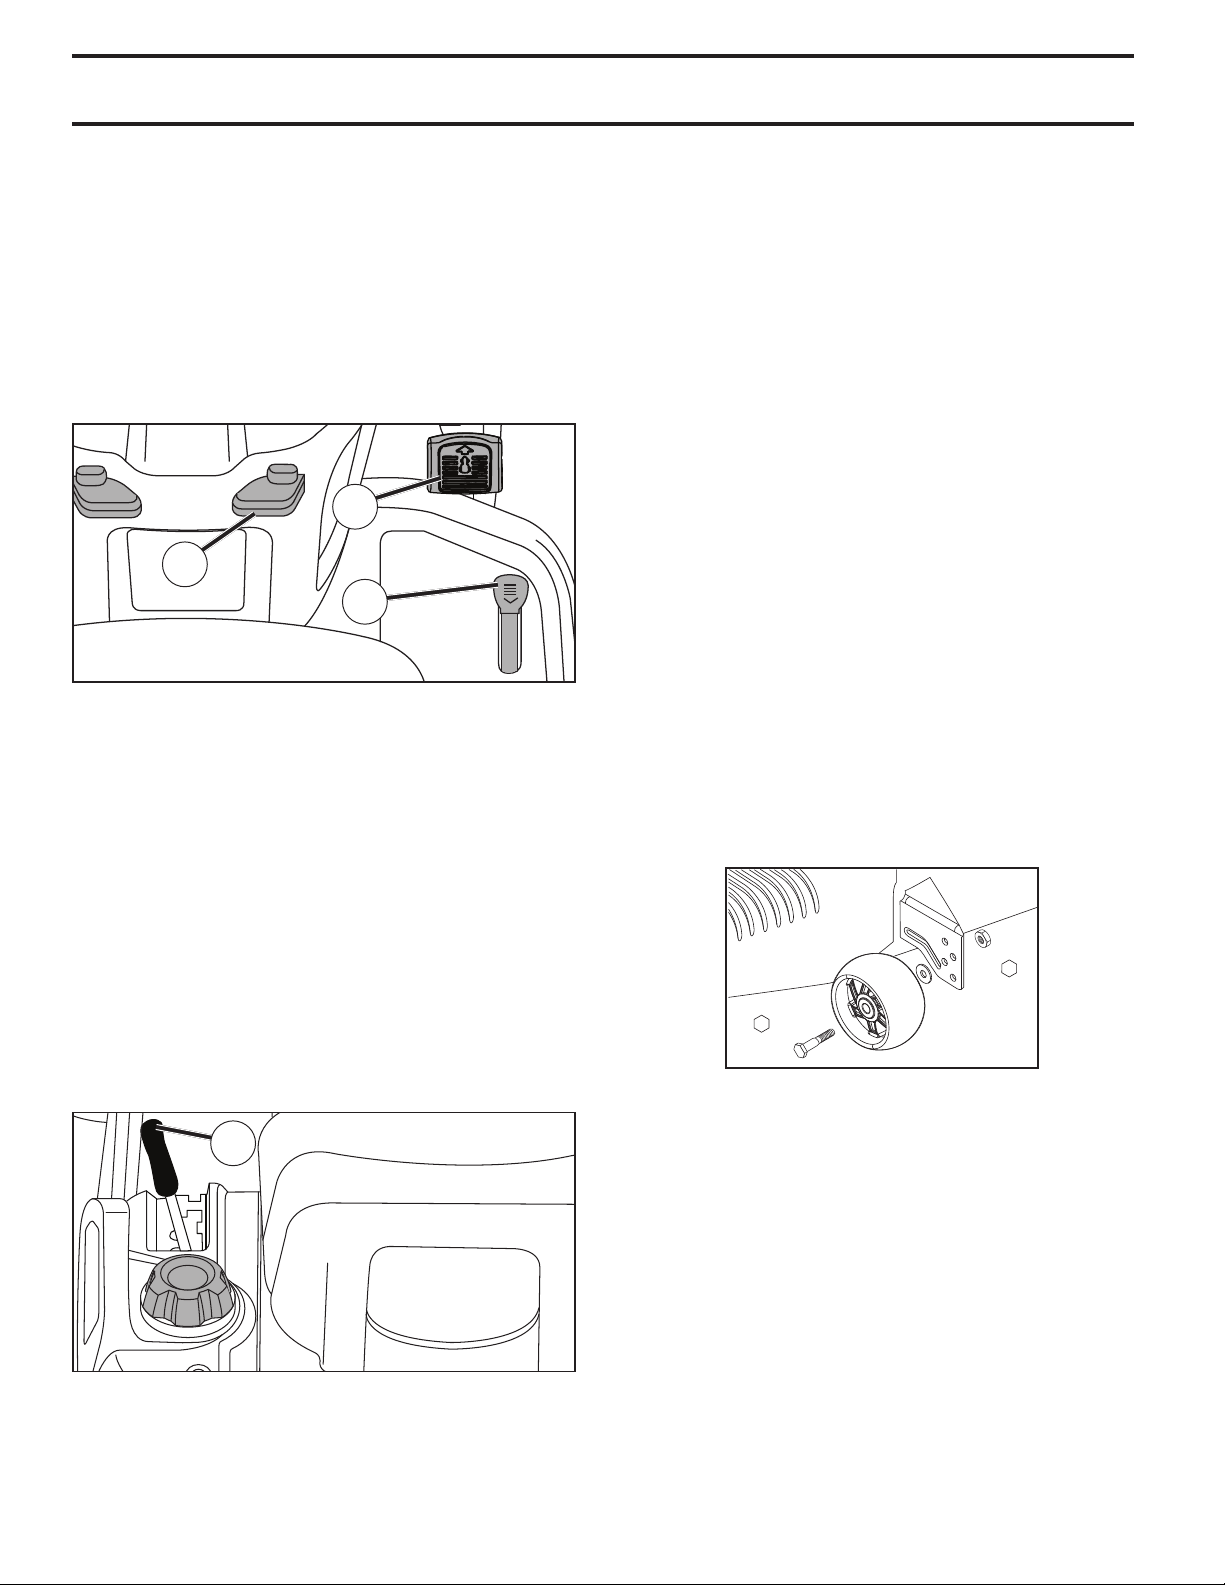
TO MOVE FORWARD AND BACKWARD
(See Fig. 7)
The direction and speed of movement is controlled by the
forward and reverse drive pedals.
• Start tractor and release parking brake.
• Slowly depress forward (K) or reverse (L) drive pedal to
begin movement. Ground speed increases the further
down the pedal is depressed.
TO USE CRUISE CONTROL (J) (See Fig. 7)
The cruise control feature can be used for forward travel
only.
K
J
L
Fig. 7
SYSTEM CHARACTERISTICS
The cruise control should only be used while mowing or
transporting on relatively smooth, straight surfaces. Other
con di tions such as trimming at slow speeds may cause the
cruise control to dis en gage. Do not use the cruise control
on slopes, rough terrian or while trimmimg or turning.
• With forward drive pedal depressed to desired speed,
pull cruise control lever (J) up and hold while lifting
your foot off the pedal, then release the lever.
To disengage the cruise control, depress the brake pedal
or tap on forward drive pedal.
TO ADJUST MOWER CUTTING HEIGHT
(See Fig. 8)
The position of the attachment lift lever (A) determines the
cutting height.
• Put attachment lift lever in desired cutting height slot.
The cutting height range is ap prox i mate ly 1 to 4" (25,4 to
101,6 mm). The heights are measured from the ground to
the blade tip with the engine not running. These heights are
approximate and may vary depending upon soil conditions,
height of grass and types of grass being mowed.
• The average lawn should be cut to approximately
2-1/2" (63,5 mm) during the cool season and to over 3"
(76,2 mm) during hot months. For healthier and better
looking lawns, mow often and after moderate growth.
• For best cutting performance, grass over 6" (152,4 mm)
in height should be mowed twice. Make the first cut
relatively high; the second to de sired height.
TO ADJUST GAUGE WHEELS (See Fig. 9)
Gauge wheels are properly adjusted when they are slightly
off the ground when mower is at the desired cutting height
in operating position. Gauge wheels then keep the deck
in proper position to help prevent scalping in most terrain
conditions.
NOTE:Adjust gauge wheels with tractor on a flat level
surface.
• Adjust mower to desired cutting height. (See “TO AD-
JUST MOWER CUT TING HEIGHT” in the Operation
sec tion of this manual.)
• With mower in desired height of cut po si tion, gauge
wheels should be assembled so they are slightly off
the ground. In stall gauge wheel in appropriate hole as
shown and tighten se cure ly.
• Repeat for opposite side installing gauge wheel in same
adjustment hole.
9/16”
3/4”
Fig. 9
A
Fig. 8
TO OPERATE MOWER
Your tractor is equipped with an operator presence sensing
switch. Any attempt by the operator to leave the seat with
the engine running and the attachment clutch engaged will
shut off the engine. You must remain fully and centrally
positioned in the seat to prevent the engine from hesitating or cutting off when operating your equipment on rough,
rolling terrain or hills.
• Select desired height of cut. (See "TO ADJUST MOWER
CUTTING HEIGHT".)
• Start mower blades by engaging at tach ment clutch
control.
10
Page 11
OPERATION
TO STOP MOWER BLADES
Disengage at tach ment clutch con trol.
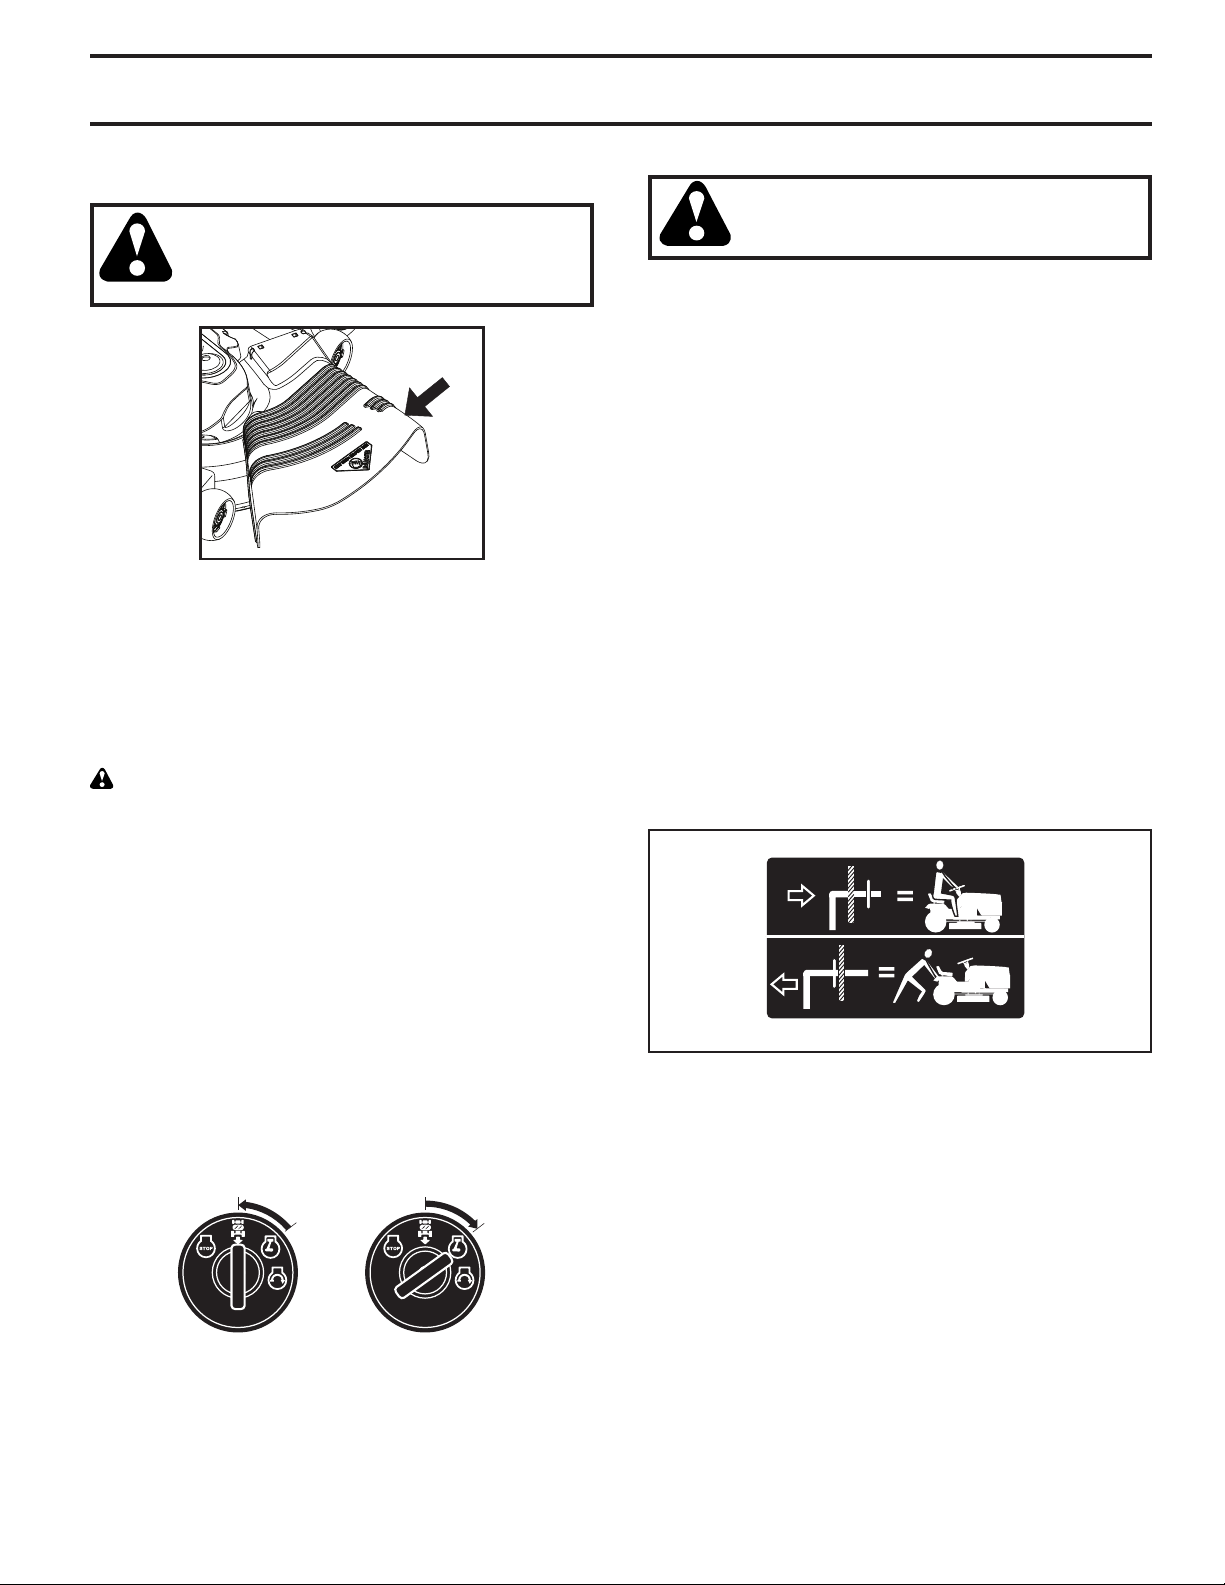
CAUTION: Do not operate the mower
without either the en tire grass catcher, on
mowers so equipped, or the deflector chute
in place (See Fig. 10).
Fig. 10
REVERSE OPERATION SYSTEM (ROS)
Your tractor is equipped with a Reverse Operation System
(ROS). Any attempt by the operator to travel in the reverse
direction with the attachment clutch engaged will shut off
the engine unless ignition key is placed in the ROS "ON"
position.
WARNING: Backing up with the attachment clutch engaged while mowing is strongly discouraged. Turning the
ROS "ON", to allow reverse operation with the attachment
clutch engaged, should only be done when the operator
decides it is necessary to reposition the machine with the
attachment engaged. Do not mow in reverse unless
absolutely necessary.
USING THE REVERSE OPERATION SYSTEM Only use if you are certain no children or other bystanders
will enter the mowing area.
• Depress brake pedal all the way down.
• With engine running, turn ignition key counterclockwise
to ROS "ON" position.
• Look down and behind before and while backing.
• Slowly depress reverse drive pedal to start movement.
• When use of the ROS is no longer needed, turn the
ignition key clockwise to engine "ON" position.
TO OPERATE ON HILLS
CAUTION: Do not drive up or down
hills with slopes greater than 15° and
do not drive across any slope.
• Choose the slowest speed before starting up or down
hills.
• Avoid stopping or changing speed on hills.
• If stopping is absolutely necessary, push brake pedal
quickly to brake position and engage parking brake.
• To restart movement, slowly release parking brake and
brake pedal.
• Slowly depress appropriate drive pedal to slowest set ting.
• Make all turns slowly.
TO TRANSPORT (See Fig. 3 & 11)
When push ing or tow ing your trac tor, ensure transmission
is disengaged by placing freewheel control in free wheel ing
po si tion. Free wheel control is located at the rear drawbar
of tractor.
• Raise attachment lift to highest position with at tach ment
lift control.
• Pull freewheel control out and into the slot and release
so it is held in the disengaged position.
• Do not push or tow tractor at more than two (2) mph
(3,2 km/h).
• To reengage transmission, reverse above procedure.
TRANSMISSION ENGAGED
02203
TRANSMISSION DISENGAGED
Fig. 11
NOTE: To protect hood from damage when transporting
your tractor on a truck or a trailer, ensure hood is closed
and secured to tractor. Use an appropriate means of tying
hood to tractor (rope, cord, etc.).
8
2
8
2
0
ROS "ON" POSITION ENGINE "ON" POSITION
(NORMAL OPERATING)
TOWING CARTS AND OTHER AT TACH MENTS
Tow only the attachments that are recommended by and
comply with specifications of the manufacturer of your tractor. Use common sense when towing. Too heavy of a load,
while on a slope, is dangerous. Tires can lose traction with
the ground and cause you to lose control of your tractor.
11
Page 12
OPERATION
BEFORE STARTING THE ENGINE
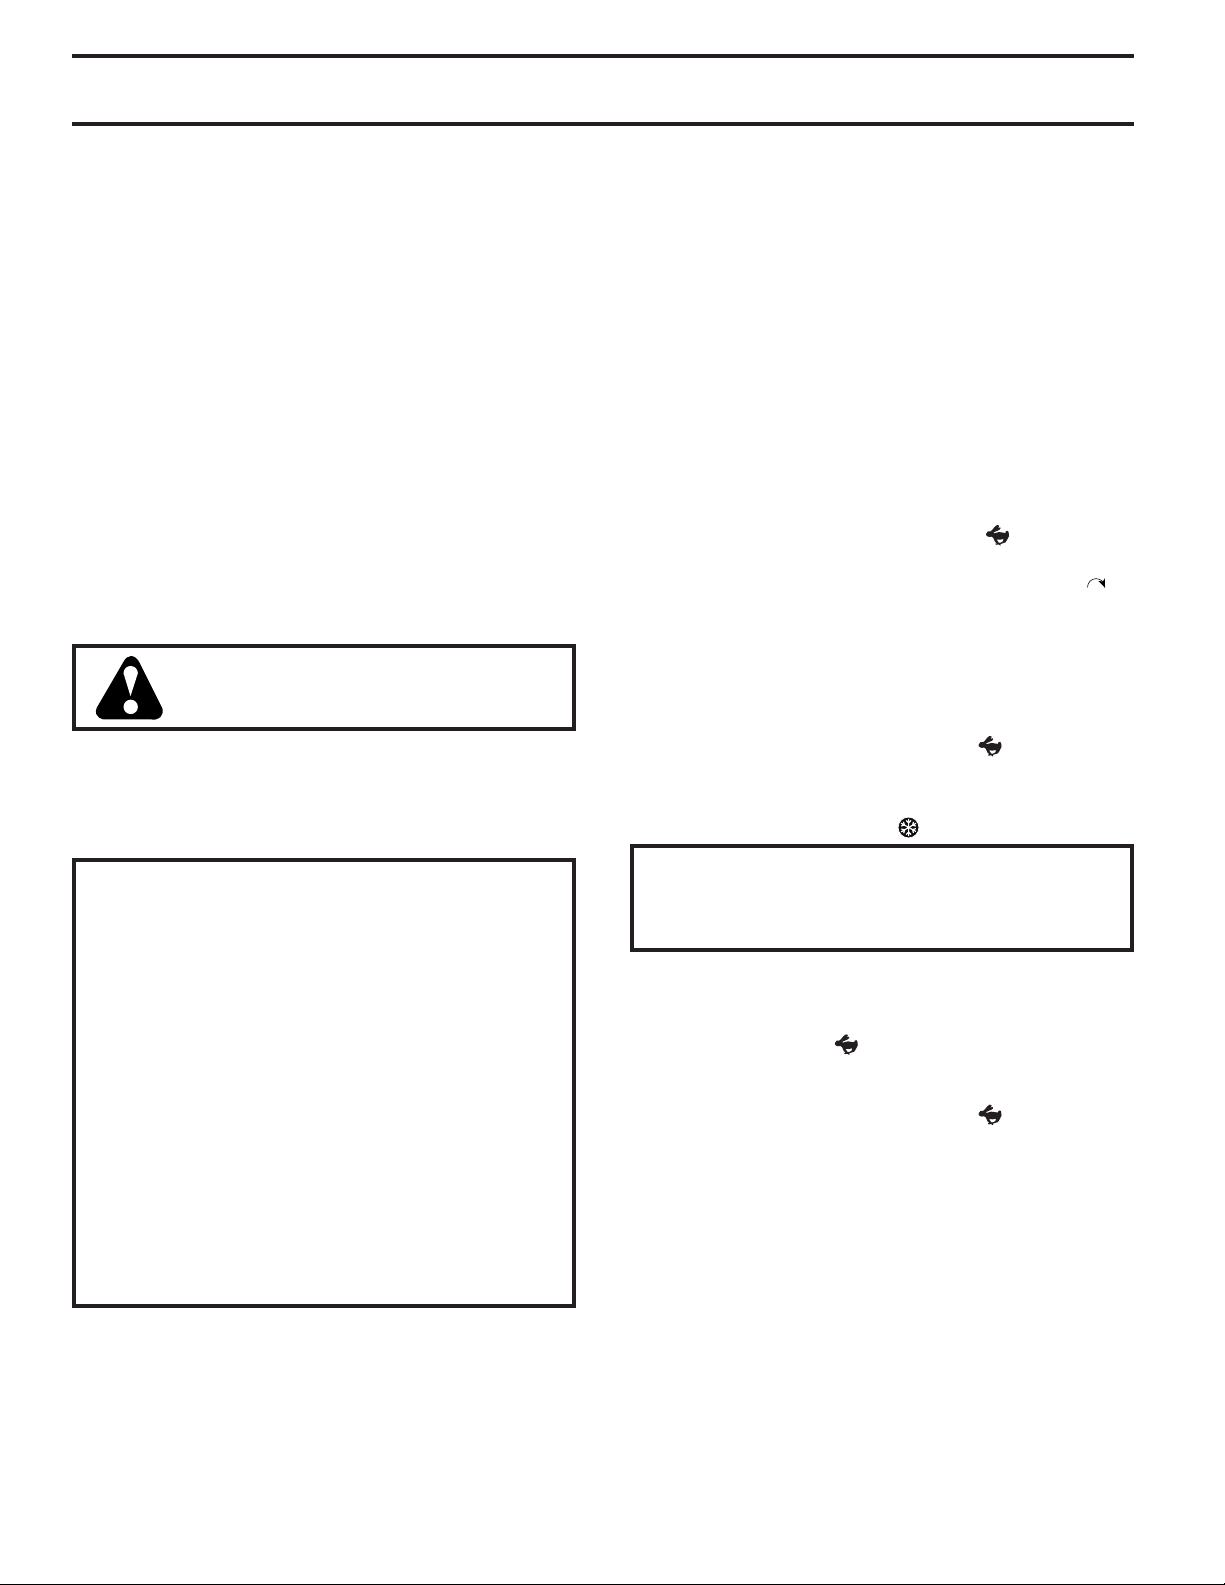
CHECK ENGINE OIL LEVEL
The engine in your tractor has been shipped from the factory already filled with sum mer weight oil.
• Check engine oil with tractor on level ground.
• Remove oil fill cap/dipstick and wipe clean, reinsert the
dipstick and screw cap tight, wait for a few seconds,
remove and read oil level. If necessary, add oil until
“FULL” mark on dipstick is reached. Do not overfill.
• For cold weather operation you should change oil for
easier starting. (See “OIL VISCOSITY CHART” in the
Maintenance sec tion of this manual.)
• To change engine oil, see the Maintenance section in
this manual.
ADD GASOLINE
• Fill fuel tank to bottom of filler neck. Do not overfill.
Use fresh, clean, regular gasoline with a minimum of
87 octane. Do not mix oil with gasoline. Purchase fuel
in quantities that can be used within 30 days to ensure
fuel freshness.
CAUTION: Wipe off any spilled oil or
fuel. Do not store, spill or use gasoline
near an open flame.
IMPORTANT: WHEN OPERATING IN TEMPERATURES
BELOW 32°F (0°C), USE FRESH, CLEAN WINTER GRADE
GASOLINE TO HELP ENSURE GOOD COLD WEATHER
STARTING.
TO START ENGINE (See Fig. 3)
The Briggs & Stratton Endurance engine equipped with
your tractor features a Ready-Start automatic choke system
to provide simplified starting in normal conditions. Please
read the following starting instruction carefully.
When starting the engine for the first time or if the engine
has run out of fuel, it will take extra cranking time to move
fuel from the tank to the engine.
• Ensure freewheel control is in the transmission en gaged
position.
• Sit on seat in operating position, depress brake pedal,
and set parking brake.
• Move attachment clutch control to “DISENGAGED”
position.
NORMAL STARTING (32°F/0°C and above)
• Move throttle control to fast position (
place.
• Insert key into ignition and turn key clockwise ( ) to
“START” position and release key as soon as engine
starts.
• When engine starts, the attachments and ground drive
can now be used. If the engine does not accept the
load and shuts off, restart the engine and allow it to
warm up for one minute.
• Leave throttle control in fast position ( ) while mowing.
COLD WEATHER STARTING (32°F/0°C and below)
• Move throttle control beyond fast position into the cold
weather starting position ( ).
) and click into
CAUTION: Alcohol blended fuels (called gasohol
or using ethanol or methanol) can attract moisture
which leads to sep a ra tion and for ma tion of acids
during storage. Acidic gas can damage the fuel
system of an engine while in storage. To avoid
engine problems, the fuel system should be emptied
before stor age of 30 days or longer. Drain the gas
tank, start the engine and let it run until the fuel
lines and carburetor are empty. Use fresh fuel next
season. See Storage In struc tions for additional
information. Never use engine or carburetor cleaner
products in the fuel tank or permanent damage may
occur. Fuel stabilizer is an acceptable alternative
in minimizing the formation of fuel gum deposits
during stor age. Add stabilizer to gasoline in fuel
tank or storage container. Always follow the mix
ratio found on stabilizer container. Run engine at
least 10 minutes after adding stabilizer to allow the
stabilizer to reach the carburetor. Do not empty
the gas tank and carburetor if using fuel stabilizer.
CAUTION: Do not run starter continuously for more
than fifteen sec onds per minute. If the engine does
not start after several attempts, wait a few minutes
and try again.
• Insert key into ignition and turn key clockwise to “START”
position and release key as soon as engine starts.
• When the engine starts, move the throttle control back
to the fast position ( ) to warm-up. The time required
for warm-up will vary from a few seconds to a minute
depending upon conditions and temperature.
• Leave throttle control in fast position ( ) while mowing.
AUTOMATIC TRANSMISSION WARM UP
• Before driving the unit in cold weather, the trans mis sion
should be warmed up as follows:
• Ensure the tractor is on level ground.
• Release the parking brake and let the brake slowly
return to operating position.
• Allow one minute for transmission to warm up. This
can be done during the engine warm up period.
• The attachments can also be used during the engine
warm-up period after the transmission has been warmed
up.
12
Page 13
OPERATION
PURGE TRANSMISSION
CAUTION: Never engage or disengage freewheel lever while the engine is run ning.
To ensure proper operation and performance, it is rec om mend ed that the transmission be purged before operating
tractor for the first time. This procedure will remove any
trapped air inside the transmission which may have de vel oped during shipping of your tractor.
IMPORTANT: SHOULD YOUR TRANSMISSION RE QUIRE
REMOVAL FOR SERVICE OR REPLACEMENT, IT SHOULD
BE PURGED AFTER REINSTALLATION BEFORE OPERATING
THE TRACTOR.
1. Place tractor safely on a level surface - that is clear
and open - with engine off and parking brake set.
2. Disengage transmission by placing freewheel control
in disengaged position. (See “TO TRANSPORT” in
this section of manual.)
3. Sitting in the tractor seat, start engine. After the engine is running, move throttle control to slow position.
Dis en gage parking brake
CAUTION: At any time, during step 4, there
may be movement of the drive wheels.
4. Depress forward drive pedal to full forward position,
hold for five (5) seconds and release pedal. Depress
reverse drive pedal to full reverse position, hold for five
(5) seconds and release pedal. Repeat this procedure
three (3) times.
5. Shut- off engine and set parking brake.
6. Engage transmission by placing freewheel control
in engaged position. (See “TO TRANSPORT” in this
sec tion of manual.)
7. Sitting in the tractor seat, start engine. After the engine
is running, move throttle control to half (1/2) speed.
Disengage parking brake.
8. Drive tractor forward for approximately 5 feet (1,5 m)
then backwards for 5 feet (1,5 m). Repeat this driving
procedure three times.
Your transmission is now purged and now ready for normal
op er a tion.
SERVICE REMINDER/HOUR METER
Service reminder shows the total number of hours the
engine has run and indicates when the engine or mower
needs servicing. After every 50 hours of operation the oil
can icon will stay on for 2 hours or until a manual reset occurs. To reset the display manually turn the ignition switch
to the on position, then the off position five times (1 second
on, 1 second off). To service engine and mower, see the
Maintenance section of this manual.
NOTE: Service reminder runs when the ignition key is in
any position but “STOP”. For accurate reading, be sure key
remains in the “STOP” position when engine is not running.
MOWING TIPS
• DO NOT use tire chains when the mower hous ing is
attached to tractor.
• Mower should be properly leveled for best mowing
performance. See “TO LEVEL MOWER HOUSING”
in the Service and Adjustments section of this manual.
• The left hand side of mower should be used for trim ming.
• Drive so that clippings are discharged onto the area
that has been cut. Have the cut area to the right of
the tractor. This will result in a more even dis tri bu tion
of clippings and more uniform cutting.
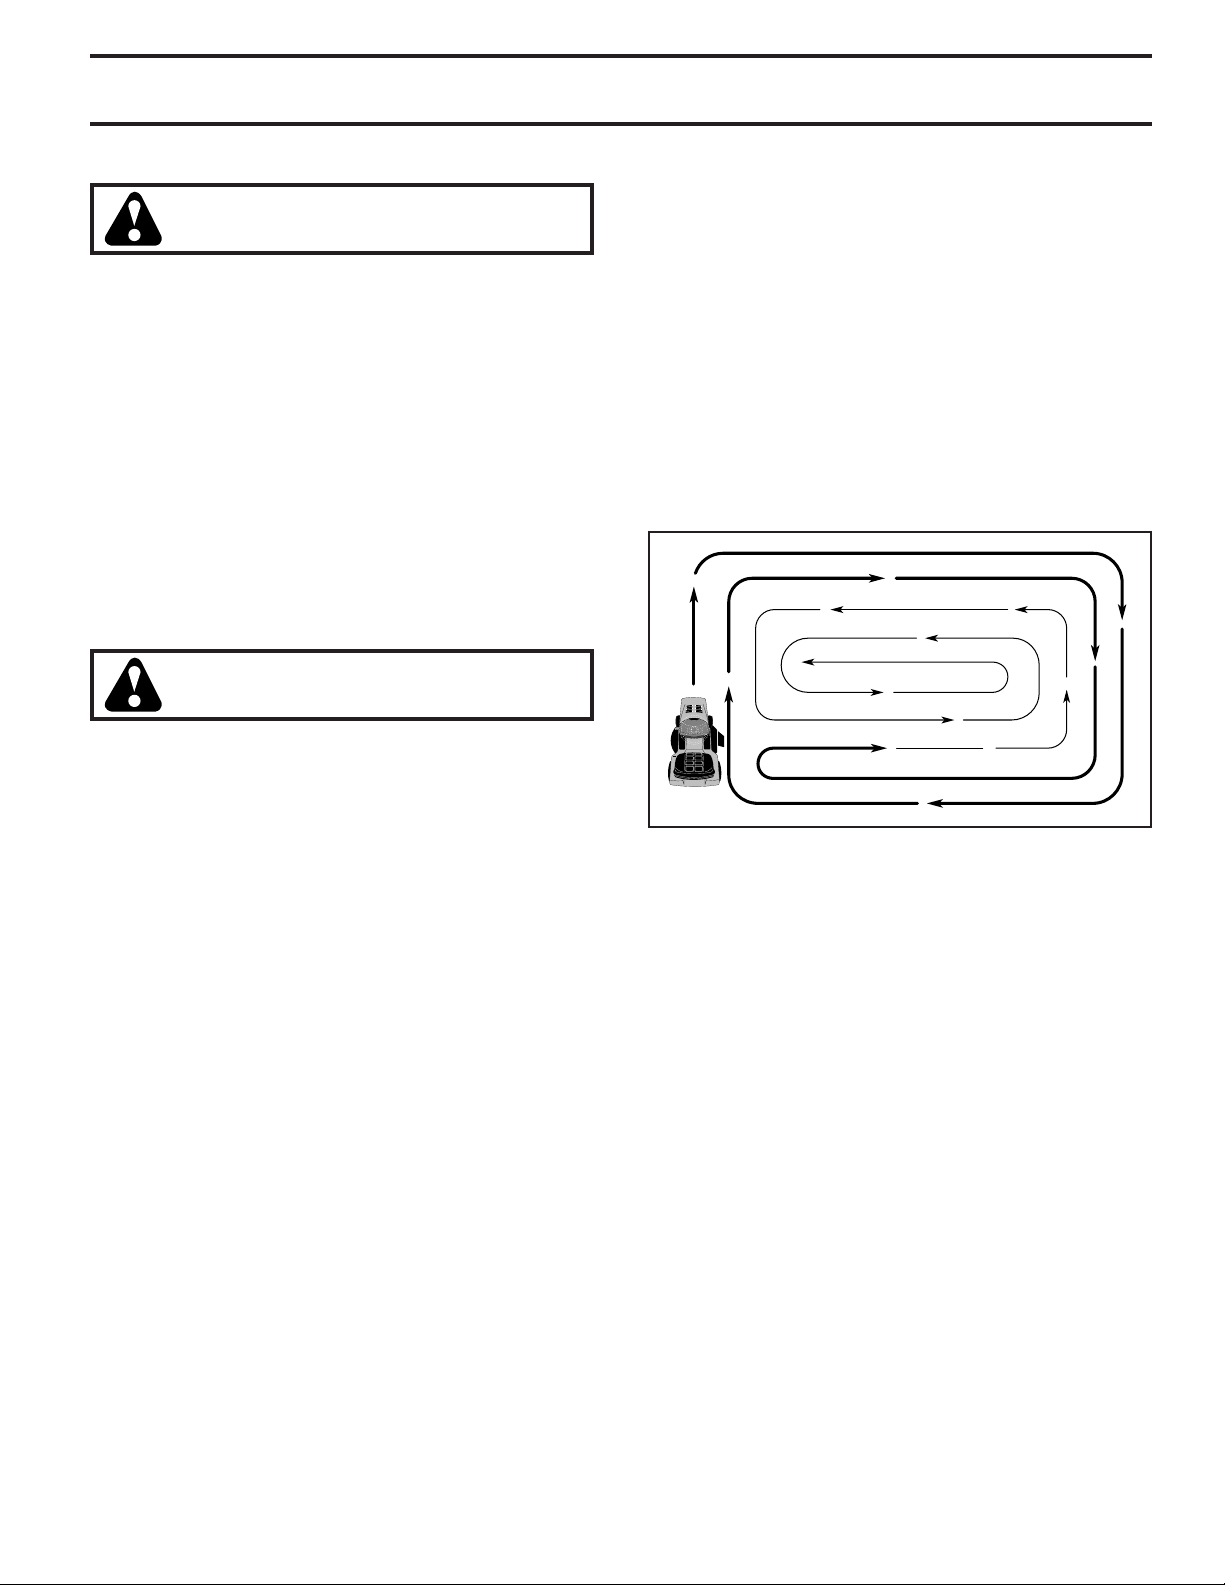
• When mowing large areas, start by turning to the right
so that clippings will discharge away from shrubs,
fences, driveways, etc. After one or two rounds, mow
in the opposite direction making left hand turns until
finished (See Fig. 12).
Fig. 12
• If grass is extremely tall, it should be mowed twice to
reduce load and possible fire hazard from dried clip pings. Make first cut relatively high; the second to the
desired height.
• Do not mow grass when it is wet. Wet grass will plug
mower and leave undesirable clumps. Allow grass to
dry before mowing.
• Always operate engine at full throttle when mow-
ing to ensure better mowing performance and proper
dis charge of material. Regulate ground speed by
se lect ing a low enough gear to give the mower cut ting
per for mance as well as the quality of cut desired.
• When operating attachments, select a ground speed
that will suit the terrain and give best performance of
the at tach ment being used.
13
Page 14
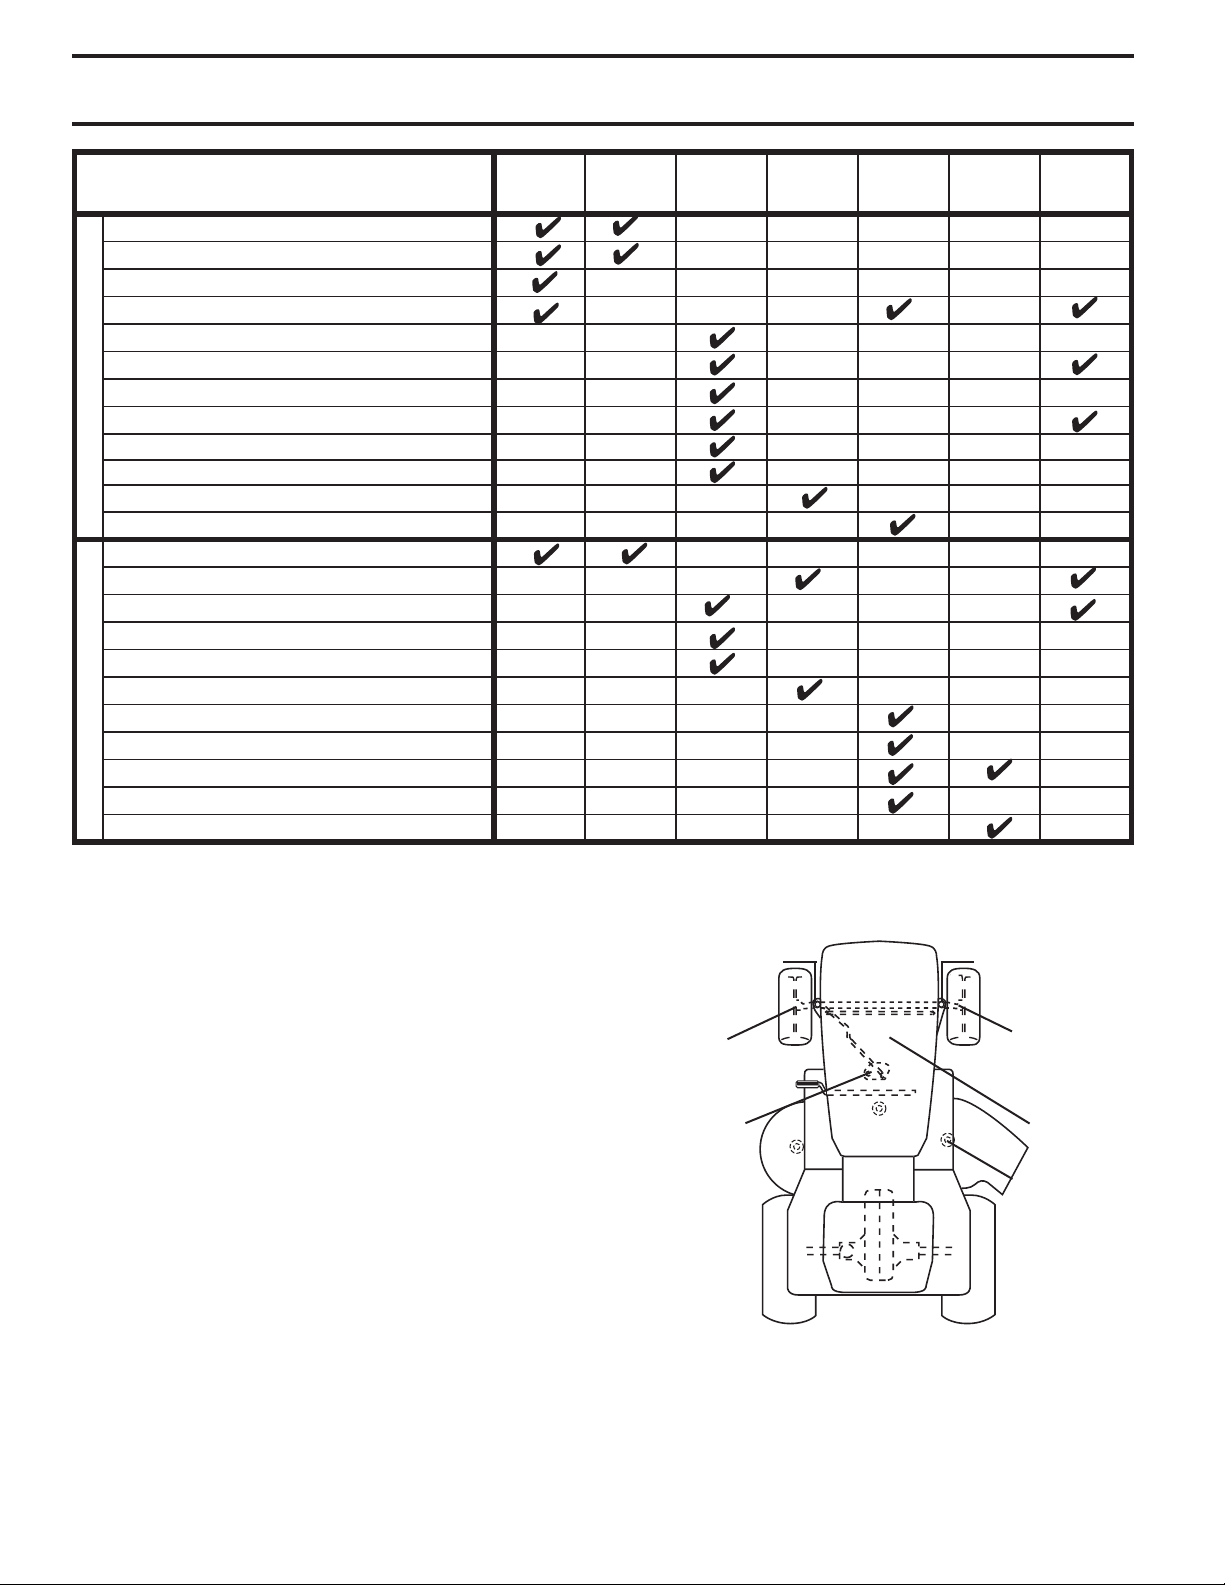
MAINTENANCE
MAINTENANCE
SCHEDULE
Check Brake Operation
Check Tire Pressure
T
Check Operator Presence & ROS Systems
R
Check for Loose Fasteners
A
Check/Replace Mower Blades
C
T
Lubrication Chart
0
Check Battery Level
R
Clean Battery and Terminals
Clean Debris Off Steering Plate
Che
ck Transaxle Cooling
Check Mower Levelness
Che
ck V-Belts
Check Engine Oil Level
Change Engine Oil (models with oil filter)
Change Engine Oil (
E
Clean Air Filter
N
Clean Air Screen
G
Inspect Muffler/Spark Arrester
I
Replace Oil Filter (If equipped)
N
E
Clean Engine Cooling Fins
Replace Spark Plug
Replace Air Filter Paper Cartridge
Replace Fuel Filter
1 - Change more often when operating under a heavy load or in high ambient temperatures
2 - Service more often when operating in dirty or dusty conditions.
models
without oil filter)
BEFORE
EACH
USE
EVERY
8
HOURS
3 - Replace blades more often when mowing in sandy soil.
4 - Not required if equipped with maintenance-free battery.
EVERY
25
HOURS
EVERY
50
HOURS
3
4
5
1,2
1,2
2
2
EVERY
100
HOURS
1
5 - See Cleaning in Maintenance Section.
EVERY
SEASON
,
2
2
2
BEFORE
STORAGE
GENERAL RECOMMENDATIONS
The warranty on this tractor does not cover items that have
been subjected to operator abuse or negligence. To receive
full value from the warranty, operator must main tain tractor
as instructed in this manual.
Some adjustments will need to be made periodically to
properly maintain your tractor.
At least once a season, check to see if you should make
any of the adjustments described in the Service and
Adjustments section of this manual.
• At least once a year you should replace the spark plug,
clean or replace air filter, and check blades and belts
for wear. A new spark plug and clean air filter assure
proper air-fuel mixture and help your engine run better
and last longer.
BEFORE EACH USE
• Check engine oil level.
• Check brake operation.
• Check tire pressure.
• Check operator presence and ROS systems for proper
operation.
• Check for loose fasteners.
LUBRICATION CHART
SPINDLE ZERK
➀
FRONT
➀
WHEEL
BEARING
ZERK
STEERING
➀
SECTOR
GEAR
TEETH
02501
General Purpose Grease
➀
Refer to Maintenance “ENGINE” Section
➁
IMPORTANT: DO NOT OIL OR GREASE THE PIVOT POINTS
WHICH HAVE SPECIAL NYLON BEARINGS. VISCOUS
LU BRI CANTS WILL ATTRACT DUST AND DIRT THAT WILL
SHORT EN THE LIFE OF THE SELF-LU BRI CAT ING BEARINGS.
IF YOU FEEL THEY MUST BE LU BRI CAT ED, USE ONLY A DRY,
POW DERED GRAPHITE TYPE LU BRI CANT SPARINGLY.
SPINDLE ZERK
➀
FRONT
➀
WHEEL
BEARING
ZERK
➁
MANDREL
➀
ZERKS
14
ENGINE
Page 15
MAINTENANCE
TRACTOR
Always observe safety rules when per form ing any
main te nance.
BRAKE OPERATION
If tractor requires more than five (5) feet (1,5 m) to stop at
highest speed in high est gear on a level, dry concrete or
paved surface, then brake must be checked and ad just ed.
(See “TO CHECK BRAKE” in the Ser vice and Ad just ments
section of this manual.)
TIRES
• Maintain proper air pressure in all tires. (See the sides
of tires for proper PSI.)
• Keep tires free of gasoline, oil, or insect control
chemi cals which can harm rubber.
• Avoid stumps, stones, deep ruts, sharp objects and
other hazards that may cause tire damage.
NOTE: To seal tire punctures and pre vent flat tires due
to slow leaks, tire sealant may be purchased from your
local parts dealer. Tire sealant also pre vents tire dry rot
and corrosion.
OPERATOR PRESENCE SYS TEM AND REVERSE
OPERATION SYSTEM (ROS) (See Fig. 13)
Be sure operator presence and reverse operation sys tems
are work ing properly. If your tractor does not function as
described, repair the problem immediately.
• The engine should not start unless the brake pedal is
fully de pressed, and the attachment clutch con trol is
in the dis en gaged position.
CHECK OPERATOR PRESENCE SYSTEM
• When the engine is running, any attempt by the op er a tor
to leave the seat without first setting the parking brake
should shut off the engine.
• When the engine is running and the at tach ment clutch
is engaged, any attempt by the operator to leave the
seat should shut off the engine.
• The attachment clutch should never operate unless
the operator is in the seat.
CHECK REVERSE OPERATION (ROS) SYSTEM
• When the engine is running with the ignition switch in
the engine "ON" position and the at tach ment clutch
engaged, any attempt by the operator to shift into
reverse should shut off the engine.
• When the engine is running with the ignition switch
in the ROS "ON" position and the at tach ment clutch
engaged, any attempt by the operator to shift into
reverse should NOT shut off the engine.
ROS "ON"
POSITION
ENGINE "ON" POSITION
(NORMAL OPERATING)
Fig. 13
BLADE CARE
For best results mower blades must be kept sharp. Re place
bent or damaged blades.
CAUTION: Use only a replacement blade approved by the manufacturer of your tractor.
Using a blade not approved by the manufacturer of your tractor is hazardous, could
damage your tractor and void your warranty.
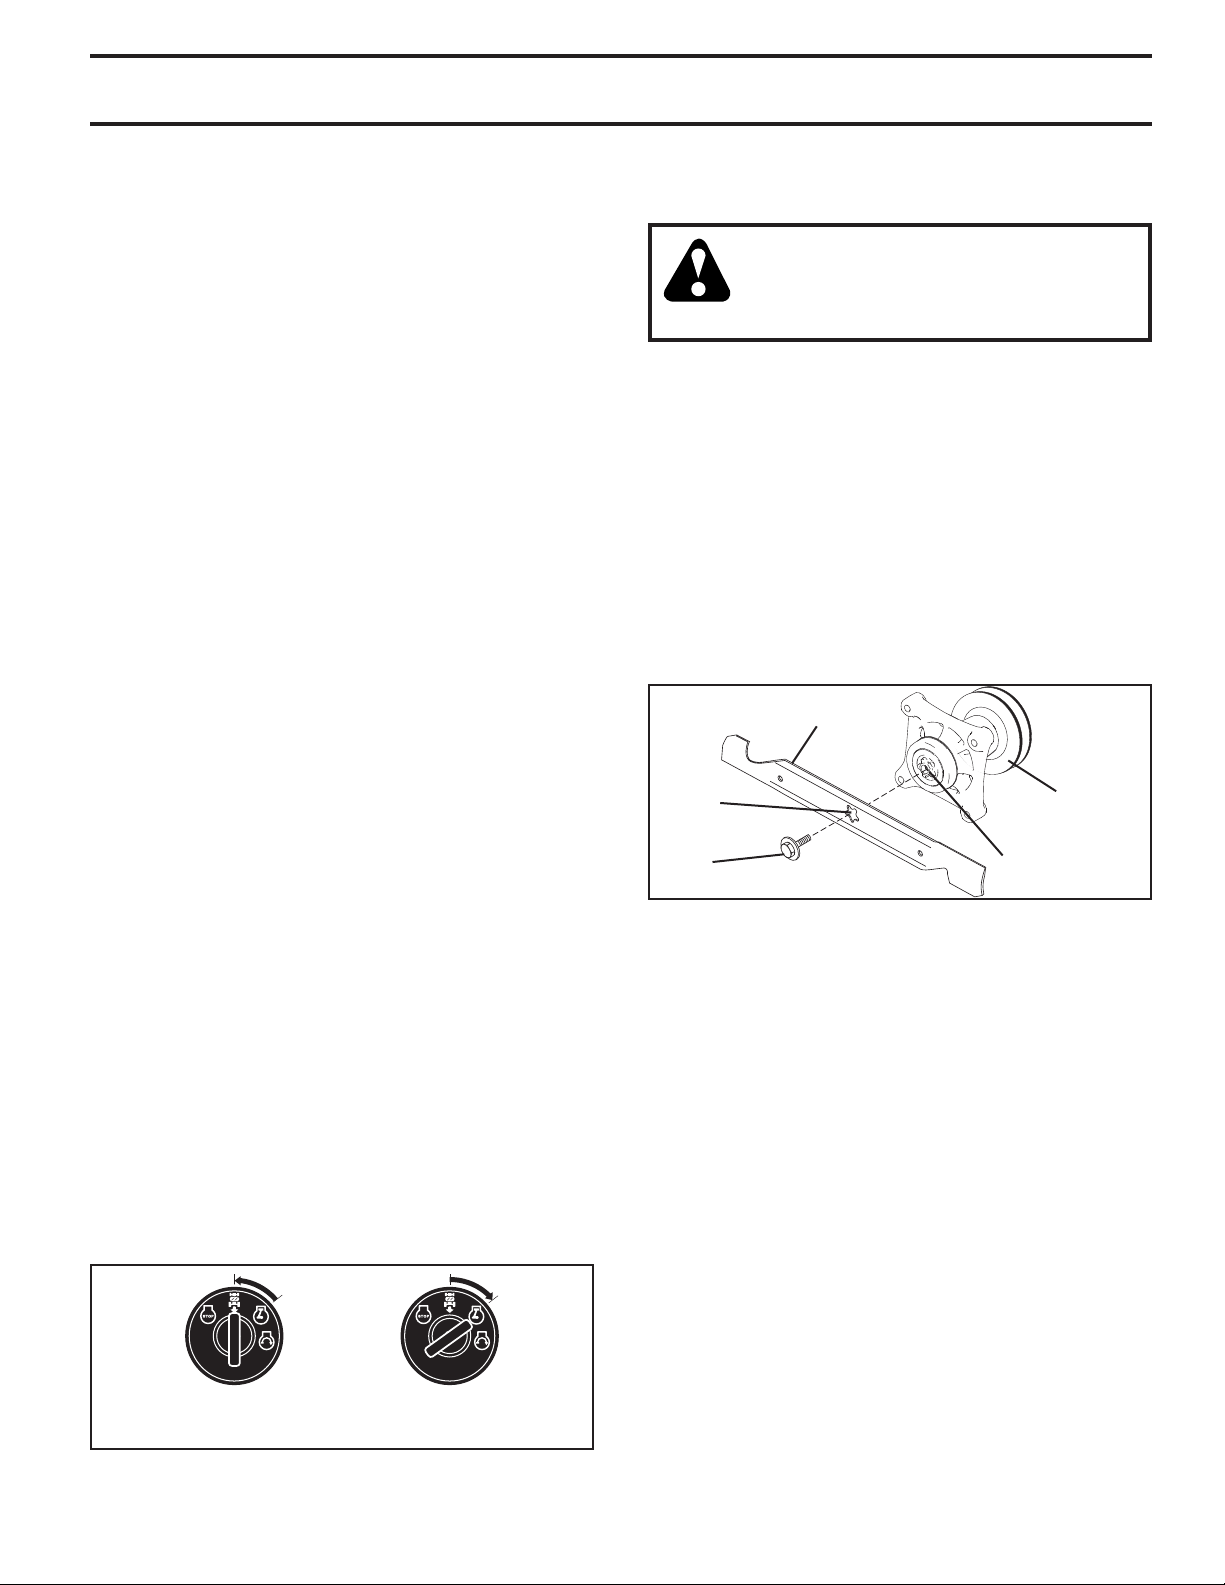
BLADE REMOVAL (See Fig. 14)
• Raise mower to highest position to allow access to
blades.
NOTE: Protect your hands with gloves and/or wrap blade
with heavy cloth.
• Remove blade bolt by turning counterclockwise.
• Install new or resharpened blade with stamped "GRASS
SIDE" facing the ground.
IMPORTANT: To ensure proper assembly, center hole in
blade must align with star on mandrel assembly.
• Install and tighten blade bolt securely (45-55 Ft. Lbs./
62-75 Nm).
IMPORTANT: SPECIAL BLADE BOLT IS HEAT TREATED.
BLADE
CENTER
HOLE
BLADE
BOLT
(SPECIAL)
MANDREL
ASSEMBLY
STAR
Fig. 14
BATTERY
Your tractor has a battery charging system which is suf fi cient
for normal use. However, periodic charging of the battery
with an automotive charger will extend its life.
• Keep battery and terminals clean.
• Keep battery bolts tight.
• Keep small vent holes open.
• Recharge at 6-10 amperes for 1 hour.
NOTE: The original equipment battery on your tractor is
maintenance free. Do not attempt to open or remove caps
or covers. Adding or checking level of electrolyte is not
necessary.
TO CLEAN BATTERY AND TERMINALS
Corrosion and dirt on the battery and terminals can cause
the battery to “leak” power.
• Remove terminal guard.
• Disconnect BL ACK battery cable first then RED bat tery
cable and remove battery from tractor.
• Rinse the battery with plain water and dry.
• Clean terminals and battery cable ends with wire brush
until bright.
• Coat terminals with grease or petroleum jelly.
• Reinstall battery. (See “REPLACING BATTERY" in the
Service and Adjustments section of this manual.)
15
Page 16
MAINTENANCE
TEMPERATURE RANGE ANTICIPATED BEFORE NEXT OIL CHANGE
SAE VISCOSITY GRADES
-20 0 30 40
80
100
-30
-20 0
20 30 40
F
C
32
-10
10
60
5W-30
SAE 30
TRANSAXLE MAINTENANCE
The transmission fan and cooling fins should be kept clean
to ensure proper cooling.
Do not attempt to clean fan or transmission while engine
is running or while the transmission is hot. To prevent pos si ble damage to seals, do not use high pressure water or
steam to clean transmission.
• Inspect cooling fan to be sure fan blades are intact and
clean.
• Inspect cooling fins for dirt, grass clippings and other
materials. To prevent damage to seals, do not use compressed air or high pressure sprayer to clean cool ing fins.
TRANSAXLE PUMP FLUID
The transaxle was sealed at the factory and fluid main te nance is not required for the life of the transaxle. Should
the transaxle ever leak or require servicing, contact your
near est au tho rized ser vice center/department.
V-BELTS
Check V-belts for deterioration and wear after 100 hours
of operation and replace if necessary. The belts are not
ad just able. Re place belts if they begin to slip from wear.
ENGINE
LUBRICATION
Only use high quality detergent oil rated with API service
classification SG-SL. Select the oil’s SAE viscosity grade
according to your expected operating temperature.
TO CHANGE ENGINE OIL (See Fig. 15 - 17)
Determine temperature range expected before oil change.
All oil must meet API service classification SG-SL.
• Be sure tractor is on level surface.
• Oil will drain more freely when warm.
• Catch oil in a suitable container.
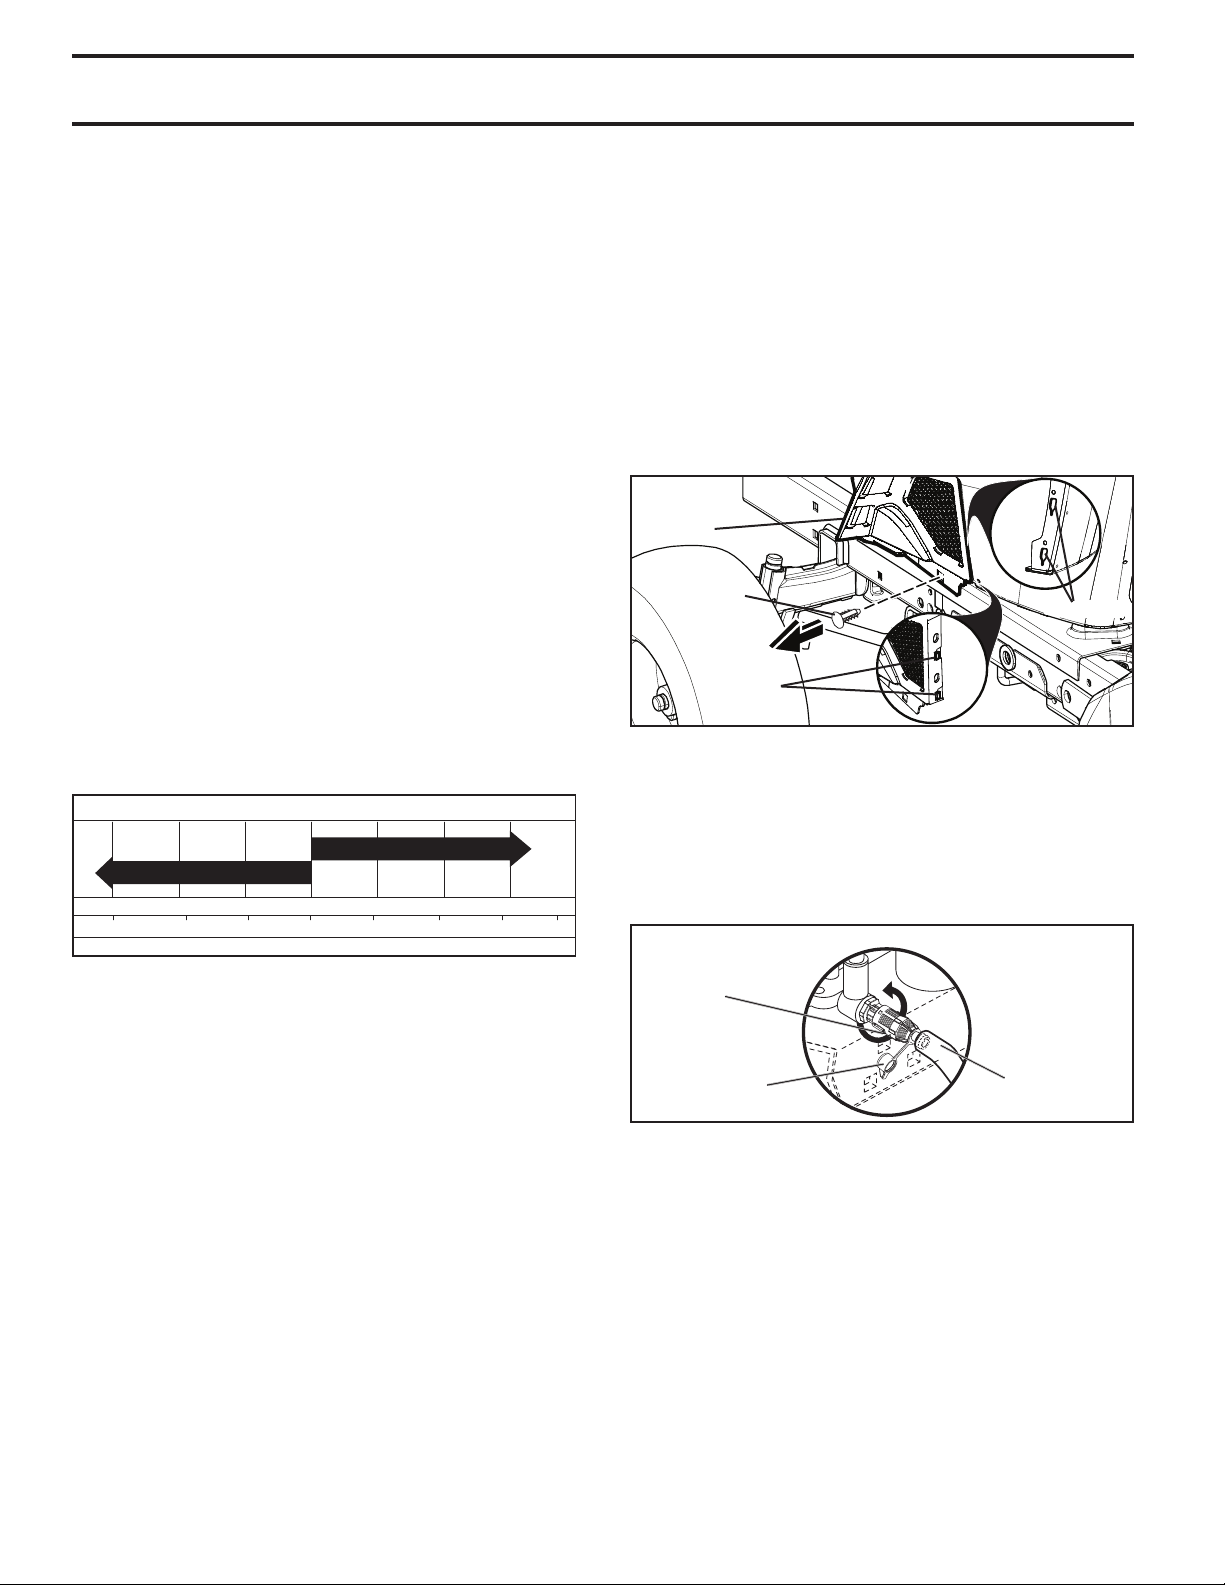
LOWER DASH COVER REMOVAL
• Raise hood.
• Remove fastener from lower dash cover.
CAUTION: Remove lower dash cover carefully to ensure
cover tabs are not broken.
• Slide lower dash cover up to release cover tabs from
tapered slots in lower dash and remove.
LOWER
DASH
COVER
FASTENER
TABS
Fig. 15
• Remove oil fill cap/dipstick. Be careful not to allow dirt
to enter the engine when changing oil.
• Remove yellow cap from end of drain valve and install
the drain tube onto the fitting.
• Unlock drain valve by pushing inward and turning
coun ter clock wise.
• To open, pull out on the drain valve.
OIL DRAIN VALVE
SLOTS
Fig. 15
NOTE: Although multi-viscosity oils (5W30, 10W30 etc.)
improve starting in cold weather, they will result in increased
oil consumption when used above 32°F/0°C. Check your
engine oil level more frequently to avoid possible engine
damage from running low on oil.
Change the oil after every 50 hours of operation or at least
once a year if the tractor is not used for 50 hours in one year.
Check the crankcase oil level before starting the engine
and after each eight (8) hours of operation. Tighten oil fill
cap/dipstick securely each time you check the oil level.
CLOSED
AND
LOCKED
POSITION
YEL LOW CAP
02463
DRAIN
TUBE
Fig. 17
• After oil has drained completely, close and lock the
drain valve by pushing inward and turning clockwise
until the pin is in the locked position as shown.
• Remove the drain tube and replace the cap onto to the
bottom fitting of the drain valve.
• Refill engine with oil through oil fill dipstick tube. Pour
slowly. Do not overfill. For approximate capacity see
“PRODUCT SPECIFICATIONS” section of this man u al.
• Use gauge on oil fill cap/dipstick for checking level.
Ensure dipstick cap is tightened securely for accurate
reading. Keep oil at “FULL” line on dipstick. Tighten
cap onto the tube securely when finished.
16
Page 17
MAINTENANCE
ENGINE OIL FILTER
Replace the engine oil filter every season or every other oil
change if the tractor is used more than 100 hours in one year.
NOTE: If needed, remove lower dash covers using steps
from "Lower dash cover removal" section of this manual.
AIR FILTER
Your engine will not run properly using a dirty air filter. Service air cleaner more often under dusty conditions.
CLEAN AIR SCREEN
The air screen is over the air intake blower located on top
of engine. The air screen must be kept free of dirt and
chaff to prevent engine dam age from overheating. Clean
with a wire brush or compressed air to re move dirt and
stubborn dried gum fibers.
ENGINE COOLING SYSTEM
To ensure proper cooling, make sure the grass screen,
cooling fins, and other external surfaces of the engine are
kept clean at all times.
Every 100 hours of operation (more often under extremely
dusty, dirty conditions), remove the blower housing and other
cooling shrouds. Clean the cooling fins and external surfaces
as necessary. Ensure the cooling shrouds are reinstalled.
NOTE: Operating the engine with a blocked grass screen,
dirty or plugged cooling fins, and/or cooling shrouds re moved
will cause engine damage due to overheating.
MUFFLER
Inspect and replace corroded muffler and spark arrester (if
equipped) as it could create a fire hazard and/or damage.
SPARK PLUGS
Replace spark plugs at the beginning of each mowing
season or after every 100 hours of operation, whichever
occurs first. Spark plug type and gap setting are shown
in “PROD UCT SPECIFICATIONS” section of this manual.
CLEANING (See Fig. 19)
• Clean engine, battery, seat, finish, etc. of all foreign
matter.
• Clean debris from steering plate. Debris can restrict
clutch/brake pedal shaft movement, causing belt slip
and loss of drive.
CAUTION: Avoid all pinch points and
movable parts.
CLUTCH/BRAKE PEDAL
CLEAN
TOP SIDE
STEERING
PLATE
STEERING SYSTEM, DASH, FENDER AND MOWER NOT SHOWN
Fig. 19
• Keep finished surfaces and wheels free of all gasoline,
oil, etc.
• Protect painted surfaces with automotive type wax.
Except for the washout port (if equipped), we do not
recommend using a garden hose or pressure washer to
clean the outside of your tractor unless the engine and
transmission are covered to keep water out. Water in
engine or transmission will shorten the useful life of your
tractor. Use compressed air or a leaf blower to remove
grass, leaves and trash from outside tractor and mower.
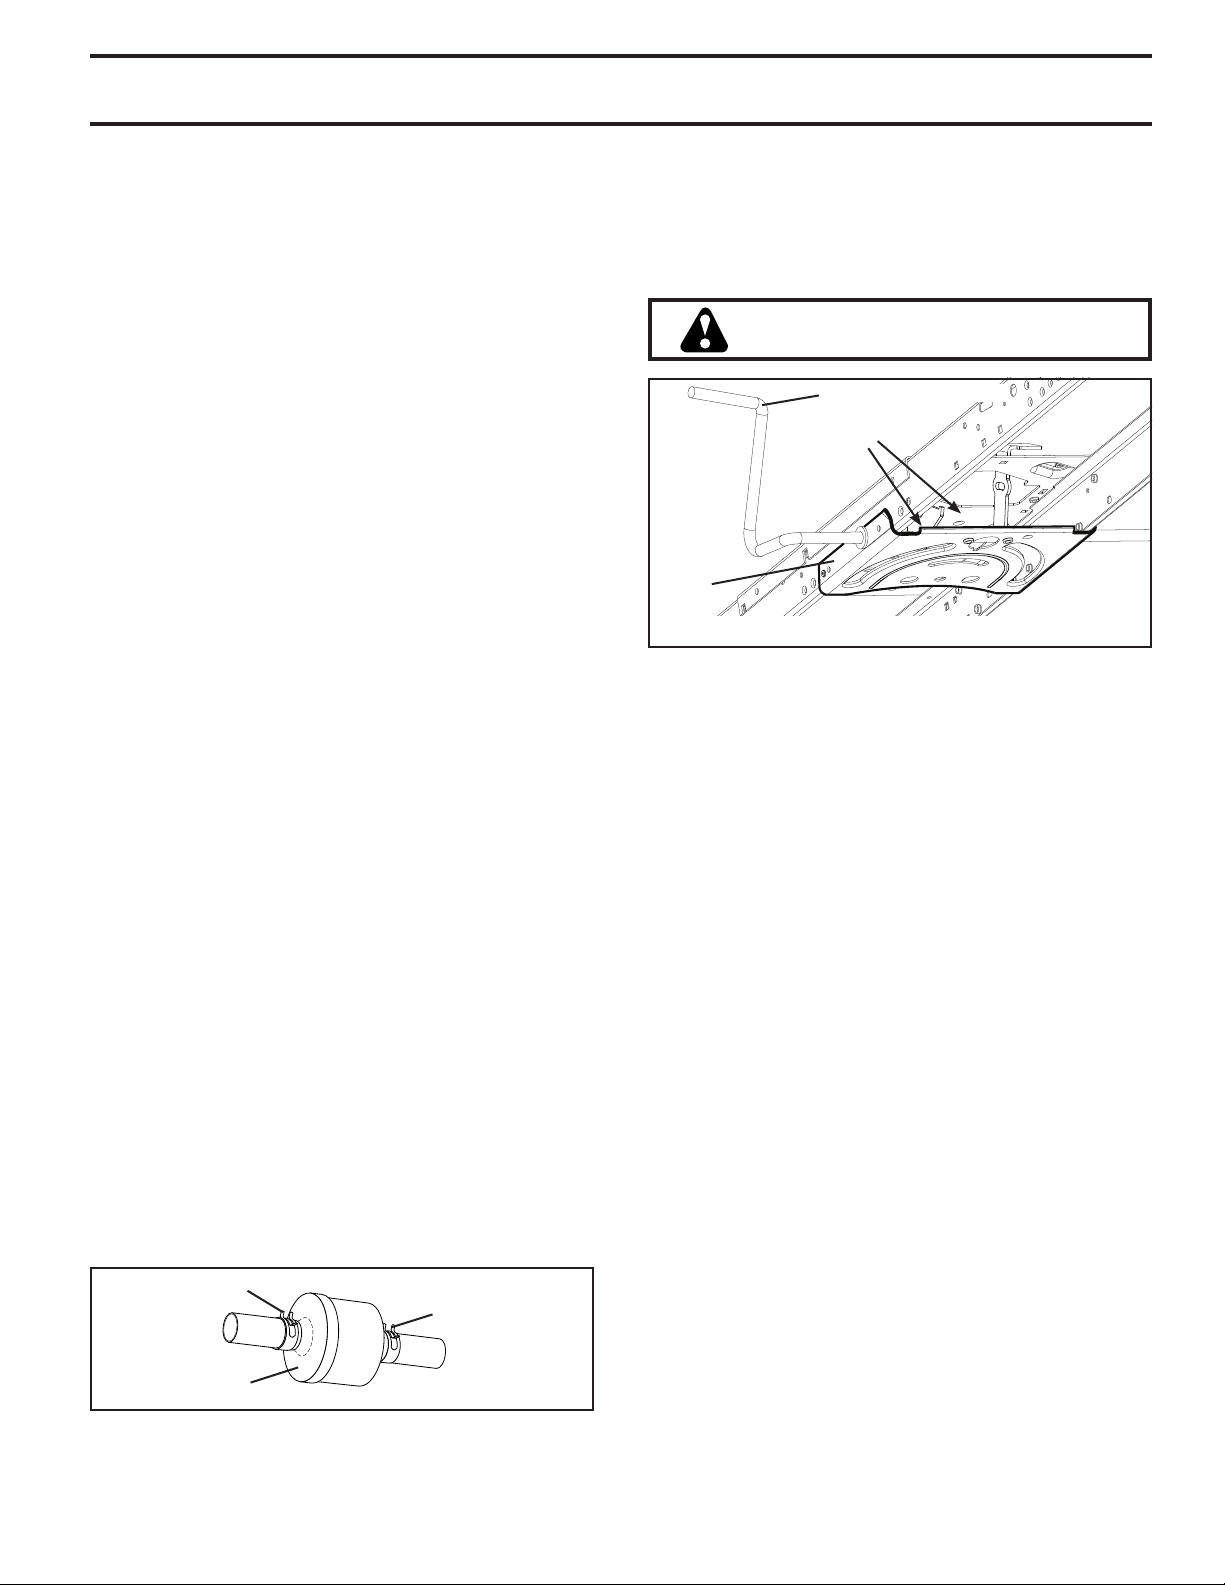
IN-LINE FUEL FILTER (See Fig. 18)
The fuel filter should be replaced once each season. If fuel
filter becomes clogged, ob struct ing fuel flow to car bu re tor,
re place ment is re quired.
• With engine cool, remove filter and plug fuel line sec tions.
• Place new fuel filter in position in fuel line with arrow
pointing towards carburetor.
• Be sure there are no fuel line leaks and clamps are
properly positioned.
• Immediately wipe up any spilled gasoline.
CLAMP
CLAMP
FUEL FILTER
Fig. 18
17
Page 18
MAINTENANCE
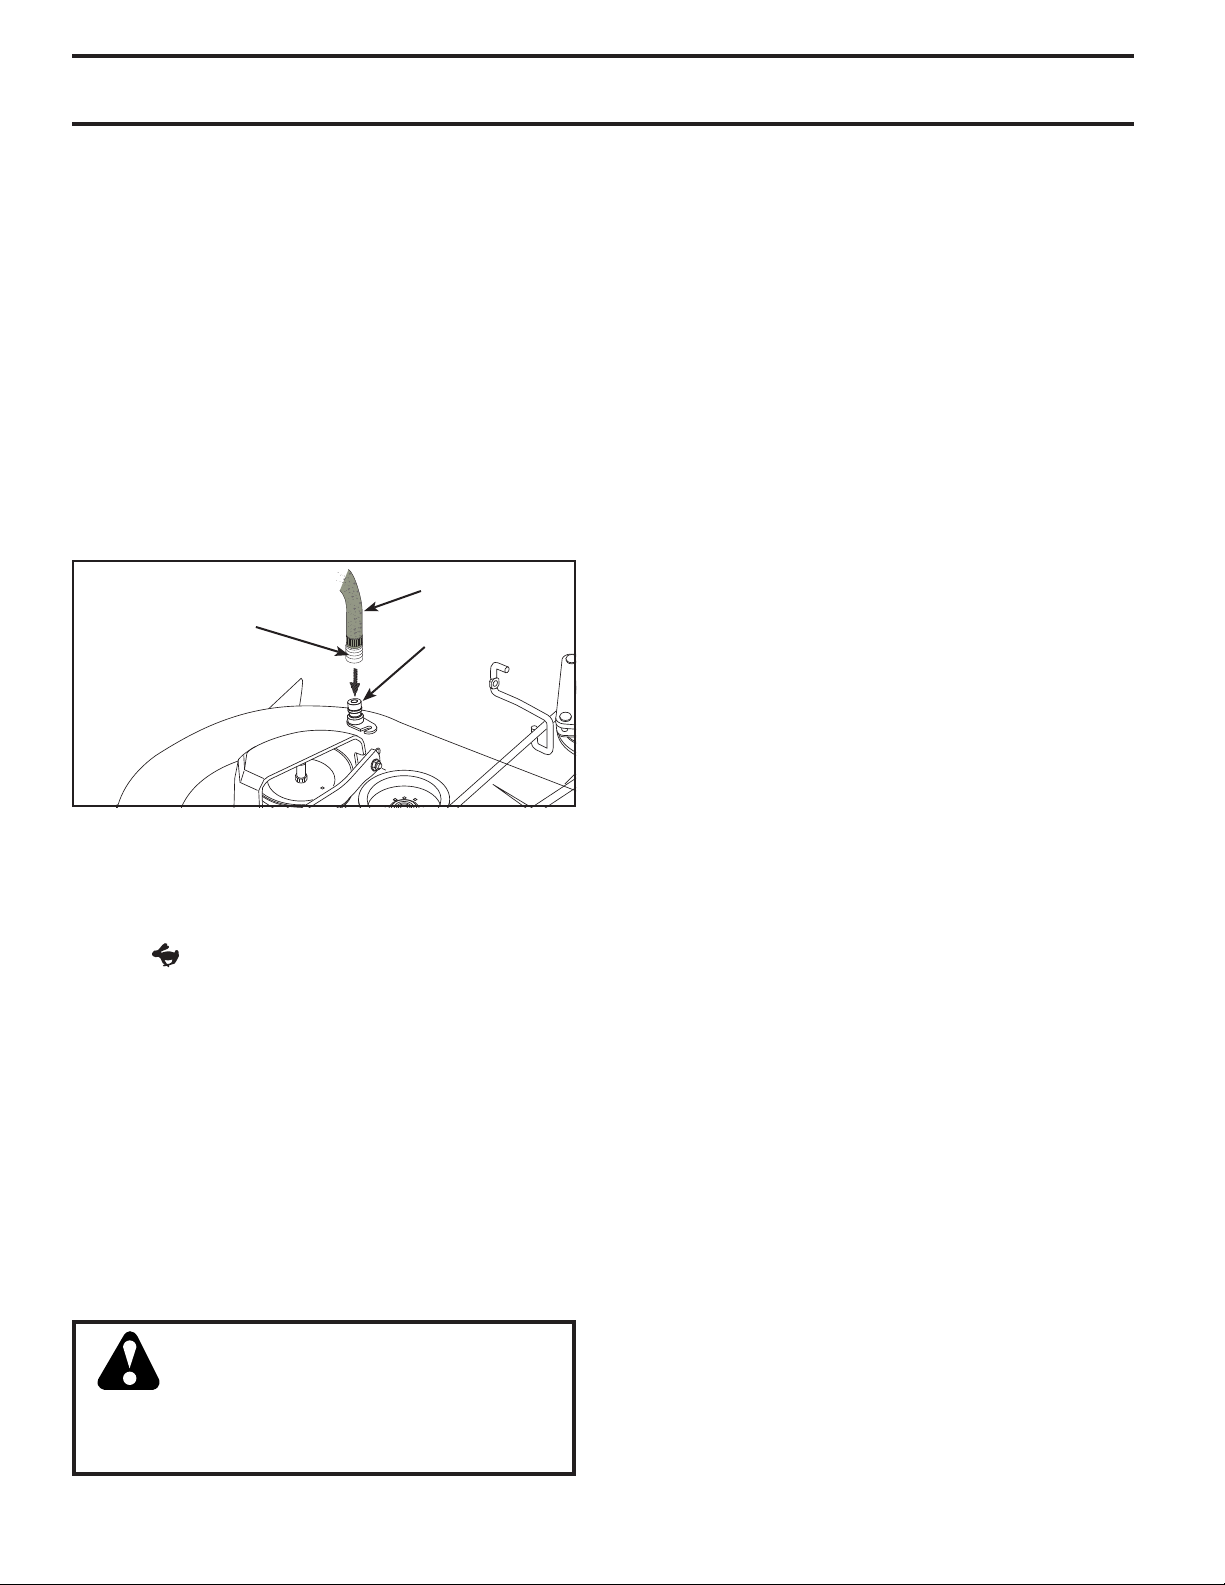
DECK WASHOUT PORT (See Fig. 20)
Your tractor’s deck is equipped with a washout port as part
of its deck wash system. It should be utilized after each use.
1. Drive the tractor to a level, clear spot on your lawn, near
enough to a water spigot for your garden hose to reach.
IMPORTANT: Make certain the tractor’s discharge chute is
directed AWAY from your house, garage, parked cars, etc.
Remove bagger chute or mulch cover if attached.
2. Make sure the attachment clutch control is in the
“DIS EN GAGED” position, set the parking brake, and
stop the engine.
3. Thread the nozzle adapter (packaged with your tractor’s
Operator’s Manual) onto the end of your garden hose.
4. Pull back the lock collar of the nozzle adapter and push
the adapter onto the deck washout port at the left end
of the mower deck. Release the lock collar to lock the
adapter on the nozzle.
HOSE
NOZZLE ADAPTER
WASHOUT
PORT
Fig. 20
IMPORTANT: Tug hose ensuring connection is secure.
5. Turn the water on.
6. While sitting in the operator’s position on the tractor,
re-start the engine and place the throttle lever in the
Fast "
IMPORTANT: Recheck the area to ensure the area is clear.
Ensure no children are in the area while cleaning the deck.
7. Move the tractor’s attachment clutch control to the
“ENGAGED” position. Remain in the operator’s position
with the cutting deck engaged until the deck is cleaned.
8. Move the tractor’s attachment clutch control to the
“DIS EN GAGED” position. Turn the ignition key to the
STOP position to turn the tractor’s engine off. Turn the
water off.
9. Pull back the lock collar of the nozzle adapter to disconnect the adapter from the nozzle washout port.
10. Move the tractor to a dry area, preferably a concrete or
paved area. Place the attachment clutch control in the
“ENGAGED” position to remove excess water and to
help dry before putting the tractor away.
• Replace broken or missing washout fitting
• Plug any holes in mower with bolts and locknuts.
" position.
WARNING: A broken or missing washout
fitting could expose you or others to
thrown objects from contact with the blade.
immediately, prior to using mower again.
18
Page 19
SERVICE AND ADJUSTMENTS
WARNING: TO AVOID SERIOUS INJURY, BEFORE PERFORMING ANY SER VICE OR AD JUST MENTS:
• Depress brake pedal fully and set parking brake.
• Place attachment clutch in “DISENGAGED” position.
• Turn ignition key to “STOP” and remove key.
• Make sure the blades and all moving parts have completely stopped.
• Disconnect spark plug wire from spark plug and place wire where it cannot come in contact with plug.
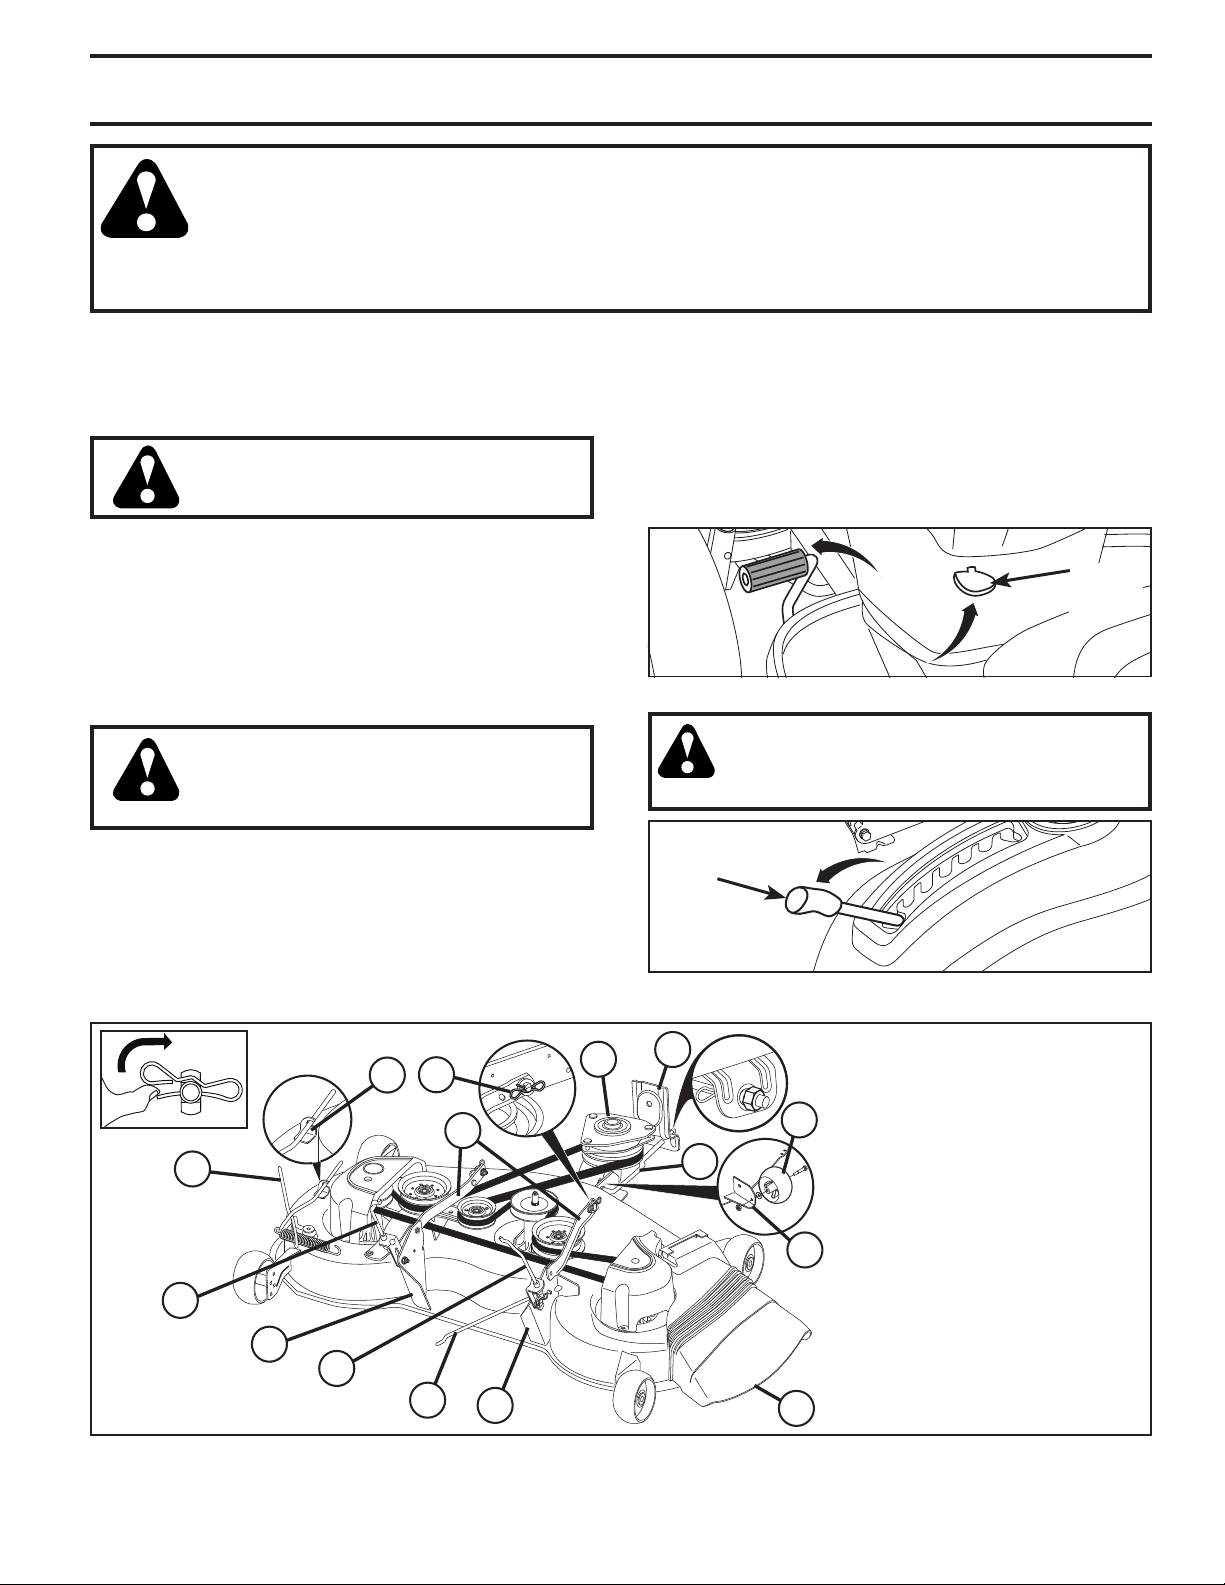
TO REMOVE MOWER (See Fig. 21)
• Place attachment clutch in “DIS EN GAGED” position.
• Lower attachment lift lever to its lowest position.
• Disengage belt tension rod (K) from lock bracket (L).
CAUTION: Belt tension rod is spring
loaded. Have a tight grip on rod and
release slowly.
• Remove mower belt from electric clutch pulley (M).
• Disconnect front link (E) from mower - remove retainer
spring and washer.
• Go to either side of mower and disconnect mower suspension arm (A) from chassis and rear lift link (C) from rear
mower bracket (D) - remove retainer springs and washers.
• Go to other side of mower and disconnect the suspension arm and rear lift link.
CAUTION: After rear lift links are disconnected, the attachment lift lever will be
spring loaded. Have a tight grip on lift lever when changing position of the lever.
• From right side of mower, disconnect anti-sway bar (S)
from right rear mower bracket (D) - remove retainer
spring and washer and pull mower toward you until the
bar falls from the hole in bracket.
• Turn tractor steering wheel to the left as far as it will go.
• Slide mower out from under right side of tractor.
TO INSTALL MOWER (See Figs. 21 - 33)
1. SET PARKING BRAKE LEVER AND LOWER ATTACHMENT LIFT LEVER (See Fig. 21 and 22)
• Depress clutch/brake pedal all the way down and hold.
• Pull parking brake lever up and hold, re lease pres sure
from clutch/brake pedal, then release parking brake
lever. Pedal should re main in brake position. Ensure
parking brake will hold tractor secure.
PARKING
BRAKE
LEVER
Fig. 22
CAUTION: Lift lever is spring loaded. Have a
tight grip on lift lever, lower it slowly and engage in lowest position. Lift lever is located
on left side of fender.
LIFT
LEVER
Fig. 23
B
L
M
A
K
C
I
C
S
D
F
A. MOWER SIDE SUSPENSION
ARMS
W
E
H
B. RETAINER SPRING
C. REAR LIFT LINK(S)
D. RIGHT SIDE REAR MOWER
BRACKET
E. FRONT LIFT LINK ASSEMBLY
F. FRONT SUSPENSION BRACKET
H. FRONT MOWER BRACKET
I. LEFT SIDE REAR MOWER
BRACKET
K. BELT TENSION ROD
L. LOCKING BRACKET
M. ENGINE CLUTCH PULLEY
Q. DEFLECTOR SHIELD
S. ANTI-SWAY BAR
W. FRONT GAUGE WHEEL
Q
Fig. 21
19
Page 20
SERVICE AND ADJUSTMENTS
PLACE 90° END INTO HOLE
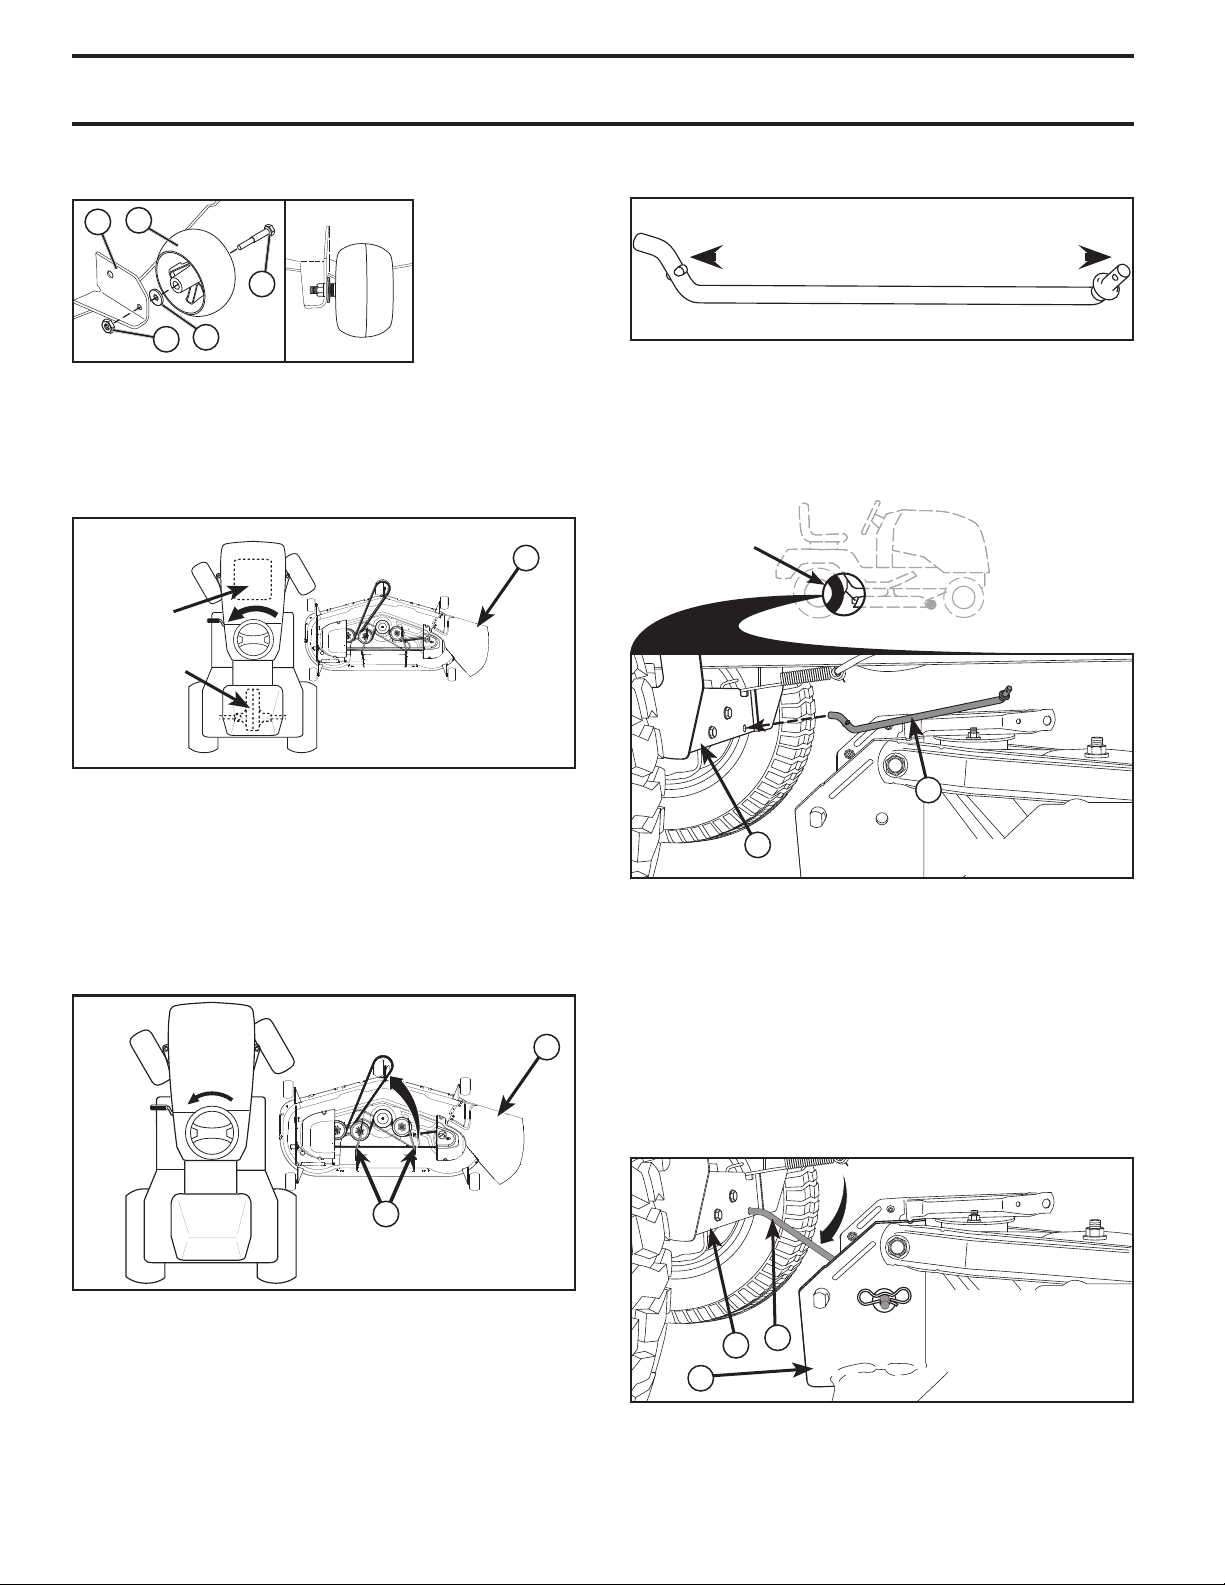
2. ASSEMBLE FRONT GAUGE WHEEL (W) TO FRONT
OF MOWER (See Fig. 24)
W
H
X
Y
Z
H. FRONT MOWER
BRACKET
W. FRONT GAUGE
WHEEL
X. SHOULDER
BOLT
Y. 1-1/4 O.D.
WASHER
Z. 3/8-16 LOCKNUT
Fig. 24
3. TURN STEERING WHEEL LEFT AND POSITION
MOWER (See Fig. 25)
• Turn steering wheel to the left as far as it will go and
position mower on right side of tractor with deflector
shield (Q) to the right.
FRONT
Q
ENGINE
TRANSAXLE
02965
BACK
Q. DEFLECTOR
SHIELD
5. INSTALL ANTI-SWAY BAR (S) (IF EQUIPPED)
(See Fig. 27 - 29)
ANTI-SWAY BAR (S)
TOWARDS TOWARDS
TRANSAXLE MOWER DECK
90° END INTEGRATED WASHER END
Fig. 27
• From right side of mower, first insert 90° end of anti-sway
bar (S) into hole in transaxle bracket (T), located near
left rear tire in front of transaxle.
NOTE: Flashlight may be helpful.
ANTI-SWAY BAR
(S) LOCATION
PLACE 90° END INTO HOLE
TRANSAXLE
BRACKET (T)
LOCATED
BETWEEN REAR
TIRES
Fig. 25
4. SLIDE MOWER UNDER TRACTOR (See Fig. 26)
• Bring belt forward and check belt for proper routing in
all mower pulley grooves.
NOTE: Be sure mower side suspension arms (A) are pointing forward before sliding mower under tractor.
• Slide mower under tractor until it is centered under
tractor.
Q
A. MOWER SIDE
A
02965
SUSPENSION
ARMS
Q. DEFLECTOR
SHIELD
Fig. 26
S
T
S. ANTI-SWAY BAR
T. TRANSAXLE BRACKET
Fig. 28
NOTE: Depending on model, bracket (T) may be differ-
ent than shown but hole for anti-sway bar will be in same
position/location.
• Pivot the integrated washer end of anti-sway bar (S)
towards mower deck bracket on right side of mower.
Insert integrated washer end of bar into hole in rear
mower bracket (D). Move mower as needed to insert
integrated washer end of bar into rear mower bracket (D).
• Secure with small washer and small retainer spring as
shown.
D. RIGHT SIDE
REAR MOWER
S
T
D
BRACKET
S. ANTI-SWAY BAR
T. TRANSAXLE
BRACKET
20
Fig. 29
Page 21
SERVICE AND ADJUSTMENTS
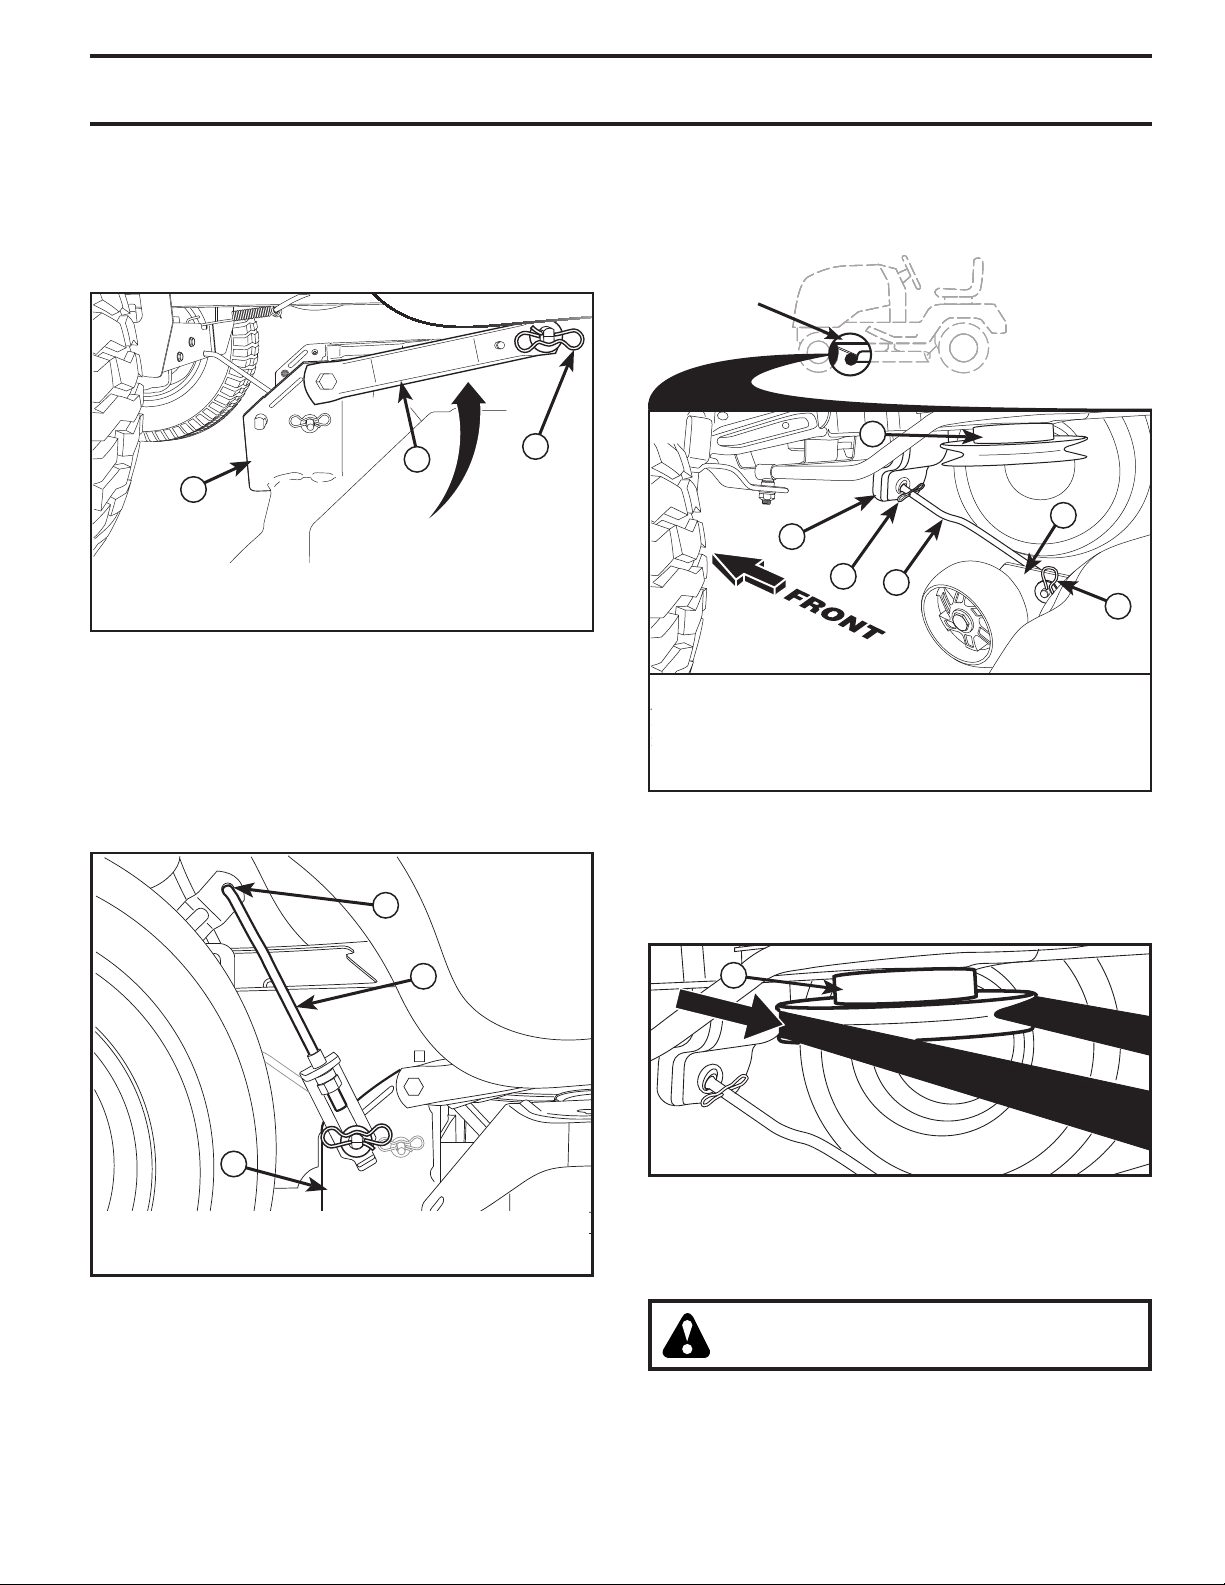
6. ATTACH MOWER SIDE SUSPENSION ARMS (A) TO
CHASSIS (See Fig. 30)
• Position front hole in side suspension arm (A) over
pin on outside of tractor chassis and secure with large
washer and large retainer spring (B).
• Repeat on opposite side of tractor.
A
D
A. MOWER SIDE SUSPENSION ARMS
B. RETAINER SPRING
D. RIGHT SIDE REAR MOWER BRACKET
B
Fig. 30
7. ATTACH REAR LIFT LINKS (C) (See Fig. 31)
• Insert rod end of rear lift link (C) into hole (U) in tractor
lift shaft suspension arm and pivot link down to mower.
• Lift rear corner of mower and position slot in link assembly over pin on rear mower bracket (D) and secure
with large washer and large retainer spring.
• Repeat on opposite side of tractor.
U
• Insert other end of link (E) into hole in front mower
bracket (H) and secure with washer and small retainer
spring (J).
NOTE: Requires deck lifting.
FRONT LINK
LOCATION
M
H
F
G
E
J
E. FRONT LIFT LINK ASSEMBLY
F. FRONT SUSPENSION BRACKET
G. LARGE RETAINER SPRING
H. FRONT MOWER BRACKET
J. SMALL RETAINER SPRING
M. ENGINE CLUTCH PULLEY
Fig. 32
9 INSTALL BELT ON ENGINE CLUTCH PULLEY (M)
(See Fig. 21 & 33)
• Disengage belt tension rod (K) from locking bracket (L).
• Install belt onto engine clutch pulley (M).
C
D
C. REAR LIFT LINK(S)
D. RIGHT SIDE REAR MOWER BRACKET
U. HOLE
Fig. 31
8 ATTACH FRONT LINK (E) (See Fig. 31)
• Turn steering wheel to position wheels straight forward.
• From front of tractor, insert rod end of front link (E)
through front hole in tractor front suspension bracket (F).
• Move to left side of mower and and insert large retainer
spring (G) through hole in front link (E) behind front
suspension bracket (F).
M
M. ENGINE
CLUTCH PULLEY
Fig. 33
IMPORTANT: Check belt for proper routing in all mower
pulley grooves and under mandrel covers.
• Engage belt tension rod (K) on locking bracket (L).
CAUTION: Belt tension rod is spring loaded.
Have a tight grip on rod and engage slowly.
• Raise attachment lift lever to highest position.
• If necessary, adjust gauge wheels before op er at ing
mower as shown in the Operation section of this manual.
21
Page 22
SERVICE AND ADJUSTMENTS
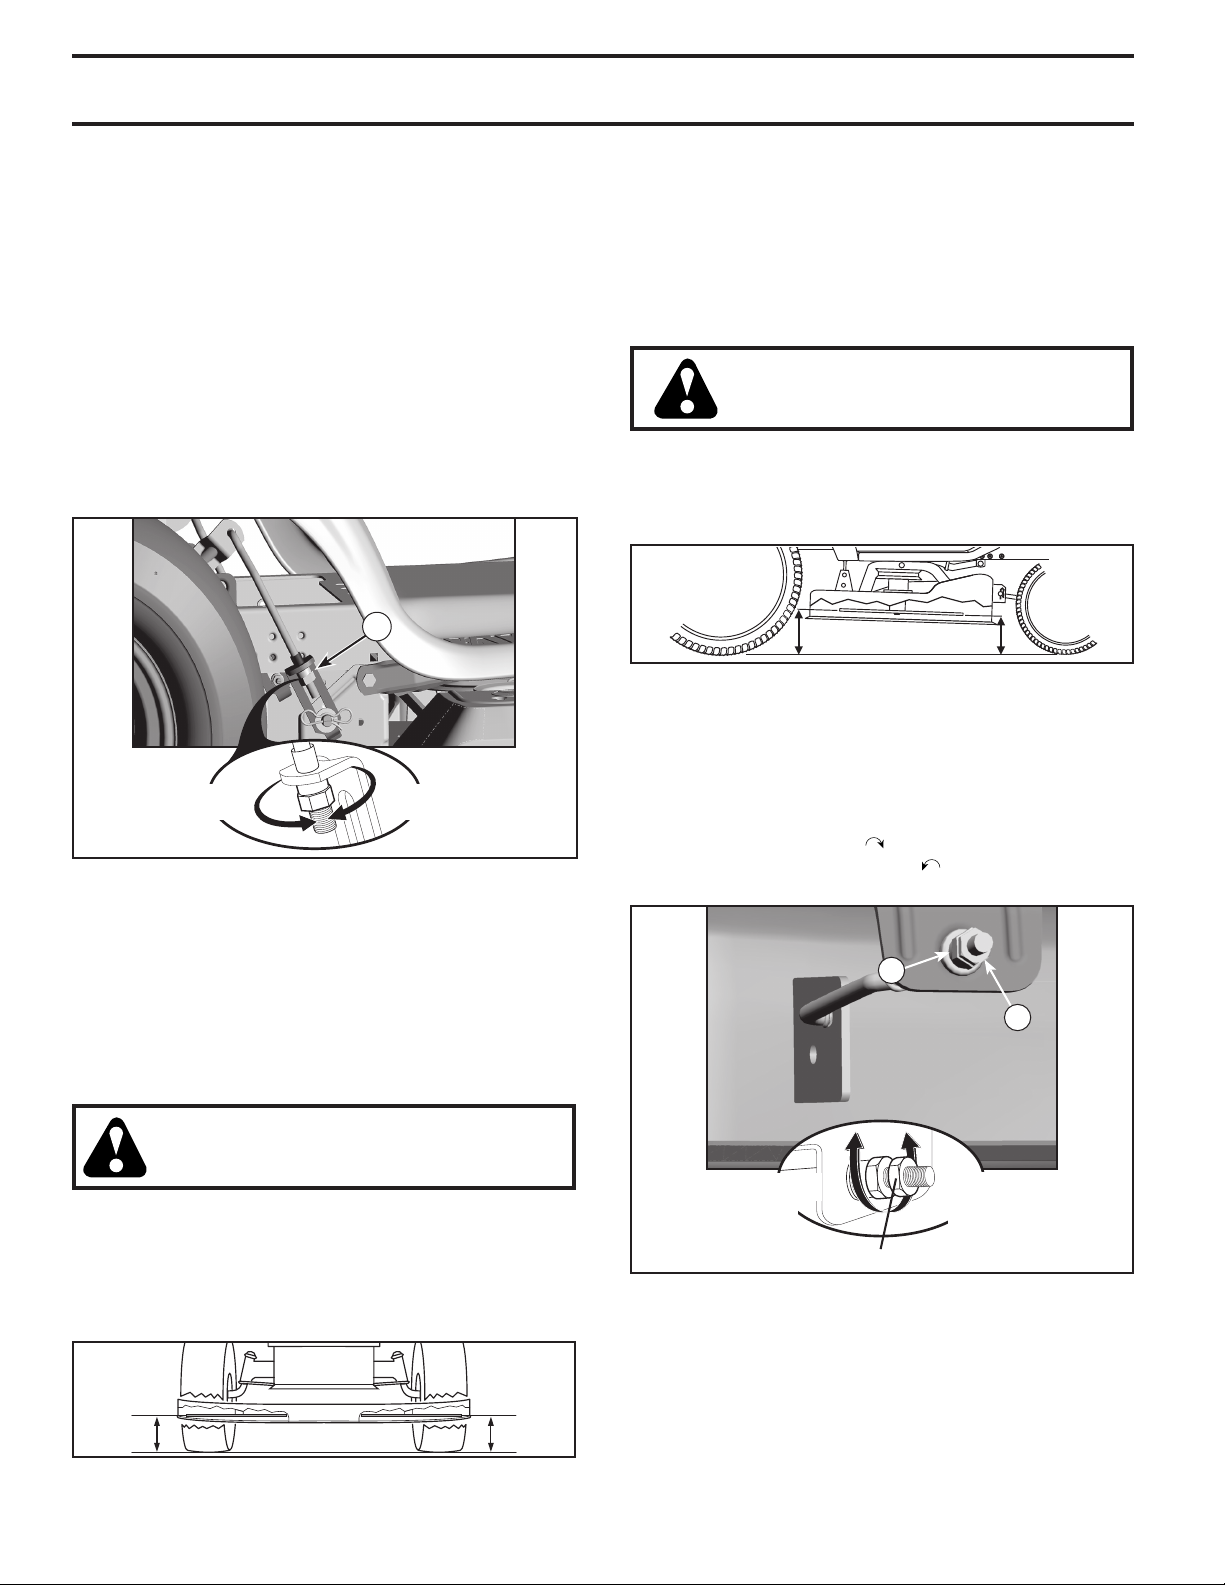
TO LEVEL MOWER
Ensure tires are properly inflated to the PSI shown on tires.
If tires are over or under inflated, it may affect the appearance of your lawn and lead you to think the mower is not
adjusted properly.
VISUAL SIDE-TO-SIDE ADJUSTMENT (See Fig. 34)
• With all tires properly inflated and if your lawn appears
unevenly cut, determine which side of mower is cutting
lower.
NOTE: As desired, you can raise the low side of mower
or lower the high side.
• Go to side of mower you wish to adjust.
• With a 3/4" or adjustable wrench, turn lift link adjustment
nut (A) to the left to lower the mower, or, to the right to
raise the mower.
A
TURN NUT RIGHT
TO RAISE MOWER
Fig. 34
NOTE: Each full turn of adjustment nut will change mower
height about 3/16" (4,7 mm).
• Test your adjustment by mowing some uncut grass and
visually checking the appearance. Readjust, if necessary, until you are satisfied with the results.
PRECISION SIDE-TO-SIDE ADJUSTMENT (See Fig. 35)
• With all tires properly inflated, park tractor on level
ground or driveway.
TURN NUT LEFT
TO LOWER MOWER
• Recheck measurements, adjust if necessary until both
sides are equal.
FRONT-TO-BACK ADJUSTMENT (See Figs. 36 & 37)
IMPORTANT: Deck must be level side-to-side.
To obtain the best cutting re sults, the mower blades should
be adjusted so the front tip is 1/8" to 1/2" (3,1 to 12,7 mm)
lower than the rear tip when the mower is in its highest
position.
CAUTION: Blades are sharp. Protect
your hands with gloves and/or wrap
blade with heavy cloth.
• Raise mower to highest position.
• Position any blade so the tip is pointing straight forward.
Measure distance (B) to the ground at front and rear tip
of the blade.
B
B
Fig. 36
• If front tip of blade is not 1/8" to 1/2" (3,1 to 12,7 mm)
lower than the rear tip, go to the front of tractor.
• With an 11/16" or adjustable wrench, loosen jam nut A
several turns to clear adjustment nut B.
• With a 3/4" or adjustable wrench, turn front link adjustment nut (B) clockwise ( ) (tighten) to raise the front of
mower, or, counterclockwise ( ) (loosen) to lower the
front mower.
B
A
CAUTION: Blades are sharp. Protect
your hands with gloves and/or wrap
blade with heavy cloth.
• Raise mower to its highest position.
• At both sides of mower, position blade at side and measure the distance (A) from bottom edge of blade to the
ground. The distance should be the same on both sides.
• If adjustment is necessary, see steps in Visual Adjustment instructions above.
AA
Fig. 35
TIGHTEN ADJUST
NUT "B" TO
RAISE MOWER
LOOSEN JAM NUT "A" FIRST
LOOSEN ADJUST
NUT "B" TO
LOWER MOWER
Fig. 37
NOTE: Each full turn of the adjustment nut will change
mower height about 1/8" (3,1 mm).
• Recheck measurements, adjust if necessary until front
tip of blade is 1/8 to 1/2" (3,1 to 12,7 mm) lower than
the rear tip.
• Hold adjustment nut in position with wrench and tighten
jam nut securely against adjustment nut.
22
Page 23
SERVICE AND ADJUSTMENTS
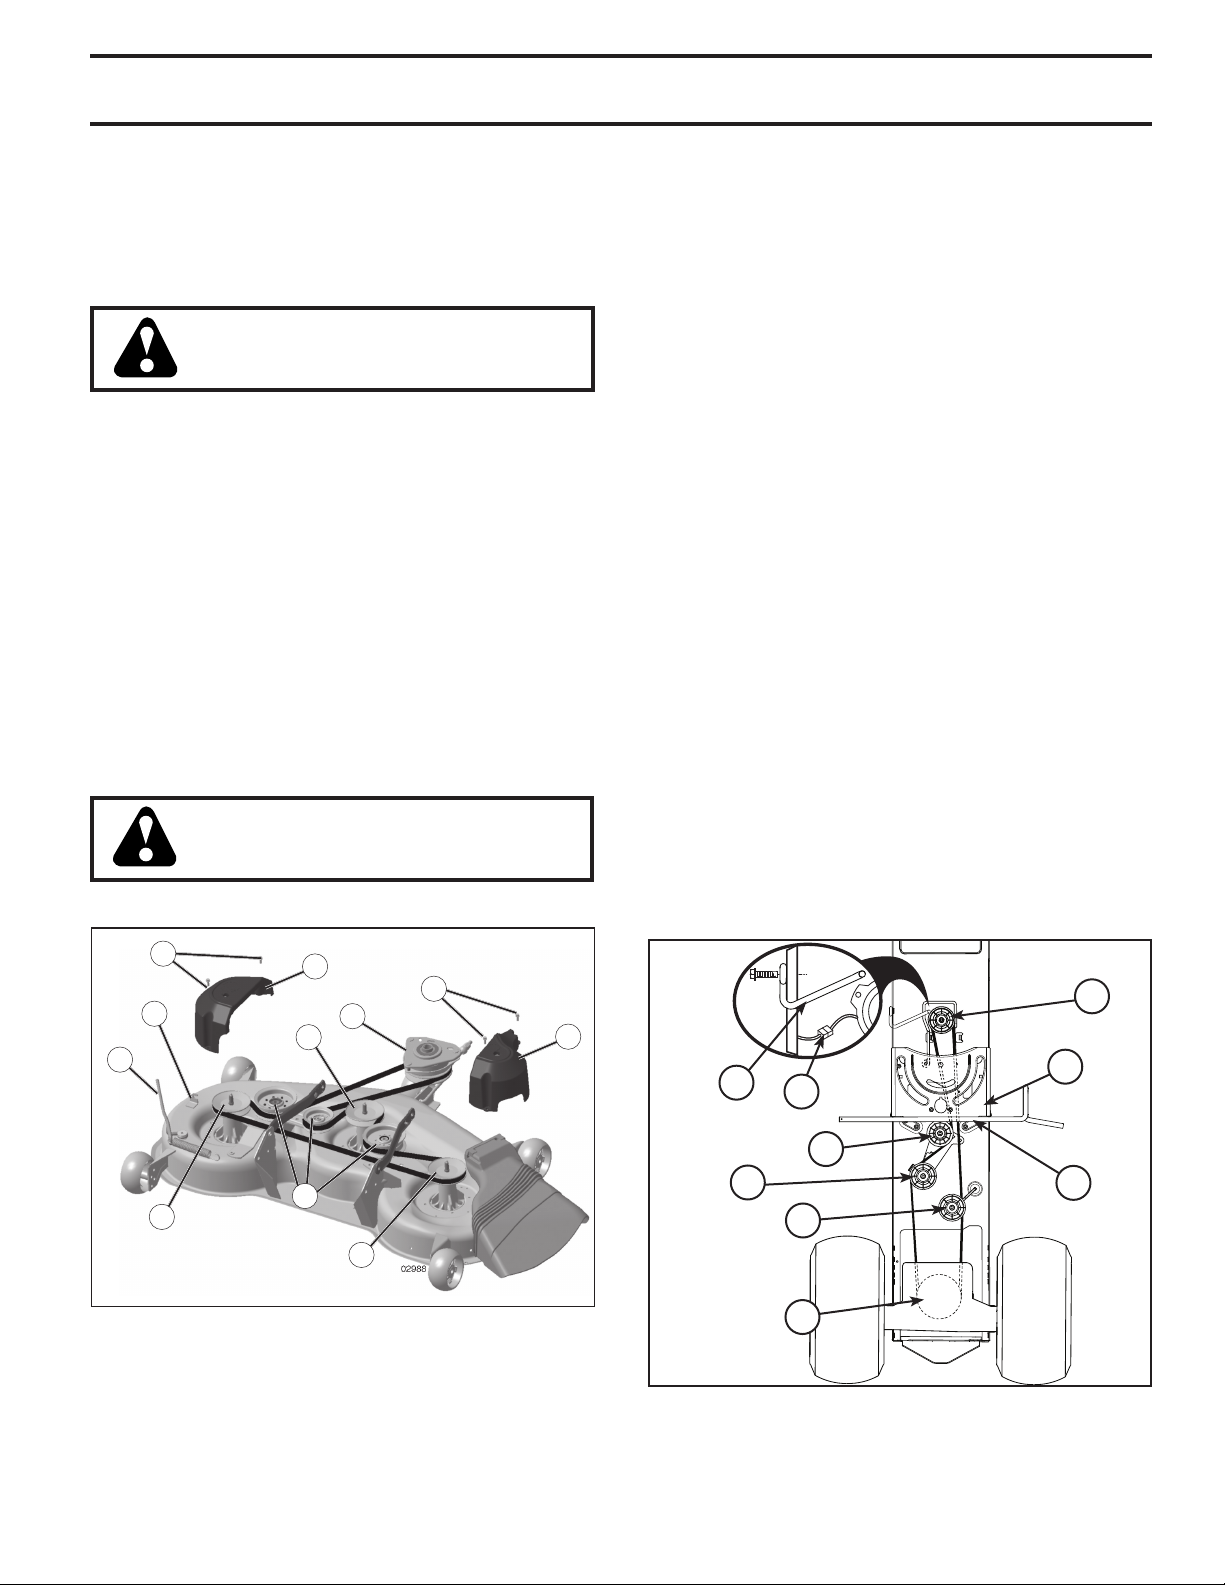
TO REPLACE MOWER BLADE DRIVE BELT
(See Fig. 38)
MOWER DRIVE BELT REMOVAL
• Park tractor on a level surface. En gage parking brake.
• Lower attachment lift lever to its lowest position.
• Disengage belt tension rod (K) from lock bracket (L).
CAUTION: Belt tension rod is spring
loaded. Have a firm grip on rod and
release slowly.
• Remove screws (P) from mandrel covers (Q) and
remove covers.
• Remove any dirt or grass clippings which may have
accumulated around mandrels and entire upper deck
surface.
• Remove belt from electric clutch pulley (M), both mandrel pulleys (R) and all idler pulleys (V).
MOWER DRIVE BELT INSTALLATION
• Install belt around all mandrel pulleys (R) and around
idler pulleys (V) as shown.
• Install belt onto electric clutch pulley (M).
IMPORTANT: Check belt for proper routing in all mower
pulley grooves.
• Reassemble mandrel covers (Q). Securely tighten all
screws.
• Engage belt tension rod (K) on locking bracket (L).
CAUTION: Belt tension rod is spring
loaded. Have a tight grip on rod and
engage slowly.
• Raise attachment lift lever to highest position.
BELT REMOVAL -
1. Remove mower (See “TO REMOVE MOWER” section
in this manual).
NOTE: Observe entire motion drive belt and position of all
belt guides and keepers.
2. Disconnect clutch wire harness (A).
3. Remove anti-rotation link (B) on right side of tractor.
4. Remove belt from stationary idler (C) and clutching idler (D).
5. Remove belt from centerspan idler (E).
6. Pull belt slack toward rear of trac tor. Carefully remove
belt up wards from trans mis sion input pulley and over
cooling fan blades (F).
7. Remove belt downward from engine pulley and around
electric clutch (G).
8. Slide belt toward rear of tractor, off the steering plate
(H) and remove from tractor.
BELT INSTALLATION -
1. Install new belt from tractor rear to front, over the steering plate (H) and above clutch brake pedal shaft (J).
2. Pull belt toward front of tractor and roll belt around
electric clutch and onto engine pulley (G).
3. Pull belt toward rear of tractor. Carefully work belt down
around transmission cooling fan and onto the input pulley (F). Be sure belt is inside the belt keeper.
4. Install belt on centerspan idler (E).
5. Install belt through stationary idler (C) and clutch ing
idler (D).
6. Reinstall anti-rotation link (B) on right side of tractor.
Tighten securely.
7. Reconnect clutch harness (A).
8. Make sure belt is in all pulley grooves and in side all belt
guides and keep ers.
9. Install mower (See “TO INSTALL MOWER” section in
this manual).
P
L
K
R
Q
P
M
R
V
R
Q
Fig. 38
TO REPLACE MOTION DRIVE BELT
(See Fig. 39)
Park the tractor on level surface. En gage parking brake.
For as sis tance, there is a belt installation guide decal on
bottom side of left footrest.
23
G
H
B
A
C
D
J
E
F
02953
electric
Fig. 39
Page 24
SERVICE AND ADJUSTMENTS
TO CHECK BRAKE
If tractor requires more than five (5) feet (1,5 m) to stop at
highest speed in high est gear on a level, dry concrete or
paved surface, then brake must be serviced.
You may also check brake by:
1. Park tractor on a level, dry concrete or paved surface,
depress brake pedal all the way down and engage
parking brake.
2. Disengage transmission by placing freewheel control
in “transmission disengaged” position. Pull freewheel
control out and into the slot and release so it is held in
the disengaged position.
The rear wheels must lock and skid when you try to manually
push the tractor forward. If the rear wheels rotate, then the
brake needs to be serviced. Contact a qualified service center.
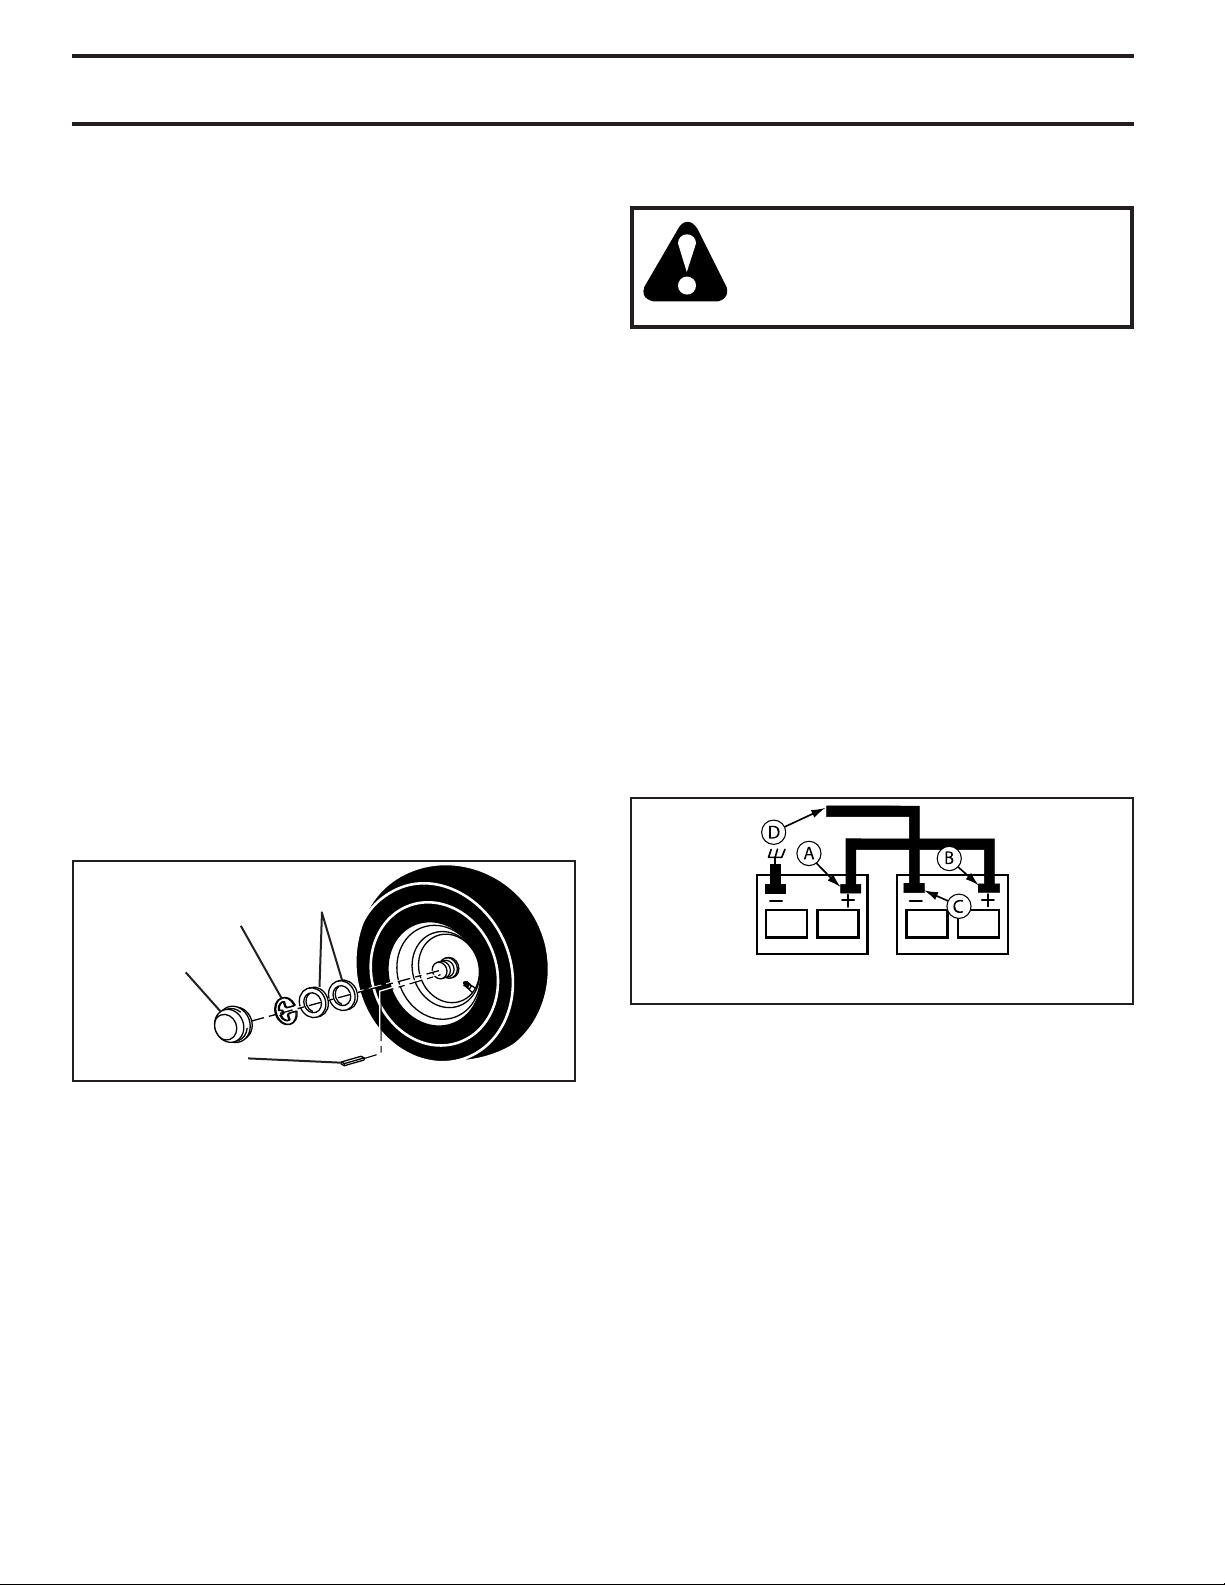
TO REMOVE WHEEL (See Fig. 40)
• Block up axle securely.
• Remove axle cover, retaining ring and washers to allow
wheel removal (rear wheel contains a square key - Do
not lose).
• Repair tire and reassemble.
• On rear wheels only: align grooves in rear wheel hub
and axle. Insert square key.
• Replace washers and snap retaining ring securely in
axle groove.
• Replace axle cover.
NOTE: To seal tire punctures and prevent flat tires due
to slow leaks, tire sealant may be purchased from your
local parts dealer. Tire sealant also prevents tire dry rot
and corrosion.
TO START ENGINE WITH A WEAK BATTERY
(See Fig. 41)
WARNING: Lead-acid batteries gen er ate
ex plo sive gases. Keep sparks, flame and
smoking ma te ri als away from bat ter ies.
Always wear eye pro tec tion when around
batteries.
If your battery is too weak to start the engine, it should be
recharged. (See "BATTERY" in the MAINTENANCE sec tion of this man u al).
If “jumper ca bles” are used for emer gen cy starting, follow
this pro ce dure:
IMPORTANT: YOUR TRACTOR IS EQUIPPED WITH A 12
VOLT SYSTEM. THE OTHER VEHICLE MUST ALSO BE A 12
VOLT SYSTEM. DO NOT USE YOUR TRACTOR BATTERY TO
START OTHER VEHICLES.
TO ATTACH JUMPER CABLES -
• Connect one end of the RED cable to the POSITIVE
(+) terminal of each battery(A-B), taking care not to
short against tractor chassis.
• Connect one end of the BLACK ca ble to the NEGA TIVE
(-) terminal (C) of fully charged battery.
• Connect the other end of the BLACK cable (D) to good
chassis ground, away from fuel tank and bat tery.
TO REMOVE CABLES, REVERSE ORDER -
• BLACK cable first from chassis and then from the fully
charged battery.
• RED cable last from both batteries.
RE TAIN ING
RING
AXLE
COVER
SQUARE KEY (REAR
WHEEL ONLY)
WASH ERS
Fig. 40
FRONT WHEEL TOE-IN/CAM BER
Your new tractor front wheel toe-in and camber is set at the
factory and is normal. The front wheel toe-in and camber
are not adjustable. If damage has occurred to affect the
factory set front wheel toe-in or camber, contact a qualified
service center.
WEAK OR
DEAD BATTERY
Fig. 41
FULLY CHARGED
BATTERY
24
Page 25
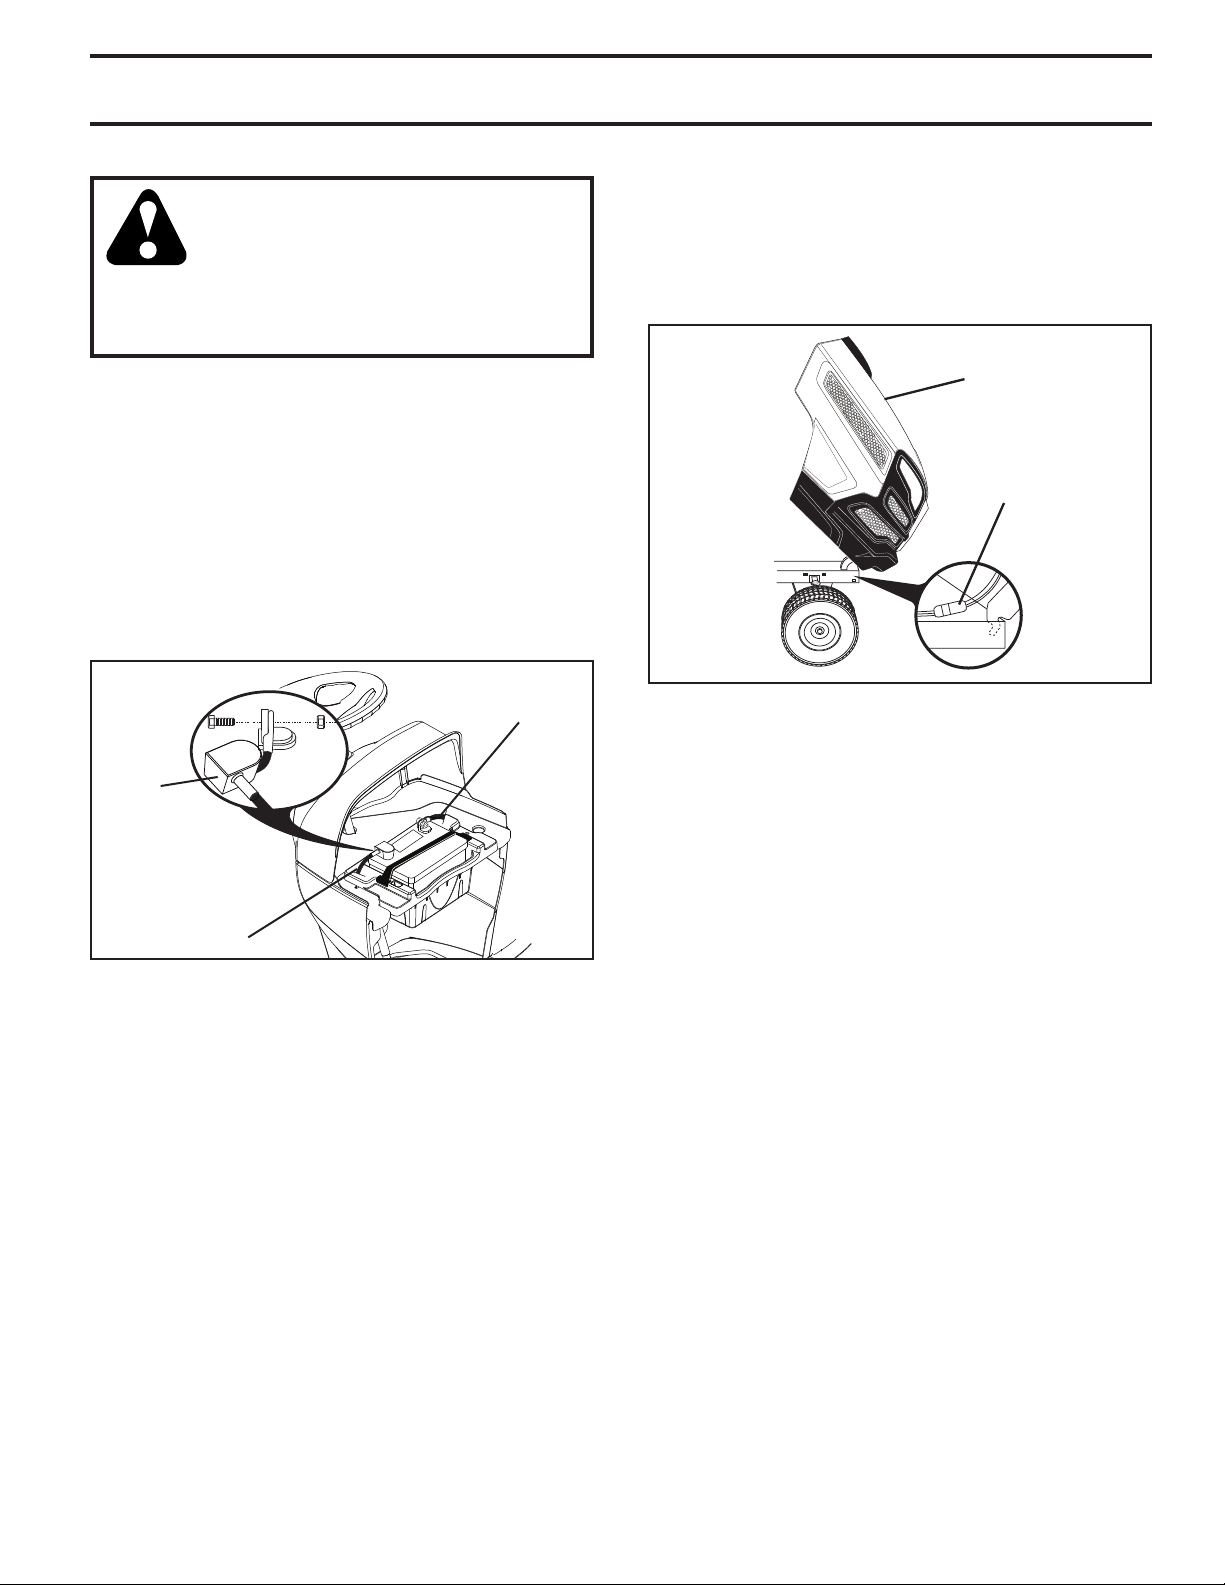
SERVICE AND ADJUSTMENTS
REPLACING BATTERY (See Fig. 42)
WARNING: Do not short battery ter mi nals by allowing a wrench or any other
object to contact both terminals at the
same time. Before connecting battery,
remove metal bracelets, wristwatch
bands, rings, etc. Positive terminal
must be connected first to prevent
sparking from ac ci den tal grounding.
• Lift hood to raised position.
• Remove terminal cover.
• Disconnect BLACK battery cable then RED battery
cable and carefully remove battery from tractor.
• Install new battery with terminals in same position as
old battery.
• Reinstall terminal cover.
• First connect RED battery cable to positive (+) battery
terminal with bolt and nut as shown. Tighten securely.
• Connect BL ACK grounding cable to negative (-) bat tery
terminal with remaining bolt and nut. Tighten securely
• Close hood.
NEGATIVE
(BLACK)
CABLE
TO REMOVE HOOD AND GRILL ASSEMBLY
(See Fig. 43 )
• Raise hood.
• Unsnap headlight wire connector.
• Stand in front of tractor. Grasp hood at sides, tilt toward
engine and lift off of tractor.
• To replace, reverse above procedure.
HOOD
HEADLIGHT WIRE
CONNECTOR
07002
Fig. 43
TERMINAL
COVER
POSITIVE
(RED)
CABLE
Fig. 42
TO REPLACE HEADLIGHT BULB
• Raise hood.
• Pull bulb holder out of the hole in the backside of the
grill.
• Replace bulb in holder and push bulb holder securely
back into the hole in the backside of the grill.
• Close hood.
INTERLOCKS AND RELAYS
Loose or damaged wiring may cause your tractor to run
poorly, stop running, or prevent it from starting.
• Check wiring.
TO REPLACE FUSE
Replace with 20 amp automotive-type plug-in fuse. The
fuse holder is located behind the dash.
TRANSMISSION
REMOVAL/RE PLACE MENT
Should your transmission require removal for service or
re place ment, it should be purged after reinstallation and
before operating the tractor. See “PURGE TRANS MIS SION”
in the Operation section of this manual.
ENGINE
TO AD JUST THROTTLE CON TROL CABLE
The throttle control has been preset at the factory and
ad just ment should not be necessary. If adjustment is nec es sary, see engine manual.
25
Page 26

STORAGE
Immediately prepare your tractor for storage at the end
of the season or if the tractor will not be used for 30 days
or more.
WARNING: Never store the trac tor with
gas o line in the tank inside a building
where fumes may reach an open flame
or spark. Allow the engine to cool before
storing in any en clo sure.
TRACTOR
Remove mower from tractor for winter storage. When mower
is to be stored for a period of time, clean it thor oughly, remove
all dirt, grease, leaves, etc. Store in a clean, dry area.
• Clean entire tractor. (See “CLEANING” in the
Main te nance section of this manual.)
• Inspect and replace belts, if necessary. (See belt
re place ment instructions in the Service and Adjustments
section of this manual.)
• Lubricate as shown in the Maintenance section of this
man ual.
• Be sure that all nuts, bolts and screws are securely
fastened. Inspect moving parts for damage, breakage
and wear. Replace if necessary.
• Touch up all rusted or chipped paint surfaces; sand
lightly before painting.
BATTERY
• Fully charge the battery for storage.
• After a period of time in storage, battery may require
recharging.
• To help prevent corrosion and power leakage during
long periods of storage, battery cables should be
dis con nect ed and battery cleaned thoroughly. (See
“TO CLEAN BATTERY AND TERMINALS” in the
Maintenance sec tion of this manual.)
• After cleaning, leave cables disconnected and place
cables where they cannot come in contact with battery
terminals.
• If battery is removed from tractor for storage, do not
store battery directly on concrete or damp surfaces.
• If unit is equipped with battery indicator/charging
plug, an optional charging unit may be purchased and
connected to the unit to charge the battery during long
term storage. Inspect and clean the battery terminals
as needed prior to long term storage with charger
connected.
ENGINE
FUEL SYSTEM
IMPORTANT: IT IS IMPORTANT TO PREVENT GUM DEPOSITS
FROM FORMING IN ES SEN TIAL FUEL SYSTEM PARTS SUCH
AS CARBURETOR, FUEL FIL TER, FUEL HOSE, OR TANK
DURING STORAGE. ALSO, EXPERIENCE INDICATES THAT
ALCOHOL BLENDED FUELS (CALLED GASOHOL OR USING
ETHANOL OR METHANOL) CAN ATTRACT MOIS TURE WHICH
LEADS TO SEPARATION AND FOR MA TION OF ACIDS DURING
STOR AGE. ACIDIC GAS CAN DAMAGE THE FUEL SYSTEM
OF AN ENGINE WHILE IN STORAGE.
• Empty the fuel tank by starting the engine and let it run
until the fuel lines and carburetor are empty.
• Never use engine or carburetor cleaner products in
the fuel tank or permanent damage may occur.
• Use fresh fuel next season.
NOTE: Fuel stabilizer is an acceptable alternative in
minimizing the formation of fuel gum deposits during stor age.
Add stabilizer to gasoline in fuel tank or storage container.
Always follow the mix ratio found on stabilizer container.
Run engine at least 10 minutes after adding stabilizer to
allow the stabilizer to reach the carburetor. Do not empty
the gas tank and carburetor if using fuel stabilizer.
ENGINE OIL
Drain oil (with engine warm) and replace with clean engine
oil. (See “ENGINE” in the Maintenance section of this
man ual.)
CYLINDER(S)
• Remove spark plug(s).
• Pour one ounce (29.5 mL) of oil through spark plug
hole(s) into cylinder(s).
• Turn ignition key to “START” position for a few seconds
to distribute oil.
• Replace with new spark plug(s).
OTHER
• Do not store gasoline from one season to another.
• Replace your gasoline can if your can starts to rust.
Rust and/or dirt in your gasoline will cause problems.
• If possible, store your tractor indoors and cover it to
give protection from dust and dirt.
• Cover your tractor with a suitable protective cover that
does not retain moisture. Do not use plastic. Plastic
cannot breathe which allows condensation to form and
will cause your tractor to rust.
IMPORTANT: NEVER COVER TRACTOR WHILE EN GINE
AND EXHAUST AREAS ARE STILL WARM.
26
Page 27

TROUBLESHOOTING
PROBLEM CAUSE CORRECTION
Will not start
1. Out of fuel. 1. Fill fuel tank.
2. Engine flooded. 2. Wait several minutes before attempting to start.
3. Bad spark plug. 3. Replace spark plug.
4. Dirty air filter. 4. Clean/replace air filter.
5. Dirty fuel filter. 5. Replace fuel filter.
6. Water in fuel. 6. Empty fuel tank and carburetor, refill tank with fresh
gasoline and replace fuel filter.
7. Loose or damaged wiring. 7. Check all wiring.
8. Engine valves out of adjustment. 8. Contact an authorized service center/department.
Hard to start
Engine will not turn
over
Engine clicks but
will not start
Loss of power
1. Dirty air filter. 1. Clean/replace air filter.
2. Bad spark plug. 2. Replace spark plug.
3. Weak or dead battery. 3. Recharge or replace battery.
4. Dirty fuel filter. 4. Replace fuel filter.
5. Stale or dirty fuel. 5. Empty fuel tank and refill tank with fresh, clean gas.
6. Loose or damaged wiring. 6. Check all wiring.
7. Engine valves out of adjustment. 7. Contact an authorized service center/department.
1. Brake pedal not depressed. 1. Depress brake pedal.
2. Attachment clutch is engaged. 2. Disengage attachment clutch.
3. Weak or dead battery. 3. Recharge or replace battery.
4. Blown fuse. 4. Replace fuse.
5. Corroded battery terminals. 5. Clean battery terminals.
6. Loose or damaged wiring. 6. Check all wiring.
7. Faulty ignition switch. 7. Check/replace ignition switch.
8. Faulty solenoid or starter. 8. Check/replace solenoid or starter.
9. Faulty operator presence switch(es). 9. Contact an authorized service center/department.
1. Weak or dead battery. 1. Recharge or replace battery.
2. Corroded battery terminals. 2. Clean battery terminals.
3. Loose or damaged wiring. 3. Check all wiring.
4. Faulty solenoid or starter. 4. Check/replace solenoid or starter.
1. Cutting too much grass/too fast. 1. Raise cutting height/reduce speed.
2.
Throttle in cold weather starting position (
3. Build-up of grass, leaves, trash under mower. 3. Clean underside of mower housing.
4. Dirty air filter. 4. Clean/replace air filter.
5. Low oil level/dirty oil. 5. Check oil level/change oil.
6. Faulty spark plug. 6. Clean and regap or change spark plug.
7. Dirty fuel filter. 7. Replace fuel filter.
8. Stale or dirty fuel. 8. Empty fuel tank and refill tank with fresh, clean gas.
9. Water in fuel. 9. Empty fuel tank and carburetor, refill tank with fresh
10. Spark plug wire loose. 10. Connect and tighten spark plug wire.
11. Dirty engine air screen/fins. 11. Clean engine air screen/fins.
12. Dirty/clogged muffler. 12. Clean/replace muffler.
13. Loose or damaged wiring. 13. Check all wiring.
14. Engine valves out of adjustment. 14. Contact an authorized service center/department.
2.
).
Move throttle control to fast position ( ).
gasoline and replace fuel filter.
Excessive
vibration
1. Worn, bent or loose blade. 1. Replace blade. Tighten blade bolt.
2. Bent blade mandrel. 2. Replace blade mandrel.
3. Loose/damaged part(s). 3. Tighten loose part(s). Replace damaged parts.
27
Page 28

TROUBLESHOOTING
PROBLEM CAUSE CORRECTION
Engine continues to
run when operator
leaves seat with
attachment clutch
engaged
1. Faulty operator-safety presence control
system.
1. Check wiring, switches and connections. If not
corrected, contact an authorized service center/
department.
CAUTION: DO NOT operate machine until
problem is corrected.
Poor cut - uneven
Mower blades will
not rotate
Poor grass
discharge
Headlight(s) not
working
(if so equipped)
1. Worn, bent or loose blade. 1. Replace blade. Tighten blade bolt.
2. Mower deck not level. 2. Level mower deck.
3. Buildup of grass, leaves, trash under mower. 3. Clean underside of mower housing.
4. Bent blade mandrel. 4. Replace blade mandrel.
5. Clogged mower deck vent holes from
buildup of grass, leaves, and trash around
mandrels.
1. Obstruction in clutch mechanism. 1. Remove obstruction.
2. Worn/damaged mower drive belt. 2. Replace mower drive belt.
3. Frozen idler pulley. 3. Replace idler pulley.
4. Frozen blade mandrel. 4. Replace blade mandrel.
1. Engine speed too slow. 1. Place throttle control in “FAST” position.
2. Travel speed too fast. 2. Shift to slower speed.
3. Wet grass. 3. Allow grass to dry before mowing.
4. Mower deck not level. 4. Level mower deck.
5. Low/uneven tire air pressure. 5. Check tires for proper air pressure.
6. Worn, bent or loose blade. 6. Replace blade. Tighten blade bolt.
7. Buildup of grass, leaves, trash under mower. 7. Clean underside of mower housing.
8. Mower drive belt worn. 8. Replace mower drive belt.
9. Blades improperly installed. 9. Reinstall blades sharp edge down.
10. Improper blades used. 10. Replace with blades listed in parts manual.
11. Clogged mower deck vent holes from buildup
of grass, leaves, trash around mandrels.
1. Switch is “OFF”. 1. Turn switch “ON”.
2. Bulb(s) or lamp(s) burned out. 2. Replace bulb(s) or lamp(s).
3. Faulty light switch. 3. Check/replace light switch.
4. Loose or damaged wiring. 4. Check wiring and connections.
5. Blown fuse. 5. Replace fuse.
5. Clean around mandrels to open vent holes.
11. Clean around mandrels to open vent holes.
Battery will not
charge
Loss of drive
Engine "backfires”
when turning
engine “OFF”
Engine dies when
tractor is shifted
into reverse
1. Bad battery cell(s). 1. Replace battery.
2. Poor cable connections. 2. Check/clean all connections.
3. Faulty regulator (if so equipped). 3. Replace regulator.
4. Faulty alternator. 4. Replace alternator.
1. Freewheel control in “disengaged” position. 1. Place freewheel control in “engaged” position.
2. Debris on steering plate (if equipped). 2. See "CLEANING" in the Maintenance section.
3. Motion drive belt worn, damaged, or broken. 3. Replace motion drive belt.
4. Air trapped in transmission during
shipment or servicing.
5. Axle key missing. 5. Install axle key at rear wheel. See "TO REMOVE
1. Engine throttle control not set between
half and full speed (fast) position before
stopping engine.
1. Reverse operation system (ROS) is not "ON"
while mower or other attachment is engaged.
4. Purge transmission.
WHEEL" in the Service and Adjustments section.
1. Move throttle control between half and full speed
(fast) position before stopping engine.
1. Turn ignition key to ROS "ON" position. See
Operation section.
28
Page 29
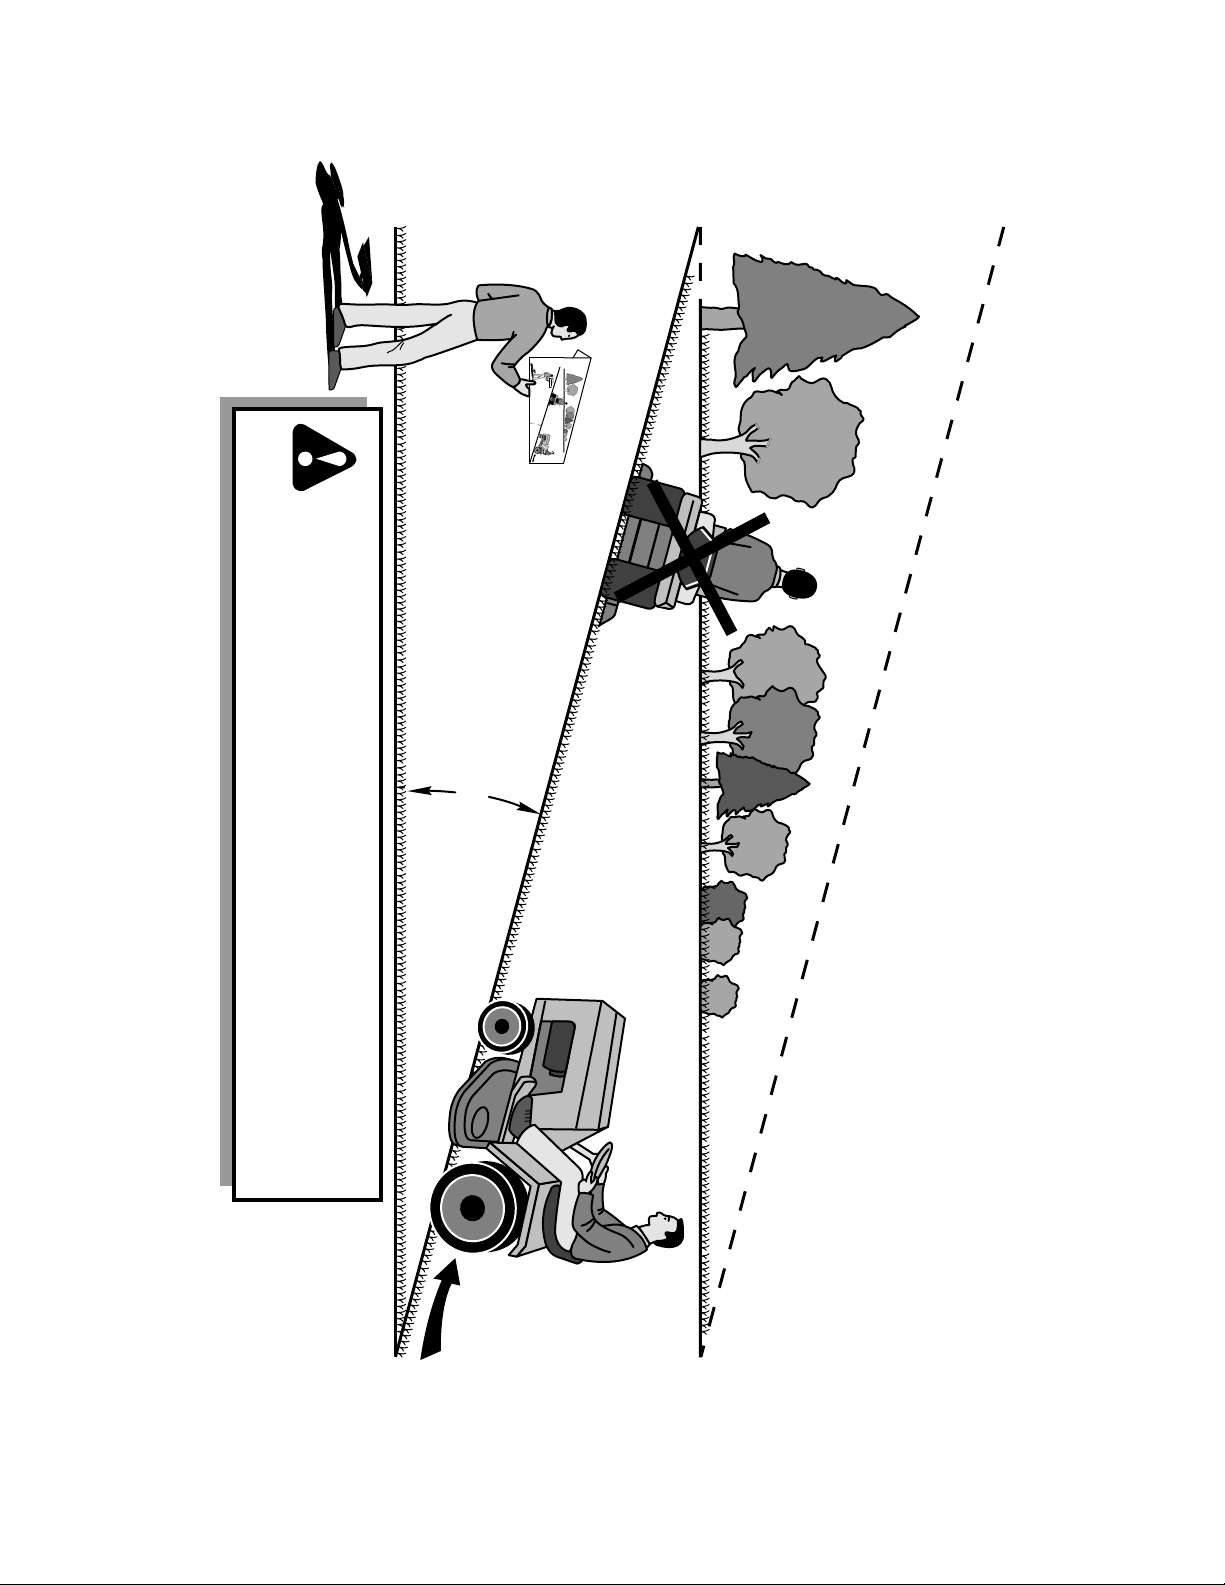
15 DEGREES MAX.
FOLD ALONG DOTTED LINE
THIS IS A 15 DEGREE SLOPE
ONLY RIDE UP AND DOWN HILL,
NOT ACROSS HILL
SUGGESTED GUIDE FOR SIGHTING SLOPES FOR SAFE OPERATION
WARNING: To avoid serious injury, operate your tractor up and
down the face of slopes, never across the face. Do not mow
slopes greater than 15 degrees. Make turns gradually to prevent
tipping or loss of control. Exercise extreme caution when
changing direction on slopes.
1. Fold this page along dotted line indicated above.
2. Hold page before you so that its left edge is vertically parallel to a tree
trunk or other upright structure.
3. Sight across the fold in the direction of hill slope you want to measure.
4. Compare the angle of the fold with the slope of the hill.
29
Page 30

Consumer Wheeled Products - Limited Warranty
A
Husqvarna warrants to the original retail purchaser that this Husqvarna® product is free from defects in material or workmanship
and maintenance from the date of retail purchase for the applicable Warranty Period shown on Exhibit A.
This Limited Warranty may not be transferred
under normal use
to any subsequent purchaser of this Husqvarna® product. Certain components (e.g., engines and transmissions) are excluded from coverage, and other
limitations apply, as described in this document. Husqvarna will repair or replace at its discretion, any defective product or part covered by the Limited
Warranty, free of charge at any authorized Husqvarna Servicing Dealer/Center using original OEM Husqvarna replacement parts, subject to the
limitations and exclusions described below. Husqvarna does not offer an over-the-counter exchange program.
DISCLAIMERS, LIMITATIONS AND EXCLUSIONS
1. WARRANTY DISCLAIMER. THIS LIMITED WARRANTY IS THE SOLE EXPRESS WARRANTY PROVIDED BY HUSQVARNA AND THERE ARE NO
WARRANTIES WHICH EXTEND BEYOND THE DESCRIPTION ON THE FACE HEREOF, EXCEPT AS MAY BE PROVIDED BY LAW. THIS WARRANTY IS
GIVEN ONLY
AGREEMENT, AND IS A COMPLETE AND EXCLUSIVE STATEMENT OF THE TERMS OF THAT AGREEMENT. THIS LIMITED WARRANTY GIVES YOU
SPECIFIC LEGAL RIGHTS, AND YOU MAY ALSO HAVE OTHER RIGHTS WHICH VARY BASED ON LOCALITY
2. LIMITED DURATION. ANY WARRANTY THAT MAY BE IMPLIED BY LAW (INCLUDING ANY IMPLIED WARRANTY OF FITNESS FOR A
PARTICULAR PURPOSE OR USE AND IMPLIED WARRANTY OF MERCHANTABILITY) IS LIMITED TO THE DURATION OF THE APPLICABLE
WARRANTY PERIOD UNDER THIS LIMITED WARRANTY. SOME LOCAL
WARRANTY LASTS, SO THE ABOVE LIMITATIONS MAY NOT APPLY TO YOU.
3. EXCLUSIVE REMEDIES. SOME LOCALITIES, INCLUDING THE PROVINCE OF QUEBEC, DO NOT ALLOW THE EXCLUSION OR LIMITATION OF
LIABILITY FOR INJURY TO PERSON OR FOR DAMAGES RESULTING FROM THE FAULT OF THE MANUFACTURER AND/OR THE EXCLUSION OR
LIMITATION OF INCIDENTAL OR CONSEQUENTIAL DAMAGES. AS SUCH, SOME OF THE FOLLOWING LIMITATIONS MAY NOT APPLY TO YOU. THE
BOVE REMEDIES ARE THE EXCLUSIVE REMEDIES FOR ANY BREACH OF THIS LIMITED WARRANTY. NO OTHER REMEDY, INCLUDING, BUT NOT
LIMITED TO ANY SPECIAL, INCIDENTAL, INDIRECT OR CONSEQUENTIAL DAMAGES, FOR LOST PROFITS, LOST SALES, INJURY TO PERSON OR
PROPERTY, OR ANY OTHER INCIDENTAL OR CONSEQUENTIAL LOSS SHALL BE AVAILABLE, AND ALL SUCH DAMAGES ARE HEREBY
DISCLAIMED.
4. Engines, Transmissions and certain other components are NOT covered. This Limited Warranty does not cover
(a) Engines and Attachments.Except where otherwise indicated on Exhibit A
items are NOT manufactured by Husqvarna in which case they may be covered separately by their respective manufacturer's warranties if one is provided and included with
the product at the time of purchase. All such claims must be submitted and sent to the appropriate manufacturer or as otherwise directed in those separate warranties.
Husqvarna is not authorized to handle warranty adjustments or repairs on engines manufactured by Briggs & Stratton, Honda, Kawasaki, or Kohler (Husqvarna does handle
warranty issues on engines manufactured by Liquid Combustion Technologies (LCT). Husqvarna does not assume any warranty obligation of the other manufacturers'
engines under this Limited Warranty.
(b) Transmissions. Except where otherwise indicated on ExhibitA
cases, these items are NOT manufactured by Husqvarna in which case they may be covered separately by their respective manufacturer's warranties if one is provided and
included with the product at the time of purchase. The following transmission / transaxle manufacturers, Dana, Hydro-Gear, Tuff-Torq provide a warranty for the
transmission / transaxle to the ultimate purchaser or to Husqvarna. Husqvarna will assign the transmission / transaxle manufacturer's warranty or any rights thereof to the
original purchaser of the unit. To obtain transmission / transaxle warranty service, first contact the retailer who you purchased the unit from. Should you require assistance
or have any questions concerning transmission / transaxle warranty coverage, contact Husqvarna directly at our website www.husqvarna.com or call 800-487-5951 (US) or
800-805-5523 (Canada) for an authorized Husqvarna service provider. All such claims must be submitted and sent to the appropriate manufacturer or as otherwise directed
in those separate warranties. Husqvarna is not authorized to handle warranty adjustments or repairs on transmissions or transaxles. Husqvarna does not assume any
obligations under this Limited Warranty for the above listed manufacturers (for exceptions - see Exhibit
(c) Expendable Parts. This Limited Warranty does not cover general maintenance parts and items ("Expendable Parts
filters, lubricants, starter cords, belts, blades, and blade adapters.
(d) Emissions Control Components. This Limited Warranty does not cover Emissions control
Protection Agency or similar state, provincial or federal agencies. Such equipment and components are covered by a separate emission control warranty statement supplied
with your new product. Please consult this separate warranty statement for details.
BY HUSQVARNA, AND MAY BE MODIFIED ONLY BY HUSQVARNA. THIS LIMITED WARRANTY IS THE FINAL EXPRESSION OF OUR
ITIES DO NOT ALLOW LIMITATIONS ON HOW LONG AN IMPLIED
any of the following:
, all Engines and Attachments are not covered by this Limited Warranty. In most cases, these
, Transmission / Transaxle (including Drive Systems) are not covered by this Limited Warranty. In most
A).
"), including without limitation spark plugs, bulbs,
equipment and components to the extent regulated by the U.S. Environmental
5. Any COMMERCIAL, INSTITUTIONAL, AGRICULTURAL, INDUSTRIAL, INCOME PRODUCING, or RENTAL use will result in either
No Warranty or a Shortened Warranty Period. Depending on the product, there is either NO WARRANTY (whether statutory, contractual or
otherwise) or a reduced warranty if the product is used for commercial, institutional, agricultural, industrial, income producing, or rental purposes and, in
such circu
mstances, this Limited Warranty is offered instead of and replaces any warranty regime provided for by law. Please refer to Exhibit A.
6. Reconditioned or Refurbished Products have a 30 Day Limited Warranty. Under this Limited Warranty, Certified Factory Reconditioned or
Refurbished products have a 30 Day Limited Warranty for parts and labor for Non-Commercial Use. Products are only reconditioned at the Husqvarna
Factory.
7. Owner's (Your) Responsibilities. To preserve your rights under this Limited Warranty, you must exercise reasonable care and use of the product,
including, following the preventative maintenance, storage, fuel and oil usages as prescribed in the enclosed operator's manual. For example, the
following items are the Owner's responsibility and are not
covered by this Limited Warranty:
a. Set-up and pre-delivery service, and engine tune-ups;
b. Adjustments after the first (30) thirty days of purchase and beyond, such as throttle cable, belt guides adjustments; and
c. Preventative maintenance as outlined in the operator's manual.
In addition, you must cease using the product immediately upon any failure or damage. The product should be taken to an authorized Husqvarna
servicing dealer prior to any further use.
8. Damages resulting from normal aging, wear and tear or neglect are NOT covered. The Limited Warranty does not cover damage other than
that resulting from defects in material or workmanship. The following are NOT considered defects in material or workmanship, and therefo
re are NOT
covered.
30
Page 31

(a) Abrasion to mower decks;
(b) Tires damaged by external punctures;
(c) Natural discoloration of materials due to ultraviolet light;
(d) Damage to cutting equipment by way of contact with, rocks, or other non-approved materials and/or structures;
In addition, this Limited Warranty does not cover damages, malfunctions or failures resulting from abuse or neglect of the product related to or including
any of the following:
(e) Failure to provide or perform required maintenance services as prescribed in the operator's manual;
(f) Abuse, misuse, neglect, modifications, alterations, normal wear, improper servicing, use of unauthorized attachments, Lack of lubrication or
engine failure, due to the use of oils that do not meet Engine manufacturer's specifications;
(g) Use of gasohol (fuel containing ethanol), containing methanol (fuel containing wood alcohol). Ethanol fuel E15 or E85 is NOT
use in Husqvarna products. Using E15 or E85 fuel will cause major engine damage which is NOT
approved for
covered by this Husqvarna warranty.
NOTE: Gasohol (fuel containing ethanol), which contains a maximum 10% ethanol (grain alcohol) is approved. The prescribed mixing ratio
of gasoline to oil is 50:1 and is listed in the Husqvarna oil label and covered in your operator’s manual.
(h) Use of ether or any starting fluids;
(i) Pressure cleaning or steam cleaning the product;
(j) Use of spark plugs other than those meeting emission performance requirements listed in the operator's manual;
(k) Tampering with engine speed governor or emission components, or running engines above specified and recommended engine speeds as
listed in your operator's manual;
(l) Operation of the unit with improperly installed/removed or modified cutting shields, guards, or safety devices;
(m) Any removed/damaged air filter, excessive dirt, abrasives, salt water, moisture, corrosion, rust, varnish, stale fuel, or any adverse reaction due
to incorrect storage procedures;
(n) Failures due to improper set up, pre-delivery service or repair service by anyone other than an authorized Husqvarna servicing dealer during
the warranty period;
(o) Dirt contaminated grease or oil, use of incorrect type of greases or oils, failure to comply with recommended greasing intervals, water or
moisture damage, and/or improper storage;
(p) Sprayers pumping or spraying caustic or flammable materials, lack of or broken strainers; or
(q) Continued use of product, after initial operational problem or failure occurs.
9. Reinforced Stamped (Armor Protected) 10 Year Limited & Fabricated Limited Lifetime, Deck Warranties. These Limited Warranties are for the deck shell
only – mechanical components/parts such as belts, pulleys, spindle housings, bearings, blades, rods, height adjusters, caster/anti scalp wheels etc… are NOT covered. The
Limited Lifetime Warranty does not cover damage other than that resulting from defects in material or workmanship. The following are NOT considered defects in material
or workmanship, and therefore are NOT covered:
(a) Abrasion to mower decks, including sand wear;
(b) Damage to cutting equipment by way of contact with, rocks, or other non-approved materials and/or structures;
(c) Rust and corrosion; and
(d) Natural discoloration of paint or other materials due to ultraviolet light.
HOW TO OBTAIN SERVICE
10. Authorized Husqvarna Servicing Dealer/Center. In order to obtain warranty coverage it is your responsibility (at your expense) to deliver or ship
your Husqvarna unit to an authorized Husqvarna Servicing Dealer/Center and arrange for pick-up or return of your unit after the repairs have been made.
If you do not know the location of your nearest authorized Husqvarna Servicing Dealer, call Husqvarna, at 1-800-487-5951 during the hours of 8:00 AM
to 8:00 PM Eastern Standard Time, or visit www.husqvarna.com.
Should you require assistance or have questions concerning this Limited Warranty, you
may contact us at 800-487-5951 (US) or 800-805-5523 (Canada) during the hours of 8:00 AM to 8:00 PM Eastern Standard Time or contact us through
the web at www.husqvarna.com.
11. Documentation Required. You must maintain and present Proof of purchase (including date, product model and, if applicable, engine serial
number) to an authorized Husqvarna Servicing Dealer for warranty service under this Limited Warranty. Proof of purchase rests solely with you.
Husqvarna encourages you to register your product online at www.usa.husqvarna.com
(US & Canada) to help ensure, among other things, that you can
be notified of important product information. However, registering your product is not a condition of warranty service.
Husqvarna Professional Products, NA, Inc.
9335 Harris Corners Parkway, Suite 500, Charlotte, NC28269
575 49 43-01 W 2013 IR
31
Page 32

)
Consumer Wheeled Limited Warranty Chart 2013
Battery
1 Year Pro rated
1 Year Pro rated
No Warranty
Consumer (personal,
household use only)
Product/Component
Riding Lawn Tractors:
Frame, Chassis, Front Axle 5 Years No Warranty No Warranty
Engine*
Transmission (if made by Husqvarna/Peerless)
XLS Models only - stamped deck shell. Armor
Protected Limited Warranty
Fabricated Deck shell. Limited Lifetime Warranty
Battery
Residential Zero Turn Mowers ( RZ Only )
Engine*
RZ4623 (967009801 & 967009802)
5426 (967003601 & 967003602) - stamped
RZ
deck shell. Armor Protected Limited Warranty
Fabricated Deck shell. Limited Lifetime Warranty
Battery
Residential Zero Turn Mowers ( EZ, MZ, M-ZT )
Engine*
Transmission** (EZ & MZ Zero Turn) 2 Years ** 1 Year ** 90 days
Transmission** (M-ZT Zero Turn) 2 Years ** 2 Years ** 90 days
MZ5424S, MZ5425S, MZ5424SR, stamped deck
shell. Armor Protected Limited Warranty. Product
# 967003902, 967003903, & 25021.
Fabricated Deck shell. Limited Lifetime Warranty
Snow Throwers, Tillers, LE475 Edger
Engine*
Auger Gearbox
elbadnepxE-noN rehtO
Tiller Tines
Walk Behind Mowers, High Wheel Trimmer
Engine*
Battery
Hovering Trimmers
Engine*
Front Mounted Deck Riders (120S, 220T, 322T)
Frame, Chassis, Front Axle 3 Years No Warranty No Warranty
Engine*
arT
Battery
Cultivators
rettaB
Spreaders
Robotic Mowers
3 Years No Warranty No Warranty
10 Years No Warranty No Warranty
1 Year Pro-rated No Warranty No Warranty
10 Years No Warranty No Warranty
1 Year Pro-rated No Warranty No Warranty
10 Years No Warranty No Warranty
-
5 Years
***
1 Year Pro-rated No Warranty No Warranty
1 Year Pro-rated No Warranty No Warranty
Consumer Commercial Rental
Commercial (any commercial,
professional, institutional,
agricultural, or income producing use,
other than Rental Use
arraW oN sraeY 3stnenopmoC elbadnepxE-noN rehtO
-
90 days 90 days
No Warranty No Warranty
ad 09sraeY 2rewoM citoboR
Exhibit A
Rental (any
rental usage)
* * *
** ** ** **)ytrap driht fi( noissimsnarT
ytnarraW oNytnarraW oN***
ytnarraW oNytn
* * *
ytnarraW oNytnarraW oN** ** noissimsnarT
ytnarraW oNytnarraW oN***
ytnarraW oNytnarraW oN sraeY 3stnenopmoC elbadnepxE-noN rehtO
* * *
ytnarraW oNytnarraW oN***
ytnarraW oNraeY 1 sraeY 3stnenopmoC elbadnepxE-noN rehtO
* * *
syad 09syad 09sraeY 3stnenopmoC
* * *
ytnarraW oNytnarraW oNsraeY 3stnenopmoC elbadnepxE-noN rehtO
* * *
syad 09raeY 1sraeY 2stnenopmoC elbadnepxE-noN rehtO
* * *
ytnarraW oNytnarraW oN** noissimsn
ytnarraW oNytnarraW oNsraeY 3stnenopmoC elbadnepxE-noN rehtO
ytnarraW oNytnarraW oNdetar-orP raeY 1y
ytnarraW oNytnarraW oNsraeY 2stnenopmoC elbadnepxE-noN rehtO
raeY 1raeY 1raeY 1redaerpS
syad 09sy
raeY 1raeY 1raeY 1yrettaB
32
Page 33
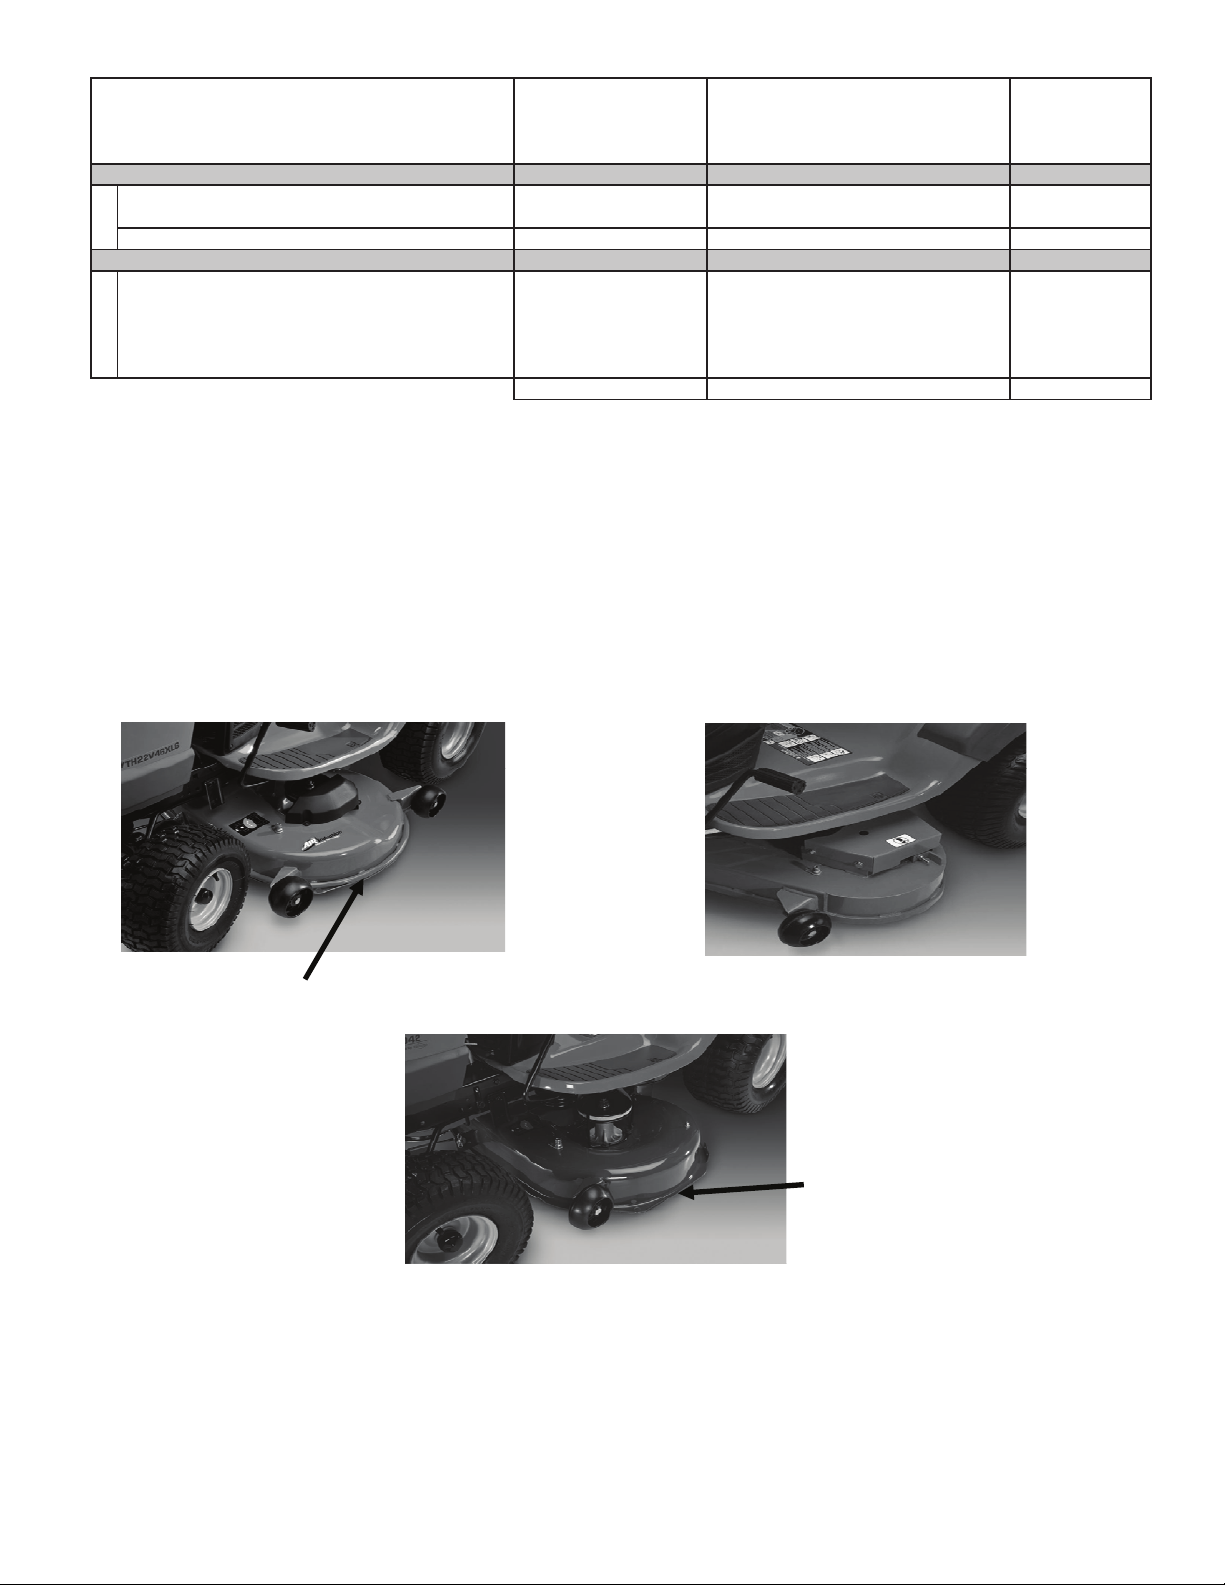
)
Consumer Wheeled Limited Warranty Chart 2013
Consumer (personal,
household use only)
Product/Component
Parts & Accessories (if purchased)
Accessories (e.g., grass catcher, bumper guard
accessories, etc.
Parts & Accessories (if replaced in Warranty Service)
Replacement parts and/or accessories provided
under this Limited Warranty are warranted only
for the BALANCE of the warranty period
applicable to the part or accessory that was
replaced.
* See Separate Engine Manufacturer's or Manufacturer's
Husqvarna.
** See reference 4 (b) of the warranty statement.
RZ - Two (2) Year Consumer warranty, parts & labor, with Hydro-Gear Distributor network.
EZ - One (1) Year Commercial warranty, parts & labor, with Husqvarna.
Two (2) Year Consumer warranty, parts & labor, with Hydro-Gear Distributor network.
MZ - (ZT3100 Transmission) One (1) Year Commercial warranty, parts & labor, with Hydro-Gear Distributor network.
(ZT3100 Transmission) Two (2) Years Consumer warranty, parts & labor, with Hydro-Gear Distributor network.
M-ZT - (ZT3400 transmission) Two (2) Year warranty, parts & labor, with Hydro-Gear Distributor network.
*** "Limited Lifetime Warranty" on Tiller tines and Fabricated Deck shell is for the life of the product or 7 (seven) years after the last
date of the complete unit's final production, whichever comes first.
decks within the Limited Lifetime Warranty.
1 Year No Warranty No Warranty
See to left See to left See to left
Consumer Commercial Rental
warranty. LCT Engines on specific Snow Throwers & Tillers, warranty through
Deck Shell replacement will be limited to a maximum of two (2)
Commercial (any commercial,
professional, institutional,
agricultural, or income producing use,
other than Rental Use
Exhibit A
Rental (any
rental usage)
ytnarraW oNytnarraW oNsyad 09).cte ,sedalb ,stleb ,.g.e( straP
Armor Protected Stamped Deck Shell Example Below Fabricated Deck Shell Example Below
Armor Protected
Stamped Deck Shell
Reinforced area
Stamped Deck Shell below, NOT reinforced
No reinforced area
Page 34
REGLAS DE SEGURIDAD
Prácticas de Operación Seguras para las Segadoras Conducibles
PELIGRO: ESTA MAQUINA CORTADORA ES CAPAZ DE AMPUTAR LAS MANOS Y LOS PIES Y DE LANZAR OBJETOS. SI NO SE
OBSERVAN LAS INSTRUCCIONES DE SEGURIDAD SIGUIENTES SE PUEDEN PRODUCIR LESIONES GRAVES O LA MUERTE.
ADVERTENCIA: Siempre desconecte el
alam bre de la bujía y póngalo donde no
pueda entrar en contacto con la bujía, para
evitar el arranque por accidente, durante la
pre pa ra ción, el transporte, el ajuste o cuan do
se hacen reparaciones.
ADVERTENCIA: No avance cuesta abajo a
punto muerto ya que podría perder el control
del tractor.
ADVERTENCIA: Remolque solamente los
accesorios recomendados y conformes a las
características indicadas por el fabricante
de su tractor. Tenga cuidado y prudencia al
utilizar el tractor. Cuando se encuentre en
un declive, oper utilizando exclusivamente la
velocidad más baja. En caso de un declive una
carga excesiva podría resultar peligrosa. Los
neumáticos pueden perder la tracción con el
suelo y hacerle perder el control de su tractor.
ADVERTENCIA
El tubo de escape del motor, algunos de sus constituyentes y algunos componentes del vehículo contienen o
desprenden productos químicos conocidos en el Estado de
California como causa de cáncer y defectos al nacimiento
u otros daños reproductivos.
• Nunca dejar una máquina encendida sin vigilancia.
Apagar siempre las cuchillas, poner el freno de estacionamiento, parar el motor, y quitar las llaves antes de bajar.
• Desenganche las hojas cuando no esté cortando césped.
Apague el motor y espere hasta que todas las partes se
detengan por completo antes de limpiar la máquina, retirar
la trampa para césped o destapar la canaleta de descarga.
• Hacer funcionar la máquina sólo con la luz del día o luz
artificial buena.
• No hacer funcionar la máquina estando bajo los efectos de
alcohol o droga.
• Poner atención al tráfico cuando se opera cerca de calles o
se cruzan.
• Poner la máxima atención al cargar o descargar la máquina
en una caravana o camión.
• Llevar siempre gafas de protección cuando se hace funcionar
la máquina.
• Los datos indican que los operadores a partir de los 60
años están afectados por un gran porcentaje de heridas
relativas a la conducción del cortacésped. Estos operadores tendrían que evaluar su habilidad de hacer funcionar
el cortacésped de modo lo bastante seguro para proteger a sí mismos y a otras personas de heridas graves.
• Seguir las recomendaciones del fabricante para los pesos
y contrapesos de las ruedas.
• Mantener la máquina libre de hierba, hojas u otros escombros que pueden tocar el tubo de escape / partes del
motor calientes y quemarse. No permitir que el puente
del cortacésped cargue hojas u otros residuos que pueden causar acumulaciones. Limpiar toda salpicadura de
aceite o carburante antes de hacer operaciones sobre la
máquina o guardarla. Dejarla enfriar antes de guardarla.
ADVERTENCIA
Los bornes, terminales y accesorios relativos de la batería contienen plomo o compuestos de plomo, productos
químicos conocidos en el Estado de California como
causa de cáncer y defectos al nacimiento u otros daños
reproductivos. Lavar las manos después de manipularlos.
I. FUNCIONAMIENTO GENERAL
• Leer, entender y seguir todas las instrucciones sobre la
máquina y en el manual antes de empezar.
• No poner las manos o los pies cerca de partes giratorias o
debajo de la máquina. Mantener siempre limpia la abertura
de descarga.
• Permitir el funcionamiento de la máquina sólo a adultos que
tengan familiaridad con las instrucciones.
• Limpiar el área de objetos como piedras, juguetes, cables,
etc. que pueden ser recogidos y disparados con las cuchillas.
• Asegurarse de que el área esté libre de otras personas antes
de ponerla en marcha. Parar la máquina si alguien entra en
el área.
• Nunca llevar pasajeros.
• No cortar marcha atrás al no ser absolutamente necesario.
Mirar siempre abajo y delante mientras se procede atrás.
• Nunca dirigir el material descargado hacia nadie. Evitar descargar material contra paredes u obstrucciones. El material
podría rebotar hacia el operador. Parar las cuchillas cuando
se pasan superficies de grava.
• No maneje la máquina si no tiene la trampa para césped
completa, la canaleta de descarga u otros dispositivos de
seguridad en su lugar y en funcionamiento.
• Ralentizar antes de girar.
II. FUNCIONAMIENTO EN PENDIENTES
Las pendientes son el mayor factor de accidentes relativos a la
pérdida de control y vuelco, que pueden causar severas heridas
o muerte. El funcionamiento en pendientes requiere una atención
extra. Si no es posible hacer marcha atrás en una pendiente o si
te sientes incomodo, no la cortes.
• Cortar hacia arriba y abajo de una pendiente, no de modo
horizontal.
• Poner atenciones a los hoyos, las raíces, los bultos, las piedras
u otros objetos escondidos. El terreno irregular puede volcar
la máquina. La hierba alta puede esconder obstáculos.
• Escoger una velocidad de marcha baja de modo que no sea
necesario pararse o cambiar estando en una pendiente.
• No cortar la hierba mojada. Las ruedas pueden perder
tracción. Poner siempre una marcha cuando se está en
pendientes. No poner en punto muerto e ir cuesta abajo.
• Evitar arrancar, pararse o girar en una pendiente. Si las ruedas pierden tracción, desconectar las cuchillas y proceder
despacio cuesta abajo en la pendiente.
• Mantener todo los movimientos en las pendientes lentos
y gradual. No hacer cambios repentinos de velocidad o
dirección, ya que pueden causar el escape de la máquina.
• Poner la máxima atención cuando la máquina funciona con
captadores de hierba u otros dispositivos enganchados;
pueden afectar la estabilidad de la máquina. No usar en
pendientes empinados.
• No intentar estabilizar la máquina poniendo el pie en el terreno.
• No cortar cerca de bajadas, cunetas y orillas. Las máquina
puede volcarse improvisamente si una rueda está en el borde
o se hunde.
34
Page 35
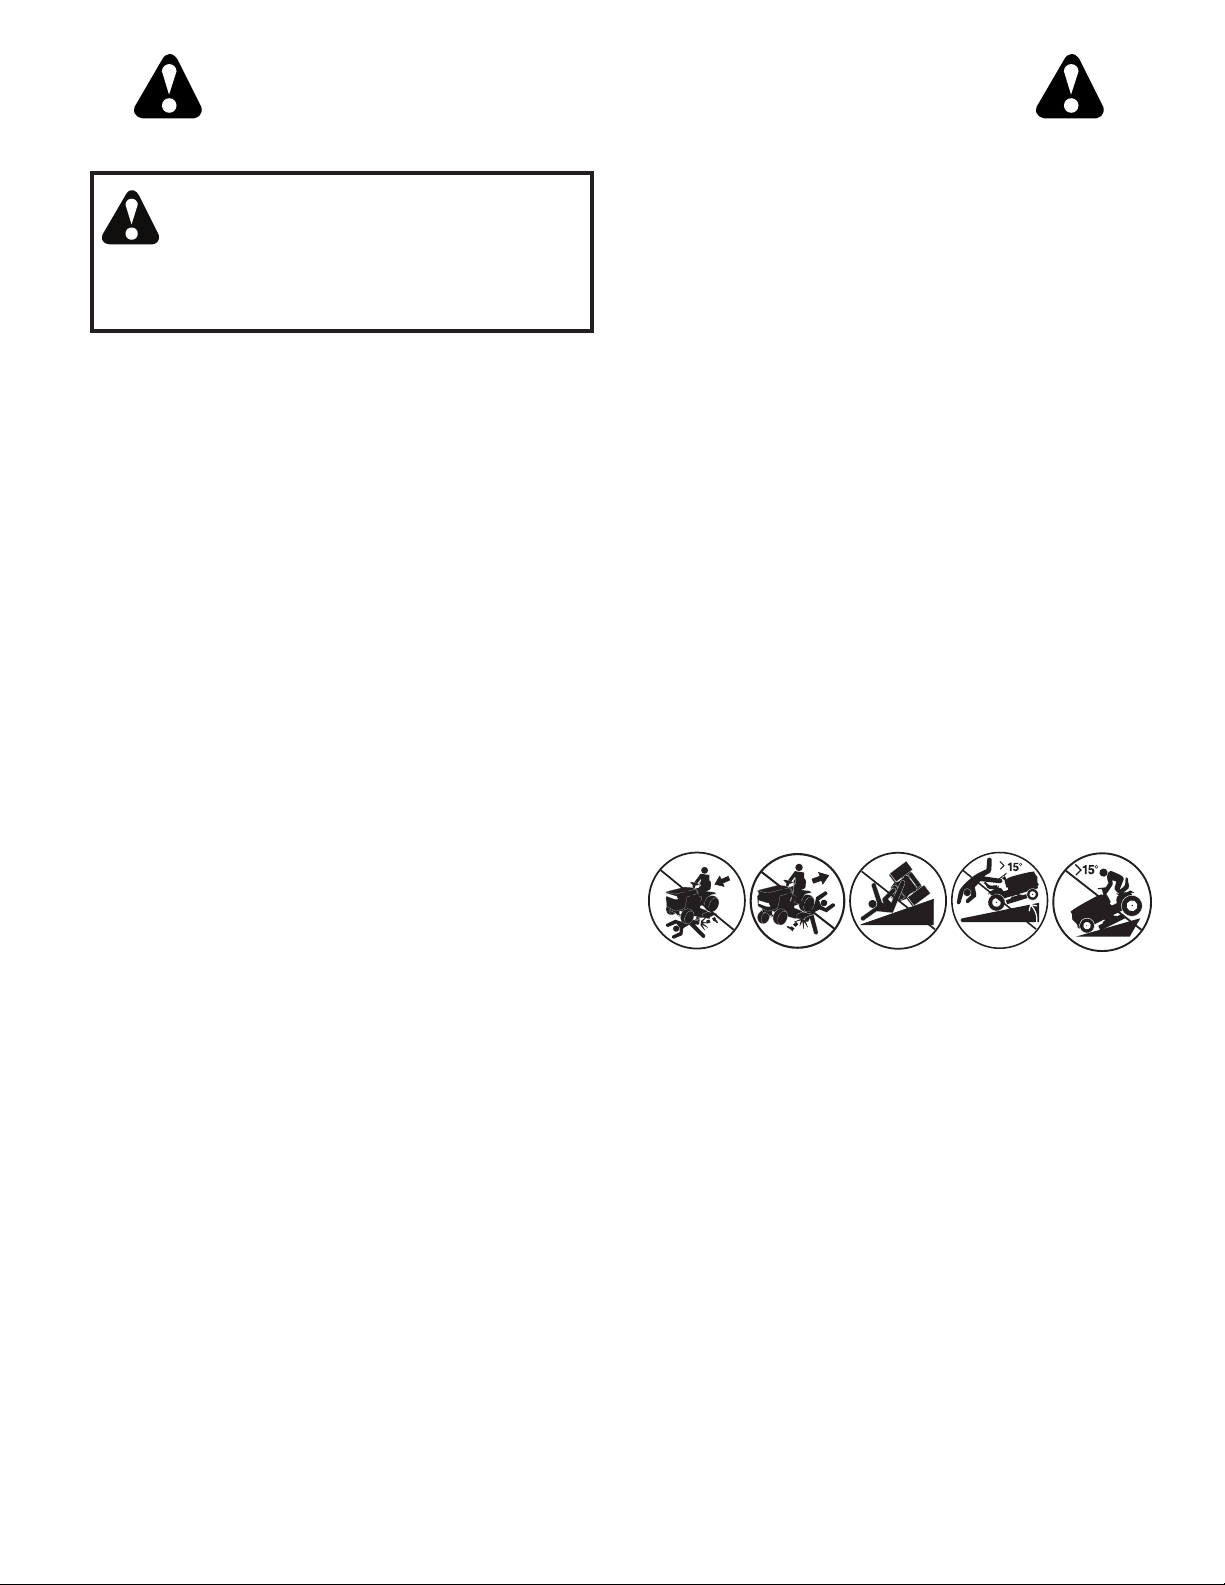
REGLAS DE SEGURIDAD
Prácticas de Operación Seguras para las Segadoras Conducibles
III. NIÑOS
ADVERTENCIA: LOS NIÑOS PUEDEN SUFRIR DAÑOS CON EL USO DE ESTE EQUIPO. La Academia
Estadounidense de Pediatría (American Academy
of Pediatrics) recomienda que sólo se permita a
niños con una edad mínima de 12 años manejar
máquinas cortacésped manuales, y al menos
de 16 años para manejar tractores cortacésped.
Si el operador no pone atención a la presencia de los niños pueden
ocurrir accidentes trágicos. Los niños a menudo están atraídos
por la máquina y las actividad de cortar. No dar por hecho de que
los niños se queden adonde estaban la última vez que los vistes.
• Mantener los niños fuera del área de corte y vigilados por
un adulto responsable que no sea el operador.
• Estar alerta y apagar la máquina si un niños entra en el área.
• Antes y durante la marcha atrás, mirar adelante y abajo para
ver si hay niños pequeños.
• Nunca llevar niños, incluso si hay las cuchillas apagadas.
Podrían caer y herirse seriamente o interferir con el funcionamiento seguro de la máquina. los niños que se han llevado precedentemente pueden aparecer de pronto en el área de corte
por otro paseo y ser atropellados o tumbados por la máquina.
• Nunca dejar que los niños manipulen la máquina.
• Tener el máximo cuidado cuando se acerca a cantos ciegos,
arbustos, árboles u otros objetos que pueden impedir la vista
de niños.
IV. REMOLQUE
• Remolcar sólo con una máquina que tenga un gancho diseñado para remolcar. Enganchar el equipo o remolcar sólo
en el punto dispuesto al efecto.
• Seguir las recomendaciones del productor con respecto a los
límites del equipo por remolcar y el remolque en pendientes.
• Nunca permitir que niños u otras personas estén dentro del
equipo por remolcar.
• En pendientes, el peso del equipo remolcado puede causar
la pérdida de tracción y la pérdida de control.
• Viajar despacio y dejar más distancia para frenar.
• Si se vierte carburante sobre la ropa, cambiarse la ropa
inmediatamente.
• Nunca llenar el depósito más de lo debido. Volver a colocar
el tapón del gas y cerrar de modo firme.
OPERACIONES DE SERVICIO GENERALES
• Nunca hacer funcionar la máquina en un área cerrada.
• Mantener todas las tuercas y pernos apretados para asegurarse de que trabaja en condiciones seguras.
• Nunca modificar los dispositivos de seguridad. Controlar su
correcto funcionamiento regularmente.
• Mantener la máquina libre de hierba, hojas u otros residuos acumulados. Limpiar las salpicaduras de aceite
o carburante y quitar cualquier cosa mojada con carburante. Dejar que la máquina se enfríe antes de guardarla.
• Si se golpea un objeto ajeno, hay que pararse e inspeccionar
la máquina. Reparar, si es necesario, antes de volver a poner
en marcha.
• Nunca hacer ningún ajuste o reparación con el motor en
función.
• Verifique los componentes de la trampa para césped y la
canaleta de descarga con frecuencia y sustituya con repuestos recomendados por el fabricante cuando sea necesario.
• Las cuchillas del cortacésped son afiladas. Envolver la cuchilla, ponerse guantes y poner la máxima
atención cuando se hacen operaciones en ellas.
• Controlar el funcionamiento del freno frecuentemente. Ajustar
y hacer las operaciones de mantenimiento cuando eso sea
necesario.
• Mantener y sustituir las etiquetas de seguridad e instrucción,
cuando sea necesario.
• Asegurarse de que el área esté libre de otras personas antes
de ponerla en marcha. para la máquina si alguien entra en
el área.
• Nunca llevar pasajeros.
V. SERVICIO
MANIPULACIÓN SEGURA DE LA GASOLINA
Para evitar heridas personales o daños a las cosas, poner el
máximo cuidado a la hora de manipular la gasolina. La gasolina
es extremamente inflamable y los vapores son explosivos.
• Apagar todos los cigarrillos, cigarros, pipas y otras fuentes
de ignición.
• Usar sólo contenedores para gasolina aprobados.
• Nunca quitar el tapón de la gasolina o añadir carburante
con el motor en marcha. dejar enfriar el motor antes del
abastecimiento de la gasolina.
• Nunca abastecer la máquina al interior de un local.
• Nunca guardar la máquina o el contenedor del carburante donde haya una llama abierta, chispas o una luz
piloto como un calentador de agua u otros dispositivos.
• Nunca llenar los contenedores al interior de un vehículo o en
una caravana o camión recubiertos con un forro de plástico.
Colocar siempre los contenedores en el terreno lejos del
vehículo cuando se está llenando.
• Quitar el equipo de gas del camión o caravana y abastecerlo
en el terreno. Si no es posible, abastecer dicho equipo con un
contenedor portátil, más bien que de un surtidor de gasolina.
• Mantener la boquilla a contacto del borde del depósito de
carburante o la abertura del contenedor durante toda la
operación de abastecimiento. No utilizar un dispositivo con
boquilla cerrada-abierta.
• No cortar marcha atrás al no ser absolutamente necesario.
Mirar siempre abajo y delante mientras se procede atrás.
• Nunca llevar niños, incluso si hay las cuchillas apagadas.
Podrían caer y herirse seriamente o interferir con el funcionamiento seguro de la máquina. los niños que se han llevado
precedentemente pueden aparecer de pronto en el área de
corte por otro paseo y ser atropellados o tumbados por la
máquina.
• Mantener los niños fuera del área de corte y vigilados por
un adulto responsable que no sea el operador.
• Estar alerta y apagar la máquina si un niños entra en el área.
• Antes y durante la marcha atrás, mirar adelante y abajo para
ver si hay niños pequeños.
• Cortar hacia arriba y abajo de una pendiente (15° Máx), no
de modo horizontal.
• Escoger una velocidad de marcha baja de modo que no sea
necesario pararse o cambiar estando en una pendiente.
• Evitar arrancar, pararse o girar en una pendiente. Si las ruedas pierden tracción, desconectar las cuchillas y proceder
despacio cuesta abajo en la pendiente.
• Si la máquina se para mientras va cuesta arriba, desconectar
las cuchillas, poner la marcha atrás y ir hacia atrás despacio.
• No girar estando en pendientes si no es necesario, y luego
girar despacio y gradualmente cuesta abajo, si es posible.
• Al cargar o descargar la máquina, no sobrepase el ángulo
máximo recomendado de 15°.
35
Page 36

ESPECIFICACIONES DEL PRODUCTO
Capacidad y Tipo
de gasolina:
Tipo de Aceite:
(API: SG-SL)
Capacidad de
Aceite:
Bujía: Champion RC12YC
Sistema de Carga: 16 AMPS @ 3600 RPM
Batería: Amp/Hr:
Torsión del Perno de
la Cuchilla:
3.0 Galones (11.35 L)
Regular Sin Plomo
SAE 30 (Sobr 32°F/0°C)
SAE 5W30 (Debajo 32°F/0°C)
Con filtro:
Sin filtro:
64 oz. (1.96 L)
60 oz. (1.77 L)
Abertura: .030"(.76 mm)
28
Min. CCA:
Case Size:
230
U1R
45-55 FT. LBS. (62-75 Nm)
FELICITACIONES por la compra de su tractor. Ha sido diseñado,
planificado y fabricado para darle la mejor confiabilidad y el mejor
rendimiento posible.
En el caso de que se encuentre con cualquier problema que no
pueda solucionar fácilmente, haga el favor de ponerse en contacto con un centro de servicio o con un otro centro de servicio
cualificado. Cuenta con técnicos bien capacitados y com pe tentes y con las herramientas adecuadas para darle servicio o para
reparar este tractor.
Haga el favor de leer y de guardar este man u al. Estas instrucciones
le permitirán montar y mantener su unidad en forma ade cua da.
Siempre observe las “REGLAS DE SEGURIDAD.”
RESPONSABILIDADES DEL CLIENTE
• Lea y observe las reglas de seguridad.
• Siga un programa regular de mantenimiento, cuidado y uso
de su tractor.
• Siga las instrucciones descritas en las secciones “Mantenimiento” y “Almacenamiento” de este manual.
• Utilice prendas de seguridad adecuadas al manejar la
máquina, incluidos (como mínimo) calzado de seguridad,
gafas protectoras y protección auditiva. No utilice pantalones
cortos y/o calzado abierto cuando corte la hierba.
• Informe siempre a alguien de que se dispone a cortar la
hierba en el exterior.
ADVERTENCIA: Este tractor viene equipado con un motor
de combustión interna y no se debe usar sobre, o cerca, de un
terreno no desarrollado cubierto de bosques, de arbustos o de
césped, o menos que el sistema de escape del motor venga
equipado con un amor ti gua dor de chispas que cumpla con las
leyes locales o estatales (si existen). Si se usa un amortiguador
de chispas, el operador debe mantenerlo en condiciones de
trabajo eficientes.
En el estado de California, la ley exige lo an te ri or (Sección 4442
del “California Public Re sourc es Code”). Otros estados pueden
contar con otras leyes parecidas. Las leyes federales se aplican
en la tierras federales.
Su centro de Servicio más cer ca no tiene disponible amor ti guado res de chispas para el si len cia dor.
TABLA DE MATERIAS
REGLAS DE SEGURIDAD ............... .......................34-35
ESPECIFICACIONES DEL PRODUCTO........................36
RESPONSABILIDADES DEL CLIENTE.........................36
MONTAJE ..................................................................37-38
OPERACIÓN ............................................................39-45
PROGRAMA DE MANTENIMIENTO ............................46
MANTENIMIENTO ..................................................46-50
SERVICIO Y AJUSTES ..........................................51-57
ALMACENAMIENTO ...................................................58
IDENTIFICACIÓN DE PROBLEMAS......................59-60
GARANTÍA................................................................ 62-65
36
Page 37
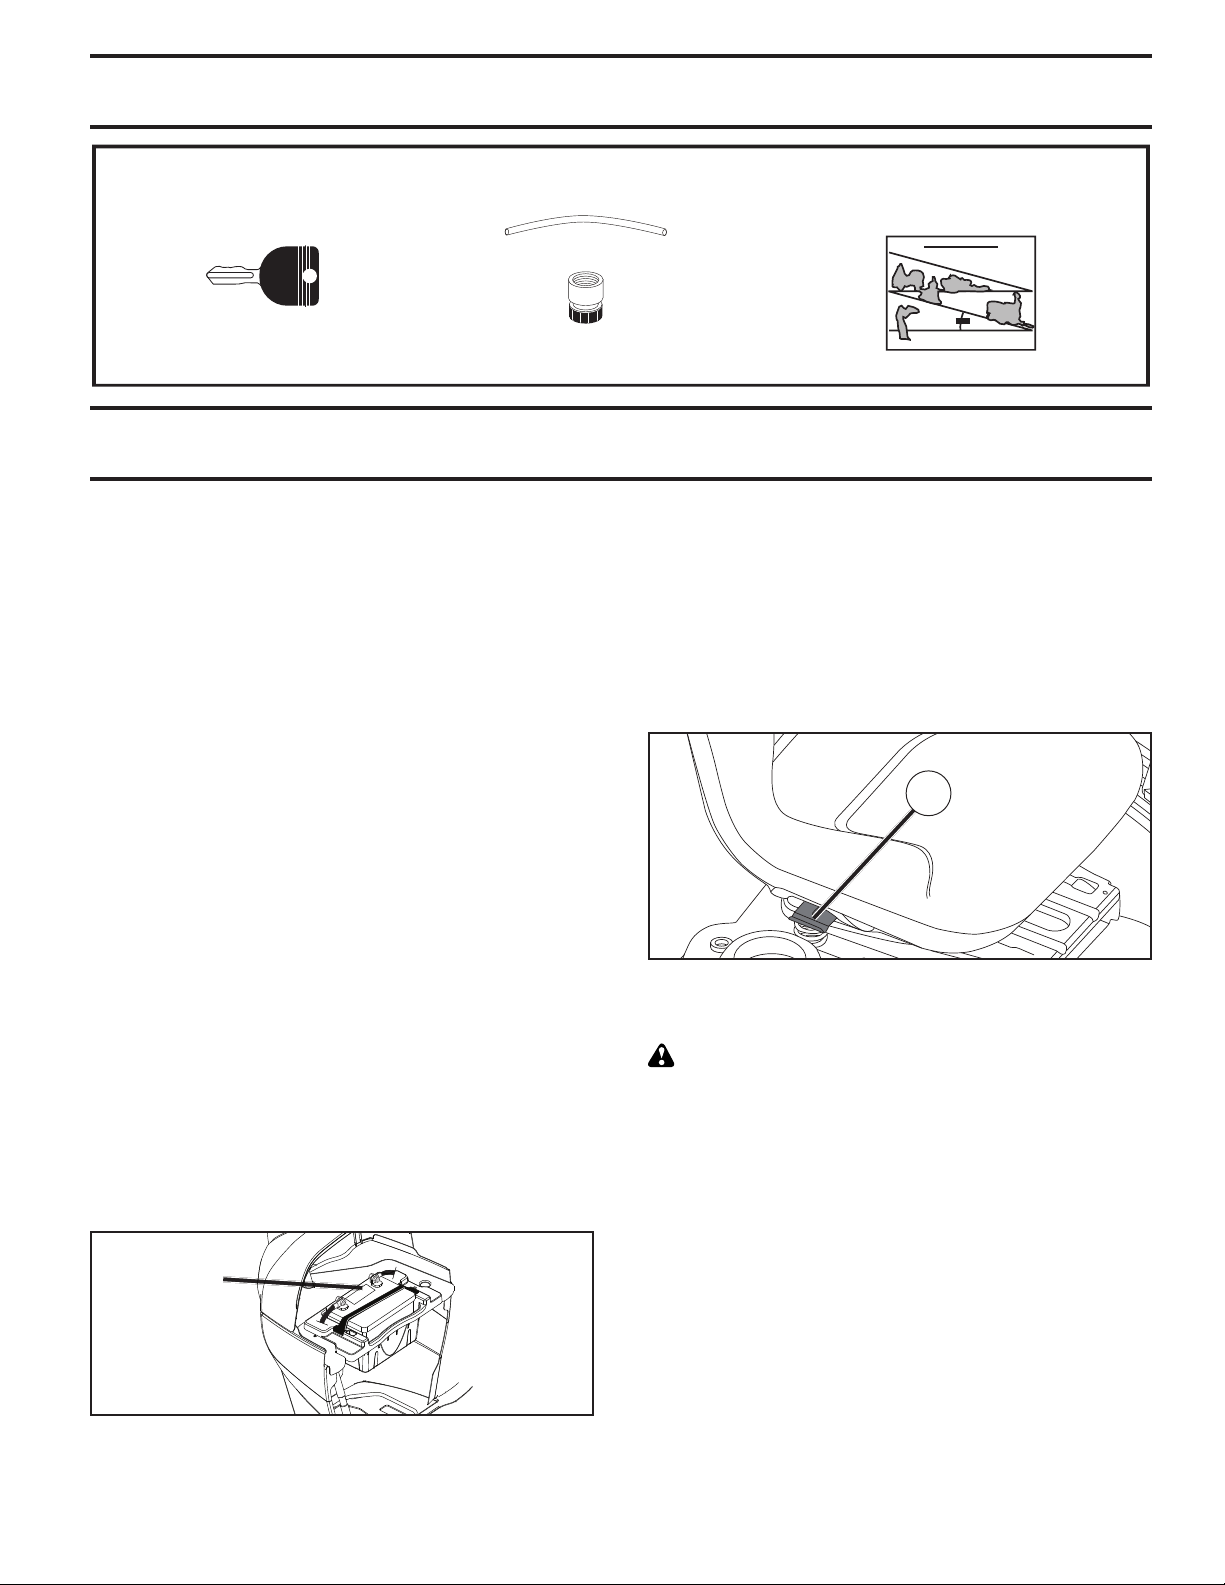
PIEZAS SIN MONTAR
Llaves
Llaves
(1) Tubo de desagüe
(1) Accesorio del conexión
Hoja de pendiente
MONTAJE
Su tractor nuevo ha sido montado en la fábrica con la excepción de aquellas partes que no se han montado por razones de envío.
HERRAMIENTAS NECESARIAS PARA EL
MONTAJE
Un juego de llaves de tubo facilitará el montaje. A continuación
se enumeran los tamaños de las llaves estándar.
(1) Llaves de 1/2" Medidor de presión de las llantas
(2) Llaves de 7/16" Cuchillo para todo uso Pinzas
Cuando en este manual se mencionan los términos “mano de re cha”
o “mano izquierda” se refiere a cuando usted se encuentra en la
posición de operación (sentado/a detrás del volante de dirección).
PARA REMOVER EL TRACTOR DE LA
CAJA DE CARTÓN
DESEMPAQUE LA CAJA DE CARTÓN
• Remueva todas las partes sueltas que estén accesibles, y
las cajas de partes, de la caja de cartón grande.
• Cortar a lo largo de las líneas de puntos en todos los cuatro
paneles de cartón. Remover los paneles de cierre y aplanar
los paneles laterales.
• Revise si hay partes sueltas adicionales o cartón y re muéva las.
ANTES DE REMOVER EL TRACTOR DE
LA CORREDERA
VERIFIQUE LA BATERÍA (Vea Fig. 1)
• Levante del capota a la posición levantada.
AVISO: Si esta batería esta utilizada después del mes y año
indicado sobre la etiqueta (la etiqueta que se encuentra entre
los terminales), cargue la batería por un mínimo de una hora a
6-10 amps. (Vea “BATERÍA” en la sección de Mantenimento de
este manual).
ETIQUETA
Fig. 1
• Para instale la batería, y cable de la batería, realice el procedimiento descrito en “REEMPLAZAR LA BATERÍA” del
capítulo de Servicio y Ajustes de este manual.
PARA AJUSTAR EL ASIENTO (Vea Fig. 2)
• Siéntese sobre el asiento.
• Levante la palanca del ajuste (A) hacia arriba y mueva el
asiento hasta que alcance una posición cómoda que le
permita presionar completamente sobre el pedal del freno.
• Desconecte la palanca para trabar el asiento en la posición.
A
Fig. 2
AVISO: Ahora puede rodar su tractor fuera de la corredera. Siga
las siguientes instrucciones para remover el tractor de la corredera.
ADVERTENCIA: Antes de empezar, leer, entender y seguir
todas las instrucciones presentes en la sección Operaciones
de este manual. Asegurarse que el tractor esté en un área bien
ventilada. Asegurarse que la zona delante del tractor esté libre
de otras personas y objetos.
PARA HACER RODAR EL TRACTOR FUERA DE LA
CORREDERA (VEA LA SECCIÓN DE LA OPERACIÓN
PARA LA LOCALIDAD Y LA FUNCIÓN DE LOS CONTROLES)
• Levante la palanca de levantamiento del accesorio a su
posición más alta.
• Suelte el freno de estacionamiento presionando el pedal del
embrague/freno.
• Ponga el control de la rueda libre en la posición de giro libre
para desenganchar la transmisión. (Vea “PARA TRANSPOR TAR” en la sección de Operación de este ma nual).
• Haga rodar el tractor hacia delante fuera de la corredera.
• Remueva las bandas que sujetan la protección contra la
descarga en contra del tractor.
Continuar con las siguientes instrucciones.
37
Page 38

MONTAJE
REVISIÓN DE LA PRESIÓN DE LAS LLANTAS
Las llantas en su unidad fueron infladas demasiado en la fábrica
por razones de envío. La presión de las llantas correctas es importante para obtener el mejor rendimiento en el corte.
• Reduzca la presión de los neumáticos a la PSI que se indica
en estos.
REVISIÓN DE LA NIVELACIÓN DEL CONJUNTO
Para obtener los mejores resultados en el corte, la caja de la
segadora tiene que estar nivelada en la forma adecuada. Vea
“PARA NIVELAR LA CAJA” en la sección de Servicio y Ajustes
de este manual.
REVISIÓN DE LA POSICIÓN ADECUADA DE TODAS LAS CORREAS
Vea las figuras que aparecen para cambiar las correas de impulsión de la cuchilla de la segadora y de movimiento en la sección
de Servicio y Ajustes de este manual. Verifique que las correas
sigan su paso correcto.
REVISIÓN DEL SISTEMA DE FRENOS
Una vez que usted haya aprendido a manejar su tractor, verifique
que el freno funcione correctamente. Ver “PARA VERIFICAR SI
FUNCIONA BIEN EL FRENO” en el capítulo de servicio y ajustes
de este manual.
✓LISTA DE REVISIÓN
ANTES DE OPERAR Y DE DISFRUTAR DE SU TRACTOR
NUEVO, LE DESEAMOS QUE RECIBA EL MEJOR
RENDIMIENTO Y LA MAYOR SATISFACCION DE ESTE
PRODUCTO DE CALIDAD.
HAGA EL FAVOR DE REVISAR LA LISTA A CONTINUACION:
✓ Se han completado todas las instrucciones de montaje.
✓ No quedan partes sueltas en la caja de cartón.
✓ La batería está preparada y cargada en for ma adecuada.
✓ El asiento ha sido ajustado en forma cómoda y apretado en
forma segura.
✓ Todas las llantas han sido infladas en forma adecuada.
(Para fines de envío, las llantas se inflaron demasiado en
la fábrica.)
✓ Asegúrese que el conjunto segador esté nivelado en forma
adecuada, de lado a lado y desde adelante hacia atrás, para
obtener los mejores resultados en el corte. (Las llantas tienen
que estar infladas en forma adecuada para la nivelación.)
✓ Revise las correas de impulsión y de la segadora. Asegúrese
que recorran el paso adecuado alrededor de las poleas y
dentro de todos los fijadores de las correas.
✓ Revise el alambrado. Fíjese que todas las conexiones todavía
estén seguras y que los alambres estén sujetos en forma
adecuada.
✓ Antes de conducir el tractor, asegúrese que el control de
rueda libre este en la posición de “transmisión enganchada”
(Vea “PARA TRANSPORTAR” en la sección de la Operación
de este manual).
AL MISMO TIEMPO QUE APRENDE A COMO USAR
SU TRACTOR, PRESTE ATENCIÓN EXTRA A LOS
PUNTOS DE IMPORTANCIA QUE SE PRESENTAN A
CONTINUACIÓN:
✓ El aceite del motor tiene que llegar al nivel adecuado.
✓ El estanque de combustible tiene que estar lleno con gasolina
sin plomo regular, nueva y limpia.
✓ Familiarícese con todos los controles – su ubicación y su
función. Opérelos antes de hacer arrancar el motor.
✓ Asegúrese que el sistema de frenos esté en una condición
de operación segura.
✓ Asegurarse de que el Sistema de Presencia del Operador
y el Sistema de Funcionamiento Atrás (ROS) funcionan de
modo adecuado (Ver las Secciones de Funcionamiento y
Mantenimiento en este manual).
✓ Es importante purgar la transmisión antes de operar su tractor
por la primera vez. Siga las instrucciones adecuadas para el
empiezo y para purgar (Vea “PARA EMPEZAR EL MOTOR”
y “PARA PURGAR LA TRANSMISIÓN” en la sección de la
Operación de este manual).
38
Page 39

OPERACIÓN
Estos símbolos pueden aparecer sobre su tractor o en la literatura proporcionada con el producto. Aprenda y comprenda sus significados.
ATRÁS
MOTOR
APAGADO
COMBUSTIBLE
ACCESORIO
DEL EMBRAGUE
ENGANCHADO
NEUTRO ALTO BAJO
SISTEMA
FUNCIONAMIENTO
ATRÁS (ROS)
BATERÍA
MARCHA
ATRÁS
ACCESORIO
DEL EMBRAGUE
DESENGANCHADO
MOTOR
ENCENDIDO
HACIA ADELANTE
MOTOR
EN MARCHA
MARCHA
PELIGRO, GUARDE
LAS MANOS Y
LOS PIES LEJOS
POSICIÓN DE
ARRANQUE EN
CLIMA FRÍO
FRENO DE
ESTACIONAMIENTO
PALANCA DE
MANDO CRUCERO
RÁPIDO
LEVANTAMIENTO
DE LA SEGADORA
MANTENGA EL
AREA DESPEJADA
(Vea la sección de las reglas de seguridad)
LENTOMARCHA
ALTURA DE LA
SEGADORA
15
INTERRUPTOR
DE IGNICIÓN
LUCES
ENSENDIDAS
PEDAL DE FRENO /
DE EMBRAGUE
PELIGROS DE
PENDIENTES
PELIGRO indica un peligro que, si no se evita,
provoca muerte o lesiones graves.
15
RUEDA LIBRE
(Solamente para los
modelos automatico)
No seguir las siguientes instrucciones
puede provocar heridas o muerte. Los
símbolos de aviso de seguridadse utilizan
para identificar informaciones de seguridad
relativas a peligros que puedenprovocar la
muerte, heridas graves y/o daños a la
máquina.
ADVERTENCIA indica un peligro que, si no se evita,
puede provocar muerte o lesiones graves.
PRECAUCIÓN indica un peligro que, si no se evita,
puede provocar lesiones ligeras o moderadas.
PRECAUCIÓN cuando se utiliza sin el símbolo de
aviso, indica una situación que puede provocar
daños al tractor y/o al motor.
SUPERFICIES CALIENTES indica un peligro que,
si no se evita, puede provocar la muerte, lesiones
graves y/o danos a la máquina.
FUEGO indica un peligro que, si no se evita, puede
provocar la muerte, lesiones graves y/o danos
a la máquina.
39
Page 40
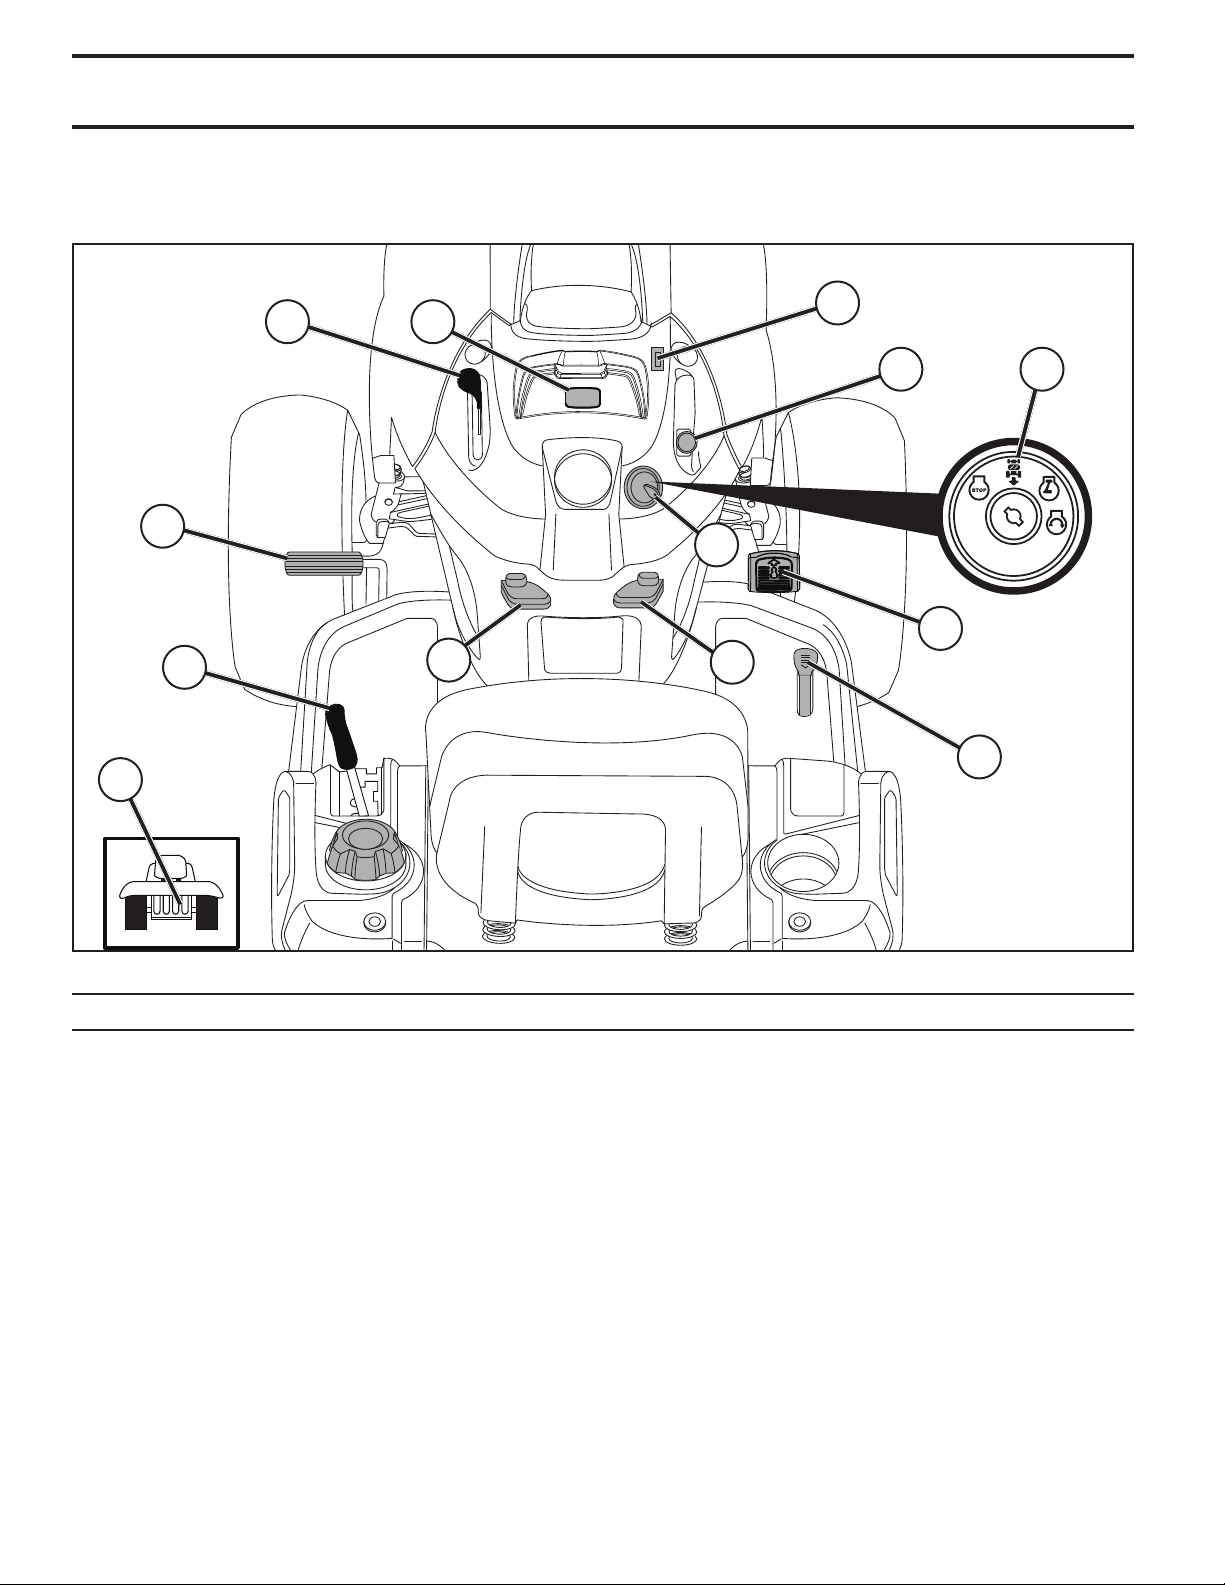
OPERACIÓN
FAMILIARICESE CON SU TRACTOR
LEA ESTE MANUAL DE OPERARIO Y LAS REGLAS DE SEGURIDAD ANTES DE OPERAR SU TRACTOR
Compare las ilustraciones con su tractor para familiarizarse con las ubicaciones de los diversos controles y ajustes. Guarde
este manual para referencia en el futuro.
M
B
A
D P
C
H
E
G
F
K
J
L
Nuestros tractores cumplen con los estándares de seguridad del American National Standard Institute.
(A) PALANCA DEL LEVANTAMIENTO DEL ACCESORIO - Se
usa para levantar, bajar y ajustar el conjunto segador o los demás
ac ce so rios montados en su tractor.
(B) PEDAL DEL EMBRAGUE/FRENO - Se usa para desembragar y frenar el tractor y para hacer arrancar el motor.
(C) PALANCA DEL FRENO DE ESTACIONAMIENTO - Asegu ra el pedal del embrague/freno en la posición del freno.
(D) COMMANDE DES GAZ - permet de démarrer le mo teur et
de commander la vitesse de moteur
(E) INTERRUPTOR DEL EMBRAGUE DEL ACCESORIO - Se
usa para enganchar las cuchillas segadoras o los demás ac ceso rios montados en su tractor.
(F) INTERRUPTOR DE IGNICIÓN - Se usa para hacer arrancar
o hacer parar el motor.
(G) SISTEMA DE FUNCIONAMIENTO HACIA ATRÁS (ROS)
EN POSICIÓN “ON” - Permite la operación del conjunto
segador o otro accesorio accionado mientras que en revés.
Fig. 3
(H) INTERRUPTOR DE LA LUZ - Enciende y apaga las luces
de lan te ras.
(J) PALANCA DE MANDO CRUCERO - Se utiliza para fijar el
movimiento hacia adelante del tractor a la velocidad deseada sin
apretar el pedal de marcha atrás.
(K) PEDAL DE MARCHA ADELANTE - Se utiliza para el movimiento del tractor hacia adelante.
(L) PEDAL DE MARCHA ATRÁS - Se utiliza para el movimiento
del tractor hacia atrás.
(M) CONTROL DE RUEDA LIBRE - Desengancha la trans-misión
para empujar o arrastrar.
(P) DISPOSITIVO DE AVISO DE SERVICIO/CRONÓMETRO - Indica cuándo hay que hacerles el servicio al motor y a la cortadora.
40
Page 41
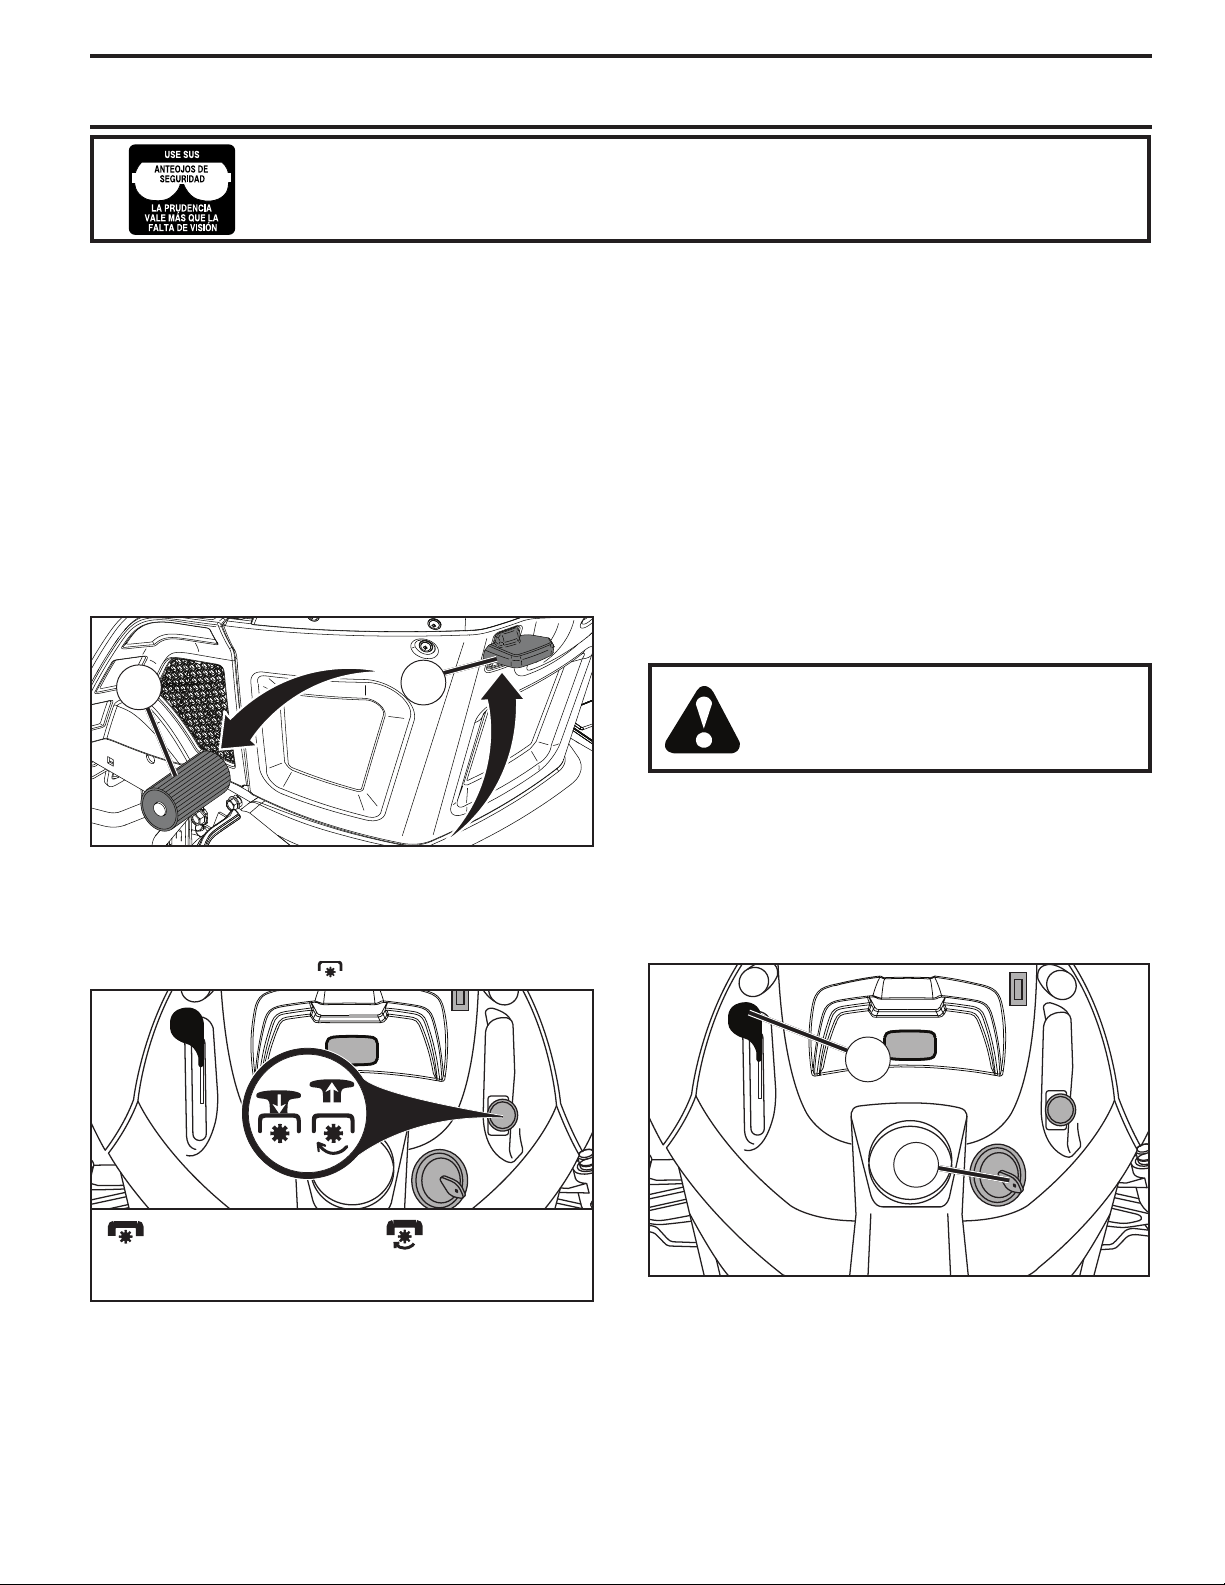
OPERACIÓN
La operación de cualquier tractor puede hacer que salten objetos extraños dentro de sus ojos, lo
que puede producir daños graves en éstos. Siempre use anteojos de seguridad o pro tec cio nes para
los ojos mientras opere su tractor o cuando haga ajustes o reparaciones. Recomendamos gafas de
seguridad o una máscara de visión amplia de seguridad usada sobre las gafas.
COMO USAR SU TRACTOR
PARA AJUSTAR EL FRENO DE
ESTACIONAMIENTO (Vea Fig. 4)
Su tractor viene equipado con un interruptor sen sor que exige la
presencia del operador. Cuando el motor está funcionando, si el
operador trata de bajarse del asiento sin primero aplicar el freno
de estacionamiento, se apagará el motor.
• Presione el pedal (C) del freno/embrague completamente y
sostengalo.
• Jale hacia arriba la palanca del freno de mano (C) y manténgala en esa posición; suelte gradualmente el pedal del
embrague/freno (B), y luego suelte la palanca del freno de
mano. El pedal tiene que quedar en la posición de freno.
Asegúrese que el freno de estacionamiento va a sujetar el
tractor en forma segura.
B
Fig. 4
PARADA (Vea Fig. 5)
CUCHILLAS DE LA SEGADORA -
• Mueva el control del embrague del accesorio a la posición
"DESENGANCHADO" (
).
C
MOTOR -
• Mueva el control de la aceleración (D) a la posición de lento.
AVISO: Si no se mueve el control de la aceleración a la posición
de lento y se permite que el motor ande en vacío antes de pararlo
puede producir la contraexplosión del motor.
• Gire la llave de ignición (F) a la posición de apagado “STOP”
y remueva la llave al abandonar el tractor para evitar el uso
no autorizado.
• No utilice la posición de arranque en clima frío para detener
el motor.
IMPORTANTE: DEJANDO EL INTERRUPTOR DE LA IGNICIÓN EN
CUALQUIER POSICIÓN OTRA QUE “STOP” CAUSAR I QUE LA BATERÍA
SE DESCARGUE (MUERTA).
AVISO: Bajo ciertas condiciones, cuando el trac tor está parado
con el motor andando en vacío, los gases de escape del motor caliente pueden hacer que el césped se ponga “café.” Para
eliminar esta posibilidad, siempre pare el motor cuando pare el
tractor en áreas con césped.
PRECAUCIÓN: Siempre pare el tractor
completamente, según se ha descrito anteriormente, antes de abandonar la posición
del operador.
PARA USAR EL CONTROL DE LA ACELERACIÓN
(D) (Vea Fig. 6)
Siempre opere el motor a una aceleración completa.
• Si el motor funciona a una velocidad inferior a la máxima
(rápida), su rendimiento disminuye.
• El rendimiento óptimo se obtiene a la velocidad máxima
(rápida).
( ) INTERRUPTOR
DEL EMBRAGUE
DEL ACCESORIO
“DESENGANCHADO”
( ) INTERRUPTOR
DEL EMBRAGUE
DEL ACCESORIO
“ENGANCHAR”
Fig. 5
IMPULSIÓN DE RECORRIDO -
• Para parar el mecanismo impulsor, presione el pedal del
freno/embrague completamente.
IMPORTANTE: LOS PEDALES DE MARCHA ADELANTE Y
ATRÁS VUELVEN A LA POSICIÓN NEUTRA CUANDO NO
ESTÁN APRETADOS.
D
F
Fig. 6
41
Page 42
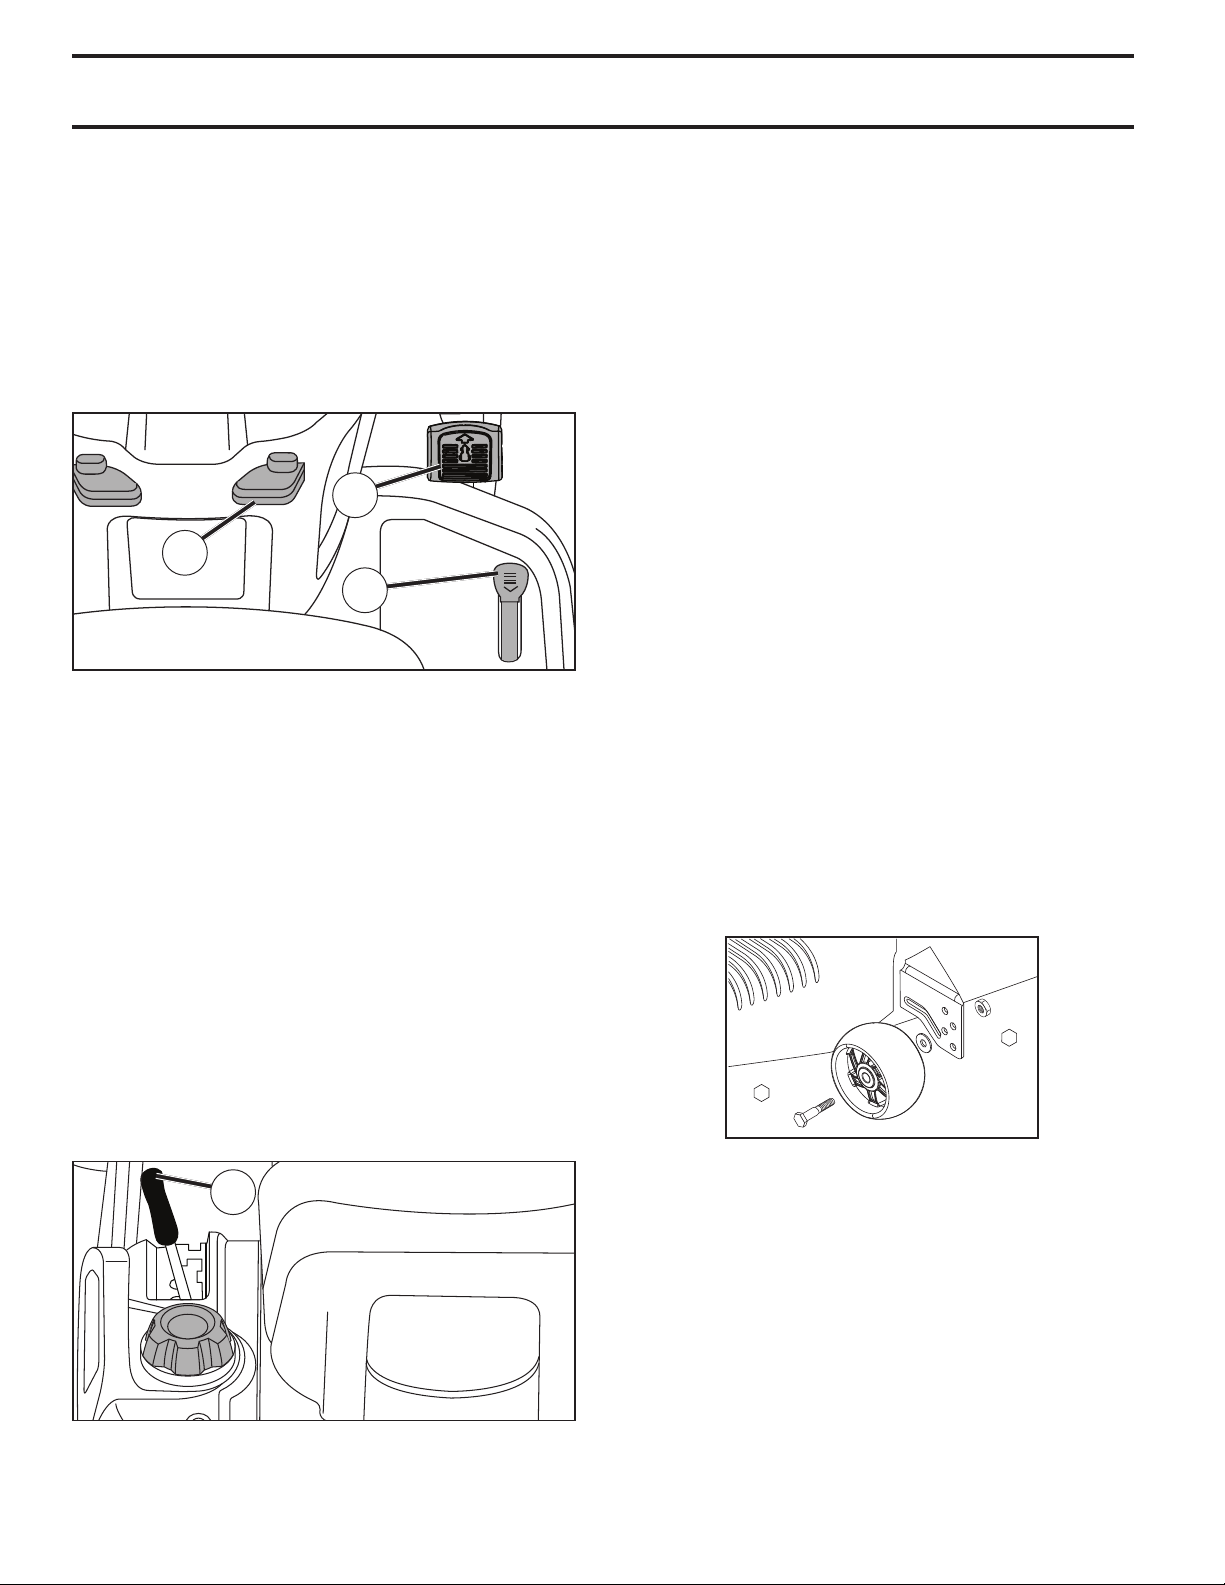
OPERACIÓN
MOVERSE HACIA ADELANTE Y HACIA ATRÁS
(Vea Fig. 7)
La dirección y la velocidad de movimientos están controlados
por los pedales de marcha adelante y atrás.
• Poner en marcha el tractor y quitar el freno de mano.
• Apretar lentamente el pedal marcha adelante (K) y atrás (L)
para iniciar el movimiento. Más se aprieta el pedal y mayor
es la velocidad.
UTILIZAR EL MANDO CRUCERO (J) (See Fig. 7)
El mando crucero se puede utilizar sólo durante la marcha hacia
adelante.
K
J
L
Fig. 7
CARACTERÍSTICAS TÉCNICAS
El control de velocidad crucero sólo debe usarse mientras el
tractor esté en labores de siega o transportación, moviéndose
sobre superficies que estén relativamente planas y rectas.
Otras condiciones de trabajo, como la poda, que requiere velocidades bajas, podrían desengranar el control de velocidad
crucero. No emplee el control de velocidad crucero mientras
el tractor se desplaza por elevaciones, terrenos escarpados o mientras el tractor esté en labores de poda o virando.
• Con el pedal (K) de marcha adelante apretado a la velocidad deseada, mover la palanca de mando de crucero hacia
adelante hasta la posición “SET” y mantenerla mientras se
levanta el pie del pedal, luego soltar la palanca (J) de mando
de crucero.
Para desconectar el control de crucero, tire la palanca hacia atrás
a la posición "OFF", o empuje completamente el pedal del freno.
PARA AJUSTAR LA ALTURA DE CORTE DE LA
SEGADORA (Vea Fig. 8)
La posición de la palanca elevadora (A) determina a qué altura
se cortará el césped.
A
Fig. 8
• Coloque la palanca elevadora en la ranura de la altura deseada.
La gama de la altura de corte es de aproximadamente 25,4 a
101,6 mm (1 a 4 pulgadas). Las alturas se miden desde el suelo
a la punta de la cuchilla cuando el motor no está funcionando.
Estas alturas son aproximadas y pueden variar dependiendo de
las con di cio nes del suelo, de la altura del césped y del tipo del
césped que se está segando.
• El césped promedio debe cortarse aproximadamente a 63,5 mm
(2-1/2 pulgadas) durante la temporada fría y sobre 76,2 mm
(3 pulgadas) durante los meses calurosos. Para obtener un
césped más saludable y de mejor apariencia, siegue a menudo
y después de un crecimiento moderado.
• Para obtener el mejor rendimiento de corte, el césped que
tiene más de 152,4 mm (6 pulgadas) de altura debe segarse
dos veces. Haga el prim er corte relativamente alto; el segundo
a la altura deseada.
PARA AJUSTAR LAS RUEDAS CALIBRADORAS
(Vea Fig. 9)
Las ruedas calibradoras están bien ajustadas cuando se encuentran un poco a distancia del terreno al mismo tiempo que la
segadora esté a la altura de corte deseada. Entonces las ruedas
calibradoras mantienen el conjunto segador en posición para
prevenir el corte raspeo en casi todos los terrenos.
AVISO: Ajuste las ruedas calibradoras con el trac tor en una
superficie ni ve la da plana.
1. Ajuste la segadora a la altura de corte deseada con la manilla
de ajuste de altura. (Vea “PARA AJUSTAR LA ALTURA DE
CORTE DE LA SEGADORA” en la sección de Operación de
este manual.)
2. Con la segadora a la altura deseada para la posición de corte,
se tienen que montar las ruedas calibradoras de modo que
queden un poco sobre el suelo. Instale las ruedas calibradoras en el agujero adecuado como indicados. Apriete con
seguridad.
3. Repita el procedimiento para el lado opuesto instalando la
rueda calibradora en el mismo agujero de ajuste.
9/16”
3/4”
Fig. 9
PARA OPERAR LA SEGADORA
Su tractor viene equipada con un interruptor sen sor que exige
la presencia del operador. Si el motor está funcionando y el embra gue del accesorio está enganchado y el operador trata de
bajarse del asiento, se apagará el motor. Tiene que mantenerse
sentado completa y centralmente en el asiento para impedir que
el motor vacile o se apague cuando se opere su equipo en terreno
disparejo, áspero o en cerros.
• Elija a qué altura cortará el césped (Vea " PARA AJUS-TAR
LA ALTURA DE CORTE DE LA SEGADORA".)
• Haga arrancar las cuchillas de la segadora enganchando el
control del embrague del accesorio.
42
Page 43
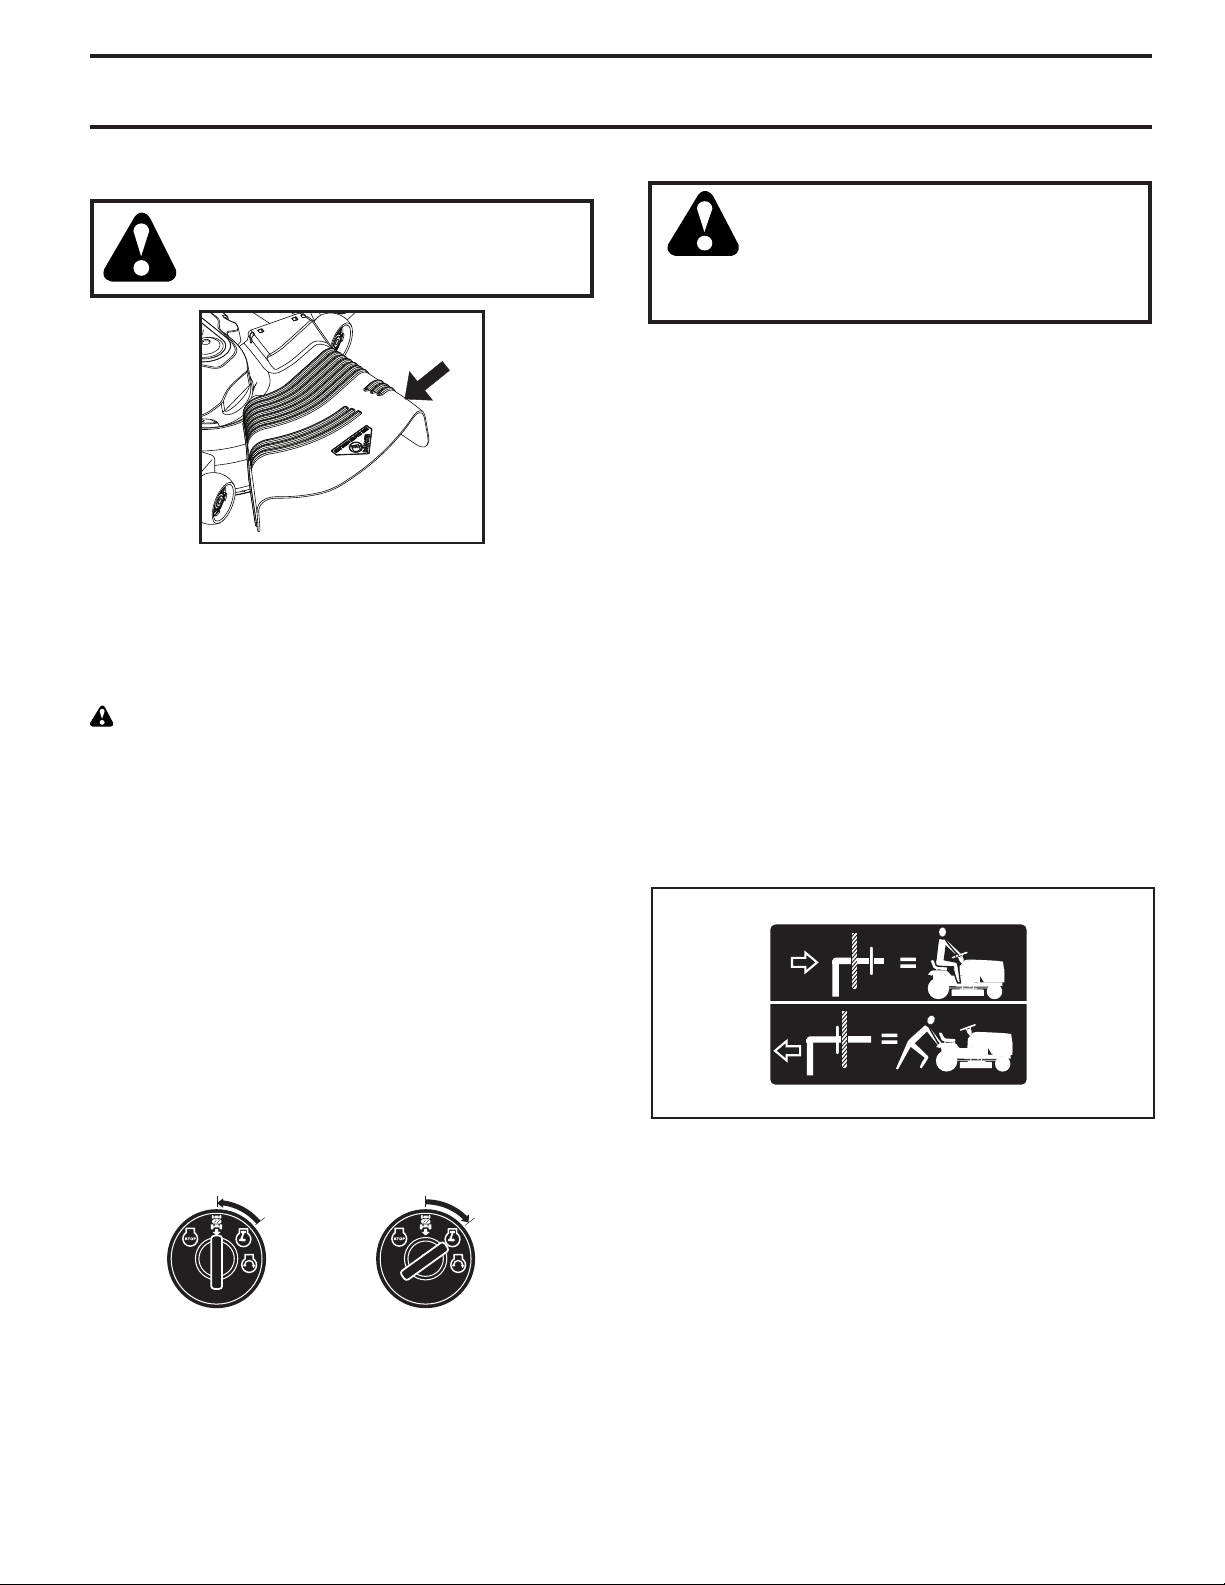
OPERACIÓN
PARA PARAR LAS CUCHILLAS DE L A SEGADORA
• Desenganche el control del embrague del accesorio.
PRECAUCIÓN: No opere la segadora sin, ya sea,
el recogedor de césped completo en las segadoras así equipadas o con la pro tec ción contra
la descarga en su lugar (Vea Fig. 10).
Fig. 10
FUNCIONAMIENTO ATRÁS (ROS)
Tu tractor está equipado con el Sistema de Funcionamiento Atrás
(ROS). Cualquier tentativa del operador de viajar marcha atrás
con el embrague puesto apagará el motor a menos que la llave
de ignición se ponga en la posición de “ON” del ROS.
ATENCIÓN: Ir marcha atrás con el embrague puesto para
cortar, no es recomendable. Poniendo el ROS en posición “ON”,
para permitir el funcionamiento atrás con el embrague puesto, se
tiene que hacer sólo cuando el operador lo considera necesario
para reposicionar la máquina con el dispositivo embragado. No
siegue en revés a menos que sea absolutamente necesario.
USAR EL SISTEMA DE FUNCIONAMIENTO ATRÁS (ROS) Utilice el tractor solamente si está seguro de que no ingresarán
niños ni otras personas o animales al área donde se va a cortar
el césped.
• Presionar el pedal freno hasta el fondo.
• Con el motor en marcha, girar la llave del interruptor de la
ignición en el sentido inverso al de las agujas del reloj hasta
la posición “ON”.
• Mire hacia abajo y hacia atrás no sólo antes de ir marcha
atrás, sino mientras esté yendo marcha atrás.
• Presione lentamente el pedal reverso de la impulsión para
comenzar el movimiento.
• Cuando el uso del ROS es más necesario, dé vuelta a la
llave de ignición en el sentido de las agujas del reloj hasta
la posición “ON”.
PARA OPERAR EN CERROS
ADVERTENCIA: No maneje hacia arriba
o hacia abajo en cerros con pendientes
su pe rio res a 15° y no maneje atravesando
nin gu na pendiente. Utilice la guía de la pendiente proporcionada en la parte posteriora
de este manual.
• Escoja la velocidad más lenta antes de arrancar hacia arriba
o hacia abajo en cerros.
• Evite parar o cambiar la velocidad en cerros.
• Si es absolutamente necesario el parar, empuje el pedal de
freno rápidamente a la posición de freno y en gan che el freno
de estacionamiento.
• Para volver a empezar con el movimiento, suelte len ta men te,
el freno de estacionamiento y el pedal de freno.
• Apretar despacio el pedal apropiado hasta la posición más
lenta.
• Gire siempre lentamente.
PARA TRANSPORTAR (Vea Fig. 11)
Cuando empuje o arrastre su tractor asegúrese de desenganchar
la transmisión poniendo el control de la rueda libre en la posición
de marcha de rueda libre. El control de marcha de rueda libre
esta situado en la barra de tracción trasera del tractor.
• Levante la palanca de levantamiento del accesorio a su
posición más alta.
• Tire del mando de la rueda libre hacia afuera y hacia abajo
hasta que se coloque en la guía y suéltalo de manera que
se mantenga en la posición de desenganchada.
• No empuje o arrastre el tractor a más de 3,2 km/h (2 mph).
• Para volver a accionar la transmisión, invierta este pro ce dimien to.
TRANSMISIÓN ENGANCHADA
02203
TRANSMISIÓN DESENGANCHADA
Fig. 11
AVISO: Para proteger el capota contra el daño cuando transporte
su tractor en un camión o remolcador, asegúrese que el capota
esté cerrado y asegurado al tractor. Use los medios apro pia dos
para amarrar el capota al tractor (cuerdas, cor de les, etc.).
POSICIÓN
ROS “ON”
8
2
8
2
0
MOTOR EN POSICIÓN “ON”
(OPERACIÓN NORMAL)
REMOLQUE DE CARRETILLAS O OTROS
ACCESORIOS
Remolque solamente los accesorios recomendados y especificados por el fabricante del tractor. Use sentido común cuado este
remolcando. Las cargas pesadas, cuando este yendo sobre una
pendiente, son peligrosas, las llantas pueden perder su tracción
con el terreno y pueden ocasionar que pierda el control de su
tractor.
43
Page 44
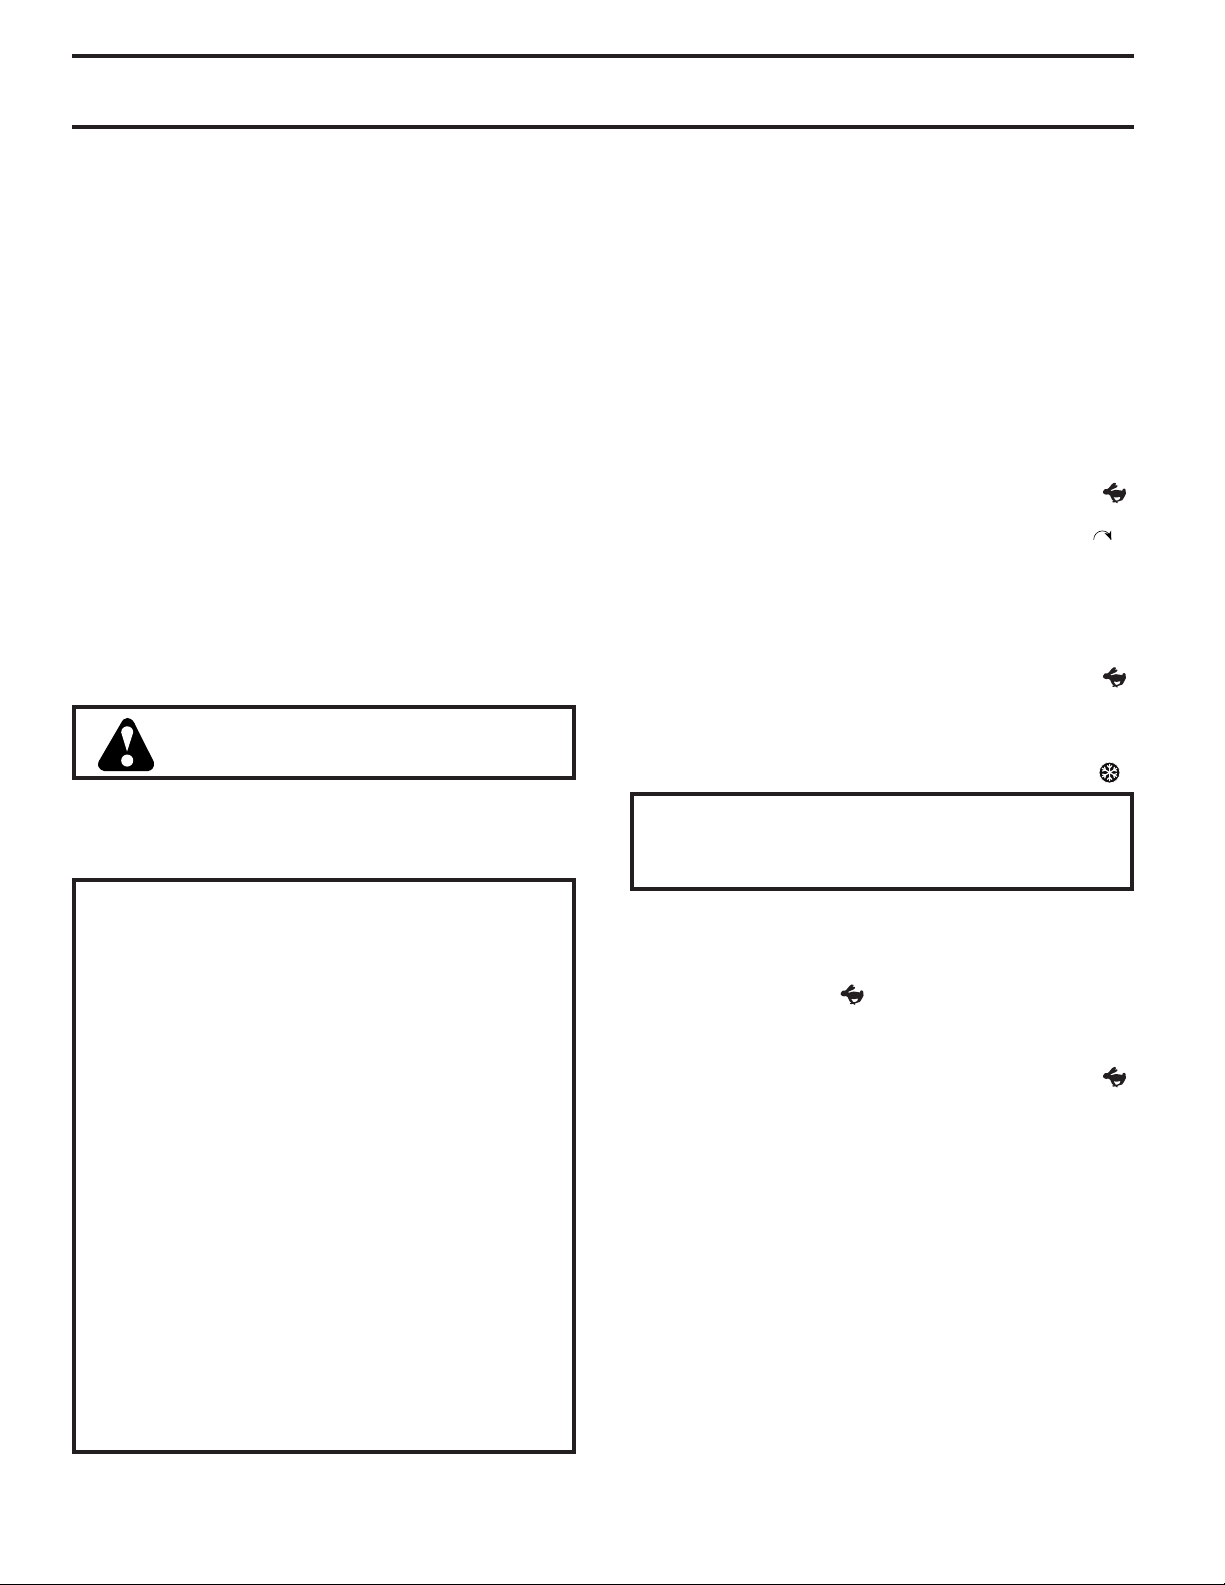
OPERACIÓN
ANTES DE HACER ARRANCAR EL MO TOR
REVISE EL NIVEL DE ACEITE DEL MOTOR
El motor de su tractor se envía de fábrica ya lleno con aceite de
peso para verano.
• Revise el aceite del motor con el tractor en terreno nivelado.
• Remueva la tapa/varilla indicadora de nivel de relleno del
aceite y límpielas, vuelva a insertar la varilla indicadora de
nivel y atornille la tapa hasta que quede apretada, espere
por unos cuantos segundos, remuévala y lea el nivel del
aceite. Si es necesario, agregue aceite hasta que se haya
al can za do la marca lleno (FULL) en la varilla indicadora de
nivel. No lo llene demasiado.
• Para la operación en clima frío, debe cambiar el aceite para
poder arrancar más fácilmente. (Vea “Tabla de Viscosidad
Del Aceite” en la sección de Mantenimento de este manual.)
• Para cambiar el aceite del motor, vea la sección de Mantenimento en este manual.
AGREGUE GASOLINA
• Llene el tanque de combustible hasta la parte inferior del
cuello de relleno. No lo llene de más. Use gasolina normal
nueva y limpia con un mínimo de 87 octanos. No mezcle
aceite con gasolina. Compre combustible en cantidades
que se puedan usar en 30 días para asegurar la frescura
del combustible.
PRECAUCIÓN: Limpie el aceite o el combustible derramado. No al ma ce ne, derrame
o use gasolina cerca de una llama expuesta.
IMPORTANTE: CUANDO SE OPERE EN TEMPERATURAS
POR DEBAJO DE 32°F (0°C) USE GASOLINA DE INVIERNO
LIMPIA Y NUEVA PARA AUEDAR A ASEGURAR UN BUEN
ARRANQUE EN CLIMA FRÍO.
PRECAUCIÓN: Los combustibles mezclados con alcohol (llamados gasohol o que usan etanol o metanol)
pueden atraer la humedad, lo que provoca la separación
y formación de ácidos durante el almacenamiento. El
gas ácido puede dañar el sistema de combustible de
un motor mientras se encuentra en almacenamiento.
Para evitar problemas con el motor, el sistema de
combustible se debe vaciar antes del almacenamiento
durante 30 días o más. Drene el tanque de gasolina,
arranque el motor y hágalo funcionar hasta que las
tuberías de combustible y del carburador estén vacías
Use combustible nuevo en la temporada siguiente.
Consulte las Instrucciones de Almacenamiento para
obtener información adicional. Nunca use productos
limpiadores para motor o carburador en el tanque de
combustible porque puede provocar daños irreparables.
El estabilizador de combustible es una alternativa aceptable para minimizar la formación de depósitos de goma
de combustible durante el almacenamiento. Agregue
estabilizador a la gasolina en el tanque de combustible
o recipiente de almacenamiento. Siga siempre la proporción de mezcla que se encuentra en el recipiente del
estabilizador. Deje funcionar el motor al menos durante
10 minutos después de agregar el estabilizador para
permitir que el estabilizador llegue al carburador. No
vacíe el tanque de gasolina y el carburador si utiliza
estabilizador de combustible.
ARRANQUE DEL MOTOR (Vea Fig. 3)
El motor Briggs & Stratton Endurance instalado en su tractor
cuenta con un sistema estrangulador automático que simplifica
el arranque en condiciones normales. Lea con atención las
siguientes instrucciones de arranque.
Cuando arranque el motor por primera vez o si al motor se le ha
agotado el combustible, se necesitará un tiempo de arranque extra
para que el combustible se desplace del tanque hasta el motor.
• Asegúrese de que el control de punto muerto esté en la
posición de transmisión engranada.
• Colóquese en el asiento en la posición de trabajo, pise el
pedal de freno y accione el freno de estacionamiento.
• Desplace el control de embrague del accesorio a la posición
“DESCONECTADO”.
ARRANQUE NORMAL(0°C / 32°F y superiores)
• Desplace el control del acelerador a la posición rápid(
y encájelo en su posición.
• Introduzca la llave de contacto, gírela a la derecha (
la posición de “ARRANQUE” y suelte la llave en cuanto se
encienda el motor.
• Cuando arranque el motor, ya puede utilizar los accesorios
y la transmisión a las ruedas. Si el motor no acepta la carga
y se apaga, vuelva a arrancarlo y espere a que se caliente
durante un minuto.
• Deje el control del acelerador en la posición rápida (
mientras corta el césped.
ARRANQUE EN CLIMA FRÍO (0°C / 32°F e inferiores)
• Desplace el control del acelerador superando la posición
rápida y sitúelo en la posición de arranque en clima frío (
PRECAUCIÓN: No accione el motor de arranque continuamente más de quince segundos por minuto. Si el
motor no arranca después de varios intentos, espere
unos minutos y repita la operación de arranque.
• Introduzca la llave de contacto, gírela a la derecha a la
posición de “ARRANQUE” y suelte la llave en cuanto se
encienda el motor.
• Cuando arranque, vuelva a situar el control del acelerador
en la posición rápida (
necesario para el calentamiento varía entre unos pocos
segundos y un minuto, dependiendo de las condiciones y
de la temperatura.
• Deje el control del acelerador en la posición rápida (
mientras corta el césped.
CALENTAMIENTO PARA LA TRANSMISION AUTOMATICA
Antes de conducir la unidad en un tiempo frío, la transmisión debe
ser calentada como las instrucciones siguientes:
• Asegúrese que el tractor este situado en una superficie
nivelada.
• Ponga la palanca de control en neutro. Alivie el freno de
estacionamiento y deje que el embrague/freno vuelva
a la posición de operación.
• Permita que la transmisión se caliente du rante un minuto.
Esto puede ser echo du rante el tiempo de calentamiento
del motor.
• Los accesorios pueden ser utilizados du rante el periodo del
recalentamiento del mo tor después que la transmisión halla
sido calentada.
) para calentar el motor. El tiempo
) a
).
)
)
)
44
Page 45
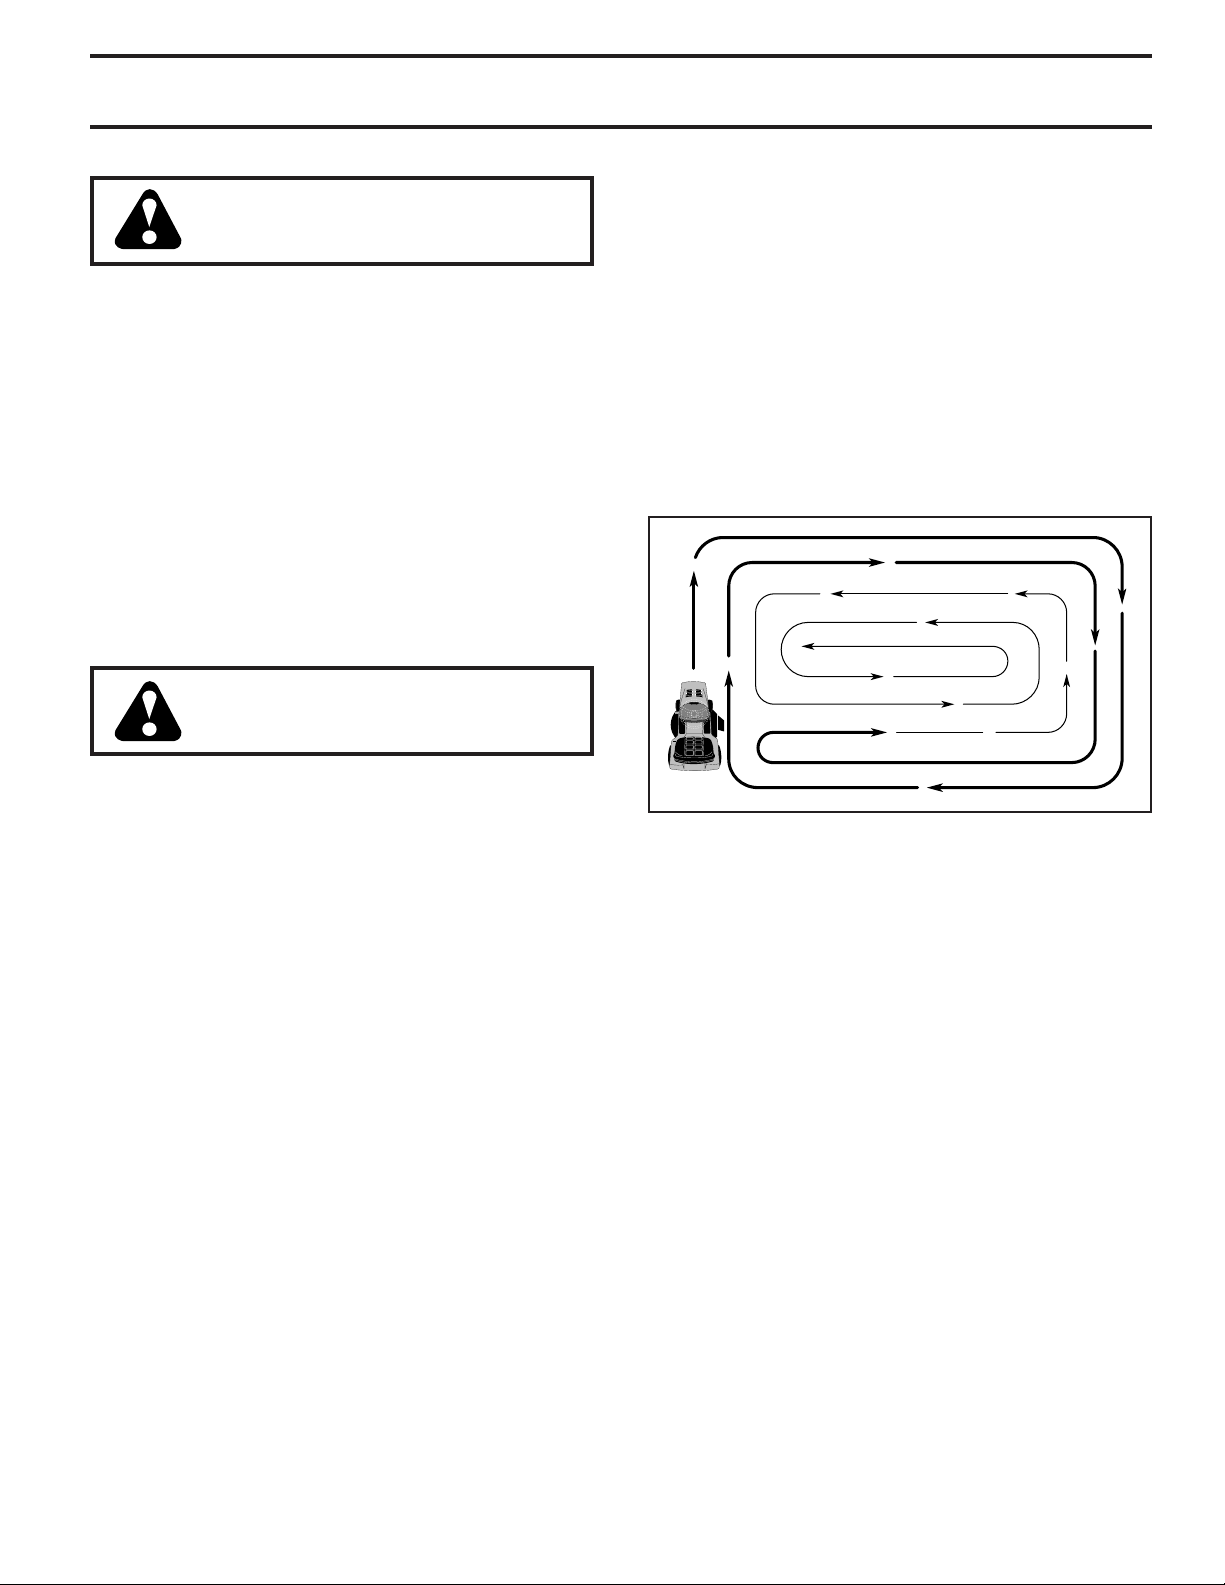
OPERACIÓN
PURGAR LA TRANSMISIÓN
PRECAUCIÓN: Nunca enganche o desenganche la palanca del control de rue da libre
cuando el motor esta fun cio nan do.
Para asegurar la operación y ejecución adecuada, es re co menda do que la transmisión sea purgada antes de operar el tractor
para la primera vez. Este proceso removerá cualquier aire adentro
de la transmisión que se halla formado durante el trans por te de
su tractor.
IMPORTANTE: SI POR ACASO SU TRANSMISIÓN DEBE SER
REMOVIDA PARA SERVICIO O REEMPLAZO, DEBE SER
PURGADA DESPUÉS DE LA REINSTALACIÓN Y ANTES DE
OPERAR EL TRACTOR.
1. Para mayor seguridad, ubique el tractor en una superficie
nivelada, despejada de cualquier objeto y abierta, con el
motor apagado y el freno de mano puesto.
2. Desenganche la transmisión poniendo el con trol de rueda
libre en la posición de desenganchado. (Vea “PARA EL
TRANS POR TE” en esta sección de este manual.)
3. Sentado en el asiento del tractor, empiece el motor. Des pués
que este corriendo el motor, mueva el control de es tran gula ción a la posición de lento. Quitar el freno de mano.
PRECAUCIÓN: En el transcurso del paso 4,
puede que de pronto se pongan en movimiento
las ruedas.
CONSEJOS PARA SEGAR
• NO use cadenas de llanta cuando la carcasa de la cortadora
de césped esté colocada en el tractor.
• La segadora debe estar nivelada en forma adecuada para
obtener el mejor rendimiento al segar. Vea “PARA NIVELAR
LA CAJA DE LA SEGADORA” en la sección de Servicio y
Ajustes de este manual.
• El lado izquierdo de la segadora se debe usar para recorte.
• Maneje de modo que los recortes se descarguen en el área
que ya ha sido cortada. Mantenga el área de corte a la
derecha del tractor. Esto producirá una distribución más
pareja de los recortes y un corte más uniforme.
• Al segar las área grandes, empiece girando a la derecha
de modo que los recortes se descarguen, alejándose de los
arbustos, cercos, entradas de automóviles, etc. Después de
una o dos vueltas, siegue en la dirección opuesta, haciendo
virajes a la izquierda, hasta que termine (Vea Fig 12).
4. Apretar el pedal de marcha adelante hasta el fondo, mantener
por cinco (5) segundos y soltar el pedal. Apretar el pedal de
marcha atrás hasta el fondo, mantener por cinco (5) segundos
y soltar el pedal. Repetir el procedimiento tres (3) veces.
5. Apague el motor y embrague el freno de estacionamiento.
6. Enganche la transmisión poniendo el control de rueda libre
en la posición de conducir. (Vea “PARA TRANSPORTAR”
en esta sección del manual.)
7. Sentado en el asiento del tractor, empiece el motor. Des pués
que este corriendo el motor, mueva el control de es tran gula ción media (1/2) velocidad. Quitar el freno de mano.
8. Conduzca su tractor hacia adelante durante aproximadamente
cinco pies y entonces hacia marcha atrás cinco pies (150
cm). Repita este proceso tres (3) veces.
Su transmisión esta ahora purgado y dispuesto para la operación
nor mal.
MECANISMO DE AVISO DE SERVICIO / CRONÓMETRO
El recordatorio de servicio muestra el número total de horas de
funcionamiento del motor e indica el momento en que el motor o
la cortadora de césped necesita mantenimiento. Después de cada
50 horas de funcionamiento, el icono de lata de aceite permanece
encendido durante 2 horas o hasta que se realiza el restablecimiento manual. Para restablecer la pantalla manualmente, gire
el interruptor de arranque a la posición de encendido y después
a la de apagado cinco veces (1 segundo encendido, 1 segundo
apagado). Para el mantenimiento del motor y de la cortadora
de césped, consulte la sección Mantenimiento de este manual.
NOTA: El recordatorio de servicio se activa cuando la llave de
contacto está en cualquier posición que no sea “STOP”. Para
una lectura precisa, la llave debe permanecer en la posición
“STOP” cuando el motor no está en marcha.
Fig. 12
• Si el césped está demasiado alto, se debe segar dos veces
para reducir la carga y los posibles peligros de incendio
debido a los recortes secos. Haga el primer corte re la ti vamen te alto; el segundo a la altura deseada.
• No siegue el césped cuando está mojado. El césped mojado
taponará la segadora y dejará montones indeseables. Permi ta que se seque el césped antes de segarlo.
• Siempre opere el motor con una aceleración completa cuan do
siegue para asegurarse de conseguir un mejor ren di miento y una descarga apropiada de los materiales. Regule la
velocidad de recorrido seleccionando un cambio lo su fi ciente men te bajo para obtener un rendimiento de corte de parte
de su segadora y también la calidad del corte deseada.
• Cuando opere con accesorios, seleccione una velocidad de
recorrido que se acomode al terreno y le permita obtener el
mejor rendimiento del accesorio que se está usando.
45
Page 46
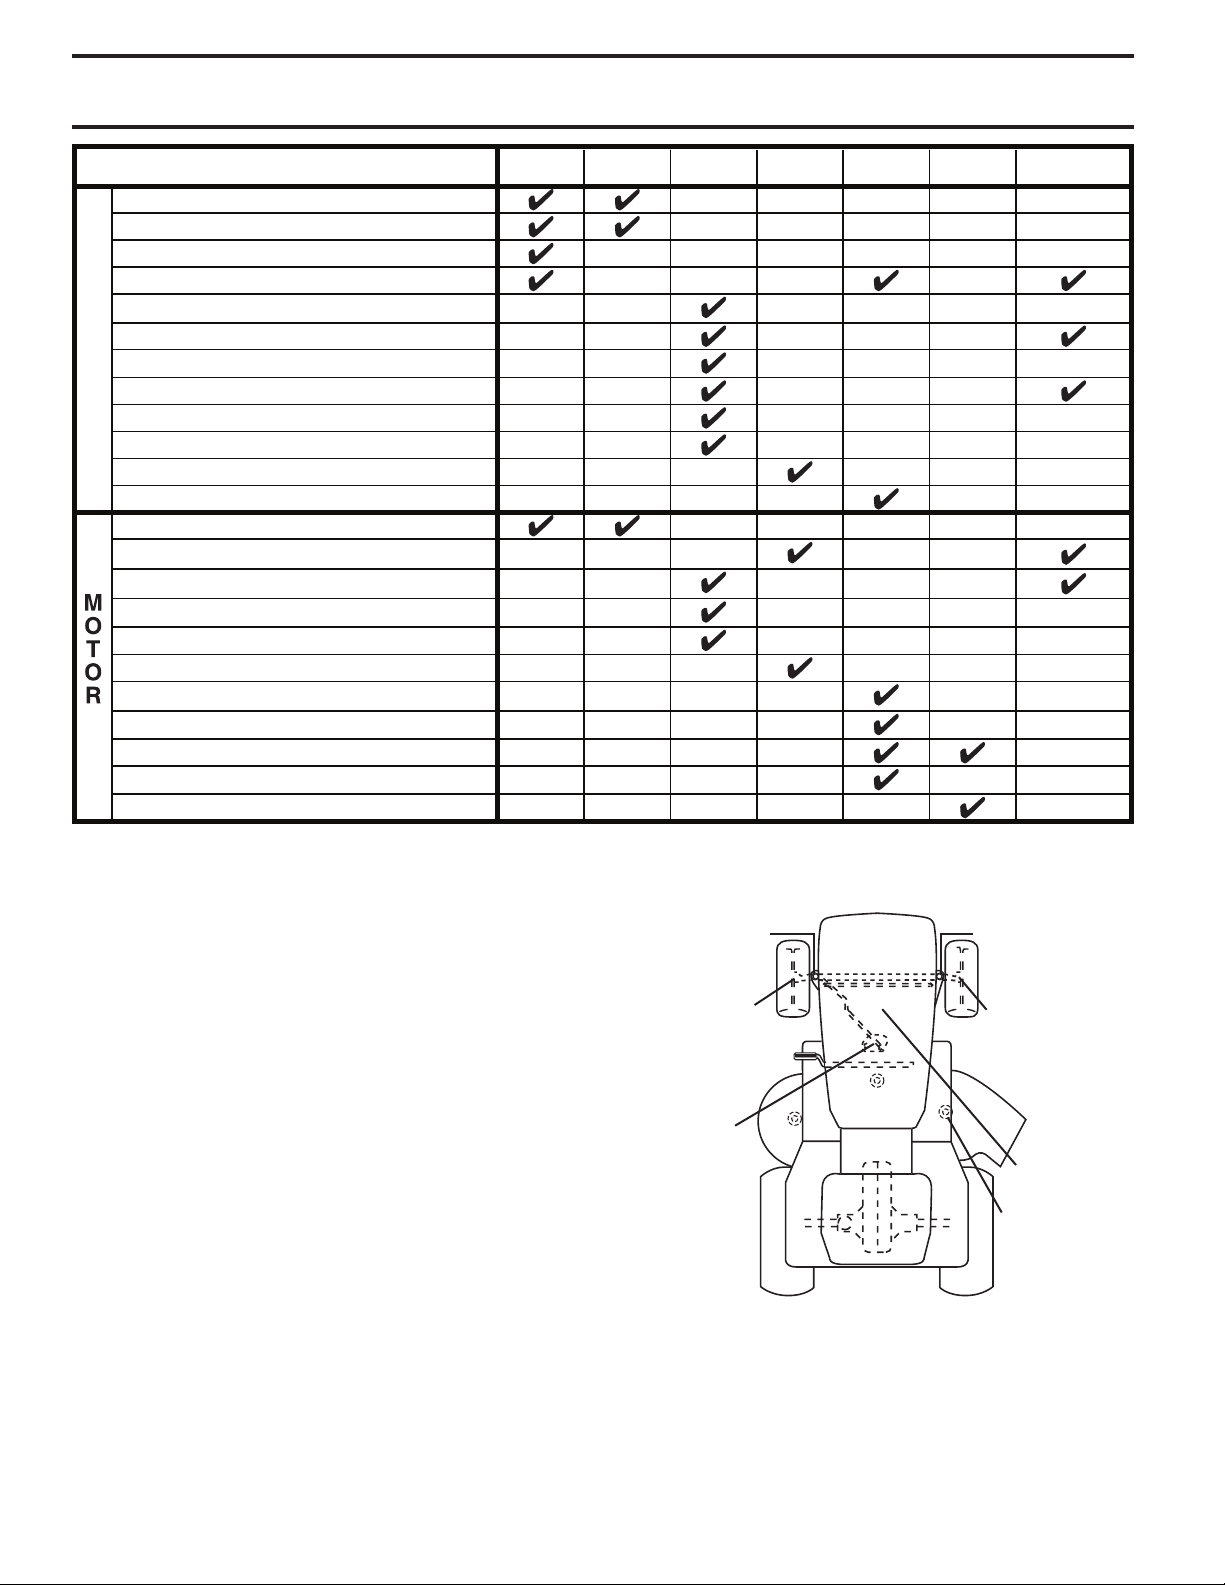
MANTENIMENTO
PROGRAMA DE MANTENIMIENTO
Revisar la operación del freno
Revisar la presión de las llantas
Verificar la sistemas presencia del operador y sistemas "ROS"
Revisar si hay sujetadores sueltos
T
R
Afilar/cambiar las cuchillas de la segadora
A
Tabla de lubricación
C
Revisar el nivel de bateria
T
Limpiar la batería y los tereminales
0
Limpie los residuos de la placa de dirección.
R
Revisar el enfriamiento del transeje
Compruebe la nivelación del cortacéspedes
Inspeccione las correas trapezoidales
Revisar el nivel del aceite del motor
Cambiar el aceite del motor (Modelos con filtro de aceite)
Cambiar el aceite del motor (Modelos sin filtro de aceite)
Limpiar el filtro de aire
Limpiar la rejilla de aire
Inspeccionar el silenciador/amortiguador de chispas
Cambiar el filtro de aceite (si equipado)
Limpiar las aletas de enfriamiento
Cambiar la bujia
Cambiar el cartucho de papel del filtro de aire
Cambiar el filtro de combustible
1- Cambiar más a menudo cuando se opere bajo carga pesada o en ambientes con altas temperaturas
2- Dar servicio más a menudo cuando se opere en condiciones sucias o polvorosas.
ANTES DE
CADA USO
CADA
8 HORAS
3- Cambiar las cuchillas más a menudo cuando se siegue en suelo arenoso.
4- No requerido si equipado con una batería libre de mantenimiento.
CADA
25 HORAS
3
4
5
1,2
2
2
CADA
50 HORAS
1,2
CADA
100 HORAS
1,2
2
2
CADA
TEMPORADA
ALMACENAMIENTO
5- Vea “LIMPIEZA” en la sección de
Mantenimento de este manual.
RECOMENDACIONES GENERALES
La garantía de este tractor no cubre los artículos que han estado
sujetos al abuso o a la negligencia del operador. Para recibir todo
el valor de la garantía, el operador tiene que mantener la se ga do ra
según las instrucciones descritas en este manual.
Hay algunos ajustes que se tienen que hacer en forma periódica
para poder mantener su trac tor adecuadamente.
Al menos una vez cada estación comprobar si es necesario
efectuar los adjustes descritos en las secciones de Servicio y
Ajustes de este manual.
• Una vez al año, cambie la bujía, limpie o cambie el filtro de
aire y revise si las cuchillas y las correas están desgastadas.
Una bujía nueva y un filtro de aire limpio aseguran una mezcla
de aire-combustible adecuada y le ayudan a que su motor
funcione mejor y que dure más.
ANTES DE CADA USO
• Revise el nivel del aceite del motor.
• Revise la operación de los frenos.
• Revise la presión de las llantas.
• Verifique que el sistema de presencia del operado y ROS
funcionen adecuatamente.
• Revise si hay sujetadores sueltos.
TABLA DE LUBRICACIÓN
ACCESORIO
➀
DE GRASA DEL
ARBOL
ACCESORIO
➀
DE GRASA DEL
RODAMIENTO
DE LA RUEDA
DELANTERA
PLANCHA
➀
DEL
ENGRANAJE
DE SECTOR
DE
DIRECCIÓN
02501
Grasa de proposito general
➀
Refiérase a la sección del “MOTOR” en Mantenimiento
➁
IMPORTANTE: NO ACEITE O ENGRASE LOS PUNTOS PIVOTES,
LOS QUE TIENEN RODAMIENTOS DE NILÓN ESPECIALES. LOS
LUBRICANTES VISCOSOS ATRAERÁN POLVO Y MUGRE, LO QUE
ACORTARA LA DURACIÓN DE LOS RODAMIENTS. SI CREE QUE
LUBRICARSE, USE SOLAMENTE UN LUBRICANTE TIPO GRAFITO
DE POLVO SECO EN FORMA MODERADA.
ACCESORIO
➀
DE GRASA DEL
ARBOL
ACCESORIO
➀
DE GRASA DEL
RODAMIENTO
DE LA RUEDA
DELANTERA
MOTOR
➁
ACCESORIO
➁
DE GRASA
DEL MANDRIL
46
Page 47
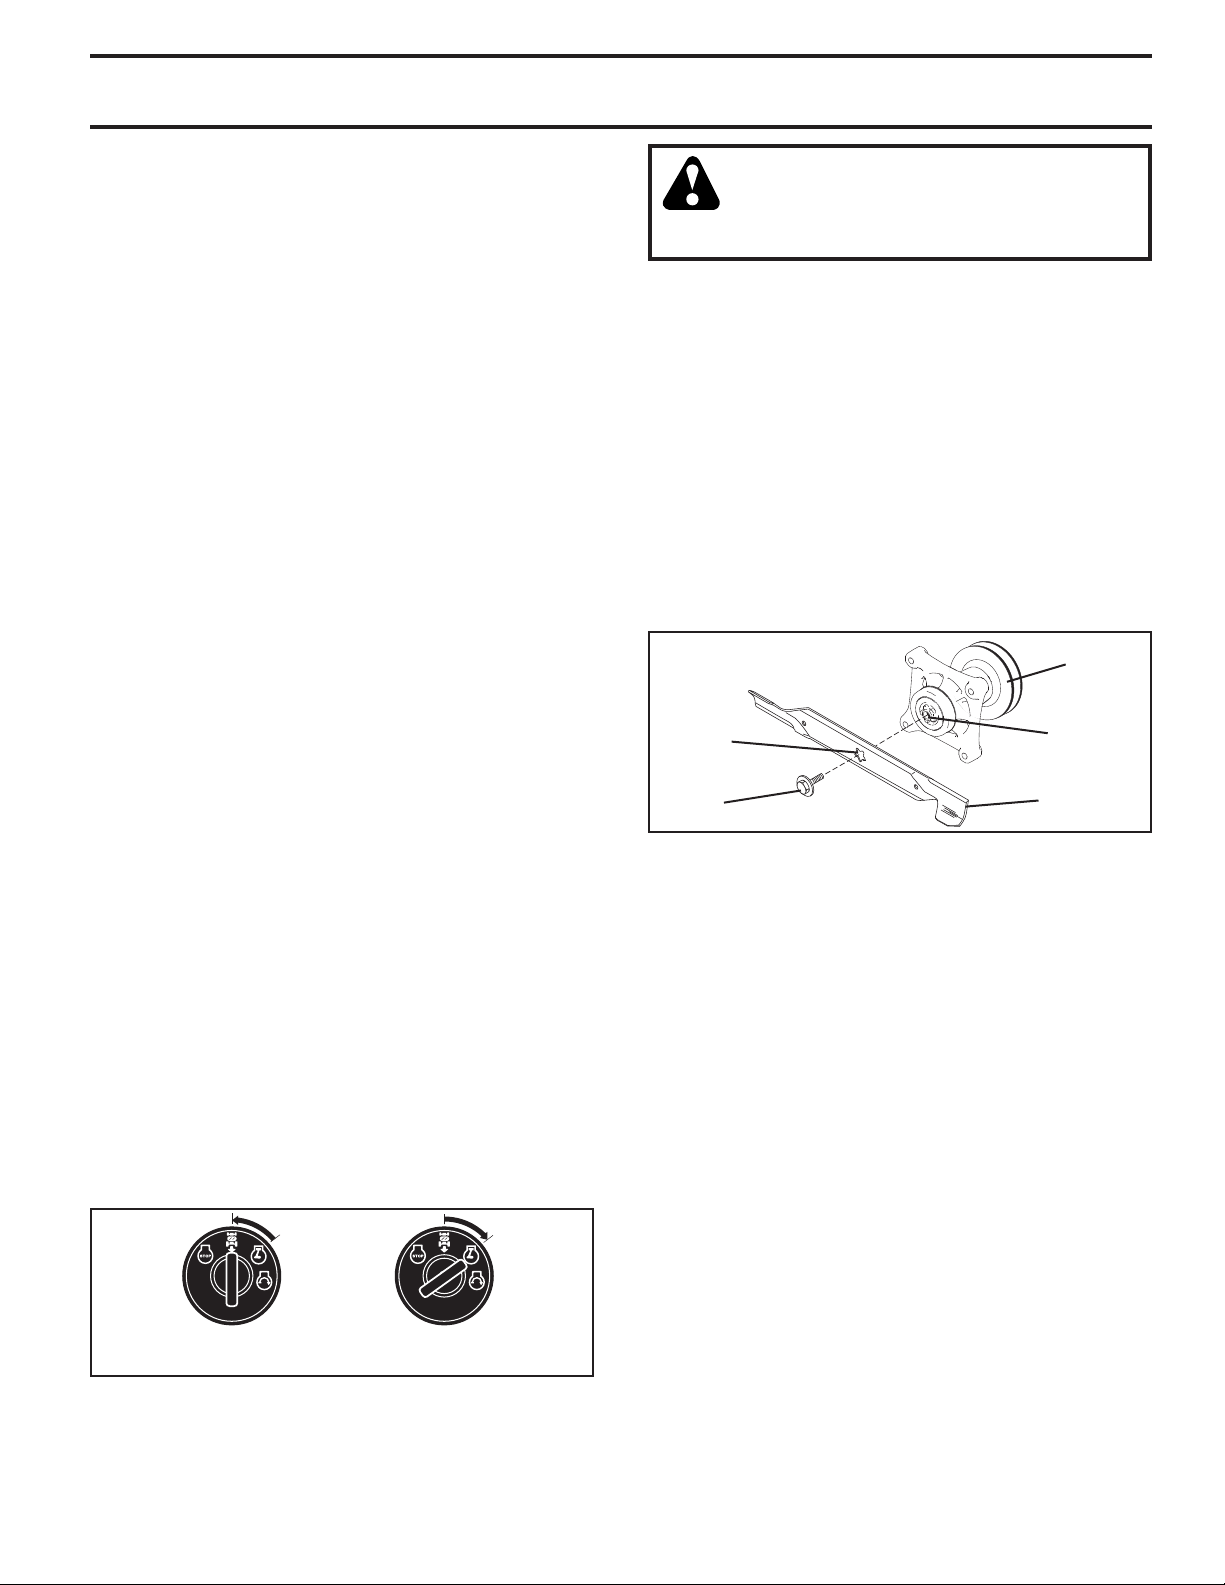
MANTENIMENTO
TRACTOR
Siempre observe las reglas de seguridad cuando dé mante nimien to.
OPERACIÓN DEL FRENO
Si el tractor necesita más de cinco (5) pies (1,5 m) para detenerse a
la máxima velocidad al cambio más alto en una superficie nivelada,
de hormigón o pavimentada, hay que hacerle el servicio al freno.
Vea “CONTROLAR Y AJUSTAR EL FRENO” en el capítulo de
Servicio y ajustes de este manual.
LLANTAS
• Mantenga todos los neumáticos con la presión de aire adecuada.
(Vea la PSI que se indica en estos.)
• Mantenga las llantas sin gasolina, aceite o substancias químicas
para control de insectos que pueden dañar la goma.
• Evite los tocones, las piedras, las grietas profundas, los objetos
afilados y otros peligros que pueden dañar a las llantas.
AVISO: Para arreglar las llantas perforadas y péra prevenir que
tenga llantas pinchadas a causa de pequeñas fugas, puede
comprar el sello para llantas de su comerciante de partes de
repuesto más cercano. Elsello previene que las llantas se sequen
y también la corrosión.
SISTEMA PRESENCIA OPERADOR Y SISTEMA FUNCIONAMIENTO ATRÁS (ROS) (Vea Fig. 13)
Asegurarse de que el sistema de presencia del operador, el
sistema de trabajo y el sistema funcionamiento atrás funcionen
bien. Si tu tractor no función como descrito, reparar el problema
inmediatamente.
• El motor no arrancará si el pedal de embrague/freno está
completamente presionado y el mando del embrague del
accesorio está desconectado.
VÉRIFIÉZ SISTEMA PRESENCIA OPERADOR
• Cuando el motor está en marcha, cualquier tentativa del
operador de abandonar el asiento sin haber puesto el freno
de estacionamiento primero, apagará el motor.
• Cuando el motor está en marcha y el embrague del accesorio
está conectado, cualquier tentativa del operador de abandonar
el asiento, apagará el motor.
• El embrague del accesorio no tendría que funcionar nunca si
el operador no está en su asiento.
VÉRIFIÉZ SISTEMA FUNCIONAMIENTO ATRÁS (ROS)
• Cuando el motor está en marcha con el interruptor de llave
en posición de motor “ON” y el embrague del accesorio
conectado, cualquier tentativa del operador de viajar marcha
atrás, apagará el motor.
• Cuando el motor está en marcha con el interruptor de llave del
sistema de funcionamiento atrás (ROS) en la posición “ON”
y el embrague del accesorio conectado, cualquier tentativa
del operador de viajar marcha atrás, NO apagará el motor.
8
2
8
2
POSICIÓN
ROS “ON”
MOTOR EN POSICIÓN “ON”
(OPERACIÓN NORMAL)
Fig. 13
CUIDADO DE LA CUCHILLA
Para obtener resultados óptimos, las cuchillas de la cortadora
deben estar afiladas. Reemplace las cuchillas que estén gastadas,
dobladas o dañadas.
0
PRECAUCIÓN: Usar solamente la hojas de repuesto aprobada por el fabricante de su cortacésped.
Usar una hoja no aprobada por el fabricante de
su cortacésped es peligroso, puede dañar su
cortacésped y anular su garantía.
REMOCIÓN DE LA CUCHILLA (Vea Fig. 14)
• Levante la segadora a su posición más alta para permitir el
acceso a las cuchillas.
AVISO: Proteja sus manos con guantes y/o envuelva la cuchilla
con una tela gruesa.
• Remueva el perno de la cuchilla dandole vueltas en el sentido
inverso al de las agujas del reloj.
• Instale una hoja que sea nueva o se haya vuelto a afilar, con
el lado que tiene "GRASS SIDE" grabado orientado al suelo.
IMPORTANTE: PARA ASEGURAR LA INSTALACION APROPIADA, POSICIONE EL AGUJERO CENTRAL DE LA CUCHILL A
CON LA ESTRELLA DEL CONJUNTO DEL MANDRIL.
• Instale y apriete el perno de la cuchilla firmemente (62-75 Nm/
45-55 Pies-Libras).
IMPORTANTE: EL PERNO DE LA CUCHILLA ES TRATADO
A CALO.
CONJUNTO DEL
MANDRIL
AGUJERO
CENTRAL
PERNO
HEX AG O NAL
ESTRELLA
CUCHILLA
Fig. 14
BATERÍA
Su tractor cuenta con un sistema de carga de la batería que es
suficiente para el uso normal. Sin embargo, si se carga la batería,
periódicamente, con un cargador de automóviles se prolongará
su duración.
• Mantenga la batería y los terminales limpios.
• Mantenga los pernos de la batería apretados.
• Mantenga los agujeros de ventilación pequeños abiertos.
• Vuelva a cargar a 6-10 amperes por 1 hora.
AVISO: La bateria del equipo original de su trac tor no becesita
servicio. No intente abrir o remover las tapas o cubiertas. No
esnecesario añadir o verificar el nivel del electrólito.
PARA LIMPIAR LA BATERÍA Y LOS TERMINALES
La corrosión y la mugre de la batería y de los terminales pueden
producir “escapes” de potencia en la batería.
mueva la protección de los terminales.
• Re
• Desconecte el cable de la batería NEGRO primero y luego el
cable de la batería ROJO y remueva la batería del tractor.
• Enjuague la batería con agua corriente y séquela.
• Limpie los terminales y los extremos del ca ble de la batería con
un cepillo de alambre hasta que queden brillantes.
• Cubra los terminales con grasa o parafina.
• Rein
stale la batería. (Vea “REEMPLAZAR LA BATERIA” en
la sección de Servicio y Ajustes de este manual.)
47
Page 48
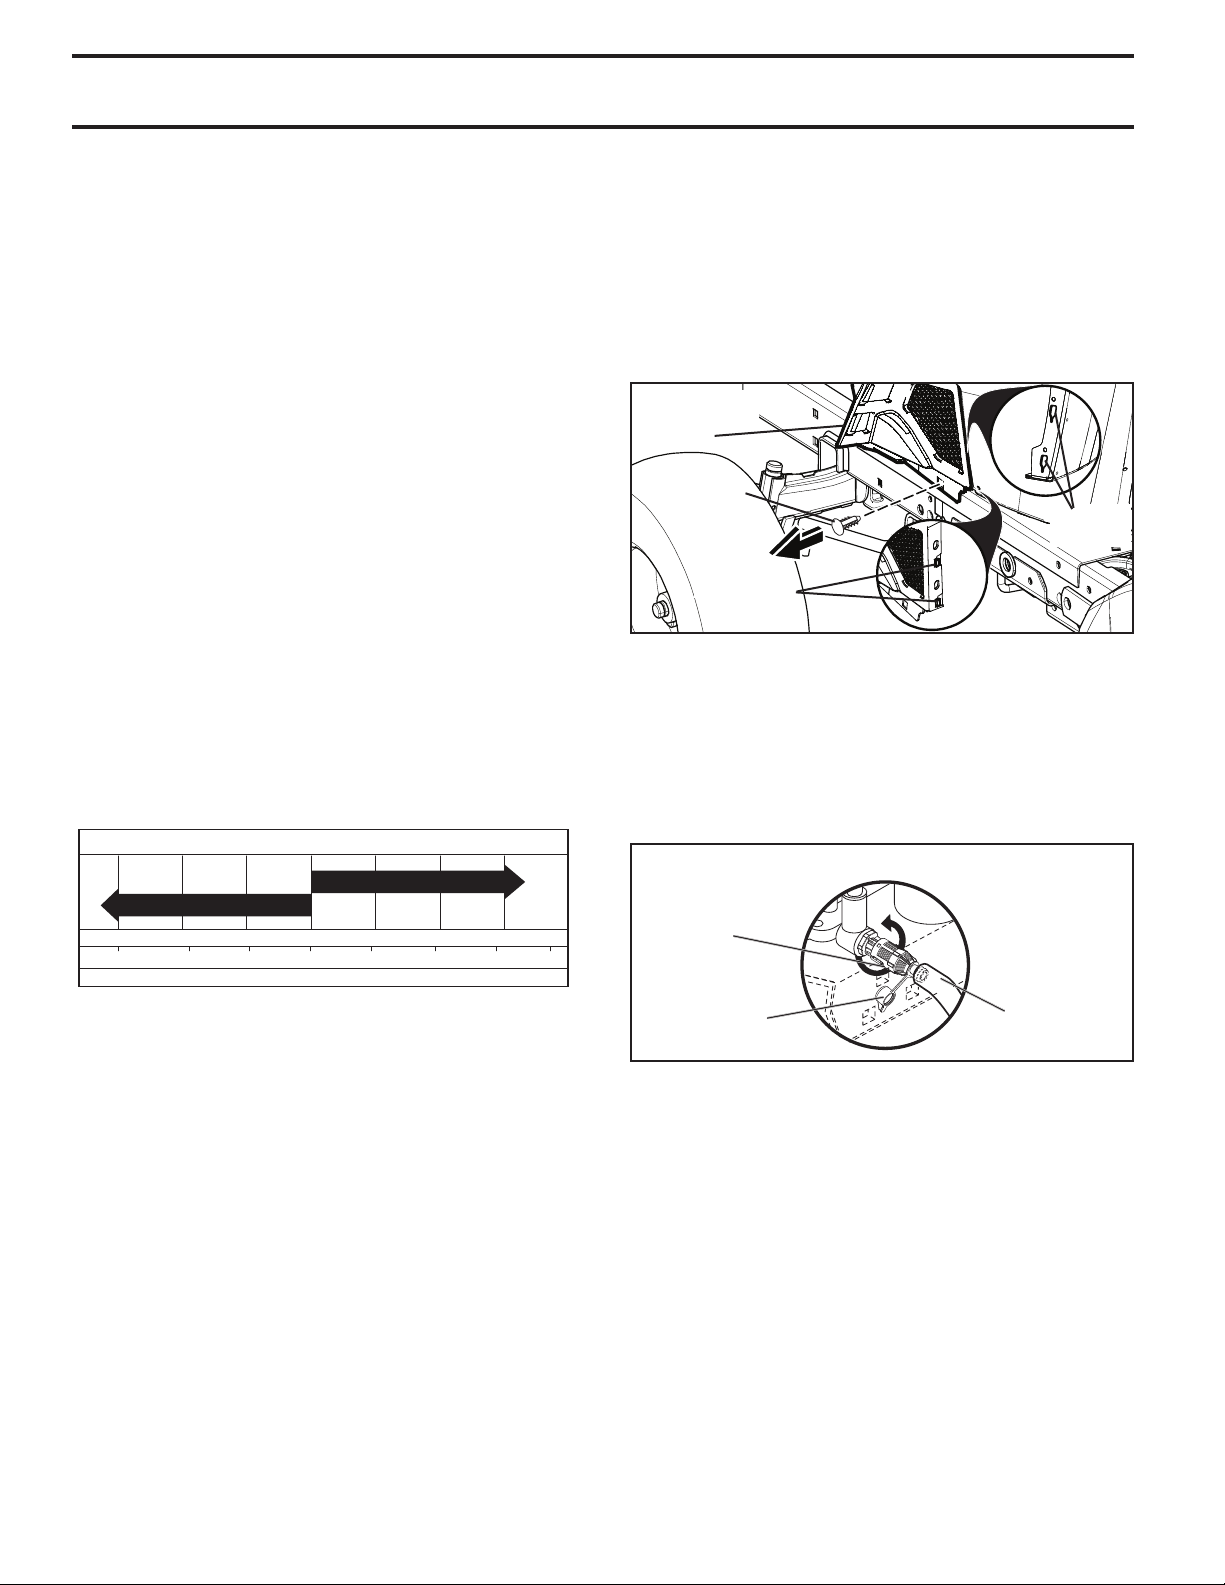
MANTENIMENTO
GAMA DE TEMPERATURA ANTICIPADA ANTES DEL PROXIMO CAMBIO DE ACEITE
CALIDADES DE VISCOSIDAD DE SAE
-20 0 30 40
80
100
-30
-20 0
20 30 40
F
C
32
-10
10
60
5W-30
SAE 30
02463
ENFRIAMIENTO DEL TRANSEJE
Las aletas de enfriamiento y el ventilador de la transmisión tienen
que mantenerse limpios para asegurar el enfriamiento adecuado.
No trate de limpiar el ventilador o la transmisión cuando el motor
esté funcionando o mientras la transmisión esté caliente.Para
impedir daños a las juntas, no use un rociador de aire compresado
o de alta presión para limpiar la transmisión.
• Inspeccione el ventilador de enfriamiento para asegurarse
que las aspas del ventilador estén intactas y limpias.
• Inspeccione las aletas de enfriamiento para verificar si hay
mugre, recortes de césped u otros materiales. Para impedir
daños a las juntas, no use un rociador de aire compresado
o de alta presión para limpiar las aletas de enfriamiento.
NIVEL DEL FLUIDO DEL TRANSEJE
El transeje ha sido sellado en la fábrica y el mantenimiento del
fluido no es necesario para la vida del transeje. En el caso de
que el transeje se filtrase o necesitase servicio, haga el favor de
ponerse en contacto con un otro centro de servicio cualificado.
CORREAS "V"
Revise las correas "V" para verificar si existe deterioro y desgaste
después de 100 horas de operación y cámbielas si es necesario.
Las correas no son ajustables. Cambie las correas si empiezan
a deslizarse debido al desgaste.
MOTOR
LUBRICACIÓN
Utilice sólo aceite detergente de alta calidad con clasificación de
servicio SG-SL. Utilice SAE 5W-30 con todas las temperaturas
de funcionamiento.
DÉPOSE DU COUVERCLE DU TABLEAU DE COMMANDE
INFÉRIEUR
• Soulevez le capot.
• Retirez l’attache du couvercle du tableau de commande
inférieur.
PRÉCAUTION: Retirez avec soin le couvercle du tableau de
commande inférieur en portant attention à ne pas briser les pattes
de fixation du couvercle.
• Faites glisser le couvercle du tableau de commande inférieur
afin de dégager les pattes de fixation du couvercle des fentes
coniques au niveau du tableau inférieure, puis déposez le tout.
CUBIERTA DEL
TABLERO
INFERIOR
SUJETADOR
RANURAS
CÓNICAS
LENGÜETAS
Fig. 16
• Enlevez le bouchon de remplissage d’huile avec la jauge
d’hui le. Ne per met tez pas que des saletés entrent dans le
moteur quand vous changez l’huile.
• Enlevez le bouchon jaune du raccord inférieur de la sou pa pe
de vidange et installez le tube de vidange sur le raccord fileté.
• Déverrouillez la soupape de vidange en poussant vers l’intérieur
et en tournant dans le sens contraire des aiguilles d’une montre.
• Pour ouvrir, tirez sur la soupape de vidange.
Fig. 15
AVISO: El nivel de aceite debe estar entre las dos marcas de la
varilla de nivel. Si se necesita más aceite, añada aceite sintético
(5W-30) hasta la marca “FULL”.
Cambie el aceite después de 25 horas de operación o por lo menos una vez al año si el trac tor se utiliza menos 25 horas el año.
Revise el nivel del aceite del cárter antes de arrancar el motor y después de cada ocho (8) horas de uso continuado.
Apriete la tapa del relleno/varilla indicadora de nivel del aceite
en forma segura cada vez que revise el nivel del aceite.
POUR CHANGER L’HUILE DE MOTEUR
(Voir la Fig. 15 - 17)
Déterminez la gamme de températures prévue avant le chan ge ment d’huile. Toute l’huile doit avoir la classification API SG-SL.
• Assurez-vous que le tracteur soit stationné sur un terrain plat.
• L’huile se vidangera plus librement quand elle est chaude.
• Recueillez l’huile dans un récipient approprié.
VÁLVULA DE DESAGÜE DEL ACEITE
POSICIÓN
CERRADA Y
BLOQUEADA
CASQUILLO
TUBO DE
DESAGÜE
Fig. 17
• Après que l’huile se soit écoulée complètement, serrez et
verrouillez la soupape de vidange en poussant vers l’in té rieur
et en tournant dans le sens des aiguilles d’une montre jusqu’à
ce que la cheville soit en position verrouillée comme montré.
• Retirez le tube de vidange et remettez le bouchon sur le
raccord infériuer de la soupape de vidange.
• Remplissez le moteur avec l’huile dans le tube de la jauge
de remplissage d’huile. Versez lentement. N’en mettez pas
trop. Voir la section de “SPÉCIFICATIONS DU PRODUIT”
pour la capacité ap proxi ma ti ve.
• Utilisez le calibre du bouchon de remplissage d’huile avec la
jauge d’huile pour vérifier le niveau d’huile. Assurez-vous que
la jauge d’huile soit serrée à fond pour obtenir une indication
correcte du niveau d’huile. Maintenez le niveau d’huile à la
marque pleine (FULL) de la jauge d’huile. Serrez à fond le
bouchon sur le tube quand vous avez fini.
48
Page 49
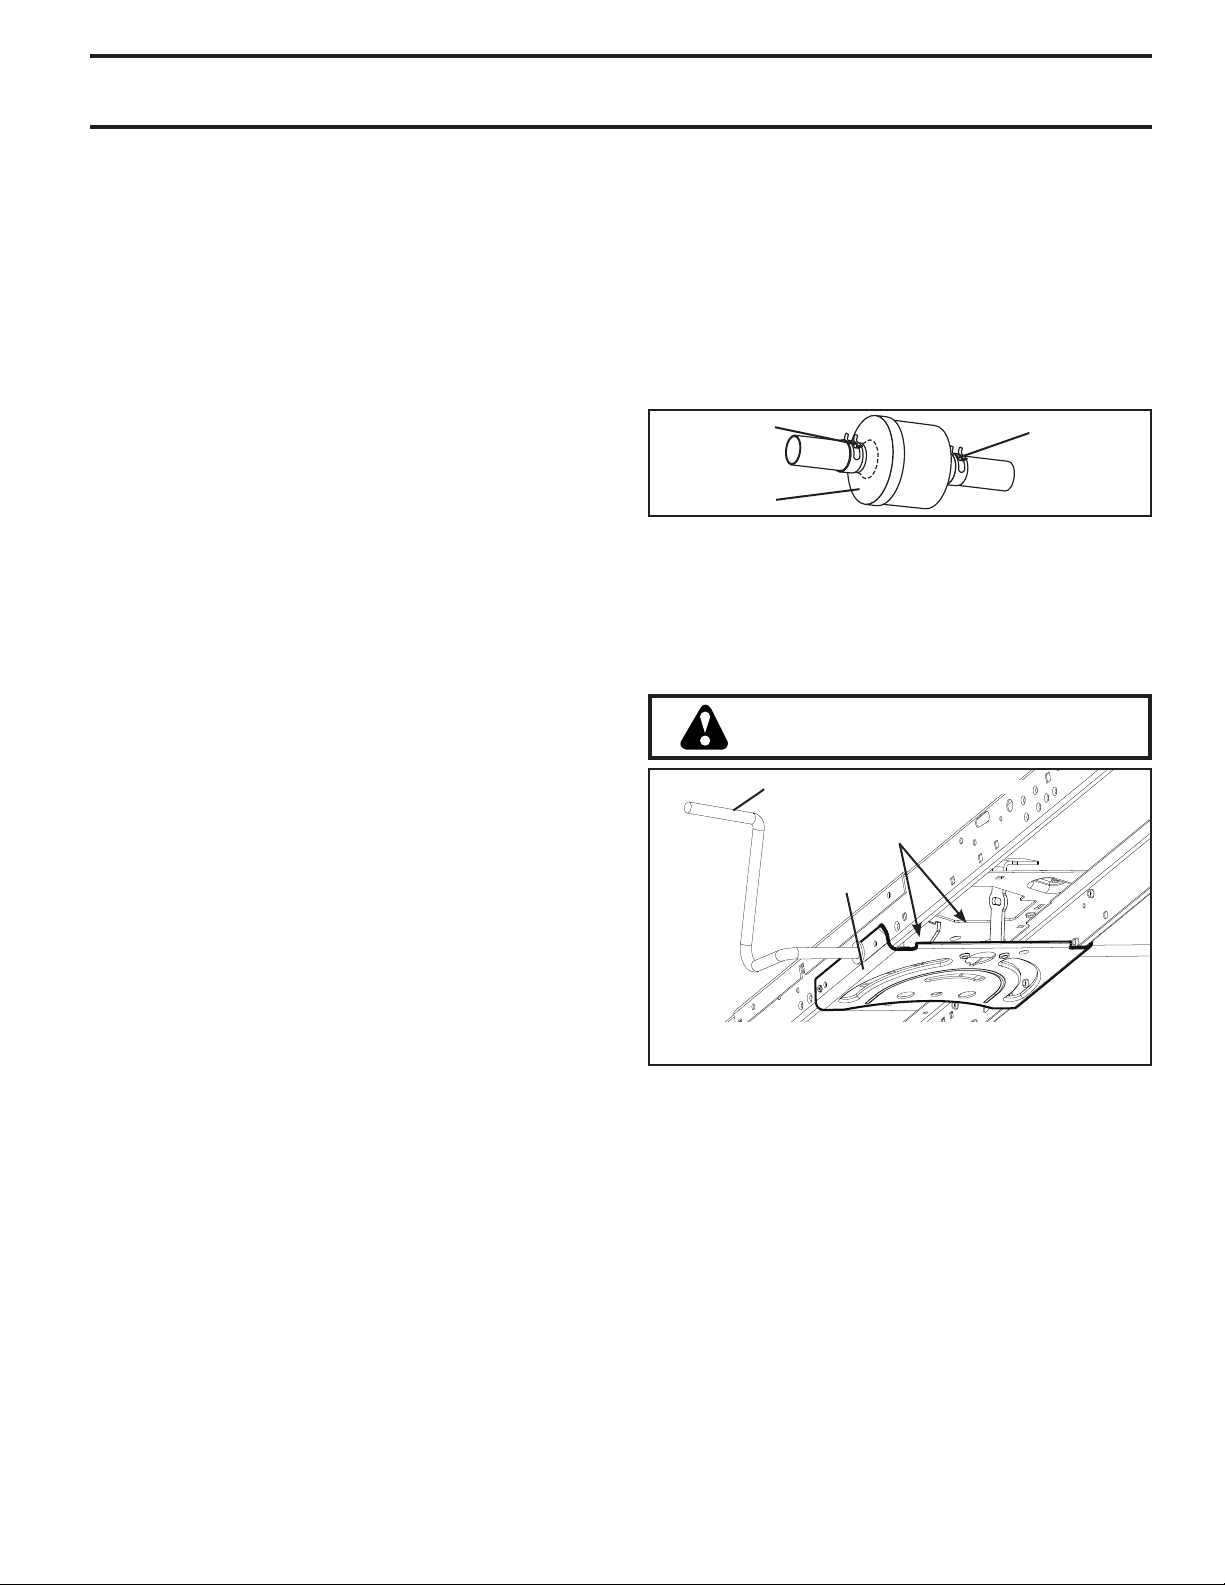
MANTENIMENTO
FILTRE D’HUILE DE MOTEUR
Remplacez le filtre d’huile de moteur chaque saison ou tous les
deux (2) changements d’huile si le tracteur a été utilisé plus de
100 heures dans une (1) année.
REMARQUE: S'il y a lieu, enlevez les déposes du tableau de
commande inférieur à l'aide des étapes décrites dans la section
"Dépose du couvercle du tableau de commande inférieur" de
ce manuel.
FILTRO DEL AIRE
Su motor puede sufrir averías y funcionar de manera incorrecta
con un filtro del aire sucio. Déle servicio al filtro de aire más a
menudo si se usa en condiciones polvorosas. Vea la manual de
la motor.
LIMPIEZA DE LA PANTALLA DE AIRE
La pantalla de aire está sobre el soplador de la toma de aire
que se ubica en la parte superior del motor. La pantalla de aire
se debe mantener libre de suciedad y paja para evitar que el
motor se dañe por sobrecalentamiento. Limpie con un cepillo
de alambre o con aire comprimido para retirar la suciedad y las
fibras de goma secas difíciles de quitar.
SISTEMA DE ENFRIAMIENTO DE AIRE
Para asegurar un enfriamiento adecuado, asegúrese que la rejilla
del césped, las aletas de enfriamiento, y otras superficies ex ter nas
del motor se mantengan limpias en todo momento.
Cada 100 horas de operación (más a menudo bajo condiciones
extremadamente polvorosas o sucias), remueva la caja del
ven ti la dor y otras tapas de enfriamiento. Limpie las aletas de
en fria mien to y las superficies externas, según sea necesario.
Ase gú re se que se vuelvan a instalar las tapas de enfriamiento.
AVISO: Si se opera la máquina con una rejilla del césped bloqueada, sucia, o con las aletas de enfriamiento taponadas, y/o
las tapas de enfriamiento removidas se producirá daño en el
motor debido al calentamiento excesivo.
SILENCIADOR
Inspeccione y cambie el silenciador corroído y el amortiguador
de chispas (si viene equipado) pues pueden crear un peligro de
incendio y/o daños.
FILTRO DE COMBUSTIBLE (Vea Fig. 18)
El filtro de combustible debe cambiarse una vez cada temporada.
Si el filtro de combustible se tapona, obstruyendo el flujo del
combustible hacia el carburador, es necesario cambiarlo.
• Con el motor frío, remueva el filtro y tapone las secciones
de la línea de combustible.
• Ponga el filtro de combustible nuevo en su posición en la
línea de combustible con la flecha señalando hacia el carbu ra dor.
• Asegúrese de que no hayan fugas en la línea del combustible y que las grapas estén colocadas en forma adecuada.
• Inmediatamente limpie toda la gasolina derramada.
ABRAZADERA
FILTRO DE
COM BUS TI BLE
Fig. 18
00
6
67
ABRAZADERA
LIMPIEZA (Vea Fig. 19)
• Limpie todo material extraño del motor, la batería, el asiento,
el pulido, etc.
• Limpie los desechos de la placa guía. Los desechos pueden
limitar el movimiento del eje del pedal del freno/embrague,
lo que hará que patine la correa y que se pierda la tracción.
PRECAUCIÓN: Evite todos los puntos de
enganche y las piezas móviles.
PEDAL DEL EMBRAGUE/FRENO
LIMPIAR PARTE
SUPERIOR
PLACA DE
DIRECCIÓN
BUJÍA(S)
Cambie las bujías al comienzo de cada temporada de siega o
después de cada 100 horas de operación, lo que suceda pri me ro.
El tipo de bujía y el ajuste de la abertura aparecen en “ES PE CIFI CA CIO NES DEL PRODUCTO” sección de este manual.
SISTEMA DE DIRECCIÓN, SALPICADERO,
GUARDA-BARROS Y SEGADORA NO MOSTRADOS
Fig. 19
• Mantenga las superficies pulidas y las ruedas sin de rra mes
de gasolina, aceite, etc.
• Proteja las superficies pintadas con cera tipo automotriz.
Excepto por el puerto de lavado (si está incluido), se recomienda
no utilizar una manguera de jardín ni el lavado a presión para
limpiar la parte externa de su tractor, a menos que el motor y la
transmisión estén cubiertos para protegerlos del agua. Si entra
agua en el motor o la transmisión se reducirá la vida útil del tractor. Utilice aire comprimido o un soplador de hojas para retirar
el césped, las hojas y la basura de la parte externa del tractor y
de la cortadora de césped.
49
Page 50
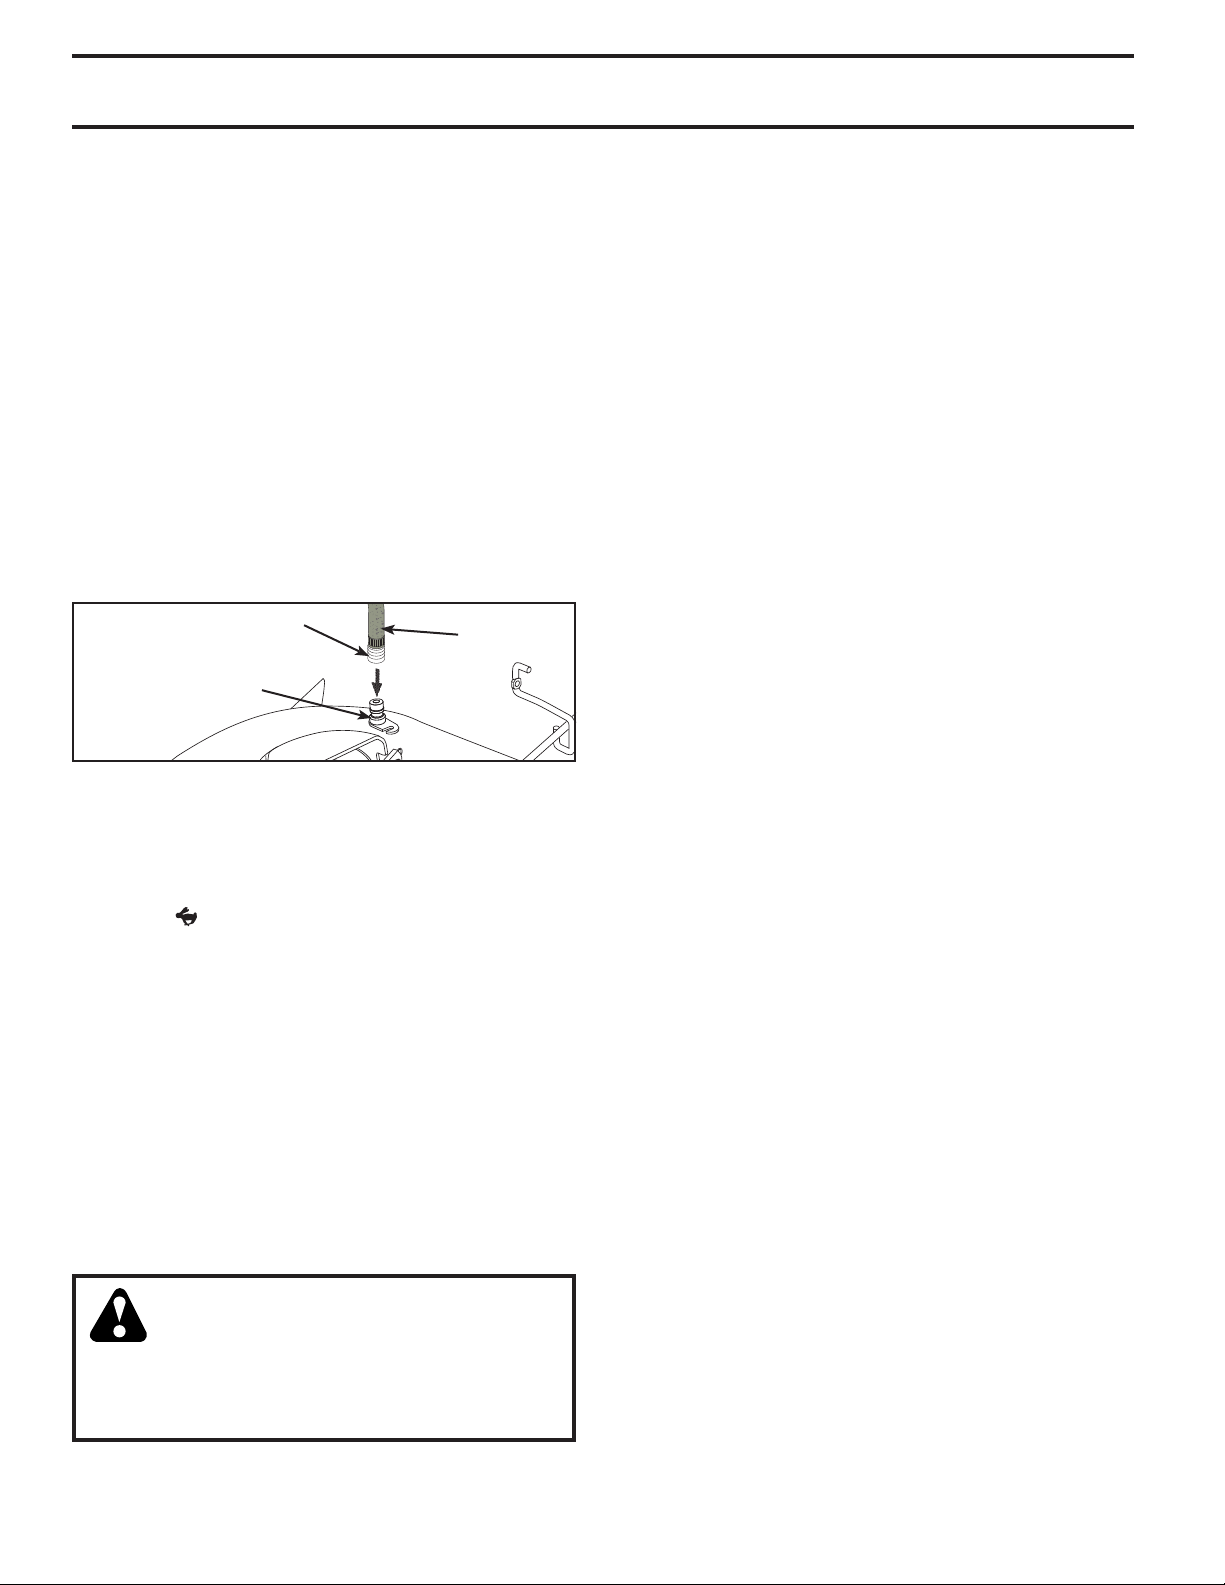
MANTENIMENTO
PUERTO DE LAVADO DE LA CUBIERTA
(Vea Fig. 20)
La plataforma del tractor está equipada con un puerto de lavado
como parte del sistema de lavado de la plataforma. Se debe
utilizar después de cada uso.
1. Lleve el tractor a un lugar horizontal y despejado de su
césped, lo bastante cerca de una boca de riego como para
que llegue la manguera del jardín.
IMPORTANTE: Asegúrese de que la boca de descarga del tractor
está orientada LEJOS de su casa, garaje, coches aparcados, etc.
Quite la boca de ensacado o cubierta de mantillo si está acoplada.
2. Mueva el control del embrague del accesorio a la posición
“DESENGANCHADO”, ponga el freno de estacionamiento
y apague el motor.
3. Enrosque el adaptador de la boquilla (empaquetado con el
manual del operador del tractor) en el extremo de la manguera
del jardín.
4. Eche hacia atrás la abrazadera de cierre del adaptador de la
boquilla y empuje éste en el puerto de lavado de la cubierta
en el extremo izquierdo de la cubierta de la segadora. Suelte
la abrazadera de cierre para fijar el adaptador en la boquilla.
ADAPTADOR DE BOQUILLA
PUERTO DE LAVADO
Fig. 20
IMPORTANTE: Tire de la manguera para asegurarse de que la
conexión está bien fija.
5. Abra la llave del agua.
6. Desde la posición del operador del tractor, vuelva a arrancar
el motor y ponga la palanca de aceleración en la posición
rápido (“
IMPORTANTE: Vuelva a revisar el área para asegurar que está
despejada. Asegúrese de que no haya niños en el área mientras
limpia la plataforma.
7. Mueva el control del embrague del accesorio a la posición
“ENGANCHAR”. Manténgase en la posición del operador con
la cubierta de corte acoplada hasta que la cubierta esté limpia.
8. Asegúrese de que el control del embrague del accesorio esté
en la posición “DESACTIVADO”. Apague el motor. Apague
el agua.
9. Tire hacia atrás la abrazadera de cierre del adaptador de la
boquilla para desconectar el adaptador del puerto de lavado
de la cubierta.
10. Lleve el tractor a una zona seca, preferentemente de cemento
o pavimentada. Mueva el control del embrague del accesorio
a la posición “ENGANCHAR” para quitar el exceso de agua
y ayudar a que se seque antes de guardar el tractor.
” ).
MANGUERA
ADVERTENCIA: Si el accesorio de lavado está
roto o no está, Ud. y otras personas estarán expuestos a que la hoja les lance aquellos objetos
con los que entre en contacto.
• Sustituya inmediatamente el accesorio de lavado
roto o que falta antes de volver a usar la segadora.
• Tape todos los orificios de la segadora con pernos
y tuercas de seguridad.
50
Page 51
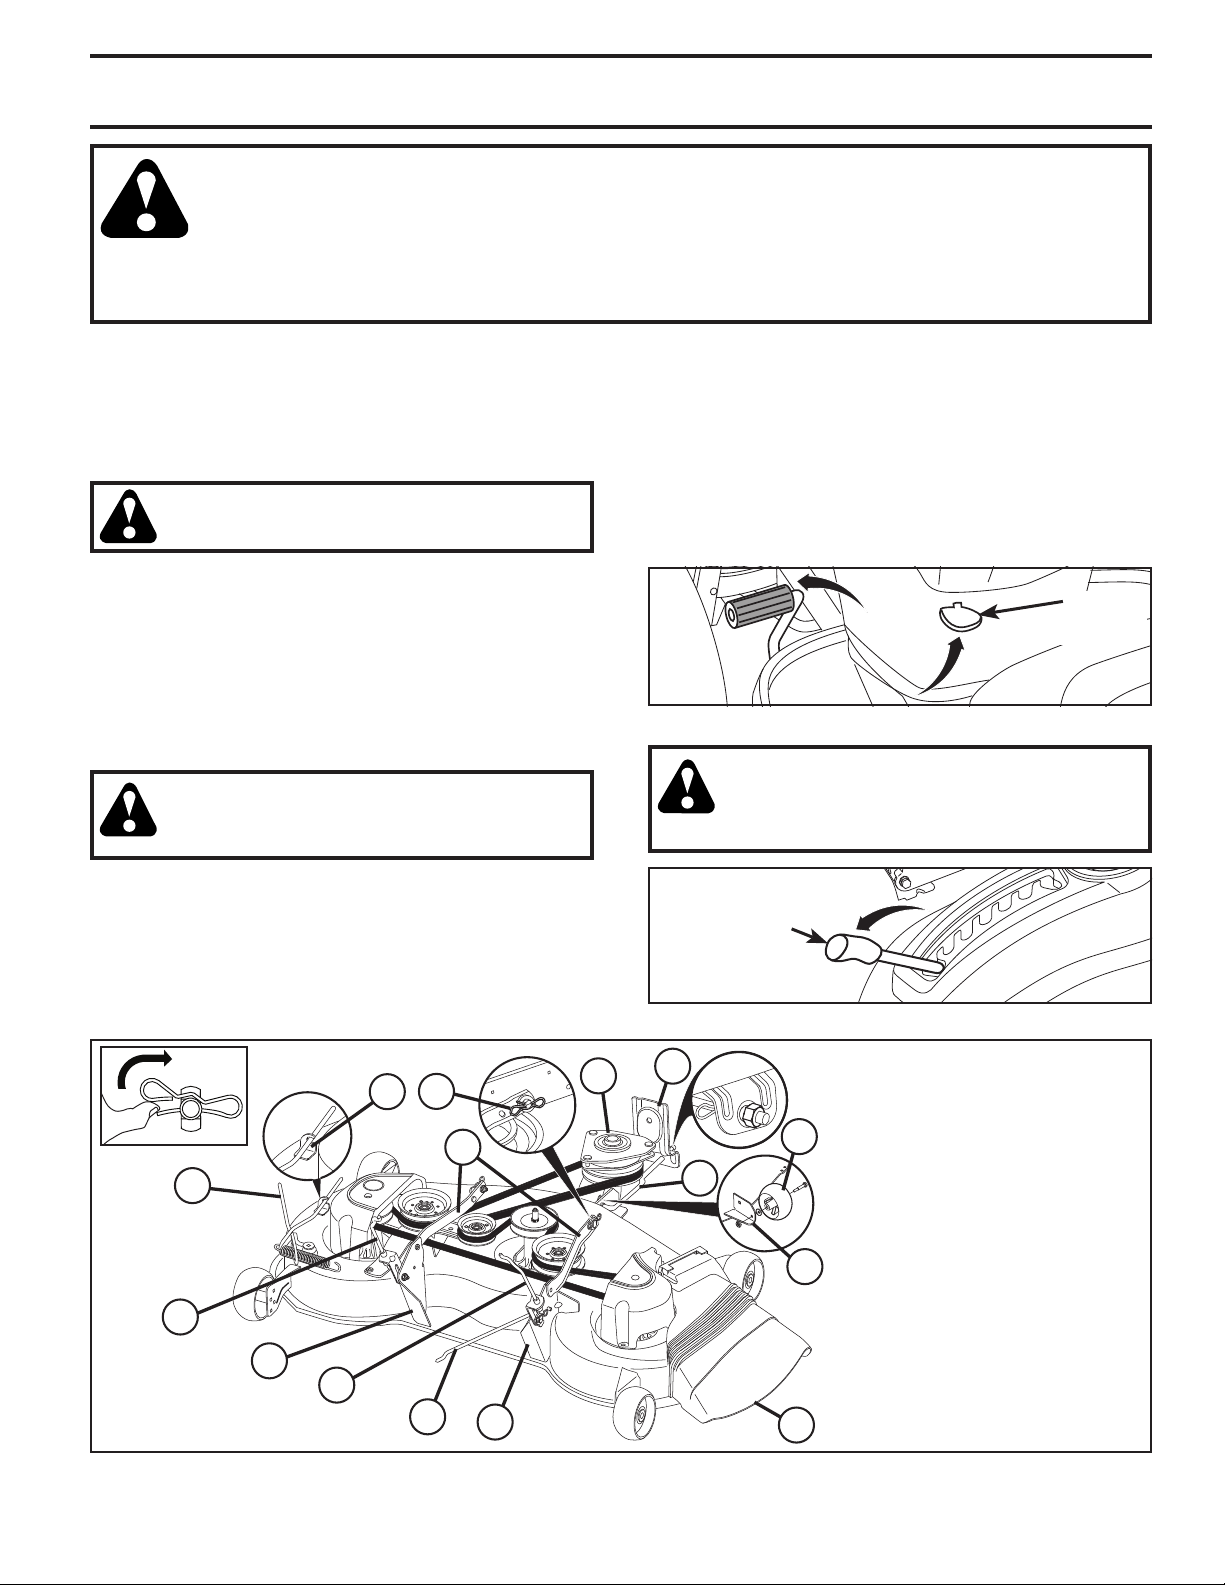
SERVICIO Y AJUSTES
ADVERTENCIA: PARA EVITAR LESIÓNES SERIAS, ANTES DE DAR CUALQUIER SERVICIO O DE
HACER AJUSTES:
• Presione el pedal de freno completamente y aplique el freno de estacionamiento.
• Ponga el embrague del accesorio en la posición "DESENGANCHADO".
• Ponga la llave de ignición en la posición de apagado (STOP) y remuévala.
• Asegúrese que las cuchillas y que todas las partes movibles se hayan detenido completamente.
• Desconecte el alambre de la bujía y póngalo en donde no pueda entrar en contacto con ésta.
PARA DESMONTAR LA CORTADORA DE CÉSPED
(Vea Fig. 21)
• Suelte el embrague poniéndolo en la posición “DESENGANCHADO”.
• Haga segadora descender a su posición más baja.
• Retire la barra de tensión de la correa (K) de la barra de sujeción (L).
CUIDADO: La barra de tensión de la correa funciona a resorte. Sujétela con fuerza y suéltela
despacio.
• Retire la correa de la cortadora de la polea del embrague
eléctrico (M).
• Desconecte la pieza de unión anterior (E) de la cortadora –
retire el resorte de contención y la arandela.
• Por uno de los lados de la cortadora, desconecte el brazo
de suspensión de la cortadora (A) del chasis y la pieza
de unión posterior (C) de la barra posterior de la cortadora (D) – retire los resortes de contención y las arandelas.
• Por el otro lado de la cortadora, desconecte el brazo de
suspensión y la pieza de unión posterior.
CUIDADO: Una vez que se desconecten las
piezas de unión posteriores, la palanca elevadora funcionará a resorte. Sujete con fuerza
la palanca elevadora al cambiarla de posición.
• Por el lado derecho de la cortadora, desconecte la barra antibalanceo (S) de la barra posterior derecha de la cortadora
(D) – retire el resorte de contención y la arandela, y jale la
cortadora hacia usted hasta que la barra se salga del orificio
de la barra.
• Haga girar el volante del tractor todo lo posible a la izquierda.
• Deslice la cortadora por debajo del lado derecho del tractor.
INSTALE LA SEGADORA (Vea Fig. 21 - 33)
1. ACCIONE LA PALANCA DEL FRENO DE ESTACIONAMIENTO Y LA PALANCA DE LEVANTAMIENTO DEL ACCESORIO INFERIOR (Vea Fig. 21 et 22)
• Presione el pedal de embrague/freno completamente hasta
abajo y manténgalo apretado.
• Tire y mantenga la palanca del freno de estacionamiento hacia
arriba, libere la presión del pedal de embrague/freno y, luego,
suelte la palanca del freno de estacionamiento. El pedal debe
permanecer en posición de frenado. Asegúrese de que el
freno de estacionamiento mantendrá asegurado el tractor.
PALANCA
DEL FRENO DE
ESTACIONAMIENTO
Fig. 22
PRECAUCIÓN: La palanca de levantamiento está
accionada por resorte. Sosténgala firmemente
apretada, bájela lentamente y engánchela en la
posición más baja. La palanca de levantamiento
se encuentra en el lado izquierdo de la defensa.
PALANCA DE
LEVANTAMIENTO
Fig. 23
B
L
M
A
K
F
W
E
C
I
C
S
D
Q
A. BRAZOS DE SUSPENSIÓN LATERAL
DE LA CORTADORA DE CÉSPED
B. RESORTE DE RETENCIÓN
C. ESLABONES DE LEVANTAMIENTO
TRASEROS
D. ESCUADRA TRASERA DERECHA
DE LA CORTADORA DE CÉSPED
E. CONJUNTO DE ESLABONES DE
LEVANTAMIENTO DELANTEROS
F. ESCUADRA DE SUSPENSIÓN
DELANTERA
H. ESCUADRA DE LA CORTADORA
H
DE CÉSPED DELANTERA
I. ESCUADRA TRASERA IZQUIERDA
DE LA CORTADORA DE CÉSPED
K. VARILLA TENSORA DE LA CORREA
L. ESCUADRA DE BLOQUEO
M. POLEA DEL EMBRAGUE DEL MOTOR
Q. BLINDAJE DEFLECTOR
S. BARRA ANTIBALANCEO
W. RUEDA CALIBRADORA
DELANTERA
Fig. 21
51
Page 52
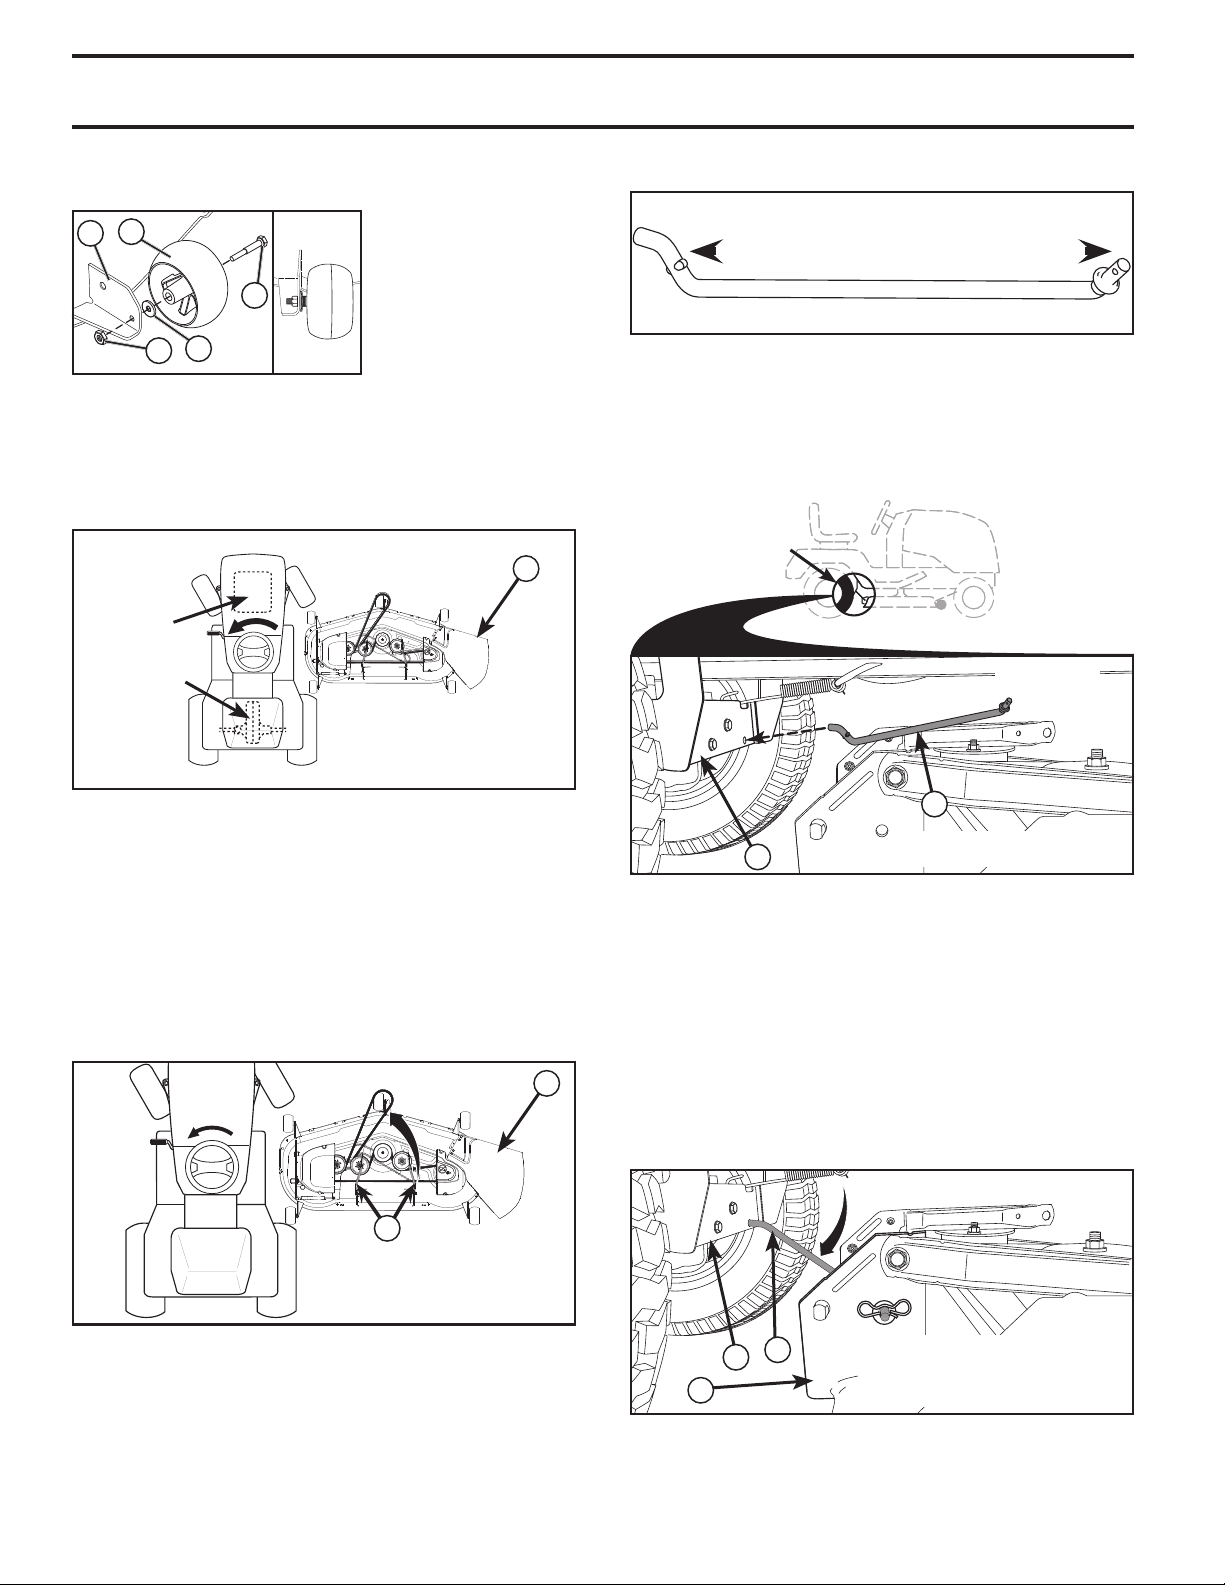
SERVICIO Y AJUSTES
COLOQUE EL EXTREMO EN 90° DENTRO
DEL AGUJERO
2. ARME LA RUEDA CALIBRADORA DELANTERA (W) EN
LA PARTE DELANTERA DE LA CORTADORA DE CÉSPED
(Vea Fig. 24)
W
H
X
Y
Z
H. ESCUADRA DE LA
CORTADORA DE
CÉSPED DELANTERA
W. RUEDA CALIBRADORA
DELANTERA
X. PERNO CON RESALTO
Y. ARANDELA DE 1-1/4
Z. TUERCA DE
SEGURIDAD DE 3/8-16
Fig. 24
3. GIRE EL VOLANTE HACIA LA IZQUIERDA Y UBIQUE LA
CORTADORA DE CÉSPED EN SU LUGAR (Vea Fig. 25)
• Gire el volante completamente hacia la izquierda y ubique
la cortadora de césped en el lado derecho del tractor con el
blindaje deflector (Q) a la derecha.
PARTE DELANTERA
Q
MOTOR
TRANSEJE
02965
PARTE TRASERA
Q. BLINDAJE
DEFLECTOR
Fig. 25
4. DESLICE LA CORTADORA DE CÉSPED DEBAJO DEL
TRACTOR (Vea Fig. 26)
• Lleve la correa hacia adelante y verifique que su trayectoria
sea correcta en todos los surcos de la polea de la cortadora
de césped.
NOTA: asegúrese de que los brazos de suspensión lateral de la
cortadora de césped (A) estén orientados hacia adelante antes
de deslizar la cortadora de césped debajo del tractor.
• Deslice la cortadora de césped debajo del tractor hasta que
se encuentre centrada debajo del tractor.
Q
5. SI LA TIENE, INSTALE LA BARRA ANTIBALANCEO (S)
(Vea Fig. 27 - 29)
BARRA ANTIBALANCEO (S)
HACIA EL HACIA LA PLATAFORMA DE
TRANSEJE LA CORTADORA DE CÉSPED
EXTREMO EN 90° EXTREMO CON ARANDELA INTEGRADA
Fig. 27
• Desde el lado derecho de la cortadora de césped, inserte
primero el extremo en 90° de la barra antibalanceo (S) dentro
del agujero de la escuadra de transeje (T), ubicado cerca de
la rueda trasera izquierda adelante del transeje.
NOTA: Puede resultar útil usar una linterna.
UBICACIÓN
DE LA BARRA
ANTIBALANCEO (S)
T
COLOQUE EL EXTREMO EN 90° DENTRO
DEL AGUJERO
S
S. BARRA ANTIBALANCEO
T. ESCUADRA TRANSEJE
ESCUADRA DE
TRANSEJE (T)
UBICADA ENTRE
LAS RUEDAS
Fig. 28
NOTA: Dependiendo del modelo, la escuadra (T) puede ser
diferente de la que se ilustra, pero el agujero para la barra antibalanceo estará en la misma posición/ubicación.
• Haga oscilar el extremo con la arandela integrada de la barra
antibalanceo (S) hacia la escuadra de la plataforma de la
cortadora de césped en el lado derecho de la cortadora.
Inserte el extremo con la arandela integrada de la barra en
el agujero de la escuadra trasera de la cortadora de césped
(D). Mueva la cortadora de césped según sea necesario para
insertar el extremo con la arandela integrada de la barra en
la escuadra trasera de la cortadora de césped (D).
• Asegure con una arandela pequeña y un resorte de retención
pequeño, como se ilustra.
02965
A
A. BRAZOS DE SUSPENSIÓN
LATERAL DE LA
CORTADORA DE CÉSPED
Q. BLINDAJE DEFLECTOR
Fig. 26
52
S
T
D
D. ESCUADRA TRASERA DERECHA
DE LA CORTADORA DE CÉSPED
S. BARRA ANTIBALANCEO
T. ESCUADRA TRANSEJE
Fig. 29
Page 53
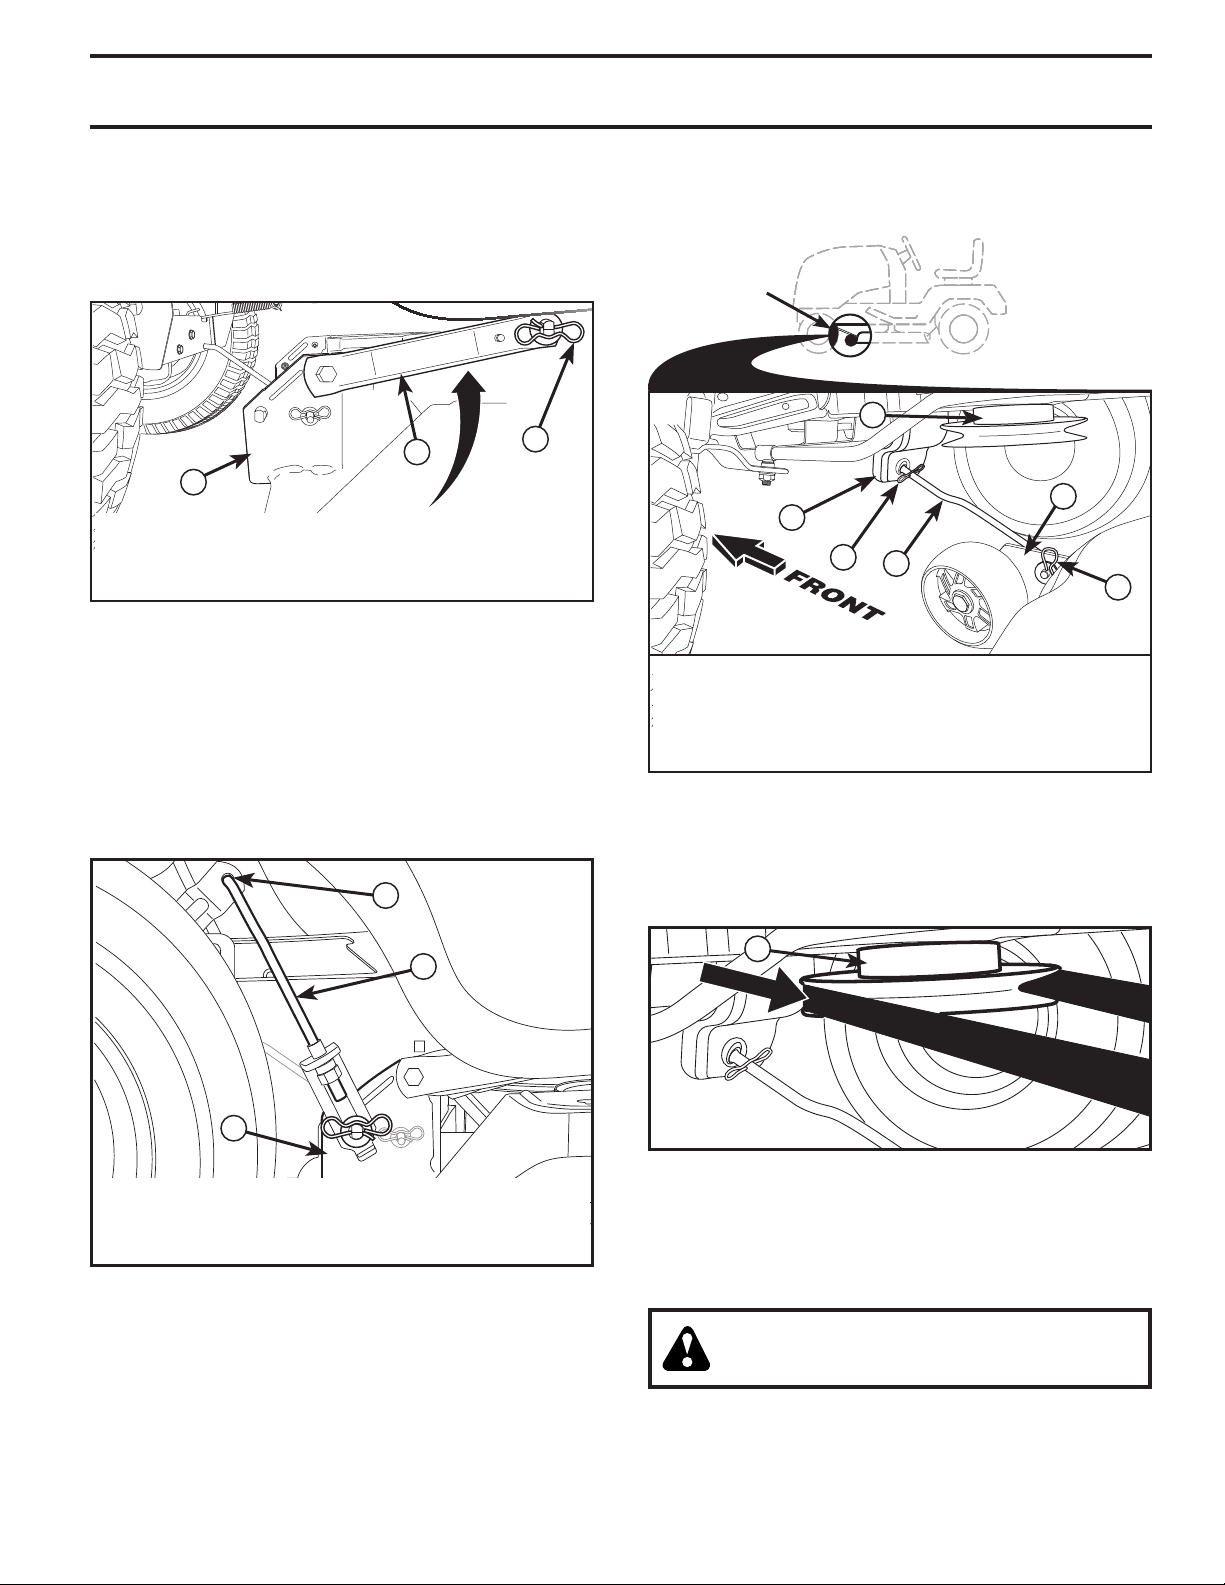
SERVICIO Y AJUSTES
6. INSTALE LOS BRAZOS DE SUSPENSIÓN LATERAL DE
LA CORTADORA DE CÉSPED (A) EN EL CHASIS
(Vea Fig. 30)
• Ubique el agujero delantero del brazo de suspensión lateral
(A) sobre la chaveta en la parte exterior del chasis del tractor
y asegure con una arandela grande y un resorte de retención
grande (B).
• Repita en el lado opuesto del tractor.
A
D
A. BRAZOS DE SUSPENSIÓN LATERAL DE LA CORTADORA
DE CÉSPED
B. RESORTE DE RETENCIÓN
D. ESCUADRA TRAS-ERA DERECHA DE LA CORTADORA DE
CÉSPED
B
Fig. 30
7. INSTALE LOS ESLABONES DE LEVANTAMIENTO TRASEROS (C) (Vea Fig. 31)
• Inserte el extremo de varilla del eslabón de levantamiento
trasero (C) dentro del agujero (U) en el brazo de suspensión
del eje de levantamiento del tractor y haga oscilar el eslabón
hacia abajo hacia la cortadora de césped.
• Levante la esquina trasera de la cortadora de césped y ubique
la ranura en el conjunto de eslabones sobre la chaveta en
la escuadra trasera de la cortadora (D); asegure con una
arandela grande y un resorte de retención grande.
• Repita en el lado opuesto del tractor.
U
• Inserte el otro extremo del eslabón (E) en el agujero de la
escuadra derecha de la cortadora de césped (H) y asegure
con una arandela y un resorte de retención pequeño (J).
NOTA: Requiere levantar la plataforma.
UBICACIÓN
DEL ESLABÓN
DELANTERO
M
H
F
G
E
J
E. CONJUNTO DE ESLABONES DE LEVANTAMIENTO DELANTEROS
F. ESCUADRA DE SUSPENSIÓN DELANTERA
G. RESORTE DE RETENCIÓN GRANDE
H. ESCUADRA DE LA CORTADORA DE CÉSPED DELANTERA
J. RESORTE DE RETENCIÓN PEQUEÑO
M. POLEA DEL EMBRAGUE DEL MOTOR
Fig. 32
9. INSTALE LA CORREA EN LA POLEA DEL EMBRAGUE
DEL MOTOR (M) (Vea Fig. 21 & 33)
• Desenganche la varilla tensora de la correa (K) de la escuadra
de bloqueo (L).
• Instale la correa en la polea del embrague del motor (M)
C
D
C. ESLABONES DE LEVANTAMIENTO TRASEROS
D. ESCUADRA TRASERA DERECHA DE LA CORTADORA DE
CÉSPED
U. AGUJERO
Fig. 31
8. INSTALE EL ESLABÓN DELANTERO (E) (Vea Fig. 32 )
• Gire el volante hasta ubicar las ruedas derechas en posición
de avance.
• Desde la parte delantera del tractor, inserte el extremo de
varilla del eslabón delantero (E) a través del agujero delantero
de la escuadra de suspensión delantera del tractor (F).
• Muévase hasta el lado izquierdo de la cortadora e inserte
un resorte de retención grande (G) a través del agujero del
eslabón delantero (E) detrás de la escuadra de suspensión
delantera (F).
M
M. POLEA DEL
EMBRAGUE
DEL MOTOR
Fig. 33
IMPORTANTE: Verifique que la trayectoria de la correa sea cor-
recta en todos los surcos de la polea de la cortadora de césped
y debajo de las cubiertas de mandril.
• Enganche la varilla tensora de la correa (K) en la escuadra
de bloqueo (L).
PRECAUCIÓN: la varilla tensora de la correa está
accionada por resorte. Sostenga la varilla firmemente apretada y engánchela lentamente.
• Haga segadora ascender a su posición más superior.
• Si es necesario, ajuste las rueditas del calibre antes de poner
en funcionamiento la cortadora, como se ilustra en el capítulo
de Manejo de este manual.
53
Page 54
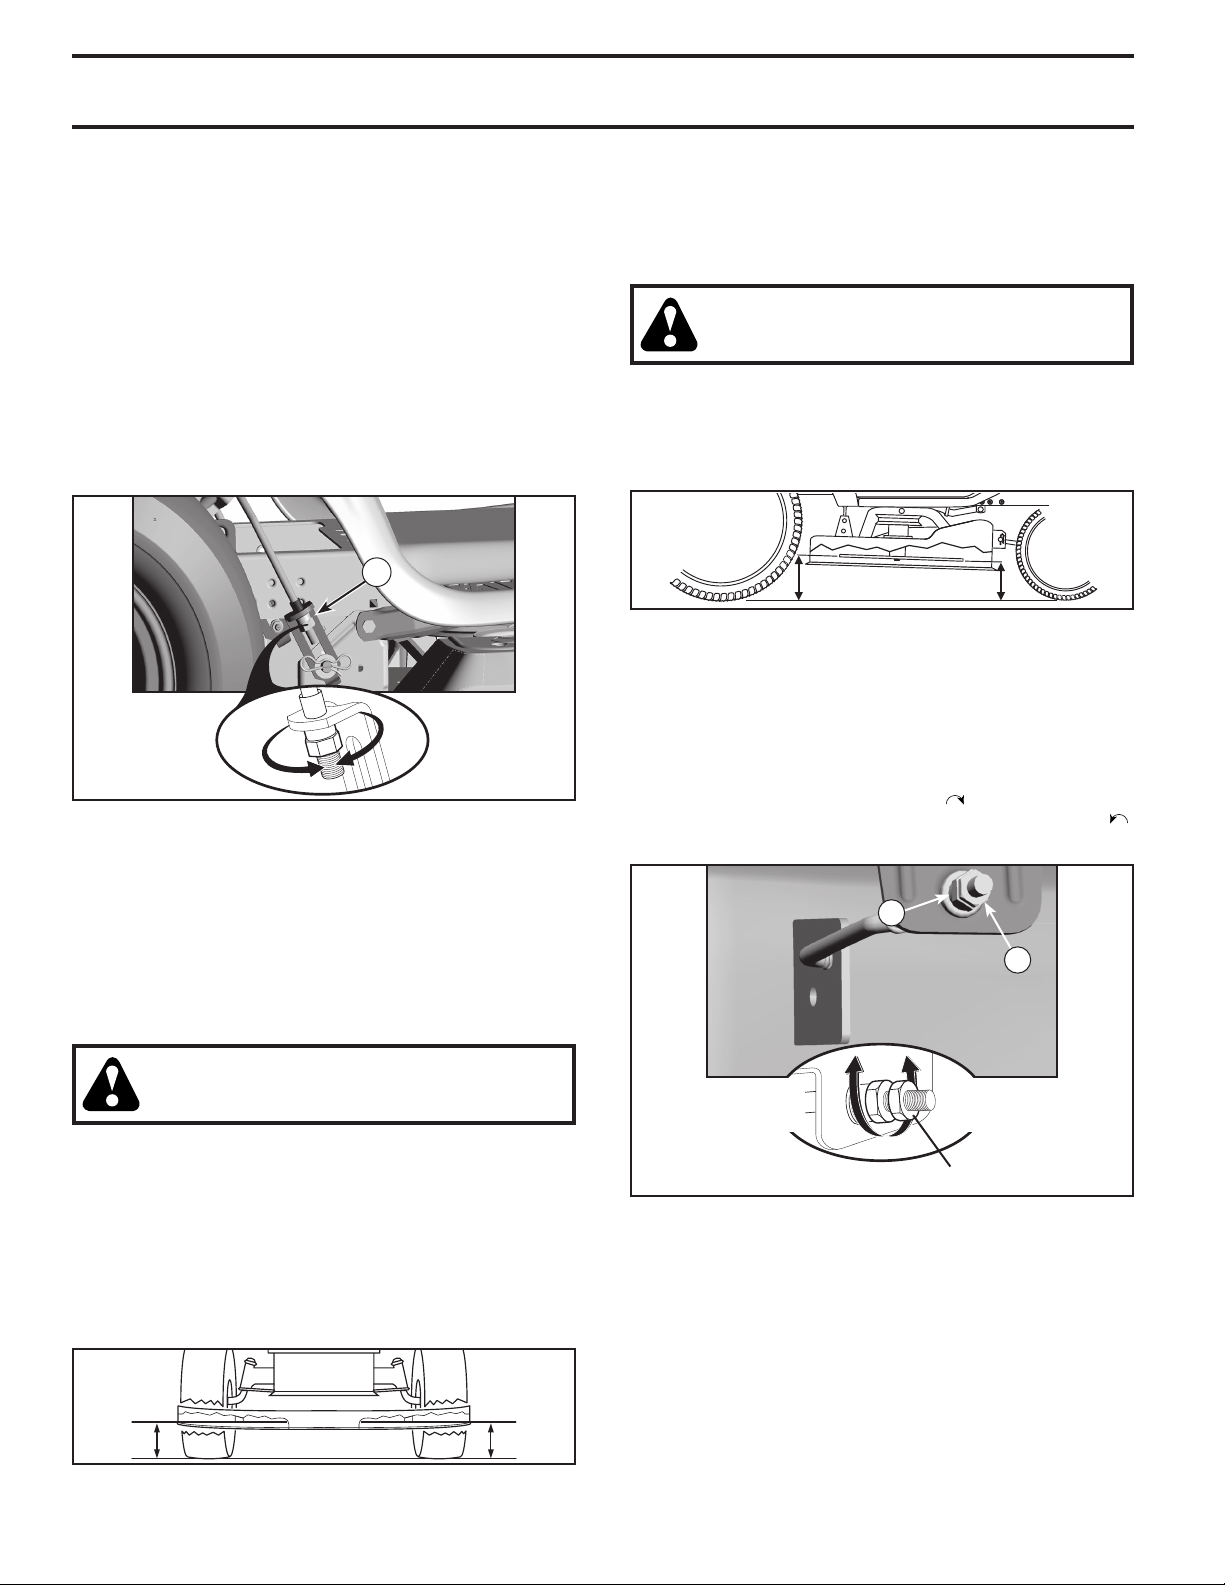
SERVICIO Y AJUSTES
PARA NIVELAR LA SEGADORA
Asegúrese de que los neumáticos estén inflados a la PSI que se
indica en estos. Si están demasiado inflados o poco inflados,
el césped no le quedará bien cortado, lo cual podrá llevarlo a
pensar que la segadora no está bien regulada.
REGULACIÓN VISUAL DE LADO A LADO (Vea Fig. 34)
• Si todos los neumáticos están correctamente inflados y el
césped parece haber quedado cortado desparejo, determine
qué lado de la cortadora está cortando más al ras.
NOTA: Según lo desee, puede subir el lado más bajo o bajar el
lado más alto de la segadora.
• Aborde el lado de la cortadora que quiera regular.
• Con una llave inglesa de 3/4” o de calibre regulable, haga girar
hacia la izquierda la tuerca de ajuste de la pieza de unión (A)
para bajar la cortadora, o bien hágala girar hacia la derecha
para subirla.
A
HAGA GIRAR LA
TUERCA HACIA
LA DERECHA
PARA SUBIR LA
SEGADORA
Fig. 34
NOTA: Cada vuelta completa de la tuerca de ajuste hará variar
la altura de la cortadora aproximadamente 4,7 mm (3/16”).
• Pruebe la regulación realizada cortando césped que aún no
haya cortado y observando cómo queda. Vuelva a ajustar,
en caso necesario, hasta obtener resultados satisfactorios.
REGULACIÓN DE LA PRECISIÓN DE LADO A LADO
(Vea Fig. 35)
• Con todos los neumáticos correctamente inflados, estacione
el tractor a nivel del suelo o en la entrada a la casa.
HAGA GIRAR LA
TUERCA HACIA
LA IZQUIERDA
PARA BAJAR LA
SEGADORA
AJUSTE DE DELANTE A ATRÁS (Vea Fig. 36 y 37)
IMPORTANTE: El piso debe quedar bien nivelado de lado a lado.
Para que el césped le quede perfectamente cortado, las cuchillas de la cortadora deben ajustarse de tal manera que la punta
anterior quede 3,1 a 12,7 mm (1/8" a 1/2") más abajo que la punta
posterior cuando la cortadora se encuentre en su posición más alta.
CUIDADO: Las cuchillas son afiladas. Protéjase las
manos con guantes o envuelva las cuchillas con
tela gruesa, o bien haga ambas cosas.
• Suba la segadora a la posición más alta.
• Ubique cualquiera de las hojas de la cuchilla de tal manera
que la punta quede apuntando directamente hacia adelante.
Mida la distancia (B) que hay entre la punta anterior y el suelo
y entre la punta posterior y el suelo.
B
B
Fig. 36
• Si la punta anterior de la hoja de la cuchilla no está 3,1 a 12,7 mm
(1/8" a 1/2") más abajo que la punta posterior, diríjase a la
parte de adelante del tractor.
• Con una llave inglesa de 11/16” o de calibre regulable, afloje
la tuerca A, dándole varias vueltas para despejar la tuerca
de ajuste B.
• Con una llave ajustable de 3/4”, gire la tuerca de ajuste de
eslabón frontal (B) hacia la derecha (
) (apriete) para elevar
el frente de la cortadora de césped, o hacia la izquierda (
(afloje) para bajar el frente de la cortadora de césped.
B
A
)
CUIDADO: Las cuchillas son afiladas. Protéjase las
manos con guantes o envuelva las cuchillas con
tela gruesa, o bien haga ambas cosas.
• Suba la segadora a la posición más alta.
• A ambos lados de la cortadora, ubique la cuchilla hacia un
lado y mida la distancia (A) que hay entre el borde inferior
de la cuchilla y el suelo. Dicha distancia debe ser la misma a
ambos lados.
• En caso que sea necesario realizar un ajuste, lea los pasos
2 y 3 de las instrucciones de Regulación visual que aparecen
más arriba.
• Vuelva a verificar las medidas y ajuste nuevamente, en caso
necesario, hasta que ambos lados queden iguales.
AA
Fig. 35
AJUSTE LA TUERCA
DE REGULACIÓN
DE ALTURA "B"
PARA LEVANTAR
LA SEGADORA
AFLOJE LA TUERCA "A" PRIMERO
02950
AFLOJE LA TUERCA
DE REGULACIÓN
DE ALTURA "B"
PARA BAJAR
LA SEGADORA
Fig. 37
NOTA: Cada vuelta completa de la tuerca de ajuste hará variar
la altura de la cortadora 3,1 mm (1/8”).
• Vuelva a verificar las medidas y ajuste nuevamente, en caso
necesario, hasta que la punta anterior de la hoja de la cuchilla
quede 3,1 a 12,7 mm (1/8" a 1/2") más abajo que la punta
posterior.
• Mantenga en la posición la tuerca de ajuste por medio de una
llave inglesa, y apriete bien la tuerca contra dicha tuerca de
ajuste.
54
Page 55
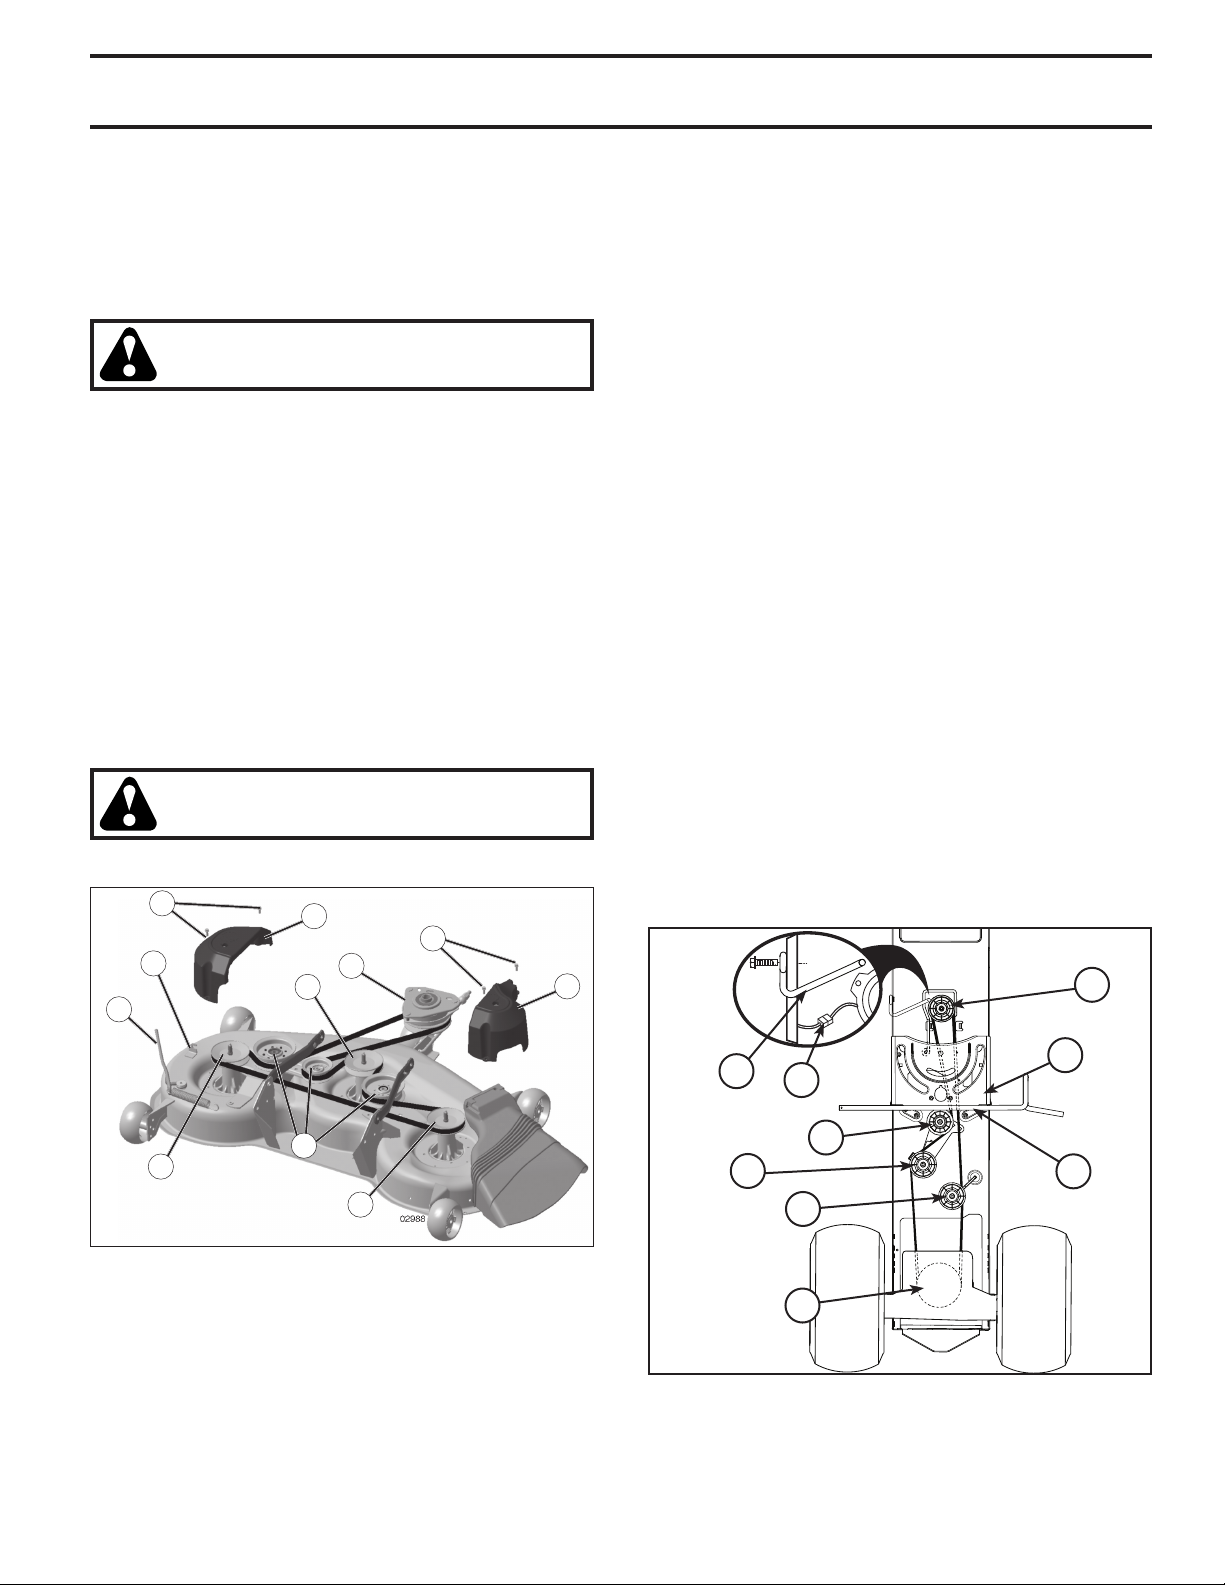
SERVICIO Y AJUSTES
PARA REEMPLAZAR LA CORREA DE LA
CUCHILLA DE LA SEGADORA (See Fig. 38)
DESMONTAJE DE LA CORREA DE LA SEGADORA
• Estacione el tractor en una superficie nivelada. Ponga el freno
de mano.
• Baje la palanca elevadora a la posición de más abajo.
• Retire la barra de tensión de la correa (K) de la barra de
sujeción (L).
CUIDADO: La barra de tensión funciona
a resorte. Sujétela con fuerza y suéltela
despacio.
• Quite los tornillos (P) de las cubiertas derecha e izquierda y
retírelas (Q).
• Quite toda suciedad y restos de hierbas que pueda haberse
acumulado alrededor de los dispositivos de recolección y de
toda la superficie superior.
• Retire la correa de la polea del embrague eléctrico (M), las
dos poleas de los dispositivos de recolección (R) y las poleas
de los piñones (V).
MONTAJE DE LA CORREA DE LA SEGADORA
• Instale la correa pasándola alrededor de las poleas (R) y
alrededor de las poleas (V), como se muestra en la figura.
• Pase la correa por encima de la polea del embrague (M).
IMPORTANTE: Verifique que la correa calce bien en todas las
ranuras de las poleas de la cortadora.
• Vuelva a colocar las cubiertas derecha e izquierda (Q). Ajuste
bien todos los tornillos.
• Coloque la barra de tensión de la correa (K) en la barra de
sujeción (L).
CUIDADO: La barra de tensión funciona
a resorte. Sujétela con fuerza y póngala
despacio.
• Suba la palanca elevadora a la posición de más arriba.
P
L
K
Q
P
M
R
Q
NOTE: Observe toda la correa de impulsión de movimiento y la
posición de todas las guías y guardacorreas.
2. Desconecte el arnés del cable del embrague (A).
3. Quite la pieza de unión anti-rotación (B) que está del lado
derecho del tractor.
4. Retire la correa del piñón estacionario (C) y del piñón del
embrague (D).
5. Retire la correa del piñón central (E).
6. Jale el cable de la correa hacia la parte de atrás del tractor.
Con mucho cuidado, retire la correa jalando hacia arriba
desde la polea de entrada de la transmisión y por encima de
las paletas del ventilador (F).
7. Retire la correa jalando hacia abajo desde la polea del motor
y alrededor del embrague eléctrico (G).
8. Deslice la correa hacia la parte de atrás del tractor, retírela
de la placa de dirección (H) y sáquela del tractor.
MONTAJE DE LA CORREA
1. Instale la correa nueva pasándola de la parte de atrás a la
parte de adelante del tractor, por encima de la placa de dirección (H) y del vástago del pedal del embrague / freno (J).
2. Jale la correa hacia la parte de adelante del tractor y pásela
alrededor del embrague y por sobre la polea del motor (G).
3. Jale la correa hacia la parte de atrás del tractor. Con mucho
cuidado, pase la correa de arriba a abajo alrededor del ventilador de transmisión y por sobre la polea de entrada (F).
Asegúrese de que la correa esté dentro del guardacorrea.
4. Monte la correa en el piñón central (E).
5. Pásela a través del piñón estacionario (C) y del piñón del
embrague (D).
6. Vuelva a instalar la pieza de unión anti-rotación (B) del lado
derecho del tractor. Ajústela bien.
7. Vuelva a conectar el arnés del embrague (A).
8. Asegúrese de que la correa calce en todas las ranuras de las
poleas y dentro de todas las guías y guardacorreas.
9. Monte la SEGADORA (Ver “PARA MONTAR LA SEGADORA”
en este capítulo del manual).
G
V
R
R
Fig. 38
PARA CAMBIAR LA CORREA DE IMPULSIÓN DE
MOVIMIENTO (Vea Fig. 39)
Estacione el tractor en una superficie nivelada. Ponga el freno
de mano. Si necesita asistencia, del lado de abajo del apoyapiés
izquierdo hay una guía práctica para el montaje de la correa
DESMONTAJE DE LA CORREA
1. Desmonte la SEGADORA (Ver “PARA DESMONTAR LA
SEGADORA en este capítulo del manual).
55
B
A
C
H
D
J
E
F
02953
electric
Fig. 39
Page 56
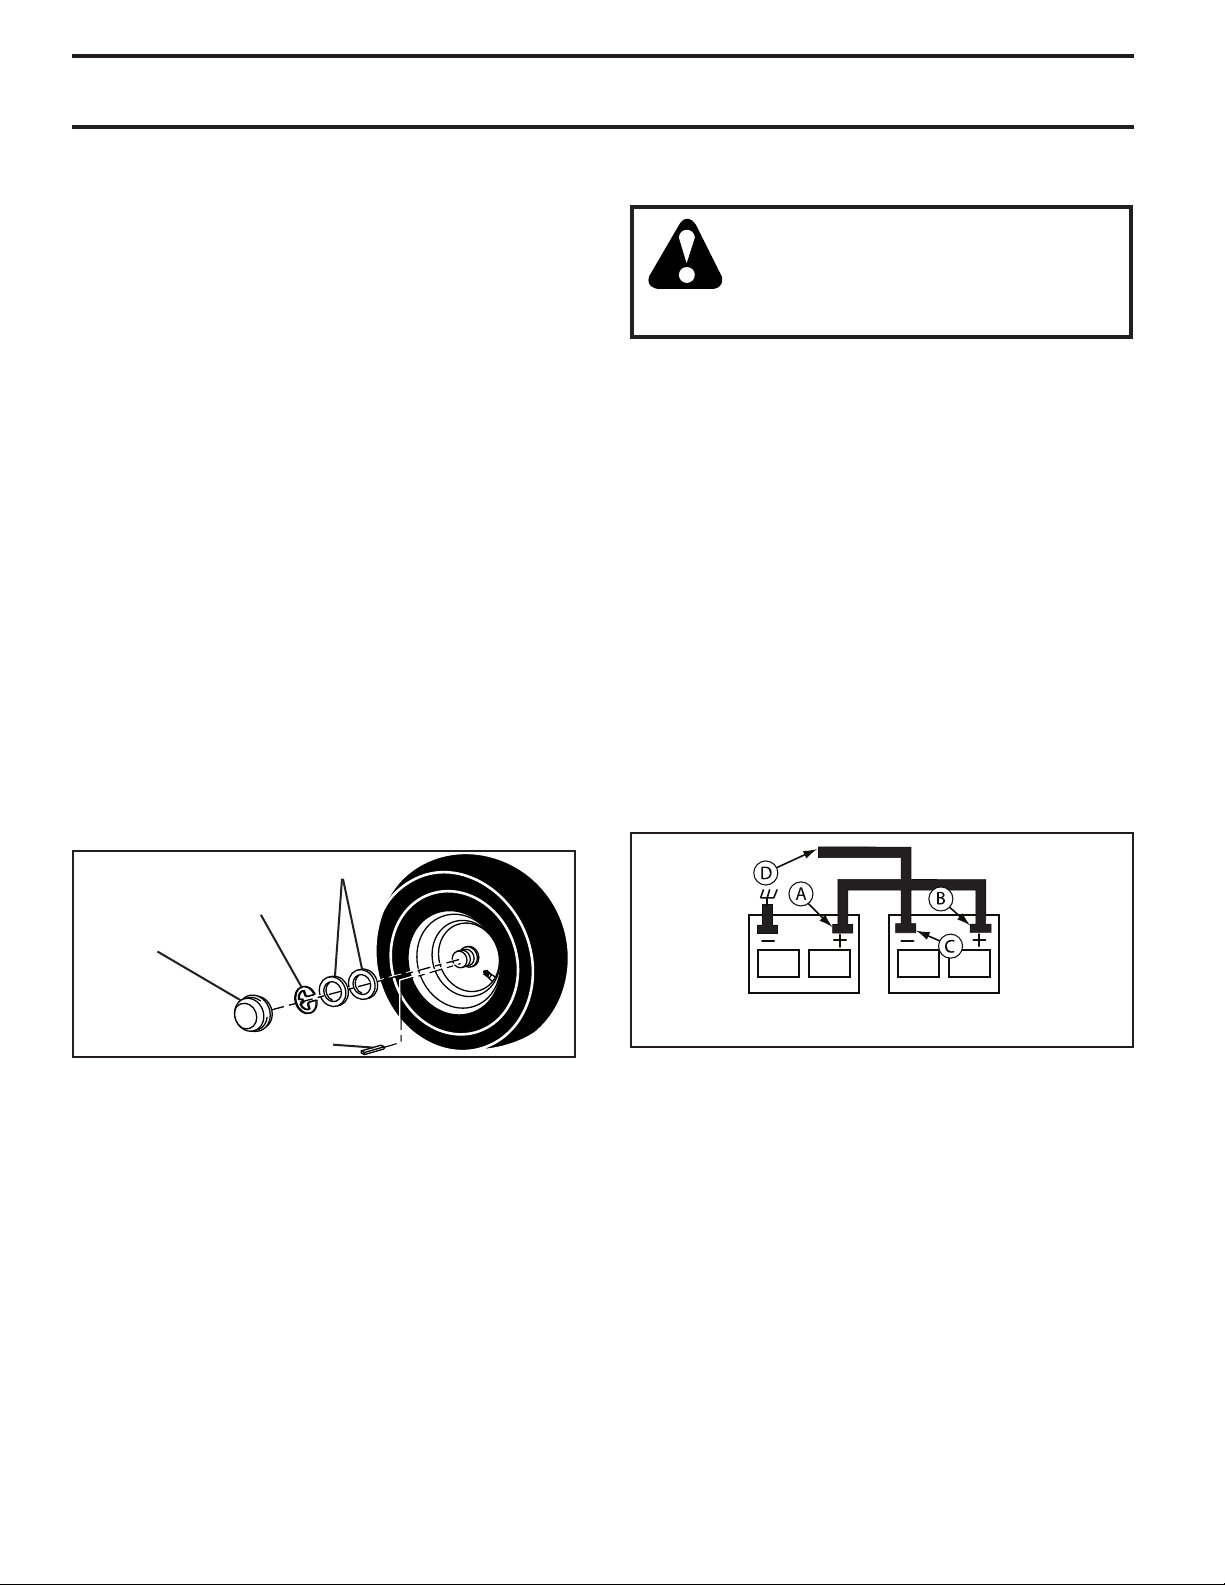
SERVICIO Y AJUSTES
CONTROLAR Y AJUSTAR EL FRENO
Si el tractor exige más de 1,5 m (cinco (5) pies) para pararse a
una velocidad más alta en el cambio más alto en una superficie
nivelada de hormigón seco o pavimentada, entonces se debe
controlar y ajustar el freno.
CONTROL DEL FRENO
1. Aparcar el tractor en una superficie nivelada de hormigón
seco o pavimentada, presionar el pedal del freno hasta el
fondo y accionar el freno de estacionamiento.
2. Desembragar la transmisión colocando el mando de la rueda
libre en la posición “transmisión desembragada”. Tirar el
mando de la rueda libre fuera y dentro la ranura y soltar así
se coloca en la posición desembragada.
Las ruedas traseras tiene que bloquearse y patinar cuando se
intenta empujar hacia adelante el tractor manualmente. Sustituir
las zapatas del freno o contactar otro centro de servicio cualificado.
PARA REMOVER LAS RUEDAS (Vea Fig. 40)
• Bloquee el eje en forma segura.
• Remueva la cubierta del eje, el anillo de retención y las
arandelas para permitir la remoción de las ruedas (la rueda
trasera contiene una llave cuadrada - no la pierda).
• Repare la llanta y vuélvala a montar.
AVISO: En las ruedas traseras solamente: alinee las ranuras en
el cubo de la rueda trasera en el eje. Inserte la llave cuadrada.
• Vuelva a colocar las arandelas e inserte el anillo de retención
en forma segura en la ranura del eje.
• Vuelva a colocar la cubierta del eje.
AVISO: Para arreglar las llantas perforadas y péra prevenir
que tenga llantas pinchadas a causa de pequeñas fugas,
comprar de su commerciante y utilizar el sello para llantas. Elsello previene que las llantas se sequen y también la corrosión.
PARA HACER ARRANCAR EL MOTOR CON UNA
BATERÍA BAJA (Vea Fig. 41)
ADVERTENCIA: Las baterías de ácidoplo mo generan gases explosivos. Mantenga las chispas, las llamas y los
materiales para fumar alejados de las
baterías. Siempre use una protección
para los ojos alrededor de las baterías.
Si su batería está demasiado baja como para hacer arrancar el
motor tiene que volverse a cargar. (Vea “BATERÍA” en la sección
de Mantenimiento de este manual).
Si se usan “cables de em pal me” para un arranque de emergencia, siga este procedimiento:
IMPORTANTE: SU TRACTOR ESTA EQUIPADO CON UN SISTEMA DE 12 VOLTS. EL OTRO VEHÍCULO TAMBIÉN TIENE QUE
TENER UN SISTEMA DE 12 VOLTS. NO USE LA BATERÍA DE SU
TRACTOR PARA HACER ARRANCAR A OTROS VEHÍCULOS.
PARA ADJUNTAR LOS CABLES DE EMPALME –
• Conecte cada extremo del cable ROJO con el terminal (A-B)
POSITIVO (+) de cada batería, preocupándose de no hacer
cortocircuito en el chasis.
• Conecte un extremo del cable NEGRO con el terminal (C)
NEGATIVO (-) de una batería completamente cargada.
• Conecte el otro extremo del cable (D) NEGRO con un buena
CONEXIÓN A TIERRA DEL CHASIS, alejado del estanque
de combustible y de la batería.
PARA REMOVER LOS CABLES, INVIERTA EL ORDEN
• El cable NEGRO primero del chasis y luego de la batería
completamente cargada.
• El cable ROJO al último de ambas baterías.
ANILLO DE
ARANDELAS
RETENCIÓN
CUBIERTA
DEL EJE
LLAVE CUADRADA
(RUEDA TRASERA SOLAMENTE)
Fig. 40
IMPRESIÓN / INCLINACIÓN DE LAS RUEDAS
DELANTERAS
La impresión e inclinación de las ruedas delanteras de su nuevo
tractor vienen así de fábrica y son normales. La impresión y
la inclinación de las ruedas delanteras no son regulables. En
caso que se produzca algún daño que afecte la impresión o la
inclinación de las ruedas delanteras tal como vinieron de fábrica,
póngase en contacto con un centro de servicios u otro centro de
servicios autorizado.
BATERÍA DÉBIL
O DESCARGADA
02614
BATERÍA COMPLETAMENTE
CARGADA
Fig. 41
56
Page 57
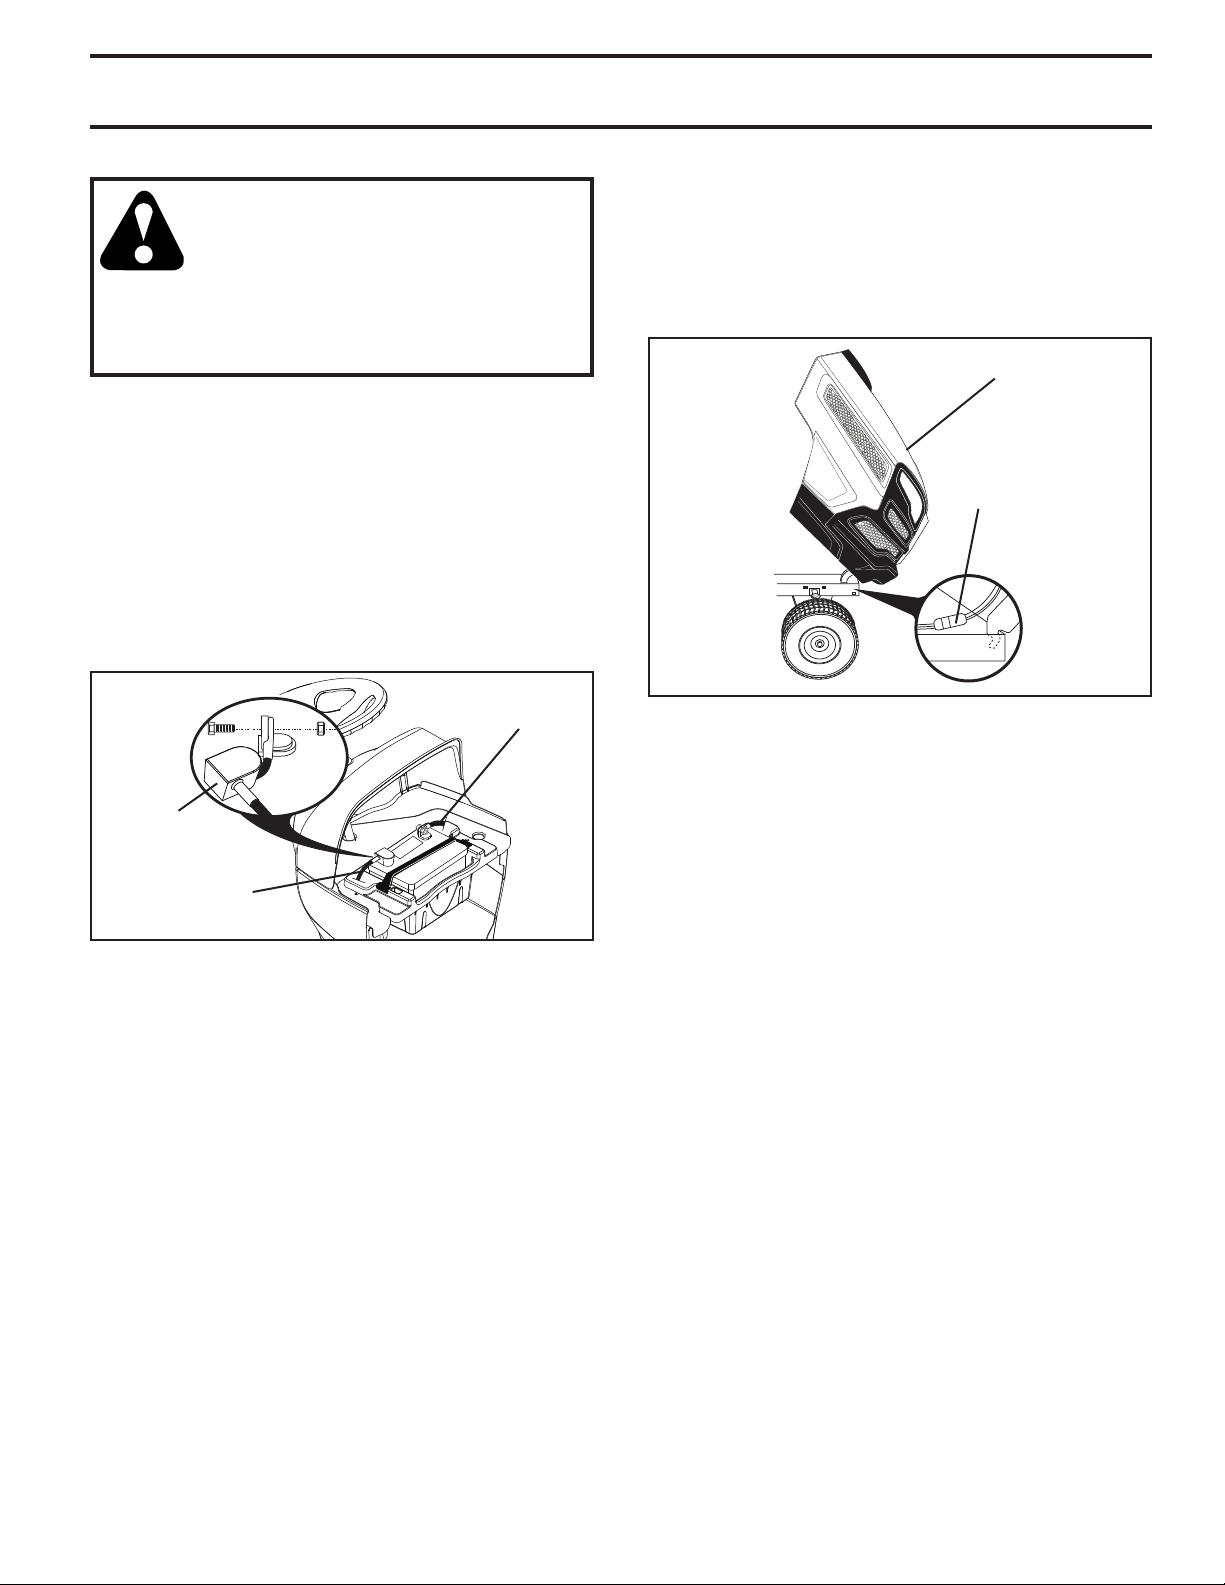
SERVICIO Y AJUSTES
REEMPLAZAR LA BATERIA (Vea Fig. 42)
ADVERTENCIA: No haga cortocircuito con los
terminales de la batería al permitir que una
llave de tuerca o cualquier otro objeto entre
en contacto con ambos terminales a la misma
vez. Antes de ins ta lar la batería remueva las
pulseras de metal, los relojes de pulsera de
metal, los anillos, etc. El terminal positivo tiene
que conectarse primero para evitar las chispas
debido a la conexión a tierra por accidente.
• Levantamos la capota a la posición levantada.
• Desconecte el cable de la batería NEGRO primero y luego
el cable de la batería ROJO y remueva la batería del tractor.
• Instale la nueva batería con los términos en misma posición
como la batería vieja.
• Reemplazamos cubierta terminal.
• Primero, conecte el cable de la batería ROJO con el terminal
positivo (+) con el perno hexagonal y la tuerca según se
muestra. Apriételos en forma segura.
• Conecte el cable de conexión a tierra NEGRO al terminal
negativo (-) con el perno hexagonal y la tuerca que queden.
Apriételos en forma segura.
• Cerramos la capota.
CABLE NEGRO
(NEGATIVO)
PARA REMOVER EL CONJUNTO DEL CAPOTA Y
DEL ENREJADO (Vea Fig. 43)
• Levante el capota.
• Desabroche el conector del alambre de las luces delanteras.
• Párese delante del tractor. Agarre el capota en los lados,
inclínelo un poco hacia el motor y sáquelo del tractor.
• Para volver a instalar el capota, asegúrese de volver a conectar el conector del alambre de las luces.
CAPOTA
CONECTOR
DEL ALAMBRE
DE LAS LUCES
DELANTERAS
07002
FIG. 43
CUBIERTA
TERMINAL
CABLE ROJO
(POSITIVO)
FIG. 42
PARA CAMBIAR LA BOMBILLA DE LA LUZ DELANTERA
• Levante el capota.
• Tire el sujetador de la bombilla fuera del agujero en la parte
trasera del enrejado.
• Cambie la bombilla en el sujetador y empuje el sujetador de
la bombilla, en forma segura, hacia atrás en el agujero en la
parte trasera del enrejado.
• Cierre el capota.
ENTRECIERRE Y RELÉ
El alambrado suelto o dañado puede producir el mal fun ciona mien to de su trac tor, o que deje de funcionar, o le impida el
arrancar.
• Revise el alambrado.
TRANSMISIÓN
REMOCIÓN/REEMPLAZO DE LA TRANSMISIÓN
Si por acaso su transmisión debe ser removida para servicio o
reemplazo, debe ser purgada después de la reinstalación y antes
de operar el tractor. Vea “PUR GAR LA TRANSMISIÓN” en la
sección de la Operación de este manual.
MOTOR
PARA AJUSTAR EL CABLE DE CONTROL DE LA
ACELERACIÓN
El control de la aceleración ha sido preajustado en la fábrica y no
debería necesitar ajustes. Revise los ajustes que se describen a
continuación, antes de soltar el cable. Si el ajuste es necesario,
vea de manual de motor.
PARA CAMBIAR EL FUSIBLE
Cámbielo por un fusible tipo enchufable de 20 amps, tipo au tomo triz. El sujetador del fusible está ubicado detrás del tablero.
57
Page 58

ALMACENAMIENTO
Inmediatamente prepare su tractor para el almacenamiento al final
de la temporada o si el tractor no se va a usar por 30 días o más.
Advertencia: Nunca almacene el tractor con
gasolina en el estanque dentro de un edificio
en donde los gases pueden al can zar una
llama expuesta o una chispa. Per mi ta que
el motor se enfríe antes de almacenarlo en
cualquier recinto privado.
TRACTOR
Remueva la segadora del tractor para el almacenamiento por el
invierno. Cuando la segadora se va a almacenar por cierto período
de tiempo, límpiela cuidadosamente, quite toda la mugre, la grasa,
las hojas, etc. Guárdela en una área limpia y seca.
• Limpie todo el tractor. (Vea “LIMPIEZA” en la sección de
Mantenimiento en este manual.)
• Inspeccione y cambie las correas, si es necesario. (Vea las
instrucciones para el cambio de las correas en la sección
de Servicio y Ajustes de este manual.)
• Lubríquelo, según se muestra en la sección de Mantenimiento
de este manual.
• Asegúrese que todas las tuercas, los pernos y los tornillos
estén sujetados en for ma segura. Inspeccione las partes
movibles para verificar si hay daño, rotura o desgaste.
Cámbielas si es necesario.
• Retoque todas superficies pintadas oxidadas o picadas;
aplique lija antes de pintar.
BATERÍA
• Cargue la batería completamente antes de guardarla.
• Después de cierto período de tiempo en almacenamiento,
la batería puede necesitar volver a cargarse.
• Para ayudar a evitar la corrosión y las fugas de potencia
durante largos períodos de almacenamiento, se deben
des co nec tar los cables de la batería y se debe limpiar cuida do sa men te. (Vea “PARA LIMPIAR LA BATERÍA Y LOS
TER MI NA LES” en la sección de Mantenimientode este
manual.)
• Después de limpiarla, deje los cables desconectados y
póngalos en donde no puedan entrar en contacto con los
terminales de la batería.
• Si se remueve la batería del tractor para el almacen-amiento,
no la guarde directamente sobre concreto o sobre su per fi cies
húmedas.
• Si la unidad está equipada con indicador de batería/conector
de carga, se puede adquirir una unidad de carga opcional
y conectarse a la unidad para cargar la batería durante
un almacenamiento prolongado. Inspeccione y limpie las
terminales de la batería conforme sea necesario antes de
almacenarse durante un tiempo prolongado con el cargador
conectado.
MOTOR
SISTEMA DE COMBUSTIBLE
IMPORTANTE: Es important evitar que se forman depositos
de goma en partes fundamentales del sistema de combus-tible
tales como el carburador, el filtro del com bus ti ble, la manguera
del combustibles mezclados con alcohol (conocido como gas o hol
o que tienen etanol o metanol) pueden atraer humedad, lo que
con duce a la separación y a la formación de acudos du rante
elalmacenamiento. La gasolina acidica puede dañar el sistema de
combustible de un motor du rante el periodo de almacenamiento.
• Vaciar el depósito del carburante poniendo en marcha el
motor y dejándolo funcionar hasta que el carburante termine
el carburador esté vacío.
• Nunca use los productos para limpieza del carburador o
del motor en el estanque de com bus ti ble pues se pueden
pro du cir daños permanentes.
• Use combustible nuevo la próxima temporada.
AVISO: El estabilizador de combustible es una alternativa acep table para reducir a un mínimo la formación de depósitos de goma
en el com bus ti ble durante el período de almacenamiento. Agre gue
estabilizador a la gasolina en el estanque de combustible o en el
envase para el almacenamiento. Siempre siga la proporción de
mezcla que se encuentra en el envase del estabilizador. Haga
funcionar el motor por lo menos 10 minutos después de agregar
el estabilizador, para permitir que éste llegue al carburador. No
vaciar la gasolina del estanque de gasolina y el carburador si se
está usando estabilizador de combustible.
ACEITE DEL MOTOR
Drene el aceite (con el motor caliente) y cámbielo con aceite de
motor limpio. (Vea “MO TOR” en la sección de "MANTENIMIENTO”
de este man u al.)
CILINDRO(S)
• Remueva la(s) bujía(s).
• Vacíe 29.5 mL (1 Oz.) de aceite a través del agujero(s) de
la bujía en el cilindro(s).
• Gire la llave de ignición a la posición de “ARRANQUE”
(START), por unos cuantos segundos para distribuir el acei te.
• Cambie por bujía(s) nueva(s).
OTROS
• No guarde la gasolina de una temporada a la otra.
• Cambie el envase de la gasolina si se empieza a oxidar. La
oxidación y/o la mugre en su gasolina producirán problemas.
• Si es posible, guarde su unidad en un recinto cerrado y
cúbrala para protegerla con tra el polvo y la mugre.
• Cubra su unidad con un forro protector adecuado que no
retenga la humedad. No use plástico. El plástico no puede
respirar, lo que permite la formación de condensación, lo
que producirá la oxidación de su unidad.
IMPORTANTE: NUNCA CUBRA EL TRACTOR MIENTRAS
EL MOTOR Y LAS ÁREAS DE ESCAPE TODAVÍA ESTÁN
CALIENTES.
58
Page 59

IDENTIFICACIÓN DE PROBLEMAS
PROBLEMA CAUSA CORRECCIÓN
No arranca
Difícil de arrancar
1. Sin combustible. 1. Llene el estanque de combustible.
2. Motor sin la “ESTRANGULACIÓN” (CHOKE)
adecuada.
3. Motor ahogado. 3. Espere varios minutos antes detratar de arrancar.
4. Bujía mala. 4. Cambie la bujía.
5. Filtro de aire sucio. 5. Limpie/cambie el filtro de aire.
6. Filtro de combustible sucio. 6. Cambie el filtro de combustible.
7. Agua en el combustible. 7. Vaciar el estanque de combustible y el carburador, vuelva
8. Alambrado suelto o dañado. 8. Revise todo el alambrado.
9. Válvulas del motor desajustadas. 9. Pongase en contacto con un centro de servicio cuali-
1. Filtro de aire sucio. 1. Limpie/cambie el filtro de aire.
2. Bujía mala. 2. Cambie la bujía.
3. Batería baja o descargada. 3.
4. Filtro de combustible sucio. 4. Cambie el filtro de combustible.
5. Combustible rancio o sucio. 5. Vaciar el estanque de combustible y vuelva a llenarlo con
6. Alambrado suelto o dañado. 6. Revise todo el alambrado.
7.
Válvulas del
motor desajustadas. 7. Pongase en contacto con un centro de servicio cualificado.
2. Vea “PARA HACER ARRANCAR EL MOTOR” en la sección de operación.
a llenar el estanque con gasolina nueva cambie el filtro de
combustible.
ficado.
Vuelva a cargar o cambie la batería.
gasolina nueva.
El motor no la vuelta
El motor suena pero
no arranca
Pérdida de fuerza
Vibración
excesiva
1. Pedal del freno no presionado. 1. Presione el pedal del freno.
2. El embrague del accesorio está enganchado. 2. Desenganche el embrague del accesorio.
3. Batería baja o descargada. 3.
4. Fusible quemado. 4. Cambie el fusible.
5.
Terminales de la batería corroídos.
6. Alambrado suelto o dañado. 6. Revise todo el alambrado.
7. Interruptor de la ignición fallado. 7. Revise/cambie el interruptor de la ignición.
8. Solenoide o arrancador fallados. 8. Revise/cambie el solenoide o arrancador.
9. Interruptor(es) que exige(n) la presencia del
operador fallado.
1. Batería baja o descargada 1.
2.
Terminales de la batería corroídos.
3. Alambrado suelto o dañado. 3. Revise todo el alambrado.
4. Solenoide o arrancador fallados. 4. Revise/cambie el solenoide o arrancador.
1.
Corta mucho césped, muy rápido.
2. Acelerador en la posición de arranque en clima
frío ( ).
3. Acumulación de césped, hojas y basura debajo
de la segadora.
4. Filtro de aire sucio. 4. Limpie/cambie el filtro de aire.
5. Nivel de aceite bajo/aceite sucio. 5. Revise el nivel de aceite/cambie el aceite.
6. Bujía fallada. 6. Limpie y vuelva a ajustar la abertura o cambie la bujía.
7. Filtro de combustible sucio. 7. Cambie el filtro de combustible.
8. Combustible rancio o sucio. 8. Vaciar el estanque de combustible y vuelva a llenarlo con
9. Agua en el combustible. 9. Vaciar el estanque de combustible y el carburador, vuelva
10. Alambrado de la bujía suelto. 10. Conecte y apriete el alambre de la bujía.
11. Rejilla/aletas de aire del motor sucias. 11. Limpie las rejilla/aletas de aire del motor.
12. Silenciador sucio/taponado. 12. Limpie/cambie el silenciador.
13. Alambrado suelto o dañado. 13. Revise todo el alambrado.
14. Válvulas del motor desajustadas. 14. Pongase en contacto con un centro de servicio cuali-
1. Cuchilla desgastada, doblada o suelta. 1. Cambie la cuchilla. Apriete el perno de la cuchilla.
2. Mandril de la cuchilla doblado. 2. Cambie la mandril de la cuchilla.
3. Parte(s) suelta(s)/dañada(s). 3. Apriete la(s) parte(s). Cambie las partes dañadas.
Vuelva a cargar o cambie la batería.
5. Limpie los terminales de la batería.
9. Póngase en contacto con un centro de servicio cualificado.
Vuelva a cargar o cambie la bate
2.
Limpie los terminales de la batería.
1. Eleve la altura de corte/reduzca la velocidád
2. Desplace el control del acelerador a la posición
rápida ( ).
3. Limpie la parte inferior de la cajade la segadora.
gasolina nueva.
a llenar el estanque con gasolina nueva y cambie el filtro
de combustible.
ficado.
ría.
59
Page 60

IDENTIFICACIÓN DE PROBLEMAS
PROBLEMA CAUSA CORRECCIÓN
El motor continúa
funcionando cuando
el operador se baja
del asiento con el
embrague del accesorio enganchado
1. Sistema de control que exige la presencia del
operador –seguridad fallado.
1. Revise el alambrado, los interruptores y la conexiones.Si
no están correctas, pongase en contacto con un centro
de servicio cualificado.
PRECAUCIÓN: NO opere la máquina sino hasta haber
corregido el problema.
El corte disparejo
Las cuchillas segadoras no rotan
Mala descarga del
césped
Las luz (ces) de
lantera(s) no
funcionando
La batería no carga
Pérdida de
impulsión
El motor tiene “contraexplosiones”
cuando se “APAGA”
El tractor se ponen
marcha atrás
1. Cuchilla desgastada, doblada o suelta. 1. Cambie la cuchilla. Apriete el perno de la cuchilla.
2. El conjunto segador no estánivelado. 2. Nivele el conjunto segador.
3. Acumulación de césped, hojas y basura debajo
de la segadora.
4. Mandril de la cuchilla doblado. 4. Cambie la mandril de la cuchilla.
5. Los agujeros de ventilación del conjunto segador taponadosdebido a la acumulación de
sped, hojas y basura
1. Obstrucción en el mecanismo del embrague. 1. Remueva la obstrucción.
2. La correa de impulsión de la segadora está
desgastada/dañada.
3. Polea de guía atascada. 3. Cambie la polea de guía.
4. Mandril de la cuchilla atascado. 4. Cambie la mandril de la cuchilla.
1. Velocidad del motor muy lenta. 1. Ponga el control de la aceleración en la posición de
2. Velocidad de recorrido demasiado rápida. 2. Cambie a una velocidad más lenta.
3. Césped mojado. 3. Permita que se seque el céspedantes de segar.
4. El conjunto segador no estánivelado. 4. Nivele el conjunto segador.
5. Presión de aire de las llantas baja o dispareja. 5. Revise las llantas para verificarque tienen la presión de aire.
6. Cuchilla desgastada, doblada o suelta. 6. Cambie/afile la cuchilla. Apriete el perno de la cuchilla.
7. Acumulación de césped, hojas y basura debajo
de la segadora.
8. La correa de impulsión de la segadora está desgastada o desajustada.
9. Las cuchillas están mal coninstaladas. 9.
10. Cuchillas inadecuadas en uso. 10. Cambie por las cuchillas enumeradas en este manual.
11. Los agujeros de ventilación del conjunto agujeros
segador taponados debido a la acumulación de
césped, hojas y basura alrededor de los mandriles.
1. El interruptor está “APAGADO”(OFF). 1. “ENCIENDA” (ON) el interruptor.
2. Bombilla(s) o lámpara(s) quemada(s). 2.
3. Interruptor de la luz fallado. 3. Revise/cambie el interruptor de la luz.
4. Alambrado suelto o dañado. 4.
5. Fusible quemado. 5. Cambie el fusible.
1.
Elemento(s) de la batería malo(s).
2.
Malas conexiones de cables.
3. Regulador fallado (si equipado). 3. Cambie el regulador.
4. Alternador fallado. 4. Cambie el alternador.
1. El control de rueda libre está enla posición
“DESENGANCHADO” (dis en gaged).
2. Residuos es en de la placa de dirección. (Si los
tiene)
3. La correa de impulsión de impulsión de movimiento. 3. Reemplace la correa de movimien-to esta gastada, dañada
4. Aire atrapado en la transporte o el servicio. 4. Purgue la transmisión.
5. Llave cuadrada de eje es ausente. 5. Vea “PARA REMOVER LAS RUEDAS” en la sección de
1. El control de la aceleración del motor no fue
ajustado en la posición de velocidad media y
máxima (rápida) antes de para el motor.
1. El sistema de funcionamiento atrás (ROS) no está
"ON", cuando enganche la segadora o otro accesorio.
alrededorde los mandriles.
3. Limpie la parte inferior de la cajade la segadora.
5. Limpie alrededor de los mandriles para abrir los de
cé-
ventilación.
2. Cambie la correa de impulsión de la segadora.
“RÁPIDO” (fast).
7. Limpie la parte inferior de la cajade la segadora.
8. Cambie/ajuste la correa de impulsión de la segadora.
Vuelva a instalar las cuchillas elborde afilado hacia abajo.
11. Limpie alrededor de los mandriles para abrir los de
ventilación.
Cambie la bombilla(s) o lámpara(s).
Revise el alambrado y las conexiones.
1. Cambie la batería.
2. Revise/limpie todas las cables.
1. Ponga el control de rueda libre enla posición
“ENGANCHADO”(disengaged).
2. Vea “LIMPIEZA” en la sección de Mantenimento de este
manual.
o rota.
Servicio y Ajustes de este manual.
1. Mueva el control de la aceleración a la posición de velocidad media y máxima (rápida) antes de para el motor.
1. Girar el ROS en la posición "ON".Vea la sección de
operación.
60
Page 61
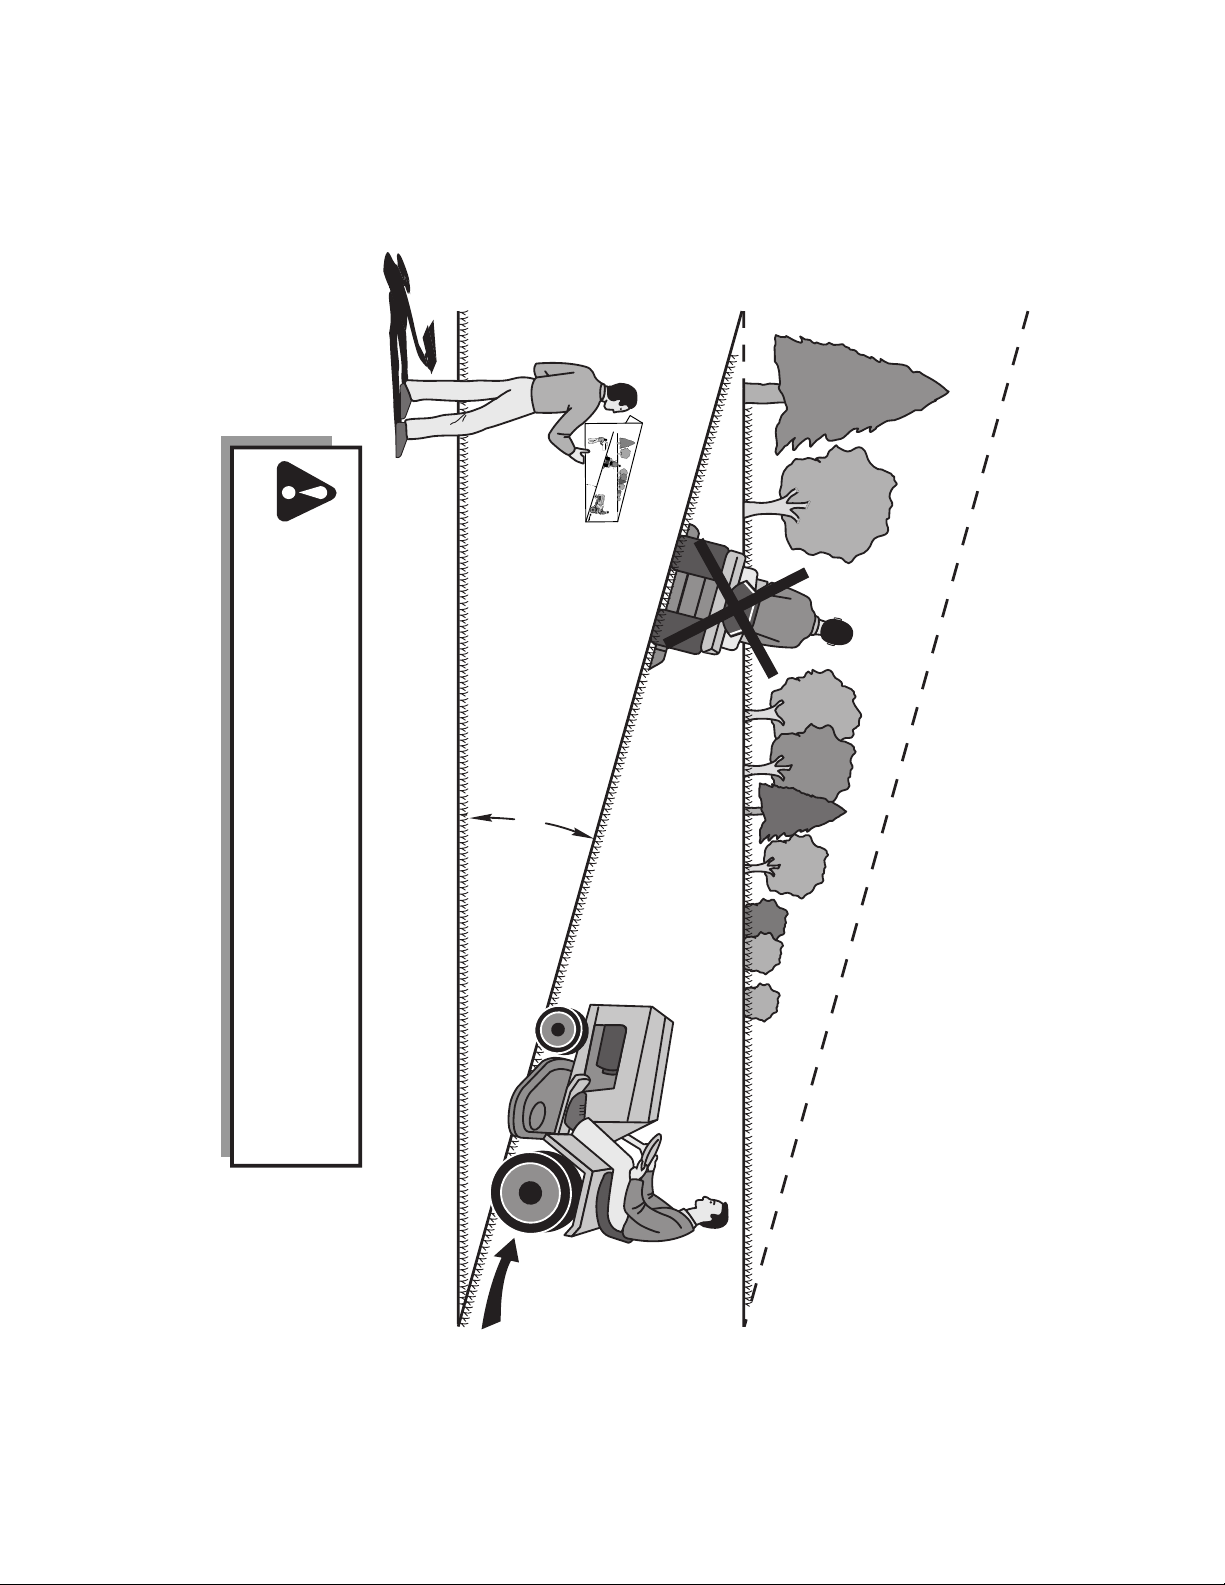
15 GRADOS MAX.
PLEGAR A LO LARGO DE LA LÍNEA PUNTEADA
ESTA ES UNA PENDIENTE DE 15 GRADOS
SOLAMENTE ANDE CUESTA ARRIBA O
CUESTA ABAJO Y NO ATRAVIESE EL CERRO
GUÍA SUGERIDA PARA MEDIR LAS PENDIENTES CON LA VISTA PARA UNA
OPERACIÓN SEGURA
ADVERTENCIA: Para evitar daños graves, haga funcionar su tractor arriba
y abajo de las pendientes, nunca transversalmente con respecto a las
pendientes. No cortar pendientes mayores de 15 grados. Haga los
virajes gradualmente para evitar volcarse o la pérdida de control.
Tenga mucho cuidado cuando cambie de dirección en las pendientes.
1. Plegar esta página a lo largo de la línea punteada arriba indicada.
2. Tener la página ante de sí mismos de modo que su borde izquierdo sea vertical
paralelo al tronco del árbol u otra estructura vertical.
3. Mirar a través del pliegue en dirección de la pendiente que se quiere medir.
4. Comparar el ángulo del pliegue con la pendiente del terreno.
61
Page 62

Productos de consumo equipados con ruedas – Garantía limitada
Husqvarna garantiza al comprador minorista original que este producto Husqvarna® carece de defectos materiales o de fabricación para un uso y mantenimiento
normales desde el día de la compra, dentro del periodo de garantía aplicable indicado en el Anexo A.
Esta Garantía limitada no se podrá transferir a ningún comprador
posterior de este producto Husqvarna®. Ciertos componentes (por ejemplo, los motores y las transmisiones) quedan excluidos de la cobertura y se aplican otras
limitaciones, según se describe en este documento. Husqvarna reparará o sustituirá, según su criterio y sin cargo alguno, cualquier producto o pieza defectuoso cubierto
por la Garantía limitada, en cualquier concesionario/centro de servicio Husqvarna autorizado, utilizando repuestos originales de OEM Husqvarna, de conformidad con
las limitaciones y exclusiones que se describen a continuación. Husqvarna no ofrece programa de cambio directo.
EXCENCIONES, LIMITACIONES Y EXCLUSIONES
1. EXENCIÓN DE GARANTÍA. ESTA GARANTÍA LIMITADA ES LA ÚNICA GARANTÍA EXPLÍCITA PROPORCIONADA POR HUSQVARNA, Y NO EXISTEN
OTRAS GARANTÍAS EXCEPTO LAS AQUÍ EXPUESTAS, SALVO LAS QUE PUEDA ESTABLECER LA LEY . ESTA GARANTÍA SOLO
POR HUSQVARNA Y SOLO HUSQVARNA LA PUEDE MODIFICAR. ESTA GARANTÍA LIMITADA ES LA MANIFESTACIÓN FINAL DE NUESTRO ACUERDO, Y
ES UNA DECLARACIÓN COMPLETA Y EXCLUSIVA DE LAS CONDICIONES DE DICHO ACUERDO. ESTA GARANTÍA LIMITADA LE OTORGA DERECHOS
LEGALES ESPECÍFICOS, AUNQUE TAMBIÉN PUEDE TENER OTROS DERECHOS DEPENDIENDO DE LA UBICACIÓN.
2. DURACIÓN LIMITADA. CUALQUIER GARANTÍA QUE PUEDA SER IMPLÍCITA DE ACUERDO CON LAS LEYES (INCLUIDA CUALQUIER GARANTÍA
IMPLÍCITA DE IDONEIDAD PARA UN FIN O USO DETERMINADO O DE COMERCIABILIDAD) SE LIMITA A LA DURACIÓN DEL PERÍODO DE GARANTÍA
APLICABLE SEGÚN ESTA GARANTÍA LIMITADA.
IMPLÍCITA, DE MODO QUE LAS LIMITACIONES ANTERIORES PUEDEN NO APLICARSE EN SU CASO.
3. RECURSOS EXCLUSIVOS. EN ALGUNAS ZONAS, INCLUIDA LA PROVINCIA DE QUEBEC, NO SE PERMITE LA EXCLUSIÓN O LIMITACIÓN DE
RESPONSABILIDADES POR DAÑOS PERSONALES O MATERIALES DERIVADOS DE FALLAS DEL FABRICANTE Y/O LA EXCLUSIÓN O LIMITACIÓN DE
DAÑOS ACCIDENTALES O DERIVADOS. POR LO TANTO, ES POSIBLE QUE NO LE AFECTEN ALGUNAS DE LAS SIGUIENTES LIMITACIONES. LAS
PREVISIONES ANTERIORES SON EXCLUSIVAS PARA CUALQUIER VIOLACIÓN DE ESTA GARANTÍA LIMITADA. NO SE DISPONE DE NINGÚN OTRO
RECURSO ANTE DAÑOS ESPECIALES, ACCIDENTALES O DERIVADOS, PÉRDIDA DE BENEFICIOS, PÉRDIDA DE VENTAS, DAÑOS PERSONALES O
MATERIALES, ENTRE OTROS, NI ANTE NINGUNA OTRA PÉRDIDA ACCIDENTAL O DERIVADA, Y SE DECLINA CUALQUIER RESPONSABILIDAD ANTE ESOS
DAÑOS.
4. Los motores, las transmisiones y otros componentes determinados NO están cubiertos. Esta Garantía limitada no cubre
(a) Motores y accesorios.A excepción de los casos en que se indica otra cosa en el Anexo A
mayoría de los casos, estos elementos NO han sido fabricados por Husqvarna, en cuyo caso pueden estar cubiertos por separado por la garantía de sus respectivos fabricantes, si tal
garantía se proporciona e incluye con el producto en el momento de la compra. Todos los reclamos de este tipo deben presentarse y enviarse al fabricante correspondiente, o según
se indique en esas garantías separadas. Husqvarna no tiene autorización para realizar ajustes o reparaciones contemplados por la garantía en motores fabricados por Briggs &
Stratton, Honda, Kawasaki o Kohler (Husqvarna sí maneja cuestiones de garantía en motores fabricados por Liquid Combustion Technologies (LCT)). Husqvarna no asume
ninguna obligación de garantía, derivada de esta Garantía limitada, relativa a los motores de otros fabricantes.
(b) Transmisiones. Excepto en los casos en que se indica otra cosa en el Anexo A
Garantía limitada. En la mayoría de los casos, estos elementos NO han sido fabricados por Husqvarna, en cuyo caso pueden estar cubiertos por separado por la garantía de sus
respectivos fabricantes, si tal garantía se proporciona e incluye con el producto en el momento de la compra. Los fabricantes de transmisiones/transejes Dana, Hydro-Gear y TuffTorq proporcionan una garantía de la transmisión/transeje al comprador final o a Husqvarna. Husqvarna asignará la garantía del fabricante de la transmisión/transeje o cualquier
derecho sobre dicho elemento al comprador original de la unidad. Para obtener servicios en garantía de transmisiones/transejes, contacte primero al minorista al que compró la
unidad. Si necesita asistencia o tiene dudas relativas al alcance de la garantía de la transmisión/transeje, contacte directamente con Husqvarna a través de nuestro sitio web
www.husqvarna.com, o llame al 800-487-5951 (EE.UU.) o 800-805-5523 (Canadá) para solicitar la asistencia de un proveedor de servicios autorizado de Husqvarna. Todos los
reclamos de este tipo deben presentarse y enviarse al fabricante correspondiente, o según se indique en esas garantías separadas. Husqvarna no tiene autorización para realizar
ajustes o reparaciones contemplados por la garantía de transmisiones o transejes. Husqvarna
fabricantes antes enumerados (para ver las excepciones, consulte el Anexo
(c) Piezas no renovables. Esta Garantía limitada no cubre piezas y elementos de mantenimiento general ("Piezas no renovables
lubricantes, cuerdas de arranque, correas, cuchillas y adaptadores de cuchillas.
(d) Componentes para control de emisiones. Esta Garantía limitada no cubre equipos ni componentes de control de emisiones
EE. UU o instituciones estatales, provinciales o federales similares. Esos equipos y componentes están cubiertos por una declaración de garantía de control de emisiones separada
que se suministra con su nuevo producto. Consulte esta declaración de garantía aparte para ver los detalles.
EN ALGUNOS SITIOS NO SE PERMITEN LAS LIMITACIONES DE LA DURACIÓN DE UNA GARANTÍA
lo siguiente:
, todos los motores y accesorios no están cubiertos por esta Garantía limitada. En la
, las transmisiones/transejes (incluidos los sistemas de transmisión) no están cubiertos por esta
no asume ninguna obligación derivada de esta Garantía limitada respecto a los
A).
"), incluidos, entre otros, bujías, bombillas, filtros,
impuestos por la agencia de protección ambiental de
ESTÁ PROPORCIONADA
5. Cualquier uso COMERCIAL, INSTITUCIONAL, AGRÍCOLA, INDUSTRIAL, GENERADOR DE INGRESOS o en ALQUILER provocará la
pérdida de garantía o la reducción del período de garantía. Dependiendo del producto, o bien NO EXISTE GARANTÍA (ya sea establecida por ley,
contractual o de otro tipo) o tiene una garantía reducida si el producto se utiliza para propósitos comerciales, institucionales, agrícolas, industriales, de
generación de beneficios o de alquiler y, en tales circunstancias, se o
frece esta Garantía limitada en su lugar, reemplazando cualquier régimen de garantías
proporcionado por ley. Consulte el Anexo A.
6. Los productos reparados o readaptados tienen una garantía limitada de 30 días. Bajo esta Garantía limitada, los productos reparados o readaptados, con
certificación de fábrica, tienen una garantía limitada de 30 días respecto a piezas y mano de obra para uso no comercial. Los productos solo se reacondician en
la fábrica Husqvarna.
7. Responsabilidades del propietario. Para conservar sus derechos bajo esta Garantía limitada, debe realizar un cuidado y uso razonables del producto, que
incluye cumplir con el mantenimiento preventivo, el almacenamiento y el uso de combustible y aceite indicados en el manual del operador proporcionado. Por
ejemplo, los siguientes elementos son responsabilidad del propietario y no
están cubiertos por esta Garantía limitada:
a. Servicio de configuración y previo a entrega, así como ajustes del motor.
b. Los ajustes después de los primeros treinta (30) días posteriores a la compra y en adelante, como ajustes del cable del acelerador o de las guías de las
correas; y
c. El mantenimiento preventivo según se describe en el manual del operador.
Además, debe dejar de utilizar el producto de inmediato si se produce cualquier falla o daño. El producto debe llevarse a un concesionario de servicio
Husqvarna autorizado antes de seguir utilizándolo.
8. Los daños provocados por envejecimiento y desgaste normales o por negligencia NO están cubiertos. La Garantía limitada no cubre otros daños
distintos de los provocados por defectos de material o mano de obra. Los siguientes NO se consideran defectos de material o mano de obra y, por lo tanto, NO
están cubiertos.
62
Page 63

(a) Abrasión en plataformas de cortadoras de césped.
(b) Neumáticos dañados por pinchaduras externas.
(c) Decoloración natural del material debido a la luz ultravioleta.
(d) Daños en los equipos de corte por contacto con piedras u otros materiales y/o estructuras no admitidos.
Además, la Garantía limitada no cubre daños, averías ni fallas derivados del mal uso o de la negligencia en el uso del producto, en relación con lo siguiente:
(e) Incumplimiento del suministro o la ejecución de los servicios de mantenimiento indicados en el manual del operador.
(f) Abuso, uso indebido, negligencia, modificaciones, alteraciones, desgaste normal, mantenimiento incorrecto, uso de accesorios no autorizados, falta
de lubricación o falla del motor por el uso de aceites que no cumplen con las especificaciones del fabricante del motor.
(g) Uso de gasohol (combustible que contiene etanol), con contenido de metanol (combustible que contiene alcohol de madera). El combustible de
E15 o E85 NO
etanol
motor que NO están
está aprobado para usarse en los productos de Husqvarna. El uso de combustible E15 o E85 causará daños importantes en el
cubiertos por esta garantía de Husqvarna. NOTA: El gasohol (combustible que contiene etanol), con un máximo de 10% de
etanol (alcohol de grano) está aprobado. La proporción de mezcla prescrita de gasolina y aceite es de 50:1, está estipulada en la etiqueta de aceite de
Husqvarna y se indica en el manual del operador.
(h) Uso de éter o de cualquier otro líquido para el arranque.
(i) Limpieza del producto con presión o vapor.
(j) Uso de bujías que no cumplan los requisitos de emisiones enumerados en el manual del operador.
(k) Manipulación del regulador de velocidad o de los componentes de control de emisiones del motor, así como el funcionamiento del motor por
encima de las revoluciones especificadas y recomendadas que se indican en el manual
del operador.
(l) Funcionamiento de la unidad con escudos de corte, protecciones o dispositivos de seguridad instalados incorrectamente, retirados o modificados.
(m) Cualquier filtro de aire retirado o dañado, suciedad excesiva, abrasivos, agua salobre, humedad, corrosión, óxido, barniz, combustible caduco o
cualquier reacción adversa debida a procedimientos de almacenamiento incorrectos.
(n) Fallas debidas a configuración incorrecta, servicio previo a entrega o de reparación, realizado por alguien que no sea concesionario de servicio
Husqvarna autorizado, durante el período de garantía.
(o) Grasa o aceite contaminado con suciedad, uso de tipos incorrectos de grasa o aceite, incumplimiento de los intervalos de engrase recomendados,
daño por agua o humedad y/o almacenamiento incorrecto.
(p) Uso de pulverizadores para bombear o pulverizar materiales cáusticos o inflamables, filtros ausentes o
rotos, o bien:
(q) Uso continuado del producto después de la aparición de un problema o falla de funcionamiento.
9. Garantía limitada a 10 años de plataforma moldeada reforzada (blindada) y limitada de por vida de plataforma soldada. Estas garantías limitadas solo cubren la
carcasa de la plataforma; NO cubren las piezas o componentes mecánicos como correas, poleas, alojamientos de eje, cojinetes, cuchillas, varillas, reguladores de altura o ruedas
guía/antidesbroce. La Garantía limitada de por vida no cubre otros daños que los provocados por defectos de material o mano de obra. Los siguientes NO se consideran defectos de
material o mano de obra y, por lo tanto, NO están cubiertos:
(a) Abrasión de las plataformas del cortacésped, incluido el desgaste por arena.
(b) Daños en los equipos de corte por contacto con piedras u otros materiales y/o estructuras no admitidos.
(c) Óxido y corrosión.
(d) Decoloración natural de la pintura u otros materiales debido a la luz ultravioleta.
CÓMO OBTENER SERVICIO
10. Centro/concesionario de servicio Husqvarna autorizado. Para obtener cobertura de garantía, es su responsabilidad (a su cargo) entregar o enviar su
unidad Husqvarna a un centro/concesionario de servicio Husqvarna autorizado y organizar la recogida o la devolución de su unidad después de que se hayan
realizado las reparaciones. Si desconoce la ubicación del concesionario de servicio Husqvarna autorizado más cercano, llame a Husqvarna al 1-800-487-5951
de 8:00 a.m. a 8:00 p.m., Hora Estándar del Este, o visite www.husqvarna.com.
Si necesita asistencia o desea realizar consultas respecto a esta Garantía limitada,
puede comunicarse con nosotros a través del número 800-487-5951 (EE. UU.) u 800-805-5523 (Canadá) de 8:00 a.m. a 8:00 p.m., Hora Estándar del Este, o
mediante www.husqvarna.com.
11. Documentación requerida. Debe conservar y presentar este Comprobante de compra (que incluya la fecha, el modelo del producto y, si corresponde, el
número de serie del motor) a un concesionario de servicio Husqvarna autorizado para obtener el servicio de garantía de esta Garantía limitada. El comprobante
de compra es de su exclusiva responsabilidad. Husqvarna recomienda que registre su producto en línea en www.usa.husqvarna.com
(EE. UU. y Canadá) para
asegurarse, entre otras cosas, de recibir información importante sobre el producto. Sin embargo, el registro del producto no es condición para recibir el servicio
de garantía.
Husqvarna Professional Products, NA, Inc.
9335 Harris Corners Parkway, Suite 500, Charlotte, NC28269
575 49 43-01 W 2013 IR
63
Page 64

Tabla de garantía limitada de 2013 para productos de consumo con ruedas
Motor***
*
A
Consumidor
(personal, solo para
uso doméstico)
Producto/Componente
Tractores cortacésped:
Motor* * * *
óisimsnarT
Solo modelos XLS - carcasa de plataforma moldeada. Garantía
dnilb led adatimil
Carcasa de plataforma soldada. Garantía limitada de por vida *** Sin garantía Sin garantía
oña 1aíretaB
Tractores cortacésped residenciales de giro cero ( Solo RZ )
Motor* * * *
RZ4623 (967009801 & 967009802)
RZ5426 (967003601 & 967003602) - carcasa de plataforma
moldeada. Garantía limitada del bl aítnarag niSaítnarag niSsoña 01ejadni
Carcasa de plataforma soldada. Garantía limitada de por vida *** Sin garantía Sin garantía
ña 1aíretaB
Tractores cortacésped residenciales de giro cero ( EZ, MZ, M-ZT)
Motor* * * *
Transmisión** (Giro cero EZ y MZ)
Transmisión** (Giro cero M-ZT)
Carcasa de plataforma moldeada MZ5424S, MZ5425S, MZ5424SR.
Garantía limitada del blindaje. Producto # 967003902, 967003903 y
Carcasa de plataforma soldada. Garantía limitada de por vida *** Sin garantía Sin garantía
Quitanieves, arados, ribeteador LE475
Motor* * * *
Cortacésped de empuje, segadora de rueda alta
2 años ** 1 año ** 90 días
2 años ** 2 años ** 90 días
ña 3soredecerep setnenopmoc sortO
Comercial (cualquier uso
comercial, profesional,
institucional, agrícola o que
genere ingresos, que no
sea para alquiler)
rag niS soña 3)sselreeP/anravqsuH rop adacirbaf se is( nóisimsnarT
g niS** ** nóisimsnarT
odaetarrorp ,o
aítnarag niSsoña 01.12052
ña 1 so
íd 09soña 3soredecerep setnenopmoc sortO
Anexo A
Alquiler
(cualquier uso
para alquiler)
aítnarag niSaítnarag niSsoña 5oretnaled eje ,sisahc ,roditsaB
aítnarag niSaítna
** ** ** **)sorecret ed se is( n
aítnarag niSaítnarag niSsoña 01eja
aítnarag niSaítnarag niSodaetarrorp ,
aítnarag niSaítnarag niS soña 3soredecerep setnenopmoc sortO
aítnarag niSaítnara
aítnarag niSaítnarag niS
aítnarag niSaítnarag niS soña 3soredecerep setnenopmoc sortO
aítnarag niS
aítnarag niSodaetarrorp ,oña 1odaetarrorp ,oña 1aíretaB
aítnarag niSo
saíd 09saíd 09soña 5ordalat ed sejanargne ed ajaC
saíd 09sa
aítnarag niSaítnarag niS***odara ed setneiD
c sortO
Cortadoras con colchón de aire
Motor* * * *
sientos de plataforma montados al frente (120S, 220T, 322T)
ed eje ,sisahc ,roditsaB
Motor* * * *
tarrorp ,oña 1aíretaB
Cultivadoras
niSodaetarrorp ,oña 1aíretaB
Esparcidoras
1arodicrapsE
Cortadoras de césped robóticas
Batería 1 año 1 año 1 año
Consumidor Comercial Alquiler
64
aítnarag niSaítnarag niSodaetarrorp ,oña 1aíretaB
aítnarag niSaítnarag niSsoña 3soredecerep setnenopmo
saíd 09oña 1soña 2soredecerep setnenopmoc sortO
aítnarag niSaítnarag niSsoña 3oretnal
aítnarag niSaítnarag niS** nóisimsnarT
aítnarag niSaítnarag niSodae
aítnarag niSaítnarag niSsoña 3soredecerep setnenopmoc sortO
aítnara
g niSaítnarag
aítnarag niSaítnarag niSsoña 2soredecerep setnenopmoc sortO
oña 1oña 1oña
saíd 09saíd 09soña 2acitóbor depséc ed arodatroC
Page 65
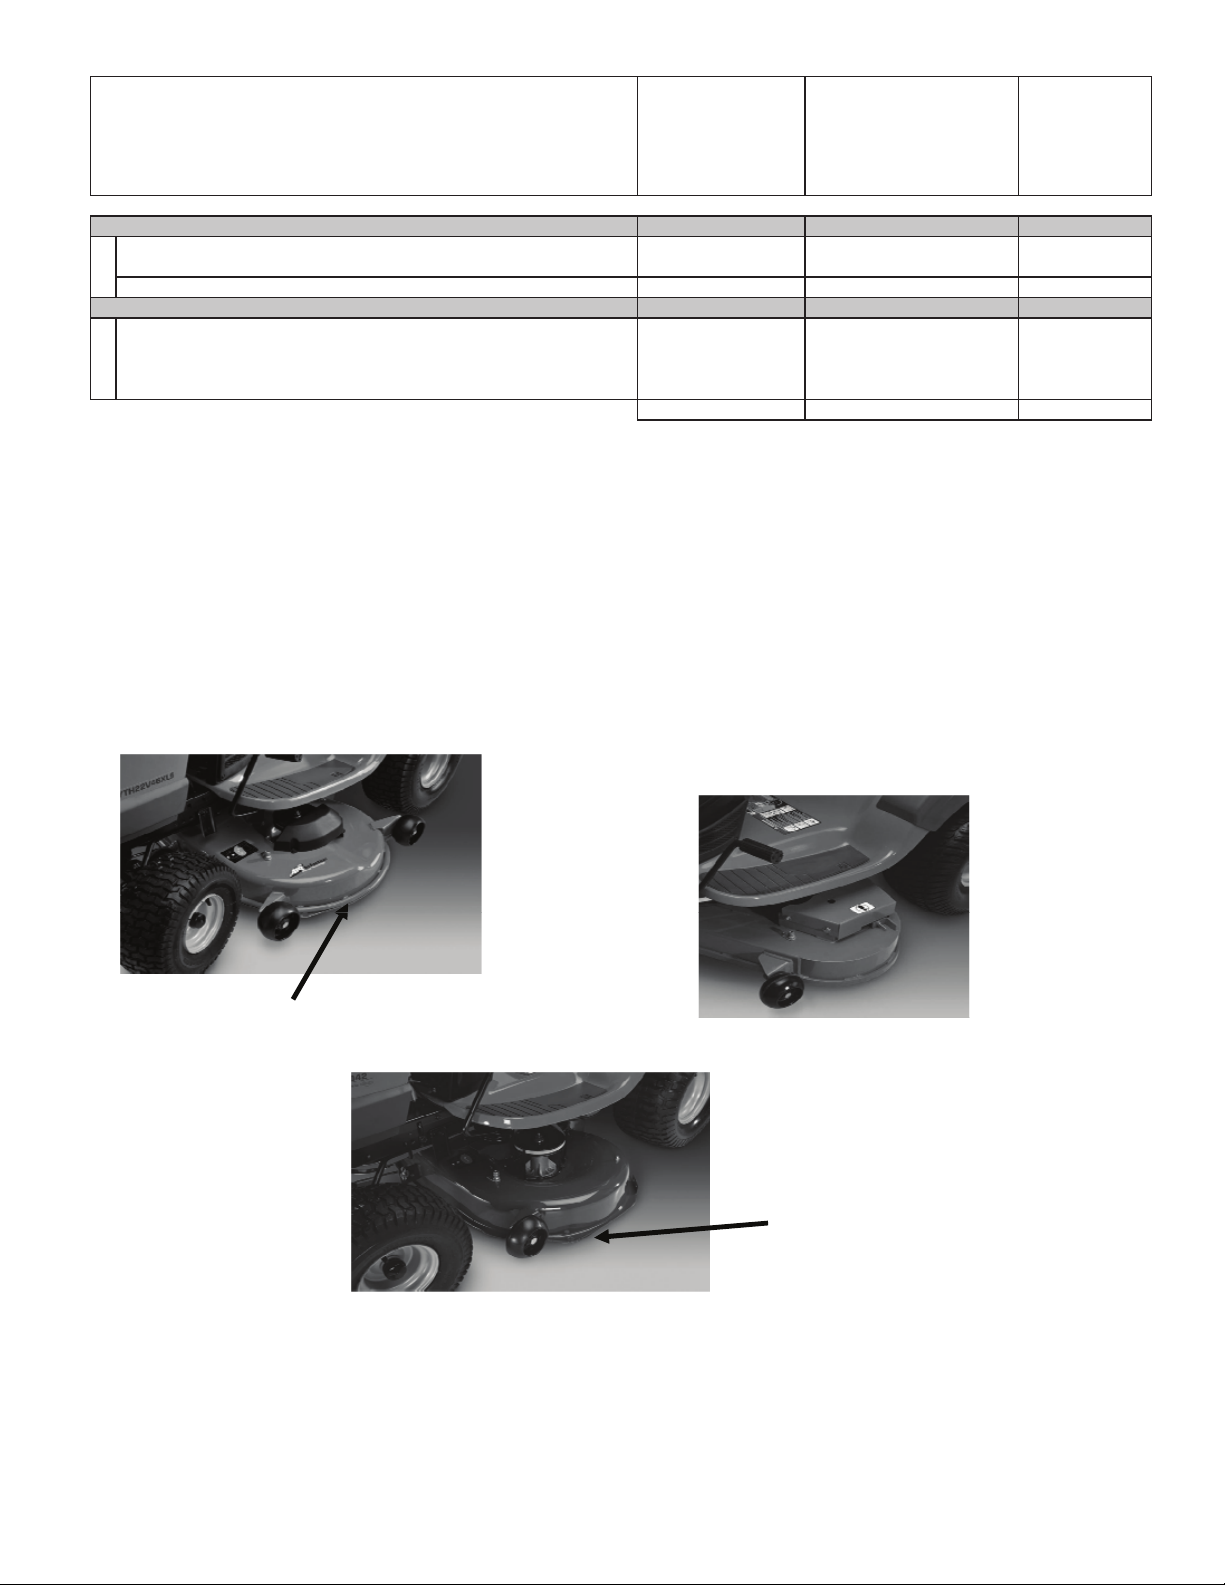
Tabla de garantía limitada de 2013 para productos de consumo con ruedas
r
l
A
r
Consumidor
(personal, solo para
uso doméstico)
Producto/Componente
Piezas y accesorios (si se compran)
Accesorios (por ejemplo, trampa para césped, accesorios de
,sallihcuc ,saerroc olpmeje rop( sazeiP
Piezas y accesorios (si se cambian en el Servicio de garantía)
Los repuestos y/o accesorios proporcionados bajo esta Garantía
limitada se garantizan únicamente por el SALDO del período de
garantía limitada aplicable a la pieza o al accesorio que se cambió. Ver a la izquierda Ver a la izquierda Ver a la izquierda
Consumido
* Consulte la garantía separada del fabricante o del fabricante del motor. Motores LCT en quitanieves y arados específico
de Husqvarna.
** Consulte la referencia 4 (b) de la declaración de garantía.
RZ – Dos (2) años de garantía al consumidor, piezas y mano de obra, con red de dist
EZ – Un (1) año de garantía comercial, piezas y mano de obra, con Husqvarna.
Dos (2) años de garantía al consumidor, piezas y mano de obra, con red de distribuidores Hydro-Gear.
MZ – (Transmisión ZT3100) Un (1) año de garantía comercial, piezas y mano de obra, con red de distribuidores Hydro-Gear.
(Transmisión ZT3100) Dos (2) años de garantía al consumidor, piezas y mano de obra, con red de distribuidores Hydro-Gear.
M-ZT – (Transmisión ZT3400) Dos (2) año de garantía comercial, piezas y mano de obra, con red de distribuidores Hydro-Gear.
*** La "Garantía limitada de por vida" de los dientes de arado y el equipo de corte soldado es para toda la vida del producto o 7 (siete) años
después de la última fecha de producción final de la unidad completa, lo que ocurra primero. La sustitución de la carcasa de co rte está limitada
a un máximo de dos (2) equipos de corte dentro de la Garantía limitada de por vida.
ribuidores Hydro-Gear.
Comercial (cualquier uso
comercial, profesional,
institucional, agrícola o que
genere ingresos, que no
sea para alquiler)
Comercia
s, garantía a través
Anexo A
Alquiler
(cualquier uso
para alquiler)
aítnarag niSaítnarag niSoña 1.).cte ,seuqohcarap arap nóiccetorp
aítnarag niSaítnarag niSsaíd 09).cte
lquile
A continuación, ejemplo de carcasa de plataforma moldeada blindada
A continuación, ejemplo de carcasa de plataforma soldada
Carcasa de plataforma
moldeada blindada
Zona reforzada
A continuación, carcasa de plataforma
moldeada, NO reforzada
Sin zona reforzada
65
Page 66

NOTES/AVISO
66
Page 67

NOTES/AVISO
67
Page 68

09/30/2013 CL/AP
 Loading...