

Page 1
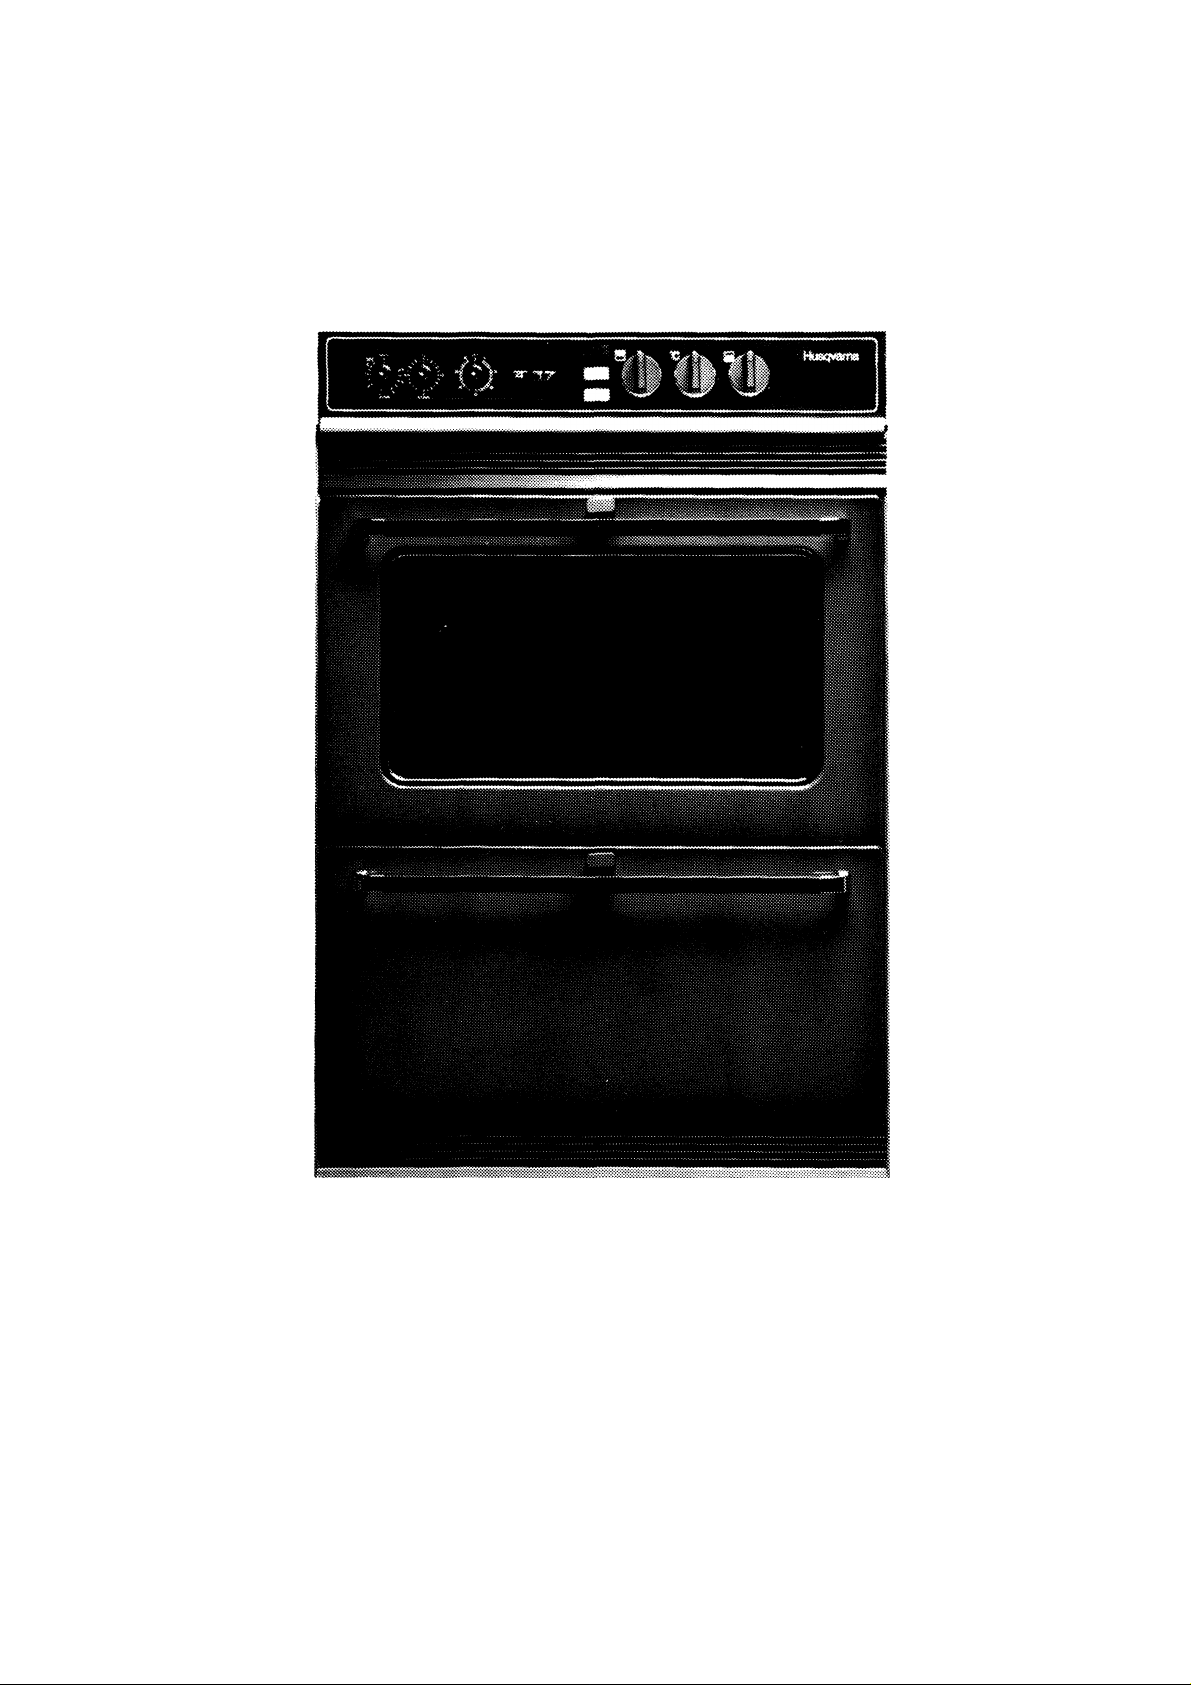
HUSQVARNA
BUILT-IN OVENS
Operating manual
Page 2
List of contents
Installation of the Oven 2
Electrical Connection 3
Fitting of Doors 3
Description 3
Using the Oven for the first time 3
Oven Controls 4
Grill Spit 4
Automatic Timer 5
General Hints \when using the ovens 6
Cleaning Instructions 7
Exchanging the Charcoal Filter and Oven Lamp 7
Service 8
Technical Data
Duo Oven
Wattage 5.07 KW
Voltage 240 volts a.c. 50HZ
Weight 58 Kg
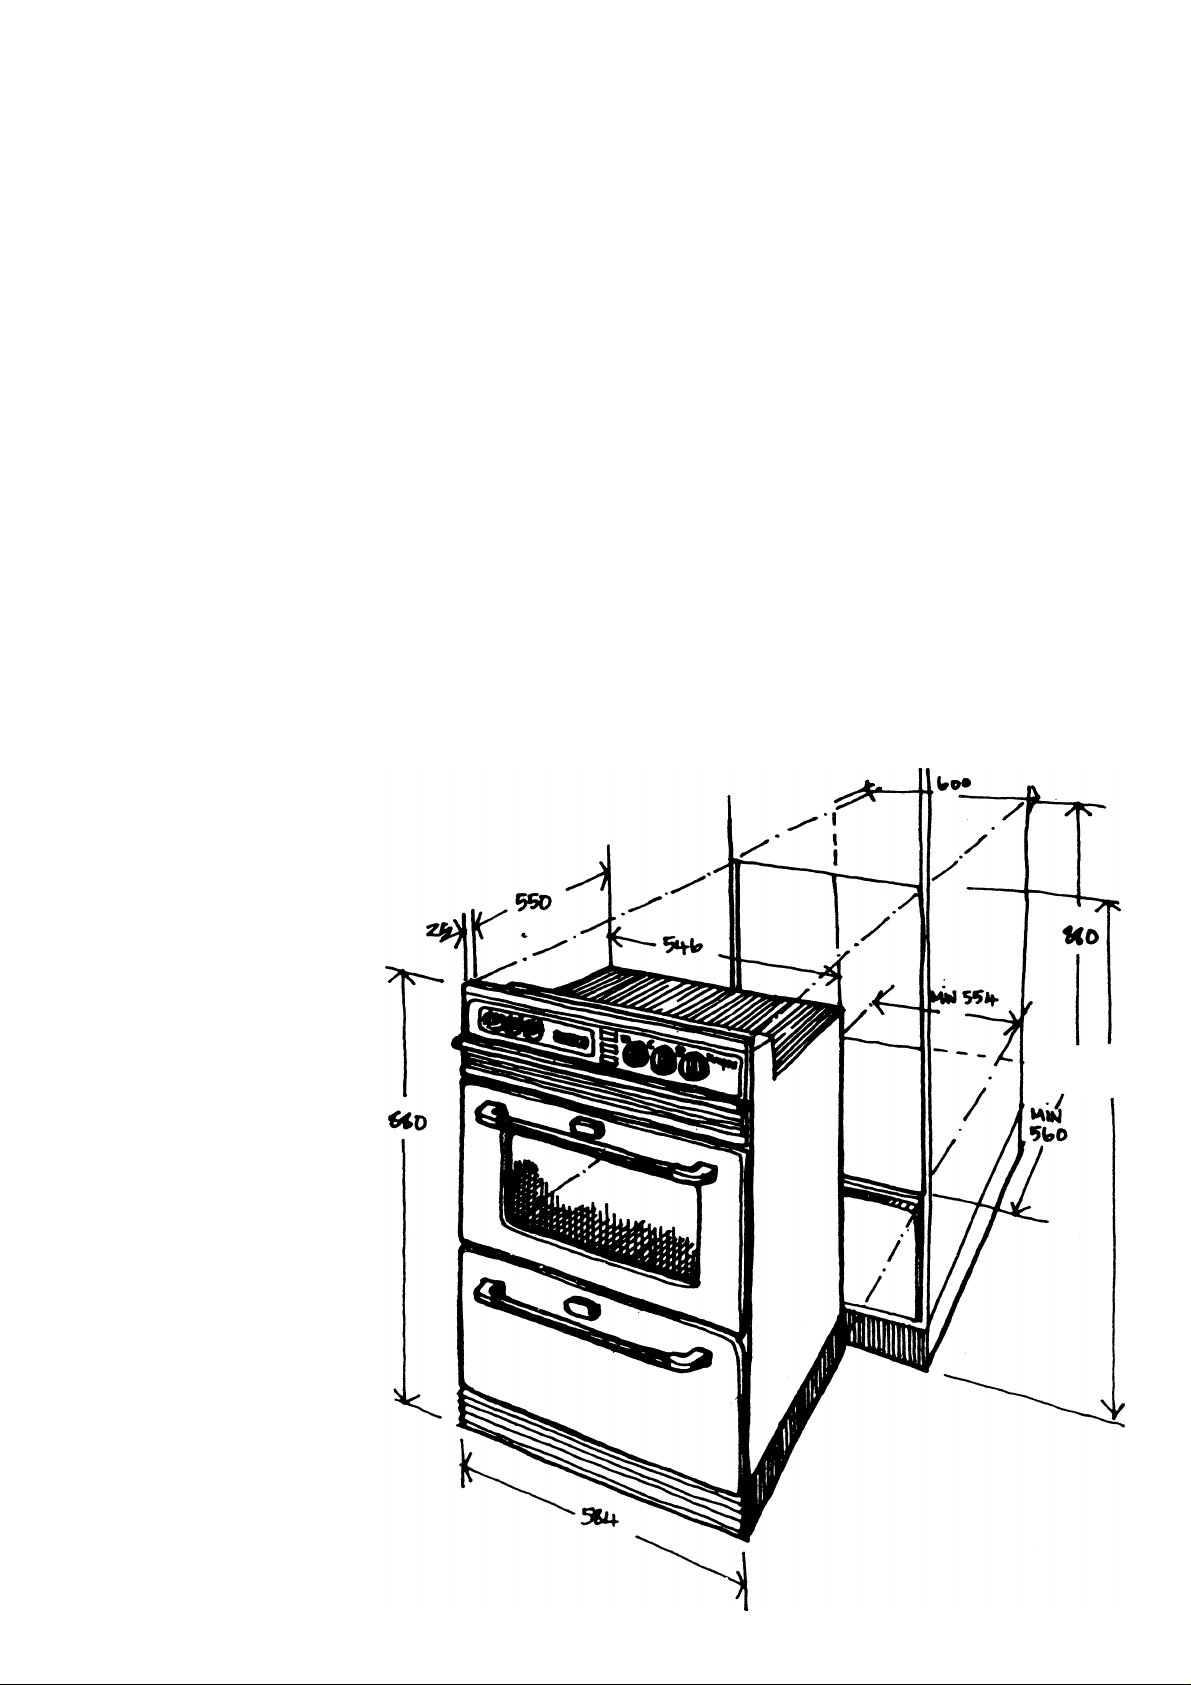
Width 584 mm
Height 880 mm
Depth 580 mm
Installation
The Reginett Duo is designed to be installed in
an oven housing having an aperture size as
indicated below. Ensure that the oven is not
installed adjacent to surfaces that can be affected
by heat such as fabric, plastic or polystyrene.
Before installing the oven in the housing
connect the appliance to the electrical supply first
so that if the need should arise for the oven to be
withdrawn from the housing the electrical cable is
sufficient in length for this to be carried out. Then
remove the air outlet ventilation grill and carbon
filter. Slide the oven into the housing. With the two
screws supplied, fix the oven to the housing through
the fixing holes on the left and right hand side of the
filter aperture. Replace the carbon filter and grill.
Page 3
Electrical connection
WARNING
- THIS APPLIANCE MUST BE
EARTHED
Your Husqvarna cooking appliance must be
connected to a double pole main switch, situated
in close proximity to the appliance, by a qualified
electrician.
Ensure that the voltage marked on the rating
plate situated on the rear of the cooker
corresponds to your mains supply voltage.
ELECTRICAL CONNECTION, DUO OVEN
® @ ®
NEUTRAL LIVE AUTO-TIMER EARTH
CONNECTION
The'thermostatic hotplate on the Reginett
electric top and the rear right-hand heating zone
of the Ceramic hob can be auto-timed by the Duo
Oven.
Disconnect the link between terminal 4 and 5
on the hobs and then connect terminal 5 to
terminal 4 on the Duo Oven.
2345
Fitting of Doors
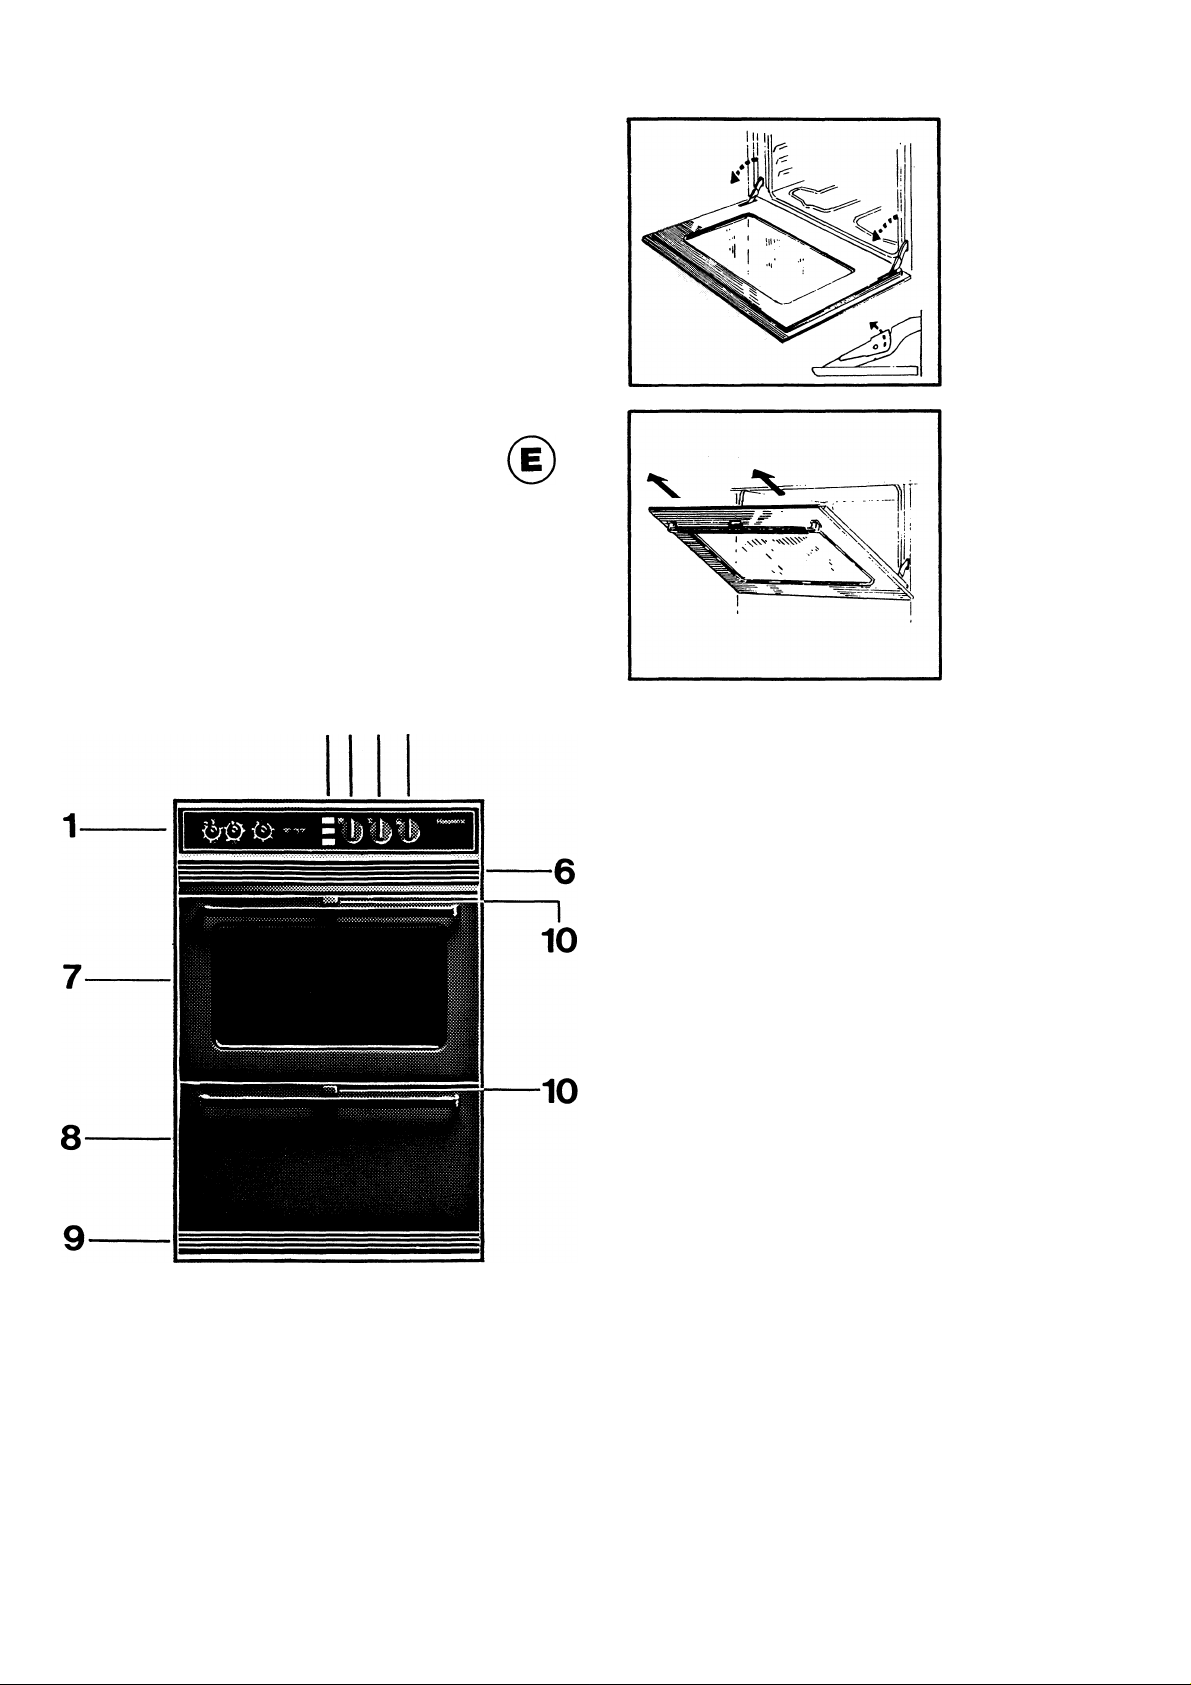
Firstly ensure that the hinge hooks are in the
upright position on all four hinges. If this is not the
case pull the hinge forward until the hook is
exposed and lift the hook up then allow the hinge
to return into the oven body until the hook grips.
Then place the door sqilarely onto the hinges,
open the door to its fullest extent, push the hooks
back into position and close the door.
Description
1. Auto-timer
2. Indicator Lamps
3. Upper Oven Element Control
4. Upper Oven Thermostat
5. Lower Oven Control
6. Air Outlet Ventilation Grill
7. Upper Oven
8. Lower Oven
9. Air inlet Ventilation Grill
10. Door Safety Catch
Using the oven for
the first time
NOTE: Before using the oven for the first time
both ovens should be burned in. Ensure that all
cardboard packing etc., is removed from both
ovens before switching on the electrical supply.
Set both ovens on their highest setting for
approx. 30 minutes making sure that the kitchen
is thoroughly ventilated as a certain amount of
smoke can develop.
Page 4
Upper Oven Element
Control
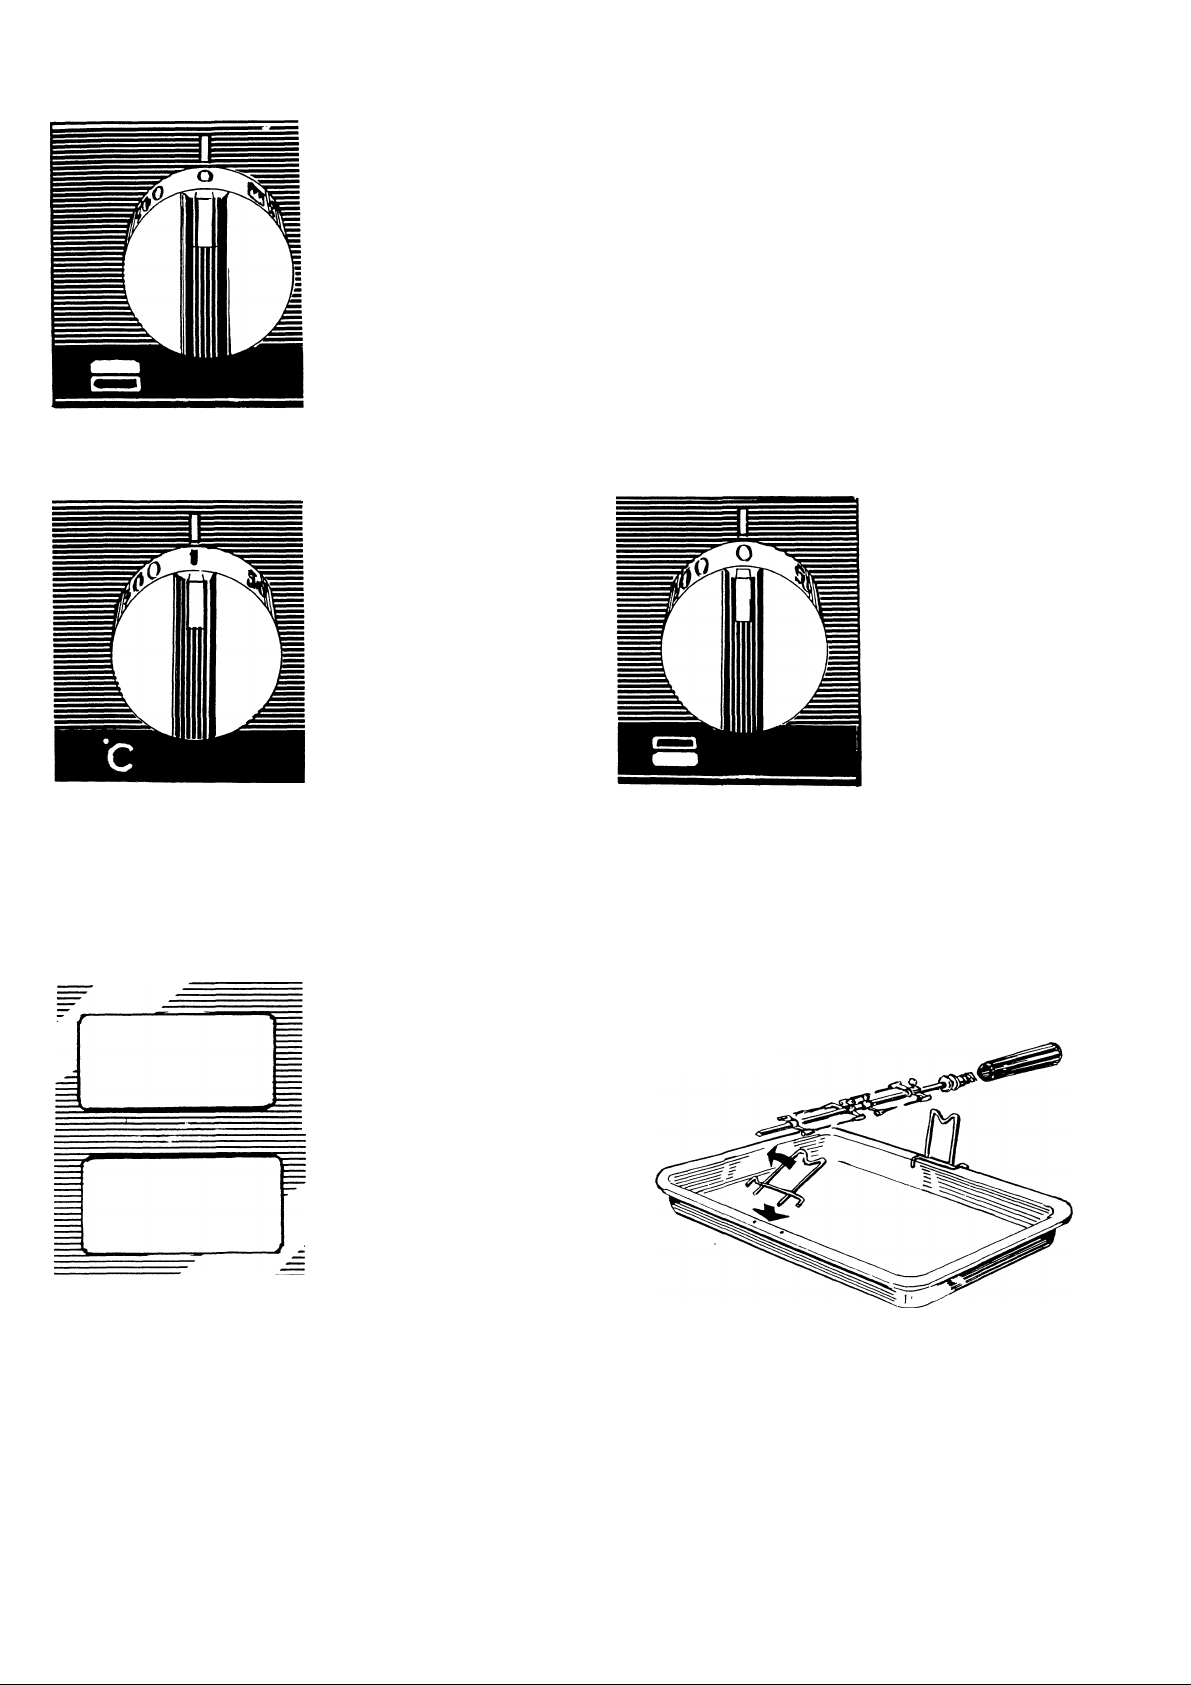
With this control you can
choose the elements you
wish to use. The symbols
on the control refer to
the location of the
elements and their power
in watts.
START3500
o 15CX)
o
o
650
2000
Rapid heating of the oven all
elements are switched on.
•Jf IMPORTANT: The rapid heating
facility should not be used
for more than 8 minutes after
this time set the control to:-
Upper and lower heat
elements only.
Lower element only.
Grill element only.
■Jf (This facility should not be
used when using the
automatic control.)
Thermostat Control, Upper
Oven
With this control knob
you choose the required
temperature in the upper
oven. The setting is
infinitely variable
between 50°C-300°C.
Indicator Lamps
Thermostat Control,
Lower Oven
With this control the
elements and the
temperature are selected.
Both the top and bottom
element are switched on
together, they cannot be
selected individually.
The setting is infinitely
variable between
50°C-300°C.
Temperature Conversion
0“C 0°F
50
100 212
150
200
250 482
300
122
302
392
572
The red light is an
indicator lamp which will
illuminate when one of the
ovens is switched on.
The first yellow light is
for the upper oven. The
second yellow light is for
the lower oven. These
lights illuminate when the
relevant oven is turned
on and will extinguish
when the oven has reached
the set temperature.
Grill Spit
Two support holders are provided for the spit and
these locate into the front and rear of the roasting
pan. Impale the food to be grilled on the skewers
and place the roasting pan with the supports in
the oven on the lowest slide rail. Place the spit on
the supports and insert the grill spit into the
socket at the rear of the oven. Ensure that the
steering track immediately in front of the spit
handle locates in the front support. Remove the
handle and close the door. Set the upper oven
thermostat at 250 - 300 and the oven knob
to O 2000.
The grill motor will operate whenever a grill
element position is selected on the oven element
control.
Page 5
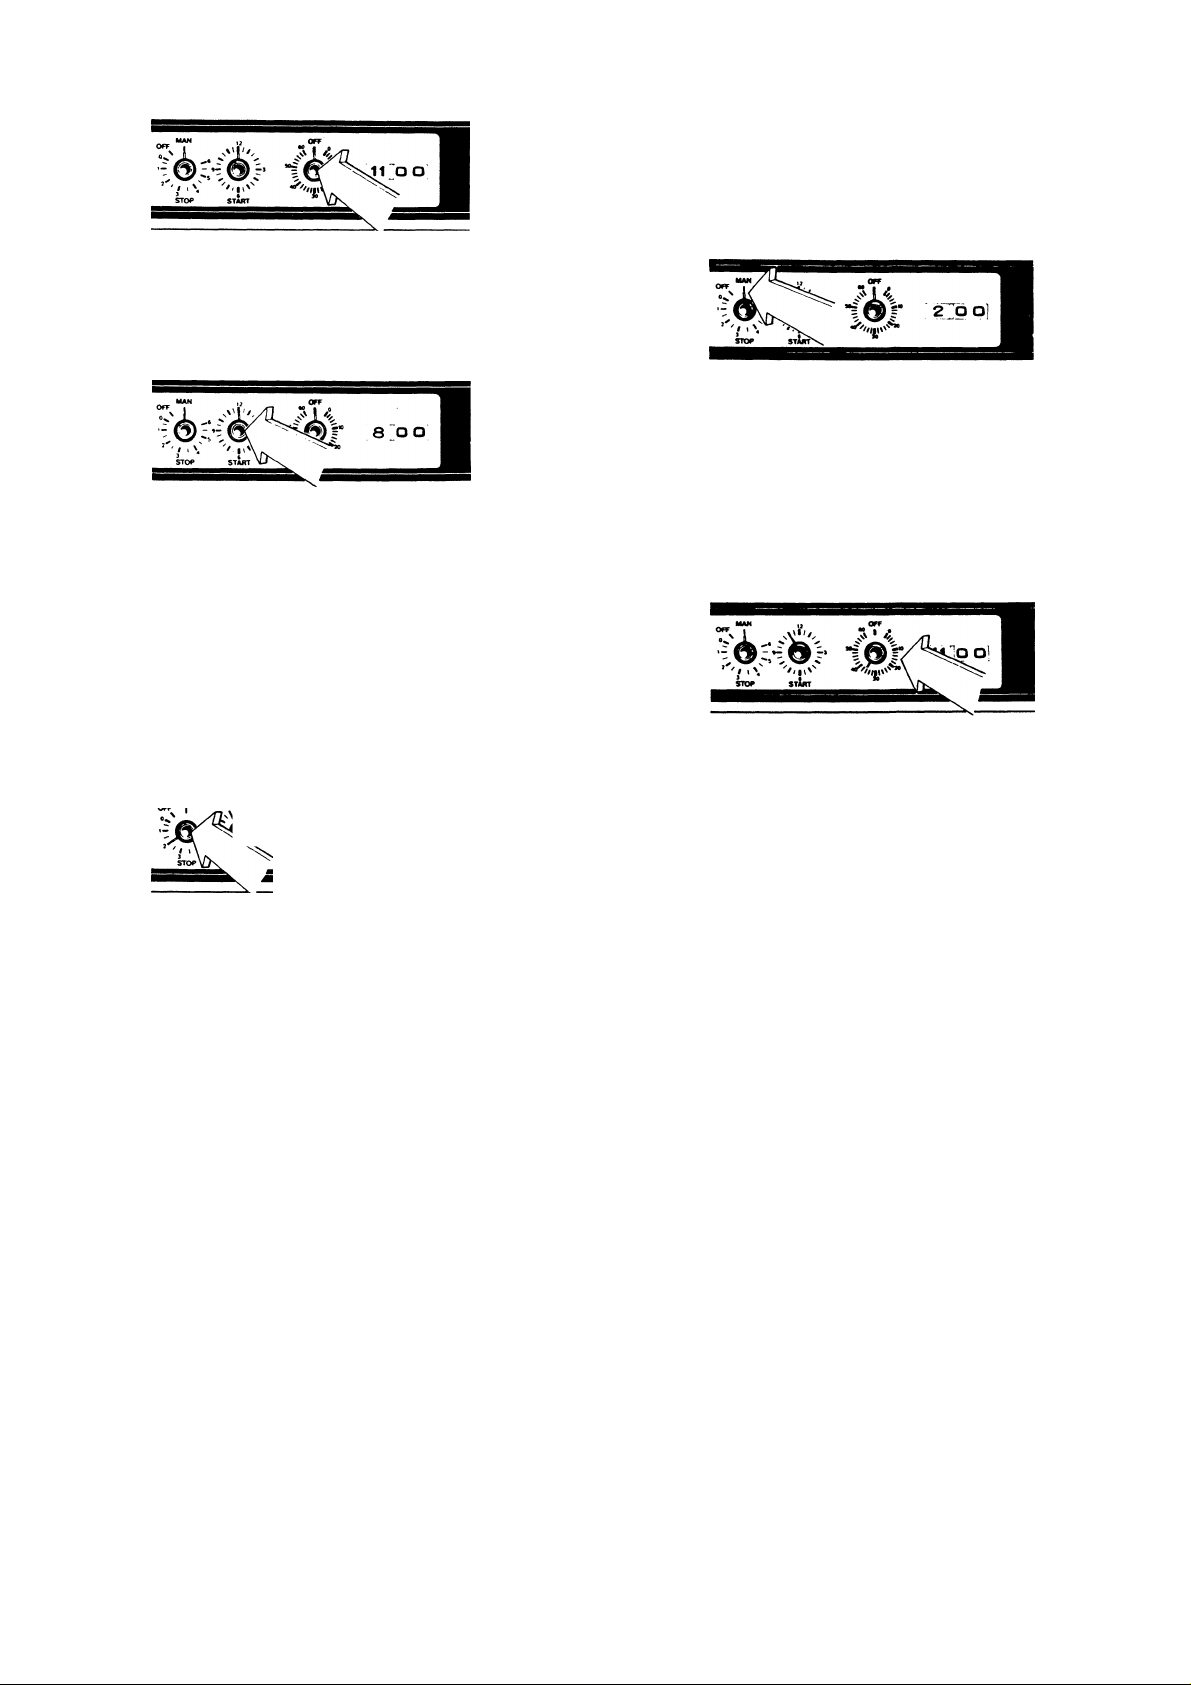
Automatic Timer
1. Setting the Correct Time
Press the knob on the signal timer in and rotate in
either direction until the required time appears.
Automatic Operation of the
Upper Oven
2. Setting the Start Time
The start time is the actual time of day you wish
the oven to switch on. In other words the time
when the food shall start to cook.
Press in the knob marked start and turn in either
direction to the required start time.
bL''
»r *l@ r
8^ Ol
1
3. Setting the Cooking Time
By means of the knob marked stop, you set the
period of time the oven will remain on, i.e. the
amount of time you wish the cooking to take.
Turn the knob in a clockwise direction to any
period up to a maximum of 6 hours. The cooking
time is dependent upon the type of food, cooking
utensil and amount of food being cooked. Under
the heading GENERAL HINTS you will find some
guiding examples.
4. Setting the Oven Controls
When the start and cooking times have been set,
it is then only necessary to set the upper oven
element and thermostat controls in the normal
manner.
5. When Automatic Cooking
is Finished
The timer will automatically turn the top oven off.
Return the oven controls to 0 and the stop control
to MAN. Until the stop control is returned to this
position you will be unable to use the oven on
Manual control.
6. Short Period Signal Timer
The signal timer can be used to time any
operation such as boiling eggs, baking cakes or to
remind you of an appointment etc. for any
duration up to 60 minutes. To set the timer turn
the knob in a clockwise direction to the required
setting. When the set time has elapsed a bell will
sound intermittently until the control is returned
to the OFF position.
If the upper oven fails to operate ensure that the
auto-timer is correctly set.
The upper oven will only function manually
when the left hand knob of the auto-timer is set to
MAN, and the centre knob is in the extended
position and is indicating the time as shown on
the digital clock. If all functions on your appliance
fail to operate ensure that the main switch is
turned ON before contacting the Service
Department.
Page 6

Generai Hints when using the Ovens
Grilling
Set the oven control at grill v—y. It Is practical to place aluminium foil in the roasting pan under the grilling grid. Start grilling the food as
soon as the grill element glows red.
Grill table
^Slide Temp,
rail
Pork chops, thin
Pork chops, thick
Pork fillet, slices 2-2.5 cm
Sirloin steak 1.5-2.0 cm
Club steak, T-bone 2-4 cm
Steak 4-5 cm, whole fillet
Chicken quarters
Ham steak (5 cm thick)
Spare ribs
Spare ribs, thin end
Sausages
*The numbers 1 -4 in the table refer to the four slide rails with which the ovens are equipped. The lowest slide rail is No. 1.
4
300° 6-8
3 300° 7-9 min one side
3 300°
3
3 300° 7-10 min one side
2
3 300°
2
3
3
3
4-5 min other side
4-6 min other side
6-8 min one side
4-5 min other side
300°
6-9 min one side
5-7
6-8
300° 8-10 min one side
6-8 min other side
10-12 min one side
5-7
20-25 min one side only
250°
20-25 min other side
250° 20-30 min one side
20-25 min other side
10-12 min one side
300°
5-7
3-4
300°
1-2
Important
Never place aluminium foil direct on the bottom of the oven or the lower element. Not only will this prohibit the efficiency of the oven but
damage to the oven liner can result.
Grilling time
min one side
min other side
min other side
min other side
min other side
min one side
min other side
Roasting
Set the oven knob at ‘upper and lower elements’
Type of meat Temp. Approx, roasting time per
Pork, fresh
Lamb
Veal
Game (reindeer, elk, venison)
Beef
Roast beef
Beef, fillet 175-200°
Cured ham
Thick ham with bone wrapped
in aluminium foil
Thin ham with bone
or
boneless ham wrapped 150-175°
in aluminium foil
160-175° approx. 2 hours
160-175°
160-175° approx. 1.5 hours
160-175° approx. 2 hours
160-175°
175-200°
125°
150-175°
125°
kg. meat. For deep-frozen
meat allow about 1 hour
extra roasting time for
1500
thawing
1.5-2.0 hours
1.5-2.0 hours
45-60 min.
30-45 min.
70-80 min.
60-70 min.
50-60 min.
45-60 min.
Oven dishes
Set the oven knob at ‘upper and lower elements’
^Sllde
rail
Fish, boiled or baked on grid
Gratin, deep-frozen on grid
Gratin, browning on grid
Puddings, shallow omelettes on grid
Puddings, deep omelettes on grid
Soufflés on grid
Toad-in-the-hole
Roast and minced meats
Casseroles
Pizza, baking
*The numbers in the table refer to the four slide rails with which the
ovens are equipped. The lowest rail is No. 1.
1500
Temp.
200-225^
1
1
200-225'
2
225-250'
2
200-225'
1
200-225'
1
175-200'
2
225-250'
1
1
3 250°
175°
150°
Set the oven knob at ‘upper and lower elements’
Bread
Loaf baked in tin
wholemeal/sifted rye/rye flour
Loaf baked in tin wheatflour
Flat loaf with hole
Soft round rolls wholemeal/
sifted rye/rye flour
Crisp rolls and dinner rolls
Scones
Pricked flat bread
Sweetened Bread, Cakes
Buns
Bun rounds
Light sponge cake
Rich sponge cake
Tea cakes
Sponge rolls
Pastry, Biscuits
Short-crust biscuits
Puff-pastry biscuits
*The numbers in the table refer to the four slide rails with which the
ovens are equipped. The lowest slide rail is No. 1.
Temp.
175°
200-225°
200-225°
225°
225-250°
250°
200-275°
225-250°
200-225°
175-200°
150-175°
200-225°
225-250°
175-200° 3 8-15
200-225° 3 5-12
o
*Slide
rail
1
1 30-4
2
2
2
2
1
2
1 15-20
1
1
2
2
1500
Time
min.
50-60
10-15
8-10
5-10
8-10
5-7
30-40
50-60
8-15
5-8
7-10
Page 7
Cleaning Instructions
Cleaning the Upper Oven
The upper oven is coated with catalyst enamel
which breaks down organic substances (particles
of fat) by combining heat and oxygen during
cooking. The cleaning process operates
continuously during the cooking cycle but
discolouration may occur when roasting or grilling
at low temperatures.
If heavy soilage does occur after use allow the
oven to cool then wipe off the worst of the spillage
with hot water, then switch the oven on to the
highest temperature for about 45 minutes.
It may be necessary to repeat the process
once more if extremely heavy soilage has been
allowed to remain for any length of time.
If flecks with a hard, shiny surface appear use
fine soap impregnated steel wool very gently over
the affected area but take care not to damage the
enamel coating. Any marks left behind will
disappear in time. Sugar spillage is difficult to
remove in any oven and should be wiped away
with hot water immediately.
As with all conventional ovens the catalyst
enamel will discolour with time and use but this
will not affect the cleaning process.
Cleaning the Lower Oven
The lower oven is coated with ordinary oven
enamel and can be cleaned with soap and water,
soap impregnated steel wool or an oven cleaner.
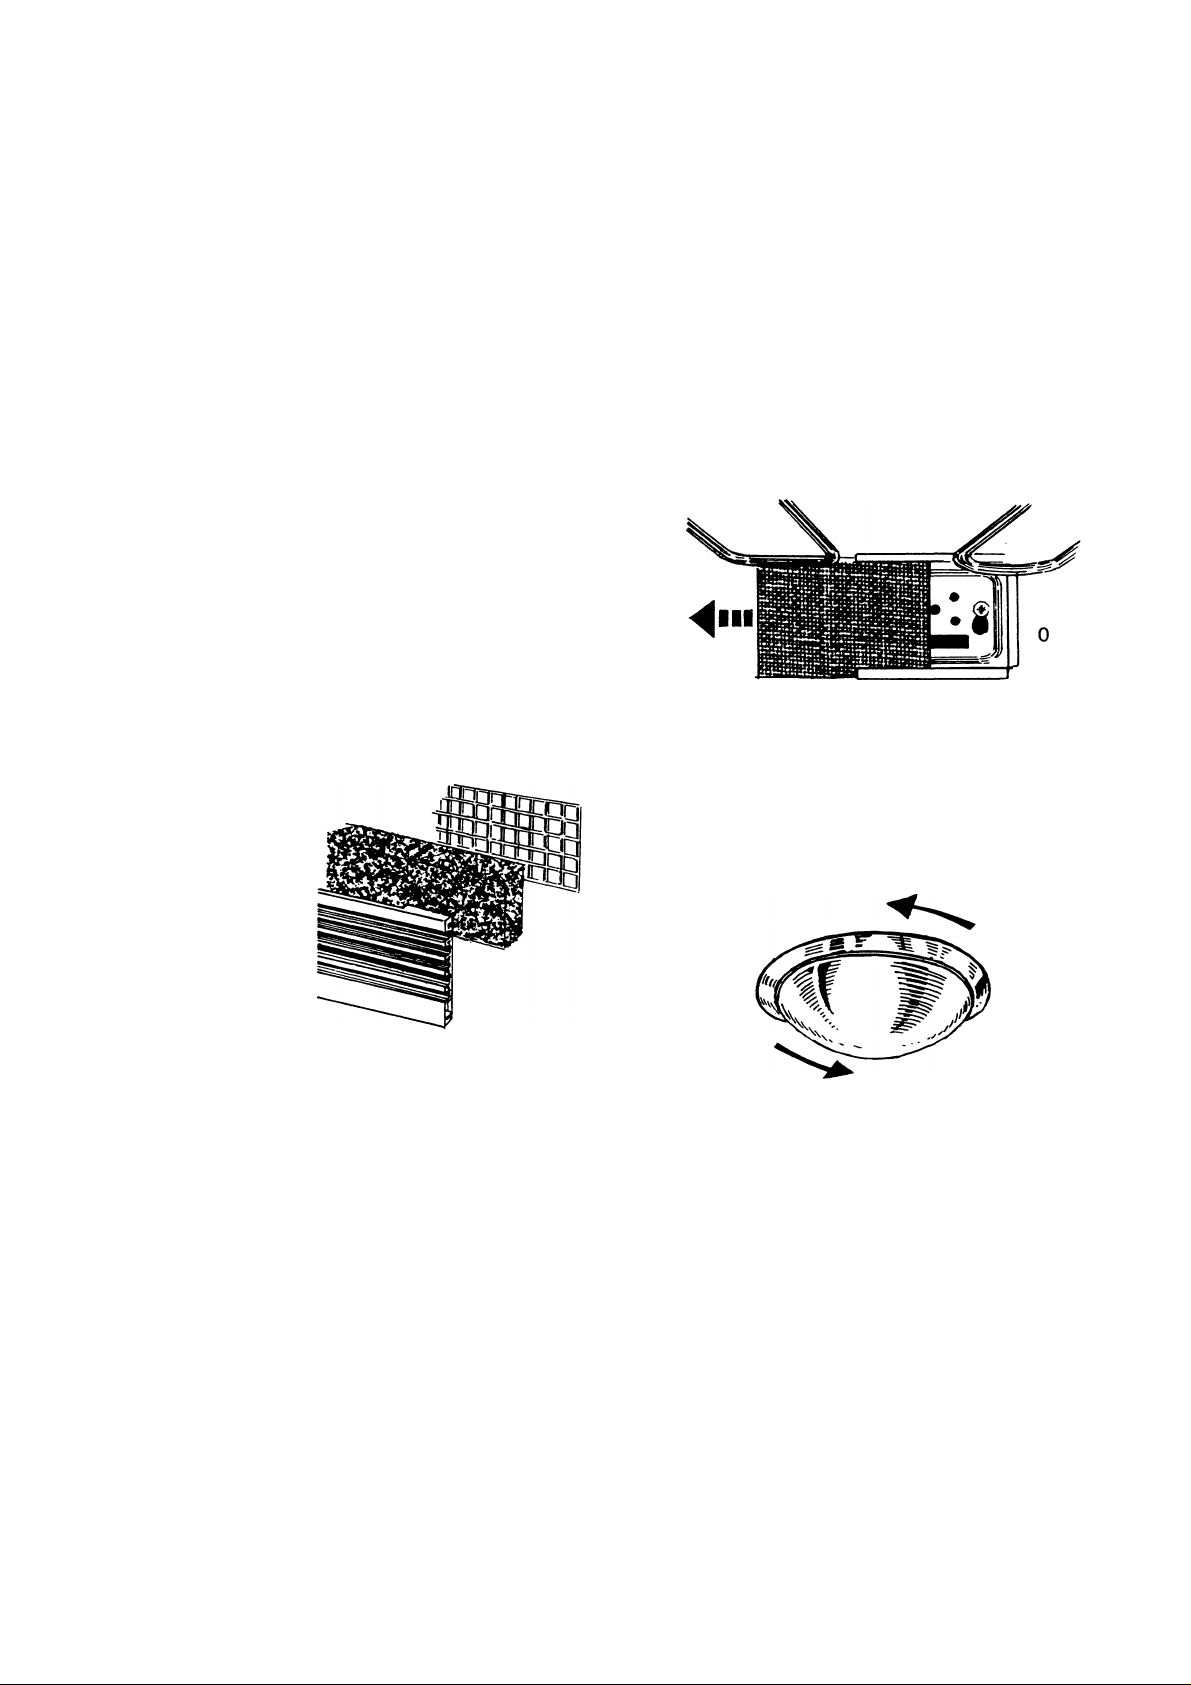
Cleaning the Grease Filter
The oven is fitted with a wire mesh grease filter
to trap particles of fat. The filter, which is fitted at
the rear of the upper oven, is easily removed by
sliding to the left. The filter should be cleaned
regularly in hot water that has washing-up liquid
added. By keeping the grease filter clean, the
charcoal filter will be more effective and will last
longer.
Exchanging the Charcoal
Filter
The purpose of this filter
is to eliminate cooking
smells, when the efficiency
decreases the charcoal
filter should be changed.
To remove the filter,
gently pull down the spring
clip above the door catch,
pull the ventilation grill
out and directly behind will
be found the filter which
can then be levered out.
If the Oven fails to work
If the upper oven fails to operate ensure that
the automatic control has been re-set.
Turn the STOP control to MAN and ensure that
the START control indicates the time as shown on
the digital clock, the button should then be in the
extended position.
Changing the Oven Lamp
Unscrew the glass cover in an anti-clockwise
direction. The lamp, type E14 thread, 15 watts,
unscrews in an anti-clockwise direction. When
replacing the glass cover ensure the metal
washer is placed between the glass and the oven
roof.
Page 8

Husqvarna service organisation
Should you require help or service in connection with
your Husqvarna domestic appliance, please contact
the Service Reception unit for your area. Before writing
or telephoning for service, please check whether your
problem is covered under the heading ‘When the
Cooker Fails to Work’. If you are asking for service
under guarantee, please ensure you have your
purchase invoice for inspection by the Service
Representative when he calls.
t SOUTHERN REGION
Electrolux Ltd, Hippodrome House, Birchett Rd,
Aldershot, Hants GU11 1LU.
Aldershot 24505 (STD code 0252).
For Southern, South Eastern and South Western
Electricity Board areas.
Brighton area. 12 Gloucester Place,
Brighton 694341 (STD code 0273)
Maidstone area. 128 Sutton Road,
Maidstone 677727 (STD code 0622).
Devon and Cornwall. 231 Albert Road,
Devonport Plymouth 58161 (STD code 0752)
Avon and Somerset. 3 Waring House, Redcliffe Hiii,
Bristol 211876 (STD code 0272)
Jersey. 1A Victoria Road, Georgetown,
St Saviour, Central 22138 (STD code 0534)
t EASTERN AND LONDON REGION
Electrolux Ltd., (Eastern & London Service Office),
Oakley Road, Luton, Beds. LU4 9QW,
Luton 55966 (STD code 0582).
For Eastern and London Electricity Board areas.
Thames area of Essex. 638 London Road,
Westcliffe, Southend 354313 (STD code 0702).
Norwich area. 1 Malthouse Lane, Norwich 614157
(STD code 0603)
fUsers residing within 20-30 miles of Croydon, Including all
London Postal Districts, may telephone 01 686 4321 to
register service requests.
MIDLANDS & SOUTH WALES REGION
Electrolux Ltd., 3 Strensham Hill, Moseley,
Birmingham B13 8AQ (021 449 5252).
For Midlands and East Midlands Electricity Board areas.
Nottingham area. 15 Heathcoat Street,
Nottingham 48355 (STD code 0602).
Potteries area. 107 Church Street,
Stoke on Trent 413414 (STD code 0782)
South Wales Electricity Board area.
19 David Street, Cardiff 387444 (STD code 0222).
Powell Duffryn House, Adelaide Street,
Swansea 51848 (STD code 0792).
NORTHERN REGION
Electrolux Ltd., Record Mill, Empire Street,
Great Harwood, Blackburn, Lancs BB6 7SR
Great Harwood 886666 (STD code 0254).
For North Western Electricity Board area.
Manchester area. 88 Bury Old Road,
Whitefield, Manchester (061-798 9689).
Merseywide & North Wales Electricity Board area.
141 Brook Street, Chester 312038 (STD code 0244)
Yorkshire Electricity Board area. 70 Cross
Gates Road, Leeds 608511 (STD code 0532).
SCOTLAND & NORTH EASTERN REGION
Electrolux Ltd., 5 Wellington Street,
Glasgow G2 6JB (041-204 0411).
For Scottish Electricity Board areas.
Aberdeen area. 8 Cornhili Arcade, Cornhili Drive,
Aberdeen 695761 (STD code 0224).
Dundee area. 119 Hiitown, Maxwell Shopping
Precinct, Dundee 22630 (STD code 0382).
Tyne & Wear Durham areas. 1 Eastbourne Avenue,
Gateshead 782381 (STD code 0632).
Teesside N. Yorks, areas. 49 Mandale Road,
Thornaby, Stockton on Tees 64848 (STD code 0642).
NORTHERN IRELAND
Electrolux Ltd., 27 Franklin Street, Belfast
BT2 8DU Belfast 27512 (STD code 0232).
REPUBLIC OF IRELAND
Electrolux (Santry) Ltd., Santry Avenue, Santry,
Dublin 9, Dublin 373721 (STD code 0001).
(iffl Husqvarna Ltd.
LUTON, BEDFORDSHIRE
Husqvarna Ltd, P.O. Box 10, LUTON, Beds. LU4 9QW, ENGLAND. Tel. (0582) 599855.
820 90 03
 Loading...