

Page 1

OPERATOR'S
MANUAL / 2008
WITH PARTS LIST
EDGER/TRIMMER
Model:
LE475 / 966951101
• Specications
• Operating
Instructions
• Maintenance
Information
Page 2

TABLE OF CONTENTS
General Safety Suggestion...................3
Edger-Trimmer Features ......................4
Assembly...............................................5
Attaching the Handle .............................. 5
Installing Throttle Wire ............................5
Fill Engine With Oil ................................. 5
Operating Your Edger-
Trimmer ..................................................6
Correct Engine Operation .......................6
Fuel Specication ................................... 5
Oil Specication ......................................5
Starting The Engine ................................6
Engaging Drive Belt ................................6
Stopping The Engine ..............................6
Correct Edger-Trimmer
Usage .....................................................8
Operation of the
Edger-Trimmer ........................................8
Maintaining Your
Edger-Trimmer ......................................9
Maintenance Check List ......................... 9
Engine ....................................................9
Oil Quality ...............................................9
Oil Level..................................................9
Oil Changes ............................................9
Spark Plug ..............................................9
Blade Maintenance .................................9
Blade Changes .......................................9
Lubrication ..............................................9
Storage Instructions................................13
Maintenance Notes.................................13-15
Parts Illustration ................................... 10
Parts List ............................................... 11
Troubleshooting Chart .........................12
Warranty ................................................Back Cover
CAUTION
TO AVOID INJURY
This symbol marks important instructions relating to your personal safety. To
avoid the possibility of injury, read and follow such instructions carefully.
When the manual refers to the left or right side of the edger-trimmer, it means
your left and right when standing in the operation position.
2
Page 3

GENERAL SAFETY SUGGESTIONS
Recommended by Outdoor Power Equipment Institute
DO NOT MODIFY EDGER-TRIMMER
Unauthorized modication to the edger-trimmer may impair
TRAINING
1. Read the Operating and Maintenance Instruction Manual carefully. Be thoroughly
familiar with the controls and proper use of
the equipment.
2. Never allow children to operate edger-trimmer.
3. Keep area of operation clear of all persons, particularly small children and pets.
4. Thoroughly train anyone using the edgertrimmer. Make sure all edger-trimer operators
know the safety, operating, and maintenance
procedures.
PREPARATION
1. Thouroughly inspect the area where edgertrimmer is to be used, and remove all stones,
sticks, wire, bones, and other foreign objects
which might be picked up and thrown.
2. Do not operate edger-trimmer when barefoot
or wearing open sandals. Always wear substantial foot wear, and pants or slacks that cover your legs when operating edger-trimmer.
3. Check fuel before starting engine. Do not ll
gasoline tank indoors, when engine is run-
ning, or while engine is still hot. Clean o any
spilled gasoline before starting engine.
4. Disengage cutterhead drive before starting
engine.
5. Do not use edger-trimmer unless blade guard,
belt guards, and debris guard are properly in
place.
6. Edge or trim only in daylight or in good articial
light.
7. Never operate equipment in wet grass. Always
be sure of
the handle and walk, never run.
your footing. Keep a rm hold on
OPERATION
1. Start the engine carefully. Keep hands and
feet well away from blade.
2. Do not change engine governor setting or
overspeed engine.
3. Wear safety glasses when operating edger-
trimmer.
4. Keep clear of discharge opening at all times.
Never direct discharge of any material toward
bystanders nor allow anyone near machine
while it is in operation.
5. Stop blade when crossing gravel drive, walks,
or roads.
6. After striking a foreign object, stop the engine
and inspect edger-trimmer for damage. Repair
damage before starting engine.
7. Avoid loss of control or tipping on slopes and
sharp corners by reducing speed.
its function and safety and aect edger-trimmer life.
8. If edger-trimmer should start to vibrate abnormally, stop the engine and check for the cause.
Vibration is generally a warning of trouble.
9. Stop the engine whenever you leave the
edger-trimmer, and when making repairs or
inspections.
10. When repairing or inspecting, make certain
blade and all moving parts have stopped.
Disconnect spark plug wire and keep wire
away from plug to prevent accidental starting.
11. Do not run engine indoors.
12. Shut engine o and wait until blade comes to
a complete stop before removing grass that
may clog blade guard.
13. Watch out for trac when working near
roadways.
14. Stay alert for uneven sidewalks, holes in terrain,
or other hidden hazards when using edger-trimmer. Always push slowly over rough ground.
15. Remember, never operate edger-trimmer
unless blade guard, belt guards, and debris
guard are properly in place.
16. Disengage power to cutterhead and stop
engine before leaving edger-trimmer, before
making repairs, inspections or adjustments,
and when transporting or not in use.
MAINTENANCE AND STORAGE
1. Check blade mounting nut frequently for
proper tightness.
2. Keep all nuts, bolts, and screws tight to be
sure equipment is in safe working condition.
3. Never store edger-trimmer with
in the tank in a building where fumes may
reach an open ame or spark. Be sure engine
has cooled before storing in any enclosure.
4. To reduce re hazard, keep engine free of
grass, leaves, or excessive grease.
5. After operating engine, never touch exhaust muer until it has cooled completely.
6. Keep edger-tirmmer in good operating
condition, and keep safety devices in place
gasoline
CAUTION
TO AVOID INJURY
Read Operator's Manual. Know location
and function of controls. Maintain safety
devices. Remove potential thrown objects.
Never edge or trim near people. Never carry
passengers. Look before backing. Avoid
slippery or steep areas. Stop blade and back
slowly if machine stops. Avoid blade unless
blade and engine are stopped.
3
.
Page 4
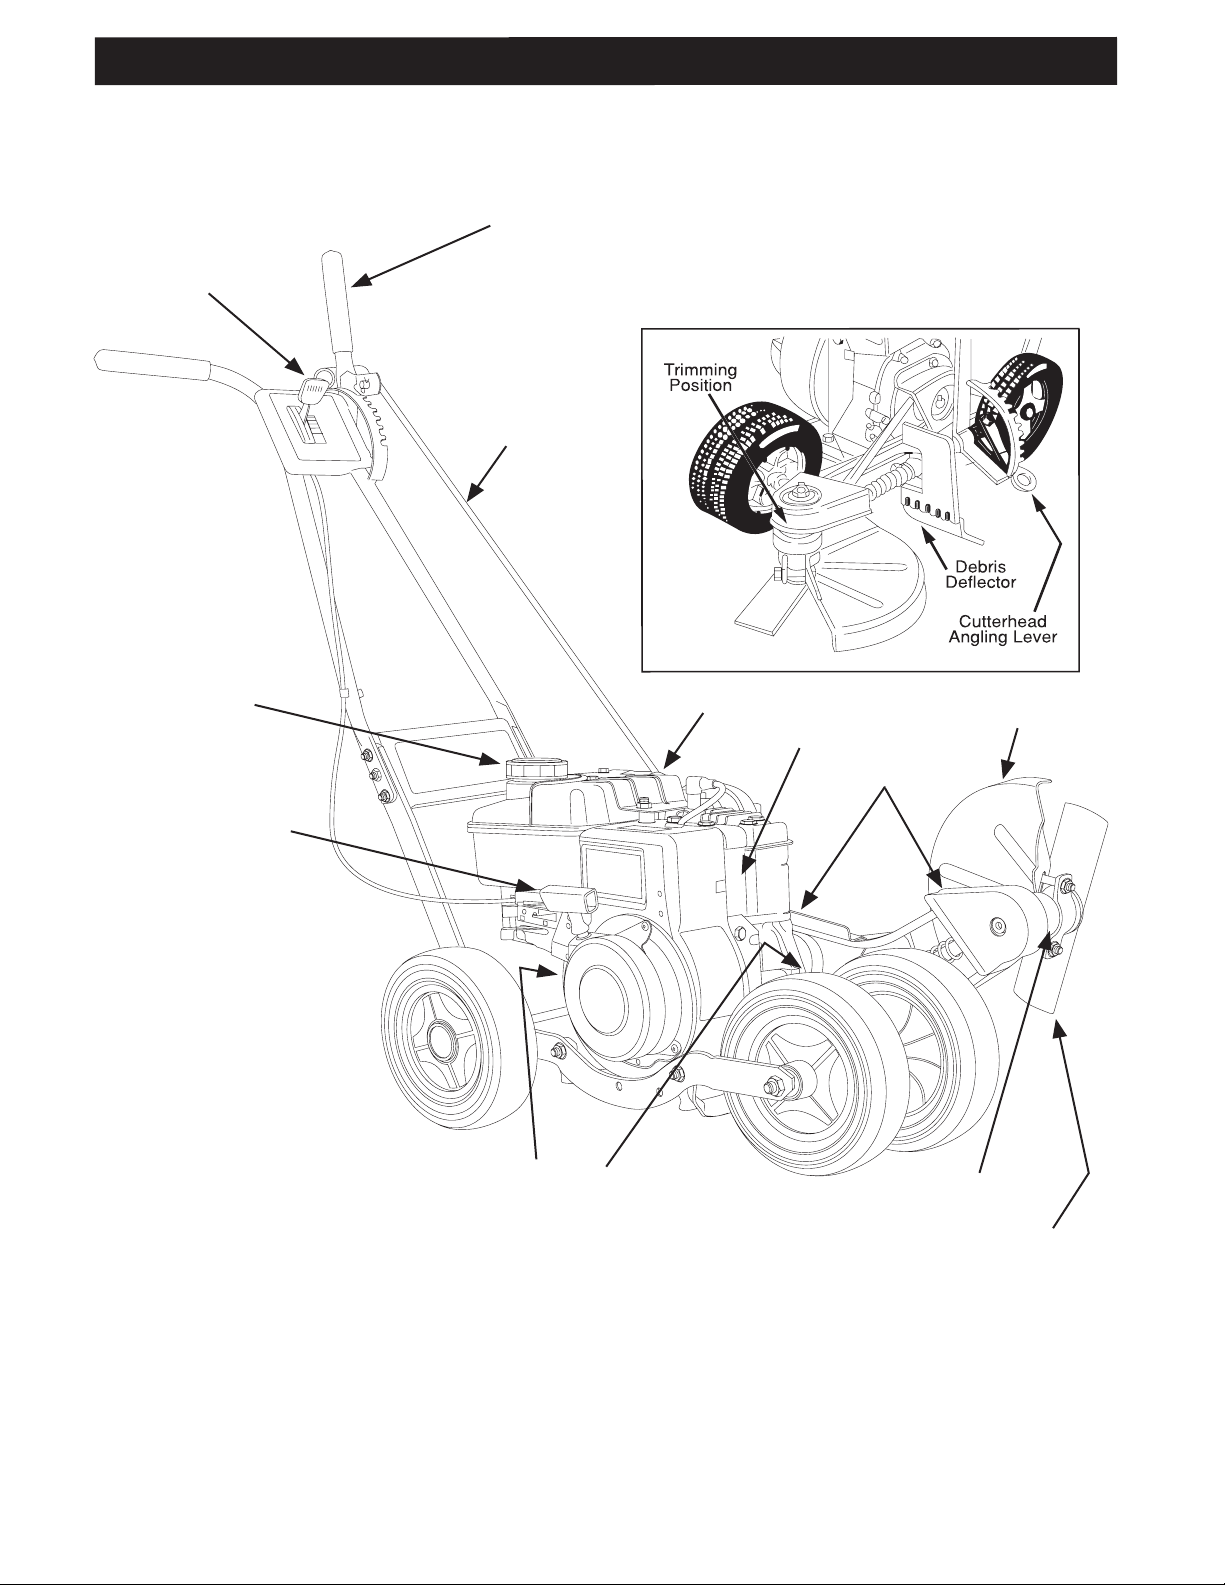
Throttle Lever
EDGER-TRIMMER FEATURES
Clutch & Depth Lever
Control Rod
Gasoline Fill
Recoil Starter
Oil Fill
Front & Back
Air Cleaner
Engine
Blade Guard
Belt Guards
Cutterhead
Blade
4
Page 5

ASSEMBLY
TOOLS REQUIRED: 7/16" Wrench, Pliers,
Screwdriver
NOTE: Reference to Left or Right side of machine
is from the operator's position of the handle,
facing forward.
The lawn edger, except the handle and throttle
control, is fully assembled, packed, and shipped
in one container.
ATTACHING THE HANDLE
1. Remove handle brace, nuts, and bolts. Align
the handle, lower support, and handle brace
holes. Use all six nuts and bolts. Leave bolts
loose until Steps 2 and 3 are completed (See
Fig. 1).
2. Install control rod into upper and lower pivot
holes and secure with cotter pins (See Fig.
1). Oil pivots lightly before installing rod.
3. Move clutch-depth lever into rear notch of
quadrant on handlebards. Move cutterhead
angling lever to top notch of quadrant.
4. Remove spark plug wire from spark plug.
Move throttle to OFF position. Check clutch
operation by pulling recoil starter rope. If
blade turns when depth lever is in top notch,
loosen handle bolts and pull toward operator.
Snug bolts and check clutch operation again.
— IMPORTANT NOTE —
FILL ENGINE WITH OIL
NOTE: There is no oil in engine crankcase.
1. Follow instructions in the engine manual for
correct grade of oil, oil lling, and oil changing.
2. Do not mix oil with gasoline.
INSTALLING THE THROTTLE WIRE
1. If the throttle cable is not attached to the
engine carburetor, follow the instructions in
the engine operating manual. Some throttle
cables cannot be attached before shipping.
Check oil level of engine every time edgertrimmer is used. An improper oil level can cause
extensive internal damage to engine.
FUEL SPECIFICATION
1. Follow fueling instruction in the engine
manual.
CAUTION
Handle fuel with care — it is highly ammable.
Use only approved fuel container. Never add
fuel while engine is running. Fill fuel tank
outdoors, with extreme care. Never ll fuel
tank indoors. Replace gasoline cap securely
and wipe up all spilled fuel.
Make sure blade does not turn when lever is in
top notch (disengaged).
5. Slip on the handle grips.
6. Tighten bolts.
Throttle Cable
Install 6 Bolts Through
Handle Lower Support
& Handle Brace Holes
Throttle
Cable Clip
Control Rod
Always clean area around fuel cap before
removing it to prevent excessive amounts of dirt
from entering fuel system. Also insure that the
fuel storage container you are using is clean and
in good condition.
CORRECT ENGINE OPERATION
CAUTION
Before starting engine, become familiar with
all controls. Read this Operator's Manual
thoroughly. Always check engine oil level
before starting engine.
WARNING
Care should be taken to avoid inhaling exhaust gasses, as they contain carbon monoxide gas, which is colorless and oderless.
Carbon monoxide is a dangerous gas that
can cause unconsciousness and is poten-
tially lethal. Do not run engine in conned
areas such as closed garages.
Fig. 1
5
Page 6

OPERATING YOUR EDGER-TRIMMER
CORRECT ENGINE OPERATION
CAUTION
Always disengage edger-trimmer blade and
shut engine o when leaving the edger-trimmer unattended, even if for just a few minutes. Prevent accidents; don't give children
or unauthorized persons an opportunity to
operate this machine.
CAUTION
Always start edger-trimmer in motion
slowly. Sudden starts can be damaging
to the equipment and could cause loss of
operator control.
CAUTION
Rotating blade can throw dirt or debris.
Wear safety glasses when operating the
edger-trimmer.
ADJUSTING CUTTERHEAD ANGLE
(See Fig. 2)
Before starting engine, adjust cutterhead angle.
The cutterhead angling lever, located on the left
hand side of the frame, enables the operator
to position the blade horizontally for trimming
or choose several vertical positions for edging.
WARNING
Never adjust cutterhead angle when engine
is running.
CLUTCH AND DEPTH LEVER
SETTINGS (See Fig. 3)
Clutch and Depth lever is used to engage and
disengage the drive belt, which operates the
blade. It is also used to regulate the depth of
edging and height of trimming.
Clutch/Depth Controls
Throttle/Choke
Controls
Depth
Settings
Fig. 3
STARTING THE ENGINE
Be sure the clutch lever is in the rear DISENGAGED
position before starting engine.
Manually pull out choke on engine.
Grasp the recoil starting handle and pull quickly.
Return the handle slowly. If the engine fails to
start after three or four pulls, lower the throttle
to the detented full throttle (fast) position.
Once the engine starts, push the choke to the o
position. Use the SLOW position to idle the engine.
Cutterhead Angle Adjustmet
Fig. 2
ENGAGING THE DRIVE BELT
Move clutch and depth lever forward to engage
drive belt and blade. Notches in base of lever
permit adjusting depth of cut for edging and height
for trimming.
TO STOP
Disengage edger-trimmer clutch and depth lever.
Move throttle control to stop position. Make
sure engine is stopped and blade is not
rotating before leaving the operating position.
6
Page 7

OPERATING YOUR EDGER-TRIMMER, CONT.
WHEEL POSITIONING (See Fig. 4)
The wheel adjusting spacer should be centered
between the wheels when edging in the vertical
position. Wheels must be in the dual position
to the right when edging with cutterhead in an
angle position or trimming (horizontal position).
WARNING
Do not change wheel positions when engine
is running.
Wheel Spacer Positioned For Trimming
Remove the spacer from between the wheels
by lifting on spacer with open side down. Slide
the left front wheel on the axle toward the
right wheel, and once again install the spacer
on the axle between the frame and wheel.
CAUTION
Before starting the engine, be sure the wheels
and cutterhead are positioned so the blade
will not strike the wheels.
NOTES
Fig. 4
CURB RIDING POSITION
Remove the spacer from between the front
wheels. Slide the right wheel toward the left wheel
and replace the spacer between the wheel and
right frame. Only vertical edging can be done in
this position.
NOTE: As pictured above, wheels are positioned
to the right for trimming. The wheels are positioned
to the left for curb riding edging.
7
Page 8

CORRECT EDGER-TRIMMER USAGE
CAUTION
Read all manuals provided before operating.
These manuals give a detailed description
of operation and point out other areas of
caution. Familiarize yourself thoroughly
with equipment before attempting to use it.
OPERATION OF THE EDGERTRIMMER
WARNING
Keep all shields in place. Never attempt to clear discharge areas or edgertrimmer blade wihout disengaging the
edger-trimmer and stopping the engine.
Your edger-trimmer is designed to give a
professionally groomed appearance to your
lawn with minimum eort. It will edge lawns at
walks, around ower beds, trim close to poles
and hydrants, and also under fences and other
hard to reach locations. For best appearance
around owers, adjust blade to 20" angle cut.
Too deep a cut will put unnecessary stress
on engine and accelerate blade wear. Cutting
too shallow allows rapid regrowth of roots.
Make sure to re-adjust cutting depth as blade
begins to wear at tips.
Avoid edging or trimming in wet grass, as it may
clog up in the blade guard and cause splattering.
The general appearance will be much better when
grass is dry.
Always push edger-trimmer at moderate walking
speed — at this speed your edger-trimmer is
designed to cut more than 100 ft. per minute.
Four-wheel design of edger-trimmer permits easy
and stable edging, riding securely on sidewalk or
cement surfaces.
Around specially shaped ower beds or
sections, follow these simple steps. It will be
easier to cut around corners when front wheels
are placed together at right side of trimmer-edger.
Before starting engine, remove wheel spacer
clip on front axle, slide wheels to side away from
blade, and replace spacer.
curved
For best results, adjust the cutting depth of the
blade to within 1/2" to 1" deep (with a new blade
usually in the third notch of the adjustment bracket
at handle).
WARNING TO PURCHASERS OF
INTERNAL COMBUSTION ENGINE
EQUIPPED MACHINERY OR DEVICES
This equipment does not include a spark arrestor
muer.
If this equipment is used on any forest-covered
land, brush-covered land, or grass-covered land
in the State of California, the law requires that
a spark arrestor be installed and in eective
working order before using this equipment on
such land. The spark arrestor must be attached to
the exhaust system and comply with Section 4442
of the California Public Resources Code.
If this equipment is used in a state or national
park or campground, a U.S.D.A. Forestry
Department approved spark arrestor muer
must be utilized.
After starting engine, set blade depth and by
slightly lifting rear wheels, guide edger-trimmer
around corners and odd angles.
8
Page 9

MAINTAINING YOUR EDGER-TRIMMER
CAUTION
To minimize the chance of injury, perform all
maintenance and adjustments on your edgertrimmer with engine o, unless instructed
otherwise in this section. Use extreme care
when working near operating machinery.
Do not wear loose tting clothing. Remove
watch and jewelry before beginning work
and observe common safety practices when
using tools.
MAINTENANCE CHECKLIST
1. Refer to the engine manual for engine maintenance instructions.
2. Correct grade of oil and gasoline is included
in the instructions.
Check the oil level of the engine every time the
edger-trimmer is used. An improper oil level can
cause extensive internal damage to engine.
Failure to change engine oil at recommended
intervals can lead to serious damage to engine.
This is especially true when using detergent
oils which are designed to hold impurities in
suspension; when saturation point is reached,
oil may suddenly break down to form a gelatinlike substance which seriously impairs and can
even stop ow of oil. Increase frequency of oil
changes if edger-trimmer is operated under
extremely dusty conditions.
Replace spark plug that is not in
good condition.
Never sand blast, wire brush, scrape, or reinstall
spark plug in poor condition. Best results are
obtained with a new plug.
Always check spark plug gap before installing a
new plug or reinstalling the original plug. Use a
spark plug gap gauge to adjust the electrode air
gap as indicated in the engine manual.
BLADE MAINTENANCE
CAUTION
Sharp edges of edger-trimmer blade can cut
you during blade maintenance or adjustment. Use suitable covering over cutting
edges of blade to prevent bodily harm.
BLADE CHANGE
1. Place a 5/16" Allen wrench on the inside of
cutterhead shaft and a 3/4" wrench on the
blade nut, and turn to loosen nut. Remove
outer washer and old blade.
2. Replace blade with only Husqvarna blade
(available in 3-pack). Place outer washer the
same direction as removed, and tighten nut
as snug as possible.
LUBRICATION (See Fig. 5)
1. The cutterhead body needs occasional greas-
ing. Use #2 multi-purpose grease.
2. The cutterhead mandrel has two precision-
sealed bearings that do not need lubrication.
SPARK PLUG
Engine misre, or generally poor operation, is
often caused by spark plug in poor condition or
with incorrect spark gap setting. Spark plug should
be checked after each fty hours of operation.
Replace a spark plug at one hundred operating
hour intervals, or sooner if inspection reveals
fouling or excessive deterioration.
Always clean area around spark plug before
removing it to prevent dirt from entering engine.
Use a spark wrench to remove and install plug.
Check condition of plug. Good operating
conditions are indicated by a light coating of grey
or tan deposit. A dead white, blistered coating
could indicate an "overrich" fuel mixture caused
by a clogged air cleaner, or improper carburetor
adjustment.
USE #2 MULTI-PURPOSE GREASE
Grease Fitting Location
Fig. 5
Oil all exposed bearings, linkage, and front
wheels. Check all nuts and bolts for tightness.
9
HORIZONTAL
20
°
10
°
VERTICAL
10
°
20
°
BLADE
ANGLE
Page 10

LAWN EDGER AND TRIMMER PARTS ILLUSTRATION
10
Page 11

LAWN EDGER AND TRIMMER PARTS LIST
REF. PART
NO. NO. DESCRIPTION
1 505289901 Handle
2 505289902 Pin, Cotter 1/8 x 3/4 (2 Req.)
3 505289903 Nut Lock Hex 7/16" - 14 (4 Req.)
4 505289904 Spring
6 505289905 Bolt, Hex 7/16 - 14 x 2
7 505289906 Rod, Clutch & Depth
8 505289907 Grip (3 Req.)
9 505289908 Lever, Clutch & Depth
10 505289909 Throttle Control (3 HP Ball Brg)
(40-3/4)
11 505289910 Clip, Throttle Cable
12 505289911 Cross Brace for Handle
13 505289912 Nut 1/4-28 Hex (10 Req.)
14 505289913 Bolt 1/4-28 x 7/8 hex (6 Req.)
15 505289914 Frame, Right Hand 8"
16 505289915 Hub Cap for 7" & 8" Rear Wheels
505289916 8" Rear Wheel Complete w/
Bearings, Wide Tire & Hub Cap
505289917 8" Rear Wheel Outside Bearing
Only
505289918 8" Rear Wheel Inside Bearing
Only. Also for 8" Front Wheel.
(2 needed/front)
16A 505289919 8" Front Wheel Complete
w/Bearing & Wide Tire
505289920 8" Tire Only
505289921 8" Rear Wheel Rim Only
505289922 8" Front Wheel Rim Only
17 --- -- -- -- Engine (Briggs & Stratton Dist.)
18 505289924 Bolt 5/16-24 x 1-1/2 (4 Req.)
19 505289925 Bolt 5/16-24 x 7/8 Hex (5 Req.)
20 505289926 Nut 7/16-14 Hex (3 Req.)
21 505289927 8" Front Axle
22 505289928 8" Front Wheel Spacer (2-13/16"
Use With 7075-7 Wheels)
23 505289929 Nut 5/16-24 Hex (9 Req.)
24 505289930 8" Fram Crossmember
25 505289931 8" Rear Axle (13-5/8") (Use with
7058 wheels)
26 505289932 Bracket, Engine Pulley Guard
27 505289933 Guard, Engine Pulley
28 505289934 Engine Pulley Guard & Bracket
Complete
29 505289935 Screw #110 x x1/2 Sheet Metal
(4 Req.)
30 505289936 8" Fram, Left Hand
31 505289937 Set Screw 5/16-24 x 5/16
33 505289938 Cutterhead Pulley & Shaft Comp.
REF. PART
NO. NO. DESCRIPTION
34 505289939 Screw 1/4-20 x 1/2 Hex
35 505289940 Cutterhead Pulley Guard
36 505289941 Cutterhead Bearing (2 Req.)
36A 505289943 Spring Washer (New 01/87)
37 505289942 Mandrel, Head
40 505289944 Clamp, Blade Guard
41 505289945 Bolt 1/4-28 x 1-1/2 Hex (2 Req.)
42 505289946 Blade Guard Main
505289947 Complete Blade Guard
44 505289948 Washer, Friction (2 Req.)
45 505289949 Nut 1/2-20
46 505289950 Deector, Debris Sweep
47 505289951 U-Clamp
505289952 Complete Debris Guard
49 505289953 Pivot Bolt
50 505289954 Flat Washer 7/16
51 505289955 Spring, Head Recoil
52 505289956 Cup
53 505289957 Body, Cutterhead
54 505289958 Lever, Angle Shifting
55 505289959 Pin 5/16 x 2
56 505289960 Spring
57 505289961 Brace Cutterhead
58 505289962 Drive Belt (4L-300)
59 505289963 Cutting Blade
61 505289964 1-1/4 Pin
62 505289965 U-Clamp Spacer
63 505289966 Grease Fitting
505289967 Handle and Wheel Bearing
505289968 Cutting Head Complete (Inc. No
33,53,51,52,54,55,56,61,37,(2)63,
505289969 LE475 Decal
NOTE: All component dimensions given in U.S. inches
1 inch = 25.4 mm
(2)36)
11
Page 12

TROUBLESHOOTING CHART
ESUAC MELBORP
1. Engine fails to start. A. Check fuel tank for gas.
B. Spark plug lead wire disconnected.
C. Throttle control lever not in starting position.
D. Check spark plug.*
E. Carburetor improperly adjusted. Engine ooded. Re-
F. Old/stale gas. Drain and rell with fresh gas.
2. Hard Starting or loss of power. A. Spark plug wire loose.
B. Carburetor improperly adjusted.*
C. Dirty air cleaner.*
3. Operation erratic. A. Dirt in gas tank. Drain, clean and rell.
B. Dirty air cleaner.*
C. Water in fuel supply. Drain and rell.
D. Vent in gas cap and/or carburetor plugged. Clear vent.
E. Carburetor improperly adjusted.*
4. Hard Starting or loss of power. A. Spark plug fouled, faulty or gap too wide.*
B. Carburetor improperly adjusted.*
C. Dirty air cleaner.*
gulp htiw enigne knarc ,gulp eht yrd ,gulp kraps evom
kraps ecalpeR .noitisop ffo ni elttorht dna ,devomer
.serudecorp gnitrats emuser dna eriw dael dna gulp
5. Idles poorly. A. Carburetor idle speed too slow.*
B. Spark plug gap too close.*
C. Carburetor idle mixture adjustment improperly set.*
6. Hard Starting or loss of power. A. Adjust carburetor.*
B. Remove any obstructions from air passages in shrouds.
C. Clean cooling ns.
D. Fill crankcase to proper oil level.
* NOTE: For repairs beyond the minor adjustments listed above, please contact your local
Lawn Mower Service Shop.
12
Page 13

STORAGE INSTRUCTIONS
Edger-trimmers stored for any length of time should be completely drained of fuel to prevent
gum deposits forming on essential parts such as the carburetor and fuel tank. Such deposits
may aect the operation of the engine when used again. Therefore, it is important that the
following instructions be adhered to before starting engine. 1. Drain fuel tank completely. 2.
Operate the engine until it stops from lack of fuel, to clean all gasoline out of carburetor. 3.
While engine is still warm, drain the crank case. Rell with fresh oil. 4. Remove spark plug, and
pour one ounce of oil into the cylinder. Pull starter rope on the engine to spread the oil. Replace
spark plug. 5. Clean dirt and cha from cylinder and cylinder head ns, blower housing, etc.
MAINTENANCE NOTES
13
Page 14

MAINTENANCE NOTES
14
Page 15

MAINTENANCE NOTES
15
Page 16

TION
CONSIDERA
TIONS
EMENT. HUSQVARNA RESERVES THE RIGHT TO CHANGE OR
AND LIMITA
This warranty shall be inapplicable to defects resulting from the following:
SECTION 4: EXCEPTIONS
starter ropes and tiller tines;
(2) Natural discoloration of material due to ultraviolet light;
(3) Engine and drive systems not manufactured by Husqvarna; these items are covered by the respective manufacturer’s
warranty as provided in writing with the product information supplied at the time of purchase; all claims must be sent to the
appropriate manufacturer;
(4) Lawn and garden attachments are covered by a third party which gives a warranty, all claims for warranty should be sent
to the manufacturer,
(5) Commercial or consumer mowing decks with sand abrasion damage.
(6) Emission Control System components necessary to comply with CARB-TIER II and EPA regulations which are
manufactured by third party engine manufacturer.
(1) Accident, abuse, misuse, negligence and neglect, including stale fuel, dirt, abrasives, moisture, rust, corrosion, or any
adverse reaction due to incorrect storage or use habits;
safety, or durability, or causes the product to fail to comply with any applicable laws; or:
REPAIR OR REPLACEMENT AS PROVIDED UNDER THIS WARRANTY IS THE EXCLUSIVE REMEDY OF THE
by Husqvarna;
(3) Alterations or modifications that change the intended use of the product or affects the product’s performance, operation,
(2) Failure to operate or maintain the unit in accordance with the Owner’s/Operator’s manual or instruction sheet furnished
(4) Additional damage to parts or components due to continued use occurring after any of the above.
BREACH OF ANY EXPRESS OR IMPLIED WARRANTY ON THESE PRODUCTS EXCEPT TO THE EXTENT
PURCHASER. HUSQVARNA SHALL NOT BE LIABLE FOR ANY INCIDENTAL OR CONSEQUENTIAL DAMAGES FOR
PROHIBITED BY APPLICABLE LAW. ANY IMPLIED WARRANTY OF MERCHANTABILITY OR FITNESS FOR A
PREVIOUSLY MANUFACTURED PRODUCTS.
IMPROVE THE DESIGN OF THE PRODUCT WITHOUT NOTICE, AND DOES NO T ASSUME OBLIGATION TO UPDATE
Some states do not allow the exclusion of incidental or consequential damages, or limitations on how long an implied
PARTICULAR PURPOSE ON THESE PRODUCTS IS LIMITED IN DURATION TO THE WARRANTY PERIOD AS
DEFINED IN THE LIMITED WARRANTY STAT
:
warranty lasts, so the above limitations or exclusions may not apply to you. This warranty gives you specific legal rights, and
The product must exhibit reasonable care, maintenance, operation, storage and general upkeep as written in the
SECTION 5: CUSTOMER RESPONSIBILITIES
you may also have other rights which vary from state to state.
maintenance section of the Owner’s/Operator’s manual. Should an operational problem or failure occur, the product should
ARRANTY
HUSQVARNA
7349 Statesville Road
Charlotte, NC 28269 2008
To obtain the benefit of this warranty, the product believed to be defective must be delivered to an authorized Husqvarna
It is the Owner’s and Retailer’s responsibility to make certain that the Warranty Registration Card is properly filled out and
section 6, rests solely with the customer.
not be used, but delivered as is to an authorized Husqvarna retailer for evaluation. Proof of purchase, as explained in
SECTION 6: PROCEDURE TO OBTAIN W
Proof of purchase must be presented to the authorized Husqvarna retailer in order to obtain warranty service. This proof
in order to confirm the warranty and to facilitate post-sale service.
mailed to Husqvarna Forest & Garden Company. This card should be mailed within ten (10) days from the date of purchase
must include date purchased, model number, serial number, and complete name and address of the selling retailer.
delivered at the owner’s expense. Downtime, pick-up and delivery charges are not covered by this warranty. An authorized
Husqvarna retailer can be normally located through the “Yellow Pages” of the local telephone directory or by calling 1-800-
HUSKY62 for a retailer in your area.
retailer in a timely manner, no later than thirty (30) days from date of the operational problem or failure. The product must be
WARRANTY STATEMENT
ARRANTY
Lifetime Warranty (“PARTS ONLY” after initial warranty expiration): Ignition coils and modules on handheld product.
Husqvarna Forest & Garden Company (“Husqvarna”) warrants Husqvarna product to the original purchaser to be free from
defects in material and workmanship from the date of purchase for the “Warranty Period” of the product as set forth below:
Lifetime Warranty (Parts and Labor): All tiller tines and trimmer shafts against breakage. Proof of purchase required.
SECTION 1: LIMITED W
:
THIS WARRANTY
TIONS UNDER THE WARRANTY
’S OBLIGA
5 year consumer warranty or 1,500 hours of use.
(New warranty applies to units sold after August 1, 2005. Also applies to units factory-equipped with R.O.P.S.
WARRANTY SCHEDULE FOR TURF CARE Equipment - Zero Turn Riders
Proof of purchase required.
iZ, LZ & BZ Zero Turn Riders:
iZ, LZ & BZ Zero Turn Riders: 5 year commercial warranty or 1,500 hours of use.
EZ Zero Turn Riders: 3 year consumer warranty or 600 hours of use (when used solely at the owner’s residence.)
3 Year or 1,500 Hour Commercial Use Warranty: spindles on zero turn riders, hydraulic pumps and wheel motors.
EZ & MZ Zero Turn Riders: 1 year commercial warranty or 600 hours of use.
Warranty Schedule for Turf Care Walk Behind Units - W, WG & WH Zero Turn Riders - 3 year consumer and commercial
2 Year Consumer Warranty: Automatic mower, all Residential Zero Turn Riders, all lawn, yard and garden tractors, all
warranty. New warranty applies to units sold after August 1, 2005. Also applies to units factory-equipped with R.O.P.S.
2 Year COMMERCIAL and CONSUMER Warranty: all Husqvarna ground-engaging commercial equipment.
WARRANTY SCHEDULE FOR CONSUMER TURF CARE EQUIPMENT
noncommercial walk behind mowers, tillers, snow blowers, electrical products and power-assist collection systems for
noncommercial, nonprofessional, noninstitutional or nonincome producing use, except as herein stated. All consumer
2 Year Consumer Warranty: all consumer chain saws, trimmers, brushcutters, clearing saws, handheld blowers, backpack
blowers, hedge trimmers, and electrical products for noncommercial, nonprofessional, noninstitutional or nonincome
producing use, except as herein stated. All consumer product use must have been limited to the owner’s residence.
2 Year or 2,000 Hour Powertrain & 1 Year or 1,000 Hour Body Warranty: Husqvarna Utility Vehicles.
1 Year Warranty: Power cutters, stump grinder, pole pruners and pole saws for non-commercial, non-professional,
noninstitutional, non-municipality or non-income producing use. All 300 series trimmers, brushcutters, clearing saws,
product use must have been limited to the owner’s residence.
WARRANTY SCHEDULE FOR CONSUMER FOREST & GARDEN EQUIPMENT
hovering trimmers, stick edgers, backpack blowers, hand held blowers, hedge trimmers, power-assist collection systems for
Automatic mower, chain saws, 100 series trimmers, power cutters, stump grinders, pole
ear prorated limited warranty with 100% replacement during the first 6 months.
commercial, institutional, professional or income producing purposes or use.
commercial, institutional, professional, municipality or income producing purposes or use except as otherwise provided herein.
90 Day Commercial Warranty:
with a warranty claim form. All care and maintenance instructions must be followed as stated by the manufacturer on the
material and workmanship. Normal wear, tear or abuse is not covered under warranty. Product must be returned to Charlotte
care label. The fit of the protective apparel/boot is not covered under warranty.
Husqvarna Safety Apparel carries a 90-day warranty from the date of the customer’s original purchase for defects in
Rental Warranty: 90 days on all applicable professional equipment reference warranty time period charts
located in the back of the Retailer Warranty Policy & Procedure Manual.
Batteries: 1 y
saws, pole pruners, snow throwers, model series 580 & 600 walk-behind mowers, or any Husqvarna product used for
1 Year Conditional Component Warranty: Chain saw crankshafts for commercial/professional use (parts and labor).Saw
must be operated with Husqvarna XP 2 cycle oil.
warranty with product at time of purchase.
30 Day Warranty: Replacement parts, accessories including bars and chains, tools and display items. Emission control
part of engine systems manufactured by third part engine manufacturers for which the purchaser has received a separate
system components necessary to comply with CARB-TIER II and EPA regulations, except for those components which are
Husqvarna will repair or replace defective components without charge for parts or labor if a component fails because of a
defect in material or workmanship during the warranty period.
SECTION 3: ITEMS NOT COVERED BY
SECTION 2: HUSQVARNA
The following items are not covered by this warranty:
(1) Normal customer maintenance items which become worn through normal regular use, including, but not limited to, belts,
blades, blade adapters, bulbs, clutches, clutch drums, filters, guide bars, lubricants, rewind springs, saw chain, spark plugs,
 Loading...