

Page 1

EN Operator's manual 2-13
ZH 操作手册 14-24
LC 219, LC 419
Page 2

Contents
1
14
15
3
5
5
2
4
4
6
9
9
10
10
12
16
13
2
11
16
7
7
8
LC 419 LC 219
3
13
Introduction..................................................................... 2
Safety..............................................................................3
Assembly........................................................................ 6
Operation........................................................................ 7
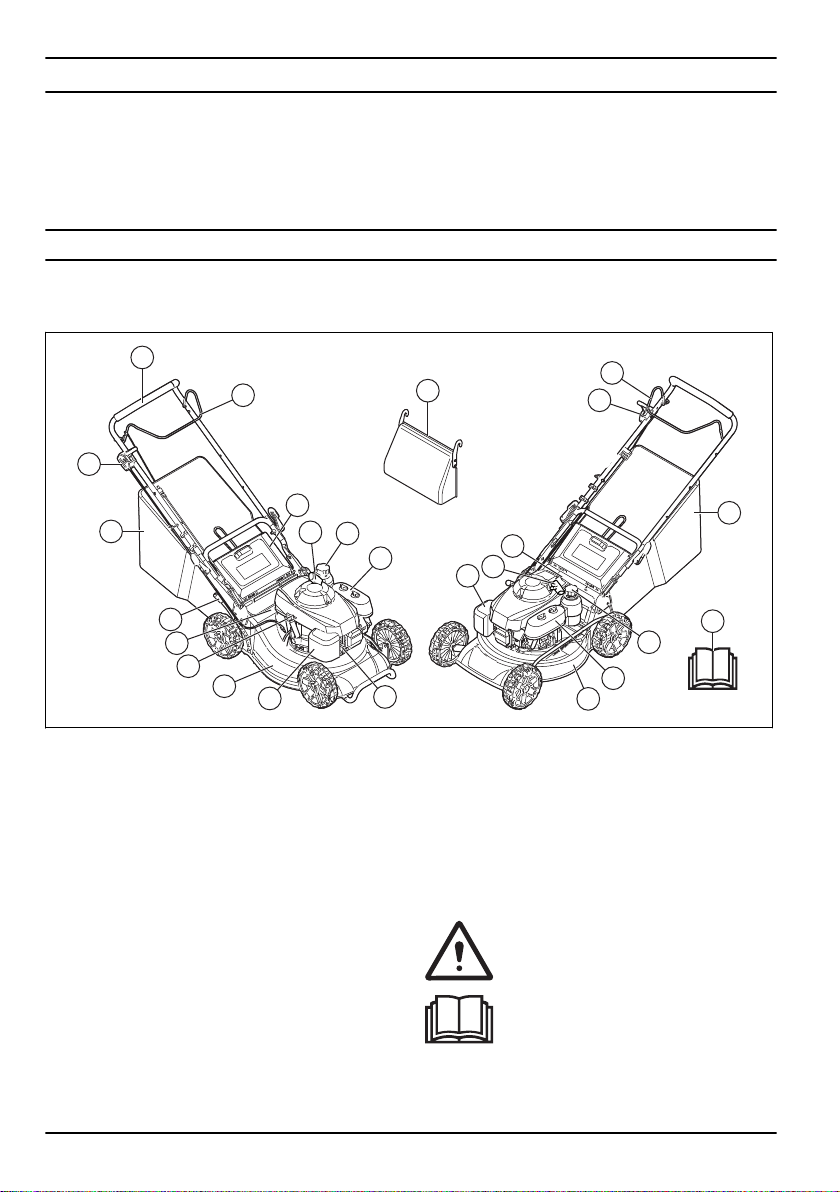
Introduction
Product overview
Maintenance................................................................... 8
Troubleshooting............................................................ 11
Transportation, storage and disposal........................... 12
Technical data.............................................................. 13
1. Handle
2. Throttle control
3. Starter rope handle
4. Grass catcher
5. Fuel tank cap
6. Cutting height lever
7. Air filter
8. Spark plug
9. Cutting cover
10. Muffler
11. Oil tank cap
12. Rear cover
13. Engine brake handle
14. Deflector
15. Operator's manual
16. Rating plate
2 1095 - 002 -
Product description
The product is a pedestrian-controlled rotary lawn
mower. The grass is collected in a grass catcher.
Remove the grass catcher to get rear discharge of the
grass.
Intended use
Use the product to cut grass in private gardens. Do not
use the product for other tasks.
Symbols on the product
WARNING: Be careful and use the product
correctly. This product can cause serious
injury or death to the operator or others.
Read the operator's manual carefully and
make sure that you understand the
instructions before use.
Page 3

Engine off.
Adjusts the engine throttle to high speed.
Warning: rotating blade. Keep hands and
feet clear.
Warning: rotating parts. keep hands and feet
clear.
Look out for thrown objects and ricochets.
Keep persons and animals at a safe
distance from the work area.
Stop the engine and remove the ignition
cable before repairs or maintenance.
Choke.
Safety
Safety definitions
Warnings, cautions and notes are used to point out
specially important parts of the manual.
WARNING: Used if there is a risk of injury or
death for the operator or bystanders if the
instructions in the manual are not obeyed.
CAUTION: Used if there is a risk of damage
to the product, other materials or the
adjacent area if the instructions in the
manual are not obeyed.
Note: Used to give more information that is necessary in
a given situation.
General safety instructions
WARNING: Read the warning instructions
that follow before you use the product.
Adjusts the engine throttle to low speed.
Note: Other symbols/decals on the product refer to
certification requirements for some markets.
Product liability
As referred to in the product liability laws, we are not
liable for damages that our product causes if:
• the product is incorrectly repaired.
• the product is repaired with parts that are not from
the manufacturer or not approved by the
manufacturer.
• the product has an accessory that is not from the
manufacturer or not approved by the manufacturer.
• the product is not repaired at an approved service
center or by an approved authority.
• This product is dangerous if used incorrectly or if you
are not careful. Injury or death can occur if you do
not obey the safety instructions.
• This product produces an electromagnetic field
during operation. This field may under some
circumstances interfere with active or passive
medical implants. To reduce the risk of serious or
fatal injury we recommend persons with medical
implants to consult their physician and the medical
implant manufacturer before operating this product.
• Always be careful and use your common sense. If
you are not sure how to operate the product in a
special situation, stop and speak to your Husqvarna
dealer before you continue.
• Keep in mind that the operator will be held
responsible for accidents that involve other persons
or their property.
• Keep the product clean. Make sure that you can
clearly read signs and decals.
• Do not let a person use the product unless you make
sure that they read and understand the contents of
the operator's manual.
• Do not let a child operate the product.
• Do not let a person, without knowledge of the
instructions, operate the product.
1095 - 002 - 3
Page 4

• Always monitor a person, with decreased physical
capacity or mental capacity, that uses the product. A
responsible adult must be there at all times.
• Do not use the product if you are tired, ill, or under
the influence of alcohol, drugs or medicine. This has
a negative effect on your vision, alertness,
coordination and judgment.
• Do not use the product if it is defective.
• Do not change this product or use it if it is possible
that it has been changed by others.
Work area safety
WARNING: Read the warning instructions
that follow before you use the product.
• Remove objects such as branches, twigs and stones
from the work area before you use the product.
• Objects that hit against the cutting equipment can
eject and cause damage to persons and objects.
Keep bystanders and animals at a safe distance
from the product.
• Never use the product in bad weather such as fog,
rain, strong winds, intense cold and risk of lightning.
To use the product in bad weather or in moist or wet
locations is tiring. Bad weather can cause dangerous
conditions, such as slippery surfaces.
• Look out for persons, objects and situations that can
prevent safe operation of the product.
• Look out for obstacles, such as roots, stones, twigs,
pits and ditches. Long grass can hide obstacles.
• To cut grass on slopes can be dangerous. Do not
use the product on ground that slopes more than
15°.
• Operate the product across the face of slopes. Do
not move up and down.
• Be careful when you go near hidden corners and
objects that prevent a clear view.
Work safety
WARNING:
that follow before you use the product.
• Use this product to cut grass lawns only. It is not
permitted to use it for other tasks.
• Use personal protective equipment. Refer to
Personal protective equipment on page 4
• Make sure that you know how to stop the engine
quickly in an emergency.
• Never start the engine in a closed space or near
flammable material. The exhaust fumes from the
engine are hot and can contain sparks which can
start a fire.
• Do not operate the product unless the blade and all
covers are attached correctly. An incorrectly
Read the warning instructions
.
attached blade can come loose and cause personal
injury.
• Make sure that the blade does not hit objects such
as stones and roots. This can do damage to the
blade and bend the engine shaft. A bent axle causes
heavy vibration and a very high risk that the blade
becomes loose.
• If the blade hits an object or if vibrations occur, stop
the product immediately. Disconnect the ignition
cable from the spark plug. Examine the product for
damages. Repair damages or let an authorised
service agent do the repair.
• Never attach the engine brake handle permanently
to the handle when the engine is started.
• Put the product on a stable, flat surface and start it.
Make sure that the blade does not hit the ground or
other objects.
• Always stay behind the product when you operate it.
• Let all the wheels stay on the ground and keep 2
hands on the handle when you operate the product.
Keep your hands and feet away from the rotating
blades.
• Do not tilt the product when the engine is started.
• Be careful when you pull the product rearward.
• Never lift up the product when the engine is started.
If you must lift the product, first stop the engine and
disconnect the ignition cable from the spark plug.
• Do not walk rearward when you operate the product.
• Stop the engine when you move across areas
without grass, for example paths made of gravel,
stone and asphalt.
• Do not run with the product when the engine is
started. Always walk when you operate the product.
• Stop the engine before you change the cutting
height. Never make adjustments with the engine
started.
• Never let the product stay out of view with the engine
started. Stop the engine and make sure that the
cutting equipment does not rotate.
Safety instructions for operation
Personal protective equipment
WARNING:
that follow before you use the product.
• Personal protective equipment cannot fully prevent
injury but it decreases the degree of injury if an
accident does occur. Let your dealer help you select
the right equipment.
• Use hearing protection if the noise level is higher
than 85 dB.
• Use heavy-duty slip-resistant boots or shoes. Do not
use open shoes or go with bare feet.
• Use heavy, long pants.
Read the warning instructions
4
1095 - 002 -
Page 5

• Use protective gloves when necessary, for example
when you attach, examine or clean the cutting
equipment.
Safety devices on the product
Fuel safety
WARNING: Read the warning instructions
that follow before you use the product.
WARNING: Read the warning instructions
that follow before you use the product.
• Do not use a product with defective safety devices.
• Do a check of the safety devices regularly. If the
safety devices are defective, speak to your
Husqvarna service agent.
To do a check of the cutting cover
The cutting cover decreases vibrations in the product
and decreases the risk of injury from the blade.
• Examine the cutting cover to make sure that there
are no damages such as cracks.
Engine brake handle
The engine brake handle stops the engine. When the
engine brake handle is released, the engine stops.
To do an inspection of the engine brake, start the engine
and then release the engine brake handle. If the engine
does not stop in 3 seconds, let an approved Husqvarna
service agent adjust the engine brake.
• Do not start the product if there is fuel or engine oil
on the product. Remove the unwanted fuel/oil and let
the product dry.
• If you spill fuel on your clothing, change clothing
immediately.
• Do not get fuel on your body, it can cause injury. If
you get fuel on your body, use soap and water to
remove the fuel.
• Do not start the product if the engine has a leak.
Examine the engine for leaks regularly.
• Be careful with fuel. Fuel is flammable and the fumes
are explosive and can cause injuries or death.
• Do not breathe in the fuel fumes, it can cause injury.
Make sure that there is a sufficient airflow.
• Do not smoke near the fuel or the engine.
• Do not put warm objects near the fuel or the engine.
• Do not add the fuel when the engine is on.
• Make sure that the engine is cool before you refuel.
• Before you refuel, open the fuel tank cap slowly and
release the pressure carefully.
• Do not add fuel to the engine in an indoor area. Not
sufficient airflow can cause injury or death because
of asphyxiation or carbon monoxide.
• Tighten the fuel tank cap fully. If the fuel tank cap is
not tightened, there is a risk of fire.
• Move the product a minimum of 3 m / 10 ft from the
position where you filled the tank before a start.
• Do not fill the fuel tank fully. Heat causes the fuel to
expand. Keep a space at the top of the fuel tank.
Safety instructions for maintenance
Muffler
The muffler keeps the noise levels to a minimum and
sends the exhaust fumes away from the operator.
Do not use the product if the muffler is missing or
defective. A defective muffler increases the noise level
and the risk of fire.
WARNING:
during and after use and when the engine
operates at idle speed. Be careful near
flammable materials and/or fumes to prevent
fire.
To do a check of the muffler
• Examine the muffler regularly to make sure that it is
attached correctly and not damaged.
1095 - 002 -
The muffler becomes very hot
WARNING:
that follow before you use the product.
• The exhaust fumes from the engine contain carbon
monoxide, an odourless, poisonous and very
dangerous gas. Do not start the engine indoors or in
closed spaces.
• Before you do the maintenance on the product, stop
the engine and remove the ignition cable from the
spark plug.
• Use protective gloves when you do maintenance on
the cutting equipment. The blade is very sharp and
cuts can easily occur.
• Accessories and changes to the product that are not
approved by the manufacturer, can cause serious
injury or death. Do not change the product. Always
use accessories that are approved by the
manufacturer.
Read the warning instructions
5
Page 6

• If the maintenance is not done correctly and
regularly, the risk of injury and damage to the
product increases.
• Only do the maintenance as given in this owner's
manual. All other servicing must be done by an
approved Husqvarna service agent.
Assembly
Introduction
WARNING: Before you assemble the
product, you must read and understand the
safety chapter.
WARNING: Remove the spark plug cable
from the spark plug before you assemble the
product.
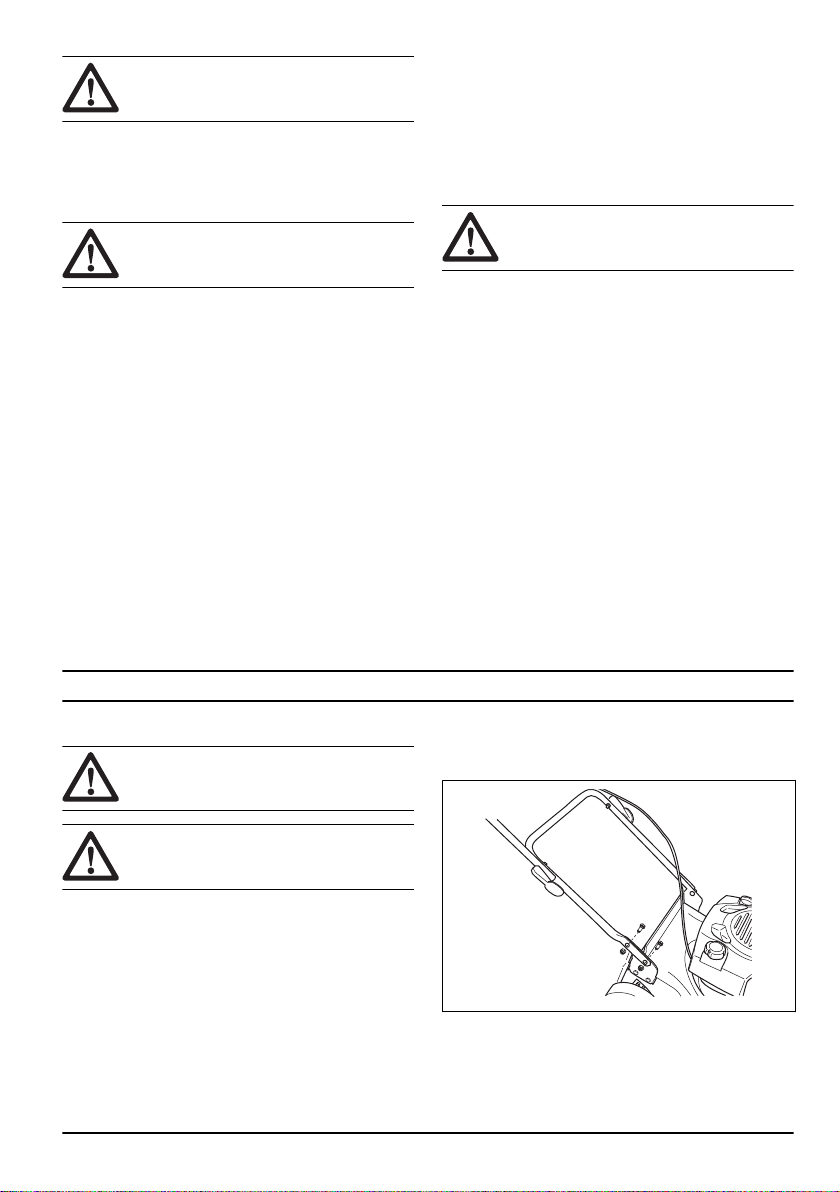
To assemble the handle
1. Attach the lower handle with 2 screws and nuts on
each side of the product.
• Let an approved Husqvarna service agent do
servicing on the product regularly.
• Replace damaged, worn or broken parts.
3. Put the wires in the cable brackets. Make sure that
the wires are not twisted. Attach the cable brackets
to the handle.
To assemble the grass catcher
1. Put the grass catcher frame into the fabric grass
bag. Make sure that the handle on the grass catcher
frame is on top of the grass bag.
2. Lift the upper handle until it aligns with the lower
handle. Tighten the knobs.
CAUTION: Be careful and do not cause
damage to the cables when you lift the
upper handle.
6
2. Attach the grass bag to the grass catcher frame with
the clips found on the fabric bag edge.
1095 - 002 -
Page 7

a) For LC 219, attach the flange to the grass
catcher frame with 3 bolts.
Operation
Introduction
WARNING: Before you operate the product,
you must read and understand the safety
chapter.
Before you operate the product
1. Read the operator's manual carefully and make sure
that you understand the instructions.
2. Examine the cutting equipment to make sure that it
is correctly attached and adjusted. See
the cutting equipment on page 9
3. Fill the fuel tank. See
4. Fill the oil tank and do a check of the oil level. See
To do a check of the oil level on page 10
To fill fuel on page 7
To fill fuel
If available, use low-emission/alkylate gasoline. If lowemission/alkylate gasoline is not available, use good
quality unleaded gasoline or leaded gasoline with octane
number not less than 90.
CAUTION: Do not use gasoline with an
octane number less than 90 RON (87 AKI).
This can cause damage to the product.
1. Open the fuel tank cap slowly to release the
pressure.
2. Fill slowly with a fuel can. If you spill fuel, remove it
with a cloth and let remaining fuel dry off.
3. Clean the area around the fuel tank cap.
4. Tighten the fuel tank cap fully. If the fuel tank cap is
not tightened, there is a risk of fire.
5. Move the product a minimum of 3 m (10 ft) from the
position where you filled the tank before a start.
To set the cutting height
1. Stop the engine.
To examine
.
.
.
b) Tighten the nuts.
3. Lift the rear cover.
4. Attach the grass catcher to the top edge of the
chassis.
5. Put the lower part of the grass catcher into the grass
discharge channel.
2. Move the cutting height lever rearward to increase
the cutting height.
3. Move the cutting height lever forward to decrease
the cutting height.
CAUTION: Do not set the cutting height too
low. The blades can hit the ground if the
surface of the lawn is not level.
To start the product
1. Make sure that the ignition cable is connected to the
spark plug.
2. Stay behind the product.
3. Adjust the throttle control.
1095 - 002 - 7
Page 8

a) If the engine is cold, set the throttle control to the
choke position.
• If the engine does not stop, disconnect the ignition
cable from the spark plug.
b) If the engine is warm, do not set the throttle
control to the choke position.
4. Hold the engine brake handle against the handlebar.
5. Hold the starter rope handle with your right hand.
6. Slowly pull out the starter rope until you feel some
resistance.
7. Pull with force to start the engine.
To stop the product
• To stop the engine, release the engine brake handle.
Maintenance
To get a good result
• Always use a sharp blade. A blunt blade gives an
irregular result and the cut surface of the grass
becomes yellow. A sharp blade also uses less
energy than a blunt blade.
• Do not cut more than ⅓ of the length of the grass.
Cut first with the cutting height set high. Examine the
result and lower the cutting height to an applicable
level. If the grass is very long, drive slowly and cut 2
times if necessary.
• Cut in different directions each time to prevent
stripes in the lawn.
Introduction
WARNING: Before you do maintenance, you
must read and understand the safety
chapter.
For all servicing and repair work on the product, special
training is necessary. We guarantee the availability of
professional repairs and servicing. If your dealer is not a
service agent, speak to them for information about the
nearest service agent.
8 1095 - 002 -
Maintenance schedule
The maintenance intervals are calculated from daily use
of the product. The intervals change if the product is not
used daily.
For maintenance identified with * refer to instructions in
Safety devices on the product on page 5
.
Page 9

Maintenance Daily Weekly Monthly
Do a general inspection X
Examine the oil level X
Clean the product X
Examine the cutting equipment X
Examine the cutting cover * X
Clean the air filter X
Clean the cooling fins on the cylinder X
Examine the muffler * X
Examine the spark plug X
Replace the oil (the first time after 5 h use, then after each 20 h use and
yearly)
Replace the air filter X
Examine the fuel system X
Examine and adjust the drive (clutch wire) X
X
To do a general inspection
• Make sure that the nuts and screws on the product
are tightened.
To clean the product externally
• Use a brush to remove leaves, grass and dirt.
• Make sure that the air intake on the top of the engine
is not blocked.
• Do not use a high pressure washer to clean the
product.
• If you use water to clean the product, do not flush
water directly on the engine.
To clean the inner surface of the cutting cover
1. Empty the fuel tank.
2. Put the product on its side with the muffler down.
CAUTION: If the product is put with the
air filter down, the engine can become
damaged.
3. Hose down the inner surface of the cutting cover
with water.
To examine the cutting equipment
WARNING: To prevent accidental start
remove the ignition cable from the spark
plug.
WARNING: Use protective gloves when you
do maintenance on the cutting equipment.
The blade is very sharp and cuts can easily
occur.
1. Examine the cutting equipment for damage or
cracks. Always replace a damaged cutting
equipment.
2. Look at the blade to see if it is damaged or blunt.
Note: It is necessary to balance the blade after it is
sharpened. Let a service center sharpen, replace and
balance the blade. If you hit an obstacle that causes the
product to stop, replace the damaged blade. Let the
service center estimate if the blade can be sharpened or
must be replaced.
1095 - 002 - 9
Page 10
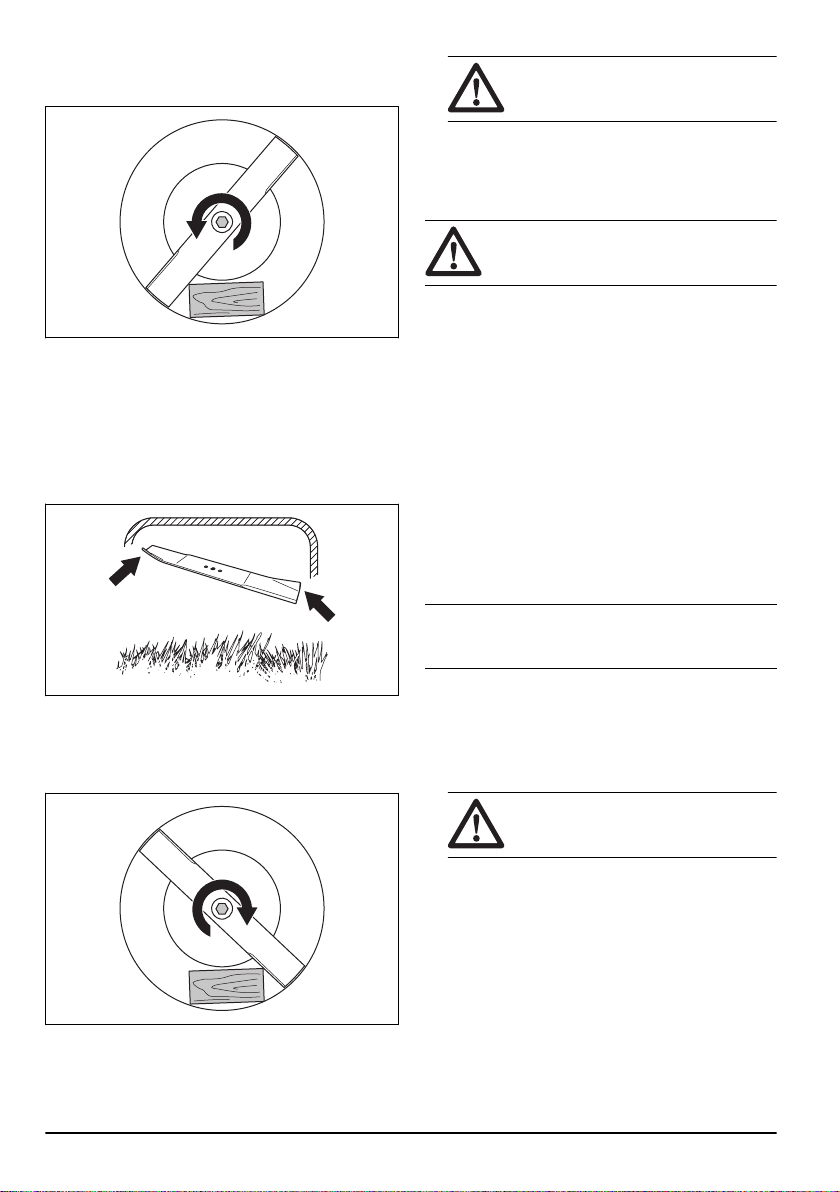
To replace the blade
1. Lock the blade with a block of wood.
2. Remove the blade bolt.
3. Remove the blade.
4. Examine the blade support and blade bolt to see if
there are damages.
5. Examine the engine shaft to make sure that it is not
bent.
6. When you attach the new blade, point the angled
ends of the blade in the direction of the cutting cover.
WARNING: Use heavy duty gloves. The
blade is very sharp and cuts can easily
occur.
10. Start the product to do a test of the blade. If the
blade is not correctly attached, there is vibration in
the product or the cutting result is unsatisfactory.
To do a check of the oil level
CAUTION: A too low oil level can do
damage to the engine. Do a check of the oil
level before you start the product.
1. Put the product on level ground.
2. Remove the oil tank cap with the attached dipstick.
3. Clean the oil from the dipstick.
4. Put the dipstick fully into the oil tank to give a correct
picture of the oil level.
5. Remove the dipstick.
6. Examine the oil level on the dipstick.
7. If the oil level is low, fill with engine oil and do a
check of the oil level again.
To fill and replace the engine oil
• For information on how to fill and replace the engine
oil, refer to the operator's manual for the engine.
Air filter
An air filter that is used for a long time cannot be
Note:
fully cleaned. Replace the air filter at regular intervals.
Always replace a damaged air filter.
7. Make sure that the blade is aligned with the center of
the engine shaft.
8. Lock the blade with a block of wood. Attach the
spring washer and tighten the bolt and washer with a
torque of 45–60 Nm.
9. Pull the blade around by hand and make sure that it
turns freely.
10
To clean the paper filter
1. Remove the air filter cover and remove the paper
filter.
2. Hit the filter against a flat surface to make the
particles fall off.
CAUTION:
compressed air to clean the paper filter.
3. Put the air filter back. Make sure that the air filter
fully seals against the air filter holder.
4. Put the air filter cover back.
Do not use solvent or
To clean the foam plastic filter
1. Remove the air filter cover and remove the foam
plastic filter.
2. Clean the foam plastic filter with soap and water.
3. Flush the foam plastic filter in clean water.
4. Squeeze the water from the foam plastic filter and let
it dry.
1095 - 002 -
Page 11
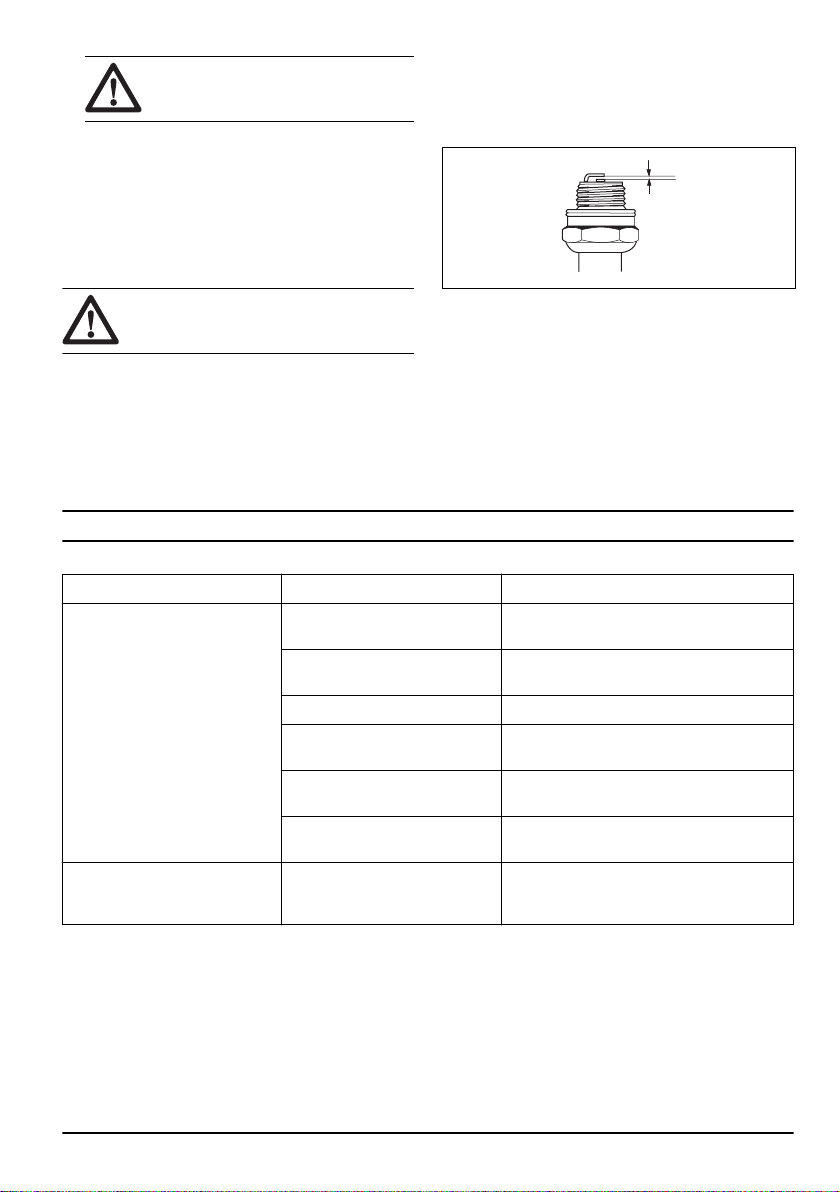
CAUTION: Do not use compressed air. It
can cause damage to the foam plastic
filter.
5. Lubricate the foam plastic filter with engine oil.
6. Press a clean cloth against the foam plastic filter to
remove unwanted oil.
7. Put the air filter back. Make sure that the air filter
fully seals against the air filter holder.
8. Put the air filter cover back.
b) Make sure that the fuel mixture is correct.
c) Make sure that the air filter is clean.
• If the spark plug is dirty, clean it and make sure that
the electrode gap is correct, refer to
on page 13
.
Technical data
To examine the spark plug
CAUTION: Always use the recommended
spark plug type. Incorrect spark plug type
can cause damage to the product.
• Examine the spark plug if the engine is low on
power, is not easy to start or does not operate
correctly at idle speed.
• To decrease the risk of unwanted material on the
spark plug electrodes, obey these instructions:
a) Make sure that the idle speed is correctly
adjusted.
• Replace the spark plug if it is necessary.
To examine the fuel system
• Examine the fuel tank cap and the seal for the fuel
tank cap to make sure that there are no damages.
• Examine the fuel hose to make sure that there are
no leaks. If the fuel hose is damaged, let a service
agent replace it.
Troubleshooting
Problem Possible cause Solution
The engine does not start. The throttle control is not in cor-
rect position.
The ignition cable is not connected correctly.
The fuel tank is empty. Fill the fuel tank with correct fuel type.
There is dirt in the carburetor or
fuel line.
The spark plug is defective. Adjust the electrode gap, clean or replace
There is too much fuel in the engine.
The engine does not stop. The stop mechanism is defective. Disconnect the ignition cable from the spark
Move the throttle control to fast position or
start position.
Connect the ignition cable to the spark plug.
Clean the carburetor and/or fuel line.
the spark plug.
Start the engine with the throttle control in
the fast position.
plug. Let an approved service agent repair
the product.
1095 - 002 - 11
Page 12

Problem Possible cause Solution
The engine does not operate
smoothly.
The engine becomes too hot. The engine oil level is too low. Fill engine oil.
There is misfire in the engine
when it operates at high speed.
The engine does not operate
smoothly at idle speed.
There is too much vibration in the
handle.
The grass is cut irregularly. The wheels are not in correct po-
The throttle control is not in correct position.
The ignition cable is not connected correctly.
There is dirt in the fuel line or the
fuel has expired.
There is blockage in the fuel tank
cap.
There is water or dirt in the fuel
system.
The air filter is dirty. Clean the air filter.
The carburetor must be adjusted. Let a servicing dealer adjust the carburetor.
The air flow is not sufficient. Clean the air filter and the air filter housing.
The carburetor must be adjusted. Adjust the carburetor.
The electrode gap in the spark
plug is too small.
The spark plug is dirty, defective
or the electrode gap is too wide.
The carburetor must be adjusted. Adjust the carburetor.
The air filter is dirty. Clean the air filter.
The blade is loose or not balanced.
The blade is bent. Replace the blade if there are damages.
sition.
The blade is not sufficiently
sharp.
Move the throttle control to fast position.
Connect the ignition cable to the spark plug.
Clean the fuel line. Fill the fuel tank with new
fuel of the correct type.
Clean the fuel tank cap.
Drain the fuel tank. Fill the fuel tank with new
fuel of the correct type.
Adjust the electrode gap.
Adjust the electrode gap or replace the spark
plug.
Tighten the blade bolts. Replace the blade if
there are damages.
Set the cutting height at the same level for all
4 wheels.
Sharpen or replace the blade.
Transportation, storage and disposal
Transportation and storage
• For storage and transportation of the product and
fuel, make sure that there are no leaks or fumes.
Sparks or open flames, for example from electrical
devices or boilers, can start a fire.
• Always use approved containers for storage and
transportation of fuel.
• Empty the fuel tank before you put the product in
storage for a long period of time. Discard the fuel at
an applicable disposal location
• Safely attach the product during transportation to
prevent damage and accidents.
12 1095 - 002 -
• Keep the product in a locked area to prevent access
for children or persons that are not approved.
• Keep the product in a dry and frost free area.
Disposal
• Obey the local recycling requirements and applicable
regulations.
• Discard all chemicals, such as engine oil or fuel, at a
service center or at an applicable disposal location.
• When the product is no longer in use, send it to a
Husqvarna dealer or discard it at a recycling
location.
Page 13
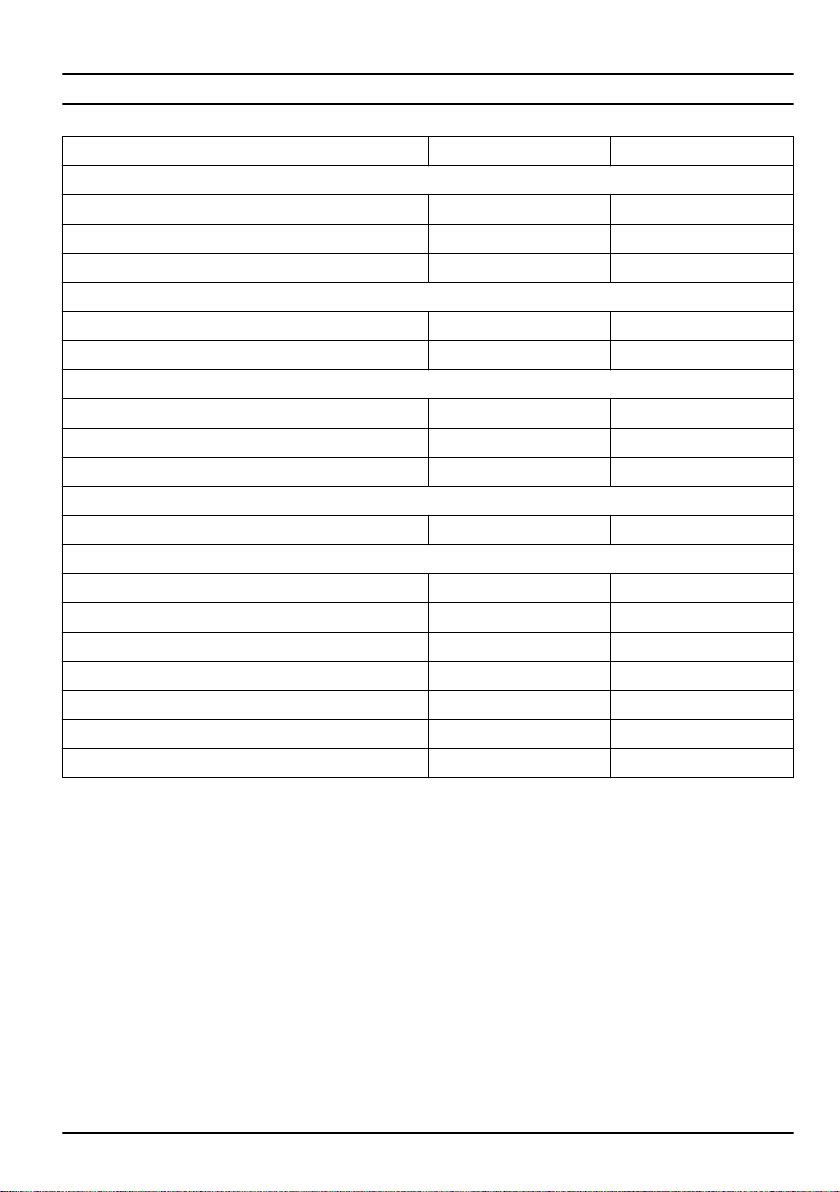
Technical data
LC 219 LC 419
Engine
Brand Honda Honda
Displacement, cm
Speed, rpm 3000 3000
Ignition system
Spark plug NGK/BPR5ES NGK/BPR5ES
Electrode gap, mm 0.5 0.5
Fuel and lubrication system
Fuel tank capacity, liter 1.8 1.8
Oil tank capacity, liter 0.65 0.65
Engine oil 10W-40 10W-40
Weight
With empty tanks, kg 34 35
Cutting
Number of cutting height positions 10 10
Cutting height, mm 18-70 18-70
Cutting width, mm 480 480
Cutting system Mulch & Catch Mulch & Catch
Grass catcher capacity, liter 50 55
Blade
Article number 597726801 (Collect) 597726801 (Collect)
3
163 163
1095 - 002 - 13
Page 14
简介...............................................................................14
1
14
15
3
5
5
2
4
4
6
9
9
10
10
12
16
13
2
11
16
7
7
8
LC 419 LC 219
3
13
安全性........................................................................... 15
安装...............................................................................17
操作...............................................................................18
产品概览
内容
维护...............................................................................20
故障排除....................................................................... 22
运输、存放和废弃处理..................................................23
技术资料....................................................................... 23
简介
1. 手柄
2. 油门控制
3. 启动绳把手
4. 集草袋
5. 燃油箱盖
6. 修剪高度杆
7. 空气滤清器
8. 火花塞
9. 切割防护盖
10. 消音器
11. 机油箱盖
12. 后盖
13. 引擎制动手柄
14. 导向板
15. 说明书
16. 标牌
14 1095 - 002 -
产品说明
本产品是一款步行控制式草坪机。草料收集在集草袋中。
拆下集草袋,以便从后方卸草。
预期用途
在私人花园中使用本产品割草。切勿将产品用于其他任
务。
本产品上的符号
警告:请多加小心,并正确使用本产品。这
可能会对操作员或其他人造成严重伤害或死
亡。
请认真阅读本说明书,确保在充分理解各项
说明之后再使用本产品。
Page 15
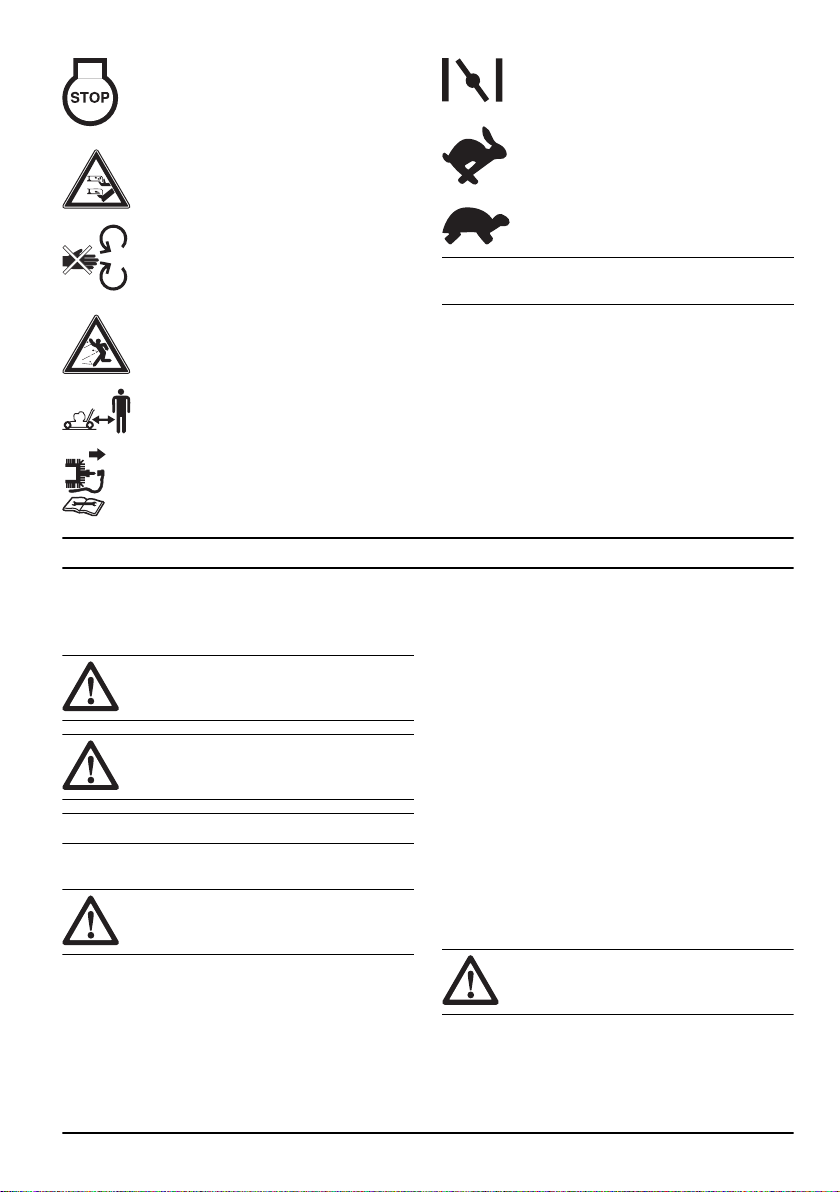
关闭引擎。
警告:旋转刀片。确保四肢远离机器。
阻气门。
将引擎油门调至高速。
将引擎油门调至低速。
警告:旋转部件。确保四肢远离机器。
注意抛掷物和反弹物。
确保人员和动物与工作区域保持安全距离。
执行维修或维护作业之前,务必将引擎熄火
并拆下点火线。
安全性
安全定义
本手册使用了“警告”、“小心”和“注意”来指出特别重要的内
容。
警告: 当不遵守手册中的说明可能会给操作
员或周围人员带来伤害或死亡风险时,会使
用此标志。
小心: 当不遵守手册中的说明可能会对产
品、其他材料或附近区域造成损坏时,会使
用此标志。
注意: 用于提供特定状况下所需的更多信息。
一般安全须知
警告: 请在使用本产品前阅读下面的警告说
明。
注意: 有关本产品上的其他符号/标识,请参阅适用于部
分市场的认证要求。
产品责任
如产品责任法律中所引用的,在以下情况下,我们对我们
的产品所导致的损坏不担负责任:
• 未正确修理产品。
• 使用并非来自制造商或者未获得制造商批准的零部件
修理产品。
• 产品具有并非来自制造商或者未获得制造商批准的附
件。
• 未在获得批准的服务中心修理产品,或者并非由获得
批准的机构修理产品。
• 请务必多加小心,并运用常识来判断。如果您不确定
在特殊情况下如何操作本产品,请停止操作并与您的
Husqvarna 经销商联系。
• 切记,操作员将对涉及他人或其财产的事故负责。
• 请保持产品清洁。确保您可以清楚地阅读标记和标
签。
• 务必确保操作员已阅读并理解说明书的内容,否则不
得使用本产品。
• 切勿让儿童操作产品。
• 切勿让不熟悉使用说明书的人员操作产品。
• 若使用产品的人员身体能力或心智能力降低,务必对
其进行监督。成人监督人必须始终在场。
• 当您感到疲倦、生病或受到酒精、麻药或药物的影响
时,请勿使用本产品。这些因素会对您的视觉、警惕
性、协调能力或判断力产生不良影响。
• 如果本产品有缺陷,切勿使用。
• 如果本产品可能被他人改动过,请勿再进行改动或使
用。
工作区安全
• 如果使用不当,或者如果您不小心,则本产品非常危
险。如果未遵守一般安全须知,可能会导致伤害或死
亡。
• 本产品在操作期间会产生电磁场。电磁场在某些情况
下会干扰有源或无源医疗植入体。为了减少严重或致
命性伤害风险,我们建议使用医疗植入体的人员在操
作本产品之前事先咨询其医生及医疗植入体制造商。
1095 - 002 - 15
• 在使用本产品之前,请清除作业区域中的树枝、枝桠
警告: 请在使用本产品前阅读下面的警告说
明。
和石头等物体。
Page 16
• 这些物体碰撞到切割设备会被弹出,导致人员受伤和
物体损坏。确保附近人员和动物与本产品保持安全距
离。
• 切勿在雾天、雨天、强风、严寒和闪电等恶劣天气下
使用本产品。在恶劣天气下或潮湿地点使用本产品容
易令人感到疲倦。恶劣天气会导致危险的情况,如湿
滑的路面。
• 留意可能妨碍本产品安全运行的人员、物体和情况。
• 留意如树根、石头、枝桠、坑和沟渠等障碍。茂盛的
草会隐藏障碍物。
• 在斜坡上割草可能非常危险。不要在坡度超过 15° 的
地面上使用本产品。
• 面对斜坡操作本产品。切勿上下移动。
• 在接近隐藏的角和物体时请小心谨慎,以免阻碍视
线。
作业安全
警告: 请在使用本产品前阅读下面的警告说
明。
• 本产品仅用于切割草坪。不允许用于其他任务。
• 使用个人保护装备。请参阅
页上
。
• 确保您知道在紧急情况下如何快速让引擎停止工作。
• 切勿在封闭空间或易燃物品附近启动引擎。引擎排出
的废气浓烟温度很高,并可能带有火花,能引发火
灾。
• 除非已正确连接刀片和所有盖板,否则请勿操作本产
品。未正确连接的刀片可能松动,导致人身伤害。
• 确保刀片不会碰到石头和树根等物体。这会损坏刀
片,并折弯引擎轴。一旦引擎轴折弯,就会导致严重
振动,同时刀片松动风险会变得极高。
• 如果刀片碰撞到任何异物或者发生振动,请立即关闭
本产品。将点火线从火花塞上断开。检查本产品是否
损坏。维修损坏的地方或让授权的保养厂执行维修。
• 启动引擎时,切勿将引擎制动手柄永久连接至手柄。
• 将本产品放置在稳定、平坦的地面上,然后将其启
动。确保刀片不会碰撞到地面或其他物体。
• 当您操作本产品时,请始终站在本产品的后面。
• 在操作本产品时使所有车轮接触地面,并将双手放在
手柄上。手和脚远离正在旋转的刀片。
• 引擎启动后,切勿倾斜本产品。
• 向后拉动本产品时请小心谨慎。
• 切勿在引擎运行时吊装本产品。如果必须吊装本产
品,务必先将引擎熄火,并将点火线从火花塞上断
开。
• 在操作本产品时切勿倒退行走。
• 当您在没有草的区域移动时,例如在石砾、石头和沥
青道路上移动时,应将引擎熄火。
• 切勿在引擎运行时和本产品一起跑着移动。操作本产
品时始终保持步行。
• 在更改修剪高度之前,请先将引擎熄火。切勿在引擎
运行时进行调整。
• 切勿在引擎运行时将本产品置于视线以外的地方。将
引擎熄火,确保切割设备不转动。
个人防护装备在第 16
操作安全须知
个人防护装备
警告: 请在使用本产品前阅读下面的警告说
明。
• 个人防护装备不能完全避免受伤,但当意外发生时,
可降低伤害程度。请经销商协助您选择正确的防护装
备。
• 如果噪声级高于 85 dB,请使用听觉保护设备。
• 穿上结实耐磨防滑靴或防滑鞋。请勿穿凉鞋或赤脚。
• 请穿上厚实的长裤。
• 必要时戴上保护手套,例如在安装、检查或清洁切割
设备时。
产品上的安全装置
警告: 请在使用本产品前阅读下面的警告说
明。
• 切勿在安全装置有故障的情况下使用产品。
• 定期检查安全装置。如果安全装置有故障,请联系您
的 Husqvarna 保养厂。
检查切割防护盖
切割防护盖可降低本产品产生的振动,并降低被刀片割伤
的风险。
• 检查切割防护盖,确保没有损坏,如裂缝。
引擎制动手柄
引擎制动手柄可让引擎停止运行。当引擎制动手柄松开
时,引擎会停止运行。
要检查引擎的制动情况,请启动引擎,然后松引擎制动手
柄。如果引擎未能在 3 秒内停止运行,应请许可的
Husqvarna 保养厂调整引擎制动。
消音器
消音器用于最大程度降低噪音并将引擎的废气浓烟导离操
作人员。
如果消音器缺失或有缺陷,请勿使用本产品。消音器损坏
时噪音会增大,并且有导致起火的风险。
16
1095 - 002 -
Page 17
警告: 消音器在使用期间和之后以及当引擎
以怠速运转时会变得很烫。务必当心附近的
易燃材料和/或烟雾,以防引起火灾。
检查消音器
• 定期检查消音器,确保其安装正确且无损坏。
燃油安全须知
• 完全拧紧燃油箱盖。如果燃油箱盖没有拧紧,则有失
火的风险。
• 启动之前,将产品从加油位置移开至少 3 米 / 10 英
尺。
• 请勿将燃油箱完全加满油。热量会使燃油膨胀。为燃
油箱顶部保留一定的空间。
维护安全须知
警告: 请在使用本产品前阅读下面的警告说
明。
• 如果产品上沾染燃油或引擎机油,切勿启动产品。去
除多余的燃油/机油,使产品保持干燥。
• 如果燃油溅到衣物上,请立即更换衣物。
• 切勿使身体沾染上燃油,否则可能会导致伤害。如果
燃油溅到身上,必须使用肥皂和水洗净。
• 如果引擎发生泄漏,切勿启动产品。定期检查引擎是
否有泄漏。
• 请小心处理燃油。燃油易燃,油烟具有爆炸性,并且
可能导致伤害或死亡。
• 切勿吸入油烟,它可能导致伤害。确保充分通风。
• 切勿在燃油或引擎附近吸烟。
• 切勿在燃油或引擎附近放置高温物体。
• 切勿在引擎运转期间添加燃油。
• 确保重新加注燃油之前,引擎处于冷却状态。
• 重新加注燃油之前,缓缓打开燃油箱盖,并小心释放
压力。
• 切勿在室内为引擎添加燃油。通风不充分情况下,可
能由于窒息性气体或一氧化碳的原因而导致伤害或死
亡。
简介
警告: 在安装本产品之前,您必须阅读并理
解安全章节。
警告: 请在使用本产品前阅读下面的警告说
明。
• 引擎排出的废气中含有一氧化碳,这是一种极危险的
无味有毒气体。切勿在室内或密闭空间中启动引擎。
• 在对本产品进行任何维护之前,务必先将引擎熄火,
并将点火线从火花塞拆下。
• 维护切割设备时,请戴上保护手套。刀片非常锋利,
很容易造成割伤。
• 未经制造商批准加装附件或改动产品可能导致严重的
伤害或死亡。切勿改动本产品。始终使用获得制造商
批准的零件。
• 如未正确和定期地进行维护,导致伤害的风险和损坏
产品的风险将会增加。
• 只能进行此用户手册所述的维护工作。所有其他保养
操作必须由许可的 Husqvarna 保养厂完成。
• 由许可的 Husqvarna 保养厂定期对本产品进行保养。
• 更换已经损坏、磨损或破损的零件。
安装
安装手柄
1. 在本产品的两侧,分别使用 2 颗螺丝和螺母将下手柄
固定至本产品。
警告: 安装产品之前,先拆下火花塞中的火
花塞电缆。
1095 - 002 - 17
Page 18
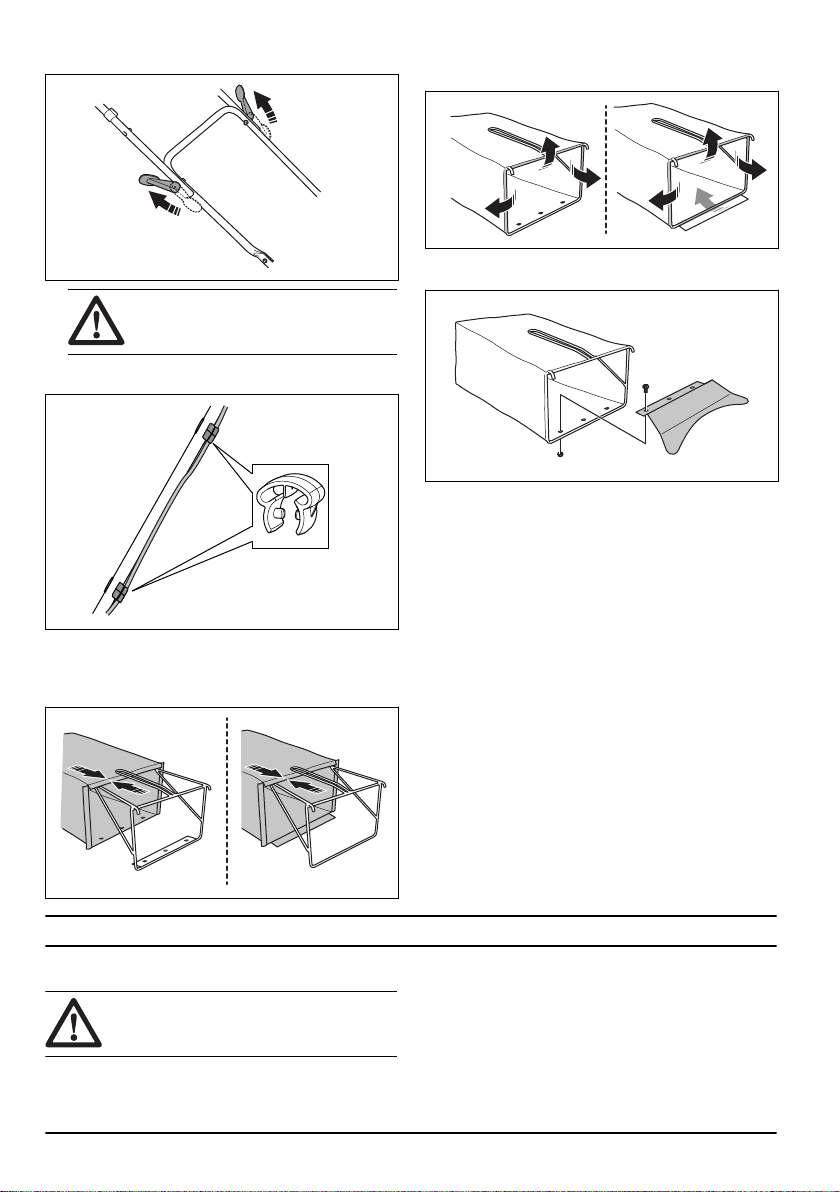
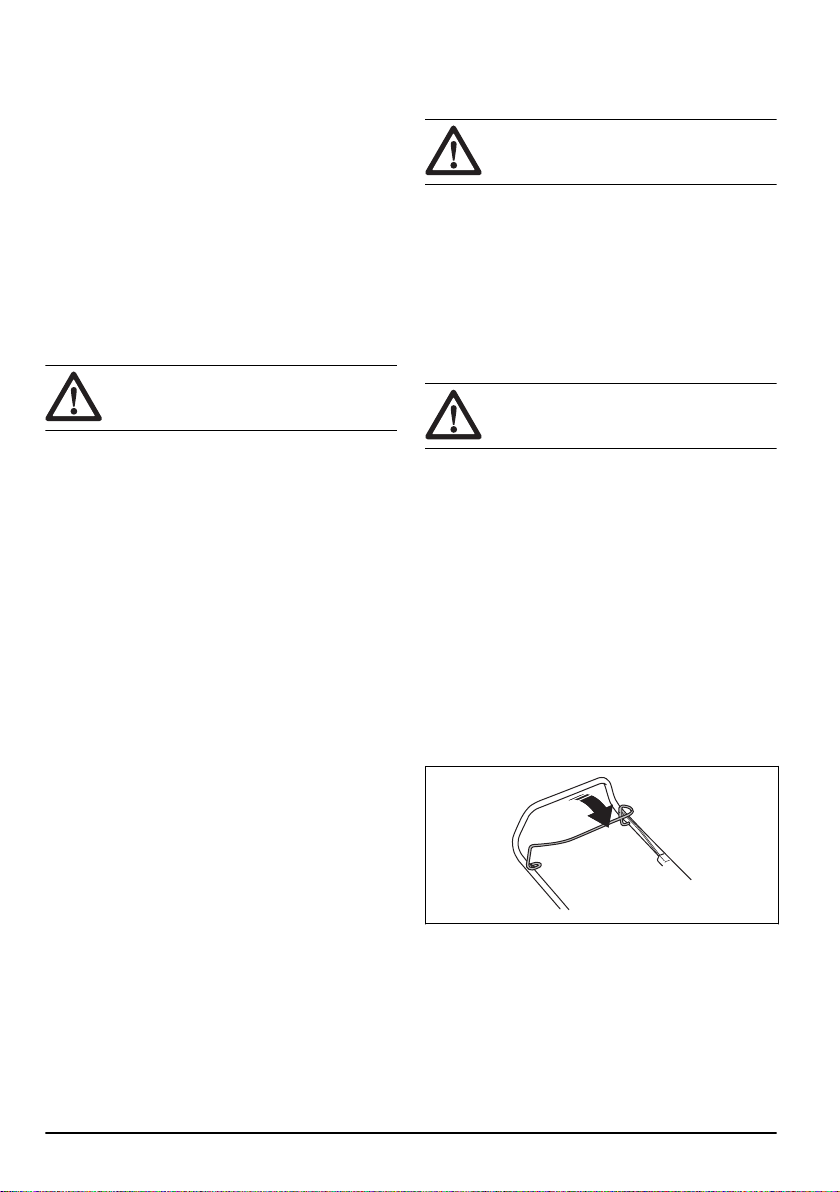
2. 提起上手柄,直至它与下手柄对齐。压紧扳手。
小心: 提起上手柄时,请小心操作,不
要损坏线索。
3. 将线索放入线索支架。确保线索不要扭结。将线索支
架装到手柄上。
2. 使用纤维袋边缘上的夹子将集草袋固定到集草器框架
上。
a) 对于 LC 219,使用 3 个螺栓将法兰装到集草袋框
架上。
b) 拧紧螺母。
3. 抬起后盖。
4. 将集草袋连接到机架顶部边缘上。
5. 将集草袋的下部放入卸草通道中。
安装集草袋
1. 将集草袋框架放入纤维草袋中。确保集草器框架上的
手柄位于集草袋的顶部。
操作
引言
警告: 在使用本产品之前,您必须阅读并理
解安全章节。
18 1095 - 002 -
操作产品之前
1. 请认真阅读本说明书,确保您充分理解各项说明。
2. 检查切割设备,确保其连接正确且调整得当。请参阅
润滑切割设备在第 20 页上
3. 加注燃油箱。请参阅
。
添加燃油在第 19 页上
。
Page 19
4. 加注机油箱并检查机油油位。请参阅
第 21 页上
。
检查机油油位在
添加燃油
如果可行,请使用低排放/烷基化汽油。如果没有低排放/
烷基化汽油,可使用优质无铅汽油或辛烷值不低于 90 的
含铅汽油。
小心: 切勿使用辛烷值低于 90 RON (87
AKI) 的汽油。这可能导致损坏产品。
1. 缓慢打开燃油箱盖以释放压力。
2. 用燃油罐慢慢加油。如果有燃油溅出,请用布擦拭,
然后让剩余的燃油挥发掉。
3. 将燃油箱盖四周清理干净。
4. 完全拧紧燃油箱盖。如果燃油箱盖没有拧紧,则有失
火的风险。
5. 启动之前,将产品从加油位置移开至少 3 m (10 ft)。
设置修剪高度
1. 将引擎熄火。
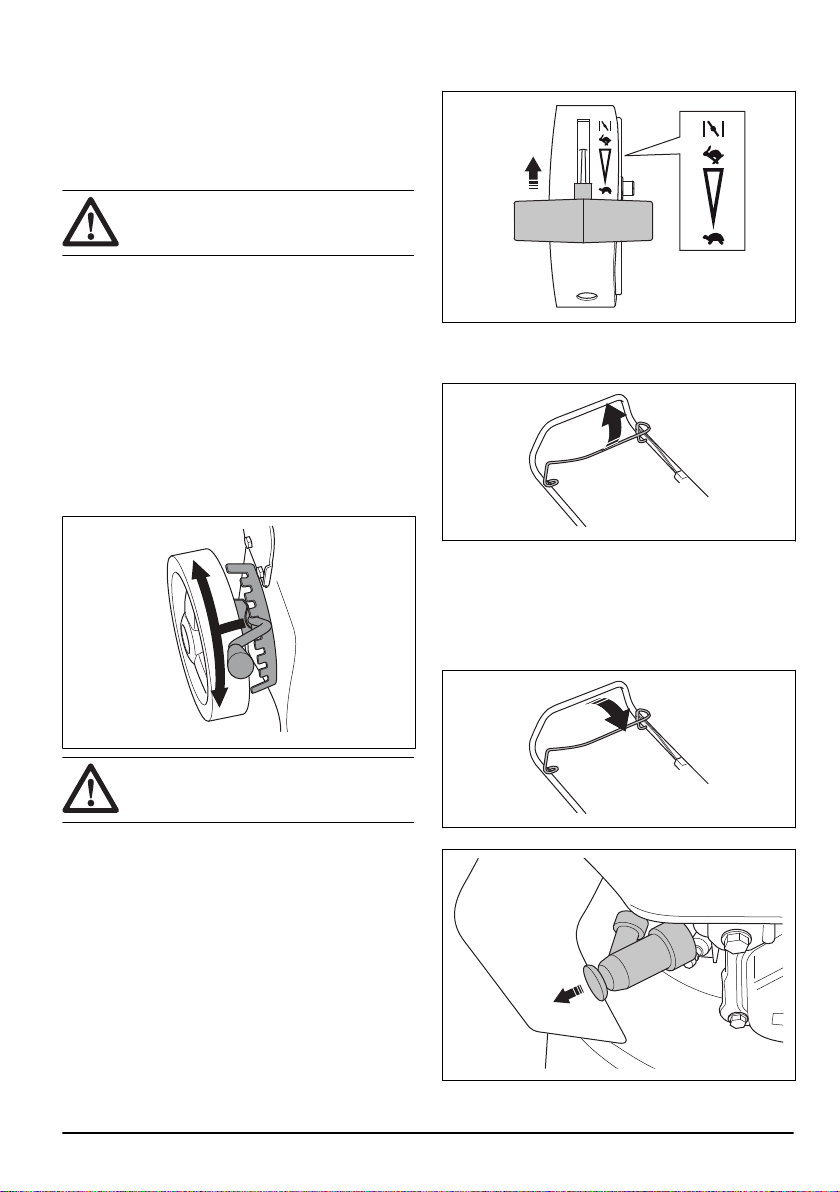
2. 向后移动修剪高度调节杆,增加修剪高度。
3. 向前移动修剪高度调节杆,降低修剪高度。
a) 如果引擎尚未预热,应将油门控制转到阻塞位
置。
b) 如果引擎处于暖机状态,请勿将油门控制转到阻
塞位置。
4. 握住引擎制动手柄,使其紧靠手柄杆。
5. 用右手握住启动绳把手。
6. 慢慢拉出启动绳,直到感觉到有阻力。
7. 用力拉启动绳,以启动引擎。
让本产品停止运行
• 要将引擎熄火,请松开引擎制动手柄。
小心: 切勿将修剪高度设置得太低。如果草
坪表面不平,刀片可能会碰到地面。
启动产品
1. 确保将点火线连接至火花塞中。
2. 站在本产品的后面。
3. 调节油门控制。
1095 - 002 -
• 如果引擎未能熄火,请将点火线从火花塞上断开。
19
Page 20
为获得良好的作业效果
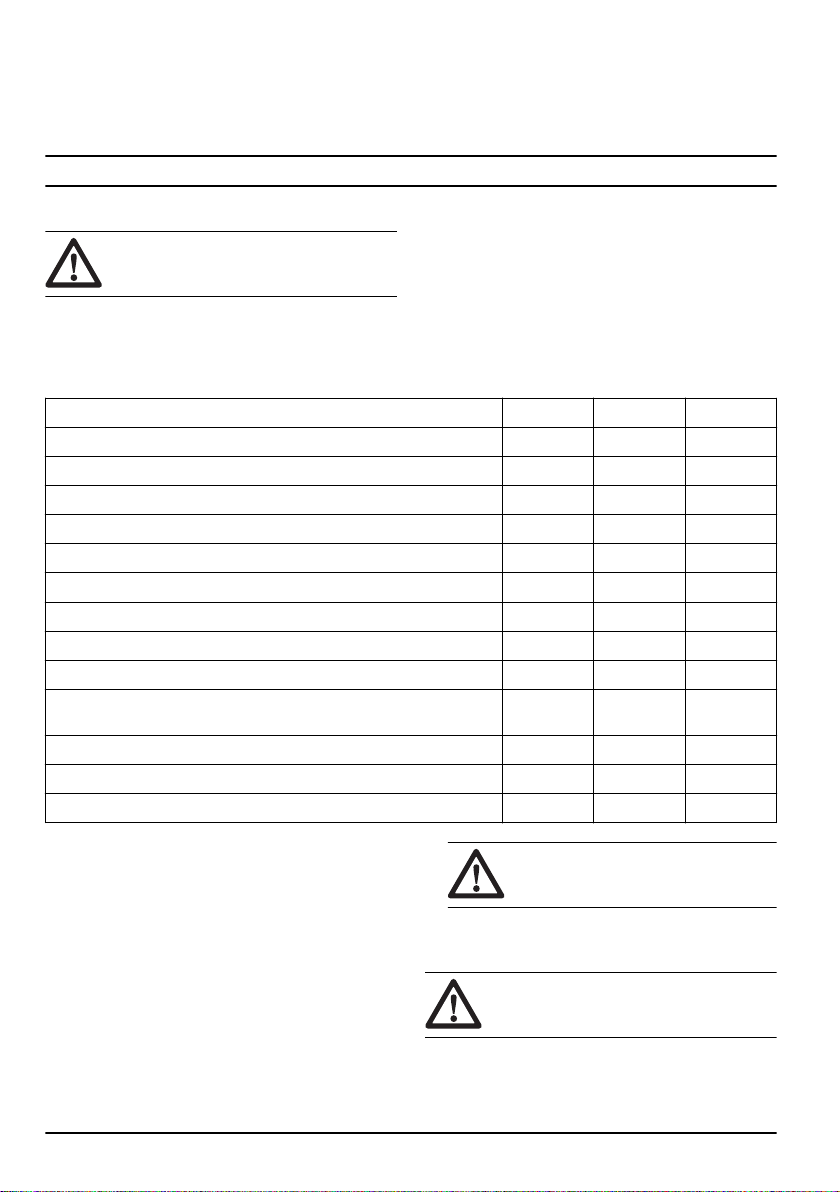
• 务必使用锐利的刀片。钝刀片会产生不规则的结果,
且草的切割表面会变黄。此外,锐利的刀片比钝刀片
更加节能。
• 修剪高度不得超过草长的 ⅓。从较高的修剪高度开始
切割。检查结果,将修剪高度降低到合适的水平。如
果草非常长,请缓慢前进,必要时切割 2 次。
• 每次的修剪方向不应相同,以防止草坪上出现条纹。
维护
引言
警告: 进行维护之前,您必须阅读并理解安
全须知章节。
要对本产品执行任何保养和维修工作,都需要经过特殊培
训。我们承诺提供专业的维修和保养。如果您的经销商不
是保养代理商,请联系该经营商以获取离您最近的保养代
理商的信息。
维护 每天 每周 每月
执行一般性检查 X
检查机油油位 X
清洁本产品 X
检查切割设备 X
检查切割防护盖* X
清洁空气滤清器 X
清洁汽缸上的散热片 X
检查消音器* X
检查火花塞 X
更换机油(使用 5 小时后首次更换,之后每使用 20 小时后及每年更换一
次)
更换空气滤清器 X
检查燃油系统 X
检查并调整驱动器(离合器导线) X
维修时间表
维护间隔在产品每天使用的情况下计算得出。如果产品并
非每天使用,维护间隔会有所不同。
对于带有 * 标记的维护作业,请参阅
在第 16 页上
中的说明。
产品上的安全装置
X
进行一般性检查
• 确保产品上的螺母和螺钉都已拧紧。
清洁本产品的外部
• 用刷子清除树叶、草和污垢。
• 确保引擎顶部的进气口畅通无阻
• 不要使用高压清洗机清洁产品。
• 如果用水清洁本产品,切勿用水直接冲洗引擎。
3. 用水冲洗切割防护盖的内表面。
润滑切割设备
清洁切割防护盖的内表面
1. 排空燃油箱。
2. 将本产品侧放,消音器朝下。
20 1095 - 002 -
小心: 如果以空气滤清器朝下的方式放
置本产品,可能导致引擎损坏。
警告: 为防止意外启动,请将点火线从火花
塞上拆下。
Page 21
警告: 维护切割设备时,请戴上保护手套。
刀片非常锋利,很容易造成割伤。
1. 检查切割设备是否有损坏或裂痕。务必更换损坏的切
割设备。
2. 检查刀片,查看是否损坏或变钝。
注意: 每次磨利刀片后,必须对刀片进行平衡调整。让
维修中心磨利、更换和平衡刀片。如果您撞到障碍物并导
致本产品停止运行,请更换损坏的刀片。让维修中心评估
刀片能否磨利还是必须更换。
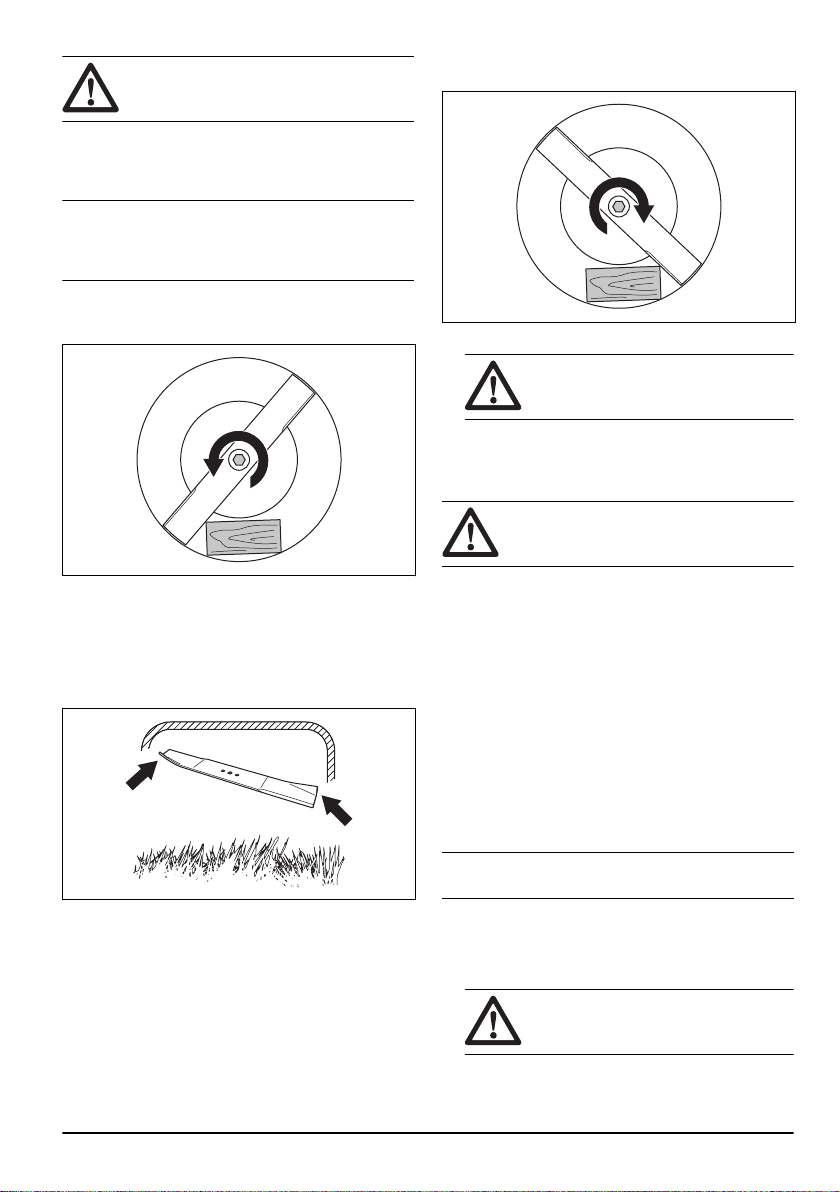
更换刀片
1. 使用木块锁定刀片。
8. 使用木块锁定刀片。连接弹簧垫片,并用 45–60 Nm
扭矩拧紧螺丝和垫片。
9. 用手拉住刀片旋转,确保刀片转动自如。
警告: 请佩戴耐磨手套。刀片非常锋
利,很容易割到手。
10. 启动本产品以测试刀片。如果刀片未正确安装,则本
产品中存在振动,或切割结果令人不满意。
检查机油油位
小心: 如果油位过低,可能导致引擎损坏。
启动本产品之前,请先检查油位。
2. 拆下刀片螺栓。
3. 拆下刀片。
4. 检查刀片支撑和刀片螺栓,查看是否有损坏。
5. 检查发动机轴,确保其未弯曲。
6. 安装新刀片时,请将刀片的倾斜端指向切割防护盖的
方向。
7. 确保刀片与发动机轴中心对准。
1095 - 002 -
1. 将产品置于平坦地面上。
2. 拆下带有油尺的机油箱盖。
3. 清洁油尺上的机油。
4. 将油尺完全放入机油箱,以便获得正确的油位显示。
5. 拆下油尺。
6. 检查油尺上的油位。
7. 如果油位过低,加注引擎机油后再次检查油位。
加注和更换引擎机油
• 有关如何加注和更换引擎机油的信息,请参阅引擎的
说明书。
空气滤清器
使用时间较长的空气滤清器可能无法彻底清洁。
注意:
定期更换空气滤清器。务必更换损坏的空气滤清器。
清洁纸制滤清器
1. 拆下空气滤清器罩,然后拆下纸制滤清器。
2. 手持滤清器敲击某个平整表面,以使灰尘颗粒脱落。
切勿使用溶剂或压缩空气清洁纸
小心:
制滤清器。
3. 装回空气滤清器。确保空气滤清器完全密封在空气滤
清器支架上。
21
Page 22
4. 装回空气滤清器罩。
清洁海绵塑料滤网
1. 拆下空气滤清器罩,然后拆下海绵塑料滤网。
2. 用肥皂和水清洁海绵塑料滤网。
3. 用清水冲洗海绵塑料滤网。
4. 拧干海绵塑料滤网,然后将其晾干。
小心: 请勿使用压缩空气。这会导致海
绵塑料滤网损坏。
5. 用引擎机油润滑海绵塑料滤网。
6. 将干净的布按在海绵塑料滤网上,吸附掉多余的油。
7. 装回空气滤清器。确保空气滤清器完全密封在空气滤
清器支架上。
8. 装回空气滤清器罩。
检查火花塞
小心: 务必使用建议的火花塞类型。火花塞
类型不正确可能导致产品损坏。
• 如果引擎动力不足,请检查火花塞是否不容易启动或
者怠速时是否运行不正确。
• 为降低在火花塞电极上出现多余物质的风险,请遵循
这些说明:
a) 确保已正确调节怠速。
b) 确保混合燃油正确。
c) 确保空气滤清器清洁。
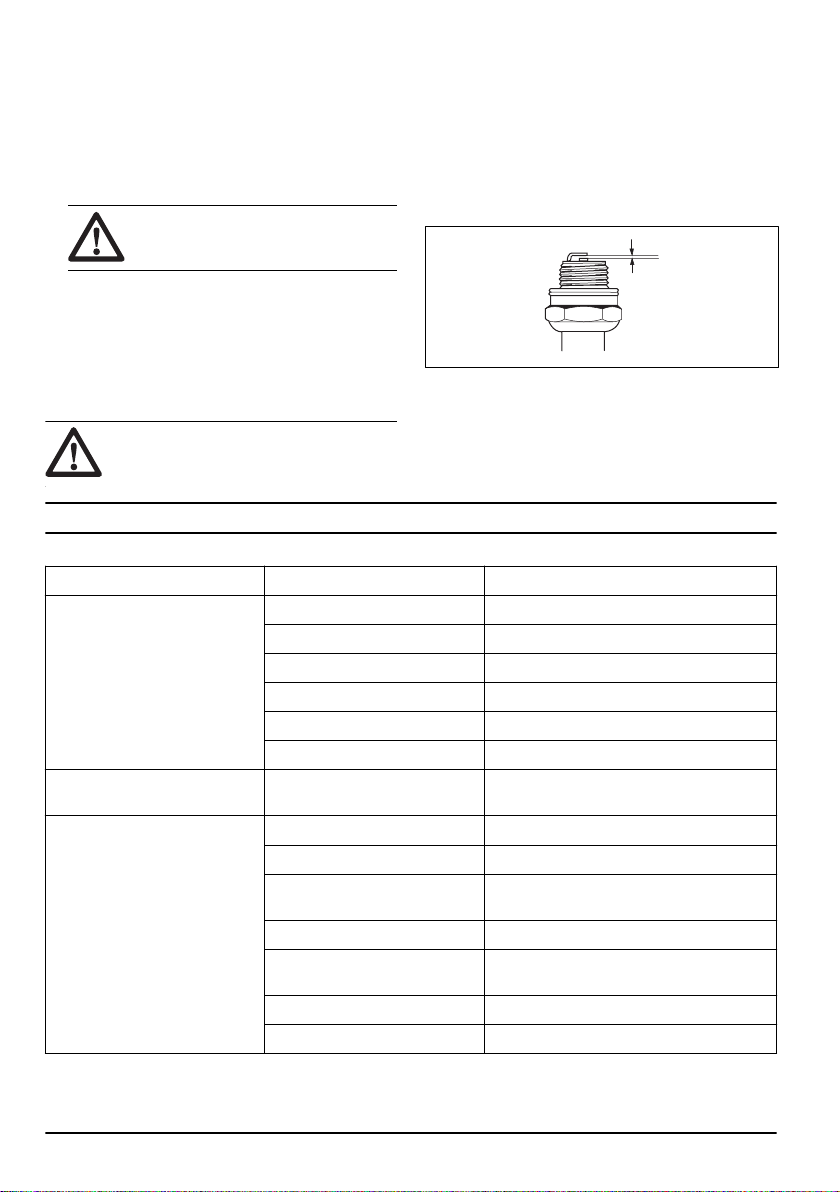
• 如果火花塞脏污,请进行清洁并确保电极间隙正确,
请参阅
技术资料在第 23 页上
• 必要时请更换火花塞。
。
检查燃油系统
• 检查燃油箱盖和燃油箱盖的密封,确保没有损坏。
• 检查油管,确保不漏油。如果油管损坏,请让保养厂
进行更换。
故障排除
问题 可能原因 解决方案
引擎不启动。 油门控制未处于正确位置。 将油门控制移至快速位置或启动位置。
点火线未正确连接。 将点火线连接到火花塞。
燃油箱无油。 向燃油箱中注入正确类型的燃油。
化油器或燃油管路中有污垢。 清洁化油器和/或燃油管路。
火花塞有故障。 调整电极间隙调,清洁或更换火花塞。
引擎中的燃油太多。 将油门控制转至快速位置,然后启动引擎。
引擎不熄火。 停止机构有故障。 将点火线从火花塞上断开。让许可保养厂维修
引擎运行不平稳。 油门控制未处于正确位置。 将油门控制移至快速位置。
点火线未正确连接。 将点火线连接到火花塞。
燃油管中有污垢或燃油已过期。 清洁燃油管路。向燃油箱中加注正确类型的新
燃油箱盖内堵塞。 清洁燃油箱盖。
燃油系统内有水或污垢。 排空燃油箱。向燃油箱中加注正确类型的新燃
空气滤清器不干净。 清洁空气滤清器。
必须调整化油器。 请保养代理商调整化油器。
本产品。
燃油。
油。
22 1095 - 002 -
Page 23
问题 可能原因 解决方案
引擎过热。 引擎机油的油位过低。 注入引擎机油。
气流不足。 清洁空气滤清器和空气滤清器外壳。
必须调整化油器。 调整化油器。
当引擎高速运转时,引擎失火。 火花塞中的电极间隙过小。 调整电极间隙。
引擎在怠速下工作不平稳。 火花塞不干净、发生故障或电极
间隙过宽。
必须调整化油器。 调整化油器。
空气滤清器不干净。 清洁空气滤清器。
手柄振动过大。 刀片松动或不平衡。 拧紧刀片固定螺栓。更换损坏的刀片。
刀片弯曲。 更换损坏的刀片。
草地切割效果不规则。 车轮位置不正确。 将所有 4 个车轮的修剪高度设置为相同水
刀片不够锋利。 磨利或更换刀片。
调整电极间隙或更换火花塞。
平。
运输、存放和废弃处理
运输及存放
• 存放和运输产品和燃油时,确保不存在泄漏或烟雾。
火花或明火(例如来自电气设备或锅炉等)可能引发
火灾。
• 务必使用获得批准的容器存放和运输燃油。
• 将产品长期存放前,先清空燃油箱。在适当的处置地
点处理燃油
• 在运输过程中安全地固定产品,以防止损坏和发生事
故。
• 将产品放在上锁的区域,以防止儿童或他人擅自触
碰。
• 将本产品存放在干燥、防冻的区域。
废弃处理
• 遵守当地的回收要求和适用的法规。
• 在服务中心或适当的处置地点处理所有化学品,如机
油或燃油。
• 当产品不再可用时,将其发送给 Husqvarna 经销商或
送至回收点处理。
技术资料
LC 219 LC 419
发动机
品牌 Honda Honda
排量,cm
速度,rpm 3000 3000
点火系统
火花塞 NGK/BPR5ES NGK/BPR5ES
跳火间距 (mm) 0.5 0.5
燃油和润滑系统
1095 - 002 - 23
3
163 163
Page 24

LC 219 LC 419
燃油箱容量,升 1.8 1.8
机油箱容量,升 0.65 0.65
发动机油 10W-40 10W-40
重量
(油箱均排空时),kg 34 35
修剪
修剪高度位置数量 10 10
修剪高度,mm 18-70 18-70
割幅,mm 480 480
切割系统 Mulch & Catch Mulch & Catch
集草袋容量,升 50 55
刀片
货号 597726801 (Collect) 597726801 (Collect)
24 1095 - 002 -
Page 25

1095 - 002 - 25
Page 26

26 1095 - 002 -
Page 27

1095 - 002 - 27
Page 28

www.husqvarna.com
Original instructions
原始说明
1141270-38
2019-04-23
 Loading...