

Page 1

LC 151, LC 151S, LB 256SP
EN Operator's manual 2-18
ES Manual de usuario 19-37
FR Manuel d'utilisation 38-56
PT-BR Manual do operador 57-75
PT Manual do utilizador 76-94
Page 2
Contents
Introduction..................................................................... 2
Safety..............................................................................3
Assembly........................................................................ 5
Operation........................................................................ 8
Maintenance................................................................. 11
Introduction
Engine troubleshooting................................................. 14
Transportation, storage and disposal........................... 15
Technical data.............................................................. 16
EC Declaration of Conformity....................................... 18
Product description
The product is a pedestrian-controlled rotary lawn
mower. For LC 151, LC 151S attach the grass catcher to
collect the grass. Attach the side discharge deflector for
side discharge of the grass. For LC 151, LC 151S attach
a mulch kit to cut the grass into fertilizer.
Intended use
Use the product to cut grass. Do not use the product for
other tasks.
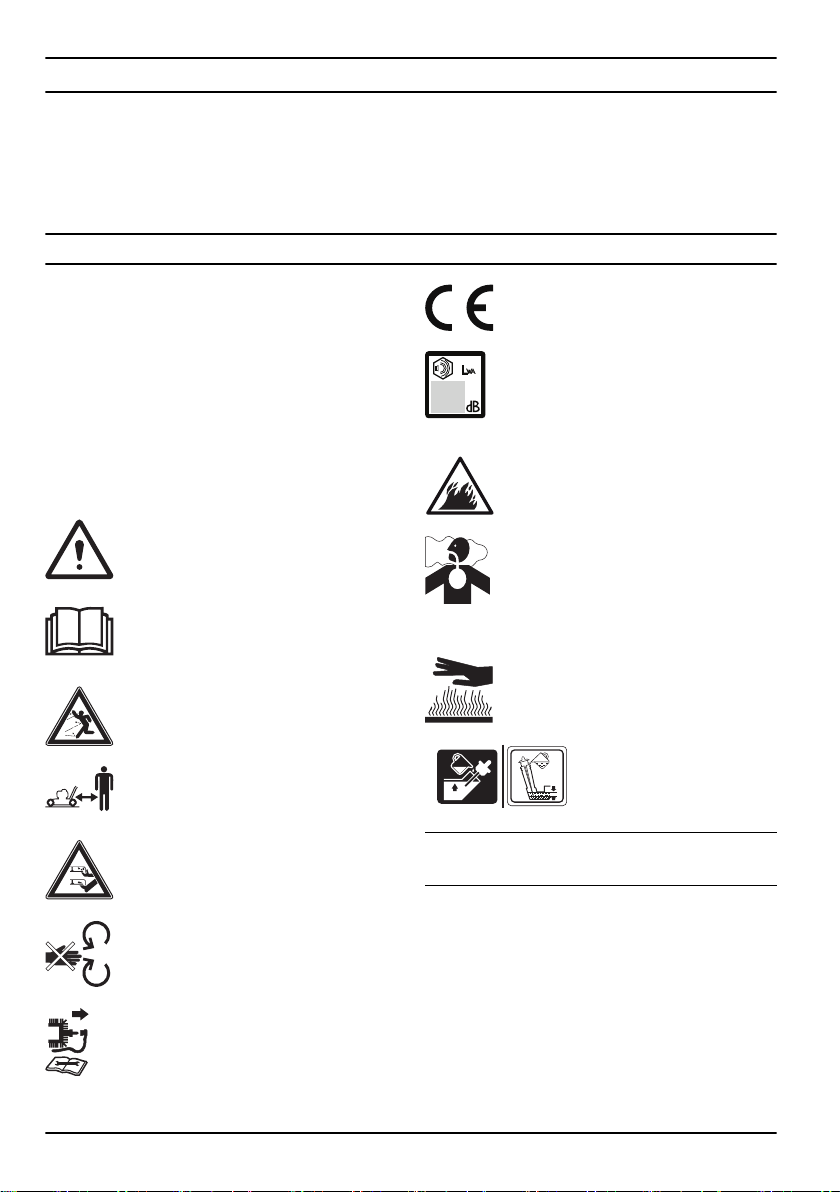
Symbols on the product
WARNING! Be careful and use the
product correctly. This product can cause
serious injury or death to the operator or
others.
Please read the operator's manual
carefully and make sure that you
understand the instructions before use.
Look out for thrown objects and ricochets.
Keep persons and animals at a safe
distance from the work area.
Warning: Keep hands and feet away from
the rotating blade.
Warning: Keep hands and feet away from
rotating parts.
Stop the engine and remove the ignition
cable before repairs or maintenance.
This product is in accordance with
applicable EC directives.
Noise emission to the environment
according to the European Community’s
Directive. The product’s emission is
specified in the Technical data chapter
and on the label.
Risk of fire.
Do not breathe in exhaust fumes. The
exhaust fumes from the engine contain
carbon monoxide, an odourless,
poisonous and very dangerous gas. Do
not start the engine indoors or in closed
spaces.
Hot surface.
Fill the engine with oil before
you start the product.
Note: Other symbols/decals on the product refer to
certification requirements for some commercial areas.
Product liability
As referred to in the product liability laws, we are not
liable for damages that our product causes if:
• the product is incorrectly repaired.
• the product is repaired with parts that are not from
the manufacturer or not approved by the
manufacturer.
• the product has an accessory that is not from the
manufacturer or not approved by the manufacturer.
2
1566 - 008 - 24.11.2021
Page 3

• the product is not repaired at an approved service
center or by an approved authority.
Safety
Safety definitions
Warnings, cautions and notes are used to point out
specially important parts of the manual.
WARNING: Used if there is a risk of
injury or death for the operator or bystanders
if the instructions in the manual are not
obeyed.
CAUTION: Used if there is a risk of
damage to the product, other materials or
the adjacent area if the instructions in the
manual are not obeyed.
Note: Used to give more information that is necessary
in a given situation.
General safety instructions
WARNING: Read the warning
instructions that follow before you use the
product.
• This product is dangerous if used incorrectly or if you
are not careful. Injury or death can occur if you do
not obey the safety instructions.
• This product produces an electromagnetic field
during operation. This field may under some
circumstances interfere with active or passive
medical implants. To reduce the risk of serious or
fatal injury we recommend persons with medical
implants to consult their physician and the medical
implant manufacturer before operating this product.
• Always be careful and use your common sense. If
you are not sure how to operate the product in a
special situation, stop and speak to your Husqvarna
dealer before you continue.
• Keep in mind that the operator will be held
responsible for accidents that involve other persons
or their property.
• Keep the product clean. Make sure that you can
clearly read signs and decals.
• Do not let a person use the product unless you make
sure that they read and understand the contents of
the operator's manual.
• Do not let a child operate the product.
• Keep children away from the work area. A
responsible adult must be there at all times.
• Do not let a person, without knowledge of the
instructions, operate the product.
• Always monitor a person, with decreased physical
capacity or mental capacity, that uses the product. A
responsible adult must be there at all times.
• Do not use the product if you are tired, ill, or under
the influence of alcohol, drugs or medicine. This has
a negative effect on your vision, alertness,
coordination and judgment.
• Do not use the product if it is defective.
• Do not change this product or use it if it is possible
that it has been changed by others.
• Do not change the adjustment for the engine speed
control.
Work area safety
WARNING: Read the warning
instructions that follow before you use the
product.
• Remove objects such as branches, twigs and stones
from the work area before you use the product.
• Objects that hit against the cutting equipment can
eject and cause damage to persons and objects.
Keep bystanders and animals at a safe distance
from the product.
• Never use the product in bad weather such as fog,
rain, strong winds, intense cold and risk of lightning.
To use the product in bad weather or in moist or wet
locations is tiring. Bad weather can cause dangerous
conditions, such as slippery surfaces.
• Look out for persons, objects and situations that can
prevent safe operation of the product.
• Look out for obstacles, such as roots, stones, twigs,
pits and ditches. Long grass can hide obstacles.
• To cut grass on slopes can be dangerous. Do not
use the product on ground that slopes more than
15°.
• Operate the product across the face of slopes. Do
not move up and down.
• Be careful when you go near hidden corners and
objects that prevent a clear view.
Work safety
WARNING:
instructions that follow before you use the
product.
• Use this product to cut grass lawns only. It is not
permitted to use it for other tasks.
• Use personal protective equipment. Refer to
Personal protective equipment on page 4
Read the warning
.
1566 - 008 - 24.11.2021
3
Page 4
• Make sure that you know how to stop the engine
quickly in an emergency.
• Never start the engine in a closed space or near
flammable material. The exhaust fumes from the
engine are hot and can contain sparks which can
start a fire.
• Do not operate the product unless the blade and all
covers are attached correctly. An incorrectly
attached blade can come loose and cause personal
injury.
• Make sure that the blade does not hit objects such
as stones and roots. This can do damage to the
blade and bend the engine shaft. A bent axle causes
heavy vibration and a very high risk that the blade
becomes loose.
• If the blade hits an object or if vibrations occur, stop
the product immediately. Disconnect the ignition
cable from the spark plug. Examine the product for
damages. Repair damages or let an authorised
service agent do the repair.
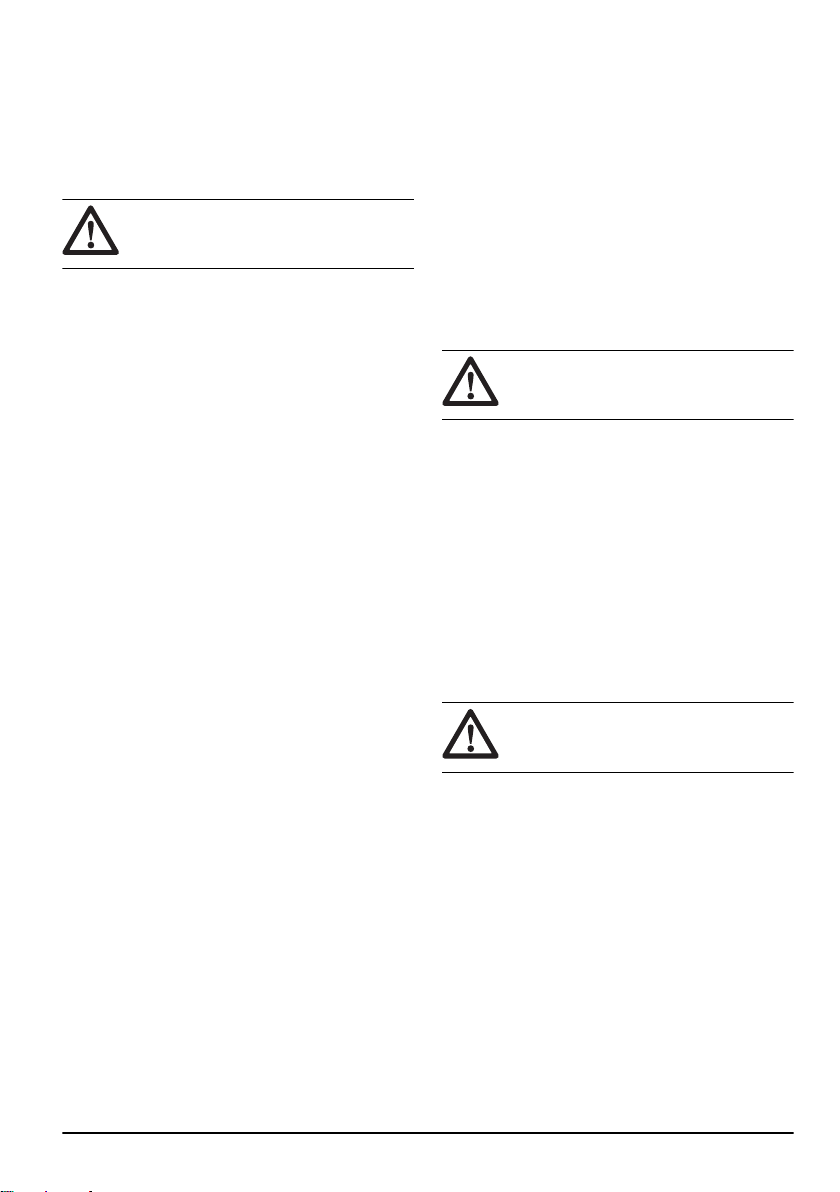
• Never attach the engine brake handle permanently
to the handle when the engine is started.
• Put the product on a stable, flat surface and start it.
Make sure that the blade does not hit the ground or
other objects.
• Always stay behind the product when you operate it.
• Let all the wheels stay on the ground and keep 2
hands on the handle when you operate the product.
Keep your hands and feet away from the rotating
blades.
• Do not tilt the product when the engine is started.
• Be careful when you pull the product rearward.
• Never lift up the product when the engine is started.
If you must lift the product, first stop the engine and
disconnect the ignition cable from the spark plug.
• Do not walk rearward when you operate the product.
• Stop the engine when you move across areas
without grass, for example paths made of gravel,
stone and asphalt.
• Do not run with the product when the engine is
started. Always walk when you operate the product.
• Stop the engine before you change the cutting
height. Never make adjustments with the engine
started.
• Never let the product stay out of view with the engine
started. Stop the engine and make sure that the
cutting equipment does not rotate.
Safety instructions for operation
Personal protective equipment
WARNING:
instructions that follow before you use the
product.
Read the warning
accident does occur. Let your dealer help you select
the right equipment.
• Use hearing protection if the noise level is higher
than 85 dB.
• Use heavy-duty slip-resistant boots or shoes. Do not
use open shoes or go with bare feet.
• Use heavy, long pants.
• Use protective gloves when necessary, for example
when you attach, examine or clean the cutting
equipment.
Safety devices on the product
WARNING: Read the warning
instructions that follow before you use the
product.
• Do not use a product with defective safety devices.
• Do a check of the safety devices regularly. If the
safety devices are defective, speak to your
Husqvarna service agent.
To do a check of the cutting cover
The cutting cover decreases vibrations in the product
and decreases the risk of injury from the blade.
• Examine the cutting cover to make sure that there
are no damages such as cracks.
To do a check of the engine brake handle
The engine brake handle stops the engine. When the
engine brake handle is released, the engine stops.
• Start the engine and then release the engine brake
handle. If the engine does not stop in 3 seconds, let
an approved Husqvarna service agent adjust the
engine brake.
To do a check of the rear cover
The rear deflector decreases the risk that objects eject
in the direction of the operator.
• Make sure that the rear cover is not damaged.
• Make sure that the springs that close the rear cover
are not damaged.
• Replace damaged springs and damaged parts.
• Make sure that the rear cover can move smoothly on
the hinges.
• Personal protective equipment cannot fully prevent
injury but it decreases the degree of injury if an
4
1566 - 008 - 24.11.2021
Page 5
Muffler
The muffler keeps the noise levels to a minimum and
sends the exhaust fumes away from the operator.
Do not use the product if the muffler is missing or
defective. A defective muffler increases the noise level
and the risk of fire.
WARNING: The muffler becomes very
hot during and after use and when the
engine operates at idle speed. Be careful
near flammable materials and/or fumes to
prevent fire.
To do a check of the muffler
• Examine the muffler regularly to make sure that it is
attached correctly and not damaged.
Fuel safety
WARNING: Read the warning
instructions that follow before you use the
product.
• Do not start the product if there is fuel or engine oil
on the product. Remove the unwanted fuel/oil and let
the product dry.
• If you spill fuel on your clothing, change clothing
immediately.
• Do not get fuel on your body, it can cause injury. If
you get fuel on your body, use soap and water to
remove the fuel.
• Do not start the product if the engine has a leak.
Examine the engine for leaks regularly.
• Be careful with fuel. Fuel is flammable and the fumes
are explosive and can cause injuries or death.
• Do not breathe in the fuel fumes, it can cause injury.
Make sure that there is a sufficient airflow.
• Do not smoke near the fuel or the engine.
• Do not put warm objects near the fuel or the engine.
• Do not add the fuel when the engine is on.
• Make sure that the engine is cool before you refuel.
• Before you refuel, open the fuel tank cap slowly and
release the pressure carefully.
• Do not add fuel to the engine in an indoor area. Not
sufficient airflow can cause injury or death because
of asphyxiation or carbon monoxide.
• Tighten the fuel tank cap fully. If the fuel tank cap is
not tightened, there is a risk of fire.
• Move the product a minimum of 3 m / 10 ft from the
position where you filled the tank before a start.
• Do not fill the fuel tank fully. Heat causes the fuel to
expand. Keep a space at the top of the fuel tank.
Safety instructions for maintenance
WARNING: Read the warning
instructions that follow before you use the
product.
• The exhaust fumes from the engine contain carbon
monoxide, an odourless, poisonous and very
dangerous gas. Do not start the engine indoors or in
closed spaces.
• Before you do the maintenance on the product, stop
the engine and remove the ignition cable from the
spark plug.
• Use protective gloves when you do maintenance on
the cutting equipment. The blade is very sharp and
cuts can easily occur.
• Accessories and changes to the product that are not
approved by the manufacturer, can cause serious
injury or death. Do not change the product. Always
use accessories that are approved by the
manufacturer.
• If the maintenance is not done correctly and
regularly, the risk of injury and damage to the
product increases.
• Only do the maintenance as given in this owner's
manual. All other servicing must be done by an
approved Husqvarna service agent.
• Let an approved Husqvarna service agent do
servicing on the product regularly.
• Replace damaged, worn or broken parts.
Assembly
Introduction
WARNING: Before you assemble the
product, you must read and understand the
safety chapter.
WARNING: Remove the spark plug
cable from the spark plug before you
assemble the product.
1566 - 008 - 24.11.2021 5
Page 6
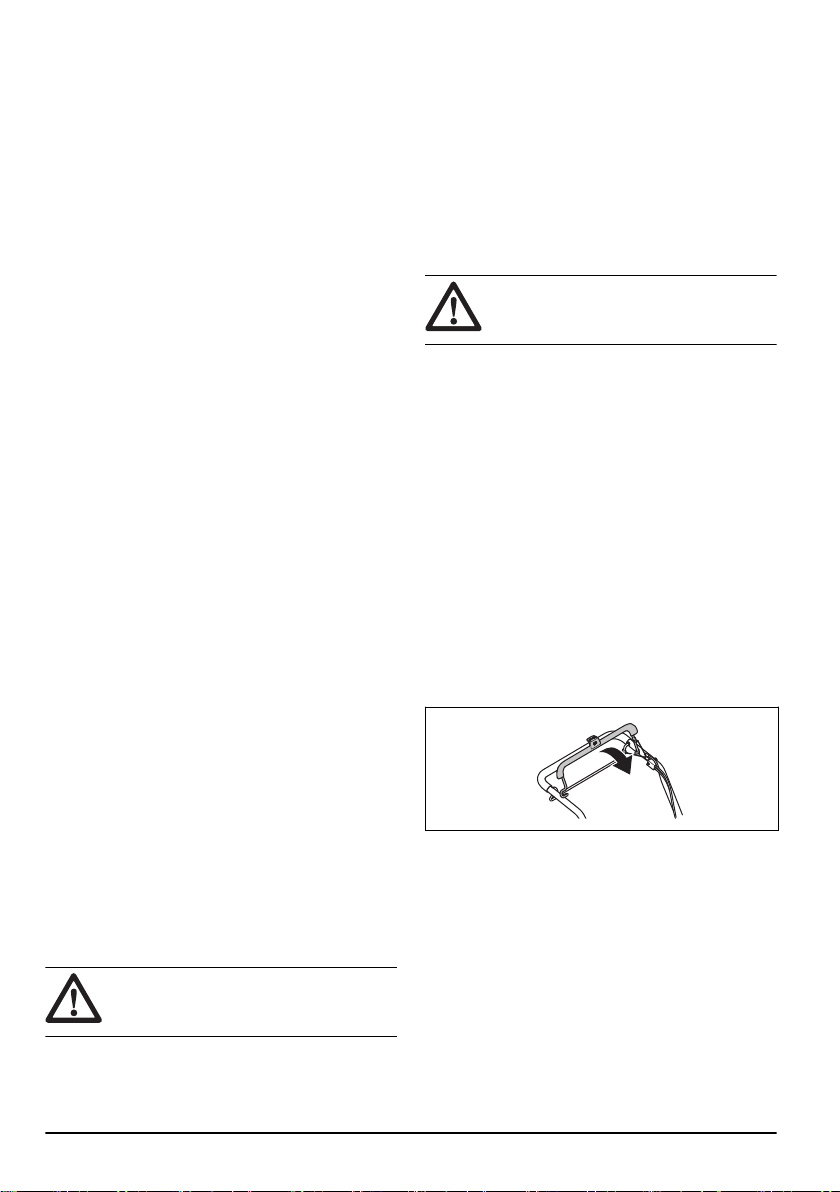
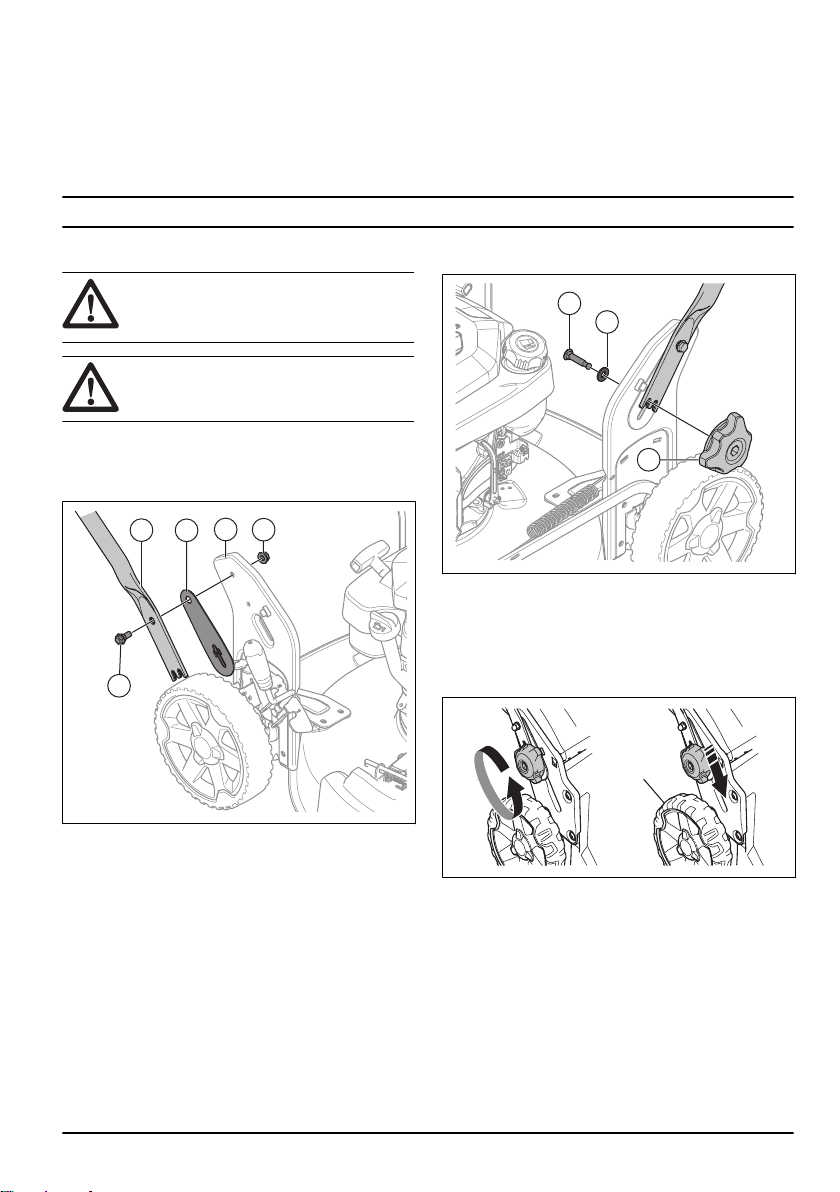
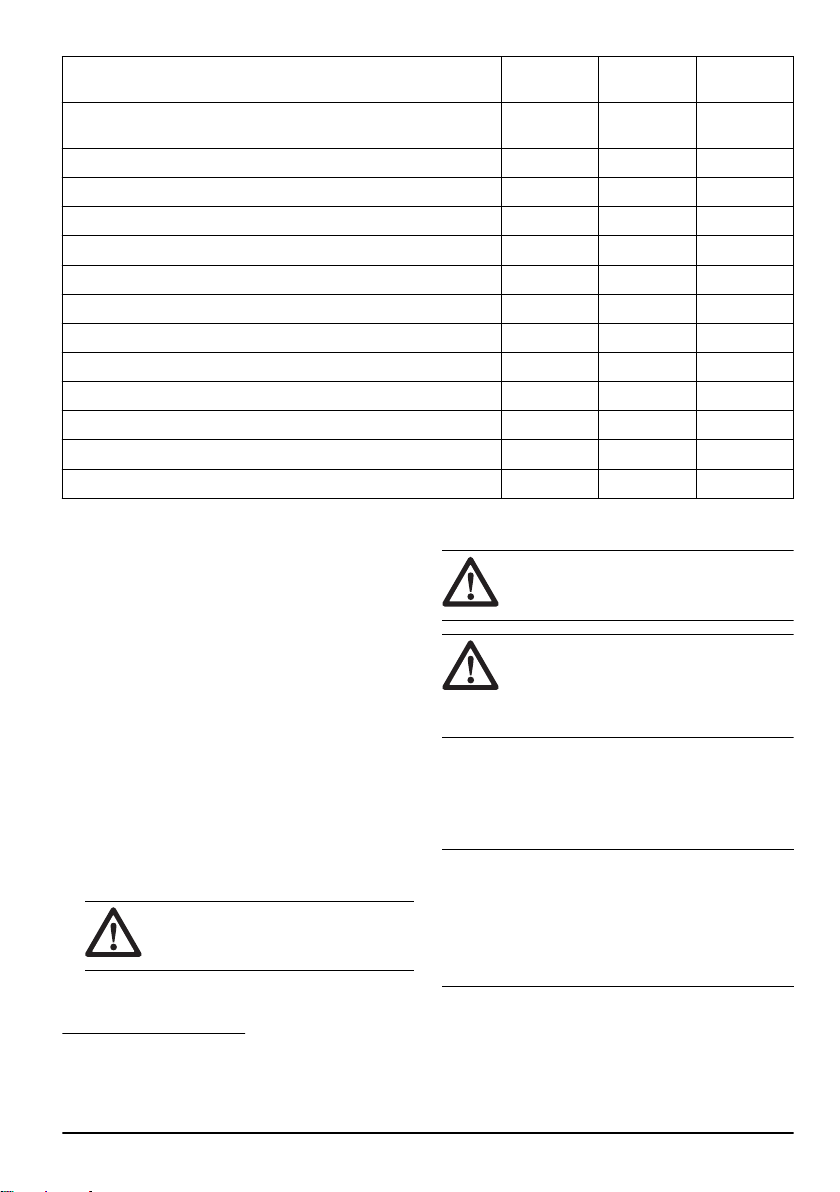
To assemble the handle
A
B
C
D
E
F
G
H
1. Push the screw (A) through the handle (B), the
plastic washer (C) and the handle support bracket
(D).
2. Tighten the nut (E) fully.
3. Push the screw (F) thrugh the washer (G) and the
handle support bracket.
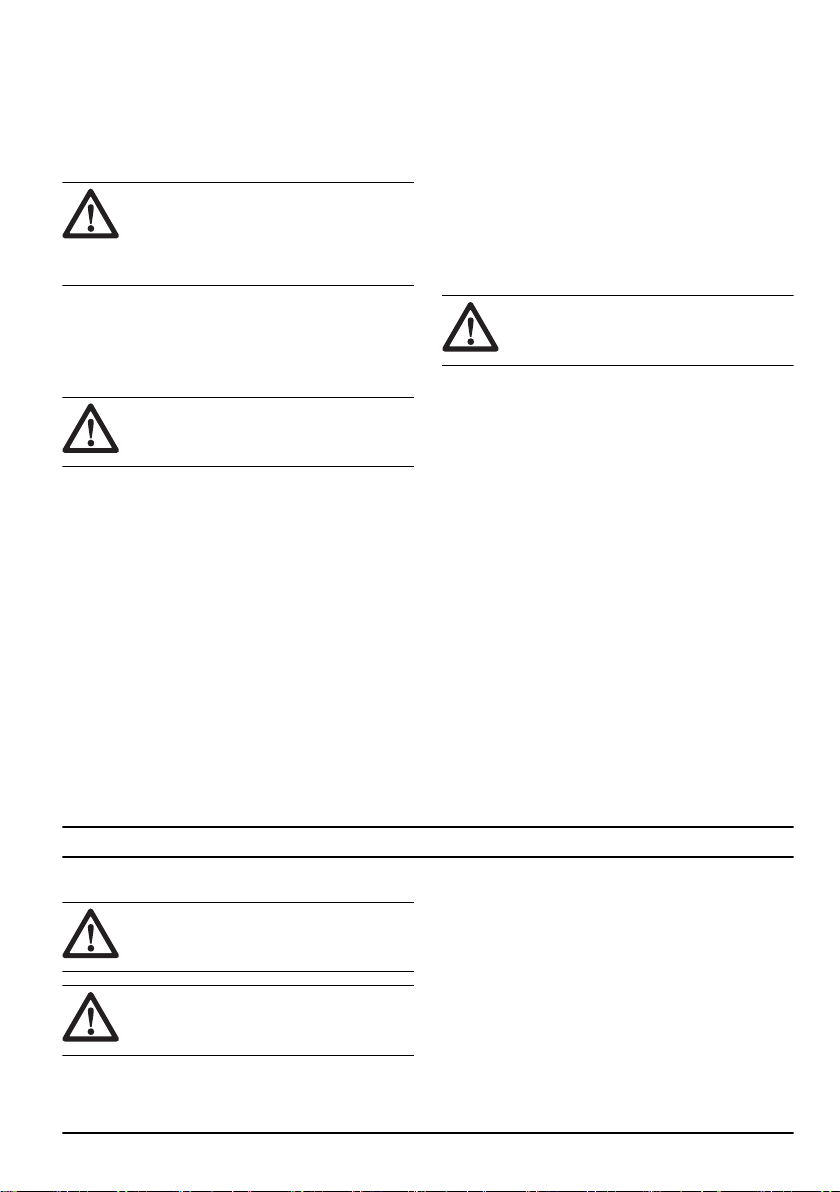
2. Move the knobs to the lower end of the grooves on
the left and the right side of the product.
3. Set the handle height in one of the 2 available
positions.
4. Move the knobs up in the direction of the handle until
they stop and you hear a click.
5. Tighten the knobs fully.
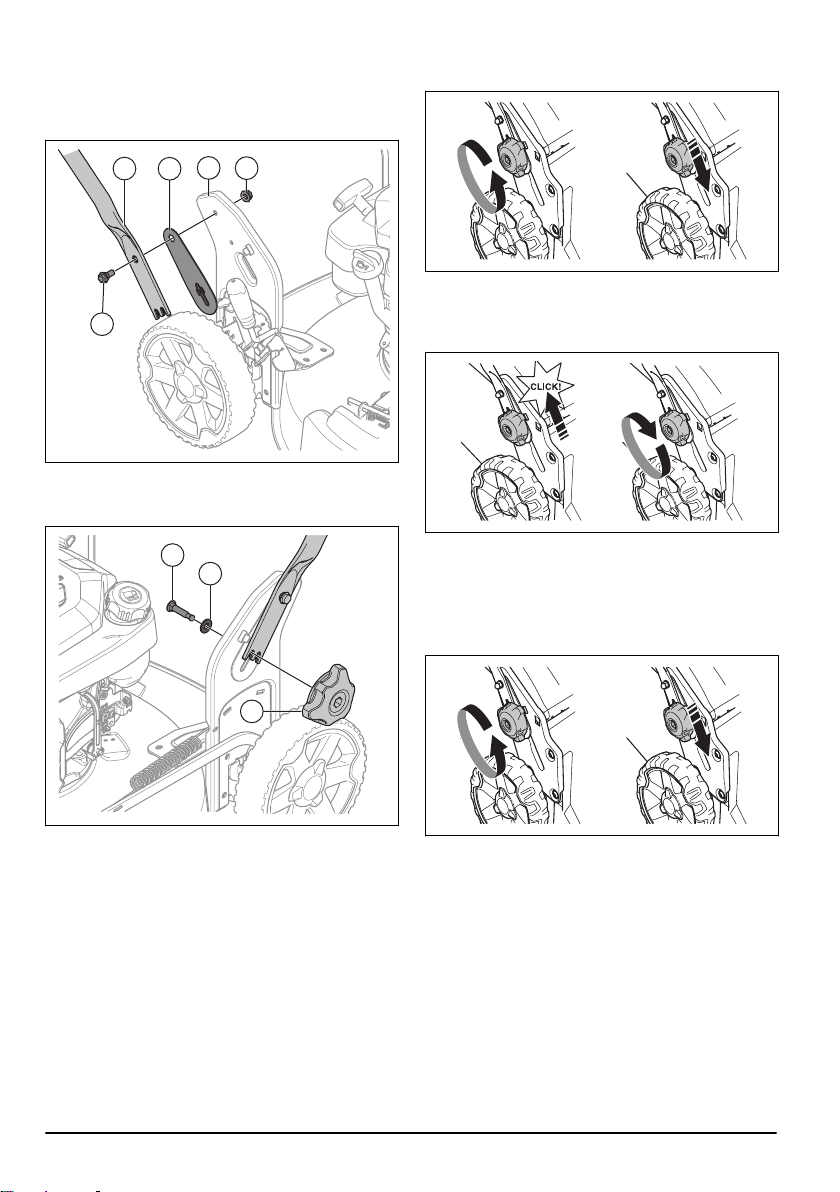
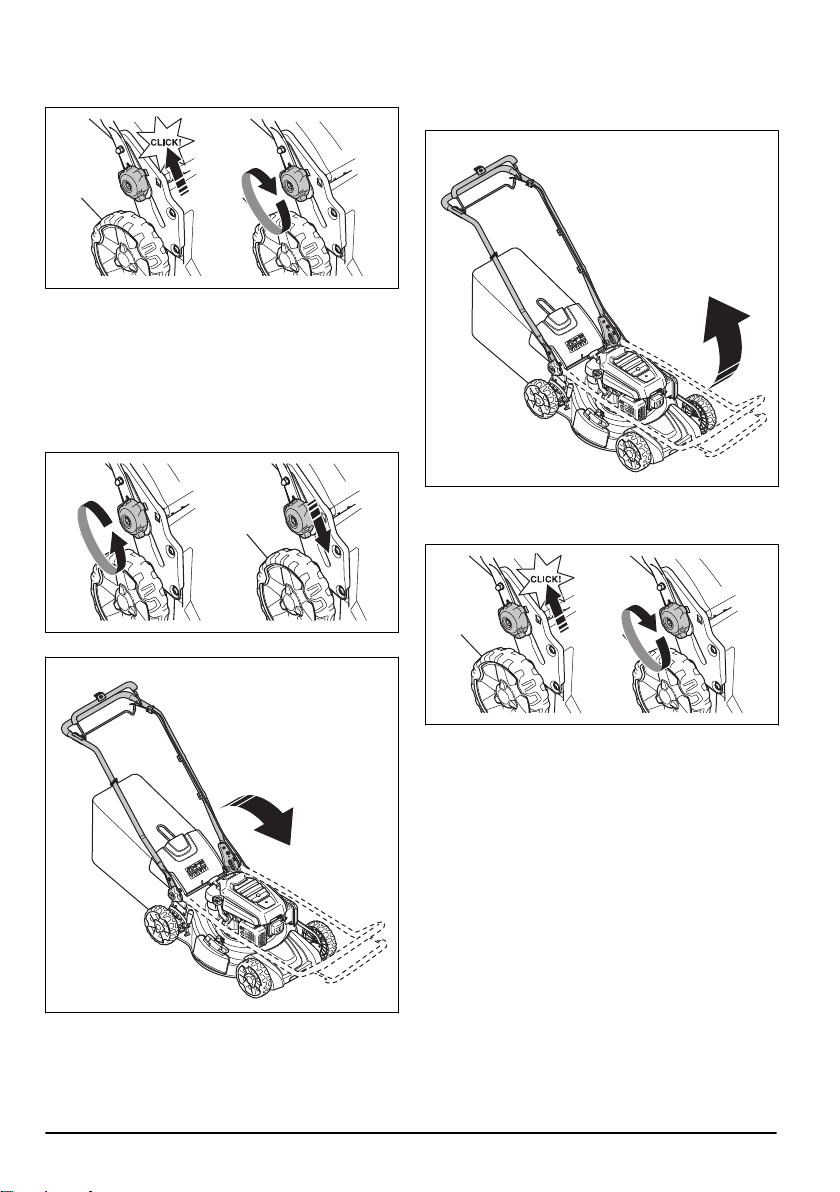
To set the product in transport position
1. Loosen the lower knobs.
2. Move the knobs to the lower end of the grooves on
the left and the right side of the product.
4. Tighten the knob (H) fully.
To adjust the handle
1. Loosen the lower knobs.
6
1566 - 008 - 24.11.2021
Page 7
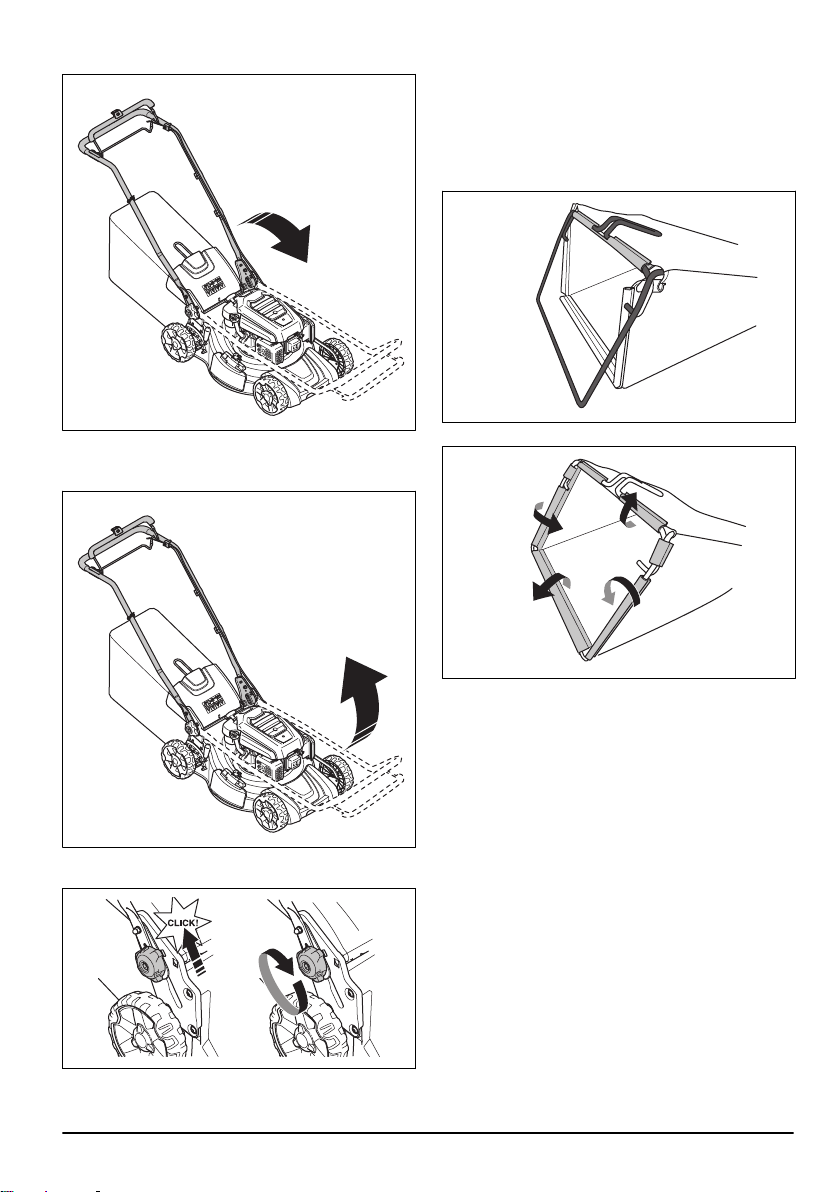
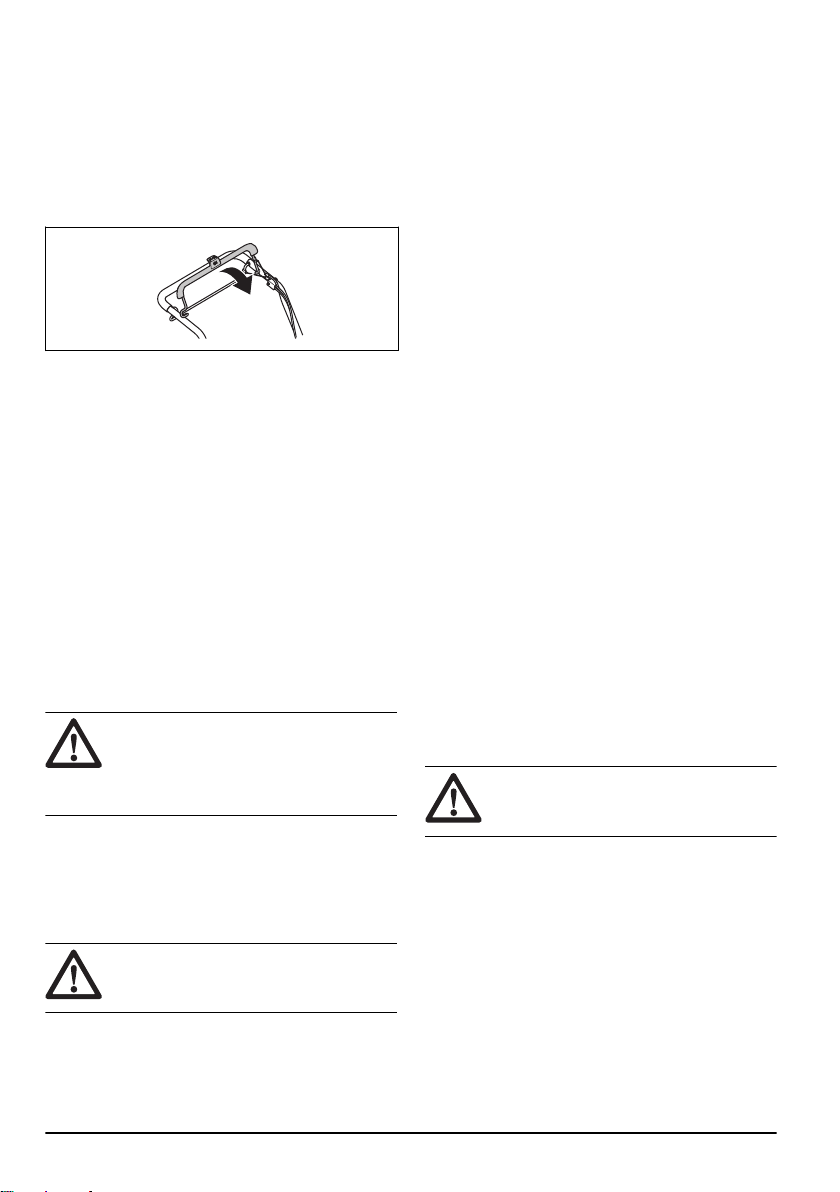
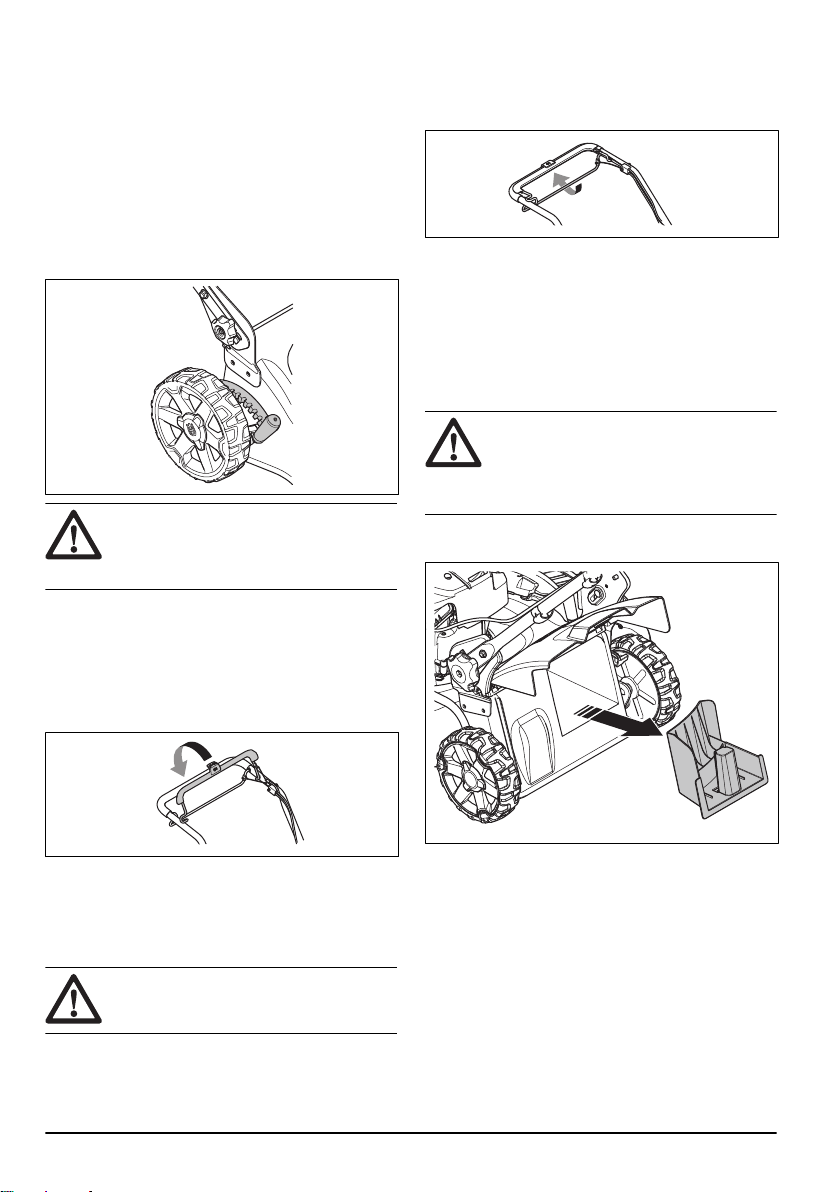
3. Fold the handle forward.
3. Tighten the knobs fully.
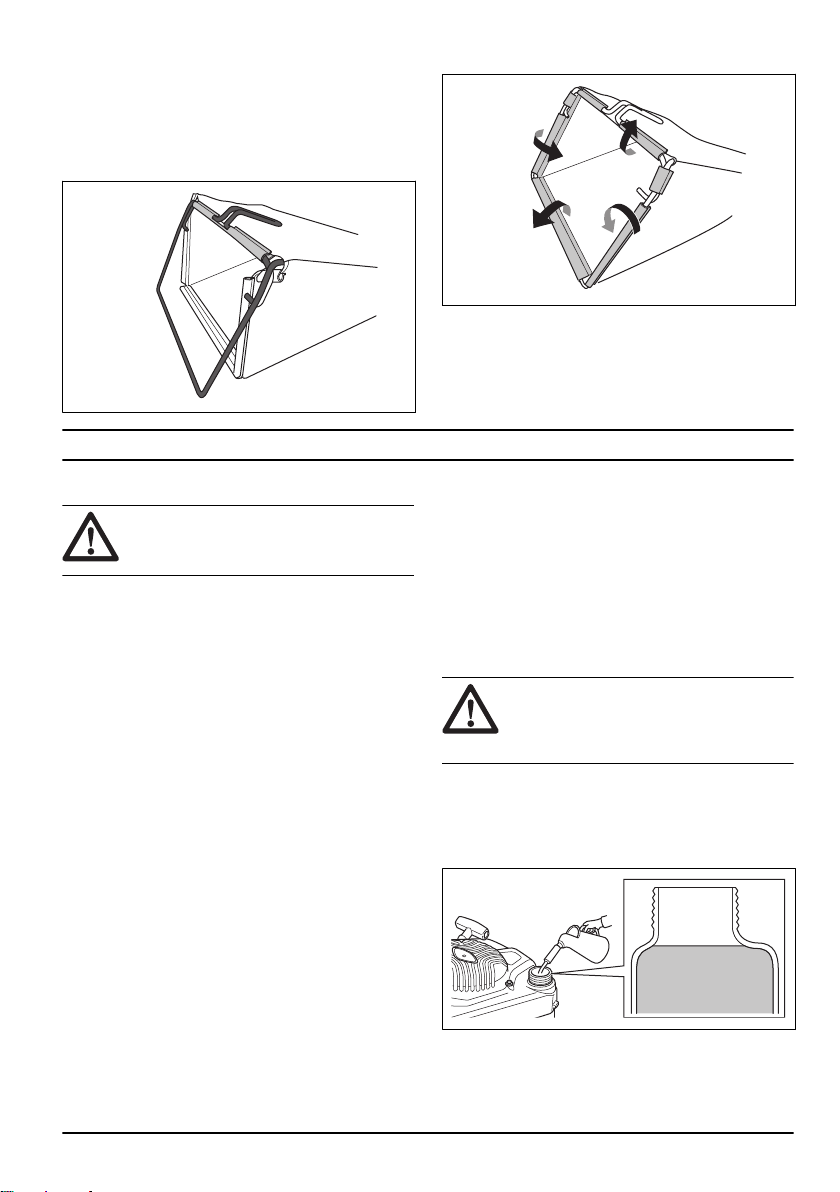
To assemble the grass catcher (LC 151, LC 151S)
1. Attach the grass catcher frame to the grass bag with
the rigid part of the bag on the bottom. Keep the
handle of the frame out of the top of the bag.
To set the product in operation position
1. Fold the handle to upright position.
2. Move the knobs up in the direction of the handle until
they stop and you hear a click.
2. Attach the grass bag to the frame with the clips.
1566 - 008 - 24.11.2021 7
Page 8
Operation
3
4
5
6
7
8
9
Introduction
WARNING: Before you operate the
product, you must read and understand the
safety chapter.
Husqvarna Connect
Husqvarna Connect is a free app for your mobile device.
The Husqvarna Connect app gives extended functions
for your Husqvarna product:
• Extended product information.
• Information about, and help with, product parts and
servicing.
To start to use Husqvarna Connect
1. Download the Husqvarna Connect app on your
mobile device.
2. Register in the Husqvarna Connect app.
3. Do the instruction steps in the Husqvarna Connect
app to connect and register the product.
Before you operate the product
1. Read the operator's manual carefully and make sure
that you understand the instructions.
2. Examine the cutting equipment to make sure that it
is correctly attached and adjusted. See
the cutting equipment on page 12
3. Fill the fuel tank. See
To fill fuel on page 8
4. Fill the oil tank and do a check of the oil level. See
To do a check of the oil level on page 12
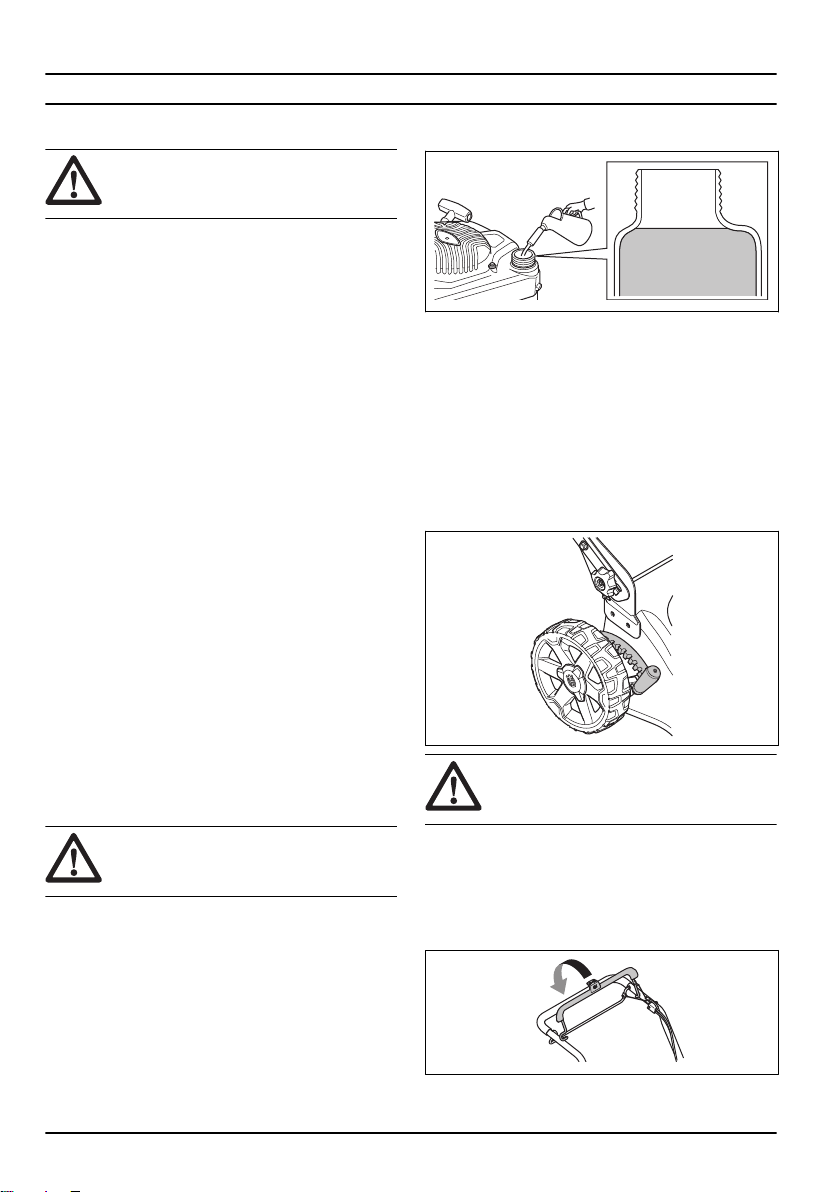
To fill fuel
If available, use low-emission/alkylate gasoline. If lowemission/alkylate gasoline is not available, use good
quality unleaded gasoline or leaded gasoline with octane
number not less than 90.
To examine
.
.
.
2. Fill slowly with a fuel can. If you spill fuel, remove it
with a cloth and let remaining fuel dry off.
3. Clean the area around the fuel tank cap.
4. Tighten the fuel tank cap fully. If the fuel tank cap is
not tightened, there is a risk of fire.
5. Move the product a minimum of 3 m (10 ft) from the
position where you filled the tank before a start.
To set the cutting height
1. Move the cutting height lever rearward to increase
the cutting height.
2. Move the cutting height lever forward to decrease
the cutting height.
CAUTION: Do not set the cutting height
too low. The blades can hit the ground if the
surface of the lawn is not level.
CAUTION:
Do not use gasoline with an
octane number less than 90 RON (87 AKI).
This can cause damage to the product.
1. Open the fuel tank cap slowly to release the
pressure.
8
To start the product
1. Make sure that the ignition cable is connected to the
spark plug.
2. Stay behind the product.
3. Hold the engine brake handle against the handlebar.
4. Hold the starter rope handle with your right hand.
1566 - 008 - 24.11.2021
Page 9
5. Slowly pull out the starter rope until you feel some
resistance.
6. Pull with force to start the engine.
WARNING: Do not twist the starter
rope around your hand.
To use the drive on the wheels LC 151S
• Push the drive bail in the direction of the handlebar.
• Release the drive bail to disengage the drive, for
example when you go near an obstacle.
• Before you pull the product rearward, disengage the
drive and push the product forward approximately 10
cm.
To use the product with the grass catcher (LC 151, LC 151S)
WARNING: Do not operate the product
without a grass catcher installed or without
the rear cover closed. Objects can eject and
cause injury to the operator.
4. Release the rear cover and put it on top of the grass
bag frame.
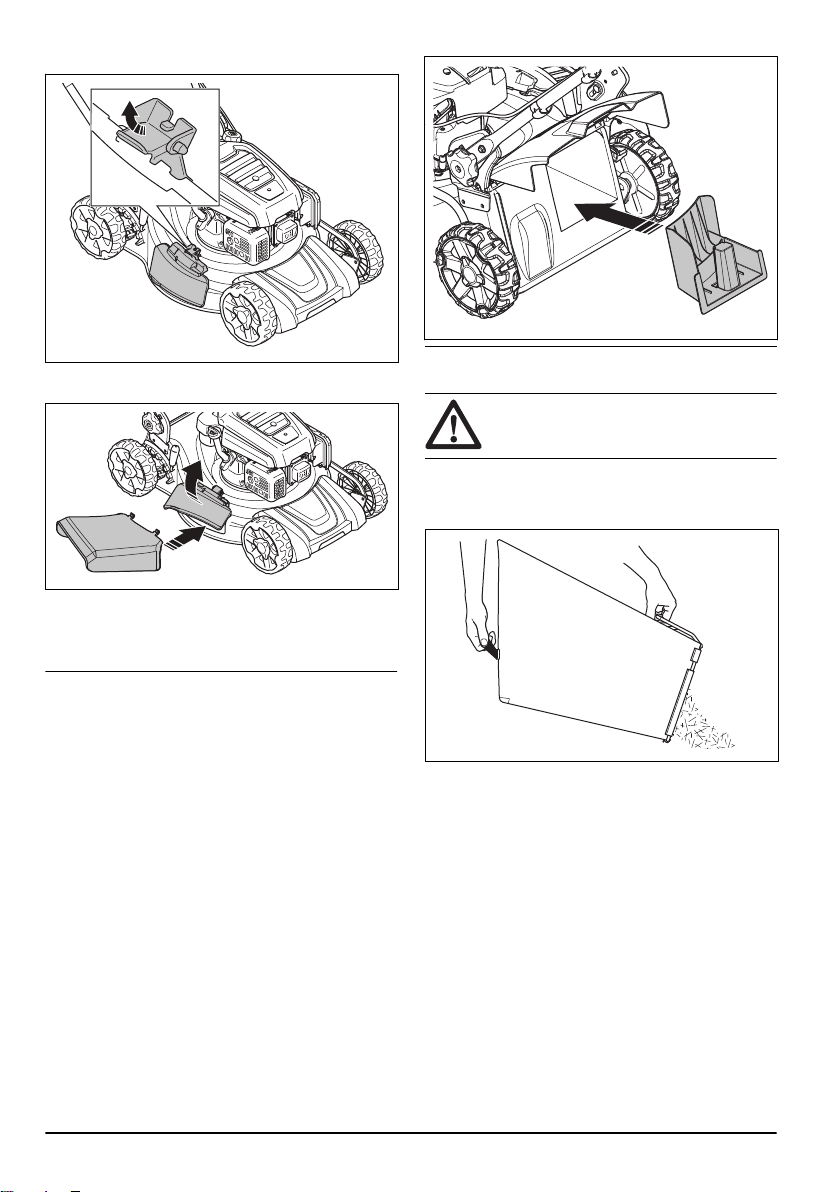
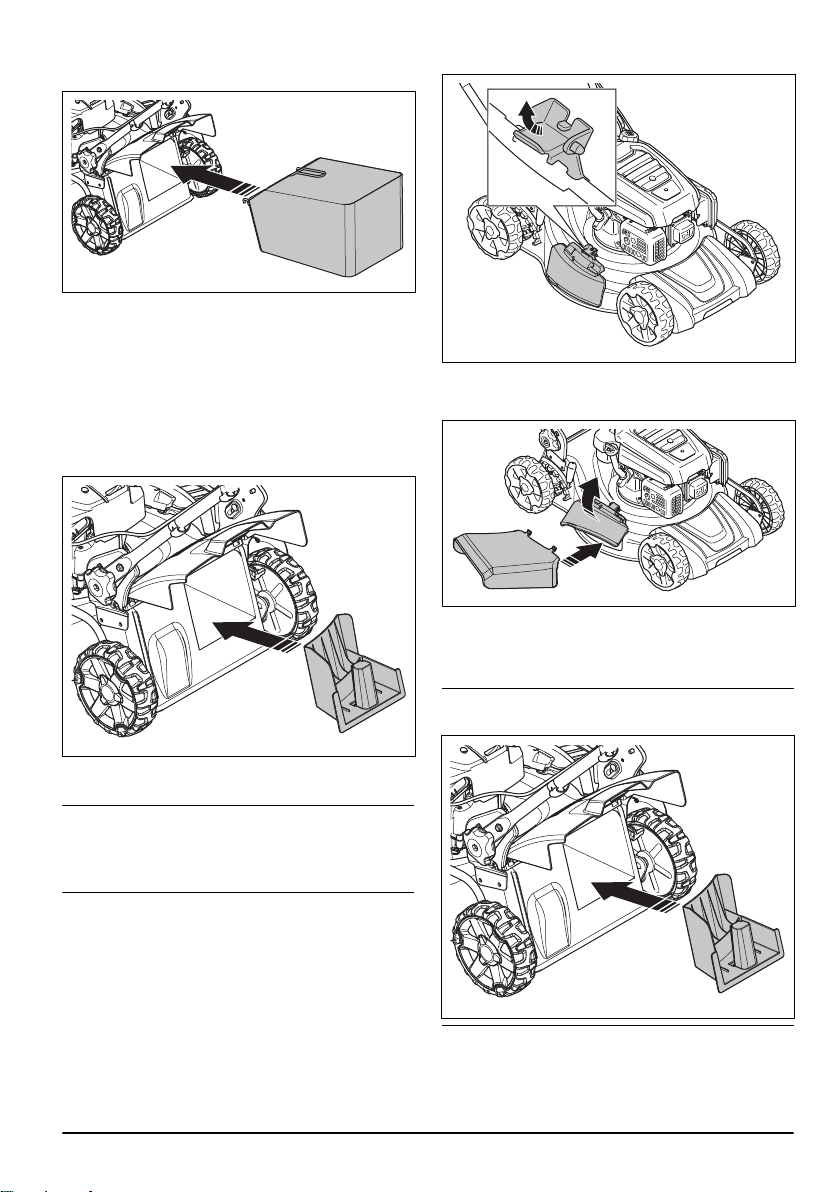
To change the product to mulch mode (LC 151, LC 151S)
Make sure the engine is off before you change the
product to mulch mode.
1. Lift the rear cover and remove the grass catcher, if it
is installed.
2. Put the mulch plug into the discharge channel.
1. Lift the rear cover and remove the mulch plug if it is
installed.
2. Assemble the grass catcher, refer to
the grass catcher (LC 151, LC 151S) on page 7
3. Put the grass catcher on the bracket.
1566 - 008 - 24.11.2021
To assemble
.
3. Close the rear cover and make sure that it is tightly
closed against the mulch plug.
To increase the performance of the mulch
Note:
mode, replace the blade with the mulch blade
accessory. Refer to
To replace the blade on page 12
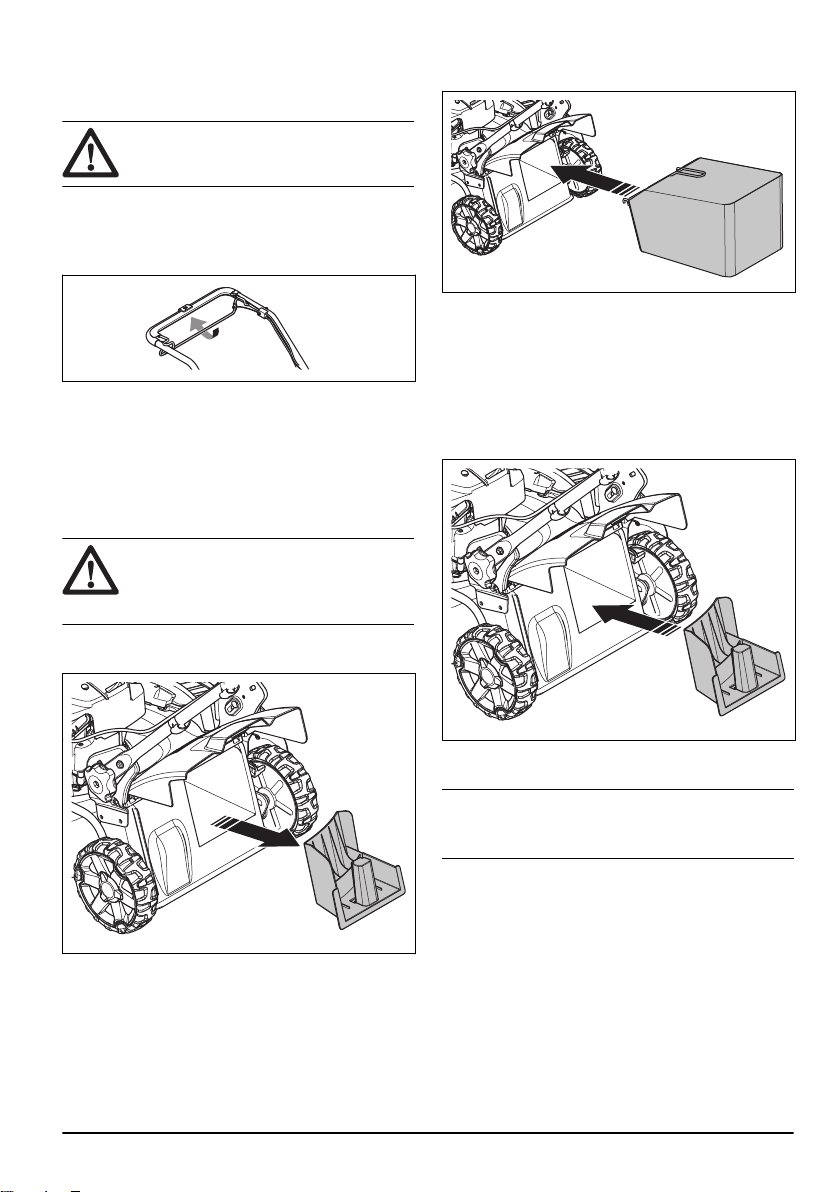
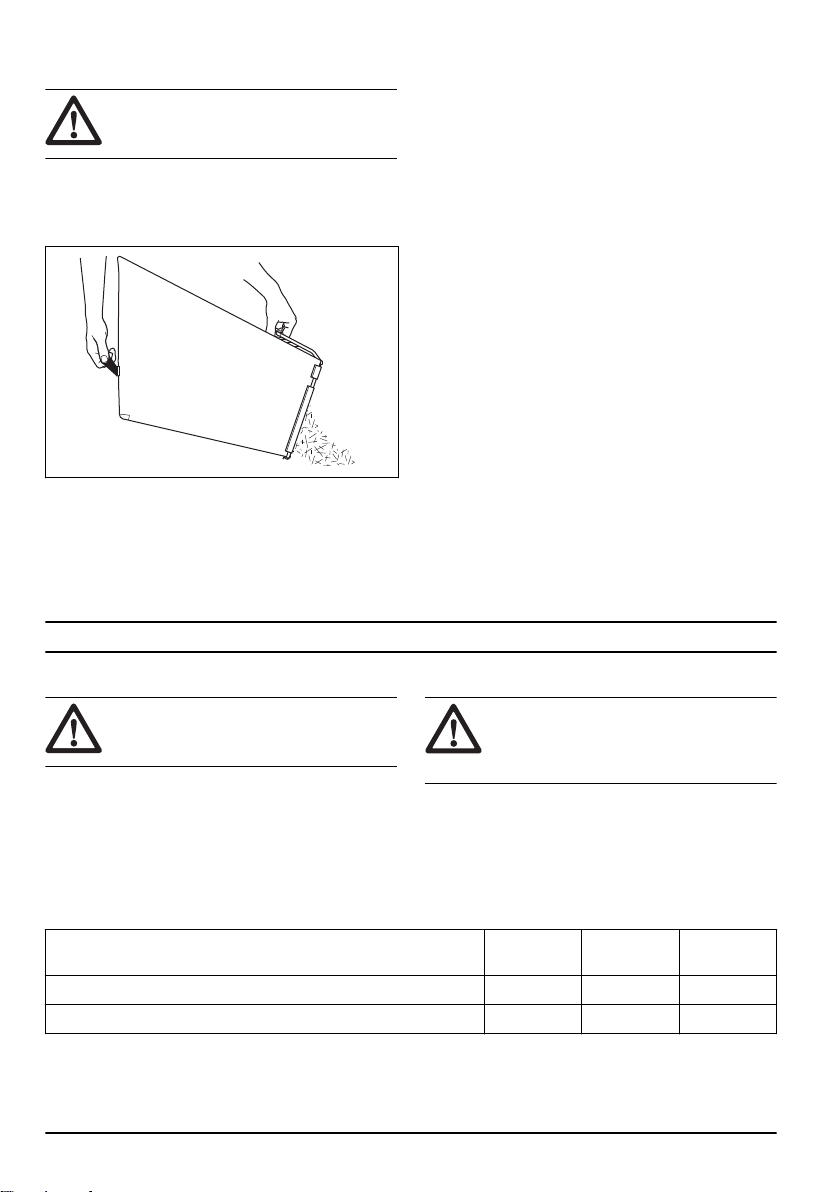
To change the product to side discharge mode
1. Lift the rear cover and remove the grass bag, if it is
installed.
2. Close the rear cover and make sure that it is tightly
closed against the product.
9
Page 10
3. Lift the discharge lock.
4. Open the side discharge cover and install the side
discharge deflector onto the support pins.
5. Let the side discharge cover close against the side
discharge deflector. Make sure that the side
discharge deflector is tightly in position before you
operate the product.
To increase the performance in side discharge
Note:
mode, install the mulch plug.
To empty the grass catcher
CAUTION: Lift the grass catcher when
you move it to prevent wear.
1. Lift the grass catcher with the frame handle.
2. Use the frame handle and the bag handle when you
empty the grass catcher.
To get a good result
• Always use a sharp blade. A blunt blade gives an
irregular result and the cut surface of the grass
becomes yellow. A sharp blade also uses less
energy than a blunt blade.
• Do not cut more than ⅓ of the length of the grass.
Use the highest cutting height when you start to cut
the grass. Examine the result and lower the cutting
height to an applicable level. If the grass is very long,
operate slowly and cut 2 times if it is necessary.
• Cut in different directions each time to prevent
stripes in the lawn.
• Lift the rear cover and remove the grass catcher.
• If a mulch plug and a mulch blade are attached,
remove them.
• Close the rear cover before you operate the product.
When you operate the product, the cut grass
discharges below the rear cover.
10
1566 - 008 - 24.11.2021
Page 11

• Keep the cutting cover clean. Buildup from grass and
dirt on the inner side of the cutting cover can
decrease the cutting result. Refer to
inner surface of the cutting cover on page 12
To clean the
.
Maintenance
Introduction
WARNING: Before you do
maintenance, you must read and
understand the safety chapter.
For all servicing and repair work on the product, special
training is necessary. We guarantee the availability of
professional repairs and servicing. If your dealer is not a
service agent, speak to them for information about the
nearest service agent.
Maintenance Daily Monthly Each season
Do a general inspection X
Examine the oil level X
Replace the oil (the first time after 5 h of use, then after each 50 h of
1
use)
Clean the product X
Examine the cutting equipment X
Examine the cutting cover * X
Examine the engine brake handle * X
Examine the muffler * X
Examine the spark plug. Clean or replace the spark plug if it is necessary
Examine the air filter X
Clean the air filter
Replace the air filter X
Examine the fuel system X
Clean the cooling fins on the cylinder X
Examine and adjust the clutch wire X
2
Maintenance schedule
CAUTION: Make sure that the air filter
is up and not against the ground when you
tilt the product. Risk of engine damage.
The maintenance intervals are calculated from daily use
of the product. The intervals change if the product is not
used daily.
For maintenance identified with * refer to instructions in
Safety devices on the product on page 4
.
X
X
X
To do a general inspection
• Make sure that all nuts and screws on the product
are tightened correctly.
1
If the product is operated with heavy load or in high ambient temperatures, replace the engine oil each 25
hours.
2
Clean more often under dusty conditions or when airborne debris is present. Replace air filter, if it is very dirty.
1566 - 008 - 24.11.2021 11
To clean the product externally
• Use a brush to remove leaves, grass and dirt.
• Make sure that the air intake on the top of the engine
is not blocked.
Page 12
• Do not use a high pressure washer to clean the
product.
• If you use water to clean the product, do not flush
water directly on the engine.
To clean the inner surface of the cutting cover
1. Empty the fuel tank.
2. Tilt the product. Make sure that the spark plug point
up.
CAUTION: If the product is put with
the air filter down, the engine can
become damaged.
3. Hose down the inner surface of the cutting cover
with water.
To examine the cutting equipment
WARNING: To prevent accidental start
remove the ignition cable from the spark
plug.
WARNING: Use protective gloves
when you do maintenance on the cutting
equipment. The blade is very sharp and cuts
can easily occur.
1. Examine the cutting equipment for damage or
cracks. Always replace a damaged cutting
equipment.
2. Look at the blade to see if it is damaged or blunt.
2. Remove the blade bolt and spring washer.
3. Remove the blade.
4. Examine the blade support and blade bolt to see if
there are damages.
5. Examine the engine shaft to make sure that it is not
bent.
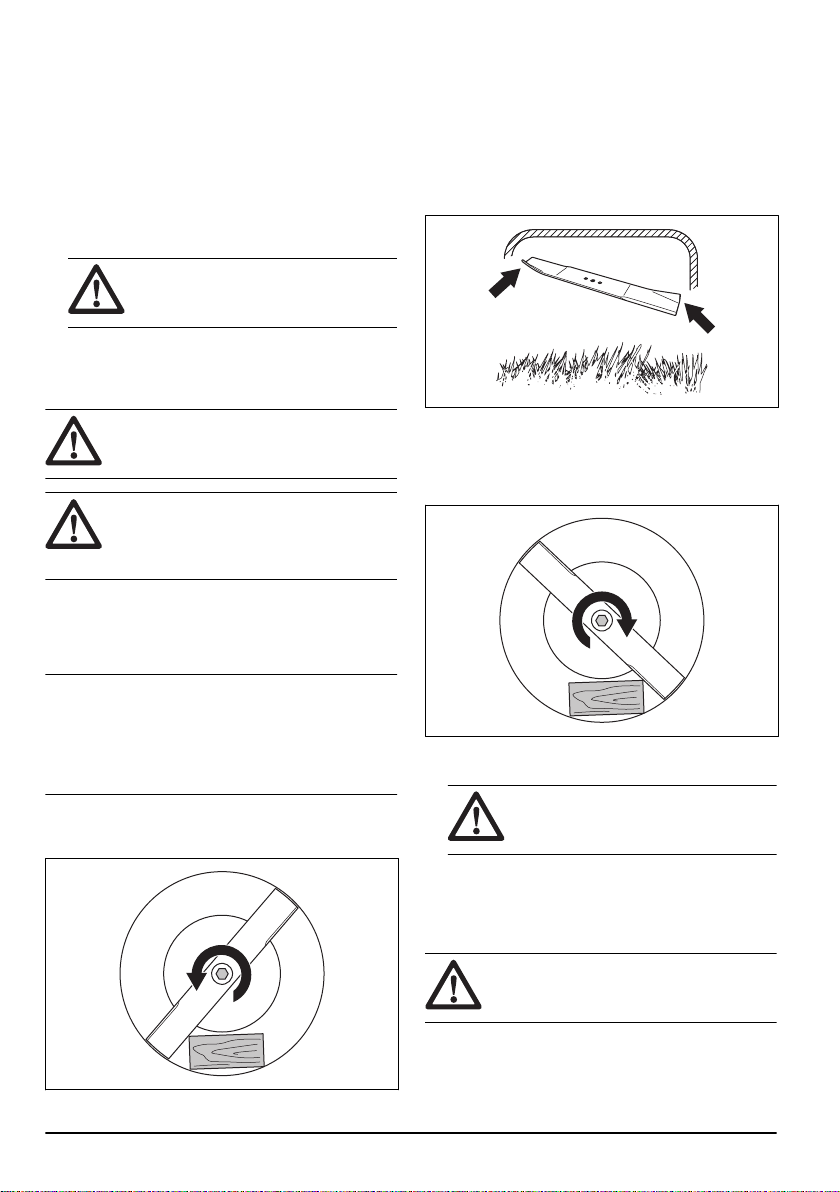
6. When you attach the new blade, point the angled
ends of the blade in the direction of the cutting cover.
7. Make sure that the blade is aligned with the center of
the engine shaft.
8. Lock the blade with a block of wood. Attach the
spring washer and tighten the bolt and washer with a
torque of 43 – 47 Nm.
It is necessary to balance the blade after it is
Note:
sharpened. Let a service center sharpen, replace and
balance the blade. If you hit an obstacle that causes the
product to stop, replace the damaged blade. Let the
service center estimate if the blade can be sharpened or
must be replaced.
To replace the blade
1. Lock the blade with a block of wood.
12
9. Pull the blade around by hand and make sure that it
turns freely.
WARNING:
The blade is very sharp and cuts can
easily occur.
10. Start the product to do a test of the blade. If the
blade is not correctly attached, there is vibration in
the product or the cutting result is unsatisfactory.
Use heavy duty gloves.
To do a check of the oil level
CAUTION:
damage to the engine. Do a check of the oil
level before you start the product.
1. Put the product on level ground.
2. Remove the oil tank cap with the attached dipstick.
3. Clean the oil from the dipstick.
A too low oil level can do
1566 - 008 - 24.11.2021
Page 13
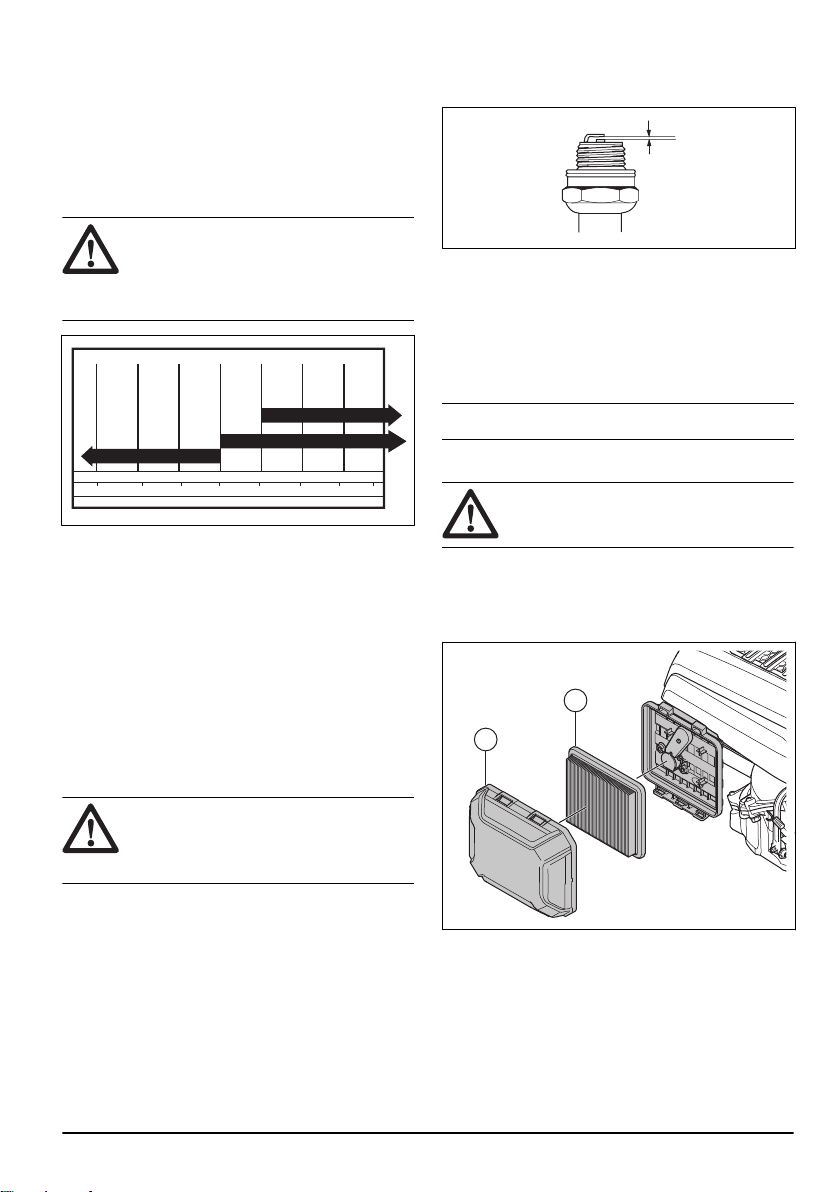
4. Put the dipstick fully into the oil tank to give a correct
-20 0 30 40
80
100
-30
-20 0
20 30 40
F
C
32
-10
10
60
SAE 10W-30
SAE 5W-30
SAE 30
A
B
picture of the oil level.
5. Remove the dipstick.
6. Examine the oil level on the dipstick.
7. If the oil level is low, fill with engine oil and do a
check of the oil level again.
To replace the engine oil
WARNING: Engine oil is very hot
directly after the engine is stopped. Let the
engine become cool before you drain the
engine oil. If you spill engine oil on your skin,
clean with soap and water.
• If the spark plug is dirty, clean it and make sure that
the electrode gap is correct, refer to
on page 16
.
Technical data
• Replace the spark plug if it is necessary.
Air filter
A dirty air filter can cause the engine to be damaged or
not operate correctly. Do maintenance on the air filter
more frequently in dusty conditions. Refer to
Maintenance on page 11
for information about when to
replace the air filter.
Note: Always replace a damaged air filter.
To remove and install the air filter
1. Operate the product until the fuel tank is empty.
2. Remove the ignition cable from the spark plug.
3. Remove the oil tank cap.
4. Put a container below the product to collect the
engine oil in.
5. Tilt the product to drain the engine oil from the oil
tank.
6. Fill with new engine oil of the type recommended in
Technical data on page 16
.
7. Do a check of the oil level. Refer to
the oil level on page 12
.
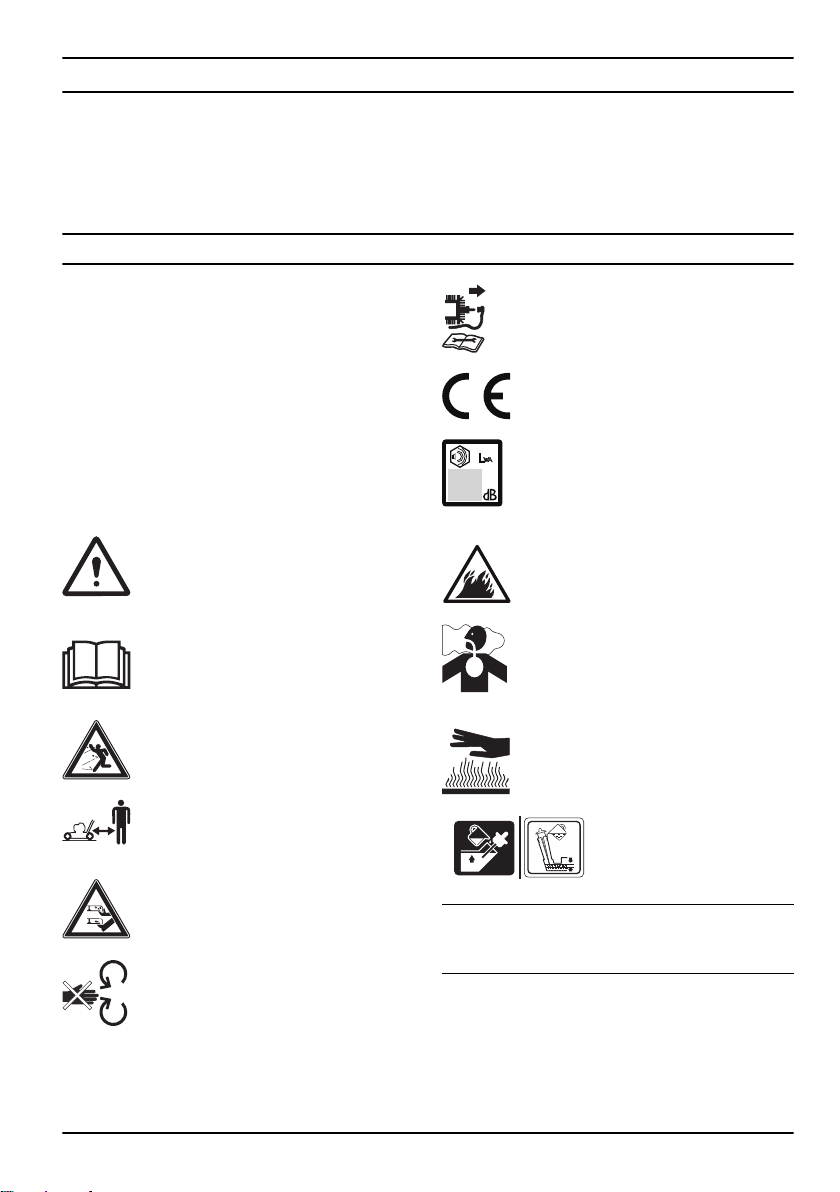
To examine the spark plug
Always use the
CAUTION:
recommended spark plug type. Incorrect
spark plug type can cause damage to the
product.
• Examine the spark plug if the engine is low on
power, is not easy to start or does not operate
correctly at idle speed.
• To decrease the risk of unwanted material on the
1566 - 008 - 24.11.2021
spark plug electrodes, obey these instructions:
a) Make sure that the idle speed is correctly
adjusted.
b) Make sure that the fuel mixture is correct.
c) Make sure that the air filter is clean.
To do a check of
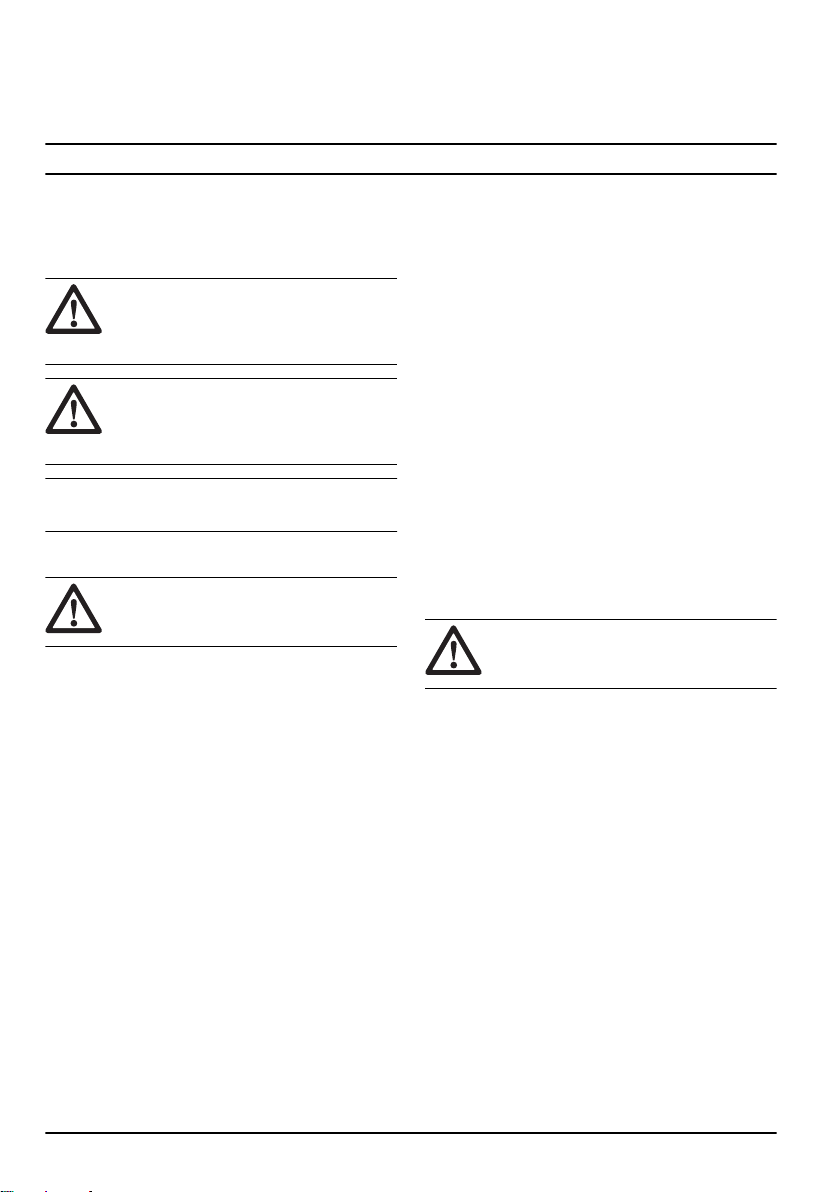
WARNING: Use protective gloves.
1. Push the clips on the air filter cover.
2. Carefully remove the air filter cover (A) from the
engine.
3. Remove the air filter (B).
4. Examine the air filter for damages. Replace a
damaged air filter.
5. Clean and examine the air filter. Refer to
the air filter on page 14
.
6. Install in the opposite sequence.
To clean
13
Page 14

To clean the air filter
A dirty air filter can cause the engine to be damaged or
not operate correctly. Do maintenance on the air cleaner
more frequently in dusty conditions.
See
Maintenance on page 11
when to replace the air filter.
1. Remove the air filter cover and remove the filter.
2. Clean the filter by hitting it against a flat surface. Do
not use solvent with petroleum, kerosene or
compressed air to clean the filter.
for information about
Note: Air filters in operation for a long time cannot
be cleaned fully. Replace the air filter at regular
intervals. Damaged air filters must always be
replaced.
3. When you assemble the air filter, make sure that it
fully seals against the filter holder.
To do a check of the side discharge deflector
The side discharge deflector is attached to the side
discharge opening of the product. It decreases the risk
of objects to eject in the direction of the mow position of
the operator.
1. Make sure that the side discharge deflector is not
damaged.
2. Examine the side discharge deflector. Make sure
that you do not see defects, such as cracks or
broken springs that push the door to close.
3. Replace the side discharge deflector or the springs if
they are damaged.
To examine the fuel system
• Examine the fuel tank cap and the seal for the fuel
tank cap to make sure that there are no damages.
• Examine the fuel hose to make sure that there are
no leaks. If the fuel hose is damaged, let a service
agent replace it.
To adjust the clutch wire (LC 151S)
For the situations that follow, it is necessary to decrease
the length of the clutch wire:
• The drive of the wheels does not engage when you
pull the drive bail or the speed control lever.
• The product moves slowly when the drive of the
wheels is engaged.
For the situations that follow, it is necessary to extend
the length of clutch wire:
• The product moves when the drive of the wheels is
not engaged.
• Adjust the clutch wire.
a) To decrease the length of clutch wire, turn the
adjuster screw counterclockwise.
b) To extend the length of the clutch wire, turn the
adjustment screw clockwise.
If the product continues to drive unsatisfactory after the
adjustment, speak to you servicing dealer
Engine troubleshooting
Problem Possible cause Solution
The engine does not start. The ignition cable is not connected cor-
rectly.
The fuel tank is empty. Fill the fuel tank with correct fuel type.
The fuel is old. Drain the fuel tank and the carburetor.
There is dirt in the carburetor or fuel line. Clean the carburetor and/or fuel line.
The spark plug is defective. Adjust the electrode gap, clean or re-
There is fuel on the spark plug. Clean the spark plug.
14 1566 - 008 - 24.11.2021
Connect the ignition cable to the spark
plug.
Refuel with new gasoline.
place the spark plug.
Page 15

Problem Possible cause Solution
The engine does not stop. The stop mechanism is defective. Disconnect the ignition cable from the
The engine does not operate
smoothly.
The engine becomes too hot. The engine oil level is too low. Fill engine oil.
There is misfire in the engine
when it operates at high
speed.
Unusual noises from the engine during normal load.
The engine does not operate
smoothly at idle speed.
The ignition cable is not connected correctly.
There is dirt in the fuel line or the fuel
has expired.
There is blockage in the fuel tank cap. Clean the fuel tank cap.
There is water or dirt in the fuel system. Drain the fuel tank. Fill the fuel tank with
The air filter is dirty. Clean the air filter.
The carburetor must be adjusted. Let a servicing dealer adjust the carbu-
The air flow is not sufficient. Clean the air filter and the air filter hous-
The carburetor must be adjusted. Let a servicing dealer adjust the carbu-
The electrode gap in the spark plug is
too small.
Incorrect type of gasoline. Drain the fuel tank and the carburetor.
The spark plug is dirty, defective or the
electrode gap is too wide.
The carburetor must be adjusted. Adjust the carburetor.
The air filter is dirty. Clean the air filter.
spark plug. Let an approved service
agent repair the product.
Connect the ignition cable to the spark
plug.
Clean the fuel line. Fill the fuel tank with
new fuel of the correct type.
new fuel of the correct type.
retor.
ing.
retor.
Adjust the electrode gap.
Refuel with new gasoline. Refer to
fuel on page 8
speak to your local service dealer.
Adjust the electrode gap or replace the
spark plug.
. If the problem continues
To fill
Transportation, storage and disposal
Transportation and storage
• For storage and transportation of the product and
fuel, make sure that there are no leaks or fumes.
Sparks or open flames, for example from electrical
devices or boilers, can start a fire.
• Always use approved containers for storage and
transportation of fuel.
• Empty the fuel tank before you put the product in
storage for a long period of time. Discard the fuel at
an applicable disposal location
• Safely attach the product during transportation to
prevent damage and accidents.
1566 - 008 - 24.11.2021 15
• Keep the product in a locked area to prevent access
for children or persons that are not approved.
• Keep the product in a dry and frost free area.
Disposal
• Obey the local recycling requirements and applicable
regulations.
• Discard all chemicals, such as engine oil or fuel, at a
service center or at an applicable disposal location.
• When the product is no longer in use, send it to a
Husqvarna dealer or discard it at a recycling
location.
Page 16

Technical data
Technical data
LC 151 LC 151S LB 256SP
Engine
Brand Husqvarna Husqvarna Husqvarna
Engine type Single cylinder, 4-
Stroke, Forced Air
Cooling, OHV
Displacement, cm
3
166 166 166
Speed, rpm 2800 2800 2800
Nominal engine output, kW
3
2.7 2.7 2.7
Ignition system
Spark plug Husqvarna HQT–7 Husqvarna HQT–7 Husqvarna HQT–7
Electrode gap, mm 0.7–0.8 0.7–0.8 0.7–0.8
Fuel and lubrication system
Engine lubrication type Splash Splash Splash
Fuel tank capacity, litre 1.0 1.0 1.0
Oil tank capacity, litre 0.5 0.5 0.5
Engine oil
4
Husqvarna SAE 30 Husqvarna SAE 30 HusqvarnaSAE 30
Weight
With empty tanks, kg 31.1 32.6 33.1
Noise emissions
5
Sound power level, measured, dB(A) 97 97 98
Sound power level, guaranteed, LWA dB(A) 98 98 98
Sound levels
6
Sound pressure level at operators ear, dB(A) 85 85 88
Vibration levels
7
Single cylinder, 4Stroke, Forced Air
Cooling, OHV
Single cylinder, 4Stroke, Forced Air
Cooling, OHV
3
The power rating of the engine indicated is the average net output (at specified rpm) of a typical production
engine for the engine model measured to SAE standard J1349/ISO1585. Mass production engines may differ
from this value. Actual power output for the engine installed on the final product will depend on the operating
speed, environmental conditions and other values.
4
If SAE-30 oil is used at temperatures lower than +5 °C, there is a risk that it does not lubricate the engine
sufficiently. This can cause engine damage. Refer to
for low temperatures.
5
Noise emissions in the environment measured as sound power (LWA) in conformity with EC directive
2000/14/EC.
6
Reported data for noise pressure level has a typical statistical dispersion (standard deviation) of 1.2 dB (A).
7
Reported data for vibration level has a typical statistical dispersion (standard deviation) of 0.2 m/s2.
To replace the engine oil on page 13
for the correct oil
16 1566 - 008 - 24.11.2021
Page 17

LC 151 LC 151S LB 256SP
Vibrations handlebar, m/s
2
8.5 8.5 7.5
Cutting equipment
Cutting height, mm 25–75 25–75 25–75
Cutting width, mm 510 510 560
Cutting system Collection / BioClip® /
Side discharge
Blade - standard Collection
598562601
Collection / BioClip® /
Side discharge
Collection
598562601
BioClip® / Side discharge
Mulch 598563601
Blade - Accessory Mulch 597683901 Mulch 597683901 –
Grass catcher capacity, liter 65 65 –
Drive
Self walk speed, km/h – 3.6 3.6
1566 - 008 - 24.11.2021 17
Page 18

EC Declaration of Conformity
EC Declaration of Conformity
Husqvarna AB, SE-561 82 Huskvarna, Sweden, tel:
+46-36-146500, declares that the lawn mower
Husqvarna LC 151, LC 151S, LB 256SP from the year
2020 and onwards, complies with the requirements of
the COUNCIL’S DIRECTIVE:
• of June 8, 2011 on the “restriction of use of certain
hazardous substances” 2011/65/EU
• of May 17, 2006 ”relating to machinery” 2006/42/EC
• of February 26, 2014 ”relating to electromagnetic
compatibility” 2014/30/EU
• of May 8, 2000 ”relating to the noise emissions in the
environment” 2000/14/EC
Information relating to noise emissions, see Technical
data.
The following standards have been applied:
EN ISO 5395-1:2013, EN ISO 5395-1:2013/A1, EN ISO
5395-2:2013, EN ISO 5395-2:2013/A1:2016, EN ISO
5395-2:2013/A2:2017, EN ISO 14982:2009
If not otherwise stated, the above listed standards are
the latest published versions.
Notified body: 0404, RISE SMP Svensk Maskinprovning
AB, Box 7035, SE-750 07 Uppsala, Sweden has
performed conformity assessment according to Annex
VI of directive 2000/14/EC.
Huskvarna, 2021-11-30
Claes Losdal, Development Manager/Garden Products
(Authorized representative for Husqvarna AB and
responsible for technical documentation)
18
1566 - 008 - 24.11.2021
Page 19
Contenido
Introducción.................................................................. 19
Seguridad..................................................................... 20
Montaje......................................................................... 23
Funcionamiento............................................................ 25
Mantenimiento.............................................................. 28
Introducción
Resolución de problemas del motor............................. 32
Transporte, almacenamiento y eliminación.................. 33
Datos técnicos.............................................................. 35
Declaración de conformidad CE................................... 37
Descripción del producto
El producto es un cortacésped giratorio conducido a pie.
Para LC 151, LC 151S, fije un recogedor de césped
para recoger la hierba. Monte el deflector de descarga
lateral para realizar una descarga lateral de la hierba.
Para LC 151, LC 151S, fije un kit de trituración para
cortar la hierba y utilizarla como abono.
Uso previsto
Utilice el producto para cortar hierba. No utilice el
producto para otras tareas.
Símbolos que aparecen en el producto
¡ADVERTENCIA! Tenga cuidado y utilice
el producto correctamente. Este producto
puede ocasionar lesiones graves o
mortales tanto al operador como a
cualquier otra persona.
Lea detenidamente el manual de usuario
y asegúrese de que entiende las
instrucciones antes de usar la máquina.
Tenga cuidado con los objetos lanzados o
rebotados.
Mantenga a las personas y animales a
una distancia de seguridad respecto a la
zona de trabajo.
Detenga el motor y quite el cable de
encendido antes de realizar tareas de
mantenimiento o reparación.
Este producto cumple con las directivas
CE vigentes.
Las emisiones sonoras en el entorno
según la directiva de la Comunidad
Europea. Las emisiones del producto se
indican en el capítulo «Datos técnicos» y
en la etiqueta.
Riesgo de incendio.
No inhale los gases de escape. Los gases
de escape del motor contienen monóxido
de carbono, que es un gas inodoro, tóxico
y muy peligroso. No arranque el motor en
interiores ni en espacios cerrados.
Superficie caliente.
Llene el motor de aceite antes de arrancar el producto.
Advertencia: Mantenga alejados las
manos y los pies de la cuchilla giratoria.
Advertencia: Mantenga alejados las
manos y los pies de las piezas giratorias.
1566 - 008 - 24.11.2021
Nota: Los demás símbolos/etiquetas que aparecen en
el producto corresponden a requisitos de homologación
específicos de algunas zonas comerciales.
Responsabilidad sobre el producto
Como se estipula en las leyes de responsabilidad del
producto, no nos hacemos responsables de los daños y
perjuicios causados por nuestro producto si:
• El producto se ha reparado incorrectamente.
19
Page 20
• El producto se ha reparado con piezas que no eran
del fabricante o no autorizadas por el fabricante.
• El producto tiene un accesorio que no es del
fabricante o no está autorizado por este.
Seguridad
Definiciones de seguridad
Las advertencias, precauciones y notas se utilizan para
destacar información especialmente importante del
manual.
ADVERTENCIA: Indica un riesgo de
lesiones o incluso de muerte del usuario o
de las personas cercanas si no se respetan
las instrucciones del manual.
PRECAUCIÓN: Indica un riesgo de
daños en el producto, otros materiales o el
área adyacente si no se respetan las
instrucciones del manual.
Nota: Se usa para proporcionar más información
necesaria en una situación determinada.
Instrucciones generales de seguridad
ADVERTENCIA: Lea las siguientes
instrucciones de advertencia antes de
utilizar el producto.
• Este producto es una herramienta peligrosa si se
usa incorrectamente o si no se tiene cuidado. Puede
causar lesiones graves o incluso la muerte si no
siguen las instrucciones de seguridad.
• Este producto genera un campo electromagnético
durante el funcionamiento. Este campo magnético
puede, en determinadas circunstancias, interferir
con implantes médicos activos o pasivos. Para
reducir el riesgo de que se den condiciones que
provocarían lesiones graves o letales, las personas
que utilizan implantes médicos deben consultar con
su médico y con el fabricante del implante antes de
poner en marcha este producto.
• Proceda siempre con cuidado y utilice siempre el
sentido común. Si no está seguro de cómo manejar
el producto en una situación especial, pare y
consulte con su distribuidor Husqvarna antes de
continuar.
• Debe tenerse en cuenta que el operador será
responsable de los accidentes que involucren a
otras personas o a su propiedad.
• Mantenga el producto limpio. Asegúrese de que
puede leer claramente las etiquetas.
• El producto no se ha reparado en un centro de
servicio autorizado o por un organismo homologado.
• No permita que nadie utilice el producto a menos
que se asegure de que haya leído y comprendido el
contenido del manual de usuario.
• No deje que un niño maneje el producto.
• Mantenga a los niños alejados de la zona de trabajo.
Debe haber presente en todo momento una persona
mayor de edad responsable.
• No permita que nadie maneje el producto sin
conocer las instrucciones.
• Si una persona con discapacidad física o mental usa
el producto, asegúrese de supervisarla en todo
momento. Debe haber presente en todo momento
una persona mayor de edad responsable.
• No utilice el producto si está cansado, enfermo o si
se encuentra bajo los efectos de alcohol, drogas o
medicamentos. Esto tiene un efecto negativo en su
visión, vigilancia, coordinación y capacidad de
decisión.
• No utilice el producto si está defectuoso.
• No modifique este producto ni lo utilice si puede
haber sido modificado por otras personas.
• No cambie el ajuste del régimen del motor.
Seguridad en el área de trabajo
ADVERTENCIA: Lea las siguientes
instrucciones de advertencia antes de
utilizar el producto.
• Retire objetos tales como ramas, palos y piedras de
la zona de trabajo antes de usar el producto.
• Los objetos que chocan contra el equipo de corte
pueden salir despedidos y causar daños a personas
y objetos. Mantenga a las personas y los animales a
una distancia de seguridad respecto al producto.
• No utilice el producto en condiciones climáticas
desfavorables, como niebla, lluvia, viento fuerte, frío
intenso y riesgo de relámpagos. El uso del producto
en condiciones climáticas desfavorables o en
entornos húmedos o mojados produce mucho
cansancio. El mal tiempo puede causar condiciones
peligrosas, como superficies resbaladizas.
• Preste atención a las personas, objetos y
situaciones que puedan impedir el funcionamiento
seguro del producto.
• Tenga cuidado con los posibles obstáculos, como
raíces, piedras, ramas, hoyos y zanjas. El césped
crecido puede esconder obstáculos.
• Cortar el césped en pendientes puede resultar
peligroso. No utilice el producto en pendientes de
más de 15°.
20
1566 - 008 - 24.11.2021
Page 21
• Utilice el producto a lo largo de las laderas de las
pendientes. No se desplace hacia arriba y hacia
abajo.
• Tenga cuidado cuando se acerque a esquinas y
objetos escondidos que puedan bloquear su campo
de visión.
Seguridad en el trabajo
ADVERTENCIA: Lea las siguientes
instrucciones de advertencia antes de
utilizar el producto.
• Utilice este producto para cortar solamente césped.
No está permitido utilizar el producto para otras
tareas.
• Utilice el equipo de protección personal. Consulte la
sección
Equipo de protección personal en la página
21
.
• Asegúrese de que saber cómo detener el motor
rápidamente en caso de emergencia.
• Nunca arranque el motor en un espacio cerrado ni
cerca de materiales inflamables. Los gases de
escape del motor están calientes y pueden contener
chispas que pueden provocar un incendio.
• No utilice el producto a menos que la cuchilla y
todas las cubiertas estén fijadas correctamente. Una
cuchilla fijada incorrectamente puede soltarse y
provocar daños personales.
• Asegúrese de que la cuchilla no golpea ningún
objeto, como piedras y raíces. Esto puede causar
daños a la cuchilla y doblar el eje del motor. Un eje
doblado causa vibraciones excesivas y un riesgo
muy alto de que la cuchilla se suelte.
• Si la cuchilla choca con algún objeto o si se
producen vibraciones, pare el producto
inmediatamente. Desconecte el cable de encendido
de la bujía. Examine el producto para comprobar si
presenta daños. Repare los daños o lleve el
producto a un taller de servicio autorizado para
realizar la reparación.
• No acople la maneta del freno del motor
permanentemente al mango cuando el motor esté
encendido.
• Ponga el producto en una superficie plana y estable,
y arránquelo. Asegúrese de que la cuchilla no entre
en contacto con el suelo u otros objetos.
• Manténgase siempre detrás del producto durante su
uso.
• Mientras utilice el producto, mantenga todas las
ruedas apoyadas en el suelo y las dos manos en el
manillar. Mantenga alejados las manos y los pies de
las cuchillas giratorias.
• No incline el producto con el motor en marcha.
• Tenga cuidado cuando tire del producto hacia atrás.
• Nunca levante el producto con el motor en marcha.
Si tiene que levantar el producto, primero apague el
motor y desconecte el cable de encendido de la
bujía.
• No camine hacia atrás mientras utiliza el producto.
• Detenga el motor cuando se desplace por áreas sin
hierba, por ejemplo, caminos de grava, piedra y
asfalto.
• No corra con el producto con el motor en marcha.
Camine siempre mientras utiliza el producto.
• Detenga el motor antes de cambiar la altura de
corte. Nunca realice ajustes con el motor en marcha.
• No deje el producto desatendido con el motor en
marcha. Pare el motor y asegúrese de que el equipo
de corte no gire.
Instrucciones de seguridad para el funcionamiento
Equipo de protección personal
ADVERTENCIA: Lea las siguientes
instrucciones de advertencia antes de
utilizar el producto.
• El equipo de protección personal no elimina
completamente el riesgo de lesiones, pero reduce la
gravedad de las lesiones en caso de accidente. Deje
que el distribuidor le ayude a seleccionar el equipo
adecuado.
• Utilice protectores auriculares si el nivel de ruido es
superior a 85 dB.
• Utilice botas o zapatos de trabajo antideslizantes.
No utilice calzado abierto ni vaya descalzo.
• Utilice pantalones largos gruesos.
• Utilice guantes protectores cuando sea necesario,
por ejemplo, para el montaje, inspección o limpieza
del equipo de corte.
Dispositivos de seguridad en el producto
ADVERTENCIA:
instrucciones de advertencia antes de
utilizar el producto.
• No utilice un producto que tenga dispositivos de
seguridad defectuosos.
• Realice una comprobación de los dispositivos de
seguridad con frecuencia. Si los dispositivos de
seguridad están defectuosos, hable con su taller de
servicio Husqvarna.
Comprobación de la cubierta del equipo de corte
La cubierta del equipo de corte disminuye las
vibraciones en el producto y el riesgo de lesiones
provocadas por la cuchilla.
• Examine la cubierta de corte para asegurarse de
que no haya daños como, por ejemplo, grietas.
Lea las siguientes
1566 - 008 - 24.11.2021
21
Page 22
Comprobación de la maneta de freno del motor
La maneta del freno del motor detiene el motor. Cuando
se suelta la maneta del freno del motor, el motor se
para.
• Arranque el motor y, a continuación, suelte la
maneta de freno. Si el motor no se detiene en 3
segundos, lleve el producto a un taller de servicio
Husqvarna autorizado para realizar el ajuste del
freno del motor.
Comprobación de la cubierta trasera
La cubierta trasera reduce el riesgo de que salgan
despedidos objetos hacia el usuario.
• Asegúrese de que la cubierta trasera no esté
dañada.
• Asegúrese de que los muelles que cierran la
cubierta trasera no estén rotos.
• Sustituya los muelles y piezas dañados.
• Asegúrese de que la cubierta trasera se mueve sin
dificultad en las bisagras.
Silenciador
El silenciador mantiene al mínimo los niveles de ruido y
aparta los gases de escape del operador.
No utilice el producto si el silenciador no está instalado
o está defectuoso. Un silenciador defectuoso aumenta
el nivel de ruido y el riesgo de incendio.
ADVERTENCIA:
calienta mucho durante y después de su
uso, y cuando el motor funciona a ralentí.
Tenga cuidado cerca de materiales
inflamables o gases para evitar incendios.
Comprobación del silenciador
• Examine el silenciador con frecuencia para
asegurarse de que está montado correctamente y
que no está dañado.
El silenciador se
Seguridad en el uso del combustible
ADVERTENCIA:
instrucciones de advertencia antes de
utilizar el producto.
• No arranque el producto si está manchado con
combustible o aceite del motor. Retire el
combustible/aceite no deseado y deje secar el
producto.
Lea las siguientes
• Si derrama combustible sobre la ropa, cámbiese
inmediatamente.
• Evite el contacto con el combustible; puede
provocarle lesiones. Si entra en contacto con el
combustible, utilice agua y jabón para eliminar el
combustible.
• No arranque el motor si el producto tiene una fuga.
Examine frecuentemente si hay fugas en el motor.
• Tenga cuidado con el combustible. El combustible
es inflamable, sus vapores son explosivos y puede
provocar lesiones o la muerte.
• No inhale los vapores de combustible, ya que
pueden causar lesiones. Asegúrese de que hay
ventilación suficiente.
• No fume cerca del combustible o el motor.
• No coloque objetos calientes cerca del combustible
o el motor.
• No agregue el combustible con el motor encendido.
• Asegúrese de que el motor esté frío antes repostar.
• Antes de repostar, abra la tapa del depósito de
combustible lentamente y deje salir el exceso de
presión con cuidado.
• No añada combustible al motor en interiores. Una
circulación de aire insuficiente puede causar
lesiones o la muerte por asfixia o inhalación de
monóxido de carbono.
• Apriete el tapón del depósito de combustible
completamente. Si el tapón del depósito de
combustible no se aprieta, existe riesgo de incendio.
• Antes de arrancar el producto, llévelo a 3 m (10
pies) de distancia como mínimo del punto en el que
llenó el depósito.
• No llene el depósito de combustible por completo. El
calor hace que el combustible se expanda. Deje
espacio en la parte superior del depósito de
combustible.
Instrucciones de seguridad para el mantenimiento
ADVERTENCIA:
instrucciones de advertencia antes de
utilizar el producto.
• Los gases de escape del motor contienen monóxido
de carbono, que es un gas inodoro, tóxico y muy
peligroso. No arranque el motor en interiores ni en
espacios cerrados.
• Antes de realizar el mantenimiento del producto,
detenga el motor y desconecte el cable de
encendido de la bujía.
• Utilice guantes protectores cuando realice el
mantenimiento del equipo de corte. La cuchilla está
muy afilada y se pueden producir cortes con mucha
facilidad.
• Los accesorios y modificaciones en el producto que
no estén aprobados por el fabricante pueden causar
daños graves o la muerte. No modifique el producto.
Lea las siguientes
22
1566 - 008 - 24.11.2021
Page 23
Utilice siempre accesorios autorizados por el
A
B
C
D
E
F
G
H
fabricante.
• Si el mantenimiento no se realiza correctamente y
de forma regular, aumenta el riesgo de lesiones y
daños en el producto.
• Realice únicamente las tareas de mantenimiento
que se indican en este manual del propietario.
Introducción
ADVERTENCIA: Antes de montar el
producto, debe leer y entender el capítulo
sobre seguridad.
ADVERTENCIA: Retire el cable de la
bujía antes de montar el producto.
Montaje del manillar
1. Coloque el tornillo (A) a través del manillar (B), la
arandela de plástico (C) y el soporte del manillar (D).
Todos los demás trabajos de mantenimiento deben
llevarse a cabo en un taller de servicio Husqvarna
autorizado.
• Lleve el producto a un taller de servicio Husqvarna
autorizado para realizar el mantenimiento de forma
regular.
• Cambie las piezas dañadas, desgastadas o rotas.
Montaje
3. Coloque el tornillo (F) a través de la arandela (G) y
el soporte del manillar.
4. Apriete la ruedecilla (H) por completo.
Ajuste del mango
1. Afloje las ruedecillas inferiores.
2. Mueva los mandos hacia el extremo inferior de las
ranuras en el lado izquierdo y derecho del producto.
2. Apriete la tuerca (E) completamente.
1566 - 008 - 24.11.2021
3. Ajuste la altura del manillar en una de las 2
posiciones disponibles.
23
Page 24
4. Mueva los mandos hacia arriba, en dirección al
manillar, hasta que finalice su recorrido y escuche
un clic.
5. Apriete las ruedecillas por completo.
Para ajustar el producto en la posición de transporte
1. Afloje las ruedecillas inferiores.
2. Mueva las ruedecillas hacia el extremo inferior de
las ranuras en el lado izquierdo y derecho del
producto.
Ajuste del producto en la posición de trabajo
1. Coloque el manillar en posición vertical.
2. Mueva las ruedecillas hacia arriba, en dirección al
manillar, hasta que finalice su recorrido y escuche
un clic.
3. Doble el mango hacia delante.
24
3. Apriete las ruedecillas a fondo.
1566 - 008 - 24.11.2021
Page 25
Para montar el recogedor de césped (LC 151, LC 151S)
1. Coloque el bastidor del recogedor de césped en la
bolsa de hierba con la parte rígida de la bolsa en la
parte inferior. Mantenga el mango del bastidor
separado de la parte superior de la bolsa.
Funcionamiento
Introducción
ADVERTENCIA: Antes de utilizar el
producto, debe leer y entender el capítulo
sobre seguridad.
Husqvarna Connect
Husqvarna Connect es una aplicación gratuita para su
dispositivo móvil. La aplicación Husqvarna Connect
proporciona más funciones para su producto
Husqvarna:
• Información ampliada sobre el producto.
• Información y asistencia sobre piezas y
mantenimiento de productos.
Para empezar a utilizar Husqvarna Connect
1. Descargue la aplicación Husqvarna Connect en su
dispositivo móvil.
2. Registre una cuenta en la aplicación Husqvarna
Connect.
3. Siga las instrucciones de la aplicación Husqvarna
Connect para conectarse y registrar el producto.
Antes de utilizar el producto
1. Lea detenidamente el manual de usuario y
asegúrese de que entiende las instrucciones.
2. Examine el equipo de corte para asegurarse de que
está conectado y ajustado correctamente. Consulte
Para inspeccionar el equipo de corte en la página
29
.
3. Llene el depósito de combustible. Consulte
Repostaje de combustible en la página 25
.
2. Fije la bolsa de hierba al bastidor con los clips.
4. Llene el depósito de aceite y realice una
comprobación del nivel de aceite. Consulte
realizar una comprobación del nivel de aceite en la
página 30
.
Para
Repostaje de combustible
Si es posible, utilice de gasolina de bajas emisiones/
alquilatos. Si no puede utilizar gasolina de bajas
emisiones/alquilatos, utilice una gasolina sin plomo o
gasolina con plomo de buena calidad con un octanaje
no inferior a 90.
PRECAUCIÓN: No utilice gasolina
con un octanaje inferior a 90 octanos RON
(87 AKI). Esto puede provocar daños en el
producto.
1. Abra el tapón del depósito de combustible
lentamente para liberar la presión.
2. Llene lentamente con una lata de combustible. Si
derrama combustible, límpielo con un paño y deje
que el combustible restante se seque.
3. Limpie la zona de alrededor del tapón del depósito
de combustible.
1566 - 008 - 24.11.2021
25
Page 26
4. Apriete el tapón del depósito de combustible
3
4
5
6
7
8
9
completamente. Si el tapón del depósito de
combustible no se aprieta, existe riesgo de incendio.
5. Antes de arrancarlo, lleve el producto a 3 m (10
pies) de distancia como mínimo del punto en el que
llenó el depósito.
Para ajustar la altura de corte
1. Mueva la palanca de altura de corte hacia atrás para
aumentar la altura de corte.
2. Mueva la palanca de altura de corte hacia delante
para reducir la altura de corte.
PRECAUCIÓN: No ajuste la altura de
corte demasiado baja. Las cuchillas pueden
golpear el suelo si la superficie del césped
no está nivelada.
Para arrancar el producto
1. Asegúrese de que el cable de encendido está
conectado a la bujía.
2. Manténgase detrás del producto.
3. Sujete la maneta del freno del motor contra el
manillar.
Uso de la transmisión de las ruedas LC 151S
• Empuje el mango de transmisión hacia el manillar.
• Suelte el mango de transmisión para desacoplar la
transmisión, por ejemplo, cuando se acerque a un
obstáculo.
• Antes de tirar del producto hacia atrás, desacople la
transmisión y empuje el producto hacia adelante
aproximadamente 10 cm.
Uso del producto con el recogedor de césped (LC 151, LC 151S)
ADVERTENCIA: No utilice el
producto sin el recogedor de césped
colocado o sin la cubierta trasera cerrada.
Pueden salir despedidos objetos y lesionar
al usuario.
1. Levante la cubierta trasera y retire el tapón del
triturador, si estuviera instalado.
4. Sostenga la empuñadura de arranque con la mano
derecha.
5. Tire lentamente de la cuerda de arranque hasta
sentir cierta resistencia.
6. Tire con fuerza para arrancar el motor.
ADVERTENCIA: No se enrolle la
cuerda de arranque alrededor de la mano.
26
2. Monte el recogedor de césped; consulte
Para
montar el recogedor de césped (LC 151, LC 151S)
en la página 25
.
3. Coloque el recogedor de césped en el soporte.
1566 - 008 - 24.11.2021
Page 27
4. Suelte la cubierta trasera y colóquela sobre el
bastidor de la bolsa para césped.
Cambio del producto al modo de trituración (LC 151, LC 151S)
Asegúrese de que el motor está apagado antes de
cambiar el producto al modo de trituración.
1. Levante la cubierta trasera y retire el recogedor de
césped, si estuviera instalado.
2. Coloque el accesorio triturador en el canal de
descarga.
3. Levante el bloqueo de descarga.
4. Abra la cubierta de descarga lateral e instale el
deflector de descarga lateral en los pasadores de
soporte.
5. Deje que la cubierta de descarga lateral se cierre
contra el deflector de descarga lateral. Asegúrese de
que el deflector de descarga lateral está firmemente
fijado en su posición antes de utilizar el producto.
Para aumentar el rendimiento en el modo de
Nota:
descarga lateral, instale el tapón del triturador.
3. Cierre la cubierta trasera y asegúrese de que está
bien cerrada contra el tapón de trituración.
Para aumentar el rendimiento del modo de
Nota:
trituración, sustituya la cuchilla por la cuchilla trituradora
auxiliar. Consulte
30
Para sustituir la cuchilla en la página
Cambio del producto al modo de descarga lateral
1. Levante la cubierta trasera y retire la bolsa para
césped, si estuviera instalada.
2. Cierre la cubierta trasera y asegúrese de que está
bien cerrada contra el producto.
1566 - 008 - 24.11.2021 27
Page 28
Vaciado del recogedor de césped
PRECAUCIÓN: Levante el recogedor
de césped cuando lo desplace para evitar
desgastes.
1. Levante el recogedor de césped con el mango del
bastidor.
2. Utilice el mango del bastidor y el asa de la bolsa al
vaciar el recogedor de césped.
Para obtener un buen resultado
• Use siempre una cuchilla afilada. Un cuchilla roma
proporciona un resultado irregular y la superficie de
corte de la hierba adquiere un tono amarillo. Una
cuchilla afilada también utiliza menos energía que
una cuchilla roma.
Mantenimiento
• No corte más de ⅓ de la longitud del césped.
Cuando empiece a cortar la hierba, utilice la altura
de corte más alta. Examine el resultado y baje la
altura de corte al nivel que corresponda. Si la hierba
está muy larga, vaya despacio y realice dos pasadas
si es necesario.
• Corte en direcciones distintas cada vez para evitar
crear rayas en el césped.
• Levante la cubierta trasera y extraiga el recogedor
de césped.
• Si hay un triturador y una cuchilla trituradora
instalados, retírelos.
• Cierre la cubierta trasera antes de utilizar el
producto. Cuando se utiliza el producto, la hierba
cortada se expulsa por debajo de la cubierta trasera.
• Mantenga limpia la cubierta del equipo de corte. La
acumulación de hierba y suciedad en el interior de
esta cubierta puede reducir el resultado del corte.
Consulte la sección
de la cubierta de corte en la página 29
Para limpiar la superficie interior
.
Introducción
ADVERTENCIA: Antes de realizar
cualquier trabajo de mantenimiento, debe
leer y entender el capítulo sobre seguridad.
Para todos los trabajos de mantenimiento y reparación
del producto, es necesario realizar una formación
especial. Nosotros garantizamos que los trabajos de
mantenimiento y reparación sean realizados por
profesionales. Si su distribuidor no es un taller de
servicio, pídale información sobre el taller de servicio
más cercano.
Mantenimiento
Inspección general X
Compruebe el nivel de aceite X
28 1566 - 008 - 24.11.2021
Programa de mantenimiento
PRECAUCIÓN: Asegúrese de que el
filtro de aire esté hacia arriba y no contra el
suelo cuando incline el producto. Podría
dañar el motor.
Los intervalos de mantenimiento se calculan a partir del
uso diario del producto. Los intervalos cambian si el
producto no se utiliza a diario.
Para las tareas de mantenimiento identificadas con un *,
consulte las instrucciones de
en el producto en la página 21
Diario Mensual
Dispositivos de seguridad
.
Cada tempo-
rada
Page 29
Mantenimiento
Cambie el aceite (la primera vez a las 5 horas de uso; después, cada 50 h de uso)
Limpie el producto X
Inspeccione el equipo de corte X
Examine la cubierta de corte * X
Examine la maneta del freno del motor* X
Inspeccione el silenciador* X
Examine la bujía. Limpie o sustituya la bujía si fuese necesario X
Inspección del filtro de aire X
Limpie el filtro de aire
Sustituya el filtro de aire X
Inspeccione el sistema de combustible X
Limpie las aletas de refrigeración del cilindro X
Inspeccione y ajuste el cable de embrague X
8
9
Diario Mensual
X
Cada tempo-
rada
X
Para realizar una inspección general
• Asegúrese de que todas las tuercas y los tornillos
del producto estén apretados correctamente.
Para limpiar el producto externamente
• Use un cepillo para retirar las hojas, la hierba y la
suciedad.
• Asegúrese de que la toma de aire de la parte
superior del motor no esté obstruida.
• No utilice un equipo de limpieza a alta presión para
limpiar el producto.
• Si utiliza agua para limpiar el producto, no dirija el
chorro directamente sobre el motor.
Para limpiar la superficie interior de la cubierta de corte
1. Vacíe el depósito de combustible.
2. Incline el producto. Asegúrese de que la bujía
apunta hacia arriba.
PRECAUCIÓN: Si el producto se
pone con el filtro de aire hacia abajo, el
motor puede dañarse.
3. Limpie la superficie interior de la cubierta de corte
con una manguera de agua.
8
Si se utiliza el producto con una carga pesada o a temperaturas elevadas, sustituya el aceite del motor cada
25 horas.
9
Límpielo con mayor frecuencia en condiciones polvorientas o cuando haya residuos en el aire. Si está muy
sucio, sustituya el filtro de aire.
Para inspeccionar el equipo de corte
ADVERTENCIA: Para evitar el
arranque accidental, desconecte el cable de
encendido de la bujía.
ADVERTENCIA: Utilice guantes
protectores cuando realice el mantenimiento
del equipo de corte. La cuchilla está muy
afilada y se pueden producir cortes con
mucha facilidad.
1. Inspeccione el equipo de corte para comprobar si
presenta daños o grietas. Sustituya siempre un
equipo de corte dañado.
2. Inspeccione la cuchilla para comprobar si está
dañada o roma.
Nota: Después de afilar la cuchilla, es necesario
equilibrarla. El afilado, la sustitución y el equilibrado de
la cuchilla deben realizarse en un centro de servicio. Si
choca con un obstáculo que haga que el producto se
pare, sustituya la cuchilla dañada. Lleve el producto a
un centro de servicio, donde estimarán si la cuchilla
puede afilarse o debe sustituirse.
1566 - 008 - 24.11.2021 29
Page 30

Para sustituir la cuchilla
-20 0 30 40
80
100
-30
-20 0
20 30 40
F
C
32
-10
10
60
SAE 10W-30
SAE 5W-30
SAE 30
1. Bloquee la cuchilla con un bloque de madera.
2. Retire el tornillo de la cuchilla y la arandela de
presión.
3. Desmonte la cuchilla.
4. Inspeccione el soporte de la cuchilla y el tornillo de
la cuchilla para comprobar si presentan daños.
5. Inspeccione el eje del motor para asegurarse de que
no está doblado.
6. Cuando instale la nueva cuchilla, colóquela con los
extremos en ángulo en dirección a la cubierta de
corte.
ADVERTENCIA:
Use guantes
resistentes. La cuchilla está muy afilada
y se pueden producir cortes con mucha
facilidad.
10. Arranque el producto para hacer una prueba de la
cuchilla. Si la cuchilla no está correctamente fijada,
se produce una vibración en el producto o el
resultado de corte no es satisfactorio.
Para realizar una comprobación del nivel de aceite
PRECAUCIÓN: Un nivel de aceite
demasiado bajo puede causar daños en el
motor. Compruebe el nivel de aceite antes
de arrancar el producto.
1. Coloque el producto sobre una superficie nivelada.
2. Retire el tapón del depósito de aceite con la varilla
de nivel acoplada.
3. Limpie el aceite de la varilla de nivel de aceite.
4. Introduzca la varilla de nivel totalmente en el
depósito de aceite para obtener un resultado
correcto del nivel de aceite.
5. Quite la varilla de nivel.
6. Compruebe el nivel de aceite que indica la varilla de
nivel.
7. Si el nivel de aceite es bajo, llene con aceite de
motor y vuelva a comprobar el nivel de aceite.
Sustitución del aceite del motor
7. Asegúrese de que la cuchilla quede alineada con el
centro del eje del motor.
8. Bloquee la cuchilla con un bloque de madera.
Coloque la arandela de presión, y apriete el tornillo y
la arandela a un par de 43 – 47 Nm.
9. Mueva la cuchilla en distintas direcciones
manualmente y compruebe que gira libremente.
30
ADVERTENCIA:
El aceite del motor
está muy caliente inmediatamente después
de apagar el motor. Deje que el motor se
enfríe antes de vaciar el aceite del motor. Si
derrama aceite del motor y entra en
contacto con la piel, lávese con agua y
jabón.
1. Ponga el producto en funcionamiento hasta que el
depósito de combustible se vacíe.
2. Quite el cable de encendido de la bujía.
3. Retire el tapón del depósito de aceite.
1566 - 008 - 24.11.2021
Page 31

4. Coloque un recipiente debajo del producto para
A
B
recoger el aceite del motor.
5. Incline el producto para drenar el aceite de motor del
depósito de aceite.
6. Llene el depósito con aceite de motor nuevo del tipo
recomendado en
7. Compruebe el nivel de aceite. Consulte la sección
Datos técnicos en la página 35
Para realizar una comprobación del nivel de aceite
en la página 30
.
Para examinar la bujía
PRECAUCIÓN: Utilice siempre el tipo
de bujía recomendado. El uso de un tipo de
bujía incorrecto puede causar averías en el
producto.
• Examine la bujía si el motor tiene baja potencia, no
es fácil de arrancar o no funciona correctamente al
régimen de ralentí.
• Para reducir el riesgo de material no deseado en los
electrodos de la bujía, siga estas instrucciones:
a) Asegúrese de que el régimen de ralentí está bien
ajustado.
b) Asegúrese de que la mezcla de combustible sea
correcta.
c) Asegúrese de que el filtro de aire esté limpio.
• Si la bujía está sucia, límpiela y asegúrese de que la
distancia entre los electrodos sea la correcta,
consulte
Datos técnicos en la página 35
• Sustituya la bujía si fuese necesario.
.
Filtro de aire
Un filtro de aire sucio puede provocar daños en el motor
o que este no funcione correctamente. En condiciones
polvorientas, realice el mantenimiento del filtro de aire
con mayor frecuencia. Consulte
página 28
cambiar el filtro de aire.
Nota:
Extracción e instalación del filtro de aire
para obtener información sobre cuándo
Sustituya siempre el filtro de aire si se avería.
Mantenimiento en la
ADVERTENCIA: Utilice guantes
protectores.
1. Presione las fijaciones de la tapa del filtro de aire.
2. Retire con cuidado la tapa del filtro de aire (A) del
motor.
3. Retire el filtro de aire (B).
.
4. Compruebe si el filtro de aire está dañado. Sustituya
el filtro de aire si está dañado.
5. Limpie y examine el filtro de aire. Consulte la
sección
Para limpiar el filtro de aire en la página
31
.
6. Para el montaje, efectúe el mismo procedimiento en
el orden inverso.
Para limpiar el filtro de aire
Un filtro de aire sucio puede provocar daños en el motor
o que este no funcione correctamente. En condiciones
de trabajo con mucho polvo, realice el mantenimiento
del filtro de aire con más frecuencia.
Consulte
Mantenimiento en la página 28
información sobre cuándo cambiar el filtro de aire.
1. Saque la cubierta del filtro de aire y extraiga el filtro.
2. Limpie el filtro golpeándolo suavemente contra una
superficie plana. Para limpiar el filtro, no utilice
nunca disolventes con petróleo, como el queroseno,
ni aire comprimido.
Los filtros de aire utilizados durante mucho
Nota:
tiempo no se pueden limpiar por completo. Sustituya
el filtro de aire con regularidad. Un filtro de aire
dañado debe cambiarse siempre.
3. Cuando monte el filtro de aire, asegúrese de que
quede totalmente sellado en su soporte.
Comprobación del deflector de descarga lateral
El deflector de descarga lateral está sujeto a la abertura
de descarga lateral del producto. Reduce el riesgo de
expulsión de objetos en dirección al usuario.
1. Asegúrese de que el deflector de descarga lateral no
esté dañado.
para obtener
1566 - 008 - 24.11.2021
31
Page 32

2. Examine el deflector de descarga lateral. Asegúrese
de que no ve defectos, como alguna grieta o que
alguno de los muelles que empujan la puerta para
cerrarla esté roto.
3. Sustituya el deflector de descarga lateral o los
muelles en caso de estar dañados.
Para inspeccionar el sistema de combustible
• Examine el tapón del depósito de combustible y la
junta del tapón para comprobar que no presenten
daños.
• Examine la manguera de combustible para
asegurarse de que no haya fugas. Si la manguera
de combustible está dañada, lleve el producto a un
taller de servicio para sustituirla.
• El producto se mueve lentamente con la transmisión
de las ruedas engranada.
En las situaciones siguientes, es necesario alargar la
longitud del cable del embrague:
• El producto se mueve sin que la transmisión de las
ruedas esté engranada.
• Ajuste del cable del embrague:
a) Para reducir la longitud del cable del embrague,
gire el tornillo de ajuste hacia la izquierda.
b) Para alargar la longitud del cable del embrague,
gire el tornillo de ajuste hacia la derecha.
Ajuste del cable del embrague (LC 151S)
En las situaciones siguientes, es necesario reducir la
longitud del cable del embrague:
• La transmisión de las ruedas no engrana cuando se
tira del mango de transmisión o de la palanca de
control de régimen.
Si el producto continúa sin funcionar de manera
satisfactoria después del ajuste, póngase en contacto
con el distribuidor.
Resolución de problemas del motor
Problema Causa posible Solución
El motor no arranca. El cable de encendido no está conecta-
do correctamente.
El depósito de combustible está vacío. Llene el depósito de combustible con el
El combustible es antiguo. Drene el depósito de combustible y el
Hay suciedad en el carburador o la tubería de combustible.
La bujía está defectuosa. Ajuste la distancia entre los electrodos y
Hay combustible en la bujía. Limpie la bujía.
El motor no para. El mecanismo de parada está defectuo-
so.
Conecte el cable de encendido a la bujía.
tipo de combustible adecuado.
carburador. Reposte con gasolina nueva.
Limpie el carburador, la tubería de combustible o ambos.
limpie o sustituya la bujía.
Desconecte el cable de encendido de la
bujía. Lleve el producto a un taller de
servicio autorizado para que lo reparen.
32 1566 - 008 - 24.11.2021
Page 33

Problema Causa posible Solución
El motor no funciona correctamente.
El motor se calienta demasiado.
Se produce un fallo de encendido en el motor cuando funciona a régimen alto.
El motor emite ruidos extraños con una carga normal.
El cable de encendido no está conectado correctamente.
Hay suciedad en la tubería de combustible o el combustible ha caducado.
Hay una obstrucción en el tapón del depósito de combustible.
Hay agua o suciedad en el sistema de
combustible.
El filtro de aire está sucio. Limpie el filtro de aire.
Es necesario ajustar el carburador. Lleve el carburador a un taller de servi-
El nivel de aceite del motor es demasiado bajo.
El caudal de aire no es suficiente. Limpie el filtro de aire y la caja del filtro
Es necesario ajustar el carburador. Lleve el carburador a un taller de servi-
La distancia entre los electrodos de la
bujía es demasiado corta.
Tipo de gasolina incorrecto. Drene el depósito de combustible y el
Conecte el cable de encendido a la bujía.
Limpie la tubería de combustible. Llene
el depósito de combustible con combustible nuevo del tipo correcto.
Limpie el tapón del depósito de combustible.
Vacíe el depósito de combustible. Llene
el depósito de combustible con combustible nuevo del tipo correcto.
cio para que lo ajusten.
Reponga con aceite de motor.
de aire.
cio para que lo ajusten.
Ajuste la distancia entre los electrodos.
carburador. Reposte con gasolina nueva. Consulte la sección
combustible en la página 25
blema persiste, póngase en contacto
con su taller de servicio más cercano.
El motor no funciona correctamente al ralentí.
La bujía está sucia o defectuosa, o la
distancia entre los electrodos es demasiado grande.
Es necesario ajustar el carburador. Ajuste el carburador.
El filtro de aire está sucio. Limpie el filtro de aire.
Ajuste la distancia entre los electrodos o
sustituya la bujía.
Repostaje de
. Si el pro-
Transporte, almacenamiento y eliminación
Transporte y almacenamiento
• Para el transporte y almacenamiento del producto y
del combustible, asegúrese de que no haya fugas ni
humos. Las chispas o llamas abiertas, por ejemplo,
de dispositivos eléctricos o calderas, pueden
producir un incendio.
• Use siempre recipientes homologados para el
transporte y almacenamiento de combustible.
• Vacíe el depósito de combustible antes de poner el
producto en almacenamiento durante un largo
1566 - 008 - 24.11.2021 33
periodo de tiempo. Deseche el combustible en una
ubicación adecuada para su eliminación.
• Asegure el producto durante el transporte para evitar
daños y accidentes.
• Mantenga el producto en un área cerrada para
impedir el acceso a niños o personas no
autorizadas.
• Mantenga el producto en un lugar seco y al abrigo
de las heladas.
Page 34

Eliminación
• Respete los requisitos de reciclaje locales y las
normas aplicables.
• Deseche todos los productos químicos, como el
aceite de motor o el combustible, en un centro de
servicio o una ubicación adecuada para su
eliminación.
• Cuando ya no use el producto, envíelo a un
distribuidor Husqvarna o deséchelo en un punto de
reciclaje.
34 1566 - 008 - 24.11.2021
Page 35

Datos técnicos
Datos técnicos
LC 151 LC 151S LB 256SP
Motor
Marca Husqvarna Husqvarna Husqvarna
Tipo de motor Monocilíndrico, 4
tiempos, refrigeración
forzada por aire,
OHV
Cilindrada, cm
3
166 166 166
Velocidad, r/min 2800 2800 2800
Potencia nominal del motor, kW
10
2,7 2,7 2,7
Sistema de encendido
Bujía Husqvarna HQT–7 Husqvarna HQT–7 Husqvarna HQT–7
Distancia entre electrodos, mm 0,7–0,8 0,7–0,8 0,7–0,8
Sistema de combustible y lubricación
Tipo de lubricación del motor Salpicadura Salpicadura Salpicadura
Capacidad del depósito de combustible, li-
1,0 1,0 1,0
tros
Capacidad del depósito de aceite, litros 0,5 0,5 0,5
Aceite del motor
11
Husqvarna SAE 30 Husqvarna SAE 30 HusqvarnaSAE 30
Peso
Con los depósitos vacíos, kg 31,1 32,6 33,1
Emisiones de ruido
12
Nivel de potencia acústica medida, dB( A) 97 97 98
Nivel de potencia acústica garantizado, L
dB(A)
Niveles acústicos
13
98 98 98
WA
Monocilíndrico, 4
tiempos, refrigeración
forzada por aire,
OHV
Monocilíndrico, 4
tiempos, refrigeración
forzada por aire,
OHV
10
La potencia de salida del motor indicada es la potencia neta media (a la velocidad especificada) de un motor
de producción típico para el modelo de motor conforme a la norma SAE J1349 / ISO1585. Los motores fabricados en serie podrían presentar valores diferentes. La potencia de salida real del motor instalado en el producto final dependerá de la velocidad de funcionamiento, las condiciones medioambientales y otros valores.
11
Si utiliza aceite SAE-30 a temperaturas inferiores a +5 °C, existe el riesgo de que no lubrique el motor correctamente. Esto puede ocasionar daños en el motor. Consulte la sección
página 30
12
Emisiones sonoras en el entorno medidas como potencia acústica (LWA) según la directiva 2000/14/CE.
13
Los datos referidos del nivel de presión sonora tienen una dispersión estadística habitual (desviación típica)
para saber cuál es el aceite correcto para temperaturas bajas.
Sustitución del aceite del motor en la
de 1,2 dB (A).
1566 - 008 - 24.11.2021 35
Page 36

LC 151 LC 151S LB 256SP
Nivel de presión sonora en el oído del usua-
85 85 88
rio, dB(A)
Niveles de vibraciones
Vibración en el manillar, m/s
14
2
8,5 8,5 7,5
Equipo de corte
Altura de corte, mm 25-75 25-75 25-75
Anchura de corte, mm 510 510 560
Sistema de corte Recogedor/BioClip®/
descarga lateral
Cuchilla estándar Recogedor
598562601
Recogedor/BioClip®/
descarga lateral
Recogedor
598562601
BioClip®/descarga lateral
Triturador 598563601
Cuchilla auxiliar Triturador 597683901 Triturador 597683901 –
Capacidad del recogedor de césped, litros 65 65 –
Transmisión
Velocidad de movimiento, km/h – 3,6 3,6
14
Los datos referidos del nivel de vibración poseen una dispersión estadística habitual (desviación típica) de 0,2
m/s2.
36 1566 - 008 - 24.11.2021
Page 37

Declaración de conformidad CE
Declaración de conformidad CE
Husqvarna AB, SE-561 82 Huskvarna (Suecia), tel.:
+46-36-146500, declara que el cortacésped Husqvarna
LC 151, LC 151S, LB 256SP del año 2020 y siguientes
cumple los requisitos expuestos en la DIRECTIVA DEL
CONSEJO:
• del 8 junio de 2011 sobre la "restricción de
utilización de determinadas sustancias peligrosas"
2011/65/UE.
• de 17 de mayo de 2006 "relativa a máquinas",
2006/42/CE.
• de 26 de febrero de 2014 "relativa a compatibilidad
electromagnética", 2014/30/UE.
• de 8 de mayo de 2000 "relativa a emisiones sonoras
en el entorno", 2000/14/CE.
Para obtener información respecto a las emisiones
sonoras, consulte la sección sobre datos técnicos.
Se han aplicado las normas siguientes:
EN ISO 5395-1:2013, EN ISO 5395-1:2013/A1, EN ISO
5395-2:2013, EN ISO 5395-2:2013/A1:2016, EN ISO
5395-2:2013/A2:2017, EN ISO 14982:2009
Si no se indica lo contrario, las normas anteriormente
indicadas constituyen las últimas versiones publicadas.
Organismo notificado: 0404, RISE SMP Svensk
Maskinprovning AB, Box 7035, SE-750 07 Uppsala,
Sweden ha realizado una evaluación de conformidad
según lo que se indica en el Anexo VI de la Directiva
2000/14/CE.
Huskvarna, 2021-11-30
Claes Losdal, Director de desarrollo/productos para el
jardín (representante autorizado de Husqvarna AB y
responsable de la documentación técnica).
1566 - 008 - 24.11.2021
37
Page 38

Sommaire
Introduction................................................................... 38
Sécurité.........................................................................39
Montage........................................................................42
Utilisation...................................................................... 44
Entretien....................................................................... 47
Introduction
Dépannage moteur....................................................... 52
Transport, entreposage et mise au rebut......................53
Caractéristiques techniques......................................... 54
Déclaration de conformité CE.......................................56
Description du produit
Le produit est une tondeuse rotative à pousser. Pour LC
151, LC 151S, fixez le collecteur d'herbe pour recueillir
l'herbe. Fixez le déflecteur d'éjection latérale pour
l'éjection latérale de l'herbe. Pour LC 151, LC 151S,
fixez un kit de mulching pour broyer l'herbe et la
transformer en engrais.
Utilisation prévue
Utilisez le produit pour couper l'herbe. N'utilisez pas ce
produit pour d'autres travaux.
Symboles concernant le produit
AVERTISSEMENT ! Soyez prudent et
utilisez le produit correctement. Ce produit
peut causer des blessures graves, voire
mortelles, à l'opérateur ou à d'autres
personnes.
Veuillez lire attentivement le manuel
d'utilisation et assurez-vous de bien
comprendre les instructions avant
utilisation.
Attention : projections et ricochets.
Maintenez les personnes et les animaux à
une distance suffisante de la zone de
travail.
Coupez le moteur et retirez le câble
d'allumage avant toute réparation ou
opération d'entretien.
Ce produit est conforme aux directives CE
en vigueur.
Émissions sonores dans l'environnement
selon la directive de la Communauté
européenne. Les émissions du produit
sont indiquées au chapitre
Caractéristiques techniques et sur les
autocollants.
Risque d'incendie.
Ne respirez pas les gaz d'échappement.
Les gaz d'échappement du moteur
contiennent du monoxyde de carbone, un
gaz inodore, toxique et très dangereux.
Ne démarrez pas le moteur en intérieur ou
dans des espaces fermés.
Surface chaude.
Remplissez le moteur d'huile
avant de démarrer le produit.
Avertissement : Maintenez les mains et
les pieds à distance de la lame en
rotation.
Avertissement : Maintenez les pieds et les
mains à distance des pièces en
mouvement.
38 1566 - 008 - 24.11.2021
Remarque: Les autres symboles/autocollants
présents sur le produit concernent des exigences de
certification spécifiques à certaines zones
commerciales.
Page 39

Responsabilité
Conformément à la loi sur la responsabilité du fait des
produits, nous déclinons toute responsabilité pour tout
dommage causé par notre produit si :
• le produit n'est pas correctement réparé ;
• le produit est réparé avec des pièces qui ne
proviennent pas du fabricant ou qui ne sont pas
homologuées par le fabricant ;
Sécurité
Définitions de sécurité
Des avertissements, des recommandations et des
remarques sont utilisés pour souligner des parties
spécialement importantes du manuel.
AVERTISSEMENT: Symbole utilisé
en cas de risque de blessures ou de mort
pour l'opérateur ou les personnes à
proximité si les instructions du manuel ne
sont pas respectées.
REMARQUE: Symbole utilisé en cas
de risque de dommages pour le produit,
d'autres matériaux ou les environs si les
instructions du manuel ne sont pas
respectées.
Remarque: Symbole utilisé pour donner des
informations supplémentaires pour une situation
donnée.
Instructions générales de sécurité
AVERTISSEMENT: Lisez les
instructions qui suivent avant d'utiliser le
produit.
• Ce produit est dangereux s'il est utilisé de manière
incorrecte ou imprudente. Des blessures graves ou
mortelles peuvent se produire si vous ne respectez
pas les instructions de sécurité.
• Ce produit génère un champ électromagnétique
durant son fonctionnement. Ce champ peut dans
certaines circonstances perturber le fonctionnement
d'implants médicaux actifs ou passifs. Pour réduire
le risque de blessures graves ou mortelles, les
personnes portant des implants médicaux doivent
consulter leur médecin et le fabricant de leur implant
avant d'utiliser ce produit.
• Soyez toujours prudent et utilisez votre bon sens. Si
vous ne savez pas comment faire fonctionner le
produit dans une situation particulière, ne l'utilisez
pas et contactez votre Husqvarna revendeur avant
de poursuivre.
• le produit est équipé d'un accessoire qui ne provient
pas du fabricant ou qui n'est pas homologué par le
fabricant ;
• le produit n'est pas réparé par un centre d'entretien
agréé ou par une autorité homologuée.
• N'oubliez pas que l'opérateur sera tenu responsable
des accidents occasionnés à des tiers et à leurs
biens.
• Maintenez le produit propre. Assurez-vous que vous
pouvez lire clairement les avertissements et les
autocollants.
• Ne laissez personne utiliser le produit avant d'avoir
lu et compris le contenu du manuel de l'opérateur.
• Ne laissez pas un enfant utiliser le produit.
• Maintenez les enfants éloignés de la zone de travail.
Un adulte responsable doit être présent à tout
moment.
• Ne laissez pas une personne utiliser le produit si elle
ne connaît pas les instructions.
• Surveillez constamment les personnes aux
capacités physiques ou mentales réduites qui
utilisent ce produit. Un adulte responsable doit être
présent à tout moment.
• N'utilisez jamais l'appareil si vous êtes fatigué ou
malade, ou si vous êtes sous l'emprise d'alcool, de
drogues ou de médicaments. Cela a un effet négatif
sur votre vision, votre vigilance, votre coordination et
votre jugement.
• N'utilisez pas le produit si celui-ci est défectueux.
• Ne modifiez jamais le produit et ne l'utilisez jamais
s'il est susceptible d'avoir été modifié par un tiers.
• Ne modifiez pas le réglage de régulation du régime
moteur.
Sécurité dans l'espace de travail
AVERTISSEMENT: Lisez les
instructions qui suivent avant d'utiliser le
produit.
• Retirez les objets tels que les branches, les brindilles
et les pierres de la zone de travail avant d'utiliser le
produit.
• Les objets heurtant l'équipement de coupe peuvent
être éjectés et causer des blessures ou des dégâts
matériels. Maintenez les personnes aux alentours et
les animaux à une distance suffisante du produit.
• N'utilisez jamais le produit par mauvais temps, par
exemple en cas de brouillard, de pluie, de vent
violent, de froid intense et de risque d'éclair. Utiliser
le produit par mauvais temps ou dans des
1566 - 008 - 24.11.2021
39
Page 40

environnements humides est fatigant. Le mauvais
temps peut rendre les conditions de travail
dangereuses : des surfaces peuvent par exemple
devenir glissantes.
• Identifiez les éventuels personnes, objets et
situations susceptibles de nuire à la sécurité du
fonctionnement du produit.
• Soyez attentif aux obstacles tels que les racines, les
pierres, les brindilles, les fosses et les fossés.
L'herbe haute peut cacher des obstacles.
• Il peut être dangereux de couper l'herbe sur des
terrains en pente. N'utilisez pas le produit sur un sol
dont la pente est supérieure à 15°.
• Faites fonctionner le produit en travers de la courbe
de la pente, jamais de haut en bas.
• Soyez prudent lorsque vous vous approchez de
coins cachés et d'objets qui empêchent d'avoir une
vue dégagée.
Sécurité du travail
AVERTISSEMENT: Lisez les
instructions qui suivent avant d'utiliser le
produit.
• Utilisez le produit uniquement pour couper les
pelouses. Il est interdit d'utiliser le produit pour
d'autres travaux.
• Utilisez un équipement de protection personnelle.
Reportez-vous à la section
protection individuelle à la page 40
• Assurez-vous que vous savez arrêter le moteur
rapidement en cas d'urgence.
• Ne démarrez jamais le moteur dans un espace clos
ou à proximité matériaux inflammables. Les gaz
d'échappement du moteur sont très chauds et
peuvent contenir des étincelles pouvant provoquer
un incendie.
• Faites fonctionner le produit uniquement si la lame et
tous les couvercles sont fixés correctement. Une
lame fixée de manière inadéquate risque de se
détacher et de causer des blessures personnelles.
• Assurez-vous que la lame ne touche pas des objets
tels que des pierres et des racines. Cela peut ne pas
endommager la lame et tordre l'arbre du moteur. Un
arbre tordu génère de fortes vibrations, il y a alors un
risque important que la lame se détache.
• Arrêtez immédiatement le produit s'il vibre ou bute
sur un objet. Débranchez le câble d'allumage de la
bougie. Vérifiez que le produit n'est pas
endommagé. Réparez les éventuels dommages ou
demandez à un atelier spécialisé agréé procéder
aux réparations.
• N'attachez jamais la poignée de frein moteur en
permanence à la poignée de commande quand le
moteur est mis en marche.
• Placez le produit sur une surface stable et plane,
puis lancez-le. Vérifiez que la lame ne touche pas le
sol ou tout autre objet.
Équipement de
.
• Restez toujours derrière le produit lorsque vous
l'utilisez.
• Faites reposer toutes les roues sur le sol et
conservez vos deux mains sur la poignée lorsque
vous faites fonctionner le produit. Maintenez les
mains et les pieds à distance des lames en rotation.
• N'inclinez pas le produit quand le moteur est mis en
marche.
• Soyez prudent lorsque vous tirez le produit vers
l'avant.
• Ne soulevez jamais le produit quand le moteur est
mis en marche. Si vous devez soulever le produit,
coupez d'abord le moteur et débranchez le câble
d'allumage de la bougie.
• Ne marchez pas vers l'arrière lorsque vous utilisez le
produit.
• Arrêtez le moteur lorsque vous vous déplacez à
travers des zones exemptes d'herbe, par exemple
des chemins de gravier, de pierre ou d'asphalte.
• Ne courez pas lorsque vous utilisez le produit et que
le moteur est mis en marche. Vous devez toujours
marcher lorsque vous utilisez le produit.
• Arrêtez le moteur avant de modifier la hauteur de
coupe. N'effectuez jamais de réglages pendant que
le moteur tourne.
• Ne quittez jamais le produit des yeux pendant que le
moteur tourne. Arrêtez le moteur et assurez-vous
que l'équipement de coupe ne tourne pas.
Consignes de sécurité pour le fonctionnement
Équipement de protection individuelle
AVERTISSEMENT:
instructions qui suivent avant d'utiliser le
produit.
• L'équipement de protection individuel ne protège pas
complètement des blessures, mais il diminue la
gravité des blessures en cas d'accident. Faites appel
à votre revendeur pour vous aider à sélectionner
l'équipement adéquat.
• Utilisez des protège-oreilles si le niveau sonore est
supérieur à 85 dB.
• Portez des bottes ou chaussures antidérapantes à
usage intensif. Ne portez pas de chaussures
ouvertes et ne soyez pas pieds nus lorsque vous
utilisez le produit.
• Utilisez des pantalons longs et épais.
• Portez des gants de protection en cas de besoin, par
exemple lorsque vous fixez, examinez ou nettoyez
l'équipement de coupe.
Lisez les
40
1566 - 008 - 24.11.2021
Page 41

Dispositifs de sécurité sur le produit
AVERTISSEMENT: Lisez les
instructions qui suivent avant d'utiliser le
produit.
• N'utilisez pas un produit avec des dispositifs de
sécurité défectueux.
• Contrôlez les dispositifs de sécurité régulièrement.
Si les dispositifs de sécurité sont défectueux, parlezen à votre agent d'entretien Husqvarna.
Pour contrôler le capot de coupe
Le capot de coupe réduit les vibrations dans le produit et
réduit le risque de blessures provoquées par la lame.
• Examinez le capot de coupe pour vous assurer qu'il
ne présente pas de dommages tels que des fissures.
Pour contrôler la poignée de frein moteur
La poignée de frein moteur arrête le moteur. Lorsque la
poignée de frein moteur est relâchée, le moteur s'arrête.
• Démarrez le moteur, puis relâchez la poignée de
frein moteur. Si le moteur ne s'arrête pas au bout de
3 secondes, demandez à un Husqvarna atelier
spécialisé agréé de régler le frein moteur.
Pour contrôler le capot arrière
Le déflecteur arrière diminue le risque d'éjection d'objets
en direction de l'opérateur.
• Assurez-vous que le capot arrière n'est pas
endommagé.
• Assurez-vous que les ressorts qui ferment le capot
arrière ne sont pas endommagés.
• Remplacez les ressorts endommagés et les pièces
endommagées.
• Assurez-vous que le capot arrière peut se déplacer
correctement sur les charnières.
Silencieux
Le silencieux est conçu pour réduire au maximum le
niveau sonore et rejeter les gaz d'échappement loin de
l'utilisateur.
N'utilisez pas la machine si le silencieux est manquant
ou défectueux. Un silencieux en mauvais état augmente
le niveau sonore et le risque d'incendie.
AVERTISSEMENT:
devient très chaud pendant et après
utilisation et lorsque le moteur fonctionne au
régime de ralenti. Soyez vigilant à proximité
des matériaux inflammables et/ou des
fumées pour prévenir tout risque d'incendie.
Pour contrôler le silencieux
• Examinez le silencieux régulièrement pour s'assurer
qu'il est correctement fixé et qu'il n'est pas
endommagé.
Le silencieux
Sécurité carburant
AVERTISSEMENT: Lisez les
instructions qui suivent avant d'utiliser le
produit.
• Ne démarrez pas le produit si du carburant ou de
l'huile moteur a été renversé(e) sur le produit.
Essuyez le carburant/l'huile et attendez que le
produit sèche.
• Si vous avez renversé du carburant sur vos
vêtements, changez de vêtements immédiatement.
• Évitez tout contact de la peau avec le carburant. Le
carburant peut causer des blessures. Si votre peau
entre en contact avec le carburant, lavez les parties
qui ont été en contact avec de l'eau et du savon.
• Ne démarrez pas le produit s'il y a une fuite de
moteur. Vérifiez régulièrement s'il y a des fuites de
moteur.
• Faites attention avec le carburant. Le carburant est
inflammable et ses vapeurs sont explosives. Il peut
causer des blessures graves, voire mortelles.
• Ne respirez pas les vapeurs de carburant, elles
peuvent causer des blessures. Assurez-vous que la
ventilation est suffisante.
• Ne fumez pas à proximité du carburant ou du
moteur.
• Ne mettez pas d'objets chauds à proximité du
carburant ou du moteur.
• N'ajoutez pas de carburant lorsque le moteur est
allumé.
• Assurez-vous que le moteur est froid avant de faire
le plein de carburant.
• Avant de faire le plein, ouvrez le bouchon du
réservoir de carburant lentement et relâchez la
pression avec précaution.
• N'ajoutez pas de carburant au moteur dans un
espace intérieur. Un débit d'air insuffisant peut
causer des blessures graves, voire mortelles dues à
une asphyxie ou au monoxyde de carbone.
• Serrez complètement le bouchon du réservoir de
carburant. Si le bouchon du réservoir de carburant
n'est pas serré, il y a un risque d'incendie.
• Déplacez le produit à un minimum de 3 m/10 ft de
l'endroit où a été fait le plein de carburant avant de
démarrer le produit.
1566 - 008 - 24.11.2021
41
Page 42
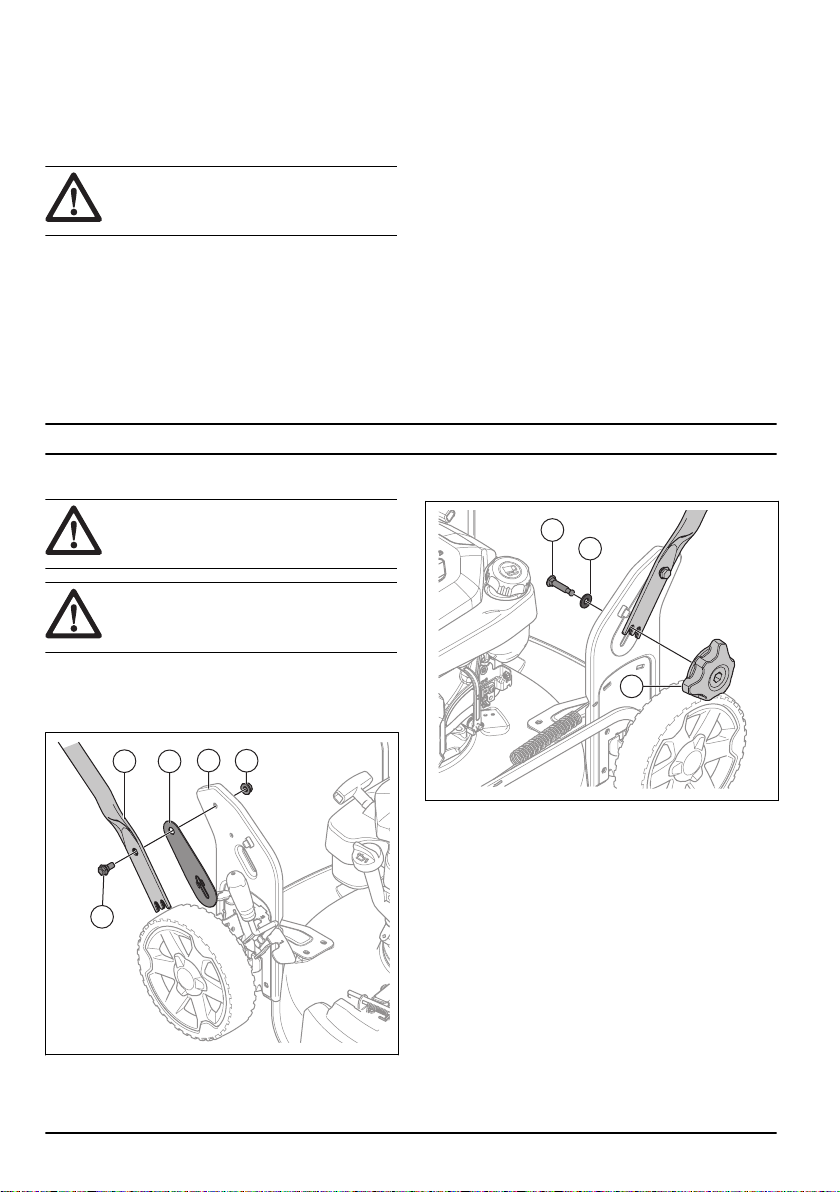
• Ne remplissez pas entièrement le réservoir de
A
B
C
D
E
F
G
H
carburant. La chaleur entraîne la dilatation du
carburant. Laissez un espace en haut du réservoir
de carburant.
Consignes de sécurité pour l'entretien
AVERTISSEMENT: Lisez les
instructions qui suivent avant d'utiliser le
produit.
• Les gaz d'échappement du moteur contiennent du
monoxyde de carbone, un gaz inodore, toxique et
très dangereux. Ne démarrez pas le moteur en
intérieur ou dans des espaces fermés.
• Avant de procéder à l'entretien du produit, arrêtez le
moteur et débranchez le câble d'allumage de la
bougie.
• Utilisez des gants de protection lorsque vous
procédez à l'entretien de l'équipement de coupe. La
Montage
Introduction
AVERTISSEMENT: Avant de
monter le produit, vous devez lire et
comprendre le chapitre sur la sécurité.
AVERTISSEMENT: Débranchez le
câble d'allumage de la bougie avant de
monter le produit.
lame est très tranchante et des coupures peuvent
survenir facilement.
• Les accessoires et les modifications apportées au
produit qui ne sont pas approuvés par le fabricant
peuvent causer des blessures très graves, voire
mortelles. Ne modifiez pas le produit. Utilisez
toujours des accessoires qui sont approuvés par le
fabricant.
• Si l'entretien n'est pas effectué correctement et
régulièrement, le risque de blessures et
d'endommagement du produit augmente.
• Effectuez uniquement les tâches d'entretien décrites
dans le présent manuel d'utilisation. Toutes les
autres tâches d'entretien doivent être effectuées par
un Husqvarna atelier spécialisé agréé.
• Demandez à un Husqvarna atelier spécialisé
d'effectuer régulièrement l'entretien du produit.
• Remplacez les pièces endommagées, usées ou
cassées.
3. Poussez la vis (F) dans la rondelle (G) et le support
de poignée.
Pour monter la poignée
1. Poussez la vis (A) dans la poignée (B), la rondelle
en plastique (C) et le support de poignée (D).
4. Serrez entièrement le bouton (H).
Pour régler la poignée
1. Desserrez les boutons inférieurs.
2. Serrez entièrement l'écrou (E).
42 1566 - 008 - 24.11.2021
Page 43

2. Faites glisser les boutons jusqu'aux extrémités
inférieures des rainures sur le côté gauche et le côté
droit de la machine.
3. Réglez la hauteur de la poignée selon l'une des deux
positions disponibles.
4. Déplacez les boutons vers le haut, en direction de la
poignée, jusqu'à ce qu'ils s'arrêtent et qu'un clic se
fasse entendre.
5. Serrez fermement les boutons.
Pour régler le produit en position de transport
1. Desserrez les boutons inférieurs.
2. Faites glisser les boutons jusqu'aux extrémités
inférieures des rainures sur le côté gauche et le côté
droit de la machine.
3. Pliez la poignée vers l'avant.
Pour régler le produit en position de fonctionnement
1. Mettez la poignée en position verticale.
1566 - 008 - 24.11.2021 43
Page 44

2. Déplacez les boutons vers le haut, en direction de la
poignée, jusqu'à ce qu'ils s'arrêtent et qu'un clic se
fasse entendre.
3. Serrez fermement les boutons.
Pour monter le collecteur d'herbe (LC 151, LC 151S)
1. Fixez le châssis du collecteur d'herbe au sac à
herbe, la partie rigide du sac étant sur la partie
inférieure. Maintenez la poignée du châssis à
l'extérieur de la partie supérieure du sac.
2. Fixez le sac à herbe sur le châssis à l'aide des clips.
Utilisation
Introduction
AVERTISSEMENT: Avant d'utiliser
le produit, vous devez lire et comprendre le
chapitre sur la sécurité.
Husqvarna Connect
Husqvarna Connect est une application gratuite pour
votre appareil mobile. L'application Husqvarna Connect
offre des fonctions étendues à votre produit Husqvarna :
• Informations produit détaillées.
• Informations et aide sur les pièces et l'entretien du
produit.
Pour commencer à utiliser Husqvarna Connect
1. Téléchargez l'application Husqvarna Connect sur
votre appareil mobile.
44 1566 - 008 - 24.11.2021
2. Enregistrez-vous sur l'application Husqvarna
Connect.
3. Suivez les instructions de l'application Husqvarna
Connect pour vous connecter et enregistrer le
produit.
Avant d'utiliser le produit
1. Lisez attentivement le manuel d'utilisation et
assurez-vous de bien comprendre les instructions.
2. Examinez l'équipement de coupe pour vous assurer
qu'il est bien fixé et réglé. Consultez la section
inspecter l'équipement de coupe à la page 49
3. Remplissez le réservoir de carburant. Consultez la
section
Pour remplir le réservoir de carburant à la
page 45
.
4. Remplissez le réservoir d'huile et contrôlez le niveau
d'huile. Consultez la section
d'huile à la page 49
Pour contrôler le niveau
.
Pour
.
Page 45
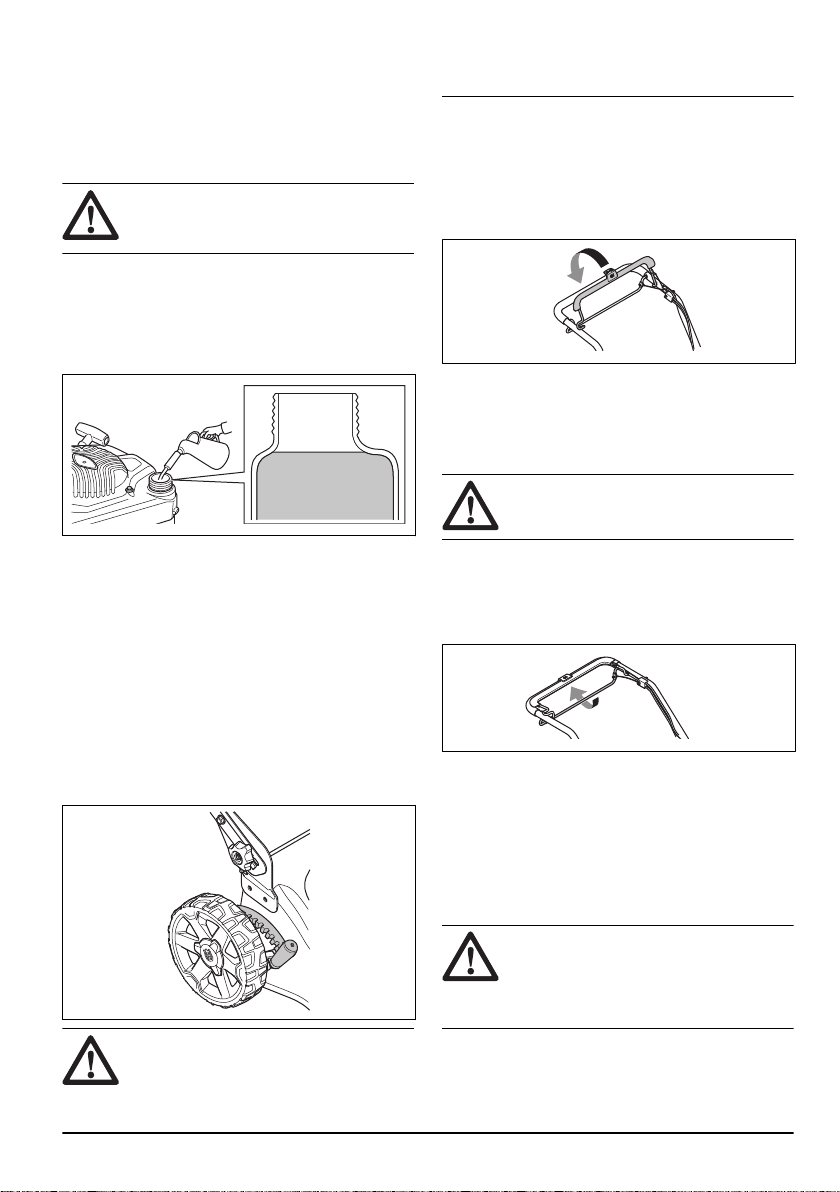
Pour remplir le réservoir de carburant
3
4
5
6
7
8
9
Si cela est possible, utilisez de l'essence d'alkylate/
écologique. Si vous ne pouvez pas vous procurer de
l'essence d'alkylate/écologique, utilisez l'essence sans
plomb de bonne qualité ou d'essence dont le taux
d'octane n'est pas inférieur à 90.
REMARQUE: N'utilisez pas d'essence
avec un indice d'octane inférieur à 90 RON
(87 AKI). Cela peut endommager le produit.
1. Ouvrez lentement le couvercle du réservoir de
carburant pour relâcher la pression.
2. Remplissez lentement le réservoir à l'aide d'un bidon
de carburant. Si vous renversez du carburant,
essuyez-le à l'aide d'un chiffon et laissez le
carburant restant sécher.
3. Essuyez le pourtour du bouchon du réservoir de
carburant.
4. Serrez complètement le bouchon du réservoir de
carburant. Si le bouchon du réservoir de carburant
n'est pas serré, il y a un risque d'incendie.
5. Déplacez le produit à un minimum de 3 m (10 ft) de
l'endroit où a été fait le plein de carburant avant de
démarrer le produit.
Pour régler la hauteur de coupe
1. Déplacez le levier de hauteur de coupe vers l'arrière
pour augmenter la hauteur de coupe.
2. Déplacez le levier de hauteur de coupe vers l'avant
pour diminuer la hauteur de coupe.
peuvent toucher le sol si la surface de la
pelouse n'est pas plane.
Pour démarrer le produit
1. Assurez-vous que le câble d'allumage est branché
sur la bougie.
2. Restez derrière le produit.
3. Tenez la poignée de freinage du moteur contre le
guidon.
4. Tenez la poignée du câble du démarreur de votre
main droite.
5. Tirez lentement sur le câble du démarreur jusqu'à ce
que vous sentiez une certaine résistance.
6. Tirez avec force pour démarrer le moteur.
AVERTISSEMENT: N'enroulez pas
le câble du démarreur autour de votre main.
Pour appliquer l'entraînement aux roues LC 151S
• Poussez la manette de commande en direction du
guidon.
• Relâchez la manette de commande pour
désengager l'entraînement, lorsque vous vous
rendez à proximité d'un obstacle par exemple.
• Avant de tirer le produit vers l'arrière, désengagez
l'entraînement et poussez le produit d'environ 10 cm
vers l'avant.
Pour utiliser le produit avec le collecteur d'herbe (LC 151, LC 151S)
AVERTISSEMENT:
N'utilisez pas le
produit sans qu'un collecteur d'herbe soit
installé ou sans que le capot arrière soit
fermé. Les objets peuvent s'éjecter et
blesser l'opérateur.
REMARQUE: La hauteur de coupe ne
doit pas être réglée trop bas. Les lames
1566 - 008 - 24.11.2021 45
Page 46
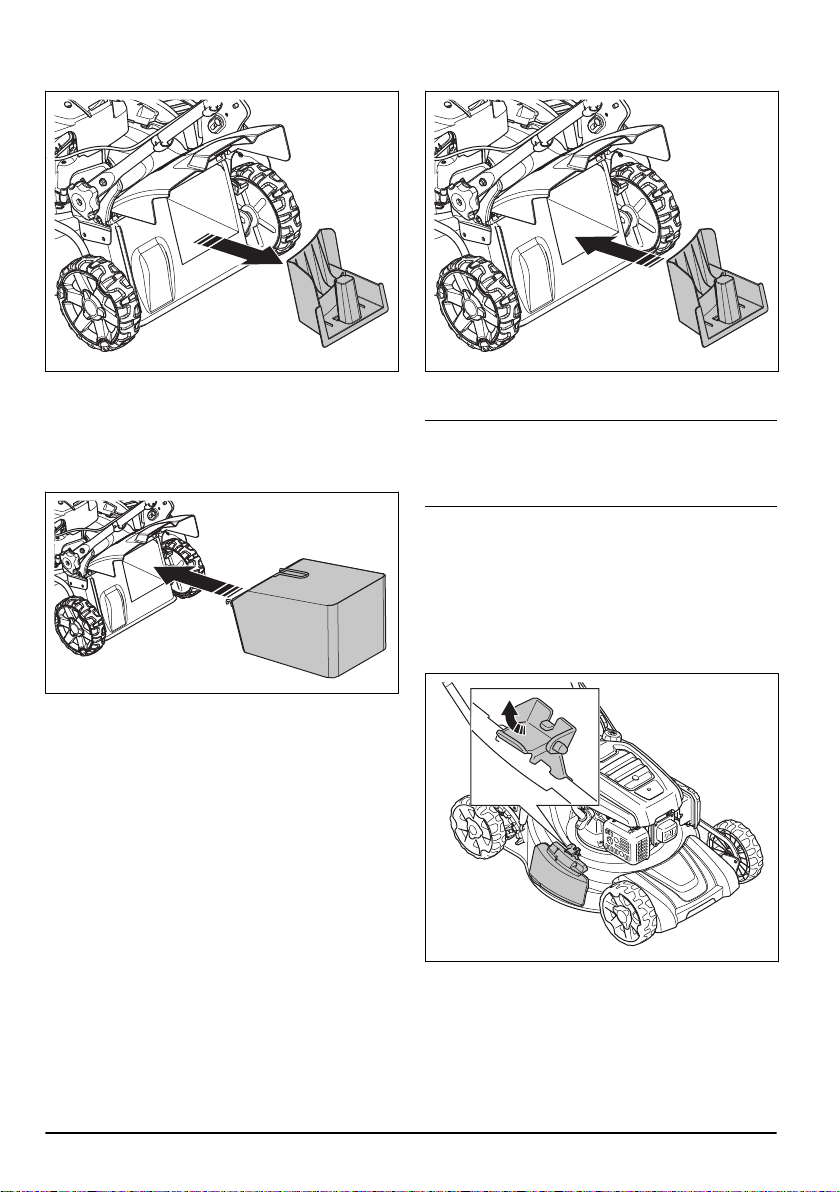
1. Soulevez le capot arrière et retirez l'obturateur du
broyeur, s'il est installé.
2. Placez l'obturateur du broyeur dans le canal
d'éjection.
2. Montez le collecteur d'herbe, reportez-vous à la
section
Pour monter le collecteur d'herbe (LC 151,
LC 151S) à la page 44
3. Placez le collecteur d'herbe sur le support.
4. Relâchez le capot arrière et placez-le sur le dessus
du châssis du collecteur d'herbe.
.
Pour passer le produit en mode broyage (LC 151, LC 151S)
Assurez-vous que le moteur est coupé avant de passer
le produit en mode broyage.
1. Soulevez le capot arrière et retirez le collecteur
d'herbe, s'il est installé.
3. Fermez le capot arrière et assurez-vous qu'il est bien
fermé contre l'obturateur du broyeur.
Remarque: pour améliorer les performances du
mode broyeur, remplacez la lame par le couteau
broyeur. Reportez-vous à la section
lame à la page 49
Pour remplacer la
Pour passer le produit en mode éjection latérale
1. Soulevez le capot arrière et retirez le sac à herbe, s'il
est installé.
2. Fermez le capot arrière et assurez-vous qu'il est bien
fermé contre le produit.
3. Soulevez le verrou d'éjection.
46
1566 - 008 - 24.11.2021
Page 47
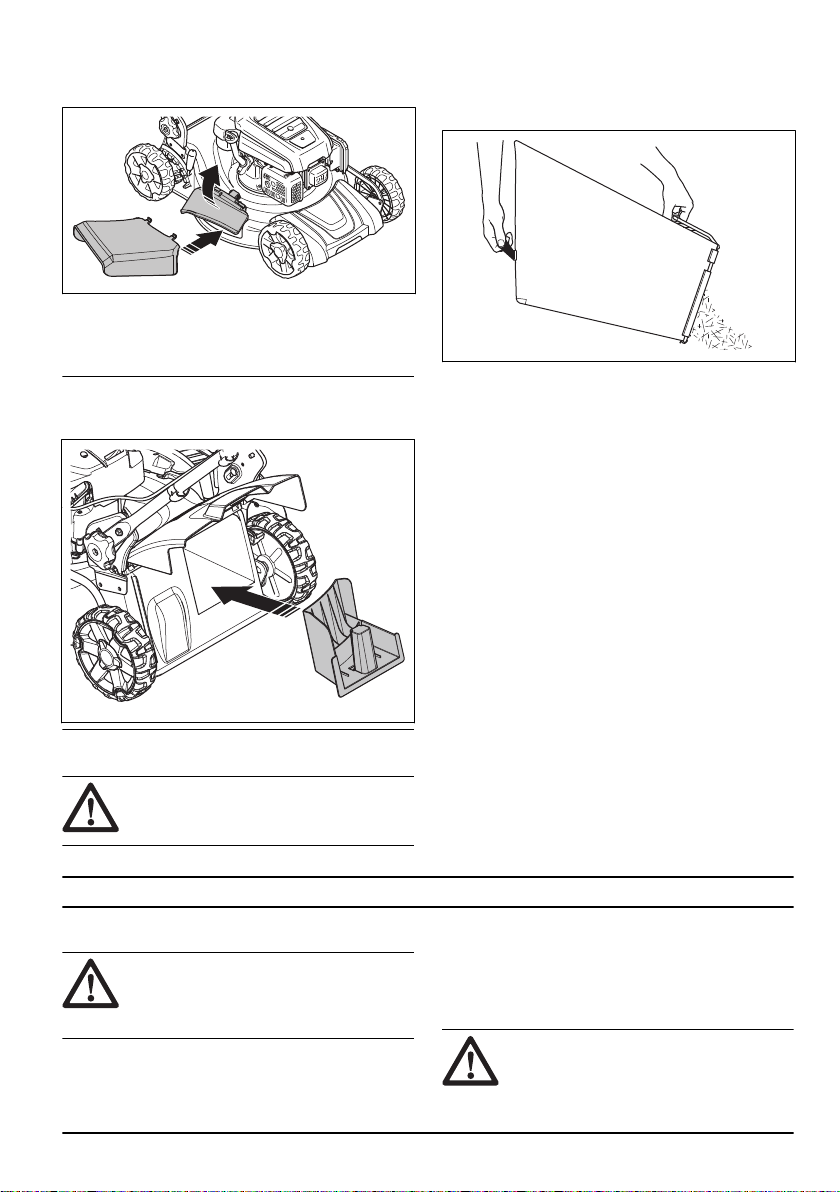
4. Ouvrez le couvercle d'éjection latérale et posez le
déflecteur d'éjection latérale sur les goupilles de
support.
5. Laissez le couvercle d'éjection latérale se fermer
contre le déflecteur d'éjection latérale. Assurez-vous
que le déflecteur d'éjection latérale est bien en place
avant d'utiliser le produit.
Remarque: pour améliorer les performances en
mode éjection latérale, installez l'obturateur pour le
broyage.
Vider le collecteur d'herbe
REMARQUE:
d'herbe lorsque vous le déplacez pour éviter
toute usure.
Soulevez le collecteur
1. Soulevez le collecteur d'herbe à l'aide de la poignée
du châssis.
2. Utilisez la poignée du châssis et la poignée du sac
pour vider le collecteur d'herbe.
Pour obtenir de bons résultats
• Utilisez toujours une lame correctement affûtée. Une
lame émoussée produit un résultat irrégulier et
l'herbe jaunira à la surface de la coupe. De plus, une
lame affûtée consomme moins d'énergie qu'une
lame émoussée.
• Ne coupez pas plus d'un tiers de la longueur de
l'herbe. Utilisez la hauteur de coupe la plus élevée
lorsque vous commencez à couper l'herbe.
Examinez le résultat et abaissez la hauteur de coupe
à un niveau convenable. Si l'herbe est très longue,
tondez lentement, et deux fois si nécessaire.
• Tondez toujours dans différentes directions afin
d'éviter de faire des lignes dans la pelouse.
• Relevez le capot arrière et retirez le collecteur
d'herbe.
• Si un obturateur et une lame de broyeur sont
montés, déposez-les.
• Fermez le couvercle arrière avant d'utiliser le produit.
Lorsque vous faites fonctionner le produit, l'herbe
coupée est évacuée sous le couvercle arrière.
• Assurez-vous que le carter de coupe reste propre.
L'accumulation d'herbe et de saleté sur la face
intérieure du carter de coupe peut réduire la qualité
du résultat de coupe. Reportez-vous à la section
Pour nettoyer la surface interne du capot de coupe à
la page 48
.
Entretien
Introduction
AVERTISSEMENT: Avant
d'effectuer des travaux d'entretien, vous
devez lire et comprendre le chapitre sur la
sécurité.
Une formation spécifique est nécessaire pour effectuer
tous les travaux d'entretien et de réparation du produit.
Nous garantissons qu'il vous est possible d'obtenir des
1566 - 008 - 24.11.2021 47
services de réparation et d'entretien effectués par des
professionnels. Si votre concessionnaire n'est pas un
atelier spécialisé, demandez-lui des informations à
propos de l'atelier spécialisé le plus proche.
Calendrier d'entretien
REMARQUE: Assurez-vous que le
filtre à air est orienté vers le haut et qu'il
n'est pas contre le sol lorsque vous inclinez
Page 48

le produit. Risque de détérioration du
moteur.
Les intervalles d'entretien sont calculés selon une
utilisation quotidienne du produit. Les intervalles sont
différents si le produit n'est pas utilisé tous les jours.
Pour les travaux d'entretien suivis d'un astérisque (*),
reportez-vous aux instructions dans la section
Dispositifs de sécurité sur le produit à la page 41
.
Entretien
Faites une inspection générale X
Inspectez le niveau d'huile X
Changez l'huile (la première fois après 5 h d'utilisation, puis toutes
les 50 h d'utilisation)
Nettoyez le produit X
Inspectez l'équipement de coupe X
Inspectez le capot de coupe * X
Inspectez la poignée de frein moteur * X
Inspectez le silencieux * X
Vérifiez la bougie. Nettoyez ou remplacez la bougie si nécessaire X
Inspectez le filtre à air X
Nettoyez le filtre à air
Remplacez le filtre à air X
Inspectez le système de carburant X
Nettoyez les ailettes de refroidissement sur le cylindre. X
Contrôlez et réglez le câble d'embrayage X
Pour faire une inspection générale
• Assurez-vous que l'ensemble des vis et des écrous
du produit sont correctement serrés.
Pour nettoyer la partie extérieure du
15
16
Pour nettoyer la surface interne du capot de coupe
1. Videz le réservoir de carburant.
2. Inclinez le produit. Assurez-vous que la bougie
produit
• Utilisez une brosse pour enlever les feuilles, l'herbe
et la saleté.
• Assurez-vous que la prise d'air sur le dessus du
moteur n'est pas obstruée.
• N'utilisez pas de nettoyeur haute pression pour le
nettoyage du produit.
• Si vous utilisez de l'eau pour nettoyer le produit, ne
projetez jamais d'eau directement sur le moteur.
3. Lavez au jet la surface intérieure du capot de coupe.
Au quotidien
pointe vers le haut.
REMARQUE: Si le produit est
posé avec le filtre à air vers le bas, le
moteur peut être endommagé.
Une fois par
mois
X
À chaque
saison
X
15
Si le produit est utilisé avec une charge lourde ou à une température ambiante élevée, remplacez l'huile moteur toutes les 25 heures.
16
Nettoyez-le plus souvent en cas de conditions poussiéreuses ou en présence de rejets aériens. Remplacez le
filtre à air s'il est très sale.
48 1566 - 008 - 24.11.2021
Page 49
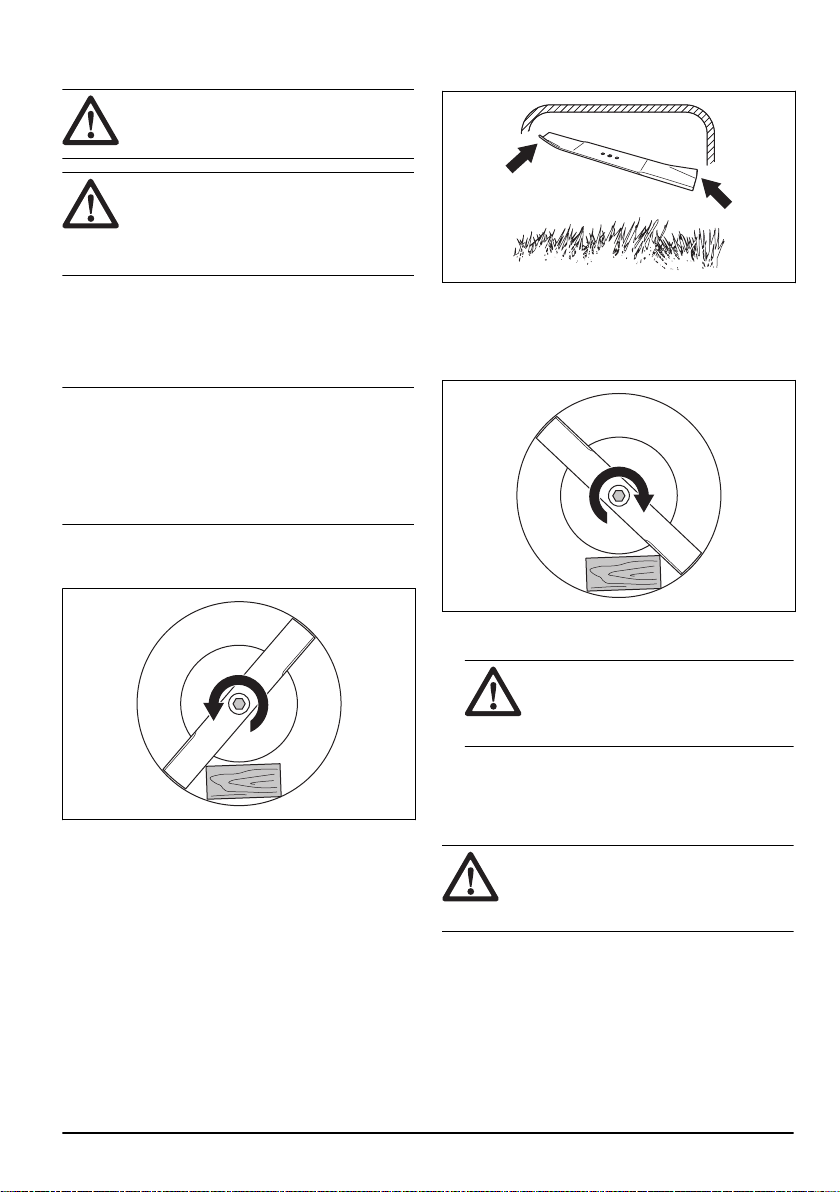
Pour inspecter l'équipement de coupe
AVERTISSEMENT: Afin d'éviter
tout démarrage accidentel, débranchez le
câble d'allumage de la bougie.
AVERTISSEMENT: Utilisez des
gants de protection lorsque vous procédez à
l'entretien de l'équipement de coupe. La
lame est très tranchante et des coupures
peuvent survenir facilement.
6. Lorsque vous fixez la nouvelle lame, orientez le
tranchant en direction du capot de coupe.
1. Inspectez l'équipement de coupe afin de détecter
d'éventuels dommages ou fissures. Remplacez
toujours un équipement de coupe endommagé.
2. Inspectez la lame pour voir si elle est endommagée
ou émoussée.
Remarque: Il est nécessaire d'équilibrer la lame
après l'avoir affûtée. Demandez à un centre d'entretien
d'affûter, de remplacer et d'équilibre la lame. Si vous
heurtez un obstacle qui entraîne l'arrêt du produit,
remplacez la lame endommagée. Demandez au centre
d'entretien d'évaluer si la lame peut être affûtée ou si
elle doit être remplacée.
Pour remplacer la lame
1. Bloquez la lame avec un bloc en bois.
2. Retirez le boulon de lame et la rondelle élastique.
3. Retirez la lame.
4. Examinez le support de lame et le boulon de lame
pour voir s'ils sont endommagés.
5. Examinez l'arbre du moteur pour vous assurer qu'il
n'est pas tordu.
7. Assurez-vous que la lame est alignée par rapport au
centre de l'arbre du moteur.
8. Bloquez la lame avec un bloc en bois. Fixez la
rondelle ressort, puis serrez le boulon et la rondelle
à un couple de 43 – 47 Nm.
9. Déplacez la lame à la main et vérifiez qu'elle tourne
librement.
AVERTISSEMENT:
gants de travail épais. La lame est très
tranchante et des coupures peuvent
survenir facilement.
10. Démarrez le produit pour tester la lame. Si la lame
n'est pas correctement fixée, le produit vibre ou le
résultat de coupe n'est pas satisfaisant.
Utilisez des
Pour contrôler le niveau d'huile
REMARQUE:
bas peut endommager le moteur. Contrôlez
le niveau d'huile avant de démarrer le
produit.
1. Placez le produit sur un sol plat.
2. Retirez le bouchon du réservoir d'huile et la jauge
qui y est attachée.
3. Nettoyez l'huile sur la jauge.
4. Insérez entièrement la jauge dans le réservoir d'huile
pour connaître le véritable niveau d'huile.
5. Enlevez la jauge.
Un niveau d'huile trop
1566 - 008 - 24.11.2021
49
Page 50

6. Inspectez le niveau d'huile sur la jauge.
-20 0 30 40
80
100
-30
-20 0
20 30 40
F
C
32
-10
10
60
SAE 10W-30
SAE 5W-30
SAE 30
A
B
7. Si le niveau d'huile est bas, faites l'appoint d'huile
moteur et contrôlez à nouveau le niveau d'huile.
Pour remplacer l'huile moteur
AVERTISSEMENT: L'huile moteur
est très chaude juste après l'arrêt du moteur.
Laissez le moteur refroidir avant de vidanger
l'huile moteur. Si vous renversez de l'huile
moteur sur votre peau, nettoyez avec de
l'eau et du savon.
1. Faites fonctionner le produit jusqu'à ce que le
réservoir de carburant soit vide.
2. Débranchez le câble d'allumage de la bougie.
3. Retirez le bouchon du réservoir d'huile.
4. Placez un récipient sous le produit pour recueillir
l'huile moteur.
5. Inclinez le produit pour vidanger l'huile moteur dans
le réservoir d'huile.
6. Faites le plein avec de la nouvelle huile moteur du
type recommandé dans
à la page 54
.
Caractéristiques techniques
7. Contrôlez le niveau d'huile. Reportez-vous à la
section
Pour contrôler le niveau d'huile à la page 49
Pour vérifier la bougie
• Si la bougie est encrassée, nettoyez-la et vérifiez
que l'écartement des électrodes est correct ;
reportez-vous à la section
techniques à la page 54
Caractéristiques
.
• Remplacez la bougie si nécessaire.
Filtre à air
Un filtre à air sale peut endommager le moteur ou
provoquer son dysfonctionnement. Effectuez l'entretien
du filtre à air plus fréquemment en cas d'utilisation en
conditions poussiéreuses. Reportez-vous à la section
Entretien à la page 47
pour plus d'informations sur le
remplacement du filtre à air.
Remarque: Remplacez toujours un filtre à air
endommagé.
Dépose et installation du filtre à air
AVERTISSEMENT: Utilisez des
gants de protection.
1. Poussez les clips sur le couvercle du filtre à air.
2. Déposez avec précaution le couvercle du filtre à
air (A) du moteur.
3. Déposez le filtre à air (B).
.
REMARQUE:
Utilisez toujours le type
de bougie recommandé. Un type de bougie
inadéquat peut endommager le produit.
• Inspectez la bougie si le moteur manque de
puissance, n'est pas facile à démarrer ou ne
fonctionne pas correctement lorsqu'il tourne au
régime de ralenti.
• Afin de réduire le risque de matériaux indésirables
présents sur les électrodes de la bougie, procédez
comme suit :
a) Assurez-vous que le régime de ralenti est
correctement réglé.
b) Assurez-vous que le mélange de carburant est
correct.
c) Assurez-vous que le filtre à air est propre.
50
4. Examinez le filtre à air à la recherche de dommages.
Remplacez le filtre à air s'il est endommagé.
5. Nettoyez et examinez le filtre à air. Reportez-vous à
la section
Pour nettoyer le filtre à air à la page 51
.
6. Effectuez l'installation en suivant les étapes dans
l'ordre inverse.
1566 - 008 - 24.11.2021
Page 51
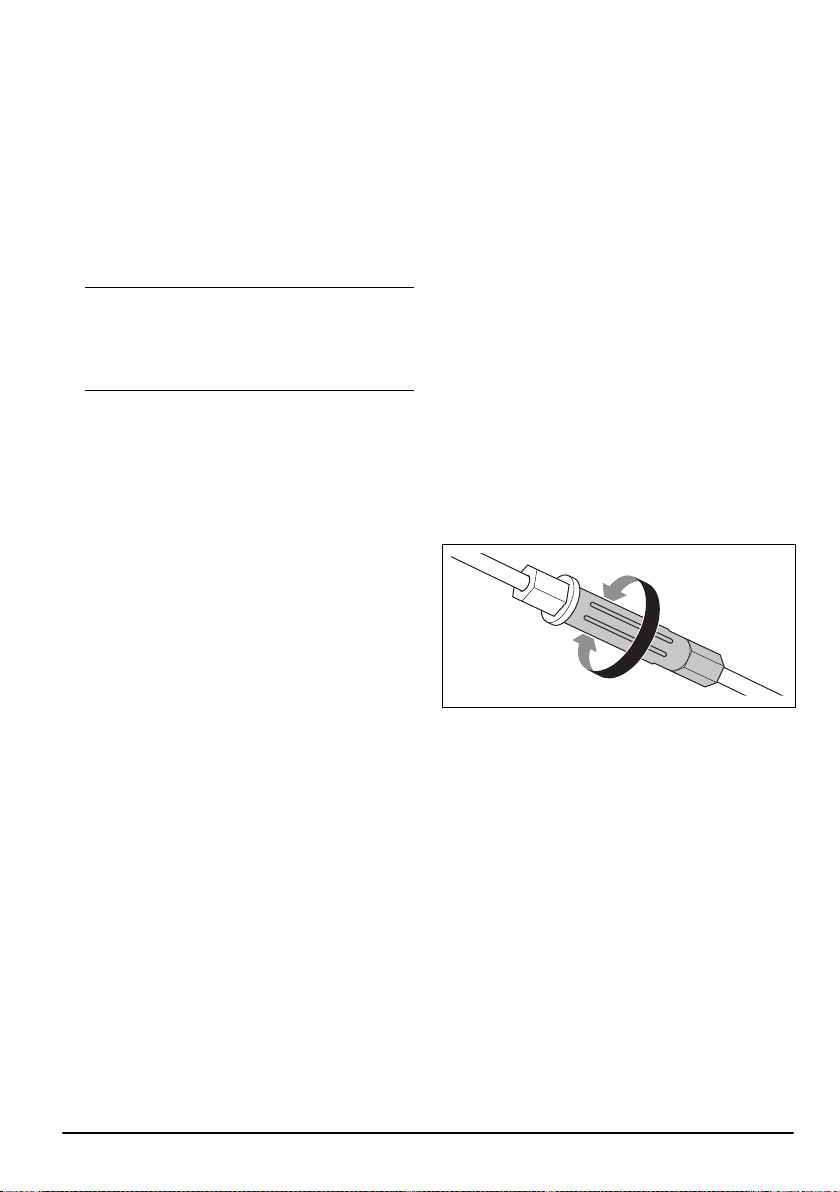
Pour nettoyer le filtre à air
Un filtre à air sale peut endommager le moteur ou
provoquer son dysfonctionnement. Effectuez l'entretien
du filtre à air plus fréquemment en cas d'utilisation en
conditions poussiéreuses.
Reportez-vous à la section
plus d'informations sur le remplacement du filtre à air.
1. Retirez le couvercle du filtre à air et le filtre.
2. Nettoyez le filtre en le frappant contre une surface
plane. N’utilisez pas de diluant avec de l'essence, du
kérosène, ou de l'air comprimé pour nettoyer le filtre.
Entretien à la page 47
pour
Remarque: Les filtres à air en fonctionnement
pendant une longue période ne peuvent pas être
nettoyés complètement. Remplacez le filtre à air à
intervalles réguliers. Les filtres à air endommagés
doivent toujours être remplacés.
3. Lors de l'assemblage du filtre à air, veillez à assurer
une bonne étanchéité entre celui-ci et le support du
filtre.
Contrôle du déflecteur d'éjection latérale
Le déflecteur d'éjection latérale est fixé à l'ouverture
d'éjection latérale du produit. Il réduit les risques de
projection d'objets vers la position de tonte de
l'utilisateur.
1. Assurez-vous que le déflecteur d'éjection latérale
n'est pas endommagé.
2. Examinez le déflecteur d'éjection latérale. Assurezvous qu'aucun défaut n'est présent, tels que des
fissures ou des ressorts cassés qui entraînent une
fermeture forcée du capot.
3. Remplacez le déflecteur d'éjection latérale ou les
ressorts s'ils sont endommagés.
Pour examiner le système de carburant
• Examinez le couvercle du réservoir de carburant et
le joint du couvercle du réservoir de carburant pour
vous assurer qu'ils ne sont pas endommagés.
• Examinez le tuyau à carburant pour vous assurer
qu'il n'y a pas de fuite. Si le tuyau à carburant est
endommagé, demandez à un atelier spécialisé de le
remplacer.
Pour régler le câble d'embrayage (LC 151S)
Pour les situations suivantes, il est nécessaire de
réduire la longueur du câble d'embrayage :
• L'entraînement des roues ne s'engage pas lorsque
vous tirez la manette de commande ou le levier de
commande de vitesse.
• Le produit se déplace lentement lorsque
l'entraînement des roues est engagé.
Pour les situations suivantes, il est nécessaire
d'augmenter la longueur du câble d'embrayage :
• Le produit se déplace lorsque l'entraînement des
roues n'est pas engagé.
• Réglez le câble d’embrayage.
a) Pour réduire la longueur du câble d'embrayage,
tournez la vis de réglage dans le sens contraire
des aiguilles d'une montre.
b) Pour augmenter la longueur du câble
d'embrayage, tournez la vis de réglage dans le
sens des aiguilles d'une montre.
Si le produit continue à ne pas fonctionner correctement
après le réglage, contactez votre atelier d'entretien
1566 - 008 - 24.11.2021
51
Page 52

Dépannage moteur
Problème Cause possible Solution
Le moteur ne démarre pas. Le câble d'allumage n'est pas branché
Le moteur ne s'arrête pas. Le mécanisme d'arrêt est défectueux. Débranchez le câble d'allumage de la
Le moteur ne fonctionne pas
correctement.
Le moteur devient trop chaud. Le niveau d'huile moteur est trop bas. Remplissez l'huile moteur.
Des ratés proviennent du moteur lorsqu'il fonctionne à
grande vitesse.
Bruits inhabituels du moteur
en charge normale.
correctement.
Le réservoir de carburant est vide. Remplissez le réservoir de carburant
Le carburant est vieux. Vidangez le réservoir de carburant et le
Il y a des saletés dans le carburateur ou
dans la durite de carburant.
La bougie d'allumage est défectueuse. Réglez l'écartement des électrodes, net-
Présence de carburant sur la bougie. Nettoyez la bougie.
Le câble d'allumage n'est pas branché
correctement.
Des saletés sont présentes dans la durite de carburant ou le carburant a expiré.
Le bouchon du réservoir de carburant
est colmaté.
De l'eau ou de la saleté sont présentes
dans le système de carburant.
Le filtre à air est sale. Nettoyez le filtre à air.
Le carburateur doit être réglé. Laissez un concessionnaire régler le car-
Le débit d'air est insuffisant. Nettoyez le filtre à air et le boîtier du filtre
Le carburateur doit être réglé. Laissez un concessionnaire régler le car-
L'écartement des électrodes dans la
bougie est trop petit.
Type d'essence incorrect. Vidangez le réservoir de carburant et le
Branchez le câble d'allumage à la bougie.
avec le carburant adéquat.
carburateur. Faites le plein d'essence
propre.
Nettoyez le carburateur et/ou la durite de
carburant.
toyez ou remplacez la bougie.
bougie. Faites réparer le produit par un
atelier de réparation homologué.
Branchez le câble d'allumage à la bougie.
Nettoyez la conduite de carburant. Remplissez le réservoir de carburant avec du
carburant neuf adéquat.
Nettoyez le bouchon du réservoir de carburant.
Videz le réservoir de carburant. Remplissez le réservoir de carburant avec du
carburant neuf adéquat.
burateur.
à air.
burateur.
Réglez l'écartement des électrodes.
carburateur. Faites le plein d'essence
propre. Reportez-vous à la section
remplir le réservoir de carburant à la page 45
. Si le problème persiste, contactez
votre revendeur local.
Pour
52 1566 - 008 - 24.11.2021
Page 53

Problème Cause possible Solution
Le moteur ne fonctionne pas
correctement lorsqu'il tourne
au régime de ralenti.
La bougie est sale, défectueuse ou
l'écartement des électrodes est trop
grand.
Le carburateur doit être réglé. Réglez le carburateur.
Le filtre à air est sale. Nettoyez le filtre à air.
Ajustez l'écartement des électrodes ou
remplacez la bougie.
Transport, entreposage et mise au rebut
Transport et stockage
• Pour le stocker et transporter le produit et le
carburant, assurez-vous qu'il n'y a pas de fuite ou de
vapeurs. Les étincelles ou les flammes nues
produites par exemple par des appareils électriques
ou chaudières peuvent provoquer un incendie.
• Utilisez uniquement des récipients homologués pour
le transport et le stockage de carburant.
• Videz le réservoir de carburant avant de remiser le
produit pendant une longue période. Mettez le
carburant au rebut dans une déchetterie appropriée
• Sécurisez le produit lors de son transport pour éviter
tout dommage ou accident.
• Conservez le produit dans un endroit verrouillé afin
que des enfants ou personnes qui ne sont pas
autorisées à l'utiliser ne puissent pas y avoir accès.
• Conservez le produit dans un endroit sec et à l'abri
du gel.
Mise au rebut
• Respectez les consignes locales de recyclage et la
réglementation en vigueur.
• Mettez au rebut tous les produits chimiques tels que
l'huile moteur ou le carburant à un centre d'entretien
ou à une déchetterie appropriée.
• Lorsque vous n'utilisez plus le produit, renvoyez-le à
un Husqvarnaconcessionnaire ou mettez-le au rebut
dans une déchetterie.
1566 - 008 - 24.11.2021 53
Page 54

Caractéristiques techniques
Caractéristiques techniques
LC 151 LC 151S LB 256SP
Moteur
Marque Husqvarna Husqvarna Husqvarna
Type de moteur Un cylindre, 4 temps,
refroidissement par
air forcé, OHV
Cylindrée, cm
3
166 166 166
Vitesse, tr/min. 2 800 2 800 2 800
Puissance nominale du moteur, kW
17
2,7 2,7 2,7
Système d'allumage
Bougie Husqvarna HQT–7 Husqvarna HQT–7 Husqvarna HQT–7
Écartement des électrodes, mm 0,7-0,8 0,7-0,8 0,7-0,8
Système de graissage/de carburant
Type de lubrification du moteur Projection Projection Projection
Capacité du réservoir de carburant, litres 1.0 1.0 1.0
Contenance du réservoir d’huile, litres 0,5 0,5 0,5
Huile moteur
18
Husqvarna SAE 30 Husqvarna SAE 30 Husqvarna SAE 30
Poids
Réservoirs vides, en kg 31,1 32,6 33,1
Émissions sonores
19
Niveau de puissance sonore mesuré, dB (A) 97 97 98
Niveau de puissance sonore, garanti, L
dB(A)
Niveaux sonores
20
98 98 98
WA
Un cylindre, 4 temps,
refroidissement par
air forcé, OHV
Un cylindre, 4 temps,
refroidissement par
air forcé, OHV
17
La puissance nominale du moteur indiquée est la puissance nette moyenne (à un régime en tr/min spécifié)
d'un moteur de production typique pour le modèle de moteur mesurée selon la norme SAE J1349/ISO1585.
Les moteurs produits à grande échelle peuvent s'écarter de cette valeur. La puissance effective du moteur
installé sur le produit fini dépend de la vitesse de fonctionnement, des conditions environnementales et d'autres valeurs.
18
Si l'huile SAE-30 est utilisée à des températures inférieures à +5 °C, il y a un risque qu'elle ne lubrifie pas
suffisamment le moteur. Cela peut endommager le moteur. Reportez-vous à la section
moteur à la page 50
19
Émissions sonores dans l'environnement mesurées comme puissance sonore (LWA) selon la directive européenne 2000/14/CE.
20
Les données reportées pour le niveau de pression sonore montrent une dispersion statistique typique (dévia-
afin de connaître l'huile appropriée pour les basses températures.
Pour remplacer l'huile
tion standard) de 1,2 dB(A).
54 1566 - 008 - 24.11.2021
Page 55

LC 151 LC 151S LB 256SP
Niveau de pression sonore à l'oreille de l'utili-
85 85 88
sateur, dB(A)
Niveaux de vibrations
Vibrations au niveau du guidon, m/s
21
2
8,5 8,5 7,5
Équipement de coupe
Hauteur de coupe, en mm 25-75 25-75 25-75
Profondeur de coupe, en mm 510 510 560
Système de coupe Collecte / BioClip® /
éjection latérale
Collecte / BioClip® /
éjection latérale
BioClip® / éjection latérale
Lame - standard Collecte 598562601 Collecte 598562601 Broyage 598563601
Lame - accessoire Broyage 597683901 Broyage 597683901 –
Capacité du collecteur d'herbe, en litres 65 65 –
Entraînement
Vitesse de marche, km/h – 3,6 3,6
21
Les données reportées pour le niveau de vibrations montrent une dispersion statistique typique (déviation
standard) de 0,2 m/s2.
1566 - 008 - 24.11.2021 55
Page 56

Déclaration de conformité CE
Déclaration de conformité CE
Nous, Husqvarna AB, SE-561 82 Huskvarna, Suède,
tél. : +46-36-146500, déclarons que la tondeuse
Husqvarna LC 151, LC 151S, LB 256SP à partir de
l'année 2020 et au-delà est conforme aux dispositions
des DIRECTIVES DU CONSEIL :
• du 8 juin 2011 « relative à la limitation de l'utilisation
de certaines substances dangereuses » 2011/65/UE
• du 17 mai 2006 « relative aux machines »
2006/42/CE
• du 26 février 2014 « relative à la compatibilité
électromagnétique » 2014/30/UE
• du 8 mai 2000 « relative aux émissions sonores
dans l'environnement » 2000/14/CE
Pour toute information relative aux émissions sonores,
veuillez consulter les caractéristiques techniques.
Les normes suivantes ont été appliquées :
EN ISO 5395-1:2013, EN ISO 5395-1:2013/A1, EN ISO
5395-2:2013, EN ISO 5395-2:2013/A1:2016, EN ISO
5395-2:2013/A2:2017, EN ISO 14982:2009
Sauf mention contraire, les normes listées ci-dessus
sont les dernières versions publiées.
L'organisme notifié : 0404, RISE SMP Svensk
Maskinprovning AB, Box 7035, SE-750 07 Uppsala,
Sweden a effectué une évaluation de conformité
conformément à l'annexe VI de la directive 2000/14/CE.
Huskvarna, 2021-11-30
Claes Losdal, Directeur du développement/Articles de
jardinage (Représentant autorisé d'Husqvarna AB et
responsable de la documentation technique)
56
1566 - 008 - 24.11.2021
Page 57

Conteúdo
Introdução.....................................................................57
Segurança.................................................................... 58
Montagem.....................................................................61
OPERAÇÃO................................................................. 63
Manutenção.................................................................. 66
Introdução
Solução de problemas do motor...................................70
Transporte, armazenamento e descarte.......................71
Dados técnicos............................................................. 73
DECLARAÇÃO DE CONFORMIDADE DA CE............ 75
Descrição do produto
O produto é um cortador de grama giratório operado por
pessoas comuns. Para LC 151, LC 151S prenda o
coletor para coletar a grama. Prenda o defletor de
descarga lateral para descarga lateral da grama. Para
LC 151, LC 151S prenda um kit de folhagem para cortar
a grama e transformá-la em fertilizante.
Uso previsto
Use o produto para cortar grama. Não use o produto
para outras tarefas.
Símbolos no produto
AVISO! Seja cuidadoso e use o produto
corretamente. Este produto pode causar
ferimentos graves ou morte do operador
ou de outras pessoas.
Leia atentamente o manual do operador e
certifique-se de que tenha entendido as
instruções antes de usar.
Cuidado com objetos arremessados e
ricochetes.
Mantenha pessoas e animais a uma
distância segura da área de trabalho.
Aviso: Mantenha mãos e pés afastados
da lâmina giratória.
Aviso: Mantenha mãos e pés afastados
de peças giratórias.
Antes de realizar reparos ou manutenção,
desligue o motor e retire o cabo de
ignição.
Este produto está em conformidade com
as Diretivas da EC.
Emissão de ruídos para o ambiente de
acordo com a Diretiva da Comunidade
Europeia. As emissões do produto estão
especificadas no capítulo de dados
técnicos e na etiqueta.
Risco de incêndio.
Não inspire os gases de escape. Os
gases de escape do motor contém
monóxido de carbono, um gás inodoro,
tóxico e muito perigoso. Não ligue o motor
em ambientes internos ou fechados.
Superfície quente.
Abasteça o motor com óleo
antes de ligar o produto.
Observação: Outros símbolos/decalques no
produto referem-se aos requisitos de certificação para
outras áreas comerciais.
Responsabilidade legal do produto
Como mencionado na legislação de responsabilidade
do produto, não somos responsáveis por danos
causados pelo nosso produto caso:
• o produto seja reparado incorretamente.
• o produto seja reparado com peças que não sejam
da marca do fabricante ou aprovadas pelo
fabricante.
1566 - 008 - 24.11.2021
57
Page 58
• o produto tenha um acessório que não seja da
marca do fabricante ou não seja aprovado pelo
fabricante.
Segurança
Definições de segurança
Avisos, cuidados e observações são utilizados para
chamar a atenção para partes especialmente
importantes do manual.
AVISO: Utilizado se existir um risco de
ferimentos ou morte para o operador ou a
terceiros se as instruções no manual não
forem respeitadas.
CUIDADO: Utilizado se existir um risco
de danos para o produto, outros materiais
ou para a área adjacente, se as instruções
no manual não forem respeitadas.
Observação: Utilizados para conferir mais
informações necessárias em uma determinada situação.
Instruções gerais de segurança
AVISO: Antes de usar o produto, leia as
instruções de aviso que seguem.
• Este produto é perigoso se utilizado de forma
incorreta ou se você não tiver cuidado. Ferimentos
ou morte podem acontecer, caso você não siga as
instruções de segurança.
• Este produto produz um campo eletromagnético
durante a operação. Sob certas circunstâncias esse
campo poderá interferir com implantes médicos de
natureza ativa ou passiva. Para reduzir o risco de
lesões graves ou fatais, recomendamos que as
pessoas que tenham implantes médicos consultem
seu médico e o fabricante do implante antes de
operar este produto.
• Sempre tome cuidado e use o bom senso. Se não
souber como operar o produto em uma situação
específica, pare e fale com seu Husqvarna
revendedor antes de continuar.
• Tenha em atenção que o operador será responsável
por acidentes que envolvam terceiros ou a sua
propriedade.
• Mantenha o produto limpo. Cerifique-se de que
consegue ler claramente sinais e decalques.
• Não deixe outra pessoa usar o produto, a menos
que você se certifique que ela leia e compreenda o
conteúdo do manual do operador.
• Não permita que o produto seja operado por
crianças.
• o produto não seja reparado em um centro de
atendimento aprovado ou por uma autoridade
aprovada.
• Mantenha crianças afastadas da área de trabalho.
Um adulto responsável deve estar presente em
todos os momentos.
• Não permita que o produto seja operado por uma
pessoa sem conhecimento das instruções.
• Pessoas com capacidade física ou mental reduzida
devem ser sempre monitoradas caso usem o
produto. Um adulto responsável deve estar presente
em todos os momentos.
• Não utilize o produto se estiver cansado doente ou
sob a influência de álcool, drogas ou remédios. Isso
possui um efeito negativo na sua visão, consciência,
coordenação e no seu julgamento.
• Não utilize o produto se estiver com defeito.
• Não altere este produto, nem o utilize caso haja a
possibilidade de ter sido modificado por outras
pessoas.
• Não altere o ajuste do controle de rotação do motor.
Segurança da área de trabalho
AVISO: Antes de usar o produto, leia as
instruções de aviso que seguem.
• Antes de usar o produto, retire todos os objetos,
como ramos, galhos ou pedras da área de trabalho.
• Objetos que batam contra o equipamento de corte
podem ejetar e causar danos a pessoas ou objetos.
Mantenha terceiros ou animais a uma distância
segura do produto.
• Nunca utilize o produto em condições climáticas
ruins, como neblina, chuva, ventos fortes, frio
intenso e risco de raios. Utilizar o produto em
condições climática ruins ou em locais úmidos ou
molhados é exaustivo. Condições climáticas ruins
podem levar a condições perigosas, como
superfícies escorregadias.
• Veja se há pessoas, objetos e situações que podem
impedir a operação segura do produto.
• Veja se há obstáculos, como raízes, pedras, galhos,
buracos e valas. Gramas altas podem ocultar
obstáculos.
• Cortar a grama em declives pode ser perigoso. Não
utilize o produto em terrenos com inclinações
superiores a 15°.
• Opere o produto paralelamente à face da inclinação.
Não movimente para cima e para baixo.
• Tenha cuidado ao se aproximar de cantos e objetos
ocultos que podem impedir que você tenha uma
visão clara.
58
1566 - 008 - 24.11.2021
Page 59

Segurança no trabalho
AVISO: Antes de usar o produto, leia as
instruções de aviso que seguem.
• Utilize este produto somente para cortar gramados.
Seu uso não é permitido para outras tarefas.
• Use sempre equipamentos de proteção individual.
Consulte
página59
• Certifique-se de saber como parar o motor
rapidamente em caso de emergência.
• Nunca dê a partida no motor em um espaço fechado
ou próximo de materiais inflamáveis. Os gases de
escape do motor são quentes e podem conter
faíscas capazes de iniciar um incêndio.
• Não opere o produto, a menos que o disco e todas
as tampas estejam fixados corretamente. Um disco
fixado incorretamente pode se soltar e causar
ferimentos.
• Certifique-se de que o disco não atinja objetos,
como pedras e raízes. Isso pode danificar o disco e
dobrar o eixo do motor. Um eixo dobrado causa
fortes vibrações e um risco elevado de que o disco
se solte.
• Se o disco atingir um objeto ou se ocorrer vibrações,
desligue o produto imediatamente. Desconecte o
cabo de ignição da vela de ignição. Examine o
produto à procura de danos. Repare os danos ou
leve a uma oficina autorizada para fazer os reparos.
• Nunca fixe a alça do freio do motor
permanentemente à alça, quando o motor estiver
ligado.
• Coloque o produto em uma superfície firme e plana
e ligue-o. Certifique-se de que o disco não atinja o
chão ou outros objetos.
• Fique sempre atrás do produto ao operá-lo.
• Deixe que todas as rodas fiquem sobre o chão e
mantenha 2 dedos na alça ao operar o produto.
Mantenha mãos e pés afastados dos discos
giratórios.
• Não incline o produto com o motor ligado.
• Tenha cuidado ao puxar o produto para trás.
• Nunca levante o produto quando o motor estiver
ligado. Se você precisar levantar o produto, primeiro,
desligue o motor e desconecte o cabo de ignição da
vela de ignição.
• Não ande para trás ao operar o produto.
• Desligue o motor ao se locomover em áreas sem
grama, por exemplo, caminhos feitos de cascalho,
pedra e asfalto.
• Não corra com o produto quando o motor estiver
ligado. Sempre ande ao operar o produto.
• Desligue o motor antes de mudar a altura de corte.
Nunca faça ajustes com o motor ligado.
Equipamento de Proteção Individualna
.
• Nunca deixe o produto sem vigilância com o motor
ligado. Desligue o motor e certifique-se de que o
equipamento de corte não gira.
Instruções de segurança para operação
Equipamento de Proteção Individual
AVISO: Antes de usar o produto, leia as
instruções de aviso que seguem.
• O equipamento de proteção individual não evita
totalmente ferimentos, mas diminui o grau do
ferimento em caso de acidente. Deixe seu
revendedor ajudar você a escolher o equipamento
certo.
• Caso o nível de ruído seja superior a 85 dB, use
proteção auditiva.
• Use botas ou calçados antiderrapantes para
trabalhos pesados. Não utilize calçados abertos e
não fique descalço.
• Use calças compridas de tecido grosso.
• Use luvas de proteção quando necessário, por
exemplo, ao ligar, examinar ou limpar o
equipamento de corte.
Dispositivos de segurança no produto
AVISO: Antes de usar o produto, leia as
instruções de aviso que seguem.
• Não use o produto com dispositivos de segurança
com defeito.
• Verifique os dispositivos de segurança
regularmente. Se os dispositivos de segurança
estiverem com defeito, entre em contato sua
Husqvarna oficina autorizada.
Para fazer uma verificação da tampa de corte
A tampa de corte diminui vibrações no produto e reduz
o risco de ferimentos do disco.
• Examine a tampa de corte para se certificar de que
não há danos, como rachaduras.
Para fazer uma verificação da alça de freio do motor
A alça do freio do motor desliga o motor. Quando a alça
do freio do motor é solta, o motor desliga.
1566 - 008 - 24.11.2021
59
Page 60
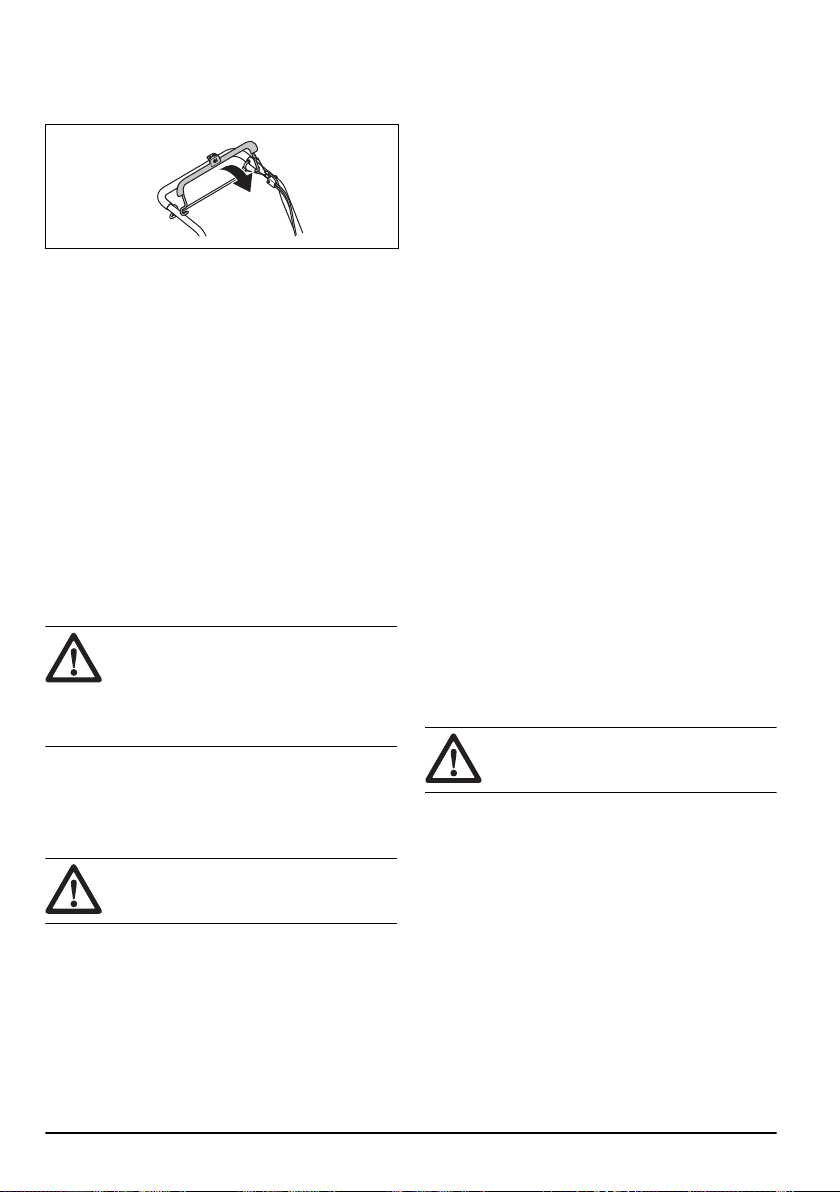
• Dê partida no motor e, em seguida, solte a alça de
freio do motor. Se o motor não desligar em 3
segundos, leve a uma Husqvarna oficina autorizada
para fazer o ajuste do freio do motor.
Para fazer uma verificação da tampa traseira
O defletor traseiro diminui o risco de objetos serem
lançados na direção do operador.
• Certifique-se de que a tampa traseira não esteja
danificada.
• Certifique-se de que as molas que fecham a tampa
traseira não estejam danificadas.
• Substitua molas e peças danificadas.
• Certifique-se de que a tampa traseira possa se
mover livremente nas dobradiças.
Silencioso
O silencioso mantém os níveis de ruído em um nível
mínimo e desvia os gases de escape para longe do
operador.
Não utilize o produto se o silenciador estiver ausente ou
com defeito. Um silenciador com defeito aumenta o
nível de ruído e o risco de incêndio.
AVISO:
durante e após a utilização e quando o
motor funciona em marcha lenta. Tenha
cuidado ao se aproximar de materiais
inflamáveis e/ou gases de escape para
evitar incêndios.
Para fazer uma verificação do silenciador
• Examine o silenciador regularmente, para garantir
que está fixado corretamente e não está danificado.
O silenciador fica muito quente
Segurança do combustível
AVISO:
instruções de aviso que seguem.
• Não ligue o produto se houver combustível ou óleo
de motor sobre ele. Remova o combustível/óleo
indesejado e deixe o produto secar.
• Se você derramar combustível em sua roupa, troque
as roupas imediatamente.
• Não deixe combustível cair no seu corpo, ele pode
causar lesões. Se você derramar combustível no
seu corpo, use sabão e água para removê-lo.
Antes de usar o produto, leia as
• Não ligue o produto se o motor tiver um vazamento.
Examine o motor à procura de vazamentos
regularmente.
• Tome cuidado com o combustível. Combustível é
inflamável e os vapores são explosivos e podem
causar lesões ou morte.
• Não inspire os vapores de combustível, eles podem
causar lesões. Certifique-se de que haja fluxo de ar
suficiente.
• Não fume nas proximidades do combustível ou do
motor.
• Não coloque objetos quentes nas proximidades do
combustível ou do motor.
• Não adicione combustível quando o motor estiver
ligado.
• Certifique-se de que o motor esteja frio antes de
reabastecer.
• Antes de reabastecer, abra a tampa do tanque de
combustível lentamente e libere a pressão
cuidadosamente.
• Não adicione combustível ao motor em uma área
coberta. Um fluxo de ar insuficiente pode causar
ferimentos ou morte por asfixia ou monóxido de
carbono.
• Aperte a tampa do tanque de combustível. Se a
tampa do tanque de combustível não estiver
apertada, há um risco de incêndio.
• Mova o produto para um mínimo de 3 m (10 pés) da
posição na qual você abasteceu o tanque antes de
ligar o motor.
• Não encha o tanque de combustível completamente.
Calor faz com que o combustível para expandir.
Mantenha um espaço na parte superior do depósito
de combustível.
Instruções de segurança para manutenção
AVISO:
instruções de aviso que seguem.
• Os gases de escape do motor contém monóxido de
carbono, um gás inodoro, tóxico e muito perigoso.
Não ligue o motor em ambientes internos ou
fechados.
• Antes de fazer a manutenção do produto, desligue o
motor e remova o cabo de ignição da vela de
ignição.
• Use luvas de proteção ao fazer a manutenção no
equipamento de corte. O disco é muito afiado e
pode cortar facilmente.
• Acessórios e alterações no produto não aprovados
pelo fabricante podem causar ferimentos graves ou
morte. Não modifique o produto. Use somente os
acessórios aprovados pelo fabricante.
• Se a manutenção não for feita correta e
regularmente, o risco de ferimentos e danos ao
produto aumenta.
Antes de usar o produto, leia as
60
1566 - 008 - 24.11.2021
Page 61
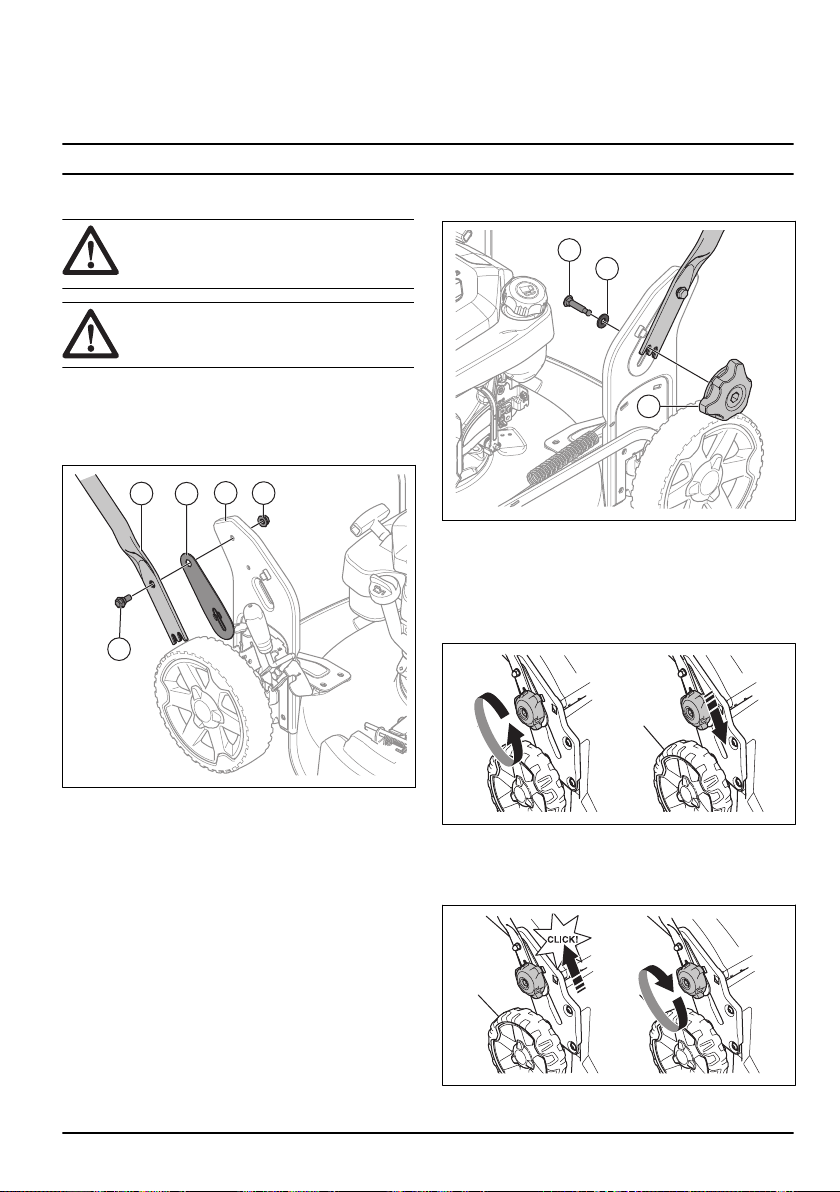
• Faça a manutenção somente como indicado no
A
B
C
D
E
F
G
H
manual do proprietário. Todas as outras operações
de manutenção devem ser realizadas por uma
Husqvarna oficina autorizada.
Introdução
AVISO: Antes de montar o produto, você
deve ler e entender o capítulo sobre
segurança.
AVISO: Retire o cabo da vela de ignição
antes de montar o produto.
Para montar a alça
1. Empurre o parafuso (A) através da alça (B), da
arruela plástica (C) e do suporte de apoio da alça
(D).
• Leve o produto regularmente a uma Husqvarna
oficina autorizada.
• Substitua peças danificadas, desgastadas ou
quebradas.
Montagem
3. Empurre o parafuso (F) através da arruela (G) e do
suporte de apoio da alça.
4. Aperte o botão (H) totalmente.
Para ajustar a alça
1. Solte os botões inferiores.
2. Mova os botões para a extremidade inferior dos
sulcos nos lados esquerdo e direito do produto.
2. Aperte a porca (E) totalmente.
1566 - 008 - 24.11.2021
3. Ajuste a altura da alça em uma das 2 posições
disponíveis.
4. Mova os botões para cima na direção da alça, até
que eles parem e você ouça o som de clique.
61
Page 62

5. Aperte os botões totalmente.
Para colocar o produto na posição de transporte
1. Solte os botões inferiores.
2. Mova os botões para a extremidade inferior dos
sulcos nos lados esquerdo e direito do produto.
3. Dobre a alça para frente.
Para colocar o produto na posição de operação
1. Dobre a alça para a posição vertical.
2. Mova os botões para cima na direção da alça, até
que eles parem e você ouça o som de clique.
3. Aperte os botões totalmente.
Para montar o coletor de grama (LC 151, LC 151S)
1. Prenda a estrutura do coletor de grama na bolsa de
grama com a parte rígida da bolsa na parte inferior.
Mantenha a alça da estrutura fora da parte superior
da bolsa.
62
1566 - 008 - 24.11.2021
Page 63
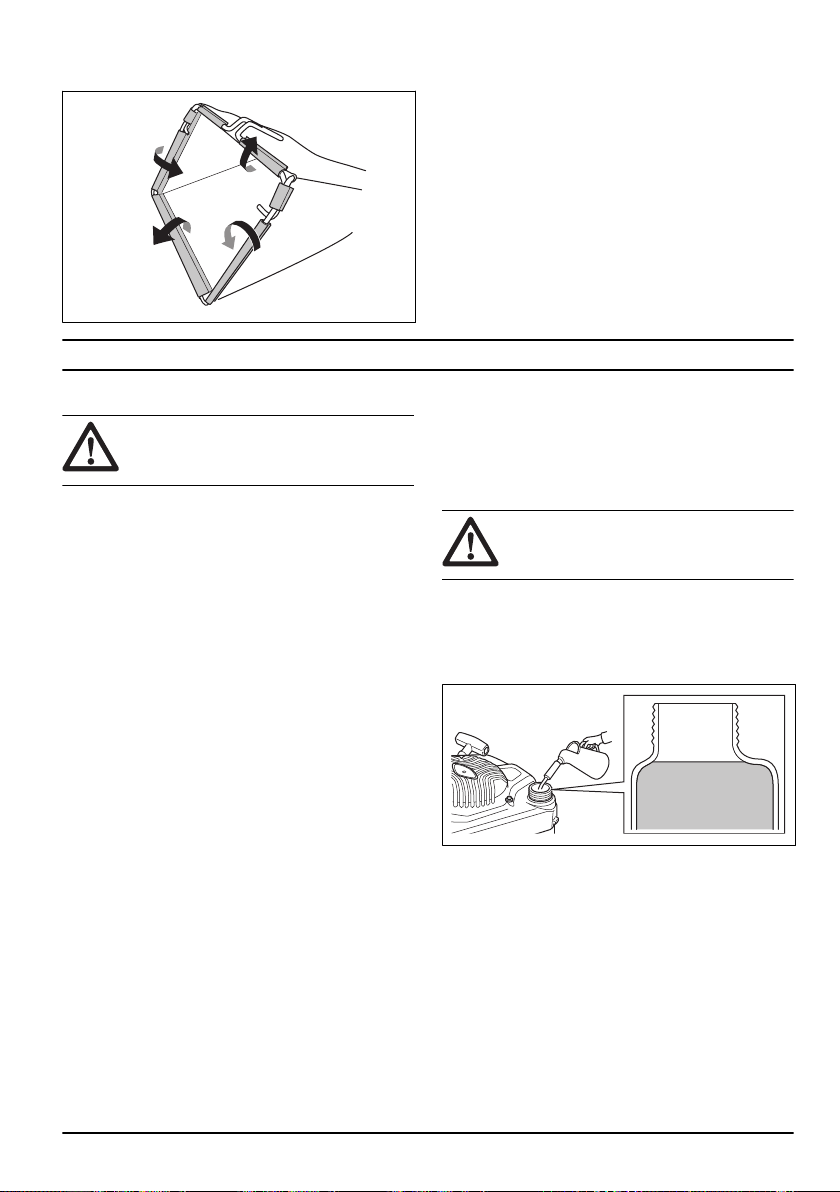
2. Prenda a bolsa de grama à estrutura com os
grampos.
OPERAÇÃO
Introdução
AVISO: Antes de operar o produto, você
deve ler e entender o capítulo sobre
segurança.
Husqvarna Connect
Husqvarna Connecté um aplicativo gratuito para seu
dispositivo móvel. O aplicativo Husqvarna Connect
oferece funções estendidas para o seu produto
Husqvarna:
• Informações estendidas sobre o produto.
• Informações e ajuda com peças do produto e
manutenção.
Para começar a usar o Husqvarna Connect
1. Baixe o aplicativo Husqvarna Connect em seu
dispositivo móvel.
2. inscreva-se no aplicativo Husqvarna Connect.
3. Siga as instruções no aplicativo Husqvarna Connect
para conectar e registrar o produto.
Antes de operar o produto
1. Leia atentamente o manual do operador e certifiquese de que tenha entendido as instruções.
2. Examine o equipamento de corte para se certificar
de que esteja preso e ajustado corretamente.
Consulte
página67
3. Abasteça o tanque de combustível. Consulte
abastecer com combustívelna página63
4. Encha o tanque de óleo e verifique o nível do óleo.
Consulte
óleona página68
Para examinar o equipamento de cortena
.
Para
.
Para fazer uma verificação do nível do
.
Para abastecer com combustível
Se disponível, utilize gasolina de baixa emissão/
alquilato. Se uma gasolina com baixa emissão/alquilato
não estiver disponível, use gasolina sem chumbo de
boa qualidade ou gasolina com chumbo com octanagem
de 90.
CUIDADO: Não use gasolina com
octanagem menor que 90 RON (87 AKI).
Isso pode causar danos ao produto.
1. Abra a tampa do tanque de combustível devagar,
para liberar a pressão.
2. Encha o tanque lentamente com o galão de
combustível. Se derramar combustível, remova-o
com um pano e deixe o restante secar.
3. Limpe a área ao redor da tampa do tanque de
combustível.
4. Aperte a tampa do reservatório de combustível. Se a
tampa do tanque de combustível não estiver
apertada, há um risco de incêndio.
5. Mova o produto para um mínimo de 3 m (10 pés) da
posição na qual você abasteceu o tanque antes de
ligar o motor.
Para ajustar a altura de corte
1. Mova a alavanca da altura de corte para trás, para
elevar a altura de corte.
1566 - 008 - 24.11.2021
63
Page 64

2. Mova a alavanca da altura de corte para frente para
3
4
5
6
7
8
9
diminuir a altura de corte.
CUIDADO: Não deixe a altura de corte
muito baixa. Os discos podem atingir o
chão, caso a superfície da grama não esteja
nivelada.
Para iniciar o produto
1. Certifique-se de que o cabo de ignição esteja
conectado à vela de ignição.
2. Fique atrás do produto.
3. Segure a alça do freio do motor contra a barra de
direção.
• Solte o braço de acionamento para desengatar, por
exemplo, quando você chegar próximo a um
obstáculo.
• Antes de puxar o produto para trás, desengate a
transmissão e empurre o produto para frente por
aproximadamente 10 cm.
Para usar o produto com o coletor de grama (LC 151, LC 151S)
AVISO: Não opere o produto sem um
coletor de grama instalado nem sem que a
tampa traseira esteja fechada. Objetos
podem ser lançados e causar ferimentos ao
operador.
1. Levante a tampa traseira e remova o plugue de
folhagem, caso esteja instalado.
4. Segura a alça da corda de arranque com sua mão
direita.
5. Puxe a corda de arranque devagar, até sentir um
pouco de resistência.
6. Puxe com força para dar partida no motor.
AVISO: Não enrole a corda de arranque
ao redor de sua mão.
Para utilizar a tração nas rodas LC 151S
• Empurre o braço de acionamento em direção à
barra de direção.
64
2. Monte o coletor de grama, consulte
coletor de grama (LC 151, LC 151S)na página62
Para montar o
.
3. Coloque o coletor de grama no suporte.
4. Solte a tampa traseira e coloque-a na parte superior
da estrutura da bolsa de grama.
Para colocar o produto no modo de folhagem (LC 151, LC 151S)
Certifique-se de que o motor esteja desligado antes de
colocar o produto no modo de folhagem.
1566 - 008 - 24.11.2021
Page 65

1. Levante a tampa traseira e remova o coletor de
grama, caso esteja instalado.
2. Coloque o plugue de folhagem no canal de
descarga.
3. Feche a tampa traseira e certifique-se de que ela
esteja bem fechada contra o plugue de folhagem.
Observação: Para aumentar o desempenho do
modo de reciclagem, substitua a lâmina pelo acessório
de lâmina de reciclagem. Consulte a
discona página68
Para substituir o
Para colocar o produto no modo de descarga lateral
1. Levante a tampa traseira e remova a bolsa de
grama, caso esta esteja instalada.
2. Feche a tampa traseira e certifique-se de que ela
esteja bem fechada contra o produto.
3. Levante a trava de descarga.
4. Abra a tampa de descarga lateral e instale o defletor
de descarga lateral nos pinos de suporte.
5. Deixe a tampa de descarga lateral fechar contra o
defletor de descarga lateral. Certifique-se de que o
defletor de descarga lateral esteja firmemente
posicionado antes de operar o produto.
Observação: Para aumentar o desempenho no
modo de descarga lateral, instale o plugue de
reciclagem.
1566 - 008 - 24.11.2021
Para esvaziar o coletor de grama
CUIDADO: Levante o coletor de grama
ao movê-lo para evitar desgaste.
1. Levante o coletor de grama com a alça da estrutura.
65
Page 66

2. Use a alça da estrutura e a alça da bolsa quando
esvaziar o coletor de grama.
Para obter um bom resultado
• Use sempre um disco afiado. Um disco cego
proporciona um resultado irregular e a superfície de
corte da grama fica amarela. Um disco afiado
também gasta menos energia do que um disco
cego.
Manutenção
Introdução
AVISO: Antes de fazer a manutenção,
você deve ler e entender o capítulo sobre
segurança.
Para todos os serviços de manutenção e reparos no
produto é necessário treinamento especial. Garantimos
a disponibilidade de reparos e manutenção
profissionais. Se o seu revendedor não for uma oficina
autorizada, peça informações para saber qual é a
oficina autorizada mais próxima.
Cronograma de manutenção
• Não corte mais do que ⅓ do comprimento da grama.
Use a altura de corte mais alta quando começar a
cortar a grama. Examine o resultado e diminua a
altura de corte para um nível apropriado. Se a
grama estiver muito alta, opere devagar e corte 2
vezes, se necessário.
• Cada vez que cortar a grama, faça em diferentes
direções para evitar listras no gramado.
• Levante a tampa traseira e remova o coletor de
grama.
• Caso um plugue de folhagem e uma lâmina de
folhagem estejam instalados, remova-os.
• Feche a tampa traseira antes de operar o produto.
Ao operar o produto, a grama cortada será
descarregada sob a tampa traseira.
• Mantenha a tampa de corte limpa. O acúmulo de
grama e sujeira no lado interno da tampa de corte
pode diminuir o resultado do corte. Consulte
Para
limpar a superfície interna da tampa de cortena
página67
.
Os intervalos de manutenção são calculados com base
no uso diário do produto. Os intervalos mudam se o
produto não for usado diariamente.
Para manutenção identificada com *, consulte as
instruções em
página59
Dispositivos de segurança no produtona
.
CUIDADO: Certifique-se de que o filtro
de ar esteja para cima e não contra o solo
ao inclinar o produto. Risco de danos ao
motor.
Manutenção
Fazer uma inspeção geral X
Examinar o nível de óleo X
Trocar o óleo (na primeira vez, após 5 horas de uso; depois, a cada
50 horas de uso)
Limpar o produto X
22
Se o produto for operado com carga pesada ou em temperaturas ambientes altas, substitua o óleo do motor
a cada 25 horas.
66 1566 - 008 - 24.11.2021
22
Diariamente Mensal
A cada tem-
porada
X
Page 67

Manutenção
Examinar o equipamento de corte X
Examinar a tampa de corte * X
Examinar a alça do freio do motor * X
Examinar o silenciador * X
Examine a vela de ignição. Limpe ou substitua a vela de ignição, se
for necessário.
Examine o filtro de ar X
Limpe o filtro de ar
Substitua o filtro de ar X
Examinar o sistema de combustível X
Limpe as aletas de arrefecimento do cilindro X
Examine e ajuste o cabo da embreagem X
23
Diariamente Mensal
X
A cada tem-
porada
X
Para fazer uma inspeção geral
• Certifique-se de que todas as porcas e parafusos do
produto estejam apertados corretamente.
Para limpar o produto externamente
• Utilize um pincel para remover folhas, grama e
sujeira.
• Certifique-se de que a entrada de ar na parte
superior do motor não esteja bloqueada.
• Não use lavadora de alta pressão para limpar o
produto.
• Se utilizar água para limpar o produto, não jogue-a
diretamente no motor.
Para limpar a superfície interna da tampa de corte
1. Esvazie o reservatório de combustível.
2. Incline o produto. Certifique-se de que a vela de
ignição esteja virada para cima.
CUIDADO: Se produto for colocado
com o filtro de ar para baixo, pode
danificar o motor.
3. Lave a superfície interna da tampa de corte com
água.
Para examinar o equipamento de corte
AVISO: Para evitar que o produto ligue
acidentalmente, remova o cabo de ignição
da vela de ignição.
AVISO: Use luvas de proteção ao fazer a
manutenção no equipamento de corte. O
disco é muito afiado e pode cortar
facilmente.
1. Verifique o equipamento de corte quanto a danos ou
rachaduras. Sempre substitua um equipamento de
corte danificado.
2. Examine o disco para verificar se está danificado ou
cego.
Observação: É necessário equilibrar o disco após
ser afiado. Leve a um centro de atendimento para afiar,
substituir e equilibrar o disco. Se você atingir um
obstáculo que causar a parada do produto, substitua o
disco danificado. Leve o produto a um centro de
atendimento para avaliar se o disco pode ser afiado ou
deve ser substituído.
23
Limpe com mais frequência em ambientes poeirentos ou quando houver detritos no ar. Substitua o filtro de
ar, se estiver muito sujo.
1566 - 008 - 24.11.2021 67
Page 68

Para substituir o disco
-20 0 30 40
80
100
-30
-20 0
20 30 40
F
C
32
-10
10
60
SAE 10W-30
SAE 5W-30
SAE 30
1. Bloqueie o disco com um bloco de madeira.
2. Remova o parafuso da lâmina e a arruela de
pressão.
3. Remova o disco.
4. Examine o suporte e o parafuso do disco para
verificar se há danos.
5. Examine o eixo do motor para se certificar de que
não está dobrado.
6. Ao colocar um novo disco, aponte as extremidades
em ângulo do disco na direção da tampa de corte.
AVISO:
Use luvas resistentes. O
disco é muito afiado e pode cortar
facilmente.
10. Ligue o produto para fazer um teste do disco. Se o
disco não estiver preso corretamente, o produto
vibrará ou o resultado do corte não será satisfatório.
Para fazer uma verificação do nível do óleo
CUIDADO: O nível muito baixo do óleo
pode danificar o motor. Antes de ligar o
produto, faça uma verificação do nível do
óleo.
1. Coloque o produto em uma superfície nivelada.
2. Remova a tampa do tanque de óleo com a vareta
fornecida.
3. Limpe o óleo da vareta.
4. Coloque a vareta totalmente dentro do tanque de
óleo para ter uma noção correta do nível do óleo.
5. Remova a vareta.
6. Examine o nível de óleo na vareta.
7. Se o nível de óleo estiver baixo, encha com óleo de
motor e faça uma verificação do nível do óleo
novamente.
Para substituir o óleo do motor
7. Certifique-se de que o disco esteja alinhado com o
centro do eixo do motor.
8. Bloqueie o disco com um bloco de madeira. Prenda
a arruela da mola e aperte o parafuso e a arruela
com torque de 43 – 47 Nm.
9. Puxe o disco, girando-o, e certifique-se de que ele
68
se movimenta livremente.
AVISO:
O óleo do motor fica muito
quente após o motor ser desligado. Deixe o
motor esfriar antes de drenar o óleo do
motor. Se derramar óleo de motor na sua
pele, limpe com água e sabão.
1. Opere o produto até esvaziar o tanque de
combustível.
2. Remova o cabo de alta tensão da vela de ignição.
3. Remova a tampa do tanque de óleo.
4. Coloque um recipiente embaixo do produto para
recolher o óleo do motor.
5. Incline o produto para drenar o óleo do motor do
tanque de óleo.
1566 - 008 - 24.11.2021
Page 69

6. Encha com o novo tipo de óleo de motor,
A
B
recomendado em
7. Faça uma verificação do nível do óleo. Consulte
Dados técnicosna página73
Para fazer uma verificação do nível do óleona
página68
.
Para examinar a vela de ignição
CUIDADO: Use sempre o tipo de vela
de ignição recomendado. O tipo errado de
vela de ignição pode causar danos ao
produto.
• Se o motor apresentar baixa potência, não iniciar
com facilidade ou não operar corretamente em
marcha lenta, examine a vela de ignição.
• Para diminuir o risco de presença de material
indesejado nos eletrodos da vela de ignição, siga as
seguintes instruções:
a) Certifique-se de que a marcha lenta esteja
ajustada corretamente.
b) Certifique-se de que a mistura de combustível
esteja correta.
c) Certifique-se de que o filtro de ar esteja limpo.
• Se a vela de ignição estiver suja, limpe-a e verifique
se a folga do eletrodo está correta, consulte
técnicosna página73
• Substitua a vela de ignição, se for necessário.
.
Filtro de ar
Um filtro de ar sujo pode fazer com que o motor seja
danificado ou não opere corretamente. Em ambientes
poeirentos, faça a manutenção no filtro de ar com maior
frequência. Consulte
obter informações sobre o momento de substituir o filtro
de ar.
Observação:
danificado.
Para remover e instalar o filtro de ar
1. Empurre as presilhas na cobertura do filtro de ar.
2. Remova cuidadosamente a cobertura do filtro de ar
(A) do motor.
Manutençãona página66
Sempre substitua um filtro de ar
AVISO: Use luvas de proteção.
Dados
para
.
3. Remova o filtro de ar (B).
4. Examine o filtro de ar quanto a danos. Sempre
substitua um filtro de ar danificado.
5. Limpe e examine o filtro de ar. Consulte
o filtro de arna página69
6. Instale na sequência oposta.
.
Para limpar
Para limpar o filtro de ar
Um filtro de ar sujo pode fazer com que o motor seja
danificado ou não opere corretamente. Faça a
manutenção no filtro de ar com maior frequência em
condições de poeira.
Consulte
Manutençãona página66
informações sobre o momento de substituir o filtro de ar.
1. Remova a tampa do filtro de ar e remova o filtro.
2. Limpe o filtro batendo-o contra uma superfície plana.
Não use solvente com petróleo, querosene ou ar
comprimido para limpar o filtro.
Observação:
muito tempo não podem ser limpos completamente.
Substitua o filtro de ar regularmente. Filtros de ar
danificados deve ser sempre substituídos.
3. Ao montar o filtro de ar, certifique-se de que ele
esteja completamente vedado contra o suporte do
filtro.
Filtros de ar em operação há
para obter
Para fazer uma verificação do defletor de descarga lateral
O defletor de descarga lateral é fixado à abertura de
descarga lateral do produto. Ele diminui o risco de
objetos serem lançados na direção da posição de corte
de grama do operador.
1. Certifique-se de que o defletor de descarga lateral
não esteja danificado.
2. Examine o defletor de descarga lateral. Certifique-se
de não observar danos, como rachaduras ou molas
quebradas empurrando a porta para fechar.
1566 - 008 - 24.11.2021
69
Page 70

3. Substitua o defletor de descarga lateral ou as molas
em caso de danos.
Para examinar o sistema de combustível
• Examine a tampa do tanque de combustível e a
vedação da tampa do tanque de combustível, para
se certificar de que não há danos.
• Examine a mangueira de combustível, para se
certificar de que não há vazamentos. Se a
mangueira de combustível estiver danificada, vá a
uma oficina autorizada para substituí-la.
• O produto se move quando a tração das rodas não é
engatada.
• Ajuste o cabo da embreagem.
a) Para diminuir o comprimento do cabo da
embreagem, gire o parafuso de ajuste no sentido
anti-horário.
b) Para aumentar o comprimento do cabo da
embreagem, gire o parafuso de ajuste no sentido
horário.
Para ajustar o cabo da embreagem (LC 151S)
Para as situações a seguir, é necessário diminuir o
comprimento do cabo da embreagem:
• A tração das rodas não engata ao puxar o braço de
acionamento ou a alavanca de controle de rotação.
• O produto se move lentamente quando a tração das
rodas é engatada.
Para as situações a seguir, é necessário aumentar o
comprimento do cabo da embreagem:
Caso a tração do produto continue insatisfatória após o
ajuste, fale com seu revendedor
Solução de problemas do motor
Problema Possível causa Solução
O motor não liga. O cabo de ignição não está conectado
corretamente.
O reservatório de combustível está vazio.
O combustível é antigo. Drene o reservatório de combustível e o
Há sujeira no carburador ou na linha de
combustível.
A vela de ignição está com defeito. Ajuste a folga entre os eletrodos, limpe
Há combustível na vela de ignição. Limpe a vela de ignição.
O motor não desliga. O mecanismo de parada está com defei-
to.
Conecte o cabo de ignição à vela de ignição.
Abasteça o reservatório de combustível
com o tipo de combustível correto.
carburador. Reabasteça com gasolina
nova.
Limpe o carburador e/ou a linha de combustível.
ou substitua a vela de ignição.
Desconecte o cabo de ignição da vela
de ignição. Leve o produto a uma oficina
autorizada para reparação.
70 1566 - 008 - 24.11.2021
Page 71

Problema Possível causa Solução
O motor não funciona corretamente.
O motor superaquece. O nível de óleo do motor está muito bai-
Há uma falha de ignição no
motor quando ele opera em
alta velocidade.
Ruídos incomuns do motor
durante a carga normal.
O cabo de ignição não está conectado
corretamente.
Há sujeira na linha de combustível ou o
combustível expirou.
Há uma obstrução na tampa do reservatório de combustível.
Há água ou sujeira no sistema de combustível.
O filtro de ar está sujo. Limpe o filtro de ar.
O carburador precisa ser ajustado. Solicite os serviços de um revendedor
xo.
O fluxo de ar não é suficiente. Limpe o filtro de ar e o alojamento do fil-
O carburador precisa ser ajustado. Solicite os serviços de um revendedor
A folga do eletrodo na vela de ignição é
muito pequena.
Tipo incorreto de gasolina. Drene o reservatório de combustível e o
Conecte o cabo de ignição à vela de ignição.
Limpe a linha de combustível. Abasteça
o reservatório de combustível com combustível novo e do tipo correto.
Limpe a tampa do reservatório de combustível.
Drene o combustível do reservatório.
Abasteça o reservatório de combustível
com combustível novo e do tipo correto.
autorizado para ajustar o carburador.
Abasteça o reservatório de óleo do motor.
tro de ar.
autorizado para ajustar o carburador.
Ajuste a folga do eletrodo.
carburador. Reabasteça com gasolina
nova. Consulte
combustívelna página63
continuar, fale com seu revendedor de
manutenção local.
O motor não funciona corretamente em marcha lenta.
A vela de ignição está suja, com defeito
ou a folga do eletrodo está muito grande.
O carburador precisa ser ajustado. Ajuste o carburador.
O filtro de ar está sujo. Limpe o filtro de ar.
Ajuste a distância entre os eléctrodos ou
substitua a vela de ignição.
Para abastecer com
. Se o problema
Transporte, armazenamento e descarte
Transporte e armazenamento
• Para transporte e armazenamento do produto e
combustível, certifique-se de que não haja
vazamentos ou gases de escape. Faíscas ou
chamas abertas, por exemplo, de dispositivos
elétricos ou caldeiras, podem iniciar um incêndio.
• Sempre utilize recipientes aprovados para
armazenamento e transporte de combustível.
• Esvazie o tanque de combustível antes de
armazenar o produto por um longo período de
1566 - 008 - 24.11.2021 71
tempo. Descarte o combustível em um local
apropriado
• Fixe o produto de forma segura durante o
transporte, para evitar danos e acidentes.
• Mantenha o produto em um local bloqueado para
evitar o acesso de crianças ou de pessoas não
autorizadas.
• Mantenha o produto em um local seco e livre de
congelamento.
Page 72

Descarte
• Respeite os requisitos locais de reciclagem e as
regulamentações aplicáveis.
• Descarte todos os produtos químicos, como óleo de
motor ou combustível, em um centro de serviço ou
em um local apropriado para o descarte.
• Quando o produto não for mais utilizado, envie-o
para um Husqvarna revendedor ou descarte-o em
um local para reciclagem.
72 1566 - 008 - 24.11.2021
Page 73

Dados técnicos
Dados técnicos
LC 151 LC 151S LB 256SP
Motor
Marca Husqvarna Husqvarna Husqvarna
Tipo do motor Monocilíndrico, 4
tempos, arrefecimento de ar forçado,
OHV
Cilindrada, cm
3
166 166 166
Rotação, rpm 2800 2800 2800
Potência nominal do motor, kW
24
2,7 2,7 2,7
Sistema de ignição
Vela de ignição Husqvarna HQT–7 Husqvarna HQT–7 Husqvarna HQT–7
Folga do eletrodo 0,7-0,8 0,7-0,8 0,7-0,8
Sistema de combustível e lubrificação
Tipo de lubrificação do motor Respingo Respingo Respingo
Capacidade do tanque de combustível, litros 1,0 1,0 1,0
Capacidade do tanque de óleo, litros 0,5 0,5 0,5
Óleo do motor
25
Husqvarna SAE 30 Husqvarna SAE 30 HusqvarnaSAE 30
Peso
Com tanques vazios, kg 31,1 32,6 33,1
Emissões de ruído
26
Nível da potência sonora, medido, dB(A) 97 97 98
Nível da potência sonora, garantido, L
dB(A)
Níveis sonoros
27
98 98 98
WA
Monocilíndrico, 4
tempos, arrefecimento de ar forçado,
OHV
Monocilíndrico, 4
tempos, arrefecimento de ar forçado,
OHV
24
A potência nominal do motor indicada é a potência média líquida (em rpm especificado) de um típico motor
de produção para o modelo do motor medido no padrão SAE J1349/ISO1585. Os motores de produção em
massa podem apresentar diferenças nesse valor. A potência real para o motor instalado no produto final vai
depender da velocidade de operação, das condições ambientais e de outros valores.
25
Se óleo SAE-30 for utilizado a temperaturas inferiores +5 °C, existe o risco de o motor não receber lubrificação suficiente. Isso pode causar danos ao motor. Consulte
obter o óleo correto para temperaturas baixas.
26
As emissões de ruído no meio ambiente são medidas como potência sonora (LWA) em conformidade com a
norma EC 2000/14/EC.
27
Os dados informados para nível de pressão de ruído têm uma dispersão estatística típica (desvio padrão) de
Para substituir o óleo do motorna página68
para
1,2 dB (A).
1566 - 008 - 24.11.2021 73
Page 74

LC 151 LC 151S LB 256SP
Nível de pressão sonora no ouvido do opera-
85 85 88
dor, dB (A)
Níveis de vibração
Vibrações na barra de direção, m/s
28
2
8,5 8,5 7,5
Equipamento de corte
Altura de corte, mm 25-75 25-75 25-75
Largura de corte, mm 510 510 560
Sistema de corte Coleta / BioClip® /
descarga lateral
Lâmina - padrão Collection
598562601
Coleta / BioClip® /
descarga lateral
Collection
598562601
BioClip® / descarga
lateral
Mulch 598563601
Lâmina - acessório Mulch 597683901 Mulch 597683901 –
Capacidade do coletor de grama, litros 65 65 –
Acionamento
Velocidade de deslocamento autônomo,
– 3,6 3,6
km/h.
28
Os dados relatados de nível de vibração têm uma dispersão estatística típica (desvio padrão) de 0,2 m/s2.
74 1566 - 008 - 24.11.2021
Page 75

DECLARAÇÃO DE CONFORMIDADE DA CE
DECLARAÇÃO DE CONFORMIDADE DA CE
A Husqvarna AB, SE–561 82 Huskvarna, Suécia, tel:
+46-36-146500, declara que o cortador de grama
Husqvarna LC 151, LC 151S, LB 256SP do ano 2020
em diante, está em conformidade com os requisitos da
DIRETIVA DO CONSELHO:
• de 8 de junho de 2011, referente a "restrição de uso
de determinadas substâncias perigosas"
2011/65/EU
• de 17 de maio de 2006 “referente às máquinas”
2006/42/CE
• de 26 de fevereiro de 2014 "referente à
compatibilidade eletromagnética" 2014/30/CE
• de 8 de maio de 2000 "referente às emissões de
ruído no meio ambiente" 2000/14/CE
Informações referentes às emissões de ruído, consulte
os dados técnicos.
As normas a seguir foram aplicadas:
EN ISO 5395-1:2013, EN ISO 5395-1:2013/A1, EN ISO
5395-2:2013, EN ISO 5395-2:2013/A1:2016, EN ISO
5395-2:2013/A2:2017, EN ISO 14982:2009
Se não indicado o contrário, os padrões listados acima
são as mais recentes versões mais publicadas.
Entidade competente: 0404, RISE SMP Svensk
Maskinprovning AB, Box 7035, SE-750 07 Uppsala,
Sweden Realizou a avaliação de conformidade de
acordo com o anexo VI da diretiva 2000/14/EC.
Huskvarna, 2021-11-30
Claes Losdal, Gerente de Desenvolvimento/Produtos
para Jardins (representante autorizado para a
Husqvarna AB e responsável pela documentação
técnica)
1566 - 008 - 24.11.2021
75
Page 76
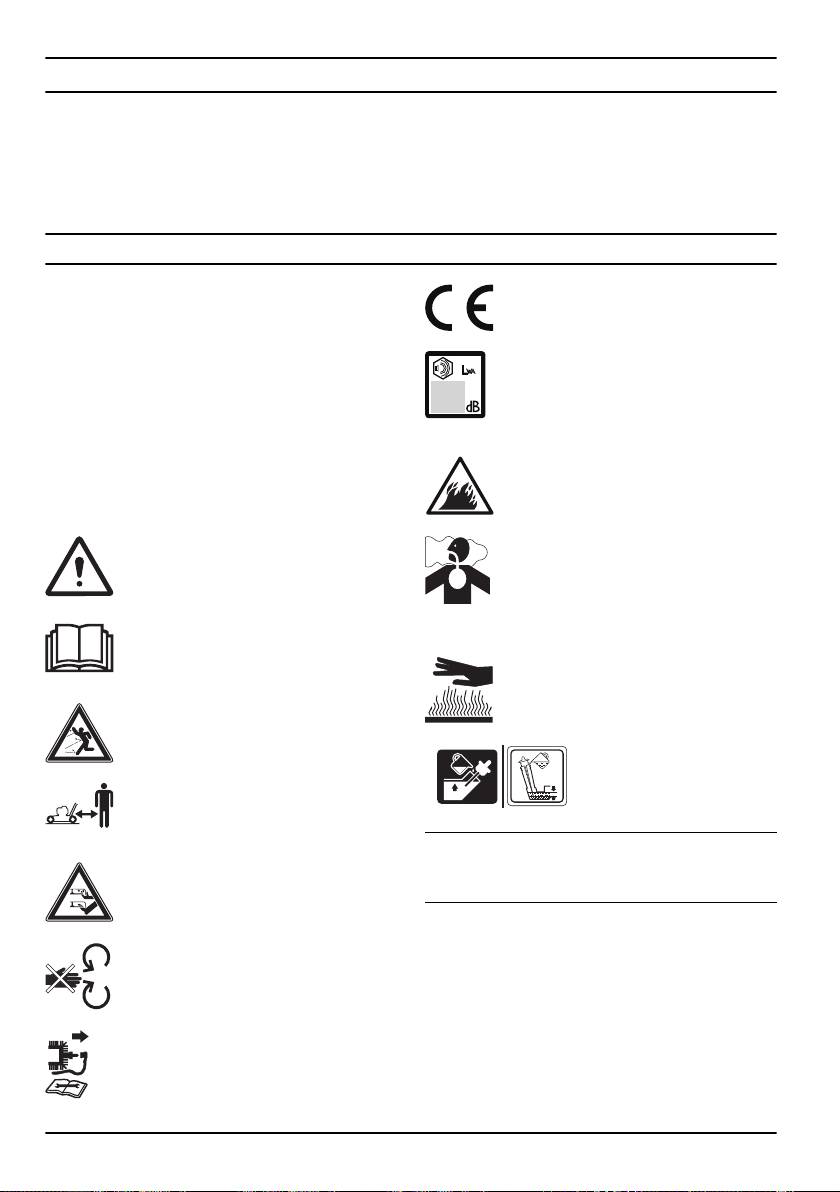
ÍNDICE
Introdução.....................................................................76
Segurança.................................................................... 77
Montagem.....................................................................80
Funcionamento............................................................. 82
Manutenção.................................................................. 85
Introdução
Resolução de problemas no motor...............................89
Transporte, armazenamento e eliminação................... 90
Especificações técnicas................................................92
Declaração CE de conformidade..................................94
Descrição do produto
O produto é um corta-relva giratório de controlo apeado.
Para LC 151, LC 151S, fixe o coletor de relva para
recolher a relva. Fixe o defletor de descarga lateral para
a descarga lateral da relva. Para LC 151, LC 151S,
prenda um kit de trituração para cortar a relva e torná-la
fertilizante.
Finalidade
Utilize o produto para cortar a relva. Não utilize o
produto para outras tarefas.
Símbolos no produto
AVISO! Seja cuidadoso e utilize o produto
corretamente. Este produto pode provocar
ferimentos graves ou a morte do utilizador
ou terceiros.
Leia o manual do utilizador com atenção e
certifique-se de que compreende as
instruções antes de utilizar o produto.
Tenha cuidado com objetos projetados e
ricochetes.
Mantenha as pessoas e os animais a uma
distância de segurança da área de
trabalho.
Aviso: Mantenha as mãos e os pés
afastados da lâmina rotativa.
Aviso: Mantenha as mãos e os pés
afastados das peças rotativas.
Desligue o motor e retire o cabo de
ignição antes de realizar tarefas de
reparação ou manutenção.
Este produto está em conformidade com
as diretivas aplicáveis da CE.
Emissões de ruído para o meio ambiente
conforme diretiva da Comunidade
Europeia. As emissões do produto são
indicadas no capítulo de Especificações
técnicas e na etiqueta.
Risco de incêndio.
Não respire os gases de escape. Os
gases de escape do motor contêm
monóxido de carbono, um gás inodoro,
tóxico e altamente perigoso. Não ligue o
motor em zonas interiores ou em espaços
fechados.
Superfície quente.
Encha o motor com óleo antes de ligar o produto.
Nota: Os restantes símbolos/autocolantes existentes
no produto dizem respeito a requisitos para
homologação em algumas áreas comerciais.
Responsabilidade pelo produto
Como referido nas leis de responsabilidade pelo
produto, não somos responsáveis por danos causados
pelo nosso produto se:
• o produto tiver sido incorretamente reparado.
• o produto tiver sido reparado com peças que não
sejam do fabricante ou que não sejam aprovadas
pelo fabricante.
76
1566 - 008 - 24.11.2021
Page 77
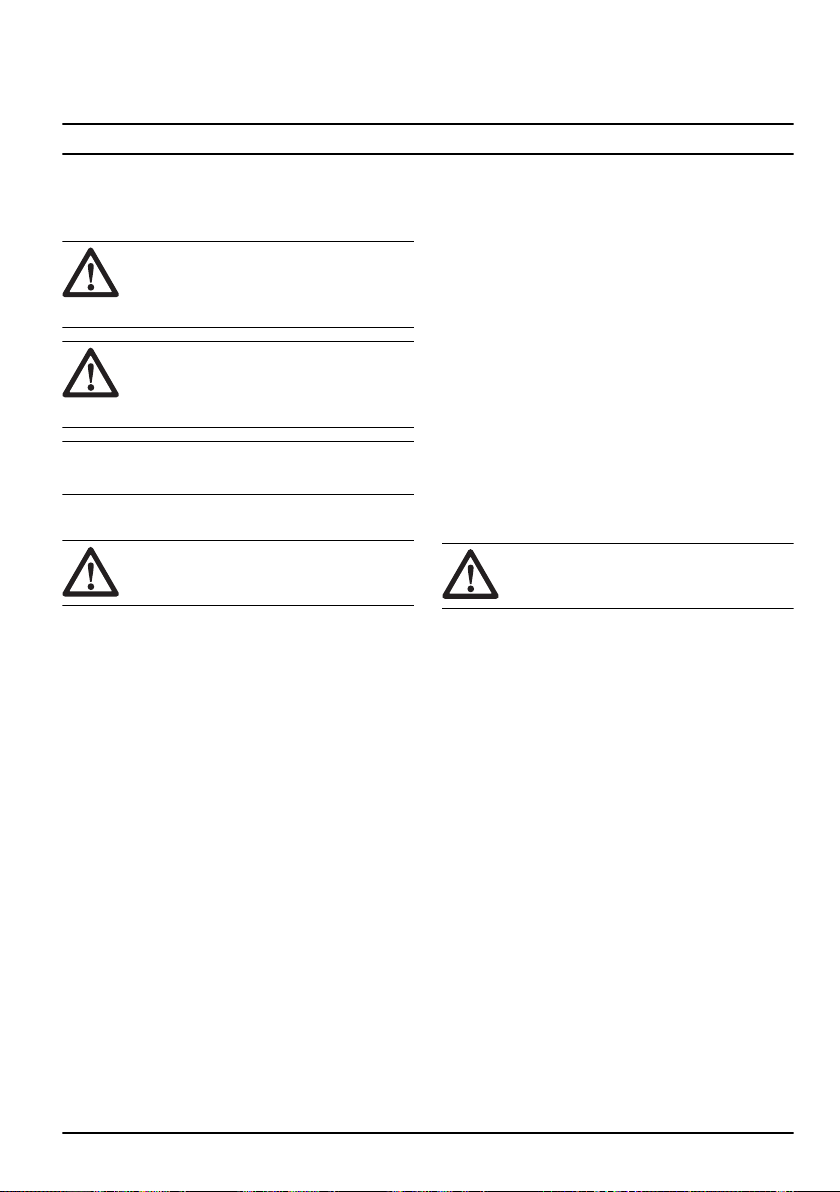
• o produto tiver um acessório que não seja do
fabricante ou que não seja aprovado pelo fabricante.
Segurança
Definições de segurança
Os avisos, as precauções e as notas são utilizados para
indicar partes especialmente importantes do manual.
ATENÇÃO: Utilizado no caso de existir
risco de ferimento ou morte para o utilizador
ou transeuntes, se não forem respeitadas as
instruções do manual.
CUIDADO: Utilizado se existir risco de
danos para o produto, para outros materiais
ou para a área adjacente, se não forem
respeitadas as instruções do manual.
Nota: Utilizado para disponibilizar informações
adicionais necessárias numa determinada situação.
Instruções de segurança gerais
• o produto não tiver sido reparado por um centro de
assistência autorizado ou por uma autoridade
aprovada.
• Mantenha as crianças afastadas da área de
trabalho. Tem de estar sempre presente um adulto
responsável.
• Não deixe que o produto seja utilizado por uma
pessoa que não conhece as instruções.
• Monitorize sempre a utilização do produto por
pessoas com diminuição da capacidade física ou
mental. Tem de estar sempre presente um adulto
responsável.
• Não utilize o produto se estiver cansado, doente ou
sob a influência de álcool, drogas ou medicamentos.
Estes têm um efeito negativo na sua visão, atenção,
capacidade de discernimento ou controlo físico.
• Não utilize o produto se este apresentar algum
defeito.
• Não altere este produto e não o utilize se houver a
possibilidade de ter sido alterado por outros.
• Não altere o ajuste do controlo da velocidade do
motor.
Segurança no local de trabalho
ATENÇÃO: Leia as instruções de aviso
que se seguem antes de utilizar o produto.
• Este produto é perigoso se for utilizado de forma
incorreta ou se não o utilizador for cuidadoso.
Podem ocorrer ferimentos graves ou mesmo morte
se as instruções de segurança não forem
respeitadas.
• Este produto produz um campo eletromagnético
durante o funcionamento. Em determinadas
circunstâncias, este campo pode interferir com o
funcionamento de implantes médicos ativos ou
passivos. Para diminuir o risco de ferimentos graves
ou mortais, recomendamos que os portadores de
implantes médicos consultem o seu médico e o
fabricante do implante antes de utilizar este produto.
• Seja sempre cuidadoso e use o seu senso comum.
Se não tiver a certeza sobre como utilizar o produto
numa situação especial, pare e fale com o seu
revendedor Husqvarna antes de continuar.
• Tenha em atenção que o utilizador é responsável
pelos acidentes que incluam outras pessoas ou a
respetiva propriedade.
• Mantenha o produto limpo. Certifique-se de que
pode ler claramente os sinais e os autocolantes.
• O produto só pode ser utilizado por pessoas que
lerem e compreenderam o conteúdo do manual do
operador.
• Não deixe uma criança utilizar o produto.
ATENÇÃO: Leia as instruções de aviso
que se seguem antes de utilizar o produto.
• Retire objetos como ramos, galhos e pedras da área
de trabalho antes de utilizar o produto.
• Os objetos que embatam no equipamento de corte
podem ser projetados e causar danos a pessoas e
objetos. Mantenha terceiros e animais a uma
distância de segurança do produto.
• Nunca utilize o produto em más condições
meteorológicas, como nevoeiro, chuva, ventos
fortes, frio intenso e risco de trovoada. A utilização
do produto em más condições meteorológicas ou
em localizações molhadas ou com humidade é
cansativa. As más condições meteorológicas podem
causar condições perigosas, como superfícies
escorregadias.
• Observe se há pessoas, objetos e situações que
possam impedir o funcionamento seguro do produto.
• Observe se há obstáculos como raízes, pedras,
ramos, buracos e valas. A relva longa pode ocultar
obstáculos.
• Cortar relva em declives pode ser perigoso. Não
utilize o produto em terrenos com um declive
superior a 15°.
• Utilize o produto ao longo da face dos declives. Não
se desloque para cima e para baixo.
• Tenha cuidado ao aproximar-se de esquinas com
pouca visibilidade e de objetos que possam impedir
uma boa visibilidade.
1566 - 008 - 24.11.2021
77
Page 78
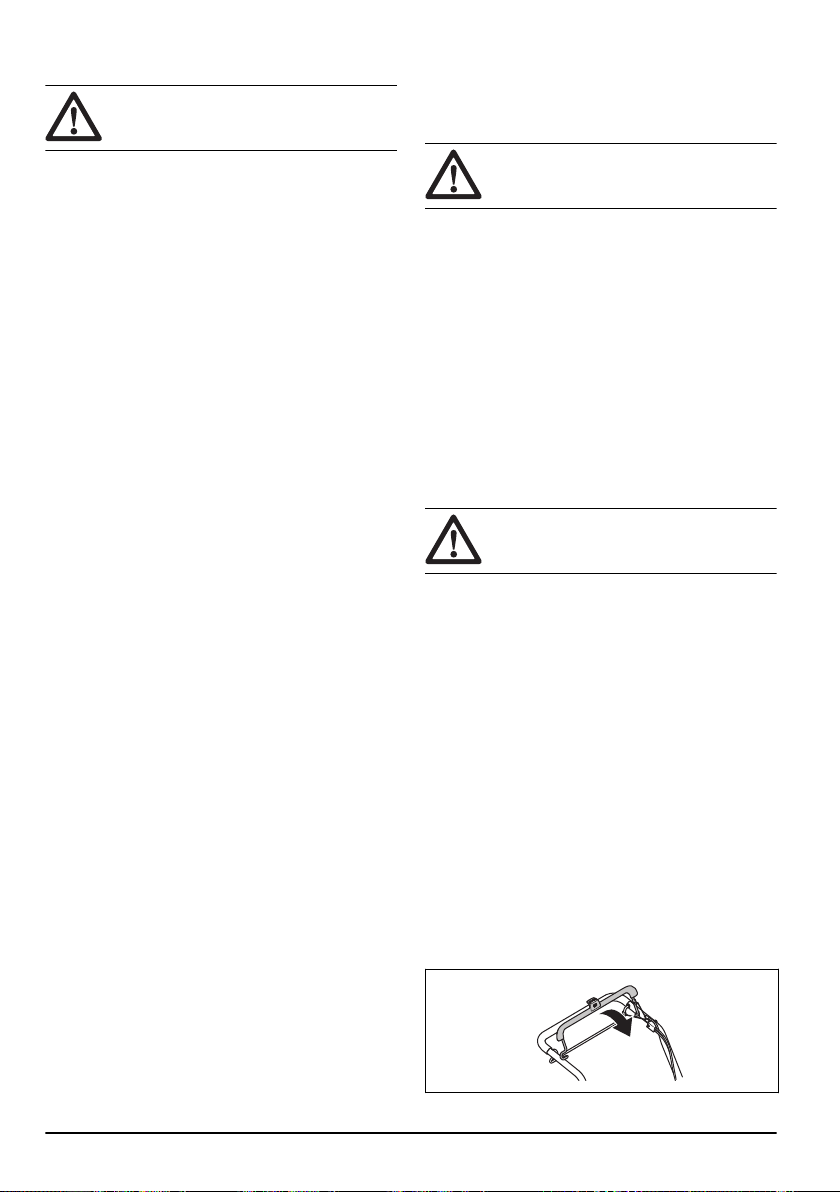
Segurança do trabalho
ATENÇÃO: Leia as instruções de aviso
que se seguem antes de utilizar o produto.
Instruções de segurança para funcionamento
Equipamento de proteção pessoal
• Utilize este produto apenas para cortar relva. Não é
permitido utilizá-lo para outras tarefas.
• Use equipamento de proteção pessoal. Consulte
Equipamento de proteção pessoal na página 78
• Certifique-se de que sabe como desligar o motor
rapidamente em caso de emergência.
• Nunca ligue o motor num espaço fechado ou perto
de material inflamável. Os gases de escape do
motor são quentes e podem conter faíscas
causadoras de incêndios.
• Não utilize o produto, a menos que a lâmina e todas
as coberturas estejam corretamente montadas. Uma
lâmina montada incorretamente pode soltar-se e
causar ferimentos pessoais.
• Certifique-se de que a lâmina não atinge objetos
como pedras e raízes. Isto pode causar danos à
lâmina e dobrar o eixo do motor. Um eixo dobrado
provoca fortes vibrações e um elevado risco de a
lâmina se soltar.
• Se a lâmina atingir um objeto ou ocorrerem
vibrações, pare o produto imediatamente. Desligue o
cabo de ignição da vela de ignição. Examine se o
produto apresenta sinais de danos. Repare os
danos ou solicite a reparação numa oficina
autorizada.
• Nunca ligue o manípulo de travão do motor de modo
permanente ao punho durante o arranque do motor.
• Coloque o produto numa superfície estável e plana e
ligue-o. Certifique-se de que a lâmina não atinge o
solo ou outros objetos.
• Mantenha-se sempre por trás do produto quando o
operar.
• Mantenha todas as rodas no chão e as duas mãos
sobre o punho quando utilizar o produto. Mantenha
as mãos e os pés afastados das lâminas rotativas.
• Não incline o produto quanto ligar o motor.
• Tenha cuidado quando puxar o produto para trás.
• Nunca levante o produto quando ligar o motor. Se
tiver de levantar o produto, desligue primeiro o motor
e o cabo de ignição da vela de ignição.
• Não caminhe para trás quando operar o produto.
• Desligue o motor quando se deslocar em zonas sem
relva, por exemplo caminhos de gravilha, pedra e
asfalto.
• Não corra com o produto quando o motor está
ligado. Caminhe sempre que operar o produto.
• Pare o motor antes de mudar a altura de corte.
Nunca efetue ajustes com o motor ligado.
• Nunca deixe o produto fora de vista com o motor
ligado. Pare o motor e certifique-se de que o
equipamento de corte não roda.
.
ATENÇÃO: Leia as instruções de aviso
que se seguem antes de utilizar o produto.
• O equipamento de proteção pessoal não previne
totalmente os ferimentos mas diminui a respetiva
gravidade em caso de acidente. Obtenha ajuda junto
do seu concessionário para selecionar o
equipamento certo.
• Utilize protetores acústicos se o nível de ruído for
superior a 85 dB.
• Use botas ou sapatos antiderrapantes resistentes.
Não use calçado aberto nem ande com os pés
descalços.
• Use calças compridas e resistentes.
• Use luvas de proteção sempre que necessário, por
exemplo, ao fixar, examinar ou limpar o
equipamento de corte.
Dispositivos de segurança no produto
ATENÇÃO: Leia as instruções de aviso
que se seguem antes de utilizar o produto.
• Não utilize o produto com dispositivos de segurança
defeituosos.
• Verifique regularmente os dispositivos de
segurança. Se os dispositivos de segurança
estiverem defeituosos, fale com a sua oficina
Husqvarna autorizada.
Verificar a cobertura de corte
A cobertura de corte reduz as vibrações no produto e o
risco de ferimentos causados pela lâmina.
• Examine a cobertura de corte para se certificar de
que não existem danos, como fissuras.
Verificar o punho do travão do motor
O manípulo de travão do motor para o motor. Quando o
manípulo de travão do motor é libertado, o motor para.
• Ligue o motor e depois solte o punho do travão do
motor. Se o motor não parar em 3 segundos, solicite
o ajuste do travão do motor numa oficina Husqvarna
autorizada.
78
1566 - 008 - 24.11.2021
Page 79
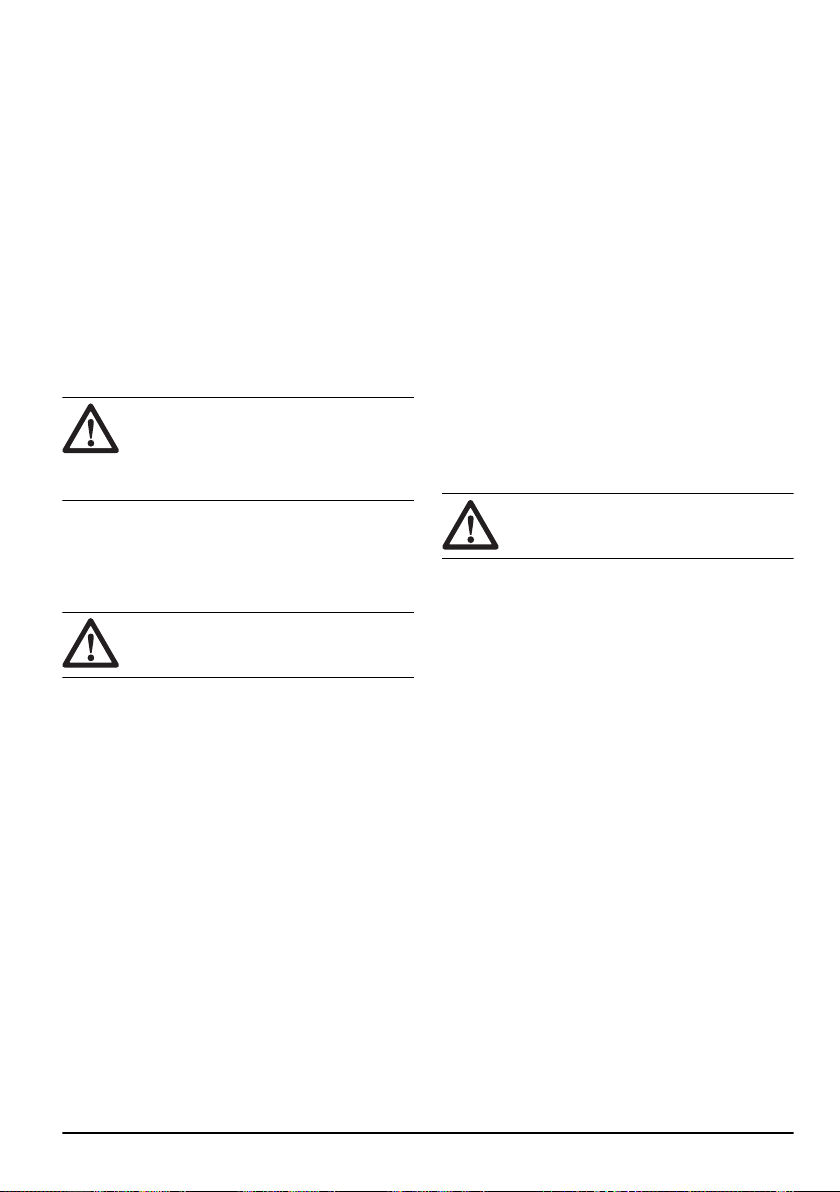
Verificar a cobertura traseira
O defletor traseiro diminui o risco de projeção de objetos
na direção do utilizador.
• Certifique-se de que a cobertura traseira não está
danificada.
• Certifique-se de que as molas que fecham a
cobertura traseira não estão danificadas.
• Substitua as molas e as peças danificadas.
• Certifique-se de que a cobertura traseira consegue
mover-se facilmente nas dobradiças.
Silenciador
O silenciador mantém o mais baixo nível de ruído
possível e afasta os gases de escape do utilizador.
Não utilize o produto se o silenciador estiver defeituoso
ou estiver em falta. Um silenciador defeituoso aumenta
o nível de ruído e o risco de incêndio.
ATENÇÃO: O silenciador fica muito
quente durante e após a utilização e quando
o motor funciona ao ralenti. Tenha cuidado
junto de materiais inflamáveis e/ou vapores
para evitar incêndios.
• Não acrescente combustível com o motor em
funcionamento.
• Certifique-se de que o motor está frio antes de
reabastecer.
• Antes de reabastecer, abra lentamente a tampa do
depósito de combustível e liberte a pressão com
cuidado.
• Não adicione combustível ao motor numa área
interior. O fluxo de ar insuficiente pode causar
ferimentos ou morte devido a asfixia ou monóxido de
carbono.
• Aperte completamente a tampa de depósito de
combustível. Se a tampa de depósito de combustível
não estiver apertada, existe um risco de incêndio.
• Desloque o produto a uma distância mínima de 3 m
(10 pés) da posição onde abasteceu o depósito
antes de começar.
• Não encha totalmente o depósito de combustível. O
calor provoca a expansão do combustível. Mantenha
um espaço na parte superior do depósito de
combustível.
Instruções de segurança para manutenção
Verificar o silenciador
• Examine o silenciador regularmente para se
certificar de que está bem fixo e não está danificado.
Segurança no manuseamento do combustível
ATENÇÃO:
que se seguem antes de utilizar o produto.
• Não ligue o produto se houver combustível ou óleo
do motor sobre o produto. Remova o combustível/
óleo indesejado e deixe o produto secar.
• Se derramar combustível na sua roupa, troque de
roupa imediatamente.
• Não deixe que o combustível entre em contacto com
o seu corpo, pois pode causar ferimentos. Se o
combustível entrar em contacto com o seu corpo,
use sabão e água para o remover.
• Não ligue o produto se o motor tiver uma fuga.
Examine regularmente o motor quanto a fugas.
• Tenha cuidado com o combustível. O combustível é
inflamável e os gases são explosivos e podem
causar ferimentos ou morte.
• Não respire os gases do combustível, podem causar
ferimentos. Certifique-se de que existe um fluxo de
ar suficiente.
• Não fume perto de combustível ou do motor.
• Não coloque objetos quentes perto do combustível
ou do motor.
Leia as instruções de aviso
ATENÇÃO: Leia as instruções de aviso
que se seguem antes de utilizar o produto.
• Os gases de escape do motor contêm monóxido de
carbono, um gás inodoro, tóxico e altamente
perigoso. Não ligue o motor em zonas interiores ou
em espaços fechados.
• Antes de proceder à manutenção do produto,
desligue o motor e retire o cabo de ignição da vela
de ignição.
• Use luvas de proteção quando realizar a
manutenção do equipamento de corte. A lâmina é
muito afiada e pode facilmente provocar cortes.
• A utilização de acessórios e a realização de
alterações no produto que não sejam aprovadas
pelo fabricante podem causar ferimentos graves ou
morte. Não altere o produto. Utilize sempre
acessórios que sejam aprovados pelo fabricante.
• Se a manutenção não for realizada de forma correta
e regular, o risco de ferimentos e danos no produto
aumenta.
• Realize apenas tarefas de manutenção indicadas
neste manual do proprietário. Todas as outras
operações de manutenção devem ser realizadas por
uma oficina Husqvarna autorizada.
• Leve o produto regularmente a uma oficina
Husqvarna autorizada para realizar a manutenção.
• Substitua as peças danificadas, gastas ou partidas.
1566 - 008 - 24.11.2021
79
Page 80

Montagem
A
B
C
D
E
F
G
H
Introdução
ATENÇÃO: Antes de montar o produto,
tem de ler e compreender o capítulo sobre
segurança.
ATENÇÃO: Retire o cabo da vela de
ignição antes de montar o produto.
Montar o punho
1. Empurre o parafuso (A) através do punho (B), da
anilha de plástico (C) e do suporte do punho (D).
2. Aperte totalmente a porca (E).
3. Empurre o parafuso (F) através da anilha (G) e do
suporte do punho.
Ajustar o punho
1. Desaperte os manípulos inferiores.
2. Desloque os botões para a extremidade inferior das
ranhuras, dos lados esquerdo e direito do produto.
3. Defina a altura do punho para uma das 2 posições
disponíveis.
4. Desloque os botões para cima em direção ao punho,
até pararem e ouvir um clique.
5. Aperte os botões totalmente.
Colocar o produto na posição de transporte
1. Desaperte os manípulos inferiores.
2. Desloque os botões para a extremidade inferior das
ranhuras, dos lados esquerdo e direito do produto.
4. Aperte totalmente o botão (H).
80
1566 - 008 - 24.11.2021
Page 81

3. Dobre a barra do guiador para a frente.
3. Aperte os botões totalmente.
Montar o coletor de relva (LC 151, LC 151S)
1. Coloque a estrutura do coletor de relva no saco de
relva com a parte rígida do saco no fundo. Mantenha
o punho da estrutura fora da parte superior do saco.
Para colocar o produto na posição de funcionamento
1. Dobre o punho para a posição vertical.
2. Desloque os botões para cima em direção ao punho,
até pararem e ouvir um clique.
2. Fixe o saco de relva à estrutura com os grampos.
1566 - 008 - 24.11.2021 81
Page 82

Funcionamento
3
4
5
6
7
8
9
Introdução
ATENÇÃO: Antes de utilizar o produto,
tem ler e compreender o capítulo sobre
segurança.
Husqvarna Connect
A Husqvarna Connect é uma aplicação gratuita para o
seu dispositivo móvel. A aplicação Husqvarna Connect
disponibiliza funções alargadas para o seu produto
Husqvarna:
• Informações alargadas sobre o produto.
• Informações sobre, e ajuda relacionada com peças
e manutenção do produto.
Começar a utilizar Husqvarna Connect
1. Transfira a aplicação Husqvarna Connect para o seu
dispositivo móvel.
2. Registe-se na aplicação Husqvarna Connect.
3. Siga os passos das instruções na aplicação
Husqvarna Connect para ligar e registar o produto.
Antes de utilizar o produto
1. Leia o manual do utilizador com atenção e certifiquese de que compreende as instruções.
2. Examine o equipamento de corte para se certificar
de que está corretamente montado e ajustado.
Consulte o capítulo
de corte na página 86
3. Encha o depósito de combustível. Consulte o
capítulo
Encher o depósito de combustível na
página 82
4. Encha o depósito de combustível e verifique o nível
do óleo. Consulte o capítulo
.
óleo na página 87
Encher o depósito de combustível
Se disponível, utilize gasolina com base em alquilatos/
ecológica. Se não estiver disponível gasolina com base
em alquilatos/ecológica, utilize gasolina sem chumbo de
boa qualidade ou gasolina com chumbo com um índice
de octanas de pelo menos 90.
CUIDADO:
um índice de octanas inferior a 90 RON (87
AKI). Caso contrário, pode causar danos no
produto.
1. Abra a tampa do depósito de combustível devagar
para libertar a pressão.
Para examinar o equipamento
.
Para verificar o nível do
.
Não utilize gasolina com
2. Encha lentamente com um recipiente de
combustível. Se derramar combustível, retire-o com
um pano e deixe o combustível restante secar.
3. Limpe bem à volta da tampa do depósito de
combustível.
4. Aperte completamente a tampa de depósito de
combustível. Se a tampa de depósito de combustível
não estiver apertada, existe um risco de incêndio.
5. Desloque o produto a uma distância mínima de 3 m
(10 pés) da posição onde abasteceu o depósito
antes de começar.
Para definir a altura de corte
1. Mova a alavanca da altura de corte para trás para
aumentar a altura de corte.
2. Mova a alavanca da altura de corte para a frente
para diminuir a altura de corte.
CUIDADO: Não regule a altura de corte
demasiado baixa. As lâminas podem entrar
em contacto com o solo se a superfície do
relvado não estiver nivelada.
Para ligar o produto
1. Certifique-se de que o cabo de ignição está ligado à
vela de ignição.
2. Mantenha-se atrás do produto.
82
1566 - 008 - 24.11.2021
Page 83

3. Segure o manípulo de travão do motor contra a
barra de direção.
4. Segure o punho do cabo de arranque com a mão
direita.
5. Puxe lentamente o cabo de arranque até sentir
alguma resistência.
6. Puxe com força para fazer arrancar o motor.
ATENÇÃO: Não enrole o cabo de
arranque na mão.
Utilizar a transmissão das rodas LC 151S
• Empurre o manípulo de direção no sentido da barra
de direção.
• Solte o manípulo de direção para desengatar a
transmissão, por exemplo quando se aproximar de
um obstáculo.
• Antes de puxar o produto para trás, desengate a
transmissão e empurre o produto para a frente
aproximadamente 10 cm.
Utilizar o produto com o coletor de relva (LC 151, LC 151S)
ATENÇÃO:
um coletor de relva instalado ou sem a
cobertura traseira fechada. Podem ser
projetados objetos que possam ferir o
utilizador.
Não utilize o produto sem
1. Levante a cobertura traseira e retire o tampão de
trituração, caso esteja instalado.
2. Monte o coletor de relva; consulte
de relva (LC 151, LC 151S) na página 81
3. Coloque o coletor de relva no suporte.
4. Solte a cobertura traseira e coloque-a na parte
superior da estrutura do saco de relva.
Montar o coletor
.
Colocar o produto em modo de trituração (LC 151, LC 151S)
Certifique-se de que o motor está desligado antes de
colocar o produto em modo de trituração.
1. Levante a cobertura traseira e retire o coletor de
relva, caso esteja instalado.
1566 - 008 - 24.11.2021
83
Page 84
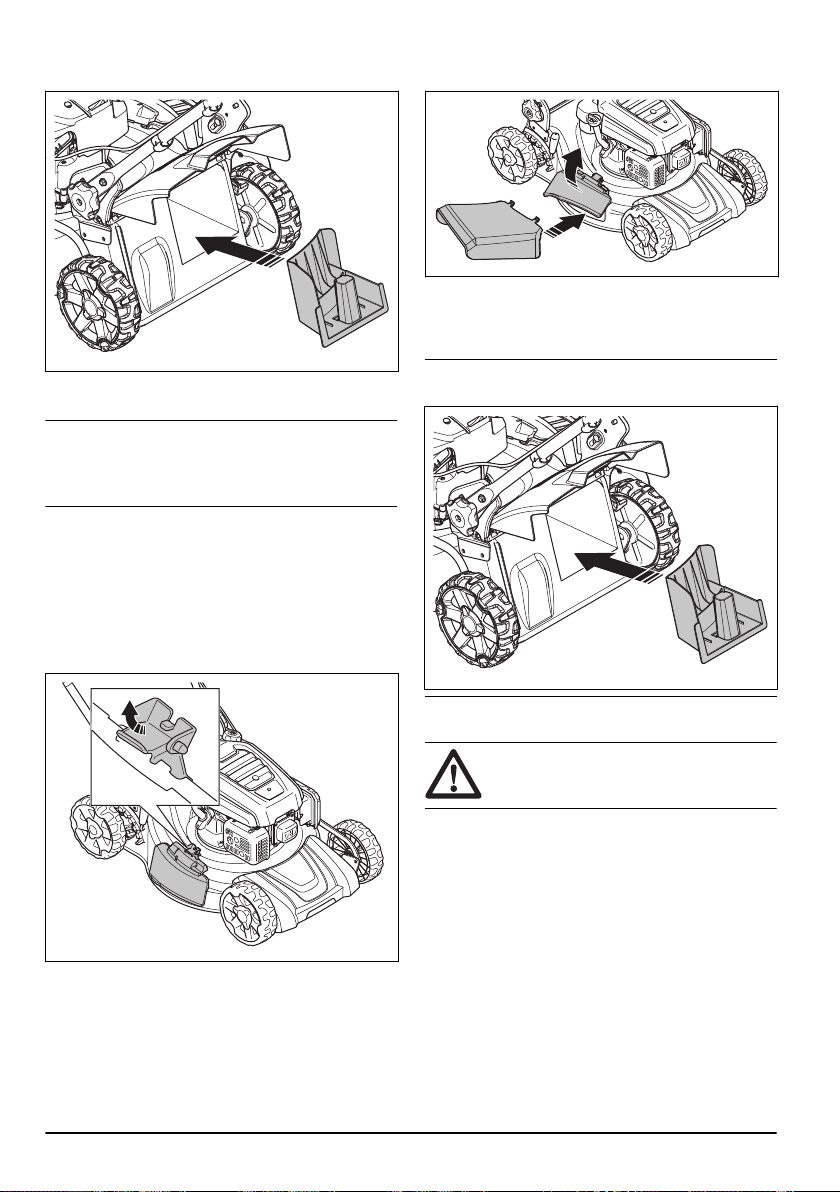
2. Coloque o tampão de trituração no canal de
descarga.
4. Abra a cobertura de descarga lateral e instale o
defletor de descarga lateral nos pinos de apoio.
5. Permita que a cobertura de descarga lateral se
feche contra o defletor de descarga lateral. Antes de
utilizar o produto, certifique-se de que o defletor de
descarga lateral está bem posicionado.
3. Feche a cobertura traseira e certifique-se de que
está bem fechada contra o tampão de trituração.
Nota: Para aumentar o desempenho do modo de
trituração, substitua a lâmina pelo acessório de lâmina
de trituração. Consulte
página 87
Para substituir a lâmina na
Colocar o produto em modo de descarga lateral
1. Levante a cobertura traseira e retire o saco de relva,
caso esteja instalado.
2. Feche a cobertura traseira e certifique-se de que
está bem fechada contra o produto.
3. Levante o bloqueio de descarga.
Nota: Para aumentar o desempenho no modo de
descarga lateral, instale o tampão de trituração.
Esvaziar o coletor de relva
CUIDADO: Levante o coletor de relva
quando o deslocar para evitar o desgaste.
1. Levante o coletor de relva com o punho da estrutura.
84
1566 - 008 - 24.11.2021
Page 85

2. Utilize o punho da estrutura e o punho do saco
quando esvaziar o coletor de relva.
Para obter bons resultados
• Utilize sempre uma lâmina bem afiada. Uma lâmina
romba produz um resultado irregular e a superfície
de corte da relva fica amarela. Uma lâmina afiada
também gasta menos energia que uma lâmina
romba.
Manutenção
Introdução
ATENÇÃO: Antes de efetuar a
manutenção, tem de ler e compreender o
capítulo sobre segurança.
É necessária formação especial para realizar qualquer
tarefa de manutenção ou reparação. Garantimos a
disponibilidade de reparações e manutenção
profissionais. Se o seu revendedor não for uma oficina
autorizada, pergunte-lhes onde se situa a oficina
autorizada mais próxima.
Esquema de manutenção
• Não corte mais do que ⅓ do comprimento da relva.
Utilize a maior altura de corte ao começar a cortar a
relva. Examine o resultado e reduza a altura de
corte para um nível aplicável. Caso a relva esteja
muito comprida, avance lentamente e corte duas
vezes, se necessário.
• Corte em diferentes direções de cada vez, para
evitar a formação de linhas no relvado.
• Levante a cobertura traseira e retire o coletor de
relva.
• Se instalados, retire o tampão de trituração e a
lâmina de trituração.
• Feche a cobertura traseira antes de utilizar o
produto. Quando utilizar o produto, a relva cortada
vai para baixo da cobertura traseira.
• Mantenha a cobertura de corte limpa. A acumulação
de relva e sujidade no lado interior da cobertura de
corte pode diminuir o resultado de corte. Consulte
Para limpar a superfície interior da cobertura de
corte na página 86
Os intervalos de manutenção são calculados a partir da
utilização diária do produto. Os intervalos são alterados
se o produto não for utilizado diariamente.
Relativamente às tarefas de manutenção identificadas
com *, consulte as instruções em
segurança no produto na página 78
.
Dispositivos de
.
CUIDADO: Quando inclina o produto,
certifique-se de que o filtro de ar está virado
para cima e não contra o solo. Risco de
danos no motor.
Manutenção
Efetuar uma inspeção geral X
Examinar o nível do óleo X
Substituir o óleo (pela primeira vez após 5 horas de utilização e,
posteriormente, após cada 50 horas de utilização)
Limpar o produto X
29
Se o produto for utilizado com carga pesada ou em temperaturas ambiente elevadas, substitua o óleo de motor a cada 25 horas.
1566 - 008 - 24.11.2021 85
29
Diariamente Mensalmente
A cada esta-
ção
X
Page 86

Manutenção
Examinar o equipamento de corte X
Examinar a cobertura de corte* X
Examinar o punho do travão do motor * X
Examinar o silenciador * X
Examine a vela de ignição. Se for necessário, limpe ou substitua a
vela de ignição
Examinar o filtro de ar X
Limpe o filtro de ar
Substitua o filtro de ar X
Examinar o sistema de combustível X
Limpe as aletas de arrefecimento do cilindro X
Examine e ajuste o cabo da embraiagem X
30
Diariamente Mensalmente
X
A cada esta-
ção
X
Para efetuar uma inspeção geral
• Certifique-se de que todas as porcas e os parafusos
do produto estão apertados corretamente.
Para limpar o produto externamente
• Utilize uma escova para remover folhas, relva e
sujidade.
• Certifique-se de que a entrada de ar na parte
superior do motor não está bloqueada.
• Não utilize uma máquina de lavar à pressão para
limpar o produto.
• Se utilizar água para limpar o produto, não verta
água diretamente sobre o motor.
Para limpar a superfície interior da cobertura de corte
1. Esvazie o depósito de combustível.
2. Incline o produto. Certifique-se de que a vela de
ignição aponta para cima.
CUIDADO: Se o produto for
colocado com o filtro de ar para baixo, o
motor pode sofrer danos.
3. Utilize uma mangueira para enxaguar a superfície
interna da cobertura de corte com água.
Para examinar o equipamento de corte
ATENÇÃO: Para evitar o arranque
acidental retire o cabo de ignição da vela de
ignição.
ATENÇÃO: Use luvas de proteção
quando realizar a manutenção do
equipamento de corte. A lâmina é muito
afiada e pode facilmente provocar cortes.
1. Examine se o equipamento de corte está danificado
ou se apresenta fissuras. Substitua sempre um
equipamento de corte danificado.
2. Olhe para a lâmina para verificar se está danificada
ou romba.
Nota: É necessário estabilizar a lâmina depois de ser
afiada. Afie, substitua e estabilize a lâmina numa oficina
especializada. Se atingir um obstáculo que faça o
produto parar, substitua a lâmina danificada. Um centro
de assistência deve avaliar se a lâmina pode ser afiada
ou se tem de ser substituída.
30
Limpe com mais frequência em ambientes poeirentos ou quando existirem resíduos aéreos. Substitua o filtro
de ar, se estiver muito sujo.
86 1566 - 008 - 24.11.2021
Page 87

Para substituir a lâmina
-20 0 30 40
80
100
-30
-20 0
20 30 40
F
C
32
-10
10
60
SAE 10W-30
SAE 5W-30
SAE 30
1. Bloqueie a lâmina com um bloco de madeira.
ATENÇÃO:
Use luvas resistentes.
A lâmina é muito afiada e pode
facilmente provocar cortes.
10. Ligue o produto para testar a lâmina. Se a lâmina
não estiver corretamente ligada, o produto vibra ou o
resultado de corte não é satisfatório.
Para verificar o nível do óleo
CUIDADO: Um nível de óleo
demasiado baixo causa danos no motor.
Verifique o nível do óleo antes de ligar o
produto.
2. Retire o parafuso da lâmina e a arruela de pressão.
3. Retire a lâmina.
4. Examine o suporte e o parafuso da lâmina para
verificar se existem danos.
5. Examine o eixo do motor para se certificar de que
não se encontra dobrado.
6. Quando colocar a lâmina nova, aponte as
extremidades inclinadas da lâmina na direção da
cobertura de corte.
7. Certifique-se de que a lâmina está alinhada com a
parte central do eixo do motor.
8. Bloqueie a lâmina com um bloco de madeira.
Prenda a arruela de pressão e aperte o parafuso e a
arruela com um binário de 43 – 47 Nm.
9. Faça rodar a lâmina com a mão de modo a
1566 - 008 - 24.11.2021
assegurar-se de que roda livremente.
1. Coloque o produto num piso nivelado.
2. Remova a tampa do depósito de óleo juntamente
com a vareta de nível.
3. Limpe o óleo da vareta de nível.
4. Coloque a vareta de nível completamente dentro do
depósito de óleo para obter uma imagem correta do
nível do óleo.
5. Remova a vareta de nível.
6. Examine o nível do óleo na vareta de nível.
7. Se o nível do óleo estiver baixo, encha com óleo de
motor e verifique novamente o nível do óleo.
Substituir o óleo de motor
ATENÇÃO: O óleo de motor está muito
quente imediatamente após desligar o
motor. Deixe o motor arrefecer antes de
drenar o óleo de motor. Se derramar óleo de
motor na pele, limpe com água e sabão.
1. Utilize o produto até esvaziar o depósito de
combustível.
2. Remova o cabo de ignição da vela de ignição.
3. Retire a tampa do depósito de óleo.
4. Coloque um recipiente por baixo do produto para
recolher o óleo de motor.
5. Incline o produto para drenar o óleo de motor do
depósito de óleo.
87
Page 88

6. Encha com óleo de motor novo do tipo
A
B
recomendado em
92
.
7. Verifique o nível do óleo. Consulte
nível do óleo na página 87
Especificações técnicas na página
Para verificar o
.
Examinar a vela de ignição
CUIDADO: utilize sempre o tipo de vela
de ignição recomendado. Um tipo de vela
de ignição incorreto pode provocar danos no
produto.
• Examine a vela de ignição para verificar se o motor
apresenta uma potência reduzida ou dificuldades de
arranque, ou se não funciona corretamente ao
ralenti.
• Para diminuir o risco de materiais indesejados nos
elétrodos da vela de ignição, siga estas instruções:
a) Assegure-se de que a rotação em vazio está
corretamente regulada.
b) Certifique-se de que a mistura de combustível
está correta.
c) Certifique-se de que o filtro de ar está limpo.
• Se a vela de ignição estiver suja, limpe-a e
certifique-se de que a distância entre os elétrodos
está correta; consulte
página 92
• Se for necessário, substitua a vela de ignição.
.
Especificações técnicas na
Filtro de ar
Um filtro de ar sujo pode provocar danos no motor ou
fazer com que este não funcione corretamente. Realize
a manutenção do filtro de ar mais frequentemente em
ambientes poeirentos. Consulte a secção
na página 85
substituir o filtro de ar.
Nota:
para obter informações sobre quando
Substitua sempre um filtro de ar danificado.
Retirar e instalar o filtro de ar
1. Pressione os grampos na cobertura do filtro de ar.
2. Retire cuidadosamente a cobertura do filtro de ar (A)
ATENÇÃO: Utilize luvas de protecção.
do motor.
Manutenção
3. Retire o filtro de ar (B).
4. Examine o filtro de ar quanto à existência de danos.
Substitua um filtro de ar danificado.
5. Limpar e examinar o filtro de ar. Consulte
limpar o filtro de ar na página 88
6. Instale na sequência inversa.
Para
.
Para limpar o filtro de ar
Um filtro de ar sujo pode provocar danos no motor ou
fazer com que este não funcione corretamente. Realize
a manutenção do filtro de ar mais frequentemente em
ambientes poeirentos.
Consulte a secção
informações sobre quando substituir o filtro de ar.
1. Retire a cobertura do filtro de ar e o filtro.
2. Limpe o filtro, batendo com o mesmo sobre uma
superfície plana. Não utilize solventes com petróleo,
querosene ou ar comprimido para limpar o filtro.
Nota:
filtros de ar em funcionamento durante muito tempo.
Substitua o filtro de ar em intervalos regulares.
Substitua sempre os filtros de ar danificados.
3. Ao montar o filtro de ar, certifique-se de que este
fica totalmente encostado ao suporte do filtro.
Manutenção na página 85
Não é possível limpar completamente os
para obter
Verificar o defletor de descarga lateral
O defletor de descarga lateral está fixo à abertura de
descarga lateral do produto. Isto reduz o risco de
projeção de objetos na direção da posição de corte do
utilizador.
1. Certifique-se de que o defletor de descarga lateral
não está danificado.
2. Examine o defletor de descarga lateral. Certifique-se
de que não são detetados defeitos, como fissuras ou
molas partidas que forcem o fecho da porta.
3. Substitua o defletor de descarga lateral ou as molas
se estas estiverem danificadas.
88
1566 - 008 - 24.11.2021
Page 89

Para examinar o sistema de combustível
• Examine a tampa do depósito de combustível e o
vedante da tampa do depósito de combustível para
se certificar de que não existem danos.
• Examine a mangueira de combustível para se
certificar de que não existem fugas. Se a mangueira
de combustível estiver danificada, deverá ser
substituída por uma oficina autorizada.
• O produto desloca-se quando a transmissão das
rodas não é acionada.
• Ajuste o cabo da embraiagem.
a) Para diminuir o comprimento do cabo da
embraiagem, rode o parafuso de ajuste para a
esquerda.
b) Para aumentar o comprimento do cabo da
embraiagem, rode o parafuso de ajuste para a
direita.
Ajustar o cabo da embraiagem (LC 151S)
Nas situações que se seguem, é necessário diminuir o
comprimento do cabo da embraiagem:
• A transmissão das rodas não é acionada quando
puxa o manípulo de direção ou a alavanca de
controlo da velocidade.
• O produto desloca-se lentamente quando a
transmissão das rodas é acionada.
Nas situações que se seguem, é necessário aumentar o
comprimento do cabo da embraiagem:
Se continuar insatisfeito com a condução do produto
depois do ajuste, contacte o seu revendedor com
assistência técnica.
Resolução de problemas no motor
Problema Causa possível Solução
O motor não arranca. O cabo de ignição não está ligado corre-
tamente.
O depósito de combustível está vazio. Encha o depósito de combustível com o
O combustível é antigo. Drene o depósito de combustível e o
Existe sujidade no carburador ou na linha de combustível.
A vela de ignição está defeituosa. Ajuste a distância entre os elétrodos,
Existe combustível na vela de ignição. Limpe a vela de ignição.
O motor não para. O mecanismo de paragem está avaria-
do.
Ligue o cabo de ignição à vela de ignição.
tipo de combustível correto.
carburador. Reabasteça com gasolina
nova.
Limpe o carburador e/ou o tubo de combustível.
limpe ou substitua a vela de ignição.
Desligue o cabo de ignição da vela de
ignição. Solicite a reparação do produto
numa oficina autorizada.
1566 - 008 - 24.11.2021 89
Page 90

Problema Causa possível Solução
O motor não funciona corretamente.
O motor fica demasiado quente.
Existe uma falha de ignição
no motor quando este funciona a alta velocidade.
Ruídos invulgares do motor
com carga normal.
O cabo de ignição não está ligado corretamente.
Existe sujidade no tubo de combustível
ou o período de utilização do combustível expirou.
Existe obstrução na tampa do depósito
de combustível.
Existe água ou sujidade no sistema de
combustível.
O filtro de ar está sujo. Limpe o filtro de ar.
O carburador tem de ser ajustado. Solicite o ajuste do carburador num re-
O nível de óleo do motor é demasiado
baixo.
O fluxo de ar não é suficiente. Limpe o filtro de ar e o alojamento do fil-
O carburador tem de ser ajustado. Solicite o ajuste do carburador num re-
A distância entre os elétrodos na vela de
ignição é demasiado pequena.
Tipo incorreto de gasolina. Drene o depósito de combustível e o
Ligue o cabo de ignição à vela de ignição.
Limpe a linha de combustível. Encha o
depósito de combustível com combustível novo do tipo correto.
Limpe a tampa do depósito de combustível.
Drene o depósito de combustível. Encha
o depósito de combustível com combustível novo do tipo correto.
vendedor de assistência técnica autorizado.
Abasteça o óleo de motor.
tro de ar.
vendedor de assistência técnica autorizado.
Ajuste a distância entre os elétrodos.
carburador. Reabasteça com gasolina
nova. Consulte
combustível na página 82
ma persistir, contacte o seu revendedor
de assistência local.
O motor não funciona corretamente ao ralenti.
A vela de ignição está suja, apresenta
defeito ou a distância entre os elétrodos
é demasiado grande.
O carburador tem de ser ajustado. Ajuste o carburador.
O filtro de ar está sujo. Limpe o filtro de ar.
Ajuste a distância entre os elétrodos ou
substitua a vela de ignição.
Encher o depósito de
. Se o proble-
Transporte, armazenamento e eliminação
Transporte e armazenamento
• Para o transporte e armazenamento do produto e do
combustível, certifique-se de que não existem fugas
ou fumos. Faíscas ou chamas abertas, por exemplo
de dispositivos elétricos ou mesmo caldeiras, podem
causar um incêndio.
• Utilize recipientes aprovados para o transporte e
armazenamento de combustível.
90 1566 - 008 - 24.11.2021
• Esvazie o depósito de combustível antes de
armazenar o produto durante um longo período de
tempo. Elimine o combustível numa localização de
eliminação aplicável
• Fixe o produto de forma segura durante o transporte
para evitar danos e acidentes.
• Mantenha o produto numa área trancada para
impedir o acesso a crianças ou pessoas que não
disponham de aprovação.
Page 91

• Mantenha o produto num local seco e sem gelo.
Eliminação
• Respeite os requisitos de reciclagem locais e os
regulamentos aplicáveis.
• Elimine todos os produtos químicos, como óleo de
motor ou combustível, num centro de assistência ou
numa localização de eliminação aplicável.
• Quando o produto deixar de ser utilizado, envie-o
para um revendedor Husqvarna ou elimine-o numa
localização de reciclagem.
1566 - 008 - 24.11.2021 91
Page 92

Especificações técnicas
Especificações técnicas
LC 151 LC 151S LB 256SP
Motor
Marca Husqvarna Husqvarna Husqvarna
Tipo de motor Monocilíndrico, 4
tempos, refrigeração
a ar forçado, OHV
Deslocamento, cm
3
166 166 166
Velocidade, rpm 2800 2800 2800
Potência nominal do motor, kW
31
2,7 2,7 2,7
Sistema de ignição
Vela de ignição Husqvarna HQT–7 Husqvarna HQT–7 Husqvarna HQT–7
Distância entre os elétrodos, mm 0,7-0,8 0,7-0,8 0,7-0,8
Sistema de lubrificação e combustível
Tipo de lubrificação do motor Salpico Salpico Salpico
Capacidade do depósito de combustível, li-
1,0 1,0 1,0
tros
Volume do depósito de óleo, litros 0,5 0,5 0,5
Óleo de motor
32
Husqvarna SAE 30 Husqvarna SAE 30 HusqvarnaSAE 30
Peso
Com depósitos vazios, kg 31,1 32,6 33,1
Emissões de ruído
33
Nível de potência sonora, medido, dB(A) 97 97 98
Nível de potência sonora, garantido LWA dB
98 98 98
(A)
Níveis acústicos
34
Monocilíndrico, 4
tempos, refrigeração
a ar forçado, OHV
Monocilíndrico, 4
tempos, refrigeração
a ar forçado, OHV
31
A potência nominal do motor indicado é a potência líquida média (a um valor de rpm especificado) de um
motor de produção típico do modelo de motor avaliado de acordo com a norma J1349/ISO1585 da SAE. Motores produzidos em série poderão divergir deste valor. A potência real do motor instalado no produto final
dependerá da velocidade de operação, das condições ambientais e de outros parâmetros.
32
Se o óleo SAE-30 for utilizado a temperaturas inferiores a +5 ° C, existe o risco de não lubrificar suficientemente o motor. Isto pode provocar danos no motor. Consulte a secção
87
para saber qual o óleo correto para temperaturas baixas.
33
Emissões de ruído para as imediações, medidas sob forma de potência sonora (LWA) em conformidade com
a diretiva da CE 2000/14/CE.
34
Os dados comunicados relativamente ao nível de pressão de ruído têm uma dispersão estatística típica (des-
Substituir o óleo de motor na página
vio padrão) de 1,2 dB (A).
92 1566 - 008 - 24.11.2021
Page 93

LC 151 LC 151S LB 256SP
Nível de pressão sonora ao nível do ouvido
85 85 88
do operador, dB(A)
Níveis de vibração
Vibrações na barra de direção, m/s
35
2
8,5 8,5 7,5
Equipamento de corte
Altura de corte, mm 25-75 25-75 25-75
Largura de corte, mm 510 510 560
Sistema de corte Recolha/BioClip®/
descarga lateral
Recolha/BioClip®/
descarga lateral
BioClip®/descarga lateral
Lâmina - padrão Recolha 598562601 Recolha 598562601 Trituração
598563601
Lâmina - acessório Trituração
597683901
Trituração
597683901
–
Capacidade do coletor de relva, litros 65 65 –
Conduzir
Velocidade de autodeslocação, km/h – 3,6 3,6
35
Os dados comunicados relativamente ao nível de vibração têm uma dispersão estatística típica (desvio padrão) de 0,2 m/s2.
1566 - 008 - 24.11.2021 93
Page 94

Declaração CE de conformidade
Declaração CE de conformidade
A Husqvarna AB, SE-561 82 Huskvarna, Suécia, tel:
+46-36-146500, declara que o corta-relva Husqvarna LC
151, LC 151S, LB 256SP de 2020 e dos anos
posteriores cumpre as disposições constantes na
DIRETIVA DO CONSELHO:
• de 8 de junho de 2011 relativa à "restrição do uso de
determinadas substâncias perigosas" 2011/65/UE
• de 17 de maio de 2006 "referente a máquinas"
2006/42/CE
• de 26 de fevereiro de 2014 "referente à
compatibilidade eletromagnética" 2014/30/UE
• de 8 de maio de 2000 "referente a emissões de
ruído para o ambiente" 2000/14/CE
Para mais informações relativas a emissões de ruído,
consulte as Especificações técnicas.
Foram respeitadas as seguintes normas:
EN ISO 5395-1:2013, EN ISO 5395-1:2013/A1, EN ISO
5395-2:2013, EN ISO 5395-2:2013/A1:2016, EN ISO
5395-2:2013/A2:2017, EN ISO 14982:2009
Salvo indicação em contrário, as normas apresentadas
acima são as versões publicadas mais recentes.
Entidade competente: 0404, RISE SMP Svensk
Maskinprovning AB, Box 7035, SE-750 07 Uppsala,
Sweden avaliou a conformidade de acordo com o Anexo
VI da Diretiva 2000/14/CE.
Huskvarna, 2021-11-30
Claes Losdal, Chefe de Desenvolvimento/Produtos de
Jardinagem (representante autorizado da Husqvarna AB
e responsável pela documentação técnica)
94
1566 - 008 - 24.11.2021
Page 95

1566 - 008 - 24.11.2021 95
Page 96

Original instructions
www.husqvarna.com
Instrucciones originales
Instructions d’origine
Instruções originais
Instruções originais
1142430-30
2021-12-02
 Loading...