

Page 1

EN Operator's manual 9-22
ES-MX Manual del usuario 23-38
PT-BR Manual do operador 39-53
RU Руководство по эксплуатации 54-70
UK Посібник користувача 71-86
325R
A05328CBHV
Page 2
22
24
31
30
3
2
5
7
6
20
21
28
27
26
25
8
18
19
1
29
4
23
9
15
14
10
17
16
11
12
13
1
2 3 4 5 6 7
8 9 10 11 12 13
14 15 16 17
Page 3
18 19
20 21
22 23
24 25
Page 4
26 27
A
B
C
H
F
F
E
A
D
C
B
G
C
D
B
A
E
28
30
29
31
32 33
Page 5
34 35
36 37
38 39
40 41
Page 6
42 43
6,0 m
18'
3,05 m
9'
2,0-2,4 mm
.079-.095"
10 cm
4"
6"
15 cm
"Click"
44 45
46
48
47
49
Page 7
50 51
2
1
0,5 mm
52
54 55
53
Page 8
56 57
58 59
Page 9

Contents
Introduction...................................................................9
Safety........................................................................... 10
Assembly.....................................................................14
Operation.....................................................................15
Maintenance................................................................ 17
Introduction
Troubleshooting......................................................... 19
Transportation, storage and disposal...................... 19
Technical data.............................................................20
Accessories.................................................................21
EC Declaration of Conformity....................................22
Operator's manual
The initial language of this operator's manual is English.
Operator's manuals in other languages are translations
from English.
Intended use
Use the product with a grass blade or a trimmer head to
cut different types of vegetation.
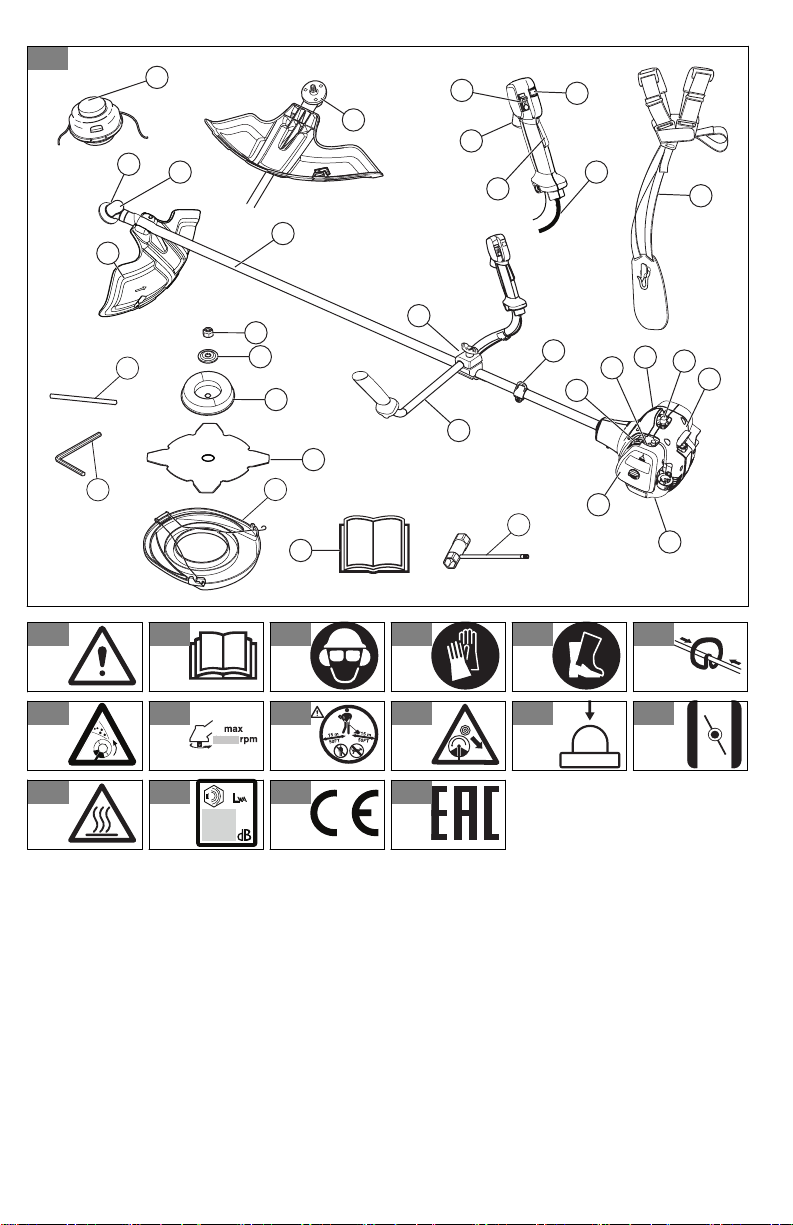
Product overview
(Fig. 1)
1. Trimmer head
2. Grease filler cap
3. Bevel gear
4. Cutting attachment guard
5. Shaft
6. Stop switch
7. Throttle trigger
8. Throttle trigger lockout
9. Handlebar
10. Harness clamp
11. Starter housing
12. Spark plug cap, spark plug
13. Starter rope handle
14. Fuel tank
15. Air filter cover
16. Air purge bulb
17. Choke control
18. Handle adjustment
19. Throttle wire
20. Fast idle button
21. Harness
22. Combination wrench
23. Operator's manual
24. Transport guard
25. Blade
26. Support cup
27. Support flange
28. Locknut
Note: National regulations can set limit to the operation
of the product.
29. Drive disc
30. Locking pin
31. Hex key
Symbols on the product
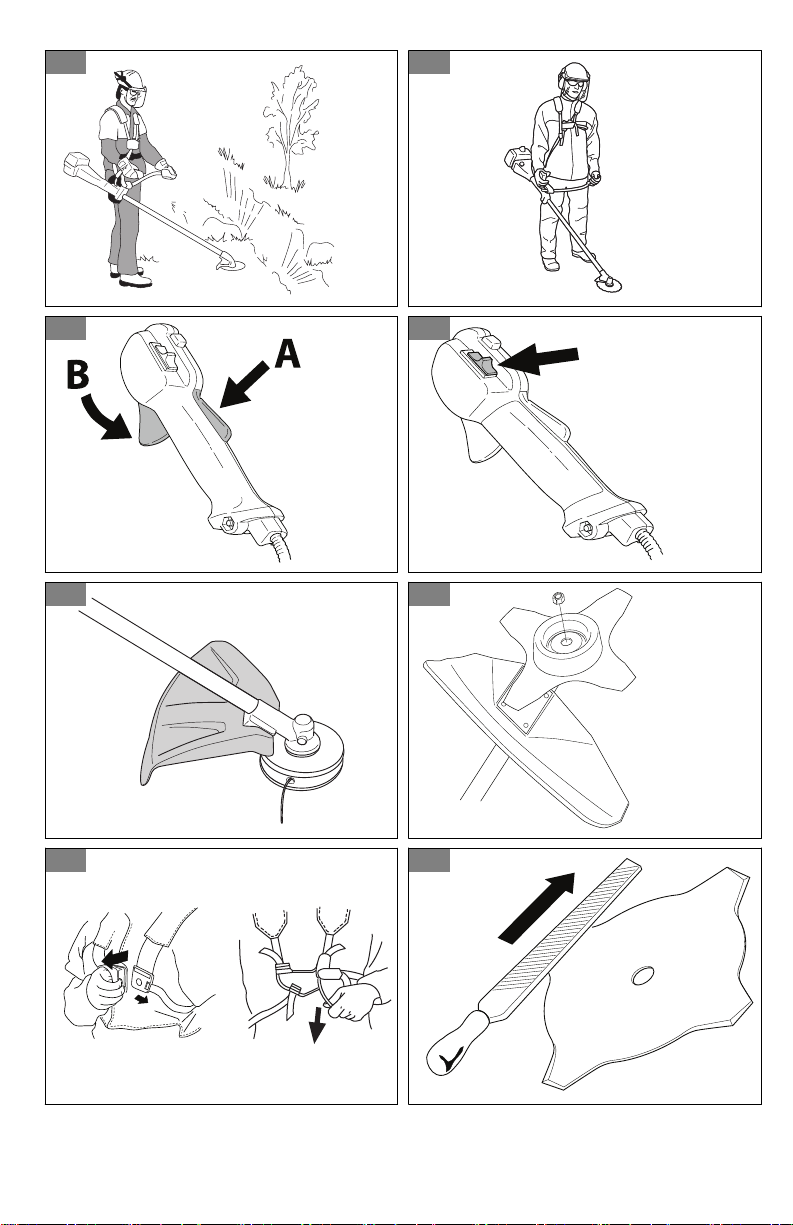
(Fig. 2) WARNING! This product is dangerous.
Injury or death can occur to the operator or
bystanders if the product is not used
carefully and correctly. To prevent injury to
the operator or bystanders, read and obey
all safety instructions in the operator's
manual.
(Fig. 3) Please read the operator's manual carefully
and make sure that you understand the
instructions before use.
(Fig. 4) Use a protective helmet in locations where
objects can fall on you. Use approved
hearing protection. Use approved eye
protection.
(Fig. 5) Use approved protective gloves.
(Fig. 6) Use heavy-duty slip-resistant boots.
(Fig. 7) The arrows show the limits for the position of
the handle.
(Fig. 8) The product can cause objects to eject,
which can cause injury.
(Fig. 9) Maximum speed of the output shaft.
881 - 001 - 10.10.2018 9
Page 10
(Fig. 10) Keep a minimum of 15 m / 50 ft distance to
(Fig. 11) Risk of blade thrust if the cutting equipment
(Fig. 12) Air purge bulb.
(Fig. 13) Choke.
(Fig. 14) Keep all parts of your body away from the
(Fig. 15) Noise emission to the environment refer to
(Fig. 16) The product agrees with the applicable EC
(Fig. 17) The product agrees with the applicable EAC
The rating
plate
shows the
serial number. yyyy is
the production year,
ww is the
production
week and
xxxxx is
the serial
number.
persons and animals during operation of the
product.
touches an object that it does not
immediately cut. The product can cut off
body parts. Keep a minimum of 15 m / 50 ft
distance to persons and animals during
operation of the product.
hot surfaces.
the European Community's Directive. The
emission of the product is specified in the
Technical data chapter and on the label.
directives.
directives.
yyyywwxxxxx
Note: Other symbols/decals on the product refer to
certification requirements for other commercial areas.
Product liability
As referred to in the product liability laws, we are not
liable for damages that our product causes if:
• the product is incorrectly repaired.
• the product is repaired with parts that are not from
the manufacturer or not approved by the
manufacturer.
• the product has an accessory that is not from the
manufacturer or not approved by the manufacturer.
• the product is not repaired at an approved service
center or by an approved authority.
EU V
WARNING: Tampering with the engine
voids the EU type-approval of this product.
Safety
Safety definitions
Warnings, cautions and notes are used to point out
specially important parts of the manual.
WARNING: Used if there is a risk of injury or
death for the operator or bystanders if the
instructions in the manual are not obeyed.
CAUTION: Used if there is a risk of damage
to the product, other materials or the
adjacent area if the instructions in the
manual are not obeyed.
Note: Used to give more information that is necessary in
a given situation.
10 881 - 001 - 10.10.2018
Vibration safety
This product is for occasional operation only.
Continuous or regular operation of the product can
cause “white finger” or equivalent medical problems
from vibrations. Examine the condition of your hands
and fingers if you operate the product continuously or
regularly. If your hands or fingers have discoloration,
have pain, tingle, or are numb, stop work and speak to a
physician immediately.
General safety instructions
WARNING: Read the warning instructions
that follow before you use the product.
• Use the product correctly. Injury or death is a
possible result of incorrect use. Only use the product
Page 11
for the tasks found in this manual. Do not use the
product for other tasks.
• Obey the instructions in this manual. Obey the safety
symbols and the safety instructions. If the operator
does not obey the instructions and the symbols,
injury, damage or death is a possible result.
• Do not discard this manual. Use the instructions to
assemble, to operate and to keep your product in
good condition. Use the instructions for correct
installation of attachments and accessories. Only
use approved attachments and accessories.
• Do not use a damaged product. Obey the
maintenance schedule. Only do the maintenance
work that you find an instruction about in this
manual. An approved service center must do all
other maintenance work.
• This manual cannot include all situations that can
occur when you use the product. Be careful and use
your common sense. Do not operate the product or
do maintenance on the product if you are not sure
about of the situation. Speak to a product expert,
your dealer, service agent or approved service
center for information.
• Disconnect the spark plug cable before you
assemble the product, put the product into storage or
do maintenance.
• Do not use the product if it is changed from its initial
specification. Do not change a part of the product
without approval from the manufacturer. Only use
parts approved by the manufacturer. Injury or death
is a possible result of incorrect maintenance.
• Do not breathe in the fumes from the engine. Longterm inhalation of the engine's exhaust fumes is a
health risk.
• Do not start the product indoors or near flammable
material. The exhaust fumes are hot and can contain
a spark which can start a fire. Not sufficient airflow
can cause injury or death because of asphyxiation or
carbon monoxide.
• When you use this product the engine makes an
electromagnetic field. The electromagnetic field can
cause damage to medical implants. Speak to your
physician and medical implant manufacturer before
you operate the product.
• Do not let a child operate the product. Do not let a
person without knowledge of the instructions operate
the product.
• Make sure that you always monitor a person, with
decreased physical capacity or mental capacity, that
uses the product. A responsible adult must be there
at all times.
• Lock the product in an area that children and
unapproved persons cannot access.
• The product can eject objects and cause injuries.
Obey the safety instructions to decrease the risk of
injury or death.
• Do not go away from the product when the engine is
on.
• The operator of the product is responsible if an
accident occurs.
• Make sure that parts are not damaged before you
use the product.
• Make sure that you are at minimum 15 m (50 ft)
away from other persons or animals before you use
the product. Make sure that persons in the adjacent
area know that you will use the product.
• Refer to national or local laws. They can prevent or
decrease the operation of the product in some
conditions.
• Do not use the product if you are fatigued or
influenced by alcohol, drugs or medicine. They can
have effects on your vision, alertness, coordination
or judgment.
Safety instructions for assembly
WARNING: Read the warning instructions
that follow before you use the product.
• Remove the spark plug cap from the spark plug
before you assemble the product.
• Use approved protective gloves.
• Make sure that you assemble the cover and shaft
correctly before you start the engine.
• The drive disc and support flange must engage
correctly in the center hole of the cutting attachment.
A cutting attachment that is attached incorrectly can
cause serious injury or death of the operator or
others.
• To operate the product safely and prevent injury to
the operator or other persons, the product must
always be attached correctly to the harness.
Safety instructions for operation
WARNING: Read the warning instructions
that follow before you use the product.
• Make sure the product is fully assembled before you
use it.
• Before a start, move the product 3 m / 10 ft away
from the position where you filled the fuel tank. Put
the product on a flat surface. Make sure that the
cutting attachment does not touch the ground or
other objects.
• The product can cause objects to eject, which can
cause damage to the eyes. Always use an approved
eye protection when you operate the product.
• Be careful, a child can come near the product
without your knowledge during operation.
• Do not operate the product if there are persons in
the work area. Stop the product if a person goes into
the work area.
• Make sure that you are always in control of the
product.
881 - 001 - 10.10.2018
11
Page 12
• Do not use the product if you cannot receive aid if an
accident occurs. Always make sure others know you
will operate the product before you start to operate
the product.
• Do not turn with the product before you make sure
that no persons or animals are in the safety area.
• Remove all unwanted materials from the work area
before you start. If the cutting attachment hits an
object, the object can eject and cause injury or
damage. Unwanted material can wind around the
cutting attachment and cause damage.
• Do not use the product in bad weather (fog, rain,
strong winds, risk of lightning or other weather
conditions.). Dangerous conditions (such as slippery
surfaces) can occur because of bad weather.
• Make sure that you can move freely and work in a
stable position.
(Fig. 18)
• Make sure that you cannot fall when you use the
product. Do not tilt when you operate the product.
• Always hold the product with your two hands. Hold
the product on the right side of your body.
(Fig. 19)
• Operate the product with the cutting attachment
below your waist.
• If the choke control is in the choke position when the
engine starts, the cutting attachment starts to turn.
• Do not touch the bevel gear after the engine stops.
The bevel gear is hot after the engine stops. Hot
areas can cause injury.
• Stop the engine before you move the product.
• Do not put down the product with the engine on.
• Before you remove the unwanted materials from the
product, stop the engine and wait until the cutting
attachment stops. Let the cutting attachment stop
before you or an aid remove the cut material.
Personal protective equipment
WARNING: Read the warning instructions
that follow before you use the product.
• Always use correct personal protective equipment
when you operate the product. The personal
protective equipment does not erase the risk of
injury. The personal protective equipment decreases
the grade of injury if an accident occurs.
• Always use an approved eye protection while you
operate the product.
• Do not operate the product with bare feet or with
open shoes. Always use heavy-duty slip-resistant
boots.
• Use heavy, long pants.
• If it is necessary, use approved protective gloves.
• Use a helmet if it is possible that objects fall on your
head.
• Always use approved ear protection while you
operate the product. Noise for a long period can
cause noise-induced hearing loss.
• Make sure that you have a first aid kit near.
Safety devices on the product
WARNING: Read the warning instructions
that follow before you use the product.
• Do not use a product with defective safety devices.
• Do a check of the safety devices regularly. Refer to
Product overview on page 9
• If the safety devices are defective, speak to your
Husqvarna servicing dealer.
Throttle trigger lockout
The throttle trigger lockout locks the throttle trigger.
(Fig. 20)
Push the throttle trigger lockout (A) to release the
throttle trigger (B). When you release the handle, the
throttle trigger lockout and the throttle trigger go back to
their initial positions.
1. Make sure that the throttle trigger (B) is locked at idle
when you release the throttle trigger lockout (A).
2. Push the throttle trigger lockout (A) and make sure
that it goes back to its initial position when you
release it.
3. Push the throttle trigger (B) and make sure that it
goes back to its initial position when you release it.
Start the engine, and then apply full throttle. Release the
throttle trigger and examine if the cutting attachment
stops. If the cutting attachment turns with the throttle in
the idle position, examine the idle adjustment screw of
the carburetor.
Stop switch
Start the engine. Make sure that the engine stops when
you move the stop switch to the stop position.
(Fig. 21)
Cutting attachment guard
The cutting attachment guard prevents a loose object to
eject in the direction of the operator.
(Fig. 22)
Examine the cutting attachment guard for damage and
replace if it is damaged. Only use the approved guard
for the cutting attachment.
Muffler
• Do not use an engine with a damaged muffler. A
damaged muffler increases the noise level and the
risk of fire. Keep a fire extinguisher near.
• Examine regularly that the muffler is attached to the
product.
.
12
881 - 001 - 10.10.2018
Page 13
• Do not touch the engine or the muffler when then
engine is on. Do not touch the engine or the muffler
for a while after the engine stops. Hot surfaces can
cause injuries.
• A hot muffler can cause a fire. Be careful, if you use
the product near flammable liquids or fumes.
• Do not touch the parts in the muffler, if the muffler is
damaged. The parts can contain some carcinogenic
chemicals.
Locknut
The locknut is used to lock some types of cutting
attachment.
(Fig. 23)
When you install the locknut, tighten it in the opposite
direction to operation direction of the cutting attachment.
Harness release function
WARNING: Do not use the harness if the
release function is defective. Make sure that
the harness release function operates
correctly when you adjust the product.
The harness release function is at the front of the
product. The harness straps must always stay at the
correct position.
(Fig. 24)
In an emergency, the harness release function helps
you to safely release from the product.
Cutting attachment
WARNING: Read the warning instructions
that follow before you use the product.
• Do the regular maintenance. Let an approved
service center regularly examine the cutting
attachment to do adjustments or repairs.
• The performance of the cutting attachment
increases.
• The life of the cutting attachment increases.
• The risk of accidents decreases.
• Only use an approved cutting attachment guard. For
more information, see
• Do not use a damaged cutting attachment.
Grass blades and grass cutters
• Use the product with an approved grass blade. Do
not use a grass blade without proper installation of
all required parts. Make sure that the installation is
done correctly and that the proper parts are used.
Inproper installation may cause the blade to fly off
and seriously injure the operator or the bystanders.
• Wear protective gloves when you handle or do
maintenance on the blade.
Accessories on page 21
.
• Use head protection when you operate a product
with a grass blade.
• Grass blades and grass cutters are used to cut
rough grass.
• A grass blade can cause injury while it continues to
spin after the engine is stopped or the throttle trigger
is released. Make sure that the grass blade has
completely stopped rotating before any
maintenance.
• Stop the engine before you do work on the cutting
attachment. Make sure the cutting attachment fully
stops. Disconnect the lead from the spark plug.
• Only use an approved cutting attachment or a
correctly sharpened blade.
• Keep the teeth of the blade correctly sharpened.
(Fig. 25)
• Do not use a damaged cutting attachment.
• Attach the transport guard to the grass blade when
you transport or store the product.
Blade thrust
• A blade thrust is a sudden movement of the product
to the side, forward or rearward. A blade thrust
occurs when the grass blade or saw blade hits an
object that cannot be cut. In areas where it is not
easy to see the material being cut the risk of blade
thrust increases.
• When a blade thrust occurs, there is a risk that the
product or the operator moves out of position. A
blade that moves can hit bystanders and there is a
risk of injuries.
• If a blade is bent, has cracks, is broken or damaged,
discard the blade.
• Use a sharp blade. The risk of blade thrust increases
when a blade is not sharp.
Fuel safety
WARNING: Read the warning instructions
that follow before you use the product.
• Do not mix the fuel indoor or near a heat source.
• Do not start the product if there is fuel or engine oil
on the product. Remove the unwanted fuel/oil and let
the product dry. Remove unwanted fuel from the
product.
• If you spill fuel on your clothing, change clothing
immediately.
• Do not get fuel on your body, it can cause injury. If
you get fuel on your body, use a soap and water to
remove the fuel.
• Do not start the engine if you spill oil or fuel on the
product or on your body.
• Do not start the product if the engine has a leak.
Examine the engine for leaks regularly.
• Be careful with fuel. Fuel is flammable and the fumes
are explosive and can cause injuries or death.
881 - 001 - 10.10.2018
13
Page 14
• Do not breathe in the fuel fumes, it can cause injury.
Make sure that there is a sufficient airflow.
• Do not smoke near the fuel or the engine.
• Do not put warm objects near the fuel or the engine.
• Do not add the fuel when the engine is on.
• Make sure that the engine is cool before you refuel.
• Before you refuel, open the fuel tank cap slowly and
release the pressure carefully.
• Do not add fuel to the engine in an indoor area. Not
sufficient airflow can cause injury or death because
of asphyxiation or carbon monoxide.
• Tighten the fuel tank cap carefully or a fire can
occur.
• Move the product at a minimum of 3 m (10 ft) from
the position where you filled the tank before a start.
• Do not put too much fuel in the fuel tank.
• Make sure that a leak cannot occur when you move
the product or fuel container.
• Do not put the product or a fuel container where
there is an open flame, spark or pilot light. Make
sure that the storage area does not contain an open
flame.
• Only use approved containers when you move the
fuel or put the fuel into storage.
• Empty the fuel tank before long-term storage. Obey
the local law on where to dispose fuel.
Assembly
Introduction
WARNING: Before you assemble the
product, you must read and understand the
safety chapter.
WARNING: Remove the spark plug cable
from the spark plug before you assemble the
product.
To assemble the handlebar
1. Remove the screw behind the throttle handle. (Fig.
26)
2. Move the throttle handle to the right side of the
handlebar.
3. Align the hole behind the throttle handle with the
hole in the handlebar.
4. Put the screw go through the holes. Tighten the
screw.
5. Attach the handlebar between the arrows on the
shaft. Tighten the screw. (Fig. 27)
To attach the harness clamp
1. Put the harness clamp on the shaft with the loop of
the harness clamp up. Put the harness clamp above
the arrows on the shaft.
• Clean the product before long-term storage.
• Remove the spark plug cable before you put the
product into storage to make sure that the engine
does not start accidentally.
Safety instructions for maintenance
WARNING: Read the warning instructions
that follow before you do maintenance on
the product.
• Do only the maintenance and servicing given in this
operator's manual. Let professional servicing
personnel do all other servicing and repairs.
• Regularly do the safety checks, maintenance and
service instructions given in this manual. Regular
maintenance increases the life of the product and
decreases the risk of accidents. Refer to
Maintenance schedule on page 17
• If the safety checks in this operator's manual is not
approved after you do maintenance, speak to your
servicing dealer. We guarantee that there are
professional repairs and servicing available for your
product.
2. Put the throttle wire in the groove of the harness
clamp at bottom.
3. Align the harness clamp screw holes.
4. Attach 2 screws into the screw holes.
5. Tighten the screws.
for instructions.
To assemble the cutting attachment
To assemble the cutting attachment guard
1. Put the cutting attachment guard (A) onto the shaft.
(Fig. 28)
2. Put the bracket (B) in the slot on the cutting
attachment guard.
3. Attach the bolt (C) through the hole on the bracket to
the cutting attachment guard.
To assemble the grass blade
1. Make sure that the cutting attachment guard (A) is
attached to the product. Refer to
cutting attachment guard on page 14
2. Put the locking pin (B) in the hole to lock the shaft.
3. Put the blade (E), support cup (F) and support flange
(G) on the output shaft (D).
4. Make sure that the drive disc (C) engages correctly
in the center hole of the blade. (Fig. 30)
To assemble the
. (Fig. 29)
14 881 - 001 - 10.10.2018
Page 15
5. Put the locknut (H) on the output shaft. Hold the
shaft of the combination wrench near the cutting
attachment guard. Turn the combination wrench
counterclockwise to tighten the locknut. Torque the
locknut to 35-50 Nm / 26-36 ft/lb.
6. Remove the locking pin.
To attach the trimmer head
1. Make sure that the cutting attachment guard (A) is
attached to the product. Refer to
cutting attachment guard on page 14
To assemble the
. (Fig. 31)
Operation
Introduction
WARNING: Before you operate the product,
you must read and understand the safety
chapter.
Fuel
This product has a two-stroke engine.
CAUTION: Incorrect type of fuel can result
in engine damage. Use a mixture of gasoline
and two-stroke oil.
Premixed fuel
• Use Husqvarna premixed alkylate fuel of a good
quality, for best performance and extension of the
engine life. This fuel contains less harmful chemicals
compared to regular fuel, which decreases harmful
exhaust fumes. The quantity of remains after
combustion is lower with this fuel, which keeps the
components of the engine more clean.
To mix fuel
Gasoline
CAUTION: Do not use gasoline with an
octane number less than 90 RON (87 AKI).
This can cause damage to the product.
CAUTION: Do not use gasoline with more
than 10% ethanol concentration (E10). This
can cause damage to the product.
• Always use new unleaded gasoline with a minimum
octane number of 90 RON (87 AKI) and with less
than 10% ethanol concentration (E10).
• Use gasoline with a higher octane number if you
frequently use the product at continuously high
engine speed.
2. Make sure that the drive disc (C) is attached to the
output shaft (D).
3. Put the locking pin (B) in the hole to lock the shaft.
4. Put the trimmer head (E) on the output shaft.
5. Turn the trimmer head counterclockwise to tighten it
to the output shaft. (Fig. 32)
6. Remove the locking pin.
Two-stroke oil
• For best results and performance use Husqvarna
two-stroke oil.
• If Husqvarna two-stroke oil is not available, use a
two-stroke oil of good quality for air-cooled engines.
Speak to your servicing dealer to select the correct
oil.
CAUTION: Do not use two-stroke oil for
water-cooled outboard engines, also
referred to as outboard oil. Do not use oil
for four-stroke engines.
To mix gasoline and two-stroke oil
Gasoline, liter Two-stroke
oil, liter
2% (50:1)
5 0.10
10 0.20
15 0.30
20 0.40
CAUTION: Small errors can influence the
ratio of the mixture drastically when you mix
small quantities of fuel. Measure the quantity
of oil carefully and make sure that you get
the correct mixture.
(Fig. 33)
1. Fill half the quantity of gasoline in a clean container
for fuel.
2. Add the full quantity of oil.
3. Shake the fuel mixture.
4. Add the remaining quantity of gasoline to the
container.
5. Carefully shake the fuel mixture.
881 - 001 - 10.10.2018
15
Page 16

CAUTION: Do not mix fuel for more than 1
month at a time.
To add fuel
• Always use a fuel container with an antispill valve.
• If there is some fuel on the container, remove the
unwanted fuel and let the container dry.
• Make sure that the area near the fuel tank cap is
clean.
• Shake the fuel container before you add the fuel
mixture to the fuel tank.
To do a run-in
• During the first 10 hours of operation, do not apply
full throttle without load for extended periods.
To start and stop
To examine before start
1. Make sure that the product has no missing,
damaged, loose or worn parts.
2. Make sure that nuts, screws and bolts are tightened.
3. Make sure that the blades or trimmer head is not
damaged.
4. Make sure that the locknut is tightened. Refer to
examine the locknut on page 18
5. Make sure that the air filter is not clogged.
6. Make sure that the safety devices on the product is
not defective.
7. Make sure that the product has no fuel leaks.
.
To adjust the harness
WARNING:
correctly attached to the harness. Do not
use a defective harness.
1. Put on the harness.
2. Connect the product to the harness.
3. Adjust the harness for the best work position.
4. Adjust the side straps to make the product weigh
equally on your shoulders. (Fig. 34)
5. Adjust the harness until the cutting attachment is
parallel to the ground.
6. Let the cutting attachment lightly touch the ground.
Adjust the harness clamp to balance the product
correctly.
If you use a grass blade, it must balance
Note:
approximately 10 cm /4 in above the ground.
The product must always be
To start a cold engine
1. Push the air purge bulb 10 times. (Fig. 35)
To
2. Pull the choke control up. (Fig. 36)
3. Hold the body of the product on the ground with your
left hand. (Fig. 37) Do not step on the product. Pull
the starter rope handle slowly until you feel some
resistance. Then pull the starter rope handle with
force.
Note: Do not pull the throttle trigger while you start
the engine.
4. Continue to pull the starter rope handle until the
engine starts or tries to start (max. 3 pulls). If the
engine starts or tries to start, push the choke control
down. Continue to pull until the engine starts. Wait
60 seconds after a start before you pull the throttle
trigger.
CAUTION: Do not pull the starter rope
until it stops. Do not let go of the starter
rope when it is fully extended. Release
the starter rope slowly. Failure to obey
these instructions can cause damage to
the engine.
To start a warm engine
1. Push the air purge bulb 10 times.
2. Pull the starter rope until the engine starts.
To start the engine when the fuel is too hot
If the product does not start, the fuel can be too hot.
Note: Always use new fuel and decrease the operation
time during warm weather.
1. Put the product in a cool area away from open
sunlight.
2. Let the product cool down for 20 minutes at
minimum.
3. Press the air purge bulb again and again for 10-15
seconds.
4. Obey the procedure to start a cold engine. Refer to
To start a cold engine on page 16
.
To stop
• Push the stop switch to stop the engine. (Fig. 21)
The stop switch automatically goes back to its
Note:
initial position.
To operate the grass trimmer
CAUTION:
engine to idle speed after each operation. A
long period at full throttle without a load on
the engine can cause damage to the engine.
Note: Clean the cover of the trimmer head when you
attach a new trimmer line to prevent vibrations. Examine
Make sure that you slow the
16 881 - 001 - 10.10.2018
Page 17

other parts of the trimmer head and clean if it is
necessary.
To trim the grass
1. Hold the trimmer head immediately above the
ground at an angle. Do not push the trimmer line into
the grass. (Fig. 38)
2. Decrease the length of the trimmer line by 10-12
cm / 4-4.75 in.
3. Decrease the engine speed to decrease the risk of
damage to plants.
4. Use 80 % throttle when you cut grass near objects.
(Fig. 39)
To cut the grass
1. Make sure that the grass trimmer line is parallel to
the ground when you cut the grass. (Fig. 40)
2. Do not push the trimmer head to the ground. This
can cause damage to the product
3. Move the product from side to side when you cut
grass. Use full throttle. (Fig. 41)
To clear grass with a grass blade
1. Grass blades and grass cutters must not be used on
woody stems.
2. A grass blade is used for all types of tall or coarse
grass.
3. The grass is cut down with a sideways, swinging
movement, where the movement from right-to-left is
the clearing stoke and the movement from left-toright is the return stoke. Let the left-hand side of the
blade (between 8 and 12 o'clock) do the cutting.
4. if the blade is angled to the left when clearing grass,
the grass will collect in a line, which makes it easier
to collect, e.g. by raking.
5. Try to work rhythmically. Stand firmly with your feet
apart. Move forward after the return stoke and stand
firmly again.
6. Let the support cup rest lightly against the ground. It
is used to protect the blade from hitting the ground.
7. Reduce the risk of material wrapping around the
blade by always work at full throttle and avoid the
previously cut material during the return stoke.
8. Stop the engine, unclip the harness and place the
machine on the ground before you start to collect the
cut material.
Grass trimmer head
• Make sure that you wind the grass trimmer line
tightly and equally around the drum to decrease the
vibration.
• Use only the approved grass trimmer heads and
grass trimmer lines. See
• Use a correct length of the grass trimmer line. A long
grass trimmer line uses more engine power than a
short grass trimmer line.
• Make sure that the cutter on the cutting attachment
guard is not damaged.
• Soak the grass trimmer line in water for 2 days
before you attach the grass trimmer line to the
product. This increases the life of the grass trimmer
line.
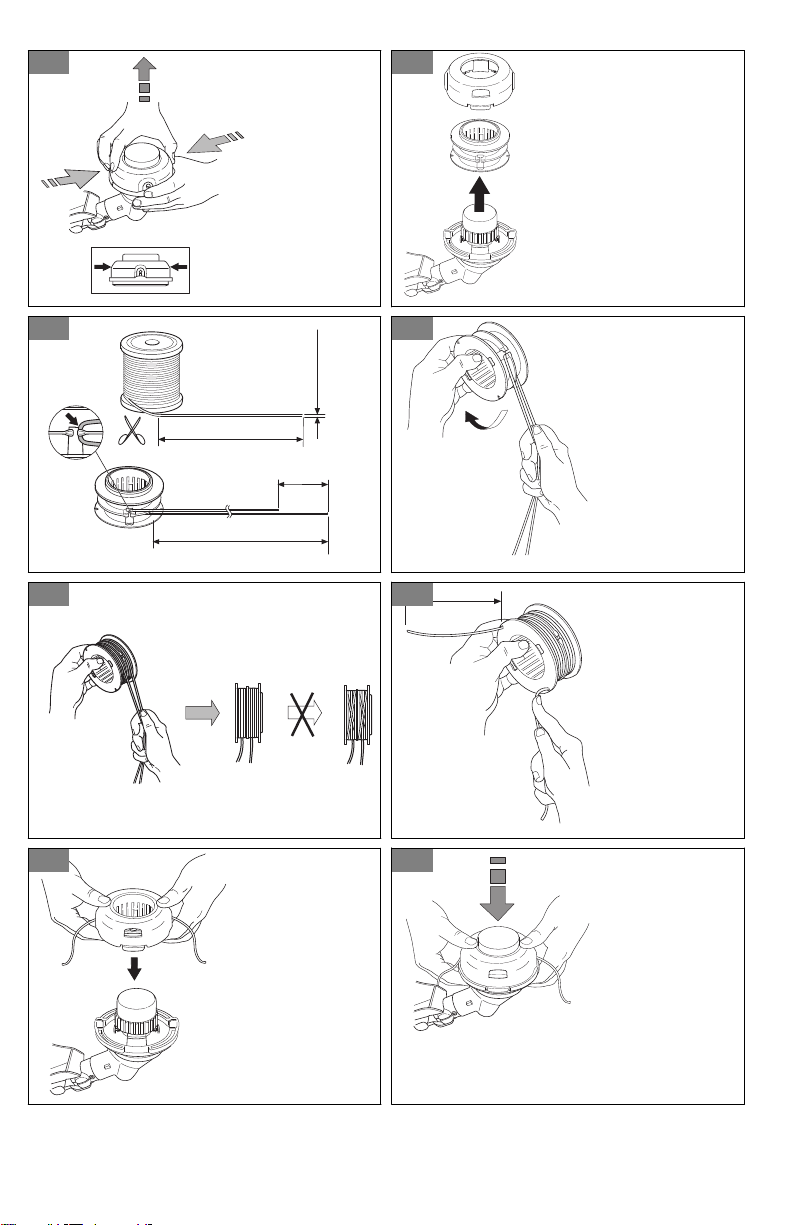
To replace the trimmer line
(Fig. 42)
(Fig. 43)
(Fig. 44)
(Fig. 45)
(Fig. 46)
(Fig. 47)
(Fig. 48)
(Fig. 49)
Accessories on page 21
.
Maintenance
Introduction
WARNING: Before you do maintenance,
you must read and understand the safety
chapter.
For all servicing and repair work on the product, special
training is necessary. We guarantee the availability of
professional repairs and servicing. If your dealer is not a
service agent, speak to them for information about the
nearest service agent.
Maintenance schedule
Weekly maintenance
• Clean the external surfaces.
881 - 001 - 10.10.2018 17
• Make sure that the cutting attachment does not
move when on idle speed. Refer to
speed on page 18
• Examine the level of grease in the bevel gear. Refer
to
To add grease to the bevel gear on page 18
• Examine the locknut. Refer to
locknut on page 18
Monthly maintenance
• Make sure that the starter rope handle and the
starter rope is not damaged.
Yearly maintenance
• Examine the spark plug. Refer to
spark plug on page 18
• Clean the external surfaces of the carburetor and its
adjacent areas.
• Clean the cooling system.
.
.
.
To adjust the idle
.
To examine the
To examine the
Page 18
• Examine the spark arrester screen. Refer to
To do
maintenance on the spark arrester screen on page
18
.
• Examine the fuel filter.
• Make sure that the fuel hose is not damaged.
• Make sure that cables and connections on the
product is not damaged.
To adjust the idle speed
• Make sure that the air filter is clean and the air filter
cover is attached before you adjust the idle speed.
• Adjust the idle speed with the idle adjustment screw
T which is identified with "T" mark.
• The idle speed is correct when the engine operates
smoothly in all positions. The idle speed must be
below the speed when the cutting attachment starts
to turn.
1. Turn the idle adjustment screw clockwise until the
cutting attachment starts to turn. (Fig. 50)
2. Turn the idle adjustment screw counterclockwise
until the cutting attachment stops.
To do maintenance on the spark
arrester screen
Use a wire brush to clean the spark arrester screen.
(Fig. 51)
To clean the cooling system
Clean the parts of the cooling system with a brush.
(Fig. 52)
To examine the spark plug
CAUTION:
plug. Make sure that the replacement is the
same as the manufacturer supplied part. An
incorrect spark plug can cause damage to
the product.
1. Examine the spark plug when:
a) the engine is low on power.
b) the engine is not easy to start.
c) the engine does not operate correctly at idle
speed.
2. If, the engine is not easy to start or operate, examine
the spark plug for unwanted materials. To decrease
the risk of unwanted material on the spark plug
electrodes:
a) make sure that the idle speed is correctly
adjusted.
b) make sure that the fuel mixture is correct.
c) make sure that the air filter is clean.
3. Clean the spark plug if it is dirty. Examine that the
electrode gap is correct. (Fig. 53)
4. Replace the spark plug when it is necessary.
Use the recommended spark
To do the maintenance to the air
filter
To clean the air filter
1. Remove the air filter cover and remove the air filter.
(Fig. 54)
2. Clean the air filter with warm soap water. Make sure
that the air filter is dry before you install it.
3. Replace the air filter if it is too dirty to fully clean it.
Always replace a damaged air filter.
4. If your product has a foam air filter, apply air filter oil.
Only apply air filter oil to a foam filter. Do not apply
oil to a felt filter.
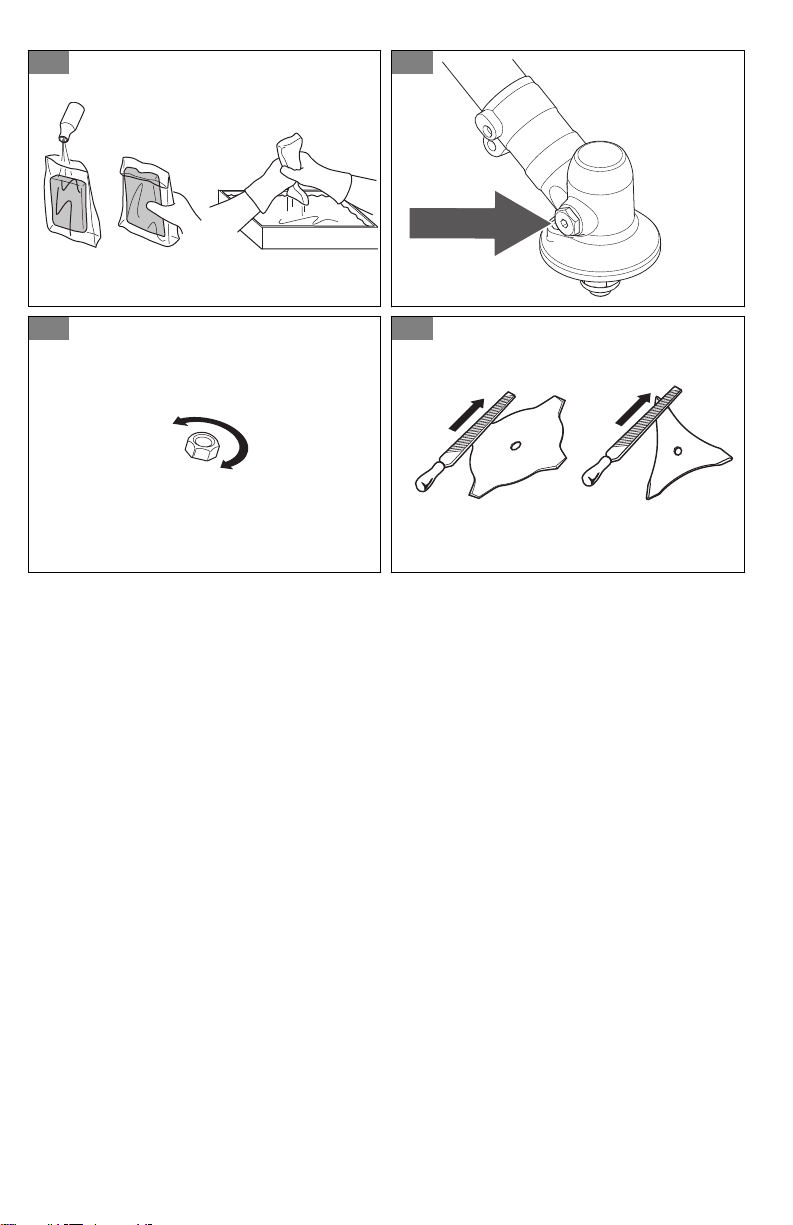
To apply air filter oil to the air filter
CAUTION: Always use special air filter oil on
foam air filters. Do not use other types of oil.
WARNING: Do not get oil on your body.
1. Remove the air filter cover and remove the air filter.
(Fig. 55)
2. Put the air filter in a plastic bag.
3. Put the air filter oil in the plastic bag. (Fig. 56)
4. Push the plastic bag to make sure the oil supplies
equally across the air filter.
5. Push on the air filter, while in the bag, to remove the
air filter oil that is not necessary. Remove the air
filter from the bag.
6. Install the air filter.
To add grease to the bevel gear
Make sure that the bevel gear is filled 3/4 full with bevel
gear grease.
(Fig. 57)
To examine the locknut
CAUTION: Replace the locknut after each
10th use.
1. Turn the locknut counterclockwise to tighten the
locknut. Turn the locknut clockwise to remove the
locknut. (Fig. 58)
2. Make sure that you can not turn the nylon lining of
the locknut with your hands. The nylon lining must
supply a minimum resistance of 1.5 Nm / 1,1 ft/lb.
3. Torque the locknut to 35-50 Nm / 26-36 ft/lb, if the
resistance is below minimum.
18
881 - 001 - 10.10.2018
Page 19

CAUTION: If you tighten the locknut too
much, it can cause damage to the
threads.
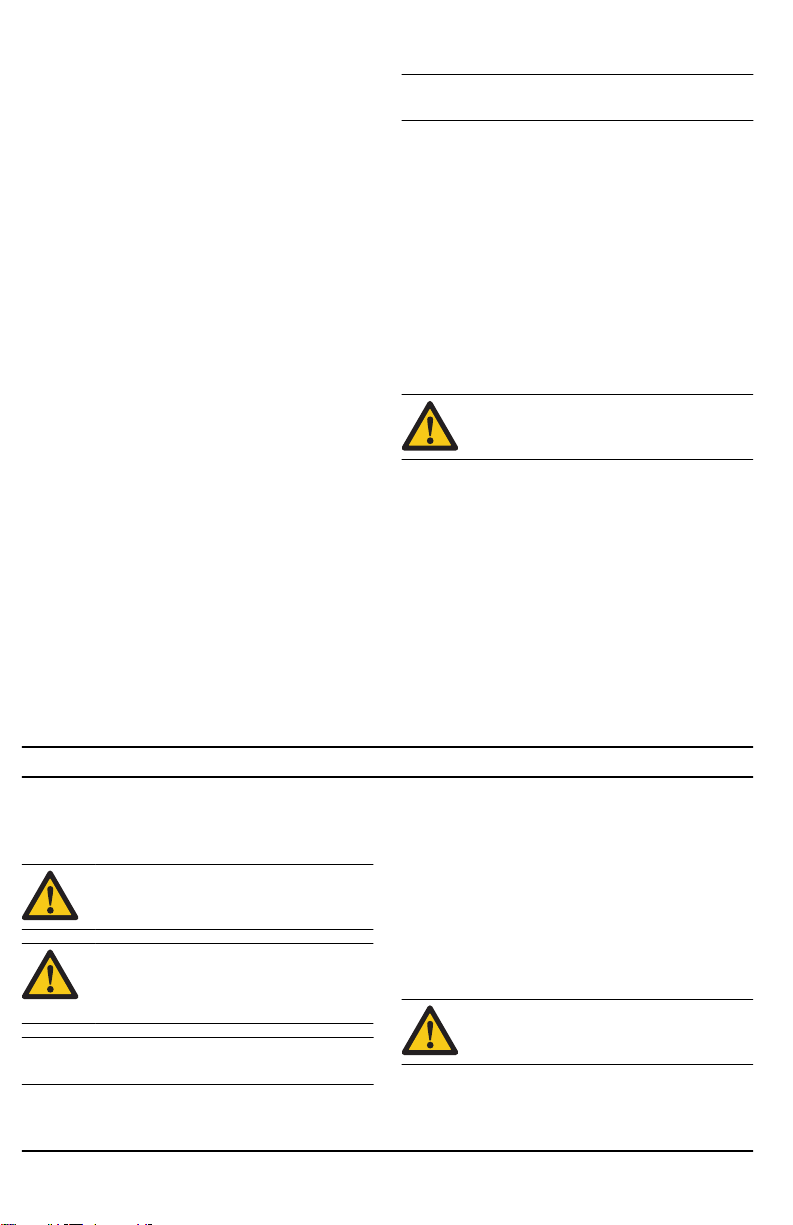
To sharpen the grass knife and
grass blade
WARNING: Stop the engine. Use protective
gloves.
• To sharpen the grass knife or grass blade correctly,
refer to the instructions that come with the cutting
attachment.
• Sharpen all edges equally to keep the balance.
• Use a single-cut flat file. (Fig. 59)
WARNING: Always discard a blade that is
damaged. Do not try to make a bent or
twisted blade straight and use it again.
Troubleshooting
The engine does not start
Check Possible cause Procedure
Stop switch. The stop switch is in the stop position. Set the stop switch to the start position.
Starter pawls. The starter pawls cannot move freely. Remove the starter cover and clean around
Fuel tank. Incorrect fuel type. Drain the fuel tank and fill with correct fuel.
Spark plug. The spark plug is dirty or wet. Make sure that the spark plug is dry and
The spark plug electrode gap is incorrect. Clean the spark plug. Make sure that the
The spark plug is loose. Tighten the spark plug.
the starter pawls.
Let an approved service agent help you.
clean.
electrode gap is correct. Make sure that the
spark plug has a supressor.
Refer to technical data for correct electrode
gap.
The engine starts but stops again
Check
Fuel tank Incorrect fuel type. Empty the fuel tank and fill it with cor-
Air filter The air filter is clogged. Clean the air filter.
Possible cause Procedure
rect fuel.
Transportation, storage and disposal
Transportation and storage
• Let the product cool before transportation or storage.
881 - 001 - 10.10.2018 19
• Remove the spark plug cap before long-term
storage.
• Attach the product during transportation. Make sure
that it cannot move.
Page 20

• Make sure that there is no risk of fuel leaks, fuel
fumes, sparks or flames during transportation and
• Clean and do servicing on the product before longterm storage.
storage.
• Attach the transport guard during transportation and
storage.
Technical data
Technical data
325R
A05328CBHV
Engine
Cylinder displacement, cm
Idle speed, rpm 2800 - 3200
Recommended max. speed, rpm 8000
Power / Max. engine output, acc. to ISO 8893, kW/hp @ rpm 0.9/1.2 @ 8000
Catalytic converter muffler No
Speed of output shaft, rpm 7200
Ignition system
Spark plug Husqvarna HQT-4
Electrode gap, mm 0.5
Fuel system
Fuel tank capacity, l/cm³ 0.343/343
Product dimensions
Weight, kg 5.5
Noise emissions
Sound power level, measured, equipped with grass blade, dB(A) 108
Sound power level, measured, equipped with trimmer head, dB(A) 110
Sound power level, guaranteed (LWA), equipped with grass blade, dB(A) 112
Sound power level, guaranteed (LWA), equipped with trimmer head, dB(A) 114
Sound levels
2
Sound pressure level at operator's ear, equipped with grass blade, dB(A) 96
3
1
27.6
1
Noise emissions in the environment measured as sound power (LWA) in conformity with EC directive 2000/14/
EC. Reported sound power level for the product has been measured with the original cutting attachment that
gives the highest level. The difference between guaranteed and measured sound power is that the guaranteed sound power also includes dispersion in the measurement result and the variations between different
products of the same model according to Directive 2000/14/EC.
2
Reported data for equivalent sound pressure level for the product has a typical statistical dispersion (standard
deviation) of 1 dB (A).
20 881 - 001 - 10.10.2018
Page 21

Sound pressure level at operator's ear, equipped with trimmer head, dB(A) 95
Vibration levels
Equivalent vibration level (ahv, eq), equipped with grass blade, left handle, m/s
Equivalent vibration level (ahv, eq), equipped with grass blade, right handle, m/s
Equivalent vibration level (ahv, eq) equipped with trimmer head, left handle, m/s
Equivalent vibration level (ahv, eq) equipped with trimmer head, right handle, m/s
3
2
2
2
2
Accessories
Accessories
325R
A05328CBHV
5.1
5.7
4.1
4.9
Approved accessories
Type Cutting attachment guard
Threaded shaft M10L
Trimmer head T35, 2.4 mm 588 11 79-01
Grass blade Grass 255-4, Ø 250 588 11 79-01
3
Reported data for equivalent vibration level has a typical statistical dispersion (standard deviation) of 1 m/s2.
881 - 001 - 10.10.2018 21
Page 22

EC Declaration of Conformity
Contents of the EC declaration of
conformity
We, Husqvarna AB, SE 561 82 Huskvarna, SWEDEN,
declare under our sole responsibility that the
represented product:
Description Gasoline Grass Trim-
Brand Husqvarna
Platform / Type / Model Platform A05328CBHV,
Batch Serial number dating 2018
complies fully with the following EU directives and
regulations:
Directive/Regulation
2006/42/EC “relating to machinery”
2014/30/EU “relating to electromagnet-
2000/14/EC “relating to outdoor noise”
2011/65/EU “restriction of use of cer-
mer / Brushcutter
representing model 325R.
and onwards.
Description
ic compatibility”
tain hazardous substances”
Harmonized standards and/or technical specifications
applied are as follows: EN ISO 12100, EN ISO 11806-1,
CISPR 12, ISO 14982, EN 50581:2012 .
In accordance with directive 2000/14/EC, Annex V, the
declared sound values are stated in the technical data
section of this manual and in the signed EC Declaration
of Conformity.
TÜV Rheinland N.A. has carried out a voluntary
examination on behalf of Husqvarna AB, providing a
Certificate of conformity to EC Council directive
2006/42/EC for machinery.
The certificate, as provided on the signed EC
Declaration of Conformity, is applicable to all
manufacturing locations and Countries of Origin, as
stated on the product.
The supplied gasoline grass trimmer / brushcutter
conforms to the example that underwent examination.
22
881 - 001 - 10.10.2018
Page 23

Contenido
Introducción................................................................ 23
Seguridad.................................................................... 24
Montaje........................................................................ 29
Funcionamiento.......................................................... 30
Mantenimiento............................................................ 32
Introducción
Solución de problemas.............................................. 34
Transporte, almacenamiento y eliminación de
residuos.......................................................................35
Datos técnicos............................................................ 35
Accesorios.................................................................. 37
Declaración de conformidad CE............................... 38
Manual del usuario
El idioma original de este manual de usuario es el
inglés. Los manuales de usuario en otros idiomas son
traducciones del inglés.
Uso específico
Utilice el producto con una hoja para hierba o un
cabezal de corte para cortar distintos tipos de
vegetación.
Descripción general de la máquina
(Fig. 1)
1. Cabezal de corte
2. Tapón de llenado de grasa
3. Engranaje angulado
4. Protección del equipo de corte
5. Eje
6. Interruptor de detención
7. Gatillo del acelerador
8. Bloqueo del acelerador
9. Manillar
10. Abrazadera de arnés
11. Cuerpo del mecanismo de arranque
12. Sombrerete de bujía y bujía
13. Empuñadura de la cuerda de arranque
14. Depósito de combustible
15. Cubierta del filtro de aire
16. Bulbo de la purga de aire
17. Estrangulador
18. Ajuste del mango
19. Cable del acelerador
20. Botón de ralentí rápido
21. Arnés
22. Llave combinada
23. Manual del usuario
24. Protección para transporte
25. Hoja
26. Cazoleta de apoyo
Tenga en cuenta: Las normativas nacionales pueden
establecer un límite para el funcionamiento del
producto.
27. Brida de apoyo
28. Contratuerca
29. Disco de arrastre
30. Pasador de bloqueo
31. Llave hexagonal
Símbolos en la máquina
(Fig. 2) ADVERTENCIA: Este producto es peligroso.
El operador o las personas que se
encuentran cerca pueden sufrir lesiones o la
muerte si el producto no se utiliza con
cuidado y correctamente. Para evitar daños
graves al operador o a las personas que se
encuentran cerca, lea y obedezca todas las
instrucciones de seguridad en el manual de
usuario.
(Fig. 3) Lea atentamente el manual del usuario y
asegúrese de que entiende las instrucciones
antes de usar el producto.
(Fig. 4) Utilice un casco protector en lugares donde
puedan caer objetos sobre usted. Use
protección auricular aprobada. Use
protección ocular aprobada.
(Fig. 5) Use guantes protectores homologados.
(Fig. 6) Use botas antideslizantes de servicio
pesado.
881 - 001 - 10.10.2018 23
Page 24
(Fig. 7) Las flechas muestran los límites de la
(Fig. 8) El producto puede provocar que los objetos
(Fig. 9) Régimen máximo del eje de salida.
(Fig. 10) Manténgase a un mínimo de 15 m/50 pies
(Fig. 11) Existe riesgo de lanzada de la hoja si el
(Fig. 12) Bulbo de la purga de aire.
(Fig. 13) Estrangulador.
(Fig. 14) Mantenga todas las partes del cuerpo lejos
(Fig. 15) Emisiones de ruido en el medioambiente
(Fig. 16) Este producto cumple con las directivas CE
(Fig. 17) El producto cumple con las directivas EAC
La placa de
características muestra el número de
serie. yyyy
es el año
de fabricación, ww
es la semana de producción y
xxxxx es el
número de
serie.
posición de la palanca.
salgan expulsados, lo que puede causar
lesiones.
de distancia de las personas y los animales
mientras el producto esté funcionando.
equipo de corte entra en contacto con un
objeto que no se corta inmediatamente. El
producto puede cortar partes del cuerpo.
Manténgase a un mínimo de 15 m/50 pies
de distancia de las personas y los animales
mientras el producto esté funcionando.
de las superficies calientes.
según la Directiva de la Comunidad
Europea. Las emisiones que genera el
producto se especifican en el capítulo Datos
técnicos y en la etiqueta.
pertinentes.
pertinentes.
yyyywwxxxxx
Tenga en cuenta: Otros símbolos o etiquetas del
producto hacen referencia a requisitos de certificación
para otras zonas comerciales.
Responsabilidad del fabricante
Como se menciona en las leyes de responsabilidad del
fabricante, no nos hacemos responsables de los daños
que cause nuestro producto si:
• el producto se repara incorrectamente
• el producto se repara con piezas que no son del
fabricante o que este no autoriza
• el producto tiene un accesorio que no es del
fabricante o que este no autoriza
• el producto no se repara en un centro de servicio
autorizado o por una autoridad aprobada.
EU V
ADVERTENCIA: La manipulación del motor
anula la homologación de este producto en
la UE.
Seguridad
Definiciones de seguridad
Las advertencias, precauciones y notas se utilizan para
señalar las piezas particularmente importantes del
manual.
24 881 - 001 - 10.10.2018
ADVERTENCIA: Se utilizan para señalar el
riesgo de lesiones graves o mortales para el
operador o para aquellos que se encuentren
cerca si no se siguen las instrucciones del
manual.
Page 25
AVISO: Se utilizan para señalar el riesgo de
dañar la máquina, otros materiales o el área
adyacente si no se siguen las instrucciones
del manual.
Tenga en cuenta: Se utilizan para entregar más
información necesaria en situaciones particulares.
Seguridad de vibración
Este producto solo sirve para su uso ocasional. El
funcionamiento continuo o regular del producto puede
provocar la enfermedad de Dupuytren o problemas
médicos equivalentes producto de las vibraciones.
Examine la condición de sus manos y dedos si opera el
producto regular o continuamente. Si sus manos o
dedos tienen una decoloración, dolor, cosquilleo o se
sienten entumecidos, detenga el trabajo y póngase en
contacto con un médico de inmediato.
Instrucciones generales de
seguridad
ADVERTENCIA: Lea atentamente las
instrucciones de advertencia siguientes
antes de usar el producto.
• Utilice el producto correctamente. Las lesiones
graves o fatales son un posible resultado de un uso
incorrecto. Solo utilice el producto para las tareas
que aparecen en este manual. No utilice el producto
para otras tareas.
• Obedezca las instrucciones contenidas en este
manual. Obedezca los símbolos y las instrucciones
de seguridad. Si el usuario no obedece las
instrucciones y los símbolos, es posible que se
produzcan daños y lesiones tanto graves como
fatales.
• No deseche este manual. Utilice las instrucciones
para montar, operar y mantener el producto en buen
estado. Utilice las instrucciones para la correcta
instalación de piezas y accesorios. Utilice solamente
piezas y accesorios homologados.
• No use un producto dañado. Cumpla con el
programa de mantenimiento. Realice solamente las
tareas de mantenimiento en las que se detallan
instrucciones en este manual. Un centro de servicio
autorizado debe realizar todos los demás trabajos
de mantenimiento.
• En este manual no se pueden abarcar todas las
situaciones que pueden ocurrir cuando se utiliza el
producto. Tenga cuidado y use el sentido común. No
haga funcionar el producto ni le realice
mantenimiento si no está seguro de la situación.
Hable con un experto en el producto, su distribuidor,
el agente de servicio o un centro de servicio
autorizado para obtener más información.
• Desconecte el cable de la bujía antes de montar o
almacenar el producto, o realizar tareas de
mantenimiento.
• No utilice el producto si cambia su especificación
inicial. No cambie una parte del producto sin la
aprobación del fabricante. Utilice solo piezas
aprobadas por el fabricante. Las lesiones graves o
fatales son un posible resultado de un
mantenimiento incorrecto.
• No respire los humos del motor. La inhalación
prolongada de los gases de escape es un riesgo
para la salud.
• No encienda el producto en interiores o cerca de
materiales inflamables. Los gases de escape están
muy calientes y pueden crear incendios debido a la
creación de chispas. Un flujo de aire insuficiente
puede causar lesiones graves o fatales por asfixia o
debido al monóxido de carbono.
• Cuando utilice este producto, el motor crea un
campo electromagnético. El campo
electromagnético puede causar daños a implantes
médicos. Hable con su médico y fabricante del
implante antes de utilizar el producto.
• No deje que un niño utilice el producto. No permita
que una persona que no conozca las instrucciones
utilice el producto.
• Asegúrese de supervisar siempre a una persona con
capacidades físicas o mentales limitadas que utilice
el producto. Debe haber un adulto responsable en
todo momento.
• Mantenga el producto en un área a la cual los niños
y las personas no autorizadas no puedan acceder.
• El producto puede expulsar objetos y causar
lesiones. Siga las instrucciones de seguridad para
reducir el riesgo de lesiones graves o fatales.
• No se aleje del producto cuando el motor esté en
marcha.
• El operador del producto es responsable en caso de
un accidente.
• Asegúrese de que las piezas no estén dañadas
antes de utilizar el producto.
• Asegúrese de estar al menos a 15 m (50 pies) de
distancia de otras personas o animales antes de
utilizar el producto. Asegúrese de que las personas
en el área adyacente sepan que utilizará el
producto.
• Consulte las leyes locales o nacionales. Estas
pueden evitar o disminuir el funcionamiento del
producto en algunas condiciones.
• No utilice el producto si está cansado o bajo la
influencia de alcohol, drogas o medicamentos.
Pueden tener efectos sobre su visión, estado de
alerta, coordinación o criterio.
881 - 001 - 10.10.2018
25
Page 26

Instrucciones de seguridad para el
montaje
ADVERTENCIA: Lea atentamente las
instrucciones de advertencia siguientes
antes de usar el producto.
• Retire el sombrerete de bujía de la bujía antes de
montar el producto.
• Use guantes protectores homologados.
• Antes de arrancar el motor, asegúrese de montar la
cubierta y el eje de forma adecuada.
• El disco de arrastre y la brida de apoyo se deben
acoplar correctamente en el orificio central del
equipo de corte. Un equipo de corte que se fija de
forma incorrecta puede causar daños graves o
incluso la muerte del operador u otras personas.
• Para utilizar el producto de forma segura y evitar
daños al operador u otras personas, el producto
siempre debe estar correctamente fijado al arnés.
Instrucciones de seguridad para el
funcionamiento
ADVERTENCIA: Lea atentamente las
instrucciones de advertencia siguientes
antes de usar el producto.
• Asegúrese de que el producto esté completamente
montado antes de usarlo.
• Antes de comenzar, mueva el producto 3 m/10 pies
de distancia desde la posición donde llenó el
depósito de combustible. Coloque el producto sobre
una superficie plana. Asegúrese de que el equipo de
corte no toque el suelo u otros objetos.
• El producto puede provocar que los objetos salgan
expulsados, lo que puede causar daños a los ojos.
Use siempre protección ocular autorizada cuando
utilice el producto.
• Tenga cuidado, un niño puede acercarse al producto
sin que lo note mientras se encuentra en
funcionamiento.
• No utilice el producto si hay personas en el área de
trabajo. Detenga el producto si una persona entra al
área de trabajo.
• Asegúrese de estar siempre en control del producto.
• No utilice el producto si no puede recibir ayuda en
caso de un accidente. Asegúrese siempre de que
los demás sepan que va a utilizar el producto antes
de comenzar a utilizarlo.
• No gire con el producto sin asegurarse de que no
haya personas ni animales en la zona de seguridad.
• Retire todos los materiales no deseados del área de
trabajo antes de empezar. Si el equipo de corte
choca contra un objeto, el objeto se puede expulsar
y causar lesiones o daños. El material no deseado
puede enredarse en el equipo de corte y causar
daños.
• No utilice el producto en malas condiciones
climáticas (niebla, lluvia, vientos fuertes, riesgo de
rayos u otros tipos de condiciones climáticas). Las
condiciones peligrosas (como superficies
resbaladizas) se pueden producir debido al mal
clima.
• Asegúrese de poder moverse libremente y trabajar
en una posición estable.
(Fig. 18)
• Asegúrese de no correr riesgos de caídas cuando
utilice el producto. No se incline cuando utilice el
producto.
• Siempre sostenga el producto con las dos manos.
Mantenga el producto al lado derecho de su cuerpo.
(Fig. 19)
• Utilice el producto con el equipo de corte por debajo
de la cintura.
• Si el estrangulador está en la posición de
estrangulamiento cuando el motor arranca, el equipo
de corte comienza a girar.
• No toque el engranaje angulado después de que se
detenga el motor. El engranaje angulado está
caliente después de que el motor se detiene. Las
áreas calientes pueden causar lesiones.
• Detenga el motor antes de mover el producto.
• No deje el producto en el suelo con el motor
encendido.
• Antes de eliminar el material no deseado del
producto, detenga el motor y espere hasta que el
equipo de corte se detenga. Deje que el equipo de
corte se detenga antes de que usted o un ayudante
quiten el material de corte.
Equipo de protección personal
ADVERTENCIA:
instrucciones de advertencia siguientes
antes de usar el producto.
• Utilice siempre el equipo de protección personal
adecuado cuando utilice el producto. El equipo de
protección personal no elimina el riesgo de lesiones.
El equipo de protección personal disminuye el grado
de la lesión en caso de un accidente.
• Use siempre protección ocular autorizada cuando
utilice el producto.
• No utilice el producto con los pies descalzos o con
zapatos abiertos. Use siempre botas antideslizantes
de servicio pesado.
• Utilice pantalones largos y gruesos.
• Si es necesario, utilice guantes de protección
aprobados.
• Use un casco si existe la posibilidad de que caigan
objetos sobre su cabeza.
• Use siempre protectores auriculares autorizados
cuando utilice el producto. Escuchar ruidos durante
un largo período puede provocar pérdida de
audición inducida por el ruido.
• Asegúrese de tener un botiquín de primeros auxilios.
Lea atentamente las
26
881 - 001 - 10.10.2018
Page 27
Dispositivos de seguridad en el producto
ADVERTENCIA: Lea atentamente las
instrucciones de advertencia siguientes
antes de usar el producto.
• No utilice un producto con dispositivos de seguridad
defectuosos.
• Revise los dispositivos de seguridad de forma
regular. Consulte
en la página 23
• Si los dispositivos de seguridad están defectuosos,
comuníquese con su concesionario de servicio
Husqvarna.
Bloqueo del acelerador
El bloqueo del acelerador bloquea el acelerador.
(Fig. 20)
Presione el bloqueo del acelerador (A) para liberar el
acelerador (B). Cuando suelta la manija, tanto el
bloqueo del acelerador como el acelerador vuelven a
sus posiciones iniciales.
1. Asegúrese de que el acelerador (B) se encuentre
bloqueado al ralentí cuando suelte el bloqueo del
acelerador (A).
2. Presione el bloqueo del acelerador (A) y asegúrese
de que vuelva a su posición inicial cuando lo suelte.
3. Presione el acelerador (B) y asegúrese de que
vuelva a su posición inicial cuando lo suelte.
Encienda el motor y aplique la aceleración máxima.
Suelte el acelerador y examine si el equipo de corte se
detiene. Si el equipo de corte gira con el acelerador en
la posición de ralentí, examine el tornillo de ajuste de
ralentí del carburador.
Interruptor de detención
Arranque el motor. Asegúrese de que el motor se
detenga cuando mueva el interruptor de detención a la
posición de detención.
(Fig. 21)
Protección del equipo de corte
La protección del equipo de corte evita que un objeto
suelto salga expulsado en dirección al usuario.
(Fig. 22)
Examine la protección del equipo de corte en busca de
daños y reemplácela si está dañada. Utilice solamente
la protección aprobada para el equipo de corte.
Silenciador
• No utilice un motor con un silenciador dañado. Un
silenciador dañado aumenta el nivel de ruido y el
riesgo de incendio. Mantenga un extintor de
incendios cerca.
• Examine frecuentemente que el silenciador esté
unido al producto.
Descripción general de la máquina
.
• No toque el motor o el silenciador cuando el motor
esté en marcha. No toque el motor o el silenciador
por un tiempo después de que el motor se detenga.
Las superficies calientes pueden causar lesiones.
• Un silenciador caliente puede provocar un incendio.
Tenga cuidado si utiliza el producto cerca de
líquidos inflamables o gases.
• No toque las piezas del silenciador si el silenciador
está dañado. Las piezas pueden contener algunos
productos químicos cancerígenos.
Contratuerca
La contratuerca se utiliza para bloquear algunos tipos
de equipos de corte.
(Fig. 23)
Cuando instale la contratuerca, apriétela en la dirección
opuesta a la dirección de funcionamiento del equipo de
corte.
Función de liberación del arnés
ADVERTENCIA: No utilice el arnés si la
función de liberación no funciona
correctamente. Asegúrese de que la función
de liberación del arnés funcione
correctamente cuando ajuste el producto.
La función de liberación del arnés se encuentra en la
parte frontal del producto. Las correas del arnés
siempre deben permanecer en la posición correcta.
(Fig. 24)
En caso de emergencia, la función de liberación del
arnés lo ayuda a liberarse de forma segura del
producto.
Equipo de corte
ADVERTENCIA:
instrucciones de advertencia siguientes
antes de usar el producto.
• Realice el mantenimiento periódico. Permita que un
centro de servicio autorizado examine
frecuentemente el equipo de corte para realizar
ajustes o reparaciones.
• El rendimiento del equipo de corte aumenta.
• La vida útil del equipo de corte aumenta.
• Disminuye el riesgo de accidentes.
• Solamente utilice una protección aprobada para el
equipo de corte. Para obtener más información,
consulte
• No utilice un equipo de corte dañado.
Hojas para hierba y cortadoras de césped
• Utilice el producto con una hoja para hierba
Accesorios en la página 37
aprobada. No utilice una hoja para hierba sin una
instalación adecuada de todas las piezas
necesarias. Asegúrese de que la instalación se haya
Lea atentamente las
.
881 - 001 - 10.10.2018
27
Page 28

realizado correctamente y que se utilicen las piezas
correctas. Una instalación inadecuada puede
provocar que la hoja salga disparada y hiera
gravemente al usuario o a los transeúntes.
• Use guantes protectores cuando manipule la hoja o
cuando realice el mantenimiento de esta.
• Utilice protección para la cabeza cuando opere un
producto con una hoja para hierba.
• Las hojas para hierba y las recortadoras de césped
se utilizan para cortar la hierba áspera.
• Una hoja para hierba puede provocar lesiones
cuando sigue girando después de que se detiene el
motor o de que se libera el acelerador. Asegúrese
de que la hoja para hierba haya dejado de girar
completamente antes de realizar cualquier
operación de mantenimiento.
• Detenga el motor antes de trabajar en el equipo de
corte. Asegúrese de que el equipo de corte se
detenga completamente. Desconecte el cable de la
bujía.
• Utilice solamente un equipo de corte aprobado o una
hoja correctamente afilada.
• Mantenga los dientes de la hoja afilados
correctamente.
(Fig. 25)
• No utilice un equipo de corte dañado.
• Instale la protección para transportes a la hoja para
hierba cuando transporte o almacene el producto.
Lanzada de hoja
• Una lanzada de hoja es un movimiento repentino del
producto hacia el lado, hacia delante o hacia atrás.
La lanzada de hoja se produce cuando la hoja para
hierba o la hoja de sierra golpean un objeto que no
se puede cortar. En zonas donde no es fácil ver el
material que se está cortando, el riesgo de lanzada
de hoja aumenta.
• Cuando se produce una lanzada de hoja, existe el
riesgo de que el producto o el usuario se salgan de
su posición. Una hoja que se mueve puede golpear
a los transeúntes, y existe un riesgo de lesiones.
• Si una hoja está doblada, tiene grietas, está rota o
dañada, deséchela.
• Utilice una hoja afilada. El riesgo de lanzada de hoja
aumenta cuando una hoja no está afilada.
Seguridad de combustible
ADVERTENCIA:
instrucciones de advertencia siguientes
antes de usar el producto.
• No mezcle el combustible en interiores o cerca de
una fuente de calor.
• No arranque el producto si hay combustible o aceite
de motor en el producto. Quite el combustible o
aceite no deseado y deje secar el producto. Quite el
combustible no deseado del producto.
Lea atentamente las
• Si derrama combustible en su ropa, cámbiese la
ropa inmediatamente.
• No permita que le caiga combustible en el cuerpo,
ya que puede causar lesiones. Si le cae combustible
en el cuerpo, utilice jabón y agua para quitarlo.
• No arranque el motor si derrama aceite o
combustible en el producto o en su cuerpo.
• No arranque el producto si el motor tiene una fuga.
Examine frecuentemente el motor en busca de
fugas.
• Tenga cuidado con el combustible. El combustible
es inflamable y los gases son explosivos y pueden
causar lesiones graves o fatales.
• No respire los gases del combustible, ya que
pueden causar lesiones. Asegúrese de que haya
suficiente flujo de aire.
• No fume cerca del combustible o del motor.
• No coloque objetos calientes cerca del combustible
o del motor.
• No agregue combustible cuando el motor esté en
marcha.
• Asegúrese de que el motor se enfríe antes de llenar
el depósito de combustible.
• Antes de llenar el depósito de combustible, abra
lentamente la tapa del depósito de combustible y
libere la presión con cuidado.
• No agregue combustible al motor en un área interior.
Un flujo de aire insuficiente puede causar lesiones
graves o fatales por asfixia o debido al monóxido de
carbono.
• Apriete la tapa del depósito de combustible con
cuidado para evitar incendios.
• Mueva el producto a un mínimo de 3 m (10 pies) de
la posición en la que se llenó el depósito antes de
empezar.
• No ponga demasiado combustible en el depósito de
combustible.
• Asegúrese de que no se puedan provocar fugas
cuando mueva el producto o el recipiente de
combustible.
• No coloque el producto ni un recipiente de
combustible donde haya una llama expuesta, una
chispa o una fuente de calor. Asegúrese de que no
haya una llama expuesta en el área de
almacenamiento.
• Utilice solamente contenedores aprobados cuando
mueva el combustible o coloque el combustible en el
almacenamiento.
• Vacíe el depósito de combustible antes de un
almacenamiento a largo plazo. Cumpla con las leyes
locales en cuanto al lugar en dónde se puede
deshacer del combustible.
• Limpie el producto antes de un almacenamiento a
largo plazo.
• Retire el cable de la bujía antes de almacenar el
producto, para asegurarse de que el motor no
arranque accidentalmente.
28
881 - 001 - 10.10.2018
Page 29

Instrucciones de seguridad para el
mantenimiento
ADVERTENCIA: Lea atentamente las
instrucciones de advertencia antes de
realizar mantenimiento al producto.
• Realice solo el mantenimiento y el servicio que se
indican en este manual del usuario. Deje que el
personal de mantenimiento profesional realice todas
las demás tareas de mantenimiento y reparación.
Montaje
Introducción
ADVERTENCIA: Antes de montar el
producto, debe leer y entender el contenido
del capítulo sobre seguridad.
ADVERTENCIA: Retire el cable de la bujía
de la bujía antes de montar el producto.
Montaje del manillar
1. Retire el tornillo situado detrás del acelerador. (Fig.
26)
2. Mueva el acelerador al lado derecho del manillar.
3. Alinee el orificio detrás del acelerador con el del
manillar.
4. Pase el tornillo por los orificios. Ajuste el tornillo.
5. Fije el manillar entre las flechas del eje. Ajuste el
tornillo. (Fig. 27)
Fijación de la abrazadera del arnés
1. Coloque la abrazadera del arnés en el eje con el
lazo de la abrazadera del arnés hacia arriba.
Coloque la abrazadera del arnés por encima de las
flechas del eje.
2. Coloque el cable del acelerador en la ranura de la
parte inferior de la abrazadera del arnés.
3. Alinee los orificios del tornillo de la abrazadera del
arnés.
4. Coloque dos tornillos en los orificios.
5. Apriete los tornillos.
Para montar el equipo de corte
Montaje de la protección del equipo de
corte
1. Coloque la protección del equipo de corte (A) en
equipo de corte en el eje. (Fig. 28)
• Realice periódicamente las comprobaciones de
seguridad, el mantenimiento y las instrucciones de
servicio que se señalan en este manual. El
mantenimiento periódico aumenta la vida útil del
producto y disminuye el riesgo de accidentes.
Consulte
Programa de mantenimiento en la página
32
para obtener instrucciones.
• Si las comprobaciones de seguridad de este manual
de instrucciones no se aprueban después de realizar
el mantenimiento, consulte con su concesionario de
servicio. Garantizamos que existen reparaciones y
servicios profesionales disponibles para su producto.
2. Coloque el soporte (B) en la ranura de la protección
del equipo de corte.
3. Fije el perno (C) a través del orificio en el soporte
hasta la protección del equipo de corte.
Montaje de la hoja para hierba
1. Asegúrese de que la protección del equipo de corte
(A) quede fija en el producto. Consulte
protección del equipo de corte en la página 29
29)
2. Coloque el pasador de bloqueo (B) en el orificio para
bloquear el eje.
3. Coloque la hoja (E), la cazoleta de apoyo (F) y la
brida de apoyo (G) en el eje de salida (D).
4. Asegúrese de que el disco de arrastre (C) se acople
correctamente en el agujero central de la hoja. (Fig.
30)
5. Coloque la contratuerca (H) en el eje de salida.
Sostenga el eje de la llave combinada cerca de la
protección del equipo de corte. Gire la llave
combinada hacia la izquierda para apretar la
contratuerca. Apriete la contratuerca entre 35 y
50 Nm (entre 26 y 36 pies/lb).
6. Retire el pasador de bloqueo.
Montaje de la
. (Fig.
Fijación del cabezal de corte
1. Asegúrese de que la protección del equipo de corte
(A) quede fija en el producto. Consulte
protección del equipo de corte en la página 29
31)
2. Asegúrese de que el disco de arrastre (C) quede fijo
en el eje de salida (D).
3. Coloque el pasador de bloqueo (B) en el orificio para
bloquear el eje.
4. Coloque el cabezal de corte (E) en el eje de salida.
5. Gire el cabezal de corte hacia la izquierda para
apretarlo al eje de salida. (Fig. 32)
6. Retire el pasador de bloqueo.
Montaje de la
. (Fig.
881 - 001 - 10.10.2018
29
Page 30

Funcionamiento
Introducción
ADVERTENCIA: Antes de utilizar el
producto, debe leer y entender el capítulo
sobre seguridad.
Combustible
Este producto tiene un motor de dos tiempos.
AVISO: Usar el tipo incorrecto de
combustible puede causar daños en el
motor. Utilice una mezcla de gasolina y de
aceite para motores de dos tiempos.
Combustible premezclado
• Utilice combustible de alquilato premezclado
Husqvarna de buena calidad para obtener el mejor
rendimiento y prolongar la vida útil del motor. Este
combustible contiene menos químicos dañinos en
comparación con el combustible normal, lo cual
disminuye los gases de escape dañinos. La cantidad
de restos después de la combustión es menor con
este combustible, que mantiene más limpios los
componentes del motor.
Para mezclar combustible
Gasolina
AVISO: No utilice gasolina con un octanaje
inferior a 90 RON (87 AKI). Esto puede
provocar daños al producto.
AVISO: No utilice gasolina con más de un
10 % de etanol concentrado (E10). Esto
puede provocar daños al producto.
• Siempre utilice gasolina sin plomo nueva con un
octanaje mínimo de 90 RON (87 AKI) y con menos
de un 10 % de etanol concentrado (E10).
• Use gasolina con un octanaje superior si con
frecuencia utiliza el producto a velocidades de motor
continuamente altas.
Aceite para motores de dos tiempos
• Para obtener los mejores resultados y el mejor
rendimiento, utilice aceite para motores de dos
tiempos Husqvarna.
• Si el aceite para motores de dos tiempos Husqvarna
no está disponible, utilice un aceite para motores de
dos tiempos de buena calidad para motores
enfriados por aire. Contáctese con su concesionario
de servicio para seleccionar el aceite correcto.
No utilice aceite para motores
AVISO:
de dos tiempos para motores fueraborda
refrigerados por agua, también conocido
como aceite para fueraborda. No utilice
aceite para motores de cuatro tiempos.
Para mezclar gasolina y aceite para motores de dos
tiempos
Gasolina, litros
5 0,10
10 0,20
15 0,30
20 0,40
AVISO: Los errores pequeños pueden influir
drásticamente en la proporción de la mezcla
cuando se mezclan cantidades pequeñas de
combustible. Mida cuidadosamente la
cantidad de aceite y asegúrese de obtener
la mezcla correcta.
(Fig. 33)
1. Llene la mitad de la cantidad de gasolina en un
recipiente limpio para combustible.
2. Agregue la cantidad total de aceite.
3. Agite la mezcla de combustible.
4. Agregue la cantidad restante de gasolina al
recipiente.
5. Agite cuidadosamente la mezcla de combustible.
AVISO: No mezcle el combustible durante
más de 1 mes cada vez.
Aceite para
motores de
dos tiempos,
litro
2 % (50:1)
Para agregar combustible
• Utilice siempre un recipiente de combustible con una
válvula antiderrames.
• Si hay combustible en el recipiente, retire el
combustible no deseado y deje que el contenedor se
seque.
• Asegúrese de que el área cerca de la tapa del
depósito de combustible está limpia.
• Agite el recipiente de combustible antes de agregar
la mezcla de combustible al tanque de combustible.
30
881 - 001 - 10.10.2018
Page 31

Para hacer un rodaje
• Durante las primeras 10 horas de funcionamiento,
no aplique aceleración máxima sin carga por
períodos extensos.
Para arrancar y detener
Qué se debe examinar antes de comenzar
1. Asegúrese de que al producto no le falten piezas ni
que tenga piezas dañadas, flojas o desgastadas.
2. Asegúrese de que las tuercas, los pernos y los
tornillos estén apretados.
3. Asegúrese de que ni las hojas ni el cabezal de corte
presenten daños.
4. Asegúrese de que la contratuerca esté apretada.
Consulte
Comprobación de la contratuerca en la
página 34
5. Asegúrese de que el filtro de aire no esté obstruido.
6. Asegúrese de que los dispositivos de seguridad del
producto no estén defectuosos.
7. Asegúrese de que el producto no presente fugas de
combustible.
Para ajustar el arnés
1. Colóquese el arnés.
2. Conecte el producto al arnés.
3. Ajuste el arnés para alcanzar la mejor posición de
trabajo.
4. Ajuste las correas laterales para que el peso del
producto sea el mismo sobre sus hombros. (Fig. 34)
5. Ajuste el arnés hasta que el equipo de corte esté
paralelo al suelo.
6. Deje que el equipo de corte toque ligeramente el
suelo. Ajuste la abrazadera del arnés para equilibrar
el producto correctamente.
Tenga en cuenta:
debe equilibrarse aproximadamente 10 cm/4 sobre
el suelo.
Para arrancar un motor frío
1. Presione el bulbo de la bomba de combustible de
aire 10 veces. (Fig. 35)
2. Tire del estrangulador hacia arriba. (Fig. 36)
3. Mantenga el cuerpo del producto en el suelo con la
mano izquierda. (Fig. 37) No se pare sobre el
producto. Tire de la empuñadura de la cuerda de
arranque lentamente hasta que sienta resistencia. A
continuación, tire de la empuñadura de la cuerda de
arranque con fuerza.
.
ADVERTENCIA: El producto debe estar
siempre correctamente fijado al arnés. No
utilice un arnés defectuoso.
Si utiliza una hoja para hierba,
Tenga en cuenta:
arranque el motor.
4. Siga tirando la empuñadura de la cuerda de
arranque hasta que el motor arranque o intente
arrancar (máximo de 3 tiros). Si el motor arranca o
intenta arrancar, mantenga presionado el
estrangulador. Siga tirando hasta que arranque el
motor. Espere 60 segundos después del arranque
antes de tirar el acelerador.
No tire del acelerador cuando
AVISO: No tire de la cuerda de arranque
hasta que se detenga. No suelte la
cuerda de arranque cuando esté
totalmente extendida. Suelte la cuerda
de arranque lentamente. Si no se siguen
estas instrucciones, se pueden producir
daños en el motor.
Para arrancar un motor caliente
1. Presione el bulbo de la bomba de combustible de
aire 10 veces.
2. Tire de la cuerda de arranque hasta que el motor
arranque.
Para arrancar el motor cuando el
combustible está demasiado caliente
Si el producto no arranca, el combustible puede estar
demasiado caliente.
Tenga en cuenta: Siempre utilice combustible nuevo y
disminuya el tiempo de funcionamiento durante clima
cálido.
1. Coloque el producto en un área fresca lejos de la luz
solar directa.
2. Permita que el producto se enfríe durante
20 minutos como mínimo.
3. Presione el bulbo de la bomba de combustible
repetidamente entre 10 y 15 segundos.
4. Obedezca el procedimiento para arrancar un motor
frío. Consulte
página 31
Para arrancar un motor frío en la
.
Para detenerlo
• Presione el interruptor de detención para detener el
motor. (Fig. 21)
Tenga en cuenta:
automáticamente a su posición inicial.
El interruptor de detención regresa
Para utilizar la recortadora de
césped
Asegúrese de disminuir la velocidad
AVISO:
del motor hasta un régimen de ralentí
después de cada operación. Un largo
período con el acelerador al máximo y sin
881 - 001 - 10.10.2018 31
Page 32

carga en el motor puede causar daños a
este último.
Tenga en cuenta: Limpie la cubierta del cabezal de
corte cuando coloque un nuevo hilo para la recortadora
a fin de evitar las vibraciones. Examine otras piezas del
cabezal de corte y límpielas si es necesario.
Para recortar el césped
1. Sostenga el cabezal de corte inmediatamente sobre
el nivel del suelo en un ángulo. No presione el hilo
de la recortadora de césped contra este último. (Fig.
38)
2. Disminuya la longitud del hilo de la recortadora entre
10 y 12 cm/4 y 4,75”.
3. Disminuya el régimen del motor para reducir el
riesgo de dañar las plantas.
4. Use una aceleración de un 80 % cuando corte el
césped cerca de objetos. (Fig. 39)
Para cortar el césped
1. Asegúrese de que el hilo de la recortadora de
césped esté paralelo al suelo cuando corte. (Fig. 40)
2. No presione el cabezal de corte contra el suelo. Esto
puede dañar el producto
3. Mueva el producto de un lado a otro cuando corte.
Utilice la aceleración máxima. (Fig. 41)
Para arrancar el pasto con una hoja para
hierba
1. Las hojas para hierba y las cortadoras de césped no
se deben utilizar para tallos leñosos.
2. Una hoja para hierba se utiliza para todos los tipos
de césped alto o hierba gruesa.
3. La hierba se corta con un movimiento lateral y
oscilante, donde el movimiento de derecha a
izquierda es de limpieza y el movimiento de
izquierda a derecha es de retorno. Deje que el lado
izquierdo de la hoja (levemente inclinada hacia la
izquierda y hacia el frente) realice el corte.
4. Si la hoja está inclinada a la izquierda cuando corta
la hierba, esta se acumulará en una línea, lo que
hace que sea más sencillo juntarla, por ejemplo, con
un rastrillo.
5. Intente trabajar a compás. Párese firmemente con
los pies separados. Avance después del movimiento
de retorno y vuelva a pararse firme.
6. Deje que la cazoleta de apoyo descanse
ligeramente sobre el suelo. Se utiliza para evitar que
la hoja golpee el suelo.
7. Reduce el riesgo de que el material envuelva la hoja
trabajando siempre a máxima velocidad y evitando
el material cortado anteriormente durante el
movimiento de retorno.
8. Detenga el motor, desenganche el arnés y coloque
la máquina en el suelo antes de comenzar a juntar el
material cortado.
Cabezal de corte para hierba
• Asegúrese de enrollar el hilo de la recortadora de
césped firme y equitativamente alrededor del tambor
para disminuir la vibración.
• Utilice solamente cabezales e hilos de corte para
hierba aprobados. Consulte
37
.
• Utilice una longitud correcta de hilo para la
recortadora. Un hilo largo para la recortadora utiliza
más potencia del motor que un hilo corto.
• Asegúrese de que la cortadora en la protección del
equipo de corte no está dañada.
• Empape el hilo de la recortadora de césped en agua
durante 2 días antes de conectarlo al producto. Esto
aumenta la vida útil del hilo de la recortadora de
césped.
Para sustituir el hilo de la recortadora
(Fig. 42)
(Fig. 43)
(Fig. 44)
(Fig. 45)
(Fig. 46)
(Fig. 47)
(Fig. 48)
(Fig. 49)
Accesorios en la página
Mantenimiento
Introducción
ADVERTENCIA: Antes de realizar el
mantenimiento, debe leer y entender el
capítulo sobre seguridad.
Para todos los trabajos de mantenimiento y reparación
del producto, se requiere capacitación especial.
Garantizamos la disponibilidad de trabajos de
mantenimiento y reparación profesionales. Si el
32 881 - 001 - 10.10.2018
concesionario no cuenta con un taller de servicio, pídale
información acerca del taller de servicio más cercano.
Programa de mantenimiento
Mantenimiento semanal
• Limpie las superficies externas.
• Asegúrese de que el equipo de corte no se mueva
en régimen de ralentí. Consulte
régimen de ralentí en la página 33
Para ajustar el
.
Page 33

• Examine el nivel de grasa en el engranaje angulado.
Consulte
Para agregar grasa al engranaje angulado
en la página 34
• Examine la contratuerca. Consulte
la contratuerca en la página 34
Mantenimiento mensual
• Asegúrese de que la empuñadura de la cuerda de
arranque y la cuerda de arranque no presenten
daños.
Mantenimiento anual
• Examine la bujía. Consulte
en la página 33
• Limpie las superficies externas del carburador y sus
zonas adyacentes.
• Limpie el sistema de refrigeración.
• Examine la rejilla apagachispas. Consulte
.
Comprobación de
.
Para examinar la bujía
.
Para
realizar tareas de mantenimiento en la rejilla
apagachispas en la página 33
• Examine el filtro de combustible.
• Asegúrese de que la manguera de combustible no
presente daños.
• Asegúrese de que los cables y las conexiones del
producto no presenten daños.
.
Para ajustar el régimen de ralentí
• Asegúrese de que el filtro de aire esté limpio y que
la cubierta del filtro de aire esté instalada antes de
ajustar el régimen de ralentí.
• Ajuste el régimen de ralentí con el tornillo de ajuste
de ralentí T, el cual se identifica con la marca "T".
• El régimen de ralentí es el correcto cuando el motor
funciona correctamente en todas las posiciones. El
régimen de ralentí debe ser inferior a la velocidad
cuando el equipo de corte empieza a girar.
1. Gire el tornillo de ajuste de ralentí hacia la derecha
hasta que el equipo de corte comience a girar. (Fig.
50)
2. Gire el tornillo de ajuste de ralentí hacia la izquierda
hasta que el equipo de corte se detenga.
Para realizar tareas de
mantenimiento en la rejilla
apagachispas
Use un cepillo de alambre para limpiar la rejilla
apagachispas.
(Fig. 51)
Para limpiar el sistema de
refrigeración
Limpie las piezas del sistema de refrigeración con un
cepillo.
(Fig. 52)
Para examinar la bujía
AVISO: Utilice la bujía recomendada.
Asegúrese de que la pieza de reemplazo
sea la misma que la que proporcione el
fabricante. Una bujía incorrecta puede
causar daños al producto.
1. Examine la bujía cuando:
a) el motor tenga poca potencia.
b) el motor no arranque fácilmente.
c) el motor no funcione correctamente a régimen de
ralentí.
2. Si el motor no arranca o funciona fácilmente,
examine la bujía en busca de materiales no
deseados. Para disminuir el riesgo de material no
deseado en los electrodos de la bujía:
a) asegúrese de que el régimen de ralentí esté
ajustado correctamente.
b) asegúrese de que la mezcla de combustible es
la correcta.
c) asegúrese de que el filtro de aire esté limpio.
3. Limpie la bujía si está sucia. Revise que la
separación entre los electrodos sea la correcta. (Fig.
53)
4. Reemplace la bujía cuando sea necesario.
Para realizar el mantenimiento del
filtro de aire
Para limpiar el filtro de aire
1. Quite la cubierta del filtro de aire y retire el filtro de
aire. (Fig. 54)
2. Limpie el filtro de aire con agua jabonosa caliente.
Asegúrese de que el filtro de aire esté seco antes de
instalarlo.
3. Reemplace el filtro de aire si está demasiado sucio
para limpiarlo completamente. Siempre reemplace
un filtro de aire dañado.
4. Si su producto tiene un filtro de aire de espuma,
aplique aceite del filtro de aire. Solo aplique aceite
del filtro de aire a un filtro de espuma. No aplique
aceite a un filtro de fieltro.
Para aplicar aceite del filtro de aire al filtro
de aire
Utilice siempre un aceite especial
AVISO:
de filtros de aire en los filtros de aire de
espuma. No utilice otros tipos de aceite.
ADVERTENCIA: Evite que le caiga aceite
en el cuerpo.
881 - 001 - 10.10.2018 33
Page 34

1. Quite la cubierta del filtro de aire y retire el filtro de
aire. (Fig. 55)
2. Coloque el filtro de aire en una bolsa de plástico.
3. Coloque el aceite del filtro de aire en una bolsa de
plástico. (Fig. 56)
4. Empuje la bolsa de plástico para asegurarse de que
el aceite se distribuya equitativamente en el filtro de
aire.
5. Presione el filtro de aire, mientras se encuentra en la
bolsa, para quitar el aceite que no sea necesario.
Saque el filtro de aire de la bolsa.
6. Instale el filtro de aire.
Para agregar grasa al engranaje
angulado
Asegúrese de que la grasa para engranajes angulados
llene 3/4 del engranaje angulado.
(Fig. 57)
Comprobación de la contratuerca
AVISO: Reemplace la contratuerca después
de cada 10 usos.
1. Gire la contratuerca hacia la izquierda para
apretarla. Gire la contratuerca hacia la derecha para
retirarla. (Fig. 58)
Solución de problemas
2. Asegúrese de que no pueda girar el revestimiento
de nailon de la contratuerca con las manos. El
revestimiento de nailon debe proporcionar una
resistencia mínima de 1,5 Nm (1,1 pie/lb).
3. Si la resistencia es inferior al mínimo, apriete la
contratuerca a 35-50 Nm (26-36 pies/lb).
AVISO: Apretar la contratuerca en
exceso puede provocar daños a las
roscas.
Afilado de la cuchilla para hierba y la
hoja para hierba
ADVERTENCIA: Detenga el motor. Use
guantes protectores.
• Para afilar correctamente la cuchilla para hierba o la
hoja para hierba, consulte las instrucciones que se
incluyen con el equipo de corte.
• Afile todos los bordes de manera uniforme para
mantener el equilibrio.
• Utilice una lima plana simple. (Fig. 59)
ADVERTENCIA: Siempre deseche una hoja
que presente daños. No intente enderezar
una hoja doblada o torcida ni volver a
utilizarla.
El motor no arranca
Verificar Causa posible Procedimiento
Interruptor de detención
Ganchos de arranque
Depósito de combustible
34 881 - 001 - 10.10.2018
El interruptor de detención está en la posición de detención.
Los ganchos de arranque no se pueden
mover libremente.
Tipo de combustible incorrecto Vacíe el depósito de combustible y llénelo
Mueva el interruptor de detención hacia la
posición de arranque.
Retire la cubierta del arranque y limpie alrededor de los ganchos de arranque.
Permita que un taller de servicio aprobado lo
ayude.
con combustible correcto.
Page 35

Verificar Causa posible Procedimiento
Bujía La bujía está sucia o mojada. Asegúrese de que la bujía esté limpia y se-
La distancia entre los electrodos de la bujía
es incorrecta.
La bujía está floja. Ajuste la bujía.
ca.
Limpie la bujía. Asegúrese de que la distancia entre los electrodos sea la correcta. Asegúrese de que la bujía está equipada con un
supresor.
Consulte los datos técnicos para comprobar
la distancia entre los electrodos.
El motor arranca, pero se detiene de nuevo.
Verificar
Depósito de combustible Tipo de combustible incorrecto Vacíe el depósito de combustible y
Filtro de aire El filtro de aire está obstruido. Limpie el filtro de aire.
Causa posible Procedimiento
rellénelo con el combustible correcto.
Transporte, almacenamiento y eliminación de residuos
Transporte y almacenamiento
• Deje enfriar el producto antes de transportarlo o
almacenarlo.
• Retire el sombrerete de bujía antes del
almacenamiento durante un período prolongado.
• Fije el producto durante el transporte. Asegúrese de
que no se mueva.
• Asegúrese de que no existan riesgos de fugas de
combustible, vapores de combustible, chispas ni
llamas durante el transporte y el almacenamiento.
• Fije la protección para transportes durante el
transporte y almacenamiento.
• Limpie y realice mantenimiento en el producto antes
de almacenarlo durante un período prolongado.
Datos técnicos
Datos técnicos
325R
A05328CBHV
Motor
Cilindrada, cm
Régimen de ralentí, rpm 2800 - 3200
Velocidad máxima recomendada, rpm 8000
Potencia/alimentación máx. del motor, según la norma ISO 8893, kW/hp a rpm 0,9/1,2 a 8000
Silenciador con catalizador No
3
27,6
881 - 001 - 10.10.2018 35
Page 36

325R
A05328CBHV
Velocidad de eje de salida, rpm 7200
Sistema de encendido
Bujía Husqvarna HQT-4
Distancia entre los electrodos, mm 0,5
Sistema de combustible
Capacidad del depósito de combustible, l/cm³ 0,343/343
Dimensiones del producto
Peso, kg 5,5
Emisiones sonoras
4
Nivel de potencia acústica, equipado con la hoja para hierba, medido en dB(A) 108
Nivel de potencia acústica, equipado con cabezal de corte, medido en dB(A) 110
Nivel de potencia acústica (LWA) garantizado, equipado con la hoja para hierba, dB(A) 112
Nivel de potencia acústica (LWA) garantizado, equipado con cabezal de corte, dB(A) 114
Niveles acústicos
Nivel de presión acústica en el oído del operador, equipado con hoja para hierba,
5
96
dB(A)
Nivel de presión acústica en el oído del operador, equipado con cabezal de corte,
95
dB(A)
Niveles de vibración
Nivel de vibración equivalente (ahv, eq), equipado con hoja para hierba, mango izquierdo, m/s
Nivel de vibración equivalente (ahv, eq), equipado con hoja para hierba, mango dere-
2
cho, m/s
Nivel de vibración equivalente (ahv, eq), equipado con cabezal de corte, mango izquierdo, m/s
Nivel de vibración equivalente (ahv, eq), equipado con cabezal de corte, mango dere-
2
cho, m/s
6
2
5,1
5,7
2
4,1
4,9
4
Las emisiones sonoras en el medioambiente medidas como potencia acústica (LWA) en conformidad con la
directiva CE 2000/14/CE. El nivel de potencia acústica registrado para el producto se midió con el equipo de
corte original que proporciona el más alto nivel. La diferencia entre la potencia acústica garantizada y medida
es que la potencia acústica garantizada también incluye la dispersión en el resultado de la medición y las variaciones entre los distintos productos del mismo modelo según la directiva 2000/14/CE.
5
Los datos informados para el nivel de presión acústica equivalente del producto tienen una dispersión estadística típica (desviación estándar) de 1 dB (A).
6
Los datos informados para nivel de vibración equivalente tienen una dispersión estadística típica (desviación
estándar) de 1 m/s2.
36 881 - 001 - 10.10.2018
Page 37

Accesorios
Accesorios
Accesorios aprobados Tipo Protección del equipo de corte
Eje roscado M10L
Cabezal de corte T35, 2,4 mm 588 11 79-01
Hoja para hierba Césped 255-4, Ø 250 588 11 79-01
881 - 001 - 10.10.2018 37
Page 38

Declaración de conformidad CE
Contenido de la declaración de
conformidad de CE
En nombre de Husqvarna AB, SE 561 82 Huskvarna,
SUECIA, declaramos bajo nuestra única
responsabilidad que el producto representado:
Descripción Recortadora de césped/
Marca Husqvarna
Plataforma/Tipo/Modelo Plataforma A05328CBHV,
Lote Números de serie del
cumplen plenamente con las siguientes directivas y
normas de la UE:
Directiva/Norma
2006/42/CE “referente a la maquina-
2014/30/UE "referente a la compatibili-
2000/14/CE "referente al ruido exteri-
2011/65/UE "restricción de uso de de-
desbrozadora de gasolina
modelo de representación
325R.
2018 y posteriores.
Descripción
ria"
dad electromagnética"
or"
terminadas sustancias
peligrosas"
Las normas o especificaciones técnicas armonizadas
que se aplican son las siguientes: EN ISO 12100, EN
ISO 11806-1, CISPR 12, ISO 14982, EN 50581:2012.
De conformidad con la directiva 2000/14/CE, Anexo V,
los valores de sonido declarados se indican en la
sección de datos técnicos de este manual y en la
declaración de conformidad CE firmada.
TÜV Rheinland N.A. ha llevado a cabo un examen de
tipo voluntario para Husqvarna AB, que proporciona el
certificado de conformidad con la directiva del Consejo
2006/42/CE para la maquinaria.
El certificado, según lo establecido en la declaración de
conformidad firmada, se aplica a todas las ubicaciones
de fabricación y países de origen, tal y como se declara
en el producto.
La recortadora de césped / desbrozadora de gasolina
suministrada concuerda con el ejemplar sometido a
examen.
38
881 - 001 - 10.10.2018
Page 39

Conteúdo
Introdução................................................................... 39
Segurança................................................................... 40
Montagem....................................................................45
OPERAÇÃO................................................................. 45
Manutenção.................................................................48
Introdução
Solução de problemas............................................... 50
Transporte, armazenamento e descarte...................51
Dados técnicos........................................................... 51
Acessórios.................................................................. 52
DECLARAÇÃO DE CONFORMIDADE DA CE........... 53
Manual do operador
O idioma inicial deste manual do operador é o Inglês.
Os manuais do operador em outros idiomas são
traduções do Inglês.
Uso previsto
Use o produto com um disco de corte de grama ou um
cabeçote de recorte para cortar diferentes tipos de
vegetação.
Visão geral do produto
(Fig. 1)
1. Cabeçote de recorte
2. Tampa do bocal de enchimento de graxa
3. Engrenagem cônica
4. Proteção do acessório para corte
5. Eixo
6. Interruptor de parada
7. Acelerador
8. Trava do acelerador
9. Barra de direção
10. Braçadeira do arnês
11. Alojamento do motor de partida
12. Capa da vela de ignição, vela de ignição
13. Alça da corda de arranque
14. Tanque de combustível
15. Tampa do filtro de ar
16. Bulbo da bomba de combustível
17. Estrangulador
18. Ajuste do cabo
19. Fio do acelerador
20. Botão de marcha lenta
21. Chicote
22. Chave combinada
23. Manual do operador
24. Protetor para transporte
25. Disco
26. Suporte
27. Flange de apoio
28. Contraporca
Observação: Regulamentos nacionais podem limitar o
funcionamento do produto.
29. Disco de acionamento
30. Pino de travamento
31. Chave sextavada
Símbolos no produto
(Fig. 2) AVISO! Este produto é perigoso. Ferimentos
graves ou morte podem ocorrer ao operador
ou a terceiros se o produto não for utilizado
com cuidado e corretamente. Para evitar
ferimentos ao operador ou a terceiros, leia e
respeite todas as instruções de segurança
no manual do usuário.
(Fig. 3) Leia atentamente o manual do operador e
certifique-se de que tenha entendido as
instruções antes de usar.
(Fig. 4) Use um capacete de proteção em locais
onde objetos possam cair sobre você. Use
protetor auricular aprovado. Use proteção
ocular aprovada.
(Fig. 5) Use luvas de proteção aprovadas.
(Fig. 6) Sempre use botas antiaderentes e
resistentes.
(Fig. 7) As setas mostram os limites da posição da
alça.
(Fig. 8) O produto pode provocar o lançamento de
objetos que podem causar ferimentos.
(Fig. 9) Velocidade máxima do eixo de saída.
881 - 001 - 10.10.2018 39
Page 40

(Fig. 10) Mantenha uma distância mínima de 15 m /
(Fig. 11) Há risco de arremesso do disco se o
(Fig. 12) Bulbo da bomba de combustível.
(Fig. 13) Afogador.
(Fig. 14) Mantenha todas as partes de seu corpo
(Fig. 15) Emissão de ruídos para o ambiente:
(Fig. 16) O produto está em conformidade com as
(Fig. 17) O produto está em conformidade com as
A plaqueta
de classificação mostra o número de
série. yyyy
é o ano de
produção,
ww é a
semana da
produção e
xxxxx é o
número de
série.
50 pés de pessoas e animais durante a
operação do produto.
equipamento de corte entrar em contato
com um objeto que não seja cortado
imediatamente. O produto pode cortar
partes do corpo. Mantenha uma distância
mínima de 15 m / 50 pés de pessoas e
animais durante a operação do produto.
longe das superfícies quentes.
consulte a Diretiva da Comunidade
Europeia. As emissões do produto são
especificadas no capítulo de dados técnicos
e na etiqueta.
diretivas CE aplicáveis.
diretivas EAC aplicáveis.
yyyywwxxxxx
Observação: Outros símbolos/adesivos no produto
referem-se aos requisitos de certificação para outras
áreas comerciais.
Responsabilidade legal do produto
Como mencionado na legislação de responsabilidade
do produto, não somos responsáveis por danos
causados pelo nosso produto caso:
• o produto seja reparado incorretamente.
• o produto seja reparado com peças que não sejam
da marca do fabricante ou aprovadas pelo
fabricante.
• o produto tenha um acessório que não seja da
marca do fabricante ou não seja aprovado pelo
fabricante.
• O produto não seja reparado em um centro de
atendimento aprovado ou por uma autoridade
aprovada.
EU V
AVISO: Interferências no motor anulam a
aprovação tipo EU deste produto.
Segurança
Definições de segurança
Avisos, cuidados e observações são utilizados para
chamar a atenção para partes especialmente
importantes do manual.
AVISO: Utilizado se existir um risco de
ferimentos ou morte para o operador ou a
terceiros se as instruções no manual não
forem respeitadas.
CUIDADO: Utilizado se existir um risco de
danos para o produto, outros materiais ou
para a área adjacente, se as instruções no
manual não forem respeitadas.
40 881 - 001 - 10.10.2018
Observação: Utilizados para conferir mais informações
necessárias em uma determinada situação.
Segurança contra vibração
Este produto se destina somente a uso ocasional. A
operação contínua ou regular do produto pode causar a
“síndrome do dedo branco” ou problemas de saúde
equivalentes causados pelas vibrações. Se você opera
o produto de maneira contínua ou regular, examine as
condições de seus dedos e mãos. Caso as mãos ou os
dedos apresentem descoloração, dor, formigamento ou
dormência, pare o trabalho e procure assistência
médica imediatamente.
Page 41

Instruções gerais de segurança
AVISO: Antes de usar o produto, leia as
instruções de aviso que seguem.
• Use o produto corretamente. O uso incorreto pode
resultar em ferimentos ou morte. Use o produto
somente nas tarefas relacionadas neste manual.
Não use o produto para outras tarefas.
• Obedeça as instruções deste manual. Obedeça os
símbolos e instruções de segurança. Se o operador
não obedecer as instruções e os símbolos, podem
ocorrer ferimentos, danos ou morte.
• Não descarte este manual. Use as instruções para
montar, operar e manter o seu produto em boas
condições. Use as instruções para fazer a correta
instalação dos acessórios. Use somente acessórios
aprovados.
• Não use um produto danificado. Obedeça a
programação de manutenção. Faça somente o
trabalho de manutenção indicado nas instruções
neste manual. Todos os demais trabalhos de
manutenção deverão ser feitos em um centro de
atendimento aprovado.
• Este manual pode não incluir todas as situações que
podem ocorrer quando você usar o produto. Tome
cuidado e use o bom senso. Não opere o produto
nem faça a manutenção se não estiver certo da
situação. Fale com um especialista no produto, seu
revendedor, agente de serviço ou centro de
atendimento aprovado para obter informações.
• Desconecte o cabo da vela de ignição antes de
montar o produto, armazená-lo ou fazer
manutenção.
• Não use o produto se ele for alterado em relação à
sua especificação inicial. Não troque uma peça do
produto sem a aprovação do fabricante. Use
somente peças aprovadas pelo fabricante. A
manutenção incorreta pode resultar em ferimentos
ou morte.
• Não respire a fumaça do motor. A inalação dos
vapores de escape do motor por longo tempo é
perigosa para a saúde.
• Não ligue o produto em um ambiente interno ou
próximo de material inflamável. A fumaça do
escapamento está quente e pode conter uma faísca
capaz de iniciar um incêndio. Um fluxo de ar
insuficiente pode causar ferimentos ou morte por
asfixia ou monóxido de carbono.
• Quando o produto é usado, o motor produz um
campo eletromagnético. O campo eletromagnético
pode causar danos a implantes medicinais. Fale
com seu médico e com o fabricante do implante
antes de operar o produto.
• Não permita que o produto seja operado por
crianças. Não permita que o produto seja operado
por uma pessoa sem conhecimento das instruções.
• Pessoas com capacidade física ou mental reduzida
devem ser sempre monitoradas caso usem o
produto. Um adulto responsável deve estar presente
em todos os momentos.
• Guarde o produto trancado em uma área fora do
alcance de crianças e pessoas desautorizadas.
• O produto pode lançar objetos e causar ferimentos.
Obedeça as instruções de segurança para diminuir
os riscos de ferimentos ou morte.
• Não saia de perto do produto com o motor ligado.
• O operador do produto é responsável se um
acidente ocorrer.
• Antes de usar o produto, verifique se não há peças
danificadas.
• Fique a, no mínimo, 15 metros (50 pés) de distância
de outras pessoas ou animais ante de usar o
produto. Informe às pessoas na área adjacentes que
você irá utilizar o produto.
• Consulte as leis locais e federais. Elas podem
restringir ou impedir a operação do produto em
algumas condições.
• Não use o produto se estiver cansado ou sob a
influência de álcool, drogas ou remédios. Essas
substâncias podem prejudicar sua visão,
consciência, coordenação e capacidade de
julgamento.
Instruções de segurança para
montagem
AVISO: Antes de usar o produto, leia as
instruções de aviso que seguem.
• Retire a capa da vela de ignição antes de montar o
produto.
• Use luvas de proteção aprovadas.
• Monte a capa e o eixo corretamente antes de ligar o
motor.
• O disco de acionamento e o flange de apoio deve
engatar corretamente no orifício central do acessório
para corte. Um acessório para corte conectado
incorretamente pode causar ferimentos graves ou
morte do operador ou de outras pessoas.
• Para utilizar o produto de forma segura e evitar
ferimentos ao operador ou a outras pessoas, o
produto deve estar sempre conectado corretamente
ao arnês.
Instruções de segurança para
operação
AVISO: Antes de usar o produto, leia as
instruções de aviso que seguem.
• Certifique-se de que o equipamento esteja
totalmente montado antes de usá-lo.
881 - 001 - 10.10.2018
41
Page 42

• Antes do arranque, mova o produto 3 m (10 pés) de
distância da posição em que você abasteceu o
tanque de combustível. Coloque o produto sobre
uma superfície plana. Certifique-se de que o
acessório para corte não entre em contato com o
chão ou outros objetos.
• O produto pode provocar o lançamento de objetos,
que podem causar danos aos olhos. Sempre use
uma proteção ocular aprovada ao operar o produto.
• Tenha cuidado, uma criança pode se aproximar do
produto sem o seu conhecimento durante a
operação.
• Não opere o produto se houver outras pessoas na
área de trabalho. Desligue o produto se uma pessoa
entrar na área de trabalho.
• Certifique-se de estar sempre no controle do
produto.
• Não utilize o produto, se não for possível receber
ajuda em caso de acidente. Certifique-se sempre de
outras pessoas saibam que você está operando o
produto antes de começar a operá-lo.
• Não gire com o produto antes de certificar-se de que
não há pessoas ou animais na área de segurança.
• Remova todos os materiais indesejados da área de
trabalho antes de começar o trabalho. Se o
acessório para corte atingir um objeto, o objeto pode
ser lançado e causar ferimentos ou danos. Material
indesejado pode entrar em contato com o acessório
para corte e causar danos.
• Não utilize o produto em condições de climáticas
ruins (neblina, chuva, ventos fortes, risco de raio ou
outras condições climáticas adversas). Condições
perigosas (como, por exemplo, superfícies
escorregadias) podem ocorrer devido ao mau
tempo.
• Certifique-se de poder mover-se livremente e
trabalhar em uma posição estável.
(Fig. 18)
• Certifique-se de não correr risco de cair enquanto
usa o produto. Não se incline ao operar o produto.
• Sempre segure o produto com as duas mãos.
Segure o produto no lado direito do seu corpo.
(Fig. 19)
• Opere o produto com o acessório para corte abaixo
da altura da cintura.
• Se o controle do afogador estiver na posição de
afogador acionado quando for dado o arranque do
motor, o acessório para corte começa a girar.
• Não toque na engrenagem cônica após o
desligamento do motor. A engrenagem cônica fica
quente após o desligamento do motor. Áreas
quentes podem causar lesões.
• Desligue o motor antes de mover o produto.
• Não coloque o produto sobre qualquer superfície
com o motor ligado.
• Antes de remover os materiais indesejados do
produto, desligue o motor e aguarde até que o
movimento do acessório para corte seja
interrompido. Deixe que o acessório para corte pare
de se mover antes de remover o material de corte.
Equipamento de Proteção Individual
AVISO: Antes de usar o produto, leia as
instruções de aviso que seguem.
• Use o equipamento de proteção individual correto ao
operar o produto. O equipamento de proteção
individual não elimina o risco de lesões. O
equipamento de proteção individual diminui o nível
da lesão em caso de acidente.
• Sempre use uma proteção ocular aprovada ao
operar o produto.
• Não opere o produto com os pés descalços ou
calçados abertos. Sempre use botas antiaderentes e
resistentes.
• Use calças compridas de tecido grosso.
• Se for necessário, use luvas de proteção aprovadas.
• Use um capacete se houver possibilidade de queda
de objetos sobre a sua cabeça.
• Sempre use proteção auricular aprovada ao operar
o produto. Ruídos por um longo período podem
causar perda auditiva induzida.
• Certifique-se de que há um kit de primeiros socorros
nas proximidades.
Dispositivos de segurança no produto
AVISO: Antes de usar o produto, leia as
instruções de aviso que seguem.
• Não use o produto com dispositivos de segurança
com defeito.
• Verifique os dispositivos de segurança
regularmente. Consulte
página39
• Se os dispositivos de segurança estiverem com
Trava do acelerador
A trava do gatilho do acelerador bloqueia o gatilho.
(Fig. 20)
Empurre a trava do acelerador (A) para soltar o
acelerador (B). Ao soltar o cabo, a trava do acelerador e
o acelerador voltam à posição inicial.
1. Certifique-se de que a trava do acelerador (B) esteja
2. Empurre a trava do acelerador (A) e certifique-se de
3. Empurre o acelerador (B) e certifique-se de que ela
.
defeito, entre em contato com o seu
Husqvarnarevendedor.
travada em marcha lenta ao soltar a trava do
acelerador (A).
que ela volte à posição inicial ao liberá-la.
volte à posição inicial ao liberá-la.
Visão geral do produtona
42
881 - 001 - 10.10.2018
Page 43

Dê a partida no motor e aplique aceleração total. Solte o
acelerador e verifique se o movimento do acessório de
corte é interrompido. Se o acessório para corte gira com
o acelerador na posição de marcha lenta, examine o
parafuso de ajuste de marcha lenta do carburador.
Interruptor de parada
Dê a partida no motor. Certifique-se de que o motor
esteja parado ao mover o interruptor de parada para a
posição de parada.
(Fig. 21)
Proteção do acessório para corte
A proteção do acessório de corte evita que um objeto
solto seja lançado na direção do operador.
(Fig. 22)
Examine a proteção do acessório para corte à procura
de danos e substitua-o se estiver danificado. Só use a
proteção aprovada para o acessório para corte.
Silenciador
• Não use um motor com um silenciador danificado.
Um silenciador danificado aumenta o nível de ruído
e o risco de incêndio. Tenha um extintor de incêndio
nas proximidades.
• Examine regularmente se o silenciador está fixado
ao produto.
• Não toque no motor ou no silenciador quando o
motor estiver ligado. Não toque no motor ou no
silenciador por um tempo após a interrupção do
funcionamento do motor. Superfícies quentes
podem causar lesões.
• Um silenciador quente pode causar um incêndio.
Seja cuidadoso se estiver operando o produto nas
proximidades e líquidos ou vapores inflamáveis.
• Não toque nas peças do silenciador se ele estiver
danificado. As peças podem conter algumas
substâncias químicas carcinogênicas.
Contraporca
A contraporca é usada para travar alguns tipos de
acessório para corte.
(Fig. 23)
Ao instalar a contraporca, aperte-a na direção oposta à
de operação do acessório para corte.
Função de liberação do arnês
Não use o arnês se houver um
AVISO:
defeito na função de liberação. Certifique-se
de que a função de liberação do arnês
esteja funcionando corretamente ao ajustar
o produto.
A função de liberação do arnês fica na parte frontal do
produto. As cintas do arnês sempre devem estar na
posição correta.
(Fig. 24)
Em caso de emergência, a função de liberação do arnês
ajuda você a soltar o produto de forma segura.
Acessório para corte
AVISO: Antes de usar o produto, leia as
instruções de aviso que seguem.
• Faça a manutenção regularmente. Peça a um centro
de atendimento para examinar regularmente o
acessório para corte para fazer ajustes ou reparos.
• O desempenho do acessório para corte
aumenta.
• A vida útil do acessório para corte é prolongada.
• O risco de acidentes diminui.
• Use apenas uma proteção aprovada para o
acessório para corte. Para mais informações,
consulte
• Não use um acessório para corte danificado.
Acessóriosna página52
Lâminas para corte de grama e cortadores de grama
• Use o produto com uma lâmina para corte de grama
aprovada. Não use uma lâmina para corte de grama
sem a instalação apropriada de todas as peças
necessárias. Certifique-se de que a instalação seja
feita corretamente e que as peças apropriadas
sejam usadas. A instalação inapropriada pode fazer
com que a lâmina seja lançada e causar lesões
graves ao operador ou pessoas nas proximidades.
• Use luvas de proteção ao manusear ou fazer a
manutenção da lâmina.
• Use proteção para a cabeça ao operar um produto
com uma lâmina para corte de grama.
• Lâminas para corte de grama e cortadores de grama
são usados para corte de grama irregular.
• Uma lâmina para corte de grama pode causar
lesões, pois ela continua a girar depois do
desligamento do motor ou da liberação do
acelerador. Certifique-se de que a lâmina para corte
de grama esteja totalmente parada antes de realizar
qualquer manutenção.
• Desligue o motor antes de realizar qualquer serviço
no acessório para corte. Certifique-se de que o
acessório para corte esteja totalmente parado.
Desconecte o cabo da vela de ignição.
• Use apenas um acessório para corte aprovado ou
uma lâmina de corte afiada corretamente.
• Mantenha os dentes da lâmina afiados
corretamente.
(Fig. 25)
• Não use um acessório para corte danificado.
• Fixe a proteção de transporte à lâmina para corte de
grama ao transportar ou armazenar o produto.
.
881 - 001 - 10.10.2018
43
Page 44

Impulso da lâmina
• Impulso da lâmina é um movimento repentino do
produto para o lado, para frente ou para trás. O
impulso da lâmina ocorre quando a lâmina para
corte de grama ou a lâmina de serra toca um objeto
que não pode ser cortado. Em áreas onde há
dificuldade para ver o material que está sendo
cortado, o risco de impulso da lâmina aumenta.
• Quando ocorre um impulso da lâmina, há um risco
de que o produto ou o operador mova-se para outra
posição. Uma lâmina em movimento pode atingir
pessoas nos arredores e há um risco de lesões.
• Se a lâmina estiver torta, trincada, quebrada ou
danificada, descarte-a.
• Use uma lâmina afiada. O risco do impulso da
lâmina aumenta quando a lâmina não está afiada.
Segurança do combustível
AVISO: Antes de usar o produto, leia as
instruções de aviso que seguem.
• Não misture o combustível em áreas interiores ou
nas proximidades de uma fonte de calor.
• Não ligue o produto se houver combustível ou óleo
de motor sobre ele. Remova o combustível/óleo
indesejado e deixe o produto secar. Remova o
combustível indesejado do produto.
• Se você derramar combustível em sua roupa, troque
as roupas imediatamente.
• Não deixe combustível cair no seu corpo, ele pode
causar lesões. Se você derramar combustível no
seu corpo, use sabão e água para removê-lo.
• Não dê partida no motor se tiver derramado óleo ou
combustível sobre o produto ou sobre o seu corpo.
• Não ligue o produto se o motor tiver um vazamento.
Examine o motor à procura de vazamentos
regularmente.
• Tome cuidado com o combustível. Combustível é
inflamável e os vapores são explosivos e podem
causar lesões ou morte.
• Não inspire os vapores de combustível, eles podem
causar lesões. Certifique-se de que haja fluxo de ar
suficiente.
• Não fume nas proximidades do combustível ou do
motor.
• Não coloque objetos quentes nas proximidades do
combustível ou do motor.
• Não adicione combustível quando o motor estiver
ligado.
• Certifique-se de que o motor esteja frio antes de
reabastecer.
• Antes de reabastecer, abra a tampa do tanque de
combustível lentamente e libere a pressão
cuidadosamente.
• Não adicione combustível ao motor em uma área
coberta. Um fluxo de ar insuficiente pode causar
ferimentos ou morte por asfixia ou monóxido de
carbono.
• Aperte cuidadosamente a tampa do tanque de
combustível, caso contrário, haverá um incêndio.
• Mova o produto para um mínimo de 3 m (10 pés) da
posição na qual você abasteceu o tanque antes de
ligar o motor.
• Não coloque combustível demais no tanque de
combustível.
• Certifique-se de que não há possibilidade de haver
um vazamento quando você mover o produto ou o
recipiente de combustível.
• Não coloque o produto ou um recipiente de
combustível onde haja uma chama aberta, fagulha
ou luz piloto. Certifique-se de que a área de
armazenamento não contenha uma chama aberta.
• Use apenas recipientes aprovados para mover o
combustível ou armazená-lo.
• Esvazie o tanque de combustível antes de
armazenar por períodos prolongados. Respeite a
legislação local sobre descarte de combustível.
• Limpe o produto antes de armazenamento por
períodos prolongados.
• Remova a vela de ignição antes de armazenar o
produto para evitar arranque acidental do motor.
Instruções de segurança para
manutenção
Antes de fazer a manutenção do
AVISO:
produto, leia as instruções de aviso que se
seguem.
• Faça a manutenção somente de acordo com o
indicado no manual do operador. Deixe todos os
serviços de manutenção e reparo a cargo dos
profissionais de assistência.
• Faça as verificações de segurança, manutenção e
serviço descritas neste manual. A manutenção
regular aumenta a vida útil do produto e reduz o
risco de acidentes. Para obter instruções, consulte
Cronograma de manutençãona página48
• Se as verificações de segurança neste manual do
usuário não forem consideradas depois de efetuar a
manutenção, fale com o revendedor. Garantimos
que existem profissionais reparadores profissionais
e assistência técnica disponíveis para o seu produto.
.
44
881 - 001 - 10.10.2018
Page 45

Montagem
Introdução
AVISO: Antes de montar o produto, você
deve ler e entender o capítulo sobre
segurança.
AVISO: Retire o cabo da vela de ignição
antes de montar o produto.
Para montar a barra de direção
1. Remova o parafuso de trás do cabo do acelerador.
(Fig. 26)
2. Mova o cabo do acelerador para o lado direito da
barra de direção.
3. Alinhe o orifício de trás do cabo do acelerador com o
orifício da barra de direção.
4. Faça o parafuso passar pelos orifícios. Aperte o
parafuso.
5. Instale a barra de direção entre as setas no eixo.
Aperte o parafuso. (Fig. 27)
Para instalar a braçadeira do arnês
1. Coloque a braçadeira do arnês no eixo, com o laço
da braçadeira para cima. Coloque a braçadeira do
arnês acima das setas no eixo.
2. Coloque o fio do acelerador no sulco da braçadeira
inferior do arnês.
3. Alinhe o parafuso da braçadeira do arnês nos
orifícios.
4. Fixe 2 parafusos nos orifícios.
5. Aperte os parafusos.
Para montar o acessório para corte
Para montar a proteção do acessório para
corte
1. Coloque a proteção do acessório para corte (A)
sobre o eixo. (Fig. 28)
2. Coloque o suporte (B) no encaixe da proteção do
acessório para corte.
3. Prenda o parafuso (C) através do orifício no suporte
da proteção do acessório para corte.
Para montar o disco de corte de grama
1. Certifique-se de que a proteção do acessório para
corte (A) esteja conectada ao produto. Consulte
Para montar a proteção do acessório para cortena
página45
. (Fig. 29)
2. Coloque o pino de travamento (B) no orifício para
travar o eixo.
3. Coloque o disco (E), o suporte (F) e o flange de
apoio (F) no eixo de saída (D).
4. Certifique-se de que o disco de acionamento (C) se
engate corretamente no orifício central do disco.
(Fig. 30)
5. Coloque a contraporca (H) no eixo de saída. Segure
o eixo da chave combinada próximo à proteção do
acessório para corte. Gire a chave combinada no
sentido anti-horário para apertar a contraporca.
Aperte a porca com torque de 35 a 50 Nm (26 a 36
pés/lb).
6. Retire o pino de travamento.
Para fixar o cabeçote de recorte
1. Certifique-se de que a proteção do acessório para
corte (A) esteja conectada ao produto. Consulte
Para montar a proteção do acessório para cortena
página45
. (Fig. 31)
2. Certifique-se de que o disco de acionamento (C)
esteja encaixado no eixo de saída (D).
3. Coloque o pino de travamento (B) no orifício para
travar o eixo.
4. Coloque o cabeçote de recorte (E) no eixo de saída.
5. Gire o cabeçote de recorte no sentido anti-horário
para apertá-la no eixo de saída. (Fig. 32)
6. Retire o pino de travamento.
OPERAÇÃO
Introdução
AVISO: Antes de operar o produto, você
deve ler e entender o capítulo sobre
segurança.
Combustível
Este produto tem um motor de dois tempos.
881 - 001 - 10.10.2018 45
Combustível pré-misturado
• Use Husqvarnacombustível alquilado pré-misturado
CUIDADO: O tipo incorreto de combustível
pode resultar em danos ao motor. Use uma
mistura de gasolina e óleo para motor de
dois tempos.
de boa qualidade para obter o melhor desempenho
Page 46

e extensão da vida útil do motor. O combustível
contém menos substâncias perigosas em
comparação com o combustível normal, o que reduz
os perigosos gases de escape. A quantidade de
resíduos após a combustão é menor com esse
combustível, o que mantém os componentes do
motor mais limpos.
Para misturar o combustível
Gasolina
CUIDADO: Não use gasolina com
octanagem menor que 90 RON (87 AKI).
Isso pode causar danos ao produto.
CUIDADO: Não use gasolina com mais de
10% concentração de etanol (E10). Isso
pode causar danos ao produto.
• Utilize apenas gasolina nova sem chumbo com
octanagem mínima de 90 RON (87 AKI) e com
concentração de etanol menor que 10% (E10).
• Use gasolina com uma octanagem mais elevada se
você usa o produto continuamente com alta rotação
do motor.
Óleo para motor de dois tempos
• Para obter melhores resultados e desempenho, use
Husqvarnaóleo de dois tempos.
• Se o óleo para motor de dois tempos Husqvarnanão
estiver disponível, você pode usar outro óleo dois
tempos de boa qualidade destinado a motores
refrigerados a ar. Fale com seu revendedor para
selecionar o óleo correto.
CUIDADO:
tempos para motores refrigerados a
água, também conhecido como óleo
para motor de popa. Não use óleo para
motores de quatro tempos.
Para misturar gasolina e óleo de dois tempos
Gasolina, litro Óleo para mo-
5 0,10
10 0,20
15 0,30
20 0,40
Não use óleo de dois
tor de dois
tempos, litro
2% (50:1)
CUIDADO: Pequenos erros podem
influenciar drasticamente a proporção da
mistura quando você mistura pequenas
quantidades de combustível. Meça a
quantidade de óleo cuidadosamente e
certifique-se de obter a mistura correta.
(Fig. 33)
1. Encha metade da quantidade de gasolina em um
recipiente limpo para combustível.
2. Adicione a quantidade total de óleo.
3. Mexa a mistura de combustível.
4. Adicione a quantidade restante de gasolina ao
recipiente.
5. Mexa a mistura de combustível com cuidado.
CUIDADO: Não misture combustível por
mais de 1 mês de cada vez.
Para adicionar combustível
• Sempre use um recipiente de combustível com uma
válvula antiderramamento.
• Se houver algum combustível no recipiente, remova
o combustível indesejado e deixe o recipiente secar.
• Certifique-se de que a área próxima à tampa do
tanque de combustível esteja limpa.
• Agite o recipiente de combustível antes de adicionar
a mistura de combustível ao tanque.
Para fazer o amaciamento
• Durante as primeiras 10 horas de operação, não
aplique aceleração total sem carga por períodos
prolongados.
Para iniciar e parar
Para examinar antes da partida
1. Verifique se há peças ausentes, danificadas, soltas
ou desgastadas no produto.
2. Certifique-se de que as porcas e os parafusos
estejam apertados.
3. Certifique-se de que nem os discos, nem o cabeçote
de recorte, estejam danificados.
4. A contraporca deve estar devidamente apertada.
Consulte
5. O filtro de ar não pode estar entupido.
6. Certifique-se de que os dispositivos de segurança
do produto não estejam com defeito.
7. Verifique se o produto apresenta vazamentos de
combustível.
Para examinar a contraporcana página49
.
46
881 - 001 - 10.10.2018
Page 47

Para ajustar o arnês
AVISO: O produto deve estar sempre
conectado corretamente ao arnês. Não use
um arnês danificado.
1. Coloque o arnês.
2. Conecte o produto ao arnês.
3. Ajuste o arnês na melhor posição para trabalho.
4. Ajuste as cintas laterais para distribuir o peso do
produto sobre os ombros por igual. (Fig. 34)
5. Ajuste o arnês até que o acessório para corte esteja
paralelo ao solo.
6. Apoie levemente o acessório para corte no solo.
Depois disso, ajuste a braçadeira do arnês para
equilibrar o produto corretamente.
Observação: Se você usar um disco de corte de
grama, ele deve equilibrar-se a aproximadamente 10
cm /4 pol acima do solo.
Para dar partida a frio em um motor
1. Empurre o bulbo da bomba de combustível 10
vezes. (Fig. 35)
2. Puxe o controle do afogador para cima. (Fig. 36)
3. Segure o corpo do produto sobre o solo com a sua
mão esquerda. (Fig. 37) Não pise no produto. Puxe
a corda de arranque lentamente até sentir alguma
resistência. Em seguida, puxe a alça da corda de
arranque com força.
Observação:
enquanto dá a partida no motor.
4. Continue a puxar a alça da corda de arranque até o
motor dar partida ou tentar ligar (máx. 3 puxões). Se
o motor entrar em funcionamento ou tentar ligar,
empurre o controle do afogador para baixo.
Continue a puxar até o motor começar a funcionar.
Aguarde 60 segundos após a partida antes de puxar
o gatilho do acelerador.
Não puxe o gatilho do acelerador
CUIDADO:
arranque até que ela pare. Não solte a
corda de arranque quando ela estiver
totalmente estendida. Solte a corda de
arranque lentamente. Não obedecer
essas instruções pode causar danos ao
motor.
Não puxe a corda de
Para dar partida a quente em um motor
1. Empurre o bulbo da bomba de combustível 10
vezes.
2. Puxe a corda de arranque até o motor entrar em
funcionamento.
Para dar partida no motor quando o
combustível estiver muito quente
Se o produto não começar a funcionar, o combustível
pode estar muito quente.
Observação: Sempre use combustível novo e diminua
o tempo de operação durante clima quente.
1. Coloque o produto em uma área afastada de luz
solar.
2. Deixe que o produto esfrie por 20 minutos, no
mínimo.
3. Pressione o bulbo da bomba de combustível
novamente e novamente por 10 a 15 segundos.
4. Obedeça o procedimento para dar partida em um
motor frio. Consulte
motorna página47
Para dar partida a frio em um
.
Para interromper o funcionamento
• Pressione o interruptor de parada para parar o
motor. (Fig. 21)
Observação: O interruptor de parada volta
automaticamente à posição inicial.
Para operar o aparador de grama
CUIDADO: Certifique-se de reduzir a
velocidade do motor para marcha lenta após
cada operação. Um longo período em
aceleração total sem carga no motor pode
causar danos ao motor.
Observação: Limpe a tampa do cabeçote do aparador
ao fixar uma nova linha do aparador para evitar
vibrações. Examine outras peças do cabeçote do
aparador e limpe-as, se necessário.
Para aparar a grama
1. Segure o cabeçote de recorte imediatamente acima
do solo em ângulo. Não empurre a linha de recorte
sobre a grama. (Fig. 38)
2. Diminua o comprimento da linha de recorte em 10 a
12 cm / 4 a 4,75 pol.
3. Diminua a rotação do motor para diminuir o risco de
danos às plantas.
4. Use 80% da aceleração ao cortar grama próximo a
objetos. (Fig. 39)
Para cortar a grama
1. Ao cortar, certifique-se de que a linha de recorte
esteja paralela ao chão. (Fig. 40)
2. Não empurre o cabeçote de recorte sobre o chão.
Isso pode causar danos ao produto
881 - 001 - 10.10.2018
47
Page 48

3. Mova o produto de um lado para outro ao cortar a
grama. Use aceleração total. (Fig. 41)
Para remover grama com uma lâmina para
corte de grama
1. Lâminas para corte de grama e cortadores de grama
não devem ser usados em ramos lenhosos.
2. Uma lâmina para corte de grama é usada para todos
os tipos de grama.
3. A grama é cortada com um movimento lateral de
pêndulo, onde o movimento da direita para a
esquerda é o de limpeza, e o movimento contrário é
o de retorno. Permita que o lado esquerdo da lâmina
(direção entre 8 e 12 horas no relógio analógico)
faça o corte.
4. Se a lâmina tiver um ângulo à esquerda ao limpar a
grama, a grama será coletada em uma linha,
facilitando o processo. Por exemplo, como um
rastelo.
5. Tente trabalhar ritmicamente. Assuma uma postura
firme com os pés separados. Mova-se para frente
após o movimento de retorno e assuma a postura
firme novamente.
6. Deixe o suporte tocar levemente o solo. Ele é usado
para proteger a lâmina para não atingir o solo.
7. Reduza o risco de qualquer material envolver a
lâmina, sempre trabalhando em potência total e
evite o material cortado anteriormente pelo
movimento de retorno.
Manutenção
Introdução
AVISO: Antes de fazer a manutenção, você
deve ler e entender o capítulo sobre
segurança.
Para todos os serviços de manutenção e reparos no
produto é necessário treinamento especial. Garantimos
a disponibilidade de reparos e manutenção
profissionais. Se o seu revendedor não for uma oficina
autorizada, peça informações para saber qual é a
oficina autorizada mais próxima.
Cronograma de manutenção
Manutenção semanal
• Limpe as superfícies externas.
• Certifique-se de que o acessório para corte não se
mova quando em marcha lenta. Consulte
ajustar a marcha lentana página48
• Examine o nível de graxa na engrenagem cônica.
Consulte
Para adicionar graxa à engrenagem
cônicana página49
• Examine a contraporca. Consulte
contraporcana página49
.
.
Para
.
Para examinar a
8. Desligue o motor, solte o chicote e coloque a
máquina no chão antes de iniciar a coleta do
material cortado.
Cabeçote do aparador de grama
• Certifique-se de enrolar a linha do aparador de
grama firmemente e igualmente ao redor do tambor
para diminuir a vibração.
• Use apenas cabeçotes e linhas de aparador de
grama aprovados. Consulte
página52
• Use o comprimento correto de linha do aparador de
• Certifique-se de que o cortador na proteção do
• Deixe a linha do aparador de grama em água por 2
.
grama. Uma linha de aparador de grama longa usa
mais potência do motor que linha de aparador de
grama mais curta.
acessório para corte não esteja danificado.
dias antes de fixar a linha do aparador de grama ao
produto. Isso aumenta a vida útil da linha do
aparador de grama.
Acessóriosna
Para substituir a linha de recorte
(Fig. 42)
(Fig. 43)
(Fig. 44)
(Fig. 45)
(Fig. 46)
(Fig. 47)
(Fig. 48)
(Fig. 49)
Manutenção mensal
• Certifique-se de que a alça do cabo de partida e o
cabo de partida não estejam danificados.
Manutenção anual
• Examine a vela de ignição. Consulte
a vela de igniçãona página49
• Limpe as superfícies externas do carburador e suas
áreas adjacentes.
• Limpe o sistema de arrefecimento.
• Examine a tela supressora de fagulhas. Consulte
Para fazer manutenção na tela supressora de
fagulhasna página49
• Examine o filtro de combustível.
• Certifique-se de que a mangueira de combustível
não esteja danificada.
• Certifique-se de que os cabos e conexões do
produto não estejam com defeito.
.
Para examinar
.
Para ajustar a marcha lenta
• Certifique-se de que o filtro de ar esteja limpo e a
tampa do filtro de ar esteja conectada antes de
ajustar a marcha lenta.
48 881 - 001 - 10.10.2018
Page 49

• Ajuste a marcha lenta com o parafuso de ajuste de
marcha lenta T que é identificado com a marca "T".
• A marcha lenta está correta quando o motor opera
suavemente em todas as posições. A marcha lenta
deve estar abaixo da rotação de quando o acessório
para corte comece a girar.
1. Gire o parafuso de ajuste de marcha lenta no
sentido horário até que o acessório para corte
comece a girar. (Fig. 50)
2. Gire o parafuso de ajuste de marcha lenta no
sentido anti-horário até que o acessório para corte
pare.
Para fazer manutenção na tela
supressora de fagulhas
Use uma escova de aço para limpar a tela supressora
de fagulhas.
(Fig. 51)
Para limpar o sistema de
arrefecimento
Limpe as peças do sistema de refrigeração com uma
escova.
(Fig. 52)
Para examinar a vela de ignição
CUIDADO: Use a vela de ignição
recomendada. Certifique-se de que a peça
de reposição seja do mesmo fabricante da
peça fornecida pelo fabricante. Uma vela de
ignição incorreta pode causar danos ao
produto.
1. Examine a vela de ignição quando:
a) O motor apresenta baixa potência.
b) Há dificuldade de dar a partida no motor.
c) O motor não funciona corretamente em marcha
lenta.
2. Se houver problemas de partida ou funcionamento
do motor, examine a vela de ignição à procura de
materiais indesejados. Para diminuir o risco de
presença de material indesejado nos eletrodos da
vela de ignição:
a) Certifique-se de que a marcha lenta esteja
ajustada corretamente.
b) Certifique-se de que a mistura de combustível
esteja correta.
c) Certifique-se de que o filtro de ar esteja limpo.
3. Limpe a vela de ignição se estiver suja. Examine se
a folga do eletrodo está correta. (Fig. 53)
4. Substitua a vela de ignição quando for necessário.
Para fazer a manutenção do filtro de
ar
Para limpar o filtro de ar
1. Remova a tampa do filtro de ar e remova o filtro.
(Fig. 54)
2. Limpe o filtro de ar com água morna e sabão.
Certifique-se de que o filtro de ar esteja seco antes e
instalá-lo.
3. Se o filtro de ar estiver sujo demais para limpá-lo
totalmente, substitua-o. Sempre substitua um filtro
de ar danificado.
4. Se o seu produto tiver um filtro de ar de espuma,
aplique óleo para filtro de ar. Só aplique óleo para
filtro de ar em um filtro de espuma. Não aplique óleo
em um filtro de feltro.
Para aplicar óleo para filtro de ar ao filtro
de ar
CUIDADO: Sempre use óleo especial para
filtro de ar em filtros de ar de espuma. Não
use outros tipos de óleo.
AVISO: Não deixe o óleo entrar em contato
com o seu corpo.
1. Remova a tampa do filtro de ar e remova o filtro.
(Fig. 55)
2. Coloque o filtro de ar em um saco plástico.
3. Coloque o óleo para filtro de ar no saco plástico.
(Fig. 56)
4. Empurre o saco plástico para certificar-se de que o
óleo seja distribuído igualmente em todo o filtro de
ar.
5. Pressione o filtro de ar dentro da bolsa para remover
excesso de óleo para filtro de ar. Remova o filtro de
ar do saco.
6. Instale o filtro de ar.
Para adicionar graxa à engrenagem
cônica
Certifique-se de que o nível de graxa da engrenagem
cônica esteja em 3/4 do total.
(Fig. 57)
Para examinar a contraporca
CUIDADO: Substitua a contraporca a cada
10 usos.
1. Gire a contraporca no sentido anti-horário para
apertá-la. Gire a contraporca no sentido horário para
removê-la. (Fig. 58)
2. Tenha certeza de que não é possível girar o
revestimento de náilon da contraporca com as
881 - 001 - 10.10.2018
49
Page 50

mãos. O revestimento de náilon deve oferecer uma
resistência mínima de 1,5 Nm (1,1 pés/lb).
3. Aperte a contraporca com torque de 35 a 50 Nm / 26
a 36 pés/lb, se a resistência for inferior ao mínimo.
CUIDADO: Se você apertar demais a
contraporca, isso poderá causar danos
nas roscas.
Para afiar a foice para corte de
• Para afiar a foice ou o disco de corte corretamente,
consulte as instruções que vêm com o acessório de
corte.
• Afie todas as bordas igualmente para manter o
equilíbrio.
• Use uma lima de corte único. (Fig. 59)
AVISO: Sempre descarte um disco
danificado. Não tente endireitar um disco
torto ou torcido para usá-lo novamente.
grama e o disco de corte
AVISO: Pare o motor. Use luvas de
proteção.
Solução de problemas
O motor não liga
Verificar Possível causa Procedimento
Interruptor de parada.
Linguetas do motor
de partida.
Tanque de combustível.
Vela de ignição. A vela de ignição está suja ou molhada. Certifique-se de que a vela de ignição esteja
O interruptor de parada está na posição parado.
As linguetas do motor de partida não se
movem livremente.
Tipo de combustível incorreto. Drene o tanque de combustível e encha com
A folga do eletrodo da vela de ignição está
incorreta.
A vela de ignição está solta. Aperte a vela de ignição.
Coloque o interruptor de parada na posição
de partida.
Remova a tampa do motor de partida e limpe
ao redor das linguetas.
Deixe um agente de serviço aprovado ajudar
você.
combustível correto.
seca e limpa.
Limpe a vela de ignição. Verifique se o eletrodo está com a folga correta. Certifique-se
de que a vela de ignição tenha um supressor.
Consulte os dados técnicos para obter a folga correta do eletrodo.
O motor dá partida, mas para novamente
Verificar
Tanque de combustível Tipo de combustível incorreto. Drene o tanque de combustível e en-
Filtro de ar O filtro de ar está entupido. Limpe o filtro de ar.
50 881 - 001 - 10.10.2018
Possível causa Procedimento
cha-o com combustível correto.
Page 51

Transporte, armazenamento e descarte
Transporte e armazenamento
• Deixe o produto esfriar antes do transporte ou
armazenamento.
• Remova a tampa da vela de ignição antes de
guardar o produto por muito tempo.
• Prenda o produto durante o transporte. Certifique-se
de que ele não possa se mover.
• Certifique-se de que não haja risco de vazamentos
de combustível, vapores de combustível, faíscas ou
chamas durante o transporte e armazenamento.
• Coloque a proteção para transporte durante o
transporte e armazenamento.
• Limpe o produto e faça a sua manutenção antes do
armazenamento por períodos prolongados.
Dados técnicos
Dados técnicos
325R
A05328CBHV
Motor
Cilindrada, cm
Marcha lenta, rpm 2800 - 3200
Velocidade máxima recomendada, rpm 8000
Potência / potência máxima do motor, conforme ISO 8893, kW/hp @ rpm 0,9/1,2 @ 8000
Silenciador do conversor catalítico Não
Rotação do eixo de saída, rpm 7200
Sistema de ignição
Vela de ignição Husqvarna HQT-4
Folga do eletrodo 0,5
Sistema de combustível
Capacidade do tanque de combustível, l/cm³ 0,343/343
Dimensões do produto
Peso, kg 5,5
Emissões de ruído
Nível de potência sonora, medido, equipado com disco de corte de grama, dB(A) 108
Nível de potência sonora, medido, equipado com cabeçote de recorte, dB(A) 110
Nível de potência sonora, garantido (LWA), equipado com disco de corte de grama,
dB(A)
3
7
27,6
112
7
As emissões de ruído no meio ambiente são medidas como potência sonora (LWA) em conformidade com a
norma EC 2000/14/EC. O nível de potência sonora relatado do produto foi medido com o acessório para
corte original que proporciona o maior nível. A diferença entre potência sonora garantida e medida é que a
potência sonora garantida também inclui dispersão no resultado da medição e as variações entre os diferentes produtos do mesmo modelo, de acordo com a diretiva 2000/14/EC.
881 - 001 - 10.10.2018 51
Page 52

Nível de potência sonora, garantido (LWA), equipado com cabeçote de recorte, dB(A) 114
Níveis sonoros
8
Nível de pressão sonora no ouvido do operador, equipado com disco de corte de grama, dB(A)
Nível de pressão sonora no ouvido do operador, equipado com cabeçote de recorte,
dB(A)
Níveis de vibração
Nível de vibração equivalente (ahv, eq), equipado com disco de corte de grama, alça
esquerda, m/s
Nível de vibração equivalente (ahv, eq), equipado com disco de corte de grama, alça
direita, m/s
Nível de vibração equivalente (ahv, eq) equipado com cabeçote de recorte, alça esquerda, m/s
Nível de vibração equivalente (ahv, eq) equipado com cabeçote de recorte, alça direi-
2
ta, m/s
9
2
2
2
Acessórios
Acessórios
325R
A05328CBHV
96
95
5,1
5,7
4,1
4,9
Acessórios aprovados
Tipo Proteção do acessório para corte
Eixo roscado M10L
Cabeçote de recorte T35, 2,4 mm 588 11 79-01
Lâmina para corte de grama Grama 255-4, Ø 250 588 11 79-01
8
Os dados informados para pressão sonora equivalente do produto têm uma dispersão estatística típica (desvio padrão) de 1 dB (A).
9
Os dados informados para nível de vibração têm uma dispersão estatística típica (desvio padrão) de 1 m/s2.
52 881 - 001 - 10.10.2018
Page 53

DECLARAÇÃO DE CONFORMIDADE DA CE
Conteúdo da declaração de
conformidade da CE
Nós, Husqvarna AB, SE 561 82 Huskvarna, SUÉCIA,
declaramos, sob nossa exclusiva responsabilidade, que
o produto representado:
Descrição Aparador de grama / ro-
Marca Husqvarna
Plataforma / Tipo / Modelo Plataforma A05328CBHV,
Lote Número de série com da-
está em total acordo com as seguintes diretivas e
normas da EC:
Diretiva/Norma
2006/42/EC "relativa a maquinário"
2014/30/EU "relativa à compatibilidade
2000/14/EC "relativa ao ruído externo"
2011/65/EU "restrição do uso de deter-
çadeira a gasolina
representando o modelo
325R.
ta a partir de 2018.
Descrição
eletromagnética"
minadas substâncias perigosas"
Os padrões harmonizados e/ou especificações técnicas
aplicadas são os seguintes: EN ISO 12100, EN ISO
11806-1, CISPR 12, ISO 14982, EN 50581:2012 .
De acordo com a diretiva 2000/14/EC, Anexo V, os
valores sonoros declarados são informados na seção de
dados técnicos deste manual na Declaração de
Conformidade da EC assinada.
A TUV Rheinland N.A. A realizou uma verificação
voluntária em nome da Husqvarna AB, fornecendo um
certificado de conformidade com a diretiva do Conselho
da CE 2006/42/EC para maquinário.
O certificado, conforme fornecido na Declaração de
Conformidade EC, é aplicável a todos os locais de
fabricação e países de origem, conforme informado no
produto.
O aparador de grama / roçadeira a gasolina fornecido
está em conformidade com o modelo que passou pelo
exame.
881 - 001 - 10.10.2018
53
Page 54

Содержание
Введение.................................................................... 54
Безопасность.............................................................56
Сборка.........................................................................61
Эксплуатация.............................................................61
Техническое обслуживание.................................... 64
Введение
Поиск и устранение неисправностей....................66
Транспортировка, хранение и утилизация...........67
Технические данные................................................ 67
Принадлежности....................................................... 69
Декларация соответствия ЕС................................. 70
Руководство по эксплуатации
Исходный текст данного руководства по работе
составлен на английском языке. Руководства по
работе на других языках являются переводами с
английского.
Назначение
Изделие предназначено для использования с
лезвием для травы или головкой триммера для
скашивания различных типов растительности.
Обзор изделия
(Pис. 1)
1. Головка триммера
2. Пробка отверстия для заправки консистентной
смазки
3. Угловая зубчатая передача
4. Щиток режущего оборудования
5. Штанга
6. Выключатель
7. Дроссельный регулятор
8. Стопор дроссельного регулятора
9. Рукоятка
10. Фиксатор подвески
11. Кожух стартера
12. Колпачок свечи зажигания, свеча зажигания
13. Ручка шнура стартера
14. Топливный бак
15. Крышка воздушного фильтра
16. Груша нагнетателя
17. Заслонка
18. Регулировка рукоятки
19. Трос дросселя
20. Кнопка быстрого холостого хода
21. Подвеска
22. Комбинированный ключ
23. Руководство по эксплуатации
24. Транспортировочный щиток
25. Нож
26. Опорный колпак
Примечание: Государственные нормативы могут
накладывать ограничения на эксплуатацию данного
изделия.
27. Опорный фланец
28. Контргайка
29. Ведущий диск
30. Стопорный штифт
31. Шестигранный ключ
Условные обозначения на
изделии
(Pис. 2) ПРЕДУПРЕЖДЕНИЕ! Данное изделие
является опасным инструментом.
Небрежная или неправильная
эксплуатация может привести к травме
или смерти оператора или посторонних
наблюдателей. Во избежание травм
оператора или посторонних
наблюдателей прочитайте и соблюдайте
все инструкции по безопасности,
приведенные в руководстве по
эксплуатации.
(Pис. 3) Перед началом работы внимательно
прочитайте руководство по эксплуатации
и убедитесь, что понимаете приведенные
здесь инструкции.
(Pис. 4) Используйте защитный шлем в тех
местах, где существует вероятность
падения предметов. Всегда пользуйтесь
защитными наушниками. Пользуйтесь
проверенными средствами защиты глаз.
54 881 - 001 - 10.10.2018
Page 55

(Pис. 5) Используйте проверенные защитные
(Pис. 6) Надевайте прочные нескользкие ботинки.
(Pис. 7) Стрелками показаны границы
(Pис. 8) Изделие может отбрасывать предметы,
(Pис. 9) Максимальная частота вращения
(Pис. 10) Посторонние лица и животные должны
(Pис. 11) Риск отскакивания ножа, если режущее
(Pис. 12) Груша нагнетателя.
(Pис. 13) Воздушная заслонка.
(Pис. 14) Держите части тела вдали от нагретых
(Pис. 15) Уровень излучения шума в окружающую
(Pис. 16) Изделие соответствует действующим
(Pис. 17) Изделие соответствует действующим
На
паспортно
й табличке
указан
серийный
номер.
yyyy
обозначае
т год
выпуска,
ww —
неделю
производс
тва, а
xxxxx —
серийный
номер.
перчатки.
расположения рукоятки.
что может стать причиной травмы.
выходного вала.
находиться на расстоянии не менее 15 м
(50 футов) от работающего инструмента.
оборудование касается предмета,
который не разрезается мгновенно. При
работе с изделием существует риск
пореза частей тела. Посторонние лица и
животные должны находиться на
расстоянии не менее 15 м (50 футов) от
работающего инструмента.
поверхностей изделия.
среду соответствует директиве ЕС.
Звуковое излучение данного изделия
приведено в разделе "Технические
данные" и на паспортной табличке.
директивам EC.
директивам EAC.
yyyywwxxxxx
Примечание: Остальные символы/этикетки на
изделии отвечают требованиям, предъявляемым к
сертификации в других коммерческих зонах.
Ответственность изготовителя
В соответствии с законами об ответственности
изготовителя мы не несем ответственности за
ущерб, вызванный эксплуатацией нашего изделия в
результате:
• ненадлежащего ремонта изделия;
• использования для ремонта изделия
неоригинальных деталей или деталей,
неодобренных производителем;
• использования неоригинальных дополнительных
принадлежностей или неодобренных
производителем;
• ремонта изделия в неавторизованном сервисном
центре или неквалифицированным
специалистом.
ЕС V
ПРЕДУПРЕЖДЕНИЕ: В случае
вмешательства в работу двигателя
данное изделие перестанет
соответствовать нормативам ЕС.
881 - 001 - 10.10.2018 55
Page 56

Безопасность
Инструкции по технике
безопасности
Предупреждения, предостережения и примечания
используются для выделения особо важных пунктов
руководства.
ПРЕДУПРЕЖДЕНИЕ: Используется,
когда несоблюдение инструкций
руководства может привести к травмам
или смерти оператора или находящихся
рядом посторонних лиц.
ВНИМАНИЕ: Используется, когда
несоблюдение инструкций руководства
может привести к повреждению изделия,
других материалов или прилегающей
территории.
Примечание: Используется для предоставления
дополнительных сведений о конкретной ситуации.
Техника безопасности в
отношении вибрации
Данное изделие предназначено только для
периодического использования. Непрерывная или
регулярная эксплуатация изделия может привести к
"синдрому белых пальцев" или аналогичным
заболеваниям, вызванным воздействием вибрации.
При продолжительном или регулярном
использовании изделия периодически проверяйте
состояние своих ладоней и пальцев. При
обнаружении таких симптомов, как изменение цвета
кожи, боль в ладонях или пальцах, покалывание или
потеря чувствительности, немедленно прекратите
работу и обратитесь за медицинской помощью.
Общие инструкции по технике
безопасности
ПРЕДУПРЕЖДЕНИЕ:
порядке прочитайте следующие
инструкции по технике безопасности,
прежде чем приступать к эксплуатации
изделия.
• Пользуйтесь изделием правильно. Неправильное
использование может привести к травме или
смертельному исходу. Изделие предназначено
только для выполнения работ, описанных в
данном руководстве. Запрещается использовать
изделие для других видов работ.
• Соблюдайте инструкции, изложенные в данном
руководстве. Обращайте внимание на знаки
безопасности и следуйте инструкциям по технике
В обязательном
безопасности. Несоблюдение оператором
инструкций и знаков может привести к травме,
повреждениям или смерти.
• Не выбрасывайте это руководство. Следуйте
инструкциям по сборке, эксплуатации и уходу за
изделием. Используйте эти инструкции для
правильной установки насадок и дополнительных
принадлежностей. Используйте только
апробированные насадки и аксессуары.
• Не используйте поврежденное изделие.
Соблюдайте график техобслуживания.
Выполняйте самостоятельно только те работы по
техобслуживанию, которые описаны в данном
руководстве. Все другие работы по
техобслуживанию должны выполняться
авторизованным сервисным центром.
• В данное руководство невозможно включить все
ситуации, которые могут возникнуть при
использовании изделия. Будьте осторожны и
руководствуйтесь здравым смыслом. Если вы не
уверены в ситуации, не используйте изделие и не
выполняйте его техобслуживание. Для получения
необходимой информации обратитесь к
специалисту по продукции, дилеру, специалисту
по обслуживанию или в авторизованный
сервисный центр.
• Отсоединяйте кабель свечи зажигания перед
сборкой изделия, помещением его на хранение
или проведением техобслуживания.
• Запрещается использовать изделие, если были
изменены его исходные технические
характеристики. Запрещено вносить изменения в
конструкцию изделия без одобрения
производителя. Используйте только
рекомендованные производителем запчасти.
Неправильное техобслуживание может привести
к травме или смертельному исходу.
• Не вдыхайте выхлопные газы двигателя.
Продолжительное вдыхание выхлопных газов
двигателя опасно для здоровья.
• Запрещается запускать изделие в помещении
или рядом с легковоспламеняющимися
материалами. Выхлопные газы имеют высокую
температуру и могут содержать искры, которые в
свою очередь могут привести к пожару.
Недостаточная вентиляция может привести к
травме или смерти в результате удушья или
отравления угарным газом.
• Во время работы вокруг двигателя создается
электромагнитное поле. Электромагнитное поле
может привести к повреждению медицинских
имплантатов. Проконсультируйтесь с врачом и
изготовителем имплантата перед
использованием изделия.
• Не позволяйте детям использовать изделие. Не
разрешайте пользоваться изделием людям,
которые не знакомы с данными инструкциями.
56
881 - 001 - 10.10.2018
Page 57

• Не позволяйте людям с ограниченными
физическими или умственными способностями
пользоваться данным изделием без присмотра.
Они должны постоянно находиться под
присмотром взрослого.
• Запирайте изделие в месте, не доступном для
детей и лиц, не допущенных к эксплуатации
изделия.
• Во время работы изделие может отбрасывать
находящиеся на земле предметы, что может
привести к травме. Чтобы уменьшить риск
получения серьезных или смертельных травм,
соблюдайте инструкции по технике безопасности.
• Запрещается оставлять изделие с работающим
двигателем без присмотра.
• При возникновении несчастного случая
ответственность несет оператор изделия.
• Перед использованием изделия проверьте
детали на отсутствие повреждений.
• Перед началом эксплуатации изделия убедитесь,
что вы находитесь на расстоянии не менее 15 м
(50 футов) от других людей или животных.
Убедитесь, что находящиеся поблизости люди
знают, что вы будете использовать изделие.
• Соблюдайте требования национальных или
местных законов. В некоторых случаях они могут
запрещать или ограничивать использование
изделия.
• Ни в коем случае не используйте изделие, если
вы устали или находитесь под воздействием
спиртного, наркотических веществ или
лекарственных препаратов. Они могут повлиять
на ваше зрение, реакцию, координацию или
оценку действительности.
Инструкции по технике
безопасности во время сборки
ПРЕДУПРЕЖДЕНИЕ:
порядке прочитайте следующие
инструкции по технике безопасности,
прежде чем приступать к эксплуатации
изделия.
• Перед сборкой изделия снимите со свечи
зажигания колпак свечи зажигания.
• Используйте проверенные защитные перчатки.
• Перед запуском двигателя проверьте
правильность установки крышки и вала.
• Ведущий диск и опорный фланец должны
правильно входить в центральное отверстие
режущего оборудования. Неправильная
установка режущего оборудования может стать
причиной серьезной травмы или смерти
оператора или других людей.
• Для безопасной эксплуатации изделия и во
избежание травм оператора или посторонних лиц
изделие всегда должно правильно крепиться к
подвеске.
В обязательном
Инструкции по технике
безопасности во время
эксплуатации
ПРЕДУПРЕЖДЕНИЕ: В обязательном
порядке прочитайте следующие
инструкции по технике безопасности,
прежде чем приступать к эксплуатации
изделия.
• Прежде чем использовать изделие, убедитесь,
что оно полностью собрано.
• Перед запуском сдвиньте изделие на 3 м (10
футов) от места, в котором вы заполняли
топливный бак. Положите изделие на ровную
поверхность. Убедитесь, что режущее
оборудование не касается грунта или других
объектов.
• Изделие может отбрасывать находящиеся на
земле предметы, что может причинить вред
глазам. Всегда пользуйтесь одобренными
средствами защиты глаз при использовании
изделия.
• Будьте осторожны, во время работы к изделию
может незаметно приблизиться ребенок.
• Не пользуйтесь изделием, если в рабочей зоне
находятся другие люди. Выключайте изделие при
входе другого человека в рабочую зону.
• Всегда держите изделие под контролем.
• Не пользуйтесь изделием, если вы не сможете
получить помощь при несчастном случае.
Прежде чем начать использовать изделие,
всегда сообщайте об этом другим людям.
• Не поворачивайтесь с изделием, не убедившись
в отсутствии людей или животных в опасной
зоне.
• Перед началом работы уберите все посторонние
материалы из рабочей зоны. При ударе
режущего оборудования о предмет последний
может отскочить и привести к травме или
повреждению. Посторонние материалы могут
намотаться на режущее оборудование и
привести к повреждению.
• Запрещается пользоваться изделием в плохую
погоду (при тумане, дожде, сильном ветре,
опасности удара молнии и других погодных
явлениях). Плохие погодные условия могут
создавать опасные условия для работы
(например, скользкие поверхности).
• Убедитесь, что вы можете свободно
перемещаться и работать в устойчивом
положении.
(Pис. 18)
• Убедитесь в отсутствии риска падения во время
использования изделия. Запрещается
наклоняться во время эксплуатации изделия.
• Всегда держите изделие двумя руками. Держите
изделие с правой стороны от тела.
881 - 001 - 10.10.2018
57
Page 58

(Pис. 19)
• Во время работы держите режущее
оборудование ниже пояса.
• Если при запуске двигателя заслонка находится в
закрытом положении, режущее оборудование
начинает вращаться.
• Не прикасайтесь к зубчатой передаче после
остановки двигателя. После остановки двигателя
она имеет высокую температуру. Горячие
поверхности могут стать причиной травм.
• Выключайте двигатель перед перемещением
изделия.
• Запрещается класть изделие на землю с
работающим двигателем.
• Чтобы очистить изделие от посторонних
материалов, выключите двигатель и дождитесь
полной остановки режущего оборудования.
Дождитесь остановки режущего оборудования,
прежде чем вы или ваш помощник уберет
срезанный материал.
Средства индивидуальной защиты
ПРЕДУПРЕЖДЕНИЕ: В обязательном
порядке прочитайте следующие
инструкции по технике безопасности,
прежде чем приступать к эксплуатации
изделия.
• Всегда используйте соответствующее защитное
снаряжение при эксплуатации изделия. Защитное
снаряжение не исключает риск травмирования.
Оно снижает тяжесть травмы при несчастном
случае.
• Всегда пользуйтесь одобренными средствами
защиты глаз при использовании изделия.
• При эксплуатации изделия запрещается быть
босиком или носить открытую обувь. Всегда
надевайте прочные нескользкие ботинки.
• Надевайте прочные длинные брюки.
• При необходимости используйте одобренные
защитные перчатки.
• Надевайте шлем, если существует вероятность
попадания объектов в голову.
• Всегда надевайте одобренные защитные
наушники при использовании изделия.
Длительное воздействие шума может привести к
снижению слуха.
• Всегда имейте при себе аптечку для оказания
первой медицинской помощи.
Защитные устройства на изделии
ПРЕДУПРЕЖДЕНИЕ:
порядке прочитайте следующие
инструкции по технике безопасности,
прежде чем приступать к эксплуатации
изделия.
В обязательном
• Запрещается использовать изделие с
неисправными защитными устройствами.
• Регулярно выполняйте проверку защитных
устройств. См. раздел
• Если защитные устройства неисправны,
обратитесь к своему сервисному дилеру
Husqvarna.
Стопор рычага дросселя
Стопор рычага дросселя блокирует рычаг дросселя.
(Pис. 20)
Нажмите на стопор рычага дросселя (A), чтобы
освободить рычаг дросселя (B). Когда вы отпускаете
ручку, стопор рычага дросселя и рычаг дросселя
возвращаются в исходное положение.
1. Убедитесь, что рычаг дросселя (B) заблокирован
в положении холостого хода в момент отпускания
стопора рычага дросселя (A).
2. Нажмите на стопор рычага дросселя (A) и
удостоверьтесь, что он возвращается в
первоначальное положение при его
освобождении.
3. Нажмите на рычаг дросселя (B) и
удостоверьтесь, что он возвращается в
первоначальное положение при его
освобождении.
Запустите двигатель и полностью откройте
дроссель. Отпустите рычаг дросселя и проверьте,
остановилось ли режущее оборудование. Если после
установки дросселя в положение холостого хода
режущее оборудование продолжает вращаться,
следует проверить винт регулировки холостого хода
карбюратора.
Выключатель
Запустите двигатель. Убедитесь, что двигатель
останавливается при установке выключателя в
положение остановки.
(Pис. 21)
Щиток режущего оборудования
Щиток режущего оборудования предотвращает
выброс предметов в сторону оператора.
(Pис. 22)
Проверьте щиток режущего оборудования на
наличие повреждений и замените его, если он
поврежден. Используйте для режущего
оборудования только одобренный щиток.
Глушитель
• Запрещается использовать двигатель с
поврежденным глушителем. Поврежденный
глушитель повышает уровень шума и риск
пожара. Держите огнетушитель в пределах
досягаемости.
Обзор изделия на стр. 54
.
58
881 - 001 - 10.10.2018
Page 59

• Периодически проверяйте надежность крепления
глушителя к корпусу изделия.
• Не прикасайтесь к двигателю или глушителю во
время работы двигателя. Не прикасайтесь к
двигателю или глушителю в течение некоторого
времени после выключения двигателя. Горячие
поверхности могут стать причиной травм.
• Горячий глушитель может стать причиной
пожара. Соблюдайте осторожность при
использовании изделия вблизи
легковоспламеняющихся жидкостей или газов.
• Не прикасайтесь к деталям глушителя, если он
поврежден. На деталях могут находиться
канцерогенные химические вещества.
Контргайка
На некоторых видах режущего оборудования для
крепления используется контргайка.
(Pис. 23)
При установке контргайки затяните ее в
направлении, противоположном направлению
вращения режущего оборудования.
Функция расцепления оснастки
ПРЕДУПРЕЖДЕНИЕ: Запрещается
использовать оснастку с неисправной
функцией расцепления. Во время
регулировки изделия убедитесь, что
функция расцепления оснастки работает
исправно.
Функция расцепления оснастки находится в
передней части изделия. Лямки оснастки должны
всегда оставаться в правильном положении.
(Pис. 24)
Функция расцепления оснастки позволяет безопасно
снять изделие в экстренной ситуации.
Режущее оборудование
ПРЕДУПРЕЖДЕНИЕ:
порядке прочитайте следующие
инструкции по технике безопасности,
прежде чем приступать к эксплуатации
изделия.
• Регулярно выполняйте техобслуживание. Ваш
авторизованный сервисный центр должен
регулярно проверять режущее оборудование и
выполнять необходимую регулировку и ремонт.
• Повышается эффективность режущего
оборудования.
• Увеличивается срок службы режущего
оборудования.
• Уменьшается риск несчастных случаев.
• Используйте только одобренный щиток режущего
оборудования. Для более подробной
В обязательном
информации смотрите
69
.
• Не используйте поврежденное режущее
оборудование.
Лезвия и ножи для травы
• Используйте изделие с одобренным лезвием для
травы. Запрещается использовать лезвие для
травы, если все необходимые детали не
установлены должным образом. Убедитесь, что
установка выполнена правильно и используются
соответствующие детали. Неправильная
установка может привести к отрыву ножа и
серьезной травме оператора или находящихся
рядом посторонних лиц.
• При работе с ножом или техническом
обслуживании всегда надевайте защитные
перчатки.
• При использовании изделия с лезвием для травы
надевайте защитный шлем.
• Лезвие и нож для травы предназначены для
выкашивания грубой травы.
• Нож для травы может стать причиной травмы,
если он продолжает вращаться после остановки
двигателя или отпускания рычага дросселя.
Убедитесь, что нож для травы полностью
остановился, прежде чем выполнять техническое
обслуживание.
• Всегда выключайте двигатель, прежде чем
приступить к работе с режущим оборудованием.
Убедитесь, что режущее оборудование
полностью остановилось. Отсоедините провод
свечи зажигания.
• Используйте только одобренное режущее
оборудование или правильно заточенный нож.
• Режущие зубья ножа должны быть правильно
заточены.
(Pис. 25)
• Не используйте поврежденное режущее
оборудование.
• Перед транспортировкой или помещением
изделия на хранение установите на лезвие для
травы транспортировочный щиток.
Отскакивание ножа
• Отскакивание ножа — это резкое движение
изделия в сторону, вперед или назад.
Отскакивание происходит, когда нож для травы
или режущий диск ударяется о прочный предмет.
В местах, где затруднен обзор разрезаемого
материала, риск отскакивания ножа возрастает.
• При отскакивании ножа существует риск
смещения положения изделия или оператора.
Движущийся нож может ударить стоящих рядом
людей и стать причиной травм.
• Утилизируйте нож, если он деформирован, имеет
трещины, сломан или поврежден.
Принадлежности на стр.
881 - 001 - 10.10.2018
59
Page 60

• Пользуйтесь заточенным ножом. Риск
отскакивания ножа возрастает при
использовании незаточенного ножа.
Правила безопасного обращения с
топливом
ПРЕДУПРЕЖДЕНИЕ: В обязательном
порядке прочитайте следующие
инструкции по технике безопасности,
прежде чем приступать к эксплуатации
изделия.
• Не смешивайте топливо в помещении или рядом
с источником тепла.
• Запрещается запускать изделие, если на него
попало топливо или моторное масло. Удалите
постороннее топливо/масло и дайте изделию
высохнуть. Удалите постороннее топливо с
поверхности изделия.
• Если топливо попало на одежду, немедленно
смените ее.
• Не допускайте попадания топлива на тело, это
может причинить вред здоровью. При попадании
топлива на тело смойте его водой с мылом.
• Запрещается запускать двигатель, если вы
пролили масло или топливо на изделие или тело.
• Запрещается запускать изделие при наличии
утечки из двигателя. Регулярно проверяйте
двигатель на наличие утечек.
• Соблюдайте осторожность при обращении с
топливом. Топливо является
легковоспламеняющейся жидкостью со
взрывоопасными парами и может привести к
серьезным или смертельным травмам.
• Запрещается вдыхать пары топлива, т. к. это
может причинить вред здоровью. Убедитесь в
наличии достаточного потока воздуха.
• Запрещается курить вблизи топлива или
двигателя.
• Запрещается ставить теплые предметы рядом с
топливом или двигателем.
• Запрещается доливать топливо при работающем
двигателе.
• Прежде чем заправить изделие, убедитесь, что
двигатель полностью остыл.
• Перед заправкой топлива медленно откройте
крышку топливного бака и осторожно сбросьте
давление.
• Запрещается заливать топливо в двигатель в
помещении. Недостаточная вентиляция может
привести к травме или смерти в результате
удушья или отравления угарным газом.
• Аккуратно затяните крышку топливного бака во
избежание возгорания.
• Переместите изделие минимум на 3 м (10 футов)
от места заправки топливом, прежде чем
запустить его.
• Не наливайте в топливный бак слишком много
топлива.
• Убедитесь, что при перемещении изделия или
емкости для топлива невозможно возникновение
утечки.
• Запрещает размещать изделие или емкость для
топлива вблизи открытого огня, искр или горящих
фитилей. Убедитесь, что в месте хранения
отсутствует открытый огонь.
• Используйте только одобренные емкости для
переноски и хранения топлива.
• Сливайте топливо из топливного бака перед
размещением изделия на длительное хранение.
Соблюдайте требования местного
законодательства в отношении места утилизации
топлива.
• Очистите изделие, прежде чем поместить его на
длительное хранение.
• Прежде чем поместить изделие на хранение,
снимите кабель свечи зажигания во избежание
случайного запуска двигателя.
Инструкции по технике
безопасности во время
технического обслуживания
ПРЕДУПРЕЖДЕНИЕ: В обязательном
порядке прочитайте следующие
инструкции по технике безопасности,
прежде чем приступать к
техобслуживанию изделия.
• Выполняйте только те работы по техническому и
сервисному обслуживанию, которые описаны в
данном руководстве по эксплуатации. Для
проведения всех остальных работ по
техническому и сервисному обслуживанию
обращайтесь к квалифицированным
специалистам по обслуживанию.
• Регулярно проверяйте состояние защитных
приспособлений и проводите техническое и
сервисное обслуживание в соответствии с
инструкциями настоящего руководства.
Регулярное техническое обслуживание
продлевает срок службы изделия и снижает
вероятность несчастных случаев. Инструкции см.
в разделе
стр. 64
• Если после выполнения обслуживания при
проведении проверки защитных приспособлений
были выявлены неисправности, обратитесь к
своему дилеру по обслуживанию. Мы
гарантируем, что ремонт и обслуживание вашего
изделия будут выполнять квалифицированные
профессионалы.
График технического обслуживания на
.
60
881 - 001 - 10.10.2018
Page 61

Сборка
Введение
ПРЕДУПРЕЖДЕНИЕ: Перед сборкой
изделия ознакомьтесь с разделом,
посвященным безопасности, и усвойте
его содержание.
ПРЕДУПРЕЖДЕНИЕ: Перед сборкой
изделия снимите со свечи зажигания
провод свечи зажигания.
Сборка рукоятки
1. Отверните винт за ручкой дросселя. (Pис. 26)
2. Сдвиньте ручку дросселя вправо от рукоятки.
3. Совместите винтовое отверстие за ручкой
дросселя с отверстием рукоятки.
4. Вставьте винт в отверстия. Затяните винт.
5. Установите рукоятку между стрелками на вале.
Затяните винт. (Pис. 27)
Крепление фиксатора подвески
1. Установите фиксатор подвески на вал петлей
фиксатора подвески вверх. Установите фиксатор
подвески над стрелками на вале.
2. Вставьте трос дросселя в нижний паз фиксатора
подвески.
3. Совместите отверстия под винты фиксатора
подвески.
4. Вставьте два винта в резьбовые отверстия.
5. Затяните винты.
Сборка режущего оборудования
Сборка щитка режущего оборудования
1. Установите щиток режущего оборудования (A) на
вал. (Pис. 28)
2. Установите кронштейн (B) в паз на щитке
режущего оборудования.
3. Установите болт (C) в отверстие кронштейна на
щитке режущего оборудования.
Установка лезвия для травы
1. Убедитесь, что щиток режущего оборудования
(A) прикреплен к устройству. См. раздел
щитка режущего оборудования на стр. 61
29)
2. Вставьте стопорный штифт (B) в отверстие,
чтобы зафиксировать вал.
3. Установите лезвие (E), опорный колпак (F) и
опорный фланец (G) на выходной вал (D).
4. Убедитесь, что ведущий диск (C) правильно
входит в центральное отверстие лезвия. (Pис. 30)
5. Наденьте на выходной вал контргайку (H).
Держите ось комбинированного ключа рядом с
щитком режущего оборудования. Поверните
комбинированный ключ по часовой стрелки,
чтобы затянуть контргайку. Затяните контргайку
моментом 35-50 Нм (26-36 фут/фунт).
6. Снимите стопорный штифт.
Сборка
. (Pис.
Установка головки триммера
1. Убедитесь, что щиток режущего оборудования
(A) прикреплен к устройству. См. раздел
щитка режущего оборудования на стр. 61
31)
2. Убедитесь, что ведущий диск (C) закреплен к
выходному валу (D).
3. Вставьте стопорный штифт (B) в отверстие,
чтобы зафиксировать вал.
4. Установите головку триммера (E) на выходной
вал.
5. Поверните головку триммера против часовой
стрелки, чтобы затянуть ее на выходном вале.
(Pис. 32)
6. Снимите стопорный штифт.
Сборка
. (Pис.
Эксплуатация
Введение
ПРЕДУПРЕЖДЕНИЕ: Перед
эксплуатацией прибора необходимо
внимательно изучить раздел
безопасности.
881 - 001 - 10.10.2018 61
Топливо
Данное изделие оборудовано двухтактным
двигателем.
ВНИМАНИЕ: Заправка неподходящим
типом топлива может привести к
повреждению двигателя. Используйте
смесь бензина и масла для двухтактных
двигателей.
Page 62

Предварительно смешанное топливо
• Для обеспечения оптимальной
производительности и продления срока службы
двигателя используйте предварительно
смешанное топливо-алкилат Husqvarna
надлежащего качества. Данный тип топлива
содержит меньшее количество вредных веществ
по сравнению с обычным топливом, что приводит
к сокращению вредных выбросов. Такое топливо
при сгорании образует меньшее количество
остатков, благодаря чему компоненты двигателя
остаются более чистыми.
Смешивание топлива
Бензин
ВНИМАНИЕ: Не используйте бензин с
октановым числом меньше 90 RON (87
AKI). Это может привести к повреждению
изделия.
ВНИМАНИЕ: Запрещается использовать
бензин с концентрацией этанола более
10% (E10). Это может привести к
повреждению изделия.
• Всегда используйте свежий неэтилированный
бензин с минимальным октановым числом 90
RON (87 AKI) и концентрацией этанола менее
10% (E10).
• Используйте бензин с более высоким октановым
числом, если изделие часто используется с
постоянно высокой частотой оборотов двигателя.
Масло для двухтактных двигателей
• Для достижения оптимальных результатов и
мощности пользуйтесь маслом Husqvarna для
двухтактных двигателей.
• Если у вас нет масла Husqvarna для двухтактных
двигателей, вы можете использовать
высококачественное масло, предназначенное
для двухтактных двигателей с воздушных
охлаждением. Для выбора правильного масла
обратитесь к своему дилеру по обслуживанию.
ВНИМАНИЕ:
использовать масло,
предназначенное для двухтактных
двигателей с внешним водяным
охлаждением, т.н. "outboard oil".
Использовать масло для
четырехтактных двигателей
запрещается.
Запрещается
Смешивание бензина и масла для двухтактных
двигателей
Бензин, л Масло для
двухтактных
двигателей,
л
2% (50:1)
5 0,10
10 0,20
15 0,30
20 0,40
ВНИМАНИЕ: Небольшие неточности при
смешивании небольшого количества
топлива могут значительно повлиять на
соотношение компонентов в смеси.
Внимательно измеряйте количество
масла, чтобы обеспечить правильное
соотношение компонентов.
(Pис. 33)
1. Добавьте половину количества бензина в чистую
емкость для топлива.
2. Добавьте все количество масло.
3. Взболтайте топливную смесь.
4. Добавьте оставшуюся часть бензина в емкость.
5. Осторожно взболтайте топливную смесь.
ВНИМАНИЕ: Срок хранения топливной
смеси не должен превышать 1 месяца.
Заправка топливом
• Всегда используйте емкость для топлива с
клапаном от переполнения.
• Если на емкость попало топливо, удалите его и
дайте емкости высохнуть.
• Убедитесь, что область вокруг крышки
топливного бака чистая.
• Встряхните емкость для топлива, прежде чем
налить топливную смесь в топливный бак.
Обкатка изделия
• В течение первых 10 часов работы изделие не
должно работать длительное время на полной
мощности без нагрузки.
62
881 - 001 - 10.10.2018
Page 63

Запуск и остановка
Осмотр перед началом работы
1. Убедитесь, что продукт не имеет поврежденных,
ослабленных, отсутствующих или изношенных
деталей.
2. Проверьте затяжку гаек, винтов и болтов.
3. Убедитесь, что лезвия или головка триммера не
повреждены.
4. Убедитесь, что контргайка затянута. См. раздел
Проверка контргайки на стр. 66
5. Убедитесь, что воздушный фильтр не засорен.
6. Убедитесь, что защитные устройства изделия
исправны.
7. Убедитесь в отсутствии утечек топлива.
Регулировка подвески
ПРЕДУПРЕЖДЕНИЕ: Изделие всегда
должно быть правильно закреплено на
подвеске. Не используйте неисправную
подвеску.
1. Наденьте подвеску.
2. Подключите изделие к подвеске.
3. Отрегулируйте подвеску до оптимального
рабочего положения.
4. Отрегулируйте боковые ремни таким образом,
чтобы вес изделия равномерно распределялся
на плечи. (Pис. 34)
5. Отрегулируйте положение подвески таким
образом, чтобы режущее оборудование
находилось параллельно земле.
6. Режущее оборудование должно слегка касаться
земли. Затем отрегулируйте фиксатор подвески
для правильного баланса изделия.
Примечание:
травы сбалансированное положение должно
находиться на высоте приблизительно 10 см/4
дюйма над землей.
При использовании лезвия для
Запуск холодного двигателя
1. Нажмите 10 раз на грушу ручного нагнетателя.
(Pис. 35)
2. Потяните заслонку вверх. (Pис. 36)
3. Прижмите корпус изделия к земле левой рукой.
(Pис. 37) Не наступайте на изделие. Медленно
потяните шнур стартера, пока не почувствуется
сопротивление. Затем резко дерните шнур
стартера.
Примечание:
запрещается тянуть дроссельный регулятор.
При запуске двигателя
.
4. Продолжайте дергать шнур стартера, пока не
запустится или не начнет запускаться двигатель
(макс. 3 раза). При запуске или попытке запуска
двигателя опустите заслонку. Продолжайте
рывки, пока двигатель не запустится. Подождите
60 секунд после запуска и потяните дроссельный
регулятор.
ВНИМАНИЕ: Не тяните шнур
стартера, пока он не остановится. Не
отпускайте шнур стартера, когда он
полностью вытянут. Медленно
отпустите шнур стартера.
Несоблюдение этих инструкций может
привести к повреждению двигателя.
Запуск прогретого двигателя
1. Нажмите 10 раз на грушу ручного нагнетателя.
2. Тяните шнур стартера до запуска двигателя.
Запуск двигателя, когда топливо очень
горячее
Если изделие не запускается, возможно, топливо
слишком горячее.
Примечание: Всегда используйте свежее топливо и
снижайте время работы в теплую погоду.
1. Поместите изделие в прохладное место, куда не
попадают прямые солнечные лучи.
2. Подождите, пока изделие остынет (не менее 20
минут).
3. Несколько раз нажмите на грушу ручного
нагнетателя на 10-15 секунд.
4. Выполните процедуру запуска холодного
двигателя. См. раздел
двигателя на стр. 63
Запуск холодного
.
Остановка
• Нажмите на выключатель, чтобы остановить
двигатель. (Pис. 21)
Примечание:
возвращается в исходное положение.
Выключатель автоматически
Эксплуатация триммера для
травы
ВНИМАНИЕ:
сбрасывайте обороты двигателя до
скорости холостого хода. Работа в
течение длительного времени при
полном открытии дроссельной заслонки
без какой-либо нагрузки на двигатель
может привести к повреждению
двигателя.
После каждой операции
881 - 001 - 10.10.2018 63
Page 64

Примечание: Очищайте крышку головки триммера
при установке новой режущей лески для
предотвращения вибрации. Проверьте другие
детали головки триммера и очистите их при
необходимости.
Стрижка травы
1. Держите головку триммера чуть выше земли под
углом. Не прижимайте режущую леску к траве.
(Pис. 38)
2. Уменьшите длину режущей лески на 10-12 см /
4-4,75 дюйма.
3. Уменьшите частоту вращения двигателя, чтобы
уменьшить риск повреждения растений.
4. При стрижке травы вблизи предметов дроссель
должен быть открыт на 80%. (Pис. 39)
Кошение травы
1. При кошении травы держите режущую леску
триммера параллельно земле. (Pис. 40)
2. Не прижимайте головку триммера к земле. Это
может привести к повреждению изделия
3. При стрижке травы перемещайте изделие из
стороны в сторону. Работайте на полной
мощности. (Pис. 41)
Подрезка травы с помощью лезвия для
травы
1. Лезвия и ножи для травы не должны
использоваться для срезания стволов.
2. Лезвие для травы предназначено для всех видов
высокой или грубой травы.
3. Производите кошение маятниковым движением
из стороны в сторону, движение справа налево
будет рабочим движением, а движение слева
направо — возвратным. Лезвие должно срезать
траву своим левым краем (между 8 и 12 часами).
4. Если немного наклонить лезвие влево при
подрезке, срезанная трава будет укладываться
ровными рядами, что облегчит ее сгребание.
5. Старайтесь работать в одном ритме. Стойте
устойчиво, поставив стопы ног на некотором
расстоянии друг от друга. После возвратного
движения передвиньтесь вперед и опять
встаньте в устойчивое положение.
6. Опорная чашка должна слегка касаться земли.
Она предохраняет лезвие от контакта с землей.
7. Чтобы уменьшить риск закручивания материала
вкруг лезвия, всегда работайте на полных
оборотах и старайтесь не проходить по уже
срезанной траве при возвратном движении.
8. Перед тем, как начать собирать срезанную траву,
остановите двигатель и снимите оснастку.
Головка триммера
• Убедитесь, что режущая леска плотно и
равномерно намотана на барабан, чтобы
уменьшить вибрацию.
• Используйте только одобренные головки
триммера и режущую леску. См.
на стр. 69
• Используйте режущую леску соответствующей
длины. Длинная режущая леска требует большей
мощности двигателя, чем короткая.
• Убедитесь, что резчик на щитке режущего
оборудования не поврежден.
• Замочите режущую леску в воде на 2 дня, прежде
чем установить ее на изделие. Это поможет
продлить срок службы режущей лески.
.
Замена режущей лески
(Pис. 42)
(Pис. 43)
(Pис. 44)
(Pис. 45)
(Pис. 46)
(Pис. 47)
(Pис. 48)
(Pис. 49)
Принадлежности
Техническое обслуживание
Введение
ПРЕДУПРЕЖДЕНИЕ: Перед
выполнением техобслуживания
необходимо внимательно изучить и
понять раздел безопасности.
Для выполнения любых работ по сервисному
обслуживанию и ремонту изделия необходимо
пройти специальное обучение. Мы гарантируем
доступность услуг по профессиональному ремонту и
сервисному обслуживанию. Если ваш дилер не
занимается сервисным обслуживанием, обратитесь к
64 881 - 001 - 10.10.2018
нему для получения информации о ближайшем
сервисном центре.
График технического
обслуживания
Еженедельное техобслуживание
• Очистите внешние поверхности.
• Убедитесь, что режущее оборудование не
вращается на холостых оборотах. См. раздел
Регулировка скорости холостого хода на стр. 65
.
Page 65

• Проверьте уровень смазки в коническом
зубчатом колесе. См. раздел
в зубчатую передачу на стр. 66
• Проверьте контргайку. См. раздел
контргайки на стр. 66
Ежемесячное обслуживание
• Убедитесь, что рукоятка шнура стартера и шнур
стартера не повреждены.
Ежегодное обслуживание
• Проверьте свечу зажигания. См. раздел
Проверка свечи зажигания на стр. 65
• Очистите внешние поверхности карбюратора и
прилегающих областей.
• Очистите систему охлаждения.
• Проверьте искрогасительную сетку. См. раздел
Добавление смазки
.
Проверка
.
.
Техобслуживание искрогасительной сетки на стр.
65
.
• Проверьте топливный фильтр.
• Убедитесь, что топливный шланг не имеет
повреждений.
• Убедитесь, что кабели и соединения устройства
не повреждены.
Регулировка скорости холостого
хода
• Перед регулировкой скорости холостого хода
убедитесь, что воздушный фильтр чистый и
установлена крышка воздушного фильтра.
• Отрегулируйте обороты холостого хода с
помощью винта регулировки холостого хода T,
обозначенного меткой "T".
• Скорость холостого хода правильная, если
двигатель работает ровно во всех положениях.
Скорость холостого хода должна быть ниже
скорости, при которой режущее оборудование
начинает вращаться.
1. Поворачивайте винт регулировки по часовой
стрелке до тех пор, пока режущее оборудование
не начнет вращаться. (Pис. 50)
2. Затем поворачивайте винт регулировки против
часовой стрелки, пока режущее оборудование не
остановится.
Техобслуживание
искрогасительной сетки
Для очистки искрогасительной сетки используйте
металлическую щетку.
(Pис. 51)
Очистка системы охлаждения
Для очистки компонентов системы охлаждения
используйте щетку.
(Pис. 52)
Проверка свечи зажигания
ВНИМАНИЕ: Используйте только
рекомендуемые свечи зажигания.
Убедитесь, что запчасть имеет такие же
характеристики, что и деталь
производителя. Применение
неподходящих свечей зажигания может
привести к повреждению изделия.
1. Проверять свечу зажигания необходимо в
следующих случаях:
a) при снижении мощности двигателя;
b) при затруднительном запуске двигателя;
c) при некорректной работе двигателя на
холостых оборотах.
2. Если двигатель запускается с трудом или не
работает, проверьте свечу зажигания на наличие
посторонних материалов. Чтобы уменьшить риск
появления посторонних материалов на
электродах свечи зажигания:
a) убедитесь в правильности регулировки
скорости холостого хода;
b) убедитесь в правильности состава топливной
смеси;
c) убедитесь, что воздушный фильтр чист;
3. очистите свечу зажигания, если она загрязнена.
Проверьте правильность зазора между
электродами. (Pис. 53)
4. При необходимости замените свечу зажигания.
Техобслуживание воздушного
фильтра
Очистка воздушного фильтра
1. Снимите крышку воздушного фильтра и
воздушный фильтр. (Pис. 54)
2. Промойте воздушный фильтр теплой мыльной
водой. Перед установкой фильтра на место
убедитесь, что он полностью высох.
3. Если воздушный фильтр слишком грязный, чтобы
полностью его очистить, замените его. Всегда
заменяйте поврежденный воздушный фильтр.
4. Если изделие оснащено поролоновым
воздушным фильтром, нанесите масло для
воздушного фильтра. Масло для воздушного
фильтра наносится только на поролоновый
фильтр. Нельзя наносить масло на фетровый
фильтр.
Нанесение масла на воздушный фильтр
ВНИМАНИЕ:
специальное масло для поролоновых
воздушных фильтров. Не используйте
другие виды масла.
Всегда используйте
881 - 001 - 10.10.2018 65
Page 66

ПРЕДУПРЕЖДЕНИЕ: Не допускайте
попадания масла на тело.
1. Снимите крышку воздушного фильтра и
воздушный фильтр. (Pис. 55)
2. Поместите воздушный фильтр в полиэтиленовый
пакет.
3. Налейте в полиэтиленовый пакет масло для
воздушного фильтра. (Pис. 56)
4. Сожмите пакет, чтобы равномерно распределить
масло по воздушному фильтру.
5. Сожмите воздушный фильтр в пакете, чтобы
удалить излишки масла. Извлеките воздушный
фильтр из пакета.
6. Установите воздушный фильтр.
Добавление смазки в зубчатую
передачу
Убедитесь, что зубчатая передача на 3/4 заполнена
смазкой для зубчатой передачи.
(Pис. 57)
Проверка контргайки
ВНИМАНИЕ: Заменяйте контргайку после
каждого 10-го использования.
1. Поверните контргайку против часовой стрелки,
чтобы затянуть контргайку. Поверните контргайку
по часовой стрелке, чтобы снять контргайку.
(Pис. 58)
2. Убедитесь, что нейлоновую прокладку контргайки
невозможно повернуть руками. Сопротивление
нейлоновой прокладки должно быть не менее 1,5
Нм (1,1 фут/фунт).
3. Затяните контргайку моментом 35-50 Нм (26-36
футо-фунтов), если сопротивление ниже
минимального значения.
ВНИМАНИЕ: Если затянуть
контргайку слишком сильно, это может
привести к повреждению резьбы.
Заточка ножа и лезвия для травы
ПРЕДУПРЕЖДЕНИЕ: Остановите
двигатель. Используйте защитные
перчатки.
• Правильную процедуру заточки ножа и лезвия
для травы см. в инструкциях, поставляемых
вместе с режущим оборудованием.
• Для сохранения балансировки все кромки
должны быть заточены одинаково.
• Используйте плоский напильник с односторонним
узором. (Pис. 59)
ПРЕДУПРЕЖДЕНИЕ: Всегда
утилизируйте поврежденные ножи. Не
пытайтесь выпрямить изогнутый или
перекошенный нож для его повторного
использования.
Поиск и устранение неисправностей
Двигатель не запускается
Проверка Возможная причина Порядок действий
Выключатель. Выключатель находится в положении
останова.
Собачки стартера. Собачки стартера не могут свободно
перемещаться.
Топливный бак. Топливо несоответствующего типа. Опорожните топливный бак и залейте
66 881 - 001 - 10.10.2018
Переведите выключатель в положение
запуска.
Снимите крышку стартера и очистите
область вокруг собачек стартера.
Обратитесь в авторизованный сервисный
центр за помощью.
правильное топливо.
Page 67

Проверка Возможная причина Порядок действий
Свеча зажигания. Свеча зажигания загрязнена или намокла. Убедитесь, что свеча зажигания сухая и
Неправильный зазор между электродами
свечи зажигания.
Крепление свечи зажигания ослаблено. Затяните свечу зажигания.
чистая.
Очистите свечу зажигания. Проверьте
правильность зазора между электродами.
Убедитесь, что свеча зажигания оснащена
изоляцией радиопомех.
Правильный зазор между электродами см.
в технических данных.
Двигатель запускается, но затем снова останавливается
Проверка
Топливный бак Топливо несоответствующего
Воздушный фильтр Засорен воздушный фильтр. Очистите воздушный фильтр.
Возможная причина Порядок действий
типа.
Опорожните топливный бак и
залейте в него правильное
топливо.
Транспортировка, хранение и утилизация
Транспортировка и хранение
• Перед транспортировкой или помещением на
хранение дайте изделию остыть.
• Перед помещением на длительное хранение
снимите колпачок свечи зажигания.
• Закрепляйте изделие на время транспортировки.
Убедитесь, что изделие неподвижно
зафиксировано.
• Убедитесь, что на время транспортировки и
хранения исключен риск возникновения утечек
топлива, испарения топлива, искр или пламени.
• На время транспортировки и хранения
устанавливайте на изделие транспортировочный
щиток.
• Перед помещением на длительное хранение
очистите изделие и проведите его
техобслуживание.
Технические данные
Технические данные
325R
A05328CBHV
Двигатель
Объем цилиндра, см
Обороты холостого хода, об/мин 2800 - 3200
Рекомендованные макс. обороты, об/мин 8000
Макс. выходная мощность двигателя, по ISO 8893, кВт/л.с. при об/мин 0,9/1,2 при 8000
3
27,6
881 - 001 - 10.10.2018 67
Page 68

325R
A05328CBHV
Глушитель с каталитическим конвертером Нет
Частота вращения выходного вала, об/мин 7200
Система зажигания
Свеча зажигания Husqvarna HQT-4
Зазор между электродами, мм 0,5
Топливная система
Емкость топливного бака, л/см³ 0,343/343
Размеры изделия
Вес, кг 5,5
Излучение шума
10
Уровень мощности звука, измеренный, с лезвием для травы, дБ (A) 108
Уровень мощности звука, измеренный, с головкой триммера, дБ (A) 110
Уровень мощности звука, гарантированный (LWA), с лезвием для травы, дБ (A) 112
Уровень мощности звука, гарантированный (LWA), с головкой триммера, дБ (A) 114
Уровни шума
Уровень звукового давления на уровне уха оператора, с лезвием для травы, дБ
11
96
(А)
Уровень звукового давления на уровне уха оператора, с головкой триммера, дБ
95
(А)
Уровни вибрации
12
Эквивалент уровня вибрации (ahv, eq), с лезвием для травы, рукоятка слева, м/с25.1
Эквивалент уровня вибрации (ahv, eq), с лезвием для травы, рукоятка справа,
2
м/с
5,7
Эквивалент уровня вибрации (ahv, eq), с головкой триммера, рукоятка слева, м/с24,1
Эквивалент уровня вибрации (ahv, eq), с головкой триммера, рукоятка справа,
2
м/с
4,9
10
Излучение шума в окружающую среду измеряется как шумовой эффект (LWA) согласно Директиве ЕС
2000/14/EC. Указанный уровень мощности звука для изделия измерен с оригинальным режущим
оборудованием, дающим наивысший уровень. Разница между гарантированной и измеренной
мощностью звука заключается в том, что гарантированная мощность звука включает результаты
измерений как диапазон и их отклонение для изделий одной и той же модели согласно директиве
2000/14/EC.
11
Указанные данные об эквивалентном уровне давления звука для устройства имеют типичный
статистический разброс (стандартное отклонение) 1 дБ (A).
12
Указанные данные о среднем уровне вибраций имеют типичный статистический разброс (стандартное
отклонение) 1 м/с2.
68 881 - 001 - 10.10.2018
Page 69

Принадлежности
Принадлежности
Соответствующие
принадлежности
Резьбовой вал M10L
Головка триммера T35, 2,4 мм 588 11 79-01
Лезвие для травы Grass 255-4, Ø 250 588 11 79-01
Тип Щиток режущего оборудования
881 - 001 - 10.10.2018 69
Page 70

Декларация соответствия ЕС
Содержание декларации о
соответствии ЕС
Компания Husqvarna AB, SE 561 82 Huskvarna,
ШВЕЦИЯ, под свою исключительную
ответственность заявляет, что представленное
изделие:
Описание Бензиновый триммер/
Марка Husqvarna
Платформа / Тип /
Модель
Партия Серийный номер с 2018
полностью соответствует следующим директивам и
нормам ЕС:
Директива/Норматив
2006/42/EC "о механическом
2014/30/EU "об электромагнитной
2000/14/EC "об излучении шума от
2011/65/EU "об ограничении
кусторез
Платформа
A05328CBHV,
представленная
моделью 325R.
года и далее.
Описание
оборудовании"
совместимости"
оборудования,
размещенного вне
помещения"
использования опасных
веществ"
предприятий и стран производителя, как указано на
изделии.
Поставляемый бензиновый триммер/кусторез
соответствует эталону, прошедшему контроль.
Применяются следующие согласованные стандарты
и/или технические спецификации: EN ISO 12100, EN
ISO 11806-1, CISPR 12, ISO 14982, EN 50581:2012 .
В соответствии с директивой 2000/14/EC,
приложение V, заявленные значения звукового
давления указаны в разделе технических данных
настоящего руководства и в подписанной
декларации соответствия ЕС.
Организацией TÜV Rheinland N.A. был проведен
добровольный контроль от имени Husqvarna AB, в
результате которого был выдан Сертификат
соответствия директиве ЕС 2006/42/EC о
механическом оборудовании.
Сертификат, предоставленный в подписанной
декларации соответствия ЕС, действителен для всех
70 881 - 001 - 10.10.2018
Page 71

Зміст
Вступ........................................................................... 71
Безпека........................................................................72
Збирання.....................................................................77
Експлуатація.............................................................. 78
ТЕХНІЧНЕ ОБСЛУГОВУВАННЯ............................... 80
Вступ
Усунення несправностей.........................................82
Транспортування, зберігання й утилізація...........83
Технічні характеристики.......................................... 83
Аксесуари................................................................... 85
Декларація відповідності ЄС.................................. 86
Посібник користувача
Оригінальна мова посібника користувача –
англійська. Посібники користувача іншими мовами є
перекладами англійського оригіналу.
Призначення
Для зрізання різних типів рослинності
використовуйте виріб із насадками на кшталт ножа
для трави або головки тримера.
Огляд виробу
(Мал. 1)
1. Головка тримера
2. Кришка мастильного фільтра
3. Зубчаста передача
4. Захисний кожух ріжучої насадки
5. Штанга
6. Вимикач
7. Курок газу
8. Елемент блокування курка газу
9. Рукоятка
10. Кріплення ременя
11. Корпус стартера
12. Ковпак свічки запалювання, свічка запалювання
13. Рукоятка стартера
14. Паливний бак
15. Кришка повітряного фільтра
16. Кнопка продувки повітря
17. Керування заслінкою.
18. Регулювання рукоятки
19. Тросик газу
20. Кнопка холостого ходу за високих обертів
21. Пасова підвіска
22. Комбінований гайковий ключ
23. Посібник користувача
24. Чохол для транспортування
25. Лезо
26. Опорна манжета
27. Опорний фланець
28. Стопорна гайка
Зверніть увагу: Норми внутрішнього законодавства
можуть накладати обмеження на використання цього
виробу.
29. Приводний диск
30. Стопорний штифт
31. Шестигранний ключ
Символи на виробі
(Мал. 2) ПОПЕРЕДЖЕННЯ! Цей виріб може бути
небезпечним. Необережне або
неправильне використання виробу може
призвести до травм або смерті оператора
чи сторонніх осіб. Щоб уникнути
травмування оператора чи сторонніх осіб,
уважно прочитайте всі правила техніки
безпеки, наведені в цьому посібнику
користувача, і дотримуйтеся них.
(Мал. 3) Перед користуванням виробом уважно
прочитайте посібник користувача та
переконайтеся, що ви зрозуміли всі
вказівки.
(Мал. 4) На ділянках, де існує ризик падіння
предметів, завжди надягайте захисний
шолом. Користуйтеся відповідними
захисними навушниками. Користуйтеся
відповідними засобами захисту очей.
(Мал. 5) Використовуйте відповідні захисні
рукавиці.
(Мал. 6) Використовуйте надміцні чоботи із
захистом від ковзання.
881 - 001 - 10.10.2018 71
Page 72

(Мал. 7) Стрілками позначені обмеження для
(Мал. 8) З-під виробу можуть викидатися
(Мал. 9) Максимальна частота обертання
(Мал. 10) Під час експлуатації виробу дистанція між
(Мал. 11) Ризик віддачі ножа у випадку, якщо
(Мал. 12) Кнопка продувки повітря.
(Мал. 13) Заслінка.
(Мал. 14) Не працюйте поблизу гарячих поверхонь.
(Мал. 15) Рівень випромінювання шуму в
(Мал. 16) Виріб відповідає належним вимогам
(Мал. 17) Виріб відповідає належним вимогам
Серійний
номер
вказаний
на
табличці з
паспортни
ми
даними.
Число
yyyy
означає рік
виробницт
ва, ww –
тиждень, а
xxxxx –
серійний
номер.
встановлення рукоятки.
предмети, що може призвести до травм.
вихідного вала.
вами й сторонніми особами чи тваринами
повинна становити щонайменше 15 м.
різальне обладнання натрапить на
предмет, який не зможе миттєво зрізати.
Виріб здатний відтяти частини тіла. Під
час експлуатації виробу дистанція між
вами й сторонніми особами чи тваринами
повинна становити щонайменше 15 м.
навколишнє середовище відповідає
Директиві ЄС. Рівень випромінювання
шуму виробу вказано в розділі «Технічні
дані» й на паспортній табличці.
директив ЄС.
директив EAC.
yyyywwxxxxx
Зверніть увагу: Інші позначення на виробі
відповідають вимогам спеціальних сертифікатів для
інших торгових зон.
Відповідальність за якість
продукції
Відповідно до законів про відповідальність за якість
продукції ми не несемо відповідальності за будь-які
пошкодження, спричинені роботою наших виробів,
якщо:
• виріб був неправильно відремонтований;
• виріб був відремонтований із використанням
деталей, виготовлених не виробником або не
затверджених ним;
• виріб обладнаний аксесуаром, виготовленим не
виробником або не затвердженим ним;
• виріб був відремонтований у неавторизованому
сервісному центрі або неавторизованою
компанією;
ЄС V
ПОПЕРЕДЖЕННЯ: Внесення змін у
двигун позбавляє чинності сертифікацію
ЄС для цього виробу.
Безпека
Визначення щодо безпеки
Попередження, застереження й примітки служать
для наголошення на особливо важливих положеннях
посібника.
72 881 - 001 - 10.10.2018
ПОПЕРЕДЖЕННЯ: Вказує на те, що в
разі порушення інструкцій, наведених у
цьому посібнику, існує небезпека
поранення або смерті оператора чи інших
осіб, що знаходяться поруч.
Page 73

УВАГА: Вказує на те, що в разі
порушення інструкцій, наведених у цьому
посібнику, існує небезпека пошкодження
виробу, інших матеріалів або навколишніх
об’єктів.
Зверніть увагу: Використовується для надання
додаткової інформації щодо певної ситуації.
Противібраційна безпека
Цей виріб призначено для періодичного
використання. Тривала або регулярна робота з
виробом може призвести до синдрому білих пальців
або інших хвороб через вібрацію. У разі тривалої або
регулярної експлуатації виробу перевіряйте стан
своїх рук та пальців. Якщо колір ваших рук або
пальців змінився, ви відчуваєте в них біль,
поколювання або оніміння, припиніть роботу та
негайно зверніться до лікаря.
Загальні правила техніки безпеки
ПОПЕРЕДЖЕННЯ: Перш ніж розпочати
використання виробу, уважно прочитайте
наведені нижче попередження.
• Використовуйте виріб правильно. Неправильне
використання може призвести до травм або
смерті. Використовуйте виріб лише для завдань,
перелічених у цьому посібнику. Забороняється
використовувати продукт для інших завдань.
• Дотримуйтеся інструкцій, наведених у цьому
посібнику. Дотримуйтеся інструкцій, зазначених
на попереджувальних знаках та в правилах
техніки безпеки. Недотримання оператором
інструкцій, зазначених на попереджувальних
знаках та в правилах техніки безпеки, може
призвести до травм, пошкоджень або смерті.
• Не викидайте цей посібник. Користуйтеся
інструкціями для монтажу, експлуатації та
підтримки виробу в задовільному стані.
Користуйтеся інструкціями для правильного
встановлення насадок та приладдя.
Використовуйте лише сертифіковані насадки та
приладдя.
• Не користуйтеся пошкодженим виробом.
Дотримуйтеся графіка технічного
обслуговування. Виконуйте лише те
обслуговування, для якого наведені інструкції в
цьому посібнику. Все інше обслуговування
повинне виконуватися в авторизованому
сервісному центрі.
• Цей посібник не включає всі ситуації, що можуть
статися під час використання виробу. Будьте
обережні та дотримуйтеся здорового глузду. Не
експлуатуйте виріб і не виконуйте технічне
обслуговування, якщо ви не можете розібратися в
поточній ситуації. Більш детальну інформацію
можна дізнатися в експерта з продукції, вашого
дилера, центрі обслуговування або в
авторизованому сервісному центрі.
• Перед монтажем, зберіганням або технічним
обслуговуванням необхідно виймати свічку
запалювання.
• Не використовуйте виріб у разі зміни його
початкових технічних характеристик. Не
замінюйте деталі виробу без дозволу виробника.
Використовуйте лише деталі, схвалені
виробником. Неправильне технічне
обслуговування може призвести до травм або
смерті.
• Не вдихайте вихлопні гази, що виходять з
двигуна. Тривале вдихання вихлопних газів
двигуна може бути небезпечним для здоров’я.
• Не вмикайте виріб у приміщенні чи біля
легкозаймистих матеріалів. Вихлопні гази мають
високу температуру та можуть містити іскри, від
яких можливе загоряння. Недостатнє
провітрювання може призвести до травм або
смерті внаслідок задухи чи отруєння моноксидом
вуглецю.
• Під час використання виробу двигун створює
електромагнітне поле. Електромагнітне поле
може пошкодити медичні імплантати. Перш ніж
працювати з цим приладом, проконсультуйтеся з
лікарем і виробником медичного імплантату.
• Не давайте використовувати прилад дітям. Не
давайте використовувати прилад особам, що не
ознайомилися з інструкціями.
• Завжди спостерігайте за особами з обмеженими
фізичними чи розумовими можливостями, що
використовують виріб. Біля виробу, що працює,
повинна завжди знаходитися відповідальна
доросла особа.
• Зачиняйте виріб у місці, куди не зможуть
отримати доступ діти та особи, що не мають
належної підготовки для використання виробу.
• З під виробу можуть викидатися предмети, що
може призвести до травм. Для зменшення ризику
травм або смерті дотримуйтеся правил техніки
безпеки.
• Не відходьте далеко від працюючого виробу.
• Відповідальність за нещасний випадок несе
оператор.
• Перед використанням виробу переконайтеся, що
його деталі не мають пошкоджень.
• Перед використанням виробу переконайтеся в
тому, що ви перебуваєте на відстані щонайменше
15 м (50 футів) від інших осіб або тварин.
Переконайтеся в тому, що особи на прилеглій
території знають, що ви збираєтеся
використовувати виріб.
• Дотримуйтеся державного та місцевого
законодавства. Норми законодавства можуть
забороняти або обмежувати використання виробу
в деяких умовах.
• Заборонено використовувати виріб, якщо ви
втомлені чи перебуваєте під впливом наркотиків,
881 - 001 - 10.10.2018
73
Page 74

алкоголю або медикаментів. Ці речовини можуть
вплинути на зір, реакцію, координацію рухів або
спроможність робити зважені рішення.
Правила техніки безпеки під час
монтажу
ПОПЕРЕДЖЕННЯ: Перш ніж розпочати
використання виробу, уважно прочитайте
наведені нижче попередження.
• Перед збиранням виробу необхідно зняти ковпак
свічки запалювання зі свічки запалювання.
• Використовуйте відповідні захисні рукавиці.
• Перед запуском двигуна переконайтеся, що
кришка й вал змонтовані правильно.
• Приводний диск і опорний фланець повинні
входити в зачеплення в центральному отворі
ріжучої насадки відповідним чином. Неправильне
встановлення ріжучої насадки може призвести до
серйозних травм або смерті оператора чи інших
осіб.
• Для забезпечення безпечної експлуатації виробу
та уникнення травмування оператора чи
сторонніх осіб, виріб повинен бути завжди
закріплений на пасовій підвісці.
Правила техніки безпеки під час
використання
ПОПЕРЕДЖЕННЯ: Перш ніж розпочати
використання виробу, уважно прочитайте
наведені нижче попередження.
• Перед використанням переконайтеся, що виріб
повністю змонтований.
• Перед запуском пересуньте виріб на 3 м від
місця, де ви заправляли його пальним.
Розташуйте виріб на рівній поверхні. При цьому
ріжуча насадка не повинна торкатися землі або
інших предметів.
• З-під виробу можуть викидатися предмети, що
може призвести до пошкодження очей. Під час
експлуатації виробу завжди користуйтеся
відповідними засобами захисту очей.
• Будьте обережні, адже під час експлуатації
виробу до вас може без дозволу підійти дитина.
• Не використовуйте виріб, якщо на робочій ділянці
знаходяться люди. Зупиніть виріб у разі, якщо на
робочу ділянку зайшла особа.
• Завжди контролюйте місце знаходження виробу.
• Не використовуйте виріб, якщо немає змоги
отримати допомогу в разі нещасного випадку.
Перед початком експлуатації виробу
переконайтеся, що інші особи знають, що ви
будете працювати з виробом.
• Не обертайтеся разом з виробом, доки не
переконаєтеся, що люди або тварини
знаходяться в безпечній зоні.
• Перед початком роботи приберіть всі непотрібні
предмети з робочої ділянки. Якщо ріжуча насадка
натрапить на якийсь предмет, він може відлетіти
та призвести до травм або пошкоджень.
Непотрібні предмети можуть намотатися на
ріжучу насадку та призвести до пошкоджень.
• Не користуйтеся виробом у погану погоду (туман,
дощ, сильний вітер, якщо є ризик виникнення
блискавки або за інших несприятливих погодних
умов). Через погану погоду можуть утворюватися
небезпечні умови (наприклад, слизькі поверхні).
• Переконайтеся, що ви можете вільно
переміщуватися та працювати, зберігаючи
стабільне положення.
(Мал. 18)
• Переконайтеся, що під час використання виробу
ви не впадете. Не нахиляйтеся під час
експлуатації виробу.
• Завжди утримуйте виріб обома руками. Тримайте
виріб праворуч.
(Мал. 19)
• Використовуйте виріб лише тоді, коли ріжуча
насадка знаходиться нижче рівня вашої талії.
• Якщо в момент запуску двигуна керування
заслінкою знаходиться в положенні заслінки,
ріжуча насадка почне обертатися.
• Не торкайтеся конічної зубчастої передачі після
зупинки двигуна. Після зупинки двигуна конічна
зубчаста передача має високу температуру.
Контакт із гарячими поверхнями може призвести
до травм.
• Перед переміщенням виробу зупиняйте двигун.
• Не кладіть працюючий виріб на землю.
• Перед тим як прибрати непотрібні предмети з
виробу, зупиніть двигун та дочекайтеся зупинки
ріжучої насадки. Дочекайтеся зупинки різальної
насадки перед тим як ви або ваш помічник почне
прибирати зрізаний матеріал.
Засоби індивідуального захисту
ПОПЕРЕДЖЕННЯ:
використання виробу, уважно прочитайте
наведені нижче попередження.
• Під час експлуатації виробу завжди
використовуйте відповідні засоби індивідуального
захисту. Засоби індивідуального захисту не
усувають повністю ризик отримання травм.
Засоби індивідуального захисту знижують рівень
пошкоджень у разі нещасного випадку.
• Під час експлуатації виробу завжди користуйтеся
відповідними засобами захисту очей.
• Не використовуйте виріб, не надягнувши взуття
або перебуваючи у відкритому взутті. Завжди
використовуйте надміцні чоботи із захистом від
ковзання.
• Використовуйте цупкі довгі штани.
Перш ніж розпочати
74
881 - 001 - 10.10.2018
Page 75

• За необхідності використовуйте сертифіковані
захисні рукавиці.
• У разі наявності ризику падіння предметів на
голову, використовуйте шолом.
• Під час експлуатації виробу завжди користуйтеся
відповідними засобами захисту органів слуху.
Довготривалий вплив шуму може призвести до
втрати слуху.
• Переконайтеся, що поряд є набір засобів для
надання першої медичної допомоги.
Механізми безпеки на пристрої
ПОПЕРЕДЖЕННЯ: Перш ніж розпочати
використання виробу, уважно прочитайте
наведені нижче попередження.
• Не використовуйте виріб із пошкодженими
захисними пристроями.
• Регулярно перевіряйте захисні пристрої. Див.
Огляд виробу на сторінці 71
• У випадку пошкодження запобіжних механізмів
зверніться до сервісного дилера Husqvarna.
Блокування курка газу
Елемент блокування курка газу блокує курок газу.
(Мал. 20)
Натисніть на елемент блокування курка газу (A), щоб
відпустити курок газу (B). Коли ви випускаєте з рук
рукоятку, елемент блокування курка газу та курок
газу повертаються до початкового положення.
1. Переконайтеся, що курок газу (B) зафіксований у
положенні для холостої роботи, після чого можна
відпустити елемент блокування курка газу (A).
2. Натисніть на елемент блокування курка газу (A)
та переконайтеся, що він повертається до
початкового положення, коли ви відпускаєте його.
3. Натисніть на курок газу (В) та переконайтеся, що
він повертається до початкового положення, коли
ви відпускаєте його.
Запустіть двигун та повністю натисніть важіль
дроселя. Відпустіть курок газу та перевірте, чи
зупинилася ріжуча насадка. Якщо важіль
знаходиться в положенні для холостого ходу, а
ріжуча насадка продовжує обертатися, перевірте
гвинт регулювання холостого ходу карбюратора.
Вимикач
Запустіть двигун. Переконайтеся, що двигун
вимикається, коли ви переводите вимикач у позицію
зупинки.
(Мал. 21)
Захисний кожух ріжучої насадки
Кожух ріжучої насадки захищає від викидання
предметів у напрямку оператора.
(Мал. 22)
.
Перевіряйте кожух ріжучої насадки на предмет
пошкоджень та в разі необхідності замінюйте його.
Використовуйте лише сертифіковані кожухи для
ріжучих насадок.
Глушник
• Не запускайте двигун з пошкодженим глушником.
Пошкоджений глушник збільшує рівень шуму та
підвищує небезпеку загоряння. Тримайте поруч
вогнегасник.
• Регулярно перевіряйте кріплення глушника до
виробу.
• Не торкайтеся двигуна або глушника під час
роботи двигуна. Після зупинки двигуна почекайте
деякий час перш ніж торкатися двигуна або
глушника. Контакт із гарячими поверхнями може
призвести до травм.
• Гарячий глушник може призвести до загоряння.
Будьте обережні в разі використання виробу біля
легкозаймистих рідин або газів.
• Не торкайтеся частин глушника в разі його
пошкодження. Ці частини можуть містити
канцерогенні хімічні речовини.
Стопорна гайка
Деякі деталі ріжучої насадки фіксуються за
допомогою стопорних гайок.
(Мал. 23)
Затягувати стопорну гайку слід у напрямку,
протилежному напрямку роботи ріжучої насадки.
Фіксатор пасової підвіски
ПОПЕРЕДЖЕННЯ:
пасову підвіску, якщо фіксатор не
спрацьовує належним чином. Під час
налаштування виробу переконайтеся, що
фіксатор пасової підвіски спрацьовує
належним чином.
Фіксатор пасової підвіски розташований на передній
частині виробу. Ремені пасової підвіски завжди
мають бути розташовані в правильному положенні.
(Мал. 24)
Фіксатор пасової підвіски надає можливість безпечно
зняти виріб, якщо виникне непередбачувана
ситуація.
Не використовуйте
Ріжуча насадка
ПОПЕРЕДЖЕННЯ:
використання виробу, уважно прочитайте
наведені нижче попередження.
• Проводьте регулярне технічне обслуговування.
Регулярний огляд, регулювання або ремонт
ріжучої насадки повинен проводитися
авторизованим сервісним центром.
Перш ніж розпочати
881 - 001 - 10.10.2018
75
Page 76

• Продуктивність ріжучої насадки збільшується.
• Строк служби ріжучої насадки збільшується.
• Небезпека виникнення нещасних випадків
зменшується.
• Використовуйте лише сертифікований захисний
кожух ріжучої насадки. Докладніше див.
Аксесуари на сторінці 85
• Не використовуйте пошкоджену ріжучу насадку.
Ножі та різці для трави
• Використовуйте лише відповідні ножі для трави.
Не використовуйте ніж для трави, доки не буде
належним чином установлено всі необхідні
деталі. Упевніться, що використовуються
відповідні частини, а також що їх установлено
належним чином. Неправильне встановлення
може призвести до від’єднання й відкидання леза
та травмування оператора та інших осіб.
• Під час роботи з лезом або його обслуговування
носіть захисні рукавиці.
• Під час роботи з виробом, оснащеним ножем для
трави, користуйтеся відповідними засобами
захисту голови.
• Ножі та різці для трави призначені для косіння
густої трави.
• Ніж для трави може нанести тяжкі травми, коли
продовжує обертатися після вимикання двигуна
або відпускання курка газу. Перш ніж проводити
технічне обслуговування, упевніться, що ніж для
трави повністю зупинився.
• Зупиняйте двигун перед будь-якими операціями з
ріжучою насадкою. Упевніться, що ріжуча насадка
повністю зупинилась. Від’єднайте кабель від
свічки запалювання.
• Використовуйте лише схвалену ріжучу насадку
або правильно загострене лезо.
• Зубці ножа повинні бути правильно загострені.
(Мал. 25)
• Не використовуйте пошкоджену ріжучу насадку.
• Перед транспортуванням або зберіганням виробу
надягайте на ніж для трави чохол для
транспортування.
Віддача ножа
• Віддача ножа – це несподіваний рух виробу вбік,
вперед чи назад. Віддача виникає, коли ніж для
трави чи полотно пилки натрапить на предмет,
який неможливо зрізати. Ризик віддачі зростає під
час роботи на ділянках, де погано видно, що саме
скошується.
• Віддача ножа може відштовхнути виріб чи
оператора. Лезо, що обертається, може нанести
травми сторонній особі.
• Якщо лезо зігнулося, тріснуло, зламалося чи
ушкоджене будь-яким іншим чином, припиніть
його використання.
• Використовуйте гостре лезо. Якщо лезо
затупилося, ризик віддачі зростає.
.
Заходи безпеки під час роботи з
паливом
ПОПЕРЕДЖЕННЯ: Перш ніж розпочати
використання виробу, уважно прочитайте
наведені нижче попередження.
• Не змішуйте паливо в приміщеннях або біля
джерел тепла.
• Не запускайте виріб, якщо на ньому залишилося
пальне або моторна олива. Приберіть непотрібне
пальне/оливу та дайте виробу просохнути.
Приберіть непотрібне пальне з виробу.
• Якщо ви пролили пальне на свій одяг, негайно
переодягніться.
• Не допускайте потрапляння пального на тіло,
адже це може призвести до травм. Для
видалення пального, що потрапило на тіло,
використовуйте мило та воду.
• Не запускайте двигун у разі потрапляння оливи
або пального на виріб або тіло.
• Не запускайте виріб у разі наявності протікання у
двигуні. Регулярно перевіряйте двигун на
протікання.
• Будьте обережні при поводженні з пальним.
Пальне є легкозаймистою речовиною, а його пари
вибухонебезпечні та можуть призвести до травм
або смерті.
• Не вдихайте вихлопні гази, це може призвести до
травм. Забезпечте належне провітрювання.
• Не паліть біля пального або двигуна.
• Не кладіть біля пального або двигуна теплі
предмети.
• Не доливайте пальне в працюючий виріб.
• Перед заправленням переконайтеся, що двигун
охолонув.
• Перед заправленням повільно відкрийте кришку
паливного бака, обережно зменшивши тиск.
• Не заправляйте виріб у приміщенні. Недостатнє
провітрювання може призвести до травм або
смерті внаслідок задухи чи отруєння моноксидом
вуглецю.
• Обережно затягуйте кришку паливного бака,
адже існує ризик виникнення пожежі.
• Перед запуском пересуньте виріб на 3 м від
місця, де ви заправляли його.
• Не заливайте в паливний бак занадто багато
палива.
• Переконайтеся у відсутності ризику протікань під
час переміщення виробу або ємності для
пального.
• Не залишайте виріб або ємність для пального
біля відкритого вогню, джерела іскор або
запальника. Переконайтеся, що в зоні зберігання
відсутні джерела відкритого вогню.
• Під час переміщення або зберігання палива
користуйтеся лише сертифікованими ємностями.
76
881 - 001 - 10.10.2018
Page 77

• Спустошуйте паливний бак перед тривалим
зберіганням. Дотримуйтеся місцевого
законодавства щодо утилізації пального.
• Очищуйте виріб перед тривалим зберіганням.
• Щоб двигун випадково не запустився, перед
зберіганням необхідно зняти кабель свічки
запалювання.
Правила техніки безпеки під час
обслуговування
ПОПЕРЕДЖЕННЯ: Перш ніж розпочати
технічне обслуговування виробу, уважно
прочитайте наведені нижче
попередження.
• Виконуйте лише ті види технічного
обслуговування, які описано в цьому посібнику
Збирання
користувача. Усі інші операції з технічного
обслуговування та ремонту мають виконуватися
кваліфікованими спеціалістами з обслуговування.
• Дотримуйтеся вимог щодо перевірок безпеки, а
також вказівок із догляду й обслуговування,
наведених у цьому посібнику. Регулярне технічне
обслуговування підвищує термін служби виробу
та зменшує небезпеку виникнення нещасних
випадків. Інструкції див. у розділі
технічного обслуговування на сторінці 81
• Якщо після технічного обслуговування виріб не
пройде перевірку, наведену в цьому посібнику
користувача, зверніться до свого дилера з
обслуговування. Ми гарантуємо можливість
професійного ремонту й обслуговування вашого
виробу.
Графік
.
Вступ
ПОПЕРЕДЖЕННЯ: Перед монтажем
виробу обов’язково прочитайте й
усвідомте зміст розділу про заходи
безпеки.
ПОПЕРЕДЖЕННЯ: Перед збиранням
виробу необхідно від’єднати кабель від
свічки запалювання.
Монтаж рукоятки
1. Вийміть гвинт, що знаходиться поза ручкою газу.
(Мал. 26)
2. Перемістіть ручку газу до правого боку рукоятки.
3. Зіставте гвинтовий отвір на ручці газу з отвором
на рукоятці.
4. Просуньте гвинт крізь отвори. Затягніть гвинт.
5. Установіть рукоятку між стрілками на валу.
Затягніть гвинт. (Мал. 27)
Установлення кріплення ременя
1. Установіть кріплення ременя на вал петлею
догори. Помістіть кріплення ременя над стрілками
на валу.
2. Вставте тросик газу в паз у нижній частині
кріплення ременя.
3. Поверніть кріплення ременя таким чином, щоб
співпадали гвинтові отвори.
4. Вставте два гвинти у гвинтові отвори.
5. Затягніть гвинти.
Монтаж ріжучої насадки
Монтаж захисного кожуха ріжучої
насадки
1. Установіть захисний кожух ріжучої насадки (A) на
вал. (Мал. 28)
2. Вставте кріпильну скобу (B) в паз на захисному
кожусі ріжучої насадки.
3. Вставте болт (C) в отвір кріпильної скоби
захисного кожуха ріжучої насадки.
Монтаж ножа для трави
1. Переконайтеся, що на пристрій установлено
захисний кожух ріжучої насадки (A). Див.
захисного кожуха ріжучої насадки на сторінці 77
(Мал. 29)
2. Вставте стопорний штифт (B) у отвір, щоб
зафіксувати вал.
3. Установіть ніж (E), опорну манжету (F) і опорний
фланець (G) на вихідний вал (D).
4. Переконайтеся, що приводний диск (C) входить у
центральний отвір ножа відповідним чином. (Мал.
30)
5. Установіть стопорну гайку (H) на вихідний вал.
Тримайте ручку комбінованого гайкового ключа
біля захисного кожуха ріжучої насадки.
Повертайте комбінований гайковий ключ проти
годинникової стрілки, щоб затягнути стопорну
гайку. Затягніть стопорну гайку, застосовуючи
момент 35–50 Н•м (26–36 футів/фунт).
6. Вийміть стопорний штифт.
Приєднання головки тримера
1. Переконайтеся, що на пристрій установлено
захисний кожух ріжучої насадки (A). Див.
Монтаж
Монтаж
.
881 - 001 - 10.10.2018
77
Page 78

захисного кожуха ріжучої насадки на сторінці 77
(Мал. 31)
2. Переконайтеся, що приводний диск (C)
встановлено на вихідний вал (D).
3. Вставте стопорний штифт (B) у отвір, щоб
зафіксувати вал.
Експлуатація
Вступ
ПОПЕРЕДЖЕННЯ: Перед експлуатацією
виробу обов’язково прочитайте й
усвідомте зміст розділу про заходи
безпеки.
Паливо
Цей виріб оснащений двотактним двигуном.
УВАГА: Заправлення паливом
невідповідного типу може призвести до
пошкодження двигуна. Використовуйте
суміш бензину й масла для двотактних
двигунів.
Попередньо змішане паливо
• Для найкращої продуктивності та подовження
терміну служби двигуна використовуйте
високоякісне попередньо змішане алкілатне
паливо Husqvarna. Це паливо містить менш
шкідливі хімічні речовини порівняно зі звичайним.
Завдяки цьому зменшується шкідливий вплив
вихлопних димів. Кількість залишків після
згоряння цього палива менша, завдяки чому
компоненти двигуна залишаються більш чистими.
Змішування палива
Бензин
Не використовуйте бензин із
УВАГА:
октановим числом нижче 90 RON (87 AKI).
Це може призвести до пошкодження
виробу.
УВАГА: Не використовуйте бензин із
концентрацією етанолу більше 10% (E10).
Це може призвести до пошкодження
виробу.
• Завжди використовуйте новий неетилований
бензин з мінімальним октановим числом 90 RON
(87 AKI) та концентрацією етанолу менше 10%
(E10).
• У разі частого використання виробу з високою
частотою обертання двигуна, необхідно
.
4. Установіть головку тримера (E) на вихідний вал.
5. Повертайте головку тримера проти годинникової
стрілки, щоб зафіксувати її на вихідному валу.
(Мал. 32)
6. Вийміть стопорний штифт.
використовувати бензин з вищим октановим
числом.
Мастило для двотактних двигунів
• Для досягнення найкращих результатів і
продуктивності використовуйте масло Husqvarna
для двотактних двигунів.
• Якщо масла Husqvarna для двотактних двигунів
немає, використовуйте інше високоякісне масло
для двотактних двигунів із повітряним
охолодженням. Щоб вибрати правильне масло,
зверніться до свого дилера з обслуговування.
УВАГА: Не використовуйте оливу для
двотактних двигунів із водяним
охолодженням, яку також називають
зовнішньою оливою. Не
використовуйте масло для
чотирьохтактних двигунів.
Змішування бензину та оливи для двотактних
двигунів
Бензин, л Масло для
5 0,10
10 0,20
15 0,30
20 0,40
УВАГА: У разі змішування невеликої
кількості палива навіть незначні
неточності можуть значно вплинути на
пропорцію суміші. Щоб отримати
правильну суміш, точно вимірюйте
кількість масла.
(Мал. 33)
1. Влийте половину об’єму бензину в чистий
резервуар для палива.
2. Додайте всю оливу.
3. Перемішайте паливну суміш.
двотактних
двигунів, л
2 % (50:1)
78
881 - 001 - 10.10.2018
Page 79

4. Влийте решту бензину в резервуар.
5. Обережно перемішайте паливну суміш.
УВАГА: Не змішуйте за один раз палива
більше, ніж необхідно на 1 місяць роботи.
Додавання палива
• Завжди використовуйте паливну ємність з
антипропускним клапаном.
• Якщо на ємності знаходиться паливо, приберіть
його та дайте ємності просохнути.
• Переконайтеся, що область навколо кришки
паливного бака чиста.
• Перед додаванням паливної суміші в паливний
бак збовтайте ємність з паливом.
Обкатування
• Протягом перших 10 годин роботи не давайте
виробу тривалий час працювати за повністю
відкритої дросельної заслінки без навантаження.
Запуск і зупинення роботи
Перевірка перед запуском
1. Перевірте виріб на предмет відсутніх,
пошкоджених, погано закріплених або зношених
деталей.
2. Переконайтеся, що всі гайки, гвинти та болти
надійно затягнуті.
3. Переконайтеся, що ножі або головку тримера не
пошкоджено.
4. Переконайтеся, що стопорну гайку затягнуто.
Див.
Перевірка стопорної гайки на сторінці 82
5. Переконайтеся, що повітряний фільтр чистий.
6. Переконайтеся у справності захисних механізмів
виробу.
7. Переконайтеся у відсутності витоків палива з
пристрою.
Регулювання пасової підвіски
ПОПЕРЕДЖЕННЯ:
правильно приєднаним до пасової
підвіски (кріплення). Не користуйтеся
пошкодженим кріпленням.
1. Надягніть пасову підвіску.
2. Приєднайте виріб до пасової підвіски.
3. Якнайкраще припасуйте ремені для роботи.
4. Відрегулюйте бокові ремені, щоб маса виробу
рівномірно розподілялася по плечах. (Мал. 34)
5. Відрегулюйте пасову підвіску таким чином, щоб
ріжуча насадка була розташована паралельно
землі.
Виріб має бути
.
6. Ріжуча насадка має легко торкатися землі.
Відрегулюйте кріплення ременя таким чином,
щоб виріб був правильно врівноважений.
Зверніть увагу: У разі використання ножа для
трави він має бути врівноважений на рівні
близько 10 см (4 дюйми) над землею.
Запуск холодного двигуна
1. Натисніть кнопку продувки повітрям 10 разів.
(Мал. 35)
2. Потягніть важіль заслінки вгору. (Мал. 36)
3. Лівою рукою притисніть корпус виробу до землі.
(Мал. 37) Не наступіть на виріб. Повільно
потягніть за ручку троса стартера доки не
відчуєте спротив. Після цього силою потягніть за
ручку троса стартера.
Зверніть увагу: Не тягніть курок газу під час
запуску двигуна.
4. Продовжуйте тягнути за ручку троса стартера
доки двигун не запуститься або не
намагатиметься запуститися (макс. 3 рази). Якщо
двигун запускається або намагається
запуститися, натисніть на важіль повітряної
шторки вниз. Продовжуйте тягнути доки двигун не
запуститься. Після запуску заждіть 60 секунд,
після чого натискайте на курок газу.
УВАГА: Не тягніть трос стартера, доки
виріб не зупиниться. Не відпускайте
трос стартера, коли він повністю
витягнутий. Відпускайте трос стартера
повільно. Невиконання цих інструкцій
може призвести до пошкодження
двигуна.
Запуск теплого двигуна
1. Натисніть кнопку продувки повітрям 10 разів.
2. Потягніть трос стартера до тих пір, поки двигун не
запрацює.
Запуск двигуна з надто гарячим паливом
Якщо двигун не запускається, паливо може бути
надто гарячим.
Зверніть увагу:
паливо й зменшуйте тривалість роботи за теплої
погоди.
1. Покладіть виріб у прохолодне місце, подалі від
прямих сонячних променів.
2. Зачекайте принаймні 20 хвилин, доки виріб
охолоне.
3. Натискайте кнопку продувки повітрям без зупинки
протягом 10–15 секунд.
4. Виконайте процедуру запуску холодного двигуна.
Див.
Завжди використовуйте нове
Запуск холодного двигуна на сторінці 79
.
881 - 001 - 10.10.2018
79
Page 80

Зупинення
• Для зупинки двигуна натисніть вимикач. (Мал. 21)
Зверніть увагу: Вимикач автоматично повертається
до початкового положення.
Експлуатація тримера
УВАГА: Після кожного використання
зменшуйте швидкість двигуна до
холостого ходу. Тривала робота на
повних оборотах без навантаження на
двигун може призвести до пошкодження
двигуна.
Зверніть увагу: У разі встановлення нової нитки
необхідно очистити кришку голівки тримера, щоб
уникнути подальших вібрацій. Огляньте інші деталі
голівки тримера та за необхідності очистіть їх.
Підстригання трави
1. Тримайте головку тримера під кутом
безпосередньо над землею. Не вдавлюйте нитку
тримера в траву. (Мал. 38)
2. Зменште довжину нитки тримера на 10–12 см / 4–
4,75 дюйма.
3. Зменште частоту обертання двигуна, щоб
зменшити ризик пошкодження рослин.
4. Під час зрізання трави поблизу предметів
використовуйте 80 % потужності. (Мал. 39)
Зрізання трави
1. Під час зрізання трави нитка тримера має бути
паралельна землі. (Мал. 40)
2. Не вдавлюйте голівку тримера в землю. Це може
призвести до пошкодження виробу.
3. Під час зрізання трави переміщуйте виріб зі
сторони в сторону. Повністю натисніть курок газу.
(Мал. 41)
Скошування за допомогою ножа для
трави
1. Ножами та різцями для трави не можна зрізувати
стовбури дерев.
2. Ніж для трави використовується для косіння всіх
видів високої та грубої трави.
3. Траву косять маятниковими рухами з боку в бік –
рух справа наліво буде робочим, а зліва
направо – зворотним. Ніж повинен косити траву
лівим краєм (що на циферблаті годинника
відповідає проміжку між 8 та 12 годиною).
4. Якщо скошуючи траву нахилити ніж трохи вліво,
то трава буде складатися в один ряд, що
полегшить її збирання, наприклад граблями.
5. Намагайтеся працювати ритмічно. Стійте
впевнено, розставивши ноги. Після зворотного
руху пройдіть вперед і знову займіть стійке
положення.
6. Опорна манжета повинна злегка прилягти на
землю. Вона запобігає удару леза об землю.
7. Щоб знизити ризик намотування матеріалу на
лезо, завжди працюйте на повній потужності та не
торкайтеся лезом скошеної трави під час
зворотного руху.
8. Перед тим як почати збирати зрізану траву,
вимкніть двигун, зніміть ремені та покладіть
інструмент на землю.
Головка тримера
• Для зменшення вібрації переконайтеся, що нитка
тримера намотана на барабан щільно та
рівномірно.
• Використовуйте лише сертифіковані головки та
нитки косарки. Див.
• Слідкуйте за правильною довжиною нитки
косарки. Для роботи з великою довжиною нитки
використовується більше потужності двигуна, ніж
з малою.
• Переконайтеся, що ніж на кожусі ріжучої насадки
не пошкоджений.
• Перед встановленням нитки на виріб, необхідно
вимочити її у воді протягом двох днів. Це
збільшить строк служби нитки.
Заміна нитки тримера
(Мал. 42)
(Мал. 43)
(Мал. 44)
(Мал. 45)
(Мал. 46)
(Мал. 47)
(Мал. 48)
(Мал. 49)
Аксесуари на сторінці 85
.
ТЕХНІЧНЕ ОБСЛУГОВУВАННЯ
Вступ
ПОПЕРЕДЖЕННЯ: Перед виконанням
робіт із технічного обслуговування
обов’язково прочитайте й усвідомте зміст
розділу про заходи безпеки.
80 881 - 001 - 10.10.2018
Для всіх робіт з обслуговування та ремонту
необхідна спеціальна підготовка. Ми гарантуємо
доступність послуг із професійного ремонту та
обслуговування. Якщо ваш дилер не є одночасно
центром обслуговування, зверніться до нього по
інформацію щодо найближчого центру
обслуговування.
Page 81

Графік технічного обслуговування
Щотижневе технічне обслуговування
• Очищення зовнішніх поверхонь.
• Переконайтеся, що ріжуча насадка не рухається
на холостому ходу. Див.
холостого ходу на сторінці 81
• Перевірте рівень мастила в конічній зубчастій
передачі. Див.
Змащування конічної зубчастої
передачі на сторінці 82
• Перевірка стопорної гайки. Див.
стопорної гайки на сторінці 82
Щомісячне технічне обслуговування
• Переконайтеся, що ручка троса стартера та трос
стартера не пошкоджені.
Щорічне обслуговування
• Перевірка свічки запалювання. Див.
свічки запалювання на сторінці 81
• Очищення зовнішніх поверхонь карбюратора та
прилеглих до нього ділянок.
• Очищення системи охолодження.
• Перевірка іскрогасника. Див.
обслуговування іскрогасника на сторінці 81
• Перевірка паливного фільтра.
• Перевірте шланг подачі пального на наявність
пошкоджень.
• Перевірте кабелі та з’єднання виробу на наявнсть
пошкоджень.
Налаштування швидкості
.
.
Перевірка
.
Перевірка
.
Технічне
.
Налаштування швидкості
холостого ходу
• Перед налаштуванням швидкості холостого ходу
переконайтеся, що повітряний фільтр чистий, а
кришка повітряного фільтра встановлена.
• Налаштуйте швидкість холостого ходу за
допомогою регулювального гвинта T, який
позначений літерою «T».
• Швидкість холостого ходу відрегульована
правильно, якщо двигун працює рівномірно в
будь-якому положенні. Швидкість холостого ходу
повинна бути нижчою від швидкості, на якій
починає обертатися насадка.
1. Повертайте гвинт регулювання холостого ходу за
годинниковою стрілкою, поки ріжуча насадка не
почне обертатися. (Мал. 50)
2. Повертайте гвинт регулювання холостого ходу
проти годинникової стрілки, поки ріжуча насадка
не зупиниться.
Технічне обслуговування
іскрогасника
Для очищення іскрогасника використовуйте дротяну
щітку.
(Мал. 51)
Очищення системи охолодження
Очищуйте елементи системи охолодження за
допомогою щітки.
(Мал. 52)
Перевірка свічки запалювання
УВАГА: Використовуйте лише
рекомендовані свічки запалювання.
Переконайтеся, що заміна буде
відбуватися на такі ж самі деталі, що були
поставлені виробником. Неправильна
свічка запалювання може призвести до
пошкодження виробу.
1. Перевіряйте свічку запалювання коли:
a) потужність двигуна низька.
b) двигун важко завести.
c) двигун працює неправильно на холостому
ходу.
2. Якщо двигун важко запускається або працює,
перевірте свічку запалювання на наявність
зайвих предметів. Щоб зменшити ризик
потрапляння зайвих предметів на електроди
свічки запалювання:
a) переконайтеся, що швидкість холостого ходу
встановлено правильно.
b) переконайтеся в правильності змішування
паливної суміші.
c) переконайтеся, що повітряний фільтр чистий.
3. Якщо свічка запалювання забруднена, почистьте
її. Перевірте правильність проміжку між
електродами. (Мал. 53)
4. За необхідності замініть свічку запалювання.
Технічне обслуговування
повітряного фільтра
Очищення повітряного фільтра
1. Зніміть кришку повітряного фільтра та витягніть
повітряний фільтр. (Мал. 54)
2. Чистити повітряний фільтр потрібно теплою
мильною водою. Перед встановленням
переконайтеся, що повітряний фільтр сухий.
3. Якщо повітряний фільтр занадто брудний для
очищення, замініть його. Пошкоджений
повітряний фільтр необхідно замінювати
обов’язково.
4. Якщо ваш виріб оснащений губчастим повітряним
фільтром, використовуйте оливу для повітряних
фільтрів. Оливу для повітряних фільтрів слід
наносити лише на губчасті фільтри.
Забороняється наносити оливу на фетровий
фільтр.
881 - 001 - 10.10.2018
81
Page 82

Нанесення оливи для повітряних
фільтрів на фільтр
УВАГА: Для обслуговування губчастих
фільтрів використовуйте лише спеціальну
оливу для повітряних фільтрів. Не
використовуйте інші типи оливи.
ПОПЕРЕДЖЕННЯ: Уникайте потрапляння
оливи на тіло.
1. Зніміть кришку повітряного фільтра та витягніть
повітряний фільтр. (Мал. 55)
2. Покладіть повітряний фільтр у пластиковий пакет.
3. Налийте в пластиковий пакет оливу для
повітряних фільтрів. (Мал. 56)
4. Натисніть на пластиковий пакет щоб
переконатися, що олива рівно розповсюдиться по
всьому повітряному фільтру.
5. Поки фільтр знаходиться в пакеті, натисніть на
нього щоб з нього вийшла непотрібна олива.
Вийміть повітряний фільтр з пакета.
6. Установіть повітряний фільтр.
Змащування конічної зубчастої
передачі
Конічна зубчаста передача має бути заповнена
мастилом для зубчастих передач на три чверті.
(Мал. 57)
Перевірка стопорної гайки
1. Щоб затягнути стопорну гайку, повертайте її
проти годинникової стрілки. Щоб відкрутити
стопорну гайку, повертайте її за годинниковою
стрілкою. (Мал. 58)
2. Переконайтеся, що нейлонову муфту стопорної
гайки неможливо повернути руками. Нейлонова
муфта має забезпечувати опір обертанню не
менше 1,5 Н•м (1,1 фута/фунт).
3. Якщо опір обертанню є меншим за мінімальне
значення, затягніть стопорну гайку до досягнення
моменту 35–50 Н•м (26–36 футів/фунт).
УВАГА: Надмірне затягування
стопорної гайки може пошкодити
різьбу.
Загострення ножа й леза для
трави
ПОПЕРЕДЖЕННЯ: Зупиніть двигун.
Використовуйте захисні рукавички.
• Для правильного загострення ножа чи леза для
трави ознайомтеся з інструкціями, що йдуть у
комплекті з ріжучою насадкою.
• Для підтримки рівноваги всі кромки необхідно
загострювати однаково.
• Використовуйте плаский напилок з одностороннім
візерунком. (Мал. 59)
ПОПЕРЕДЖЕННЯ:
ножі необхідно утилізувати. Не
намагайтеся вирівняти ножі й
використовувати їх далі.
У разі пошкодження
УВАГА: Стопорну гайку слід заміняти
після 10 використань.
Усунення несправностей
Двигун не запускається
Перевірка Можлива причина Процес
Вимикач. Вимикач перебуває в положенні STOP
(Стоп).
Собачки стартера. Собачки стартера не можуть вільно
рухатися.
Паливний бак. Неправильний тип палива. Спорожніть паливний бак і залийте в нього
82 881 - 001 - 10.10.2018
Установіть вимикач у положення запуску.
Зніміть кришку стартера й очистьте місце
навколо собачок стартера.
Зверніться по допомогу до
уповноваженого центру обслуговування.
правильний тип палива.
Page 83

Перевірка Можлива причина Процес
Свічка
запалювання.
Свічка запалювання брудна або волога. Переконайтеся, що свічка запалювання
Неправильний проміжок між електродами
свічки запалювання.
Свічка запалювання відкрутилася. Закрутіть свічку запалювання.
суха та чиста.
Чищення свічки запалювання.
Переконайтеся, що проміжок між
електродами правильний. Переконайтеся,
що свічка запалювання має обмежувач
напруги.
Інформація про коректний проміжок між
електродами подається у розділі технічних
даних.
Двигун запускається, але вимикається
Перевірка
Паливний бак Неправильний тип палива. Спорожніть паливний бак і залийте
Повітряний фільтр Засмічено повітряний фільтр. Почистіть повітряний фільтр.
Можлива причина Процес
в нього правильний тип палива.
Транспортування, зберігання й утилізація
Транспортування та зберігання
• Перед транспортуванням чи зберіганням
необхідно дати виробу охолонути.
• Перед тривалим зберіганням необхідно зняти
ковпак зі свічки запалювання.
• Під час транспортування закріплюйте виріб.
Переконайтеся, що виріб не рухатиметься під час
транспортування.
• Переконайтеся, що ризик виникнення витоків
палива, випарювань, іскор або вогню під час
транспортування й зберігання відсутній.
• Під час транспортування й зберігання необхідно
встановлювати чохол для транспортування.
• Перед тривалим зберіганням виріб необхідно
промити й провести технічне обслуговування.
Технічні характеристики
Технічні характеристики
325R
A05328CBHV
Двигун
Об’єм циліндра, см
Холостий хід, об/хв 2800-3200
Рекомендована максимальна частота обертання, об/хв 8000
3
27,6
881 - 001 - 10.10.2018 83
Page 84

325R
A05328CBHV
Потужність / макс. потужність двигуна відповідно до ISO 8893, кВт / к. с. (оберти) 0,9/1,2 при 8000
Глушник з каталітичним конвертером Ні
Швидкість обертання вихідного валу, об./хв. 7200
Система запалювання
Свічка запалення Husqvarna HQT-4
Проміжок між електродами, мм 0,5
Паливна система
Ємність паливного бака, л / см³ 0,343 / 343
Розміри виробу
Вага, кг 5,5
Випромінювання шуму
13
Виміряний рівень звукової потужності з ножем для трави, дБ(A) 108
Виміряний рівень звукової потужності з головкою тримера, дБ(A) 110
Гарантований рівень звукової потужності (LWA) з ножем для трави, дБ(А) 112
Гарантований рівень звукової потужності (LWA) з головкою тримера, дБ(А) 114
Рівні звуку
14
Рівень звукового тиску на слухові органи оператора з ножем для трави, дБ(А) 96
Рівень звукового тиску на слухові органи оператора з головкою тримера, дБ(А) 95
Рівні вібрації
Еквівалент рівня вібрації (ahv, eq), з ножем для трави, ліва ручка, м/с
Еквівалент рівня вібрації (ahv, eq), з ножем для трави, права ручка, м/с
Еквівалент рівня вібрації (ahv, eq), з головкою тримера, ліва ручка, м/с
Еквівалент рівня вібрації (ahv, eq), з головкою тримера, права ручка, м/с
15
2
2
2
2
5.1
5,7
4,1
4,9
13
Випромінювання шуму в середовище, виміряне як звукова потужність (LWA), відповідає директиві ЄС
2000/14/EC. Зазначений рівень звукової потужності виробу був виміряний з оригінальним різальним
устаткуванням, що дає найвищий рівень. Різниця між гарантованим і вимірюваним рівнем звукової
потужності полягає в тому, що гарантована звукова потужність включає також дисперсію результатів
вимірювання та відмінності між різними виробами тієї самої моделі відповідно до
Директиви 2000/14/EC.
14
Представлені дані для еквівалентного рівня звукового тиску для виробу мають типову статистичну
дисперсію (стандартне відхилення) в 1 дБ(A).
15
Представлені дані про еквівалентний рівень вібрації мають типову статистичну дисперсію (стандартне
відхилення) в 1 м/с2.
84 881 - 001 - 10.10.2018
Page 85

Аксесуари
Аксесуари
Схвалені аксесуари Тип Захисний кожух ріжучої насадки
Нарізний вал M10L
Головка тримера T35, 2,4 мм 588 11 79-01
Ніж для трави Grass 255-4, Ø 250 588 11 79-01
881 - 001 - 10.10.2018 85
Page 86

Декларація відповідності ЄС
Зміст декларації відповідності ЄС
Ми, Husqvarna AB, SE 561 82 м. Гускварна, Швеція,
заявляємо під свою виключну відповідальність, що
представлений виріб:
Опис Бензиновий тример /
Бренд Husqvarna
Платформа / Тип /
Модель
Партія Серійні номери за
повністю відповідає наступним директивам і нормам
ЄС:
Директива/норма
2006/42/EC «Про механічне
2014/30/EU «Про електромагнітну
2000/14/EC «Про випромінювання
2011/65/EU «Про обмеження
Кущоріз
Платформа
A05328CBHV,
представлена
модель 325R
2018 рік і пізніше
Опис
обладнання»
сумісність»
шуму від обладнання,
призначеного для
використання надворі»
використання деяких
небезпечних речовин»
Застосовуються наступні узгоджені стандарти й/або
технічні специфікації: EN ISO 12100, EN ISO 11806-1,
CISPR 12, ISO 14982, EN 50581:2012.
Згідно з директивною 2000/14/EC, додаток V,
заявлені шумові характеристики зазначені в розділі
технічних даних цього посібника та в підписаній
декларації відповідності ЕС.
Компанія TÜV Rheinland N.A. виконала добровільну
перевірку компанії Husqvarna AB та видала їй
сертифікат відповідності нормам директиви Ради ЕС
2006/42/EC «Про машини та механізми».
Сертифікат, як зазначено в підписаній декларації
відповідності ЕС, діє для всіх місць виробництва та
країн-виробників, зазначених на виробі.
Бензиновий тример/кущоріз, що постачається,
жодним чином не відрізняється від зразка, що
пройшов випробування.
86
881 - 001 - 10.10.2018
Page 87

881 - 001 - 10.10.2018 87
Page 88

www.husqvarna.com
Original instructions
Instrucciones originales
Instruções originais
595960404
Оригинальные инструкции
Оригінальні інструкції
2018-10-23
 Loading...