

Page 1
R
Warranty Registration by Internet
Registro Garantía mediante Internet
Internet Address: www.huskypowerwasher.com
Sitio Internet: www.huskypowerwasher.com
SEE OUR WEB SITE FOR REPLACEMENT, MISSING PARTS AND TROUBLESHOOTING
VISITEN NUESTRO SITIO WEB PARA SUSTITUCIONES Y/O PARTES FALTANTES
READ AND SAVE THESE INSTRUCTIONS
LEER Y CONSERVAR ESTA INSTRUCCIONES
This product is covered by US Patents and other international patents.
Copyright. All Rights Reserved.
Este producto se encuentra cubierto por patentes de EE.UU. y otras internacionales.
Copyright. Todos los derechos reservados
Page 2
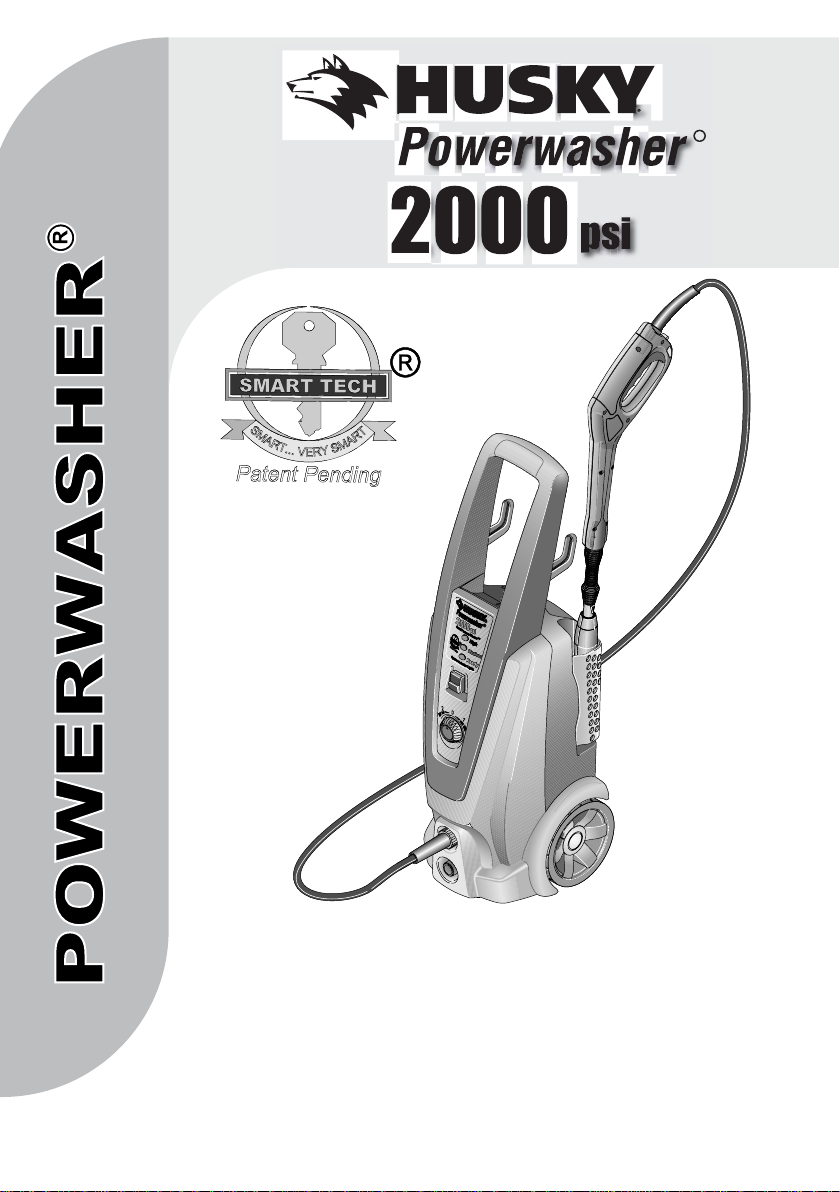
Your Model Number is: Husky 2000S
IMPORTANT
Attention Valued Customer: The serial number of your machine
and date of purchase is necessary information to facilitate
warranty claims and the ordering of replacement parts.
For ease of reference, please record this information
in the space provided below.
Serial Number: ...............................................................................
Date of Purchase: / /200
You can conveniently register
your new online at:
www.huskypowerwasher.com
2
Page 3
El Número de su Modelo es: Husky 2000S
IMPORTANTE
Atención Estimado cliente: el número de serie de su lavado-
ra de presión y la fecha de compra es información necesaria
para facilitar los derechos de garantía y la petición de partes
de recambio.
Para consultas más fáciles, registre el número de serie y la
fecha de compra en el siguiente espacio
Número de Serie: ...........................................................................
Fecha de Compra: / /200
Si lo desea, se puede registrar cómodamente
su nuevo en nuestra página web
www.huskypowerwasher.com
3
Page 4
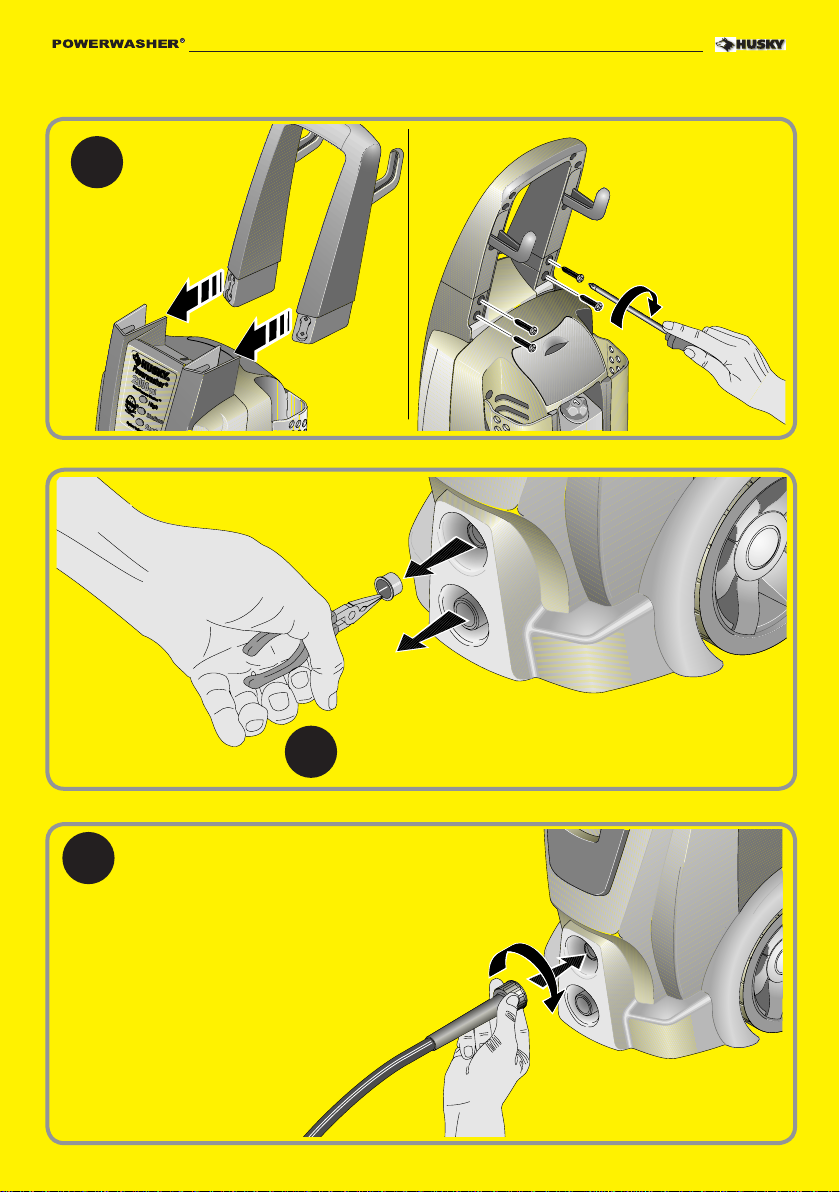
FOR EASY INSTALLATION
1
INSERT THE
HANDLE INTO THE
HANDLE BASE
INSTALACIÓN FÁCIL
AFFIX THE HANDLE
TO THE BASE WITH
THE FOUR SCREWS
PROVIDED.
REMOVE THE SHIPPING PLUGS FROM THE MACHINE INLET AND OUTLET.
RETIRE LAS CLAVIJAS DE ENVÍO DE LA TOMA Y
2
LA SALIDA DE LA MÁQUINA.
3
CONNECT THE HIGH PRESSURE HOSE. MAKE SURE
THREADS ARE ALIGNED PROPERLY.
CONECTE LA MANGUERA DE ALTA PRESIÓN.
ASEGURARSE QUE TODOS LOS TUBOS ESTÉN
ALINEADOS CORRECTAMENTE.
4
4
Page 5
CONNECT THE GARDEN HOSE.
4
CONECTE LA MANGUERA PARA JARDÍN.
INSERT THE WAND INTO THE SPRAY GUN
5
INTRODUZCA EL TUBO EN LA PISTOLA ROCIADORA
NOTE: Make sure wand is locked.
NOTA: Asegúrese de que el tubo esté cerrado.
CONNECT THE GARDEN HOSE TO WATER SUPPLY
AND OPEN THE VALVE FULLY.
6
CONECTAR LA MANGUERA A UNA TOMA DE AGUA
Y ABRIR TOTALMENTE LA VÁLVULA.
Note: Use cold water only
Nota: Utilizar sólo agua fría
5
5
Page 6
SQUEEZE AND HOLD TRIGGER UNTIL WATER FLOW IS
STEADY. THEN RELEASE THE TRIGGER.
7
APRETAR Y SOSTENER EL GATILLO HASTA QUE HAYA
UN FLUJO CONSTANTE Y ESTABLE DE AGUA. A CON-
TINUACIÓN SOLTAR EL GATILLO.
DEPRESS THE “ON” BUTTON. THE GREEN “READY” LIGHT SHOULD BE
ILLUMINATED. SQUEEZE THE TRIGGER TO START MOTOR AND WATER
8
FLOW.
PULSE EL BOTÓN “ON”. SE ENCENDERÁ LA LUZ
VERDE “LISTO” (READY). APRIETE EL ACCIONADOR
PARA PONER EN MARCHA EL MOTOR Y EL CAUDAL
DE AGUA.
IMPORTANT
IMPORTANTE
CAREFULLY READ THE OPERATORS INSTRUCTIONS BEFORE
USING THE PRESSURE WASHER FOR THE FIRST TIME.
ALWAYS STORE YOUR PRESSURE WASHER IN A LOCATION
WHERE THE TEMPERATURE WILL NOT FALL BELOW 40°F.
FREEZE DAMAGE IS NOT COVERED BY THE WARRANTY.
LEA ATENTAMENTE EL MANUAL DE INSTRUCCIONES ANTES DE
PONER EL EQUIPO POR PRIMERA VEZ EN FUNCIONAMIENTO.
TIENE QUE PONER SIEMPRE LA MÁQUINA DE LAVAR A PRESIÓN
EN UN SITIO DONDE LA TEMPERATURA NO DIMINUE BAJO 40°F.
LOS DAÑOS QUEL EL HIELO PROVOCA NO SON REMBOLSDADO
DE LA GARANTIA.
6
6
Page 7

INDEX
ÍNDICE
1.0 IMPORTANT SAFETY
INSTRUCTIONS ............................... page 8
1.1 PARTS DRAWING ...................... page 11
2.0 SAFETY FEATURES ........................... page 12
3.0 INSTALLATION ................................ page 13
3.1 HIGH PRESSURE HOSE .............. page 13
3.2 WATER CONNECTION ............... page 13
3.3 POWER SUPPLY
CONNECTION ........................... page 14
4.0 OPERATING INSTRUCTIONS ............ page 15
4.1 START-UP PROCEDURE ............... page 15
4.2 CLICK-N-CLEAN
4.3 USE OF CLEANING DETERGENTS page 18
4.4 CLEANING TECHNIQUES ........... page 19
4.5 HIGH PRESSURE/
TURBO SPRAY ............................ page 20
4.6 END OF OPERATION ................. page 20
5.0 USER MAINTENANCE ..................... page 20
5.1 CONNECTIONS ......................... page 20
5.2 NOZZLE ..................................... page 20
5.3 LUBRICATION ............................. page 21
5.4 WATER SCREEN ......................... page 21
5.5 COOLING SYSTEM ..................... page 21
6.0 MOVING AND STORAGE
INSTRUCTIONS ............................... page 21
6.1 AFTER EXTENDED STORAGE ....... page 22
7.0 TROUBLESHOOTING ....................... page 23
TM
..................... page 16
1.0 IMPORTANTES INSTRUCCIONES
DE SEGURIDAD .................................. pag. 8
1.1 ILUSTRACIÓN DE PIEZAS ............ pag. 11
2.0 CARACTERÍSTICAS RELATIVAS
A LA SEGURIDAD ............................ pag. 12
3.0 INSTALACIÓN ................................. pag. 13
3.1 MANGUERA DE
ALTA PRESIÓN .......................... pag. 13
3.2 CONEXIÓN DEL AGUA .............. pag. 13
3.3 EMPALME DE LA
POTENCIA DE ALIMENTACIÓN ........ pag. 14
4.0 INSTRUCCIONES DE USO ................ pag. 15
4.1 PROCEDIMIENTO DE
PUESTA EN MARCHA .................. pag. 15
4.2 CLICK-N-CLEAN
4.3 USO DE PRODUCTOS
DETERGENTE .............................. pag. 18
4.4 TÉCNICAS DE LIMPIEZA .............. pag. 19
4.5 CHORRO DE
ALTA PRESIÓN / TURBO .............. pag. 20
4.6 FINALIZACIÓN
DE LA OPERACIÓN ..................... pag. 20
5.0 MANTENIMIENTO USUARIO ........... pag. 20
5.1 CONEXIONES ............................ pag. 20
5.2 BOQUILLA .................................. pag. 20
5.3 LUBRICACIÓN ............................ pag. 21
5.4 FILTRO DE AGUA ....................... pag. 21
5.5 SISTEMA DE REFRIGERACIÓN ..... pag. 21
6.0 MANIPULACIÓN Y
ALMACENAMIENTO ........................ pag. 21
6.1 DESPUÉS DE UN ALMACENAMIENTO
PROLONGADO ........................... pag. 22
7.0 SOLUCIÓN DE PROBLEMAS ............. pag. 28
TM
.................... pag. 16
8.0 TECHNICAL DATA ........................... page 33
8.0 DATOS TÉCNICOS .......................... pag. 33
7
Page 8
1.0 IMPORTANT SAFETY
INSTRUCTIONS
Safety precautions are essential when any mechanical
equipment is involved. These precautions are necessary
when using, storing, and servicing mechanical equipment.
Using this equipment with the respect and caution
demanded will considerably lessen the possibilities of
personal injury. If safety precautions are overlooked
or ignored, personal injury or property damage may
occur.
The following symbols shown below are used extensively
throughout this manual.
Always heed these precautions, as they are essential
when using any mechanical equipment.
This warning symbol identifies specific
instructions or procedures which if not
WARNING
CAUTION
This unit was designed for specific applications. It should
not be modified and/or used for any application other
than that which it was designed.
WARNING
1. Read all the instructions before using the product.
2. To reduce the risk of injury, close supervision is
necessary when a product is used near children.
3. Know how to stop the product and bleed pressures
quickly. Be thoroughly familiar with the controls.
4. Stay alert - watch what you are doing.
5. Do not operate the product when fatigued or under
the influence of alcohol or drugs.
6. Keep operating area clear of all persons.
7. Do not overreach or stand on unstable support.
Keep good footing and balance at all times.
8. Follow the maintenance instructions specified in the
manual.
9. This product is provided with a Ground Fault
10. Outlets with a third prong ground are required. Do
11. Do not touch plug or outlet with wet hands.
correctly followed could result in personal
injury or death.
This caution symbol identifies specific
instructions or procedures which, if not
strictly observed, could result in damage
to, or destruction of equipment and/or
property.
When using this product basic precautions
should always be followed, including the
following:
Circuit Interrupter built into the power cord plug.
If replacement of the plug or cord is needed, use
only identical replacement parts.
not use without grounded prong.
1.0 IMPORTANTES INSTRUCCIONES
DE SEGURIDAD
Cuando se trata de un equipo mecánico, las precauciones
inherentes a la seguridad son esenciales.
Por ello es necesario adoptar dichas precauciones durante
el uso, el almacenamiento y la mantenimiento del equipo
mecánico. Utilizando los aparatos con el respeto y la
cautela requeridos, las posibilidades de provocar lesiones
personales disminuirán notablemente. Si se pasan por alto o
no se consideran estas precauciones de seguridad, podrían
producirse lesiones en las personas o daño al equipo. Los
símbolos que describiremos a continuación son utilizados
ampliamente en el presente manual. Tenga siempre en
cuenta dichas precauciones puesto que son esenciales
cuando se utiliza el equipo mecánico.
Es el símbolo que identifica las instrucciones
para procedimientos específicos; si no
PELIGRO
IMPORTANTE
Esta unidad ha sido diseñada para aplicaciones específicas. No
se debería modificar y/o utilizar para aplicaciones diferentes
de aquellas para las cuales ha sido pensada.
PELIGRO
1 Lea todas las instrucciones antes de utilizar el equipo.
2 Para reducir el riesgo de lesiones, es necesario pre-
star mucha atención cuando se utilice un producto
cerca de niños pequeños.
3 Aprenda a detener el producto y purgar la presión
rápidamente. Familiarícese con los controles.
4 Esté siempre atento: preste atención a lo que está
haciendo.
5 No utilice el equipo si se encuentra fatigado, ha
bebido alcohol o ha consumido drogas.
6 Mantenga la zona de trabajo despejada de perso-
nas.
7 No se extralimite ni se coloque sobre un soporte inestable.
Adopte siempre una posición de estabilidad y equilibrio.
8 Respete las instrucciones de mantenimiento que se
detallan en este manual.
9. Este producto es suministrado con un interruptor de
circuito con conexión a tierra insertado en el enchufe
del cable de alimentación. Si fuera necesario cambiar
el enchufe o el cable, utilicen piezas de repuesto del
mismo tipo.
10. Se necesitan enchufes con una tercera punta con toma
a tierra. No utilice enchufes sin la toma de tierra.
11. No toque el enchufe o la toma con las manos
mojadas.
son seguidas, pueden provocar lesiones
personales o la muerte.
Esta señal de precaución identifica las
instrucciones o procedimientos específicos
que, si no se cumplen rigurosamente,
pueden provocar daños o la destrucción
del equipo y/o bienes materiales.
Cuando el equipo es utilizado, hay que
seguir precauciones básicas, entre las
cuales se encuentran las siguientes:
8
Page 9
12. Avoid accidental starts. Move switch on unit to
“OFF” position before connecting or disconnecting
cord to electrical outlets.
13. Water spray must never be directed towards any
electric wiring or directly towards the pressure
washer machine itself or fatal electric shock may
occur.
14. Never carry your pressure washer by the cord. Do
not pull on the cord to disconnect from the outlet.
15. To prevent damage, the cord should not be crushed,
placed next to sharp objects or near a heat source.
16. Check power cords before using. Damaged cords
can reduce performance of pressure washer or
cause a fatal electric shock.
17. The narrow pin point stream is very powerful. It
is not recommended for use on painted surfaces,
wood surfaces or items attached with an adhesive
backing.
18. Keep operating area clear of all persons and
animals.
19. Always use both hands when operating pressure
washer to maintain complete control of the wand.
20. Do not touch nozzle or water spray while operating.
21. Wear safety goggles while operating.
22. Disconnect power plug from the outlet when not in
use and prior to the detaching of the high pressure
hose.
23. Never tie knots or kink the high pressure hose as
damage could result.
24. Do not operate or store this product in temperatures
below 40°F. Freeze damage is not covered by the
warranty.
25. Carefully observe all chemical instructions and
warnings before using.
26. The pressure washer should not be used in areas
where gas vapors may be present. An electric spark
could cause an explosion or fire.
27. To minimize the amount of water getting into the
pressure washer, the unit should be placed as far as
possible from the cleaning site during operation.
28. To prevent accidental discharge, the spray gun
should be secured by locking the trigger when not
in use.
29. To allow free air circulation, the pressure washer
should NOT be covered during operation.
WARNING: Risk of injection or injury-Do
WARNING
not direct discharge stream at persons.
“SAVE THESE INSTRUCTIONS”
12. Eviten encendidos accidentales. Coloque el
interruptor en APAGADO antes de conectar o
desconectar el cable eléctrico a una toma.
13. No dirija nunca el chorro del agua sobre instalaciones
eléctricas o sobre la misma máquina de lavar a presión,
con el fin de evitar descarga eléctrica.
14. No utilice el cable para mover la máquina de lavar
a presión. No tire del cable para desconectar el
equipo de la toma.
15. Con el fin de evitar daños, el cable no debe ser
aplastado, no debe ser colocado cerca de objetos
cortantes ni de fuentes de calor.
16. Antes del uso revise los cables eléctricos.
Los cables dañados no sólo reducen los rendimiento
de la máquina de lavar a presión, sino que pueden
provocar descargas eléctricas.
17. El pequeño chorro de punta de alfiler es muy
potente. No se aconseja su uso sobre superficies
pintadas, sobre superficies de madera o sobre
objetos con revestimiento adhesivo
18. Aleje a las personas y animals del área de trabajo.
19. Use siempre ambas manos cuando se utiliza la
máquina de lavar a presión, con el fin de mantener
un completo control del tubo/de la manguera.
20. No toque el boquilla o el chorro de agua cuando
está en funcionamiento.
21. Durante el uso, utilice gafas de protección.
22. Desconecte el enchufe eléctrico de la toma cuando
no está en uso e, igualmente, antes de desconectar
la manguera de alta presión.
23. Nunca anude o doble la manguera de alta presión
ya que podría dañarla.
24. No hagan funcionar este producto a temperaturas
inferiores a 40°F. Los daños provocados por el
hielo no están cubiertos por la garantía.
25. Siga cuidadosamente todas las instrucciones con
respecto a productos químicos y las advertencias
antes del uso.
26. No hay que utilizar la máquina de lavar a presión
en áreas donde hayan vapores gaseosos. Una
eventual chispa eléctrica podría provocar una
explosión o un incendio.
27. Para reducir al máximo la cantidad de agua que
podría entrar en la máquina de lavar a presión,
durante el uso, colóquela lo más lejos posible de
la zona que debe ser limpiada.
28. Con el fin de evitar escapes accidentales, cuando
no está en uso, la pistola rociadora debe estar
asegurada con el gatillo de bloqueo.
29. Durante el uso, NO cubra la máquina de lavar a presión
con el fin de permitir una ventilación adecuada.
ATENCIÓN Riesgo de inyección o de daños.
ATENCIÓN
No orienten el flujo contra las personas.
“CONSERVE LAS PRESENTES INSTRUCCIONES”
9
Page 10
GROUND FAULT CIRCUIT INTERRUPTER
PROTECTION
This pressure washer is provided with a Ground-Fault
Circuit-Interrupter (GFCI) built into the plug of the power
supply cord. This device provides additional protection
from the risk of electric shock. Should replacement of
the plug or cord become necessary, use only identical
replacement parts that include GFCI protection.
INTERRUPTOR DE CIRCUITO CON TOMA DE
TIERRA
La máquina de lavar a presión está dotada de un interruptor de circuito con toma de tierra (GFCI) montado
en el enchufe del cable de alimentación eléctrica. Dicho
dispositivo suministra una protección adicional contra
el riesgo de descargas. Si fuere necesario substituir el
enchufe o el cable, utilicen exclusivamente repuestos
similares provistos de protección GFCI.
SERVICING A DOUBLE-INSULATED APPLIANCE
In a double-insulated product, two systems
of insulation are provided instead of
grounding.
No grounding means is provided on a
double-insulated product, nor should a
means for grounding be added to the product.
Servicing a double-insulated product requires extreme
care and knowledge of the system, and should be done
only by qualified service personnel.
Replacement parts for a double-insulated product must
be identical to the parts they replace.
A double-insulated product is marked with the words
“DOUBLE-INSULATION” or “DOUBLE-INSULATED”.
The symbol above may also be marked on the
product.
MANUTENCIÓN DE UN EQUIPO CON DOBLE
AISLAMIENTO
Un equipo con doble aislamiento está
dotado de dos sistemas de aislamiento en
lugar de la puesta a tierra. No es montada
ninguna puesta a tierra sobre un artículo
de doble aislamiento, ni puede ser añadida a la hidrolimpiadora. La manutención de este tipo
de instalación requiere sumo cuidado, un buen conocimiento del sistema y debe ser efectuada solamente por
personal cualificado. Las piezas de repuesto de una
instalación de doble aislamiento deben ser idénticas a
las piezas que hay que cambiar. Estos equipos están
identificados por las palabras “DOBLE AISLAMIENTO”
(DOUBLE-INSULATION o DOUBLE-INSULATED).
El equipo puede estar identificado también con el
símbolo.
10
Page 11
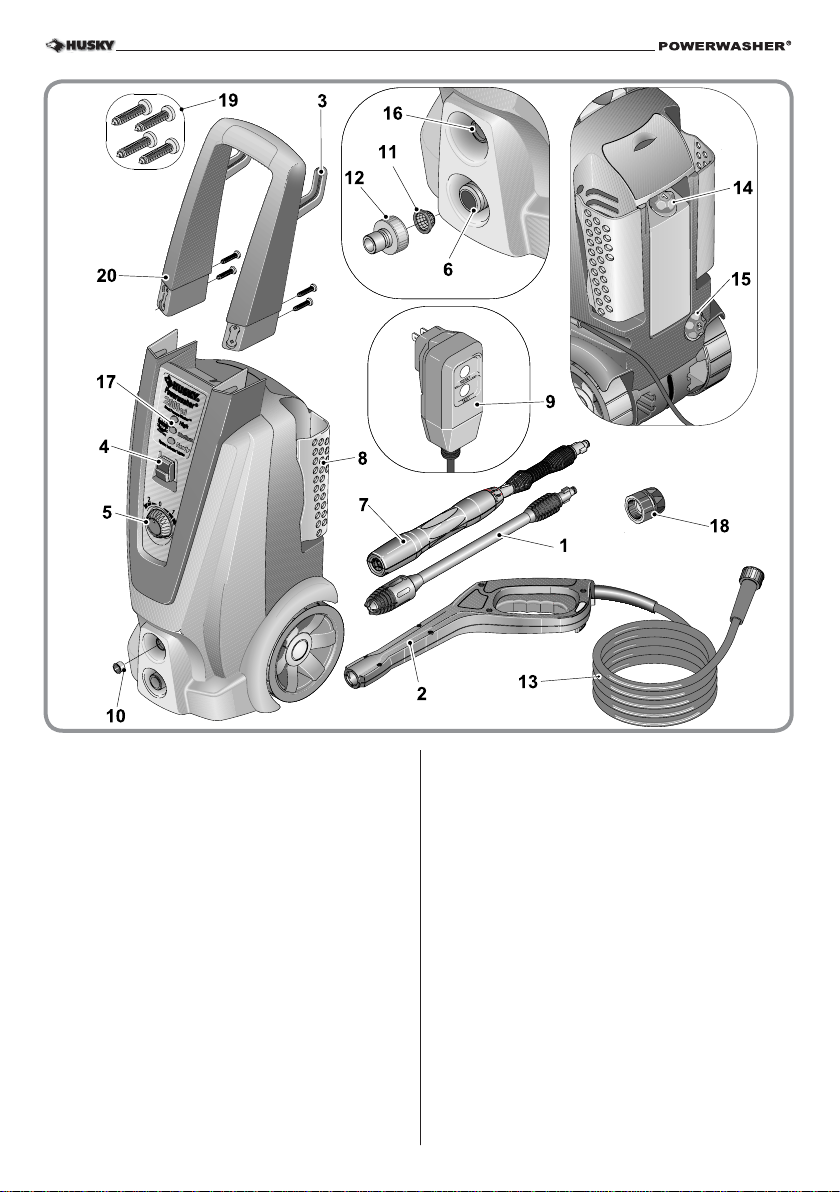
ILUSTRACIÓN DE PIEZAS PARTS DRAWING
PARTS LIST
1 Turbo Nozzle with Lance
2 Spray Gun
3 Holder for Power Cable
4 ON/OFF Switch
5 Detergent Dial
6 Machine Inlet
7 Click-N-Clean
TM
Variable Spray Lance
8 Holder for Accessories
9 Ground Fault Circuit Interrupter (GFCI)
10 Shipping Plug
11 Water Inlet Filter Screen (factory installed)
12 Inlet Nipple (factory installed)
(shown on page 13, figure 2)
13 High-Pressure Hose
14 Upper tank cap
15 Lower tank cap
16 High Pressure outlet
17 Smart Tech Indicator Lights
18 Quick Connector (in a plastic bag)
19 Screws
20 Handle
LISTA DE PIEZAS
1 Tubo con Boquilla Turbo
2 Pistola rociadora
3 Portacable de alimentación
4 Interruptor de encendido y apagado
5 Dosificador de detergente
6 Entrada de agua con rosca
7 Lanza de pulverización variable Click-N-Clean
8 Porta-accesorios
9 Interruptor diferencial automático de seguridad (GFCI)
10 Tapón para el agua
11 Filtro (instalado)
12 Niple de entrada (instalado)
(Representado à la figura 2 de la página 13)
13 Manguera de alta presión
14 Tapón de estanque superior
15 Tapón de estanque inferior
16 Salida de alta presión
17 Indicadores luminosos Smart Tech
18 Conexión rápida (en un saco de plástica)
19 Tornillos
20 Mango
11
TM
Page 12

2.0 SAFETY FEATURES
AUTOMATIC TOTAL STOP
The pressure washer is equipped with a stop device
which will sense when the trigger on the gun is released.
It will open the power circuit to the motor and cause the
pressure washer to stop.
If Automatic Total Stop® fails to operate,
DO NOT USE THE MACHINE. Contact our
Customer Service department. Further use
WARNING
will damage the machine and/or cause
personal injury.
WARNING: The pressure washer is also
equipped with a main power ON/OFF
switch located on the unit. It should always
WARNING
be moved to the OFF position when the
pressure washer is not being used to
prevent possible injury or damage.
MOTOR OVERLOAD
The electric motor in this pressure washer is equipped with
an overload protection device which will automatically
shut off the motor in the event the motor draws excessive
current or overheats. The device will automatically
reset itself and resume normal operation after a short
period of time.
GROUND-FAULT CIRCUIT INTERRUPTER PROTECTION
This pressure washer is provided with
a Ground-Fault Circuit-Interrupter
(GFCI) built into the plug of the power
supply cord. This device provides
additional protection from the risk of
electric shock. Should replacement of
the plug or cord become necessary,
use only identical replacement parts
that include GFCI protection.
EXTENSION CORDS
Use only extension cords that are intended for outdoor
use. These extension cords are identified by a marking
“Acceptable for use with outdoor appliances; store
indoors while not in use”.
Use only extension cords having an electrical rating
not less than the rating of the product.
Do not use damaged extension cords. Examine extension cord before using and replace if damaged. Do
not abuse extension cord and do not yank on any cord
to disconnect.
Keep cord away from heat and sharp edges. Always
disconnect the extension cord from the receptacle before
disconnecting the product from the extension cord.
WARNING: To reduce the risk of
electrocution, keep all connections dry
WARNING
and off the ground. Do not touch plug
with wet hands.
®
2.0 CARACTERÍSTICAS RELATIVAS
A LA SEGURIDAD
AUTOMATIC TOTAL STOP
La máquina de lavar a presión está dotada de un dispositivo
de detención que detecta cuándo está desenganchado el
gatillo de la pistola. Abre el circuito eléctrico al motor y
bloquea la máquina de lavar a presión.
Si la opción de Automatic Total Stop® deja
de funcionar, NO UTILIZAR LA MÁQUINA.
Contactar con el Departamento de Atención
ATENCIÓN
al Cliente. Si, por el contrario, continua
utilizándola, pueden resultar dañadas
personas o la propia máquina.
ATENCIÓN: La máquina de lavar a presión
está también dotada de un interruptor
eléctrico principal de encendido y apagado.
Cuando la hidrolimpiadora no está en
ATENCIÓN
uso, es necesario que dicho interruptor
esté colocado siempre en apagado para
prevenir posibles accidentes o daños.
SOBRECARGA DEL MOTOR
El motor eléctrico de la hidrolimpiadora posee un dispositivo de
protección contra la sobrecarga que bloquea automáticamente
el motor en el caso de exceso de corriente o en el caso de
recalentamiento.
El dispositivo se reinicia automáticamente
y reactiva las condiciones normales de
funcionamiento después de un breve
período.
INTERRUPTOR DE CIRCUITO
CON TOMA DE TIERRA
La máquina de lavar a presión está
dotada de un interruptor de circuito
con toma de tierra (GFCI) montado en
el enchufe del cable de alimentación
eléctrica. Dicho dispositivo suministra
una protección adicional contra el
riesgo de descargas. Si fuere necesario
substituir el enchufe o el cable, utilicen
exclusivamente repuestos similares
provistos de protección GFCI.
EXTENSIONES
Use exclusivamente extensiones para uso exterior.
Dichas extensiones están marcadas por la frase “Aptas
para uso exterior si no las utiliza, colóquelas en un
lugar cubierto”.
Utilice solamente alargadores que tengan una potencia
eléctrica igual o superior a la del producto.
No utilice extensiones dañadas.
Antes del uso, revise la extensión y si está dañada
sustitúyala.
Utilice el alargador correctamente y no tire del cable
para desconectar el aparato.Mantenga las extensiones
lejos de fuentes de calor y de ángulos cortantes.
Antes de desconectar el equipo de la extensión, desconecte siempre esta última de la toma corriente.
IMPORTANTE: Para reducir la posibilidad de electrocución, mantengan la extensión seca y fuera de tierra. No toquen
ATENCIÓN
el enchufe con las manos mojadas.
12
®
Page 13
When using an extension cord, observe the specification
below:
Cable Length Wire Gauge
Up to 25 ft. 12 AWG Outdoor
WARNING: To reduce the risk of
electrocution, keep all connections dry
WARNING
and off the ground. Do not touch plug
with wet hands.
Cuando se utilizan extensiones, respeten las siguientes
características:
Longitud del cable Calibres del cable
Hasta 25 pies 12 AWG Fuera
IMPORTANTE: Para reducir la posibilidad
de electrocución, mantengan la extensión
ATENCIÓN
seca y fuera de tierra. No toquen el enchufe
con las manos mojadas.
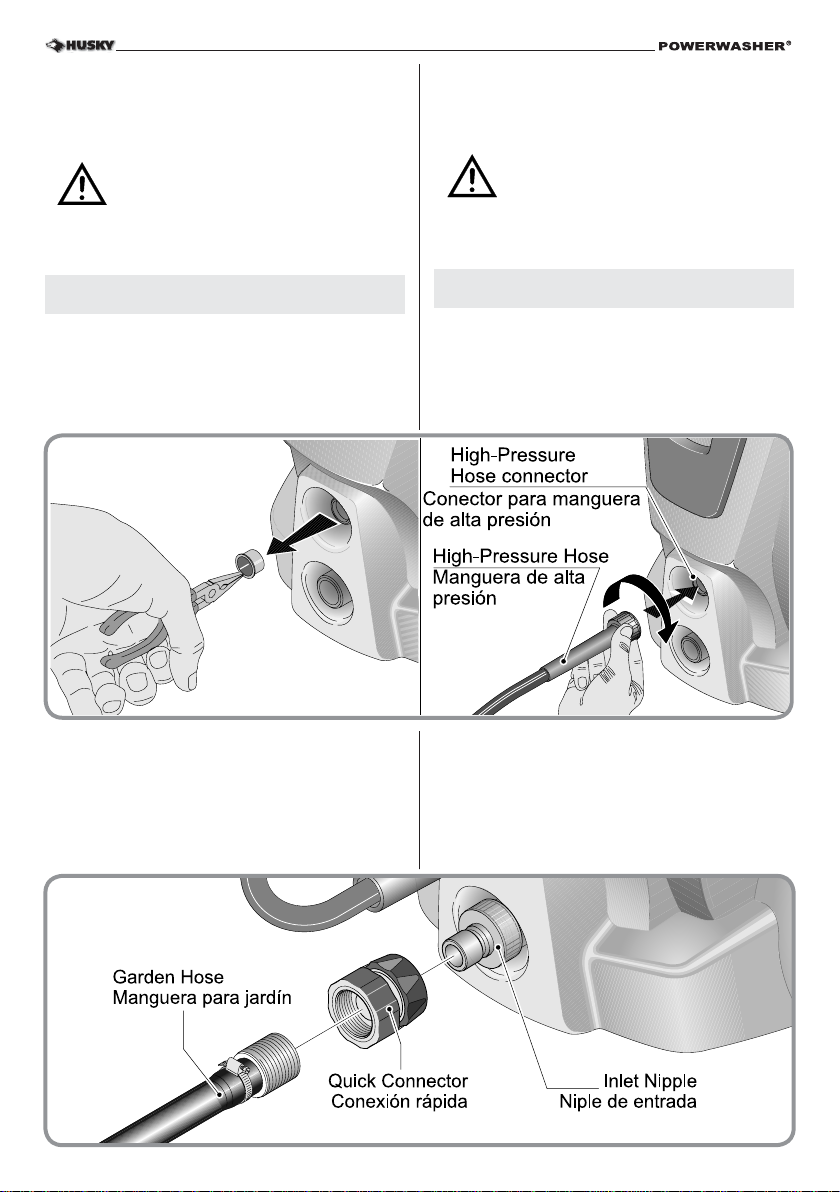
3.0 INSTALLATION
3.1 HIGH PRESSURE HOSE
Remove and discard the water plug (Fig. 1) before
attaching the high pressure hose. Carefully insert the
fitting with the o-ring into the high pressure outlet and
tighten the threaded nut by hand. (Fig. 1)
Fig. 1
Fig. 2
3.2 WATER CONNECTION (Cold water)
Before connecting, run water through the garden
hose (not supplied) to flush out any foreign matter.
Attach garden hose to the pressure washer water inlet
connection (Fig. 2). If your water source is a well, the
garden hose length can only be 30 ft. Max.
Fig. 2
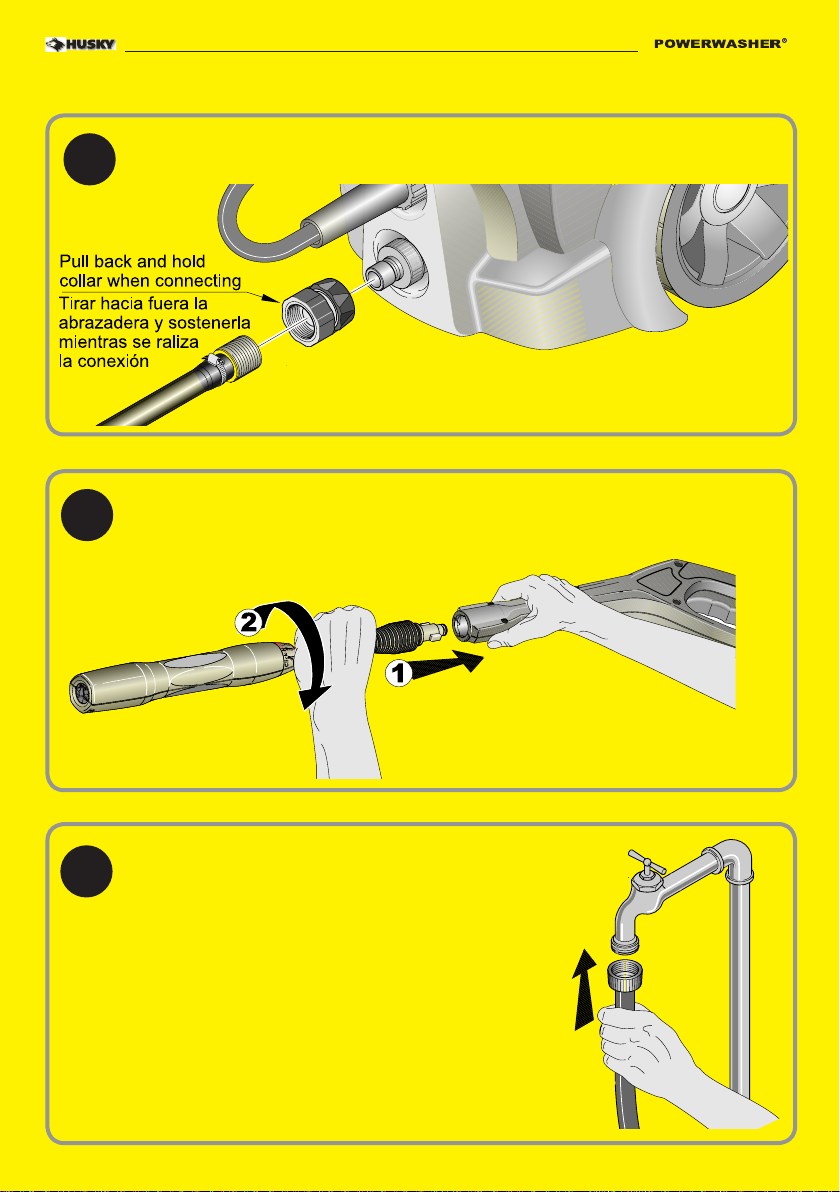
3.0 INSTALACIÓN
3.1 MANGUERA DE ALTA PRESIÓN
Extraiga y deseche el tapón para el agua (Fig. 1)
antes de acoplar el tubo de alta presión. Introduzca
con cuidado el accesorio con la junta tórica dentro
de la salida de alta presión y apriete manualmente
la tuerca roscada. (Fig. 1).
3.2 CONEXIÓN DEL AGUA (Agua fría)
Antes de efectuar la conexión, haga correr el agua en
la manguera para jardín (no incluida en el suministro)
para hacer salir los materiales extraños. Conecte la
manguera para jardín a la conexión para la entrada
del agua de la máquina para lavar a presión (Fig. 2).
Si su fuente hídrica es un pozo, la largura del tubo de
jardín puede ser sólo 30 ft. Máx.
13
Page 14

3.3 POWER SUPPLY CONNECTION
The pressure washer is factory-equipped with an
electrical cord and a Ground Fault Circuit Interrupter
(GFCI) power plug.
This cord should only be connected to an electrical outlet
installed in accordance with local safety regulations.
NOTE: The power supply must be 120v, 60hz and a
minimum 15 amp circuit. (Dedicated)
WARNING ATENCIÓN
A. Inspect cord before using. Do not use if cord is
damaged.
B. Keep all connections dry and off the ground.
C. Do not touch plug with wet hands.
D. The pressure washer is provided with a ground
fault circuit interrupter built into the power plug.
If replacement of the plug or cord is needed, use
only identical replacement parts. Contact Customer
Service for proper replacement parts via e-mail at:
customerservice@huskypowerwasher.com. or order
online at www.huskypowerwasher.com
Extension cords are not recommended unless they are
plugged into a receptacle protected by a ground fault
circuit interrupter.
Any extension cord used must be 12 AWG outdoor
with maximum length of 25 feet to prevent excessive
voltage loss.
Use only extension cords intended for outdoor use.
These extension cords are identified by a marking
“Acceptable for use with outdoor appliances; store
indoors when not in use”.
3.3 CONEXIÓN CON LA POTENCIA DE
ALIMENTACIÓN
La máquina de lavar a presión está dotada de
fábrica de un cable eléctrico y de un enchufe de
alimentación con interruptor de circuito con toma
de tierra (GFCI).
El cable deberá ser conectado únicamente a una toma
corriente eléctrica instalada en conformidad con las
normativas locales de seguridad.
NOTA: La corriente eléctrica deberá ser de 120V,
60 Hz con un circuito de por lo menos 15 amperios.
(Dedicado).
A. Revise el cable antes del uso. Si está dañado, no
lo utilice.
B. Mantenga secas y fuera de tierra todas las conexiones
C. No toque el enchufe con las manos mojadas
D. La máquina de lavar a presión es suministrada con un
interruptor de circuito con toma de tierra instalado en
el enchufe de alimentación. Si es necesario substituir
el enchufe o el cable, usen sólo piezas de repuesto del
mismo tipo. Para una substitución correcta, contacte
al Servicio al Cliente por e-mail:
customerservice@huskypowerwasher.com. o haga
un pedido por Internet en www.huskypowerwasher.com.
No se aconseja el uso de extensiones si no están introducidas
en una tomacorriente protegida por el interruptor de circuito
con toma de tierra.
Cualquier extensión utilizada debe ser del tipo 12 AWG
fuera y la longitud no debe superar los 25 pies con el
fin de prevenir una excesiva dispersión de voltaje.
Utilice sólo extensiones para uso exterior. Tales
extensiones están señaladas con la siguiente frase:
“Adecuadas para uso exterior; almacenar en lugar
cerrado cuando no es utilizada.”
14
Page 15

4.0 OPERATING INSTRUCTIONS
4.0 INSTRUCCIONES DE USO
WARNING: Risk of injection or injury.
Do not direct discharge stream at self or
others.
4.1 START-UP PROCEDURE
1. Connect the high pressure hose to the machine outlet.
Ensure that the threads are aligned properly and that
the connection is secure.
2. Connect the garden hose to the machine inlet using
the quick connect. Make sure that the garden hose
is connected to a water supply that is turned on.
3. Insert the Click-N-Clean
TM
or Turbo lance into the
gun by pushing firmly and simultaneously twisting
a ¼ of a turn until locked into place (Fig.5).
Fig. 3
Safety lock “unlocked”
Bloqueo de seguridad “abierto”
Safety lock “locked”
Bloqueo de seguridad “cerrado”
IMPORTANTE: Riesgo de ingerirlo o
de lesiones. NO dirija el chorro hacia sí
ATENCIÓNWARNING
mismo o hacia otras personas.
4.1 PROCEDIMIENTO DE PUESTA EN MARCHA
1. Conecte el tubo de alta presión a la salida de la máquina. Asegúrese de que los conductos están correctamente
alineados y de que la conexión es segura.
2. Conecte la manguera del jardín a la entrada de la
máquina mediante el dispositivo de conexión rápida. Asegúrese de que la manguera del jardín está
conectada a una toma de agua que esté activa.
3. Introduzca la lanza Click-N-Clean
TM
o Turbo en la
pistola. Para ello, presione con firmeza al tiempo
que gira un cuarto de vuelta hasta que queda fijada
en su lugar (Fig.5).
Fig. 4
Listo
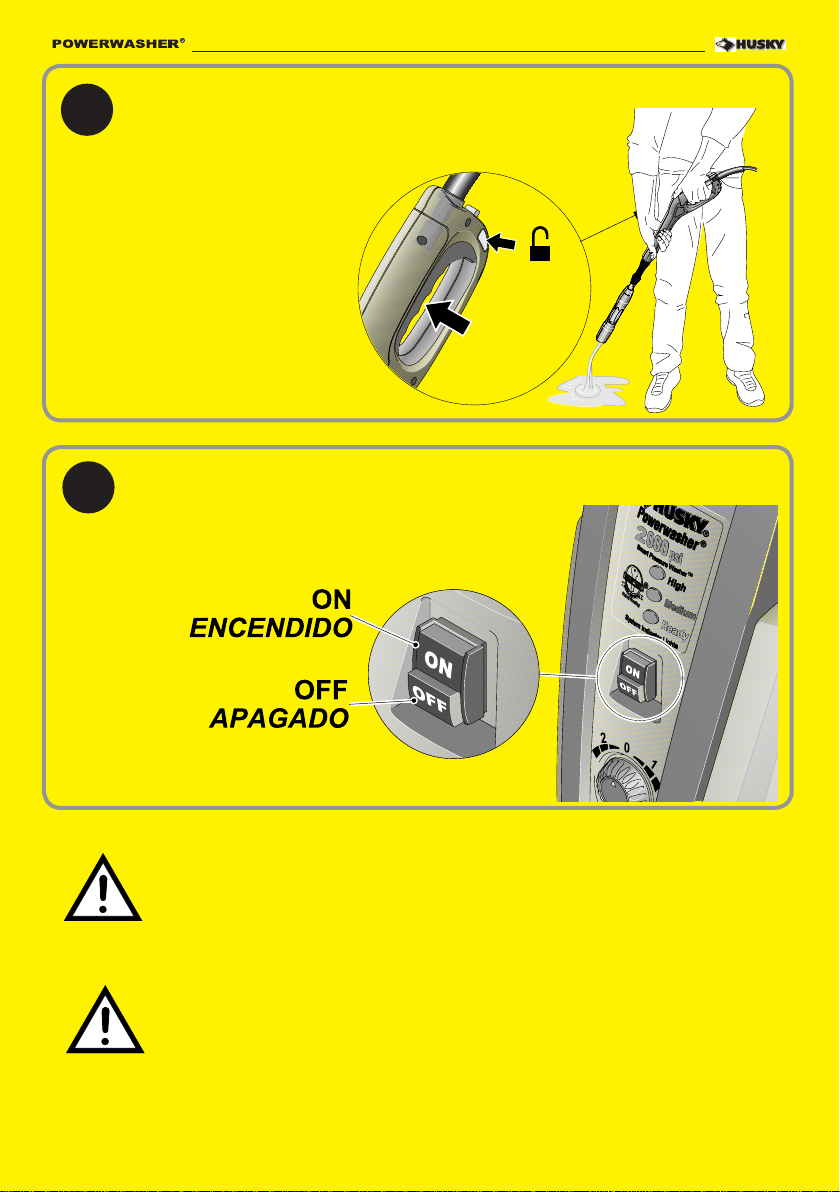
4. Plug the GFCI into the power receptacle.
5. Ensure that the gun safety is unlocked (Fig. 3) and
squeeze the trigger until the air has excaped and a
steady flow of water is coming from the nozzle.
6. Depress the ON button (Fig.6 - page 16). Note that
the motor will momentanly start then stop. The green
“Ready” light should be illuminated (Fig.4).
7. Squeeze the trigger to start motor and water flow.
NOTE: Make sure wand is locked (Fig.5).
Fig. 5
4. Enchufe el GFCI a la toma de corriente.
5. Asegúrese de que el dispositivo de seguridad de
la pistola está desbloqueado (Fig. 3) y apriete el
accionador hasta que salga aire y se genere un
caudal de agua constante desde la boquilla.
6. Pulse el botón ON (Fig.6-pág.16). Recuerde que
el motor se encenderá momentáneamente y, a
continuación, se detendrá. La luz verde “Listo”
(Ready) se encenderá (Fig.4).
7. Apriete el accionador para poner en marcha el
motor y el caudal de agua.
NOTA:Asegúrese de que la varilla está bloqueada (Fig.5).
15
Page 16

WARNING
Fig. 6
WARNING: If the wand is not securely
locked into place, it could be ejected under
high pressure when operating the gun,
possibly causing injury or damage.
ATENCIÓN
IMPORTANTE: Si el lanzador no está
bien bloqueado, cuando se utiliza la
pistola, podría ser expulsada debido a la
alta presión, provocando lesiones o daños
y perjuicios.
4.2 CLICK-N-CLEAN
TM
(see Fig.7)
CAUTION: Do not move the nozzle
to adjust pressure while the trigger is
WARNING
The Click-N-Clean
squeezed.
TM
nozzle has three adjustments. Turn
the collar 120° to set the desired selection.
The High Pressure Fan Spray
position is intended for cleaning with
maximum pressure. (Fig. 7)
The Medium Fan Spray position
is intended for cleaning with medium
pressure. (Fig. 7)
The Detergent Spray position is
intended for dispensing detergent
(Fig. 7).
4.2 CLICK-N-CLEAN
(consulte la Fig.7)
TM
PRECAUCIÓN: No mueva la boquilla
para ajustar la presión mientras esté pul-
ATENCIÓN
La boquilla Click-N-Clean
sado el accionador.
TM
puede ajustarse en tres
posiciones. Gire el cuello 120° para ajustarla a la
posición que desee.
La posición de Pulverización en
abanico a alta presión está
indicada para limpiar con la máxima
presión. (Fig. 7).
La posición de Pulverización en aba-
nico media está indicada para limpiar
con una presión media. (Fig. 7).
La posición de Pulverización con
detergente está indicada para
suministrar detergente (Fig. 7).
Fig. 7
16
Page 17

Smart Tech Indicator Light System (Fig.8).
Sistema de indicadores luminosos Smart Tech
(Fig.8).
Fig. 8
The green “Ready” light should be illuminated when
the “ON” button is depressed and power is supplied
to the machine.
NOTE: The green “Ready” light should remain illuminated
until the ON/OFF switch is moved to the OFF position.
When using the Click-N-Clean
TM
lance set in the
“Medium Fan Spray”, ”Detergent Spray” position, or
when using the Turbo lance, the yellow “Medium” light
should be illuminated.
NOTE: The yellow “Medium” light should be illuminated
when the gun trigger is depressed, motor is running
and water is spraying from the nozzle.
The blue “High” light should be illuminated when using
the Click-N-Clean
TM
lance set in the “High Pressure Fan
Spray” position.
NOTE: The blue “High” light should be illuminated
when the gun trigger is depressed, motor is running
and water is spraying from the nozzle.
NOTE: The pressure of the spray on the surface you
are cleaning increases as you move the wand closer
to the surface.
CAUTION: The high pressure fan
spray adjustment is very aggressive.
We recommend that for most cleaning
CAUTION
applications, a twenty degree (20°)
spray angle be used to avoid damage
to the surface being sprayed.
l indicador luminoso verde “Listo” (Ready) se encenderá
cuando se pulse el botón “ON” y la máquina reciba
alimentación eléctrica.
NOTA: La luz verde “Listo” (Ready) permanecerá encendida hasta que se coloque el interruptor ON/OFF
en la posición OFF.
TM
Al utilizar la lanza Click-N-Clean
en la posición
“Pulverización en abanico media”, “Pulverización con
detergente”, o al utilizar la lanza Turbo, se encenderá
el indicador amarillo “Media” (Medium).
NOTA: La luz amarilla “Media” (Medium) se encenderá
cuando se pulse el accionador de la pistola, el motor
esté en funcionamiento y el agua salga pulverizada
por la boquilla.
La luz azul “Alta” (High) se encenderá cuando se
utilice la lanza Click-N-Clean
TM
ajustada a la posición
“Pulverización en abanico a alta presión”.
NOTA: La luz azul “Alta” (High) se encenderá cuando
se pulse el accionador de la pistola, el motor esté en
funcionamiento y el agua salga pulverizada por la
boquilla.
NOTA: La presión que ejerce el pulverizador sobre la
superficie que está limpiando aumenta a medida que
acerca la varilla a la superficie.
PRECAUCIÓN: El ajuste de pulverización en abanico a alta presión es muy
agresivo. Le recomendamos que utilice
ATENCIÓN
un ángulo de pulverización de veinte
grados (20°) para la mayoría de las
aplicaciones de limpieza. De este modo
evitará que se produzcan daños en la
superficie que se va a pulverizar.
17
Page 18

4.3 USE OF CLEANING DETERGENTS
CAUTION: Only use cleaning detergents
recommended for pressure washers.
CAUTION
CAUTION: Fill and flush the detergent
tanks with clear water after use.
This product is equipped with dual Dial-N-Wash
detergent tanks. The dial (3-Fig. 9) is used to control
the suction between detergent tanks (1-2-Fig. 9) and
increase/decrease detergent flow.
Fig. 9
4.3 USO DE DETERGENTE
CUIDADO:Use tan solo detergentes específicos
para máquina de lavar a presión.
CUIDADO: Limpie con agua clarificada el
ATENCIÓN
El aparato incorpora dos depósitos de detergente
®
Dial-N-Wash
estanque luego de haber utilizado productos
químicos.
®
.El dosificador de detergente (3-Fig. 9)
se utiliza para seleccionar entre ambos depósitos de
detergente (1-2-Fig. 9) y para dosificar la cantidad
de detergente.
1. Remove the tank caps (1-2) located on the back of
the machine. (Fig. 10)
2. Fill the tanks with suitable cleaning solution. Use
only approved pressure washer cleaners. Do not
use bleach, chlorine, or any cleaners containing
acids (Fig.10).
NOTE: Tank #1 is removable and can be released
by shifting left or right and then pulling out.
3. Turn dial (3) to choose the desired tank and increase/
decrease detergent flow(Fig.9).
4. Set the Click-N-Clean
TM
to the “Detergent Spray“
position. The detergent will automatically be mixed
with the water and discharged through the nozzle.
NOTE: WHEN THE Click-N-Clean
TM
NOZZLE IS
MOVED TO THE HIGH PRESSURE OR MEDIUM
FAN SPRAY POSITION, DETERGENT WILL NOT
BE DISCHARGED.
1. Retire los tapones de los depósitos (1-2) situados
en la parte trasera de la máquina. (Fig. 10).
2. Llene los depósitos con la solución de limpieza adecuada. Utilice sólo agentes limpiadores para limpieza
a presión homologados. No utilice lejía, cloro ni
ningún limpiador que contenga ácido (Fig.10).
NOTA: El Depósito #1 es desmontable y, para
sacarlo, sólo tiene que girarlo a la izquierda o a
la derecha y extraerlo.
3. Gire la rueda (3) para elegir el depósito deseado y
aumentar/disminuir el caudal de detergente (Fig. 9).
4. Ajuste la lanza Click-N-Clean
TM
a la posición de
“Pulverización con detergente”. El detergente
se mezclará automáticamente con el agua y se
descargará a través de la boquilla.
NOTA: CUANDO LA BOQUILLA Click-N-CleanTM
SE COLOCA EN LA POSICIÓN DE PULVERIZACIÓN EN ABANICO A ALTA PRESIÓN O A MEDIA
PRESIÓN, NO SALDRÁ DETERGENTE.
Fig. 10
18
Page 19

4.4 CLEANING TECHNIQUES
When cleaning with the pressure washer, some cleaning
tasks can be solved with water alone, but for most tasks
it is advantageous to use a detergent. A detergent
ensures a quick soaking of the dirt allowing the high
pressure water to penetrate and remove the dirt more
effectively.
The low pressure position provides a gentle application
of detergents.
This position is also recommended to rinse a surface
after wax application or for other applications which
require the low pressure of a garden hose. Low pressure
is the equivalent of a garden hose set at the lowest
output to properly apply detergent. FOR DETERGENT
APPLICATION, TURN COLLAR ACCORDING TO
SECTION 4.2.
4.4 TÉCNICAS DE LIMPIEZA
Cuando se procede a la limpieza con la máquina de lavar
a presión, se pueden efectuar diferentes operaciones sólo
con el agua; en muchos casos, sin embargo, es conveniente
utilizar también un detergente.
El uso de un detergente asegura un tratamiento inmediato
de la suciedad, permitiendo al agua con alta presión
penetrar y eliminar eficazmente la suciedad.
La posición de baja presión permite una aplicación
delicada del detergente. Recomendamos esta posición
también para enjuagar una superficie después de la
aplicación de cera y de otras aplicaciones que requieran
la baja presión de una manguera de jardín.
La baja presión equivale a una manguera de jardín
programada en el rendimiento más bajo para aplicar
en modo correcto el producto químico.
PARA APLICACIONES CON DETERGENTE, GIRAR
LA ABRAZADERA COMO SE ESPECIFICA EN LA
SECCIÓN 4.2.
APPLICATION OF DETERGENT
1. Apply the solution to a DRY work surface.
NOTE: WETTING THE SURFACE FIRST IS NOT
RECOMMENDED, AS IT DILUTES THE DETERGENT
AND REDUCES ITS CLEANING ABILITY.
On a vertical surface, apply horizontally from
side to side starting from the bottom to avoid
streaking.
2. Allow detergent to remain on the surface for a short
time before rinsing.
CAUTION: Damage may occur to painted
surface if detergent is allowed to dry on the
surface. Wash and rinse a small section at
CAUTION
a time. Avoid working on hot surfaces or
in direct sunlight.
3. Rinse with clean water under high pressure. On
a vertical surface, first rinse from the bottom up,
then rinse from the top down. Hold nozzle 6 to 8
inches from the work surface at a 45° angle using
the flat spray as a peeling tool rather than a scrub
brush.
NOTE: Ensure that the detergent injection system is
completely clean prior to switching from one detergent
to another.
APPLICATION OF LIQUID VEHICLE WAX
1. Immediately after cleaning, apply pressure washer
liquid vehicle wax using low pressure. Pour wax
into detergent tank.
2. Apply the wax sparingly in an even layer.
Apply to wet surfaces from the bottom up for even
distribution and to avoid streaking.
APLICACIÓN DE DETERGENTE
1. Aplique la solución de jabón de la máquina de lavar
a presión sobre una superficie de trabajo SECA.
NOTA: NO SE ACONSEJA MOJAR LA SUPERFICIE
ANTES, PUESTO QUE DILUYE EL DETERGENTE Y
REDUCE SU CAPACIDAD DE LIMPIEZA.
Ante la presencia de una superficie vertical, aplique
el jabón horizontalmente comenzando por la parte
baja para evitar estriados.
2. Antes de enjuagar, dejen el detergente sobre la
superficie durante un breve lapso de tiempo.
ATENCIÓN: Si se deja secar el jabón, las
superficies pintadas podrían dañarse. Lave
y seque una pequeña sección por vez. No
ATENCIÓN
trabaje sobre superficies calientes o bajo
la luz directa del sol.
3. Enjuague con agua limpia y con alta presión. Sobre
las superficies verticales, comience a enjuagar antes
desde la parte baja hacia la parte alta y luego
viceversa. Tenga la boquilla a 6/8 pulgadas de la
superficie de trabajo con un ángulo de 45° utilizando
el chorro turbo como si fuera una herramienta para
pelar en lugar de cepillo de acero.
NOTA: Asegúrese de que el sistema de inyección de
detergente esté completamente limpio antes de cambiar
detergente.
APLICACIÓN DE LA CERA
1. Después de haber limpiado, apliquen la cera con
la hidrolimpiadora regulada sobre la baja presión.
Coloquen la cera dentro el depósito del liquido
detergente.
2. Apliquen la cera en un estrato uniforme.
Apliquen sobre superficies mojadas desde abajo
hacia arriba, para distribuirla uniformemente y
para evitar los estriados.
19
Page 20

3. Rinse off the surplus wax. NOTE – IF SURPLUS
WAX IS NOT REMOVED, A HAZY FINISH MAY
RESULT.
4. Wipe dry to reduce water spotting.
4.5 HIGH PRESSURE/TURBO SPRAY
CAUTION: Do not move the nozzle to
CAUTION
The turbo lance (Fig.11) high pressure spray pattern
delivers the optimal cleaning effect. Keep the turbo
lance a minimum of 8” away from the cleaning surface
at all times.
NOTE: When using this lance, it is normal for the
yellow “Medium” light on the Smart Tech display to
illuminate.
Fig. 11
4.6 END OF OPERATION
When you have completed use of the detergent injection
system, continue to run in low pressure position and
flush clean water through the detergent tank until it is
thoroughly cleaned. NOTE: Failure to clean properly
will cause the injection system to become clogged and
inoperable.
z Stop the unit by pressing the ON/OFF button.
z Disconnect electrical plug.
z Turn off water and depressurize unit by squeezing
CAUTION
z Disconnect the high pressure discharge hose and
adjust pressure. The turbo nozzle is not
adjustable.
trigger.
WARNING: Turn off water supply and
squeeze trigger to depressurize the unit.
Failure to do so could result in personal
injury due to discharge of high pressure
water.
the water inlet hose.
3. Elimine el exceso de cera del aparato. NOTA: SI EL
EXCESO DE CERA NO ES EXTRAÍDO, SE PUEDE
OBTENER UN RESULTADO OPACO.
4. Seque la superficie para disminuir las manchas de
agua.
4.5 CHORRO DE ALTA PRESIÓN / TURBO
ATENCIÓN: No actúe sobre la boquilla
para modificar la presión. La rueda regulable
ATENCIÓN
El patrón de pulverización a alta presión de la lanza Turbo
(Fig.11) ofrece un efecto de limpieza óptimo. Mantenga
la lanza Turbo a una distancia mínima de 20,32 cm con
respecto a la superficie de limpieza en todo momento.
NOTA: Cuando utilice esta lanza, es normal que la luz
amarilla “Media” (Medium) de la pantalla Smart Tech
se ilumine.
4.6 FINALIZACIÓN DE LA OPERACIÓN
Cuando haya terminado de utilizar el sistema de
inyección de detergente, haga funcionar aún a baja
presión y haga pasar agua limpia por el depósito
del líquido detergente hasta que esté completamente
limpio. NOTA: la falta de una limpieza a fondo puede
provocar una obturación en el sistema de inyección y
será inutilizable.
z Detenga el equipo presionando el botón on/off.
z Desconecte la toma eléctrica.
z Cierre el agua y depresurice el equipo presionando
ATENCIÓN
z Desconecte la manguera de descarga de la alta
turbo no se puede ajustar.
el gatillo.
ATENCIÓN: Cierren la suministro de agua
y presione el gatillo para depresurizar el
equipo. La falta de despresurización puede
provocar daños a las personas debido a la
descarga del agua de alta presión.
presión y la manguera de introducción del agua.
5.0 MAINTENANCE
5.1 CONNECTIONS
Connections on Pressure Washer hoses, gun and spray
wand should be cleaned regularly and lubricated with
non-water soluble grease to prevent leakage and damage
to the o-rings.
5.2 NOZZLE
The nozzles should be lubricated with non-water soluble
grease or light oil regularly. Clogging of the nozzle
causes the pump pressure to build up too high and
cleaning is immediately required.
1. Clear blockage in nozzle by forcing stiff wire
through center hole.
5.0 MANTENIMIENTO
5.1 CONEXIONES
Las conexiones a mangueras, la pistola y el tubo de
chorro de la hidrolimpiadora, deberían ser limpiados
regularmente y lubricados para prevenir las pérdidas
y la rotura de los aros tóricos.
5.2 BOQUILLA
Las boquillas deben lubricarse periódicamente con una
grasa que no sea soluble al agua o aceite ligero.La
obturación de la boquilla provoca el aumento de la presión
de la bomba. Se requiere una limpieza inmediata.
1. Eliminen el bloqueo en la boquilla forzando el cable
rígido a través el agujero central.
20
Page 21

2. Backflush the nozzle with water.
Restart the pressure washer and depress the trigger on
the spray gun. If the pressure is still too high, repeat
above items 1-2.
5.3 LUBRICATION
The pressure washer is designed with a permanent
lubrication system. Conventional oil check and oil
changes are not necessary.
NOTE: IN CASE OF OIL LEAKAGE, CONTACT
OUR CUSTOMER SERVICE DEPARTMENT AT:
customerservice@huskypowerwasher.com.
A SMALL AMOUNT OF OIL LEAKAGE IS NORMAL.
2. Dejen pasar el agua a través la boquilla
Reinicie arrancar nuevamente la máquina de lavar
a presión y oprimir el gatillo de la pistola de chorro.
Si la boquilla está aún bloqueada o parcialmente
bloqueada, repita dichas operaciones desde el punto
1 hasta el punto 2.
5.3 LUBRICACIÓN
La máquina de lavar a presión ha sido creada con un
sistema de lubricación permanente. No son necesarios
controles convencionales ni la substitución de aceites.
NOTA: EN CASO DE PÉRDIDA DE ACEITE, CONTACTE
VÍA E-MAIL CON EL DEPARTAMENTO DE ATENCIÓN AL
CLIENTE EN customerservice@huskypowerwasher.com.
UNA PEQUEÑA PÉRDIDA DE ACEITE ES NORMAL.
5.4 WATER SCREEN
The pressure washer is equipped with a water inlet
screen to protect the pump.
CAUTION: If the screen is not kept clean,
the flow of water to the pressure washer
CAUTION
z To clean inner water screen, remove quick connector
z Backflush screen to clean.
z Replace screen and quick connect immediately
CAUTION
5.5 COOLING SYSTEM
The air vents, located in and around the pressure washer,
must be kept clean and free of any obstructions to ensure
proper air cooling of the motor during operation.
CAUTION
will be restricted and the pump may be
damaged.
and the inlet nipple in order to remove the filter
screen from the pump inlet.
to prevent any foreign matter from entering the
pump.
CAUTION: Do not damage the screen
while removing or cleaning. Any foreign
particles entering the pump may damage
the pump.
WARNING: Prevent water from penetrating the vents of the pressure washer
to minimize the risk of damage to the
machine and to reduce the risk of shock
to the operator.
5.4 FILTRO DE AGUA
La máquina de lavar a presión está dotada de un filtro
de introducción de agua para proteger la bomba.
ATENCIÓN: Si no se mantiene limpio el
filtro, el flujo del agua hacia la máquina de
ATENCIÓN
z Para limpiar la pantalla de agua interior, retire
z El filtro de retorno del flujo debe estar limpio.
z Reemplace de inmediato el filtro y la unión
ATENCIÓN
5.5 SISTEMA DE REFRIGERACIÓN
Los respiraderos de aire colocados en la máquina de
lavar a presión y a su alrededor, deben ser mantenidos
limpios de cualquier obstrucción para garantizar la
refrigeración del motor con aire limpio durante el uso.
ATENCIÓN
lavar a presión se ve limitado y la bomba
puede dañarse.
en secuencia el dispositivo de conexión rápida, el
niple de entrada y saque la pantalla del filtro de
la entrada de la bomba.
rápida para evitar que entre material extraño
en la bomba.
ATENCIÓN: No dañe el filtro cuando lo
lo extraiga y limpie. Cualquier partícula
extraña que pudiera entrar en las bombas,
podría dañarla.
IMPORTANTE: Evite que el agua penetre
en los respiraderos de la máquina de lavar
a presión para que el riesgo de dañar la
máquina sea mínimo y para reducir el
peligro de sacudida eléctrica al usuario.
6.0 MOVING AND STORAGE
INSTRUCTIONS
CAUTION: Prior to moving the unit,
CAUTION
always disconnect the garden hose via the
quick connect.
6.0 MANIPULACIÓN Y
ALMACENAMIENTO
ATENCIÓN:
PRECAUCIÓN: Antes de mover la unidad,
ATENCIÓN
21
desconectar siempre la manguera del jardín
con la Conexión rápida.
Page 22
CAUTION: Always store your pressure
washer in a location where the temperature
will not fall below 40°F. The pump in this
CAUTION
machine is susceptible to permanent damage
if frozen. FREEZE DAMAGE IS NOT
COVERED BY THE WARRANTY.
End of use and winter storage instructions
1. When finished using the pressure washer, you must
first drain and rinse the detergent tanks.
2. Run the pressure washer in low pressure until all
of the soap is drained from the detergent tanks.
3. Pour clear water into the tanks and run it through
on low pressure as though it were detergent.
4. Turn the machine OFF and squeeze the trigger to
release the trapped pressure inside of the machine.
5. Remove both the garden hose and high pressure
hose from the unit.
6. Turn ON the machine and allow it to run for 5
seconds. (This will clear out most of the water
trapped in the pump).
7. Unplug the machine and store in a dry, climate
controlled environment.
Do not store the machine or accessories
in a place where the temperature could
drop below 40°F.
ATENCIÓN: Almacene la máquina de
lavar a presión en un local cuya temperatura
no descienda por debajo de los 40°F. En el
caso de congelamiento, la bomba de este
ATENCIÓN
equipo está sujeta a daño permanente.
LOS DAÑOS PROVOCADOS POR EL
HIELO NO ESTÁN CUBIERTOS POR
LA GARANTÍA.
Instrucciones de almacenaje y finalización
de uso
1. Después de utilizar la lavadora a presión, se deben
vaciar y aclarar los dos depósitos de detergente.
2. Poner la lavadora a presión baja hasta que se
haya ido todo el detergente de los depósitos.
3. Vertir agua limpia en los depósitos y poner la máquina
a presión baja, como si llevara detergente.
4. Poner la máquina en posición OFF y apretar el
gatillo para liberar la presión acumulada dentro
de la máquina.
5. Desconectar la manguera y la manguera de alta
presión de la máquina.
6. Poner la máquina en posición ON y dejarla que
funcione durante 5 segundos. (Esto va a permitir
que se vacíe el agua atrapada en el depósito).
7. Desconectar la máquina y guardarla en un espacio
seco y con la temperatura controlada.
No guardar la máquina o los acesorios
en un espacio donde la temperatura
pueda descender hasta 4°C.(40°F)
6.1 AFTER EXTENDED STORAGE
Scale deposits may form in the pump when it is not
used for some time.
This causes the motor to hesistate or not start up at all.
z Connect machine to water supply and rinse
thoroughly with water. Do not plug unit into
electrical outlet.
z Connect high pressure hose to the gun and then
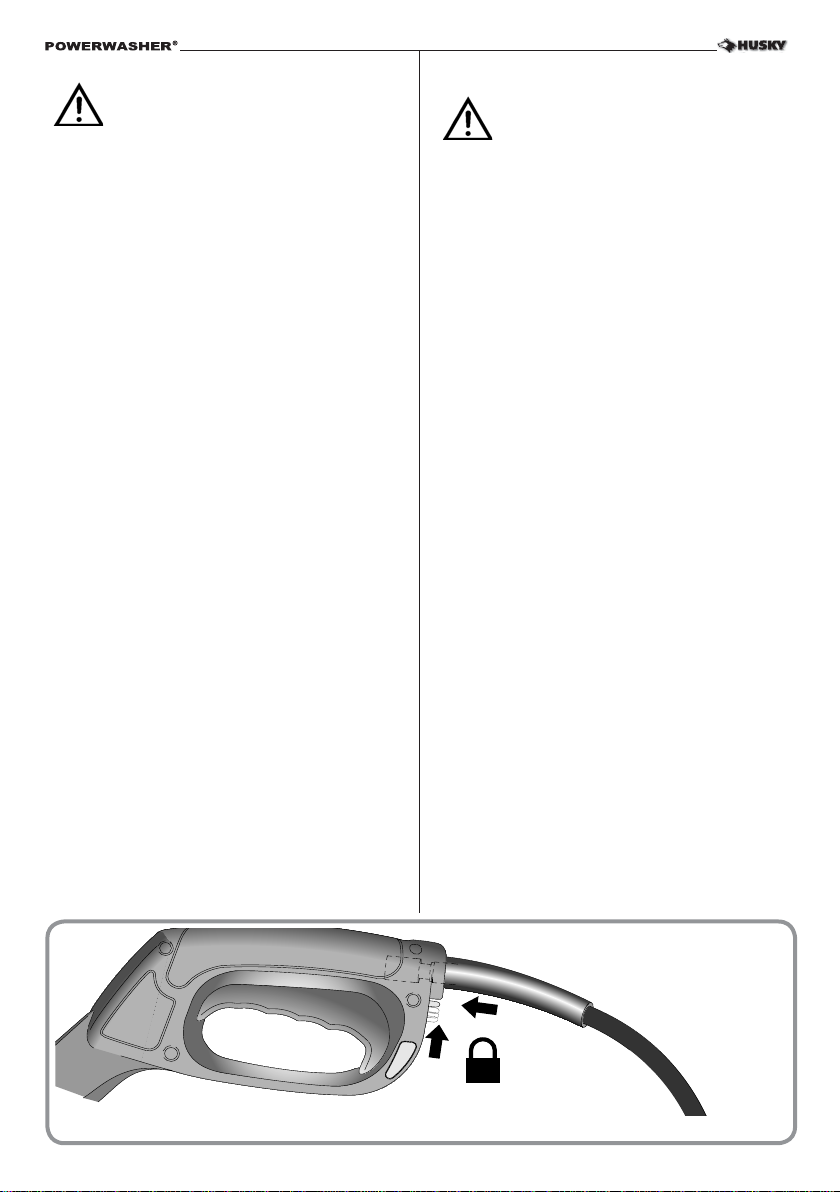
lock hose safety device. (Fig. 12)
Fig. 12
6.1 DESPUÉS DE UN ALMACENAMIENTO
PROLONGADO
Cuando no es utilizada durante mucho tiempo, se
podrían formar en la bomba depósitos calcáreos.
Ello podría implicar que el motor no funcione correctamente
o que directamente no funcione.
z Conecte la máquina a la alimentación del agua
y enjuague. No introduzca el enchufe en el
tomacorriente principal.
z Conectar la manguera de alta presión a la pistola y
a continuación cerrar el dispositivo de l a manguera
de seguridad. (Fig.12)
Safety lock “locked”
Bloqueo de seguridad
“cerrado”
22
Page 23

7.0 TROUBLESHOOTING
PROBLEM OR CONCERN POSSIBLE CAUSE SOLUTION
Detergent Leak Disconnected or Kinked Detergent
Pick up Tube
Reservoir Tank won’t hold
Chemical Tank Nipple Broken The Chemical Tank Nipple is attached to the inside
Detergent
Detergent is not dispensing Incorrect wand is attached to the
Gun
TM
The Click-N-Clean
wand is
not set in the “Detergent Spray”
position.
Nozzle is clogged with debris Straighten out a paper clip and insert it into the tip
Detergent to Water ratio Adjust the Dial-N-Wash
Detergent - What to use We recommend that you use a cleaner which is
Detergent Tank fills up with
water
Detergent Suction Assembly (the
part which the High Pressure hose
connects to) is defective
Circuit breaker trips or Fuse
Circuit overload Check that the circuit is rated at 15 amps or
blown in Fuse Box
Extension cord too long or wire
size too small
Nozzle partially blocked Clean Nozzle as instructed in section 5.2.
Excessive pressure Clean Nozzle as instructed in section 5.2
GFCI Plug installation
GFCI Plug malfunction
23
Remove the front cover of the unit and check if the
clear tube is still properly attached or kinked. If it is
not attached then reconnect it or unkink it.
wall of the Reservoir Tank. If it is broken you can
order a replacement by emailing us at:
customerservice@huskypowerwasher.com.
Make sure that the Click-N-Clean
TM
wand is
attached to the Gun and set in the “Detergent
Spray” position Detergent will not dispense with
the Turbo Wand
Turn the shaft of the wand until clicked into the
“Detergent Spray” position (see fig 7 pag. 16).
of the Nozzle. Back flush the Nozzle with water.
(see section 5.2)
®
dial to increase/decrease
detergent flow. Most power washer chemicals are
generally concentrated within that range so minimal
adjustment is required. If you feel like you are using
more detergent than is required for the application you
can dilute it with regular tap water. (see section 4.3)
specifically designed for power washers. There
are different kinds available depending on the
application. Check with your local Home Depot
store for the product which is best suited for your
needs. Never use Bleach, Ammonia or
Hot water in the unit.
The part will have to be replaced, Please email
us directly at:
customerservice@huskypowerwasher.com.
You can also order the part directly at:
www.huskypowerwasher.com.
greater. Make sure the unit is plugged into a
dedicated circuit.
Use proper extension cord as recommended in
Owner’s Manual.
For instructions regarding the GFCI Plug installation or malfunction please email us directly at:
customerservice@huskypowerwasher.com.
Page 24

PROBLEM OR CONCERN POSSIBLE CAUSE SOLUTION
Gun/Hose - Leaking water Gun/Hose will need to be replaced. Replacement parts
are not available for the Gun/Hose. Email us at:
customerservice@huskypowerwasher.com
for assistance or order online at:
www.huskypowerwasher.com.
Leaking Oil from Pump A small amount of leakage is
normal
Leaking water from bottom
of unit
Machine Inlet connection is defective
If leakage occurs please contact use directly at
customerservice@huskypowerwasher.com.
Check the Machine Inlet at the front of the unit
to ensure that water is not leaking from it. If the
connection is leaking it will have to be replaced.
Contact us at:
customerservice@huskypowerwasher.com
or order a replacement directly online at:
www.huskypowerwasher.com.
Pump housing is leaking water Email us at:
customerservice@huskypowerwasher.com
for assistance.
Low pressure Faucet not fully open or unit is not
Open the faucet all the way.
receiving a full volume of water
Not building maximum Pressure Screen Filter is clogged Clean the Screen filter as instructed in the section 5.4.
Irregular Pressure Gun or Hose failure Replace Gun and/or Hose. Contact us at:
customerservice@huskypowerwasher.com
or order online at:
www.huskypowerwasher.com.
Kink in the Garden Hose or Hose
is wrapped on a storage wheel
Water leaking from either Hose
or Unit
Unwrap the Garden Hose and lay it out flat to
ensure that there are no kinks in the Hose.
Stop water from leaking before using the unit or
contact us if you need assistance.
Garden Hose length is too long Shorten the length of the Garden Hose. We
recommend a maximum length of 25 to 50
feet for City water supply and 30 feet for Well
water supply.
Clogged Nozzle Clean the Nozzle as instructed in section 5.2.
Air in Pump Let Pressure washer run with Gun trigger depressed
and Wand removed until a steady stream of water
is released.
TM
No Wand attached to the front
of the Gun
Attach either the Click-N-Clean
Wand to the gun. (High Pressure in created with
or Turbo
the Wand and not the Gun).
No water coming out of Wand Clogged Nozzle Clean Nozzle as instructed in section 5.2.
Quick Connect is attached
incorrectly
See section 3.2. To Attach Quick Connect properly,
keep the outer collar of the Quick Connect held back
while sliding the Quick Connect all the way forward
against the Inlet Nipple and then release the collar to
lock it into place. (The collar is spring loaded so if it is
released too soon it will not lock into place).
Sceen Filter is clogged Clean the Sceen filter as instructed in section 5.4.
Kink in the Garden Hose or Hose
is wrapped on a storage wheel
Unwrap the Garden Hose and lay it out flat to
ensure that there are no kinks in the Hose.
24
Page 25

PROBLEM OR CONCERN POSSIBLE CAUSE SOLUTION
No water coming out of Wand
(contd)
Detergent Suction Assembly (the
part which the High Pressure
Hose connects to) is defective
Remove the Gun and Hose assembly from the
front of the unit. Aim water stream away from
electric source. Turn the faucet on. Water should
start to come out of the front of the unit. If no
water comes out, the Detergent Suction Assembly
will have to be replaced. Contact us at:
customerservice@huskypowerwasher.com
or order a replacement directly online at:
www.huskypowerwasher.com.
Gun/Hose Assembly is defective
Attach the Gun/Hose to the front of the unit
with no wand attached to the Gun. Squeeze the
trigger of the gun to ensure that water comes
out of the front of the Gun at a rate equal to the
Garden Hose. If no water comes out of the Gun
it will have to be replaced. Contact us at:
customerservice@huskypowerwasher.com
or order a replacement directly online at:
www.huskypowerwasher.com.
Trigger will not move Gun Safety Lock in engaged Release Safety Lock as instructed in Manual.
Unit will not start
Note: Unit will only start when
trigger is depressed.
Unit stops while operating
Unit is not turned on Press ON/OFF Switch into ON position.
Loose or disconnected Plug Reconnect Plug.
Defective GFCI Plug If the Plug does not work it will need to be repla-
ced. Contact us at:
customerservice@huskypowerwasher.com
or order a replacement directly online at:
www.huskypowerwasher.com.
Extension Cord length or gauge
incorrect
Gun trigger not operating
properly
Use proper Extension Cord as instructed in section
2.0.
Contact us at:
customerservice@huskypowerwasher.com
or order a replacement directly online at:
www.huskypowerwasher.com.
Defective Gun Remove the Gun and Hose assembly from the front
of the unit. Aim water stream away from electric
source and switch the unit into the ON position.
If the unit starts and water comes out of the front,
the Gun may need to be replaced.
Contact us at:
customerservice@huskypowerwasher.com
or order a replacement directly online at:
www.huskypowerwasher.com.
Tripped Pressure washer Thermal
Allow to cool and restart unit.
Switch
Defective ON/OFF Switch
Contact us at:
customerservice@huskypowerwasher.com
or order a replacement directly online at:
www.huskypowerwasher.com.
Unit will not stop when trigger
is released
Screen filter is clogged Clean the Screen filter as instructed in the
section 5.4.
Garden Hose is kinked or leaking
water
Make sure the Garden Hose is laid out flat and
there are no kinks in it. The hose should not be
wrapped on a storage wheel. Make sure the
faucet is open all the way and there is a full
volume of water reaching the unit.
25
Page 26

PROBLEM OR CONCERN POSSIBLE CAUSE SOLUTION
Unit will not stop when trigger is
released (contd)
Wand - Attaching
Wand - Removing Release the back pressure in the Gun/Hose.
The green “Ready” light is not
illuminated.
NOTE: The green “Ready” light
should illuminate when the machine
is plugged in and the ON button is
depressed.
The yellow “Medium” light will
not illuminate.
NOTE: The yellow “Medium” light
will only illuminate when using the
turbo wand or the Click-N-CleanTM
wand set to the “Medium Fan Spray”
or “Detergent Spray” position and
the gun trigger is depressed motor is
running and water is spraying from
the nozzle.
The blue “High” light will not
illuminate.
NOTE: The blue “High” light will
only illuminate when the Click-NCleanTM wand is set to the “High
Pressure Fan Spray” position
and the gun trigger is depressed,
motor is running and water is
spraying from the nozzle.
Wand is malfunctioning Test both wands to ensure that one is not
Gun is not operating properly Remove Wand from the Gun and squeeze trigger to
No power Check that the circuit is dedicated and rated
The Click-N-CleanTM is not set
to the proper position.
Use of improper extension
cord.
Clogged nozzle Clean nozzle as instructed in Owner’s Manual
Faucet not fully open or unit is
not receiving a full volume of
water.
Screen filter clogged. Clean the screen filter as instructed in Owner’s
malfunctioning.
ensure that the water is coming out of the front of the
Gun at a rate equal to the Garden Hose.
To attach the Wand apply some moderate downward
pressure force on the Wand (In the direction of the
trigger) while simultaneously twisting the wand a 1/4
of a turn counterclockwise. (It may help if you set the
gun vertically on a flat surface with the wand pointing
upwards). The two tabs on the end of the Wand must
slide all the way in before the Wand will twist and
lock. If this does not work remove the o-ring from the
end of the wand and attach it without the o-ring. If the
wand attaches, you will need to replace the o-ring.
Contact us at:
customerservice@huskypowerwasher.com
or order a replacement directly online at:
www.huskypowerwasher.com.
Remove the Garden Hose from the unit and
squeeze the trigger of the Gun. Apply some
moderate downward pressure force on the
Wand (In the direction of the trigger) while
simultaneously twisting the wand a 1/4 of
a turn clockwise. (It may help if you set the
gun vertically on a flat surface with the Wand
pointing upwards). For additional assistance
you can email us at:
customerservice@huskypowerwasher.com.
at 15 amps or greater.
Make sure that the Click-N-CleanTM wand is set
to the “Medium Fan Spray” or “Detergent Spray”
position.
Use proper extension cord as recommended in
Owner’s Manual.
section 5.2.
Ensure that the faucet is fully open.
Check garden hose connection and ensure that
the garden hose meets criteria as described in the
Owner’s Manual.
Manual section 5.4.
26
Page 27

The Husky 2000S Powerwasher requires a 15 amp minimum rated circuit to function properly. It is important that
your Husky unit does not share a circuit with any other electrical device. If the circuit is shared, the additional
device will create an amperage drain that ultimately causes the Husky to draw more amperage in order to run
full force. Eventually the machine will overheat and shut itself down.
The Husky shuts down as part of the designed safety feature to protect against overheating. The same effect occurs
when two or more outlets are connected to the same circuit. The diagram below shows outlet 1 and outlet 2 on
the same circuit.
In regards to overheating and restarting, the unit requires a minimum of a 45 minute period in which the machine
can properly cool.
27
Page 28

7.0 SOLUCIÓN DE PROBLEMAS
PROBLEMA CAUSAS POSIBLES SOLUCIÓN
Pierde detergente Tubo de conexión desconectado
El depósito de reserva no
admite detergente
No dispensa detergente La pistola lleva conectado un tubo
Proporción de agua por
detergente
Qué detergente usar Recomendamos usar un detergente específico para
El depósito del detergente
se llena de agua
El interruptor del circuito
salta o están quemados
los fusibles en la caja de
fusibles
Instalación del interruptor
GFCI
El interruptor GFCI no
funciona bien
La pistola / la manguera
pierde agua
o embozado a causa de los
detergente
La boquilla del depósito de
detergente está rota
incorrecto.
La varilla Click-N-CleanTM no
puede ajustarse en la posición
“Pulverización con detergente”.
La abrazadera está atascada con
porquería.
El succionador de detergente
(la parte a la que se conecta la
manguera de alta presión) está
estropeada
Sobrecarga en el circuito
eléctrico
Alargo demasiado largo o dimensión
del cable demasiado pequeña
Boquilla parcialmente
bloqueada
Presión excesiva Limpiar la boquilla como se indica en el Manual
Retirar la tapa frontal de la unidad y comprobar si el
tubo está conectado correctamente o si está embozado.
Reconectarlo o desembozarlo según convenga.
La boquilla del depósito de detergente va unida a la
pared interior del depósito de reserva. Si ésta está
rota puede pedirnos un recambio vía e-mail en:
customerservice@huskypowerwasher.com
Asegúrese de que la varilla Click-N-CleanTM está
acoplada a la pistola y ajustada a la posición de
“Pulverización con detergente”. El detergente no
se dispensará con la varilla Turbo.
Gire el eje de la varilla hasta que haga clic en la
posición “Pulverización con detergente”.
(ver fig. 7 pág. 16).
Gire el cabezal de la boquilla hasta que las
dos hojas metálicas se separen por completo.
Enderece un clip e introdúzcalo por la punta de
la boquilla. Rocíe la boquilla con agua (consulte
la sección 5.2).
Ajuste la rueda Dial-N-Wash® para aumentar/
reducir el caudal de detergente. La mayoría de
detergentes para lavar a presión están concentrados
en esta proporción, así que apenas se requiere
un mínimo ajuste. Si cree que está usando más
detergente del que precisa, lo puede diluir con
agua corriente (ver capítulo 4.3).
máquinas de lavar a presión. Hay diferentes tipos
de detergente, dependiendo de la aplicación.
Pregunte en la droguería de su barrio cuál es el
producto que mejor se adapta a sus necesidades.
NO poner nunca lejía, amoniaco o agua
caliente en la unidad.
Hay que cambiar la pieza. Contacte con nosotros
vía e-mail en:
customerservice@huskypowerwasher.com
También puede hacer un pedido directamente en:
www.huskypowerwasher.com
Comprobar que el circuito está regulado en 15
o más amperios. Asegurarse que la unidad está
enchufada a un circuito apropiado.
Utilizar un alargo como el recomendado en el
Manual del usuario.
Limpiar la boquilla como se indica en el Manual
del usuario (ver capítulo 5.2).
del usuario (ver capítulo 5.2).
Si desea información sobre la instalación del interruptor
GFCI o si éste no funciona bien, contacte con nosotros
vía e-mail en:
customerservice@huskypowerwasher.com.
Hay que cambiar la pistola / la manguera entera. No
tenemos recambios de las piezas que componen la
pistola o la manguera. Si desea información, contacte
con nosotros en :
customerservice@huskypowerwasher.com
o realizar un pedido en Internet en:
www.huskypowerwasher.com.
28
Page 29

PROBLEMA CAUSAS POSIBLES SOLUCIÓN
La bomba tiene pérdidas de
aceite
La parte inferior de la unidad
tiene pérdidas de agua
Presión baja El grifo no está totalmente abierto
No alcanza la presión
máxima
Presión irregular Fallo en la pistola o en la
No llega agua del tubo. Boquilla atascada Limpiar la boquilla tal como se indica en el
La manguera del jardín se ha
Una pequeña pérdida de aceite
es normal
La conexión de entrada de la
máquina está estropeada
La bomba pierde agua. Para obtener información, contacte con nosotros en:
o la unidad no está recibiendo un
volumen de agua regular.
La pantalla del filtro está
empañada
manguera
La manguera del jardín se ha
doblado o está atrapada en la
rueda para cargarla
La manguera o la unidad
gotean
La manguera del jardín es
demasiado larga
Boquilla atascada Limpiar la boquilla como se indica en el Manual
Aire en la bomba Dejar la máquina de lavar a presión en funcionamiento
La pistola no tiene ningún tubo
conectado.
La Conexión rápida está mal
conectada
La pantalla del filtro está
empañada
doblado o está atrapada en la
rueda para cargarla
Si la pérdida de aceite es excesiva, contacte
con nosotros en:
customerservice@huskypowerwasher.com.
Comprobar la conexión de entrada de la parte
frontal de la unidad para asegurarse que la pérdida
de agua no proviene de allí. Si la conexión gotea,
habrá que cambiarla. Contacte con nosotros vía
e-mail en:
customerservice@huskypowerwasher.com
o realice un pedido en:
www.huskypowerwasher.com
customerservice@huskypowerwasher.com.
Abrir el grifo totalmente.
Limpiar la pantalla del filtro como indica el
manual (ver capítulo 5.4).
Cambiar pistola y/o manguera. Contacte con
nosotros en:
customerservice@huskypowerwasher.com
o haga un pedido en:
www.huskypowerwasher.com.
Desliar la manguera del jardín y dejarla plana en
el suelo para asegurarse que no tiene nudos.
Cerrar el agua antes de usar la unidad o contactar
con nosotros si necesita ayuda.
Cortar la manguera. Recomendamos una longitud
máxima de 25 a 50 pies (7,5 a 15,2 m.) para
suministros de agua urbanos y 30 pies (9 m.) para
suministros interurbanos.
del usuario (ver capítulo 5.2).
con el gatillo apretado y el tubo extraído, hasta que se
obtenga un flujo de agua regular.
Acople la varilla Click-N-CleanTM o Turbo a la pistola
(se crea alta presión con la varilla; no con la pistola).
Manual del usuario (ver capítulo 5.2).
Consultar Manual del usuario, capítulo 3.2. Para realizar
la Conexión rápida correctamente, mantener sujeta la
abrazadera hacia atrás y deslizar la manguera en su
interior, hasta la boquilla de entrada. A continuación
soltar la abrazadera para que la manguera quede sujeta
en su lugar. (La abrazadera se monta muy rápido, si se
suelta demasiado pronto, la manguera no se colocará
en su lugar).
Limpiar la pantalla del filtro como indica el
capítulo 5.4.
Desliar la manguera del jardín y dejarla plana en
el suelo para asegurarse que no tiene nudos.
29
Page 30
PROBLEMA CAUSAS POSIBLES SOLUCIÓN
No llega agua del tubo.
(continuación)
El gatillo no se mueve El bloqueo de seguridad de la
El motor no arranca.
Nota: La unidad sólo funciona cuando se aprieta
el gatillo.
El motor se detiene durante
el funcionamiento.
La unidad no se para hasta
que no se suelta el gatillo.
El succionador de detergente
(la parte a la que se conecta la
manguera de alta presión) está
estropeado.
La juntura de la manguera/
pistola está estropeada
pistola está conectado
La unidad no está encendida Colocar el interruptor ON/OFF en posición ON
Tapón desconectado o con
pérdidas.
Interruptor GFCI estropeado. Si el interruptor no funciona, hay que cambiarlo.
Extensión o grosor del alargo
incorrecto.
El gatillo de la pistola no funciona
correctamente.
Pistola estropeada. Extraer la pistola y la manguera de la parte frontal
Interruptor de presión de lavado
templado atascado.
Interruptor ON/OFF
estropeado.
La pantalla del filtro está
empañada.
La manguera del jardín está
doblada o tiene una pérdida.
Extraer la pistola y la manguera de la parte frontal
de la unidad. No dirigir el chorro de agua hacia
ninguna fuente de corriente eléctrica. Abrir el grifo.
Debería salir agua de la parte frontal de la unidad.
Si no sale agua, hay que cambiar el succionador de
detergente. Contacte con nosotros vía e-mail en:
customerservice@huskypowerwasher.com
También puede hacer un pedido directamente en:
www.huskypowerwasher.com.
Conectar la manguera/pistola a la unidad sin que
la pistola tenga ningún tubo conectado. Apretar
el gatillo de la pistola para asegurarse que el
agua sale de la pistola en una proporción igual
a la de la manguera del jardín. Si no sale agua
de la pistola, hay que cambiar la pieza. Contacte
con nosotros vía e-mail en:
customerservice@huskypowerwasher.com
También puede hacer un pedido directamente en:
www.huskypowerwasher.com.
Desenganchar el bloqueo de seguridad como se
indica en el Manual del usuario.
(encendido).
Volver a conectar el tapón.
Contacte con nosotros vía e-mail en:
customerservice@huskypowerwasher.com.
También puede hacer un pedido directamente en:
www.huskypowerwasher.com.
Utilizar un alargo adecuado como el indicado en
el Manual del usuario, capítulo 2.0.
Contacte con nosotros vía e-mail en:
customerservice@huskypowerwasher.com.
También puede hacer un pedido directamente en:
www.huskypowerwasher.com.
de la unidad. Conectar la unidad en posición ON y
no dirigir el chorro de agua hacia ninguna fuente de
corriente eléctrica. Si la unidad se pone en marcha
y sale agua de la parte frontal, hay que cambiar la
pistola. Contacte con nosotros vía e-mail en:
customerservice@huskypowerwasher.com.
También puede hacer un pedido directamente en:
www.huskypowerwasher.com.
Dejar que la unidad se enfríe y reiniciarla.
Contacte con nosotros vía e-mail en:
customerservice@huskypowerwasher.com.
También puede hacer un pedido directamente en:
www.huskypowerwasher.com
Limpiar la pantalla del filtro como indica el
capítulo 5.4.
Asegurarse que la manguera del jardín no está
liada o tiene nudos. Puede que la manguera esté
atrapada en la rueda para cargarla. Asegurarse
que el grifo está abierto completamente y que hay
un volumen de agua regular.
30
Page 31

PROBLEMA CAUSAS POSIBLES SOLUCIÓN
La unidad no se para hasta que no se
suelta el gatillo. (continuación)
El tubo no funciona
correctamente
La pistola no funciona
correctamente
Comprobar los dos tubos para asegurarse que
ninguno de los dos está funcionando mal.
Extraer el tubo de la pistola y apretar el gatillo
para asegurarse que el agua sale de la pistola
en una proporción igual a la de la manguera
del jardín.
Conectar el tubo Para conectar el tubo hay que ejercer una presión
moderada en él (en dirección al gatillo,) al mismo
tiempo que se le da 1/4 de vuelta en el sentido
de las agujas del reloj. (Es más fácil si se pone la
pistola en posición vertical y con la punta hacia
arriba en una superficie plana). Las dos lengüetas
que hay en el extremo del tubo se deben deslizar
bajo el acoplador antes de girar y encajar el tubo.
Si esto no funciona, extraer la arandela del final
del tubo y conectarlo sin él. Si el tubo se conecta,
deberá cambiar la arandela.
Contacte con nosotros vía e-mail en:
customerservice@huskypowerwasher.com.
También puede hacer un pedido directamente en:
www.huskypowerwasher.com.
Extraer el tubo Liberar la presión de la pistola/ manguera
por la parte trasera. Extraer la manguera de la
unidad y apretar el gatillo de la pistola. Ejercer
una presión moderada en el tubo (en dirección
al gatillo), al mismo tiempo que se le da ¼ de
vuelta en el sentido de las agujas del reloj. (Es
más fácil si se pone la pistola en posición vertical
y con la punta hacia arriba en una superficie
plana). Para obtener más información, contacte
con nosotros vía e-mail en:
customerservice@huskypowerwasher.com.
La luz verde “Listo” (Ready) no se
enciende.NOTA: La luz verde “Listo”
No hay alimentación
eléctrica.
Compruebe que el circuito está dedicado y posee
una potencia nominal de al menos 15 amperios.
(Ready) se encenderá cuando la
máquina esté enchufada y el botón
ON esté pulsado.
La luz amarilla “Media” (Medium)
no se enciende.
NOTA: La luz amarilla “Media” (Medium)
sólo se encenderá cuando se coloque la
varilla Turbo o la varilla Click-N-CleanTM
en la posición “Pulverización en
abanico media” o “Pulverización
con detergente” y el accionador de
la pistola esté pulsado, el motor esté
La varilla Click-N-CleanTM
no está colocada en la
posición correcta.
Se está utilizando un
cable alargador que no
es adecuado.
La boquilla está
obstruida.
Asegúrese de que la varilla Click-N-CleanTM está
colocada en la posición “Pulverización media” o
“Pulverización con detergente”.
Utilice un alargador adecuado, como se
recomienda en el Manual del propietario.
Limpie la boquilla como se indica en la Sección 5.2
del Manual del propietario.
funcionando y el agua salga pulverizada
desde la boquilla.
La luz azul “Alta” (High) no se
enciende.
NOTA: La luz azul “Alta” (High) sólo
se encenderá cuando se coloque la
varilla Click-N-Clean
TM
en la posición
“Pulverización en abanico a alta
presión” y el accionador de la pistola
esté pulsado, el motor esté funcionando
El grifo no está
completamente abierto
o la unidad no recibe
un volumen completo de
agua.
El filtro de la pantalla
está obstruido.
Asegúrese de que el grifo está completamente
abierto. Revise la conexión de la manguera del
jardín y asegúrese de que cumple los requisitos que
se describen en el Manual del propietario.
Limpie el filtro de la pantalla como se indica en la
Sección 5,4 del Manual del propietario.
y el agua salga pulverizada desde
la boquilla.
31
Page 32

La unidad Husky 2000S PowerWasher necesita de un circuito mínimo de 15 amp para su correcto funcionamiento.
Es importante que su unidad Husky no comparta el circuito con otros aparatos eléctricos. En el caso de que se
compartiera, el aparato adicional provocaría una fuga de amperes que haría que la máquina absorbiera más
amperes para funcionar a plena fuerza. Al final, la unidad Husky se sobrecalentaría y se pararía. Husky se
paraliza como parte de sus pensadas funciones de seguridad para evitarle un posible recalentamiento. Se produce
el mismo efecto cuando dos o más tomas de corriente se conectan al mismo circuito.
El diagrama que aparece más abajo muestra una toma de corriente 1 y una toma de corriente 2 en el mismo
circuito.
Por lo que se refiere al recalentamiento y al reinicio, la unidad necesita un período mínimo de 45 minutos para
que la máquina pueda enfriarse debidamente.
32
Page 33
8.0 TECHNICAL DATA
8.0 DATOS TÉCNICOS
Maximum pressure (pump) 2000 psi MAX.
*Operation Pressure
Electrical requirement 120V, 13 Amps, 60 Hz
Electrical cord 35 ft.
High Pressure Hose 27 ft.
Water Flow at 1800 psi 1.6 gpm
Minimum Amperage source 15 amp
Pressure of inlet water 20 - 100 psi
Soap Consumption Rate 6 - 10%
Inlet Water Cold Tap Water
Turbo Nozzle Spray 30°
* Water Flow and Maximum Pressure Ratings determined
in accordance with PWMA. Standard PW101.
In a continued commitment to improve quality, the
Manufacturer reserves the right to make component
changes or design changes when necessary.
Presión massima (bomba) 2000 psi MAX
*Presión de uso man.
Necesidades de electricidad 120V, 13 Amp., 60 Hz
Cable eléctrico 35 pies
Manguera de alta presión 27 pies
Flujo de agua a 1800 psi 1.6 gpm
Fuente mínima de amperaje 15 Amp.
Presión del agua
de introducción de 20 a 100 psi
Porcentaje de la consumición
del jabón 6 - 10%
Agua de entrada Agua fría de grifo
Chorro boquilla turbo 30 grados
* Flujo de agua y tasa de massima presión determinado
de acuerdo y PWMA. Standard PW101.
Con un compromiso continuo de mejorar la calidad
del producto, el Fabricante se reserva el derecho de
realizar cambios en los componentes o en el diseño
del producto, si lo considera necesario.
If there are missing or damaged parts,
DO NOT RETURN THIS PRODUCT TO
THE STORE.
VISIT OUR WEBSITE FOR REGISTRATION,
TROUBLESHOOTING, AND REPLACE-
MENT PARTS.
www.huskypowerwasher.com
Si faltan piezas o hay piezas dañadas,
NO DEVUELVA EL EQUIPO A LA
TIENDA
VISITE NUESTRO SITIO WEB PARA REGI-
STRO, SOLUCION, Y REPUESTOS.
www.huskypowerwasher.com
33
Page 34

This product is warranted against defects in material
and workmanship for a period of three years on the
motor and pump group. All other components are
covered for one year, excluding the gun, hose, lance,
and ground fault circuit interrupter (GFCI) which are
only covered for 90 days; effective from the date of retail
purchase and is not transferable. This warranty excludes
incidental/consequential damages and failures due to
misuse, abuse or normal wear and tear. This warranty
applies only to products used in consumer (home) applications. This warranty does not apply to commercial
or rental applications. This warranty gives you specific
rights, and you may also have other rights, which vary
from state to state.
Please visit www.huskypowerwasher.com for details.
Please register by Internet at www.huskypowerwasher.com
or complete and return the enclosed Product Registration
Card so that we can reach you in the unlikely event a safety
recall is needed. Registration is not required to validate
this warranty.
WHAT IS COVERED: Replacement parts and labor.
Please note that we reserve the right to repair or replace
the product as we deem appropriate.
WHAT IS NOT COVERED: This warranty does not
include such parts as nozzles which must be replaced
as part of normal maintenance of the equipment, rather
than as the result of a defect. Transportation charges to
warranty center for defective products. Transportation
charges to consumer for repaired products. Damages
caused by abuse, accident, improper repair, or failure
to perform normal maintenance.
Use of improper chemicals or noncompliance with the
operators manuals instructions. Sales outside of the
United States or Canada.
Any other expense including consequential damages,
incidental damages, or incidental expenses, including
damage to property. Some states do not allow the
exclusion or limitation of incidental or consequential
damages, so the above limitation or exclusion may not
apply to you. This warranty does not cover damage
resulting from failure to observe any of the following
conditions:
1) The inlet water pressure must be between 20 and
100 p.s.i.
2) The inlet water temperature must not exceed
90°F.
3) The unit should not be stored in areas where
temperatures may drop below 40° F.
Este producto tiene una garantía que cubre los defectos
causados al usar el artículo o defectos en los materiales
del motor y del tambor durante tres años. El resto de
los componentes tienen una garantía de un año, con
excepción de la pistola, la manguera, la lanza y el
módulo para prevenir descargas eléctricas (GFCI), que
tan sólo tienen garantía de 90 días, efectivos a partir
del día de compra y sin opción de ampliarlos. Esta
garantía no incluye daños ocasionados por accidente
y defectos causados por un uso incorrecto, abuso o
desgaste natural del producto. Esta garantía se aplica
sólo a los productos destinados a usos privados (casas).
Esta garantía no se puede aplicar a usos comerciales o
de alquiler. Esta garantía concede derechos específicos,
que pueden variar de Estado a Estado.
Por favor, visite www.huskypowerwasher.com si desea
más información.
Registro por Internet al sitio: www.huskypowerwasher.com
o complete y devuelva la anexa Ficha de registro del
producto, para que podamos comunicarnos con usted.
en la improbable eventualidad de que se haga necesario
reclamar la mercancía por motivos de seguridad. La
inscripción no es necesaria para los fines de la validez
de la presente garantía.
LA GARANTÍA CUBRE: piezas de repuesto substitución
y mano de obra
Debe tener en cuenta que nos reservamos el derecho
de reparar o cambiar el producto cuando lo limpiamos
correctamente.
EXCLUSIONES DE LA COBERTURA EN GARANTÍA:
la presente garantía no incluye aquellas piezas que, como
las boquillas, deben ser substituidas como piezas de normal
mantenimiento del equipo, y no como consecuencia de un
defecto. Los gastos por transporte a un centro autorizado
por los productos defectuosos. Los gastos de transporte
al consumidor por los productos reparados. Los daños
causados por un mal uso, accidente, reparación impropia
o falta de mantenimiento.
El empleo de productos químicos inadecuados y el no
respeto de las instrucciones del manual para el uso.
Las ventas fuera de los Estados Unidos o de Canadá.
Cualquier otro gasto que comprenda daños indirectos,
daños accidentales o gastos accidentales, incluidos los
daños a la propiedad. Algunos Estados no permiten
la exclusión o la limitación de los daños accidentales
o indirectos; por lo tanto, dicha limitación o exclusión
podría no ser referida a usted.
La presente garantía no cubre los daños resultantes
de la falta de observación de una de las siguientes
condiciones:
1) La presión del agua en entrada debe estar entre
los 20 y los 100 p.s.i.
2) La temperatura del agua en entrada no debe
superar los 90° F
3) El equipo no debe ser almacenado en zonas donde la
temperatura puede llegar por debajo de los 40° F.
.
34
Page 35

IMPLIED WARRANTIES:
Any implied warranties, including the implied warranties
of merchantability and fitness for a particular purpose,
are limited in duration to three years on the motor and
pump group. All other components are covered for
one year, excluding the gun, hose, lance, and ground
fault circuit interrupter (GFCI) which are only covered
for 90 days; effective from the date of retail purchase
and is not transferable. This warranty excludes incidental/
consequential damages and failures due to misuse, abuse or
normal wear and tear. This warranty applies only to products
used in consumer (home) applications. This warranty does
not apply to commercial or rental applications. This warranty
gives you specific rights, and you may also have other rights,
which vary from state to state.
Please visit www.huskypowerwasher.com for details.
GARANTÍAS IMPLÍCITAS:
Toda garantía implícita, incluyendo las garantías implícitas
de aprovechamiento e idoneidad del producto para un
propósito concreto, se limitan a tres años en el motor y
en el depósito.
El resto de los componentes tienen una garantía de un
año, con excepción de la pistola, la manguera, la lanza y
el módulo para prevenir descargas eléctricas (GFCI), que
tan sólo tienen garantía de 90 días, efectivos a partir del
día de compra y sin opción de ampliarlos. Esta garantía
no incluye daños ocasionados por accidente y defectos
causados por un uso incorrecto, abuso o desgaste
natural del producto. Esta garantía se aplica sólo a
los productos destinados a usos privados (casas). Esta
garantía no se puede aplicar a usos comerciales o de
alquiler. Esta garantía concede derechos específicos,
que pueden variar de Estado a Estado.
Por favor, visite www.huskypowerwasher.com si desea
más información.
HOW TO OBTAIN WARRANTY SERVICE:
Contact our Customer Service Department at:
customerservice@huskypowerwasher.com.
To the extent any provision of this warranty is prohibited by
federal, state or municipal law, and cannot be preempted,
it shall not be applicable. This warranty gives you specific
rights, and you may also have other rights which vary
from state to state.
CÓMO OBTENER EL SERVICIO GARANTÍA:
Llame a nuestro Departamento de Servicio al Cliente al:
customerservice@huskypowerwasher.com.
Cualquiera de las cláusulas de la presente garantía no
será aplicable en el caso de prohibición por parte de un
Estado o de una administración comunal federal y no
pueda ser substituida. La presente garantía les confiere
derechos específicos y Uds. pueden tener también otros
derechos que varían de un Estado a otro.
35
Page 36

Distributed by
Home Depot U.S.A. Inc
2455 Paces Ferry Rd. N. W.
Atlanta, GA 30339
1-888-550-1606
MADE IN ITALY
Distribuido by
Home Depot U.S.A. Inc
2455 Paces Ferry Rd. N. W.
Atlanta, GA 30339
1-888-550-1606
HECHO EN ITALY
Internet Address:
www.huskypowerwasher.com
Warranty Registration via Internet
Sitio Internet:
www.huskypowerwasher.com
Warranty Registration via Internet
d. e. 10/2007 - cod. PLDCxxxxxx (REV. 0)
 Loading...