

Page 1

Important! Please follow these instructions. This kit may be different from the one specified in instruction booklet.
07/31/2006
COMBINATION 8X8 and 10X8 FLOOR KIT
This floor kit will build either the 10’ wide or 8’ wide x 7’ 8-5/8” deep floor size
FOR MARCO SERIES, SOLAR SHED AND MWP IMPERIAL ONLY
This floor kit is for 10’ x 7’ 8-5/8” and 8’ x 7’ 8-5/8” buildings. Please refer to the appropriate pages
of this instruction manual to build the floor size needed. If constructing an 8X8 storage building,
you will have additional material which can be used to construct a shelf (some cutting required)
or other projects.
- BEFORE YOU BEGIN -
First...
Read these instructions thoroughly before you begin
assembly. Assembly is easiest if you follow the steps in
the order shown.
Lumber is graded from only one side. Check the part for
the most attractive face and make sure to face it to the
outside.
Check all parts
Compare parts you have to the list on page 2. If a part is
missing, circle the part in question in the parts list and
call us toll-free at 1-800-437-0784.
Assistance required
We recommend that you assemble this floor on level
ground in the location it will be used. Assistance is
necessary to handle, fit, and secure some components.
Two people maybe needed for some steps.
Squareness is very Important!
Keeping all 90° corners and 90° perpendiculars square
throughout the assembly of this floor kit will make each
succeeding step easier and is necessary to assure that
all components fit together properly.
■ Tools required
❑ Hammer
❑ Level
❑ Pencil
❑ Tape Measure
■ Optional tools
❑ Chalk Line
❑ Square
❑ Nail Pouch
❑ Saw
8x8
See pages 2-3-4
Check local zoning
Before starting construction, check with your local
building code official for any required permits, variances,
etc.
Check floor kit size
Before starting construction on your floor, make sure
that you check in the instruction manual to ensure that
you are building the correct size floor kit for your
building.
Always wear OSHA-APPROVED safety
glasses throughout assembly process
#16628
10x8
See pages 5-6
1
Page 2
Parts Needed:
FLOOR KIT INSTRUCTIONS
FOR 8X8 BUILDINGS
ACTUAL SIZE 96” WIDE x 92-5/8” DEEP
A
2 - 48x92-5/8x5/8" Floor Panels
C
5 - 2x4x89-1/2" Floor Joist
D
2 - 2x4x72" Bond Boards
F
2 - 2x4x24" Bond Boards
- 2" and 3" Nails
NOTE: Part letters are Not stamped on floor kits. ASSEMBLY OF 8’ x 92-5/8” FLOOR FRAME
IMPORTANT!
If you will be storing heavy items (such as lawn tractor, motorcycle, snowmobile etc.)
we recommend you upgrade from 24” on center (61 cm) to 12” on center (30.5cm) floor
framing. This requires you to add the following material:
• Qty. (4) of 2”x 4”x 89-1/2” (5 x 10 x 227 cm) Treated • 16 ea. 3” (7.6cm) galvanized nails
A
24"
(61 cm)
(4) 3" Nails
F
F
at Joint
D
C C
24"
(61 cm)
D
C
Center of
Stud
96"
(244 cm)
C
F
D
24"
(61 cm)
(2) 3" Nails
Center of
Stud
D
92-5/8"
24"
(61 cm)
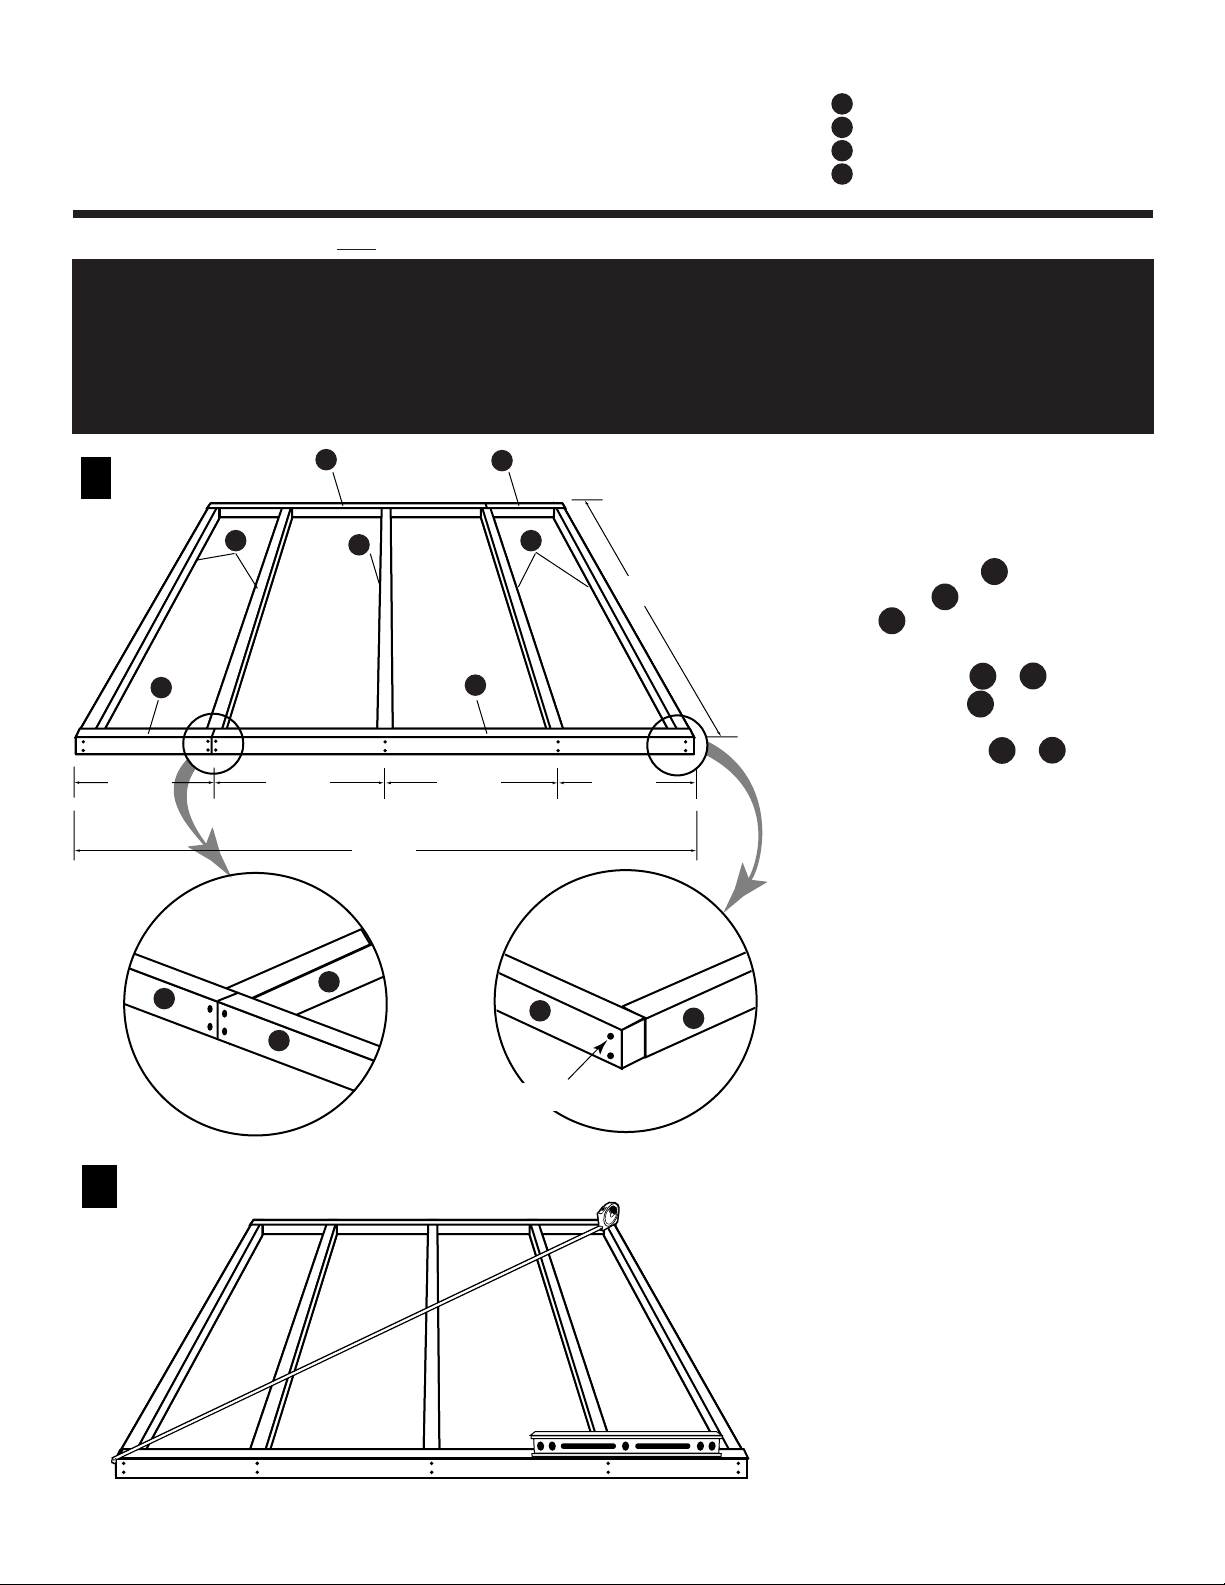
A: Position Floor Joists 89-1/2”, Floor
Bond Boards 72”, and Floor Bond
Boards 24” as shown.
F
C
D
Using 3” nails, nail twice through
F
each Bond Board & into each
end of each Joist , keeping pieces
D
C
flush at top and ends, and maintain
24” spacing. Where & join
F
D
together use 4-3” nails.
C
B
X
Y
B: Completed Floor Frame should be
X
positioned at building site, leveled,
using shims between floor frame and
ground before proceeding to Floor
Panel Attachment.
Square frame by making corner-tocorner measurements (X to X and
Y to Y) the same.
Y
2
Page 3
Nails every 12" (30 cm)
through Floor Panels into all
Floor Bond Boards and Floor
Joists
D
C
C
D
A
AA
F
DF
92-5/8"
96"
24"
(61 cm)
24"
(61 cm)
8X8 FLOOR KIT INSTRUCTIONS
CONTINUED
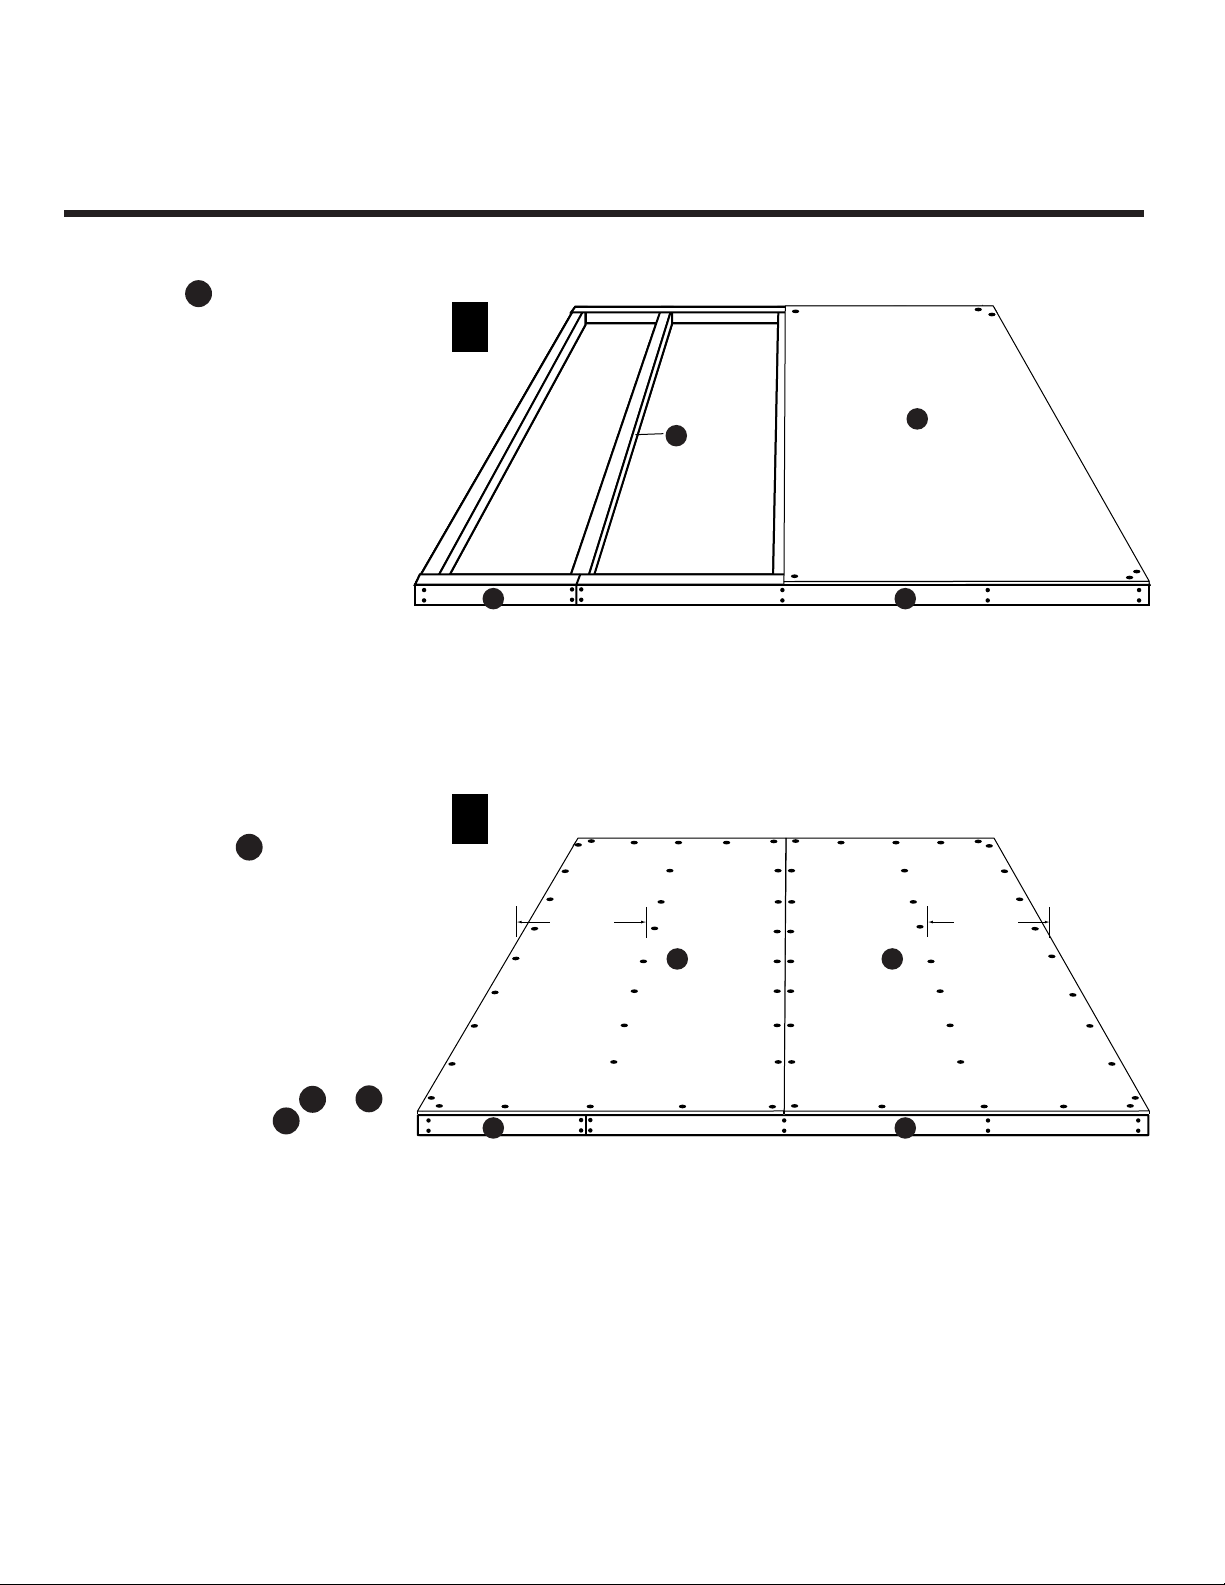
FLOOR PANEL ATTACHMENT:
C: Position a 48 x 92-5/8” Floor
Panel flush to the outside
edges of sides and back of
Floor Frame. Secure panel with
two 2” nails at outside corners
and one 2” nail at other
corners.
A
D: Position the other 48” x 92-5/8”
Note: Mark a line on the Floor Panel
Floor Panel flush against
first panel and flush to edges of
Floor Frame. Secure panel with
two 2” nails at outside corners
and one 2” nail at each of other
corners.
With Floor Panels flush to
outside edges of Floor Frame,
nail with 2” nails every 12”
through Floor Panels into all
Floor Bond Boards &
and Floor Joists .
over the center of each Floor
Joist @ 24” using a pencil and a
piece of lumber from the kit (or
use a chalk line) to make
nailing easier.
Your Floor is now complete.
Check to be sure it is properly
positioned and leveled to
ground before beginning
assembly of your Handy Home
Wooden Storage Building.
A
D
C
F
3
Page 4

8X8 OPTIONAL SHELF
INSTRUCTIONS
Parts needed to cut:
B
1 - 23-7/8x92-5/8x5/8" Floor Panel
C
1 - 2x4x89-1/2" Floor Joist
E
2 - 2x4x48" Bond Boards
- 2" and 3" Nails
A
(1) - 89-1/2" Board cut down to 88"
E
24-11/16"
Cut
23-3/16"
(2) - 48" Board cut down to 2
pieces of 24-11/16 and 23-3/16"
SHELF PARTS TO CUT:
A: Cut the 89-1/2” Board
down to 88”. Cut both 48”
boards at 24-11/16”
E
leaving 23-3/16”. Finally
cut the 23-7/8x 92-5/8”
panel to 89-1/2”.
B
C
3" Nails
3" Nails
C
C
E
C
Rear Wall
3" Nails
B
24-11/16"
Cut
3" Nails
3" Nails
23-3/16"
28"
Cut
B
(1) - 23-7/8x92-5/8" Panel cut down to 23-7/8x89-1/2"
23-3/16"
88"
32"
Center
of Stud
B
Center
of Stud
24-11/16"
3" Nails
SHELF ASSEMBLY:
B: Mark the 88” Board as shown at 28” then another
32”. Attach the 23-3/16” with (2) 3” nails as
shown. Attach the 24-11/16” boards to each end
of the 88” board with (2) 3” nails.
SHELF INSTALLATION:
C: Install the shelf frame resting on the horizonal Back
Wall Brace. Attach middle braces with 3” nails as
shown. Level front of frame and nail into Side
Wall Studs or Top Plate depending on your
building model with 3” nails as shown.
SHELF PANEL INSTALLATION:
D: Center the 23-7/8x89-1/2” panel on the
shelf frame and attach with 2” nails as
shown.
2" Nails
Rear Wall
2" Nails
D
23-7/8x89-1/2" Panel
4
Page 5

2 - 48x92-5/8x5/8" Floor Panels
1 - 23-7/8x92-5/8x5/8" Floor Panel
6 - 2x4x89-1/2" Floor Joist
2 - 2x4x72" Bond Boards
2 - 2x4x48" Bond Boards
- 2" and 3" Nails
A
B
C
D
E
Parts Needed:
FLOOR KIT INSTRUCTIONS
FOR 10X8 BUILDINGS
ACTUAL SIZE 120” WIDE x 92-5/8” DEEP
NOTE: Part letters are Not stamped on floor kits. ASSEMBLY OF 10’ x 92-5/8” FLOOR FRAME
IMPORTANT!
If you will be storing heavy items (such as lawn tractor, motorcycle, snowmobile etc.)
we recommend you upgrade from 24” on center (61 cm) to 12” on center (30.5cm) floor
framing. This requires you to add the following material:
• Qty. (5) of 2”x 4”x 89-1/2” (5 x 10 x 227 cm) Treated • 20 ea. 3” (7.6cm) galvanized nails
A
24"
(61 cm)
E
Center of
Stud
E
(4) 3" Nails
at Joint
D
C C
24"
(61 cm)
Center of
Stud
D
24"
(61 cm)
(305 cm)
C
C
Center of
120"
D
(61 cm)
Stud
E
24"
(2) 3" Nails
Center of
Stud
D
92-5/8"
24"
(61 cm)
NOTE: Part letters are not stamped on floor
kits.
ASSEMBLY OF 10’ x 92-5/8” FLOOR FRAME
A: Position Floor Joists 89-1/2”, Floor
Bond Boards 72”, and Floor Bond
Boards 48” as shown.
E
C
D
Using 3” nails, nail twice through
D
each Bond Board & into each
end of each Joist , keeping pieces
E
C
flush at top and ends, and maintain 24”
E
spacing. Where & join together
D
use 4-3” nails.
C
B
Y
X
X
B: Completed Floor Frame should be
positioned at building site, leveled,
using shims between floor frame and
ground before proceeding to Floor
Panel Attachment.
Square frame by making corner-tocorner measurements (X to X and
Y to Y) the same.
Y
5
Page 6

D
Nails every 12" (30 cm)
through Floor Panels into all
Floor Bond Boards and Joists
C
E
A A
A
AAB
DE
DE
DE
C
92-5/8"
120"
24"
(61 cm)
24"
(61 cm)
10X8 FLOOR KIT INSTRUCTIONS
CONTINUED
FLOOR PANEL ATTACHMENT:
C: Position a 48 x 92-5/8” Floor
Panel flush to the outside
edges of sides and back of
Floor Frame. Secure panel with
two 2” nails at outside corners
and one 2” nail at other corners.
D: Position the other 48” x 92-5/8”
Floor Panel flush against
first panel and flush to edges of
Floor Frame. Secure panel with
one 2” nail at each of the four
corners.
E: Position the 23-7/8” x 92-5/8”
Floor Panel flush against
second panel and flush to
edges of Floor Frame. Secure
panel with two 2” nails at
outside corners and one 2” nail
at each of other corners.
A
A
B
With Floor Panels flush to
outside edges of Floor Frame,
nail with 2” nails every 12”
through Floor Panels into all
E
Floor Bond Boards &
and Floor Joists .
D
C
Note: Mark a line on the Floor Panel
over the center of each Floor
Joist @ 24” using a pencil and a
piece of lumber from the kit (or
use a chalk line) to make
nailing easier.
Your Floor is now complete.
Check to be sure it is properly
positioned and leveled to
ground before beginning
assembly of your Handy Home
Wooden Storage Building.
6
Page 7

NOTES:
7
Page 8

NOTES:
8
 Loading...