

Page 1
ICE HELIX® CHIRP SERIES Quick Start Guide
Power On/Off
1 Power On: Press the POWER key.
2 Select the Start-Up Mode: Press the MENU key on startup.
Select Normal, and press the RIGHT Cursor key.
Quick Setup: Use the Cursor Control key to select settings.
3
Press the EXIT key to close the menu.
Power Off: Press and hold the POWER key.
Power On/Off
Select Settings for Ice Fishing
1 Display a Sonar View: Press the VIEW key until a Sonar view is displayed.
2
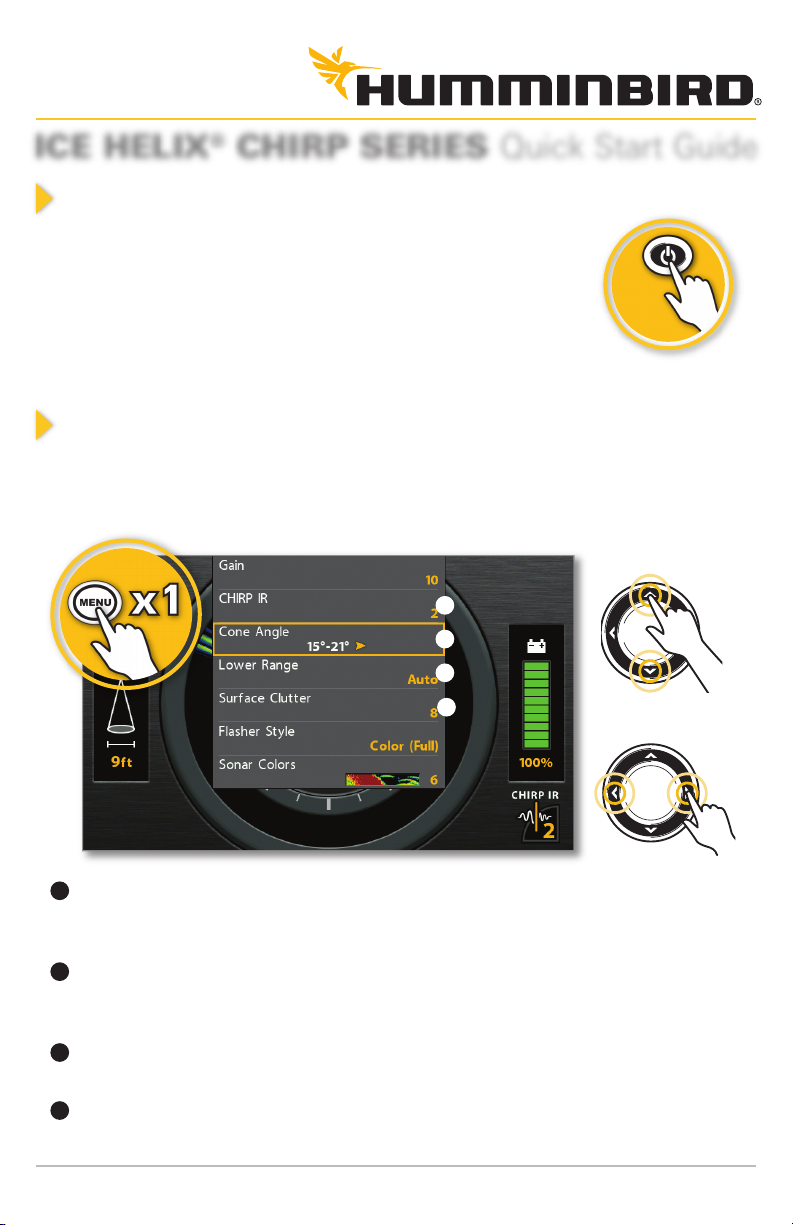
Open the X-Press™ Menu: Press the MENU key once.
Open the X-Press Menu
Select a Menu
A
B
C
D
Select a Setting
A
CHIRP IR (Interference Rejection) (CHIRP models only) - If you are fishing near
other ICE flashers or transducers, use CHIRP IR to reduce interference or noise on
the sonar display.
B
Cone Angle (CHIRP models only) - Select 15º for a narrowly focused down beam.
Select 21º for a wide down beam and larger coverage area. Select 15º-21º to use the
full frequency range for your transducer. CHIRP IR must be off to set the Cone Angle.
C
Lower Range - Use the default Auto depth range setting included with your control
head, or manually set the depth range.
D
Surface Clutter - Use Surface Clutter to reduce the noise that may appear due to
algae and aeration. The lower the setting, the less surface clutter will be displayed.
1
532586-2_B
Page 2
Display the Flasher View
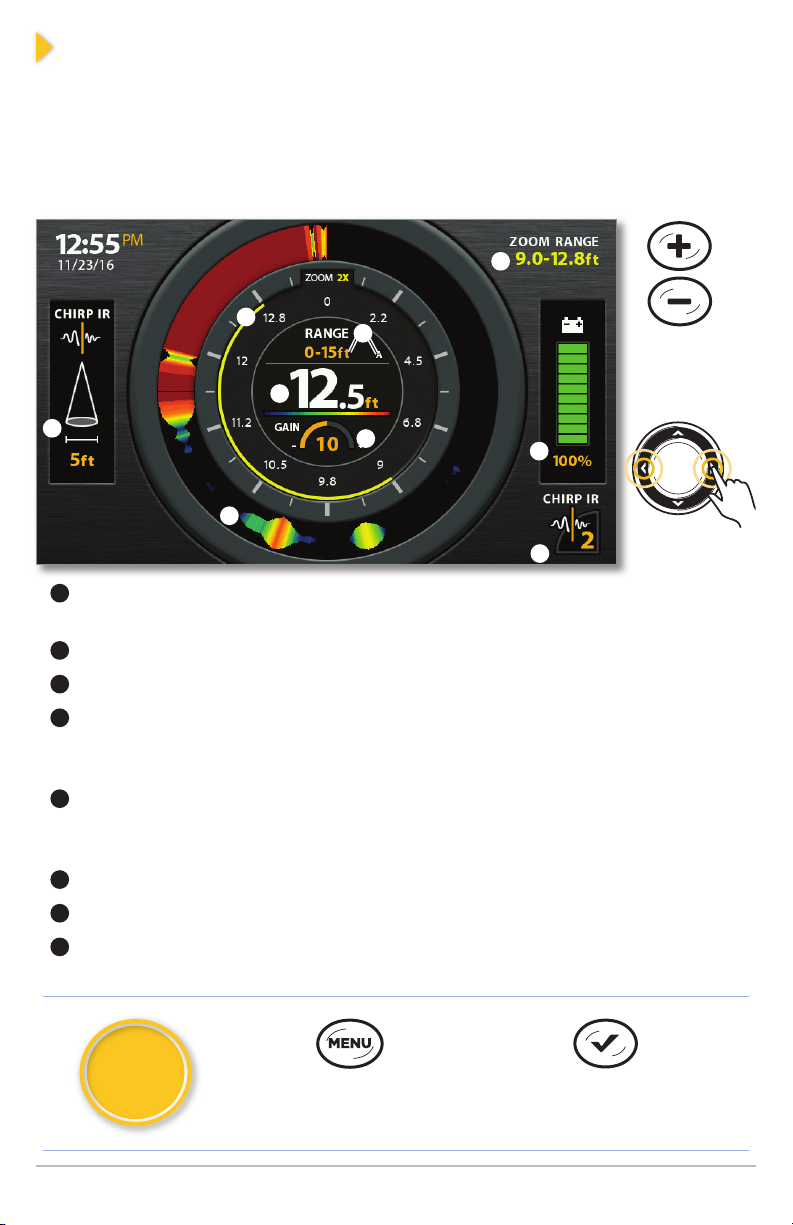
Flasher View provides two ways to view sonar data in traditional flasher format. Press
the ZOOM In (+) key to magnify an area on the display. (GPS models only. To zoom in
or out on non-GPS models, use the X-Press Menu.)
Press the VIEW key until the Flasher View (shown below) is displayed.
1
Using Zoom in Flasher View
G
G
C
Zoom
In/Out
B
A
H
D
E
(GPS models
only)
Move the
F
A
Cone Angle shows the diameter of the sonar beam based on depth. This setting is
Zoom Range
affected by the CHIRP IR setting. See Select Settings for Ice Fishing.
B
Current Depth
C
Current Depth Range and Lower Range Mode Indicator (Auto [A] or Manual [M]).
D
Gain - Adjust the Gain setting from the X-Press Menu to see more or less detail on
the sonar display. Decrease the setting to see less clutter. Increase the setting to see
weaker returns in very clear and/or deep water.
E
Battery Status - The percentage of power remaining for the connected battery. To
help extend battery life, reduce the screen’s backlight setting using the Power
X-Press Menu (press the POWER key once) > Light.
F
CHIRP IR setting. See Select Settings for Ice Fishing.
G
Zoom Range
H
Flasher Window (Flasher Style set to Color [A-Scope]) displays the sonar returns.
Select the Flasher Style from the X-Press Menu.
Quick
Tips!
Open the
X-Press Menu
Change the CHIRP IR Setting
(GPS models only)
2
Page 3

Display a 2D Sonar View
Your control head includes many different sonar views. Display the 2D Sonar Zoom
View to see a magnified view of the bottom and structure.
Using the 2D Sonar Zoom View
Cursor Dialog Box (with active cursor)
B
A
C
C
Move the
Zoom Preview
Box Up/Down
the Water
Column
D
zoomed view
A
Active Cursor will freeze the sonar history. To show the active cursor, turn on Show
E
zoom preview box shows the portion
of the full sonar view that is magnified
on the left side of the view
E
(without an
active cursor)
Cursor in the X-Press Menu. Use the Cursor Control key to move the cursor around
the view. To remove the cursor, press the EXIT key.
B
Digital Readouts can be displayed as an overlay with fixed data readouts (shown
above) or as data boxes, which can be customized.
C
Real Time Sonar™ (RTS) shows the depth and intensity of sonar returns for both
the full sonar view and the zoomed view. With an active cursor, the sonar history will
freeze, but the RTS Window™ will continue to display sonar returns in real time. To
select the display style (currently set to Color [A-Scope]) and width of the RTS
Windows (or to turn off), use the X-Press Menu.
D
CHIRP IR setting. See Select Settings for Ice Fishing.
E
Lower Depth Range. See Select Settings for Ice Fishing.
Quick
Tips!
Zoom In/Out
(GPS models only)
3
Mark a Waypoint
(GPS models only)
Page 4

Use Combo Views
Combo Views display two views (or more) on the screen at the same time. To change
the settings, select menus or actions, or change the size of either view, you must select
the view as the Active Pane from the X-Press Menu.
X-Press Menu > Active Pane
Flasher/Sonar View
indicates the
Active Pane
Jig Charge
Your control head can be used to charge glow jigs. To access the jig charge feature,
open the Power X-Press Menu (press the POWER key once) > Jig Charge. Your
screen will display white at full brightness for 10 seconds. To extend that time, press
the LEFT Cursor key.
Customize the Display
To quickly change display settings like Sonar Colors, Chart Speed, and Gain, use the
X-Press Menu. To change advanced display settings like Units of Measure, Time and
Date, adjust for Daylight Saving Time, display Digital Readouts, etc., use the Main
Menu > Setup tab. Press the MENU key twice to open the Main Menu.
NOTE: Some menu settings are only available in Advanced User Mode. To change
the User Mode to Advanced, go to Main Menu > Setup tab > User Mode.
Download your Operations Manual
For additional instructions and information about your control head, download the
operations manual from our Web site at humminbird.com.
NOTE: Your control head is compatible with other transducers and can be used on
open water. To activate open water features, go to Main Menu > Sonar tab > Open
Water.
NOTE : Yo ur con tro l he ad (exclu di ng SKU 4111 80- 1) is co mpati ble w it h
Humminbird® LakeMaster® maps. To purchase LakeMaster region maps, visit
our We b site at humm in bird.co m. To purc ha se individua l lake ma ps , v isit
https://chartselect.humminbird.com.
© 2019 Johnson Outdoors Marine Electronics, Inc. All rights reserved.
4
 Loading...