

Page 1

4
1
300 Series™ In-Dash Mounting Kit
Returning Your Unit for Service
Before sending your unit in for repair, please contact the factory, either by
phone or by email, to obtain a Repair Authorization Number for your unit.
NOTE: Please do not return your Humminbird® to the store for service.
Please have your product model name and serial number available
before calling the factory. If you contact the factory by e-mail, please
include your product model name and serial number in the e-mail, and
use Request for Repair Authorization Number for your e-mail subject
header. You should include your Repair Authorization Number in all
subsequent communications about your unit.
For IN-WARRANTY service, complete the following steps:
• Obtain a Repair Authorization Number from the Humminbird®
Customer Resource Center.
• Tag product with your name, street address, phone number and
your assigned Repair Authorization Number.
• Include a brief written description of the problem.
Contact Humminbird®
Contact the Humminbird® Customer Resource Center
in any of the following ways:
By Telephone
(Monday - Friday 8:00 a.m. to 4:30 p.m. Central Standard Time):
1-800-633-1468
By e-mail
(typically we respond to your e-mail within three business days):
cservice@johnsonoutdoors.com
For direct shipping, our address is:
Humminbird
Service Department
678 Humminbird Lane
Eufaula, AL 36027 USA
531483-1_D
300 Series™ In-Dash Mounting Kit
Thank You
Thank you for choosing Humminbird®, America's #1 name in fishfinders. Humminbird® has built its reputation
by designing and manufacturing top-quality, thoroughly reliable marine equipment. Genuine Humminbird®
accessories offer the opportunity to upgrade and expand the capabilities of your Humminbird® product.
Your Humminbird® is designed for trouble-free use in even the harshest marine environment. In the unlikely
event that your Humminbird® does require repairs, we offer an exclusive Service Policy - free of charge
during the first year after purchase, and available at a reasonable rate after the one-year period. For
complete details, see the Warranty section included in this manual.
Contact our Customer Resource Center at 1-800-633-1468 or visit our web site at www.humminbird.com.
Installation Overview
M
Following are instructions for the recessed installation of the 300 Series
TM
dash. Before you start installing the 300 Series
control head, we encourage you to read these instructions
carefully in order to get the full benefit from your Humminbird® accessory.
If you find that any items are missing from your installation kit, call our Customer Resource Center at
1-800-633-1468 or visit our web site at www.humminbird.com.
T
control head into a hole in the
531483-1_D
• Include a copy of your receipt (to show proof and date of
purchase).
• Return product freight prepaid to Humminbird®, using an insured
carrier with delivery confirmation.
For OUT-OF-WARRANTY service, complete the following steps:
• Obtain a Repair Authorization Number from the Humminbird®
Customer Resource Center.
• Include payment in the form of credit card number and expiration
date, money order or personal check. Please do not send cash.
• Tag product with your name, street address, phone number and
your assigned Repair Authorization Number.
• Include a brief written description of the problem.
• Return product freight prepaid to Humminbird®, using an insured
carrier with delivery confirmation.
In addition to the hardware supplied with your In-Dash Mounting Kit, you will need a reciprocating saw for
cutting the dash material and masking tape to hold the mounting template in place.
In-Dash Mounting
To in-dash mount the 300 Series™ control head, start by placing the components on the surfaces where you
intend to install them before installation. Make sure that the surfaces you have chosen provide adequate
protection from wave shock, and that all cables can reach the control head.
NOT E: If a cable is too short for your application, extension cables are available. Call Humminbird®
Customer Support at 1-800-633-1468 for more information.
1. Locate a suitable, flat area of the dash to mount the control head. The control head requires a depth of
at least 3 inches (76 mm).
2. Tape the paper In-Dash Mounting template to the desired in-dash mounting location.
3. At a location inside the dotted line on the template, drill a hole large enough to insert the blade of the
reciprocating saw. Carefully begin cutting toward the dotted line, then follow the dotted line around the
template. Remove the template when finished.
© 2009 Humminbird®, Eufaula AL, USA.
All rights reserved.
© 2009 Humminbird®, Eufaula AL, USA.
All rights reserved.
Page 2
2
3
300 Series™ In-Dash Mounting Kit
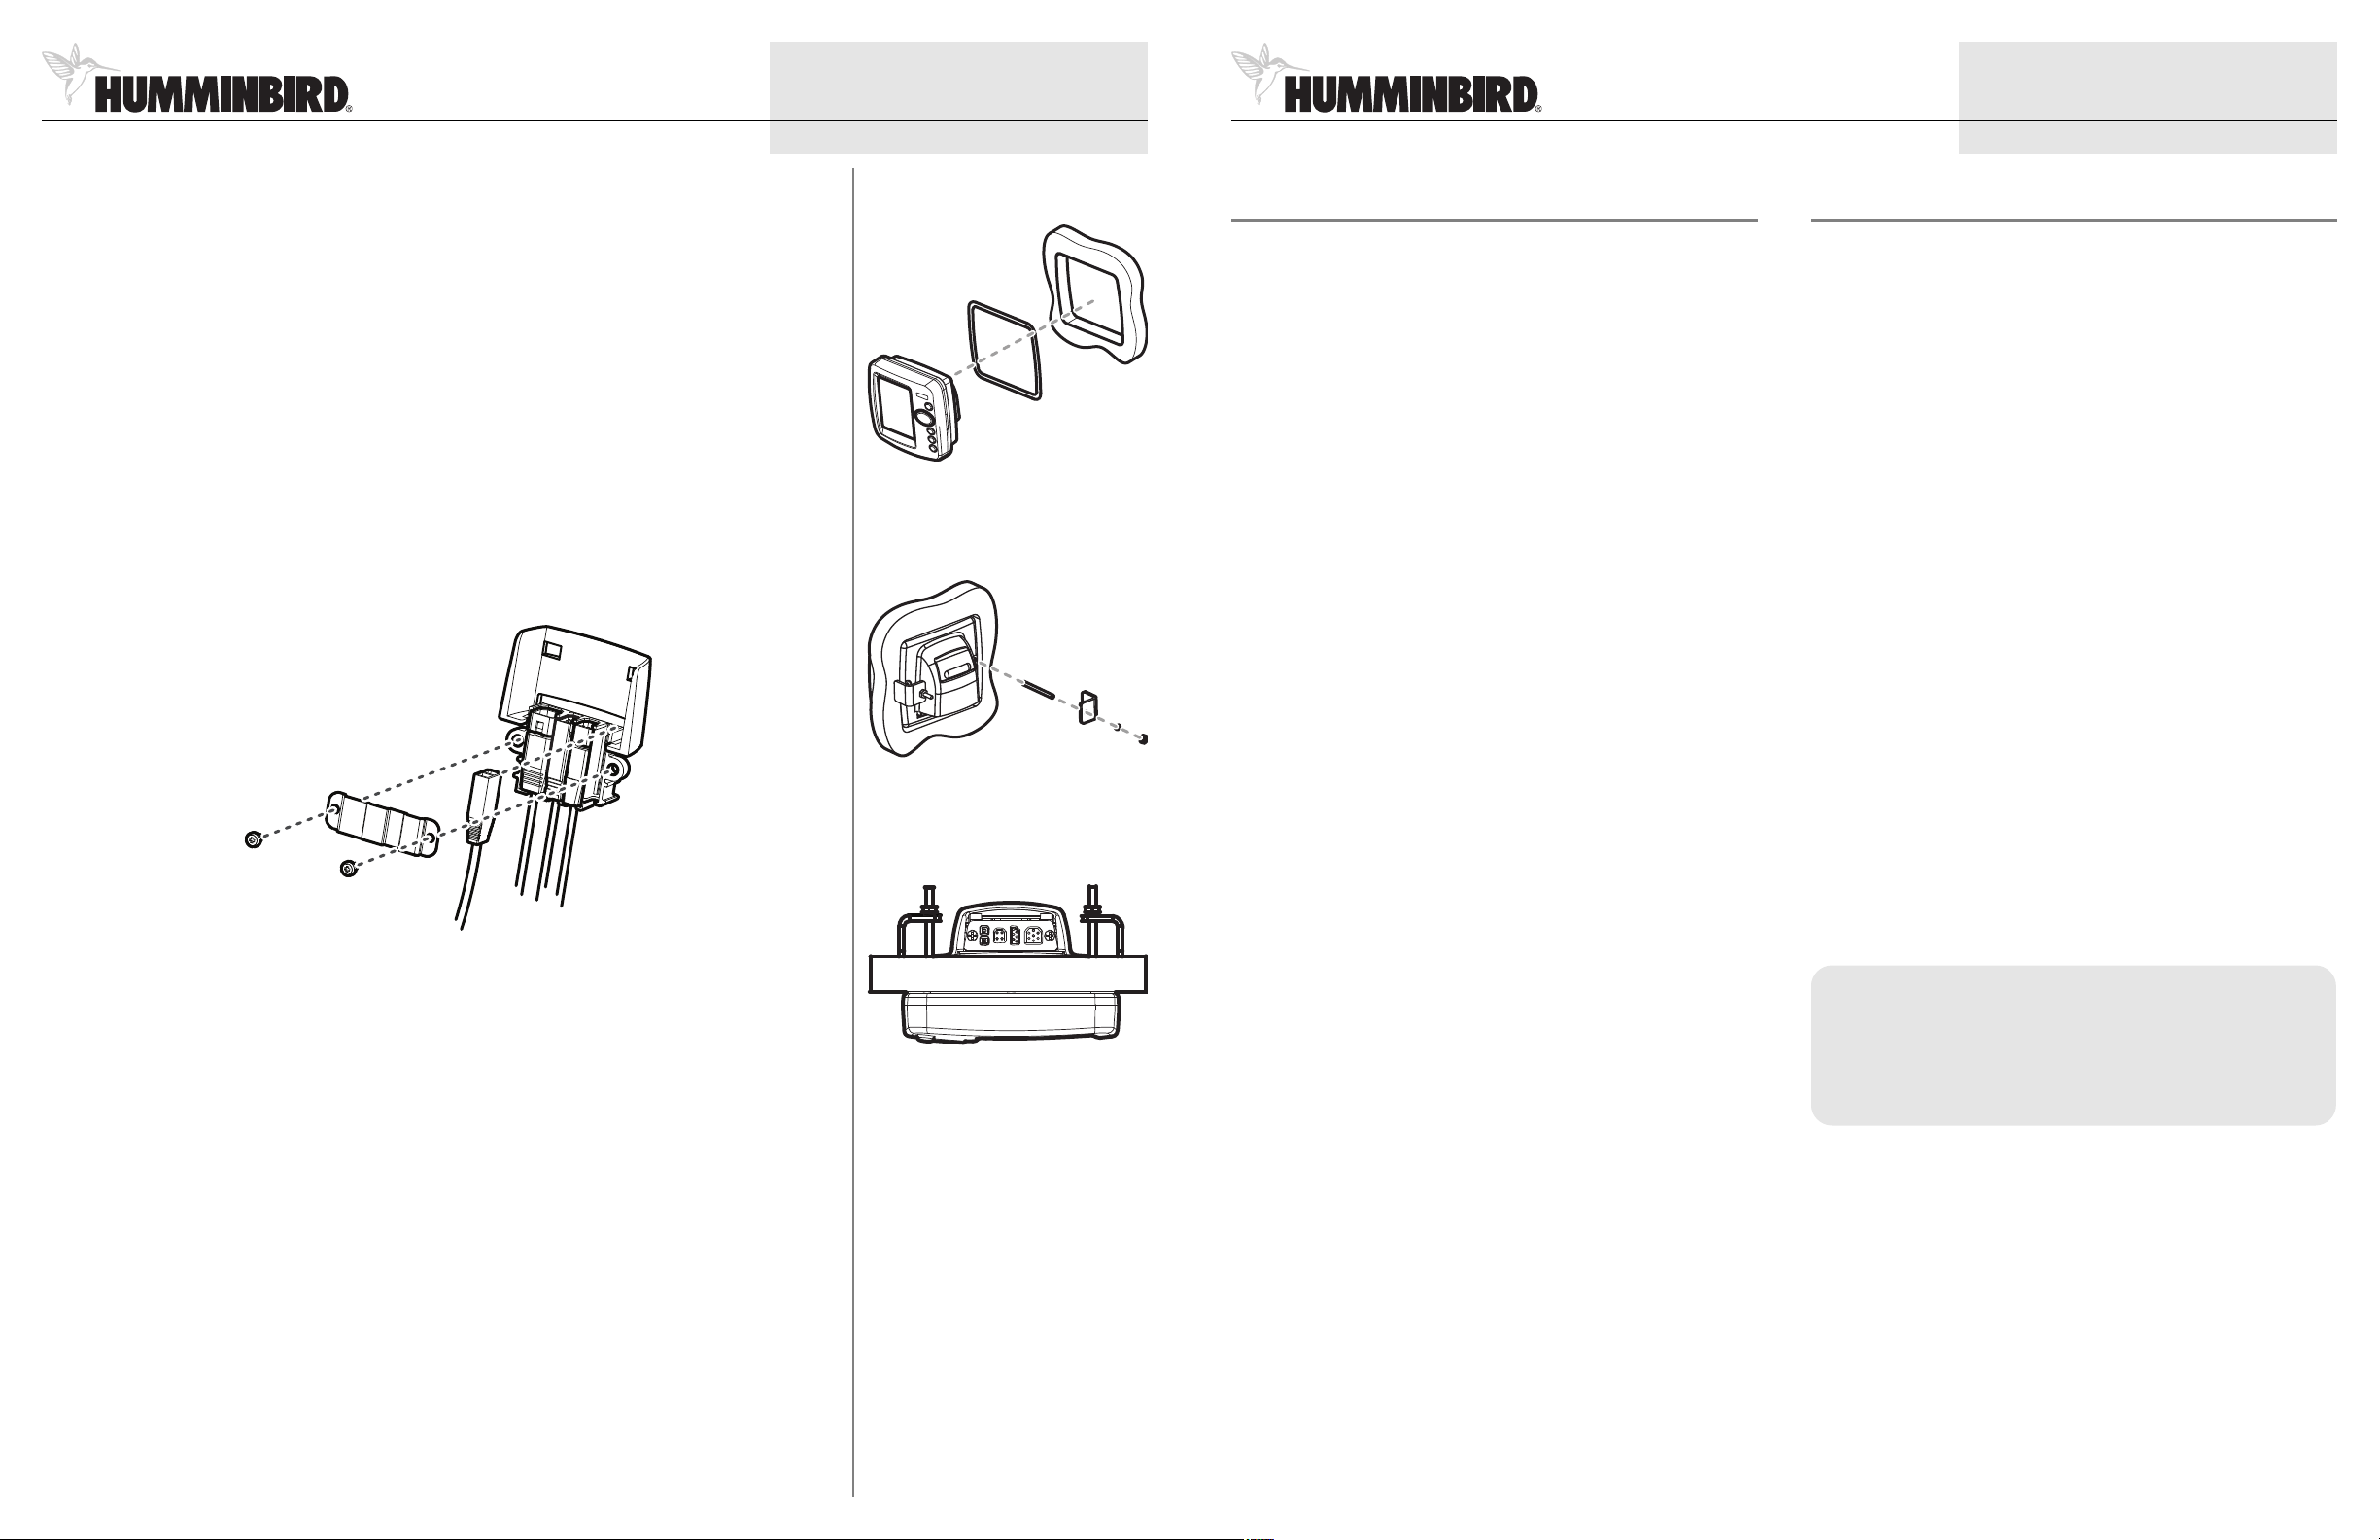
. Insert and tighten the two threaded rods into the two threaded inserts located on the back side of the
4
control head. Peel off the adhesive-backed foam pad and place it on the back of the control head.
5. Insert the control head through the mounting hole from the front side of the dash. From the back side
of the dash, align the two threaded rods on the rear of the housing with the two holes on each in-dash
mounting bracket. Place a lock washer onto each threaded rod, then secure brackets by placing a hex
nut onto each threaded rod and tighten fully.
NOTE: Brackets will tend to rotate out when nuts are tightened. This is normal, but it is important not to
overtighten nuts.
6. Insert cable connectors into the proper recesses on the cable collector. The cable connectors are keyed
to prevent reverse installation, so be careful not to force the connectors into the wrong slots.
7. While holding cables in place in the cable collector, place retainer over cables and screw in place using
the two Phillips screws provided.
Assembling the Cable Connector
Applying the Foam Pad
Assembling the Bracket
531483-1_D
300 Series™ In-Dash Mounting Kit
1-Year Limited Warranty
We warrant the original retail purchaser that products made by
Humminbird® have been manufactured free from defects in materials
and workmanship. This warranty is effective for one year from the date
of original retail purchase. Humminbird® products found to be defective
and covered by this warranty will be replaced or repaired free of charge
at Humminbird® option and returned to the customer freight prepaid.
Humminbird® sole responsibility under this warranty is limited to the
repair or replacement of a product that has been deemed defective by
Humminbird®. Humminbird® is not responsible for charges connected
with the removal of such product or reinstallation of replaced or
repaired parts.
This warranty does not apply to a product that has been:
• Improperly installed;
• Used in an installation other than that recommended in the
product installation and operation instructions;
• Damaged or has failed because of an accident or abnormal
operation;
531483-1_D
Humminbird® Service Policy
Even though you'll probably never need to take advantage of our
incredible service policy, it's good to know that we back our products
this confidently. We do it because you deserve the best. We will make
every effort to repair your unit within three business days from the
receipt of your unit at our factory. This does not include shipping time to
and from our factory. Units received on Friday are typically shipped by
the following Wednesday, units received Monday are typically shipped
by Thursday, etc.
All repair work is performed by factory-trained technicians to meet
exacting factory specifications. Factory-serviced units go through the
sa me rigo rous testing and quality contro l inspection s as new
production units.
After the original warranty period, a standard flat rate service charge
will be assessed for each repair (physical damage and missing parts are
not included). Any repairs made after the original warranty will be
warranted for an additional 90 days after service has been performed
by our factory technicians. You can contact our Customer Resource
Center or visit our web site to verify the flat rate repair fee for your
product (visit the Product Support section):
8. Place the cable collector assembly into the back of the control head. Cable connectors and cable
sockets are keyed to prevent reverse installation, so be careful not to force the connectors into the
wrong sockets.
NOTE: It is very important that the cable collector is used and secured in place in the In-Dash installation.
Assembled In-Dash View
• Repaired or modified by entities other than Humminbird®.
Please retain your original receipt as a proof of the purchase date. This
will be required for in-warranty service.
THIS WARRANTY IS EXPRESSLY IN LIEU OF ANY OTHER WARRANTIES,
OBLIGATIONS OR LIABILITIES ON THE PART OF HUMMINBIRD® AND
WILL BE THE CUSTOMER'S EXCLUSIVE REMEDY, EXCEPT FOR ANY
APPLICABLE IMPLIED WARRANTIES UNDER STATE LAW WHICH ARE
HEREBY LIMITED IN DURATION TO ONE YEAR FROM THE DATE OF
ORIGINAL PURCHASE. IN NO EVENT WILL HUMMINBIRD® BE LIABLE
FOR ANY INCIDENTAL OR CONSEQUENTIAL DAMAGES FOR BREACH
OF ANY EXPR ESS OR I MPLIED WAR RANTY RELATI NG TO THE
PRODUCTS.
Some states do not allow limitations on an implied warranty, or the
exclusion of incidental or consequential damages, so the above
exclusions may not apply to you. You may also have other rights, which
vary from state to state.
http://www.humminbird.com
We reserve the right to deem any product unserviceable when
replacement parts are no longer available or impossible to obtain. This
Service Policy is valid in the United States only. This applies only to
Humminbird® products returned to our factory in Eufaula, Alabama.
This Service Policy is subject to change without notice.
DOMESTIC (USA) CUSTOMERS:
PLEASE DO NOT RETURN THIS PRODUCT TO STORE FOR SERVICE
For all technical issues please call 1-800-633-1468
or visit www.humminbird.com, click SUPPORT.
Please reference product serial number and
model number when contacting Humminbird®.
© 2009 Humminbird®, Eufaula AL, USA.
All rights reserved.
© 2009 Humminbird®, Eufaula AL, USA.
All rights reserved.
 Loading...