

Huawei U8120 User Manual

Key press
vibration
Select to have the phone vibrate briefly
each time you touch a key on the onscreen
keyboard.
Layout in
portrait mode
Layout in
landscape
mode
Swipe to
switch layout
Mixed
language input
Select
languages
Using the Onscreen Keyboard
Select the layout to display in portrait
mode.
Select the layout to display in landscape
mode.
Select check box to be able to swipe
horizontally over the keyboard to switch
layout.
Select check box to enable mobile phone to
auto detect language if no more than 3
languages have been selected.
Select the languages you want to use.
57

Predict next
word
Select check box to enable the ability to
predict the next word when you are typing.
Correct
mistyping
Slide-down
symbols
Relevant
words
Help
Select to automatically correct some
common misspellings as you type.
Select check box to enable you to slide
down on keys to enter symbols.
Select check box to enable you to slide on
candidate words for synonyms or other
relevant.
Access the online user manual for using
TouchPal.
TouchPal View the version of TouchPal.
Touch > Settings > Language & keyboard > Android keyboard to
customize the Android keyboard settings.
Using the Onscreen Keyboard
58

Vibrate on
keypress
Select to have the phone vibrate briefly
each time you touch a key on the onscreen
keyboard.
Sound on
keypress
Autocapitalization
Quick fixes
Show
suggestions
Autocomplete
Using the Onscreen Keyboard
Select to play a brief sound each time you
touch a key on the onscreen keyboard.
Select to have the onscreen keyboard
automatically capitalize the first letter of
the first word after a period, the first word in
a text field, and each word in name fields.
Select to automatically correct some
common misspellings as you type.
Select to show suggested words in a strip
above the onscreen keyboard as you type.
Select to automatically enter a suggested
word, highlighted in orange in the strip
above the keyboard, when you enter a
space or punctuation.
59

Messaging
The Messaging application allows you to exchange text messages (SMS)
and multimedia messages (MMS) with your friends on their mobile
phones. With the Email application you can read and send email.
SMS and MMS
Text messages: One text message can contain up to 160 characters.
You can send a text message of any length, but every 160 characters or
portion thereof will be charged as one text message. For recipients, the
message will count as just one text message.
Multimedia messages: Multimedia messages make everyday messages
extra special. You can record a message and send it as an audio file or
send a slideshow of photographs. For example, you can sing "Happy
Birthday" to someone, send them a video message, or send photos of a
special event.
Opening Messaging
• Touch on the Home screen.
• Touch > Messaging.
Messaging
60

Creating and Sending a Text Message
1. Touch > Messaging > New message.
2. Enter a phone number in the To field, or touch + to selec t a nu mber
from Contacts.
Tip: As you enter the phone number, matching contacts appear. You can t ouch
a suggested recipient or continue entering the phone number.
3. Touch the composition text box to start entering your message.
Tip: If you press while composing a message, it is saved as a draft in your
message list. Touch the message to resume compo sing it.
4. Once you are done, touch Send.
Messaging
61
The message list opens, and your name appears in the list, followed by
the message you just sent. Responses appear in the wind ow. As you view
and send additional messages, a message thread is created.
Messaging
62

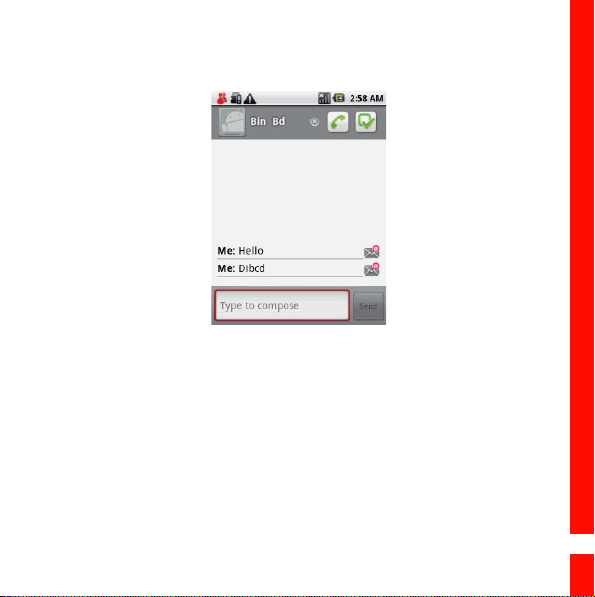
Text Message Editing Screen
picture
1
2
3
Touch to enter a mobile phone number or the name of a
1
contact with a mobile number.
2 Touch to start entering your message.
3 Touch to send the message.
Messaging
63
Creating and Sending a Multimedia Message
1. Touch > Messaging > New Message.
2. Enter a phone number in the To field, or touch + to selec t a nu mber
from Contacts.
Tip: You can also press , and then touch Add recipient to add more
recipients.
3. Touch the composition text box to start entering your message.
Tip: If you want to enter a smiley face, , and then touch Insert smiley.
4. Press to display the options panel.
5. Touch Add subject to add the message subject. Your mobile phone is
now in multimedia message mode.
6. Touch Attach to add a picture, music, or video file. Then touch any of
the following:
• Slideshow: A screen opens where you can assemble photos into a
slideshow of up to 10 slides to attach to the message. Pleas e refer to
“Adding a Slideshow” on page 65.
• Pictures: You are prompted to touch a picture to attach it.
Messaging
64
• Capture picture: The camera opens so you can take a picture and
attach it.
• Videos: You are prompted to select a video to attach.
• Capture video: The camcorder opens so you can record a video and
attach it.
• Audio: You are prompted to select an audio file to attach.
• Record audio: A screen opens where you can record a voice
message and attach it.
7. When the message is ready to be sent, touch Send.
Adding a Slideshow
If you want to attach more than one file to your message, use the
Slideshow option.
1. On the message editing screen, press to display the options panel.
2. Touch Attach > Slideshow, and then select a slide to start editi ng it.
3. Press , and then touch Add slide to add more slides.
Tip: You can touch the green arrow icon to switch between slides.
Messaging
65

4. Touch Done to finish composing your message and return to the
multimedia message screen.
5. To alter your multimedia message, touch Edit on the multimedia
message screen. When the message is rea dy to be sent, touch Send.
Opening and Viewing a Multimedia Message
1. In the message list, touch the message thread to open it.
2. Touch the Play button at the top of a multimedia message to view the
message.
3. Press followed by Next slide to vi ew the ne xt slid e.
Replying to a Message
1. In the message list, touch a text or multimedia message thread to open
it.
2. Touch the text box to compose your message, a nd then touch Send.
Customizing the Message Settings
In the message list, press , and then touch Settings to customize the
message settings.
Messaging
66

Email
Your mobile phone puts email at your fingertips, too. Using your Email
application, you can add versions of Yahoo!, AOL, and other popular email
services to your phone. These kinds of email accounts are known as
POP3, IMAP, or Exchange accounts.
Adding an Email Account
When using the Email application for the first time, you must configure
your email account. The Email setup wizard helps you set up your
account for many popular email systems, so you can read and work with
the same email that you do on a computer in a web browser, or with
another email application.
You can also set up a Microsoft Exchange ActiveSync account, so you can
read and work with the same email that you do when using Microsoft
Outlook on a computer.
1. Touch > Email.
2. To customize your email settings, answer the onscreen prompts, and
then touch Next. Or touch Manual Setup if you want to set the mail
server yourself.
Messaging
67
Note: If you touch Manual Setup, contact your email service provider for th e
values required for your account if you don't know what the y are.
3. Enter the name for your account and the name you want other people
to see when they receive an e mail from you.
4. Touch Done.
Your mobile phone starts downloading your email messa ges and you can
start using the phone to send and receive messages.
Note:
After the initial setup, your email application opens to the last screen you were viewing or, if you have not used Email recently, it displays the contents of your Inbox or
the accounts screen (when you have more than one account).
Adding Other Email Accounts
After creating your initial email account, press on the accounts
screen, and then touch Add account to create another email account.
Tip:
When adding a subsequent email account, you can also select the option to use the
new account to send all outgoing messages.
Messaging
68
Deleting an Email Account
1. On the accounts screen, touch and hold the email account you want to
delete.
2. Touch Remove account.
3. Touch OK to confirm.
Changing Email Account Settings
You can change a number of settings for an account, including how often
you check for emails, how you are notified of a new mail, and details
about the servers the account uses to send and receive mails.
Note:
Your account’s incoming and outgoing settings depend on the kind of email service
for your account: Exchange ActiveSync, IMAP, or POP3. You can enter the neces sary
details manually, although you will typically need to contact your email service provider to determine the right settings for the account.
1. Touch > Email.
2. On the Your accounts screen, touch and hold t he email account you
want to change.
3. Touch Account settings.
Messaging
69
4. Change Email account settings, Incoming settings, or Outgoing
1
2
3
settings.
Viewing an Email Message
1. On the accounts screen, touch the email account you want to use.
2. Access a folder, and then touch the message that you want to view.
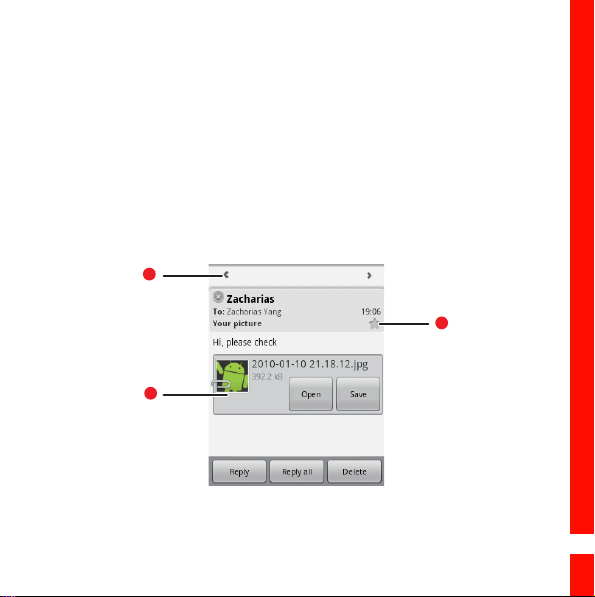
Email Message Screen
Messaging
70

1 Touch to read the next or previous message in the folder.
2 Touch to open an attachment.
Touch to place a star next to an important message to
3
make it easy to locate.
Creating and Sending an Email Message
1. On the Your accounts screen, touch the email account you want to
use.
2. On the Inbox screen, press , and then touch Compose in the
options panel.
3. In the To field, enter the name or the email address.
4. Write the subject and email.
Tip: To send an attachment with the message, press , and then touch Add
attachment .
5. When you are finished, touch Send.
Tip: If you are not quite ready, touch Save as draft or press to s ave the
Messaging
71

message as a draft.
Replying to an Email Message
1. On the Your accounts screen, touch the email account you want to
use.
2. Touch the email message you want to view and reply to.
3. Touch Reply or Reply all to reply to the email message.
Messaging
72
Getting Connected
GPRS/3G
Your mobile phone will be automatically configured to use your wireless
service provider’s GPRS/3G/EDGE (when available) service when you
turn on your mobile phone (if the SIM card is inserted) for the first time.
Checking the Network Connection
1. Touch > Settings.
2. Touch Wireless & networks > Mobile networks.
3. Touch Network operators or Access Point Names to check the
network connection.
Note:
Generally your mobile phone will automatically read the access point of the SIM
card. For this reason, do not change the parameters of the access point, or you
might not be able to access network sources.
Turning on the Data Service
1. Touch > Settings.
Getting Connected
73

2. Touch Wireless & networks > Mobile networks.
3. Select the Data Service check box to turn on the data connection.
Wi-Fi
Wi-Fi (WLAN) gives you wireless access to broadband Internet access. To
use Wi-Fi on your mobile phone, you need access to a wireless access
point called a “hotspot”. The range of a Wi-Fi signal is affected by the
obstacles that may be in its way.
Turning On Wi-Fi
1. Touch > Settings.
2. Touch Wireless & networks, and then select the Wi-Fi check box to
turn on the Wi-Fi.
Connecting to a Wireless Network
1. After turning on the Wi-Fi, touch > Settings.
2. Touch Wi-Fi settings. You will see a list of detected Wi-Fi networks in
the Wi-Fi networks section.
3. Touch a Wi-Fi network to connect to it.
Getting Connected
74
 Loading...