

Page 1

Welcome to Huawei
HUAWEI M865
User Guide
Page 2

Contents
1 Reading Before Proceeding...................................................1
1.1 Safety Precautions................................ ....................................... 1
1.2 Personal Information and Data Security ...................................... 2
1.3 Legal Notice .................................................. ............................... 3
2 Getting to Know Your Mobile Phone......................................6
2.1 Mobile Phone View ...................................................................... 6
2.2 Installing Your Mobile Phone ....................................................... 8
2.3 Power On or Off Your Mobile Phone ......................................... 10
2.4 Using the Touchscreen ...................................................... ........ 11
2.5 Locking and Unlocking the Screen ............................................ 11
2.6 Home Screen ..................................................... ........................ 12
2.7 Application List..... ......................................................... ............. 16
2.8 Using a microSD Card ....................................... ........................ 17
3 Calling..................................................................................17
3.1 Making a Call ............................................................................. 18
3.2 Answering or Rejecting a Call................. ................................... 19
3.3 Other Operations During a Call ................................................. 20
3.4 Using Call log................................................................ ............. 21
3.5 Using Airplane Mode ......................................... ........................ 21
3.6 TTY Operation ............................................. ............................. 21
3.7 Setting Hearing Aid Compatibility .............................................. 22
4 Contacts...............................................................................22
4.1 Opening the Contacts Application ............................................. 22
4.2 Adding a Contact ....................................... ................................ 23
4.3 Indexing Contacts...................................................................... 23
4.4 Searching for a Contact ............................................................. 23
4.5 Editing a Contact ............ ........................................................... 23
4.6 Communicating with Your Contacts........................................... 24
Page 3

4.7 Deleting a Contact .......................... ........................................... 24
4.8 Managing Groups ...................................................................... 24
4.9 Joining and Separating Contacts ............................................. .. 25
4.10 Staying Close to Your Friends ................................................. 26
5 Using the Onscreen Keyboard.............................................26
5.1 Displaying the Keyboard Panel..................... ............................. 26
5.2 Customizing Keyboard Settings.................... ............................. 29
6 Messaging ...........................................................................29
6.1 SMS and MMS............. .............................................................. 29
6.2 Email............................... ........................................................... 31
7 Getting Connected...............................................................34
7.1 Turning on the Data Service ................................... ................... 34
7.2 Wi-Fi ............................... ......................................................... .. 34
7.3 Sharing Your Phone’s Data Connection.................................... 35
7.4 Browser.............................................. ........................................ 35
7.5 Bluetooth....................................................................... ............. 37
8 Entertainment ......................................................................38
8.1 Taking Photos and Recording Videos ....................................... 38
8.2 Using the Gallery .................................................................. ..... 40
8.3 Enjoying Music........... ................................................................ 41
9 Google Services ..................................................................43
9.1 Creating a Google Account........................................................ 43
9.2 Using Gmail ............................................................................... 44
9.3 Using Talk ............................ ...................................................... 45
9.4 Using Maps ........................ ........................................................ 46
9.5 Using YouTube .......................................................................... 47
9.6 Using Market................................... ........................................... 48
10 Synchronizing Information.................................................49
ii
Page 4

10.1 Managing Your Accounts...... ................................................... 50
10.2 Customizing Your Account Synchronization.... ........................ 51
11 Using Other Applications...................................................52
11.1 Using All Backup...................................................................... 52
11.2 Using the Calendar .................................................................. 53
11.3 Using the File Manager. ........................................................... 55
11.4 Using the Clock........................................... ............................. 57
11.5 Using the Calculator ........................ ........................................ 58
11.6 Using the Richpad ........................................................ ........... 58
12 Managing Your Mobile Phone ...........................................58
12.1 Setting the Date and Time....................................................... 59
12.2 Setting the Display ...................................................... ............. 59
12.3 Setting Ringers ........................................................................ 59
12.4 Setting Phone Services ........................................................... 60
12.5 Setting Text-to-Speech ............................................ ................ 61
12.6 Protecting Your Mobile Phone ................................................. 61
12.7 Managing Applications....... ...................................................... 62
12.8 Resetting Your Mobile Phone .................................................. 64
12.9 Online Update ....................... ................................................... 64
13 Appendix............................................................................65
13.1 Warnings and Precautions.......... ............................................. 65
13.2 FAQ ................................. ................................ ........................ 71
iii
Page 5

iv
Page 6

1 Reading Before Proceeding
1.1 Safety Precautions
Please read the safety precautions carefully to ensure the correct use of your mobile
phone.
Do not crash, throw, or puncture your mobile phone. Avoid the
falling, squeezing, and bending of your mobile phone.
Do not use your mobile phone in a moist environment, such as the
bathroom. Prevent your mobile phone from being soaked or washed
in liquid.
Do not switch on your mobile phone when it is prohibited to use
phones or when the phone may cause interference or danger.
Do not use your mobile phone while driving.
Follow any rules or regulations in hospitals and health care facilities.
Switch off your mobile phone near medical apparatus.
Switch off your mobile phone in aircraft. The phone may cause
interference to control equipment of the aircraft.
Switch off your mobile phone near high-precision electronic devices.
The phone may affect the performance of these devices.
Do not attempt to disassemble your mobile phone or its accessories.
Only qualified personnel are allowed to service or repair the phone.
1
Page 7
Do not place your mobile phone or its accessories in containers with
a strong electromagnetic field.
Do not place magnetic storage media near your mobile phone.
Radiation from the phone may erase the information stored on them.
Do not put your mobile phone in a high-temperature place or use it in
a place with flammable gas such as a gas station.
Keep your mobile phone and its accessories away from children. Do
not allow children to use your mobile phone without guidance.
Use only approved batteries and chargers to avoid the risk of
explosions.
Observe any laws or regulations on the use of wireless devices.
Respect others’ privacy and legal rights when using your wireless
device.
Strictly follow the relevant instructions of this manual while using the
USB cable. Otherwise your mobile phone or PC may be damaged.
1.2 Personal Information and Data
Security
The use of some functions or third-party applications on your device could result in
your personal information and data being lost or becoming accessible to others.
Several measures are recommended to help you protect personal and confidential
information.
• Place your device in a safe area to prevent it from unauthorized use.
• Set your device screen to lock and create a password or unlock pattern to open it.
2
Page 8

• Periodically back up personal information kept on your memory card or stored in
your device memory. If you change to a different device, be sure to move or delete
any personal information on your old device.
• If you are worried about viruses when you receive messages or emails from a
stranger, you can delete them without opening them.
• If you use your device to browse the Internet, avoid websites that might pose a
security risk to avoid theft of your personal information.
• If you use services such as Wi-Fi tether or Bluetooth, set passwords for these
services to prevent unauthorized access. When these services are not in use, turn
them off.
• Install or upgrade device security software and regularly scan for viruses.
• Be sure to obtain third-party applications from a legitimate source. Downloaded
third-party applications should be scanned for viruses.
• Install security software or patches released by Huawei or third-party application
providers.
• Some applications require and transmit location information. As a result, a thirdparty may be able to share your location information.
• Your device may provide detection and diagnostic information to third-party
application providers. Third party vendors use this information to improve their
products and services.
• If you have concerns about the security of your personal information and data,
please contact mobile@huawei.com.
1.3 Legal Notice
Copyright © Huawei Technologies Co., Ltd. 2011. All rights reserved.
No part of this document may be reproduced or transmitted in any form or by any
means without prior written consent of Huawei Technologies Co., Ltd.
The product described in this manual may include copyrighted software of Huawei
Technologies Co., Ltd. and possible licensors. Customers shall not in any manner
reproduce, distribute, modify, decompile, disassemble, decrypt, extract, reverse
engineer, lease, assign, or sublicense the said software, unless such restrictions are
prohibited by applicable laws or such actions are approved by respective copyright
holders.
3
Page 9

Trademarks and Permissions
, , and are trademarks or registered trademarks of Huawei
Technologies Co., Ltd.
Other trademarks, product, service and company names mentioned are the property
of their respective owners.
Notice
Some features of the product and its accessories described herein rely on the
software installed, capacities and settings of local network, and therefore may not be
activated or may be limited by local network operators or network service providers.
Thus the descriptions herein may not match exactly the product or its accessories you
purchase.
Huawei Technologies Co., Ltd. reserves the right to change or modify any information
or specifications contained in this manual without prior notice and without any liability.
Third-Party Software Statement
Huawei Technologies Co., Ltd. does not own the intellectual property of the third-party
software and applications that are delivered with this product. Therefore, Huawei
Technologies Co., Ltd. will not provide any warranty of any kind for these third-party
software and applications. Neither will Huawei Technologies Co., Ltd. provide support
to customers who use these third-party software and applications, nor be responsible
or liable for the functions of these third-party software and applications.
Third-party software and applications services may be interrupted or terminated at
any time. Huawei Technologies Co., Ltd. does not guarantee that any content or
service would be maintained for any period during its availability. Third-party service
providers provide content and services through network or transmission tools outside
of the control of Huawei Technologies Co., Ltd. To the greatest extent permitted by
applicable law, it is explicitly stated that Huawei Technologies Co., Ltd. shall not
compensate or be liable for services provided by third-party service providers, or the
interruption or termination of third-party contents or services.
Huawei Technologies Co., Ltd. shall not be responsible for the legality , quality, or any
other aspects of any software installed on this product, or for any uploaded or
downloaded third-party works, such as texts, images, videos, or software. Customers
shall bear the risk for any and all effects, including incompatibility between the
software and this product, which result from installing software or uploading or
downloading the third-party works.
4
Page 10

This product uses the open-sourced Android operating system. Huawei
Technologies Co., Ltd. has made necessary changes to the system. Therefore, this
product may not support all the functions that are supported by the standard Android
operating system or may be incompatible with third-party software. Huawei
Technologies Co., Ltd. shall not be liable for any of such situation.
DISCLAIMER OF WARRANTIES
THE CONTENTS OF THIS MANUAL ARE PROVIDED “AS IS”. EXCEPT AS
REQUIRED BY APPLICABLE LAWS, NO WARRANTIES OF ANY KIND, EITHER
EXPRESS OR IMPLIED, INCLUDING BUT NOT LIMITED TO, THE IMPLIED
WARRANTIES OF MERCHANTABILITY AND FITNESS FOR A PARTICULAR
PURPOSE, ARE MADE IN RELATION TO THE ACCURACY, RELIABILITY OR
CONTENTS OF THIS MANUAL.
LIMITATIONS OF LIABILITY
TO THE MAXIMUM EXTENT PERMITTED BY APPLICABLE LAW, IN NO EVENT
SHALL HUAWEI TECHNOLOGIES CO., LTD. BE LIABLE FOR ANY SPECIAL,
INCIDENTAL, INDIRECT, OR CONSEQUENTIAL DAMAGES, OR LOST
PROFITS, BUSINESS, REVENUE, DATA, GOODWILL OR ANTICIPATED
SAVINGS.
THE MAXIMUM LIABILITY (THIS LIMITATION SHALL NOT APPLY TO LIABILITY
FOR PERSONAL INJURY TO THE EXTENT APPLICABLE L AW PROHIBITS
SUCH A LIMITATION) OF HUAWEI TECHNOLOGIES CO., LTD. ARISING FROM
THE USE OF THE PRODUCT DESCRIBED IN THIS DOCU MENT SHALL BE
LIMITED TO THE AMOUNT PAID BY CUSTOMERS FOR THE PURCHASE OF
THIS PRODUCT.
Import and Export Regulations
Customers shall comply with all applicable export or import laws and regulations and
be responsible to obtain all necessary governmental permits and licenses in order to
export, re-export or import the product mentioned in this manual including the
software and technical data therein.
5
Page 11
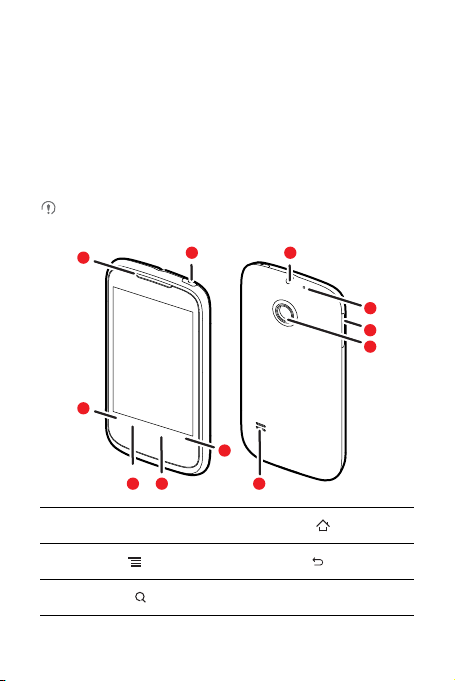
2 Getting to Know Your Mobile
Phone
2.1 Mobile Phone View
2.1.1 P hone at a Glance
All the pictures in this guide are for your reference only. The actual appearance
and display features depend on the mobile phone you purchase.
1
2
11
5
10
9
8
7
63 4
1 Earpiece 2
3
Menu
5
Search
6
Home
4
Back
6 Speaker
Page 12

7 Camera 8 Volume keys
9 The second microphone 10 Headset jack
11
Power
2.1.2 Ke y Functions at Your Fingertips
• Press and hold to power on your mobile phone.
• Press and hold to open the
• Press to lock the screen when your mobile phone is active.
• Touch to return to the previous screen.
• Touch to exit any application you are running.
• Touch to hide the keyboard.
Touch to open the menu on an active screen.
• Touch to return to the Home scr een.
• Touch and hold to show the most recently used applications.
Touch to open Google search for searching your mobile phone and
the web.
Phone options
menu.
7
Page 13

2.2 Installing Your Mobile Phone
2.2.1 Ins talling the Battery and the microSD C ard
1
Remove the battery cover
3
Insert the microSD card
8
2
Install the battery
4
Install the battery cover
Page 14

2.2.2 C harging the Battery
Before charging the battery, ensure that it has been properly inserted into your phone.
1. Connect the USB cable that came with your mobile phone to the charger.
2. Connect the USB cable to your mobile phone. Then, plug in the connector of the
charger to an electrical outlet. The phone begins charging.
If your mobile phone is charged when it is powered on, the battery icon on the
Notification bar shows the charging status. When the battery icon changes to , it
indicates that your mobile phone is fully charged.
2.2.3 I mportant Information A bout t he B attery
• If the battery has not been used for a long period of time, you may not be able to
power on your mobile phone immediately after you begin charging the battery.
Allow the battery to charge for a few minutes with the phone powered off before
attempting to power on the phone.
• The battery will not hold a charge for the way it did when it was new. When the
battery life becomes noticeably shorter than usual after being charged properly,
replace the battery with a new one of the same type.
• Using data services increases demand on the battery and will reduce the length of
time it can hold a charge.
• The time required to charge the battery depends on the ambient temperature and
the age of the battery.
• When the battery is low on power, the phone plays an alert and displays a prompt.
When battery power is almost exhausted, your phone will power off automatically.
2.2.4 B attery Saving Tips
The longevity of battery power depends on the network that you connect to, and how
you use your mobile phone.
9
Page 15

Try the following to conserve battery power:
• Use normal wallpaper rather than live wallpaper.
• When your mobile phone is not in use, switch off the screen.
• Reset the time it takes for your screen light to switch off when you leave your phone
idle.
• Lower the screen brightness.
• Use the AC adapter to plug your phone into an external power source whenever
possible.
• Turn Bluetooth off when you are not using it. Only make your phone visible to other
Bluetooth devices when you need to establish a Bluetooth connection.
• Switch off Wi-Fi when you are not using it.
• Turn off your phone connection to GPS satellites when you are not using it.
• Lo wer the volume.
• Close power-draining programs, when you do not need them.
• Turn off the data service.
2.3 Power On or Off Your Mobile Phone
2.3.1 P owering On Yo ur M obile Phone
Press and hold . The first time you power on your phone, you will be asked to
sign in to your account and set up your mobile phone.
2.3.2 S etting Up Your M obile Ph one
The first time you power on your mobile phone, the phone displays a setup wizard to
help you set up the phone.
The setup wizard helps you:
• Learn about your mobile phone
• Create or sign into your account
• Make some initial decisions about how you want to use your mobile phone
2.3.3 P owering Off Your Mobile Ph one
1. Press and hold to open the
10
Phone options
menu.
Page 16

2. Touch
Power off
3. Touch OK.
.
2.4 Using the Touchscreen
2.4.1 T ouchscreen A ctions
•
Touch
: Use the touch of your finger to select an item, confirm a selection, or start an
application.
•
Touch and hold
your mobile phone responds. For example, to open the options menu for the active
screen, touch the screen and hold down until the menu appears.
•
Flick
•
Drag
item to any part of the screen. You can drag an icon to move or delete it.
: Touch an item with your finger and continue to press down until
: Move your finger either vertically or horizontally across the screen.
: Touch and hold the desired item with your finger. To move an item, drag the
2.4.2 R otating Y our Mobile Phone Screen
The orientation of most screens will rotate with the phone as you turn it from upright to
sideways and back again.
Touch >
Settings
>
Display
>
Auto-rotate screen
to disable the function.
2.5 Locking and Unlocking the Screen
2.5.1 L ocking the S creen
• When your phone is on, press to lock the screen. When the screen is locked,
you can still receive messages and calls.
• If your phone is idle for a while, the screen will lock automatically.
2.5.2 U nlocking the Screen
1. Press to wake up the screen.
2. Drag the lock icon from left to right to unlock the screen.
11
Page 17

If you have set up a screen unlock pattern, you will be prompted to draw the
pattern on the screen to unlock it.
2.6 Home Screen
10:23
Notifications bar:
Displays the reminders and status icons of
your phone. Flick down to open the
notifications panel.
Display area:
Shows the operation and display areas of
your phone.
Indicates the current screen.
Touch to view thumbnails of all screens.
Shortcuts
Touch and hold one of the shortcuts until the mobile phone vibrates, you can
drag it to your desired location or move it to the trash. You can also drag a screen
item to the shortcut position.
12
Touch to view all your applications.
Page 18

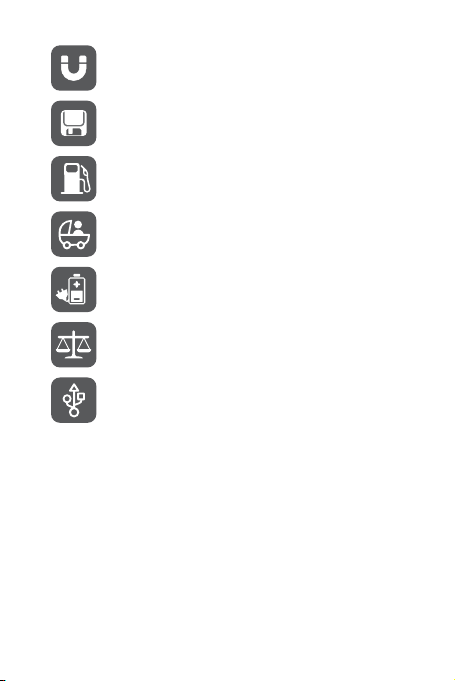
2.6.1 No tification and Status I cons
Call in progress Bluetooth is on
Missed call Connected to a PC
GPS connected New chat message
New voicemail New email
Roaming Battery is charging
Battery is full Battery is very low
Uploading Downloading
Call mute Wi-Fi network in range
Memory is full Error
New gmail
Preparing mircoSD card Synchronizing data
Synchronization failed
More undisplayed
notifications
2.6.2 N otifications Panel
Your mobile phone will notify you when you receive a new message or there is an
upcoming event. The notifications panel also informs you of alarms and settings.
13
Page 19

Open the notifications panel to see your network operator or to view a message,
reminder, or event notification.
Opening the Notifications Panel
1. When a new notification icon appears on the notification bar, flick down to open the
notifications panel.
Touch >
Notifications
to open the panel.
2. On the panel, you can:
• Touch a notification to open the related application.
• To uch
Clear
to clear all notifications.
Closing the Notification Panel
Flick up to close the panel.
2.6.3 V iewing Other Parts of the Home Screen
Touch >
the screen number.
14
10:23
Flick your finger left or
right across the Home
screen.
Home settings
Touch to view thumbnails
of the Home screen and its
extensions. Touch a thumbnail
to open the screen.
>
Advanced settings
10:23
>
Screen number
to set
Page 20

2.6.4 C ustomizing the H ome Screen
Adding a New Screen Item
1. Touch and hold a blank area on the Home screen until the
displayed.
You can also touch >
Add
to display the
Select action
Select action
menu is
menu.
2. Select an item to add it to the Home screen.
Moving a Screen Item
1. Touch and hold an item on the Home screen until the item expands in size and the
mobile phone vibrates.
2. Without lifting your finger, drag the item to the desired position on the screen, and
then release it.
Removing a Screen Item
1. Touch and hold an item on the Home screen until the item expands and the mobile
phone vibrates.
2. Without lifting your finger, drag the item to the trash can. When the item and the
trash can turn red, the item is ready to be removed.
3. Release the item to remove it from the Home screen.
2.6.5 Se rvice S hortcuts
1. Open the notification bar.
2. Touch at the top of the screen to switch on or off data services.
You can also touch , , or to switch on or off corresponding
services.
2.6.6 Se tting Home Screen Animations
1. On the Home screen, touch >
2. Select an animation, and then touch
The Home screen animation will take effect.
Home settings
Save
.
>
Animation
.
15
Page 21

2.6.7 C hanging the Wallpaper
1. On the Home screen, touch >
2. Touch option to select a picture and set it as the wallpaper.
Wallpaper
.
2.6.8 C hanging the Theme
1. On the Home screen, touch >
2. Do any of the following:
• To uch
Theme
• To uch
• To uch
3. Touch
The selected theme will take effect.
to select a theme.
Application icons
Download
Save
.
Home settings
to select a series of application icons.
to download themes from the Internet.
.
2.6.9 Ed iting a Screen Item
1. Touch and hold an item on the Home screen until the
displayed.
2. Touch
Edit icon
• Customize the title of the screen item.
• Select a new icon for the screen item.
3. Touch
The changes will take effect.
, and then do any of the following:
Save
.
Select action
menu is
2.7 Application List
Application list holds icons for all of the applications on your phone. You can touch
on the Home screen to open the application list.
2.7.1 M oving I cons in t he Application List
1. In the application list, touch .
2. Touch and hold the icon you want to move in the application list until the phone
vibrates.
16
Page 22

3. Without lifting your finger, drag the icon to the desired location, and then release it.
To move more icons, repeat step 2 and 3.
4. Touch or touch to save.
2.8 Using a microSD Card
2.8.1 Us ing t he m icroSD Car d a s USB Mass Storage
To transfer all your favorite music and pictures from your PC to your mobile phone’s
microSD card, set the micr oSD card as USB mass storage.
1. Connect your mobile phone to your PC with the USB cable. Your PC will detect the
microSD card as a removable disk.
2. Open the notification bar, and then touch
3. Touch
Turn on USB storage
to transfer files.
You can now transfer files from your PC to your mobile phone’s microSD card.
When your microSD card acts as USB mass storage, your mobile phone will not
use this memory space. Your PC will tell you how to safely disconnect the USB
mass storage device (your mobile phone) when you have finished transferring
files.
USB connected
in the dialog box that opens to confirm that you want
.
2.8.2 R emoving the microSD Ca rd
1. Touch >
2. Scroll down the screen, and then touch
3. Carefully remove the microSD card.
Settings
.
Storage
>
Unmount SD card
.
3 Calling
To make a phone call, you can dial a number or touch a number from your contact
list, on a Web page, or in a document. When you are on a call, you can answer other
incoming calls or send them to your voicemail box. You can also set up conference
calls with several participants.
17
Page 23

3.1 Making a Call
To make a call, you can use the
or
Call log
.
When you are on a call, you can touch to use other functions. To return to the
calling screen, flick the notification bar down and touch
Do not block the microphone at the bottom of your phone if you want your voice
heard.
3.1.1 M aking a Cal l wi th t he Di aler Application
1. Touch >
2. Touch the appropriate numeric keys to enter the phone number.
3. Touch to initiate the call.
Dialer
If you are already working with
Your mobile phone supports the SmartDial function, that is, when you touch
numbers on the dialer, the phone automatically searches among your contacts
and lists the matching results based on the accuracy. If no contact is matched
with your entered information, the phone will not display any result.
During a call, touch
3.1.2 M aking a Cal l f rom Contacts
1. Touch >
2. In the list, touch the contact you want to call.
3. Touch to dial the phone number.
Contacts
If you are already working with
3.1.3 M aking a Cal l f rom Call log
1. If you are already working with
2. Touch to the right of the log entry to dial.
If you touch and hold a log entry, the options menu will open.
Dialer
application, or select a number from
to display the dialer.
Contacts
or
Dialpad
to enter other numbers on the dialpad.
to display the contact list.
Dialer
or
Call log
Contacts
or
Dialer
Call log
, touch the
Current call
, touch the
, touch the
.
Contacts
Call log
Dialer
tab.
Contacts
tab.
tab.
18
Page 24

3.2 Answering or Rejecting a Call
3.2.1 A nswering an Incoming C all
When you receive a phone call, the incoming call screen opens with the caller's name
and number that you have entered in
Drag the to the right to answer the call.
3.2.2 E nding a Ca ll
During a call, touch
End
3.2.3 R ejecting an I ncoming Call
Drag the to the left to reject the call.
to hang up.
Contacts
.
19
Page 25

3.3 Other Operations During a Call
3.3.1 M aking a Co nference Call
If you receive a new call while you are already on a call, you can connect the second
call to the call you are on. This feature is known as conference calling. You can also
set up a conference call with multiple callers.
Contact your network operator to learn if conference calls are supported and, if
yes, how many can participate.
1. To initiate a conference call, dial the number of the first participant. After you have
connected to the first participant, keep the connection open, touch
2. Enter the phone number of the next person you want to join the conversation and
touch , or select someone from your
is automatically placed on hold while you do this.
3. Once you have connected to the second person, touch
conference call.
4. To end the conference call and disconnect everyone, touch
Call log
or
Contacts
3.3.2 Swi tching Between Calls
If you receive a new call while you are already on a call, you can switch between the
two calls.
20
. The first participant
Merge calls
End
.
Add call
to begin the
.
Page 26

1. While you are on the first call and the second call comes in, answer the incoming
call, and then touch
2. The current call is placed on hold and you are connected to the first call.
Manage calls
.
3.4 Using Call log
The
Call log
contains a list of calls that you have dialed, received, or missed. You can
use the call log to reference a recently called number quickly or add an incoming
number to your contact list.
3.4.1 A dding an e ntry t o Contacts
1. If you are already working with
2. Touch and hold the entry you want to add.
3. Touch
Add to contacts
4. Touch
Create new contact
contact name.
Dialer
or
Contacts
, touch the
Call log
tab.
in the options menu.
or scroll through the contact list and touch an existing
3.5 Using Airplane Mode
Some locations may require you to turn off your phone’s wireless connections. Rather
than powering off your phone, you can place it in
1. Press and hold .
2. Touch
Airplane mode
in the options menu.
Airplane mode
.
3.6 TTY Operation
3.6.1 Us ing t he TT Y Device
The Teletypewriter (TTY) is a typewriting device. By connecting the phone to the TTY
device, you can use the TTY functions to send/receive messages. When you use the
TTY function, do as follows:
1. Connect the TTY device to the headset jack of the phone and set the phone to the
TTY mode.
2. Make or answer calls as normal.
21
Page 27

3. When the call is put through, use the TTY device to send or receive the letters.
4. Press the
End
to end the call.
3.6.2 Se tting t he TTY Mode
1. Touch >
2. Select one TTY mode.
Settings
>
Call settings
>
TTY mode
•
TTY Off
: The standard voice speaking mode and the listening mode.
•
TTY Full
: Transmit and receive the TTY characters.
•
TTY HCO
: Transmit TTY characters but receive by listening to the earpiece.
•
TTY VCO
: Receive TTY characters but transmit by speaking into the
microphone.
.
3.7 Setting Hearing Aid Compatibility
Touch >
compatible with a hearing aid.
Settings
>
Call settings
>
Hearing aids
to set your phone to be
4 Contacts
The
Contacts
phone numbers and addresses of your contacts. After you save contact information
on your mobile phone, you have easy access to the people with whom you want to
communicate.
4.1 Opening the Contacts Application
If you have a new mobile phone and have not yet added any contacts,
displays a message with hints on how to start adding contacts to your mobile phone.
Touch >
All of your contacts are displayed alphabetically in a list that you can scroll through.
22
application enables you to save and manage information such as
Contacts
Contacts
to open the
Contacts
application.
Page 28

4.2 Adding a Contact
1. In the contact list, touch >
2. If you have more than one account with contacts, touch the account to which you
want to add the contact.
3. Enter the contact's name, and then add detailed information such as phone
number or address.
4. When you are finished, touch
4.2.1 A dding a Co ntact to Y our F avorites
• Touch and hold the contact you want to add to
Favorites
.
• Touch a contact, and then touch the star to the right of the contact’s name. The star
turns gold.
Create contact
Done
.
to save the contact information.
Favorites
. Then touch
Add to
4.3 Indexing Contacts
You can index your
1. Touch >
2. Touch or move any letter in the alphabet to list all contacts starting with the letter.
Contacts
to quickly find your desired contact.
Contacts
.
4.4 Searching for a Contact
1. In the contact list, touch >
2. Enter the name of the contact you wish to search for. As you type, contacts with
matching names appear below the search box.
Search
.
4.5 Editing a Contact
You can make changes to the information you have stored for a contact at any time.
1. In the contacts list, touch and hold the contact whose details you want to edit, and
then touch
Edit contact
in the options menu.
23
Page 29

2. Touch the category of contact information you wish to change: name, phone
number, email address, or any other information you recorded earlier.
3. Make the desired changes to the contact information, and then touch
cancel all of your changes, touch
Cancel
.
Done
. To
4.6 Communicating with Your Contacts
From the
Contacts
or
Favorites
multimedia message (MMS) to a contact’s default phone number. You can also open
details to view a list of all the ways you can communicate with that contact. This
section describes how to communicate with a contact when you view your contacts
list.
tab, you can quickly call or send a text (SMS) or
4.6.1 C onnecting Th rough Quick Contact for An droid
1. Touch the contact's picture or picture frame (if you have not assigned a picture to
the contact) to open Quick Contact for Android.
2. Touch the icon for the way you want to communicate with the contact.
The icons available depend on the information you have entered for the contact,
the applications on your phone, and the accounts you have.
4.6.2 C ommunicating with a Contact
1. In the contacts list, touch the contact that you want to communicate with.
2. On the contact’s details screen, touch the icon to the right of the number to call or
send messages.
4.7 Deleting a Contact
1. In the contacts list, touch and hold the contact that you want to delete, and then
touch
Delete contact
2. Touch OK to confirm that you want to delete the contact.
in the options menu.
4.8 Managing Groups
You can create your own groups or use default groups, such as Coworkers, Family
and Friends.
24
Page 30

4.8.1 Cr eating a Gr oup
1. Press >
2. In the groups list, touch , and then touch
3. Enter the name and picture you want to store for the group, and then give the group
4. Touch
5. Select the contacts to be added to the group, and then touch
6. When you are finished, touch
a ringtone.
Add Members
Contacts
, and then touch the
to add members on the group list.
Done
Groups
tab.
Create group
to save the group information.
.
OK
4.8.2 Ed iting a Group
You can always make changes to the information you have stored for a group.
1. In the groups list, touch and hold the group whose details you want to edit, and then
touch
Edit group
2. Make the desired changes to the group information, and then touch
cancel all changes you made to the group information, touch
in the options menu.
Cancel
Done
.
. To
4.8.3 A dding a Contact to Y our G roups
To add a contact to your groups, you can do any of the following:
• Touch and hold the contact you want to add to
groups
.
• When editing a group, press , and then touch
contacts you want to add to group.
Groups
Add Members
. Then touch
Add to
to select the
4.9 Joining and Separating Contacts
When you add an account or add contacts in other ways, such as by exchanging
emails, you may have duplications in your Contacts. To avoid duplication, you can join
two contacts together to form a single contact.
4.9.1 Jo ining Con tacts
Make sure you have added an account and have duplicate contacts in Contacts.
1. Touch >
Contacts
.
25
Page 31

2. Touch a duplicated contact.
3. Touch
Joined Contacts
4. Select the contact to be joined to combine two duplicate contacts.
Two contacts will be joined together and displayed as one contact. Touch the contact
to view the joined information. If you touch the contact, and then touch
Contacts
, you can see that the contact is joined together by two contacts.
>
Add contact
.
Joined
4.9.2 S eparating Contacts
If contact information from different sources was joined together with error, you can
separate the contacts.
1. Touch >
2. Touch a contact to be separated.
3. Touch
4. Select a contact, and then it is separated.
The contact is then separated into two contacts and displayed as two contacts in
Contacts
Contacts
Joined Contacts
.
.
.
4.10 Staying Close to Your Friends
Touch >
friends.
Streams
to log in to social networking sites and stay close to your
The first time you do this, you will be requested to sign in to your account.
5 Using the Onscreen Keyboard
5.1 Displaying the Keyboard Panel
To enter text, use the onscreen keyboard. Some applications open the keyboard
automatically. In others, touch a text field to open the keyboard.
Touch the space where you want to write text to display the keyboard.
Touch to hide the keyboard.
26
Page 32

Touch and hold the space where you usually write your text to open the options
menu.
5.1.1 C hoosing an Input Method
1. Touch and hold the space where you enter your text until the
displayed.
2. Touch
Input method
.
3. Select the input method.
The keyboard panel will be displayed automatically.
Edit text
5.1.2 Us ing t he An droid K eyboard
q w e r t y u i o p
a s d f g h j k
z x c v b n m
Touch to insert a space.
Touch to enter text by voice.
Touch to change from text mode to symbol/number mode.
Touch once to capitalize the next letter you type.
Touch and hold for all caps.
Touch >
Voice input
Settings
to turn on or turn off voice input.
l
DEL
.
Next?123
>
Language & keyboard
Touch to delete a character
to the left of the cursor.
Touch and hold to delete all
characters to the left of the
cursor.
>
Android keyboard
menu is
>
27
Page 33

5.1.3 Us ing t he Swyp e Keyboard
1
23 _%(
#
qENw e
r t y u i o p
&
$ 456 +: ; ”
a s d f g h j k
!7890/?
z x c v b n m
_
SYM
’
Touch to insert a space.
Touch to change from text mode to symbol/number mode.
Touch and hold to get helpful tips.
Touch to get swype functions.
Touch once to capitalize the next letter you type.
Touch twice for all caps.
1
23 _%(
#
qENw e
r t y u i o p
&
$456+: ;”
a s d f g h j k
!7890/?
z x c v b n m
_
SYM
’
1
23 _%(
#
qENw e
r t y u i o p
&
$456+: ;”
a s d f g h j k
!7890/?
z x c v b n m
_
SYM
’
l
’
:)
.
)
l
’
:)
.
)
l
’
:)
.
)
Touch to delete a character
to the left of the cursor.
Touch and hold to delete all
characters to the left of the
cursor.
bay
To enter a word, just drag your
finger over the letters in the word.
I’ll
To capitalize, go above the
keypad.
To enter apostrophes in common
words drag through the ‘n’.
To enter double letters, circle the
letter.
28
Page 34

5.1.4 U sing t he Landscape K eyboard
If you find the keyboard inconvenient or difficult to use, turn your mobile phone
sideways. The screen will display the keyboard in landscape orientation, providing
you with a wider keyboard layout.
5.2 Customizing Keyboard Settings
1. Touch >
2. Select an input method to customize the keyboard settings.
Settings
>
Language & keyboard
.
6 Messaging
The Messaging application allows you to exchange text messages (SMS) and
multimedia messages (MMS) with anyone using an SMS-or-MMS-capable phone.
With the
Email
application you can read and send emails.
6.1 SMS and MMS
6.1.1 O pening Messaging
Touch >
6.1.2 Cr eating an d Sending a Text Message
1. Touch >
2. Enter a phone number or a contact's name in the To field, or touch to select a
Messaging
.
Messaging
>
New message
contact from
Contacts
.
As you enter the phone number or the contact's name, the phone displays
possible matches from your contacts. Select a contact from the list of possible
matches or continue entering.
After you select a contact or finish entering a number, add a comma and you can
enter another recipient. You can also touch a previously entered contact again
to edit or delete it.
.
29
Page 35

3. Touch the composition text box to start entering your message.
While entering your message, you can touch to insert contact information.
4. When you are ready to send the message, touch
Send
.
The message list opens, and your name appears in the list, followed by the message
you just sent. Responses appear in the window. As you view and send additional
messages, a message thread is created.
6.1.3 Cr eating an d Sending a Multimedia Message
You can use multimedia messages to make everyday communications very special.
You can record a message and send it as an audio file, sing 'Happy Birthday' and
send it to friend, or send a slideshow of photographs of a special event. The
possibilities are endless.
1. Touch >
2. Enter a phone number in the To field, or touch to select a contact from
Contacts
3. Touch the composition text box to start entering your message.
4. Touch to display the options panel.
5. When the message is ready to be sent, touch
Adding a Slideshow
If you want to attach more than one file to your message, use the Slideshow option.
1. On the message editing screen, touch to display the options panel.
2. Touch
3. Touch and touch
30
Messaging
>
New message
.
.
If you want to enter a smiley face, touch , and then touch
• To uch
Add subject
multimedia message mode.
• To uch
to add the message subject. Your mobile phone is now in
Attach
to add a picture, music, or video file.
Send
You can select a media file directly (music, video or picture) and send it as an
attachment to a multimedia message. In
file, and then touch
Attach
>
Slideshow
Share
>
, and then select a slide to start editing it.
Add slide
File Manager
Messaging
.
to add more slides.
Insert smiley
.
, touch and hold a media
.
Page 36

4. Touch
Done
to finish composing your message and return to the multimedia
message screen.
5. To alter your multimedia message, touch the slideshow on the multimedia
message screen. When the message is ready to be sent, touch
Send
.
6.1.4 O pening and Viewing a Multimedia Message
1. In the message list, touch the message thread you wish to view.
2. Touch the multimedia message to view the message.
6.1.5 Re plying t o a Mes sage
1. In the message list, touch a text or multimedia message thread to open it.
2. Touch the text box to compose your message, and then touch
You can also do the following to reply to a message: In
>
Multiselect
. Select one or more message threads, and then touch
Send
Messaging
.
, touch
Reply
.
6.1.6 C opying a T ext Message to Calendar
1. In the message list, touch a text message thread to open it.
2. Touch and hold one of the messages, and then touch
3. Touch
Calendar
For information about how to use
to save it as a note or an event.
Calendar
Copy message to
, refer to the relevant sections.
.
6.1.7 C ustomizing the M essage Settings
In the message list, touch , and then touch
settings.
Settings
to customize the message
6.2 Email
Your mobile phone also puts email at your fingertips. With your phone’s
application, you can use your email account with Yahoo!, AOL, or other popular email
services on your phone.
Email
31
Page 37

6.2.1 A dding a n Email Ac count
When using the
account. The Email setup wizard helps you set up your account. A number of popular
email systems are supported. You can work with the same email service that you use
on your PC or you can select another email service.
1. Touch >
2. To customize your email settings, answer the onscreen prompts, and then touch
Next
3. Enter the account name and the name you want other people to see when they
receive an email from you.
4. Touch
After the initial setup, your
the application was opened. If, however, the
a period of time, it displays the contents of your Inbox or the accounts screen (if you
have more than one account).
Adding Other Email Accounts
1. After creating your initial email account, touch on the
touch
2. Touch on the accounts screen, and then touch
another email account.
Email
application for the first time, you must configure an email
Email
.
. Or touch
Manual setup
If you choose to set up your account manually, you will need the correct
parameters for the account. Contact your email service provider for this
if you want to set the mail server yourself.
information.
Done
.
Email
opens to the screen you were viewing the last time
Email
application has not been used for
Inbox
Add account
screen, and then
to create
Accounts
to access the accounts screen.
When adding an additional email account, you have the option to use the new
account to send all outgoing messages.
6.2.2 V iewing an Em ail M essage
1. On the accounts screen, touch the email account you want to use.
2. Access a folder, and then touch the message that you want to view.
32
Page 38

6.2.3 Cr eating an d Sending an E mail Message
1. On the accounts screen, touch the email account you want to use.
2. On the
Inbox
3. In the To field, enter the name or the email address.
4. Enter the subject of your message and compose the message.
5. When you are finished, touch
screen, touch , and then touch
To send an attachment with the message, touch , and then touch
attachment
.
If you are not ready to send the message, touch
save the message as a draft.
Send
.
Compose
Save as draft
in the options panel.
Add
or touch to
6.2.4 Re plying t o an Email Message
1. On the accounts screen, touch the email account you want to use.
2. Touch the email message you want to reply to.
3. Touch
Reply
or
Reply all
to reply to the email message.
6.2.5 Sa ving an Ema il Attachment
1. On the Accounts screen, touch the email account you want to use.
2. Touch the email message you want to view.
3. Touch
Save
to download the email attachment.
The attachment will be saved in the root directory of the microSD card.
6.2.6 De leting an Email Account
1. On the accounts screen, touch and hold the email account you want to delete.
2. Touch
Remove account
3. Touch OK.
.
6.2.7 C hanging Em ail Account Se ttings
You can change a number of settings for an account, including how often you check
for emails, how you are notified of a new mail, and details about the servers the
account uses to send and receive mails.
33
 Loading...