

Page 1

Huawei IP Phone eSpace 7950
V100R001C01
User Manual
Issue 01
Date 2012-10-15
HUAWEI TECHNOLOGIES CO., LTD.
Page 2

Proprietary and Confidential
Copyright © Huawei Technologies Co., Ltd. 2012. All rights reserved.
No part of this document may be reproduced or transmitted in any form or by any means without prior
written consent of Huawei Technologies Co., Ltd.
Trademarks and Permissions
and other Huawei trademarks are trademarks of Huawei Technologies Co., Ltd.
All other trademarks and trade names mentioned in this document are the property of their respective
holders.
Notice
The purchased products, services and features are stipulated by the contract made between Huawei and
the customer. All or part of the products, services and features described in this document may not be
within the purchase scope or the usage scope. Unless otherwise specified in the contract, all statements,
information, and recommendations in this document are provided "AS IS" without warranties, guarantees or
representations of any kind, either express or implied.
The information in this document is subject to change without notice. Every effort has been made in the
preparation of this document to ensure accuracy of the contents, but all statements, information, and
recommendations in this document do not constitute a warranty of any kind, express or implied.
Huawei Technologies Co., Ltd.
Address: Huawei Industrial Base
Bantian, Longgang
Shenzhen 518129
People's Republic of China
Website: http://enterprise.huawei.com
Issue 01 (2012-10-15)
Huawei
Copyright © Huawei Technologies Co., Ltd.
i
Page 3

Huawei IP Phone eSpace 7950
Proprietary and Confidential
User Manual Contents
Contents
1 Safety Precautions.........................................................................................................................1
2 IP Phone Overview .......................................................................................................................3
2.1 Appearance....................................................................................................................................................... 3
2.1.1 Button......................................................................................................................................................3
2.1.2 LED......................................................................................................................................................... 4
2.2 Screen............................................................................................................................................................... 5
2.2.1 Home Screen...........................................................................................................................................5
2.2.2 Icons in the Status Bar ............................................................................................................................6
2.2.3 Line Button Icon ..................................................................................................................................... 7
3 Phone Settings ...............................................................................................................................8
3.1 Preferences.......................................................................................................................................................8
3.1.1 Ringtone..................................................................................................................................................8
3.1.2 Key Tone.................................................................................................................................................9
3.1.3 Brightness ...............................................................................................................................................9
3.1.4 Wallpaper................................................................................................................................................9
3.1.5 Answering Mode...................................................................................................................................10
3.1.6 Auto Dial...............................................................................................................................................10
3.1.7 Import Contacts.....................................................................................................................................10
3.2 Call Features................................................................................................................................................... 11
3.2.1 Call Forward .........................................................................................................................................11
3.2.2 Call Waiting.......................................................................................................................................... 11
3.3 Buttons ........................................................................................................................................................... 11
3.3.1 Expansion Module ................................................................................................................................ 11
3.3.2 Line Button ...........................................................................................................................................12
3.3.3 # as Dial ................................................................................................................................................13
3.3.4 Redial Button ........................................................................................................................................13
3.4 System............................................................................................................................................................ 13
3.4.1 Date and Time....................................................................................................................................... 13
3.4.2 Language............................................................................................................................................... 13
3.4.3 Power Saving ........................................................................................................................................14
3.4.4 Bluetooth............................................................................................................................................... 15
3.4.5 Phone Lock ...........................................................................................................................................15
Issue 01 (2012-10-15) Huawei
ii
Copyright © Huawei Technologies Co., Ltd.
Page 4

Huawei IP Phone eSpace 7950
Proprietary and Confidential
User Manual Contents
3.4.6 Restart...................................................................................................................................................16
3.4.7 Restore Factory Defaults.......................................................................................................................16
3.5 Status.............................................................................................................................................................. 16
3.5.1 Peripheral Status ...................................................................................................................................16
3.5.2 Network ................................................................................................................................................ 16
3.5.3 About Phone.......................................................................................................................................... 17
3.5.4 Certificate..............................................................................................................................................17
3.6 Advanced........................................................................................................................................................17
3.7 Log Out ..........................................................................................................................................................17
4 Web Page Settings....................................................................................................................... 18
4.1 Logging In to the Web Page...........................................................................................................................18
4.2 Preferences.....................................................................................................................................................18
4.2.1 Contacts ................................................................................................................................................ 18
4.2.2 Ringtone................................................................................................................................................21
4.2.3 Key Tone...............................................................................................................................................21
4.2.4 Wallpaper..............................................................................................................................................21
4.2.5 Answering Mode...................................................................................................................................22
4.3 Call Features...................................................................................................................................................22
4.3.1 Call Forward .........................................................................................................................................22
4.3.2 Hotline .................................................................................................................................................. 23
4.3.3 Call Waiting.......................................................................................................................................... 23
4.3.4 Automatic Answering............................................................................................................................23
4.3.5 Auto Dial...............................................................................................................................................23
4.4 Button.............................................................................................................................................................24
4.4.1 Expansion Module ................................................................................................................................24
4.4.2 Line Button ...........................................................................................................................................24
4.4.3 # as Dial ................................................................................................................................................24
4.4.4 Redail Button ........................................................................................................................................24
4.5 System............................................................................................................................................................ 25
4.5.1 Date and Time....................................................................................................................................... 25
4.5.2 Language............................................................................................................................................... 25
4.5.3 Power Saving ........................................................................................................................................25
4.5.4 Phone Lock ...........................................................................................................................................26
4.5.5 Restart...................................................................................................................................................26
4.5.6 Restore Factory Defaults.......................................................................................................................27
4.6 Status.............................................................................................................................................................. 27
4.6.1 Network ................................................................................................................................................ 27
4.6.2 Peripheral Status ...................................................................................................................................27
4.6.3 Certificate..............................................................................................................................................27
4.6.4 About Phone.......................................................................................................................................... 27
5 Phone Usage.................................................................................................................................28
Issue 01 (2012-10-15) Huawei
iii
Copyright © Huawei Technologies Co., Ltd.
Page 5

Huawei IP Phone eSpace 7950
Proprietary and Confidential
User Manual Contents
5.1 Multiple Accounts and Lines..........................................................................................................................28
5.2 Answering Incoming Calls............................................................................................................................. 28
5.2.1 Answering Calls Manually....................................................................................................................28
5.2.2 Answering Calls Automatically.............................................................................................................28
5.2.3 Rejecting Calls...................................................................................................................................... 28
5.2.4 Muting the Phone..................................................................................................................................28
5.2.5 Recording..............................................................................................................................................29
5.3 Making Calls..................................................................................................................................................29
5.3.1 Making Calls by Typing Numbers........................................................................................................29
5.3.2 Making Calls Using the Redial Button .................................................................................................29
5.3.3 Making Calls Using My Contacts ......................................................................................................... 30
5.3.4 Making Calls Using History .................................................................................................................30
5.3.5 Making Calls Using the Corporate Directory........................................................................................30
5.3.6 Making Calls Using the eSpace Desktop.............................................................................................. 31
5.3.7 Making Calls Using the Speed Dial Button ..........................................................................................31
5.3.8 Making Emergency Calls......................................................................................................................31
5.3.9 Auto Dial...............................................................................................................................................31
5.4 Contacts..........................................................................................................................................................32
5.4.1 Adding Contacts.................................................................................................................................... 32
5.4.2 Searching for Contacts..........................................................................................................................32
5.4.3 Modifying Contacts ..............................................................................................................................33
5.4.4 Deleting Contacts.................................................................................................................................. 33
5.4.5 Adding Groups...................................................................................................................................... 33
5.4.6 Modifying Groups.................................................................................................................................34
5.4.7 Deleting Groups.................................................................................................................................... 34
5.4.8 Deleting Contacts in a Group................................................................................................................34
5.4.9 Corporate Directory ..............................................................................................................................35
5.5 History............................................................................................................................................................36
5.5.1 Missed Call Notification ....................................................................................................................... 36
5.5.2 Viewing History.................................................................................................................................... 36
5.5.3 Deleting History.................................................................................................................................... 36
5.5.4 Adding Contacts.................................................................................................................................... 37
5.6 Call Hold........................................................................................................................................................38
5.7 Call Transfer...................................................................................................................................................38
5.8 Call Deflection ............................................................................................................................................... 39
5.9 Call Forward...................................................................................................................................................39
5.10 Call Waiting..................................................................................................................................................40
5.11 Call Pickup...................................................................................................................................................41
5.11.1 Designated Pickup...............................................................................................................................41
5.11.2 Co-Group Pickup ................................................................................................................................41
5.12 Call Park.......................................................................................................................................................41
5.13 Hotline..........................................................................................................................................................42
Issue 01 (2012-10-15) Huawei
iv
Copyright © Huawei Technologies Co., Ltd.
Page 6

Huawei IP Phone eSpace 7950
Proprietary and Confidential
User Manual Contents
5.14 Automatic Callback(For eSpace UC2.0)......................................................................................................42
5.15 Distinctive Ringtone.....................................................................................................................................43
5.16 Busy Lamp Field..........................................................................................................................................44
5.17 DND.............................................................................................................................................................44
5.18 Local Meetings.............................................................................................................................................44
5.18.1 Creating Local Meetings..................................................................................................................... 44
5.18.2 Managing Local Meetings .................................................................................................................. 45
5.19 Shared Line between the Manager and the Secretary................................................................................... 46
5.20 Message........................................................................................................................................................47
5.21 Input Method................................................................................................................................................48
6 eSpace UC-Related Functions...................................................................................................49
6.1 Association with the eSpace Desktop.............................................................................................................49
6.1.1 Enabling the Association with the eSpace Desktop ..............................................................................49
6.1.2 Using the Association with the eSpace Desktop ...................................................................................51
6.2 One-Key Switch (For eSpace UC2.0)............................................................................................................ 56
6.3 Instant Meetings (For eSpace UC2.0)............................................................................................................ 56
6.4 Group Meeting (For eSpace UC2.0) ..............................................................................................................58
6.5 Status Presence (For eSpace UC2.0).............................................................................................................. 60
7 FAQs ..............................................................................................................................................61
7.1 How to View the Detailed Information of the Phone .....................................................................................61
7.2 How to Set the Language ...............................................................................................................................61
7.3 How to Change the Default Ringtone ............................................................................................................62
7.4 How to Adjust the Volume of the Ringtone.................................................................................................... 62
7.5 How to Transfer Incoming Calls to the Voice Mailbox or an Associated Number.........................................62
7.6 How to Retrieve Voice Messages ...................................................................................................................62
Issue 01 (2012-10-15) Huawei
v
Copyright © Huawei Technologies Co., Ltd.
Page 7

Huawei IP Phone eSpace 7950
Proprietary and Confidential
User Manual 1 Safety Precautions
For safety purposes, read these safety precautions carefully and observe them during
operation.
Basic Requirements
Keep the device dry during storage, transportation, and operation.
Prevent collision of the device during storage, transportation, and operation.
Do not attempt to dismantle the device. In case of any fault, contact an authorized
maintenance center for assistance or repair.
Without prior written consent, no organization or individual is permitted to make any
change to the structure or safety and performance design of the device.
While using the device, observe all applicable laws, directives and regulations, and
respect the legal rights of others.
Environment Requirements
Place the device in a well-ventilated place. Do not expose the device to direct sunlight.
Keep the device clean, free of dust and stains.
Do not place the device near a water source or in a damp area.
Place the device on a stable surface.
Do not place any object on the top of the device. Reserve sufficient space around the
device for heat dissipation.
Do not place the device on or near inflammable materials such as foam.
Keep the device away from heat source or flames, such as radiators or candles.
Keep the device away from any household appliances that generate strong magnetic or
electromagnetic fields, such as microwave ovens, refrigerators, or mobile phones.
1
Safety Precautions
Operation Requirements
Do not allow children to play with the device or accessories. Swallowing the accessories
may be fatal.
Use only accessories (such as the power adapter and the battery) provided or authorized
only by the manufacturer.
Issue 01 (2012-10-15) Huawei
1
Copyright © Huawei Technologies Co., Ltd.
Page 8

Huawei IP Phone eSpace 7950
Proprietary and Confidential
User Manual 1 Safety Precautions
Ensure that the device does not get wet. If water gets into the device, disconnect the
power supply immediately and unplug all the cables connected to the device, such as the
power cable and the telephone cable, and then contact an authorized maintenance center.
When installing the phone, comply with Limited Power Source (LPS) and local electric
security standards, and use the power supply of saftty extra low voltage (SLEV).
Before connecting or disconnecting any cable, shut down the device and disconnect the
power supply.
While connecting or disconnecting any cable, ensure that your hands are dry.
Do not step on, pull, or bend any cable excessively; doing so may result in the cable may
be damaged, leading to device malfunction.
Do not use old or damaged cables.
Keep the power plug clean and dry, to prevent electric shock or dangerous situations.
During lightning, disconnect the device from the power supply, and unplug all the cables
connected to the device, such as the power cable and the telephone cable, to avoid
lightning strike.
If the device is unused for a long time, disconnect the power supply and unplug the
power plug.
If smoke, sound, or smell is emitted from the device, stop using the device immediately,
disconnect the power supply, and unplug the power supply and other cables. Contact an
authorized maintenance center for advice and repair.
Make sure that no objects (such as metal shavings) enter the device through the speaker.
Cleaning Requirements
Before cleaning the device, stop using it, disconnect the power supply, and unplug all the
cables connected to the device, such as the power cable and the telephone cable.
Do not clean the device exterior with any cleaning solution or cleanser spray. Use a piece
of soft cloth to clean the device shell.
LCD Usage Requirements
Do not expose the LCD to direct sunlight.
Do not press, scratch, or damage the LCD; do not place heavy objects on top of it.
Do not stare at the display screen for a long time. This may harm your eyes or blur your
vision.
LCD Cleaning Requirements
According to the instructions given in the attached manual, use a piece of soft cloth to
remove dust from the surface of the LCD.
Do not clean the screen with volatile solvent, such as alcohol, benzene or dilution agent.
Do not touch the screen with rubber or plastic material for a long time. This will
deteriorate the surface gloss of the LCD.
Environmental Protection
Do not dispose of the device and the accessories in a garbage can. Dispose of the device
according to the local regulations on disposing of packing materials, exhausted batteries and
abandoned devices, and support the recycling activity.
Issue 01 (2012-10-15) Huawei
2
Copyright © Huawei Technologies Co., Ltd.
Page 9
Huawei IP Phone eSpace 7950
Proprietary and Confidential
User Manual 2 IP Phone Overview
2.1 Appearance
2.1.1 Button
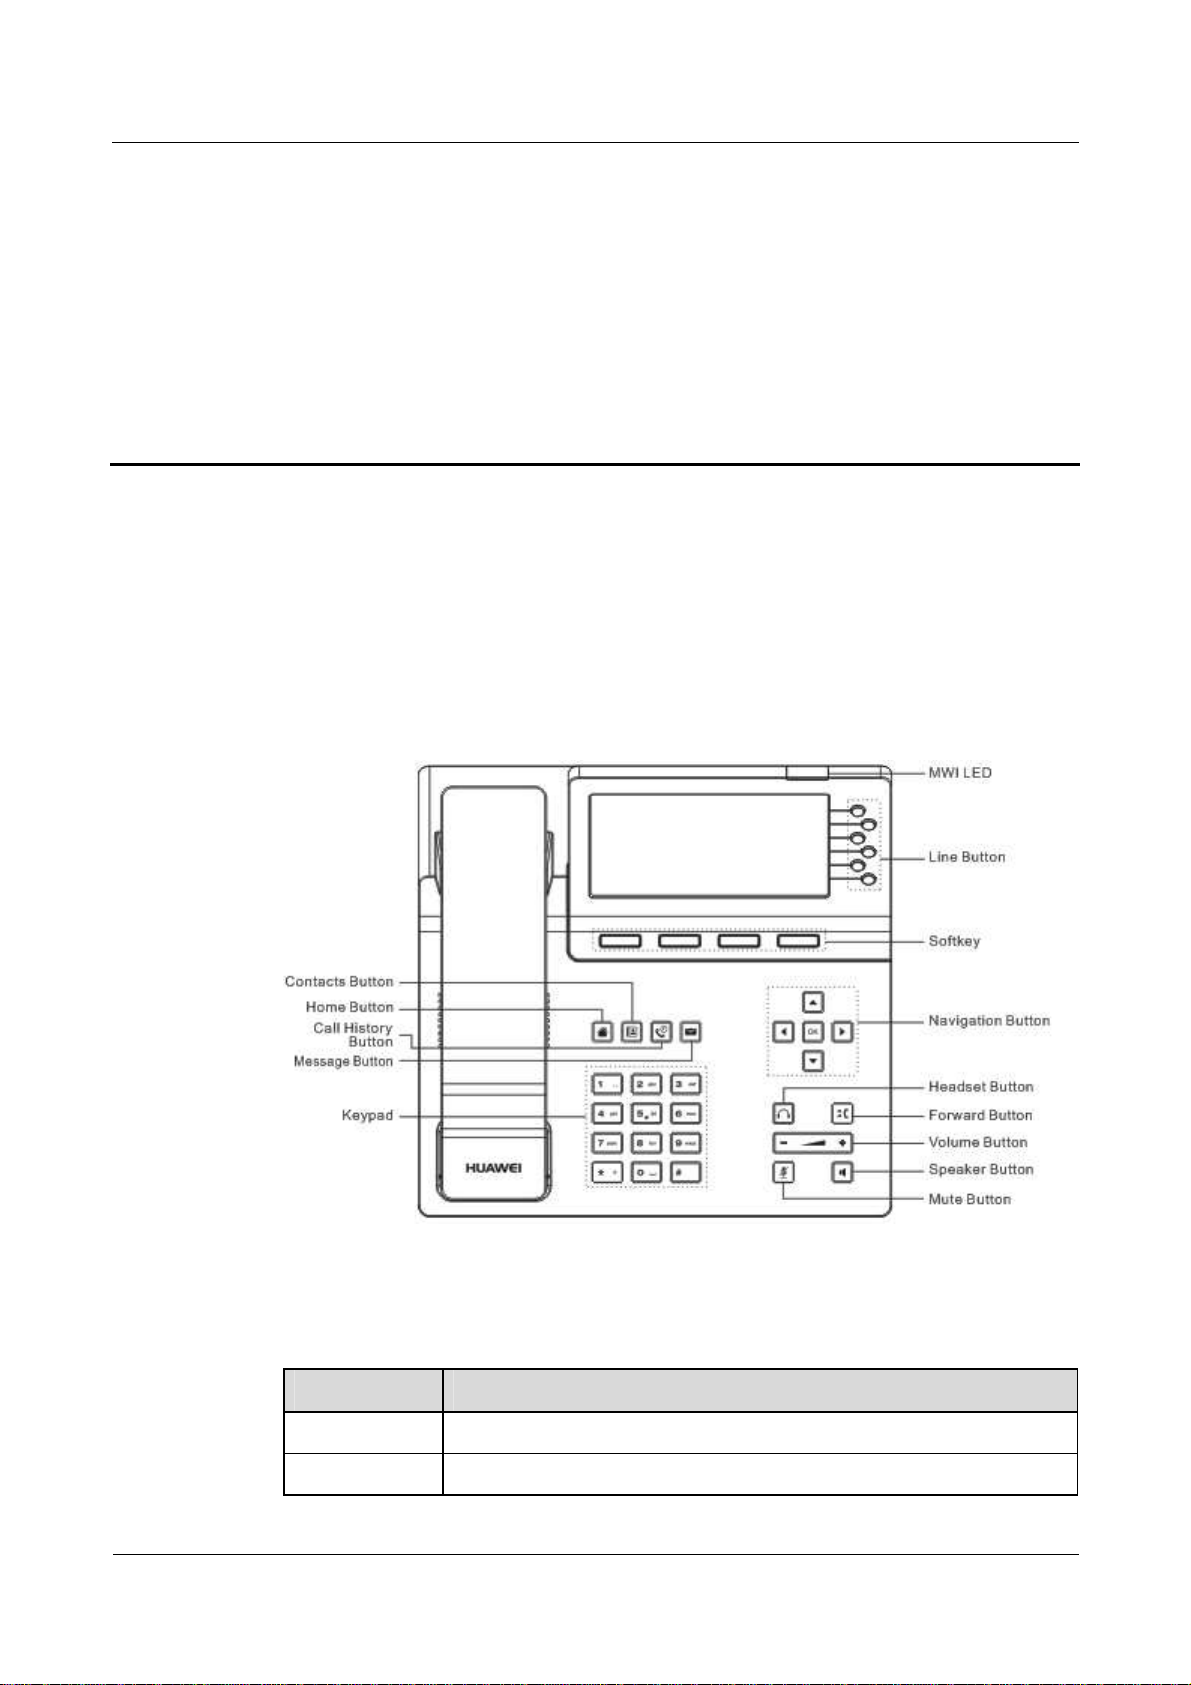
Figure 2-1 shows the appearance of the IP phone.
Figure 2-1 Appearance
2
IP Phone Overview
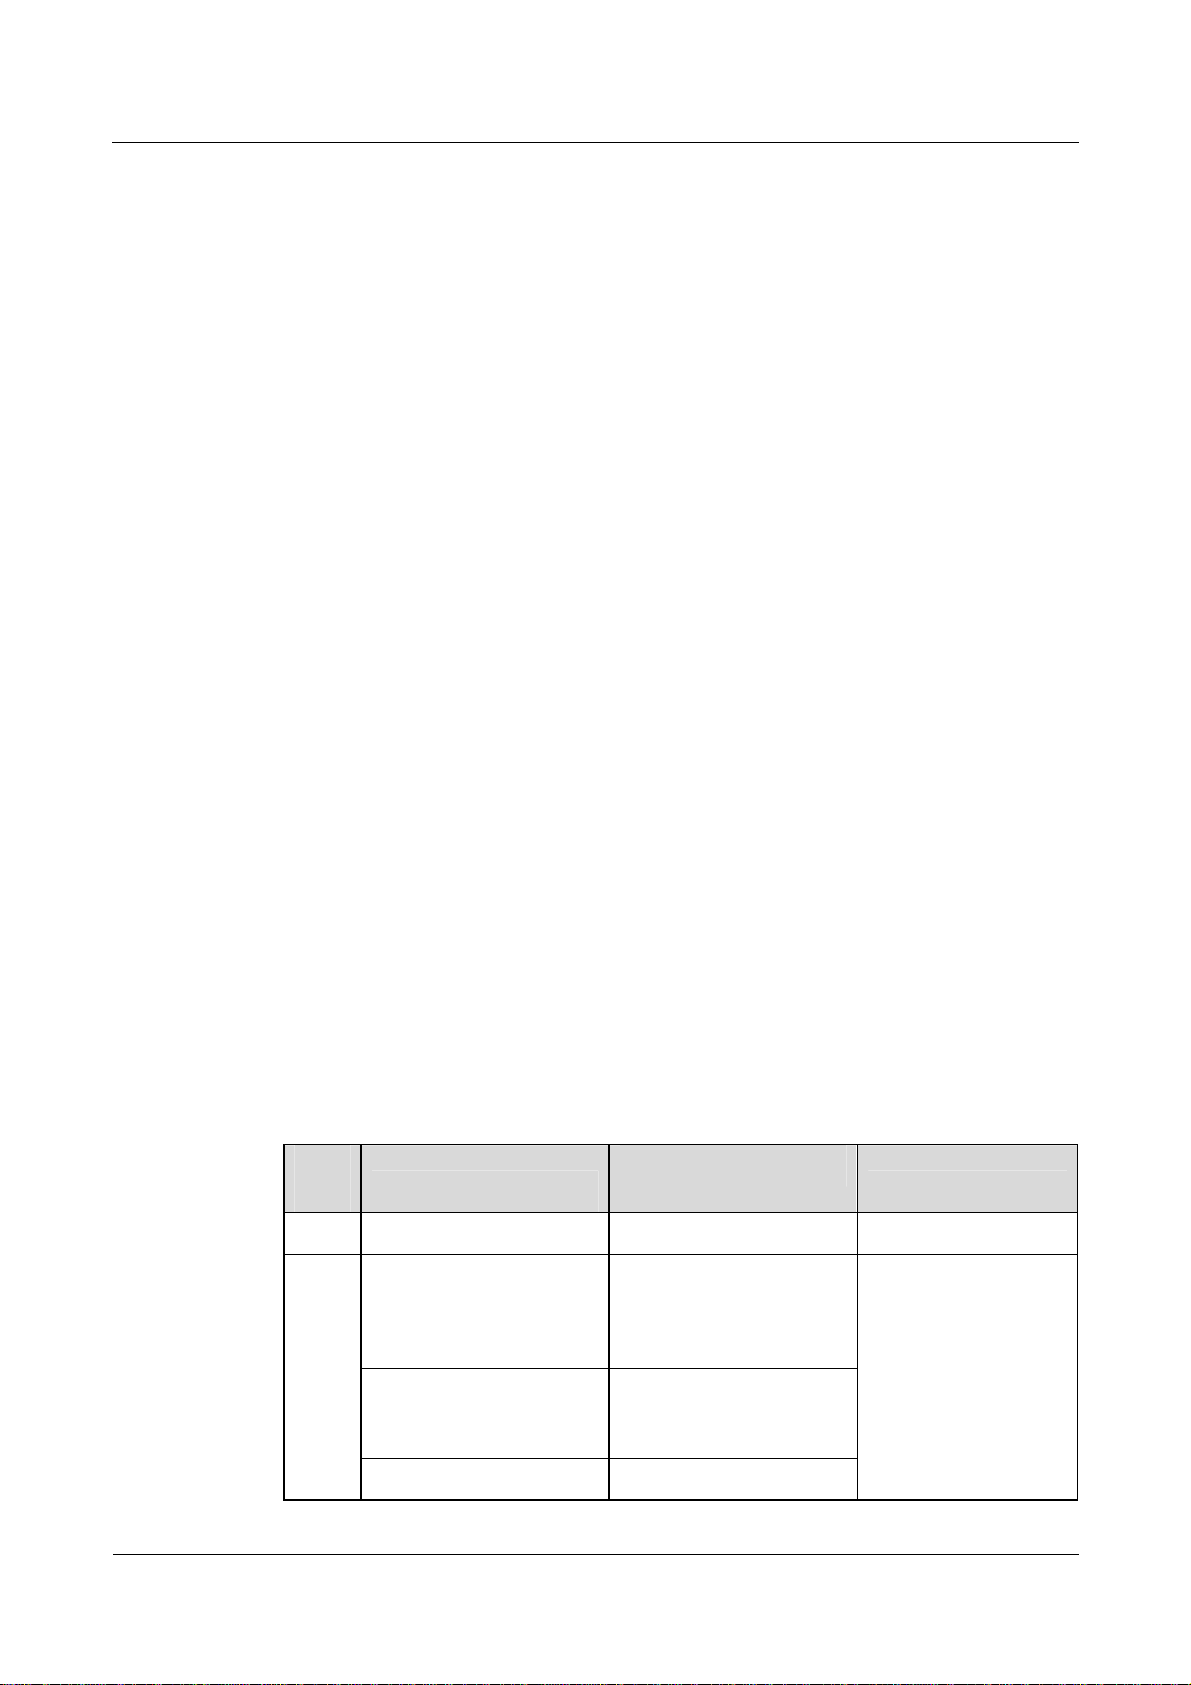
Table 2-1 describes the buttons on the phone.
Table 2-1 button description
button Description
Contacts Button Displays the Contacts screen.
Home Button Displays the home screen.
Issue 01 (2012-10-15) Huawei
3
Copyright © Huawei Technologies Co., Ltd.
Page 10
Huawei IP Phone eSpace 7950
Proprietary and Confidential
User Manual 2 IP Phone Overview
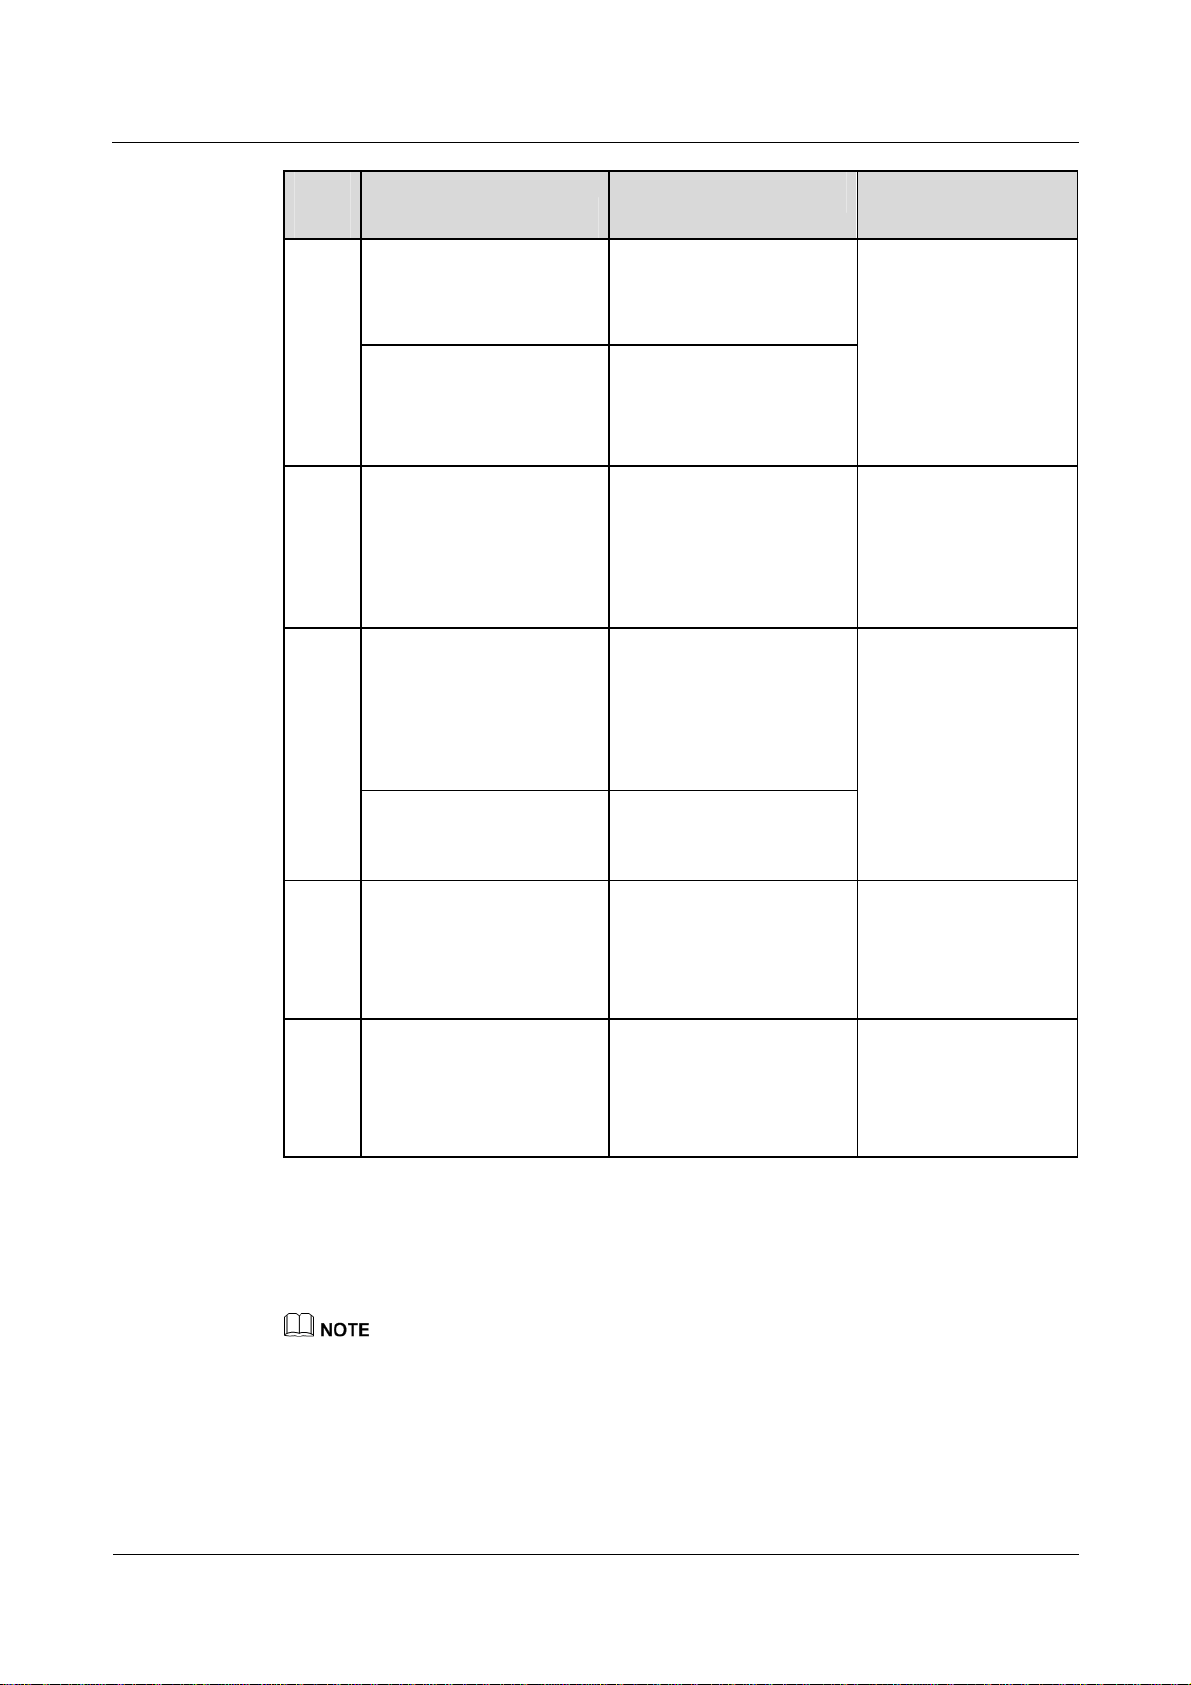
button Description
Call History
Displays the History screen.
Button
Message Button Displays the Message screen.
Keypad
Allows you to type digits, lowercase or uppercase letters, and special
characters.
Line Button Displays the account status and can be set as the shortcut button.
Navigation
Button
Provides four direction buttons, that is, Up, Down, Left, and Right, and
one OK button.
The direction buttons allow you to move the cursor on the screen.
The OK button functions as the same as the Softkey on the left,
which displays the selected main menu.
Forward Button Displays the call forwarding setting page.
Mute Button When the phone is in idle or ringing state, you can:
Press + to turn up the volume of the ringtone.
Press - to turn down the volume of the ringtone.
When the phone is picked up, and in dialing or talking state, you can:
press + to turn up the volume of the handset, headset, and
speakerphone.
press - to turn down the volume of the handset, headset, and
speakerphone.
2.1.2 LED
Speaker Button
When there is an incoming call, you can press the button to answer the
call in hands-free mode, and press the button again to end the call.
Headset Button
When there is an incoming call, you can press the button to answer the
call with the headset, and press the button again to end the call.
Volume Button
Mutes or unmutes the phone. When you press the button to mute your
phone, the other party cannot hear you.
Table 2-2 describes the status of the LED.
Table 2-2 LED description
Indicator Description
MWI LED
When there is an incoming call, the LED blinks in red
every second.
When there is an unread message, the LED blinks in red
every three second.
Line button LED
When the phone is in pickup, dialing, or talking state,
the LED is steady green.
Issue 01 (2012-10-15) Huawei
4
Copyright © Huawei Technologies Co., Ltd.
Page 11
Huawei IP Phone eSpace 7950
Proprietary and Confidential
User Manual 2 IP Phone Overview
Indicator Description
When there is an incoming call, the LED blinks in red.
When the call hold is initiated by yourself, the LED
blinks in green.
Headset LED
When the phone is picked up or in talking state, the LED is
steady red.
Speaker LED
When the phone is picked up or in talking state, the LED is
steady red.
Mute LED When the phone is muted, the LED is steady red.
Call History LED When there is a missed call, the LED is steady red.
Programmable button LED
or line button LED (The
programmable button on the
expansion board or line
button is set as the shortcut
button. The BLF function is
enabled.)
Programmable button LED
or line button LED (The
When the monitored account is in idle state, the LED is
steady green.
When the monitored account is picked up, and in
dialing or talking state, the LED is steady red.
When the monitored account is in ringing state, the
LED blinks in red.
When the monitored account is offline, the LED is off.
When the phone is picked up or in talking state, the LED is
steady red.
programmable button on the
expansion board or line
button is set as the shortcut
button. The BLF function is
disabled.)
Line button LED (The line is
shared by the manager and
secretary.)
2.2 Screen
2.2.1 Home Screen
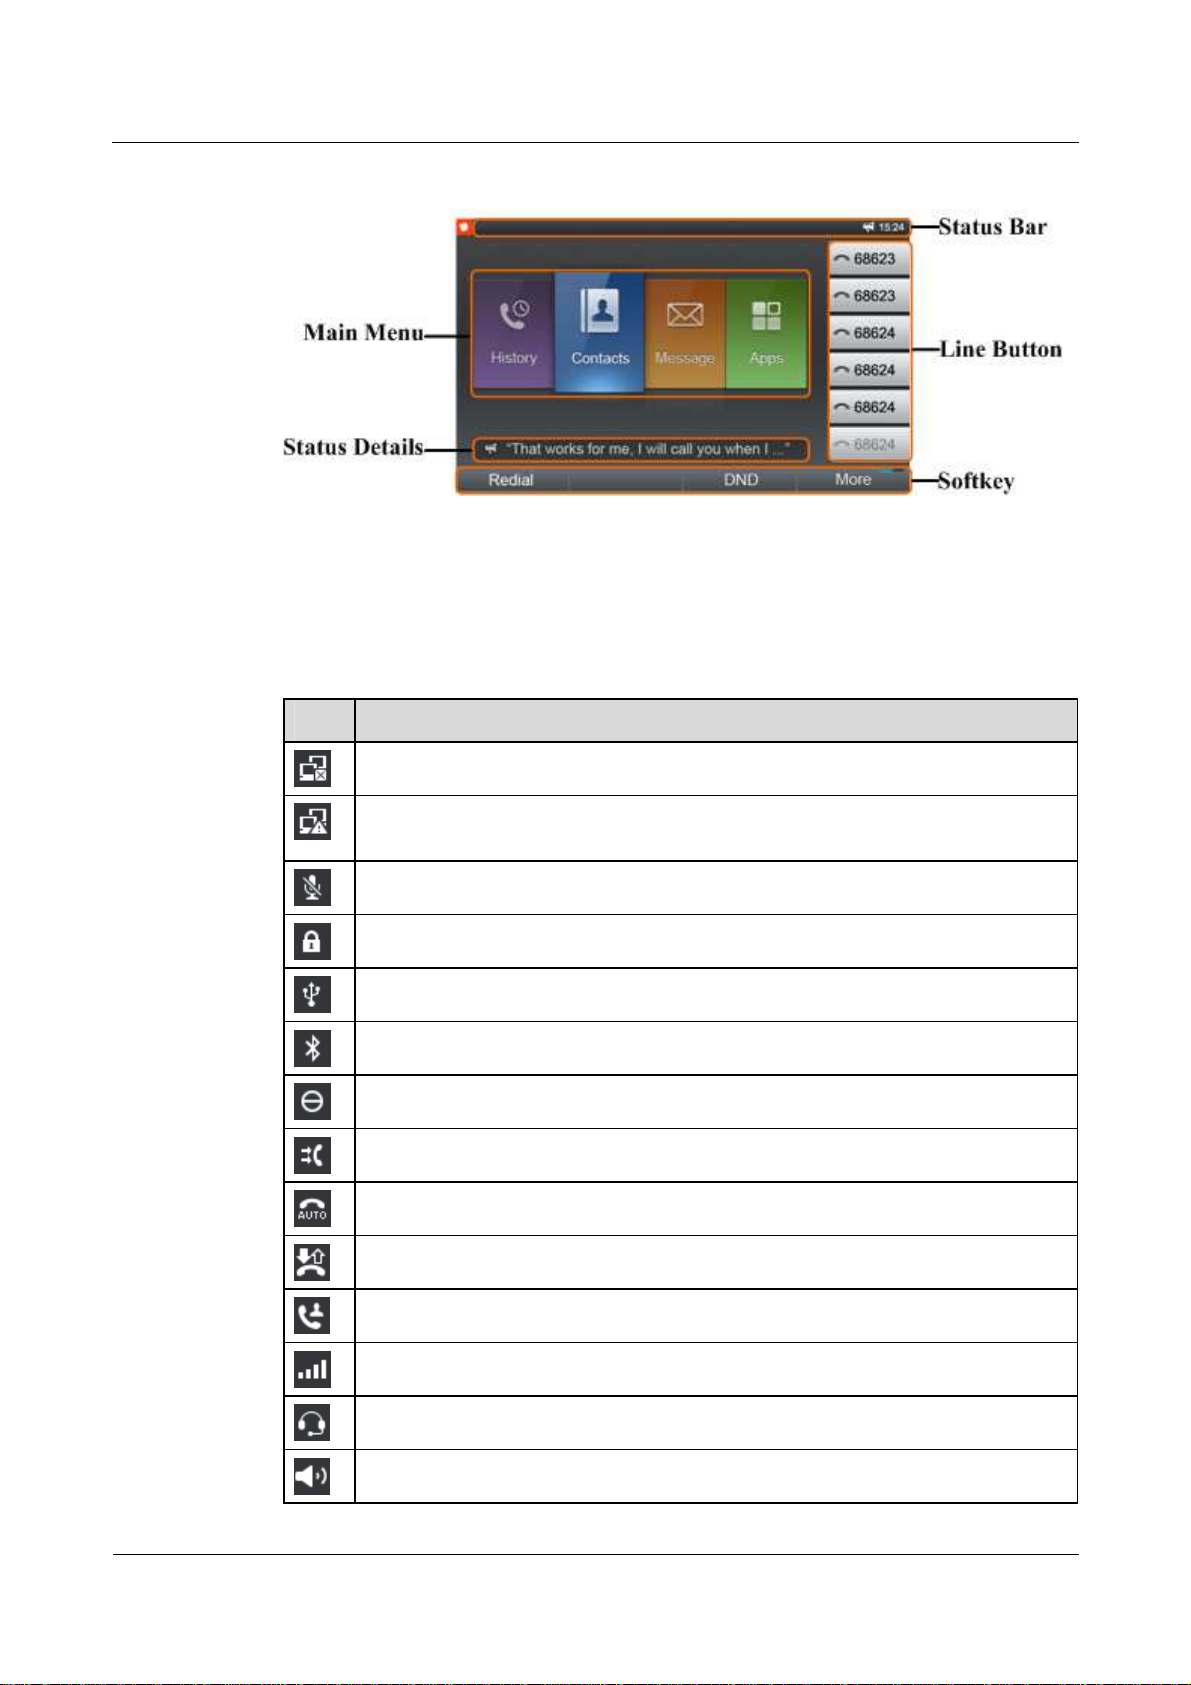
Figure 2-2 shows the home screen.
When there is an incoming call on the shared line, the
LED blinks in read every second.
When the shared line is in talking state, the LED is
steady red.
When the call hold is enabled on the shared line
actively, the LED blinks in red every three seconds.
Issue 01 (2012-10-15) Huawei
5
Copyright © Huawei Technologies Co., Ltd.
Page 12
Huawei IP Phone eSpace 7950
Proprietary and Confidential
User Manual 2 IP Phone Overview
Figure 2-2 Home screen
2.2.2 Icons in the Status Bar
Table 2-3 describes the icons in the status bar.
Table 2-3 Icons in the status bar
Icon Description
No network cable is connected to the phone.
A network cable is connected to the phone, but IP address conflict exists in the
network.
The phone is muted.
The phone is locked.
A USB device is connected to the phone.
The bluetooth function is enabled.
The do not disturb (DND) function is enabled.
The call forwarding function is enabled.
The automatic answering function is enabled.
The automatic callback (ACB) function is enabled.
A call is transferred to the phone.
Network signals during a call.
Voice output in headset mode.
Voice output in hands-free mode.
Issue 01 (2012-10-15) Huawei
6
Copyright © Huawei Technologies Co., Ltd.
Page 13
Huawei IP Phone eSpace 7950
Proprietary and Confidential
User Manual 2 IP Phone Overview
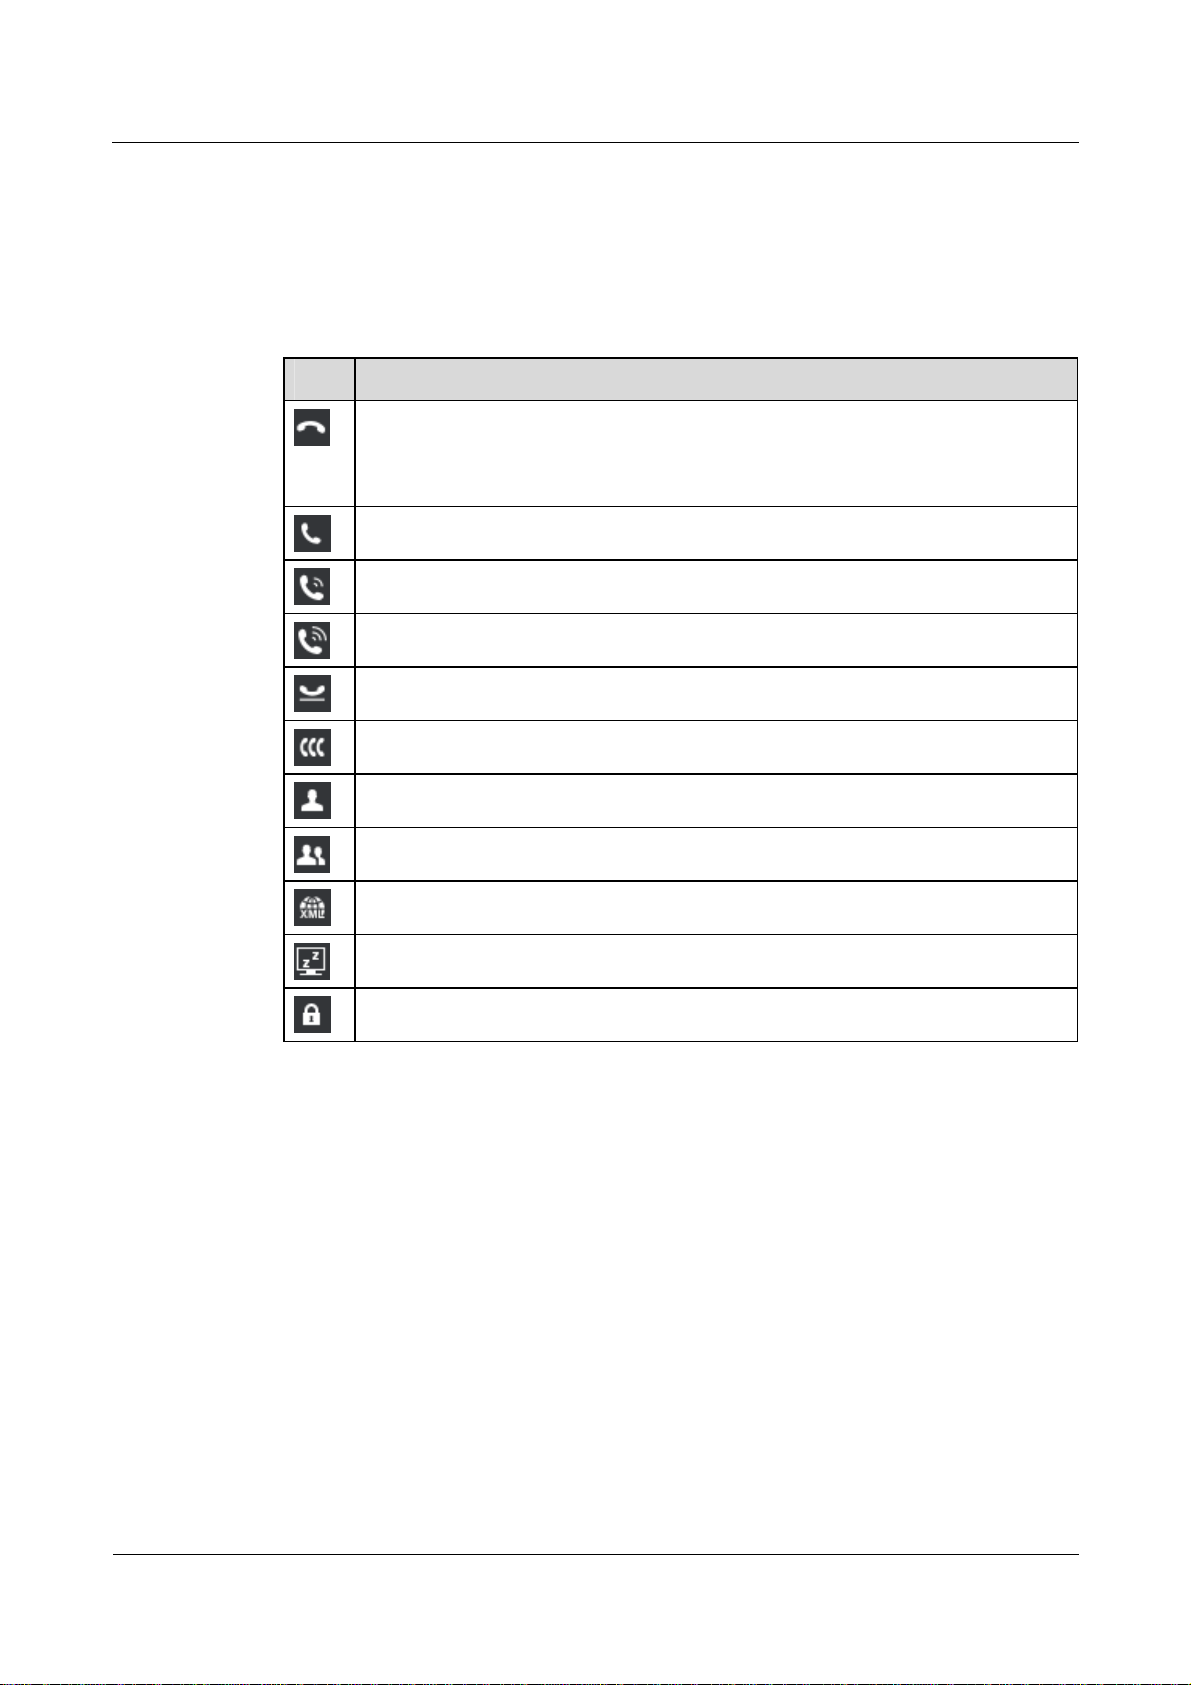
2.2.3 Line Button Icon
Table 2-4 describes the line button icons.
Table 2-4 Line key icon
Icon Description
To register an account:
When the account is registered successfully, the icon is black.
When the account fails to be registered, the icon is grey.
The account is in dialing state.
The account is in callout state.
The account is in talking state.
The account is in active call hold state.
The account is in a conference call.
The line button is set as the speed dial button.
The line button is set as the grouping button.
The line button is set as the XML request button.
The line button is set as the dormancy button.
The line button is set as the phone lock button.
Issue 01 (2012-10-15) Huawei
7
Copyright © Huawei Technologies Co., Ltd.
Page 14

Huawei IP Phone eSpace 7950
Proprietary and Confidential
User Manual 3 Phone Settings
3.1 Preferences
3.1.1 Ringtone
Importing Ringtones
You can perform the following operations to import ringtones.
You can import ringtones in .wav format using the USB device.
Step 1 On the home screen, choose Apps > Settings > Preferences > Ringtone.
The Ringtone screen is displayed.
Step 2 Select Library and press Modify.
Step 3 Press Import.
Step 4 Select a ringtone to import and press Select.
3
Phone Settings
Press Clear to deselect a ringtone.
Step 5 Press Import.
----End
Setting Ringtones
You can perform the following operations to set ringtones.
Step 1 On the home screen, choose Apps > Settings > Preferences > Ringtone.
The Ringtone screen is displayed.
Step 2 Select a ringtone type and press Modify.
Default: If no intranet or extranet ringtone is set for an account, the default ringtone is
played when there is an incoming call.
On-net: When there is an incoming call from an internal user, the intranet ringtone is
played.
Issue 01 (2012-10-15) Huawei
Copyright © Huawei Technologies Co., Ltd.
8
Page 15

Huawei IP Phone eSpace 7950
Proprietary and Confidential
User Manual 3 Phone Settings
Off-net: When there is an incoming call from an external user, the extranet ringtone is
played.
Step 3 Select a ringtone to use.
Step 4 Press Select.
----End
On the Library screen, you can play or delete imported ringtones. The system ringtones cannot be
deleted.
3.1.2 Key Tone
You can perform the following operations to set the key tone.
Step 1 On the home screen, choose Apps > Settings > Preferences.
Step 2 Select Key Tone, and press Enable or Disable.
----End
3.1.3 Brightness
You can perform the following operations to adjust the screen brightness.
Step 1 On the home screen, choose Apps > Settings > Preferences.
Step 2 Select Brightness and press Modify.
The Brightness dialog box is displayed.
Step 3 Press - or + to adjust the screen brightness.
Step 4 Press Finish.
----End
3.1.4 Wallpaper
Import Wallpapers
You can perform the following operations to import wallpapers.
You can import wallpapers in .jpg, .bmp, .png, or .gif format using the USB device.
Step 1 On the home screen, choose Apps > Settings > Preferences > Wallpaper.
The Wallpaper screen is displayed.
Step 2 Press Import.
Step 3 Select a wallpaper to import and press Select.
Press Clear to deselect a wallpaper.
Issue 01 (2012-10-15) Huawei
9
Copyright © Huawei Technologies Co., Ltd.
Page 16

Huawei IP Phone eSpace 7950
Proprietary and Confidential
User Manual 3 Phone Settings
Step 4 Press Import.
----End
Setting Wallpapers
You can perform the following operations to set wallpapers.
Step 1 On the home screen, choose Apps > Settings > Preferences > Wallpaper.
The Wallpaper screen is displayed.
Step 2 Select a wallpaper to use.
Step 3 Press Select.
----End
3.1.5 Answering Mode
You can perform the following operations to set the answering mode.
Step 1 On the home screen, choose Apps > Settings > Preferences > Answering Mode.
The Answering Mode dialog box is displayed.
Step 2 Select Speaker, Bluetooth earphone, USB earphone or Headset.
Step 3 Press Select.
----End
3.1.6 Auto Dial
For details about how to set and use the Auto Dial function see 5.3.9 Auto Dial.
3.1.7 Import Contacts
You can perform the following operations to import contacts.
You can import the contact file in .csv or .vCard format using the USB device.
Step 1 On the home screen, choose Apps > Settings > Preferences > Import Contacts.
The Import Contacts screen is displayed.
Step 2 Select a contact file to import.
Step 3 Press Import.
----End
Issue 01 (2012-10-15) Huawei
10
Copyright © Huawei Technologies Co., Ltd.
Page 17
Huawei IP Phone eSpace 7950
Proprietary and Confidential
User Manual 3 Phone Settings
3.2 Call Features
3.2.1 Call Forward
After the call forward function is enabled, incoming calls are transferred to the voicemail or
number. For details about how to set and use the call forward function, see 5.9 Call Forward.
3.2.2 Call Waiting
After the call waiting function is enabled, the new incoming call is displayed when the phone
is in talking state. For details about how to set and use the call waiting function, see 5.10 Call
Waiting.
3.3 Buttons
3.3.1 Expansion Module
You can perform the following operations to set programmable button on the expansion
Module. This topic describes how to set the programmable button to the speed dial key.
Step 1 On the home screen, choose Apps > Settings > Button > Expansion Module.
The Expansion Module screen is displayed.
Step 2 Select a programmable button on the expansion Module, and press Modify.
The screen for setting the programmable button on the expansion Module is displayed.
Step 3 Select Speed Dial and press Select.
Step 4 Set the parameters.
Table 3-1 describes the parameters of programmable button on the expansion Module.
Step 5 Press Finish.
----End
Table 3-1 Functions of programmable btton on the expansion Module
Funct
ion
None - - Disables a function.
Speed
Dial
Parameter
Number
Label
BLF
Description
Allows you to dial the
number directly by
pressing the
programmable button.
Displays the function
name of the
programmable button.
Monitors the status of the
Usage
Press the
programmable button
on the expansion
Module to dial the
number.
To use the status
monitoring service,
ensure that your
account has been
Issue 01 (2012-10-15) Huawei
11
Copyright © Huawei Technologies Co., Ltd.
Page 18
Huawei IP Phone eSpace 7950
Proprietary and Confidential
User Manual 3 Phone Settings
Funct
ion
Group -
XML
App
Parameter
Select Callout Account
XML Address
Description
phone number in real
time, including idle,
ringing, talking, and
offline.
Allows you to select an
account to call the phone
number.
If a group has been added,
select a group, and press
Select to save the settings.
Indicates the website in
the format of http://IP
address/file name, for
example,
http://192.169.1.72/Menu.
xml.
Usage
assigned the status
monitoring right. If
you have any
questions, contact the
system administrator.
Only Huawei eSpace
UC1.1 solution
supports the status
monitoring function.
Press the
programmable button
on the expansion
Module to go to the
screen of the specified
group.
Press the
programmable button
on the expansion
Module to go to the
specified website.
Sleep - -
Phone
Lock
3.3.2 Line Button
You can perform the following operations to set the line button.
On the line button that has no account can be set to the shortcut key.
Step 1 On the home screen, choose Apps > Settings > Button > Line Button.
Label
- -
Displays the function
name of the
programmable button.
Press the
programmable button
on the expansion
Module to hibernate
the phone.
Press the
programmable button
on the expansion
Module to lock the
phone.
The Line Button screen is displayed.
Step 2 Select a line button to import and press Modify.
Issue 01 (2012-10-15) Huawei
12
Copyright © Huawei Technologies Co., Ltd.
Page 19

Huawei IP Phone eSpace 7950
Proprietary and Confidential
User Manual 3 Phone Settings
The line button setting screen is displayed.
Step 3 Select a function to use and set the parameters. For details, see 3.3.1 Expansion Module.
----End
3.3.3 # as Dial
You can perform the following operations to set the pond key (#) as the callout key.
Step 1 On the home screen, choose Apps > Settings > Button.
Step 2 Select # as Dial, and press Enable or Disable.
----End
3.3.4 Redial Button
The redial button allows you to redial the dialed number. For details about how to set and use
the redial button, see 5.3.2 Making Calls Using the Redial Button.
3.4 System
3.4.1 Date and Time
You can perform the following operations to set the date and time.
Step 1 On the home screen, choose Apps > Settings > System > Date and Time.
The Date and Time screen is displayed.
Step 2 Select NTP, and press Enable to synchronize the network time to the system time.
If you disable NTP, set Date and Time manually.
Step 3 Set the parameters based on site requirements.
----End
3.4.2 Language
You can perform the following operations to set the language.
Step 1 On the home screen, choose Apps > Settings > System > Language.
The Language screen is displayed.
Step 2 Select a language.
Step 3 Press Select.
----End
Issue 01 (2012-10-15) Huawei
13
Copyright © Huawei Technologies Co., Ltd.
Page 20

Huawei IP Phone eSpace 7950
Proprietary and Confidential
User Manual 3 Phone Settings
3.4.3 Power Saving
On the Power Saving screen, you can set the following functions:
Auto Sleep
If no operation is performed on the phone within the specified hibernation duration, the
phone changes to the hibernate state.
Sleep
Once the hibernation is enabled, the phone changes to the hibernation state instantly.
Auto Brightness
When the phone is in talking state, the screen brightness is lowered automatically.
Enabling the Auto Sleep
You can perform the following operations to enable the Auto Sleep function:
Step 1 On the home screen, choose Apps > Settings > System > Power Saving > Auto Sleep.
The Auto Sleep screen is displayed.
Step 2 Press Enable.
The Sleep After field is displayed.
Step 3 Select a value.
Step 4 Press Select.
----End
Disabling the Auto Sleep
You can perform the following operations to disable the Auto Sleep function:
Step 1 On the home screen, choose Apps > Settings > System > Power Saving > Auto Sleep.
The Auto Sleep screen is displayed.
Step 2 Select Auto Sleep and press Disable.
----End
Sleep
You can perform the following operations to set the one-click hibernation function:
Step 1 On the home screen, choose Apps > Settings > System > Power Saving.
The Power Saving screen is displayed.
Step 2 Select Sleep.
Step 3 Press Enable.
----End
Issue 01 (2012-10-15) Huawei
14
Copyright © Huawei Technologies Co., Ltd.
Page 21

Huawei IP Phone eSpace 7950
Proprietary and Confidential
User Manual 3 Phone Settings
Press any button to disable the hibernation function.
Auto Brightness
You can perform the following operations to set the Auto Brightness function:
Step 1 On the home screen, choose Apps > Settings > System > Power Saving.
The Power Saving screen is displayed.
Step 2 Select Auto Brightness.
Step 3 Press Enable or Disable.
----End
3.4.4 Bluetooth
You can perform the following operations to set the bluetooth function:
Step 1 On the home screen, choose Apps > Settings > System > Bluetooth.
The Bluetooth screen is displayed.
Step 2 Press Enable or Disable.
----End
3.4.5 Phone Lock
Enabling the Phone Lock Function
You can perform the following operations to enable the phone lock function:
Step 1 On the home screen, choose Apps > Settings > System > Phone Lock.
The Phone Lock screen is displayed.
Step 2 Press Enable.
The Lock After parameter is displayed.
Step 3 Select a value.
Step 4 Press Select.
----End
Disabling the Phone Lock Function
You can perform the following operations to disable the phone lock function:
Step 1 On the home screen, choose Apps > Settings > System > Phone Lock.
The Phone Lock screen is displayed.
Step 2 Select Phone Lock.
Issue 01 (2012-10-15) Huawei
15
Copyright © Huawei Technologies Co., Ltd.
Page 22

Huawei IP Phone eSpace 7950
Proprietary and Confidential
User Manual 3 Phone Settings
Step 3 Press Disable.
----End
3.4.6 Restart
You can perform the following operations to restart the phone:
Step 1 On the home screen, choose Apps > Settings > System.
Step 2 Select Restart and press Select.
A message "Restart Phone?" is displayed.
Step 3 Press Restart.
----End
3.4.7 Restore Factory Defaults
Step 1 On the home screen, choose Apps > Settings > System.
Step 2 Select Restore Factory Defaults and press Select.
A message "All settings will be deteled.Continue?" is displayed.
Step 3 Press Restore.
----End
3.5 Status
3.5.1 Peripheral Status
You can perform the following operations to view the peripheral status.
Step 1 On the home screen, choose Apps > Settings > Status.
Step 2 Select Peripheral Status.
Step 3 Press View.
----End
3.5.2 Network
You can perform the following operations to view the network status.
Step 1 On the home screen, choose Apps > Settings > Status.
Step 2 Select Network.
Step 3 Press View.
----End
Issue 01 (2012-10-15) Huawei
16
Copyright © Huawei Technologies Co., Ltd.
Page 23

Huawei IP Phone eSpace 7950
Proprietary and Confidential
User Manual 3 Phone Settings
3.5.3 About Phone
You can perform the following operations to view the phone information:
Step 1 On the home screen, choose Apps > Settings > Status.
Step 2 Select About Phone.
Step 3 Press View.
----End
3.5.4 Certificate
You can perform the following operations to view the certificate:
Step 1 On the home screen, choose Apps > Settings > Status.
Step 2 Select Certificate.
Step 3 Press View.
----End
3.6 Advanced
To use the advanced setting service, ensure that your account must be assigned the
administrator right. If you have any questions, contact the system administrator.
3.7 Log Out
You can perform the following operations to deregister the phone:
Step 1 On the home screen, select Apps.
The Apps screen is displayed.
Step 2 Select Settings and press Select.
Step 3 Select Log Out and press Select.
The Log out? dialog box is displayed.
Step 4 Press OK.
The Log in screen is displayed.
----End
Issue 01 (2012-10-15) Huawei
17
Copyright © Huawei Technologies Co., Ltd.
Page 24

Huawei IP Phone eSpace 7950
ietary and Confidential
User Manual 4 Web Page Settings
4
4.1 Logging In to the Web Page
You can perform the following operations to access the web page of the IP phone.
Step 1 On the PC, open the browser and type the IP address of the IP phone, for example,
http://192.169.1.72.
The login page is displayed.
Step 2 Type Account and Password. (The default account and password are those used to log in to
the IP phone.)
Step 3 Click Log In.
----End
4.2 Preferences
Web Page Settings
4.2.1 Contacts
Adding Contacts
You can perform the following operations to add contacts.
Step 1 On the web page, choose Preferences > Contacts.
Step 2 Click Add.
The Edit page is displayed.
Step 3 Modify the contact information.
Step 4 Click Finish.
----End
On the Edit page, click Edit to import the profile picture of the contact. only the image less than 10 KB
and in .jpg, .bmp, or .gif format can be imported.
Issue 01 (2012-10-15) Huawei Propr
Copyright © Huawei Technologies Co., Ltd.
18
Page 25

Huawei IP Phone eSpace 7950
ietary and Confidential
User Manual 4 Web Page Settings
Importing Contacts
You can perform the following operations to import contacts.
Click Export Contacts to export a contact file in .csv or .vCard format. Modify the contact file.
Step 1 On the web page, choose Preferences > Contacts.
Step 2 Click Import.
Step 3 Select the modified file to import.
----End
Searching for Contacts
You can perform the following operations to search for contacts.
Step 1 On the web page, choose Preferences > Contacts.
Step 2 In the search text box, type key words of a contact, including first name, second name,
number, or name in pinyin.
Step 3 Click Search.
----End
Modifying Contacts
You can perform the following operations to modify contacts.
Step 1 On the web page, choose Preferences > Contacts.
Step 2 Click next to the contact to modify.
The Edit page is displayed.
Step 3 Modify the contact information.
Step 4 Click Finish.
----End
Deleting Contacts
You can perform the following operations to delete contacts.
Step 1 On the web page, choose Preferences > Contacts.
Step 2 Click next to the contact to delete.
A message "Are you sure you want to delete the contact?" is displayed.
Step 3 Click OK.
----End
Issue 01 (2012-10-15) Huawei Propr
19
Copyright © Huawei Technologies Co., Ltd.
Page 26

Huawei IP Phone eSpace 7950
ietary and Confidential
User Manual 4 Web Page Settings
Clearing Contacts
You can perform the following operations to clear contacts.
Step 1 On the web page, choose Preferences > Contacts.
Step 2 Click Clear Contacts.
A message "Are you sure you want to clear contacts?" is displayed.
Step 3 Click OK.
----End
Creating Groups
You can perform the following operations to create groups.
Step 1 On the web page, choose Preferences > Contacts.
Step 2 Click Groups.
The Groups page is displayed.
Step 3 Click Add Group.
The Edit page is displayed.
Step 4 Modify the group.
Step 5 Click Finish.
----End
A contact can be added to a group after added to my contacts.
Modifying Groups
You can perform the following operations to modify groups.
Step 1 On the web page, choose Preferences > Contacts.
Step 2 Click Groups.
The Groups page is displayed.
Step 3 Select a group to modify and click Edit.
The Edit page is displayed.
Step 4 Modify the group.
Step 5 Click Finish.
----End
Deleting Groups
You can perform the following operations to delete groups.
Issue 01 (2012-10-15) Huawei Propr
20
Copyright © Huawei Technologies Co., Ltd.
Page 27

Huawei IP Phone eSpace 7950
ietary and Confidential
User Manual 4 Web Page Settings
Step 1 On the web page, choose Preferences > Contacts.
Step 2 Click Groups.
The Groups page is displayed.
Step 3 Select a group to delete and click Delete.
A message "Are you sure you want to delete the group?" is displayed.
Step 4 Click OK.
----End
4.2.2 Ringtone
You can perform the following operations to set ringtones.
Step 1 On the web page, choose Preferences > Ringtone.
Step 2 Select a ringtone type.
Default: If no intranet or extranet ringtone is set for an account, the default ringtone is
played when there is an incoming call.
On-net: When there is an incoming call from an internal user, the intranet ringtone is
played.
Off-net: When there is an incoming call from an external user, the extranet ringtone is
played.
Step 3 Select a ringtone to use, and click Save.
----End
4.2.3 Key Tone
You can perform the following operations to set the key tone.
Step 1 On the web page, choose Preferences > Key Tone.
Step 2 Select Enable or Disable.
Step 3 Click Save.
----End
4.2.4 Wallpaper
You can perform the following operations to set wallpapers.
You can click Import Ringtone to import customized ringtones in .wav format.
When you place the pointer on a ringtone or select a ringtone, is displayed for you to delete
the ringtone. The system ringtones cannot be deleted.
Step 1 On the web page, choose Preferences > Wallpaper.
Step 2 Select a wallpaper to use, and click Save.
Issue 01 (2012-10-15) Huawei Propr
21
Copyright © Huawei Technologies Co., Ltd.
Page 28

Huawei IP Phone eSpace 7950
ietary and Confidential
User Manual 4 Web Page Settings
----End
Click Import Wallpaper to import customized wallpapers in .jpg, .bmp, .png, or .gif format.
When you place the pointer on a wallpaper or select a wallpaper, is displayed for you to delete
the ringtone. The system wallpapers cannot be deleted.
4.2.5 Answering Mode
You can perform the following operations to set the answering mode.
Step 1 On the web page, choose Preferences > Answering Mode.
Step 2 Select Handsfree, Bluetooth earphone, USB earphone or Headset.
Step 3 Click Save.
----End
4.3 Call Features
4.3.1 Call Forward
Enabling the Call Forward Function
You can perform the following operations to enable the call forward function:
Step 1 On the web page, choose Call Features > Call Forward.
Step 2 Select a call forwarding mode from the Call Forward drop-down list box.
Step 3 Select Message or Number.
Message: Incoming calls are forwarded to the voice mailbox.
Number: Incoming calls are forwarded to the associated number.
Step 4 Click Save.
----End
Disabling the Call Forward Function
You can perform the following operations to disable the call forward function:
Step 1 On the web page, choose Call Features > Call Forward.
Step 2 Select Disable from the Call Forward drop-down list box.
Step 3 Click Save.
----End
Issue 01 (2012-10-15) Huawei Propr
22
Copyright © Huawei Technologies Co., Ltd.
Page 29

Huawei IP Phone eSpace 7950
ietary and Confidential
User Manual 4 Web Page Settings
4.3.2 Hotline
For details about how to set and use the hotline service, see 5.13 Hotline.
4.3.3 Call Waiting
You can perform the following operations to set the call waiting function.
Step 1 On the web page, choose Call Features > Call Waiting.
Step 2 Select Enable or Disable.
Step 3 Click Save.
----End
4.3.4 Automatic Answering
Enabling the Automatic Answering Function
You can perform the following operations to enable the automatic answering function.
Step 1 On the web page, choose Call Features > Automatic Answering.
Step 2 Select Enable.
Step 3 Select a value from the Delay Time drop-down list box.
Step 4 Click Save.
----End
Disabling the Automatic Answering Function
You can perform the following operations to disable the automatic answering function.
Step 1 On the web page, choose Call Features > Automatic Answering.
Step 2 Select Disable.
Step 3 Click Save.
----End
4.3.5 Auto Dial
You can perform the following operations to set the Auto Dial function.
Step 1 On the web page, choose Call Features > Auto Dial.
Step 2 Select Enable and set Dial After.
Step 3 Click Save.
----End
Issue 01 (2012-10-15) Huawei Propr
23
Copyright © Huawei Technologies Co., Ltd.
Page 30

Huawei IP Phone eSpace 7950
ietary and Confidential
User Manual 4 Web Page Settings
4.4 Button
4.4.1 Expansion Module
You can perform the following operations to set programmable button on the expansion
Module.
Step 1 On the web page, choose Button > Expansion Module.
Step 2 Click the grey button next to the programmable button on the expansion Module.
The Select Programmable Button Functions page is displayed.
Step 3 Select a function to use and set the parameters.
Table 3-1 describes the functions and parameters of the programmable button.
Step 4 Click Save.
----End
4.4.2 Line Button
You can perform the following operations to set the line button.
Step 1 On the web page, choose Button > Line Button.
Step 2 Click the grey button next to the line button.
The Select Line Button Functions page is displayed.
Step 3 Select a function to use and set the parameters.
Table 3-1 describes the functions and parameters of the programmable button.
Step 4 Click Save.
----End
4.4.3 # as Dial
You can perform the following operations to set the pond key (#) as the callout key.
Step 1 On the web page, choose Button > # as Dial.
Step 2 Select Enable or Disable.
On the line button that has no account can be set to the shortcut button.
Step 3 Click Save.
----End
4.4.4 Redail Button
You can perform the following operations to set the redial button.
Issue 01 (2012-10-15) Huawei Propr
24
Copyright © Huawei Technologies Co., Ltd.
Page 31

Huawei IP Phone eSpace 7950
ietary and Confidential
User Manual 4 Web Page Settings
Step 1 On the web page, choose Button > Redail Button.
Step 2 Select Redial directly or Display redial list.
Step 3 Click Save.
----End
4.5 System
4.5.1 Date and Time
You can perform the following operations to set the date and time.
Step 1 On the web page, choose System > Date and Time.
Step 2 Select Automatic or Manual.
If Manual is selected, the System Time must be set manually.
Step 3 Set the parameters based on site requirements.
Step 4 Click Save.
----End
4.5.2 Language
You can perform the following operations to set the language.
Step 1 On the web page, choose System > Language.
Step 2 Select a language from the Phone Language drop-down list box.
Step 3 Click Save.
----End
4.5.3 Power Saving
Enabling the Auto Sleep
You can perform the following operations to enable the Auto Sleep function:
Step 1 On the web page, choose System > Power Saving.
Step 2 Select Enable.
Step 3 Select a value from the Hibernation Time drop-down list box.
Step 4 Click Save.
----End
Issue 01 (2012-10-15) Huawei Propr
25
Copyright © Huawei Technologies Co., Ltd.
Page 32

Huawei IP Phone eSpace 7950
ietary and Confidential
User Manual 4 Web Page Settings
Disabling the Auto Sleep
You can perform the following operations to disable the Auto Sleep function:
Step 1 On the web page, choose System > Power Saving.
Step 2 Select Disable.
Step 3 Click Save.
----End
Setting the Auto Brightness
You can perform the following operations to set the Auto Brightness function:
Step 1 On the web page, choose System > Power Saving.
Step 2 Select Enable or Disable.
Step 3 Click Save.
----End
4.5.4 Phone Lock
Enabling the Phone Lock Function
You can perform the following operations to enable the phone lock function:
Step 1 On the web page, choose System > Phone Lock.
Step 2 Select Enable.
Step 3 Select a value from the Lock After drop-down list box.
Step 4 Click Save.
----End
Disabling the Phone Lock Function
You can perform the following operations to disable the phone lock function:
Step 1 On the web page, choose System > Phone Lock.
Step 2 Select Disable.
Step 3 Click Save.
----End
4.5.5 Restart
You can perform the following operations to restart the phone:
Step 1 On the web page, choose System > Restart.
Issue 01 (2012-10-15) Huawei Propr
26
Copyright © Huawei Technologies Co., Ltd.
Page 33

Huawei IP Phone eSpace 7950
ietary and Confidential
User Manual 4 Web Page Settings
Step 2 Click Restart.
A message "Are you sure you want to restart the phone?" is displayed.
Step 3 Click OK.
----End
4.5.6 Restore Factory Defaults
You can perform the following operations to restore the factory settings.
Step 1 On the web page, choose System > Restore Factory Defaults.
Step 2 Click Restore Factory Defaults.
A message "Are you sure you want to restore factory defaults?" is displayed.
Step 3 Click OK.
----End
4.6 Status
4.6.1 Network
On the web page, choose View Status > Network to view the network status.
4.6.2 Peripheral Status
On the web page, choose View Status > Peripheral Status to view the peripheral status.
4.6.3 Certificate
On the web page, choose View Status > Certificate to view the certificate information.
4.6.4 About Phone
On the web page, choose View Status > About Phone to view the phone information.
Issue 01 (2012-10-15) Huawei Propr
27
Copyright © Huawei Technologies Co., Ltd.
Page 34

Huawei IP Phone eSpace 7950
Proprietary and Confidential
User Manual 5 Phone Usage
5.1 Multiple Accounts and Lines
Multiple accounts: A maximum of six accounts can be registered with the eSpace7950.
Multiple lines: A maximum of six lines can be configured for an account on the
eSpace7950.
5.2 Answering Incoming Calls
5.2.1 Answering Calls Manually
If there is an incoming call when the phone is in idle state, you can pick up the phone, press
Speaker button, press Headset button, or press the line key of the account to answer the
call.
If the detailed information such as name, number, department, and profile picture of a contact is saved in
my contacts or corporate directory, the information are displayed on the screen when there is incoming
call from the contact.
5
Phone Usage
5.2.2 Answering Calls Automatically
After the automatic answering function is enabled, the phone can answer calls automatically.
For details about how to enable the automatic answering function, see 4.3.4 Automatic
Answering.
5.2.3 Rejecting Calls
When there is an incoming call, you can press Reject to reject the call.
5.2.4 Muting the Phone
After muting your phone, you can hear the other party but the other party cannot hear you.
Muting: During a call, press Volume button. is displayed in the status bar.
Unmuting: When a phone is muted, press Volume button to unmute the phone.
Issue 01 (2012-10-15) Huawei
Copyright © Huawei Technologies Co., Ltd.
28
Page 35

Huawei IP Phone eSpace 7950
Proprietary and Confidential
User Manual 5 Phone Usage
5.2.5 Recording
During a call, you can perform the following operations to enable the recording function:
Step 1 Press More to switch between softkeys.
Step 2 Press Record.
The recording function is enabled.
Step 3 Press Stop.
The recording function is disabled.
----End
To use the recording service, ensure that your account has been assigned the recording right. If you have
any questions, contact the system administrator.
5.3 Making Calls
5.3.1 Making Calls by Typing Numbers
You can perform the following operations to make calls by typing numbers.
Step 1 Pick up the phone, press Speaker button, press Headset button, or press the line key of the
account.
The dialing screen is displayed and the dial tone is played. The line indicator is steady green.
Step 2 Type the number of a contact, or press Up or Down to select a contact in the existing
contacts.
Step 3 Press Call.
----End
When you type the number of a contact, the phone automatically queries and displays the contact.
After a contact is selected, you can press Edit Dial to change the number of the contact.
5.3.2 Making Calls Using the Redial Button
Setting the Redial Button
Step 1 On the home screen, choose Apps > Settings > Button > Redial Button.
Step 2 Select Redial directly or Display redial list.
Redial directly: Press Redial to redial the number that was dialed last time.
Display redial list: Press Redial to display the list of dialed numbers.
Step 3 Press Select.
Issue 01 (2012-10-15) Huawei
29
Copyright © Huawei Technologies Co., Ltd.
Page 36

Huawei IP Phone eSpace 7950
Proprietary and Confidential
User Manual 5 Phone Usage
----End
Using the Redial Button
Step 1 Pick up the phone, press Speaker button, press Headset button, or press the line key of the
account.
Step 2 press Redial.
If Redial Button is set to Display redial list, the list of dialed numbers is displayed. You can
select a number to dial, and press Call.
----End
On the home screen, press Redial to display the list of dialed numbers or redial the number that was
dialed last time in hands-free mode.
5.3.3 Making Calls Using My Contacts
If a contact has been added to My Contacts, you can call the contact on the My Contacts
screen.
Step 1 Press Contacts.
The My Contacts screen is displayed.
Step 2 Press Up or Down to search for a contact or type key words including first name, second
name, number, or pinyin in the Search text box to search for a contact.
Step 3 Select a contact and press Call.
----End
5.3.4 Making Calls Using History
Step 1 Press History.
On the displayed All Calls screen, press Left or Right to switch between the All Calls and
Missed Calls screens.
Step 2 Press Up or Down to select a call record.
Step 3 Press Call.
----End
When a call record is selected, press More to switch between softkeys., and press Edit Dial to change
the number of the contact.
5.3.5 Making Calls Using the Corporate Directory
Step 1 Press Contacts.
The My Contacts screen is displayed.
Issue 01 (2012-10-15) Huawei
30
Copyright © Huawei Technologies Co., Ltd.
Page 37

Huawei IP Phone eSpace 7950
Proprietary and Confidential
User Manual 5 Phone Usage
Step 2 Press Right to switch to the Corporate screen.
Step 3 Press Up or Down to search for a contact or type key words including first name, second
name, number, or pinyin in the Search text box to search for a contact.
Step 4 Select a contact and press Call.
----End
5.3.6 Making Calls Using the eSpace Desktop
After the phone is linked to the eSpace Desktop, you can make calls using the eSpace
Desktop.
Step 1 Type key words in the search text box or search for a contact in the corporate directory on the
eSpace Desktop.
Step 2 Click next to a contact.
The phone calls the contact in hands-free mode.
----End
5.3.7 Making Calls Using the Speed Dial Button
After the programmable Button on the expansion board or line Button is set as the speed dial
Button, you can dial a specified number by pressing the programmable Button or line Button.
For details about how to set the speed dial Button, see 3.3.1 Expansion Module or 3.3.2 Line
Button.
5.3.8 Making Emergency Calls
When a registered phone is locked, you can still make emergency calls.
Step 1 press Emerg..
Step 2 Type an emergency number.
Step 3 Press Call.
----End
5.3.9 Auto Dial
After the Auto Dial function is enabled, the phone automatically makes a call if:
A number is typed on the dialing screen, and no dialing or hungup operation is
performed in a specified period.
A contact is selected on the dialing screen, and no dialing or hungup operation is
performed in a specified period.
Enabling the Auto Dial Function
Step 1 On the home screen, choose Apps > Settings > Preferences > Auto Dial.
Issue 01 (2012-10-15) Huawei
31
Copyright © Huawei Technologies Co., Ltd.
Page 38

Huawei IP Phone eSpace 7950
Proprietary and Confidential
User Manual 5 Phone Usage
Step 2 Press Enable.
The Dial After field is displayed.
Step 3 Type a value.
Step 4 Press Finish.
----End
Disabling the Auto Dial Function
Step 1 On the home screen, choose Apps > Settings > Preferences > Auto Dial.
Step 2 Press Disable.
----End
5.4 Contacts
5.4.1 Adding Contacts
Step 1 Press Contacts button.
The My Contacts screen is displayed.
Step 2 Press Add.
The Add Contact screen is displayed.
For existing contacts, you can press Up or Down to select a contact, and press More to switch between
softkeys.
Step 3 Modify the contact information.
Select Office NO., Family NO., or Mobile NO., and press Primary. The selected number is
set to the primary number to dial by default.
Step 4 Press Finish.
----End
On the home screen, select Contacts and press OK. The My Contacts screen is displayed.
On the My Contacts screen, select a contact and choose Details to view, call, modify, or delete the
contact information.
5.4.2 Searching for Contacts
Step 1 Press Contacts button.
The My Contacts screen is displayed.
Step 2 In the search text box, type key words of a contact, including first name, second name,
number, or name in pinyin.
Issue 01 (2012-10-15) Huawei
32
Copyright © Huawei Technologies Co., Ltd.
Page 39

Huawei IP Phone eSpace 7950
Proprietary and Confidential
User Manual 5 Phone Usage
The phone searches for the contacts including the key words in my contacts, corporate
directory, and call records, and displays the queried contacts.
----End
If contact groups have been created, you can press Left or Right to display the My Groups screen and
search for contacts by group.
5.4.3 Modifying Contacts
Step 1 Press Contacts button.
The My Contacts screen is displayed.
Step 2 Search for a contact to modify. For details about how to search for a contact, see 5.4.2
Searching for Contacts.
Step 3 press More to switch between softkeys, and choose Edit.
The Edit Contact screen is displayed.
Step 4 Modify the contact information.
Step 5 Press Finish.
----End
5.4.4 Deleting Contacts
Step 1 Press Contacts button.
The My Contacts screen is displayed.
Step 2 Search for a contact to delete For details about how to search for a contact, see 5.4.2
Searching for Contacts.
Step 3 Press More to switch between softkeys, and choose Delete.
A message "Delete contact?" is displayed.
Step 4 Press Delete.
----End
5.4.5 Adding Groups
Step 1 Press Contacts button.
The My Contacts screen is displayed.
Step 2 Press Left or Right to switch to the My Groups screen.
Step 3 Press Add.
Step 4 Type a group name, select Group Ringtone, and press Add.
The Add screen is displayed.
Issue 01 (2012-10-15) Huawei
33
Copyright © Huawei Technologies Co., Ltd.
Page 40

Huawei IP Phone eSpace 7950
Proprietary and Confidential
User Manual 5 Phone Usage
Select Group Ringtone and press Modify to select a ringtone for the group.
Add is displayed only when there is at least one contact in the group.
A contact can be added to a group after added to my contacts.
Step 5 Press Select to select a contact.
Press Clear to deselect a contact.
Step 6 Press Add to add a contact to a group.
Step 7 Press Finish to save the settings.
----End
On the My Groups screen, select a group, and press Details to view and call the contacts in the group.
5.4.6 Modifying Groups
Step 1 Press Contacts button.
The My Contacts screen is displayed.
Step 2 Press Left or Right to switch to the My Groups screen.
Step 3 Select a group to modify, press More to switch between softkeys, and press Edit.
Step 4 Modify the group.
Step 5 Press Finish.
----End
5.4.7 Deleting Groups
Step 1 Press Contacts button.
The My Contacts screen is displayed.
Step 2 Press Left or Right to switch to the My Groups screen.
Step 3 Select a group to delete, press More to switch between softkeys, and press Delete.
A message "Are you sure you want to delete the group?" is displayed.
Step 4 Press Delete.
----End
5.4.8 Deleting Contacts in a Group
Step 1 Press Contacts button.
The My Contacts screen is displayed.
Step 2 Press Left or Right to switch to the My Groups screen.
Step 3 Select a group to modify, press More to switch between softkeys, and press Edit.
Issue 01 (2012-10-15) Huawei
34
Copyright © Huawei Technologies Co., Ltd.
Page 41

Huawei IP Phone eSpace 7950
Proprietary and Confidential
User Manual 5 Phone Usage
The Edit page is displayed.
Step 4 Select a contact to delete, and press Delete.
The "Delete the group member?" is displayed.
Step 5 Press Delete.
----End
5.4.9 Corporate Directory
Before using the corporate directory function, ensure that the corporate directory server has been
configured. If you have any questions, contact the system administrator.
Viewing Contact Details
You can perform the following operations to view the details of a contact in the corporate
directory.
Step 1 Press Contacts.
The My Contacts page is displayed.
Step 2 Press Left or Right to switch to the Corporate screen.
Step 3 Press Up or Down to select a contact to view.
Step 4 Press Details.
----End
Adding Contacts in the Corporate Directory to My Contacts
You can perform the following operations to add a contact in the corporate directory to my
contacts.
Step 1 Press Contacts.
The My Contacts page is displayed.
Step 2 Press Left or Right to switch to the Corporate screen.
Step 3 Press Up or Down to select a contact, and press +Contacts.
The Add Contact screen is displayed.
Step 4 Modify the contact information.
Step 5 Press Finish to save the settings.
Step 6
----End
Issue 01 (2012-10-15) Huawei
35
Copyright © Huawei Technologies Co., Ltd.
Page 42

Huawei IP Phone eSpace 7950
Proprietary and Confidential
User Manual 5 Phone Usage
5.5 History
5.5.1 Missed Call Notification
When there are missed calls:
The call record indicator is steady red.
The icon indicating the number of missed calls is displayed at the upper-right corner on
the main call record menu.
After you view the missed calls, the indicator is off and the icon disappears.
5.5.2 Viewing History
Step 1 Press History button.
On the displayed ALL Calls screen, press Left or Right to switch between the ALL Calls
and Missed Calls screens.
Step 2 To view the detailed information about a call record, select the call record and press Details.
----End
The received and dialed calls of a number are merged into one record. the missed calls of a number
are merged into one record.
On the home screen, select History and press OK. The History screen is displayed.
5.5.3 Deleting History
Deleting a History
Step 1 Press History button.
On the displayed ALL Calls screen, press Left or Right to switch between the ALL Calls
and Missed Calls screens.
Step 2 Select a record to delete.
Step 3 Press More to switch between softkeys, and press Delete.
A message "Delete call record?" is displayed.
Step 4 Press Delete.
----End
Deleting All History
Step 1 Press History button.
On the displayed ALL Calls screen, press Left or Right to switch between the ALL Calls
and Missed Calls screens.
Step 2 Press More to switch between softkeys, and press Clear.
Issue 01 (2012-10-15) Huawei
36
Copyright © Huawei Technologies Co., Ltd.
Page 43

Huawei IP Phone eSpace 7950
Proprietary and Confidential
User Manual 5 Phone Usage
A message "Clear all call records?" is displayed.
Step 3 Press Clear.
----End
By pressing Clear, you can delete all call records on the current page.
5.5.4 Adding Contacts
Adding a New Contact
You can save a number as a new contact.
Step 1 Press Call Records.
On the displayed ALL Calls screen, press Left or Right to switch between the ALL Calls
and Missed Calls screens.
Step 2 Select a call record.
Step 3 Press More to switch between softkeys, and press +Contact.
Step 4 On the displayed dialog box, select Save as New Contact, and click OK.
The Select a number save type dialog box is displayed.
Step 5 Select a number type and press Select.
The Add Contact screen is displayed.
Step 6 Edit the contact information, and press Finish.
----End
Modify an Existing Contact
You can modify the information of an existing contact.
Step 1 Press Call Records.
On the displayed ALL Calls screen, press Left or Right to switch between the ALL Calls
and Missed Calls screens.
Step 2 Select a call record.
Step 3 Press More to switch between softkeys, and press +Contact.
Step 4 On the displayed dialog box, select Save to the existing contact list and click OK.
The Select Contact screen is displayed.
Step 5 Select the contact to modify, and press Select.
The Select a number save type dialog box is displayed.
Step 6 Change the number of the contact.
If a number exists for the selected number type, press Replace to replace the existing
number.
Issue 01 (2012-10-15) Huawei
37
Copyright © Huawei Technologies Co., Ltd.
Page 44

Huawei IP Phone eSpace 7950
Proprietary and Confidential
User Manual 5 Phone Usage
If no number exists for the selected number type, press Select to save the number under
this type.
The Add Contact screen is displayed.
Step 7 Edit the contact information, and press Finish.
----End
5.6 Call Hold
During call hold, the two parties in the call cannot hear each other.
Holding a call: During a call, press Hold to hold the call.
Resume a call: During active call hold, press Resume to resume the call.
5.7 Call Transfer
Blind Transfer
Step 1 Press Transfer during a call.
Step 2 The blind transfer can be performed in the following ways:
During a call, you can transfer the call to a third party.
A call can be transferred in the following three modes:
Blind transfer
A call is transferred to a third party directly.
Semi-attended transfer
A call is transferred to a third party after the third party rings.(For eSpace UC1.1)
Fully-attended transfer
A call is transferred to a third party after the third-party answers the call.
To enable the call transfer service for an account, at least two lines are configured for the account.
The call hold is enabled.
Type the number of a third party, press More to switch between softkeys, and press
Done.
Press Up or Down to select a contact, and press Done.
----End
Semi-Attended Transfer(For eSpace UC1.1)
Step 1 Press Transfer during a call.
The call hold is enabled.
Step 2 Type the number of a third party or press Up or Down to select a contact.
Issue 01 (2012-10-15) Huawei
38
Copyright © Huawei Technologies Co., Ltd.
Page 45

Huawei IP Phone eSpace 7950
Proprietary and Confidential
User Manual 5 Phone Usage
Step 3 Press Call.
Step 4 When hearing the ring back tone, press Done.
----End
Fully-Attended Transfer
Step 1 Press Transfer during a call.
The call hold is enabled.
Step 2 Type the number of a third party or press Up or Down to select a contact.
Step 3 Press Call.
After the third party answers the call, ask him or her whether to answer the call.
Step 4 If yes, press Done.
----End
5.8 Call Deflection
The call deflection function allows you to transfer a call to a third party directly.
Step 1 Press Transfer.
Step 2 Type the number of a contact, or press Up or Down to select a contact in the existing
contacts.
Step 3 Press Transfer.
----End
5.9 Call Forward
After the call forward function is enabled, incoming calls that meet the call forward
conditions are forwarded to the Voicemail or Number.
A call can be forwarded in the following modes:
Call forward unconditional (CFU)
All incoming calls are forwarded to the Voicemail or Number.
Call forward on busy (CFB)
When the phone is picked up, and in dialing or talking state, an incoming call is
forwarded to the Voicemail or Number.
Call forward on no reply (CFNR)
When an incoming call is not answered in a specified period, the call is forwarded to the
Voicemail or Number.
Call forward offline (CFO)
When the phone is offline, an incoming call is forwarded to the Voicemail or Number.
Issue 01 (2012-10-15) Huawei
39
Copyright © Huawei Technologies Co., Ltd.
Page 46

Huawei IP Phone eSpace 7950
Proprietary and Confidential
User Manual 5 Phone Usage
To use the call forward service, ensure that your account has been assigned the call forward right. If
you have any questions, contact the system administrator.
The call forward function is available only for the current account. For a new account, the call
forward function must be enabled again.
Enabling the Call Forward Function
You can perform the following operations to enable the call forward function:
Step 1 On the home screen, choose Apps > Settings > Call Features > Call Forward.
Step 2 Select a forward mode, and press Select.
Step 3 Select a call forward destination.
Voice mailbox: Incoming calls are forwarded to the voice mailbox.
Associated number: Type the number of a third party, and press Select.
----End
Disabling the Call Forward Function
You can perform the following operations to disable the call forward function:
Step 1 On the home screen, choose Apps > Settings > Call Features > Call Forward.
Step 2 Select Disable and press Select.
----End
5.10 Call Waiting
After the call waiting function is enabled, the new incoming call is displayed on the screen
when the phone is in talking state.
To use the call waiting service, ensure that your account has been assigned the call waiting right. If
you have any questions, contact the system administrator.
To use the call waiting service, at least two lines are configured for the account.
How to set
Step 1 On the home screen, choose Apps > Settings > Call Features.
Step 2 Select Call Waiting, and press Enable or Disable.
----End
How to Use
If there is an incoming call when the phone is in talking state, you can:
Press Answer.
Answer the new call and hold the original call.
Issue 01 (2012-10-15) Huawei
40
Copyright © Huawei Technologies Co., Ltd.
Page 47

Huawei IP Phone eSpace 7950
Proprietary and Confidential
User Manual 5 Phone Usage
Press Ignore.
Stop the ringtone of the new call. If the calling party does not hang up, you still can press
Answer to answer the call.
Press Reject.
Reject the new call and display the original call screen.
5.11 Call Pickup
The following call pickup modes are supported:
Designated pickup
Answer the calls of a specified account.
Co-group pickup
Answer the calls of all accounts in a group.
To use the call pickup service, ensure that your account has been assigned the call pickup right. If you
have any questions, contact the system administrator.
5.11.1 Designated Pickup
You can perform the following operations to use the designated pickup function:
Step 1 On the home screen, press More to switch between softkeys.
Step 2 Press Pickup.
The dialing screen is displayed and the dial tone is played. The line indicator is steady green.
Step 3 Type the number of the designated phone and press Pickup.
----End
5.11.2 Co-Group Pickup
You can perform the following operations to enable the group pickup function:
Step 1 On the home screen, press More to switch between softkeys.
Step 2 Press GPickup.
----End
5.12 Call Park
You can hold a call and resume the call on another phone within five minutes.
To use the call park service, ensure that your account has been assigned the call park right. If you have
any questions, contact the system administrator.
Issue 01 (2012-10-15) Huawei
41
Copyright © Huawei Technologies Co., Ltd.
Page 48

Huawei IP Phone eSpace 7950
Proprietary and Confidential
User Manual 5 Phone Usage
Enabling the Call Park Function
Step 1 Press More to switch between softkeys.
Step 2 Press Park.
----End
Disabling the Call Park Function
Step 1 On the home screen of another phone, press More to switch between softkeys.
Step 2 Press Unpark.
The dialing screen is displayed and the dial tone is played. The line indicator is steady green.
Step 3 Type a number, and press Unpark.
----End
5.13 Hotline
After the hotline function is enabled, you can pick up the phone, press Speaker button, press
Headset button, or press the line key of the account. If no dialing operation is performed in a
specified period, the phone automatically dials the hotline number.
Enabling the Hotline Function
Step 1 On the web page, choose Call Features > Hotline.
Step 2 Select Enable.
Step 3 Type Hotline Number, and select a value from the Delay Time drop-down list box.
Step 4 Click Save.
----End
Disabling the Hotline Function
Step 1 On the web page, choose Call Features > Hotline.
Step 2 Select Disable.
Step 3 Click Save.
----End
5.14 Automatic Callback(For eSpace UC2.0)
When the called number cannot be connected currently, you can enable the automatic callback
(ACB) function. When the called number is in idle state, a call will be initiated automatically.
The following ACB modes are supported:
Issue 01 (2012-10-15) Huawei
42
Copyright © Huawei Technologies Co., Ltd.
Page 49

Huawei IP Phone eSpace 7950
Proprietary and Confidential
User Manual 5 Phone Usage
ACB on busy
When the called number is in busy state, you can enable the ACB on busy function.
When the called number is in idle state, a call will be initiated automatically.
ACB on no reply
When the called number has no response, you can enable the ACB on no reply function.
When the called number has call records, a call will be initiated automatically.
To use the ACB service, ensure that your account has been assigned the ACB right. If you have any
questions, contact the system administrator.
Using the ACB Function
Step 1 When you make a call, ACB is displayed.
Step 2 Press ACB. If the ACB function is registered successfully, the ACB icon is displayed in the
status bar.
Step 3 When the called number is in idle state, a call will be initiated automatically.
Step 4 After you and the called party both answer the call, the call is connected.
----End
After an ACB call is connected, the ACB record is deleted. A maximum of five ACB records can be
saved.
Viewing ACB Records
Step 1 On the home screen, press More to switch between softkeys.
Step 2 Press Callback list.
The Callback list screen is displayed.
----End
Select an ACB record, and press Cancel to delete the record.
5.15 Distinctive Ringtone
You can set distinctive ringtones for internal and external calls.
For details, see 3.1.1 Ringtone.
The ringtone priorities are described as follows in descending order: contact ringtone, group
ringtone, internal or external ringtone, and default ringtone.
To use the distinctive ringtone service, ensure that your account has been assigned the distinctive
ringtone right. If you have any questions, contact the system administrator.
Issue 01 (2012-10-15) Huawei
43
Copyright © Huawei Technologies Co., Ltd.
Page 50

Huawei IP Phone eSpace 7950
Proprietary and Confidential
User Manual 5 Phone Usage
5.16 Busy Lamp Field
After the busy lamp field (BLF) function is enabled, the status of the monitored account is
displayed on the programmable key. You can press the programmable key to dial the
monitored number.
For details about how to set the BLF, see 3.3.1 Expansion Module. For details about the
indicator status, see 2.1.2 LED.
To use the BLF service, ensure that your account has been assigned the BLF right. If you have any
questions, contact the system administrator.
Only Huawei eSpace UC1.1 solution supports the status monitoring function.
5.17 DND
After the do not disturb (DND) function is enabled, all incoming calls are rejected
automatically but you can still make calls.
Enable the DND: On the home screen, press DND to enable the DND function.
DND enabled is displayed on the home screen, and is displayed in the status bar.
Disable the DND: In DND state, press DND to disable the DND function.
The DND function is available only for the current account. For a new account, the DND function must
be enabled again.
5.18 Local Meetings
5.18.1 Creating Local Meetings
To use the local meeting service, at least two lines are configured for the account.
Creating Meetings Using Join Meeting
Step 1 When users A and B are talking, user A presses Conf to hold the current call, and hears the
dial tone.
Step 2 Type the number of user C, and press Call.
Step 3 When user C answers the call, user A can talk with user C. User A presses Join to create a
local meeting.
----End
Creating Meetings Using Merging Calls
Step 1 The call between user A and user B is in talking state, and the call between user A and user C
is in hold state.
Issue 01 (2012-10-15) Huawei
44
Copyright © Huawei Technologies Co., Ltd.
Page 51

Huawei IP Phone eSpace 7950
Proprietary and Confidential
User Manual 5 Phone Usage
Step 2 User A presses Merge to create a local meeting.
----End
5.18.2 Managing Local Meetings
After creating a local meeting, the initiator can manage the local meeting.
Adding Participants
Step 1 The initiator presses Add.
Step 2 Type the number of a contact, press Contact to select a contact in my contacts, or press
History to select a contact in call records.
Step 3 Press Call.
Step 4 Press Join after the contact answers the call.
----End
A local meeting supports a maximum of six channels of video calls.
Muting Participants
Step 1 Press the direction key to select a participant to mute.
Step 2 Press Mute.
----End
Press Unmute to unmute the participant.
Removing Participants
Step 1 Press the direction key to select a participant to remove.
Step 2 Press More to switch between softkeys, and press Remove.
A message "Remove the Participant?" is displayed.
Step 3 Press Yes.
----End
Holding Meetings
Hold a meeting: Press Hold.
Resume a meeting: Press Resume to resume a meeting in hold state.
Issue 01 (2012-10-15) Huawei
45
Copyright © Huawei Technologies Co., Ltd.
Page 52

Huawei IP Phone eSpace 7950
Proprietary and Confidential
User Manual 5 Phone Usage
When the initiator presses Hold, all participants' calls are held.
When a participant presses Hold, only the participant's call is held.
Ending Meetings
Step 1 Press More to switch between softkeys, and press End.
A message "End conference?" is displayed.
Step 2 Press Yes.
When the initiator presses End, the meeting is ended.
When a participant presses End, only the participant leaves the meeting.
----End
5.19 Shared Line between the Manager and the Secretary
A line is shared by the manager and secretary. When there is an incoming call for the manager,
both the manager's phone and secretary's phone ring. The secretary determines whether to
transfer the call to the manager.
To use the shared line service, ensure that your account has been assigned the shared line right. If
you have any questions, contact the system administrator.
For details about how to configure a shared line between the manager and secretary, contact the
system administrator.
Supposing:
Manager A's line 1 and secretary B's line 1 are shared. Manager A's line 2 and secretary
B's line 2 are private lines.
User C calls the number of manager A's line 1.
Call Answered by the Manager
The manager presses Line 1 to answer the call from user C.
Call Transferred from the Secretary to the Manager
Step 1 Secretary B presses Line 1 to answer the call from user C.
When the indicator of manager A's line 1 is steady red, the secretary has answered the call.
Step 2 Secretary B presses Line 2 and type the number of the manager A's private line to call
manager A.
User C's call is held.
Step 3 Manager A presses Line 2 to answer the call from secretary B.
User C's call is held.
Step 4 Manager A presses Line 1 to talk with user C.
Issue 01 (2012-10-15) Huawei
46
Copyright © Huawei Technologies Co., Ltd.
Page 53

Huawei IP Phone eSpace 7950
Proprietary and Confidential
User Manual 5 Phone Usage
Secretary B is in hold state. Secretary B hangs up to end the call with manager A.
Step 5 Manager A or user C hangs up. The call ends.
----End
Call Barged by the Manager(For eSpace UC1.1)
Step 1 Secretary B presses Line 1 to answer the call from user C.
When the indicator of manager A's line 1 is steady red, the secretary has answered the call.
Step 2 Manager A presses Line 1.
Step 3 Manager A presses Barge to talk with user C.
----End
Private Calls (For eSpace UC2.0)
The private call function is supported so that the manager's line is not shared by the secretary.
After the private call function is enabled:
You can perform the following operations to enable or disable the private call function:
Step 1 On the home screen, press More to switch between softkeys, and press Private Call.
The Secretary Private Call screen is displayed.
Step 2 Press Enable or Disable to enable or disable the private call function.
After the private call function is enabled, the line key changes to .
----End
5.20 Message
The message function allows the calling party to leave voice messages so that you will not
miss any calls.
Only the manager's phone can be configured with the private call function.
User C calls manager A. The incoming call is only displayed on manager A's phone.
Manger A's line is in talking state and secretary B's line is still in idle state.
To use the message service, ensure that your account has been assigned the message right. If you have
any questions, contact the system administrator.
Enabling the Message Function
Enable the call forward function and set the call forward to the message. For details, see 5.9
Call Forward
Issue 01 (2012-10-15) Huawei
.
47
Copyright © Huawei Technologies Co., Ltd.
Page 54

Huawei IP Phone eSpace 7950
Proprietary and Confidential
User Manual 5 Phone Usage
Viewing Message
When there are unread voice messages, the number of unread voice messages is displayed on
the message icon on the home screen, or the MWI indicator blinks every three seconds.
Step 1 Press Message.
The Message screen is displayed.
Step 2 Select a voice message, and press Call.
On the home screen, select Message and press OK. The Message screen is displayed.
----End
5.21 Input Method
The phone supports the following five input methods:
Chinese pinyin. The softkey is PINYIN.
English uppercase letter. The softkey is ABC.
English lowercase letter. The softkey is abc.
Digit. The softkey is 123.
Special character. The softkey is SYM.
You can perform the following operations to change the input method or delete characters:
Press abc, ABC, PINYIN, SYM, or 123 to change the input method.
Press to delete the character on the left of the cursor.
Issue 01 (2012-10-15) Huawei
48
Copyright © Huawei Technologies Co., Ltd.
Page 55

Huawei IP Phone eSpace 7950
Proprietary and Confidential
User Manual 6 eSpace UC-Related Functions
6
eSpace UC-Related Functions
6.1 Association with the eSpace Desktop
6.1.1 Enabling the Association with the eSpace Desktop
Prerequisites
The Enterprise eSpace Desktop has been installed.
The eSpace 7950 IP phone has been installed.
The UC account has been configured.
To use the association service, ensure that your account has been assigned the association right. If you
have any questions, contact the system administrator.
Procedure
Step 1 Double-click .
The Log in page is displayed, as shown in Figure 6-1.
Issue 01 (2012-10-15) Huawei
Copyright © Huawei Technologies Co., Ltd.
49
Page 56

Huawei IP Phone eSpace 7950
Proprietary and Confidential
User Manual 6 eSpace UC-Related Functions
Figure 6-1 Login
Step 2 Enter UC account and Password.
Step 3 Click Settings.
The server setting page is displayed.
Step 4 Set the parameters by referring to Figure 6-2.
To set UC account, Password, Server, and Server IP Address, contact the system administrator.
Issue 01 (2012-10-15) Huawei
50
Copyright © Huawei Technologies Co., Ltd.
Page 57

Huawei IP Phone eSpace 7950
Proprietary and Confidential
User Manual 6 eSpace UC-Related Functions
Figure 6-2 Association server settings
Step 5 Click Log In.
The eSpace Desktop is displayed.
Step 6 Select Take IP Phone as call equipment, as shown in Figure 6-3.
The IP phone has been associated with the eSpace Desktop, and the line key changes to
.
Figure 6-3 Association with the eSpace Desktop
----End
6.1.2 Using the Association with the eSpace Desktop
If the phone has been associated with the eSpace Desktop, the phone status including idle,
ringing, dialing, and talking are displayed on the eSpace Desktop client. You can use the
eSpace Desktop client to dial, answer, reject, and transfer calls for the phone.
Issue 01 (2012-10-15) Huawei
51
Copyright © Huawei Technologies Co., Ltd.
Page 58

Huawei IP Phone eSpace 7950
Proprietary and Confidential
User Manual 6 eSpace UC-Related Functions
Answering or Rejecting Calls Using the eSpace Desktop
When there is an incoming call, the eSpace Desktop and IP phone ring simultaneously, as
shown in Figure 6-4.
Figure 6-4 Incoming call page on the eSpace Desktop
Click Answer to replace the IP phone to answer the call.
Click Reject to replace the IP phone to reject the call.
Transferring Calls Using the eSpace Desktop
When there is an incoming call, the eSpace Desktop and IP phone ring simultaneously, as
shown in Figure 6-5.
Figure 6-5 Incoming call page on the eSpace Desktop
Step 1 Click Forward.
The Forward-to number dialog box is displayed, as shown in Figure 6-6.
Figure 6-6 Forward-to number dialog box
Step 2 Click
Issue 01 (2012-10-15) Huawei
next to the account to forward.
52
Copyright © Huawei Technologies Co., Ltd.
Page 59

Huawei IP Phone eSpace 7950
Proprietary and Confidential
User Manual 6 eSpace UC-Related Functions
The numbers of the contact are displayed, as shown in Figure 6-7.
Figure 6-7 Numbers of the contact
Step 3 Click a number. The call is forwarded to the number.
----End
Making Calls Using the eSpace Desktop
Method 1:
Step 1 Click next to the account to call, as shown in Figure 6-8.
Figure 6-8 eSpace Desktop client
Step 2 Click a number of the account, as shown in Figure 6-9.
Issue 01 (2012-10-15) Huawei
53
Copyright © Huawei Technologies Co., Ltd.
Page 60

Huawei IP Phone eSpace 7950
Proprietary and Confidential
User Manual 6 eSpace UC-Related Functions
Figure 6-9 Dialing a number using the eSpace Desktop
----End
Method 2:
Step 1 Click . The dial pad is displayed, as shown in Figure 6-10.
Figure 6-10 Dial pad
Step 2 Enter a phone number and click .
----End
Switching from IP Phone to eSpace Desktop
Step 1 Click on the talking page of the eSpace Desktop.
Issue 01 (2012-10-15) Huawei
54
Copyright © Huawei Technologies Co., Ltd.
Page 61

Huawei IP Phone eSpace 7950
Proprietary and Confidential
User Manual 6 eSpace UC-Related Functions
The communication modes are displayed, as shown in Figure 6-11.
Figure 6-11 Communication modes
Step 2 Click Communicate by PC.
----End
To switch a call from the eSpace Desktop to the phone, you can click Communicate by phone.
Figure 6-12 shows the talking page on the eSpace Desktop.
Figure 6-12 Talking page on the eSpace Desktop
Press to hold the call.
Press to transfer the call.
Press to end the call.
Issue 01 (2012-10-15) Huawei
55
Copyright © Huawei Technologies Co., Ltd.
Page 62

Huawei IP Phone eSpace 7950
Proprietary and Confidential
User Manual 6 eSpace UC-Related Functions
and are available only when a user uses the eSpace Desktop to talk with the other party.
If you hold a call actively, click to resume the call.
6.2 One-Key Switch (For eSpace UC2.0)
After the One-Key Switch function is enabled, you can transfer a call from the IP phone to the
mobile phone or retrieve the call from the mobile phone to the IP phone.
To use the One-Key Switch service, ensure that your account has been assigned the One-Key Switch
right. If you have any questions, contact the system administrator.
Switching Calls Made by the IP Phone to the Mobile Phone
Step 1 On the talking screen, press More to switch between softkeys, and press Switch.
The dialing screen is displayed.
Step 2 Type a number and press Call.
Step 3 Answer the call using the mobile phone.
The One-Key Switch talking screen is displayed.
----End
Switching Calls Answered by the IP Phone to the Mobile Phone
Step 1 On the talking screen, press More to switch between softkeys, and press Switch.
Step 2 Answer the call using the mobile phone.
The One-Key Switch talking screen is displayed.
----End
Retrieving Calls from the Mobile Phone to the IP Phone
Press Retrieve Call to retrieve the call from the mobile phone to the IP phone.
Switching Calls Answered by the Mobile Phone to the IP Phone
When there is an incoming call on the mobile phone, press More on the home screen, and
press Switch to transfer the call to the IP phone.
6.3 Instant Meetings (For eSpace UC2.0)
Creating Instant Meetings
You can perform the following operations to create an instant meeting.
Issue 01 (2012-10-15) Huawei
56
Copyright © Huawei Technologies Co., Ltd.
Page 63

Huawei IP Phone eSpace 7950
Proprietary and Confidential
User Manual 6 eSpace UC-Related Functions
Step 1 Press Conf on the home screen.
The dialing screen is displayed.
Step 2 Type the number of a contact, press Contact to select a contact in my contacts, or press
History to select a contact in call records.
Step 3 Press Add.
The Participant List screen is displayed.
Adding participants: Press More to switch between softkeys, and press Add. For details,
see Adding Participants.
Deleting participants: Select a participant to delete, press More to switch between
softkeys, and press Delete.
Step 4 Press Start.
A maximum of 20 participants can join an instant meeting. If there are more than 20 contacts in the
participant list, only the first 20 contacts (including yourself) can join the meeting.
Select a participant, and press Other Number to change the invitation number.
----End
Adding Participants
Step 1 The initiator presses Add.
Step 2 Type the number of a contact, press Contact to select a contact in my contacts, or press
History to select a contact in call records.
Step 3 Press Call.
Step 4 Press Join after the contact answers the call.
----End
Muting Participants
Step 1 Press the direction key to select a participant to mute.
Step 2 Press Mute.
----End
Press Unmute to unmute the participant.
Removing Participants
Step 1 Press the direction key to select a participant to remove.
Step 2 Press More to switch between softkeys, and press Remove.
A message "Remove the Participant?" is displayed.
Step 3 Press Yes.
Issue 01 (2012-10-15) Huawei
57
Copyright © Huawei Technologies Co., Ltd.
Page 64

Huawei IP Phone eSpace 7950
Proprietary and Confidential
User Manual 6 eSpace UC-Related Functions
----End
Holding Meetings
Hold a meeting: Press Hold.
Resume a meeting: Press Resume to resume a meeting in hold state.
When the initiator presses Hold, all participants' calls are held.
When a participant presses Hold, only the participant's call is held.
Ending Meetings
Step 1 Press More to switch between softkeys, and press End.
A message "End conference?" is displayed.
Step 2 Press Yes.
When the initiator presses End, the meeting is ended.
When a participant presses End, only the participant leaves the meeting.
----End
6.4 Group Meeting (For eSpace UC2.0)
Creating Group Meetings
You can perform the following operations to create a group meeting.
Step 1 Press Contacts.
The My Contacts screen is displayed.
Step 2 Press Left or Right to switch to the My Groups screen.
Step 3 Select a group and press Conf.
The Participant List screen is displayed.
Adding participants: Press More to display the softkeys, and press Add. For details, see
Adding Participants.
Deleting participants: Select a participant to delete, press More to display the softkeys,
and press Delete.
Step 4 Press Start.
A maximum of 20 participants can join a group meeting. If there are more than 20 contacts in the
participant list, only the first 20 contacts (including yourself) can join the meeting.
Select a participant, and press Other Number to change the invitation number.
----End
Issue 01 (2012-10-15) Huawei
58
Copyright © Huawei Technologies Co., Ltd.
Page 65

Huawei IP Phone eSpace 7950
Proprietary and Confidential
User Manual 6 eSpace UC-Related Functions
Adding Participants
Step 1 The initiator presses Add.
Step 2 Type the number of a contact, press Contact to select a contact in my contacts, or press
History to select a contact in call records.
Step 3 Press Call.
Step 4 Press Join after the contact answers the call.
----End
Muting Participants
Step 1 Press the direction key to select a participant to mute.
Step 2 Press Mute.
----End
Press Unmute to unmute the participant.
Removing Participants
Step 1 Press the direction key to select a participant to remove.
Step 2 Press More to display the softkeys, and press Remove.
A message "Remove the Participant?" is displayed.
Step 3 Press Yes.
----End
Holding Meetings
Hold a meeting: Press Hold.
Resume a meeting: Press Resume to resume a meeting in hold state.
When the initiator presses Hold, all participants' calls are held.
When a participant presses Hold, only the participant's call is held.
Ending Meetings
Step 1 Press More to display the softkeys, and press End.
A message "End conference?" is displayed.
Step 2 Press Yes.
When the initiator presses End, the meeting is ended.
When a participant presses End, only the participant leaves the meeting.
----End
Issue 01 (2012-10-15) Huawei
59
Copyright © Huawei Technologies Co., Ltd.
Page 66

Huawei IP Phone eSpace 7950
Proprietary and Confidential
User Manual 6 eSpace UC-Related Functions
6.5 Status Presence (For eSpace UC2.0)
After a contact in the corporate directory is added to my contacts and set as the speed dial
number, the status of the contact can be displayed in real time.
The status are described as following:
Green: The phone is in idle status.
Red: The phone is picked up, and in dialing or talking state.
Grey: The phone is offline.
Issue 01 (2012-10-15) Huawei
60
Copyright © Huawei Technologies Co., Ltd.
Page 67

Huawei IP Phone eSpace 7950
Proprietary and Confidential
User Manual 7 FAQs
7
FAQs
7.1 How to View the Detailed Information of the Phone
Question
How can I view the detailed information of the phone, including IP address, software version,
and sequence number?
Answer
Step 1 On the home screen, choose Applications > Set > Status.
Step 2 Select an item and click View.
----End
7.2 How to Set the Language
Question
How can I set the language displayed on the screen?
Answer
Step 1 On the home screen, choose Applications > Set > System > Language.
Step 2 Select a language.
Step 3 Press Select.
----End
Issue 01 (2012-10-15) Huawei
Copyright © Huawei Technologies Co., Ltd.
61
Page 68

Huawei IP Phone eSpace 7950
Proprietary and Confidential
User Manual 7 FAQs
7.3 How to Change the Default Ringtone
Question
How can I change the default ringtone?
Answer
Step 1 On the home screen, choose Applications > Set > Customization > Ringtone.
The Ringtone screen is displayed.
Step 2 Select Default Ringtone and press Select.
Step 3 Select a ringtone to use.
Step 4 Press Select.
----End
7.4 How to Adjust the Volume of the Ringtone
Question
How can I adjust the volume of the ringtone?
Answer
Press Mute Key to adjust the volume of the ringtone when the phone is in idle or ringing
state.
7.5 How to Transfer Incoming Calls to the Voice Mailbox
or an Associated Number
Question
How can I transfer incoming calls to the voice box or an associated number?
Answer
For details, see 5.9 Call Forward.
7.6 How to Retrieve Voice Messages
Question
How can I retrieve voice messages?
Issue 01 (2012-10-15) Huawei
62
Copyright © Huawei Technologies Co., Ltd.
Page 69

Huawei IP Phone eSpace 7950
Proprietary and Confidential
User Manual 7 FAQs
Answer
Step 1 Press Voice Mailbox.
The Voice Mailbox screen is displayed.
Step 2 Select a voice message, and press Call to retrieve the message.
----End
Issue 01 (2012-10-15) Huawei
63
Copyright © Huawei Technologies Co., Ltd.
Page 70

Huawei eSpace 7950 IP Phone
Compliance and Safety Manual
Issue 01
Date 2012-11-06
HUAWEI TECHNOLOGIES CO., LTD.
Page 71

Page 72

Contents
Proprietary and Confidential
Copyright © Huawei Technologies Co., Ltd. 2010. All rights reserved.
No part of this document may be reproduced or transmitted in any form or by any means without prior written
consent of Huawei Technologies Co., Ltd.
Trademarks and Permissions
and other Huawei trademarks are trademarks of Huawei Technologies Co., Ltd.
All other trademarks and trade names mentioned in this document are the property of their respective holders.
Notice
The purchased eSpace 7950, services and features are stipulated by the contract made between Huawei and the
customer. All or part of the eSpace 7950, services and features described in this document may not be within the
purchase scope or the usage scope. Unless otherwise specified in the contract, all statements, information, and
recommendations in this document are provided "AS IS" without warranties, guarantees or representations of any
kind, either express or implied.
The information in this document is subject to change without notice. Every effort has been made in the preparation
of this document to ensure accuracy of the contents, but all statements, information, and recommendations in this
document do not constitute the warranty of any kind, express or implied.
Huawei Technologies Co., Ltd.
Address: Huawei Industrial Base
Bantian, Longgang
Shenzhen 518129
People's Republic of China
Website:
Email: support@huawei.com
http://enterprise.huawei.com
Issue 01(2012-11-15)
Huawei
Copyright © Huawei Technologies
Co., Ltd.
iii
Page 73

Contents
Proprietary and Confidential
Intended Audience
This document describes Electromagnetic Compatibility (EMC) and other safety standards
compliance and information about the eSpace 7950 IP Phone.
This document provides the general safety guidelines for handling, installing or operating the
eSpace 7950 IP Phone.
This document is intended for:
About This Document
Maintenance engineers
Technical support engineers
Installation engineers
Network planning engineers
Symbol Conventions
The symbols that may be found in this document are defined as follows.
Symbol Description
Indicates a hazard with a high level of risk, which if not
avoided, will result in death or serious injury.
Indicates a hazard with a medium or low level of risk,
which if not avoided, could result in minor or moderate
injury.
Indicates a potentially hazardous situation, which if not
avoided, could result in equipment damage, data loss,
performance degradation, or unexpected results.
iv
Indicates a tip that may help you solve a problem or save
time.
Provides additional information to emphasize or
supplement important points of the main text.
Huawei
Copyright © Huawei Technologies
Co., Ltd.
Issue (2012-11-15)
Page 74

Contents
Proprietary and Confidential
Change History
Changes between document issues are cumulative. Therefore, the latest document issue
contains all the changes in previous issues.
Issue 01(2012-11-15)
Huawei
Copyright © Huawei Technologies
Co., Ltd.
v
Page 75

Contents
Proprietary and Confidential
Contents
1 Regulatory Compliance Statement.............................................................................................1-1
2 Regulatory Compliance Information.........................................................................................2-1
2.1 Regulatory Compliance Standards ................................................................................................................2-1
2.2 European Regulatory Compliance.................................................................................................................2-3
2.3 U.S.A Regulatory Compliance......................................................................................................................2-4
2.3.1 FCC Part 15..........................................................................................................................................2-4
2.3.2 FCC Part 68..........................................................................................................................................2-5
2.4 CISPR 22 Compliance ..................................................................................................................................2-5
2.5 China RoHS hazardous substance table ........................................................................................................2-5
2.6 Other Markets................................................................................................................................................2-6
3 Safety Information.......................................................................................................................3-7
vi
Huawei
Copyright © Huawei Technologies
Co., Ltd.
Issue (2012-11-15)
Page 76

nd Confidential
Tables
Table 2-1 Regulatory compliance standards .......................................................................................................2-2
Table 2-2 China RoHS hazardous substance table..............................................................................................2-5
Issue ()
Huawei Proprietary a
Copyright © Huawei Technologies Co., Ltd.
i
Page 77

Page 78

ietary and Confidential
1 Regulatory Compliance Statement
1
About This Chapter
This chapter provides the certification details for eSpace 7950.
Regulatory Compliance Statement
Issue () Huawei Propr
1-1
Copyright © Huawei Technologies Co., Ltd.
Page 79

Page 80

Proprietary and Confidential
2 Regulatory Compliance Information
2
Regulatory Compliance Information
About This Chapter
2.1 Regulatory Compliance Standards
2.2 European Regulatory Compliance
2.3 U.S.A Regulatory Compliance
2.4 CISPR 22 Compliance
2.5 China RoHS hazardous substance table
2.6 Other Markets
2.1 Regulatory Compliance Standards
eSpace 7950 complies with the standards listed in Table 2-1.
Issue () Huawei
2-1
Copyright © Huawei Technologies Co., Ltd.
Page 81

2 Regulatory Compliance Information
Proprietary and Confidential
Table 2-1 Regulatory compliance standards
Discipline Standards
EMC
Safety
EN 55022 Class B
CISPR 22
EN 55024
CISPR 24
ETSI EN 301 489-1
ETSI EN 301 489-17
AS/NZS CISPR 22 Class B
IEC 61000-3-2
EN 61000-3-2
IEC 61000-3-3
EN 61000-3-3
IEC 61000-6-1
EN 61000-6-1
IEC 61000-6-3
EN 61000-6-3
CFR 47 FCC Part 15 Class B
ICES 003 Class B
IEC 60950-1
EN 60950-1
UL 60950-1
CSA C22.2 No 60950-1
AS/NZS 60950.1
BS EN 60950-1
RF
Telecom FCC Part 68 (HAC)
Environmental protection
2-2 Huawei
Copyright © Huawei Technologies Co., Ltd.
CFR 47 FCC Part 2
CFR 47 FCC Part 15
ETSI EN 300 328
2002/95/EC & 2011/65/EU (RoHS)
EC NO. 1907/2006 (REACH)
2002/96/EC (WEEE)
Issue ()
Page 82

Proprietary and Confidential
2 Regulatory Compliance Information
Discipline Standards
NOTE
EMC: electromagnetic compatibility
NEBS: Network Equipment Build Standard
RF: radio frequency
CISPR: International Special Committee on Radio Interference
EN: European Standard
ETSI: European Telecommunications Standards Institute
CFR: Code of Federal Regulations
FCC: Federal Communication Commission
IEC: International Electrotechnical Commission
AS/NZS: Australian/New Zealand Standard
VCCI: Voluntary Control Council for Interference
CNS: Chinese National Standard
UL: Underwriters Laboratories
CSA: Canadian Standards Association
BS: British Standard
IS: Indian Standard
GR: General Requirement
FDA: Food and Drug Administration
BTS: Base Transceiver Station
GSM: Global System for Mobile communications
WLAN: wireless local area network
ICNIRP: International Commission on Non-Ionizing Radiation Protection
OET: Office of Engineering Technology
IEEE: Institute of Electrical and Electronics Engineers
RoHS: restriction of the use of certain hazardous substances
2.2 European Regulatory Compliance
eSpace 7950 complies with the following European directives and regulations.
2004/108/EC (EMC)
2006/95/EC (low voltage)
2002/95/EC & 2011/65/EU (RoHS)
EC NO. 1907/2006 (REACH)
2002/96/EC (WEEE)
eSpace 7950 complies with Directive 2002/95/EC, 2011/65/EU and other similar regulations
from the countries outside the European Union, on the RoHS in electrical and electronic
equipment. The device does not contain lead, mercury, cadmium, and hexavalent chromium
and brominated flame retardants (Polybrominated Biphenyls (PBB) or Polybrominated
Diphenyl Ethers (PBDE)) except for those exempted applications allowed by RoHS directive
for technical reasons.
Issue () Huawei
Copyright © Huawei Technologies Co., Ltd.
2-3
Page 83

2 Regulatory Compliance Information
Proprietary and Confidential
eSpace 7950 complies with Regulation EC NO. 1907/2006 (REACH) and other similar
regulations from the countries outside the European Union. Huawei will notify to the
European Chemical Agency (ECHA) or the customer when necessary and regulation requires.
eSpace 7950 complies with Directive 2002/96/EC on waste electrical and electronic
equipment (WEEE). Huawei is responsible for recycling its end-of-life devices, and please
contact Huawei local service center when recycling is required. Huawei strictly complies with
the EU Waste Electrical and Electronic Equipment Directive (WEEE Directive) and electronic
waste management regulations enacted by different countries worldwide. In addition, Huawei
has established a system for recycling and reuse of electronic wastes, and it can provide
service of dismantling and recycling for WEEE. By Huawei recycling system, the waste can
be handled environmentally and the resource can be recycled and reused fully, which is also
Huawei WEEE stratagem in the word. Most of the materials in eSpace 7950 are recyclable,
and our packaging is designed to be recycled and should be handled in accordance with your
local recycling policies.
In accordance with Article 11(2) in Directive 2002/96/EC (WEEE), eSpace 7950 were marked
with the following symbol: a cross-out wheeled waste bin with a bar beneath as below:
2.3 U.S.A Regulatory Compliance
2.3.1 FCC Part 15
2.3.2 FCC Part 68
2.3.1 FCC Part 15
eSpace 7950 complies with Part 15 of the FCC Rules. Operation is subject to the following
two conditions:
This device does not cause harmful interference.
This device must accept any interference received, including interference that may cause
undesired operation.
If this device is modified without authorization from Huawei, the device may no longer
comply with FCC requirements for Class B digital devices. In that a case, your right to use the
device may be limited by FCC regulations. Moreover, you may be required to correct any
interference to radio or television communications at your own expense.
2-4 Huawei
Issue ()
Copyright © Huawei Technologies Co., Ltd.
Page 84

Proprietary and Confidential
2 Regulatory Compliance Information
This device has been tested and found to comply with the limits for a Class B digital device,
pursuant to Part 15 of the FCC rules. These limits are designed to provide reasonable
protection against harmful interference in a residential installation.
This device generates, uses and radiates radio frequency energy. If it is not installed and used
in accordance with the instructions, it may cause harmful interference to radio
communications.
However, there is no guarantee that interference will not occur in a particular installation. If
this device does cause harmful interference to radio or television reception, which can be
determined by turning the device off and on, the user may take one or more of the following
measures:
Reorient or relocate the receiving antenna.
Reinforce the separation between the device and receiver.
Connect the device into an outlet on a circuit different from that to which the receiver is
connected.
Consult the dealer or an experienced radio or TV technician for assistance.
2.3.2 FCC Part 68
This device is hearing aid–compatible.
2.4 CISPR 22 Compliance
eSpace 7950 complies with CISPR 22 for Class B by the ITE.
2.5 China RoHS hazardous substance table
This eSpace 7950 described in this guide complies with the Chinese RoHS.
Table 2-2 China RoHS hazardous substance table
产品中有害物质或元素的名称及含量
产品中有害物质或元素的名称及含量
产品中有害物质或元素的名称及含量产品中有害物质或元素的名称及含量
部件名称
部件名称
部件名称部件名称
镉
镉 铅铅铅铅 汞汞汞汞 六价铬
镉镉
六价铬 多溴联苯
六价铬六价铬
多溴联苯 多溴联苯醚
多溴联苯多溴联苯
多溴联苯醚
多溴联苯醚多溴联苯醚
Frame
Alloy Parts
Power Adapter
Metal Fittings
Issue () Huawei
〇 ╳ 〇 〇 〇 〇
〇 ╳ 〇 〇 〇 〇
〇 ╳ 〇 〇 〇 〇
〇 〇 〇 〇 〇 〇
2-5
Copyright © Huawei Technologies Co., Ltd.
Page 85

2 Regulatory Compliance Information
Proprietary and Confidential
PCBA
Capacitor
Other electronics
Screen
Solder
Cable
Plastic and Polymer
Label
Battery
〇 ╳ 〇 〇 〇 〇
〇 ╳ 〇 〇 〇 〇
〇 ╳ 〇 〇 〇 〇
〇 〇 〇 〇 〇 〇
〇 ╳ 〇 〇 〇 〇
╳ ╳ 〇 〇 〇 〇
〇 ╳ 〇 〇 〇 ╳
〇 〇 〇 〇 〇 〇
〇 〇 〇 〇 〇 〇
2.6 Other Markets
For relevant compliance information/documentation for markets not mentioned above,
please contact Huawei representative.
2-6 Huawei
Issue ()
Copyright © Huawei Technologies Co., Ltd.
Page 86

Proprietary and Confidential
3 Safety Information
For safety purposes, read these safety precautions carefully and observe them during
operation.
Basic Requirements
Keep the device dry during storage, transportation, and operation.
Prevent collision of the device during storage, transportation, and operation.
Do not attempt to dismantle the device. In case of any fault, contact an authorized
maintenance center for assistance or repair.
Without prior written consent, no organization or individual is permitted to make any
change to the structure or safety and performance design of the device.
While using the device, observe all applicable laws, directives and regulations, and
respect the legal rights of others.
Environment Requirements
Place the device in a well-ventilated place. Do not expose the device to direct sunlight.
Keep the device clean, free of dust and stains.
Do not place the device near a water source or in a damp area.
Place the device on a stable surface.
Do not place any object on the top of the device. Reserve sufficient space around the
device for heat dissipation.
Do not place the device on or near inflammable materials such as foam.
Keep the device away from heat source or flames, such as radiators or candles.
Keep the device away from any household appliances that generate strong magnetic or
electromagnetic fields, such as microwave ovens, refrigerators, or mobile phones.
3
Safety Information
Operation Requirements
Do not allow children to play with the device or accessories. Swallowing the accessories
may be fatal.
Use only accessories (such as the power adapter and the battery) provided or authorized
only by the manufacturer.
Issue () Huawei
3-7
Copyright © Huawei Technologies Co., Ltd.
Page 87

3 Safety Information
Proprietary and Confidential
Ensure that the device does not get wet. If water gets into the device, disconnect the
power supply immediately and unplug all the cables connected to the device, such as the
power cable and the telephone cable, and then contact an authorized maintenance center.
When installing the phone, comply with Limited Power Source (LPS) and local electric
security standards, and use the power supply of saftty extra low voltage (SLEV).
Before connecting or disconnecting any cable, shut down the device and disconnect the
power supply.
While connecting or disconnecting any cable, ensure that your hands are dry.
Do not step on, pull, or bend any cable excessively; doing so may result in the cable may
be damaged, leading to device malfunction.
Do not use old or damaged cables.
Keep the power plug clean and dry, to prevent electric shock or dangerous situations.
During lightning, disconnect the device from the power supply, and unplug all the cables
connected to the device, such as the power cable and the telephone cable, to avoid
lightning strike.
If the device is unused for a long time, disconnect the power supply and unplug the
power plug.
If smoke, sound, or smell is emitted from the device, stop using the device immediately,
disconnect the power supply, and unplug the power supply and other cables. Contact an
authorized maintenance center for advice and repair.
Make sure that no objects (such as metal shavings) enter the device through the speaker.
Cleaning Requirements
Before cleaning the device, stop using it, disconnect the power supply, and unplug all the
cables connected to the device, such as the power cable and the telephone cable.
Do not clean the device exterior with any cleaning solution or cleanser spray. Use a piece
of soft cloth to clean the device shell.
LCD Usage Requirements
Do not expose the LCD to direct sunlight.
Do not press, scratch, or damage the LCD; do not place heavy objects on top of it.
Do not stare at the display screen for a long time. This may harm your eyes or blur your
vision.
LCD Cleaning Requirements
According to the instructions given in the attached manual, use a piece of soft cloth to
remove dust from the surface of the LCD.
Do not clean the screen with volatile solvent, such as alcohol, benzene or dilution agent.
Do not touch the screen with rubber or plastic material for a long time. This will
deteriorate the surface gloss of the LCD.
Environmental Protection
Do not dispose of the device and the accessories in a garbage can. Dispose of the device
according to the local regulations on disposing of packing materials, exhausted batteries and
abandoned devices, and support the recycling activity.
3-8 Huawei
Issue ()
Copyright © Huawei Technologies Co., Ltd.
 Loading...