

Page 1

IPC6123-WDL-A&6131-WD-A
V100R001C00
Quick Start Guide
Issue
Date 2014-12-25
HUAWEI TECHNOLOGIES CO., LTD.
02
Page 2

Copyright © Huawei Technologies Co., Ltd. 2015. All rights reserved.
No part of this document may be reproduced or transmitted in any form or by any means without prior written
consent of Huawei Technologies Co., Ltd.
Trademarks and Permissions
and other Huawei trademarks are trademarks of Huawei Technologies Co., Ltd.
All other trademarks and trade names mentioned in this document are the property of their respective holders.
Notice
The purchased products, services and features are stipulated by the contract made between Huawei and the
customer. All or part of the products, services and features described in this document may not be within the
purchase scope or the usage scope. Unless otherwise specified in the contract, all statements, information,
and recommendations in this document are provided "AS IS" without warranties, guarantees or representations
of any kind, either express or implied.
The information in this document is subject to change without notice. Every effort has been made in the
preparation of this document to ensure accuracy of the contents, but all statements, information, and
recommendations in this document do not constitute a warranty of any kind, express or implied.
Huawei Technologies Co., Ltd.
Address: Huawei Industrial Base
Bantian, Longgang
Shenzhen 518129
People's Republic of China
Website: http://enterprise.huawei.com
Issue 02 (2014-12-25) Huawei Proprietary and Confidential
Copyright © Huawei Technologies Co., Ltd.
i
Page 3
IPC6123-WDL-A&6131-WD-A
Quick Start Guide About This Document
About This Document
Purpose
This document describes the installation and basic operation of the network cameras.
This document applies to the IPC6123-WDL-A and IPC6131-WD-A.
Intended Audience
This document is intended for:
l Installation and commissioning engineers
l Technical support engineers
Symbol Conventions
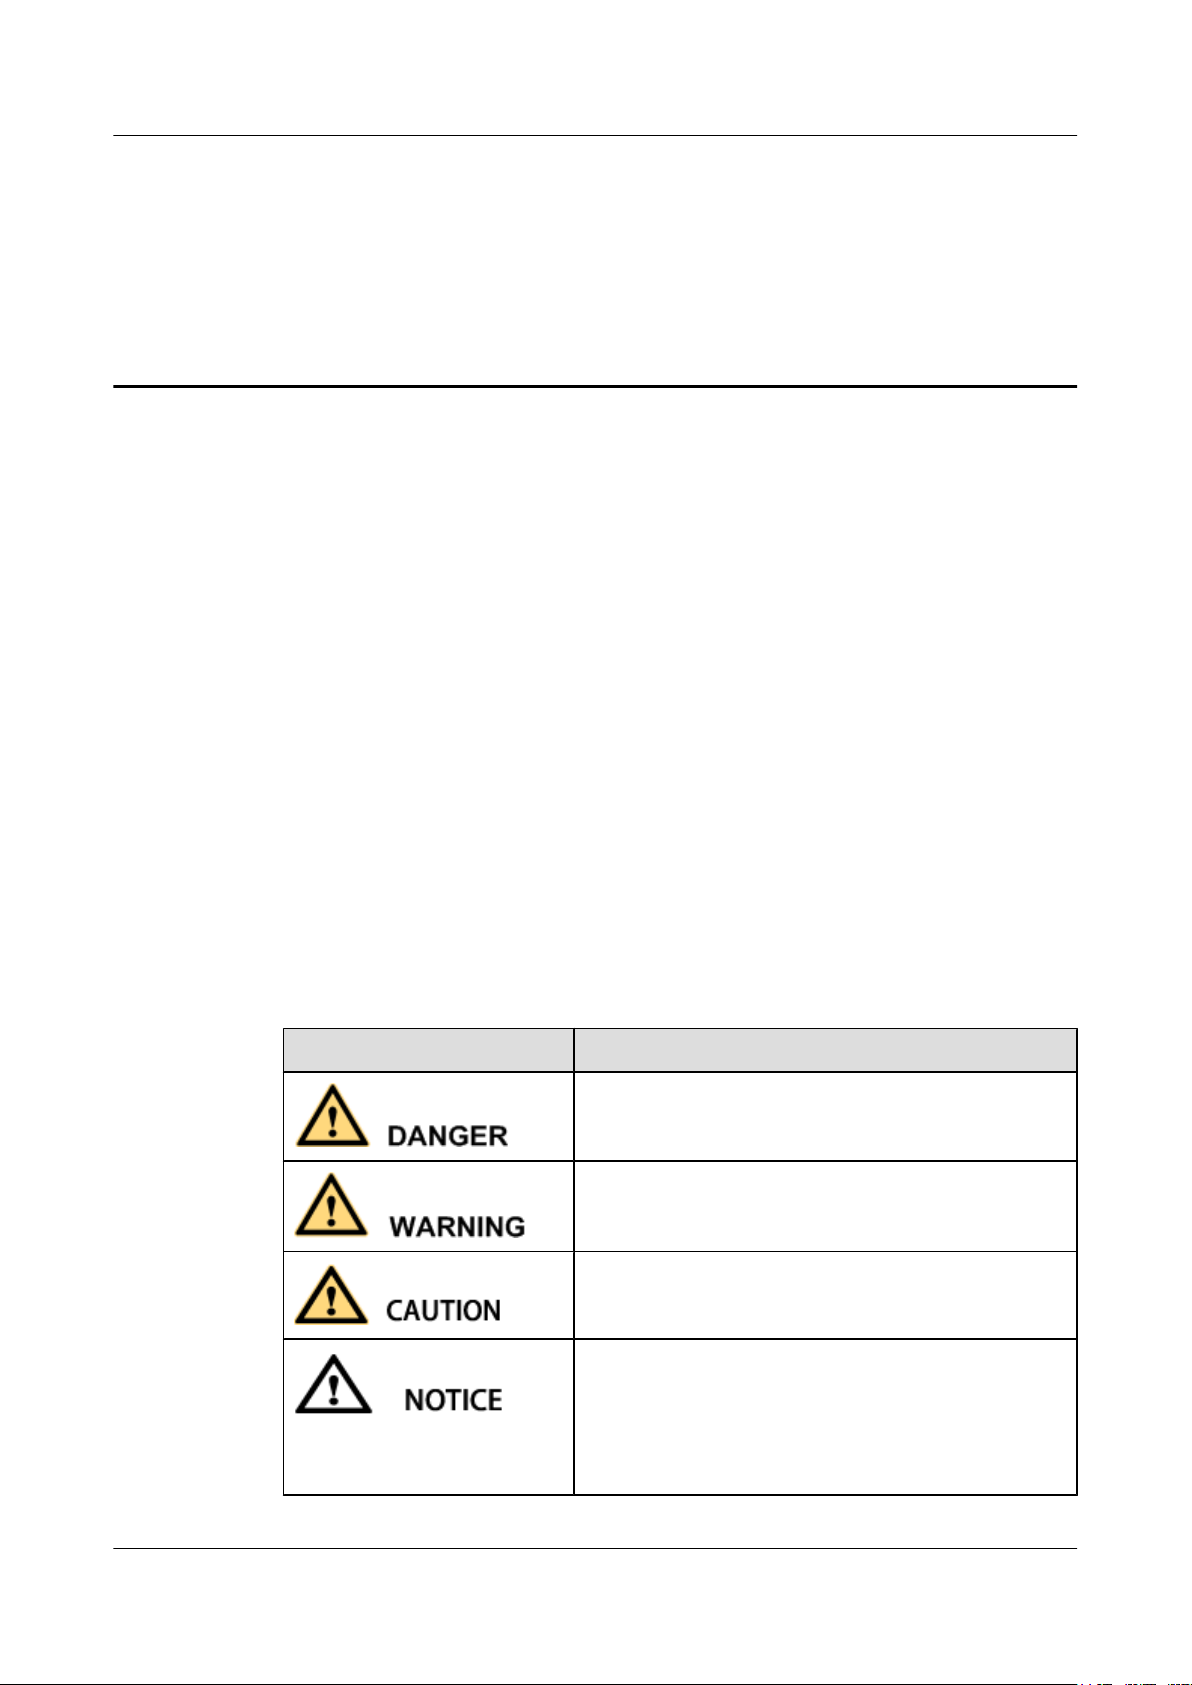
The symbols that may be found in this document are defined as follows.
Symbol Description
Indicates an imminently hazardous situation which, if not
avoided, will result in death or serious injury.
Indicates a potentially hazardous situation which, if not
avoided, could result in death or serious injury.
Indicates a potentially hazardous situation which, if not
avoided, may result in minor or moderate injury.
Indicates a potentially hazardous situation which, if not
avoided, could result in equipment damage, data loss,
performance deterioration, or unanticipated results.
NOTICE is used to address practices not related to
personal injury.
Issue 02 (2014-12-25) Huawei Proprietary and Confidential
Copyright © Huawei Technologies Co., Ltd.
ii
Page 4

IPC6123-WDL-A&6131-WD-A
Quick Start Guide About This Document
Symbol Description
Calls attention to important information, best practices and
tips.
NOTE is used to address information not related to
personal injury, equipment damage, and environment
deterioration.
Change History
Issue Date Description
02 2014-12-25 This is the first release.
01 2014-05-05 This issue is used for first office application
(FOA).
Issue 02 (2014-12-25) Huawei Proprietary and Confidential
Copyright © Huawei Technologies Co., Ltd.
iii
Page 5

IPC6123-WDL-A&6131-WD-A
Quick Start Guide
Contents
Contents
About This Document.....................................................................................................................ii
1 Packing List and Certificate.........................................................................................................1
2 Notices and Precautions...............................................................................................................2
3 Installation......................................................................................................................................4
3.1 Overview........................................................................................................................................................................4
3.2 Installation......................................................................................................................................................................6
3.2.1 Lens Installation..........................................................................................................................................................6
3.2.2 SD Card Installation....................................................................................................................................................7
3.2.3 Pendant Installation.....................................................................................................................................................7
3.2.4 Wall Mounting.............................................................................................................................................................9
3.2.5 Wall Mounting with Housing....................................................................................................................................12
3.2.6 Pole Mounting...........................................................................................................................................................15
4 Quick Settings..............................................................................................................................19
4.1 Accessing the Camera..................................................................................................................................................19
4.2 Live View via Web Browser........................................................................................................................................20
4.3 Logout...........................................................................................................................................................................22
5 Troubleshooting..........................................................................................................................23
5.1 Image Exception...........................................................................................................................................................23
5.2 Power Supply and Interference.....................................................................................................................................24
5.3 Camera Grounding and Protection...............................................................................................................................24
5.4 Camera Network Problem............................................................................................................................................25
5.5 Other Questions............................................................................................................................................................25
A Toxic and Harmful Substances Declaration..........................................................................26
Issue 02 (2014-12-25) Huawei Proprietary and Confidential
Copyright © Huawei Technologies Co., Ltd.
iv
Page 6

IPC6123-WDL-A&6131-WD-A
Quick Start Guide
1 Packing List and Certificate
1 Packing List and Certificate
Items
Network Camera 1
Quick Start Guide 1
CS-to-C Adaptor 1
Amount
For details, access http://enterprise.huawei.com, choose Support > Product Support >
Unified Communications and Collaboration > Video Surveillance > Cameras > 6100 Series
Box Network Camera, and select a specific product model, and select the desired production
version in the Product Version drop-down list box, and download the desired documents.
Issue 02 (2014-12-25) Huawei Proprietary and Confidential
Copyright © Huawei Technologies Co., Ltd.
1
Page 7

IPC6123-WDL-A&6131-WD-A
Quick Start Guide
For a correct and safe use of the device, please read the notices and precautions before you start,
and strictly follow them.
NOTE
2 Notices and Precautions
2 Notices and Precautions
Power Supply
Operation
l The pictures in the manual are only for reference.
l The device is subject to change without notice.
l To get the newly developed firmware or patch, please contact the after-sale service department.
l Contact your dealer, with any problem occurred when using the device.
l The user should be responsible for any damage caused by unauthorized operation or operation without
following the construction of the manual.
l Please install lightening conductor in case of lightening stroke. And the camera must be
effectively grounded.
l Please do not connect many cameras to one adaptor; fire may be caused if the adaptor
temperature is too high.
l Before the installation is complete, please do not power on. And before power off the
camera, please do not disconnect the power cable.
l Keep the power connector clean and dry, in case of electrical shock or other damage.
l Check the specification of the products for the installation environment.
l Make sure the power supply is matched with your required voltage to avoid damage.
l If the product does not function properly, please contact your dealer or the nearest service
center. Do not disassemble the camera for repair or maintenance by yourself.
l Make sure that the wall is strong enough to withstand three times the weight of the camera.
Cleaning Camera
l Before you clean the camera, please power off the camera and unplug all the cables
connected.
Issue 02 (2014-12-25) Huawei Proprietary and Confidential
Copyright © Huawei Technologies Co., Ltd.
2
Page 8

IPC6123-WDL-A&6131-WD-A
Quick Start Guide 2 Notices and Precautions
l Do not touch the lens with your fingers. To dedust it, wipe the lens softly using a soft cloth
with alcohol.
Environment Requirement
l Please keep the camera away from water or any form of liquid. In case there are water drop
into the camera, please disconnect all the cables immediately.
l Please make sure there are enough distance between the camera and the electromagnetic
field to avoid interference.
l The camera shall be installed in ventilated and dry place.
Person
The installation and maintenance of the camera must be done by professionals.
Issue 02 (2014-12-25) Huawei Proprietary and Confidential
Copyright © Huawei Technologies Co., Ltd.
3
Page 9
IPC6123-WDL-A&6131-WD-A
Quick Start Guide
3.1 Overview
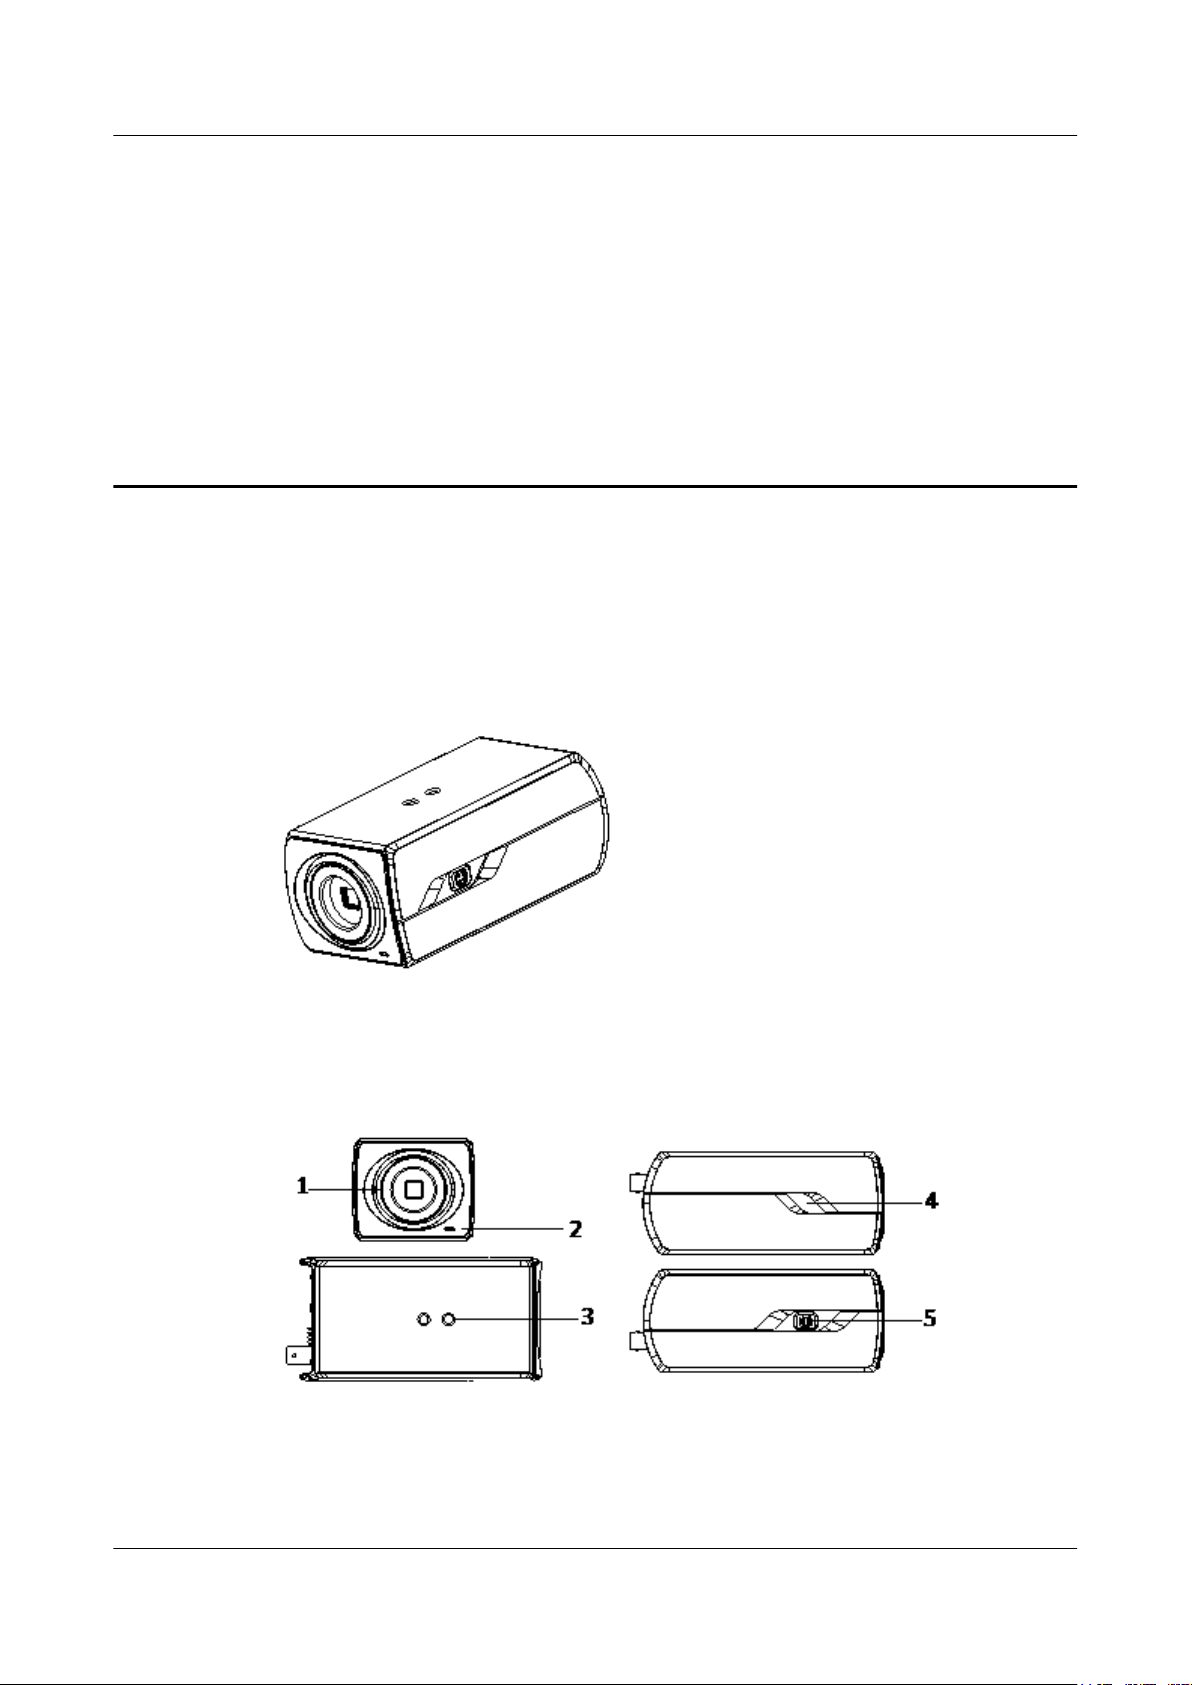
The overview of the IPC6131-WD-A network box camera is shown below.
3 Installation
3 Installation
Figure 3-1 Overview (1)
The overview of the components and the interface are shown below:
Figure 3-2 Overview (2)
The interfaces on the rear panel are shown below:
Issue 02 (2014-12-25) Huawei Proprietary and Confidential
Copyright © Huawei Technologies Co., Ltd.
4
Page 10

IPC6123-WDL-A&6131-WD-A
Quick Start Guide
Figure 3-3 Overview (3)
3 Installation
Table 3-1 Description of Box Camera
No. Description
1 MIC
2 ¼-20 UNC Screw Hole
3 Power Indicator
4 Auto-iris Interface
5 LAN(PoE)
6 Power Outlet(AC24V±10% or DC12V±10%)
7 Reset
8 Micro SD Card Slot
9 Video Out
10 Grounding
11 Alarm Out
12 RS-232
13 RS-485
14 Alarm In
15 Audio Out
16 ABF
17 Audio In
Issue 02 (2014-12-25) Huawei Proprietary and Confidential
Copyright © Huawei Technologies Co., Ltd.
5
Page 11
IPC6123-WDL-A&6131-WD-A
Quick Start Guide
NOTE
l Press RESET before the camera is powering on and hold it for 10 seconds when powering-on to restore
the default settings.
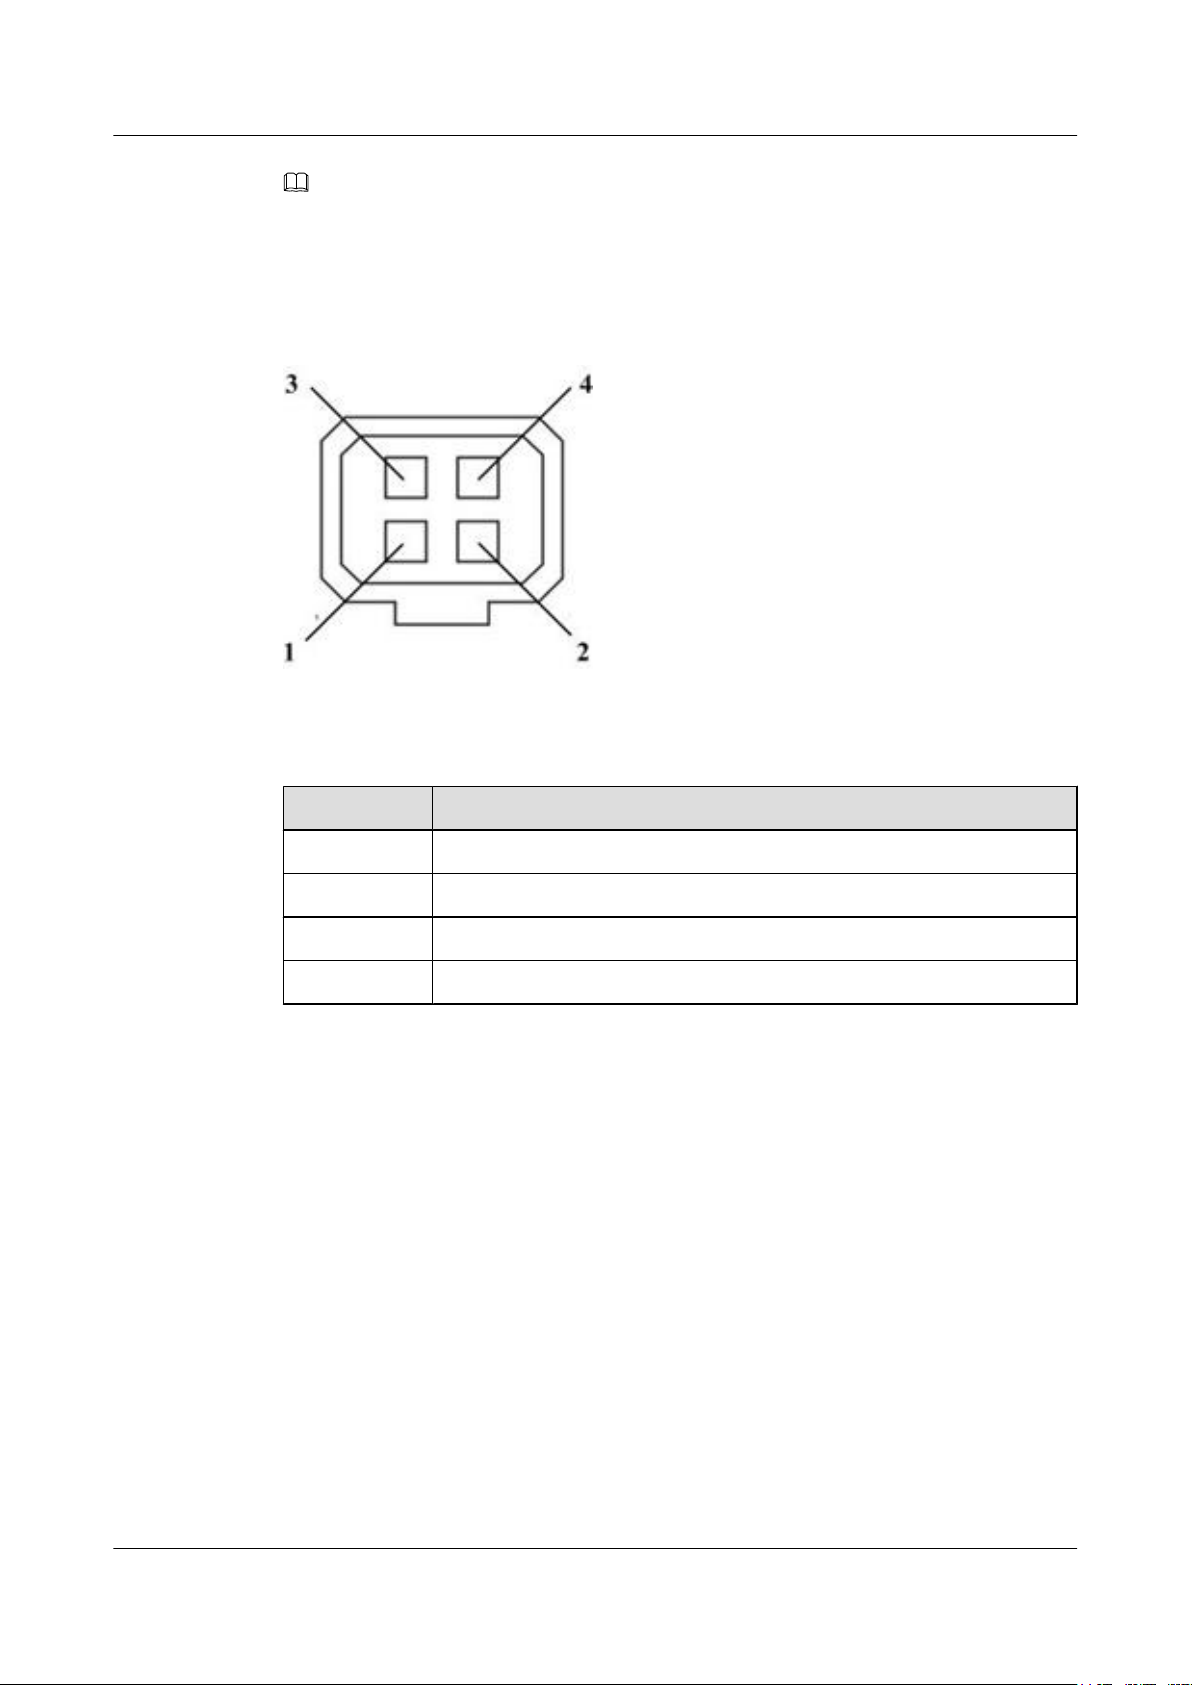
l The type of auto-iris interface is shown as below figure:
Figure 3-4 Auto-iris Interface
3 Installation
Table 3-2 Pins
NO. DC-drive
1 Damp-
2 Damp+
3 Drive+
4 Drive-
Power, Video and GND pins are used when the auto-iris is driven by video; Damp+, Damp-,
Drive+ and Drive- pins are used when the auto-iris is driven by DC.
3.2 Installation
3.2.1 Lens Installation
Step 1 Dismount the cover of the camera sensor.
Step 2 Install the lens on the sensor and rotate it clockwise until it is tighten.
Step 3 Connect the cable of the lens to the auto-iris interface on the side-panel of the camera. (Skip this
step if you use manual iris.)
Step 4 Adjust the focus until you get the satisfied image and the lock the focus adjusting lever.
Issue 02 (2014-12-25) Huawei Proprietary and Confidential
Copyright © Huawei Technologies Co., Ltd.
6
Page 12

IPC6123-WDL-A&6131-WD-A
Quick Start Guide 3 Installation
NOTE
If the lens to be installed is C-type lens, a CS adaptor must be used.
----End
3.2.2 SD Card Installation
There is a SD card slot on the back panel of the camera.
Step 1 Insert the SD card into the card slot.
Step 2 Press the SD card slightly to install it.
Step 3 To take out the SD card, press the card again and it will be ejected.
----End
3.2.3 Pendant Installation
Step 1 Install the ceiling mount to the ceiling with the supplied expansion screws.
Figure 3-5 Install the Mount
Issue 02 (2014-12-25) Huawei Proprietary and Confidential
Copyright © Huawei Technologies Co., Ltd.
7
Page 13

IPC6123-WDL-A&6131-WD-A
Quick Start Guide 3 Installation
Step 2 Fit the lens (not supplied) to the camera and rotate it to get it tightened.
NOTE
l Install the adapter ring to the lens interface if a C-mount lens is used.
l A manual-iris lens can be directly installed to the camera without plugging the power cable of the auto-
iris to the auto-iris interface.
Step 3 Plug the auto-iris cable to the auto-iris interface.
Figure 3-6 Install the Lens
Step 4 Align the screw hole on the camera with the ceiling mount and rotate the camera to get it fixed.
Step 5 Adjust the surveillance angle.
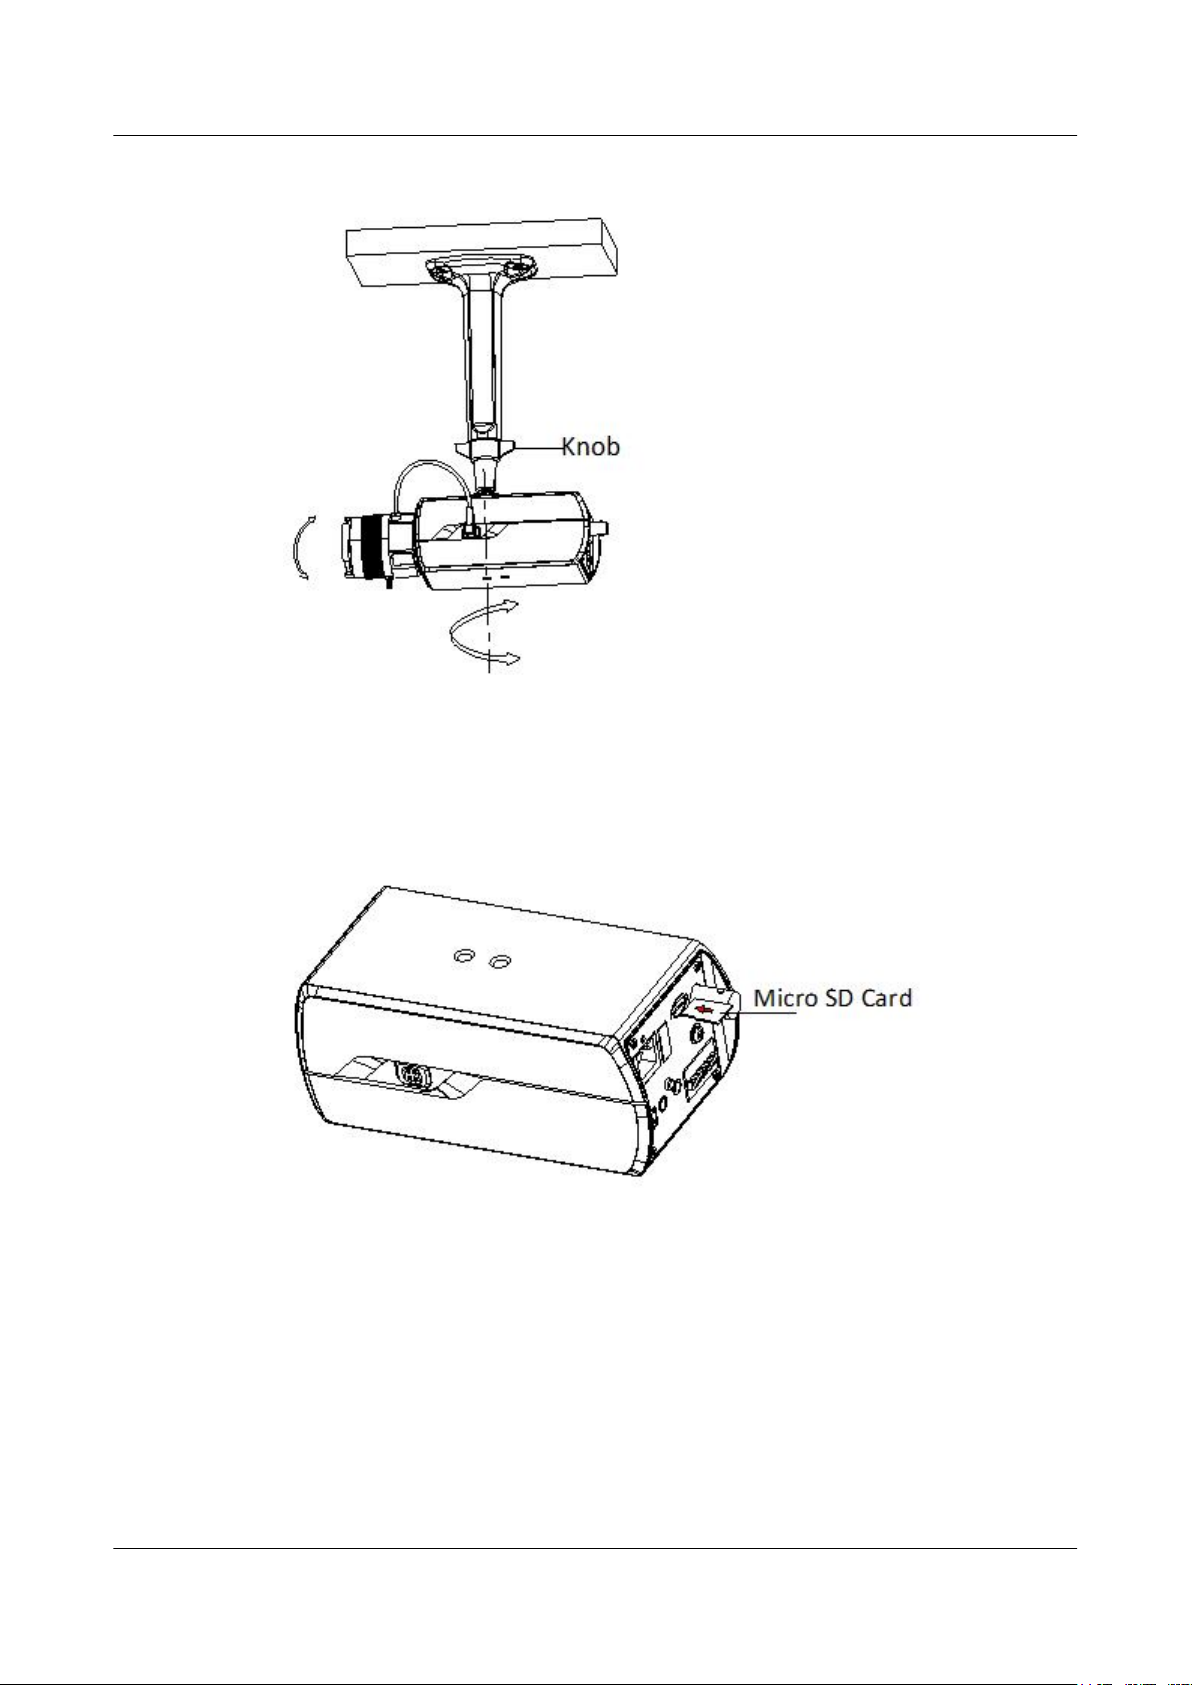
1. Loosen the pan nut to adjust the pan angle [0°-360°].
2. Loosen the knob on the ceiling mount to adjust the tilt angle [0°-90].
Step 6 Adjust the Lens
1. Connect the VIDEO OUT interface of the camera to the debugging monitor.
2. Adjust the Zoom Lever and Focus Level to obtain a perfect image on the monitor.
Issue 02 (2014-12-25) Huawei Proprietary and Confidential
Copyright © Huawei Technologies Co., Ltd.
8
Page 14
IPC6123-WDL-A&6131-WD-A
Quick Start Guide
Figure 3-7 Install the Camera and Adjust the Lens
3 Installation
Step 7 Insert the SD card to the SD card slot to get it installed.
Step 8 Push the inserted SD card slightly to get it sprung by its built-in springing to remove it.
Figure 3-8 Install the SD Card
----End
3.2.4 Wall Mounting
Step 1 Uninstall the swing mount.
Issue 02 (2014-12-25) Huawei Proprietary and Confidential
Copyright © Huawei Technologies Co., Ltd.
9
Page 15

IPC6123-WDL-A&6131-WD-A
Quick Start Guide 3 Installation
Figure 3-9 Uninstall the swing mount
Step 2 Fix the bracket on the wall.
Figure 3-10 Fix bracket
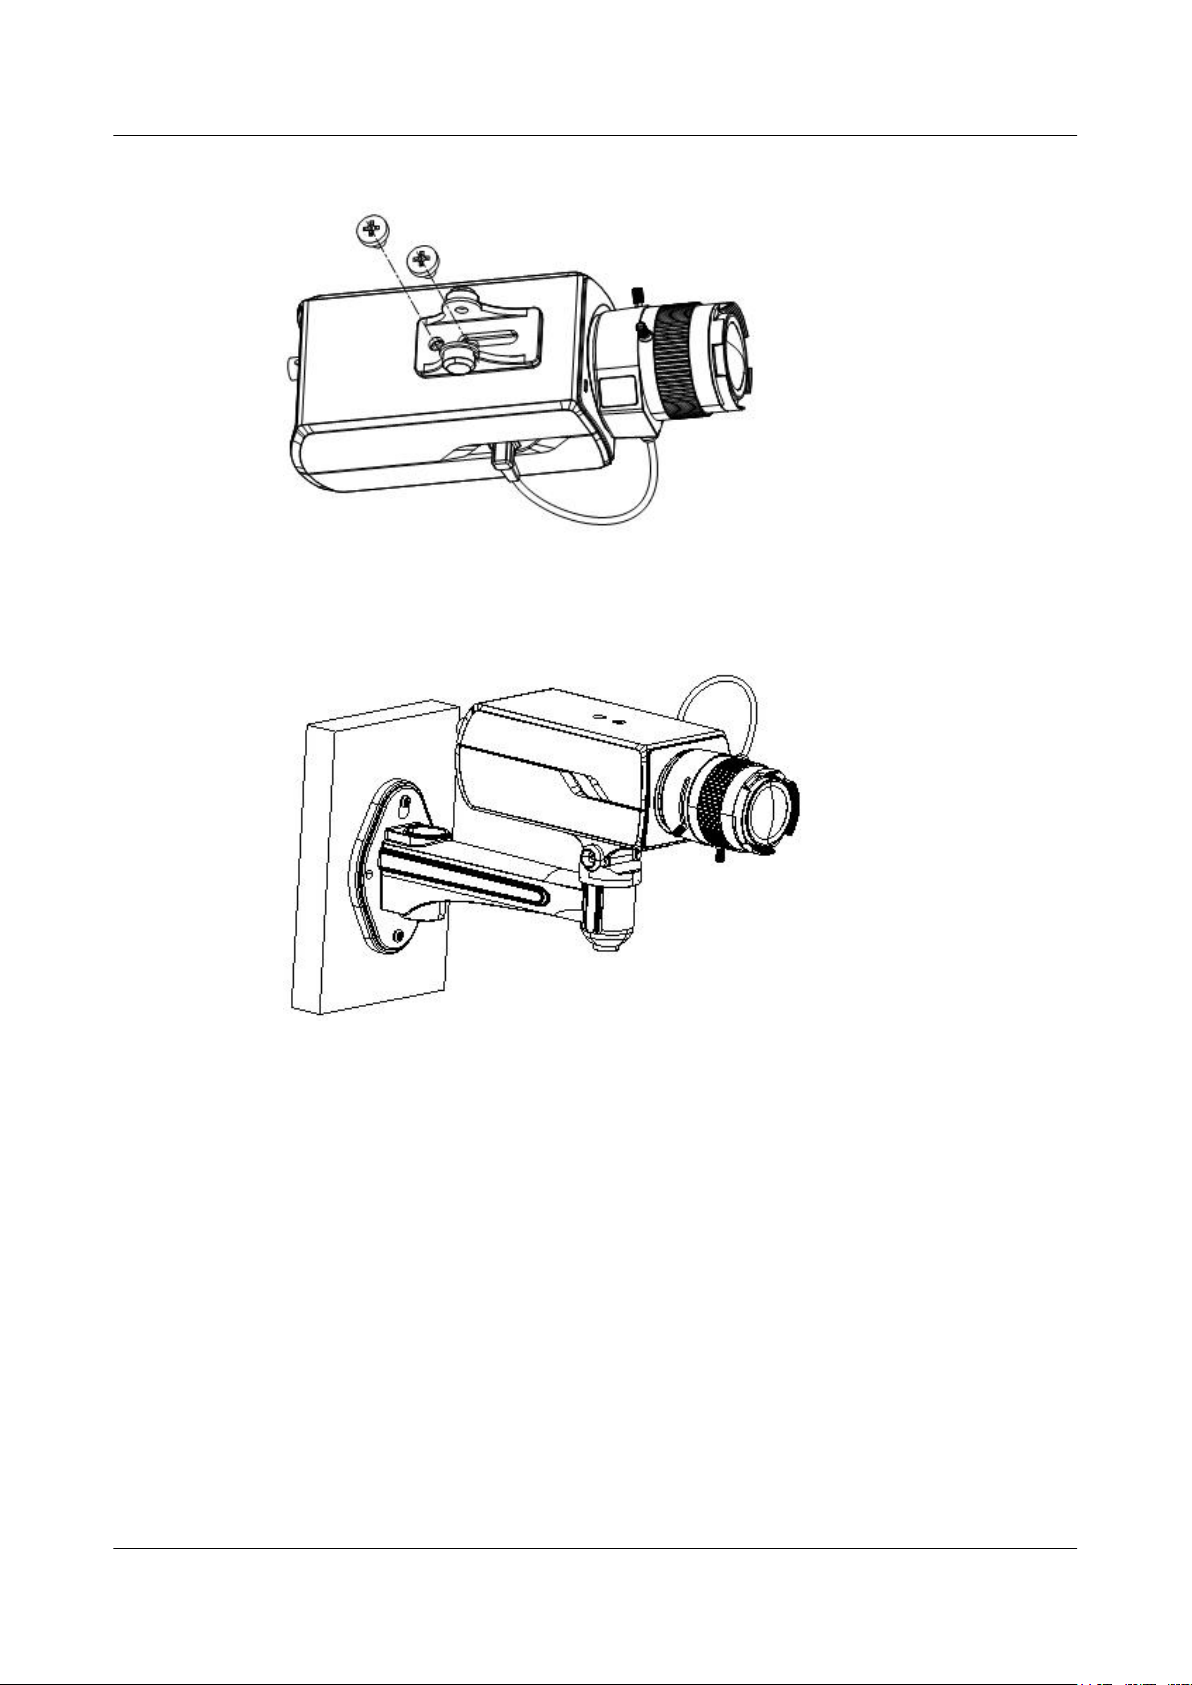
Step 3 Fix the camera on the swing mount by the provided screws and then fix the swing mount on the
bracket.
Issue 02 (2014-12-25) Huawei Proprietary and Confidential
Copyright © Huawei Technologies Co., Ltd.
10
Page 16
IPC6123-WDL-A&6131-WD-A
Quick Start Guide 3 Installation
Figure 3-11 Screws to fix the mount
Figure 3-12 Fix the swing bracket
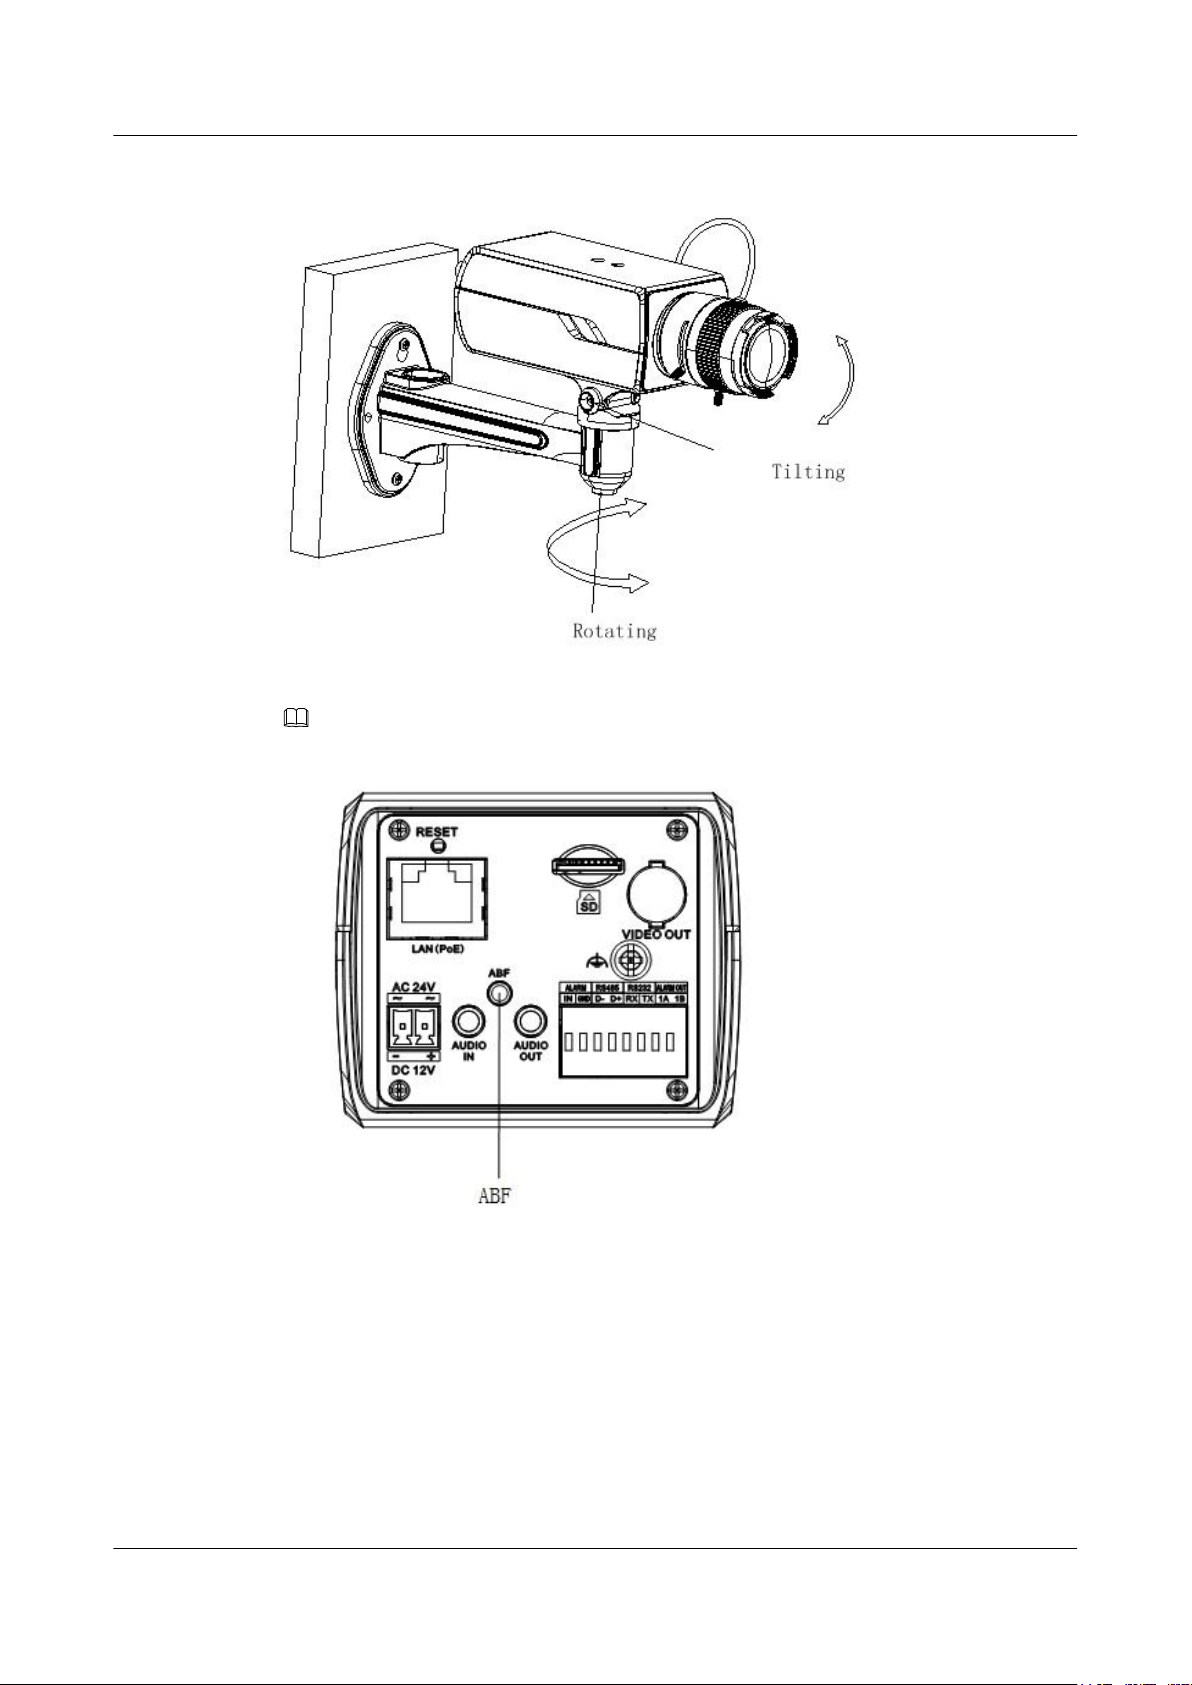
Step 4 Adjust the focus and surveillance angle. You can rotate the focus lever to adjust the focal length
and rotate the (F-N) lever until you get the satisfied image. If you want to change the surveillance
target area, you can loosen the screw on the swing mount and then turn the camera to focus on
the desired area.
Issue 02 (2014-12-25) Huawei Proprietary and Confidential
Copyright © Huawei Technologies Co., Ltd.
11
Page 17
IPC6123-WDL-A&6131-WD-A
Quick Start Guide
Figure 3-13 Adjust the surveillance angel
3 Installation
NOTE
You can also press the ABF button on the back panel to enable auto-focus function.
----End
3.2.5 Wall Mounting with Housing
Step 1 Fix the camera on the baseboard.
Issue 02 (2014-12-25) Huawei Proprietary and Confidential
Copyright © Huawei Technologies Co., Ltd.
12
Page 18
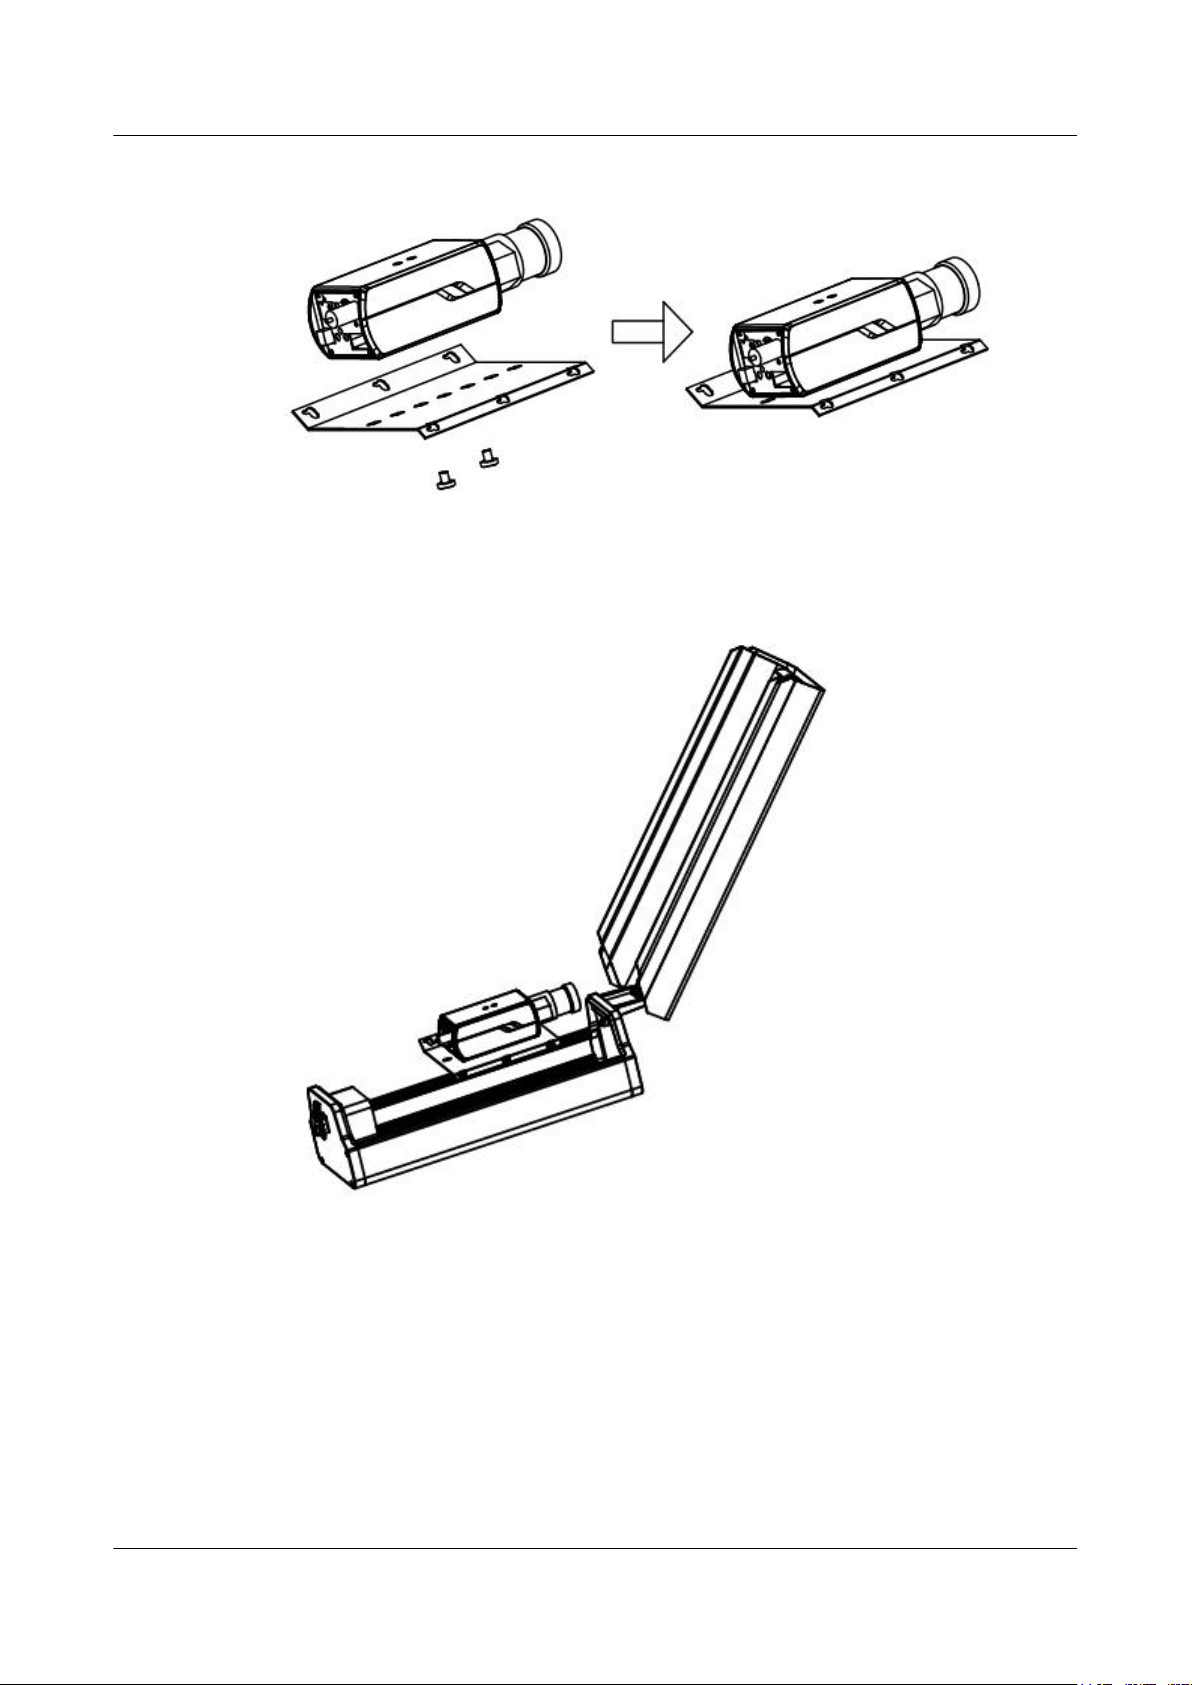
IPC6123-WDL-A&6131-WD-A
Quick Start Guide
Figure 3-14 Install the baseborad
Step 2 Fix the baseboard with the camera on the housing.
Figure 3-15 Put the camera into the housing
3 Installation
Step 3 Connect the cables to the camera and route the cables to the cable outlet.
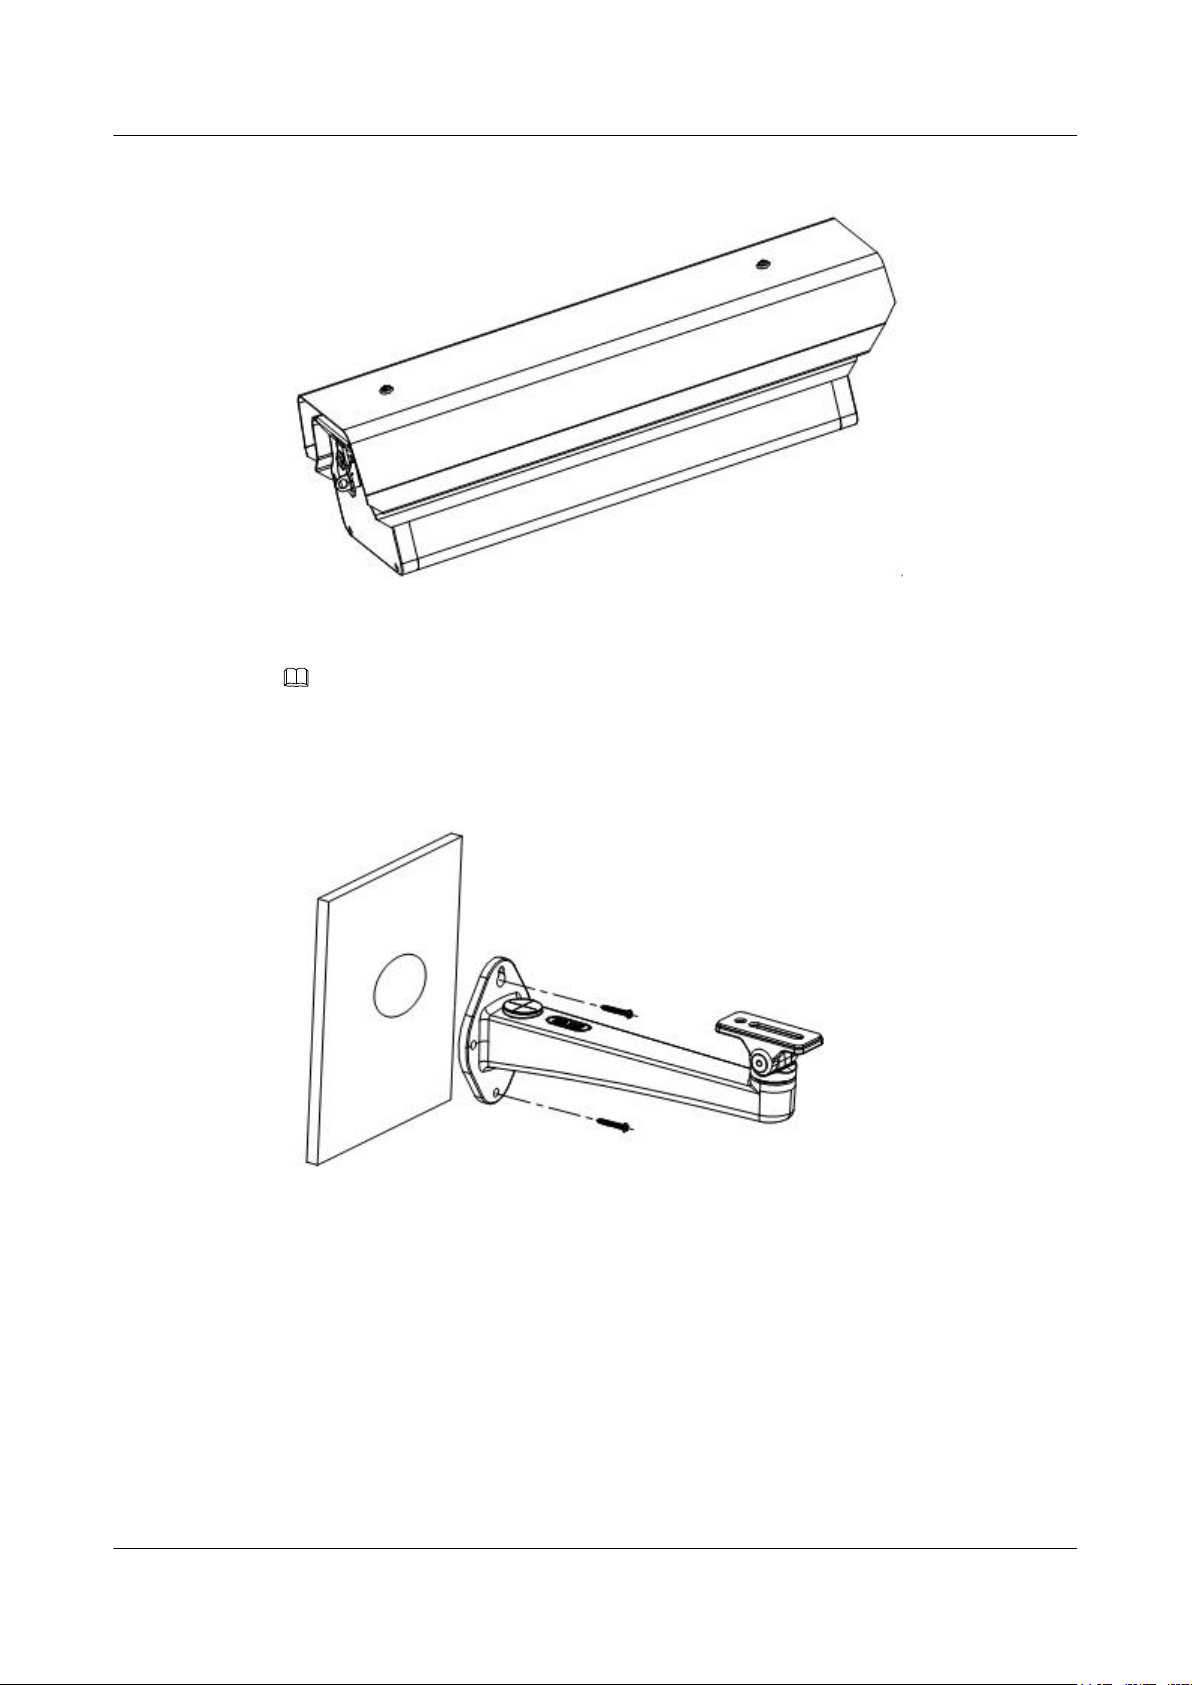
Step 4 Cover the cover of the housing.
Issue 02 (2014-12-25) Huawei Proprietary and Confidential
Copyright © Huawei Technologies Co., Ltd.
13
Page 19
IPC6123-WDL-A&6131-WD-A
Quick Start Guide
Figure 3-16 Cover the housing
Step 5 Install the mounting bracket to the wall.
3 Installation
NOTE
If the wall is made of cement, you have to use expansion screws before installing the mounting bracket. If
the wall is made of wood, you can use the self-tapping screws to install the bracket.
Figure 3-17 Install the bracket
Step 6 Install the camera housing on the bracket with screws.
Issue 02 (2014-12-25) Huawei Proprietary and Confidential
Copyright © Huawei Technologies Co., Ltd.
14
Page 20

IPC6123-WDL-A&6131-WD-A
Quick Start Guide
Figure 3-18 Install camera on the bracket
3 Installation
Step 7 Adjust the surveillance angel.
Figure 3-19 Adjust surveillance angel
----End
3.2.6 Pole Mounting
NOTE
the pole must be able to withstand 3 times the weight of the camera, bracket and shield.
Issue 02 (2014-12-25) Huawei Proprietary and Confidential
Copyright © Huawei Technologies Co., Ltd.
15
Page 21
IPC6123-WDL-A&6131-WD-A
Quick Start Guide
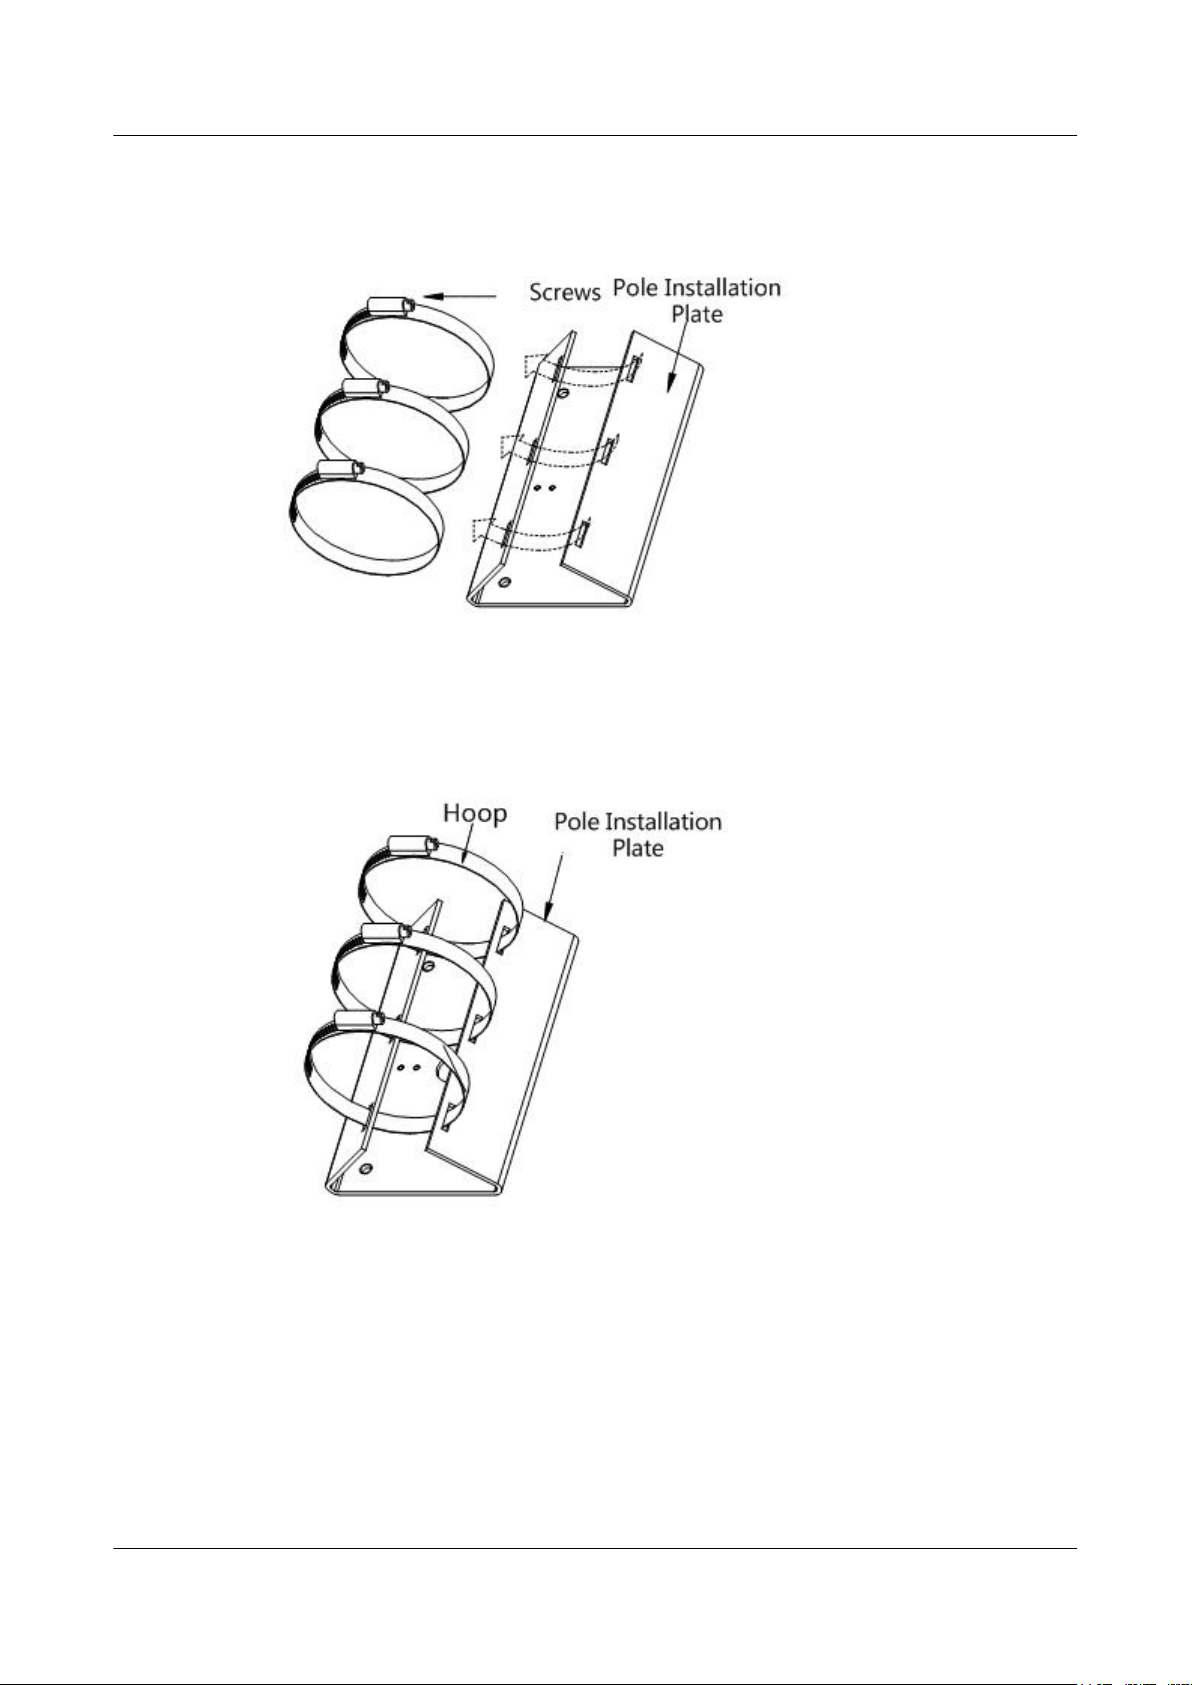
Step 1 Rotate the knob on the hoop anti-clockwise to loosen it.
Figure 3-20 Loosen the knob
3 Installation
Step 2 Route the hoop through holes of the pole installation plate.
Figure 3-21 Route the hoop through the plate
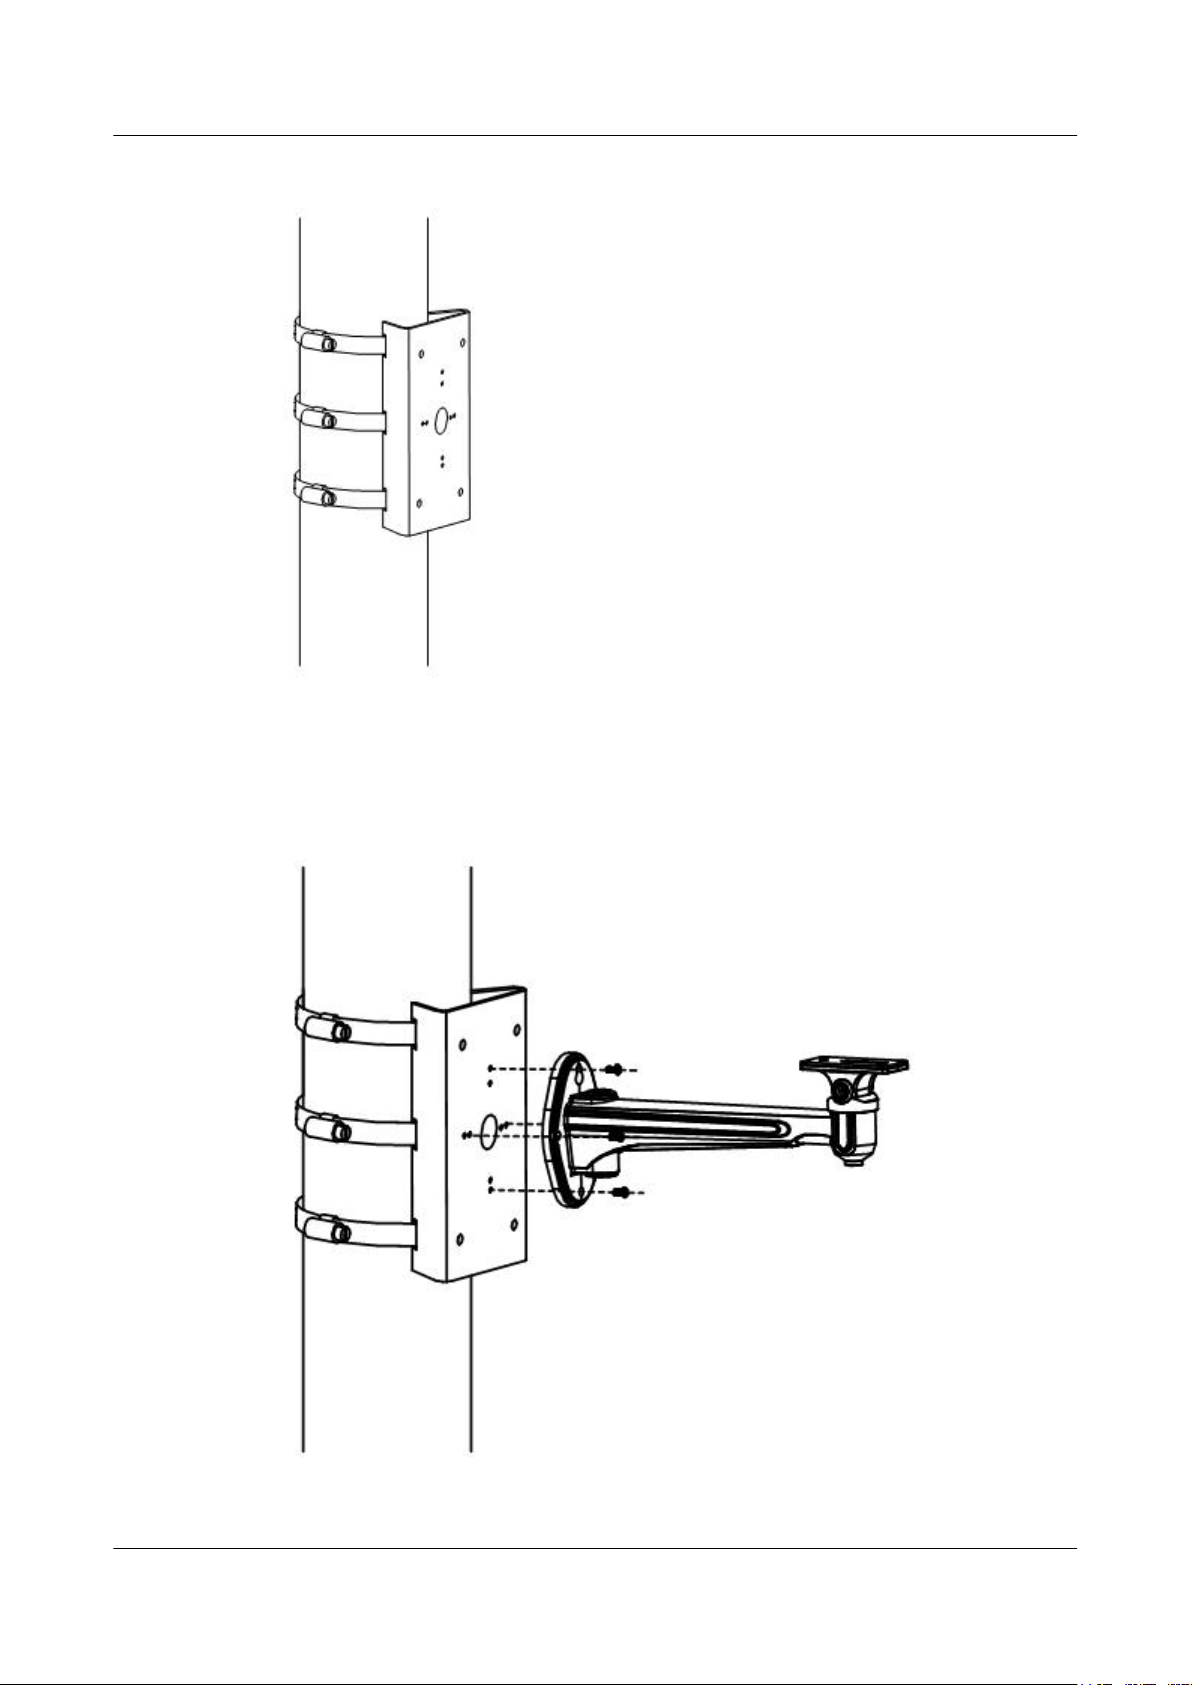
Step 3 Install the hoop on the pole and rotate screws clockwise until they are fasten.
Issue 02 (2014-12-25) Huawei Proprietary and Confidential
Copyright © Huawei Technologies Co., Ltd.
16
Page 22
IPC6123-WDL-A&6131-WD-A
Quick Start Guide 3 Installation
Figure 3-22 Install the hoop
Step 4 Install the camera bracket on the installation plate.
Figure 3-23 Install the bracket on the plate
Issue 02 (2014-12-25) Huawei Proprietary and Confidential
Copyright © Huawei Technologies Co., Ltd.
17
Page 23

IPC6123-WDL-A&6131-WD-A
Quick Start Guide
Step 5 Install the camera on the bracket.
Figure 3-24 Install the camera on the bracket
3 Installation
Step 6 Adjust the surveillance angel.
Figure 3-25 Adjust the surveillance angel
----End
Issue 02 (2014-12-25) Huawei Proprietary and Confidential
Copyright © Huawei Technologies Co., Ltd.
18
Page 24
IPC6123-WDL-A&6131-WD-A
Quick Start Guide
4.1 Accessing the Camera
Purpose
4 Quick Settings
4 Quick Settings
Procedure
Step 1 To get the IP address, use Tools for Quickly Configuring Network PUs and show the online
Step 2 Change the camera IP address and subnet mask to the same subnet as of your PC.
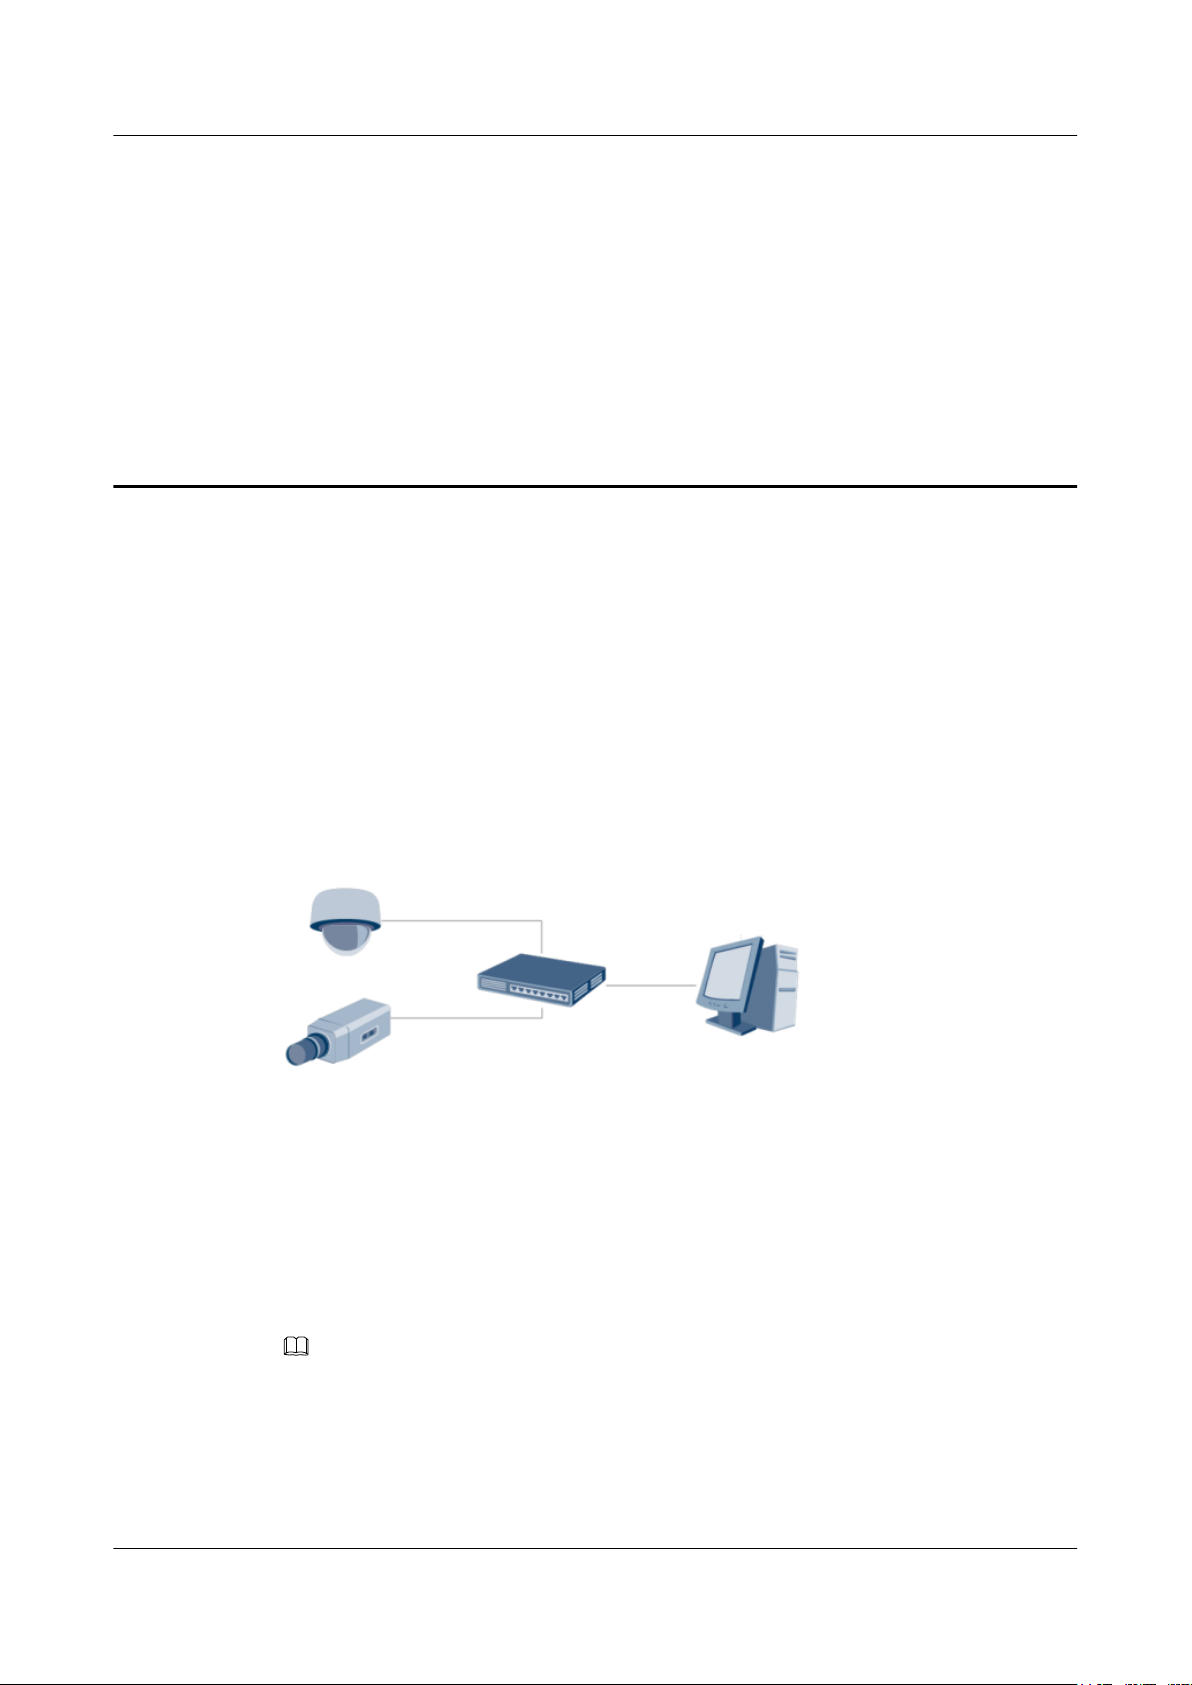
To view and configure the camera via LAN (Local Area Network), you need to connect the
network camera in the same subnet with your PC. Then install related software to search and
change the IP of network camera.
The following figure shows the cable connection of a network camera and a PC:
Figure 4-1 Wiring over LAN
devices. Please refer to the user manual of your software for detailed information.
Step 3 Enter the IP address of network camera in the address field of the web browser to view the live
video.
NOTE
l The default value of the IP address is 192.168.0.120 and the port number is 8000. The default user
name is admin, and password is HuaWei123.
l For accessing the network camera from different subnets, please set the gateway for the network camera
after you login.
----End
Issue 02 (2014-12-25) Huawei Proprietary and Confidential
Copyright © Huawei Technologies Co., Ltd.
19
Page 25

IPC6123-WDL-A&6131-WD-A
Quick Start Guide 4 Quick Settings
4.2 Live View via Web Browser
System Requirement
l Operating System: Microsoft Windows7/Windows 2008 (32/64-bit) Windows 2003/
Windows XP/Windows 2000 (32-bit)
l CPU: Intel Pentium IV 3.0 GHz or higher
l RAM: 1G or higher
l Display: 1024x768 resolution or higher
l Web Browser: Internet Explorer 7.0, Internet Explorer 8.0, Internet Explorer 9.0, Apple
Safari, Mozilla Firefox and Google Chrome
Procedure
Step 1 Open the web browser.
Step 2 In the browser address bar, input the IP address of the network camera. E.g. 192.0.0.64.
Step 3 Hit Enter.
Step 4 In the login interface, input the user name and password. The default user name is admin and
password is HuaWei123 as shown in Figure 4-2.
Figure 4-2 Login Interface
Issue 02 (2014-12-25) Huawei Proprietary and Confidential
Copyright © Huawei Technologies Co., Ltd.
20
Page 26
IPC6123-WDL-A&6131-WD-A
Quick Start Guide 4 Quick Settings
NOTE
l Change and save the password when you log in to the system for the first time to ensure system security.
A password should no less than eight characters which consist of upper-case letters, lower-case letters,
and numeric.
l A password cannot be the same as the user name or the reverse of the user name.
l If you enter an incorrect password more than three times consecutively, your account locked. You must
wait for thirty minutes to enter the login information.
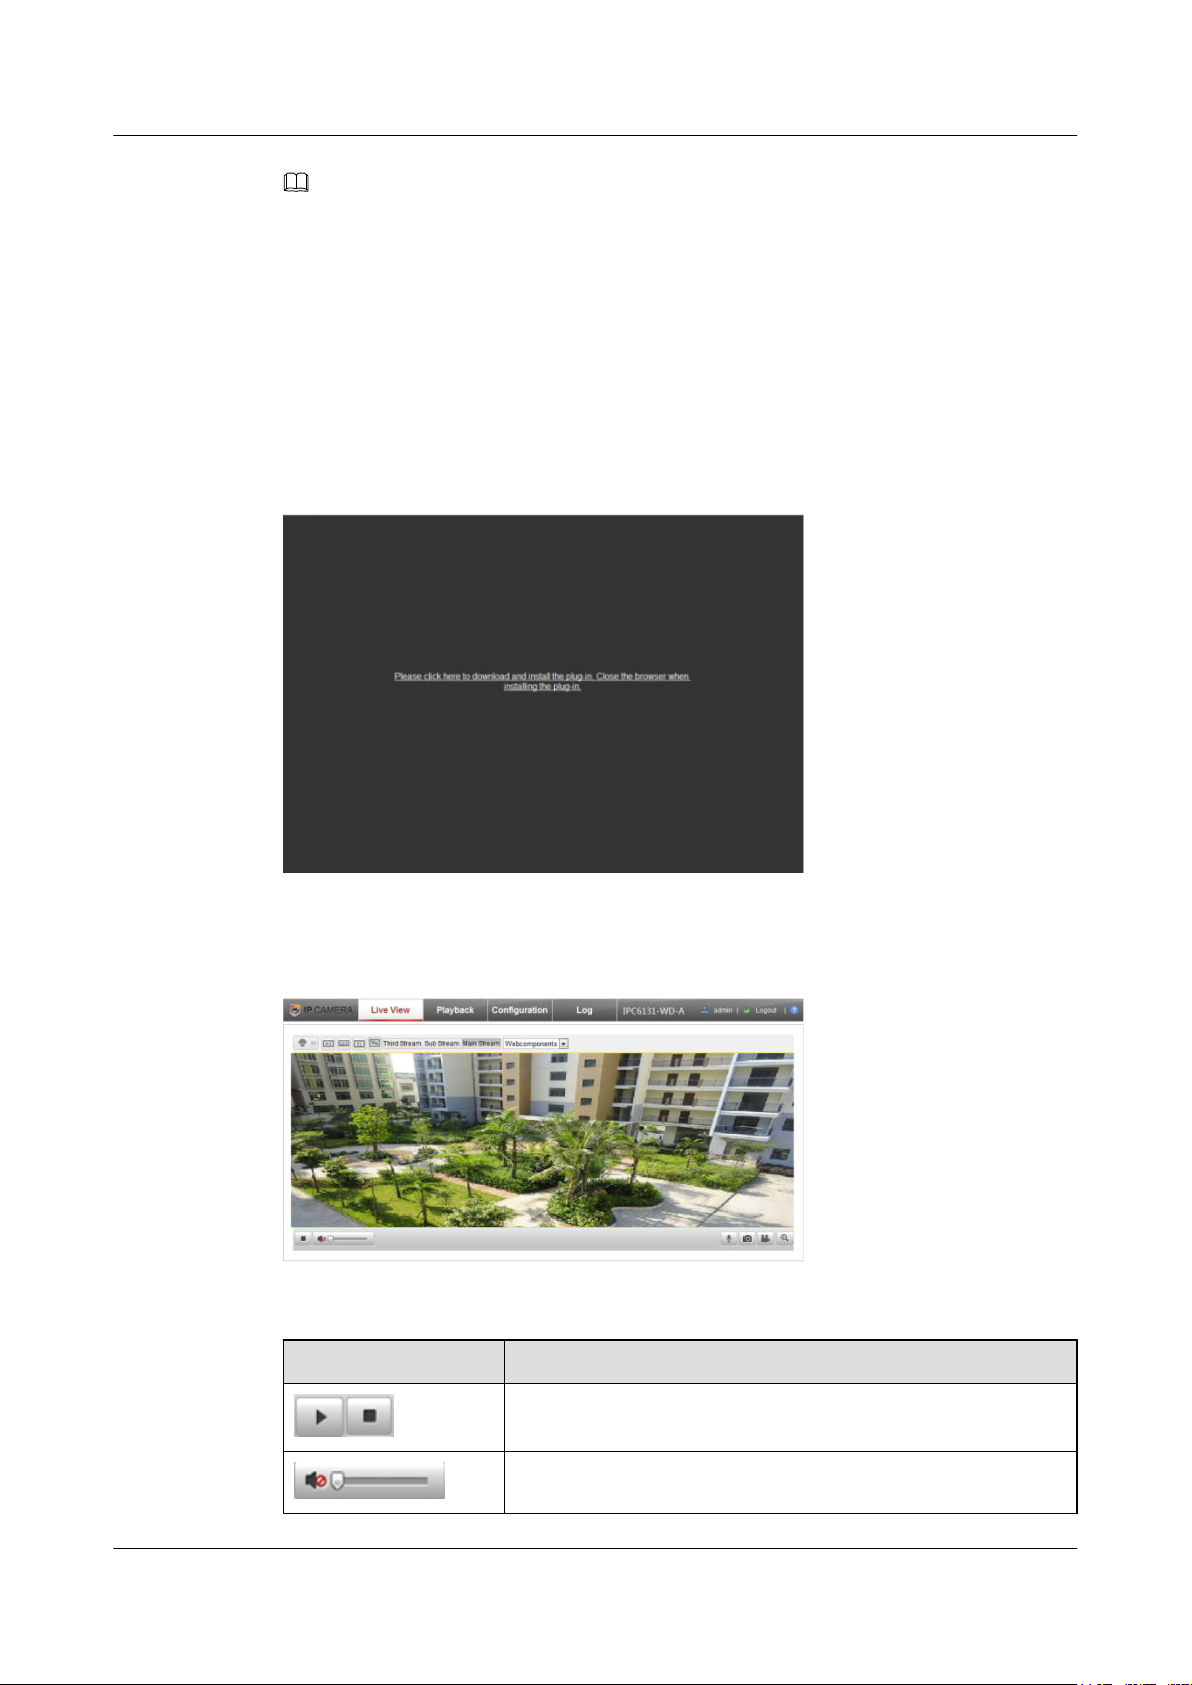
l You need to install the plug-in to login, as shown in Figure 4-3 Click Please click here to download
and install the plug-in. Close the browser when installing the plug-in, and install the .plug-in as
prompted.
Figure 4-3 Plug-in Downloading and Installing
Step 5 Click Login to enter the live view interface. Refer to Figure 4-4 for viewing live view.
Figure 4-4 Live View Interface
Table 4-1 Live View Icon Description
Icon Description
Start/Stop Live View
Audio On/Off;
Issue 02 (2014-12-25) Huawei Proprietary and Confidential
Copyright © Huawei Technologies Co., Ltd.
21
Page 27

IPC6123-WDL-A&6131-WD-A
Quick Start Guide
Icon Description
4 Quick Settings
Volume Adjustment
Start/ Stop Two-way Audio
Capture
Start/Stop Recording
Image Size 4:3/16:9
Original Size/Self-adaptive
4.3 Logout
Live view with sub-stream
Live view with main stream
Web component switch
Digital Zoom
PTZ Control
NOTE
For detailed instructions of further configuration, please refer to the user manual of network camera.
----End
On the Web page of the camera, click Logout button on the upper right corner, and click OK
to confirm logout.
Issue 02 (2014-12-25) Huawei Proprietary and Confidential
Copyright © Huawei Technologies Co., Ltd.
22
Page 28

IPC6123-WDL-A&6131-WD-A
Quick Start Guide
5.1 Image Exception
The image of the camera is blurry
5 Troubleshooting
5 Troubleshooting
l The lens and the lens interface are not match. Check the interface and see whether it is C
interface or CS interface.
l The camera is not focused. Click the Zoom in, or zoom out, and focus+ and focus- to refocus
the camera.
l The camera shield is not clean. Clean the lens or lens shield.
l Image blur may also be caused if the camera lens is against strong light in auto-iris mode.
Change the iris mode to electronic iris.
l The resolution is too low.
Why the image is clear in the day time, but blurry at night
l In the day time, to get a clear image, the iris size is small, and the focal length of the object
in the camera scene is big. But when at night, the iris size is big and the focal length is
small, so the defocus may be caused.
l You are recommended to change the auto-iris into electrical shutter mode. Or adjust focus
in low illumination environment.
Why are there color cast and distortion
l Please choose proper white balance mode to fit the color temperature of the environment.
l Low illumination may cause the big noise point on the image.
l Overexposure may cause the color distortion.
l When the bitrate is set too low, the color cast may also take places.
Issue 02 (2014-12-25) Huawei Proprietary and Confidential
Copyright © Huawei Technologies Co., Ltd.
23
Page 29

IPC6123-WDL-A&6131-WD-A
Quick Start Guide
5.2 Power Supply and Interference
What should be noticed when choosing camera power
l The power device should be lightening protection and anti-creeping with effective
grounding mechanism.
l Voltage Attenuation: If there are too many cameras connecting to the samr adapter, the
voltage may become unstable. You are recommended to adopt short distance power supply.
And for one power adaptor, if you connect too many cameras, the voltage won't be stable.
For the long distance power supply (more than 100 meters), you can choose a general power
with 220 voltage AC, and use an adaptor to change it to DC current. The nearer the adaptor
to the camera, the less the current loss, and the more stable the image.
l When using the power cable outside, you should use a waterproof box.
How can I handle the image signal is interfered
l Check whether there are strong interference source near the camera.
5 Troubleshooting
l The voltage may not be stable.
l The camera may not be effectively grounded.
What problems will be caused if the power supply is insufficient
l ICR camera cannot stop switching.
l Black image.
l Ripple on image.
l Camera restart frequently.
5.3 Camera Grounding and Protection
How to ground the camera
There are two kinds of the grounding of the camera, the video grounding and the power
grounding.
l Video Grounding: The video signal is normally grounded via the DVR or matrix. If you
use an optical transeiver to transmit the signal, you are recommended to grounding the
camera on the local side.
l Power Grounding: When using the centralized power supply, the direct current and the
alternate current should be grounded together.
l Grounding Standard: The ground cable must be copper core insulation wire, and cross
section must be bigger than 6 square millimeters.
How to prevent the camera from water
l For outdoor camera, you can use a shield and the cables should be enclosed too.
Issue 02 (2014-12-25) Huawei Proprietary and Confidential
Copyright © Huawei Technologies Co., Ltd.
24
Page 30

IPC6123-WDL-A&6131-WD-A
Quick Start Guide 5 Troubleshooting
l The exposed cables should be places with U-shape, but not straight, in case the water flows
into the shield with the cable.
5.4 Camera Network Problem
To remotely access the camera over WAN, which ports should be mapped
You need to perform the port mapping for the camera.
The 80 for HTTP, 8000 for service port, and 554 port for RTSP.
You can enable the UPnP function on both the camera and the router if the router supports the
function.
How do I perform the port mapping
l On the router, you can map the device IP address to 80, 8000 and 554 ports.
l If the router supports the UPnP auto port mapping function, you can enable the UPnP
function on both sides.
5.5 Other Questions
ONVIF protocol explanation
The frame rate value that specified by the ONVIF protocol can be considered as a value range.
You can only set discrete value for the frame rate of the speed dome. The system will not return
error message for any configuration exception, but fetch an approximate value less than what
you have configured. For example, if the frame rate is configured as 21fps, the actual frame rate
validated by the device should be 20fps..
Issue 02 (2014-12-25) Huawei Proprietary and Confidential
Copyright © Huawei Technologies Co., Ltd.
25
Page 31
IPC6123-WDL-A&6131-WD-A
Quick Start Guide A Toxic and Harmful Substances Declaration
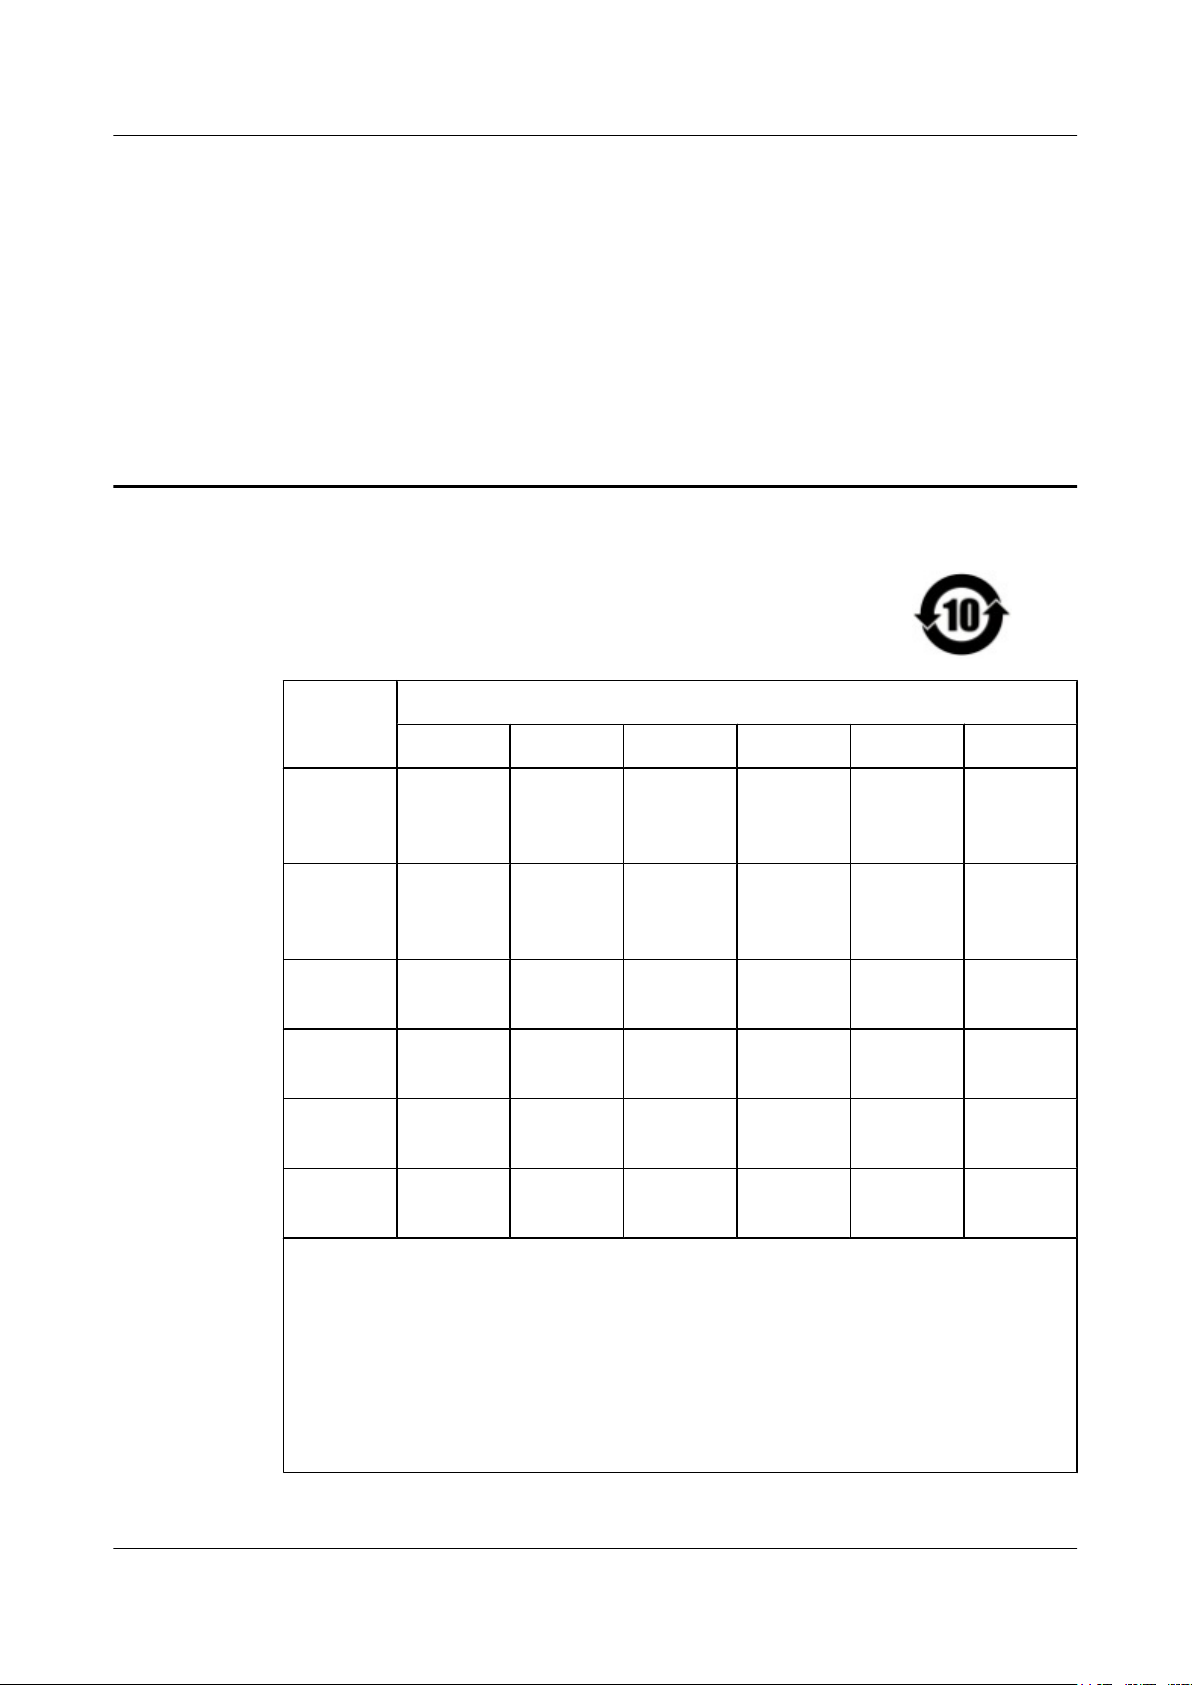
A Toxic and Harmful Substances Declaration
According to Electronic product pollution control management measures
Assembly
Units
Circuit
Board
Assembly
Camera
Body
Materials
Cable
Materials
Power
Adaptor
Package
Assembly
Accessori
es
○: means the toxic and harmful substances in the assembly units are within the limit stipulated
by the of the SJ/T11363-2006 standard.
Toxic and Harmful Substances Declaration
Pb Hg Cd Cr VI PBB PBDE
○ ○ ○ ○ ○ ○
○ ○ ○ ○ ○ ○
○ ○ ○ ○ ○ ○
○ ○ ○ ○ ○ ○
○ ○ ○ ○ ○ ○
○ ○ ○ ○ ○ ○
× : means the toxic and harmful substances in the assembly units exceed the limit stipulated
by the SJ/T11363-2006 standard. Using the product properly within the environmental
protection use period, the substances will not leak or mutate, and no damage to human body
or property will be caused. The toxic and harmful substances must be recycled by the relevant
sectors of the government according to the local laws and regulations. And the users are not
allowed to handle by themselves.
Issue 02 (2014-12-25) Huawei Proprietary and Confidential
Copyright © Huawei Technologies Co., Ltd.
26
 Loading...