

Page 1

User Guide
Page 2
1 Reading Before Proceeding
1.1 Safety Precautions
Please read the safety precautions c aref ully to en sur e the c orr ect us e of y our mobile pho ne.
Do not crash, throw, or puncture your mobile phone. Avoid the falling, squeezing,
and bending of your mobile phone.
Do not use your mobile phone in a moist environment, such as the bathroom.
Prevent your mobile phone from being soaked or washed in liquid.
Do not switch on your mobile phone when it is prohibited to use phones or when
the phone may cause interference or danger.
Do not use your mobile phone while driving.
Follow any rules or regulations in hospitals and health care facilities. Switch off
your mobile phone near medical apparatus.
Switch off your mobile phone in aircraft. The phone may cause interference to
control equipment of the aircraft.
Switch off your mobile phone near high-precision electronic devices. The phone
may affect the performance of these devices.
Do not attempt to disassemble your mobile phone or its accessories. Only
qualified personnel are allowed to service or repair the phone.
Do not place your mobile phone or its accessories in containers with a strong
electromagnetic field.
Do not place magnetic storage media near your mobile phone. Radiat ion from the
phone may erase the information stored on them.
Do not put your mobile phone in a high-temperature place or us e it in a plac e with
flammable gas such as a gas station.
1
Page 3
Keep your mobile phone and its accessories away from children. Do not allow
children to use your mobile phone without guidance.
Use only approved batteries and chargers to avoid the ris k of explosions.
Observe any laws or regulations on the use of wireless devices. Respect others’
privacy and legal rights when using your wireless device.
Strictly follow the relevant instructions of this manual while using the USB cable.
Otherwise your mobile phone or PC may be damaged.
1.2 Legal Notice
Copyright © Huawei Technologies Co., Ltd. 2010. All rights reserved.
No part of this document may be reproduced or tr ansmitted in any fo rm or by a ny me ans wit hout
prior written consent of Huawei Technologies Co ., Lt d.
The product described in this manual may include copyrig hted s oftware o f Huaw ei Techno logies
Co., Ltd. and possible licensors. Customers s hall not in any ma nner reprod uce, distrib ute, modify,
decompile, disassemble, decrypt, extract, rever se engin eer, lease, as si gn, or sublicen se the said
software, unless such restrictions ar e proh ibited by app licab le law s or such a cti ons are approv ed
by respective copyright holders under lice nse s.
Trademarks and Permissions
, , and are trademarks or registered trademarks o f Huawei Technologies Co.,
Ltd.
Other trademarks and product, service and compa ny names mentione d are th e pro perty of the ir
respective owners.
WOW HD, SRS and the symbol are trademarks of SR S L abs, I nc. W OW HD t echnolo gy is
incorporated under license from SRS Labs, Inc.
WOW HD™ significantly improves the playback quality of audio, deliver ing a dyna mic 3D
entertainment experience with deep, rich bass and hig h frequ ency c larity for cr isp det ail.
Notice
Some features of the product and its accessories des cribed herein re ly on the sof twar e installed,
capacities and settings of local network, and may not be ac tivat ed or may be limited by local
network operators or network service prov iders. Thus th e descr iptions herein may not ex actly
match the product or its accessories you pu rc hase.
Huawei Technologies Co., Ltd. reserves the right t o change or mod ify any informa tion or
specifications contained in this manual without prior notice or obliga tion.
2
Page 4

Huawei Technologies Co., Ltd. is not re sponsible for the legitimacy and quality of any produc ts that
you upload or download through this mobile phone, inclu ding bu t not limit ed to t he text, pictures ,
music, movies, and non-built-in software with copyright protection . Any consequences ar ising from
the installation or usage of the preceding products on this mobile phone shall be borne by yourself.
NO WARRANTY
THE CONTENTS OF THIS MANUAL ARE PROVIDED “AS IS”. EXCEPT AS REQUIRED BY
APPLICABLE LAWS, NO WARRANTIES OF ANY KIND, EITHER EXPRESS OR IMPLIED,
INCLUDING BUT NOT LIMITED TO, THE IMPLIED WARRANTIES OF MERCHANTABILITY
AND FITNESS FOR A PARTICULAR PURPOSE, ARE MADE IN RELATION TO THE
ACCURACY, RELIABILITY OR CONTENTS OF THIS MANUAL.
TO THE MAXIMUM EXTENT PERMITTED BY APPLICABLE LAW, IN NO CASE SHALL HUAWEI
TECHNOLOGIES CO., LTD. BE LIABLE FOR ANY SPE CIA L, IN CIDE NTAL, IND IRECT, OR
CONSEQUENTIAL DAMAGES, OR LOST PROFITS, BUSINESS, REVENUE, DATA,
GOODWILL OR ANTICIPATED SAVINGS.
Import and Export Regulations
Customers shall comply with all applicable export or import laws and regulations and will obtain all
necessary governmental permits and licenses in order t o expo rt, r e-e xpo rt or impo rt th e pro duct
mentioned in this manual including the software and tec hnical data t herein.
3
Page 5

2 Getting to Know Your Mobile Phone
2.1 Mobile Phone View
2.1.1 Phone at a Glance
■ Note:
All the pictures in this guide are for your reference only. The actual appearan ce and display
features depend on the mobile phone you purchase.
Headset
jack
Earpiece
Charge/Data port
■ Note:
If you apply protective film on the phone, please use the protectiv e film wit h good transmittance.
2.1.2 Key Functions at Your Fingertips
• Press to power on your mobile phone.
• Press and hold to open the
• Press to lock the screen when your mobile phone is active.
• Touch to return to the previous screen.
• Touch to exit any application you are running.
• Touch to hide the keyboard.
Touch to open the menu on an active screen.
• Touch to return to the Home screen.
• Touch and hold to show the most recently used applications.
Phone options
menu.
Camera
Volume
key
4
Page 6
• Touch to open Google search for searching your mobile phone and the web.
• Touch and hold to open Google search by voice.
2.2 Installing Your Mobile Phone
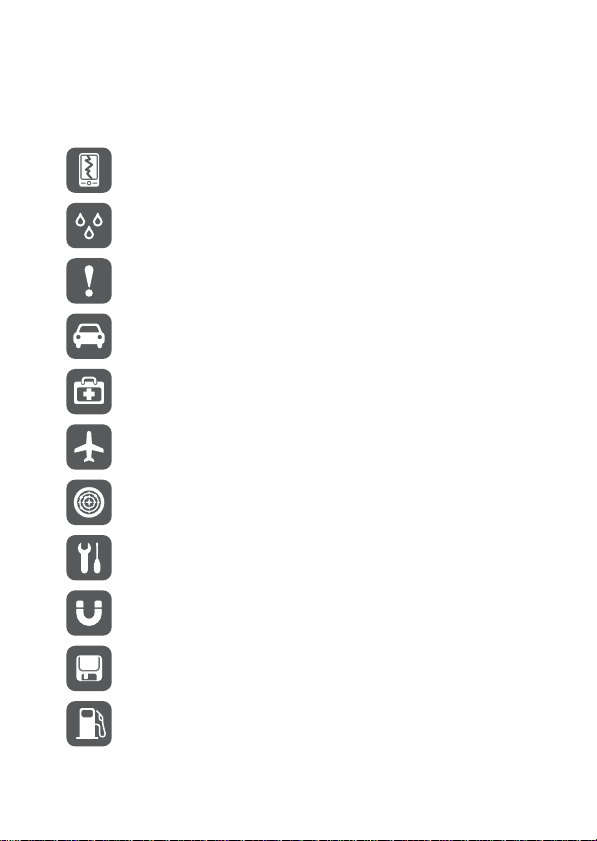
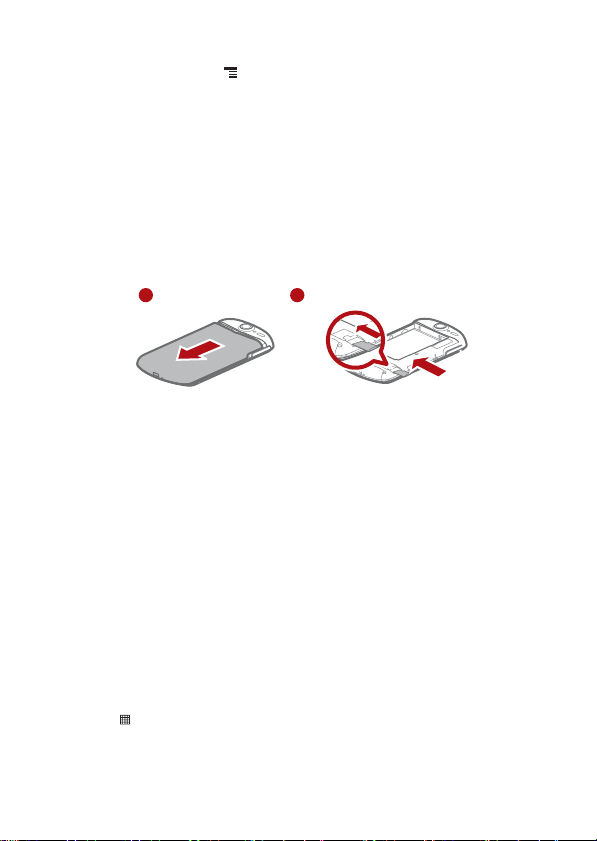
2.2.1 Installing the SIM Card
There are two steps to install the SIM card:
1 2
1. Remove the battery cover.
2. Insert the SIM card.
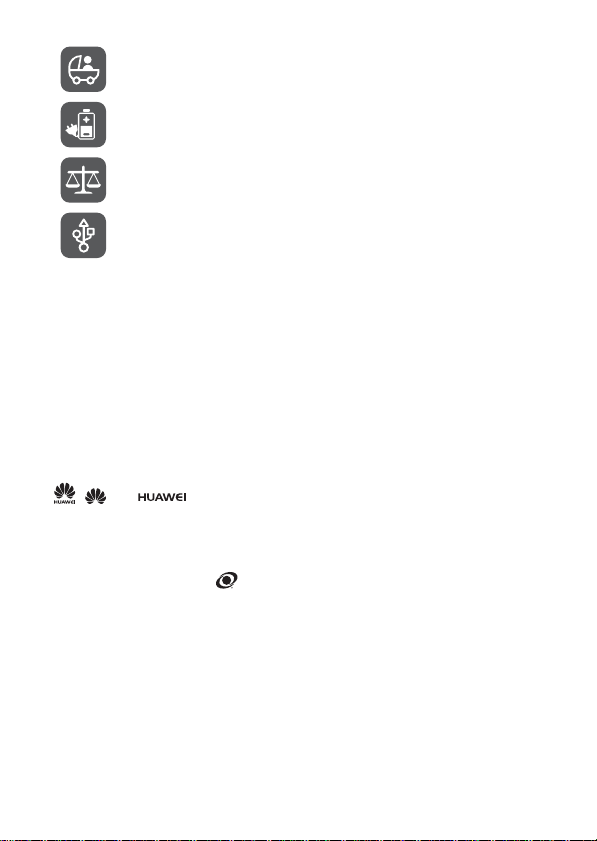
2.2.2 Installing the Battery
1. Angle the edge labeled a (with the contacts) into the bottom end of the battery slot.
2. Push down the edge labelled b until the battery clicks firmly into place.
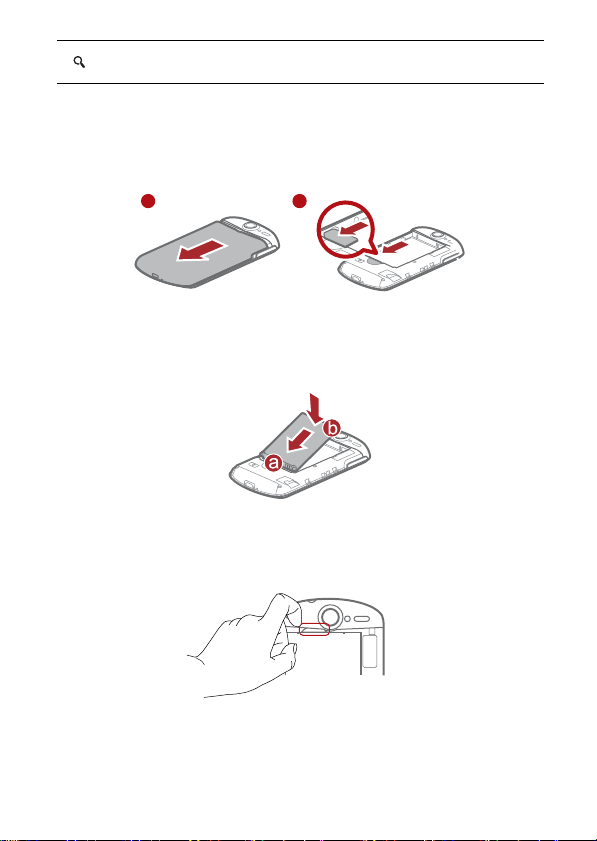
2.2.3 Removing the Battery
■ Note:
Do not use a sharply pointed object to remove the battery as this could puncture the battery and
allow the release of toxic battery fluid.
5
Page 7
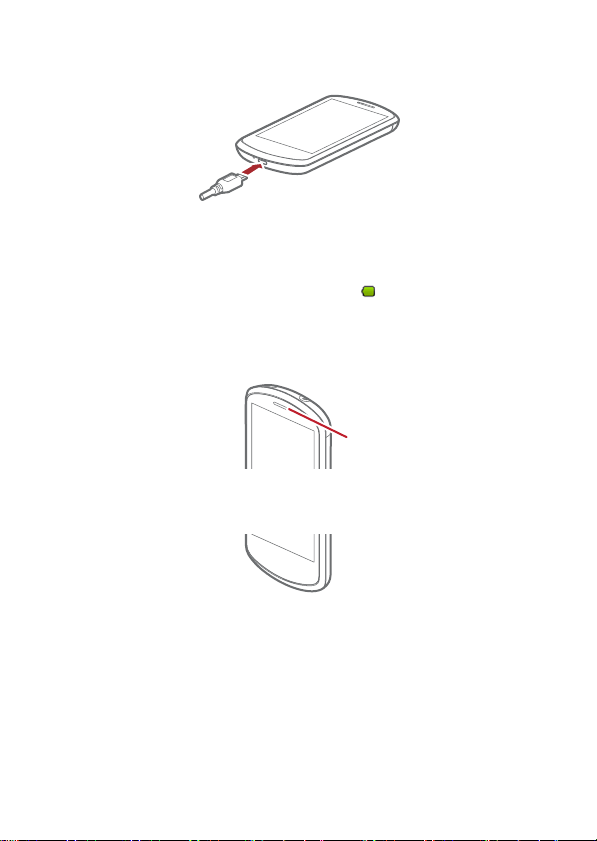
2.2.4 Charging the Battery
Before charging the battery, ensure that it has been prop erly ins erted in to y our pho ne.
1. Connect the USB cable that came with your mobile phone to the charg er.
2. Connect the USB cable to your mobile phone. Th en, plug in the conne ctor of the char ger to an
electrical outlet. The phone begins charging.
If your mobile phone is charged when it is powered on, the batte ry icon on t he Not ificatio n bar
shows the charging status. When the battery icon c hang es to , it indicates that your mobile
phone is fully charged.
Status Indicator
The color of the status indicator tells the batte ry stat us of y our mobile ph one.
Status Indicator
Green: Fully charged (when connected to charger).
Orange: Charging in progress (when connected to charger).
Red: Battery low.
2.2.5 Important Information About the Battery
• If the battery has not been used for a long period of time, you may not be able to power on
your mobile phone immediately after you begin charging the battery. Allow the battery to
charge for a few minutes with the phone powered off before attempting to power on the phone.
• The battery will not hold a charge for the way it did when it was new. When the battery life
becomes noticeably shorter than usual a fter bein g char ged proper ly, re plac e the batt ery w ith
a new one of the same type.
• Using data services increases demand on the battery and will reduce the length of time it can
hold a charge.
6
Page 8

• The time required to charge the battery depends on the ambient temperature and the age of
the battery.
• When the battery is low on power, the phone plays an alert and displays a prompt. When
battery power is almost exhausted, your phone will power off automatically.
2.2.6 Battery Saving Tips
The longevity of battery power depends on t he network th at you connec t to, and ho w you use your
mobile phone.
Try the following to conserve batte ry pow er:
• When you do not need 3G services, set your phone to connect to a 2G network.
• When your mobile phone is not in use, switch off the screen.
• Reset the time it takes for your screen light to switch off when you leave your phone idle.
• Lower the screen brightness.
• Use the AC adapter to plug your phone into an external power source whenever possible.
• Turn Bluetooth off when you are not using it. Only make your phone visible to other Bluetoo th
devices when you need to establish a Bluetooth connection.
• Switch off Wi-Fi when you are not using it.
• Turn off your phone connection to GPS satellites when you are not using it.
• Lower the volume.
• Close power-draining programs, when you do not need them.
• Turn off th e data service.
2.3 Power On or Off Your Mobile Phone
2.3.1 Powering On Your Mobile Phone
Press . The first time you power on your phone, you will be asked to sign in to your ac count
and set up your mobile phone.
■ Note:
If personal identification number (PIN) protection is enabled on your mobile phon e, you must enter
your PIN before using the mobile phone.
2.3.2 Setting Up Your Mobile Phone
The first time you power on your mobile phone, the phone displays a setup wizar d to help yo u set
up the phone.
The setup wizard helps you:
• Learn about your mobile phone
• Create or sign into your account
• Make some initial decisions about how you want to use your mobile phone
2.3.3 Powering Off Your Mobile Phone
1. Press and hold to open the
Phone options
menu.
7
Page 9
2. Touch
Power off
3. Touch OK.
.
2.4 Using the Touchscreen
2.4.1 Touchscreen Actions
•
Touch
: Use the touch of your finger to select an item, co nfirm a selection, or start an
application.
•
Touch and hold
phone responds. For example, to open the options menu for the active screen, touch the screen
and hold down until the menu appears.
•
Flick
•
Drag
part of the screen. You can drag an icon to mov e or delete it.
: Touch an item with your finger and continue to pre ss down until your mobile
: Move your finger either vertically or horizo ntally across the sc reen.
: Touch and hold the desired item with your finger. To move an item, Dr ag the item to any
2.4.2 Rotating Your Mobile Phone Screen
The orientation of most screens will rotate with the phone as you turn it from upr ight to side ways
and back again.
2.5 Locking and Unlocking the Screen
2.5.1 Locking the Screen
• When your phone is on, press to lock the screen. When the screen is locked, you can still
receive messages and calls.
• If your phone is idle for a while, the screen will lock automatically.
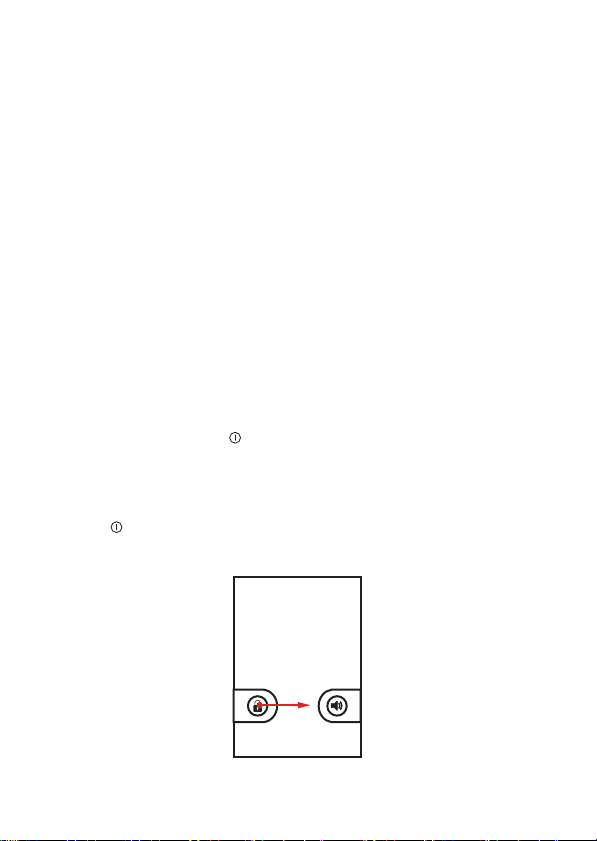
2.5.2 Unlocking the Screen
1. Press to wake up the screen.
2. Drag the lock icon from left to right to unlock the screen.
8
Page 10
■ Note:
If you have set up a screen unlock pattern, you will be prompted to draw the pattern on the screen
to unlock it.
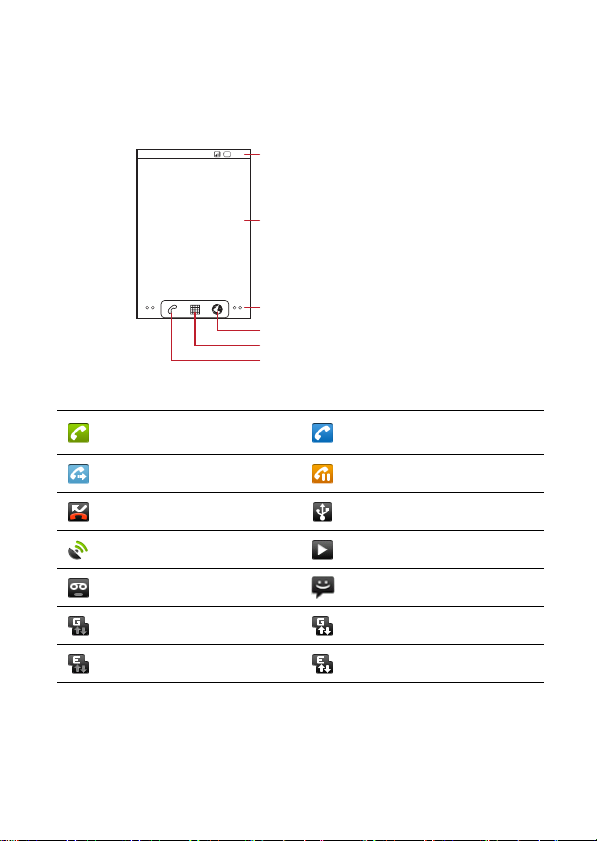
2.6 Home Screen
10:23
Notifications bar:
Displays the reminders and status icons of
your phone. Flick down to open the
notifications panel.
Display area:
Shows the operation and display areas of
your phone.
Screen switching dots:
Indicate the number of the screens on the
left or right. Touch the left or right dots to
switch between the screen.
Touch to open the Browser.
Touch to view all your applications.
Touch to open the Phone application.
2.6.1 Notification and Status Icons
Call in progress
Call in progress using a Bluetooth
device
Call forwarding on Call on hold
Missed call Connected to a PC
GPS connected Music playing
New voicemail New message
GPRS connected GPRS in use
EDGE connected EDGE in use
2.6.2 Notification Panel
Your mobile phone will notify you when you receive a new message or there is an inc oming event.
The notification panel also informs you about a larms and s ettin gs, fo r examp le, w hen
forwarding
is activated. Open the notification panel to s ee who the wireless n etwork operator is or
to view a message, reminder, or event notification.
Call
9
Page 11
Opening the Notification Panel
1. When a new notification icon appears on the notification bar, touch and hold the notification
bar, and then flick down to open the notification pane l.
2. On the notification panel, you can do the following:
• Touch a notification to open the related application.
• Touch
Clear
to clear all notifications.
Closing the Notification Panel
Touch and hold the bottom of the panel. Then flick up to clo se it.
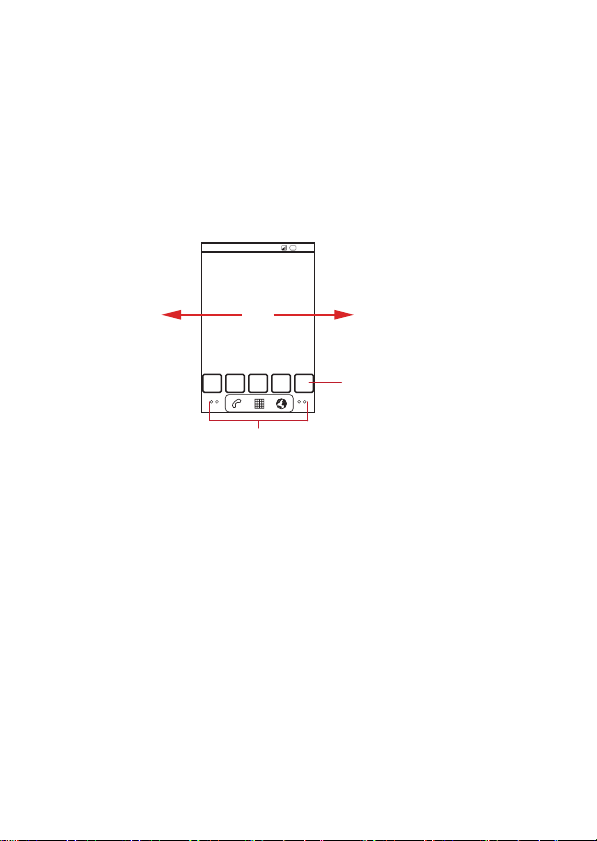
2.6.3 Viewing Other Parts of the Home Screen
10:23
Flick your finger left or
right across the Home
screen.
Touch a thumbnail to
open the Home screen
or its extensions.
Touch and hold the small dots to view thumbnails
of the Home screen and its extensions.
2.6.4 Customizing the Home Screen
Adding a New Screen Item
1. Touch and hold a blank area on the Home screen until the
displayed.
2. Select an item to add it to the Home s creen.
Moving a Screen Item
1. Touch and hold an item on the Home screen until the item expands in size and the mobile
phone vibrates.
2. Without lifting your finger, drag the ite m to the desired pos ition on the screen, and then release
it.
Removing a Screen Item
1. Touch and hold an item on the Home screen until the item expands and the mobile phone
vibrates.
2. Without lifting your finger, drag the item to the trash can. When the item and the trash can turn
red, the item is ready to be r emoved.
3. Release the item to remove it from the Home screen.
Add to Home screen
menu is
10
Page 12
2.6.5 Changing the Wallpaper
1. On the Home screen, touch >
2. Do any of the following:
• Touch
Live wallpapers
• Touch
Gallery
• Touch
to select a picture and set it as the wallpaper.
Wallpapers
to select a picture and set it as the wallpaper.
Wallpaper
.
to select a picture and set it as the wallpaper.
2.7 Using a microSD Card
2.7.1 Installing the microSD Card (Optional)
Your mobile phone is already equipped with a large-volume b uilt-in eMMC ca rd. If y ou want to
expand your phone memory, you can also insert a microSD card.
1 2
1. Remove the battery cover.
2. Insert the microSD card into the card slot as shown in the diagr am.
2.7.2 Using the microSD Card as USB Mass Storage
To transfer all your favorite music and pictures from yo ur PC to your mobile phone’s microSD card,
set the microSD card as USB mass storage.
1. Connect your mobile phone to your PC with the USB cable. You r PC will detect the mic roSD
card as a removable disk.
2. Open the notification bar, a nd then touch
3. Touch
Turn on USB storage
files.
You can now transfer files from your PC to your mobile p hone’s mic roSD c ard.
■ Note:
When your microSD card acts as USB mass storage, your mobile phone will no t use this memory
space. Your PC will tell you how to safely disconnect the USB mass storage device (your mobile
phone) when you have finished transferring files.
2.7.3 Removing the microSD Card
1. Touch >
2. Scroll down the screen, and then to uch
3. Carefully remove the microSD card.
Settings
.
USB connected
in the dialog box that opens to confirm that you want to transfer
SD card & phone storage
.
>
Unmount SD card
.
11
Page 13

3 Calling
To make a phone call, you can dial a number or touch a number from your contact lis t, on a Web
page, or in a document. When you ar e on a call, you can answer other incomin g calls or send them
to your voicemail box. You can also set up conference calls with several participants.
3.1 Making a Call
To make a call, you can use the
When you are on a call, you can touch to return to the Home screen and use other funct ions.
To return to the calling screen, flick the notification bar down and touch
■ Note:
Do not block the microphone at the bottom of your phone if you want your voice heard.
3.1.1 Making a Call with the Phone Application
1. Touch >
If you are already working with
2. Touch the appropriate numeric keys to enter the phone number.
3. Touch to initiate the call.
During a call, touch
Phone
3.1.2 Making a Call from Contacts
1. Touch >
If you are already working with
2. In the list, touch the contact you want to call.
3. Touch to dial the phone number.
Contacts
3.1.3 Making a Call from Call log
1. If you are already working with
2. Touch to the right of the log entry to dial.
★ Tip:
If you touch and hold a log entry, the options menu will open.
3.2 Answering or Rejecting a Call
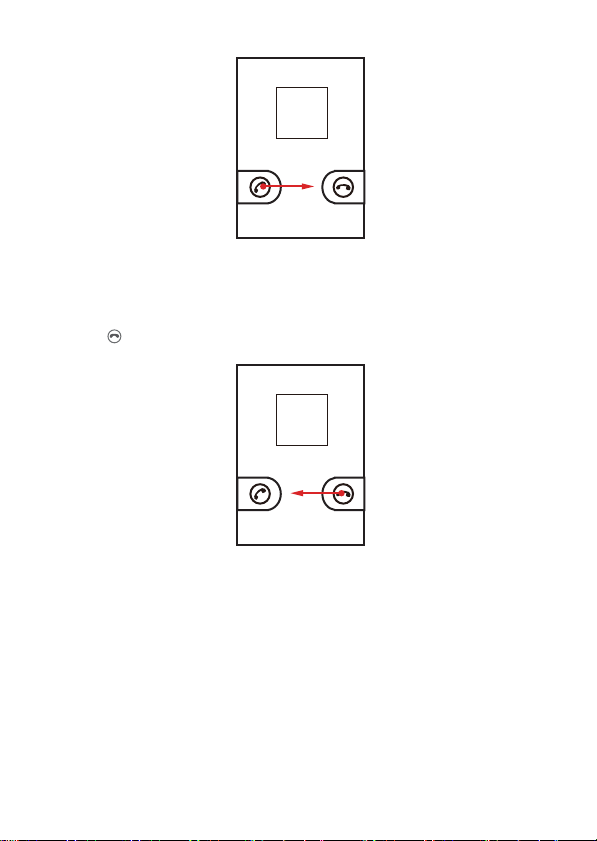
3.2.1 Answering an Incoming Call
When you receive a phone call, th e incoming call sc reen opens wit h the caller's name and number
that you have entered in
Drag the to the right to answer the call.
Phone
application, or select a number from
to display the dialer.
Contacts
or
Call log
Dialpad
to enter other numbers on the dialpad.
to display the contact list.
Phone
or
Call log
Contacts
or
Phone
Contacts
.
, touch the
, touch the
, touch the
Current call
Phone
Contacts
Call log
Contacts
tab.
tab.
tab.
.
or
Call log
.
12
Page 14
3.2.2 Ending a Call
During a call, touch
End
to hang up.
3.2.3 Rejecting an Incoming Call
Drag the to the left to reject the call.
3.3 Other Operations During a Call
3.3.1 Making a Conference Call
If you receive a new call while you are already on a call, you can connect the second call to the call
you are on. This feature is known as conference calling. You can also set up a conference call with
multiple callers.
■ Note:
Contact your network operator to learn if confere nce calls are supported and, if yes, how many can
participate.
1. To initiate a conference call, dia l the numb er of the first par ticipant. A fter yo u have c onnected
to the first participant, keep the connection open, touc h
Add call
.
13
Page 15

2. Enter the phone number of the next person you want to join the conve rsation and touch ,
or select someone from your
on hold while you do this.
3. Once you have connected to the second person, tou ch
call.
4. To add more people, touch
5. To end the conference call and disconnect everyone, touch
Call log
or
Contacts
Add call
, and then repeat steps 2 and 3.
. The first participant is automatica lly placed
Merge calls
to begin the conference
End
.
3.3.2 Switching Between Calls
If you receive a new call while you are already on a call, yo u can s witch b etwee n the tw o ca lls.
1. While you are on the first call and the second call comes in, answer the incoming call, and then
touch
Swap
2. The current call is placed on hold and you are connected to the new call.
.
3.4 Using Call log
The
Call log
log to reference a recently called number quickly or add an inc oming number to your c ontact lis t.
contains a list of calls that you have dialed, received, or missed. You can use the call
3.4.1 Adding an entry to Contacts
1. If you are already working with
2. Touch and hold the entry you want to add.
3. Touch
Add to contacts
4. Touch
Create new contact
name.
Phone
or
Contacts
, touch the
Call log
tab.
in the options menu.
or scroll through the contact list and to uch an exis ting contact
3.5 Using Airplane Mode
Some locations may require you to turn off your phon e’s w ireless co nnectio ns . Rath er than
powering off your phone, you can place it in
1. Press and hold .
2. Touch
Airplane mode
in the options menu.
Airplane mode
.
14
Page 16

4 Contacts
The
Contacts
and addresses of your contacts. After y ou save con tact inf ormation on y our mobile ph one, you
have easy access to the people with whom you wa nt to c ommunicat e.
4.1 Opening the Contacts Application
If you have a new mobile phone and have not yet add ed an y cont acts ,
message with hints on how to start adding contacts to your mobile ph one.
Touch >
All of your contacts are displayed alphabetically in a list that yo u ca n scro ll throug h.
4.2 Importing Contacts from a SIM Card
1. In the contact list, touch >
2. Touch
3. If you have more than one account on your phone, touch th e account into which you want to
4. Wait for the SIM card contents to be loaded. Select the contacts you want to import or touch
4.3 Adding a Contact
1. In the contact list, touch >
2. If you have more than one account with contacts, touch th e account to which you want to add
3. Enter the contact's name, and then add detailed information such as phone number or
4. When you are finished, touch
4.3.1 Adding a Contact to Your Favorites
• Touch and hold the contact you want to add to
• Touch a contact, and then touch the star to the right of the contact’s name. The star turns gold.
application enables you to save and manage inform ation su ch a s phone n umber s
Contacts
Contacts
Import from SIM card
import the contacts.
>
Import all
the contact.
address.
to open the
to import all contacts.
Contacts
application.
Import/Export
.
New contact
Done
.
.
to save the contact information.
Favorites
. Then touch
displays a
Add to favorites
.
4.4 Searching for a Contact
1. In the contact list, touch >
2. Enter the name of the contact you wish to search for . As you type, conta cts with matching
names appear below the search box.
Search
.
4.5 Editing a Contact
You can make changes to the information you have stored fo r a cont act a t any t ime.
15
Page 17

1. In the contacts list, touch and hold the contact whose details you want to edit, and then touch
Edit contact
2. Touch the category of contact information you wish to change: name, phone number, email
address, or any other information you reco rded earlier.
3. Make the desired changes to the contact information, and then touch
your changes, touch
in the options menu.
Revert
.
Done
. To cancel all of
4.6 Communicating with Your Contacts
From the
Contacts
or
Favorites
message (MMS) to a contact’s default phone number. You can also open details to view a list of
all the ways you can communicate with that contac t. This section describes how to communicate
with a contact when you view your contacts list.
tab, you can quickly call or send a text (SMS) or multimedia
4.6.1 Connecting Through Quick Contact for Android
1. Touch the contact's picture or picture frame (if you have no t assigned a pict ure to the contact)
to open Quick Contact for Android.
2. Touch the icon for the way you want to communicate with the contac t.
■ Note:
The icons available depend on the information you have entered for the contact,
the applications on your phone, and the accounts you have.
4.6.2 Communicating with a Contact
1. In the contacts list, touch the contact that you want to communicate with.
2. On the contact’s details sc reen, touc h the icon to the r ight of th e number to call or send
messages.
4.7 Deleting a Contact
1. In the contacts list, touch and hold the contact tha t you want to delete, an d then touch
contact
2. Touch OK to confirm that you want to delete the contact.
in the options menu.
Delete
16
Page 18

5 Using the Onscreen Keyboard
5.1 Displaying the Keyboard Panel
To enter text, use the onscreen keyboard. Some applications open the keyboard au tomatically. I n
others, touch a text field to open th e keybo ard .
Touch the space where you want to write text to disp lay the key board.
Touch to hide the keyboard.
★ Tip:
Touch and hold the space where you usually write your text to open the options menu.
5.1.1 Choosing an Input Method
1. Touch and hold the space where you enter your text until the
2. Touch
Input method
3. Select the input method.
The keyboard panel will be displayed automatically.
.
5.1.2 Using the Android Keyboard
q w e r t y u i o p
Touch once to capitalize the next letter you type.
Touch and hold for all caps.
★ Tip:
Touch >
or turn off voice input.
Settings
a s d f g h j k
z x c v b n m
Touch to insert a space.
Touch to enter text by voice.
Touch to change from text mode to symbol/number mode.
>
Language & keyboard
l
DEL
.
Next?123
>
Android keyboard
Edit text
menu is displayed.
Touch to delete a character
to the left of the cursor.
Touch and hold to delete all
characters to the left of the
cursor.
>
Voice input
to turn on
17
Page 19

5.1.3 Using the Swype Keyboard
1
23 _%(
#
qENw e
r t y u i o p
&
$ 456 +: ;”
a s d f g h j k
!7890/?
z x c v b n m
_
SYM
’
)
l
Touch to delete a character
to the left of the cursor.
’
.
Touch and hold to delete all
:)
characters to the left of the
cursor.
Touch to insert a space.
Touch to change from text mode to symbol/number mode.
Touch and hold to get helpful tips.
Touch to get swype functions.
Touch once to capitalize the next letter you type.
Touch twice for all caps.
1
23 _%(
#
qENw e
r t y u i o p
&
$456+: ;”
a s d f g h j k
!7890/?
z x c v b n m
_
SYM
’
1
23 _%(
#
qENw e
r t y u i o p
&
$456+: ;”
a s d f g h j k
!7890/?
z x c v b n m
_
SYM
’
)
bay
l
To enter a word, just drag your
’
.
’
.
finger over the letters in the word.
:)
)
I’ll
To capitalize, go above the
keypad.
l
To enter apostrophes in common
words drag through the ‘n’.
To enter double letters, circle the
:)
letter.
5.1.4 Using the Landscape Keyboard
If you find the keyboard inconvenient or difficult to use, t urn yo ur mo bile phone s ideways . The
screen will display the keyboard in landscape orientation, providing you with a wider keyboa rd
layout.
5.2 Customizing Keyboard Settings
1. Touch >
2. Select an input method to customize the keyboard settings.
18
Settings
>
Language & keyboard
.
Page 20

6 Messaging
The Messaging application allows you to exchange text messages (SMS) and mult imedia
messages (MMS) with anyone using an SMS-or-MMS-capab le phone. With the
you can read and send emails.
6.1 SMS and MMS
6.1.1 Opening Messaging
Touch >
6.1.2 Creating and Sending a Text Message
1. Touch >
2. Enter a phone number in the To field.
3. Touch the composition text box to start entering your message.
4. Once you are done, touch
The message list opens, and your name appear s in the list, follo wed by the message yo u just sent.
Responses appear in the window. As y ou view an d send additional mes sages, a message thr ead
is created.
6.1.3 Creating and Sending a Multimedia Message
You can use multimedia messages to make everyday communications ver y special. You can
record a message and send it as an audio file, sing 'Happy Birt hday' and sen d it to friend , or sen d
a slideshow of photographs of a special event. The possib ilities are endle ss.
1. Touch >
2. Enter a phone number in the To field.
3. Touch the composition text box to start entering your message.
4. Touch to display the options panel.
5. When the message is ready to be sent, touch
Adding a Slideshow
If you want to attach more than one file to you r messa ge, use th e Slid esh ow opt ion.
1. On the message editing screen, touch to display the option s panel.
2. Touch
3. Touch and touch
Messaging
.
Messaging
>
New message
As you enter the phone number, matching contacts appear. You can touch a suggested
recipient or continue entering the phone number.
Send
Messaging
>
New message
★ Tip:
If you want to enter a smiley face, touch , and then touch
• Touch
Add subject
message mode.
• Touch
Attach
Attach
to add the message subject. Your mobile phone is now in multimedia
to add a picture, music, or video file.
>
Slideshow
, and then select a slide to start editing it.
More
>
Add slide
.
to add more slides.
.
.
Send
.
Email
application
Insert smiley
.
19
Page 21

4. Touch
Done
5. To alter your multimedia message, touch
message is ready to be sent, touch
to finish composing your message and return to the mu ltimedia message screen.
Edit
on the multimedia message screen. When the
Send
.
6.1.4 Opening and Viewing a Multimedia Message
1. In the message list, touch the message thread you wish to view.
2. Touch the multimedia message to view the message.
6.1.5 Replying to a Message
1. In the message list, touch a text or multimedia message thread to open it.
2. Touch the text box to compose your message, and then touch
Send
.
6.1.6 Customizing the Message Settings
In the message list, touch , and then touch
Settings
to customize the message settings.
6.2 Email
Your mobile phone also puts email at your fingertips. With your phone’s
use your email account with Yahoo!, AOL, or other pop ular email se rvices on your phone.
6.2.1 Adding an Email Account
When using the
Email setup wizard helps you set up yo ur ac count. A number of p opular email s ystems a re
supported. You can work with the same email service t hat you use on your PC or y ou can s elect
another email service.
1. Touch >
2. To customize your email settings, answer the onscreen prompt s, and then touch
touch
■ Note:
for the account. Contact your email service provider fo r this information.
3. Enter the account name and the name you want other people to see when they receive an
email from you.
4. Touch
After the initial setup, your
was opened. If, however, the
the contents of your Inbox or the accounts sc ree n (if yo u have mor e than o ne ac count ).
Adding Other Email Accounts
1. After creating your initial email account, touch on the
Accounts
2. Touch on the accounts screen, and then touch
account.
Email
application for the first time, you must configure an e mail acc ount. The
Email
.
Manual setup
Done
if you want to set the mail server yourself.
If you choose to set up your account manually, you will need the correct parameters
.
Email
opens to the screen you were view ing the last time the application
Email
application has not been used for a period of time , it di splays
to access the accounts screen.
Add account
Email
Inbox
screen, and then touch
to create another email
application, you can
Next
. Or
20
Page 22

★ Tip:
When adding an additional email account, you have the option to use the new ac count to sen d all
outgoing messages.
6.2.2 Viewing an Email Message
1. On the accounts screen, touch the email account you want to use.
2. Access a folder, and then touch the message that you wa nt to view.
6.2.3 Creating and Sending an Email Message
1. On the accounts screen, touch the email account you want to use.
2. On the
Inbox
3. In the To field, enter the name or the email address.
4. Enter the subject of your message and compose the message .
To send an attachment with the message, touch , and then touch
5. When you are finished, touch
If you are not ready to send the message, touch
message as a draft.
screen, touch , and then touch
Send
.
Compose
in the options panel.
Save as draft
Add attachment
or touch to save the
.
6.2.4 Replying to an Email Message
1. On the accounts screen, touch the email account you want to use.
2. Touch the email message you want to reply to.
3. Touch
Reply
or
Reply all
to reply to the email message.
6.2.5 Deleting an Email Account
1. On the accounts screen, touch and hold the email account you want to delete.
2. Touch
Remove account
3. Touch OK.
.
6.2.6 Changing Email Account Settings
You can change a number of settings for an acco unt, in clud ing how of te n you ch ec k for e mails,
how you are notified of a new mail, and details about the ser vers th e ac count uses t o send an d
receive mails.
■ Note:
Your account’s incoming and outgoing settings depend on the kind of ema il service you are using.
You can enter the necessary details manually, although you may need to contact your email
service provider to obtain the correct information for the account.
1. Touch >
2. On the accounts screen, touch and hold the email account you want to change.
3. Touch
4. Change
Email
.
Account settings
General settings, Notification settings
.
, or
Server settings
.
21
Page 23

7 Getting Connected
7.1 GPRS/3G
Your mobile phone will be automatically configured to use your w ireless service provid er’s GPRS/
3G/EDGE service (if available) when you turn on the phone for t he first time. Note that the SIM
card must be inserted.
7.1.1 Checking the Network Connection
1. Touch >
2. Touch
3. Touch
■ Note:
Your mobile phone will automatically read the access point of the SIM card. For this reason, do not
change the parameters of the access point; otherwise, you might not be able to access network
sources.
7.1.2 Turning on the Data Service
1. Touch >
2. Touch
3. Select the
7.2 Wi-Fi
Wi-Fi gives you wireless acce ss to broadband Int ernet access. To use Wi-Fi on your mobile phon e,
you need to have an access to wireless access points (hotspots). Obstacles that block the Wi-Fi
signal will reduce its strength.
7.2.1 Turning On Wi-Fi
1. Touch >
2. Touch
7.2.2 Connecting to a Wireless Network
1. After turning on Wi-Fi, touch >
2. Touch
the
3. Touch a Wi-Fi network to connect to it.
• If you select a network that is se cured with Wired Equiv alent Privacy (WEP) and c onnect to
★ Tip:
On the
22
Settings
Wireless & networks
Network operators
Wireless & networks
Data enabled
Wireless & networks
Wireless & networks
Wi-Fi networks
it for the first time, enter the password, and t hen touch
wireless network that you have already used, you will not be prompted to enter the
password again unless you reset your mobile phone to its default set ting s.
Wi-Fi settings
.
>
Mobile networks
or
Access Point Names
Settings
.
>
Mobile networks
check box to turn on the data connection.
Settings
.
, and then select the
Settings
>
Wi-Fi settings
section.
screen, touch
Add Wi-Fi network
.
to check the network connec tion.
.
Wi-Fi
check box to turn on Wi-Fi.
.
. You will see a list of detected Wi-Fi networks in
Connect
. If you connect to a secured
to add a new Wi-Fi network.
Page 24

7.3 Sharing Your Phone’s Data Connection
You can share your mobile phone's data c onnection wit h a single compu ter via a US B cable: US B
tethering. You can share your mobile phone's data connection with devices at the same time, by
turning your phone into a portable Wi-Fi hotspot.
7.3.1 Installing the USB tethering Drive
If your computer is running Windows 7 or a recent distribution of some flavors of Linux (such as
Ubuntu), you typically do not need to prepare your compute r for tethering. But if you are runnin g an
earlier version of Windows or another operat ing syst em, you may need t o prepar e your co mputer
to establish a network connection via U SB.
Install the
USB tethering
1. Connect a USB cable to a computer.
2. Open the
DownloadActiveSync.url
3. Download and install
4. After the installation, you are able to use USB tethering.
Sharing Your Phone’s Data Connection via USB
To use USB tethering in different operating systems , you ma y need t o prepar e your c ompute r to
establish a network connection via USB.
■ Note:
You can not share your mobile phone’s data connection and SD car d via US B at the same time.
1. Touch >
2. Touch
Wireless & networks
3. Select the
7.3.2 Sharing Your Phone’s Data Connection as a Portable Wi-Fi Hotspot
1. Touch >
2. Touch
Wireless & networks
3. Select the
★ Tip:
settings
drive in the following steps:
drivers
>
usbnet_driver_win2k_xp
.
ActiveSync 4.5
Settings
.
>
USB tethering
Settings
Portable Wi-Fi hotspot
When
Portable Wi-Fi hotspot
to change its network name or secure it.
Tethering & portable hotspot
check box to share your data connection.
.
>
Tethering & portable hotspot
folder and double-click the link
or a later version.
check box to share your data conn ection.
is selected, you can touch
.
.
Portable Wi-Fi hotspot
7.4 Browser
Your mobile phone comes with a browser. You can use
Internet.
★ Tip:
Your browser supports Flash applications.
7.4.1 Opening the Browser
Touch >
Browser
to open the home page.
Browser
to access and browse the
23
Page 25

★ Tip:
When the known or open Wi-Fi networks and the mobile networks ar e present at the same time,
your phone will preferably select a Wi-Fi network for internet access.
Open the browser options menu and perform one of the f ollowing ope rations , tou ch :
•
New window
•
Bookmarks
•
Windows
a new web page on this screen.
•
Refresh
•
Forward
•
More
downloading, or setting options.
: Touch to open a new window.
: Touch to display bookmarks.
: Touch to go to the web p review screen. You can switch to another web page or open
: Touch to refresh the current page.
: Touch to browse the next web page.
: Touch to open other menus and perform operations such as searching, selec ting text,
7.4.2 Opening a Web Page
1. In a browser window, touch the URL field at the top of th e screen.
2. Use the keyboard to enter the web page address. You can touch to enter the web page
address by voice.
3. As you enter the address, matching web page addres ses will appear on the sc reen. If you see
the address you want, touch it and go directly to that web page or complete enter ing the
address of the web page you want.
7.4.3 Setting a Home Page
1. In a browser window, touch .
2. Touch
More
>
Settings
>
3. Enter the address of the desired home page, and then touch OK.
Set home page
.
7.4.4 Managing Bookmarks
You can store as many bookmarks as you want on your mobile ph one.
Adding a Bookmark
1. In a browser screen, go to the web page you want to save as a bookmark.
2. Touch , and then touch
3. Edit the bookmark name as needed and then touch OK.
Opening a Bookmark
1. In a browser window, touch , and then touch
On the
Bookmarks
touch the
2. Touch the bookmark of the website you want to open.
Most visited
Bookmarks
screen, touch the
tab to view the pages you have visited most frequently .
>
Add
. The add bookmark screen opens.
Bookmarks
History
tab to view the pages you have visited. Or
.
7.4.5 Customizing the Browser Settings
Customize the browser to suit your browsing style. U se
security preferences. In the brows er sc reen, t ouch , a nd then tou ch
Browser
to set page content, privacy, and
More
>
Settings
24
.
Page 26

7.5 Bluetooth
Your mobile phone has Bluetooth, which allows you t o creat e a wi reless co nnectio n with ot her
Bluetooth devices so you can share files with your friend s, talk ha nds -free with a B luetoot h
headset, or even transfer photos on yo ur ph one t o your PC.
If you are using Bluetooth, remember to stay within 10 meters (3 3 feet) of other Bluet ooth devices.
Be aware that obstacles like walls or other electronic eq uipment may interf ere with your Blue tooth
connection.
7.5.1 Turning On Bluetooth
1. Touch >
2. Touch
When Bluetooth is turned on, the Bluetooth icon appear s in the notificatio n bar.
3. Touch
visible to other Bluetooth devices.
7.5.2 Pairing and Connecting a Bluetooth Device
Your mobile Bluetooth lets you do the following:
• Hands Free Profile (HFP): allows you to use a hands-free Bluetoot h device.
• Headset Profile (HSP): allows you to use a mono Bluetooth he adset.
• Object Push Profile (OPP): allows you to tr ansfer files through Bluetooth.
• Advanced Audio Distribution Profile (A2DP): allows you t o use a stereo Bluetooth heads et.
• A/V Remote Control Profile (AVRCP): allows you to co ntrol what plays through the B luetooth
headset remotely.
Before you use Bluetooth, you need to pair yo ur mobile pho ne w ith anot her Blue to oth device as
follows:
1. Ensure that the Bluetooth fu nction on y our mobile phon e is enabled.
2. Touch >
then scan for Bluetooth devices in range.
3. Touch the device you want to pair with your mobile phone.
4. Enter the pairing password to comple te the co nnection.
7.5.3 Sending Files via Bluetooth
With Bluetooth, you can share pictures, videos, or music files with you r family and friends. To send
files via Bluetooth, do as follows:
1. Touch and hold the file to be sent. The active options menu is displayed.
2. Touch
7.5.4 Disconnecting or Unpairing a Bluetooth Device
1. Touch >
2. Navigate to the
You can also just touch a connected device to disconnect it.
3. Touch
Settings
Wireless & networks
Bluetooth settings
Share
Unpair
.
Settings
>
Wireless & networks
, and then touch
Settings
>
Wireless & networks
Bluetooth devices
to disconnect the device.
, and then select the
, and then select the
Bluetooth
section, and then touch and hold the connected device.
Bluetooth
check box to turn on Bluetooth.
Discoverable
>
Bluetooth settings
to select a paired device.
>
Bluetooth settings
to make your mobile phone
. Your mobile phone will
.
25
Page 27

8 Entertainment
In addition to being a communication device and pers onal ass istant , you r mobile phon e also
provides you with a multitude of entertainment possibilities. You can take photos, create videos
and audio clips, and download and listen to music.
8.1 Taking Photos and Recording Videos
The camera is a combination of camera and camcorder that you can use to shoot and share
pictures and videos.
8.1.1 Opening Your Camera
• Touch >
take a picture or record a video.
• Touch to close the camera.
Capture Screen
Camera
to open the camera. The camera opens in landscape mode, ready to
Touch to customize the camera settings.
On the capture screen, touch to show the capture panel.
Thumbnail of last
photo. Touch to
preview the photos
or videos.
Drag up to record
videos, drag down
to take photos.
Touch to take a
photo.
3
5
8.1.2 Taking a Photo
1. Open your camera and switch to the camera mode.
2. If necessary, change the camera settings. The preview cha nges as you change the se ttings.
3. Compose your photo within the photo capture screen.
4. Touch and hold . When the frame turns green, the image is in focus.
5. Release to take your photo.
The photo you just took is displayed for a moment. You c an take an other p hoto or preview yo ur
photos.
8.1.3 Viewing Your Photos
1. After taking a photo, a thumbnail of the photo you have just taken is shown in the upper right
corner of the capture screen. Touch the thumbnail to view it.
26
Page 28

2. Touch the onscreen button to do any of the followi ng:
• Touch
Share
• Touch
• Touch
to send the photo in a message or post it online.
Delete
to delete the photo.
More
>
Set as
to set a picture as contact icon or wallpaper.
8.1.4 Recording a Video
1. Open the camera, and then switch to camcorder mode.
2. If necessary, change the camcorder settings.
3. Frame the scene which you want to start your video.
4. Touch to start recording a video.
5. Touch to stop recording.
8.1.5 Viewing Your Videos
1. After recording a video, a thumbnail of the video yo u have just recorded is sh own in the upper
right corner of the Capture screen. Touch the thumbnail to view it.
2. Touch the onscreen button to do any of the followi ng:
• Touch
Share
• Touch
On the video playing screen, touch the controls to sk ip forward or back or to play or pause th e
video.
3. If you want to view more videos, flick your finger left or right acr oss the screen.
to send the video in a message or post it online.
Delete
to delete the video.
8.2 Using the Gallery
Your
Gallery
and microSD card. Use
watch videos, and set a picture as wallpaper or a s a phot o for a c ontac t.
8.2.1 Opening the Gallery
Touch >
The
files in folders. Touch a folder to view the pictures or videos inside.
8.2.2 Viewing a Picture
1. In the
2. Touch the picture to view it in full-screen mode.
3. Touch the screen. Then the zoom panel appears. You can zoom in or zoo m out on the picture.
8.2.3 Rotating a Picture
1. When viewing a picture, touch to display the operations panel.
application can automatically search for pictures and vide os on yo ur mo bile phone
Gallery
to sort photos and videos into folders, view and edit pictur es,
Gallery
to open the viewer.
Gallery
application categorizes your pictures and videos by storage location and stores these
Gallery
, touch the folder that contains the pictures you want to view .
★ Tip:
The picture viewer supports the automatic rotation function. When you rotate your
mobile phone, the picture adjusts itself to the rotation.
27
Page 29

2. Touch
More
3. Select either
.
Rotate Left
or
Rotate Right
. The picture is saved with the n ew orientation.
8.2.4 Cropping a Picture
1. When viewing a picture, touch to display t he more operations panel, and then touch
>
Crop
.
2. Use the cropping tool to select the portion of the picture to crop.
• Drag from the inside of the cropping tool to move it.
• Drag an edge of the cropping tool to resize the image.
• Drag a corner of the cropping tool to resize the image without changing t he length to w idth
ratio.
3. Touch
Save
to save the cropped picture. Touch
Discard
to discard the changes.
8.3 Enjoying Music
You can download music files to your PC or insert a CD and copy t he files to your microSD card so
you can listen to music on your mobile phone.
8.3.1 Copying Music to the microSD Card
1. Connect the phone to your computer with a USB cable and mount the microS D card.
2. On the PC, navigate to th e USB dr ive and open it.
3. Create a folder in the root directory of the microSD card (for examp le,
4. Copy the music from your computer to the folder you have crea ted.
5. After copying music, unmount or eje ct the drive as req uired by you r PC’s op erating syste m to
safely remove the mobile phone.
6. Disconnect the mobile phone from the PC.
8.3.2 Opening the Media Library
Touch >
The
Albums, Songs
Music
to display the media library.
Music
application organizes your music files b y storage location. It c ontains four tabs:
and
Playlists
.
8.3.3 Playing Music
1. Touch a category on the music library screen.
2. Touch the song you want to play.
★ Tip:
When you are listening to music, touch , to use another app licat ion. Your music continues to
play. To return to the music controls, open the notification panel and then touch the song.
8.3.4 Adding Music to a Playlist
1. Touch a category on the music library screen.
2. In the list that appears, select the song you want to add to the playlist.
28
Music
).
More
Artists
,
Page 30

3. Touch and hold the song, and then touch
• Touch
• Touch
Current playlist
New
to add the song to an existing playlist.
to create a playlist and add the song to it.
8.3.5 Playing a Playlist
1. Touch the
2. Touch and hold the playlist you w ant to pla y.
3. Touch
Playlists
Play
to play the playlist.
tab on the music library screen.
Add to playlist
in the options menu.
29
Page 31

9 Google Services
■ Note:
Availability of Google applications, services, and features may vary according to your country or
carrier. Please follow the local laws and regulations to use them.
When you turn on your mobile phone for the first time, touc h a Google servic es suc h as
Gmail\Google Mail
■ Note:
Ensure that your mobile phone has an active data connection (3G/ GP RS) before you sign in to
your Google account.
If you already have a Google account, touch
, or
Market
, and you will be prompted to sign in to your Google account.
Sign in
and enter your username and password.
9.1 Creating a Google Account
If you do not have a Google account, you can cr eate on e:
1. After reading the setup information, touch
2. Touch
Create
3. Enter a first name, last name, and user name for your Google account, and then touch
The mobile phone will connect to the Google server to check whether the username is
available. If the username you entered is already in use, you will be prompted to choose
another one or select one from a list.
4. Enter and confirm your Google account password.
5. Select a security question from the drop down menu, and then enter the answer .
6. Touch
7. When the
8. Enter the characters that appear on the screen, and th en touch
★ Tip:
To use another Google account, go to the
account
.
Create
.
Google Terms of Service
to select which type of accounts you want to add.
Next
.
screen appears, touch
Accounts & sync settings
I agree, Next
Next
.
screen, and touch
9.2 Using Gmail\Google Mail
Gmail\Google Mail
may have configured it to use an existing
The first time you open the
the messages from your
9.2.1 Opening Gmail\Google Mail
Touch >
your mobile phone will go to your
9.2.2 Switching Between Accounts
1. In the mail list, touch , and then touch
is Google’s web-based email service. When you first set up y our pho ne, you
Gmail\Google Mail
Gmail\Google Mail
Gmail\Google Mail
Gmail\Google Mail
application on your phone, your
account on the web.
. The
Inbox
mail list appears. Any emails you decide to keep on
Inbox
folder.
Accounts
account or create a new account.
.
.
Inbox
Talk
,
Next
Add
will contain
.
30
Page 32

2. Touch the account that contains the email you want to read.
9.2.3 Creating and Sending an Email
1. In the mail list, touch , and then touch
2. Enter the message recipient’s email address in the
several recipients, separate the email addresses with commas. You can add as many
message recipients as you want.
If you want to send a copy (Cc) or a blind copy (Bcc) of the email to other recipients, touch
, and then touch
3. Enter the email subject and write your message.
If you want to add a picture attachment, touch , and then touch
you want to attach.
4. After composing your email, touch >
Add Cc/Bcc
Compose
.
To
field. If you are sending the email to
.
Attach
to select the picture
Send
.
9.2.4 Replying To or Forwarding an Email
1. In the mail list, touch the email that you want to reply to or forward.
2. Touch , and then touch
3. Do one of the following:
• If you selected
• If you selected
want to include with the forwarded message.
4. Touch >
Send
Reply, Reply all
Reply
or
Reply all
Forward
, specify the message recipients and add any additional text you
.
, or
Forward
, enter your message.
.
9.2.5 Searching for an Email
1. In the mail list, touch , and then touch
2. Enter the search keywords in the box, and then touch .
Search
.
9.2.6 Customizing Your Gmail\Google Mail Settings
In the mail list, touch , and then touch
Mail
.
More
>
Settings
to customizing your
Gmail\Google
9.3 Using Talk
Talk
is Google’s instant messaging service. You can use it to communicate in real time with other
people using
9.3.1 Opening Talk
Touch >
■ Note:
Your
Talk
on a phone or on the web.
Talk
to open the application.
Talk
account is based on the Google account you set up with your mobile phone.
31
Page 33

9.3.2 Adding a Friend
1. In the friends list, touch , and then touch
2. Enter the
3. Touch
Talk
instant messaging ID or Google email ad dress of the friend you want to add.
Send invitation
.
Add friend
.
9.3.3 Accepting an Invitation
1. If you have invited anyone to chat or if someone else has invited you to chat, th is information
will appear in the friends list.
2. Touch a pending invitation, and then touch
Accept
.
9.3.4 Starting a Chat
1. In the friends list, touch a friend's name in the friends list.
2. Use the onscreen keyboard to enter text and chat with your friend.
3. After entering your message, tou ch
Send
.
9.3.5 Setting Notifications for New Instant Messages
Whenever you receive an instant message, your mob ile phon e ca n play a s ound, v ibra te, or
display an icon. To set up one of these ha ndy not ifications , st art in th e frien ds list , and then to uch
. Then touch
Settings
. Now choose from one of the following:
IM
notifications
Select
ringtone
Vibrate
Select the check box to receive a notification on the notification bar whe n
you receive an instant message.
Touch to choose the ringtone used for a new instant message. You will
hear a short sample of the ringtone when you select it. To turn the ringtone
off, select
Silent
.
Select the check box to make your mobile ph one vi brate w hen yo u recei ve
a new instant message.
9.3.6 Signing Out of Talk
In the friends list screen, touch , and then touch
Sign out
to quit
Talk
.
9.4 Using Maps
Maps
lets you find your current location, view real-time traffic conditions (depending on availability
in your locale), and get detailed directions to various destinations on a satellite, traffic , or other kind
of map.
9.4.1 Enabling Location Source
Before you open
"location source".
32
Maps
to find your location or search for places o f interest , you must en able
Page 34

1. Touch >
2. Touch
3. In the
satellites
Settings
Location & security
My Location
check box, or both.
.
section, select the
.
Use wireless networks
check box,
Use GPS
9.4.2 Opening Maps
Touch >
Maps
to open the application.
9.4.3 Searching for Places of Interest
1. On the map, touch , and then touch
2. Enter the place you want to search for in the search box , and then touch the Se arch icon.
3. Your search results will then be displayed. Touch a place you are interes ted in and the
application will show where it is on the map.
Search
.
9.4.4 Getting Directions
1. While viewing a map, touch , and then to uch
2. Enter the starting point in the first text box, and then en ter your destination in the second text
box.
3. Touch the icon for car, public tra nsit, or walk ing directions .
4. Touch Go. Your directions will appear in a list.
5. Touch a direction item on the list to show it on the map.
6. When you finish viewing or following the directions, touch >
Directions
.
Clear map
to reset the map.
9.5 Using YouTube
YouTube
is Google’s free online video streaming service for viewing, searching for, and uploading
videos.
9.5.1 Opening YouTube
Touch >
categories, such as
9.5.2 Searching for a Video
1. On the
2. Enter a search keyword, and then touch the Sear ch icon.
3. You will see a number of search results displayed below the notification bar. Scroll through the
9.5.3 Sharing a Video
1. On the
YouTube
. You will then see the YouTube screen. The videos will be grouped into
Most viewed, Most discussed, Top rated
YouTube
screen, touch , and then touch
results and touch a video to watch it.
YouTube
• While viewing a list of videos, touch and hold a video entry, and then touch
options menu.
screen, do one of the following:
Search
, and more.
.
Share
on the
33
Page 35

• While watching a video, touch , a nd then touch
2. Compose a message if you like, address the email, and send it.
Share
.
9.6 Using Market
Android Market provides direct access to applications and game s which yo u can dow nload and
install on your phone.
9.6.1 Opening Market
1. Touch >
2. When you open
appear. Touch
9.6.2 Searching for Applications
There are a few different ways to find applications on the
• Featured applications.
• List of applications by category: Includes subcategories, which you can sort by popularity
(most to least) or by date (newest to oldest).
• List of games.
• Search function.
• Your downloads.
9.6.3 Installing an Application
■ Note:
If you want to install a non-Market application, touch >
select the
1. In the
2. Touch a category, and then touch the item you want to download .
3. On the item details screen, r ead more about the applic ation, includin g its cost, o verall rating,
and user comments. If you scroll down to the
applications from the same developer, link to the developer's web site, or send the developer
an email.
4. To install the item, touch
5. To check the progress of a download, open the notification panel. Most applicatio ns are
installed within seconds. To stop an item from downloading, touch
6. After the application has been downloaded and installed on your mobile phone, the content
download icon appears in the notification bar.
9.6.4 Uninstalling an Application
1. On the
2. Touch the application you want to uninstall, and then touch
3. When prompted, touch OK to remove the application from your mobile phone.
34
Market
.
Market
Accept
Unknown sources
Market
, touch
Apps
Market
screen, touch
for the first time, the
to continue.
check box to allow installation of the non-Market application.
.
Install
(if the item is free) or
Downloads
Android Market Terms of Service
Market
home screen, including:
Settings
>
Applications
About the developer
Buy
.
section, you can see other
, whichever is displayed.
Cancel download
Uninstall
.
window will
, and then
.
Page 36

4. Choose the reason for removing the application, and then touch OK.
35
Page 37

10 Synchronizing Information
Some applications on your mobile phone give you access to the same per sonal inf ormation tha t
you can add, view, and edit on your computer. If you a dd, change, or delete your infor mation in any
of these applications on the web, the updated informat ion also app ear s on you r mob ile phone.
This is made possible through over-the-air data sync hron ization . The pro cess occ urs in the
background and does not interfere with use of you r mobile phone. W hen you r phone is
synchronizing, a data synchronization icon will be shown in th e not ification b ar.
10.1 Managing Your Accounts
You can synchronize contacts, email, and other informa tion on y our mobile ph one w ith multip le
Google accounts or other kinds of accounts, depending on the applications installed on your
mobile phone.
For example, you can start by adding your personal Goo gle ac count , so y our pers ona l email,
contacts, and calendar are always available. Y ou coul d then ad d a w ork ac cou nt, so yo ur w orkrelated emails and work contacts are handy. If you like, y ou may add multiple Goo gle accoun ts or
other accounts.
10.1.1 Adding an Account
When you add an account,
with contacts from your existing mobile phone account s and at tempts to merg e dup licates int o a
single entry in
not merged.
1. Touch >
2. Touch
3. Touch the kind of account to add.
4. Follow the onscreen steps to enter the required and option al information about the acco unt.
5. Configure the account. Depending on the kind of account , you may be aske d to configure wh at
Contacts
settings and a list of your current accounts.
■ Note:
example, you may need to know the account’s domain or server ad dres s.
Add account
Most accounts require a username and password, but the deta ils depend on the kind of
account and the configuration of the service to which you are conne cting.
kind of data you want to sy nc to the mobile phone , to name the acc ount, and for other details.
When you are finished, the account is added to the list in the
screen.
10.1.2 Removing an Account
You can remove an account, deleting it and all information associ ated wi th it from y our mobile
phone, including email, contacts, settings, and so on. Y ou cann ot, ho wev er, remov e so me
accounts, such as the first account y ou signe d into on th e mobile pho ne. If y ou attempt t o remove
certain accounts, all personal information associated with it will be deleted.
1. On the
Accounts & sync settings
Contacts
compares contacts from the newly synchronized ac count
. While it is presented as a single contact entry, t he cont act da ta itself is
Settings
>
Accounts & sync
In some cases, you may need to obtain account details from an IT s upport. For
.
. The screen displays your current synchronization
Accounts & sync settings
screen, touch the account to delete.
36
Page 38

2. Touch
Remove account
3. Confirm that you want to remov e the acc ount.
.
10.2 Customizing Your Account Synchronization
You can configure background data use and synchroniz ation op tion s for all the applic ations on
your phone. You can also configure what kind of dat a yo u sync hronize fo r each ac c ount.
For some accounts, synchronizing is two-direc tional; changes t hat you make to the information on
your mobile phone are made to the copy of that informat ion on t he web. Some ac cou nts suppo rt
only one-way synchronize; the information on your mobile ph one is rea d-o nly.
10.2.1 Configuring General Sync Settings
On the
Accounts & sync settings
• Select or clear the
can transmit data when you are not workin g with t hem direct ly (that is, w hen they ar e runn ing
in the background).
If you clear this option,
synchronizing events, and so on, until you touch the
• Select or clear the
on the phone or on the web are automatically synchronized with each other.
For example, when this option is selected, ch anges that y ou make in
are automatically made in Google Contacts on the web.
Background data
Auto-sync
10.2.2 Changing an Account’s Synchronization Settings
1. On the
Accounts & sync settings
you want to change. The data and synchr onization screen opens, displaying a list of the kind s
of information the account can s ynchron ize.
2. Selected items are configured to sy nchronize to your mobile phone.
3. Select or clear the check box of information you want to synchroni ze to the mobile phone.
screen, do the following:
check box to control whether applicat ions and s ervices
Gmail\Google Mail
check box to control whether changes you make t o information
stops receiving new mail,
Refresh
screen, touch the account whose synchronization se ttings
Calendar
menu item or send an email.
Contacts
stops
on the phone
37
Page 39

11 Using Other Applications
11.1 Using the Calendar
Use
Calendar
synchronization settings, the calendar on your phone can be synchronized with the internet-based
calendar you use.
11.1.1 Opening the Calendar
Touch >
★ Tip:
To access Google calendar, touch , and then touch
11.1.2 Creating an Event
1. On any calendar view, touch . Then touch
2. Enter the event name.
3. Enter the location of the event and a description.
4. If you have more than one calendar, select the calendar where you want to save the event.
5. Enter email addresses to invite guests to the event.
6. Set the time of your event reminder in
7. Touch
★ Tip:
To quickly create an event in the
and then touch
date in the
11.1.3 Setting an Event Reminder
1. On any calendar view, touch an event to view its details or an event summary.
2. Touch the
3. Touch the reminder time, and then touch the length of time before the event when you want to
11.1.4 Customizing the Calendar Settings
On any calendar view, touch . Then touch
to create and manage events, meetings, and appointments. Depending on your
Calendar
to open the application.
More
>
Calendars
.
New event
to open the
• If there is a time frame for the event, touch
of the event.
• If the event is a special occasion such as a birthday or a day-long activity, set the date for
From
and To, and then select the
event recurs and, if it does, how frequently.
Done
.
New event
From
and To fields.
Add reminder
an existing reminder.
be reminded. When the time comes, you will receive a notification about the event.
Day, Week
. A new event details screen will appear with the selected time slot and
button to add a reminder. Or touch the reminder’s “-” button to delete
From
All day
check box.
Reminders
, or
Month
More
and To to set the beginning and end times
, and then specify in
view, touch and hold an empty time slot,
>
Settings
.
Event details
Repetition
screen.
whether the
38
Page 40

•
Hide declined events
•
Set alerts & notifications
or to turn off event notifications on your mobile phone.
•
Select ringtone
•
Vibrate
•
: Select to vibrate the mobile phone when you receive an event notification.
Default reminder time
to occur.
: Select to hide events for which you have declined invitations.
: Touch to set event reminders to alert you, send you a notification,
: Touch to select the ringtone to sound when y ou receive an event reminder.
: Touch to select the default time befor e a n even t for e ve nt remin der s
11.2 Using the Clock
In addition to displaying the date and time, the
weather and your phone. You can also use
11.2.1 Opening the Clock
Touch >
Clock
local weather and other useful information.
Clock
to open the application.
opens with the date and time displayed on your Home s creen wallpaper , alo ng with y our
11.2.2 Opening the Alarms
On the
Clock
screen, touch to open the
Adding an Alarm
1. On the alarm list screen, touch
2. Set the alarm, and then touch
Setting an Alarm
1. On the alarm list screen, touch one of the alarms on the screen.
2. Touch
Time
3. Touch
4. Touch
5. Select the
6. Touch
7. Touch
Customizing Alarm Settings
On the alarm list screen, touch , and then touch
to set the time of the alarm.
Repeat
to set the days when you want the alarm to sound.
Ringtone
to select a ringtone for the alarm.
Vibrate
Label
to enter a name for the alarm.
Done
.
Done
check box to have the phone v ibrate, in a ddition to pla ying the ring tone.
Add alarm
.
Clock
application displays information about the
Clock
to turn your mobile phone into an alarm clock.
Alarms
.
.
Settings
.
11.3 Using the Calculator
Use the calculator to solve simple arithmetic problems or use its a dvanced operators to solve more
complex equations.
11.3.1 Opening the Calculator
Touch >
Calculator
to open the application.
39
Page 41

11.3.2 Switching to the Advanced panel
On the
Calculator
and
Basic panel
screen, flick the screen to the right or left to switc h be tween
.
11.4 Using the Note pad
Note pad
features a simple text p rocessor and lis ts all notes in a linear structur e. You can add, ed it,
and delete notes.
1. Touch >
2. Touch , and then touch
3. Touch to save the note.
Note pad
to open the application.
Add note
to create a note.
Advanced panel
40
Page 42

12 Managing Your Mobile Phone
To configure your mobile phone, touch >
12.1 Setting the Date and Time
By default, your mobile phone automatically uses t he date , t ime zone, and time prov ided by t he
network.
■ Note:
When your mobile phone is using date and time settings provided automati cally by t he net work,
you cannot manually set the date, time, and time zone.
1. On the
Settings
2. Clear the
3. Touch
year, and then touch
4. Touch
view more time zones.
5. Touch
Touch
6. Select or clear the
hour format.
7. Touch
screen, touch
Automatic
check box.
Set date
. On the set date screen, touch or to adjust the date, month, and
Set
Select time zone
Set time
Set
when the configuration is complete.
Select date format
when the configuration is complete.
, and then select the desired time zone from the list. Scroll the list to
. On the set time screen, touch or to adjust the hour and minute.
Use 24-hour format
to select how you want the d ate to display on your mo bile phone.
12.2 Setting the Display
12.2.1 Adjusting the Screen Brightness
1. On the
Settings
Settings
screen, touch
screen, touch
2. Drag the slider left to make the screen darker, or right to make it brighter.
3. Touch OK to save the adjustment.
12.2.2 Adjusting the Time Before the Screen Turns Off
If your mobile phone is idle for several minutes, it will turn off the screen to save battery power. To
set a longer or shorter idle time, do the following:
1. On the
2. Select the duration you want the screen to be illu minated.
Settings
.
Date & time
Display
Display
.
check box to switch between 24-hour format and 12-
>
Brightness
.
>
Screen timeout
.
12.3 Setting Ringers
12.3.1 Turning On Silent Mode
1. On the
Settings
2. Select the
media sound.
screen, touch
Silent mode
Sound
check box to silence all sounds exc ept alarms, and music an d video
.
41
Page 43

12.3.2 Adjusting the Volume
You can adjust the volume from the Home screen or any application s creen. Press t he Vo lume
keys to adjust volume to the level you desire.
You can also adjust the volume from the settings scre en.
1. On the
Settings
2. Drag the slider left to make the volume lower, or right to make it higher.
screen, touch
3. Touch OK to save the adjustment.
Sound
>
Volume
.
12.3.3 Changing the Phone Ringtone
1. On the
Settings
2. Touch the ringtone you want to use, and then touch OK. The ringtone plays when selected.
screen, touch
Sound
>
Phone ringtone
.
12.3.4 Changing the Message Ringtone
1. On the Home screen, touch >
2. In the message list, touch >
3. Touch the ringtone you want to use, and then touch OK. The ringtone plays when selected.
Messaging
Settings
.
>
Select ringtone
.
12.4 Setting Phone Services
12.4.1 Customizing Call Settings
You mobile phone service provider offers different se rvices such a s call fo rw ardi ng, call w aiting,
fixed dialing numbers, and voicemail. You ca n customize many of these services if they are par t of
your calling plan.
On the
Settings
screen, touch
12.4.2 Turning on Data Roaming
1. On the
Settings
2. Select the
■ Note:
Accessing data services while roaming may incur additional charges. Ask your wireless service
provider about data roaming fees.
Data roaming
12.4.3 Switching off the Data Service
1. On the
Settings
2. Clear the
Data enabled
Call settings
screen, touch
check box.
screen, touch
check box.
to customize your call functions.
Wireless & networks
Wireless & networks
>
Mobile networks
>
Mobile networks
.
.
12.5 Setting Text-to-Speech
Use the Text-to-Speech settings to configure the And roid t ext-to-speech synthesizer, for
applications that can take advantage of this feature.
42
Page 44

12.5.1 Installing Voice Data
1. On the
Settings
screen, touch
.
voice data
2. If your mobile phone does not have speech synthesizer data instal led, connect to Android
Market and let it guide you through the process of downloading and installing the data.
3. Follow the instructions to install the voice data.
Voice input & output
>
Text-to-speech settings
>
Install
12.5.2 Adjusting the Speech Rate
1. On the
Settings
rate
2. Select a speed at which the text is to be spoken.
screen, touch
.
Voice input & output
>
Text-to-speech settings
>
Speech
12.6 Protecting Your Mobile Phone
12.6.1 Turning on Your SIM Card PIN
1. On the
Settings
2. Select the
3. Use the keyboard to enter the SIM card PIN, and then to uch OK.
4. To change the SIM card PIN at any time, touch
■ Note:
You can dial emergency numbers any time from your mobile phone.
screen, touch
Lock SIM card
12.6.2 Protecting Your Mobile Phone with a Screen Lock
To keep your data more secure, lock the screen and/or require a scree n unlock pattern every time
your mobile phone is turned on or wakes up from sleep mode.
1. On the
Settings
2. Flicking your finger vertically, horizontally or diagonally, con nect at least four dots in any order
you choose. Lift your finger from the screen wh en you are finished.
You must flick your finger on the screen to create the pattern, not simply t ouch individual d ots.
3. Your mobile phone will record the pattern. Touch
4. When prompted, draw the screen unlock pattern again, and then t ouch
To change your unlock screen pattern, touch
screen, touch
Location & security
check box.
Location & security
>
Set up SIM card lock
Change SIM PIN
>
Set up screen lock
Continue
.
Location & security
.
.
>
Pattern
Confirm
>
Change screen lock
.
.
.
12.7 Managing Applications
12.7.1 Viewing an Installed Application
1. On the
Settings
2. In the applications list, do any of the following:
screen, touch
• Touch , and then touch
• Touch an application directly to view its details.
Applications
Sort by size
>
Manage applications
. Then touch an application to view its details.
.
43
Page 45

12.7.2 Removing an Installed Application
1. On the
Settings
2. Touch an application, and then touch
phone.
screen, touch
Applications
Uninstall
>
Manage applications
to remove the application from your mo bile
.
12.7.3 Ways to Free Up Your Mobile Phone Memory
• Move files and email attachments to the microSD card.
• In
Browser
• Uninstall any downloaded programs that you no longer use.
• Reset your mobile phone.
, clear all temporary Internet files and Browser hist ory information.
12.8 Resetting Your Mobile Phone
12.8.1 Backing Up My Data
You can use your Google account to back up your mobile phone ’s setting s to Go ogle serv ers. If
you replace your mobile phone, the settings you have backed up will be transferred to the new
mobile phone the first time you sign in to your Google acc ount.
1. On the
Settings
2. Select the
screen, touch
Back up my data
12.8.2 Restoring Factory Data
If you reset your phone to the settings that were configured at the factory, all of your pe rsonal data
stored on the phone, including information about your Go ogle A ccou nt, an y othe r acco unts, yo ur
system and application settings, and any applica tions you h ave download ed w ill be era sed.
Resetting the phone does not erase any syst em sof tware upda tes y ou ha ve down loade d or any
files on your microSD card, such as mus ic c lip s or ph oto s.
1. On the
Settings
2. When prompted, touch
resets the settings to the original factory sett ings, and then restar ts.
screen, touch
Privacy
check box.
Privacy
Reset phone
.
>
Factory data reset
, and then touch
.
Erase everything
. The mobile phone
44
Page 46

13 Appendix
13.1 FAQ
How do I set a song as phone ringtone?
Touch and hold the song to be set as ringtone, an d then touc h
How do I prevent automatic switching of orientation when rotating phone?
Touch >
How do I set the unlock pattern?
Touch >
How can I change the keyboard mode?
Touch and hold the area where you write text and then select the in put method you p refer .
How do I stop the song playing in the background?
Touch the notification bar, flick downwards to ope n th e notif ications panel, and then tou ch the
music playing notification to go to the music playing scre en.
How do I return to the calling screen?
While on a call, if you’re on another screen, you can to uch the notification bar , and drag downwards
to open the notifications panel. Then touch the current call notification to return to the calling
screen.
How do I create an application shortcut on the Home screen?
Touch and hold an application icon on the main menu screen until th e Ho me scre en is disp layed.
Then drag the icon where you want it to go and relea se your finger .
How do I hide the keyboard?
Touch to hide the keyboard.
Settings
Settings
>
Display
>
Auto-rotate screen
>
Location & security
>
Set up screen lock
Use as phone ringtone
to disable the function.
>
Pattern
.
.
45
Page 47

Android is a trademark of Google Inc.
Use of this trademark is subject to Google Permissions.
V100R001_04
 Loading...