

Page 1

GSM Mobile Phone
HUAWEI G6150
User Guide
Page 2

Copyright © Huawei Technologies Co., Ltd. 2010 . All rights reserved.
No part of this document may be reproduced or
transmitted in any form or by any means without prior
written consent of Huawei Technologies Co., Ltd.
The product described in this manual may include
copyrighted software of Huawei Technologies Co., Ltd.
and possible licensors. Customers shall not in any
manner reproduce, distribute, modify, decompile,
disassemble, decrypt, extract, reverse engineer, lease,
assign, or sublicense the said soft ware, unless such
restrictions are prohibited by applicable laws or such
actions are approved by respective copyright holders
under licenses.
Trademarks and Permissions
, HUAWEI, and are trademarks or
registered trademarks of Huawei Technologies Co., Ltd.
Other trademarks, products, services, and company
names mentioned are the property of their respective
owners.
Notice
Some features of the product and its accessories
described herein rely on the software installed,
capacities and settings of the local network, and may
not be activated or may be limited by local network
operators or network service providers. Thus, the
descriptions herein may not exactly match the product
or its accessories you purchase.
Page 3

Huawei Technologies Co., Ltd. reserves the right to
change or modify any information or specifications
contained in this manual without prior notice or
obligation.
NO WARRANTY
THE CONTENTS OF THIS MANUAL ARE PROVIDED “AS
IS”. EXCEPT AS REQUIRED BY APPLICABLE LAWS, NO
WARRANTIES OF ANY KIND, EITHER EXPRESS OR
IMPLIED, INCLUDING BUT NOT LIMITED TO, THE
IMPLIED WARRANTIES OF MERCHANTABILITY AND
FITNESS FOR A PARTICULAR PURPOSE, ARE MADE IN
RELATION TO THE ACCURACY, RELIABILITY OR
CONTENTS OF THIS MANUAL.
TO THE MAXIMUM EXTENT PERMITTED BY APPLICABLE
LAW, IN NO CASE SHALL HUAWEI TECHNOLOGIES CO.,
LTD BE LIABLE FOR ANY SPECIAL, INCIDENTAL,
INDIRECT, OR CONSEQUENTIAL DAMAGES, OR LOST
PROFITS, BUSINESS, REVENUE, DATA, GOODWILL OR
ANTICIPATED SAVINGS.
Import and Export Regulations
Customers shall comply with all applicable export or
import laws and regulations and will obtain all necessary
governmental permits and licenses in order to export,
re-export or import the product mentioned in this
manual including the software and technical data
therein.
Page 4

Table of Contents
1 Introduction....................................................1
SIM Card ...................................................... 1
microSD Card................................................ 2
Charging the Battery...................................... 2
Your Phone.................................................... 3
Keys and Functions ........................................ 5
Screen Icons .................................................7
2 Getting Started..............................................10
Phone Code................................................. 10
PIN and PUK................................................ 10
Automatically Switching Between Profiles........ 11
File Management ......................................... 11
Other Applications........................................ 11
Screen Settings ........................................... 12
3 Voice Services............................................... 13
Making a Call............................................... 13
Answering a Call.......................................... 14
Background sound ....................................... 15
4 Text Input..................................................... 16
Changing the Text Input Mode....................... 16
Using the FN Key ......................................... 16
Entering Words............................................ 16
Entering Digits............................................. 17
Entering Symbols......................................... 17
i
Page 5

5 Messaging .....................................................18
Creating and Sending a Text Message............. 18
Creating and Sending a Multimedia Message
6 Email............................................................. 20
Creating and Activating an Email Account ....... 20
Creating and Sending an Email ...................... 21
7 Contacts........................................................ 22
Creating a Contact ....................................... 22
Searching for a Contact ................................ 22
8 Multimedia ....................................................23
Camera ...................................................... 23
Video Recorder............................................ 23
Media Player................................................ 24
FM Radio..................................................... 26
Twitter........................................................ 27
9 Connectivity ..................................................28
USB ........................................................... 28
Bluetooth.................................................... 28
10 WAP ............................................................30
Setting the Connection Profile ....................... 30
Connecting to the Network............................ 31
11 Warnings and Precautions......错误!未定义书签。
ii
..... 18
Page 6
1 Introduction
All the figures
reference. The actual app
depends on your phone.
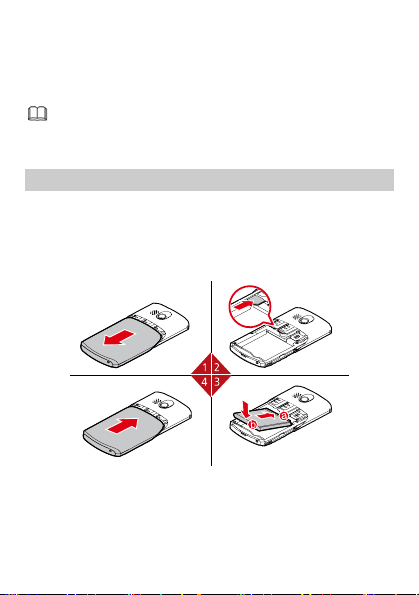
SIM Card
Insert your SIM card before using your phone. Remov
the SIM card e and the battery only after powering off
your phone.
lowing figures show the installation of the SIM
The fol
card.
in this guide are provided only for
earance and display
your
1
Page 7
Your phone support
two SIM cards into the phone at one time, and select
Menu > Settings > Dual SIM settings > Dual
SIM open to enable the dual-SIM mode.
two SIM cards. you can insert
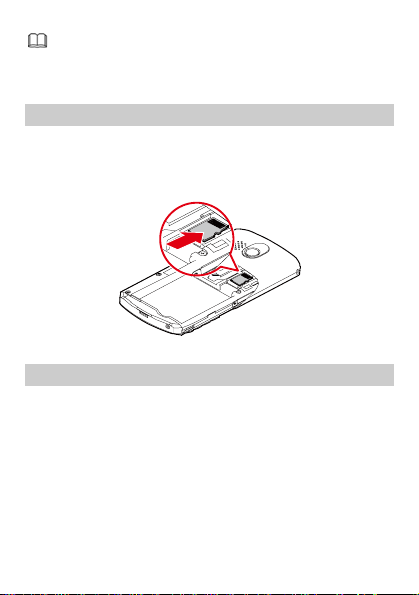
microSD Card
Your phone a capacity of
up to 4 GB.
The following of the
microSD card
supports a microSD card with
figure shows the installation
.
Charging the Battery
1.
Connect the charger to an AC power socket.
2.
Connect the charger to the charger jack on the
phone.
3. Wait until the battery is fully charged.
During the charging, the charging icon is displayed in
animation. When the charging icon becomes static, it
indicates that the battery is fully charged.
4. Disconnect the charger from the phone.
5. Disconnect the charger from the AC power socket.
2
Page 8
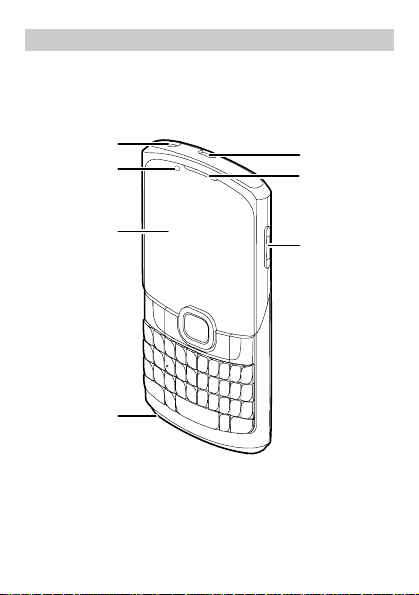
Your Phone
4
The following figure shows the appearance of your
phone and it is for your reference only.
The Front View
1
2
7
6
3
3
5
Page 9
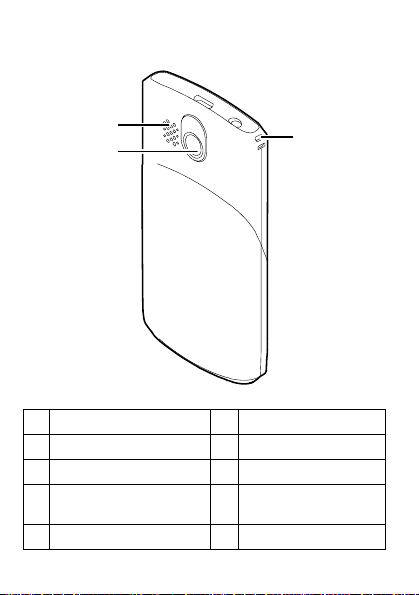
The Back View
0
8
9
Emotional lighting
1 Headset jack
3 Screen 4 Microphone
5 Volume control keys 6 Earpiece
Charger interface/Data
7 Speaker
cable connector
9 Camera 10 Strap hole
2
8
4
1
Page 10
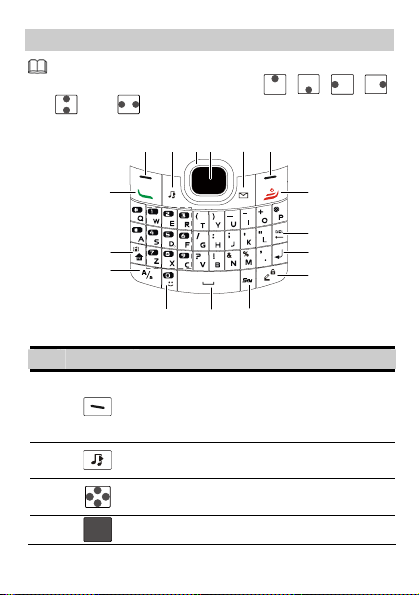
Keys and Functions
In this guide, the following icons indicate the
navigation keys of your phone:
, and .
1 2
3 4 65
, , , ,
16
15
14
13
11
12
No. Press … To …
z
Select the option displayed in the
1
2
3
4
lower left corner of the screen.
z
Access the main menu in standby
mode.
Access Media player in standby
mode.
Press the keys to scroll up, down, left,
and right on the display.
Confirm a selection.
5
7
8
9
10
Page 11

No. Press … To …
5
6
7
8
9
10
11
12
13
Access Write message in standby
mode.
z
Select the option displayed in the
lower right corner of the screen.
z
Switch the standby screen between
the widget mode and the shortcut
mode.
z
Power on or power off the phone (by
pressing and holding the key for
about 3s).
z
End a call or reject an incoming call.
z
Return to the standby mode.
z
Delete the letter on the left of the
cursor in editing mode.
z
Press and hold the key to delete all
the letters at a time.
Enter a linefeed character in text input
mode.
z
Press and hold the key to lock the
keypad in standby mode.
z
Switch between text input modes in
text input mode.
Access the symbol list in text input
mode.
Enter a space in text input mode.
Enter a smiley in editing mode.
6
Page 12
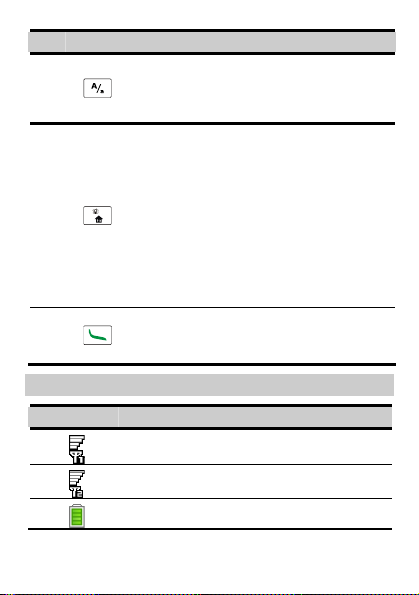
No. Press … To …
Switch between "abc" mode (lower
14
15
16
case), "Abc" mode (capitalization of
the first letter), and "ABC" mode
(upper case) in text input mode.
z
Activate or deactivate the Meeting
profile in standby mode by pressing
and holding the key for about 3s.
z
Press the key and another key to
enter the upper character on the
other key in text input mode.
z
Press the key twice consecutively,
and then press other keys to enter
upper characters on the keys in text
input mode. Press the key again to
cancel this function.
z
Make a call.
z
Answer an incoming call.
z
View call logs in standby mode.
Screen Icons
Icon Indicates …
SIM1 signal strength.
SIM2 signal strength.
Battery power level.
7
Page 13
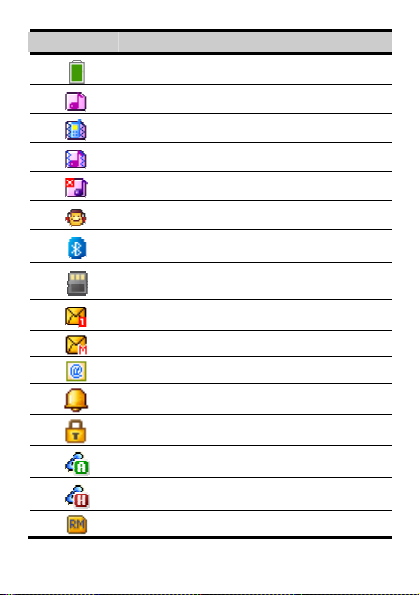
Icon Indicates …
Battery power level is extremely low.
The General profile is activated.
The Meeting profile is activated.
The Outdoor profile is activated.
The Silence profile is activated.
The Headset profile is activated.
The Bluetooth function is enabled.
A microSD card is inserted into the
phone.
A new text message is received.
A new multimedia message is received.
A new email is received.
An alarm or a schedule is activated.
The keyboard is locked.
Answering call(s).
Holding call(s).
The phone is in roaming state.
8
Page 14

9
Page 15

2 Getting Started
Phone Code
The phone code is used to protect your phone from
unauthorized use and restore factory settings. If the
phone lock function is enabled, you need to enter the
phone code every time you power on the pho
default, the phone lock function is disabled.
The phone code is set to 1234 by default. You can sele
Menu > Settings > Security settings > Change
password > Phone password to change t
code to any numeric string of 4 to 8 digits.
Do remember your phone code. If
code, contact the servi
ce center.
you forget the phone
PIN and PUK
The personal identification number (PIN) protects your
SIM card from unauthorized use. The PIN unblocking
key (PUK) can unlock the blocked PIN. Both the PIN an
the PUK are delivered with the SIM card
contact your service provider.
If you enter wrong PINs for a specified number of time
consecutively, the phone asks you to enter the PUK.
If you enter wrong PUKs for a specified numbe
consecutively, the SIM card becomes invalid
permanently . In
for a new one.
this case, contact your service provider
10
ne. By
he phone
. For details,
r of times
ct
d
s
Page 16

Automatically Switching Between
Profiles
You can set your phone to activate different profiles at
different times. The phone can automatically switch
between profiles according to your settings.
1. Select Menu > Profiles > Profile switch Timing.
2. Select a clock.
3. Set the status, time, and repetition days, and then
assign a profile.
4. Press (Done) to save the settings.
File Management
The File Manager manages the multimedia files saved in
the phone memory or on the microSD card. Through the
File Manager , y ou can view the sizes and creation dates
of ebooks, images, photos, videos, and audios, and
open the multimedia files.
Other Applications
z
Calendar: to view dates and set events.
z
Tasks: to view and set tasks.
z
Alarm: to set alarms.
z
World clock: to view and set the world clock.
z
Calculator: to perform simple calculation.
z
Java: to download and install java applications and
games.
11
Page 17

Screen Settings
Standby Screen
T o switch the standby screen between the widget mode
and the shortcut mode, you can press
standby mode or select Menu > Settings > Phone
settings > Idle setting > Standby settings.
In shortcut mode, you can select Menu > Settings
> Phone settings > Idle setting > Display on
idle to customize the seven shortcuts displayed on
the standby screen.
Menu Screen
To move a menu item, do as follows:
1. In standby mode, press (Menu) to access the
main menu.
2. Press or to scroll to the desired menu item.
3. Press (Move) to highlight the menu item.
4. Press or to move the menu item to the
desired position.
5. Press (OK) to confirm the position.
12
(Switch) in
Page 18

3 Voice Services
Making a Call
1. In standby mode, enter the phone number.
z
To make an international call, enter the international
long-distance code (+), country code or regio
area code, and phone number in seq uence.
z
T o call an extension number, enter the phone nu
P or W d extension number i, an
2. Press to dial the number.
3. Press to end the call.
n sequence.
13
n code,
mber ,
Page 19

z
If you enter P between the phone number and the
extension number, after the phone number is
connected, the phone automatically dials the
extension number.
z
If you enter W between the phone number and
the extension number, after the phone number is
connected, the phone prompts you to choose
whether to dial the extension number.
z
You can also make a call through call logs,
contacts, and messages.
z
During a call, you can press the volume control
keys
z
Your phone supports two SIM cards and if the
dual-SIM mode is enabled, select the SIM card
you want to use according to the prompt on the
screen.
to adjust the volume.
Answering a Call
When there is an incoming call, you can do as follows:
z
Press to answer the call.
z
Select Options > Answer to answer the call.
z
Press , and then select Answer to answer the
call.
z
Press to reject the call.
z
Press (Silent) to mute the speaker, and then
press
z
If the any-key answer function is enabled, you can
press any key except
call.
(Reject) again to reject the call.
and to answer the
14
Page 20

Background sound
Your phone supports background sound, through which
you can imitate the environment where you are. By
default, the background sound is disabled.
To enable the background sound, select Menu >
Settings > Call settings > Advance settings >
Background sound > Select when make call, and
then select On. You can also select a default background
sound.
If the background sound function is enabled and if you
make a call, the other party will hear the background
sound you configured.
If the background sound function is enabled and if you
answer a call, you can select Options > Call
background sound to activate the backgroun d s ound,
and then select a background sound to imitate the
environment where you are.
To disable the background sound during a call, select
Options > Background sound > Status, and then
select Off.
15
Page 21

4 Text Input
Changing the Text Input Mode
The indicator of the current text input mode is displa
in the upper left corner of the scre
to c ange the input mode. text
h
z
Press to delete the ch ter on the left of
the cursor. Press and hol
clear al e characters. l th
z
Press to enter a space.
z
Press to move the cursor to the next line.
z
Press
lower case.
to switch to the upper case or the
en. You can press
arac
for about 3s to
d
Using the FN Key
Press and then press a key labeled with the
number or symbol to enter the corresponding numb
symbol labeled in the upper right part of the key.
Press
labeled with numbers or symbols to enter corresponding
numbers or symbols label
the keys continuously.
twice consecutively, and then press keys
ed in the upper right part of
Entering Words
T o enter a word, pres s the keys accordin g to the spelling
sequence of the word.
16
yed
er or
Page 22

Entering Digits
z
In "123" text input mode, you can directly pres a
number key labeled with the desired digit.
z
In any text input mode except "123", press
then press the key labeled wi
th the desired digit.
Entering Symbols
1. Press to display the symbol list.
2. Press to scroll to the desired symbol.
Press to enter the symbol. 3.
In any text input mode, press , and then press
the keys labeled with th
to enter the symbols.
e commonly used symbols
s
, and
17
Page 23

5 Messaging
z
Contact your service provider for the availability of
the Multimedia Messaging Service (MM
method of subscribing to the service.
z
Open multimedia messages with caution. Objects
in multimedia messages may contain viruses
can damage
software.
z
Your phone supports two SIM cards and if the
dual-SIM mode
want to u
screen.
your phone, such as malicious
is enabled, select the SIM card
se according to the prompt on the
Creating and Sending a Text
Message
1. Select Menu > Messaging > Write message.
2. Edit th xt message.
e te
Press
3.
You can enter the phone number of the re
add the cipient(s) through Contacts.
Press
4.
message.
to add the recipient (s).
re
or select Options > Send to to send the
Creating and Sending a Multimedia
Message
1. Select Menu > Messaging > Write message.
S) and the
that
you
cipient(s) or
18
Page 24

2. Select Options > Switch to MMS to manually
change the text message to a multimedia message,
or add attachments such as pictures, videos, and
audios to the message to automatically change the
text message to a multimedia message.
3. Select Options > Add subject. Add and edit the
subject of the message.
4. Select Options. Edit the content of the message. You
can add pictures, videos, and audios to multimedia
messages.
5. Press or select Options > Send to to send the
message.
19
Page 25

6 Email
z
Contact your service provider for the availability of
the email service
the service.
z
Open emails with caution. Objects in emails may
contain viruses that can d
as malicious software.
z
The phone ca
characters.
Creating and Activating an Email
Account
For the details about the settings of the email account,
contact your email service provider.
If the email account you need has been configured by
default, you can enter your user name and password to
access the email. You can also activate mobile access to
your account from email server w
Creating an Email Account
Select Menu
1. > Messaging > Email > Email
accounts.
2. tions > New account to create a new
Select Op
account.
3.
Configure the relevant settings i n sequence.
After setting an item, sele
proceed to another item.
and the method of subscribing to
amage your phone, such
n only display no more than 1000
eb sites from your PC.
ct Options > Next to
20
Page 26

4. Select Options > Done to sav
e the email account.
Activating an Email Account
Select Menu
1. > Messaging > Email > Email
accounts.
2. Select your email account.
3. tions > Activate to activate the email
Select Op
account.
Creating and Sending an Email
Before sending or receiving emails, you need to create
and activate an email account.
1. Select Menu > Messaging > Email > Write Email.
2. Cc, or Bcc to add the email address of a
Select To,
recipient.
3. Select Subject to edit the email subject.
4. Select Attachments to
5. Set the email priority.
6. Select Content to edit the text tents of the email.
After editing the email, press
7.
se
lect Send to send the email.
add an attachment.
con
(Done), and then
21
Page 27

7 Contacts
Creating a Contact
1. Select Menu > Contacts.
2. Select Options > Add new contact.
3. Select To SIM or To phone for saving the contact.
Your phone supports two SIM cards and if the
dual-SIM mode is en
SIM1 or To SIM
4. Edit th ontact. e c
Press
to save the contact. 5.
Searching for a Contact
1. Select Menu > Contacts.
2. name, or the first several letters of
Enter the contact
a contact name.
3. Press
to scroll to the contact.
abled, you need to select To
2.
22
Page 28

8 Multimedia
Camera
1. Select > Multimedia > Camera.
2.
3. In cam mode, you can doera
z
z
z
z
z
z
z
z
z
Video Recorder
1. Select > Multimedia > Video recoMenu rder.
2. Press to configure relevant settings.
Menu
Press
to view the photo album or to configure
relevant settings.
as follows:
Press to take a photo.
Press to adjust the brightness.
Press to zoom in or zoom out.
Press to set the image size.
Press to set the image quality.
Press to set the white balance.
Press to set the self-timer.
Press to set continuous shooting.
Press to hide or display screen icons.
Press
to start recording a video clip. 3.
During e recording, you can do as th follows:
23
Page 29

z
Press to adjust the brightness.
z
Press to zoom in or zoom out.
z
Press to pause or continue.
4. Press to stop recording the video clip.
Media Player
Playing the Music
1. Select Menu > Multimedia > Media player.
2. Select a music file.
Press
3.
When he m
follows:
z
Press
volume
z
Press to fast-forward or rewind the music.
z
Press to pause or continue.
z
Press to access My playlists.
z
Press to access the current playlist.
Press
play the music in the backgro nd. u
to play the music.
t usic is being played, y can do as
the
volume control keys to adjust the
.
ou
to exit the screen of the audio player and 4.
24
Page 30

WOW HD, SRS and the
trademarks of SRS Labs, Inc. WOW HD
is incorporated under license from SRS Labs, Inc.
WOW HD™ significantly improves the playback
quality of audio, delivering a dynamic 3D
entertainment experience w ith deep, rich bass a
high frequency clarity for crisp detail.
symbol are
technology
nd
Listening to Music by Using a Bluetooth Headset
To
listen to music by using a Bluetooth headset, do as
fo
llows:
1.
Select Menu > Multimedia > Media player to
m
access edia player, and then switch on your
Bluetooth headset to pair the headset with your
phone.
e
S lect Options > Settings > Bluetooth settings,
2.
ena
ble Bluetooth stereo output, and then select the
Blue t is
tooth headset. After the Bluetooth headse
pair he media player screen is
ed with your phone, t
di
splayed.
s
3. Pres
hea
to listen to music by using the Bluetooth
dset.
25
Page 31

z
If the Bluetooth function is not switched on when
you use a Bluetooth he
the phone prompts you to sw
Bluetooth function.
z
If no Bluetooth headset is paired with your pho
when you use a Bluetooth headset to listen to
music, you m
and pair the headset with your phone.
z
Before pairing your phone with a Bluetooth
headset that has a preset password, you must
enter the correct password.
ust search for a Bluetooth headset
adset to listen to music,
itch on the
ne
FM Radio
Listenin e FM Radio g to th
The headset cable functions as an antenna as well. To
sure good reception of radio programs, do not
en
sconnect the headset f
di rom the phone or severely bend
the heads cable. et
1. Connect a compatible headset to the phone.
2. nu > Multimedia > dio to display
Select Me
the FM o screen.
radi
the channel that you listened to last time.
3.
On the FM radio screen, you can do as follows:
z
Press to switch be en the tuning modes.
z
Press
frequency
you have sel
z
Press to switch off or on the FM radio.
to change channels or adjust the
by 0.1 MHz according to the tuning mode
The p e plays the program
ected.
twe
26
hon
FM ra
on
Page 32

z
Press the volume control keys
.
volume
Press
view and set the channel list, adjust the fre quency , or
configure other settings.
z
Press (Back) or to exit the FM radio
(Options) or z to set the speaker,
to adjus
t the
screen and play the program in the background.
Your phone supports twitter. To log in to twitter and
share instant messages, select Menu > Twitter, enter
your user name and password, and then press
(Done).
27
Page 33

9 Connectivity
USB
After being connected to a PC through the USB cable,
your phone can be used as a USB mass storage device.
You can save files to the corresponding folders that are
automatically cre
microSD card.
1. le.
Connect your phone to the PC by using the USB cab
The phon
device.
2. he phone memory and on the
Read the files saved in t
microSD card directly.
Only Windows 2000, Windows XP and Wi
Vista operat
Bluetooth
Through Bluetooth, you can synchronize data between a
PC and your phone, exchange data with
devices, and use a Bluetooth headset .
You can configure Bluetooth-relat
enabling the Bluetooth function.
Select Menu > Settings > Connectivity > Bluetooth
> Power, an
function.
ated in the phone memory or on the
e is recognized as a USB mass storage
ndows
ing systems are supported.
other Bluetooth
ed settings only after
d then select On to enable the Bluetooth
28
Page 34

Using a Bluetooth Headset
No Bluetooth headset is delivered in the product
package. If a Bluetoo th headset is re quired, you can buy
one yourself.
1. Select Inquiry audio device to search for the
Bluetooth headset.
2. After the search, press (Pair).
3. Enter the password for pairing the phone with th e
Bluetooth headset.
After the phone sets up a connection with the headse t,
the headset icon is displayed on the standby screen
and you can use the headset.
Transferring Data
Select My device > Inquiry new device to search for
available Bluetooth devices, and then pair the phone
with the desired device. After pairing, you can transfer
data between the phone and the Bluetooth device.
When a Bluetooth device sets up a c onnection with the
phone for the first time, you need to enter a pairing
password for authentication.
29
Page 35

10
WAP
You can access WAP sites and use WAP-based services
on your phone. To access WAP sites through your phone,
you need to subscribe to the corresponding service from
the service provid
on your phone.
For details about the se
your service provider.
Your phone supports two SIM cards and if the
double-SIM mode is enabled, you need to set the
account information of the SIM1 and the SIM2, and
select Menu > Browser > Wap > Settings > Select
SIM to set the
network.
er and configure the relevant settings
rvice and the charge, contact
default SIM card when connecting to the
Setting the Connection Profile
Before accessing WAP sites through your phone, you
need to set your account first. The acc
is provided by your service provider.
1. > Browser > Wap > Settings >
Select Menu
Profiles.
2. Select y r service provider. ou
3. Press , and then select Activate.
4. Press to activate the profile.
30
ount information
Page 36

Connecting to the Network
You can browse WAP pages on your phone after setting
the connection profile.
1. Select Menu > Browser > Wap.
2. Use one of the following methods to connect to the
network. The browser displays the corresponding
WAP page.
z
Select Homepage to display the homepage.
z
Select Bookmarks to select a WAP site address from
the list, and then select Options > Go to.
z
Select Input address to enter an address, and then
select Options > Done.
11
Warnings and Precautions
This section contains important information pertaining
to the operating instructions of your device. It also
contains information about how to use the device safely.
Read this information
Electronic Device
Power off your device if using the device is prohibited
Do not use the device when using the device ca
danger or interferen
carefully before using your device.
ce with electronic devices.
31
uses
.
Page 37

Medical Device
z
Follow rules and regulations set forth by h ospitals and
health care facilities. Do not use your device when
using the device is prohibited.
z
Pacemaker manufacturers recommend that a
minimum distance of 15 cm be maintained between a
device and a pacemaker to prevent po
interference with the pacemaker. If yo
pacemaker, use the device on the opposite side of t
pacemaker and do not carry the device in your fron
pocket.
tential
u are using a
he
Potentially Explosive Atmosphere
Power off your device in any area with a potentially
explosive atmosphere, and comply with all signs and
instructions. Areas that may have potentially explosive
atmospheres include the areas wher e you would
normally be advised to turn off your vehicle engine.
Triggering of sparks in such areas could cause an
explosion or a fire, resulting in bodily injuries or even
deaths. Do not power on your device at refueling points
such as service stations. Comply with restrictions on the
use of radio equipment in fuel depot s, storage, and
distribution areas, and chemical plants. In addition
adhere to restrictions in areas where blasting operations
are in progress. Before using the device, watch out for
areas that have potentially explosive atmospheres tha
are often, but not always, clearly marked. Such
locations include areas below the deck on boats,
chemical transfer or storage facilities, and areas wher
the air contains
dust, or metal powders. Ask the manufacturers of
chemicals or particles such as grain,
32
,
t
t
e
Page 38

vehicles using lique
or butane) whether this device can be safely used in
their vicinity.
fied petroleum gas (such as propane
Traffic Security
Observe local laws and regulations while using the
vice. In additi
de on, if using the device while driving a
vehicle, comply with the following guidelines:
z
Concentrate on driving. Y
drive safely.
z
Do not talk on the device while driving. Use
hands-free accessories.
z
When you have to make or answer a call, park the
vehicle at the ro
z
RF signals may affect electronic systems of motor
vehicles. For more information, consult the vehicle
manufacturer.
z
In a motor vehicle, do not
air bag or in the air bag deployment area. Otherwis
the device may hurt you owing to the strong force
when the air bag inflates.
z
Do not use your device while flying in an aircraft.
Power off your device before boarding an airc
Using wireless devi
danger to the operation of
wireless telephone network. It may also be
considered illegal.
O
perating Environment
z
Do not use or charge the device in dusty, damp, and
dirty places or places with magnetic fields. Otherwise,
it may result in a malfunction of the circuit.
our first responsibility is to
ad side before using your device.
place the device over the
ces in an aircraft may cause
the aircraft and disrupt the
raft.
33
e,
Page 39

z
The device complies with the RF specifications when
the device is used near your ear or at a distance of 2.0
cm from your body. Ensure that the device
accessories such as a device case
are not composed of metal components. Keep your
device 2.0 cm away from your body to meet the
requirement earlier mentioned.
z
On a stormy day with thunder, do not use your device
when it is being charged, to prevent any danger
caused by lightning.
z
When you are on a call, do not touch the antenna
Touching the antenna affects the cal l quality and
results in increase in power consumption. As a result,
the talk time and the standby time are reduced.
z
While using the device, observe the local laws and
regulations, and respect others' privacy and legal
rights.
z
Keep the ambient temperature between 0°C
55°C while the device is being char
ambient temperature between -10
using the device powered by a battery.
and a device holster
.
and
ged. Keep the
°C to 55°C for
Prevention of Hearing Damage
Using a headset at hig
hearing. To reduce the
the headset volume to a safe and comfortable level.
h volume can damage your
risk of damage to hearing, low
er
Safety of Children
Comply with all precautions with regard to children's
safety. Letting the child play with your device or its
accessories, which may include parts that can
detached from the device, may be dangerous, as it may
34
be
Page 40

present a choki
kept away from the device and accessories.
ng hazard. Ensure that small children are
Accessories
Use the accessories deliver ed only by the manufactu rer.
Using accessories of other manufacturers or vend
with this device model may invalidate any approv
warranty applicable to th
non-operation of the device, and cause danger.
B
attery and Charger
z
Unplug the charger from the electrical plug and the
device when not in use.
z
The battery can be charged and discharged hundreds
of times before it eventually wears
standby time and the talk time are shorter than the
normal time, replace the battery.
z
Use the AC power supply defined in the s
of the charger. An improper power voltage may
a fire or a malfunction of the charger.
z
Do not connect two poles of the battery with
conductors, such as metal materials, keys, or
jewelries. O
short-circuited and may cause injuries and burns on
your body.
z
Do not disassemble the battery
poles. Otherwise, it may lead to electrolyte leaka
overheating, fire, or explosion.
z
If battery electrolyte leaks out, ensure that the
electrolyte does not touch your skin and eyes. When
the electrolyte touches y
therwise, the battery may be
e device, result in the
out. When the
or solder the battery
our skin or splashes into your
35
ors
al or
pecifications
cause
ge,
Page 41

eyes, wash your eyes with clean water immediately
and consult a doctor.
z
If there is a case of battery deformation, color change
or abnormal heating while you charge or store the
battery, remove the battery imm
using it. Otherwise, it may lead to battery leakage,
overheating, explosion, or fire.
z
If the power cable is damaged (for example, the cord
is exposed or broken), or the plug loosens, stop using
the cable at once. Otherwise, it may lead to an
electric shock, a short circuit of the charger, or a fi
z
Do not dispose of batteries in
explode. Batteries may also explode if dam
C
leaning and Maintenance
z
The device, battery, and charger are not
water-resistant. Keep them dry. Protect the device
battery, and charger from water or vapor. Do not
touch the device or the charger with a wet hand.
Otherw
ise, it may lead to a short circuit, a
malfunction of the device, and an electric shock to t
user.
z
Do not place your device, battery, and charger in
places where they can get damaged because of
collision. Otherwise, it may lead to battery leak
device malfunction, overheating, fire, or explosion
z
Do not place magnetic storage media su ch as
magnetic cards an
Radiation from the device may erase the information
stored on them.
d floppy disks near the device.
ediately and stop
fire as they may
aged.
36
age,
,
re.
,
he
.
Page 42

z
Do not leave your device, battery, and charger in a
place with
Otherwise, they may not function properly and may
lead to a fire or an explosion. When the temperature
is lower than 0°C, performance of the battery is
affected.
z
Do not place sharp metal objects such as pins near
the earpiece. The earpiece may attract these objects
and hurt you when you are using the device.
z
Before you clean or maintain the device, p ower off the
device and disconnect it from the charger.
z
Do not use any chemical detergent, powder, or other
chemical agents (such as alcohol a
clean the device and the charger. Otherwise,
the device may be damaged or a fire can be
You can clean the device and the charger with a pie
of damp and soft antistatic cloth.
z
Do not dismantle
Otherwise, the w
accessories is invalid and the manufacturer is not
liable to pay for the damage.
an extreme high or low temperature.
nd benzene) to
the device or accessories.
arranty on the device and
parts of
caused.
Emergency Call
You can use your device for emergenc
service area. The connection, howeve
guaranteed in all conditions. You should not rely solely
on the device for
essential communications.
y calls in the
r, cannot be
Certification Information (SAR)
This mobile device meets guidelines for exposure to
radio wa ves.
37
ce
Page 43

Your device is a low-power radio transmitter and recei
As recommended by international guidelines, the mo
device is designed not to exceed the limits for exposure
to radio waves. These guideline s were dev eloped b
independent scientific organization International
Commission on Non-Ionizing Radiation Prot ection
(ICNIRP) and include safety measures designed to
ensure safety for all users, regardless of age and health.
The Specific Absorption Rate (SAR) is the unit of
measurement for the amount of radio frequency en
absorbed by the body when using a devic e. The S
value is determined at the highest certified power level
in laboratory conditions, but the actual SAR level of the
device when being operated can be well below the valu e.
This is because the device is designed to use the
minimum power required to reach the network.
The tests are performed in positions and locations (that
is, at the ear and worn on the body) as required by th
FCC for each model. For body worn operation, this
phone has been tested and meets FCC RF exposure
guidelines when the handset is positioned a minimum of
15 mm from the body with an accessory that contains no
metal part. Use of other accessories may not ensure
complia
nce with FCC RF exposure guidelines. The SAR
limit adopted by USA and Canada is 1.6 watts/kilog
(W/kg) averaged over one gram of tissue. The highe
SAR value for this device type when tested at the ear i
0.571W/kg, and when properly worn on the body is 1.03
W/kg.
The SAR limit also adopted by Europe is 2.0 W/kg
averaged over 10 grams of tissue. The highest SAR
38
bile
y the
ergy
AR
ram
ver .
st
e
s
Page 44

value reported to t
when tested for use at the ear is 0.668 W/kg.
he FCC and IC for this device type
FCC Statement
This device has been tested and found to comply with
the limits for a Class B digital device, pursuant to Part 1
of the Federal Communications Commission (FCC) rule
This device complies with Part 15 of the FCC Rules.
Operation is subject to the following two conditions:
(1) This device may not cause harmful interference
(2) his devi
including interference that may cause undesired
operation.
Warning: Changes or modifications made to this device
not expressly approved by Huawei Technol
may vo
Disposal
certified collection point for recycling or proper disposal
at the end of their life.
For more detailed information about the recycling of th
device or batteries, contact your lo
household waste disposal service, or the retail store
where you purchased this device.
The disposal of this device is subject to the Waste from
Electrical and Electronic Equipment (WEEE) directiv
ce must accept any interference received,
id
the FCC authorization to operate this device.
ogies Co., Ltd.
and Recycling Information
This symbol on the device (and any included
batteries) indicates that they should not be
disposed of as normal household garbage . Do
not dispose of your device or batteries as
unsorted municipal waste. The device (and
any batteries)
should be handed over to a
cal city office, the
39
s.
, and
e of
5
e
Page 45

the European Union. The reason for separating WEEE
and batteries from other waste is to minimize
potential environmental impacts on human he
hazardous substances that may be present
the
alth of any
.
Reduction of Hazardous Substances
This device is compliant with the EU Registration,
Evaluation, Authorisation and Restriction of Chemicals
(REACH) Regulation (Regulation No 1907/2006/EC of
the European Parliament and of the Council) and the EU
Restriction of Hazardous Substances (RoHS) Directive
(Directive 2002/95/EC of the European Parlia
of the Council). For more information about the R
compliance of the device, visit the Web site
www.huaweidevice.com/c
recommended to visit the Web site
up-to-date information.
ertification. You are
regularly for
ment and
EACH
EU Regulatory Conformance
Hereby , Huawe i Technologies Co., Ltd. dec lares that this
device is in compliance with the essential requiremen
and other relevant provisions of Directive 1999/5/EC
For the declaration
www.huaweidevice
of conformity, visit the Web site
.com/certification.
ts
.
Notice: Observe the national local regulations in the
where the device is to be used. This device may
location
e restricted for use in some or all countries of European
b
Union.
40
 Loading...