


Wonderful Communication, Mobile Life
Welcome to use HUAWEI ETS3053/3253 Fixed Wireless Terminal.
HUAWEI ETS3053/3253 Fixed Wireless Terminal
User Guide

Notice
Copyright © 2008 Huawei Technologies
Co., Ltd.
All Rights Reserved
1 No part of this manual may be reproduced or
transmitted in any form or by any means without
prior written consent of Huawei Technologies
Co., Ltd.
2
Trademarks
3 and HUAWEI are trademarks of Huawei
Technologies Co., Ltd. All other trademarks and
trade names mentioned in this manual are the
property of their respective holders.
4
Notice
5 The information in this manual is subject to
change without notice. Every effort has been
made in the preparation of this manual to ensure
accuracy of the contents, but all statements,
information, and recommendations in this
manual do not constitute the warranty of any
kind, expressed or implied.
Huawei Technologies Co., Ltd.
Address:
6 Administration Building, Huawei Technologies
Co., Ltd., Bantian, Longgang District, Shenzhen,
P. R. China
Postal Code: 518129
Website: http://www.huawei.com

1Table of Contents
Table of Contents 1
Getting to Know Your FWT 1
Packing List ................................................1
Front View ..................................................1
Back View...................................................2
Screen Icons ..............................................3
Installation 4
Installing the SIM Card ...............................4
Installing the Battery ................................... 4
Installing the Power Adapter ......................5
Installing the Indoor Antenna......................5
Placing the FWT .........................................5
Validating....................................................6
Basic Operations 7
Powering on or off the FWT .......................7
Making a call ..............................................7
Answering or Rejecting a Call ....................8
Text Entry ...................................................8
Messages 10
Creating a Message .................................10
Viewing a Message ..................................10
Voice Mail .................................................10
Message Settings.....................................11
Memory Status .........................................11
Phonebook 12
Adding a Contact ......................................12
Viewing a Contact ....................................12
Memory Status ......................................... 12
Call History 13
Phone Settings 14
Profiles ..................................................... 14
Auto Dialing.............................................. 14
Time & Date ............................................. 14
Languages ...............................................15
Network Service ....................................... 15
Security .................................................... 15
Applications 16
Alarm Clock.............................................. 16
Wireless Data Service 17
Connecting the Terminal to PC................ 17
Installing the Management Program ...... 17
Accessing the Internet ............................. 18
Maintenance and Troubleshooting 19
Maintenance ............................................ 19
Troubleshooting ....................................... 19
Warnings and Precautions 21
1

2

1Getting to Know Your FWT
Your Fixed Wireless Terminal (hereinafter referred to
as the FWT) is based on the Global System for
Mobile Communications (GSM) technology.
It provides the voice service, SMS service and supports two saving modes for the contacts and the
SMS, the SIM card and the FWT.
The FWT is an ideal wireless terminal for the household use.
Packing List
Your FWT package box contains the following items.
If any of the items is lost or damaged, contact your
local dealer.
1 Main unit, handset, and coiled cord
2 Power adapter
3 Battery
4 Certificate of Quality
5 User Guide
Front View
1
2
3
4
5
6
7
8
9
11
10
12
Item
1 Display Screen
2 Antenna Receive signals.
3 Left soft key Select the option displayed on the
Description
Display information.
lower left corner of the screen.
1
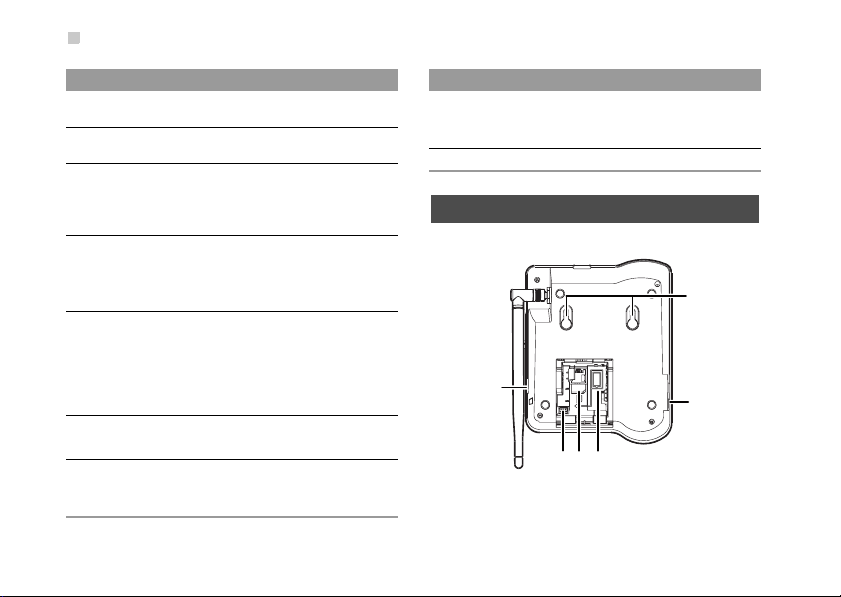
Back View
Item
4 Scroll keys Access the shortcut screen in
5 Right soft key Select the option displayed on the
6 OK key • Access the main menu in standby
7 End key • End a call or reject an incoming
Description
standby mode.
lower right corner of the screen.
mode.
• Select the option displayed on the
lower left corner of the screen.
call.
• Press and hold it to power on or off.
• Return to the standby mode.
8 Handsfree key • Make or answer a call without lifting
9 Call/Redail
key
10 # key
the handset.
• Cancel the dialing, when dialing in
the handsfree mode.
• End the current call during a call in
the handsfree mode.
• Make or answer a call.
• View dialed calls in standby mode.
• Enter the "#".
• Switch between different input
methods in the edit mode.
2
Item
Description
11 * key • Enter the "*".
• Display a symbol list in the edit
mode.
12 Number keys
Enter numbers and characters.
Back View
6
54 3
1
2
No. Item NO. Item
1 Wall-mounting
brackets
3 Battery container 4 SIM card slot
5 Battery cord jack 6 Data port
2 Main unit spiral
cord jack
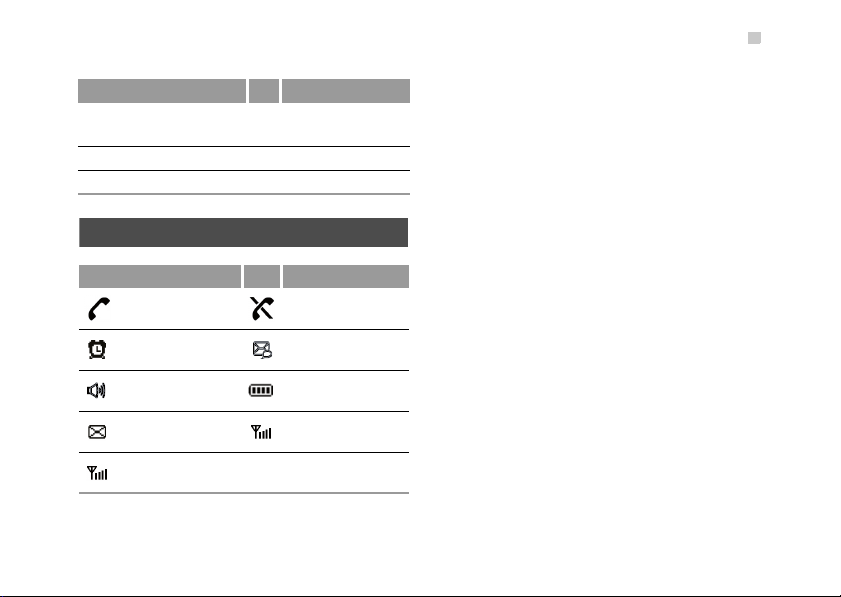
Screen Icons
Icon Description Icon Description
Calling No service
Alarm clock is on Hands-free mode
Screen Icons
Message received Powered by the
Voice message
received
Network signal
strength
power adapter
Battery power level
3
2Installation
Before installing or removing the battery, indoor
Note
antenna or SIM card, swich off the FWT and
disconnect the FWT from the power adapter. To
prevent lighting from injuring human body,
remove the outdoor antenna too.
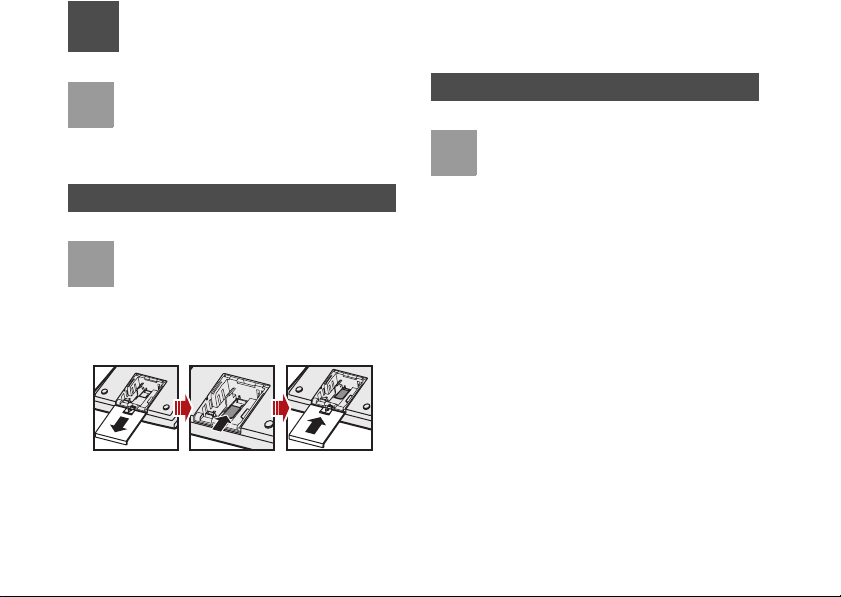
Installing the SIM Card
The SIM card and its golden contact can be
Note
easily damaged by a scratch or bend. Be careful when installing or removing the SIM card.
Install the SIM card according to the following figure.
Make sure that the golden contact of the SIM card is
facing downwards.
4
Installing the Battery
• When the ambient temperature exceeds the
Note
Insert the connection cable of the battery into the battery cord jack, and then seat the battery in the battery container.
temparature allowed for charging, the system
will stop charging the battery.
• When the power adapter is in use, the FWT
will automatically charge the battery and stop
it after the battery is fully charged.
• Take the battery out of the FWT if the FWT is
left unused for a long period.
• Make sure that the battery has been charged
for more than 8 hours before it supplies
power for the FWT at the first time. The
charging time depends on the environmental
temperature and the age of the battery.
• When installing battery, make sure that the
battery cord plug matches the battery jack.
Do not insert conversely.

3
Installing the Power Adapter
1 Make sure that the FWT is switched off.
2 Connect the power adapter to the FWT, and plug
it to the power socket.
Installing the Indoor Antenna
1 Make sure that the FWT is switched off.
Installing the Power Adapter
2 Align the indoor antenna with the antenna port
on the FWT host in the right direction, and then
screw the antenna, ensuring that the connection
is secure.
Placing the FWT
Horizontal Placing
Place the FWT on a flat surface. Select a cool and
ventilated site for the FWT to dissipate the heat.
5
 Loading...