

Page 1

Quick Start
Page 2

Copyright © Huawei Technologies Co., Ltd. 2010. All rights
reserved.
No part of this document may be reproduced or transmitted in any form or by any
means without prior written consent of Huawei Technologies Co., Ltd.
The product described in this manual may include copyrighted software of
Huawei Technologies Co., Ltd and possible licensors. Customers shall not in any
manner reproduce, distribute, modify, decompile, disassemble, decrypt, extract,
reverse engineer, lease, assign, or sublicense the said software, unless such
restrictions are prohibited by applicable laws or such actions are approved by
respective copyright holders under licenses.
Trademarks and Permissions
, , and
Technologies Co., Ltd.
Other trademarks, product, service and company names mentioned are the property of
their respective owners.
Notice
Some features of the product and its accessories described herein rely on the software
installed, capacities and settings of local network, and may not be activated or may be
limited by local network operators or network service providers. Thus the descriptions
herein may not exactly match the product or its accessories you purchase.
Huawei Technologies Co., Ltd reserves the right to change or modify any information or
specifications contained in this manual without prior notice or obligation.
NO WARRANTY
THE CONTENTS OF THIS MANUAL ARE PROVIDED “AS IS”. EXCEPT AS REQUIRED BY
APPLICABLE LAWS, NO WARRANTIES OF ANY KIND, EITHER EXPRESS OR IMPLIED,
INCLUDING BUT NOT LIMITED TO, THE IMPLIED WARRANTIES OF MERCHANTABILITY
AND FITNESS FOR A PARTICULAR PURPOSE, ARE MADE IN RELATION TO THE
ACCURACY, RELIABILITY OR CONTENTS OF THIS MANUAL.
TO THE MAXIMUM EXTENT PERMITTED BY APPLICABLE LAW, IN NO CASE SHALL
HUAWEI TECHNOLOGIES CO., LTD BE LIABLE FOR ANY SPECIAL, INCIDENTAL,
INDIRECT, OR CONSEQUENTIAL DAMAGES, OR LOST PROFITS, BUSINESS, REVENUE,
DATA, GOODWILL OR ANTICIPATED SAVINGS.
Import and Export Regulations
Customers shall comply with all applicable export or import laws and regulations and
will obtain all necessary governmental permits and licenses in order to export, re-export
or import the product mentioned in this manual including the software and technical
data therein.
are trademarks or registered trademarks of Huawei
1
Page 3
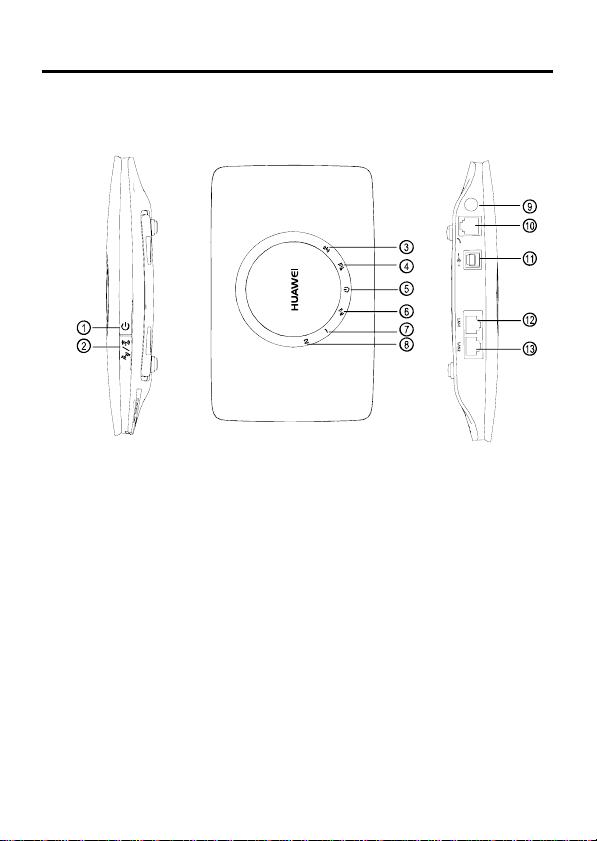
Getting to Know Your Device
Note:
Pictures are for reference only. Please examine the actual device
to determine where features are located.
1. On/Off key
2. Wi-Fi/WPS key
3. Wi-Fi indicator
4. Network status indicator
5. Power indicator
6. WPS indicator
z
Wi-Fi: wireless fidelity
z
WPS: Wi-Fi protected setup
z
LAN: local area network
7. LAN1 indicator
8. LAN2 indicator
9. External antenna port
10. Telephone port
11. Power port
12. LAN1 port
13. LAN2 port
2
Page 4
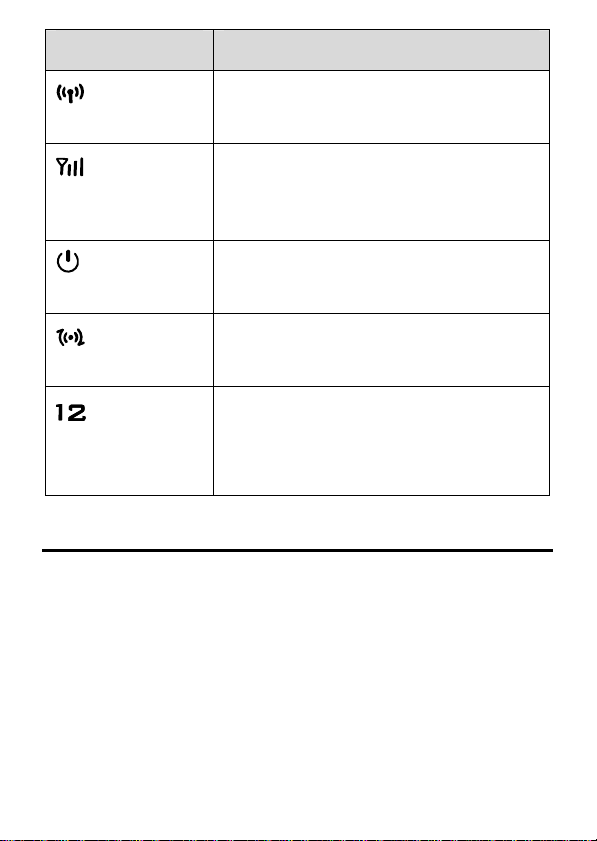
Indicator Status
z
Wi-Fi indicator
Network status
indicator
Off: Wi-Fi not activated
z
Steady on: Wi-Fi activated
z
Off: Searching for network
z
Yellow, steady on: Registered to network
z
Green, steady on: Dial-up access
successful
Power indicator
WPS indicator
/
LAN1/LAN2
indicator
Steady on: Power connected
z
Off: WPS not activated
z
Blinking: WPS activated
z
Steady on: WPS successfully connected
z
Off: Network cable
disconnected/Connection failed
z
Steady on: Network cable connection
normal
z
Blinking: Data transfer in progress
PC Configuration Requirements
Recommended PC configurations are as follows:
z
CPU: Pentium 500 MHz or higher.
z
Memory: 128 MB RAM or higher.
z
Hard disk: 50 MB disk space available.
z
Operating system: Windows 2000, Windows XP, Windows Vista, or
Windows 7.
z
LCD resolution: At least 800 x 600 pixels. A resolution of 1024 x 768
pixels is recommended.
3
Page 5

z
Web browser: Microsoft Internet Explorer 6 or higher, Firefox 1.5 or
higher, or Safari 3.0.
Setting Up Your Device
Step 1: Install the SIM card.
Remove the card cover. Slide the SIM card into the card slot with the
gold contact facing downward. Replace the card cover.
Caution:
Before inserting or removing the SIM card, disconnect the
device from the power adapter.
Step 2: Connect the power adapter to the device.
Caution:
Use a power adapter that is compatible with the device or else
the device may be damaged.
4
Page 6

Step 3: Use an Ethernet cable to connect the
device to a PC.
If the indicator light for the LAN port to which the Ethernet cable is
connected is on, the connection is active. The network cable
connecting to the PC must not be longer than 100 meters (328 feet).
Step 4: (Optional) Connect a fixed-phone to the
device.
Radio signals interfere with the fixed-phone and affect the quality of the
connection. Place the fixed-phone 1 meter (3.28 feet) away from the
device.
Note:
If you do not plan to use the voice service provided by the device,
skip this step.
Step 5: Place the device.
Your device can be placed horizontally, be placed upright with the use
of a table stand, or hung on the wall. Place your device on a surface
well above the floor or near a window, so it can receive a strong signal.
5
Page 7

Insert the latches on the table stand into the slots on the back of the
device. The table stand allows the device to stand on a flat surface like
a table or desk. See the following figures.
Note:
z
The table stand is optional. If a table stand was not included
with your device, you may purchase a compatible table stand
from your wireless service provider.
z
To avoid the interference caused by radio signals, place the
device at least 1 meter (3.28 feet) away from other electrical
devices.
Step 6: (Optional) Connect the external antenna to
the device.
Connect the antenna to the external antenna port on the device. Install
the antenna securely by screwing it completely into the antenna jack.
Note:
z
The external antenna is optional. If an external antenna was
not included with your device, you may purchase a compatible
external antenna from your wireless service provider.
z
To make the external antenna active, you must set the antenna
mode to external on the management page (http://192.168.1.1).
For details, go to the management page and consult Help.
z
While a conversation or data transfer is in progress, you may
not switch between the internal antenna and the external
6
Page 8

antenna.
z
If you do not need the external antenna, skip this step.
Powering Your Device On/Off
Press and hold the Power key to power the device on or off.
Making a Call (Optional)
Pick up the handset. When you hear a dial tone, you may make a call.
Setting Up the Wireless Connection
(Take a computer with Windows XP
operating system as an example)
Activate Wi-Fi or WPS.
After the device is powered on, press and hold to activate WiFi. Release
again to activate WPS. Release
when is steady on. Press and hold
when is blinking.
7
Page 9

Note:
Press and hold to deactivate Wi-Fi or WPS. Release
when
or is off.
Set up the Wi-Fi connection.
1. Ensure that is steady on.
2. Choose Start > Control Panel >
Network Connections > Wireless
Network Connection.
Note:
Before setting up a Wi-Fi connection,
be sure that the PC has a
wireless network adapter
installed. If Wireless
Network Connection is
displayed in the Network
Connections window, the
wireless network adapter is
ready for use. If not, you
must check that the wireless network adapter is working properly.
3. Click View available wireless
networks to display a list of
wireless network connections.
4. Select the wireless network
whose name is the same as the
SSID of the device and click
Note:
Wait a moment until the wireless network
connection icon appears in the notification area
at the bottom of the screen. This indicates that
the wireless network is connected.
.
z
If the wireless network has a security mechanism, you must
enter the correct wireless password.
z
The SSID and password are printed on the device tag.
8
Page 10

Set up a WPS connection.
If the Wi-Fi device to which your device connects supports WPS, a
password is generated automatically; there is no need to enter it. To
set up a WPS connection, do as follows:
1. Start your device.
2. Start the Wi-Fi device to which your device connects.
3. Activate WPS on the device.
4. Activate WPS on the Wi-Fi device.
Note:
z
If is steady on, the WPS connection is active.
z
For details about operations on the client, see the user guide of
the client.
Logging In to the Management Page
To set detailed parameters for the device, log in to the management
page:
1.
Launch a web browser and enter http://192.168.1.1
bar.
2.
Enter the password and click Login.
Admin: The administrator has the right to view and change
configurations. The default password is admin.
Note:
Only one user at a time is allowed to log in to the management
page. This prevents configuration conflicts.
in the address
Accessing the Internet
After a connection between your device and the Wi-Fi device is active,
you can access the Internet in the following modes:
Mode Operation
Auto
After being powered on, the device connects to the
Internet automatically and will remain connected
9
Page 11

Mode Operation
regardless of whether or not data is transferred.
Manual
On
Demand
After logging in to the management page, you can
follow prompts to connect to or disconnect from the
Internet.
After being powered on, the device connects to the
Internet automatically when data is transferred. The
device will disconnect from the Internet when there is no
data being transferred.
Restoring Factory Defaults
If you become uncertain of which parameters you have set or changed,
you can restore the factory defaults which the device came with and
set the parameters again.
Press and hold the Reset hole until all indicators,
are blinking. Wait a moment for the factory defaults to be restored.
Note:
Restoring factory defaults removes all personal configurations and
resets all configurations on the management page to their default
values.
, , , and ,
10
Page 12

Friendly Tips
If you are unable to use the device normally, do as follows:
z
See Help on the management page.
z
Restart the device.
z
Restore the device to factory defaults.
z
Contact your wireless service provider.
Version: V100R001_01 Part Number: 31010CWR
11
 Loading...