

HTC DREA110 Quick Start Manual

Quick Start Guide

Please Read Before Proceeding
THE BATTERY IS NOT CHARGED WHEN YOU TAKE IT OUT OF THE BOX.
DO NOT REMOVE THE BATTERY PACK WHEN THE DEVICE IS CHARGING.
YOUR WARRANTY IS INVALIDATED IF YOU DISASSEMBLE OR ATTEMPT TO
DISASSEMBLE THE DEVICE.
PRIVACY RESTRICTIONS
Some countries require full disclosure of recorded telephone conversations, and
stipulate that you must inform the person with whom you are speaking that the
conversation is being recorded. Always obey the relevant laws and regulations
of your country when using the recording feature of your PDA Phone.
Limitation of Damages
TO THE MAXIMUM EXTENT PERMITTED BY APPLICABLE LAW, IN NO EVENT
SHALL HTC OR ITS PROVIDERS BE LIABLE TO USER OR ANY THIRD PARTY
FOR ANY INDIRECT, SPECIAL, CONSEQUENTIAL, INCIDENTAL OR PUNITIVE
DAMAGES OF ANY KIND, IN CONTRACT OR TORT, INCLUDING, BUT NOT LIMITED
TO, INJURY, LOSS OF REVENUE, LOSS OF GOODWILL, LOSS OF BUSINESS
OPPORTUNITY, LOSS OF DATA, AND/OR LOSS OF PROFITS ARISING OUT OF,
OR RELATED TO, IN ANY MANNER, OR THE DELIVERY, PERFORMANCE OR
NONPERFORMANCE OF OBLIGATIONS, OR USE OF THE WEATHER INFORMATION,
DATA OR DOCUMENTATION HEREUNDER REGARDLESS OF THE FORESEEABILITY
THEREOF.

Contents
1. Welcome to the HTC Dream Quick Start Guide .................5
2. Inside the Box ................................................................................5
3. Getting to Know the HTC Dream ............................................6
4. Installing the SIM Card, Battery, and Storage Card...........7
5. Charging the Battery ................................................................ 10
6. Starting Up ...................................................................................10
7. The Home Screen ...................................................................... 12
8. Accessing Device Applications and Settings ................... 14
9. Making Your First Call ............................................................... 16
10. Creating Contacts ..................................................................... 17
11. Entering Information ............................................................... 19
12. Basic Settings.............................................................................. 20
13. Sending a Text Message ......................................................... 25
14. Sending a Multimedia Message .......................................... 26
15. Using Wi-Fi ...................................................................................27
16. Sending E-mails .........................................................................28
17. Surfing the Web and Viewing Internet Videos ...............29
18. Bluetooth ..................................................................................... 31
19. Managing Your Time ................................................................ 32

Table of Contents
20. Taking Pictures ........................................................................... 34
21. Copying Multimedia Files to Your Device ........................ 35
22. Listening to Music ..................................................................... 36
23. Viewing Pictures ........................................................................ 37
24. Synchronizing Your Device ....................................................38
25. Downloading Applications....................................................39
26. Resetting Your Device ............................................................. 40

Quick Start Guide 5
1. Welcome to the HTC Dream Quick Start Guide
Congratulations on your purchase of the HTC Dream.
This Quick Start Guide will help you get started with your
Android™ powered Touch Phone. The Quick Start Guide offers
information about the basic features and functions that you
want to know or use right away after you turn on the device for
the first time.
For a more complete guide in using your device, refer to the
User Manual PDF that we have included in the microSD™ card
that came with the device. Copy the User Manual PDF to your
PC for viewing.
2. Inside the Box
You should find the following items inside the box.
HTC Dream device• Battery•
USB cable• AC adapter•
Wired stereo headset• Pouch•
1GB microSD™ card• Quick Start Guide•
6 Quick Start Guide
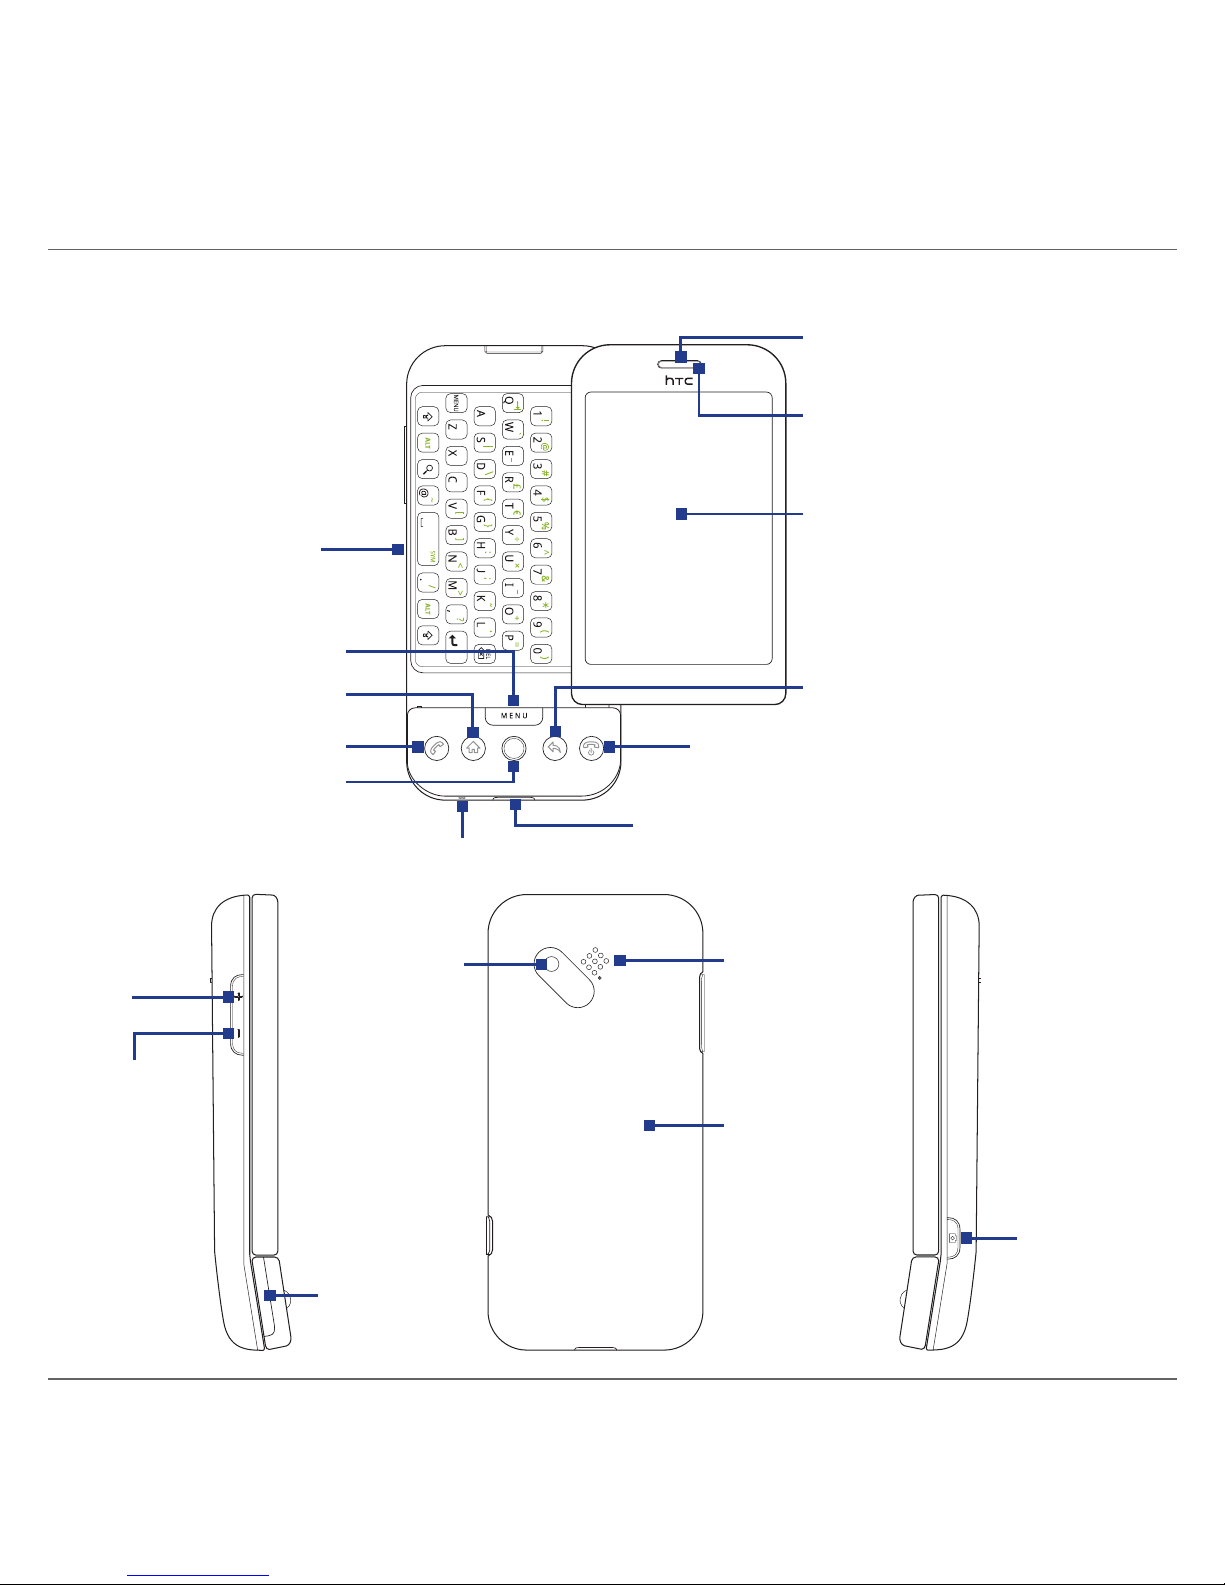
3. Getting to Know the HTC Dream
Notification LED
Touch Screen
HOME
END CALL/POWER
BACK
TRACKBALL
CALL
MENU
Earpiece
Keyboard
USB Connector/Earphone Jack
Microphone
VOLUME
UP
3.2
Megapixel
Camera
Speaker
Back Cover
CAPTURE
Storage
Card Slot
VOLUME
DOWN

Quick Start Guide 7
4. Installing the SIM Card, Battery, and Storage Card
Make sure your device is turned off before installing the SIM
card, battery, and storage card. You also need to remove the
back cover before you can install the battery and SIM card.
To remove the back cover
Hold the device sideways with the control buttons on the
right.
Slide the screen panel up to reveal the keyboard and the
back cover release tab.
Gently push down the release tab with your finger until the
back cover disengages from the device.
Back cover
release tab
3
2
4. Pull the back cover out, then set it aside.
1.
2.
3.
8 Quick Start Guide
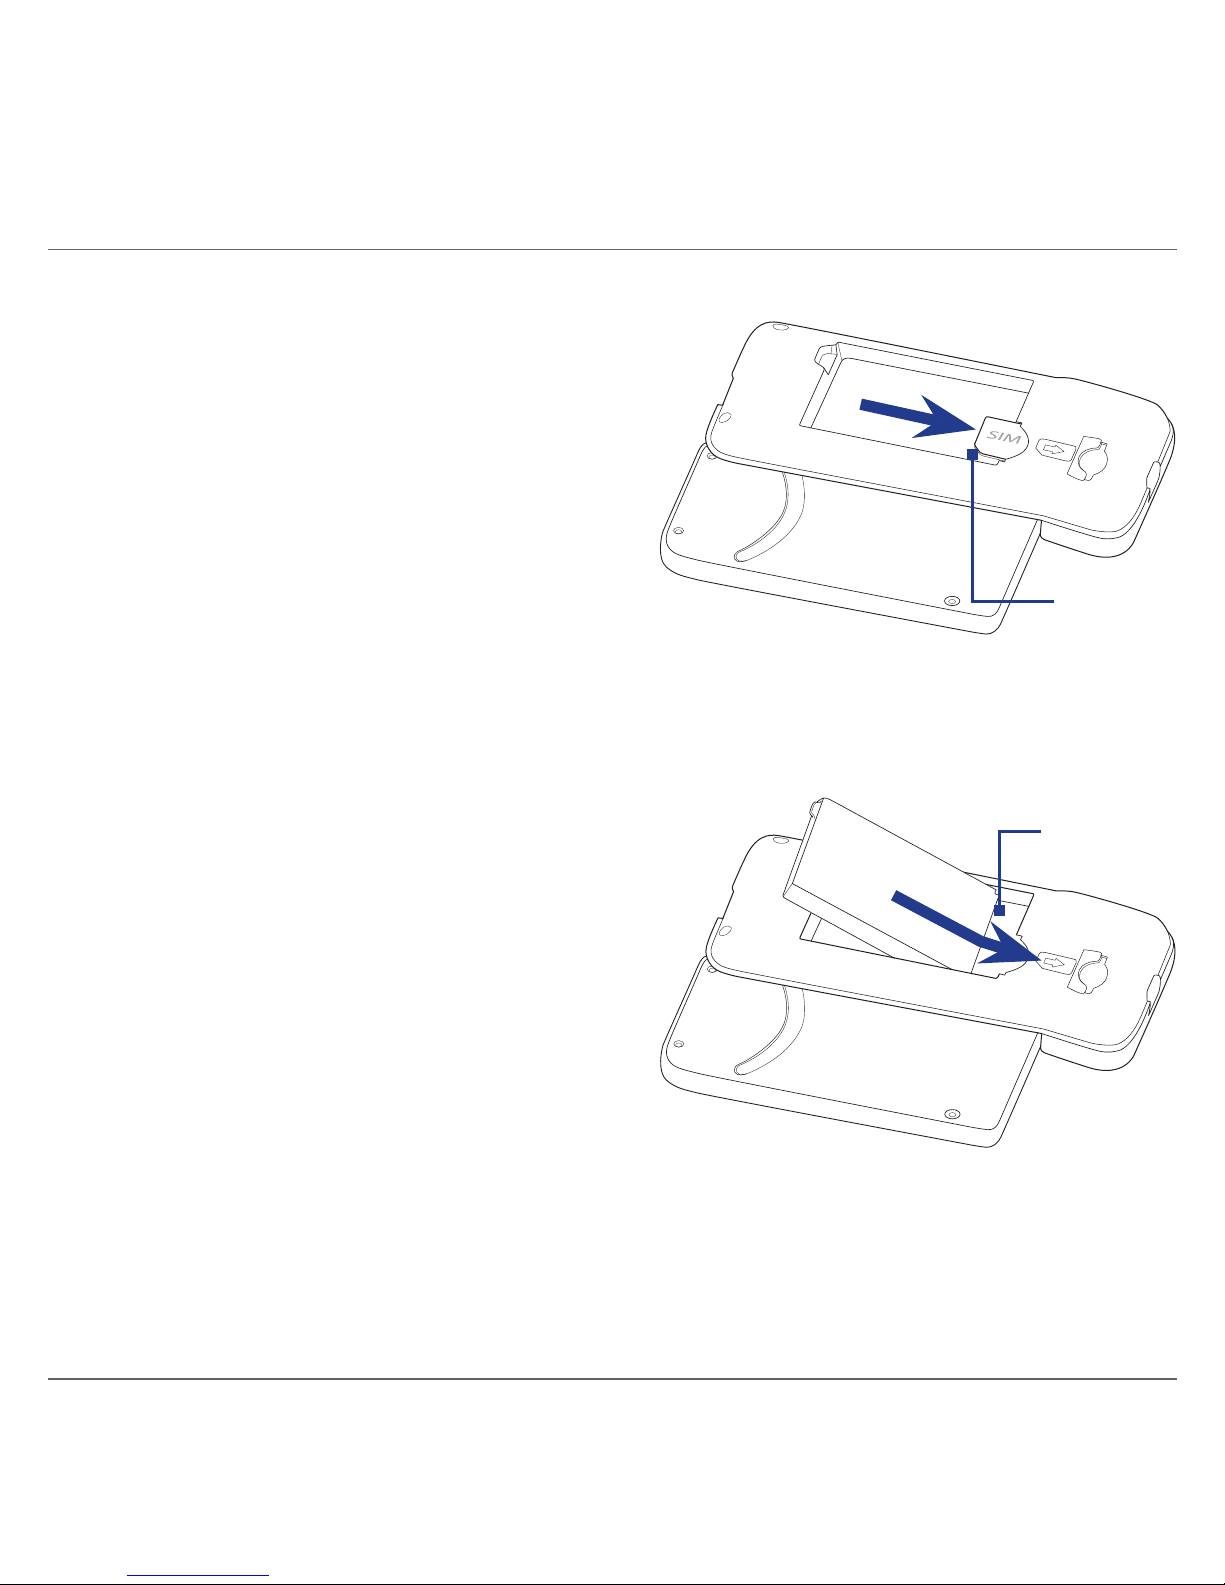
To install the SIM card
Locate the SIM card slot,
then insert the SIM card
with its gold contacts
facing down and its cutoff corner facing out the
card slot.
Slide the SIM card
completely into the slot.
1.
2.
Cut-off
corner
To install the battery
Align the battery’s
exposed copper
contacts with the battery
connectors inside the
battery compartment.
Insert the contact side
of the battery first then
gently push the battery
into place.
Replace the back cover.
1.
2.
3.
Battery
contacts
Quick Start Guide 9
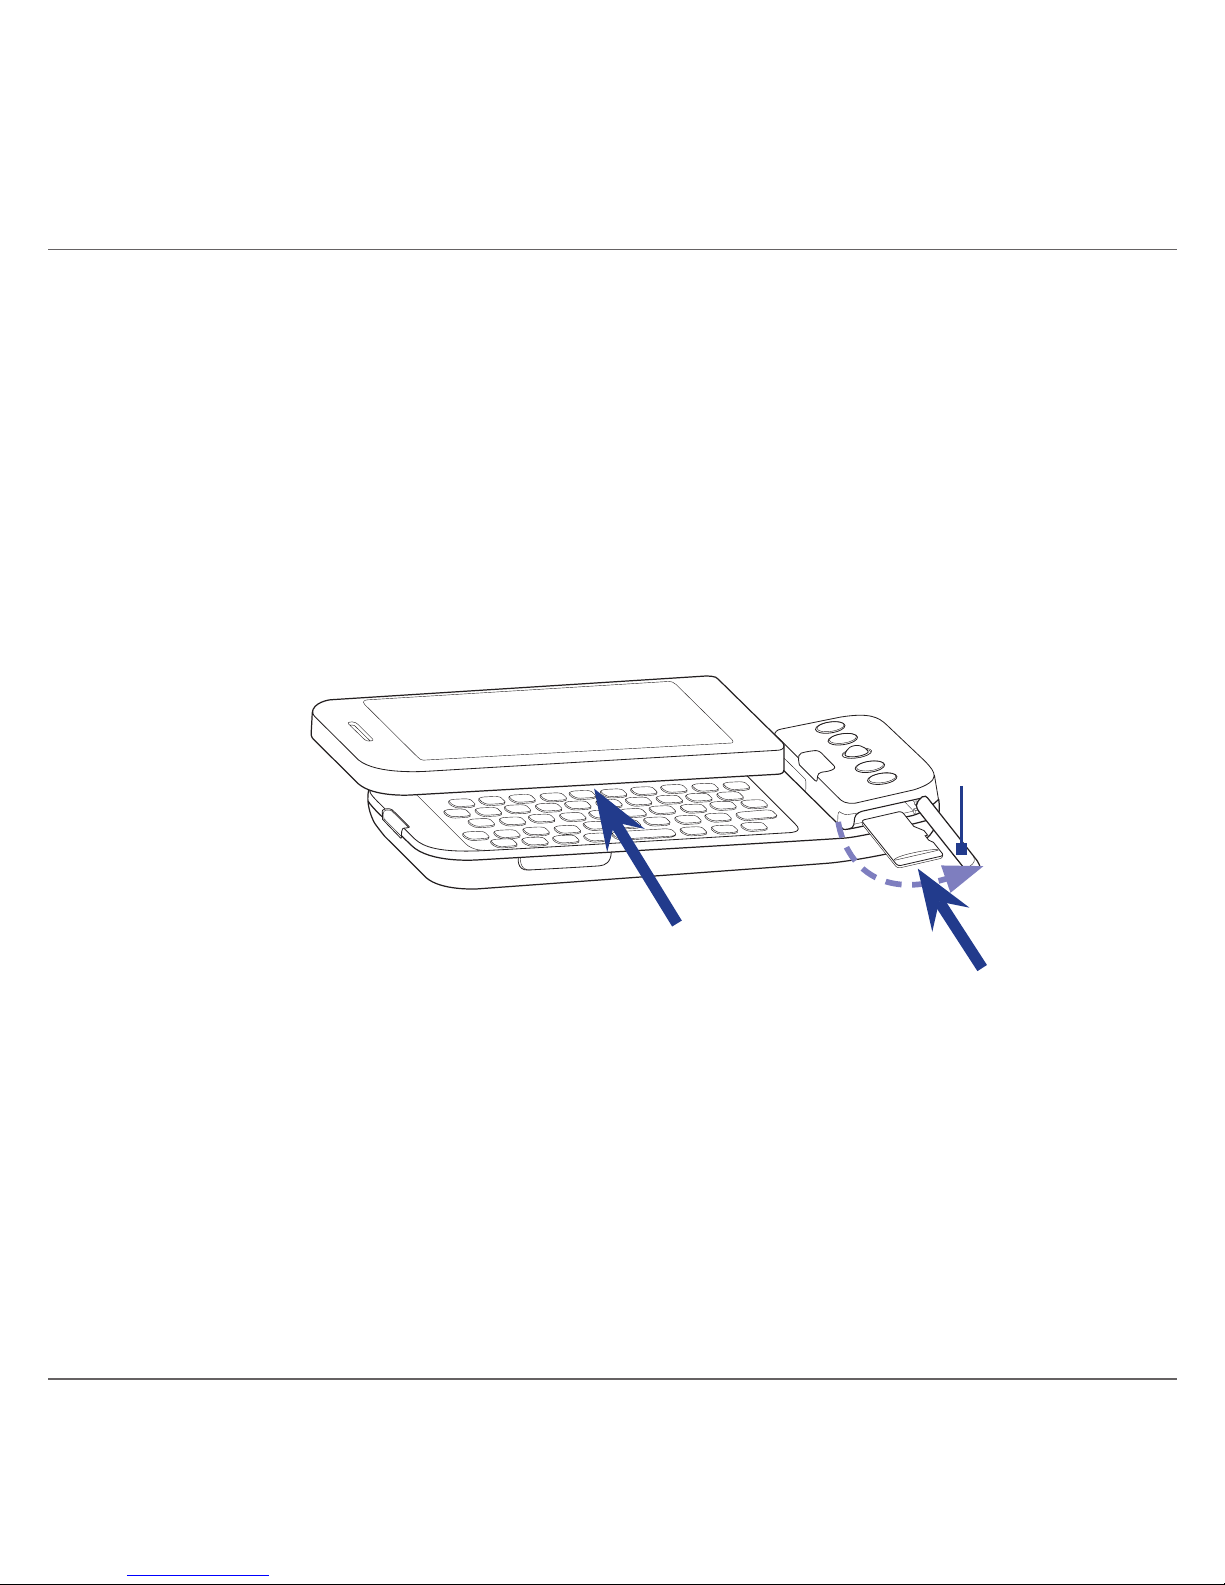
To install the storage card
Hold the device sideways with the control buttons on the
right.
Open the keyboard, then locate the storage card slot at the
side of the control buttons.
Pry open the storage card slot cover.
Insert the microSD card into the slot with its golden
contacts facing down until it clicks in place.
2 4
Storage card
slot cover
3
5. Replace the storage card slot cover.
Note Make sure that both ends of the cover are properly seated on the slot.
The device will not detect the storage card when the slot cover is not
properly replaced.
1.
2.
3.
4.

10 Quick Start Guide
5. Charging the Battery
New batteries are shipped partially charged. Before you start
using your device, it is recommended that you install and charge
the battery.
To charge the battery
Flip open the USB connector cover at the bottom panel of
your device.
Insert the USB connector of the AC adapter to the USB
connector on your device.
Plug in the AC adapter to an electrical outlet to start
charging the battery.
The battery is fully charged after about 3 hours of charging.
6. Starting Up
After installing your SIM card and battery and charging the
battery, you can now power on and start using your device.
Turn on the power
Press the END CALL/POWER button.
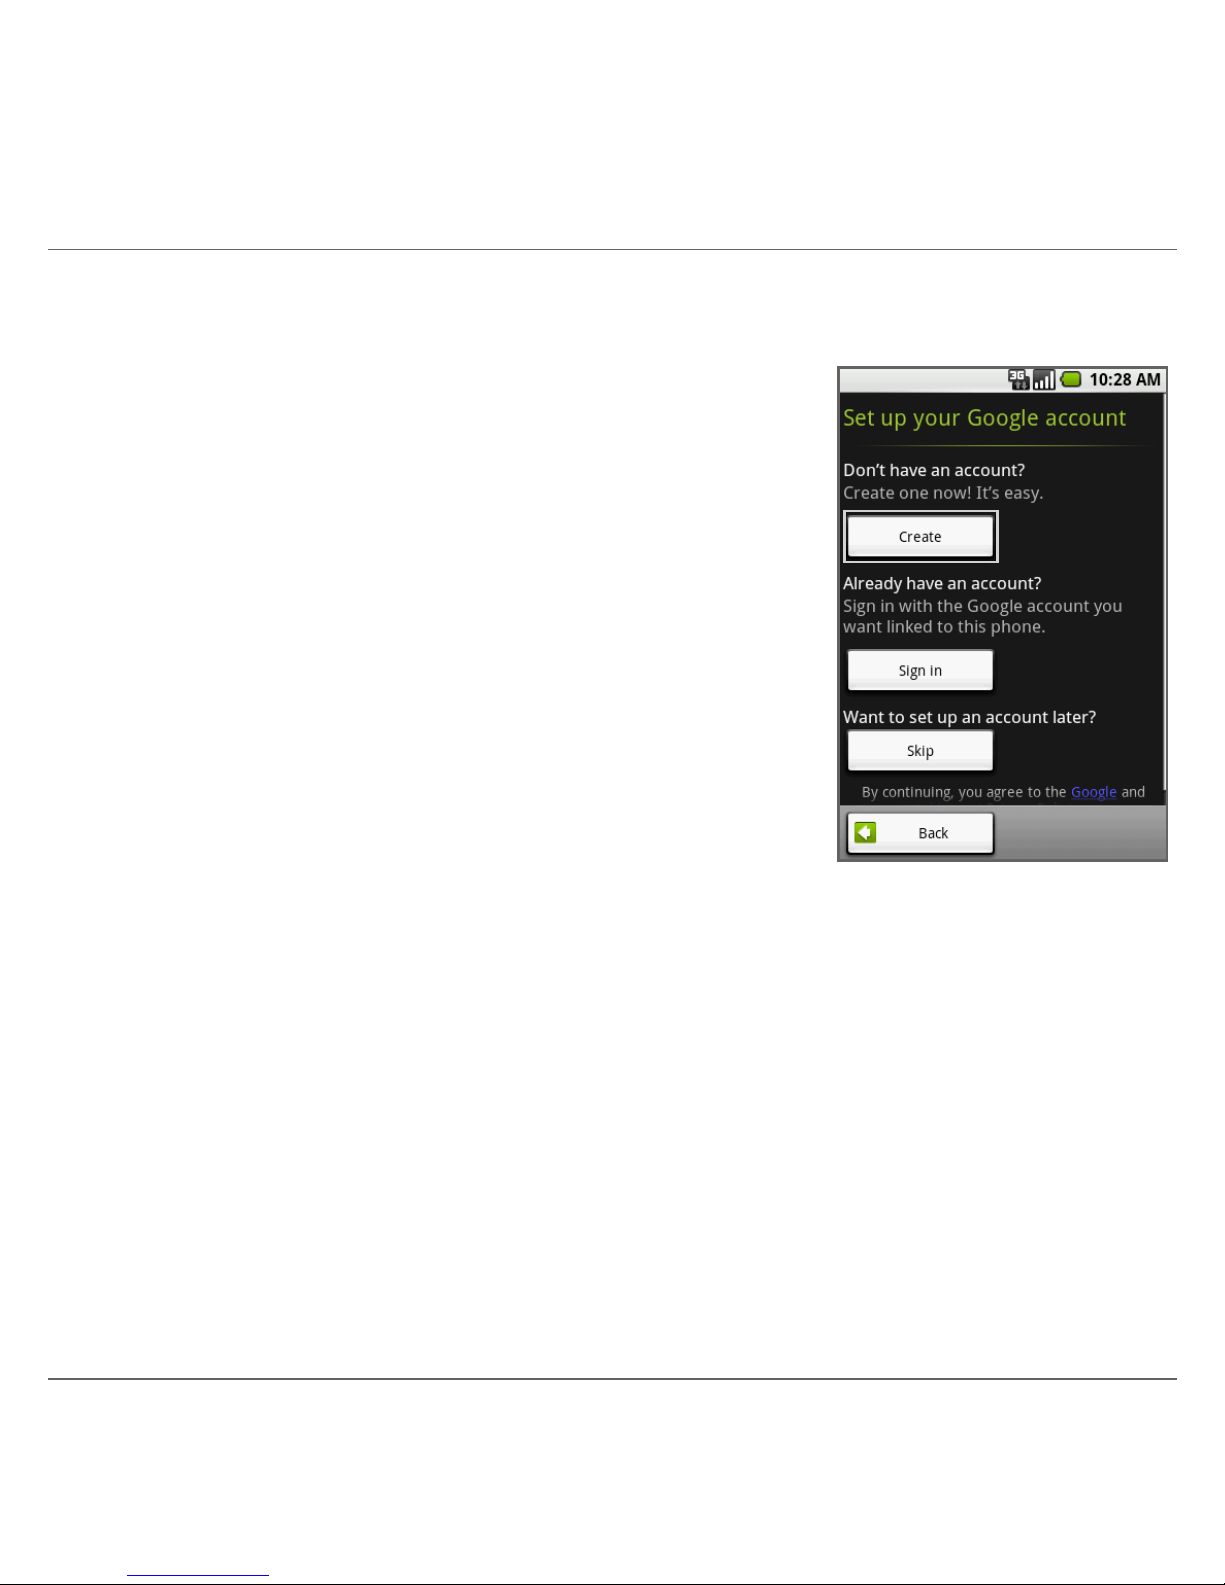
After you turned on the device for the first time, you will
be prompted to create a Gmail account or sign in to your
existing Gmail account. Touch the screen to begin.
1.
2.
3.
1.
2.
Quick Start Guide 11
Create a Gmail™ account and sign in
Read the set up information on the screen then touch Next.
2. Touch Create.
Notes • If you have an existing Gmail
account, touch Sign in. Use the
keyboard to enter your user
name and password, then touch
Sign in. All e-mails, contacts,
and calendar events on your
Gmail account will automatically
synchronize with your device.
• Touch Skip if you want to set up
an account later and start using
your device. The Home screen will
display.
3. Open the keyboard, then enter your name and account
user name, then touch Next. Follow screen instructions to
create your Gmail account.
4. The device synchronizes with your Gmail account. Touch
Finish setup to display the Home screen.
1.

12 Quick Start Guide
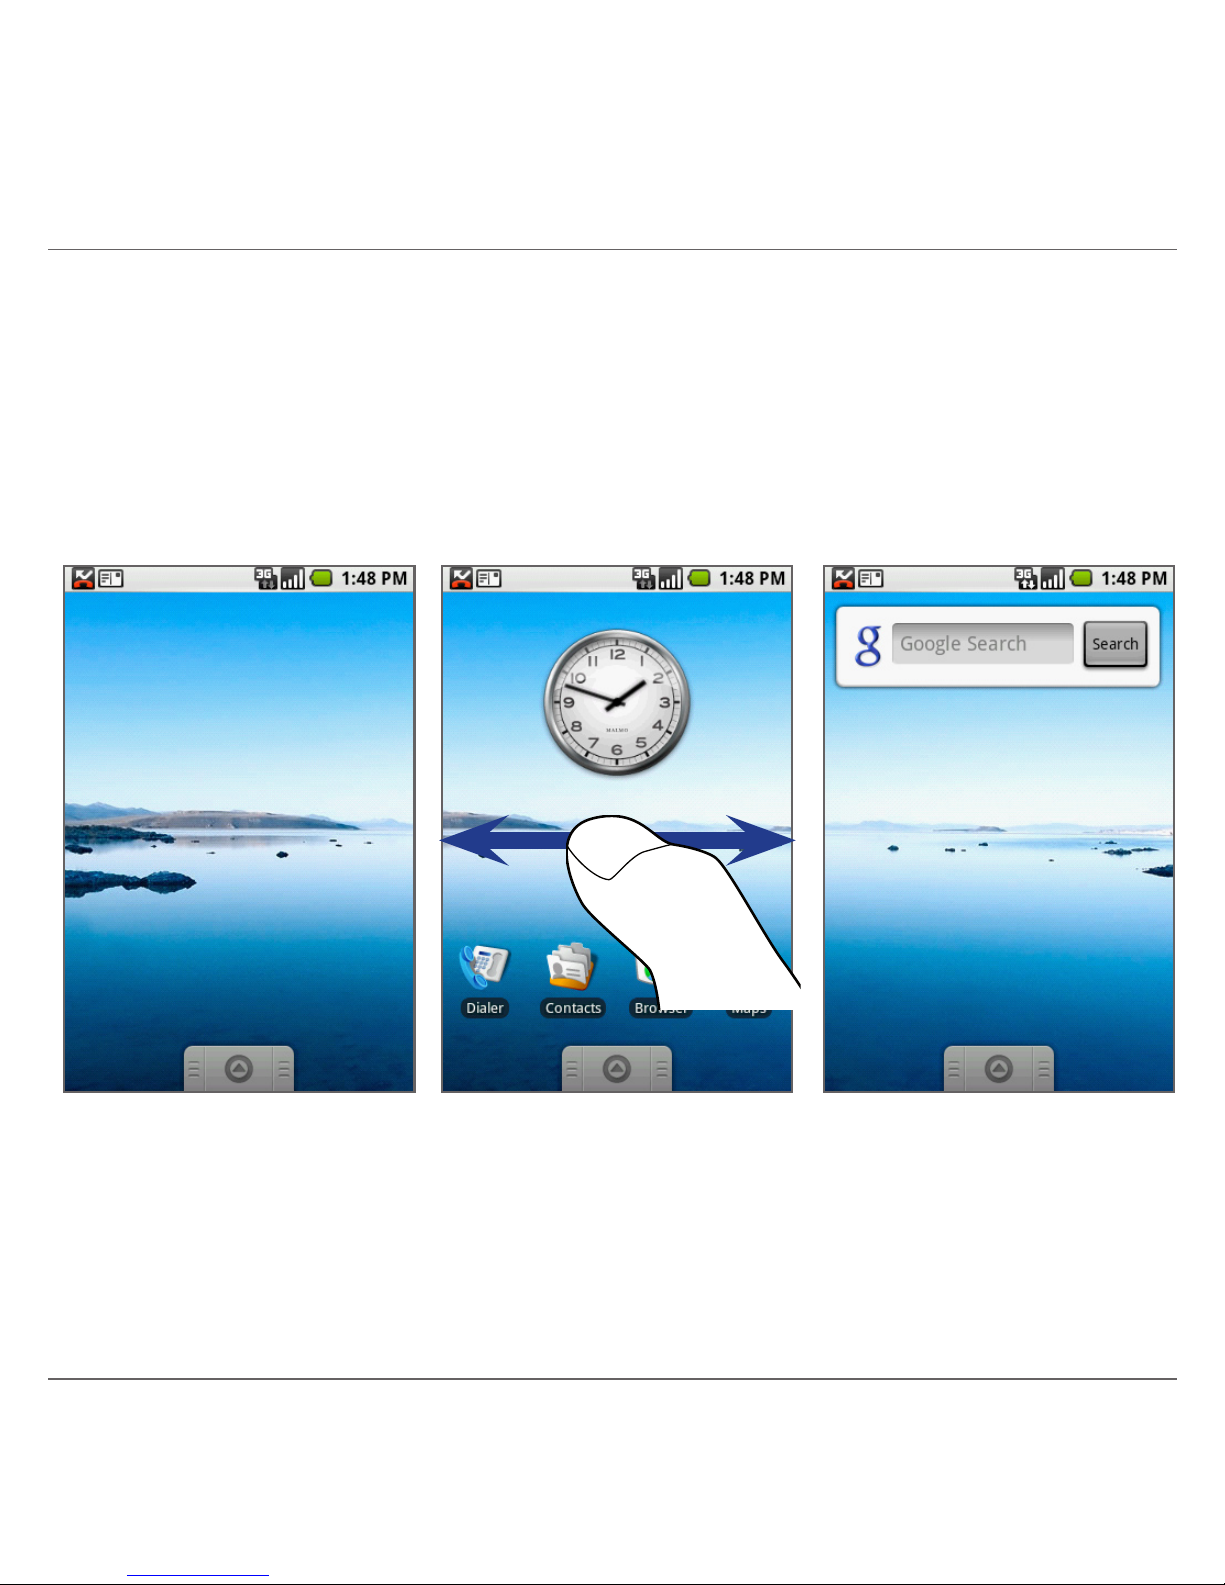
7. The Home Screen
The Home screen is your starting point for using the applications
on your device. You can customize the Home screen to display
application icons, shortcuts, folders, and widgets according to
your preference.
Notifications.
Your call, text, and
other notifications
appear here.
Touch and hold
this area to display
the date.
•
•
Signal strength
Battery status
Connection status
Touch an icon to
open the related
application
Touch the
Applications
tab to access the
applications of
your device.
Time
Tip While in any application, press HOME to display the Home screen.
Quick Start Guide 13
To go to the left and right side of the extended
Home screen
The Home screen extends beyond the screen width to provide
more space for adding icons, widgets, and more. Slide your
finger horizontally across the screen to go to the left or right
side of the extended Home screen.
Tip While on an extended Home screen, press HOME to return to the
center Home screen.
To learn how to customize the Home screen, refer to the
“Getting Started” chapter in the User Manual PDF.
14 Quick Start Guide
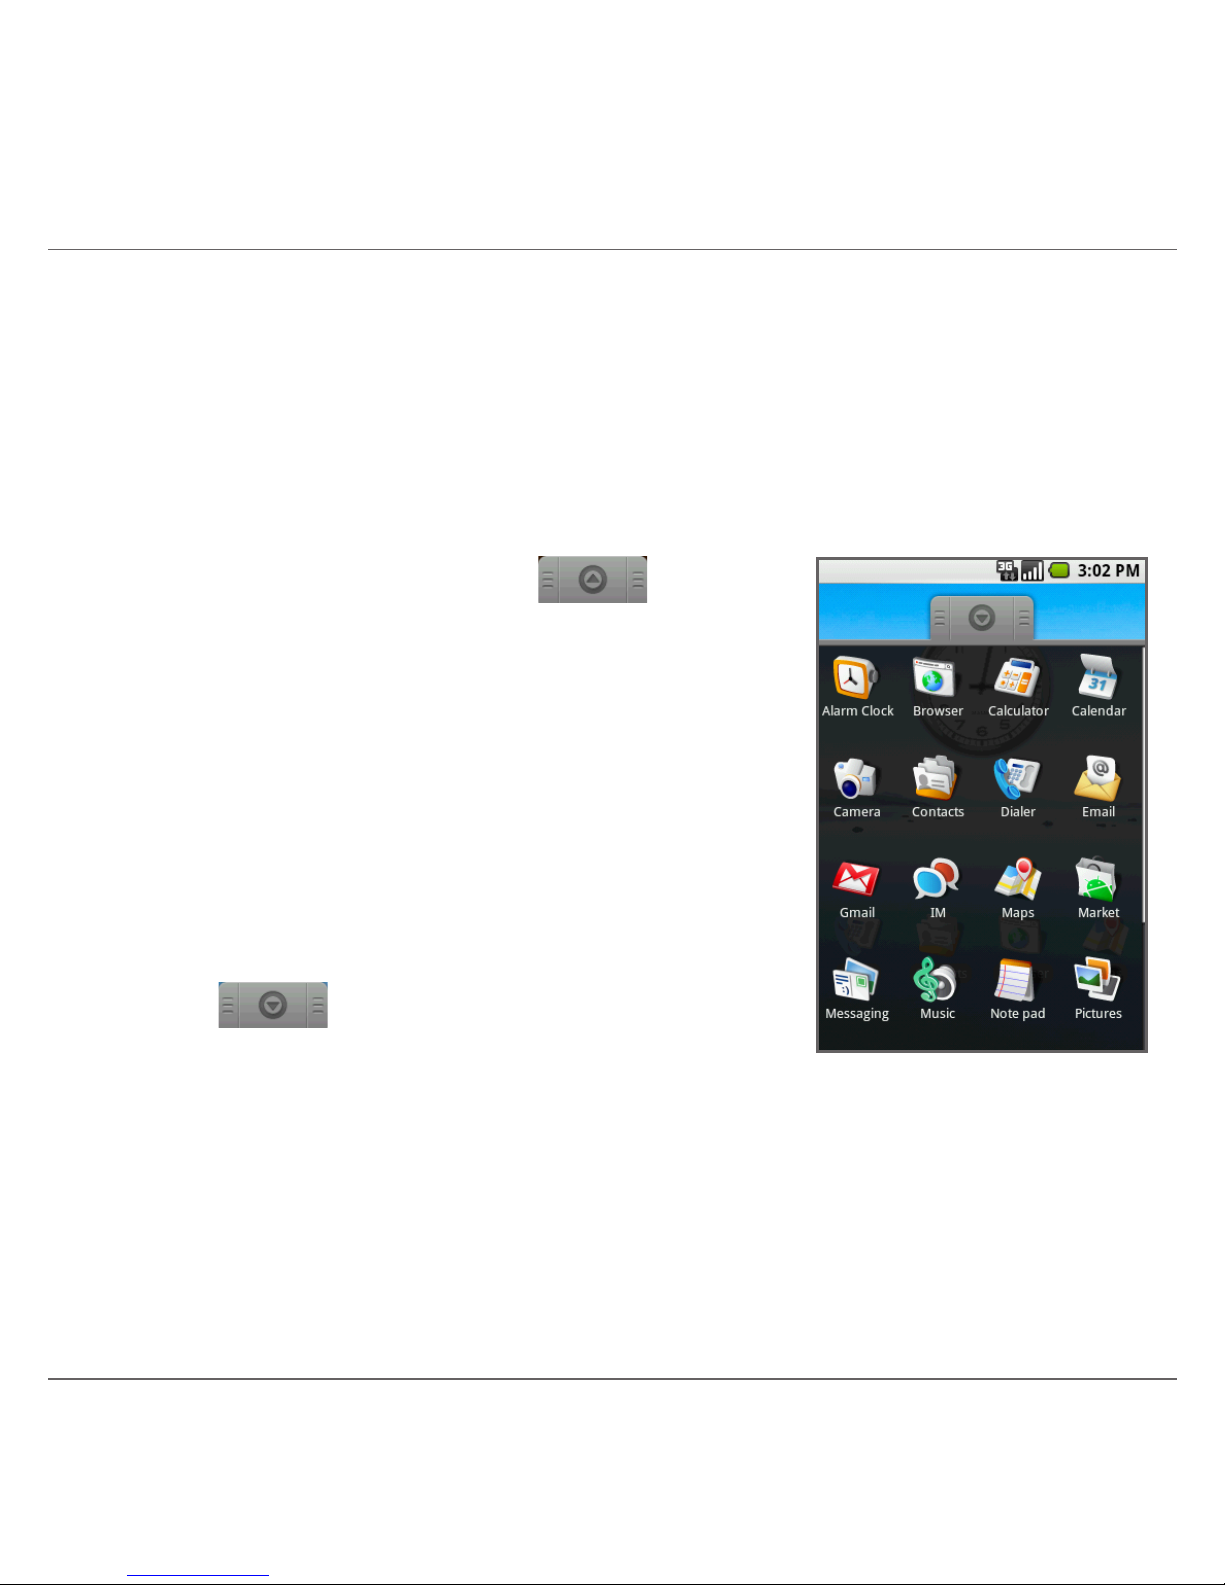
8. Accessing Device Applications and Settings
The Applications tab holds all pre-installed applications on your
device. This tab will also hold the icons of applications that you
download and install from Android Market.
To open the Applications tab
Press HOME, then touch .
On the Applications tab:
Touch an icon to open the related
application.
Scroll up/down on the tab using
your finger or the TRACKBALL to
view more applications.
Note To hide the Applications tab, touch
or press the BACK button.
•
•
For complete information about applications that are
pre-installed on your device, refer to the User Manual PDF
Quick Start Guide 15
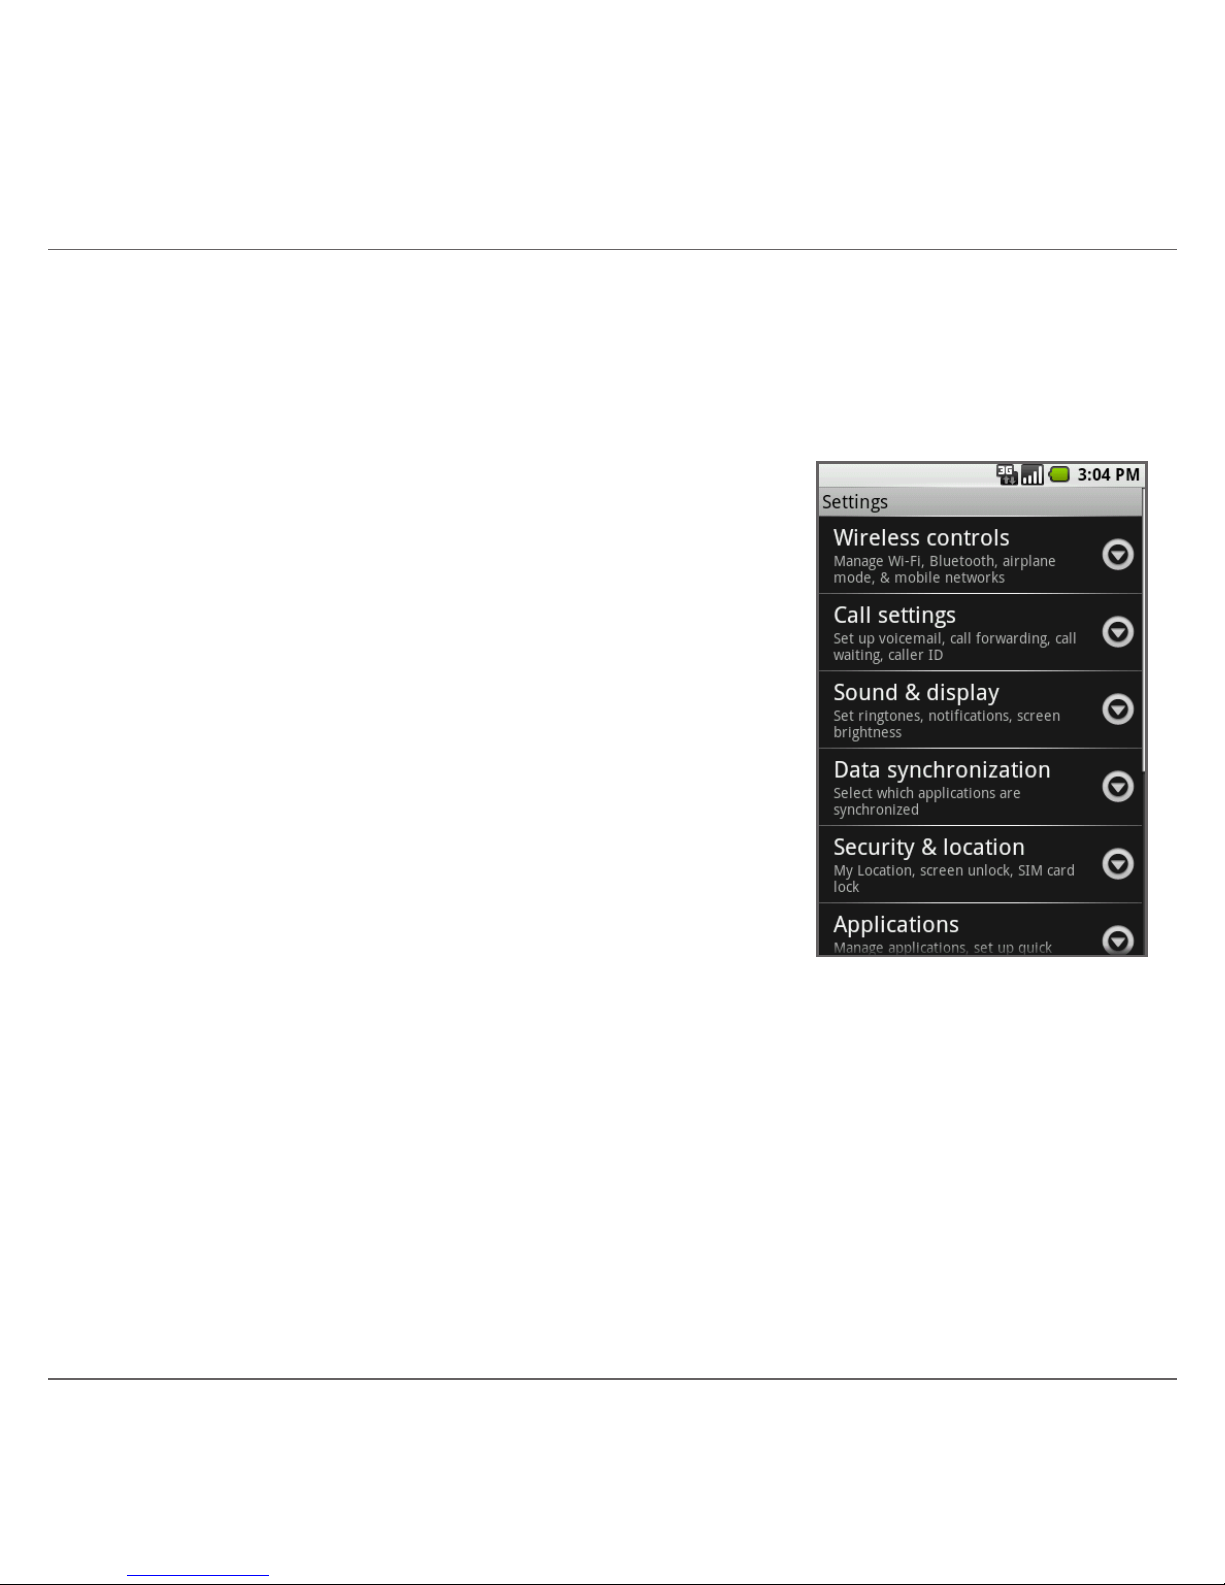
Control and customize device settings from the Settings screen.
To open the Settings screen
On any application screen, press
HOME > MENU, then touch
Settings.
On the Home screen, touch the
Applications tab, then touch
Settings.
For complete information about the
settings on your device, consult the
User Manual PDF.
•
•
The following sections in this Quick Start Guide will show you
how to use basic device functions including how to make a
call, enter information, send text and e-mail messages, and
more.
16 Quick Start Guide
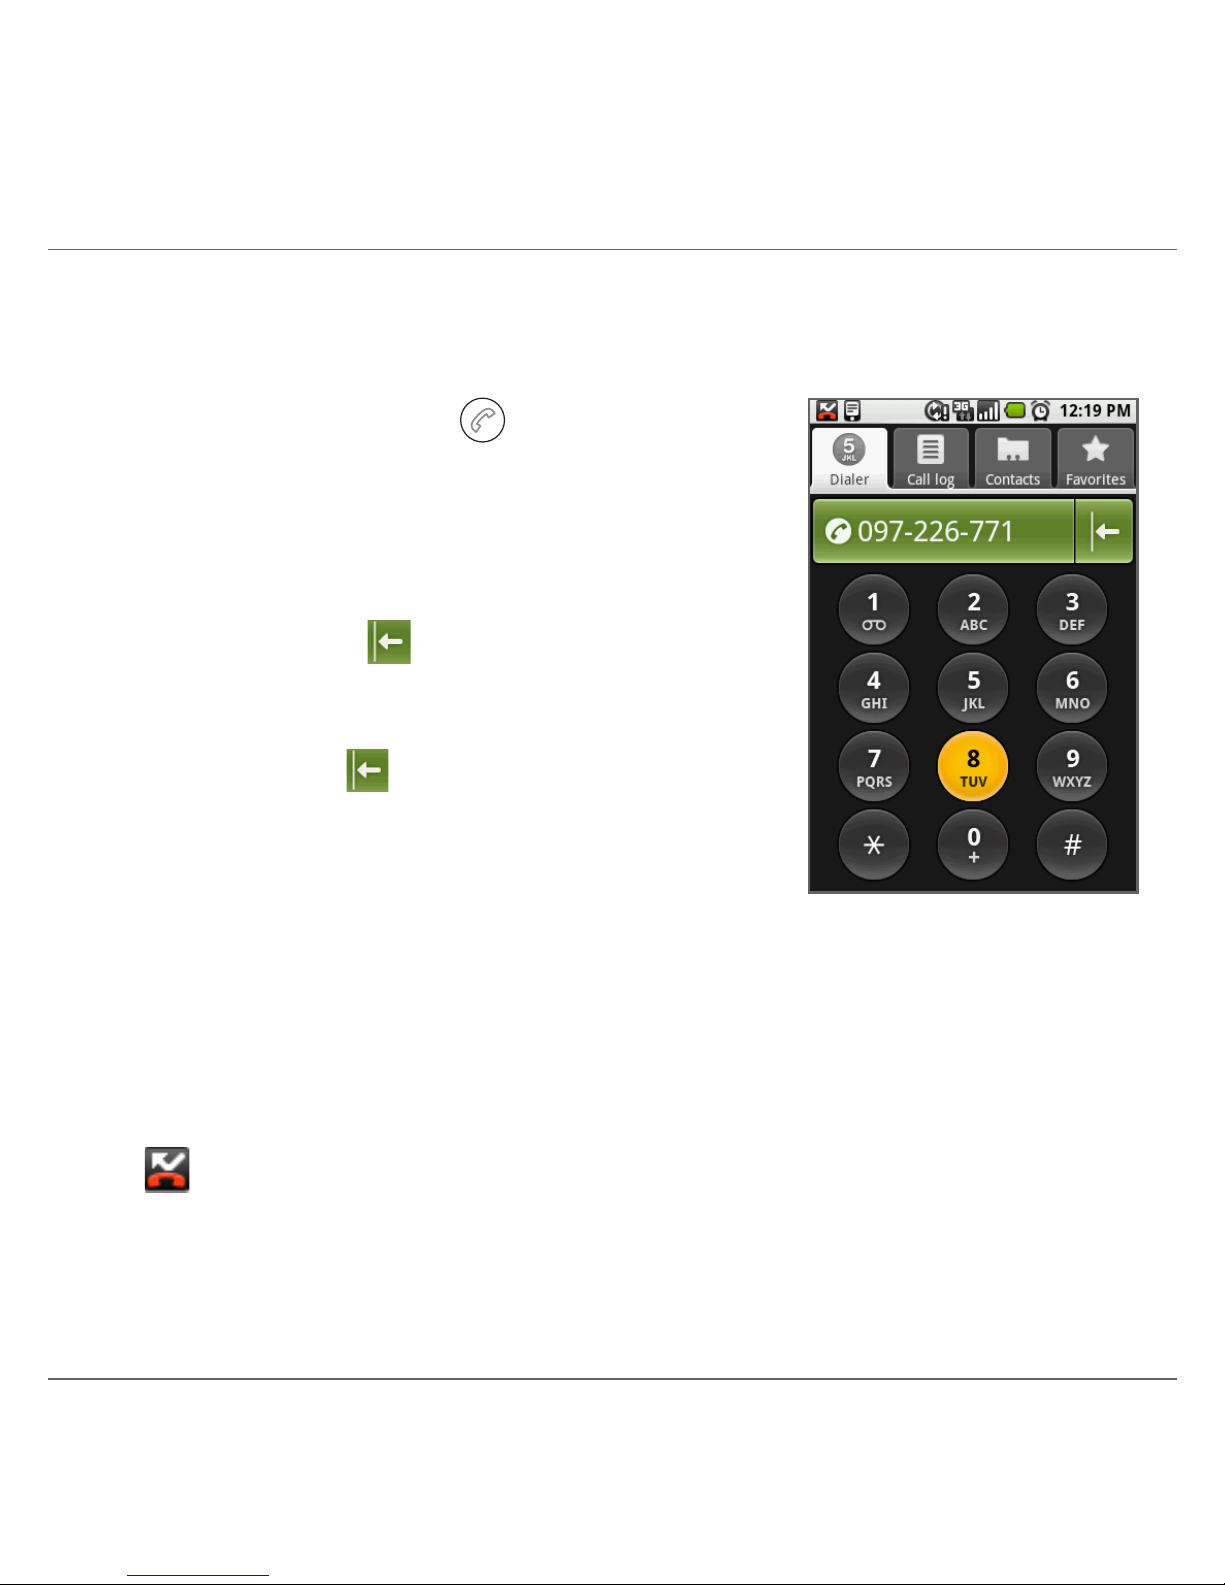
9. Making Your First Call
To place a call
Press the CALL ( ) button, then
touch the Dialer tab.
Touch the keys on the dialer to
enter the phone number.
If you touched a wrong number
key, touch to erase each
subsequent digit of a number.
To erase the entire number, touch
and hold .
Press the CALL button to place
the call.
1.
2.
3.
Tip During a call, press the VOLUME UP or VOLUME DOWN button on
the left panel of the device to adjust the in-call volume.
To check missed calls
When you have missed calls, you will see the missed call icon
( ) in the status bar. To check who the caller was, touch
and hold the status bar, then drag your finger downward on
the screen to open the notifications panel. The missed call
information will be displayed in the notifications list.
 Loading...