

Page 1

Chapter 5
Synchronizing Information
With Your Computer
5.1 About Synchronization
5.2 Setting Up Windows Mobile® Device Center
on Windows Vista®
5.3 Setting Up ActiveSync® on Windows XP®
5.4 Synchronizing With Your Computer
5.5 Synchronizing via Bluetooth
5.6 Synchronizing Music and Video
Page 2

90 Synchronizing Information With Your Computer
5.1 About Synchronization
You can take information from your computer wherever you go by
synchronizing them to your device. The following types of information can
be synchronized between your computer and your device:
• Microsoft® Office Outlook® information, which include Office
Outlook e-mail, contacts, calendar, tasks, and notes
• Notes, which are created using Microsoft® Office OneNote® 2007
• Media, such as pictures, music, and video
• Favourites, which are the bookmarked links to your favourite web
sites
• Files, such as documents and other files
Before you can synchronize, you need to install and set up first the
synchronization software on your computer. For more information, see
“Setting Up Windows Mobile Device Center on Windows Vista®” and “Setting
Up ActiveSync® on Windows XP®” in this chapter.
Note ActiveSync or Windows Mobile Device Center only synchronises data on your
computer and device. To back up files in the internal storage, use Windows
Explorer on your computer to copy files from the internal storage to your
computer.
Ways to synchronize
After you have installed the synchronization software on your computer,
connect and synchronize your device with your computer by:
• Using the supplied USB sync cable.
Upon connecting the sync cable to your device and your computer,
the synchronization process automatically starts.
• Using Bluetooth.
You must first set up a Bluetooth partnership between your device
and your computer before you can synchronize information
between them using Bluetooth. For more information about setting
up a Bluetooth partnership, see Chapter 9. For information about
synchronizing through Bluetooth, see “Synchronizing via Bluetooth”
later in this chapter.
Try to synchronize regularly in order to keep information up-to-date in both
your device and your computer.
Page 3
Synchronizing Information With Your Computer 91
Notes • You can also synchronize Outlook e-mail, contacts, calendar, and tasks on
• If you are sending your device for repair or performing a hard reset, data
your device with the Exchange Server at your work. For more information
about setting up your device to synchronize with the Exchange Server,
see Chapter 7.
from your device will be lost. It is recommended that you sync your device
to your computer to back up your files. To back up files in the internal
storage to your computer, use Windows Explorer to copy files from the
internal storage to the computer.
5.2 Setting Up Windows Mobile® Device Center on Windows Vista®
Microsoft Windows Mobile® Device Center is the replacement for
Microsoft® ActiveSync® on Windows Vista®.
Note Some versions of Windows Vista® come with Windows Mobile Device Center
already installed. If Windows Mobile Device Center is not available on your
Windows Vista®, you can install it from the Getting Started Disc that came
with your device.
Set up synchronization in Windows Mobile Device Center
When you connect your device to your computer and start Windows Mobile
Device Center for the first time, you are asked to create a Windows Mobile
partnership with your device. To create a partnership:
1. Connect your device to your computer. Windows Mobile Device
Center configures itself, then opens.
2. On the license agreement screen, click Accept.
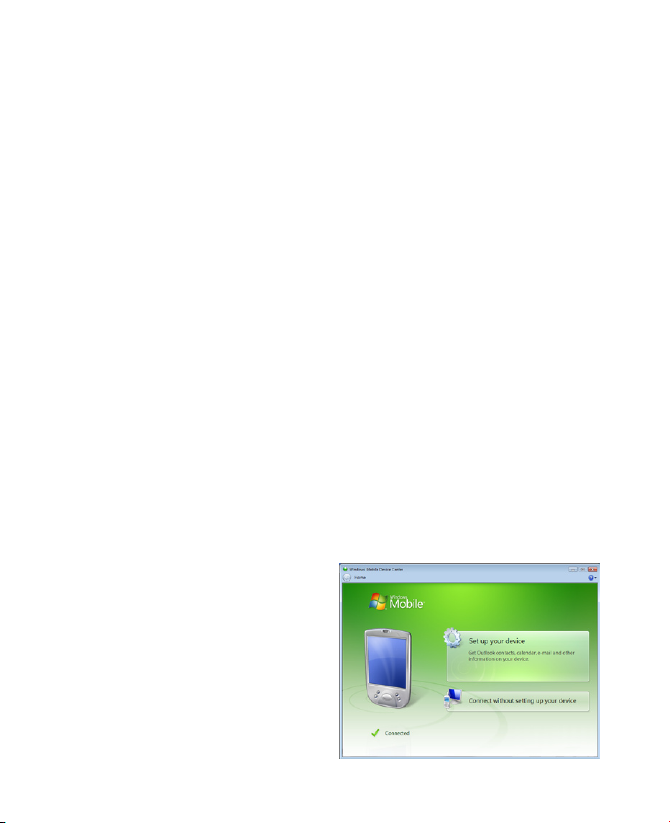
3. On the Windows Mobile
Device Center’s Home
screen, click Set up your
device.
Note Choose Connect
without setting up
your device if you only
want to transfer media
files, check for updates,
and explore your device
but not synchronize
Outlook information.
Page 4
92 Synchronizing Information With Your Computer
4. Select the items you want to synchronize, then click Next.
5. Enter a device name, then click Set Up.
When you finish the setup wizard, Windows Mobile Device Center
synchronizes your device automatically. Notice that Outlook e-mails and
other information appear on your device after synchronization.
Use Windows Mobile Device Center
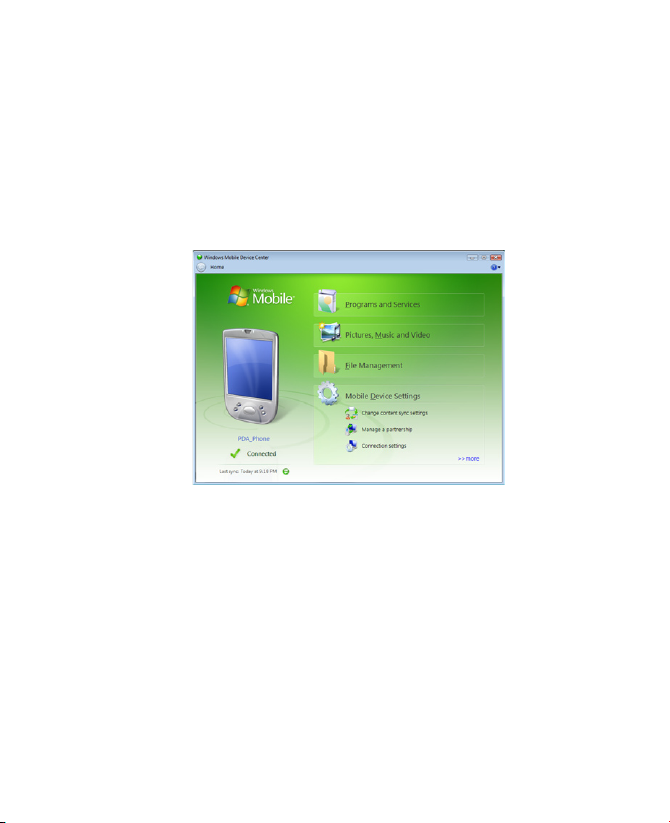
To open Windows Mobile Device Center, click Start > All Programs >
Windows Mobile Device Center on your Windows Vista computer.
On Windows Mobile Device Center, you can do the following:
• Click Mobile Device Settings to change synchronization settings.
• When you click Pictures, Music and Video > XX new pictures/
video clips are available for import, a wizard guides you to tag
and transfer photos from your device to the Photo Gallery on your
computer.
• Click Pictures, Music and Video > Add media to your device from
Windows Media Player to synchronize music and video files using
Windows Media® Player. For more information, see “Using Windows
Media® Player Mobile” in Chapter 11.
• Click File Management > Browse the contents of your device to
view documents and files on your device.
Note See Windows Mobile Device Center Help for more information.
Page 5

Synchronizing Information With Your Computer 93
5.3 Setting Up ActiveSync® on Windows XP®
The Getting Started disc that comes with your device contains Microsoft
ActiveSync 4.5 or later. Follow the steps in this section to install and set up
ActiveSync on Windows XP or other compatible Windows systems.
Note For a list of compatible Windows systems, go to
http://www.microsoft.com/windowsmobile/activesync/activesync45.mspx.
Install ActiveSync
1. Place the Getting Started disc to the disc drive of your computer.
2. Click Setup and Installation.
3. Select the ActiveSync check box, then click Install.
4. Read the license terms, then click Accept.
5. When installation is completed, click Done.
6. On the Getting Started with Windows Mobile screen, click Close.
Set up synchronization in ActiveSync
1. Connect your device to your computer. The Synchronization
Setup Wizard automatically starts and guides you to create a
synchronization partnership. Click Next to proceed.
2. To synchronize your device with your computer, clear the
Synchronize directly with a server running Microsoft Exchange
check box, then click Next.
3. Select the information types that you want to synchronize, then click
Next.
4. Select or clear the Allow wireless data connections check box
according to your preference.
5. Click Finish.
When you finish the wizard, ActiveSync synchronizes your device
automatically. Notice that Outlook e-mails and other information appear on
your device after synchronization.
Page 6

94 Synchronizing Information With Your Computer
5.4 Synchronizing With Your Computer
Connect and synchronize your device with your computer using the USB
cable or Bluetooth connection.
Start and stop synchronization
You can manually synchronize either from your device or computer.
From your device
• On the TouchFLO 3D Home screen, slide to the Settings tab and then
touch Sync Data; or
• Tap Start > Programs > ActiveSync, then tap Sync. To end
synchronization before it completes, tap Stop.
Tip To delete a partnership with one computer completely, disconnect your
device from that computer first. In ActiveSync on your device, tap Menu >
Options, tap the computer name, then tap Delete.
From Windows Mobile Device Center
1. Click Start > All Programs > Windows Mobile Device Center.
2. Click at the lower left of the Windows Mobile Device Center.
To end synchronization before it completes, click .
From ActiveSync on your computer
When you connect your device to your computer, ActiveSync automatically
opens on your computer and synchronizes.
• To manually start synchronization, click .
• To end synchronization before it completes, click .
Change which information is synchronized
You can change the information types and the amount of information to
synchronize for each type either on your device or your computer. Follow
the steps below to change synchronization settings on your device.
Note Before changing synchronization settings on your device, disconnect it from
your computer.
1. In ActiveSync on your device, tap Menu > Options.
Page 7

Synchronizing Information With Your Computer 95
2. Select the check box for any items you want to synchronize. If you
cannot select a check box, you might have to clear the check box for
the same information type elsewhere in the list.
3. To change synchronization settings for an information type, for
instance, E-mail, select it and tap Settings.
You can then set the download size limit, specify the time period of
information to download, and more.
Notes • Some information types such as Favourites, Files and Media cannot be
• A computer can have sync partnerships with many different Windows
• Outlook e-mail can be synchronized with only one computer.
selected in ActiveSync Options on your device. You can only select or
clear these items from your computer’s Windows Mobile Device Center or
ActiveSync.
Mobile powered devices, but a device can have sync partnerships with at
most two computers. To ensure that your device will synchronize properly
with both computers, set up the second computer using the same
synchronization settings you used on the first computer.
Troubleshoot sync connection problem
In some cases, when the computer connects to the Internet or a local
network, it may disconnect the connection with your device in favor of the
Internet or network connection.
If this happens, tap Start > Settings > Connections tab > USB to PC, then
clear the Enable advanced network functionality check box. This makes
your computer utilize a serial USB connection with your device.
5.5 Synchronizing via Bluetooth
You can connect and synchronize your device with the computer using
Bluetooth.
Note To connect and synchronize your device with a computer via Bluetooth,
your computer must have a built-in Bluetooth or installed with a Bluetooth
adapter or dongle.
Page 8

96 Synchronizing Information With Your Computer
To synchronize with a computer via Bluetooth
1. Set up Windows Mobile Device Center or ActiveSync on your
computer to synchronize through Bluetooth. See the program’s Help
for instructions.
2. On your device, tap Start > Programs > ActiveSync.
3. Make sure that Bluetooth on both your device and the computer are
turned on and set to visible mode. See “Bluetooth Modes” in Chapter
9 for details.
If this is the first time you have connected to this computer via
Bluetooth, you must first complete the Bluetooth wizard on your
device and set up a Bluetooth partnership between your device
and the computer. For more information about creating a Bluetooth
partnership, see “Bluetooth Partnerships” in Chapter 9.
4. Tap Menu > Connect via Bluetooth. Make sure the Bluetooth
function of both your device and the computer are turned on and set
to visible mode.
Note To conserve battery power, turn off Bluetooth when not in use.
5.6 Synchronizing Music and Video
If you want to carry your music or other digital media along with you while
you travel, set up Windows Media® Player on your computer to synchronize
music and video with your device.
Other than selecting the Media information type to be synchronized, all
media synchronization settings must be set in Windows Media® Player.
Before media can be synchronized, you must do the following:
• Install Windows Media® Player Version 11 on your computer.
(Windows Media® Player 11 works only in Windows XP or later
versions).
• Connect your device to the computer with a USB cable. If your device
is currently connected using Bluetooth, you must end that connection
before media can be synchronized.
• Set up a sync partnership between your device and your computer’s
Windows Media® Player.
For more information about using Windows Media® Player Mobile, see
Chapter 11.
Page 9

Chapter 6
Exchanging Messages
6.1 Messaging
6.2 Text Messages
6.3 MMS
6.4 Types of E-mail Accounts
6.5 E-mail Setup Wizard
6.6 Using E-mail
Page 10
98 Exchanging Messages
6.1 Messaging
Messaging is a central location where you will find all types of messaging
accounts, which include text messages (SMS), multimedia messages (MMS),
and e-mail accounts.
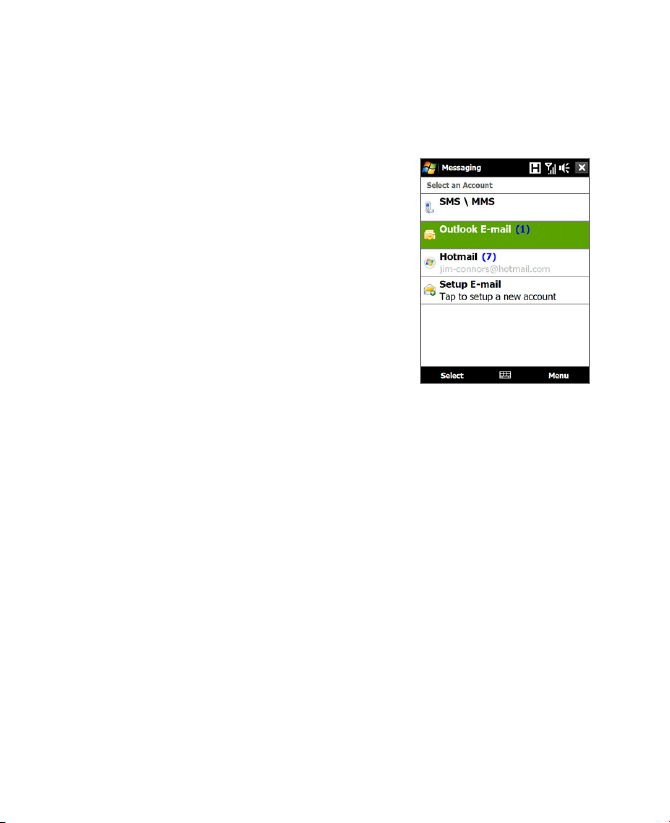
To select a messaging account
Do one of the following:
• On the TouchFLO 3D Home screen, slide
to the Mail tab and then touch Menu
> Accounts > Accounts. The Account
Picker screen then opens where you can
select an account.
Tip You can also tap Start > Messaging.
to access the Account Picker screen.
• While you are in a message list of a
certain account, for example SMS \ MMS,
tap Menu > Go To to switch to other
types of messaging accounts.
To configure message account settings
• Tap Menu > Options on the Account Picker screen; or
• Tap Menu > Tools > Options while you’re in a message list.
To automatically add a signature in outgoing messages
You can automatically add your name and other information as your
signature in outgoing SMS, MMS, and e-mail messages:
Note You need to specify your signature for each type of messaging account.
1. Tap Start > Messaging, then tap Menu > Options.
2. Tap Signatures.
3. Select a messaging account in which to add a signature.
4. Select the Use signature with this account check box.
5. In the provided text box, enter the information that will be displayed
as your signature.
Account Picker screen
Page 11

Exchanging Messages 99
6. If you want the signature to be added whenever you reply or forward
messages, select the Use when replying and forwarding check box,
then tap OK.
7. Repeat the steps to add a signature to other messaging accounts.
6.2 Text Messages
Send short text messages (SMS) up to 160 characters long to other mobile
phones.
Create a new text message
Depending on your preference, there are a number of alternative ways you
can create a new text message.
From the TouchFLO 3D Home screen
1. On the Home screen, slide to the Messages tab.
2. Touch the New icon ( ) on the upper right side of the screen.
Tip To send a text message to a favourite contact, first select the photo of
the desired contact in the People tab to open his or her contact card and
then touch Send text message. For more information about working with
favourite contacts, see “People” in Chapter 3.
From the Account Picker screen
1. Tap Start > Messaging > SMS \ MMS.
2. Tap Menu > New > SMS.
From the Contacts screen
1. Tap Start > Contacts.
2. Tap the contact’s name to open his or her contact card.
3. Touch Send text message.
Page 12
100 Exchanging Messages
Compose and send a text message
After creating a new text message, follow the steps below to enter your
message and then send it.
1. To add recipients,
separating them with a semicolon. Y
Add Recipient to add mobile phone numbers from Contacts..
2. Enter your message.
Tip To choose from preset messages, tap Menu > My Text and tap a desired
message. To check the spelling, tap Menu > Spell Check.
3. Tap Send.
Tips • For more information about entering text and symbols, see Chapter 4.
• If you want to know when a text message is received, before sending the
message that you are composing, tap Menu > Message Options, then
select the Request message delivery notification check box.
• To always receive a delivery notification, tap Menu > Tools > Options in
the text message list, tap SMS \ MMS, then select the Request delivery
notifications check box.
Manage text messages
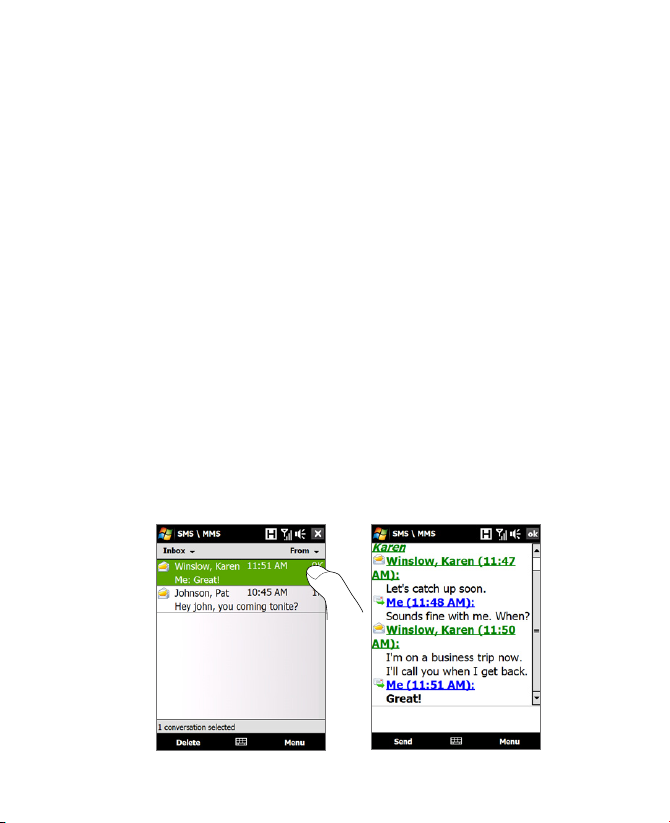
Text messages that are sent to and received from a contact (or number)
are grouped as a single thread in your inbox. Threaded SMS lets you see
exchanged messages (similar to a chat program) with a contact on the
screen.
enter their mobile phone numbers in the To field,
ou can also tap To or tap Menu >
Page 13
Exchanging Messages 101
To reply to a text message
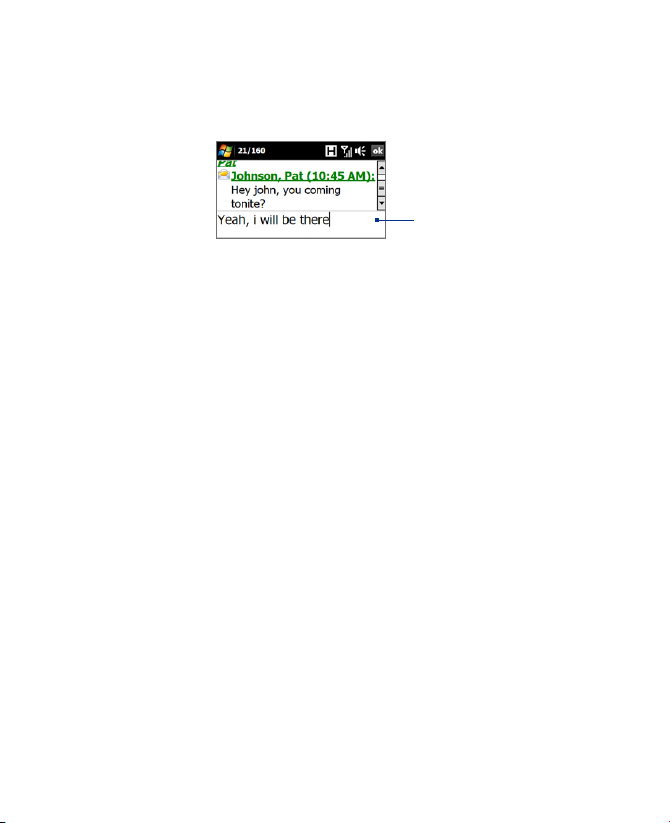
1. In the SMS \ MMS inbox, tap a message thread to open it.
2. At the bottom of the screen, type your reply message and then tap
Send.
Enter your reply
message here
To copy a message in the thread to the SIM card
1. In the SMS \ MMS inbox, tap the message to open it.
2. Use the Navigation Up or Down control to select a message in the
thread that you want to copy to the SIM card.
Note You cannot copy a sent message from the thread to the SIM card.
3. Tap Menu > Copy to SIM.
To copy a text message from the SIM card to the device
1. In the SMS \ MMS inbox, select the SIM message you want to copy.
2. Tap Menu > Copy to Phone.
Note Copying SIM text messages to your device results in duplicate messages in
the Inbox folder when your SIM card is in use.
To delete a message in the thread
1. In the SMS \ MMS inbox, tap a message thread to open it.
2. Use the Navigation Up or Down control to select a message in the
thread that you want to delete.
3. Tap Menu > Delete.
To delete all messages in a thread
1. In the SMS \ MMS inbox, select a message thread using the Navigation
Up or Down control.
2. Tap Delete.
Page 14

102 Exchanging Messages
To reply to a text message with an MMS message
You can reply to a text message in a thread or to a SIM text message using
an MMS message.
1. In the SMS \ MMS inbox, tap a message thread to open it.
2. Tap Menu > Insert, and then in the menu, select the item you want to
insert: Picture/Video, Audio or Attachment.
3. Tap Send.
Tips • You can also insert a vCard or vCalendar in your MMS message.
• To compose an MMS message complete with text, emoticons, media
and attachments, tap Menu > Advanced Composer. For instructions on
composing and sending an MMS message, see “MMS” in this chapter.
6.3 MMS
Sending multimedia messages (MMS) to your friends and family is fun
and easy. You can include pictures, videos, and audio clips in a multimedia
message.
Notes • Multimedia messaging is a charged service and has to be provisioned on
Change MMS settings
Check your device to see if it is preconfigured with your wireless service
provider’s MMS settings. Add the MMS settings of your wireless service
provider if there are no preset MMS settings found on your device.
To configure MMS message settings
your mobile phone account. Contact your wireless service provider to
have MMS provisioned as part of your calling plan.
• Make sure the size of MMS messages that you send is within the limits
allowed by your wireless service provider.
1. Tap Start > Messaging > SMS \ MMS.
2. Tap Menu > MMS Options. The Settings screen then appears.
3. In the Preferences tab, choose from the available options according
to your needs.
Page 15
Exchanging Messages 103
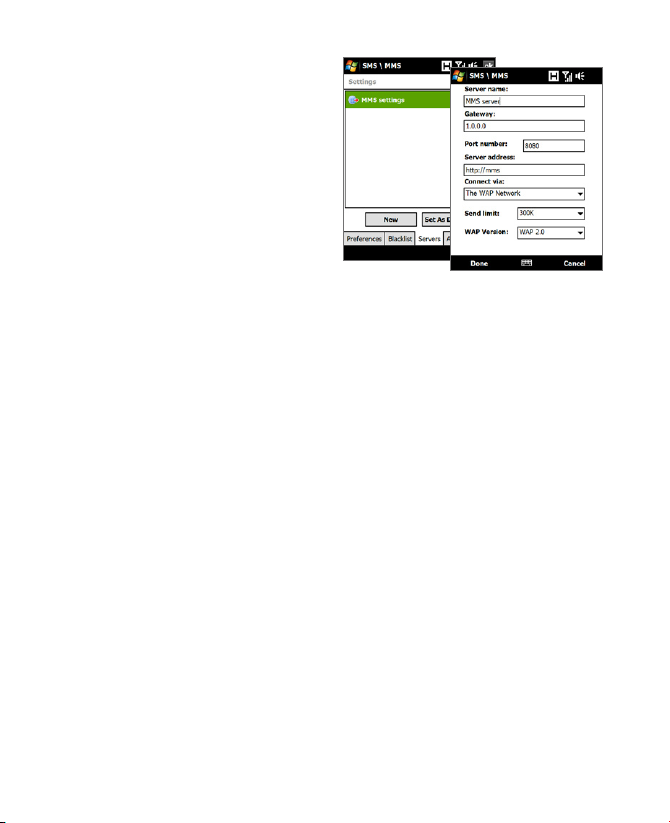
4. Tap the Servers tab and
check if your device is
preset with MMS server
settings.
If there are no preset
settings, tap New and
enter the following
information, which you
obtained from your
wireless service provider:
• Gateway. Location of the MMS server, which is usually in the form
of an IP address.
• Port number. HTTP port number used for connecting to the MMS
server and for file transfer.
• Server address. URL address of the server where MMS messages
are stored.
• Connect via. Select the connection that your device uses for MMS
messages.
• Send limit. Select the maximum MMS message size allowed by
your wireless service provider.
• WAP version. Select either WAP 1.2 or WAP 2.0, depending on
which one is being used by your wireless service provider.
5. Tap Done.
Notes • If your device already has preset MMS settings, it is recommended that
• If you add several MMS message service providers to the Settings screen,
you do not change these settings. If you change the preset settings, your
device may not be able to send and receive MMS messages.
you can choose one as your default provider. Select the provider's name
in the list, then tap Set As Default.
Page 16

104 Exchanging Messages
Create and send MMS messages
You can compose MMS messages in a combination of slides, where each
slide can consist of a photo, video or audio clip, and/or text.
To compose an MMS message
1. Tap Start > Messaging > SMS \ MMS, then tap Menu > New > MMS.
2. When you see the Choose a MMS screen, tap a preset template, or tap
Custom to open a blank MMS message.
Note If you prefer to start composing from a blank MMS message every time,
select the Always choose custom check box.
3. In To, enter the recipient’s phone number or e-mail address directly,
or tap To, Cc, or Bcc to choose a phone number or an e-mail address
from Contacts.
Note You may need to scroll up to see Cc and Bcc.
4. Enter a subject for your message.
5. Tap the Insert icon ( )to select and insert a photo or video clip.
When selecting a photo or video clip, you can:
• Tap Select to insert the selected photo or video clip into the MMS
message you are composing.
• Tap
• Tap
• Tap Exit ( ) to quit selection and return to the MMS message.
6. Enter text and insert audio clips by tapping the respective areas. See
“To add text to an MMS message” and “To add an audio clip to an
MMS message” for details.
7. To add more slides, tap or tap Menu > Slides > Insert Slide.
Repeat steps 5 and 6 to insert photos/videos, text, and audio onto
your slides.
8. Tap Send to send the MMS message.
Tip You can also send an MMS message from Pictures & Videos, Album, or the
Camera program.
to take a photo and insert it into the MMS message.
to record MMS video and insert it into the MMS message.
Page 17
Exchanging Messages 105
To add text to an MMS message
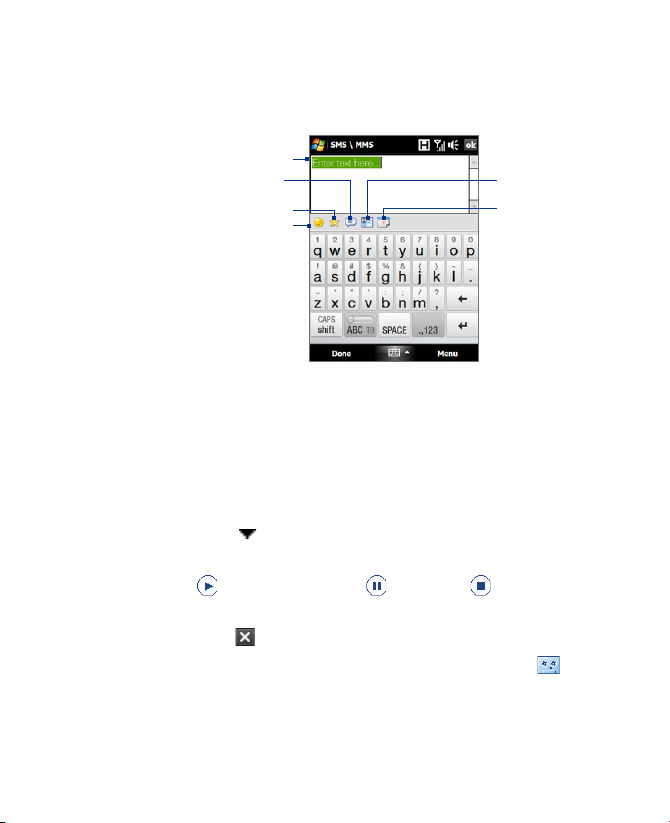
When you tap Insert text here on your MMS message, an empty screen
appears where you can enter your text. You can insert the following types of
information:
Choose from common words
or phrases from the My Text list
Tip To edit or delete a phrase on the My Text list, tap and hold a string, then tap
Enter your own text
Include a Favourites link
Add an emoticon
Edit or Delete from the shortcut menu. To add a new phrase, tap New.
Insert contact
information
Insert calendar
appointment
To add an audio clip to an MMS message
You can add one audio clip per slide in your MMS message.
1. Tap Insert audio on your MMS message.
By default, My Documents will be shown. Tap My Music or another
folder that contains audio files. When navigating folders, tap the
down arrow ( ) to return to the upper folder.
2. Select an audio file. When selected, you can:
• Tap to play the audio clip, to pause, or to stop playback.
• Tap Select to insert it into your MMS message.
• Tap Exit ( ) to quit selection and return to your MMS message.
Note To record a new audio clip and add it to your MMS message, tap . The
Record pop-up window then opens. Tap Record to start recording, and Stop
to end the recording. Tap Play to listen to the recorded audio clip, then tap
Add. The new audio clip is then inserted into your MMS message.
Page 18

106 Exchanging Messages
View and reply to MMS messages
To view an MMS message
• Use the playback controls , , and .
• Tap Contents to see a list of files included in the message. On the
Message Contents screen, you can do the following:
• To save a file, select it, and tap Menu > Save.
• To save the contents of a text file to the My Text list, tap Menu >
Save into My Text.
• To associate a photo to one of your contacts, tap Menu > Assign
to Contact.
To reply to an MMS message
1. In the SMS \ MMS inbox, press Navigation Up or Down to select the
mobile phone number or name of the contact who sent you the MMS
message.
2. In the threaded message, MMS messages will have the icon. Tap
this icon to open and view an MMS message.
3. After viewing the MMS message, tap Menu > via MMS to reply
with an MMS message or tap Menu > via SMS to reply with a text
message.
To block a phone number from sending you MMS messages
If you do not want to receive MMS messages from a particular sender, you
can add the sender’s phone number to the MMS Blacklist.
1. When you receive a new MMS message, open and view the message.
2. To avoid receiving MMS messages from this sender next time, tap
Menu > Show > Message Detail.
3. On the Message Detail screen, tap Menu > Show Contact Details.
4. Tap Menu > Save to Blacklist.
5. Tap Done.
Tip To unblock a phone number and allow the sender to send you MMS
messages, remove the number from the Blacklist. Go to the SMS \ MMS
inbox, tap Menu > MMS Options > Blacklist tab, tap and hold the phone
number in the Blacklist, and then tap Delete.
Page 19

Exchanging Messages 107
6.4 Types of E-mail Accounts
You can set up the following types of e-mail accounts on your device:
• Outlook e-mail that you sync with your computer or the Exchange
Server.
• E-mail account that you have from an Internet Service Provider (ISP)
or other e-mail provider.
• Web-based e-mail accounts such as Gmail®, Yahoo!® Mail Plus, AOL®,
and others.
• Work account that you access using a VPN connection.
Set up your device to synchronize Outlook e-mail with
the computer
If you have installed the synchronization software on your computer and
created a partnership with your device, then your device is ready to send
and receive Outlook e-mail.
If you have not yet installed the synchronization software nor created a
partnership, do so by following the procedures in Chapter 5.
Tip To set up your company e-mail account so that you can access Outlook
e-mail messages wirelessly, you must set up your device to synchronize via
an over-the-air connection with your company’s Exchange Server. For more
information about synchronizing with your company e-mail server, see
Chapter 7.
Add an e-mail account
To add a new e-mail account, you can do one of the following:
On the TouchFLO 3D Home screen, slide to the Mail tab and then
•
touch Menu > Accounts > New Account; or
Tap Start > Messaging > Setup E-mail.
•
The E-mail Setup wizard then opens and lets you enter your e-mail account
settings. See “E-mail Setup Wizard” in this chapter for details.
Page 20

108 Exchanging Messages
6.5 E-mail Setup Wizard
Windows Mobile’s E-mail Setup wizard walks you through the process
of setting up your e-mail account. It has an Auto Setup feature which can
automatically set up your e-mail account based on the e-mail address and
password that you enter, if your e-mail provider settings are preconfigured
on your device. If the settings are not found on your device, Auto Setup
then attempts to retrieve the settings online for which you may be charged
when your device connects to the Internet and downloads them. If it
cannot find the e-mail settings online, you need to enter them manually.
Note For more information about setting up your company Outlook e-mail
account, see Chapter 7.
Set up an Internet e-mail account
Set up a POP3 or IMAP4 e-mail account on your device if you have an
e-mail account from an Internet service provider (ISP) or other e-mail
service provider, or a web-based account such as Gmail, Yahoo! Mail Plus,
or AOL. You can also add a work account that you access using a VPN server
connection as a POP3/IMAP4 account.
1. Add a new e-mail account. See “Add an e-mail account” for
instructions.
2. Enter your E-mail address and the Password for your e-mail account
and select the Save password option. Tap Next.
3. If e-mail provider settings are found preconfigured on your device,
the E-mail Setup wizard shows a successful message. Tap Next.
If the settings are not found on your device, select the Try to get e-
mail settings automatically from the Internet checkbox to find and
download e-mail server settings from the Internet and then tap Next.
4. Enter Your name and the Account display name and then tap Next.
Note If the E-mail Setup wizard was unsuccessful in finding and downloading
settings from the Internet, select Internet e-mail from the Your e-mail
provider list on the next screen. You will be asked to enter e-mail server
settings. See “To specify e -mail server settings” for details.
Page 21

Exchanging Messages 109
5. In the Automatic Send/Receive list, choose how frequent you want
e-mail messages to be automatically sent and downloaded on your
device.
Note Tap Review all download settings to select download options, set the
e-mail format as HTML or plain text, and more. For more information,
see “To customize download and format settings."
6. Tap Finish.
To specify e-mail server settings
If Auto Setup is unsuccessful, contact your ISP or e-mail provider for the
Incoming mail server and Outgoing mail server settings so you can enter
them on your device.
Other options that you can select include the following:
• Select the Outgoing server requires authentication check box, if
required by your provider.
• If the outgoing e-mail server requires a different user name and
password for sending e-mail, clear the Use the same user name and
password for sending e-mail check box. You will be prompted to
enter this information.
• Tap Advanced Server Settings, then select the Require SSL check
boxes if your e-mail provider uses an SSL connection for more secured
e-mail. From the Network connection list, select the data connection
that you use for connecting to the Internet.
To customize download and format settings
Before you tap Finish when setting up your POP3 or IMAP4 e-mail account,
you can tap the Review all download settings link at the bottom of the
screen to choose download options, message format, and other settings.
Options Description
Automatic Send/Receive You can select a time interval for connecting to
Download messages Set the number of days of messages that you
the Internet automatically to send and receive
messages.
want to be downloaded to your device.
Page 22

110 Exchanging Messages
Options Description
Send/receive when I click
Send
Use automatic send/
receive schedule when
roaming
When deleting messages Choose whether to delete messages from the
Message format Select HTML or Plain Text.
Message download limit Select the e-mail download size. If you have large
Set up a custom domain e-mail
When you are using an e-mail domain name that is hosted by a different email provider (for example, your e-mail address may be Benjamin@startup.
com but Email.com hosts the e-mail account and provides e-mail services),
select the Custom Domain option in the E-mail Setup wizard to set up your
e-mail account on your device.
1. Add a new e-mail account. See “Add an e-mail account” for
instructions.
2. Enter your E-mail address and the Password for your e-mail account
and select the Save password option. Tap Next.
3. Clear the Try to get e-mail settings automatically from the
Internet and then tap Next.
4. In Your e-mail provider, select Custom domain and then tap Next.
5. Enter the domain of your e-mail provider and then tap Next.
6. The E-mail Setup wizard then tries to find the e-mail provider settings
on your device or from the Internet. If the settings are found, it shows
a successful message. Tap Next.
By default, messages are immediately delivered
when you tap Send. If you prefer to save
outgoing messages to the Outbox folder first,
clear the check box. (In this case, you will need
to manually send messages by tapping Menu >
Send/Receive).
This allows your device to data roam when
there is a set time interval for connecting to the
Internet automatically. Since this may result in
higher connection costs, you may want to leave
the check box cleared.
mail server when you delete them on your device.
volumes of e-mail, use a lower size or select to
download headers only.
Page 23

Exchanging Messages 111
7. Enter Your name and the Account display name and then tap Next.
Note If the E-mail Setup wizard was unsuccessful in finding the settings, you
will be prompted to enter e-mail server settings on the succeeding
screens. See “To specify e-mail server settings” for details.
8. In the Automatic Send/Receive list, choose how frequent you want
e-mail messages to be automatically sent and downloaded on your
device.
Note Tap Review all download settings to select download options, set the
e-mail format as HTML or plain text, and more. For more information,
see “To customize download and format settings."
9. Tap Finish.
6.6 Using E-mail
After setting up e-mail accounts on your device, you can start sending and
receiving e-mail messages.
Create a new e-mail message
Depending on your preference, there are two ways you can create a new
e-mail message.
To start from an empty message
1. On the TouchFLO 3D Home screen, slide to the Mail tab.
2. Select the e-mail account you want to use on the right side of the
screen.
Tip To choose from other e-mail accounts that are not displayed on the
Mail tab, touch Menu > Accounts > Accounts and then select an e-mail
account from the Account Picker screen.
3. Touch the New Mail icon ( ) to create a new e-mail.
To send an e-mail to a favourite contact
1. On the TouchFLO 3D Home screen, slide to the People tab.
2. Swipe your finger on the screen to flip through the photos of your
favourite contacts.
3. When the photo of the desired contact is displayed, touch the
displayed photo and then touch Send e-mail.
Page 24

112 Exchanging Messages
For more information about working with favourite contacts, see “People” in
Chapter 3.
Tip You can also touch Start > Contacts, select a contact name, and then touch
Send e-mail.
Compose and send an e-mail
After creating a new e-mail, follow the steps below to enter your message
and then send it.
1. To add recipients, enter their e-mail addresses, separating them with
a semicolon. You can also tap To if you want to add e-mail addresses
stored in Contacts.
2. Enter a subject and compose your message.
Tip To choose from preset messages, tap Menu > My Text and tap a desired
message. To check the spelling, tap Menu > Spell Check.
3. Tap Send.
Tips • For more information about entering text and symbols, see Chapter 4.
• To set the message priority, tap Menu > Message Options.
• If you are working offline, e-mail messages are moved to the Outbox
folder and will be sent the next time you connect.
To add an attachment to a message
1. In the message that you are composing, tap Menu > Insert and tap
the item you want to attach: Picture, Voice Note, or File.
2. Select the file or picture you want to attach, or record a voice note.
Filter the Inbox message list
When the Inbox on your device is full of messages, you can filter your Inbox
to display only the messages that contain a particular sender or subject you
are searching for.
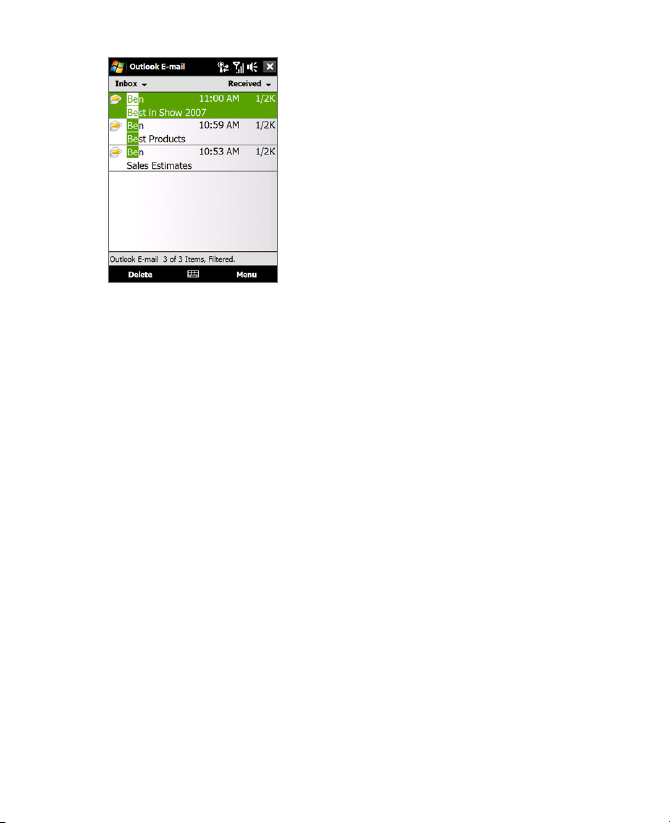
To filter your Inbox
Enter the sender name or e-mail subject you want to look for. As you type
characters, the message list narrows down to the sequence of characters
you have entered.
Page 25
Exchanging Messages 113
For example, entering “B”, then “E” narrows
the list to only the e-mails that contain
sender names and e-mail subjects that start
with “BE.”
View and reply to messages
To download a complete e-mail
By default, each e-mail received in the inbox on your device contains only
the first few kilobytes of the message. When you open an e-mail, it displays
only the headers and part of the message. You must download the whole
e-mail to view the complete content.
To download a complete e-mail message, open the e-mail and then do one
of the following:
• Finger-scroll to the end of the message, and tap Get entire message
and any attachments (POP3 e-mail account) or tap Get the rest of
this message (IMAP4 and Outlook e-mail accounts).
• Tap Menu > Download Message.
Notes • The Fetch Mail feature, which is available for POP3 and IMAP4 Internet
• Download may take some time, depending on the speed of your Internet
e-mail accounts, downloads an entire e-mail without the need for you to
perform a full synchronization. This limits the download to just the e-mail
message that you want and helps save data cost.
Fetch Mail is also available for Outlook E-mail. See “Instant download
through Fetch Mail” in Chapter 7 for details.
connection, size of the whole e-mail, and whether file attachments are
automatically downloaded.
Page 26

114 Exchanging Messages
To download file attachments
POP3 e-mail account:
•
File attachments of a POP3 Internet e-mail account are automatically
downloaded when you download a complete e-mail.
IMAP4 and Outlook e-mail accounts:
•
File attachments appear below the subject of an e-mail message.
Tapping an attachment opens the attachment if it has been fully
downloaded or marks it for download the next time you send and
receive e-mail.
You can set automatic download of file attachments. See “Customize
e-mail settings” in this chapter for details.
To reply to or forward a message
1. Open the message and tap Menu > Reply, Menu > Reply All, or
Menu > Forward.
2. Enter your response, then tap Send.
Notes • You can receive and view HTML e-mails from any type of e-mail account.
• When replying using an Outlook e-mail account, you can customize
The HTML format is retained, without layout shifting or resizing.
HTML e-mail support in Outlook Mobile is available only if you are
synchronizing your device with Microsoft Exchange Server 2007.
ActiveSync to exclude addresses, including your own, from being added
to the recipient list. Tap Menu > Options in ActiveSync, select the E-mail
item, tap Settings, then tap Advanced. In the My e-mail addresses text
box, enter e-mail addresses you want to exclude.
Synchronize e-mails
Synchronizing e-mails ensures that new e-mails are downloaded to the
device Inbox folder, e-mails in the Outbox folder are sent, and e-mails
deleted from the server are removed from your device. The manner in which
you synchronize e-mails depends on the type of e-mail account you have.
To automatically synchronize an Outlook e-mail account
1. Connect your device to your computer through USB or Bluetooth.
Otherwise, connect through Wi-Fi or a data connection if you are
synchronizing Outlook e-mail with the Exchange Server. For more
information, see Chapter 7.
Page 27

Exchanging Messages 115
2. Synchronization automatically begins, and your device sends and
receives Outlook e-mail.
To manually synchronize your Outlook or Internet e-mail account
1. Select your Internet e-mail account. (See “To select a messaging
account” in this chapter.)
2. Tap Menu > Send/Receive.
Customize e-mail settings
To change the download size and format for Outlook e-mail
1. Disconnect your device from the computer.
2. Tap Start > Programs > ActiveSync.
3. Tap Menu > Options, select E-mail, then tap Settings.
4. On the E-mail Sync Options screen:
• Under Message format, select HTML or Plain text.
• Under Download size limit, select the desired e-mail size.
5. Close ActiveSync and reconnect your device to the computer.
To change the download size and format for Internet e-mail
1. Tap Menu > Options on the Account Picker screen, or tap Menu >
Tools > Options while you’re in a message list.
2. Tap your POP3 or IMAP4 Internet e-mail account.
3. Tap Download Size Settings.
4. Under Message format, select HTML or Plain text.
5. Under Download size limit, select the desired e-mail size.
6. Tap Done.
Page 28

116 Exchanging Messages
To automatically receive attachments on Outlook e-mails
1. Tap Start > Programs > ActiveSync.
2. Tap Menu > Options.
3. Tap E-mail > Settings, then select Include file attachments.
To automatically receive attachments on IMAP4 e-mails
1. Tap Menu > Options on the Account Picker screen, or tap Menu >
Tools > Options while you’re in a message list.
2. Tap the name of your IMAP4 e-mail account.
3. Tap Download Size Settings.
4. In Download attachments:
Select All attachments to always download file attachments; or
•
Select a file size limit for auto-downloading attachments.
•
5. Tap Done.
To store attachments on the internal storage
1. Tap Start > Messaging.
2. Tap Menu > Options > Storage tab.
3. Select the When available, use this storage card to store
attachments check box.
Page 29

Chapter 7
Working With Company E-mails
and Meeting Appointments
7.1 Synchronizing with the Exchange Server
7.2 Working With Company E-mails
7.3 Managing Meeting Requests
7.4 Finding Contacts in the Company Directory
Page 30

118 Working With Company E-mails and Meeting Appointments
7.1 Synchronizing with the Exchange Server
To keep up-to-date with your company e-mails and meeting schedules
while you’re out of the office, you can connect your device to the Internet
through Wi-Fi or a data connection and synchronize with your company’s
Exchange Server.
Set up an Exchange Server connection
Before you can synchronize or access information on the Exchange Server,
you need to set up an Exchange Server connection on your device. You
need to get the following information from your network administrator and
enter them on your device:
• Exchange Server name (must be Outlook Web Access server name)
• Domain name
• User name and password that you use at work
If you have not synchronized your device with your computer, follow these
steps to set up an Exchange Server connection.
1. Add a new e-mail account. See “Add an e-mail account” in Chapter 6
for instructions.
2. Enter the E-mail address and Password for the e-mail account and
select the Save password option. Tap Next.
3. Clear the Try to get e-mail settings automatically from the
Internet option and tap Next.
4. In Your e-mail provider, select Exchange server and tap Next.
5. Tap Next again.
6. Select the Attempt to detect Exchange Server Settings
automatically option and tap Next.
7. Enter the Domain name and tap Next.
8. In Server address, enter the Exchange Server address and tap Next.
9. Select the items that you want to sync with the Exchange Server.
Page 31

Working With Company E-mails and Meeting Appointments 119
Tips • To change synchronization settings of an information item, for
example, E-mail, select the item, then tap Settings.
• To change the rules for resolving synchronization conflicts, tap Menu
> Advanced.
10. Tap Finish.
Notes • If you synchronized e-mails with your computer before, open ActiveSync
• To change Exchange Server settings, open ActiveSync on your device,
on your device, then tap Menu > Add Server Source to set up an
Exchange Server connection. When prompted to select information types
for synchronization, you must first clear the E-mail check box under the
Windows PC item before you can select E-mail under Exchange Server.
then tap Menu > Configure Server.
Start synchronization
Before you start synchronizing with the Exchange Server, make sure your
device has been set up with a Wi-Fi or data connection to the Internet
so that you can synchronize over the air. For more information about
connections, see Chapter 8.
After you finish setting up an Exchange Server connection, your device
automatically starts synchronization.
To manually start synchronization, you can do one of the following:
On the TouchFLO 3D Home screen, slide to the Settings tab and then
•
touch Sync Data; or
Tap Start > Programs > ActiveSync and then tap Sync.
•
Note If you connect your device to your office computer via a USB or Bluetooth
connection, you can use this connection to the computer to “pass through”
to the network and download Outlook e-mails and other information to your
device.
Page 32

120 Working With Company E-mails and Meeting Appointments
7.2 Working With Company E-mails
Your device gives you instant access to your company e-mails and lets
you manage your messages easier. Direct Push, Fetch Mail, Remote e-mail
search, and e-mail flags are just some of the tools you can use to manage
your e-mails.
Note Some messaging features depend on the Microsoft Exchange Server version
used in your company. Check with your network administrator for the
availability of these features.
Automatic synchronization through Direct Push
Direct Push technology (push e-mail feature) enables you to receive new
e-mails on your device as soon as they arrive in your Inbox on the Exchange
Server. Items such as contacts, calendar and tasks are also immediately
updated onto your device when these items have been changed or new
entries have been added on the Exchange Server. To make Direct Push work,
you need to have a Wi-Fi or data connection on your device.
You need to perform a full synchronization between your device and the
Exchange Server first before Direct Push can be enabled.
Requirement The Direct Push feature works for your device only if your company
You can turn on Direct Push in the Comm Manager or ActiveSync.
To turn on Direct Push in Comm Manager
1. To open the Comm Manager, slide to the Settings tab on the
TouchFLO 3D Home screen and then touch Communications.
Tip You can also tap Start > Programs > Comm Manager.
2. On the Comm Manager screen, touch Microsoft Direct Push.
To turn on Direct Push in ActiveSync
1. Tap Start > Programs > ActiveSync and then tap Menu > Schedule.
2. Select As items arrive in the Peak times and Off-peak times boxes.
Note When Direct Push is off, you need to manually retrieve your e-mails.
is using Microsoft Exchange Server 2003 Service Pack 2 (SP2)
with Exchange ActiveSync or higher version.
Page 33

Working With Company E-mails and Meeting Appointments 121
Scheduled synchronization
If you do not want to use Direct Push, you can set a regular schedule for
synchronizing Outlook e-mail and information.
1. In ActiveSync on your device, tap Menu > Schedule.
2. Select a shorter time interval in the Peak times box for you to be able
to receive e-mails more frequently. (Peak times usually refer to your
working hours when e-mail volume is high).
3. Select a longer interval in the Off-peak times box.
Tip To set the days and hours that make up your peak and off-peak times,
tap the peak times link at the bottom of the screen.
Instant download through Fetch Mail
The Fetch Mail feature downloads an entire e-mail immediately without the
need for you to perform a full Send/Receive action. This limits the download
to just the e-mail message that you want and helps save data cost.
Requirement Fetch Mail works for your device only if your company is using
1. On the TouchFLO 3D Home screen, slide to the Mail tab, select your
Outlook account, and then tap Inbox.
Tip You can also tap Start > Messaging > Outlook E-mail.
2. Open an e-mail message.
3. By default, only the first few words of the message is shown. To
download the whole e-mail, finger-scroll to the end of the message,
then tap Get the rest of this message.
4. Wait for the remainder of the message body to download.
Notes • For information about changing e-mail sync options such as setting the
• When you receive an e-mail that contains a link to a document such as a
Microsoft Exchange Server 2007 or higher.
download size for e-mail, see "Customize e-mail settings" in Chapter 6.
PDF or Microsoft Office document located on SharePoint or an internal
file server, you can tap the link to view the document on your device. You
can view the document only if you have a Microsoft Outlook account that
synchronizes with Microsoft Exchange Server 2007 or later. Exchange
Server must also be set up to allow access to SharePoint document
libraries or internal file servers.
Page 34

122 Working With Company E-mails and Meeting Appointments
Search for e-mails on the Exchange Server
You can access e-mails that are not available on your device by searching
your Microsoft Exchange Server mailbox. The search results are downloaded
and displayed in a Search Results folder.
Requirement Your company must be using Microsoft Exchange Server 2007 or
higher.
1. Tap Start > Messaging > Outlook E-mail.
2. Tap Menu > Tools > Search Server.
3. In the Look for text box, enter the search keyword.
4. Choose the date range of messages to search from.
5. In the Look in list, specify whether to search in the Inbox, Sent Items,
or All Folders.
6. Tap Search.
Tip To clear the search results and return to the message list, tap Menu > Clear
Results.
Flag your messages
Flags serve as a reminder for you to follow-up on important issues or
requests contained in e-mail messages. Flagging messages, which has been
a useful feature on desktop Outlook E-mail, can also be done in Outlook
Mobile on your device. You can flag received e-mail messages on your
device.
Requirement Flags are enabled only if e-mails are synchronized with Microsoft
To flag or unflag a message
1. Open Outlook on your device and access the Inbox.
2. Select a message or open a message.
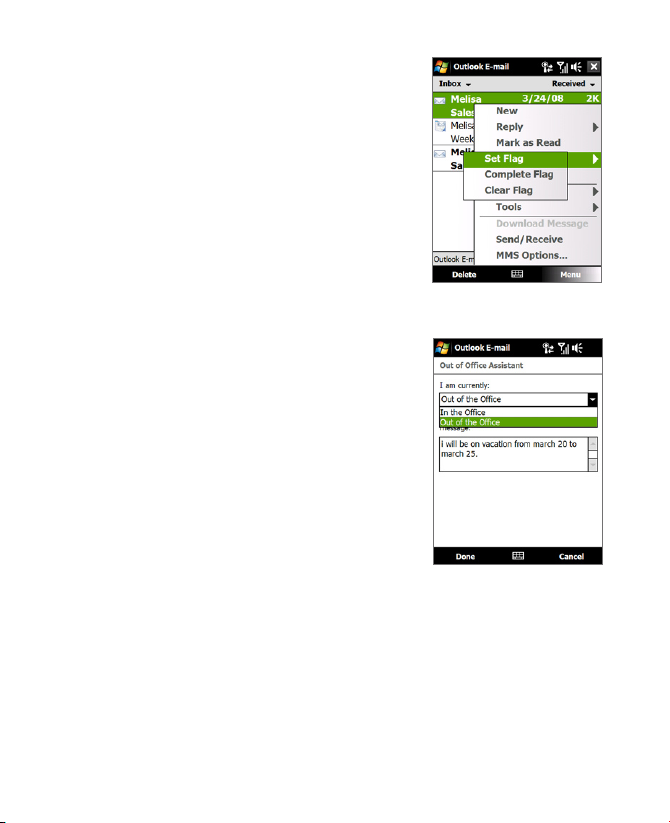
3. Tap Menu > Follow Up and select one of the following options:
• Set Flag Mark the message with a red flag to indicate that it needs
Exchange Server 2007 or higher. Flags are disabled or hidden
if e-mails are synchronized with earlier versions of Microsoft
Exchange Server.
follow up.
Page 35
Working With Company E-mails and Meeting Appointments 123
• Complete Flag Mark the message
with a check mark to indicate that
the issue or request in the e-mail is
already completed.
• Clear Flag Remove the flag to
unmark the message.
Note E-mail message reminders are displayed
on your device if the messages are
flagged with reminders and synchronized
from the Exchange Server.
Out-of-office auto-reply
Outlook Mobile allows you to retrieve and
change your out-of-office status. Just like
desktop Outlook E-mail, Outlook Mobile
automatically sends an auto-reply message
when you’re not available.
To send out-of-office auto-reply messages
1. Tap Start > Messaging > Outlook
E-mail.
2. Tap Menu > Tools > Out of Office.
3. In the I am currently list, select Out of
the Office.
4. Enter your auto-reply message, then
tap Done.
Page 36
124 Working With Company E-mails and Meeting Appointments
7.3 Managing Meeting Requests
When you schedule and send meeting requests from your device, you can
invite attendees to your meeting and check their status to know about their
availability.
When you receive a meeting request, you can reply by accepting or
declining the request. The meeting request also clearly indicates whether or
not there are conflicting or adjacent meetings.
Requirement Your company must be using Microsoft Exchange Server 2007 or
To reply to a meeting request
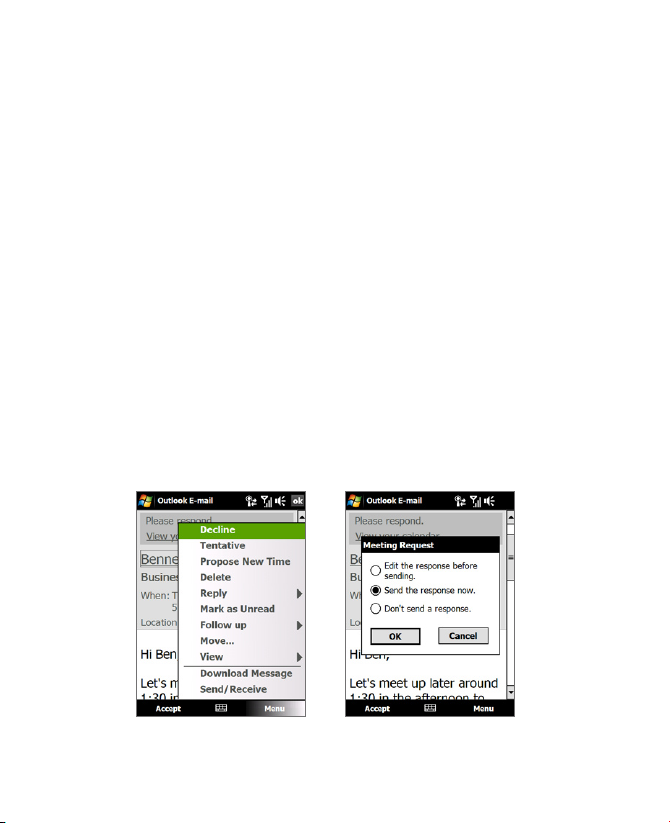
1. When you receive a meeting request e-mail, a notification will be
displayed on your device. Open the e-mail.
2. Tap Accept to reply and accept the meeting request, or tap Menu >
Decline if you cannot attend the meeting.
Tips • Before responding, you can check your availability during the time
• If the time of the meeting conflicts with your other appointments,
3. Choose whether or not to edit your response e-mail before sending,
then tap OK.
higher.
of the requested meeting by tapping View your calendar.
a “Scheduling Conflict” status appears on top of the e-mail.
If you accepted the meeting request, it will automatically be added as
an appointment in Calendar on your device.
Page 37

Working With Company E-mails and Meeting Appointments 125
To view the list of meeting participants
1. Tap Start > Calendar.
2. Tap a meeting request that you sent and then tap Attendees. The
required and optional attendees will be listed.
Icons indicating whether each attendee has accepted or declined the
meeting request will also be displayed.
Note To see the icon indicators in the attendees list, make sure Calendar is
synchronized with the Exchange Server.
Tips • For information about creating a meeting request, see “To send a meeting
• To view an attendee’s contact information, tap the attendee’s name. If
request” in Chapter 12.
the attendee is included in your contacts list, you will see the contact
information immediately. If the attendee is not in your contacts list, tap
Company Directory to view the contact information.
7.4 Finding Contacts in the Company Directory
In addition to having contacts on your device, you can access contact
information from your organization’s Company Directory. By having
over-the-air access to the Company Directory, you can easily send e-mail
messages and meeting requests to anyone in your company.
Requirement Access to the Company Directory is available only if your
1. Synchronize with the Exchange Server.
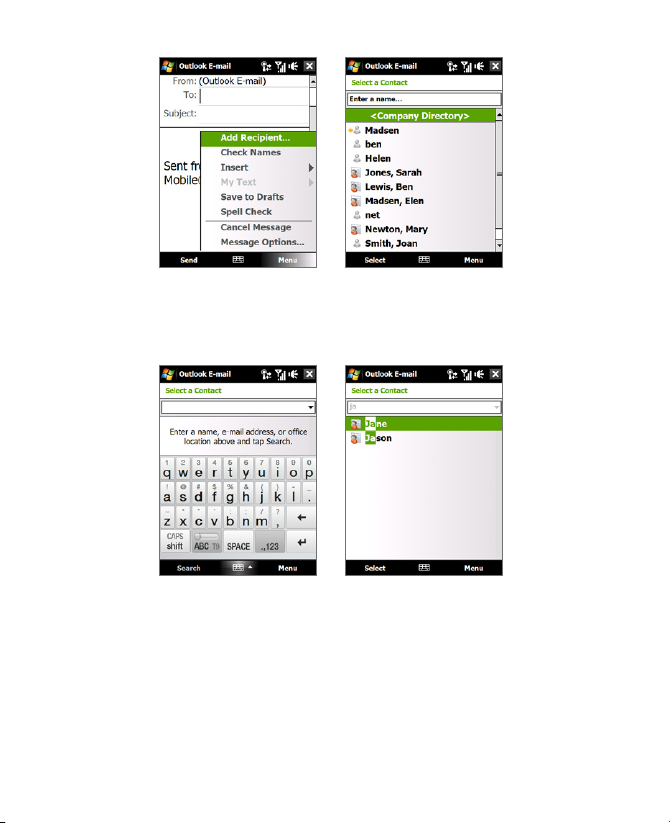
2. Do any of the following:
• In Contacts, tap Menu > Company Directory.
• In a new e-mail message, tap the To box (or tap Menu > Add
organization is running Microsoft Exchange Server 2003 SP2 or
higher, and you have completed your first synchronization with
the Exchange Server.
Recipient), then tap Company Directory on the top of the list.
Page 38
126 Working With Company E-mails and Meeting Appointments
• When creating a meeting request and selecting required and
optional attendees in Calendar, tap Company Directory.
3. Enter a partial or full contact name and tap Search. In the search
results list, tap a contact to select it.
Notes • You can save a contact from the Company Directory to your device by
• You can search on the following information as long as that information is
selecting the contact, then tapping Menu > Save to Contacts.
included in the Company Directory: First name, Last name, E-mail name,
Display name, E-mail address, or Office location.
Page 39

Chapter 8
Internet
8.1 Ways of Connecting to the Internet
8.2 Starting a Data Connection
8.3 Using Opera Mobile™
8.4 Using YouTube™ Client
8.5 Using Streaming Media
8.6 Using Windows Live™
8.7 Using Your Device as a Modem
(Internet Sharing)
8.8 Using RSS Hub
Page 40

128 Internet
8.1 Ways of Connecting to the Internet
Your device’s networking capabilities allow you to access the Internet or
your corporate network at work through one of the following connections:
• Wi-Fi
• GPRS, 3G or EDGE
• Dial-up
Note You can also add and set up the following connections:
• VPN: A VPN connection is used to access your corporate network by using
• Proxy: A Proxy connection is used to access the Internet using an existing
Wi-Fi
Wi-Fi provides wireless Internet access over distances of up to 300 feet (100
meters).
To use Wi-Fi on your device, you need access to a wireless access point or
“hotspot”.
Note The availability and range of your device’s Wi-Fi signal depends on the
To turn Wi-Fi on and off
To connect to a wireless network
After Wi-Fi is turned on, your device scans for available wireless networks in
your area.
an existing Internet connection.
connection to your corporate or WAP network.
number, infrastructure, and other objects through which the signal passes.
1. On the Home screen, slide to the Settings tab.
2. On the Settings screen, tap Communications > Wi-Fi to enable/
disable the wireless function.
When enabled, the On indicator is activated and available wireless
networks will be detected.
Page 41
Internet 129
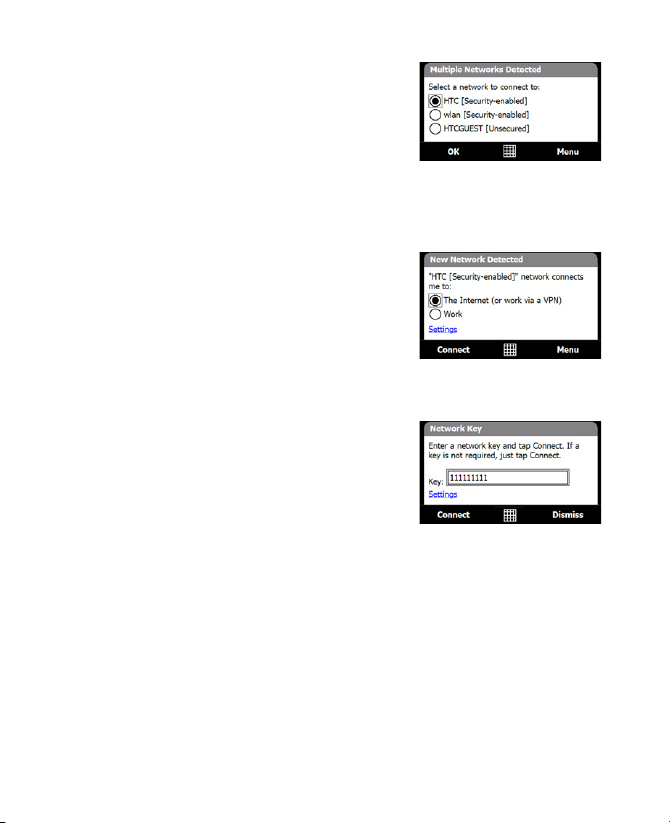
1. The network names of the detected
wireless networks are displayed on
a pop-up message window. Tap the
desired wireless network, then tap
OK.
Note When you select an open (unsecured)
network, you will be automatically
connected to the network after
tapping OK. You do not need to do
steps 2 and 3.
2. On the next pop-up message window,
do one of the following:
• Tap The Internet if the wireless
network connects your device to
the Internet.
• Tap Work if the wireless network
connects your device to a private
network.
3. Enter the key and then tap Connect.
Next time you use your device to detect wireless networks, you will not see
the pop-up message windows again, and you will not be prompted to enter
the network key of the previously accessed wireless network (unless you
perform a hard reset which will erase custom settings on your device).
Note Wi-Fi networks are self-discoverable, which means no additional steps are
required for your device to connect to a Wi-Fi network. It may be necessary
to provide a username and password for certain closed wireless networks.
Page 42
130 Internet
To check wireless network status
You can check the current wireless connection status from any of the
following screens of your device:
• Title bar.
When you enable Wi-Fi on your device, the Wi-Fi ON icon appears
on the title bar.
After Wi-Fi is turned on, your device scans for available wireless
networks and the wireless signal icon appears on the title bar. The
arrows in this icon move back and forth while your device is scanning
for a wireless network signal. Once your device successfully connects
to a wireless network, the arrows stop moving.
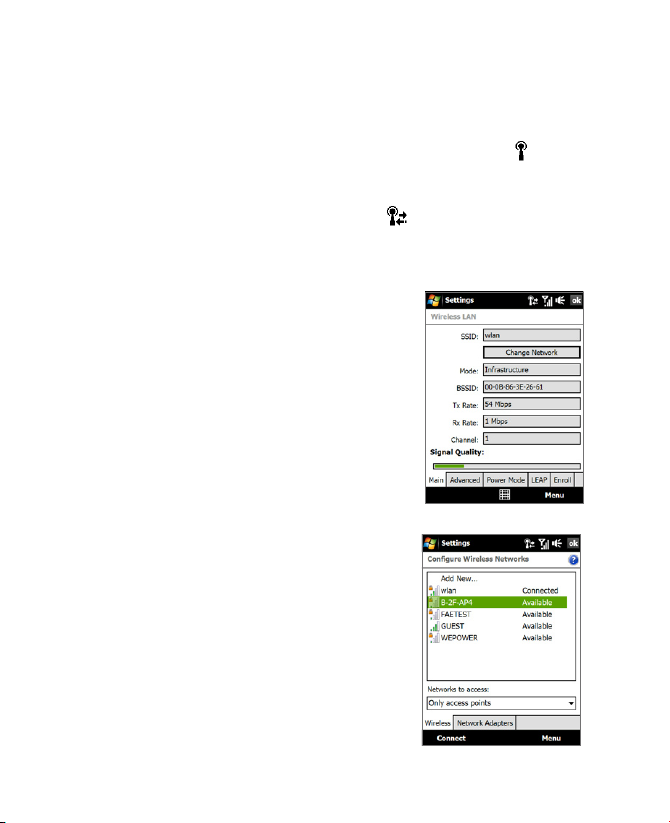
• Wireless LAN screen.
On the Home screen, slide to the
Settings tab and then tap Menu >
Wireless Networks. On the Main tab,
you will see the wireless network that
your device is currently connected to.
The configuration and signal quality of
the wireless network are also shown.
• Configure Wireless Networks screen.
On the Home screen, slide to the
Settings tab and then tap All Settings.
In the Connections tab, tap Wi-Fi. This
screen displays the wireless networks
currently available.
To connect to a wireless network in the
list, tap and hold on the desired network,
then tap Connect. Tap a wireless
network in the list to view or change its
connection settings.
You can also add new wireless networks,
if available, by tapping Add New.
Page 43
Internet 131
To save battery power while connected to a wireless network
Using Wi-Fi quickly consumes battery power. Turn off Wi-Fi when not in use.
You can also enable power saving settings.
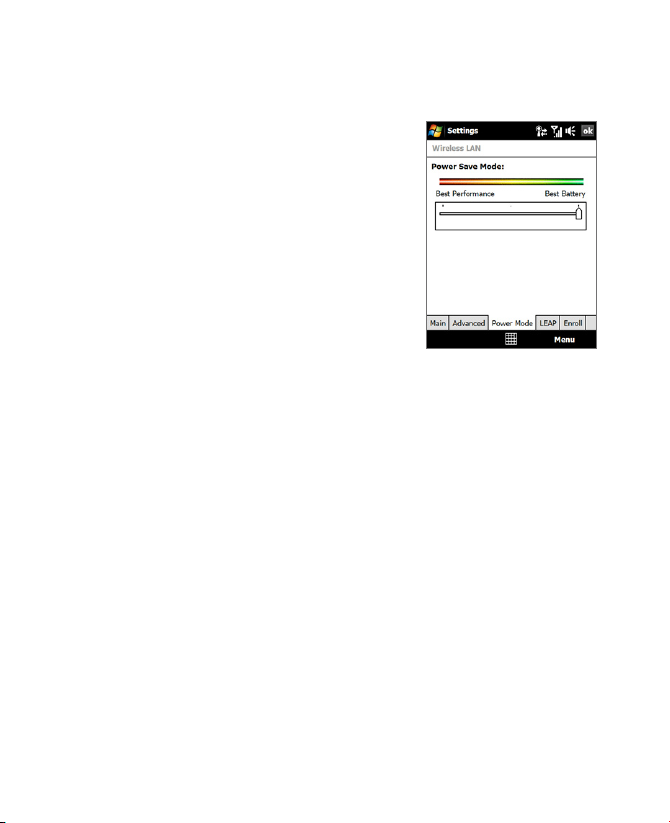
1. On the Home screen, slide to the
Settings tab.
2. On the Settings screen, tap Menu >
Wireless Networks > Power Mode
tab.
3. On the Power Mode tab, move the
Power Save Mode slider to a position
that optimizes performance with the
least power consumption.
For example, move the slider to
the left (Best Performance) to
have the optimal wireless network
performance; move to the right (Best
Battery) to obtain the maximum
battery usage.
GPRS/3G
Use GPRS/3G (or EDGE, if available) to connect to the Internet and to send
and receive e-mail and picture messages on your device. You will need a
data plan to use your wireless service provider’s GPRS/3G network. Check
with your wireless service provider to find out about GPRS/3G rates.
GPRS/3G settings are already preconfigured on your device, and your device
is ready to use your wireless service provider’s GPRS/3G services. Do not
change the settings as this may cause services to stop working.
To add a new GPRS/3G connection
When you need to add another GPRS/3G connection on your device, obtain
the Access point name from your wireless service provider. Also, check if
the GPRS/3G network requires a user name and password.
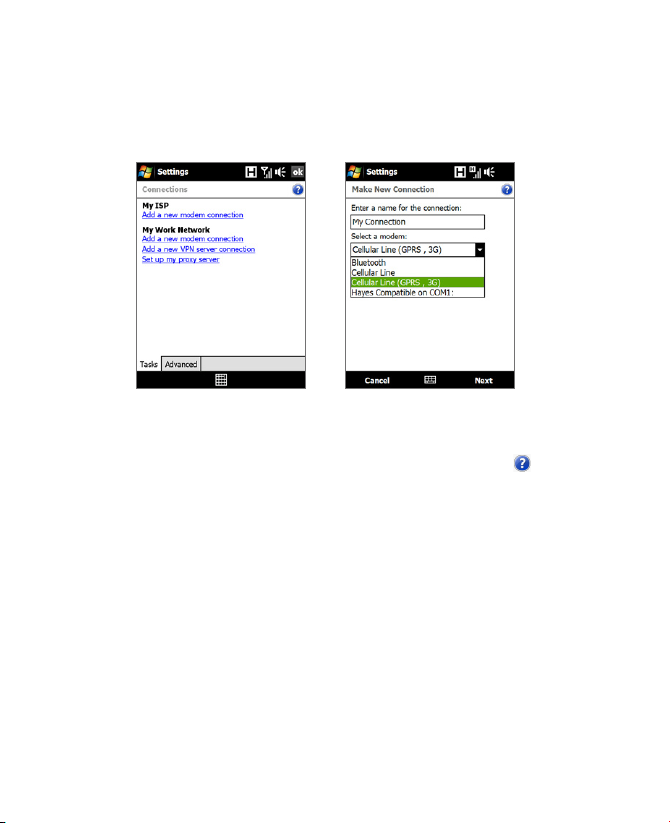
1. On the Home screen, slide to the Settings tab and then tap All
Settings.
2. On the Connections tab, tap Connections.
Page 44
132 Internet
Notes • To view help information for any screen, tap the help icon ( ).
• To modify your connection settings, tap Manage existing connections
Dial-up
To set up a dial-up connection to your Internet Service Provider (ISP) on
your device, you need the same settings that you normally use when you
dial up from your computer. This includes the ISP server phone number,
your user name and password.
3. In My ISP, tap Add a new modem connection.
4. On the Make New Connection screen, enter a name for the
connection.
5. In the Select a modem list, select Cellular Line (GPRS , 3G), then tap
Next.
6. Enter the Access point name, then tap Next.
7. Enter the user name and password, if required, then tap Finish.
on the Connections screen, and complete the connection wizard.
1. On the Home screen, slide to the Settings tab and then tap All
Settings.
2. On the Connections tab, tap Connections.
3. In My ISP, tap Add a new modem connection.
4. In the Select a modem list, select Cellular Line, then tap Next.
Page 45

5. Enter the ISP server phone number, then tap Next.
6. Enter your user name, password, and any other information required
by your ISP, then tap Finish.
8.2 Starting a Data Connection
After setting up a data connection such as GPRS/3G or ISP dial-up on your
device, you can now connect your device to the Internet. The connection
is started automatically when you begin using a program that accesses the
Internet such as Opera Mobile.
To manually start a data connection
If you have set up multiple types of data connections on your device, you
can manually start a connection.
1. On the Home screen, slide to the Settings tab and then tap All
Settings.
2. On the Connections tab, tap Connections.
3. Tap Manage existing connections.
4. Tap and hold the name of the desired connection, then tap Connect.
To disconnect active data connections
1. Tap Start > Programs > Comm Manager.
2. Tap the Data Connection button.
Note You cannot reconnect a data connection in Comm Manager.
Internet 133
Page 46
134 Internet
8.3 Using Opera Mobile™
Opera Mobile™ is a full-featured Internet browser, optimized for use on
your device.
Note You can also use Internet Explorer® Mobile to browse the web. To open
Internet Explorer Mobile, tap Start > Internet Explorer.
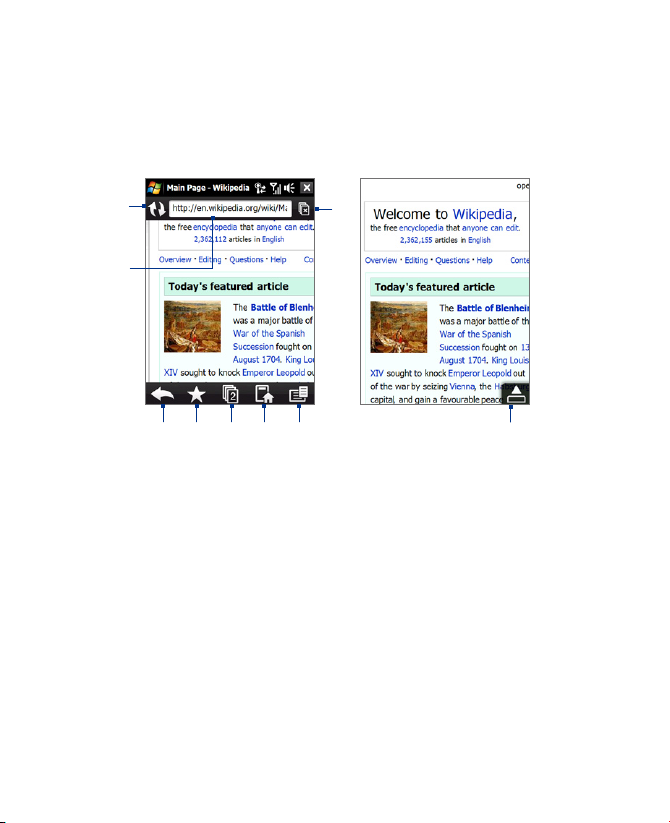
1
8
2
3 4 5 6 7
1 Refresh. Tap to reload the web page being viewed.
2 Address bar. Enter the URL of the web site here.
3 Back. Tap to go back to the previous web page viewed.
4 Favourites. Tap to go to the Favourites screen where you can add a favourite,
edit favourite web pages, and send the favourite URL link via one of the
Messaging accounts.
5 Tabs. Tap to add a new browsing tab or switch to another existing browsing tab.
6 Home. Tap to go to the Home page.
7 Menu. Tap to open a list where you can change Opera Mobile settings, check
downloads, view History, and more.
8 Close tab. Tap to close the current tab. This is only enabled if you have more than
one tab opened.
9 Exit Full Screen mode. When browsing the web, Opera Mobile automatically
switches to Full screen mode. Tap to show the address and Menu bars again.
9
Page 47
Internet 135
To open Opera Mobile
On the Home screen, slide to the Internet tab and then tap Browser.
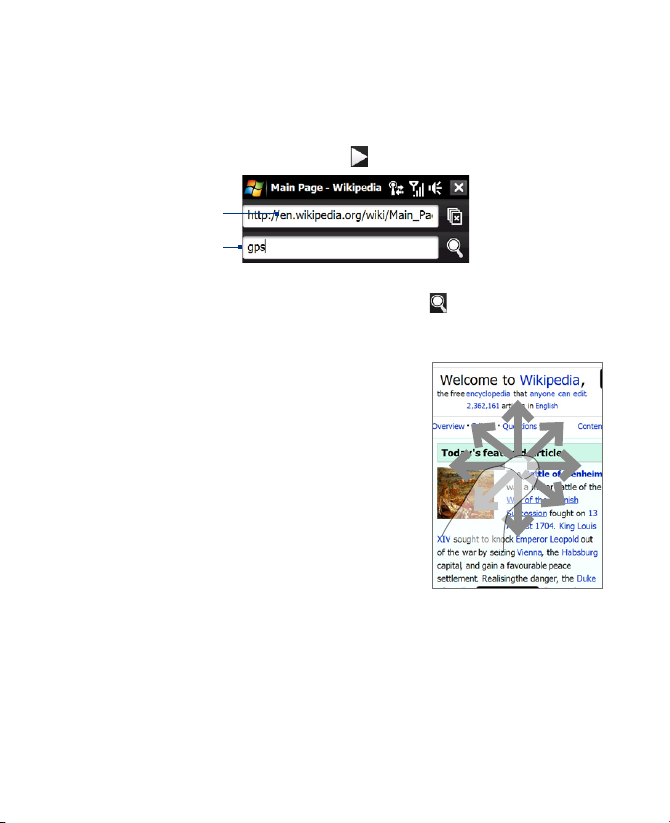
To go to a web site
1. On the Opera Mobile screen, tap the address bar.
2. Enter the URL address and tap .
Address bar
Search field
Tip When you tap the address bar, a search field also appears. Quickly search the
web by entering the search item and tapping .
View web pages
While browsing web pages, use finger
gestures to pan and zoom on the web page.
To zoom in, tap your finger twice on the
screen. To zoom out, tap your finger twice
on the screen again.
Tip Touch and hold an empty area on a web
page to open a shortcut menu that lets
you go back to the previous page, reload
the page, add the page as a Favourite,
and more. You can also tap and hold a
link or image on a web page to open a
menu with different options.
To change the screen orientation
Change the screen orientation by simply turning your device sideways.
Page 48
136 Internet
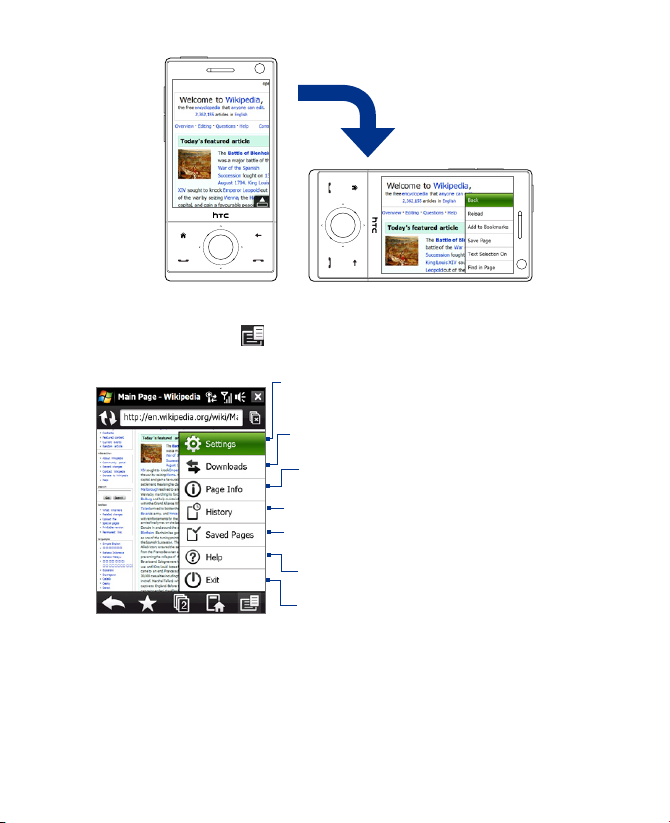
Opera Mobile menu
On the menu bar, tap to open the menu.
Note: For more information about using Opera Mobile, go to:
Tap to open the Settings screen where you
can set the default home page, change display
settings, set privacy settings, and more.
Tap to view items being downloaded. You
can also resume or stop current downloads.
Tap to view information about the Web
page you are browsing.
Tap to see web pages that you have viewed.
Tap to manage and view web pages that you
have saved.
Tap to open the Opera Mobile help file.
Tap to close Opera Mobile completely.
Opera Mobile will not run in the background.
http://www.opera.com/products/mobile/
Page 49
8.4 Using YouTube™
YouTube™ lets you browse, search, and watch video clips from the YouTube
server.
Note You need an active connection to use YouTube. If you are using a GPRS/3G
connection, your data connection bill may increase significantly due to large
file sizes of the videos.
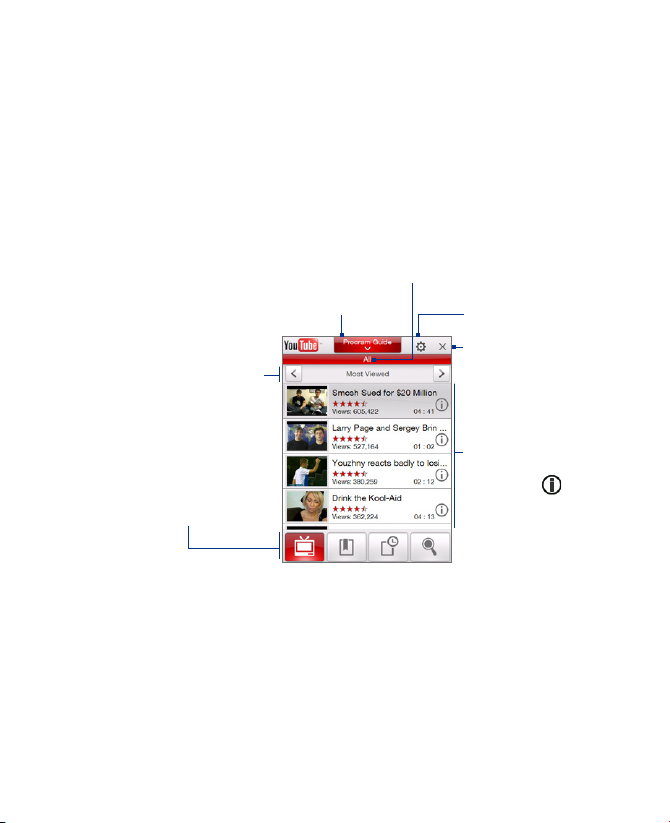
To open YouTube
Tap Start > Programs > YouTube.
Tap to open the Program
Guide list. The Program
Guide list only appears if you
are subscribed to a channel.
Tap the arrows to
filter the list by Most
Viewed, Top Rated,
and Featured.
Tap to switch
between the
different YouTube
screens.
Browse for videos
The Program Guide list lets you change the program channel so you can
browse different types of videos available on the YouTube server. By default,
there is only one channel in the Program Guide.
Displays the current program
channel being viewed.
Tap to set video
playback quality.
Tap to close the
YouTube.
Displays the
available videos
for the selected
program channel.
Tap a video to
watch it. Tap to
view details about
the video.
Internet 137
Page 50
138 Internet
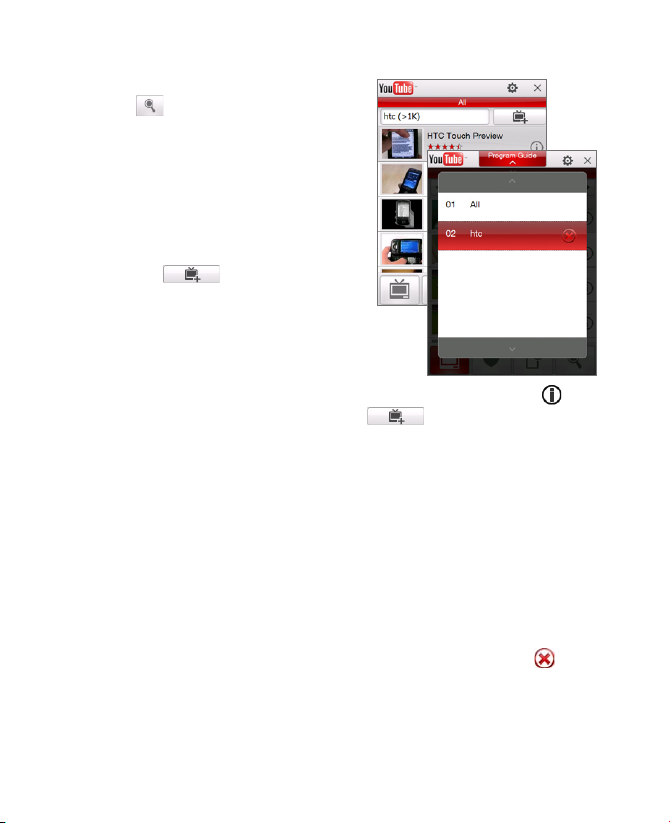
To add a new program channel into the Program Guide list
Tip You can also add a YouTube user as a program channel. To add, tap in any
To change the program channel
To delete a program channel from the Program Guide list
You can only delete program channels that you have added to the Program
Guide list.
1. On the YouTube screen, tap
.
2. On the Search screen, enter
the channel you want to add
to the Program Guide list.
3. Tap Search. YouTube searches
for the channel and then
displays the available videos
from it.
4. Tap and then on
the confirmation screen, tap
OK. The channel you just
subscribed to will now be
shown when you tap Program
Guide.
of the YouTube screens and then tap .
1. On the Videos screen, tap Program Guide at the top of the screen.
2. On the Program Guide list, select a channel.
3. The video list refreshes to display the available videos for the newly
selected channel.
1. On the Videos screen, tap Program Guide.
2. Scroll down to the channel you want to delete and then tap .
3. On the confirmation screen, tap Yes.
Page 51
Internet 139
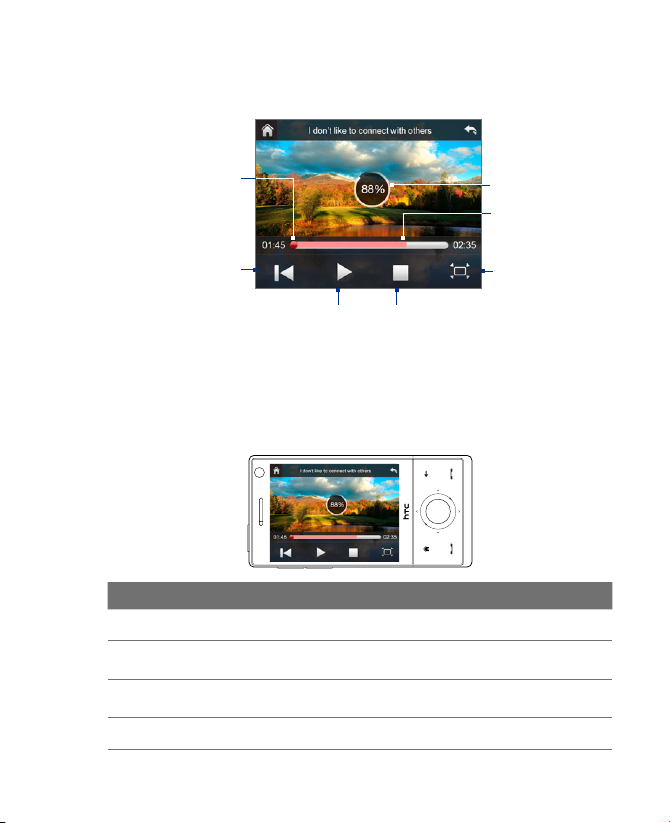
Watching videos
On the Videos, Bookmarks, or History screen, tap a video to launch the
YouTube Video Player.
Drag to go forward or
backward in the video.
Tap to go back to
the beginning of the
video. .
Tap to toggle
between playing
and pausing the
video.
Tip To adjust the volume, press the VOLUME CONTROLS on the side of the
device.
Tap to stop the
video playback.
Download
progress
Buffered video
Tap to resize
the video to
fit the screen.
Tap again to go
back to actual
size.
Navigation Control
This control Does this
ENTER Toggle between playing and pausing video playback.
NAVIGATION RIGHT
(Landscape orientation)
NAVIGATION LEFT
(Landscape orientation)
VOLUME BUTTONS Press to adjust the volume.
Press and hold to go forward in the video.
Press and hold to go back in the video
Page 52
140 Internet
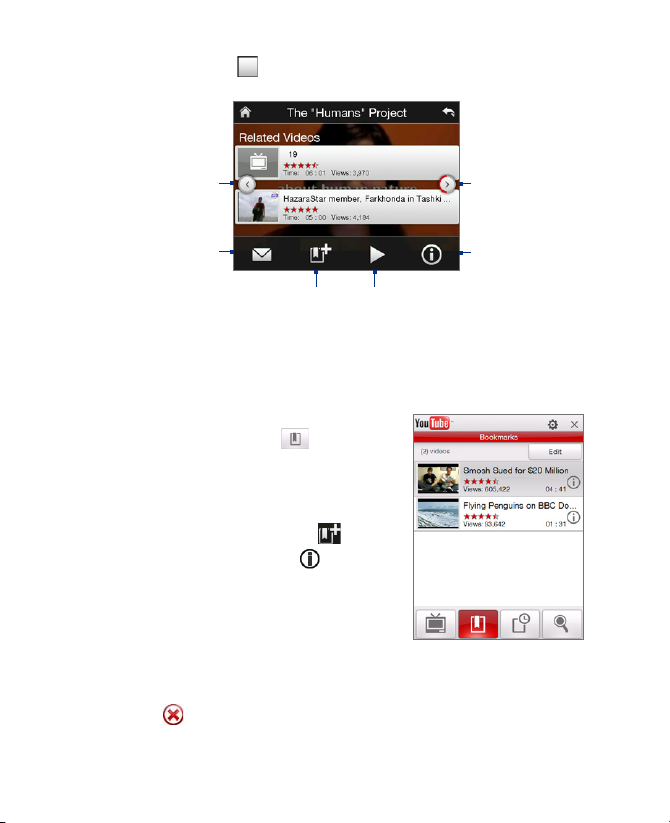
When you tap Stop ( ) or finish watching the entire video, you are
presented with options on what you can do next.
Tap to go back to
the previous page
of related videos.
Tap to send the link
to the video you just
watched to another
person using one
of the Messaging
accounts.
Bookmarks
You can store frequently viewed videos into Bookmarks for quick access.
To view Bookmarks
On the YouTube screen, tap .
Tap a video to watch it.
To add a video into Bookmarks
Do one of the following:
Tap to add the
video to your
Bookmarks.
• After watching a video, tap .
• On the list of videos, tap on the
video you want to add to Bookmarks
and then tap Bookmark.
Tap to go to the
next page of
related videos.
If no action
is taken, it
automatically goes
to the next page
after 10 seconds.
Tap to view details
about the video
you just watched.
Tap to play back
the video again.
To delete a video from Bookmarks
1. On the Bookmarks screen, tap Edit.
2. Tap on the video you want to remove from Bookmarks.
3. On the confirmation screen, tap Yes.
4. Tap Done.
Page 53
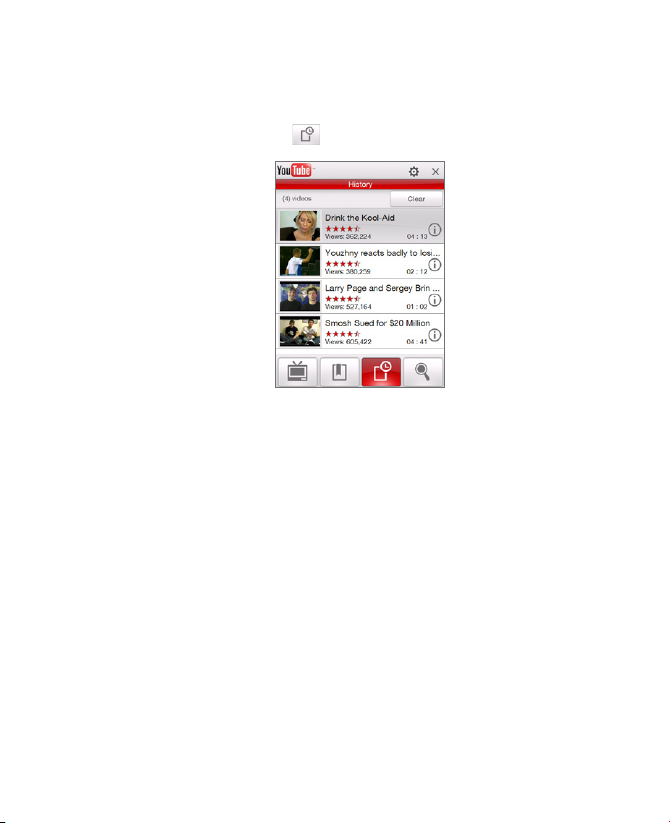
History
View recently watched videos on the History screen.
To view History
On the YouTube screen, tap . Tap a video to watch it.
Note To clear the History list, tap Clear.
8.5 Using Streaming Media
Streaming Media lets you stream live broadcasts or on-demand media
content from the web. The media is sent in a continuous stream to your
device and is played as it arrives, along with the audio.
The Streaming Media program allows you to play 3GP and MPEG-4 files. It
also supports playback of SDP (Session Description Protocol) files.
To access streaming content via Opera Mobile
In Opera Mobile, you can open a web page containing RTSP (Real Time
Streaming Protocol) links to streaming media content then play the content
in the Streaming Media program.
1. On the Home screen, slide to the Internet tab and tap Browser.
2. In the address bar, enter the URL address of the web page that
contains the RTSP link to the desired *.3gp, *.mp4, or *.sdp file.
Internet 141
Page 54
142 Internet
To stream media files directly on the Streaming Media Player
Streaming Media only supports RTSP links when you stream *.3gp and
*.mp4 files directly on the program.
Note Before you launch the Streaming Media program, make sure that you are
3. On the web page, tap the RTSP link.
4. Streaming Media then automatically opens and starts playing the file.
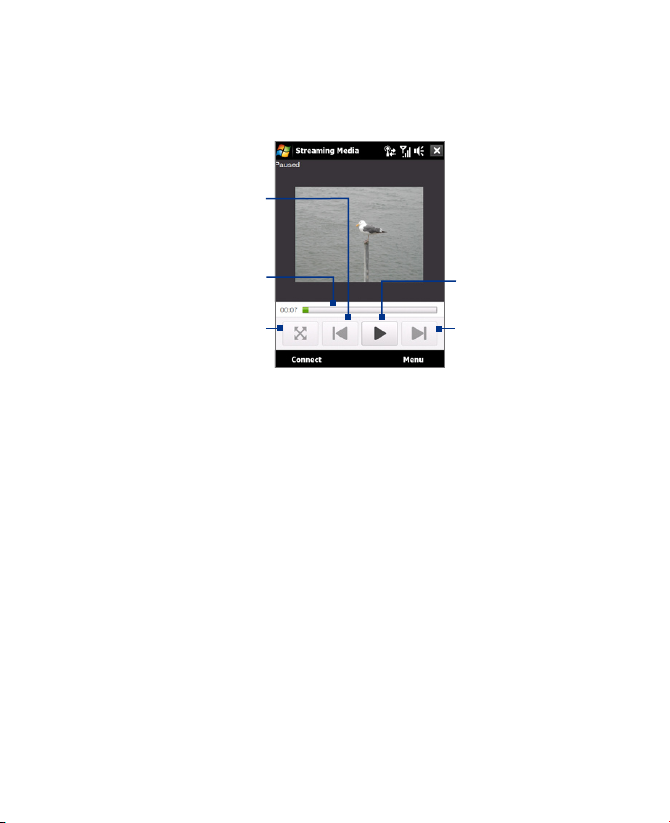
During playback, use the button controls to play/pause, switch to full
screen, rewind, and fast forward.
Rewind
Drag to go backward
or forward on the
video.
Tap to switch to full
screen mode. In full
screen mode, tap the
screen to switch back.
connected to the Internet.
Tap to toggle
between playing or
pausing the video
playback.
Fast forward
1. Tap Start > Programs > Streaming Media.
2. From the program, tap Connect.
3. Enter the URL for the web site (rtsp://) and the file name.
4. Tap Connect.
5. Streaming Media then starts playing the file. During playback, use the
button controls to play/pause, switch to full screen, rewind, and fast
forward.
Page 55

To view streaming video information
Tap Menu > Properties to view the properties and general information of a
streaming video clip, such as video codec, audio codec, dimension, frames,
and duration of the video.
To configure streaming video connection settings
Tap Menu > Options to configure the following settings:
• Connect via. Choose whether you want to connect to the Internet or
corporate network (intranet) to locate a streaming video clip.
• UDP port range. Specify a range of port numbers to use for
streaming.
• Media buffer. Specify the memory space (in terms of duration) to
allot for storing video and audio data while streaming media.
8.6 Using Windows Live™
Windows Live™ gives you a full Internet experience on your device.
Windows Live™ helps you to find information, pursue your interests, and get
in touch with friends and family on the Internet easier.
Windows Live™ offers the following key features:
• Live Search Bar, which lets you search for information on the web.
• Live Messenger, the next generation of MSN Messenger Mobile.
• Live Mail, the next generation of Hotmail.
• Live Contacts, your address book for storing Live Mail, Live
Messenger and Hotmail contacts.
Set up Windows Live™
The first time you use Windows Live™, sign in using your Windows Live™ ID,
which is your Windows Live™ Mail or Hotmail address, and password.
To set up Windows Live™ for the first time
1. Tap Start > Programs > Windows Live and then tap Sign in to
Windows Live.
2. Tap the links to read the Windows Live™ Term of Use and the
Microsoft Privacy Statement. After reviewing them, tap Accept.
Internet 143
Page 56
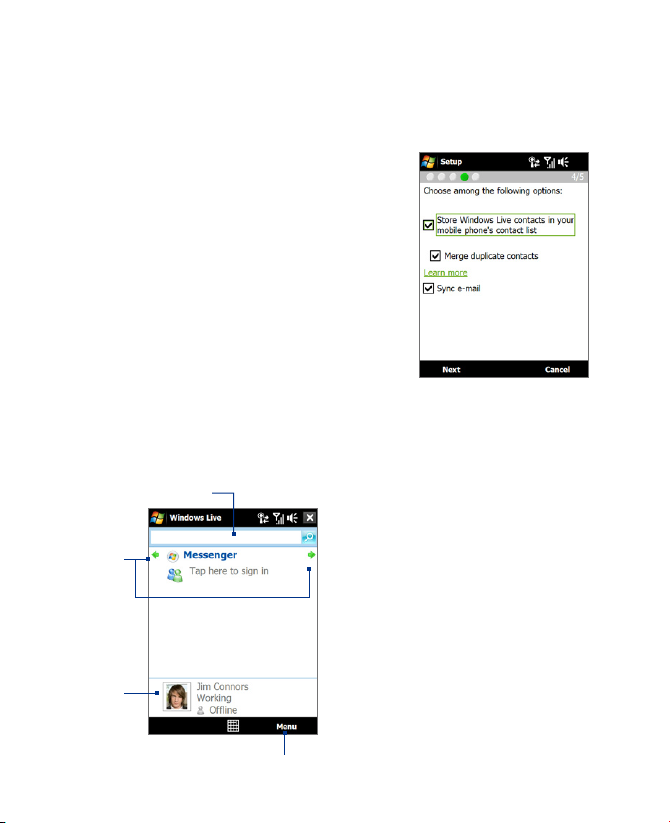
144 Internet
The Windows Live™ interface
On the Windows Live™ main screen, you will see a search bar, navigation
buttons, and an area where you can show and customize your profile.
3. Enter your Windows Live™ Mail or Hotmail address and password, select
the Save password checkbox, then tap Next.
4. Tap Next.
5. Choose what information you want to sync online with your device.
If you select Store Windows Live
contacts in your mobile phone’s
contact list, your Windows Live™
contacts will be added to the contact
list and to Windows Live™ Messenger
on your device.
If you select Sync e-mail, your Windows
Live™ Mail or Hotmail inbox messages
will be downloaded to your device.
6. Tap Next.
7. After synchronization is complete, tap
Done.
1
2
3
1 Search bar
2 Navigation buttons. Tap the left
or right arrow to switch between
Windows Live™ Messenger, Windows
Live™ Mail, and Sync status.
3 Tap to change the display name,
picture, or personal message.
4 Tap Menu to access and change
settings.
4
Page 57
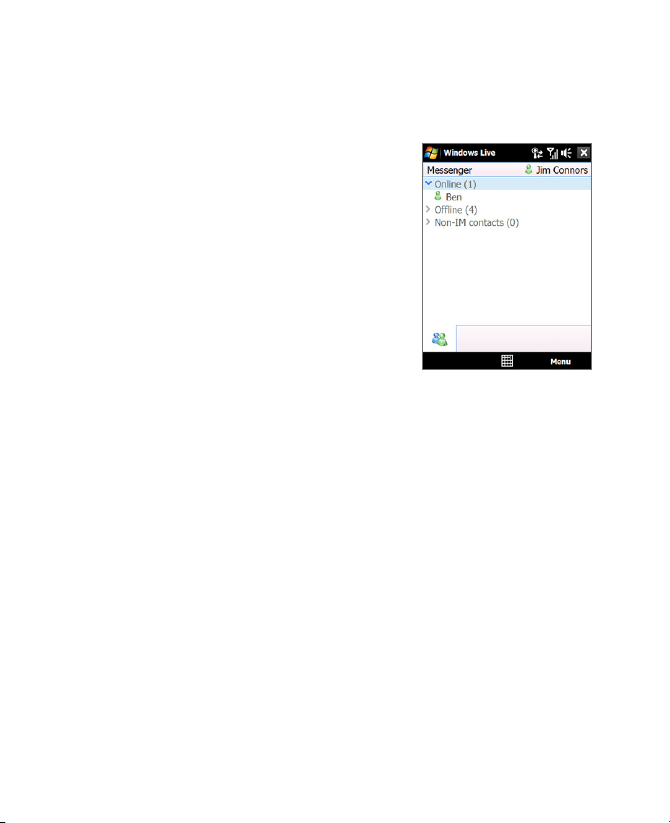
Internet 145
Windows Live™ Messenger
With this mobile version of Windows Live™ Messenger, you enjoy many of
the same cool features that you get from the desktop version, which include
the following:
• Instant messaging via text and voice
• Multiple conversations
• Insert emoticons
• Contact list with presence
• Send and receive files including
photos
• Change status/display name
• View contacts by online status,
groups, and more
• Send messages even when a contact
is offline
Note Before you can use Windows Live™ Messenger, your device must be
connected to the Internet. For information about setting up an Internet
connection, see “Ways of Connecting to the Internet” in this chapter.
Launch Messenger and sign in
To open Windows Live™ Messenger
Do one of the following:
• Tap Start > Programs > Messenger.
• On the Windows Live™ main screen, tap the left or right arrow until
you see Messenger, then tap it.
To sign in and out
1. Tap Sign in on the Messenger screen.
2. If this is your first time to sign in, a message appears to inform you
that your messenger contacts will be added to the contact list on your
device. Tap OK to add them.
Signing in may take several minutes, depending on your connection speed.
3. To sign out, tap Menu > Sign Out.
Page 58

146 Internet
To start and end conversations
Tips • To send a file, tap Menu > Send. You can choose to send a picture, voice
• To invite one or more contacts to the conversation, tap Menu > Options >
• To send a voice message, tap Voice Clip on a message screen then start
Add Windows Live™ contacts
You can add new Windows Live™ contacts in Windows Live™ Messenger or
in Contacts.
To add a Windows Live™ contact in Live Messenger
To add a Windows Live™ contact in Contacts
1. In the contact list, select a contact, then tap Send IM to open a
message screen.
2. Enter your text message in the text entry area of the message screen.
3. To add an emoticon, tap Menu > Add emoticon then tap an icon
from the list.
4. Tap Send.
5. To end a conversation with the current contact, tap Menu > End
conversation.
clip or any file.
Add participant.
talking. After you have recorded a message, tap Send.
1. Tap Menu > Add new contact.
2. Enter the e-mail address of the contact, then tap OK.
1. On the Home screen, slide to the People tab and then tap All People.
2. Tap New, then tap Windows Live.
3. In the IM box, enter the e-mail address of the contact, which can be a
Windows Live ID or any other e-mail address.
Tip You can fill in other information about the contact, if desired. This is
not necessary if you will communicate with the contact only through
Windows Live™ Messenger or Live Mail.
4. Tap OK.
5. Follow the remaining instructions to add the new contact to your
Windows Live™ contact list.
Page 59
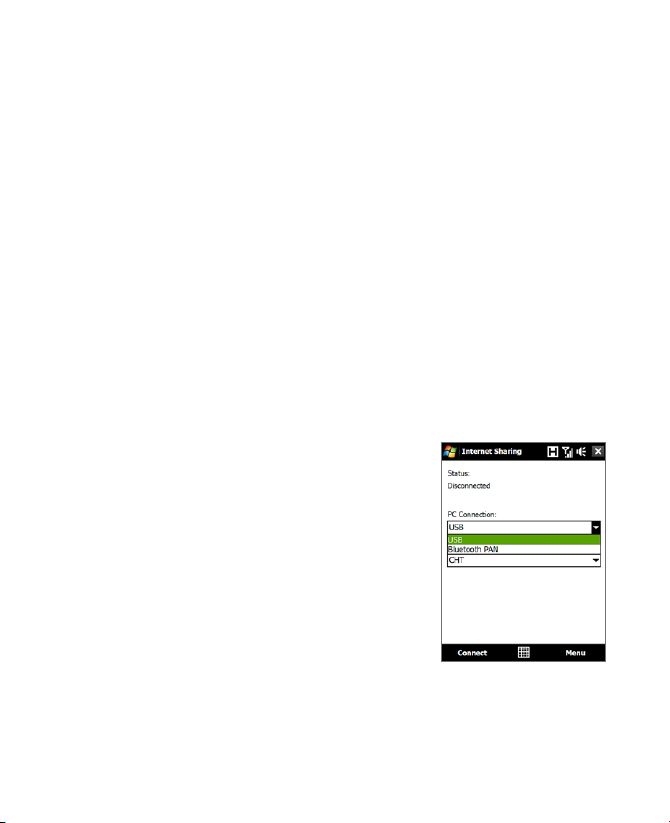
8.7 Using Your Device as a Modem
(Internet Sharing)
Internet Sharing connects your desktop or notebook computer to
the Internet by using your device’s data connection (GPRS or EDGE, for
instance). You can choose to connect via USB or Bluetooth.
Notes • Make sure your device has a SIM card installed, and your device has a
GPRS/3G or phone dial-up modem connection. If your device has not
been set up with a data connection yet, tap Menu > Connection Settings
on the Internet Sharing screen. For more information about setting up
these connections, see "GPRS/3G" and "Dial-up" in this chapter.
• If you want to use a USB cable connection, you must first install Windows
Mobile Device Center or Microsoft ActiveSync version 4.5 or later on the
computer.
• If you want to use a Bluetooth connection, make sure your computer has
built-in Bluetooth capability. If your computer does not have Bluetooth,
you can connect and use a Bluetooth adapter or dongle.
• Before using Internet Sharing, disconnect from Windows Mobile Device
Center or ActiveSync on your computer.
To set up your device as a USB modem
1. On your device, tap Start > Programs >
Internet Sharing.
2. In the PC Connection list, select USB.
3. In the Network Connection list, select
the name of the connection that your
device uses to connect to the Internet.
4. Connect your device to the computer
using the USB cable.
5. Tap Connect.
Internet 147
To use your device as a Bluetooth modem
For the computer to use the Internet connection of your device, activate
Internet Sharing on your device, then set up a Bluetooth Personal Area
Network (PAN) between the computer and your device.
Page 60

148 Internet
1. On your device, turn on Bluetooth and set it to visible mode by
following the steps in “To turn Bluetooth on and make your device
visible” section in Chapter 9.
2. Initiate a Bluetooth partnership from your device by following the
steps in “To create a Bluetooth partnership”
3. Tap Start > Programs > Internet Sharing.
4. Select Bluetooth PAN as the PC Connection.
5. From the Network Connection list, select the name of the
connection that your device uses to connect to the Internet.
6. Tap Connect.
7. On your computer, set up a Bluetooth Personal Area Network (PAN)
with your device:
For Windows Vista:
a. Click Start > Control Panel > Network and Internet > Network
and Sharing Center.
b. Click Manage network connections and then under Personal
Area Network, double-click Bluetooth Network Connection.
c. In the Bluetooth Personal Area Network Devices dialog box, select
your device, then click Connect.
For Windows XP:
a. Tap Start > Control Panel > Network Connections.
b. Under Personal Area Network, click the Bluetooth Network
Connection icon.
c. Under Network Tasks, click View Bluetooth network devices.
d. In the Bluetooth Personal Area Network Devices dialog box, select
your device, then click Connect.
Note If the Bluetooth adapter or dongle on your computer was installed
using a third-party provided driver, open the Bluetooth software that
came with the Bluetooth adapter/dongle to connect your computer
and device via Bluetooth. Refer to the Bluetooth adapter/dongle
documentation for more information.
8. On the Internet Sharing screen on your device, check if a connected
status message is displayed, which indicates that your computer has
Page 61
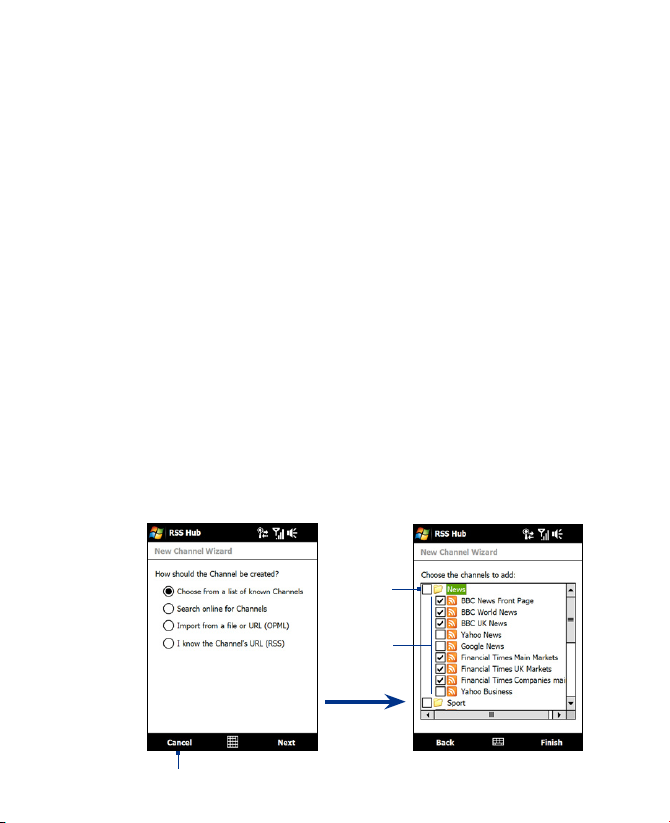
been successfully connected to the Internet using your device as a
Bluetooth modem.
To end the Internet connection
On the Internet Sharing screen, tap Disconnect.
8.8 Using RSS Hub
RSS Hub is an RSS reader that keeps you up-to-date with the latest news
from the Internet. It monitors Internet news channels and downloads the
most current news updates and podcasts so you are instantly informed of
breaking news and events.
For more information and tips on using RSS Hub, see Help on your device.
Note Make sure you have an active Internet connection (such as EDGE or GPRS)
before using RSS Hub.
Subscribe to and organize news channels
You must subscribe to news channels before you can receive RSS feeds.
To subscribe to news channels
1. Tap Start > Programs > RSS Hub, then tap Continue.
2. In the New Channel Wizard screen, select the Choose from a list
of known Channels option, then tap Next. A list of RSS channels is
displayed.
Category
Internet 149
Tap to load pre-selected RSS channels.
Channels
Page 62
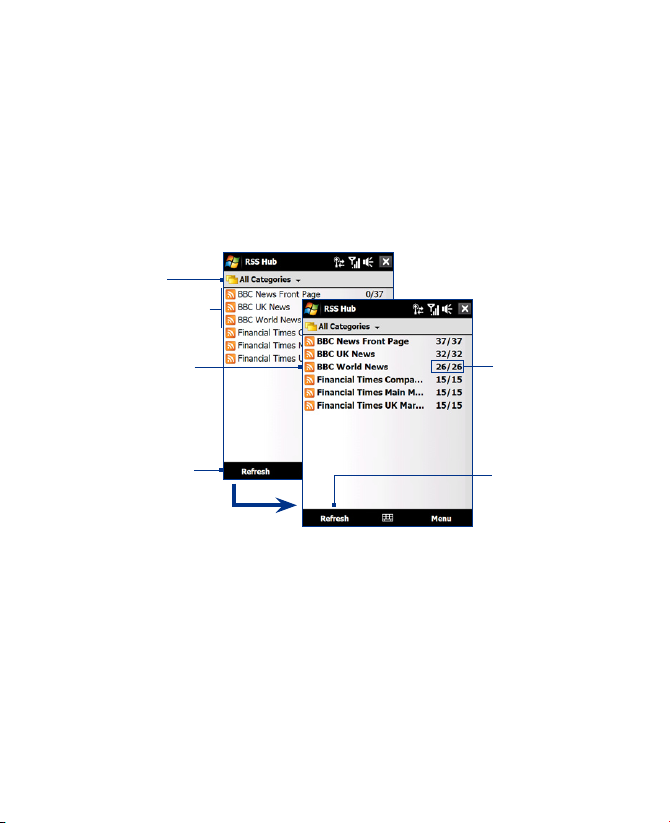
150 Internet
Tap to select the
channel category
to display
Channel is updated.
Tap it to view the
headlines.
Note If the RSS channel you want to subscribe to is not in the list of known
channels, tap Back, then select another option on the New Channel
Wizard screen. For more information on these other options, see the
Help on your device.
3. Select the checkboxes of the RSS channels you want to subscribe to,
then tap Finish.
Tip Channels are grouped by categories. If you want to select all channels in
a category, select the category check box.
4. The channel list appears. Tap Refresh to update the channels.
Channel list
Headline count
Tap to update
the channels
Tap to cancel
channel updating
To add new channels
1. In the channel list, tap Menu > Channel > New to open the New
Channel Wizard screen.
2. Select an option, then follow screen instructions to add new channels.
For more information on New Channel Wizard options, see Help on
your device.
To filter the channels in the display
In the channel list, tap Menu > View, then select:
• Updated to display only those channels with unread headlines.
• All to display all subscribed channels.
Page 63
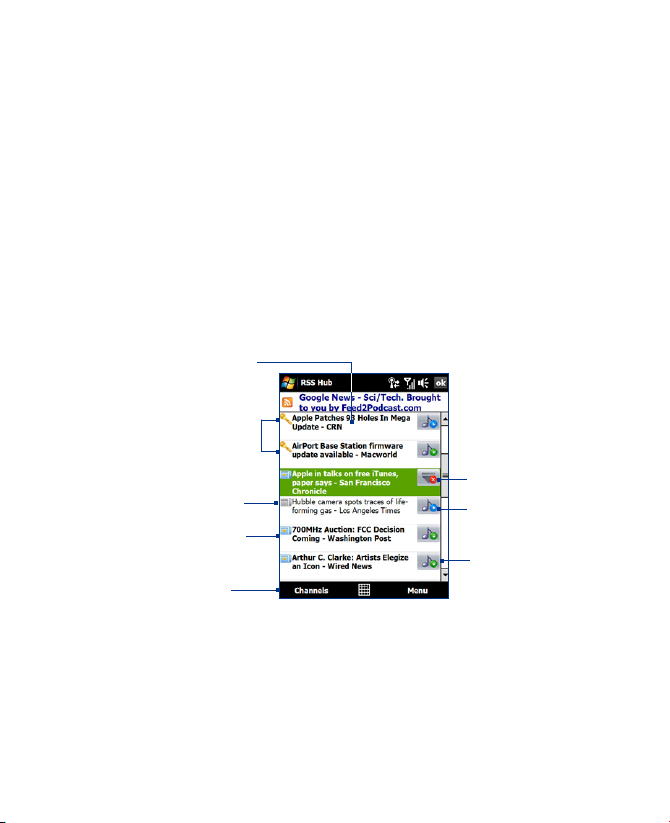
Internet 151
Manage channel categories
To view all the channels in a particular category, tap All Categories in
the upper left area of the channel list, then tap the category you want to
display.
To add a new category, tap Menu > Categories in the channel list to display
all categories, then tap Menu > New.
To rename or delete a category, tap Menu > Categories in the channel list
to display all categories, select a category, then tap Menu > Rename or
Menu > Delete.
If you want to change the channel category, tap and hold the channel in the
channel list, then tap Change Category. Select a new category and tap OK.
View and organize headlines
Tap a channel in the channel list to display the headlines for that channel.
Tap a headline to
open the news
summary screen
Headline or news
summary contains
a keyword
Headline has
been read
New or unread
headline
Tap to return to
the channel list
New or unread headlines display in bold and are marked with a blue
newspaper icon. Headlines that have been read are marked with a gray
newspaper icon.
Audio/Video/Image
file attachment is
downloading
Tap to play back or view
the file attachment.
Tap to download audio/
video file attachment
Page 64
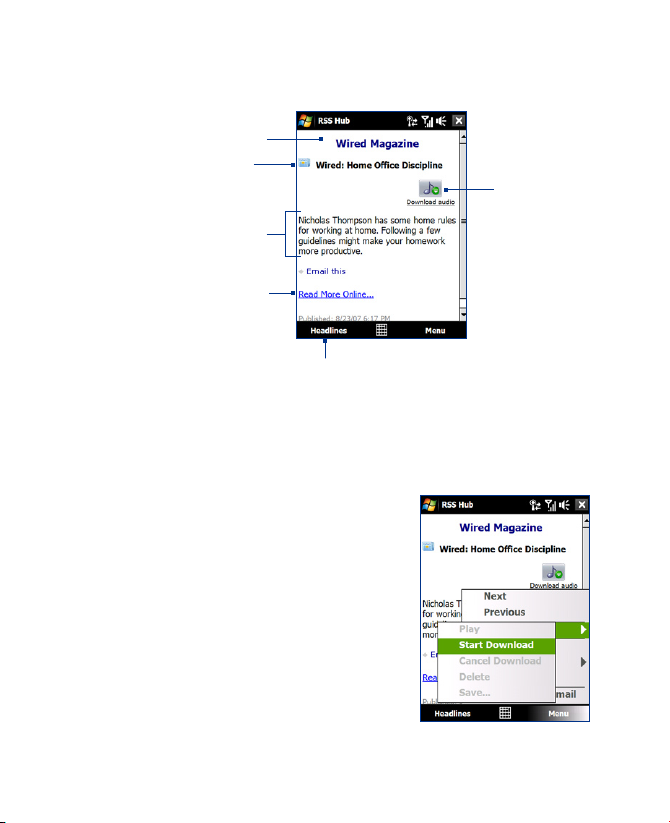
152 Internet
View the news summary
Tap a headline in the headline list to display the news summary.
To change view options
In the news summary screen, tap Menu to change the text size, fit the text
to the screen (text wrap), or enable ClearType for better viewing.
To download, play, or save podcasts
Channel name
Headline and
read status
News summary
Tap to open the news
item in Opera Mobile.
See “Using Opera
Mobile” in this chapter
for details.
Tap to return to the headline list
1. When you see an audio or video file
attachment in the news summary, do
one of the following to download the
file:
• Tap Menu > Podcasts > Start
Download.
• Tap the Download audio/Download
video link below the audio/video file
icon.
Tip To cancel the file download, tap Menu
> Podcasts > Cancel Download,
or tap Cancel download below the
audio/video file icon.
Audio/Video/Image
file attachment.
Tap to download
the file.
Page 65

Internet 153
2. After downloading the file, do one of the following:
• Tap Menu > Podcasts > Play or tap Play audio/Play video below
the audio/video file icon to play back the file.
• Tap Menu > Podcast > Save to save a copy of the file to the
device main memory or internal storage.
To send the headline link via e-mail
1. In the news summary screen, tap Menu > Send Link via Email.
2. Messaging opens and displays the Account Picker screen. Tap the
e-mail account you want to use to send the headline link.
A new e-mail message is then created with the headline link.
3. Specify the e-mail recipients, then send it.
Note For more information on how to compose e-mails, see “Using E-mail” in
Chapter 6.
To view the next or previous news summary
In the news summary screen, tap Menu > Next or Menu > Previous, or
press NAVIGATION left or right.
For more information about the features and configuring RSS Hub, refer to
the online help. To open the online help, tap Start > Help while in RSS Hub.
Page 66

154 Internet
Page 67

Chapter 9
Bluetooth
9.1 Bluetooth Modes
9.2 Bluetooth Partnerships
9.3 Connecting a Bluetooth Hands-free or
Stereo Headset
9.4 Beaming Information Using Bluetooth
9.5 Bluetooth Explorer and Bluetooth
File Sharing
9.6 Printing Files via Bluetooth
Page 68

156 Bluetooth
9.1 Bluetooth Modes
Bluetooth is a short-range wireless communications technology. Devices
with Bluetooth capabilities can exchange information over a distance of
about eight meters without requiring a physical connection.
Bluetooth on your device operates in three different modes:
• On. Bluetooth is turned on. Your device can detect other Bluetooth-
enabled devices, but not vice versa.
• Visible. Bluetooth is turned on, and all other Bluetooth-enabled
devices can detect your device.
• Off. Bluetooth is turned off. In this mode, you can neither send nor
receive information using Bluetooth.
Notes • By default, Bluetooth is turned off. If you turn it on, then turn off your
• Turn off Bluetooth when not in use to conserve battery power, or in places
To turn Bluetooth on and make your device visible
To turn off Bluetooth visibility after a certain period of time
You can automatically turn off Bluetooth visibility after a specified period of
time.
device, Bluetooth also turns off. When you turn on your device again,
Bluetooth automatically turns on.
where using a wireless device is prohibited, such as on board an aircraft
and in hospitals.
1. On the Home screen, slide to the Settings tab and then tap Menu >
Bluetooth Devices > Mode tab.
2. Select the Turn on Bluetooth and Make this device visible to other
devices check boxes.
3. Tap OK. The Title bar will show to indicate that the device is in
Visible mode.
1. On the Home screen, slide to the Settings tab and then tap Menu >
Bluetooth Devices > Timeout tab.
2. In Turn off Visible mode, select the time before your device’s
Bluetooth visibility turns off. Tap OK.
Page 69

9.2 Bluetooth Partnerships
A Bluetooth partnership is a relationship that you create between your
device and another Bluetooth-enabled device in order to exchange
information in a secure manner.
To create a Bluetooth partnership
1. On the Home screen, slide to the Settings tab and then tap Menu >
Bluetooth Devices > Devices tab.
2. Tap Add new device. Your device displays the names of other
Bluetooth devices within range.
3. Tap the device name in the box, then tap Next.
4. Specify a passcode to establish a secure connection. The passcode
can be 1 up to 16 characters.
5. Tap Next.
6. Wait for the paired device to accept the partnership. The receiving
party needs to enter the same passcode that you specified.
7. The name of the paired device is then displayed. You may edit and
enter a new name for that device.
8. Select the check boxes of services that you want to use from the
paired device, then tap Finish.
Note Creating a Bluetooth partnership between two devices is a one-time process.
Once a partnership is created, the devices can recognize the partnership and
exchange information without entering a passcode again.
To accept a Bluetooth partnership
1. Ensure that Bluetooth is turned on and in visible mode.
2. Tap Yes when prompted to establish a partnership with the other
device.
3. Enter a passcode (the same passcode that is entered on the device
requesting the partnership) to establish a secure connection. The
passcode must be between 1 and 16 characters.
4. Tap Next.
5. Tap Finish. You can now exchange information with the paired
device.
Bluetooth 157
Page 70

158 Bluetooth
Tips • To rename a Bluetooth partnership, tap and hold the partnership’s name
• To delete a Bluetooth partnership, tap and hold the partnership’s name on
on the Devices tab of the Bluetooth screen, then tap Edit.
the Devices tab, then tap Delete.
9.3 Connecting a Bluetooth Hands-free or Stereo
Headset
For hands-free phone conversations, you can use a Bluetooth hands-free
headset such as a car kit with your device. Your device also supports A2DP
(Advanced Audio Distribution Profile) which allows you to use a Bluetooth
stereo headset for hands-free phone conversations and for listening to
stereo music.
To connect a Bluetooth hands-free or stereo headset
1. Make sure that both your device and the Bluetooth headset are
turned on and within close range, and that the headset is visible.
Refer to the manufacturer’s documentation to find out how to set the
headset in visible mode.
2. On the Home screen, slide to the Settings tab and then tap Menu >
Bluetooth Devices > Devices tab > Add new device.
3. Tap the name of the Bluetooth headset, then tap Next. The device will
automatically pair the device with the Bluetooth headset.
Windows Mobile will automatically try one of the preconfigured passcodes
(0000, 1111, 8888, 1234) to pair the Bluetooth headset with the device.
If this fails, you have to enter the passcode delivered with your headset
manually.
Note If the Bluetooth stereo headset becomes disconnected, turn the headset on
and repeat step 1 to 2 above. Tap and hold the name of the Bluetooth stereo
headset and tap Set as Wireless Stereo.
Page 71

9.4 Beaming Information Using Bluetooth
You can beam information, such as contacts, calendar items, tasks, and files
from your device to your computer or to another Bluetooth-enabled device.
Note If your computer does not have built-in Bluetooth capability, you need to
connect and use a Bluetooth adapter or dongle on your computer.
To beam information from your device to a computer
1. Turn on Bluetooth on your device, and make your device visible. For
information about this, see “To turn Bluetooth on and make your
device visible”.
2. Set Bluetooth on your computer to visible mode, create a Bluetooth
partnership, then enable your computer to receive Bluetooth beams.
Note If the Bluetooth adapter or dongle on your computer was installed
using a third-party provided driver, open the Bluetooth software that
came with the Bluetooth adapter/dongle and enable the adapter/
dongle to be discovered by other devices. Refer to the Bluetooth
adapter’s documentation for more information.
If your computer has Windows Vista or Windows XP SP2 and your
computer’s Bluetooth adapter is supported by your Windows version,
do the following steps:
a. On your computer, open Bluetooth Devices from the Control
Panel, then click the Options tab on the Bluetooth Devices
window.
b. For Windows Vista, select Allow Bluetooth devices to find this
computer.
For Windows XP, select Turn discovery on and Allow Bluetooth
devices to connect to this computer.
c. Create a Bluetooth partnership between your device and
computer. For information about creating a partnership, see
“Bluetooth partnerships”.
d. In the Options tab of Bluetooth Devices, select Show the
Bluetooth icon in the notification area.
e. To enable your computer to receive Bluetooth beams, right-click
the Bluetooth icon in the notification area at the bottom-right
corner of your computer screen and select Receive a File. You are
now ready to beam.
Bluetooth 159
Page 72

160 Bluetooth
3. On your device, select an item to beam. The item can be an
appointment in your calendar, a task, a contact card, or a file.
4. To beam a contact, tap Menu > Send Contact > Beam.
To beam other types of information, tap Menu > Beam [type of
item].
5. Tap the device name to which you want to send the item.
6. If you beamed a calendar, task, or contact item to your computer and
it is not automatically added to Outlook, select File > Import and
Export in Outlook to import it.
To beam information to a Bluetooth-enabled device such as another
Windows Mobile-powered device, follow steps 1 to 5 in the above
procedure.
Tips • The default folder on your computer where beamed items are stored
• For your device to receive Bluetooth beams, tap Start > Settings >
may be C:\Documents and Settings\your_username\My Documents in
Windows XP or C:\Users\your_username\My Documents in Windows Vista.
Connections tab > Beam and make sure the Receive all incoming
beams check box is selected.
9.5 Bluetooth Explorer and Bluetooth File Sharing
Bluetooth Explorer searches for other Bluetooth devices that have file
sharing enabled and lets you access their Bluetooth shared folder. You
can copy files from and to their shared folder, and create subfolders in it.
When you enable Bluetooth file sharing on your device, other Bluetoothenabled devices will also be able to access your Bluetooth shared folder.
To enable Bluetooth Explorer and Bluetooth file sharing on your device
1. On the Home screen, slide to the Settings tab and then tap Menu >
Bluetooth Devices > FTP tab.
2. Select the Enable Bluetooth Explorer check box. This makes the
\Bluetooth device folder visible in the File Explorer.
Page 73
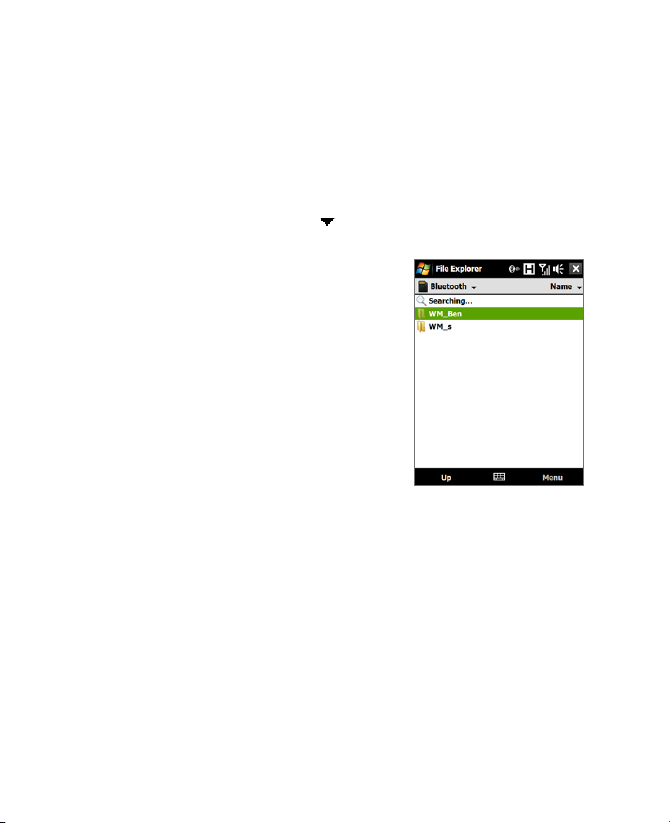
Bluetooth 161
3. Select the Enable File Sharing check box.
You can use the default Bluetooth shared folder, or tap Browse to use
another folder as your shared folder.
4. Tap OK.
To use Bluetooth Explorer
1. Bluetooth Explorer is integrated with the File Explorer program. You
can open it by tapping Start > Programs > Bluetooth Explorer or by
tapping the down arrow ( ) on the upper left of File Explorer screen
then tapping Bluetooth.
2. Bluetooth Explorer then scans for
other Bluetooth devices that have
file sharing enabled. From the list,
tap to select a Bluetooth device you
want to connect to. You may need
to enter a passcode in order for you
to connect to the selected device.
If there are files contained in the
Bluetooth shared folder on the
other device, you will be able to
see them on the Bluetooth Explorer
screen.
3. Select one or more files, then tap Menu > Edit and choose to cut or
copy the files.
4. Tap Up twice.
5. Navigate to the folder where you want to paste the files on your
device, then tap Menu > Edit > Paste.
Page 74

162 Bluetooth
9.6 Printing Files via Bluetooth
Connect your device to a Bluetooth printer to print contact information,
appointment details, images, and other file types.
Note You can print files in the .txt, .jpg, .xhtml, .vcf, .vcs file formats.
Before you start printing, make sure to turn on the Bluetooth printer and
to turn on Bluetooth on your device. To turn on Bluetooth, tap Start >
Programs > Comm Manager, then tap the Bluetooth button.
To print contact information
1. On the Home screen, slide to the People tab and then tap All People.
2. Select the contact whose information you want to print.
3. Tap Menu > Print via Bluetooth > Menu > Search Devices. Your
device starts to search for Bluetooth devices.
4. Select the Bluetooth printer and tap Menu > Send File.
5. Set the printing options you want, then tap Print.
To print a calendar appointment
1. Tap Start > Calendar, then select (highlight) the appointment whose
details you want to print.
2. Follow steps 3 to 5 in the “To print contact information” procedure.
To print a JPEG file
1. In Pictures & Videos, locate the JPEG file you want to print.
2. Tap and hold the JPEG image file and then on the menu, tap Print via
Bluetooth.
3. Follow steps 3 to 5 in the “To print contact information” procedure:
To print a text file
1. In File Explorer, locate the text file you want to print.
2. Tap and hold the txt file and then on the menu, tap Print via
Bluetooth.
3. Follow steps 3 to 5 in the “To print contact information” procedure:
Page 75

Chapter 10
Navigating on the Road
10.1 Google™ Maps
(Available by Country)
10.2 Guidelines and Preparation
for Using GPS
10.3 Downloading Satellite Data
via QuickGPS
Page 76
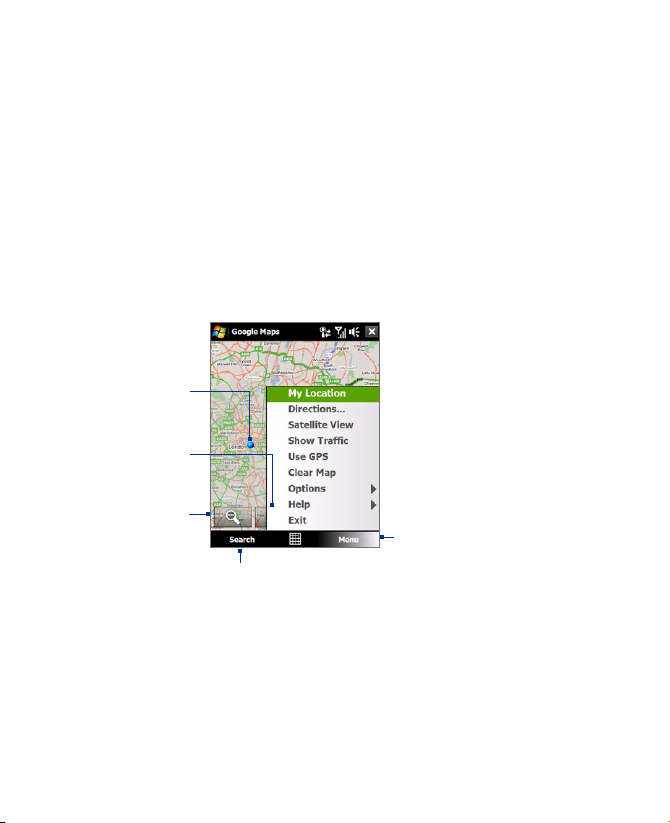
164 Navigating on the Road
10.1 Google™ Maps (Available by Country)
Google™ Maps lets you track your current location, view real-time traffic
situations, and receive detailed directions to your destination. It also
provides a search tool where you can locate places of interest or an address
on a vector or a satellite map.
Note You need an active data connection or Wi-Fi connection to use Google Maps.
Open Google Maps
Tap Start > Programs > Google Maps.
Note The first time you open Google Maps, you will be asked to accept terms
and conditions when using Google Maps. You must agree to the terms and
conditions for you to be able to run Google Maps.
Your current
location.
Tap to zoom in
on the map.
Tap to zoom
out on the map.
Tap to search for places of
interest and addresses.
Tap to open a menu where you
can view your current location,
get directions, see traffic
information, and more.
Notes • Currently, traffic information is only available for the U.S.
• Tap Menu > Options > Reset Google Maps to reset the Google Map
Tip Tap Menu > Help > Tips to learn more about the program and its many
cookies, history of search terms, preferences, and image cache.
features
Page 77
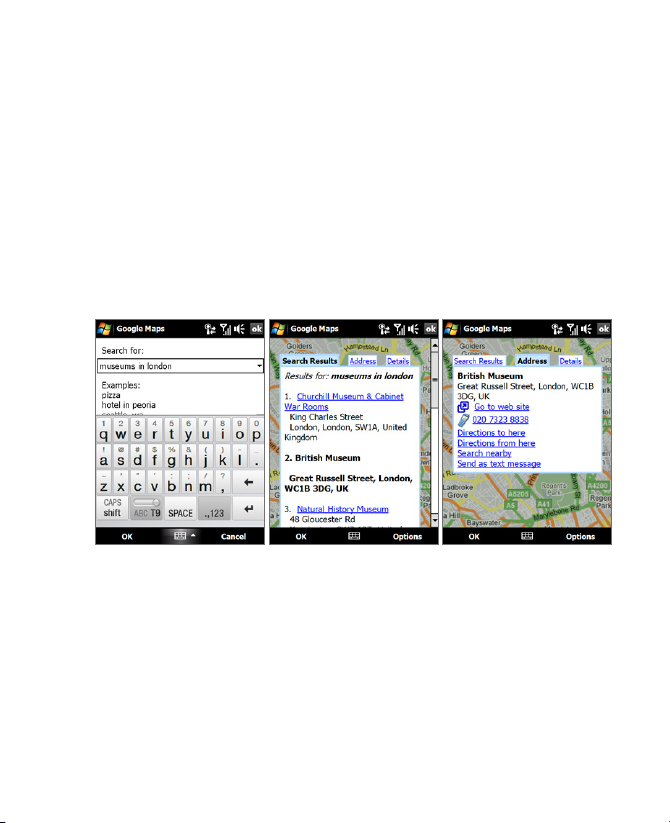
Navigating on the Road 165
Search for a place of interest
You can search and locate a place of interest using Google Maps. Google
Maps also shows the contact information and gives directions on how to
get to the place of interest from your current location.
Note You can also search for keywords, addresses, and postal codes.
1. On the Google Maps screen, tap Search.
2. Enter the place of interest you want to go to (for example, museums
in London), then tap OK.
3. On the Search Results tab, tap an item to view its contact
information.
Note If the place of interest you want is the first item, just tap the Address tab
to view the contact information.
4. On the Address tab, you can:
• Tap Go to web site to open the web site of the place of interest.
Note This information only appears when the web site of the place of interest
is available.
• Tap the [phone number] to call the place of interest that you have
selected.
• Tap Directions to here or Directions from here to get directions
on how to get to the place of interest from your current location or
vice versa.
Page 78
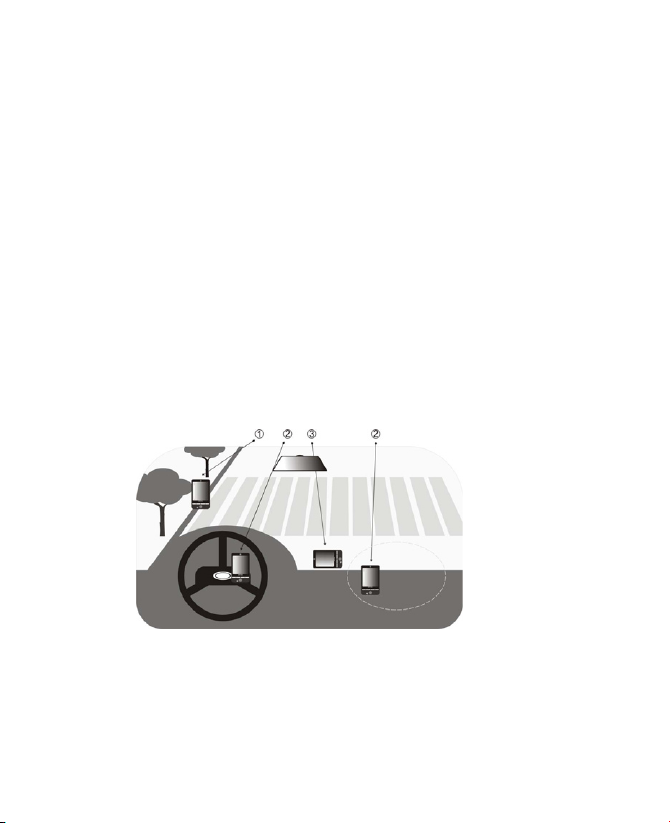
166 Navigating on the Road
• Tap Search nearby to search for other places of interest near your
current location.
• Tap Send as text message to send the contact information to a
contact saved on your device via SMS.
For more information about Google Maps, go to http://www.google.com/
gmm/index.html.
10.2 Guidelines and Preparation for Using GPS
If you install a GPS software on your device, please follow these guidelines
before and when using your device as a GPS device.
•Do not operate the GPS system while driving. The plotted GPS route
is only for driving reference. It should not interfere with actual driving
behavior.
•When using the device inside a vehicle, use the car holder to mount
the device securely in place. Avoid placing the device in the areas
shown in the following diagram:
1 Do not place where it will block the driver’s vision.
2 Do not place where air bags could deploy.
3 Do not place anywhere in the vehicle without securing the device
in the holder.
Page 79

Navigating on the Road 167
•Please use the GPS system cautiously. Users shall be liable for any
damages resulting from negligent operation of the system.
• The GPS signal cannot pass through solid non-transparent objects.
Signal reception may be affected by obstructions such as high-rise
buildings, tunnels, bridges, forests, weather (rainy or cloudy days),
etc. If the vehicle’s visor contains metal, it will be difficult for the GPS
signal to pass through.
• Wireless communication products (such as mobile phones or radar-
detecting devices) may interfere with the satellite signal, resulting in
unstable signal reception.
• The Global Positioning System (GPS) is built and operated by the US
Defense Department. The Department is responsible for the accuracy
and maintenance of the system. Any changes that the Department
makes may affect the accuracy and function of the GPS system.
• Do not leave your device in a vehicle or expose the device to direct
sunlight to avoid overheating the battery, which could pose damage
to the device or risk to the vehicle.
10.3 Downloading Satellite Data via QuickGPS
Before you start using your device for GPS navigation, open the QuickGPS
program first to download ephemeris data (current satellite position and
timing information) onto your device. This data is needed to determine the
GPS position of your current location.
QuickGPS downloads ephemeris data from a web server, instead of from
the satellites, using the Internet connection on your device, which can be
via Wi-Fi, ActiveSync or GPRS/3G. This significantly speeds up the time for
determining your GPS position.
To open QuickGPS
Tap Start > Programs > QuickGPS.
Page 80
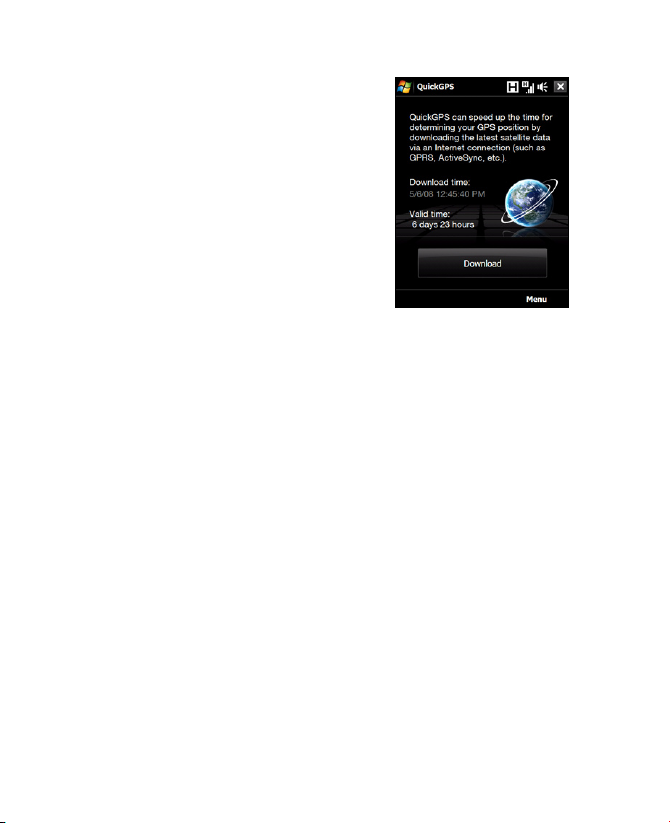
168 Navigating on the Road
To download data
Tap Download on the QuickGPS screen.
On the screen, initially, you will see the
Valid time of the downloaded data. As
time passes, the remaining days and
hours of validity will be shown.
To speed up GPS positioning, download
the latest ephemeris data when the
validity of the data expires.
Download options
To configure download times, tap Menu > Options and choose from the
available options:
• Remind me when data expires.
Enables your device to display a reminder message when the validity
of the ephemeris data has expired.
When you see the reminder message, tap Menu to dismiss the
reminder or to set the snooze time so that you will be reminded
again. Tap OK to open the QuickGPS program and download the
latest data.
• Autodownload when data expires. Allows ephemeris data to be
automatically updated onto your device when the data has expired.
• Autodownload when connected to PC via ActiveSync.
Allows ephemeris data to be automatically downloaded via
ActiveSync to your device when your device is connected to your
computer. Your computer must be connected to the Internet in order
to download data.
Note The ephemeris data is stored on HTC web servers. QuickGPS is
preconfigured to connect to these servers.
 Loading...