

Page 1

User’s Guide
HP iPAQ rx3000 series
Mobile Media Companion
Document Part Number: 364351-001
May 2004
Page 2

© 2004 Hewlett-Packard Development Company, L.P.
HP, Hewlett Packard, and the Hewlett-Packard logo are trademarks of
Hewlett-Packard Company in the U.S. and other countries.
iPAQ is a trademark of Hewlett-Packard Development Company, L.P. in the
U.S. and other countries.
Microsoft, Windows, the Windows logo, Outlook, and ActiveSync are
trademarks of Microsoft Corporation in the U.S. and other countries.
HP iPAQ Mobile Media Companion is Powered by Microsoft®
Windows®.
HP iPAQ products are Powered by Microsoft® Windows 2003 ®.
SD Logo is a trademark of Secure Digital.
Nevo, NevoMedia, Nevo Backup, NevoEdit, the Nevo logo, and the Nevo
home screen are trademarks of Universal Electronics, Inc. in the U.S. and
other countries.
All other product names mentioned herein may be trademarks of their
respective companies.
Hewlett-Packard Company shall not be liable for technical or editorial
errors or omissions contained herein or for incidental or consequential
damages in connection with the furnishing, performance, or use of this
material. The information in this document is provided “as is” without
warranty of any kind, including, but not limited to, the implied warranties
of merchantability and fitness for a particular purpose, and is subject to
change without notice. The warranties for HP products are set forth in the
express limited warranty statements accompanying such products. Nothing
herein should be construed as constituting an additional warranty.
This document contains proprietary information that is protected by
copyright. No part of this document may be photocopied, reproduced, or
translated to another language without the prior written consent of
Hewlett-Packard Company.
WARNING: Text set off in this manner indicates that failure to
Å
follow directions could result in bodily harm or loss of life.
CAUTION: Text set off in this manner indicates that failure to follow
Ä
directions could result in damage to equipment or loss of information.
User’s Guide
HP iPAQ rx3000 series Mobile Media Companion
First Edition (May 2004)
Document Part Number: 364351-001
Page 3

Contents
1 Getting to Know Your HP iPAQ
Using the Stylus . . . . . . . . . . . . . . . . . . . . . . . . . . . . . . . . 1–5
Setting the Date and Time . . . . . . . . . . . . . . . . . . . . . . . . 1–6
Setting the Time for Home and Locations You Are
Visiting . . . . . . . . . . . . . . . . . . . . . . . . . . . . . . . . . . . 1–6
Setting the Date . . . . . . . . . . . . . . . . . . . . . . . . . . . . . 1–6
Entering Owner Information . . . . . . . . . . . . . . . . . . . . . . 1–7
Resetting the Unit. . . . . . . . . . . . . . . . . . . . . . . . . . . . . . . 1–8
Performing a Normal Reset . . . . . . . . . . . . . . . . . . . . 1–8
Performing a Full Reset. . . . . . . . . . . . . . . . . . . . . . . 1–9
Aligning the Screen . . . . . . . . . . . . . . . . . . . . . . . . . . . . 1–12
Routine Care. . . . . . . . . . . . . . . . . . . . . . . . . . . . . . . . . . 1–12
2 Learning the Basics
Using the Launch Page or Traditional Today Screen . . . 2–1
Navigation Bar and Command Bar . . . . . . . . . . . . . . 2–3
Status Icons . . . . . . . . . . . . . . . . . . . . . . . . . . . . . . . . 2–4
Pop-Up Menus. . . . . . . . . . . . . . . . . . . . . . . . . . . . . . 2–5
Creating information . . . . . . . . . . . . . . . . . . . . . . . . . 2–6
Customizing the Today Screen . . . . . . . . . . . . . . . . . 2–7
Using Applications. . . . . . . . . . . . . . . . . . . . . . . . . . . . . . 2–7
Using the iTask Launcher . . . . . . . . . . . . . . . . . . . . . 2–7
Launching Applications. . . . . . . . . . . . . . . . . . . . . . . 2–8
Pocket Internet Explorer . . . . . . . . . . . . . . . . . . . . . . 2–8
Switching Between Landscape and Portrait Screen
Orientations . . . . . . . . . . . . . . . . . . . . . . . . . . . . . . . . 2–9
Manual Title Variable www.hp.com 1
Page 4

Minimizing Applications. . . . . . . . . . . . . . . . . . . . . 2–10
Closing Applications . . . . . . . . . . . . . . . . . . . . . . . . 2–10
Installing Applications. . . . . . . . . . . . . . . . . . . . . . . 2–11
Backing Up Information . . . . . . . . . . . . . . . . . . . . . 2–11
Using iPAQ File Store Folder . . . . . . . . . . . . . . . . . 2–13
3 Synchronizing with Your Computer
Using Microsoft ActiveSync . . . . . . . . . . . . . . . . . . . . . . 3–1
Installing ActiveSync . . . . . . . . . . . . . . . . . . . . . . . . 3–1
Synchronizing with Your Computer . . . . . . . . . . . . . 3–3
Changing Synchronization Settings. . . . . . . . . . . . . . 3–3
Manually Copying or Moving Files. . . . . . . . . . . . . . . . . 3–5
Installing a Program . . . . . . . . . . . . . . . . . . . . . . . . . . . . . 3–6
Backing up and Restoring Files . . . . . . . . . . . . . . . . . . . . 3–6
Synchronizing Links . . . . . . . . . . . . . . . . . . . . . . . . . . . . 3–7
Sending and Receiving E-mail Messages . . . . . . . . . . . . 3–7
Sending a Meeting Request . . . . . . . . . . . . . . . . . . . . . . . 3–8
4 Learning Input Methods
Contents
Using Input Software . . . . . . . . . . . . . . . . . . . . . . . . . . . . 4–1
Changing Word Suggestion Options . . . . . . . . . . . . . 4–1
Using the On-Screen Keyboard. . . . . . . . . . . . . . . . . 4–4
Writing with the Stylus and the Letter Recognizer . . 4–4
Writing with the Stylus and Microsoft Transcriber . . . . . 4–5
Writing with the Stylus and Block Recognizer . . . . . 4–6
Drawing and Writing on the Screen . . . . . . . . . . . . . 4–7
5 Using Your HP Photosmart Camera
Getting to Know Your Camera Components . . . . . . . . . . 5–2
Capturing . . . . . . . . . . . . . . . . . . . . . . . . . . . . . . . . . . . . . 5–3
HP Photosmart Camera . . . . . . . . . . . . . . . . . . . . . . . 5–3
Reviewing and Displaying . . . . . . . . . . . . . . . . . . . . . . . 5–15
HP Image Zone . . . . . . . . . . . . . . . . . . . . . . . . . . . . 5–15
DockWare Screen Saver Application . . . . . . . . . . . 5–19
Manual Title Variable www.hp.com 2
Page 5

Editing . . . . . . . . . . . . . . . . . . . . . . . . . . . . . . . . . . . . . . 5–20
Editing Photos . . . . . . . . . . . . . . . . . . . . . . . . . . . . . 5–21
Recording Audio Files. . . . . . . . . . . . . . . . . . . . . . . 5–21
Attaching a Sound File to a Photo . . . . . . . . . . . . . . 5–22
HP Image Zone for PCs . . . . . . . . . . . . . . . . . . . . . . . . . 5–23
HP Image Transfer . . . . . . . . . . . . . . . . . . . . . . . . . . . . . 5–25
Printing. . . . . . . . . . . . . . . . . . . . . . . . . . . . . . . . . . . . . . 5–28
Using HP Mobile Printing . . . . . . . . . . . . . . . . . . . . 5–28
Configuration. . . . . . . . . . . . . . . . . . . . . . . . . . . . . . 5–33
Changing System Settings. . . . . . . . . . . . . . . . . . . . 5–46
Print Manager . . . . . . . . . . . . . . . . . . . . . . . . . . . . . 5–47
Using File Explorer to Print Photos. . . . . . . . . . . . . 5–57
Using HP Instant Share Printing . . . . . . . . . . . . . . . 5–58
Printing With a Memory Card . . . . . . . . . . . . . . . . . 5–59
Sharing . . . . . . . . . . . . . . . . . . . . . . . . . . . . . . . . . . . . . . 5–60
Setting up Your Share Menu . . . . . . . . . . . . . . . . . . 5–61
Tagging Photos With Destinations . . . . . . . . . . . . . 5–62
Tips for Taking Better Pictures . . . . . . . . . . . . . . . . . . . 5–64
6 Getting to Know iPAQ Mobile Media
Contents
Using the iPAQ Mobile Media Features . . . . . . . . . . . . . 6–1
Setting Up iPAQ Mobile Media on Your HP iPAQ . . . . 6–3
Setting Up iPAQ Mobile Media On
Your Personal Computers . . . . . . . . . . . . . . . . . . . . . . . . 6–6
Minimum System Requirements . . . . . . . . . . . . . . . . 6–7
Using Digital Media with iPAQ Mobile Media. . . . . . . . 6–9
Supported Media Formats . . . . . . . . . . . . . . . . . . . . 6–10
Organizing Digital Media on
Your Personal Computer . . . . . . . . . . . . . . . . . . . . . 6–10
Copying Music CDs and Videos . . . . . . . . . . . . . . . 6–12
Organizing Digital Media on Your HP iPAQ . . . . . 6–15
Digital Media--not Copy-Protected . . . . . . . . . . . . . 6–16
Copy-Protected Music (.wma format) . . . . . . . . . . . 6–18
Using NevoMedia Server. . . . . . . . . . . . . . . . . . . . . . . . 6–19
Understanding the NevoMedia Server Options. . . . 6–20
Manual Title Variable www.hp.com 3
Page 6

Contents
The File Menu . . . . . . . . . . . . . . . . . . . . . . . . . . . . . 6–20
The View Menu . . . . . . . . . . . . . . . . . . . . . . . . . . . . 6–20
The Media Collection Menu . . . . . . . . . . . . . . . . . . 6–22
The Tools Menu. . . . . . . . . . . . . . . . . . . . . . . . . . . . 6–22
The Help Menu . . . . . . . . . . . . . . . . . . . . . . . . . . . . 6–23
The NevoMedia Server Icons . . . . . . . . . . . . . . . . . 6–24
The Context Menu . . . . . . . . . . . . . . . . . . . . . . . . . . 6–24
Performing Common NevoMedia Server Tasks . . . . . . 6–25
Scanning a Folder . . . . . . . . . . . . . . . . . . . . . . . . . . 6–25
Updating the List of Media . . . . . . . . . . . . . . . . . . . 6–26
Viewing the Details of Media Stored in the Server. 6–26
Removing Individual Media Folders. . . . . . . . . . . . 6–26
Removing Your Entire Collection. . . . . . . . . . . . . . 6–27
Exiting NevoMedia Server . . . . . . . . . . . . . . . . . . . 6–27
Using NevoMedia Player . . . . . . . . . . . . . . . . . . . . . . . . 6–28
Understanding the NevoMedia Player Options . . . . 6–29
The File Menu . . . . . . . . . . . . . . . . . . . . . . . . . . . . . 6–29
The View Menu . . . . . . . . . . . . . . . . . . . . . . . . . . . . 6–29
The Help Menu . . . . . . . . . . . . . . . . . . . . . . . . . . . . 6–30
The Context Menu . . . . . . . . . . . . . . . . . . . . . . . . . . 6–30
Performing Common NevoMedia Server Tasks . . . . . . 6–31
Playing Multiple Media Types Simultaneously . . . 6–31
Switching between Full-Screen and
Regular-Screen Modes . . . . . . . . . . . . . . . . . . . . . . 6–31
Viewing Information about Currently
Playing Media . . . . . . . . . . . . . . . . . . . . . . . . . . . . . 6–32
Exiting NevoMedia Player . . . . . . . . . . . . . . . . . . . 6–33
Using NevoBackup . . . . . . . . . . . . . . . . . . . . . . . . . . . . 6–33
Creating a Custom Backup . . . . . . . . . . . . . . . . . . . 6–34
Restoring a Previous Backup Configuration . . . . . . 6–35
Starting iPAQ Mobile Media . . . . . . . . . . . . . . . . . . . . . 6–36
Navigating iPAQ Mobile Media . . . . . . . . . . . . . . . 6–36
Navigating the Media Play Screens. . . . . . . . . . . . . 6–37
Navigating Pop-up Menus . . . . . . . . . . . . . . . . . . . . 6–38
Navigating the List View. . . . . . . . . . . . . . . . . . . . . 6–39
Navigating the Controls View . . . . . . . . . . . . . . . . . 6–40
Manual Title Variable www.hp.com 4
Page 7

Contents
Selecting a Storage Location . . . . . . . . . . . . . . . . . . 6–41
Quick Links . . . . . . . . . . . . . . . . . . . . . . . . . . . . . . . 6–41
Currently Playing. . . . . . . . . . . . . . . . . . . . . . . . . . . 6–42
Playing Digital Media on My HP iPAQ . . . . . . . . . . . . 6–43
Playing Local Media (Local Media Mode) . . . . . . . 6–44
Selecting a Media Location . . . . . . . . . . . . . . . . . . . 6–44
The Local Media Customize Menu . . . . . . . . . . . . . 6–45
Playing Music . . . . . . . . . . . . . . . . . . . . . . . . . . . . . 6–46
Controlling Music Play . . . . . . . . . . . . . . . . . . . . . . 6–47
Viewing Pictures . . . . . . . . . . . . . . . . . . . . . . . . . . . 6–48
Controlling Pictures. . . . . . . . . . . . . . . . . . . . . . . . . 6–49
Navigating the Controls View . . . . . . . . . . . . . . . . . 6–50
Playing Videos. . . . . . . . . . . . . . . . . . . . . . . . . . . . . 6–51
Controlling Video Play . . . . . . . . . . . . . . . . . . . . . . 6–52
Deleting Media . . . . . . . . . . . . . . . . . . . . . . . . . . . . 6–53
Deleting Individual Tracks . . . . . . . . . . . . . . . . . . . 6–55
Deleting All Media in a Storage Location. . . . . . . . 6–55
Streaming Media (Media Stream Mode) . . . . . . . . . 6–56
Selecting a Media Server. . . . . . . . . . . . . . . . . . . . . 6–56
The Media Stream Customize Menu . . . . . . . . . . . . 6–57
Playing Music . . . . . . . . . . . . . . . . . . . . . . . . . . . . . 6–58
Controlling Music Play . . . . . . . . . . . . . . . . . . . . . . 6–59
Viewing Pictures. . . . . . . . . . . . . . . . . . . . . . . . . . . 6–59
Playing Videos. . . . . . . . . . . . . . . . . . . . . . . . . . . . . 6–60
Searching for Media . . . . . . . . . . . . . . . . . . . . . . . . 6–60
Playing Digital Media on Other Devices
(Media Control) . . . . . . . . . . . . . . . . . . . . . . . . . . . . . . . 6–62
Selecting a Media Server. . . . . . . . . . . . . . . . . . . . . 6–62
Selecting a Media Player . . . . . . . . . . . . . . . . . . . . . 6–62
When you play the media, it plays in the
digital media player you selected. . . . . . . . . . . . . . . 6–63
The Media Control Customize Menu . . . . . . . . . . . 6–63
Playing Music . . . . . . . . . . . . . . . . . . . . . . . . . . . . . 6–64
Navigating the Media Control Music Folders . . . . . 6–65
Controlling Music Play . . . . . . . . . . . . . . . . . . . . . . 6–65
Viewing Pictures . . . . . . . . . . . . . . . . . . . . . . . . . . . 6–66
Manual Title Variable www.hp.com 5
Page 8

Contents
Playing Videos. . . . . . . . . . . . . . . . . . . . . . . . . . . . . 6–67
Searching for Media . . . . . . . . . . . . . . . . . . . . . . . . 6–67
Downloading Media (Media Copy) . . . . . . . . . . . . . . . . 6–69
The Media Copy Customize Menu . . . . . . . . . . . . . 6–69
Selecting a Media Server. . . . . . . . . . . . . . . . . . . . . 6–70
Downloading Music . . . . . . . . . . . . . . . . . . . . . . . . 6–70
Selecting Music to Download . . . . . . . . . . . . . . . . . 6–71
Downloading Pictures . . . . . . . . . . . . . . . . . . . . . . . 6–73
Selecting Pictures to Download. . . . . . . . . . . . . . . . 6–73
Downloading Videos . . . . . . . . . . . . . . . . . . . . . . . . 6–73
Selecting Videos to Download . . . . . . . . . . . . . . . . 6–74
Controlling Home Entertainment Devices
(NevoHome Control) . . . . . . . . . . . . . . . . . . . . . . . . . . . 6–74
Starting Up NevoHome Control . . . . . . . . . . . . . . . 6–75
Navigating the NevoHome Control Screens . . . . . . 6–75
Setting up the Key Guides . . . . . . . . . . . . . . . . . . . . 6–77
Adding a Device . . . . . . . . . . . . . . . . . . . . . . . . . . . 6–77
Downloading Device Codes . . . . . . . . . . . . . . . . . . 6–78
Controlling a Device . . . . . . . . . . . . . . . . . . . . . . . . . . . 6–79
Contol multiple home entertainment devices
with just a few taps. . . . . . . . . . . . . . . . . . . . . . . . . . 6–79
Customizing the Control Screen . . . . . . . . . . . . . . . . . . 6–80
Adding a Key . . . . . . . . . . . . . . . . . . . . . . . . . . . . . 6–80
Editing a Key . . . . . . . . . . . . . . . . . . . . . . . . . . . . . . 6–81
Copying a Key . . . . . . . . . . . . . . . . . . . . . . . . . . . . . 6–82
Moving a Key . . . . . . . . . . . . . . . . . . . . . . . . . . . . . 6–82
Deleting a Key . . . . . . . . . . . . . . . . . . . . . . . . . . . . . 6–82
Display Labels . . . . . . . . . . . . . . . . . . . . . . . . . . . . . 6–83
Express Learning . . . . . . . . . . . . . . . . . . . . . . . . . . . 6–83
Adding and Deleting Pages . . . . . . . . . . . . . . . . . . . 6–84
Setting Up Favorites. . . . . . . . . . . . . . . . . . . . . . . . . . . . 6–85
Adding a Favorite Using the Icons . . . . . . . . . . . . . 6–85
Manually Adding a Favorite . . . . . . . . . . . . . . . . . . 6–87
Moving a Favorite . . . . . . . . . . . . . . . . . . . . . . . . . . 6–89
Deleting a Favorite . . . . . . . . . . . . . . . . . . . . . . . . . 6–89
Adding and Deleting Pages . . . . . . . . . . . . . . . . . . . 6–90
Manual Title Variable www.hp.com 6
Page 9

Appending Favorites Pages . . . . . . . . . . . . . . . . . . . 6–90
Adding Rooms. . . . . . . . . . . . . . . . . . . . . . . . . . . . . 6–91
Editing a Room . . . . . . . . . . . . . . . . . . . . . . . . . . . . 6–91
Deleting a Room . . . . . . . . . . . . . . . . . . . . . . . . . . . 6–92
Adding Users . . . . . . . . . . . . . . . . . . . . . . . . . . . . . . 6–92
Editing Users . . . . . . . . . . . . . . . . . . . . . . . . . . . . . . 6–93
Deleting Users . . . . . . . . . . . . . . . . . . . . . . . . . . . . 6–93
Adding Activities. . . . . . . . . . . . . . . . . . . . . . . . . . . 6–94
Editing an Activity. . . . . . . . . . . . . . . . . . . . . . . . . . 6–95
Deleting an Activity. . . . . . . . . . . . . . . . . . . . . . . . . 6–95
Downloading Additional Features. . . . . . . . . . . . . . 6–96
Downloading Graphics . . . . . . . . . . . . . . . . . . . . . . 6–96
Downloading Device Key Functions. . . . . . . . . . . . 6–96
7 Getting to Know the iPAQ Wireless
Manager
Power Buttons . . . . . . . . . . . . . . . . . . . . . . . . . . . . . . 7–2
Settings Buttons. . . . . . . . . . . . . . . . . . . . . . . . . . . . . 7–2
Wi-Fi Settings Button . . . . . . . . . . . . . . . . . . . . . . . . 7–3
Bluetooth Settings Button . . . . . . . . . . . . . . . . . . . . . 7–3
Bluetooth Manager Button . . . . . . . . . . . . . . . . . . . . 7–3
Contents
8 Using Wi-Fi
Getting Acquainted . . . . . . . . . . . . . . . . . . . . . . . . . . . . . 8–1
Getting Started with Wi-Fi. . . . . . . . . . . . . . . . . . . . . . . . 8–2
Powering Wi-Fi On or Off. . . . . . . . . . . . . . . . . . . . . 8–2
Automatically Connecting to a Network . . . . . . . . . . 8–3
Manually Entering New Network Settings . . . . . . . . 8–4
Searching for Networks to Access. . . . . . . . . . . . . . . 8–7
Managing Wireless Network Settings . . . . . . . . . . . . . . . 8–7
Viewing or Editing a Wireless Network . . . . . . . . . . 8–8
Deleting a Wireless Network. . . . . . . . . . . . . . . . . . . 8–8
Monitoring Signal Strength and Status . . . . . . . . . . . . . . 8–8
Advanced Network Settings. . . . . . . . . . . . . . . . . . . . . . . 8–9
Manual Title Variable www.hp.com 7
Page 10

Advanced Wi-Fi Terms . . . . . . . . . . . . . . . . . . . . . . . 8–9
Looking Up an IP Address . . . . . . . . . . . . . . . . . . . 8–10
Changing TCP/IP Settings. . . . . . . . . . . . . . . . . . . . 8–11
Changing DNS and WINS Settings. . . . . . . . . . . . . 8–12
Setting Up VPN Server Connections. . . . . . . . . . . . 8–13
Editing VPN Server Connections . . . . . . . . . . . . . . 8–13
Starting VPN Server Connections . . . . . . . . . . . . . . 8–14
Setting Up Proxy Server Settings . . . . . . . . . . . . . . 8–14
9 Using Bluetooth
Getting Acquainted with Bluetooth . . . . . . . . . . . . . . . . . 9–2
Understanding Terms . . . . . . . . . . . . . . . . . . . . . . . . 9–3
Supported Services . . . . . . . . . . . . . . . . . . . . . . . . . . 9–4
Working with Bluetooth Settings. . . . . . . . . . . . . . . . . . . 9–4
Turning On Bluetooth . . . . . . . . . . . . . . . . . . . . . . . . 9–5
Opening Bluetooth Settings. . . . . . . . . . . . . . . . . . . . 9–5
Setting Accessibility Properties. . . . . . . . . . . . . . . . . 9–5
Enabling Bluetooth Services . . . . . . . . . . . . . . . . . . . 9–6
Setting a Shared Folder . . . . . . . . . . . . . . . . . . . . . . . 9–8
Understanding Profiles . . . . . . . . . . . . . . . . . . . . . . . 9–9
Working with Bluetooth Manager . . . . . . . . . . . . . . . . . 9–12
Opening Bluetooth Manager . . . . . . . . . . . . . . . . . . 9–12
Locating and Selecting a Device . . . . . . . . . . . . . . . 9–12
Connecting to Other Devices . . . . . . . . . . . . . . . . . . . . . 9–14
Identifying the Communications Port . . . . . . . . . . . 9–14
Working with Connections . . . . . . . . . . . . . . . . . . . 9–14
Establishing an ActiveSync Connection . . . . . . . . . 9–16
Establishing a Serial Connection. . . . . . . . . . . . . . . 9–20
Joining a Personal Area Network . . . . . . . . . . . . . . 9–21
Establishing a Cell Phone Partnership. . . . . . . . . . . 9–21
Working with Files. . . . . . . . . . . . . . . . . . . . . . . . . . . . . 9–21
Creating a File Transfer Connection . . . . . . . . . . . . 9–22
Sending Files . . . . . . . . . . . . . . . . . . . . . . . . . . . . . . 9–22
Creating a Folder on a Remote Device . . . . . . . . . . 9–22
Receiving a File from a Remote Device . . . . . . . . . 9–23
Contents
Manual Title Variable www.hp.com 8
Page 11

Deleting a File from a Remote Device . . . . . . . . . . 9–23
Using Business Card Exchange. . . . . . . . . . . . . . . . 9–23
Setting Up Your Business Card Information. . . . . . 9–24
Opening a Connection . . . . . . . . . . . . . . . . . . . . . . . . . . 9–26
Viewing Connection Status . . . . . . . . . . . . . . . . . . . 9–26
Closing a Connection. . . . . . . . . . . . . . . . . . . . . . . . 9–27
Viewing Connection Information . . . . . . . . . . . . . . 9–27
10Managing the Battery
Installing the Battery . . . . . . . . . . . . . . . . . . . . . . . . . . . 10–1
Removing the Battery . . . . . . . . . . . . . . . . . . . . . . . . . . 10–5
Charging the Battery . . . . . . . . . . . . . . . . . . . . . . . . . . . 10–5
Charging with the AC Adapter . . . . . . . . . . . . . . . . 10–5
Charging with the Desktop Cradle and AC Adapter 10–7
Changing the Backlight Settings . . . . . . . . . . . . . . . 10–9
Changing the Wireless LAN Power Saving Modes 10–9
Disabling the Application Buttons . . . . . . . . . . . . 10–10
Manually Monitoring the Battery . . . . . . . . . . . . . 10–11
Contents
11Expansion Cards
Installing Secure Digital (SD) or MultiMedia (MMC)
Expansion Cards. . . . . . . . . . . . . . . . . . . . . . . . . . . . . . . 11–2
Removing Secure Digital (SD) or MultiMedia (MMC)
Expansion Cards. . . . . . . . . . . . . . . . . . . . . . . . . . . . . . . 11–3
Viewing the Content of Memory Cards . . . . . . . . . . . . . 11–4
12Troubleshooting
Common Problems. . . . . . . . . . . . . . . . . . . . . . . . . . . . . 12–1
ActiveSync . . . . . . . . . . . . . . . . . . . . . . . . . . . . . . . . . . . 12–5
Expansion Cards. . . . . . . . . . . . . . . . . . . . . . . . . . . . . . . 12–7
Bluetooth . . . . . . . . . . . . . . . . . . . . . . . . . . . . . . . . . . . . 12–8
Wireless LAN. . . . . . . . . . . . . . . . . . . . . . . . . . . . . . . . . 12–9
Manual Title Variable www.hp.com 9
Page 12

A Regulatory Notices
Federal Communications Commission Notice. . . . . . . . . A–1
Declaration of Conformity for products marked
with the FCC logo—United States only . . . . . . . . . . A–2
Canadian Notice . . . . . . . . . . . . . . . . . . . . . . . . . . . . . . . . A–3
Avis Canadien . . . . . . . . . . . . . . . . . . . . . . . . . . . . . . A–3
Japanese Notice . . . . . . . . . . . . . . . . . . . . . . . . . . . . . . . . A–3
Korean Notice . . . . . . . . . . . . . . . . . . . . . . . . . . . . . . . . . A–3
European Regulatory Notice . . . . . . . . . . . . . . . . . . . . . . A–3
Declaration of Conformity. . . . . . . . . . . . . . . . . . . . . A–4
Battery Warning . . . . . . . . . . . . . . . . . . . . . . . . . . . . . . . . A–6
a . . . . . . . . . . . . . . . . . . . . . . . . . . . . . . . . . . . . . . . . . A–6
Equipment Warning . . . . . . . . . . . . . . . . . . . . . . . . . . . . . A–7
Airline Travel Notice . . . . . . . . . . . . . . . . . . . . . . . . . . . . A–7
Wireless Notices. . . . . . . . . . . . . . . . . . . . . . . . . . . . . . . . A–7
U.S. Regulatory Wireless Notice. . . . . . . . . . . . . . . . A–8
Canadian Regulatory Wireless Notice. . . . . . . . . . . . A–8
Japanese Regulatory Wireless Notice . . . . . . . . . . . . A–8
Brazilian Regulatory Wireless Notice . . . . . . . . . . . . A–9
Contents
B Specifications
System Specifications . . . . . . . . . . . . . . . . . . . . . . . . . . . B–1
Physical Specifications. . . . . . . . . . . . . . . . . . . . . . . . . . . B–2
Operating Environment . . . . . . . . . . . . . . . . . . . . . . . . . . B–3
Manual Title Variable www.hp.com 10
Page 13

1
Getting to Know Your HP iPAQ
Congratulations on purchasing an HP iPAQ rx3000 series Mobile
Media Companion. Use this guide to find out about setting up
your HP iPAQ and to learn about how it works.
The software programs described below are preinstalled on the
HP iPAQ. These preinstalled programs are not deleted if your HP
iPAQ loses power.
You can find detailed information for using these programs in the
Help files on your HP iPAQ. To access these Help files, from the
Start menu, tap Help and select a program.
In addition, Microsoft Pocket PC Basics provides instructions on
operating the HP iPAQ. To locate Pocket PC Basics, tap Start >
Help > Pocket PC Basics.
Bonus Software On-Device Information Function
DockWare Tap Start > Help >
DockWare.
iPAQ Backup Tap Start > Programs>
iPAQ Backup >Options
> About.
Experience HP iPAQ Tap Programs >
Experience HP iPAQ.
User’s Guide 1–1
Turn your HP iPAQ into a
desk clock, monthly
calendar, and personal
digital picture frame.
Back up your data to
protect it from loss due to
a drained battery,
accidental deletion, or
hardware failure.
Learn about all the
things you can do with
your HP iPAQ.
Page 14

Getting to Know Your HP iPAQ
(Continued)
Bonus Software On-Device Information Function
Flash Player Tap Start > Programs >
iPAQ Mobile Media Tap Start > Help > iPAQ
Nevo Home Control Tap Start > Help >
HP Image Zone for
iPAQs
HP Photosmart Tap Start > Help >
Self-Test Tap Start > Settings >
Asset Viewer Tap Start > Settings >
Flash Player > Help.
Mobile Media.
Nevo.
Tap Start > Help > HP
Image Zone.
Photosmart.
System tab > Self Test.
System tab > hp Asset
Viewer.
Play Macromedia Flash
files on your HP iPAQ.
Browse and play your
music, photo, and video
collections over a
wireless network from
anywhere in your home.
Control your home
entertainment devices
using your HP iPAQ.
View, edit, annotate,
share, and print photos
from your HP iPAQ. Print,
send, or view slideshows
directly from your HP
iPAQ. Create photo
slideshows and play
videos to share with
friends and family.
Snap photos, record
video and modify camera
settings on your HP
iPAQ.
Run a basic diagnostic
test on the device.
List detailed information
about your system and
its configuration.
Bluetooth Manager Tap Start > Help >
Bluetooth.
User’s Guide 1–2
Enables short-range
wireless communication
for exchanging
information up to a
distance of about 30 feet
(10 meters).
Page 15

Getting to Know Your HP iPAQ
(Continued)
Bonus Software On-Device Information Function
HP Mobile Print Center Tap Start > Help > HP
iPAQ Wireless From the Launch page,
iTask Tap Start > Help >
Microsoft Pocket PC
Software Functions
ActiveSync Synchronize the information between your HP
Calculator Perform calculations and convert currency.
Calendar Schedule appointments, meetings, and other
Image Zone.
tap
then
iPAQ Wireless main
menu.
iTask.
iPAQ and computer so you have the latest
information in both locations. Be sure you install
ActiveSync on your computer before connecting
the desktop cradle and HP iPAQ to your
computer.
events, and set an alarm to remind you of the
appointments. Appointments for the day can be
displayed on the Today screen.
on the
Enable photo printing in
HP Image Zone.
Turn on/off Wi-Fi and/or
Bluetooth.
Quickly access the most
frequently-used features
on your HP iPAQ.
Contacts Keep an updated list of friends and colleagues
File Explorer Manage your data (Program files, document
Find Search for information on your HP iPAQ. Tap
Games (Solitaire,
Jawbreaker)
User’s Guide 1–3
to e-mail and telephone.
folders, music, video and photo files).
Start > Help > Find. Enter your search text or,
tap the drop-down arrow to access data.
Play these pre-installed electronic games on
your HP iPAQ.
Page 16

Getting to Know Your HP iPAQ
(Continued)
Microsoft Pocket PC
Software Functions
MSN Messenger Set up an MSN Messenger (Passport) account
Messaging Receive and send Internet e-mail messages on
Notes Create handwritten or typed notes, drawings,
Pocket Excel Create and edit workbooks or view and edit
Pocket Internet Explorer Browse the Internet and download pages
Pocket Word Create new documents or view and edit Word
Pocket MSN Sign up to get MSN services on your HP iPAQ,
Settings Obtain quick access to settings for the backlight,
Tasks Keep track of your to-do list.
to exchange messages instantly with your
family and friends.
your HP iPAQ or your computer, if ActiveSync is
installed. You must have an e-mail address
provided by your Internet Service Provider (ISP)
or employer to send and receive e-mail.
and recordings.
Excel workbooks created on your computer.
through synchronization or by connecting to the
Internet.
documents created on your computer.
such as MSN Hotmail and MSN Messenger.
clock, memory, power, regional settings,
Launch page or Today screen, password,
sounds and notifications, etc.
Windows Media Player 9
Series
User’s Guide 1–4
Play digital audio and video files in Windows
Media or MP3 format on your device.
Battery Saving Tip: You can program an
Application Button to turn off the screen when
an MP3 is playing, saving battery power used to
run the screen. Tap Start > Windows Media >
Tools > Settings > Buttons. From the Select
Function drop-down list, tap Screen Toggle.
Press one of the programmable buttons on the
front of your HP iPAQ, then tap OK.
Page 17

Getting to Know Your HP iPAQ
Battery Saving Tip:
to turn off the screen when an MP3 is playing, saving battery
power used to run the screen. Tap Start > Windows Media >
Too ls > Settings > Buttons. From the Select Function
drop-down list, tap Screen Toggle. Press one of the
programmable buttons on the front of your HP iPAQ, then tap
OK.
Using the Stylus
Your HP iPAQ comes with a stylus that you should use to tap or
write on your screen.
CAUTION: To prevent damage to your HP iPAQ screen, never use any
Ä
device other than the stylus that comes with it or an approved
replacement to tap or write on the screen. If you lose or break your
stylus, you can order extras at www.hp.com/go/ipaqaccessories.
You can perform three basic actions using the stylus:
Tap —Lightly touch the screen to select or open an item. Lift the
stylus after you tap an item. Tapping is equivalent to clicking an
item with the mouse on your computer.
Drag—Place the point of the stylus on the screen and drag an
item across the screen without lifting the stylus until you have
completed the selection. Dragging is equivalent to dragging with
the left mouse button pressed on your computer.
Tap and hold—Hold the stylus pointer on an item for a short
time until a menu displays. Tapping and holding is equivalent to
right-clicking your computer mouse button. When you tap and
hold, a circle of red dots appears around the stylus to indicate that
the menu will soon pop up.
You can program an Application Button
User’s Guide 1–5
Page 18

Getting to Know Your HP iPAQ
Setting the Date and Time
When you turn on your HP iPAQ for the first time, you are
requested to select your time zone. After setting the time zone,
you still need to set the time and date on your unit. All three
settings are located in the Clock Settings screen and can be set at
the same time.
Note:
your computer each time the two devices connect using
ActiveSync.
By default, the time on the HP iPAQ is synchronized with
Setting the Time for Home and Locations
You Are Visiting
From the Start menu, tap Settings > System tab > Clock icon.
Shortcut:
the time.
1. Tap either Home or Visiting.
2. Tap the time-zone down arrow, and select the appropriate
time zone.
3. Tap the hour, minutes, or seconds, and use the up and down
arrows to adjust the time.
Shortcut:
of the clock with the stylus.
4. Tap AM or PM.
5. Tap OK.
6. Tap Ye s to save the time.
From the Launch page, tap the Clock icon to set
You can also adjust the time by moving the hands
Setting the Date
1. From the Start menu, tap Settings > System tab > Clock
icon.
User’s Guide 1–6
Page 19

Getting to Know Your HP iPAQ
Shortcut:
From the Launch page, tap the Clock icon to set
the date.
2. Tap the down arrow next to the date.
3. Tap the left or right arrow to select a month and year.
4. Tap a day.
5. Tap OK.
6. Tap Ye s to save the date settings.
You need to reset your time zone, time, and date if:
■
The location time (Home or Visiting) needs to be changed.
■
All power to the HP iPAQ is lost, which removes all saved
settings.
■
You perform a full reset of your HP iPAQ.
Shortcut:
From the Launch page, tap the Clock icon to set
the time zone, time, and date.
Entering Owner Information
You can personalize your HP iPAQ by entering owner
information. To enter owner information:
1. From the Launch page, tap Start > Settings > Owner
Information.
2. Tap in the Name field. A keyboard appears at the bottom of
the screen. Tap on the characters to enter your name.
Note:
If you prefer, you can use Letter Recognizer, Microsoft
Transcriber, or Block Recognizer to input information. Refer to
Chapter 4, “Learning Input Methods” for more information.
3. Tap the Ta b key on the keyboard to move the cursor to the
next field.
4. Continue entering whatever information you want to include.
User’s Guide 1–7
Page 20

5. To display owner information at startup, tap in the Show
information when device is turned on checkbox.
6. Tap on the Notes tab to enter any notes.
7. Tap OK to save the information and return to the Launch
page.
Resetting the Unit
Performing a Normal Reset
A soft reset does not erase any programs or saved data. Before
performing a soft reset, be sure to save any unsaved data since
any unsaved data will be lost.
Perform a soft reset when:
■
You want to stop all running applications.
■
After installing a new application.
■
If your HP iPAQ “locks up.”
Getting to Know Your HP iPAQ
Follow these steps to save data and reset your HP iPAQ:
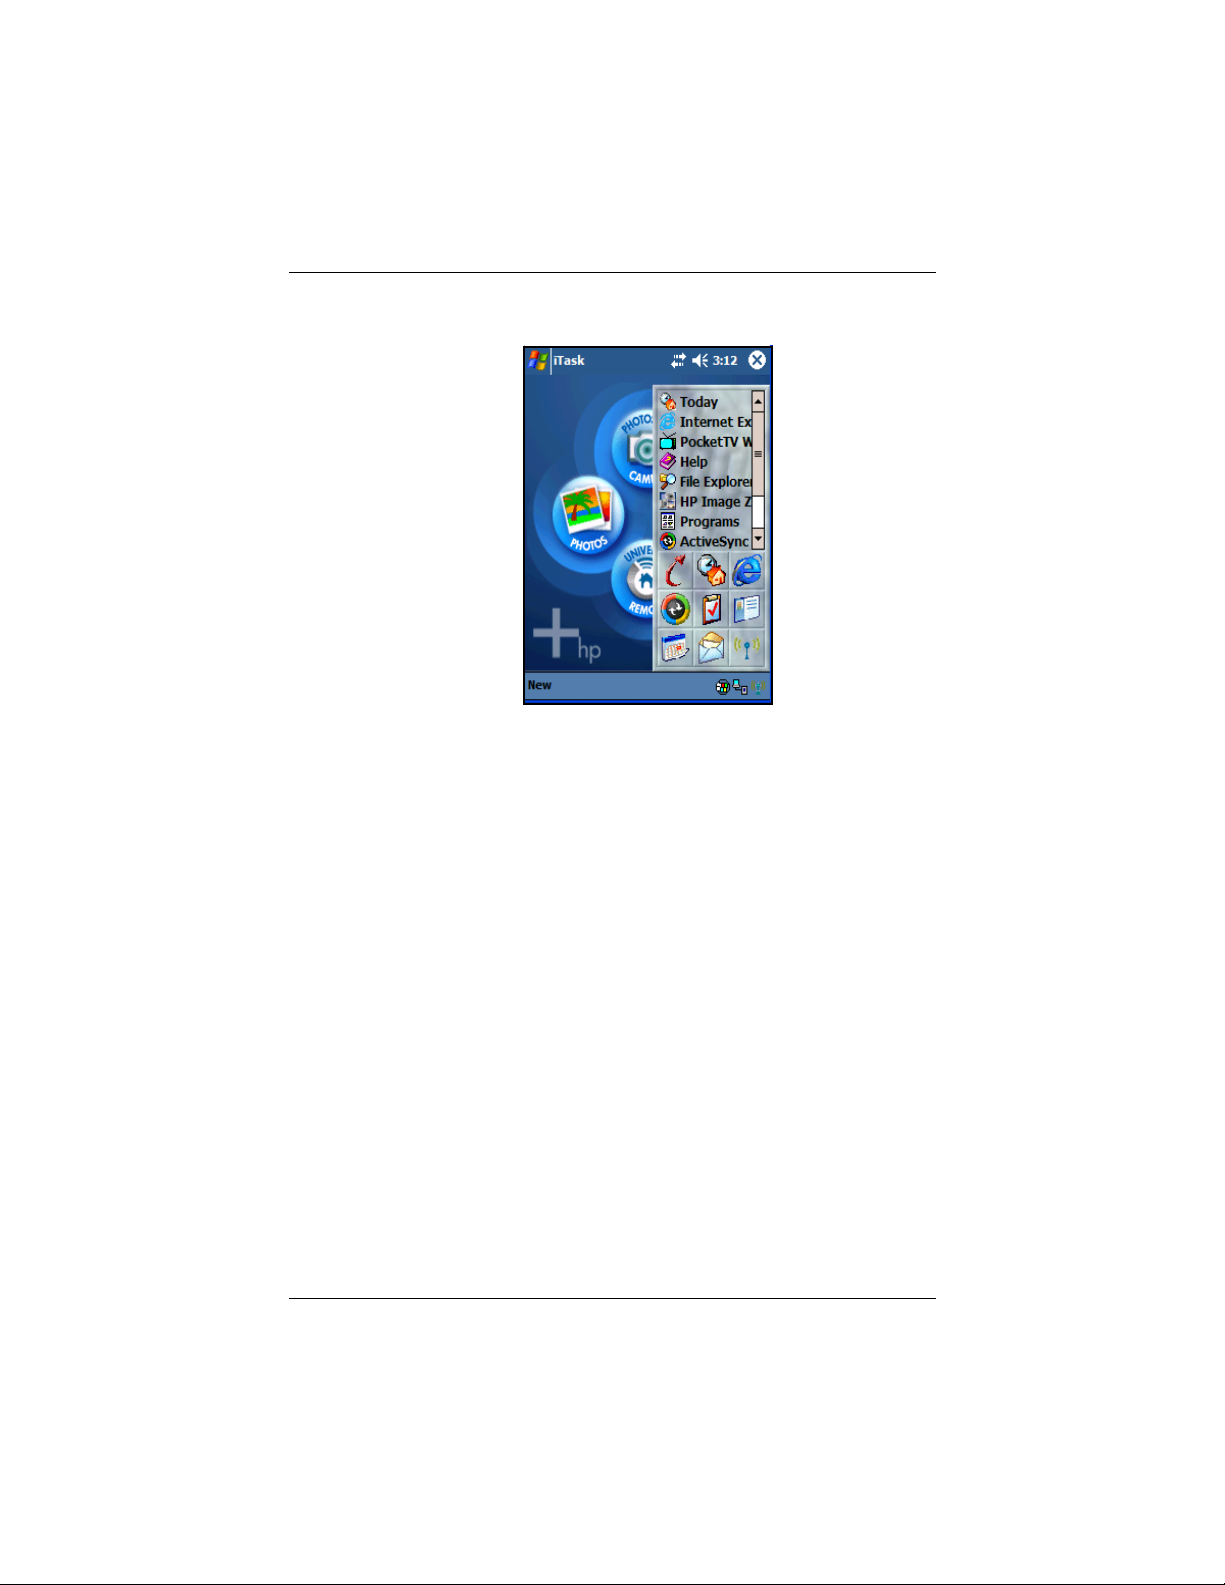
1. Press the iTask button.
2. Tap and hold any application in the list.
User’s Guide 1–8
Page 21
Getting to Know Your HP iPAQ
3. Tap Close All Tasks.
4. Locate the recessed Reset button on the bottom of your HP
iPAQ.
5. Use the stylus to lightly press the Reset button. The HP
iPAQ restarts and displays the Launch Page or traditional
Tod ay screen.
Performing a Full Reset
Perform a hard reset when:
■
You want to clear all programs and data from main memory
(where data and programs you have loaded are stored).
■
You want to restore default settings.
■
A problem with your HP iPAQ is not fixed after a soft reset.
Performing a hard reset on your HP iPAQ does not erase
programs that came with your HP iPAQ. The information that you
have entered into your HP iPAQ will be erased. This information
(or data) includes your Word documents, photos, music files, and
other settings.
User’s Guide 1–9
Page 22

Getting to Know Your HP iPAQ
For more information about saving your data files, refer to “How
Do I Back Up and Restore My Data” described in this document.
If the battery installed in your HP iPAQ discharges completely,
once the battery has been recharged your HP iPAQ operates as if a
hard reset had been performed. Refer to “How Do I Check the
Battery Level?” in this document for more information.
CAUTION: If you perform a hard reset, your HP iPAQ returns to its
Ä
default settings and loses all information (files, settings, etc.) that is
recorded in main memory. Information stored in iPAQ File Store will
not be lost. For more information on using iPAQ File Store, refer to
“Learning the Basics” in this User’s Guide. You will also need to
reestablish your partnerships. For more information on reestablishing
your partnerships, refer to “How Do I Synchronize Calendar, E-mail,
Contact Data and More between My HP iPAQ and PC (installing
Microsoft ActiveSync and establishing Partnerships)?” in the How Do
I Guide located on the Companion CD.
User’s Guide 1–10
Page 23
Getting to Know Your HP iPAQ
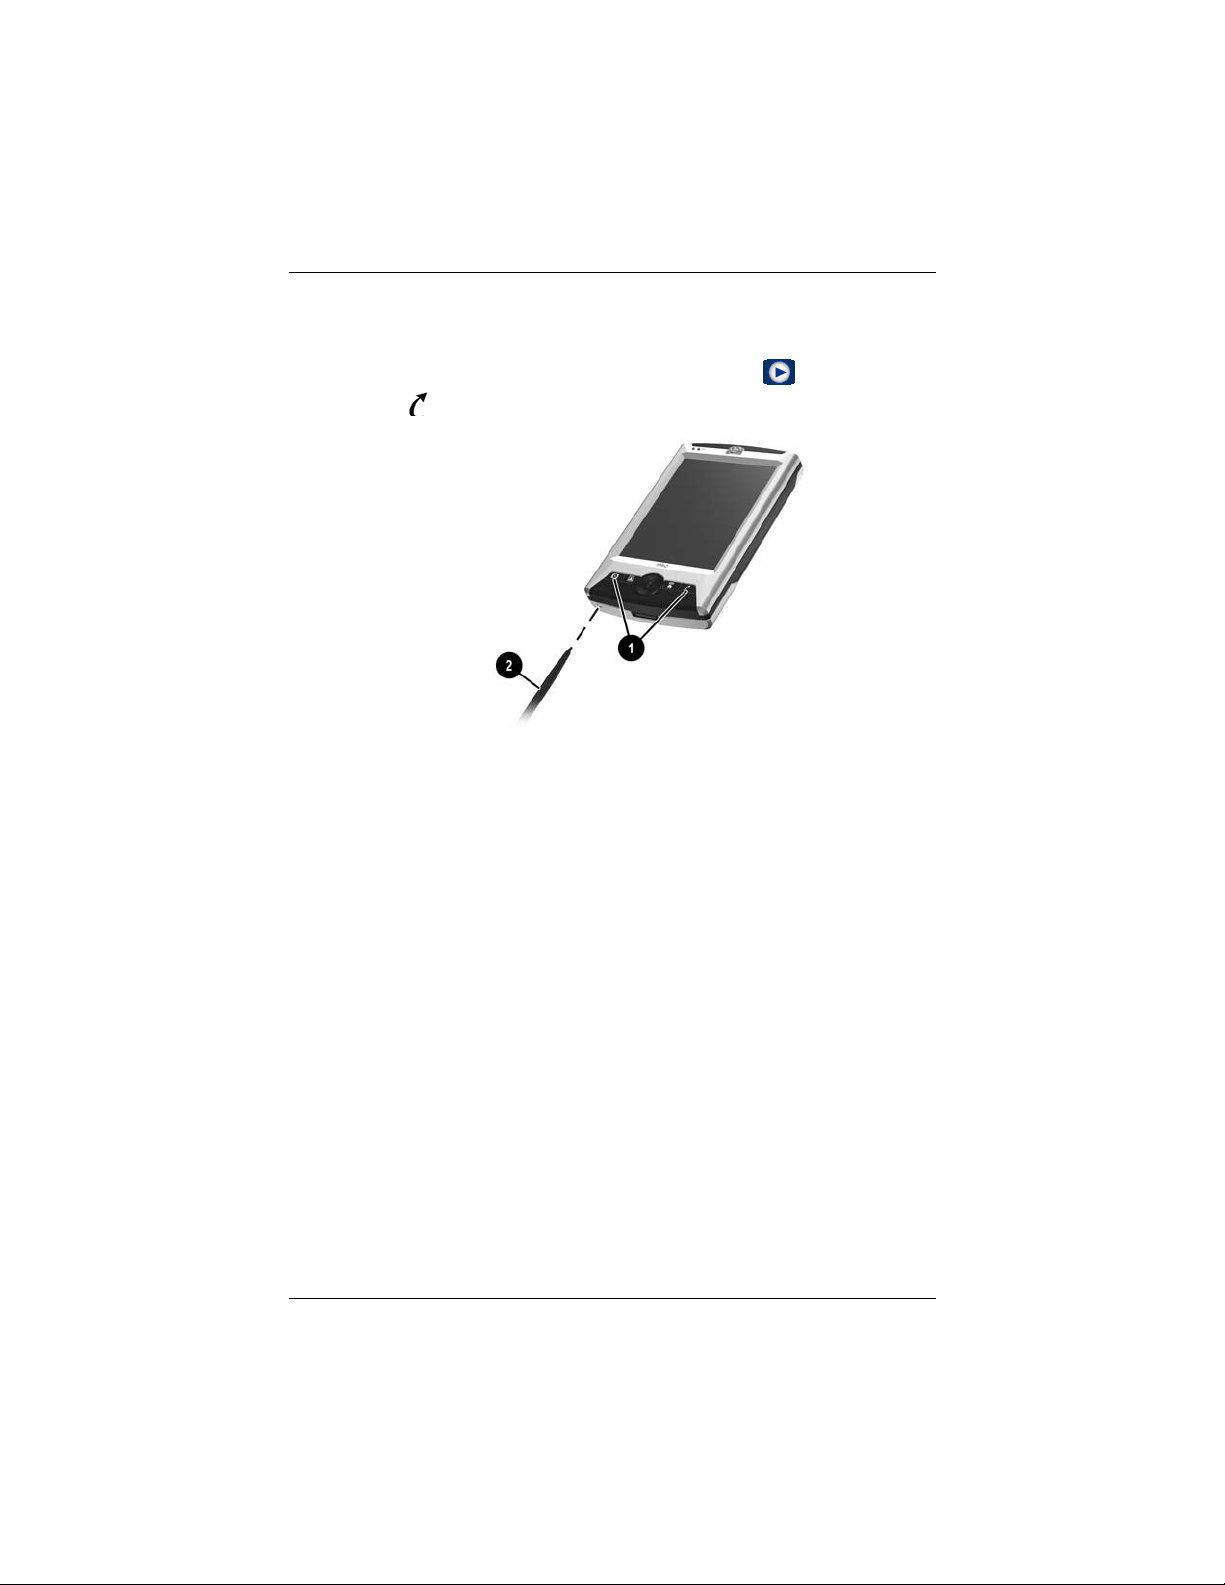
To perform a hard reset:
1. Press and hold the iPAQ Mobile Media ( ) and iTask
( ) buttons on your HP iPAQ.
2. While holding the iPAQ Mobile Media and iTask buttons,
use the stylus to lightly press the Reset button on the bottom
of your HP iPAQ for about three seconds or until the screen
begins to fade.
3. When the iPAQ screen begins to fade, release the iPAQ
Mobile Media and iTasks buttons then remove the stylus
from the Reset button. The HP iPAQ resets and powers on.
If the HP iPAQ does not power on after a reset, try the following:
■
Check the battery door to ensure it is locked. If not,
replace the battery door by matching the tabs on the cover
to the latches on the HP iPAQ and snap it into place. This
action locks the battery door. If the battery door is not
locked, the HP iPAQ does not power on. For more
information, refer to “Managing the Battery” described in
this document.
Perform a soft reset on your HP iPAQ. Refer to “How Do I
Regain Functionality if My HP iPAQ Locks Up or Runs Slowly
(Perform a Soft “Normal” Reset)?” described in the How Do I
Guide located on the Companion CD.
User’s Guide 1–11
Page 24

Aligning the Screen
When the HP iPAQ is turned on for the first time, you are guided
through a screen alignment process. You must realign your screen
if:
■
The HP iPAQ does not respond accurately to your taps.
■
You perform a full reset of your HP iPAQ.
To realign the HP iPAQ screen:
1. From the Start menu, tap Settings > System tab > Screen
icon.
2. Tap the Align Screen button.
3. Tap the cross-hair object at each location. Be precise when
tapping the cross-hair object.
4. Tap OK.
Routine Care
You should observe the following practices to protect the screen
and camera lens of your HP iPAQ from damage.
Getting to Know Your HP iPAQ
■
When transporting your HP iPAQ in a purse, pocket,
briefcase, etc., ensure the device does not get compressed,
bent, dropped, hit, or sat on.
■
When not in use, store your HP iPAQ in a case. You can
select from a wide variety of case options at
www.hp.com/go/ipaqaccessories.
■
Do not place anything on top of your HP iPAQ.
■
Do not bang your HP iPAQ against hard objects.
■
Never use any device other than the stylus that comes with
the HP iPAQ or an approved replacement to tap or write on
the screen. If you lose or break your stylus, you can order
extras at www.hp.com/go/ipaqaccessories.
User’s Guide 1–12
Page 25

Getting to Know Your HP iPAQ
■
Clean your HP iPAQ by wiping the screen, the camera lens,
and the exterior with a soft, damp cloth lightly moistened
only with water.
CAUTION: To reduce the risk of damage to the internal components,
Ä
do not spray liquid directly on the screen or allow excess liquid to drip
inside your HP iPAQ. Using soap or other cleaning products on the
screen may discolor the finish and damage it.
User’s Guide 1–13
Page 26
2
Learning the Basics
Using the Launch Page or Traditional
Today Screen
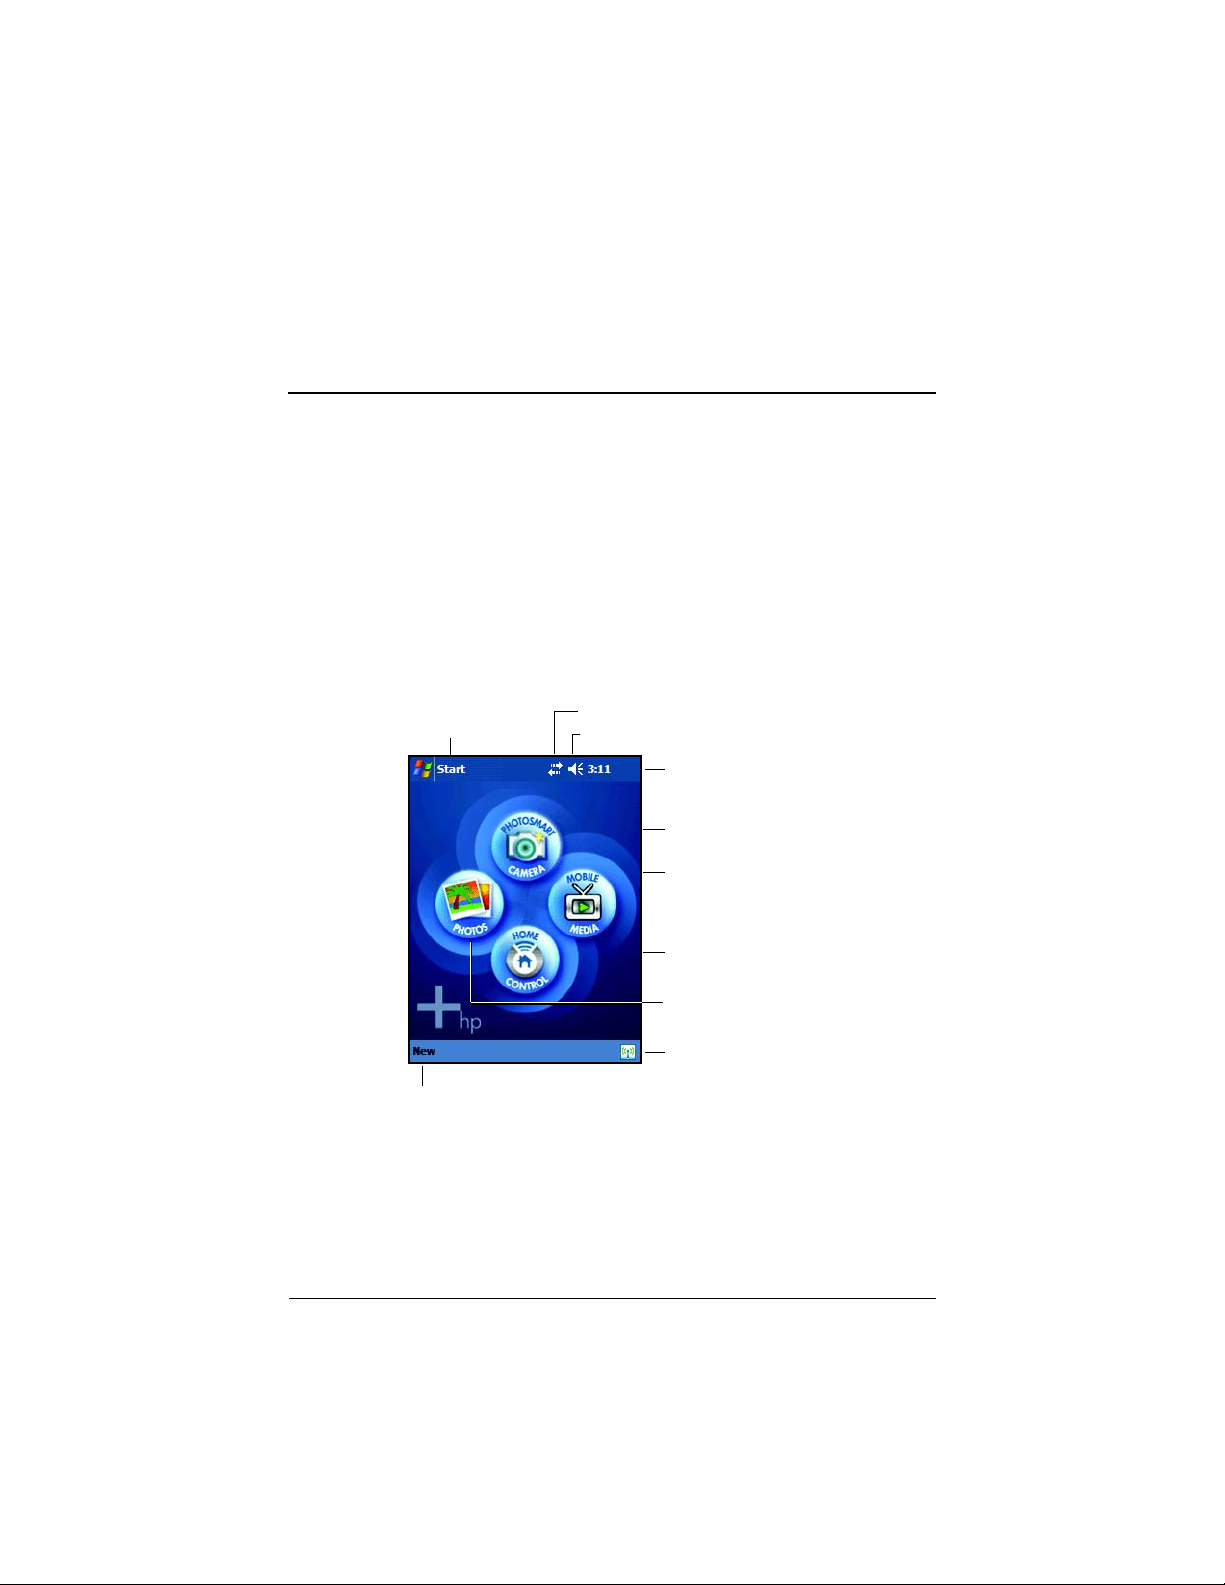
When you first turn on your HP iPAQ, the Launch page displays.
You can also display it by tapping Start > Toda y.
Tap t o v iew
Programs menu
Tap to create a new item
You can switch from the Launch page to view the traditional
Tod ay screen. To begin, on your HP iPAQ:
Tap to view connections
Tap to change volume or mute all sounds
Tap to change date and time
Tap to launch HP Photosmart
camera
Tap to open iPAQ Mobile
Media
Tap to open Nevo Universal
Remote
Tap to launch HP Image Zone
Tap to view and set Wi-Fi
and or Bluetooth settings
User’s Guide 2–1
Page 27
Learning the Basics
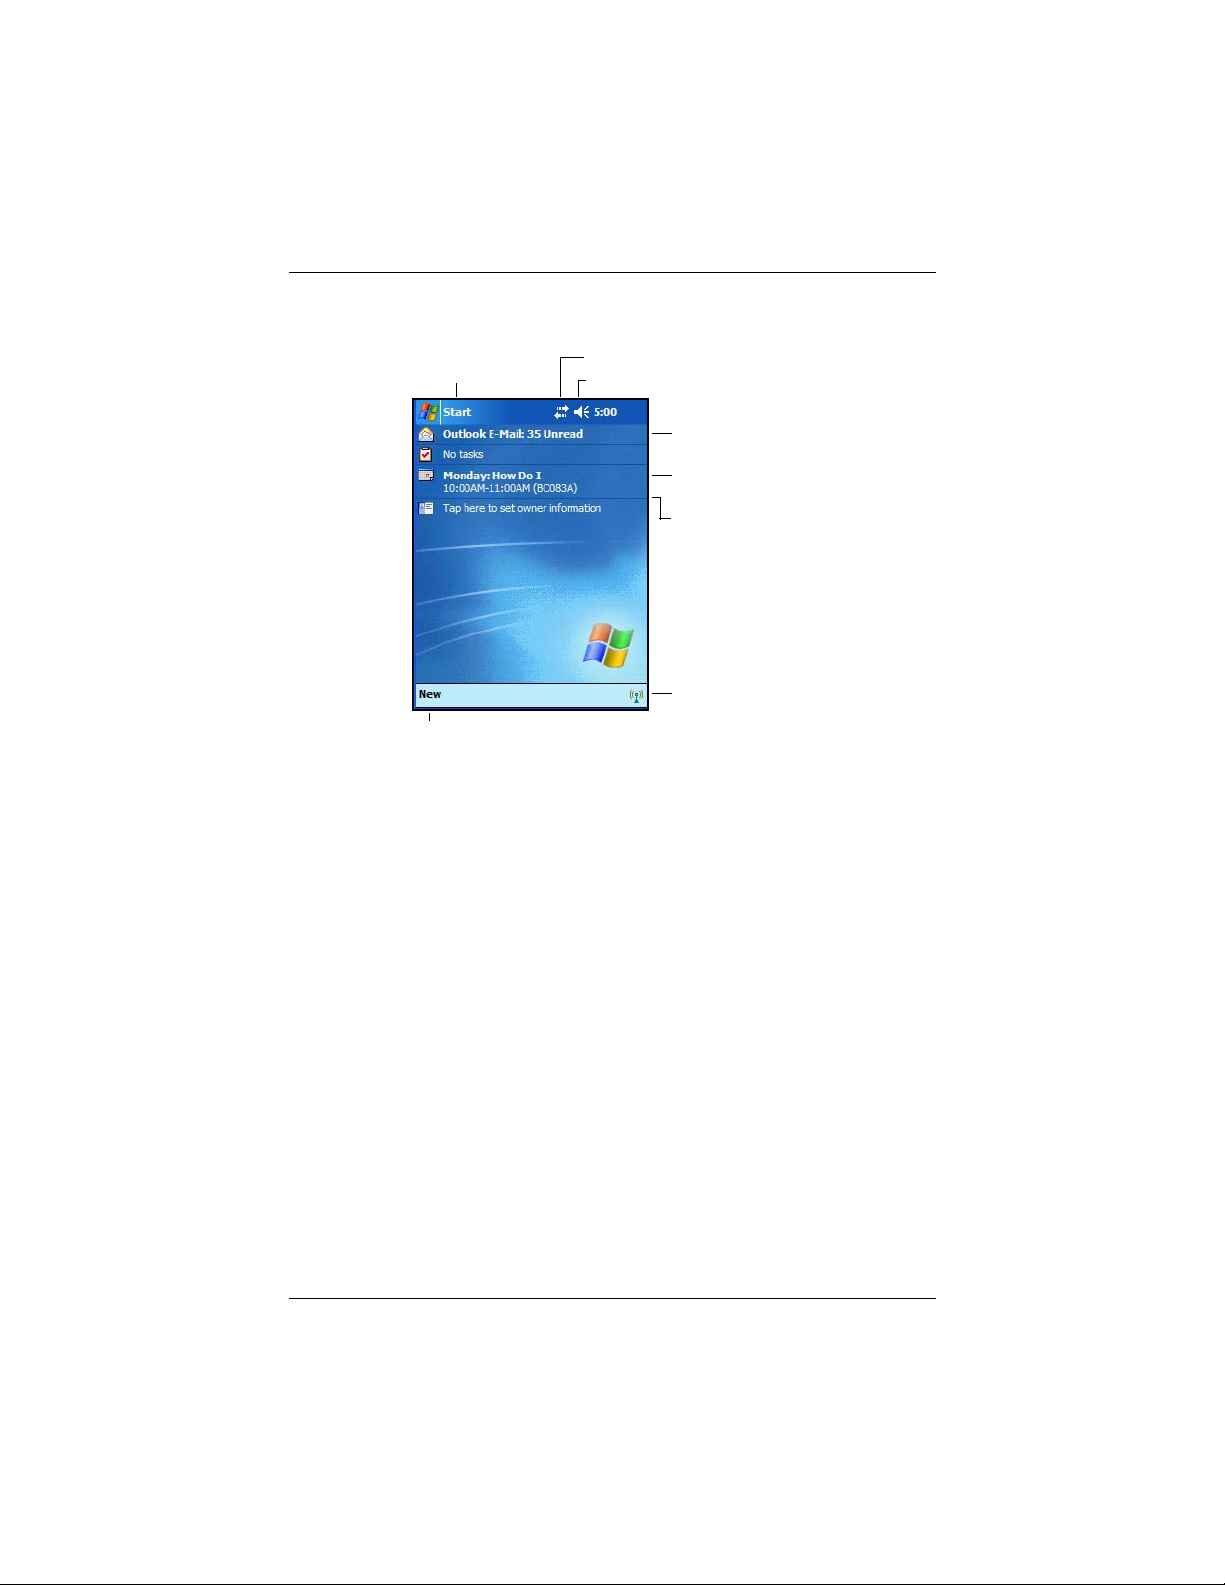
Tap t o v iew
Programs menu
Tap to create a new item
Tap to view Connections
Tap to change volume or mute all sounds
Tap to change date and time
Tap to set appointment or
view existing appointment
Tap to read e-mail
Tap to view and set Wi-Fi
and Bluetooth settings
1. Tap Start > Settings>Today.
2. In Settings, tap the Items tab and uncheck the iPAQ
Entertainment box to turn off the Launch page.
3. Under the Items tab, check the options you want to view on
the traditional Tod ay screen.
4. Click OK to accept your selections. The traditional Tod ay
screen displays.
User’s Guide 2–2
Page 28
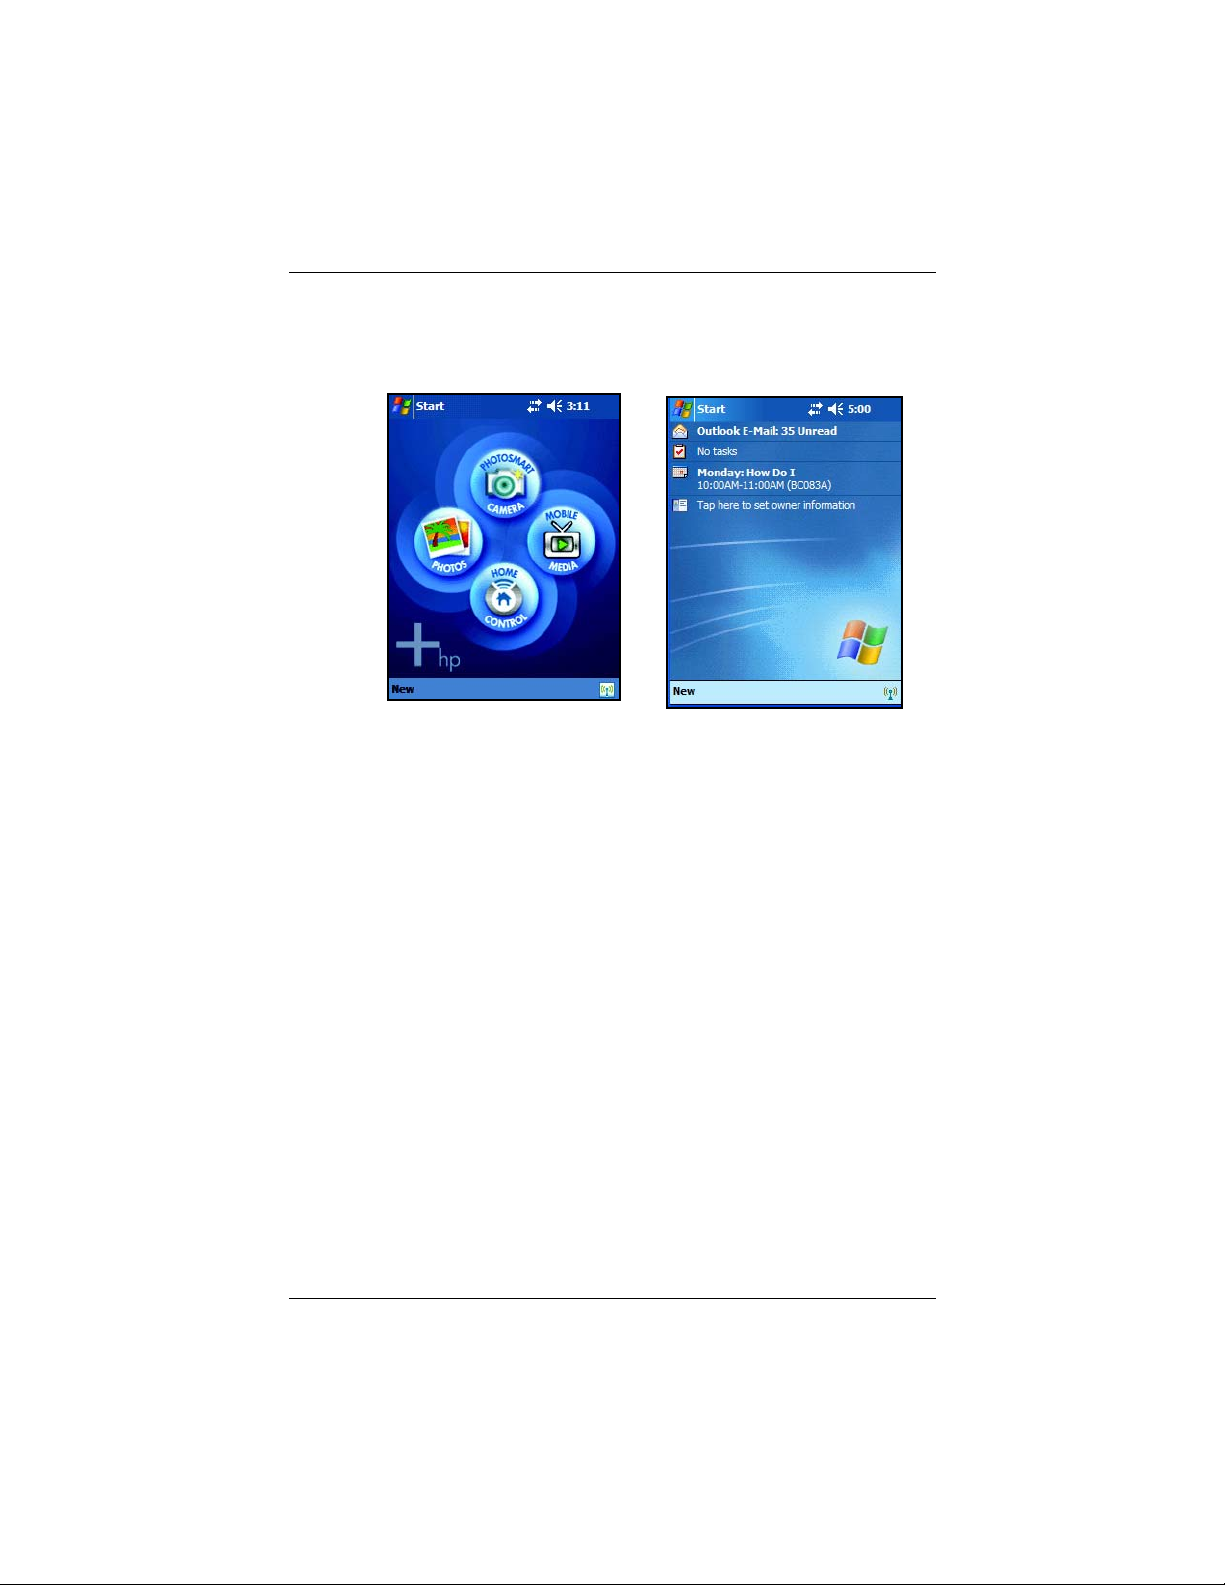
Launch Page Traditional Today Screen
Navigation Bar and Command Bar
Learning the Basics
The Navigation bar is located at the top of the screen. It displays
the current time, the status of sounds and connections, and allows
you to open new programs. Use the Start menu to select a
program.
User’s Guide 2–3
Page 29
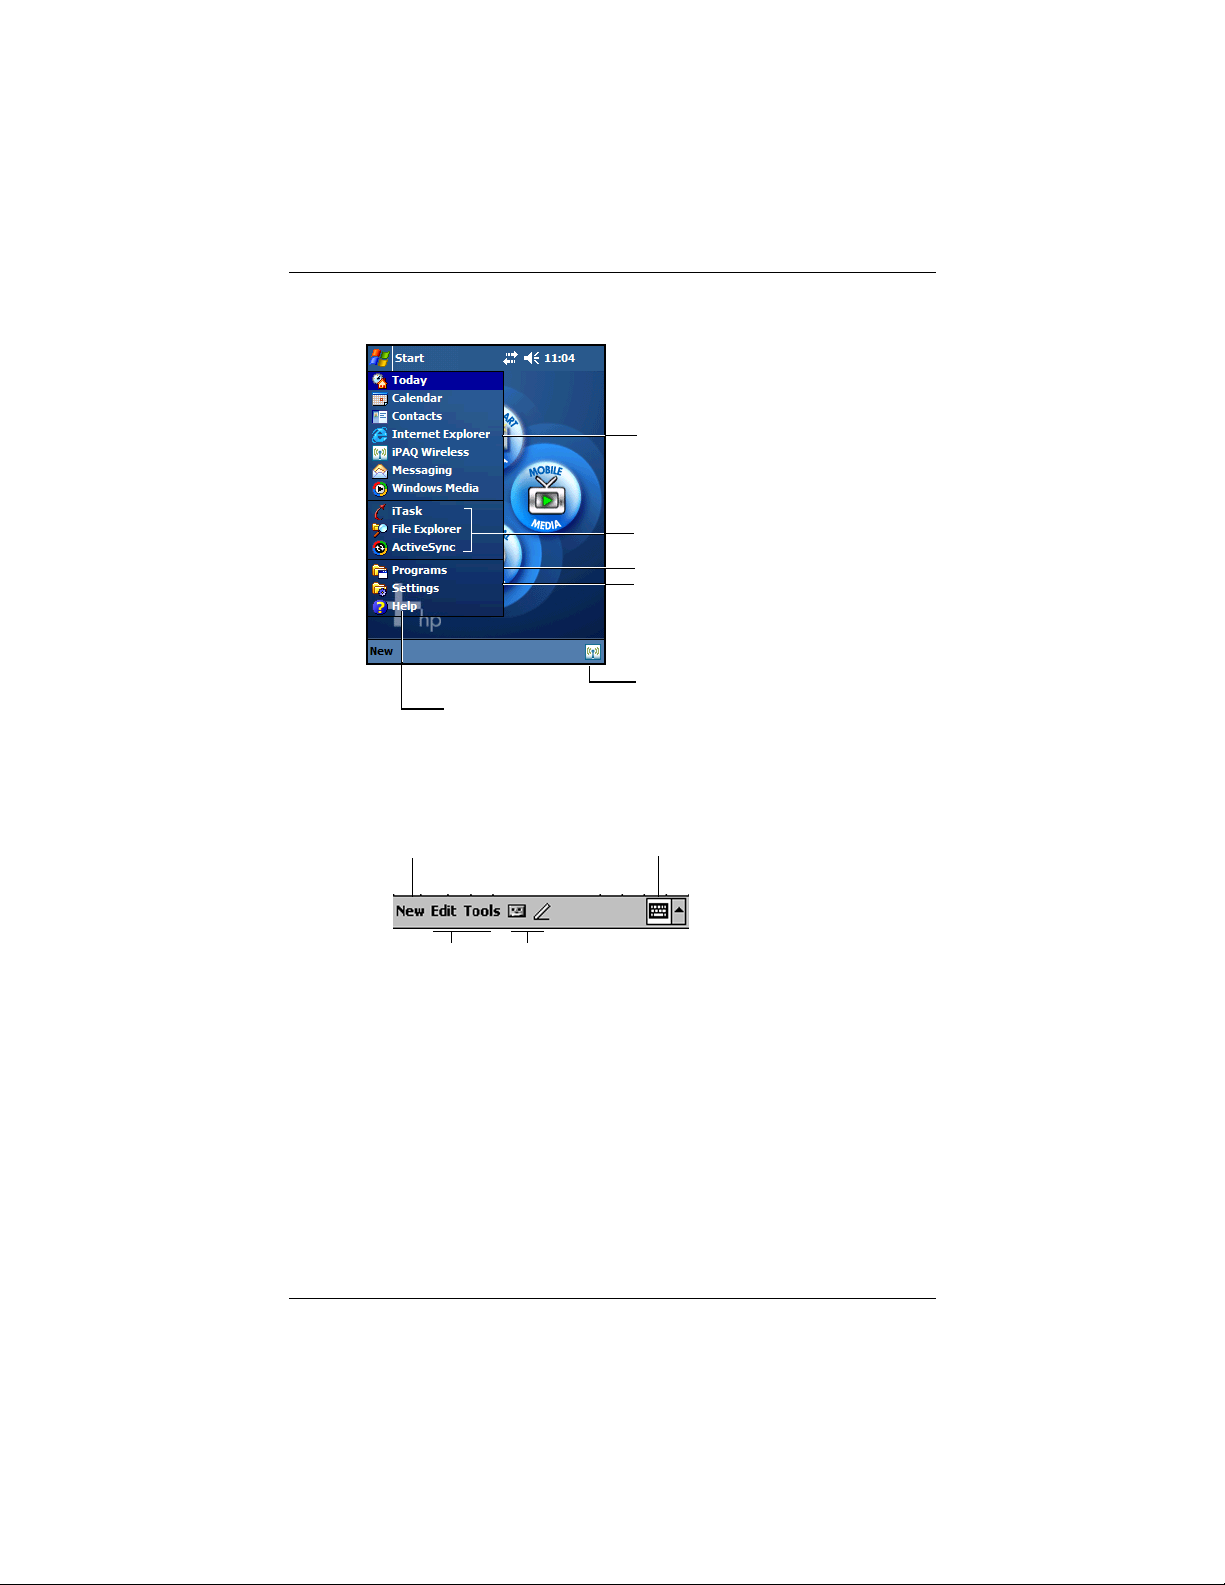
Learning the Basics
Tap to select a program
Tap to select a program you
used recently
Tap to see additional programs
Tap to customize the settings
Tap to view and set Wi-Fi and Bluetooth
Tap to view online Help
settings
Within each program, use the Command bar located at the bottom
of the screen to perform tasks. Tap New to create a new item in
the current program.
New button
Menu Buttons
actions
Input panel button
Status Icons
You may see the following status icons displayed on the
Navigation bar or Command bar. Tap the icon on the screen
to view more information related to the item.
User’s Guide 2–4
Page 30
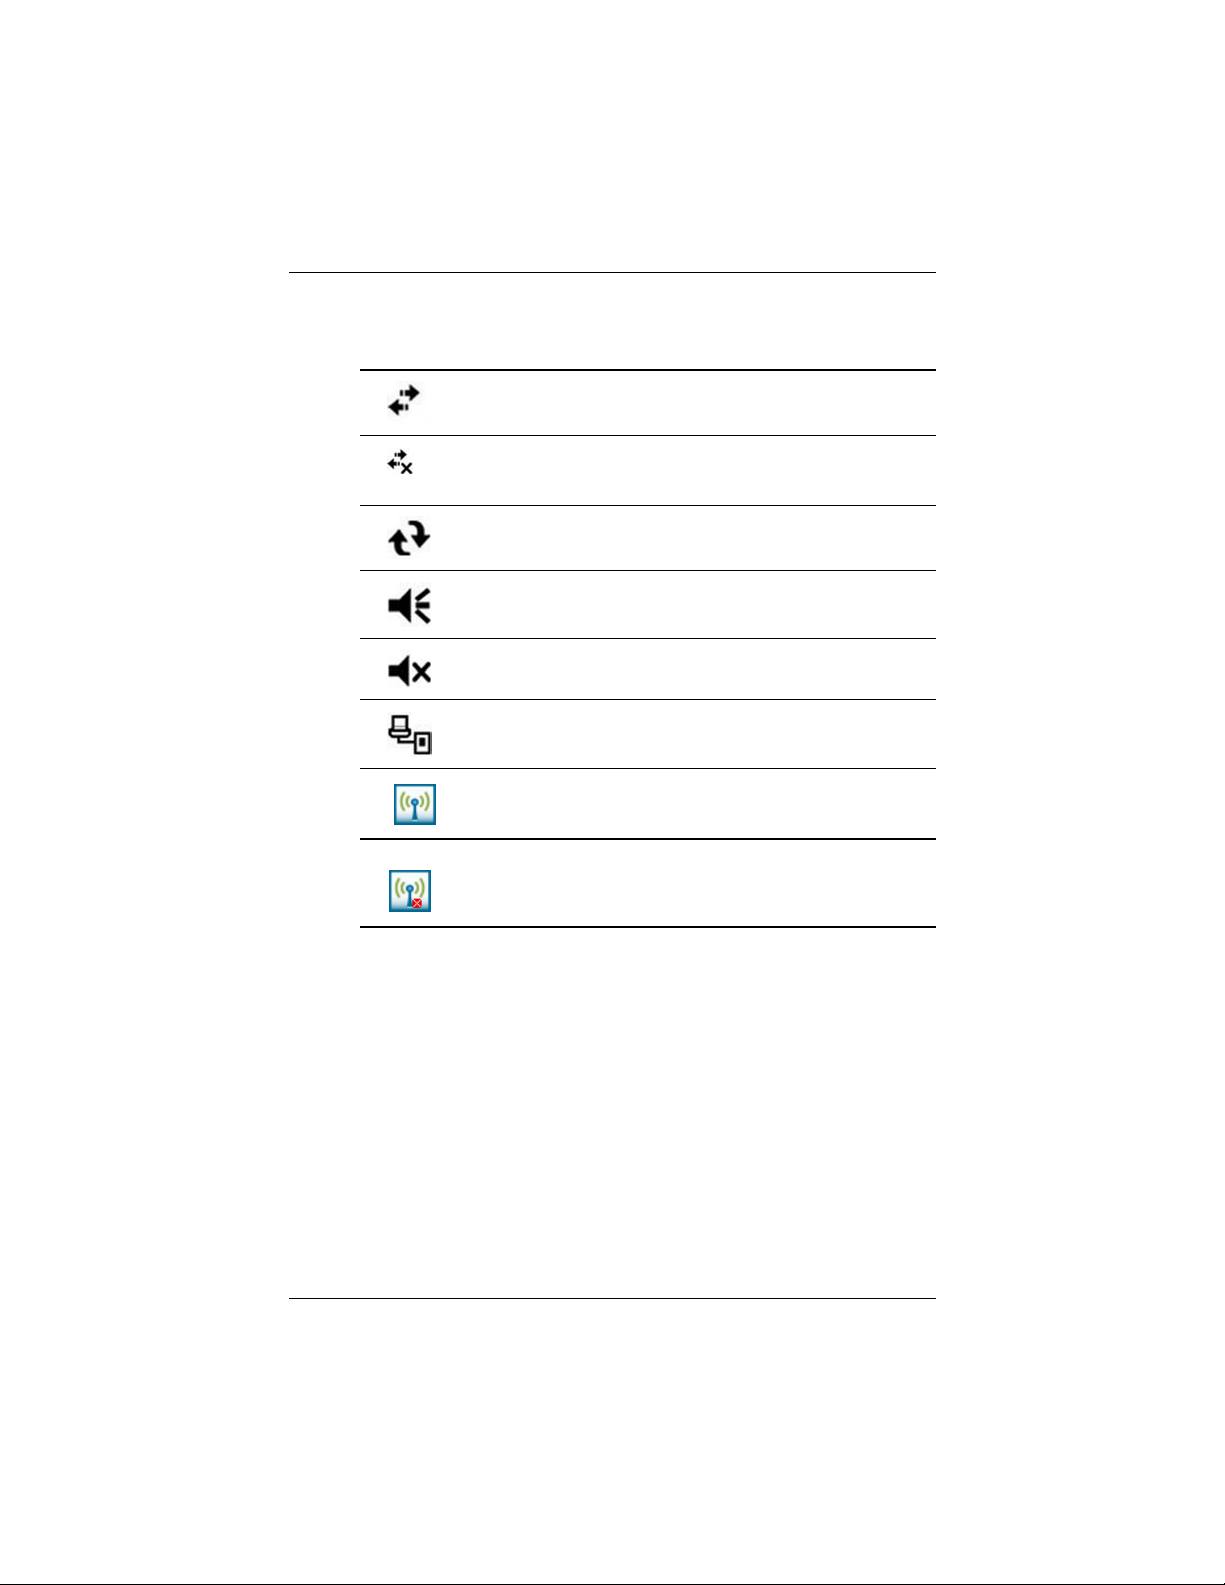
Learning the Basics
Active connection to computer or wireless network.
Inactive connection to computer or wireless network.
Microsoft ActiveSync is synchronizing.
Speaker is on.
Speaker is off.
HP iPAQ and the desktop cradle are connected. This icon
appears only when there is an active connection.
Wireless icon. When Bluetooth or Wi-Fi is on, the
Wireless LED turns blue.
Wireless icon. When Bluetooth or Wi-Fi is off, the
Wireless LED is off.
Pop-Up Menus
Pop-up menus allow you to quickly perform an action. Use the
pop-up menu to cut, copy, rename, and delete an item, also send
an e-mail or send a file to another device.
To access a pop-up menu, tap and hold the stylus on the item on
which you want to perform the action. When the menu appears,
tap the desired action, or tap anywhere outside the menu to close
it without performing an action.
User’s Guide 2–5
Page 31
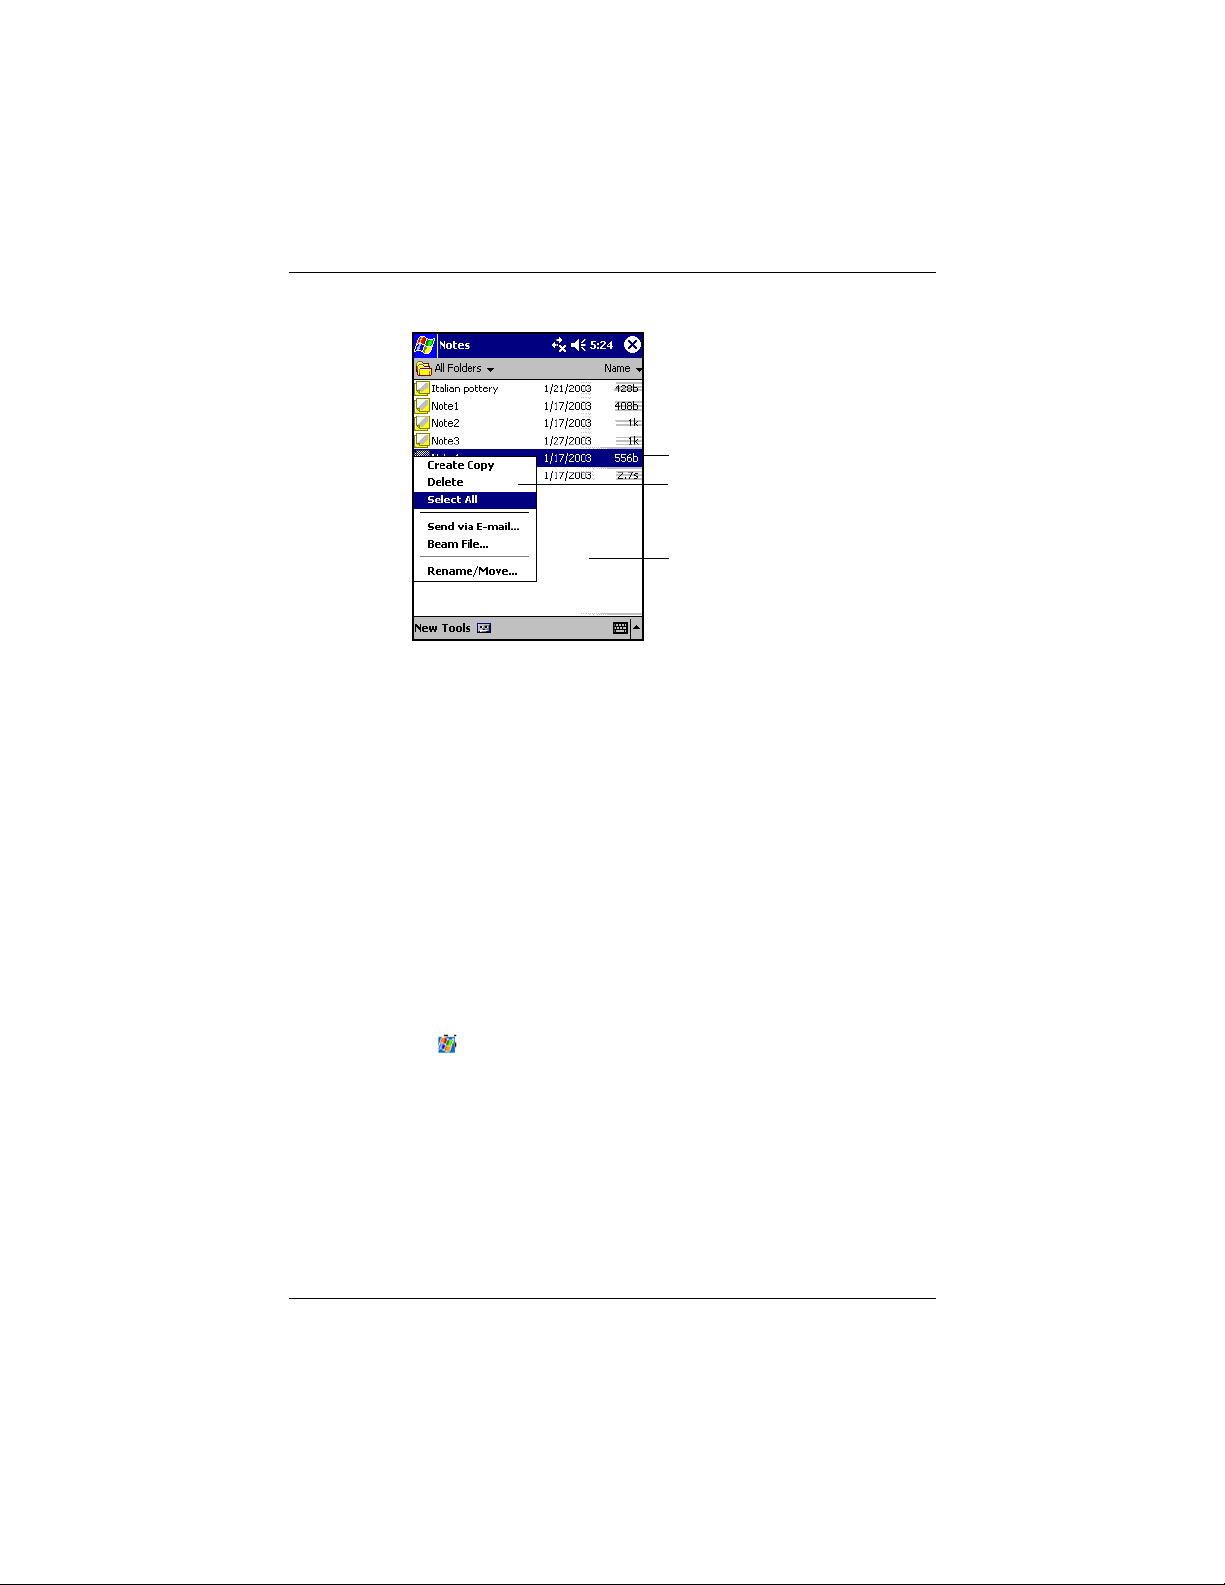
Creating information
From the Launch page or Toda y screen, you can create new
information, including:
■
Appointments
■
Contacts
Learning the Basics
Tap and hold to display
the pop-up menu.
Tap the action you want.
Tap outside the menu to close
it without performing an action.
■
Messages
■
Excel Workbook
■
Notes
■
Tasks
■
Word documents
1. Tap , or from the Start menu, tap Tod ay > New.
2. Tap an option to create a new item.
3. Tap OK after you finish creating a new item.
User’s Guide 2–6
Page 32

Customizing the Today Screen
You can:
■
Add a picture as the background.
■
Select the information that appears on the traditional Tod ay
screen.
■
Set the order of the information.
■
Set when to see the traditional Tod ay screen.
1. Tap , or from the Start menu, tap Settings > To day.
2. Select Use this picture as the background checkbox.
3. Tap the Browse button to select a picture from File Explorer.
4. Tap the Items tab to select or reorder the information on the
Tod ay screen.
5. Tap an item to highlight it.
6. Tap Move Up or Move Down to change the order of items on
the Tod ay screen.
7. Tap the down arrow associated with Display Today screen if
device is not used for...hours checkbox to determine how
many hours must pass before the Toda y screen displays.
Learning the Basics
Note:
Today screen.
You cannot change the placement of the Date on the
8. Tap OK.
Using Applications
Using the iTask Launcher
Using iTask, you are able to initiate your frequently-preformed
tasks. iTask will quickly launch, switch, and close your
applications.
User’s Guide 2–7
Page 33

Icon Default Button Functions
Learning the Basics
IPAQ Wireless Launches Wireless Manager
Inbox Displays e-mail messages in
Calendar Launches the Calendar and
Contacts Displays your contacts.
Mute/Unmuted Sound Turns sound on and off.
Today Displays the Launch page or
You can access iTask in two ways:
■
Pressing the iTask button on your HP iPAQ. The iTask
menu is displayed. Choose your task.
■
Tapping Start > Programs > iTask. The iTask menu is
displayed. Choose your task.
Launching Applications
Open any application on your HP iPAQ from the Start menu.
Note:
Application Button. To assign Applications buttons, from the
Launch page or Toda y screen, tap Start > Settings > Buttons.
You also can open an application by assigning it to an
application.
your Inbox.
displays your appointments.
Today screen.
To open an application:
1. Tap Start > Programs.
2. Tap the desired application title or logo.
Pocket Internet Explorer
To start the Pocket Internet Explorer:
User’s Guide 2–8
Page 34
Learning the Basics
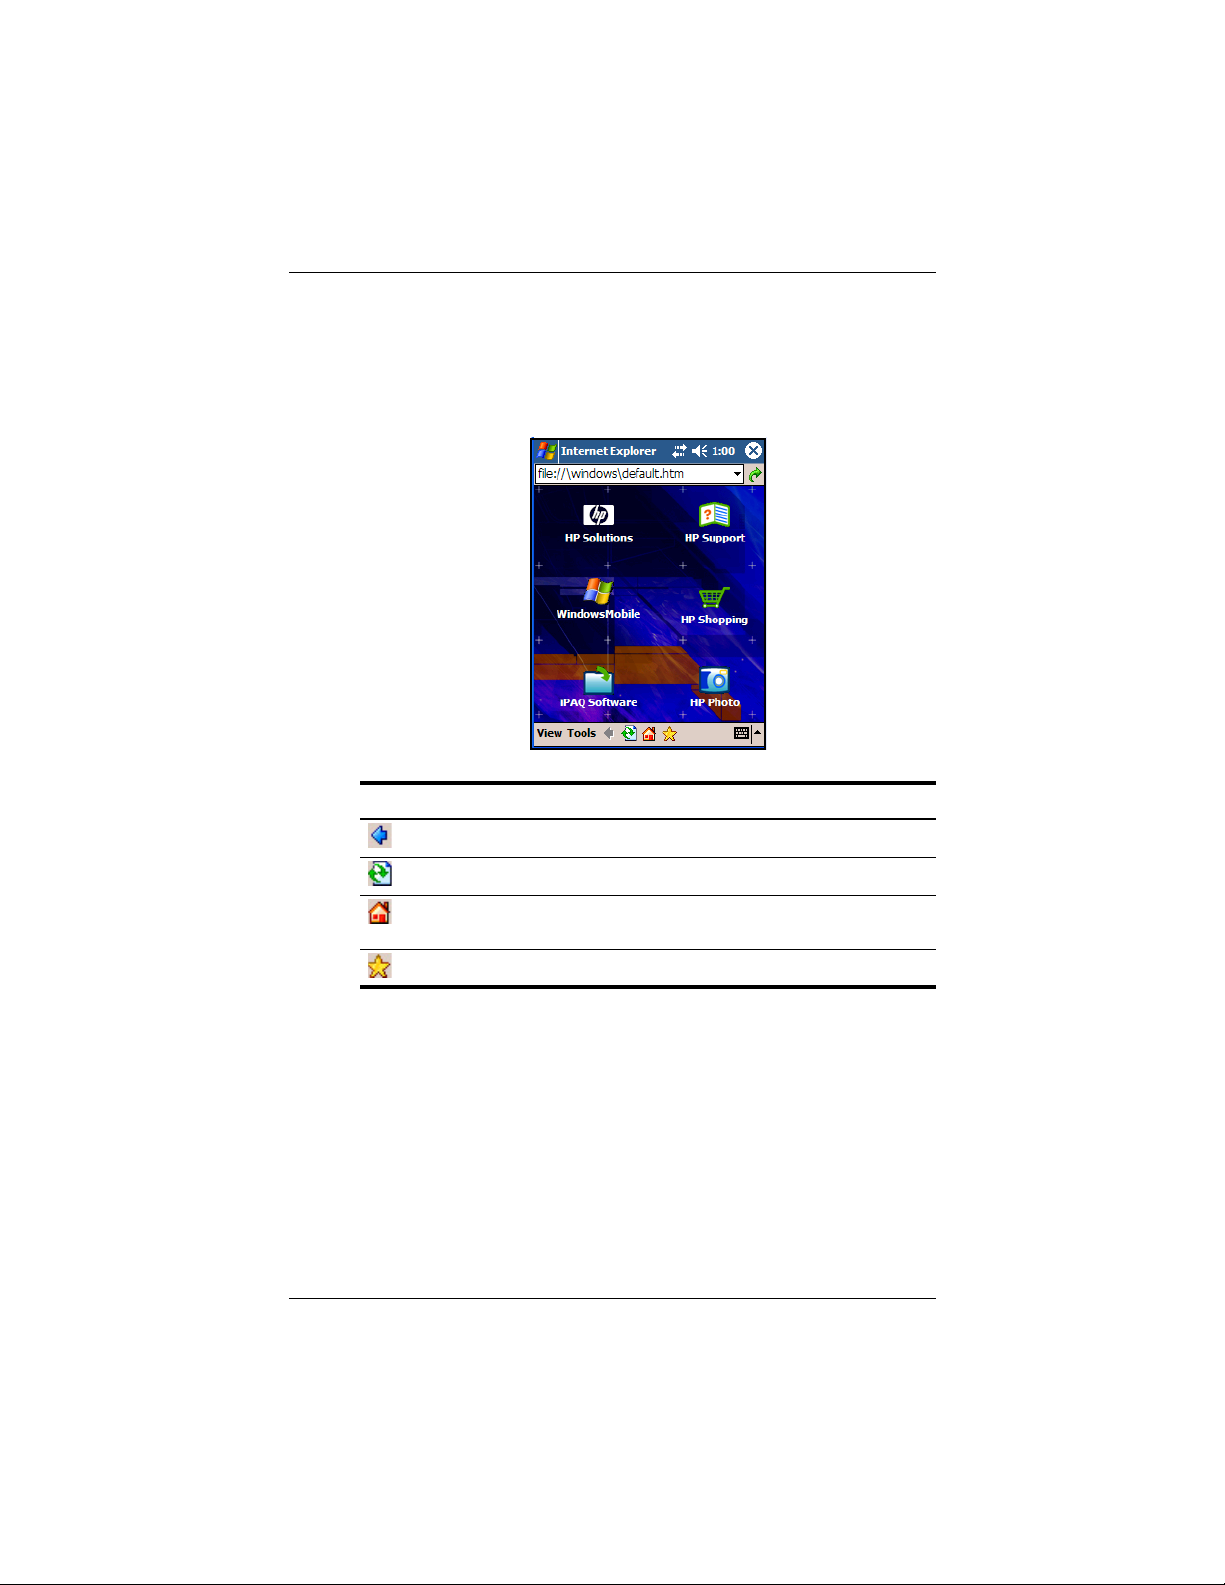
1. Tap Start > Internet Explorer. The Internet Explorer
application is displayed.
2. Make your selection from the Home page.
Icons Button Function
Back Takes you back to previous page.
Refresh Refreshes the current page.
Home Takes you back to the Internet Explorer
Star Takes you to your Favorites list.
Home Page.
Switching Between Landscape and Portrait
Screen Orientations
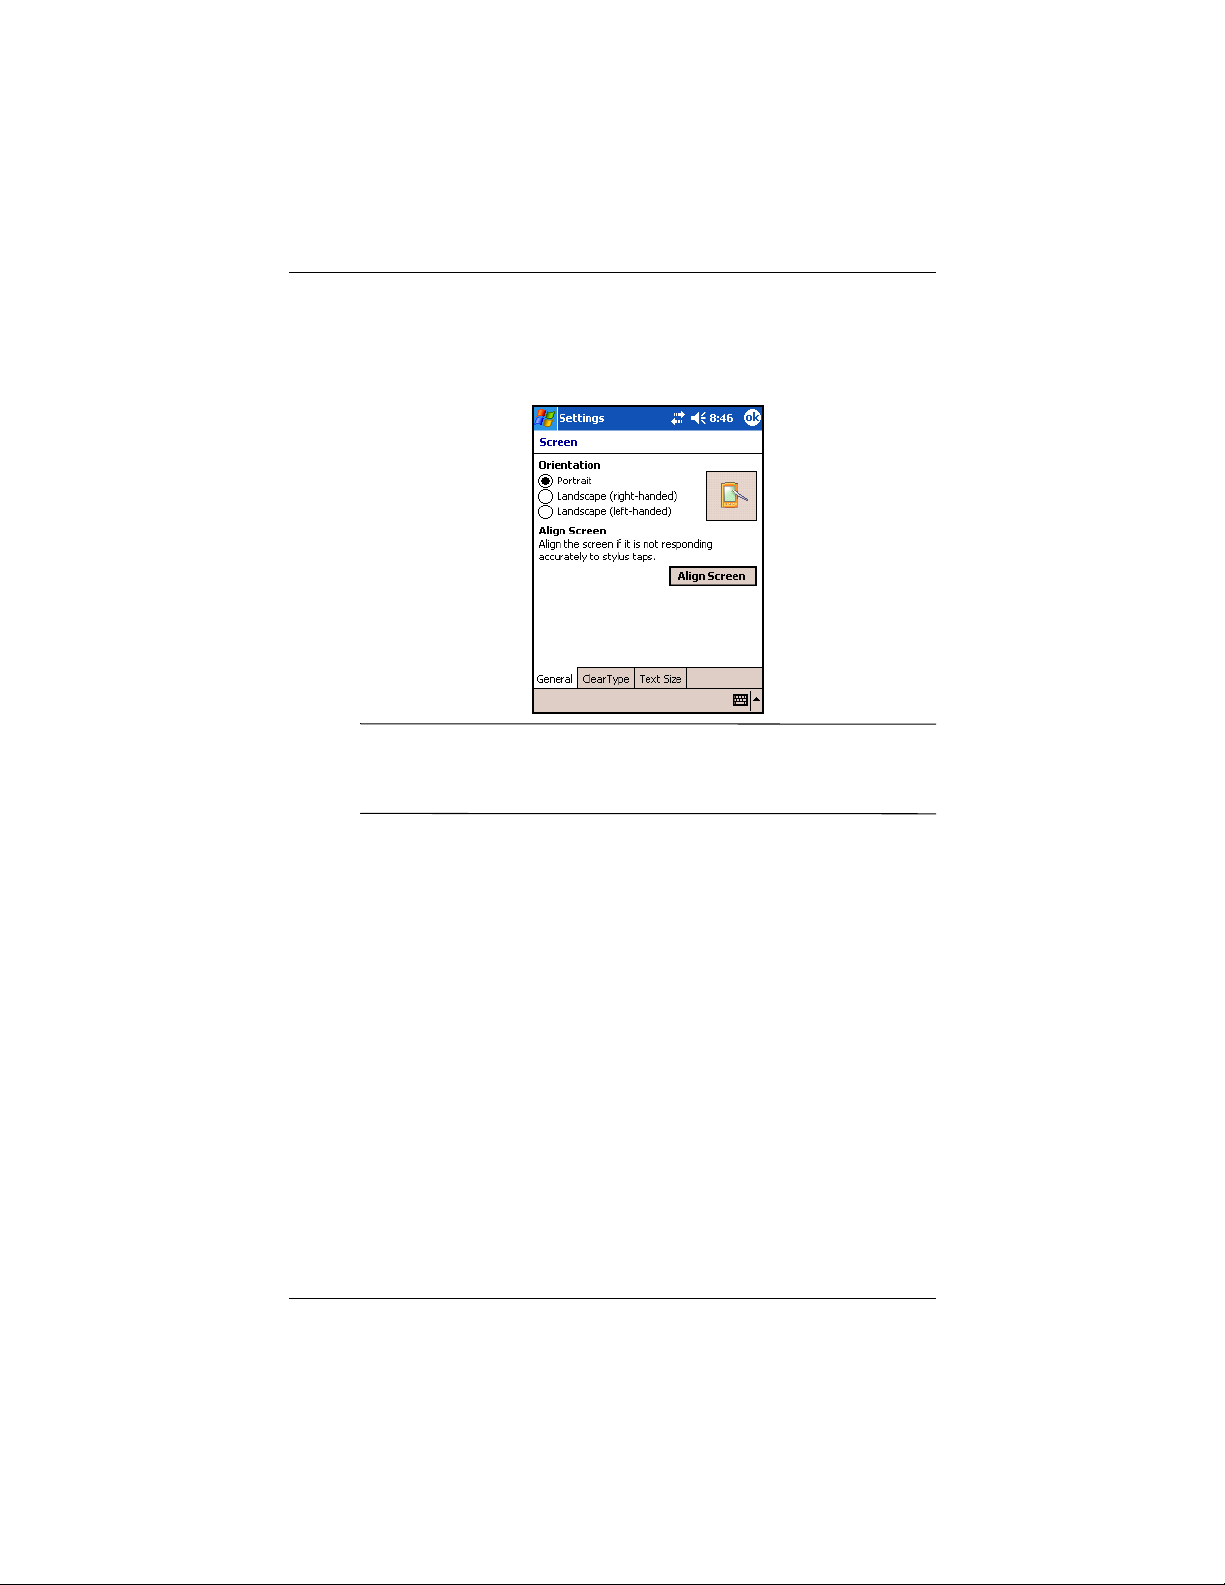
To change the display setting on your HP iPAQ:
1. Tap Start > Settings.
2. Tap the System tab at the bottom of the Settings screen.
3. Tap the Screen icon. The Screen Orientation options are
displayed.
User’s Guide 2–9
Page 35
Learning the Basics
4. Make your selection and press the OK button. Your display
screen is now in the new orientation.
Note:
switch the orientation automatically when you start the
application.
Some applications only work in Portrait mode and may
Minimizing Applications
To minimize an open application, tap the x at the top right of the
screen.
Closing Applications
Applications automatically close based on available memory.
However, if your HP iPAQ is running slowly, you can close
applications using iTask or the Settings menu.
Closing with iTask
1. Press the iTask button
2. Tap and hold the program to be closed.
3. From the pop-up menu, tap Close This Task.
User’s Guide 2–10
Page 36

Closing Manually
1. From the Start menu, tap Settings > System tab >
Memory > Running Programs tab.
2. Tap Stop All or select a particular application, then tap Stop.
Learning the Basics
Note:
To bring a currently running program to the foreground,
tap Activate.
Installing Applications
Install applications on your HP iPAQ from your:
■
Computer by using Microsoft ActiveSync.
■
HP iPAQ if the application file has a .cab extension.
■
HP iPAQ or your computer by copying an application file
that has an .exe or .cef extension.
When installing applications, look for the correct version for your
HP iPAQ model.
■
Follow the instructions provided with the application and
next to the installation Wizard to install applications from
your computer.
■
Tap the application file in File Explorer on your HP iPAQ.
Then follow the instructions on the Installation Setup Wizard
to install applications on your HP iPAQ.
Backing Up Information
Use iPAQ Backup or Microsoft ActiveSync Backup to back up
and restore information on your HP iPAQ.
Note:
iPAQ Backup is already installed on the HP iPAQ. You
must install ActiveSync on your computer before using
ActiveSync Backup.
User’s Guide 2–11
Page 37

To help reduce the chance of losing information, you should back
up information on a regular schedule.
Backup/Restore using iPAQ Backup
iPAQ Backup saves your data in a backup file. You may designate
a file name and a location for the file to be saved. iPAQ Backup
backs up to a memory card, main memory, or the iPAQ File Store
folder. Close all programs on your HP iPAQ before backing up or
restoring your information.
CAUTION: Restoring your information replaces the current information
Ä
on your HP iPAQ with the information saved in your backup.
To backup/restore using iPAQ Backup:
1. Tap , or from the Start menu, tap Programs > iPAQ
Backup.
2. Tap the Backup tab or the Restore tab.
3. Select the files and folders to be backed up or restored.
4. Select file location for backed-up data.
5. Set backup or restore options.
6. Press the Backup or Restore button, and press the Start
button on the next screen.
Learning the Basics
Backup/Restore Using ActiveSync
Close all programs on your HP iPAQ before backing up or
restoring your information.
CAUTION: Restoring your information replaces the current information
Ä
on your HP iPAQ with the information saved in your backup.
To backup/restore using ActiveSync:
1. Be sure the HP iPAQ is connected to your computer.
2. From your computer, open Microsoft ActiveSync. From the
Start menu, click Programs > Microsoft ActiveSync.
3. From the Tool s menu, click Backup/Restore.
User’s Guide 2–12
Page 38

4. Click the Backup or Restore tab, and select your options.
5. Click Backup Now or Restore Now.
Using iPAQ File Store Folder
You can install programs and save files to the iPAQ File
Store folder, which is accessed from File Explorer on your HP
iPAQ . (This feature is not available on all models and/or in all
regions.)
Programs and files stored in iPAQ File Store are held in secure
memory and are saved if you perform a full reset of your HP
iPAQ or if the battery discharges completely.
To store files in iPAQ File Store:
1. Browse for programs and files in your HP iPAQ by tapping
Start > Programs > File Explorer.
2. Copy the programs or files you want to store:
❏
To select one file to copy, tap and hold to highlight the
file.
❏
To select several files to copy, tap and drag to highlight
the files; then tap and hold the files.
Learning the Basics
3. In the pop-up menu, tap Copy.
4. Open iPAQ File Store by tapping Start > Programs > File
Explorer > My Documents > My Device > iPAQ File
Store.
5. At the bottom of the screen, tap Edit > Paste.
To view available memory in iPAQ File Store:
1. Tap Start > Settings > System tab >Memory > Storage
Card tab.
User’s Guide 2–13
Page 39

Learning the Basics
2. Select iPAQ File Store from the drop-down list.
Note:
Before saving files to the iPAQ File Store folder, it is a
good idea to determine how much memory is available in the
folder. To view the amount of memory, from the Start menu, tap
Settings > System tab > Memory > Storage Card tab, then
select iPAQ File Store from the drop-down menu.
User’s Guide 2–14
Page 40

Synchronizing with Your
Using Microsoft ActiveSync
Microsoft ActiveSync is a program you install on your desktop or
laptop computer to transfer data back and forth. In this manner,
you only have to input information once either at your computer
or your HP iPAQ. Using ActiveSync and the sync cable, you
connect your HP iPAQ and a computer to:
■
Copy files (data, audio or video) between your HP iPAQ and
up to two host computers so you always have the latest
information in all locations.
■
Install programs on your device.
■
Back up and restore files.
■
Synchronize web links.
3
Computer
■
Send and receive e-mail messages.
■
Request meetings.
Installing ActiveSync
These instructions assume the battery has been previously
charged.
CAUTION: The first time you synchronize, perform Steps 1 and 2
Ä
below (install Microsoft ActiveSync on your computer). Then, when
prompted to do so, connect your HP iPAQ to your computer.
User’s Guide 3–1
Page 41

Synchronizing with Your Computer
To install Microsoft ActiveSync on your computer:
1. Insert the Companion CD into the CD-ROM tray or slot in
your computer.
2. After the introduction displays, click Start Here. Follow the
Setup Wizard screen instructions.
When prompted, connect your HP iPAQ and your personal
computer using the supplied cables in the following manner:
To create an ActiveSync partnership between your HP iPAQ and
your personal computer:
3. When prompted to do so, use the desktop cradle or sync cable
to connect your HP iPAQ and your personal computer as
follows:
❏
If you have an rx3700 series, connect the USB connector
to the USB port on your computer. Insert the HP iPAQ
into the desktop cradle. Connect the AC adapter to the
desktop cradle to charge it.
❏
If you have an rx3400 series, connect the sync cable to
the USB port on your computer and the other end to the
HP iPAQ. Connect the AC adapter to the sync cable to
charge it
Note:
The HP iPAQ supports a serial connection. However, to
synchronize via a serial connection, you must use a serial sync
cable (sold separately.)
4. The Setup Wizard detects the programs on your computer,
and guides you step-by-step so you can install ActiveSync on
your computer and other optional programs on your device.
Once you finish the Setup Wizard, you can disconnect the
HP iPAQ from the computer.
User’s Guide 3–2
Page 42

Synchronizing with Your Computer
Synchronizing with Your Computer
Once ActiveSync is installed on your computer, you can:
■
Create an additional partnership with a second computer so
you can synchronize information.
■
Change the type of data (Contacts, Calendar, Messaging,
Tasks, Favorites, Files, Notes, or AvantGo) to synchronize.
Note:
To synchronize files, select files in your computer; then
drag and drop the files into the synchronization folder on your
device. If you named your HP iPAQ “PC1” when you created
your partnership, then the synchronized folder is named “PC1.”
When you synchronize, the files are automatically moved to and
from the PC1 folder.
Changing Synchronization Settings
You can modify the synchronization settings to:
■
Set a time for synchronization to occur.
■
Change the type of connection.
■
Select the types of files to synchronize.
■
Select the files and information you do not want to
synchronize (ex: e-mail attachments).
■
Determine how conflicts between information on your HP
iPAQ and information on your computer are to be handled.
To modify synchronization settings:
1. On your computer, open ActiveSync by clicking Start >
Programs > Microsoft ActiveSync.
2. In ActiveSync, click Tools > Options.
a. In the Sync Options page, check the Mobile select items
to be synchronized.
User’s Guide 3–3
Page 43

Synchronizing with Your Computer
b. Click the Schedule tab to set the time for
synchronization.
c. Click the Rules tab to determine how conflicts between
information on your HP iPAQ and information on your
computer are to be handled.
3. Tap OK.
4. From the File menu, click Connection Settings... . Select the
type of connection to use between the HP iPAQ and the
computer.
Using the Serial Infrared (IR) Connection
Your HP iPAQ has an infrared port. If your computer has an
infrared port or an infrared USB adapter, you can synchronize
your HP iPAQ and your computer using an infrared connection
instead of the sync cable. The infrared connection option only
works on computers with Microsoft Windows 98SE, Me, 2000, or
XP operating systems.
To set up an infrared connection to your computer:
1. Follow your computer manufacturer’s instructions to set up
the infrared port.
2. Line up the HP iPAQ infrared port with the computer infrared
port so they are unobstructed and within 12 inches (30 cm) of
each other.
3. On your HP iPAQ, tap Start > ActiveSync > Too ls >
Connect via IR... . Synchronization begins automatically.
4. To disconnect, move the HP iPAQ and computer away from
each other, or tap the X in the upper right corner of the screen
on your device.
User’s Guide 3–4
Page 44

Synchronizing with Your Computer
Establishing an ActiveSync Partnership with a
Bluetooth Computer
Your HP iPAQ is Bluetooth-enabled, so you can establish a
Bluetooth ActiveSync connection. By establishing a Bluetooth
ActiveSync connection, you can synchronize your computer and
HP iPAQ instead of using the sync cable.
To set up a Bluetooth ActiveSync connection to your computer:
1. If needed, remove your HP iPAQ from the desktop cradle.
2. Tap Start > Program > ActiveSync.
3. In ActiveSync, tap Tools > Options.
4. From the PC Synchronization menu, tap the Options
button.
5. Select Bluetooth ActiveSync from the drop-down arrow list.
6. Tap OK.
7. Then tap OK again. You can now synchronize your HP iPAQ
with your computer using Bluetooth instead of the sync
cable.
Manually Copying or Moving Files
You can copy or move files to and from your computer using
Explore in ActiveSync and Windows Explorer.
To copy a file:
1. Connect your HP iPAQ and computer via the desktop cradle
or sync cable.
2. On your computer, right-click the Start menu.
3. In the pop-up menu, click Explore. This opens the file
hierarchy in your computer.
4. Browse through your folders and subfolders and locate a file
to be copied or moved to your HP iPAQ.
User’s Guide 3–5
Page 45

Synchronizing with Your Computer
5. Once you find a file(s), leave the window open.
Note:
10. If you want, on your HP iPAQ, open File Explorer. Tap My
You cannot copy preinstalled files or system files.
6. On your computer, open ActiveSync by clicking Start >
Programs > Microsoft ActiveSync.
7. In ActiveSync, click Explore. This opens the file hierarchy in
your HP iPAQ (under the folder Mobile Device).
8. Go to My Pocket PC > My Documents and leave the
window open.
9. Drag and drop the file(s) between your computer and your
HP iPAQ. If you are prompted for permission to convert a file
so it can be used in the HP iPAQ, answer yes.
Device. See the file(s) you have just copied or moved.
Installing a Program
To install a program from your computer using ActiveSync:
1. Connect your HP iPAQ to your computer using the sync
cable.
2. Follow the instructions on the computer screen for installing
that particular program.
3. Check the screen on your HP iPAQ to see if further steps are
necessary to complete the installation.
Backing up and Restoring Files
To help reduce the chance of losing information, you should back
up information to your computer regularly. For more information
on backing up and restoring information using Microsoft
ActiveSync, see “Chapter 2, “Learning the Basics.”
User’s Guide 3–6
Page 46

Synchronizing Links
You can synchronize links to web sites from the Favorites list on
your computer to view them offline with Pocket Internet
Explorer.
1. On your computer, open Internet Explorer.
2. Click Favorites to see the list of links to your favorite web
sites.
3. To save a website link to Mobile Favorites, open the web site
and click Create Mobile Favorite.
■
If you have selected “Favorites” as an information type to be
synchronized, ActiveSync copies your mobile favorite
to your HP iPAQ the next time you synchronize.
■
If you have not selected “Favorites” as an information type to
be synchronized, ActiveSync will not copy your mobile
favorite to your HP iPAQ the next time you synchronize.
To manually synchronize your favorite links, follow the
instructions described in this chapter.
Synchronizing with Your Computer
Sending and Receiving E-mail
Messages
You can send and receive e-mail messages by synchronizing your
HP iPAQ with your computer using ActiveSync. When sending
and receiving e-mail messages, the name of the current folder is
displayed at the bottom of the screen.
For more information on sending and receiving e-mail using
ActiveSync, view Messaging Help by going to Start > Help >
Messaging.
User’s Guide 3–7
Page 47

Synchronizing with Your Computer
Sending a Meeting Request
You can schedule a meeting and send a meeting request via
ActiveSync. You create the meeting information in Messaging
and the next time you synchronize with your computer, the
meeting request will be sent.
Note:
Outlook on their computer(s).
For more information, view Calendar Help by going to Start >
Help > View > All Installed Help > Calendar.
The person(s) you invite must use Outlook or Pocket
User’s Guide 3–8
Page 48

Learning Input Methods
Using Input Software
CAUTION: To avoid damaging your HP iPAQ screen, always use a
Ä
stylus. Never use a pen or any type of metal pointer on the screen.
To input information to your HP iPAQ, you can tap the on-screen
keyboard or write with the Letter Recognizer, Microsoft
Transcriber, or Block Recognizer in any application. You can use
the stylus to draw and write on the screen in the Notes application
and from any Notes tab in the Calendar, Contacts, and Tasks
applications.
Changing Word Suggestion Options
As you type or write, the HP iPAQ suggests words for you in a
box above the keyboard, Letter Recognizer, or Block Recognizer,
but not in the Transcriber.
4
You determine:
■
If words are suggested.
■
The number of letters you enter before a word is suggested.
■
The number of words that are suggested per entry.
To change settings for word suggestions:
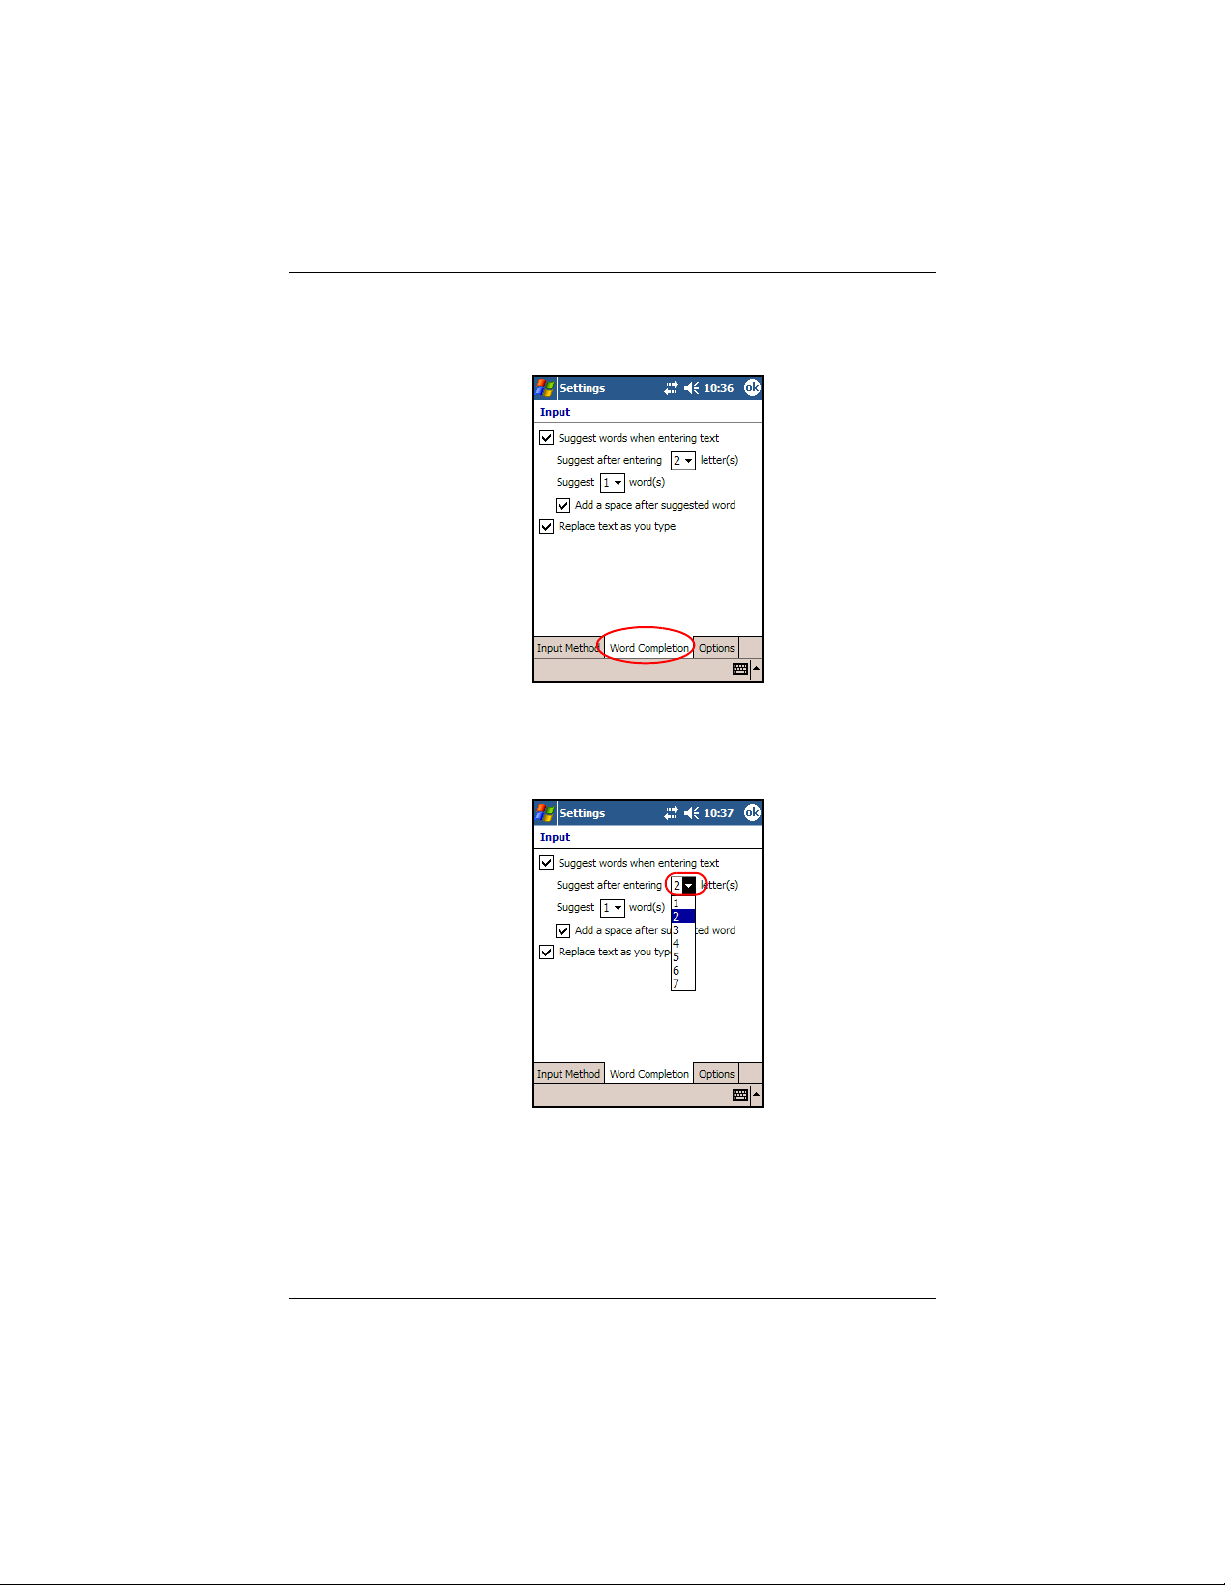
1. From the Start menu, tap Settings > Input.
User’s Guide www.hp.com 4–1
Page 49
Learning Input Methods
2. Tap the Word Completion tab.
3. Tap the down arrow associated with letters and select the
number of letters you want to type before a word is
suggested.
t
4. Tap the down arrow associated with words and select the
number of words you want suggested.
User’s Guide www.hp.com 4–2
Page 50
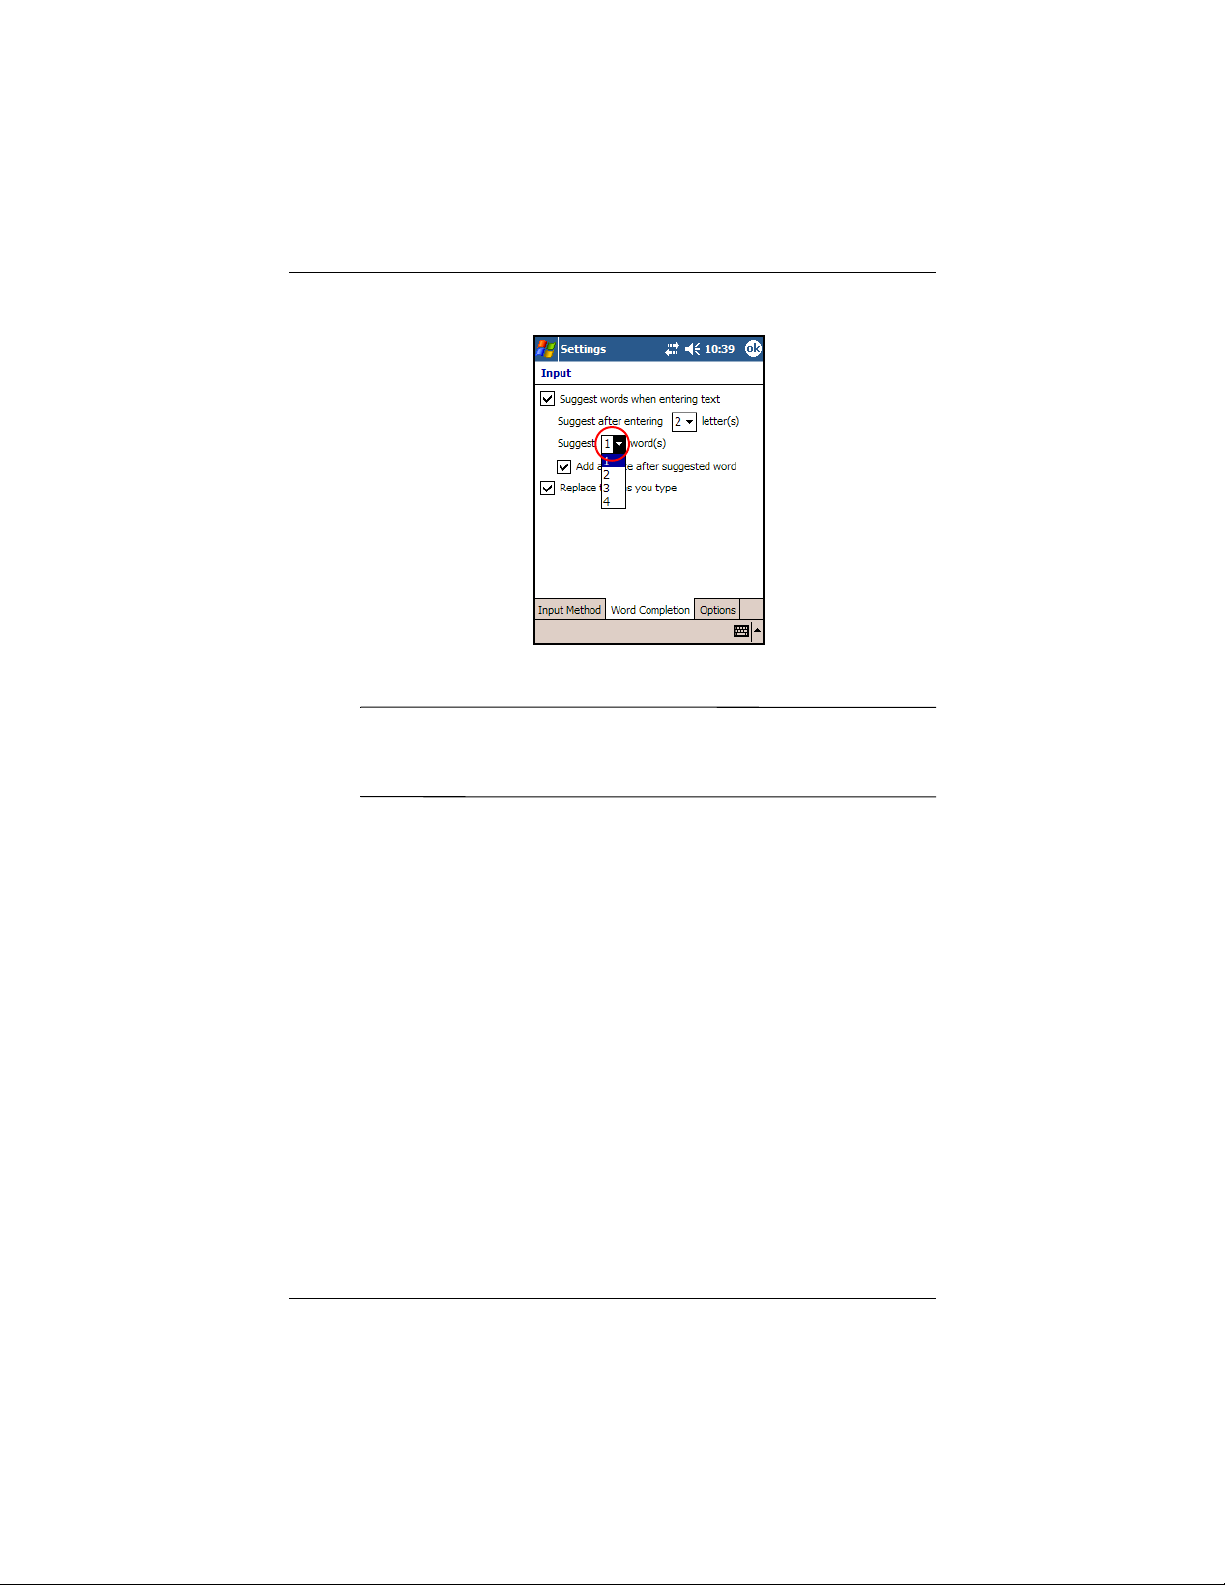
5. Tap OK.
Learning Input Methods
Note:
If you do not want any words suggested, remove the
checkmark by tapping the checkbox next to Suggest Words
When Entering Text.
User’s Guide www.hp.com 4–3
Page 51
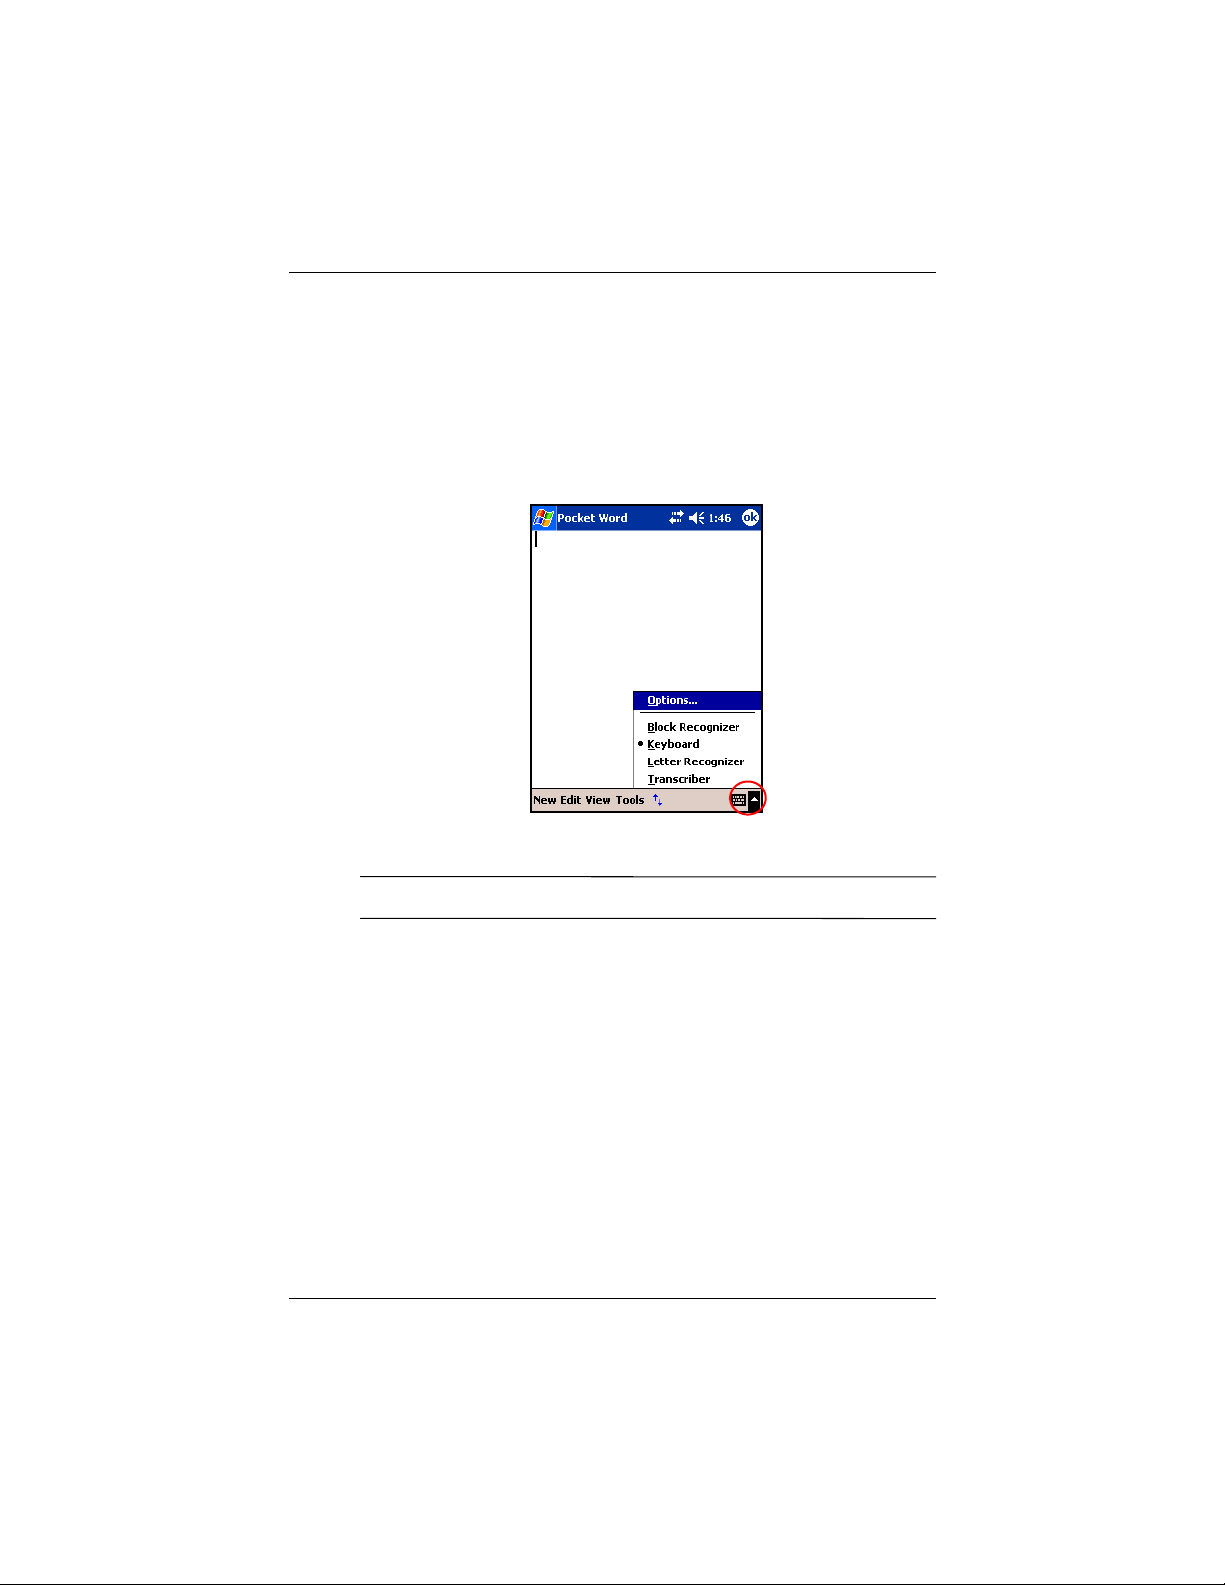
Using the On-Screen Keyboard
Use the stylus to tap letters, numbers, and symbols on the
on-screen keyboard to enter typed text directly onto the screen.
1. From any application, tap the up arrow next to the Input
Panel icon.
Learning Input Methods
2. Tap Keyboard to display a keyboard on the screen.
Note:
To see symbols, tap the
3. Tap a letter, symbol, or number to enter information.
4. Tap OK.
123
or
Shift
key.
Writing with the Stylus and the Letter
Recognizer
Use the stylus and Letter Recognizer to write letters, numbers,
and symbols on the screen. Create words and sentences by
writing in uppercase (ABC), lowercase (abc), and symbols (123)
as instructed here.
To write with the stylus and Letter Recognizer:
User’s Guide www.hp.com 4–4
Page 52

Learning Input Methods
1. From any application, tap the up arrow next to the Input
Panel icon.
2. Tap Letter Recognizer.
3. Write a letter or symbol between the dashed line and
baseline.
a. To display in uppercase, write a letter between the hatch
marks labeled ABC.
b. To display in lowercase, write a letter between the hatch
marks labeled abc.
c. Write a number or draw a symbol between the hatch
marks labeled 123.
What you write will be converted to text.
Note:
Note:
characters between the dashed line and baseline.
■
■
A question mark within a program indicates a Help file.
For the Letter Recognizer to work effectively, write
If you are writing a letter like “p,” write the top portion
within the dashed line and baseline, and the tail portion
below the baseline.
If you are writing a letter like “b,” write the bottom portion
within the dashed line and baseline, and the top portion
above the dashed line.
Writing with the Stylus and
Microsoft Transcriber
Use the stylus and Microsoft Transcriber to write words, letters,
numbers, and symbols anywhere on the screen.
User’s Guide www.hp.com 4–5
Page 53

Learning Input Methods
1. From any application, tap the up arrow next to the Input
Panel icon.
2. Tap Transcriber to display the Transcriber Intro screen.
3. Tap OK.
4. Tap New at the bottom of the screen.
5. Begin writing on the screen. What you write will be
converted to text.
Note:
“
screen and follow the instructions.
To “teach” Transcriber your style of writing, tap on the
a
” icon at the bottom of the screen to display the Letter Shapes
Writing with the Stylus and Block
Recognizer
Write letters, numbers, and symbols using the stylus and Block
Recognizer. Create words and sentences by writing letters and
numbers in specific areas.
1. From any application, tap the up arrow next to the Input
Panel button.
2. Tap Block Recognizer.
Note:
For online Help, tap the
?.
User’s Guide www.hp.com 4–6
Page 54
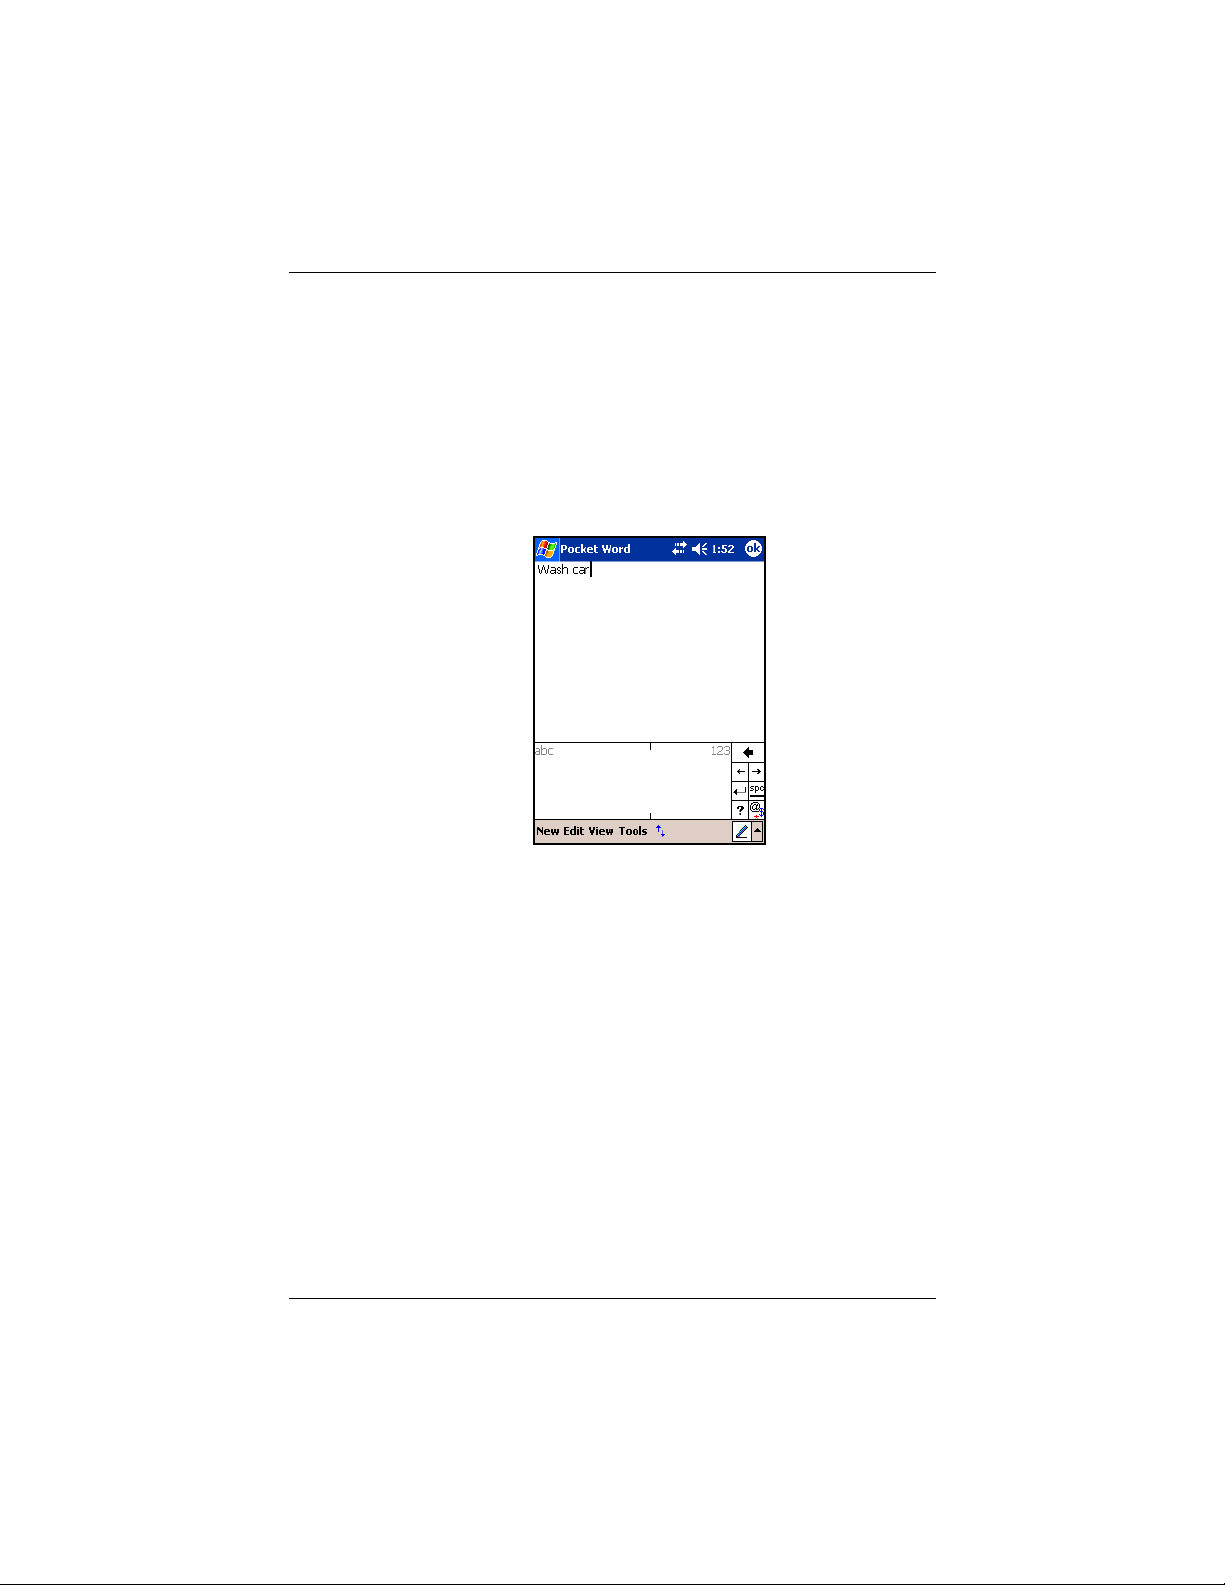
Learning Input Methods
3. Write a word, letter, or symbol between the hatch marks.
a. To type text, write a letter between the hatch marks
labeled “abc.”
b. To type numbers or symbols, write a number or symbol
between the hatch marks labeled “123.”
What you write will be converted to text.
Drawing and Writing on the Screen
Use the stylus as a pen to draw and write on the screen in the
Notes program or from the Notes tab in Calendar, Contacts,
or Tasks.
1. From the Start menu, tap Notes > New.
2. Draw and write on the screen.
3. Tap the Pen icon.
4. Tap OK.
User’s Guide www.hp.com 4–7
Page 55

Converting Writing to Text
You can convert your writing to text when you write with the
stylus in the Notes program or from the Notes tab in:
■
Calendar
■
Contacts
■
Tasks
To convert writing to text:
1. From the Start menu, tap Notes or tap the Notes tab in
Calendar, Contacts, or Tasks.
2. Tap a note to open it.
3. Tap Tools.
4. Tap Recognize.
Learning Input Methods
Note:
To convert a particular word or phrase, highlight it before
you tap Recognize. If a word is not recognized, it will not be
converted.
5. Tap OK.
User’s Guide www.hp.com 4–8
Page 56

5
Using Your HP Photosmart
Camera
Your HP iPAQ rx3000 series Mobile Media Companion has a
camera that allows you to turn your HP iPAQ into a mobile digital
imaging center. You can share images through e-mail or the Web,
print from your HP iPAQ wirelessly, or transfer files to the HP
iPAQ for storage.
The software programs described below are included on your HP
iPAQ or on the Companion CD.
Software Function
HP Photosmart camera Snap photos, record video, and
HP Image Zone for iPAQs View, edit, annotate, share, and
User’s Guide 5–1
modify camera settings on your
HP iPAQ.
print photos from your HP iPAQ.
Print, send, or view slideshows
directly from your HP iPAQ.
Create photo slideshows and play
videos to share with friends and
family.
Page 57
Using Your HP Photosmart Camera
Software Function
HP Image Zone for PC Manage your still photos and
video clips from your HP iPAQ.
Edit photos, use photos in
printing projects and on
multimedia CDs, and send photos
to friends and family.
HP Image Transfer Transfer photos to your personal
computer automatically when you
synchronize using ActiveSync.
Getting to Know Your Camera
Components
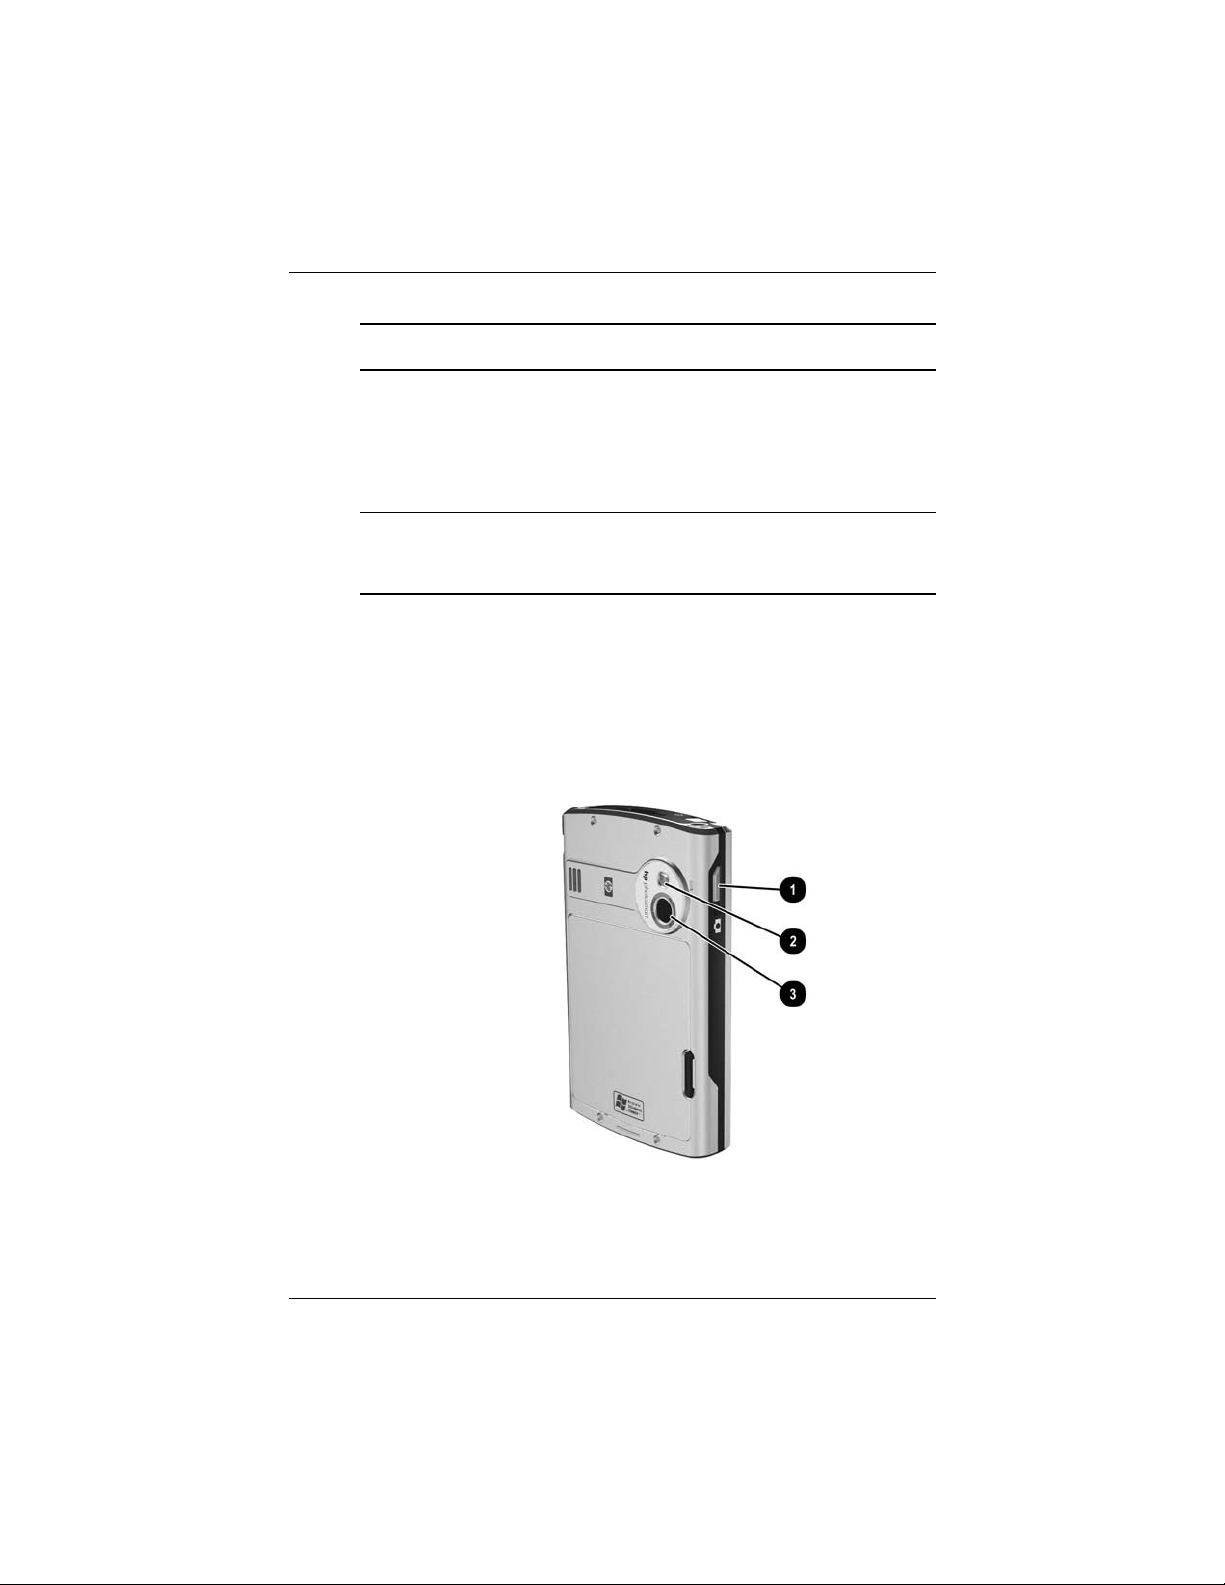
The Image Capture button 1 is located on the left side. The
mirror 2 and camera lens 3 are located on the back of the
HP iPAQ.
(Continued)
Pressing the Image Capture button allows you to launch the HP
Photosmart camera software so you can capture photos or record
video.
User’s Guide 5–2
Page 58
Capturing
Use your HP Photosmart camera to take photos and videos of all
of your memories. In this section, we discuss taking photos and
videos, understanding and using instant review, and how to
change the HP Photosmart camera settings.
HP Photosmart Camera
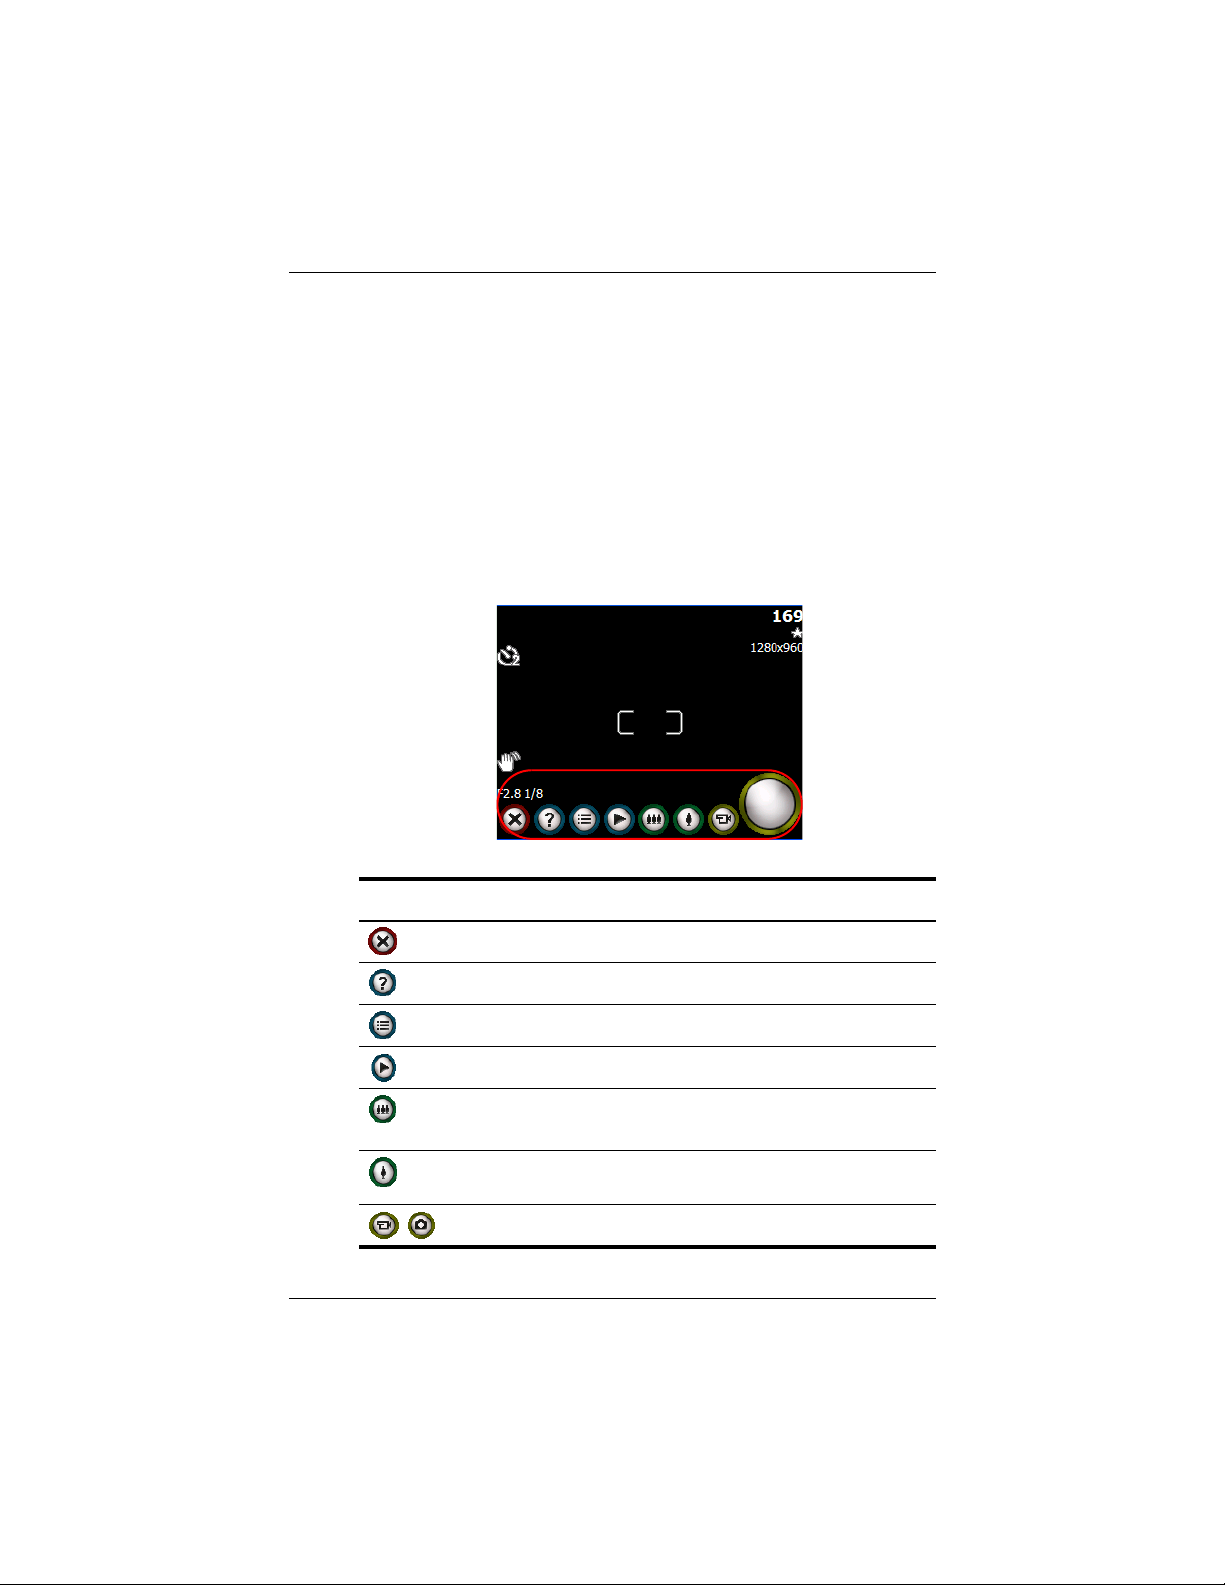
When you launch the HP Photosmart camera application, the
following camera icons are displayed on the screen.
Using Your HP Photosmart Camera
Icon Definition
Tap to close the HP Photosmart camera application.
Tap f o r H e lp.
Tap to access the Settings menu.
Tap to review photos and video in HP Image Zone.
Tap the icon or press down on the Navigation Touch pad to
zoom out.
Tap the icon or press up on the Navigation Touch pad to
zoom in.
Tap to switch between video and camera modes.
/
User’s Guide 5–3
Page 59
Using Your HP Photosmart Camera
Icon Definition
Taking Photos
To take a photo using your HP Photosmart camera:
1. From the Start menu, tap Programs > HP Photosmart or
from the Launch page, tap Photosmart camera.
2. Locate the camera lens on the back of the HP iPAQ and frame
the subject to be photographed in the screen.
3. Tap to zoom in on the subject or tap to zoom out.
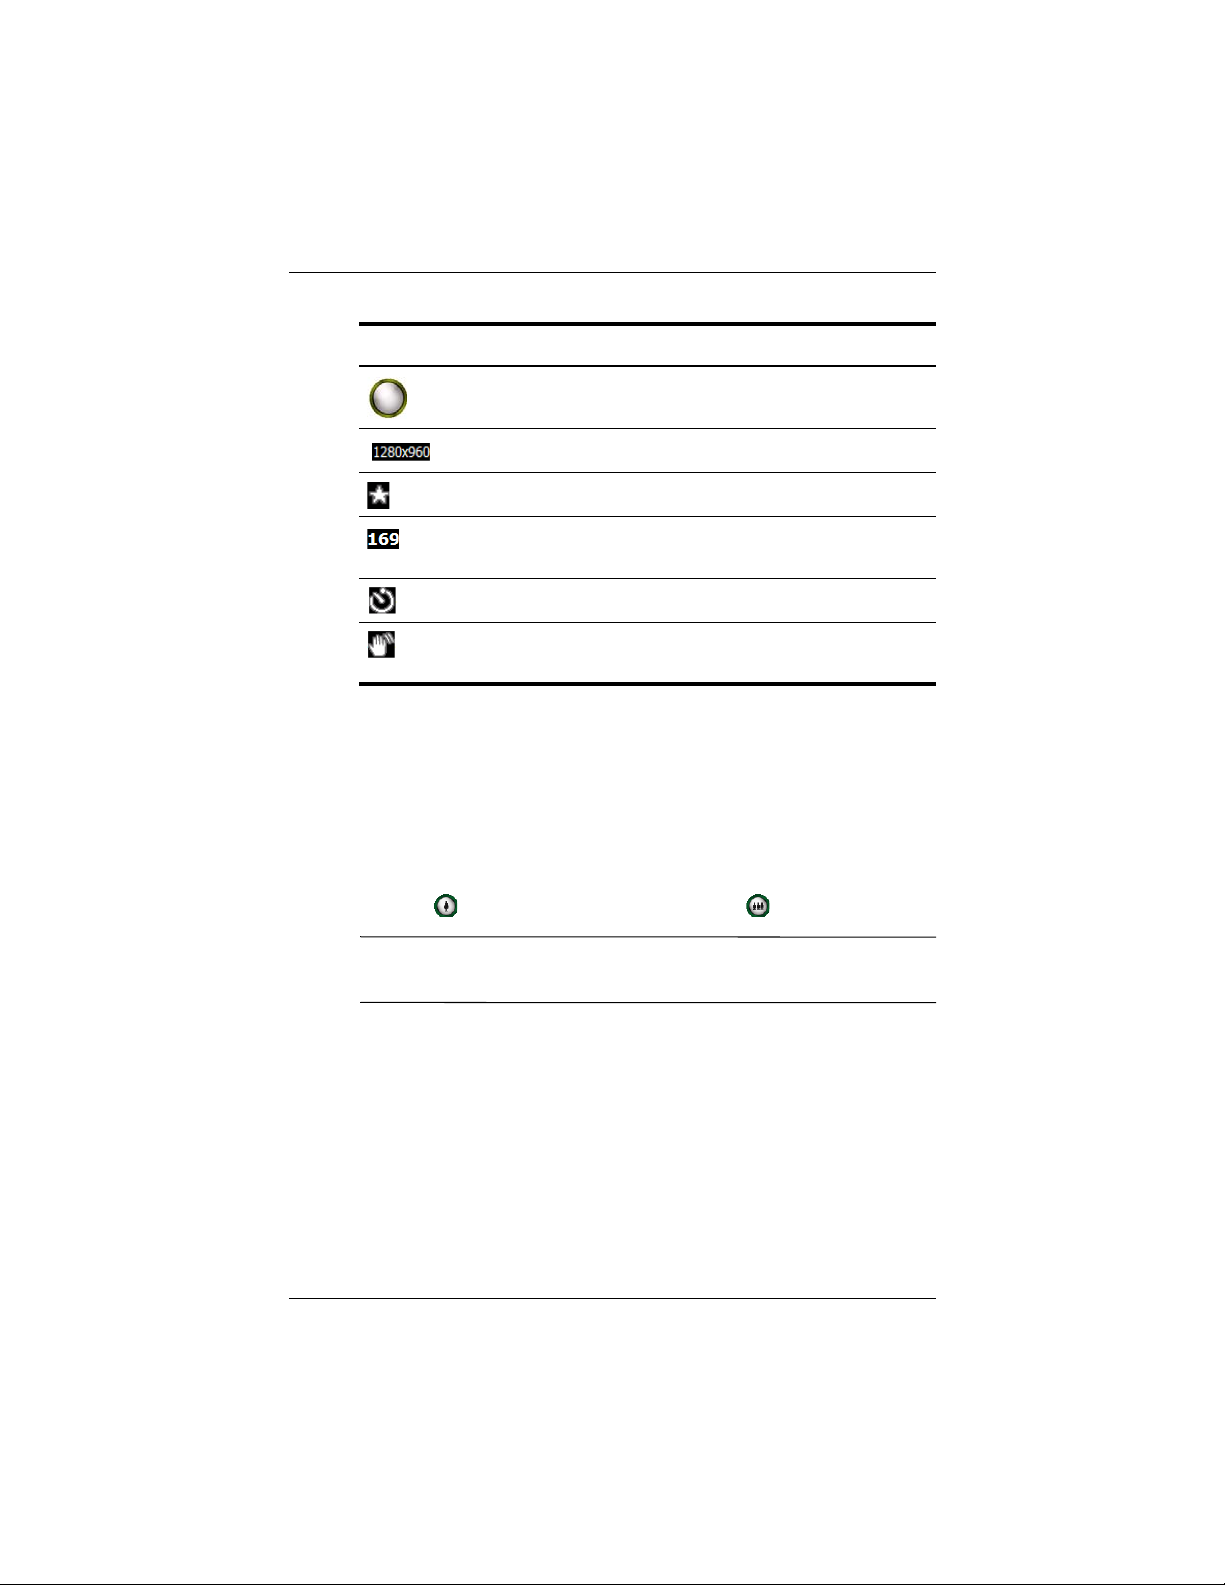
(Continued)
Tap to take a photo or start/stop recording a video.
Resolution currently selected.
Compression type currently selected.
Number of pictures remaining based on memory space
available at the specified file location.
Indicates the timer is on.
Indicates the camera should be held steady to ensure a
clear photo.
Note:
You also can press up on the Navigation Touch pad to
zoom in or press down to zoom out.
4. To ensure a clear photo, make sure that both you and your
subject do not move.
User’s Guide 5–4
Page 60

5. Press the Image Capture button on the side of the HP iPAQ
or tap on the screen to take a photo.
Note:
Once you have taken a photo, it takes a few seconds to
process and store the image. During the processing, a wait cursor
is displayed on the screen.
To exit the HP Photosmart camera application, tap the Close
button on the screen.
Note:
You also can photograph yourself. Use the small mirror
located on the back of the HP iPAQ to center your self-portrait.
Taking Video
Your HP iPAQ has the ability to record and save videos using the
HP Photosmart camera.
To record a video:
1. From the Start menu, tap Programs > HP Photosmart or
from the Launch page, tap Photosmart camera.
Using Your HP Photosmart Camera
2. Tap the Video icon in the camera application to switch to
the video mode.
3. Tap the Shutter icon to start recording video. Tap it
again when you are ready to stop recording.
4. Tap the Review icon to take you to the Video Review
screen in HP Image Zone.
5. Tap the Play icon to play the video you just recorded.
To view a video:
1. From the Start menu, tap Programs > HP Image Zone.
2. Tap the thumbnail of the video you want to view, and then tap
on the video preview image.
User’s Guide 5–5
Page 61

3. Tap the Play icon to view the video.
4. Tap OK to close the Video Review screen in HP Image Zone.
Understanding Instant Review
Instant Review allows you to see a preview of the photo you just
captured. This setting provides an opportunity to delete, save, or
send the photo.
When you take a photo, your HP iPAQ makes an audible shutter
sound (if you have not muted the sounds). It might take a few
seconds to process and store the photo, depending on its size,
quality, and complexity.
Immediately after taking a photo, Instant Review automatically
displays three icons so you can decide to either discard, send, or
keep the photo.
Tap one of the three icons to perform the following functions:
❏
Trash icon - use to delete the current photo
❏
E-mail icon - use to attach the photo to an e-mail
message
Using Your HP Photosmart Camera
❏
OK icon - use to close Instant Review because you
are finished reviewing the photo and want to keep it
Note:
Instant Review times out in 6 seconds. For information on
changing the Instant Review settings, refer to “Modifying Instant
Review Settings” discussed later in this chapter.
Adjusting the Camera Settings
Your HP iPAQ rx3000 series Mobile Media Companion includes
simple point-and-shoot photography capabilities as well as other
features:
■
White Balance
User’s Guide 5–6
Page 62
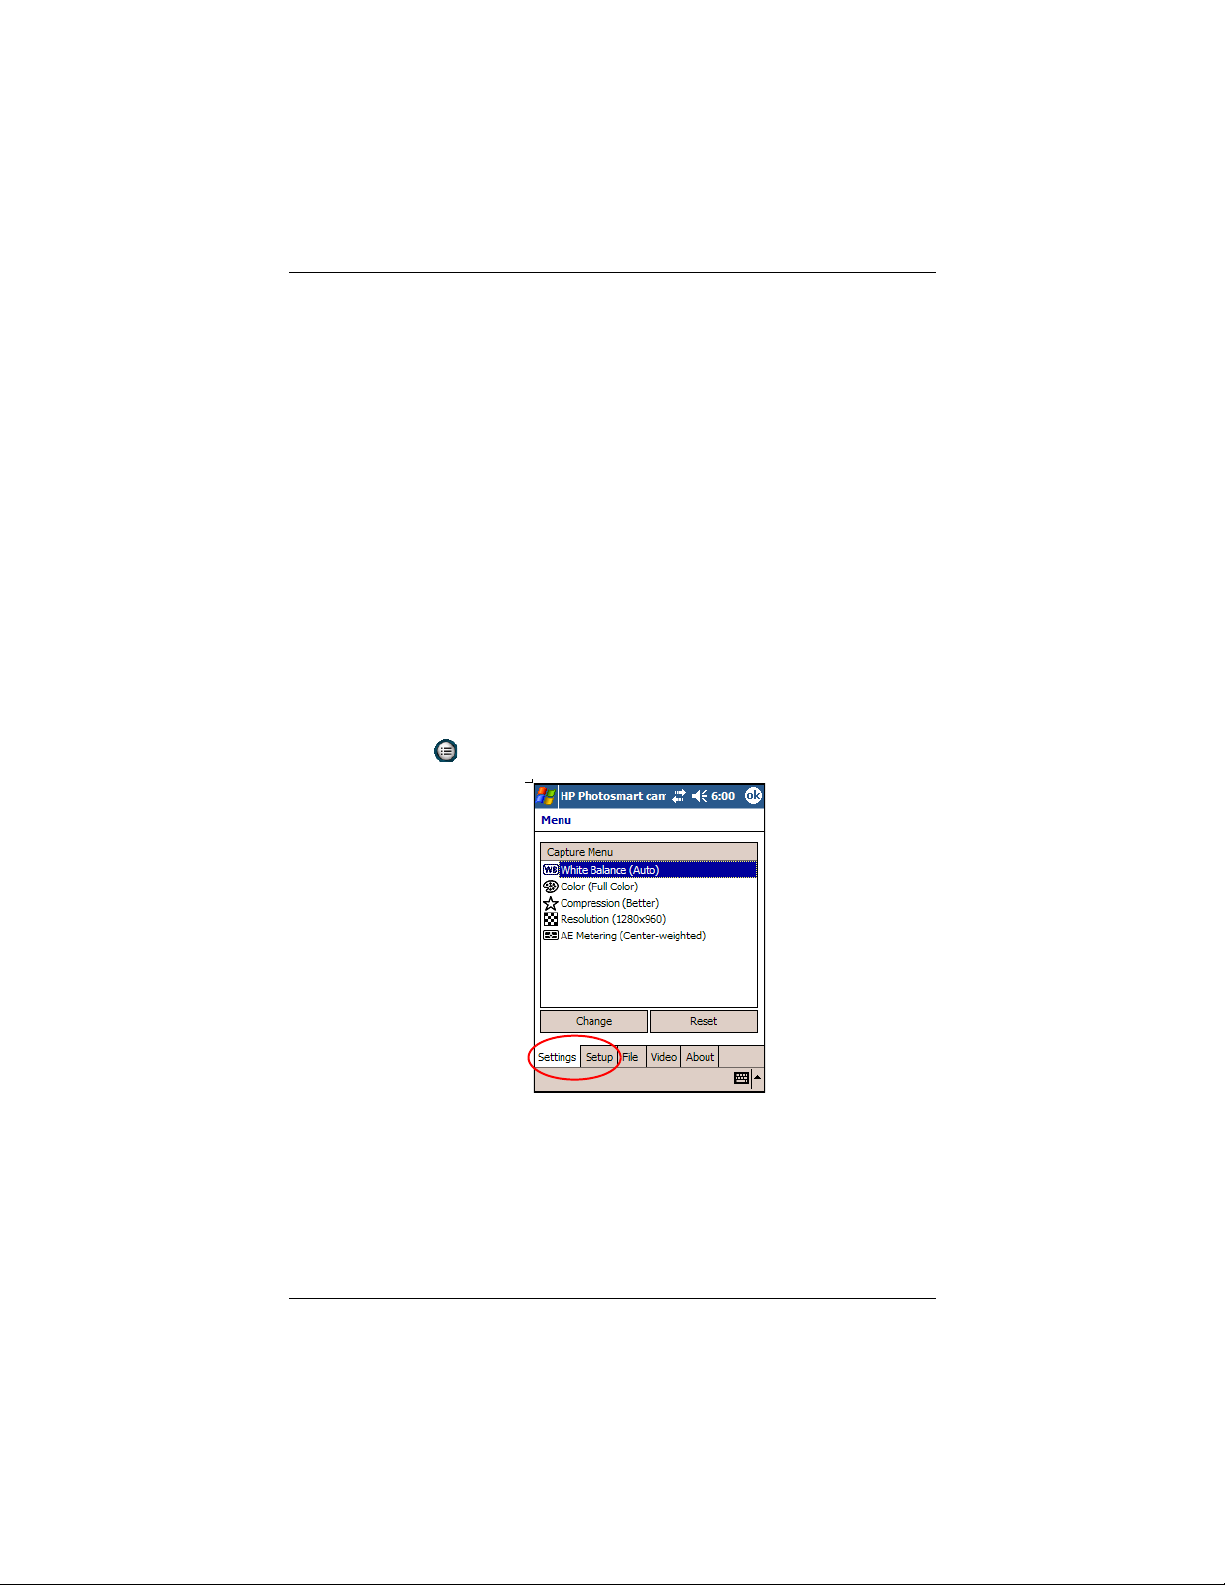
Using Your HP Photosmart Camera
■
Color
■
Compression
■
Resolution
■
Auto Exposure (AE) Metering
■
Camera Sounds
■
Instant Review
■
Self-timer
■
File
■
Video Recording
To make changes to the camera settings:
1. From the Start menu, tap Programs > HP Photosmart or
from the Launch page, tap Photosmart camera.
2. Tap > Settings or Setup tab.
3. Tap the category you want to change, and then tap the
Change button.
4. Select the desired setting and tap OK.
5. Tap OK again to exit the Capture menu.
User’s Guide 5–7
Page 63

Using Your HP Photosmart Camera
Adjusting the White Balance
You can adjust the color balance (between red, green, and blue) in
a photo, depending on the lighting conditions. You have the
option to select Auto where the camera automatically adjusts the
color for the best possible photo or you can select a specific type.
To change the white balance:
1. From the Start menu, tap Programs > HP Photosmart or
from the Launch page, tap Photosmart camera.
2. Tap > Settings tab > White Balance > Change button.
3. Select the option you want and tap OK.
The white balance settings that are available are:
■
Auto (default)--Automatically selects the best white balance
for the photo.
■
Sun--Best for outdoor shots with natural lighting (sunny or
cloudy conditions)
■
Tungsten--Best for indoor shots using incandescent
yellow/lighting
■
Fluorescent--Best for shots taken with fluorescent
white/lighting.
Modifying Color
With your HP iPAQ, you can capture photos using different color
effects such as Sepia (brown and white) for old-fashioned photos
or Black and White.
To change the color setting:
1. From the Start menu, tap Programs > HP Photosmart or
from the Launch page, tap Photosmart camera.
2. Tap > Settings tab > Color > Change button.
3. Select the color image type you want and tap OK.
User’s Guide 5–8
Page 64

Using Your HP Photosmart Camera
The color image types available are:
■
Full Color (default)--Standard color output
■
Black and White--Grayscale photos
■
Sepia--Brown and White for old-fashioned photos
■
Negative--Produces a color negative of the photo
■
Cool--Blue and white photos
Using Compression
The compression setting determines how small or large the photo
files become once the file is saved. You can choose one of three
compression types to compress the photo file size.
To change the compression setting:
1. From the Start menu, tap Programs > HP Photosmart or
from the Launch page, tap Photosmart camera.
2. Tap > Settings tab > Compression > Change button.
3. Select the compression type you want and tap OK.
The compression types available are:
■
Good--smallest file size and lowest quality
■
Better (default)--medium file size and medium quality
■
Best--largest file size and best quality
This table lists the approximate file sizes for the different
resolutions available:
Compression
Good 148 kB 44 kB 17 kB 6 kB
Better 305 kB 85 kB 35 kB 11 kB
Best 501 kB 127 kB 56 kB 17 kB
User’s Guide 5–9
1280x960
(24-Bit
Color)
640x480
(24-Bit
Color)
320x240
(24-Bit
Color)
160 x 12 0
(24-Bit
Color)
Page 65

Using Your HP Photosmart Camera
Choosing the Resolution
You can choose from four resolutions (or sizes) for photos
captured (width by height in pixels) on your HP iPAQ. By using
one of the four resolutions, you can choose the photo quality for
your snapshots. Higher-quality (high resolution) photos look and
print better, especially at greater magnification. However,
higher-quality photos are larger in file size and require more
storage space. Lower-quality photos require less storage space
and less time to load when sending them by e-mail or infrared.
The Photosmart camera displays on the top right side of the
screen the estimated number of images remaining at the current
resolution and compression settings. For an example, refer to the
“Using Compression” section discussed earlier in this chapter.
The four resolutions available are:
■
1280x960 (default)
■
640x480 pixels
■
320x240 pixels
■
160x120 pixels
Changing AE Metering
AE Metering settings allow you to specify which area of the
photo the camera will use to calculate the exposure.
To change the AE Metering types:
1. From the Start menu, tap Programs > HP Photosmart or
from the Launch page, tap Photosmart camera.
2. Tap > Settings tab > AE Metering > Change button.
3. Select the exposure type you want and tap OK.
The following table defines the AE Metering types available on
your HP iPAQ.
User’s Guide 5–10
Page 66
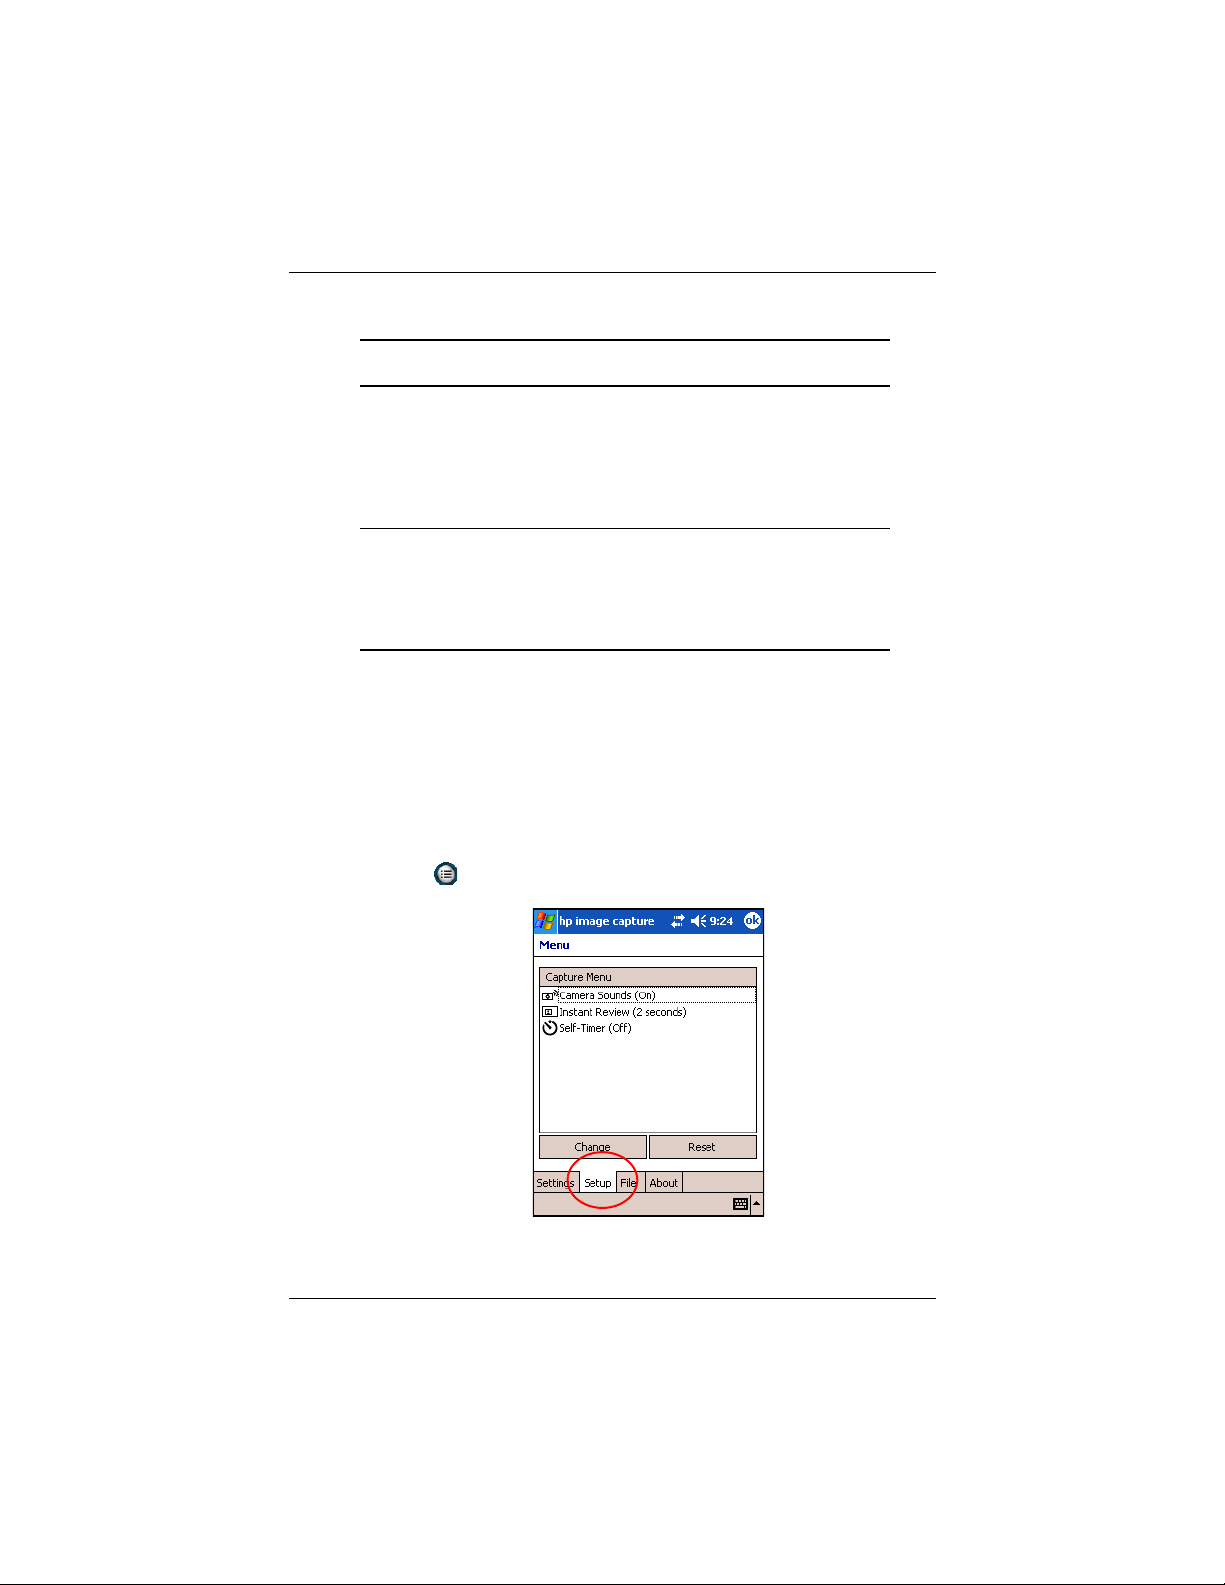
Using Your HP Photosmart Camera
l
Setting Description
Average The camera uses the entire photo area to
Center-weighted
(default setting)
calculate the exposure. Use this setting
when you want everything in the photo to
be used equally to calculate the exposure,
for example, when you are taking pictures
of a mountain scene.
The camera uses a large area in the center
of the photo area to calculate the exposure.
Use this setting when the subject is in the
center of the frame, so exposure is based
more on the subject than the surroundings.
Turning Camera Sounds On/Off
With the camera sounds setting, you can turn on or off all camera
sounds made by your HP iPAQ.
To change the camera sounds setting:
1. From the Start menu, tap Programs > HP Photosmart or
from the Launch page, tap Photosmart camera.
2. Tap > Setup tab > Camera Sounds > Change button.
User’s Guide 5–11
Page 67

Using Your HP Photosmart Camera
3. Tap Off to turn off the sounds or tap On to turn on the
sounds.
4. Tap OK to exit the Capture menu.
Modifying Instant Review Settings
To configure or change Instant Review setting options:
1. From the Start menu, tap Programs > HP Photosmart or
from the Launch page, tap Photosmart camera.
2. Tap > Setup tab > Instant Review > Change button.
3. Select the period of time you want the Instant review photo to
remain on the screen:
4. Tap one of the four setting options to perform the following
functions:
❏
Off - disables Instant Review
❏
2 seconds - allows a 2-second review
❏
4 seconds - allows a 4-second review
❏
6 seconds (default) - allows a 6-second review
5. Tap OK to exit the Instant Review menu.
Using the Self-Timer
The Self-Timer allows you to set a short delay before a photo is
taken. You can use this feature when you want to appear in your
own photos.
To set the timer:
1. From the Start menu, tap Programs > HP Photosmart or
from the Launch page, tap Photosmart camera.
2. Tap > Setup tab > Self-Timer > Change button.
User’s Guide 5–12
Page 68

Using Your HP Photosmart Camera
3. Select a delay of either 2, 10 seconds, or none at all. When
choosing a delay, the photo is taken either 2 or 10 seconds
after the Shutter button is pressed.
4. Tap OK to exit the Self-Timer menu.
Note:
If the timer is turned on, the camera displays the icon
on the screen.
Configuring File Settings
The File Settings menu allows you to specify how photos and
videos are named and stored on your HP iPAQ. Using the File
tab, you can change the filename prefix of the photos and videos
you capture and adjust the image counter. The combination of
these two (filename prefix and counter value) provide the actual
filename of your photo or video. You also can specify the folder
on your HP iPAQ where photos and videos are stored.
To access the File Settings menu:
1. From the Start menu, tap Programs > HP Photosmart or
from the Launch page, tap Photosmart camera.
2. Tap > File tab.
3. Make your changes to the file configuration.
4. Tap OK to exit the File menu.
To create, rename, and delete a folder:
1. Tap on the Open Folder button within the File menu.
2. Tap a folder to select it.
3. Tap it again to edit the folder’s name.
4. Use the icons at the bottom of the screen to create, delete, or
refresh a folder.
5. Tap OK to exit the File menu.
User’s Guide 5–13
Page 69

Using Your HP Photosmart Camera
Note:
Only empty folders can be deleted; therefore, you must
remove all files and sub-folders before deleting a folder.
Changing Video Settings
You can record video with audio using your HP iPAQ’s built-in
camera. You can record in either MotionJPEG format or H.263
format (available only on the rx3700 series). With MJPEG, a
higher resolution of video can be captured, but it requires much
more memory space per minute of video. With the H.263 format,
lower resolutions must be used but longer video clips can be
stored in less memory space. The amount of video you can record
with your HP iPAQ is limited only by the amount of memory
space you have on your HP iPAQ or on an SD/MMC memory
card.
To access the Video Settings menu:
1. From the Start menu, tap Programs > HP Photosmart or
from the Launch page, tap Photosmart camera.
2. Tap > Video tab.
3. Select the video format (MJPEG or H.263).
4. Select the video size you want:
❏
MJPEG
◆
320x240
◆
176x144
◆
160x120
❏
H.263
◆
176x144
◆
128x96
5. Tap the Record audio checkbox to enable sound in the video.
6. Tap OK to exit the Video menu.
User’s Guide 5–14
Page 70

Using Your HP Photosmart Camera
Reviewing and Displaying
Use HP Image Zone to view and edit photos and video stored on
your HP iPAQ or SD card.
HP Image Zone
Note:
By default, HP Image Zone displays photos that are saved
in the My Documents/My Pictures folder on your HP iPAQ.
You can use HP Image Zone to:
■
View photos stored on your HP iPAQ or SD card
■
Record and playback sound clips attached to photos
■
Send photos by HP Instant Share E-mail, Infrared, or
personal e-mail attachments
■
Organize folders (create, rename, and delete)
■
Print using HP Mobile Printing or HP Instant Share
■
View a slideshow
■
Add text comments to JPEG photos
■
Launch the HP Photosmart camera application
■
Draw on photos, adjust photo quality, add text to photos, and
try creative filtering
User’s Guide 5–15
Page 71
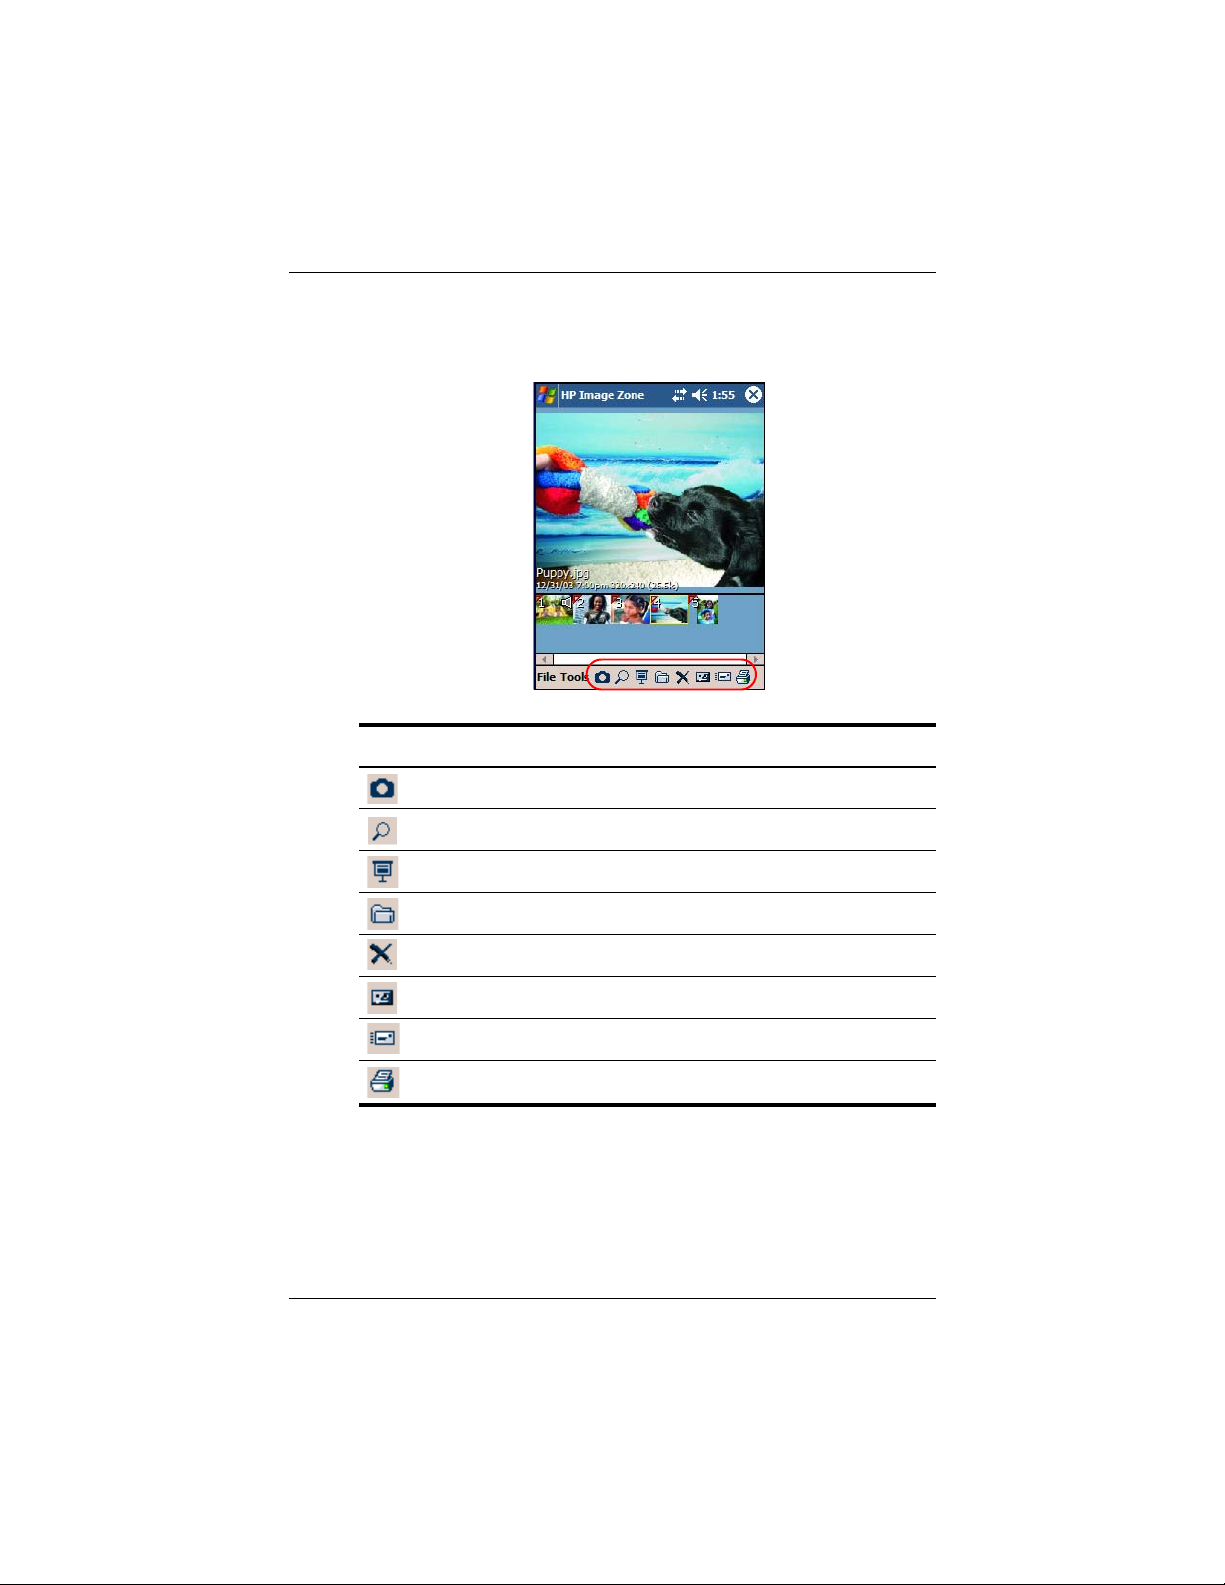
Using Your HP Photosmart Camera
When you launch the HP Image Zone, the following icons are
displayed on the bottom of the screen.
Icon Definition
Tap to switch between video and camera mode.
Tap to view the photo in full screen.
Tap to start slideshow mode.
Tap to change folders.
Tap to delete photo or video.
Tap to record and attach an audio clip to the photo.
Tap to send the photo or video using your favorite method.
Tap to print using your favorite method.
User’s Guide 5–16
Page 72
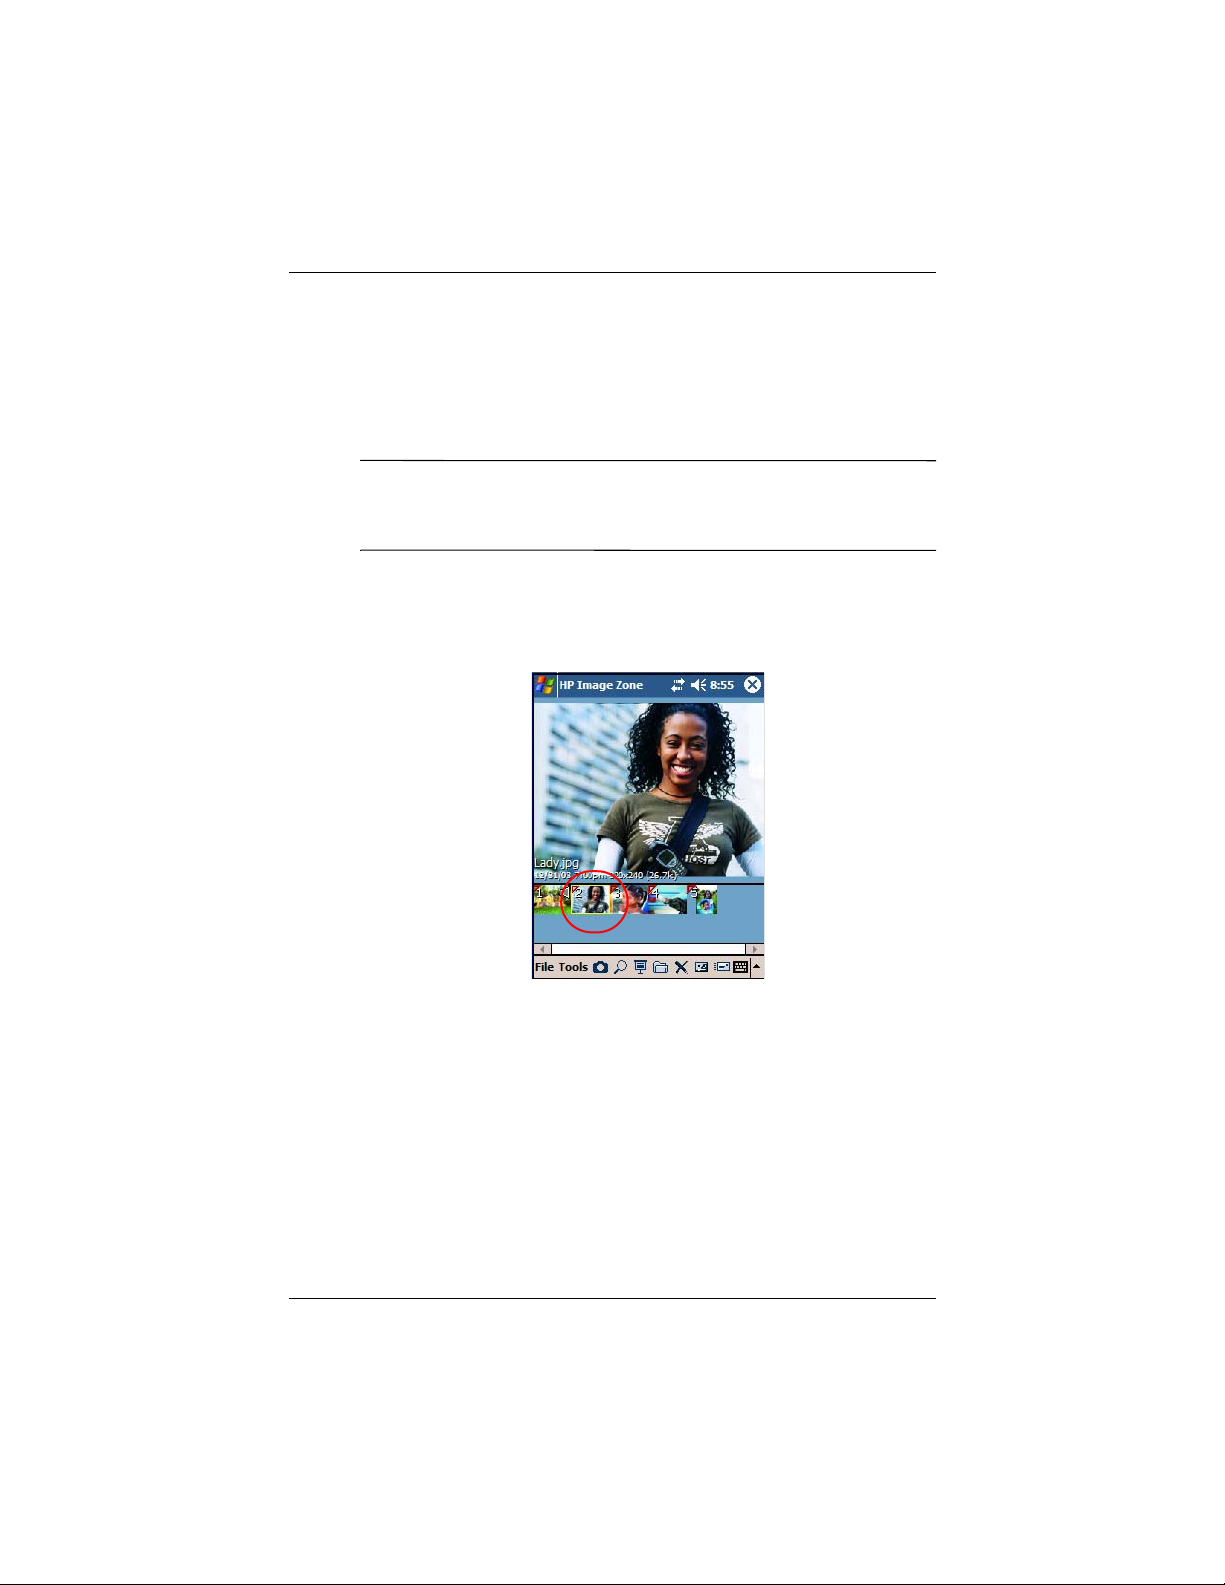
Viewing Thumbnail Photos
To view a photo:
1. From the Start menu, tap Programs > HP Image Zone, or
from the Launch page, tap Photos.
Note:
By default, the viewer opens in Browse mode. Browse
mode displays a thumbnail view of the photos in the current
folder.
2. Tap a thumbnail (i.e., a small representation of a larger
image) to select the photo. A preview of the photo and
information about it is displayed.
Using Your HP Photosmart Camera
To view photos in a different folder:
1. Tap File in the Command bar, and then tap Open.
2. Select the folder you want.
User’s Guide 5–17
Page 73

3. Tap OK. HP Image Zone now displays the photos from the
new file folder you selected.
Note:
To view photos in HP Image Zone, be sure your scroll bar
has been moved all the way to the left. Otherwise, you might not
be able to see other photos in the thumbnail view.
Viewing a Photo Full-Screen
To view a photo full-screen and zoom in or out:
1. From the Start menu, tap Programs > HP Image Zone, or
from the Launch page, tap Photos.
2. Select the photo by tapping on its thumbnail.
3. Tap Tools > View Image or tap on the preview window.
4. Zoom in or out using the tool bar buttons. If the photos are
too large to fit on the screen, you can display other parts of
the photo by dragging the stylus on the screen. You also can
use the Navigation buttons to resize photos.
Using Your HP Photosmart Camera
5. Tap OK to close the View Image screen.
Viewing a Slideshow
You can view a slideshow of the photos in a specified folder.
1. From the Start menu, tap Programs > HP Image Zone, or
from the Launch page, tap Photos.
2. Tap Tools > View Slideshow.
3. Tap anywhere on the screen to display the on-screen controls.
You then can use the on-screen controls to move forward or
backward through the slides or to end the slideshow.
The Navigation button also can be used to move forward or
backward through the slides.
User’s Guide 5–18
Page 74

You can control display options, such as:
■
Sequence--the order in which photos are displayed
■
Delay--the amount of time each photo displays before the
slideshow moves to the next photo
■
Rotation--the slideshow can automatically rotate the photos
so they display on the full screen
■
Transition Effect--the method used by photos to exit and
enter the slideshow
To change slideshow settings:
1. From the Start menu, tap Programs > HP Image Zone, or
from the Launch page, tap Photos.
2. Tap Tools > Settings > Slideshow tab.
3. Select the settings and effects you want to use in your
slideshow.
4. Tap OK to exit the menu.
Exiting HP Image Zone
Using Your HP Photosmart Camera
To exit from HP Image Zone, from the Command Bar, tap File >
Exit. You also can tap the in the upper-right corner of the
screen to close this application.
DockWare Screen Saver Application
Your HP iPAQ is preinstalled with a screen saver application
called DockWare. The Ilium DockWare software turns your HP
iPAQ into a desk clock, monthly calendar, and personal digital
picture frame.
When you place your HP iPAQ in its cradle, the DockWare
application automatically starts up after 5 minutes of inactivity. A
current calendar and a large display of the date and time are
displayed. Also, a slideshow of pictures is displayed.
User’s Guide 5–19
Page 75

Starting DockWare
When your HP iPAQ is not in use (after five minutes) and is still
turned on or placed in its cradle, DockWare automatically starts.
You also can start DockWare by tapping on Start > Programs >
DockWare icon.
To change the DockWare settings, use your stylus to tap and hold
anywhere on the screen.
Stopping DockWare
The application stops as soon as you touch the screen or push any
button on the HP iPAQ, with the exception of scrolling up or
down to view a picture. Also, DockWare stops running if an
alarm or any other popup window appears.
Be aware of the following:
■
If your HP iPAQ is running on battery power, DockWare does
not automatically start.
■
If DockWare is running and you take your HP iPAQ out of the
cradle, DockWare will continue to run on battery power until
you stop it.
Using Your HP Photosmart Camera
To disable DockWare, tap and hold anywhere on the screen, and
then uncheck Starts Automatically from the popup menu. This
menu item acts as a toggle switch to start and stop the DockWare
software program. Therefore, if you want to start DockWare
again you need to select this option again.
Refer to Start > Help > DockWare for additional tips and hints
on using the DockWare application.
Editing
In HP Image Zone, you can edit your photos in several ways:
■
Draw on a photo using a variety of pen types and colors
■
Add text on a photo
■
Crop, rotate, rescale a photo
User’s Guide 5–20
Page 76

■
Adjust the quality of a photo
■
Apply creative filters and effects to a photo
Editing Photos
To edit photos:
1. From the Start menu, tap Programs > HP Image Zone, or
from the Launch page, tap Photos.
2. Select the photo you want to edit by tapping on its thumbnail.
3. Tap Tools located on the Command bar at the bottom of the
screen.
4. Tap Edit and this action launches the HP Image Zone Editor
where you can perform a variety of editing functions.
For more information on the HP Image Zone Editor and its
functions, refer to Start > Help > HP Image Zone.
Recording Audio Files
You can record audio (sound) files for each of your photos. When
you display a photo with an associated sound file attached, HP
Image Zone displays the photo and plays the associated sound file
at the same time.
Using Your HP Photosmart Camera
Note:
If you disabled the Auto-play associated sound files
during preview option, the sound file will not play. To enable the
option again, from the Start menu, tap Programs > HP Image
Zone, or from the Launch page, tap Photos. Next, tap Tool s >
Settings > General tab > Auto-play associated sound files
during preview checkbox.
User’s Guide 5–21
Page 77

Using Your HP Photosmart Camera
Attaching a Sound File to a Photo
To add sound to a photo:
1. From the Start menu, tap Programs > HP Image Zone, or
from the Launch page, tap Photos.
2. Select the photo to which you want to attach a sound file by
tapping on its thumbnail.
3. Tap the Cassette icon on the Command bar located at the
bottom of the screen.
4. Tap the Record button on the Sound toolbar.
Icon Name Function
Record
Starts recording sound.
Stop
Play
Stops the current recording.
Plays the recorded sound associated
with a selected photo.
Delete
Deletes the recorded sound
associated with a selected photo.
5. Speak into the microphone or record the sound you want to
associate with the photo.
6. Tap the Stop button on the Sound toolbar.
All photos with associated sound files have a speaker icon on the
thumbnail.
To change audio options:
1. From the Start menu, tap Programs > HP Image Zone, or
from the Launch page, tap Photos.
2. Tap Tools located on the Command bar at the bottom of the
screen.
3. Tap Settings > Audio tab.
User’s Guide 5–22
Page 78

4. Select your audio options.
❏
Codec settings: PCM or GSM 6.10.
◆
GSM 6.10 provides good voice recording and takes
up far less space than Pulse Code Modulation
(PCM).
◆
PCM provides better sound quality but may take up
to 86 times more storage space than GSM 6.10
recordings.
❏
Format: Select sound quality.
Higher sound quality recordings take up more storage
space.
5. Tap OK to exit this menu.
HP Image Zone for PCs
The HP Image Zone for PCs application allows you to view, print,
and edit photos that were captured using your HP iPAQ. This
application is located on the HP Image Zone CD that came with
your HP iPAQ.
You can use HP Image Zone for PCs to:
Using Your HP Photosmart Camera
■
mange your still photos and video clips
■
edit your photos
■
create multimedia CDs
■
use your photos in printing projects using HP Instant Share
■
send photos to family and friends using HP Instant Share
■
view MotionJPEG videos from your HP iPAQ
To successfully install HP Image Zone for PCs onto your
personal computer, the following items are required:
■
Operating System
❏
Microsoft Windows 98
User’s Guide 5–23
Page 79

Using Your HP Photosmart Camera
❏
Microsoft 2000 Professional
❏
Microsoft Millennium Edition
❏
Microsoft XP with SP1 or later
■
Microsoft Internet Explorer 5.0 or higher
■
CD-ROM drive
■
VGA graphics card or compatible video graphics driver at
256 color or higher
■
Keyboard
■
Microsoft mouse or compatible input device
■
500MB hard disk space is required
■
600 MHz Pentium III, K6, or AMD Athlon processor or
better
■
115MB RAM required
To install HP Image Zone for PCs, insert the appropriate CD into
the CD-ROM drive on your computer. The HP Image Zone CD
starts automatically.
If the HP Image Zone CD doesn’t start automatically (auto run),
click Start > Run. Type D:\ (where D is the location of your
CD-ROM drive) in the Open: text box. Select setup.exe, then
double-click OK to run the Setup program.
Note:
Additional software may be required to view
H.263/MPEG4 video files on your personal computer that are
recorded by your HP iPAQ.
After you’ve installed HP Image Zone for PCs, refer to the online
Help to get more information about file formats and using this
software. To access the help topics, click Start > Programs > HP
Image Zone or double-click the HP Image Zone icon on your
desktop. From the main menu of HP Image Zone for PCs,
double-click on Help.
User’s Guide 5–24
Page 80

HP Image Transfer
Using the HP Image Transfer software and Microsoft ActiveSync
3.7.1, you can automatically transfer photos and videos from your
HP iPAQ to your personal computer for printing and sharing with
family and friends. With HP Image Transfer, you can:
■
transfer photos and videos from your HP iPAQ to your PC
■
transfer from a SD or MMC card to your PC
■
modify the image transfer settings
Note:
To transfer images, you must first install Microsoft
ActiveSync 3.7.1 to establish a standard partnership between your
HP iPAQ and desktop computer.
To install HP Image Transfer:
1. From the Companion CD, select Software and Accessories
> Desktop Software, and then select the Install this
checkbox next to HP Image Transfer.
2. Select Install Now located at the top of the Install Desktop
Software screen and follow the instructions on the screen.
Using Your HP Photosmart Camera
User’s Guide 5–25
Page 81
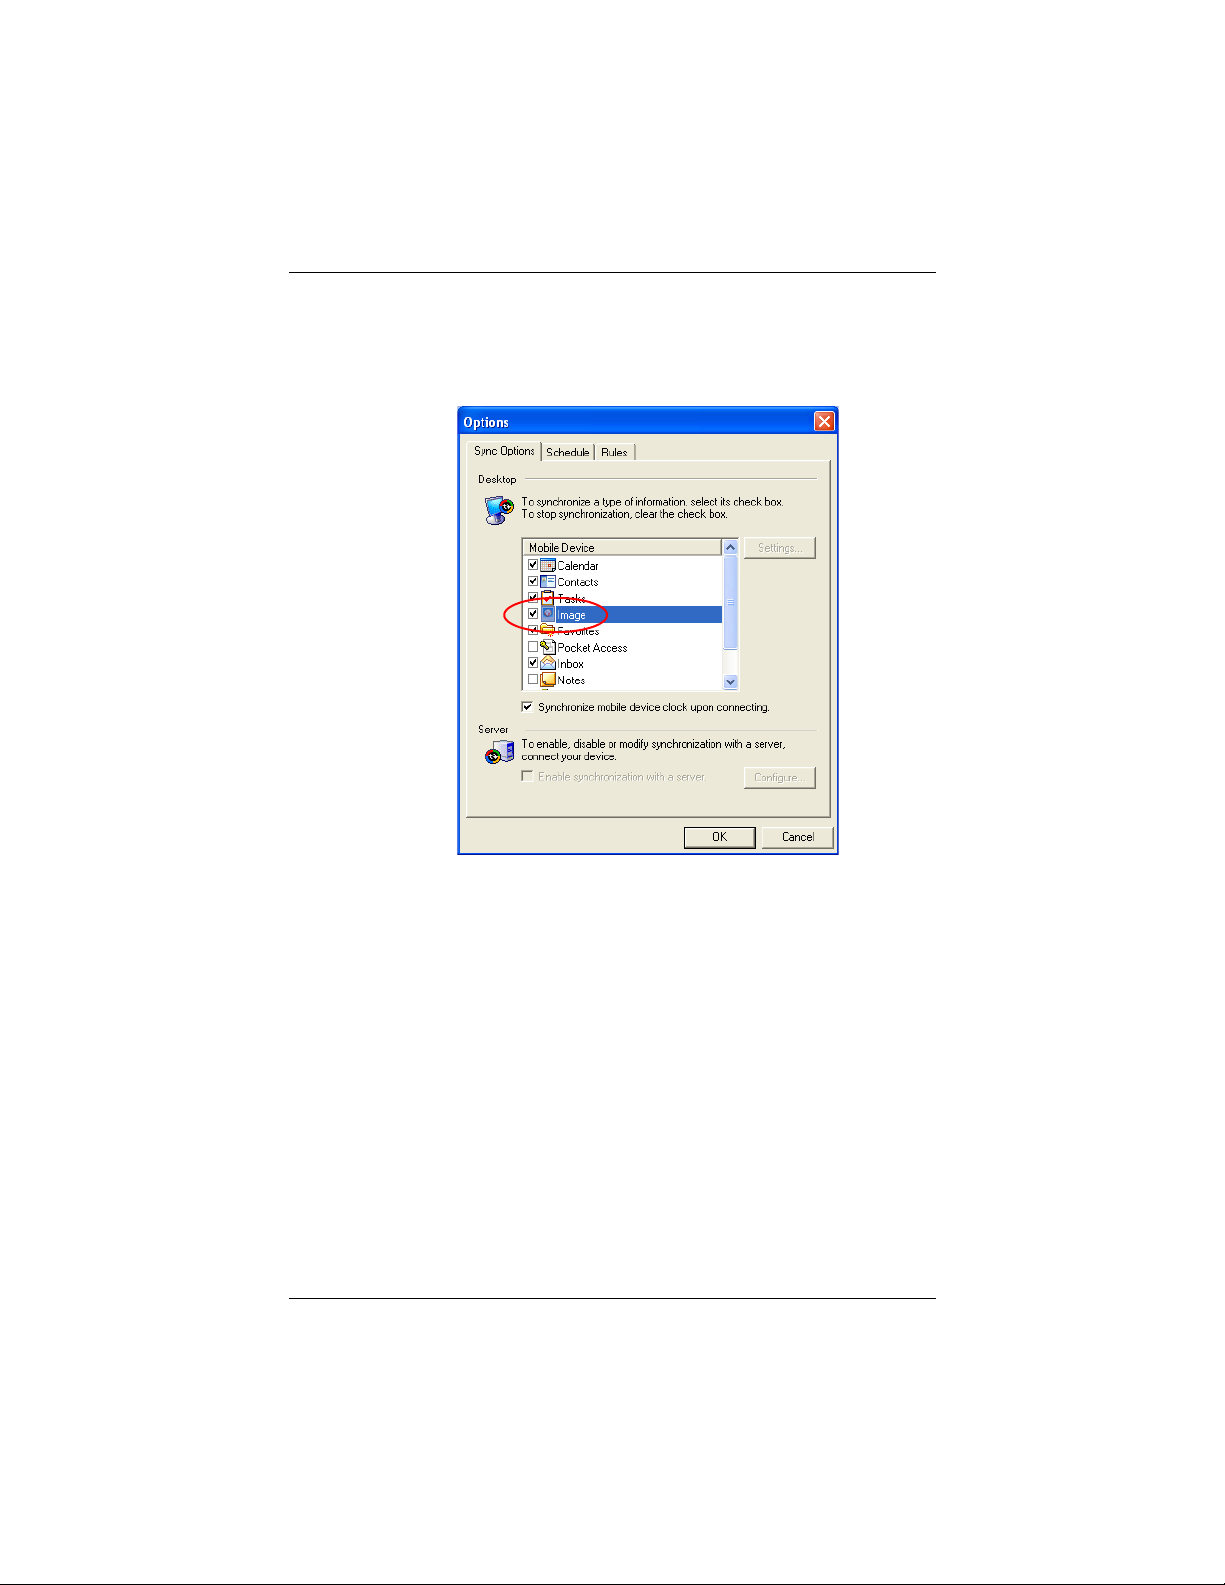
Using Your HP Photosmart Camera
Once HP Image Transfer has been installed and is recognized by
ActiveSync, the ActiveSync window displays the Image
checkbox.
To enable and modify HP Image Transfer settings:
1. Open ActiveSync on your personal computer, if it is not
already open.
2. Double-click Image under the Details window or select
Options from the ActiveSync menu.
3. Select Image on the Sync options tab, and then select the
Settings button.
User’s Guide 5–26
Page 82
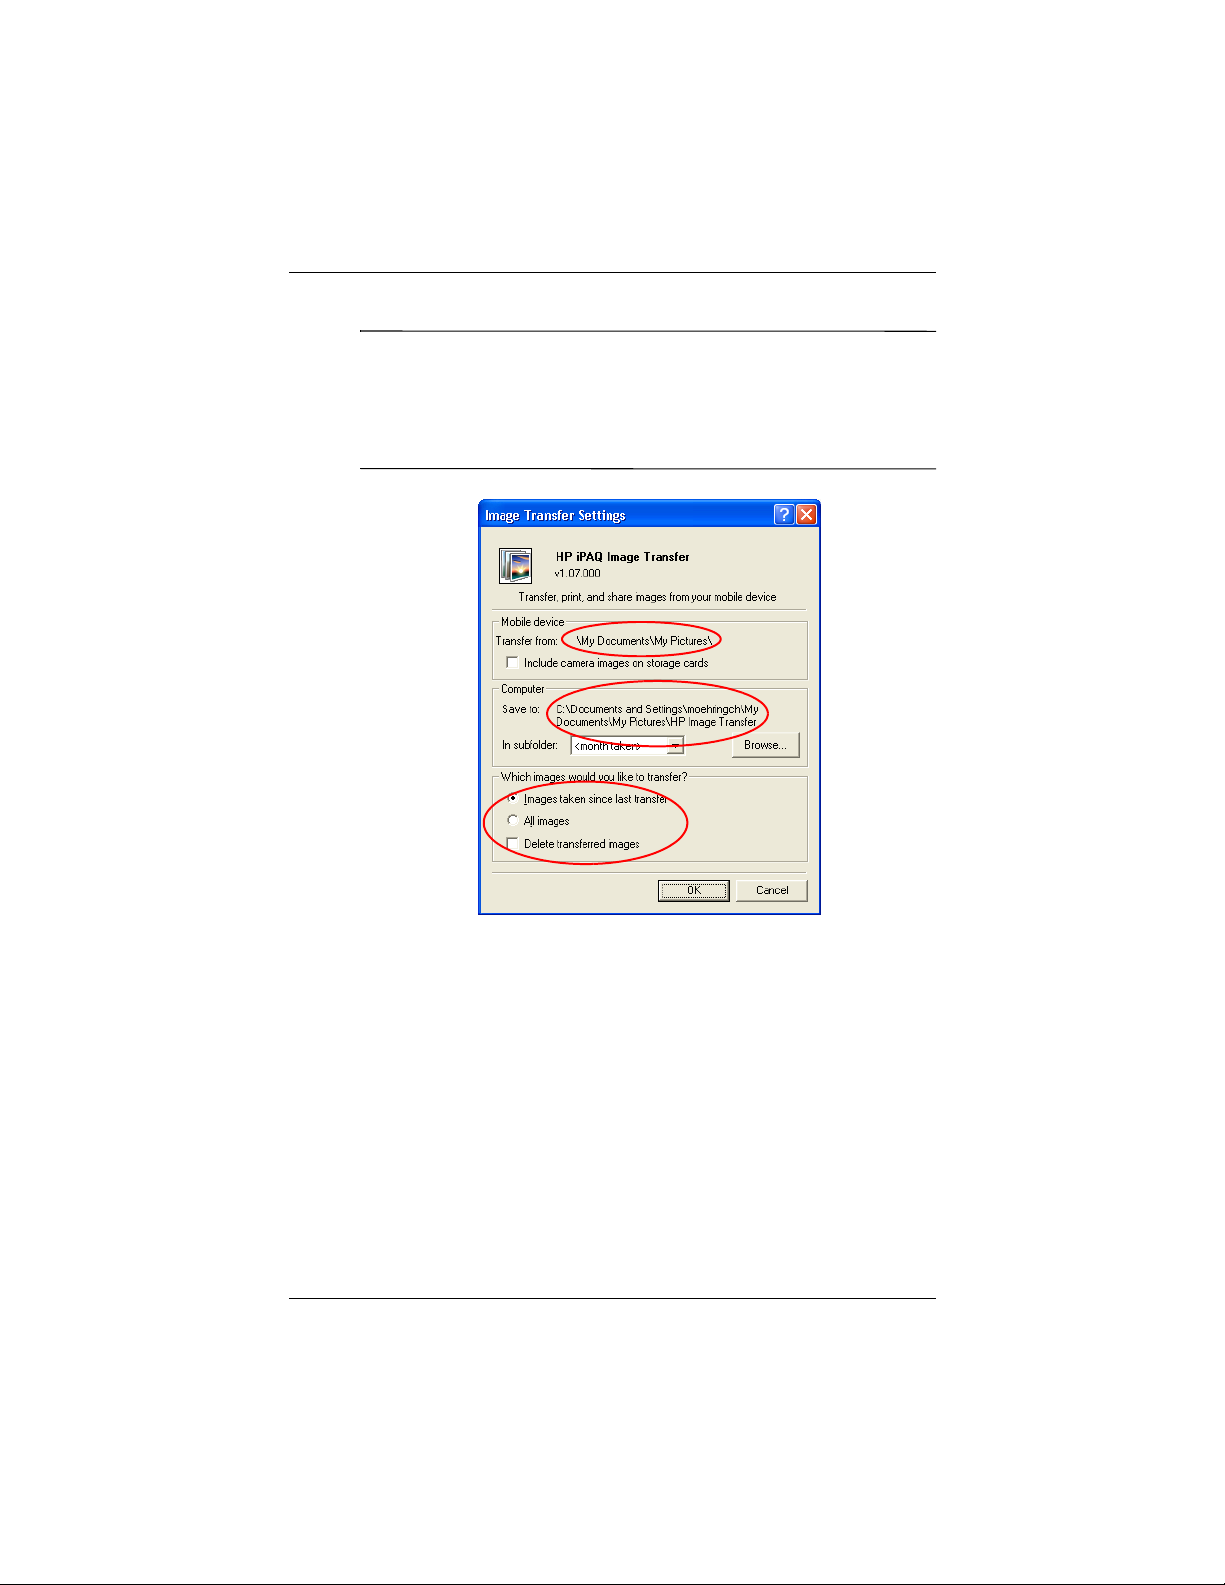
Using Your HP Photosmart Camera
Note:
Once image transfer has been enabled, the schedule and
rules you have configured for ActiveSync synchronization is also
applied to your image transfers. Depending on your
configuration, images may be transferred continuously while the
device is connected, only upon connection, or manually.
HP iPAQ Image Transfer allows transfer, print, share images in
the following ways:
■
The Mobile Device setting displays the location of the images
you want to transfer from your HP iPAQ. Also, if you want to
transfer images to storage cards, check the Include camera
images on storage cards checkbox.
■
The Computer setting allows you to create subfolders on your
desktop computer where images can be saved. For example,
you can configure the images to be transferred to a subfolder
with the same name as the folder on your HP iPAQ. If you are
transferring images from a folder with multiple subfolders,
all the subfolders are automatically created in the folder you
User’s Guide 5–27
Page 83

Using Your HP Photosmart Camera
designated as the Save to: folder. You also can designate the
images to be transferred to a subfolder with the month taken
or the current date as the folder name.
■
Which images would you like to transfer? allows you to
choose the transfer type of your choice:
❏
Transfer images taken since your last transfer
❏
Transfer all images
❏
Delete transferred images from your HP iPAQ after they
have been transferred
Note:
Some settings on the HP iPAQ Image Transfer screen only
can be changed while your HP iPAQ is connected to your desktop
computer. If your HP iPAQ is not connected, you are notified that
some settings cannot be changed and some settings are
inaccessible.
Printing
Use HP Mobile Printing and HP Instant Share Printing to print
your photos and share videos.
Using HP Mobile Printing
The HP Mobile Print program allows you to print from your HP
iPAQ to a variety of printers.
To print from HP Image Zone:
Note:
The HP Image Zone software installed on your HP iPAQ
supports the printing of photos. If you want to print e-mail
messages, Word documents, and more, install the full-version of
HP Mobile Printing for Pocket PC software from the Companion
CD onto your HP iPAQ.
User’s Guide 5–28
Page 84
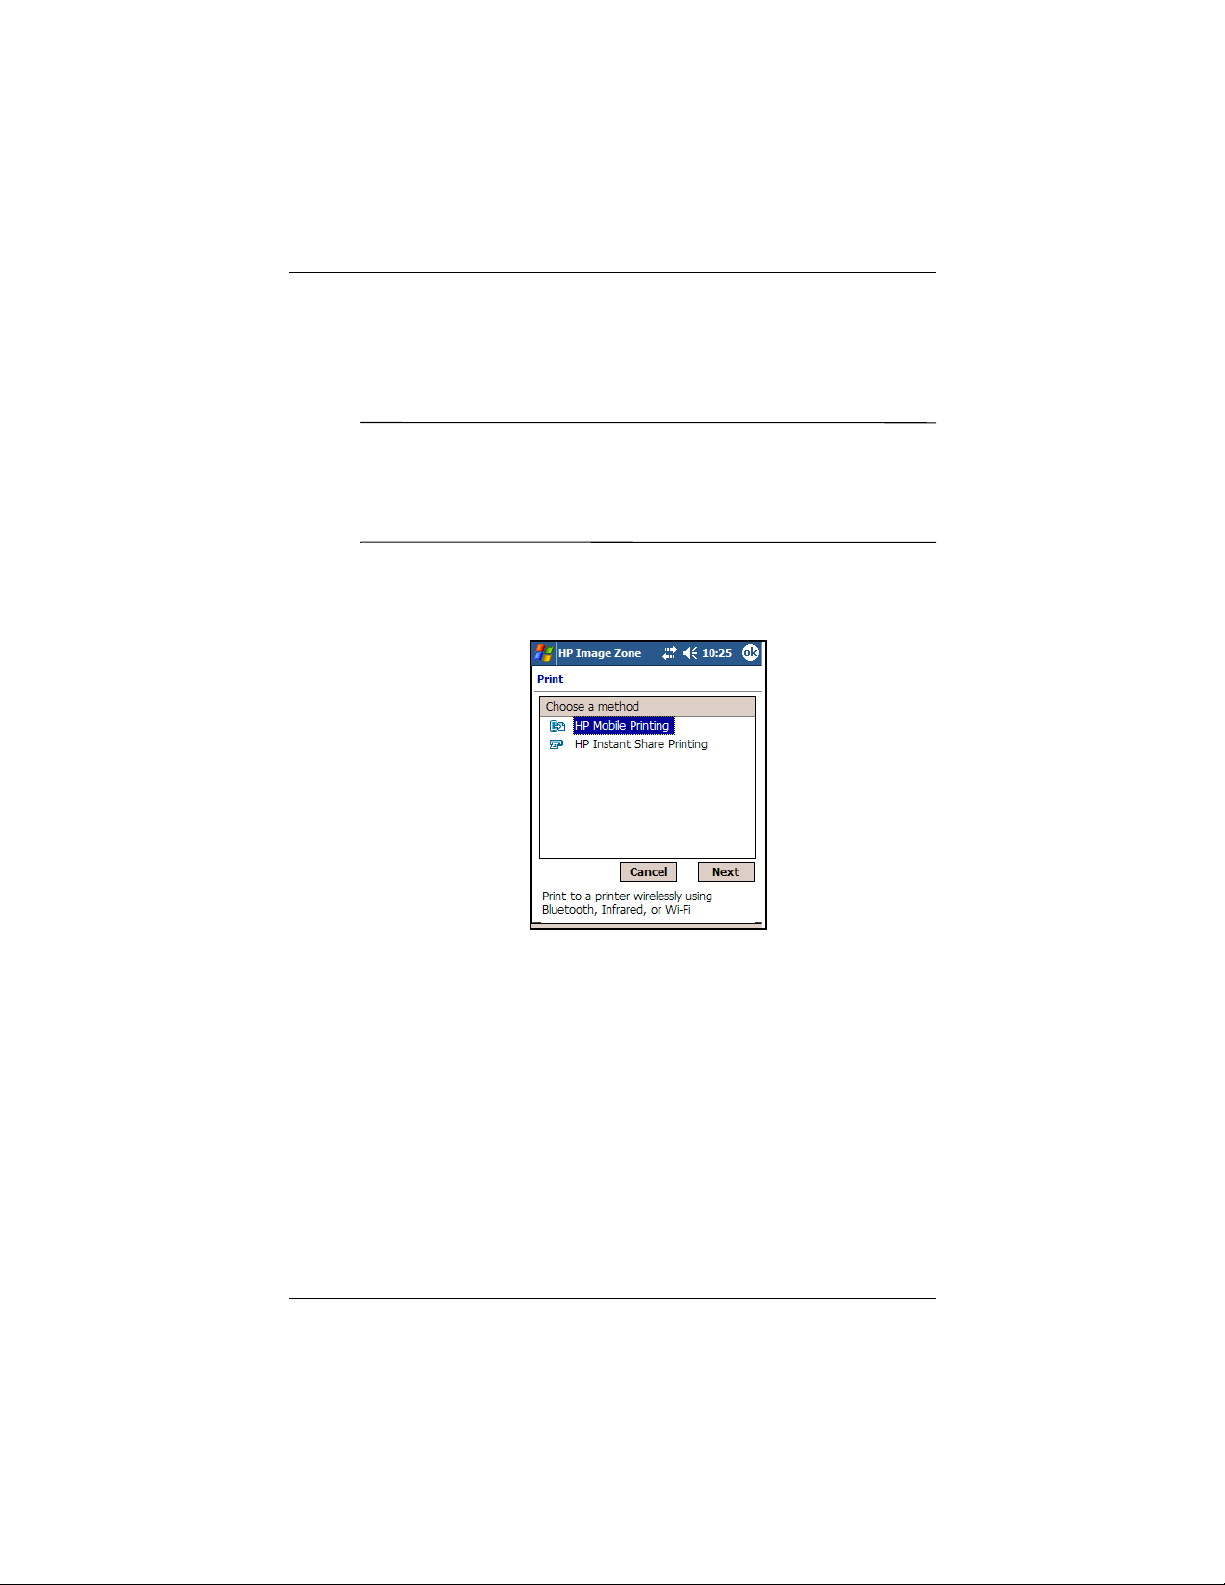
Using Your HP Photosmart Camera
1. From the Start menu, tap Programs > HP Image Zone or
from the Launch page, tap Photos.
2. Tap the photo you want to print.
Note:
If you want to print several photos, tap Tools > Select >
Range. Tap the first and last photo in the desired range. Once the
photos are selected for printing, a green flag is displayed on each
photo.
3. Tap File > Print.
4. Choose HP Mobile Printing.
5. Tap the Next button.
6. Select Configure, and then tap Add.
User’s Guide 5–29
Page 85
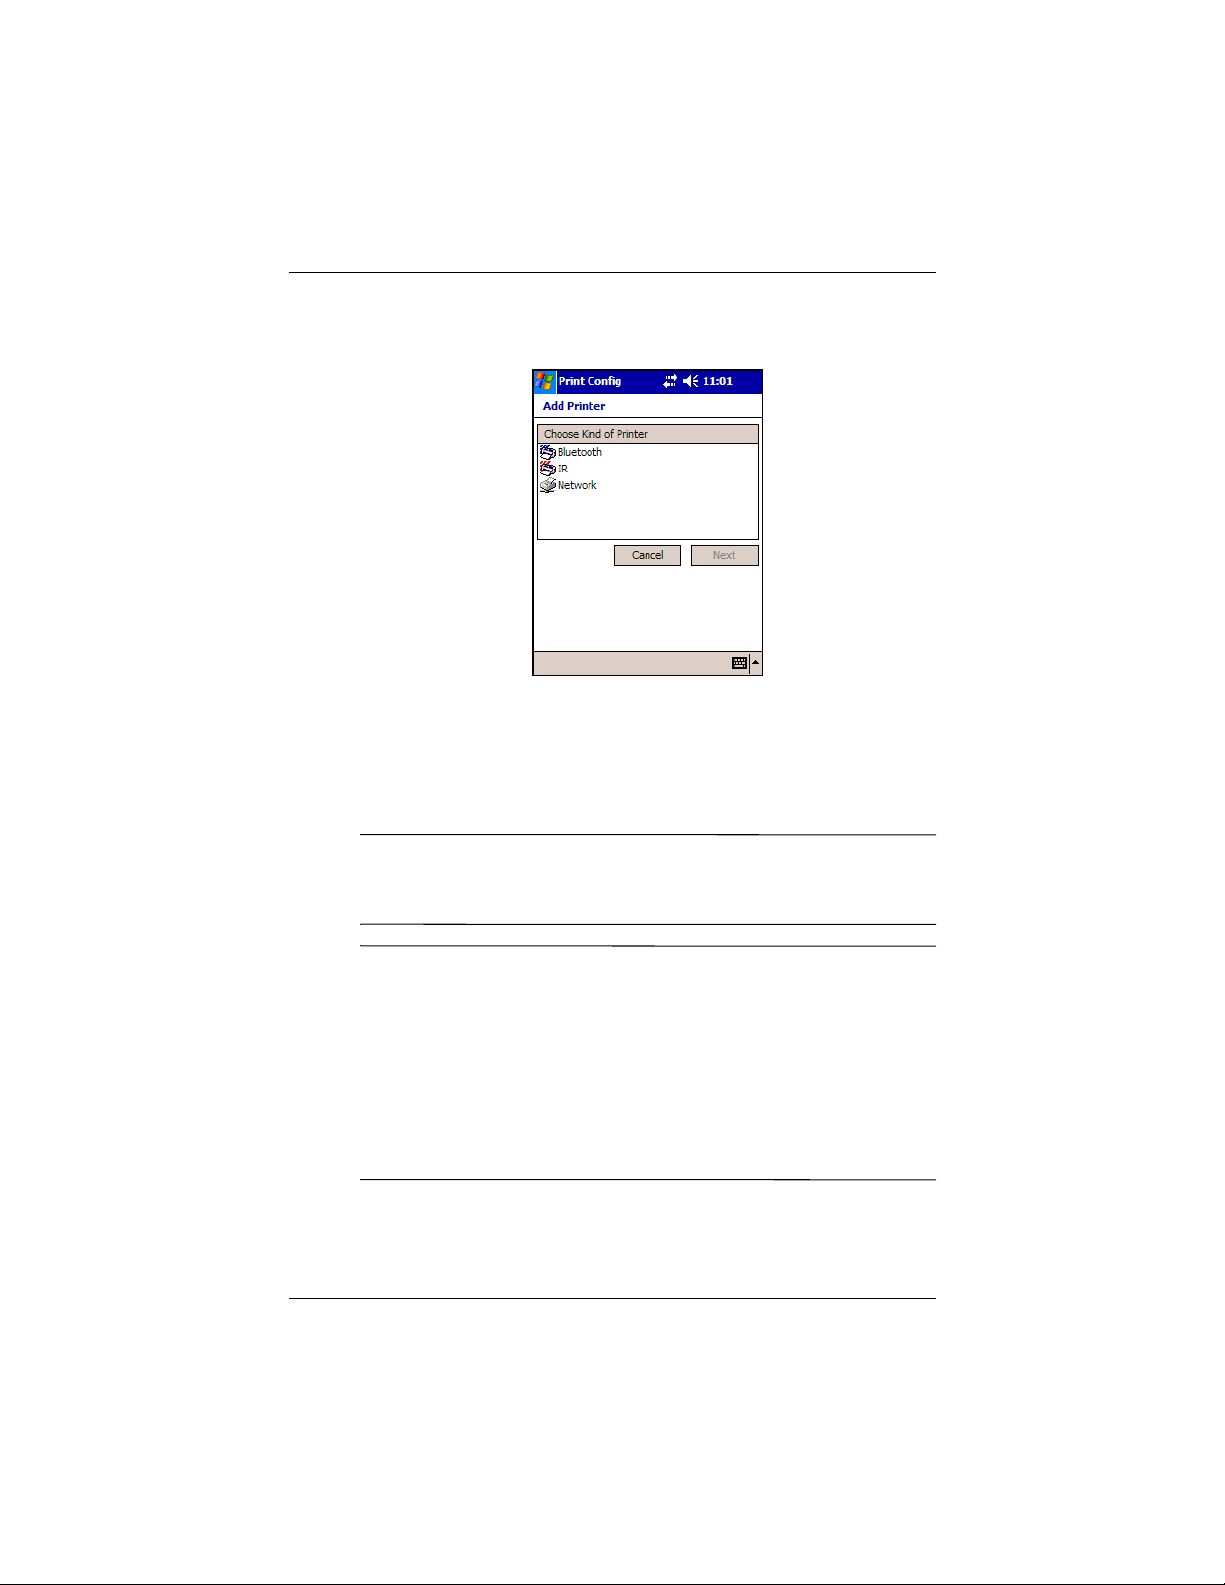
Using Your HP Photosmart Camera
7. Select the desired type of printer and tap Next.
8. Follow the instructions on the screen to complete the
configuration process for your printer. (You will be prompted
to enter specific details about your printer. For additional
information on configuring your printer, refer to the
on-screen Help for HP Image Zone.)
Note:
You should only need to perform the above steps once for
each printer you want to use. You do not need to install drivers
when you add a printer to your list.
Note:
Use of dial-up and wireless Internet, e-mail, corporate
networks, and other wireless communications, such as
Bluetooth-enabled devices, may require separately purchased
additional hardware and other compatible equipment, in addition
to a standard Wi-Fi infrastructure and a separately purchased
service contract. Check with your service provider for availability
and coverage in your area. Not all Web content may be available.
Some Web sites may not be formatted to fit mobile device screens
and may require installation of additional software.
User’s Guide 5–30
Page 86
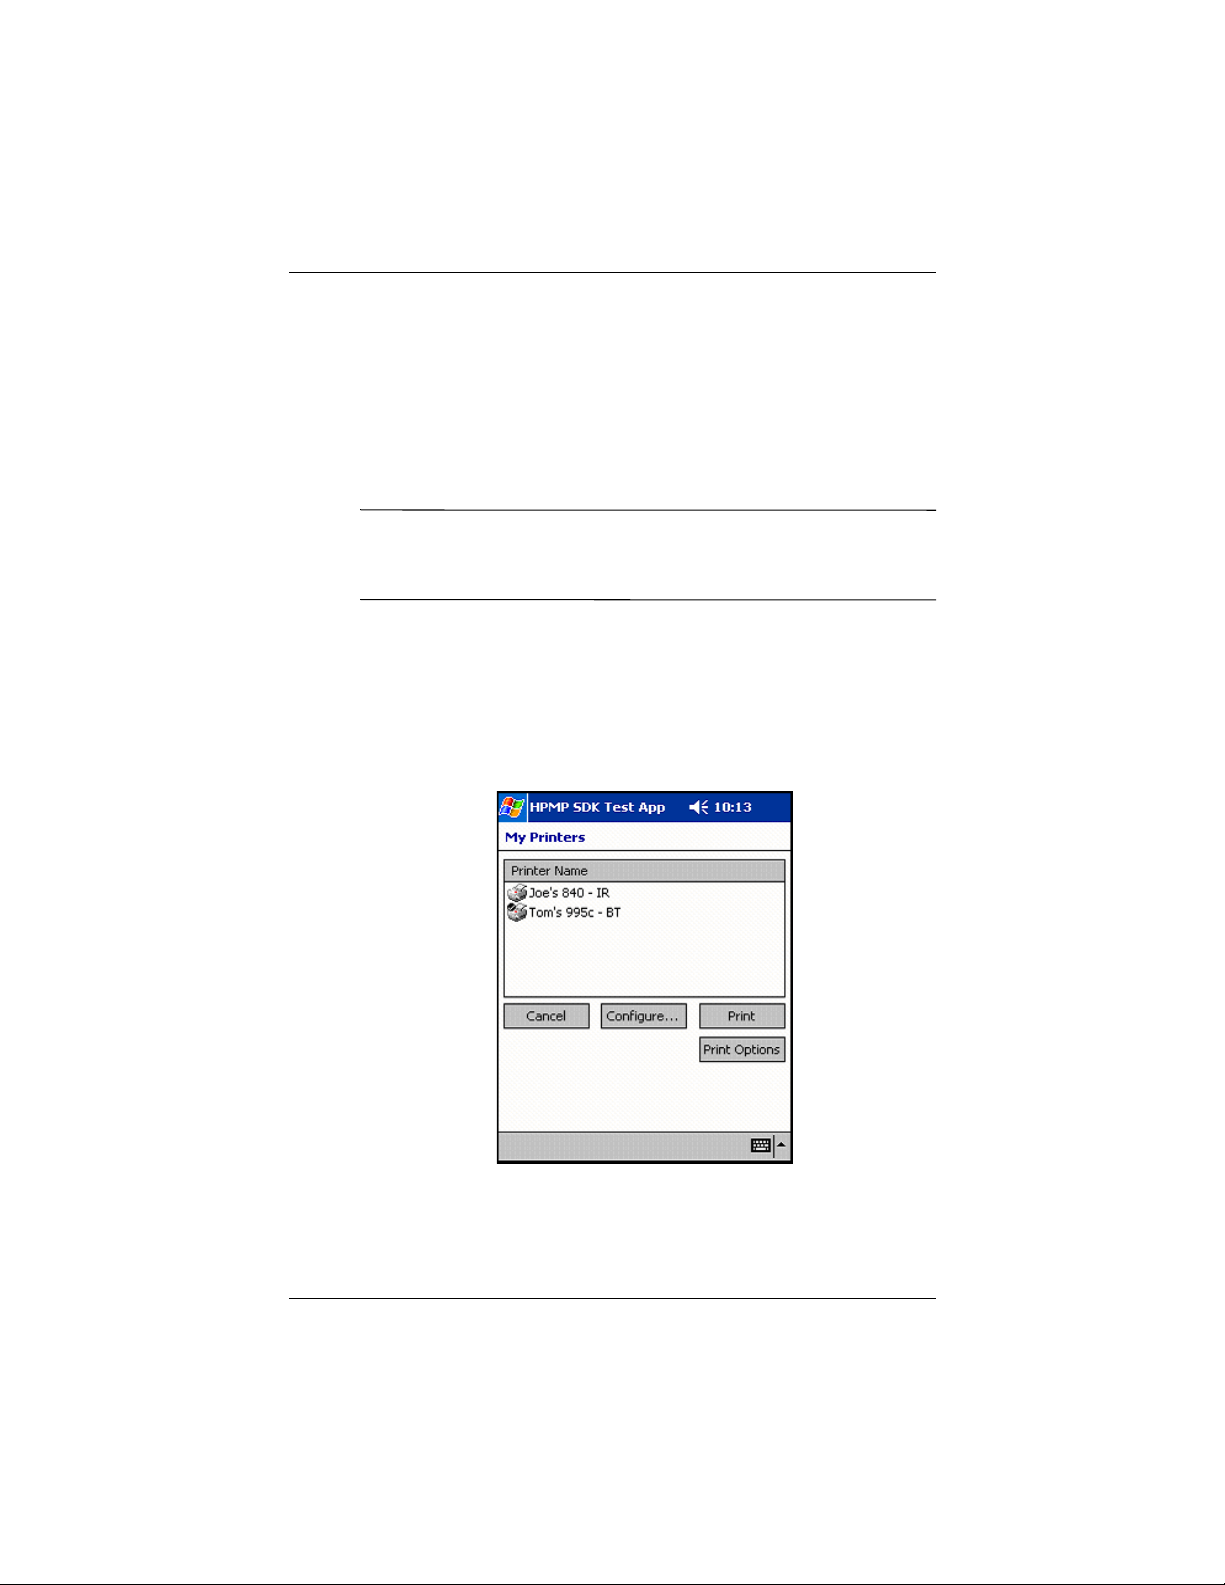
Selecting a Printer
The Printer Selection screen allows you to select a printer, choose
to configure printers, or choose to change print options. If there
is no printer in this list or the printer that you want to print to is
not listed, tap the Configure… button to add a printer. If a printer
is grayed out, it is because HP Mobile Print does not currently
support the document type you have chosen.
Note:
There might be other software applications available that
can enable printing of this document type through HP Mobile
Print.
To select a printer:
1. Select a printer from the list.
2. Tap the Print button. To change your print options before
printing, refer to “Print Options” discussed later in this
chapter.
Using Your HP Photosmart Camera
After tapping the Print button, your document will be printed. To
view the status of your document or to cancel printing, go to the
Print Manager.
User’s Guide 5–31
Page 87
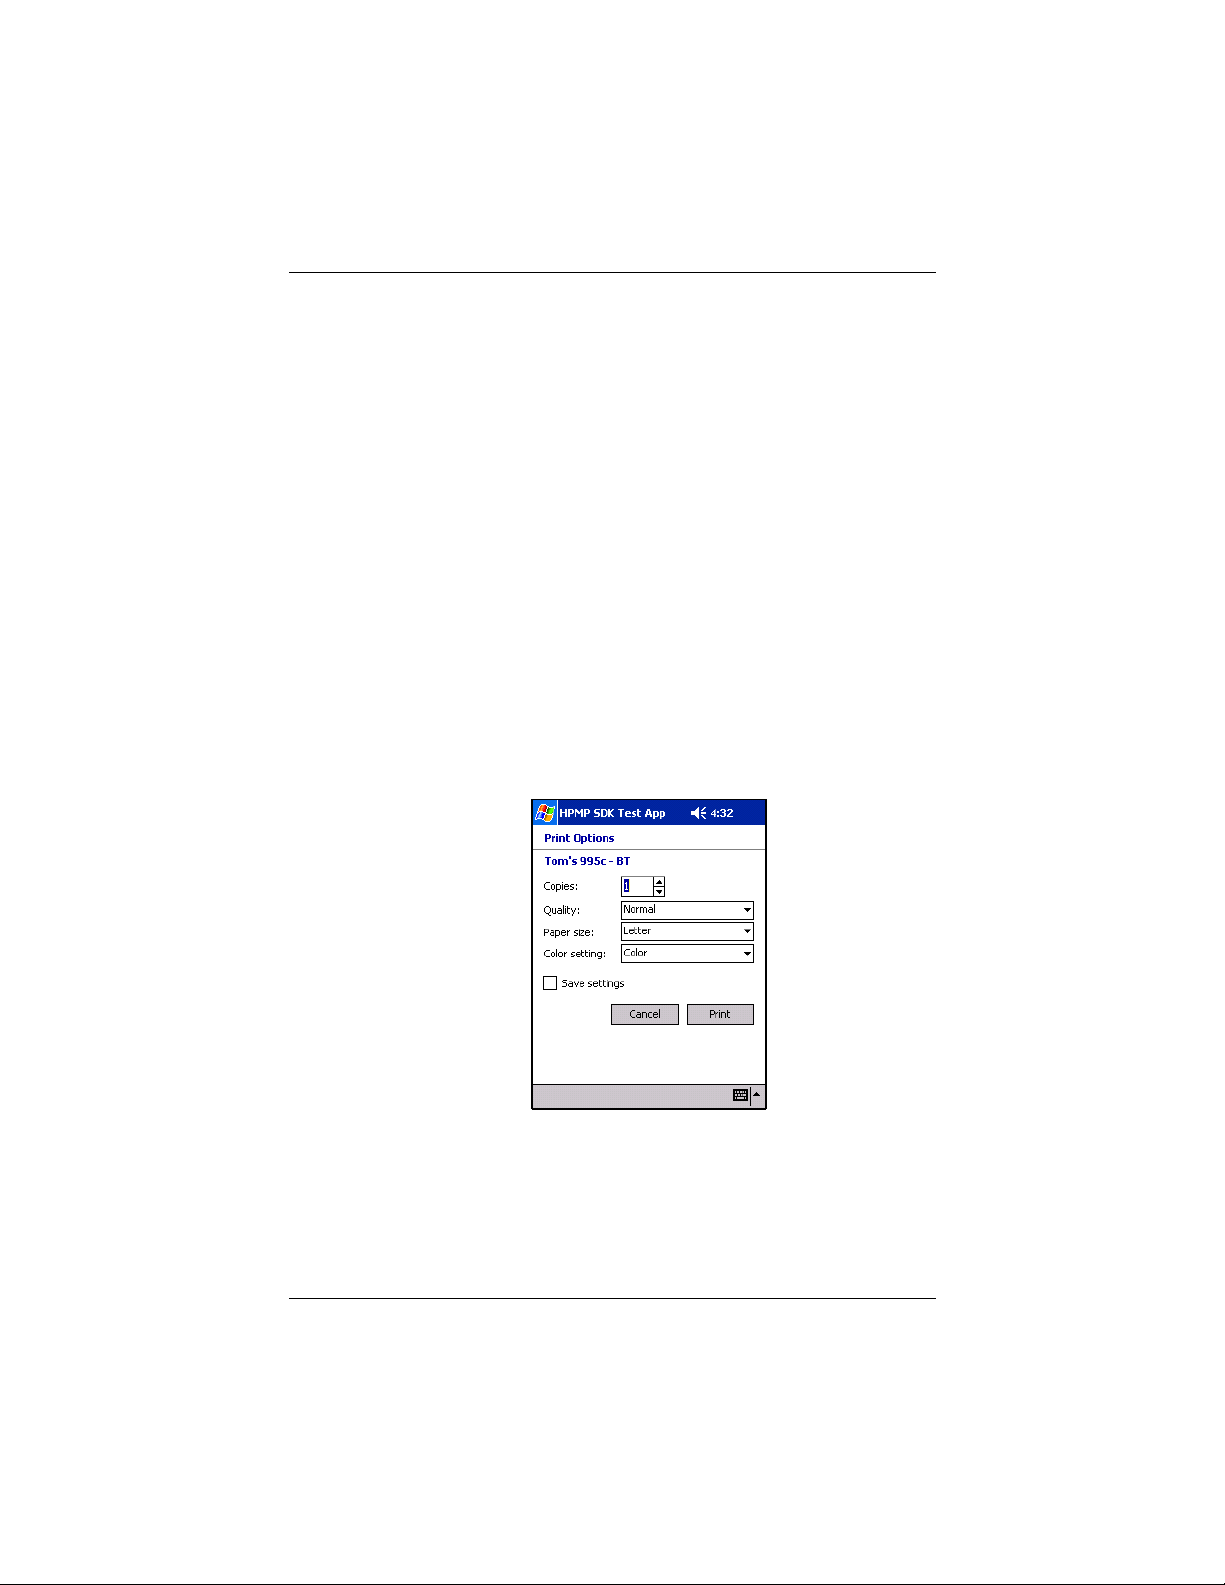
Using Your HP Photosmart Camera
Printing to an IR Printer
Make sure the IR port of your device is directly aligned with the
IR port of the printer.
Printing to a Bluetooth Printer
Make sure the selected Bluetooth printer is in range of your
device and the Bluetooth radio of your device is on.
Printing to a network printer via 802.11
Make sure you have an active network connection and that the
selected printer is connected to the same network.
Print Options
To change print options:
1. Select a printer from the Printer Selection screen
2. Tap the Print Options button.
User’s Guide 5–32
Page 88

Using Your HP Photosmart Camera
Print Options allow you to change the following:
Copies Number of copies to be printed.
Quality Print quality to use. Note: Some printers that
Paper size Paper size. Note: If you load a paper size
Color setting Select Color or Black and White from the
After setting the print options, you can save these options for this
printer by checking the Save Settings box. All future documents
you print to this printer will use these settings.
3. Tap the Print button to print the document.
Configuration
The Configuration screen allows the user to add or remove
printers, modify printer settings, or change system settings.
can sense the type of media that is loaded will
over-ride this setting.
other than the size you specify, you will not
receive an error. The document will be printed
and formatted for the paper size you specified.
drop-down menu.
User’s Guide 5–33
Page 89
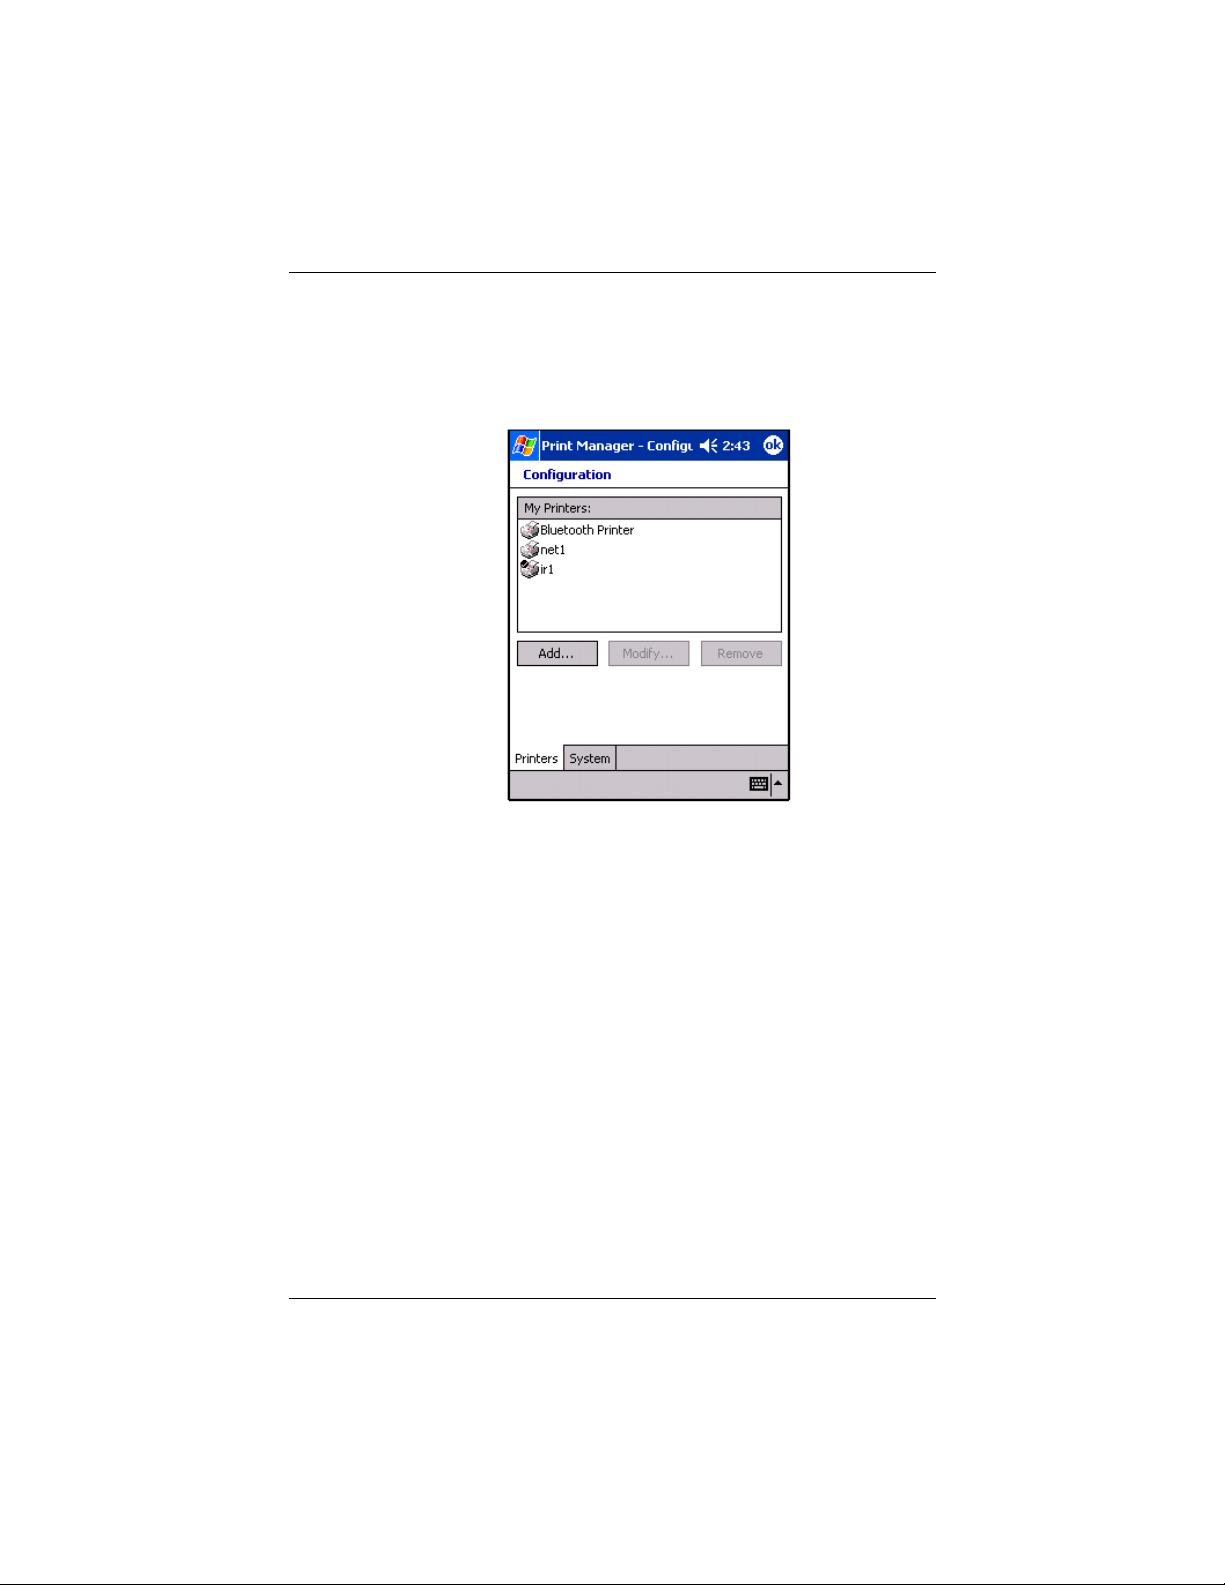
Using Your HP Photosmart Camera
To access the Configuration screen:
1. Enter the Print Manager or tap the Configure… button on the
Printer Selection screen.
User’s Guide 5–34
Page 90
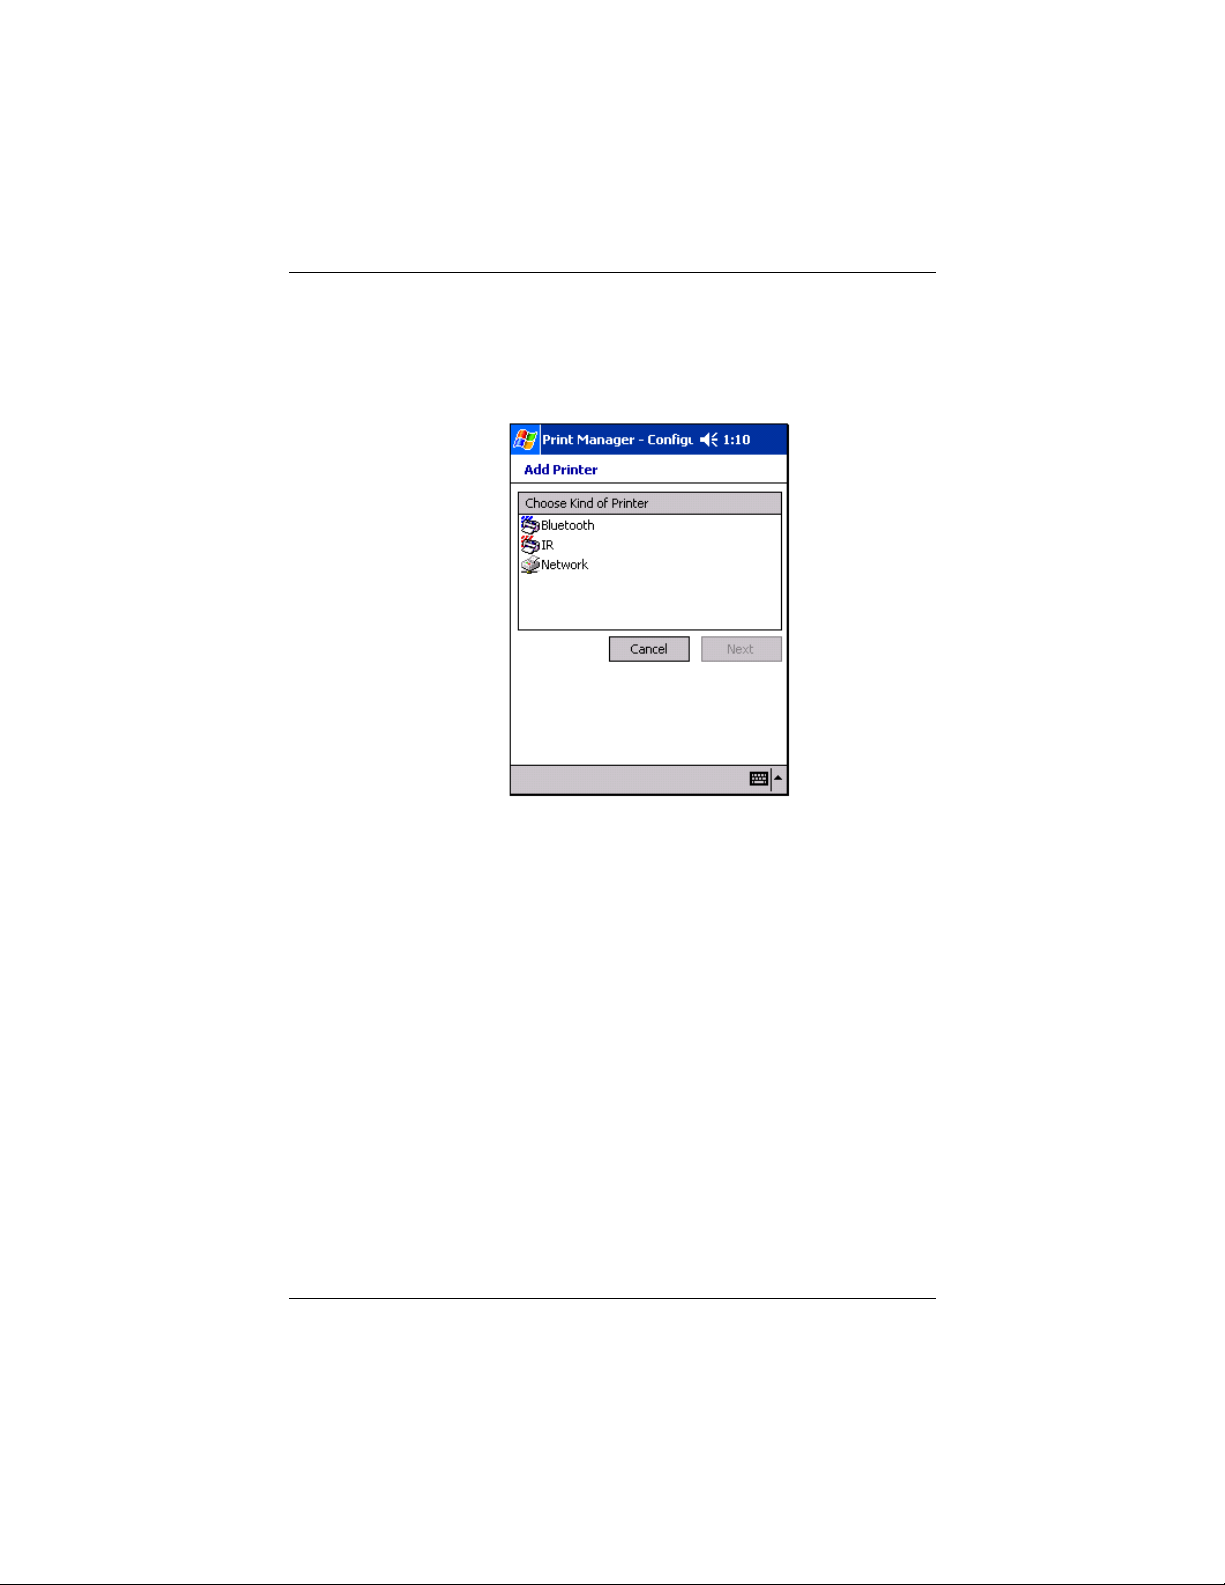
Adding a Printer
To add a printer, tap the Add… button on the Configuration
screen.
How To Connect To The Printer
Using Your HP Photosmart Camera
Before selecting the printer, HP Mobile Print needs to know how
it will be connecting to that printer. HP Mobile Print currently
supports Infrared (IR), Bluetooth, Network-based, and
Service-based connections. While the printer may have multiple
ways to connect, only one connection method can be set up at a
time. For example, the HP DeskJet 995c supports both IR and
Bluetooth connections, thus both IR and Bluetooth are valid
selections for connecting to this printer. The user can set up a
connection to print via Bluetooth right now and later set up an IR
connection to the same printer.
Selecting a connection method depends on what connections your
printer supports. To determine if a printer has IR or Bluetooth
capabilities, look for the IR port and Bluetooth radio located on
the outside of the printer. If neither of these are visible, then you
might try connecting to the printer via a network or through a
print service.
User’s Guide 5–35
Page 91

Using Your HP Photosmart Camera
■
Bluetooth Connections - Faster than IR, but setting up a
Bluetooth connection can differ from device to device. For
more information, refer to “Adding a Bluetooth Printer”
■
IR Connections - IR connections are the slowest, but easiest
to use. For more information, refer to “Adding an IR Printer”
■
Network Connections - Network connections are somewhat
more complicated to set up than IR and Bluetooth
connections, but have the advantage of being the fastest. For
more information, refer to “Adding a Network Printer.”
Once you have determined what connection you will use, choose
the connection method from the Choose Kind of Printer list and
tap the Next button. As previously mentioned, the next screen
displayed depends on which connection method was chosen.
Adding a Bluetooth Printer
Bluetooth connectivity differs from device to device. Also, a
device might have Bluetooth built-in or it may be an optional
accessory. Before continuing, you might want to familiarize
yourself with the Bluetooth options available on your HP iPAQ
and your Bluetooth printer.
For more information on Bluetooth, refer to Chapter 9, “Using
Bluetooth.”
User’s Guide 5–36
Page 92
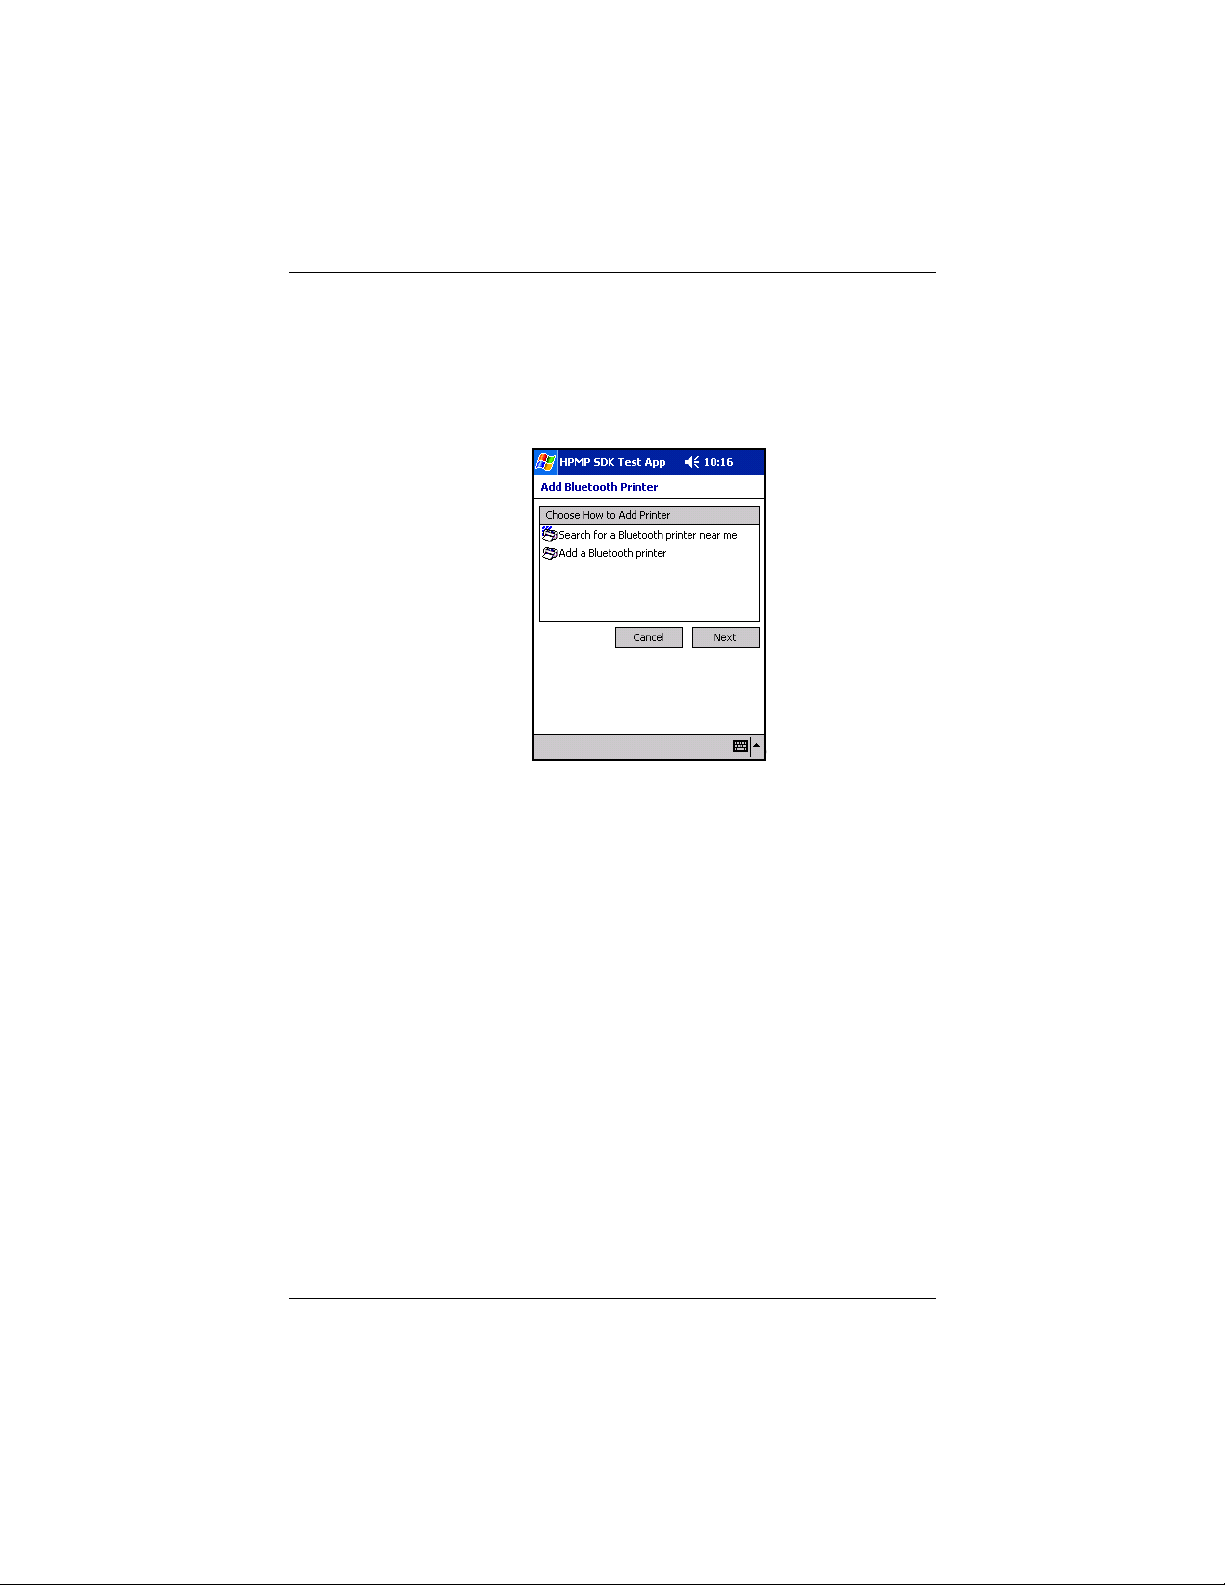
Using Your HP Photosmart Camera
To search for Bluetooth Printer(s):
1. Once the Next button has been tapped, the Specify Bluetooth
Printer screen gives the user the option to choose Search for
a Bluetooth printer near me or to Add a Bluetooth printer.
The option, Search for a Bluetooth printer near me, discovers
Bluetooth printers near you and automatically sets up the
connection. The option to Add a Bluetooth printer requires you
to set up your Bluetooth connection using the Bluetooth Manager.
User’s Guide 5–37
Page 93
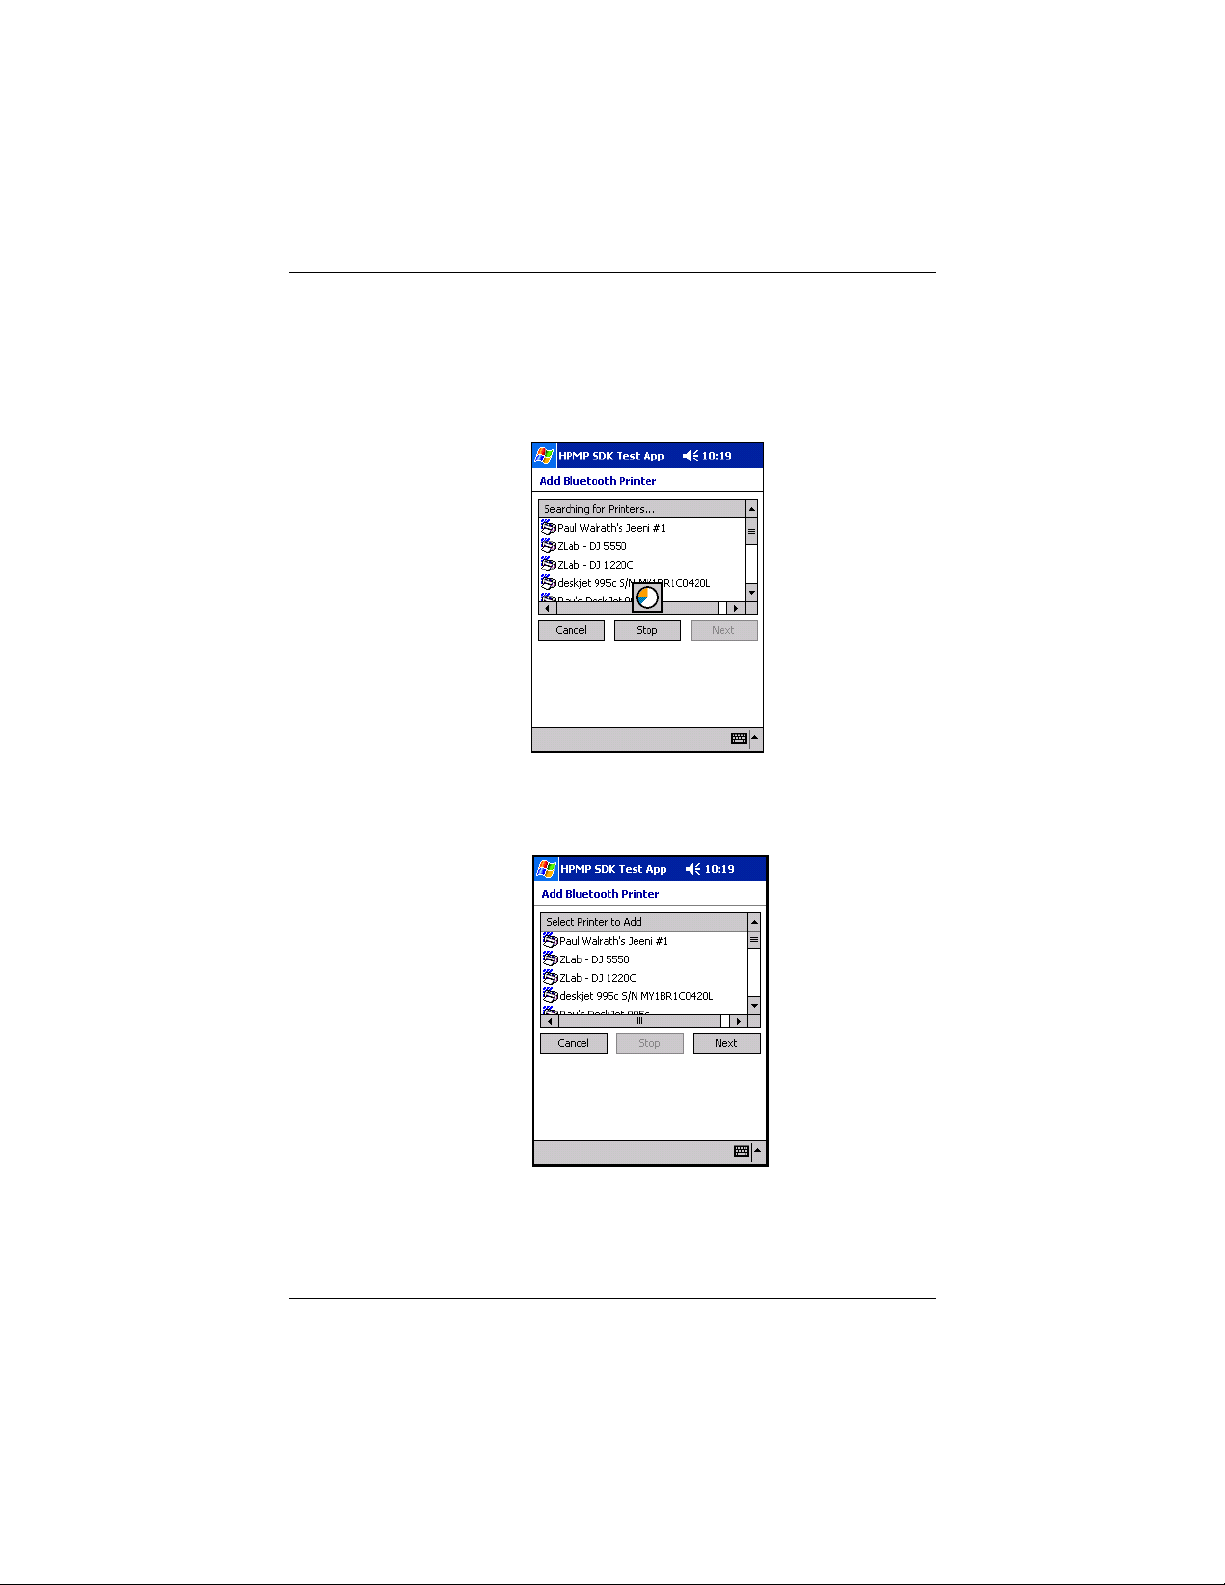
Using Your HP Photosmart Camera
2. Discovering Bluetooth Printer(s)
Once the Next button has been tapped, a "Searching for
devices…" message indicates the HP Mobile Print is searching
for and will list the Bluetooth printers discovered.
Tapping the Stop button will cancel discovery and allow you to
choose any printer already discovered. After discovery is
complete, select a printer to add, and then tap Next.
User’s Guide 5–38
Page 94
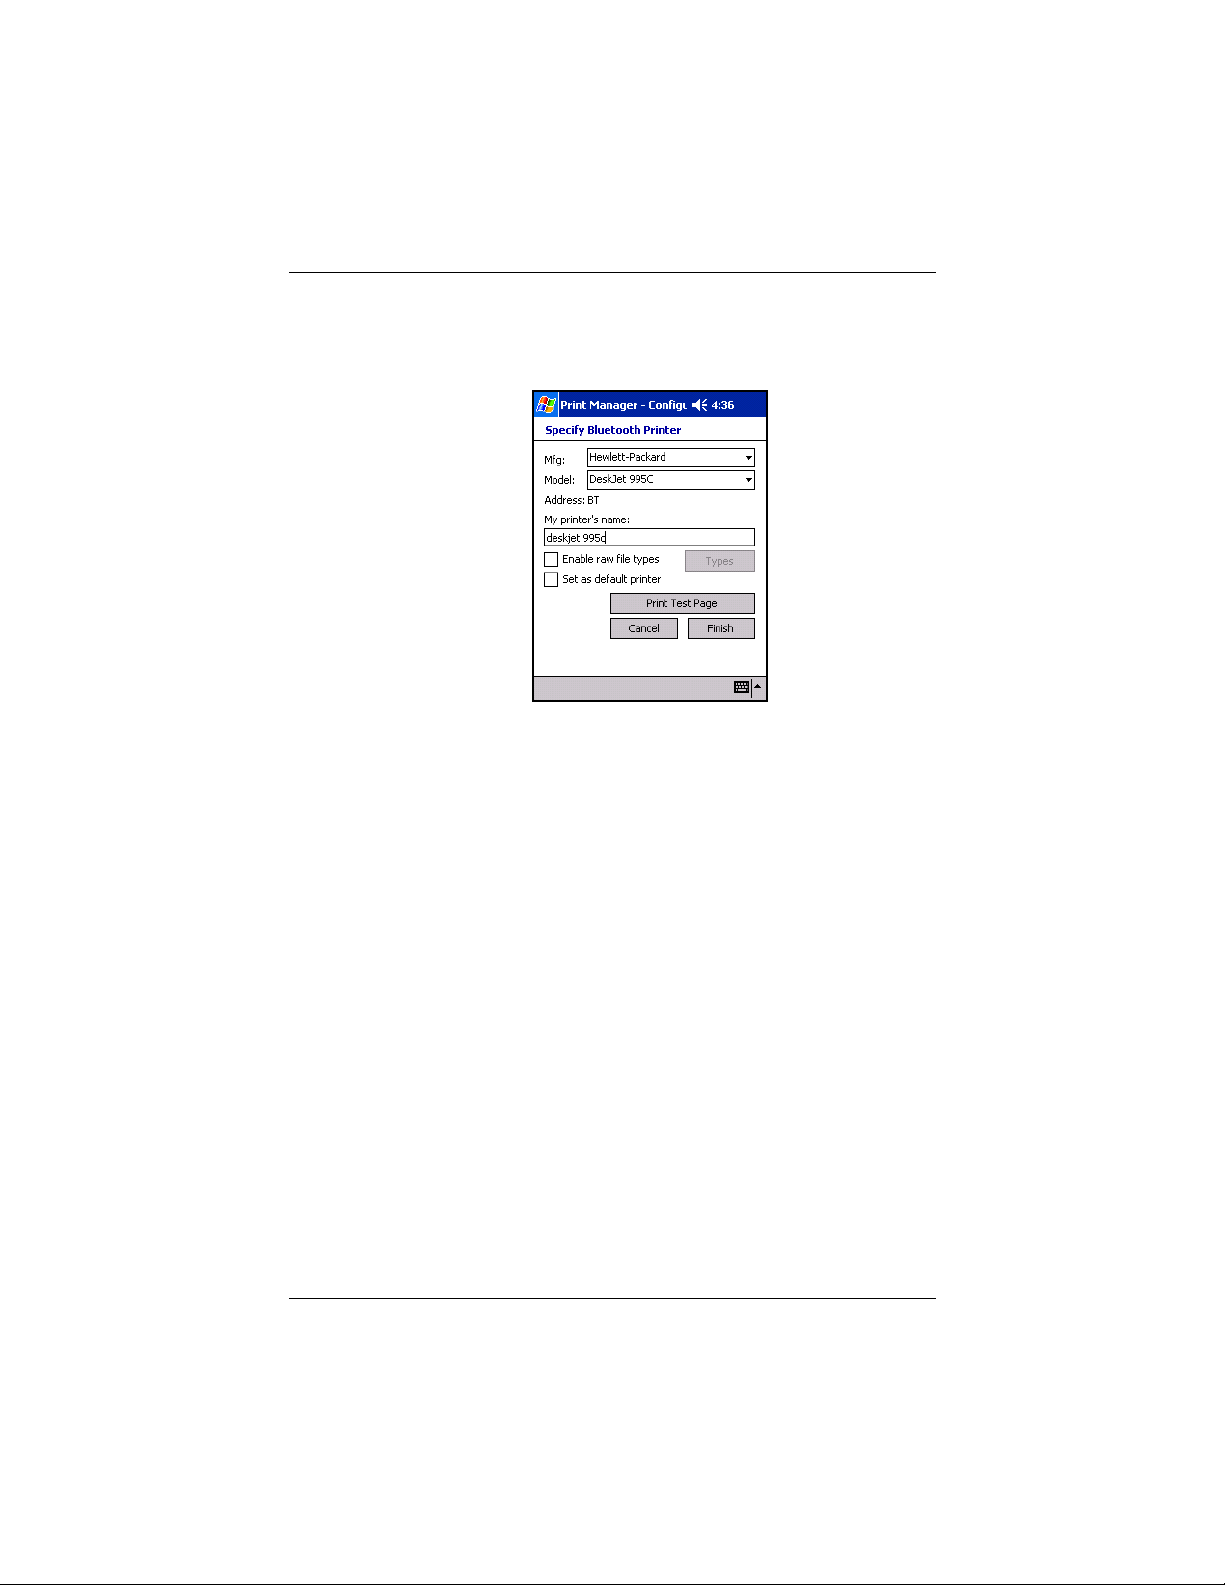
Using Your HP Photosmart Camera
3. Specify the Bluetooth Printer by filling in the blank
information fields.
Mfg: Select the manufacturer of the printer you would like to
print to, from the drop-down list.
Model: Choose the printer model family that best represents the
printer from the Model drop-down list. The printer's name and
model are usually displayed somewhere on the printer. (If the
printer's family isn't in the list, choose the closest possible match
and try to print. If that fails, then try a different printer family
until one is found that works.)
Printer Address: This field will auto-populate with "BT",
denoting Bluetooth.
My Printer Name: Enter a unique name to identify the printer. It
will be helpful to choose a name that describes the printer type
and connection method used. An example of a good name is
"Joe's DJ 995c over Bluetooth".
Enable Raw File Types: This is an advanced option and can be
ignored by most users. This option enables certain file types to be
sent directly to the printer in their native format. Raw PCL, JPG,
and PS files are examples of file types that might be candidates
for sending directly to the printer.
Set As Default: This check box, when checked, indicates that
you want this printer to be your default printer.
User’s Guide 5–39
Page 95
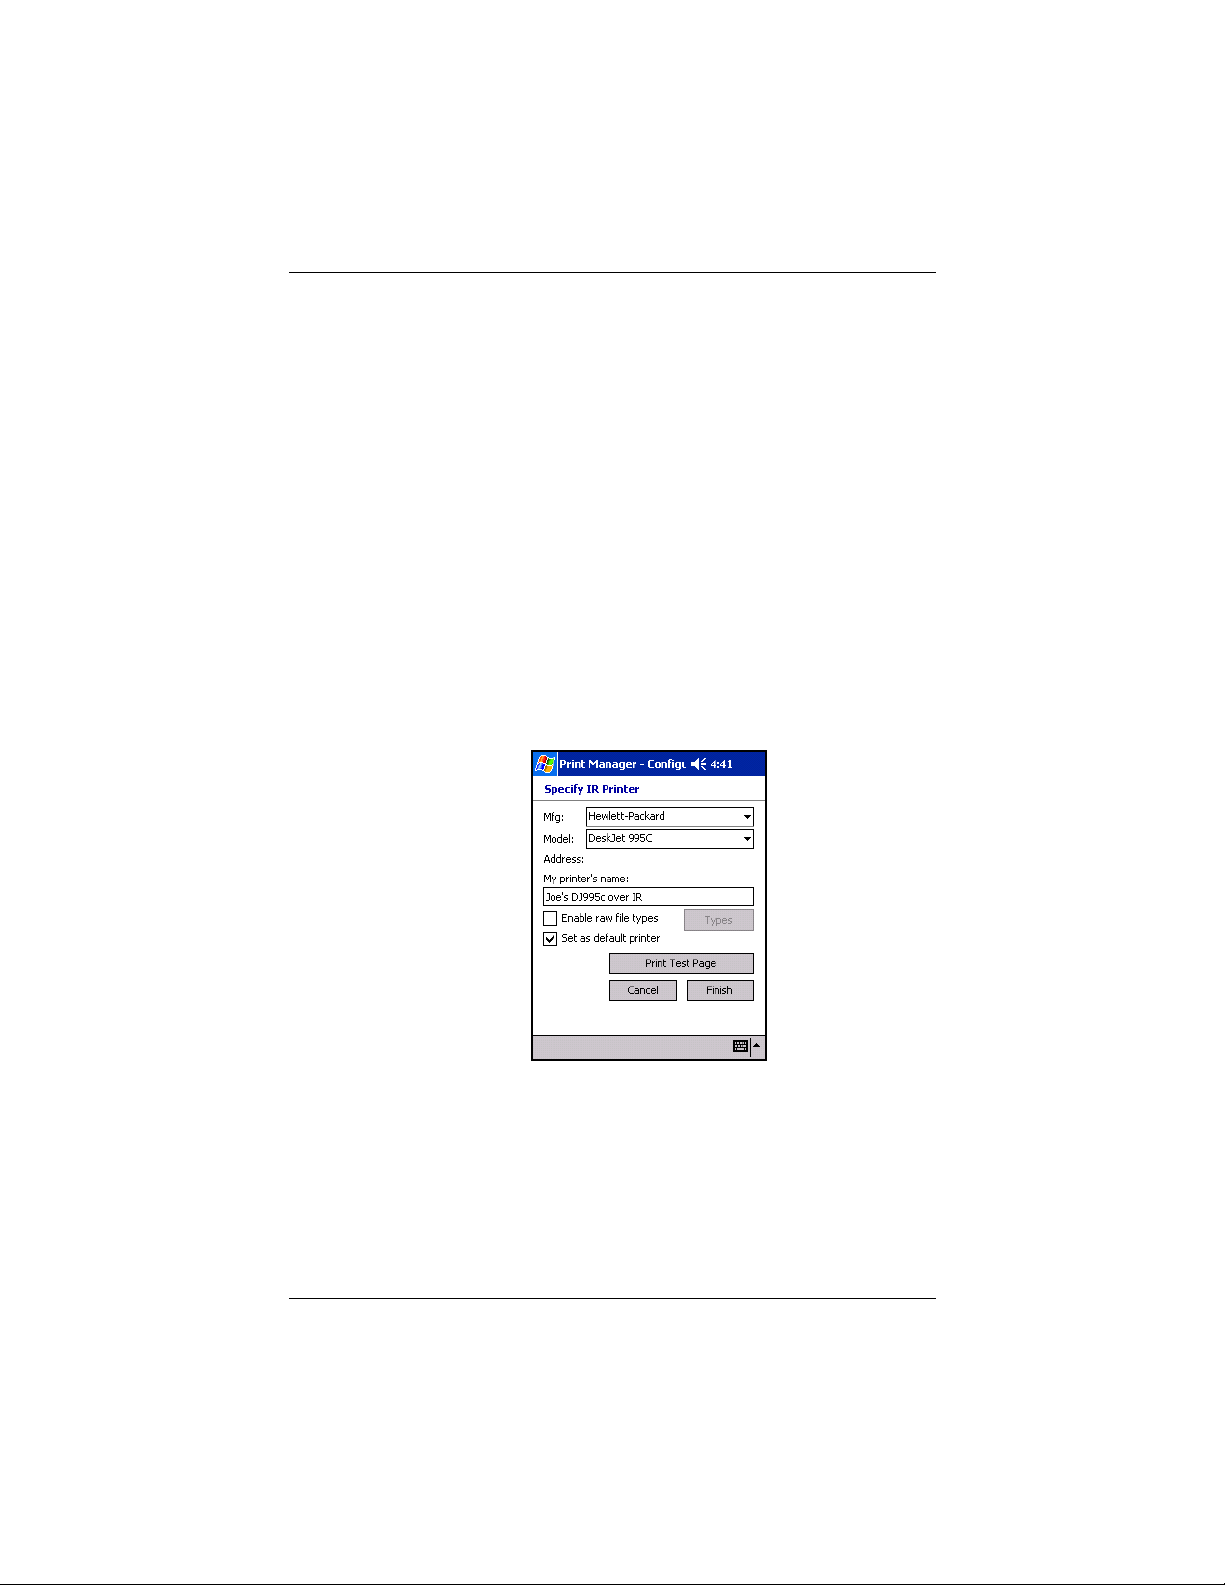
Using Your HP Photosmart Camera
Print Test Page: This button allows you to make sure you can
print to the selected printer, using the settings you have chosen,
by printing a test page.
4. Tap the Finish button to add the printer.
Adding an IR Printer
To add an IR Printer:
1. Choose an IR printer and tap the Next button. This brings up
the IR Printer Identification screen that asks the user to align
IR port of the printer with the IR port of the HP iPAQ.
2. Align the IR ports and tap the OK button. This brings up the
Specify IR Printer screen. The Mfg and Model fields are
filled if the printer is identified.
3. Specify the IR Printer by filling in the blank information
fields.
Mfg: Select Hewlett-Packard from the drop-down menu. HP
Mobile Print currently supports only Hewlett-Packard printers.
Model: Choose the printer model family that best represents the
target printer from the Model drop-down menu. The printer's
name and model are usually displayed somewhere on the printer
and should be easy to establish. (If the target printer's family isn't
User’s Guide 5–40
Page 96

Using Your HP Photosmart Camera
on the list, choose the closest possible match and try to print. If
that fails, then try a different printer family until one is found that
allows a good quality print to come out.)
Address: This field will auto-populate with "IR."
My Printer Name: Enter a unique name to identify the printer. It
is helpful to choose a name that describes the printer type and
connection method used. An example of a unique name is "Joe's
DJ 995c over IR.”
Enable Raw File Types: This is an advanced option and can be
ignored by most users. This option enables certain file types to be
sent directly to the printer in their native format. Raw PCL, JPG,
and PS files are examples of file types that might be candidates
for sending directly to the printer.
Set As Default: This check box indicates you are choosing this
printer to be your default printer.
Print Test Page: This button allows you to make sure you can
print to the selected printer, using the settings you have chosen,
by printing a test page.
4. Tap the Finish button to add the printer.
Adding a Network Printer
1. Choose a Network printer and tap the Next button. This
brings up the Specify Network Printer screen.
User’s Guide 5–41
Page 97
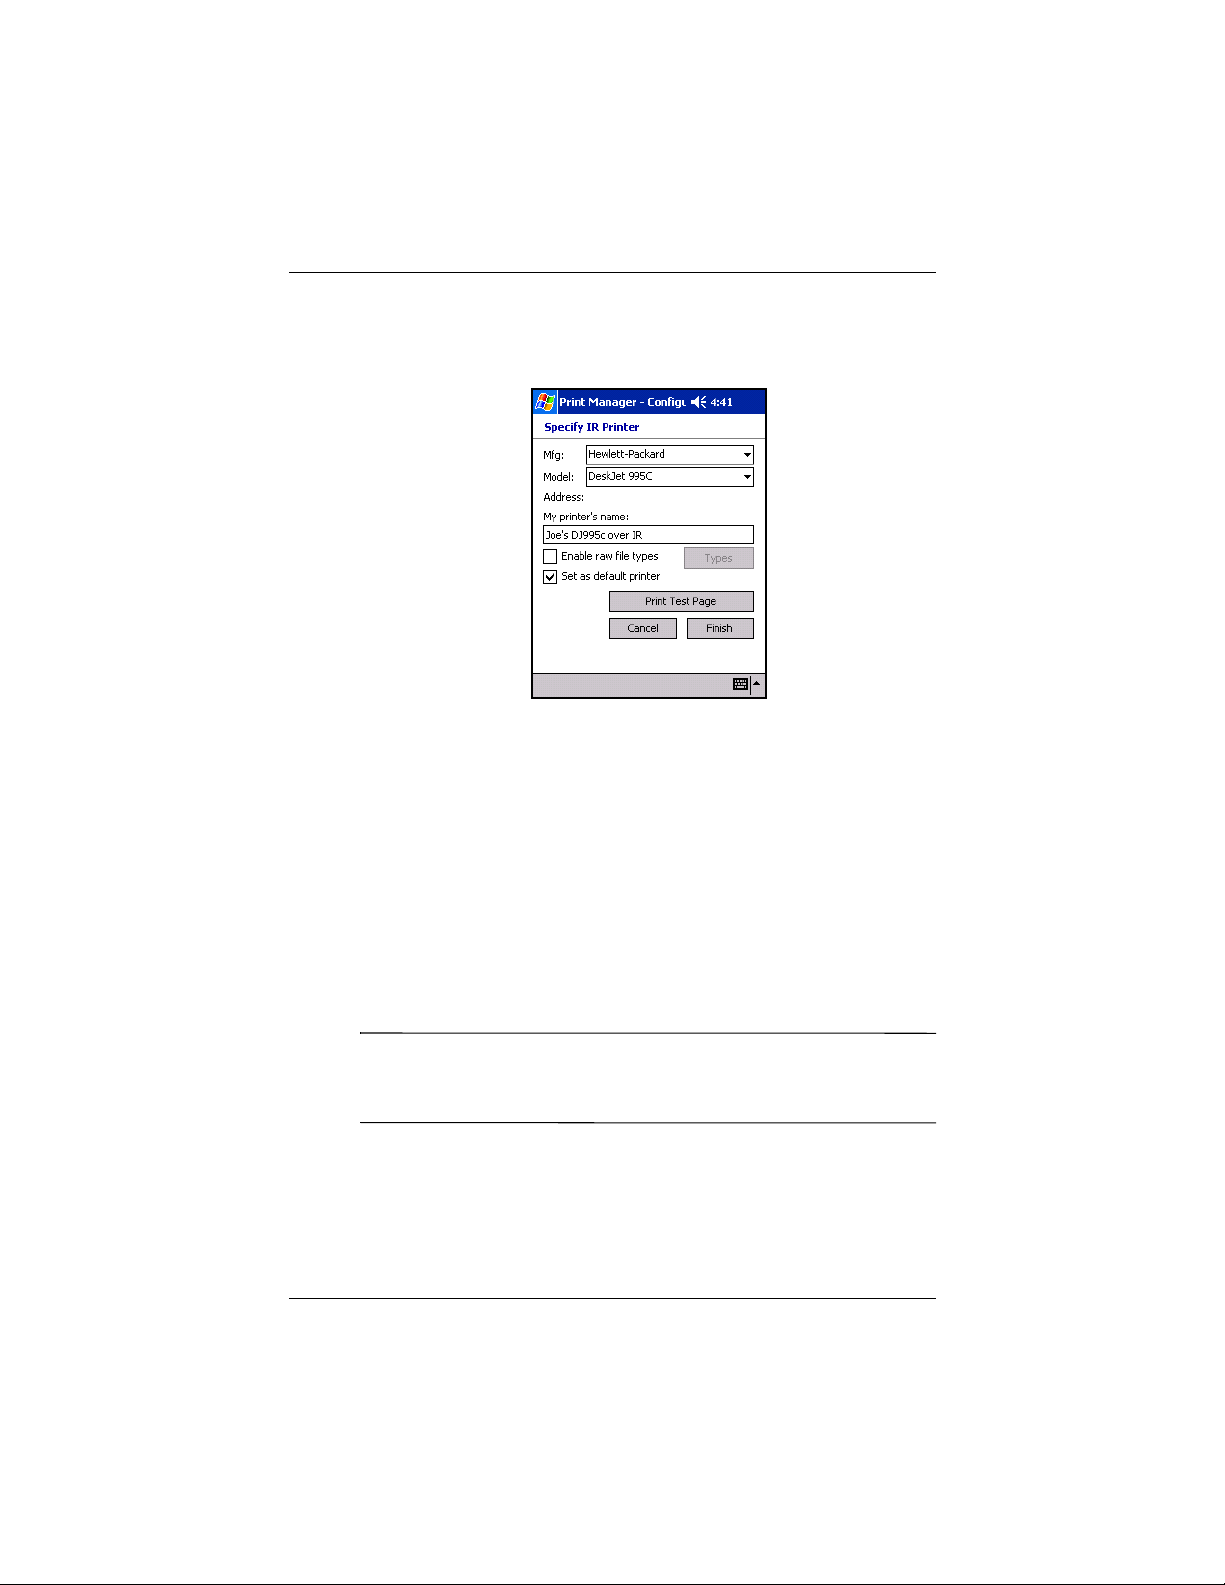
Using Your HP Photosmart Camera
2. Specify the Network Printer by filling in the blank
information fields.
Mfg: Select Hewlett-Packard from the drop-down menu. HP
Mobile Print supports currently only Hewlett-Packard printers.
Model: Choose the printer model family that best represents the
target printer from the Model drop-down menu. The printer's
name and model are usually displayed somewhere on the printer
and should be easy to establish. (If the target printer's family isn't
on the list, choose the closest possible match and try to print. If
that fails, then try a different printer family until one is found that
allows a good quality print to come out.)
Address: Enter the network address of your Printer. The
network address is usually of the form:
\\server\printer_share_name
Note:
A Windows CE device cannot connect to a printer using a
UNC path when it is in the cradle. In this case, always use an IP
address.
My Printer's Name: Enter a unique name to identify the printer.
It is helpful to choose a name that describes the printer type and
connection method used.
User’s Guide 5–42
Page 98

Using Your HP Photosmart Camera
Enable Raw File Types: This is an advanced option and can be
ignored by most users. This option enables certain file types to be
sent directly to the printer in their native format. Raw PCL, JPG,
and PS files are examples of file types that might be candidates
for sending directly to the printer.
Set As Default: This checkbox indicates you are choosing this
printer to be your default printer.
Print Test Page: This button allows you to make sure you can
print to the selected printer, using the settings you have chosen,
by printing a test page.
3. Tap the Finish button to add the printer.
Note:
Use of dial-up and wireless Internet, e-mail, corporate
networks, and other wireless communications, such as
Bluetooth-enabled devices, may require separately purchased
additional hardware and other compatible equipment, in addition
to a standard Wi-Fi infrastructure and a separately purchased
service contract. Check with your service provider for availability
and coverage in your area. Not all Web content may be available.
Some Web sites may not be formatted to fit mobile device screens
and may require installation of additional software.
User’s Guide 5–43
Page 99
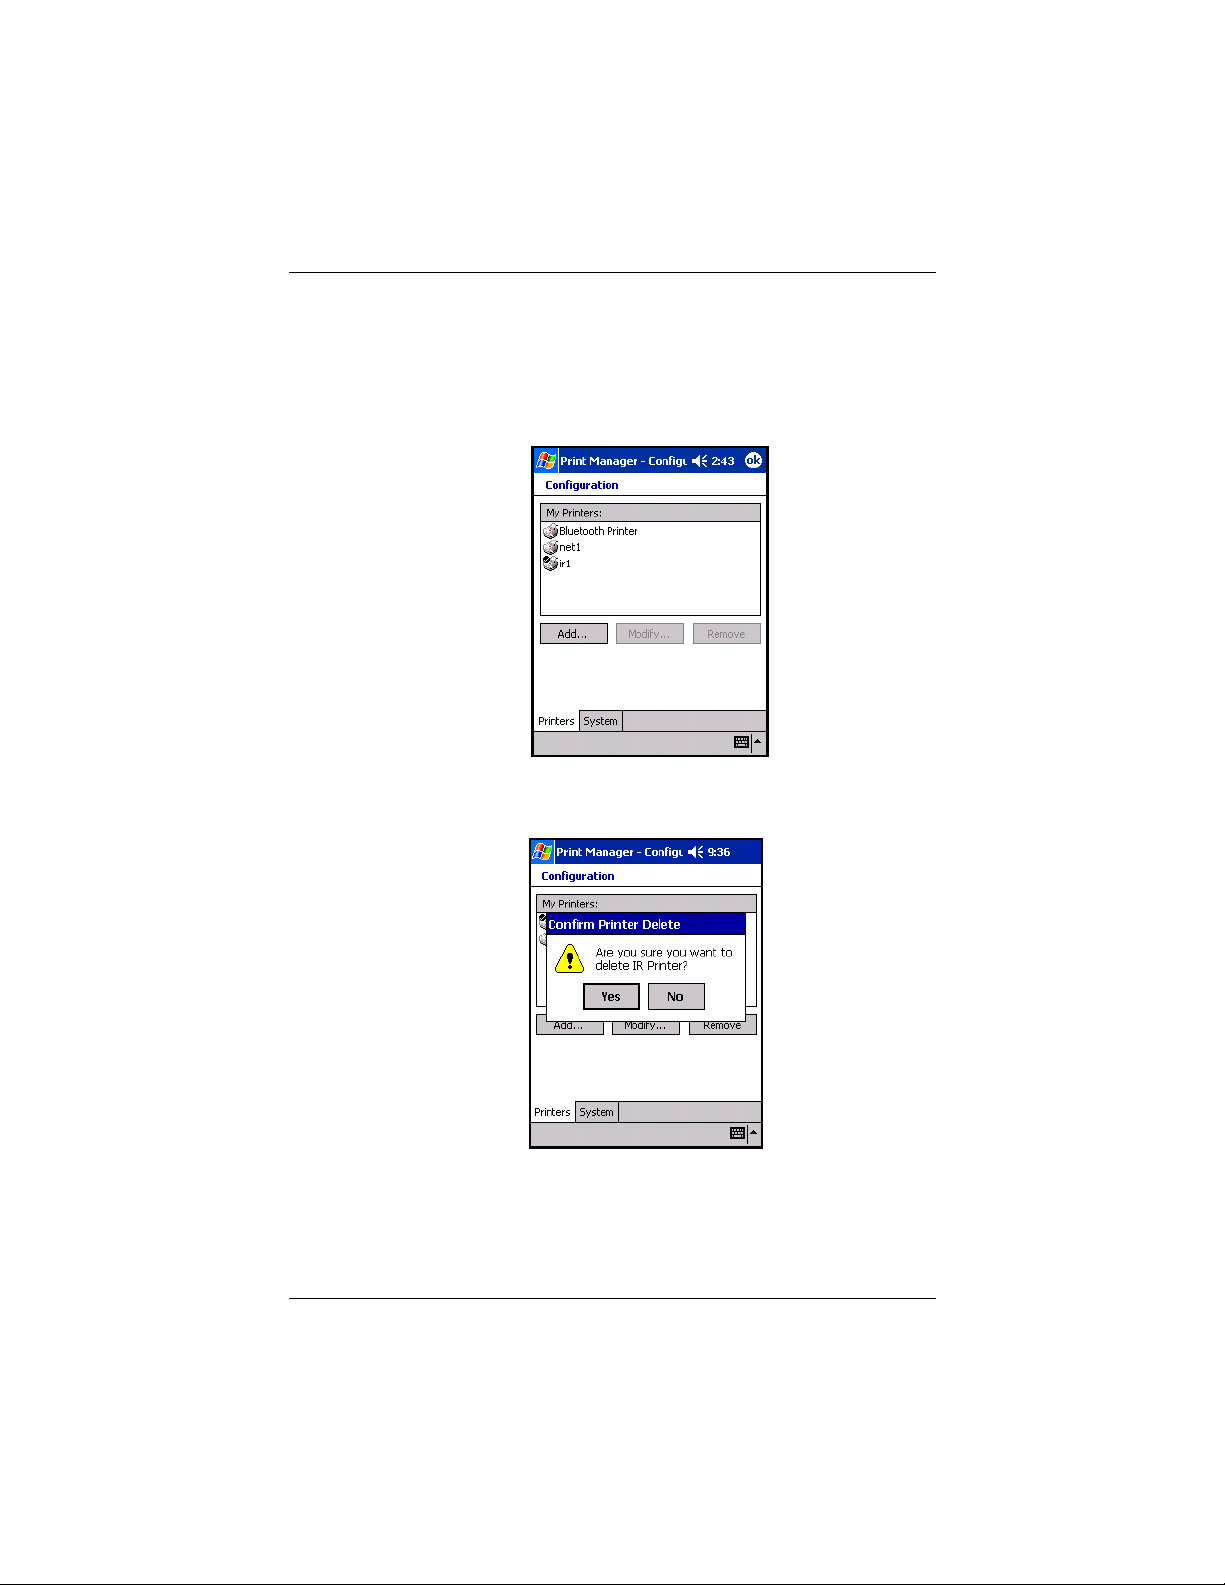
Using Your HP Photosmart Camera
Removing Printers from the Printer Selection List
To remove a printer from the Printer Selection List, highlight the
printer you want to remove on the Configuration screen, and then
tap the Remove button.
Because the printer will be removed permanently, a message box
will ask you to confirm the deletion.
Tap Ye s and the printer will be permanently removed/deleted
from your HP iPAQ.
User’s Guide 5–44
Page 100
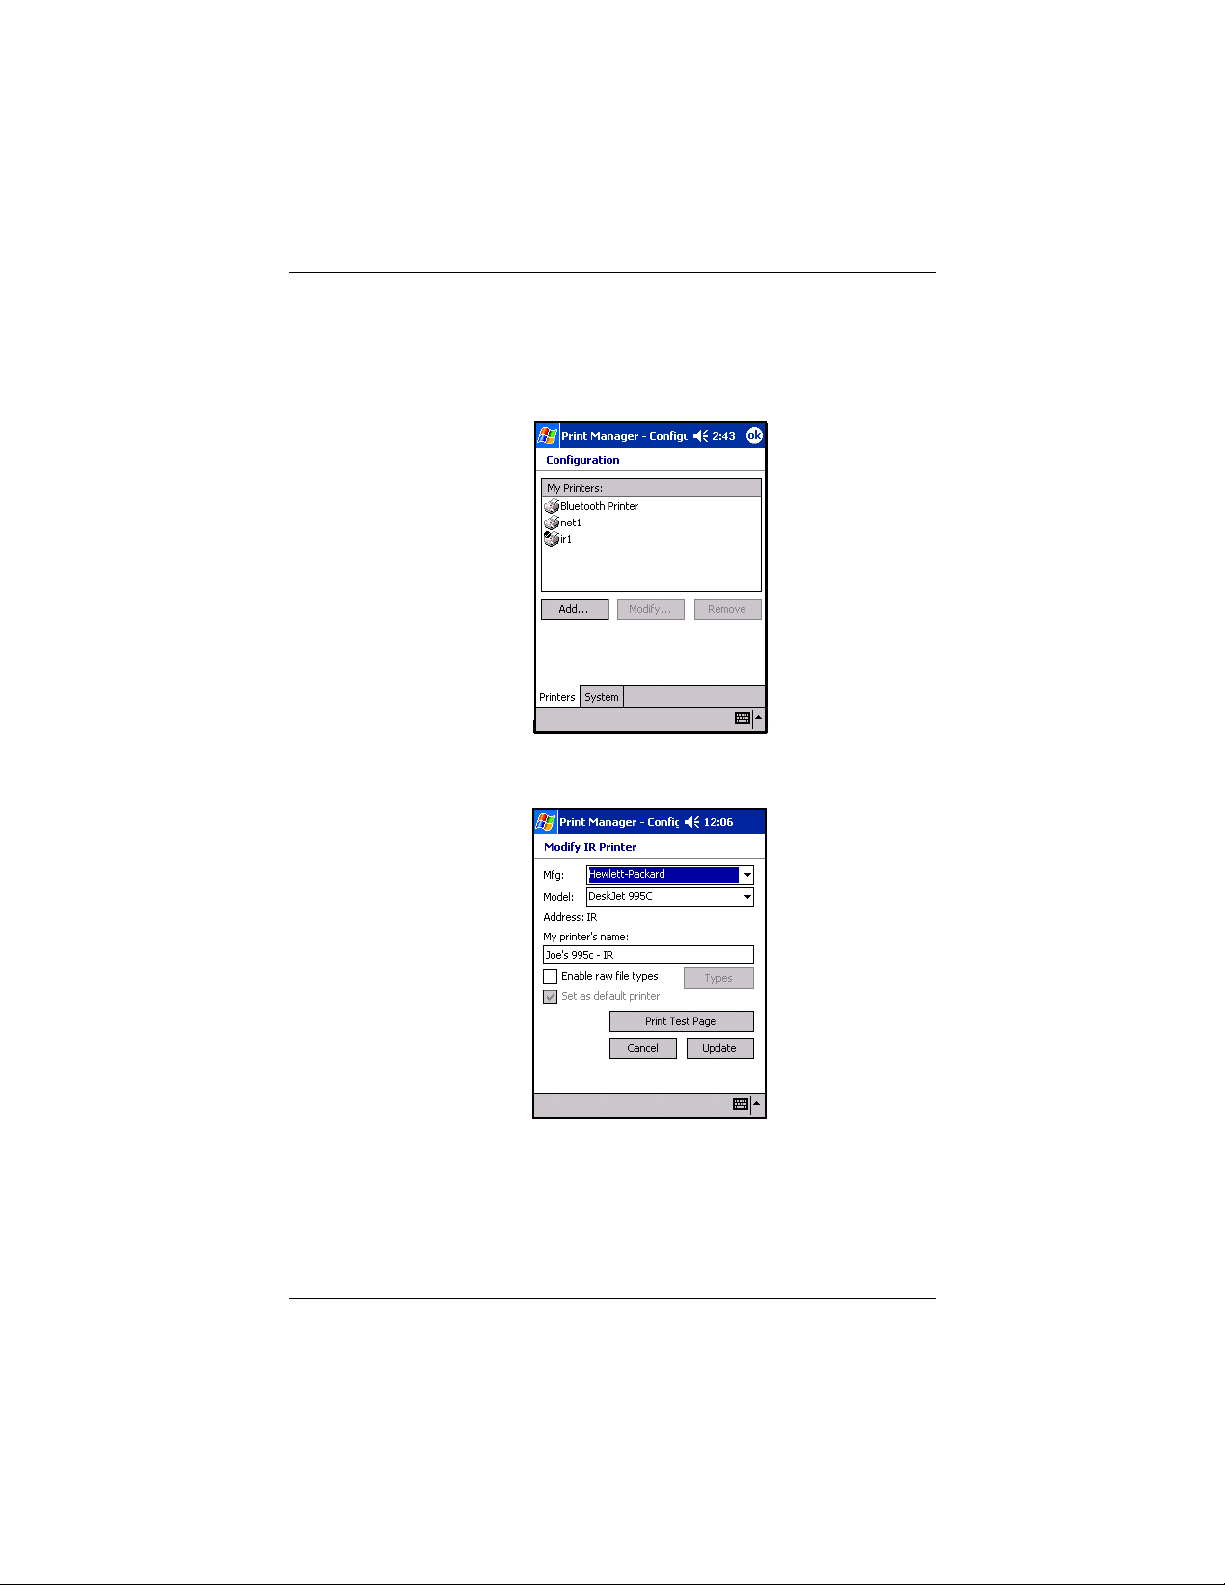
Using Your HP Photosmart Camera
Modifying Printers from the Printer Selection List
On the Configuration screen, select the printer you want to
modify and tap the Modify… button.
The following window can vary, depending on the printer type
selected.
Make any modifications necessary and tap Update to save the
changes or tap Cancel to discard the changes.
User’s Guide 5–45
 Loading...