

HTC DIAM400 Users Manual

To check wireless network status
You can check the current wireless connection status from any of the following screens of your device:
Title bar. When you enable Wi-Fi on your device, the Wi-Fi ON icon appears on the title bar. After
•
Wi-Fi is turned on, your device scans for available wireless networks and the wireless signal icon
appears on the title bar. The arrows in this icon move back and forth while your device is scanning for a
wireless network signal. Once your device successfully connects to a wireless network, the arrows stop
moving.
Wireless LAN screen. On the Home screen, slide to the Settings tab
•
and then tap Menu > Wireless Networks. On the Main tab, you will
see the wireless network that your device is currently connected to.
The configuration and signal quality of the wireless network are also
shown.
Configure Wireless Networks screen. On the Home screen, slide
•
to the Settings tab and then tap All Settings. In the Connections
tab, tap Wi-Fi. This screen displays the wireless networks currently
available. To connect to a wireless network in the list, tap and hold on
the desired network, then tap Connect. Tap a wireless network in the
list to view or change its connection settings. You can also add new
wireless networks, if available, by tapping Add New.
Internet 81
To save battery power while connected to a wireless network
Using Wi-Fi quickly consumes battery power. Turn off Wi-Fi when not in use. You can also enable power saving
settings.
1. On the Home screen, slide to the Settings tab.
2. On the Settings screen, tap Menu > Wireless Networks > Power Mode tab.
3. On the Power Mode tab, move the Power Save Mode slider to a position that optimizes performance
with the least power consumption.
For example, move the slider to the left (Best Performance) to
have the optimal wireless network performance; move to the
right (Best Battery) to obtain the maximum battery usage.

82 Internet
Dial-up
Your device’s networking capability allows you to access the Internet through the dial-up connection. Settings
for connecting to your service provider’s 1xRTT/EVDO network are already preconfigured on your device, and
your device is ready to connect to the Internet. Please do not change these settings as this may cause your
data connection to stop working.
If you need to use another dial-up connection from an ISP (Internet Service Provider), you can manually
add it to your device. To establish a dial-up connection on your device, you need the same settings that you
normally use when you dial up from your computer. This includes the ISP server phone number, your user
name and password.
1. On the Home screen, slide to the Settings tab and then tap All Settings.
2. On the Connections tab, tap Connections.
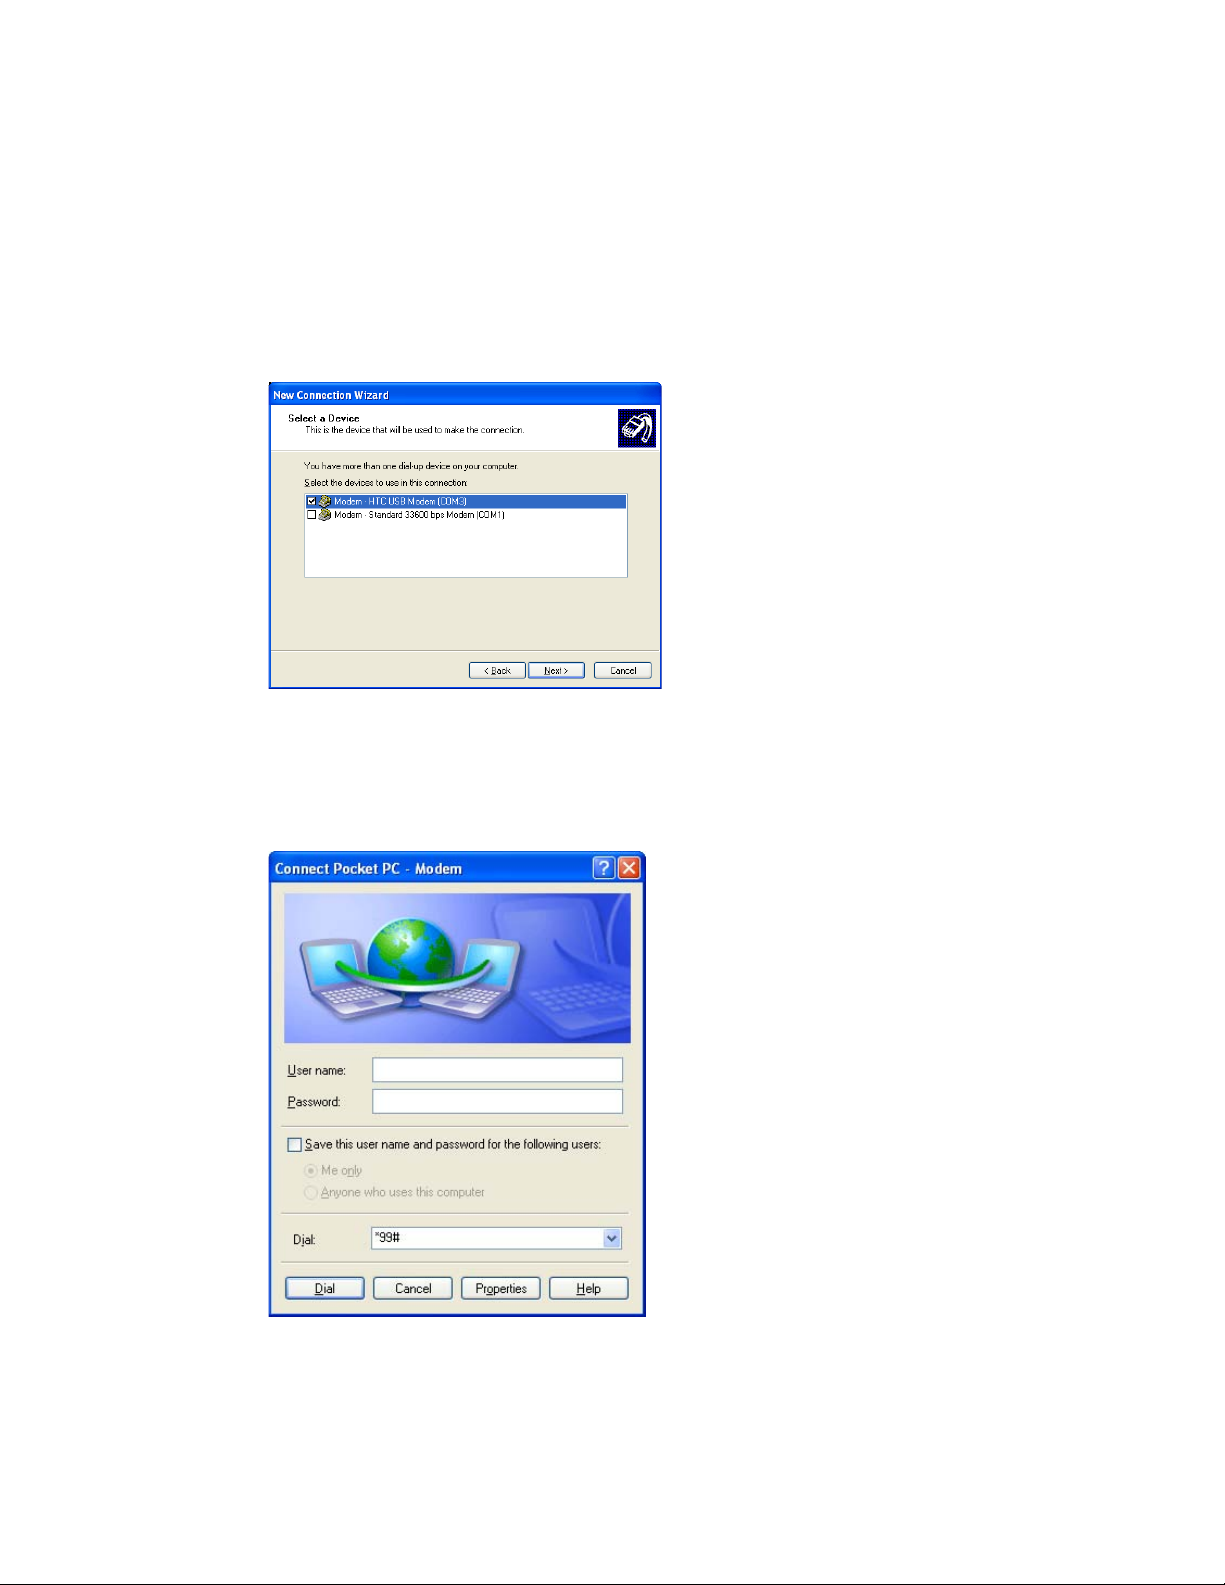
3. Tap Add a new modem connection.
4. On the Make New Connection screen, enter a name for the connection and select Cellular Line in the
Select a modem list, then tap Next.
5. Enter the ISP server phone number, then tap Next.
6. Enter your user name, password, and any other information required by your ISP, then tap Finish.
8.2 Starting a Data Connection
After setting up a data connection on your device, you can now connect your device to the Internet. The
connection is started automatically when you begin using a program that accesses the Internet such as Opera
Mobile.
To manually start a data connection
If you have set up multiple types of data connections on your device, you can manually start a connection.
1. On the Home screen, slide to the Settings tab and then tap All Settings.
2. On the Connections tab, tap Connections.
3. Tap Manage existing connections.
4. Tap and hold the name of the desired connection, then tap Connect.
To disconnect active data connections
1. Tap Start > Settings > Connections tab > Comm Manager.
2. Tap the Data Connection button.
Note You cannot reconnect a data connection in Comm Manager.

8.3 Using Opera Mobile™
Opera Mobile™ is a full-featured Internet browser, optimized for use on your device.
Note You can also use Internet Explorer® Mobile to browse the Web. To open Internet Explorer Mobile, tap Start >
Internet Explorer
.
Internet 83
1
2
1 Refresh. Tap to reload the Web page being viewed.
2 Address bar. Enter the URL of the Web site here.
3 Back. Tap to go back to the previous Web page viewed.
4 Favorites. Tap to go to the Favorites screen where you can add a favorite, edit favorite Web pages, and
send the favorite URL link via one of the Messaging accounts.
5 Tabs. Tap to add a new browsing tab or switch to another existing browsing tab.
6 Home. Tap to go to the Home page.
7 Menu. Tap to open a list where you can change Opera Mobile settings, check downloads, view History,
and more.
8 Close tab. Tap to close the current tab. This is only enabled if you have more than one tab opened.
9 Exit Full Screen mode. When browsing the Web, Opera Mobile automatically switches to Full screen
mode. Tap to show the address and Menu bars again.
3 4 5 6 7
8
9
To open Opera Mobile
On the Home screen, slide to the Browser tab and then tap Launch Browser.
To go to a Web site
1. On the Opera Mobile screen, tap the address bar.
2. Enter the URL address and tap .
Address bar
Search field
Tip When you tap the address bar, a search field also appears. Quickly search the Web by entering the search item and
tapping .
84 Internet
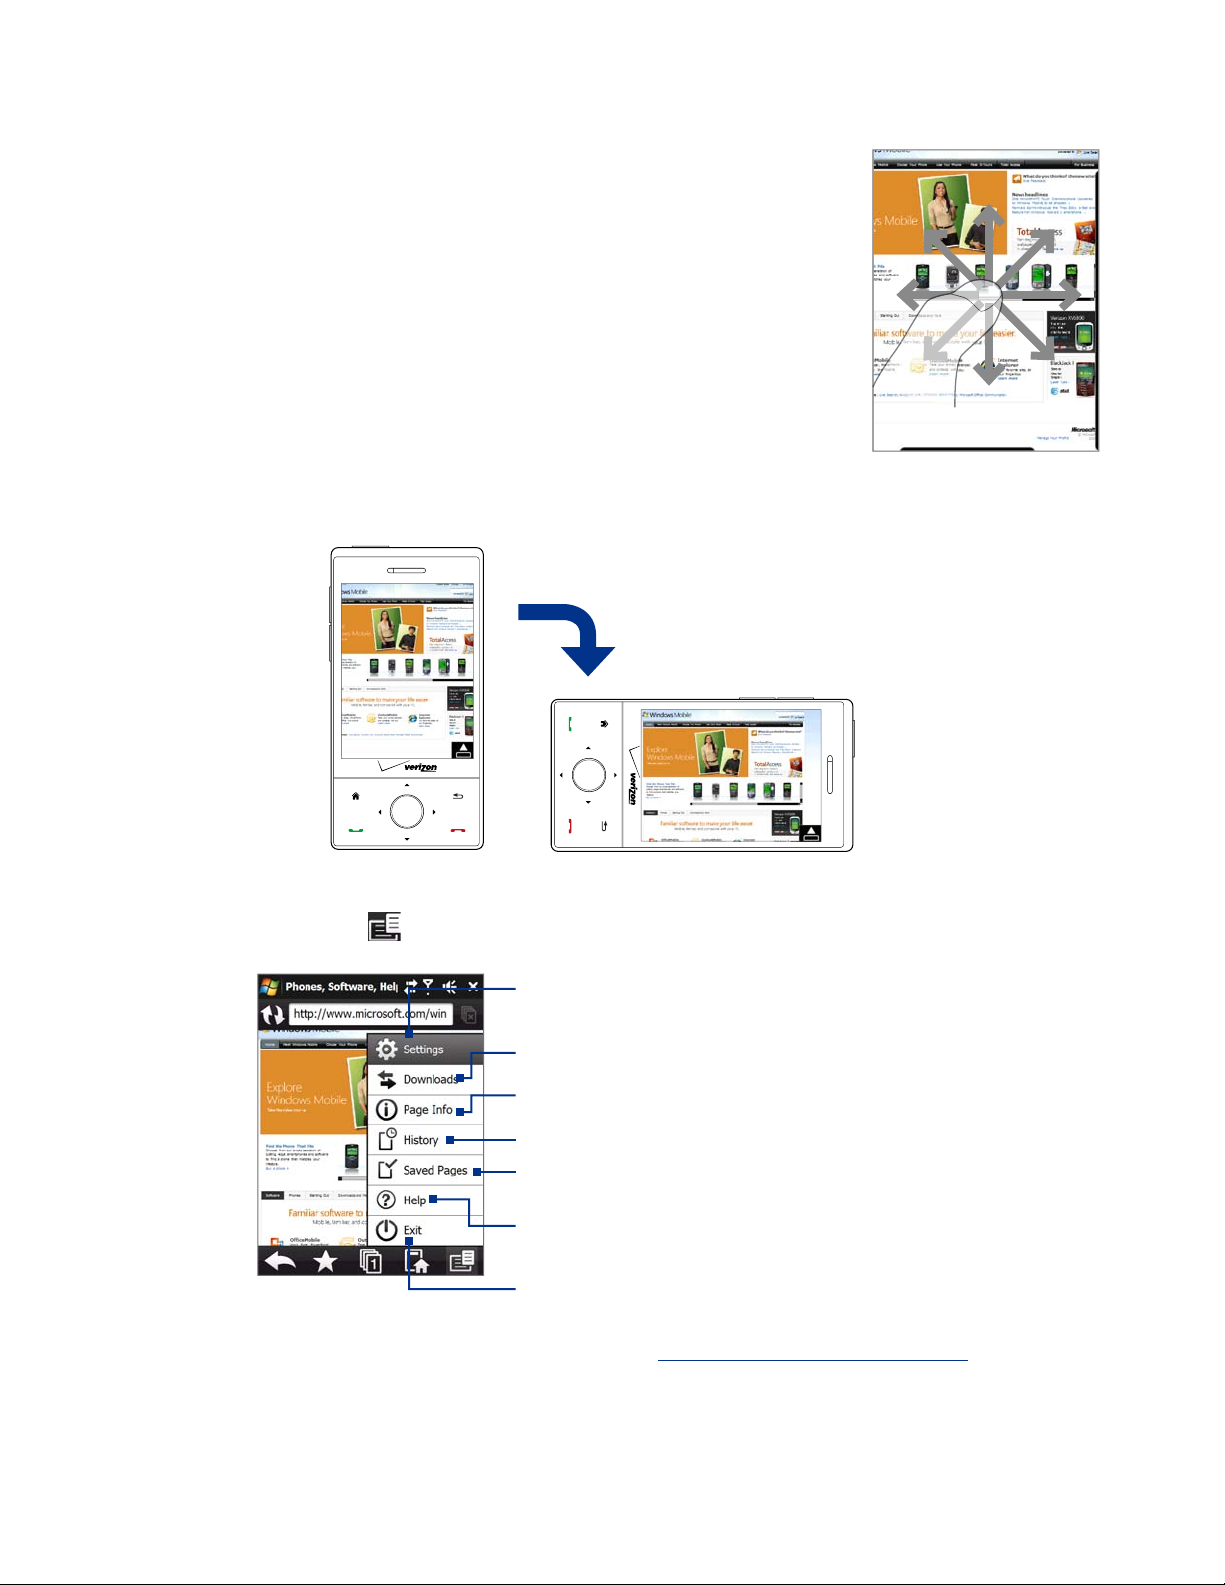
View Web pages
While browsing Web pages, use finger gestures to pan and zoom on the Web
page. To zoom in, tap your finger twice on the screen. To zoom out, tap your
finger twice on the screen again.
Tip Touch and hold an empty area on a Web page to open a shortcut menu that
lets you go back to the previous page, reload the page, add the page as a
Favorite, and more. You can also tap and hold a link or image on a Web page to
open a menu with different options.
To change the screen orientation
Change the screen orientation by simply turning your device sideways.
Opera Mobile menu
On the menu bar, tap to open the menu.
Tap to open the Settings screen where you
can set the default home page, change display
settings, set privacy settings, and more.
Tap to view items being downloaded. You can
also resume or stop current downloads.
Tap to view information about the Web page
you are browsing.
Tap to see web pages that you have viewed.
Tap to manage and view web pages that
you have saved.
Tap to open the Opera Mobile help file.
Tap to close Opera Mobile completely.
Note For more information about using Opera Mobile, go to: http://www.opera.com/products/mobile/
Opera Mobile will not run in the background.

8.4 Using YouTube™
YouTube™ lets you browse, search, and watch video clips from the YouTube server.
Note You need an active connection to use YouTube. If you are using a data connection, your data connection bill may
increase significantly due to large file sizes of the videos.
To open YouTube
Tap Start > Programs > YouTube.
Tap to open the Program Guide list.
The Program Guide list only appears
if you are subscribed to a channel.
Tap the arrows to filter the
list by Most Viewed,
Rated, and Featured.
Top
Displays the current program
channel being viewed.
Tap to set video playback quality.
Tap to close the YouTube.
Displays the available videos for the
selected program channel. Tap a video
to watch it. Tap
about the video.
Internet 85
to view details
Tap to switch between the
different YouTube screens.
Browse for videos
The Program Guide list lets you change the program channel so you can browse different types of videos
available on the YouTube server. By default, there is only one channel in the Program Guide.
To add a new program channel into the Program Guide list
1. On the YouTube screen, tap .
2. On the Search scr
the Program Guide list.
3. Tap Search. Y
displays the available videos from it.
4. Tap
The channel you just subscribed to will now be shown when
you tap Program Guide.
Tip You can also add a YouTube user as a program channel. To add, tap in any of the YouTube screens and then tap
.
een, enter the channel you want to add to
ouTube searches for the channel and then
and then on the confirmation screen, tap OK.
To change the program channel
1. On the Videos screen, tap Program Guide at the top of the screen.
2. On the Program Guide list, select a channel.
3. The video list refreshes to display the available videos for the newly selected channel.

86 Internet
To delete a program channel from the Program Guide list
You can only delete program channels that you have added to the Program Guide list.
1. On the Videos screen, tap Program Guide.
2. Scroll down to the channel you want to delete and then tap .
3. On the confirmation screen, tap Yes.
Watching videos
In the Videos, Bookmarks, or History screen, tap a video to launch the YouTube Video Player.
Drag to go forward or
backward in the video.
Tap to go back to the
beginning of the video. .
Tap to stop the video playback.
Tap to toggle between playing
Tip To adjust the volume, press the VOLUME CONTROLS on the side of the device.
and pausing the video.
Download progress
Buffered video
Tap to resize the video to fit the screen.
Tap again to go back to actual size.
Navigation Control
This control Does this
ENTER
Navigation Right
(Landscape orientation)
Navigation Left
(Landscape orientation)
VOLUME BUTTONS Press to adjust the volume.
Toggle between playing and pausing video playback.
Press and hold to go forward in the video.
Press and hold to go back in the video

Internet 87
When you tap Stop ( ) or finish watching the entire video, you are presented with options on what you can
do next.
Tap to go to the next page of
Tap to go back to the previous
page of related videos.
Tap to send the link to the
video you just watched to
another person using one of
the Messaging accounts.
Tap to add the video
to your Bookmarks.
Tap to play back
the video again.
related videos. If no action is taken,
it automatically goes to the next
page after 10 seconds.
Tap to view details about the
video you just watched.
Bookmarks
You can store frequently viewed videos into Bookmarks for quick access.
To view Bookmarks
On the YouTube screen, tap . Tap a video to watch it.
To add a video into Bookmarks.
Do one of the following:
•
After watching a video, tap
•
On the list of videos, tap
.
on the video you want to add to Bookmarks
and then tap Bookmark.
To delete a video from Bookmarks
1. On the Bookmarks screen, tap Edit.
2. Tap on the video you want to remove from Bookmarks.
3. On the confirmation screen, tap Yes.
4. Tap Done.
History
View recently watched videos on the History screen.
To view History
On the YouTube screen, tap . Tap a video to watch it.
Note To clear the History list, tap Clear.
88 Internet
8.5 Using Windows Live™
Windows Live™ gives you a full Internet experience on your device. Windows Live™ helps you to find
information, pursue your interests, and get in touch with friends and family on the Internet easier.
Windows Live™ offers the following key features:
Live Search Bar, which lets you search for information on the Web.
•
•
Live Messenger, the next generation of MSN Messenger Mobile.
•
Live Mail, the next generation of Hotmail.
•
Live Contacts, your address book for storing Live Mail, Live Messenger and Hotmail contacts.
Set up Windows Live™
The first time you use Windows Live™, sign in using your Windows Live™ ID, which is your Windows Live™ Mail
or Hotmail address, and password.
To set up Windows Live™ for the first time
1. Tap Start > Programs > Windows Live and then tap Sign in to Windows Live.
2. Tap the links to read the Windows Live™ Term of Use and the Microsoft Privacy Statement. After
reviewing them, tap Accept.
3. Enter your Windows Live™ Mail or Hotmail address and password, select the Save password checkbox,
then tap Next.
4. Tap Next.
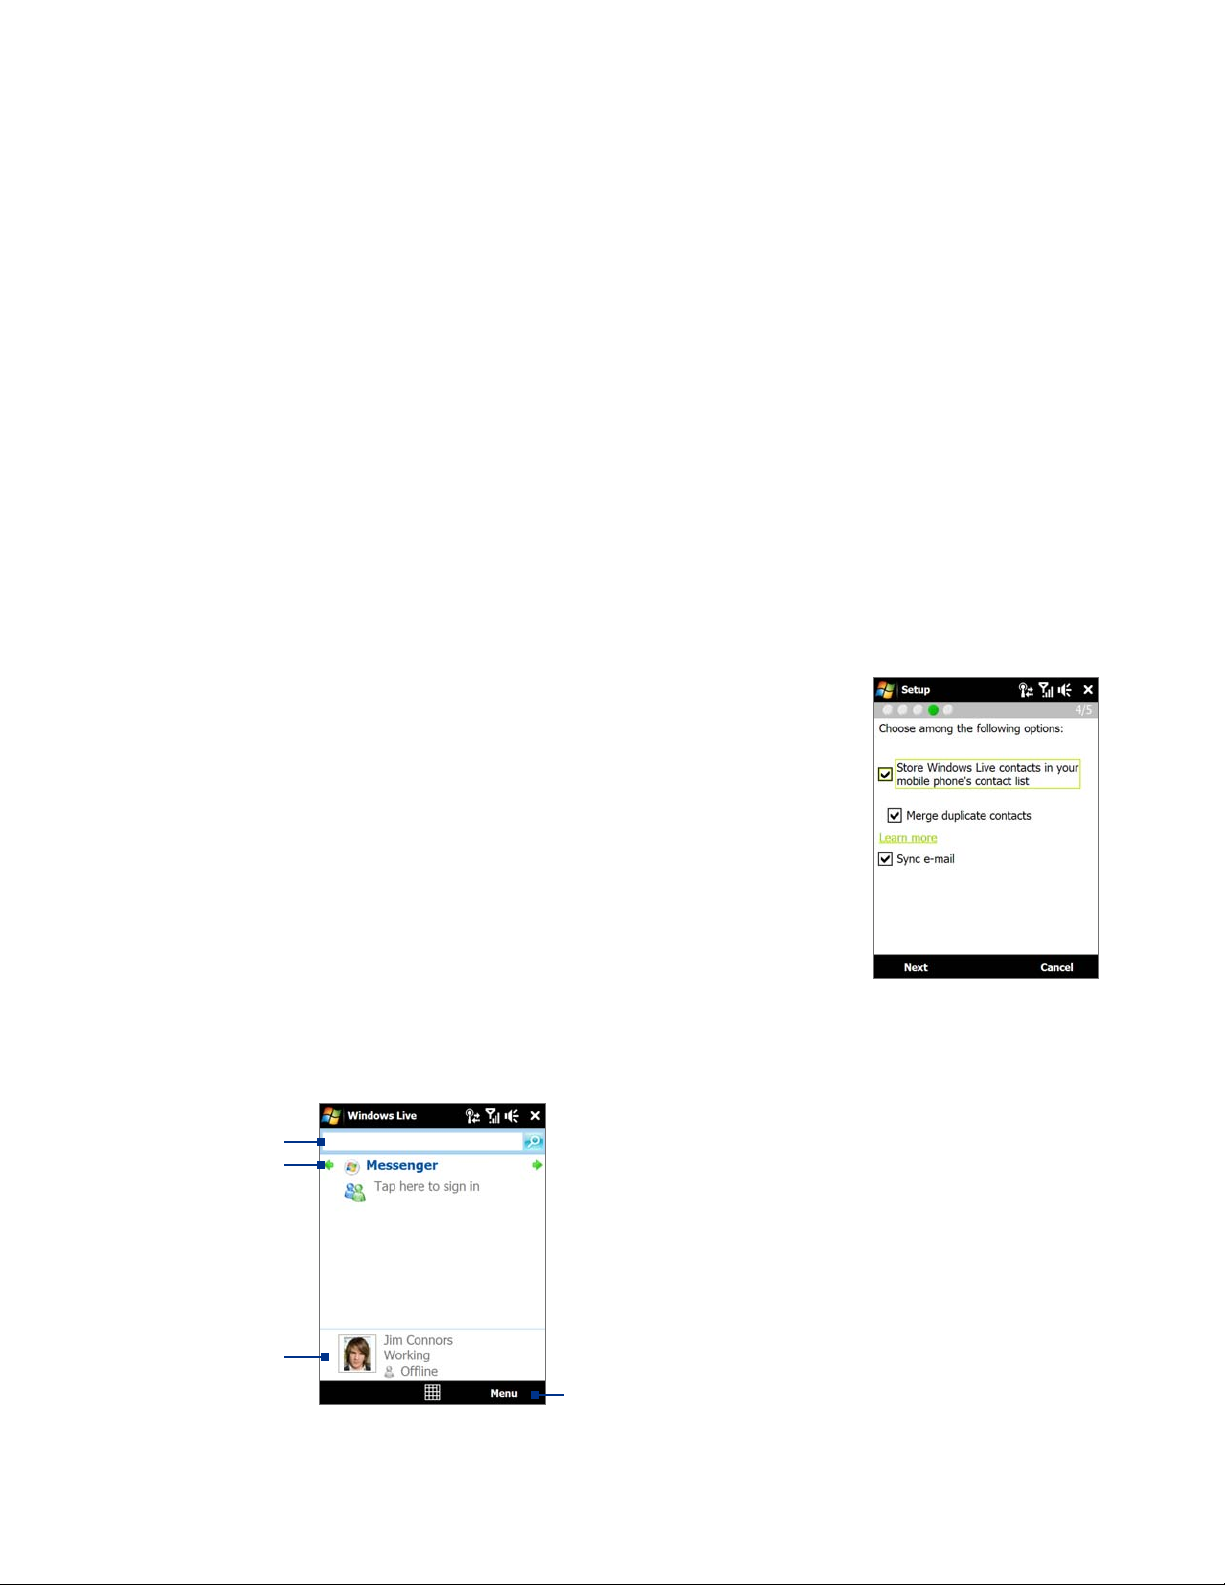
5. Choose what information you want to sync online with your device.
If you select Store Windows Live contacts in your mobile phone’s
c
ontact list, your Windows Live™ contacts will be added to the contact
list and to Windows Live™ Messenger on your device.
If you select Sync e-mail,
messages will be downloaded to your device.
6. Tap Next.
7. A
fter synchronization is complete, tap Done.
your Windows Live™ Mail or Hotmail inbox
The Windows Live™ interface
On the Windows Live™ main screen, you will see a search bar, navigation buttons, and an area where you can
show and customize your profile.
1
2
3
1 Search bar
2 Navigation buttons. T
to switch between Windows Live™ Messenger,
Windows Live™ Mail, and Sync status.
3 Tap to change the display name, picture, or
personal
4 Tap Menu t
4
message.
o access and change settings.
ap the left or right arrow
Windows Live™ Messenger
With this mobile version of Windows Live™ Messenger, you enjoy many of
the same cool features that you get from the desktop version, which include
the following:
Instant messaging via text and voice
•
Multiple conversations
•
Insert emoticons
•
Contact list with presence
•
Send and receive files including photos
•
Change status/display name
•
View contacts by online status, groups, and more
•
Send messages even when a contact is offline
•
Note Before you can use Windows Live™ Messenger, your device must be connected to the Internet. For information
about setting up an Internet connection, see “Ways of Connecting to the Internet” in this chapter.
Launch Messenger and sign in
To open Windows Live™ Messenger
Do one of the following:
Tap Start > Programs > Messenger.
•
•
On the Windows Live™ main screen, tap the left or right arrow until you see Messenger, then tap it.
Internet 89
To sign in and out
1. Tap Sign in on the Messenger screen.
2. If this is your first time to sign in, a message appears to inform you that your messenger contacts will
be added to the contact list on your device. Tap OK to add them. Signing in may take several minutes,
depending on your connection speed.
3. To sign out, tap Menu > Sign Out.
To start and end conversations
1. In the contact list, select a contact, then tap Send IM to open a message screen.
2. Enter your text message in the text entry area of the message screen.
3. To add an emoticon, tap Menu > Add emoticon then tap an icon from the list.
4. Tap Send.
5. To end a conversation with the current contact, tap Menu > End conversation.
Tips • To send a file, tap Menu > Send. You can choose to send a picture, voice clip or any file.
• To invite one or more contacts to the conversation, tap Menu > Options > Add participant.
• To send a voice message, tap Voice Clip on a message screen then start talking. After you have recorded a
message, tap Send.
Add Windows Live™ contacts
You can add new Windows Live™ contacts in Windows Live™ Messenger or in Contacts.
To add a Windows Live™ contact in Live Messenger
1. Tap Menu > Add new contact.
2. Enter the e-mail address of the contact, then tap OK.
To add a Windows Live™ contact in Contacts
1. On the Home screen, slide to the My Favorites tab and then tap All People.
2. Tap New, then tap Windows Live.
90 Internet
3. In the IM box, enter the e-mail address of the contact, which can be a Windows Live ID or any other
e-mail address.
Tip You can fill in other information about the contact, if desired. This is not necessary if you will
communicate with the contact only through Windows Live™ Messenger or Live Mail.
4. Tap OK.
5. Follow the remaining instructions to add the new contact to your Windows Live™ contact list.
8.6 Using Your Device As a Modem (Wireless Modem)
While traveling, you can use your Windows Mobile powered device as a modem for your notebook. Wireless
Modem allows you to use your device as a USB modem.
Note When you activate Wireless Modem, ActiveSync will be disabled automatically.
Activate your device as a modem
Connect your device to your notebook using the USB cable, then follow the steps below to activate your
device as a modem.
1. On your device, tap Start > Programs > WModem.
2. Tap Menu > Start.
3. The next thing to do is to add your device as a modem onto your notebook.
Add your device as a modem to your notebook
After you tap Menu > Start on the Wireless Modem screen of your device, your notebook will automatically
detect that your device has been connected. The Found New Hardware dialog box will then appear on your
computer.
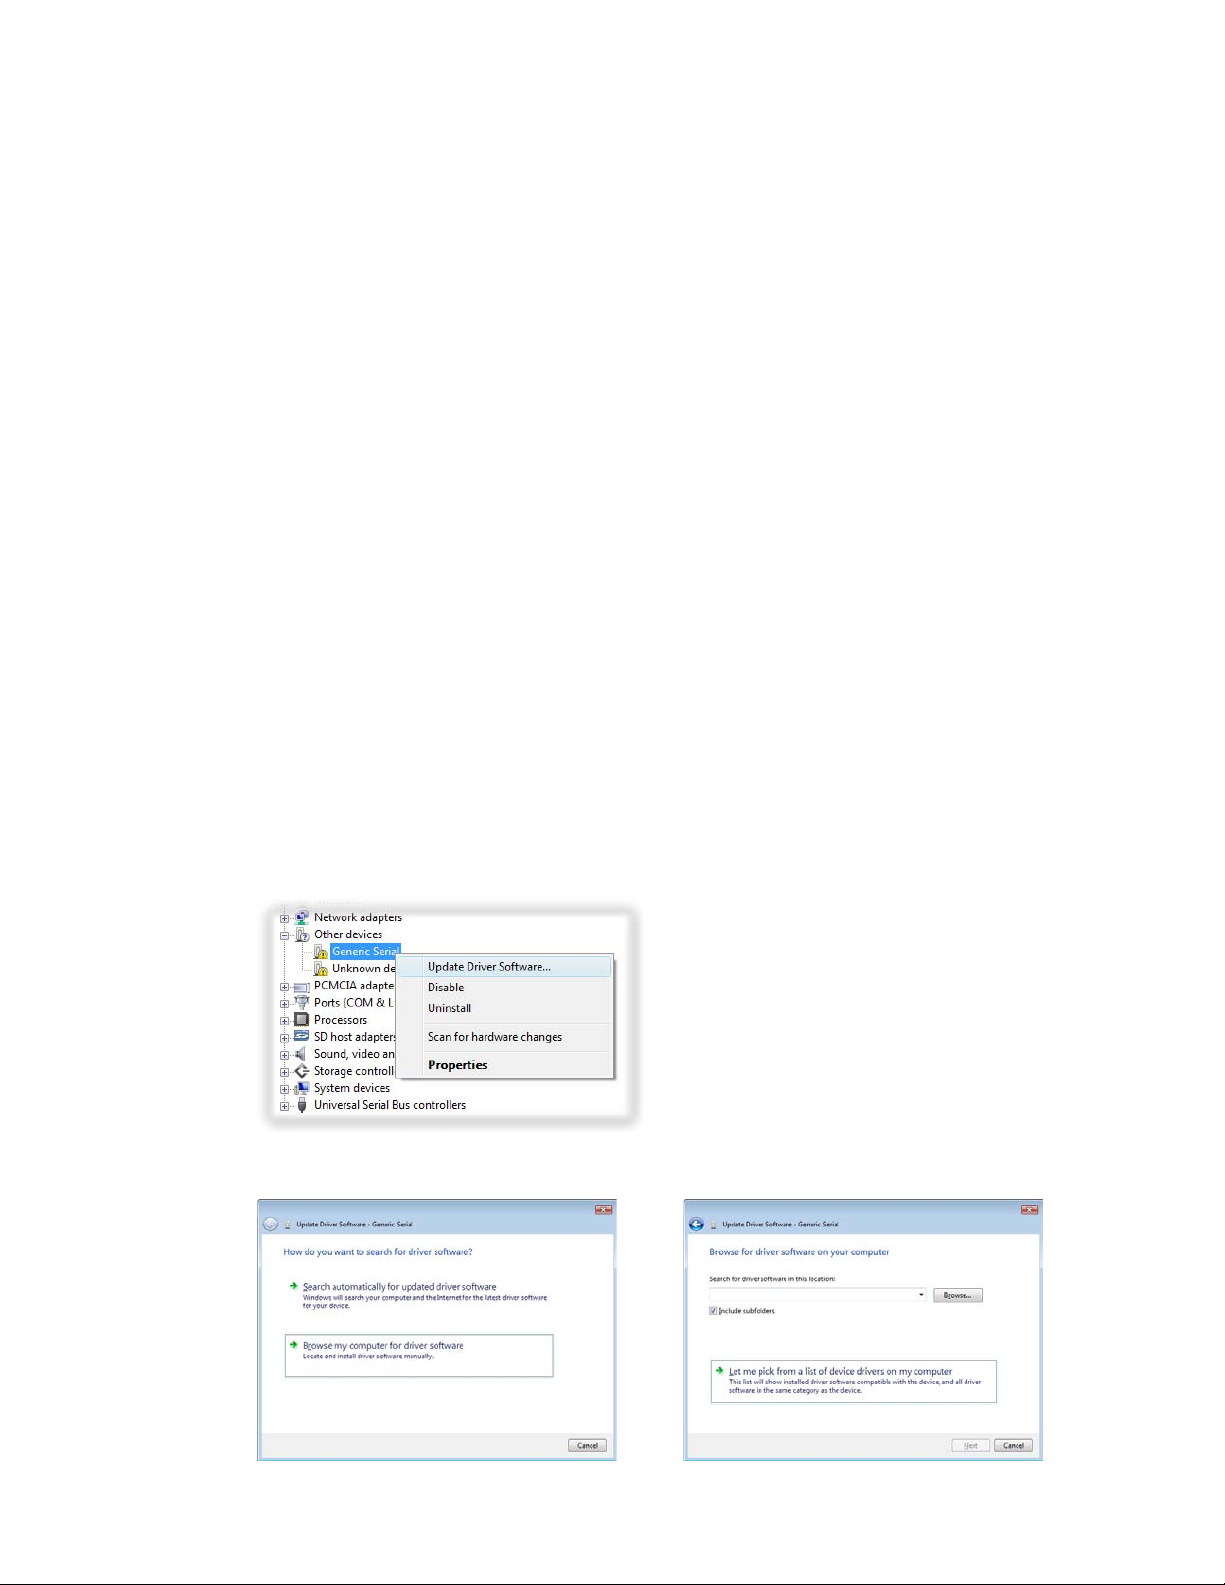
To add your device as a modem to a Windows Vista notebook
1. Click Cancel to close the Found New Hardware dialog box.
2. Open the Control Panel, then click Device Manager.
3. Right-click Generic Serial, then click Update Driver Software.
4. Click Browse my computer for driver software, then click Let me pick from a list of device drivers
on my computer.

5. Click Show All Devices, then click Have Disk and browse the Getting Started Disc to locate the USB
modem driver for your device.
6. HTC USB Modem will then be displayed. Select this modem driver then click Next.
7. If you see the Update Driver Warning message, simply click Yes to continue with the installation.
8. In the Windows Security dialog box, click Install this driver software anyway to continue with the
installation.
9. Wait for the installation of the HTC USB Modem to complete, then tap Close.
To add your device as a modem to a Windows XP notebook
1. In the Found New Hardware dialog box, select Install from a list or specific location (Advanced) and
click Next.
2. Select Search for the best drivers in these locations.
3. Insert the Getting Started Disc into your CD drive. Select the Include this location in the search check
box. Click Browse and choose the CD drive and root folder where the modem driver is located, then
click Next.
4. Wait for the installation to complete, then click Finish.
5. Click Start > Settings > Control Panel.
6. Double-click Phone and Modem Options.
7. Click
8. You can now connect your computer to the Internet.
the Modems tab
Modem list, then click OK.
Follow the steps in “Dial up and connect to the Internet.”
. Select the new modem from the
Internet 91

92 Internet
Create a modem dial-up connection
After your notebook recognizes your device as a modem, create a modem dial-up connection on your
notebook.
To set up a modem dial-up connection in a Windows Vista notebook
1. On your notebook, click Start > Control Panel.
2. Double-click Network and Sharing Center.
3. On the left-hand panel of the Network and Sharing Center, click Set up a connection or network.
4. Click Set up a dial-up connection then click Next.
5. Enter the following information: dial-up phone number (#777), your user name and password. Also
select the Remember this password check box.
6. When you have finished entering the information, click Connect. Your notebook then starts to dial up
to the Internet using your device as a modem.
7. When you see a dialog box that shows you are connected to the Internet, click Close.
8. In the Set Network Location dialog box, choose the type of location where you will use the dial-up
connection.
To set up a dial-up connection in a Windows XP notebook
1. On your computer, click Start > Settings > Control Panel.
2. Double-click Network Connections.
3. Click File > New Connection.
4. In the New Connection Wizard, click Next.
5. Click Connect to the Internet then click Next.
6. Select Set up my connection manually then click Next.
7. Select Connect using a dial-up modem then click Next.
8. Select the USB modem that you previously installed, then click Next.
Internet 93
9. Enter a descriptive name for this connection, then click Next.
10. Enter #777 as the dial-up phone number then click Next.
11. Under Internet Account Information, enter your user name and password then click Next.
12. Click Finish to exit the wizard.
13. The Connect dialog box then opens. Click Dial to dial up and connect to the Internet.

94 Internet
Dial up and connect to the Internet
Whenever you want to dial up to the Internet on your notebook using your device as a modem, tap Menu >
Start in Wireless Modem of your device, then do the following steps to connect to the Internet.
1. If Wireless Modem has not yet been activated on your device, select the type of connection (USB or
Bluetooth) then tap Menu > Start.
2. On a Windows Vista notebook, click Start > Connect to, select the name of the dial-up connection,
then tap Connect.
3. On a Windows XP notebook, click Start > Settings > Control Panel, double-click Network
Connections, then double-click the modem connection.
4. The Connect dialog box then opens. Click Dial to dial up and connect to the Internet.
To end the modem session
On the Wireless Modem screen, tap Done or tap Menu > Stop.

8.7 Using RSS Hub
RSS Hub is an RSS reader that keeps you up-to-date with the latest news from the Internet. It monitors
Internet news channels and downloads the most current news updates and podcasts so you are instantly
informed of breaking news and events.
For more information and tips on using RSS Hub, see Help on your device.
Note Make sure you have an active Internet connection (such as a data connection) before using RSS Hub.
Subscribe to and organize news channels
You must subscribe to news channels before you can receive RSS feeds.
To subscribe to news channels
1. Tap Start > Programs > RSS Hub, then tap Continue.
2. In the New Channel Wizard screen, select the Choose from a list of known Channels option, then tap
Next. A list of RSS channels is displayed.
Internet 95
Category
Channels
Note If the RSS channel you want to subscribe to is not in the list of known channels, tap Back, then select
another option on the New Channel Wizard screen. For more information on these other options, see
the Help on your device.
Tap to load pre-selected RSS channels.
3. Select the checkboxes of the RSS channels you want to subscribe to, then tap Finish.
Tip Channels are grouped by categories. If you want to select all channels in a category, select the category
check box.
4. The channel list appears. Tap Refresh to update the channels.
Tap to select the channel
category to display
Channel list
Channel is updated.
it to view the headlines.
Tap
Headline count
Tap to update the channels
Tap to cancel channel updating

96 Internet
To add new channels
1. In the channel list, tap Menu > Channel > New to open the New Channel Wizard screen.
2. Select an option, then follow screen instructions to add new channels. For more information on New
Channel Wizard options, see Help on your device.
To filter the channels in the display
In the channel list, tap Menu > View, then select:
•
Updated to display only those channels with unread headlines.
•
All to display all subscribed channels.
To manage channel categories
•
To view all the channels in a particular category, tap All Categories in the upper left area of the channel
list, then tap the category you want to display.
•
To add a new category, tap Menu > Categories in the channel list to display all categories, then tap
Menu > New.
•
To rename or delete a category, tap Menu > Categories in the channel list to display all categories,
select a category, then tap Menu > Rename or Menu > Delete.
•
If you want to change the channel category, tap and hold the channel in the channel list, then tap
Change Category. Select a new category and tap OK.
View and organize headlines
Tap a channel in the channel list to display the headlines for that channel.
Tap a headline to open the
news summary screen
Headline or news summary
contains a keyword
Audio/Video/Image file
attachment is downloading
Headline has been read
New or unread headline
Tap to return to the channel list
Tap to play back or view the
file attachment.
Tap to download audio/video
file attachment
New or unread headlines display in bold and are marked with a blue newspaper icon. Headlines that have
been read are marked with a gray newspaper icon.
View the news summary
Tap a headline in the headline list to display the news summary.
Channel name
Headline and
read status
Audio/Video/Image file attachment.
Tap to download the file.
News summary
Tap to return to
the headline list
Tap to open the news item in Opera
Mobile. See “Using Opera Mobile” in
this chapter for details.

Internet 97
To change view options
In the news summary screen, tap Menu to change the text size, fit the text to the screen (text wrap), or enable
ClearType for better viewing.
To download, play, or save podcasts
1. When you see an audio or video file attachment in the news summary, do one of the following to
download the file:
Tap Menu > Podcasts > Start Download.
•
•
Tap the Download audio/Download video link below the audio/video file icon.
Tip To cancel the file download, tap Menu > Podcasts > Cancel Download, or tap Cancel download
below the audio/video file icon.
2. After downloading the file, do one of the following:
•
Tap Menu > Podcasts > Play or tap Play audio/Play video below the audio/video file icon to play
back the file.
•
Tap Menu > Podcast > Save to save a copy of the file to the device main memory.
To send the headline link via e-mail
1. In the news summary screen, tap Menu > Send Link via Email.
2. Messaging opens and displays the Account Picker screen. Tap the e-mail account you want to use to
send the headline link. A new e-mail message is then created with the headline link.
3. Specify the e-mail recipients, then send it.
Note For more information on how to compose e-mails, see “Using E-mail” in Chapter 6.
To view the next or previous news summary
In the news summary screen, tap Menu > Next or Menu > Previous, or press Navigation left or right.
For more information about the features and configuring RSS Hub, refer to the online help. To open the online
help, tap Start > Help while in RSS Hub.

98 Internet

Chapter 9
Bluetooth
9.1 Bluetooth Modes
9.2 Bluetooth Partnerships
9.3 Connecting a Bluetooth Hands-free
or Stereo Headset
9.4 Beaming Information
Using Bluetooth
9.5 Bluetooth Explorer and
Bluetooth File Sharing
9.6 Printing Files via Bluetooth

100 Bluetooth
9.1 Bluetooth Modes
Bluetooth is a short-range wireless communications technology. Devices with Bluetooth capabilities can
exchange information over a distance of about eight meters without requiring a physical connection.
Bluetooth on your device operates in three different modes:
On
. Bluetooth is turned on. Your device can detect other Bluetooth-enabled devices, but not vice versa.
•
•
Visible. Bluetooth is turned on, and all other Bluetooth-enabled devices can detect your device.
•
Off. Bluetooth is turned off. In this mode, you can neither send nor receive information using Bluetooth.
Notes • By default, Bluetooth is turned off. If you turn it on, then turn off your device, Bluetooth also turns off. When you
turn on your device again, Bluetooth automatically turns on.
• Turn off Bluetooth when not in use to conserve battery power, or in places where using a wireless device is
prohibited, such as on board an aircraft and in hospitals.
To turn Bluetooth on and make your device visible
1. On the Home screen, slide to the Settings tab and then tap Menu > Bluetooth Devices > Mode tab.
2. Select the Turn on Bluetooth and Make this device visible to other devices check boxes.
3. Tap OK. The Title bar will show to indicate that the device is in Visible mode.
To turn off Bluetooth visibility after a certain period of time
You can automatically turn off Bluetooth visibility after a specified period of time.
1. On the Home screen, slide to the Settings tab and then tap Menu > Bluetooth Devices > Timeout
tab.
2. In Turn off Visible mode, select the time before your device’s Bluetooth visibility turns off. Tap OK.
9.2 Bluetooth Partnerships
A Bluetooth partnership is a relationship that you create between your device and another Bluetooth-enabled
device in order to exchange information in a secure manner.
To create a Bluetooth partnership
1. On the Home screen, slide to the Settings tab and then tap Menu > Bluetooth Devices > Devices tab.
2. Tap Add new device. Your device displays the names of other Bluetooth devices within range.
3. Tap the device name in the box, then tap Next.
4. Specify a passcode to establish a secure connection. The passcode can be 1 up to 16 characters.
5. Tap Next.
6. Wait for the paired device to accept the partnership. The receiving party needs to enter the same
passcode that you specified.
7. The name of the paired device is then displayed. You may edit and enter a new name for that device.
8. Select the check boxes of services that you want to use from the paired device, then tap Finish.
Note Creating a Bluetooth partnership between two devices is a one-time process. Once a partnership is created, the
devices can recognize the partnership and exchange information without entering a passcode again.
To accept a Bluetooth partnership
1. Ensure that Bluetooth is turned on and in visible mode.
2. Tap Yes when prompted to establish a partnership with the other device.
3. Enter a passcode (the same passcode that is entered on the device requesting the partnership) to
establish a secure connection. The passcode must be between 1 and 16 characters.
4. Tap Next.
5. Tap Finish. You can now exchange information with the paired device.
Tips • To rename a Bluetooth partnership, tap and hold the partnership’s name on the Devices tab of the Bluetooth
screen, then tap Edit.
• To delete a Bluetooth partnership, tap and hold the partnership’s name on the Devices tab, then tap Delete.

9.3 Connecting a Bluetooth Hands-free or Stereo Headset
For hands-free phone conversations, you can use a Bluetooth hands-free headset such as a car kit with your
device. Your device also supports A2DP (Advanced Audio Distribution Profile) which allows you to use a
Bluetooth stereo headset for hands-free phone conversations and for listening to stereo music.
To connect a Bluetooth hands-free or stereo headset
1. Make sure that both your device and the Bluetooth headset are turned on and within close range,
and that the headset is visible. Refer to the manufacturer’s documentation to find out how to set the
headset in visible mode.
2. On the Home screen, slide to the Settings tab and then tap Menu > Bluetooth Devices > Devices tab
> Add new device.
3. Tap the name of the Bluetooth headset, then tap Next. The device will automatically pair the device
with the Bluetooth headset.
Windows Mobile will automatically try one of the preconfigured passcodes (0000, 1111, 8888, 1234) to pair
the Bluetooth headset with the device. If this fails, you have to enter the passcode delivered with your headset
manually.
Note If the Bluetooth stereo headset becomes disconnected, turn the headset on and repeat step 1 to 2 above. Tap and
hold the name of the Bluetooth stereo headset and tap Set as Wireless Stereo.
Bluetooth 101
9.4 Beaming Information Using Bluetooth
You can beam information, such as contacts, calendar items, tasks, and files from your device to your
computer or to another Bluetooth-enabled device.
Note If your computer does not have built-in Bluetooth capability, you need to connect and use a Bluetooth adapter or
dongle on your computer.
To beam information from your device to a computer
1. Turn on Bluetooth on your device, and make your device visible. For information about this, see “To
turn Bluetooth on and make your device visible”.
2. Set Bluetooth on your computer to visible mode, create a Bluetooth partnership, then enable your
computer to receive Bluetooth beams.
Note If the Bluetooth adapter or dongle on your computer was installed using a third-party provided driver,
open the Bluetooth software that came with the Bluetooth adapter/dongle and enable the adapter/
dongle to be discovered by other devices. Refer to the Bluetooth adapter’s documentation for more
information.
If your computer has Windows Vista or Windows XP SP2 and your computer’s Bluetooth adapter is
supported by your Windows version, do the following steps:
a. On your computer, open Bluetooth Devices from the Control Panel, then click the Options tab on
the Bluetooth Devices window.
b. For Windows Vista, select Allow Bluetooth devices to find this computer. For Windows XP,
select Turn discovery on and Allow Bluetooth devices to connect to this computer.
c. Create a Bluetooth partnership between your device and computer. For information about
creating a partnership, see “Bluetooth partnerships”.
d. In the Options tab of Bluetooth Devices, select Show the Bluetooth icon in the notification
area.
e. To enable your computer to receive Bluetooth beams, right-click the Bluetooth icon in the
notification area at the bottom-right corner of your computer screen and select Receive a File.
You are now ready to beam.
3. On your device, select an item to beam. The item can be an appointment in your calendar, a task, a
contact card, or a file.
4. To beam a contact, tap Menu > Send Contact > Beam. To beam other types of information, tap Menu
> Beam [type of item].

102 Bluetooth
5. Tap the device name to which you want to send the item.
6. If you beamed a calendar, task, or contact item to your computer and it is not automatically added to
Outlook, select File > Import and Export in Outlook to import it.
To beam information to a Bluetooth-enabled device such as another Windows Mobile-powered device, follow
steps 1 to 5 in the above procedure.
Tips • The default folder on your computer where beamed items are stored may be C:\Documents and Settings\your_
username\My Documents in Windows XP or C:\Users\your_username\My Documents in Windows Vista.
• For your device to receive Bluetooth beams, tap Start > Settings > Connections tab > Beam and make sure the
Receive all incoming beams check box is selected.
9.5 Bluetooth Explorer and Bluetooth File Sharing
Bluetooth Explorer searches for other Bluetooth devices that have file sharing enabled and lets you access
their Bluetooth shared folder. You can copy files from and to their shared folder, and create subfolders in it.
When you enable Bluetooth file sharing on your device, other Bluetooth-enabled devices will also be able to
access your Bluetooth shared folder.
To enable Bluetooth Explorer and Bluetooth file sharing on your device
1. On the Home screen, slide to the Settings tab and then tap Menu > Bluetooth Devices > FTP tab.
2. Select the Enable Bluetooth Explorer check box. This makes the \Bluetooth device folder visible in
the File Explorer.
3. Select the Enable File Sharing check box. You can use the default Bluetooth shared folder, or tap
Browse to use another folder as your shared folder.
4. Tap OK.
To use Bluetooth Explorer
1. Bluetooth Explorer is integrated with the File Explorer program. You can open it by tapping Start >
Programs > Bluetooth Explorer or by tapping the down arrow ( ) on the upper left of File Explorer
screen then tapping Bluetooth.
2. Bluetooth Explorer then scans for other Bluetooth devices that have file sharing enabled. From the list,
tap to select a Bluetooth device you want to connect to. You may need to enter a passcode in order for
you to connect to the selected device. If there are files contained in the Bluetooth shared folder on the
other device, you will be able to see them on the Bluetooth Explorer screen.
3. Select one or more files, then tap Menu > Edit and choose to cut or copy the files.
4. Tap Up twice.
5. Navigate to the folder where you want to paste the files on your device, then tap Menu > Edit > Paste.

9.6 Printing Files via Bluetooth
Connect your device to a Bluetooth printer to print contact information, appointment details, images, and
other file types.
Note You can print files in the .txt, .jpg, .xhtml, .vcf, .vcs file formats.
Before you start printing, make sure to turn on the Bluetooth printer and to turn on Bluetooth on your device.
To turn on Bluetooth, tap Start > Settings > Connections tab > Comm Manager, then tap the Bluetooth
button.
To print contact information
1. On the Home screen, slide to the My Favorites tab and then tap All People.
2. Select the contact whose information you want to print.
3. Tap Menu > Print via Bluetooth > Menu > Search Devices. Your device starts to search for Bluetooth
devices.
4. Select the Bluetooth printer and tap Menu > Send File.
5. Set the printing options you want, then tap Print.
To print a calendar appointment
1. Tap Start > Calendar, then select (highlight) the appointment whose details you want to print.
2. Follow steps 3 to 5 in the “To print contact information” procedure.
Bluetooth 103
To print a JPEG file
1. In Pictures & Videos, locate the JPEG file you want to print.
2. Tap and hold the JPEG image file and then on the menu, tap Print via Bluetooth.
3. Follow steps 3 to 5 in the “To print contact information” procedure:
To print a text file
1. In File Explorer, locate the text file you want to print.
2. Tap and hold the txt file and then on the menu, tap Print via Bluetooth.
3. Follow steps 3 to 5 in the “To print contact information” procedure:

104 Bluetooth

Chapter 10
Navigating on the Road
10.1 Guidelines and Preparation
for Using GPS
10.2 Downloading Satellite Data
via QuickGPS
 Loading...