

Page 1

Confidential
VIVE 2018 Dev kit guide
Page 2

2 Contents
Confidential
Contents
Unboxing
What's inside the box? 4
What are the system requirements? 4
Getting started 5
Headset
About the VIVE 2018 headset 6
Putting on the VIVE 2018 headset 8
Can I wear my prescription glasses while using VIVE 2018? 11
Adjusting the IPD on the headset 11
Flipping up the visor 12
Removing the face cushions 13
Replacing the front cover 13
Connecting a USB device to VIVE 2018 15
Reattaching the front and back pads to the headset 17
Removing the front and back pads 18
Plugging in the earphones 18
Attaching the on-ear headphones to the headset band 19
Detaching the on-ear headphones from the headset band 27
Attaching the cable guides to the headset band 28
Detaching the cable guides from the headset band 29
Attaching the top strap to the headset band 32
Detaching the top strap from the headset band 33
Updating the headset firmware 33
What does the status light on the headset mean? 34
Cleaning the headset lenses 34
Cleaning the face cushions 35
Link box
About the link box 36
Connecting the headset to your computer 36
Restarting the link box 37
Controllers
About the VIVE 2018 controllers 38
Inserting the batteries into the controller 39
Removing the batteries from the controller 40
Attaching the lanyards to the controllers 41
Turning the controllers on or off 41
Pairing the controllers with the headset 41
Trademarks and copyrights
Index
Page 3
Confidential
3 About this guide
About this guide
We use the following symbols to indicate useful and important information:
This is a note. It provides detailed information for setup, common questions, and what to do in
specific situations.
This is a tip. It will give you an alternative way to do a particular step or procedure that you may
find helpful.
This indicates important information that you need in order to accomplish a certain task or to
get a feature to work properly.
This is a warning. Take note to avoid potential problems or prevent damage to your hardware.
Information contained in this guide may have changed. For the most up-to-date information,
including the latest version of this guide, go to VIVE Support.
Before using the product, carefully review VIVE safety information and follow all product safety
and operating instructions on https://www.vive.com/us/legal/.
Page 4

4 Unboxing
Confidential
Unboxing
What's inside the box?
Your VIVE 2018 comes with the following items, which you'll use to experience immersive VR
environments:
Main component Accessories
VIVE 2018 § Headset cable (attached)
§ Audio cable (attached)
§ On-ear headphones (attached)
§ Top strap (attached)
§ Face cushion frame with cushions (attached)
§ Headset cable guide
§ Audio cable guide
§ Rubber pad
§ Screws (x4)
Link box § Power adapter
§ DisplayPort™ cable
§ USB 3.0 cable
Controllers (x2) § Lanyards (x2)
§ Alkaline AA batteries (x4)
What are the system requirements?
To use VIVE 2018, your computer must meet the following system requirements.
To find out if your computer is ready for VR, download and run the Vive Quick Compatibility
Check.
Component Recommended system
requirements
Processor Intel® Core™ i5-4590/AMD FX™ 8350
equivalent or better
Minimum system requirements
Intel Core i5-4590/AMD FX 8350
equivalent or better
Page 5

5 Unboxing
Confidential
Component Recommended system
requirements
GPU NVIDIA® GeForce® GTX 1070/ /
Quadro P5000 equivalent or better,
AMD Radeon™ Vega 56 equivalent or
better
Memory 4 GB RAM or more 4 GB RAM or more
Video output DisplayPort 1.2 or newer DisplayPort 1.2 or newer
USB port 1x USB 3.0 or newer 1x USB 3.0 or newer
Operating
system
Windows® 10 Windows 7 SP1, Windows 8.1 or
Minimum system requirements
NVIDIA GeForce GTX 970, AMD
Radeon R9 290 equivalent or better
later, Windows 10
Getting started
To get started using VIVE 2018, check your email to download the setup file.
Run the .EXE file to install drivers and follow the step-by-step instructions for setting up the play
area.
To connect the VIVE 2018 headset using the link box to your computer, see Connecting the
headset to your computer on page 36.
Page 6
Confidential
6 Headset
Headset
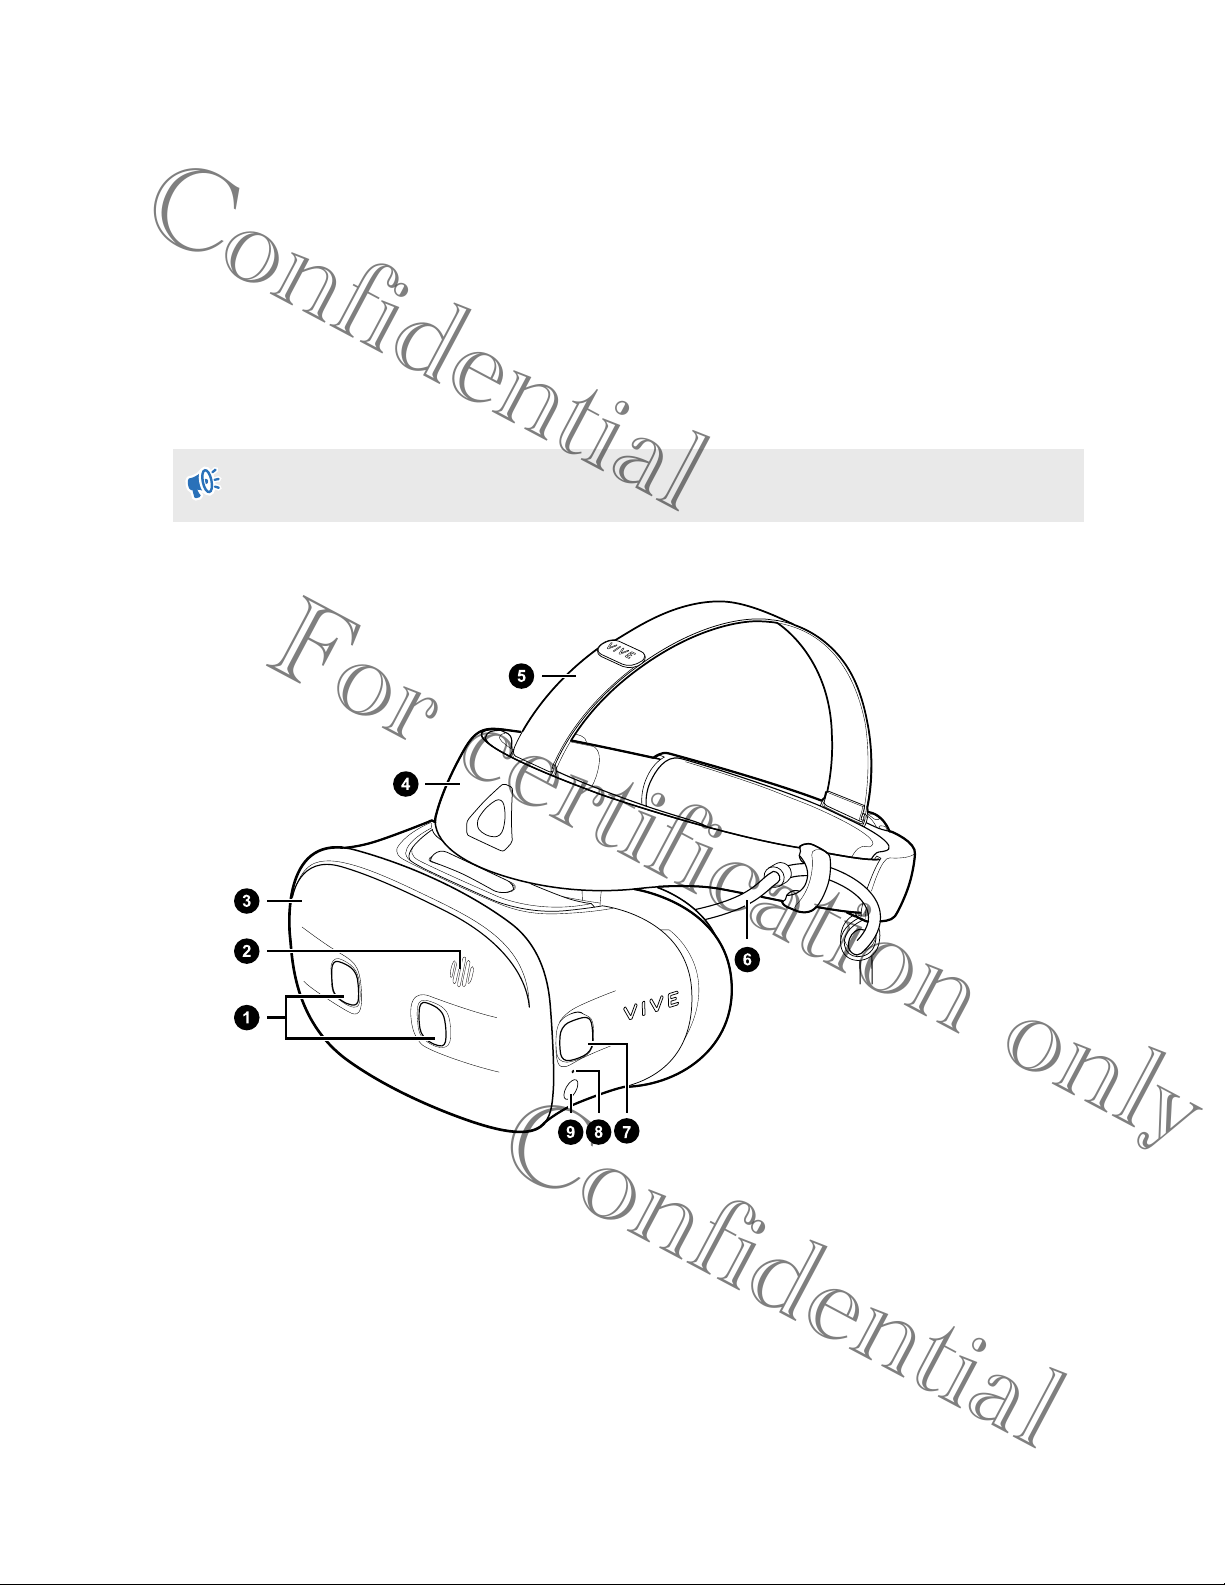
About the VIVE 2018 headset
The headset is your window to the VR environment.
The headset has cameras that are used for inside-out tracking.
The cameras on the headset are sensitive. Do not cover or scratch the cameras.
Front and side views
1. Dual cameras
2. Vent
3. Front cover
4. Headset band
5. Top strap
6. Headset cable
7. Tracking camera
Page 7
Confidential
7 Headset
8. Status light
9. Headset button
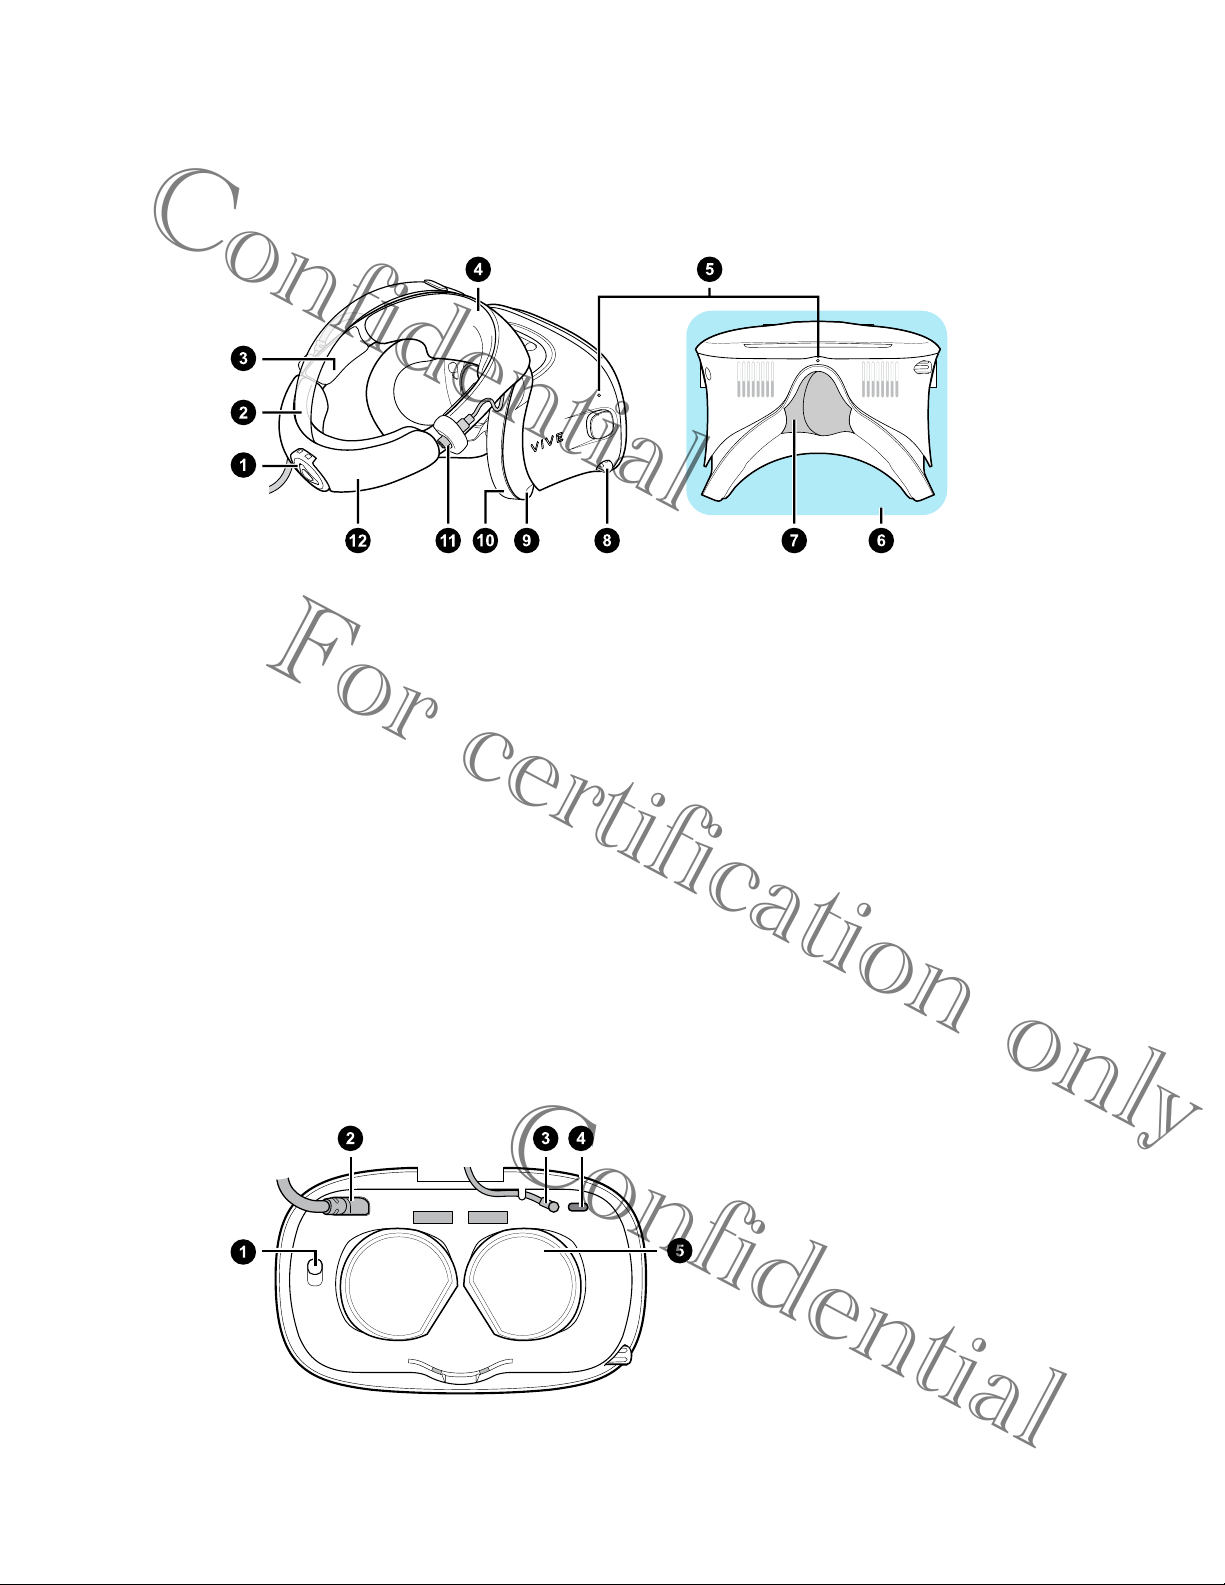
Back and bottom views
1. Adjustment dial
2. Back pad
3. Side cushion
4. Front pad
5. Mic
6. Visor
7. Nose rest
8. Interpupillary distance (IPD) knob
9. Face cushion frame
10. Face cushion
11. Audio cable connector
12. Headset band
Inner view (face cushion frame removed)
1. Front cover lock button
2. Headset cable
3. Audio cable
4. USB cable slot
5. Lenses
Page 8
Confidential
8 Headset
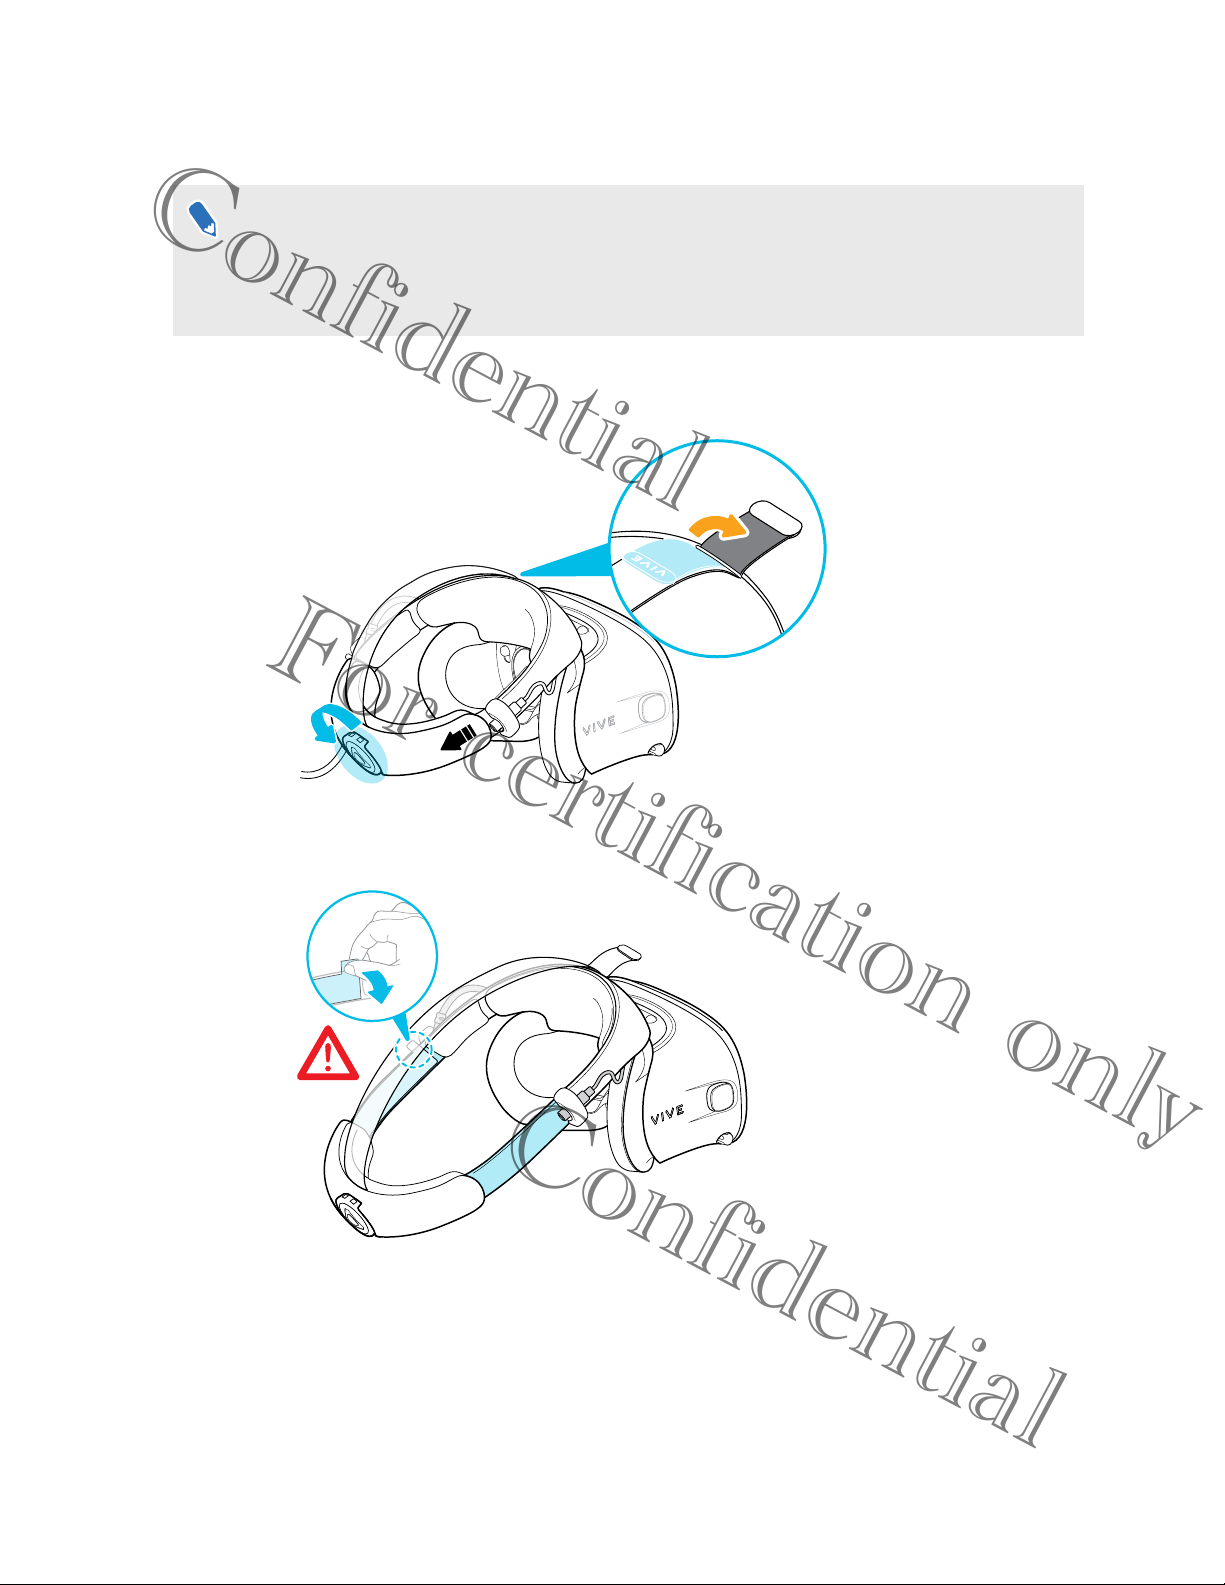
Putting on the VIVE 2018 headset
Before putting on the headset, make sure that you've peeled the protective film off of the
lenses.
Remember to also plug in the earphones. For details, see Plugging in the earphones on page
18.
1. Loosen the band by turning the adjustment dial counter-clockwise, and then detach the
velcro fastener on the top strap.
The first time you're using the headset, make sure to loosen the band fully. Then peel off
the protective film starting from the left side of the band.
2. While holding the visor with one hand, pull up the band.
Page 9
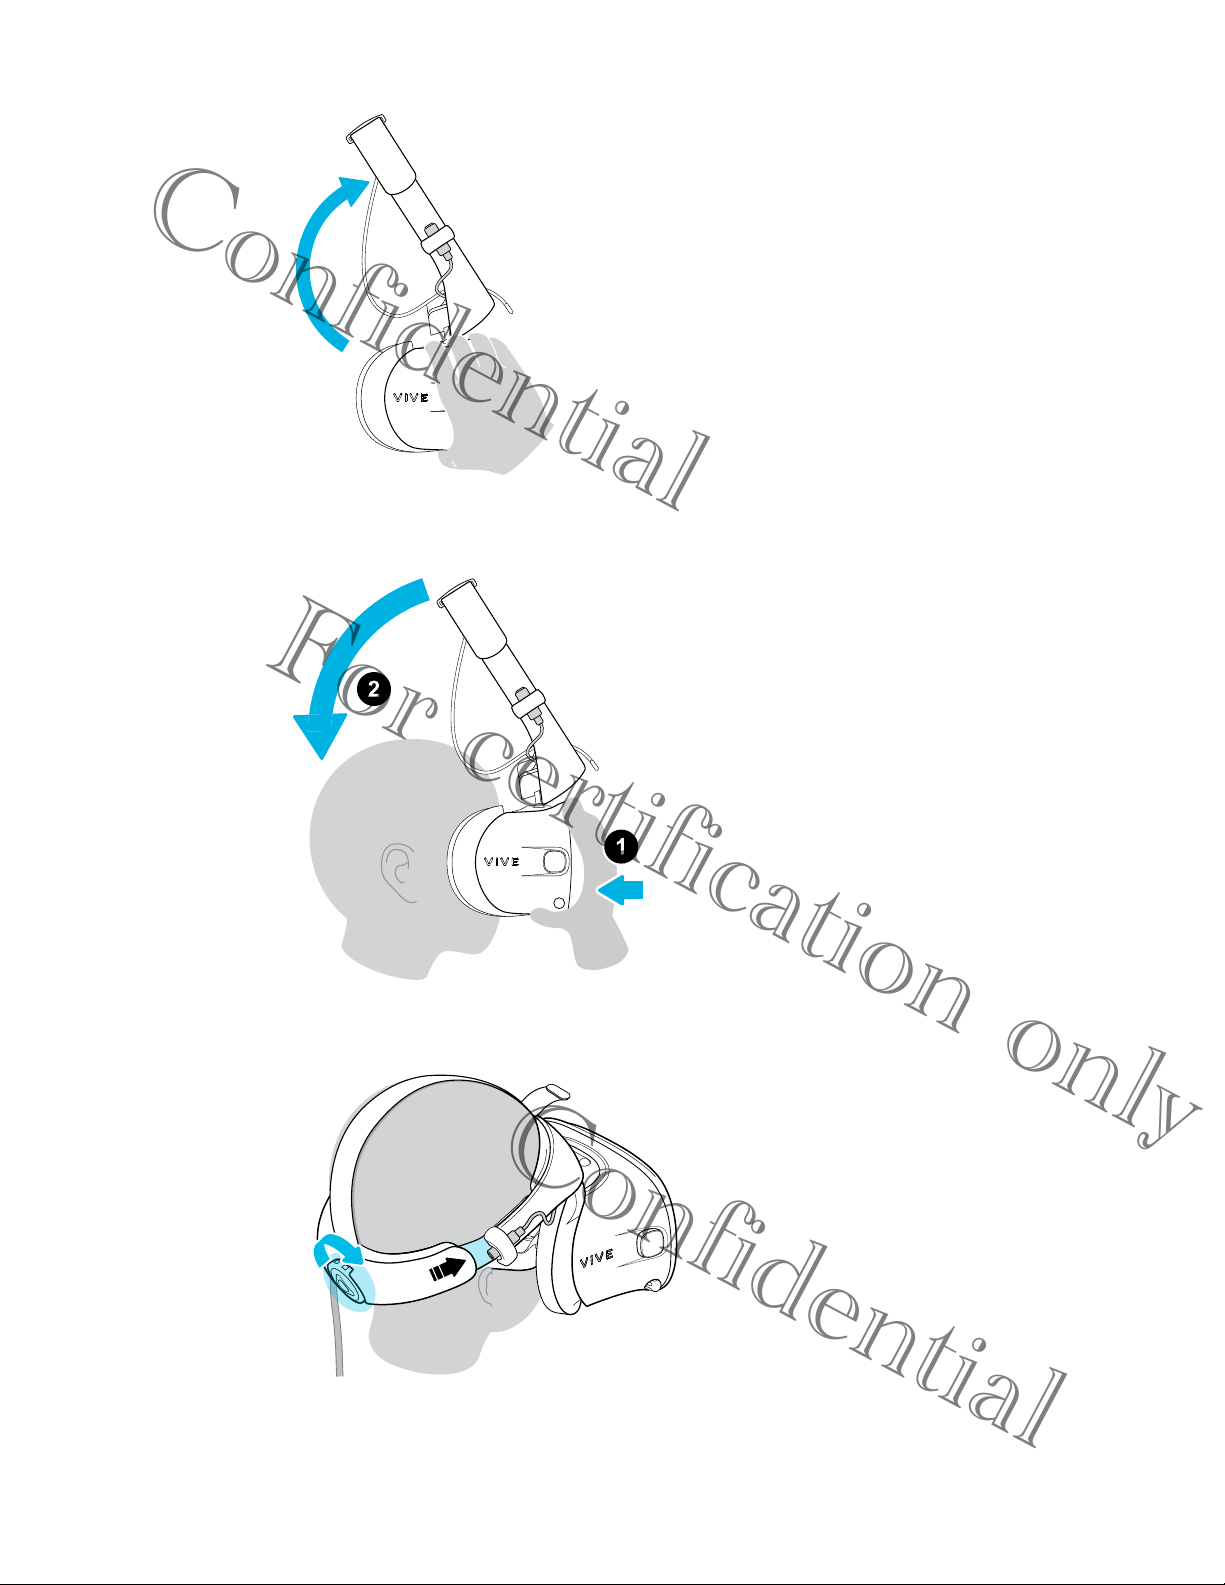
Confidential
9 Headset
3. Hold the visor to your eyes, and then pull down the band around the back of your head.
You'll hear a click when it locks into place.
4. Turn the adjustment dial clockwise until the headset fits snugly.
Page 10
Confidential
10 Headset
5. Adjust the top strap until snug, and then fasten the velcro strap.
6. Make sure that the visor faces straight ahead. If the band sits too low on the back of your
head, the visor will be tilted.
7. Make sure that the headset cable runs straight down your back.
When taking the headset off, remember to first loosen the band by turning the adjustment dial
counter-clockwise.
Page 11
11 Headset
Confidential
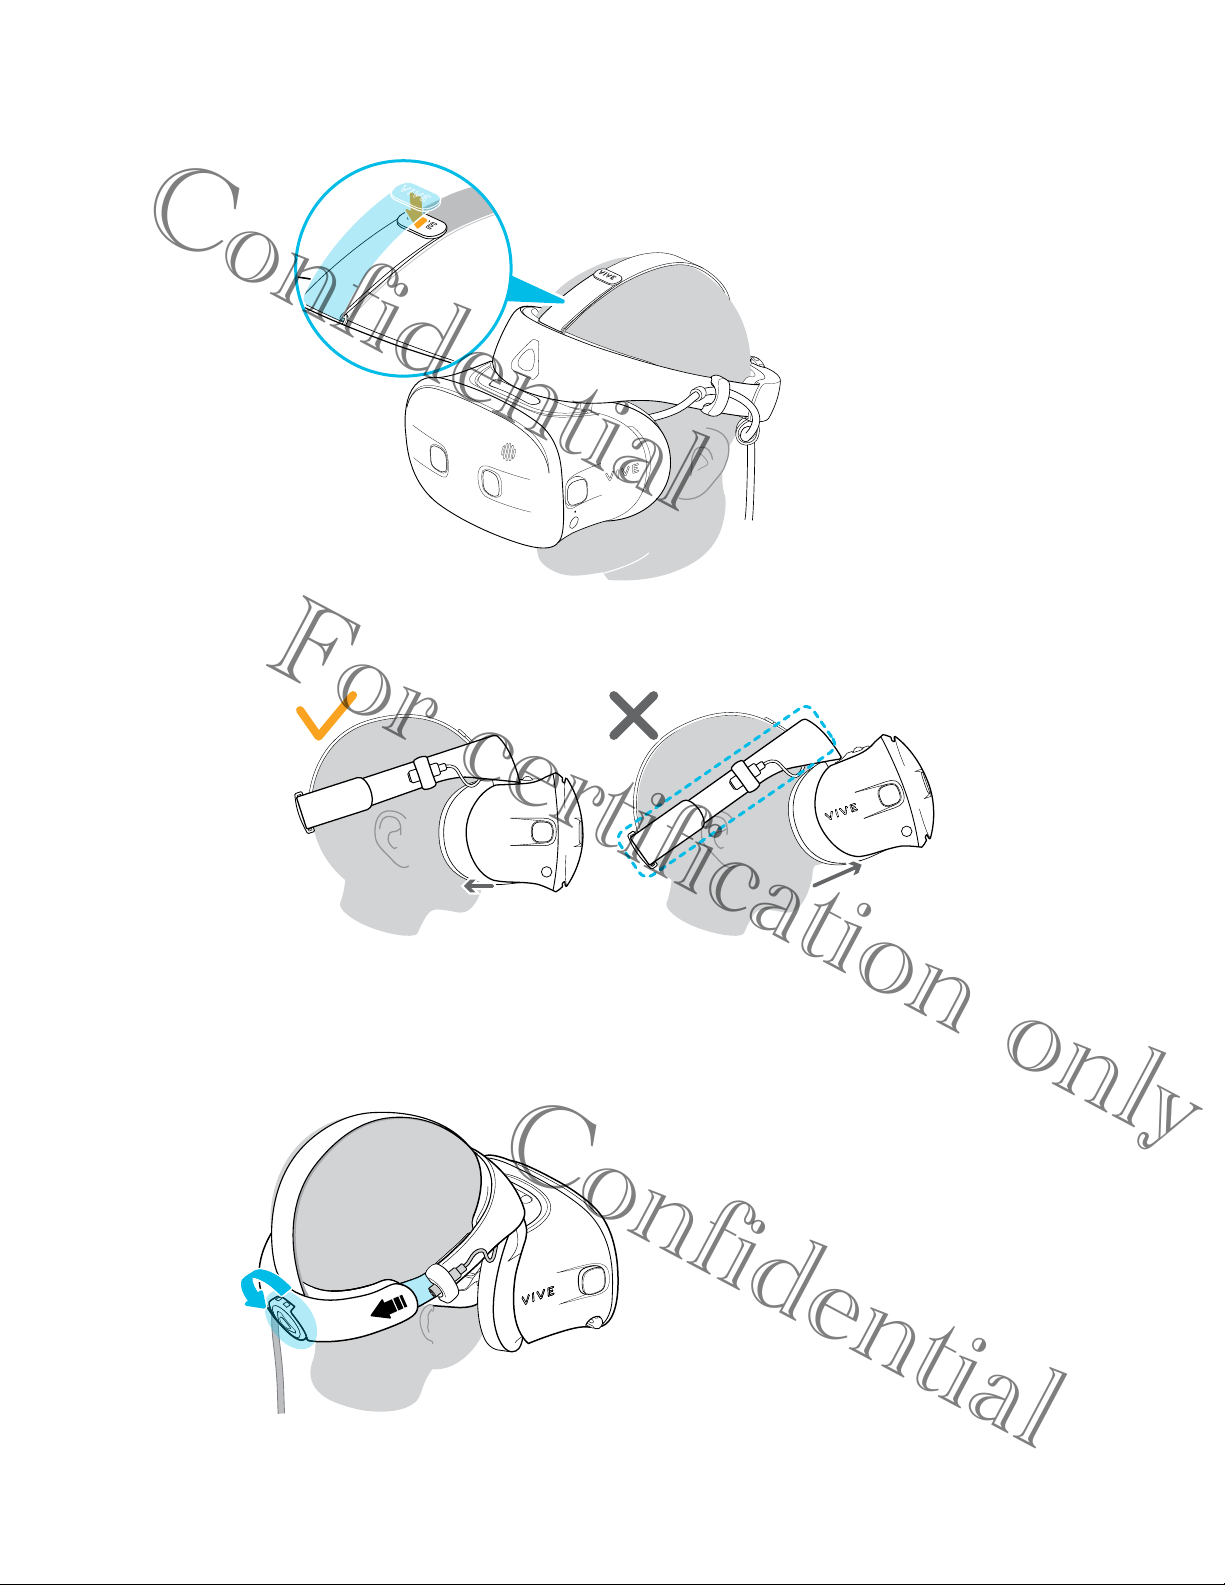
Can I wear my prescription glasses while using VIVE 2018?
Most glasses fit inside the headset.
Make sure that no part of your glasses scratch the headset lenses.
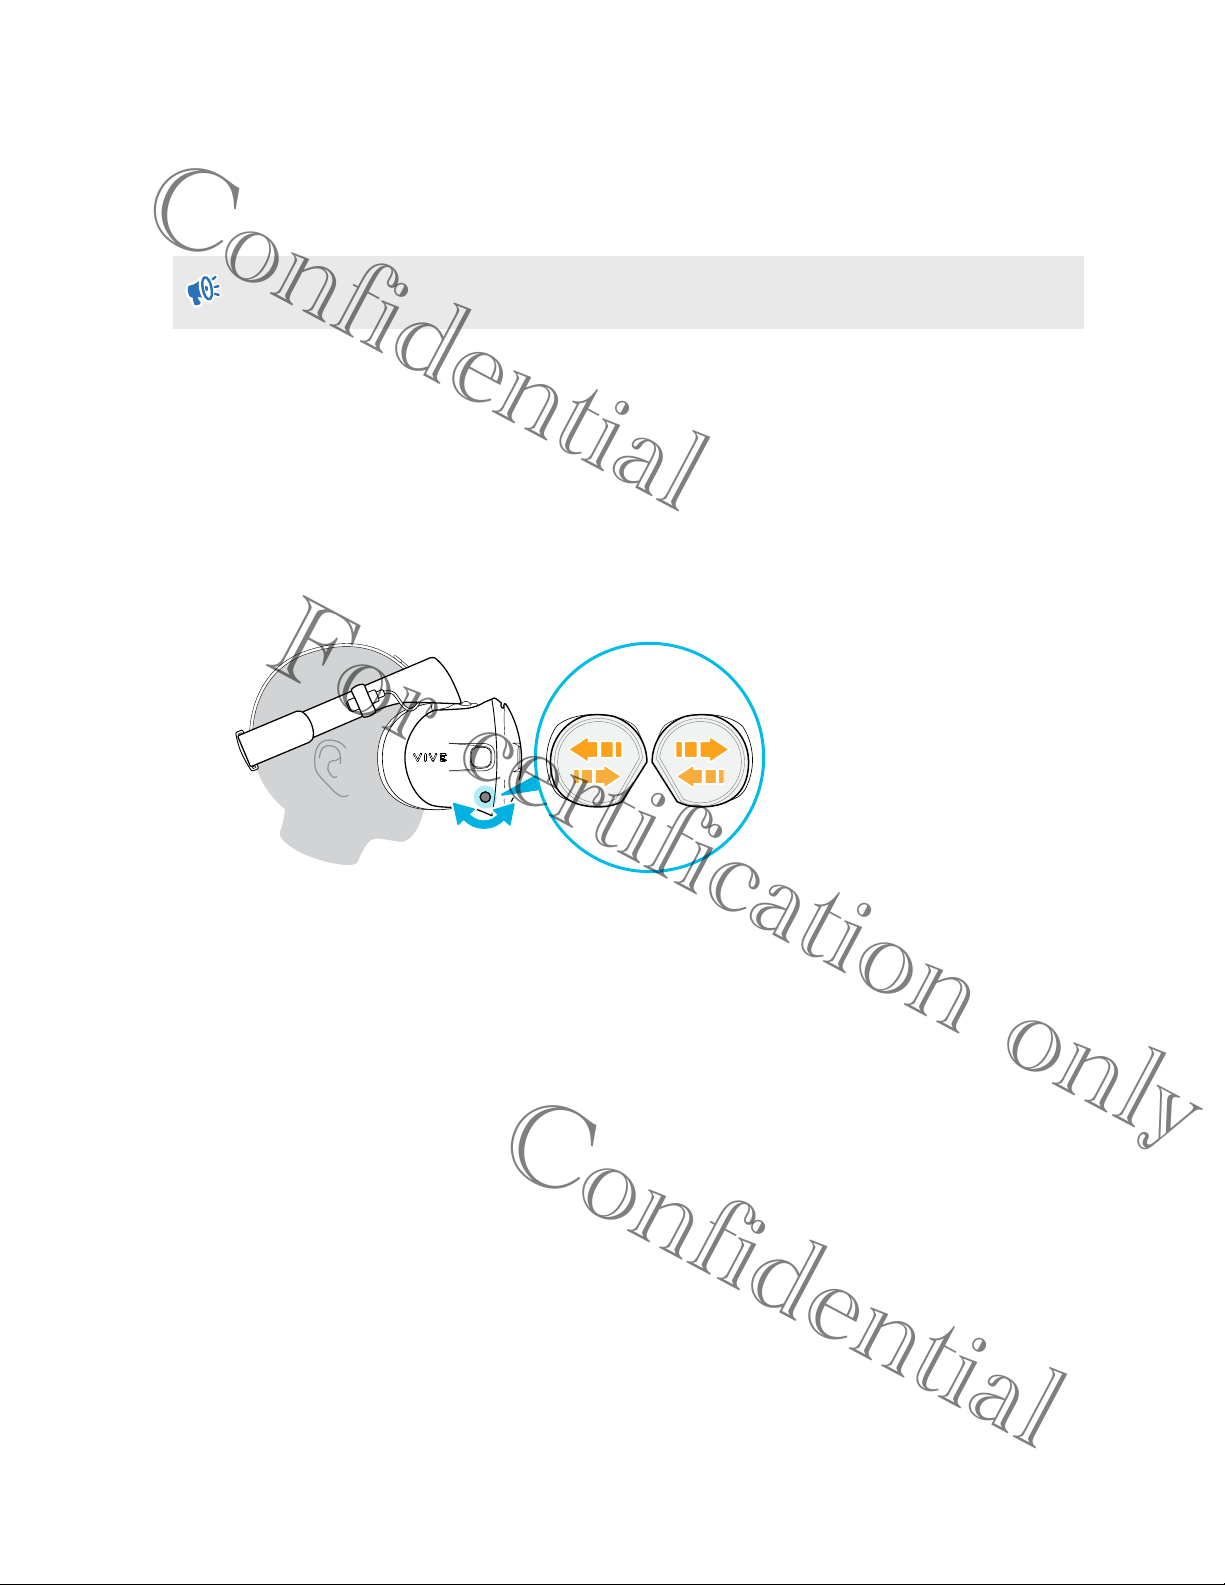
Adjusting the IPD on the headset
Interpupillary distance (IPD) is the distance between the centers of your pupils. A quick way to get
an estimate is by facing a mirror and holding a millimeter ruler against your brow. Use this
measurement as a guide to adjust the distance between the lenses of the headset so that you'll
have a better viewing experience.
To increase the distance between the lenses, rotate the IPD knob clockwise. To decrease, rotate
the IPD knob counterclockwise.
As you adjust the IPD, you'll see a prompt indicating the current distance between the centers of
the lenses.
Page 12

Confidential
12 Headset
Flipping up the visor
Quickly take a break from VR to check your surroundings.
While wearing VIVE 2018, hold the visor with one or both hands, and then gently flip it up.
To return it to its original position, tilt the visor down until it completely covers your eyes.
If you wear large glasses, you may need to adjust the headset to sit higher on your head when
flipping the visor up or down.
Page 13

Confidential
13 Headset
Removing the face cushions
You can remove the face cushions for cleaning.
1. To remove the face cushions, gently peel starting from the bottom ends of each face
cushion until they detach from the face cushion frame.
2. To reattach, align one end of the face cushion with the marker on the bottom part of the
face cushion frame. Press down the face cushion against the outline of the frame, and then
check that the other end of the face cushion lines up with the marker on the top part of the
frame.
Make sure that the velcro and adhesive strips attach firmly.
Replacing the front cover
You can replace the front cover on the headset.
1. Slide down and hold the lock button inside the compartment to unlatch the front cover.
2. Pry open the front cover starting from the bottom right corner with the visor facing you.
Page 14

Confidential
14 Headset
3. Carefully pull out the front cover until it detaches from the visor.
4. Insert the tabs on the replacement front cover into the slots on the visor, and then press
down on the front cover.
5. Make sure to minimize the gap between the front cover and the visor, and that all tabs are
fully locked into place.
You'll hear a click when the front cover locks in place.
Page 15

Confidential
15 Headset
Connecting a USB device to VIVE 2018
You can connect a compatible USB Type-C device to VIVE 2018 using a USB cable.
1. While holding the visor with one hand, pull up the band.
2. Detach the face cushion frame from the headset by gently pulling out the middle part of
the frame from each of its latches.
3. Insert the cable connector of the device into the USB Type-C port on the headset.
Page 16

Confidential
16 Headset
4. Align and push the tabs on the face cushion frame into their corresponding slots on the
headset. Make sure to position the ridge of the face cushion frame below the headset,
audio, and USB cables. You'll hear a click when the face cushion frame locks in place.
5. Connect the other end of the USB cable to USB Type-C device.
Page 17

Confidential
17 Headset
Reattaching the front and back pads to the headset
Always make sure that the front and back pads are attached to the headset.
1. While holding the visor with one hand, pull up the band.
2. Starting from the middle, align the front pad tabs with their corresponding slots on the
band, and then press along the front pad. You may need to gently bend the ends of the
front pad to align the outermost tabs with the slots on the band.
Make sure to minimize the gap between the pad and the band and that all tabs are fully
locked into place.
3. Align the back pad tabs with their corresponding slots on the band, and then press along
the back pad to reattach. Make sure to minimize the gap between the pad and the band.
Page 18

18 Headset
Confidential
Removing the front and back pads
You can remove the front and back pads from the headset band for cleaning.
To remove the front and back pads, peel starting from the ends of each pad until they detach
from the headset band.
Plugging in the earphones
Plug in the earphones before putting on the VIVE 2018 headset.
To hear sound from your VR content, insert the earphone plug into the 3.5mm audio cable
connector on the right side of the headset band.
Page 19

Confidential
19 Headset
Attaching the on-ear headphones to the headset band
If you want to use the on-ear headphones, you can attach them to the headset band.
1. Remove the side cushions, screws, rubber pad, and cable guides from the headset band.
For details, see Detaching the cable guides from the headset band on page 29.
Use a cross-shaped screwdriver (PH00) to detach the screws. Make sure to keep these
parts in a safe place.
Page 20

Confidential
20 Headset
1. Audio cable guide
2. Rubber pad
3. Screws
4. Side cushions
5. Headset cable guide
6. Cable stopper
2. Before attaching the headphones to the headset band, flip open the metal clasp on each
headphone.
Page 21

Confidential
21 Headset
Attaching the right on-ear headphone to the headset band
Attach the right on-ear headphone with the audio plug to the right side of the headset band.
1. Hook the headphone clip over the top of the band.
The screw holes and line marker on the band are helpful guides for positioning the clip.
While the clasp is loose, you can reposition the headphone clip for a more comfortable fit.
Just make sure that the other clip is similarly placed on its side of the band.
2. Make sure the audio cable is firmly pressed and not falling out of the groove.
3. Make sure the audio cable runs under the band, and not over the top. Check that it isn't
also wedged between the clip and the band.
Page 22

Confidential
22 Headset
4. Close the clasp around the band, and then snap into place.
5. Connect the audio cable connector to the headphone plug.
Page 23

23 Headset
Confidential
Attaching the left on-ear headphone to the headset band
Attach the left on-ear headphone to the left side of the headset band.
1. Pin the headset cable along the cable guide on the left headphone.
2. Hook the headphone clip over the top of the band.
The screw holes and line marker on the band are helpful guides for positioning the clip.
While the clasp is loose, you can reposition the headphone clip for a more comfortable fit.
Make sure that the other clip is similarly placed on its side of the band.
3. Make sure the audio cable is firmly pressed in place and not falling out of the groove.
Page 24

Confidential
24 Headset
4. Make sure the audio cable runs under the band, and not over the top. Check that it isn't
also wedged between the clip and the band.
5. Close the clasp around the band and snap into place. The stopper on the headset cable
shouldn't be caught in the clasp, and must be on the visor side to prevent damage to the
visor while gaming.
Page 25

Confidential
25 Headset
Attaching the on-ear headphones audio cable to the headset band
After attaching the on-ear headphones, make sure to also properly attach its audio cable.
1. Remove the front pad from the headset band. For details, see Removing the front and back
pads on page 18.
2. On the front section of the band, press the audio cable marker into the slot in the center.
Then press the cable along the groove until flush with the band.
3. Reattach the front pad and side cushions to the headset band. Make sure that the side
cushions cover the metal clasps on the band.
Page 26

Confidential
26 Headset
Adjusting the fit of the on-ear headphones
While wearing the VIVE 2018 headset, adjust the headphones to a comfortable position over your
ears, then press the headphones into place.
Is the fit too loose or tight? Especially if you feel pressure around your temples, adjust the
position of the headphones for a more comfortable fit. To do so, flip open the metal clasp on each
headphone and reposition the headphone clip on the headset band.
Page 27

27 Headset
Confidential
Detaching the on-ear headphones from the headset band
If you want to use your own earphones, you must first detach the on-ear headphones from the
headset band.
1. On the right side of the band, disconnect the audio plug from the audio cable connector.
2. Remove the side cushions and front pad from the headset band. For details, see Removing
the front and back pads on page 18.
3. On the front section of the band, carefully pull out the cable of the on-ear headphones
from the groove.
4. On the left and right sides of the band, flip open the metal clasp of each earphone to
detach it.
After detaching the on-ear headphones, you need to attach cable guides before plugging in your
own earphones. For details, see Attaching the cable guides to the headset band on page 28.
Page 28

Confidential
28 Headset
Attaching the cable guides to the headset band
If you want to use your own earphones, you first need to attach the audio cable guide and headset
cable guide to the headset band.
Before you attach the cable guides, make sure to remove the on-ear headphones from the
headset band, including the front pad and side cushions. For details, see Detaching the on-
ear headphones from the headset band on page 27.
Use a cross-shaped screwdriver (PH00) to attach the screws.
1. Audio cable guide
2. Rubber pad
3. Screws
4. Side cushions
5. Headset cable guide
6. Cable stopper
1. On the right side of the band, place the audio connector between the rubber pad and audio
cable guide. Align the holes on the band, rubber pad, and audio cable guide, and then
screw in place.
2. On the left side of the band, align the headset cable guide holes with the holes on the
band, then screw in place. Make sure that the headset cable passes through the headset
cable guide. The stopper on the headset cable must also be placed on the visor side of the
cable guide.
3. Reattach the front pad and side cushions to the headset band. Make sure that each side
cushion is aligned with the curvature on the band.
Page 29

Confidential
29 Headset
After attaching the cable guides, you can now plug in the earphones. For details, see Plugging in
the earphones on page 18.
Detaching the cable guides from the headset band
If you want to reattach the on-ear headphones, you first need to detach the audio cable guide and
headset cable guide from the headset band.
Make sure to keep these parts in a safe place.
§ To remove the audio cable guide from the right side of the band, do the following:
Remove the side cushion.
a)
Remove the screws using a cross-shaped screwdriver (PH00).
b)
Remove the rubber pad that holds the audio cable connector against the audio cable
c)
guide.
Page 30

30 Headset
Confidential
1. Side cushion
2. Screws
3. Rubber pad
4. Audio connector
5. Audio cable guide
§ To remove the headset cable guide from the left side of the band, do the following:
Remove the side cushion.
a)
Remove the screws using a cross-shaped screwdriver (PH00).
b)
Detach the headset cable guide.
c)
1. Side cushion
2. Screws
3. Cable stopper
4. Headset cable guide
Detaching the audio cable guide
You can remove the audio cable guide from the right side of the band.
1. Remove the side cushion.
2. Remove the screws using a cross-shaped screwdriver (PH00).
3. Remove the rubber pad that holds the audio cable connector against the audio cable
guide.
Page 31

Confidential
31 Headset
1. Side cushion
2. Screws
3. Rubber pad
4. Audio connector
5. Audio cable guide
Detaching the headset cable guide
You can remove the headset cable guide from the left side of the band
1. Remove the side cushion.
2. Remove the screws using a cross-shaped screwdriver (PH00).
3. Detach the headset cable guide.
1. Side cushion
2. Screws
3. Cable stopper
4. Headset cable guide
Page 32

32 Headset
Confidential
Attaching the top strap to the headset band
For added comfort, attach the top strap before wearing the headset. You can adjust the top strap
by using the velcro strip.
You'll need to first remove the front and back pads on the headset. For details, see Removing
the front and back pads on page 18.
1. Starting from the rear of the headset band, align the hooks of the top strap (side without
the clasp) to its corresponding slots. Gently pull up the strap to hook into place.
2. Align and insert the hooks on the other end of the top strap with the inner slots of the
headset band, and then pull up on the strap to hook into place.
3. Reattach the front and back pads to the headset. For details, see Reattaching the front and
back pads to the headset on page 17.
Page 33

Confidential
33 Headset
Detaching the top strap from the headset band
If you want to, you can detach the top strap from the headset band.
You'll need to first remove the front and back pads on the headset. For details, see Removing
the front and back pads on page 18.
1. Starting from the rear of the headset band, pull down the strap to unhook it.
2. On the other end of the strap, pull down and out the strap to unhook it.
3. Reattach the front and back pads to the headset. For details, see Reattaching the front and
back pads to the headset on page 17.
Updating the headset firmware
1. From your computer, open the SteamVR app.
2. If you see the icon, mouse over it to check if the firmware is out of date.
3. Click Update headset firmware. The firmware update will start automatically.
Do not unplug any cables from the headset, link box, or your computer any time before the
firmware update is complete. Doing so could result in a firmware error.
4. When the update is complete, click Done.
Page 34

34 Headset
Confidential
What does the status light on the headset mean?
The status light turns:
§ Green when the headset is in normal mode
§ Dim green when the headset is on standby
§ Red when the headset is in sleep mode
Cleaning the headset lenses
1. Use the cleaning cloth provided in the box to wipe the lenses.
2. Moisten the cleaning cloth with alcohol or lens cleaner.
3. Wipe in a circular motion from the center to the outer edges of the lenses.
While cleaning the lenses, do not scratch the lenses nor disassemble other parts of the
headset.
Page 35

Confidential
35 Headset
Cleaning the face cushions
1. Before cleaning the face cushions, remove it first from the VIVE 2018 headset.
2. When cleaning the face cushions, remember to:
§ Dampen a clean smooth cloth with cold water and gently wipe the area you want to
clean.
§ Air dry at room temperature. Don't tumble dry, iron, or expose it to direct sunlight.
§ Don't scrub, wring, or bleach.
§ Don’t dip or soak in water.
Page 36

Confidential
36 Link box
Link box
About the link box
Use the link box to connect the headset to your computer.
1. Headset cable port
2. Power button
3. Power port
4. DisplayPort port
5. USB 3.0 port
Connecting the headset to your computer
1. Connect the DisplayPort cable, USB 3.0 cable, and power adapter cable on their
corresponding ports on the link box.
2. Plug the power adapter into an electrical outlet.
3. Connect the other end of the USB 3.0 cable on a USB 3.0 port on your computer.
4. Connect the other end of the DisplayPort cable to the DisplayPort port on the graphics
card of your computer where the monitor is also connected. Do not connect the
DisplayPort cable to ports on the motherboard.
Page 37

Confidential
37 Link box
5. Insert the headset cable connector (side with triangle mark up) to the port on the link box
with the corresponding triangle mark.
6. Press the Power button to turn the link box on.
Restarting the link box
If you need to restart the link box, follow these steps.
1. Close all Steam apps on your computer, including the SteamVR app.
2. Press the Power button to turn the link box off, and then press the Power button again to
turn it back on. On your computer, you might see a notification that drivers are being
installed. Wait for the installation to finish.
3. To verify that VIVE™ hardware is detected, restart SteamVR on your computer.
Page 38

38 Controllers
Confidential
Controllers
About the VIVE 2018 controllers
Use the controllers to interact with objects in the VR world.
The button labels on the controllers that you received with your developer kit may vary. Please
check the hardware for the matching label.
Front view
1. Joystick
2. System/Menu button
3. B/Y button
4. A/X button
5. B button
6. A button
Page 39

Confidential
39 Controllers
Back view
1. Right bumper
2. Right trigger
3. Grip button
4. Left bumper
5. Left trigger
6. Battery cover
Inserting the batteries into the controller
Make sure that the included batteries have been inserted before turning on the controllers.
1. Gently push down on the icon near the top of the battery cover, then slide and lift to
remove it.
2. Insert 2 alkaline AA batteries into the compartment. Make sure that the positive and
negative ends are facing the correct direction, and that the batteries are put over the thin
film in the battery compartment.
3. Replace the battery cover.
Page 40

Confidential
40 Controllers
Removing the batteries from the controller
1. Gently push down on the icon near the top of the battery cover, then slide and lift to
remove it.
2. Pull up the thin film in the battery compartment to remove the batteries.
3. Replace the battery cover.
Page 41

41 Controllers
Confidential
Attaching the lanyards to the controllers
Using the lanyards may help prevent the controllers from accidentally being dropped; however,
please do not fling or violently throw the controller as the lanyard may break.
1. Gently push down on the top of the battery cover, then slide and lift to remove it.
2. Insert the lanyard loop on the corresponding hole at the bottom of the controller. Make
sure that the loop is hooked around the post.
3. After replacing the battery cover, slide the lanyard over your wrist, and then slide the lock
to tighten the lanyard comfortably around your wrist.
Turning the controllers on or off
§ To turn the controller on, briefly press the System/Menu button.
§ To turn the controller off, press and hold the System/Menu button for around 3 seconds.
Pairing the controllers with the headset
1. From your computer's Windows system tray, click VIVE 2018 Settings.
2. Select Control Unit and Pair Controller in Left controller or Right controller.
3. Turn on one of the controllers by briefly pressing the System/Menu button.
4. To initiate the pairing process, press the System/Menu and B/Y buttons at the same time.
When the pairing is successful, the blinking light turns solid.
5. Pair the other controller by repeating steps 2 to 4.
Page 42

Confidential
42 Trademarks and copyrights
Trademarks and copyrights
©
2019 HTC Corporation. All Rights Reserved.
VIVE, the VIVE logo, HTC, the HTC logo, and all other HTC product and service names are
trademarks and/or registered trademarks of HTC Corporation and its affiliates in the U.S. and
other countries.
Steam, the Steam logo and SteamVR are trademarks and/or registered trademarks of Valve
Corporation in the U.S. and/or other countries.
All other trademarks and service marks mentioned herein, including company names, product
names, service names and logos, are the property of their respective owners and their use herein
does not indicate an affiliation with, association with, or endorsement of or by HTC Corporation.
Not all marks listed necessarily appear in this User Guide.
Screen images contained herein are simulated. HTC shall not be liable for technical or editorial
errors or omissions contained herein, nor for incidental or consequential damages resulting from
furnishing this material. The information is provided “as is” without warranty of any kind and is
subject to change without notice. HTC also reserves the right to revise the content of this
document at any time without prior notice.
No part of this document may be reproduced or transmitted in any form or by any means,
electronic or mechanical, including photocopying, recording or storing in a retrieval system, or
translated into any language in any form without prior written permission of HTC.
Page 43

43 Index
Confidential
Index
C
Controller
- inserting the batteries
Controllers
- about
- pairing with the headset
- turning on or off
H
Headset
- about
- adjusting the IPD
- connecting a USB device
- putting on
- replacing the face cushion
L
Link box
- about
- connecting the headset
38
41
6
11
8
36
39
41
15
13
36
 Loading...