

Page 1

HP ZCentral Connect User Guide
Table of Contents
1. Overview
1.1. Components
1.2. Features
1.3. Compatibility & Requirements
2. Getting Started
2.1. Integrating with Intel AMT
2.1.1 Provisioning AMT
2.1.2 AMT Connection Options
3. HP ZCentral Connect Manager Installation
3.1. Selecting a Service Account
3.1.1. Understanding Managed Service Accounts
3.1.2. Setup Microsoft RSAT Tools
3.1.3. Ensure KDS Root Key Exists
3.1.4. Enable PowerShell Script Execution
3.1.5. Create a Managed Service Account
3.1.6. Specify the MSA During Manager Installation
3.2. Silent Install
3.3. Accessing the HP ZCentral Connect Administrator Portal
3.4. Changing the Administrator Password
3.5. Advanced Settings
4. Administrator Features
4.1. Hosts
4.1.1. Registering and Importing Hosts
4.1.2. Status
4.1.3. Availability
4.1.4. Agent Status
4.1.5. AMT Status
4.1.6. Managing Hosts
4.1.7. Removing Hosts
4.2. Pools
4.2.1. Creating Pools
4.3. Private Hosts
4.3.1. Creating Private Host Associations
4.4. Security Groups
4.4.1. Importing Security Groups
4.5. Users
4.5.1. Importing Users
4.6. Sessions
4.7. Certicates
4.7.1. Accepting Self-Signed Certicates in Your Environment
4.7.2. Make Agent Trust New Manager Certicate
4.7.3. Using Your Own Certicate
4.8. HP ZCentral Connect Manager Cong App (ManagerCong.exe)
4.8.1 Recovering HP ZCentral Connect Administrator Password
4.8.2. Renewing HP ZCentral Connect Self-Signed Certicate
Page 2

5. HP ZCentral Connect Agent
5.1. Installing ZCentral Connect Agent
5.2. Agent Tokens and Renewal
5.3. ZCentral Connect Agent Cong
5.3.1. Register Agent
5.3.2. Congure Settings
5.3.3. Run Unattended AgentCong
5.4. ZCentral Connect Agent Logs
5.5. Running the Agent as non-root user on Linux
5.6. Uninstalling ZCentral Connect Agent
6. HP ZCentral Connect Client Portal Features
6.1 Prerequisites
6.2 Accessing the HP ZCentral Connect Client Portal
6.3. Client Authentication
6.4. HP ZCentral Connect Client
6.4.1. Installing HP ZCentral Connect Client
6.4.2. HP ZCentral Connect Client Already Installed
7. Licensing Guide
7.1 Providing a Hostname When Purchasing a License to Use (LTU)
7.2. How to Install a License File for HP ZCentral Connect Software
8. Security Recommendations
8.1 Use Single Sign On Authentication
8.2 Network Transport Security
8.2.1 TLS Protocols
8.2.2 Disabling Weak Ciphers (Triple DES and RC4 Ciphers)
8.3. Do Not Use LocalSystem
8.4. Admin Account Password
9. Backup and Restore
9.1. Create a Backup
9.2. Restore a Backup
10. Uninstallation
11. Known Issues and Limitations
Page 3
1. Overview
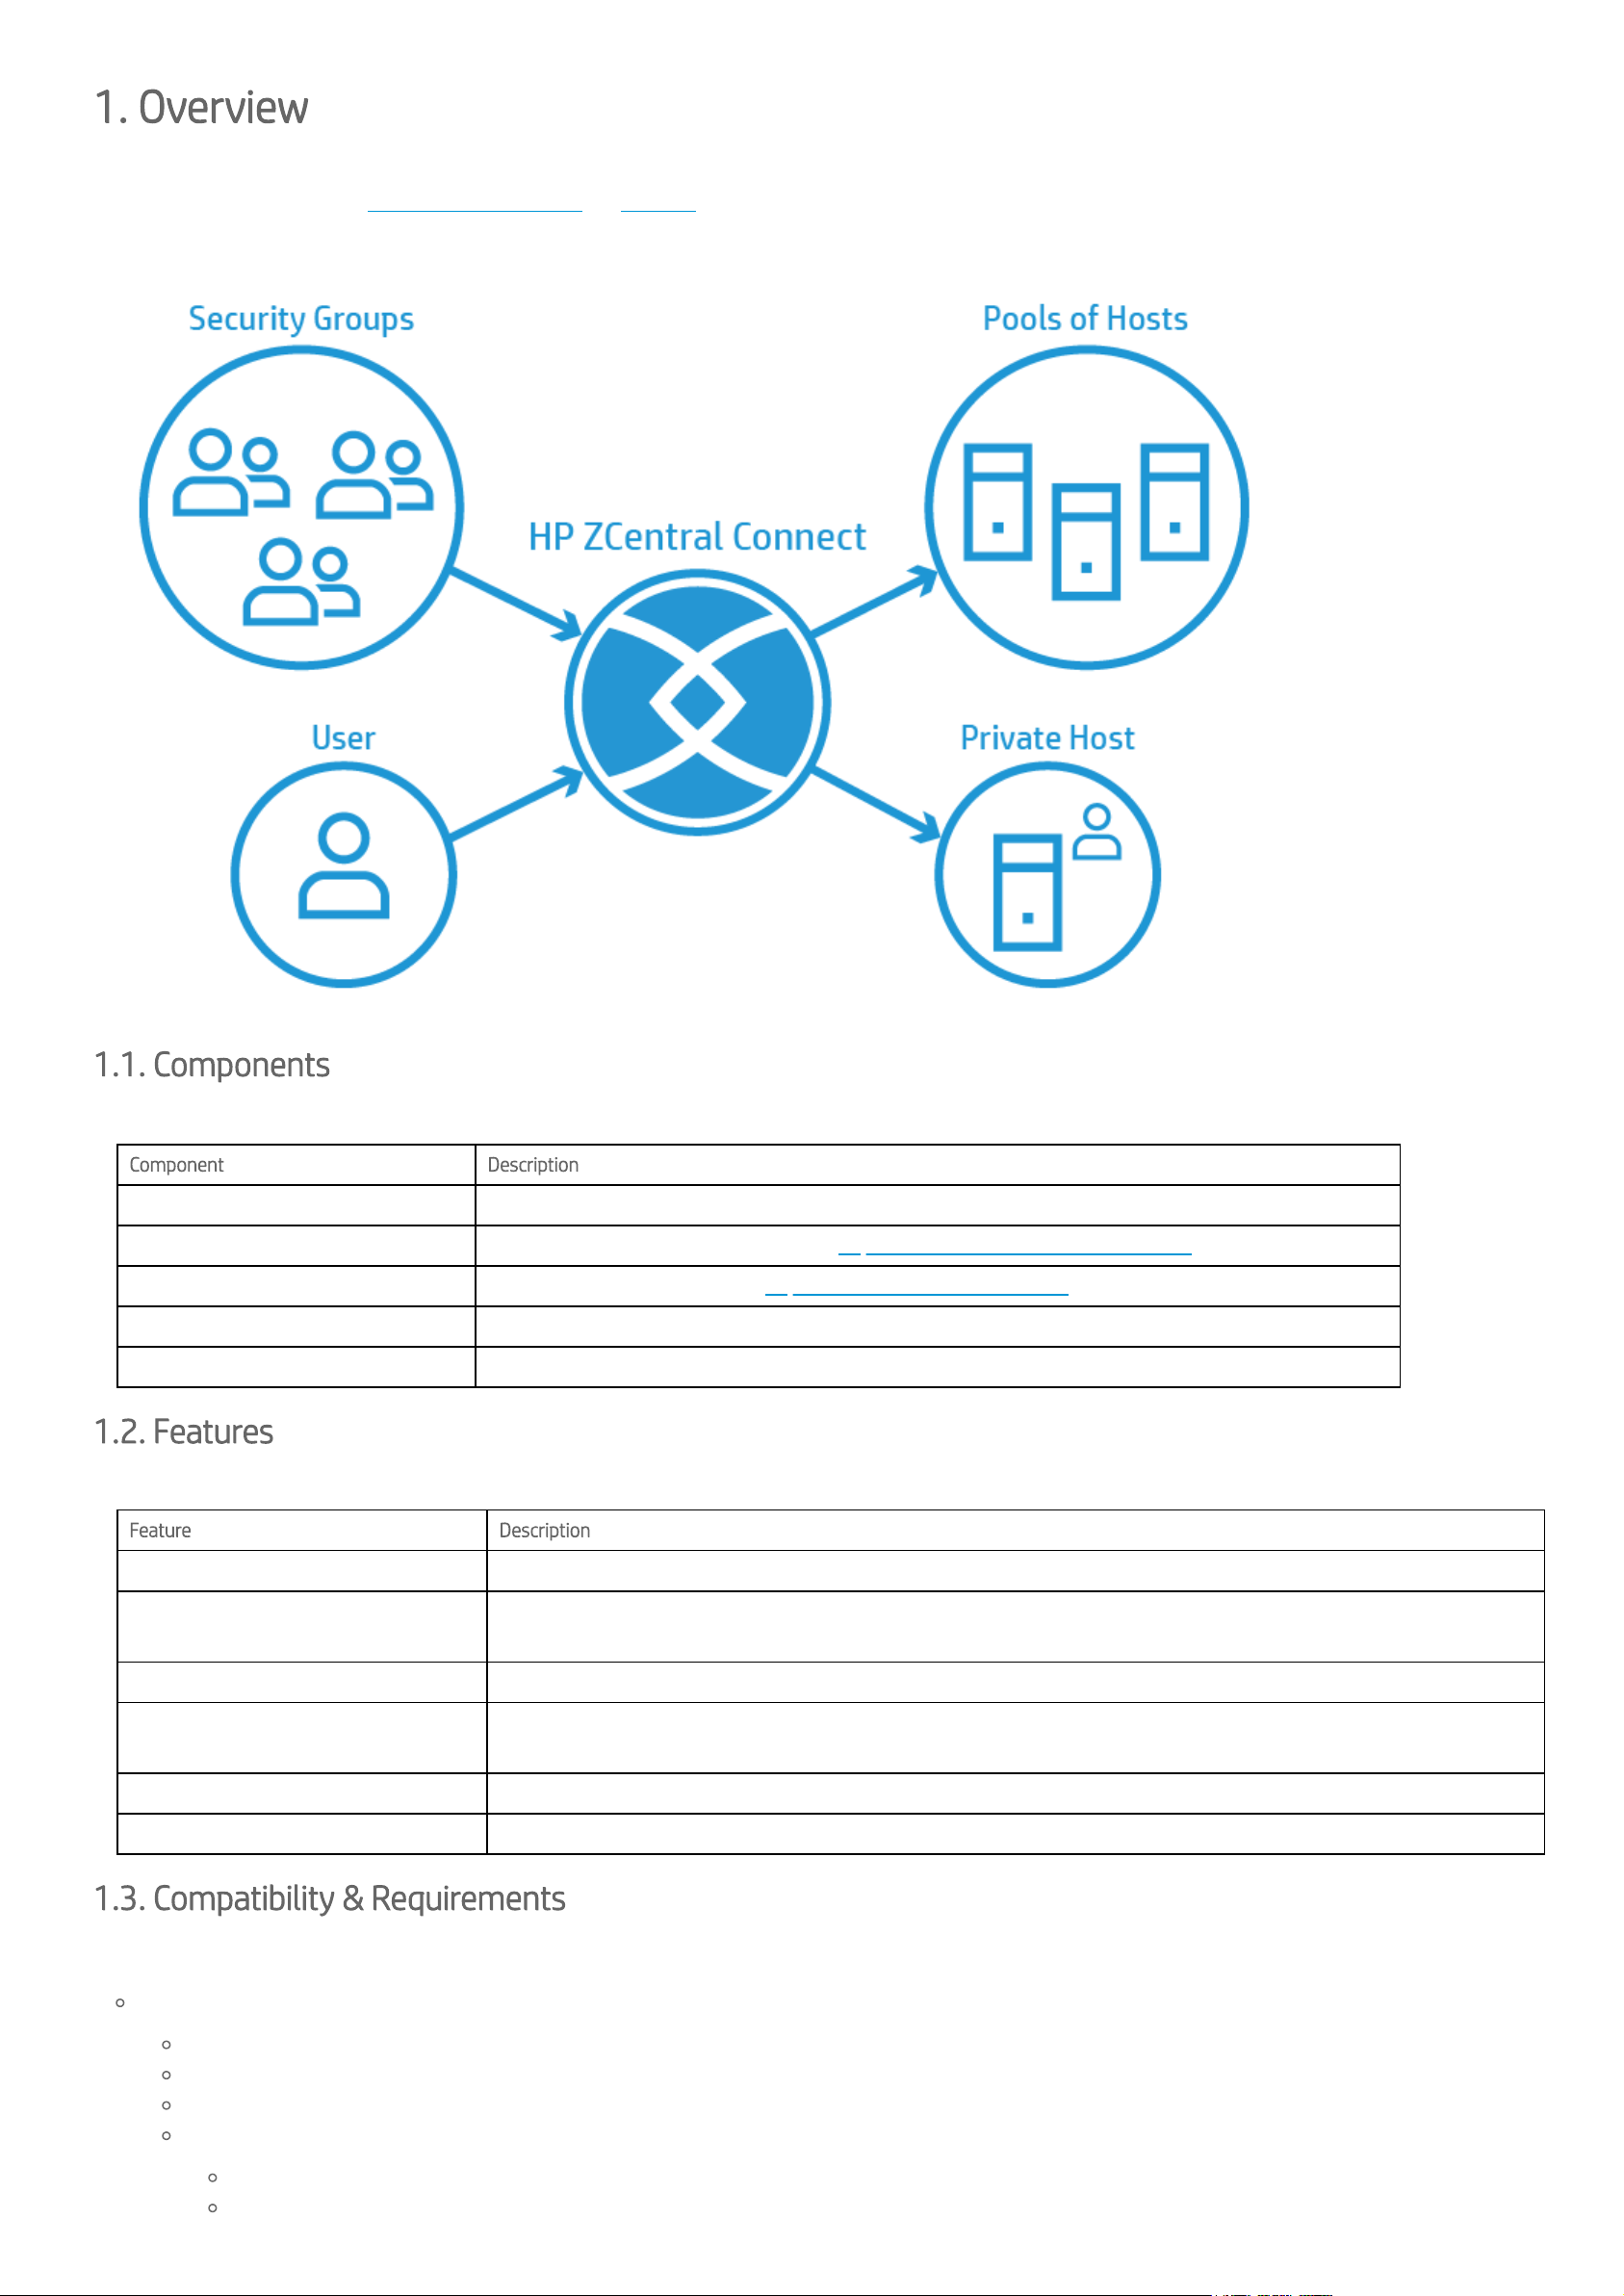
HP ZCentral Connect is a management and brokering solution that lets IT administrators organize remote workstations for many users. ZCentral Connect leverages existing tools
and market standards, such as HP ZCentral Remote Boost and Intel AMT, to provide administrators a lightweight, but effective, remote management experience.
ZCentral Connect denes two basic roles: Administrators and Users. Administrators are responsible for conguring policies for connection brokering, managing, and monitoring
workstations (Hosts). Users seek remote workstations to work remotely via HP ZCentral Remote Boost.
1.1. Components
The following are the major components of ZCentral Connect:
Component Description
HP ZCentral Connect Manager The HP ZCentral Connect Manager Windows service that hosts web endpoints for both administrators and users
HP ZCentral Connect Administrator Portal Web endpoint for Administrators.
Example: https://zcentralconnect.local.domain/admin
HP ZCentral Connect Client Portal Web endpoint for Users.
Example: https://zcentralconnect.local.domain/
HP ZCentral Connect Client Launches HP ZCentral Remote Boost locally in end-user machines
HP ZCentral Connect Agent Monitors the state of a Host and sends status updates to the Manager
1.2. Features
The main features of ZCentral Connect include the following:
Feature Description
Hosts Inventory ZCentral Connect contains a list of managed Hosts, where a Host is a workstation intended for remote desktop access by a User.
HP ZCentral Remote Boost Connection
Brokering
ZCentral Connect brokers suitable Hosts running ZCentral Remote Boost Sender for Users. Brokering policies can be congured
by administrators.
Remote Power Management Allows Administrators and Users to remotely manage Host power by leveraging the Intel AMT technology.
Host Monitoring Actively monitors Hosts for logged in Users and ZCentral Remote Boost Sender service status. Requires the ZCentral Connect
Agent.
Pool Association of one or more Hosts with one or more Groups and/or Users.
Private Host Association of a single Host with a single User.
1.3. Compatibility & Requirements
In order to deploy ZCentral Connect, some requirements must be met.
HP ZCentral Connect Manager (Service):
Microsoft Active Directory Domain Services 2012 R2 or greater
Domain joined Windows 10 (version 1607 or higher), Windows Server 2016 or Windows Server 2019
.NET Framework 4.7.1 or newer
Recommended minimum system requirements
4-Core 2 GHz CPU (i3, i5, i7, Xeon or vCPU)
4 GB of RAM
Page 4

240 GB Solid State Drive (with at least 50 GB of free space)
1 Gbps Network Connection
HP ZCentral Connect Client (User side):
HP RGS Receiver version 7.5, HP ZCentral Remote Boost Receiver 2020 or newer
Windows/Linux(RHEL/Suse/ThinPro)/macOS
Edge/Chrome/Firefox
HP ZCentral Connect Agent (Host side):
.NET Framework 4.7.1 or newer
HP RGS Sender version 7.5, HP ZCentral Remote Boost Sender 2020 or newer
Intel AMT version 9 or later (required for remote power control)
Agent service (required for monitoring logins and HP RGS Sender or HP ZCentral Remote Boost Sender service status)
Windows 10
Linux (RHEL7/RHEL8/Ubuntu18.04)
NOTE ZCentral Connect allows end users to connect remotely to supported workstations to access software applications. End users are responsible for ensuring that each
workstation operating system and the software applications accessed via ZCentral Connect are properly licensed according to the terms of the operating system or software
application provider.
Page 5
2. Getting Started
Some prerequisites for getting started with ZCentral Connect:
1. If you installed ZCentral Connect Beta versions before, please uninstall it before proceeding
2. Have a machine available that can host HP ZCentral Connect and that is connected to your Microsoft Active Directory Domain
3. Have a set of workstations (Hosts) already provisioned with ZCentral Remote Boost Sender and Intel AMT
4. Install the ZCentral Remote Boost Receiver on all of the machines that are going to be made available for the users to access ZCentral Connect
This is a high-level set of steps to get started with ZCentral Connect:
1. Install the ZCentral Connect Manager
2. Log in to the ZCentral Connect Administrator Portal
3. Register or import the Hosts you want ZCentral Connect to manage
4. Import Users and Security Groups from Active Directory as necessary
5. Congure Pools and Private Hosts
6. Ensure you have a valid license le installed
7. Share the ZCentral Connect Client Portal address with Users and allow them to create Sessions to Hosts
2.1. Integrating With Intel AMT
To enable power operations through the ZCentral Connect Manager it must rst be integrated with Intel AMT and each Host needs to be provisioned.
NOTE For security reasons, it is strongly recommended that Kerberos is used when integrating ZCentral Connect with Intel AMT. Only TLS (Transport Layer Security) connections
will be supported by the Manager to communicate with AMT devices. Mutual TLS (mTLS) is recommended to provide two-way authentication between the Manager and the AMT
devices.
2.1.1 Provisioning AMT
A brief overview of provisioning HP Workstations is available in the Setting up and conguring Intel AMT in HP Business Notebooks, Desktops, and Workstations white paper
provided by HP. For more in depth information about provisioning AMT, please refer to the documentation provided by Intel: Intel® Active Management Technology
Implementation.
Enterprise Provisioning
To benet from the added security and easy access of TLS, mTLS, and Kerberos, enterprise provisioning is required. Enterprise provisioning is also useful for provisioning large
numbers of AMT devices where a manual process is not feasible.
Intel(R) Setup and Conguration Software (SCS) and the Remote Conguration Server (RCS) it contains are required for enterprise provisioning.
The SCS User Guide can be referenced to help setup your environment.
Intel provides an AMT Conguration Utility (ACU) executable that can be run on a Windows host machine and request provisioning from the RCS.
There is an Intel SCS add-on for Microsoft System Center Conguration Manager (SCCM) which can help in bulk provisioning.
The following are some example steps that can be taken to provision a group of Windows machines to be used with ZCentral Connect:
1. Create a provisioning prole with Active Directory (AD) Integration, Access Control Lists, TLS, and Mutual Authentication (mTLS).
2. Create a script that calls the ACU executable, specifying the CongViaRCSOnly command to use Intel SCS to provision a device, and point it at your Remote Conguration
Server (RCS) and the prole created.
3. Use group policy to distribute the script and ACU executable to machines that need to be provisioned.
NOTE There is no support for the AMT Conguration Utility on Linux. Booting a Windows OS or using "Bare-Metal Setup and Conguration" (refer to Intel SCS User Guide) is
required.
Manual Provisioning
The most basic provisioning that can be done on a system is through a manual process. The features supported with this provisioning are limited when compared to enterprise
provisioning. In addition, the process requires physical access to each Host that needs to be provisioned.
Following is a summarized list of the steps required to enable and congure Intel AMT for ZCentral Connect:
1. Boot the machine
2. During POST press F6 or Ctrl + P to enter the MEBx setup menu (this depends on the model of the workstation)
3. Select MEBx Login and enter the default password “admin”
4. Enter a new password. For best practices regarding AMT passwords, refer to the Setting up and conguring Intel AMT in HP Business Notebooks, Desktops, and
Workstations white paper provided by HP
5. Select Intel AMT Conguration
6. Select Power Control
7. In Host Sleep States, ensure that the Intel AMT ON option is set to On in S0, ME Wake in S3, S4-5
8. Press Esc to go back to the previous menu
9. Select Activate Network Access
10. Press Y to activate network access
11. Exit the MEBx setup menu
You can verify that Intel AMT was correctly provisioned by browsing to http://<hostname>:16992 and signing in with the username “admin” and the newly created
password.
NOTE Network traffic is unencrypted before setting up TLS. HP recommends performing a manual provisioning setup and conguration in a closed network.
Page 6

Next, TLS will have to be set up on the AMT device. The easiest way to do this is with MeshCommander. The following steps show an example of the process:
1. Open MeshCommander
2. Open the
Certicate Manager
page
3. Create a Root Certicate
4. View the new Root Certicate and save the .cer le
5. Import the .cer le to a certicate store on the machine running the Manager
The account running the Manager service needs to trust this certicate
The best place for this is the LocalMachine Trusted Root store
6. Open the
Computer Management
page.
7. Add the Host that was just provisioned
8. Connect to the Host
9. Open the
Security Settings
tab
10. Click
Add Certicate...
and add the root certicate you just created as a
Trusted Root Certicate
11. Click
Issue Certicate
and use the root certicate to issue a
TLS Server (HTTPS)
certicate
Ensure that the common name matches what you plan to use to reference the Host in the Manager
12. Click on the link next to
Remote TLS Security
13. Select the newly issued certicate and Server-auth TLS only
14. Click OK and reconnect to the Host with TLS to test the connection
When TLS is enabled, the web interface is reachable through https://<hostname>:16993.
Mutual TLS can be setup through MeshCommander as well. The following steps show an example of the process:
1. Open MeshCommander
2. If this is the rst time conguring a Host with mTLS follow these steps:
1. Open the
Certicate Manager
page
2. Use the Root Certicate created when setting up TLS to issue a new Client Certicate for
Intel(R) AMT Console
The common name used will be required later and is not tied to a specic Host
3. View the new Client Certicate and save the .p12 le
4. Import the certicate to the LocalMachine Personal certicate store on the ZCentral Connect Manager machine
Follow the steps in the Mutual TLS section to integrate with the Manager
3. Connect to the Host being congured
4. Open the
Security Settings
tab
5. Click on the link next to
Remote TLS Security
6. Select Mutual-auth TLS only for
Security
7. Add the common name of the issued certicate to the
Remote CN's
list
8. Click OK
9. Connect to the Host through the Manager
NOTE When enabling TLS and mTLS through MeshCommander a Root Certicate can also be imported from the le system. The private key needs to be imported as well.
NOTE This process needs to be done for each Host individually and it is not possible to setup Kerberos through manual provisioning. For a scalable and secure solution, use
enterprise provisioning.
2.1.2 AMT Connection Options
TLS
TLS (Transport Layer Security) is used to encrypt communication between the Manager and the AMT device. The AMT device holds a server certicate that must be trusted by the
Manager to establish a connection. To avoid name mismatch errors, the hostname used for the Host by the Manager must match the Common Name or an Alternative Subject
name of the certicate.
NOTE To enable TLS for an AMT device, it must either be provisioned using enterprise provisioning with Intel SCS or enabled after manual provisioning with external tools such as
MeshCommander.
Mutual TLS
Mutual TLS (mTLS) adds extra security to AMT by adding extra certicate validation. In addition to the Manager needing to trust the server certicate from AMT, the AMT device
needs to trust the client certicate that the Manager has access to. The client certicate used for mTLS with AMT is special and requires additional steps to setup in your
environment (refer to Chapter 9: Preparing the Certication Authority in Intel SCS User Guide).
The account running the Manager service must have access to the private key of a client certicate. For this to happen, a client certicate must be issued by a Certicate Authority
that the AMT device trusts. This certicate must be placed in the Personal certicate store for either the Current User or Local Machine (depending on which account is running the
Manager). If an AD account is used to run the Manager service, the certicate should live in the Current User Personal store. If LOCALSYSTEM or a Managed Service Account (MSA)
is used to run the Manager service, the certicate must live in the Local Machine Personal store. In addition, if an MSA is used it must be given access to the private key. This can
be done by following these steps:
1. Open the MMC snap in for managing Local Machine certicates (run certlm.msc)
2. Right click on the issued AMT client certicate
3. Click on All Tasks -> Manage Private Keys
Page 7

4. Add the MSA to the list of users and give it
Read
permissions
The subject name of the certicate must then be added as the value for the
AMTMutualAuthCertName
setting in the Manager settings le. Edit the settings le by following the
instructions described in the Advanced Settings section of the User Guide.
NOTE The certicate will attempt to be gathered if there is a value for the
AMTMutualAuthCertName
setting. If the certicate is not able to be found, all AMT connections will fail.
The certicate is not sent to the AMT device until it is requested, so non-mTLS connections will not be affected as long as the certicate is accessible.
NOTE To enable mTLS for an AMT device it must either be provisioned using enterprise provisioning with Intel SCS or enabled after manual provisioning with external tools such
as MeshCommander.
Kerberos
ZCentral Connect can use Kerberos to authenticate with an AMT device. Kerberos authentication provides better security and does not require managing AMT credentials for each
host. To take advantage of Kerberos authentication, the account running the Manager must be given permissions which are set up during provisioning. When creating the
provisioning prole with Intel SCS, the account running the Manager must be given "PT Administration" realm privileges (refer to the Adding a User to the ACL section of Intel SCS
User Guide). The permissions can be granted by either directly adding the account to the prole or adding it to a group that has the permissions already. During the provisioning
process the provisioning server will add an object to AD with a service principal attribute. The hostname used in the Manager must match one of these service principals for the
connection to succeed.
NOTE The Manager service must be restarted after the account has been given permissions.
NOTE To enable Kerberos authentication for an AMT device it must be provisioned using enterprise provisioning with Intel SCS.
Digest
The Manager has the ability to use username and password to connect to an AMT device. The username and password have to be held for each Host that needs to connect to
AMT. The passwords used for AMT are encrypted when stored by the Manager. Digest is enabled through manual provisioning.
NOTE Digest authentication is not recommended by HP, since it is the least secure authentication option and requires upkeep of credentials for each host. Every communication
with the AMT device requires the username and password to be sent over the network. Consider using Kerberos authentication instead.
NOTE If Digest is being used, consider using different passwords for each AMT Host; this reduces the area of attack if a single password is leaked.
Page 8
3. HP ZCentral Connect Manager Installation
The Manager can be installed in a variety of platforms, such as a workstation, a server, or a virtual machine.
The Manager installer will:
1. Copy the Manager les to the host
2. Create a Windows service to host the Manager
3. Create a self-signed certicate to encrypt the Manager network communication
4. Create a rewall rule in the Manager machine so Administrators and Users can access ZCentral Connect pages from the network
5. Create an user-dened password for the Administrator user
6. Start the Manager Windows service
NOTE If you need to use a custom certicate instead of the self-signed certicate generated by the installer, please follow the steps provided in "Using Your Own Certicate".
To get started, please log in the machine where you want to install the Manager and follow the installation wizard.
During the installation wizard you will be prompted to dene the Administrator password and to congure how the Manager connects to the network. Please change these
settings if you need a custom network conguration:
Web address is the network endpoint that the Manager service will bind to. It will be used as the Common Name for the self-signed Certicate generated at
installation. Web address can be a hostname, a fully qualied domain name or an IP address.
Web Service Port is the TCP port used to connect to the Manager via HTTPS. The default port for secure connections is 443. If you choose a different port, you will
need to include the port number in the URL when accessing the Manager pages. For example, if you choose Web address: zcentralconnect and Port: 8443, you should
use https://zcentralconnect:8443 to connect with your browser.
Message Bus Port is the TCP port used for Agents to communicate with the HP ZCentral Connect Manager. The default port for secure connections is 8883. Please
refer to the Agent Deployment Guide for more details.
NOTE Do not use port 42966 if Remote Boost Sender is running on the Manager system.
In case of failure, please follow the installation troubleshooting at the Troubleshooting page.
3.1. Selecting a Service Account
The ZCentral Connect Manager runs as a service and can use one of 3 types of accounts:
A Managed Service Account (MSA)
A standard Active Directory account or service account
The LocalSystem account
The installer prompts for the account type and required parameters. Using Managed Service Accounts require special setup and conguration however it does not require manual
password management and upkeep as a standard Domain Account would. The password of an MSA is managed by AD and regenerated regularly, increasing security. The script
MSASetup.ps1 is provided in the scripts directory within the installation package to help create and congure an MSA for use with the Manager. HP does not recommend using
LocalSystem to deploy the Manager service. See Section Do Not Use LocalSystem for more information.
NOTE Changing the account used to run the Manager service after installation is not supported. If an account change is required, reinstallation of the Manager is required.
The following sections outline the steps required to create and use an MSA with the Manager.
3.1.1. Understanding Managed Service Accounts
Managed Service Accounts are the preferred account type for hosting the Manager service. For more information about MSAs:
Managed Service Account Overview
MSA Best Practices
3.1.2. Setup Microsoft RSAT Tools
The MSASetup.ps1 script requires PowerShell modules provided by the Microsoft RSAT. These tools are typically installed on Server versions of Windows. Windows 10 may
require additional installation as described here:
PowerShell ExecutionPolicy
NOTE this step may be optional depending upon the conguration of your operating system.
3.1.3. Ensure KDS Root Key Exists
Before a domain controller can create a Managed Service Account, the root key for the Key Distribution Services must exist. For more information, see:
KDS Root Key
To check for the existence of the KDS root key, from a PowerShell prompt run: *
Get-KdsRootKey
* The command should produce output containing the details of the root key. If
no output appears, follow the instructions in the link above to create the root key.
NOTE If you nd that you have to create a root key, you must wait 10 hours before creating an MSA.
3.1.4. Enable PowerShell Script Execution
Page 9

If you attempt to run MSASetup.ps1 and receive ExecutionPolicy errors, you may need to bypass the current execution policy to allow the script to run. Bypass the execution
policy by running:
PowerShell.exe -ExecutionPolicy Bypass -File .\MSASetup.ps1 [command] [account]
See below for further explanation of parameters
NOTE This step may be optional depending upon the conguration of your operating system.
3.1.5. Create a Managed Service Account
Create an MSA using the MSASetup.ps1 script. Run the script from the machine where you intend to install the ZCentral Connect Manager. The machine must be joined to an
Active Directory Domain.
Run: MSASetup.ps1 [command] [account]
The command parameter can be either add or remove.
Add creates the MSA and congures it for use on the local machine.
Remove removes the local MSA conguration and deletes the MSA from AD.
Account is the name of the account for the MSA.
After successful execution, the account will appear within the Active Directory Users and Computers tool beneath the Managed Service Accounts OU.
For example, to create an MSA named "hpmangermsa", run:
MSASetup.ps1 add hpmanagermsa
3.1.6. Specify the MSA During Manager Installation
During the installation process when "Use a Managed Service Account (MSA)" has been selected, the installer will prompt for account information. This account must be specied
in DOMAIN\ACCOUNTNAME form. When the account is an MSA, the account name must be specied using a trailing dollar sign. For example, if the MSA account name is
"hpmanagermsa" and the domain name is "somedomain.com", specify the MSA in the installer using:
somedomain\hpmanagermsa$
3.2. Silent Install
The Manager installer supports silent installation. The following properties are used for silent installs:
Hostname: The hostname to use for the Manager.
Port: The web service port to use for the Manager (Optional: Default is 443).
MessageBusPort: The message bus port to use for the Manager (Optional: Default is 8883).
AdminPassword: The administrator password to use for the Administrator Portal.
Service_Account: The account name used to run the Manager service in DOMAIN\ACCOUNT form. When specifying an MSA, include a trailing $.
Service
Account
Type: The account type used to run the Manager service. LocalSystem or SvcAccount.
Service
Account
Password: The password for the service account used to run the Manager. Leave blank for MSA.
An example of a silent install in a trusted enterprise environment using default ports:
msiexec.exe /i HP_ZCentral_Connect_2020_Manager.msi /qn Hostname=zcentralconnect.domain.local AdminPassword=SuperSecretPassword
Service_Account=domain\zcentralconnectmsa$ Service_Account_Type=SvcAccount
An example of a silent install in a lab environment:
msiexec.exe /i HP_ZCentral_Connect_2020_Manager.msi /qn Hostname=zcentralconnect Port=8443 MessageBusPort=8080
AdminPassword=SuperSecretPassword Service_Account=LocalSystem Service_Account_Type=LocalSystem
Remember: Always keep the ZCentral Connect Administrator password secure, avoid storing the password in any script that is written.
3.3. Accessing the HP ZCentral Connect Administrator Portal
After ZCentral Connect is installed, you should be able to access the ZCentral Connect Administrator Portal from one of the supported browsers on any machine that has a
network connection to the host machine.
NOTE Remember to specify the network port in the URL if you chose a different port than the default, 443.
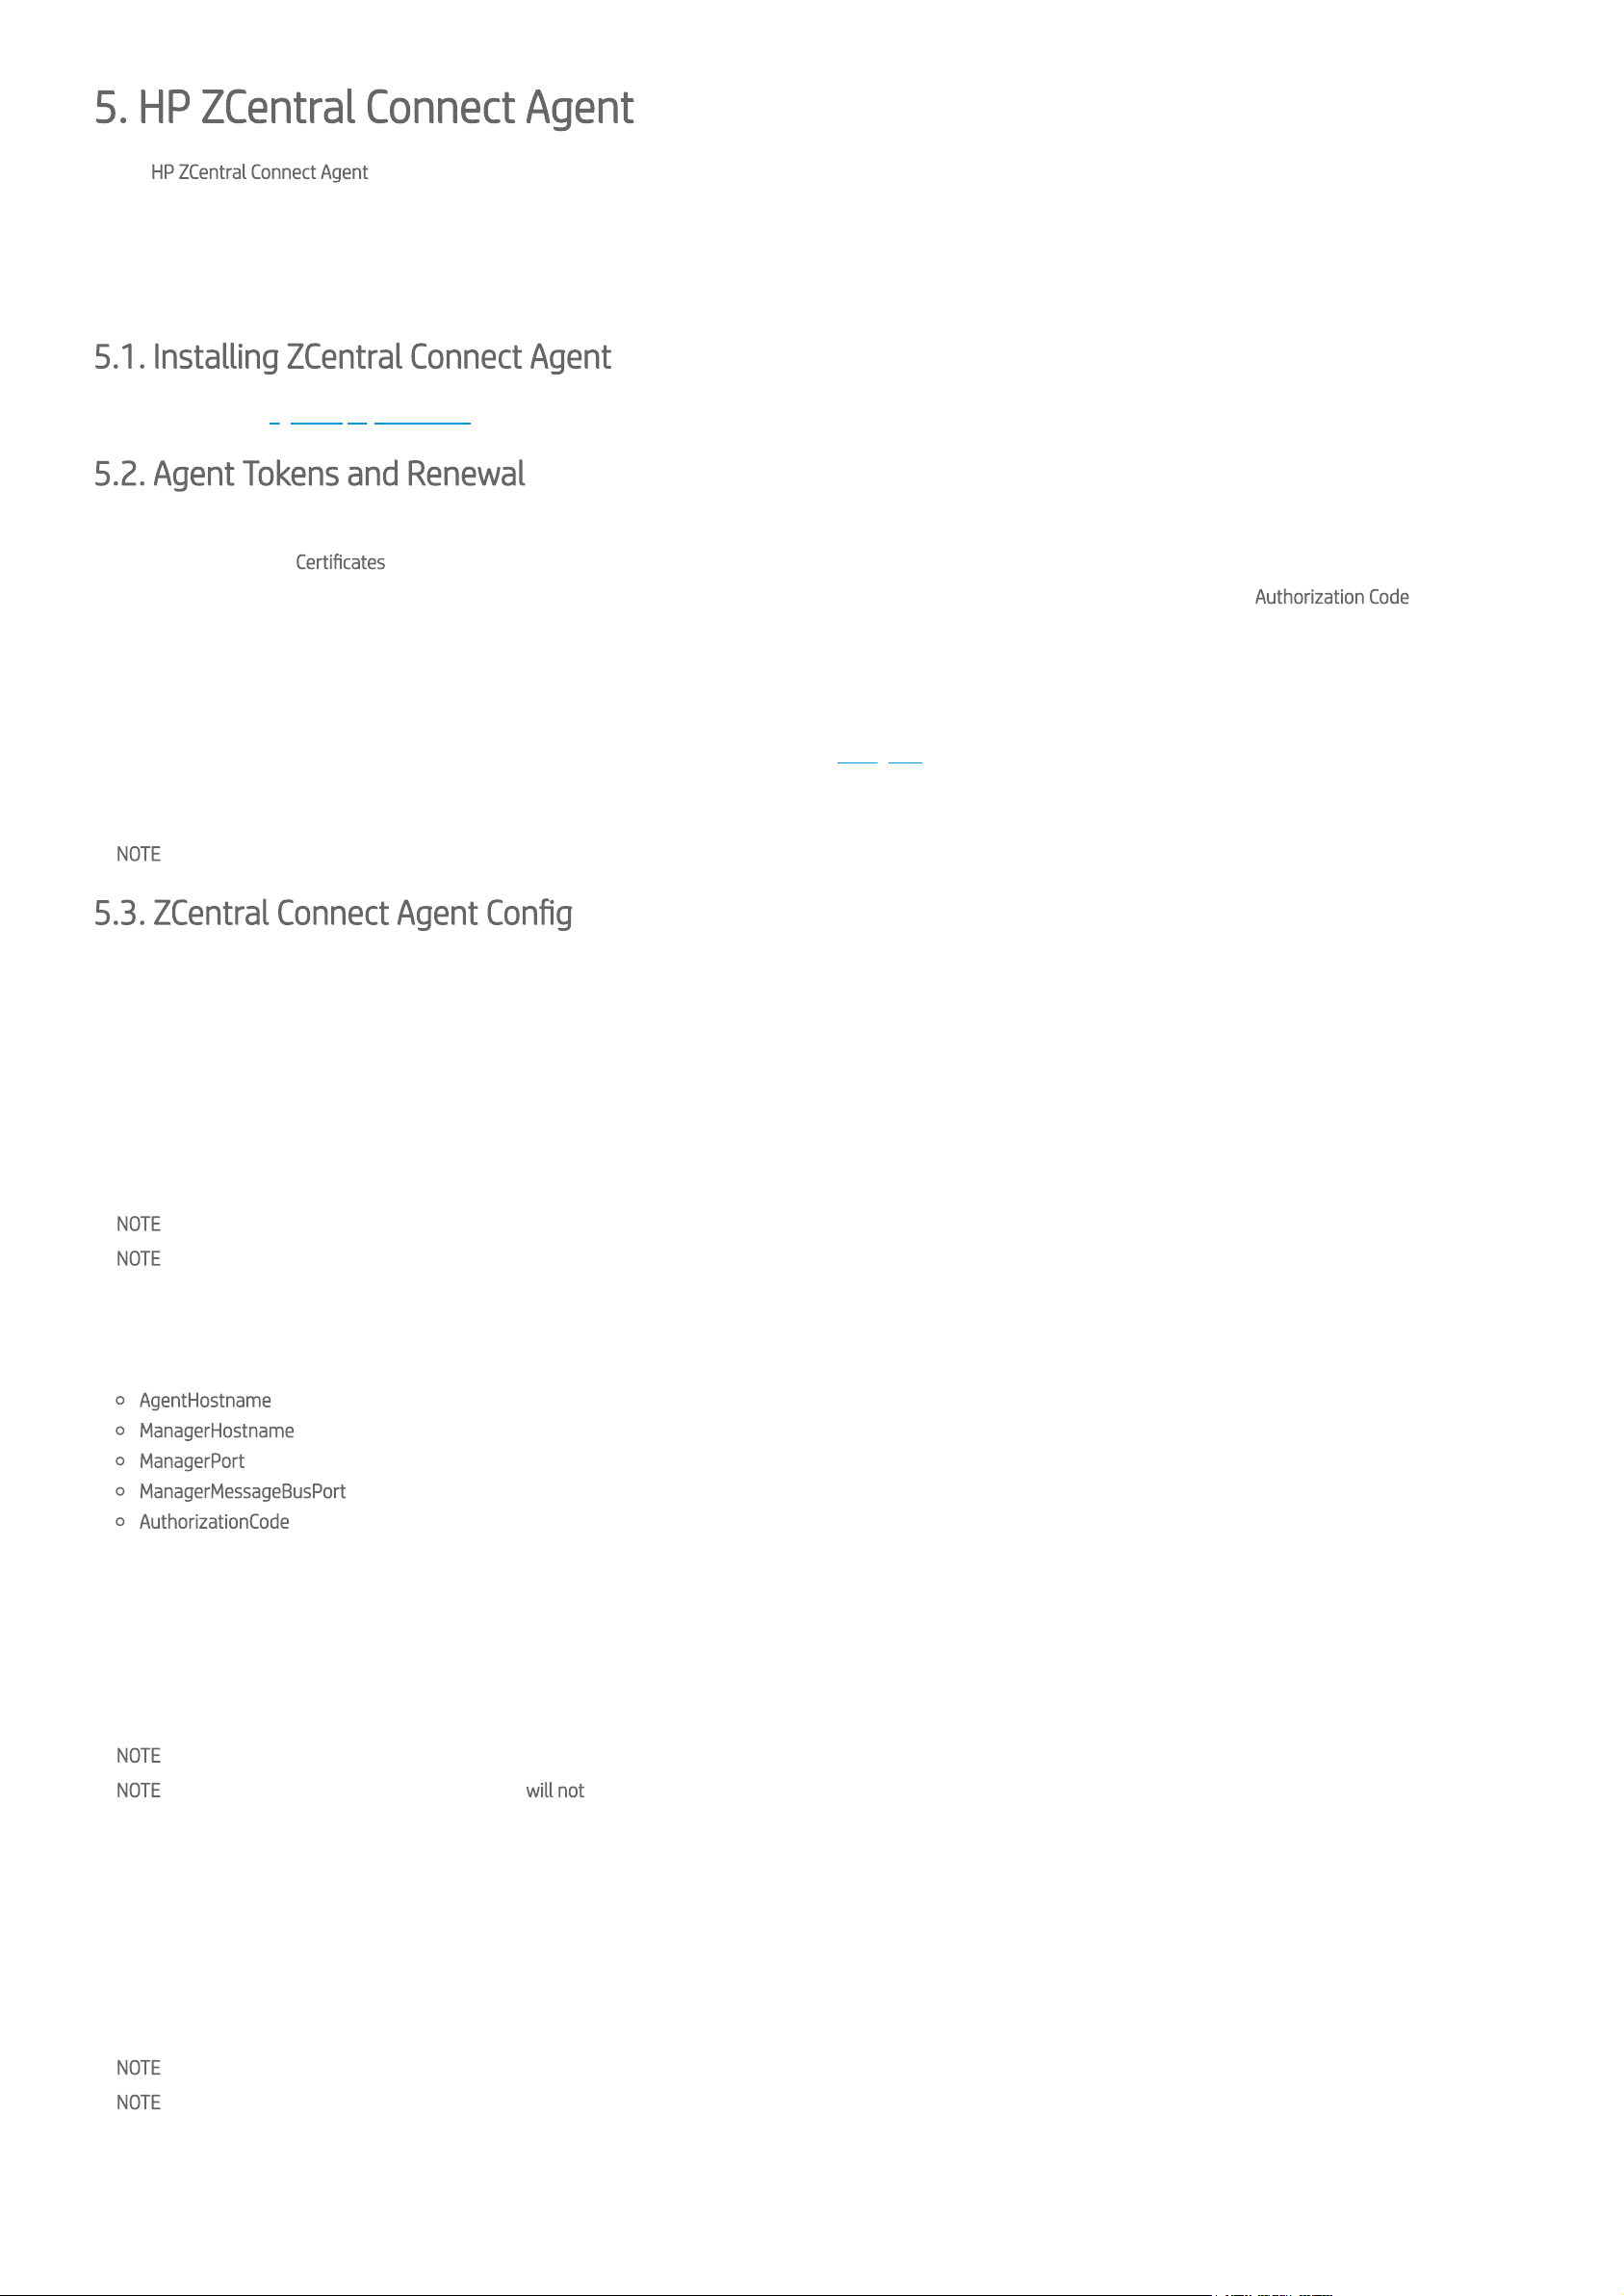
Since the Manager creates its own self-signed certicate when installed, you will see a warning message similar to the following:
Your connection is not private
.
NOTE You can accept the self-signed certicate on your client machine following the guide in Section Accepting Self-Signed Certicates In YOur Environment.
NOTE If you need to use a custom certicate instead of the generated one, please follow the steps provided in Section Using Your Own Certicate.
You can proceed by clicking Advanced and selecting the option Proceed to hostname (unsafe).
Page 10
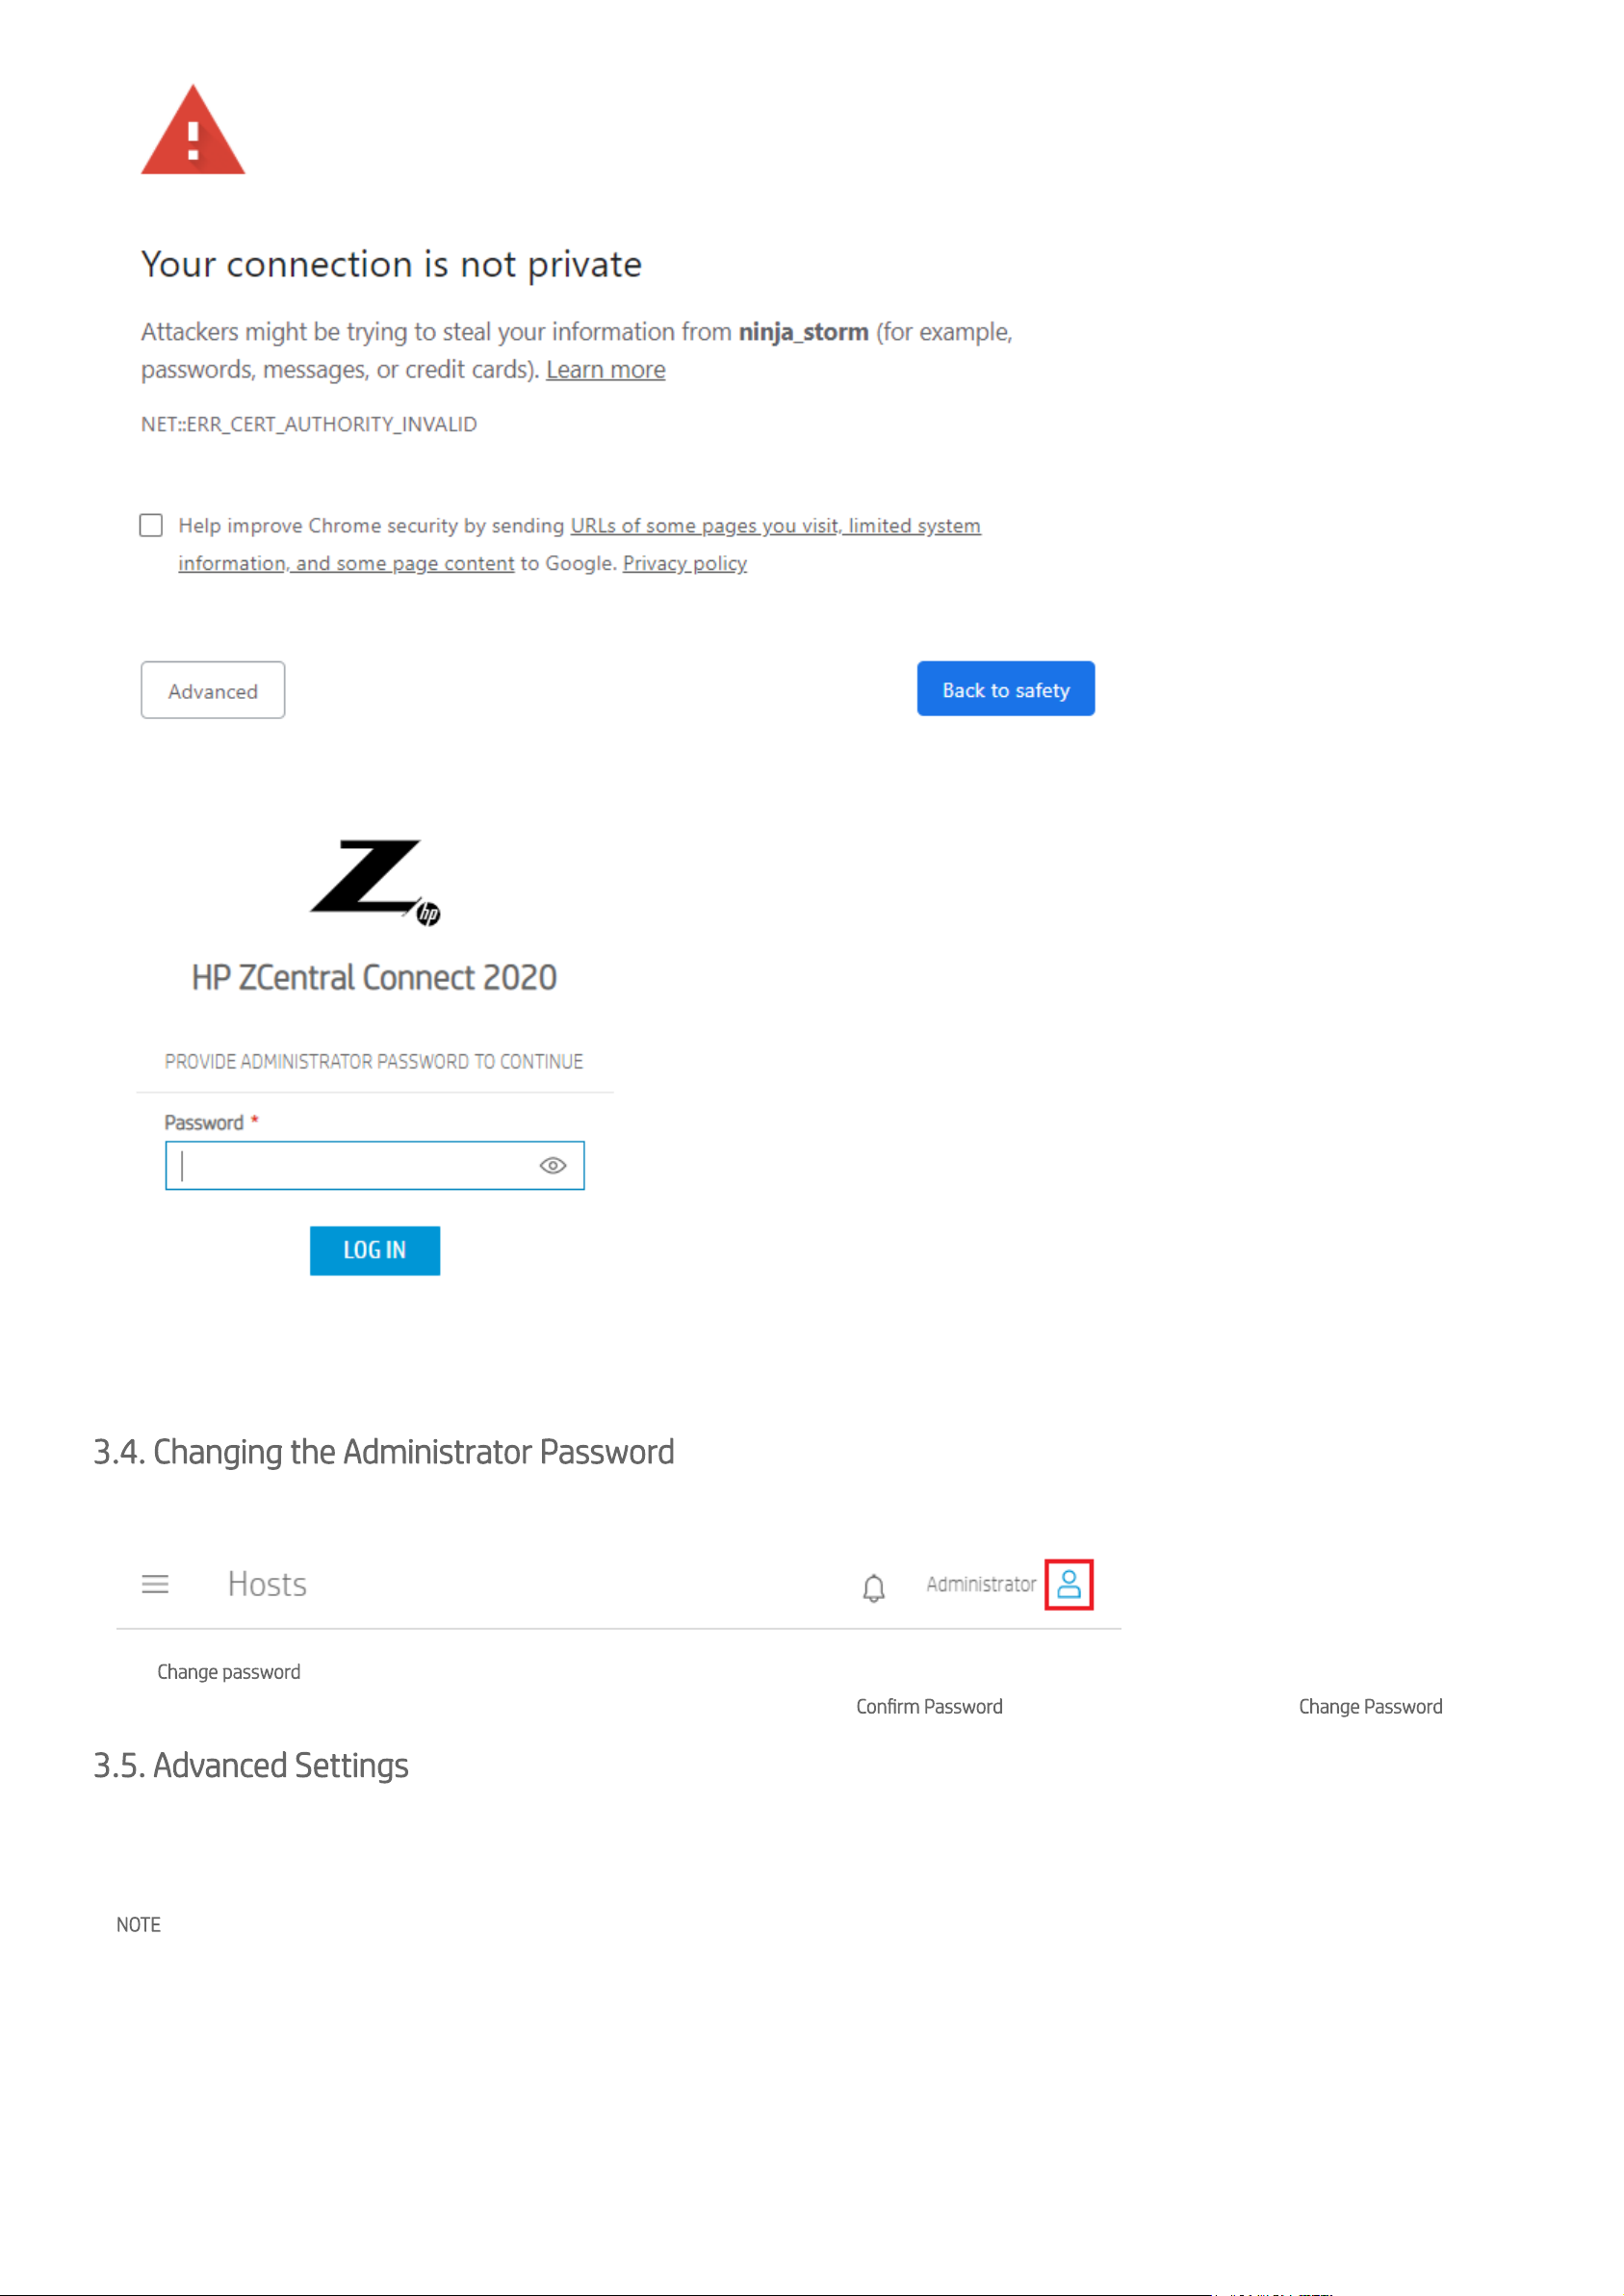
To log in for the rst time, type the password dened during the ZCentral Connect Manager installation.
Once you are logged in, the Hosts page will be displayed.
3.4. Changing the Administrator Password
To change the Administrator password, look for the user icon at the top right of the screen:
Click Change password.
Type the current password and include the new password; conrm the new password in the Conrm Password eld. To apply the changes, click the Change Password button.
3.5. Advanced Settings
HP ZCentral Connect has a certain number of settings that can be congured but they are not currently accessible through the HP ZCentral Connect Portal.
Administrators are able to customize HP ZCentral Connect behavior by changing the settings le located at
%PROGRAMDATA%\HP\ZCentralConnectManager\settings.json.
NOTE ZCentral Connect Manager service must be restarted for the changes to take effect.
The supported elds and the corresponding default values are dened below:
Page 11

{
/* Hostname where HP ZCentral Connect listens to. */
"Hostname": "myconnecthostname.domain",
/* ZCentral Connect HTTPS port */
"Port": "443",
/* Port where ZCentral Connect listens for Agent connections. */
"MessageBusPort": "8883",
/* The thumbprint of the certificate used to encrypt HP ZCentral Connect network traffic. */
"CertificateThumbprint": "",
/* The store of the certificate used to encrypt HP ZCentral Connect network traffic. */
"CertificateStore": "Root",
/* Defines the number of days before the admin will get notified when the certificate is about to expire. */
"CertificateExpirationDaysToNotify": "30",
/* Removes the capability to perform power operations from the HP ZCentral Connect Client Portal. */
"DisablePowerOperationsForUsers": "false",
/* Disables single sign-on authentication option for HP ZCentral Connect Client Portal users */
"DisableKerberosAuth": "false",
/* Defines how long the authentication cookie for an admin or user will last. Format: HH:mm:ss. */
"CookieExpirationTime": "00:30:00",
/* Expiration time, in days, for an Agent authentication token */
"AgentTokenExpirationTimeInDays": "30",
/* Defines the frequency for automatic Agent authentication token renewal process. Format: Days.HH:mm:ss. Example: 1.00.00:00
will renew every 24 hours; 0.04.00:00 will renew every 4 hours. */
"AgentTokenRenewPeriod": "1.00:00:00",
/* Defines the number of concurrent connection requests that the Manager Message Bus can handle at a time. This value can be
lowered to reduce the Manager resource utilization. */
"MessageBusConnectionBacklog": "20",
}
NOTE The settings le may contain other properties not documented above which are intended for internal use only and should not be changed.
Page 12
4. Administrator Features
The Administrator role manages and monitors ZCentral Connect.
The ZCentral Connect Administrator Portal can be accessed by adding the
/admin
suffix to the ZCentral Connect Client Portal address, for example:
https://zcentralconnect.local.domain/admin
.
ZCentral Connect leverages Intel AMT support on HP Workstations to provide an integrated remote management and remote monitoring experience. Refer to the Integrating With
Intel AMT section for more information.
In terms of brokering capabilities, Administrators must congure Pools and/or Private Hosts in order to make Hosts available for Users. The following is a simplied list of actions
that Administrators must execute to create Pools and Private Hosts:
Create Pools
1. Register or Import Hosts
2. Import Security Groups and/or Users
3. Create Pools and assign Hosts and Security Groups/Users to them
Create Private Host associations
1. Register or Import Hosts
2. Import Users
3. Create Private Host associations between Hosts and Users
Next, this guide will provide a demonstration of the main capabilities and features available for Administrators.
4.1. Hosts
The Hosts page is one of the main areas of ZCentral Connect. It provides:
Inventory of managed Hosts
Remote Host power management
Remote Host monitoring
4.1.1. Registering and Importing Hosts
To get started, please access the Administrator Portal and go to the Hosts page by clicking Hosts on the left menu.
Registering a new Host can be done in two ways:
Add Host: Adds a single host from its IP Address, Hostname or Fully Qualied Domain Name.
Import Host: Imports one or more hosts from Microsoft Active Directory. You can search your Microsoft Active Directory by:
Name: Name of the Host in Active Directory
Member of: Search for all Hosts that are part of a group
NOTE The 'Member of' search requires you to type the exact name of the Security Group in Active Directory.
By clicking the 'Search Icon', the Manager will query Active Directory and display the search results in the table below.
NOTE Search results will not be in alphabetical order.
In both scenarios, you will be given the option to congure how ZCentral Connect manages the Host. Here is a description of each option:
Hostname: A valid network name (IP Address, Hostname or Full Qualied Domain Name) for the Host. See Best Practices for Hostnames below.
Monitor Host Status with Agent: If checked, the Manager will wait for connections from an Agent on this Host (capable of monitoring login changes and the Remote
Boost Sender service). For this option, you will need to install the ZCentral Connect Agent. Please refer to the Agent Deployment Guide for more details.
Manage Host With AMT: If checked, the Manager will attempt to monitor and control the Power State of this Host remotely. For this option, you will need to provision
Intel AMT for this Host. Refer to the Integrating with Intel AMT section for more information.
Use Alternative Hostname For AMT and Alternative Hostname or IP Address: In cases where the AMT device can be reached through a different FQDN or IP address
than the regular hostname, this option instructs the Manager to use an alternative hostname to connect to the AMT device. Refer to the Integrating with Intel AMT
section for more information.
Use Digest Authentication (Not Recommended): If checked, the Manager will use Digest authentication to connect with the AMT device. This is the least secure
authentication option and it is not recommended by HP. Refer to the Integrating with Intel AMT section for more information. NOTE If Digest is being used, consider
using different passwords for each AMT Host; this reduces the area of attack if a single password is leaked.
AMT Username and AMT Password: These are the Digest credentials congured for the AMT device of this Host. These are not required if Kerberos is enabled for AMT.
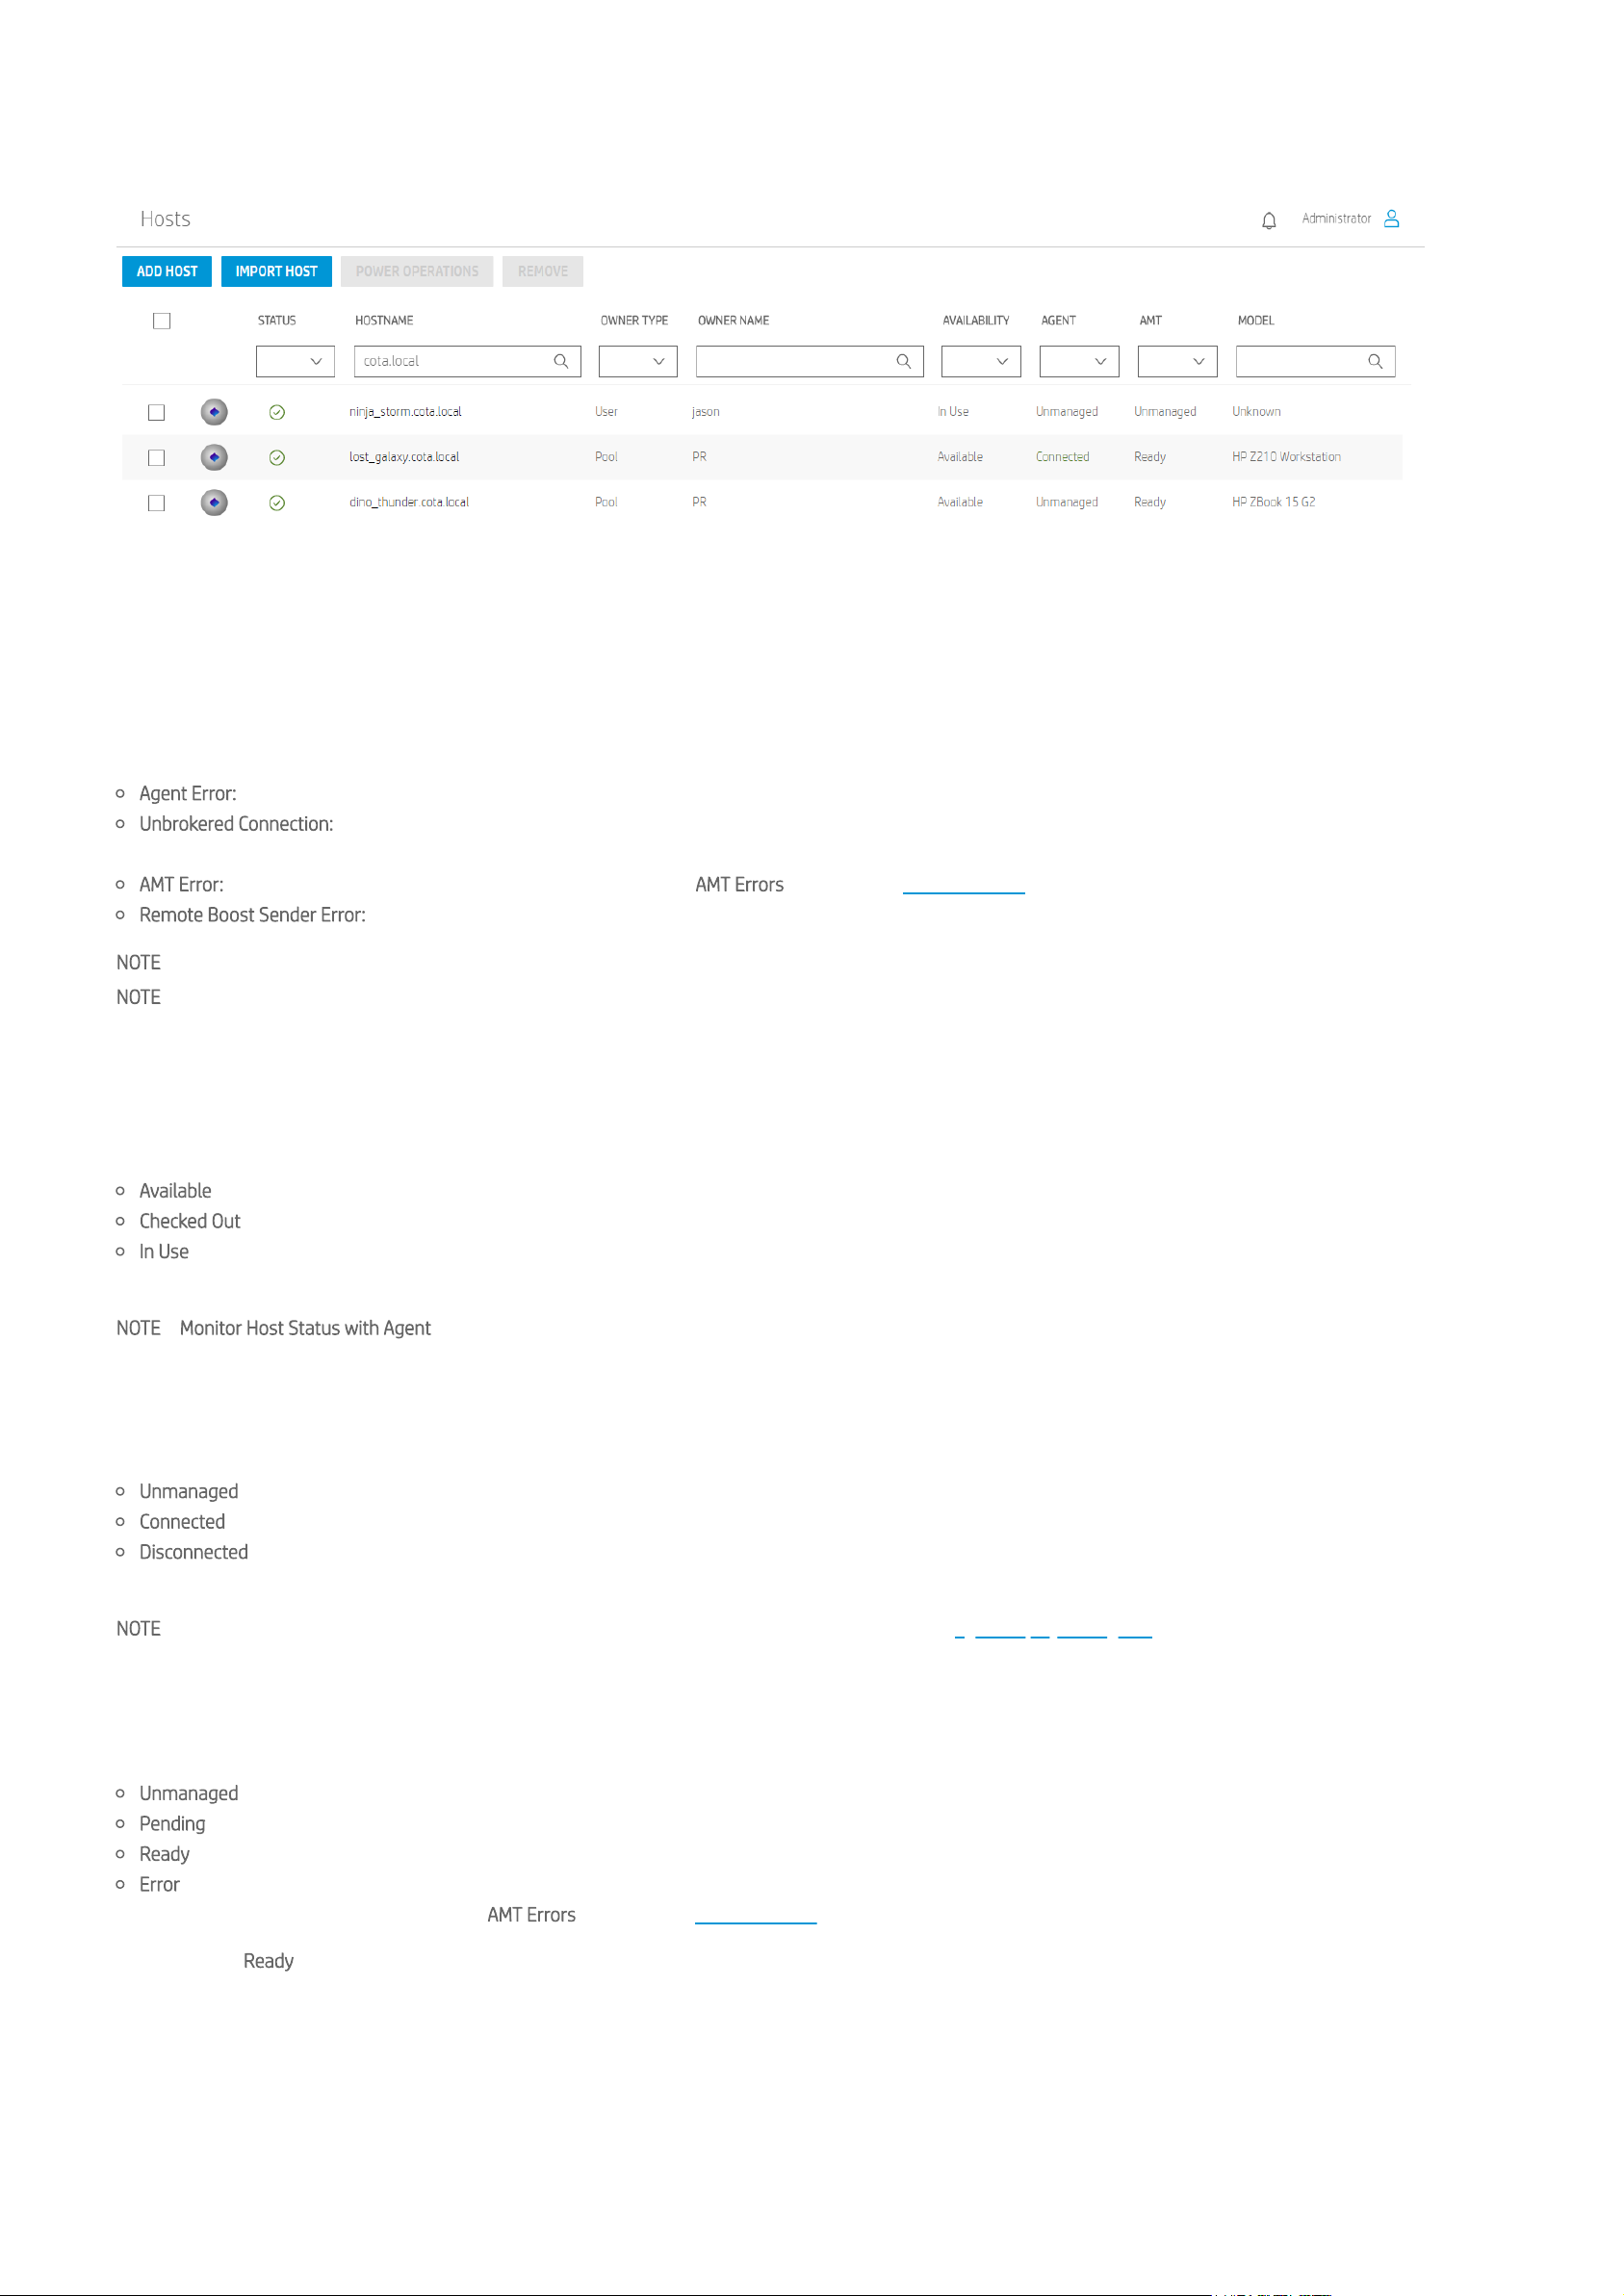
Once your Host is added or imported, it appears in the Hosts page.
NOTE Hostnames are converted to lower case by ZCentral Connect.
NOTE ZCentral Connect does not currently offer a way to display what security groups a host is in, or what hosts are in a security group. An administrator must use Active
Directory tools external to this product to view this information.
Best Practices for Hostnames
Page 13
ZCentral Connect requires hostnames to be unique. However, there are multiple ways that a Host can be referenced on a network. The hostname, FQDN, DNS alias, and IP are
some examples. For security and functionality reasons ZCentral Connect must hold only a single reference to each Host. If a single Host is registered more than once, it is possible
that multiple Users would be assigned to the same Host at the same time. To avoid multiple references to a single Host it is best practice to use only a single type of reference,
depending on the environment and conguration. FQDN is the suggested pattern as it is required for most Intel AMT environments by default.
4.1.2. Status
Each Host has a status which is affected by any errors that the Manager can detect. If there are no errors detected then the status column on the Hosts page for a specic Host
will contain a green checkmark. If there are any errors the column will contain a red warning icon. Clicking on the icon will display a list of the errors affecting the status.
There are 4 types of errors that can affect the status:
Agent Error: The Agent is expected to be connected to the Message Bus but is not. This error will be present if the Agent connection status is
Disconnected
.
Unbrokered Connection: A user is logged into a Host that has not been checked out by that same user. This can happen for Hosts regardless of
Availability
. A connected
Agent is required to monitor a Host for unbrokered connections.
AMT Error: If the AMT connection status is in the
Error
state. View the AMT Errors section of the Troubleshooting page for more information on each error.
Remote Boost Sender Error: The Remote Boost Sender process on the host is not running. A connected Agent is required to monitor the Remote Boost Sender process.
NOTE For any agent related errors to be detected the agent has to be in the
Connected
or
Disconnected
state.
NOTE Status does not prevent a host from being checked out. However, the status of a host affects its priority when being assigned to a user from a pool. The more errors that
are detected for a Host the lower priority it is given.
4.1.3. Availability
Availability denes the brokering state of a Host. The possible states for this property are:
Available: Host is available for check out.
Checked Out: Host is checked out by a User.
In Use: The Host is actively being used by the User who checked it out; the Agent on the Host has notied the Manager that the User has logged in. This state can only be
reached if an Agent is installed on the Host.
NOTE If Monitor Host Status with Agent is disabled for a Host, the possible states are
Available
and
Checked Out
.
4.1.4. Agent Status
The Agent column on the Hosts page tracks the status of the Agent associated with the Host. The possible states are:
Unmanaged: 'Monitor Host Status With Agent' option is not enabled for the Host.
Connected: The Agent is connected to the Message Bus.
Disconnected: The Agent is expected to be connected to the Message Bus but is not. This can happen because the Agent is not installed, the Agent is not able to connect,
or if the Host is powered down.
NOTE The Agent will be in a disconnected state until the Agent deployment process is complete. See the agent deployment guide for more information.
4.1.5. AMT Status
Tracking the current connection status with an AMT device can be done with the AMT attribute of a Host. The possible states are:
Unmanaged: AMT management has not been enabled for the Host. This can be enabled through the Host's management panel.
Pending: AMT management was enabled for this Host and the Manager is attempting to connect to the AMT device using the current conguration.
Ready: AMT management was enabled for this Host and the Manager was able to successfully connect to the Host using AMT.
Error: AMT management was enabled for this Host and the Manager had a problem connecting to the AMT device. The details of the error will be available in the
management panel for that Host. View the AMT Errors section of the Troubleshooting page for more information on each error.
If AMT Status is Ready, Host information such as Hardware Model, Serial Number and IP address will be available on the Host's management panel.
4.1.6. Managing Hosts
To view monitoring data or remotely manage a Host, clicking on the Hostname in the table will display the right panel with the Host details:
Page 14
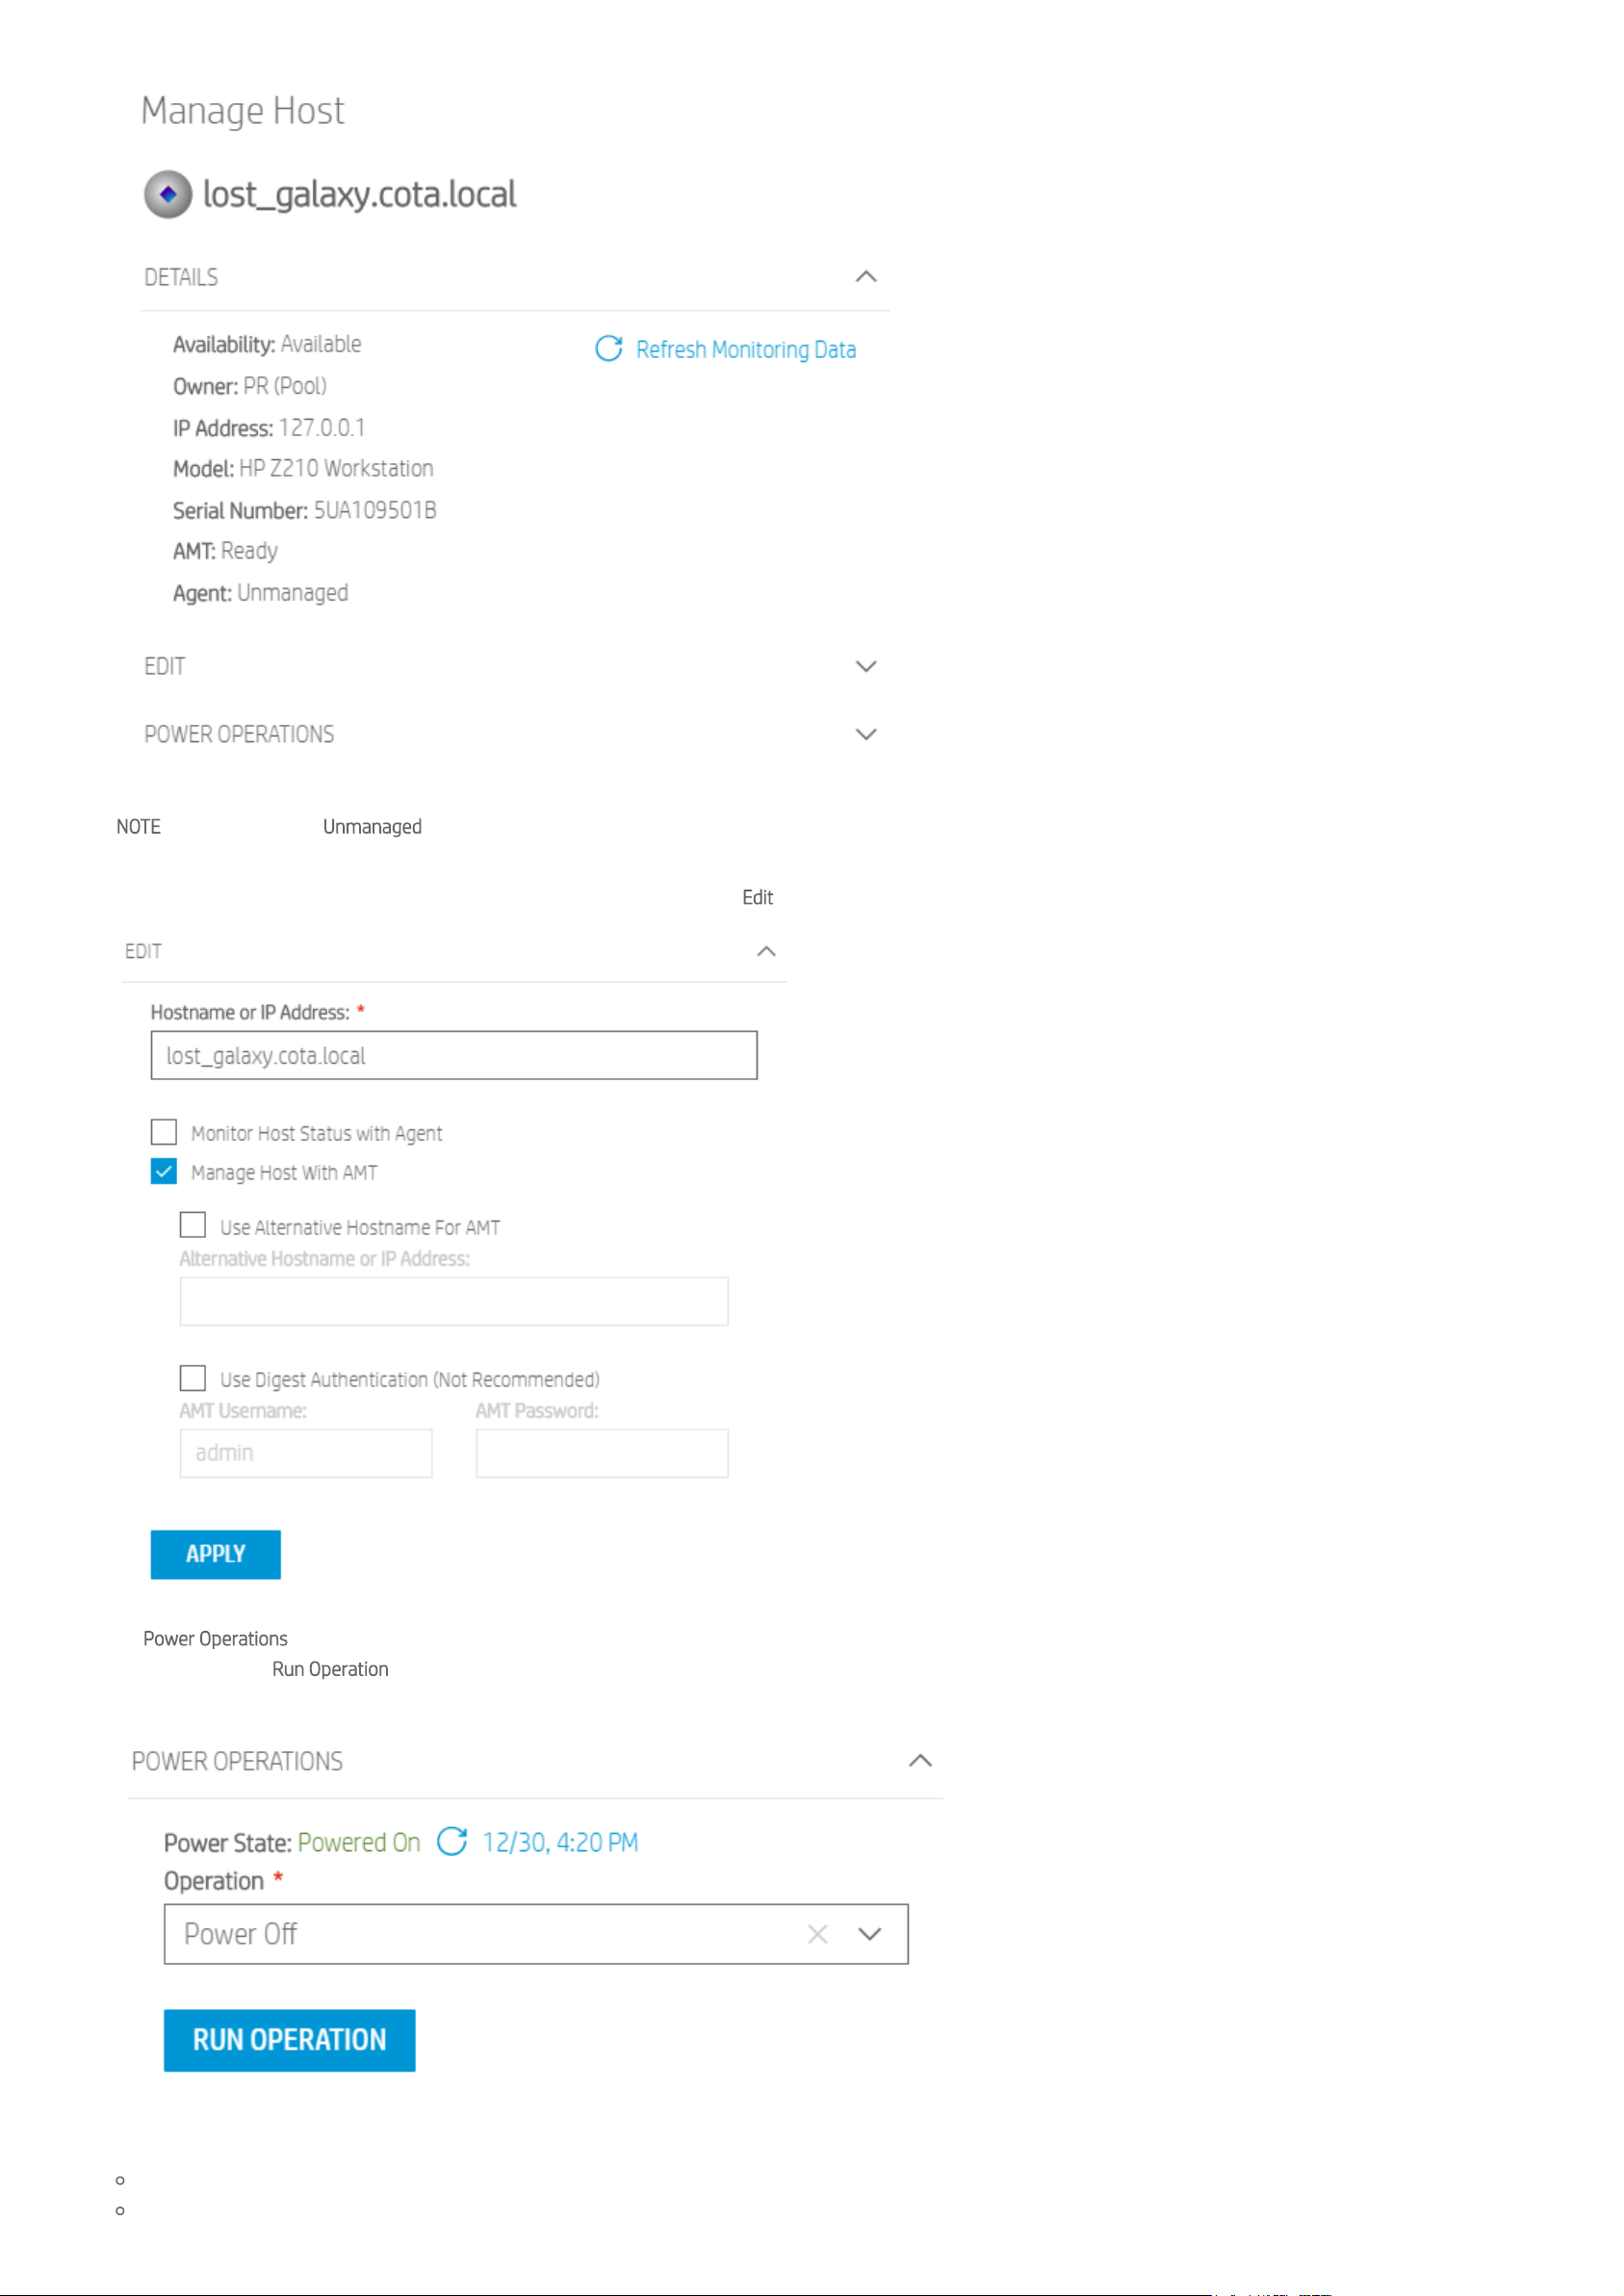
NOTE If the AMT Status is Unmanaged, all power operation features will be disabled and some hardware information will be unavailable.
In the management panel, the Host information can be edited by opening the Edit drop-down. The Hostname, AMT, and Agent settings can be changed:
On Power Operations the power state of the Host can be viewed and remotely managed. In order to change the power state of a Host, select an operation from the drop-down
menu and click the Run Operation button. When a power operation completes the current power state will be updated. The power state can be updated at any time by clicking
the refresh next to the current state.
The available remote power operations are:
Power On
Power Off
Page 15
Graceful Shutdown
Reset
Graceful Restart
NOTE Graceful Shutdown and Graceful Restart require a version of Intel AMT higher than 9 and also require
Intel Management and Security Application Local Management Service
to be installed in the target Host. For instructions on how to update the Intel Management Engine Firmware, check the Updating Intel Management Engine Firmware section of
the Troubleshooting page. After powering on or restarting a Host, graceful power operations may take 2-3 minutes to be available again.
When the remote power operation is completed, a message will be displayed.
NOTE You do not have to wait for the power operation to complete to close the management panel.
4.1.7. Removing Hosts
If you want to remove one or more Hosts from the Manager you can select them using the check-box in the table and then click on the Remove button.
If this Host is part of a Pool or a Private Host, you will need to remove it from that association before you can remove it.
NOTE You cannot remove a Host that is being actively used in a Session, to remove it, you will need to terminate the Session from Sessions tab.
4.2. Pools
Pools are logical associations between a group of Hosts and Security Groups/Users. All Hosts that are part of a Pool will be available to the Users member of the associated
Security Groups and to the Users directly associated.
Pools can be created, edited and deleted.
NOTE A Host can only be part of one Pool or a Private Host at a time.
4.2.1. Creating Pools
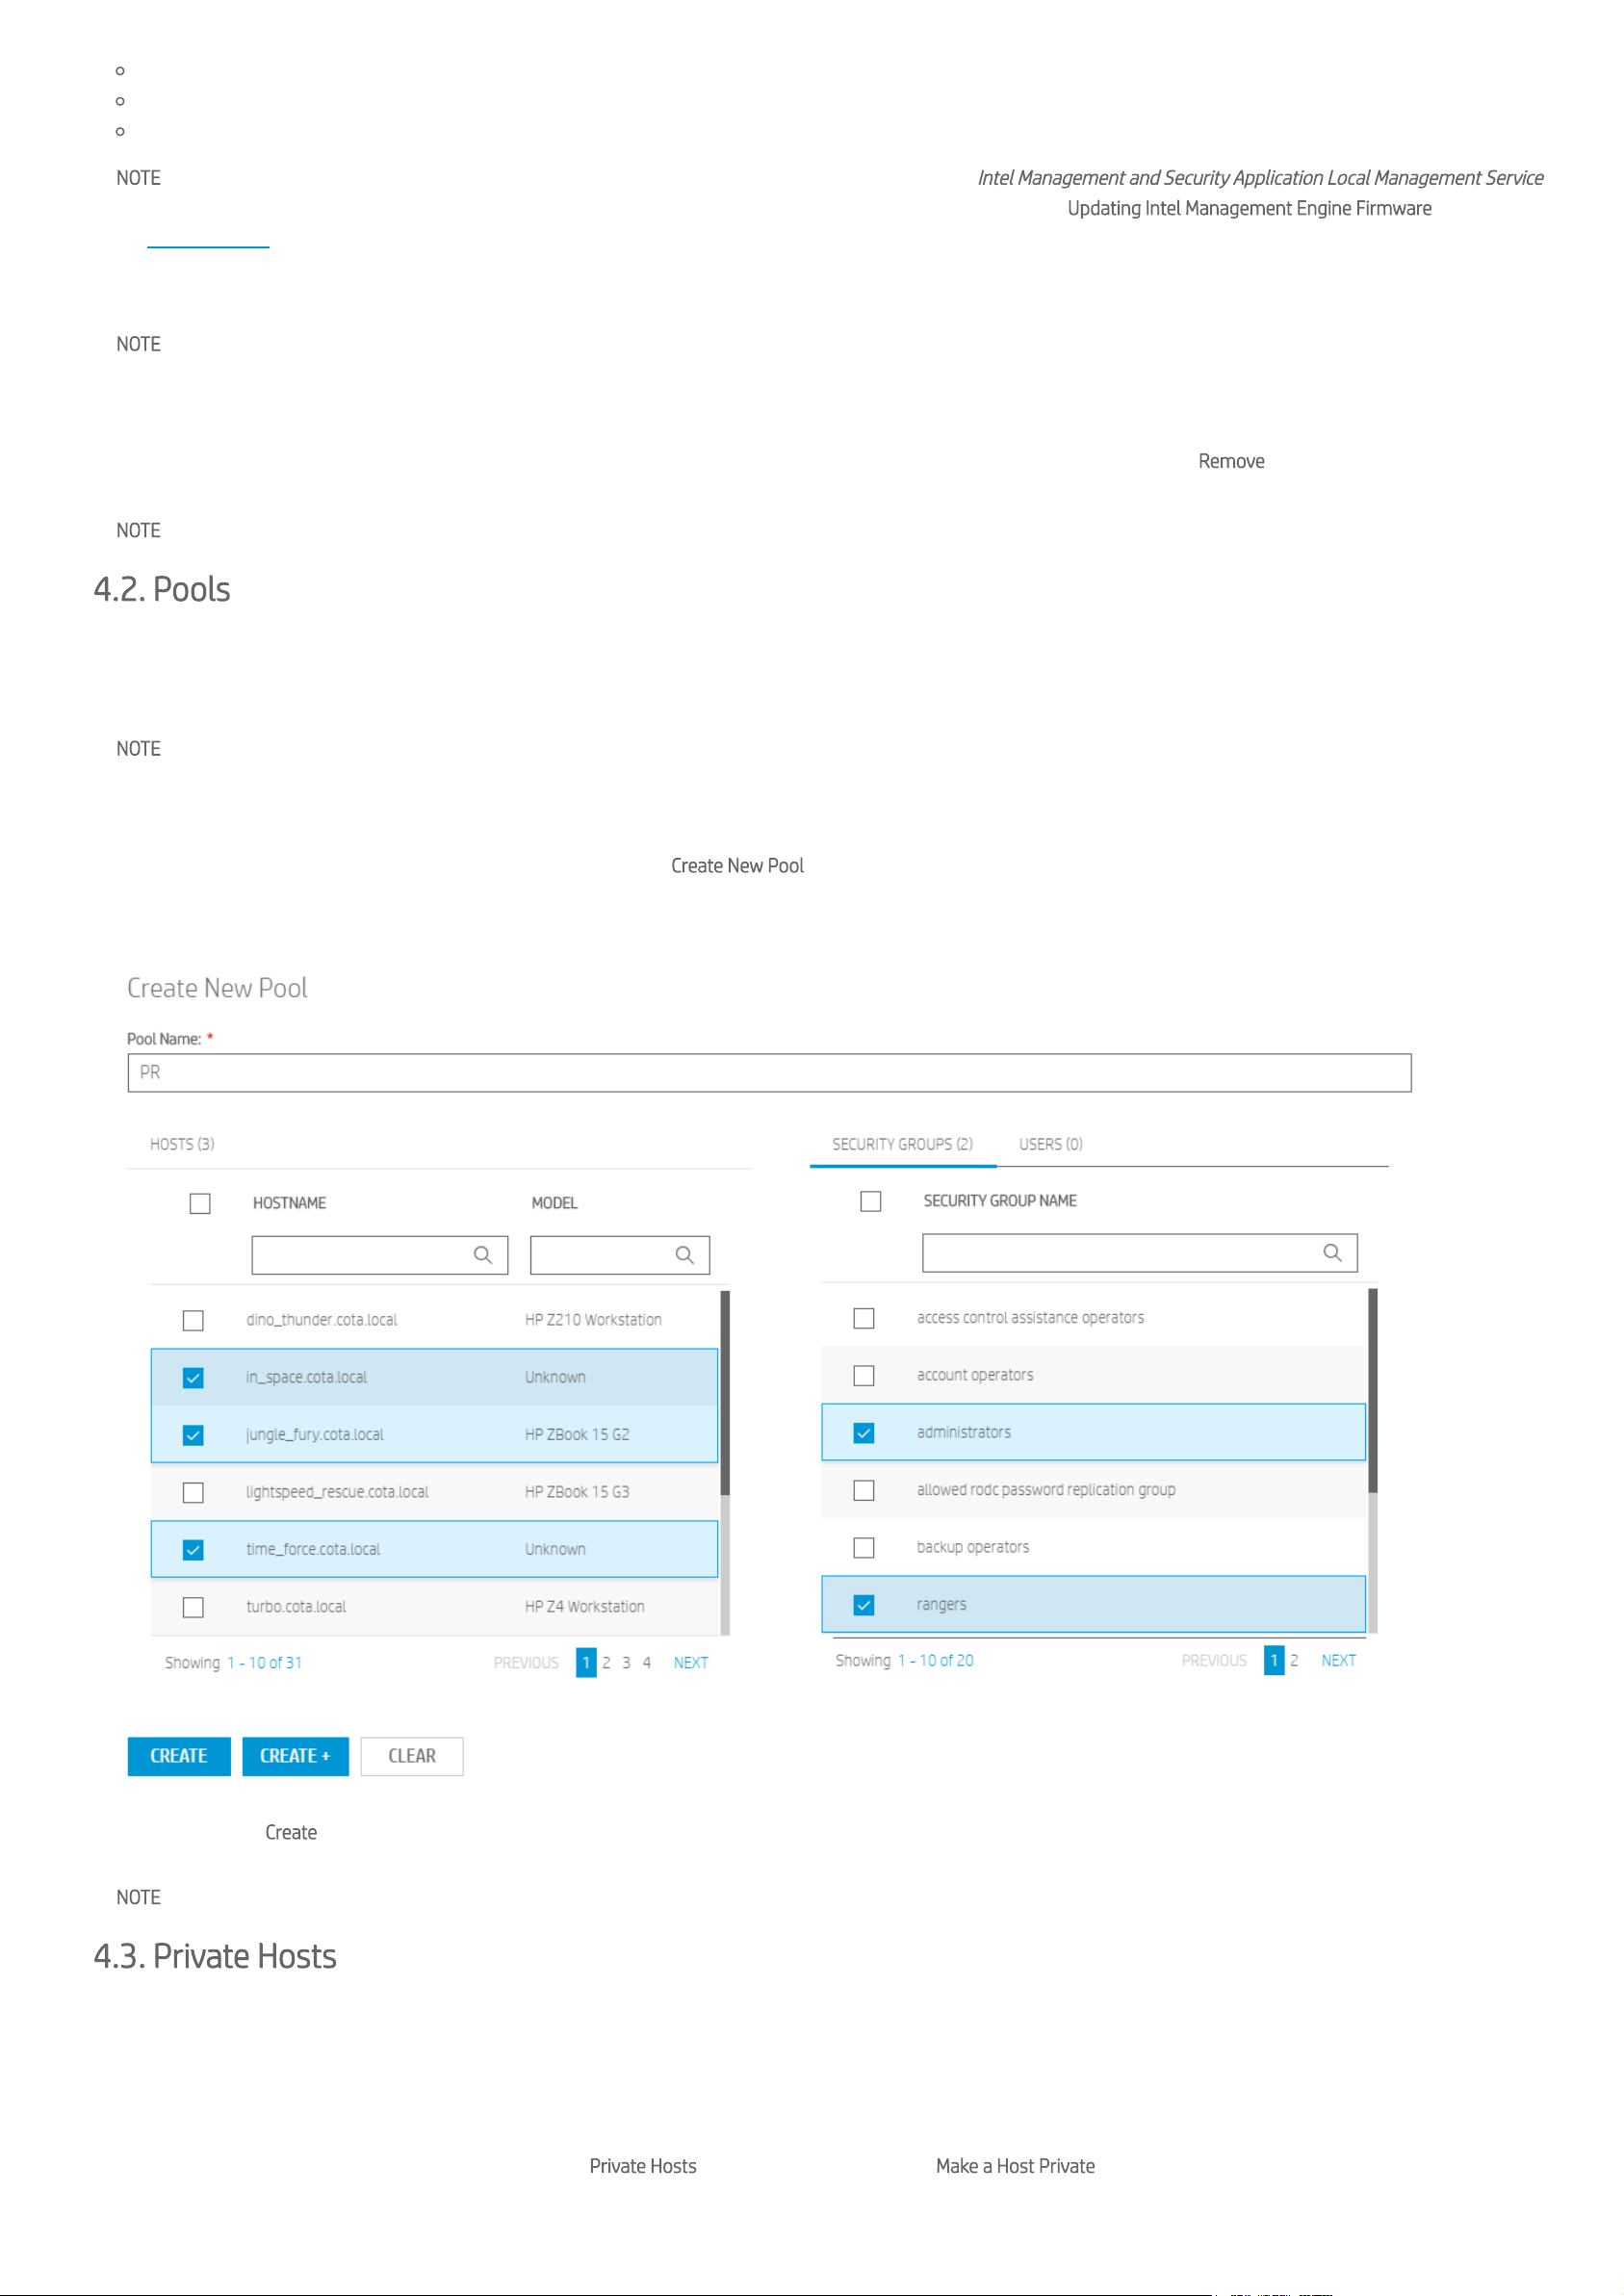
To create a new Pool, access the Pools tab on the left panel and click Create New Pool.
On the modal, assign a name to the Pool, select which Hosts will be in the Pool, and select which Security Groups and/or the Users that will be assigned to the Pool. There is no
limit to how many of each can be selected:
Once you click the Create button, your Pool will be created. All Users directly associated and the Users in the Security Groups associated to the Pool will be able to create Sessions
with the Hosts in that Pool.
NOTE The Manager will assign Hosts to eligible Users following a least recent used prioritization. Users are not guaranteed to receive the same Host from a previous Session.
4.3. Private Hosts
Private Hosts are logical associations between a single Host and a single User.
Private Host associations can only be created and deleted.
4.3.1. Creating Private Host Associations
In order to create a new Private Host association, open the Private Hosts tab in the left panel and click Make a Host Private.
Only one Host and one User must be selected.
Page 16
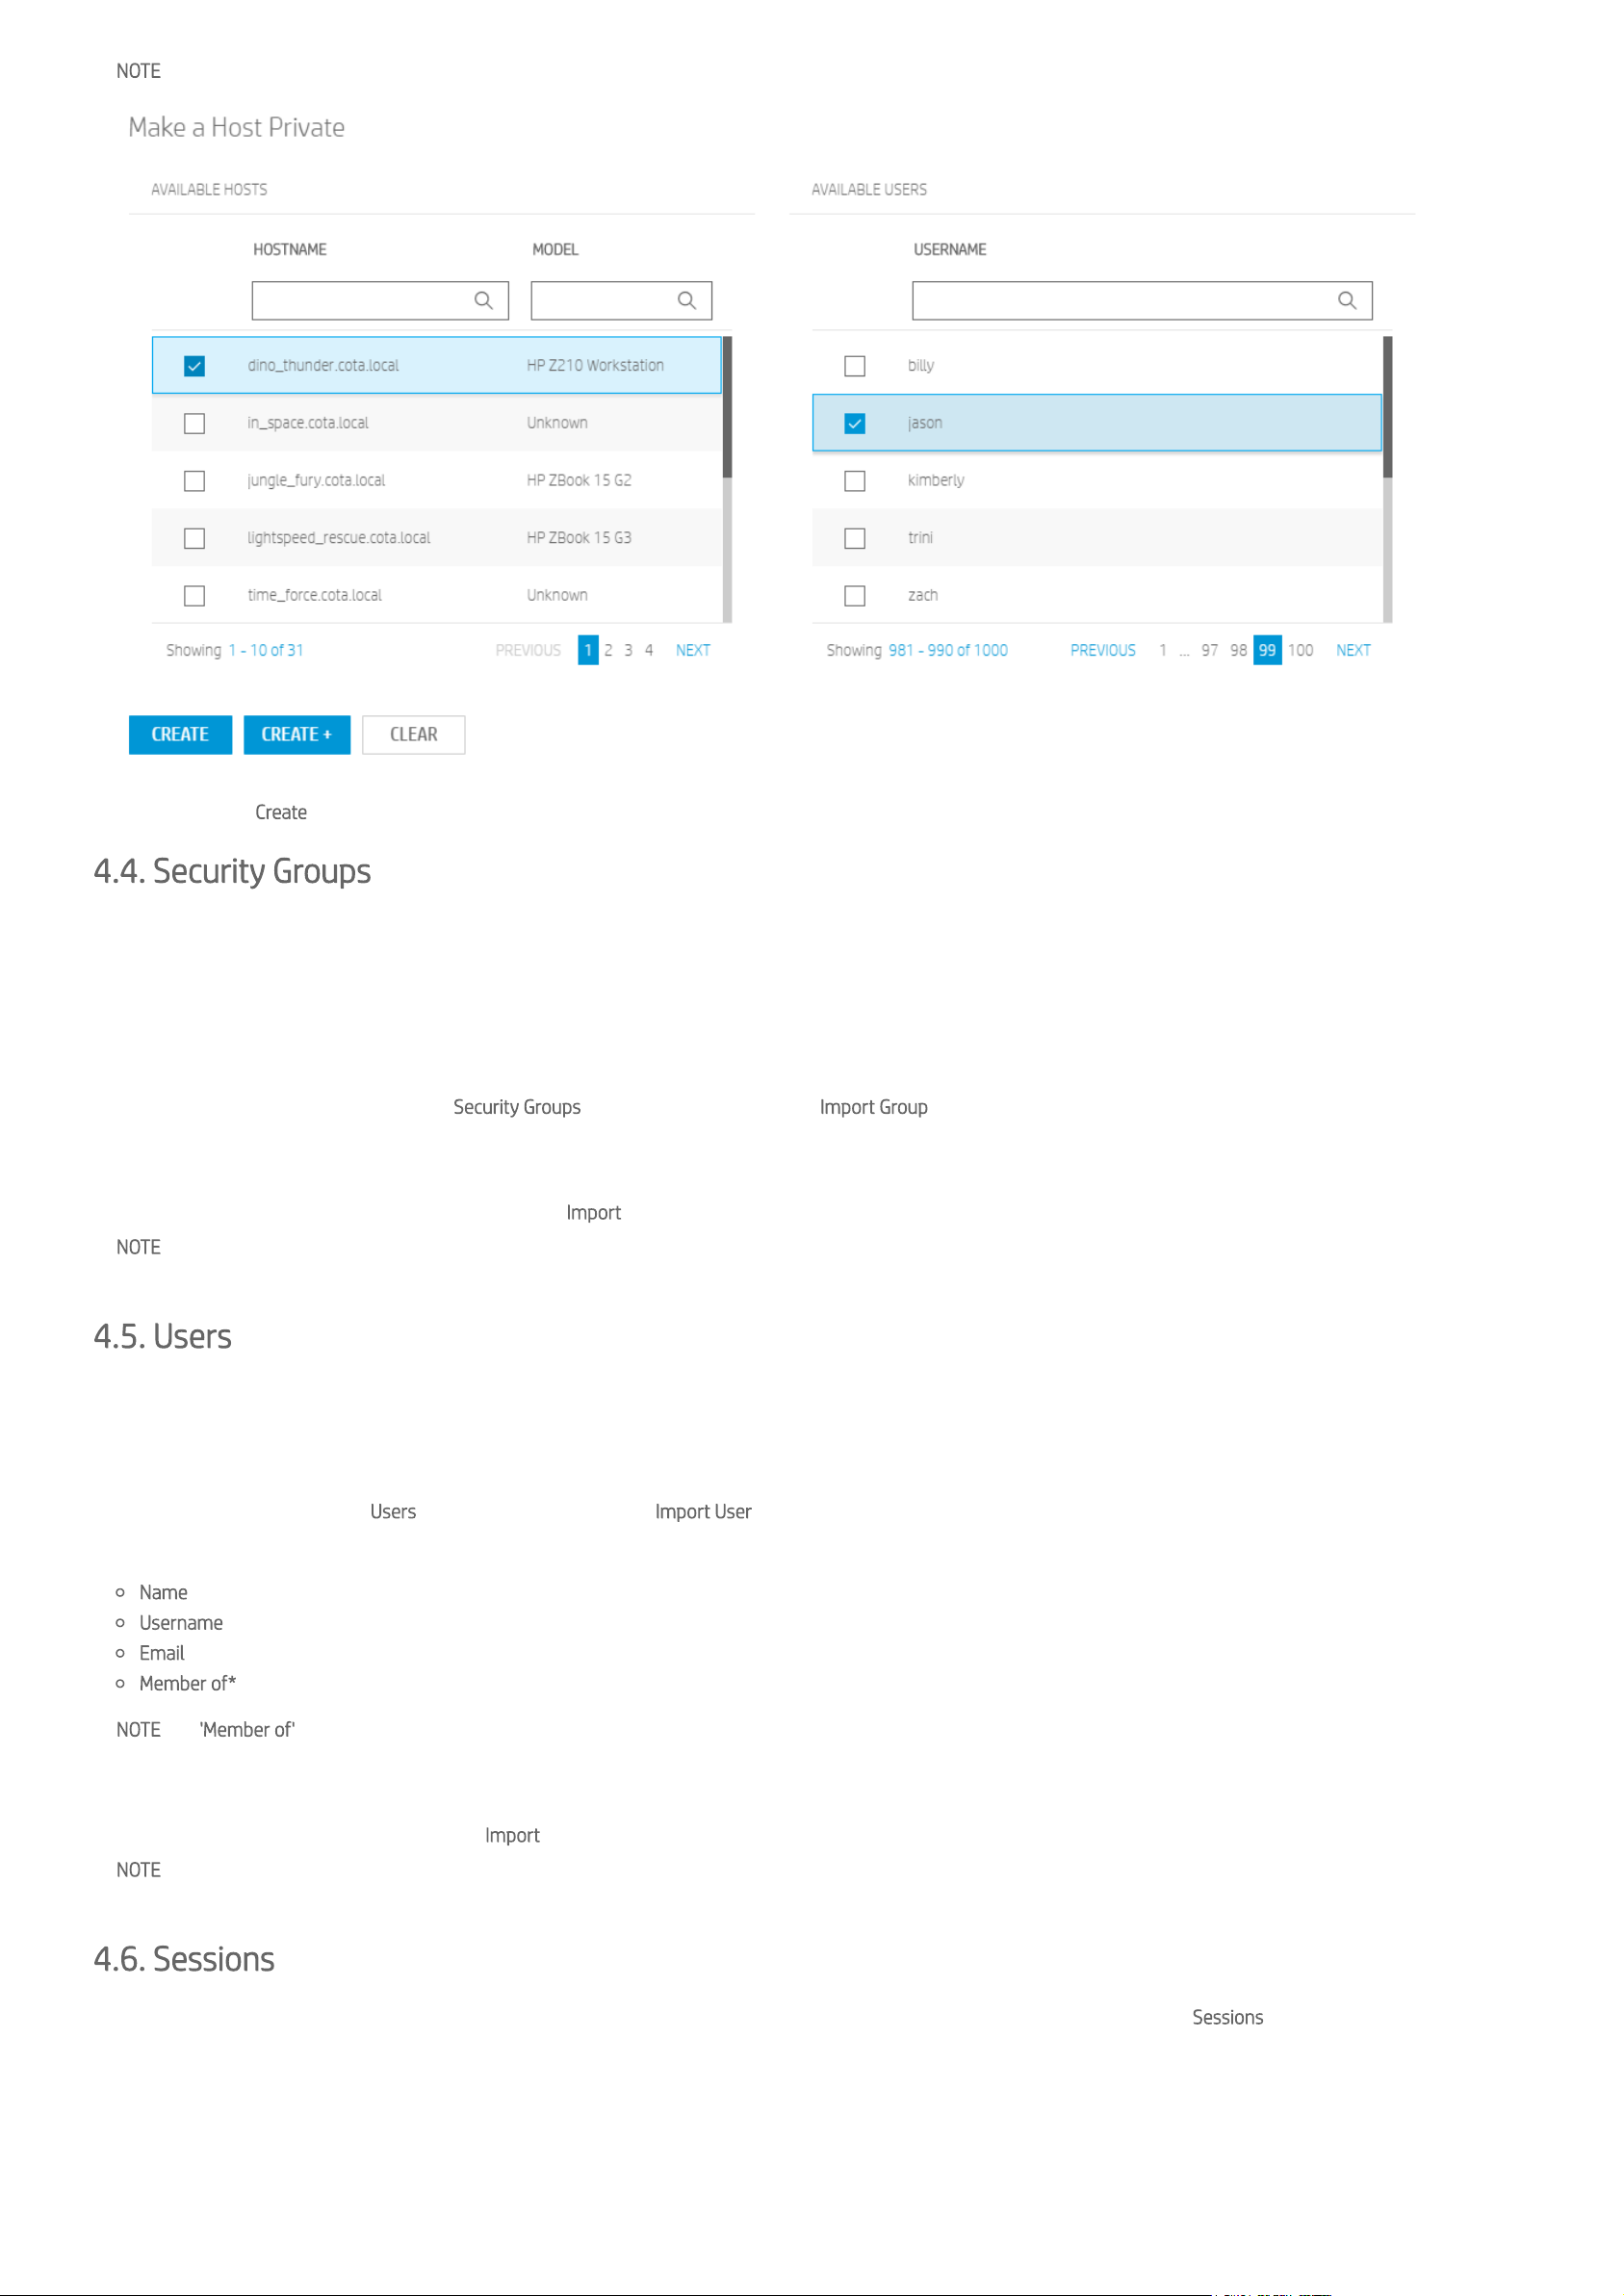
NOTE Hosts that are part of a Pool or another Private Host association are not available for a new Private Host association.
After clicking the Create button, the Host will now be considered Private. Only the associated User will be able to create a Session with that Host.
4.4. Security Groups
There are two forms of common security principals in Active Directory: user accounts and computer accounts. These accounts represent a physical entity (a person or a
computer). User accounts can also be used as dedicated service accounts for some applications. Security groups are used to collect these user accounts, computer accounts, and
other groups into manageable units.
4.4.1. Importing Security Groups
To import a new Security Group, open the Security Groups tab in the left panel and click Import Group.
In the new Window, search Microsoft Active Directory by 'Name', typing the rst characters of the target Security Group Name at the search box.
By clicking the 'Search Icon', the Manager will query Active Directory and display the search results on the table below.
Select as many Security Groups as needed and click the Import button.
NOTE The Manager does not currently offer a way to display what security groups a Host or User is in, or what Users and Hosts are in a Security Group. An Administrator must use
Active Directory tools external to this product to view this information.
4.5. Users
A User is a logical representation of a ZCentral Connect Client User. Users can be imported from Active Directory and later removed from the Manager as necessary.
4.5.1. Importing Users
To import a new User, open the Users tab in the left panel and click Import User.
On the new Window, search Microsoft Active Directory by:
Name: Name of the User in Active Directory
Username: Username of the User in Active Directory
Email: User's email in Active Directory
Member of*: Search for all Users that are part of a group
NOTE The 'Member of' search requires you to type the exact name of the Security Group in Active Directory.
By clicking the 'Search Icon', the Manager will query Active Directory and display the search results on the table below.
Select as many Users as needed and click the Import button.
NOTE ZCentral Connect does not currently offer a way to display what Security Groups a User is in, or what Users are in a Security Group. An administrator must use Active
Directory tools external to this product to view this information.
4.6. Sessions
Sessions are a logical representation of a Remote Boost connection between a User and a Host. Existing Sessions are displayed in the Sessions panel:
Page 17
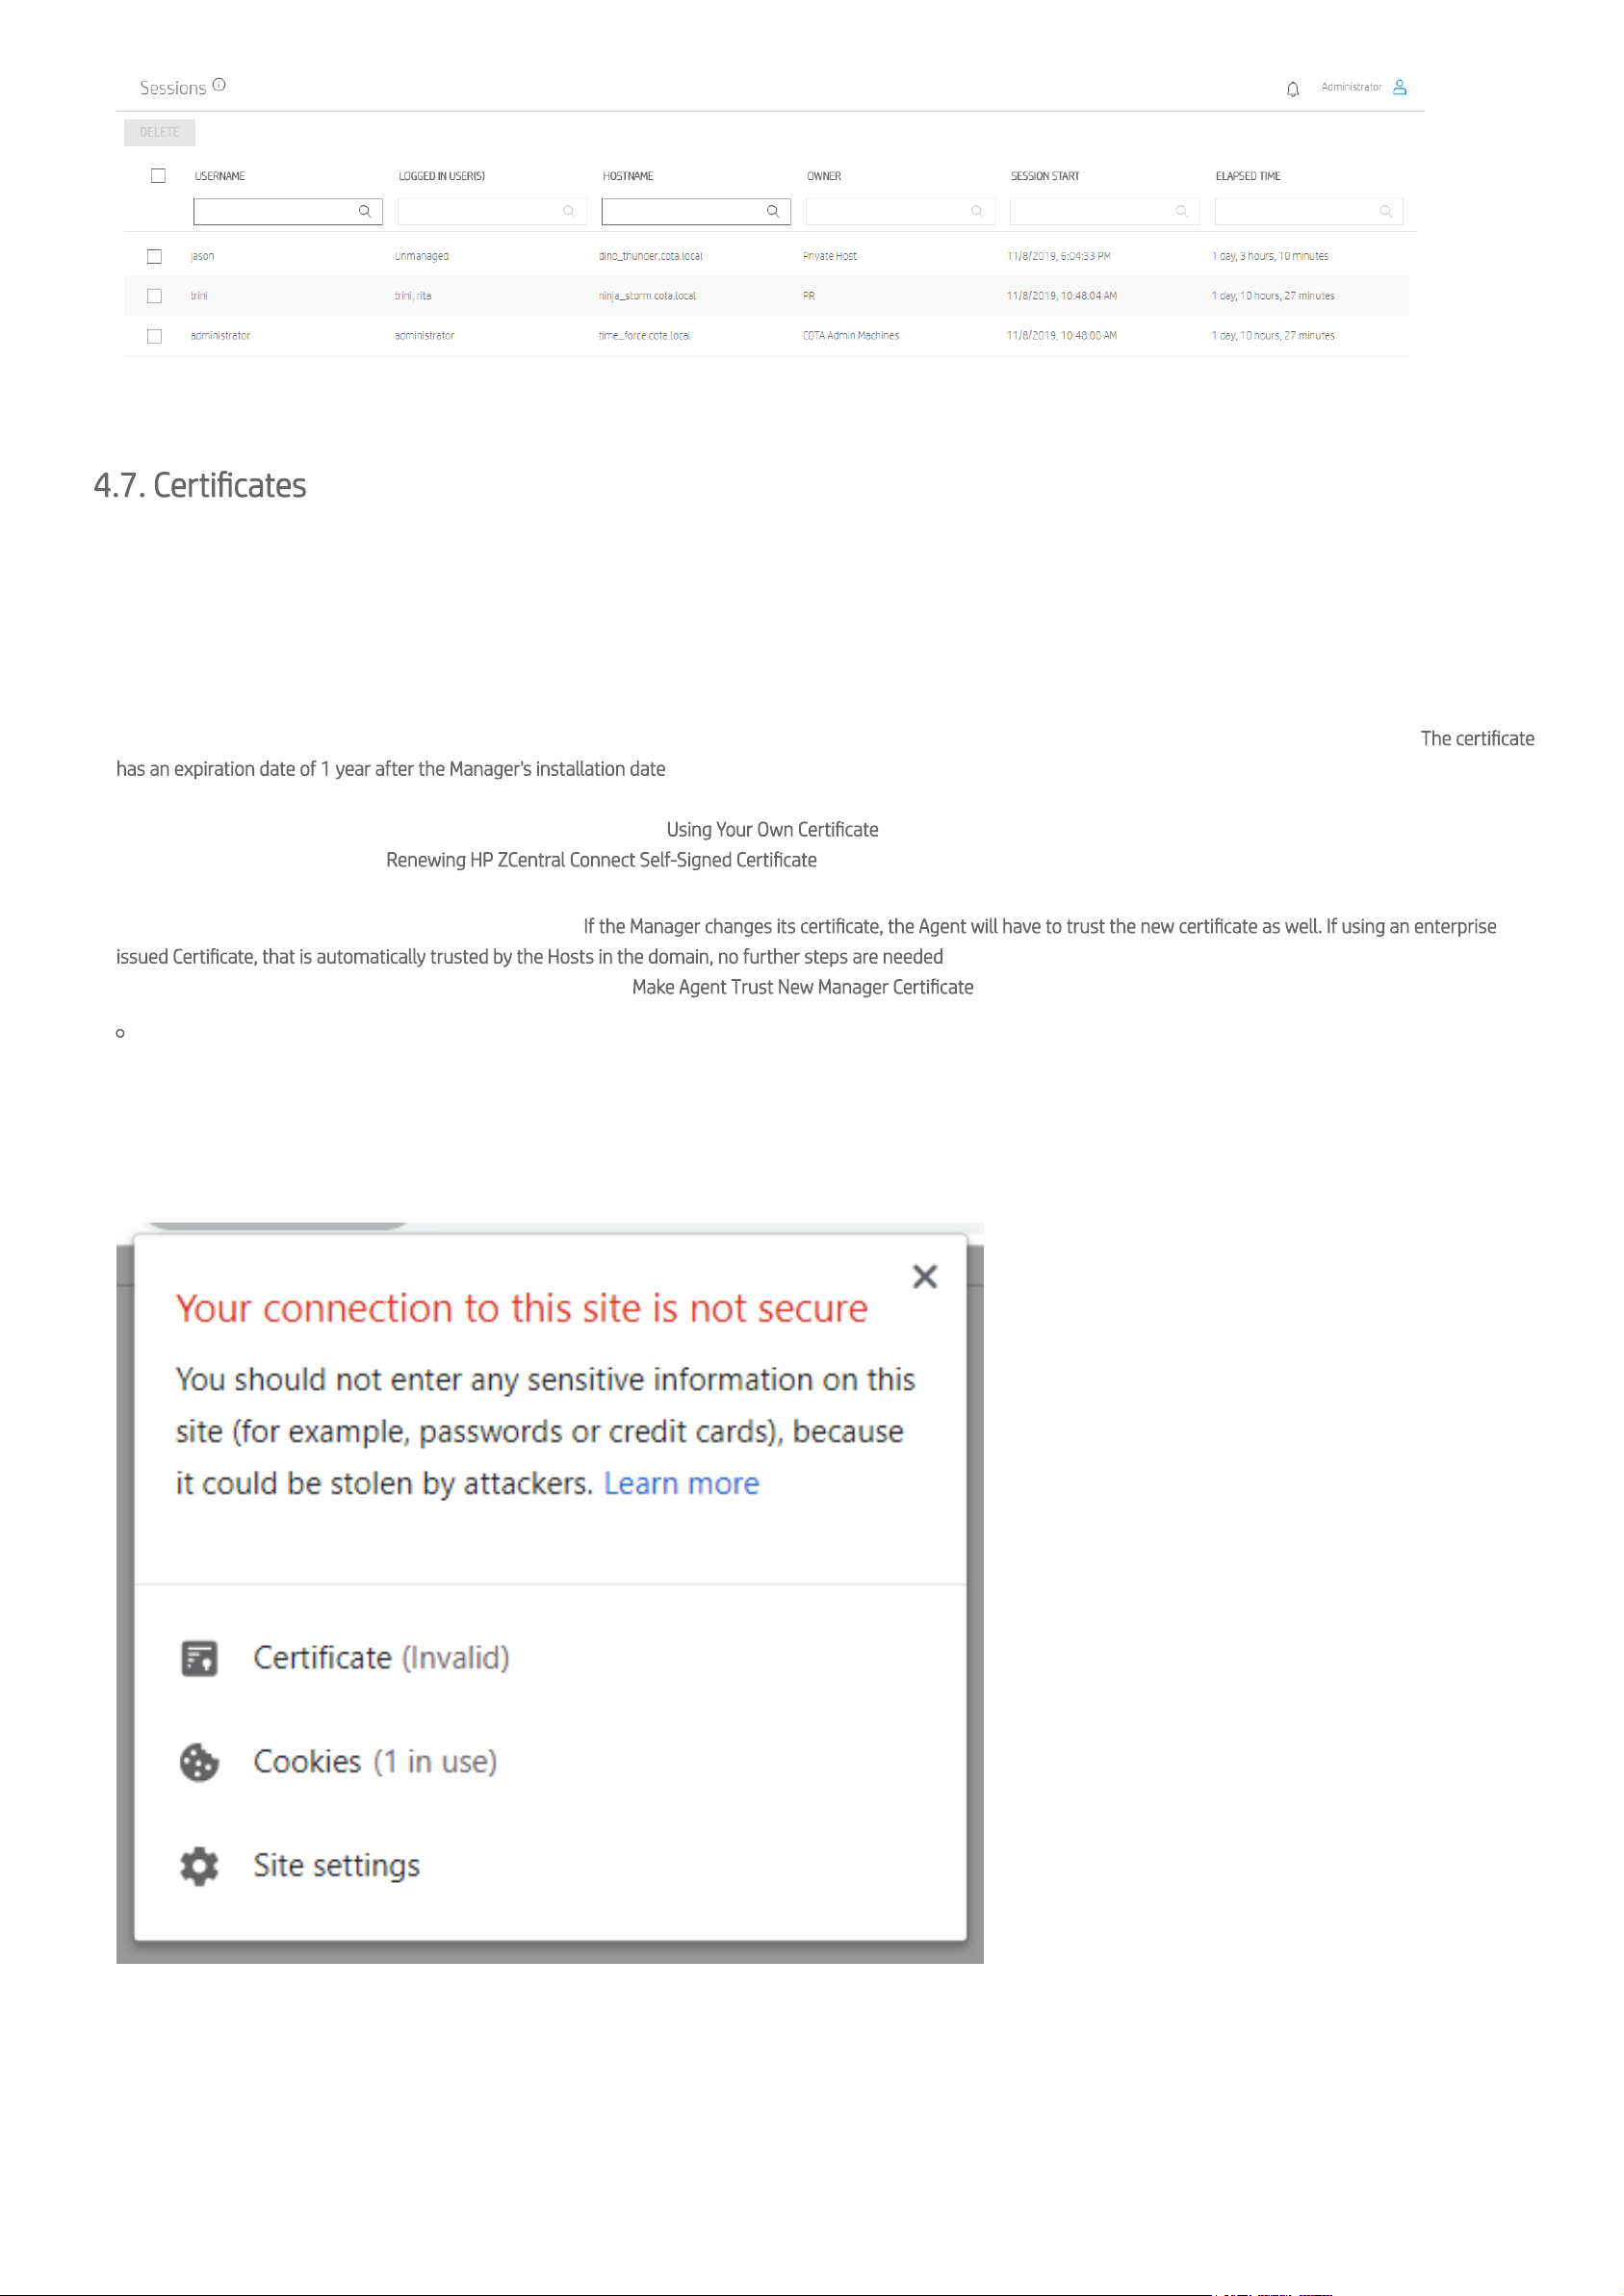
Administrators can monitor which Hosts are in use by each User and can forcefully terminate active Sessions. Deleting an active Session takes the Host back to the 'Available'
state; however, it will not cause the Remote Boost connection to stop immediately.
4.7. Certicates
The Manager secures communication with Transport Layer Security (TLS) which uses Private Key Infrastructure (PKI). Certicates are used to setup TLS encrypted connections.
Certicates are also used by the ZCentral Connect Manager to provide authentication to entities connecting to it. This includes any ZCentral Connect Agents attempting to register
or connect to the Manager. If an Agent does not trust the certicate that the Manager provides it will not successfully connect.
Certicates that are issued by an enterprise Certicate Authority (CA) will be trusted by any Agent running on a domain joined host (Provided correct Group Policy settings are
used). Because of this, there is much less management required for enterprise issued certicates. When a new certicate is issued to the Manager by an enterprise CA all Agents
and end-user browsers in the domain will trust the new certicate without any additional steps.
To ensure encrypted communication from installation time, the Manager's installer creates a self-signed certicate that is used by the Manager when it rst starts. The certicate
has an expiration date of 1 year after the Manager's installation date. These certicates will not be automatically trusted in the domain. Because these certicates are self-signed
they do not provide the same level of authentication that an enterprise issued certicate would. For security and manageability reasons HP recommends that a enterprise issued
certicate is used as soon as possible. For more information see the Using Your Own Certicate section. If self-signed certicates are the only option and the one created during
installation is about to expire see Renewing HP ZCentral Connect Self-Signed Certicate section for instructions on renewing.
When using a self-signed certicate (Or any certicate not automatically trusted), Agent installers will prompt for the user to accept the certicate. When this is done the Agent
will begin to trust the certicate even if the host does not. If the Manager changes its certicate, the Agent will have to trust the new certicate as well. If using an enterprise
issued Certicate, that is automatically trusted by the Hosts in the domain, no further steps are needed. If the new certicate is another self-signed or otherwise untrusted
certicate there are additional management steps required, see Make Agent Trust New Manager Certicate section for instructions.
The Manager uses the System Certicate Store (Local Machine Personal store by default) to store and access certicates.
4.7.1. Accepting Self-Signed Certicates in Your Environment
By accepting the generated self-signed certicate, client browsers will trust the certicate created during installation. The following was created using Google Chrome as an
example. Other browsers provide similar methods for accessing certicates:
1. Access the HP ZCentral Connect service by entering its hostname or IP address in the URL bar.
2. Click the
Not Secure
area of the URL and click
Certicate
.
3. Access the
Details
tab and click
Copy to File...
.
4. Follow the Certicate Export Wizard to save the HP ZCentral Connect certicate to a le. Use the default export settings.
5. Access Chrome Settings.
6. Click
Advanced Settings
.
7. Under
Privacy and security
click
Manage Certicates
.
8. Click the
Trusted Root Certication Authorities
tab.
Page 18

9. Click
Import
.
10. Select the certicate you exported and follow the wizard to complete the import.
11. Refresh your page.
4.7.2. Make Agent Trust New Manager Certicate
If the Manager's certicate is changed after an Agent has already registered the new certicate needs to be trusted by the Agent to allow for further communication. If the
Manager's certicate is automatically trusted by the Host these steps are not required.
1. Gather the thumbprint of the new certicate (see
Finding the Certicate Thumbprint
section for instructions)
2. Access Agent Host
3. Stop the Agent service
4. Run the AgentCong application to set the ManagerCerticateThumbprint setting to the new certicate thumbprint
Example: AgentConfig.exe set --ManagerCertificateThumbprint XXXXXXXXXXXXXXXXXXXXXXXXXXXXXXXXXXXXXXXX
5. Restart the Agent service
NOTE This process can be automated with scripts. See the Example Scripts section in the Agent Deployment Guide for more details.
4.7.3. Using Your Own Certicate
In order to use any other certicate with the ZCentral Connect Manager it must have an exportable key that is readable by the account running the Manager. The certicate should
be placed in the Local Machine Personal store (by default). The following steps must be taken for the Manager to use a certicate for TLS communication:
1. Make sure the Manager is correctly installed and reachable by your browser.
2. Generate your certicate using the hostname chosen for the Manager.
For example, if you can access the Manager via the URL https://zcentralconnectdemo.domain.local, zcentralconnect.domain.local is the hostname you should
use to generate your certicate.
In an enterprise environment a Computer certicate template can be used.
3. Place certicate with exportable private key in the LocalMachine Personal Certicate Store
This can be done by importing a certicate from a le or by certicate enrollment in an enterprise environment
If using enrollment the private key can be setup to be exportable in the Certicate Template. If it is not then the setting must be changed as part of the
request.
For example, if requesting a new certicate with
certlm.msc
:
1. Expand
Details
and clicking on
Properties
2. Go to the
Private Key
tab and expand
Key Options
3. Check the box next to
Make Private Key Exportable
4. Run the Manager Cong App to congure the Manager to use the certicate.
Run ManagerCong.exe with the --congure command passing in the thumbprint of the certicate and the service account used to run the Manager
Example: ManagerConfig.exe certificate --configure --serviceAccount domain\zcentralconnectmsa$ --
certificateThumbprint XXXXXXXXXXXXXXXXXXXXXXXXXXXXXXXXXXXXXXXX
5. Restart the Manager service using the Windows Service management console.
NOTE The store used can be changed as long as the private key is exportable and readable by the service account running the Manager (see Advanced Settings section for more
information).
Importing Certicate From File
1. Double-click on the certicate le (.pfx or .p12) and click
Install Certicate
.
2. Select
Local Machine
3. Enter password if required
4. Ensure that the checkbox next to
Mark this key as exportable
is checked
5. Ensure that the checkbox next to
Include all extended properties
is checked
6. In the next window, select
Place all certicates in the following store
and specify
Personal
as the target location for the certicate import
7. Finish the wizard
Finding the Certicate Thumbprint
1. Right-Click on the Windows Button on the Windows taskbar and select Run
2. Type
certlm.msc
3. In the left panel, expand
Personal
>
Certicates
4. In the right panel, look for the certicate that was just imported using the columns
Issued To
and
Issued By
. Find the certicate that matches the hostname used when
HP ZCentral Connect was deployed
5. Double-click the certicate and open the
Details
tab. Scroll down to the Thumbprint value
Manual Conguration
The same steps that the Manager Cong App takes to congure the Manager to use a certicate can be done manually if desired by following these steps:
1. Give private key read permissions to account running the Manager service
1. Open the MMC snap in for managing Local Machine certicates (run certlm.msc)
Page 19

2. Right click on the certicate meant for TLS on the Manager (under Personal -> Certicates)
3. Click on All Tasks -> Manage Private Keys
4. Add the service account to the list of users and give it Read permissions
2. Bind certicate to the port used by the Manager
This can be done with the netsh command as seen here
3. Update the Manager
settings.json
le
1. Open the le
settings.json
in %PROGRAMDATA%\HP\ZCentralConnectManager and replace the
CerticateThumbprint
value with the Thumbprint of your
certicate
4.8. HP ZCentral Connect Manager Cong App (ManagerCong.exe)
HP ZCentral Connect comes with a tool to perform several operations outside the Administrator UI.
This tool is called ManagerConfig.exe and is located in the same folder where HP ZCentral Connect Manager is installed, typically
%PROGRAMFILES%\HP\ZCentralConnectManager\bin.
4.8.1. Recovering HP ZCentral Connect Administrator Password
The Administrator password is dened during HP ZCentral Connect installation. If the Administrator password is lost, it can be recovered by using the provided HP ZCentral
Connect Cong App.
1. Open an administrator command prompt and navigate to the folder where HP ZCentral Connect is installed (see 2.6).
2. In the Command Prompt, type the following command and press enter:
ManagerConfig.exe password --recover
3. Type the new Administrator password and press enter.
4. Conrm the new Administrator password and press enter.
5. Login into HP ZCentral Connect using the new password.
NOTE The HP ZCentral Connect Cong App requires computer Administrator privileges to run.
NOTE The entered characters for the new password will not be echoed to the console for security reasons.
NOTE Existing Administrator sessions will not be terminated after an Administrator password recovery. For the password change to take effect, it is necessary to login again using
the new credentials.
4.8.2. Renewing HP ZCentral Connect Self-Signed Certicate
1. Open an administrator command prompt and navigate to the folder where HP ZCentral Connect is installed (see 2.6).
2. (Recommended) Stop the HP ZCentral Connect Manager Service.
3. Type the following command in the Command Prompt and press enter:
ManagerConfig.exe certificate --renew --serviceAccount <Account used to run the Manager service>
4. Information about the current certicate and the new one will be displayed on the console. Type "yes" to continue the procedure.
5. Once the Cong App nishes, restart the HP ZCentral Connect Service.
NOTE You can add --confirm to the command to bypass the conrmation required on the console.
NOTE --serviceAccount is needed to give the correct access to the new certicate's private key. Use the same account given during installation.
Page 20
5. HP ZCentral Connect Agent
The HP ZCentral Connect Agent is an optional component of ZCentral software which allows ZCentral Connect to observe login status changes to Hosts and detect when the HP
ZCentral Remote Boost Sender stops running. Some benets of having the Agent installed on the Host include being able to tell when a User has actually logged into a Host that
is checked out to them; seeing a warning if an unintended User is logged into a Host; seeing a warning if the Remote Boost Sender stops running, and more.
The ZCentral Connect Agent is a service that can be installed in both Windows 10 and Linux (RHEL 7, RHEL8 or Ubuntu 18.04). The Agent service runs as local administrator and
connects with the Manager using the Message Bus port, congured during the Manager installation.
5.1. Installing ZCentral Connect Agent
Please refer to the Agent Deployment Guide for details.
5.2. Agent Tokens and Renewal
The communication between ZCentral Connect Agents and the Manager is secured by encryption and authentication. Encryption is ensured by the TLS certicate used by the
Manager. Refer to the Certicates section in this User Guide for more details about Manager certicate conguration.
Authentication is ensured upon the Agent deployment process, where the person installing the Agent has to input a unique and one-time use Authorization Code. This
registration password identies that Agent, allowing the Manager to trust it and exchange an authentication token between the Manager and the Agent. Agent Tokens are a
secret kept by the Agent in a protected folder in the File System - and depending on the operating system, encrypted.
The authentication token expires every 30 days. The Manager will renew the authentication token for each Agent once a day or every time a Session is closed with the Host. The
default expiration time and the renewal period used by the Manager can be congured in the Manager settings le by modifying AgentTokenExpirationTimeInDays and
AgentTokenRenewPeriod respectively. Please refer to the Manager settings section in the user guide for more details.
If the Agent gets disconnected for more than 30 days, the authentication token will expire, and the Agent will no longer be able to connect and send status updates to the
Manager. If this happens, the Agent must be re-registered with the Manager to receive a new token. Follow the instructions in the Registration section for more details.
NOTE The Token Renewal process runs once a day in the Manager. It is scheduled to run 24 hours after the Manager service was started or whenever an Agents connects.
5.3. ZCentral Connect Agent Cong
The AgentCong is a command line tool that is installed alongside the ZCentral Connect Agent and allows Administrators to customize and register Agents.
This tool is located in the same folder where the Agent was installed, typically %PROGRAMFILES%\HP\ZCentralConnectAgent\bin in Windows and
/opt/hp/zcentralconnectagent in Linux.
5.3.1. Register Agent
To register an Agent, you must run the AgentCong tool with the
register
parameter. Example:
AgentConfig.exe register
NOTE AgentCong must be run in an elevated command prompt (Administrator in Windows and root in Linux).
NOTE On Linux, the RPM and DEB installers will indicate that you should run AgentConfig register once installation completes. On Windows, registration is built into the
installation process.
The registration command will ask for required registration parameters. If the Agent was previously registered, AgentCong will display the values currently set. The registration
command will prompt for the following parameters:
AgentHostname: The hostname of the Host. It must match the name that the Host is registered within the Manager.
ManagerHostname: The Hostname of HP ZCentral Connect Manager.
ManagerPort: The HTTPS Port of HP ZCentral Connect Manager.
ManagerMessageBusPort: The Message Bus Port of HP ZCentral Connect Manager.
AuthorizationCode: The authorization code obtained from the Manager web interface for the Host
Once complete, the registration process will update the settings le and restart the Agent service.
5.3.2. Congure Settings
AgentCong can also be used to update conguration in the ZCentral Connect Agent service. Example:
AgentConfig.exe set --ManagerCertificateThumbprint 65D6B7431D8A5F8E52D3BBA3B9D3B5B242A2BC5D
NOTE Please refer to the next section for a list of all the properties that can be customized in the Agent service.
NOTE Using the AgentCong to customize settings will not automatically restart the Agent service. The Agent service must be manually restarted for the new settings to take
effect.
Once the settings conguration command is executed, the AgentCong tool will update the internal settings le for the Agent.
ZCentral Connect Agent Settings
The ZCentral Connect Agent has a certain number of settings that are automatically congured during the installation process and some that can later be changed by
Administrators if required. The Settings le can be found in the following path: %PROGRAMDATA%\HP\ZCentral ConnectAgent\settings.json in Windows and
/etc/hpzcentralconnectagent/settings.json in Linux.
NOTE The AgentCong tool can be used to change/update the following properties.
NOTE The ZCentral Connect Agent service must be restarted for the changes to take effect.
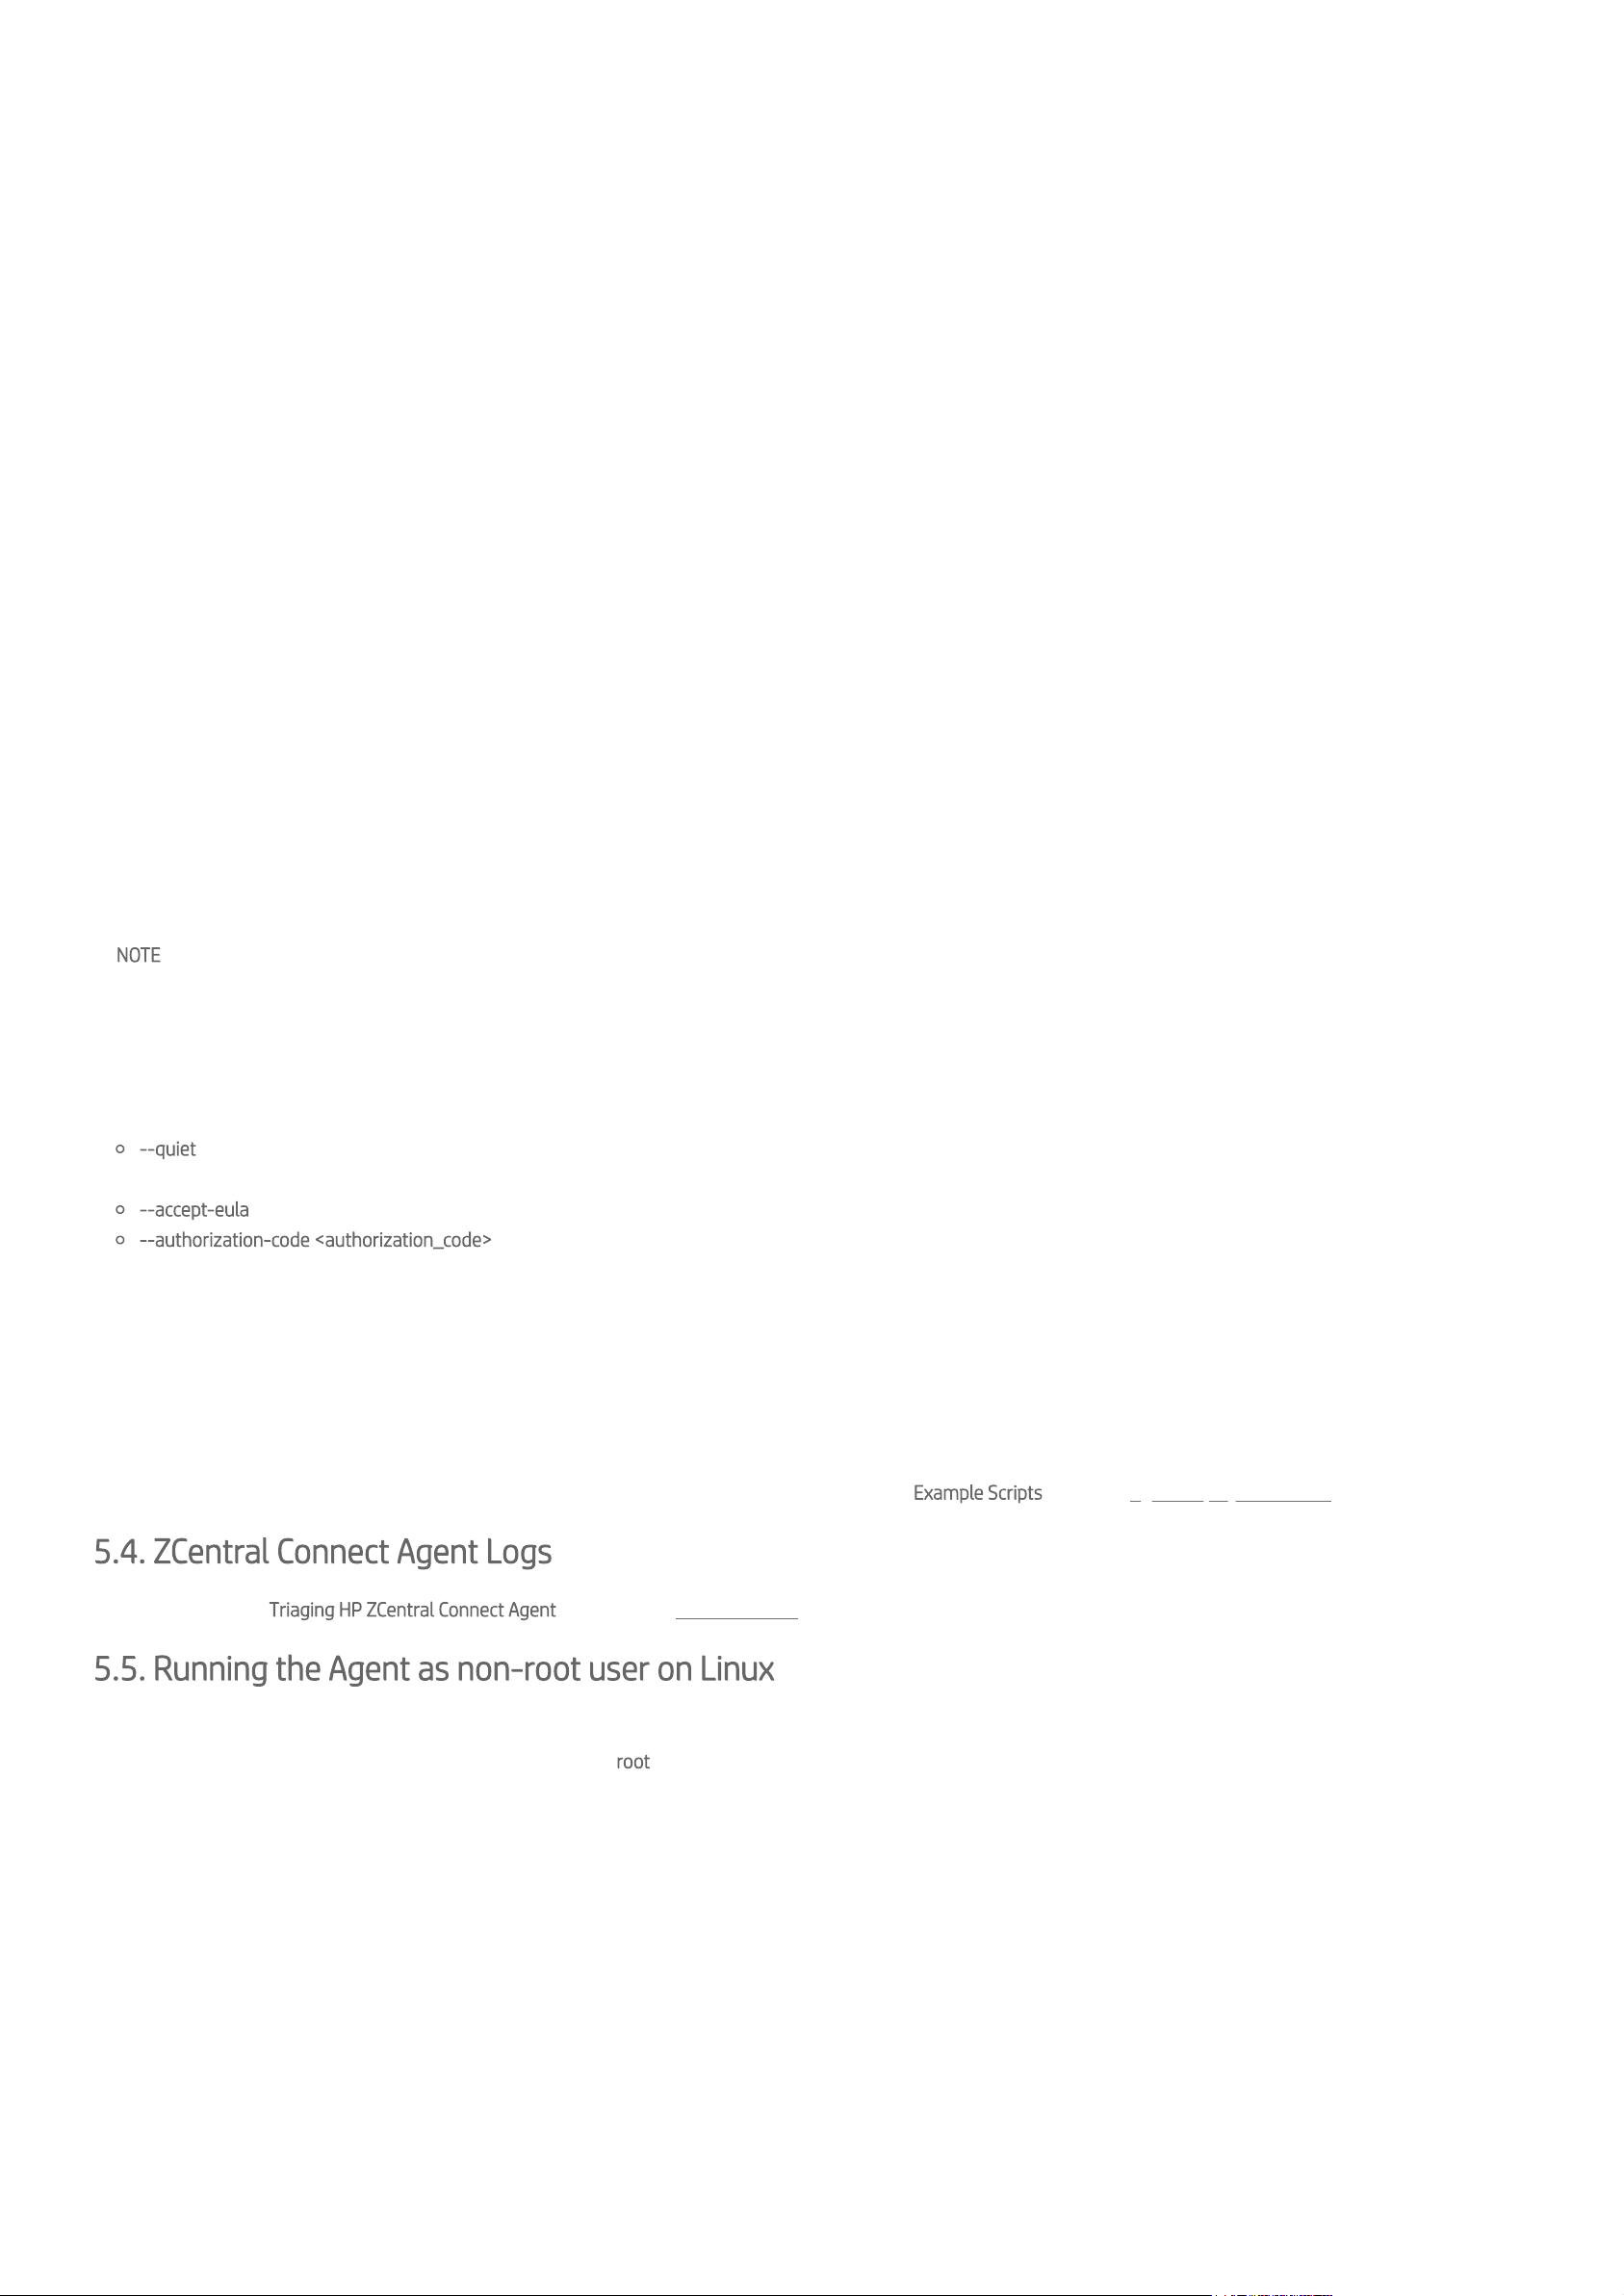
The supported elds and the corresponding default values are dened below:
Page 21
{
/* The Hostname of HP ZCentral Connect Manager. */
"ManagerHostname": "myconnecthostname.domain",
/* The HTTPS Port of HP ZCentral Connect Manager. */
"ManagerPort": "443",
/* The Message Bus Port of HP ZCentral Connect Manager. */
"ManagerMessageBusPort": "8883",
/* The thumbprint of the Manager certificate used to encrypt network traffic. */
"ManagerCertificateThumbprint": "",
/* The hostname of this Host. It must match how the Host is registered in the Manager. */
"AgentHostname": "myhostname.local",
/* Defines the time in seconds that the Agent will wait before reconnecting with the Manager after a new token is received. */
"TokenRenewReconnectionWaitTime": "10",
/* Defines the maximum time in seconds of the Keep Alive used on the Message Bus. Keep Alive is a heartbeat message sent on
the Message Bus that keeps the active connection open and reliable */
"MessageBusKeepAlive": "30",
/* Defines the maximum time in seconds that a message can take to reach its destination. */
"MessageBusCommunicationTimeout": "20"
/* Defines the maximum time in seconds that the Agent waits before trying to reconnect to the Message Bus. */
"MessageBusReconnectionWaitTime": "60"
}
NOTE The settings le may contain other properties not documented above which are intended for internal use only and should not be changed.
5.3.3. Run Unattended AgentCong
For automated deployments, it is possible to run the AgentCong tool without the need of user interaction. To achieve that, the AgentCong provides the following command line
arguments:
--quiet: Prevents AgentCong from prompting the command line for input arguments during registration. When this option is set, AgentCong will re-use the contents of
settings.json le.
--accept-eula: Accepts the EULA without a command line prompt.
--authorization-code <authorization_code>: Inputs the Authorization Code from command line into the AgentCong for registration.
An example of unattended registration:
Step 1: Conguring required parameters:
AgentConfig set --AgentHostname myHost.domain.local --ManagerHostname zconnectionmanager.domain.local --ManagerPort 443 --
ManagerMessageBusPort 8883 --ManagerCertificateThumbprint 65D6B7431D8A5F8E52D3BBA3B9D3B5B242A2BC5D
Step 2: Unattended Registration:
AgentConfig register --quiet --accept-eula --authorization-code 58433e64-95bb-43c2-b53c-4ccc680c6270
For more details in unattended registration and automating the deployment of Agents, refer to the Example Scripts section of Agent Deployment Guide.
5.4. ZCentral Connect Agent Logs
Please refer to the Triaging HP ZCentral Connect Agent chapter in the Troubleshooting page for details on how to obtain the ZCentral Connect Agent Logs.
5.5. Running the Agent as non-root user on Linux
By default, the Agent service on Linux runs as the root user. To increase the system security, it's possible to run the service with a less-privileged user.
To achieve that, follow the steps described below logged in as root user:
1. Stop ZCentral Connect Agent service: systemctl stop hpzcentralconnectagent
2. Add the user account that will be running the Agent service: useradd -U -M zcentralconnect
3. Assign folder permissions to the new user: chown -R zcentralconnect:zcentralconnect /var/log/hpzcentralconnectagent
/etc/hpzcentralconnectagent /opt/hp/zcentralconnectagent
4. Set the Agent service capabilities: setcap CAP_SYS_NICE,CAP_DAC_OVERRIDE,CAP_NET_ADMIN+ep
/opt/hp/zcentralconnectagent/ZCentralConnectAgent
5. Specify that the created user will run the agent service:
1. Edit the le /etc/systemd/system/multi-user.target.wants/hpzcentralconnectagent.service with the editor of your choice.
2. In the [Service] section, add the following line: User=zcentralconnect
3. Save and close the le.
6. Reload the services conguration: systemctl daemon-reload
7. Start Agent service: systemctl restart hpzcentralconnectagent
Page 22

5.6. Uninstalling ZCentral Connect Agent
To uninstall the Agent on Windows, press Win + R and type
appwiz.cpl
. That will open the
Add or Remove programs
window. Search for the
HP ZCentral Connect Agent
entry
and follow the normal uninstallation procedure.
On Linux, uninstall the package named
hpzcentralconnectagent
using rpm -e on Red Hat and dpkg -r on Ubuntu. The package will stop the Agent service and remove
installed binaries from the system.
NOTE Uninstalling the Agent will not remove the corresponding Host entry in the Administrator Portal; on the Portal, the Host will go into a
Disconnected
Agent state if it is still
expecting the Agent to be present.
NOTE Uninstalling the Agent will not remove residual data, such as log les or settings les.
Page 23
6. HP ZCentral Connect Client Portal Features
The HP ZCentral Connect Client Portal allows users to interact with HP ZCentral Connect to request access to Hosts. Please refer to the HP ZCentral Connect Client Portal guide for
more details.
6.1 Prerequisites
Every client machine used by Users to access the Client Portal must meet the following requirements:
Have HP RGS Receiver version 7.5, HP ZCentral Remote Boost Receiver 2020 or newer installed
Use one of the supported Operating Systems
Windows 10 (64-bits only)
Linux
RHEL 7 or RHEL 8
Ubuntu 18.04
ThinPro 7 or later
NOTE Gnome Desktop is supported. KDE is not currently supported
macOS 10.12 or later
Use one of the supported Internet browsers
Chrome version 70.0.3538 or later
Firefox version 60.3.0 or later
Microsoft Edge
Safari and other browsers have limited support
6.2 Accessing the HP ZCentral Connect Client Portal
The HP ZCentral Connect Client Portal can be accessed by using the default portal address, for example:
https://zcentralconnect.local.domain/
.
NOTE Users may need to include the port number in the URL if ZCentral Connect was installed in a port other than 443. If the selected port was 8443, the URL would be:
https://zcentralconnect.local.domain:8443/
.
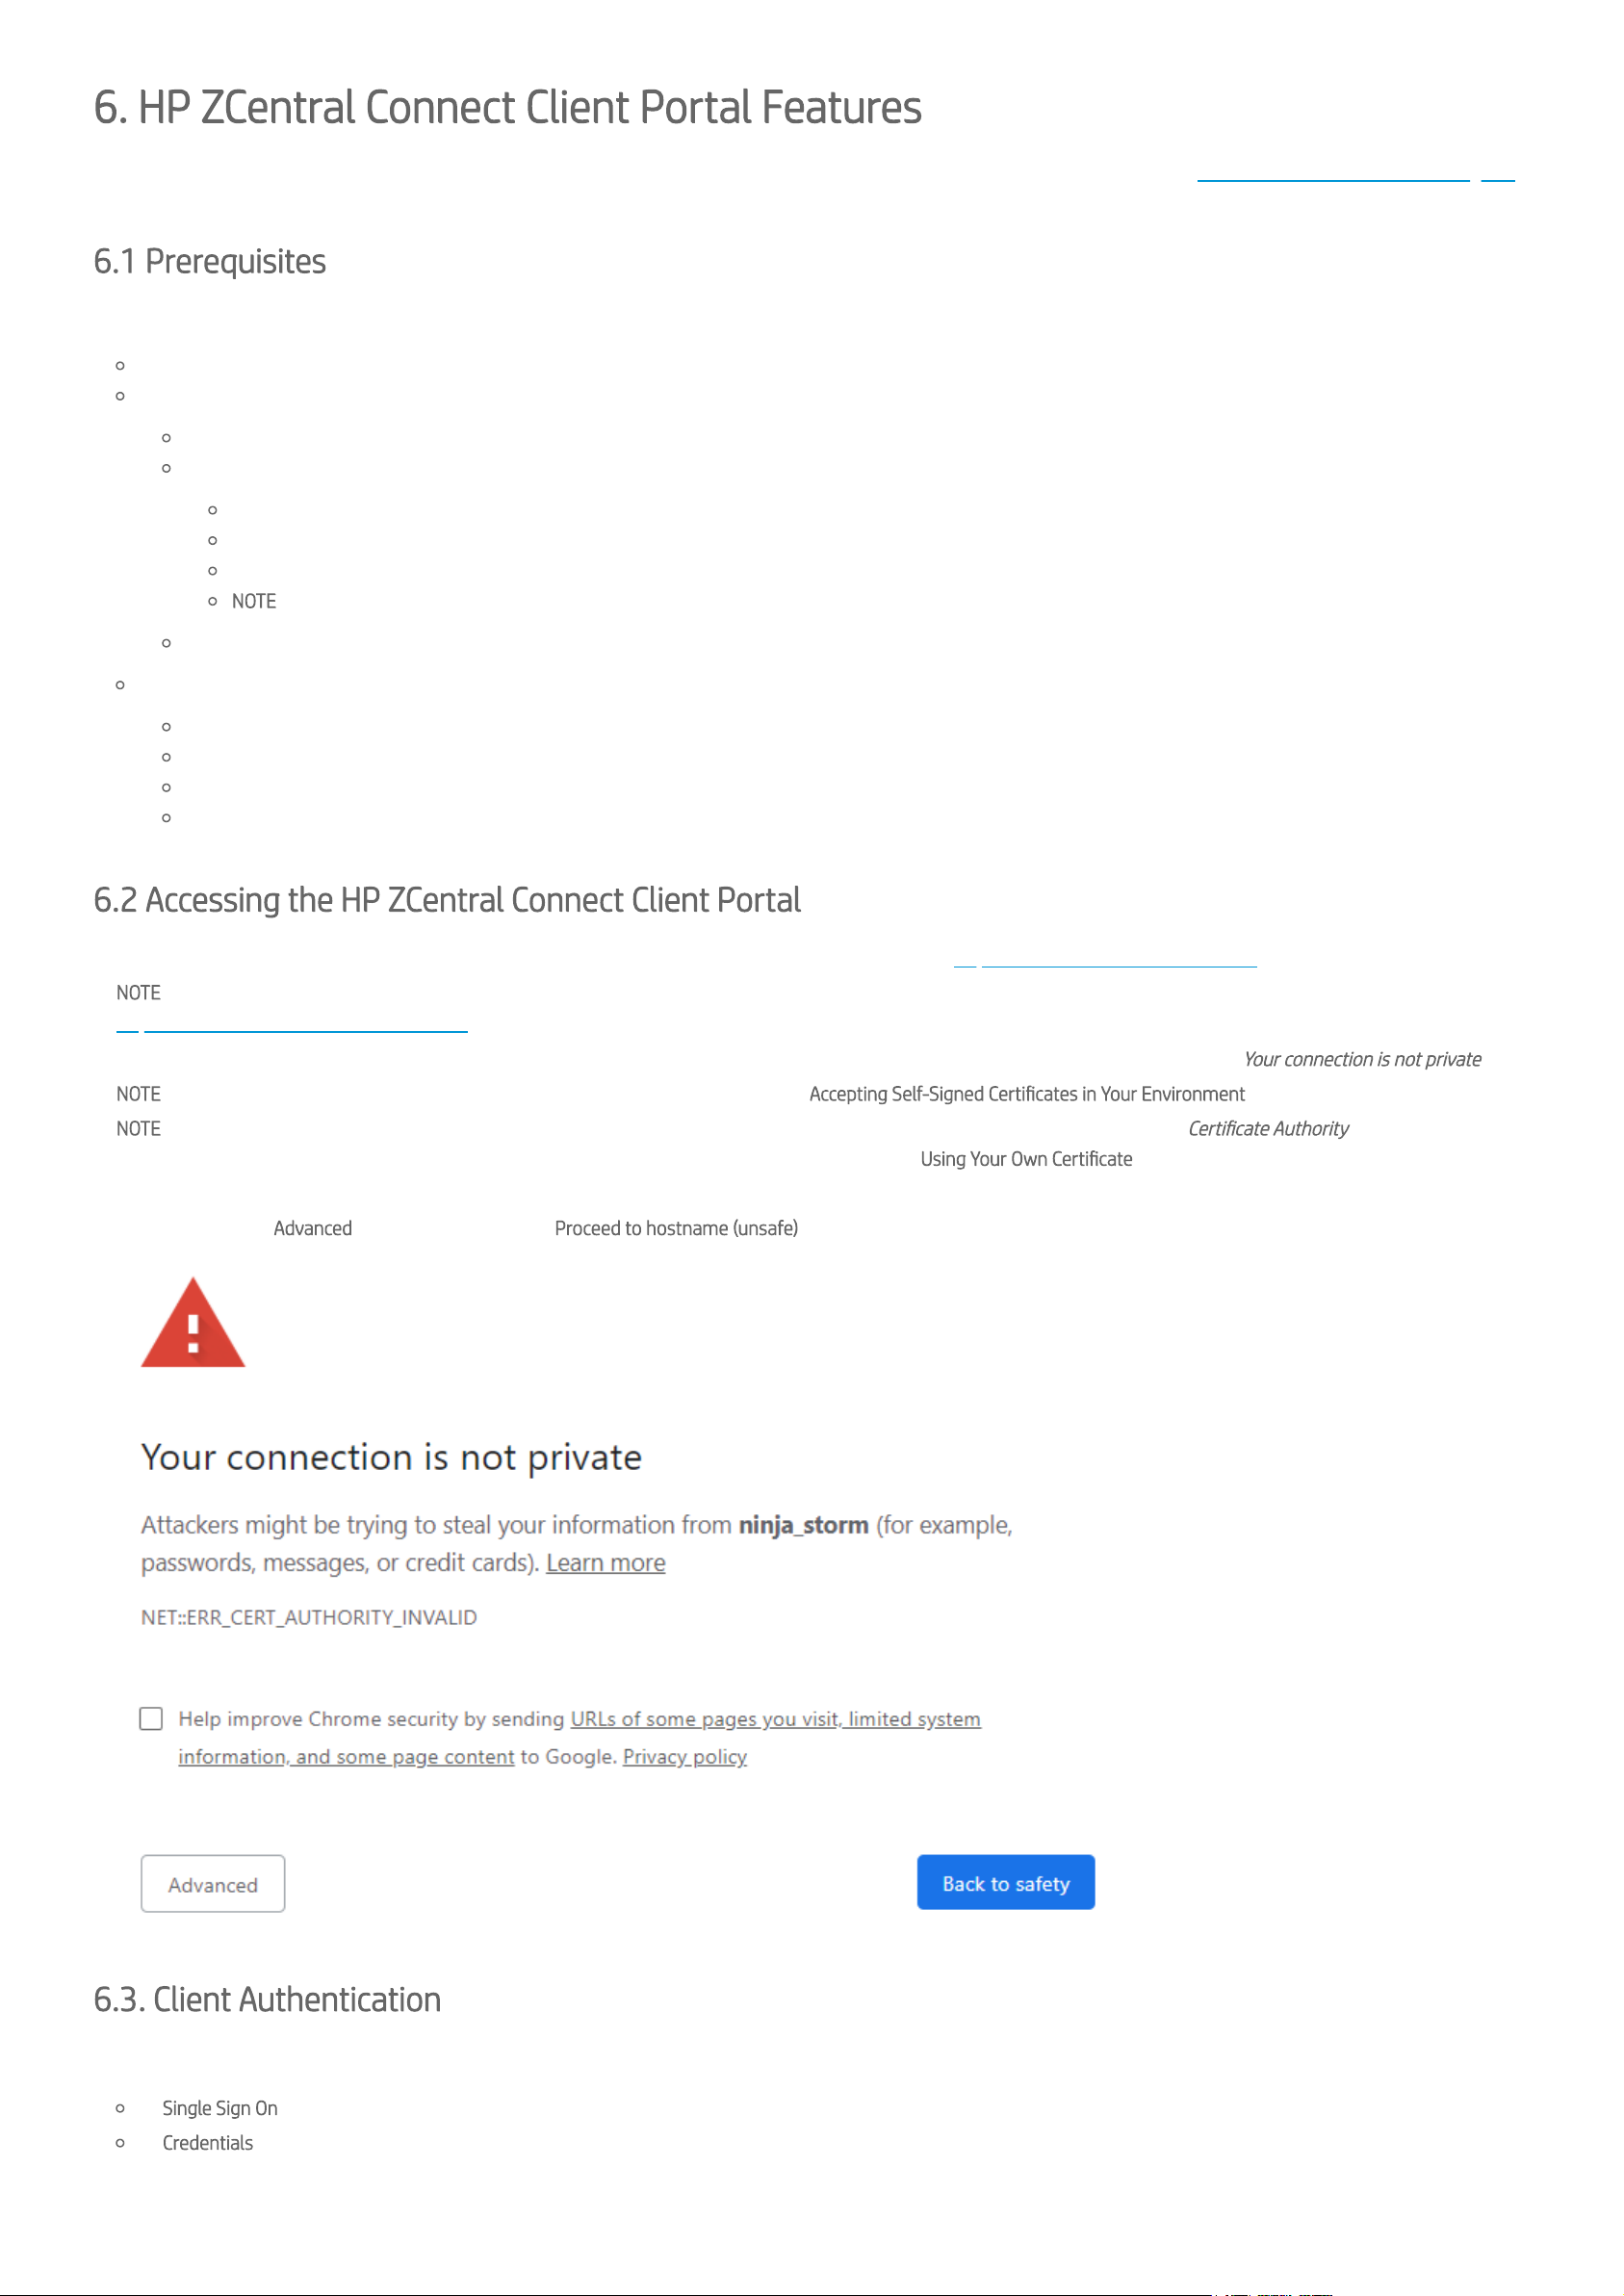
Since HP ZCentral Connect creates its own self-signed certicate during installation, you will see a warning message similar to the following:
Your connection is not private
.
NOTE Users can accept the self-signed certicate following the steps described on the Accepting Self-Signed Certicates in Your Environment section on this User Guide.
NOTE If you use a custom certicate instead of the generated self-signed one, you will not see this message if the machine trusts the
Certicate Authority
that created the
certicate. If you need help conguring a custom certicate, please follow the steps described in the Using Your Own Certicate section on this User Guide.
Proceed by clicking Advanced and selecting the option Proceed to hostname (unsafe).
6.3. Client Authentication
The Client Portal supports two types of authentication for User login:
Single Sign On: This option uses Kerberos to leverage the logged in User in the local OS from Active Directory. This is the default authentication method.
Credentials: If Single Sign On is not available, the User will be prompted to login using their Active Directory credentials.
Page 24
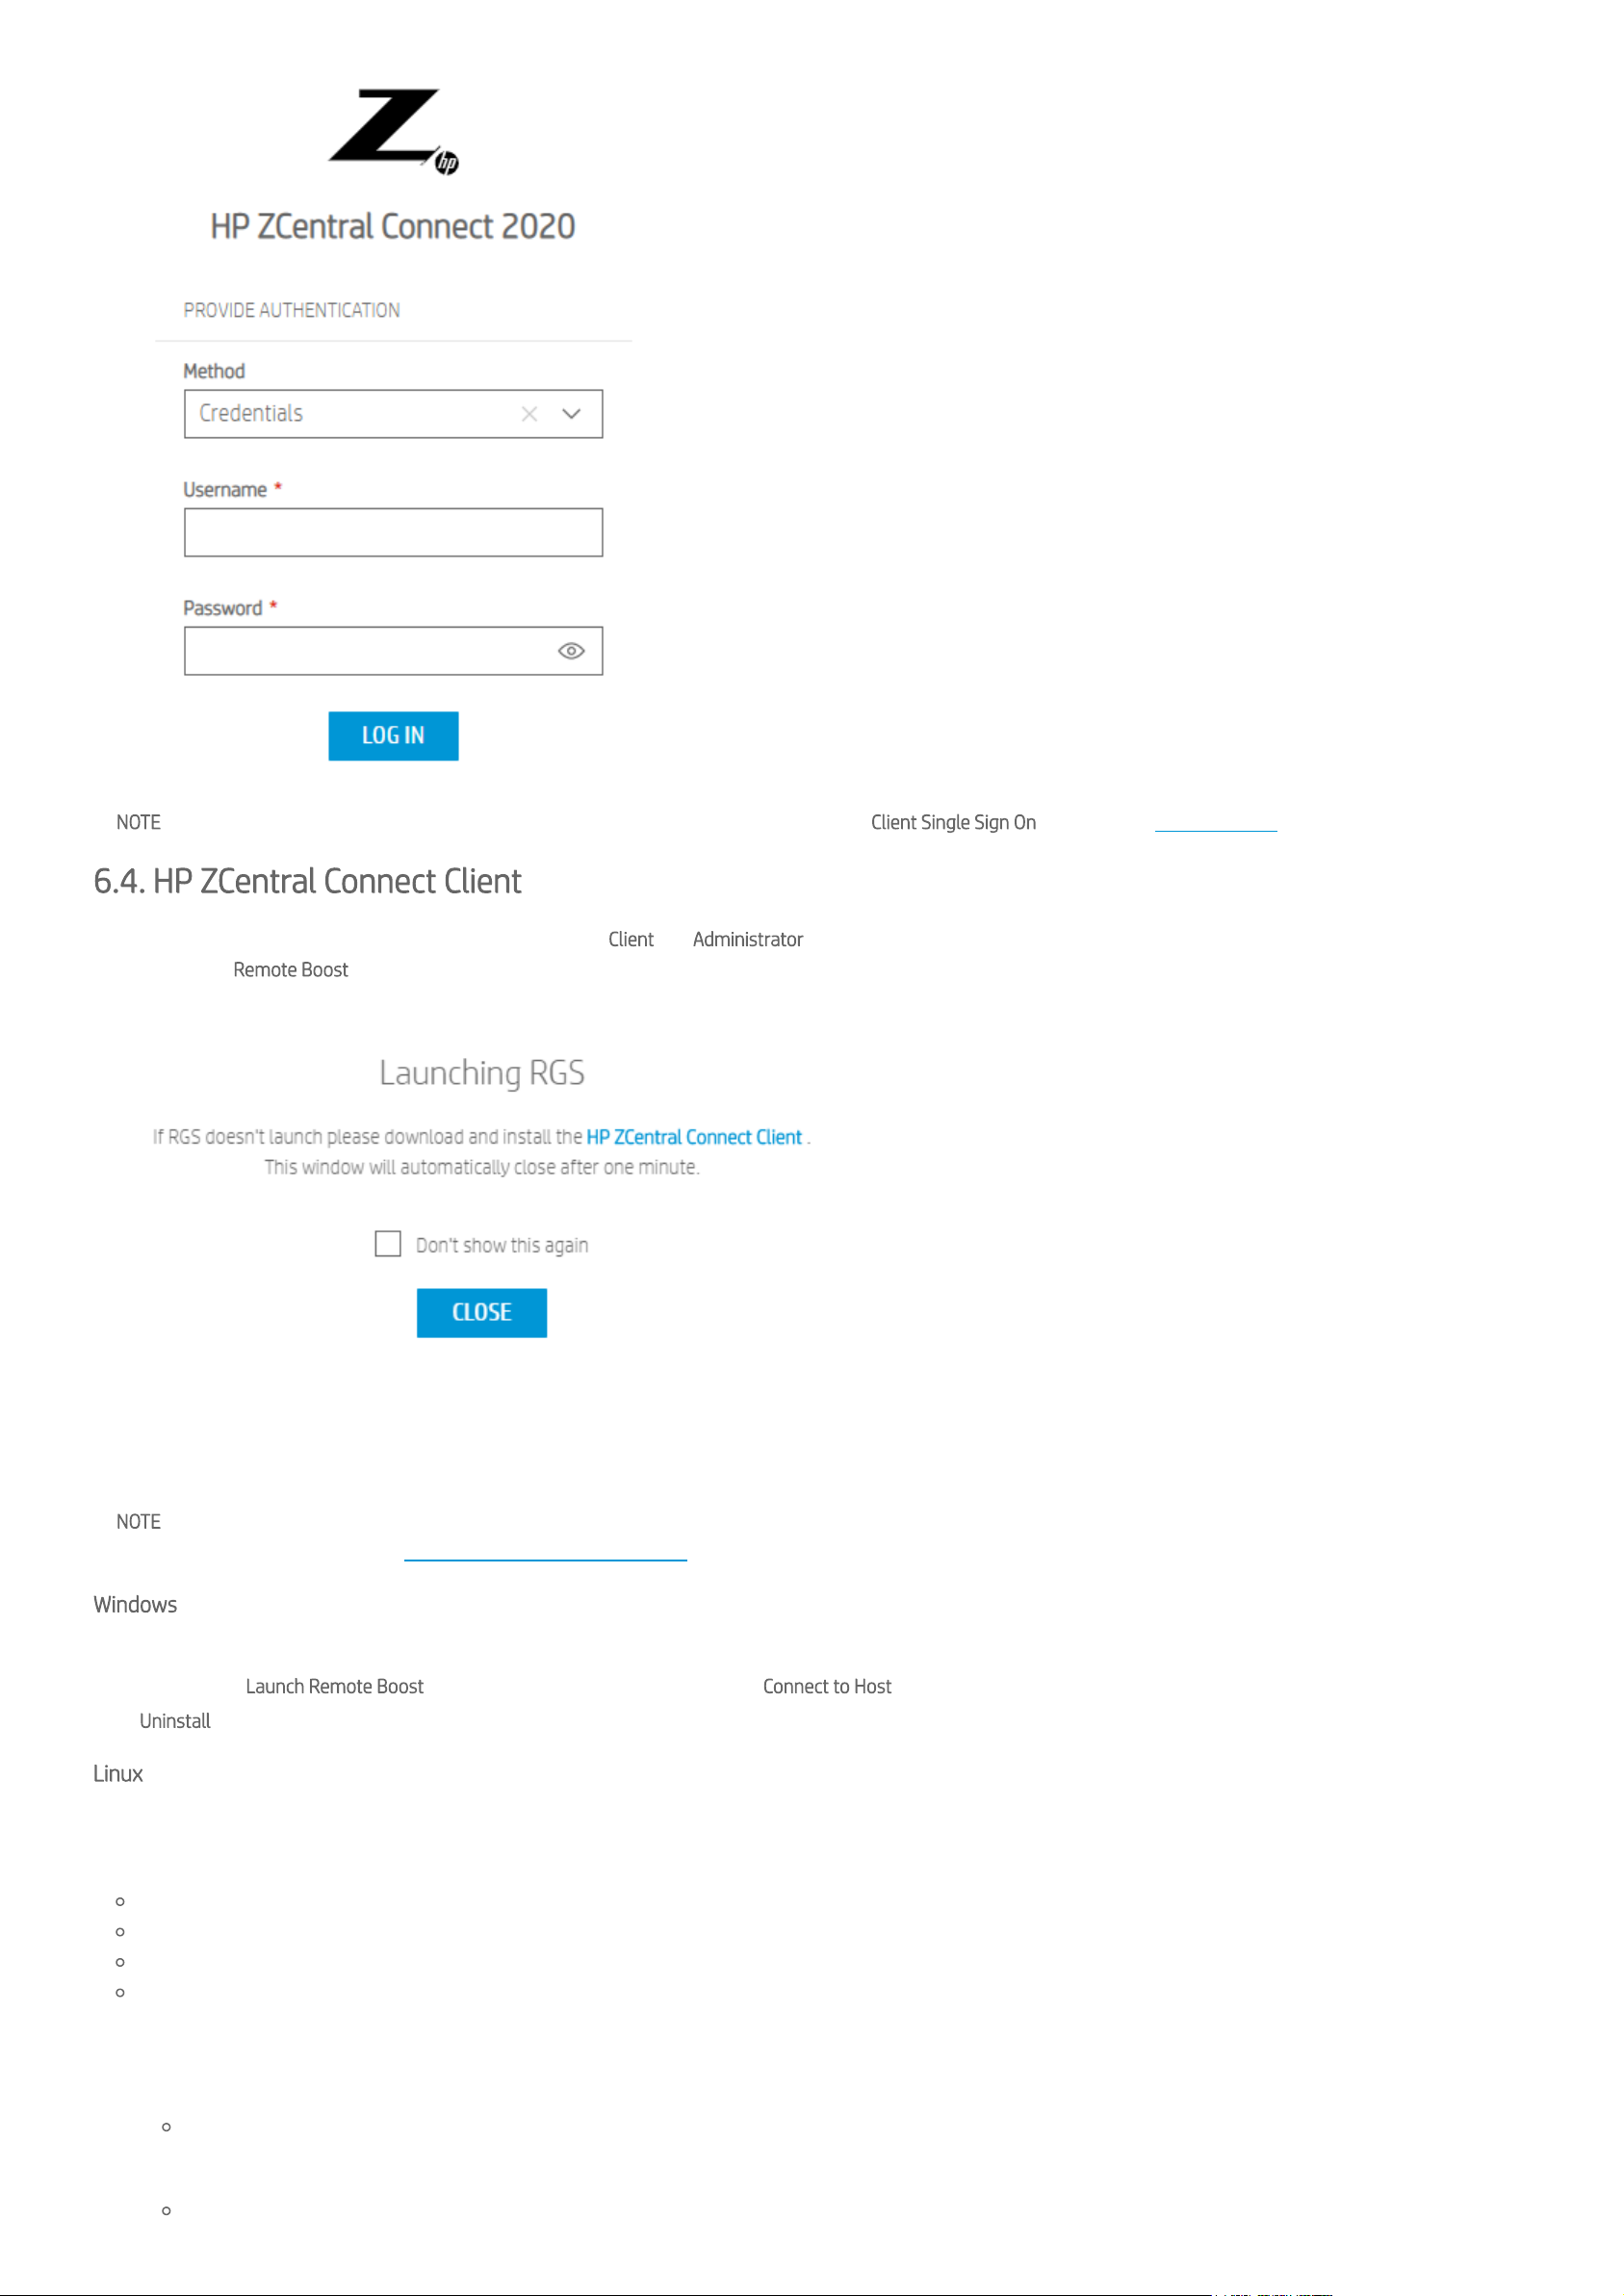
NOTE If you are having issues to log in using the Single Sign On functionality, please check the Client Single Sign On section of the Troubleshooting page for help.
6.4. HP ZCentral Connect Client
ZCentral Connect Client is an application that allows both the Client and Administrator Portals to launch the HP ZCentral Remote Boost Receiver application to a targeted Host.
Whenever the Remote Boost button is clicked, Users can start a Remote Boost connection. The user will be prompted with a modal informing that the installation of HP ZCentral
Connect Client is required.
By enabling the
Don't show this again
option, the modal will not be displayed anymore until the User removes the ZCentral Connect cookies from the browser.
6.4.1. Installing HP ZCentral Connect Client
NOTE Users must have HP ZCentral Remote Boost Receiver or HP Remote Graphics Software Receiver installed before installing or launching the ZCentral Connect Client. Remote
Boost can be downloaded from the HP ZCentral Remote Boost Website.
Windows
For Windows systems, click the
download link
to download the HP ZCentral Connect Client Installer. Double-click on the installer le and retry the operation by closing the prompt
and clicking the Launch Remote Boost button on the Administrator Portal or the Connect to Host button on the Client Portal.
To Uninstall the Client, open
Add and Remove Programs
on Windows, select
HP ZCentral Connect Client
and follow the uninstallation process.
Linux
For Linux systems the
download link
will download a
.sh
le capable of registering the Remote Boost URI protocol. This script can be installed in any of the supported Linux
environments:
RHEL 7
RHEL 8
Ubuntu 18.04
ThinPro 7 or later
To install the ZCentral Connect Client, follow these steps:
1. Give execute permissions to the install_zcentralconnect_client.sh le
chmod +x install_zcentralconnect_client.sh
2. Run the script
sudo ./install_zcentralconnect_client.sh
Page 25

3. Close the message in the browser and retry the operation by clicking the Launch Remote Boost button on the Administrator Portal or the Connect to Host button on the
Client Portal.
HP ThinPro requires extra steps to enable launching Remote Boost from the ZCentral Connect pages due to the default browser conguration for users. One way to enable the
ZCentral Connect Client on ThinPro is to create a custom launcher for Firefox:
1. Right-click on ThinPro Desktop
2. Create > Other > Custom
3. Right-click on Custom shortcut and click
Edit
4. The name can be changed to something meaningful, such as: HP ZCentral Connect Client
5. On the command to run, type: refox https://<HPZCentralConnectHostname>:<Port>/. Example: refox https://zcentralconnectdemo/
6. Click
Apply
7. With this launcher Users will be able to access the HP ZCentral Connect portal directly and also launch Remote Boost correctly
To Uninstall the ZCentral Connect Client, run the same install_zcentralconnect_client.sh with the -u parameter. Example: sudo ./install_zcentralconnect_client.sh -u
macOS
For macOS, the
download link
will download a compressed le,
app.zip
, that registers the Remote Boost URI protocol and opens the Remote Boost Launcher. This application is
supported by macOS Sierra (10.12) or later.
To install ZCentral Connect Client in macOS, follow these steps:
1. Unzip the
HP ZCentral Connect Client.app.zip
2. Copy the
HP ZCentral Connect Client.app
to a permanent location. This le will be used every time you launch Remote Boost
3. Press the Control key, then click the
HP ZCentral Connect Client.app
4. Choose Open from the shortcut menu
5. Click Open
6.4.2. HP ZCentral Connect Client Already Installed
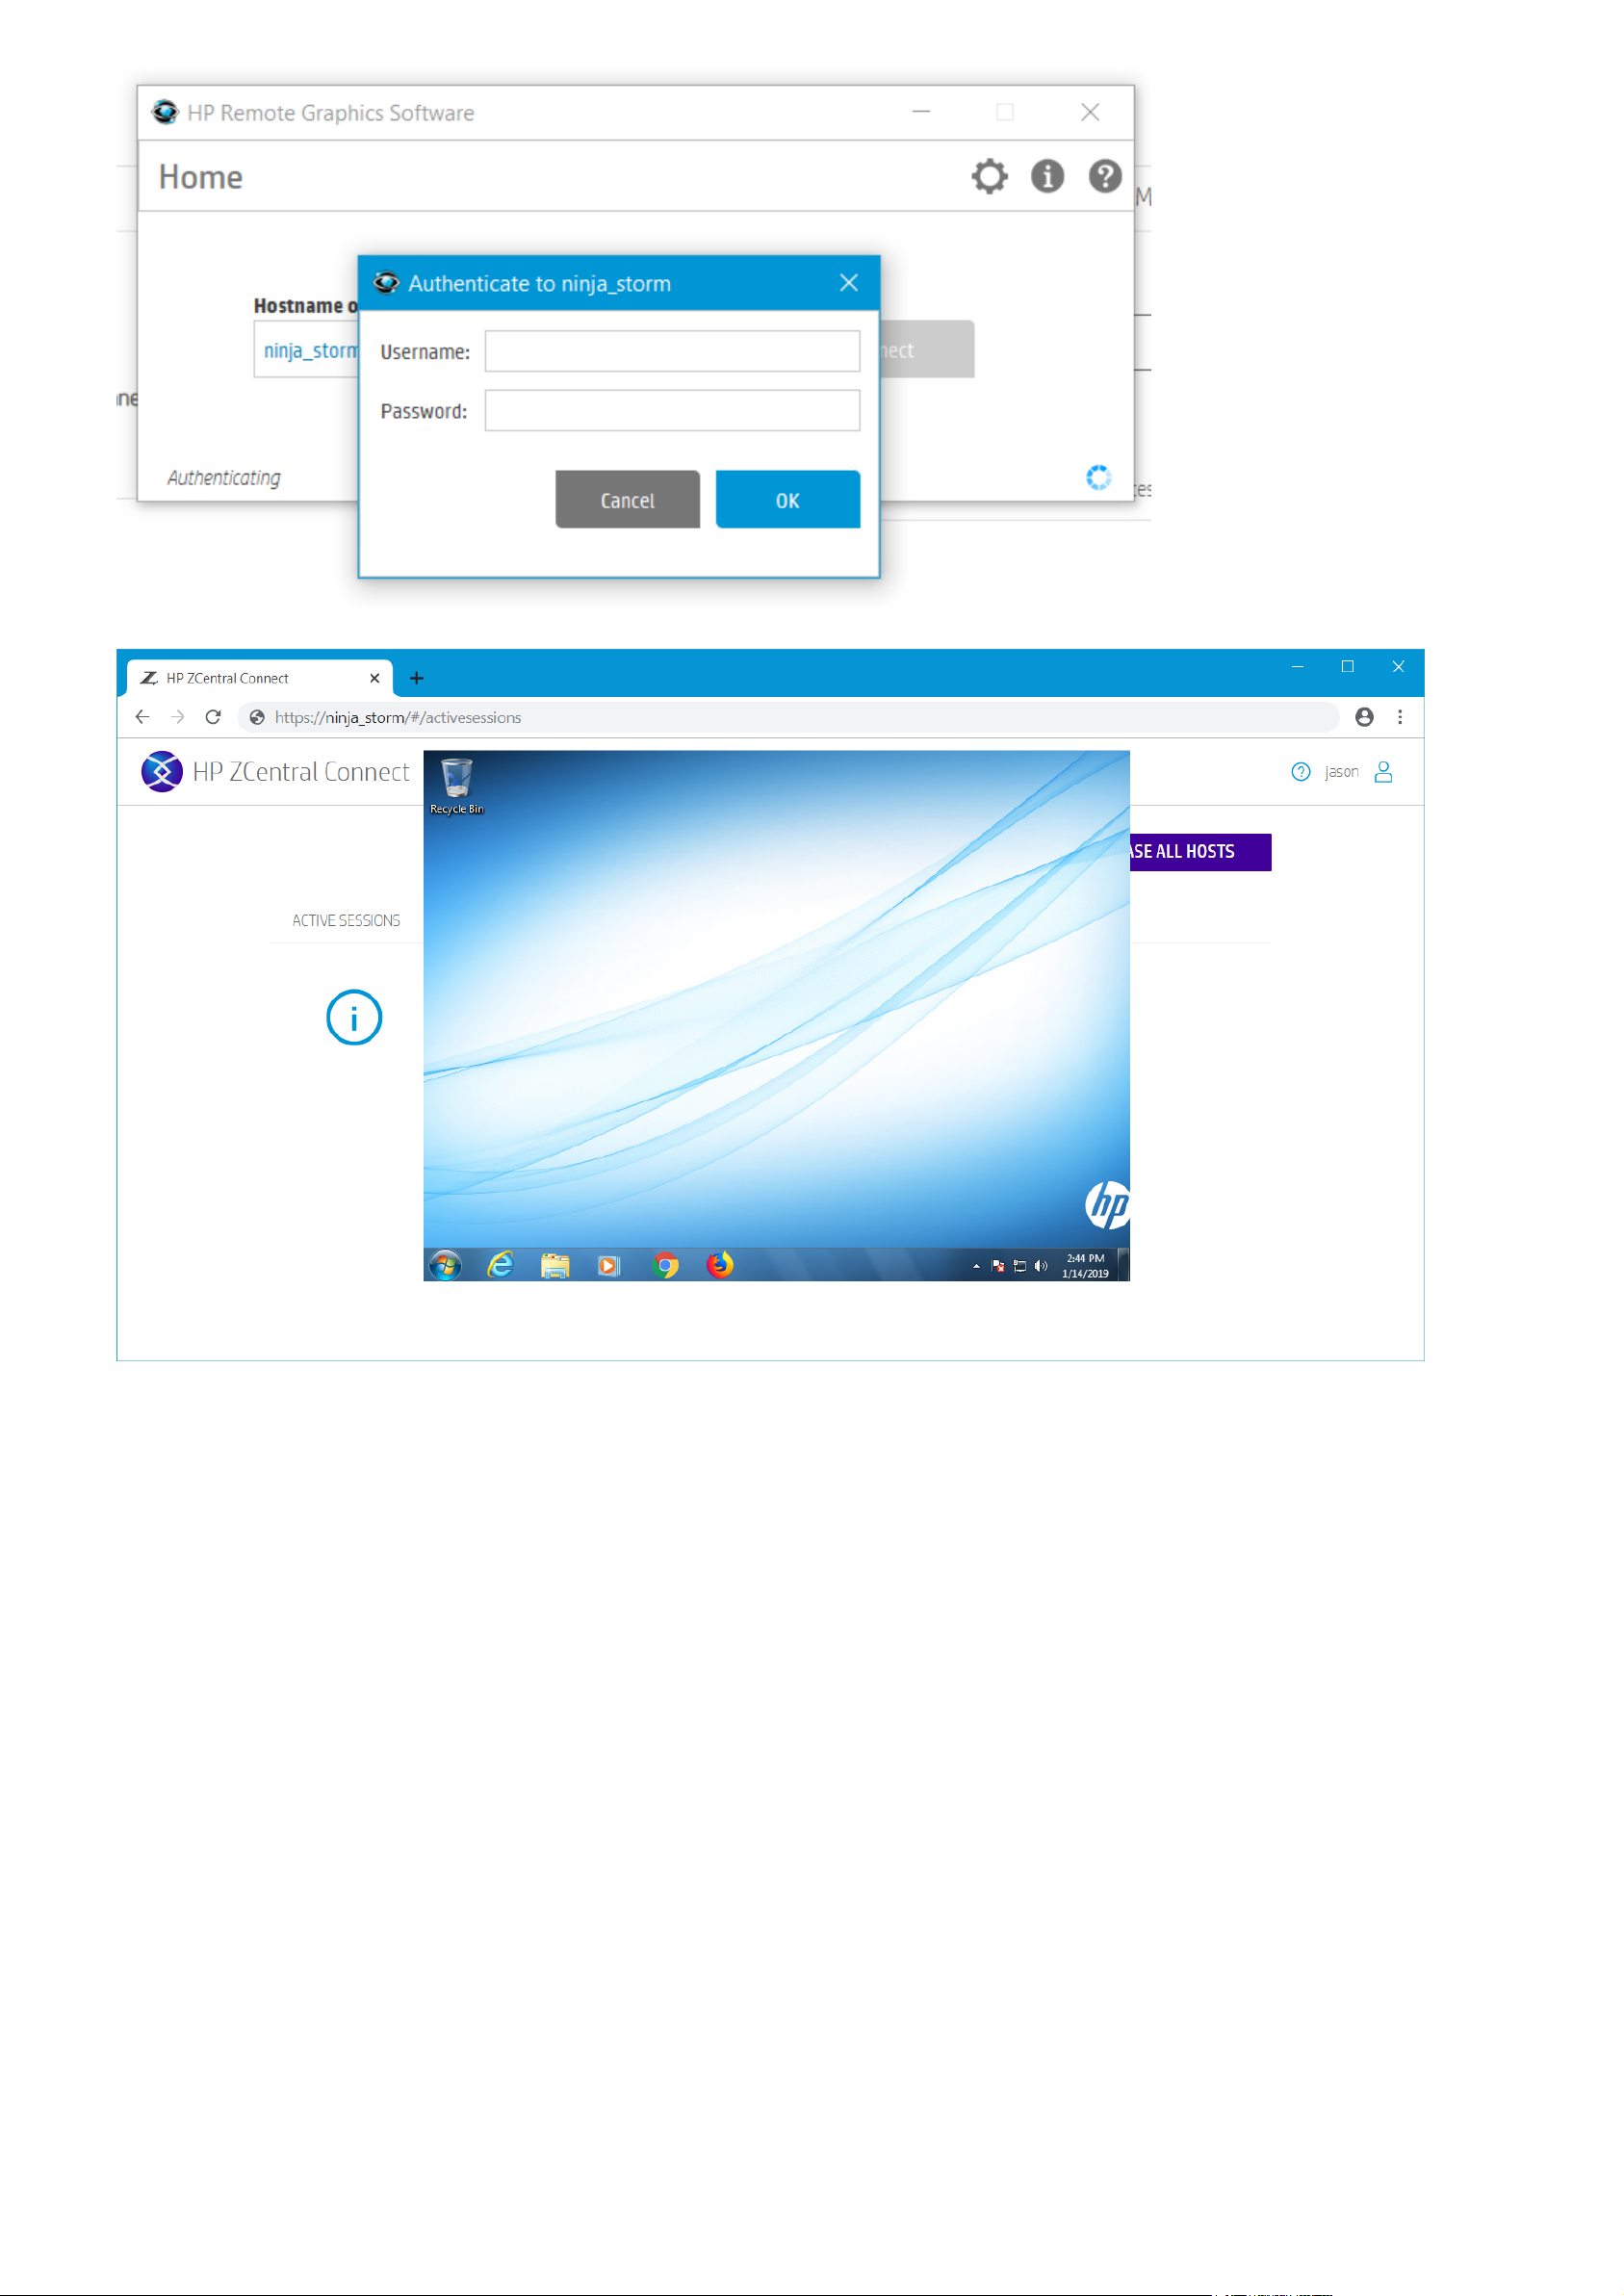
Once the ZCentral Connect Client is installed, Users can start a ZCentral Remote Boost connection by clicking the Launch Remote Boost button on the Administrator Portal or
Connect to Host button on the Client Portal. The Client will launch Remote Boost and start a remote connection to the assigned Host:
NOTE ZCentral Connect does not change any security policies related to the ZCentral Remote Boost connection. Single sign on and other authentication features are available as
Remote Boost features and can be congured using the Remote Boost user guide.
Page 26
Page 27
7. Licensing Guide
ZCentral Connect Manager licensing applies to the Manager software only. Complimentary software, ZCentral Connect Agent and ZCentral Connect Client can be installed and
used freely.
The license le is checked by the Manager software each time a User starts a new session with a Host. New sessions will be denied once the licensed maximum is reached. This
number is dened in the license le, denoted as "Qty=N". You can also view the maximum quantity your license allows in the About Section.
For information on how to download a free 60 day trial license supporting up to 5 connections, or for information on purchasing and renewing a license, please visit
hp.com/Zcentral.
7.1. Providing a hostname when purchasing a License to Use (LTU)
When you acquire a ZCentral Connect Manager license le, you will need to provide the server hostname where you intend to install and run the Manager on. To nd the
hostname of the server, type 'hostname' into a Windows Command Prompt.
The signature included in the license le reects the hostname that you provided. Changing the hostname within the license le to a different server's hostname will invalidate
the license key. If you need to change your Manager server hostname, contact the appropriate HP Regional License Center.
7.2. How to Install a License File for HP ZCentral Connect Software
The license le should be copied to the ZCentral Connect Manager data directory: %PROGRAMDATA%\HP\ZCentralConnectManager
If you have any issue with licensing, please read the Licensing section in the Troubleshooting page.
NOTE - The ZCentral Connect Agent and ZCentral Connect Client do not require a license le.
NOTE - License les must end with the .lic suffix
Page 28
8. Security Recommendations
Some precautions can be taken in your own environment to make ZCentral Connect as secure as possible. A few of them are listed here.
8.1 Use Single Sign On Authentication
To better protect end-user passwords, it is recommended that users authenticate through the ZCentral Connect Client Portal using the
Single Sign On
option, and not the
Credentials
option. Single Sign On will perform authentication using Kerberos, which will prevent the need for entering and transporting a password. In order for an end-user to
use Single Sign On, their device must be joined to the Active Directory domain used by the ZCentral Connect Manager. If it is not possible for a given device to be joined to the
domain, then
Credentials
will be the only available authentication option.
NOTE If you are having issues making Single Sign On function properly, please check the Client Single Sign On section of the Troubleshooting page for help.
8.2 Network Transport Security
8.2.1 TLS Protocols
ZCentral Connect software already uses the highest available TLS protocol and strongest ciphers offered by the operating systems it runs on. If older or outdated operating
systems exist in your environment, some network connections could be negotiated with lower TLS standards and potentially weaker ciphers. While it is not a requirement, it may
be desirable to limit the ZCentral Connect Manager to only accept connections using TLS 1.2, and to disable some vulnerable ciphers.
Because ZCentral Connect Manager uses network security settings determined by the operating system, some registry settings must be modied in order to change the behavior
of the Manager. It should be noted that editing the registry can cause harm to the operating system if not done correctly. Modifying these settings will impact all network
applications on the system that rely on the operating system to do SSL encryption. To minimize impacts on other programs, it's recommended that HP ZCentral Connect Manager
be the only major software on the host on which it resides. It is also good practice to backup any Windows registry before making modications to it. See Microsoft's instructions
here on how to perform a registry backup and restore.
NOTE Be aware that there is a known issue with Windows Agents where the installer cannot communicate with a ZCentral Connect Manager that only accepts TLS 1.2
connections. A special registry entry must be set on every Agent machine for the installer to work with TLS 1.2. Hence, disabling TLS 1.0 and 1.1 support for the ZCentral Connect
Manager will implicitly require that every Windows Agent have a special registry entry set.
NOTE If Intel AMT with a version lower than 12 is present in Workstations managed by ZCentral Connect, ensure that the system hosting the Manager supports TLS 1.1 for
outbound connections. Do not explicitly disable TLS 1.1 Client support or the SHA1 hash in the Windows registry settings. Be aware that the steps below only show how to
congure Server TLS support for inbound connections.
To limit accepted connections to TLS 1.2, please follow instructions from Microsoft here to disable TLS 1.0 and TLS 1.1, and enable TLS 1.2. If intermediate keys do not already
exist, they may need to be created. A summary of steps looks like this:
On the Manager machine:
1. Click on the start menu, search for the Registry Editor app and open it. Navigate to the path
[HKEY_LOCAL_MACHINE\SYSTEM\CurrentControlSet\Control\SecurityProviders\SCHANNEL\Protocols].
2. Under [HKEY_LOCAL_MACHINE\SYSTEM\CurrentControlSet\Control\SecurityProviders\SCHANNEL\Protocols\TLS 1.0], create a subkey called
Server and create a DWORD entry inside of it named Enabled. Make sure the value of Enabled is set to 0.
3. Do the same with [HKEY_LOCAL_MACHINE\SYSTEM\CurrentControlSet\Control\SecurityProviders\SCHANNEL\Protocols\TLS 1.1].
4. To pick up registry changes, please reboot the system.
At this point, these changes should be sufficient to disable TLS 1.0 and TLS 1.1 from being offered. Though it should not be necessary, it is also possible to explicitly enable TLS
1.2 protocol with the following steps:
1. Under [HKEY_LOCAL_MACHINE\SYSTEM\CurrentControlSet\Control\SecurityProviders\SCHANNEL\Protocols\TLS 1.2], create a subkey called
Server and create a DWORD entry inside of it called Enabled. Make sure the value of Enabled is set to 1.
2. To pick up registry changes, please reboot the system.
On the Agent machine:
To enable a Windows ZCentral Connect Agent installer to communicate with a TLS 1.2-limited Manager, please set the following registry entry on each Agent machine requiring
communication:
Under [HKEY_LOCAL_MACHINE\SOFTWARE\[Wow6432Node]\Microsoft\.NETFramework\v4.0.30319], create or modify the DWORD entry called
SystemDefaultTlsVersions to 1.
8.2.2 Disabling Weak Ciphers (Triple DES and RC4)
ZCentral Connect Manager depends on ciphers provided by the operating system to start its HTTPS server. If the operating system supports weak ciphers, the security of the TLS
communication for the Manager can be compromised. The following section contains notes for disabling the Triple DES and RC4 Ciphers which are the ciphers found by our
testing to be alternatively available on fresh installs of Windows Server 2016 and Windows Server 2019. See this guide from Microsoft for more information about enabling and
disabling ciphers.
NOTE Modifying the registry can cause harm to the operating system. See Microsoft's instructions here on how to perform a registry backup and restore.
To disable Triple DES on your Windows operating system, make the following registry change:
1. Click on the start menu, search for the Registry Editor app and open it. Navigate to the path
[HKEY_LOCAL_MACHINE\SYSTEM\CurrentControlSet\Control\SecurityProviders\SCHANNEL\Ciphers].
2. Under [HKEY_LOCAL_MACHINE\SYSTEM\CurrentControlSet\Control\SecurityProviders\SCHANNEL\Ciphers\Triple DES 168], create a
DWORD entry called Enabled and make sure its value is set to 0.
To disable RC4 ciphers on your Windows operating system, make the following registry changes:
Page 29
[HKEY_LOCAL_MACHINE\SYSTEM\CurrentControlSet\Control\SecurityProviders\SCHANNEL\Ciphers\RC4 128/128]
"Enabled"=dword:00000000
[HKEY_LOCAL_MACHINE\SYSTEM\CurrentControlSet\Control\SecurityProviders\SCHANNEL\Ciphers\RC4 40/128]
"Enabled"=dword:00000000
[HKEY_LOCAL_MACHINE\SYSTEM\CurrentControlSet\Control\SecurityProviders\SCHANNEL\Ciphers\RC4 56/128]
"Enabled"=dword:00000000
To pick up registry changes, please restart the HP ZCentral Connect Manager Service.
8.3. Do Not Use LocalSystem
HP recommends using either a Managed Service Account or AD account to host the Manager service rather than running the service as LocalSystem. Using an MSA improves
security in two ways:
The password for the MSA is never exposed to an end user. Only machine to machine interactions can retrieve and use the MSA password. Further, the Domain Controller
maintains and regularly rotates a strong password for the MSA.
The MSA can be granted only the permissions required to operate. Thus, the exposure of a system due to the compromise of the underlying service is limited by the
permissions of the MSA account (as compared to running as LocalSystem).
8.4. Admin Account Password
Requirements
To help secure the Administrator account, ZCentral Connect Manager has the following requirements for the password:
Must be between 12 and 128 characters
Must not begin or end with whitespace
Must not be found in a list of well-known passwords
During the installation of the Manager, as well as within the conguration utility and the UI, validation is performed to ensure these requirements are met.
Recommendations
In addition to the requirements it is best practice to follow the guidelines from NIST. The most recent guidelines can be found here.
8.5. Agent Data Folder Protection
ZCentral Agent installers will set data folder permissions to ensure they are administrator or root protected. These permissions are in place to prevent non-administrative read
and write access to application data les and should not be modied.
On Windows, the Agent will use additional security measures to protect Host information. If these measures are not available, you will see a warning written to the Agent log le
with a message that contains "There was an issue utilizing Microsoft's CNG api." If you receive this warning, please ensure your Window's OS is up to date. If the warning persists,
please contact HP Support.
Page 30

9. Backup and Restore
Execute the following steps to backup and restore ZCentral Connect Manager data.
NOTE The AMT passwords for hosts are encrypted in the Windows installation where ZCentral Connect Manager was originally deployed. Recovering backups on a different
Windows installation will require all AMT passwords to be re-entered by the Administrator. For more details, read the Known Issues and Limitations section in the
Troubleshooting page.
9.1. Create a Backup
1. Stop the
HP ZCentral Connect Manager
service using the Windows Service management console.
2. Save all les in the folder %PROGRAMDATA%\HP\ZCentralConnectManager.
3. Save the TLS certicate:
1. Right-Click on the Windows Button on the Windows taskbar and select Run.
2. Type
certmgr.msc
.
3. In the left panel, expand
Trusted Root Certication Authorities
>
Certicates
.
4. In the right panel, look for the certicate with the Friendly Name
HP ZCentral Connect Manager
and double-click it.
5. Access the
Details
tab and click
Copy to File
.
6. Follow the wizard to export your certicate to a le.
4. Restart the
HP ZCentral Connect Manager
service using the Windows Service management console.
9.2. Restore a Backup
NOTE If you are restoring a backup into a new installation of the Manager, rst Install the Manager and then proceed with the following steps.
NOTE Backups are not compatible between different versions of the Manager. You can only backup and restore from the same version of the Manager.
1. Stop the
HP ZCentral Connect Manager
service using the Windows Service management console.
2. Restore all the les saved from the backup to the %PROGRAMDATA%\HP\ZCentralConnectManager folder.
3. Restore the TLS certicate:
1. Double-click on the certicate le and click
Install Certicate
.
2. Select
Local Machine
.
3. In the next window, select
Place all certicates in the following store
and specify
Trusted Root Certication Authorities
as the target location for the certicate
import.
4. Finish the wizard.
5. Right-Click the Windows Button in the Windows taskbar and select Run.
6. Type
certmgr.msc
.
7. In the left panel, expand the
Trusted Root Certication Authorities
>
Certicates
8. In the right panel, look for the certicate that was just imported using the columns
Issued To
and
Issued By
. Find the certicate that matches the hostname
used when the Manager was deployed.
9. Open the properties for the certicate and set its friendly name to:
HP ZCentral Connect Manager
.
10. Double-click the certicate and access the
Details
tab. Scroll down to the thumbprint value.
4. Check the Manager conguration le:
1. Access the folder %PROGRAMDATA%\HP\ZCentralConnectManager.
2. Open the le settings.json.
3. Check if the
Hostname
and
Port
properties match the values of the current computer. Adjust the values if necessary.
4. Check if the
CerticateThumbprint
property value matches with the thumbprint of your certicate. Adjust the value if necessary.
5. Restart the
HP ZCentral Connect Manager
service using the Windows Service management console.
Page 31

10. Uninstallation
To uninstall the Manager, please press Win + R and type
appwiz.cpl
. That will open the
Add or Remove programs
window. Search for the
HP ZCentral Connect Manager
entry
and follow the normal uninstallation procedure.
NOTE Uninstalling the Manager will not affect client machines or managed workstations.
NOTE The Manager data will not be removed during uninstallation. All Manager data will remain in the %PROGRAMDATA%\HP\ZCentralConnectManager folder.
Page 32

11. Known Issues and Limitations
Please read the Known Issues and Limitations section at the Troubleshooting page.
(c) Copyright 2018-2020 HP Development Company, L.P.
 Loading...