

Page 1

HP VISUALIZE Linux Workstation
User’s Guide
XL-Class Workstations
Printed in USA September 1999
Manufacturing Part Number: A1297-90000
Edition E0999
© Copyright 1999 Hewlett-Packard Company
Page 2

Legal Notices
The information contained in this document is subject to change without
notice.
Hewlett-Packard makes no warranty of any kind with regard to this
material, including, but not limited to, the implied warranties of
merchantability and fitness for a particular purpose. Hewlett-Packard
shall not be liable for errors contained herein or for incidental or
consequential damages in connection with the furnishing, performance,
or use of this material.
Hewlett-Packard assumes no responsibility for the use or reliability of its
software on equipment that is not furnished by Hewlett-Packard.
This document contains proprietary information that is protected by
copyright. All rights reserved. No part of this document may be
photocopied, reproduced or translated to another language without the
prior written consent of Hewlett-Packard Company.
Trademark Acknowledgments
Adobe® Reader © 1987-1999 Adobe Systems Incorporated. All rights
reserved. Adobe and Acrobat are trademarks of Adobe Systems
Incorporated.
Red Hat® , the Red Hat “Shadow Man” logo, RPM, Maximum RPM, the
RPM logo, Linux Library, PowerTools, Linux Undercover, RHmember,
RHmember More, Rough Cuts, Rawhide and all Red Hat-based
trademarks and logos are trademarks or registered trademarks of
RedHat, Inc. in the United States and other countries.
Linux® is a registered trademark of Linus Torvalds.
Netscape® is a trademark of Netscape Communications Corporation.
PentiumTM is a trademark of Intel Corporation.
HP Printing Division:
Hewlett-Packard Company 3404 E. Harmony Road Fort Collins, CO 80528-9599 USA
ii
Page 3

IMPORTANT HP Linux Warranty Information
HP has made every effort to ensure the accuracy of our
product testing. However, because each customer’s
environment is different from HP’s laboratory test
environment, it is the customer’sresponsibilityto validate the
Year 2000 readiness of these products in their own
environment. Therefore, information about the Year 2000
status of HP products is provided “as is” without warranties of
any kind and is subject to change without notice. The
information provided here constitutes a Year 2000 Readiness
Disclosure for purposes of the Year 2000 Information and
Readiness Disclosure Act.
Hewlett-Packard makes no representation or warranty about
the Year 2000 readiness of non-HP products including
pre-installed operating systems or application software. Such
information, if any, was provided by the manufacturers of
those products and customers are urged to contact the
manufacturer directly to verify Year 2000 readiness.
ATTENTION: DUE TO THE NATURE OF LINUX
SOFTWARE, HP PROVIDES LINUX SOFTWARE “AS IS”
AND WITHOUT ANY WARRANTY WITH RESPECT TO
YEAR 2000 COMPLIANCE. LINUX MAY REQUIRE
CUSTOMER INSTALLATION OF SOFTWARE PATCHES
FOR YEAR 2000 COMPLIANCE AND MAY REQUIRE
ADDITIONAL PATCHES IN THE FUTURE. FOR RED
HAT
®
LINUX, CUSTOMER IS URGED TO FREQUENTLY
REVIEW THE RED HAT WEB SITE FOR THE LATEST
YEAR 2000 INFORMATION AT:
http://www.redhat.com
iii
Page 4

iv
Page 5

Contents
v
Page 6

Chapter 1 Setting Up and Using Your
HP Visualize Linux Workstation 1
Unpacking Your HP Visualize Linux Workstation............................................... 2
Connecting the Mouse, Keyboard, Display and Printer ........................................ 4
Connecting to a Network....................................................................................... 5
Connecting Audio Accessories.............................................................................. 6
Connecting an External SCSI Accessory............................................................... 7
Connecting the Power Cords ................................................................................. 9
The MaxiLife Control Panel................................................................................ 10
Starting and Stopping Your HP Visualize Linux Workstation............................ 11
Starting Your Workstation for the First Time................................................ 11
Initializing Your Software ............................................................................. 11
Creating a Rescue Disk Set............................................................................ 12
Stopping Your HP Visualize Linux Workstation .......................................... 13
Additional Information and Help............................................................. 13
Setting BIOS Passwords...................................................................................... 14
Setting a Password......................................................................................... 14
Chapter 2 How to Install Accessories In Your HP Visualize Linux Workstation ... 15
Supported HP Accessories................................................................................... 16
Removing and Replacing the Cover.................................................................... 17
Removing the Cover...................................................................................... 17
Replacing the Cover....................................................................................... 18
Removing and Replacing the Airflow Guide....................................................... 19
To Replace the HP UltraFlow Airflow Guide ............................................... 19
Installing Mass Storage Devices.......................................................................... 20
Connecting Devices....................................................................................... 20
Installing Drivers and Utilities............................................................................. 22
Chapter 3 Troubleshooting Your HP Visualize Linux Workstation ........................ 23
Using HP MaxiLife to Diagnose Problems ......................................................... 24
Other Features................................................................................................ 25
If Your HP Visualize Linux Workstation Does Not Start Properly..................... 28
Display is Blank and There Are No Error Messages..................................... 28
If Your HP Visualize Linux Workstation Has a Hardware Problem................... 33
Display Does Not Work Properly.................................................................. 33
Troubleshooting Accessories on the HP Visualize Linux Workstation......... 34
If Your Keyboard Does Not Work................................................................. 34
vi
Page 7

If Your Mouse Does Not Work ..................................................................... 35
Recovering Your HP Visualize Linux Workstation’s Operating System............ 36
Chapter 4 Hewlett Packard Support and Information Services................................ 37
Introduction.......................................................................................................... 38
Your HP-Authorized Reseller.............................................................................. 39
Hewlett-Packard Information Services................................................................ 40
HP World Wide Web Site ............................................................................. 40
Hewlett-Packard Telephone Support................................................................... 41
Lifeline Telephone Support ................................................................................. 43
Summary.............................................................................................................. 44
Declaration of Conformity................................................................................... 46
Regulatory Information........................................................................................ 47
FCC (for USA only)....................................................................................... 47
HP Hardware Warranty........................................................................................ 50
Three Year Limited Hardware Warranty....................................................... 50
Limitation of Warranty.................................................................................. 51
Obtaining On-Site Warranty Service............................................................. 52
Customer Responsibilities ............................................................................. 53
Obtaining Parts Warranty Service ................................................................. 53
HP Telephone Support Services .................................................................... 53
HP Software Product License Agreement and
Software Product Limited Warranty.............................................................. 54
HP Software Product License Agreement ..................................................... 54
HP Software Product Warranty ..................................................................... 56
vii
Page 8

viii
Page 9

Preface
This owner’s guide describes how to use your HP VISUALIZE Linux
XL-Class Workstation. This Workstation features the Red Hat Linux
Operating System, pre-installed by Hewlett-Packard.
The HP VISUALIZE Linux Workstation is designed to perform
simulations, formal verification, and other high-end computation tasks.
ix
Page 10

It provides the computing power of one or two 550MHz Intel Pentium III
Xeon processors with 512KB of high-speed cache. It is equipped with
dual SCSI controllers, single or dual 9GB internal discs, supports up to
1GB of system memory, and the ELSA GLoria Synergy+ graphics
subsystem.
Red Hat Linux is apopular open source operating systemthat gives you
the ability to develop custom tools and applications or select from a
growing number of commercial software and freeware solutions.
Special Notice for Users
The HP VISUALIZE Linux Workstation is made from a combination of
high performance Industry Standard components (for example, the Intel
Pentium III Xeon processor), popular HP value-added technologies and
the Red Hat Linux Operating System. The HP VISUALIZE Linux
Workstation also shares some important technologies with the HP
Kayak Workstations, including certain processor system board features.
Since these common technologies are used by the HP VISUALIZE Linux
Workstationsand the HP Kayak Workstations, your HP VISUALIZE Linux
Workstation will occasionally make reference to “HP Kayak PC
Workstations,” “HP Kayak XU,” or “HP Kayak XW.” This is particularly
true during the initial Power-On Self Test and when you see MaxiLife
LCD messages.
Audience
This guide is intended for HP VISUALIZE Linux Workstation users who want to:
• Set up the HP VISUALIZE Linux Workstation for the first time.
• Configure the HP VISUALIZE Linux Workstation.
• Troubleshoot problems on the HP VISUALIZE Linux Workstation.
• Add accessories to the HP VISUALIZE Linux Workstation.
• Find out where to get more information and support.
x
Page 11

Important Safety Information
WARNING If you have any doubt that you can lift the HP VISUALIZE Linux
Workstation or display safely, do not try to move it without help.
For your safety, always connect the equipment to a grounded
wall outlet. Always use a power cord with a properly grounded
plug, such as the one provided with this equipment, or one in
compliance with you national regulations. This HP VISUALIZE
Linux Workstation is disconnected from the power by removing
the power cord from the power outlet. This means the HP
VISUALIZE Linux Workstation must be located close to a power
outlet that is easily accessible.
For your safety, never remove the HP VISUALIZE Linux
Workstation’s cover without first removing the power cord from
the power outlet, and any connection to the telecommunications
network. Always replace the cover on the workstation before
switching it on.
To avoid electric shocks, do not open the power supply. There are
no user-serviceable parts inside.
This HP VISUALIZE Linux Workstation is a class 1 laser product.
Do not attempt to make any adjustment to the laser units.
Important Ergonomic Information
It is strongly recommended that you read the ergonomic information
before using you HP VISUALIZE Linux Workstation.
xi
Page 12

Installation Notice
Products designated in the applicable Hewlett-Packard price list as
customer-installable can be installed by computer-knowledgeable
customers who carefully read and follow the instructions provided.
Customers who elect to have the product installed by our field personnel
are charged the applicable field installation charge, as covered under the
standard terms and conditions. For more information, please contact
your local sales representative.
Revision History
The revision history for each edition of the manual is listed below: Edition Revision History E0999 First Printing
Problems, Questions, and Suggestions
If you have any problems or questions with our hardware, software, or
documentation, please contact either your HP Response Center or your
local HP representative. If you have access to a web browser, you can get
the latest software and hardware patches at the following URL:
http://us-support.external.hp.com/
For further information about HP Linux program:
http://www.hp.com/visualize/products/linux
For more information about the Red Hat Operating System, see:
http://www.redhat.com
xii
Page 13

Documentation Conventions
Unless otherwise noted in the text, this guide uses the following symbolic conventions.
user-supplied values
screen display Information that the system displays, commands that
Enter Keycaps are presented with a special keycap font as
Italic words or characters in syntax and command
descriptions represent values that you must supply.
Italics are also used in text for emphasis.
you must use literally, and path names appear in this
typeface.
shown in the left column. (In this document, we refer to the Enter key. On your keyboard, the key may be labeled either Enter or Return.)
Electrostatic Discharge (ESD) Precautions
Electrostatic charges can damage the integrated circuits on printed
circuit boards. To prevent such damage from occurring, observe the
following precautions during board unpacking and installation:
• Stand on a static-free mat.
• Wear a static strap to ensure that any accumulated electrostatic
charge is discharged from your body to ground.
• Create a common ground for the equipment you are working on by
connecting the static-free mat, static strap, and peripheral units to
that piece of equipment.
• Keep uninstalled printed circuit boards in their protective antistatic bags.
• Handle printed circuit boards by their edges, once you have removed
them from their protective antistatic bags.
xiii
Page 14

xiv
Page 15

1 Setting Up and Using Your
HP VISUALIZE Linux Workstation
1
Page 16
Setting Up and Using Your HP Visualize Linux Workstation
Unpacking Your HP Visualize Linux Workstation
Unpacking Your HP Visualize Linux
Workstation
WARNING If you are in any doubt that you can lift the HP VISUALIZE Linux
Workstation and the display safely, do not try to move them
without help.
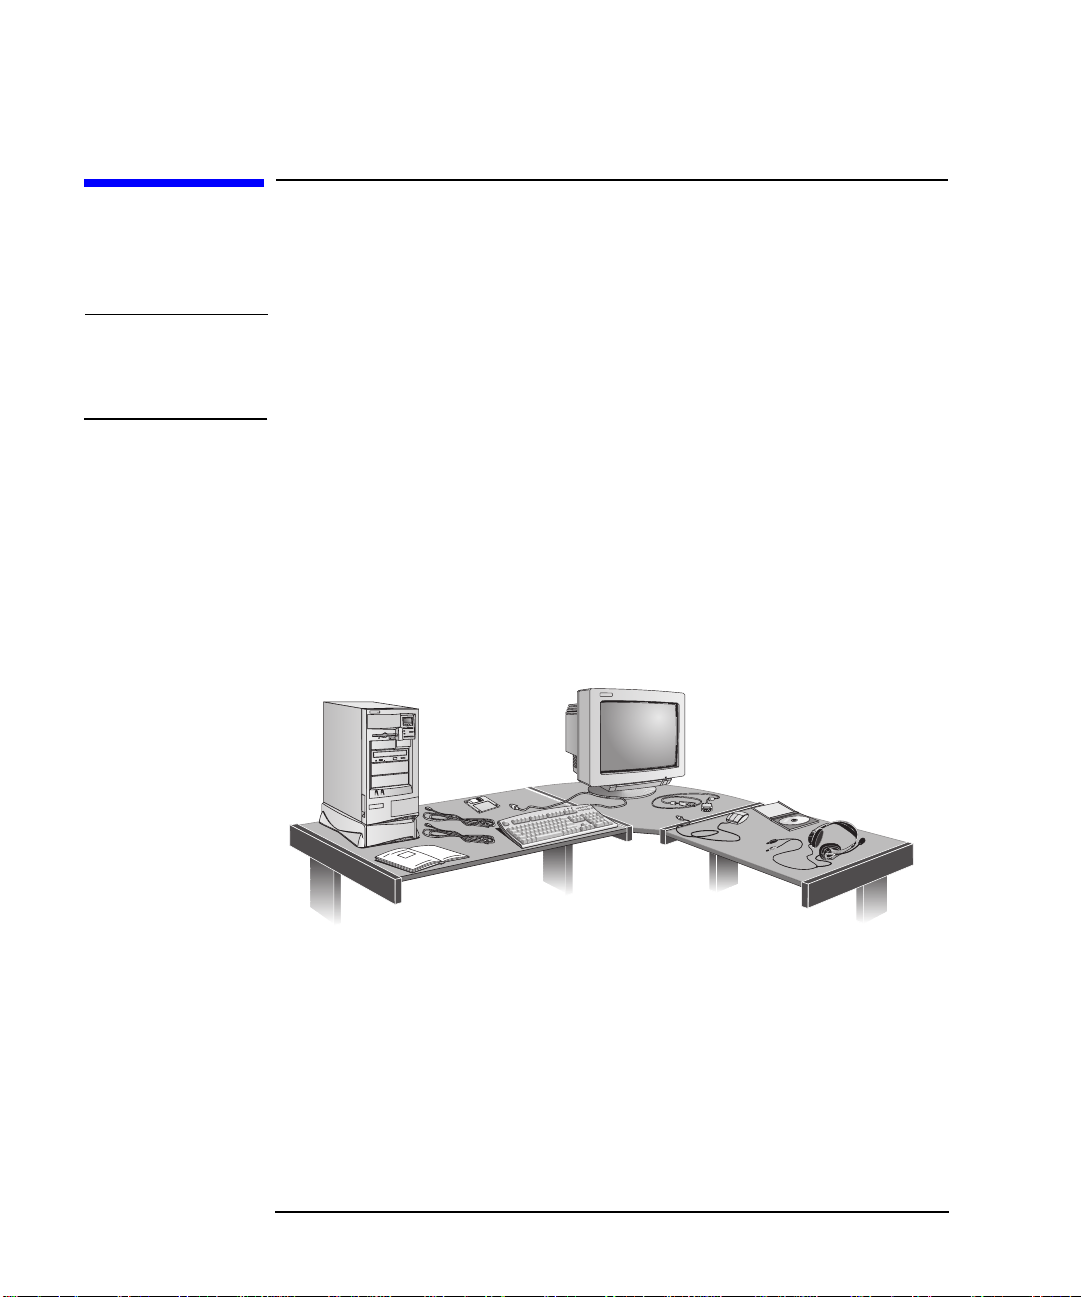
1. When you receive your Workstation, unpack all of the components:
˘ Computer and power cords
˘ Display and its video cable
˘ HP keyboard, mouse and headphones
˘ Manuals, Diskettes and CD-ROMs.
2. Place the HP VISUALIZE Linux Workstation on a sturdy desk with
easily accessible power outlets and enough space for the keyboard,
mouse, and any other accessories.
3. Position the HP VISUALIZE Linux Workstation so that its rear connectors are easily accessible.
4. Place the display next to the computer.
2 Chapter1
Page 17

Setting Up and Using Your HP Visualize Linux Workstation
Unpacking Your HP Visualize Linux Workstation
Installation Tools No tools are required to install your HP VISUALIZE Linux Workstation.
However, if you plan to install a disk drive or an accessory board inside
your workstation, you will need a flat-blade screwdriver. For more
information on installing accessories, refer to the chapter “How to Install
Accessories In Your HP VISUALIZE Linux Workstation.”
Chapter 1 3
Page 18

Setting Up and Using Your HP Visualize Linux Workstation
Connecting the Mouse, Keyboard, Display and Printer
Connecting the Mouse, Keyboard, Display and
Printer
Connect the mouse, keyboard, display and printer to the back of the HP
VISUALIZE Linux Workstation. Theconnectors are shaped to go in one way
only. Tighten the display cable attachment screws.
Serial
Port A
Parallel
Connector
Monitor
Connector
Serial
Port B
Mouse
Connector
Keyboard
Connector
4 Chapter1
Page 19
Setting Up and Using Your HP Visualize Linux Workstation
Connecting to a Network
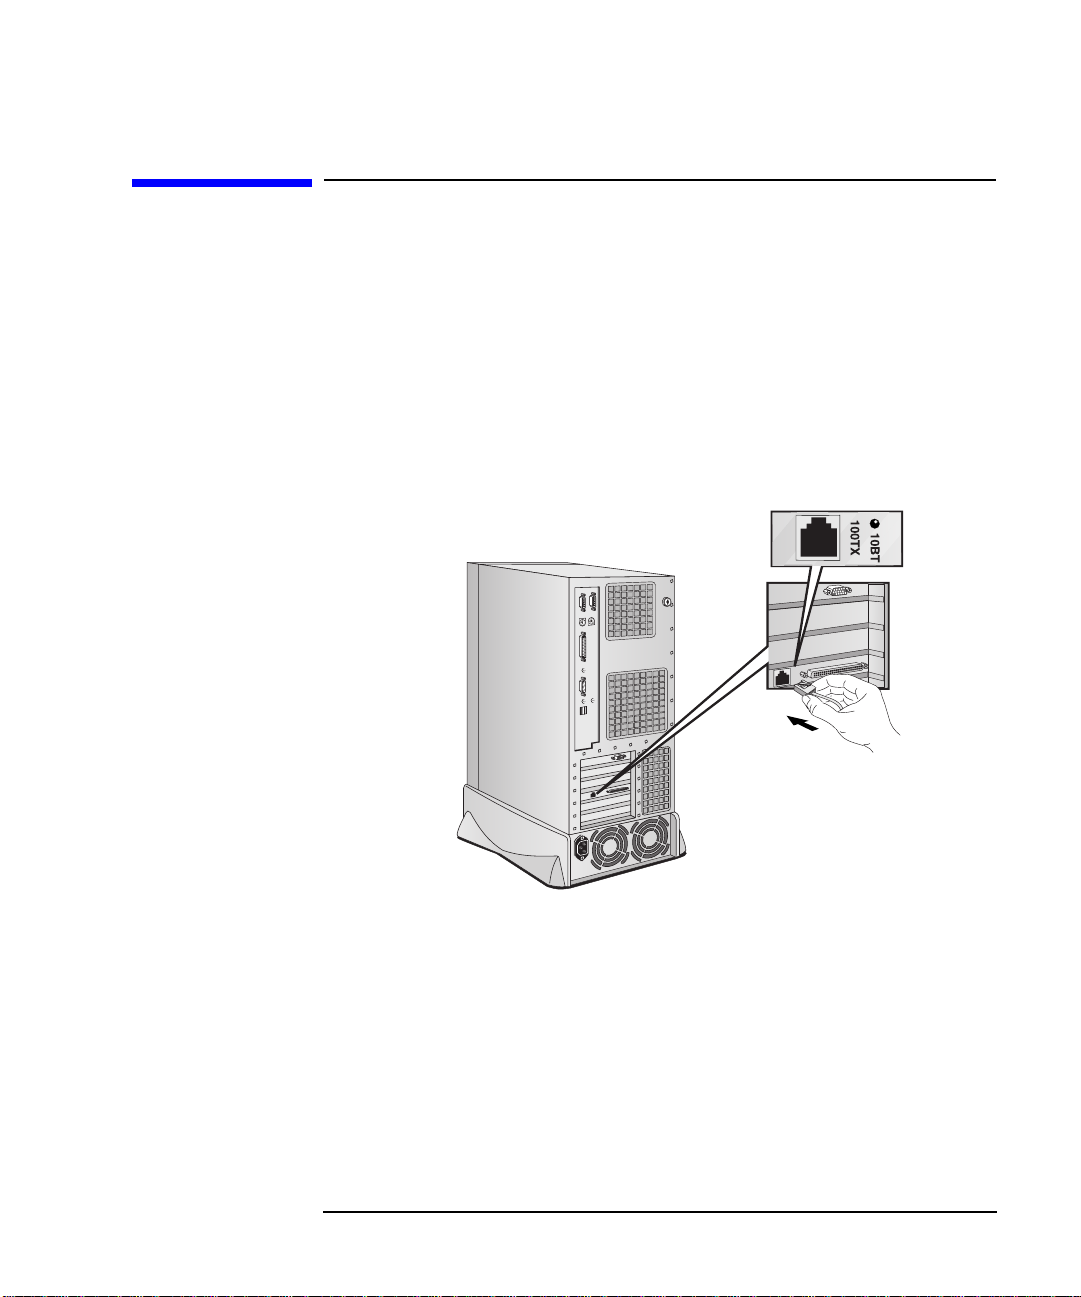
Connecting to a Network
Your HP VISUALIZE Linux Workstation has a 10/100BT LAN interface adapter.
The LAN adapter supports both 10 Mbit/s and 100 Mbit/s operations and
automatically detects which network type is being used.
1. Connect the RJ-45 plug on your network cable to the LAN connector
on the LAN Adapter. Push the plug into the connector until the plug
clicks into place.
The board shown
here is a combined
SCSI/LAN board.
2. Attach the other end of the LAN cable to a hub (or into a wall socket
that is connected to a hub).
Let your Network Administrator know that you are connecting your
HP VISUALIZE Linux Workstation to the network.
For further instructions on configuring your network connection,
refer to the Upgrade and Configuration Guide available on HP’s Web
site.
Chapter 1 5
Page 20
Setting Up and Using Your HP Visualize Linux Workstation
e
o
e
n
Connecting Audio Accessories
Connecting Audio Accessories
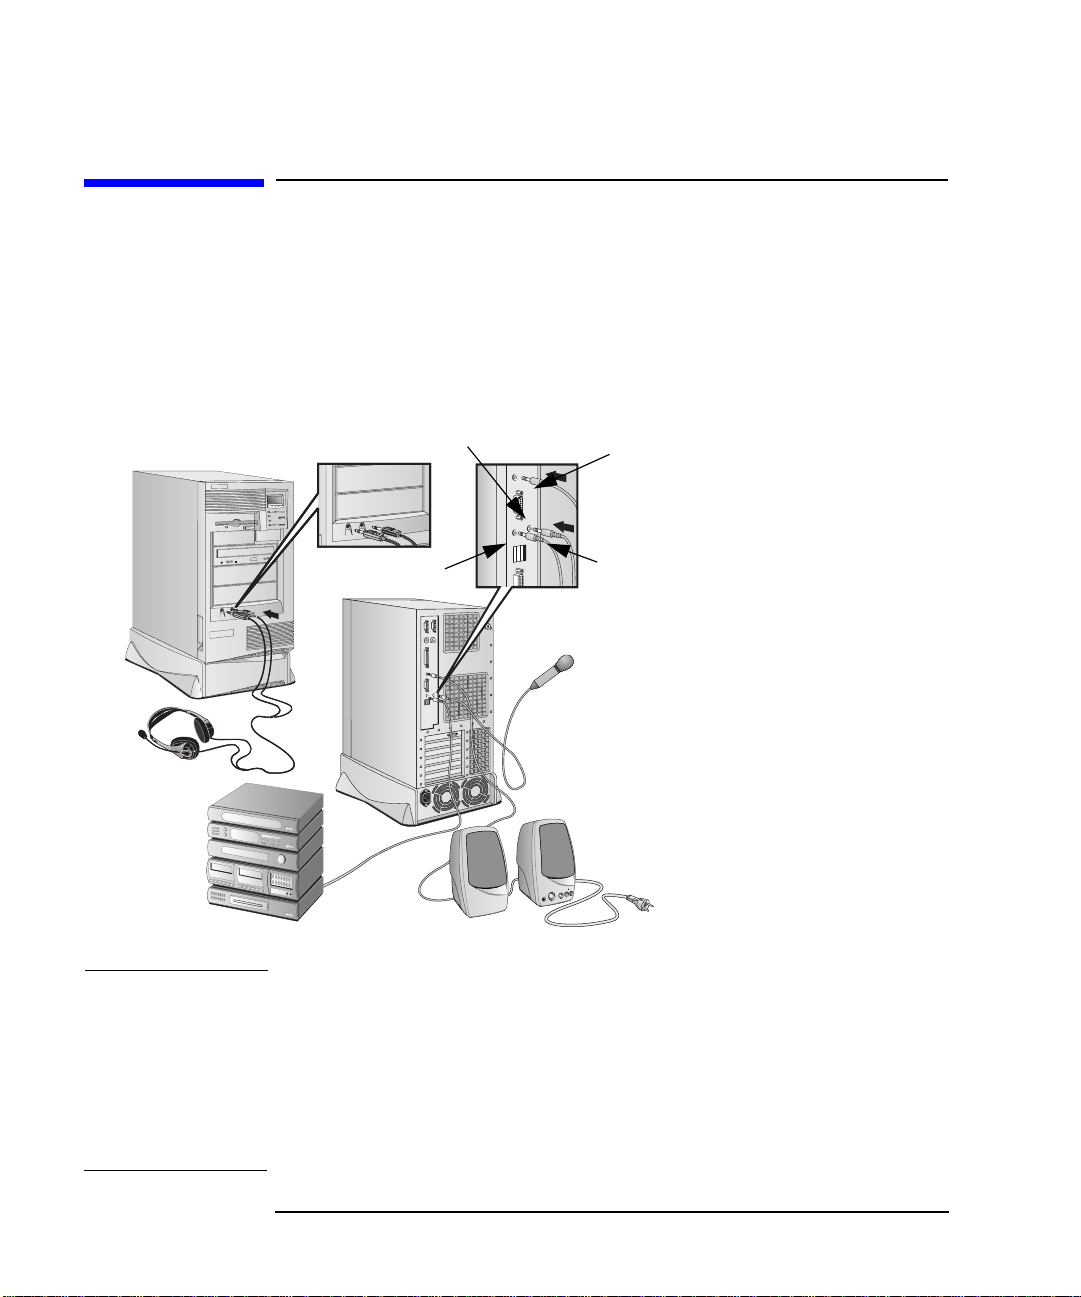
Your HP VISUALIZE Linux Workstation has a Headphone Out jack and a
Microphone In jack on the Audio Front Panel. A LINE IN jack, LINE
OUT jack, MIC IN jack, and MIDI/Joystick connector are located on the
rear panel.
NOTE:
The internal speaker and
LINE OUT jack on the rear
panel of your Linux
Personal Workstation are
deactivated when you use th
Headphones jack on the Audi
Front Panel.
The internal speaker is
deactivated when you use th
LINE OUT jack.
External speakers you
connect should have a built-i
power supply.
The audio accessories shown
here (microphone, speakers,
and audio system) are not
supplied with your
workstation.
Volume can be controlled
through the HP software
volume contr
ol.
Audio Front
Panel
Dual
MIDI/Joystick
connector
LINE IN
LINE OUT jack
MIC IN
WARNING To avoid discomfort from unexpected noise, always turn down
the volume before connecting headphones or speakers. Listening
to loud sounds for prolonged periods may permanently damage
your hearing. Before putting on headphones, turn down the
volume. When you put on the headphones, slowly increase the
volume until you find a comfortable listening level, then leave
the volume control in that position.
6 Chapter1
Page 21
Setting Up and Using Your HP Visualize Linux Workstation
Connecting an External SCSI Accessory
Connecting an External SCSI Accessory
An external SCSI device can be connected as follows:
1. You should assign an unused SCSI ID to the device. SCSI IDs range
from 0 to 15 for wide 16-bit SCSI devices. Generally, the SCSI ID 0 is
reserved for the first SCSI hard disk drive and SCSI ID 7 is reserved
for the SCSI controller (the default for narrow and wide SCSI
devices).
NOTE You don’t need to set a SCSI ID for Plug and Play SCSI devices (SCSI
devices that support the SCAM protocol).
2. Make sure the SCSI device is terminated correctly—either internally
or by a terminating resistor (refer to the manual provided with the
SCSI device).
3. Connect the SCSI device to your HP VISUALIZE Linux Workstation’s
external 16-bit SCSI connector with a shielded SCSI cable.
Step 2: Make
sure the SCSI
device is
terminated
Step 3: Connect
SCSI device to
your workstation
Chapter 1 7
Page 22

Setting Up and Using Your HP Visualize Linux Workstation
Connecting an External SCSI Accessory
4. Refer to the manual provided with the SCSI device to learn how to
install any software that may be necessary to use it.
NOTE The total length of the external SCSI cables should not exceed 3 meters
(approximately 10 feet).
8 Chapter1
Page 23
Setting Up and Using Your HP Visualize Linux Workstation
Connecting the Power Cords
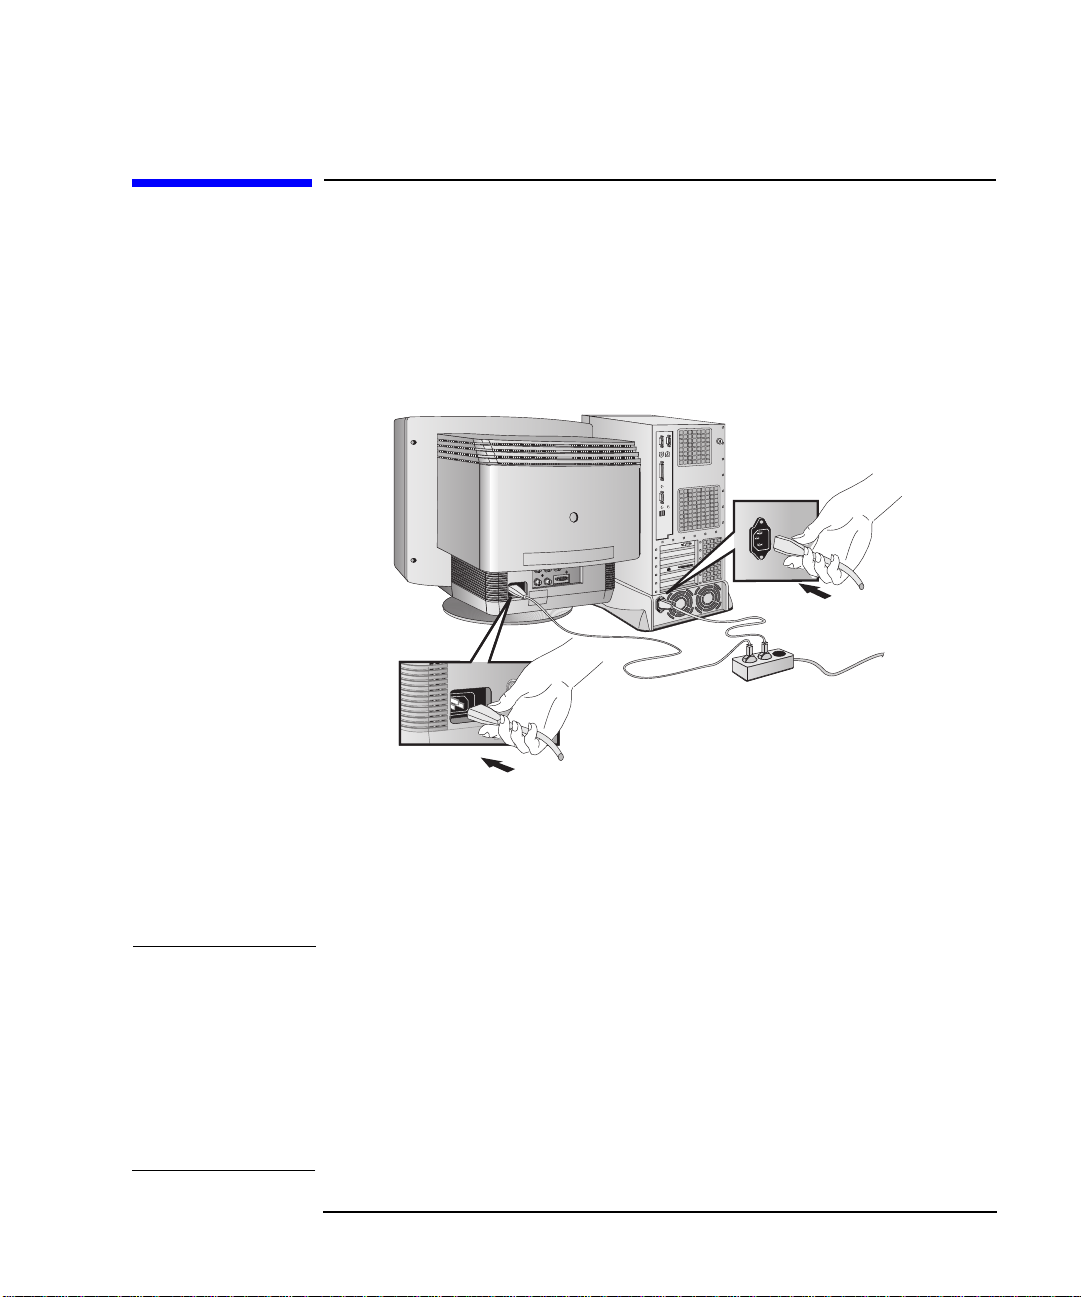
Connecting the Power Cords
1. Remove any warning labels that may be covering the computer’s
power connector on the rear of the computer.
2. Connect the power cords to the display and the computer. (The
connectors are shaped to go in one way only.)
Workstation
Power
Grounded Outlet
Display Power
3. Connect the display’s power cord and the computer’s power cord to grounded outlets.
WARNING For your safety, always connect the equipment to a grounded
wall outlet. Always use a power cord with a properly grounded
plug, such as the one provided with this equipment, or one in
compliance with your national regulations. This HP VISUALIZE
Linux Workstation is disconnected from the power by removing
the power cord from the power outlet. This means the HP
VISUALIZE Linux Workstation must be located close to a power
outlet that is easily accessible.
Chapter 1 9
Page 24

Setting Up and Using Your HP Visualize Linux Workstation
O
The MaxiLife Control Panel
The MaxiLife Control Panel
The MaxiLife panel is located on the front of your HP VISUALIZE Linux Workstation.
HP MaxiLife and
its Liquid Crystal
Display (LCD)
Hard Disk Activity Light
Network Activity Light
HP MaxiLife and its LCD screen helps you diagnose problems with your
HP VISUALIZE Linux Workstation and provides system information you
may need to obtain support. Press one of the LCD control buttons to
display the menu. Use to scroll through the menu items and to
select the item required. For more information on using the LCD, refer to
the section “Using HP MaxiLife to Diagnose Problems” in the chapter
“Troubleshooting Your HP VISUALIZE Linux Workstation.”
LCD Control Buttons
Power On/
Button and
LED
Reset Button
Lock Button
and LED
Network Activity
Light
Hard Disk Activity
Light
This light glows/flickers when your HP VISUALIZE Linux Workstation is
accessing the network.
This light glows/flickers when your hard disk drive is being accessed.
10 Chapter1
Page 25

Setting Up and Using Your HP Visualize Linux Workstation
Starting and Stopping Your HP Visualize Linux Workstation
Starting and Stopping Your HP VISUALIZE Linux Workstation
Starting Your Workstation for the First Time
Your HP VISUALIZE Linux Workstation has preinstalled Red Hat Linux
and HP software. It is initialized the first time you start the HP
VISUALIZE Linux Workstation. The software initialization process takes a
few minutes. Upon startup, you will see the screen depicted below. Fill-in
the information requested.
Initializing Your Software
NOTE Do NOT switch OFF the HP VISUALIZE Linux Workstation while the
software is being initialized—this could cause unexpected results.
Chapter 1 11
Page 26

Setting Up and Using Your HP Visualize Linux Workstation
Starting and Stopping Your HP Visualize Linux Workstation
To initialize your software:
1. Turn on the display first, and then the HP VISUALIZE Linux
Workstation.
When you switch on the computer, it carries out the Power-On-Self-Test
(POST). If you wish to view the POST details, press to get the HP
Summary Screen. If there is an error in the POST, the error will
automatically be displayed. For details, see the section “If a POST Error
Message is Displayed” in the chapter “Troubleshooting Your HP
Visualize Linux Workstation.”
If you have set a password in the Workstation’s Setup program, the
password prompt displays after the POST has completed. If the
Password prompt is displayed, type your password and press
to be able to use the Workstation.
Creating a Rescue Disk Set
During the initialization of your software, it is very important that you
create a Rescue Disk Set for the operating system, when prompted. HP
recommends that you use new diskettes for this purpose.
To create these back-up diskettes, follow instructions that appear in the
HP Linux Setup and Recovery Guide (HP Part Number A1297-90010)
that is included with your Workstation.
12 Chapter1
Page 27

Setting Up and Using Your HP Visualize Linux Workstation
Stopping Your HP VISUALIZE Linux Workstation
To stop the workstation (when running an operating system), first make
sure that you have exited all applications and then use your operating
system’s shutdown command. Then press the power button on your
Workstation’s control panel. If you stop the workstation without
following these instructions, data loss or a damaged file system
may result.
Additional Information and Help
After completing the Setup Program and rebooting, your Workstation
will launch a special “Getting Started” program (see above) that will
provide access to several on-line documents and manuals. This program
will guide you to additional information regarding the Red Hat and HP
software.
Chapter 1 13
Page 28

Setting Up and Using Your HP Visualize Linux Workstation
Setting BIOS Passwords
Setting BIOS Passwords
You can set two BIOS passwords, the Hardware Administrator (or
Supervisor) password and the Hardware User password, to provide two
levels of protection for your HP VISUALIZE Linux Workstation. You set
both passwords using the Security menu in the Setup program (refer to
the section “The HP BIOS Summary Screen and Setup Program” in the
chapter “Troubleshooting Your HP VISUALIZE Linux Workstation”).
Setting a Password
To set a Hardware Administrator or User password:
1. Start the BIOS Setup program (refer to the section “The HP BIOS Summary Screen and Setup Program” in the chapter “Troubleshooting Your HP VISUALIZE Linux Workstation”).
2. Select the Security menu.
3. Select the Administrator or User password submenu.
4. Choose the Set Administrator or User password setup item. You will
be asked to enter your password twice.
5. To save your changes and exit the Setup program press or select Exit Menu, then Exit Saving Changes.
To remove the password, follow the same procedure as to set a password.
You will be asked to enter the existing password first. Then, for the new
password, leave the password field blank and press . To confirm
your choice, press a second time.
14 Chapter1
Page 29

2 How to Install Accessories In
Your HP VISUALIZE Linux
Workstation
15
Page 30
How to Install Accessories In Your HP Visualize Linux Workstation
D
Supported HP Accessories
Supported HP Accessories
Internal Mass
Storage Devices
Main Memory Upgrades
(DIMM slots for ECC S
- 128 MB Non-buffered
- 256 MB Non-buffered
5 Pairs of Rails for Front
Access Devices:
- 3.5-inch disk drive rails
- 5.25-inch disk drive
rails
Up to six accessory boards
can be installed:
- One AGP slot (graphics)
- Four 32-bit PCI slots (one for SCSI/LAN board.
- One combination PCI or ISA slot
IMPORTANT Some of the accessories mentioned in this section reflect components that
were not fully qualified by HP with the Linux Operating System at the
time this manual was written. However, they are stated as being
supported on Red Hat Linux Version 6.0.
Contact HP or your dealer for an up-to-date list of supported devices.
Front Access Drives, for
example:
- 3.5-inch 1.44 MB flexible
disk drive (one third height)
- 5.25-inch 1.2 MB flexible
disk drive (half height)
- 5.25-inch tape drive (half
height)
Four spare screws
16 Chapter2
Page 31
How to Install Accessories In Your HP Visualize Linux Workstation
Removing and Replacing the Cover
Removing and Replacing the Cover
WARNING For your safety, never remove the HP VISUALIZE Linux
Workstation’s cover without first removing the power cord from
the power outlet, and any connection to a telecommunications
network. Always replace the cover on the HP VISUALIZE Linux
Workstation before switching it on again.
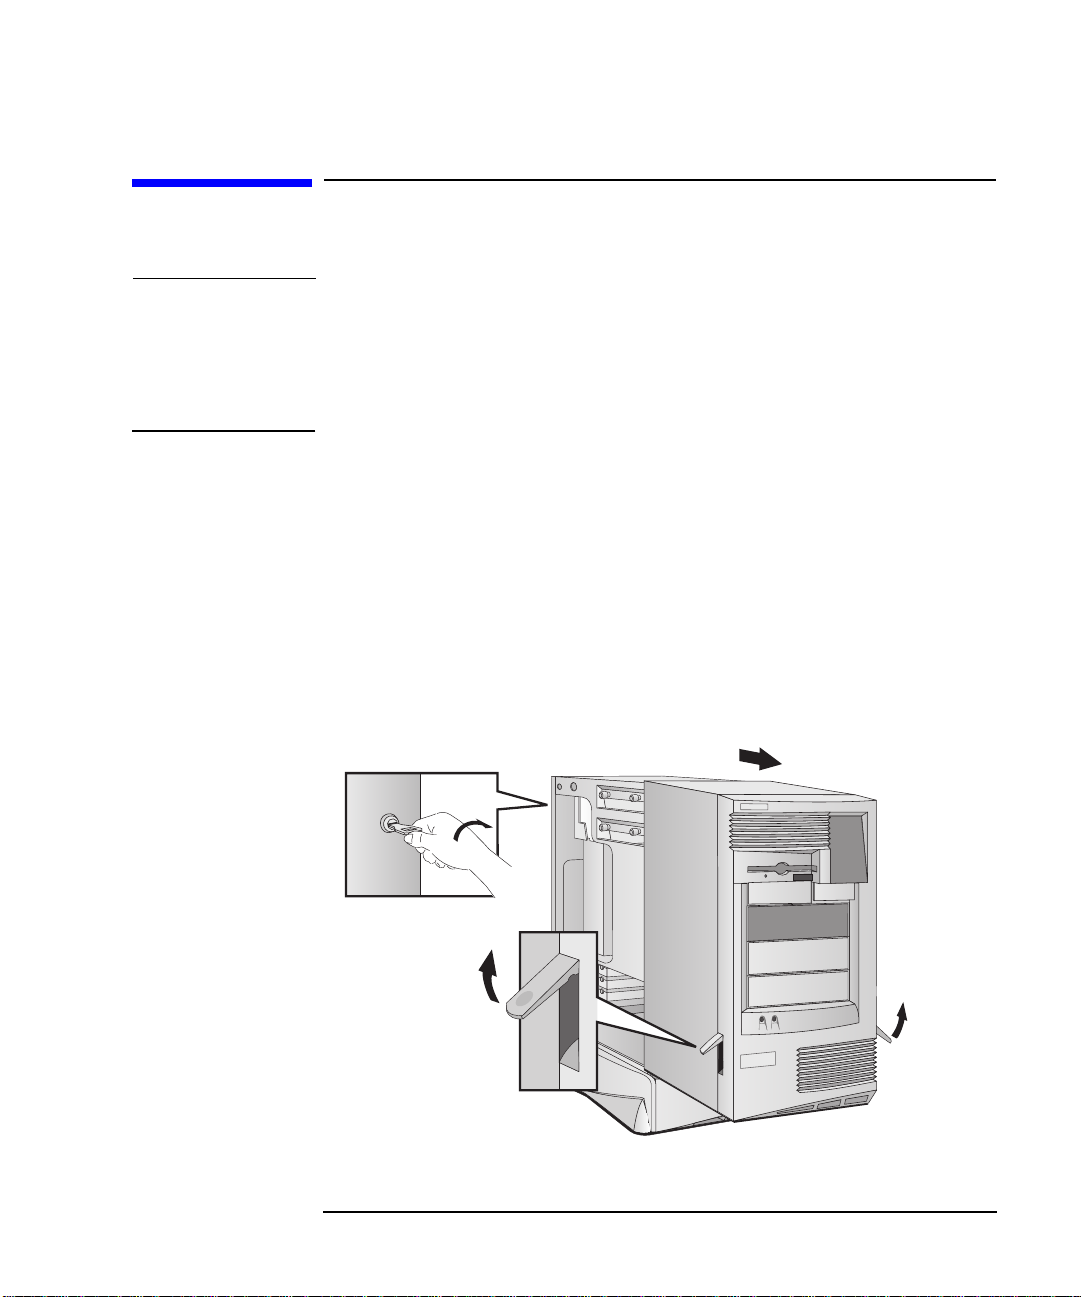
Removing the Cover
1. Switch off the display and computer.
2. Disconnect all power cables and any telecommunications cables.
3. If necessary, unlock the cover using the key on the back panel.
4. Lift the two latches on the front sides of the computer upwards.
5. Grasp the cover on the sides at the back of the computer and slide it
forwards and off the computer.
Chapter 2 17
Page 32

How to Install Accessories In Your HP Visualize Linux Workstation
Removing and Replacing the Cover
Replacing the Cover
1. Ensure that you have installed all your accessories and that all
internal cables are properly connected and safely routed.
2. Ensure that the two latches on the front sides of the cover are lifted
up, and that the lock is unlocked.
3. Slide the cover onto the computer, making sure that the two guides at
the bottom of the case slide into the two rails on the base of the
computer. Firmly slide the cover backwards into position.
4. Lower the latches on the front sides of the cover.
5. If required, lock the cover using the key provided.
6. Reconnect all the power and telecommunications cables.
18 Chapter2
Page 33

How to Install Accessories In Your HP Visualize Linux Workstation
Removing and Replacing the Airflow Guide
Removing and Replacing the Airflow Guide
1. Press the retaining buttons on each side of the airflow guide and lift it
partly out of the HP VISUALIZE Linux Workstation’s case.
2. Remove the fan connection to the system board and lift the airflow
guide completely out of the HP VISUALIZE Linux Workstation’s case.
To improve access when installing accessories you may need to remove
the airflow guide.
To Replace the HP UltraFlow Airflow Guide
1. Hold the airflow guide partly inside the HP VISUALIZE Linux
Workstation’s case and reconnect the fan to the system board.
2. Align the airflow guide with the retaining slots on the HP VISUALIZE
Linux Workstation’s case and push firmly down into the case until it
clicks into place.
Chapter 2 19
Page 34

How to Install Accessories In Your HP Visualize Linux Workstation
Installing Mass Storage Devices
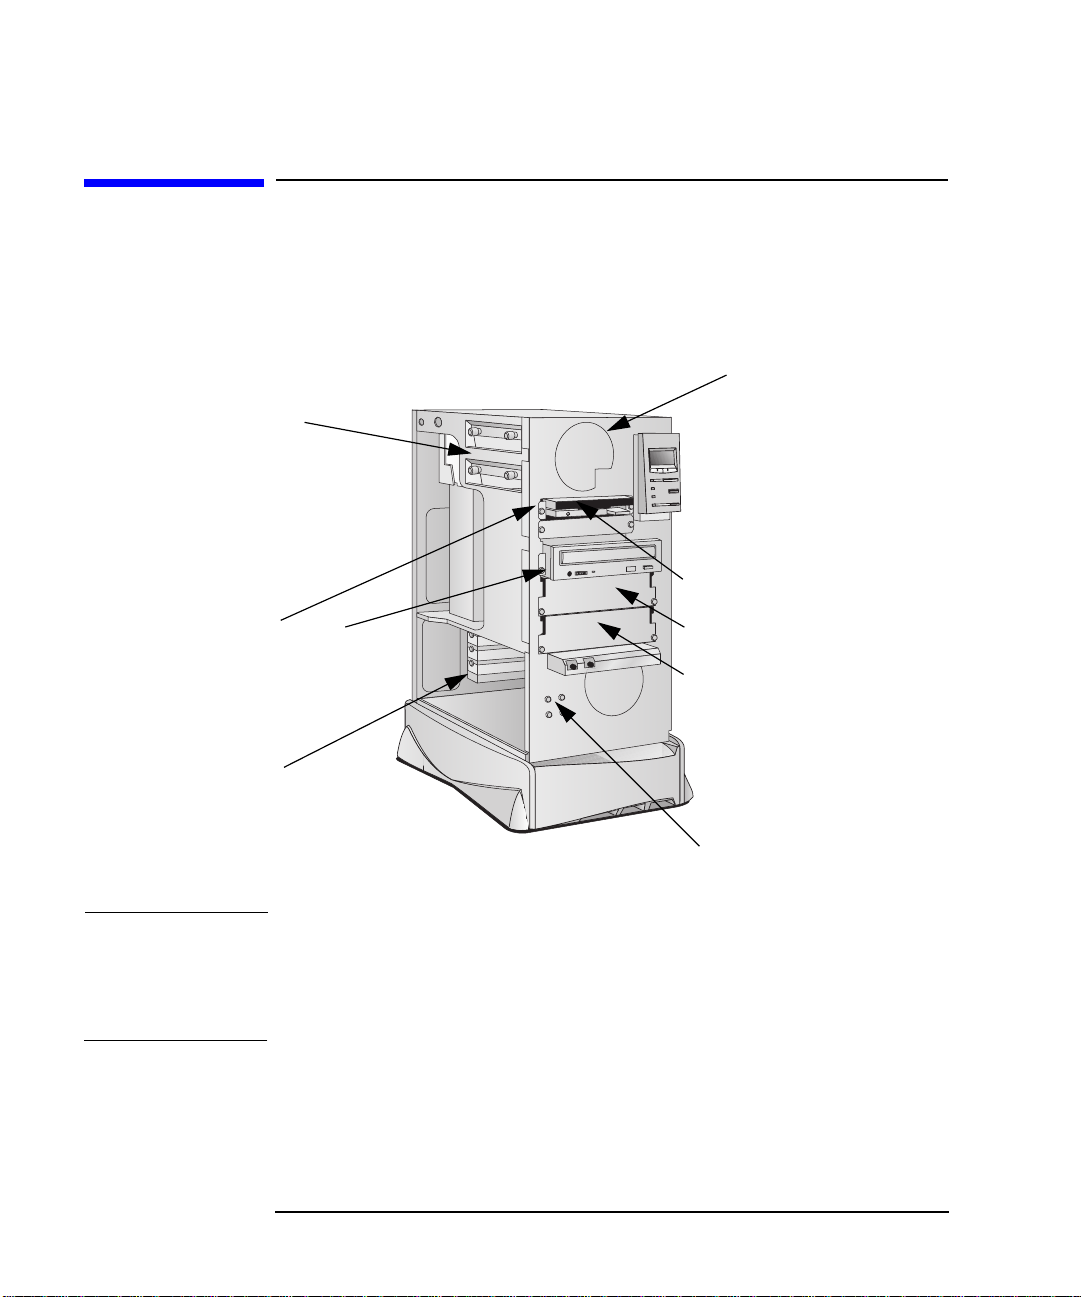
Installing Mass Storage Devices
Connecting Devices
If you add an additional mass storage device, you need to connect it to
power and data cables. The figure below shows all data cables and power
connectors provided.
Cable with one
connector for 3.5-inch
Flexible Disk Drive
16-bit SCSI with five
68-pin SCSI
34-pin connector
68-pin SCSI connectors
16-bit External 68pin SCSI connector
8-bit SCSI with
two
Cable with two 40-pin
connectors for IDE Drives,
such as CD-ROM Drives, Zip
Drives or Hard Disk Drives
PowerCables for Hard
Disk Drives, Zip
Drives, Tape Drives,
CD-RW, and
CD-ROM Drives.
Power Cable for 3.5inch Flexible Disk Drive
20 Chapter2
Page 35

How to Install Accessories In Your HP Visualize Linux Workstation
Installing Mass Storage Devices
Before Installing an IDE Hard Disk
Before Installing a SCSI Hard Disk
NOTE You do not need to select a SCSI address for Plug and Play SCSI hard
Refer to the drive’s installation guide to see if you must set jumpers or if
there is a special installation procedure to follow.
If you are installing an additional SCSI drive, you should assign an
unused SCSI ID to this accessory. SCSI IDs range from 0 to 6 for Ultra
narrow 8-bit SCSI and from 0 to 15 for Ultra wide 16-bit SCSI. SCSI ID 0
is used by the first SCSI hard disk drive and SCSI ID 7 is reserved for
the integrated SCSI controller (the default for narrow and wide SCSI
devices).
disks (SCSI hard disks that support the SCAM protocol).
You should assign an unused SCSI ID to the second SCSI hard disk drive (for example, SCSI ID 1).
The SCSI ID is usually configured with jumpers on the SCSI hard disk
drive. Refer to the installation guide supplied with the drive for
information on selecting a SCSI ID.
Some internal SCSI disk drives may have termination resistors that
must be removed or disabled before installation in your computer. Refer
to the drive’s installation guide for more details and to see if there is a
special installation procedure to follow.
Chapter 2 21
Page 36

How to Install Accessories In Your HP Visualize Linux Workstation
Installing Drivers and Utilities
Installing Drivers and Utilities
Once you have installed accessory boards and mass-storage devices on
your system, you will need to install their drivers. To install the latest
drivers or utilities for the HP VISUALIZE Linux Workstation go to the
following web site:
http://www.hp.com/visualize/support
22 Chapter2
Page 37

3 Troubleshooting Your HP
VISUALIZE Linux Workstation
This chapter provides information that can help you solve problems you
may have when using your HP VISUALIZE Linux Workstation.
23
Page 38

Troubleshooting Your HP Visualize Linux Workstation
Using HP MaxiLife to Diagnose Problems
Using HP MaxiLife to Diagnose Problems
Your HP LCD can help you to diagnose problems with your HP
VISUALIZE Linux Workstation, even when you are unable to get your
system and monitor working properly.
Pre-Boot Checks When you press your HP VISUALIZE Linux Workstation’s on/off button,
HP MaxiLife will check your system before it initiates the start-up
sequence. You will see one of the following screens on the LCD:
Error!
No CPU 1
Check that processor is
correctly installed in
socket 1.
Error!
CPU Freq
Ensure that the two
processors installed are the
same speed (frequency).
Error!
Power supply
Check power supply and
power cable connections.
Error!
BIOS
Error!
CPU Socket 2
Check that a processor or
terminator is correctly
installed in socket 2.
Error!
CPU Type
Ensure that the two
processors installed have
the same cache voltage.
Error!
Power
Check that configurationof
VRMs and terminators is
correct or that the power
supply is properly
connected.
Error!
No Video
Error!
Power CPU 1
Check installationof VRM
1.
Error!
Power Cache
Ensure that VRM is
correctly installed in
VRM 2 socket.
Error!
RAM type
Check that RAM types
installed are compatible.
HP KAYAK XU
Error!
Power CPU 2
Check installationof VRM
3.
Error!
Board PLL
Check system board.
Error!
No RAM
Check memory installation.
Flash new BIOS or start
system using crisis switch
(system board switch 10).
24 Chapter3
Check that graphics card is
installed correctly.
No errors occurred during
pre-boot. POST is
initiated.
Page 39

Troubleshooting Your HP Visualize Linux Workstation
Using HP MaxiLife to Diagnose Problems
POST Phase Following these checks, the POST (Power-On Self Test) sequence is
initiated. One of the following screens will appear in this phase:
HP KAYAK XU
No errors occurred.
Error!
POST XXXX
A POST error occurred. Refer to the
Upgrade and Configuration Guide
for more information.
Other Features
HP MaxiLife can also be configured to:
• Display the configuration details of your HP VISUALIZE Linux
Workstation required to obtain support (System info.)
• Indicate POST (Power-On Self Test) steps during the power-on phase
(Boot steps)
• Perform diagnostic tests on your HP VISUALIZE Linux Workstation’s
various hardware components and display the results (Diags).
To configure your HP LCD:
1. Ensure that your HP VISUALIZE Linux Workstation’s power cord is
connected to a grounded outlet.
In this state, your HP VISUALIZE Linux Workstation’s hardware
management chip is active, even if your system is not powered on.
2. Press one of the LCD control buttons. The following menu is displayed.
System info
Boot steps
Next Go
Diags
Exit
Next Go
3. Use to scroll down through the menu items and to select the required menu item.
Chapter 3 25
Page 40

Troubleshooting Your HP Visualize Linux Workstation
Using HP MaxiLife to Diagnose Problems
System Info. System information is displayed on the LCD one screen at a time and
should detail the following:
• Bios version
• Number & speed of processors
• Number and capacity of memory modules installed
• Serial Number
To view these details, use the button to scroll through the
information screens.
Boot Steps Where available, the Boot steps option will display all POST steps the
next time your HP VISUALIZE Linux Workstation is powered on. For
support purposes, POST steps are shown as POST codes and displayed
on the LCD as follows:
HP KAYAK XU
POST Code 24
Post steps will be
displayed on the LCD the
next time your
workstation is powered
on.
Diags If your HP VISUALIZE Linux Workstation is powered off when Diags is
selected, the LCD displays a second menu. To perform the diagnostics
tests, select Power on from this menu to enable the hardware
management chip to assess the status of your system’s components.
If your HP VISUALIZE Linux Workstation is already powered on, the diagnostic tests will be performed as soon as you select Diags from the LCD’s main menu.
To view the test results for each system component, press the
control button.
26 Chapter3
Page 41

Troubleshooting Your HP Visualize Linux Workstation
Using HP MaxiLife to Diagnose Problems
If no component errors are detected, the following screen will appear.
COMPONENT
Next
No errors were detected.
If an error is detected, an error screen appears indicating the problem.
To continue viewing the test results of the other system components,
press the control button.
Forexample, if there is a problem with the
boot processor the following error screen
will appear. For more information, see
"Check Internal Items", on page 28.
COMPONENT
Next
Error!
Power CPU 1
When the diagnostic tests are complete, one of the following screens is displayed.
Diagnostics:
Done FAIL
Exit
Diagnostics:
Done OK
Exit
Systemerrorswere
detected.
No errors were
detected.
You can exit the test session by pressing the button.
Chapter 3 27
Page 42

Troubleshooting Your HP Visualize Linux Workstation
If Your HP Visualize Linux Workstation Does Not Start Properly
If Your HP VISUALIZE Linux Workstation Does Not Start Properly
Display is Blank and There Are No Error Messages
If your display is blank and there are no error messages when you turn
on your HP VISUALIZE Linux Workstation, follow this procedure:
1. Check the LCD screen (refer to “Using HP MaxiLife to Diagnose Problems”).
2. Check external items.
3. Check internal items.
Check External Items
Check Internal Items
Be sure the following external items are functioning properly:
• Check that the computer and display are turned on. (The power light should be illuminated.)
• Check the display’s contrast and brightness settings.
• Make sure that all cables and power cords are firmly plugged in.
• Make sure the power outlet is working.
If the HP VISUALIZE Linux Workstation still does not start properly,
follow this procedure to check the internal items:
1. Turn off the display, the computer, and all external devices.
2. Unplug all power cords and cables, noting their positions. Disconnect
the HP VISUALIZE Linux Workstation from any telecommunications
network.
3. Remove the cover and check the following items:
LCD Error
Messages
Check all internal cables Ensure they are correctly
Action Reference
attached and firmly in place.
28 Chapter3
Page 43

Troubleshooting Your HP Visualize Linux Workstation
If Your HP Visualize Linux Workstation Does Not Start Properly
LCD Error
Messages
Power CPU 1 Power CPU 2 Power Cache
CPU error Reset the workstation or
No RAM, RAM type
Temp disk, Temp CPU Temp IO slot
Check that the processors and VRMs are correctly installed.
power-off the LAN.
Check that the memory
modules are correctly installed.
Check that accessory boards
are firmly seated in their slots.
Verify that any switches and jumpers on the accessory board are properly set.
Check that the switches on the system board are properly set.
Check fans and that air flow
guide is not blocked.
Action Reference
Refer to “Installing a
Processor” in the Upgrade and
Configuration Guide.
Refer to “The MaxiLife Control Panel” in Chapter 1
Referto “Installing Memory” in
the Upgrade and Configuration
Guide.
Refer to “Installing Accessory
Boards” in the Upgrade and
Configuration Guide.
Refer to the manuals that came with each board.
Refer to “System Board
Switches in the Upgrade and
Configuration Guide.
Fan CPU, Fan disk Fan IO slot
Power supply Check that power supply is
Power Check that power supply is
No video Check that the video card is
Chapter 3 29
Check that fans are installed correctly.
properly connected.
properly connected, and that
terminators and VRMs are
properly installed.
properly installed.
Refer to “Installing a
Processor” in the Upgrade and
Configuration Guide.
Refer to the manual that came with the video card.
Page 44

Troubleshooting Your HP Visualize Linux Workstation
If Your HP Visualize Linux Workstation Does Not Start Properly
LCD Error
Messages
Power CPU 1
Power CPU 2
Power Cache
CPU error Reset the workstation or
No RAM,
RAM type
Temp disk, Temp
CPU Temp IO slot
Check that the processors and
VRMs are correctly installed.
power-off the LAN.
Check that the memory
modules are correctly installed.
Check that accessory boards
are firmly seated in their slots.
Verify that any switches and
jumpers on the accessory board
are properly set.
Check that the switches on the
system board are properly set.
Check fans and that air flow
guide is not blocked.
Action Reference
Refer to “Installing a
Processor” in the Upgrade and
Configuration Guide.
Refer to “The MaxiLife
Control Panel” in Chapter 1
Referto “Installing Memory” in
the Upgrade and Configuration
Guide.
Refer to “Installing Accessory
Boards” in the Upgrade and
Configuration Guide.
Refer to the manuals that came
with each board.
Refer to “System Board
Switches in the Upgrade and
Configuration Guide.
Fan CPU, Fan disk
Fan IO slot
Power supply Check that power supply is
Power Check that power supply is
No video Check that the video card is
30 Chapter3
Check that fans are installed
correctly.
properly connected.
properly connected, and that
terminators and VRMs are
properly installed.
properly installed.
Refer to “Installing a
Processor” in the Upgrade and
Configuration Guide.
Refer to the manual that came
with the video card.
Page 45

Troubleshooting Your HP Visualize Linux Workstation
If Your HP Visualize Linux Workstation Does Not Start Properly
LCD Error
Messages
Power CPU 1
Power CPU 2
Power Cache
CPU error Reset the workstation or
No RAM,
RAM type
Temp disk, Temp
CPU Temp IO slot
Check that the processors and
VRMs are correctly installed.
power-off the LAN.
Check that the memory
modules are correctly installed.
Check that accessory boards
are firmly seated in their slots.
Verify that any switches and
jumpers on the accessory board
are properly set.
Check that the switches on the
system board are properly set.
Check fans and that air flow
guide is not blocked.
Action Reference
Refer to “Installing a
Processor” in the Upgrade and
Configuration Guide.
Refer to “The MaxiLife
Control Panel” in Chapter 1
Referto “Installing Memory” in
the Upgrade and Configuration
Guide.
Refer to “Installing Accessory
Boards” in the Upgrade and
Configuration Guide.
Refer to the manuals that came
with each board.
Refer to “System Board
Switches in the Upgrade and
Configuration Guide.
Fan CPU, Fan disk
Fan IO slot
Power supply Check that power supply is
Power Check that power supply is
No video Check that the video card is
Chapter 3 31
Check that fans are installed
correctly.
properly connected.
properly connected, and that
terminators and VRMs are
properly installed.
properly installed.
Refer to “Installing a
Processor” in the Upgrade and
Configuration Guide.
Refer to the manual that came
with the video card.
Page 46

Troubleshooting Your HP Visualize Linux Workstation
If Your HP Visualize Linux Workstation Does Not Start Properly
LCD Error
Messages
No CPU 1 Check that boot processor is
correctly installed in socket 1.
CPU Socket 2 Check that the terminator is
correctly installed in socket 2.
CPU Freq. Check that the processors
installed are the same speed
(frequency).
CPU Type Check that the processors
installed have the same cache
voltage.
4. Replace the cover.
5. Reconnect all cables and power cords.
6. Turn on the display and computer.
Action Reference
Refer to “Installing a
Processor” in the Upgrade and
Configuration Guide.
Refer to “Installing a
Processor” in the Upgrade and
Configuration Guide.
32 Chapter3
Page 47

Troubleshooting Your HP Visualize Linux Workstation
If Your HP Visualize Linux Workstation Has a Hardware Problem
If Your HP VISUALIZE Linux Workstation Has a Hardware Problem
This section describes what to do if you have problems with your display, keyboard, or mouse.
Display Does Not Work Properly
If Nothing Is Displayed On the Screen
Other Display Problems
If nothing is displayed on the screen, but the HP VISUALIZE Linux
Workstation starts and the keyboard, disk drives, and other peripheral
devices seem to operate properly:
• Check your HP VISUALIZE Linux Workstation’s LCD screen to help you diagnose the problem.
• Make sure that the display is plugged in and switched ON.
• Check that the brightness and contrast controls are properly set.
• Ensure that the display video cable is correctly connected.
• Switch off the display, and unplug it from the power outlet.
• Disconnect the video cable and examine the video cable connector
pins. If the pins are bent, carefully straighten them.
• Check that the video upgrade is properly installed if you have one.
• If the display works correctly during the Power-On-Self-Test (POST),
but goes blank, check that you have enough memory for the video
mode you have selected.
• If your screen’s refresh rate is set too high, the screen might be blank.
Check the refresh settings to ensure they are not too high.
If the display image is not aligned with the screen, use the display’s
controls to center the image (refer to the display manual for
instructions). If the screens generated by the applications do not appear
to be correct, check the application’s manual to find out which video
standard is required. Also check your display manual to find out which
refresh rate is required. Use your operating system’s procedures, to
select the correct refresh rate.
Chapter 3 33
Page 48

Troubleshooting Your HP Visualize Linux Workstation
If Your HP Visualize Linux Workstation Has a Hardware Problem
Troubleshooting Accessories on the HP VISUALIZE Linux Workstation
This section describes what you should do if your keyboard or mouse does not work.
If Your Keyboard Does Not Work
• Ensure that the keyboard is correctly connected.
• If you turn on your HP VISUALIZE Linux Workstation, the operating
system boots, and the keyboard is correctly connected but still not
available, the power-on password may be set to “keyboard locked”.
You will need to enter a password to unlock the keyboard and mouse.
You can change this setting in the BIOS Setup program. Refer to the
Power Menu in the HP BIOS Setup program.
34 Chapter3
Page 49

Troubleshooting Your HP Visualize Linux Workstation
If Your HP Visualize Linux Workstation Has a Hardware Problem
If Your Mouse Does Not Work
• Ensure that the mouse is correctly connected.
• Clean the mouse ball and rollers as shown in the figure below (use a
non-residual contact cleaner).
Cleaning the mouse ball
Cleaning the mouse rollers
Chapter 3 35
Page 50

Troubleshooting Your HP Visualize Linux Workstation
Recovering Your HP Visualize Linux Workstation’s Operating System
Recovering Your HP VISUALIZE Linux Workstation’s Operating System
If, for some reason, you should need to recover your HP VISUALIZE Linux
Workstation’s operating system (for example, a system crash, etc.), refer
to the HP Linux Setup and Recovery Guide (HP Part Number A1297-
90010). This manual, which is included with your Workstation, provides
complete information on how to re-install or recover your pre-installed
software.
36 Chapter3
Page 51

4 Hewlett Packard Support and
Information Services
37
Page 52

Hewlett Packard Support and Information Services
Introduction
Introduction
Hewlett Packard computers are engineered for quality and reliability to
give you many years of trouble-free service. To ensure that your desktop
system maintains its reliability and to keep you up-to-date with the
latest developments, HP and a worldwide network of trained and
authorized resellers provide a comprehensive range of service and
support options which are listed below:
• HP-Authorized Reseller support
• HP Information Service on the World Wide Web
• HP Support Services
Technical phone support
Lifeline phone support
.
NOTE When calling any of the international telephone numbers listed in this
chapter, replace the ‘+’ with your international telephone access code.
38 Chapter4
Page 53

Hewlett Packard Support and Information Services
Your HP-Authorized Reseller
Your HP-Authorized Reseller
HP-Authorized Resellers have been trained on HP Workstation
equipment and are familiar with its configuration and environment.
Authorized Resellers can also answer questions regarding non-HP
hardware, software and systems as well as answer queries about usage
not intended for, or not common for, the HP Workstation.
Authorized HP Resellers can also offer consulting services tailored to
your specific needs regarding product development or custom
installations. Similar support services are offered by third parties or the
HP Customer Support organization in your country.
Chapter 4 39
Page 54

Hewlett Packard Support and Information Services
Hewlett-Packard Information Services
Hewlett-Packard Information Services
Hewlett-Packard Electronic Information Services are available 24 hours
a day, 7 days a week, ensuring that the most up-to-date information is
always available.
HP World Wide Web Site
The HP World Wide Web site gives you access to information about HP,
its products, including product data sheets, service and support
information, electronic newsletters and technical tips. You can also
download the latest versions of drivers, BIOS and software utilities.
The Access Guide Directory guides you through the information and services available.
Service World Wide Web URL
For product information
For service and support
information
http://www.hp.com/visualize/linux
http://www.hp.com/visualize/support
40 Chapter4
Page 55

Hewlett Packard Support and Information Services
Hewlett-Packard Telephone Support
Hewlett-Packard Telephone Support
HP North American Customer Support Center
HP European Customer Support Center
Assistance from the HP North American Customer Support Center is
available Monday to Friday, 7:00 am to 6:00 pm Mountain time.
The number is: +1 (970) 635-1000
Assistance from the HP European Customer Support Center is available
Monday to Friday, 8:30 am to 6:00 pm Central European time.
Country Language Local Number
United Kingdom English 0171 512 5202 Ireland English 01 662 5525 Netherlands Dutch 020 606 8751 Belgium Dutch 02 626 8806
French 02 626 8807
Switzerland French 084 880 1111
German 084 880 1111
Germany German 0180 525 8143
1
France French 01 43 62 34 34 Austria German 0660 6386 Norway Norwegian 22 11 6299 Denmark Danish 3929 4099 Sweden Swedish 08 619 2170 Italy Italian 02 26410350
1. For non-listed European countries, support is available in English by calling
+44 171 512 5202.
Chapter 4 41
Page 56

Hewlett Packard Support and Information Services
Hewlett-Packard Telephone Support
Country Language Local Number
Spain Spanish 902 321 123 Portugal Portuguese 01 441 7199
Please have the following information ready when you call so that your
enquiry can be dealt with quickly:
• Your HP VISUALIZE Linux Workstation model number and serial number.
• The operating system version and the configuration.
• A description of the software installed and the accessories used.
42 Chapter4
Page 57

Hewlett Packard Support and Information Services
Lifeline Telephone Support
Lifeline Telephone Support
Lifeline is a fee-based telephone support program for Workstations
available after the one-year telephone support provided as part of the
hardware warranty has expired.
Your call can either be charged to your phone bill at a per-minute rate or
to your credit card (Visa, Mastercard or American Express) at a flat fee.
The charge begins AFTER you have been put in contact with a support
technician. If your problem is found to be covered by the HP Hardware
Warranty, no charge will be applied.
In the US please call the appropriate number listed below.
Number Method of Payment Charge Type
1 (900) 555-1500 Charged to phone bill per-minute rate 1 (800) 999-1148 Charged to credit card Flat fee
In Europe, please call the telephone support center (+44 171 512 5202).
Free access to HP information services is not affected by this service.You
are encouraged to access HP Information Services throughout the life of
your HP VISUALIZE Linux Workstation, whether in or out of warranty.
Chapter 4 43
Page 58

Hewlett Packard Support and Information Services
Summary
Summary
The table below summarizes the services and support available from HP or authorized resellers.
Service Covers Period
covered
Basic Warranty
Technical Phone support
Lifeline phone support
Parts and
labor for HP
products: first
year on-site
parts & labor;
second and
third year
parts only.
Basic
assistance for
Workstation
setup,
configuration,
start-up and
hardware
diagnostics.
Basic
assistance for
Workstation
setup,
configuration,
start-up and
hardware
diagnostics.
Three years from date of purchase.
First year. Business
After first
year.
Response
time
Next working day for on-site.
hours.
Business hours.
Fee When
available
No charge. At time of
purchase.
No charge. At time of
purchase.
Per-call fee, no time limit.
Anytime
after first
year.
Purchase
from
HP
HP
HP
Service Contracts
Technical Support.
44 Chapter4
Customer
defined.
As required.
Annual fee, or fee per incident.
Anytime. Reseller.
Page 59

A Regulatory Information and
Warranty
This section contains all Regulatory and Warranty Information.
45
Page 60

Regulatory Information and Warranty
Declaration of Conformity
Declaration of Conformity
according to ISO/IEC Guide 22 and EN 45014
Manufacturer: Hewlett-Packard Company
Declares, that the:
Product Name: HP Visualize Workstation
Product Number: A5014A, A1297A
Product Options: all
conforms to the following specifications:
Safety IEC 950:1991+A1+A2+A3 +A4 / EN 60950:1992+A1+A2+A3+A4
EMC CISPR 11: 1990 / EN 55011: 1991 Class A
AS/NZS 4251.1:1994
and is certified by:
supplementary information:
The product herewith complies with the requirements of the following Directives and carries the CE
marking accordingly:
- the EMC directive 89/336/EEC and 92/31/EEC and 93/68/EEC
- the Low Voltage Directive 73/23/EEC and 93/68/EEC
This product was tested in a typical Hewlett Packard workstation configuration.
Original signed by Ruth Lutes, Site Quality Manager
Fort Collins, CO, USA
For Compliance Information ONLY, contact:
European Contact: Your local Hewlett-Packard Sales and Service Office or Hewlett-Packard GmbH, Department
HQ-TRE Standards Europe, Herrenberger Straße 130, D-71034 Böblingen (FAX: +49-7031-14-3143)
Americas Contact: Hewlett-Packard, Fort Collins Site Quality Manager, mail stop 46, 3404 E. Harmony Rd., Ft.
Collins, CO 80528, USA
IEC 60825-1:1993/EN60825-1:1994+A11 Class 1 for LED’s
USA 21CFR Subpart J - for FC Laser module
China GB4943-1995
Russia GOST R 50377-92
CISPR 22: 1993 / EN 55022: 1994 +A1+A2 Class A
EN 50082-1:1992
US FCC Part 15, Class A
Japan VCCI Class A
Australia/New Zealand AS/NZS 2046.1/2:1992, AS/NZS 3548:1995, and
China GB9254-1988
Taiwan CNS13438 Class A
Russia GOST R 29216-94
UL Listed to UL1950, 2nd edition, File E132277
cUL Listed to CSA 22.2 No.950-M93
TUV Certified to EN60950 2nd edition with A1+A2+A3+A4+A11
HP Fort Collins CCQD HQE
3404 East Harmony Road
Fort Collins, CO 80528
USA
IEC 1000-4-2: 1995 / EN 61000-4-2: 1995 - 4kV CD, 8 kV AD
IEC 1000-4-3: 1995 / EN 61000-4-3: 1995 - 10 v/m
IEC 1000-4-4: 1995 / EN 61000-4-4: 1995 - 2 kV Signal, 4 kV Power Lines
46 AppendixA
Page 61

Regulatory Information and Warranty
Regulatory Information
Regulatory Information
FCC (for USA only)
Federal Communications Commission Radio Frequency
Interference Statement
Warning:
This equipment has been tested and found to comply with the limits for a
Class B digital device, pursuant to Part 15 of the FCC Rules. These
limits are designed to provide reasonable protection against harmful
interference in a residential installation. This equipment generates and
uses, and can radiate radio frequency energy and, if not installed and
used in accordance with the instructions, may cause harmful
interference to radio communications. However, there is no guarantee
that interference will not occur in a particular installation. If this
equipment does cause harmful interference to radio or television
reception, which can be determined by turning the equipment off and on,
the user is encouraged to correct the interference by one or more of the
following measures:
• reorient or relocate the receiving antenna
• increase the separation between the equipment and the receiver
• connect the equipment into an outlet on a circuit different from that to
which the receiver is connected
• consult the dealer or an experienced radio/TV technician for help.
Hewlett-Packard’s FCC Compliance Tests were conducted with HPsupported peripheral devices and HP shielded cables, such as those you
receive with your system. Changes or modifications not expressly
approved by Hewlett-Packard could void the user’s authority to operate
the equipment.
Notice for Canada
This Class B digital apparatus meets all requirements of the Canadian
Interference-Causing Equipment Regulations.
Cet appareil numérique de la Class B respecte toutes les exigences du
Règlement sur le matériel brouilleur du Canada.
Safety Warning for the USA and Canada
If the power cord is not supplied with the computer, select the proper
power cord according to your local national electric code.
USA: use a UL listed type SVT detachable power cord.
Appendix A 47
Page 62

Regulatory Information and Warranty
Regulatory Information
Canada: use a CSA certified detachable power cord.
For your safety, never remove the PC’s cover without first removing the
power cord and any connection to a telecommunication network. Always
replace the cover before switching on again.
Si le cordon secteur n’est pas livré avec votre ordinateur, utiliser un
cordon secteur en accord avec votre code electrique national.
USA: utiliser un cordon secteur “UL listed,” de type SVT.
Canada: utiliser un cordon secteur certifié CSA.
Pour votre sécurité, ne jamais retirer le capot de l’ordinateur sans avoir
préalablement débranché le cordon secteur et toute connection à un
réseau de télecommunication. N’oubliez pas de replacer le capot avant de
rebrancher le cordon secteur.
Notice for the United Kingdom
The HP VISUALIZE Personal Workstations are approved under approval
number NS/G/1234/J/100003 for indirect connection to Public
Telecommunication Systems within the United Kingdom.
NL
Notice for the Netherlands
Bij dit apparaat zijn batterijen geleverd. Wanneer deze leeg zijn, moet U
ze niet weggooien maar inleveren als KCA.
Notice for Germany
Wenn die Batterie nicht korrekt eingebaut wird, besteht
Explosionsgefahr. Zu ihrer eigenen Sicherheit sollten Sie nicht
versuchen, die Batterie wiederaufzuladen, zu zerlegen oder die alte
Batterie zu verbrennen. Tauschen Sie die Batterie nur gegen den
gleichen oder ähnlichen Typ aus, der vom Hersteller empfohlen wird. Bei
der in diesem PC intergrierten Batterie handelts sich um eine LithiumBatterie, die keine Schwermetalle enthält. Batterien und
Akkumulatoren gehören nicht in den Hausmüll. Sie verden vom
Hersteller, Händler oder deren Beauftragten kostenlos
zurückgenommen, um sie einer Verwertung bzw. Entsorgung
zuzuführen.
Noise Declaration for Germany
Lärmangabe nach Maschinenlärmverordnung - 3 GSGV (Deutschland)
LpA < 70 db am Arbeitsplatz normaler Betrieb nach EN27779: 11.92.
48 AppendixA
Page 63
Regulatory Information and Warranty
Regulatory Information
Notice for Japan
This equipment is in the Class B category information technology
equipment based on the rules of the Voluntary Control Council For
Interference by Information Technology Equipment (VCCI). Although
aimed for residential area operation, radio interference may be caused
when used near a radio or TV receiver. Read the instructions for correct
operation.
Notice for Korea
Recycling Your PC
HP has a strong commitment toward the environment. Your HP Personal
Computer has been designed to respect the environment as much as
possible.
HP can also take your old PC back for recycling when it reaches the end of its useful life.
HP has a product take-back program in several countries. The collected
equipment is sent to one of HP’s recycling facilities in Europe or the
USA. As many parts as possible are reused. The remainder is recycled.
Special care is taken for batteries and other potentially toxic substances,
which are reduced into non-harmful components through a special
chemical process.
If you require more details about HP’s product take-back program,
contact your dealer or your nearest HP Sales Office.
Appendix A 49
Page 64

Regulatory Information and Warranty
HP Hardware Warranty
HP Hardware Warranty
Important: This is your hardware product warranty statement. Please, read it carefully.
Warranty terms may be different in your country. If so, your Authorized
HP Dealer or Hewlett-Packard Sales and Service Office can give you
details.
HP products may contain remanufactured parts equivalent to new in
performance or may have been subject to incidental use.
HP products external to the system processor unit —such as external
storage subsystems, displays, printers, and other peripherals— are
covered by the applicable warranties for those products; HP software is
covered by the HP Software Product Limited Warranty
Three Year Limited Hardware Warranty
Hewlett-Packard (HP) warrantsthis hardwareproduct against defects in
materials and workmanship for a period of three years from receipt by
the original end-user purchaser.
The three year warranty includes on-site service during the first year of
use (free parts and labor), and parts service provided by an HP Service
Center or a participating Authorized HP Personal Computer Dealer
Repair Center, during the second and third years of use.
If HP receives notice of above defined defects during the warrantyperiod,
HP will either, at its option, repair or replace products, which prove to be
defective.
Should HP be unable to repair or replace the product within a reasonable
amount of time, the customer's alternate exclusive remedy shall be a
refund of the purchase price upon return of the product.
The system processor unit, keyboard, mouse, and Hewlett-Packard
accessories inside the system processor unit —such as video adapters,
mass storage devices, and interface controllers— are covered by this
warranty.
This warranty is extended worldwide under certain conditions (please
check with your local HP office) to products purchased from HP or an
Authorized HP Personal Computer Dealer which are reshipped by the
50 AppendixA
Page 65

Regulatory Information and Warranty
HP Hardware Warranty
original purchaser either for use by the original purchaser or provided as
an incidental part of systems integrated by the original purchaser. When
available in the country of use, service is provided in the same manner as
if the product was purchased in that country and can only be provided in
countries where the product is designed to operate. If the product is not
normally sold by HP in the country of use, it must be returned to the
country of purchase for service. Response time for on-site service, and
parts delivery turn-around time for parts service, are subject to changes
from standard conditions based upon non-local parts availability.
Limitation of Warranty
Warranty does not apply to defects resulting from (a) improper or
inadequate maintenance or calibration, (b) software, interfacing, parts or
supplies not supplied by HP, (c) unauthorized modification or misuse, (d)
operation outside of the published environmental specifications for the
product, or (e) improper site preparation or maintenance.
TO THE EXTENT ALLOWED BY LOCAL LAW, THE ABOVE
WARRANTIES ARE EXCLUSIVE AND NO OTHER WARRANTY OR
CONDITION, WHETHER WRITTEN OR ORAL, IS EXPRESSED OR
IMPLIED AND HP SPECIFICALLY DISCLAIMS ANY IMPLIED
WARRANTIES OR CONDITIONS OF MERCHANTABILITY,
SATISFACTORY QUALITY, AND FITNESS FOR A PARTICULAR
PURPOSE. Some countries, states or provinces do not allow limitations
on the duration of an implied warranty, so the above limitation or
exclusion might not apply to you. This warranty gives you specific legal
rights and you might also have other rights that vary from country to
country, state to state, or province to province.
TO THE EXTENT ALLOWED BY LOCAL LAW, THE REMEDIES IN
THIS WARRANTY STATEMENT ARE YOUR SOLE AND EXCLUSIVE
REMEDIES. EXCEPT AS INDICATED ABOVE, IN NO EVENT WILL
HP OR ITS SUPPLIERS BE LIABLE FOR LOSS OF DATA OR FOR
DIRECT, SPECIAL, INCIDENTAL, CONSEQUENTIAL (INCLUDING
LOST PROFIT OR DATA), OR OTHER DAMAGE, WHETHER BASED
IN CONTRACT, TORT, OR OTHERWISE. Some countries, states or
provinces do not allow the exclusion or limitation of incidental or
consequential damages, so the above limitation or exclusion may not
apply to you.
THE WARRANTY TERMS CONTAINED IN THIS STATEMENT,
EXCEPT TO THE EXTENT LAWFULLY PERMITTED, DO NOT
EXCLUDE, RESTRICT OR MODIFY AND ARE IN ADDITIONTO THE
Appendix A 51
Page 66

Regulatory Information and Warranty
HP Hardware Warranty
MANDATORY STATUTORY RIGHTS APPLICABLE TO THE SALE OF
THIS PRODUCT TO YOU.
Obtaining On-Site Warranty Service
To obtain on-site warranty service, the customer must contact an HP
Sales and Service Office (in the US, call the HP Customer Support
Centerat(970)635-1000)oraparticipatingAuthorizedHPPersonal
Computer Dealer Repair Center. The customer must be prepared to
supply proof of the purchase date.
The system processor unit, keyboard, mouse, and Hewlett-Packard
accessories inside the system processor unit —such as video adapters,
mass storage devices, and interface controllers— are covered by this
warranty.
During the on-site warranty period, customer-replaceable components
may be serviced through expedited part shipment. In this event, HP will
prepay shipping charges, duty, and taxes; provide telephone assistance
on replacement of the component when necessary; and pay shipping
charges, duty, and taxes for any part that HP asks to be returned.
On-site visits caused by non-Hewlett-Packard products —whether
internal or external to the system processor unit— are subject to
standard per-incident travel and labor charges.
On-site service for this product is restricted or unavailable in certain
locations. In HP Excluded Travel Areas— areas where geographical
obstacles, undeveloped roads, or unsuitable public transportation
prohibit routine travel— service is provided on a negotiated basis at
extra charge.
Response time for HP on-site service in an HP Service Travel Area is
normally next business day (excluding HP holidays) for HP Travel Zones
1-3 (generally 100 miles or 160 Km from the HP office). Response time is
second business day for Zones 4 and 5 (200 miles, 320 Km); third
business day for Zone 6 (300 miles, 480 Km); and negotiated beyond Zone
6. Worldwide Customer Support Travel information is available from any
HP Sales and Service Office.
Travel restrictions and response time for dealer or distributor service are
defined by the participating dealer or distributor.
Service contracts which provide after-hour or weekend coverage, faster
response time, or service in an Excluded Travel Area are often available
from HP, an authorized dealer, or authorized distributor at additional
52 AppendixA
Page 67

Regulatory Information and Warranty
HP Hardware Warranty
charge.
Customer Responsibilities
The customer may be required to run HP-supplied diagnostic programs
before an on-site visit or replacement part will be dispatched.
The customer is responsible for the security of its proprietary and
confidential information and for maintaining a procedure external to the
products for reconstruction of lost or altered files, data, or programs.
The customer must provide: access to the product; adequate working
space and facilities within a reasonable distance of the product; access to
and use of all information and facilities determined necessary by HP to
service the product; and operating supplies and consumables such as the
customer would use during normal operation.
A representative of the customer must be present at all times. The
customer must state if the product is being used in an environment
which poses a potential health hazard to repair personnel; HP or the
servicing dealer may require that the productbe maintainedby customer
personnel under direct HP or dealer supervision.
Obtaining Parts Warranty Service
When parts warranty service applies, the customer may be required to
run HP-supplied diagnostic programs before a replacement part will be
dispatched. The customer must be prepared to supply proof of purchase.
The customer shall return some defective parts upon HP demand. In
that case, HP will prepay shipping charges for parts returned to the HP
parts service center.
HP Telephone Support Services
HP Free telephone support for your Personal Workstation is available
during the first year from date of purchase. This service will also provide
technical assistance with the basic configuration and setup of your HP
VISUALIZE Personal Workstation and for the bundled or pre-loaded
operating system.
Telephone support is available at the end of the first year from date of
purchase, via the Lifeline program, which is a fee-based service (North
America and Europe only).
Appendix A 53
Page 68

Regulatory Information and Warranty
HP Hardware Warranty
HP does NOT provide telephone support for Personal Workstations
configured as network servers. We recommend HP NetServers for your
network server requirements.
(Rev. 17/03/98)
HP Software Product License Agreement and Software Product Limited Warranty
YOUR HP VISUALIZE PERSONAL WORKSTATION CONTAINS
PREINSTALLED SOFTWARE PROGRAMS. PLEASE READ THE
SOFTWARE LICENSE AGREEMENT BEFORE PROCEEDING.
CAREFULLY READ THIS LICENSE AGREEMENT AND LIMITED
WARRANTY STATEMENT BEFORE PROCEEDING TO OPERATE
THIS EQUIPMENT. RIGHTS IN THE SOFTWARE ARE OFFERED
ONLY ON THE CONDITION THAT THE CUSTOMER AGREES TO
ALL TERMS AND CONDITIONS OF THE LICENSE AGREEMENT.IF
YOU DO NOT AGREE WITH THE TERMS OF THE LICENSE
AGREEMENT, YOUMUST NOW EITHER REMOVETHE SOFTWARE
FROM YOUR HARD DISK DRIVE AND DESTROY THE MASTER
DISKETTES, OR RETURN THE COMPLETE COMPUTER AND
SOFTWARE FOR A FULL REFUND. PROCEEDING WITH
CONFIGURATION OR USE SIGNIFIES YOUR ACCEPTANCE OF
THE LICENSE TERMS.
HP Software Product License Agreement
The HP Visualize Workstationcontains (a) the Red Hat Linux operating
system and (b) additional software from HP and HP’s suppliers.
A. Terms for Red Hat Linux operating system. The Linux operating
system is licensed pursuant to the GNUGeneral Public License a copy of
which accompanies the software. A copy can also be obtained by writing
to the Free Software Foundation, Inc., 675 Mass Ave, Cambridge, MA
02139, USA.
B. Terms for all software other than the Red Hat Linux operating
system.
License Grant. HP grants you a license to Use one copy of the Software.
“Use” means storing, loading, installing, executing or displaying the
Software. You may not modify the Software or disable any licensing or
control features of the Software. If the Software is licensed for
“concurrent use”, you may not allow more than the maximum number of
54 AppendixA
Page 69

Regulatory Information and Warranty
HP Hardware Warranty
authorized users to Use the Software concurrently.
Ownership. The Software is owned and copyrighted by HP or its third
party suppliers. Your license confers no title or ownership and is not a
sale of any rights in the Software, its documentation or the media on
which they are recorded or printed. Third party suppliers may protect
their rights in the Software in the event of any infringement.
Copies and Adaptations. You may only make copiesor adaptations of the
Software for archival purposes or when copying or adaptation is an
essential step in the authorized Use of the Softwareon a backup product,
provided that copies and adaptations are used in no other manner and
provided further that Use on the backup product is discontinued when
the original or replacement product becomes operable. You must
reproduce all copyright notices in the original Software on all copies or
adaptations. You may not copy the Software onto any public or
distributed network.
No Disassembly or Decryption. You may not disassemble or decompile
the Software without HP’s prior written consent. Where you have other
rights under statute, you will provide HP with reasonably detailed
information regarding any intended disassembly or decompilation. You
may not decrypt the Software unless necessary for the legitimate use of
the Software.
Transfer. Your license will automatically terminate upon any transfer of
the Software. Upon transfer, you must deliver the Software, including
any copies and related documentation, to the transferee. The transferee
must accept these License Terms as a condition to the transfer.
Termination. HP may terminate your license upon notice for failure to
comply with any of these License Terms. Upon termination, you must
immediately destroy the Software, together with all copies, adaptations
and merged portions in any form.
Export Requirements. You may not export or re-export the Software or
any copy or adaptation in violation of any applicable laws or regulations.
U.S. Government Restricted Rights. The Software and any accompanying
documentation have been developed entirely at private expense. They
are delivered and licensed as “commercial computer software” as defined
in DFARS 252.227-7013 (Oct 1988), DFARS 252.211-7015 (May 1991) or
DFARS 252.227-7014 (Jun 1995), as a “commercial item” as defined in
FAR 2.101(a), or as “Restricted computer software” as defined in FAR
52.227-19 (Jun 1987)(or any equivalent agency regulation or contract
clause), whichever is applicable. You have only those rights provided for
Appendix A 55
Page 70

Regulatory Information and Warranty
HP Hardware Warranty
such Software and any accompanying documentation by the applicable
FAR or DFARS clause or the HP standard software agreement for the
product involved.
HP Software Product Warranty
A. Linux Operating System.
TO THE EXTENT ALLOWED BY LOCAL LAW, THE SOFTWARE IS
PROVIDED “AS IS” WITH ALL FAULTS AND WITHOUT ANY
WARRANTIES OR CONDITIONS OF ANY KIND, EXPRESS OR
IMPLIED, INCLUDING BUT NOT LIMITED TO, WARRANTIES OR
CONDITIONS RELATING TO MERCHANTABILITY,SATISFACTORY
QUALITY, OR FITNESS FOR A PARTICULAR PURPOSE.
B. HP Software. HP warrants for a period of NINETY (90) DAYS after
the date of purchase that HP software will not fail to execute its
programming instructions, due to defects in material and workmanship
when properly installed and used. If HP receives notice of such defects
during the warranty period, HP will replace software which does not
execute its programming instructions due to such defects.HP does not
warrant that the operation of HP products will be uninterrupted or error
free. If HP is unable, within a reasonable time, to repair or replace any
product to a condition as warranted, you will be entitled to a refund of
the purchase price upon prompt return of the product.
Notice of Warranty Claims. Customer must notify HP in writing of any
warranty claim not later than thirty (30) days after the expiration of the
warranty period.
Limitation of Warranty. TO THE EXTENT ALLOWED BY LOCAL LAW,
THE ABOVE WARRANTIES ARE EXCLUSIVE AND NO OTHER
WARRANTY OR CONDITION, WHETHER WRITTEN OR ORAL, IS
EXPRESSED OR IMPLIED AND HP SPECIFICALLY DISCLAIMS
ANY IMPLIED WARRANTIES OR CONDITIONS OF
MERCHANTABILITY, SATISFACTORY QUALITY, AND FITNESS
FOR A PARTICULAR PURPOSE. Some countries,states or provinces do
not allow limitations on the duration of an implied warranty, so the
above limitation or exclusion might not apply to you. This warranty gives
you specific legal rights and you might also have other rights that vary
from country to country, state to state, or province to province.
C. Limitation of Liability and Remedies applicable to both HP and nonHP software. TO THE EXTENT ALLOWED BY LOCAL LAW, THE
REMEDIES IN THIS WARRANTY STATEMENT ARE YOUR SOLE
56 AppendixA
Page 71

Regulatory Information and Warranty
HP Hardware Warranty
AND EXCLUSIVE REMEDIES. EXCEPT AS INDICATED ABOVE, IN
NO EVENT WILL HP OR ITS SUPPLIERS BE LIABLE FOR LOSS OF
DATA OR FOR DIRECT,SPECIAL, INCIDENTAL,CONSEQUENTIAL
(INCLUDING LOST PROFIT OR DATA), OR OTHER DAMAGE,
WHETHER BASED IN CONTRACT, TORT, OR OTHERWISE. Some
countries, states or provinces do not allow the exclusion or limitation of
incidental or consequential damages, so the above limitation or exclusion
may not apply to you.
Appendix A 57
Page 72

Regulatory Information and Warranty
HP Hardware Warranty
58 AppendixA
Page 73

Index
59
Page 74

Numerics
10/100BT LAN interface 5
A
accessories
installing 15
supported 16
activity light
hard disk 10
network 10
audio
connector 6
LINE IN 6
LINE OUT 6
B
BIOS
obtaining via World Wide Web 40
C
cables
keyboard 4
connecting
display 4
keyboard 4
to network 5
connector
audio 6
external SCSI 7
headphones 6
microphone 6
MIDI 6
parallel port 4
power 9
printer 4
RJ-45 5
serial port 4
control panel 10
cover
removing 17
replacing 18
D
disk drives
installing 20
display
connecting 4
drivers
obtaining via World Wide Web 40
E
Electrostatic discharge (ESD) xiii
ESD (electrostatic discharge) xiii
H
hard disk
activity light 10
headphones
connector 6
Hewlett-Packard
information services 40
support and information services 37
World Wide Web access 40
HP MaxiLife 10
I
information services 40
initializing
software 12
installing
accessories 15
disk drives 20
printer 4
K
keyboard
connecting 4
troubleshooting 34
L
LINE IN jack 6
60
Page 75

LINE OUT 6
M
Mass Storage Devices 16
microphone
connector 6
MIDI
connector 6
mouse
troubleshooting 35
N
network
activity light 10
connecting to 5
RJ-45 connector 5
O
Operating system recovery 36
P
parallel port
connector 4
password
setting 14
Personal Workstation
starting and stopping 11
starting first time 11
stopping 13
troubleshooting 23
unpacking 2
Plug and Play
SCSI 21
power
connector 9
printer
connector 4
installing 4
R
RAIDport 16
Recovery, operating system 36
RJ-45
connector 5
S
SCSI 7
external connector 7
Plug and Play 21
Wide 16-bit 7
serial port
connector 4
setting
password 14
software
initializing 12
Starting
and stopping Personal Workstation 11
starting
Personal Workstation first time 11
stopping
Personal Workstation 13
support
by telephone 41, 43
information services 37
summary of services 44
supported HP accessories 16
T
telephone support
out of warranty 43
under warranty 41
tools
required for installation 3
troubleshooting 23
keyboard 34
mouse 35
Personal Workstation 23
61
Page 76

U
unpacking the Personal Workstation 2
URL
for HP World Wide Web site 40
W
World Wide Web
access to HP 40
62
 Loading...