

HP Visual Collaboration, Visual Collaboration Gateway, Visual Collaboration Portal, Visual Collaboration Room, Visual Collaboration Router User Manual
Page 1
HP Visual Collaboration Desktop
User Guide
HP Visual Collaboration Desktop v1.0
First edition: November 2010
Page 2

Legal notices
© Copyright 2010 Hewlett-Packard Development Company, L.P.
The information contained herein is subject to change without notice. The only warranties for HP products and services are
set forth in the express warranty statements accompanying such products and services. Nothing herein should be construed
as constituting an additional warranty. HP shall not be liable for technical or editorial errors or omissions contained herein.
Microsoft, Windows, and Windows NT are U.S. registered trademarks of Microsoft Corporation.
Printed in the US.
Page 3

Contents
Installation and Configuration .............................................................................................................................. 5
Installing the Desktop Client .................................................................................................................................. 5
System requirements ........................................................................................................................................ 5
Hardware requirements ................................................................................................................................... 5
Accessing the Visual Collaboration User Portal ................................................................................................ 6
Installing the software ...................................................................................................................................... 7
Selecting devices ............................................................................................................................................. 7
Managing Meetings ............................................................................................................................................. 8
Getting started ...................................................................................................................................................... 8
Desktop versions .............................................................................................................................................. 9
Getting a meeting up and running quickly .......................................................................................................... 10
Types of rooms .............................................................................................................................................. 10
Types of meetings .......................................................................................................................................... 10
Starting the Desktop client .............................................................................................................................. 10
Inviting participants to a meeting ................................................................................................................... 11
Joining a meeting as a registered user ........................................................................................................... 11
Joining a meeting as a guest ......................................................................................................................... 12
About guest participants ................................................................................................................................ 12
Conducting Meetings .......................................................................................................................................... 13
Starting a meeting ......................................................................................................................................... 13
Adding a participant during a meeting .......................................................................................................... 13
Knowing when and how to connect ............................................................................................................... 14
User Status ............................................................................................................................................. 14
Room Status ........................................................................................................................................... 14
Calling another user directly .......................................................................................................................... 15
Starting a meeting with a legacy system ........................................................................................................ 15
Signing out .................................................................................................................................................... 15
Closing the client ........................................................................................................................................... 15
Managing contacts ............................................................................................................................................. 16
Adding a contact ........................................................................................................................................... 16
Removing a contact ....................................................................................................................................... 16
Controlling the Meeting Environment .................................................................................................................. 17
Managing layout, share, and view options ......................................................................................................... 17
Viewing participants ...................................................................................................................................... 17
Maximum viewing capacity ........................................................................................................................... 17
Layout controls ............................................................................................................................................... 18
Sharing content .............................................................................................................................................. 18
Share and view controls ................................................................................................................................ 18
Volume and camera controls ......................................................................................................................... 19
User Portal meeting controls ........................................................................................................................... 19
Customizing Settings .......................................................................................................................................... 20
User Portal settings .............................................................................................................................................. 20
Changing your password .............................................................................................................................. 20
Setting a secure access code ......................................................................................................................... 20
Changing the portal language ....................................................................................................................... 21
Page 4

Desktop client settings ......................................................................................................................................... 21
Viewing your meeting status .......................................................................................................................... 21
Viewing participants in your room ................................................................................................................. 21
Changing device settings ............................................................................................................................... 22
Changing video settings ................................................................................................................................ 22
Changing language and meeting options ...................................................................................................... 22
Page 5

5
Installation and Configuration
Installing the Desktop Client
This section describes the following:
• Minimum system and hardware requirements
• Accessing Visual Collaboration website to get the Desktop client software
• Installing and starting the Desktop client
• Configuring your speakers, microphone, and camera
System requirements
Recommended configuration (Windows) to encode 640p@15 fps/decode 720p@30 fps
○ Microsoft® Windows® XP SP2, Vista, or Windows 7
○ Intel® Core™ 2 Duo 2.4 GHz (or better), or Intel® Core™ i3 2.1 GHz (or better)
○ 2 GB RAM
○ System must support DirectX v9.0c or later and fully support both DirectDraw Acceleration
and Direct3D Acceleration
Installation and Configuration
Recommended configuration (Windows) to encode and decode 720p@30 fps
○ Microsoft® Windows® XP SP2, Vista, or Windows 7
○ Intel® Core™ 2 Quad 2.66 GHz (or better), or Intel® Core™ i5 2.4 GHz (or better)
○ 2 GB RAM
○ System must support DirectX v9.0c or later and fully support both DirectDraw Acceleration
and Direct3D Acceleration
Hardware requirements
The following equipment is required to use Visual Collaboration Desktop.
○ Industry-standard PC or laptop
○ Camera
− Logitech HP Pro Webcam B910 (recommended)
− Logitech Pro Webcam 9000
− Microsoft LifeCam
− Cinema Web Cam
○ Echo-cancelling headset
− Logitech USB Headset H330 (recommended)
− Plantronics Audio 480 USB Headset
− HP PC Headset 860
− Microsoft Lifechat LX-3000 Headset
○ Optional speaker phone
− ClearOne Chat 50 Speakerphone (recommended)
Page 6
Installation and Configuration
Accessing the Visual Collaboration User Portal
When your system administrator adds you as a Visual Collaboration user, you will receive an email
with your User Name, Password, and a URL to access the website.
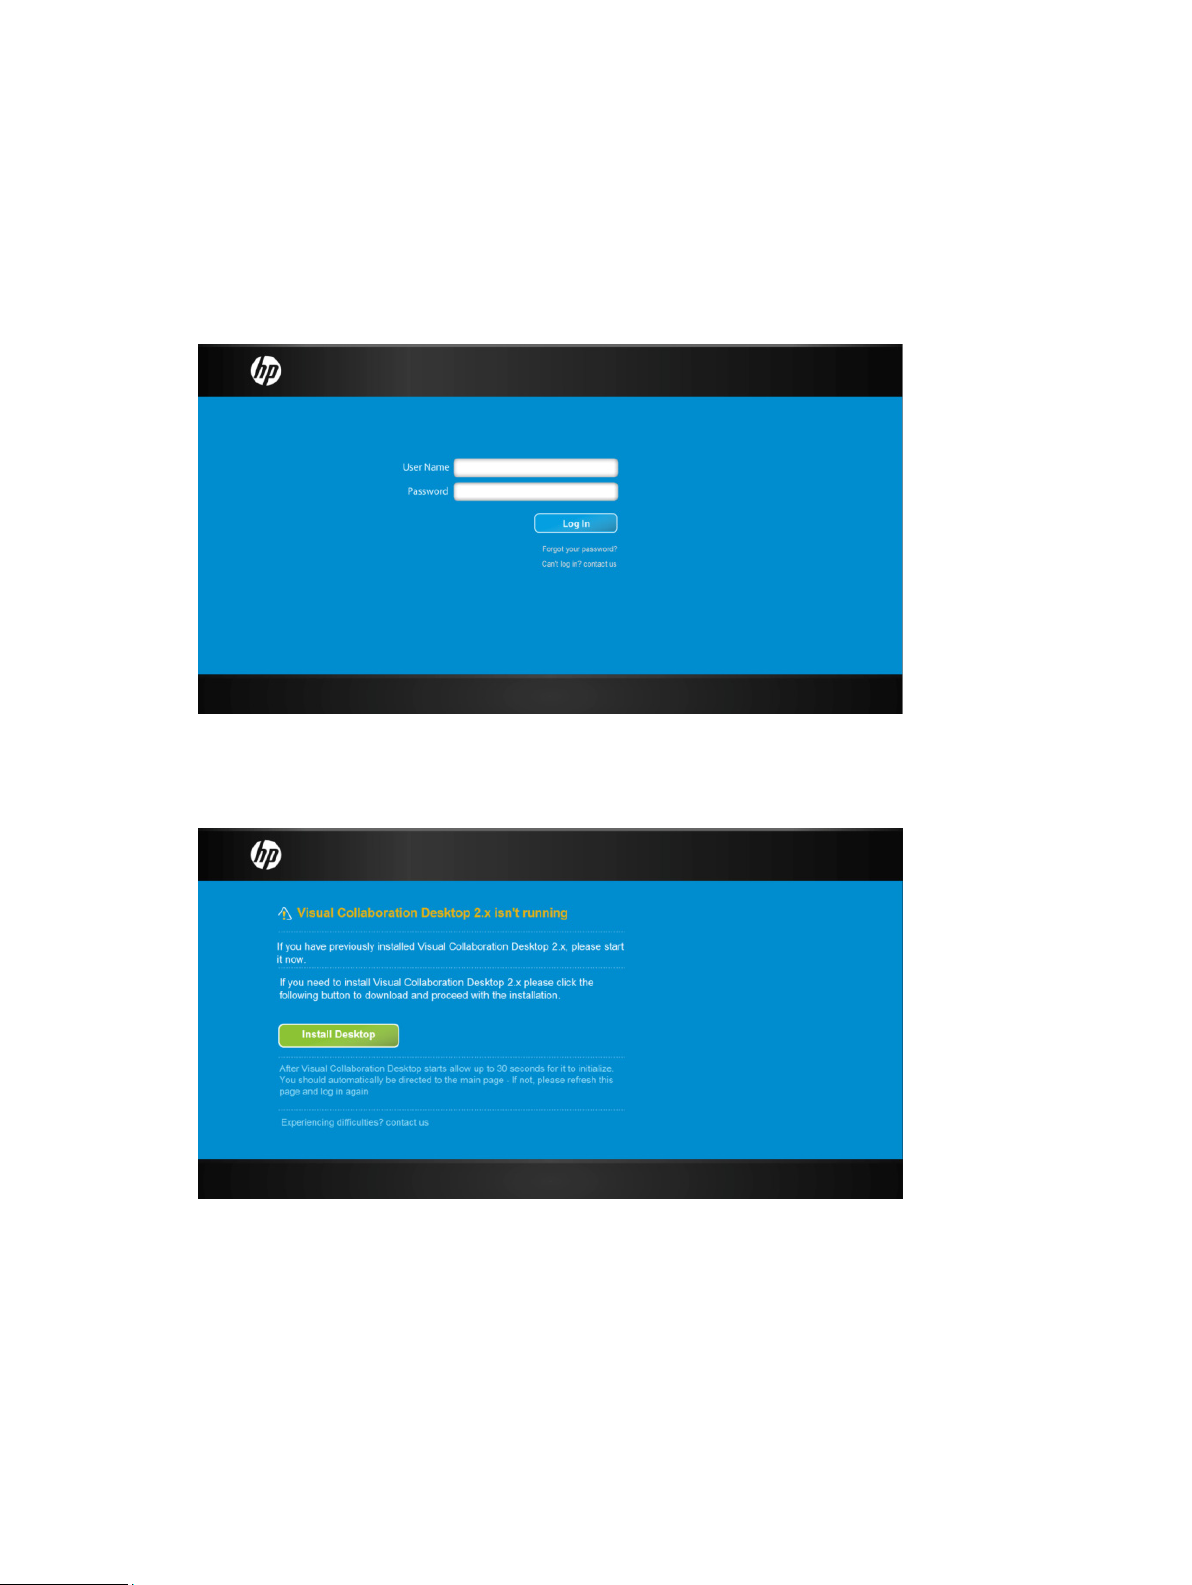
1. Open a web browser.
2. Browse to the address you received from your administrator.
3. Enter your user name and password, and then click Log In.
The first time you log in to the website, you are prompted to install the software. Later on, if there is an
upgrade available, you will be prompted to upgrade.
The latest software is always available on the User Portal.
6
Page 7
7
Installing the software
Before you install the Desktop client software, install the headset and camera according to the
instructions that came with the devices.
The first time you log in, you will see a message that Visual Collaboration Desktop is not running.
1. Click Install Desktop to start the Installation Wizard.
2. When prompted, click I Agree to accept the license agreement.
3. When installation is complete, click Finish to close the installer.
The Desktop icon appears in the system tray.
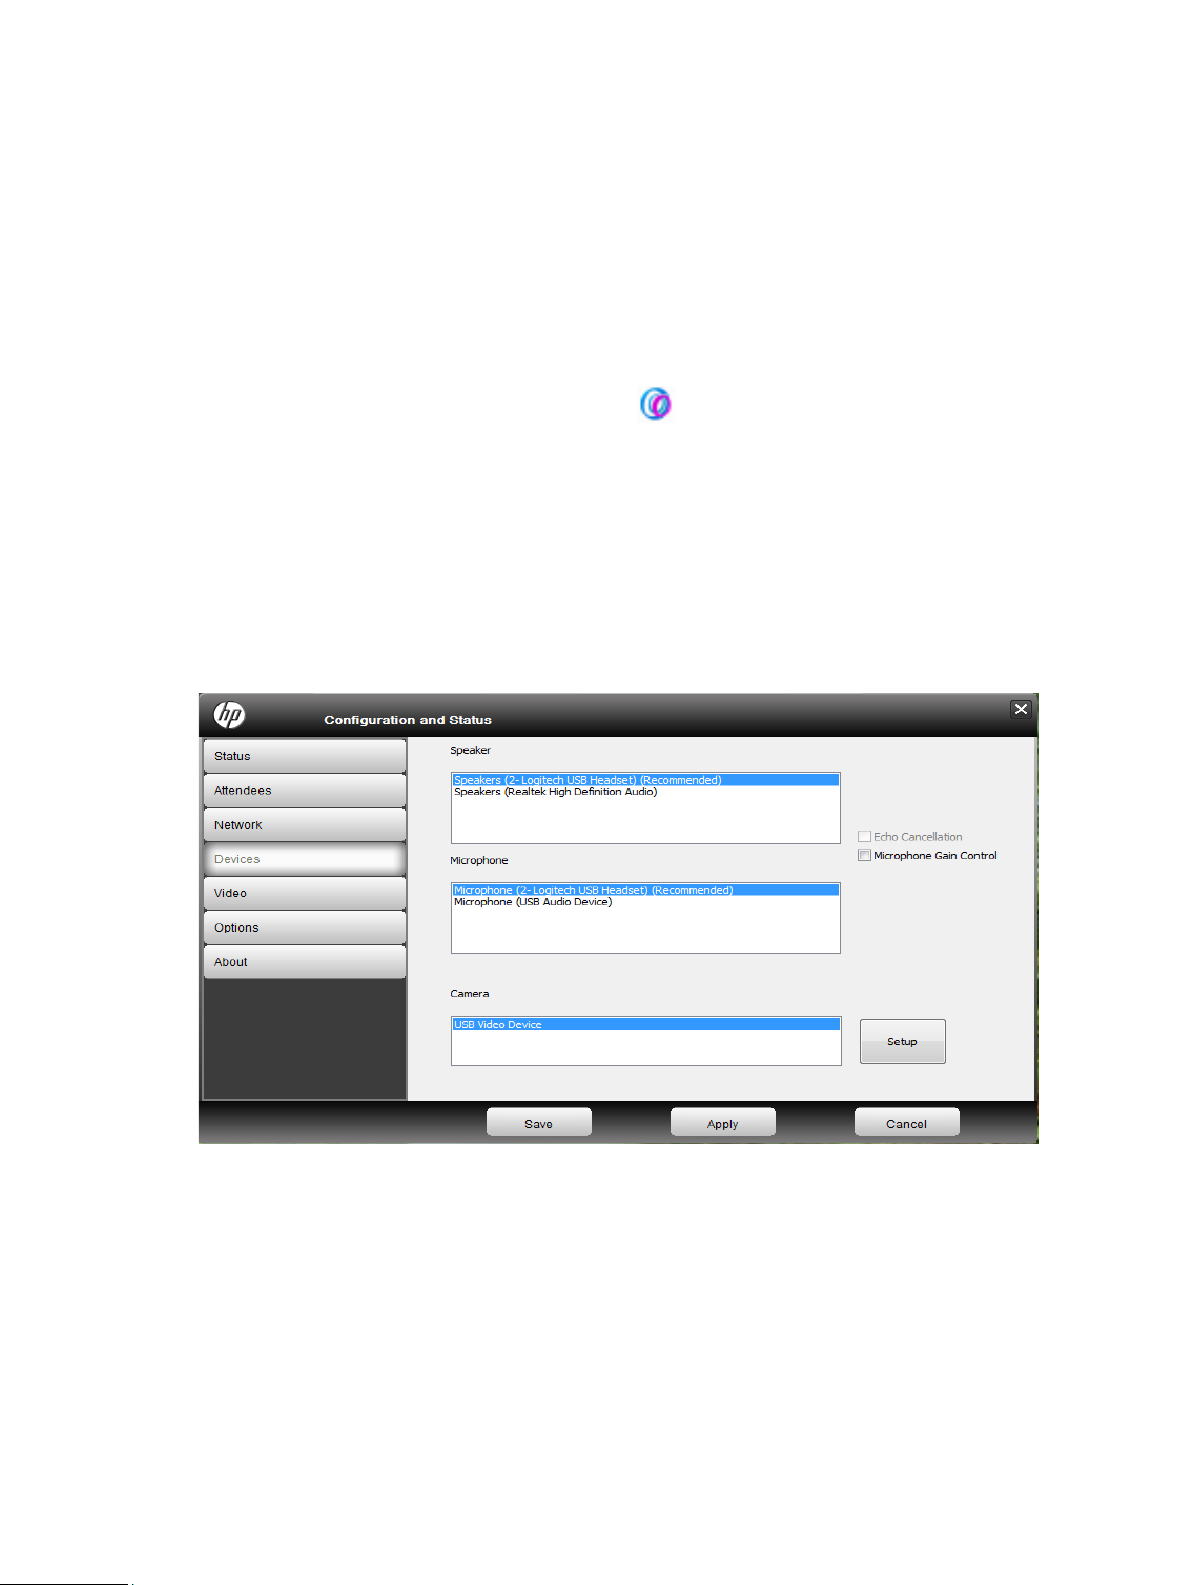
Selecting devices
You need to select the appropriate speaker, microphone, and camera devices for Visual
Collaboration Desktop to work properly.
1. Right-click the Desktop icon in the system tray, and then click Configuration.
2. Select your devices from the list of installed devices.
Installation and Configuration
3. Click Apply to apply the devices.
Page 8

Managing Meetings
Getting started
The HP Visual Collaboration Desktop Client and the web-based User Portal are software that allow
you to participate in video-conferencing meetings with your personal computer.
With these products, you can perform the following tasks:
• Start a meeting
• Join a meeting
• Place a direct call to one user in the system
• Invite users to a meeting
• Control a meeting
• Manage your contacts list
• Change personal settings
Managing Meetings
The Visual Collaboration Desktop is software on your local computer that allows you to participate in
meetings. The desktop software allows you to manage meeting sharing and layout while a meeting is
in progress.
The User Portal is a web-based user interface. It is your meeting “Command Center” where you start,
join, and manage meetings.
IMPORTANT: You cannot access the User Portal unless the Desktop software is running on your local
computer.
8
Page 9

9
Desktop versions
There are two versions of the HP Visual Collaboration Desktop:
Visual Collaboration Desktop
Managing Meetings
○ Download the Desktop client from the Visual Collaboration website.
○ It can be installed on any industry-standard PC or laptop.
Visual Collaboration Executive Desktop
○ The Executive Desktop runs on the HP Touchsmart platform.
Page 10

Getting a meeting up and running quickly
This section describes types of rooms and meetings, starting the Desktop client, sending meeting
invitations, and starting and joining meetings.
Types of rooms
There are two kinds of Visual Collaboration rooms.
• A Visual Collaboration Room is a physical room containing the Visual Collaboration hardware,
controlled by the remote control.
• A Meeting Room is the virtual space where you connect to other users; you connect to a meeting
room using the Join Room button in the Visual Collaboration Room software. Each Desktop user
or Visual Collaboration Room has one meeting room.
Types of meetings
There are two types of meetings:
• Direct calls (also known as point-to-point meetings). Only two users can participate.
• Multi-point meetings. More than two users can participate.
Managing Meetings
Starting the Desktop client
If the Desktop client is not already running, start it before you access the web interface.
1. Click Start, and then click All Programs.
2. Click HP Visual Collaboration.
3. Select Visual Collaboration Desktop.
The Visual Collaboration Desktop icon appears in the system tray.
4. Right-click the icon in the system tray, and then click Place a Call.
The Visual Collaboration Home page opens.
10
Page 11

11
Inviting participants to a meeting
You can invite participants to a meeting by sending a room link via email.
NOTE: Participants do not have to be a Visual Collaboration registered user. You can invite “Guest”
users who do not have the Desktop client installed.
1. Right-click the Desktop icon in the system tray, and then click Place a Call.
2. Select the Invite by Email link at the bottom of the Home page.
If you are prompted to create a link to your meeting room, select OK.
3. Enter the email addresses of your attendees, and then click Send.
Managing Meetings
Joining a meeting as a registered user
To accept a meeting invitation as a registered user, do the following:
1. Click on the link in the email invitation.
The meeting log-in screen appears.
2. Enter your User Name and Password, and then click Join.
Page 12

Joining a meeting as a guest
To accept a meeting invitation as an unregistered guest, do the following:
1. Click the link in the email.
2. Enter your name in the Guest Name field, and then click Join.
Managing Meetings
3. If you are prompted, install Visual Collaboration Desktop 2.x.
a. Select Install Desktop.
b. Select Run twice.
c. Follow the instructions in the installation wizard.
4. Select the camera, microphone, and speakers to use for the meeting.
NOTE: If you are using a headset, select it instead of microphone and speakers.
5. Select Save.
The meeting begins in the HP Visual Collaboration Desktop. If you are the first participant to enter the
meeting, you will only see yourself.
About guest participants
• Create one meeting link for all guests
• The meeting link grants access to your meeting room only
• Guests do not require user names or passwords
• Guests can join your room before you start the meeting
12
Page 13

13
Conducting Meetings
Starting a meeting
After you invite your participants, you should enter your meeting room and wait for others to join you.
You do not have to be in the room first for others to enter it.
1. Click My Room.
2. Click Join Room.
TIP: You can join your own meeting room from the Visual Collaboration Desktop icon. Right-click the
Desktop icon and then select Start My Meeting.
Adding a participant during a meeting
You can add invite a new participant to a current meeting.
1. Select Control Meeting.
Managing Meetings
2. Select Add Participants.
3. Enter the user’s name in the Add Participants field.
4. Select the user from the list below the Add Participants field.
5. Select Add.
6. Select Connect.
The user receives an invitation to join your meeting through their Visual Collaboration Desktop.
When they accept the invitation, they join the meeting.
Page 14

Knowing when and how to connect
The user or room status determines whether you can place a call to that user, join that user’s room, or
invite that user to attend a meeting.
User Status
The following table describes the user status icons. These icons appear next to the user name in the
contacts list.
This status… Means this…
Available. The user is available for a direct call. You can join their room, or invite them to a
meeting.
Busy. The user is busy and you cannot call them directly or invite them to a meeting. You can
join their room if it is not full or locked.
In room. The user is in their room. You cannot call them directly. You can join their room if it
is not full or locked, and they can leave their room and join yours.
Managing Meetings
Room Status
Like users, the room status determines whether or not you can connect. For example, the room may be
PIN protected, locked, or not accepting new participants.
This status… Means this…
In room/room full. The user is in the room and the room is full. You cannot call them directly
or join their room, but they can leave their room and join yours.
In room/room locked. The user is in their room and the room is locked. You cannot call them
directly or join their room. They can leave their room and join yours.
In a PIN-protected room. The user is in the room and the room is PIN protected. You cannot
call them directly, but you can join their room if you have the PIN code. They can leave their
room and join yours.
Offline. The user is not signed in to the portal. You cannot call them directly, but you can join
their room if it is not full or locked.
Legacy. This is a legacy endpoint user type.
Empty. No one is currently in the room and you can join it. The Join Room button is active.
Full. The room is fully occupied and cannot accept more participants. The Join Room button
is inactive.
Locked. The room is locked and you cannot join it. The Join Room button is inactive.
Occupied. The room is occupied but additional participants can join it. The Join Room button
is active.
PIN Protected. You must enter a PIN number to join the room. The Join Room button is active.
(The PIN is in the invitation email from the room owner.)
14
Page 15

15
Calling another user directly
Calling a user directly begins a meeting in which only the caller and recipient can participate. Unlike
joining a meeting room, no other participants can join this meeting.
1. Search for the user or room, or locate them in the My Contact list.
2. Select Call Direct.
The Visual Collaboration Desktop opens, and the user receives a pop-up invitation.
Starting a meeting with a legacy system
If you are unable to find a legacy system on the portal Home page, you can call it directly.
To connect to a legacy system, you must know the system’s extension or IP address. Contact your
system administrator for this information.
1. Enter the extension or IP address on the portal Home page.
2. Select Call Direct.
The Visual Collaboration Desktop opens, and the legacy system receives an invitation. The user
selects Answer to connect to the meeting.
Managing Meetings
Signing out
Sign out from the Management Portal to close the interface. You will still be connected to the Visual
Collaboration system and be able to receive incoming calls.
1. From the Management Portal, select Log out.
2. Select OK.
Closing the client
You can exit the Visual Collaboration Desktop to avoid receiving incoming calls.
1. Right-click (Control + click for Macintosh) the Desktop icon in the taskbar or dock.
2. Select Quit.
Page 16

Managing contacts
Contacts are users and rooms with which you can hold meetings. They appear on the My Contacts tab
on the Home page.
Managing Meetings
When you first use the room, the contact list contains your room only. If you meet with a contact
regularly, you can add that contact to your personal My Contacts list
Adding a contact
To add a contact, do the following:
1. Search for the contact under My Contacts.
2. Click the desired contact to highlight it.
3. Click Add Contact.
The contact is added to the My Contacts list, and will remain there until you remove it. Contacts
appear in alphabetical order, and you may need to scroll to view them all.
Removing a contact
If your My Contact list gets too long, or if you no longer meet with a contact frequently, you can
remove that contact from your My Contact list.
1. Search for the contact under My Contacts.
2. Click the desired contact to highlight it.
3. Click Remove Contact.
The contact is removed from your My Contact list.
16
Page 17

17
Controlling the Meeting Environment
Controlling the Meeting Environment
Managing layout, share, and view options
Meeting controls appear at the top of the participant window. The meeting controls allow you to
manage layout, to share and view content, and to control the volume.
Viewing participants
In Preferred mode, the speaker (or last speaker), appears largest on the screen. To toggle
Preferred mode on or off, click the Layout button.
Maximum viewing capacity
To select a specific number of participants to view, click the drop-down arrow on the Layout
button. This applies only when three or more participants are in a meeting.
The maximum number of participants that can be viewed is eight, plus self-view.
Page 18

Click this…
To do this…
Controlling the Meeting Environment
Layout controls
Click this…
Sharing content
Select the Down arrow button to select an application or screen to share.
To do this…
Click the Layout button to switch between preferred and non-preferred view mode.
Click the Down arrow to select a specific number of participants to vie.
Show meeting in full-screen view.
Share and view controls
Use the following controls to manage what you and other participants see during a meeting.
Maximize the meeting window to full-screen view.
Click the Down arrow to select the application or display to share.
Click the Share button to toggle sharing on and off.
Click the Toggle Share button to cycle through shared content.
Click the Down arrow to select a specific shared view.
Turn self- view on or off. Allows you to see an image of yourself or not.
Turn your camera on or off. Mutes your video so that others do not see you. Does not
mute audio.
18
Page 19

19
Select this…
To do this…
Volume and camera controls
Use the following controls to set you speaker and microphone volume.
Controlling the Meeting Environment
Click this…
To do this…
Click the Speaker button to mute and unmute your speakers.
Click the Down arrow to select a volume level.
Click the Speaker button to mute and unmute your microphone.
Click the Down arrow to select a volume level.
User Portal meeting controls
In addition to the Desktop meeting controls, you can also perform tasks from the web interface. You
access the Control Meeting page from the portal Home page.
Sign in to the portal, and then click Control Meeting.
Add a participant to the meeting.
Connect all participants and start the meeting.
Disconnect all participants and end the meeting.
Lock the room so that no other participants can join.
Mute all participants.
Unmute all participants.
Remove all participants from the room.
Send an email inivitaion with a link to your meeting room.
Page 20

Customizing Settings
User Portal settings
From the portal, you can change your password, meeting room link, meeting room PIN, and portal
display language.
From the user portal Home page, select Settings.
Customizing Settings
Changing your password
You can change the password you use for signing in to the portal.
1. Select Account.
2. Select Change Password
3. Enter the new password in the Password and Confirm Password fields.
4. Select Save.
Setting a secure access code
You can set a secure access code (room PIN), to protect your room from entry by unauthorized users.
The room PIN is included with email invitations.
1. Select My Room.
2. Enter a PIN in the Room PIN field.
The Pin must be between 4 and 10 numerical digits.
3. Select Save.
20
Page 21

21
Changing the portal language
The portal can display text in any one of eleven languages.
1. Select Language.
2. Select the language you want displayed.
3. Select Save.
Desktop client settings
From the Desktop, you can control the network, device, video, and meeting options settings the
Desktop uses when connecting to meetings.
1. Right-click Desktop icon in the system tray.
2. Select Configuration…
Customizing Settings
Viewing your meeting status
If you are in a meeting, the Status tab shows what meeting room you are connected to, as well as any
alarms to indicate a problems with the meeting.
Viewing participants in your room
The Attendees tab shows participants who are in the same meeting you are in. All participants in the
meeting you are connected to are displayed.
Select Refresh to update the list of participants.
NOTE: If you see small boxes instead of letters or characters, the user’s name is written in a
language font not supported by your computer.
Page 22

Changing device settings
When you installed the Desktop client, you selected your default speaker, microphone, and camera. If
you need to update or change these, you can do this from the Devices page.
NOTE: If the Desktop detects a new device when you join a call, this menu opens automatically.
Changing video settings
You can choose from several different video settings that affect how the Desktop encodes video. It is
best to leave the default at Best Quality (recommended).
Changing language and meeting options
Normally the Desktop uses the same display language you selected in the User Portal. If you want the
desktop to use a different language than the portal, you can select it from the Desktop Options page.
NOTE: When you restart the Desktop, the language will revert to the same language specified in the
User Portal.
Customizing Settings
There are several global desktop options you can select from this tab.
Check this … To do this …
Start Visual Collaboration Desktop on login The desktop will start on computer startup.
Auto Answer Enabled You do not have to accept invitations; if you receive a meeting
invitation and you are available, you join the meeting
automatically.
Play a tone when participants join or leave Sounds an alert when users join or leave a meeting.
Start Conference in Full-screen All meetings begin in full-screen mode, instead of in a window.
Always Display Toolbar The meeting toolbar does not fade away in full-screen mode.
1. Select Options.
2. Select the language and options.
3. Select Save.
22
 Loading...