

Page 1

HP Virtual Connect Enterprise Manager
User Guide
HP Part Number: 460924-002
Published: April 2008, second edition
Page 2

© Copyright 2007, 2008 Hewlett-Packard Development Company, L.P.
Legal Notices
Confidential computer software. Valid license from HP required for possession, use or copying. Consistent with FAR 12.211 and 12.212, Commercial
Computer Software, Computer Software Documentation, and Technical Data for Commercial Items are licensed to the U.S. Government under
vendor's standard commercial license.
The information contained herein is subject to change without notice. The only warranties for HP products and services are set forth in the express
warranty statements accompanying such products and services. Nothing herein should be construed as constituting an additional warranty. HP shall
not be liable for technical or editorial errors or omissions contained herein.
Acknowledgments
Microsoft and Windows are U.S. registered trademarks of Microsoft Corporation. Windows Server 2003 is a U.S. trademark of Microsoft Corporation.
Adobe and Acrobat are trademarks of Adobe Systems Incorporated.
Page 3

Table of Contents
About this document....................................................................................11
Intended audience................................................................................................................................11
Publishing history..................................................................................................................................11
Document organization..........................................................................................................................11
Typographic conventions........................................................................................................................11
Related documents................................................................................................................................12
HP encourages your comments...............................................................................................................12
1 Introduction.............................................................................................13
Key features and benefits.......................................................................................................................13
Key features....................................................................................................................................13
Key benefits....................................................................................................................................14
Platform support....................................................................................................................................14
Architectural overview............................................................................................................................14
HP Virtual Connect technology..........................................................................................................14
Managing HP Virtual Connect...........................................................................................................15
HP Virtual Connect Manager.......................................................................................................15
HP Virtual Connect Enterprise Manager.........................................................................................15
Virtual Connect Enterprise Manager operations...................................................................................16
Setup summary.....................................................................................................................................17
2 Installing and configuring Virtual Connect Enterprise Manager.......................19
Preparing for a VCEM installation...........................................................................................................19
VCEM checklist.....................................................................................................................................19
Prerequisites for installation....................................................................................................................19
Hardware installation requirements....................................................................................................20
Insight Control Management hardware installation requirements.......................................................20
Software installation requirements......................................................................................................20
Insight Control Management software installation requirements.........................................................20
Performing an installation.......................................................................................................................21
Performing an Insight Control Management integrated installation..........................................................21
Performing post-installation configuration tasks..........................................................................................34
Post-installation configuration tasks.....................................................................................................34
3 Managing VC Domains............................................................................37
VC Domains.........................................................................................................................................37
Requirements for adding a VC Domain to a VC Domain Group.............................................................38
VC Domain actions..........................................................................................................................39
Licensing an enclosure for VCEM.......................................................................................................40
Creating a VC Domain Group...........................................................................................................40
Adding a VC Domain to a VC Domain Group.....................................................................................40
Removing a VC Domain from a VC Domain Group..............................................................................41
Making changes to a VC Domain in VC Domain Maintenance..............................................................42
Changes in Virtual Connect Manager that might affect completing VC Domain Maintenance...............43
4 Managing VC Domain Groups..................................................................45
VC Domain Groups...............................................................................................................................45
Creating a VC Domain Group...........................................................................................................46
Updating a VC Domain Group configuration.......................................................................................46
Canceling a VC Domain Group configuration.....................................................................................48
Removing a VC Domain from a VC Domain Group..............................................................................48
Table of Contents 3
Page 4

Removing a VC Domain Group.........................................................................................................49
5 Managing server profiles...........................................................................51
Profiles................................................................................................................................................51
Creating a profile............................................................................................................................52
Deleting a profile.............................................................................................................................53
Editing a profile...............................................................................................................................53
Assigning a profile...........................................................................................................................53
Unassigning a profile.......................................................................................................................53
Copying and assigning a profile to a bay...........................................................................................53
Moving a profile..............................................................................................................................54
Performing a VC Profile Failover.........................................................................................................54
Preconditions for VC Profile Failover..............................................................................................54
Designating spare bays...............................................................................................................54
Initiating VC Profile Failover through the VCEM CLI.........................................................................54
Initiating VC Profile Failover through the VCEM GUI........................................................................55
Initiating VC Profile Failover using HP SIM Automatic Event Handling................................................55
6 Managing bays.......................................................................................57
Bays....................................................................................................................................................57
Powering down a bay......................................................................................................................58
Assigning a profile to a bay..............................................................................................................58
Unassigning a profile from a bay.......................................................................................................59
Performing a VC Profile Failover.........................................................................................................59
Preconditions for VC Profile Failover..............................................................................................59
Designating spare bays...............................................................................................................59
Initiating VC Profile Failover through the VCEM CLI.........................................................................59
Initiating VC Profile Failover through the VCEM GUI........................................................................60
Initiating VC Profile Failover using HP SIM Automatic Event Handling................................................60
7 Managing MAC and WWN addresses......................................................63
MAC Addresses....................................................................................................................................63
Tracking individual MAC addresses....................................................................................................63
Creating MAC exclusion ranges........................................................................................................64
Deleting MAC exclusion ranges.........................................................................................................64
Reclaiming external MAC addresses...................................................................................................64
Adding custom MAC address ranges..................................................................................................65
Editing custom MAC address ranges..................................................................................................65
Removing custom MAC address ranges..............................................................................................65
WWN Addresses.................................................................................................................................65
Tracking individual WWN addresses.................................................................................................66
Creating WWN exclusion ranges......................................................................................................66
Deleting WWN exclusion ranges.......................................................................................................67
Allocating WWN addresses.............................................................................................................67
Reclaiming external WWN addresses................................................................................................67
Adding custom WWN address ranges...............................................................................................68
Editing custom WWN address ranges................................................................................................68
Deleting custom WWN address ranges..............................................................................................68
8 Tracking VCEM job status..........................................................................69
Jobs....................................................................................................................................................69
Job status message window...............................................................................................................69
Reviewing job details.......................................................................................................................70
Deleting jobs...................................................................................................................................70
4 Table of Contents
Page 5

9 Upgrading Virtual Connect firmware after VCEM is managing VC Domains.....71
Preparation checklist..............................................................................................................................71
Performing the firmware update using the VC Domain Maintenance capability..............................................71
10 External manager account.......................................................................73
11 Command Line Interface usage in Virtual Connect Enterprise Manager..........75
Perform VC Profile Failover on specified VC Domain Bay Server..................................................................75
List details for specified VCEM job...........................................................................................................76
Show CLI Usage online help...................................................................................................................76
CLI Exit/Error codes..............................................................................................................................77
12 Troubleshooting Virtual Connect Enterprise Manager...................................79
Troubleshooting....................................................................................................................................79
A Job appears with Failed status........................................................................................................79
Enclosure has two Onboard Administrators, and one fails.....................................................................79
WWN exclusion range displays a conflict message even when there is no conflict...................................79
Missing enclosure model...................................................................................................................79
VCEM is prompting for Onboard Administrator credentials on a configured VC Domain...........................79
Unable to add VC Domain to a VC Domain Group..............................................................................79
Unable to add an unconfigured VC Domain to a VC Domain Group......................................................80
VC Domain displays Missing External Manager lock status...................................................................80
VC Domain displays Configuration Mismatch status..............................................................................80
VC Domain displays Connectivity failure status....................................................................................81
Operation fails to perform in the group and VC Domain Group is under updating process error message
appears.........................................................................................................................................82
Operation fails to perform in the VC Domain Group under Maintenance status........................................82
Remove from VC Domain Group job is successful but with errors............................................................82
VC Domain displays Expired License status..........................................................................................83
Error on database operation occurs....................................................................................................83
Errors occur while loading VCEM pages.............................................................................................83
Failed to execute VCEM operation because VC firmware not supported..................................................84
Creating a profile or adding a VC Domain to a VC Domain Group fails.................................................84
Uninstalling VCEM...........................................................................................................................84
Backing up and restoring VCEM........................................................................................................85
Edit profile does not display all the Fibre Channel SAN connections.......................................................85
Unable to change the MAC/WWN range in Virtual Connect Manager..................................................85
VCEM database is inaccessible or unretrievable with no backup, or VCEM file systems are corrupt with no
backup...........................................................................................................................................86
Enclosure has a hardware failure and must be replaced........................................................................86
VCEM is inaccessible because HP SIM was uninstalled.........................................................................87
An HP SIM-initiated custom tool calling the VCEM Failover CLI completed with an error stating The system
cannot find the path specified............................................................................................................87
Failover fails to initiate with an ERROR (30) - Could not initiate failover; nested exception is:
java.net.SocketTimeoutException: Read timed out.................................................................................87
VC Profile Failover fails during Onboard Administrator replacement.......................................................87
VCEM cannot power down ProLiant server model BL465 G1.................................................................88
VC Profile Failover CLI fails with Internal VCEM Error Message: VCEM failed to resolve the note [{0}]
message.........................................................................................................................................88
Cannot upgrade VCEM because one or more VC Domains are under VCEM control................................88
13 Appendix HP services and technical support..............................................89
HP contact information...........................................................................................................................89
Table of Contents 5
Page 6

Glossary....................................................................................................91
Index.........................................................................................................95
6 Table of Contents
Page 7

List of Figures
1-1 HP Virtual Connect technology..........................................................................................................15
1-2 Virtual Connect Enterprise Manager operations..................................................................................17
3-1 VC Domains page..........................................................................................................................37
4-1 VC Domain Groups.........................................................................................................................45
5-1 Profiles page..................................................................................................................................51
6-1 Bays page.....................................................................................................................................57
6-2 Window displaying the power status of a bay....................................................................................58
6-3 Bay status with tab and hold.............................................................................................................58
7-1 MAC Ranges List page....................................................................................................................63
7-2 WWN Ranges List page..................................................................................................................66
7-3 WWN Ranges List page..................................................................................................................67
8-1 Jobs list..........................................................................................................................................69
12-1 Backing up and restoring VCEM.....................................................................................................85
7
Page 8

8
Page 9

List of Tables
2-1 Insight Control Management hardware installation requirements............................................................20
2-2 Insight Control Management software installation requirements.............................................................20
9
Page 10

10
Page 11

About this document
Intended audience
This document is intended to be used by technical professionals who manage multiple HP BladeSystem
enclosures and use HP Virtual Connect Manager to control network connectivity. This documentation assumes
that you have installed Virtual Connect Manager, have read the
User Guide
Publishing history
Document organization
• Chapter 1, Introduction, provides an overview of Virtual Connect Enterprise Manager, its key features
• Chapter 2, Installing and configuring Virtual Connect Enterprise Manager, provides an installation
• Chapter 3, Managing VC Domains, provides requirements for adding a VC Domain to a VC Domain
• Chapter 4, Managing VC Domain Groups, provides information on creating a VC Domain Group,
• Chapter 5, Managing server profiles, provides information on creating and managing server profiles
• Chapter 6, Managing bays, provides information on powering down a bay, assigning a profile to a
• Chapter 7, Managing MAC and WWN addresses, provides information on managing MAC and
• Chapter 8, Tracking VCEM job status, provides information on Job status message windows, reviewing
• Chapter 9, Upgrading Virtual Connect firmware after VCEM is managing VC Domains, describes the
• Chapter 10, External manager account, describes how to remove an external manager account from
• Chapter 11, Command Line Interface usage in Virtual Connect Enterprise Manager, describes command
• Chapter 12, Troubleshooting Virtual Connect Enterprise Manager, identifies and provides solutions for
• Chapter 13, HP services and technical support, provides information for HP software support services.
, and understand its concepts.
and benefits, platform support, an architectural overview, and setup summary.
checklist, prerequisites for installation, and the procedures for installation and post-installation
configuration.
Group and describes VC Domain actions.
updating and canceling a VC Domain Group configuration, removing a VC Domain from a VC Domain
Group, and removing a VC Domain Group.
for use with VCEM.
bay, unassigning a profile from a bay, and performing VC Profile Failovers.
WWN addresses using VCEM.
job details, and deleting jobs.
additional steps required when for upgrading Virtual Connect firmware when VCEM is managing the
VC Domain.
a Virtual Connect Manager. Removing the external the external manager account results in Virtual
Connect Manager being removed from VCEM control.
line usage in VCEM for VC Failover operations.
commonly encountered issues, as well as answers to frequently asked questions.
HP Virtual Connect for c-Class BladeSystem
Publication dateEdition numberManufacturing part number
April 20081.10460924-002
November 20071.0460924-001
Typographic conventions
find
(1) HP-UX manpage. In this example, “find” is the manpage name and “1” is the
manpage section.
Book Title
Title of a book or other document.
Intended audience 11
Page 12

Linked Title
http://www.hp.com A Web site address that is a hyperlink to the site.
Command Command name or qualified command phrase.
user input Commands and other text that you type.
computer output Text displayed by the computer.
Enter The name of a keyboard key. Note that Return and Enter both refer to the same
term Defined use of an important word or phrase.
variable The name of an environment variable, for example PATH or errno.
value A value that you may replace in a command or function, or information in a display
<element> An element used in a markup language.
attrib= An attribute used in a markup language.
Related documents
In addition to this guide, the following resources are available:
• http://www.hp.com/go/vcem
•
HP Insight Control Management Support Matrix
•
HP Virtual Connect Enterprise Manager Data Migration Guide
Title that is a hyperlink to a book or other document.
key. A sequence such as Ctrl+A indicates that you must hold down the key labeled
Ctrl while pressing the A key.
that represents several possible values.
•
HP Virtual Connect Enterprise Manager Release Notes
For more information about Virtual Connect Manager, see the following resources:
•
BladeSystem c-Class Solution Overview
•
HP Virtual Connect for c-Class BladeSystem User Guide
•
HP Virtual Connect Manager Release Notes
HP encourages your comments
Your comments and suggestions regarding product features will help us develop future editions of VCEM.
For contact information, see chapter 13.
12 About this document
Page 13

1 Introduction
HP Virtual Connect Enterprise Manager (VCEM) simplifies the management of multiple HP BladeSystem
enclosures that use HP Virtual Connect to control LAN and Storage Area Network (SAN) connectivity, helping
organizations increase productivity, respond more quickly to business demands, and significantly reduce
operating costs.
Built on the Virtual Connect architecture integrated into every BladeSystem c-Class enclosure, VCEM provides
a central console to manage and control server-to-network connections for up to 100 BladeSystem enclosures,
a single resource pool for LAN and SAN address administration, group-based configuration management,
plus the rapid assignment and movement of server connection profiles and workloads across the data center.
Use VCEM in environments with multiple HP BladeSystem enclosures to complete key data center tasks
quickly, reliably, and without disruption to production LANs and SANs. VCEM enables you to:
• Install new blade servers and enclosures
• Perform fast and cost-effective server recovery
• Complete planned systems maintenance with minimal downtime
• Deploy large Virtual Connect installations
• Rapidly migrate and repurpose blade servers
Together, Virtual Connect and VCEM create a change-ready data center environment that enables
administrators to add, replace, and recover blade servers in minutes without impacting LAN and SAN
availability, significantly reducing typical deployment and maintenance costs.
For more information on VCEM, see http://www.hp.com/go/vcem.
Key features and benefits
VCEM delivers the following key features and benefits.
Key features
The key features of VCEM include:
• Single intuitive console to control multiple HP BladeSystem infrastructures that use Virtual Connect to
control LAN and SAN connectivity
• Central database administers over 65,000 Media Access Control (MAC) and World Wide Names
(WWNs)
• Group-based management of multiple Virtual Connect domains using common baseline configuration
profiles
• Embedded maintenance tools to configure and modified Virtual Connect network settings
• Scripted and manual movement of server connection profiles and associated workloads between
BladeSystem enclosures
• Automated failover of server connection profiles and workloads to spare server pools
• Flexible options enable VCEM to be installed as a physical stand-alone server, as a plug-in to HP
Systems Insight Manager (HP SIM) 5.2 and later, and as a VMware ESX virtual machine
• Integrates seamlessly and extends Virtual Connect infrastructures—Discovers existing VC Domains and
aggregates resources into a central VCEM console
• Licensed per c-Class enclosure—Simplifies deployment and enables VCEM support for current and
future blade server hardware
Key features and benefits 13
Page 14

Key benefits
The key benefits of VCEM include:
• Centrally manage individual and groups of BladeSystem enclosures that use Virtual Connect to control
LAN and SAN connectivity
• VCEM database enables more efficient LAN and SAN address management and eliminates conflicts
• Group-based management of Virtual Connect domains increases infrastructure consistency and enables
rapid change management across multiple enclosures using a single task
• Add, change, and replace servers across the data center in minutes when your business needs it without
impacting production LAN and SAN availability
• Significantly reduce the costs and time to deploy and maintain BladeSystem infrastructures
• Increase productivity and server-to-administrator ratios
• Release LAN and SAN administrators from routine server administration tasks
• Scalable across small and large data center environments
Platform support
VCEM is supported on a defined set of HP BladeSystem c-Class hardware, storage, software, and third-party
operating platforms.
For a full list of supported platforms and components, see the
HP Insight Control Management Support Matrix.
Architectural overview
This section provides an overview of the architecture, functionality, and operations of Virtual Connect
technology and VCEM.
HP Virtual Connect technology
HP Virtual Connect is a virtual I/O technology for HP BladeSystem that simplifies the setup and administration
of server connections to LANs and SANs. Virtual Connect is also a key building block in the HP Adaptive
Infrastructure strategy, which is designed to help organizations build next-generation data centers.
The Virtual Connect architecture is built into every HP BladeSystem c-Class enclosure, and extended through
standard Ethernet and Fibre Channel hardware module options that plug into the interconnect bays of the
enclosure. Virtual Connect uses pools of MAC address and World Wide Names in combination with server
profiles to establish dynamic connections between HP BladeSystem servers and production networks. Virtual
Connect enables IT organizations to wire LAN and SAN connections once, then add, replace, or recover
servers in minutes, rather than hours, days, or weeks. With Virtual Connect you can:
• Significantly reduce cabling and server connection complexity
• Maintain constant end-to-end connections to preferred fabric brands
• Separate server enclosure administration from LAN and SAN administration
• Enable system administrators to make server changes more optimally without impacting LAN or SAN
operations and administrators
• Relieve LAN and SAN administrators from server-centric maintenance
The following figure illustrates Virtual Connect technology.
14 Introduction
Page 15
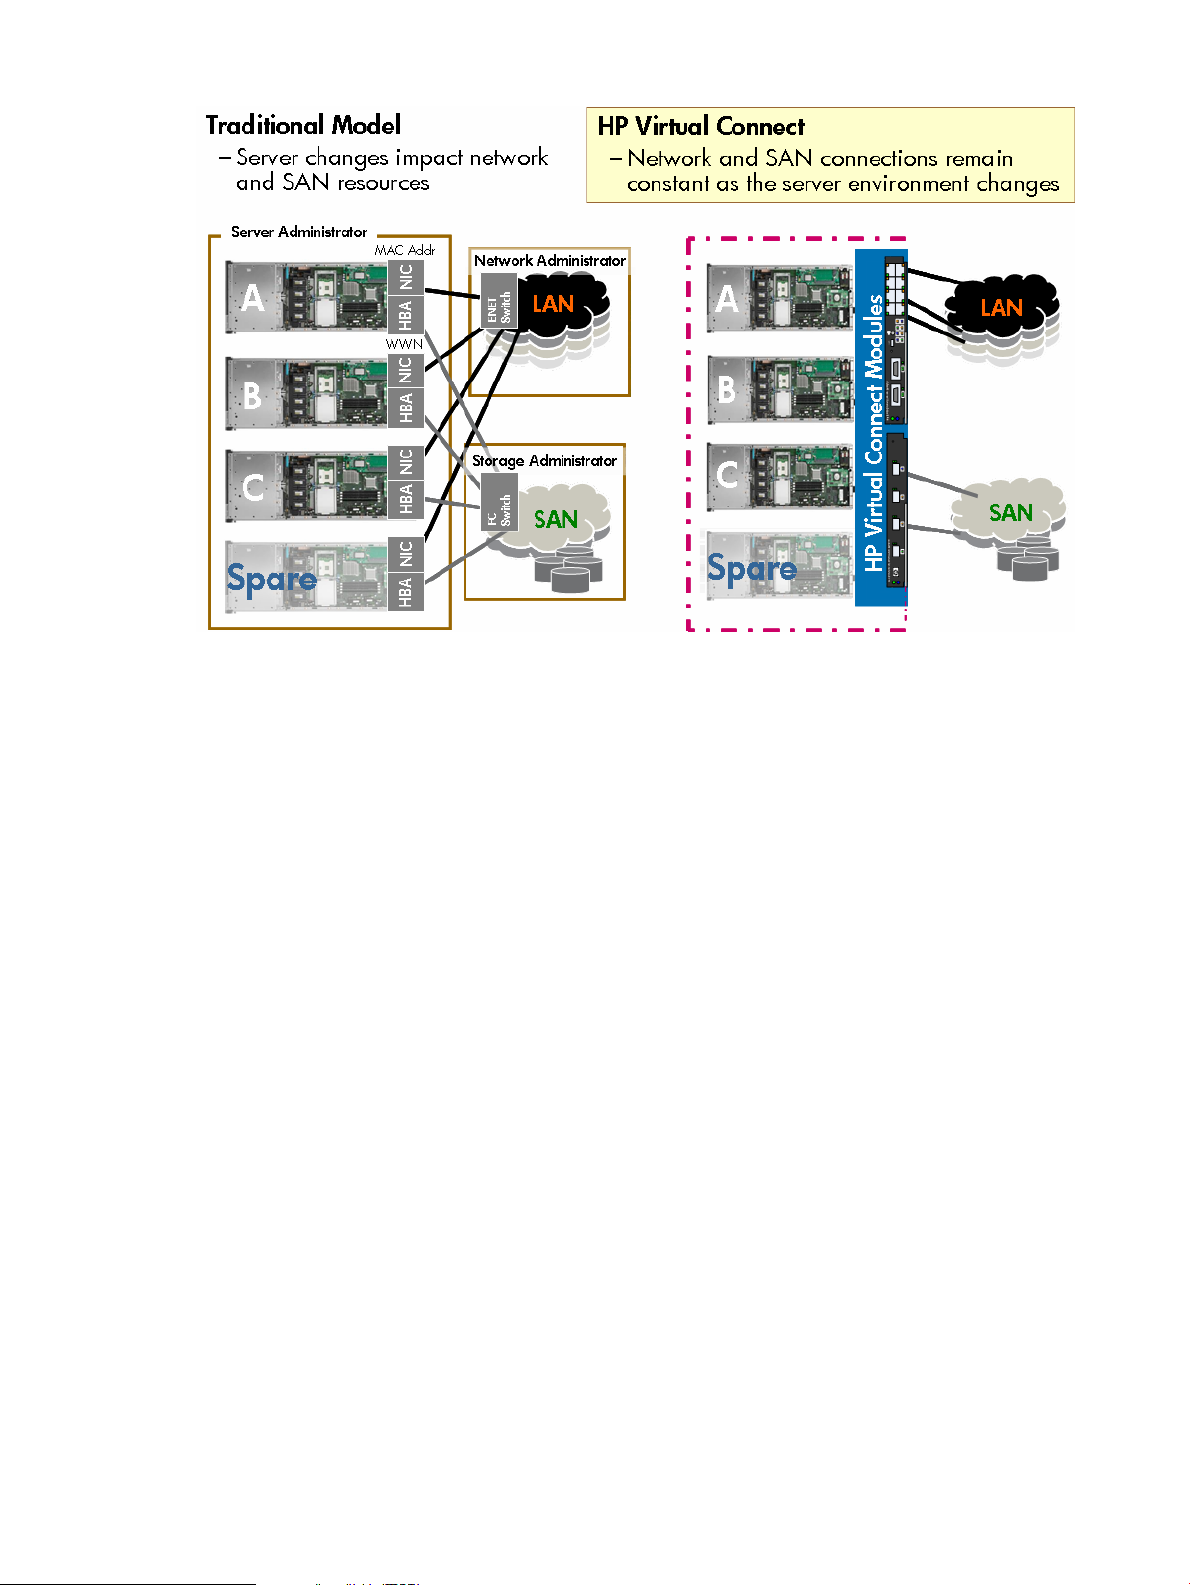
Figure 1-1 HP Virtual Connect technology
Virtualized server connectivity to LAN and SAN increases productivity and reduces complexity and costs.
Managing HP Virtual Connect
A Virtual Connect server profile is a logical grouping of server connection attributes that can be assigned
to any bay in a BladeSystem enclosure—also called a VC Domain. When assigned to an enclosure bay,
the server in that bay assumes the attributes of the profile which can include:
• MAC addresses for all NICs
• WWNs for all Host Bus Adapters (HBAs)
• Fibre Channel SAN boot parameters
HP provides a choice of management tools that enable administrators to quickly pre-configure and modify
Virtual Connect server profiles and assign them dynamically to BladeSystem enclosures and bays. Associating
LAN and SAN connections to enclosure bays means that even if the server environment changes the network
connections remain constant.
HP Virtual Connect Manager
Virtual Connect Manager is a web-based console integrated into Virtual Connect Ethernet module firmware,
providing local management for individual VC Domains.
Typical Environment—Small environments with HP BladeSystem c-Class and Virtual Connect contained in a
local data center.
HP Virtual Connect Enterprise Manager
Virtual Connect Enterprise Manager (VCEM) is an advanced software application that provides centralized
management for multiple BladeSystem enclosures configured with Virtual Connect. VCEM uses a single
console to manage many BladeSystem enclosures, a central resource pool for LAN and SAN address
administration, and grouping capabilities that enable rapid, reliable deployment and movement of server
connection profiles between blade enclosures and across the data center.
Typical Environment
• Medium to large HP BladeSystem environments that use Virtual Connect
• BladeSystem environments that extend to multiple locations, such as remote sites or across data centers
Architectural overview 15
Page 16

• Organizations that require centralized administration of Virtual Connect infrastructures to control
server-to-network connectivity.
• Organizations that require rapid server movement between enclosures—can be used for cost effective
server recovery, planned maintenance, and server repurposing.
For more information about Virtual Connect and Virtual Connect Manager, see the
c-Class BladeSystem User Guide.
Virtual Connect Enterprise Manager operations
VCEM extends Virtual Connect technology with a single console that aggregates the management and
control of multiple BladeSystem infrastructures. This intuitive solution delivers advanced Virtual Connect
management that leverages and integrates with other HP management tools, including HP SIM, Virtual
Connect firmware, and the Onboard Administrator integrated into HP BladeSystem c-Class enclosures.
VCEM can be installed in a variety of configurations that include a physical stand-alone console, as a plug
into HP SIM 5.2 or later, and as a VMware ESX Server virtual machine.
VCEM uses its own dedicated homepage to perform the following core tasks:
• Discover and import existing VC Domains
• Aggregate individual Virtual Connect address pools for LAN and SAN connectivity into a centrally
administered VCEM address database
• Create VC Domain Groups
• Assign and un-assign VC Domains to domain groups
• Define server profiles and link to available LAN and SAN resources
HP Virtual Connect for
• Assign server profiles to BladeSystem enclosures, enclosure bays and VC Domain Groups
• Change and re-assign server profiles to alternative enclosures and enclosure bays. Use this capability
to quickly perform server recovery, planned maintenance, and multiple server repurposing across the
data center.
• Rapidly install new bare-metal HP BladeSystem enclosures by assigning to a VC Domain Group
The following figure identifies the main elements associated with the implementation and operations of
VCEM.
16 Introduction
Page 17
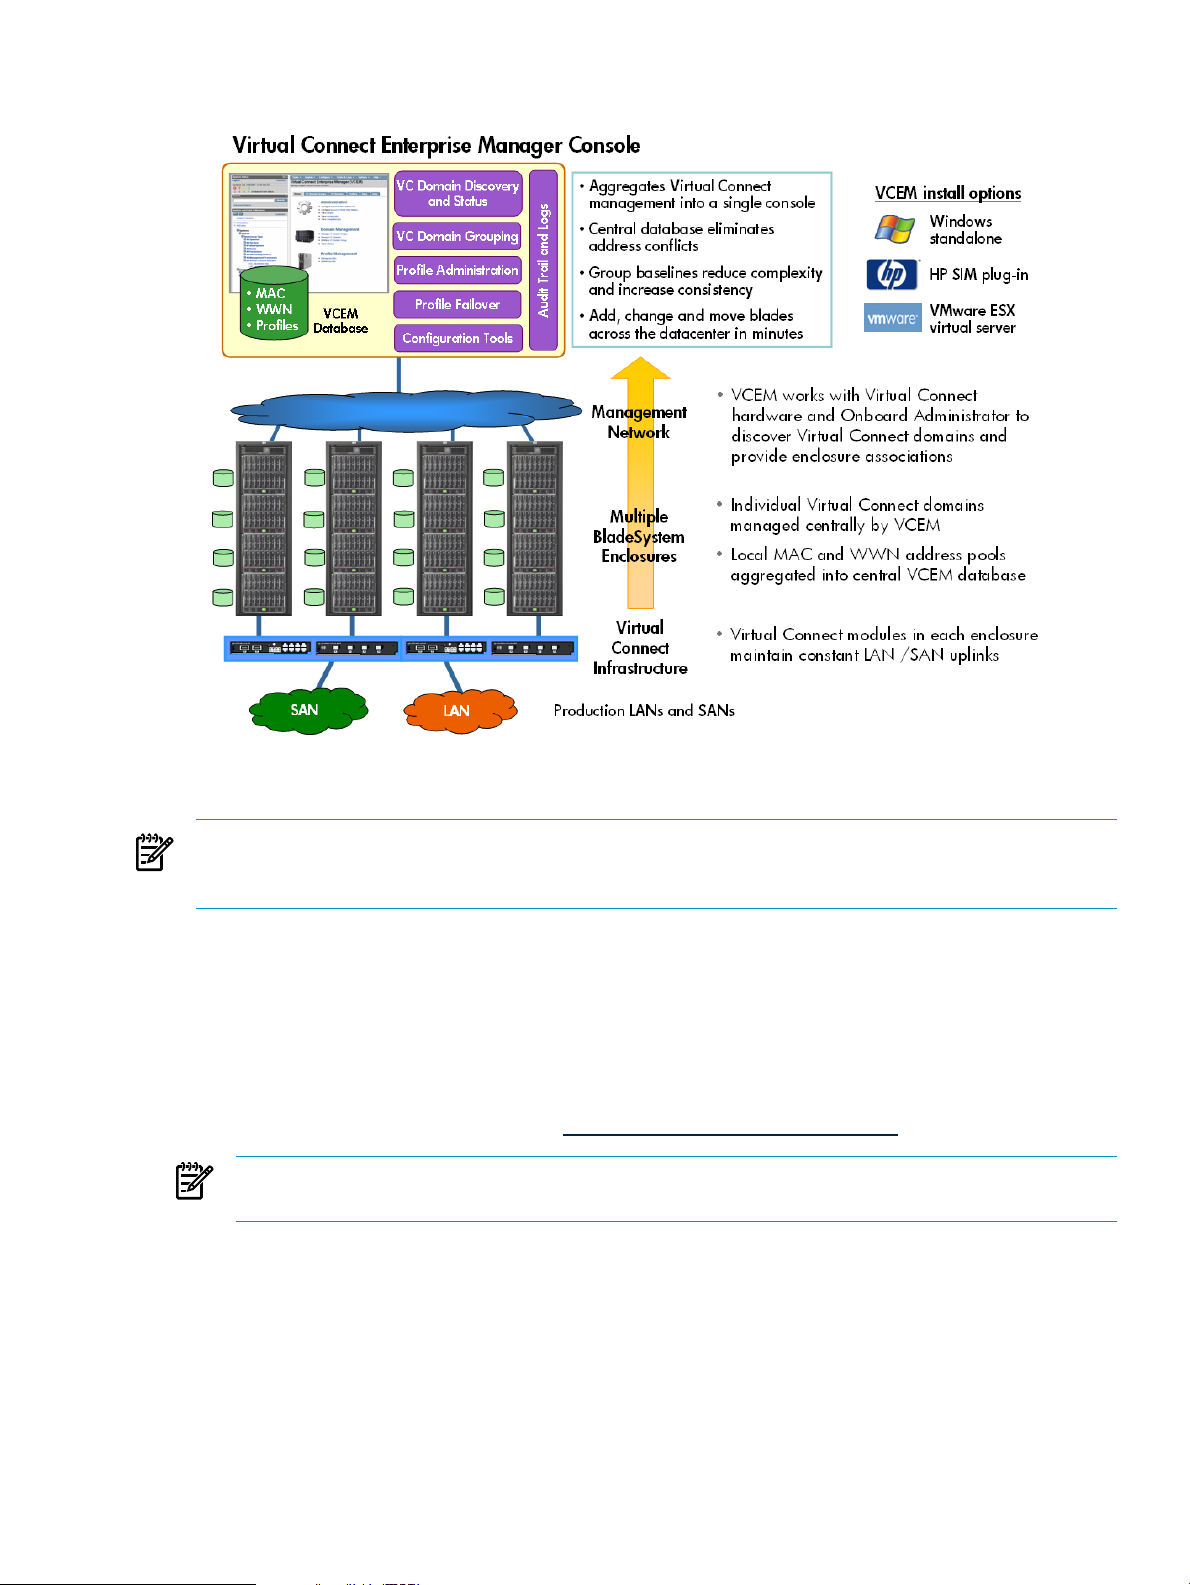
Figure 1-2 Virtual Connect Enterprise Manager operations
VCEM centralizes Virtual Connect infrastructure management and aggregates LAN and SAN address pools.
NOTE: VCEM does not support profile failover for Integrity server blades or profile moves of Integrity
blades in a 'boot from SAN' configuration. Profile moves for Integrity blades with local boot storage are
supported by VCEM.
Setup summary
To configure VCEM into an existing HP BladeSystem environment running Virtual Connect:
1. Verify that existing Virtual Connect module firmware and HP Onboard Administrator firmware meets
the minimum requirements.
2. Install the VCEM software on a designated host system running Microsoft Windows Server 2003 SP2
or later using the HP Insight Control Management (ICM) DVD.
ICM media can be downloaded from http://www.hp.com/go/insightcontrol.
NOTE: For a complete list of hardware, firmware, and software requirements, see “Prerequisites for
installation”.
3. Open the VCEM console, and discover all existing VC Domains.
4. From the list of discovered domains, select which ones you want to manage using VCEM.
5. Apply a single VCEM license to the BladeSystem enclosure of each domain to be managed. A VCEM
license enables operations across all bays in an enclosure for the life of the enclosure.
6. From the VCEM console, create a VC Domain Group, and assign an available VC Domain to the group.
• The configuration of the first domain in a VC Domain Group defines the characteristics for all
subsequent group members.
• All domains in a group have the same Virtual Connect uplink connections to LAN and SAN.
Setup summary 17
Page 18

After you complete these steps, VCEM is now ready to be used to centrally manage your HP BladeSystem
and Virtual Connect infrastructures. You can now add, change, and move blade servers across the data
center in minutes.
18 Introduction
Page 19

2 Installing and configuring Virtual Connect Enterprise
Manager
This chapter describes how to install and configure VCEM.
IMPORTANT: This guide assumes that you have installed Virtual Connect Manager, have read the
Virtual Connect for c-Class BladeSystem User Guide
Preparing for a VCEM installation
To prepare for a VCEM installation, decide which type of installation is best for your environment. VCEM
1.10 can be installed or upgraded as a stand-alone product. VCEM can also be installed as part of a full
HP SIM installation that enables administrators to take advantage of other HP SIM-based plug-in tools.
Possible installation scenarios include:
• Upgrade a standalone VCEM 1.00 installation to a VCEM 1.10 standalone installation.
This installation uses the ICM DVD VCEM Standalone option.•
• This installation upgrades VCEM 1.00 to a 1.10 standalone version with no loss of information.
• This installation offers no HP SIM plug-in support.
• Perform a new VCEM 1.10 standalone installation.
This installation uses the ICM DVD VCEM Standalone option.•
• This installation installs a new 1.10 standalone version of VCEM.
• This installation offers no HP SIM plug-in support.
• Perform a new VCEM 1.10 installation along with HP SIM.
This installation uses the Insight Control Management suite customized List option.•
HP
, and understand its concepts.
• This installation installs HP SIM as well as VCEM 1.10.
• This installation can be made on a system already running HP SIM.
• This installation upgrades a previous version of HP SIM to the current version.
• This installation fully supports SIM plug-in installations.
• Perform a new VCEM 1.10 installation as part of a HP Insight Dynamics - VSE installation.
VCEM 1.10 is installed as part of the suite but is licensed separately.•
• Will upgrade a previous version of SIM to the current version.
• Fully supports HP SIM plug-in installations.
• Perform a new VCEM 1.10 installation and migrate a VCEM 1.00 installation.
1. Install VCEM 1.10 as a new standalone installation or as part of a new HP SIM installation as described
previously.
2. Migrate the VCEM 1.00 data to VCEM 1.10.
For more information about VCEM 1.0 migration, see http://www.hp.com/go/vcem.
VCEM checklist
You must have the following information before performing a VCEM installation:
Prerequisites for installation
This section describes the server prerequisites for installing VCEM, including the hardware and software
prerequisites.
Preparing for a VCEM installation 19
Page 20

Hardware installation requirements
Insight Control Management hardware installation requirements
The "Insight Control Management hardware installation requirements" lists the hardware installation
requirements for Insight Control Management.
Table 2-1 Insight Control Management hardware installation requirements
SpecificationComponent
Server
Disk space
HP ProLiant BladeSystem c-Class or p-Class server blades, or HP
ProLiant 300, 500, and 700 series ML or DL servers
At least 2 GB RAM (4 GB RAM recommended)Memory
At least 1.6 GHz (2 GHz or faster recommended)Processor
At least 5 GB for Insight Control Management software. However,
the actual amount of disk space may vary according to the number
of Insight Control Management components selected to install.
New Technology File System (NTFS)File structure
Local or mapped DVD drive requiredDVD drive
Insight Control Management suites support installation on VMware ESX 3.0.1 and 3.0.2 virtual servers.
IMPORTANT: Insight Control Environment licenses all ProLiant ML and DL 300, 500, and 700 servers.
Insight Control Environment for BladeSystem licenses all ProLiant BladeSystem servers and select BladeSystem
workstations. See the appropriate component support matrixes to understand the server hardware and
operating system support for each particular component.
Insight Control Environment supports the new HP ProLiant ML785 server, but Insight Power Manager does
not support this server.
Software installation requirements
Insight Control Management software installation requirements
The "Insight Control Management software installation requirements" table lists the software installation
requirements for Insight Control Management. Installations with Microsoft Data Engine (MSDE) 2000 SP3a
will be migrated to Microsoft SQL 2005 Express Edition SP2.
Table 2-2 Insight Control Management software installation requirements
SpecificationComponent
Operating system
Services
Database
Microsoft Windows Server® 2003, Standard Edition SP2 (32-bit
only)
Windows Server 2003, Enterprise Edition SP2 (32-bit only)
Windows Server 2003 R2, Standard Edition SP2 (32-bit only)
Windows Server 2003 R2, Enterprise Edition SP2 (32-bit only)
.NET 2.0 Framework
SNMP
TCP/IP with DNS installed so that system names must resolve to
an IP addresses. It is necessary that IP addresses must resolve to
system names.
Microsoft SQL Server 2005 Express Edition SP2 *
Microsoft SQL Server 2000 Standard Edition, SP3 or SP4 (for
Standard Server operating system)
Microsoft SQL Server 2000 Enterprise Edition, SP3 or SP4 (for
Advanced Server operating system)
Microsoft SQL Server 2005 running on Windows Server 2003
20 Installing and configuring Virtual Connect Enterprise Manager
Page 21
SpecificationComponent
Applications
* SQL Server 2005 Express Edition supports 500 systems and 5,000 events.
IMPORTANT: If you are upgrading previous ICM installations with a local version of Rapid Deployment Pack, you must first install
Microsoft WAIK 2.1, also known as the "Automated Installation Kit (AIK) for Windows Vista SP1 and Windows Server 2008". It is
available at http://www.microsoft.com/downloads/details.aspx?familyid=94bb6e34-d890-4932-81a5-5b50c657de08.
NOTE: The CMS supports Windows 2000 and 2003 International Server - French, German, Italian, Spanish, and Japanese (latest
service pack available for each language).
Microsoft Internet Explorer 6.0 SP1 or 7.0
Adobe® Acrobat® Reader
Mozilla Firefox 1.5.0.12 (not supported by all components)
Mozilla Firefox 2.0.0.4 (not supported by all components)
VMware ESX 3.0.1 or 3.0.2 (supported installation platform)Virtualization platform
Performing an installation
Performing an Insight Control Management integrated installation
IMPORTANT: Be sure that maintenance activities do not reboot the system during installation.
The Insight Control Management integrated installation is completed in a single process, with all Insight
Control Management software components installed on a single management server. Variations to this
installation process might occur under any of the following scenarios:
• If HP SIM 5.1 or higher is already installed, Insight Control Management and all its components are
installed on the HP SIM Central Management Server (CMS). If necessary, HP SIM and all its components
are updated to the latest version.
• If Rapid Deployment Pack 3.10, 3.50, or 3.60 is installed on your HP SIM CMS, Insight Control
Management upgrades Rapid Deployment Pack to version 3.70.
• If Rapid Deployment Pack 3.70 is already installed, you can provide the Insight Control Management
installer with information to incorporate your existing Rapid Deployment Pack installation. In this
configuration, the Rapid Deployment Pack 3.70 can reside on the same server or on a different server
from the HP SIM CMS.
• If neither HP SIM nor Rapid Deployment Pack is present, both components are installed, along with the
other Insight Control Management components, during the Insight Control Management integrated
installation process.
IMPORTANT: Microsoft IIS 6.0 or later must be installed on the target CMS to successfully install and use
the Vulnerability and Patch Management Pack. For more information about configuring HTTPS service in IIS,
see http://support.microsoft.com/?kbid=324069.
NOTE: Before beginning the installation process, identify all operating systems to be deployed.
You can install or upgrade an Insight Control Management or HP Insight Dynamics - VSE suite either by
management suite or by customized product list, selecting one or more suites or components for installation.
Individual components may also be installed or upgraded using the integrated installer. In addition an option
to install Virtual Connect Enterprise Manager (VCEM) in Standalone mode, the only mode supported in
VCEM 1.0, is available from the main installer screen. The standalone install option can also be used to
upgrade a VCEM 1.0 installation to 1.10 in standalone mode. Note this upgrade option only updates a
VCEM 1.0 to standalone mode. A migration utility is available at http://www.hp.com/go/vcem to help
upgrade VCEM 1.0 standalone data to a VCEM 1.10 SIM plug-in installation. A VCEM standalone installation
requires a dedicated physical or virtual server to host the application, and uses a specialized version of HP
Systems Insight Manager that does not support the installation of additional Insight Control software plug-ins.
Performing an installation 21
Page 22
To install Insight Control Management, perform the following procedure. If you need help at any time during
the installation process, click the ? icon.
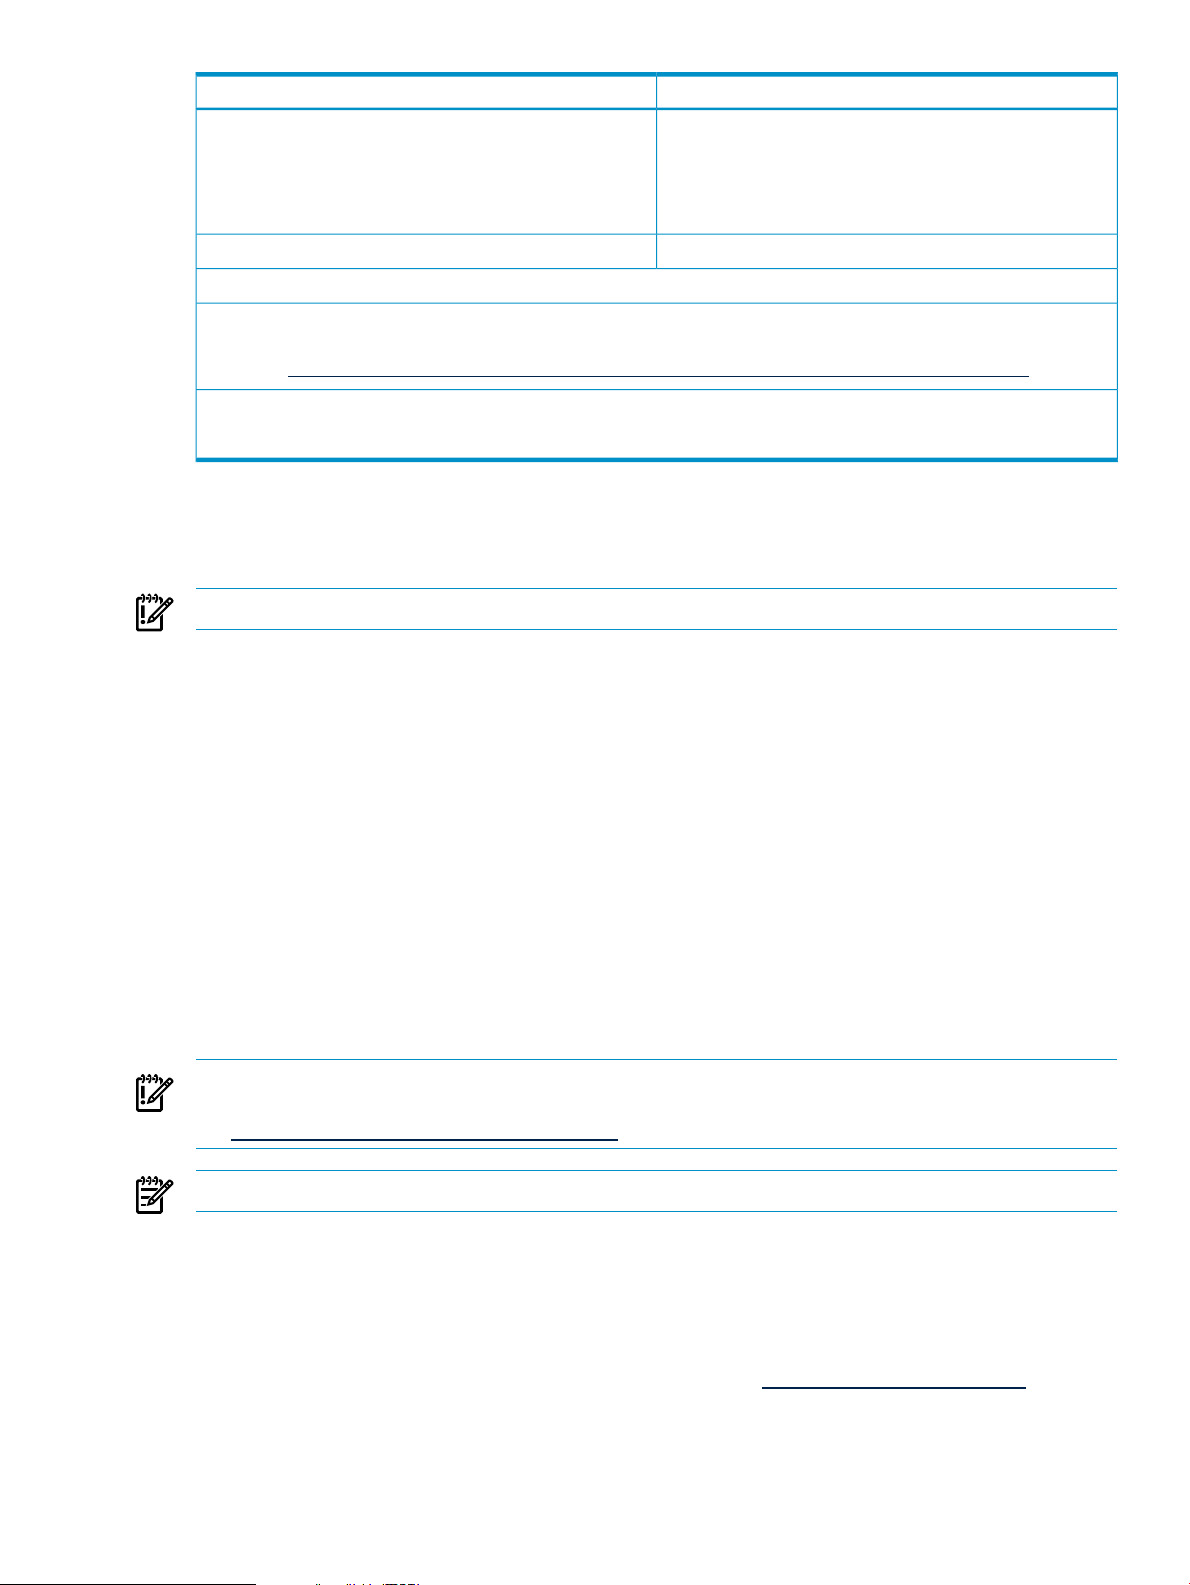
1. Insert the Insight Control Management DVD into the DVD-ROM of the intended management server. The
End User License Agreement appears. Read the agreement, and then to continue, click Agree.
2. The Welcome to the Insight Control Management DVD screen appears. To ensure that your
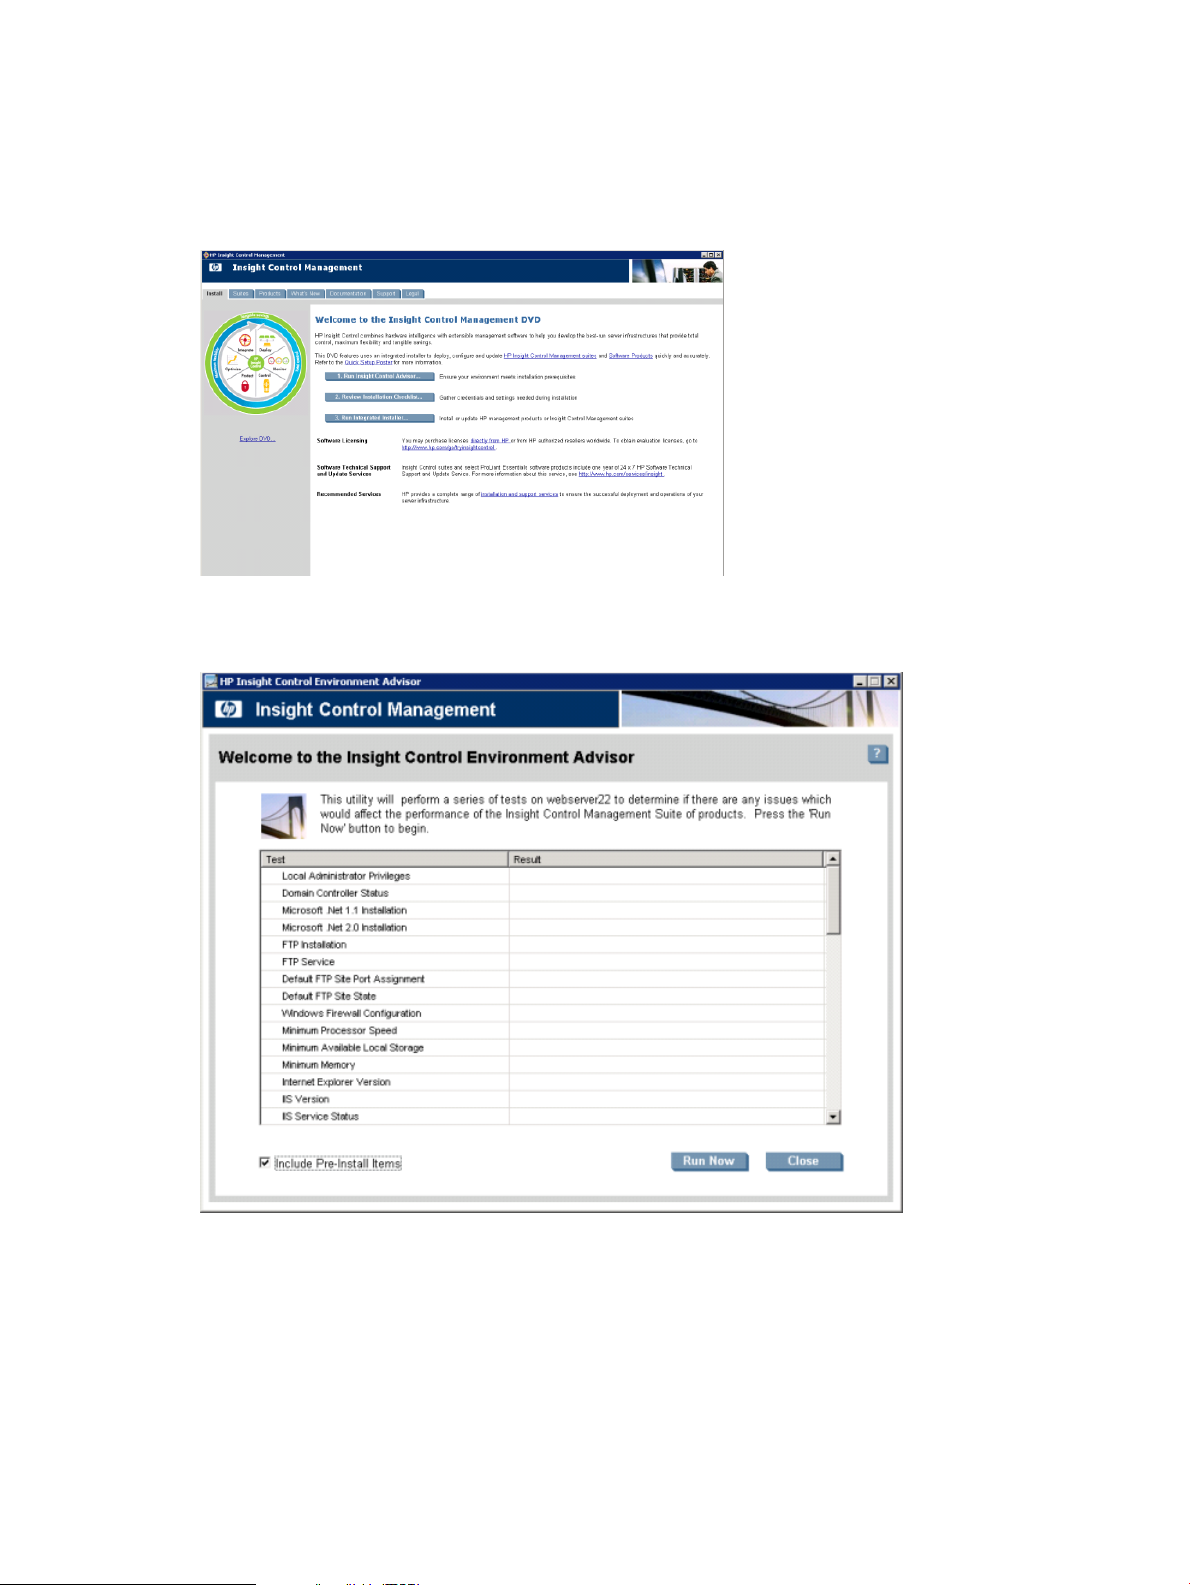
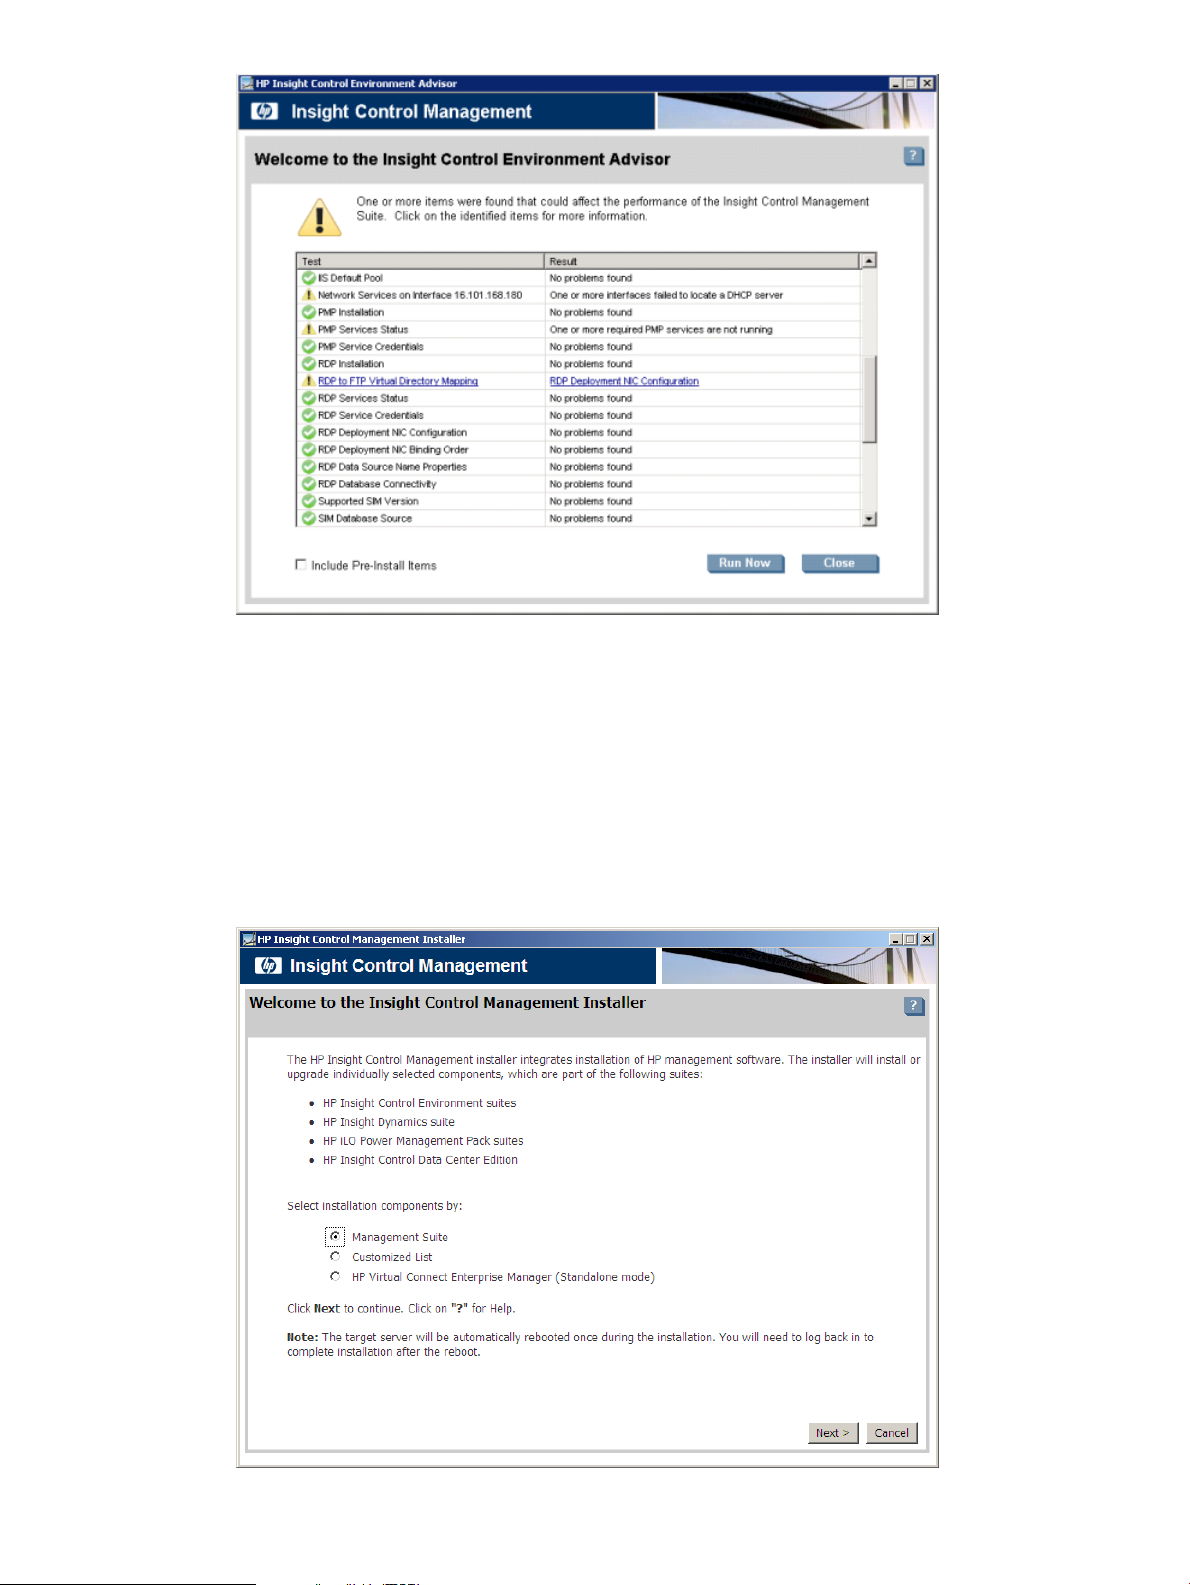
environment meets the appropriate installation requirements, click Run Insight Control Advisor.
The Insight Control Environment Advisor screen appears. The Insight Control Environment Advisor
is a tool that verifies the target platform for compliance with installation prerequisites.
3. Click Run Now. The Welcome to Insight Control Environment Advisor results screen identifies
issues that could affect the installation of the Insight Control Management suite. The following example
screen shows three items that could affect the installation of the Insight Control Management suite. For
more information on those issues, click the corresponding hyperlinks, and then resolve the issues.
22 Installing and configuring Virtual Connect Enterprise Manager
Page 23
The Welcome to Insight Control Environment Advisor screen reappears. Resolve any remaining
issues or click Close to exit Insight Control Environment Advisor.
After you close Insight Control Management Advisor, the Welcome to the Insight Control Management
DVD screen reappears.
4. On the Welcome to the Insight Control Management DVD, click Review Installation Checklist.
A PDF of the Insight Control Management Installation Checklist appears. You must identify the
configuration parameters or configure the settings as listed in the checklist. The integrated installer uses
this information to implement and configure HP SIM and the ProLiant Essentials products.
5. On the Welcome to the Insight Control Management DVD, click Run Integrated Installer. The
Welcome to the Insight Control Management Installer screen appears.
Performing an installation 23
Page 24
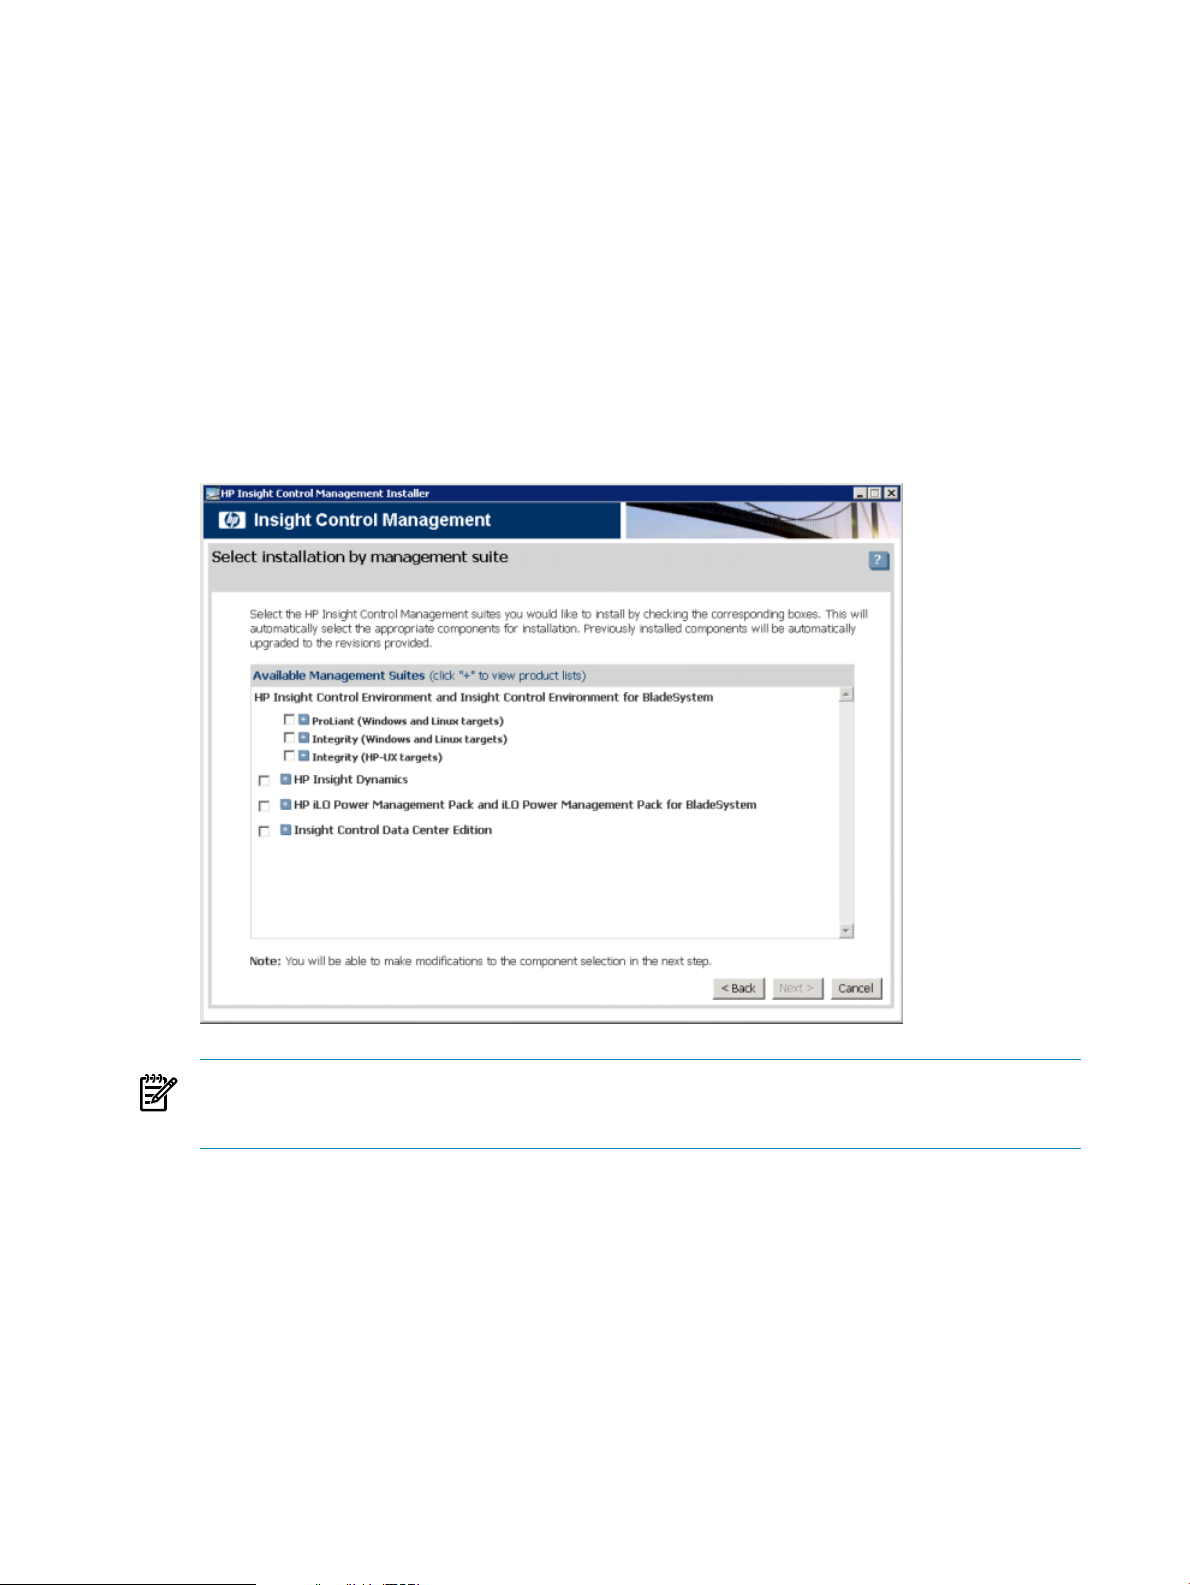
Choose either of the following options:
• To install by management suite, select management suite, click Next, and then go to step 6.
• To install by customized product list, select customized list, click Next, and then go to step 7.
• To install Virtual Connect Enterprise Manager (VCEM) in standalone mode or to upgrade a VCEM
1.0 install to 1.10 standalone mode, select HP Virtual Connect Enterprise (Standalone mode), click
Next and then go to step 8. A standalone installation does not support installation of other HP SIM
related plug-in tools.
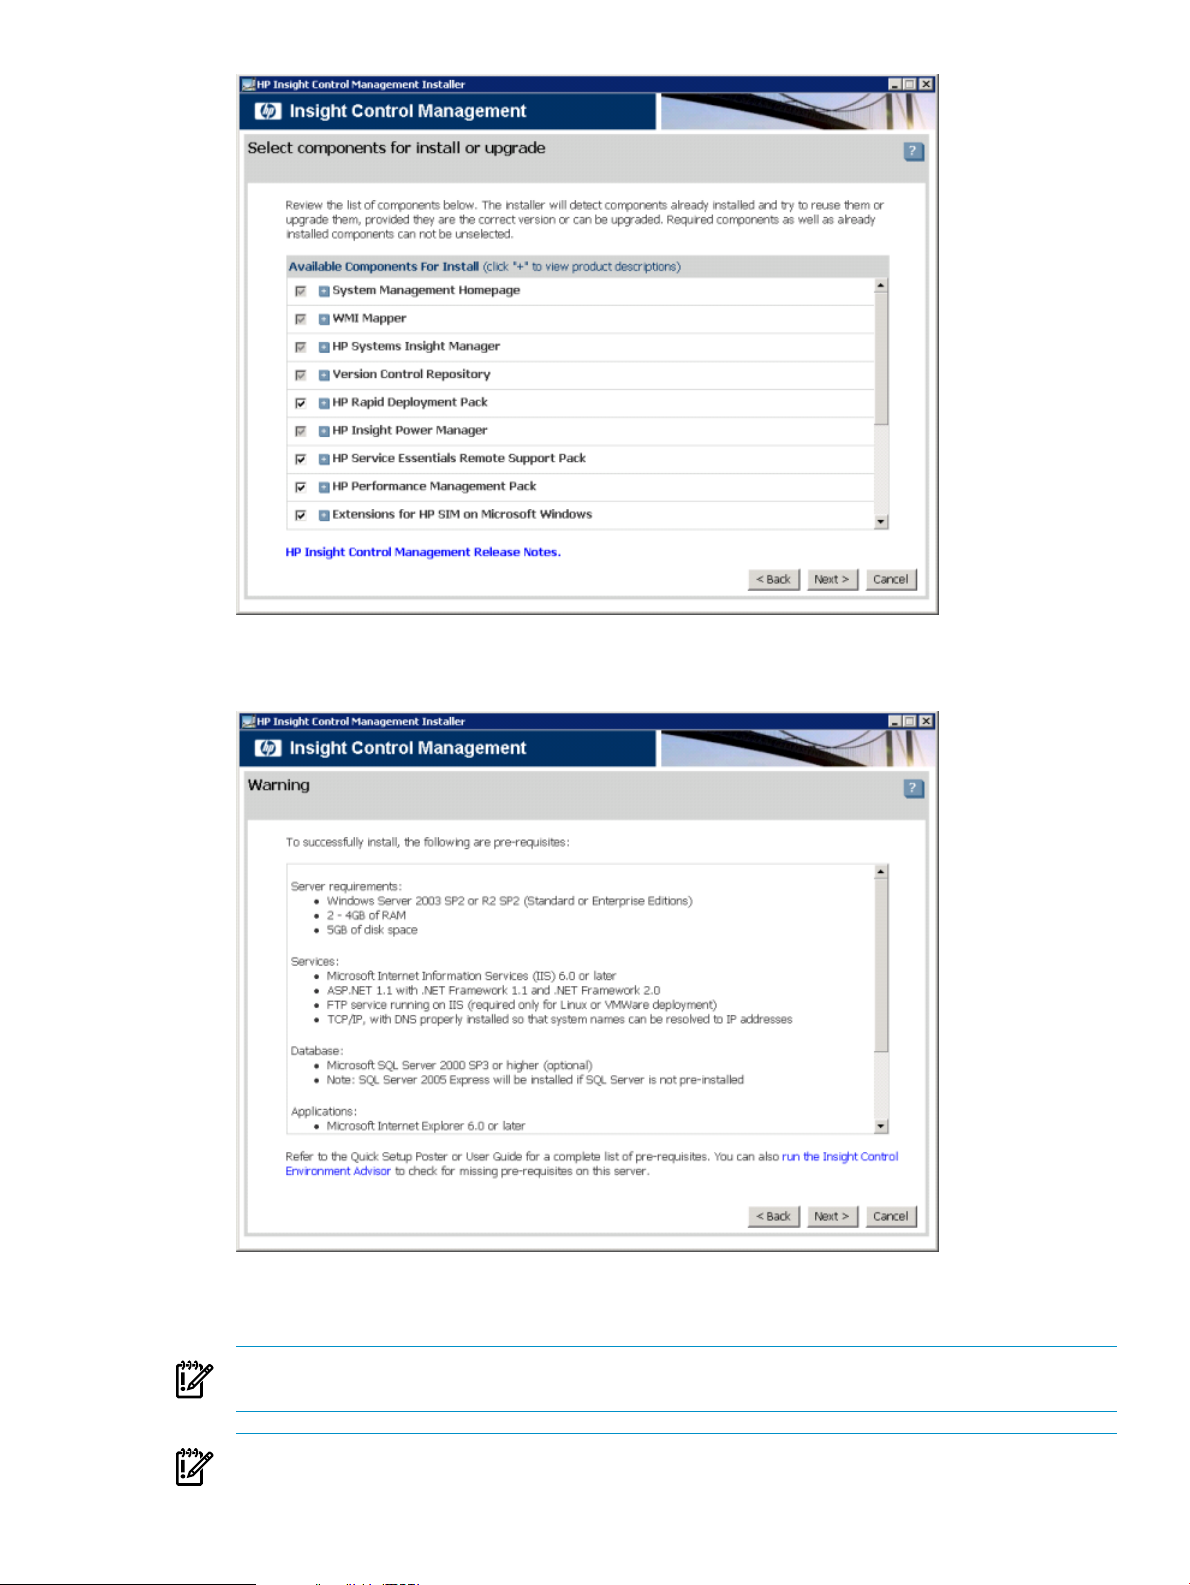
When installing by management suite, the Select installation by management suite screen appears.
6. Select the corresponding checkboxes of suites to install. This action automatically selects the appropriate
components for installation. Previously installed components are automatically upgraded to the revisions
provided. Components have expandable lists that enable you to see the list of components, as shown
in the following figure. You can customize the default component selections in the next step. As previously
noted VCEM is automatically installed with the HP Insight Dynamics suite option but is licensed separately.
NOTE: The ProLiant (Windows and Linux) targets checkbox is automatically selected when Insight
Control Environment suites are selected. This checkbox can be cleared if you are not managing ProLiant
systems (that is, managing only Integrity blades).
When installing by customized product list or continuing with a management suite installation, the
Select components for install or upgrade screen appears.
7. Select the corresponding checkboxes of components to install, and then click Next. Components have
expandable lists that enable you to see their descriptions. The installer detects components already
installed and uses or upgrades those components if they are the correct version or can be upgraded.
Checkboxes for required components and previously installed components cannot be cleared. This
option is used to install VCEM in Systems Insight Plug-in manager mode.
24 Installing and configuring Virtual Connect Enterprise Manager
Page 25
The Warning screen appears, listing the system prerequisites for installation. Your system must meet all
these prerequisites. Prerequisites are based on selections from step 7.
8. To use the Insight Control Environment Advisor to verify prerequisite status, click the run the Insight
Control Environment Advisor hyperlink provided at the bottom of the Warning screen.
IMPORTANT: The installation server IP address is assigned by Dynamic Host Configuration Protocol
(DHCP). The IP address must not be changed.
IMPORTANT: If you are upgrading previous ICM installations with a local version of Rapid Deployment
Pack, you must first install Microsoft WAIK 2.1, also known as the "Automated Installation Kit (AIK) for
Performing an installation 25
Page 26
Windows Vista SP1 and Windows Server 2008". It is available at http://www.microsoft.com/
downloads/details.aspx?familyid=94bb6e34-d890-4932-81a5-5b50c657de08.
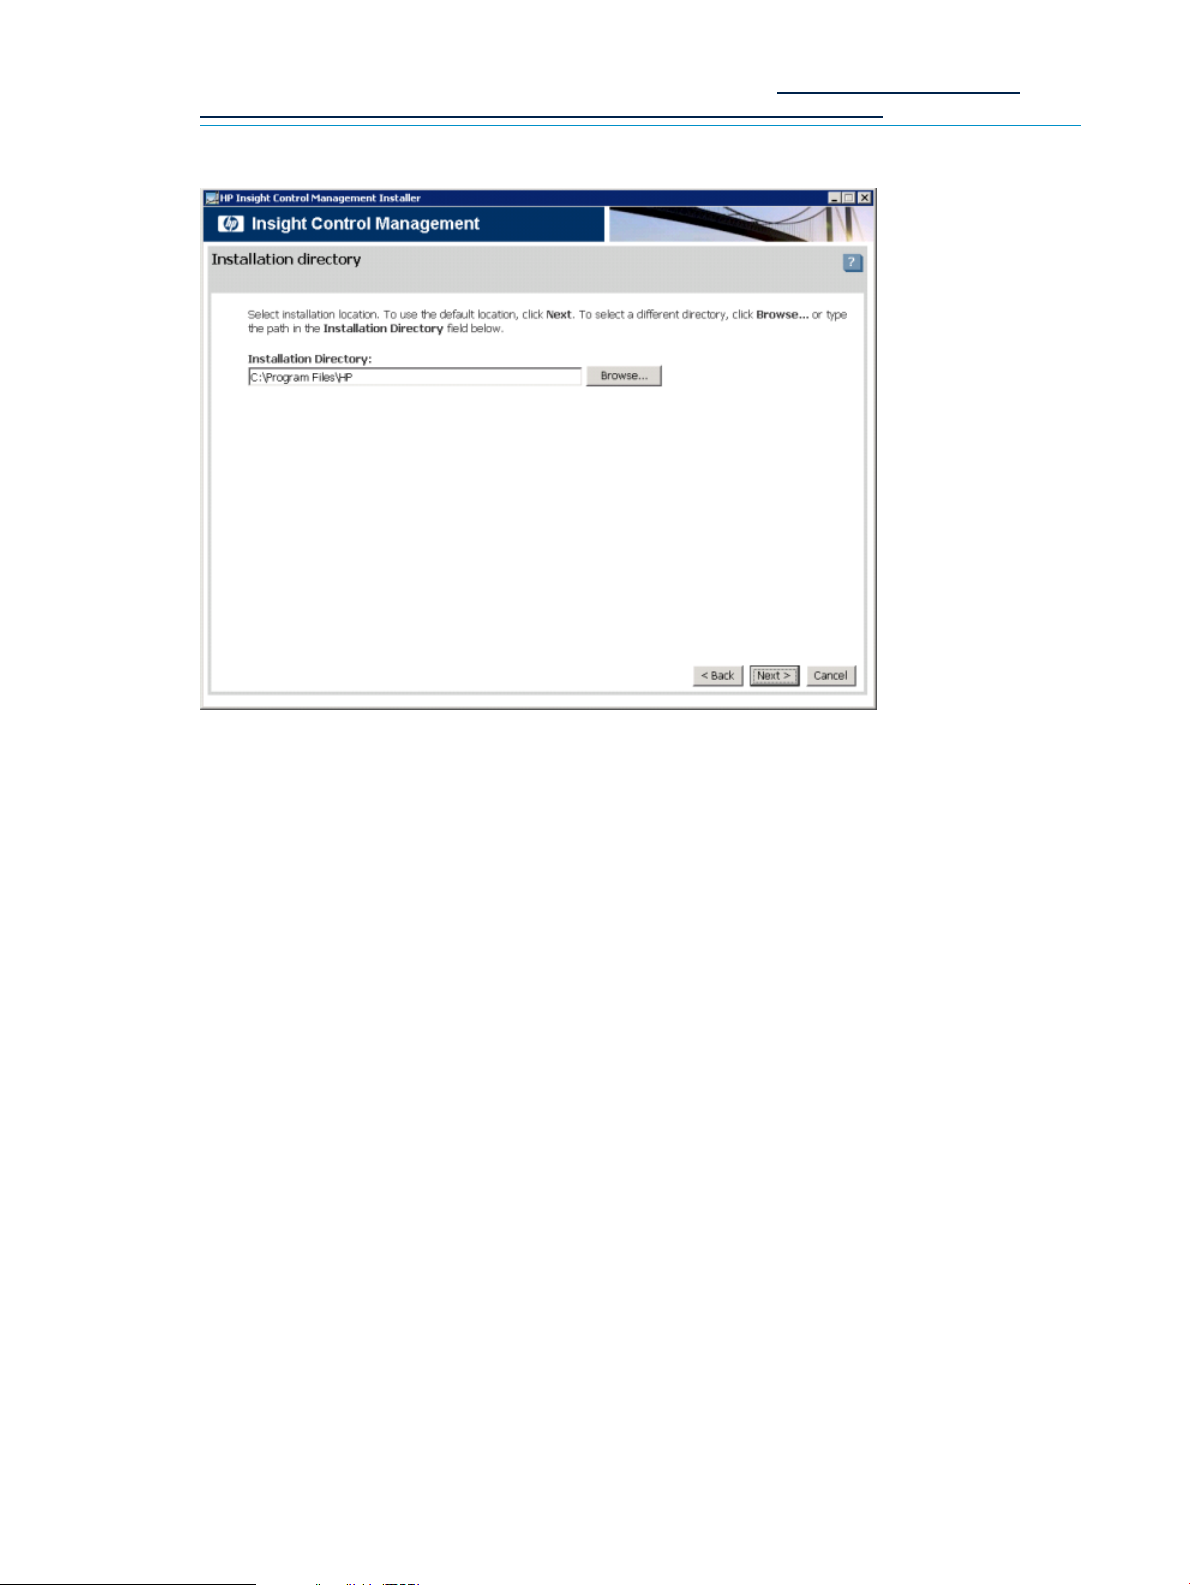
9. Click Next. The Installation Directory screen appears.
10. Select the installation location by performing either of the following steps:
• To use the default directory location, click Next.
• To select a different directory, click Browse, or enter the path in the Installation Directory box
and click Next.
If you previously installed Insight Control Management, then the installation directory remains the
same and cannot be changed. If you have already installed a component outside of Insight Control
Management suite, then the integrated installer upgrades that component in the original installation
location.
11. If you have selected Rapid Deployment Pack and it is not already installed, the HP Rapid Deployment
Pack installation options screen appears where you must choose to install the Rapid Deployment
Pack on this server or use Rapid Deployment Pack on an existing remote server.
26 Installing and configuring Virtual Connect Enterprise Manager
Page 27

Choose either of the following options:
• To install on this server, select Install Rapid Deployment Pack on this server, and then select the
deployment network interface to be used by Preboot eXecution Environment (PXE).
• To use the Rapid Deployment Pack already installed on an existing remote server, select Use
existing remote Rapid Deployment Pack, and then enter the credentials.
IMPORTANT: If you use an existing remote RDP server, then DHCP services must be running on your
network to operate properly.
12. Click Next. If the locally installed Rapid Deployment Pack must be upgraded, the Use existing HP
ProLiant Essentials Rapid Deployment Pack screen appears.
Performing an installation 27
Page 28

13. From the Use existing HP ProLiant Essentials Rapid Deployment Pack enter the service credentials,
and then click Next.
14. From the Service account credentials screen, enter the credentials, and then click Next. All Insight
Control Management components use these credentials. If HP SIM is already installed, then the Username
and Domain box are automatically populated.
28 Installing and configuring Virtual Connect Enterprise Manager
Page 29
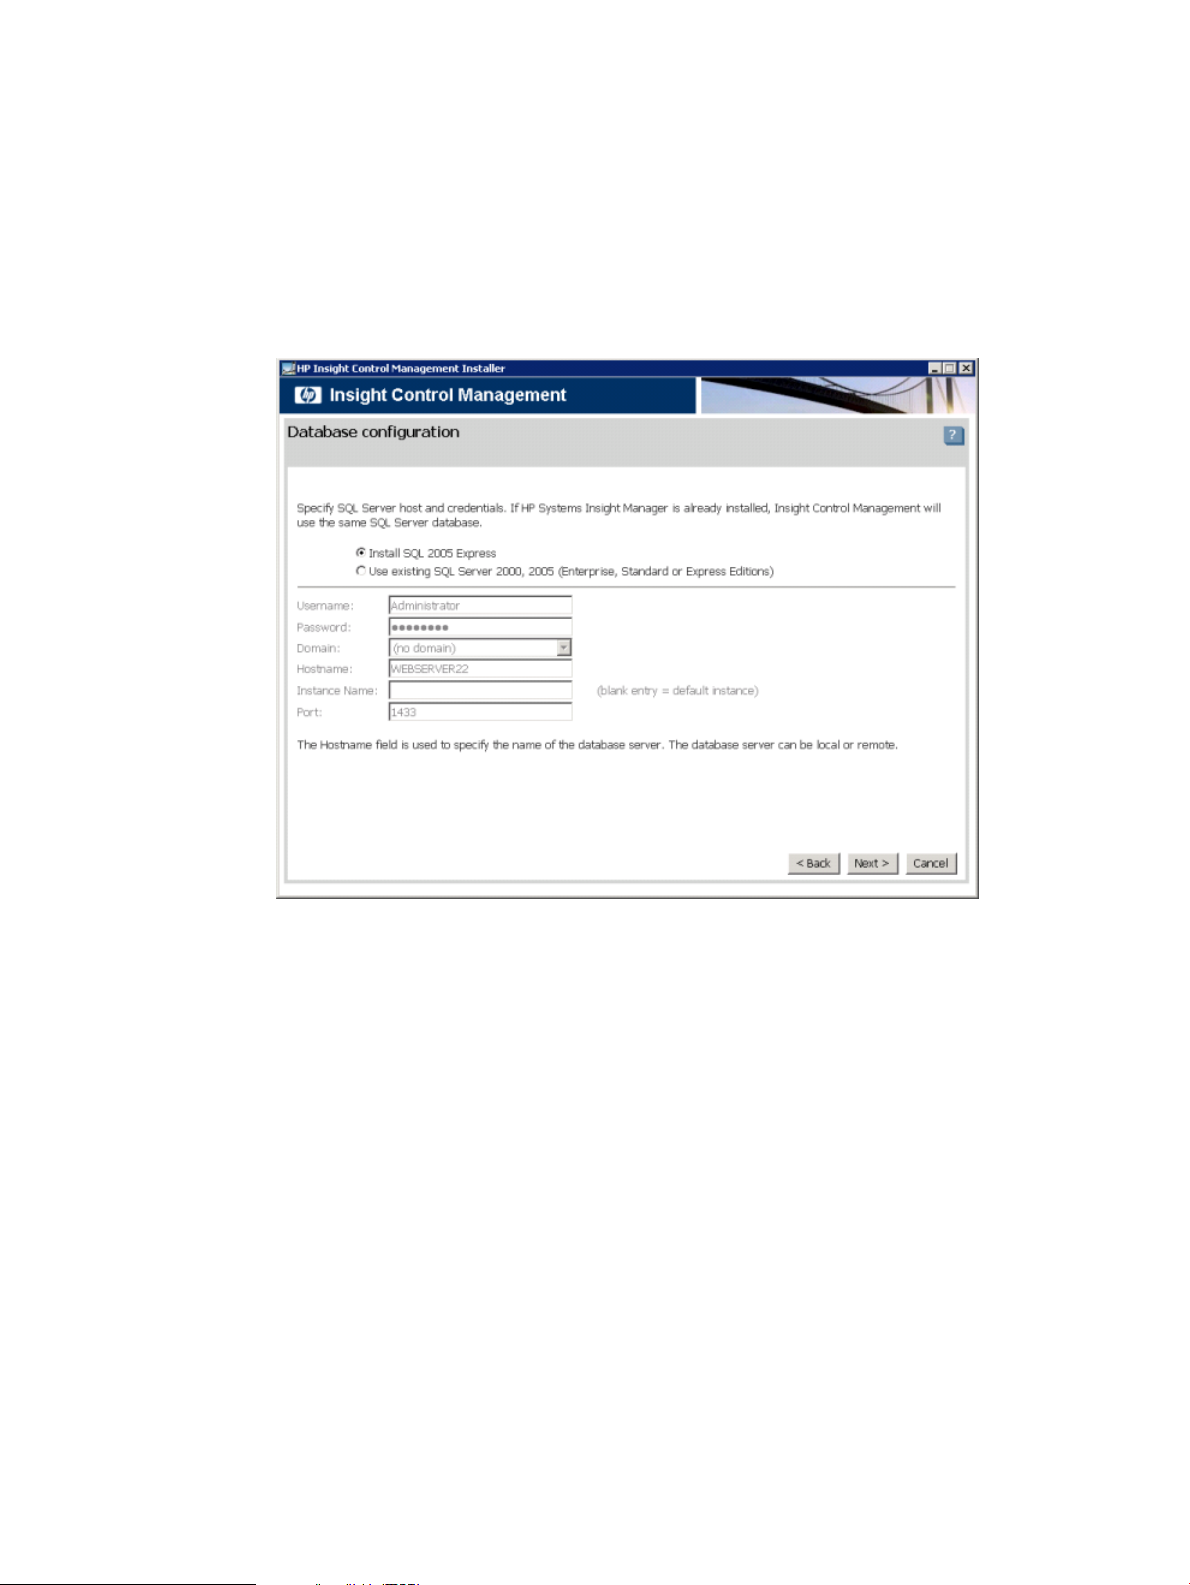
15. From the Database configuration screen, depending on whether the local database is detected, perform
either of the following steps:
a. If a local database is detected, enter the credentials for the existing database, and then click Next.
b. If no local database server is detected, select the appropriate option to install SQL 2005 Express,
or enter the name of a remote database server:
i. To install Microsoft SQL 2005 Express, select Install SQL 2005 Express.
ii. To use existing SQL Server 2000, 2005 (Enterprise, Standard or Express Editions), select Use
existing SQL Server 2000, 2005 (Enterprise, Standard or Express Editions).
c. Enter the password. To use an existing database, you must provide the server and database
information. Entering Instance Name is optional. click Next.
16. (Optional) From the Automatic logon configuration screen, to enable automatic logon after the
installation reboot, select Enable Automatic Logon, and then provide logon credentials. These
credentials are used only for the reboot initiated during the installation process.
The Automatic logon configuration screen appears only if HP SIM or Rapid Deployment Pack is
installed or upgraded because the system requires a reboot during the installation process.
Performing an installation 29
Page 30

17. (Optional) From the Extensions for HP SIM on Microsoft Windows configuration screen, select the
desired tools, and then provide the required information. click Next.
• If you select Ignite-UX and Software Distributor (HP-UX), then you must provide the Ignite and
software distributor server IP address or host name. If you select Configure secure shell (SSH)
access, you must provide the username and password.
• If you select OpenView GlancePlus (Glance) for HP-UX and Linux, then you must provide the
username for logon to target systems. The default is root.
18. (Optional) If your network requires a proxy server to access the Internet, then enter the proxy settings
in the boxes on the Proxy Configuration screen. VPM uses these settings to acquire patches, while
30 Installing and configuring Virtual Connect Enterprise Manager
Page 31

Insight Control Management uses them to verify new component versions. If your network does not use
a proxy or you do not intend to use this feature, then you can omit this step. Click Next.
19. (Optional) If you are installing Rapid Deployment Pack, from the Deployment operating systems screen,
select all operating systems to deploy using Rapid Deployment Pack, and then click Copy Files. To
quickly select or clear all options, select the Check/uncheck all checkbox. You are prompted to provide
the media or location for each operating system. When you finish copying files, click Next.
20. If you are installing Rapid Deployment Pack, from the Deployment configuration options screen,
then specify the configuration options for Rapid Deployment Pack, and then click Next.
Performing an installation 31
Page 32

NOTE: Obtain Windows operating system product keys from Microsoft.
21. (Optional) If you are installing HP SIM, from the Basic settings for HP Systems Insight Manager
screen, enter the global protocol settings (the WBEM credentials) and the SNMP default read community
string. These credentials enable access to managed targets. click Next. HP recommends performing
this step at this time, although you can provide these values later through HP SIM. You can also add
additional global settings or individual system settings in HP SIM.
22. (Optional) If you are installing HP SIM, the Discovery settings for HP Systems Insight Manager
screen appears. Enter at least one IP address range that includes the devices for network discovery to
find. To enter multiple ranges, separate the ranges with white space (for example, tabs, new lines, or
32 Installing and configuring Virtual Connect Enterprise Manager
Page 33

spaces). click Next. HP recommends performing this step so that HP SIM discovers devices faster. This
discovery is a onetime discovery. For more information about performing and scheduling discoveries,
see the
HP Systems Insight Manager User Guide
.
23. The HP Virtual Server Environment Management Software configuration screen enables you to specify
the location where Virtual Server Environment (VSE) Management information is stored.
For more information on the Central Management Server (CMS) hardware requirements for VSE
Management, see the
HP Insight Control Management Support Matrix
.
24. From the Installation summary screen, verify that the actions are correct, and then click Install. An
estimated install time is provided based on the installation selections.
Performing an installation 33
Page 34

IMPORTANT: The system automatically reboots after the HP SIM and RDP components are installed
or upgraded.
25. To access HP SIM after the installation completes, click the Click here to access HP Systems Insight
Manager hyperlink. Use the credentials provided during installation to log in to HP SIM. When a user
with full configuration rights logs in to HP SIM for the first time, the HP Systems Insight Manager
Registration window appears. Click Register HP SIM now, or if you do not have Internet access, click
Register Later.
A task is scheduled to check for Insight Control Management component updates immediately after
installation and then weekly thereafter. If updates are available, an event with component download
information is logged in the HP SIM events list.
Performing post-installation configuration tasks
Post-installation configuration tasks
If this is the first time you have installed VCEM, the following tasks must be performed:
1. To access VCEM, select Start→All Programs→HP Virtual Connect Enterprise Manager→HP Virtual
Connect Enterprise Manager. If VCEM is a stand-alone installation, click the HP SIM desktop icon.
The HP SIM screen appears.
2. Enter the credentials that you entered when performing the install. The VCEM home page appears.
• If an HP SIM discovery of the IP address range that includes the Virtual Connect module you want
to work with has been previously performed, all Virtual Connect modules should appear.
• If an HP SIM discovery has not been previously performed, and no Virtual Connect modules appear,
an HP SIM discovery must be performed before continuing. Ensure to discover the Onboard
Administrator IP addresses with enclosures that have VC Ethernet modules. For more information
about performing an HP SIM discovery, see the
Domains have been discovered, click the VC Domains tab.
HP SIM User Guide
. To see whether any VC
34 Installing and configuring Virtual Connect Enterprise Manager
Page 35

3. (Optional) Configure the pool of MAC addresses to match the needs in the data center.
a. From the VCEM Home page, click the Home tab. To return to the Home page, you can also click
the Home link on the upper right-hand corner of the screen.
b. Click Configure a pool of MAC addresses.
c. To create a custom range, click Add custom.
For more information, see Adding custom MAC address ranges.
4. If required, then create MAC exclusion ranges. For more information, see Creating MAC exclusion
ranges.
5. (Optional) Configure the pool of WWN ranges to meet your requirements.
a. From the VCEM Home page, click the Home tab. To return to the Home page, you can also click
the Home link on the upper right-hand corner of the screen.
b. Click Configure a pool of World Wide names.
c. To create a custom range, click Add custom.
The WWN range used by the Virtual Connect Enterprise Manager domain must be unique within the
environment. HP provides a set of pre-defined ranges that are reserved for use by Virtual Connect and
VCEM and does not conflict with server factory-default WWNs.
When using the HP-predefined WWN ranges, be sure that each range is used only once within the
environment.
For more information, see Adding custom WWN address ranges.
6. Click the VC Domains tab. VC Domains appear as the following:
• Unconfigured VC Domains—appear as VCD_name, where name is the temporary name
automatically given to the VC Domain.
• Configured VC Domain—appear with their VC Domain name.
7. Select a VC Domain, and then click License to license the domain. For more information on licensing,
see Licensing an enclosure for VCEM.
8. Create a new VC Domain Group, and then add one or more already licensed VC Domains to it. For
more information on creating a new VC Domain Group, see Creating a VC Domain Group.
You are now ready to continue using VCEM and its additional functions such as creating profiles and
assigning them to bays.
Performing post-installation configuration tasks 35
Page 36

36
Page 37

3 Managing VC Domains
VC Domains
This section describes how to use Virtual Connect Enterprise Manager to manage VC Domains.
The VC Domains page appears. You can filter the VC Domain list by VC Domain Group. The default filter
shows all VC Domains.
Figure 3-1 VC Domains page
The following table lists and describes the columns on the VC Domains page.
DescriptionItem
Describes VC Domain statusStatus
Identifies the VC Domain nameVC Domain Name
VC Manager
Identifies the domain IP address for the primary VC Ethernet
module
Identifies the enclosure nameEnclosure
Identifies the VC Domain Group name, if anyVC Domain Group
The following table lists and describes VC Domain status icons and descriptions.
DescriptionStatus
The VC Domain enclosure has not been licensedNot licensed
The VC Domain enclosure has been licensed to VCEMLicensed
VC Domains 37
Page 38

DescriptionStatus
Connectivity failure
Missing external manager lock
Managed by VCEM
Configuration mismatch
VC Domain Maintenance
Failed to connect to the VC Domain. Possible causes are:
• Connection timeout
• Ethernet VC Module is physically not available
• VC Manager fail is taking place
• VC Domain firmware update in progress
• VC-Enet IP address changed (through DHCP or EBIPA
configuration)
VCEM checks the VC Domain connectivity before executing any
operation that involves the VC Manager. VCEM omits the VC
Domains with connection failure status when executing
an operation.
VCEM was unable to obtain the necessary permissions for External
Manager user. Possible cause is VCEM lost the External Manager
lock at the VC Domain.
The VC Domain enclosure has an expired license.Expired license
The VC Domain is part of a VC Domain Group and operating
normally.
The VC Domain configuration has changed and does not match
the VC Domain Group configuration.
VC Domain is unlocked for domain and network changes through
the Virtual Connect Manager. After completing the domain and
network changes, you must confirm the new VC Domain
configuration in VCEM. VCEM operations related to this VC
Domain, such as create profile, move profile, profile failover, and
so on, are blocked while in VC Domain Maintenance.
NOTE: For information on how to resolve these issues, see "Troubleshooting."
To display the properties of a particular VC Domain, click the VC Domain name. Properties include the
primary IP address, status, Ethernet networks, and Fibre Channel SAN fabrics.
Requirements for adding a VC Domain to a VC Domain Group
To add a configured VC Domain to a VC Domain Group, the following requirements must be met:
• VC Domain names do not already exist in VCEM.
• Profile names do not already exist in VCEM.
• MAC or WWN addresses ranges that are assigned to a profile must not be in use by VCEM or in a
VCEM exclusion list. If the WWN or MAC addresses are user-defined, then you must define a range
in VCEM.
• If the VC Domain contains server profiles, the MAC and WWN addresses allocated (HP-predefined,
user-defined or factory-default) of these server profiles must be compatible with the MAC and WWN
range types of the VC Domain Group:
• A VC Domain containing server profiles with addresses allocated as factory-default range type
can only be added to a VC Domain Group with the factory-default range type.
• A VC Domain containing server profiles with addresses allocated as user-defined range type can
be added to a VC Domain Group with a user-defined or HP-predefined range type. A user-defined
(custom) MAC and WWN range that includes all addresses allocated to server profiles within the
VC Domain must be defined in VCEM before adding the domain to the VC Domain Group.
• A VC Domain containing server profiles with addresses allocated as HP-predefined range type
can be added to a VC Domain Group with an HP-predefined or a user-defined range type.
• MAC and WWN address types in all server profiles from the VC Domain must be identical. A
VC Domain unconfigured or without server profiles has no range type restrictions when adding
in the VC Domain to a VC Domain Group.
38 Managing VC Domains
Page 39

The following table summarizes MAC or WWN address compatibility when adding a VC Domain to a VC
Domain Group.
addresses allocated as
VCEM-supportedMAC or WWN in VC Domain GroupVC Domain has profiles with MAC or WWN
YesHP-predefined or user-definedHP-predefined
YesHP-predefined or user-definedUser-defined
YesFactoryFactory
YesHP-predefined or user-definedFactory
NoFactoryHP-predefined or user-defined
VC Domain configuration must be identical to the VC Domain Group configuration. Verify the following
items are identical:
• Interconnect bays location and model
• Enclosure model
• Network and storage uplinks
• For each Fibre Channel Fabric–the Fibre Channel fabric name, slot (IO bay), uplink port speed, and
uplink port used
• Number of Fibre Channel Fabrics configured in the VC Domain
• For each single network uplink–the network name, state, smart link, network port location, speed/duplex
mode, and connection mode
• Number of networks configured in the VC Domain
• For each shared network uplink–the uplink set name, state, network port location, and speed/duplex
mode, and connection mode
• For each VLAN-tagged–the network name, VLAN ID, Native, and Smart Link
• Number of VLANs tagged
• Network and Fibre Channel SNMP settings–read community, System Contact, and IP addresses
• Enable Fast MAC Cache Failover
• MAC Refresh Interval
• Enable IGMP Snooping
• IGMP Idle Timeout Interval
• Enable SMI-S
To add an unconfigured VC Module to a VC Domain Group, the following items must be identical:
• Interconnect bays location and model
• Enclosure model
• Uplinks of the network and storage
• Power state of the VC Modules
VC Domain actions
From the VC Domains page, you can perform the following actions:
• License an enclosure for VCEM
• Create a VC Domain Group
• Add a VC Domain to a VC Domain Group
• Remove a VC Domain from a VC Domain Group
• Make changes to a VC Domain in VC Domain Maintenance
VC Domains 39
Page 40

Licensing an enclosure for VCEM
You must purchase a license for each enclosure to be managed. For licensing information, see the Virtual
Connect Enterprise Manager QuickSpecs at http://www.hp.com/go/vcem.
To set a VC Domain license:
1. From VC Domain page, select the VC Domain, and then click License. The License Enclosure page
appears.
2. Click Add Key.
3. Enter the license key string, and then click OK. If the license key is valid, then it is added to HP SIM.
4. The License Enclosure page reappears displaying the number of available licenses.
5. Select the VC Domain to which you want to apply the VCEM license.
6. Click Apply License.
7. The VC Domain list page reappears, displaying the updated status of VC Domains.
8. To view the status of the license, scroll up. The VC Domain appears with Informational status.
Creating a VC Domain Group
You can create a VC Domain Group by selecting the domains that you want to incorporate into a new
group.
To create a VC Domain Group from the VC Domains page, select the domains:
1. Click New VC Domain Group.
2. (Optional) If the enclosures related to the selected VC Domains are not licensed to VCEM, then the
License page appears below the VC Domains list. For more information, see Licensing an enclosure for
VCEM. Otherwise, the Create VC Domain Group appears below the VC Domains list.
3. (Optional) You can provide a new name for the unconfigured VC Domains. Valid VC Domain Group
names are alphanumeric, hyphens (-), underscore (_), and cannot exceed 64 characters.
4. Enter the username and password for each VC Domain. Ensure you provide VC Domain credentials
will full privileges. VC Domains appear as either:
• Unconfigured domains, which appear in the System Name column with the unassigned name,
VCD_name
• Configured domains, which appear in the System Name column with their previously assigned
name
5. Enter the username and password for the Onboard Administrator of each VC Domain. Ensure you
provide the Onboard Administrator credentials with full privileges if the Virtual Connect Module is not
configured.
6. Enter the VC Domain Group name in the VC Domain Group Name field. Valid VC Domain Group
names are alphanumeric, hyphens (-), underscore (_), and cannot exceed 64 characters.
7. From the Configuration based on VC Domain list, select the VC Domain configuration upon which the
new VC Domain Group is to be based. The Configuration VC Domain list contains only configured VC
Domains.
8. From the Select MAC range type list, select whether the MAC address range type is HP-predefined,
user defined, or factory-default. You can only select the User-Defined for MAC range type if a custom
range is defined.
9. From the Select WWN range type list, select whether the WWN address range type is HP predefined,
user-defined, or factory-default. You can only select the User-Defined for WWN range type if a custom
range is defined.
10. Click OK. The Virtual Connect Enterprise Manager is executing the request message
appears.
11. Click OK. The Jobs page appears, enabling you to monitor job progress.
Adding a VC Domain to a VC Domain Group
You can select the Add to VCD Group button if there is at least one VC Domain Group created, and the
current selection contains VC Domains that do not belong to VC Domain Groups, and that have a valid
license.
40 Managing VC Domains
Page 41

Before adding a VC Domain to a VC Domain Group, verify the domain meets the minimum requirements
as well as the VC Domain Group configuration for the configured VC Domains. For the complete list of
configuration checks, see Requirements for adding a VC Domain to a VC Domain Group.
To add a VC Domain to a VC Domain Group:
1. From the VC Domains page, select one or more domains you want to add to the VC Domain Group.
2. Click Add to VC Domain Group.
3. (Optional) If the enclosures related to the selected VC Domains are not licensed to VCEM, then the
License page appears below the VC Domains list. For more information, see Licensing an enclosure for
VCEM. Otherwise, the Add VC Domain to VCD Group appears below the VC Domains list.
4. (Optional) You can provide a new name for the unconfigured VC Domains. Valid VC Domain Group
names are alphanumeric, hyphens (-), underscore (_), and cannot exceed 64 characters.
5. Enter the username and password for each VC Domain. Ensure you provide VC Domain credentials
with full privileges. VC Domains appear as:
• Unconfigured domains, which appear in the System Name column with the unassigned name,
VCD_name
• Configured domains, which appear in the System Name column with their previously assigned
name
6. Enter the username and password for the Onboard Administrator of each VC Domain. Ensure you
provide the Onboard Administrator credentials with full privileges if the Virtual Connect Module is not
configured.
7. Select the VC Domain Group name to which you want to add the selected VC Domains.
8. Click OK. The Virtual Connect Enterprise Manager is executing the request message
appears.
9. Click OK. The Jobs page appears, enabling you to monitor job progress.
Removing a VC Domain from a VC Domain Group
IMPORTANT: If you remove the last VC Domain from a VC Domain Group, you lose all unassigned profiles
within that VC Domain Group.
When releasing the VC Domain control back to the VC Manager, such as when deleting the VC Domain
Group or removing the VC Domain from a VC Domain Group, the MAC and WWN ranges to the VC
Manager must be able to manage the allocation of new addresses. HP recommends that you provide MAC
and WWN address ranges that are:
• Not in use by VCEM. Ensure you enter an address range already defined in the VCEM exclusion list,
as these address ranges are not used by VCEM. If a range is not already defined in the exclusion list,
then to add an exclusion range go to the MAC/WWN screen.
• Not in use by any other VC Domain in your network
You can click Remove from VCD Group only if the current selection contains VC Domains that belong to VC
Domain Groups.
To remove a VC Domain or domains from a VC Domain Group:
1. From the VC Domain Groups page, select the domains to be removed.
2. Click Remove from VC Domain Group. The Remove VC Domain Group information appears below
the table.
VC Domains 41
Page 42

3. Perform the following actions for each VC Domain that uses HP-predefined or user-defined ranges within
the VC Domain Group that you want to remove. Factory-default MAC and WWN ranges are released
back to the VC Manager as factory-default.
If factory-default MAC or WWN addresses are not being used, address ranges must be specified for
each removed domain. These address ranges must be unique and distinct to avoid assignment of
duplicate addresses. Each selected address range must also be recorded as an exclusion range to
prevent assignment by VCEM.
The HP-predefined range is identified as a user-defined range by the VC Manager after the VC Domain
is removed from VCEM.
a. Enter the MAC address range. To use an HP-predefined MAC range, from the MAC Range section,
select the Use range box, and then select a range from the list. You can also clear the Use range
box and then enter the start and end addresses for the MAC range. The VC Domain configuration
applies this MAC address range after being removed from VCEM control.
b. Enter the WWN address range. To use an HP-predefined WWN range, from the WWN Range
section, select the Use range box, and then select a range from the list. You can also clear the
Use range box and then enter the start and end addresses for the WWN range. The VC Domain
configuration applies this WWN address range after being removed from VCEM control.
4. Click OK. The Virtual Connect Enterprise Manager is executing the request message
appears.
5. Click OK. The Jobs page appears, enabling you to monitor job progress.
Making changes to a VC Domain in VC Domain Maintenance
VC Domain Maintenance is a useful way to perform updates on a particular VC Domain without having to
remove it from a VC Domain Group. VCEM accomplishes this task by enabling domain and network changes
through the Virtual Connect Manager.
Some of the useful domain-level operations enabled during VC Domain Maintenance include:
• Firmware upgrade
• Administering local user accounts
• Directory setting (LDAP)
• SSH
• Domain Configuration
Domain name•
• Static IP address
• SSL Certificate
• Reset Virtual Connect Module (soft reset)
Port monitoring is a network-level operation enabled during VC Domain Maintenance.
To make changes to a VC Domain, you must access the VC Manager web interface. After making the
changes, you must confirm those changes in VCEM. VCEM blocks all VC Domain operations while it is in
VC Domain Maintenance.
To make changes to a VC Domain in VC Domain Maintenance:
1. Select a VC Domain.
2. Click Maintenance.
3. Click the Click here to enable the VC Domain Maintenance hyperlink. Virtual Connect Manager
appears in a separate browser window. The VC Domain Maintenance information indicates that the
VC Domain is unlocked for Domain and Network changes.
4. Using Virtual Connect Manager, log in with full user rights at VC Manager, and save the necessary
changes. Close the VC Manager.
5. Return to the VC Domain Maintenance page in VCEM.
42 Managing VC Domains
Page 43

6. To apply the changes, click Complete VC Domain Maintenance. The Virtual Connect
Enterprise Manager is executing the request message appears with a job ID code.
7. Click OK. The Jobs page appears, enabling you to monitor job progress.
IMPORTANT: When a domain is put in VC Domain Maintenance, operations such as backup and restore
Virtual Connect configurations are allowed. Restoring Virtual Connect configurations require additional care.
If an old configuration is restored, then the configuration of this specific domain might become out of synch
with VCEM. (For example, actual profiles in the VC Domain after the restore may not match the previous
state registered by VCEM.) If a VCEM-managed VC Domain must have an old configuration restored, first
remove this domain from the VC Domain Group, and then restore the configuration using the embedded
Virtual Connect Manager graphical user interface (GUI). After performing this procedure, you can add this
VC Domain back to a VC Domain Group.
While VC Domain Maintenance enables the following actions to be performed on this VC Domain, the
actions might cause side effects in VCEM and are therefore not recommended.
Domain privileges (not recommended through VC Domain Maintenance):
• Configuration restoration
• Domain deletion
To perform these domain privileges operations safely, remove the VC Domain from VCEM, make the needed
changes, and then re-import.
Network privileges (not recommended through VC Domain Maintenance):
• IGMP Snooping
• Fast MAC Cache Failover
• SNMP Ethernet settings
• Network configuration (Create network, delete, create VLAN, and so on)
To perform these network privileges operations safely, see Updating a VC Domain Group configuration.
Changes in Virtual Connect Manager that might affect completing VC Domain Maintenance
When you enable VC Domain Maintenance and make changes in VC Domain base configuration, attempts
to complete VC Domain Maintenance result in VCEM creating a failed job and the VC Domain will remain
under VC Domain Maintenance.
Changes in Virtual Connect Manager that might cause problems in completing VC Domain Maintenance
include:
• Updating the Virtual Connect firmware to an incompatible version, (Domain Settings→Firmware
Management). To resolve this issue, update the Virtual Connect firmware version to a compatible
version and complete VC Domain Maintenance again.
• Deleting the domain (Domain Settings→Domain Configuration). To resolve this issue, restore the
Virtual Connect configuration from a backup, or remove the VC Domain from the VC Domain Group.
• Making certain network changes. VC Domain Maintenance unlocks all network configurations in Virtual
Connect Manager. However, if you change some configurations, VC Domain Maintenance cannot be
completed. Port monitoring is the only network configuration that will not cause problems in completing
VC Domain Maintenance. To resolve this issue, undo all network configuration changes before disabling
VC Domain Maintenance.
• Breaking the Virtual Connect lock using VC command line. To resolve this issue, remove the VC Domain
from the VC Domain Group.
• Virtual Connect fails to respond. To resolve this issue, even if the VC Domain Maintenance job fails
because of poor or failed VC communication, fix the communication and complete VC Domain
Maintenance again.
VC Domains 43
Page 44

44
Page 45

4 Managing VC Domain Groups
VC Domain Groups
This section describes the management of Virtual Connect (VC) Domain Groups using VCEM.
A VC Domain consists of an enclosure and a set of associated modules and server blades that are managed
together by a single instance of Virtual Connect Manager. The VC Domain contains specified networks,
server profiles, and user accounts that simplify the setup and administration of server connections. Establishing
a VC Domain enables administrators to upgrade, replace, or move servers within their enclosures without
changes being visible to the external LAN/SAN environments.
VCEM collects unassigned server profiles at the VC Domain Group level.
You can move and copy profiles within a domain, and domains within a VC Domain Group or a collection
of VC Domains.
IMPORTANT: All unassigned profiles in VC Domains become part of the VC Domain Group after the VC
Domain becomes managed by Virtual Connect Enterprise Manager. In addition, any unassigned profiles
created through Virtual Connect Enterprise Manager become part of the VC Domain Group.
To access the VC Domain Group page in VCEM, click the VC Domain Group tab. The VC Domain Group
page appears.
Figure 4-1 VC Domain Groups
The following table lists and describes the columns on the VC Domain Groups page.
DescriptionItem
Describes Virtual Connect Domain Group statusStatus
Lists Virtual Connect Domain Group nameName
Identifies the number of domains in the group# of Domains
The following table lists and describes VC Domain Group icons and status.
VC Domain Groups 45
Page 46

DescriptionStatus
Configuration in synch
Configuration update not completed
To display the properties for a particular VC Domain Group, such as status, MAC range type, WWN range
type, domain names, and server profiles, click the group name.
From the VC Domain Groups page, you can perform the following actions:
• Create a VC Domain Group
• Update a VC Domain Group configuration
• Cancel a VC Domain Group configuration
• Remove a VC Domain from a VC Domain Group
• Remove a VC Domain Group
Creating a VC Domain Group
1. Click New VC Domain Group.
2. (Optional) If the enclosures related to the selected VC Domains are not licensed to VCEM, then the
License page appears below the VC Domains list. For more information, see Licensing an enclosure for
VCEM. Otherwise, the Create VC Domain Group appears below the VC Domains list.
3. (Optional) You can provide a new name for the unconfigured VC Domains. Valid VC Domain Group
names are alphanumeric, hyphens (-), underscore (_), and cannot exceed 64 characters.
4. Enter the username and password for each VC Domain. Ensure you provide VC Domain credentials
will full privileges. VC Domains appear as:
• Unconfigured domains, which appear in the System Name column with the unassigned name,
VCD_name
• Configured domains, which appear in the System Name column with their previously assigned
name.
5. Enter the username and password for the Onboard Administrator of each VC Domain. Ensure you
provide the Onboard Administrator credentials with full privileges if the Virtual Connect Module is not
configured.
6. Enter the VC Domain Group name in the VC Domain Group Name field. Valid VC Domain Group
names are alphanumeric, hyphens (-), underscore (_), and cannot exceed 64 characters.
7. From the Configuration based on VC Domain list, select the VC Domain configuration upon which the
new VC Domain Group is to be based. The Configuration VC Domain list contains only configured VC
Domains.
8. From the Select MAC range type list, select whether the MAC address range type is HP-predefined,
user defined, or factory-default. You can only select the User-Defined for MAC range type if a custom
range is defined.
9. From the Select WWN range type list, select whether the WWN address range type is HP-predefined,
user-defined, or factory-default. You can only select the User-Defined for WWN range type if a custom
range is defined.
10. Click OK. The Virtual Connect Enterprise Manager is executing the request message
appears.
11. Click OK. The Jobs page appears, enabling you to monitor job progress.
All VC Domains that belong to this VC Domain Group share the
same domain configuration
The domain configuration of this VC Domain Group is unlocked
for changes on networks or Fibre Channel configurations directly
from the VC Manager page. After you finish with the new
configuration, select the VC Domain Group, click Update
Configuration, and then confirm the changes.
Updating a VC Domain Group configuration
1. Click the VC Domain Groups tab. The VC Domain Groups page appears.
2. Select the VC Domain Group to be updated.
3. Click Update Configuration. The Update VC Domain Group Configuration page appears.
46 Managing VC Domain Groups
Page 47

4. To unlock Virtual Connect Manager for network and storage changes, click the Click here to make
changes directly to the VC Manager web interface hyperlink. Virtual Connect Manager appears in
a separate browser window. The Update VCD Group Configuration information indicates that the VC
Domain Group is unlocked. To confirm or cancel the configuration changes, repeat steps 1 through 3.
5. Using Virtual Connect Manager, log in with full user rights at VC Manager, and save the necessary
changes. To close the VC Manager browser and return to the VC Manager page, click the Click here
to make changes directly to the VC Manager web interface hyperlink.
6. From the Update VC Domain Group Configuration information in VCEM, click OK. The Virtual
Connect Enterprise manager is executing the request message appears with a job id
code.
7. Click OK. The Jobs page appears, enabling you to monitor job progress.
The following information is replicated to all VCEM domains in the Domain Group as a result of this procedure:
• Network Common Configurations
Enable Fast MAC Cache Fail-over•
• MAC Refresh Interval
• Enable IGMP (Internet Group Management Protocol) Snooping
• IGMP Idle Timeout Interval
• Enable SNMP (Simple Management Network Protocol)
• SNMP System Contact
• SNMP Read Community
• For each SNMP trap: Community, IP address
• Fibre Channel Common Configurations
Enable SMI-S•
• Enable SNMP
• SNMP System Contact
• SNMP Read Community
• For each SNMP trap: Community, IP address
• FC Fabric
Name•
• Interconnect Bays
• For each logical Ports: id, Speed
• Network Single
Name•
• State
• Connection Mode
• Smart Link
• For each Port: id, enabled, Duplex Mode, Speed, Trunking Mode
• Network Shared
Name•
• State
• Smart Link
• External VLAN ID
• Native VLAN
• For each Shared Uplink Set:
VC Domain Groups 47
Page 48

• Name
• For each port: id, enabled, Duplex Mode, Speed, Trunking Mode.
• Uplink Set
Name•
• Connection Mode
• For each port: id, enabled, Duplex Mode, Speed, Trunking Mode
Canceling a VC Domain Group configuration
Canceling the VC Domain Group Configuration discards any configuration changes that you have performed
until now, and returns it to its previous configuration.
To cancel a VC Domain Group configuration:
1. Click the VC Domain Groups tab. The VC Domain Groups page appears.
2. Select the VC Domain Group already enabled for updating the configuration. The VC Domain Group
status Configuration update is not completed.
3. Click Update Configuration. The Update VC Domain Group Configuration information appears.
4. Click Cancel. The Virtual Connect Enterprise manager is executing the request
message appears with a job id code. If the VCEM detects there were no changes, then no jobs are
performed.
5. Click OK. The Jobs page appears, enabling you to monitor job progress.
Removing a VC Domain from a VC Domain Group
IMPORTANT: If you remove the last VC Domain from a VC Domain Group, then you lose all unassigned
profiles within that VC Domain Group.
When releasing the VC Domain control back to the VC Manager, such as when deleting the VC Domain
Group or removing the VC Domain from a VC Domain Group, the MAC and WWN ranges to the VC
Manager must be able to manage the allocation of new addresses. It is highly recommended that you enter
MAC and WWN address ranges that are:
• Not in use by VCEM. Make sure you enter an address range already defined in the VCEM exclusion
list, as these address ranges are not used by VCEM. If a range is not already defined in the exclusion
list, then to add an exclusion range go to the MAC/WWN screen.
• Not in use by any other VC Domain in your network.
To remove a VC Domain from a VC Domain Group:
1. Click the VC Domain Groups tab. The VC Domain Groups page appears.
2. Select the VC Domains to be removed.
3. Click Delete. The Delete VC Domain Group information appears below the table.
48 Managing VC Domain Groups
Page 49

4. Perform the following actions for each VC Domain you are removing from the VC Domain Group that
use HP-predefined or user-defined ranges (factory-default MAC and WWN ranges are released back
to VC Manager as factory-default):
If factory-default MAC or WWN addresses are not being used, address ranges must be specified for
each removed domain. These address ranges must be unique and distinct to prevent assignment of
duplicate addresses. Each selected address range must also be recorded as an exclusion range to
prevent assignment by VCEM.
a. Enter the MAC address range. To use an HP-predefined MAC range, select the Use range box
from the MAC Range section, and then select a range from the list. The HP-predefined MAC range
is identified as a user-defined range by the VC Manager after the VC Domain is removed from
VCEM. You can also clear the Use rang e box and enter the start and end addresses for the MAC
range.
The VC Domain configuration applies this MAC address range after being removed from VCEM
control.
b. Enter the WWN address range. To use an HP-predefined WWN range, select the Use range box
from the WWN Range section, and then select a range from the list. The HP-predefined WWN
range is identified as a user-defined range by the VC Manager after the VC Domain is removed
from VCEM. You can also clear the Use range box and enter the start and end addresses for the
WWN range. The VC Domain configuration applies this WWN address range after being removed
from VCEM control.
5. Click OK. The Virtual Connect Enterprise Manager is executing the request message
appears.
6. Click OK. The Jobs page appears, enabling you to monitor job progress.
VCEM generates an HP SIM event that describes in detail about the released VC Domain, such as domain
name, MAC range type, WWN range type, server profiles and related MAC/WWN addresses, network
connections, FC SAN connection range types, and so on.
Removing a VC Domain Group
If you remove a VC Domain Group, you lose all unassigned profiles within that VC Domain Group.
To remove a VC Domain Group:
1. Click the VC Domain Groups tab. The VC Domain Groups page appears.
2. Select the VC Domains to be removed.
3. Click Delete. The Remove VC Domain Group page appears.
4. Perform the following actions for each VC Domain Group that you are removing that use HP predefined
or user-defined ranges. Factory-default MAC and WWN ranges are released back to VC Manager as
factory-default:
If Factory-default MAC or WWN addresses are not being used, address ranges must be specified for
each removed domain. These address ranges must be unique and distinct to prevent assignment of
duplicate addresses. Each selected address range must also be recorded as an exclusion range to
prevent assignment by VCEM.
a. Enter the MAC address range. To use a MAC range that is predefined by HP, from the MAC Range
section, select the Use range box, and then select a range from the list. The HP-predefined WWN
range is identified as a user-defined range by the VC Manager after the VC Domain is removed
from VCEM. You can also clear the Use range box and then enter the start and end addresses for
the MAC range. The VC Domain configuration applies this MAC address range after being removed
from VCEM control.
b. Enter the WWN address range. To use a WWN range that is predefined, from the WWN Range
section, select the Use range box, and then select a range from the list. You can also clear the Use
range box and then enter the start and end addresses for the WWN range. The VC Domain
configuration applies this WWN address range after being removed from VCEM control.
5. Click OK. The Virtual Connect Enterprise Manager is executing the request message appears.
6. Click OK. The Jobs page appears, enabling you to monitor job progress.
VC Domain Groups 49
Page 50

50
Page 51

5 Managing server profiles
Profiles
This section describes how to create and manage profiles for use with Virtual Connect Enterprise Manager.
A Virtual Connect server profile is a logical grouping of attributes related to server connectivity that can be
assigned to a server bay. A server profile can be assigned to any server bay within the VC Domain Group.
VCEM requires the server to power down for any profile operations such as create, delete, unassign, copy,
move, and edit. For more information on this procedure, see "Jobs.".
To access the Profiles page, click the Profiles tab. The Profiles page appears. Information on the Profiles
pages can be filtered by selecting one of the following entries in the Show profiles for this list.
• VC Domain—Select this option to show all bays that exist in a specified VC Domain. The second list
can be used to select a specific VC Domain to use as a filter.
• VC Domain Group—Select this option to show all bays that exist in a VC Domain Group. The second
list can be used to select a specific VC Domain Group to use as a filter.
Figure 5-1 Profiles page
A profile defines connections for a server. Profiles can include the following information:
• BIOS settings
• IP networks
• Profile name
• WWN
A server enclosure has 16 bays. Each bay, in turn, can house a server. You can assign only one profile per
bay, although an enclosure can have more than 16 profiles. These extra profiles can be switched with
already assigned profiles when needed.
The following table lists the columns in the managing profile table.
Profiles 51
Page 52

DescriptionItem
Profile status (assigned or not assigned)Status
Profile nameName
VC Domain Group nameVC Domain Group
VC Domain nameVC Domain
Enclosure nameEnclosure
Bay numberBay
From the managing profiles screen, you can perform the following tasks:
• Create a profile
• Delete a profile
• Edit a profile
• Assign a profile
• Unassign a profile
• Copy a profile to a bay
• Move a profile
• View network information for a profile
• Perform a VC Profile Failover operation
Creating a profile
1. From the profiles page, click New. The Create New Profile information appears below the profiles list.
2. In the Profile name box, enter a unique profile name.
3. In the Member of VC Domain group dropdown menu, enter the VC Domain Group to which this profile
belongs.
4. (Optional) To use factory-assigned MAC addresses and WWNs, and override the VCEM-provided
settings, select the Show advanced settings checkbox.
If you choose to use factory-assigned MAC addresses and WWNs, these changes apply to every
Ethernet and Fibre Channel connection in a profile.
• To use server factory defaults for Ethernet MAC addresses, select the Use Server Factory Defaults
for Ethernet MAC addresses checkbox.
• To use server factory defaults for Fibre Channel WWNs, select the Server Factory Defaults for
Fibre Channel WWNs checkbox.
5. In the Ethernet network connections table, select at least two Ethernet networks. Network names are
optional. To add more connections, click Add Network Connection.
6. In the FC SAN connections table, set the Fibre Channel SAN connections.
7. (Optional) In the Fibre Channel Boot Parameters table, enter the boot parameters for defined FC SAN
connections. The default boot parameter is Use Bios. The World Wide Part Number (WWPN) and
Logical Unit Number (LUN) are required only for the primary and secondary SAN boot.
8. (Optional) To create the bay assignment, select Assign to bay, and then select an available target
server bay. If a profile is not assigned to a server bay or fails to assign to a server bay, then that profile
becomes unassigned to a VC Domain Group.
9. Click OK. The Virtual Connect Enterprise Manager is executing the request message
appears.
10. Click OK. The Jobs page appears, enabling you to monitor job progress.
52 Managing server profiles
Page 53

Deleting a profile
1. From the profiles page, select the profiles to be deleted.
2. Click Delete. The selected profiles are deleted. You are prompted to confirm the deletion.
3. Click OK. The Jobs page appears, enabling you to monitor job progress.
Editing a profile
When editing profiles, VC Domain Group memberships and server bay assignments are read-only. To edit
a profile:
1. From the profiles page, select the profile to be edited.
2. Click Edit. The Edit Profile information appears below the profile table.
3. Enter changes to the Profile name as needed.
4. Enter changes to the Ethernet network connections (physical ports) as needed, and then click Add
Network Connection.
5. Enter changes to FC SAN connections, and Fibre Channel boot parameters as necessary. Depending
on the physical changes to the FC Virtual Connect modules, the Add FC Connection button or the Remove
FC Connection button appears.
6. (Optional) To inform the bay assignment, select Assign to bay, and then select an available target
server bay. If a profile is not assigned to a server bay or fails to assign to a server bay, then that profile
becomes unassigned to a VC Domain Group. The Assign to bay button is available only if the selected
server profile being edited is unassigned.
7. Verify the server bay assignment.
8. Click OK. The Virtual Connect Enterprise Manager is executing the request message
appears.
9. Click OK. The Jobs page appears, enabling you to monitor job progress.
Assigning a profile
1. From the profiles page, filter the profiles by the VC Domain Group that has the unassigned profiles.
2. In the profiles list, click the Assign link, or select a profile to assign, and then click Assign. The Profile
Assignment page appears.
3. Select an available server bay to which the profile is assigned.
4. Click OK. The Virtual Connect Enterprise Manager is executing the request message
appears.
5. Click OK. The Jobs page appears, enabling you to monitor job progress.
Unassigning a profile
1. From the profiles page, select the assigned profile to unassign.
2. Click Unassign. You are prompted to confirm the unassignment.
3. Click OK. The Virtual Connect Enterprise Manager is executing the request message
appears.
4. Click OK. The Jobs page appears, enabling you to monitor job progress.
Copying and assigning a profile to a bay
1. From the profiles page, select the profile that must be copied and assigned.
2. Click Copy.
3. Enter a unique name for the new profile.
4. Select an available bay to which the new profile is assigned.
5. Set the port information.
6. Enter a unique name for the new profile.
7. Click OK. The Virtual Connect Enterprise Manager is executing the request message
appears.
8. Click OK. The Jobs page appears, enabling you to monitor job progress.
Profiles 53
Page 54

Moving a profile
NOTE: VCEM does not support profile moves of Integrity blades in a 'boot from SAN' configuration. Profile
moves for Integrity blades with local boot storage are supported by VCEM.
To move a profile:
1. From the profiles page, select a profile.
2. Click Move. The Move Profile page appears.
3. In the Move to Bay list, select an available bay to which the new profile is to be moved.
4. Click OK. The Virtual Connect Enterprise Manager is executing the request message
appears.
5. Click OK. The Jobs page appears, enabling you to monitor job progress.
Performing a VC Profile Failover
VC Profile Failover is a feature whereby a server hardware failure might be recoverable, either manually or
automatically, by restarting the failed server boot drive on a designated replacement (or spare) server.
VC Profile Failover functionality enables you to designate spare servers and perform one-button VC Profile
Failover operations. Also, when full HP SIM server discovery is enabled, you can enable trigger-initiated VC
Profile Failovers using action-on-events functionality in HP SIM.
NOTE: VCEM does not support profile failover for Integrity server blades or profile moves of Integrity
blades in a 'boot from SAN' configuration. Profile moves for Integrity blades with local boot storage are
supported by VCEM.
Preconditions for VC Profile Failover
• The failed server is a ProLiant server that is configured as SAN-boot
• The failed server has no dependency on a local drive
• A spare server within the same VC Domain Group has been designated and is powered off
• The spare server is the same model as the failed server
Designating spare bays
1. Select one or more bays that do not have a profile applied.
2. Click Apply Spares.
You can initiate VC Profile Failover either through the command line interpreter (CLI) or through the VCEM
graphical user interface (GUI).
Designate spares according to the service level needs and the blade models being used. For example, if a
data center is using three blade models in the environment, designate a spare for each of the three blade
model types. These designated spares can be any systems that do not already have a profile assigned within
the same VC Domain Group.
Initiating VC Profile Failover through the VCEM CLI
You must have HP SIM administrative privileges to perform VC Profile Failover tasks using the CLI.
To initiate VC Profile Failover through the VCEM CLI, enter C:\>VCEM -failover arguments, then
enter the appropriate argument as follows:
• For a bay, enter -bay enclosure_name:bay_number
• For a host, enter -host hostname
• For an IP address, enter -ip IP_address
The host and IP address are valid arguments only when HP SIM runs on the same system as VCEM and full
server discovery is in operation in HP SIM.
For more information about CLI usage in VCEM, see the "Command Line Interface usage in Virtual Connect
Enterprise Manager" chapter in the
54 Managing server profiles
HP Virtual Connect Enterprise Manager User Guide
.
Page 55

Initiating VC Profile Failover through the VCEM GUI
1. Select an assigned profile with an acceptable spare server.
2. Click VC Profile Failover. The Virtual Connect Enterprise Manager is executing the
request message appears.
3. Click OK. The Jobs page appears, enabling you to monitor job progress.
Initiating VC Profile Failover using HP SIM Automatic Event Handling
The VCEM CLI can be used to automatically trigger VC Profile Failovers using HP SIM automatic event
handling. A collection of sample failover SNMP traps exists in the "Profile Failover Trigger Events” collection
under “VCEM Events” in the VCEM user interface. VCEM has also created two custom tools to facilitate
automated VC Profile Failover.
For automatic event handling to work, the following prerequisites must be met:
• VCEM 1.10 has been installed as part of a SIM installation
• DNS is properly configured in the environment
• The Administrator account is usable on the system in which VCEM and SIM reside
The custom tools enable an administrator to initiate a VC Profile Failover. Any administrator that can run all
the tools on HP SIM or VCEM installation can perform a failover. The two custom tools can be deleted from
the HP SIM or VCEM installation with no impact other than the inability to configure automatic event handling.
IMPORTANT: Enabling automated failover actions can have implications in a datacenter. Before completing
this task, review any automatic event handlers. Unintended failovers can result in the loss of data and
unnecessary system downtime.
To set up automated VC Profile Failover, complete the following steps:
1. Enable HP SIM automatic discovery by selecting Options→Discovery. Discovery must be enabled to
discover servers within the environment.
2. Enable active event handling by selecting Options→Events→Automatic Event Handling→New
Task. This step launches a wizard to aid in the creation of a task.
3. Use the wizard to select a name for the event handler.
4. To monitor the selected CPU and memory-related failures, select the Profile Failover Trigger Events
event collection.
5. Select the systems that the event handler must monitor. You can select specific systems or a collection
of systems.
6. Step 4 of the wizard enables you to choose what actions the event handler must if one of the selected
systems generates an event. Select Run custom CMS tool, and then select VCEM Profile Failover
by Hostname.
7. If there is a specific time the event handler must be active, choose a time filter.
8. Review the selected events, systems, and actions for the automatic event handler.
VC Profile Failovers will now occur whenever any of the designated systems generate one of the events
within the event collection. When an event triggers a VC Profile Failover, a VCEM Failover job appears to
have originated from the administrator user account and will failover the system which generated the event.
For more information about VC Profile Failover, see the failover white paper at http://www.hp.com/go/vcem.
For more information about Automatic Event Handling, see the
http://www.hp.com/go/hpsim.
HP SIM User Guide
at
Profiles 55
Page 56

56
Page 57

6 Managing bays
Bays
Only those bays that are inside a VC Domain Group appear on the Bays page.
Bays can be filtered by selecting one of the following entries in the Filter list:
• VC Domain—Select this option to show all bays that exist in a specified VC Domain. The second list
can be used to select a specific VC Domain to use as a filter.
• VC Domain Group—Select this option to show all bays that exist in a VC Domain Group. The second
list can be used to select a specific VC Domain Group to use as a filter.
Figure 6-1 Bays page
The following table lists the columns in the bays list table.
DescriptionItem
Enclosure nameEnclosure
Bay numberBay #
Select spares to apply as VC Profile FailoverSpare
Profile nameProfile
To see more information about bays, select the Show more info checkbox. The following table lists the
additional information that appears on the screen.
DescriptionItem
Profile nameProfile
Model of blade serverBlade model
Enclosure is powered-up or powered-downPower
UID
Unique identifier that tells if the light on the device is powered-up
or powered-down
Bays 57
Page 58

Powering down a bay
To view a window displaying the power status of a bay, click the number in the Bay# column. You can
power down and power up the server inside that bay by clicking the buttons.
Figure 6-2 Window displaying the power status of a bay
To remotely power down a bay:
1. Click the Bays tab.
2. To determine the power status of the bay, click the bay number. A status window appears.
3. Depending on the power status of the bay, perform one of the following steps:
• If the bay is currently powered down, then proceed to the Assigning a profile to a bay procedure
that follows.
• If the bay is currently powered up, then click Momentary Press, which automatically powers
down the bay.
• If the bay is currently powered up and clicking Momentary Press does not power down the bay,
then click Press and Hold.
CAUTION: Clicking Press and Hold should only be done after other attempts to powering down the
bay have failed, such as attempting to shut down physical bay instead of remotely.
Figure 6-3 Bay status with tab and hold
Assigning a profile to a bay
You can assign a profile to a bay only if the bay is not associated with a server or if the server is powered
down. To assign a profile to a bay:
1. Click the Bays tab.
2. From the Filter list, select VC Domain or VC Domain Group.
3. Select the bay.
58 Managing bays
Page 59

4. Click Assign profile. The Assign Profile page appears.
5. Select an unassigned profile.
6. Click OK. The Virtual Connect Enterprise Manager is executing the request message
appears.
7. Click OK. The Jobs page appears, enabling you to monitor job progress.
Unassigning a profile from a bay
You can only unassign a profile from a bay if the bay is not associated with a server of if the server is
powered down. To unassign a profile from a bay:
1. Click the Bays tab.
2. From the Filter list, select VC Domain or VC Domain Group.
3. Select the bay for which you want to unassign a profile.
4. Click Unassign profile. You are prompted to confirm the unassignment.
5. Click OK. The Virtual Connect Enterprise Manager is executing the request message
appears.
6. Click OK. The Jobs page appears, enabling you to monitor job progress.
Performing a VC Profile Failover
VC Profile Failover is a feature whereby a server hardware failure may be recoverable, either manually or
automatically, by restarting the failed server boot drive on a designated replacement (or spare) server.
VC Profile Failover functionality enables you to designate spare servers and perform one-button VC Profile
Failover operations. Also, when full HP SIM server discovery is enabled, you can enable trigger-initiated VC
Profile Failovers using action-on-events functionality in HP SIM.
NOTE: VCEM does not support profile failover for Integrity server blades or profile moves of Integrity
blades in a 'boot from SAN' configuration. Profile moves for Integrity blades with local boot storage are
supported by VCEM.
Preconditions for VC Profile Failover
• The failed server is a ProLiant server that is configured as SAN-boot.
• The failed server has no dependency on a local drive.
• A spare server within the same VC Domain Group has been designated and is powered off.
• The spare server is the same model as the failed server.
Designating spare bays
1. Select one or more bays that do not have a profile applied.
2. Click Apply Spares.
You can initiate VC Profile Failover either through the command line interpreter (CLI) or through the VCEM
graphical user interface (GUI).
Designate spares according to the service level needs and the blade models being used. For example, if a
data center is using three blade models in the environment, designate a spare for each of the three blade
model types. These designated spares can be any systems that do not already have a profile assigned within
the same VC Domain Group.
Initiating VC Profile Failover through the VCEM CLI
You must have HP SIM administrative privileges to perform VC Profile Failover tasks using the CLI.
Bays 59
Page 60

To initiate VC Profile Failover using the CLI, enter C:\>VCEM -failover arguments, then enter the
appropriate argument as follows:
• For a bay, enter -bay enclosure_name:bay_number
• For a host, enter -host hostname
• For an IP address, enter -ip IP_address
The host and IP address are valid arguments only when HP SIM runs on the same system as VCEM and full
server discovery is in operation in HP SIM.
For more information about CLI usage in VCEM, see the "Command Line Usage in Virtual Connect Enterprise
Manager" chapter in the
HP Virtual Connect Enterprise Manager User Guide
Initiating VC Profile Failover through the VCEM GUI
1. Select an assigned profile with an acceptable spare server.
2. Select a bay with an assigned profile.
3. Click VC Profile Failover. The Virtual Connect Enterprise Manager is executing the
request message appears.
4. Click OK. The Jobs page appears, enabling you to monitor job progress.
Initiating VC Profile Failover using HP SIM Automatic Event Handling
The VCEM CLI can be used to automatically trigger VC Profile Failovers using HP SIM automatic event
handling. A collection of sample failover SNMP traps exists in the "Profile Failover Trigger Events” collection
under “VCEM Events” in the VCEM user interface. VCEM has also created two custom tools to facilitate
automated VC Profile Failover.
For automatic event handling to work, the following prerequisites must be met:
.
• VCEM 1.10 has been installed as part of a SIM installation
• DNS is properly configured in the environment
• The Administrator account is usable on the system in which VCEM and SIM reside
The custom tools enable an administrator to initiate a VC Profile Failover. Any administrator that can run all
the tools on HP SIM or VCEM installation can perform a failover. The two custom tools can be deleted from
the HP SIM or VCEM installation with no impact other than the inability to configure automatic event handling.
IMPORTANT: Enabling automated failover actions can have implications in a data center. Before completing
this task, review any automatic event handlers. Unintended failovers can result in the loss of data and
unnecessary system downtime.
To set up automated VC Profile Failover, complete the following steps:
1. Enable HP SIM automatic discovery by selecting Options→Discovery. Discovery must be enabled to
discover servers within the environment.
2. Enable active event handling by selecting Options→Events→Automatic Event Handling→New
Task. This step launches a wizard to aid in the creation of a task.
3. Use the wizard to select a name for the event handler.
4. To monitor the selected CPU and memory-related failures, select the Profile Failover Trigger Events
event collection.
5. Select the systems that the event handler must monitor. You can select specific systems or a collection
of systems.
6. Step 4 of the wizard enables you to choose what actions the event handler must if one of the selected
systems generates an event. Select Run custom CMS tool, and then select VCEM Profile Failover
by Hostname.
7. If there is a specific time the event handler must be active, choose a time filter.
8. Review the selected events, systems, and actions for the automatic event handler.
VC Profile Failovers will now occur whenever any of the designated systems generate one of the events
within the event collection. When an event triggers a VC Profile Failover, a VCEM Failover job appears to
have originated from the administrator user account and will failover the system which generated the event.
60 Managing bays
Page 61

For more information about VC Profile Failover, see the failover white paper at http://www.hp.com/go/vcem.
For more information about Automatic Event Handling, see the
HP SIM User Guide
at
http://www.hp.com/go/hpsim.
Bays 61
Page 62

62
Page 63

7 Managing MAC and WWN addresses
MAC Addresses
This section describes how to manage MAC and WWN addresses using VCEM.
When using VCEM-assigned MAC addresses, you can choose between HP-predefined MAC address ranges
or user-defined MAC address ranges.
• HP-predefined MAC address ranges—HP recommends this range. This predefined range is reserved
and never appears as factory-default on any hardware. There are 65,536 unique addresses from which
VCEM automatically assigns to profiles on demand.
• User-defined MAC address range—To prevent potential conflict with other hardware MAC addresses
in the environment, you can use a subrange of MAC addresses reserved by the IEEE for locally
administered MAC addresses. Ensure that the range does not conflict with any Ethernet device already
deployed within the enterprise.
From the VCEM home page, click the pool of MAC addresses hyperlink. The MAC Ranges List page
appears.
Figure 7-1 MAC Ranges List page
Tracking individual MAC addresses
Individual addresses in a MAC range (either HP-predefined or user-defined) can be monitored by clicking
on the Individual addresses secondary tab within the MAC Ranges List page.
The following table lists and describes the MAC address status at Individual address page.
External Addresses
DescriptionItem
Address available to use in VCEM.Free
Address currently used by a server profile in VCEM.In use
Addresses used by server profiles in a VC Domain that has been
released back to VC Manager and no longer managed by VCEM.
MAC Addresses 63
Page 64

Creating MAC exclusion ranges
VCEM requires that you define exclusion ranges for both MAC and WWN address ranges that are in use
by VC Domains outside VCEM management. Exclusion ranges are used to set aside addresses that might
be in use for other purposes within your data center. Excluded address ranges are not assigned for use by
VCEM.
1. From the VCEM home page, under the Administration heading, click the pool of MAC addresses
hyperlink.
2. From the Select ranges to configure list, select MAC.
3. Select a MAC address range. The exclusion range must be contained within the address range to which
the exclusion range belongs.
4. Select the Exclusion ranges tab.
5. To create the exclusion range, click New.
IMPORTANT: Including external addresses to a MAC exclusion range overrides these external address
status to become excluded status. When you remove these addresses from the exclusion range, they
are unavailable for use in VCEM.
6. Select a HP-predefined address range, or enter the address range manually.
Deleting MAC exclusion ranges
1. From the VCEM home page, under the Administration heading, click the pool of MAC addresses
hyperlink.
2. From the Select ranges to configure list, select MAC.
3. Select a MAC address range. The exclusion range must be contained within the address range to which
the exclusion range belongs.
4. Select a MAC exclusion range.
5. Click Delete. You are prompted to confirm your choice.
6. Click OK. The selected MAC exclusion range is removed.
IMPORTANT: If the exclusion range includes external addresses, then these external addresses are
automatically available to use in VCEM when the MAC exclusion range is removed.
To avoid conflicts, ensure all addresses within this range are not being used by any other Ethernet device
on your network.
Reclaiming external MAC addresses
External MAC addresses are generated when a VC Domain containing server profiles is removed from a
VC Domain Group. Since every profile contains one or more MAC addresses associated with it, VCEM
identifies these addresses as external. Addresses identified as external are those that, despite the addresses
not being currently managed by VCEM, cannot be allocated because they are being used by a VC Domain
outside of VCEM.
To return external addresses to VCEM allocation, click Reclaiming External. Before reclaiming addresses
to VCEM, verify the VC Domain is not using the MAC addresses.
To reclaim MAC addresses:
1. From the VCEM home page, under the Administration heading, click the pool of MAC addresses
hyperlink.
2. From the Select ranges to configure list, select MAC.
3. Select a MAC address range.
4. Select the Individual addresses tab.
5. From the Filter list, select External.
6. Select the external addresses to be reclaimed.
7. Click Reclaim External. You are prompted to confirm your choices.
8. Click OK. The selected MAC addresses are reclaimed.
64 Managing MAC and WWN addresses
Page 65

Adding custom MAC address ranges
Because there is a limit on the maximum size of the range, it might take awhile for large ranges to be created.
Only one custom range can exist.
To add custom MAC address ranges:
1. From the VCEM home page, under the Administration heading, click the pool of MAC addresses
hyperlink.
2. From the Select ranges to configure list, select MAC.
3. Select a MAC address range. Valid MAC ranges cannot contain all 0s or all Fs, and must have an even
value in their first octet.
4. Click Add custom. The Add Custom MAC Address Range information appears.
5. Enter custom MAC address range.
6. Click OK. The MAC addresses are added.
Editing custom MAC address ranges
Because there is a limit on the maximum size of the range, it might take awhile for large ranges to be created.
If you are reducing the size of a custom range, verify that any addresses or exclusion ranges already in use
are not outside the edited range.
To edit custom MAC address ranges:
1. From the VCEM home page, under the Administration heading, click the pool of MAC addresses
hyperlink under the Administration heading.
2. From the Select ranges to configure list, select MAC.
3. Select the custom MAC address range.
4. Click Edit.
5. Edit the custom MAC address range as necessary.
6. Click OK. The selected MAC addresses are edited.
Removing custom MAC address ranges
You must verify there are no addresses already in use for this range. To remove custom MAC address ranges:
1. From the Virtual Connect Enterprise Manager home page, under the Administration heading, click the
pool of MAC addresses hyperlink.
2. From the Select ranges to configure list, select MAC.
3. Select the custom MAC address range.
4. Click Delete. You are prompted to confirm your choice.
5. Click OK. The selected custom MAC address range is removed.
NOTE: Removing a custom MAC address range also removes its defined exclusion ranges.
WWN Addresses
The WWN range used by the VCEM domain must be unique within the environment. HP provides a set of
predefined addresses that are reserved for Virtual Connect and VCEM and does not conflict with server
factory-default WWNs.
Overall, WWN range management in VCEM is very similar to MAC ranges. VCEM allocates WWNs
automatically according to VC Domain Group configuration using HP-predefined or user-defined WWNs.
From the VCEM home page, click the pool of World Wide names hyperlink. The WWN Ranges List page
appears.
WWN Addresses 65
Page 66

Figure 7-2 WWN Ranges List page
Tracking individual WWN addresses
Individual addresses in a WWN range (either HP-predefined or user-defined) can be monitored by clicking
on the Individual addresses secondary tab within the WWN Ranges List page.
The following table lists and describes the WWN address status at Individual address page.
External Addresses
Creating WWN exclusion ranges
VCEM requires that you define exclusion ranges for both MAC and WWN address ranges that are in use
by VC Domains outside VCEM management. Exclusion ranges are used to set aside addresses that might
be in use for other purposes within your data center. Excluded address ranges are not assigned for use by
VCEM.
1. From the VCEM home page, under the Administration heading, click the pool of WWN addresses
hyperlink.
2. From the Select ranges to configure list, select WWN.
3. Select a WWN address range. The exclusion range must be contained within the address range to
which the exclusion range belongs.
4. Select the Exclusion ranges tab.
5. To create the exclusion range, click New.
DescriptionItem
Address available to use in VCEM.Free
Address currently used by a server profile in VCEM.In use
Addresses used by server profiles in a VC Domain that has been
released back to VC Manager and no longer managed by VCEM.
IMPORTANT: Including external addresses to a WWN exclusion range overrides these external
address status to be excluded status. When you remove these addresses from the exclusion range, they
are available for use in VCEM.
6. Select a HP-predefined address range, or manually enter the address range.
66 Managing MAC and WWN addresses
Page 67

Deleting WWN exclusion ranges
1. From the VCEM home page, under the Administration heading, click the pool of WWN addresses
hyperlink.
2. From the Select ranges to configure list, select WWN.
3. Select a WWN address range. The exclusion range must be contained within the address range to
which the exclusion range belongs.
4. Click Delete. You are prompted to confirm your choice.
The selected custom WWN range is removed.
IMPORTANT: If the exclusion range includes external addresses, these external addresses are
automatically available to use in VCEM when the WWN exclusion range is removed.
To avoid conflicts, ensure all addresses within this range are not being used by any other Fibre Channel
device on your network.
Allocating WWN addresses
Exclusion ranges are used to set aside addresses that might be in use for other purposes within your data
center. Excluded address ranges are not assigned for use by VCEM.
To allocate WWN addresses:
1. From the VCEM home page, under the Administration heading, click the pool of World Wide names
hyperlink.
2. From the Select ranges to configure list, select WWN. The WWN Ranges List page appears.
Figure 7-3 WWN Ranges List page
3. Select a WWN address range. The exclusion range must be contained within the address range to
which the exclusion range belongs. Valid WWN ranges cannot contain all 0s or all Fs and cannot have
an F within either of the first two octets.
4. Click the Exclusion ranges tab.
5. To create the exclusion range, click New. The selected WWN address range is allocated.
Reclaiming external WWN addresses
External WWN addresses are generated when a VC Domain containing server profiles is removed from a
VC Domain Group. Since every profile contains one or more WWN addresses associated with it, VCEM
WWN Addresses 67
Page 68

identifies these addresses as external. Addresses identified as external are those that, despite the addresses
not being currently managed by VCEM, cannot be allocated because they are being used by a VC Domain
outside of VCEM.
To return external addresses to VCEM allocation, click Reclaiming External. Before reclaiming addresses
to VCEM, verify the VC Domain is not using the WWN addresses.
To reclaim WWN addresses:
1. From the Virtual Connect Enterprise Manager home page, under the Administration heading, click the
pool of World Wide names hyperlink.
2. From the Select ranges to configure link, select WWN. The WWN Ranges List page appears.
3. Select a WWN address range.
4. Click the Individual addresses tab.
5. From the Filter link, select External.
6. Select the external addresses.
7. Click Reclaim External. You are prompted to confirm your choices.
8. Click OK. The selected WWN addresses are reclaimed.
Adding custom WWN address ranges
Because there is a limit on the maximum size of the range, it might take awhile for large ranges to be created.
Only one custom range can exist.
To add WWN custom address ranges:
1. From the Virtual Connect Enterprise Manager home page, under the Administration heading, click the
pool of World Wide names hyperlink.
2. From the Select ranges to configure link, select WWN.
3. Select a WWN address range. Valid WWN ranges cannot contain all 0s or all Fs, and cannot have
an F within either of the first two octets.
4. Click Add custom. The Add Custom WWN Address Range information appears.
5. Enter the custom WWN address range.
6. Click OK. The selected custom WWN address range is added.
Editing custom WWN address ranges
1. From the Virtual Connect Enterprise Manager home page, under the Administration heading, click the
pool of World Wide names hyperlink.
2. From the Select ranges to configure link, select WWN.
3. Select a WWN address range.
4. Click Edit.
5. Edit the WWN address range as necessary. Valid WWN ranges cannot contain all 0s or all Fs and
cannot have an F within either of the first two octets.
6. Click OK. The selected WWN address range is edited.
Deleting custom WWN address ranges
1. From the Select ranges to configure link, select WWN.
2. Select the custom WWN range.
3. Click Delete. You are prompted to confirm your choice.
4. Click OK. The selected custom WWN range is deleted.
NOTE: Removing a custom WWN address range also removes its defined exclusion ranges.
68 Managing MAC and WWN addresses
Page 69

8 Tracking VCEM job status
Jobs
The Jobs list provides detailed information about jobs that have occurred and are related to Virtual Connect
Enterprise Manager. To view these jobs, click the Jobs tab. The Jobs list appears. From this list, you can
perform the following tasks:
• Review a summary of jobs
• Select and review details of jobs
• Select and delete jobs
Figure 8-1 Jobs list
The following table lists and describes the job item columns in the Jobs list.
User Name
End Time
Job status message window
When a function is performed, a job is created. A message window appears displaying the Job ID.
Details of the job can be viewed in the Jobs tab. When jobs are created, events might also be created in
HP SIM.
DescriptionItem
Identifies the job number with the task performedJob ID
Describes the job performed or to be performedTask
Provides job statusStatus
Describes the progress of the current jobProgress
Identifies the person who performed the function that created the
job
Identifies job start timeStart Time
Identifies the time when the job was completed (if the job is not
complete, this field is blank)
Jobs 69
Page 70

VCEM limits the number of jobs that it displays to 65,000. If the limit is reached, then only the most recent
65,000 jobs are viewable. To keep the list smaller, you can select the jobs to be deleted, and then click
Delete.
Reviewing job details
To review the details of a particular job, click the hyperlink of the appropriate job name. The Job Details
window appears.
Deleting jobs
To delete a particular job or multiple jobs, click Delete. Only pending, failed, or completed jobs can be
deleted. You cannot delete a running job.
70 Tracking VCEM job status
Page 71

9 Upgrading Virtual Connect firmware after VCEM is
managing VC Domains
The process for upgrading Virtual Connect (VC) firmware requires extra steps when VCEM is managing the
VC Domain. VCEM gains exclusive access to managed domains. However, using the VC Domain Maintenance
capability, the Virtual Connect Manager can be used to upgrade VC firmware while the VC Domain is being
managed by VCEM.
Preparation checklist
Before upgrading VC firmware, you must perform the following tasks:
• Ensure that the installed version of VCEM supports the VC firmware upgrade. See the
Enterprise Support Matrix
The VC firmware version might require installation of a VCEM Firmware Support Update or new version
of VCEM. Ensure the following requirements have been met:
• Download and install the VCEM Firmware support Update or a new VCEM version that supports
VC Firmware.
• Acquire the HP BladeSystem c-Class Virtual Connect Firmware. You can download the firmware from
http://www.hp.com. Firmware installation instructions are included with the download.
• You can determine whether any other components must be updated before upgrading the VC firmware
by reviewing the Virtual Connect firmware documentation and. The VC firmware might have
dependencies on specific versions of the following items:
• HP BladeSystem c-Class Onboard Administrator
• HP ProLiant c-Class Server BIOS – System ROM
• HP Integrity c-Class Server EFI
• HP c-Class Embedded NICs
• HP c-Class Server Mezzanine Cards
• HP Integrated Lights-Out 2 (iLO 2)
at http://www.hp.com/go/vcem.
HP Virtual Connect
Performing the firmware update using the VC Domain Maintenance capability
1. From the VC Domains screen, select a VC Domain.
2. Click VC Domain Maintenance.
3. Click the Click here to enable the VC Domain Maintenance hyperlink. Virtual Connect Manager
appears in a separate browser window. The VC Domain Maintenance information indicates that the
VC Domain is unlocked for Domain and Network changes.
4. Using Virtual Connect Manager, log in with full user rights at VC Manager and upgrade the firmware.
When the firmware upgrade is complete, close the VC Manager browser.
5. Return to the VC Domain Maintenance page in VCEM.
6. To apply the changes, click Complete VC Domain Maintenance. The Virtual Connect
Enterprise Manager is executing the request message appears with a job ID code.
7. Click OK. The Jobs page appears, enabling you to monitor job progress.
Preparation checklist 71
Page 72

72
Page 73

10 External manager account
For VCEM to manage VC Domains (using the Virtual Connect Manager, the embedded software in a Virtual
Connect Ethernet module) VCEM uses programmatic interfaces with each Virtual Connect Manager. VCEM
automatically creates an external manager account in each Virtual Connect Manager for subsequent
authentication.
VCEM creates a local account on each Virtual Connect Manager it manages. To prevent inadvertent
modification, this account is not visible from the user-interface on the Virtual Connect Manager associated
with the VC Domain being managed by VCEM. This account has full privileges to the Virtual Connect
Manager and the credentials are used for SOAP interfaces with the Virtual Connect Manager, using a
connection over Secure Sockets Layer (SSL). These credentials are securely stored on the Central Management
Server (CMS) used to run VCEM. Each Virtual Connect Manager managed by VCEM has a unique,
randomly-generated password.
There are two ways this external manager account can be removed from a Virtual Connect Manager.
Removing the external manager account results in Virtual Connect Manager being removed from VCEM
control.
• Preferred method—Uses the VCEM user-interface and removes the account from the Virtual Connect
Manager and the credential store from VCEM.
• Remove the VC Domain from the VC Domain Group
• Un-authorize the VC Domain
• Secondary method—Uses the Virtual Connect Manager command line interface to remove the account
from the Virtual Connect Manager.
If the preferred method is not possible, then the Virtual Connect Manager supports command line
interfaces which allow the external manager account to be deleted from the Virtual Connect Manager
and allows a Virtual Connect Manager to be removed from VCEM control.
To remove the external manager account:
1. Telnet into the Virtual Connect Manager using an SSH connection such as SSH
Administrator@
2. To determine the username of the external manager account, from the Virtual Connect Manager
command prompt, enter show external-manager. For this example, assume the username
returned was xyz.
3. To disable the account, from the Virtual Connect Manager command prompt, enter set
external-manager Username=xyz Enabled=false.
4. To remove the account, from the Virtual Connect Manager command prompt, enter remove
external-manager Username=xyz.
To release the VC Domain from VCEM control:
From the Virtual Connect Manager command prompt, enter the MAC address type and the ranges of
MAC and WWN addresses for the Virtual Connect Manager to use by entering the following command:
set domain mactype=Factory-Default/User-Defined MacStart=>< MacEnd=><
wwnType=Factory-Default/User-Defined WwnStart=>< WwnEnd=><
xxx.xxx.xxx.xxx
, where
xxx
is the VC Domain IP address.
73
Page 74

74
Page 75

11 Command Line Interface usage in Virtual Connect
Enterprise Manager
VCEM provides support for a command line interface (CLI) to perform several Failover-related functions. These
same functions are also available in the VCEM GUI.
Perform VC Profile Failover on specified VC Domain Bay Server
This CLI command initiates a VC Profile Failover operation. Options for specifying the source server as the
VC Profile Failover target are:
• Specifying a VC Domain Enclosure Name and Bay Number as the source server
>vcem –failover –bay “EnclosureName:BayNumber”
• Specifying a VC Domain Bay Server Hostname as the source server
>vcem –failover –host “BayServerHostname”
• Specifying a VC Domain Bay Server IP Address as the source server
>vcem –failover –ip “BayServerIPAddress”
If the CLI Failover command for any of these three options is successful, the exit code from the CLI is
zero, and the following example output displays (through stdout) on the screen. The CLI also displays
the job number of the VCEM Failover job (represented by ‘N’ below) that has just been initiated.
Performing VC Profile Failover on the specified VC Domain Bay Server...
VC Profile Failover has been initiated: "EnclosureName:BayNumber"
VCEM Failover Job Number is: N
Performing VC Profile Failover on the specified VC Domain Bay Server...
VC Profile Failover has been initiated: "BayServerHostname"
VC Profile Failover Job Number is: N
Performing VC Profile Failover on the specified VC Domain Bay Server...
VC Profile Failover has been initiated: "BayServerIPAddress"
VC Profile Failover Job Number is: N
If the CLI Failover command for any of these three options has failed, the exit code is some value greater
than zero and the associated error message appears. The following shows some output examples.
Performing VC Profile Failover on the specified VC Domain Bay Server...
ERROR (30) - Could not initiate VC Profile Failover
Internal VCEM Error Code: 5013
Internal VCEM Error Message: Specified server bay number is out of range, it must be between 1 – 16.
Performing VC Profile Failover on the specified VC Domain Bay Server...
ERROR (30) - Could not initiate VC Profile Failover
Internal VCEM Error Code: 5058
Internal VCEM Error Message: Enclosure name contains too many characters - limit is 32
Performing VC Profile Failover on the specified VC Domain Bay Server...
ERROR (30) - Could not initiate VC Profile Failover
Internal VCEM Error Code: 5009
Internal VCEM Error Message: Invalid format for IP address - it must be: [0-255].[0-255].[0-255].[0-255]
Perform VC Profile Failover on specified VC Domain Bay Server 75
Page 76

List details for specified VCEM job
This CLI command can be used to list the details and status for a particular VCEM job and can be used to
determine the status of a CLI Failover job.
>vcem –list –details –job JobNumber
If the CLI ‘List Job Details’ command is successful, the exit code from the CLI is zero, and the following
example output displayed (through stdout) on the screen.
>vcem –list –details –job 1
Listing details for specified VCEM Job...
Job Number: 1
Job Type: MDM
Job State: COMPLETED
Job Progress: % Complete, Time, Possible Error Msg, Possible Detailed Error Msg
Job Priority: 5
Job User Name: “MachineUserNameHere”
Job Create Time: 1:58:34 PM
Job Start Time: 1:58:34 PM
Job End Time: 1:58:42 PM
In the preceding example, the Job State status shows as Completed. Valid values for this status are:
• Unknown
• Pending
• Running
• Completed
• Failed
• Cancelled
If the CLI ‘List Job Details’ command has failed, the exit code is some value greater than zero and the
associated error message appears. The following shows some output examples.
Listing details for specified VCEM Job...
ERROR (63) - Specified VCEM Job Number is not an integer
Listing details for specified VCEM Job...
ERROR (64) - Could not list details for job
Internal VCEM Error Code: 5014
Internal VCEM Error Message: No Job is found. Verify that the specified Job ID must be bigger than 0 and valid.
Show CLI Usage online help
This CLI command can be used to display brief usage help on the screen.
>vcem -help
Here is an example output from this command. Several CLI option keywords provide for abbreviated
alternatives – that is, {-failover | -fo}.
76 Command Line Interface usage in Virtual Connect Enterprise Manager
Page 77

VCEM (Virtual Connect Enterprise Manager) CLI Usage:
- Perform VC Profile Failover on specified VC Domain Bay Server
>vcem {-failover | -fo} {-bay "EnclosureName:BayNumber" | -host "BayServerHostName" | -ip "BayServerIPAddress"}
- Listing details for specified VCEM Job
>vcem {-list | -ls} {-details | -dt} -job "jobNumber"
- Show CLI Help
>vcem {-help | -h}
CLI Exit/Error codes
The CLI returns a numeric value that either indicates success or a particular error or failure. The CLI also
displays an associated error message (through stdout). A zero numerical returned value indicates success.
Some returned value greater than zero indicates an error or failure. The following list shows all possible
exit and error codes and messages that might be returned by the VCEM CLI.
VCEM CLI syntax error codes/messages
Error messageCode
ERROR - Invalid command line syntax1
ERROR - Invalid command line option2
ERROR - Argument not allowed for this option3
ERROR - Only one required argument allowed for this option4
ERROR – Missing a required argument for this option5
ERROR – Missing operational option6
ERROR – Missing command line option(s)7
ERROR - Invalid command line argument8
ERROR – Duplicate options not allowed9
ERROR – Option not allowed10
VCEM CLI User Authorization and Login error codes/messages
Error MessageCode
ERROR - Could not locate VCEM SOAP Service15
16
ERROR - Could not login to VCEM
- SIM must be running
- VCEM must be installed
- User must be in OS Administrator group
- User must be valid SIM user
- User must have adequate VCEM authorization
CLI Exit/Error codes 77
Page 78

78
Page 79

12 Troubleshooting Virtual Connect Enterprise Manager
Troubleshooting
A Job appears with Failed status
A job might fail for several reasons. For more information about the reason of job failure and how to correct
the issue, see the job details:
1. From the VCEM Home page, click the Jobs tab.
2. Locate the job, either by its ID or its name.
3. For detailed information about the job and how you can resolve the issue, click the task name of this
job.
4. (Optional) Job details might get truncated when the appended exceeds 256 characters. If this occurs,
to view the full job description, go to HP SIM left navigation panel→Events→Shared→VCEM
Events.
Enclosure has two Onboard Administrators, and one fails
If an enclosure has two Onboard Administrators with redundancy and one fails, then the redundant Onboard
Administrator might take several minutes to take over. Before performing any operations to the VC Domain,
wait until the Onboard Administrator has failed over. Perform an HP SIM discovery to rediscover the new
Onboard Administrator IP address. If it is not rediscovered then see the
WWN exclusion range displays a conflict message even when there is no conflict
HP BladeSystem c-Class User Guide
.
When adding or editing a WWN exclusion range that does not fit inside either the HP-predefined or
user-defined WWN range, VCEM might issue a message that incorrectly states there is a conflict with another,
existing exclusion range.
To correct this issue, enter the start and end addresses within the existing HP-predefined or user-defined
WWN range.
Missing enclosure model
If the HPSIM is unable to correctly discover the enclosure model related to the VC Domain, then you might
not be able to apply a VCEM license to this VC Domain.
To correct this issue, perform one of the following actions:
• Access the HP SIM menu, select Options→Identify Systems, select the related Management Processor
(Onboard Administrator for the enclosure), click Apply, and then click Run Now.
• If you entered information at Discovery settings for HP Systems Insight Manager page during VCEM
install, then access the HP SIM menu, select Options→Discovery, select the Virtual Connect
Enterprise Manager Network Discovery or Insight Control Management Network Discovery
task, and then click Run Now.
VCEM is prompting for Onboard Administrator credentials on a configured VC Domain
VCEM might prompt for Onboard Administrator credentials on a VC Domain that has already been configured
where the Onboard Administrator has been imported and discovered. This issue occurs when a backup VC
is discovered or if a failover of a VC Module occurred in a redundancy environment. To correct this issue,
perform a rediscovery on the Onboard Administrator IP address associated with the VC Module.
Unable to add VC Domain to a VC Domain Group
If the VC Domain is not the same as the VC Domain configuration group, then you might not be able to add
the VC Domain to the VC Domain Group. To correct this issue, verify that the VC Domain meets the
requirements for adding a VC Domain to a VC Domain Group.
Troubleshooting 79
Page 80

Also, a VC Domain might fail to add to the VC Domain Group because of any of the following reasons:
• Network issues
• Invalid IP address
• Insufficient credentials permission
• Another VCEM or the external manager already exists
To correct this issue, perform any of the following tasks:
• Verify that you can ping from the command line of the VCEM server and log in the Virtual Connect
Manager using the browser.
• In a redundant environment, check if the failover between an active and standby VC module occurs.
If so, wait until the failover completes and then perform re-discovery of the Onboard Administrator
associated to the VC module.
• VCEM requires Virtual Connect Manager credentials with full privileges to communicate to Virtual
Connect Module.
• Access the Virtual Connect Manager Command Line Interface:
Telnet into the Virtual Connect Manager using an SSH connection such as SSH
1.
Administrator@
2. To determine the username of the external manager account, enter show external manager
in the Virtual Connect Manager Command User Interface. The status of the external manager name
appears.
xxx.xxx.xxx.xxx
, where
xxx.xxx.xxx.xxx
is the VC Domain IP address.
For more information, see the
HP Virtual Connect Command Line Interface User Guide
Unable to add an unconfigured VC Domain to a VC Domain Group
If you are unable to add an unconfigured server to a VC Domain Group, verify that the VC Domain meets
the requirements for adding a VC Domain to a VC Domain Group. For more information, see Requirements
for adding a VC Domain to a VC Domain Group.
VC Domain displays Missing External Manager lock status
If the VC Domain displays a status of Missing External Manager lock icon, the external manager lock has
either been suspended or removed.
To correct this issue, remove the VC Domain from VC Domain Group, break the external manager lock and
release these MAC and WWN address ranges as follows:
1. Telnet in to the Virtual Connect Manager using an SSH connection such as
SSH Administrator@
2. To determine the username of the external manager account, from the Virtual Connect Manager command
prompt, enter show external manager. For this example, assume the username returned was xyz.
3. To disable the account, from the Virtual Connect Manager command prompt, enter set
external-manager Username=xyz Enabled=false.
4. To remove the account, from the Virtual Connect Manager command prompt, enter remove
external-manager Username=xyz.
5. Release the VC Domain from VCEM control. From the Virtual Connect Manager command prompt, enter
the MAC address type and the ranges of MAC and WWN addresses for the Virtual Connect Manager
to use. From the Virtual Connect Manager command prompt, enter the following:
set domain mactype=<Factory-Default/User-Defined> MacStart=<> MacEnd=<>
wwnType=<Factory-Default/User-Defined> WwnStart=<> WwnEnd=<>
xxx.xxx.xxx.xxx
, where
xxx.xxx.xxx.xxx
is the VC Domain IP address.
.
For more information, see the
HP Virtual Connect Manager Command Line Interface User Guide
VC Domain displays Configuration Mismatch status
If the VCEM data does not match the data from the VC Domain, then the Configuration Mismatch icon
appears. This might happen when either the user suspends the external manager lock and then modifies the
VC Domain, or adds or removes VC Modules from rear-enclosure interconnect bays.
80 Troubleshooting Virtual Connect Enterprise Manager
.
Page 81

To correct this issue:
1. Remove the VC Domain from the VC Domain Group.
2. Add the VC Domain to the same VC Domain Group again.
VC Domain displays Connectivity failure status
The Connectivity failure icon might appear if any of the following occur:
• Connection timeout, network problems, VC-Enet Modules physically not available, or enclosure problem
• VC Manager failover is taking place
• VC Domain firmware update is in progress
• VC-Enet module IP address was changed either using EBIPA configuration on Onboard Administrator
or using DHCP server. VCEM is unable to detect that the VC Domain IP changed and subsequent VCEM
operations continue trying to connect to the old VC Domain IP address and the operation will fail.
To correct this issue, perform any of the following:
• Ethernet VC Modules are not physically available anymore or there is a connection timeout or network
problems between VCEM and VC Ethernet modules.
To correct this issue, verify the Ethernet VC Modules are still available and that there are no network
related issues with the Virtual Connect Manager. From the command line at the Virtual Connect Enterprise
Manager server, ping the VC Domain IP.
For information on enclosure problems, see Enclosure has a hardware failure and must be replaced.
• In a redundant environment, the failover between active and standby Virtual Connect module is taking
place.
To correct this issue, verify failover between the active and standby Virtual Connect module is taking
place, wait a few minutes until the failover completes, and then try again. Log into the Virtual Connect
Manager (https://<VCDomain_IP>). A status of Active Virtual Connect Manager not at this IP address
might appear. You must also rediscover the Onboard Administrator related to this VC Domain again
by selecting HP SIM menu Options→Identify System or Options→Discovery.
• Verify firmware update is in progress and wait a few minutes until update is completed. Log into the
Virtual Connect Manager (https://<VCDomain_IP>), and then to verify the VC Domain firmware status,
click Domain Settings→Firmware Management.
• Remove the VC Domain from VC Domain Group, run the HP SIM discovery task to identify the new VC
Domain IP address, break the external manager lock, and then release these MAC and WWN address
ranges as follows:
1. Telnet into the Virtual Connect Manager using an SSH connection such as
SSH Administrator@
2. To determine the username of the external manager account, from the Virtual Connect Manager
command prompt, enter show external manager. For this example, assume the username
returned was xyz.
3. To disable the account, from the Virtual Connect Manager command prompt, enter set
external-manager Username=xyz Enabled=false.
4. To remove the account, from the Virtual Connect Manager command prompt, enter remove
external-manager Username=xyz.
Release the VC Domain from VCEM control. From the Virtual Connect Manager command prompt,
enter the MAC address type and the ranges of MAC and WWN addresses for the Virtual Connect
Manager to use, and then enter the following command:
set domain mactype=<Factory-Default/User-Defined> MacStart=<> MacEnd=<>
wwnType=<Factory-Default/User-Defined> WwnStart=<> WwnEnd=<>
xxx.xxx.xxx.xxx
, where
xxx.xxx.xxx.xxx
is the VC Domain IP address.
Troubleshooting 81
Page 82

Operation fails to perform in the group and VC Domain Group is under updating process error message appears
VCEM cannot perform any operations related to VC Domains in a VC Domain Group which has the
Configuration Update not completed icon because of any of the following:
• Update configuration process has not completed by clicking OK or Cancel
• Update configuration job is still running
• Update configuration job fails
To correct this issue:
• Click the VC Domain Groups tab, select the VC Domain Group, and then click Update Configuration.
Click OK or Cancel.
• Verify the update configuration job is running. If so, wait until the update configuration job completes.
• If the configuration job failed, click the VC Domain Groups tab, select the VC Domain Group, and
then click Update Configuration. Fix the problem with the VC Domain, and then to update the
configuration, click OK, or to revert back to the original VC Domain configuration, click Cancel. Wait
until the update configuration job has completed with a status of success.
Operation fails to perform in the VC Domain Group under Maintenance status
VCEM cannot perform any operations related to VC Domains which has Maintenance icon because of any
of the following:
• VC Domain Maintenance process has not completed by clicking Disable VC Domain Maintenance.
• VC Domain Maintenance job is still running
• VC Domain Maintenance job fails
To correct this issue:
1. Click the VC Domains tab, select the VC Domain, and then click VC Domain Maintenance. Click
Disable VC Domain Maintenance.
2. Verify the VC Domain maintenance job is running. If so, wait until the maintenance job completes.
3. If the maintenance job failed, click the VC Domains tab, select the VC Domain, and then click the Go
to VC Domain Manager hyperlink. Fix the problem with the VC Domain configuration, and then to
complete the maintenance operation, click Disable VC Domain Management. Wait until the
maintenance job has completed with a status of success.
Remove from VC Domain Group job is successful but with errors
Occasionally, when successfully performing a remove from VC Domain Group job, an error might appear
in the job detail. The error is related to VCEM being unable to:
• Release control over the MAC and WWN address pools because either VCEM cannot communicate
to the VC Domain or the external manager lock is removed.
• Remove external manager which is caused by the external manager lock being removed or suspended.
To correct the issue related to release control of MAC and WWN address pools, release the MAC and
WWN ranges by entering the following information:
1. Telnet into the Virtual Connect Manager using an SSH connection such as
SSH Administrator@
2. To determine the username of the external manager account, from the Virtual Connect Manager command
prompt, enter show external manager. For this example, assume the username returned was xyz.
3. To disable the account, from the Virtual Connect Manager command prompt, enter set
external-manager Username=xyz Enabled=false.
xxx.xxx.xxx.xxx
, where
xxx.xxx.xxx.xxx
is the VC Domain IP address.
82 Troubleshooting Virtual Connect Enterprise Manager
Page 83

4. To remove the account, from the Virtual Connect Manager command prompt, enter remove
external-manager Username=xyz.
5. Release the VC Domain from VCEM control. From the Virtual Connect Manager command prompt, enter
the MAC address type and the ranges of MAC and WWN addresses for the Virtual Connect Manager
to use, and then enter the following command:
set domain mactype=<Factory-Default/User-Defined> MacStart=<> MacEnd=<>
wwnType=<Factory-Default/User-Defined> WwnStart=<> WwnEnd=<>
To correct the issue related to removal of external manager, perform the following tasks:
1. Telenet in to the Virtual Connect Manager using an SSH connection such as SSH
Administrator@
2. To determine the username of the external manager account, enter show external manager in the
Virtual Connect Manager Command Line Interface. For this example, assume the username returned
was xyz.
3. To disable the account, enter set external-manager Username-xyz Enabled-false in the
Virtual Connect Manager Command Line Interface.
4. To remove the account, enter remove external-manager Username-xyz in the Virtual Connect
Manager Command User Interface.
xxx.xxx.xxx.xxx
, where
xxx.xxx.xxx.xxx
VC Domain displays Expired License status
If a VC Domain has an Expired License icon, perform the following:
1. License the enclosure with a Flexible Quantity License (FQL) VCEM license. For information on purchasing
licenses, see the Virtual Connect Enterprise Manager QuickSpecs at http://www.hp.com/go/vcem.
2. Click the VC Domain tab.
3. Select the VC Domain, and then click License.
4. Click Add Key.
5. Enter a valid FQL license key, and then click OK.
6. Click Apply License.
7. Perform the failed operation again.
is the VC Domain IP address.
Error on database operation occurs
Errors might occur during database operations if:
• VCEM tables, such as Database Administrator deleted some VCEM tables, are missing.
• HP SIM database is not running.
To correct this issue:
1. If VCEM tables are missing, then you must restore the database backup. For more information, see
Backing up and restoring VCEM.
2. Check the HP SIM database server status:
• If the database server is remote, then log in the database server.
• In Windows taskbar, check if the Microsoft SQL or MSDE service is running. A red status means
they are not running.
• Right-click the status, and then select Start.
3. If this issue still occurs, then uninstall and install VCEM again.
Errors occur while loading VCEM pages
If errors occur while loading VCEM pages, then the HP SIM service is most likely down. To correct this issue:
1. Check if HP SIM service is up and running.
2. Select Start→Control Panel→Administrative Tools→Services.
3. Check the HP Systems Insight Manager service status.
4. If the service is not running, right-click, and then select Start.
Troubleshooting 83
Page 84

Failed to execute VCEM operation because VC firmware not supported
If the VC firmware version you have is not supported, then VCEM operations might fail to execute. For more
information about supported Virtual Connect firmware, see http://www.hp.com/go/vcem.
To correct this issue, related to the VC firmware version not supported, perform the following steps and
execute the VCEM operation again:
• Update VC firmware using the Virtual Connect Manager user interface.
a. Access the VC Manager user interface.
b. Using the VC Domain account with full credentials, log in to the VC Domain.
c. From the left panel, click Managing Firmware, click Upload, and then enter the firmware file.
d. Click Activate.
To correct this issue, in cases where the VC Domain is under VCEM Management:
1. If VC Domain is under VCEM management, you can either:
• Remove the VC Domain from VC Domain group.
• Enable VC Domain Maintenance. For more information, see the "Making changes to a VC Domain
in VC Domain Maintenance" in Making changes to a VC Domain in VC Domain Maintenance.
2. Update VC Firmware using the Virtual Connect Manager user interface.
a. Access the VC Manager user interface.
b. Using the VC Domain account with full credentials, log in to the VC Domain.
c. From the left panel, click Managing Firmware, click Upload, and then enter the firmware file.
d. Click Activate.
3. In VCEM, add the VC Domain to the VC Domain Group. If the VC Domain is already under VCEM
management then return to VC Domain Maintenance page and disable VC Domain maintenance.
Creating a profile or adding a VC Domain to a VC Domain Group fails
Attempting to create a profile or adding a VC Domain to a VC Domain Group might fail if any of the following
occur:
• Not enough free MAC or WWN addresses
• Some MAC or WWN addresses are already being used by another server profile
• The MAC or WWN addresses in use by the VC Domain do not exist in VCEM
To correct this issue:
1. Verify VCEM has enough free addresses.
2. Verify there are no MAC or WWN address conflicts for the VC Domain to be added to the VC Domain
Group.
3. Create a MAC or WWN custom range, and then verify that this range contains the MAC or WWN
addresses from the server profiles defined in the VC Domain to be managed by VCEM.
4. Perform the operation again.
Uninstalling VCEM
If there is one or more VC Domains that are being managed, then VCEM uninstall does not proceed. In this
case, the VCEM uninstaller fails and a button appears in HP Insight Control Management. You can click the
button to open an error log that instructs you of the corrective action to take.
To uninstall VCEM:
• Select Start→All Programs→Insight Control Management→Uninstall HP Insight Control
Management.
NOTE: Depending on your operating system, the following menu options might slightly vary.
• From the Control Panel, double-click Add or Remove Programs, click Insight Control Management,
and then click Remove.
84 Troubleshooting Virtual Connect Enterprise Manager
Page 85

IMPORTANT: The uninstall operation does not remove a VCEM folder from installation directory, such
as C:\Program Files\HP\Virtual Connect Enterprise Manager\. The folder is empty and no system
damage or inability to reinstall or upgrade VCEM again in the future occurs.
Backing up and restoring VCEM
In the event of catastrophic and complete VCEM failure, all server blades continue to operate, and the
integrity of the server application and data are not compromised.
VCEM can be restored to an operational state after complete loss of the VCEM Application or Database.
While it is possible to restore VCEM to its state before the loss, minor or major configuration loss might
occur, depending on the availability of a database backup. If no database backup is available, then a large
amount of information can be reconstructed from the contents of the Virtual Connect modules.
It is important that you understand what information is stored in the database, and can be lost without proper
backup practices.
Figure 12-1 Backing up and restoring VCEM
The Network and SAN Configuration and assigned Server Profiles can be recovered from the Virtual Connect
modules. Unassigned Server Profiles, the list of Authorized VC Domains, VC Domain Group definitions, and
MAC and WWN address exclusions are stored only on the Management Server.
For more information on performing backups and restoring VCEM, see “Backing up and restoring HP Systems
Insight Manager 5.1 data files in a Windows environment” at http://h20000.www2.hp.com/bc/docs/
support/SupportManual/c00809568/c00809568.pdf.
Edit profile does not display all the Fibre Channel SAN connections
The Fibre Channel SAN connections might not display when editing a profile. This is caused by the Virtual
Connect FC modules being added after the VC Domain has been configured and profiles are created.
To correct this issue, edit the server profile and perform the following steps:
1. Click the Server Profiles tab.
2. Select the Server Profile, and click Edit.
3. Click Add FC Connection.
4. Click OK. The Virtual Connect Enterprise Manager is executing the request message
appears.
5. Click OK. The Jobs page appears, enabling you to monitor job progress.
Unable to change the MAC/WWN range in Virtual Connect Manager
After removing the VC Domain from a group, you might not be able to modify the MAC/WWN range in
Virtual Connect Manager after removing all profiles.
To correct the issue, reset the Virtual Connect Module. From the Virtual Connect Manager user interface,
select Tools→Reset Virtual Connect Manager.
Troubleshooting 85
Page 86

VCEM database is inaccessible or unretrievable with no backup, or VCEM file systems are corrupt with no backup
Without a backup, the VCEM cannot restore to the original point. But the network and SAN configuration
and assigned server profiles can be recovered from the Virtual Connect modules. Reinstall the VCEM to a
fresh system, ensuring that the backup is well-prepared on VCEM and its database on the new VCEM. For
more information, see Backing up and restoring VCEM.
To correct this issue:
1. Install VCEM 1.10 in a fresh machine.
2. Break the external manager lock in all VC Domains that were previously managed by VCEM 1.10. To
remove the external manager account:
a. Telnet into the Virtual Connect Manager using an SSH connection such as
SSH Administrator@
b. To determine the username of the external manager account, from the Virtual Connect Manager
command prompt, enter show external manager. For this example, assume the username
returned was xyz.
c. To disable the account, from the Virtual Connect Manager command prompt, enter set
external-manager Username=xyz Enabled=false.
d. To remove the account, from the Virtual Connect Manager command prompt, enter remove
external-manager Username=xyz.
3. Release the VC Domain from VCEM control. From the Virtual Connect Manager command prompt, enter
the MAC address type and the ranges of MAC and WWN addresses for the Virtual Connect Manager
to use, and then enter the following command:
set domain mactype=<Factory-Default/User-Defined> MacStart=<> MacEnd=<>
wwnType=<Factory-Default/User-Defined> WwnStart=<> WwnEnd=<>
xxx.xxx.xxx.xxx
, where
xxx.xxx.xxx.xxx
is the VC Domain IP address.
4. In HP SIM, perform a new discovery.
5. License the VC Domains with the same key.
NOTE: If the previous configuration used custom MAC and/or WWN ranges, then add the same
ranges to the new setup before proceeding.
6. Create new VC Domain Groups mirroring the pre-fail configuration informing the currently working
credentials.
NOTE: Unassigned Server Profiles and external MAC and WWN addresses are not recovered with
this procedure.
Enclosure has a hardware failure and must be replaced
An enclosure that is being managed by VCEM indicates a hardware failure that requires replacement.
When a VC-Enet module is removed from an enclosure and placed in another, its settings are automatically
cleared and all domain configuration is lost, including any existing server profiles.
To correct this issue:
1. From the VCEM home page, click the VC Domains tab.
2. Select the VC Domain that has an enclosure problem.
3. Click Remove from VC Domain Group. Wait for the job to complete successfully.
4. Connect the new enclosure in the network. Verify the network and SAN connections wired to the new
enclosure are the same as the failed one.
5. From the Interconnect Bays of the failed enclosure, remove the VC/FC modules and place them in the
same rear-panel positions of the Interconnect Bays in the new enclosure.
6. From the failed enclosure, remove all blades and place them in the same front-panel positions in the
new enclosure.
7. To configure the VC Domain, see the
HP Virtual Connect for c-Class BladeSystem User Guide
.
86 Troubleshooting Virtual Connect Enterprise Manager
Page 87

8. Access the Onboard Administrator web interface for the enclosure to verify that the VC Domain link in
the bottom left correctly points to the VC Domain Manager IP address.
9. To find the new enclosure, run an HP SIM discovery against the Onboard Administrator IP address.
10. From the VCEM Home page, click the VC Domains tab.
11. Select the newly discovered VC Domain, and then click Add to a VC Domain Group. Wait for the job
to complete successfully.
VCEM is inaccessible because HP SIM was uninstalled
To uninstall VCEM, select Start→Programs→HP Insight Control Management→Uninstall HP Insight
Control Management. However, without HP SIM, the VCEM cannot be accessed, and all VC Domains that
are managed by VCEM continue externally managed.
To correct this issue:
1. Break the external manager lock in all VC Domains that are managed by VCEM 1.10. To remove the
external manager account:
a. Telnet in to the Virtual Connect Manager using an SSH connection such as
SSH Administrator@
b. To determine the username of the external manager account, from the Virtual Connect Manager
command prompt, enter show external manager. For this example, assume the username
returned was xyz.
c. To disable the account, from the Virtual Connect Manager command prompt, enter set
external-manager Username=xyz Enabled=false.
d. To remove the account, from the Virtual Connect Manager command prompt, enter remove
external-manager Username=xyz.
2. Release the VC Domain from VCEM control. From the Virtual Connect Manager command prompt, enter
the MAC address type and the ranges of MAC and WWN addresses for the Virtual Connect Manager
to use, and then enter the following command:
set domain mactype=<Factory-Default/User-Defined> MacStart=<> MacEnd=<>
wwnType=<Factory-Default/User-Defined> WwnStart=<> WwnEnd=<>
xxx.xxx.xxx.xxx
, where
xxx.xxx.xxx.xxx
is the VC Domain IP address.
An HP SIM-initiated custom tool calling the VCEM Failover CLI completed with an error stating The system cannot find the path specified
This message indicates that the path to the VCEM CLI is set incorrectly. VCEM attempts to set the
VCEM_INSTALL environment variable during installation. This variable is used during execution of the custom
tool. To resolve the issue, identify the path where the VCEM CLI resides and then edit the tool to the correct
path. Replace "%%VCEM_INSTALL%%\cli\vcem" with the full path to the VCEM command for both the
IP address and the hostname initiated custom tools.
Failover fails to initiate with an ERROR (30) - Could not initiate failover; nested exception is: java.net.SocketTimeoutException: Read timed out
This error can occur when the CLI is unable to communicate to the VCEM SOAP interface. This inability to
communicate can occur when an IP address or hostname lookup takes more than a few minutes to return or
when there is a networking issue on the VCEM server. To resolve this issue, verify that the HP SIM system is
running properly by logging in and that the IP address or hostname for the source system exists. If the IP
address or hostname does not exist, perform an HP SIM discovery.
VC Profile Failover fails during Onboard Administrator replacement
If an enclosure has two Onboard Administrators with redundancy and one fails, then the redundant Onboard
Administrator might take several minutes to take over. The VC Profile Failover operation fails when source
or spare bays are associated to an enclosure while the redundant Onboard Administrator is taking place.
To resolve this issue:
Troubleshooting 87
Page 88

1. Wait until the Onboard Administrator has failed over. Perform an HP SIM discovery to rediscover the
new Onboard Administrator IP address. If the address is not rediscovered, see the
c-Class User Guide
2. If you initiated VC Profile Failover through the VCEM GUI:
a. From the VCEM home page, click the Profiles tab.
b. Select the server profile to failover and click VC Profile Failover. The Virtual Connect
Enterprise Manager is executing the request message appears.
c. Click OK. The Jobs page appears, enabling you to monitor job progress.
.
HP BladeSystem
VCEM cannot power down ProLiant server model BL465 G1
All VCEM operations that explicitly power down the server (such as VC Profile Failover, Momentary Press
or Press and Hold) might not work well for ProLiant server model BL465c G1 unless the Onboard Administrator
firmware version is 2.10. If you are managing enclosures that contain ProLiant server model BL465c G1,
verify that you use Onboard Administrator firmware version 2.10.
VC Profile Failover CLI fails with Internal VCEM Error Message: VCEM failed to resolve the note [{0}] message
This error message indicates that the system IP address or hostname is not in the HP SIM database. To resolve
this issue, verify that the system is present in HP SIM after a server discovery and that the DNS operates
correctly within the environment.
Cannot upgrade VCEM because one or more VC Domains are under VCEM control
This error occurs because VCEM 1.10 simplifies domain management by omitting the Authorized state. As
a result, any domain in the Authorized state must be moved into a VC Domain Group, or it must be in the
licensed or unlicensed state. To resolve this issue, log into the VCEM 1.00 system and remove authorization
from all free VC Domains, or create appropriate VC Domain Groups for the authorized domains. You can
then proceed with the upgrade without receiving this error. Restart the VCEM installation process.
88 Troubleshooting Virtual Connect Enterprise Manager
Page 89

13 Appendix HP services and technical support
HP offers a number of software support services, many of which are provided to our customers at no additional
charge.
• Software Technical Support and Update Service—VCEM includes one year of 24 x 7 HP Software
Technical Support and Update Service. This service provides access to HP technical resources for
assistance in resolving software implementation or operations problems. The service also provides
access to software updates and reference manuals either in electronic form or on physical media as
they are made available from HP. (Customers who purchase an electronic license to use are eligible
for electronic updates only.) With this service, customers benefit from expedited problem resolution as
well as proactive notification and delivery of software updates. For more information about this service,
see http://www.hp.com/services/insight.
Registration for Software Technical Support and Update Service:
There are two methods for registering:
• If you received a license entitlement certificate, automated registration for this service will take
place upon online redemption of the license certificate/key.
• If the license information you received for your product instructs you to register for Software
Technical Support and Update Service, follow the instructions so that you will be eligible for
telephone support and product updates.
How to Use Your Software Technical Support and Update Service:
Once registered, you will receive a service contract in the mail containing the Customer Service phone
number and your Service Agreement Identifier (SAID). You will need your SAID when calling for technical
support. Using your SAID, you can also go to the Software Update Manager (SUM) web page to view
your contract online and elect electronic delivery for product updates.
• Warranty—HP will replace defective delivery media for a period of 90 days from the date of purchase.
This warranty applies to VCEM and all Insight Control Management, HP Systems Insight Manager, and
ProLiant Essentials products.
• Join the discussion—The HP Support Forum is a community-based, user-supported tool for HP customers
to participate in discussions amongst the customer community about HP products. See the “Management
Software and System Tools” area.
• Software and Drivers download pages—These pages provide the latest software and drivers for your
HP products.
• Management Security (http://www.hp.com/servers/manage/security)—HP is proactive in its approach
to the quality and security of all its management software. Be sure to check this website often for the
latest down loadable security updates.
HP Worldwide Customer Service contact numbers are available at
http://www.hp.com/country/us/en/wwcontact.html.
HP contact information
For the name of the nearest HP authorized reseller:
• In the United States, see the HP U.S. service locator at http://www.hp.com/service_locator.
• In other locations, see Contact HP Worldwide at http://welcome.hp.com/country/us/en/wwcontact.html.
For HP technical support:
• In the United States, for contact options see Contact HP United States at
http://welcome.hp.com/country/us/en/contact_us.html.
• To contact HP by phone, call 1-800-HP-INVENT (1-800-474-6836). This service is available 24 hours
a day, 7 days a week. For continuous quality improvement, calls may be recorded or monitored.
• In other locations, see Contact HP Worldwide at http://welcome.hp.com/country/us/en/wwcontact.html.
HP contact information 89
Page 90

90
Page 91

Glossary
bays A device bay where the server blade is connected. HP BladeSystem c7000 Enclosure has a total
of 16 device bays and HP BladeSystem c3000 Enclosure has a total of 8 device bays.
blade server A server that is located in a rack or enclosure.
See also
central
management
server (CMS)
collections The method for grouping system or event searches.
container A rack or an enclosure is considered a container.
A system in the management domain that executes the HP Systems Insight Manager software. All
central operations within HP Systems Insight Manager are initiated from this system.
See also
critical status A state generated when HP Systems Insight Manager can no longer communicate to a managed
system.
Desktop
Management
Interface (DMI)
discovery A feature within a management application that finds and identifies network objects. In HP
domain groups Logical collection of domains with the same netwok and storage configuration.
Domain Name
Service (DNS)
domains A VC Domain includes a single HP c-Class BladeSystem enclosure.
enclosure A physical container for a set of blades servers. It consists of a backplane that routes power and
event Information sent to certain users that something in the managed environment has changed. Events
An industry standard protocol, primarily used in client management, established by the DMTF.
DMI provides an efficient means of reporting client system problems. DMI-compliant computers
can send status information to a central management system over a network.
management applications, discovery finds and identifies all the HP systems within a specified
network range.
A service that translates domain names into IP addresses.
communication signals and additional hardware for cabling and thermal issues. It also hosts the
CPU or server power supplies.
are generated from SNMP traps and are preconfigured in this release. HP Systems Insight Manager
receives a trap when an important event occurs. Events are defined as:
• Informational. Events of this type require no attention and are provided as useful
enclosure, racks.
enclosure, racks.
information.
• Normal. Events of this type indicate that this event is not a problem.
• Minor. Events of this type indicate a warning condition that can escalate into a more
serious problem.
• Major. Events of this type indicate an impending failure.
• Critical. Events of this type indicate a failure and signal the need for immediate attention.
exclusion range Exclusion ranges are used to set aside addresses that might be in use for other purposes within
your data center. Excluded address ranges are not assigned for use by VCEM.
external Address in use by server profiles in a VC Domain that was released back to VC Manager control
and are no longer managed by VCEM.
external manager
or external
manager lock
external port The Ethernet connectors (10GBASE-CX4 and RJ45) on the faceplate of the VC-Enet module labeled
free Address available for VCEM allocation.
full-configuration-rights user
A Virtual Connect user account created and exclusively used by Virtual Connect Enterprise
Manager.
as ports 1-8, X1, and X2.
91
Page 92

A user who is automatically authorized for the All Tools toolbox on all systems, including the
CMS. This type of user has been given special privileges to administer the HP Systems Insight
Manager software.
hardware status The operating state of SNMP-based systems. A hardware status is determined by polling SNMP
information from the system. Status is defined as:
• Critical. HP Systems Insight Manager can no longer communicate with the system. The
system was previously discovered, but cannot be pinged. The system might be down, powered
off, or no longer accessible on the network because of network problems.
• Major. A problem exists.
• Minor. The system is functioning but with errors.
• Normal. The system is functioning correctly.
• Unknown. HP Systems Insight Manager is not able to obtain management information
about the system.
▲ Disabled
HP Systems Insight
Manager database
The database that stores vital information about HP Systems Insight Manager, including users,
systems, and toolboxes.
(database)
identification An aspect of the discovery process that identifies the management protocol and type of system.
in use Address currently allocated by a server profile managed by VCEM.
Internet Protocol
(IP)
Specifies the format of datagrams (packets) and the addressing scheme on a network. Most
networks combine IP with Transmission Control Protocol (TCP), which establishes a virtual
connection between a destination and a source.
Major status Aggregate status information collected from the system that indicates one or more of the monitored
subsystems are not operating properly which is impacting the system. Action should be taken
immediately.
Minor status Aggregate status information collected from the system that indicates one or more of the monitored
subsystems are not operating properly which is impacting the system. Action should be taken as
soon as possible to prevent further failure.
Onboard
Administrator
The Onboard Administrator is the central point for controlling an entire c-Class rack. It offers
configuration, power, and administrative control over the rack, and its associated blades (Compute
Servers), blade management processors (iLOs), network switches (depending on the models of
switches used) and storage components (such as SAN or SATA). The Onboard Administrator is
a single management processor, with shared resources to an optional backup twin processor for
failover.
profiles Virtual Connect server profile is a logical grouping of attributes related to server connectivity that
can be assigned to a server blade.
racks A set of components cabled together to communicate between themselves. A rack is a container
for an enclosure.
reclaim external Returns the external address to VCEM allocation.
server blade Typically a very dense server system containing microprocessors, memory, and network connections
that can be easily inserted into a rack-mountable enclosure to share power supplies, fans, switches,
and other components with other server blades. Server blades tend to be more cost-efficient,
faster to deploy, and easier to adapt to growth and change than traditional rack-mounted or
tower servers.
See also
enclosure, racks.
shared uplink port An Ethernet uplink port that carries the traffic for multiple Virtual Connect networks. Each associated
Virtual Connect network is mapped to a specific Virtual Local Area Network (VLAN) on the
external connection and appropriate VLAN tags are removed or added as Ethernet packets enter
or leave the VC Domain.
92 Glossary
Page 93

shared uplink port
set
A set of Ethernet uplinks that are used together to provide improved throughput and availability
to a group of associated Virtual Connect networks. Each associated Virtual Connect network is
mapped to a specific VLAN on the external connection and appropriate VLAN tags are removed
or added as Ethernet packets enter or leave the VC Domain.
Simple Network
Management
Protocol (SNMP)
One of the management protocols supported by HP Systems Insight Manager. Traditional
management protocol used extensively by networking systems and most servers. MIB-2 is the
standard information available consistently across all vendors.
Smart Link A feature that, when enabled, configures a Virtual Connect network so that if all external uplinks
lose link to external switches, Virtual Connect will drop the Ethernet link on all local server blade
Ethernet ports connected to that network.
stacking port A VC-Enet module external port used to connect to other VC-Enet modules within an active VC
Domain. Stacking ports are automatically identified by the VC-Enet modules. The port number
(port ID) is lit amber.
system Nodes on the network that communicate through TCP/IP or IPX. To manage a system, some type
of management protocol (for example, SNMP, DMI, or WBEM) must be present on the system.
Examples of systems include servers, workstations, desktops, portables, routers, switches, hubs,
and gateways.
uncleared event
status
Events that have a Critical, Major, Minor, Normal, or Informational severity.
Critical. A failure has occurred, and immediate attention is required.•
• Major. A failure is impending.
• Minor. A warning condition exists that can escalate into a more serious problem.
• Normal. These events are not a problem.
• Informational. No attention require. This status is provided as useful information
unknown status HP Systems Insight Manager is not able to obtain management information about the system
using SNMP or DMI. Although no management instrumentation information is available, the
system can be pinged. It might have an invalid community string or security setting.
uplink port An external port that is configured within Virtual Connect for use as a connection to external
networking equipment. Uplink ports are defined within Virtual Connect by the enclosure name,
interconnect bay containing the module, and the part number. The port number (port ID) for uplink
ports is lit green.
uplink port set A set of uplinks that are used together to provide improved throughput and availability for a
single Virtual Connect network connection to external networking equipment.
user A network user with a valid login on the CMS that has been added to HP Systems Insight Manager.
VC Domain Group
configuration
A Virtual Connect domain configuration (including network definition, storage definition, MAC
address setting, and WWN address setting) applied to all the Virtual Connect modules in one
VC Domain group. It requires these Virtual Connect modules managed by the VC Domain Group
to have identical hardware configuration.
Version Control
Agent (VCA)
An agent that is installed on a server to enable you to see the HP software installed on that server.
The VCA can be configured to point to a VCRM agent, enabling easy version comparison and
software update from the repository.
Virtual Connect
Enterprise
Manager (VCEM)
Virtual Connect
VCEM simplifies the management of multiple HP BladeSystem enclosures that use Virtual Connect
to control LAN and Storage Area Network (SAN) connectivity, helping organizations increase
productivity, respond more quickly to business demands, and significantly reduce operating costs.
The firmware embedded software provided with each Virtual Connect module.
Manager (VCM)
Virtual Connect
server profile
A logical grouping of attributes related to server connectivity that can be assigned to a server
blade. A server profile can be assigned to any server blade within the VC Domain.
93
Page 94

94
Page 95

Index
A
application requirements for installation, 20
B
bays
assigning a profile from a key, 58
performing a VC Profile Failover, 59
powering down a bay, 58
unassigning a profile from a key, 59
D
database
requirements for installation, 20
disk space requirements for installation, 20
DVD drive requirements for installation, 20
F
file structure requirements for installation, 20
H
hardware installation requirements, 20
HP Virtual Connect
managing, 15
technology, 14
HP Virtual Connect Enterprise Manager
architectural overview, 14
features and benefits, 13
platform support, 14
post-installation configuration tasks, 34
setup summary, 17
VCEM operations, 15
I
installing HP Insight Control Management, 21
P
performing an integrated installation, 21
processor requirements for installation, 20
product installation, 21
profiles
assigning a profile, 53
copying and assigning a profile to a bay, 53
creating a profile, 52
deleting a profile, 53
editing a profile, 53
moving a profile, 54
performing a VC Profile Failover, 54
unassigning a profile, 53
R
requirements
application, 20
database, 20
disk space, 20
DVD, 20
file structure, 20
hardware, 20
memory, 20
operating system, 20
processor, 20
server, 20
software, 20
S
server
requirements for installation, 20
services requirements for installation, 20
software
installation requirements, 20
J
jobs
deleting jobs, 70
Job status message window, 69
reviewing job details, 70
M
MAC address
adding custom MAC address ranges, 65
creating MAC exclusion ranges, 64
deleting MAC exclusion ranges, 64
editing custom MAC address ranges, 65
reclaiming external MAC addresses, 64
removing custom MAC address ranges, 65
tracking individual MAC addresses, 63
memory requirements for installation, 20
O
operating system
requirements for installation, 20
T
troubleshooting
A Job appears with Failed status, 79
An HP SIM-initiated custom tool calling the VCEM
Failover CLI completed with an error stating The system
cannot find the path specified, 87
backing up and restoring VCEM, 85
Cannot upgrade VCEM because one or more VC
Domains are under VCEM control, 88
Creating a profile or adding a VC Domain to a VC
Domain Group fails, 84
Edit profile does not display all the Fibre Channel SAN
connections, 85
Enclosure has a hardware failure and must be replaced,
86
Enclosure has two Onboard Administrators, and one
fails, 79
Error on database operation occurs, 83
Errors occur while loading VCEM pages, 83
95
Page 96

Failed to execute VCEM operation because VC firmware
not supported, 84
Failover fails to initiate with an ERROR (30) - Could not
initiate failover; nested exception is:
java.net.SocketTimeoutException: Read timed out, 87
missing enclosure model, 79
Operation fails to perform in the group and VC Domain
Group is under updating process error message
appears, 82
Operation fails to perform in the VC Domain Group
under Maintenance status, 82
Remove from VC Domain Group job is successful but
with errors, 82
Unable to add an unconfigured VC Domain to a VC
Domain Group, 80
Unable to add VC Domain to a VC Domain Group, 79
Unable to change the MAC/WWN range in Virtual
Connect Manager, 85
uninstalling VCEM, 84
VC Domain displays Configuration Mismatch status, 80
VC Domain displays Connectivity failure status, 81
VC Domain displays Expired License status, 83
VC Domain displays Missing External Manager lock
status, 80
VC Profile Failover CLI fails with Internal VCEM Error
Message: VCEM failed to resolve the note [{0}]
message, 88
VC Profile Failover fails during Onboard Administrator
replacement, 87
VCEM cannot power down ProLiant server model BL465
G1, 88
VCEM database is inaccessible or unretrievable with
no backup, or VCEM file systems are corrupt with no
backup, 86
VCEM is inaccessible because HP SIM was uninstalled,
87
VCEM is prompting for Onboard Administrator
credentials on a configured VC Domain, 79
WWN exclusion range displays a conflict message
even when there is no conflict, 79
list details for specified VCEM job, 76
performing VC Profile Failover on specified VC Domain
Bay Server, 75
show CLI Usage online help, 76
W
WWN address
adding custom WWN address ranges, 68
allocating WWN addresses, 67
creating WWN exclusion ranges, 66
deleting custom WWN address ranges, 68
deleting WWN exclusion ranges, 67
editing custom WWN address ranges, 68
reclaiming external WWN addresses, 67
tracking individual WWN addresses, 66
V
VC Domain Group
canceling a VC Domain Group configuration, 48
creating a VC Domain Group, 46
removing a VC Domain from a VC Domain Group, 48
updating a VC Domain Group configuration, 46
VC Domains
Adding a VC Domain to a VC Domain Group, 40
Creating a VC Domain Group, 40
Licensing an enclosure for VCEM, 40
Making changes to a VC Domain in VC Domain
Maintenance, 42
Removing a VC Domain from a VC Domain Group, 41
Requirements for adding a VC Domain to a VC Domain
Group, 38
VC Domain actions, 39
VC Profile Failover
CLI Exit/Error codes, 77
96 Index
 Loading...