

Page 1

User Guide
Page 2

Intellectual property notices
Recycling and disposal
© 2009–2011 Hewlett-Packard Development Company, L.P. The information contained herein
is subject to change without notice. Microsoft, Exchange ActiveSync, and Outlook are
trademarks of the Microsoft group of companies. Facebook is a registered trademark of
Facebook, Inc. Google, Gmail, Google Maps, and YouTube are trademarks of Google, Inc.
LinkedIn and the LinkedIn logo are registered trademarks of LinkedIn Corporation in the United
States and/or other countries. Yahoo! and Yahoo! Mail are registered trademarks of Yahoo! Inc.
Amazon, Amazon MP3, and the Amazon MP3 logo are trademarks of Amazon.com, Inc. or its
affiliates. Quickoffice is a registered trademark of Quickoffice, Inc. PDF View is provided by
Documents To Go
names are or may be trademarks of their respective owners. All screen images simulated.
Disclaimer and limitation of liability
Hewlett-Packard, Inc. and its suppliers assume no responsibility for any damage or loss
resulting from the use of this guide. Hewlett-Packard, Inc. and its suppliers assume no
responsibility for any loss or claims by third parties that may arise through the use of this
software. Hewlett-Packard, Inc. and its suppliers assume no responsibility for any damage or
loss caused by deletion of data as a result of malfunction, dead battery, or repairs. Be sure to
make backup copies of all important data on other media to protect against data loss.
Patent pending. This product also is licensed under United States patent 6,058,304.
Email, mobile number, and related information required for setup and activation. Actual speeds
may vary. Required data services sold separately; unlimited plan recommended and may be
required. Not all web content may be available.
Open Source License information
You can view the Open Source License terms on your smartphone. Tap the center of the
gesture area and then tap the Launcher icon. Swipe left until the PDF View icon appears. Tap
PDF View and then tap Open Source Information.pdf.
®
, a product of DataViz, Inc. (dataviz.com). All other brand and product
This symbol indicates that HP products should be recycled and not be disposed of in
unsorted municipal waste. HP products should be sent to a facility that properly
recycles electrical and electronic equipment. For information on environmental
programs visit hp.com/environment or recyclewirelessphones.com/.
As part of HP’s corporate commitment to be a good steward of the environment, we strive to
use environmentally friendly materials, reduce waste, and develop the highest standards in
electronics recycling.
v. 1.0
You can also view the file on your computer. Connect your smartphone to your computer with
the USB cable. On your smartphone, tap USB Drive. On your computer, locate and
double-click the removable drive named for your smartphone. To locate the drive, do the
following for your operating system:
• Windows Vista/Windows 7: Open Computer.
• Windows XP: Open My Computer.
• Mac: Open Finder.
• Linux (Ubuntu): The drive is displayed on the desktop.
• Other Linux distribution: The location of the drive may vary by system.
After you open the drive, double-click the file Open Source Information.pdf.
Page 3

Contents
Chapter 1 Welcome
8 Your HP Veer 4G
9What’s in the box?
10 Where can I learn more?
Chapter 2 Basics
14 Get to know your smartphone
18 Set up your smartphone
19 Charge the battery
21 Turn your smartphone on/off
23 Use gestures: tap, swipe, drag, flick, pinch
28 Update the HP webOS operating system
Chapter 3 Just Type
32 Just Type overview
32 Get in touch with a contact
33 Search the web
33 Find information in an application on your
smartphone
34 Create a new item such as a message or memo
35 Open an application
36 Repeat a recent search
36 Customize Just Type
Chapter 4 Work with applications
40 Open applications
41 Go up one level in an app (back gesture)
42 Use the menus
43 Enter and save information
48 Close applications
48 Delete applications
48 Manage applications in Card view
50 Manage applications in the Launcher
52 Manage online accounts
54 View and work with notifications
55 Create and work with favorites
Chapter 5 Copy files and sync your personal data
58 Copy files between your smartphone and your
computer
59 Overview: Get your personal data onto your
smartphone
61 Transfer data from an old phone
61 Export data from a desktop organizer on your
computer
62 Get data from an online account in the cloud
63 Sync your desktop organizer and your smartphone
Contents 3
Page 4

Chapter 6 Phone
Chapter 10 Web and wireless connections
66 Make calls
70 Receive calls
71 Use voicemail
71 What can I do during a call?
74 What’s my number?
75 View your call history
75 Work with favorites
77 Save a phone number to Contacts
77 Use a phone headset
79 Customize smartphone settings
83 Use SIM Toolkit
Chapter 7 Email, text, multimedia, and instant messaging
86 Email
98 Messaging: All messages in one application
101 Messaging: Text and multimedia messaging
104 Messaging: Instant messaging
Chapter 8 Contacts, Calendar, and other personal
information
110 Contacts
121 Calendar
128 Tasks
132 Memos
133 Clock
135 Calculator
135 Facebook
154 Wi-Fi
158 Palm mobile hotspot
161 VPN
163 Web
169 Location Services
170 Google Maps
171 AT&T Navigator
176 YPmobile
178 Bluetooth
®
wireless technology
Chapter 11 Documents
182 Quickoffice® mobile office software
185 PDF View
Chapter 12 HP webOS App Catalog and Software Manager
190 Browse applications in HP webOS App Catalog
191 Download a free application
191 Buy an application
193 Reinstall a deleted application
193 Set up a billing account
194 Update or delete a billing account
194 Manage applications with Software Manager
195 Update a downloaded application from a
notification
195 Manually check for application updates
Chapter 13 Preferences
Chapter 9 Photos, videos, and music
138 Camera
138 Photos
143 Videos
146 YouTube
147 Music
150 Amazon MP3
4Contents
198 Backup
202 Date & Time
203 Device Info
206 Exhibition
208 Regional Settings
209 Screen & Lock
211 Sounds & Ringtones
Page 5

Chapter 14 Troubleshooting
216 6Ts: Ways to get your HP Veer 4G working again
218 Palm profile
222 Battery
223 Screen and performance
225 Phone
226 Hands-free devices
227 Synchronization
229 Data connections
230 Email
231 Messaging
233 Wi-Fi
234 Web
235 Calendar and Contacts
238 Camera
238 Photos, Videos, and Music
239 Amazon MP3
239 HP webOS App Catalog
242 Transferring information to and from your computer
243 Backing up and restoring data
244 Updates
244 Transferring information from another HP webOS
phone
244 Making room on your smartphone
Glossary of Terms
Online accounts available for HP webOS
smartphones
Specifications
Regulatory and safety information
Index
Contents 5
Page 6

6Contents
Page 7

Welcome
Congratulations on the purchase of your HP Veer 4G.
In this chapter
8 Your HP Veer 4G
9 What’s in the box?
10 Where can I learn more?
Chapter 1 : Welcome 7
Page 8

Your HP Veer 4G
NOTE When referring to the company that makes your Veer, this document uses
both the terms HP and Palm. HP and Palm are the same company; the use of both
terms reflects company terminology.
In one compact and indispensable device, you now have all of the following:
• An advanced wireless smartphone running the HP webOS platform
• A full suite of organizer applications: Contacts, Calendar, Memos, and
Ta s k s
• High-speed data transfer with 4G, 3G, and GPRS/EDGE support
• Wi-Fi capability
• A 5-megapixel digital camera
• GPS functionality
• Integrated text, multimedia, and instant messaging (IM)
• Applications to view and manage Microsoft Office and Adobe PDF files
• HP webOS App Catalog, from which you can download applications
designed for your smartphone; select from an ever-expanding list of
applications
Your Veer puts HP webOS—a multitasking, gesture-based operating
system—inside a small, beautiful device with a keyboard that you can slide
out whenever you need it. Here are a few highlights of your new
smartphone.
Multitasking: You can have many applications open at once and easily
move among them. Go to the Launcher to open apps. See the lineup of your
open apps in Card view. Tap an app to bring it into the foreground and work
with it. For more information, see Open applications. You can also send
email or surf the web while on a call.
Just Type: Need to call Ed? Just slide out the keyboard and type ed. If he’s
listed in your Contacts, you can get his numbers from the search results. Tap
a number and you’ve made the call. Just Type works just as fast when you
need to search the web, find info in an application on your smartphone, start
an action such as creating an email message or memo, or update your
status on social networking sites such as Facebook or Twitter. For more
information, see Just Type.
The HP Synergy feature: The HP Synergy feature works in the background
to gather your information from the various online sources where you keep
it and then display that information in a single view on your smartphone.
You can access your info quickly without having to remember where you
stored it.
For example, suppose you have a Google account for personal email,
contacts, and calendar events, and an Exchange account for your corporate
email, contacts, and events. The Email, Contacts, and Calendar applications
on your Veer all provide a view in which you can see information from both
of those accounts in one place—but even though the information is brought
into one view, the sources of that information are kept separate. For more
information, read about linked contacts, layered calendars, and the single
inbox for your email in Contacts, Calendar, and Email.
Gestures: On your Veer, you make calls, move around, and manage your
applications and info by making simple gestures either on the touchscreen
or in the gesture area directly beneath the screen. For more information, see
Use gestures: tap, swipe, drag, flick, pinch. Carry the Quickstart Guide
(included in the box with your Veer) around with you for reference. Soon
you’ll know the most important gestures by heart.
8Chapter1:Welcome
NOTE See for the current list of online accounts that you can set up on your
smartphone and for information about the behavior of these accounts.
Thanks also to the Synergy feature, in the Messaging application, all your
conversations with the same person are grouped together in one chat-style
view. If you start an IM chat with Ed, for example, you can continue the
same conversation when Ed signs out of IM by sending him a text
message—and you can see it all in the same view. For more information, see
Messaging: All messages in one application.
Page 9

Sync: Your Veer gives you synchronization without a cable. You can sync
with online services so that you can store and sync your info in online
accounts. For more information, see Get data from an online account in the
cloud.
Yo ur Pa l m pr o f i l e : When you set up your smartphone, you create a Palm
profile by entering a valid email address. Your profile gives you an account in
which to create and store contacts and calendar events. It also gives you
access to services like automatic updates and automatic, frequent backups
of any of your info that is stored only on your smartphone and isn’t
synchronized with an online account (see What information is backed up?).
WARNING Please refer to Regulatory and safety information for information that
helps you safely use your smartphone. Failure to read and follow the important
safety information in this guide may result in property damage, serious bodily
injury, or death.
What’s in the box?
All of the following items are included in the smartphone box.
Hardware
• HP Veer 4G
• USB cable (charging and data transfer cable with magnetic connector)
• AC charger
• Standard lithium-ion battery (installed and nonremovable)
• 3.5mm headset adapter
DID YOU KNOW? The USB cable included with your smartphone (the one with
the magnetic connector on one end) is used both to charge your smartphone
battery (see Charge the battery) and to connect your smartphone to your
computer as a removable USB drive (see Copy files between your smartphone and
your computer). To simplify charging, you can purchase an HP Touchstone
charging dock (sold separately). You also need to purchase a compatible USB cable
if one is not included in the charging dock package—the charging cable for your
Veer is not compatible with a Touchstone charging dock.
Print material
• Quickstart Guide
• Limited Warranty
• General User Guide: Important Safety and Legal Information
Chapter 1 : Welcome 9
Page 10

Where can I learn more?
• On-device Help: Read short how-tos and watch animations on your new
smartphone.
• To view all Help: Open Help .
• To view Help topics for a single application: Open the application,
open the application menu, and tap Help.
10 Chapter 1 : Welcome
• Online start-up help: Visit palm.com/gettingstarted to view videos on
basic topics such as managing info, transferring data, and maximizing
battery life.
• Tools available from online support: Visit palm.com/support to access the
200+ page User Guide detailing every facet of your smartphone. On the
support site you can also edit your Palm profile, watch how-to animations,
and access a tool to help you export data from your desktop to your new
smartphone (the Data Transfer Assistant).
Page 11

• Peer-to-peer support: Visit forums.palm.com to share your experiences
and get help and advice from fellow customers.
• Self-paced learning guides: Visit learning.palm.com to take a free online
tutorial about your new smartphone. Available in English only.
• Customer service from AT&T: For questions about your mobile account or
features, contact AT&T customer care.
Chapter 1 : Welcome 11
Page 12

12 Chapter 1 : Welcome
Page 13

Basics
You’re about to discover the many things about your
HP Veer 4G that will help you better manage your life
and have fun, too. Read this chapter to learn about
your smartphone and take the few easy steps to set it
up and get it running. Then learn about the gestures
that make moving around on your smartphone easy.
Later, after you’re familiar with your smartphone,
you’ll want to personalize the settings and add
applications to make it uniquely yours.
In this chapter
14 Get to know your smartphone
18 Set up your smartphone
19 Charge the battery
21 Turn your smartphone on/off
23 Use gestures: tap, swipe, drag, flick, pinch
28 Update the HP webOS operating system
Chapter 2 : Basics 13
Page 14

Get to know your smartphone
Slide out the keyboard
• Hold the smartphone as shown below and gently push up.
Front view
TIP When you are on a call or using data services to check email, browse the web,
and so on, you may experience better sound or connection quality if you keep the
keyboard slid out.
14 Chapter 2 : Basics
1 Earpiece: When you hold your smartphone up to your ear when on a call, the screen
darkens. See Why the screen goes dark.
2 Touchscreen: Tap and make other gestures directly on the screen. See To u c h s c r e e n .
3 Vo lu me
4 Gesture area: Make the back gesture and begin other gestures here. See Use gestures: tap,
swipe, drag, flick, pinch.
5 Keyboard: See Use the keyboard.
6 Charger/connector: Connect the magnetic end of the USB cable to charge your
smartphone battery (see Charge the battery) or copy files (see Copy files between your
smartphone and your computer). Connect the magnetic end of the 3.5mm headset adapter
provided to connect a 3.5mm headset (see Use a wired headset).
7 Microphone
Page 15

NOTE The volume you set for each individual audio component is saved
automatically, whether the audio component is the earpiece of your smartphone,
a wired headset, a wireless headset that uses Bluetooth
®
wireless technology,
music heard through the speaker, music heard through a headset, and so on.
When you return to using an audio component, the audio plays at the volume you
left it the last time you used that component.
Keyboard
To u c h s c r e e n
TIP Be careful not to scratch, crush, or apply too much pressure on the
touchscreen. Do not store your smartphone in a place where other items might
damage it. Do not use harsh chemicals, cleaning solvents, or aerosols to clean the
smartphone or its accessories.
Card view
1 Option: Press to enter numbers, punctuation, and symbols that appear above the letters on
the keys (see Enter alternate keyboard characters), or to move the cursor (see Tex t s el ec t io n
gestures).
2 Shift: See Enter uppercase letters and Text selection gestures.
3 Space
4 Backspace
5 Enter: Press to enter a line return (for example, in a memo or in an email message you are
composing) or to accept information you entered in a field. See Enter information in a field.
6 Sym: Press to enter symbols and accented characters that don't appear on the keys. See
Enter characters from the symbols table.
1 Just Type field: Displays text you type to look for, create, or use information on your
smartphone, without needing to go to a specific app. See Just Type.
2 Wallpaper: The background image in Card view. You can customize your wallpaper. See
Change your wallpaper.
3 Quick Launch: Bar containing up to four icons for the apps you use most, plus an icon to
open the Launcher. You can customize the apps that appear in Quick Launch. See Open an
application in Quick Launch and Line up your favorite applications in Quick Launch.
Chapter 2 : Basics 15
Page 16
The Launcher
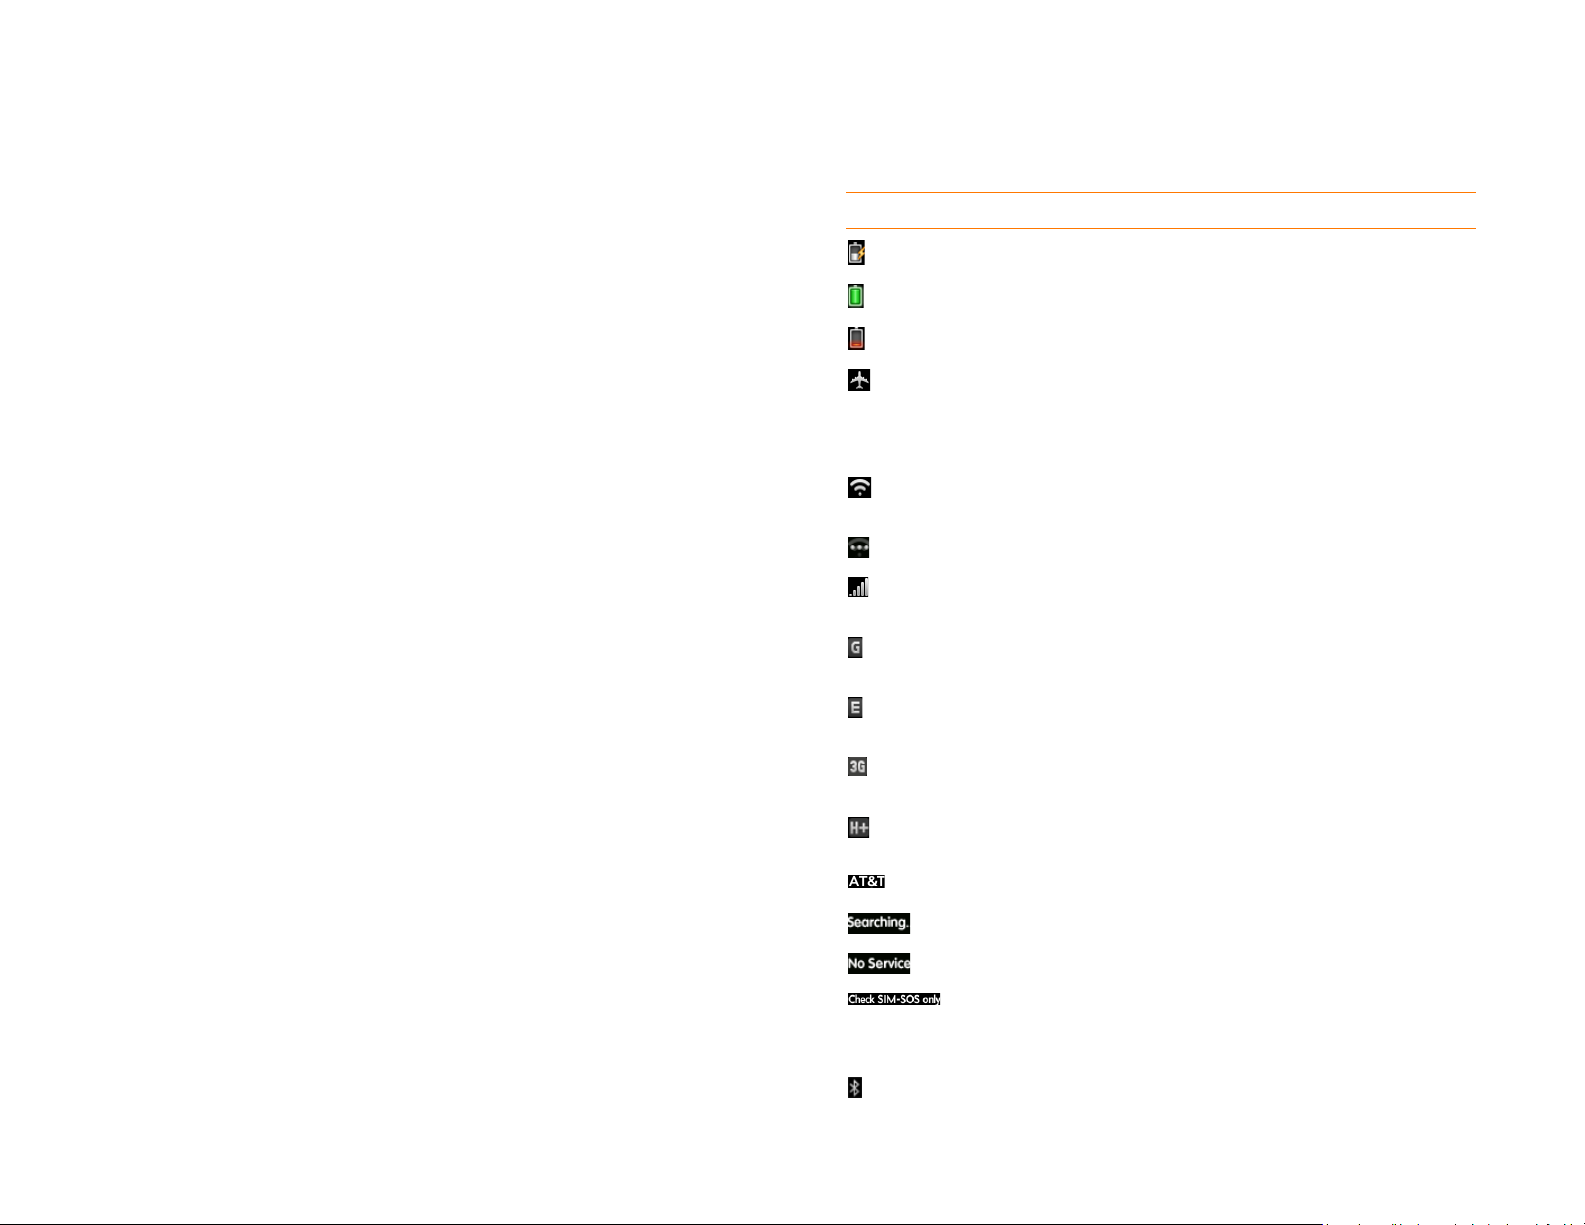
Icons in the title bar
Table 1. Title bar icons and descriptions
Item Description
The battery is being charged.
The battery is fully charged.
The battery is low. See Charge the battery.
1 Application name: Displays the name of the currently open application. Drag down over
the app name to open the application menu.
2 Launcher: See Open an application in the Launcher.
3 Connection icons: Show the status of wireless service connections and battery strength
(see Icons in the title bar). Drag down over the icons to open the connection menu.
4 Page indicator: Shows that there are Launcher pages to the right of the currently displayed
page. Tap to move to the next page. You can also swipe right or left on the screen to move
among Launcher pages.
5 Page name: Tap and hold to change the name (see Rename a Launcher page).
6 Notification icons: Show missed calls, new voicemail and email messages, and more. Tap
the bottom of the screen to view notification details. See View and work with notifications.
Airplane mode is turned on. This means that the phone,
Bluetooth
®
wireless technology feature, and the Wi-Fi and
VPN features are off (incoming calls go to voicemail). See
Turn wireless services off (airplane mode).
Wi-Fi is turned on. The number of filled-in bars denotes
signal strength. See Wi-Fi.
The smartphone is searching for a Wi-Fi network.
The phone is on. The number of filled-in bars denotes signal
strength. See Tur n w i re le ss se rv ic es o n.
Your smartphone is connected to a GPRS data network. See
I don’t know if I have a data connection.
Your smartphone is connected to an EDGE data network.
See I don’t know if I have a data connection.
Your smartphone is connected to a 3G data network. See I
don’t know if I have a data connection.
Your smartphone is connected to a 4G data network. See I
don’t know if I have a data connection.
Your phone is on and connected to the AT&T network.
Your phone is searching for the AT&T network.
16 Chapter 2 : Basics
The AT&T network is not available.
Your smartphone cannot detect or read your SIM card. You
can call your national emergency number only. See Set up
your smartphone.
Bluetooth
®
wireless technology is turned on. See Bluetooth®
wireless technology.
Page 17

Table 1. Title bar icons and descriptions
Item Description
A Bluetooth connection is in progress.
A Bluetooth connection has been made.
Your smartphone is performing a search on the characters
you entered. If you are in Card view or the Launcher, your
smartphone conducts a global search on your smartphone
(see Just Type). If you are in an application such as Contacts
or Memos, your smartphone searches for items within the
app that match the search term you entered.
Your smartphone is in roaming coverage. See Set roaming
and data usage preferences.
TTY is turned on. See Turn TTY/TDD on/off.
Back view
The back cover of your Veer cannot be removed. Attempting to remove the
back cover voids your smartphone’s warranty.
The back cover is compatible with the HP Touchstone charging dock (sold
separately).
1 Camera lens
2 Speaker
Top view
1 Power: Press to wake up or turn off the screen. Press and hold to turn wireless services on
and off or turn your device completely on and off.
2 Ringer switch: Slide to turn the ringer and notification sounds on or off. (Red means off.)
The ringer switch does not affect music or video playback sounds.
3 Lanyard loop
4 SIM card slot: See Insert the SIM card and set up your smartphone.
Chapter 2 : Basics 17
Page 18

Set up your smartphone
Insert the SIM card and set up your smartphone
Your SIM (Subscriber Identity Module) card contains information on your
wireless account. To make calls or use your smartphone’s email or web
features, you need to insert a SIM card.
If you don’t have a SIM card, contact AT&T.
2 Insert the SIM card. Note the position of the notch.
To take advantage of the high-speed data connection available on your
smartphone, you may need to have a 4G or 3G SIM card. Check with AT&T
for information.
1 Use your fingernail to open the SIM card slot cover.
* Notch
3 Close the SIM card slot cover.
4 Press and hold the power button on the upper-right corner of
your smartphone until you see a logo on the screen (approximately five
seconds). Your smartphone needs a few seconds to start up.
TIP If your smartphone does not turn on after you press and hold power, you
need to connect your smartphone to the AC charger to charge it.
5 Follow the onscreen instructions to complete setup.
6 To create a Palm profile, enter a working email address, create a
password for your profile, and select and answer a security question.
IMPORTANT Be sure to write down the email address and password that you
use to create your profile; you will need them later.
18 Chapter 2 : Basics
Page 19

NOTE If you already have a Palm profile, you can use the same email address and
password to sign in to your new smartphone. This will sign you out of the Palm
profile on the other device, restore your backed-up data to your new smartphone,
and reinstall any apps you purchased from HP webOS App Catalog on your new
smartphone. Alternately, if you want to keep using the Palm profile on a different
device, you can create a new profile for your new smartphone and start fresh. You
need to use another email address to do this. Only one smartphone can be
associated with a Palm profile at a time.
Your smartphone is ready to use. To learn how to make your first call, see
Make calls.
Verify your profile
After you finish setup, look for an email on your computer at the address you
used for your Palm profile. If you don’t see the confirmation email in your
Inbox, check your spam mail folder in your desktop email program. Click the
link in the email to do the following:
• Verif y you r Palm pro file.
• Follow a link to go to palm.com/gettingstarted, where you can watch
short how-to videos, learn about transferring your information to your
smartphone, and more.
Your Palm profile gives you the following benefits:
• Automatic system and software updates are sent to your smartphone.
• A Palm profile account is automatically created for you on your
smartphone. In this account you can store Contacts and Calendar info
that you don’t store in online accounts like Google or Exchange.
NOTE You cannot access Palm profile data on the profile website. You can access
the data on your smartphone only.
• Info stored in your Palm profile account, as well as info you have in
applications on your smartphone (like Memos and Tasks), is automatically
backed up to the webOS servers.
• If your smartphone is lost or stolen, open the web browser on your
computer, sign in to your Palm profile on palm.com/palmprofile, and do a
remote erase of the info on the smartphone.
NOTE If you want to erase data on your smartphone while you are still in
possession of the smartphone—for example, before you give it to someone else—
don’t do a remote erase. Instead, do a partial or full erase of the smartphone itself
(see Erase data and reset your smartphone).
For detailed information about your Palm profile, see Backup.
What is a Palm profile?
Although you create a Palm profile by entering a valid email address, setting
up a Palm profile is different from setting up email on your smartphone. To
set up email, see Set up email. To change your Palm profile information after
you have set it up, see Update your Palm profile settings.
Charge the battery
When the battery is very low, the battery icon in the upper-right corner
of the screen changes to red. When the battery is fully charged, the icon
appears full and changes to green .
Chapter 2 : Basics 19
Page 20

WARNING Use only chargers that are approved by HP with your smartphone.
Failure to use a charger approved by HP may increase the risk that your
smartphone will overheat, catch fire, or explode, resulting in property damage,
serious bodily injury, or death. Use of unapproved third-party power supply
accessories may damage the device and void the Limited Warranty for the
product.
TIP You can also charge your smartphone battery by connecting your
smartphone to your computer using the USB cable. Charging this way takes much
longer than using the AC charger. Do not, however, connect a Touchstone
charging dock (sold separately) to your computer.
Although the battery may come with a sufficient charge to complete the
setup process, we recommend that after setup you charge your smartphone
until the battery icon in the upper-right corner of the screen is full to
ensure that the battery is fully charged.
WARNING Never remove the back cover of your Veer. The battery is built in to
your smartphone and is not removable.
See Maximizing battery life for tips on making your battery’s power last
longer.
1 Attach the magnetic end of the USB cable to the charger/connector.
The silver circle on the cable faces the front of the smartphone.
2 Connect the other end of the USB cable to the AC charger.
3 Plug the AC charger into a working outlet.
Maximizing battery life
The battery of your smartphone cannot be removed.
Battery life depends on how you use your smartphone. You can maximize
the life of your battery by following a few easy guidelines:
• Charge your smartphone whenever you can. Charge it overnight.
• Set your screen to turn off automatically after a shorter period of inactivity
(see Set the interval for turning the screen off automatically).
• Keep your battery away from direct sunlight and other sources of heat.
Temperatures over 113 degrees Fahrenheit (45 degrees Celsius) can
permanently reduce the capacity and life span of any lithium-ion battery.
• As with any mobile phone, if you are in an area with no wireless coverage,
your smartphone continues to search for a signal, which consumes power.
Turn off the phone if you are outside a coverage area (see Tu rn wi re l es s
services off (airplane mode)). If you live or work in an area of poor
coverage, you might consider purchasing a signal booster (sold
separately) from AT&T. These typically connect to your broadband
Internet connection, if available.
• If you set up an email account in the Email application, set the interval to
automatically download email to every two hours or less frequently (see
Enter advanced account settings).
• Lower the screen brightness (see Change screen brightness).
• Use a Wi-Fi connection to download system updates and applications
from App Catalog (see Update the HP webOS operating system and HP
webOS App Catalog and Software Manager). Downloads occur faster
over Wi-Fi than over an AT&T data connection, and thus use less battery
power.
• Keep in mind that frequent use of instant messaging (IM) can reduce
battery life. Sign out of your IM account when you are not using it (see
Sign out of an IM account).
20 Chapter 2 : Basics
Page 21

• Shut down the smartphone completely when you won’t be using it for an
extended period of time (see Shut down your smartphone).
TIP If you think that the battery needs to be replaced, see I need to replace the
battery for instructions.
Turn the screen on/off
Turn the screen on and leave the wireless services turned off when you want
to use only the organizer features, for example, when you’re on a plane and
you must turn off all wireless services, but you want to look at your calendar.
To turn the screen on, do one of the following:
Turn your smartphone on/off
The screen on your Veer can be turned on and off separately from its
wireless services (which are the Phone app, Wi-Fi app, Bluetooth
app, and VPN app). This means you can wake up the screen to use
just the organizer features of your device (Calendar, Contacts, Tasks,
Memos, and so on) without turning on the phone and other wireless
features. Also, when the screen is turned off, the phone can be on and ready
for you to receive phone calls or messages.
Why the screen goes dark
If you hold the smartphone up to your ear while on a call, the screen goes
dark. This is normal behavior. It prevents your accidentally tapping an item
on the screen and saves battery power. When you take the smartphone
away from your ear, the screen automatically turns back on, ready for use. If
the screen doesn’t turn on fast enough for you, tap the screen to wake it up.
The same behavior occurs anytime you’re on a call and the smartphone
screen is placed near another surface. The screen turns on automatically (if
the smartphone is still on) when you move the smartphone away from the
other surface.
®
• Press power . Drag up to unlock the screen.
* Power
• Slide out the keyboard.
TIP You can also unlock the screen by dragging up from the gesture area across
the onscreen lock icon.
To turn the screen off, press power .
NOTE Pressing power to turn the screen off also works when your smartphone is
placed on a Touchstone charging dock (sold separately).
When the smartphone is on and idle, the screen first dims and then turns off.
This also is normal behavior, caused by the auto shut-off interval. You can
adjust this auto shut-off interval to be as long as three minutes (see Set the
interval for turning the screen off automatically). At first, the screen dims as
a power-saving measure. Just tap the screen to brighten it. Then, if your
smartphone remains inactive for the full interval you set, the screen turns
itself off. Press power to turn the screen back on.
Turn wireless services off (airplane mode)
Airplane mode turns off your smartphone’s wireless services (which are the
Phone app, Wi-Fi app, Bluetooth
airplane mode when you are on a plane or anywhere else you need to turn
®
app, and VPN app). Use
Chapter 2 : Basics 21
Page 22

off all wireless services. You can’t browse the web, but you can still use apps
®
like Calendar, Contacts, Photos, Music, Quickoffice
mobile office software,
and PDF View.
Do one of the following:
• Tap the upper-right corner of any screen to open the connection menu.
Ta p Turn on Airplane Mode.
• Press and hold power and tap Airplane Mode.
When your smartphone is in airplane mode, the airplane mode icon
appears at the top of every screen, and Airplane Mode appears in the
upper-left corner of the screen in the Launcher, Card view, and Phone. The
phone is not connected to any mobile network.
TIP When your smartphone is in airplane mode, you can turn the Wi-Fi,
Bluetooth, and VPN features on individually (see Tur n Wi- Fi on /o f f, Tu rn the
Bluetooth feature on/off, and VPN). To turn the phone back on so you can make
and receive calls, you must turn airplane mode off. Note that to make a VPN
connection while your smartphone is in airplane mode, you must first connect to a
Wi-Fi network.
Turn wireless services on
When you turn on your smartphone, it automatically connects to your
mobile network so that you can make and receive phone calls and use other
wireless services (if supported by the local network).
If airplane mode is turned on, you need to turn it off before you can connect
to your mobile network. Tap the upper-right corner of any screen to open
the connection menu. Tap Tu rn of f A i rp la n e M od e .
When your smartphone locates a signal, AT&T appears in the upper-left of
the screen in the Launcher, Card view, and Phone, and the signal-strength
icon appears at the top of the screen.
* These indicate that wireless services are off (airplane mode).
22 Chapter 2 : Basics
* These indicate that wireless services are on.
Page 23

When you are inside a coverage area, the bars of the signal-strength
icon are filled in according to the strength of the signal. If you’re outside a
coverage area, the bars in the signal-strength icon appear dimmed with
an X.
Shut down your smartphone
Use gestures: tap, swipe, drag, flick, pinch
Gestures are an important, basic part of your smartphone. They’re easy to
learn, and they make working with the smartphone fast. You make most
gestures with one finger. For a few, you need two. Make gestures with the
tip of your finger. Do not use your fingernail. Don’t bear down.
Usually, turning your smartphone off and/or putting it in airplane mode is
sufficient for normal periods when you have the smartphone with you but
you’re not using it. On rare occasions, however, you may want to put your
smartphone into deep sleep because you are not going to use it for an
extended period. At those times, shut down the screen and wireless services
completely by doing one of the following:
• Open Device Info and tap Reset Options. Tap Shut Down, and tap
Shut Down again.
• Press and hold power , and tap Power. Tap Shut Down.
NOTE When you turn everything off, the smartphone’s alarms, ringer, and
notifications are also turned off.
You make gestures in two areas on your smartphone: the touchscreen and
the gesture area. The gesture area is the black area extending along the
bottom of the screen.
* Gesture area
When you’re working in an application, the center of the gesture area
displays a lighted bar.
• Tap the bar to minimize the app and display Card view (see Manage
applications in Card view).
• The lighted bar also appears when you tap the center of the gesture area
to maximize a card in Card view.
• When the screen is off, the lighted bar pulses when a notification arrives
and continues to pulse until you tap the notification or turn on the screen
(see Get notifications when the screen is locked or off).
To turn both the screen and wireless services back on, press and hold
power until a logo appears onscreen.
Chapter 2 : Basics 23
Page 24

Ta p
Tap with the tip of the finger, not the fingernail. Tap fast and firmly, and then
immediately lift your fingertip off the screen. Don’t bear down on what
you’re tapping. Don’t wait for a response; the response comes after you lift
your finger. Don’t linger on the gesture; a tap takes a split second to do.
Tap the center of the gesture area to do the following:
• When you’re working in an application, tap the center of the gesture area
to see Card view. Card view shows you all the applications that are
currently open, displayed as a series of cards (small windows).
• When you’re in Card view, tap the center of the gesture area to maximize
the app in the center of the view.
Swipe
In Web, the back gesture performs the same function as the back button on
the browser, allowing you to move back through previously viewed pages.
The forward gesture, available in Web only, is a swipe from left to right
anywhere in the gesture area. The forward gesture allows you to move
forward through previously viewed web pages.
Drag
Drag is the gesture you make for a slow scroll up and down, such as in a list,
in a document, or on a web page. Slide your fingertip slowly along the
surface—no need to bear down.
A swipe is most often a horizontal gesture, from right to left or left to right.
Do it fast, do it lightly. In a swipe, your fingertip just skims the surface of the
touchscreen or gesture area.
One kind of swipe you’ll use a lot: back. Make the back gesture from right to
left anywhere in the gesture area. Back takes you up one level from a
detailed view to a more general view of the application you’re working in.
For example, when you finish reading an email message, make the back
gesture to close the message and return to your list of messages. Or when
you finish writing a memo, make the back gesture to close and save the
memo and return to the display of all your memos. When you make the
back gesture in an application and that’s the only screen of that app that’s
open, you minimize the app and go back to Card view.
24 Chapter 2 : Basics
Drag an item: Tap and hold the item, drag it. Wait till you get a visual cue
that the item is ready to be dragged, and then drag it. Lift your finger to drop
it. For example, an icon in the Launcher or a card in Card view is ready to be
dragged when it becomes enlarged and transparent.
Page 25

Display Quick Launch: One kind of drag that you’ll use a lot brings up
Quick Launch when you’re in an application. This drag gesture begins in
the gesture area and ends on the touchscreen. As your fingertip slowly
crosses the border between the gesture area and the touchscreen, it seems
to drag Quick Launch into view. To open one of the apps in Quick Launch,
move your finger to its icon. When you see the app name appear, lift your
finger. The application opens.
Flick
As its name tells you, this is a quick gesture, great for scrolling long lists,
documents, or pages. Do it fast, do it lightly; as with a swipe, your fingertip
just skims the surface. The faster you flick, the faster and farther you scroll
up or down a list.
Delete a list item: In some applications, such as Email, Messaging, Tasks,
Music, and Bluetooth, you can throw a list item off the side of the screen to
delete the item.
Throw the item off the side of the screen. If prompted, tap Delete to confirm
the deletion.
Close an application: To close an application in Card view, flick the card up
toward the top of the touchscreen. This is called throwing the card off the
top of the screen.
If you can’t delete a list item by throwing it, open the item and look in the
application menu for a Delete menu item.
TIP To delete multiple list items, throw each one off the screen. If you get the
Delete confirmation prompt after throwing the first item, you don’t need to tap
it—just throw the second item, and the first deletion is confirmed automatically.
TIP In some apps, such as Email, you can set a preference whether to show a
confirmation screen when you delete a list item.
Chapter 2 : Basics 25
Page 26

Display Card view or the Launcher: If an application is maximized, you
can flick up from the gesture area to the screen to minimize the app and
display Card view. This is the up gesture. If you make the up gesture when
Card view is displayed, you open the Launcher.
Pinch (zoom gestures)
Zoom in/pinch out to increase the size of items on the screen (Email, Web,
Photos, PDF View, and Google Maps): Place two fingers on the screen and
spread them slowly apart.
Zoom in or out a fixed amount (Web, Photos, Quickoffice
software, PDF View): Double-tap the screen.
Scroll gestures
Scroll slow: Drag the screen in the desired direction.
®
mobile office
Zoom out/pinch in to decrease the size of items on the screen (Email, Web,
Photos, PDF View, and Google Maps): Place two fingers on the screen and
bring them together.
26 Chapter 2 : Basics
Page 27

Scroll fast: Flick the screen in the desired direction.
Insert the cursor in a text field: Tap the location.
Stop scrolling: Tap or drag the screen while scrolling.
Text se l e c t i o n g e sture s
For information on working with text after you select it, see Cut, copy, and
paste information and Use the Copy All or Select All feature.
Move the cursor: Tap the location to insert the cursor. Press and hold
Option . Place your finger anywhere onscreen and drag your finger in the
direction you want to move the cursor.
Chapter 2 : Basics 27
Page 28

Select text when you can see a cursor: Tap the location to insert the
cursor. Press and hold Shift . Place your finger anywhere onscreen and
drag your finger in the direction you want to select text. Tap the highlighted
text to deselect it.
Update the HP webOS operating system
Select a paragraph of text: When you cannot insert a cursor in the text—
for example, on a web page or in an email you received—the smallest
amount of text you can select is a whole paragraph. Press and hold
Shift , and then tap a paragraph. Tap an adjacent paragraph to add it to
your selection (you can’t skip around). If you need to scroll down to select
the next paragraph, release Shift , scroll, press Shift , and tap the
paragraph. Tapping any part of the highlighted selection deselects it.
28 Chapter 2 : Basics
HP provides updates to your smartphone’s operating system. Update
notifications are sent to your smartphone automatically when a system
update is available (see Respond to a system software notification). When
you update your smartphone’s operating system, your personal information
and files are not affected. In addition to receiving update notifications, you
can manually check for operating system updates at any time (see Manually
check for system updates).
What’s more, both HP and many application developers make updates
available for applications you installed on your smartphone. You can check
in Software Manager at any time for application updates (see Update a
downloaded application from a notification and Manually check for
application updates).
Page 29

Respond to a system software notification
Manually check for system updates
When you get a notification that a system update is available, do one of the
following:
• Ta p Install Now twice. When installation is complete and the
smartphone resets, tap Done. Installation times vary, depending on the
size of the update. You cannot use your smartphone while an update is
being installed, not even for emergency calls.
• Ta p Install Later. The next time you charge your smartphone, you receive
another update notification. You can again choose whether to install the
update now or later. If you do not tap Install Later within 10 minutes of
receiving the notification, installation begins automatically.
Here is some additional information about system updates:
• Whenever possible, use a Wi-Fi connection to download system updates.
Downloads occur faster over Wi-Fi than over an AT&T data connection,
and use less battery power. If you see that a system update is available,
make sure you have your smartphone’s Wi-Fi feature turned on.
• If you have Wi-Fi turned on and the battery has enough charge, your
smartphone automatically downloads a system update if one is
available—you don’t have to do anything. If Wi-Fi is not turned on when
the update becomes available, the HP servers continue to check your
device for Wi-Fi availability.
• If you do not have Wi-Fi turned on anytime within a few days of the
system update notification, your smartphone automatically downloads
the update over the AT&T network the next time the battery has enough
charge and you have a data connection, as indicated by the , , , or
icon at the top of the screen.
• If the battery does not have enough charge, you must charge the battery
before you can download or install an update.
• To avoid roaming charges, updates are not downloaded if your
smartphone is in roaming coverage.
• If you do not install an update immediately after downloading it, you are
prompted to install the update the next time you charge your smartphone.
You can choose whether to install the update now or later. You have ten
minutes to decide; otherwise, the update installs automatically.
1 Open System Updates .
2 If a message appears stating that a system update is available, do the
following:
• Ta p Download now.
• When prompted, tap Install Now.
• After installation has finished and the smartphone resets, tap Done.
Chapter 2 : Basics 29
Page 30

30 Chapter 2 : Basics
Page 31

Just Type
Just Type changes the way you create, look for, and
use information on your smartphone. Instead of
starting a task by opening an app, start in Card view
simply by typing your idea, message, or task. Then you
choose what you want to do with the text you typed:
use it to search the web, post it to your Facebook page,
send it as a message, save it as a memo. Just Type
opens the app you need to complete your task.
In this chapter
32 Just Type overview
32 Get in touch with a contact
33 Search the web
33 Find information in an application on your
smartphone
34 Create a new item such as a message or memo
35 Open an application
36 Repeat a recent search
36 Customize Just Type
Chapter 3 : Just Type 31
Page 32

Just Type overview
The Just Type feature lets you do almost anything you want on your
smartphone, without having to go to a specific app. When it crosses your
mind to look up, do, or make note of something, just type to put your
thought into action.
Just Type works from the two screens on your smartphone that you access
most often: Card view and the Launcher. By just typing on either of those
screens, you can begin doing any of the following:
You can also start a search by copying text in another application, opening
the Launcher or Card view, and pasting the text. The text appears at the top
of the screen as the search term. To paste using the application menu (Edit
> Paste) in Card view, you first need to tap the Just type box. If you paste
by pressing and holding the gesture area and then pressing the V key, you do
not need to tap in the box.
Get in touch with a contact
1 Open Card view (see Manage applications in Card view) or the
Launcher (see Open an application in the Launcher).
2 Begin typing the contact’s first and last initials (no space), first or last
name, or email address.
• Call or send a message to a contact (see Get in touch with a contact)
• Search the web (see Search the web)
• Search for email messages, web bookmarks, videos, and more (see Find
information in an application on your smartphone)
• Map a location (see Find information in an application on your
smartphone)
• Create a new message, memo, or other item (see Create a new item such
as a message or memo)
• Update your Facebook or Twitter status (see Create a new item such as a
message or memo)
• Open an app (see Open an application)
32 Chapter 3 : Just Type
3 When the contact name appears, do one of the following. If only the
contact name is displayed, tap the name to display ways to get in
touch.
• Tap the name to open the person’s contact information.
• Tap a phone number to dial it, an email address to send a message,
and so on. Tap to the right of a phone number to send a text
message.
Page 33

• Ta p Add Reminder to add a reminder message to the contact (see
Assign a reminder message to a contact).
NOTE If you are using Exchange with a corporate server, you can search your
company's Global Address List (GAL) for a contact: Enter the contact name, and
then tap Global Address Lookup.
Search the web
You have several options for using Just Type to search the web.
1 Open Card view (see Manage applications in Card view) or the
Launcher (see Open an application in the Launcher).
2 Begin typing the search term.
• To view suggested search terms from your default search engine
based on the characters you entered: Tap Suggest to the right of
your default search engine name. Tap a suggestion to search on that
term. If the characters you entered return no contacts, applications,
or other items on your smartphone, suggestions are displayed
automatically. Tap one to search on it.
• To search the web using a different search engine: Under Launch &
Search, tap a search engine name. If the search engine is for a
specific website, such as Wikipedia, your smartphone searches that
site only.
TIP You can also use Just Type to go directly to a website. In Card view or the
Launcher, type the website address, such as hp.com. When the address appears at
the top of the search results, tap Go to website.
Find information in an application on your smartphone
You can search for email messages, web bookmarks, and websites you’ve
visited (browsing history) on your smartphone. You can also search for
items in Google Maps or HP webOS App Catalog right from Just Type.
3 Do one of the following. You may need to scroll down to see web
search engines.
• To search the web using your default search engine: Tap the search
engine name. The search engine appears directly beneath any
matching contact entries.
If your search term does not show results for a certain app, you may need to
turn on a preference to include that app in a Just Type search (see
Customize Just Type). You can use this preference to include more apps in
Just Type searches.
1 Open Card view (see Manage applications in Card view) or the
Launcher (see Open an application in the Launcher).
2 Begin typing the information you want to find. Depending on which
app you want to search, this could be the subject of an email address, a
Chapter 3 : Just Type 33
Page 34

physical address you want to locate on a map, a bookmark name, the
name of an app you want to download, or some other term.
3 Depending on the app you want to search in, tap one of the following.
You may need to scroll down to see app search results.
Bookmarks & History: Your smartphone displays the number of
websites in your bookmarks list and browsing history list whose name
contains your search term. Tap Bookmarks & History to view a list of
the websites. Tap an entry to go to the website.
Create a new item such as a message or memo
You can use Just Type to create a new item such as an email message or
memo by entering all or part of the item’s text. These items are grouped in
the Quick Actions section of the search results.
For some Quick Actions, you need to turn on a preference to create that
type of item from your search results (see Customize Just Type).
1 Open Card view (see Manage applications in Card view) or the
Launcher (see Open an application in the Launcher).
2 Type all or part of the item text, such as email message text or memo
text.
Email: Your smartphone displays the number of email messages
whose sender name or subject contains your search term. Tap Email
to display the list of matching messages. Tap a message to view it.
Google Maps: To view your search term on a map, under Launch &
Search, tap Google Maps.
App Catalog: To search App Catalog for apps that match your search
term, under Launch & Search, tap HP webOS App Catalog.
NOTE In addition to Just Type, applications such as Contacts, Email, Memos, and
PDF View also offer the ability to search within the app for entries or files. When
you’re in one of those apps, from the list view, type the file name; a few words from
a memo; or a contact name, initials, address, or number. See the individual
application sections for details. You can also enter a search term in the Help
application to search for help content related to the term.
34 Chapter 3 : Just Type
3 If needed, scroll down to see the Quick Actions field. Tap New [item
type]. The relevant application opens, displaying your text as part of a
new item. Here are some examples:
• To create a new email message: Tap New Email. A new message
opens with the text you entered as the message text.
• To c re at e a n ew me mo : Ta p New Memo. A new memo opens
containing the text you entered.
4 To see more available quick actions, tap More.
Page 35

Open an application
Table 1. Application keywords
Application Name Keywords
1 Open Card view (see Manage applications in Card view) or the
Launcher (see Open an application in the Launcher).
2 Begin typing the app name or a related keyword. See Use application
keywords for a list.
3 When the app appears, tap it.
Use application keywords
Calendar Datebook, Meetings, Events
Clock Alarm, Time, Watch
Contacts Addresses, People
Date & Time Clock, Settings, Preferences
Device Info Settings, Preferences, Reset
Email Mail
Google Maps Maps
Location Services Settings, Preferences
Memos Notes, Stickies, Notepad
Messaging Text, SMS, MMS, IM, Instant Chat
Music Songs, Tunes, Audio
PDF View Acrobat
Phone Dial
Photos Pictures
Quickoffice Word, Excel, PowerPoint
Regional Settings Settings, Preferences
Screen & Lock Wallpaper, Security, Desktop, Brightness,
Unlock, Gestures, Settings, Preferences
If you don’t know the name of the app you are searching for, you can enter a
keyword associated with the app. This table shows the keywords you can
use to find an app on your smartphone.
Table 1. Application keywords
Application Name Keywords
App Catalog Store
Backup Settings, Preferences
Bluetooth Settings, Preferences, Wireless
Software Manager Store
Sounds & Ringtones Audio, Music, Volume, Vibrate, Silent, Settings,
Preferences
System Updates Settings, Preferences
Tas ks To D o, Tod os , C hec kl is t
Videos Movies
Web Browser, Blazer, Internet
Yo uTu be Vi de os , M ov i es
Chapter 3 : Just Type 35
Page 36

Repeat a recent search
To search on a term you recently entered, you don’t need to enter the term
again.
1 In Card view, tap Just type.
2 Your recent searches are displayed. Tap a search term to repeat the
search.
TIP To clear your recent search history, tap Clear.
3 Select any of the following options:
Customize Just Type
You can select the types of information that are included in a search. For
contacts, you can also turn Global Address Lookup on or off. You can choose
which web search options to display in the search results, and add new
search engines to the list. You can select the applications that you can
launch directly from search results.
1 In Card view or the Launcher, type a few letters to bring up the search
results screen.
2 Scroll to the bottom of the search results screen and tap Preferences.
TIP You can also access Just Type preferences by typing some text in Card view or
the Launcher, opening the application menu, and tapping Preferences.
Default Search Engine: This is the search engine your smartphone
uses to search the web when you enter a search term. To change the
search engine, tap the currently displayed engine, and then tap the one
you want. The list contains two types of search engines: Engines that
search the entire web, such as Google, and engines that search within
a specific website only, such as Wikipedia.
Applications: If you include applications in your searches, any
matching items in those applications are included in your search
results. To add an application to your search results, tap Add
Application Searches, and then tap the application name.
Launch & Search: This list displays other web search engines and
applications available for Just Type searches. Search engines are
designated by Web—you can make any listed search engine the
default search engine. Applications included in your searches are
designated by App. To include other search engines or applications in
your searches, tap Add More Searches and tap the item you want.
Quick Actions: This displays the types of items you can create from
your search results, such as an email message or a memo. To add a
new item type, tap Add Quick Actions and tap the item.
36 Chapter 3 : Just Type
Page 37

Find More: This option lets you search App Catalog for third-party
applications and services that you can use to perform any of the
following Just Type functions: web search, app search, or creation of a
new item (Quick Action). For example, you can use Find More to
download a new web search engine. To use this feature, tap Find
More, and then download an app from the list displayed in App
Catalog (see HP webOS App Catalog and Software Manager).
TIP There’s another way to add a search engine to Just Type. If you open a web
page and an additional search engine is available, a notification appears alerting
you that you can add the search engine. If you add the search engine, it appears as
an option in Just Type.
4 (Optional) Within any of the sections in Just Type preferences (Launch
& Search, Quick Actions, and so on), you can change the order of the
items by tapping and dragging. This changes the order in which the
items appear in the Just Type search results.
Chapter 3 : Just Type 37
Page 38

38 Chapter 3 : Just Type
Page 39

Work with applications
Whatever you need to do in an app, your HP Veer 4G
makes it easy. There are multiple ways to open apps,
so you can access the one you want quickly. You can
have more than one app open at a time and easily
switch among them in Card view.
Once you become familiar with using menus, Text
Assist, favorites, online accounts, and notifications,
you can manage your apps with ease.
In this chapter
40 Open applications
41 Go up one level in an app (back gesture)
42 Use the menus
43 Enter and save information
48 Close applications
48 Delete applications
48 Manage applications in Card view
50 Manage applications in the Launcher
52 Manage online accounts
54 View and work with notifications
55 Create and work with favorites
Chapter 4 : Work with applications 39
Page 40

Open applications
TIP You can also open the Launcher by flicking up twice from the gesture area to
the screen. If you are in Card view, just flick up once to open the Launcher
You can have as many applications open at one time as you like, limited only
by the amount of memory available on your smartphone at the time.
Open an application using Just Type
For detailed information on the Just Type feature, see Just Type.
1 Open Card view (see Manage applications in Card view) or the
Launcher (see Open an application in the Launcher).
2 Begin typing the name of the application or one of its keywords (see
Use application keywords).
3 When the application icon appears in the search results, tap it.
Open an application in the Launcher
The Launcher displays all your applications. The Launcher includes multiple
pages, which you can organize to group apps the way you want (see
Reorder Launcher icons and Reorder Launcher pages).
3 To find the app you want, flick up or down to see all the icons on a
page. To see other pages, swipe right or left on the screen, or tap the
arrows in the upper-left and upper-right corner of the screen.
1 Page indicator shows that there are pages to the right of the current page. Tap the arrow
to move to the next page.
2 Page name. Tap and hold to change the name.
4 Tap the application icon.
1 If you’re in an app, tap the center of the gesture area to display Card
view.
2 In Card view, tap .
40 Chapter 4 : Work with applications
To close the Launcher, do one of the following:
• Tap the center of the gesture area.
• Make the up gesture: Flick up from the gesture area to the screen.
Open an application in Quick Launch
Quick Launch is the bar of five icons that always appears at the bottom of
Card view. You can also make a simple gesture to access Quick Launch from
inside an app.
Page 41

You can customize Quick Launch to contain the icons for apps you use most
often. To open an application from Quick Launch, just tap the icon.
* Quick Launch
2 Move your finger to the application icon. When you see the app name
appear, lift your finger. The application opens.
Go up one level in an app (back gesture)
Quick Launch can display no more than five icons. By default it displays,
from left to right, Phone, Contacts, Email, Calendar, and the Launcher. You
can change the order of icons (except the Launcher icon) in Quick Launch
(see Reorder Quick Launch icons), or swap in whatever applications you like
(see Line up your favorite applications in Quick Launch).
NOTE If you have a notification or the dashboard is open (see View and work
with notifications), you need to dismiss the open item to access Quick Launch.
When you’re in an app, make the following gesture to display Quick Launch
and open one of its applications.
1 Drag up slowly from the gesture area to the screen.
NOTE Don’t confuse this “drag up” with the up gesture, which is a quick flick up
from the gesture area to the screen.
The back gesture takes you up one level from a detailed level to a more
general view of the application you’re working in. For example, when you
finish reading an email message, make the back gesture to close the
message and return to your list of messages. Or when you finish writing a
memo, make the back gesture to close and save the memo and return to the
display of all your memos. When you make the back gesture in an
application and that’s the only screen of that app that’s open, you minimize
the app and go back to Card view.
To make the back gesture, swipe right to left anywhere in the gesture area.
Chapter 4 : Work with applications 41
Page 42

Use the menus
Most applications have an application menu hidden in the upper-left corner,
which provides access to additional features. There is also a connection
menu hidden in the upper-right corner, which provides access to wireless
services.
Some applications have additional menus. For example, in Photos, tap an
open picture and tap to display a menu of tasks you can do with the
picture (see Photos).
To get the most out of your smartphone, it’s a good idea to familiarize
yourself with the additional features available through the menus in various
applications.
Open the application menu
The application menu contains items for the application you are working in,
such as Cut and Copy, Preferences, Help, and other application-specific
menu items. Help is available on the application menu of every application.
• Tap the application name in the upper-left corner of the screen.
2 Tap a menu item to open it. If a menu item displays a right-pointing
arrow , tap the item to display the submenu for that item—for
example, tap the Edit menu item to open a submenu containing Cut,
Copy, and Paste items. If you see a downward-pointing arrow at
the bottom of the menu, scroll down to see additional menu items.
1 In an app, do one of the following:
• Drag down from the upper-left corner of the smartphone (above the
screen) onto the screen.
42 Chapter 4 : Work with applications
1 Application menu
2 Tap to open the submenu
3 Scroll to see more items
3 To close the menu without selecting an item, repeat one of the options
in step 1.
If an application menu item is followed by this symbol plus a letter, it
means a keyboard shortcut is available for that menu item. To use a
keyboard shortcut, press and hold the gesture area and press the letter key
of the shortcut. For examples of using keyboard shortcuts, see Cut, copy,
and paste information.
Page 43

DID YOU KNOW? Pressing and holding the gesture area is sometimes called a
“meta-tap.”
Open the connection menu
Enter and save information
Use the keyboard
The connection menu lets you manage wireless services—the phone,
®
Bluetooth
DID YOU KNOW? The connection menu also displays the current day and date
and the battery charge level.
wireless technology, Wi-Fi, and VPN.
1 Do one of the following:
• Drag down from the upper-right corner of the smartphone (above
the screen) onto the screen.
• Tap the upper-right corner of the screen.
1 Option: Press to enter numbers, punctuation, and symbols that appear above the letters on
the keys (see Enter alternate keyboard characters), or to move the cursor (see Tex t s ele ct io n
gestures).
2 Shift: See Enter uppercase letters and Text selection gestures.
3 Space
4 Backspace
5 Enter: Press to enter a line return (for example, in a memo or in an email message you are
composing) or to accept information you entered in a field (see Enter information in a field).
6 Sym: See Enter characters from the symbols table.
Enter uppercase letters
2 Tap a menu item to turn that wireless feature on or to display a list of
menu items for that feature (see Turn wireless services off (airplane
mode)). If you see a downward-pointing arrow at the bottom of
the menu, scroll down to see additional menu items.
3 To close the menu without selecting an item, repeat one of the options
in step 1.
By default, the first letter of each sentence or field is capitalized and the
remaining text you enter is lowercase. To enter other uppercase letters, do
one of the following:
• Press Shift and press the letter key. The Shift symbol appears. You
don’t need to hold down Shift while you press the letter key.
Chapter 4 : Work with applications 43
Page 44

• Turn on Caps Lock: Press Shift twice. The Caps Lock symbol
appears.
• Tur n off Ca ps Lo ck: Pres s Shift .
Enter alternate keyboard characters
Numbers, punctuation, and symbols appear above the letters on the keys. To
enter these characters, do one of the following:
• Press Option and press the key for the character. The alternate
character symbol appears. You don’t need to hold down Option while
pressing the second key.
• Enter a series of alternate characters: Press Option twice to turn on
Option Lock. The Option Lock symbol appears.
• Tur n off Opt ion Lo ck : P res s Option .
Enter passwords
You can see each character of a password only as you enter it, so be careful.
Be sure Caps Lock and Option Lock are off unless you need them. For
information on how to enter characters, see Enter uppercase letters and
Enter alternate keyboard characters.
TIP The symbols and accented characters are grouped according to their
similarity to the corresponding key. In some cases, the symbol is related to the
alternate character on the key, not the letter. For example, to type a € or other
currency symbol, press Sym + h. Why? Because the alternate character on the H
key is $.
3 Scroll to find the character you want.
4 Tap the character to insert it.
Symbols and accented characters
Table 1. Symbols and accented characters
Press Sym and
press…
a or A á à ä â ã å æ Á À Ä Â Ã Å Æ ª ~ \ ` • ÷ ^ [ ] { } < >
b or B ~ \ ` • ÷ ^ [ ] { } < > « » Ø μ |
c or C © ç Ç ¢
d or D † ‡
e or E é è ë ê ē É È Ë Ê € ¹ ¼ ½
to select…
« » Ø μ |
Enter characters from the symbols table
You can enter symbols and accented characters that don’t appear on the
keys by using the symbols table. See Symbols and accented characters for a
list of the available symbols and accented characters.
1 Press Sym to display the symbols table.
2 Narrow the list by pressing the key that corresponds to the character
you want. For example, to enter an é, press e.
44 Chapter 4 : Work with applications
h or H ¢ € £ ¥ ƒ
i or I í ì ï î Í Ì Ï Î ÷ ‰
j or J ¡
k or K :-) :-( ;-)
l or L ` ‘ ’ ‚ "
m or M μ :-) :-( ;-)
n or N ñ Ñ ¿
o or O ó ò ö ô œ õ ø Ó Ò Ö Ô Œ Õ Ø º “ ” „ < > « »
p or P ¶ ~ \ ` • ÷ ^ [ ] { } < > « » Ø μ |
q or Q \ ~ |
Page 45

Table 1. Symbols and accented characters
Work with the Text Assist feature
Press Sym and
to select…
press…
r or R ® ²
s or S ß š Š ~ \ ` • ÷ ^ [ ] { } < > « » Ø |
t or T ™ ³ ¾
u or U ú ù ü û Ú Ù Ü Û [ ] { } < > « »
v or V ^
w or W ÷ ^ ±
x or X x ¤
y or Y ÿ ý Ÿ Ý ¥ [ ] { } < > « »
zž Ž •
, or _ ~ \ ` • ÷ ^ [ ] { } < > « » Ø μ |
. … ~ \ ` • ÷ ^ [ ] { } < > « » Ø μ |
@° • Ø
Enter information in a field
You can enter information in a field by typing or by pasting previously
copied information (see Cut, copy, and paste information). The Text Assist
feature works with all text fields (see Work with the Text Assist feature).
To accept the information you entered, do one of the following:
• Tap outside the field.
• Press Enter . If a screen contains multiple fields, pressing Enter accepts
the information you just entered and moves the cursor to the next field.
• When you are done entering information on the screen containing the
field, make the back gesture to accept the information and back out of the
screen (see Go up one level in an app (back gesture)).
Text Assist, the assisted text entry feature, works on any screen in which you
can enter text, including email, text/multimedia, and instant messages;
memos; contact and calendar entry screens; and more. Text Assist includes
auto-correction, auto-capitalization, and shortcuts.
NOTE If a Text Assist feature does not seem to be working, make sure that
feature is turned on (see Customize Text Assist settings).
• If Text Assist recognizes a common misspelling, it auto-corrects the word.
A sound is played and the word appears with a gray underline to indicate
it has been corrected. If the ringer switch is turned off, the smartphone
vibrates instead of playing a sound.
• If auto-correction doesn’t recognize a spelling, it highlights the word with
an orange underline. Tap the word to display a list of close matches, and
then tap the correct word. If the word is spelled correctly as you typed it,
tap the word, and then tap + to add the word to the auto-correction
dictionary. A notification appears to indicate that the word has been
added to the dictionary.
• Auto-correction inserts punctuation such as apostrophes in contractions.
So you can quickly type dont, and it appears correctly as don’t.
• The auto-capitalization feature automatically capitalizes the first word of a
sentence and other letters that would commonly be capitalized, such as
the letter i by itself.
• The shortcut feature recognizes and expands common shorthand
expressions, such as replacing u with you or r with are.
• To cancel an auto-correction, auto-capitalization, or shortcut expansion,
press Backspace . To cancel auto-correction of a misspelled word, you
can also tap the word and tap the original spelling.
TIP Suppose the language on your smartphone is English and you need to write
an email in French. To prevent Text Assist from trying to correct everything you
enter, temporarily turn off auto-correction (see Customize Text Assist settings).
Chapter 4 : Work with applications 45
Page 46

Customize Text Assist settings
You can customize individual Text Assist features: auto-correction,
auto-capitalization, and shortcuts. To customize the user dictionary, see Add
your own words and shortcuts.
1 Open Te x t A s si s t .
2 Do any of the following:
• To turn auto-capitalization, shortcuts, or auto-correction on or off:
Ta p Off or On for that entry.
• To change whether a tone plays, the smartphone vibrates, or neither
happens when an auto-correction takes place: Tap Alert, and then
tap System Sound, Vibrate, or Mute. The Alert option is available
only if auto-correction is turned on.
Add your own words and shortcuts
1 Open Te x t A s si s t .
2 Ta p Edit User Dictionary.
3 To edit the auto-correction dictionary, tap Learned Words and do any
of the following:
• To add a word: Tap , enter the new word, and then tap Add.
• To change the spelling of a word: Tap the word, and then type the
correction to the word. Tap Done.
• To delete a word: Throw the word off the side of the screen. Tap
Delete to confirm.
4 To edit the shortcuts list, tap Shortcuts and do any of the following:
• To add a shortcut: Tap , enter the new shortcut and replacement
text, and then tap Add.
• To change a shortcut and/or its replacement text: Tap the shortcut
you want to change. Tap the Shortcut field or the Replace With
field, and then enter the new shortcut or replacement text. Tap
Done.
• To delete a shortcut: Throw the shortcut off the side of the screen.
Ta p Delete to confirm.
46 Chapter 4 : Work with applications
Page 47

Cut, copy, and paste information
Select items in a list
You can copy any selectable text, and you can cut any selectable text that
you entered, for example, in a memo or an email. This includes text you can
select by dragging the cursor and paragraphs you can select by tapping
them (see Tex t s e le ct ion g es tures ).
1 Select the text you want to cut or copy (see Text selection gestures).
2 Open the application menu and tap Edit > Cut or Copy.
3 Open the app and insert the cursor where you want to paste the text
(see Text selection gestures).
4 Open the application menu and tap Edit > Paste.
You can also use keyboard shortcuts to cut, copy, and paste. After selecting
the text or inserting the cursor, press and hold the gesture area; the lighted
bar begins to pulse and glow more brightly. Then press X (cut), C (copy), V
(paste), or A (select all, in the apps that support this feature). A notification
appears indicating that the text has been successfully cut, copied, or
selected.
Use the Copy All or Select All feature
Lists enable you to select from a range of options. Lists are different from
menus (see Use the menus), which give you access to additional features.
Lists are hidden until you tap the currently displayed option for that list.
1 Tap the currently displayed option to open the list. For example, when
creating a new event in Calendar, tap 15 minutes before to display the
list of reminder options.
Some applications offer a Copy All menu option. For example, in Messaging,
you can start or open a conversation, open the application menu, and tap
Edit > Copy All. This saves the entire conversation as plain text, which you
can paste in a memo, email message, and so on.
Other apps offer a Select All menu option. For example, in Memos, you can
open a memo, open the application menu, and tap Edit > Select All. This
highlights the full memo text, which you can cut or copy.
Some apps, such as Contacts and Email, offer both the Copy All and Select
All features to perform different text selection tasks. See the app section in
this guide for details.
2 Tap the list item you want.
Chapter 4 : Work with applications 47
Page 48

Save information
3 While pressing and holding Option , tap the app icon.
• On most screens, your information is saved automatically. Just make the
back gesture to close the screen (see Go up one level in an app (back
gesture)), and your info is saved at the same time.
• Your info is also saved if you minimize an app to a card in Card view and
throw the card off the top of the screen to close the app.
• On screens with a Done button, either tap Done or make the back
gesture to save your information.
Close applications
• In Card view (see Manage applications in Card view), throw the card off
the top of the screen. To close a card stack, you must close each card
individually.
4 Ta p Delete.
TIP You can also delete an application you installed by opening the Launcher,
opening the application menu, and tapping List Apps. On the list of applications,
tap and hold an app name or throw the app off the side of the screen, and then tap
Delete.
Manage applications in Card view
Card view displays open applications as small cards so that you can easily
scroll through them and drag them to change their order.
When you have no open applications, your smartphone displays Card view
automatically. You don’t have to do anything to open Card view. When no
cards are open, Card view shows only the Just Type field (see Just Type),
your wallpaper (see Change your wallpaper), and Quick Launch (see Open
an application in Quick Launch).
Delete applications
You can delete applications that you installed on your smartphone.
1 Open the Launcher (see Open an application in the Launcher).
2 Scroll to the page containing the app you want to delete.
48 Chapter 4 : Work with applications
1 Just Type field
2 Wallpaper
3 Quick Launch
Page 49

When an application fills the screen and you want to go to Card view, do
one of the following:
2 Tap a card to maximize the application.
• Tap the center of the gesture area.
• Make the up gesture: Flick up from the gesture area to the screen.
Work with stacked cards
If you are working in an application and perform an action that opens a new
screen or launches a second application—for example, composing a new
email from your Inbox or dialing a phone number from Contacts (which
opens the Phone app)—your smartphone treats the app screens as a group.
If you minimize one of the screens, that screen and all screens associated
with it appear as a set of stacked cards in Card view.
You can also manually stack and unstack cards.
Move among cards and stacks
TIP You can also maximize the center card in Card view by tapping the center of
the gesture area, or by flicking down from the screen to the gesture area.
TIP You can set a preference to move among open apps without first going to
Card view (see Tu r n a dv an ce d ge st u re s o n/o f f).
Reorder/stack single cards
1 In Card view (see Manage applications in Card view), tap and hold a
card.
2 After the card becomes transparent, do one of the following:
• To stack the card: Drag the card on top of another card. Release
when the cards are positioned to be stacked.
• To change the card order: Drag the card to another position.
1 In Card view (see Manage applications in Card view), swipe left or
right on the screen to see other open apps.
TIP To unstack cards, tap and hold a card in a stack, and drag it to a position
outside the stack.
Chapter 4 : Work with applications 49
Page 50

Reorder a card within a stack
Reorder Quick Launch icons
1 In Card view (see Manage applications in Card view), tap and hold the
card you want to move.
2 After the card becomes transparent, drag it across the other cards in
the stack to another position.
Line up your favorite applications in Quick Launch
Quick Launch is a convenient lineup of your favorite apps. When you swap
an app icon into Quick Launch, you don’t remove it from the Launcher; you
have access to the icon in two places.
1 Open the Launcher (see Open an application in the Launcher).
2 Scroll to the page containing the app icon you want to move into
Quick Launch.
3 Tap and hold the icon, and wait for the visual cue that the icon is ready
to be dragged. The Launcher pages become a series of cards. Quick
Launch appears at the bottom of the screen.
4 Drag the icon on top of the Quick Launch icon you want to replace.
The current Quick Launch icon disappears, and the new one takes its
place. The icon that disappeared from Quick Launch is still available in
the Launcher.
You can change the position of any Quick Launch icon except the Launcher
icon.
1 In Card view (see Manage applications in Card view), tap and hold a
Quick Launch icon.
2 Wait for a visual cue, and then drag the icon to another location on the
Quick Launch bar.
Manage applications in the Launcher
Reorder Launcher icons
NOTE If Quick Launch contains fewer than five icons, you can drag the app icon
from the Launcher between two Quick Launch icons to drop it into the blank
space. If you simply want to remove an icon from Quick Launch without replacing
it, go to Card view, tap and hold a Quick Launch icon, and drag it off the bar. The
only one you can’t remove is the Launcher icon.
50 Chapter 4 : Work with applications
1 In the Launcher (see Open an application in the Launcher), tap and
hold an icon, and wait for the visual cue that the icon is ready to be
dragged. The Launcher pages become a series of cards.
Page 51

2 Drag the icon to a new location on any page.
3 Scroll to the page you want to move.
4 Tap and hold the page.
5 Drag the page to its new location, and release.
6 (Optional) Repeat steps 3–5 to move other Launcher pages.
Rename a Launcher page
1 Open the Launcher (see Open an application in the Launcher).
TIP You can also add your closest contacts and favorite websites to the Launcher
(see Add a contact entry to the Launcher and Add a web page to the Launcher),
and then organize your Launcher icons and pages to create a page of contacts and
a page of websites.
Add a Launcher page
1 Open the Launcher (see Open an application in the Launcher).
2 Open the application menu and tap Add Launcher Page. The page
appears to the right of the page that was displayed when you opened
the menu.
3 Enter a new name for the page.
4 Tap outside the field or press Enter to accept the new name.
Reorder Launcher pages
1 Open the Launcher (see Open an application in the Launcher).
2 Scroll to the page you want to rename.
3 Tap and hold the current name.
4 When the current name is highlighted, enter a new name.
5 Tap outside the field or press Enter to accept the new name.
Delete a Launcher page
Before you delete a Launcher page, you must move all the icons to another
page, as described here. You can’t delete a page displaying any icons.
1 Open the Launcher (see Open an application in the Launcher).
2 Scroll to the page you want to delete.
3 Move the icons that appear to another Launcher page (see Reorder
Launcher icons), or delete the icons for applications you installed (see
Delete applications).
4 Tap in the center of the empty page.
2 Open the application menu and tap Reorder Launcher Page. This
reduces the Launcher pages to a series of cards.
Chapter 4 : Work with applications 51
Page 52

Manage online accounts
You can also set up your smartphone to post photos to online accounts such
as Facebook or Photobucket. See Set up an online pictures account on your
smartphone.
You can set up online accounts in the Accounts application, or in individual
applications on your smartphone. The online account must already be set
up on the web or server before you can add it to your smartphone.
KEY TERM Online account An online account is a web-based or server-based
location, such as Google, Yahoo!, or Exchange, where you keep contacts and/or
calendar information. These accounts often have an email component as well.
Such web-based or server-based accounts are sometimes talked about as being “in
the cloud.”
The HP Synergy feature works in the background to get data from an online
account onto your smartphone. After you set up one of these accounts on your
smartphone, you can access the data from that online account. For some kinds of
accounts, you can also add and change data on your smartphone, which is then
synchronized to the online account in the cloud.
Whether you decide to set up your online accounts in the Accounts app or
from within an individual app, the process is the same. You can specify
which apps should get data from the online account. For example, you can
choose to set up your Google account so that your smartphone displays
your Google contacts, Google Talk instant messages, and Gmail messages,
but not your Google calendar events.
• To set up an online account in the Accounts app: See Use the Accounts
application to set up an online account for details.
• To set up within an individual app: The first time you open Email,
Contacts, Calendar, or Messaging, you are given the option to enter
settings for one or more online accounts. See Set up email, Use Contacts
for the first time, Use Calendar for the first time, or Set up an instant
messaging (IM) account.
See Online accounts available for HP webOS smartphones for the current
list of default online accounts that synchronize your info and those that do a
one-way transfer of info either from the web to your smartphone, or from
your smartphone to the web.
NOTE If you are setting up your smartphone for the first time and downloading a
large number of contacts or calendar events from an online account to your
smartphone, you may not see all your data on your smartphone right away. Some
online account providers such as Google set limits on the amount of data that a
user can import in a given time frame. Also, if you have many years’ worth of data
or thousands of entries in an online account, you may want to review the data and
reduce the number of entries before setting up the account on your smartphone.
Filling your smartphone memory with a large number of account entries can affect
performance.
Use the Accounts application to set up an online account
1 Open Accounts .
You can add more accounts at any time using the Accounts app or the
preferences in any of the applications mentioned above. See Set email
preferences, Customize Contacts, Customize Calendar, or Set up an instant
messaging (IM) account.
52 Chapter 4 : Work with applications
2 Ta p Add Account.
Page 53

3 Do one of the following:
• To add one of the listed accounts: Tap the account name.
• To search for other accounts: Tap Find More. This displays a list of
available online accounts. Tap the account you want to download
and install it.
4 Enter your username and password, and tap Sign In.
5 Depending on the account, you may be presented with options for
which apps should download data from that account. For each app,
tap On or Off, and then tap Create.
Use the Accounts application to edit or delete an online account
If you change the username, email address, or password you use with an
online account, you need to enter the new information in the account
settings on your smartphone. You can do that from within one of the
applications associated with that account, or from the Accounts app.
1 Open Accounts .
2 Tap the account name.
3 Do one of the following:
• To change the account display name: Under Account Name, tap
the current name to highlight it, and enter the new name.
• To change which applications are associated with the account: For
each app listed, tap On or Off.
• To edit the account information: Tap Change login settings, enter
the new username and password, and tap Sign In.
• To delete the account: Tap Remove account. Tap Remove Account
again to confirm.
Chapter 4 : Work with applications 53
Page 54

IMPORTANT If you delete an account from your smartphone using the
Accounts app, all data is removed from all apps on your smartphone associated
with the account. The account itself still exists online. For example, if you delete an
Exchange account using the Accounts app, all your Exchange data is removed
from Email, Contacts, Calendar, and Tasks. If you want to delete data only from
one app served by the account—for example, you want to delete the calendar
events but keep the contacts—simply turn that app off for that account.
View and work with notifications
Notifications show up at the bottom of the screen to notify you of new
voicemail and messages, upcoming appointments, missed calls, application
updates, and more. Some notifications also display app controls, such as
music playback controls, when you are not in the app itself.
There are several kinds of notifications:
Banner alert: This is a notification that appears in a small strip at the
bottom of the screen. Some banner alerts appear as confirmation of an
action—for example, to confirm that text was selected or copied. Others
notify you of an item you can act on—for example, a missed call or an
incoming text message. For these alerts, if you do not tap the alert after a
few seconds, it becomes an icon in the lower-right portion of the screen. Tap
the bottom of the screen to display the alerts as dashboard items.
Dashboard item: The dashboard provides an expanded view of all
notifications you can act on. For example, you can tap a voicemail
dashboard item to check your voicemail, or a calendar dashboard item to
open your calendar.
If the dashboard item has a number next to it, the number indicates how
many items are included in the notification—how many voicemail or email
messages you have, and so on.
54 Chapter 4 : Work with applications
Page 55

Some dashboard items enable you to perform multiple actions. For example:
• On a calendar dashboard item, tap the calendar icon to open Calendar in
Day view with the event displayed, or tap the event name to open the
event details screen.
• For a missed call, tap the icon to open your call history, or tap the missed
call item to call back the number.
• If an item’s icon displays a number, tap the icon to open the associated
app to the list view (such as an Email inbox), or tap the item itself to open
that individual item (such as an email message).
To delete a dashboard item, throw it off the side of the screen.
Pop-up notification: This is a larger notification that you can act on right
away. Examples of pop-up notifications are incoming call notifications,
calendar appointment notifications, and alarms.
App controls: If you are listening to songs in Music and leave the app, the
music playback controls remain displayed at the bottom of the screen. This
lets you continue to manage music playback without having to go back into
the app.
Create and work with favorites
You can quickly reach your closest contacts by phone, email, or text/
multimedia message by designating them as favorites. Creating a favorite
from a contact lets you view and touch base with that contact in just a few
taps.
You can create and manage favorites in Contacts (see Create a favorite) and
in Phone (see Create a favorite).
You can view favorites in the following apps:
Phone: See all your favorites by tapping on the dial pad. In your call
history list, calls to and from favorites are noted by a star. If you enter a
contact name to call a contact, matching favorites appear at the top of the
search results list and are noted by a star.
NOTE By default, if a banner alert or pop-up notification arrives when the screen
is off, the gesture area light pulses. You can turn this feature off (see Get
notifications when the screen is locked or off).
Chapter 4 : Work with applications 55
Page 56

Contacts: See all your favorites by tapping Favorites on the contacts list
screen. On your complete contacts list, favorites are noted by a star.
Just Type: When you enter a search term, matching favorites appear at the
top of the contacts search results and are noted by a star.
Email and Messaging: When you begin typing a contact name to address a
message, matching favorites appear grouped at the top of the search results
list and are noted by a star.
56 Chapter 4 : Work with applications
Page 57

Copy files and sync your personal data
You didn’t buy your HP Veer 4G simply to make calls;
you bought it because it’s also a handheld computer
with lots of the features and functions of your desktop
computer. One important feature that your
smartphone shares with your computer is that it has
storage space for your files and for your personal data.
This chapter explains how to get these two kinds of
data—files and personal data—onto your smartphone.
Copying files to your smartphone is easy. Getting your
personal data onto your smartphone is also easy; you
just need to decide where you want that data to be
stored and how you want to access it.
In this chapter
58 Copy files between your smartphone and your
computer
59 Overview: Get your personal data onto your
smartphone
61 Transfer data from an old phone
61 Export data from a desktop organizer on your
computer
62 Get data from an online account in the cloud
63 Sync your desktop organizer and your smartphone
Chapter 5 : Copy files and sync your personal data 57
Page 58

Copy files between your smartphone and your
1 Connect your smartphone to your computer using the USB cable.
computer
Copy files and folders using USB Drive mode
You can copy any type of file from a computer to your smartphone, and
from your smartphone to your computer, by putting your smartphone in
USB Drive mode. In this mode, your smartphone appears as a removable
hard drive to your desktop computer.
After you copy a file to your smartphone, you can open the file if your
smartphone has an application that supports the file type. You can open
many file formats for photos, videos, and music; Microsoft Office files; and
PDF files. You can also copy ringtones that you download from your
computer’s web browser.
IMPORTANT All files that you store on the USB drive of your smartphone are
not backed up to your Palm profile, and they cannot sync to any of your online
accounts. So be sure to keep a copy of all such files somewhere besides your
smartphone just in case you lose your smartphone or you must do a full erase of
the info on your smartphone. For example, from time to time, you may want to
back up photos and videos you recorded on your smartphone by copying them to
a computer. Or, if Amazon MP3 is available, you may have purchased MP3 music
on your smartphone and wish to enjoy it on another playback device. Your photos
and videos taken using your smartphone are stored in the DCIM folder of your
smartphone’s USB drive. Downloaded music files are stored in the AmazonMP3
folder.
2 On your smartphone, tap USB Drive. On your computer, your
smartphone appears as a removable drive.
3 On a Windows computer, if the Found New Hardware wizard opens,
click Cancel to close the wizard.
4 Open My Computer (Windows XP), Computer (Windows
Vista/Windows 7), or the Finder (Mac), double-click the drive
representing your smartphone, and drag and drop files to your
smartphone. The drive displays folders that you can use to organize
the files you copy. You can also create your own folders.
NOTE If you copy ringtones to your smartphone, be sure to place them in the
ringtones folder on your smartphone’s USB drive. Photos and videos taken on the
smartphone are in DCIM > 100Palm.
5 End the connection safely. If you do not eject safely, your smartphone
resets when you disconnect the USB cable:
• On a Windows computer, right-click the drive representing your
smartphone and click Eject.
• On a Mac computer, from your desktop, drag the drive representing
your smartphone to the Tra s h . Trash changes to Eject.
6 Disconnect the USB cable from the computer when the USB drive
screen is no longer displayed on your smartphone.
BEFORE YOU BEGIN Before you copy files from your computer, make
sure you have enough storage space on your smartphone to fit the files.
Open Device Info and look at the Available field under Phone.
When your smartphone is in USB Drive mode, incoming calls go to
voicemail; you can’t make calls or use any other application until you
complete step 5 below.
58 Chapter 5 : Copy files and sync your personal data
Delete files and folders using USB Drive mode
When your smartphone is in USB Drive mode, you can’t make or receive
calls or use other wireless features such as email or the web.
1 Connect your smartphone to your computer using the USB cable.
Page 59

2 On your smartphone, tap USB Drive. On your computer, your
smartphone appears as a removable drive.
3 On a Windows computer, if the Found New Hardware wizard opens,
click Cancel to close the wizard.
Overview: Get your personal data onto your smartphone
4 Open My Computer (Windows XP), Computer (Windows
Vista/Windows 7), or Finder (Mac), double-click the drive
representing your smartphone, and delete the files or folders.
5 End the connection safely. If you do not eject safely, your smartphone
resets when you disconnect the USB cable:
• On a Windows computer, right-click the drive representing your
smartphone and click Eject.
• On a Mac computer, from your desktop, drag the drive representing
your smartphone to the Tra s h . Trash changes to Eject.
6 Disconnect the USB cable from the computer and the smartphone
when the USB drive screen is no longer displayed on your smartphone.
Copy music, photos, and videos using third-party software
Besides using USB Drive mode to copy your photos, videos, and DRM-free
music between your computer and your smartphone, you can also use
solutions available from third-party software developers (sold separately)
that facilitate the transfer of media files to your smartphone. For more
information, open the browser on your computer and go to
palm.com/sync-solutions.
KEY TERM DRM-free: Describes a file that is not protected by Digital Rights
Management. DRM-free files can be copied as many times as you like and can be
played on your Veer.
Your personal data consists of the following:
• Your contact list (names, phone numbers, street and email addresses)
• Your calendar events
• Your tasks (to-do list)
• Yo ur me mo s/n ot es
On your computer, you typically store such personal data in organizer
software like Microsoft Outlook, Palm Desktop by ACCESS, or the Mac’s
iCal and Address Book software.
It’s also likely that you store some personal data in accounts that you created
on the web. These are called online accounts. Sometimes you’ll hear that
data stored in online accounts is stored “in the cloud.” That’s just another
way to say that your data is stored on a server that you access through the
Internet. For example, if you have a Google/Gmail or a Yahoo! account, you
have a contact list stored in the cloud. You may even use the calendars in
these accounts to keep track of your schedule, so you may also have
calendar events stored in the cloud.
Finally, you may have important phone numbers stored only on an old
phone. You no longer use that phone now that you have a Veer, but you
want those numbers on your new smartphone.
You want to be able to access all this data on your smartphone. This section
explains how you can do that. The actual how-to part of getting your
personal data on your smartphone is pretty simple. But before you take that
step, we recommend that you spend some time thinking about where you
want your personal data to be stored and how you want to access it.
On your smartphone and in the cloud: You can set up a sync relationship
between your smartphone and an online account in the cloud. This enables
you to create and change data in one place—on your smartphone or in the
online account—and have it show up in both places.
Chapter 5 : Copy files and sync your personal data 59
Page 60

On your smartphone and on your computer: You can set up a sync
relationship between your smartphone and selected desktop organizers.
Different kinds of sync relationships are possible using third-party solutions.
This enables you to create and change data in one place—on your
smartphone or in the desktop organizer—and have it show up in both
places.
On your smartphone only: Store and create contact and calendar data in
your Palm profile account. It’s backed up to your Palm profile in the cloud.
You cannot create, change, or look at your Palm profile account data except
on your smartphone.
For further information about getting personal data onto your smartphone,
see palm.com/migrate-webOS.
What do we recommend? We recommend that you set up a Google
account and move your contacts and calendar data to the cloud. That way,
you can access, create, and change your data both on your smartphone and
in your Google online account. The remaining personal data that you create
on your smartphone—tasks and memos—are automatically backed up as
part of your Palm profile.
Use the following table to review your options. Then click the link to learn
how to complete the solution you choose for your personal data.
NOTE Data that you store in your Palm profile account cannot be accessed
anywhere but on your smartphone. Palm profile account data is backed up daily.
No one, not even you, can see that data.
These solutions are not mutually exclusive. Do what works best for you. You
could potentially use all these solutions. You could, for example, sync several
online accounts, including an Exchange account; sync data with a desktop
organizer using a third-party solution; and store and create new data in your
Palm profile account.
Table 1. Data transfer and synchronization solutions for HP webOS smartphones
My personal data is here I want to access data here Do this Learn how here
Online account (Google, Yahoo!,
Facebook, and so on)
Corporate Exchange account My smartphone and
My smartphone and my online
account
Outlook/other corporate email
Set up the online account on your smartphone See Manage online
accounts
Set up an online account for Exchange on your smartphone See Manage online
accounts
app on my computer
Desktop organizer software—
and I want to stop using it
My smartphone and maybe
elsewhere
Export your personal data from the desktop organizer and add
it to an account on your smartphone, either an online account
(accessible in the cloud) or your Palm profile account
See Export data from a
desktop organizer on your
computer
(accessible only on your smartphone)
Desktop organizer software—
and I want to keep using it
My smartphone and my desktop
organizer
Set up a sync relationship between the smartphone and your
desktop organizer using a third-party solution
See Sync your desktop
organizer and your
smartphone
An old phone My smartphone and maybe
elsewhere
Work with your wireless service provider to transfer data from
the old phone to an account on your new smartphone, either
See Transfer data from an
old phone
an online account (accessible in the cloud) or your Palm
profile account (accessible only on your smartphone)
Nowhere—I just want personal
My smartphone Create new contacts and new calendar events in your Palm
data on my smartphone
60 Chapter 5 : Copy files and sync your personal data
See Backup
profile account
Page 61

Transfer data from an old phone
BEFORE YOU BEGIN If you want the data from your old phone to be
transferred to an online account, be sure you set up that account on the web
and on your smartphone first.
BEFORE YOU BEGIN If you want the data from your desktop organizer to
be transferred to an online account, be sure you set up that account on the
web and on your smartphone first.
• On your computer, create an account on the Google website (go to
gmail.com) or in Exchange (speak to an IT person at your company).
• Set up the same account on your smartphone (see Manage online
accounts).
Otherwise, your data must be transferred to your Palm profile account (see
What is a Palm profile?).
1 On your computer, go to palm.com/migrate-webOS.
• On your computer, create an account on the Google website (go to
gmail.com) or in Exchange (speak to an IT person at your company).
• Set up the same account on your smartphone (see Manage online
accounts).
Otherwise, your data must be transferred to your Palm profile account (see
What is a Palm profile?).
• Go to a AT&T store and ask a support agent for help in transferring
data from your old smartphone. When you’re ready to transfer data
from your old smartphone, be sure to tell the agent which account to
transfer the data to.
Export data from a desktop organizer on your computer
2 Click the link for transferring Contacts/Calendar data from a desktop
organizer.
3 Read the instructions and follow the links to download the Data
Transfer Assistant.
NOTE If you are setting up your smartphone for the first time and downloading a
large number of contacts or calendar events from an online account to your
smartphone, you may not see all your data on your smartphone right away. Some
online account providers such as Google set limits on the amount of data that a
user can import in a given time frame. Also, if you have many years’ worth of data
or thousands of entries in an online account, you may want to review the data and
reduce the number of entries before setting up the account on your smartphone.
Filling your smartphone memory with a large number of account entries can affect
performance.
About the Data Transfer Assistant (DTA)
The DTA enables you to do a one-time, one-way export of data from
selected desktop apps to your Veer through the USB cable included with
your smartphone. After the data is on your smartphone, you can select the
account you want to import the data to.
Chapter 5 : Copy files and sync your personal data 61
Page 62

IMPORTANT The DTA is not synchronization software. It is meant to be used
once per desktop app, to export your info from the desktop app to an account on
your smartphone.
These are the desktop apps that the DTA works with, and the data that the
DTA transfers to your smartphone:
NOTE You cannot use the DTA to transfer Calendar and Contacts to a Yahoo!
account. Instead, you must use the upload tool provided by Yahoo!. Data is
transferred from your computer to Yahoo.com, and then from Yahoo.com to the
smartphone. Data is not transferred from the smartphone to Yahoo!. For more
information, go to palm.com/migrate-webOS.
Table 2. DTA: application data transferred
Operating
System
Windows
XP or
®
Vista
Windows
Desktop
application
Outlook 2003,
Contacts Calendar Tasks/ To
Memos/
dos
2007, or 2010
, or
Palm Desktop
Notes
7
Mac OS
10.5
Address Book
iCal
Note the following:
• If you use a desktop organizer that is not listed in the table, go to
palm.com/migrate-webOS and click the link for transferring
Contacts/Calendar data from “somewhere else”.
• Depending on the amount of data you are transferring, it can take up to an
hour to complete the transfer of your data.
• Do not use the DTA to transfer data from a copy of Outlook that is
associated with Exchange ActiveSync, which wirelessly syncs data
between your smartphone and an Exchange server (see Manage online
accounts).
• The DTA is compatible with Palm Desktop versions 4.14e, 4.2, 6.2, and
6.22. If your version of Palm Desktop is not one of these, you can
download version 6.2 for free from palm.com/desktop. Install it, sync with
your old Palm device, and then use the DTA to transfer your data.
• If you use Palm Desktop on the Mac, you can export your contacts,
calendar events, and To do items into Address Book and iCal. Then use
the DTA to transfer your data. For more information, go to
palm.com/migrate-webOS.
Get data from an online account in the cloud
If you are already using Google, Facebook, Yahoo!, and/or Exchange to
manage your calendar and contacts, then all you need to do to sync data to
your smartphone is set up one or more of these accounts on your
smartphone. The data syncs automatically. See Manage online accounts for
information on how to create an online account on your smartphone.
Table 3. Online account sync table
Set up your Veer to sync with... To sync this data...
Google Contacts and calendar events
Exchange Contacts, calendar events, and tasks
Yahoo! Contacts and calendar events
Facebook Contacts and calendar events
62 Chapter 5 : Copy files and sync your personal data
Page 63

NOTE Changes you make in your Yahoo! or Facebook account on the web show
up on your smartphone. There's nothing you have to do. You cannot, however,
change Yahoo! or Facebook contacts and calendar events on your smartphone.
Sync your desktop organizer and your smartphone
If you prefer to sync your Veer directly to your computer without going
through the web, using Wi-Fi, Bluetooth technology, or your smartphone’s
USB cable, you can download a third-party application (sold separately) that
enables synchronization of your smartphone directly to your desktop.
1 Go to palm.com/sync-solutions to learn about third-party applications
that enable you to sync your smartphone with your computer.
2 Follow the instructions given by the third-party vendor to install the
app on your computer.
If you want to continue using a desktop organizer to store your contacts,
calendar events, and tasks—iCal and Address Book on the Mac, or desktop
Outlook
choices:
• Sync directly with your desktop organizer, avoiding the web completely.
• Sync your desktop organizer with Google on the web, and then sync
Both choices require you to use a third-party solution (sold separately). Go
to palm.com/sync-solutions to learn more about these third-party solutions.
®
or Palm Desktop by ACCESS on Windows—you have two
Google with your smartphone.
Sync directly with your desktop organizer
NOTE You may also have to install another part of the application on your
smartphone. Follow the instructions of the third-party vendor.
Sync your desktop organizer to Google, and Google to your smartphone
Download and install a third-party application (sold separately) that can
sync your desktop app to Google. Your desktop app syncs with your Google
account, and your smartphone also syncs with Google.
1 On your computer, set up an account on the Google website if you
don't already have one (go to gmail.com).
Chapter 5 : Copy files and sync your personal data 63
Page 64

2 Set up your Google account on your smartphone. See Manage online
accounts.
3 Install a third-party application on your computer that enables you to
sync with Google. Go to palm.com/sync-solutions to learn about
available third-party sync solutions.
4 Follow the instructions given by the third-party vendor to sync the data
in your desktop app with Google. The next time Google syncs with
your smartphone, your data appears on your smartphone.
64 Chapter 5 : Copy files and sync your personal data
Page 65

Phone
Your HP Veer 4G enables you to effectively manage
multiple calls. You can answer a second call, swap
between calls, and set up a six-way conference call.
Use Just Type to make a call by typing your contact’s
first and last initials.
You can also work with other applications while on a
call. Your Veer helps you to do all these tasks with
ease.
In this chapter
66 Make calls
70 Receive calls
71 Use voicemail
71 What can I do during a call?
74 What’s my number?
75 View your call history
75 Work with favorites
77 Save a phone number to Contacts
77 Use a phone headset
79 Customize smartphone settings
83 Use SIM Toolkit
Chapter 6 : Phone 65
Page 66

Make calls
Dial by contact name using voice dialing
1 To open Voice Dial, do one of the following:
For information on how to turn the phone on your smartphone off and back
on, see Turn wireless services off (airplane mode).
* These indicate that the phone is on. You can make and receive calls.
• Open Vo i ce D ia l .
• Press and hold volume.
• Open Phone , and tap and hold .
• If you have a headset connected to your smartphone, press and hold
the button on the headset.
NOTE The first time you open Voice Dial, a brief audio tutorial explains how to
use voice dialing. You can choose to skip the tutorial.
* These indicate that the phone is off (airplane mode). You cannot make calls. Incoming calls
go to voicemail.
66 Chapter 6 : Phone
2 Say the contact name, number, or name and number type (such as
“John Smith mobile”).
3 If prompted, provide additional information for the number you want
to call. For example, if you say a contact name only, and you have
multiple phone numbers for that contact, Voice Dial prompts you to
say the type of number you want to call. Or, if you say a contact name
that matches more than one contact in your contacts list, Voice Dial
prompts you to specify which contact you want.
Page 67

Additional Voice Dial commands: You can say any of the following voice
commands when Voice Dial is open:
• To redial the last number called: Say, “Redial.”
• To check voicemail: Say, “Voicemail.”
• To repeat the last audio prompt: Say, “Repeat.”
• To go back one step and repeat the preceding audio prompt: Say, “Back”
or “Try Again.”
• To start from the beginning: Say, “Restart,” “Reset,” or “Start Over.”
• To exit Voice Dial without making a call: Say, “Cancel,” “Stop,” or “Exit.”
You can also exit Voice Dial by tapping Cancel, pressing and holding
volume, closing the Voice Dial app, or pressing the button on an attached
headset.
TIP You can turn on a preference that allows you to use voice dialing when the
screen is locked (see Use voice dialing when the screen is locked). If this preference
is on, you can access voice dialing by first turning the screen on if it is off (by
pressing power or sliding out the keyboard), and then pressing and holding
volume. You do not need to enter your PIN or password. If this preference is on
and you have a headset attached to your smartphone, you can access voice dialing
when the screen is locked by pressing and holding the button on the headset—you
don’t need to turn the screen on first.
TIP You can use voice dialing to call any contact number type except the
following: fax, pager, assistant, and radio. Some of these types appear for contacts
in certain online accounts only (such as a Google or Exchange contact).
2 Begin typing the contact first or last name, or initials.
3 Tap one of the contact’s phone numbers to dial it. If only the contact
name appears, tap the name to display the phone numbers for that
contact, and tap a number.
Dial using the onscreen dial pad
The onscreen dial pad is useful when you need to dial numbers that are
expressed as letters and when you need large, brightly lit numbers that you
can tap.
Dial by contact name using Just Type
1 Display Card view (see Manage applications in Card view) or open the
Launcher (see Open an application in the Launcher).
1 Open Phone .
Chapter 6 : Phone 67
Page 68

2 Tap the dial pad numbers to enter the number.
3 Ta p to d ial .
TIP Press Backspace or tap the onscreen backspace icon (at the top of the screen,
to the right of the number you entered) to delete numbers one at a time. Tap and
hold the icon to delete all the numbers.
TIP You can paste numbers copied from other applications—for example, from an
email message or a memo—into the dial pad.
2 When you finish entering the number, press Enter or tap the
number to dial.
TIP If you turn off the preference to show contact matches in the dial pad (see
Turn contact match display on/off), this changes how you dial using the keyboard
in the Phone application. In Phone, after you enter the number with the keyboard,
tap the onscreen dial icon to dial.
TIP To enter +, tap and hold 0 onscreen.
Dial using the keyboard
1 In the Launcher, Card view, or Phone, use the keyboard to enter the
number. You do not need to press Option to enter numbers, *,
or #.
68 Chapter 6 : Phone
Dial a favorite
See Create a favorite for instructions on creating a favorite.
1 Open Phone .
2 Ta p .
Page 69

3 Tap the favorite. The call is made using the default number you
selected for that favorite.
• If your company uses Microsoft Exchange Server with a Global
Address List (GAL), entering the contact search information returns
matching results from the GAL as well. GAL results appear with the
icon next to the name.
Dial using a speed dial
See Assign a speed dial to a contact for instructions on creating a speed dial.
• In the Launcher, Card view, or Phone, press and hold the speed-dial key
you assigned to the number.
Dial by contact name in the Phone application
See How do I add names and other info into Contacts? for instructions on
adding contacts to your smartphone. You can also look up and dial contacts
using Just Type (see Dial by contact name using Just Type) or Voice Dial (see
Dial by contact name using voice dialing).
1 Open Phone .
2 Using the keyboard, enter a name or initials until the contact you want
appears. Note the following:
• If you press E, R, or any other key that displays both a letter and a
number, you see both matching names and numbers onscreen.
3 Tap the number.
TIP If you do not want contact matches to appear when you type a number on
the keyboard, you can turn off the Show Contact Matches preference (see Tu r n
contact match display on/off). When this preference is off, you can still dial by
contact name in the Phone application. After opening Phone, tap the contact list
icon to the right of “Enter name or number.” Type the contact name or initials, and
tap the number when it appears.
Redial the last number dialed
1 Open Phone .
2 Tap . When the contact name or number appears at the top of the
screen, tap again to dial.
Chapter 6 : Phone 69
Page 70

Dial your national emergency number
To dial 911, do the following:
Receive calls
1 Press power to wake up the screen if needed.
2 Drag up to unlock the screen if needed.
3 Do one of the following:
• If Secure Unlock is not on (see Set options for unlocking the screen),
tap the center of the gesture area to display Card view if Card view is
not displayed. Enter the emergency number, and tap the number to
dial. You don’t have to press Option to enter numbers.
• If Secure Unlock is on, tap Tap to dial emergency call, and then tap
Emergency call. Edit the displayed number if needed, and then tap
to dial.
NOTE If the phone is turned off (that is, if it’s in airplane mode), you don’t have to
turn it on. It automatically tries to connect to a network to make the call.
Dial from another application
If a phone number appears in another application as an underlined link, you
can begin dialing the number directly from that application. For example,
you can dial phone numbers that appear in web pages; in messages (email,
text, or multimedia); or in notes to calendar events.
If you want to answer calls, the phone must be on. This is different from
having only the screen turned on (see Turn your smartphone on/off). When
the phone is off, your calls go to voicemail.
You can pick the ringtone for incoming calls (see Select a file from the
ringtones folder as a ringtone). You can set a ringtone for individual contacts
as well (see Add a ringtone to a contact).
Answer a call
Do one of the following:
• If the screen is on when the smartphone starts ringing, tap .
1 If a phone number appears as an underlined link, tap the number. This
displays the dial pad with the number already entered.
2 Ta p to d ia l .
In Messaging, you can dial a contact from a conversation by tapping Te x t or
the IM account name in the upper-right corner of the screen to open a list of
phone numbers you have for that contact, and then tapping next to the
number you want to call.
70 Chapter 6 : Phone
• If the screen is off, drag up to unlock the screen and answer the call.
• If a headset is attached, press the button on the headset.
• If the smartphone is placed on an HP Touchstone charging dock (sold
separately), simply lift the smartphone off the dock to automatically
answer the call.
Page 71

TIP You can see a photo of the person calling you by assigning a caller ID photo.
See Add a photo to a contact.
Use voicemail
TIP If you miss a call, a notification appears at the bottom of the screen. Tap the
notification to open the missed call dashboard item. On the dashboard item, tap
the name or number to call the person back, or tap the icon on the left to open
your call history (see View your call history).
Silence the ringer on an incoming call
When you silence the ringer on an incoming call, you can answer the call or
let it ring through to voicemail.
Do one of the following:
• Press power .
• Press volume.
• Slide the ringer switch off (red means off). This silences the ringer and
any notification sounds. These sounds remain off until you slide the ringer
switch back on. Other sounds, such as music and video playback, are not
affected by sliding the ringer switch off.
Ignore a call
Set up voicemail
1 Do one of the following:
• In the Launcher, Card view, or Phone, press and hold 1 .
• Open Phone . Then tap .
• Open Phone . Then tap and hold 1 onscreen.
2 Follow the voice prompts to set up your voicemail.
Listen to voicemail messages
1 Do one of the following:
• In the Launcher, Card view, or Phone, press and hold 1 .
• Tap a voicemail notification at the bottom of the screen.
• Open Phone . Then tap .
• Open Phone . Then tap and hold 1 onscreen.
2 Follow the voice prompts to listen to your messages.
To send a call immediately to voicemail, do one of the following:
• Tap .
• Press power twice.
To reply to a caller who is in your Contacts list after you ignore a call, tap the
ignored call notification. This opens the caller’s contact entry, where you can
select a reply method. To reply to a caller who is not in your Contacts list, go
to your call history (see View your call history).
What can I do during a call?
Your smartphone offers many advanced telephone features, including call
waiting, conference calling, and call forwarding. These features depend on
your service plan. Contact AT&T for more information.
While you’re on a call, info about the call appears on the call screen. When
you’re on a call, you can open other applications and work in them, and you
won’t lose your call. See Open applications.
Chapter 6 : Phone 71
Page 72

If you created a reminder in the contact info of a caller, the reminder appears
as a notification when you make a call to or receive a call from the person.
See Assign a reminder message to a contact.
NOTE If you hold the smartphone up to your ear while you’re on a call, the
screen goes dark to prevent your accidentally tapping an item on the screen. This
is normal behavior. See Why the screen goes dark for more information.
* Vo l um e
Manage a call
Do any of the following:
• Put the call on speakerphone: Tap .
• Mute the microphone so you can’t be heard: Tap .
TIP You don’t need an on-hold button to put a call on hold. Just tap the mute icon
to mute your end of the line.
• Open the dial pad to enter numbers for navigating phone trees,
responding to prompts, and so on: Tap .
• Add a call: See Make a second call.
• Adjust call volume: Press volume.
DID YOU KNOW? You can send and receive text messages during a call. This is
a great way to stay connected with friends and colleagues during a long call (see
Create and send a text or multimedia message).
End a call
Do one of the following:
• Tap .
• Minimize the call screen to a card, and throw the card off the top of the
screen.
• If a headset is attached, press the button on the headset.
Use another application while on a call
The applications that you can use when you’re on a call depend on the kind
of network your smartphone is connected to. How can you tell which kind of
network you’re connected to? See Icons in the title bar.
GPRS network: You can use the personal information applications
(Contacts, Calendar, and so on) and send and receive text messages. But
some kinds of data connections are not possible: You cannot browse the
web, or send or receive email, multimedia, or instant (IM) messages. To
browse the web or send or receive email or IM messages while on a call,
you must connect to a Wi-Fi network. See Wi-Fi.
72 Chapter 6 : Phone
Page 73

4G or 3G network: You can make simultaneous voice and data
connections. So when you’re on a call, you can also send and receive email;
browse the web; and send and receive text, multimedia, and IM messages.
NOTE You can’t send or receive multimedia messages using a Wi-Fi network.
1 While on a call, do one of the following:
• Display Card view (see Manage applications in Card view) and
begin typing the name of the app.
• Open the Launcher (see Open an application in the Launcher).
• Open Quick Launch (see Open an application in Quick Launch).
2 Tap the application to open and work in it.
3 Tap the call notification at the bottom of the screen to return to the call
screen.
Make a second call
Switch between two calls
• Tap to put the active call on hold and switch to the other call.
For example, in the screen shown here, the call on the top of the screen,
555-0267 is currently on hold. The call on the bottom of the screen,
555-7592, is the active call—the caller you’re talking to. To switch between
the two, so that you switch to talking to 555-0267, tap . Just remember to
tap to switch between the two calls.
1 While on a call, tap . This does not mute the microphone or put
the first call on hold.
2 Dial the second call.
Answer a second call (call waiting)
When a second call notification appears, tap . The first call is put on hold.
Tap to end either call. If you end the currently active call, the call on hold
becomes active.
Make a conference call
You can join up to five calls into a six-way conference call. The number of
calls you can join in conference depends on your service plan. Additional
charges may apply, and minutes in your mobile account may be deducted
for each call you make. Contact AT&T for more information.
1 Make or answer a first call, and then make or answer a second call.
Chapter 6 : Phone 73
Page 74

2 Tap to create the conference call.
3 Do any of the following:
Look up or send a message to a contact
When you’re on a call with a contact, tap the contact name to see the
person’s information in Contacts. With the contact entry open, you can do
the following:
• Tap to send the contact a text message. For example, if the contact is
on hold while you’re having a long conversation with a second caller, you
can send the contact a text stating that you’ll call him or her back.
• Ta p Edit to edit the contact entry. For example, if a contact gives you his
or her new email address while you’re talking, you can enter the address
during the call.
What’s my number?
1 Open Phone .
2 Open the application menu and tap Preferences & Accounts. Your
phone number appears at the top of the Phone Preferences screen.
• To ad d ca l le rs : Ta p .
• To extract a call from the conference and talk privately: Tap the caller
name or number, and then tap .
• To return an extracted call to the conference: Tap .
4 When you’re done, tap to end either an extracted call or the
conference call.
74 Chapter 6 : Phone
TIP You can also see your phone number by opening Device Info. The number
appears as the first entry under Phone.
Page 75

View your call history
Your call history is more than just a log. It’s also a place where you can dial a
number, send a text message, and save or view contacts.
1 Open Phone .
2 Ta p .
3 Do any of the following:
• To delete a call history entry: Throw the entry off the side of the
screen. Tap Delete to confirm.
• To clear the call history: Open the application menu, tap Clear Call
History, and tap Clear Call History to confirm.
4 If you displayed additional options for the contact or number, do any of
the following:
• To call an alternate number for a contact: Tap the number.
• To send a text message: Tap .
• To save the number to Contacts: Tap Add to Contacts (see Save a
phone number to Contacts).
• To view a contact entry: Tap View Contact.
DID YOU KNOW? The additional options display includes the time and type
(incoming, outgoing, missed) of the call. If a call history entry collapses multiple
calls, the additional options show information for each call.
Work with favorites
• To switch the types of calls displayed: Tap All Calls or Missed Calls.
• To call a number: Tap the number.
• To display other options for the contact or number: Tap the contact
icon or the contact picture to the right of the number.
DID YOU KNOW? If a call history entry displays a number next to the contact
picture or icon, this indicates that you made and/or received multiple calls to or
from that phone number or contact in the same day. If you had calls to or from a
contact using more than one of that contact’s phone numbers, all calls are
collapsed into a single entry, and the most recently used phone number is
displayed.
You can quickly reach your closest contacts by phone, email, or text/
multimedia message by designating them as favorites. Creating a favorite
from a contact lets you view and touch base with that contact in just a few
taps.
For instructions on calling a contact you designate as a favorite, see Dial a
favorite.
Create a favorite
You can also create favorites in Contacts (see Create a favorite).
1 Open Phone .
Chapter 6 : Phone 75
Page 76

2 Ta p .
3 Ta p Add Favorite, search for the contact, and tap the contact when
the name appears.
3 Tap the contact photo or contact icon to the right of the favorite
name.
4 Do one of the following:
• To call the favorite using a different number: Tap the number.
• To send the favorite a text/multimedia message: Tap .
• To view the favorite’s contact entry: Tap View Contact.
Add a phone number to a favorite
If you create a favorite in Contacts, but the contact does not have a phone
number associated with it, you can add a phone number to the favorite in
Phone.
1 Open Phone .
4 If the contact has more than one phone number, tap the number you
want to set as the favorite. When you call the favorite, the call is made
using this number.
View favorite details
From the favorites list, you can dial a different phone number for that
contact, send a message, or view the favorite’s contact entry.
TIP In the favorites list, you can change the order of any favorite with an assigned
default number (see Create a favorite and Set or change the default number for a
favorite) by tapping and dragging. So you can put the people you call most at the
top of the list.
1 Open Phone .
2 Ta p .
2 Tap and tap the favorite.
3 Enter the number, and tap to select the phone number type (see
Create a contact for information).
4 Ta p Done.
NOTE You can enter more than one phone number for the favorite here. If you
do, you need to set one of the numbers as the default (see Set or change the
default number for a favorite).
Set or change the default number for a favorite
If you create a favorite in Contacts, but the contact has more than one
phone number associated with it, you need to set the default number for the
favorite in the Phone app.
Also follow these steps if you want to use a different number as the default
number for a favorite.
76 Chapter 6 : Phone
Page 77

1 Open Phone .
1 Do one of the following:
2 Ta p .
3 Do one of the following:
• To set a default number: Tap the favorite.
• To change the default number: Tap the contact photo or contact
icon to the right of the favorite name, and tap Change Default
Number.
4 Tap the number you want to use.
Remove a contact from the favorites list
When you remove a contact as a favorite, you do not delete the contact
itself. The contact no longer shows up as a favorite in Phone, Contacts,
Email, Messaging, or Just Type search results.
1 Open Phone .
2 Ta p .
3 Throw the favorite off the side of the screen. Tap Remove to confirm.
• If you enter a phone number in Just Type that is not associated with
a contact, tap Add to Contacts.
• Before dialing a number you entered in the dial pad, tap Add to
Contacts.
• During a call, tap at the top of the screen.
• After a call, from the dial pad, tap . Tap the contact icon to
the right of the number, and tap Add To Contacts.
2 Tap one of the following:
Add New Contact: Create a new contact for the phone number.
Add To Existing: Tap the contact you want to add the phone
number to.
Use a phone headset
You can connect a 3.5mm headset to your smartphone for hands-free
operation. You can also connect to a wireless headset using Bluetooth
wireless technology. Both 3.5mm and wireless headsets are sold separately.
®
TIP You can also remove a contact as a favorite from within the Contacts app (see
Remove a contact from favorites).
Save a phone number to Contacts
You can save the number from an incoming or outgoing call to an existing
contact, or create a new contact for the number. If an incoming call uses
caller ID blocking, you cannot save the number.
WARNING If driving while using a phone is permitted in your area, we
recommend using a headset or hands-free car kit (sold separately). However, be
aware that use of a headset that covers both ears impairs your ability to hear other
sounds. Use of such a headset while operating a motor vehicle or riding a bicycle
may create a serious hazard to you and others, and may be illegal. If you must use
a stereo headset while driving, place a speaker in only one ear. Leave the other ear
free to hear outside noises, and use the headset only if it is legal and you can do so
safely.
Chapter 6 : Phone 77
Page 78

Use a wired headset
Your smartphone works with headsets that have a 3.5mm connector (look
for three colored bands on the plug). When in doubt, ask the third-party
headset manufacturer if the product is compatible with your smartphone. If
you hear a headset buzz or poor microphone performance, your headset
may be incompatible with your smartphone.
1 Connect the magnetic end of the 3.5mm headset adapter to the
charger/connector on the right side of your smartphone.
• Hang up a single active call or all calls on a conference call.
• Switch between calls if there is one active call and one call on hold.
4 If you want to stop using the headset, do any of the following:
• To switch from the headset to your smartphone’s speakerphone:
Tap a nd ta p Speaker.
• To switch from the wired headset to a previously paired Bluetooth
hands-free device: Tap and tap the device name.
• To use your smartphone without the headset: Disconnect the
headset.
Set up and use a Bluetooth® hands-free device
®
2 Insert a 3.5mm headset into the jack on the adapter. When you are on
a call, the icon changes to .
TIP After use, keep the headset adapter connected to the headset, so you can
easily attach them to your smartphone again.
3 The button on the headset performs different actions depending on
the headset model and what’s happening on the smartphone. Press
the button once to perform any of the following tasks supported by
your particular headset:
• Answer an incoming call.
• Respond to call waiting.
Your smartphone is compatible with many headsets and car kits (sold
®
separately) enabled with Bluetooth
wireless technology version 2.1, with
EDR and Stereo (with AVRCP media controls).
After you set up a connection with a Bluetooth headset or hands-free car kit,
you can communicate using that device whenever it is within range and the
Bluetooth feature on your smartphone is turned on. The range can vary
greatly, depending on environmental factors. The maximum is about 30 feet
(10 meters).
NOTE You can use an A2DP-enabled Bluetooth headset or speakers to listen to
music files on your smartphone.
1 Open Bluetooth .
2 If the Bluetooth setting at the top of the screen is off, tap Off to switch
the Bluetooth feature from Off to On.
3 Ta p Add device.
4 In Ty pe , make sure Audio is selected.
5 Tap t he de vi ce na me .
78 Chapter 6 : Phone
Page 79

6 To use a Bluetooth device with your smartphone, follow the
instructions that came with the Bluetooth device.
7 To switch to another Bluetooth device while on a call: Tap and tap
the new device name. You can also tap Handset or Speaker to use
your smartphone without the headset.
TIP If you make a Bluetooth connection with a car kit, you might get a notification
on your smartphone asking if you want to upload contacts to the car kit. Tap Allow
to upload contacts. If you later want to delete the contacts from the car kit, check
the car kit documentation for instructions.
Turn contact match display on/off
By default, when you have the dial pad displayed but you’re using the
keyboard to enter a phone number, both numbers and letters appear and
your smartphone performs a search of matching names in Contacts. If you
turn off this preference, typing on the keyboard with the dial pad displayed
enters numbers only, and no search is done in Contacts.
1 Open Phone .
2 Open the application menu and tap Preferences & Accounts.
For more information on using the Bluetooth feature on your smartphone,
see Bluetooth® wireless technology.
Customize smartphone settings
Use Phone Preferences to customize smartphone settings.
3 In Show Contact Matches, tap On or Off.
TIP If you turn off the Show Contact Matches preference, you can still perform a
contact search in the Phone application. After opening Phone, tap the contact list
icon to the right of “Enter name or number.” Type the contact name or initials, and
tap the number when it appears.
Turn call forwarding on/off
You can forward calls to another phone number. Check with AT&T about
availability and pricing of forwarded calls; additional charges may apply.
1 Open Phone .
2 Open the application menu and tap Preferences & Accounts.
3 In Call Forwarding, tap On or Off.
4 If you turn call forwarding on, tap Enter Number and enter the call
forward number. Tap to change an existing number.
Chapter 6 : Phone 79
Page 80

Turn my caller ID on/off
The caller ID feature controls whether your phone number appears on
another person’s phone when you call them. Check with AT&T about
availability and pricing of the caller ID feature.
DID YOU KNOW? The caller ID feature does not affect whether your
smartphone displays the caller ID for an incoming call. Your smartphone always
shows the incoming caller ID unless the number is hidden or private.
U.S. or Canada. So you can simply enter the 10-digit number or dial a
contact with a 10-digit number, and the call goes through correctly. The
preference does not work with 7-digit numbers.
1 Open Phone .
2 Open the application menu and tap Preferences & Accounts.
3 In International Dialing, tap Off to switch international dialing from
Off to On.
1 Open Phone .
2 Open the application menu and tap Preferences & Accounts.
3 In Show My Caller ID, tap On or Off.
Turn c a ll wa i t ing on/o ff
You can choose to be notified when you receive a call while you are on a
call. You can choose to accept the call or not. See Answer a second call (call
waiting). Check with AT&T about availability and pricing of the call waiting
feature.
1 Open Phone .
2 Open the application menu and tap Preferences & Accounts.
3 In Call Waiting, tap On or Off.
Turn the international dialing auto-prefix feature on/off
4 Begin typing the name of the country you are currently located in, or
scroll the list to find it.
5 Tap the country when it appears.
Change your voicemail number
1 Open Phone .
2 Open the application menu and tap Preferences & Accounts.
3 By default, under Voic e mai l Nu m ber , your current voicemail number
is highlighted. To change it, simply type the new number. If the current
number is not highlighted, tap the number to highlight it, and then
type the new number.
Use dialing shortcuts
Dialing shortcuts add a prefix at the beginning of a number, so you can dial
an extension instead of the whole number.
When the international dialing preference is on, your smartphone
automatically adds the correct international dialing prefix and country code
to any 10-digit U.S. or Canadian number when you are traveling outside the
80 Chapter 6 : Phone
1 Open Phone .
2 Open the application menu and tap Preferences & Accounts.
3 Under Dialing Shortcuts, tap Add new number.
Page 81

4 Set the following:
3 Do one of the following:
When I Dial: Tap this field and select the number of digits you need to
enter to have your smartphone add a dialing prefix.
Use This Dialing Prefix: Enter the prefix to be added at the beginning
of the dialed number. The combination of prefix and digits you enter
must add up to a complete phone number.
5 Ta p Done.
Example: A complete phone number in your company’s phone system has
11 numbers, for example, 1-408-555-1122. When dialing from a phone that’s
part of the system, you need to dial only the last five digits (51122). When
you create a dialing shortcut on your smartphone, you select “5 digit
numbers” for When I Dial and enter “140855” in Use This Dialing Prefix.
So when you dial your co-worker’s five-digit extension (51122), your
smartphone automatically dials the whole number: 1-408-555-1122.
Lock or unlock the SIM card
You can lock your SIM card to prevent unauthorized use of your mobile
account. When your SIM card is locked, you must enter your PIN to turn on
your smartphone to make or receive calls, except for emergency numbers.
The SIM card remains locked even if you move the card to another phone.
To unlock your SIM card, turn on the smartphone and enter your PIN.
• To lock the SIM card: Tap Lock SIM Card. Enter the PIN provided
by AT&T to lock the SIM and tap Done. The SIM card locks anytime
you turn off your smartphone. To turn the smartphone back on, you
must enter the PIN.
• To change the PIN: Tap Change SIM Card PIN and enter the old
PIN. Enter the new PIN twice and tap Done.
• To t urn of f SI M l ock: Tap Unlock SIM Card. Enter the PIN and tap
Done.
Use restricted dialing
When restricted dialing is turned on, you can make calls to or answer calls
from only those numbers that are on your list of restricted numbers.
To add to or change the list, you need to enter a PIN2. If you enter an
incorrect PIN2 more times than allowed by AT&T, the SIM card locks. After
the SIM card locks, you need to enter a PUK2 to unlock the SIM card.
Contact AT&T to learn more about restricted dialing.
BEFORE YOU BEGIN Get your PIN2 from AT&T. If you have entered your
PIN2 incorrectly and your SIM card is locked, obtain your PUK2 from AT&T.
1 Open Phone .
2 Open the application menu and tap Preferences & Accounts.
BEFORE YOU BEGIN
• Get your default PIN from AT&T.
• Make sure the phone is on and that you’re inside a coverage area (see
Turn wi re le ss ser vi ce s o n ).
1 Open Phone .
2 Open the application menu and tap Preferences & Accounts.
3 In Restricted Dialing, tap On or Off.
4 If you turn restricted dialing on, enter the PIN2 and tap Next.
5 To edit the restricted number dialing list: In Restricted Dialing, tap
View Restricted Dialing List and do one of the following:
• To add an entry: Tap Add an entry and enter the PIN2. Enter the
name and phone number and tap Done.
• To edit an entry: Tap the entry and enter the PIN2. Edit the
information and tap Done.
Chapter 6 : Phone 81
Page 82

• To delete an entry: Swipe the entry off the side of the screen and
enter the PIN2. Tap Delete to confirm.
Set roaming and data usage preferences
Use roaming and data usage preferences to set options for using your
smartphone in your home network and while roaming. For example, you can
set options to prevent placing a call or making a data connection while
roaming, so that you avoid extra charges.
• The multimedia messaging APN name (MMS APN)
• Your username and password for accessing the multimedia messaging
APN
• The multimedia messaging service center name (MMSC)
• The multimedia messaging proxy server name (MMS proxy)
• The maximum multimedia messaging size
1 Open Phone .
2 Open the application menu and tap Preferences & Accounts.
1 Open Phone .
2 Open the application menu and tap Preferences & Accounts.
3 Under Network, set any of the following:
Network Auto-Select: Set whether your smartphone automatically
selects a network. If you turn auto-select off, tap the network to use.
Network Type: Set whether your smartphone automatically connects
to any available network type, or whether to connect to 4G/3G
networks only or 2G networks only.
Data Roaming: Set whether to allow web browsing, email,
multimedia messaging, and instant messaging when you are roaming.
Data Usage: Set whether to turn data services—web browsing, email,
multimedia messaging, and instant messaging—on or off.
Manually select network settings
If your smartphone cannot read the network settings from your SIM card
during setup, you can manually enter the settings.
3 Under Network, in Manual, tap Off to switch manual network
settings from Off to On.
4 Ta p Edit Network Settings.
5 Ta p Internet APN and enter the settings you obtained from AT&T.
6 Ta p MMS APN and enter the settings you obtained from AT&T.
7 Ta p Change Settings.
Turn TTY/TDD on/off
A TTY (also known as TDD or text telephone) is a telecommunications
device that allows people who are deaf or hard of hearing, or who have
speech or language disabilities, to communicate by telephone. Your
smartphone is compatible with select TTY devices.
You can connect a TTY/TDD machine to your smartphone using the
3.5mm headset adapter. Check with the manufacturer of your TTY device
for connectivity information. Be sure that the TTY device supports digital
wireless transmission.
BEFORE YOU BEGIN Obtain the following from AT&T:
• The Internet access point name (APN)
• Your username and password for accessing the Internet APN
82 Chapter 6 : Phone
When TTY/TDD is turned on, the icon appears in the title bar.
Page 83

1 Attach the magnetic end of the 3.5mm headset adapter to the charger/
connector on the side of your smartphone.
2 Connect a TTY/TDD device to the jack on the 3.5mm headset
adapter.
3 Open Phone .
4 Open the application menu and tap Preferences & Accounts.
5 In TTY/TDD, tap On or Off.
Use SIM Toolkit
The SIM Toolkit app gives you access to services from AT&T such as
account information, payment, and news.
1 Open SIM Toolkit .
2 View and work with the features displayed.
Chapter 6 : Phone 83
Page 84

84 Chapter 6 : Phone
Page 85

Email, text, multimedia, and instant messaging
Enjoy the ease and speed of keeping in touch with
friends, family, and colleagues anywhere you can
access the AT&T data network or a Wi-Fi network.
You can send and receive attachments as well.
And keep the Messaging app in mind for times when
you need to send a short text, multimedia, or instant
message to a mobile phone number—especially
handy when you’re in a meeting that’s running late.
In this chapter
86 Email
98 Messaging: All messages in one application
101 Messaging: Text and multimedia messaging
104 Messaging: Instant messaging
Chapter 7 : Email, text, multimedia, and instant messaging 85
Page 86

How do I send and receive email on my smartphone?
Use the Email application on your smartphone to access the many email
accounts you have: company (like Exchange), ISP (like Earthlink or
Comcast), and web-based (like Gmail). You must create the account online
before you can set it up on your smartphone.
You can set up your email accounts in either of these locations. The
procedure is the same in both locations.
• The Accounts app (see Use the Accounts application to set up an online
account)
• The Email app
The HP Synergy feature (see Your HP Veer 4G) provides another advantage:
During the same process you go through to set up an email account, you
also set up the same account for all other applications that can display data
from that account. For details on how Synergy works for the current list of
online accounts, see Online accounts available for HP webOS smartphones.
For example, suppose you want to set up your Gmail account on your
smartphone. The last step in setup is to select all the other apps that you
want to receive data from your Google account (besides Email, you can
include Contacts, Messaging, and Calendar). After setup is complete, your
smartphone begins to download your email and all data for all other apps
you selected for synchronization.
If you want, you can also use your smartphone’s web browser to view your
web-based email—just go to the email provider’s website.
Merged inboxes in Email
You can set up multiple email accounts on your smartphone. When you
open Email, you see all your accounts in a single view: Account List view.
From there, you can open the inbox of an individual account, or you can
open the All Inboxes smart folder and see all messages from all your inboxes
displayed in a merged view.
1 Number to the right of All Inboxes indicates the total number of unread email messages in
all your email accounts.
2 Number to the right of an individual folder name indicates the number of unread messages
in that folder.
If you reply to a message when you’re working in All inboxes, the message is
sent from the same account in which it was received. To reply from a
different account, tap the From field and tap a different account to send the
email from.
If you create a new message when you’re working in All Inboxes, the
message goes out using the account you set as the default account (see Set
email preferences).
86 Chapter 7 : Email, text, multimedia, and instant messaging
Page 87

Set up email
5 Ta p Done.
Follow this procedure if you have a common email provider, for example,
AOL, EarthLink, or Yahoo!. If you are setting up the Email application to
work with your corporate email account that uses Microsoft Exchange
ActiveSync or Lotus Notes, see Set up email: Microsoft Exchange and Lotus
Notes.
1 Open Email .
2 Do one of the following:
• The first time you open Email, tap an account type or tap Email
Account.
• If you have already set up an account that takes advantage of the
Synergy feature and want to set up another one, tap Add An
Account, and then tap an account type or tap Email Account.
• Any other time you open Email, open the application menu, tap
Preferences & Accounts, tap Add Account, and tap an account
type or tap Email Account.
NOTE If automatic setup fails for your email account, an error message appears.
Ta p Manual Setup or Find a Synergy Service, gather the settings info you need,
and enter the account settings (see Set up email when automatic setup fails).
Set up email: Microsoft Exchange and Lotus Notes
Follow this procedure to get email for Microsoft Exchange and Lotus Notes
accounts.
BEFORE YOU BEGIN Get this info from your email provider or system
administrator:
• Mail server name or IP address for receiving mail
• Server domain name
• Your username and password
NOTE If your corporate Exchange system utilizes policies such as remote wipe
and password enforcement (including minimum password length, allowed
number of failed password attempts, and other parameters), those policies are
supported in your Exchange account on your smartphone. Check with your system
administrator for details.
3 Enter your email address and password, and tap Sign In.
4 Depending on the account, you may be presented with options for
which apps should download data from that account. For each app,
tap On or Off, and then tap Create.
1 Open Email .
2 Do one of the following:
• The first time you open Email, tap Microsoft Exchange.
• If you have already set up an account that takes advantage of the
Synergy feature and want to set up another one, tap Add An
Account, and tap Microsoft Exchange.
Chapter 7 : Email, text, multimedia, and instant messaging 87
Page 88

• Any other time you open Email, open the application menu, tap
Preferences & Accounts, tap Add Account, and then tap
Microsoft Exchange.
Set up email when automatic setup fails
Follow these steps if automatic setup (see Set up email) does not work for
your email account.
BEFORE YOU BEGIN Get this info from your email provider or system
administrator:
• Account type (POP or IMAP)
• Incoming and outgoing mail server names
• Incoming mail server username and password
• Incoming and outgoing server port numbers
• Any SSL requirements for incoming and/or outgoing mail
• Any authentication (ESMTP) requirements for outgoing mail
• Root folder (IMAP accounts only)
3 Enter your email address and password, and tap Manual Setup.
4 Enter info for the incoming mail server as needed, based on the server
information you got from your email provider or system administrator.
You can enter either the server name or IP address in the Incoming
Mail Server field.
5 Ta p Sign In.
To keep your Exchange account secure, you may be asked to set a
password or PIN that is required to unlock the smartphone. Tap Set
Password or Set Pin. Enter a password or PIN and tap Done.
6 You may be presented with options for which apps should download
data from that account. For each app, tap On or Off, and then tap
Create.
7 Ta p Done.
1 If you have already started account setup and an “Unable To Sign In”
message appears, tap Manual Setup, and skip to step 6. Otherwise,
start at step 2.
2 Open Email .
3 Do one of the following:
• The first time you open Email, tap Email Account.
• If you have already set up an account that takes advantage of the
Synergy feature and want to set up another one, tap Add An
Account, and then tap Email Account.
88 Chapter 7 : Email, text, multimedia, and instant messaging
Page 89

• Any other time you open Email, open the application menu, tap
Preferences & Accounts, tap Add Account, and then tap Email
Account.
3 Tap the account name.
4 Set any of the following:
4 Enter your email address and password, and tap Manual Setup.
5 Ta p t he Mail Type field and tap your account type.
6 Enter info for the incoming and outgoing mail server as needed, based
on the server information you got from your system administrator.
7 Ta p Sign In.
8 Depending on the account, you may be presented with options for
which apps should download data from that account. For each app,
tap On or Off, and then tap Create.
9 Ta p Done.
Enter advanced account settings
These settings apply only to the account you select in step 3.
1 Open Email .
2 Open the application menu and tap Preferences & Accounts.
Account Name: Enter the name that appears in the account list.
Full Name: Enter the name you want to appear in the From field for
messages you send.
Show Icon: Set whether a notification icon appears onscreen when a
new message arrives.
Alert: When Show Icon is on, set whether a sound plays when a new
message arrives (see Turn new email notifications on/off).
Signature: Tap to create a signature that’s added to outgoing
messages (see Add a signature to outgoing messages).
Reply-to Address: Enter the address you want recipients to see and
reply to on your outgoing messages, if this is different from the email
address you send the message from.
Show Email: Set how many days’ worth of messages to retrieve from
the server.
Get Email: Set how frequently to synchronize email for this account.
Chapter 7 : Email, text, multimedia, and instant messaging 89
Page 90

Sync deleted emails (POP accounts only): Set whether messages
should be deleted on the server when you delete them on your
smartphone.
Sync server to device (POP accounts only): Set whether messages
should be deleted on your smartphone when they are deleted on the
server.
Change account login settings
When you change your password for an online email account, remember to
make the change in the account settings on your smartphone.
1 Open Email .
Default Folders (IMAP accounts only): Specify the folder where
messages you send, save as drafts, or delete are stored.
Change Login Settings: See Change account login settings.
Remove Account: See Delete an email account.
Turn new email notifications on/off
The settings you select here apply to individual email accounts. You can
apply different settings to each email account.
1 Open Email .
2 Open the application menu and tap Preferences & Accounts.
3 Tap an account in Accounts.
4 In Show Icon, tap On or Off.
5 Ta p Alert, and tap any of the following:
2 Open the application menu and tap Preferences & Accounts.
3 Tap the account name.
4 Ta p Change Login Settings and tap the relevant fields to change the
account information.
Rename an account
You can change the name that appears in the account list.
1 Open Email .
2 Open the application menu and tap Preferences & Accounts.
3 Tap the account name.
4 Ta p Account Name and enter a new name.
Delete an email account
Vibrate: The smartphone vibrates with no other sound.
System Sound: The system sound plays. If the ringer is off, the
smartphone vibrates.
Ringtone: Tap Ringtone, and tap a ringtone name. To hear the
ringtone: Tap to the right of its name.
Mute: No sound plays and the smartphone does not vibrate.
90 Chapter 7 : Email, text, multimedia, and instant messaging
When you delete an email account from your smartphone, it removes the
account information from your smartphone only. It does not affect your
account with the email provider.
1 Open Email .
2 Open the application menu and tap Preferences & Accounts.
3 Tap the account name.
4 Ta p Remove Account, and then tap Remove Email Account.
Page 91

Create and send an email message
1 Open Email .
2 Ta p .
TIP If you have set up an email account, you can also start writing an email from
Card view or the Launcher. Start typing a message, scroll down the list of search
options, and tap New Email. The Email application opens at a new email message,
with the text you entered in the body of the message.
TIP To address an email directly from the Launcher or Card view, type the email
address. If the email address is already associated with a contact, the contact is
displayed. Tap the email address. A new email is opened, with the address in the To
field.
5 (Optional) Tap To to open the Cc and Bcc fields, and enter an address.
6 (Optional) Repeat steps 4 and 5 to enter additional addresses.
7 Enter the subject, press Enter , and enter the body text.
8 (Optional) To set the priority for the message: Open the application
menu and tap Set As Normal Priority or Set As High Priority.
9 (Optional) To discard a message: Open the application menu and tap
Discard Message.
10 Ta p .
Format email text
To format the text of a message you are creating, do one of the following:
3 (Optional) Tap From to change the email account you are using to
send the message. This option appears only if you have more than one
email account set up on your smartphone.
4 In the To field, do one of the following to address the message:
• Enter a contact name, initials, or email address. Tap the email
address when it appears. When you enter a contact name, favorites
appear at the top of the search results (see Create a favorite).
• Tap to open the full contact list. Tap the contact you want, or
enter a name or address to narrow the list.
• Enter the full email address for a recipient who is not a contact.
• To enter bold, italic, or underlined text: Open the application menu and
tap Edit > [the option you want]. Enter the text. To turn off the
formatting, open the application menu and tap Edit > [the option you
want to turn off].
• To enter colored text: Open the application menu and tap Edit > scroll
down > Tex t C o l o r. Tap the color and enter the text.
• To format text you already entered: Select the text (see Tex t se le c ti on
gestures), open the application menu, and tap Edit > [the option you
want]. To turn off a formatting option, open the application menu and tap
Edit > [the option you want to turn off]. For text color, tap the black
square.
Chapter 7 : Email, text, multimedia, and instant messaging 91
Page 92

Add attachments to a message
1 Open Email .
1 While composing a message, tap .
2 To get the file you want to attach, do the following:
• Tap an icon at the bottom of the screen to search for pictures,
videos, music files, or documents.
• Begin typing the file name.
• To take a new picture to send as an attachment: Tap the photo icon
at the bottom of the screen, tap New Photo, take the photo, and
then tap Attach Photo.
• To record a new video to send as an attachment: Tap the video icon
at the bottom of the screen, tap New Video, record the video.
3 Ta p th e fi le na me.
4 Repeat steps 1–3 to attach other files.
TIP To remove an attachment you added to an email: Throw the attachment off
the side of the screen and tap Delete to confirm.
Save a message as a draft
2 If the folders for the account you want are hidden, tap to display
the folders.
3 Tap the folder you want to check messages for. If synchronization
doesn’t start, tap .
How can you tell if sync is happening? Look for the animated circular
movement around the number of messages in the upper-right corner
of the screen.
4 Tap a message to open it.
• While composing a message, open the application menu and tap Save As
Draft.
Receive and read email messages
The Email application synchronizes messages anytime you open a mail
folder. It also synchronizes messages on an automatic schedule—the default
interval depends on the type of account you have (see Enter advanced
account settings for information on changing the interval).
Follow these steps to manually retrieve messages.
92 Chapter 7 : Email, text, multimedia, and instant messaging
5 (Optional) Do any of the following:
• To call a number: Tap the number, and tap to call it.
• To send a text message: Tap and hold the number, and tap Tex t .
• To add a number to Contacts: Tap and hold the number, and tap
Add to Contacts. Tap Save As New to create a new contact, or tap
Add To Existing to add this number to an existing contact.
• To send an email: Tap the email address, enter your message, and
tap .
• To go to a web address: Tap it.
• To share a link to a web site: Press and hold Option and tap the
link. Then tap Share Link.
Page 93

• To copy a link to a web site: Press and hold Option and tap the
link. Then tap Copy URL.
• To copy an email so you can paste it into a memo or other
document: Open the application menu and tap Edit > Copy All.
• To play an MP3 file attachment: Tap . Tap to pause. MP3 files you
download from Email are not saved to USB storage, and they are not listed
in Music.
6 Tap or in the subject line to view the previous or next message.
7 To view messages for another account, make the back gesture twice
(see Go up one level in an app (back gesture)) to return to the account
list, and tap the account name.
Open email attachments
You can receive any kind of file sent to you in email, but you can open an
attachment only if your smartphone has an application that can open the file
type.
• To open a single attachment: Tap the attachment name to download the
attachment. If the attachment is a supported file type (MP3, PDF, DOC,
DOCX, XLS, XLSX, PPT, PPTX, TXT, GIF, or JPG), it opens automatically.
• To open multiple attachments: Tap the list of attachment names to view
the attachments, and tap an attachment name to open the file.
Save attachments
When you open attachments of certain file types, you can save them to your
smartphone so you can view them later in one of your smartphone’s
applications.
1 Open the attachment (see Open email attachments).
2 Do one of the following:
• For pictures in JPG, GIF, BMP, or PNG format, tap Copy To Photos.
• For other file types, open the application menu and tap Save As. If
the Save As menu item is not available, you cannot save the
attachment. To save Microsoft Word, Excel
you must have set up a Quickoffice account (see Quickoffice®
mobile office software).
3 To open a saved attachment on your smartphone, open the application
that can display the attachment. The attachment appears in the list of
available files. Tap the file to open it.
®
, or PowerPoint® files,
Save or share an inline image
If a message contains an inline image—an image inserted right into the
body text—you can share the image with someone else via email. If you
choose this option, a new blank email message opens with the image file as
an attachment.
If the image is in JPG, GIF, BMP, or PNG format, you can also save it to and
view it in the Photos app.
Chapter 7 : Email, text, multimedia, and instant messaging 93
Page 94

Do one of the following:
View a contact from an email message
• To share an image: With the message open, press and hold Option
and tap the image. Then tap Share Image.
• To copy an image to Photos: Tap the image file name and then tap Copy
to Photos (if available).
Add a contact from an email message
You can add a contact name or email address to your Contacts list directly
from the header or from the To or Cc field of an incoming email message.
You can either create a new contact or add the information to an existing
contact.
1 Do one of the following in a message you’ve received:
• To add a contact from the message header: Tap the name or email
address in the header.
• To add a contact from the To or Cc field: Tap To and tap an email
address in the list of recipients.
2 Ta p Add To Contacts.
3 Tap one of the following:
Add New Contact: Create a new contact for the name or address.
• In a message you’ve received from someone listed in the Contacts app,
tap the name to open the contact entry.
Search for an email message
You can search for messages in any email folder. Incoming messages must
be fully downloaded to your smartphone to show up in search results.
• In Launcher or Card view, type a few characters of a name, email address,
or subject of an email. Tap Email, scroll to find the email you want, and
tap to open it.
• Open Email , and open the folder containing the message. Start typing
a name, email address, or subject line of a message you're looking for.
Matching results appear as you type. Keep entering characters to narrow
the list.
Reply to a message
1 Open a message.
2 Tap one of the following:
: Reply to just the sender.
Add To Existing: Tap the contact you want to add the name or
address to.
DID YOU KNOW? You can add an email address to Contacts directly from the
Launcher or Card view. Type the email address. If the email address is not already
in Contacts, tap Save to contacts. Tap Add To Contacts, and tap Add New
Contact or Add To Existing. If you are adding to an existing contact, tap the
contact you want to add the name or address to. Enter the contact details and tap
Done.
94 Chapter 7 : Email, text, multimedia, and instant messaging
: Reply to the sender and all other addressees.
3 Enter the reply message text and tap .
Forward a message
1 Open a message and tap .
Page 95

2 Address the forwarded message (see Create and send an email
message).
3 Enter the forwarded message text and tap .
Show or hide message recipients
Mark all messages in a folder as read
1 Open a folder.
2 Open the application menu, tap Mark All Read, and then tap Mark
All Read again.
You can show all recipients in the To or Cc fields of an email you received.
1 Open a message.
2 Open the application menu, tap Show Recipients or Hide
Recipients.
Copy messages
You can copy the body text of a message.
1 Open a message.
2 Open the application menu, tap Edit, and tap Copy All.
Move a message to another folder
1 Open a message.
2 Open the application menu and tap Move To Folder.
3 Tap the folder you want.
Flag or unflag a message
When you flag a message, a is placed beside the message in your Inbox.
You might flag a message to highlight it as something that you need to
return to.
1 Open a message.
2 Open the application menu and tap Set flag or Remove flag.
Show or hide message header details
1 Open a message.
2 Tap a recipient name to show details. Tap again to hide details.
Delete a message
Deleting a message moves it to your deleted items folder, so it’s still on your
smartphone. Depending on your email account, this folder is called Deleted
Items, Deleted, Trash, or something else.
Do one of the following:
Mark a message as read or unread
1 Open a message.
2 Open the application menu and tap Mark as Read/Unread.
• In the message list: Throw the message off the side of the screen.
• In an open message: Tap .
Chapter 7 : Email, text, multimedia, and instant messaging 95
Page 96

To avoid deleting a message accidentally, you can turn the Delete
Confirmation preference on (see Set email preferences). If you do
accidentally delete a message, you can move it back to the original folder
(see Move a message to another folder). To remove a message from your
smartphone permanently, delete it from the deleted items folder. To delete
all messages from the deleted items folder, open the application menu while
in the folder, tap Empty Trash, and then tap Empty Trash again.
TIP If you change the folder where you store deleted messages for an IMAP
account (see Enter advanced account settings), deleting messages from the folder
removes them from your smartphone.
Add a signature to outgoing messages
A signature includes information you want to add to the closing of all your
outgoing messages—for example, your name, address, and phone numbers;
your website; or a personal motto. You can use a different signature for each
email account.
1 Open Email .
2 Open the application menu and tap Preferences & Accounts.
3 Tap the account you want.
4 Tap t he Signature field and enter the signature text. To format the text
with bold, italics, or color, select the text (see Text selection gestures),
open the application menu, and tap Edit > [the option you want].
View mail folders
1 Open Email .
2 Tap to the right of an account name.
3 Tap the folder name you want to open.
4 (Optional) Tap the folder header to view information such as last sync
and number of messages.
96 Chapter 7 : Email, text, multimedia, and instant messaging
Page 97

Sort email in a folder
Set email preferences
1 Open Email .
2 If the folder you want is not displayed, tap to display the folders for
one of your accounts.
3 Tap a folder, open the application menu, and tap Sort.
4 Tap any of the following:
By Date: Sort the folder contents by date, from most recent to oldest.
Ta p By Date again to sort in reverse order.
By Sender: Sort by sender first name, from A to Z. Tap By Sender
again to sort in reverse order. In outgoing message folders, such as
Sent and Outbox, By Sender sorts emails by recipient first names.
By Subject: Sort by subject, from A to Z. Tap By Subject again to sort
in reverse order.
Add an email folder as a favorite
Favorites appear at the top of Account List view.
1 Open Email .
2 If the folder you want is not displayed, tap to the right of the email
account name to display the folder.
3 Tap to the right of the folder name.
To remove a folder as a favorite, repeat steps 1 and 2 and tap to the right
of the folder name.
1 Open Email .
2 Open the application menu and tap Preferences & Accounts.
3 Set any of the following:
Smart Folders: Set whether to include All Inboxes and/or All
Flagged messages as favorites at the top of Account List view.
Delete Confirmation: Tap to turn this setting On/Off. When Delete
Confirmation is on, you are asked to confirm deletion of email
messages.
Accounts: Tap an account name to enter advanced settings or to
change synchronization settings for email, contacts, calendar events,
or tasks (see Enter advanced account settings and Rename an
account).
Add Account: See Set up email.
Default Account: Tap the account shown and then tap the account
you want to set as the new default. The default account is used to send
a message when you create a new message in Account List view or in
a merged folder view such as All Inboxes or All Flagged.
Chapter 7 : Email, text, multimedia, and instant messaging 97
Page 98

Reorder accounts
Send email messages from within another application
You can change the order of the accounts in Account List view.
1 Open Email .
2 Open the application menu and tap Preferences & Accounts.
3 Tap and hold the account name, wait for the visual cue, and then drag
the account up or down.
Reply to meeting invitations
You receive meeting invitations on your smartphone in the same way that
you receive email messages. You cannot create meeting invitations on your
smartphone.
Tap to accept, tentatively accept, or decline an invitation.
Here are the key features of meeting invitations:
• Meeting invitations appear on your smartphone in the Email application,
not in the Calendar application.
• From within the Email application, you can accept, decline, or tentatively
accept a meeting invitation.
• If you accept or tentatively accept an invitation, it appears as an event in
Calendar.
• You can reply to and forward meeting invitations in the same way as
email messages.
TIP If you receive an updated meeting invitation, you can again choose to accept,
decline, or tentatively accept. If you receive a meeting cancellation, open the
message and tap Remove From Calendar to delete the meeting from your
calendar.
Use the share menu item in any application that supports this feature to
send an item as an attachment to an email message. This feature is available
in the Contacts, Photos, PDF View, and Memos applications, among others.
Depending on the app, the menu item might be named Share, Send, or
Email. For details, see the section in this guide on the specific application.
Messaging: All messages in one application
What kinds of messages can I send and receive?
You can use the Messaging application to send and receive the following
types of messages:
• Text and multimedia messages (see Create and send a text or multimedia
message)
• Instant messages for an IM account you already have set up online (see
Set up an instant messaging (IM) account)
The Synergy feature enables the Messaging app to gather all your text,
multimedia, and instant messages to and from the same contact into a
single conversation (sometimes called a “thread”). So you can see your
entire message history with someone regardless of the different methods
you happened to use to communicate with that person (see Work with
conversations). You can even switch from account to account without losing
the thread of your conversation (see Switch between messaging accounts in
a conversation)—just pick the messaging account that’s most likely to keep
you in unbroken contact with the person you’re talking to.
Work with conversations
98 Chapter 7 : Email, text, multimedia, and instant messaging
When you exchange more than one message with a person, the messages
are grouped into a conversation. A single conversation can contain text,
multimedia, and IM messages. When you start or continue a conversation,
Page 99

the upper part of Conversations view displays all messages you’ve
exchanged with this person, and the bottom part provides the area where
you type your next message.
You can carry on multiple conversations at the same time.
1 Open Messaging .
2 Do one of the following:
• Start a new conversation: Create a message (see Create and send a
text or multimedia message or Send and receive IM messages), or
tap a message and reply to it.
• Continue an existing conversation: Tap the conversation.
3 Enter your message.
4 Tap .
TIP You can copy the contents of a conversation as plain text, which you can
paste in a memo, email message, and so on (see Copy messages).
1 In Messaging, start a new conversation or open one that’s listed in
Conversations view.
2 Ta p Te x t or an IM account name in the upper-right corner of the
screen. If available, the other ways to communicate with this contact
appear in a list. Tap the account or phone number you want to use.
Dial a number from a conversation
Switch between messaging accounts in a conversation
In a single conversation, you can switch between text/multimedia
messaging and an IM account. So if you are having an IM chat with
someone and he or she goes offline, you can send the person a text message
to wrap up the conversation. You can also switch between different phone
numbers for sending a text message to a person.
TIP To be able to switch between text messaging and IM messaging with
someone, that person’s mobile phone number and IM address must be in the same
single contact or a linked contact. If the address and number are in different
unlinked contacts, link them (see Link a contact).
1 Open Messaging .
2 Tap a conversation.
3 Do one of the following:
• Tap the contact name or phone number at the top of the screen, and
tap the number you want to call.
• Ta p Te x t or the IM account name in the upper-right corner, and tap
beside the number you want to call.
Chapter 7 : Email, text, multimedia, and instant messaging 99
Page 100

Switch between Conversations view and Buddies view
Conversations view lists all of your Messaging conversations. Buddies view
lists all of your IM buddies.
1 Open Messaging .
2 For Conversations view, tap Conversations. For Buddies view, tap
Buddies.
the recipient’s smartphone, as long as the receiving IM application supports
the image.
This table shows the emoticons that are supported on your smartphone.
NOTE Emoticon combinations that use words, such as :cool or :cry, are not
supported in most messaging applications. Emoticons created using these
combinations may not appear correctly on the recipient’s phone.
Table 1. Supported emoticons
3 In Buddies view, tap to expand a buddy list. Tap a buddy name to
contact that person.
TIP You can set a preference to show all your buddies, whether they are online or
offline, or to hide offline buddies. In Buddies view, open the application menu and
tap Show/Hide Offline Buddies.
Use emoticons in a message
To d ispl ay t hi s
emoticon...
Enter any of these keyboard character combinations...
>:o >:-o >:O >:-O >:( >:-( :angry :mad
o_O :confused
8) 8-) B) B-) :cool
:’( =’( :cry
:[:-[=[=-[:redface
:S :-S :s :-s %-( %( X-( X( :eww :gross
:! :-! :eek
:( :-( =( =-( :sad
:O :-O :o :-o =O =-O =o =-o :surprised
:shock :omg
^^ ^_^ ^-^ :grin :biggrin
<3 :heart
To include an emoticon in a text, multimedia, or IM message, type a
keyboard character combination for that emoticon. Most emoticons can be
created by more than one combination. After you send the message, the
emoticon image appears in the conversation on your smartphone and on
100 Chapter 7 : Email, text, multimedia, and instant messaging
O:) O:-) o:) o:-) :innocent :angel
:-*:*=*=-*:kiss
 Loading...