

Page 1

HP Device Manager 3.8
User Manual
Page 2

© Copyright 2008 Hewlett-Packard
Development Company, L.P. The
information contained herein is subject to
change without notice.
Microsoft and Windows are trademarks of
Microsoft Corporation in the U.S. and other
countries.
Pentium is a trademark of Intel Corporation
in the U.S. and other countries.
Java is a US trademark of Sun
Microsystems, Inc.
The only warranties for HP products and
services are set forth in the express warranty
statements accompanying such products
and services. Nothing herein should be
construed as constituting an additional
warranty. HP shall not be liable for technical
or editorial errors or omissions contained
herein.
This document contains proprietary
information that is protected by copyright. No
part of this document may be photocopied,
reproduced, or translated to another
language without the prior written consent of
Hewlett-Packard Company.
First Edition (April 2008)
ii
Page 3

Table of Contents
HP Device Manager User Manual
CHAPTER 1
Introduction 1
What is HP Device Manager? 1
Overview 2
Concepts 4
The Device Pane 4
Device Tree 4
Element 4
Task Template 4
Managed Device 5
OS Tabs 5
PXE 5
Repository 5
Task 5
Task Pane & Summary Pane 6
Template Pane 6
Status Bar 6
EWF 6
Agent Mode 6
Getting More Information 7
The Internet 7
Technical Support 7
iii
Page 4

Tab le o f C on te nt s
About This Manual 7
Overview of Contents 7
Terms & Conventions 9
CHAPTER 2
Installing HP Device Manager 11
Introduction 11
System Requirements 12
Management Console 12
Management Server 12
Management Gateway 13
Management Agent 13
Third Party Software 13
Network Requirements 14
Installing HP Device Manager 16
Configuring DHCP Servers 30
Management Server Installed Separately to the
DHCP Server 30
Management Server Installed on DHCP Server
Machine 30
Adding DHCP Option 60 and 201 to an ISC DHCP
Server 32
Configuring a Linux DHCP Server 33
Configuring Routers 33
Uninstalling Device Manager 34
CHAPTER 3
Getting Started 37
Logging in to the HP Management Console 37
Configuring the Repository 39
Creating an FTP Repository 39
Management Console Overview 43
Client Discovery 45
HP Management Agent Broadcast 45
Discover Agent 45
Discover by DHCP Tag 49
iv
Page 5

Agent Configuration 49
Adding Elements to the Repository 51
Importing an Element into the Repository 52
Table of Contents
CHAPTER 4
Using the HP Management Console 57
Menu Item Overview 57
Toolbar Overview 62
Device Management 64
Device Tree Icons 65
Displaying Device Properties 66
Deleting Devices 67
Discovering Devices 68
Grouping Devices 71
Dynamic Grouping 71
Manual Grouping 75
Naming Grouping Properties 78
Changing Grouping Properties 79
Pre-assigning Devices to Groups 80
Editing the Device Filter 81
Filter Security 85
Searching for a Device in the Device Tree 86
Checking Network Connection Status 87
Printing Information About Devices & Tasks 89
Printing Device Information 89
Printing a Device Task Report 90
Shadowing Devices 91
Power Management 93
Task Template Management 94
Task Template Categories 94
Creating & Editing Task Templates 95
Adding a Template to Favorites 96
Using Template Sequence Templates 96
Importing & Exporting Task Templates 97
Task Management 98
v
Page 6

Tab le o f C on te nt s
Task Pane Icons 98
Applying Tasks to Devices 99
Displaying Task Properties 102
Configuring Task Parameters 103
Pausing Tasks 105
Continuing Tasks 106
Resending Tasks 106
Deleting Tasks 107
Displaying Task Logs 107
Opening VNC Viewer for Shadowing 108
Opening a Result Template 108
Device Status Tools 109
Status Walker 109
Status Snapshot 114
CHAPTER 5
CHAPTER 6
Common Tasks 117
Performing a Task 117
Changing Connection Settings 119
Changing Device Settings 122
Configuring Network Settings 122
Configuring Display Settings 123
Configuring Time Settings 124
Configuring Write Filter Settings 125
Using File and Registry Templates 127
Merging File and Registry Template s 130
Copying Files 131
Remote Command Execution 134
Remote Execution of Windows Scripts 136
Advanced Tasks 137
Snapins 137
Introduction 137
Applying a Snapin to a Thin Client 138
Images 145
vi
Page 7

Table of Contents
Introduction 145
Images & Repository Management 145
Client BIOS Settings for PXE 146
Pulling a PXE Image From a Client 147
Pushing a PXE Image to a Client 150
Preparing an XPe Client for Image Distribution 152
Cloning an XPe Image 153
Updating Images 157
Changing Registry Settings 159
Getting Registry Settings 159
Installing an XPe Software Component 166
Transferring an XPe Software Component to the FTP
Repository 166
Installing an XPe Software Component on Client
Devices 169
Performing a Persistent Write Operation on NeoLinux 4.x
Devices 170
Adding Devices Using MAC Addresses 173
Configuring Agents 175
Setting Agent Parameters 175
Updating the Agent Version 176
CHAPTER 7
Configuration Management 177
User Management 177
Working With Users 177
Working With Groups 180
FTP Repositories 183
Configuring an FTP Repository 183
Deleting a Repository 184
Exporting a Repository 184
Importing a Repository 185
FTP Repository Selection for Templates 185
FTP Mappings 186
Listing Devices & their FTP Servers 186
Listing Subnets & their FTPs Servers 187
vii
Page 8

Tab le o f C on te nt s
Filtering Devices or Subnets 188
Grouping Property Name 190
Task Parameters 191
Valid Time and Timeout 191
Write Filter Policy Setting 192
Task Settings 193
Status Walker Configuration 194
Licensing 195
Importing a New License 195
Authentication Management 196
Key Management 196
Gateway Access Control 201
Report Management 202
Adding a Report Template 202
Importing a Report Plug-in File 206
Generating a Report Using a Report Template 207
Alias Management 209
Device Version Alias 209
Subnet Address Alias 211
Exporting an Alias 212
Importing an Alias 212
Template Plugin Management 213
Importing a Template Plugin 213
Removing a Template Plugin 214
viii
APPENDIX A
APPENDIX B
Installing & Running JRE 215
Introduction 215
Windows-based Server Installation 215
Linux-based Server Installation 216
Installing & Running MySQL 217
Installing MySQL on Linux-based Servers 217
Running MySQL on Linux-based Servers 218
Page 9

Table of Contents
APPENDIX C
Error Code Reference 219
Error Codes 219
Index 239
ix
Page 10

Tab le o f C on te nt s
x
Page 11

CHAPTER 1 Introduction
This chapter introduces HP Device Manager and describes the
scope of this User Manual.
What is HP Device Manager?
HP Device Manager is a server-based application that provides
sophisticated centralized administration capabilities for thin client
devices running HP software. Features of HP Device Manager
include:
• Centralized management of software configuration and
upgrades.
HP Device Manager User Manual
• A central server-based database.
• The ability to easily create, store and update tasks.
• The ability to report on work done and task status.
• The ability to access any file or the system registry in thin client
devices.
• XML-based task file.
• Design tool for administrator to create tasks.
• User-friendly graphical user interface.
• Easy and powerful repository management.
• Support for WAN environment.
• Windows® XPe device management.
1
Page 12
Introduction
• Easy to change Enhanced Write Filter setting for XPe Agent.
• The ability to adjust the response time.
• Communicate with Data Encryption and Data Compression
between HP Management Server and HP Management Gateway.
• Easy to set the work mode of Agent.
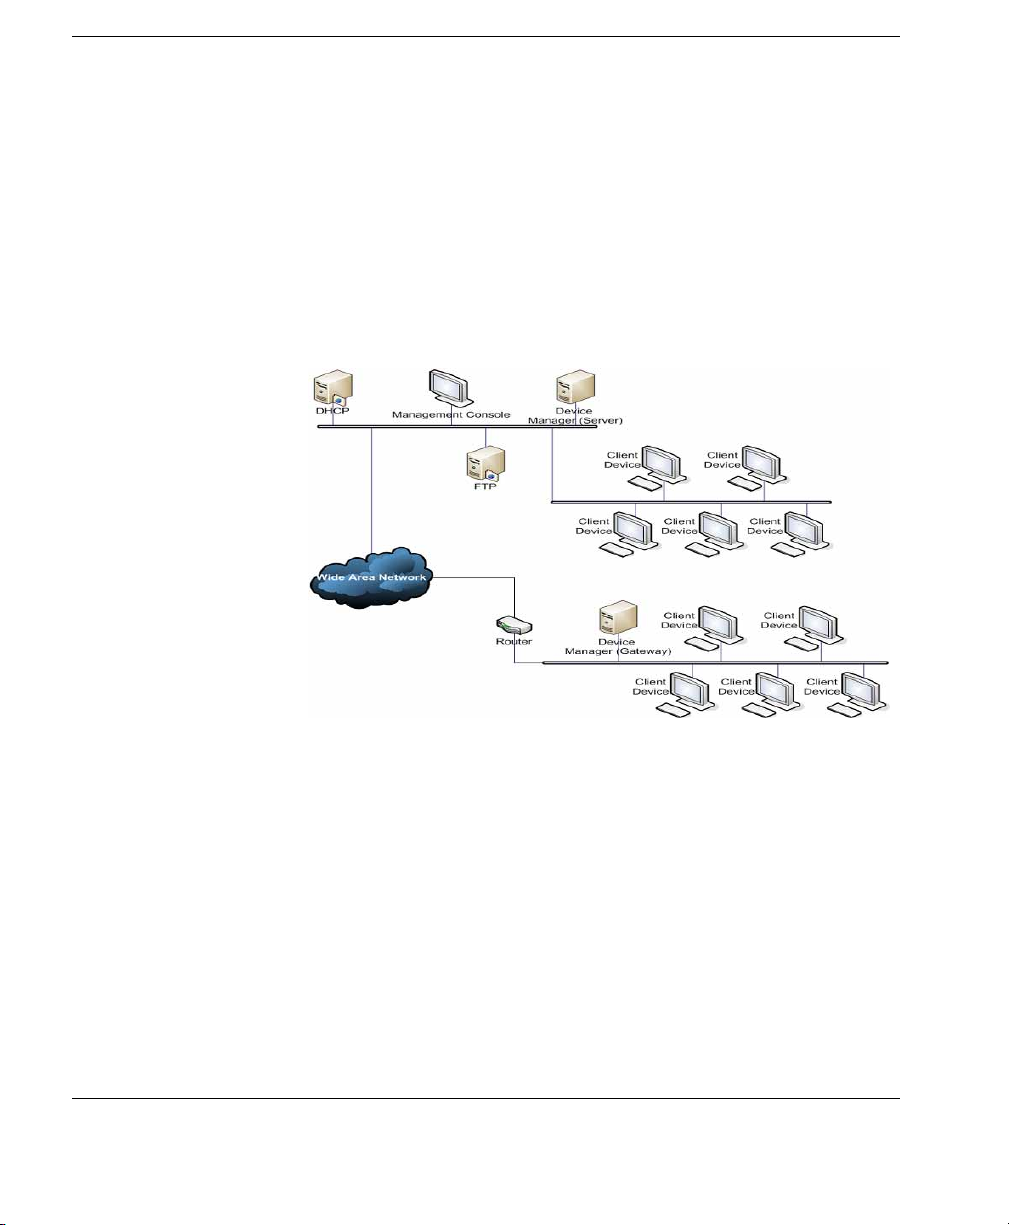
Overview HP Device Manager is structured as a Console - Server - Gateway
system.
HP Management Console
The HP Management Console is the user interface of HP Device
Manager. Several HP Management Consoles can interact with an HP
Management Server. The console allows system administrators to
view details for each controlled device, organize device trees, create
and maintain remote job definitions, and monitor tasks sent out to
devices.
2 What is HP Device Manager?
Page 13

Introduction
HP Management Server
The HP Management Server controls agents through the HP Management Gateway. Tasks, stored as Task Templates on the server, can
be sent to each agent through each agent’s respective gateway to perform commands as required.
HP Management Gateway
The HP Management Gateway serves as the link between devices
and the HP Management Server. Devices register with the gateway
when they are started. The machine installed with the HP Management Gateway also normally contains the PXE Server installed by
HP Device Manager.
Device Agent
The HP Management Agent is a software component installed on
thin client devices so that HP Device Manager can interact with
them. Agents are embedded into each HP operating system to enable
Device Manager to manage devices out-of-the-box (however, agents
on older devices may need to be upgraded). Agents get task
commands, execute the commands and report on their status.
FTP Server
The FTP server is where files are stored in a repository of components, images, etc. that can be uploaded from or downloaded to the
agents at the request of the HP Management Server. You can create a
repository on more than one FTP server. The repository on an FTP
server is referred to as the "FTP Repository" in dialogs and in this
User Manual to distinguish it from the HP Management Server
Repository (the "Server Repository").
What is HP Device Manager? 3
Page 14

Introduction
Concepts
The Device Pane The Device Pane is in the top-left of the Management Console’s
main screen. All thin clients of a selected product type that are
connected to the server are displayed in this pane.
This pane contains the
Device Tree and the Grouping Scheme drop-
down menus.
Device Tree The Device Tree is the organized structure of all the managed
devices in the Management Console, displayed in the
Device Pane,
on the top-left of the main screen.
The tree contains all the devices reported to the Management Server.
Devices can be automatically sorted and grouped according to their
attributes, or they can be dragged and dropped into arbitrary groups
when the devices are grouped by their customized extended
properties.
Tasks can be designated to groups of devices to meet their specific
needs.
Element An Element is a type of resource (such as a software component,
system image, diagnostic tool or agent file) stored in the
Repository
which can be applied to a device using a particular template.
Task Template Task Templates are some of the tools administrators may use to
remotely control the devices. They are displayed in the
. Each Task Template is an XML file that defines the configura-
Pane
Template
tion change or software update that administrators want the remote
devices to do.
4 Concepts
HP Device Manager provides a variety of built-in Task Templates
and many examples on how to manage remote devices, including
device name changes, network settings, home URL changes, ICA
connection clones, add/remove software components and so on.
Page 15

Introduction
Task Templates can be imported or exported by using tools on the
Management Console. New Task Templates can be downloaded
from HP’s FTP site, then imported to your HP Management Server.
Managed Device Managed device, client device, remote device, or device, as
mentioned in this manual, means a device managed by HP Device
Manager, such as a thin client.
OS Tabs OS Tabs enable you to select the different categories of Platform
Operating System that are controlled by HP Device Manager.
PXE PXE is a protocol defined on a foundation of industry-standard
Internet protocols and services that are widely deployed in the
industry (namely TCP/IP, DHCP, and TFTP).
HP Device Manager utilizes PXE to execute thin-client image
extraction and distribution.
Repository The Repository is a collection of elements which may consist of
software components, system images, diagnostic tools and agent
files stored on one or more FTP servers. The Repository actually
resides over several servers, these being the HP Management Server
Repository (the "Server Repository") and one or more FTP Server
Repositories (the "FTP Repository").
Task A task, or job, is the scheduled action to execute Task Templates to a
device or group of devices. To create a task, just drag and drop the
desired Task Template from the template pane to a device or a group
of devices in the device tree. Once executed, the details of the task
will be displayed in the
displayed in the
Summary Pane.
Task Pane and the summaries will be
Concepts 5
Page 16

Introduction
Task Pane & Summary Pane
The Task Pane and Summary Pane are in the bottom area of the
main Management Console window. They display the execution status for each task. If there is more than one device for a listed task,
the status of each device will be listed.
Template Pane The Template Pane is in the top-right of the Management Console
main screen. The templates that are applicable to the listed client
devices are listed here.
Status Bar The Status Bar is shown at the very bottom of the main Management
Console window. Descriptions of various items in HP Device Manager are displayed here when the mouse cursor moves over them; for
example, a description of each
Device Pane icon is displayed when
the mouse cursor moves over each icon.
EWF Enhanced Write Filter (EWF) provides the ability to write-protect a
run-time image. By redirecting all write requests to either a separate
disk partition or RAM, EWF allows the run-time image to maintain
the appearance of a writeable run-time image. Additionally,
Enhanced Write Filter provides the ability to deploy a run-time
image onto read-only media, such as a CD-ROM.
Agent Mode Agent Mode is the mode of the Management Agent to acquire tasks
from the Management Gateway. Through configurations to the
Agent mode, the agent can work at the NAT network without Gateway. The Agent mode can be either Push mode or Pull mode. Push
mode means the gateway sends the available task to the agent, and
Pull mode means the agent would require the task from the gateway
at regular intervals.
6 Concepts
Page 17

Introduction
Getting More Information
The Internet Current and archival information about HP products, including the
latest software updates, is available at:
http://www.hp.com
In addition, this user manual and other HP documentation are available at the HP web site for browsing or downloading.
Technical Support For technical support regarding HP products, call HP at +1-610-277-
8300 or request support using the form at:
http://www.hp.com/support/support_request.html
About This Manual
This manual explains how to use HP Device Manager version 3.8.
Occasionally it will refer to items displayed by client operating
systems. For a description of these items, please refer to the User
Manual for the type of client operating system being used.
Overview of Contents
This manual is divided into the following chapters and appendices:
Chapter 1: Introduction
Introduces HP Device Manager and describes the scope
of this User Manual.
Chapter 2: Installing HP Device Manager
Describes the requirements for running HP Device
Manager and how to install it.
Chapter 3: Getting Started
Describes how to start using the HP Management
Console, set up a repository, and discover clients.
Getting More Information 7
Page 18

Introduction
Chapter 4: Using the HP Management Console
Covers the main functions of the Management Console,
including device management, task templates and task
management.
Chapter 5: Common Tasks
Describes how to use the Management Console to
change device settings, copy files and execute
commands.
Chapter 6: Advanced Tasks
Describes how to use snapins, images, change registry
settings, install XPe software components, and set the
agent mode.
Chapter 7: Configuration Management
Explains the administration of the console, working
with users, advanced server configuration, and
licensing.
Appendix A: Installing & Running JRE
Describes how to install and run the Java® Runtime
Environment.
8 About This Manual
Appendix B: Installing & Running MySQL
Describes how to install and run MySQL.
Appendix C: Error Code Reference
Explains the meaning of error codes which may be
generated by HP Device Manager.
Page 19

Introduction
Terms & Conventions
The following terms and conventions are used in this manual:
devices, clients and thin clients
The terms "devices", "clients", "thin clients" are interchangeable and
refer to any client devices that are running HP software.
keys to press
When you need to press two or more keys together at the same time,
such as the Ctrl key and the C key, this will be indicated by a plus
character inbetween the key names, which will be highlighted. For
example: Ctrl + C. The "+" character does not represent a key to be
pressed.
double-click
To "double-click" means to click the left mouse button twice in
quick succession when the mouse pointer is on a particular item on
the display, such as an icon. You should use the left mouse button
unless specifically told otherwise.
drag
To "drag" means to position the mouse pointer on an item on the display (such as the edge of a window), then hold down the left mouse
button and move the mouse while keeping the button held down.
About This Manual 9
Page 20

Introduction
10 About This Manual
Page 21

Introduction
HP Device Manager User Manual
CHAPTER 2 Installing HP Device
Manager
This chapter describes the requirements for running HP Device
Manager and how to install it.
HP Device Manager consists of four modules:
• Management Console
The graphical application used by administrators to access
the management system.
• Management Server
The central server which consolidates and controls all
management activities.
• Management Gateway
The gateway which serves as the link between Agents and the
Management Server.
• Management Agent
Software installed on the client to enable device management.
The Management Console, Management Server and Management
Gateway may be installed on the same machine, or on different
machines separately.
11
Page 22

Installing HP Device Manager
System Requirements
Management Console
Management Server
The Management Console can be installed on any number of
machines. It has the following minimum system requirements:
• Operating System
Windows 2000 Professional (SP4)
Windows 2000 Server (SP4)
Windows XP Professional (SP2)
Windows 2003 Server
• Third-party Software
Java™ Runtime: SUN Java Runtime Environment version 1.4.2.
• Hardware
Pentium-III or greater
512MB RAM
256MB free disk space.
The Management Server should be installed on a single machine. It
has the following minimum system requirements:
• Operating System
Windows 2000 Server (SP4)
Windows 2003 Server
• Third-party Software
Java Runtime:
SUN Java Runtime Environment version 1.4.2.
DBMS - any of the following are supported:
Microsoft SQL Server 2000
MySQL 4.1
Microsoft Access 2000 or later.
• Hardware
12 System Requirements
Pentium® III or greater
512 MB RAM
512 MB free disk space.
Page 23

Installing HP Device Manager
Management Gateway
The Management Gateway may be installed on multiple machines.
However, only one Gateway should be present on a subnet. It has the
following minimum system requirements:
• Operating System
Windows 2000 Professional (SP4)
Windows 2000 Server (SP4)
Windows 2003 Server
• Third-party Software
N/A
• Hardware
Pentium-III or greater
512 MB RAM
512 MB free disk space.
Management Agent The Mana gement Agent should be installed on each device that will
be managed by the system. It has the following minimum system
requirements:
• Operating System
NeoLinux 4.0.1
Neoware CE 8.1
Neoware XP embedded 1.4.2 or later
NeoLinux 3
Third Party Software
• Hardware
Thin-client device supporting one of the operating systems listed
above.
2 MB free disk space.
The following FTP Servers are recommended for use with HP
Device Manager:
• FTP Server
Microsoft Internet Information Server (IIS) 5.0
Rhinosoft Serv-U FTP Server 4.0
SCO UNIX OpenServer FTP Server 5.0.4 or 5.0.6.
System Requirements 13
Page 24

Installing HP Device Manager
Network Requirements
The network should not contain any other running PXE servers. It
should permit free communication on ports used by HP Device Manager. A number of UDP and TCP ports are required for client/server
communication. See Table 1 for a list of standard ports required, and
Table 2 for a list of custom ports required.
If you are using a Server behind a firewall, please add ports 1099 and
40002 to the exception ports in the firewall settings.
Table 1: Standard Ports Required
Port Protocol Purpose
67 & 68 UDP PXE - Bootstrap.
69 UDP TFTP (Trivial File Transfer Protocol).
4011 UDP DHCP Proxy Service (this is an alternative to ports
67 and 68 if those ports are not available).
20 & 21 TCP FTP (used for the Repository).
5900 TCP VNC Server.
Table 2: Custom HP Device Manager Ports Required
Receiver
Port
Sender Receiver Protocol Purpose
1099 Console Server TCP Console queries the RMI
40000 Server/
40001 Gateway Agent TCP Gateway sends task to Agent.
40002 Console Server TCP Console calls the remote
40003 Server/
14 System Requirements
Agent
Agent
Registry.
Gateway UDP Server/Agent polls Gateway.
objects on Server by RMI.
Gateway TCP Server sends task to
Gateway;
Agent sends report to
Gateway.
Page 25

Installing HP Device Manager
Table 2: Custom HP Device Manager Ports Required
Receiver
Port
40005 Gateway Server TCP Gateway sends report to
Sender Receiver Protocol Purpose
Server.
System Requirements 15
Page 26

Installing HP Device Manager
Installing HP Device Manager
The installation program will determine if the software required to
run Device Manager is already installed.
Note: Different operating systems may have slightly different steps
and wording for the installation process.
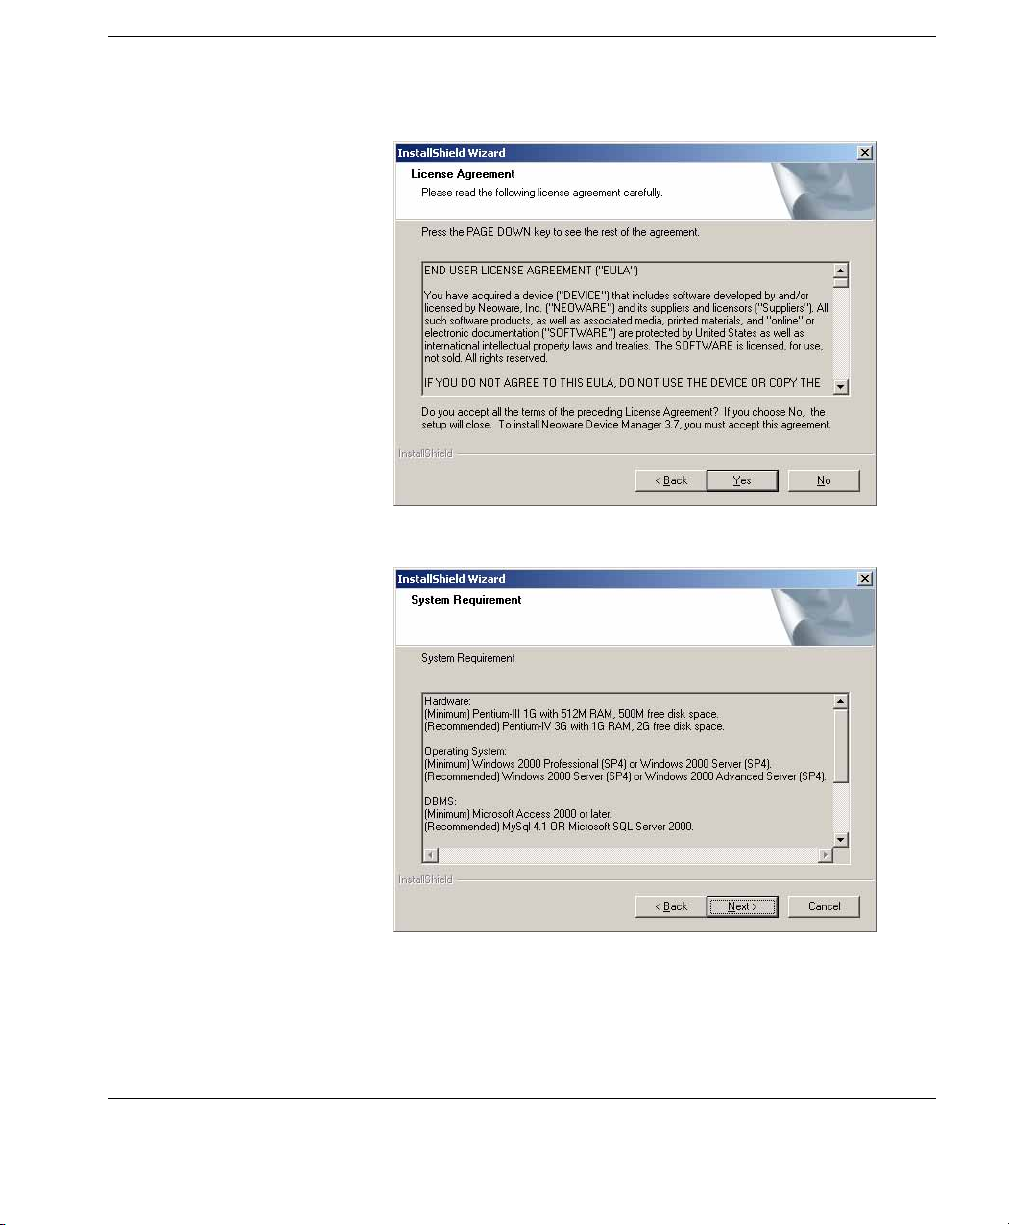
1 Run the Device Manager InstallShield Wizard. The installa-
tion’s introductory dialog will be displayed.
2 Click Next.
3 Read then accept all the terms in the License Agreement dialog
by clicking
16 Installing HP Device Manager
Yes.
Page 27
Installing HP Device Manager
4 Read the System Requirement then click Next.
5 In the Choose Destination Location dialog, select the folder
where Device Manager will be installed. Accept the default
folder or click
Browse and navigate to a specific location.
Installing HP Device Manager 17
Page 28

Installing HP Device Manager
6 Click Next and select a Setup Type.
Typical - The Management Console, Server and Gateway will be
installed with their default configurations. A Microsoft Access
database will be initialized as the Server’s database.
Compact - Only the Management Console will be installed.
18 Installing HP Device Manager
Page 29
Installing HP Device Manager
Custom - Select the components to install and specify the con-
figuration of each one:
• Console - Does not require any configuration.
• Server - You can choose which database will be used for the
Server. The optional databases are Microsoft Access,
MySQL and Microsoft SQL Server.
• Gateway - You should configure DHCP and Gateway set-
tings. The DHCP server is used by the PXE boot ROM to get
an IP address as well as other basic networking information
(subnet mask, default gateway, etc.).
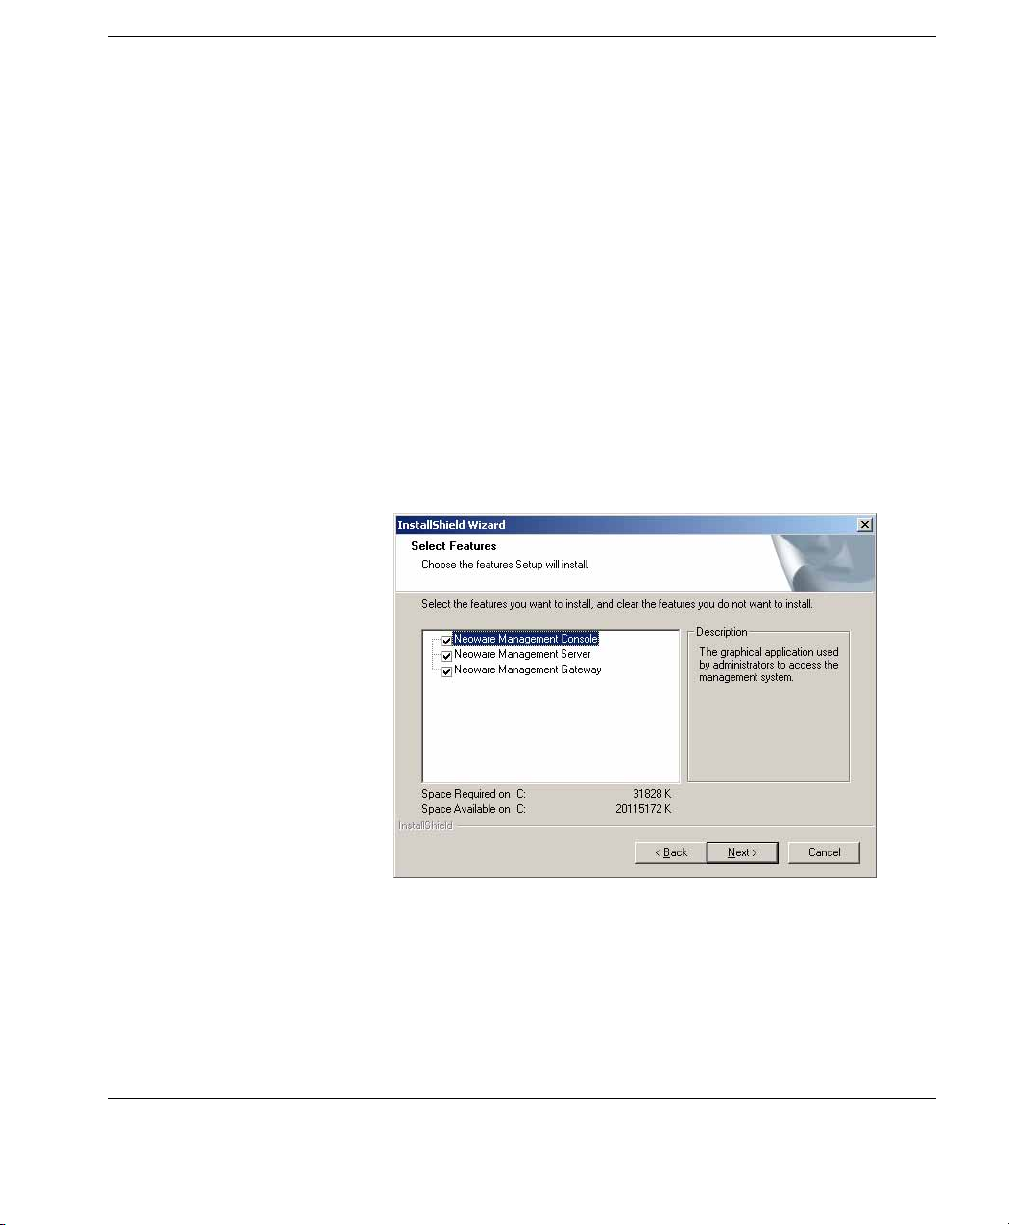
7 Select Custom as an example, then click Next to continue.
8 Select the Device Manager components that you wish to install
then click
Next to continue.
Installing HP Device Manager 19
Page 30
Installing HP Device Manager
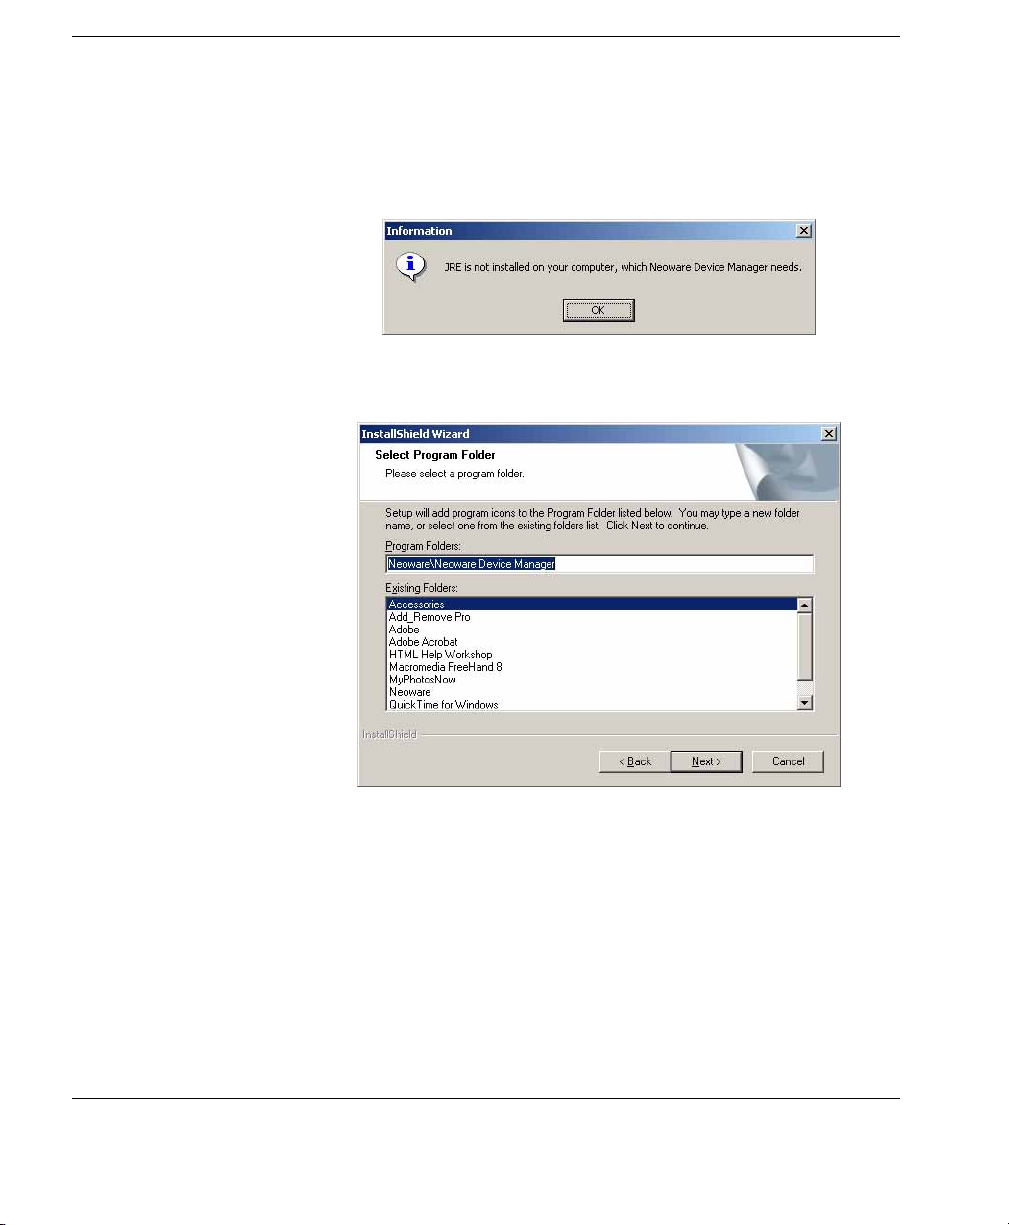
9 In the Select Program Folder dialog, select the name of the
A Java Runtime Environment of version 1.4 or later, including
any Java2 platform system, is required to run Device Manager. If
JRE is not installed on your machine or its version is older than
1.4, the system will display the following dialog:
folder to store HP Device Manager.
20 Installing HP Device Manager
Page 31

Installing HP Device Manager
10 Click Next to preview the current installation settings.
11 Click Next to start installing the selected HP Device Manager
component(s).
Installing HP Device Manager 21
Page 32
Installing HP Device Manager
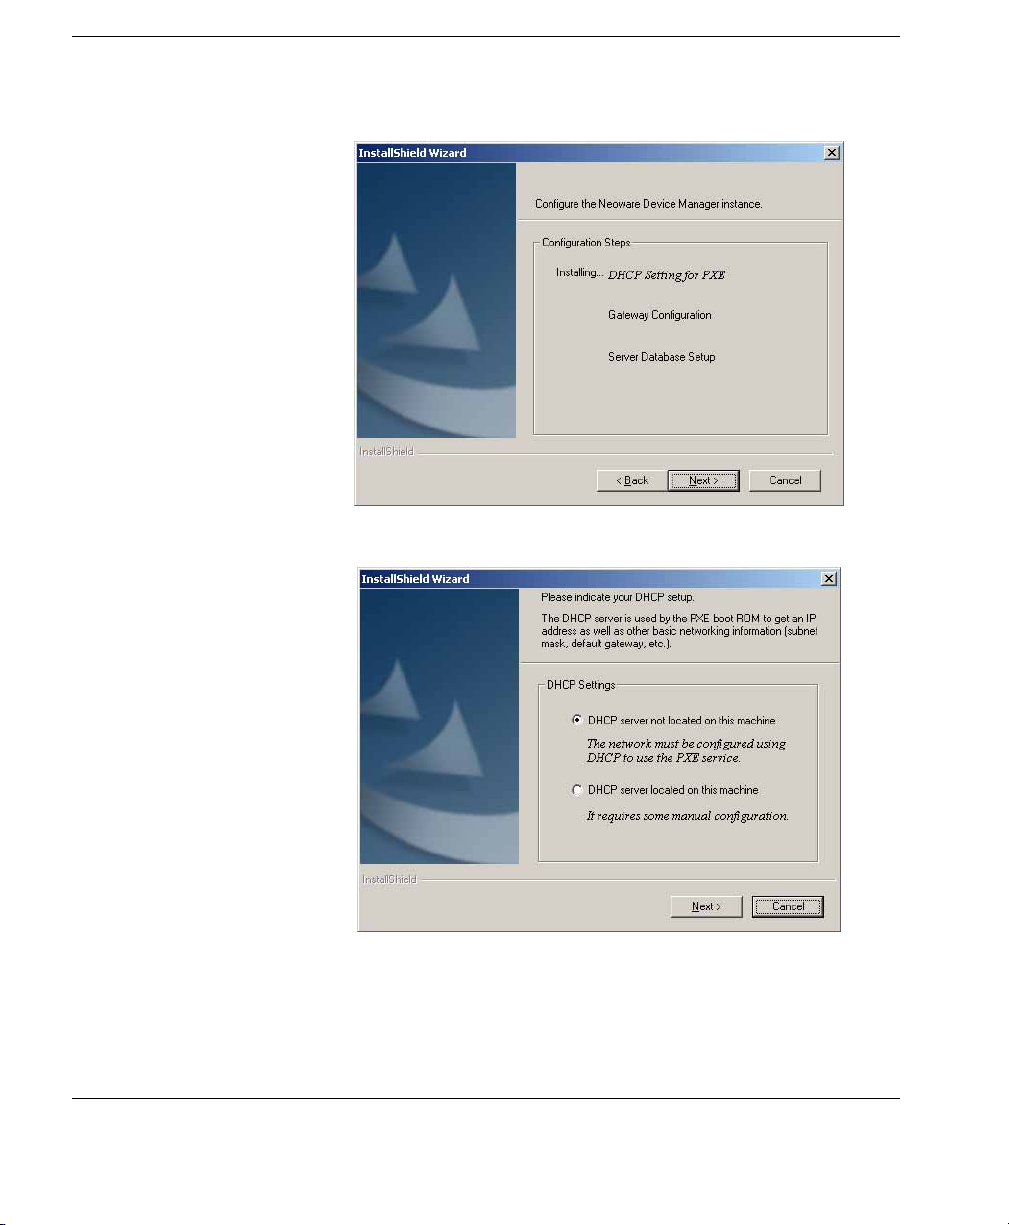
12 Please wait until the file copying process is finished.
13 Click Next and the DHCP Configuration dialog will appear.
Specify whether the DHCP server is located on the machine you
are installing HP Device Manager.
22 Installing HP Device Manager
Page 33
Installing HP Device Manager
Note: The DHCP server may need to be configured so that it can
be used with Device Manager, particularly if it is on the same
machine as Device Manager. See “Configuring DHCP Servers”
on page 30 for further information.
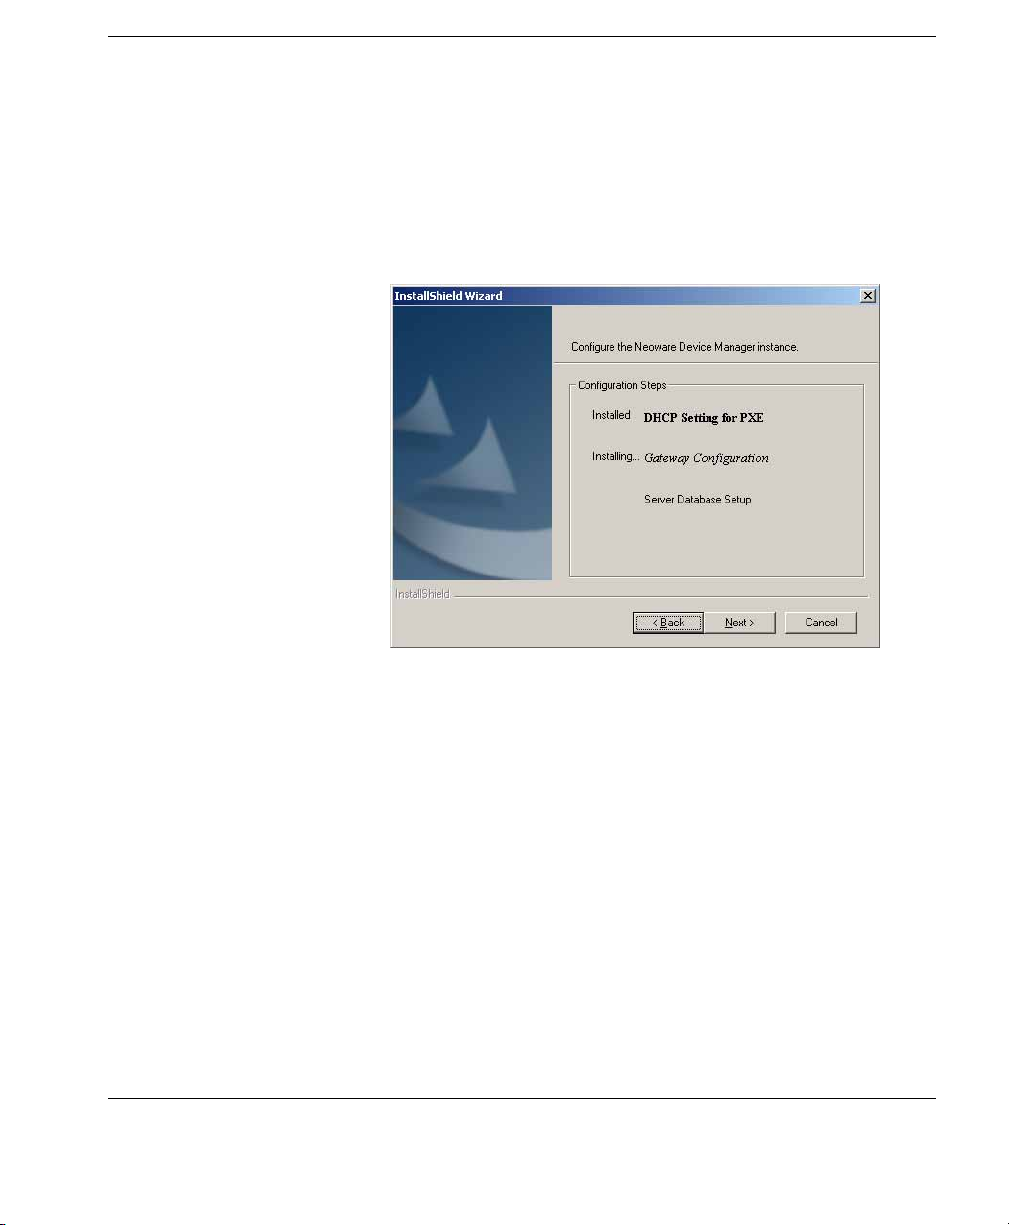
14 Click Next to install the Management Server and Management
Gateway services to your machine.
Installing HP Device Manager 23
Page 34
Installing HP Device Manager
15 Click Next to display the Gateway Configuration dialog.
Management Server Address is the address for the Manage-
The
ment Server that the Management Gateway will report to.
Local NIC selects which NIC the gateway will receive agent
The
reports on. If there is only one NIC for the system, this field can
be left blank.
Start PXE service when Gateway is started setting deter-
The
mines whether the PXE service will be started along with the
Management Gateway. The PXE service is always installed
along with the Gateway, but can be controlled independently of
the Gateway (by changing this setting to NO) if required. If this
is set to YES, when the Gateway is stopped, the PXE service
will also stop; when the Gateway is started, the PXE service will
also start.
24 Installing HP Device Manager
Page 35

Installing HP Device Manager
16 Once you have set up the Gateway, click OK to save the settings
and continue.
17 Click Next to start the Management Server Database configura-
tion.
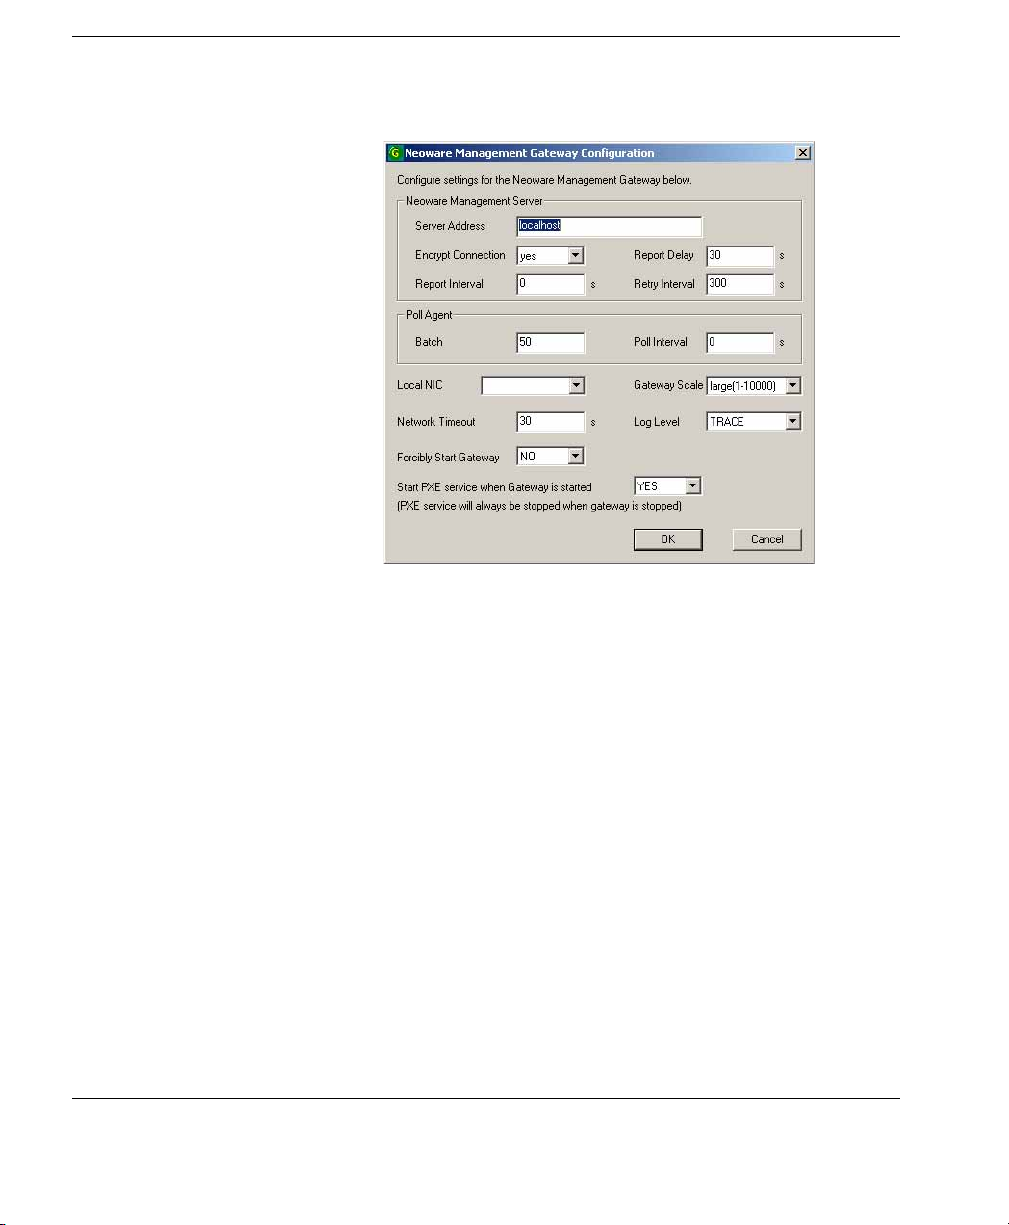
18 Select one database installation option and click Next to start the
configuration.
Installing HP Device Manager 25
Page 36
Installing HP Device Manager
Create new database:
Note: If a Database named ndmdb already exists, it will be
overwritten without any warning!
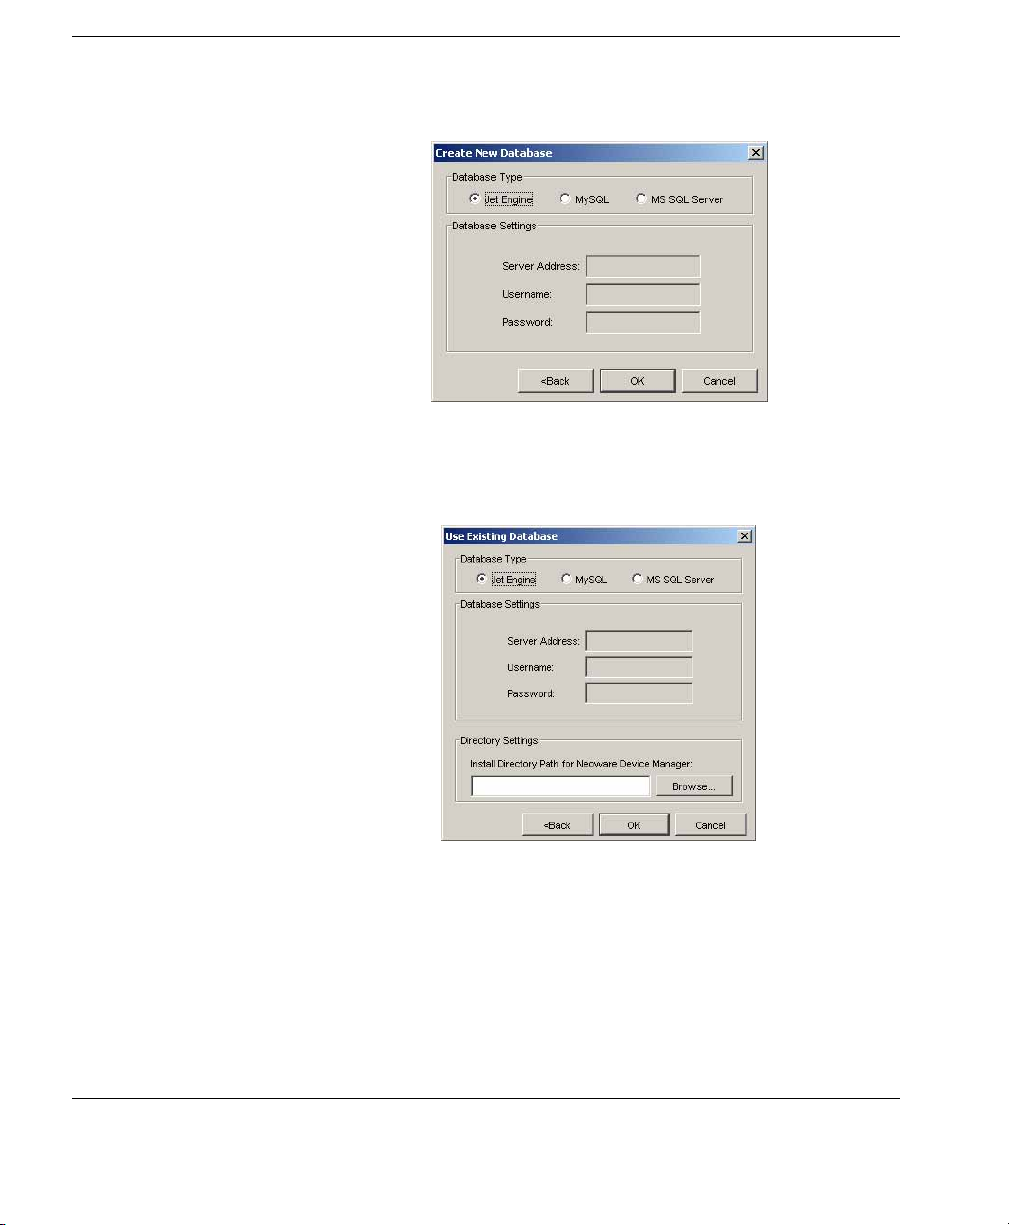
Use Device Manager database at existing location:
Select the folder where Device Manager has been installed.
Input the path or click
Directory Settings box.
in the
26 Installing HP Device Manager
Browse and navigate to a specific location
Page 37

Installing HP Device Manager
Migrate Device Manager database to new location:
Select the folder where Device Manager has been installed.
Input the path or click
Directory Settings box.
in the
19 The following dialog will appear when the database has been
Browse and navigate to a specific location
successfully created.
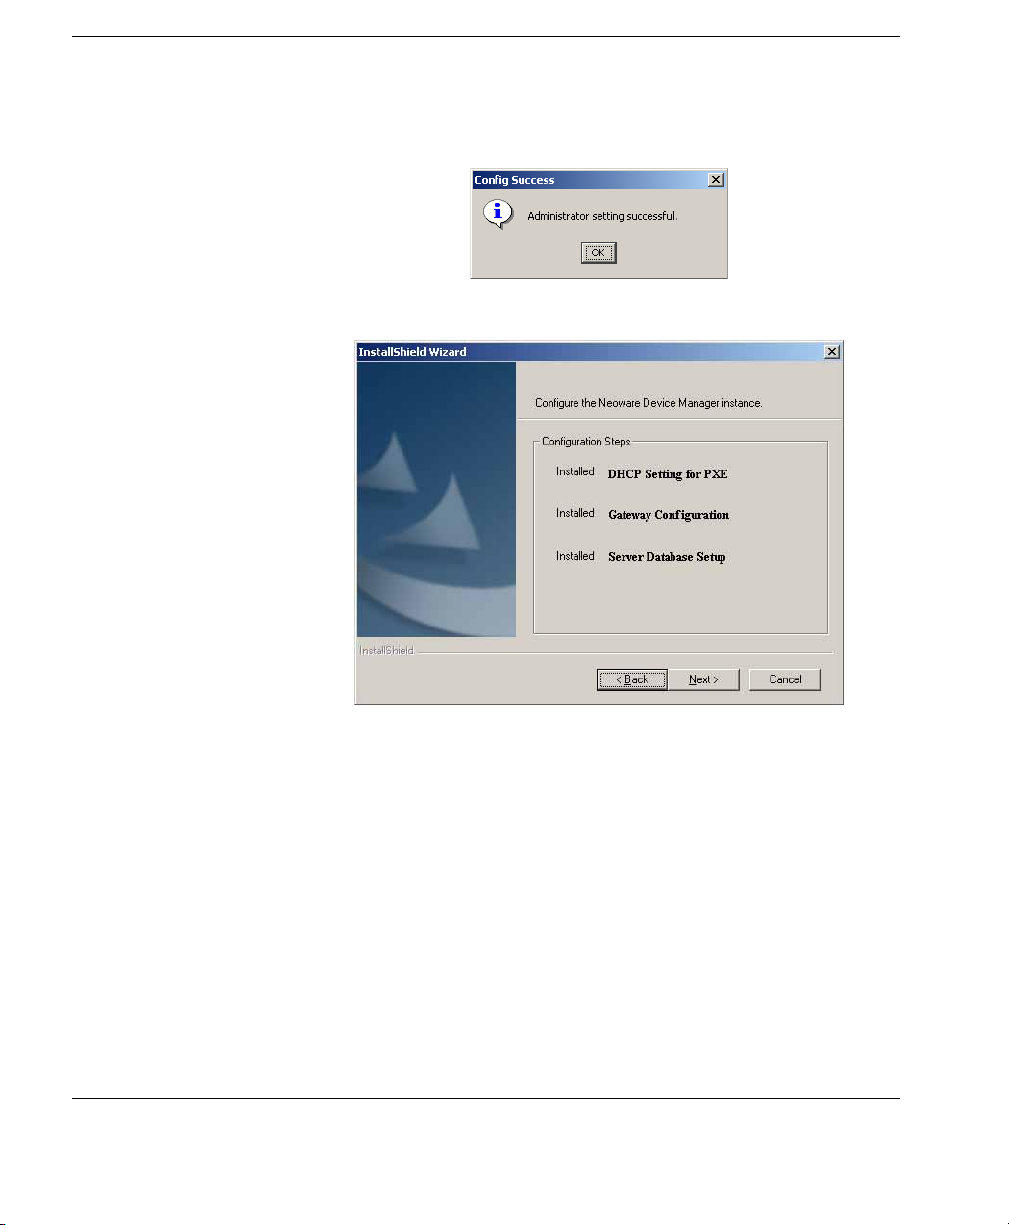
20 Click OK to set the Administrator password.
Installing HP Device Manager 27
Page 38
Installing HP Device Manager
21 Click OK and you will be informed that the password has been
22 Click OK.
set successfully.
23 Click Next.
28 Installing HP Device Manager
Page 39
Installing HP Device Manager
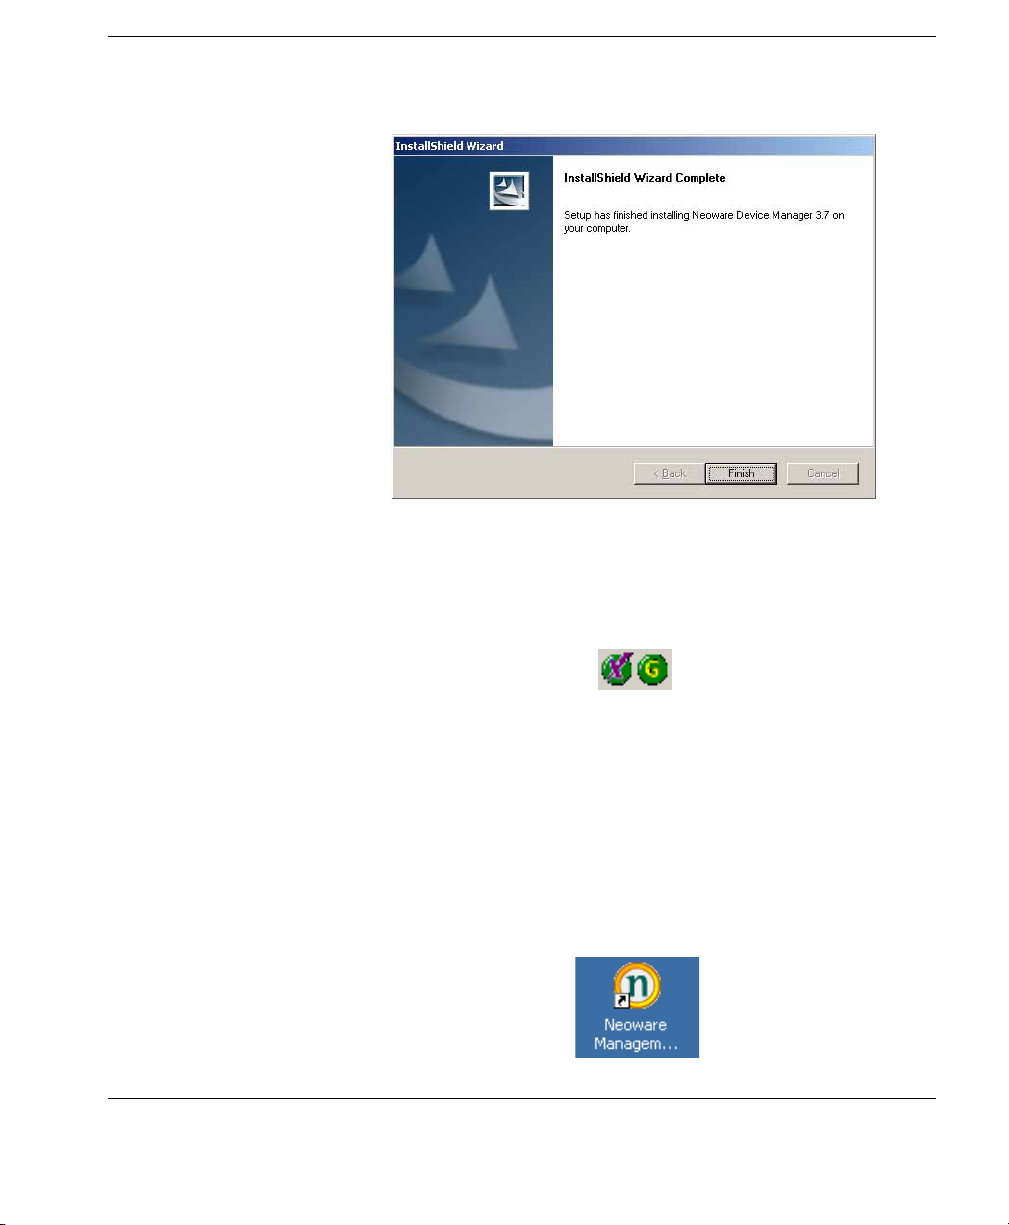
24 Click Finish to complete the installation process.
25 If the Management Console, Server and Gateway are setup
successfully, icons of the Server and Gateway will be displayed
in the Systray of your machine as shown below.
A green icon indicates the service is running, a yellow icon
indicates the service is starting up, and a red icon indicates the
service has stopped.
Note: You can start/stop services and configure the Gateway
server again by using the menu options displayed when you
right-click on the Systray icons.
An icon for the Management Console will be displayed on the
desktop.
Installing HP Device Manager 29
Page 40

Installing HP Device Manager
Configuring DHCP Servers
This section describes how to configure the DHCP server for use
with PXE.
Management Server Installed Separately to the DHCP Server
Management Server Installed on DHCP Server Machine
Should problems occur when using PXE, the DHCP servers may
need to be checked for certain settings that may conflict with PXE.
However, on most networks, these issues should not occur.
The DHCP server is used by the PXE boot ROM to get an IP address
as well as other basic networking information (subnet mask, default
gateway, etc.).
Note: The network must be configured using DHCP to use the PXE
service.
Configuring the DHCP Server
1 Ensure the DHCP server has not been previously configured for
a PXE bootstrap.
2 If the DHCP options 43 & 60 are set, remove them.
Note: The Device Manager PXE service will detect the DHCP
packets sent by any PXE BootROMs and will offer PXE network
parameters without disturbing the standard DHCP negotiation
process. This is called DHCP Proxy.
The DHCP server should then be ready to be used with PXE.
If Management Server is installed with a DHCP server on the same
machine, it requires some manual configuration.
The Management Server installation process installs the HP PXE
Service. This service provides the PXE remote-imaging function.
The service is automatically started and stopped with the operating
system.
30 Configuring DHCP Servers
Page 41

Installing HP Device Manager
The DHCP server is used by the PXE boot ROM to get an IP address
as well as other basic networking information (subnet mask, default
gateway, etc.).
The following instructions assume that:
• The network is already configured using DHCP.
• The DHCP server has not been previously configured for a PXE
bootstrap.
• There are no other TFTP servers running on the same network.
Configuring the DHCP Server:
By default options 60 and 201 are not set under Windows 2000.
These options will have to be added in order to tell PXE clients
where to find the Management Server.
1 If DHCP option 43 is set, remove it. (This is due to the fact that
Management Server is installed on the same machine as the
DHCP server.)
2 Add option 60, and set value to “PXEClient”. If option 60 does
not exist, see the following instructions on setting this option.
Either:
• From the main Windows menu select Start > Run.
• Enter Cmd in the Open: field. A Command shell appears.
• Enter netsh then press the Enter key.
• Enter dhcp then press the Enter key.
• Enter server \\servername (using the UNC name for the
server).
Or:
• Enter server <ip_address> (using the IP address of the
server.). A “dhcp server >” prompt appears in the command
window.
Configuring DHCP Servers 31
Page 42

Installing HP Device Manager
3 Add option 201, and set the value to
• Enter add optiondef 60 (name of your choice) STRING 0
then press the
• Enter set optionvalue 60 STRING “PXEClient“ then press
Enter key.
the
• To confirm that the settings are correct, enter show option-
value all then press the
Enter key.
Enter key.
“‘Management_Gateway_IP_Address’ ‘40003’“
• Type in add optiondef 201 (name of your choice) STRING
0 then press the
• Type in set optionvalue 201 STRING
Enter key.
‘Management_Gateway_IP_Address’ ‘40003’ then press
the
Enter key. (The Management_Gateway_IP_Address is
the address of the server running the Management Gateway
service.)
• To confirm that the settings are correct, type in show option-
value all then press the
Enter key.
Note: When setting optionvalue 201, ‘Management_Gateway_
IP_Address’ ‘40003’ must be written exactly as shown above,
including the single quotes and separated by a single space, otherwise errors will occur.
The DHCP server should then be ready to be used with PXE.
Adding DHCP Option 60 and 201 to an ISC DHCP Server
If ISC DHCP server 2.0 is in use, it must be updated to ISC DHCP
server 3.0 as version 2.0 does not support vendor specific information. For more information, see
32 Configuring DHCP Servers
HTTP://WWW.ISC.ORG.
Page 43

Installing HP Device Manager
Configuring a Linux DHCP Server
Configuring Routers
1 Edit the DHCP server configuration file /etc/dhcpd.conf. Add
the following lines to the beginning of the file exactly as shown:
ddns-update-style ad-hoc;
Authoritative;
Option NDM code 201 =string;
Option vendor-class-identifier “PXEClient”;
Option NDM “‘Management_Gateway_IP_Address’ ‘40003’”;
2 Restart dhcpd to use the new configuration.
3 The HP Device Manager config string should be:
‘Management_Gateway_IP_Address’ ‘40003’
For PXE to function properly, any network that uses DHCP and has
multiple subnets should have an IP helper configured in the router
between any clients requiring a dynamic IP address and the DHCP
server. The router will need to be configured to have an additional IP
helper address to point to the Management Gateway.
Example (Cisco Router):
1 Go to Global Configuration mode.
2 Type ip forward-protocol udp 67 and press Enter.
3 Type ip forward-protocol udp 68 and press Enter.
4 Go to the LAN interface(s) that serves the PXE workstations.
5 Type ip helper-address <DHCP Server IP address> and press
Enter.
6 Type ip helper-address <Management Gateway IP address>
and press Enter.
Note: The above IP addresses should be entered without the < or >
characters.
Configuring Routers 33
Page 44
Installing HP Device Manager
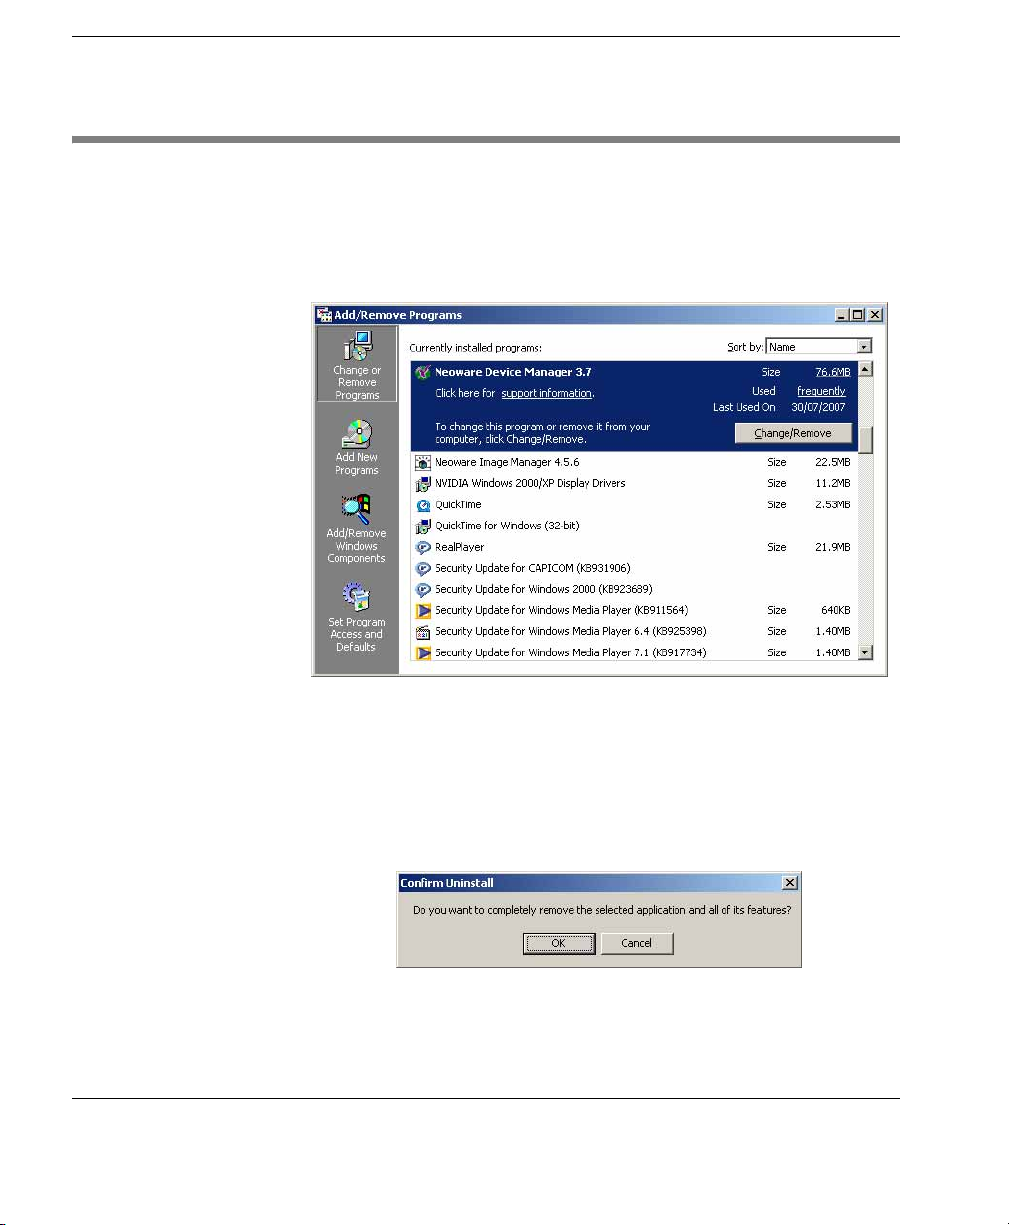
Uninstalling Device Manager
1 Open the Microsoft Windows Control Panel (On a Windows
2000 system, select
2 Double-click Add/Remove Programs. The Add/Remove Pro-
grams window will appear.
Start > Settings > Control Panel).
3 Select Neoware Device Manager from the list of currently
installed programs.
4 Click Change/Remove to activate the Device Manager configu-
ration program.
5 You will be asked to confirm your decision.
Click OK to continue.
34 Uninstalling Device Manager
Page 45
Installing HP Device Manager
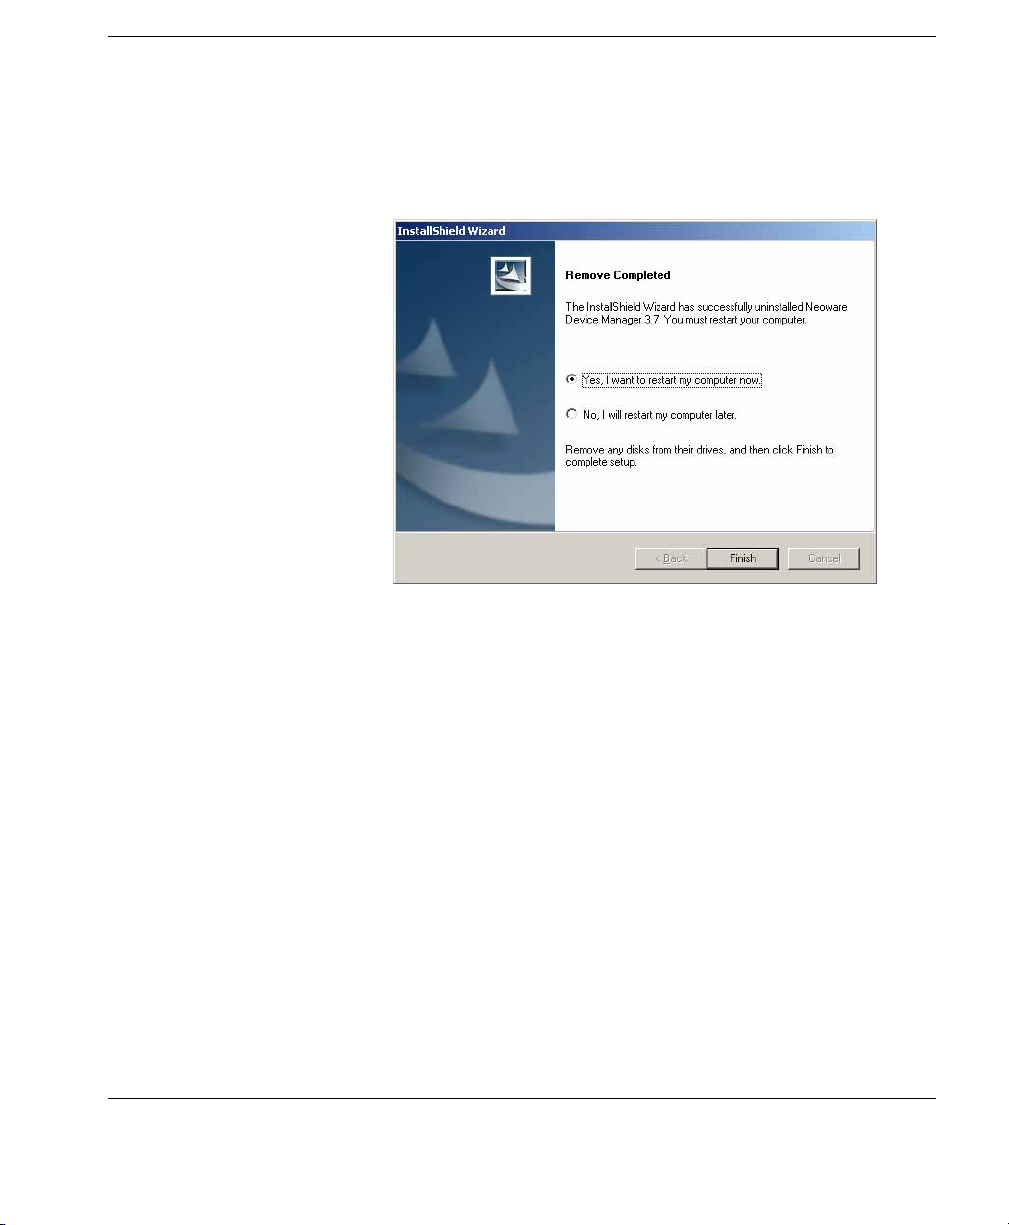
6 Once Device Manager has been uninstalled, the computer
should be rebooted. Click
dialog to reboot the computer, or select
Finish if you intend to reboot the computer yourself later.
7 HP Device Manager has now been uninstalled from your
Finish on the Remove Completed
No before clicking
system.
Uninstalling Device Manager 35
Page 46

Installing HP Device Manager
36 Uninstalling Device Manager
Page 47

CHAPTER 3 Getting Started
This chapter describes how to start using the HP Management
Console, set up a repository, and discover clients.
Logging in to the HP Management Console
To launch the HP Management Console:
1 Double-click the Neoware Management Console icon on the
Windows desktop.
HP Device Manager User Manual
OR
From the main Windows screen select:
Start > Programs > Neoware > Neoware Device Manager >
Neoware Management Console
37
Page 48
Getting Started
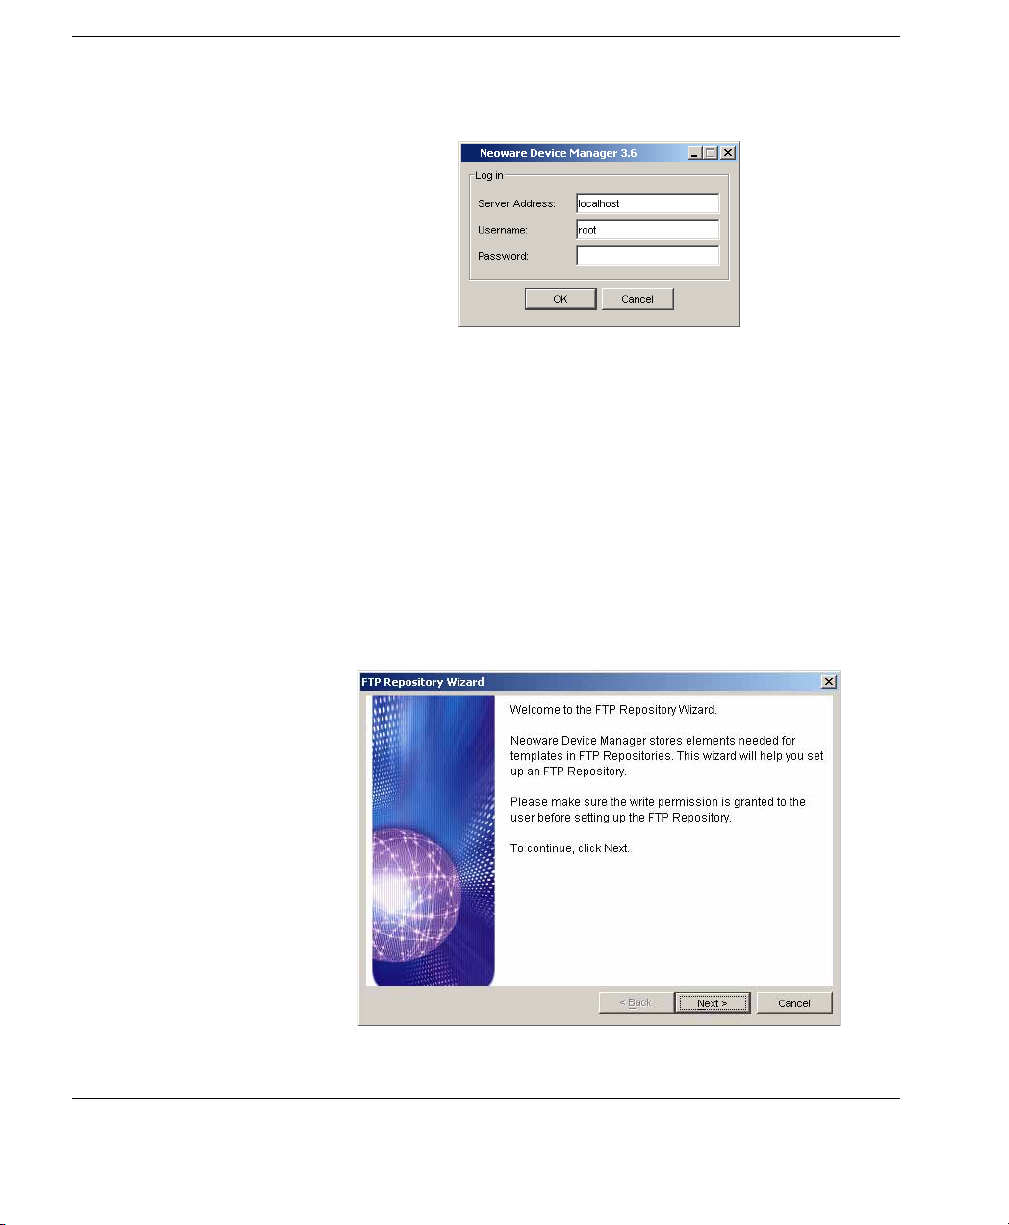
Log in dialog will appear.
The
2 Enter the Server Address of your network’s HP Management
Server. The address can be entered as an IP address or as a
machine name. If the console is on the same machine as the HP
Management Server, then enter “localhost”.
3 Enter your Username and Password in their respective fields.
4 Click OK to log in to the Console.
Once the username and password are verified, the main window
of the HP Management Console appears.
If this is the first time you have logged in the Management
Console, the
FTP Repository Wizard will be displayed.
38 Logging in to the HP Management Console
Page 49

Configuring the Repository
The HP Management Repository is used to store software
components, system images, diagnostic tools and agent files. Each
of the individual items stored in the Repository is referred to as an
element. Once elements are stored in the Repository, they can be
applied to client devices using templates.
The HP Management Repository actually resides over several
servers, these being the HP Management Server Repository (the
"Server Repository") and one or more FTP Server Repositories (the
"FTP Repository"). The
import elements into the Server Repository and then transfer them to
the relevant FTP Repository. An element must be transferred to an
FTP Repository before it can be applied to clients.
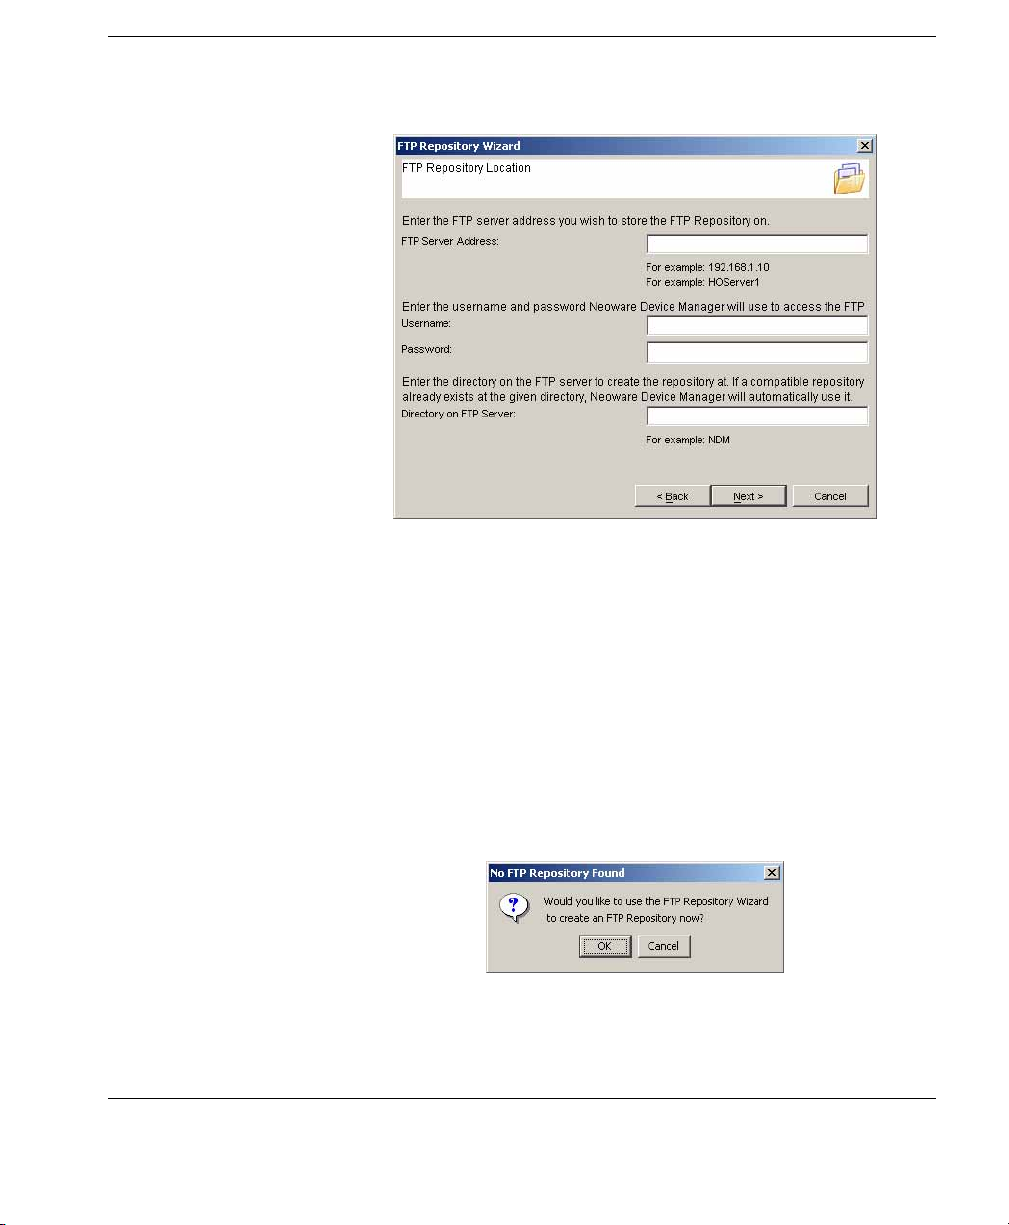
When you log in the HP Device Manager Console for the first time
you will be automatically prompted to create an FTP Repository
using the
create an additional FTP Repository later, you can run the
Repository Wizard again by selecting Tools > Configuration from
the Console’s menu bar, selecting
tree pane, then clicking the
right corner.
Getting Started
Repository Management tool is used to
FTP Repository Wizard as described below. If you need to
FTP
FTP Repositories in the left-hand
Launch FTP Wizard button in the top-
Creating an FTP Repository
To create an FTP Repository:
1 If the FTP Repository Wizard is not displayed already, select
Tools > Configuration in the Console’s menu bar, select FTP
Repositories
FTP Wizard
Welcome screen will be displayed.
The
in the left-hand tree pane, then click the Launch
button in the top-right corner.
Configuring the Repository 39
Page 50

Getting Started
2 Click Next to display the FTP Repository Name screen.
3 Enter a name to identify this FTP Repository in the FTP
Repository Name
4 Click Next to display the FTP Repository Location screen.
40 Configuring the Repository
field.
Page 51
Getting Started
5 In the FTP Server Address field, enter the IP address or host-
name of the server on which the FTP Repository is to be created.
Enter the
Device Manager to access it. The
User Name and Password for the server to enable HP
User Name and Password
must have write permissions for the server.
Enter a
FTP Repository. When you click
Wizard will search for the directory, and if an existing FTP
directory on the FTP server that will be used to store the
Next, the FTP Repository
Repository is found at that location, it will use it. If an existing
FTP Repository is not found, you will be asked if you want to
create the directory and FTP Repository as required.
Configuring the Repository 41
Page 52

Getting Started
6 When you have entered all of the details for the FTP Repository,
Next to create it.
click
7 Click Finish to close the FTP Repository Wizard.
The FTP Repository is now ready for you to add elements to it
using the
Repository Management tool as described in the sec-
tion “Adding Elements to the Repository” on page 51.
42 Configuring the Repository
Page 53

Management Console Overview
The Management Console window consists of three panes and a
series of tabs which determine their content.
OS Tabs Device Toolbar Template Toolbar Template Pane
Getting Started
Device Pane Status Bar Task Pane
• OS Tabs
Selects the different categories of terminal operating systems that
are controlled by HP Device Manager. Note that only the tabs for
the operating system types of the devices currently managed by
HP Device Manager will be displayed.
• Device Toolbar
Provides tools enabling you to power on/off the client devices,
shadow a remote client, send tasks, print device properties,
discover an agent, etc. Refer to the section “Toolbar Overview”
on page 62 for more information.
Management Console Overview 43
Page 54

Getting Started
• Device Pane
All clients of the selected OS type that are connected to the server
are displayed in this window. This pane contains the
Device Tree,
which is heirachical list of all the client devices, sorted with a
custom grouping scheme.
• Template Toolbar
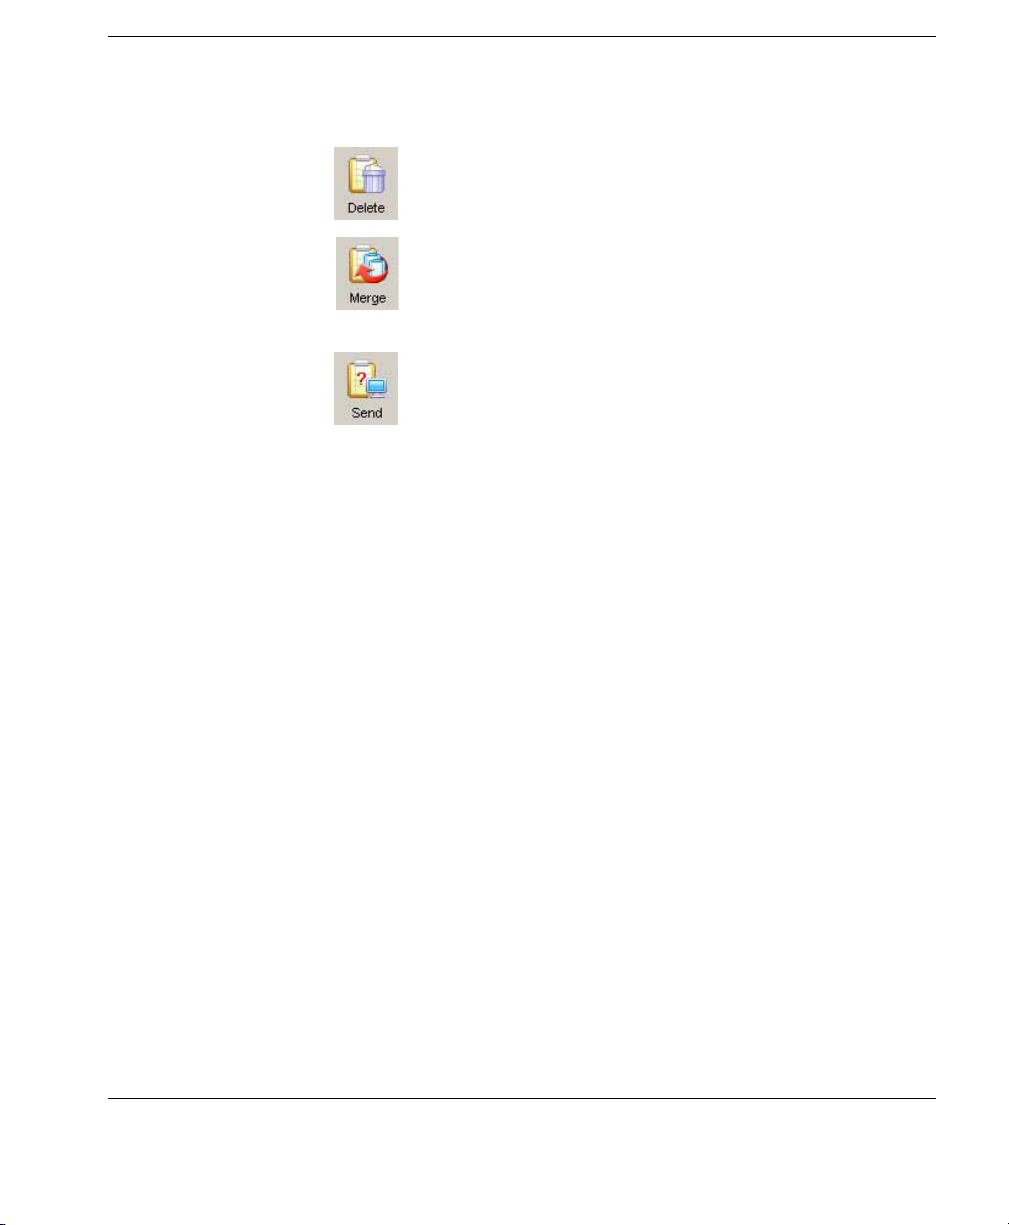
Selects the different options to delete, merge or send templates.
• Template Pane
The templates that are applicable to the listed client devices are
listed here.
• Task Pane
Displays the execution status for each task in a hierachical
structure. If there is more than one device for a listed task, the
status of each device will be listed.
• Status Bar
Descriptions of various items in the HP Management Console are
displayed here when the cursor moves over them.
44 Management Console Overview
Page 55

Client Discovery
Getting Started
Clients which have the HP Management Agent installed must be
‘discovered’ by HP Device Manager before they can be used. There
are four approaches to client discovery:
• Through an HP Management Agent Broadcast (automatic)
• Server-side discovery using IP walking
• Discover Agent using DHCP Tag
• Agent Configuration
HP Management Agent Broadcast
The HP Management Gateway will normally be able to detect most
HP Management Agents. The gateway functions by listening for a
network broadcast message sent when each agent starts up. However, to ensure that the gateway is able to detect all agents, it must be
running before each agent is started up.
If the gateway is unable to detect an agent, Discover Agent, IP
walking, DHCP Tag or Agent Configuration can be used instead.
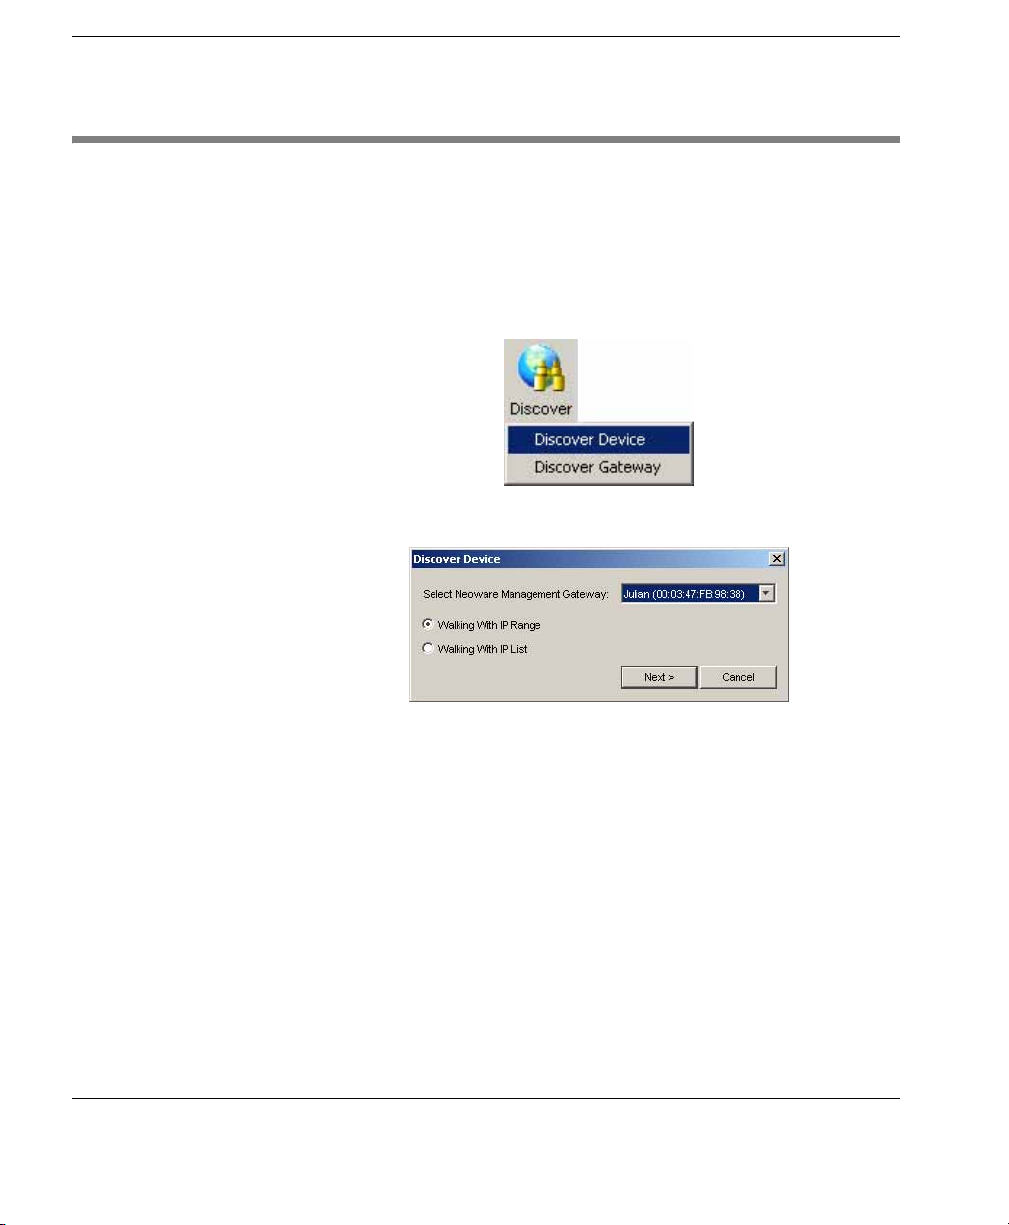
Discover Agent HP Device Manager can search a range of IP addresses for agents
and gateways.
1 Click on the Discover button in the Device Toolbar and select
Discover Device in the menu.
The
Discover Device dialog will be displayed.
Client Discovery 45
Page 56

Getting Started
Walking with IP Range
2 Select the gateway in the Select Neoware Management Gate-
list box, then select the Walking with IP Range option.
way
3 Click Next to display the Discover by Range dialog.
46 Client Discovery
4 IP scopes define set ranges where HP Device Manager will
search for client agents. Select
IP Search Scope, or deselect the box and enter a Starting IP
an
Address
and an Ending IP Address. IP walking will search this
Use Preset IP Scope then select
range of addresses for a reply.
To configure an IP scope, select the
Search Scope
list box to display the Edit IP Walking Scope
Edit... option in the IP
dialog.
Page 57

Getting Started
Select an existing IP scope from the
Add to create a new one.
click
IP Walking Scopes list or
Enter a scope name to be used by HP Device Manager to refer to
the new search scope, then click
OK.
Define the IP address range you want HP Device Manager to
search for client agents by filling in the
Ending IP Address. The IP address can be copied from another
location and pasted here. Click
OK to exit.
Apply to save the settings, then
Starting IP Address and
Client Discovery 47
Page 58
Getting Started
Walking with IP List
2 Select the gateway in the Select Neoware Management Gate-
list box, then select the Walking with IP List option.
way
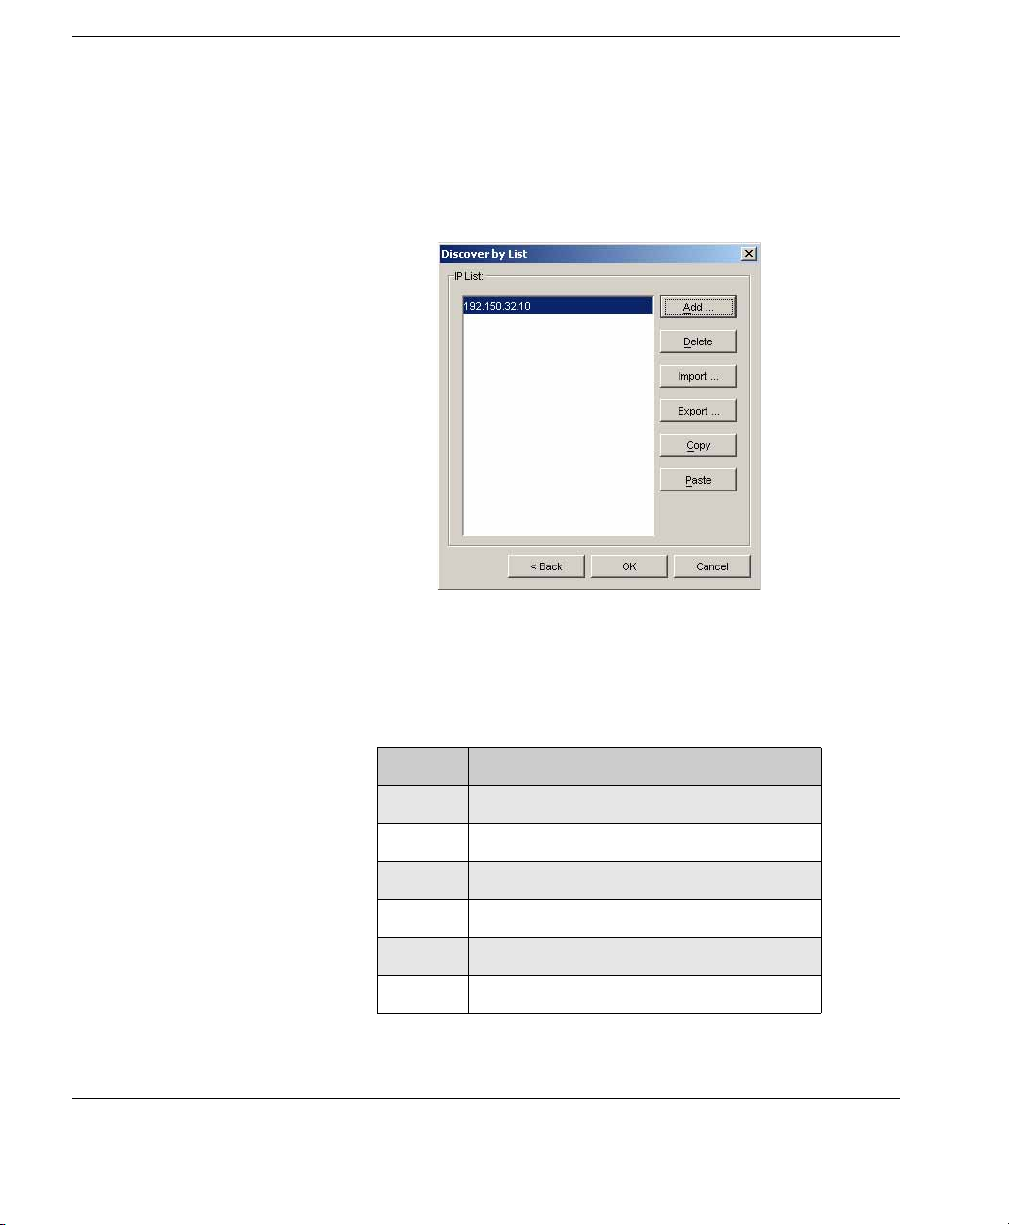
3 Click Next to display the Discover by List dialog.
4 The IP addresses in the IP List can be customized according to
your specific needs. Refer to the table below for descriptions of
each button in the dialog.
48 Client Discovery
Table 3: Discover by List - Button Functions
Button Function
Add Add a new IP address to the IP list.
Delete Remove an existing IP address from the list.
Import... Import a *.txt or *.csv file to the IP list.
Export... Export the IP list as a *.txt file.
Copy Copy the current IP list.
Paste Paste a copied IP address.
Page 59
Getting Started
5 Click on OK to search for agents or gateways. Once the search
has finished, a report will show the clients detected by HP
Device Manager.
6 Click Close to automatically add the successful IP addresses to
Device Pane.
the
Discover by DHCP Tag
Agent Configuration
An agent can automatically register with a gateway based on the
content of a DHCP tag it receives during start-up. Add option 202 to
DHCP server and set the value to "<Server IP> <Gateway IP>".
(The Server IP and Gateway IP is the IP address of the server running the Management Server and Gateway respectively.) Please refer
to “Configuring DHCP Servers” on page 30 for details on how to
configure DHCP Server and add options.
You can manually add the IP address of the gateway to the agent's
configuration file so that the agent can search for the gateway automatically.
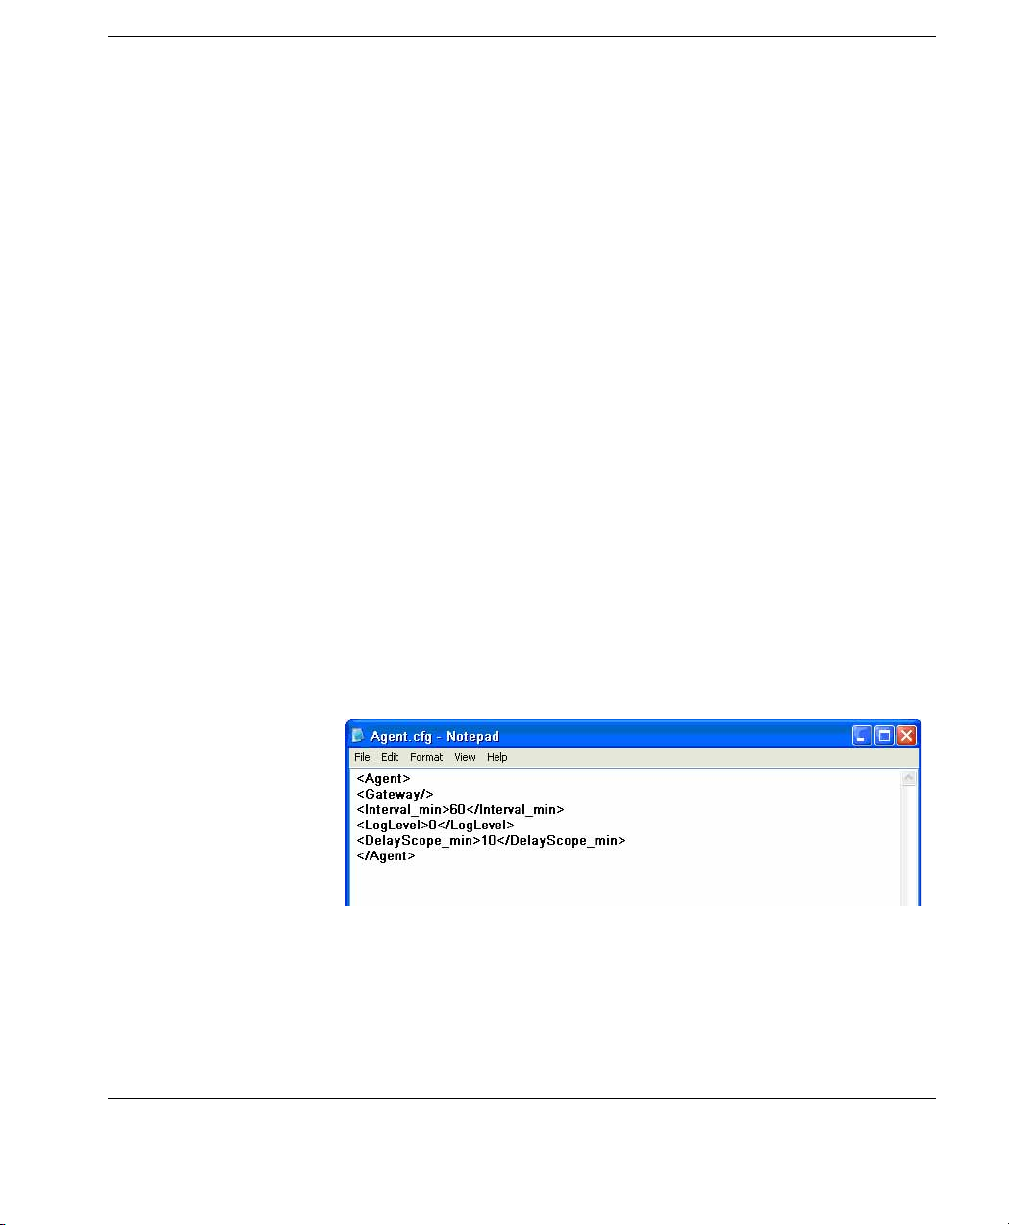
To Configure Windows XP Embedded Agents:
1 Open the directory of C:\WINDOWS\xpeagent.
2 Open the Agent.cfg file with the Notepad application.
Client Discovery 49
Page 60

Getting Started
3 Modify the gateway IP address in the second line. Please take
the format of the following illustration as an example (where
192.168.0.106 is the IP address of the gateway).
4 Save your modifications and close this file.
When rebooted, the agent will search for the gateway according to
your specified IP address in the Agent.cfg file.
Note 1: The agents in the NAT environment must be configured as
described above.
Note 2: As for the agents that have successfully finished one task at
least, the IP address of the gateway has been added into the original
format of the Agent.cfg file on these agents. Hence you do not need
to manually configure these agents again.
50 Client Discovery
Page 61

Adding Elements to the Repository
This section describes how elements are added to the HP Management Repository so that they are available for applying to client
devices. You must have configured an FTP Repository using the
Repository Wizard before you can add elements to it (refer to the
section “Configuring the Repository” on page 39 for details).
The HP Management Repository actually resides over several servers, these being the HP Management Server Repository (the "Server
Repository") and one or more FTP Server Repositories (the "FTP
Repository"). The
elements into the Server Repository and then transfer them to the
relevant FTP Repository. An element must be transferred to an FTP
Repository before it can be applied to clients.
Note: When importing an element into the HP Management
Repository, a relay FTP server must be selected to temporarily hold
the element, which is then automatically transferred to the Server
Repository.
The
Repository Management tool is displayed by selecting Tools >
Repository Management from the Management Console’s menu
bar. The following section describes how to use it to import an
element into the Server Repository, then transfer it to an FTP
Repository.
Repository Management tool is used to import
Getting Started
FTP
Elements created through the Console using a template (for example, an image file), are placed in the FTP Repository specified in the
template. If you want the element to be available in another FTP
Repository, you first need to transfer it to the Server Repository
using the
Repository Management tool’s Download button, then
transfer the element from the Server Repository to the other FTP
Repository using the
Upload button.
Adding Elements to the Repository 51
Page 62

Getting Started
Importing an Element into the Repository
The following procedure describes how to import an element into
the Repository. In this example we are importing a snapin which can
be used to add Adobe Reader to NeoLinux 4 clients.
1 Copy the element to be imported to a temporary location on your
local drive. (In this case the element is a snapin downloaded
from the support section of the HP website.)
2 Select Tools > Repository Management from the Management
Console’s menu bar to display the
Repository Management
dialog.
52 Adding Elements to the Repository
Page 63
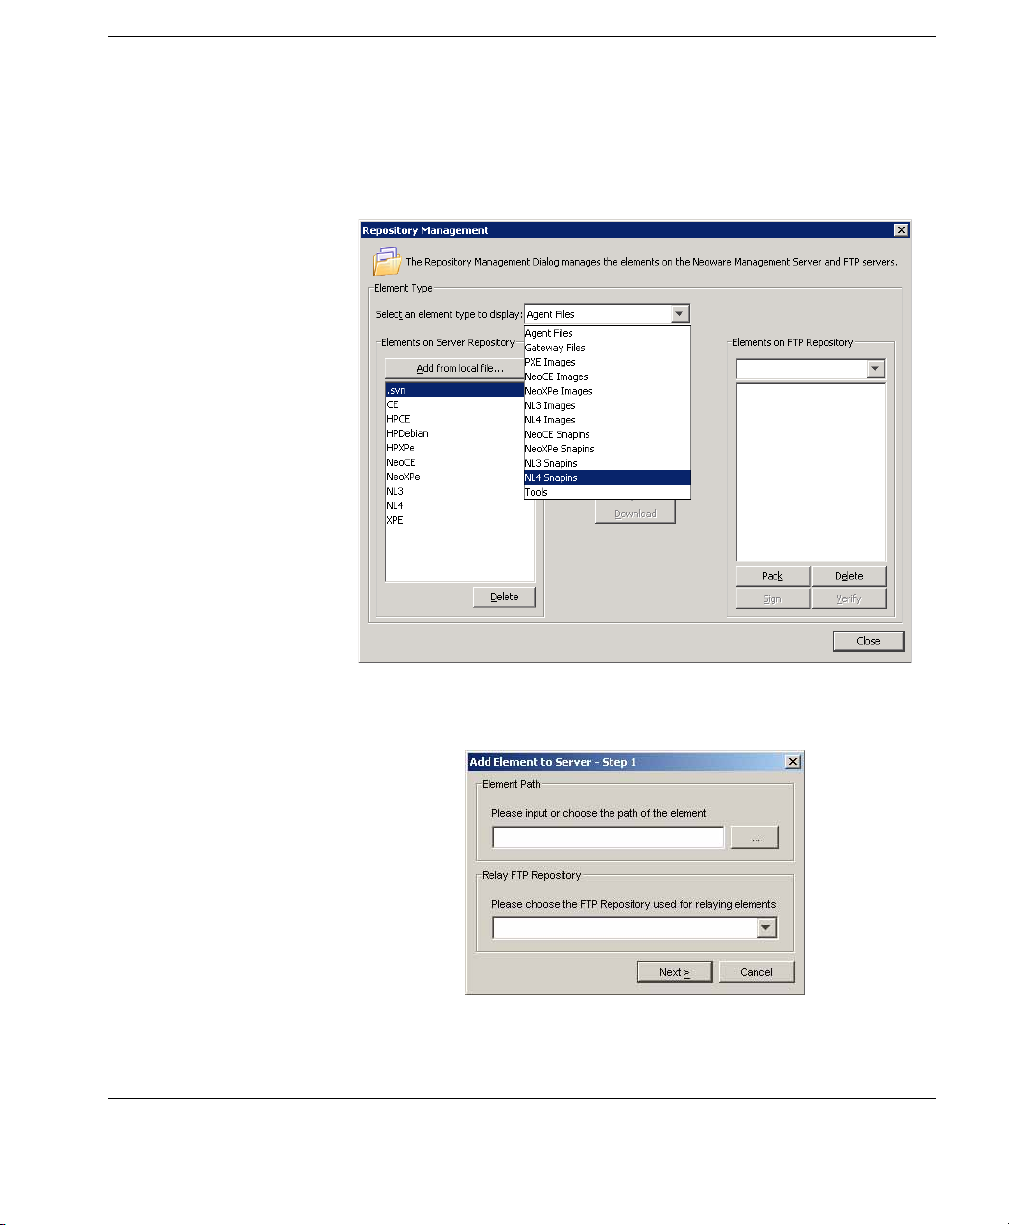
Getting Started
3 In the Select an element type to display field, select the appro-
priate element option from the drop-down list. For this example
we will be using a NeoLinux 4 snapin to install Adobe Acrobat
Reader to NeoLinux 4 thin clients, so
NL4 Snapins is selected.
4 Click the Add from local file button to display the Add Element
to Server - Step 1
dialog.
Adding Elements to the Repository 53
Page 64
Getting Started
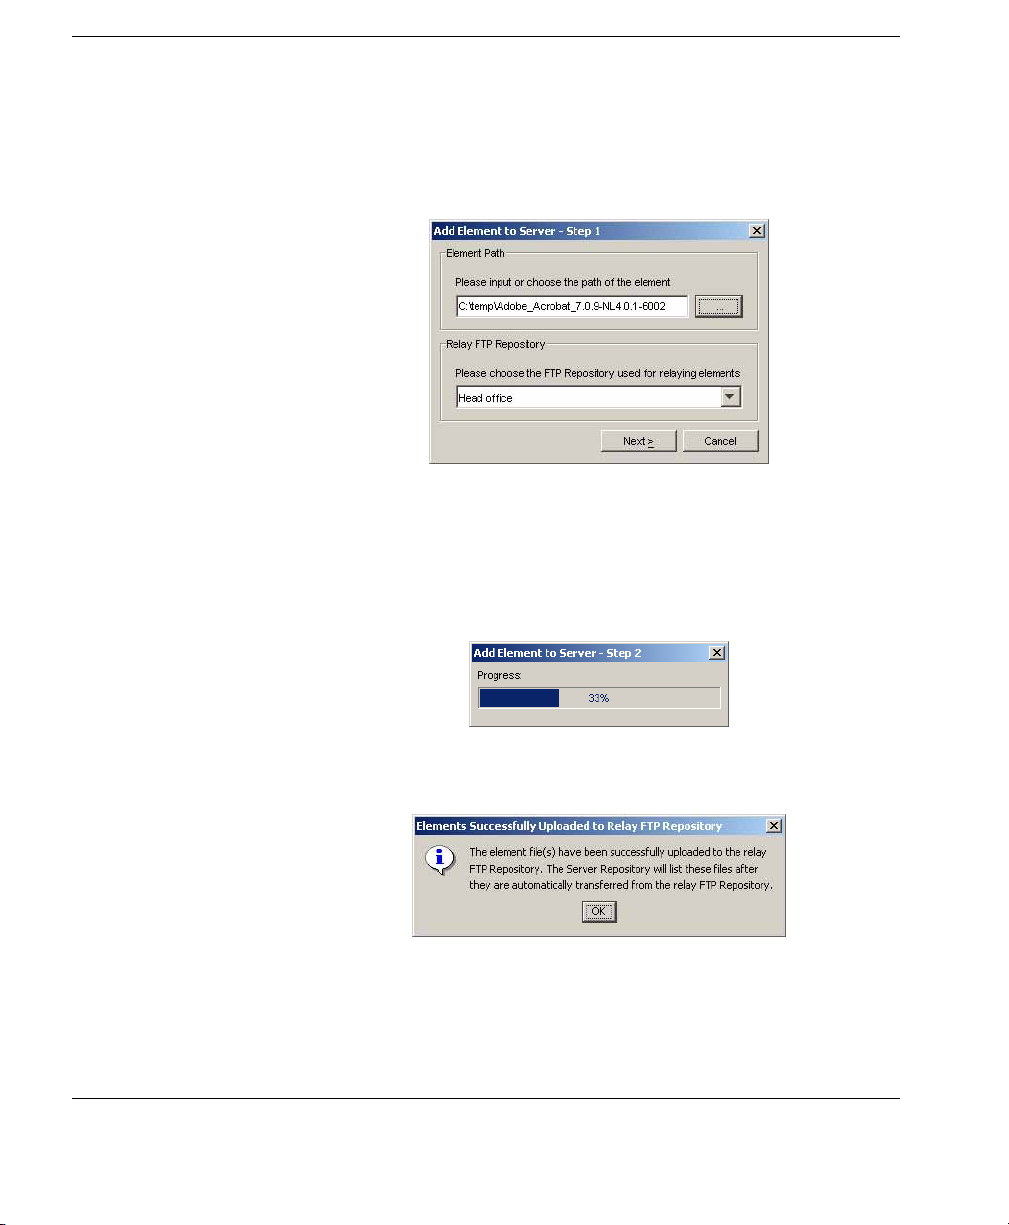
5 Click the ... button in the Element Path box to browse to the
directory containing the snapin you downloaded in step 1. Select
the folder containing the snapin files (in our example it is
Adobe_Acrobat_7.0.9-NL4.0.1-6002) then click
Relay FTP Repository field will display the name of the FTP
The
Choose.
Repository to use for relaying element files. You can change this
if required.
6 Click Next to start copying the element files to the relay FTP
Repository.
A message box will be displayed once the element files have
been successfully uploaded to the relay FTP Repository.
7 Click OK to automatically transfer the element files from the
relay FTP Repository to the Server Repository.
54 Adding Elements to the Repository
Page 65

Getting Started
The
Repository Management dialog should now display the
name of the element in the
Elements on Server Repository field.
8 Select the name of the FTP Repository to which you want to
transfer the element from the
Elements on FTP Repository drop-
down list box.
9 Select the element to transfer in the Elements on Server Reposi-
field, then click the Upload button.
tory
Once the element has been transferred, it will be listed in both
Server Repository and FTP Repository fields.
the
Adding Elements to the Repository 55
Page 66

Getting Started
Now that the element is in the FTP Repository, it can be applied
to client devices using a template.
56 Adding Elements to the Repository
Page 67

Menu Item Overview
HP Device Manager User Manual
CHAPTER 4 Using the HP
Management Console
This chapter covers the main functions of the Console, including
device management, task templates and task management.
The following table provides a brief description of the functions of
all the menu items available in the Management Console.
Table 4: Management Console - Menu Items
Menu Item Description
File Import License Import a new license for Device Manager.
Import Scheme Import a device grouping scheme.
Export Scheme Export a device grouping scheme.
Print Device
Information
Print Device
Task Report
Print Task Report Displays and prints information on tasks.
Exit Exit the Management Console.
Print information about the devices.
Displays and prints task information on all
users or a specific device.
See “Printing a Device Task Report” on
page 90 for more information.
57
Page 68

Using the HP Management Console
Menu Item Description
Table 4: Management Console - Menu Items
View Edit Grouping
Scheme
Search Device
Tree
Device Filter Configure the device filters so as to filter the
Refresh Contact the Management Server to refresh the
Tools Configuration Configure settings related to FTP servers, IP
User
Management
Sort the device list using customized properties according to the actual requirements.
See “Grouping Devices” on page 71 for more
information.
Search for a device in the Device Tree according to the IP address, host name and device
IDs. This option is very useful in a network
containing a large number of devices.
devices when the Management Console is
sending tasks. As a result, only the required
devices can receive and perform the task.
status of the console.
search scopes, system time-outs, shadowing,
gateway polling and extension properties.
See “Configuring the Repository” on page 39
for more details.
Configure user accounts and user groups for
the console.
See “User Management” on page 177 for
more information.
58 Menu Item Overview
Repository
Management
Report
Management
Control the elements (such as images and
software components) that are stored on the
Management Server repository and the FTP
server repositories.
See “Configuring the Repository” on page 39
for more details.
Manage the reports of the Devices and the
Tasks so that the user can get the required
reports according to the customized conditions.
Page 69

Using the HP Management Console
Table 4: Management Console - Menu Items
Menu Item Description
Authentication
Management
Status Walker This tool makes a list of all the IPs available
Status Snapshot This tool takes a snapshot, creates a report of
Device Check
Connection
Status
Add Add a new device.
Key Management - Manage the communication keys such as add, update, import and
export options, etc.
Gateway Access Control - Decide if a specified gateway is an authenticated gateway. If
not, the gateway will be banned and cannot
communicate with the Management Server.
and walks to them; taking back their status
information and displaying it.
See “Status Walker” on page 109 for details.
the devices’ status and stores it in the server
to be displayed when the tool is opened.
See “Status Snapshot” on page 114 for more
information.
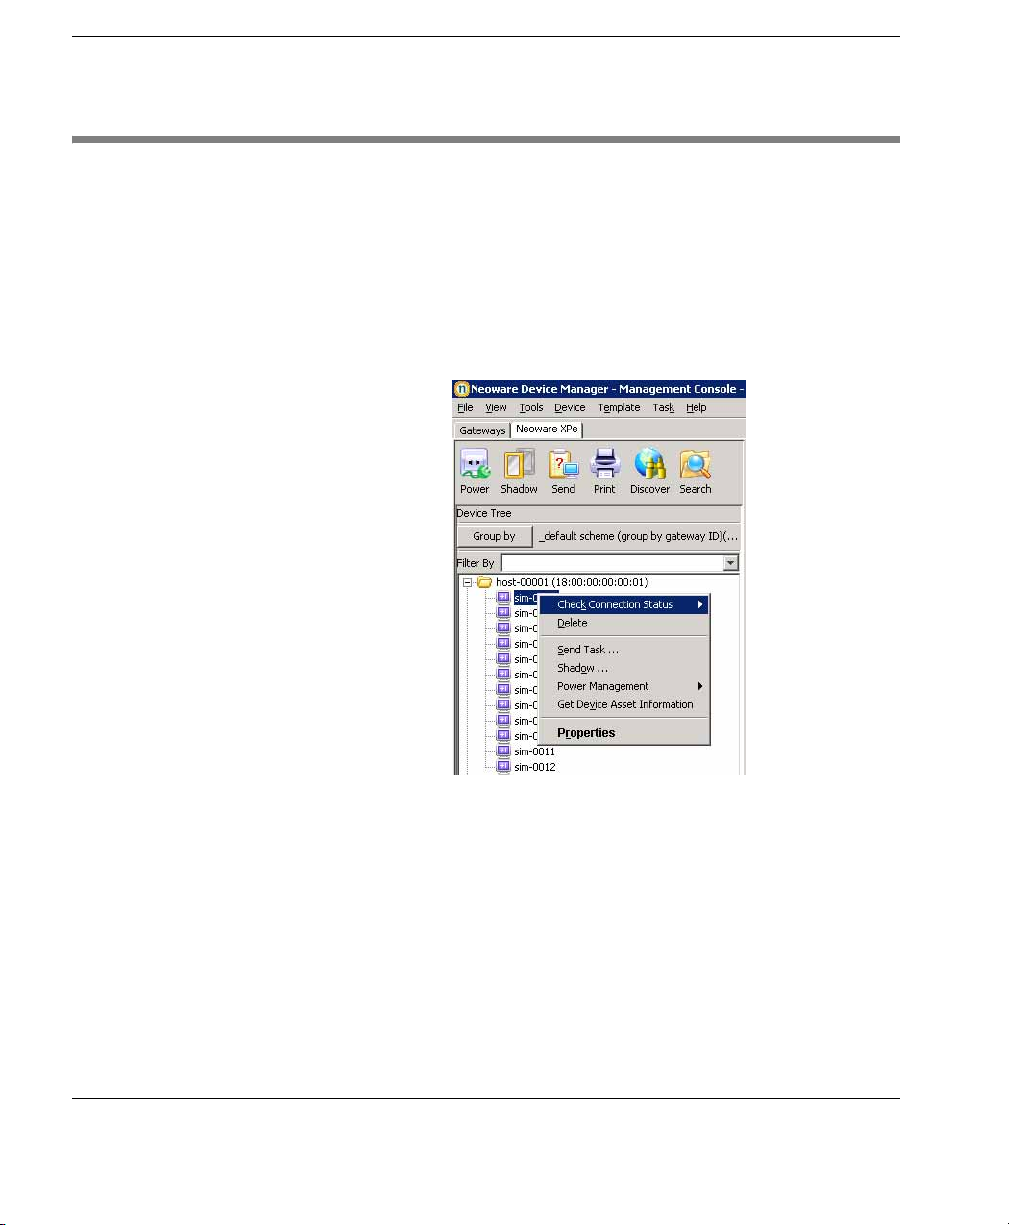
Check the network connection status of the
agents via Ping and Trace Route.
See “Adding Devices Using MAC
Addresses” on page 173 for more
information.
Delete Delete the selected device.
Manual Group Add Folder, Rename or Delete.
Send Task Send a Task Template task to the selected
device.
See “Applying Tasks to Devices” on page 99
for more information.
Shadow Attempts to shadow the selected device.
See “Shadowing Devices” on page 91 for
more information.
Menu Item Overview 59
Page 70

Using the HP Management Console
Menu Item Description
Table 4: Management Console - Menu Items
Template
Power
Management
Get Device Asset
Information
Properties Displays the properties for the selected
Delete Remove the selected template.
Merge Merge two or more selected composite tem-
Reboot - Sends a command to reboot the
selected device.
Wake on LAN - Sends a command to the
selected device to start it up.
Shutdown - Sends a command to shut down
the selected device.
See “Power Management” on page 93 for
more information.
Get the specific information of the selected
device, such as General, Software, Hardware,
Hotfix, Network, Configuration and other
extended properties, etc.
device.
See “Displaying Device Properties” on
page 66 for more information.
plates.
See “Merging File and Registry Templates”
on page 130 for more information.
60 Menu Item Overview
Send Task Send the selected template to the devices as a
task.
Properties Edit the selected template’s properties.
Add to Favorites Add the frequently used templates to the
Favorites tab in the Template Pane for more
convenient usage.
Import Import an XML template file into the cur-
rently selected template category.
See “Importing & Exporting Task Templates”
on page 97 for more information.
Page 71

Using the HP Management Console
Table 4: Management Console - Menu Items
Menu Item Description
Export Export an XML template file into the cur-
rently selected template category.
See “Importing & Exporting Task Templates”
on page 97 for more information.
Template Plugin
Management
Task Pause Pause the selected task.
Continue Continue the selected task.
Resend Resend the selected task.
Cancel Cancel the selected task.
Cancel All Cancel all tasks.
Delete Delete the selected task.
Delete All Delete all tasks in the Task Pane.
Delete All
Finished
Open VNC
Viewer for
Shadowing
Open Result
Template
View Task
Contents
Manage the plugin of the templates, such as
import or uninstall plugin, etc.
Delete all finished tasks in the Task Pane.
When a remote device has finished the
Shadow task, you can login the device via the
VNC viewer.
View the content of the result template, which
is created by certain types of templates on the
completion of their tasks.
View the specific content of the tasks.
View Task Log View the task status log.
Help About Display copyright and licensing information
for Device Manager.
Menu Item Overview 61
Page 72

Using the HP Management Console
Toolbar Overview
The toolbar provides quick access to frequently used tools.
This enables you to
Reboot, Wake on LAN or Shutdown
the currently selected device(s) in the device tree. Refer
to the section “Power Management” on page 93 for
details.
This enables you to shadow the selected device. The
Editor dialog will be displayed. Click OK to apply the
Task
shadowing task to the device. Refer to the section “Shadowing Devices” on page 91 for details.
This will display the
Template Chooser dialog enabling
you to send a template task to the currently selected
device(s). Refer to the section “Applying Tasks to
Devices” on page 99 for details.
This enables you to print information about the device(s)
currently selected in the device tree. Refer to the section
“Printing Information About Devices & Tasks” on
page 89 for details.
This enables you to discover client devices or gateways
on the network. Refer to the section “Discovering
Devices” on page 68 for details.
This enables you to find a specific device in the device
tree. Refer to the section “Searching for a Device in the
Device Tree” on page 86 for details.
62 Toolbar Overview
Page 73
Using the HP Management Console
The following tools are available in the
This will delete the currently selected template. You will
be prompted to confirm the action before it is actually
deleted.
This will display the
you to merge two or more
Merge Templates dialog enabling
File and Registry templates.
Refer to the section “Merging File and Registry Templates” on page 130 for details.
This will display the
Task Editor dialog enabling you to
send a template task to the currently selected device(s).
Refer to the section “Applying Tasks to Devices” on
page 99 for details.
Template Pane:
Toolbar Overview 63
Page 74
Using the HP Management Console
Device Management
All thin clients that connect to the server are displayed in the Device
of the Management Console window. Selecting one of the OS
Pane
tabs below the menu bar will display all of the clients of the chosen
OS type in the
or clicking on a folder icon will expand the device list.
Pane
Select one or more devices and then right-click to see a menu of
applicable commands.
Device Pane. Double-clicking an item in the Device
All of these commands are also available in the
is displayed from the Console’s menu bar.
64 Device Management
Device menu which
Page 75

Using the HP Management Console
Device Tree Icons On the Gateway tab, a G icon indicates a Management Gateway:
A green G icon represents a gateway that is currently active.
A greyed-out G icon represents a gateway that is currently
down or disconnected.
On the
OS tabs, devices are represented by the following icons:
A folder represents a number of devices that have been
grouped together using the grouping schemes function.
A screen icon with a power symbol over it indicates that currently the status of this device cannot be confirmed because a
gateway to the device cannot be found.
A greyed-out screen icon with an exclamation mark over it
indicates the device is currently powered-off.
A screen icon with a curved arrow over it indicates the device
is currently in pull mode.
A screen icon with a curved arrow and padlock over it
indicates the device is currently in pull-lock mode (Enhanced
Write Filter is ON).
A screen icon with a straight arrow over it indicates the device
is currently in push mode.
A screen icon with a straight arrow and padlock over it
indicates the device is currently in push-lock mode.
Device Management 65
Page 76

Using the HP Management Console
Displaying Device Properties
To display the properties of a device:
1 Right-click on the device in the Device Pane.
2 Select Properties from the menu (or double-click any device) to
display the
Device Properties dialog.
The
client devices that are connected to the server. The dialog lets you
see different types of information.
Note: The IP address and MAC address in the device properties
dialog can be selected and copied. The selected address will be
highlighted, then you can right-click to copy the selected address.
66 Device Management
Device Properties dialog displays the properties of the thin
Page 77

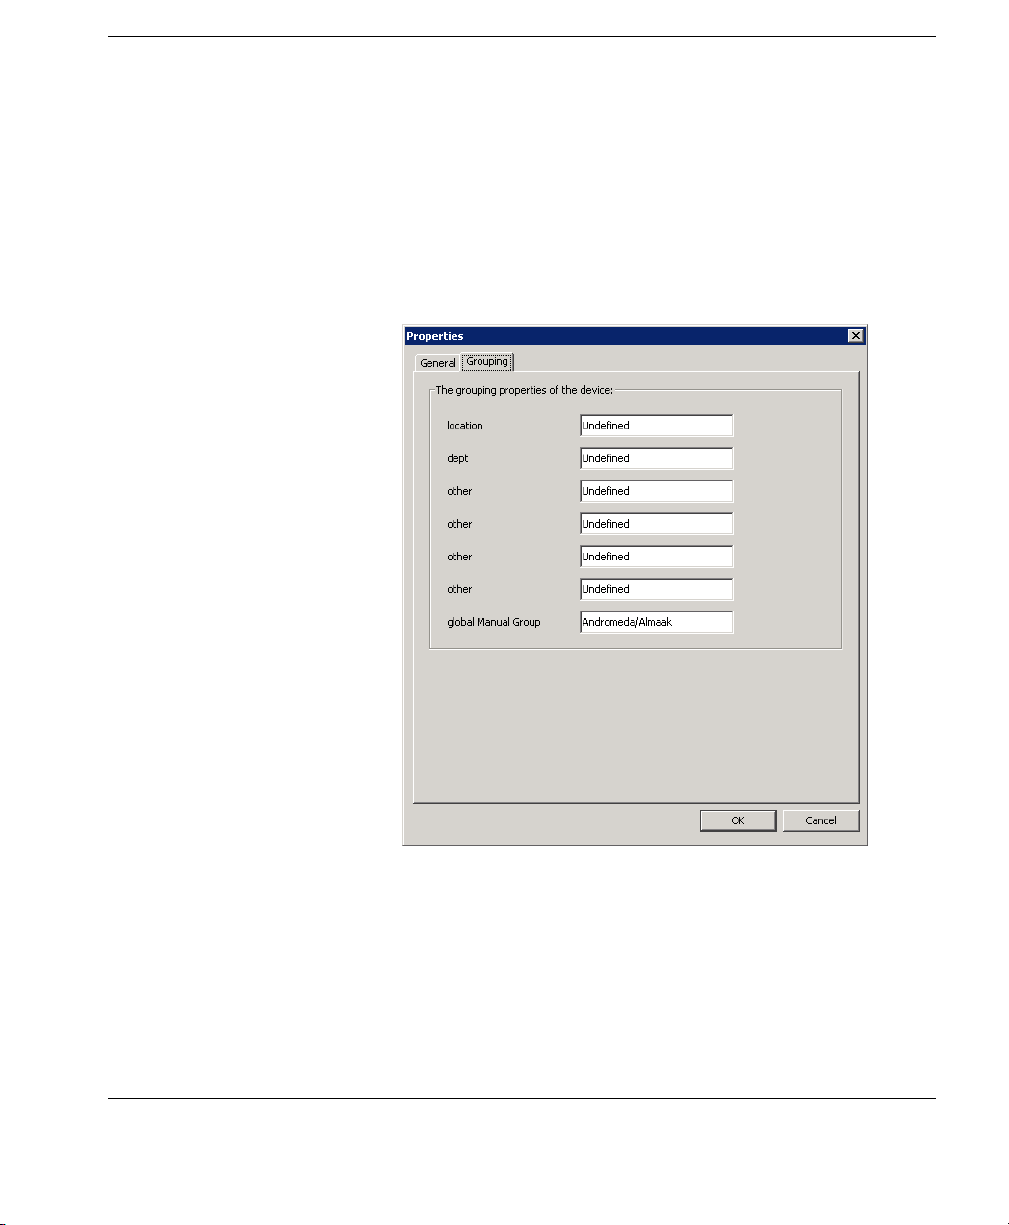
Using the HP Management Console
Click the
Grouping tab to set grouping properties, which are used as
grouping criteria. See “Changing Grouping Properties” on page 79
for information on how to rename these grouping properties.
Note: To set the grouping properties, you can also right-click a
device in the
Task View
menu.
Deleting Devices To delete a device:
1 Right-click the device in the Device Pane.
2 Select Delete from the menu.
The selected device is removed from the
and select
Edit Device Properties
Device Pane.
Device Management 67
in the
Page 78
Using the HP Management Console
Discovering Devices
The Discover Devices option allows Device Manager to search a
range of IP addresses for agents and gateways.
To use
1 Click on the Discover button in the Device Toolbar and select
2 Select the corresponding gateway in the Select Neoware Man-
Discover Devices:
Discover Device in the menu opened.
Discover Device dialog will be displayed.
The
agement Gateway drop-down menu, then select the Walking
with IP Range
option.
68 Discovering Devices
Page 79

Using the HP Management Console
3 Click Next to display the Discover by Range dialog.
4 Check the Use Preset IP Scope box and select an IP Search
Scope, or deselect the box and enter a Starting IP Address and
Ending IP Address. IP Walking will search this range of
an
addresses for a reply.
OR
You can select the corresponding gateway in the
drop-down menu, and then select the
option. Click
Next to display the Discover by List dialog.
Walking with IP List
Discovering Devices 69
Select Gateway
Page 80

Using the HP Management Console
In the
be customized according to your specific needs. See the following table for descriptions of each button in this dialog.
5 Click OK to search for devices.
Discover by List dialog, the IP addresses in the IP List can
Table 5: Discover by List - Button Functions
Button Function
Add Add a new IP address to the IP list.
Delete Remove an existing IP address from the IP list.
Import... Import a *.txt or *.csv file to the IP list.
Export... Export the IP list as a *.txt file.
Copy Copy the current IP list.
Paste Paste a copied IP address.
70 Discovering Devices
Page 81

Using the HP Management Console
Grouping Devices
Grouping devices according to specified criteria makes it easier for
administrators to manage them. Devices can be grouped automatically according to any of their properties, or manually assigned to
groups in any way that is suitable for your requirements. Note that
you can also pre-assign the group to which a device belongs from the
device itself by editing its agent configuration settings.
Dynamic Grouping Dynamic grouping allows you to automatically group devices by
specific properties. For example, you could create a grouping
scheme that will group all devices by their CPU type or agent version. You can specify more than one grouping property for a group,
and you can define up to six customizable grouping properties. Once
you have defined the properties associated with a dynamic grouping
scheme, all devices with matching properties will automatically be
assigned to the relevant group, including any devices added to
Device Manager in the future.
Defining a Dynamic Grouping Scheme
1 Display the View menu from the Console’s menu bar and select
Edit Grouping Schemes.
Grouping Devices 71
Page 82

Using the HP Management Console
The
schemes and enables you to create or edit a grouping scheme.
Two schemes are supplied by default: _default scheme will
group devices by gateway ID, whereas _no scheme will not
group devices but just list every device managed by Device
Manager.
2 To create a new dynamic grouping scheme, click Add.
3 Enter a name for the new grouping scheme then click OK.
Dynamic schema tab lists existing dynamic grouping
72 Grouping Devices
4 Select a property by which you want to group devices in the
Candidate Properties list, then click Add to add it to the Grouping Scheme
list. You can specify more than one property.
Page 83

Using the HP Management Console
Table 6: Candidate Properties
Properties Description
Gateway ID Group by gateway ID.
Subnet Address Group by subnet address.
Device Status Group by status (on/off).
Device Type Group by product type.
Device Version Group by device version.
Agent Version Group by agent version.
Write Filter Enabled Group by EWF status.
CPU Type Group by processor type.
Time Zone Group by time zone.
location (Extension
Property 1)
dept (Extension Property 2)
other (Extension
Property 3 - 6)
Customizable grouping property.
Customizable grouping property.
Customizable grouping property.
Note that there are six customizable grouping properties you can
use to group your devices as required.
5 Once you have selected the properties to use, specify the priority
of those properties by clicking
property in the
Grouping Scheme to a higher or lower grouping
Up or Down to move the selected
priority. Device Manager will group devices using the property
with the highest priority in the order list. Other properties in the
order list are then considered in turn.
You can remove a selected property from the
list by clicking
Delete.
Grouping Scheme
Grouping Devices 73
Page 84

Using the HP Management Console
6 Click OK to create the new grouping scheme.
7 Click the Group by button in the Device Tree panel and select
Dynamic Group. The new grouping scheme will be listed and
available for selection.
74 Grouping Devices
8 Select the new grouping scheme to group all devices managed
by Device Manager accordingly.
Page 85

Using the HP Management Console
Manual Grouping You can create grouping schemes in which you manually assign
devices to groups in whatever way you require.
Defining a Manual Grouping Scheme
1 Display the View menu from the Console’s menu bar, select Edit
Grouping Schemes
, then click on the Manual schema tab.
The
Manual schema tab lists existing manual grouping schemes
and enables you to create or edit a grouping scheme. One
scheme is supplied by default: _global will not group devices
but just list every device managed by Device Manager.
2 To create a new manual grouping scheme, click Add.
3 Enter a name for the new grouping scheme then click OK. The
name will appear in the
Existing Schemes list.
Grouping Devices 75
Page 86

Using the HP Management Console
4 Click Close.
5 Click the Group by button in the Device Tree panel and select
Manual Group. The new grouping scheme will be listed and
available for selection.
76 Grouping Devices
6 Select the new manual grouping scheme.
Any organisational changes you now make to the devices and
folders listed in the
Device Tree panel will be saved to this
grouping scheme.
Page 87

Using the HP Management Console
7 To create a new folder in which to group devices, right-click in
Device Tree pane and select Manual Group > Add Folder
the
from the pop-up menu.
8 Enter a name for the group folder then click OK.
9 You can now drag-and-drop the names of devices into this group
folder within the
Device Tree panel.
Grouping Devices 77
Page 88

Using the HP Management Console
Naming Grouping Properties
Grouping properties are used to group devices into a customized
order suitable for your organization’s network configuration. These
groups provide simple management of devices over different departments or different locations. Each property name can be renamed as
required.
To rename grouping properties:
1 Display the Tools menu from the Console’s menu bar and select
Configuration.
2 Select the Grouping Property Name item in the left-hand tree
pane.
78 Grouping Devices
3 Enter the names for the 1st, 2nd, 3rd, 4th, 5th and 6th grouping
properties as required.
Note: Changing the name of the properties does not alter the
data for each property. The 1st property always remains the 1st
property, the 2nd the 2nd, and so on.
4 Click Apply to save the settings.
5 Click OK to finish.
Page 89
Using the HP Management Console
Changing Grouping Properties
Grouping properties can be set by entering them into the properties
window for each device, or assigned by dragging and dropping
devices between property groups.
Setting grouping properties:
1 Right-click the device whose properties you wish to view.
2 Select the Grouping tab.
3 Edit the data in each field as required.
4 Click OK when done.
These properties can now be used to categorize your devices using
grouping schemes in the
Device Pane.
Grouping Devices 79
Page 90

Using the HP Management Console
Dragging and dropping devices:
1 Ensure that the device tree has at least one grouping property
selected in the grouping scheme.
2 Click on a device, hold down the mouse button then drag the
device to another group on the device tree.
Note: Devices can only be dragged between groups of the same
level on the device tree, and groups being dragged between must
have a grouping property.
3 Release the mouse button and the grouping property for the
device will be set to that of the group being dropped into. The
device will then be re-grouped under the target group.
Pre-assigning Devices to Groups
You can pre-assign a device to a specific group using the Agent Con-
figuration dialog on the device itself. On the Group tab, select Use
Static Custom Groups
> Add Group Name "Manual Group" and
specify a value. Once the device agent has registered with the server,
you will see the device placed in the specified pre-assigned group
folder if you choose the global manual grouping scheme (click the
Group By button and select Manual Group > _global.)
80 Grouping Devices
Page 91
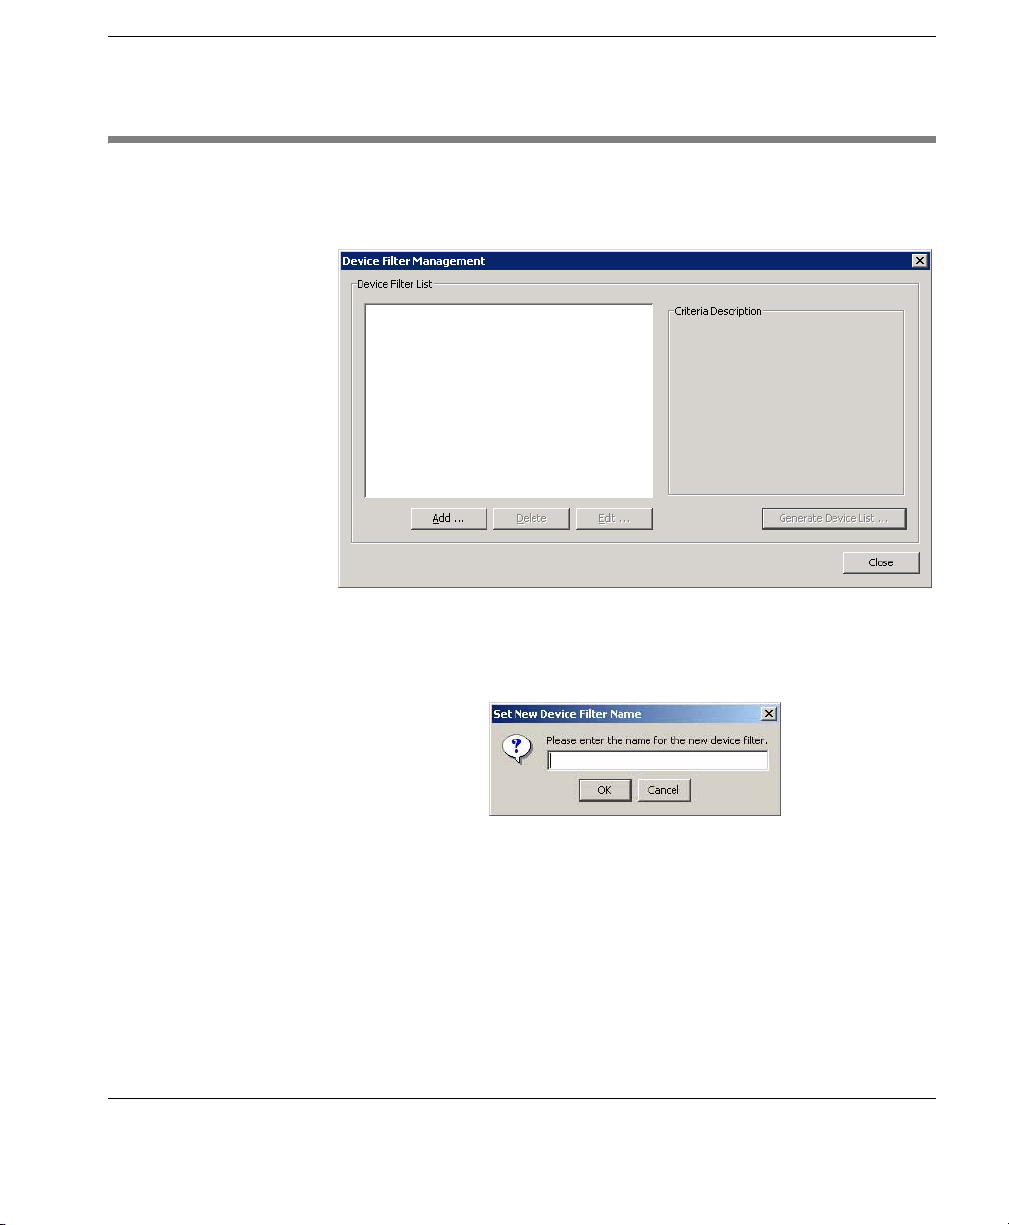
Editing the Device Filter
To edit the Device Filter:
1 Select Device Filter... from the View menu.
2 Click Add... to display the Set New Device Filter Name dialog.
You can also click
existing Device Filters.
Using the HP Management Console
Delete and Edit... to remove or modify the
3 Enter a name for the new device filter (e.g. XPe) and click OK to
display the
Edit Device Filter dialog.
Editing the Device Filter 81
Page 92
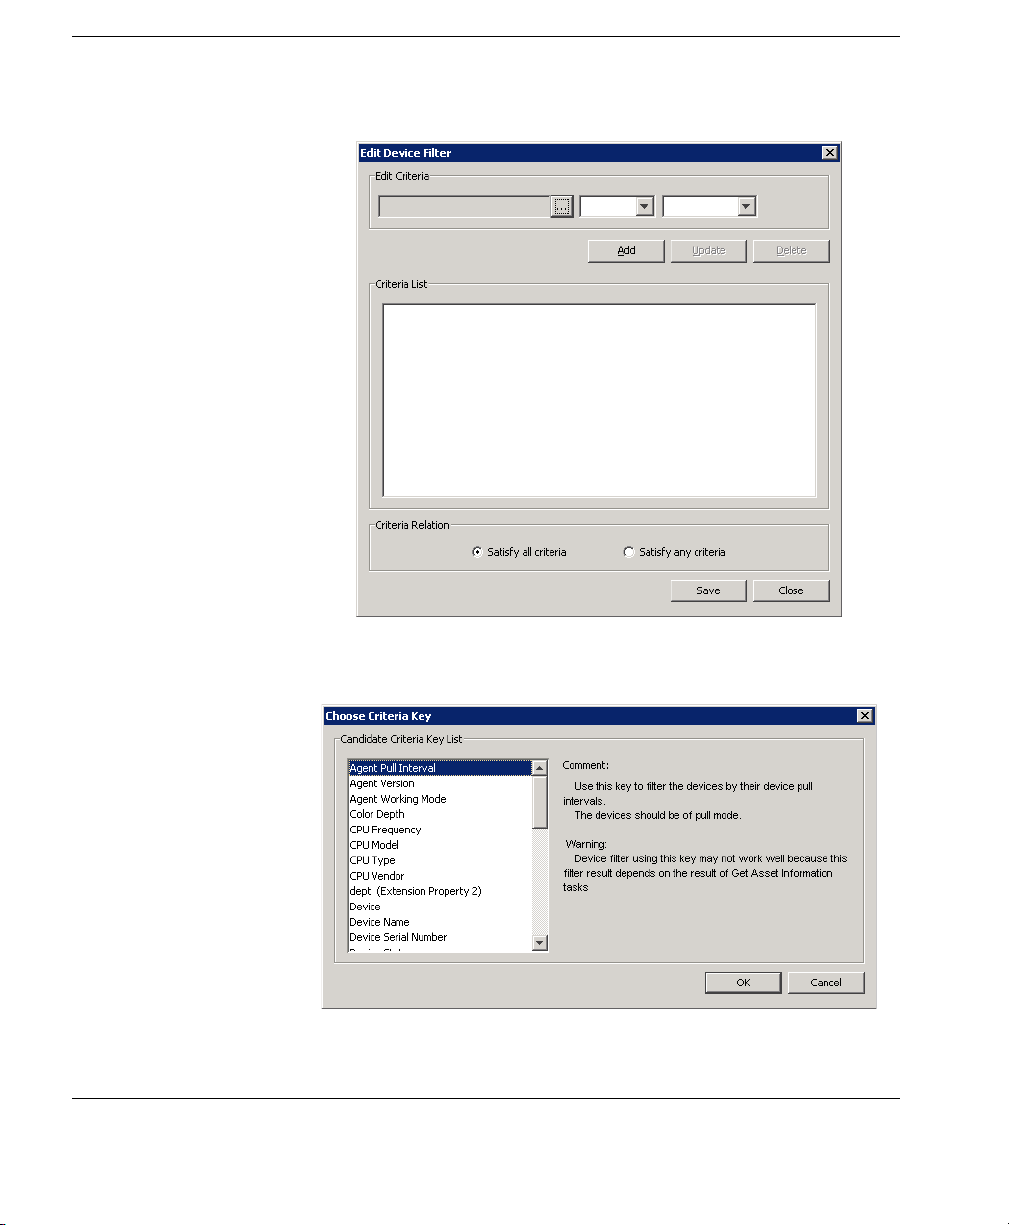
Using the HP Management Console
4 Click the browse button in the Edit Criteria section to open the
Choose Criteria Key dialog.
82 Editing the Device Filter
Page 93

Using the HP Management Console
5 In the Candidate Criteria Key List, select the criteria according
to your needs. Click
6 Click the arrow button in the Edit Criteria section to select
OK to return to the Edit Device Filter dialog.
conditions in the drop-down menus. For example: Write Filter
Status = Enabled.
7 Click Add to add it to the Criteria List below. You also can select
one of the lists to modify or delete.
8 If multiple filters exist in the Criteria List, you can select Satisfy
all criteria
the
or Satisfy any criteria. Then click Save to return to
Device Filter Management dialog.
Editing the Device Filter 83
Page 94
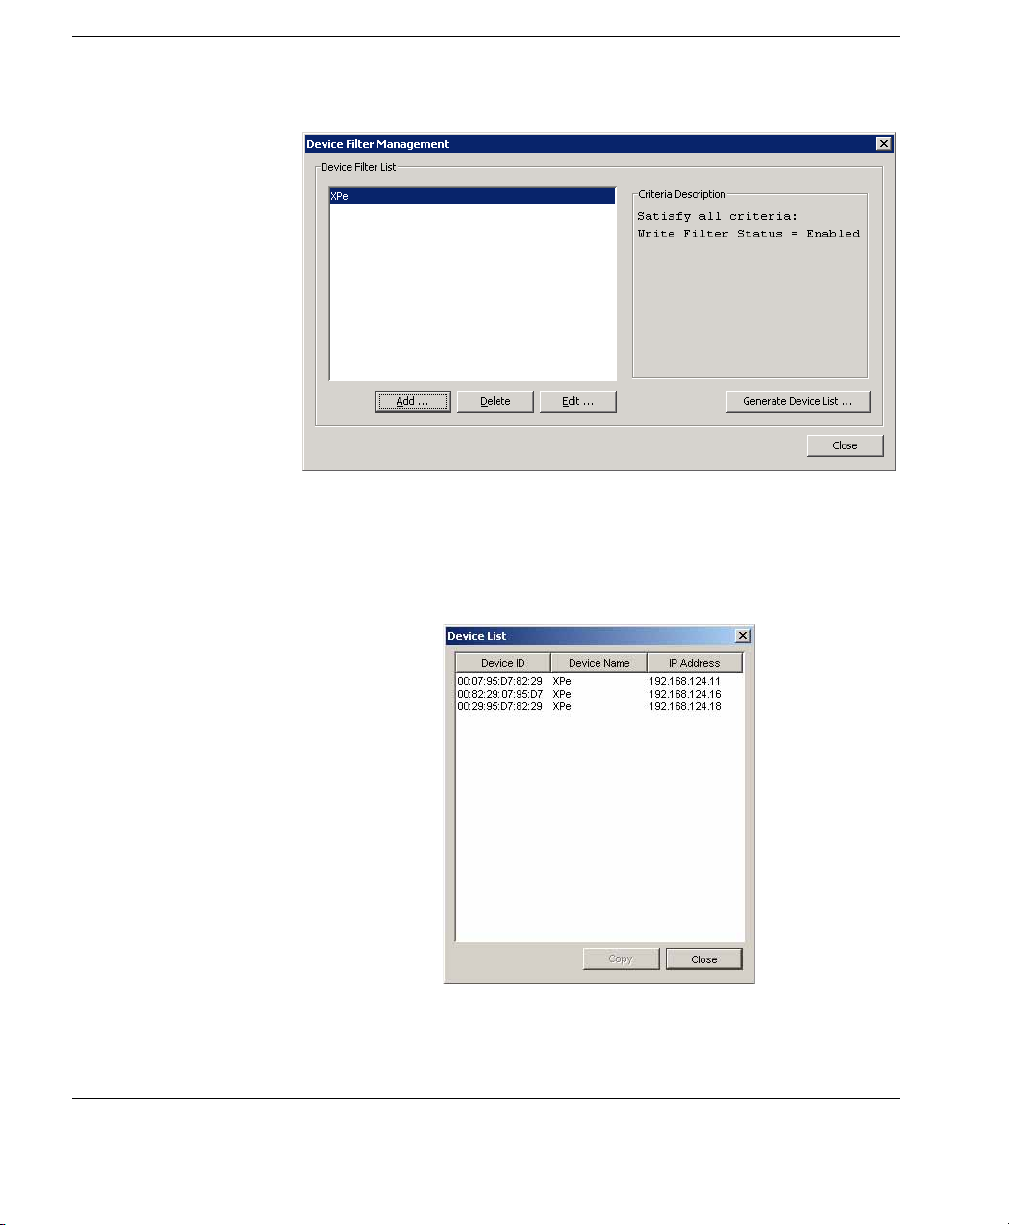
Using the HP Management Console
9 In the Device Filter Management dialog you can edit or remove
the selected filter according to your requirements.
10 Click the Generate Device List... button to create the filtered
device list.
Now the administrator can use the device filters to manage the
devices in the network.
84 Editing the Device Filter
Page 95

Using the HP Management Console
Filter Security You can limit the devices a user can see by assigning a filter to that
user as his security filter. The procedure is as follows:
1 Display the Tools menu and select User Management....
2 Select the name of the user on the Users tab, then click Edit.
3 Display the Filter tab.
4 Select the filter to use in the Enhanced Filter drop-down list.
When you log on as that user you will see that only the devices
allowed by the selected filter are displayed.
Editing the Device Filter 85
Page 96

Using the HP Management Console
Searching for a Device in the Device Tree
You can quickly display a particular device in the Console’s device
tree either by selecting
bar, or by clicking the
Search Device dialog will be displayed.
The
You can find a device either by entering its IP Address, Host Name,
Device ID or Device Serial Number, as specified in the
field. Enter the relevant information in the field below then click
By
Find. If the device is found, the console will automatically change
the display to show the device in the device tree.
Device > Search Device Tree from the menu
Search button in the toolbar.
Find Device
86 Searching for a Device in the Device Tree
Page 97

Checking Network Connection Status
You can check the network connection status of a device (i.e.
whether it is connected to the network or not).
1 In the Device Pane, select one or more devices and right-click
them to display a menu.
2 Select Check Connection Status.
Using the HP Management Console
3 Select the utility you want to use to check the connection status
of the device. You can choose from:
Ping - A basic Internet program that lets you verify that a partic-
ular Internet address exists and can accept requests. Pinging is
diagnostically used to ensure that a host computer, which you
are trying to reach, actually operates.
Trace Route - This diagnostic tool determines the path taken to a
destination by sending ICMP Echo Request messages with varying Time to Live (TTL) values to the destination. Each router
along the path is required to decrement the TTL in an IP packet
by at least 1 before forwarding it. Effectively, the TTL is a max-
Checking Network Connection Status 87
Page 98

Using the HP Management Console
imum link counter. When the TTL on a packet reaches 0, the
router is expected to return an ICMP Time Exceeded message to
the source computer.
A window displaying the network connection status of the
device will appear.
4 Click Close.
88 Checking Network Connection Status
Page 99

Printing Information About Devices & Tasks
Using the HP Management Console
Printing Device Information
To print information about any devices listed in the Console:
1 In the Device Pane, select the devices you want to print (CTRL-
click and/or SHIFT-click them).
2 Click the Print icon in the toolbar to display the Print Device
window. Information about all the selected devices is displayed
in the window.
3 Either click Export to export the list to a *.csv file.
Enter a name and click
Printing Information About Devices & Tasks 89
Save.
Page 100

Using the HP Management Console
OR
Click
window opens.
4 If you are satisfied with the preview, click the printer icon or dis-
play the
printing settings.
Print Preview to print the device report. The Print Preview
File menu and select Print. Click OK if you accept the
Printing a Device Task Repor t
To print information about tasks:
1 In the Device Pane, select one device ONLY.
2 Right-click on it and select Device Task Report from the menu.
3 Tick Tasks from all users or Tasks from current users depend-
ing on what information you need to print.
4 Define the period you want to get login information for by
clicking the buttons for both
5 Click Next then Print.
90 Printing Information About Devices & Tasks
Starting Date and Ending Date.
 Loading...