

Page 1

HP TeemTalk Terminal Emulator 7.0
User Manual
Page 2

ii
© Copyright 2008 Hewlett-Packard
Development Company, L.P. The
information contained herein is subject to
change without notice.
Microsoft and Windows are trademarks of
Microsoft Corporation in the U.S. and other
countries.
The only warranties for HP products and
services are set forth in the express warranty
statements accompanying such products
and services. Nothing herein should be
construed as constituting an additional
warranty. HP shall not be liable for technical
or editorial errors or omissions contained
herein.
This document contains proprietary
information that is protected by copyright. No
part of this document may be photocopied,
reproduced, or translated to another
language without the prior written consent of
Hewlett-Packard Company.
Second Edition (August 2008)
Page 3

iii
This application includes code:
Copyright 1987, 1988 by Digital Equipment Corporation, Maynard, Massachusetts, and the Massachusetts
Institute of Technology, Cambridge, Massachusetts.
All Rights Reserved DIGITAL DISCLAIMS ALL WARRANTIES WITH REGARD TO THIS SOFTWARE,
INCLUDING ALL IMPLIED WARRANTIES OF MERCHANTABILITY AND FITNESS, IN NO EVENT SHALL
DIGITAL BE LIABLE FOR ANY SPECIAL, INDIRECT OR CONSEQUENTIAL DAMAGES OR ANY
DAMAGES WHATSOEVER RESULTING FROM LOSS OF USE, DATA OR PROFITS, WHETHER IN AN
ACTION OF CONTRACT, NEGLIGENCE OR OTHER TORTIOUS ACTION, ARISING OUT OF OR IN
CONNECTION WITH THE USE OR PERFORMANCE OF THIS SOFTWARE.
And code:
Copyright (c) 1989 The Regents of the University of California.
All rights reserved.
THIS SOFTWARE IS PROVIDED BY THE REGENTS AND CONTRIBUTORS ``AS IS'' AND ANY
EXPRESS OR IMPLIED WARRANTIES, INCLUDING, BUT NOT LIMITED TO, THE IMPLIED
WARRANTIES OF MERCHANTABILITY AND FITNESS FOR A PARTICULAR PURPOSE ARE
DISCLAIMED. IN NO EVENT SHALL THE REGENTS OR CONTRIBUTORS BE LIABLE FOR ANY
DIRECT, INDIRECT, INCIDENTAL, SPECIAL, EXEMPLARY, OR CONSEQUENTIAL DAMAGES
(INCLUDING, BUT NOT LIMITED TO, PROCUREMENT OF SUBSTITUTE GOODS OR SERVICES; LOSS
OF USE, DATA, OR PROFITS; OR BUSINESS INTERRUPTION) HOWEVER CAUSED AND ON ANY
THEORY OF LIABILITY, WHETHER IN CONTRACT, STRICT LIABILITY, OR TORT (INCLUDING
NEGLIGENCE OR OTHERWISE) ARISING IN ANY WAY OUT OF THE USE OF THIS SOFTWARE, EVEN
IF ADVISED OF THE POSSIBILITY OF SUCH DAMAGE.
And code:
Copyright 1989 Massachusetts Institute of Technology Permission to use, copy, modify, distribute, and sell
this software and its documentation for any purpose is hereby granted without fee, provided that the above
copyright notice appear in all copies and that both that copyright notice and this permission notice appear in
supporting documentation, and that the name of M.I.T. not be used in advertising or publicity pertaining to
distribution of the software without specific, written prior permission. M.I.T. makes no representations about
the suitability of this software for any purpose. It is provided "as is" without express or implied warranty.
M.I.T. DISCLAIMS ALL WARRANTIES WITH REGARD TO THIS SOFTWARE, INCLUDING ALL IMPLIED
WARRANTIES OF MERCHANTABILITY AND FITNESS, IN NO EVENT SHALL M.I.T. BE LIABLE FOR
ANY SPECIAL, INDIRECT OR CONSEQUENTIAL DAMAGES OR ANY DAMAGES WHATSOEVER
RESULTING FROM LOSS OF USE, DATA OR PROFITS, WHETHER IN AN ACTION OF CONTRACT,
NEGLIGENCE OR OTHER TORTIOUS ACTION, ARISING OUT OF OR IN CONNECTION WITH THE USE
OR PERFORMANCE OF THIS SOFTWARE.
And code:
Copyright (c) 1996-1997 Sam Leffler
Copyright (c) 1996 Pixar
And code:
Copyright (c) 1988-1997 Sam Leffler
Copyright (c) 1991-1997 Silicon Graphics, Inc.
Page 4

iv
THE SOFTWARE IS PROVIDED "AS-IS" AND WITHOUT WARRANTY OF ANY KIND, EXPRESS,
IMPLIED OR OTHERWISE, INCLUDING WITHOUT LIMITATION, ANY WARRANTY OF
MERCHANTABILITY OR FITNESS FOR A PARTICULAR PURPOSE.
IN NO EVENT SHALL SAM LEFFLER OR SILICON GRAPHICS BE LIABLE FOR ANY SPECIAL,
INCIDENTAL, INDIRECT OR CONSEQUENTIAL DAMAGES OF ANY KIND, OR ANY DAMAGES
WHATSOEVER RESULTING FROM LOSS OF USE, DATA OR PROFITS, WHETHER OR NOT ADVISED
OF THE POSSIBILITY OF DAMAGE, AND ON ANY THEORY OF LIABILITY, ARISING OUT OF OR IN
CONNECTION WITH THE USE OR PERFORMANCE OF THIS SOFTWARE.
Page 5

v
HP Tee mTa lk Ter mi nal Emul at or 7. 0 U ser Manu al
Table of Contents
CHAPTER 1
Introduction 1
What is TeemTalk? 1
About This User's Manual 2
Overview of Contents 2
Terms & Conventions 4
Getting More Information 5
Technical Support 5
Contacting Us 5
CHAPTER 2
Getting Started 7
Introduction 7
Creating a Session Using the Session Wizard 7
Introduction 7
Using the Session Wizard 8
Running a Session Configuration 12
Desktop Icon 12
TeemTalk Menu 12
Command Line Option 12
The TeemTalk Window 13
The Configuration Bar 15
Page 6

Tab le o f C ont en ts
vi
Saving the Session Configuration 15
The Status Bar 16
CHAPTER 3
Host Connection 17
Introduction 17
Telnet Settings 19
TCP/IP Transport 21
SSH2 Transport 22
Making a Host Connection 22
Creating an Authentication Profile using a
Password 23
Creating an Authentication Profile using a New
Public Key 26
Serial Transport 31
Auto Logon 34
CHAPTER 4
Keyboard Configuration 37
Keyboard Mapping 37
Defining Key Functions 38
Compose Character Sequences 41
CHAPTER 5
Mouse Functions 47
Default Mouse Functions 47
Defining Mouse Functions 48
Standard Mouse Functions 49
Defining a Macro 50
CHAPTER 6
Soft Buttons 53
Introduction 53
Defining Soft Button Functions 54
CHAPTER 7
Display Attributes 57
Introduction 57
Page 7

Table of Contents
vii
The Attributes Dialog 58
Changing the Screen Background Colour 59
Changing Text Foreground and Background
Colours 59
Disabling an Attribute 60
Preferences 60
CHAPTER 8
Editing Options 63
The Edit Menu 63
Clipboard Options 65
CHAPTER 9
Printing 67
Print Screen 67
Emulation Printer Settings 68
Status 68
Settings 69
Advanced - System Printer 71
Advanced - Serial Device 72
Advanced - LPR 75
Advanced - File 77
CHAPTER 10
VT Series Emulations 79
Introduction 79
Creating a VT Series Emulation Session 81
Using the TeemTalk Session Wizard 81
Using the TeemTalk Emulator Window 82
Keyboard Mapping 83
The Status Bar 86
Scrolling the Display 87
Typing Direction for Hebrew Language 87
TTY Print Mode 88
AT&T 4410 Emulation 88
Keyboard Mapping 88
Display 88
Page 8

Tab le o f C ont en ts
viii
Programming the Function Keys & Buttons 89
Setup Options 90
General Settings 91
Display Settings 97
Preferences 101
Tab Settings 104
CHAPTER 11
HP 700-92/96 Emulation 105
Creating an HP 700-92/96 Emulation Session 105
Using the TeemTalk Session Wizard 105
Using the TeemTalk Emulator Window 106
Keyboard Mapping 107
Display Configuration 109
Function Keys & Buttons 109
Mode Selection 110
Configuration Selection 114
Device Control 114
Device Modes 116
Margins, Tabs & Start Column 118
Programming Function Keys & Buttons 121
User Keys Mode 121
User Key Definitions 121
Default Definitions 122
Key String Treatment 122
Function Indicator 122
Key String Definition 122
Character Display Attributes 123
Setup Options 125
General Settings 125
Configuration Settings 128
Preferences 132
CHAPTER 12
IBM 3151 Emulation 137
Creating an IBM 3151 Emulation Session 137
Page 9

Table of Contents
ix
Using the TeemTalk Session Wizard 137
Using the TeemTalk Emulator Window 138
Keyboard Mapping 139
The Status Line 141
Defining Function Keys 143
Setup Options 145
General Settings 145
Display Settings 148
Preferences 151
CHAPTER 13
IBM 3270 Display Emulation 155
Creating an IBM 3270 Display Emulation Session 155
Using the TeemTalk Session Wizard 155
Using the TeemTalk Emulator Window 156
IBM 3270 Emulation Capabilities 157
Keyboard Mapping 157
SysReq Key Support 159
Network Virtual Terminal Mode 159
The Status Line 160
Operating Mode & Communication 160
Do Not Enter 160
Typing Direction 162
Bilingual Keyboard Mode 162
Numeric Lock 162
Insert Mode 162
Display Direction 162
Cursor Position 162
Text Display Options 163
Display Right-to-Left 163
Typing Direction 163
Close Key 163
Push Mode 163
Bilingual Keyboard Support 164
Alternate Code Page 164
Page 10

Tab le o f C ont en ts
x
Record & Playback Keystrokes Facility 165
Recording Keystrokes 165
Playback Keystrokes 166
Editing Macros 167
Error Codes 168
Notice Board Facility 169
Introduction 169
Key Functions 169
Copying Screen Data to the Display 169
Copying Screen Data to a Function Key 170
Setup Options 171
Model Settings 171
National Settings 174
Display Settings 178
Keyboard Settings 180
Notice Board Settings 181
CHAPTER 14
IBM 3270 Printer Emulation 183
Creating an IBM 3270 Printer Emulation Session 183
Using the TeemTalk Session Wizard 183
Using the TeemTalk Emulator Window 184
IBM 3287-1 Printer Support 185
Setup Options 186
Model Settings 186
National Settings 189
Print By Pass Settings 193
CHAPTER 15
IBM 5250 Display Emulation 195
Creating an IBM 5250 Display Emulation Session 195
Using the TeemTalk Session Wizard 195
Using the TeemTalk Emulator Window 196
IBM 5250 Emulation Capabilities 197
Keyboard Mapping 197
Network Virtual Terminal Mode 199
Page 11

Table of Contents
xi
The Status Line 200
Operating Mode & Communication 200
Do Not Enter 200
Typing Direction 200
Bilingual Keyboard Mode 200
Insert Mode 201
Display Direction 201
Cursor Position 201
Fax Image Support 201
Word Processing Mode 202
Text Display Options 203
Display Right-to-Left 203
Typing Direction 203
Close Key 203
Push Mode 203
Bilingual Keyboard Support 204
Alternate Code Page 204
Record & Playback Keystrokes Facility 205
Recording Keystrokes 205
Playback Keystrokes 206
Error Codes 207
Setup Options 209
Model Settings 209
National Settings 211
Display Settings 215
Environment Variables 217
CHAPTER 16
IBM 5250 Printer Emulation 221
Creating an IBM 5250 Printer Emulation Session 221
Using the TeemTalk Session Wizard 221
Using the TeemTalk Emulator Window 222
Setup Options 223
Model Settings 224
National Settings 225
Page 12

Tab le o f C ont en ts
xii
Environment Variables 229
CHAPTER 17
TA6530 Emulation 235
Creating a TA6530 Emulation Session 235
Using the TeemTalk Session Wizard 235
Using the TeemTalk Emulator Window 236
Operating Modes 237
Conversational Mode 237
Block Mode 237
ANSI Mode 238
The Rule Cursor 238
Keyboard Mapping 238
The Status Line 240
Setup Options 242
General Settings 242
Display Settings 244
Preferences 246
CHAPTER 18
Wyse Emulations 249
Introduction 249
Creating a Wyse Emulation Session 250
Using the TeemTalk Session Wizard 250
Using the TeemTalk Emulator Window 251
Display Format 252
Keyboard Mapping 252
Status Line Messages 254
Standard & Extended Status Line 254
Standard Status Line 255
Extended Status Line 255
Setup Options 256
General Settings 257
Display 261
Preferences 264
Tab Settings 268
Page 13

Table of Contents
xiii
CHAPTER 19
Running Scripts 269
Introduction 269
Script Item on Tools Menu 269
Using a Key or Button Definition 270
CHAPTER 20
Capturing Host Communication 271
Introduction 271
Capture File 272
Replay File 273
CHAPTER 21
Command Line Options 275
Introduction 275
Session Configuration 276
Load Session File 276
Path for Language/Codepage Files 276
Translation File 276
Do Not Display Query Save Session Message 276
Do Not Display Dialog When Host Connection
Closed 276
Replay File to Emulation Only 277
Replay File to Host Only 277
Replay File to Both Host & Emulation 277
Enable Debug 277
Enable Debug Two-Way 278
Set Bitwise Debugging Flags 278
Window Appearance 279
Do Not Show Splash Screen 279
Show Window Full Screen 279
Show Window Minimized 279
Show Window Maximized 279
Set Window Position 279
Set Window Size 279
Disable Window Resize 280
Remove the Window Frame 280
Page 14

Tab le o f C ont en ts
xiv
Remove the Title Bar 280
Add the Title Bar 280
Window Title 280
Window Subtitle 280
Remove the System Menu 280
Add the System Menu 281
Remove/Disable Minimize Button 281
Add/Enable Minimize Button 281
Remove/Disable Maximize Button 281
Add/Enable Maximize Button 281
Remove the Menu Bar 281
Remove the File Menu 281
Remove the Edit Menu 281
Remove the View Menu 282
Remove the Connection Menu 282
Remove the Session Menu 282
Remove the Tools Menu 282
Remove the Help Menu 282
Remove Menu Items 282
Remove the Configuration Bar 284
Remove Configuration Bar Items 284
Remove the Emulation Status Bar 284
Remove the Window Status Bar 284
Remove the Soft Buttons 284
Soft Button Levels Displayed 284
Emulation Workspace 285
Mouse Cursor Style 285
Reflection 4 Colour Support 285
APPENDIX A
Programming Keys & Buttons 287
Introduction 287
Including Key Function Combinations & Sequences 288
Virtual Key Names 288
Key Combinations 288
Page 15

Table of Contents
xv
Key Sequences 288
Including Special Characters 289
Control Characters 289
Backslash Values 289
The Euro Character 289
Running a Script File 290
APPENDIX B
Virtual Key Names 291
Introduction 291
Standard Virtual Key Names 292
Mouse Buttons 294
Extended Keyboard Functions 294
AT&T 4410 Virtual Key Names 295
DEC VT510 Virtual Key Names 296
HP 700-92/96 Virtual Key Names 298
IBM 3151 Virtual Key Names 300
IBM 3270 Virtual Key Names 302
IBM 5250 Virtual Key Names 304
IBM 5250 Word Processing Mode 306
TA6530 Virtual Key Names 307
Wyse Virtual Key Names 309
APPENDIX C
Product Specification 311
Introduction 311
General 311
Telnet 312
AixTerm 312
Digital VT Emulation 313
HP 700/92 Emulation 313
IBM 3270 Emulation 313
IBM 5250 Emulation 313
IBM 3151 Native Emulation Model 11 & 31 314
Stratus V102 314
Tandem 6526/6530 Emulation 314
Page 16

Tab le o f C ont en ts
xvi
Televideo 955 315
Wyse 60 Native Emulation 315
Wyse 50, 50+, TVI 910, 925, 950, ADDS-A2, HZ 1500,
Wyse PC-Term 316
Index 317
Page 17

1
HP Tee mTa lk Ter mi nal Emul at or 7. 0 U ser Manu al
CHAPTER 1 Introduction
This chapter introduces TeemTalk and describes the scope of this
manual.
What is TeemTalk?
HP’s TeemTalk host access software provides the ability to
connect and communicate with applications on mainframes and
midrange systems. These connections can be made from virtually
any desktop running Microsoft Windows or Linux. TeemTalk
enables desktops to emulate more than 30 different green screen
terminals including IBM 3270, 5250, DEC VT, HP, and Wyse.
TeemTalk also provides a range of facilities to enhance your
terminal emulation experience. These include the following:
• Programmable soft buttons.
• Redefinable key and mouse button functions.
• Redefinable display attributes and colours.
• Multiple cuncurrent sessions displayed on tabs.
• Auto logon for automating all or part of the host logon process.
• Script language to automate various operations.
Page 18

Introduction
2 About This User's Manual
About This User's Manual
This manual explains how to use TeemTalk version 7.0. It assumes
you are familiar with the operating system in which you are running
TeemTalk. Note that your version of TeemTalk may not support
every emulation or feature described in this manual.
Overview of
Contents
This manual is divided into the following chapters and appendices:
Chapter 1: Introduction
Introduces TeemTalk and the scope of this manual.
Chapter 2: Getting Started
Describes the procedure for creating a session and
describes various TeemTalk display features.
Chapter 3: Host Connection
Describes how to configure TeemTalk to communicate
with the host.
Chapter 4: Keyboard Configuration
Describes how to configure the keyboard, define key
functions and compose special characters.
Chapter 5: Mouse Functions
Describes the functions assigned to the mouse buttons
by TeemTalk, and how to redefine them.
Chapter 6: Soft Buttons
Describes how to use the soft buttons.
Chapter 7: Display Attributes
Describes how to change the colours used in the
emulation workspace and specify how text with
attributes is displayed.
Chapter 8: Editing Options
Describes how to use the editing options provided on
the
Edit menu.
Page 19

Introduction
About This User's Manual 3
Chapter 9: Printing
Describes the printing options supported by TeemTalk.
Chapter 10: VT Series Emulations
Describes features of the VT suite of terminal
emulations.
Chapter 11: HP700-92/96 Emulation
Describes features of the Hewlett-Packard HP700-92/
96 emulation.
Chapter 12: IBM 3151 Emulation
Describes features of the IBM 3151 emulation.
Chapter 13: IBM 3270 Display Emulation
Describes features of the IBM 3270 display emulation.
Chapter 14: IBM 3270 Printer Emulation
Describes features of the IBM 3270 printer emulation.
Chapter 15: IBM 5250 Display Emulation
Describes features of the IBM 5250 display emulation.
Chapter 16: IBM 5250 Printer Emulation
Describes features of the IBM 5250 printer emulation.
Chapter 17: TA6530 Emulation
Describes features of the Tandem 6530 emulation.
Chapter 18: Wyse Emulations
Describes features of the Wyse terminal emulations.
Chapter 19: Running Scripts
Describes how to run a script program.
Chapter 20: Capturing Host Communication
Describes how to capture the communication between
the host and the emulator in a file, then replay it.
Chapter 21: Command Line Options
Describes the command line options that can be used to
specify the TeemTalk startup configuration.
Page 20

Introduction
4 About This User's Manual
Appendix A: Programming Keys & Buttons
Describes how to program a key or button to generate
specific key functions and characters when pressed.
Appendix B: Virtual Key Names
Lists the virtual key names available for defining key
functions and including specific key functions in macro
definitions.
Appendix C: Product Specification
Describes the level of support provided by each
terminal emulation.
Terms &
Conventions
The following terms and conventions are used in this manual:
keys to press
When you need to press two or more keys together at the same time,
such as the Shift key and the F4 key, this will be indicated by a plus
character between the key names. For example: Shift + F4. The "+"
character does not represent a key to be pressed.
click
To "click" means to click the left mouse button once when the
mouse pointer is on a particular item on the display, such as an icon.
You should use the left mouse button unless specifically told otherwise.
double-click
To "double-click" means to click the left mouse button twice in
quick succession when the mouse pointer is on a particular item on
the display, such as an icon. You should use the left mouse button
unless specifically told otherwise.
drag
To "drag" means to position the mouse pointer on an item on the
display (such as the edge of a window), then hold down the left
mouse button and move the mouse while keeping the button held
down.
Page 21

Introduction
Getting More Information 5
Getting More Information
Technical Support Current information about HP products including the latest software
updates is available at:
http://www.hp.com/support
In addition, this user manual and other HP documentation is
available at the HP web site for browsing or downloading.
Contacting Us If you need to contact HP, use one of the methods listed at:
http://welcome.hp.com/country/us/en/wwcontact_us.html
Page 22

Introduction
6 Getting More Information
Page 23

7
HP Tee mTa lk Ter mi nal Emul at or 7. 0 U ser Manu al
CHAPTER 2 Getting Started
This chapter describes the basic procedure for creating and running a session and describes various TeemTalk display features.
Introduction
This chapter describes how to use the TeemTalk Session Wizard to
create a session configuration file, then the various methods
available to run it. An overview of the TeemTalk window elements
follows, then descriptions of the configuration bar and status bar.
Creating a Session Using the Session Wizard
Introduction TeemTalk enables you to create session configuration files which
specify the terminal emulation to run and its settings, how to connect to the host, and additional features such as display colours,
soft button definitions and keyboard macros.
A TeemTalk session configuration file can be created using the
TeemTalk Session Wizard as decribed in this section, or when
TeemTalk is running a session by selecting
Save Session As on the
File menu.
Page 24

Getting Started
8 Creating a Session Using the Session Wizard
Using the Session
Wizard
1 Run the TeemTalk Session Wizard from the Start menu by
selecting
All Programs > HP > HP TeemTalk Terminal Emulator
>
Session Wizard.
2 In the Session Name field, enter a unique name that will identify
this session configuration for future selection.
The name specified here will be used as the filename for the .tts
session configuration file that will be created, and it will also
appear in the title bar of the TeemTalk window in brackets when
the session is being run.
3 Select the Transport method then click the Configure button to
specify settings.
SSH2 The SSH2 (Secure Shell) client/server protocol is
used to encrypt and transmit data securely over a
network, with authentication provided by a
password and/or key. Refer to the section “SSH2
Transport” on page 22 for details.
Serial Enables host communication using the serial
transport protocol. Refer to the section “Serial
Transport” on page 31 for details.
Page 25

Getting Started
Creating a Session Using the Session Wizard 9
TCP/IP Enables host communication using the TCP/IP
protocol. Refer to the section “TCP/IP Transport”
on page 21 for details.
4 Select the Connection type (currently only Telnet is supported)
then click the
Configure button to specify settings.
5 Select the required terminal emulation in the Emulation list box
then click the
Configure button to specify settings.
VT Series Enables emulation of a suite of DEC VT
and VT-based terminals. Refer to the chapter “VT Series Emulations” on page 79 and
the section “Setup Options” on page 90.
HP70092 Enables emulation of the Hewlett-Packard
HP 700-92/96 terminal. Refer to the chapter
“HP 700-92/96 Emulation” on page 105
and the section “Setup Options” on
page 125.
IBM 3151 Enables emulation of the IBM 3151
terminal. Refer to the chapter “IBM 3151
Emulation” on page 137 and the section
“Setup Options” on page 145.
IBM3270 Display Enables emulation of the IBM 3270
terminal. Refer to the chapter “IBM 3270
Display Emulation” on page 155 and the
section “Setup Options” on page 171.
IBM3270 Printer Enables emulation of the IBM 3270 printer.
Refer to the chapter “IBM 3270 Printer
Emulation” on page 183 and the section
“Setup Options” on page 186.
IBM5250 Display Enables emulation of the IBM 5250
terminal. Refer to the chapter “IBM 5250
Display Emulation” on page 195 and the
section “Setup Options” on page 209.
Page 26

Getting Started
10 Creating a Session Using the Session Wizard
IBM5250 Printer Enables emulation of the IBM 5250 printer.
Refer to the chapter “IBM 5250 Printer
Emulation” on page 221 and the section
“Setup Options” on page 223.
TA6530 Enables emulation of the Tandem TA 6530
terminal. Refer to the chapter “TA6530
Emulation” on page 235 and the section
“Setup Options” on page 242.
Wyse Enables emulation of a suite of Wyse
terminals and Wyse terminal emulations.
Refer to the chapter “Wyse Emulations” on
page 249 and the section “Setup Options”
on page 256.
6 Click Next to display the Advanced Options dialog.
Auto Logon Enables you to automate all or part of the
host login process. Refer to the section
“Auto Logon” on page 34.
Key Macros Enables you to define the function of keys
and key combinations on your keyboard.
Refer to the section “Defining Key Functions” on page 38.
Page 27
Getting Started
Creating a Session Using the Session Wizard 11
Mouse Actions Enables you to define the function of the
mouse buttons when clicked on their own
or with modifier keys. Refer to the section
“Defining Mouse Functions” on page 48.
Soft Buttons Enables you to define the function of the
soft buttons displayed at the bottom of the
TeemTalk window by default. Refer to the
section “Defining Soft Button Functions”
on page 54.
Attributes Enables you to change the colours and text
attributes displayed in the emulation workspace. Refer to the chapter “Display
Attributes” on page 57.
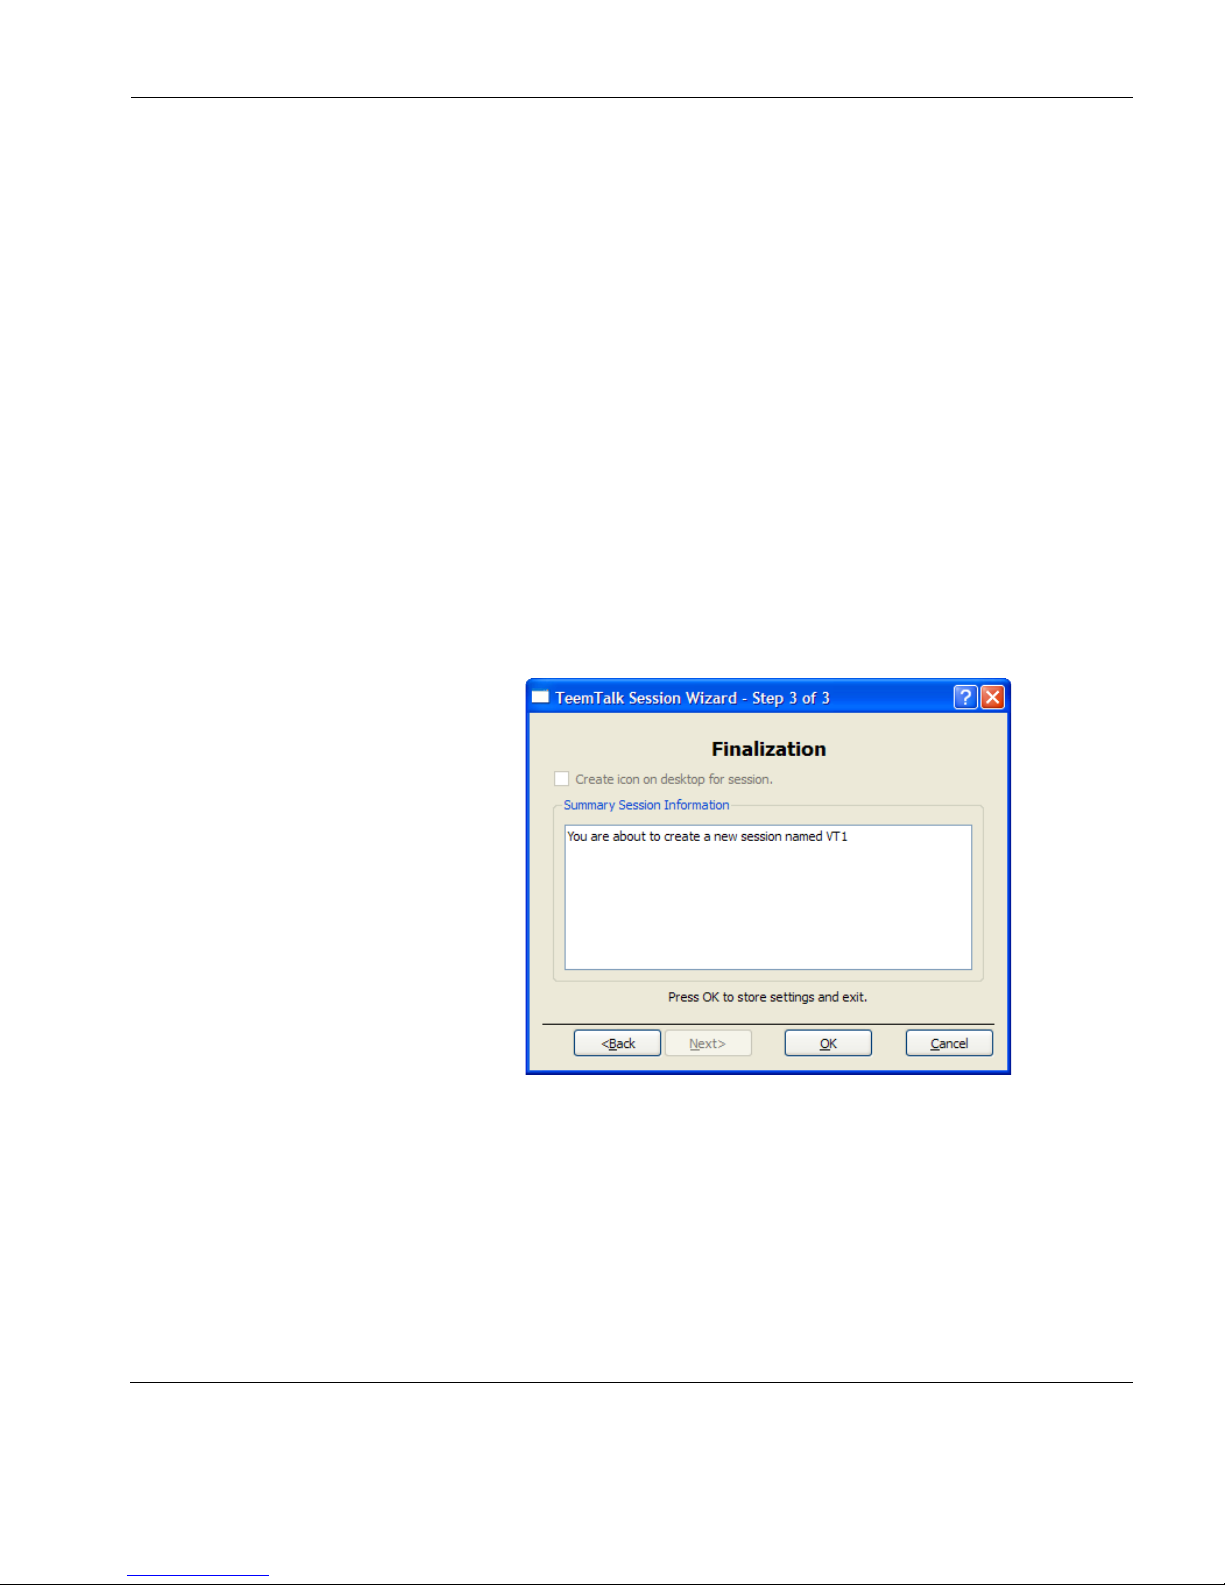
7 Click Next to display the Finalization dialog.
8 If you want a shortcut icon for this session to be created on the
desktop, check the box labelled
Create icon on desktop for
session
.
9 Check the information displayed in the Summary Session Infor-
mation box is correct. If not, click the <Back button to edit.
10 Click OK to create the session configuration file (with the file-
name extension .tts) and exit the Wizard.
Page 28

Getting Started
12 Running a Session Configuration
Running a Session Configuration
You can run a TeemTalk session configuration using one of the
following methods.
Desktop Icon If a desktop icon was created for the session configuration, double-
clicking on it will automatically run TeemTalk and cause it to load
the settings contained in the session configuration file.
TeemTalk Menu To run a session configuration file while TeemTalk is running, run
TeemTalk either by double-clicking on the
TeemTalk icon displayed
on the desktop, or from the
Start menu by selecting All Programs >
HP > HP TeemTalk Terminal Emulator > TeemTalk, then display the
File menu and select Open Session. Select the name of the required
.tts session file then click
Open.
Command Line
Option
The command line for running the TeemTalk executable file can
include a command to load the settings stored in a specified session
configuration file. The format of the command is as follows:
+lsf"sessionfile.tts"
The filename must include the extension .tts and must be enclosed
within double-quote characters. The command must be preceded by
a space to separate it from the name of the TeemTalk executable file
or other command line options.
For example, to run TeemTalk and load the settings stored in the
session configuration file mysettings.tts, you would enter the
following on the command line:
teemtalk.exe +lsf"mysettings.tts"
Refer to the chapter “Command Line Options” on page 275 for more
information on command line options.
Page 29
Getting Started
The TeemTalk Window 13
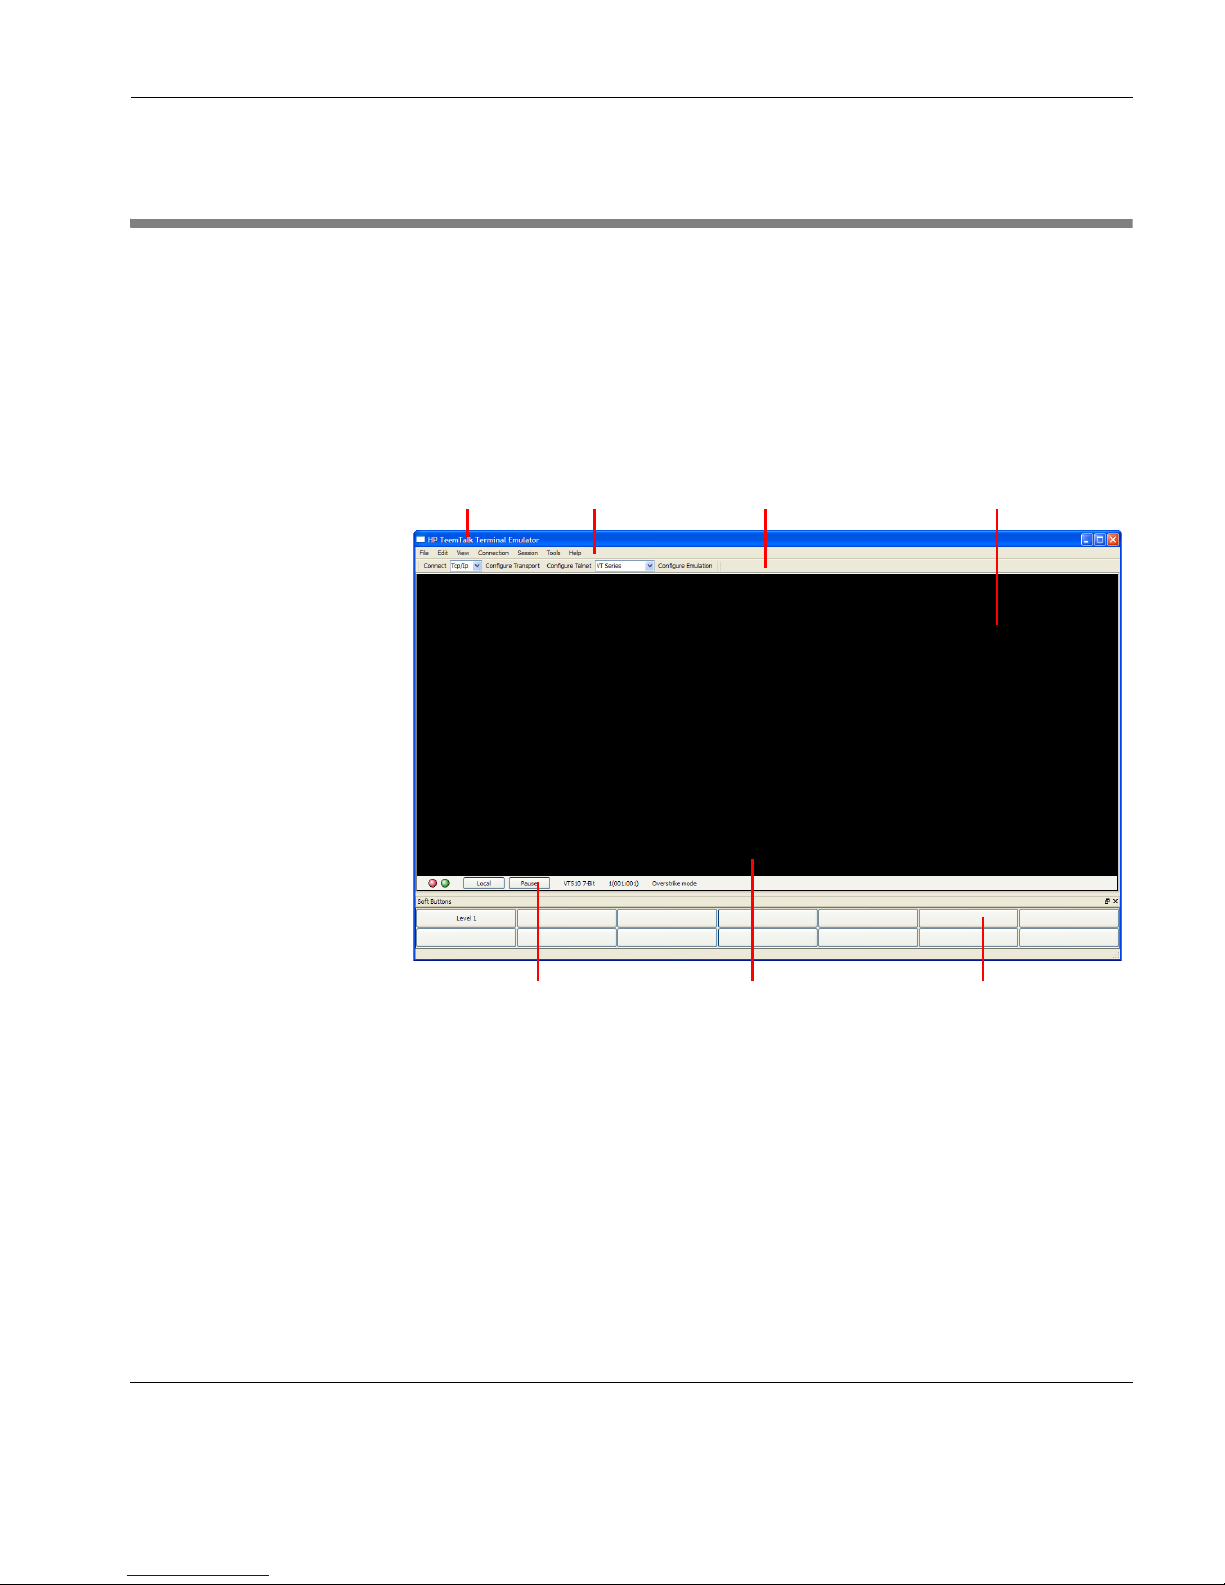
The TeemTalk Window
The TeemTalk window display consists of various elements which
are described below. The
View menu allows you to toggle the
display of the configuration bar, status bar and soft buttons on and
off. Note that you can also remove individual display elements from
the TeemTalk window using command line options as described in
the chapter “Command Line Options” on page 275.
Title Bar
The title bar displays the name of the session currently being run in
brackets.
Menu Bar
The menu bar provides access to a series of commands and setup
dialogs that enable you to perform various operations and configure
TeemTalk and the terminal emulation. Individual menus and menu
items can be removed from the display using command line options.
Title Bar Menu Bar Configuration Bar Emulation Workspace
Status Bar Emulation Status Line Soft Buttons
Page 30

Getting Started
14 The TeemTalk Window
Configuration Bar
The configuration bar provides a quick way of creating or configuring a session by clicking buttons or selecting from drop-down list
boxes. Refer to the section “The Configuration Bar” on page 15 for
more details.
Emulation Workspace
The emulation workspace is the TeemTalk window area providing
the terminal emulation display. You can create multiple emulation
workspaces in the TeemTalk window on separate tabs by selecting
New Tab in the File menu. If you require a new TeemTalk window
rather than an emulation workspace tab, select
New Window in the
File menu.
Emulation Status Line
Some terminal emulations use the last line of the display as a status
line to indicate the status of various operations.
Status Bar
The status bar shows the status of various TeemTalk operations. The
information displayed depends on the terminal emulation currently
running. Refer to the section “The Status Bar” on page 16 for more
details.
Soft Buttons
A set of programmable soft buttons is displayed at the bottom of the
TeemTalk window by default. The soft buttons can be detached in a
separate window.
There are four soft button levels. Each level consists of twelve buttons providing a combined total of 48 programmable buttons. You
can display all four levels at the same time if required. All levels are
accessible even if not all are displayed, levels stored off-screen can
be 'scrolled' into view by clicking the
Level # button.
Refer to the chapter “Soft Buttons” on page 53 for more details.
Page 31

Getting Started
The Configuration Bar 15
The Configuration Bar
The configuration bar provides a quick way of creating or configuring a session by clicking buttons or selecting from drop-down list
boxes.
You can remove the configuration bar from the TeemTalk window
by selecting
Toolbars > Configuration from the Tools menu. This
will toggle display of the configuration bar on and off.
Attempts to make a host connection using the current
Transport,
Telnet and Emulation settings. On a successful connection this
button performs a
Disconnect from host when clicked.
Enables you to select and configure the transport used to
communicate with the host.
Enables you to configure the Telnet host connection.
Enables you to select and configure the terminal emulation.
Saving the Session
Configuration
You can save the session configuration by selecting either Save Ses-
sion
(overwrite existing session configuration file) or Save Session
As
(create a new session configuration file) from the File menu.
Page 32

Getting Started
16 The Status Bar
The Status Bar
The status bar shows the status of various TeemTalk operations and
enables you to switch between operating modes. You can remove
the status bar from the TeemTalk window by selecting
Status Bar on
the
Tools menu. This will toggle display of the status bar on and off.
The information displayed on the status bar depends on the terminal
emulation currently running.
Item
1: This LED indicates whether you are connected to the host.
It will appear red when not connected and green when you
are connected.
Item
2: This LED indicates whether data is being sent to or from
the host. It will appear dull green when there is no activity,
red when data is being sent to the host, and bright green
when data is being received from the host.
Item
3: This button enables you to switch between Local and
Online mode. The label indicates the mode you will switch
to when the button is clicked.
Item
4: This button enables you to Pause or Resume scrolling data
in the window. The label indicates the action that will be
taken when the button is clicked.
Item
5: Indicates the current terminal emulation.
1 2 3 4 5
Page 33

17
HP Tee mTa lk Ter mi nal Emul at or 7. 0 U ser Manu al
CHAPTER 3 Host Connection
This chapter describes how to configure TeemTalk to communicate
with the host.
Introduction
Host connection settings are specified using the Transport and
Connection options which can be found in three locations:
• TeemTalk Session Wizard:
• TeemTalk configuration bar:
Page 34

Host Connection
18 Introduction
• TeemTalk Session menu:
The
Transport setting specifies the physical method by which the
host connection is made. TeemTalk supports three transport protocols for communication with the host:
TCP/IP For host communication using the internet protocol
suite TCP (Transport Control Protocol) and IP (Internet
Protocol). See “TCP/IP Transport” on page 21.
SSH2 A secure shell client/server protocol used to encrypt and
transmit data securely over a network, with authentication provided by a password and/or key. See “SSH2
Transport” on page 22.
Serial For host communication requiring data to be sent
sequentially, one bit at a time. See “Serial Transport” on
page 31.
The
Connection setting specifies the host connection protocol.
Currently only
Telnet is supported.
TeemTalk also provides an Auto Logon feature which enables you
to automate all or part of the host logon procedure by specifying
what is sent to the host in response to prompts displayed on the
screen. See “Auto Logon” on page 34.
Page 35

Host Connection
Telnet Settings 19
Telnet Settings
The settings for a Telnet host connection are specified using the
Telnet Settings dialog which can be displayed using one of the
following three methods:
Session Wizard:In Step 1 set Connection to Telnet then click
the
Configure button.
TeemTalk Window:On the Session menu, select Connection >
Telnet then select Configure Connection....
On the configuration bar, click the
Configure
Telnet
button.
Specify the settings required by the host using the options described
below, then click the
Connect button.
Terminal Id
Factory default: Depends on the selected terminal emulation
This specifies the terminal identification string that is passed to the
host.
Send Echo
Factory default: Unchecked
When this option is unchecked the emulator is prevented from
generating the Telnet echo option on connection.
Page 36

Host Connection
20 Telnet Settings
Send CR with Break
Factory default: Unchecked
This determines whether a Carriage Return is sent with a Telnet
break packet.
Send TM with Break
Factory default: Unchecked
This determines whether a Timing Mark is sent with a Telnet break
packet.
Page 37

Host Connection
TCP/IP Transport 21
TCP/IP Transport
A host connection using the TCP/IP protocol is made using the TCP/
IP Settings
dialog which can be displayed using one of the follow-
ing three methods:
Session Wizard:In Step 1 set Transport to TCP/IP then click
the
Configure button.
TeemTalk Window:On the Session menu, select Transport >
TCP/IP then select Configure Transport....
On the configuration bar, select
TCP/IP in
the
Transport list box then click Configure
Transport
.
1 In the Host box enter the URL or IP address of the host to
connect to.
2 In the Port box specify the number of the host port to connect to
(default is 23).
3 Click the Connect button.
Page 38

Host Connection
22 SSH2 Transport
SSH2 Transport
The SSH2 (Secure Shell) client/server protocol is used to encrypt
and transmit data securely over a network, with authentication
provided by a password and/or key.
Making a Host
Connection
A host connection using the SSH2 protocol is made using the SSH
Settings
dialog which can be displayed using one of the following
three methods:
Session Wizard:In Step 1 set Transport to SSH2 then click
the
Configure button.
TeemTalk Window:On the Session menu, select Transport >
SSH2 then select Configure Transport....
On the configuration bar, select
SSH2 in the
Transport list box then click Configure
Transport.
The basic procedure for making an SSH2 connection is as follows:
1 Specify the IP Address of the host to connect to.
2 Specify the host’s SSH Port number (default is 22).
3 Select an Authentication profile (refer to the following sections
for information on creating profiles).
4 Click the Connect button.
Page 39

Host Connection
SSH2 Transport 23
Creating an
Authentication
Profile using a
Password
To create an authentication profile using a password:
1 Select SSH2 Profile... on the Tools menu.
2 Click the Add button.
3 Enter a User name. The Profile name will automatically display
the
User name entered, but you can change it if required. Click
Next >.
Page 40

Host Connection
24 SSH2 Transport
4 Select Use a password for authentication then click Next >.
5 Enter and confirm the password then click Next >.
6 Check the summary. If it is incorrect you can go back and make
changes by clicking the
< Back button, otherwise click Finish to
generate the authentication profile. The new profile will now be
listed in the
SSH2 Profile Settings dialog.
Page 41

Host Connection
SSH2 Transport 25
7 To use the new profile, display the SSH2 Settings dialog (see
“Making a Host Connection” on page 22) and select the name of
the profile from the
Authentication profile list box.
Page 42

Host Connection
26 SSH2 Transport
Creating an
Authentication
Profile using a New
Public Key
To create an authentication profile using a new public key:
1 Select SSH2 Profile... on the Tools menu.
2 Click the Add button.
3 Enter a User name. The Profile name will automatically display
the
User name entered, but you can change it if required. Click
Next >.
Page 43

Host Connection
SSH2 Transport 27
4 Select Use a public key for authentication then click Next >.
5 Select Create a new key then click Next >.
6 Enter a Key filename. If necessary, check the Find a new seed
prime number
box. Click Next >.
Page 44

Host Connection
28 SSH2 Transport
7 Select either RSA algorithm or DSA algorithm then click Next >.
8 Enter and confirm the passphrase to use for your new key file
then click
Next >.
Page 45

Host Connection
SSH2 Transport 29
9 Check the summary. If it is incorrect you can go back and make
changes by clicking the
< Back button, otherwise click Finish to
generate the authentication profile. The new profile will now be
listed in the
SSH2 Profile Settings dialog.
To make use of your key you need to copy it on to the server as
follows:
10 Select the name of the profile in the SSH2 Profile Settings
dialog then click the
Edit button.
11 Select and copy everything displayed in the new window.
12 Logon to your server using username and password.
13 In your home directory you need to have a sub-directory called
.ssh. You may have to create this directory yourself. Within the
.ssh directory you need a file called authorized_keys. Again if
it is not there you will have to create it.
14 Using whatever editor is available on your server, paste the key
into the file and save it.
Page 46

Host Connection
30 SSH2 Transport
15 To use the new profile, display the SSH2 Settings dialog (see
“Making a Host Connection” on page 22) and select the name of
the profile from the
Authentication profile list box.
Page 47

Host Connection
Serial Transport 31
Serial Transport
A serial host connection is made using the Serial Settings dialog
which can be displayed using one of the following three methods:
Session Wizard:In Step 1 set Transport to Serial then click
the
Configure button.
TeemTalk Window:On the Session menu, select Transport >
Serial then select Configure Transport....
On the configuration bar, select
Serial in the
Transport list box then click Configure
Transport
.
Specify the settings required by the host using the options described
below, then click the
Connect button.
Communications Port
Factory default: COM3
This specifies the port used to communicate with the host.
Page 48

Host Connection
32 Serial Transport
Baud Rate
Factory default: 9600
Specifies the connection speed in the range 110 to 115200 baud.
Parity
Factory default: None
This option specifies the parity mode for each transmitted character.
If the number of data bits specified by
Word Length is 8, set this
option to
None.
Selecting
Odd will cause an eighth bit to be added with a value of 1
if the previous 7 bits add up to an even number, and 0 if the previous
7 bits add up to an odd number. Selecting
Even will cause an eighth
bit to be added with a value of 1 if the previous 7 bits add up to an
odd number, and 0 if the previous 7 bits add up to an even number.
Mark parity will set every eighth bit to 1 and Space parity every bit
to 0.
Word Length
Factory default: 8
This option specifies the number of data bits sent for each transmitted character.
Stop Bits
Factory default: 1
This specifies the number of stop bits sent for each transmitted
character.
Flow Control
Factory default: Both
This option specifies the type of flow control used by the line port to
communicate readiness to transmit or receive data from the host.
None No flow control.
Input XON/XOFF on received data.
Output XON/XOFF on transmitted data.
Page 49

Host Connection
Serial Transport 33
Both XON/XOFF on transmitted & received data.
Hardware RTS/CTS hardware flow control.
Half Duplex
Factory default: Unchecked
The setting of this option determines whether keyboard entered
characters are immediately displayed on the screen when transmitted
to the host (otherwise known as local echo). When unchecked,
characters are not displayed locally when they are transmitted unless
the host 'echoes' them back.
Buffer Size
Factory default: 4096
This specifies the size of the buffer used for temporary storage of
input and output data.
Block on Full
Factory default: Unchecked
This determines what happens when the buffer becomes full.
Checking this option will cause TeemTalk to block all actions until
the buffer is ready to receive new data.
Page 50

Host Connection
34 Auto Logon
Auto Logon
TeemTalk enables you to automate all or part of the host logon
procedure. Settings in the
Auto Logon Options dialog enable you to
specify what is sent to the host in response to prompts displayed on
the screen.
The
Auto Logon Options dialog can be displayed using one of the
following methods:
Session Wizard: Click on the Auto Logon... button in Step 2.
TeemTalk Window: Select Auto Logon... on the Tools menu.
To specify auto logon settings:
1 If an initiation string is required by the host when you first make
a connection, check the
Set initiation string box, enter the
required characters in the
Initiate with box (the Respond With
box in the illustration above), then click the
Add button. The ini-
tiation string will be added to the
Script window on the right.
2 The Wait For options enable you to specify the prompt or key-
board locked or unlocked command that the automatic login
process is to wait for before proceeding. Some systems are case
Page 51

Host Connection
Auto Logon 35
sensitive, so make sure your
Text entries follow the correct con-
ventions for your system.
Note: When running the IBM 3270 or IBM 5250 emulation,
Text
entries are only applicable in NVT mode.
3 Enter the response required in the Respond With box. In order
for a text entry to be sent to the host it must be followed by a
carriage return command. This is specified by selecting
C.
Return
in the list of predefined commands in the list box below
then clicking the
Insert button. A <CR> will appear in the
Respond With box.
You can also enter a predefined key function in the
Respond
With box by selecting Key Definition in the list of predefined
commands in the list box below, selecting one of the virtual key
names listed in the box below that, then clicking the
Insert
button.
The list of predefined commands that can be inserted include
UserName (indicated by <UN>) and Password (indicated by
<PW>). Selecting either of these will cause a dialog box to pop-
up when logging on to the host prompting the user to enter a
name or password, respectively. You can also delay the script
response by 2 seconds by inserting Delay (2s) (indicated by
<D>) or 0.255 seconds by inserting Pause (0.255) (indicated by
<P>).
4 When you have finished specifying the response to a particular
prompt, click the
Add button to add the definition to the Script
window on the right.
The script will perform the actions in the order displayed in the
Script window. To change the order of the script lines, use the
up and down arrow buttons to the right of the
Script window.
5 Repeat this procedure for each prompt as required.
Page 52

Host Connection
36 Auto Logon
If you want to edit one of the script lines, select the line in the
Script window then click Remove to send it to the edit boxes on
the left. Make the change(s) then click
Add to send it back to the
script. Note that this will now be the last line of the script.
6 When the Script window contains all the required responses to
the relevant prompts in the correct order, click
Finish.
Page 53

37
HP Tee mTa lk Ter mi nal Emul at or 7. 0 U ser Manu al
CHAPTER 4 Keyboard
Configuration
This chapter describes how to configure the keyboard, define key
functions and compose special characters.
Keyboard Mapping
The keyboard is mapped as close as possible to the terminal being
emulated. The mapping of key functions in each terminal emulation can be determined by referring to the
Emulation Keys list box
in the
Key Macro Settings dialog.
The information in brackets in the right column indicates the
default mapping of the key function named in the left column. In
the list, S+ indicates the Shift key, C+ indicates the Control key
and A+ indicates the Alt key.
For example:
WY_INSLINE (S+C+VK_INSERT)
indicates that the Wyse emulation Insert Line function is mapped
to the key combination Shift + Control + Insert.
Special key functions supported by each terminal emulation can be
mapped to keys using the predefined macros listed in the
Key
Macro Settings
dialog.
Page 54

Keyboard Configuration
38 Defining Key Functions
Defining Key Functions
You can redefine the function of keys on the keyboard using the Key
Macro Settings dialog. The options in this dialog enable you to rede-
fine the function of most of the keys on your keyboard including the
key combinations listed below:
Key Alt + Key
Shift + Key Alt + Shift + Key
Control + Key Alt + Control + Key
Control + Shift + Key Alt + Control + Shift + Key
The
Key Macro Settings dialog can be displayed using one of the
following methods:
Session Wizard: Click on the Key Macros... button in Step 2.
TeemTalk Window: Select Key Macros... on the Tools menu.
Page 55

Keyboard Configuration
Defining Key Functions 39
The top right panel is used to display information about keys that
have been programmed and enables you to select them in order to
edit or delete. The
Key column identifies the programmed key using
its virtual key name. The
Type column specifies how the macro is to
be processed. The
Macro column displays the function definition.
The
Emulation Keys list box enables you to select from a list of
standard key functions specific to the currently selected terminal
emulation. The information in brackets in the right column indicates
the default mapping of the key function named in the left column. In
the list, S+ indicates the Shift key, C+ indicates the Control key and
A+ indicates the Alt key.
For example:
WY_INSLINE (S+C+VK_INSERT)
indicates that the Wyse emulation Insert Line function is mapped to
the key combination Shift + Control + Insert.
The
Virtual Keys list box enables you to select from a list of standard
key functions available for all terminal emulations.
The procedure for programming a key is as follows:
1 On your keyboard, press the key or key combination you want to
define. The
Key to Program box will display the corresponding
virtual key name for each key pressed.
2 In the Macro box enter the function definition for the key or key
combination.
The definition may contain a string of up to 127 characters. The
combined total of all the characters that may be programmed
into keys is determined by the 127 character limit per definition
and the amount of memory available in your PC.
The definition can contain key functions and control characters
to be actioned as well as normal text. Refer to the appendix
“Programming Keys & Buttons” on page 287 for details.
Double-clicking on an
Emulation Key or Virtual Key will apply
that key function to the key definition.
Page 56

Keyboard Configuration
40 Defining Key Functions
You can clear the macro by clicking the
Clear button.
3 Test the function definition by clicking the Play Macro button.
4 Specify how the macro is to be processed by selecting one of the
following options in the
Type list box.
Normal the macro will be processed according to the current
operating mode when the key or key combination is
pressed.
Remote the macro will be transmitted to the host.
Local the macro will be actioned locally.
Startup the macro will be processed automatically
on startup.
5 If you want to program another key using the current macro
definition, click the
New Key button.
If you want to program another key with a different macro
definition, click the
New Macro button.
You can delete a key definition by selecting it in the list of
defined keys (top right) then clicking the
Delete Macro button.
6 When you have finished defining key functions, click OK.
7 To save the key definitions, select File > Save Session.
Page 57

Keyboard Configuration
Compose Character Sequences 41
Compose Character Sequences
Compose character sequences can be used to generate codes for
characters not shown on your keyboard. The characters that can be
composed depend on whether the terminal emulation is in National
or Multinational character set mode. When the terminal emulation is
in National character set mode, only characters found in the
character set that corresponds to the selected keyboard nationality
can be composed. When the terminal emulation is in Multinational
character set mode, characters from all national keyboard layouts
can be composed.
If a character is a diacritical symbol (e.g. ´ or ¨) and this symbol does
not appear on the keyboard, an equivalent character can be used in
some cases. The diacritical symbols and the possible substitutes are
shown below. There are no equivalents for the circumflex accent and
tilde mark.
Diacritical Mark Equivalent Character
´ Acute accent ' Apostrophe
¨ Umlaut " Double quote
` Grave accent ' Single quote
° Ring mark * Asterisk or degree sign
To compose a character, first find the character you wish to compose
in the left hand column of the following tables. The two characters
shown in the right hand column are the keys that are used to create
it. Several alternatives may be given for generating the same character. A compose sequence is initiated by pressing the keys Alt + C
together, followed by the key bearing the first character then the key
bearing the second character.
Note: The compose character sequence can also be initiated by
pressing a key defined with the COMPOSE virtual key name.
A compose character sequence may be abandoned before
completion by pressing the Delete key. Pressing Alt + C (or the key
defined with the COMPOSE virtual key name) again before
completing a compose character sequence will cause it to be
Page 58

Keyboard Configuration
42 Compose Character Sequences
abandoned and a second sequence to be started. An invalid compose
character sequence will cause the bell to sound.
The following tables use several conventions:
• The keys bearing the characters used to compose a special char-
acter may be pressed in any order unless (in order) is specified.
• (DEC Multinat.) indicates that the character can only be com-
posed if the terminal emulation is in Multinational mode and the
Character Set option is set to Multinational.
• (Latin-1) indicates that the character can only be composed if the
terminal emulation is in Multinational mode and the
Character
Set
option is set to ISO Latin-1.
• If a nationality is specified with the character description, for
example (Dutch), then the character can only be composed when
the terminal emulation is in National mode and the system is configured for the relevant language.
Page 59

Keyboard Configuration
Compose Character Sequences 43
COMPOSE CHARACTER SEQUENCES
¨ space
+ +
' space
( (
/ /
or / <
) )
^ space
` space
( -
/ ^
) -
~ space
! !
quotation mark
number sign
apostrophe
commercial at
opening bracket
back slash
closing bracket
grave accent
opening brace
vertical line
closing brace
tilde
inverted !
cent sign
pound sign
yen sign
currency sign
copyright sign
"
#
'
@
[
\
]
^
`
{
|
}
~
¡
¢
£
¥
§
¤
C
circumflex
accent
section
sign
a a or A A
a a
or A A or a A
(Multinational)
(National)
c / or C /
c |
or C |
l -
or L -
l =
or L =
y -
or Y -
y =
or Y =
s o
or S O or s !
S !
or s 0 or S 0
National includes s O or S o
(National & Multinational)
x o or X O
x 0
or X 0
c o
or C O
c 0
or C 0
a -
or A _
< <
+ -
2 ^
3 ^
p !
or P !
. ^
1 ^
o _
or O _
> >
? ?
A `
A '
A ^
A ~
degree sign
superscript 2
superscript 3
micro sign
paragraph sign
centred period
superscript 1
Florin (Dutch)
i j sign (Dutch)
inverted ?
A grave
A acute
A circumflex
A tilde
feminine ordinal
indicator
ª
«
°
±
2
3
µ
¶
·
1
º
»
1
/
4
1
/
2
3
/
4
fl
ij
¿
À
Á
Â
Ã
double open
angle brackets
plus or
minus sign
masculine
ordinal indicator
double closed
angle brackets
fraction
one quarter
fraction
one half
fraction threequarters (Dutch)
0 ^ (Multinational)
°
space (National)
/ u or / U
(in order)
1 4
(in order)
1 2
(in order)
3 4
(in order)
f l
(in order)
i j
(in order)
Page 60

Keyboard Configuration
44 Compose Character Sequences
COMPOSE CHARACTER SEQUENCES
A " or ¨ A
E `
E '
E ^
E "
or
¨ E
I `
I '
I ^
I "
or
¨ I
N ~
O `
O '
O ^
O ~
O "
or
¨ O
O /
U `
U '
A umlaut
A ring
A E diphthong
C cedilla
E grave
E acute
E circumflex
E umlaut
I grave
I acute
I circumflex
I umlaut
N tilde
O grave
O acute
O circumflex
O tilde
O umlaut
O slash
U grave
U acute
Ä
Å
Æ
Ç
È
É
Ê
Ë
Ì
Í
Î
Ï
Ñ
Ò
Ó
Ô
Õ
Ö
Ø
Ù
Ú
O E diphthong
(DEC Multinat.)
A * or A
°
(degree sign)
A E
(in order)
/ u or / U
(in order)
O E
(in order)
Û
Ü
ß
à
á
â
ã
ä
å
æ
ç
è
é
ê
ë
ì
í
î
ï
ñ
ò
U ^
U "
or
¨ U
Y "
or
¨ Y
s s
a `
a '
a ^
a ~
a "
or
¨ a
e `
e '
e ^
e "
or
¨ e
i `
i '
i ^
i "
or
¨ i
n ~
o `
U circumflex
U umlaut
a grave
a acute
a circumflex
a tilde
a umlaut
a ring
a e diphthong
c cedilla
e grave
e acute
e circumflex
e umlaut
i grave
i acute
i circumflex
i umlaut
n tilde
o grave
Y umlaut
(DEC Multinat.)
German small
sharp s
a * or a
°
(degree sign)
a e
(in order)
c ,
(comma)
Page 61

Keyboard Configuration
Compose Character Sequences 45
COMPOSE CHARACTER SEQUENCES
ó
ô
õ
ö
ø
ù
ú
û
ü
ÿ
N
S
P
¬
o '
o ^
o ~
o "
or ¨ o
o /
u `
u '
u ^
u "
or ¨ u
y "
or ¨ y
space space
| |
or ! ^
o acute
o circumflex
o tilde
o umlaut
o slash
u grave
u acute
u circumflex
u umlaut
y umlaut
- ,
(in order)
o e
(in order)
- -
R O
- ^
or _ ^
- :
x x
' '
Y '
y '
- D
- d
macron
(Latin-1)
three quarters
(Latin-1)
" " or
" space
T H
(in order)
t h
(in order)
o e diphthong
(DEC Multinat.)
no break space
(Latin-1)
broken vertical
bar (Latin-1)
logical not
(Latin-1)
R
3
/
4
÷
´
¨
Y
´
D
´
y
division sign
(Latin-1)
multiplication
sign (Latin-1)
acute accent
(Latin-1)
dieresis (umlaut)
(Latin-1)
Y acute
(Latin-1)
y acute
(Latin-1)
capital Icelandic
thorn (Latin-1)
small Icelandic
thorn (Latin-1)
capital Icelandic
Eth (Latin-1)
small Icelandic
Eth (Latin-1)
soft (syllable)
hyphen (Latin-1)
registered trademark (Latin-1)
3 4
(in order)
Page 62

Keyboard Configuration
46 Compose Character Sequences
Page 63

47
HP Tee mTa lk Ter mi nal Emul at or 7. 0 U ser Manu al
CHAPTER 5 Mouse Functions
This chapter describes the functions assigned to the mouse buttons
by TeemTalk, and how to redefine them.
Default Mouse Functions
You can assign up to sixteen functions to each of the mouse buttons
when used in conjunction with modifier keys. The following functions are defined by default:
Left Button Click Double-Click
No Modifier: Select Move Cursor
Shift+: Extend Selection -
Control+: Paste -
Shift+Control+: Copy Paste -
Alt+: Select Rect -
Right Button Click Double-Click
No Modifier: Copy -
Shift+: - Select Word
Shift+Control+: - Select Line
Alt+: Send CR -
Middle Button Click Double-Click
No Modifier: Paste -
Page 64

Mouse Functions
48 Defining Mouse Functions
Defining Mouse Functions
You can redefine the functions assigned to the mouse buttons using
the
Mouse Action Settings dialog. This enables you to specify the
functions of the mouse buttons when single or double-clicked on
their own or in conjunction with modifier keys.
The
Mouse Action Settings dialog can be displayed using one of the
following methods:
Session Wizard: Click on the Mouse Actions... button in
Step 2.
TeemTalk Window: Select Mouse Actions... on the Tools menu.
You can assign up to sixteen functions to each button by selecting
from a list of standard functions described in the next section or
defining macros as described in the section “Defining a Macro” on
page 50.
Page 65

Mouse Functions
Defining Mouse Functions 49
Standard Mouse
Functions
Select
This will select all text from the start position (mouse button held
down) to the finish position (mouse button released), working left to
right across the entire width of the display
Extend Selection
Enables the current selection to be extended.
Copy
This will copy the current selection to the Clipboard.
Paste
This will paste the contents of the Clipboard at the current cursor
position.
Move Cursor
When the emulator is in any of the local block modes you can use
the mouse instead of the cursor keys to position the text cursor using
this function.
Select Rect
This will only select text contained within the rectangular area
defined by the start position (mouse button held down) which sets
the top left corner, and the finish position (mouse button released)
which sets the bottom right corner of the rectangular area.
Select Word
This will select the word under the mouse cursor.
Select Line
This will select the entire line under the mouse cursor
Copy Paste
Copies the current selection and sends it to the host.
Macro
Actions a user-defined macro. See “Defining a Macro” on page 50.
Page 66

Mouse Functions
50 Defining a Macro
Send CR
Sends a carriage return command.
Paste Rect
This will paste the contents of the Clipboard into the rectangular
area selected by the
Select Rect function.
Cursor Select
This does the same as Move Cursor, but when running the IBM 3270
or IBM 5250 emulation it also performs a cursor select.
Defining a Macro
You can assign a macro to a mouse button or button and modifier
key combination as follows:
1 In the Mouse Action Settings dialog select the Macro option
from the drop-down list for the button or button and modifier
key combination required. Click
OK to close the dialog.
2 Display the Key Macro Settings dialog.
Page 67

Mouse Functions
Defining a Macro 51
3 In the Virtual Keys box, scroll down to the bottom of the list and
you will see six virtual key names for the three mouse buttons
when clicked (VK_MSE_B#_CLK) or double-clicked
(VK_MSE_B#_DBL). Note that the middle mouse button is
number 4.
4 If you are defining a button and modifier key combination, hold
down the modifier key(s).
5 Double-click on the virtual key name of the button to be
programmed (then release the modifier key(s) if pressed).
The
Key to Program field will display the virtual key name(s) of
the button and modifier key(s) pressed.
6 Enter the macro definition in the Macro box, either by entering
your own definition as described in the appendix “Programming
Keys & Buttons” on page 287, or selecting standard key
functions in the
Emulation Keys and Virtual Keys list boxes.
(For more information about using the
Key Macro Settings dia-
log, refer to the section “Defining Key Functions” on page 38.)
7 Click OK when you have finished.
Page 68

Mouse Functions
52 Defining a Macro
Page 69

53
HP Tee mTa lk Ter mi nal Emul at or 7. 0 U ser Manu al
CHAPTER 6 Soft Buttons
This chapter describes how to use the soft buttons.
Introduction
A set of soft buttons are provided which can be programmed to
perform a wide variety of functions when clicked. By default they
are displayed at the bottom of the TeemTalk window.
There are four soft button levels. Each level consists of twelve buttons providing a combined total of 48 programmable buttons. You
can display all four levels at the same time if required. All levels
are accessible even if not all are displayed, levels stored off-screen
can be 'scrolled' into view by clicking the
Level # button.
The button below the
Level # button on each level cannot be pro-
grammed, but it has two uses. It can be used to scroll through the
available levels in reverse order, and you can specify text to be displayed on it as a label describing the buttons on that level.
You can detach the soft buttons so that they are displayed in a separate window either by clicking the
Restore Down button above the
top-right soft button, or by unchecking the
Attached to the window
option in the
Soft Button Settings dialog.
Page 70

Soft Buttons
54 Defining Soft Button Functions
To re-attach the soft buttons to the TeemTalk window, either double-click on the title bar of the
Soft Buttons window, or select the
Attached to the window option in the Soft Button Settings dialog.
You can remove the soft buttons from the display either by selecting
Windows > Soft Buttons from the View menu so that it is
unchecked, or in the
Soft Button Settings dialog by setting the
Visible Levels option to 0.
To re-display the soft buttons, either select
Windows > Soft Buttons
from the
View menu so that it is checked, or in the Soft Button
Settings
dialog, set the Visible Levels option to any number other
than 0.
Defining Soft Button Functions
Soft button functions are defined using the Soft Button Settings
dialog which can be displayed using one of the following methods:
Session Wizard: Click on the Soft Buttons... button in Step 2.
TeemTalk Window: Select Soft Buttons... on the Tools menu.
Page 71

Soft Buttons
Defining Soft Button Functions 55
The top right panel is used to display information about soft buttons
that have been programmed and enables you to select them in order
to edit or delete. The
Title column displays the text that will appear
on the soft button. An asterisk in the
Lcl column indicates that the
function will be actioned locally. The
Macro column displays the
function definition.
The
Emulation Keys list box enables you to select from a list of
standard key functions specific to the currently selected terminal
emulation. The information in brackets in the right column indicates
the default mapping of the key function by TeemTalk. For example:
WY_INSLINE (S+C+VK_INSERT)
indicates that the Wyse emulation Insert Line function is mapped to
the key combination Shift + Control + Insert on a standard
Enhanced AT keyboard.
The
Virtual Keys list box enables you to select from a list of standard
key functions available for all terminal emulations.
Page 72

Soft Buttons
56 Defining Soft Button Functions
The procedure for defining a soft button is as follows:
1 In the top-right panel, select the button number (B1 - B12) on the
required level (
Lvl1 - Lvl4).
Note that selecting one of the
Lvl# button levels will enable you
to specify a title for that group of buttons. The title will be
displayed on the button immediately below the
Level # button,
but you cannot program this button.
2 In the Title box enter the text to be displayed on the button (up to
twenty characters).
3 In the Macro box enter the function definition for the button.
The definition can contain key functions and control characters
to be actioned as well as normal text. Refer to the appendix
“Programming Keys & Buttons” on page 287 for details.
Double-clicking on an
Emulation Key or Virtual Key will apply
that key function to the button definition.
4 Test the function definition by clicking the Play Macro button.
5 If you want the function to be performed locally only, check the
Local box.
6 Specify how many soft button levels you want to be displayed at
any one time using the
Visible Levels selection list. You can
display up to four levels at a time with each level containing
twelve programmable soft buttons. Selecting
0 will remove the
soft buttons from the display.
7 If you want the soft buttons displayed in a separate window,
uncheck the
Attached to the window option.
8 When you have finished defining soft button functions, click
OK.
9 To save the soft button settings, select File > Save Session.
Page 73

57
HP Tee mTa lk Ter mi nal Emul at or 7. 0 U ser Manu al
CHAPTER 7 Display Attributes
This chapter describes how to change the colours used in the emulation workspace and specify how text with attributes is displayed.
Introduction
TeemTalk provides a variety of options for you to customise how
the display appears in the emulation workspace. You can change
the colour of the screen background and the foreground text. You
can assign different colours to text with specific attributes or
attribute combinations, and you can change the default text
attributes.
Text with attributes can be displayed in various ways. For example,
characters with the underline attribute can be displayed as standard
(e.g. underlined only), as a particular colour only (e.g. green without the underline), or with both attribute and a specific colour (e.g.
underlined and green).
This chapter describes how to use the
Attributes dialog to specify
the display settings you prefer.
Page 74

Display Attributes
58 The Attributes Dialog
The Attributes Dialog
The Attributes dialog can be displayed using one of the following
methods:
Session Wizard: Click on the Attributes... button in Step 2.
TeemTalk Window: Select Attributes... on the Tools menu.
The
Screen Element list box enables you to select the display
element you want to modify. This includes each character attribute
(such as bold or underline) and attribute combination (such as
bold+underline).
The
Foreground and Background colour palettes enable you to
specify the colours for the selected
Screen Element. You can select
different colours for the palettes by clicking the
Set Colour button.
The
Active Attribute options allow you to enable or disable the
attributes assigned to text by default. For example, if you want
Page 75

Display Attributes
The Attributes Dialog 59
characters normally displayed with the underline attribute to be
displayed without the underline, select the
Underline (UL) option in
the
Screen Element list box then uncheck the Underline (UL) option
under
Active Attribute.
The
Sample Text box is used to show how the attribute settings
currently applied to the selected screen element will appear on the
display.
The
Preferences list box enables you to select additional display
options, some of which are terminal emulation specific. For
example, the
AutoColour Mode option is only applicable to DEC VT
terminal emulations and when selected will cause displayed
characters to be colour coded according to type (numeric,
alphabetic, etc.).
Changing the
Screen Background
Colour
To change the colour of the screen background:
1 Select Screen Background in the Screen Element list box. The
Sample Text box will show the current colour assigned.
2 Click on the desired colour in either the Foreground or Back-
ground colour palettes. The Sample Text box will show the new
colour selection.
Changing Text
Foreground and
Background
Colours
To change text foreground and background colours:
1 In the Screen Element list box, select Normal Text or one of the
character with attributes(s) options such as
Underline (UL) or
IN+UL for inverse+underline (see note below). The Sample Text
box will show the current colours assigned.
2 Click on the desired colour for the text character in the Fore-
ground
colour palette, and click on the desired colour for the
character cell background in the
Background colour palette. The
Sample Text box will show the new colour selection.
Note: Each character attribute and attribute combination has its
own colour foreground and background setting. The
Normal Text
option will only affect text with no attributes.
Page 76

Display Attributes
60 Preferences
Disabling an
Attribute
To disable an attribute assigned to text (e.g. turning off the blinking
attribute):
1 In the Screen Element list box, select the text attribute or
attribute combination containing the attribute you want to
disable.
2 In the Active Attribute list, uncheck the box next to the attribute
you want to disable.
Preferences
The Preferences options in the Attributes dialog enable you to
select additional display options, some of which are terminal
emulation specific.
Attribute implies a colour
Factory default: Unchecked
This option allows you to enable or disable the colour associated
with an attribute.
Inverse Colours
Factory default: Unchecked
When this option is checked, characters with the inverse attribute
will have the text (foreground) colour swapped with that of the text
cell (background).
Swap Black/White
Factory default: Unchecked
When checked, anything that has the white attribute will be
displayed as black, and vice versa.
Page 77

Display Attributes
Preferences 61
Autocolour Mode
Factory default: Unchecked
This option is only applicable to the DEC VT terminal emulations.
When checked, displayed characters are colour coded according to
type. For example, all numeric characters are displayed in one
colour while all alphabetic characters are displayed in another.
Unchecking this option will cause characters to be displayed using
the settings in this dialog.
Ansi Colours Disabled
Factory default: Unchecked
Selecting this option will cause ANSI colour commands to be
ignored.
Colours Clear with Attributes
Factory default: Checked
The setting of this option determines whether the foreground and
background colours are cleared to the default colours when an ANSI
clear attributes command is received.
Start Fields use Normal BG
Factory default: Unchecked
This option only applies to the IBM 3270 emulation. If attribute
indicators take up character positions on the screen, you can force
those positions to display the normal background colour instead of
the attributes by selecting this option.
Use Italic with Intensity
Factory default: Unchecked
Selecting this option will cause any characters that have the intensity
(bold) attribute to be italicized.
Page 78

Display Attributes
62 Preferences
Use Font with Intensity
Factory default: Unchecked
Selecting this option will cause all characters to be displayed using a
bold font.
Blink Underline
Factory default: Unchecked
Selecting this option will cause characters with the underline
attribute to blink.
Blink Column Separators
Factory default: Unchecked
Selecting this option will cause column separators to blink.
Blink Foreground/Background
Factory default: Unchecked
Selecting this option will cause the foreground and background
colours to alternate.
Page 79

63
HP Tee mTa lk Ter mi nal Emul at or 7. 0 U ser Manu al
CHAPTER 8 Editing Options
This chapter describes how to use the editing options provided on
the
Edit
menu.
The Edit Menu
The Edit menu provides a range of editing options.
Clipboard Options
This displays the Clipboard Options dialog that enables you to
specify how data is copied. The options in this dialog are described
in the section “Clipboard Options” on page 65.
Clear Buffer
This will erase the contents of the window and the scroll buffer.
Copy
The Copy command becomes available when data has been
selected. It will cause the currently selected text to be copied to the
Clipboard in the format specified in the
Clipboard Options dialog.
The data can then be inserted in a different location using the
Paste
Page 80

Editing Options
64 The Edit Menu
command. The next block of data that is copied will delete the previous block on the Clipboard.
Paste
This will cause data that has been copied to the Clipboard to be
pasted at the current cursor position. The same block of data may be
pasted repeatedly as the Clipboard stores it until the
Copy command
is used again.
Paste Rect
This will paste the contents of the Clipboard into the rectangular
area selected by the
Select Rect function.
By default the
Select Rect function is actioned by holding down the
Alt key and pressing the left mouse button. It will only select text
contained within the rectangular area defined by the start position
(mouse button held down) which sets the top left corner, and the
finish position (mouse button released) which sets the bottom right
corner of the rectangular area. Refer to the chapter “Mouse
Functions” on page 47 for more details.
Select All
This will select the contents of the window (not the entire buffer).
Page 81

Editing Options
Clipboard Options 65
Clipboard Options
The Clipboard Options dialog is displayed by selecting Clipboard
Options...
on the Edit menu.
Format
Factory default: Text
This setting determines the format in which data is copied.
Selecting
Text will enable a standard copy of selected text.
Selecting
Bitmap will enable graphics to be copied in device
independent bitmap format.
Parse On
Factory default: None
This option enables you to specify that copied text is tab delimited
either at the end of each word or at the end of each field. This is useful when you want to paste data into cells.
Field Element
Factory default: Both
This option enables you to specify that only text in protected fields is
copied, only text in unprotected fields, or both.
Page 82

Editing Options
66 Clipboard Options
Page 83

67
HP Tee mTa lk Ter mi nal Emul at or 7. 0 U ser Manu al
CHAPTER 9 Printing
This chapter describes the printing options supported by
TeemTalk.
Print Screen
Selecting Print Screen... in the File menu will display the standard
Print dialog enabling you to specify printer settings. Clicking the
Print button will print the current screen.
Page 84

Printing
68 Emulation Printer Settings
Emulation Printer Settings
The Emulation Printer Settings dialog is displayed by selecting
Emulation Printer... in the Tools menu.
Status
This tab indicate the current status of the printer and allows you to
perform a print screen, close the printer and abort print.
Page 85

Printing
Emulation Printer Settings 69
Settings
Printer Method
Factory default: Print to System Printer
The following printer methods are available:
Print to File Send print data to a file. Refer to the
section “Advanced - File” on page 77 for
setup options.
Print to System Printer Send print data to the printer connected to
your system. Refer to the section
“Advanced - System Printer” on page 71
for setup options.
Print to Serial Device Send print data to a serial device. Refer to
the section “Advanced - Serial Device” on
page 72 for setup options.
Print to LPR Send print data to a network printer. Refer
to the section “Advanced - LPR” on
page 75 for setup options.
Throw page on close
Factory default: Unchecked
When this option is checked a form will be issued when closing the
printer. This is required for most page printers.
Page 86

Printing
70 Emulation Printer Settings
Close delay
Factory default: 0
Specifies the time (in tenths of a second) to wait before closing. Note
that the printer will not be closed if a new open is requested before
time out. The application will be blocked during a close if the buffers require flushing. Specifying a large value can avoid blocking.
Output Character Set
Factory default: Iso Latin-1
This determines the character translation used by the printer.
PC Ansi Codepage
Factory default: PC Multinational (437)
This determines the Codepage value when the
Output Character Set
is set to PC Ansi.
Page 87

Printing
Emulation Printer Settings 71
Advanced - System
Printer
These options are available when the Printer Method option on the
Settings tab is set to Print to System Printer.
Setup System Printer
Clicking this button will display the standard Print dialog for specifying printer settings.
Process CR/LF/FF
Factory default: Unchecked
When checked, a Carriage Return or Line Feed command will output a new line, and a Form Feed command will output a new page.
Page 88
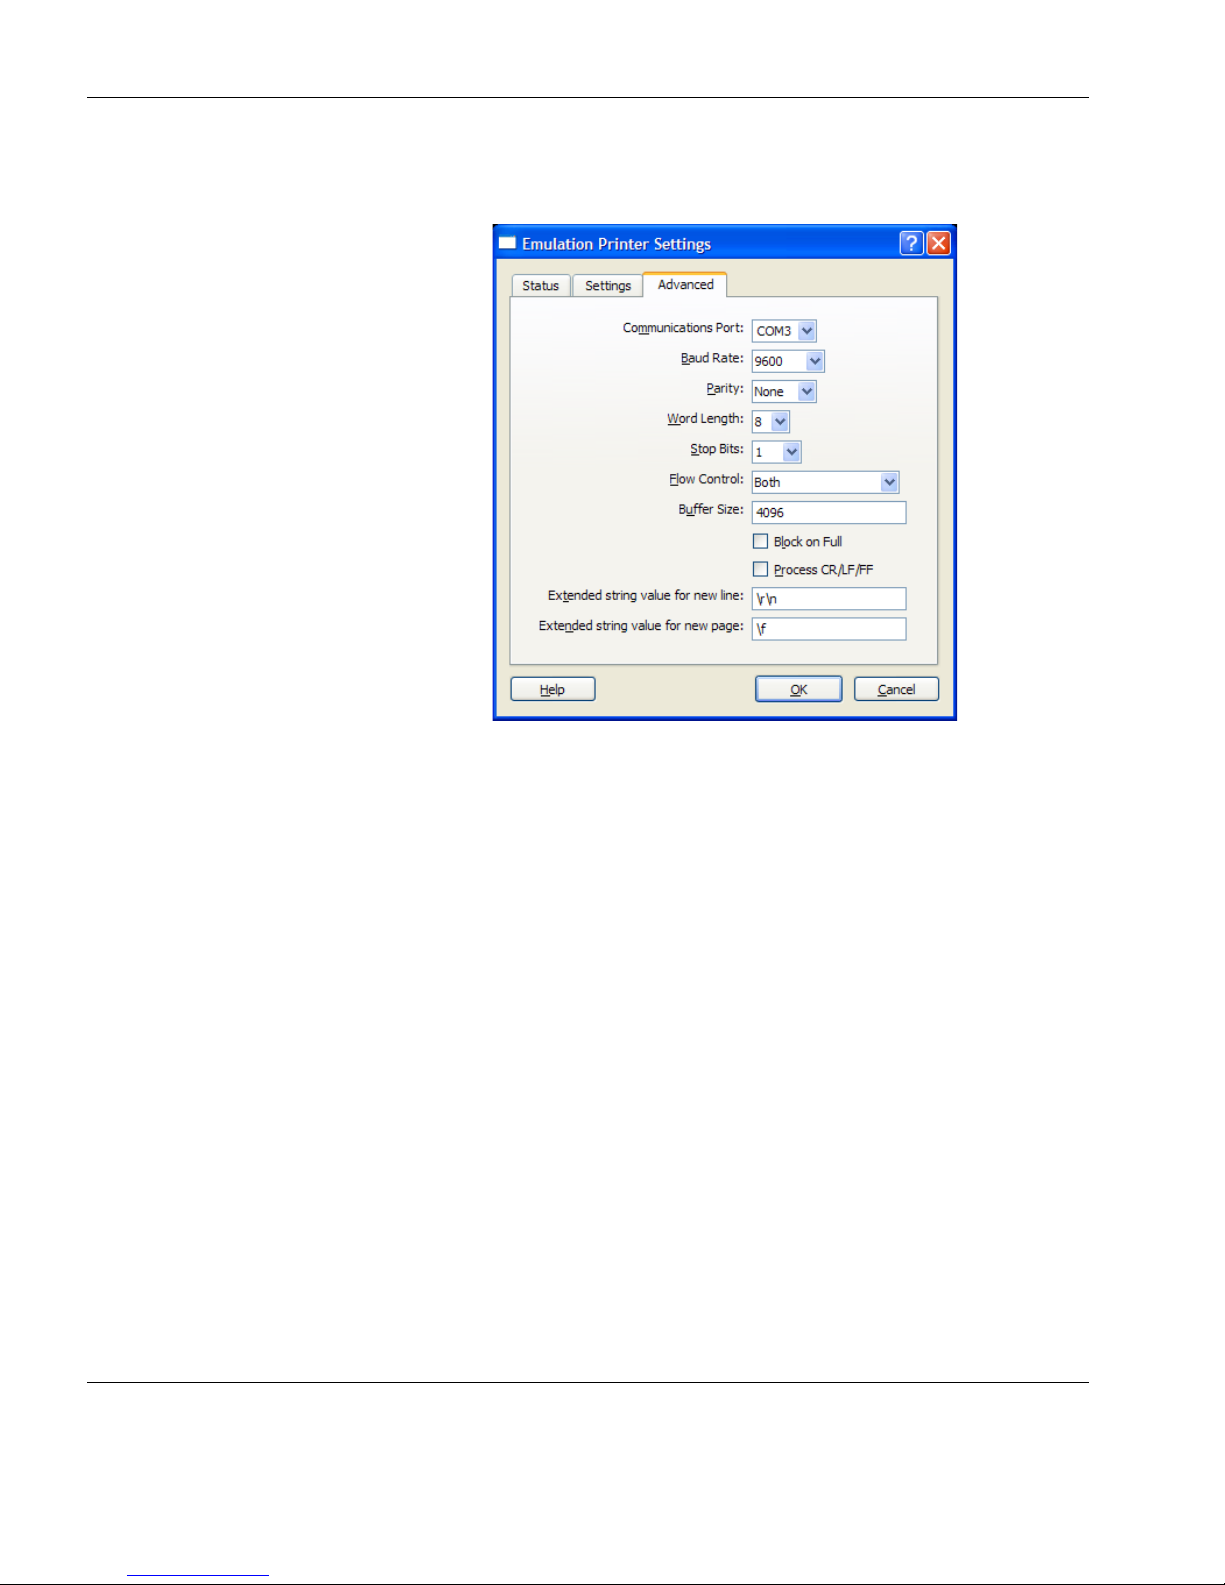
Printing
72 Emulation Printer Settings
Advanced - Serial
Device
These options are available when the Printer Method option on the
Settings tab is set to Print to Serial Device.
Communications Port
Factory default: COM3
Specifies the COM port to use for printer communication.
Baud Rate
Factory default: 9600
Specifies the connection speed in the range 110 to 115200 baud.
Parity
Factory default: None
This option specifies the parity mode for each transmitted character.
If the number of data bits specified by
Word Length is 8, set this
option to
None.
Page 89

Printing
Emulation Printer Settings 73
Selecting
Odd will cause an eighth bit to be added with a value of 1
if the previous 7 bits add up to an even number, and 0 if the previous
7 bits add up to an odd number. Selecting
Even will cause an eighth
bit to be added with a value of 1 if the previous 7 bits add up to an
odd number, and 0 if the previous 7 bits add up to an even number.
Mark parity will set every eighth bit to 1 and Space parity every bit
to 0.
Word Length
Factory default: 8
This option specifies the number of data bits sent for each transmitted character.
Stop Bits
Factory default: 1
This specifies the number of stop bits sent for each transmitted
character.
Flow Control
Factory default: Both
This option specifies the type of flow control used by the line port to
communicate readiness to transmit or receive data from the host.
None No flow control.
Input XON/XOFF on received data.
Output XON/XOFF on transmitted data.
Both XON/XOFF on transmitted & received data.
Hardware RTS/CTS hardware flow control.
Buffer Size
Factory default: 4096
This specifies the size of the buffer used for temporary storage of
input and output data.
Page 90

Printing
74 Emulation Printer Settings
Block on Full
Factory default: Unchecked
This determines what happens when the buffer becomes full.
Checking this option will cause TeemTalk to block all actions until
the buffer is ready to receive new data.
Process CR/LF/FF
Factory default: Unchecked
When checked, a Carriage Return or Line Feed command will output a new line, and a Form Feed command will output a new page.
Extended string value for new line
Factory default: \r\n
You can specify an extended string value for a new line using any of
the following entries:
\a, \b, \f, \n, \r, \t, \v, or \(decimal), \(0octal), \(0xHexadecimal).
Extended string value for new page
Factory default: \f
You can specify an extended string value for a new page using any
of the following entries:
\a, \b, \f, \n, \r, \t, \v, or \(decimal), \(0octal), \(0xHexadecimal).
Page 91

Printing
Emulation Printer Settings 75
Advanced - LPR
These options are available when the Printer Method option on the
Settings tab is set to Print to LPR.
LPR Name
Factory default: Unspecified
Enter the name of the LPR/LPD driver to print to here.
Extended string value LPR for Header
Factory default: Unspecified
You can specify an extended string value to be sent to initialise LPR
using any of the following entries:
\a, \b, \f, \n, \r, \t, \v, or \(decimal), \(0octal), \(0xHexadecimal).
Extended string value LPR for Trailer
Factory default: Unspecified
You can specify an extended string value to be sent to trail LPR
using any of the following entries:
\a, \b, \f, \n, \r, \t, \v, or \(decimal), \(0octal), \(0xHexadecimal).
Page 92

Printing
76 Emulation Printer Settings
Process CR/LF/FF
Factory default: Unchecked
When checked, a Carriage Return or Line Feed command will output a new line, and a Form Feed command will output a new page.
Extended string value for new line
Factory default: \r\n
You can specify an extended string value for a new line using any of
the following entries:
\a, \b, \f, \n, \r, \t, \v, or \(decimal), \(0octal), \(0xHexadecimal).
Extended string value for new page
Factory default: \f
You can specify an extended string value for a new page using any
of the following entries:
\a, \b, \f, \n, \r, \t, \v, or \(decimal), \(0octal), \(0xHexadecimal).
Page 93

Printing
Emulation Printer Settings 77
Advanced - File
These options are available when the Printer Method option on the
Settings tab is set to Print to File.
File Name
Factory default: Unspecified
Enter the name of the file to which print data is to be sent here.
Mode
Factory default: Write (destroy existing)
This determines the mode in which the file is opened.
Selecting
Write will cause the contents of an existing file to be
replaced with new print data.
Selecting
Append will add print data to existing file contents.
Selecting
User Defined enables you to define the mode using the
User Defined Mode option.
User Defined Mode
Factory default: wb+
When
Mode is set to User Defined, this enables you to specify the
mode in which the file is opened.
Page 94

Printing
78 Emulation Printer Settings
Process CR/LF/FF
Factory default: Unchecked
When checked, a Carriage Return or Line Feed command will output a new line, and a Form Feed command will output a new page.
Extended string value for new line
Factory default: \r\n
You can specify an extended string value for a new line using any of
the following entries:
\a, \b, \f, \n, \r, \t, \v, or \(decimal), \(0octal), \(0xHexadecimal).
Extended string value for new page
Factory default: \f
You can specify an extended string value for a new page using any
of the following entries:
\a, \b, \f, \n, \r, \t, \v, or \(decimal), \(0octal), \(0xHexadecimal).
Page 95

79
HP Tee mTa lk Ter mi nal Emul at or 7. 0 U ser Manu al
CHAPTER 10 VT Series Emulations
This chapter describes features of the VT suite of terminal
emulations.
Introduction
The VT Series suite of terminal emulations consists of the following emulations which can be selected using the
Emulation mode
option in the
VT Series Settings dialog:
AIXTerm Provides compatibility with software designed to
drive an X terminal using X Windows.
Ansi BBS This emulation is a derivative of the ANSI device
driver ANSI.SYS supplied with all DOS based
PCs and which provides the screen management
for the DOS console screen. PC based UNIX systems and Bulletin Board Systems (BBS) often rely
on the ANSI emulation when being accessed by a
PC. In ANSI BBS mode the screen size is adjusted
to 25 lines and the preferred character set is set to
ANSI.
AT 386 Provides compatibility with software designed to
drive the AT&T AT 386 terminal.
ATT4410 Provides compatibility with software designed to
drive the AT&T Dataspeed 4410 terminal. Refer
to the section “AT&T 4410 Emulation” on
page 88 for details.
Page 96

VT Series Emulations
80 Introduction
Sco Console This is an emulation of the SCO UNIX box.
VT PCTerm Provides compatibility with software designed for
the PC Term mode supported by DEC.
VT52 and VT100
These emulations enable you to run applications
written for the DEC VT52 and VT100 terminals,
respectively.
VT100+ This emulation is an enhanced version of the VT100
emulation that provides additional functionality
such as colours. It is the same as the VT-UTF8 emulation except that it only supports ASCII characters
0-127 (decimal).
VT+HP220 This emulation is based on the VT500 terminal
series and includes the HP function keys F1 - F8
(not user programmable). The terminal ID is set to
VT220.
VT510 7-Bit and VT510 8-Bit
These emulations enable you to run applications
written for the DEC VT320 terminal, the difference
is in their treatment of 8-bit control codes. When
VT510 7-Bit is selected, all 8-bit codes are con-
verted to their 7-bit equivalents, whereas
VT510 8-
Bit
leaves 8-bit codes unchanged. If you are using
VT200 applications, select
VT510 7-Bit.
VT-UTF8 This emulation is an enhanced version of the VT100
emulation that supports non-English and drawing
characters. It supports localization of the single-byte
and double-byte character sets and all other languages supported by Windows. Additional functionality, such as colours, is also provided.
Page 97

VT Series Emulations
Creating a VT Series Emulation Session 81
Creating a VT Series Emulation Session
You can create a session either using the TeemTalk Session Wizard
or while TeemTalk is running.
Using the TeemTalk
Session Wizard
This section describes how to use the TeemTalk Session Wizard to
create an VT Series emulation session.
1 To run the TeemTalk Session Wizard from the Start menu,
select
All Programs > HP > HP TeemTalk Terminal Emulator >
Session Wizard.
2 In the Session Name field, enter a unique name that will identify
this session configuration for future selection.
3 Select the Transport method then click the Configure button to
specify settings.
4 Select the Connection type then click the Configure button to
specify settings.
5 Select VT Series in the Emulation list box then click the Config-
ure
button to specify settings. (The options are described in the
section “Setup Options” on page 90.)
6 Click Next to display the Advanced Options dialog.
7 Click Next to display the Finalization dialog.
8 If you want a shortcut icon for this session to be created on the
desktop, check the box labelled
Create icon on desktop for
session
.
9 Click OK to create the session and exit.
10 To run the session, either double-click on the desktop icon if one
was created for the session, or run TeemTalk, display the
File
menu and select
Open Session. Select the name of the required
.tts session file then click
Open.
Page 98

VT Series Emulations
82 Creating a VT Series Emulation Session
Using the TeemTalk
Emulator Window
This section describes the procedure for creating a VT Series emulation session from the TeemTalk emulator window.
1 Display the Session menu from the menu bar and select
Transport... to set the transport method.
2 Display the Session menu and select Connection... to set the
connection method.
3 Display the Session menu and select Emulation.... Set the
emulation to
VT Series.
4 You can configure the transport, connection and emulation set-
tings by selecting the relevant
Configure options in the Session
menu. The options displayed by selecting
Configure emulation
are described in the section “Setup Options” on page 90.
5 To save the session, display the File menu and select Save ses-
sion as. In the File Name field, enter a unique name that will
identify this session configuration for future selection, then click
Save. Note that session files have the filename extension .tts.
6 To run the session, display the File menu and select Open Ses-
sion. Select the name of the .tts session file then click Open.
Page 99

VT Series Emulations
Keyboard Mapping 83
Keyboard Mapping
The keyboard is mapped as close as possible to the terminal being
emulated. The mapping of key functions can be determined by referring to the
Emulation Keys list box in the Key Macro Settings dialog,
which is displayed by selecting
Key Macros... on the Tools menu.
The information in brackets in the right column indicates the default
mapping of the key function named in the left column. In the list, S+
indicates the Shift key, C+ indicates the Control key and A+ indicates the Alt key.
For example:
VT_F20 (A+VK_F10)
indicates that the F20 function is mapped to the key combination Alt
+ F10.
The keyboard has operating two modes, Normal or DEC. You can
toggle between the two modes by pressing the keys Alt + Num
Lock together. The 9th item on the status bar will display DEC
when the keyboard is in DEC mode.
Special key functions usually found on a DEC VT keyboard can be
mapped to any key on your keyboard using the VT virtual key
names listed in the
Key Macro Settings dialog.
The illustrations on the following pages show where DEC VT510
keyboard functions are mapped to keys on a 101/102 key keyboard.
Page 100

VT Series Emulations
84 Keyboard Mapping
101/102 Key Keyboard Layout
Normal Mode
All unmarked keys function as indicated by the legends on the keycaps.
Functions in round brackets are generated when used in conjunction with Control.
Functions in square brackets are generated in application keypad mode.
Alt key usage:
Normal key usage:
,
BREAK
INSERT
HERE
SELECT
F14
F13
PF3
DEC
NUMLK
REMV
[
]
+
,
FIND
PREV
SCREEN
NEXT
SCREEN
Alt + Num Lock toggles between
Normal & DEC mode.
F13
PF3
F12
PF2
F14
PF4
F11
PF1
F17
F7
DO
F6
F18
F8
HELP
F11
F20
F10 F12
F19
F9
DELETE
BACKSPACE
(SCRL) (SCRL) (SCRL)
(SCRL)
/
*
-
 Loading...