

Page 1

Administrator's Guide
Linux-based HP Compaq t5725 Thin Clients
Page 2

© Copyright 2007 Hewlett-Packard
Development Company, L.P. The information
contained herein is subject to change without
notice.
Microsoft and Windows are trademarks of
Microsoft Corporation in the U.S. and other
countries.
The only warranties for HP products and
services are set forth in the express warranty
statements accompanying such products and
services. Nothing herein should be construed
as constituting an additional warranty. HP
shall not be liable for technical or editorial
errors or omissions contained herein.
This document contains proprietary
information that is protected by copyright. No
part of this document may be photocopied,
reproduced, or translated to another
language without the prior written consent of
Hewlett-Packard Company.
Administrator's Guide
Business PCs
Second Edition (February 2007)
Document Part Number: 439122–002
Page 3

About This Book
WARNING! Text set off in this manner indicates that failure to follow directions could result in
bodily harm or loss of life.
CAUTION: Text set off in this manner indicates that failure to follow directions could result in
damage to equipment or loss of information.
NOTE: Text set off in this manner provides important supplemental information.
ENWW iii
Page 4

iv About This Book ENWW
Page 5

Table of contents
1 Introduction
Thin client image ...................................................................................................................... 1
Desktop options ....................................................................................................................... 2
Taskbar .................................................................................................................................. 4
Desktop themes ........................................................................................................................ 4
Synaptic ................................................................................................................................. 5
TeemTalk ................................................................................................................................ 8
Connection types ..................................................................................................................... 8
System information ................................................................................................................... 9
Image location ......................................................................................................................... 9
2 Control Panel Settings
Date/Time ............................................................................................................................. 12
Enabling Network Time Protocol ............................................................................... 12
Configuring the system hardware clock from BIOS ...................................................... 13
Display ................................................................................................................................. 14
Screen saver ........................................................................................................... 14
Keyboard .............................................................................................................................. 15
Mouse .................................................................................................................................. 15
Network Manager ................................................................................................................. 16
Interfaces ............................................................................................................... 16
General ................................................................................................................. 17
DNS ...................................................................................................................... 18
Printers ................................................................................................................................. 19
Parallel printer ........................................................................................................ 19
USB printer ............................................................................................................. 21
Network printer ...................................................................................................... 22
Samba printer ......................................................................................................... 24
Print jobs ................................................................................................................ 26
Sound — ALSA Mixer ............................................................................................................. 26
User Manager ....................................................................................................................... 27
Managing a user account ........................................................................................ 27
Add a user .............................................................................................. 27
Modify a user account .............................................................................. 28
Delete a user ........................................................................................... 30
Automatic logon ..................................................................................................... 30
Managing a group .................................................................................................. 31
Adding a group ....................................................................................... 32
Modifying a group ................................................................................... 33
ENWW v
Page 6

Deleting a group ...................................................................................... 33
Thin State .............................................................................................................................. 34
Thin State Capture ................................................................................................... 34
Thin State Deploy .................................................................................................... 35
FTP Update ........................................................................................................................... 36
3 HP Connection Administrator
HP Connection Administrator window ....................................................................................... 37
Adding, editing, and deleting connections ................................................................. 38
Connection types .................................................................................................... 39
Citrix ICA ................................................................................................ 40
Firefox connection .................................................................................... 44
rdesktop connection ................................................................................. 44
XDM connection ...................................................................................... 50
Other ...................................................................................................... 51
Advanced Configuration utility .................................................................................. 51
Configuring available connections ............................................................. 52
Configuring user connections ..................................................................... 52
Assigning connections to users .................................................... 53
Configuring connections as primary, secondary, or to auto
connect .................................................................................... 54
GLOBAL UI (User Interface) in KIOSK Mode ................................................ 56
Setting Citrix global settings ...................................................................... 56
Server Location ......................................................................... 56
Preferences ............................................................................... 57
Hotkeys .................................................................................... 57
Drive Mapping ......................................................................... 58
COM ports ............................................................................... 58
4 Citrix
Introduction ........................................................................................................................... 61
Citrix (ICA) ............................................................................................................................ 61
ICA Client Settings .................................................................................................. 61
Preferences .............................................................................................. 62
Connection View ...................................................................................... 62
Program Neighborhood Agent (PNAgent) ................................................... 62
5 Support
Hardware warranty ................................................................................................................ 63
Software warranty .................................................................................................................. 63
Image updates and add-ons .................................................................................................... 63
Custom image requests ........................................................................................................... 63
Availability of Linux open source code ...................................................................................... 64
6 Frequently Asked Questions
Linux operating system ............................................................................................................ 65
System Administration ............................................................................................................. 65
System Management .............................................................................................................. 65
General ................................................................................................................................ 66
vi ENWW
Page 7

Auto-logon/Auto-launch .......................................................................................................... 68
Manageability ....................................................................................................................... 71
7 Troubleshooting
Altiris .................................................................................................................................... 75
HP Connection Administrator ................................................................................................... 75
Citrix ICA .............................................................................................................................. 75
rdesktop ................................................................................................................................ 76
Firefox .................................................................................................................................. 76
XDM ..................................................................................................................................... 77
Kiosk .................................................................................................................................... 77
Printing ................................................................................................................................. 77
ELO Touch Monitor ................................................................................................................ 78
USB ...................................................................................................................................... 78
Network ............................................................................................................................... 78
Keyboard .............................................................................................................................. 79
Multimedia ............................................................................................................................ 79
Miscellaneous ........................................................................................................................ 79
8 Useful information
Index ................................................................................................................................. 83
ENWW vii
Page 8

viii ENWW
Page 9

1
Introduction
CAUTION: Thin clients are designed for remote data storage and excessive writes to flash may
damage the flash memory.
This guide provides the network administrator with instructions for configuration of the Linux-based thin
client and explains the various configuration utilities.
NOTE: Not all features described in this guide are available in all Linux-based terminal models.
Typically, to configure multiple terminals, you can configure a terminal locally and then use it as a template
for other terminals, which you can then configure using remote administration tools.
NOTE: A default administrator account is pre-installed with the following settings: User name
and Password = root. This default account is also the Administrator “rights” account for Linux.
Therefore, HP recommends that you change the password as soon as possible. Additionally, the
HP t5725 ships with a basic user account with the user name and password = user.
Thin client image
HP's t5725 Linux thin client offers an extensible Linux image built upon Debian. HP has extensive Debian
experience and selected Debian as the foundation for its thin client based on its stability, security, and
market acceptance. Debian comes standard with the Aptitude package management system that ties into
the Debian and HP repositories. Aptitude is a command-line and/or text-based GUI program for
connecting to and managing Debian packages locally and in a repository. Debian package is the generic
term for all software, drivers, features, etc., that are “wrapped” in code that allows the software to be
easier and more logical to automatically install into proper directories and check for any other
dependences that are required to ensure they work properly once installed. Once created, packages
reside in various repositories that are maintained by the Open Source Community for open source
packages. HP hosts a unique repository for updates and features specifically for the HP t5725.
Additionally, the t5725 image comes with Synaptic, a graphical user interface-based package
management tool, allows you to easily add and remove Debian package software and driver packages.
Synaptic and Aptitude must be run as root and can not be run at the same time. HP hosts a repository
specifically for HP t5725 options, add-on, and package updates, such as new ICA and rdesktop updates.
This image also comes with FTP update for installing new packages and settings files using an FTP server
and ThinState capture. For more information about ThinState, see
Thin State on page 34
You can use the Altiris client to provide remote management of the thin client and to upgrade the Linux
image with feature enhancements, device drivers, and maintenance updates.
ENWW Thin client image 1
Page 10

Desktop options
The following sections describe the Linux thin client desktops.
The Linux desktop has a Windows-like look and feel. The desktop includes icons and a Start menu.
By default, the following icons appear on the Desktop for the root (administrator) user:
●
Home — Allows you to see a graphical representation of the files and folder on the system and allow
for browsing of the various folders.
●
Firefox — Allows you to launch an Internet Web browser.
●
Connections — Allows you to launch HP Connection Administrator for using and managing various
types of connections. You can also launch Connection Administrator by clicking Start > Programs
> Apps > Net. For more information about configuring connections, see
HP Connection
Administrator on page 37.
●
TeemTalk — Allows you to launch a terminal emulator session. For more information, see
TeemTalk on page 8.
●
Settings — Allows you to configure settings for the unit. Non-root users can access a reduced number
of settings. You can also launch Settings Manager by clicking Start > Programs > Apps >
System > Admin.
●
Synaptic — Only displayed for the root user, this icon launches the package management system.
For more information, see
Synaptic on page 5.
Middle-click (or press the scroll wheel) on the desktop to show all running programs and the workspaces
in which the programs are running.
You can select an image to use as the desktop’s backdrop.
NOTE: You can change the background image to any .jpg or .png image.
To change the background image:
1.
Right-click on the desktop.
2Chapter 1 Introduction ENWW
Page 11
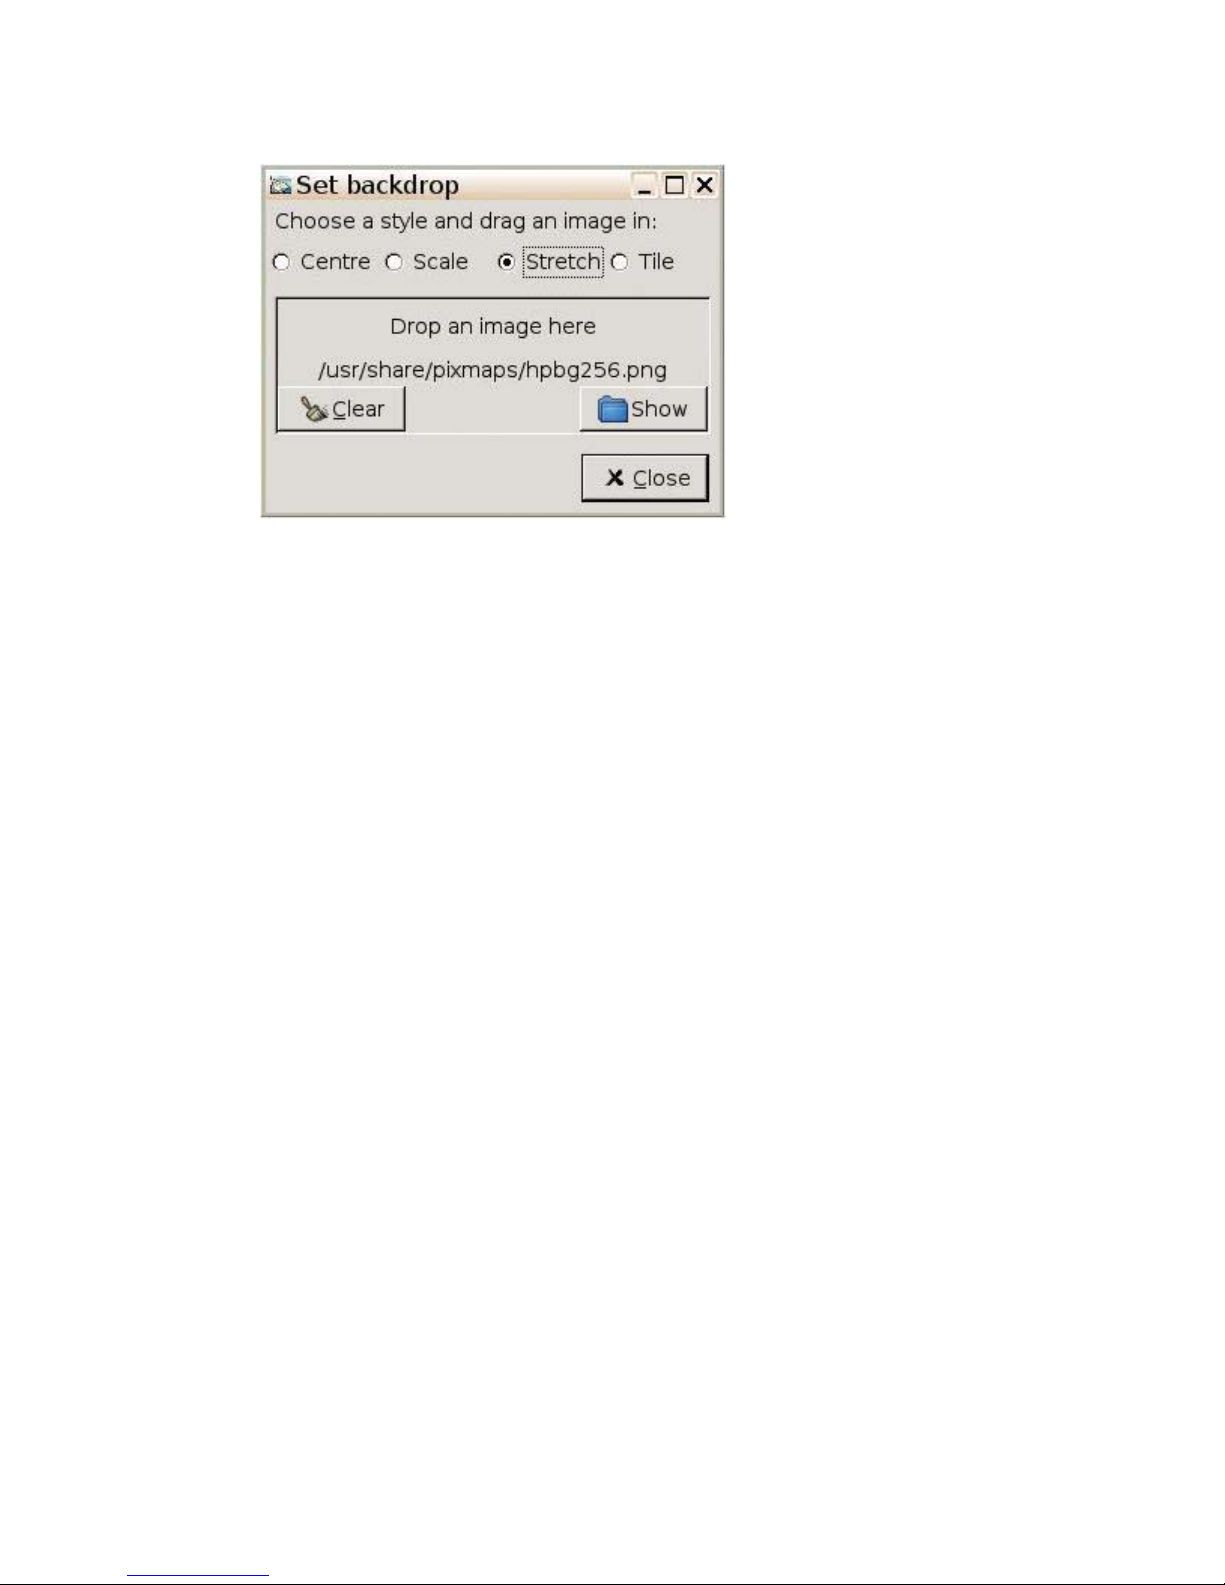
2. Select Backdrop. The Set backdrop window displays.
3. Click Show. The /usr/share/pixmaps/window displays.
4.
Navigate to and select a .jpg or .png file
5. Click and drag the graphic file to the Set Backdrop window.
ENWW Desktop options 3
Page 12
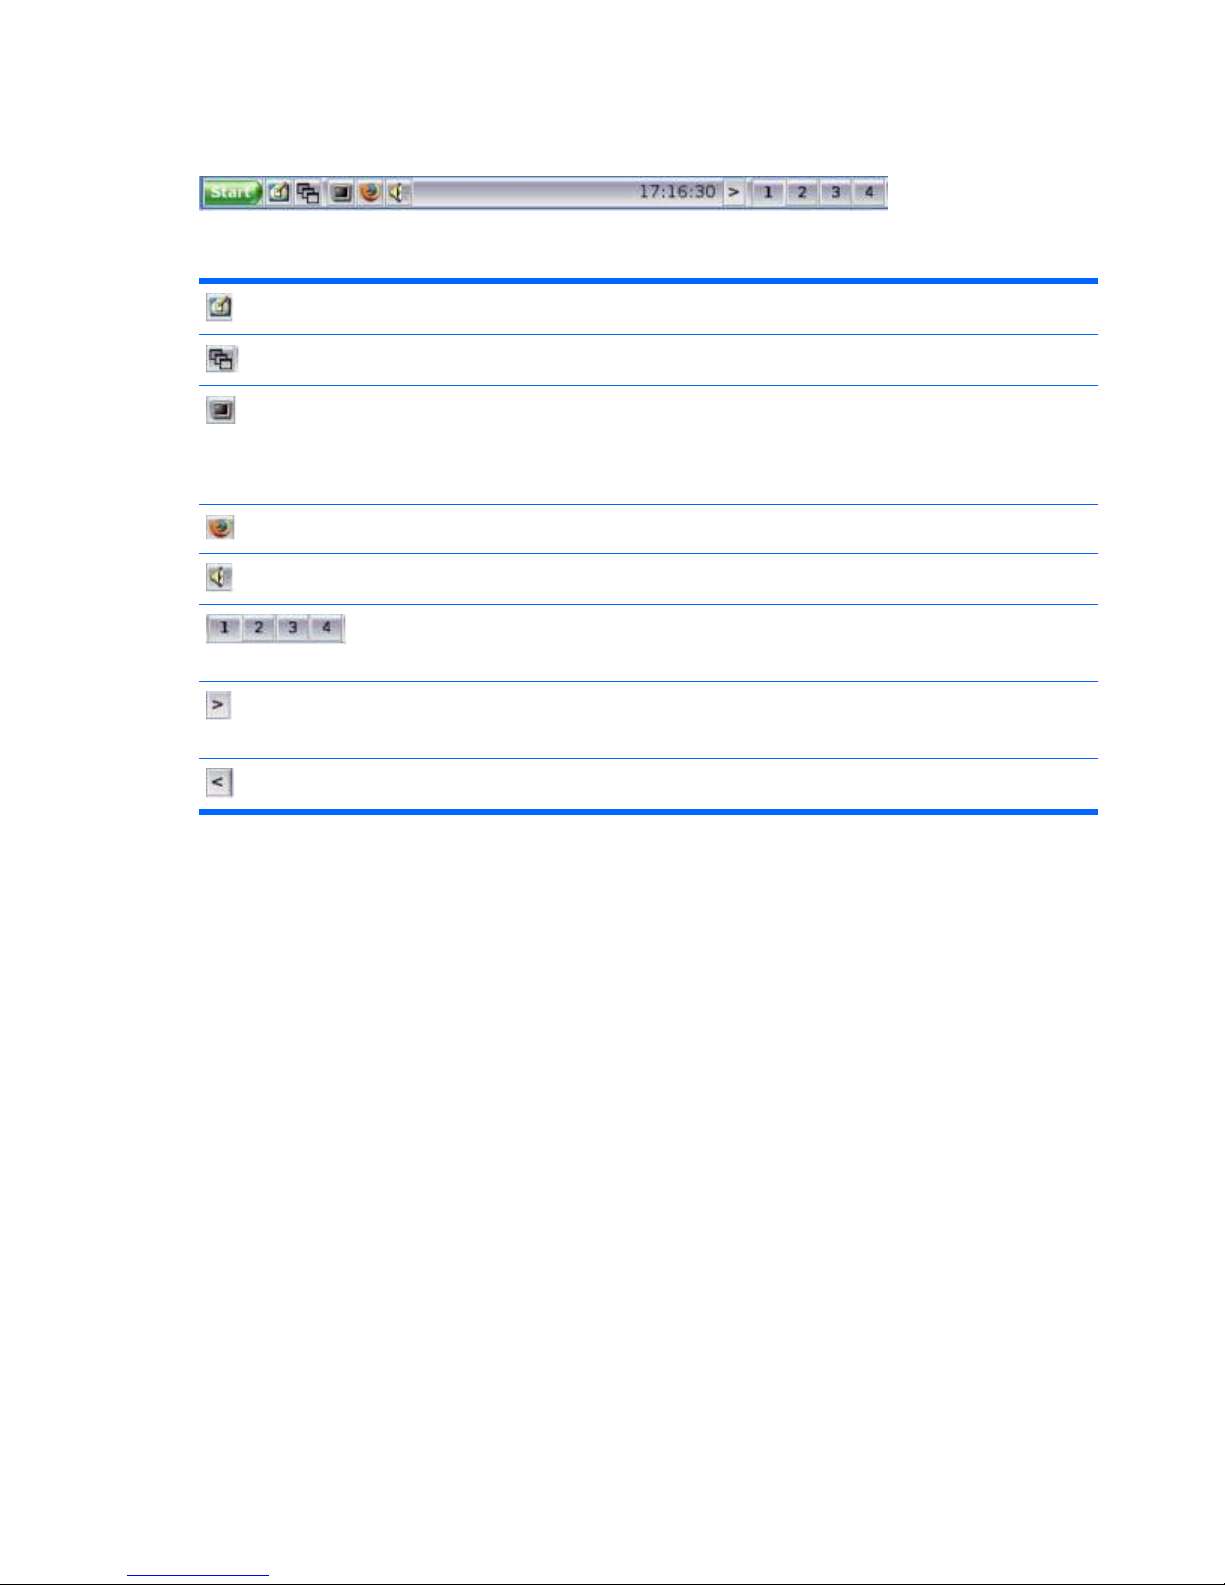
Taskbar
The default taskbar contains the following icons that provide quick function access:
Show Desktop — Displays the desktop.
Window List Menu — Displays a list of available workspaces.
XTerm — Accesses the terminal command window. The xterm
program is a terminal emulator for the X Window System for
programs that cannot use the window system directly. For more
configuration options, type man xterm on the xterm command
line.
Mozilla Firefox — Opens the Firefox browser.
Mixer — Opens the sound mixer configuration window.
Workspace icons — Provides instant display access to the four
available workspaces (sessions). Each workspace can have
different programs running. Click an icon to open a workspace.
Minimize the toolbar — Allows you to minimize the toolbar,
during which an icon remains that allows you to maximize the
toolbar.
Maximize the toolbar — Allows you to maximize the toolbar.
Right-click the taskbar to open a pop-up window with options that allow you to choose how to display the
different workspaces.
Desktop themes
The image includes a variety of themes that can change the look and feel of the desktop and taskbar.
Additionally, the open source community has many more themes available.
To change the theme of your desktop, click Start > Themes, and select a theme.
4Chapter 1 Introduction ENWW
Page 13

Synaptic
Thin client software is organized into “packages”. The Synaptic desktop icon provides access to Synaptic
Package Manager that allows you to easily add, upgrade, and remove packages to and from your thin
client.
Most applications reuse the functionality of other applications or libraries. Therefore, most packages
depend on other packages. The Synaptic Package Manager resolves the dependencies automatically.
Synaptic provides the following features:
●
Install, remove, configure, upgrade, and downgrade single and multiple packages.
●
Upgrade entire system.
●
Manage package repositories.
●
Search packages by name, description, and several other attributes.
●
Select packages by status, section, name, or a custom filter.
●
Sort packages by name, status, size, or version.
●
Browse all available online documentation related to a package.
●
Lock packages to the current version.
●
Force the installation of a specific package version.
HP hosts a repository for HP t5725 options, add-on, and package updates at
ftp://ftp.hp.com/pub/
tcdebian.
NOTE: You must log in as root or a user in the Administrator group to use Synaptic.
NOTE: Reload package information regularly so you do not miss important security upgrades.
NOTE: Synaptic requires an active network connection to work properly.
NOTE: Synaptic requires that the thin client have Internet access.
NOTE: If the HP Repository appears to be down or does not connect when trying to update the
package list, wait and retry again.
From time to time HP may release new or updated packages to the HP repository. HP packages have
hptc- at the beginning of their name (i.e. hptc-control-panel); however, for the benefit of our customers,
other vendors may also post packages in the HP repository (i.e., ICA updates, ThinPrint packages, etc.)
that follow the vendor's naming convention and therefore do not begin with hptc-.
The first time you launch Synaptic, it uncompresses itself and loads the list of all available packages from
default ftp sites.
To launch Synaptic for the first time:
1.
Log in as root
2.
Select the Synaptic icon on the desktop. An xterm window opens.
ENWW Synaptic 5
Page 14
3.
Type Y, and then press Enter. The install results display on-screen.
4.
Read the installation results to confirm the packages successfully installed, and then close the window.
NOTE: After running Synaptic for the first time, its icon changes.
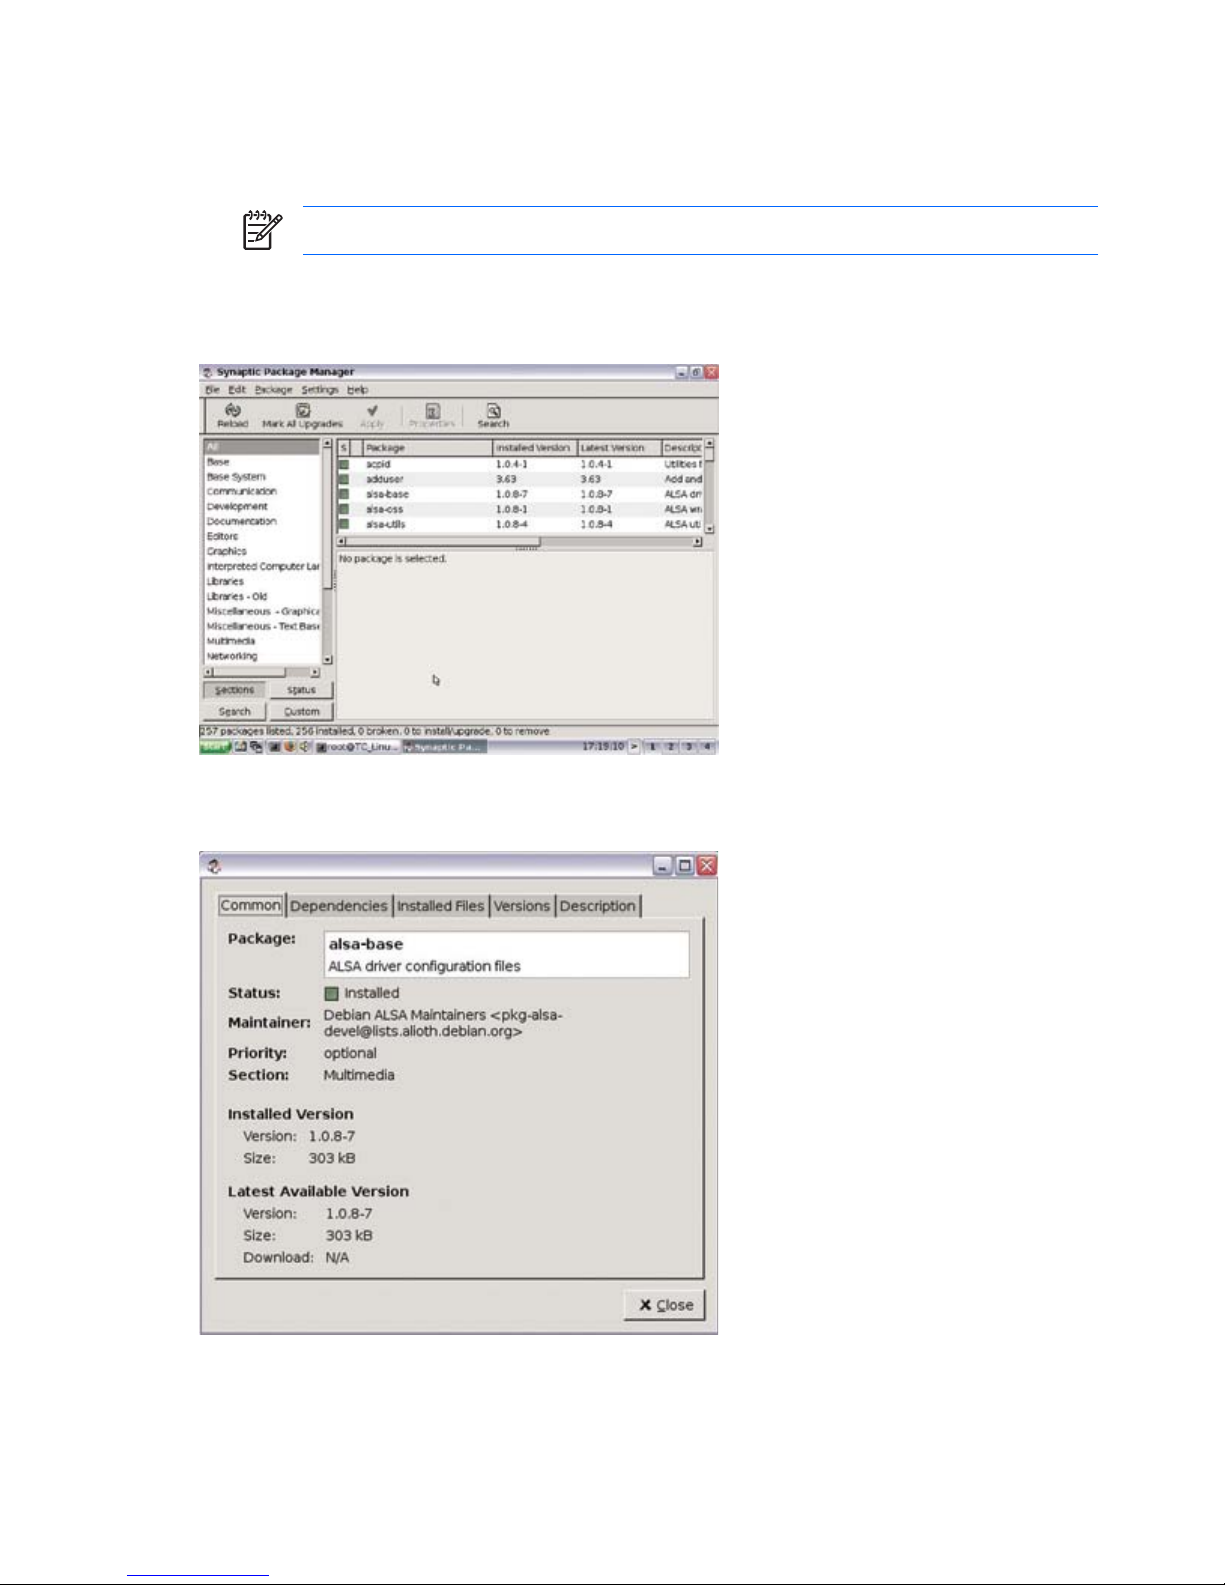
The Synaptic Package Manager window includes a pane (left) that allows you to list packages by
category, a pane (upper right) that lists all packages within a selected category, and a pane (lower right)
that provides information about a specific selected package.
For detailed information about a package, including size, version number, dependencies, files, and more,
right-click the package and select the Properties button.
To install packages on the thin client:
6Chapter 1 Introduction ENWW
Page 15
NOTE: Be sure to read the installation messages as they can require user input.
installing or removing packages requires administrator root permissions.
1. Open Synaptic Package Manager by double-clicking Synaptic on the desktop.
2. Click Search to open the Find dialog box.
3. Type a parameter of what you are searching for in the Search box, then select the category to
search within in the Look in list, and then click Search. The upper right pane displays all packages
located based on your search criteria.
4.
In the upper right pane, select the specific package to install. If desired, read about the selected
package in the lower right pane.
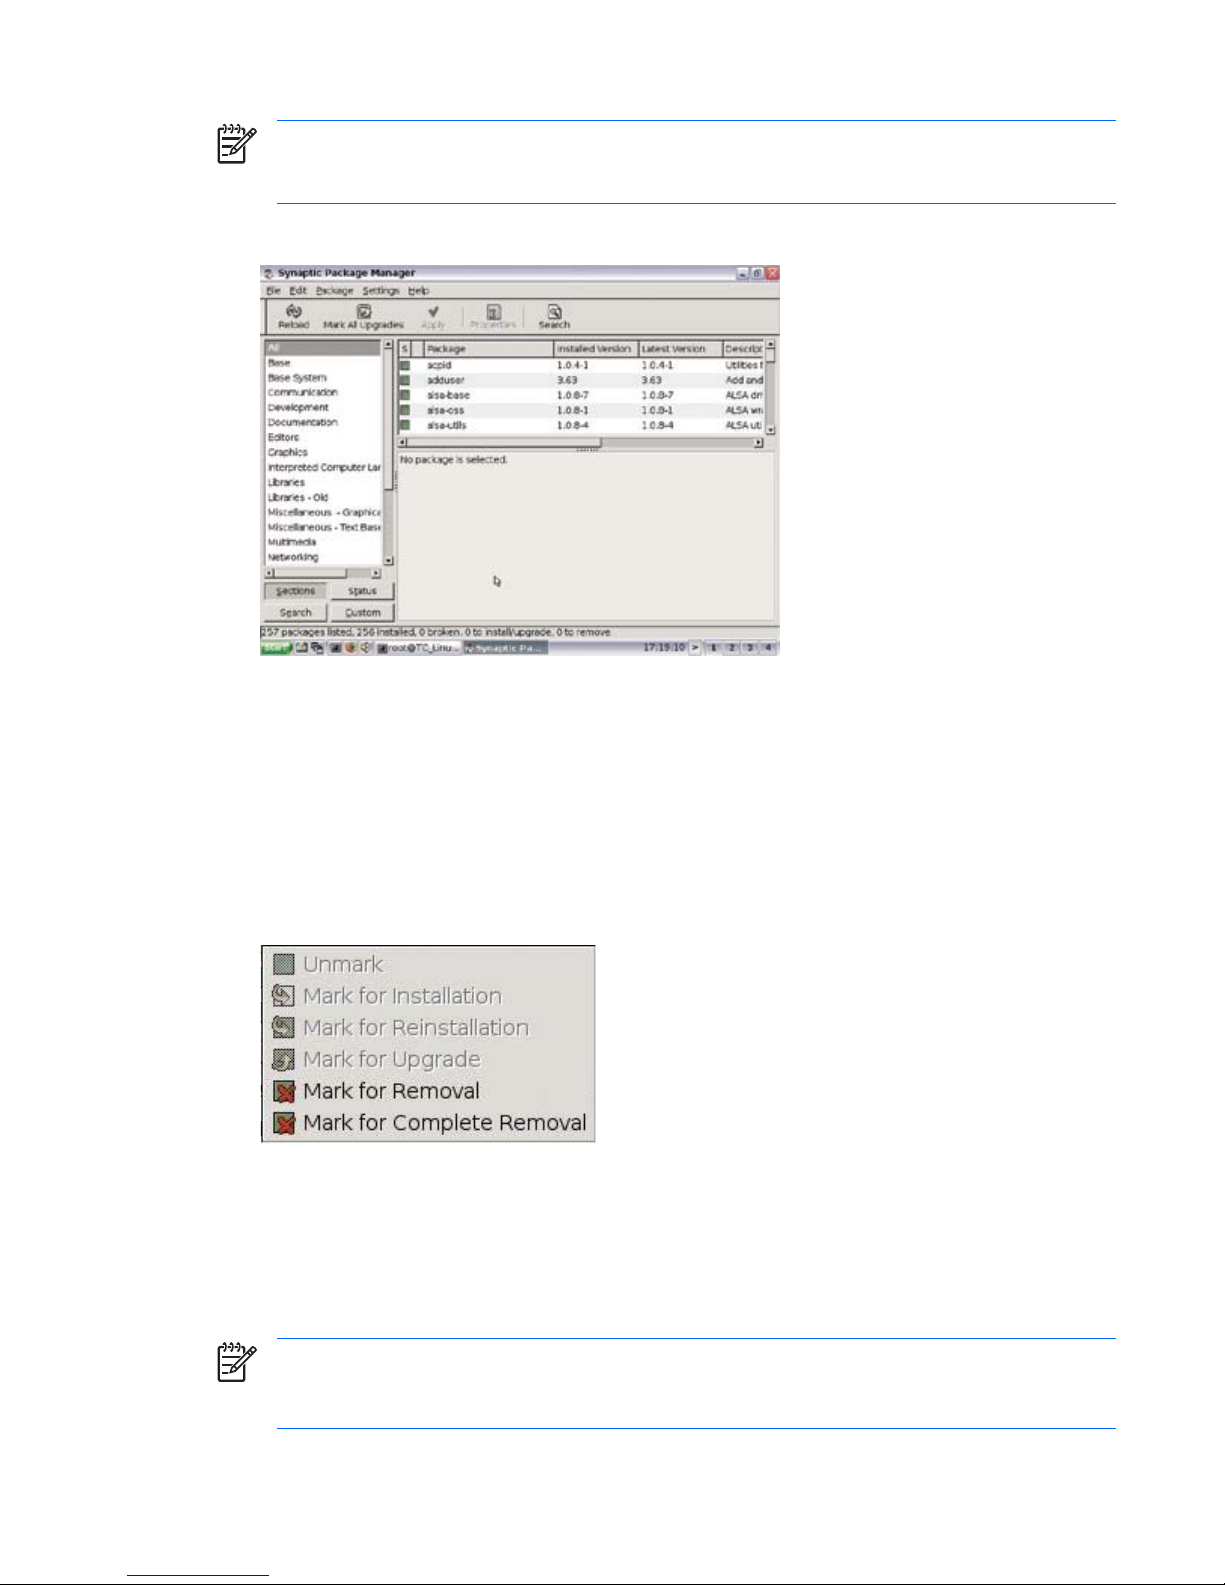
5.
A pop-up box provides installation options. Select the option based on the type of installation you
are performing.
6.
If necessary, repeat steps 2 - 5 to location and mark more packages for installation.
7. Click Apply.
8. Confirm the action and click Apply.
9. Click Close after all packages are succesfully installed.
NOTE: When uninstalling packages, Mark for Removal uninstalls the package from the thin
client without removing the configuration files. Mark for Complete Removal removes all traces
of the package from the thin client.
ENWW Synaptic 7
Page 16
For more information about Synaptic functions and features, go to the local synaptic help file by launching
a Firefox browser and typing the following location: File:///usr/share/synaptic/html/
index.html
.
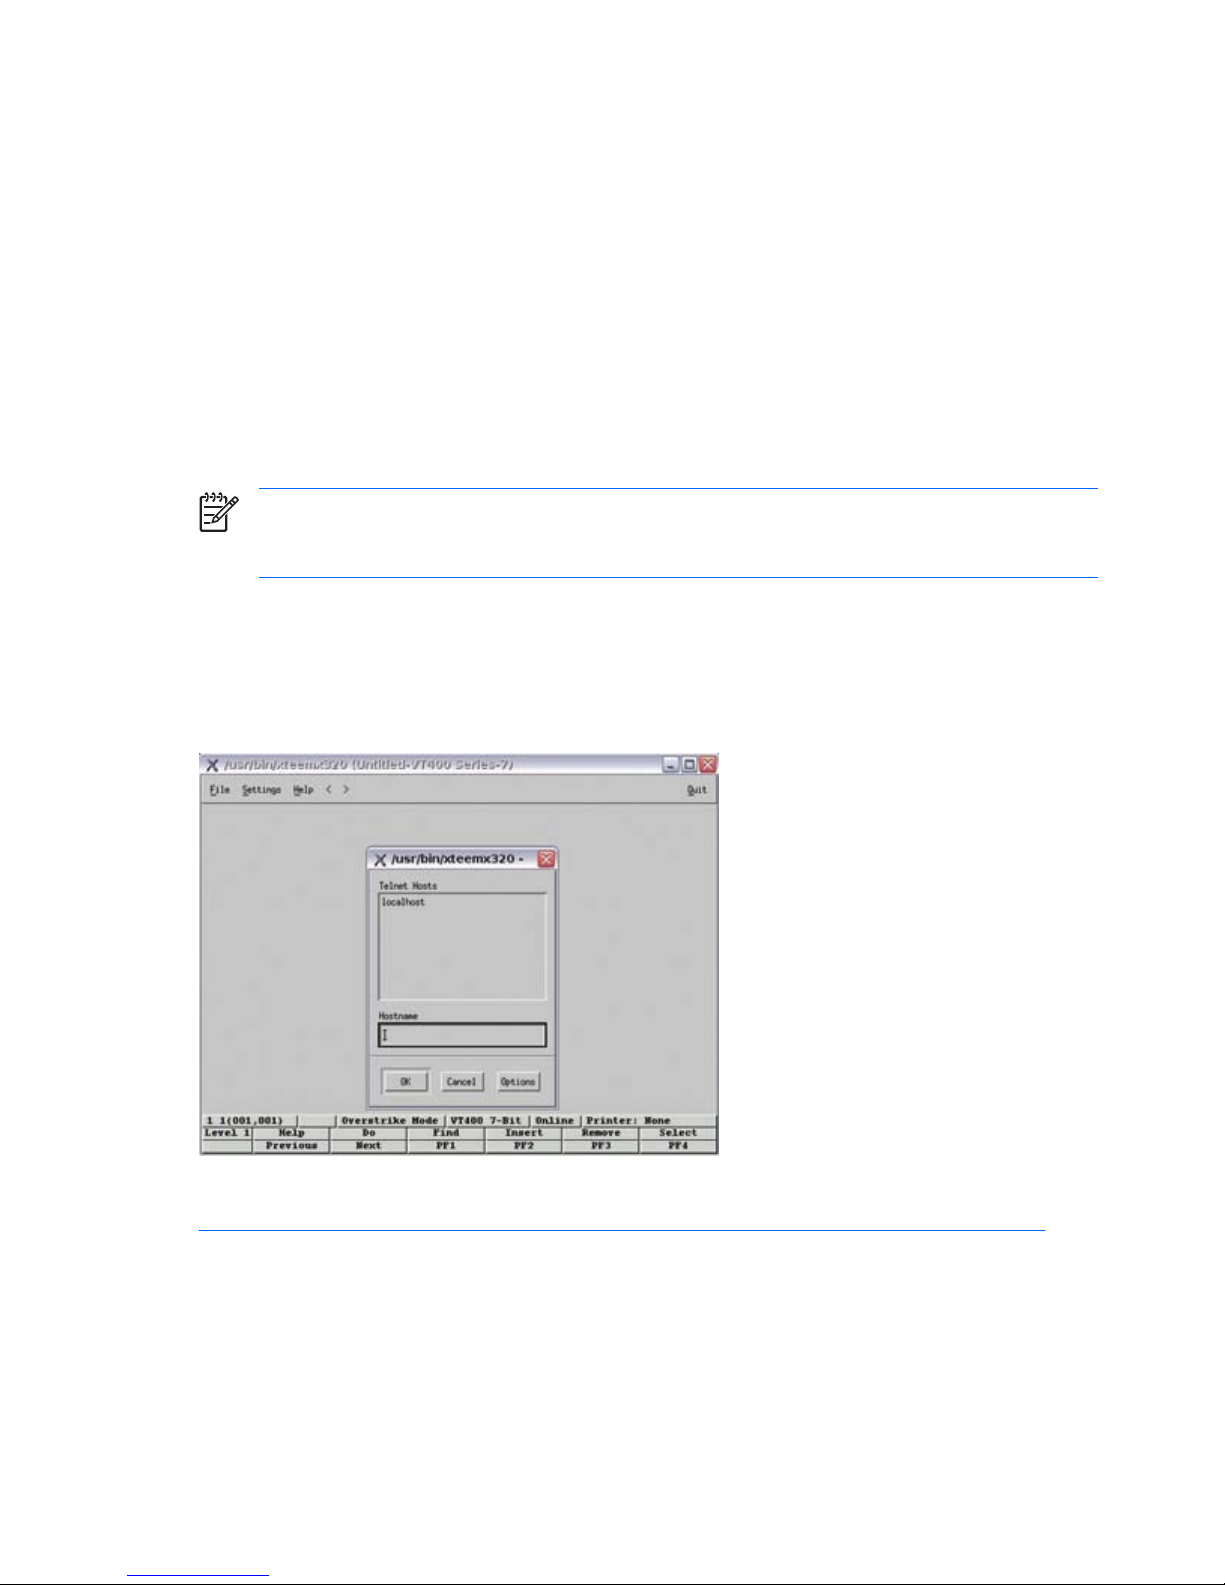
TeemTalk
TeemTalk is the essential connectivity tool for enabling non-X based applications to be run in the X
environment. TeemTalk provides precise emulation of a wide range of industry standard terminals with
impressive additional features formulated to increase productivity and reduce network loading. These
include dynamic window sizing, hotspots, soft buttons, keyboard mapping, mouse button definition and
customizing capabilities. TeemTalk integrates seamlessly into the X Window system with the same look
and feel as other applications.
NOTE: The X Window System is a network-based windowing system that provides a common
graphical interface for application programs. It defines how applications create windows and the
graphics displayed in them.
The basic function of TeemTalk is to accept command sequences from a host application (client) and
convert them into equivalent X functions, which can then be passed on to the X display server. This means
that current investment in host application software can be retained in the X Windows environment.
Each window displayed by TeemTalk is, in effect, a separate 'terminal'. Several terminal emulation
windows may be displayed simultaneously on the same display server, all running different programs.
For more information about TeemTalk, see the TeemTalk 5.0 for Unix User Guide at
http://h20000.www2.hp.com/bc/docs/support/SupportManual/c00782549/c00782549.pdf.
Connection types
By default the t5725 comes ready to run use the following connection types:
●
ICA
●
rdesktop
8Chapter 1 Introduction ENWW
Page 17
●
Firefox
●
XDM
●
Other
Other connections may be available in the Debian repositories and in the Open Source Community and
configured through Connection Administrator’s “Other” connection type.
For more information about connections, see
HP Connection Administrator on page 37.
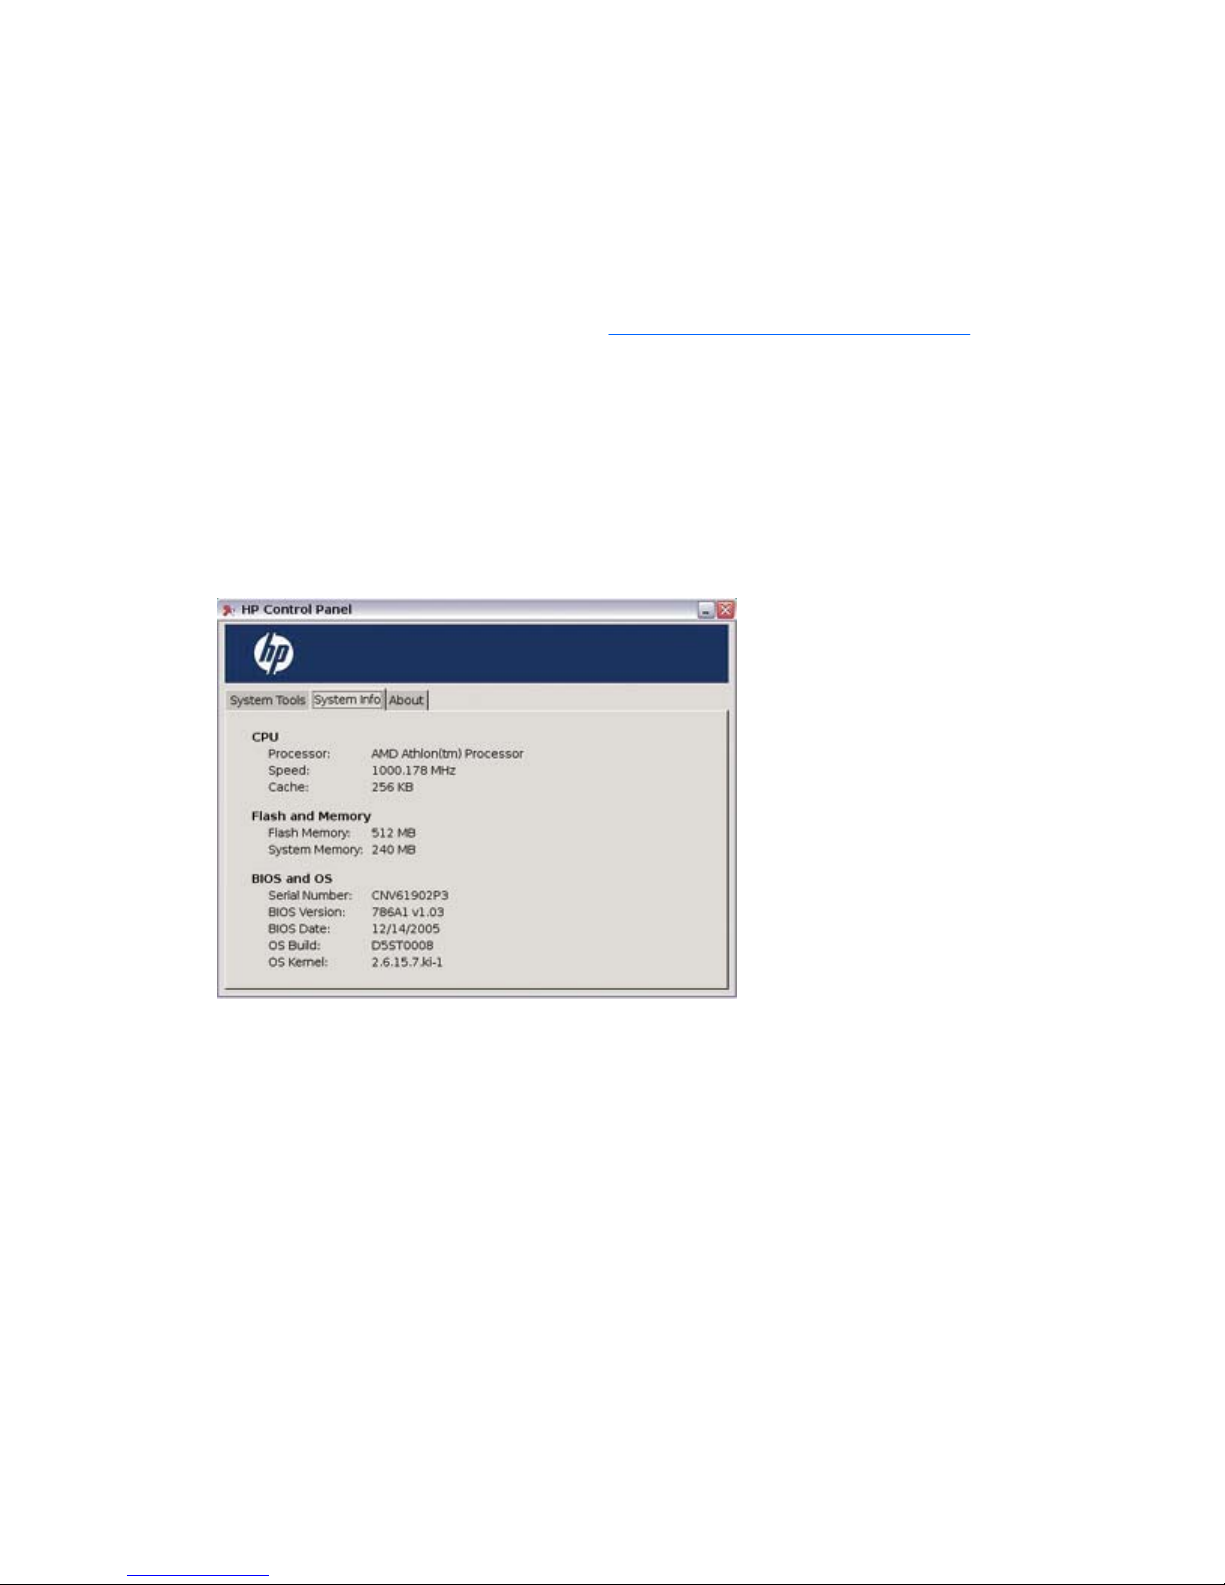
System information
To locate information about the system and operating system:
1. Select the Settings icon.
2. Click the System Info tab.
The screen displays information about the CPU, flash, memory, BIOS, and operating system.
Image location
The image is stored in various formats. The bootup process decompresses and loads certain portions of
the image in RAM. Some features and aspects of the image are not loaded until they are needed. The
image is stored in two partitions as follows:
●
/dev/hda1 – ext2 – Core operating system
●
/dev/hda5 – ext2 – Persistent configuration information, user home directories, and data.
ENWW System information 9
Page 18

10 Chapter 1 Introduction ENWW
Page 19

2
Control Panel Settings
This chapter provides an overview of the utilities in the Control Panel. You can use the Control Panel utilities
for local and remote administration.
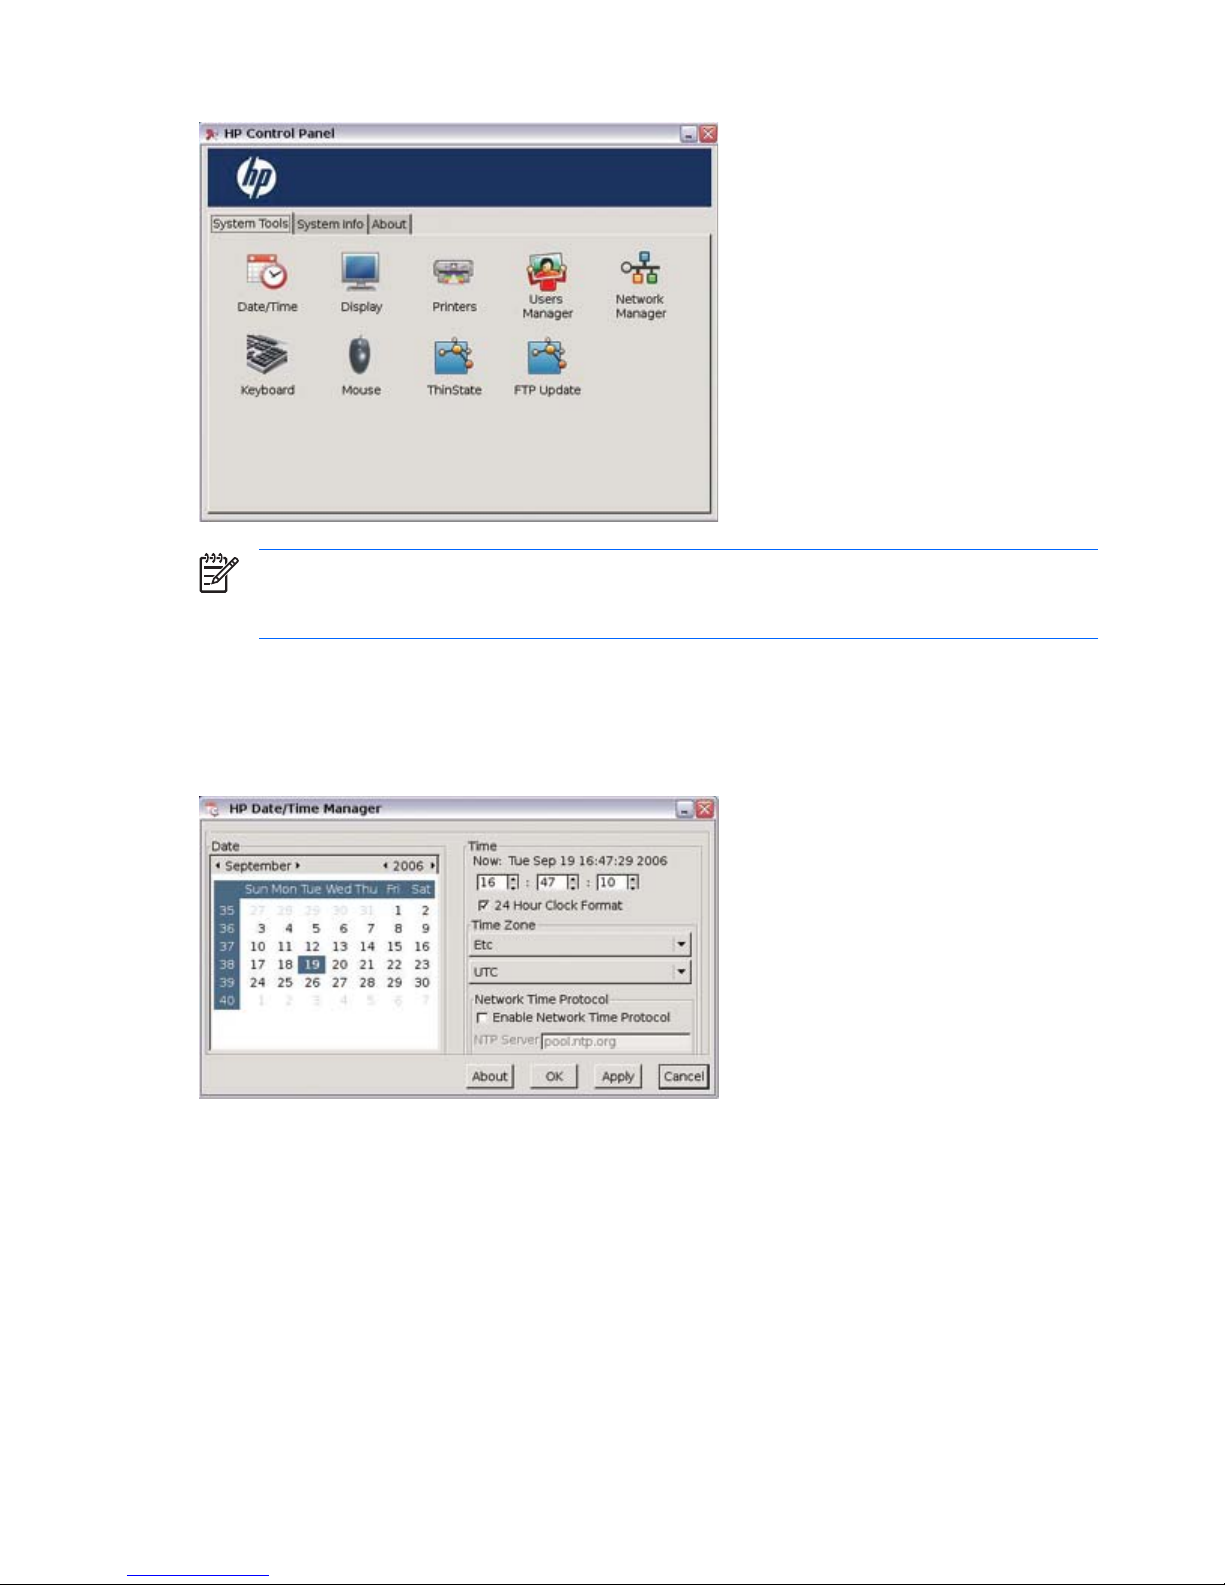
There are nine controls under the System Tools tab for the root user. By default, non-root users see only
the keyboard and mouse applets. The nine controls are:
●
Date/Time
●
Display
●
Printers
●
User Manager
●
Network Manager
●
Keyboard
●
Mouse
●
ThinState
●
FTP Update
The Taskbar provides access to many other controls, such as sound.
You can open the Control Panel in any of the following ways:
●
Select Settings on the desktop.
●
Click the Settings button on the HP Connection Administrator window.
●
Click Start > Programs > Apps > System to access the utilities located in the Control Panel as
well as several other system programs and applications.
ENWW 11
Page 20
NOTE: The utilities available in Control Panel vary depending on whether the current user is
logged in a root account. Some utilities require root user access. You can control this by assigning
individual users additional rights in the “Users” applet or editing /usr/share/hp/panel/hpcpl.conf.
Date/Time
The Date/Time Properties utility allows you to set the date and current time, select the appropriate time
zone, and enable NTP (Network Time Protocol).
Use the values in the Date, Time, and Time Zone areas to select the appropriate date and time
information.
Enabling Network Time Protocol
Network Time Protocol (NTP) is designed to synchronize the clocks of computers over a network. There
are numerous servers available on the Internet that are synchronized to Coordinated Universal Time (UTC).
To enable NTP:
1.
Select the appropriate time zone.
2. Select Enable Network Time Protocol.
12 Chapter 2 Control Panel Settings ENWW
Page 21

3. In the NTP Server box, type the IP address of the NTP server you want to use to set the time on the
thin client. For NTP to function properly, the date on the thin client must match the date on the server.
4. Click Apply.
Configuring the system hardware clock from BIOS
You can set the system hardware clock to your local date and time using the BIOS setup utility as follows:
1.
Reboot the system and press F10.
2.
After the Setup utility displays, press Esc.
3.
Select the standard CMOS features option, and then press Enter.
4.
Set the date and time using the Page Up and Page Down keys.
5.
To save the changes, press F10, and then press Enter.
ENWW Date/Time 13
Page 22

Display
The Display Settings utility allows you to configure the monitor’s screen resolution, color depth, and refresh
frequency.
After you change display settings, the thin client allows you to test the settings. If the settings do not provide
the desired results, you can cancel them to revert to the previous settings.
The default resolution is 800x600x16@60Hz.
Screen resolutions and refresh rates differ depending on monitor.
You must reboot the terminal or restart the session for the changes to take effect.
NOTE: Some displays report incorrect information. If you configure the display setting out of
range, you can reset to factory defaults by pressing Alt+F2 and then logging in as root administrator
and editing the XF86config.
Screen saver
Select the Screen Saver tab to enable and configure the screen saver. If you select Password
Protected, the thin client uses your logon password as the screen saver password.
To enable DPMS, select Monitor Power Saver Option (DPMS). You can query settings using xset
–q in the console.
14 Chapter 2 Control Panel Settings ENWW
Page 23
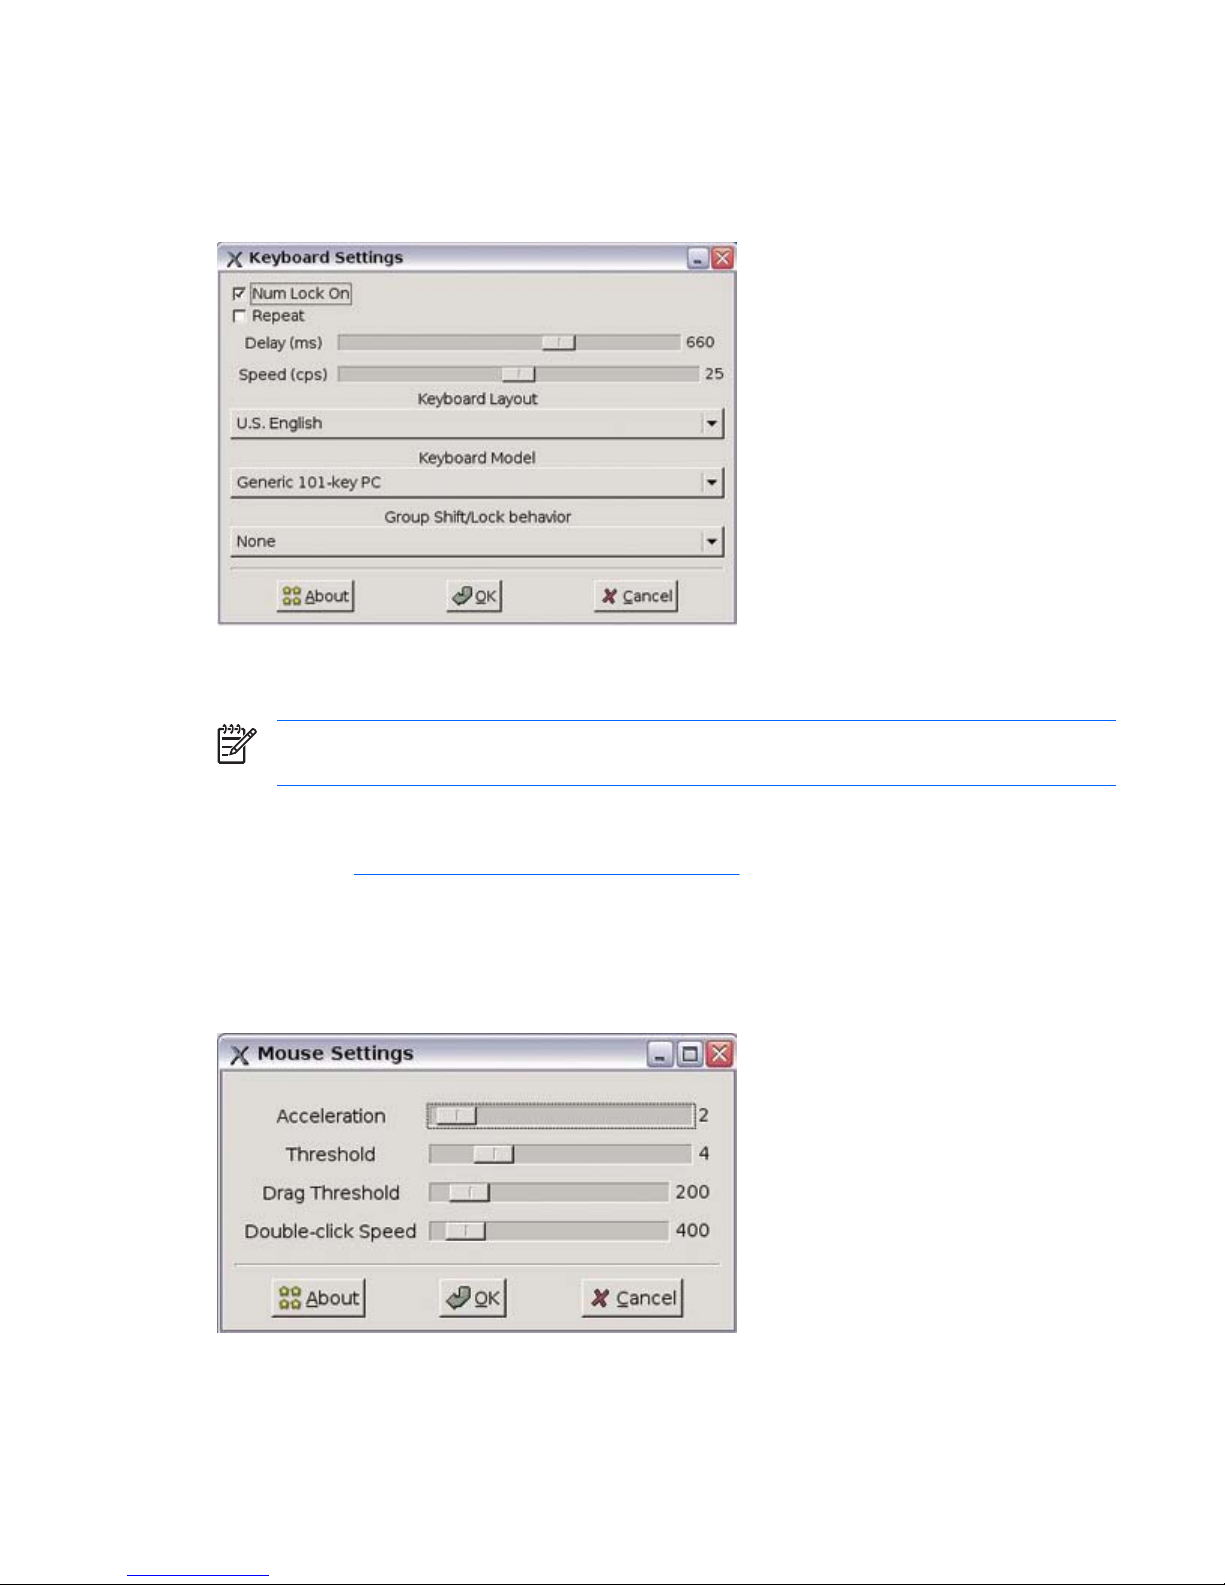
Keyboard
The Keyboard Settings utility allows you to select a keyboard language and model, key behavior,
keyboard character repeat parameters, and the Numlock setting.
Changes to the keyboard language apply locally. Remote settings are determined by the applications
(rdesktop, Citrix, etc) and server, but may be affected by local settings.
NOTE: Drivers for the various languages do not transfer to the remote computer; therefore, you
must also install the drivers for the selected language on the remote computer.
Group Shift/Lock behavior—Use this list to select the hot keys used to switch between keyboard
layout groups for keyboards that support more than layout group. For more information about configuring
keyboards, see
http://xfree86.org/current/XKB-Config.html.
Mouse
The Mouse Settings utility allows you to set the mouse double-click sensitivity, screen speed, and drag and
drop settings.
ENWW Keyboard 15
Page 24
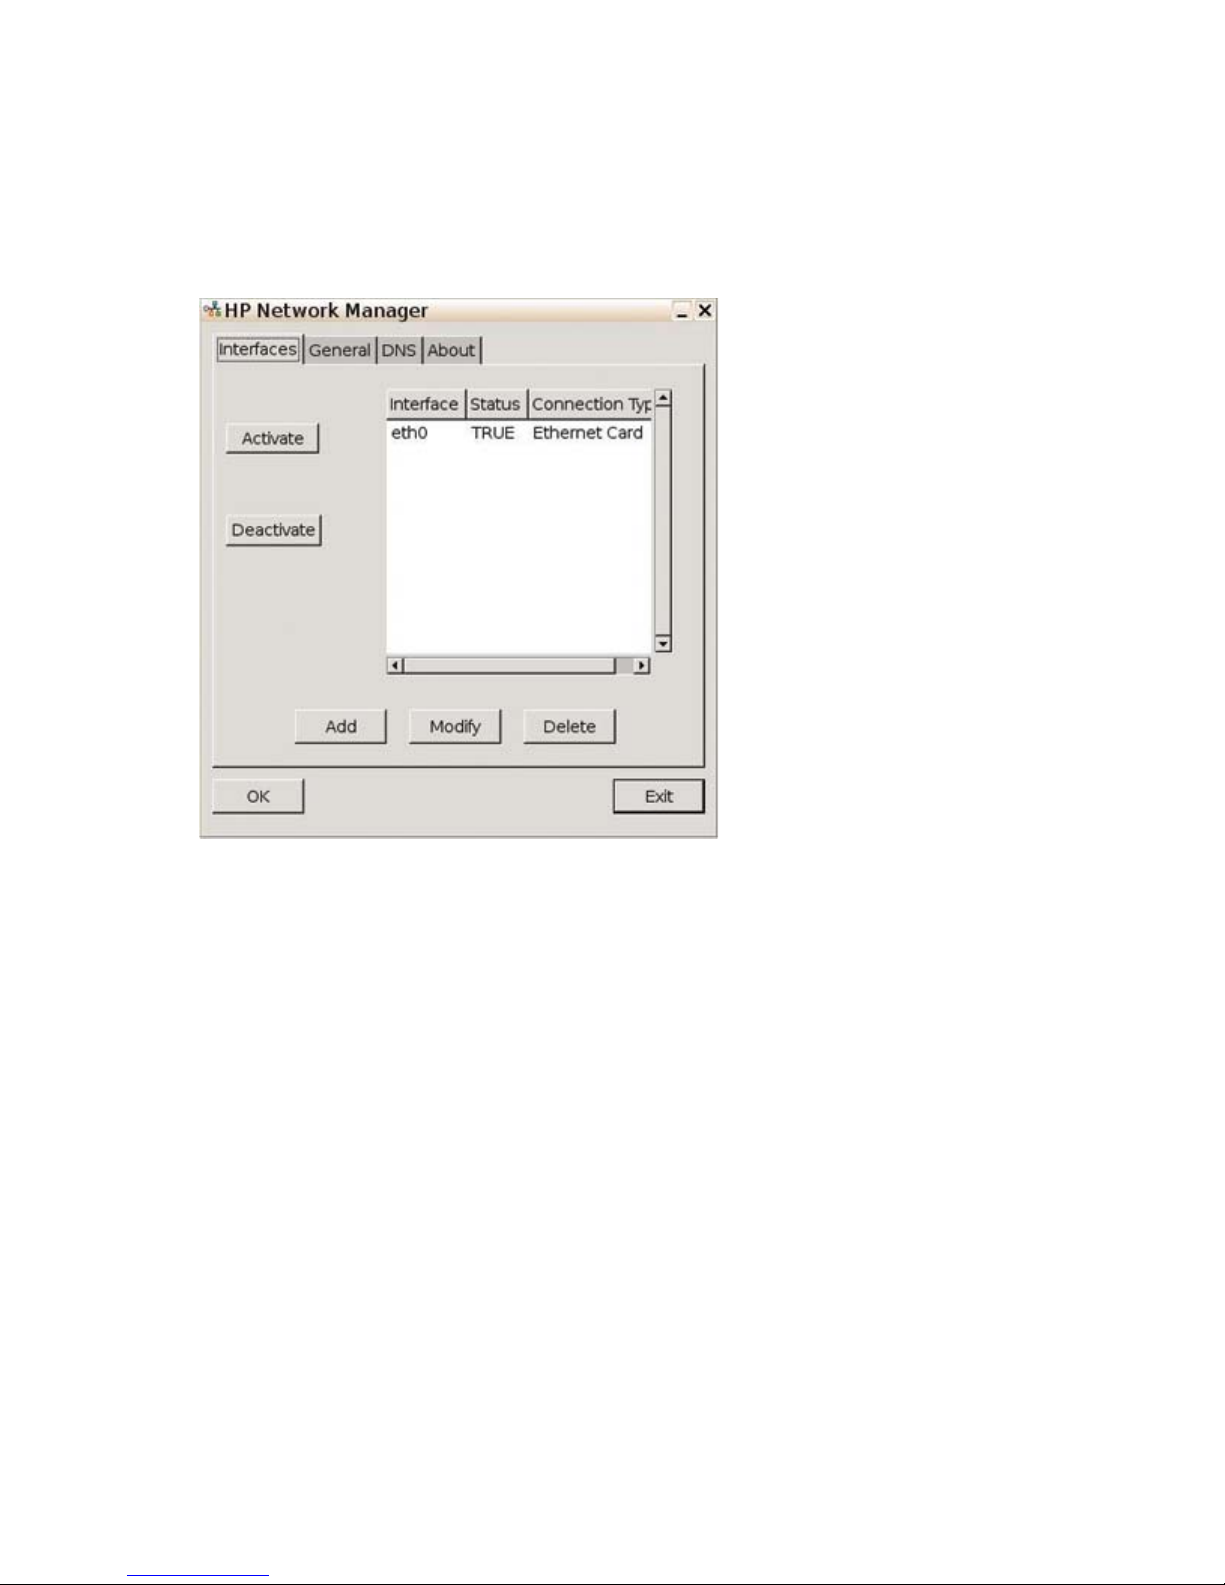
Network Manager
The Network Manager utility allows you to configure connectivity between the terminal and the Internet,
a network, or a computer.
Interfaces
Allows adding, removing or modifying network interfaces in /etc/network/interfaces. Select the interface,
and then use the following buttons as necessary:
●
Activate: Click to activate an inactive NIC if the unit has multiple Ethernet cards installed (for
example, the down network card and an additional PCI NIC card).
●
Deactivate: Click to deactivate a specific card if the unit has multiple Ethernet cards installed.
●
Add: Click to walk through the options to set up a new NIC interface.
●
Modify: Click to modify an existing interface. The following window is displayed:
16 Chapter 2 Control Panel Settings ENWW
Page 25
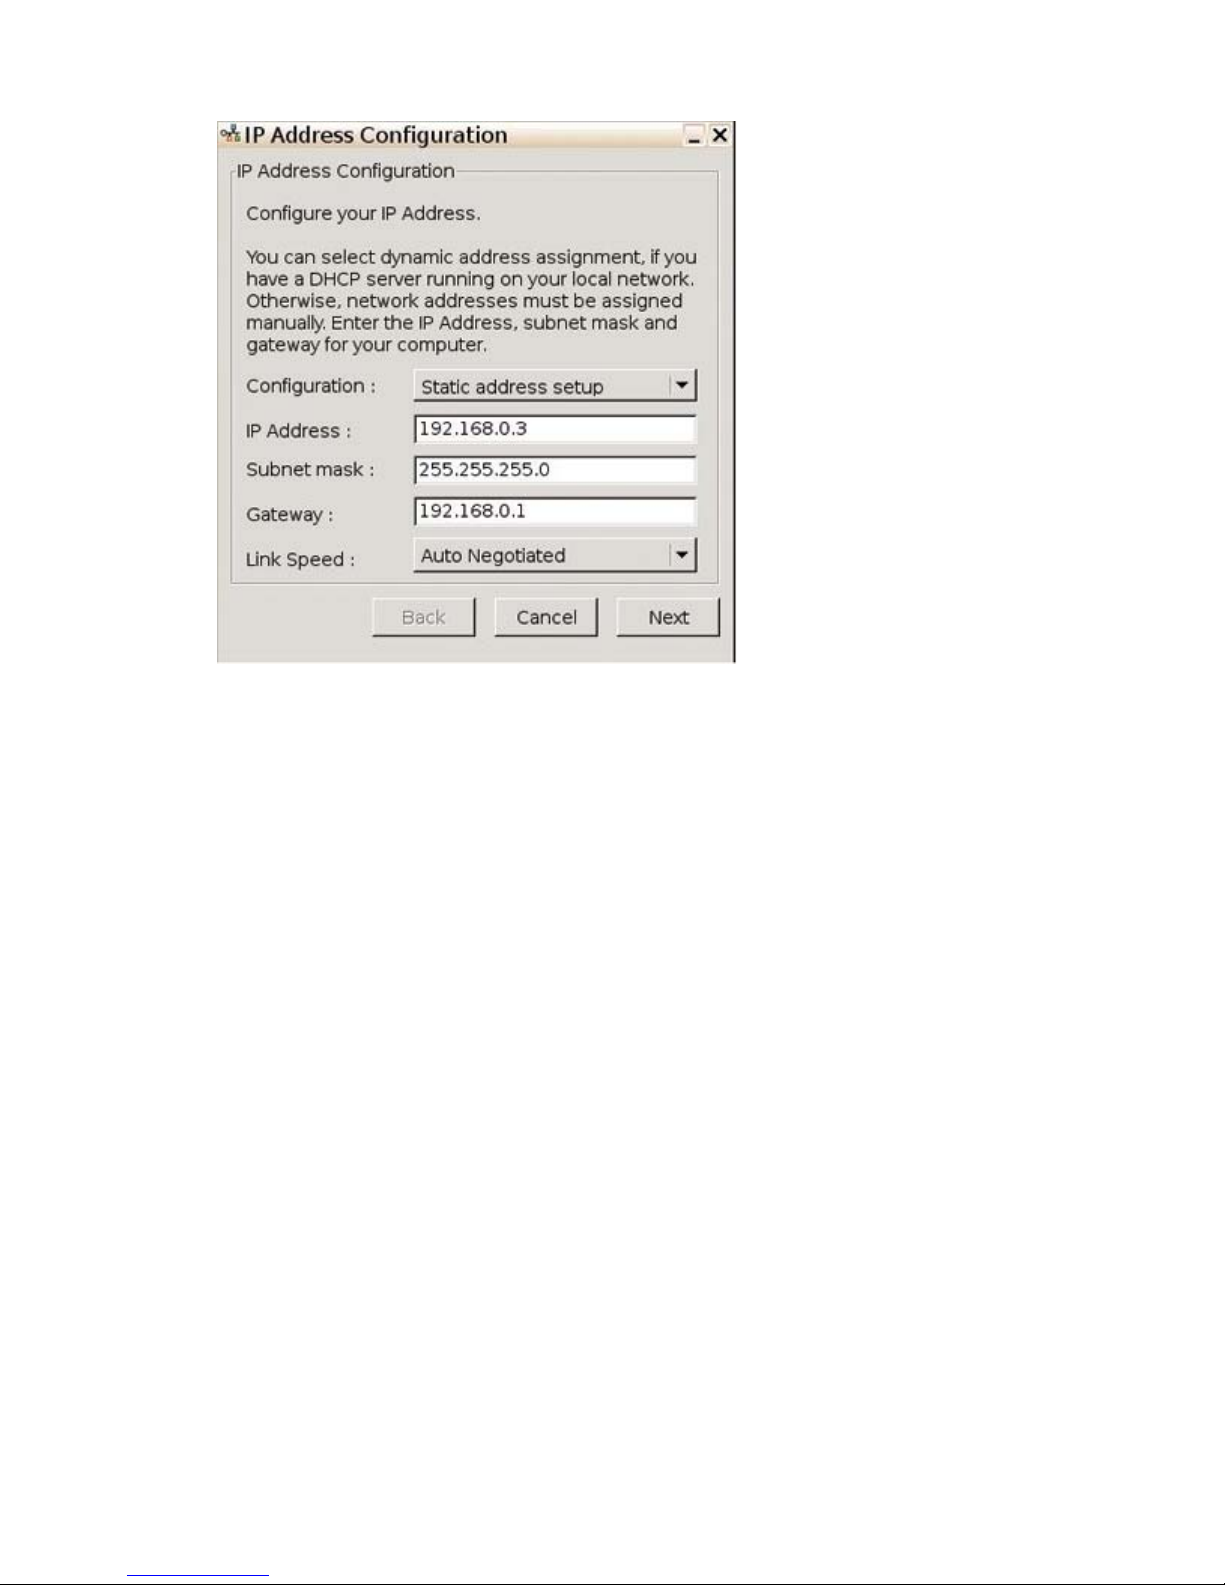
●
Configuration: Select from the following options:
● Automatic address setup (via DHCP): Enables DHCP and displays settings provided by
IT or allows configuration.
●
Static address setup: Allows you to enter a specific IP address, Subnet Mask, and Gateway.
●
Link Speed: Allows you to specify a specific link speed. Set to Auto Negotiated by default.
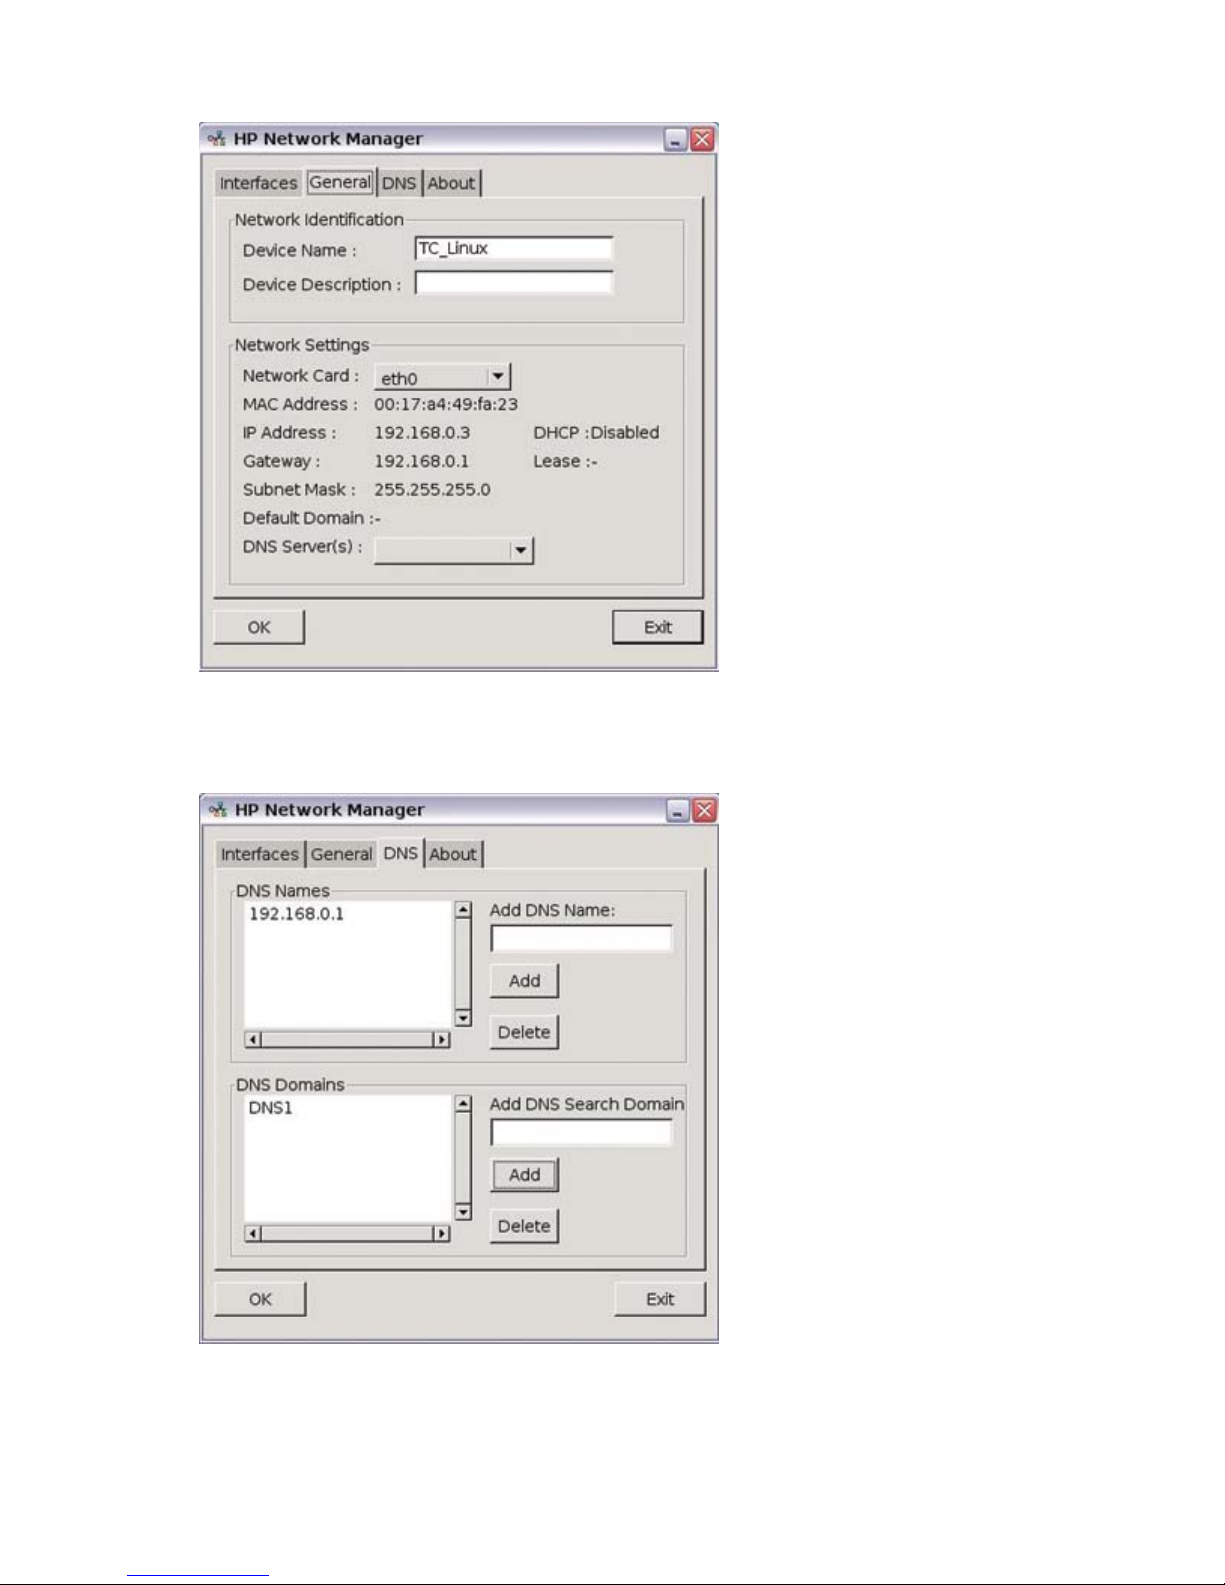
General
The General tab allows you to locate network identification information and current IP settings.
Additionally, this tab allows you to name the interface and provide a description, as well as provides the
ability to select between provided DNS servers.
ENWW Network Manager 17
Page 26
DNS
Displays and allows configuration of DNS names and domains.
18 Chapter 2 Control Panel Settings ENWW
Page 27
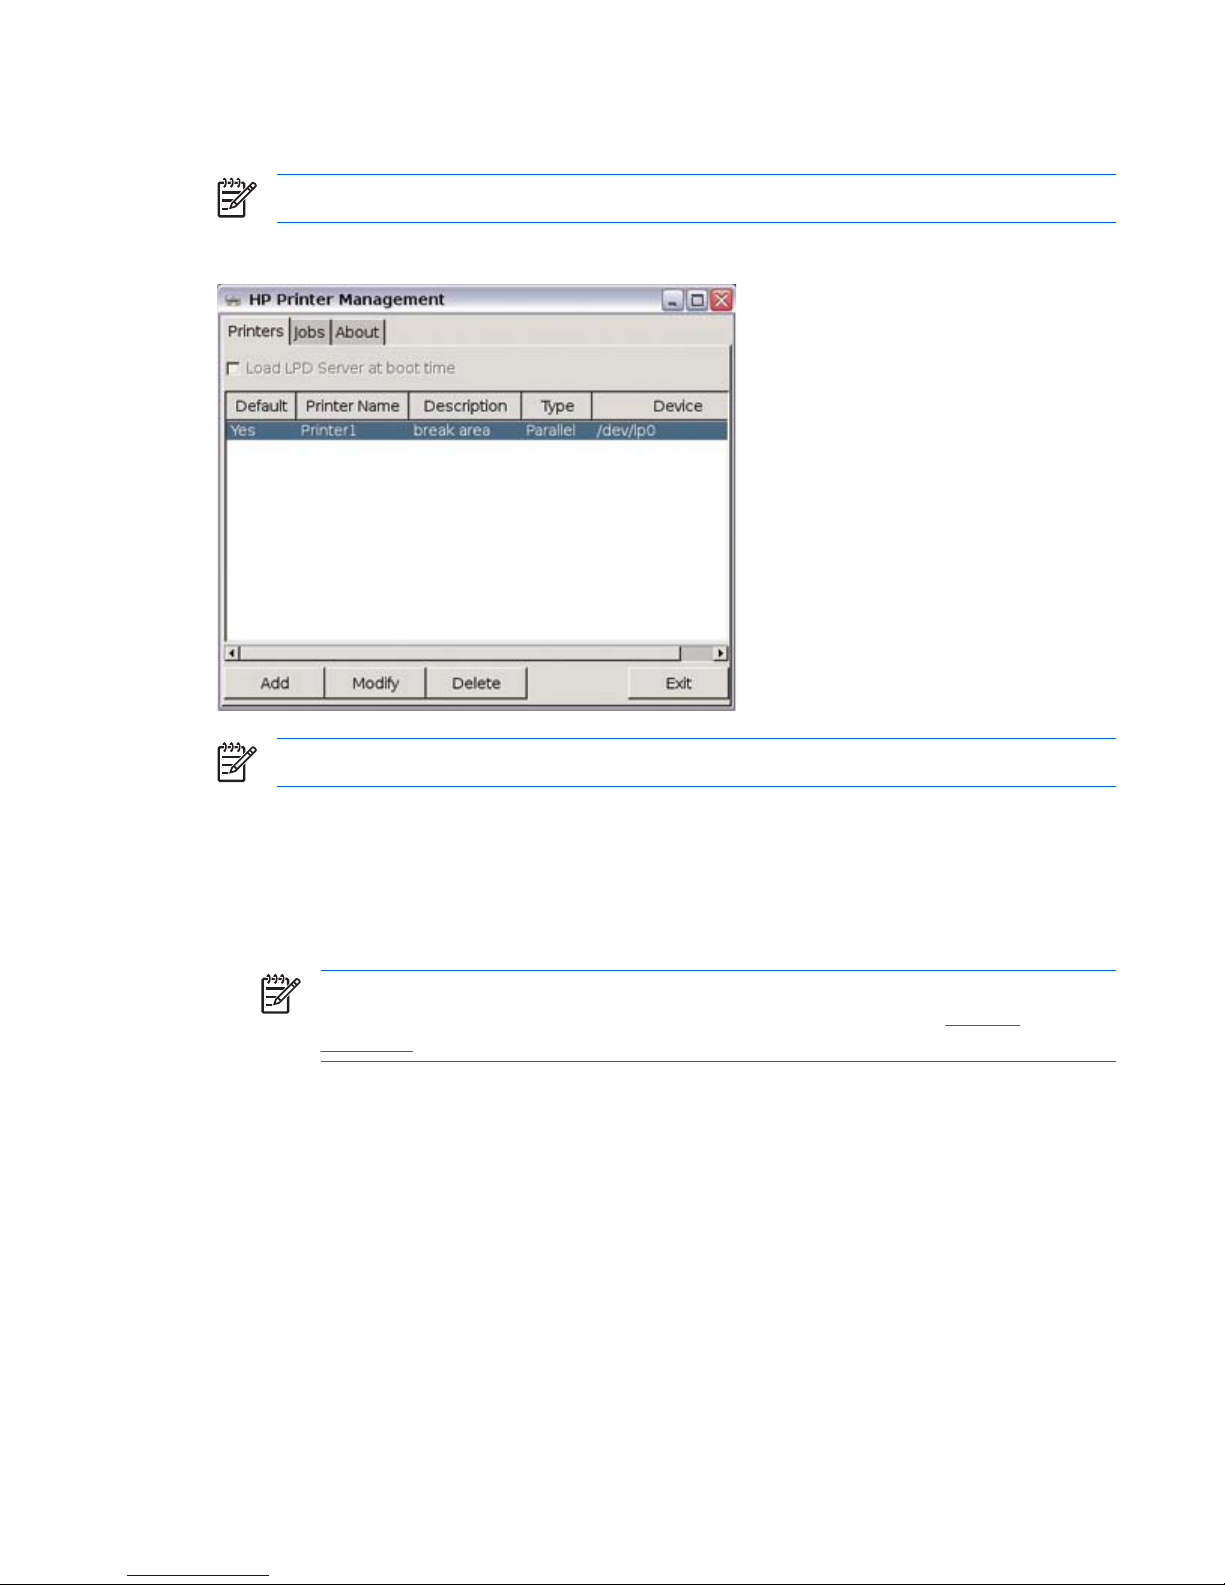
Printers
NOTE: To enable printing, you must install “lprng” using Synaptic.
The Printer Management utility allows you to add a new printer and modify printer settings.
NOTE: Text and postscript print formats are currently supported locally.
Parallel printer
1. Select the Printers tab.
2. Select Load LPD Server at boot time. If this check box is not available, “lprng” is not installed.
You must install “lprng” to enable printing.
NOTE: To install lprng, use the package management system (Synaptic or aptitude) and
search for and install lprng. For more information about Synaptic, see
Synaptic
on page 5
3. Click Add.
ENWW Printers 19
Page 28
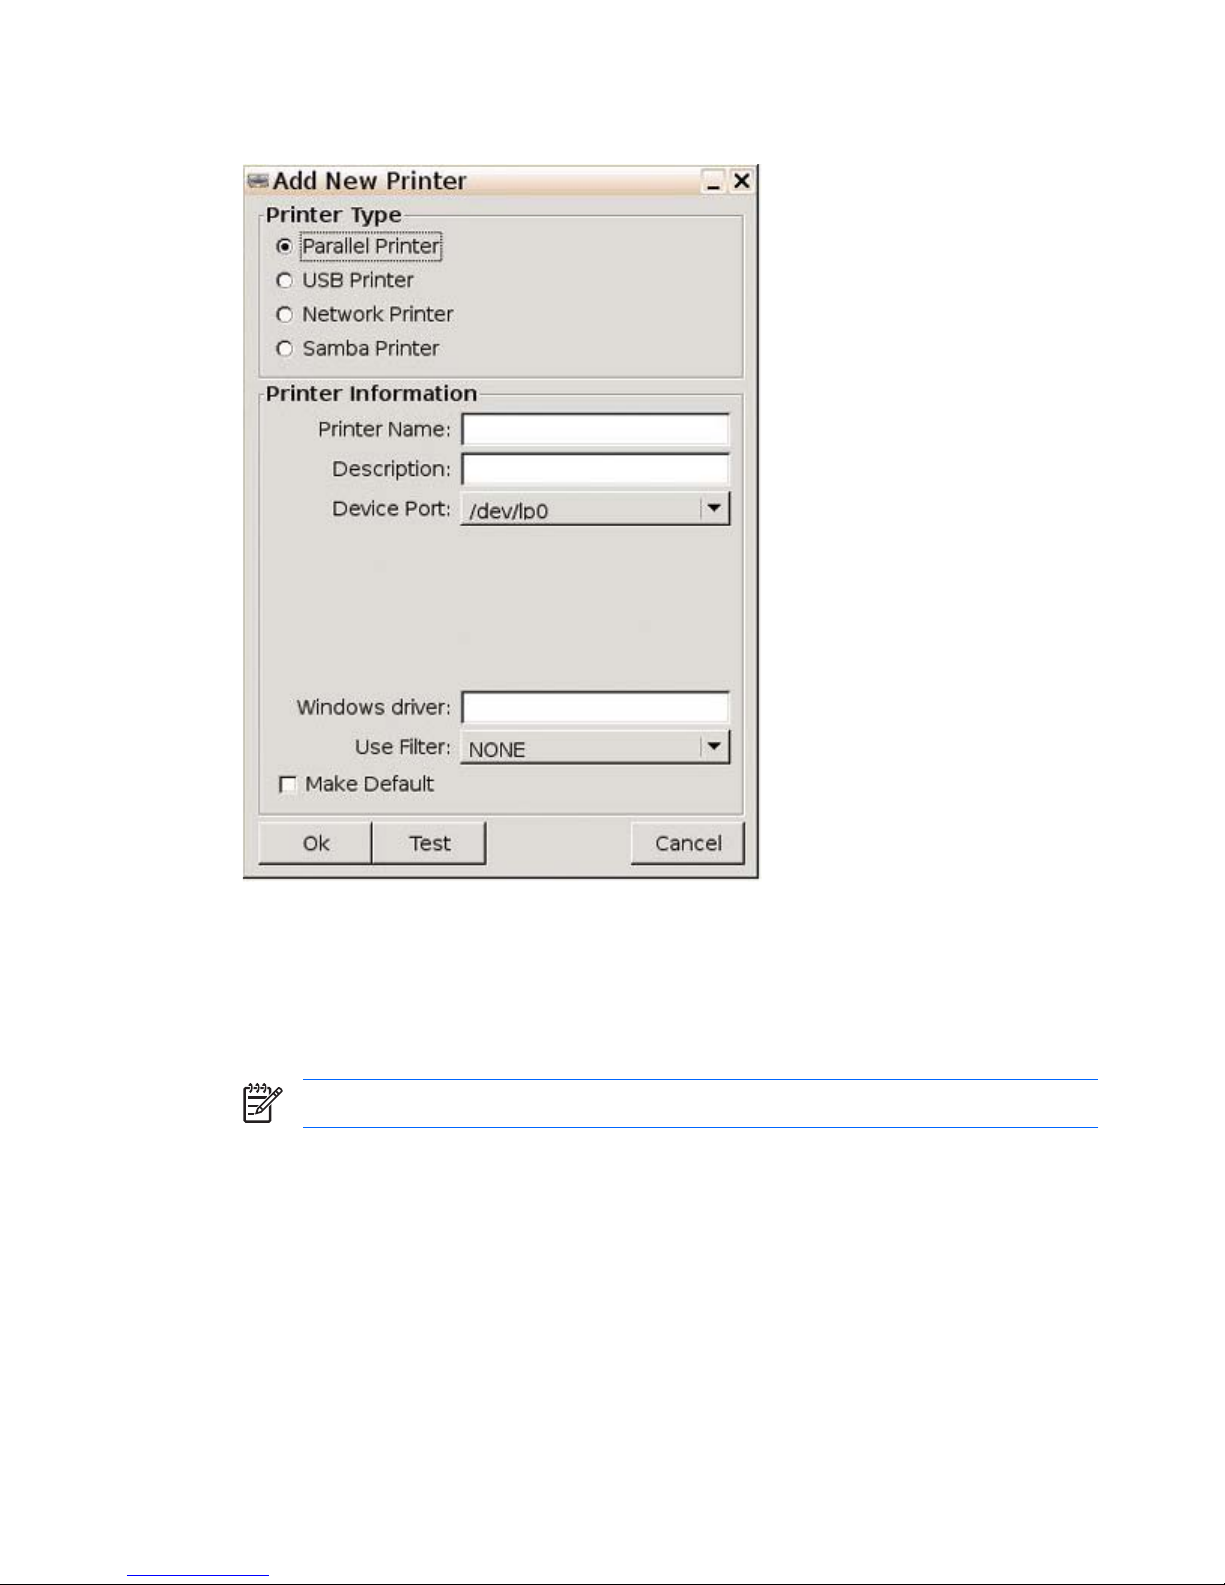
4. Select Parallel Printer.
5. Type a Printer Name and Description (optional).
6. Use the value that defaults in the Device Port box. If the box is empty, there is no printer connected
to the client.
7. If necessary, type a driver name in the Windows driver box. Citrix iCA and RDP use this field to
set the printer driver for the session.
NOTE: You must type the windows driver name exactly as it is on the server.
8. From the Use Filter list, select /usr/lib/lprng/filter/lpf. If NONE displays, “lprng” is not
installed
9. If you want to make this the default printer, select Make Default.
10. If desired, click Test to send a sample job to the printer.
11. Click Ok to save changes.
20 Chapter 2 Control Panel Settings ENWW
Page 29

USB printer
1. Select the Printers tab.
2. If Load LPD Server at boot time is not available, “lprng” is not installed. You must install “lprng”
to enable printing.
NOTE: To install lprng, use the package management system (Synaptic or aptitude) and
search for and install lprng. For more information about Synaptic, see
Synaptic
on page 5
3. Click Add.
4. Select USB Printer.
5. Type a Printer Name and Description (optional).
6. Select the appropriate Device Port. If the list is empty, there is no printer connected to the client.
7. If necessary, type a driver name in the Windows driver box. Citrix iCA and RDP use this field to
set the printer driver for the session.
NOTE: You must type the windows driver name exactly as it is on the server.
ENWW Printers 21
Page 30

8. From the Use Filter list, select /usr/lib/lprng/filter/lpf. If NONE displays, “lprng” is not
installed
9. If you want to make this the default printer, select Make Default.
10. If desired, click Test to send a sample job to the printer.
11. Click Ok to save changes.
Network printer
1. Select the Printers tab.
2. If Load LPD Server at boot time is not available, “lprng” is not installed. You must install “lprng”
to enable printing.
3. Click Add.
22 Chapter 2 Control Panel Settings ENWW
Page 31

4. Select Network Printer.
5. Type a Printer Name and Description (optional).
6. Select the appropriate Device Port. If the list is empty, there is no printer connected to the client.
7. Fill in the LPD Server box. This value is the Printer Server IP address.
8. Fill in the Shared Printer box. This value is the shared printer name on the server.
9. If necessary, type a driver name in the Windows driver box. Citrix iCA and RDP use this field to
set the printer driver for the session.
NOTE: You must type the windows driver name exactly as it is on the server.
10. From the Use Filter list, select /usr/lib/lprng/filter/lpf. If NONE displays, “lprng” is not
installed
11. If you want to make this the default printer, select Make Default.
12. If desired, click Test to send a sample job to the printer.
13. Click Ok to save changes.
ENWW Printers 23
Page 32

Samba printer
1. Select the Printers tab.
2. If Load LPD Server at boot time is not available, “lprng” is not installed. You must install “lprng”
to enable printing.
3. Click Add.
24 Chapter 2 Control Panel Settings ENWW
Page 33

4. Select Samba Printer.
5. Type a Printer Name and Description (optional).
6. Select the appropriate Device Port. If the list is empty, there is no printer connected to the client.
7. Fill in the Samba Server box.
8. Fill in the Shared Printer box.
9. Fill in the User Name, Password and Workgroup boxes. These values are determined by your
Windows Server configuration.
10. If necessary, type a driver name in the Windows driver box. Citrix iCA and RDP use this field to
set the printer driver for the session.
NOTE: You must type the windows driver name exactly as it is on the server.
11. From the Use Filter list, select /usr/lib/lprng/filter/lpf. If NONE displays, “lprng” is not
installed
12. If you want to make this the default printer, select Make Default.
13.
If you want the system to automatically translate carriage returns when printing from Linux to
Windows and Windows to Linux, select Translate.
ENWW Printers 25
Page 34

14. If desired, click Test to send a sample job to the printer.
15. Click Ok to save changes.
Print jobs
To view print jobs:
1. Select the Jobs tab.
2. Select the printer to view from the Select Printer list.
3. Click the Delete or Delete All buttons to delete jobs from the print queue.
Sound — ALSA Mixer
The ALSA Mixer dialog box allows you to set a wide variety of sound controls for the thin client.
There are two ways to access the ALSA Mixer:
●
Click the speaker icon on the taskbar.
●
Click Start > Programs > Apps > Sound > alsamixergui
26 Chapter 2 Control Panel Settings ENWW
Page 35

For more information on ALSA Mixer go to http://www.alsa-project.org/
User Manager
The User Management utility allows you to create and modify user accounts and groups or configure the
system to auto login as a specific user.
Managing a user account
The following sections include instructions for adding, modifying, and deleting a user account.
Add a user
To add a new user:
1. In the User Management window, click the User tab.
ENWW User Manager 27
Page 36

2. Click Add, and then click the User tab.
3.
Type a user name and the associated user's full name.
4. Type a password for the account in the Password and Confirm Password boxes.
5. Type or select a user ID in the User ID box.
6. To add the user to an existing group, select a group name from the Primary Group list.
7. If you want to disable the user account, select Disable user
8. If you want to enable automatic logon for the account, select Auto logon.
NOTE: The root user is not permitted to auto logon.
9. Click Ok to save changes.
Modify a user account
To change user access:
1.
In the User Management screen, select a user.
28 Chapter 2 Control Panel Settings ENWW
Page 37

2. Click Modify. The Modify user dialog box opens. You can change the user name, disable the user
account, reset the password, change the user ID, and change the primary group for the user account.
ENWW User Manager 29
Page 38

3. If you want to change user privileges, click the Privileges tab and make the desired changes. Each
privilege is associated with one or more groups on the Group tab.
NOTE: The Access to system administration tasks option assigns the account to the
Administrator group, which allows users to perform administrative tasks after logging on with
their own password instead of a root user password.
4. If you want to change group associations for the account, click the Group tab and make the desired
changes.
5. Click Ok to save changes.
Delete a user
To delete a user:
1.
In the User Management screen, select a user.
2. Click Delete, and then click Ok to confirm the deletion.
Automatic logon
You can set a user (except for the root user) to automatically log on at reboot.
For more information about adding and defining users, see
User Manager on page 27.
30 Chapter 2 Control Panel Settings ENWW
Page 39

To enable automatic logon for a user:
1. From the desktop, select Settings.
2. Click the System Tools tab.
3. Select Users Manager.
4.
Select the user for which to set up automatic logon.
5. Click Modify.
6. Select Auto Logon.
7. Click Ok.
8. Click Exit.
NOTE: To stop the auto login process from outside the root account, open an xterm session or
press Ctrl+Alt+F2, log in as root (su root), and then run /usr/share/hp/panel/
hpusers_app. Select the auto-login user and clear the box.
Managing a group
The following sections include instructions for adding, modifying, and deleting a group.
ENWW User Manager 31
Page 40

Adding a group
To add a new group:
1. In the User Management screen, click the Group tab.
2. Click Add.
32 Chapter 2 Control Panel Settings ENWW
Page 41

3. In the Group Name box, type a group name.
4. Type or select an ID for the group in the Group ID box.
5. To add users to this group, select a user from the Users list, and then click the Right arrow.
6. To remove users from the group, select the user from the Members list, and then click the Left
arrow.
7. Click Ok to save changes.
Modifying a group
To change user access:
1. In the User Management screen, click the Group tab.
2. Type or select a group, and then click Modify.
3. To add users to this group, select a user from the Users list, and then click the Right arrow.
4. To remove users from the group, select the user from the Members list, and then click the Left
arrow.
5. Click Ok to save changes
Deleting a group
NOTE: You must delete all users from a group before you can delete the group.
To delete a group:
1. From the User Management screen, click the Group tab.
2. Select the group to delete, and then click Delete.
3. Click Ok to confirm.
ENWW User Manager 33
Page 42

Thin State
Thin State capture and deploy allows you to capture a thin client image and deploy it to other thin clients
of the same model.
Thin State Capture
The HP ThinState Capture tool is a simple wizard-based tool that can be used to capture an HP thin client
image that can then be deployed to another HP thin client of identical model and hardware.
What do you need to have?
●
An HP thin client Linux unit that contains the latest HP provided image.
●
An HP-approved USB drive key.
NOTE: The HP ThinState Capture tool is not a standalone tool and can only be accessed by the
administrator from within the thin client image.
NOTE: Save all data on the USB flash drive on some other device prior to performing this
procedure. The USB flash drive will be formatted and all data will be lost.
1.
Once you launch the ThinState Capture tool from within the Control Panel, you are presented with
the following screen.
34 Chapter 2 Control Panel Settings ENWW
Page 43

2. Click Next.
3.
At this point, attach to the unit a USB drive key. The drive key drive letter and size are displayed. The drive
key must be greater in size than the on-board flash disk. As a result, if your thin client has
512–MB Flash, then the USB drive key must be 1 GB. Once the right drive key size is attached,
the following screen displays.
4. Click Capture.
5. Click Yes on the warning screen. The ThinState Capture tool formats and makes the USB flash drive
bootable. ThinState Capture will now reboot the system.
After you perform these actions, the ThinState Capture tool displays the following screen. Please follow
the on-screen instructions.
You can now use the USB flash drive to deploy the captured image to another HP thin client of the exact
same model and hardware.
Thin State Deploy
To perform a ThinState deployment:
1.
Set the boot order in the F10 System Bios to USB boot (if necessary).
2.
Attach the USB flash drive to the thin client unit you wish to deploy the captured image to, and then
power on the unit.
3.
Follow the on-screen instructions.
After you remove the USB flash drive and cycle power to the system, the image unbundles. Do not interrupt
or cycle power to the unit during this process.
You may use the captured image (flash.dd) found in the USB flash drive in combination with Altiris
Deployment Solution to remotely image multiple thin client units.
ENWW Thin State 35
Page 44

NOTE: You must use flash.dd in conjunction with HP’s ThinState Deploy utility (e.g. ibr.exe).
Flash.dd is not compatible with Altiris’ rdeploy.exe or rdeployt.exe utilities. Please consult the HP
Compaq Thin Client Imaging Tool at:
http://h20000.www2.hp.com/bc/docs/support/
SupportManual/c00485307/c00485307.pdf
For more information about Altiris, see http://www.altiris.com/.
FTP Update
Use this window to enable automatic FTP updates as an alternative to Altiris Deployment Solution. Enabling
this feature allows you to configure the thin client to check a specific ftp location for a newer image or
package upon reboot.
NOTE: FTP Update does not support full image updates on the t5725.
The Network Administrator can set up the DHCP Scope Options for FTP server. You can find these options
at /etc/ftpclient.conf, and include:
●
180 – force ftp imaging
●
181 – ftp server ip
●
182 – ftp server path
●
183 – user name
●
184 – password
●
190 – altiris server ip
For more information, see the FTP white paper at
http://h20000.www2.hp.com/bc/docs/support/
SupportManual/c00555197/c00555197.pdf.
36 Chapter 2 Control Panel Settings ENWW
Page 45

3
HP Connection Administrator
HP Connection Administrator allows you to manage server and application connections by setting up
Web, RDP, XDM, ICA, and other types of connections and assigning them to users.
To access all HP Connection Administrator functionality, you must log in with root permissions as a member
of the root group; however, non-root users can run and be assigned to connections.
HP Connection Administrator window
HP Connection Administrator allows you to start, add, edit, and delete connections.
Click the Connections icon on the desktop to access HP Connection Administrator.
NOTE: You must log in with root permissions to access all components of the HP Connection
Administrator window.
The HP Connection Administrator features the following:
●
Connections Display: Lists all server and/or application connections assigned to the user currently
logged on to the terminal. For each connection, the display shows the name, type, and status of the
connection.
NOTE: Double-click any displayed connection to activate that connection.
●
Connect: Click to activate a selected connection.
●
Exit: Click to exit HP Connection Administrator if the terminal is not in Kiosk mode. If the terminal is
in Kiosk mode, click this button to end the session. If you are a member of the admin or shutdown
groups, the thin client displays options to turn off or reboot the terminal.
ENWW HP Connection Administrator window 37
Page 46

● Settings: Click to access the Settings applications. For more information, see Control Panel
Settings on page 11
●
Delete: Click to delete a selected connection. The connection is deleted from the list of connections
available to all users, not just the user currently logged on to the terminal.
●
Add: Click to create a new connection and add it to the list of connections assigned to the user
currently logged on to the terminal. You can assign the new connection to other users in the Advanced
Configuration utility. For more information, see
Adding, editing, and deleting connections
on page 38.
●
Edit: Click to edit the selected connection. For more information, see
Adding, editing, and deleting
connections on page 38.
●
Advanced: Click to access the Advanced Configuration utility, where you can configure and assign
connections and configure the terminal user interface. For more information, see
Advanced
Configuration utility on page 51.
Adding, editing, and deleting connections
You can add, edit, or delete connections in the HP Connection Administrator or in the Advanced
Configuration utility. However, you need to note the following important difference based on where you
add connections:
●
Adding a connection in the HP Connection Administrator only adds it to the list of connections
assigned to the user currently logged on to the terminal.
●
Adding a connection in the Advanced Configuration utility automatically adds the connection to the
currently selected user. The new connection will also be available in the Advanced Configuration
utility for assignment to other users.
For more information about the different types of connections, see the related sections later in this chapter.
To add, edit, or delete a connection:
1. Click Add. The system displays the Add Connection dialog box, which lists the connection types
registered with the system.
2. Select the type of connection you want to create and click OK. For more information, see
3.
Follow the on-screen instructions to add the connection to the user's connections list and to the list of
available connections that you can assign to other users in the Advanced Configuration utility.
4. To edit the connection, select the connection and click Edit.
5. To delete the connection, select the connection and click Delete. The connection is deleted from all
user connection lists.
38 Chapter 3 HP Connection Administrator ENWW
Page 47

Connection types
You can use the HP Connection Administrator to create the following types of connections:
●
Citrix ICA
●
Firefox
●
rdesktop
●
XDM
●
Other
ENWW HP Connection Administrator window 39
Page 48

Citrix ICA
Use the following tabs to configure a Citrix ICA connection:
●
Server: Allows you to choose published applications or add a server and to configure server
location settings.
Select the appropriate button depending on whether the connection being created is to a server or
to a published application. Click the Refresh button to update the list of available connections of
that type or a specific server name you can type.
Server Location button: Click to launch the Server Location screen where you can add or delete
specific server connections for all connections or for this specific connection. To add or delete
connections for all ICA server connections, select Default from the Server Group list. To add or
delete ICA server connections for this specific connection, select Custom from the Server
Group list. You can modify settings for a newly added ICA server connection using the Global
ICA Setting button on the HP Connection Administrator screen. For more information about
Connection Administrator, see
HP Connection Administrator on page 37
NOTE: Adding or deleting ICA servers from the Default group on this screen adds or
removes them for all ICA connections.
40 Chapter 3 HP Connection Administrator ENWW
Page 49

● Applications: Allows you to select applications by entering a command line.
Command line: If required, type the specific command line to launch an application. The user's
Citrix environment determines whether the a command line is required.
Working directory: If required, type the working directory information for the user's specific
environment.
●
Logon: Allows you to specify logon information for connecting to a remote application.
If desired, you can specify logon information to be used when connecting the remote application.
Select Allow smartcard logon to enable smart card authentication with ICA connections.
ENWW HP Connection Administrator window 41
Page 50

● Window: Allows you to specify how the application window size and color.
Select Seamless Window to enable the connection to start in seamless windows mode.
42 Chapter 3 HP Connection Administrator ENWW
Page 51

● Options: Allows you to configure the following options:
Microphone input links into the audio input in ICA global settings. If the ICA global setting is
disabled, the setting within the connection is not applied. In general, refer to Citrix documentation
for a description of settings at:
http://support.citrix.com/servlet/KbServlet/download/
180-102-12980/Unix_Client_Admin_Guide.pdf
NOTE: There is no one best configuration for these options. Each option may or may not
be beneficial to the connection depending on the installed Citrix ICA environment.
NOTE: Use disk cache for bitmaps option may be slower and cause excessive
wearing of the flash drive.
●
Firewall Settings: Allows you to configure the proxy address and port.
ENWW HP Connection Administrator window 43
Page 52

Firefox connection
The Firefox connection allows you to create a browser connection.
You must complete the following settings to configure this connection:
●
Start Page: Enter the Web address to launch with this connection.
●
Name this connection: Type a name to associate with this connection.
rdesktop connection
This connection allows you to set up a remote desktop connection. rdesktop is an open source client
capable of speaking Remote Desktop Protocol (RDP). Unlike Citrix ICA, rdesktop requires no server
extensions.
You can configure the rdesktop connection using the following tabs:
●
General
Allows you to select a remote computer and provide the logon credentials for accessing this computer.
To select a computer:
1.
Type the computer name or select a computer from the drop-down menu.
2.
Enter the user name and password.
44 Chapter 3 HP Connection Administrator ENWW
Page 53

3.
Enter the domain (optional).
4. (Optional) In the Client Hostname box, type the host name for the terminal services session.
This entry allows you to dictate what is displayed when viewed shared resources.
5. In Connection Settings section, type a name for the connection.
●
Display
Allows you to configure the size and color of the remote desktop.
NOTE: Settings on the remote computer might override this setting. The remote computer
may be unable to pass to the thin client the requested settings.
●
Local Resources
Allows you to configure local devices.
ENWW HP Connection Administrator window 45
Page 54

46 Chapter 3 HP Connection Administrator ENWW
Page 55

This window allows you to configure the following:
●
Remote computer sound, which allows you to play the remote computer’s sound on your thin
client, play no sound at all, or leave the sound at the remote computer.
●
The desired keyboard language.
●
Connection to the following local devices:
disk drives - Type the path. Using a symbolic link may result in undesirable behavior.
printers - Type the path to the printer.
parallel ports - Type the location of the physical device. The default is /dev/lp0.
serial ports - Type the location of the physical device. The default is /dev/ttyS0.
For more information, type the rdesktop command in the console.
NOTE: To forward rdesktop connections, HP recommends redirecting from /media/usb0
(where 0 = 1st device, 1= 2nd device, 2 = 3rd device, 3 = 4th device) for hard drive and
USB drive key. As devices are added and removed, links are automatically created in this
location. For USB CD-ROM drives, redirect from /media/cd.
You can change device ownership and attributes by editing /etc/fstab. See “man fstab” and
“man mount” for details. You can type man fstab or man mount at a xterm session
command line to display the options and settings available for editing and configuring “fstab”.
If you select the Printers box, the following window is displayed.
This window displays installed printers for you to select.
Select the printer to redirect.
NOTE: When creating an rdesktop connection, if you receive a printer error, for example,
“Couldn’t open printcaps,” make sure you properly installed the printer using the printing
applet in the system setting control panel.
●
Programs
Allows you to launch programs through the remote desktop connection.
ENWW HP Connection Administrator window 47
Page 56

To launch a program:
1. Select Start the following program on connection.
2.
Type the program path and file name.
3.
Type the folder from which you want the program to launch.
4. Click Save.
●
Experience
Allows you to configure the thin client desktop and performance factors.
48 Chapter 3 HP Connection Administrator ENWW
Page 57

You can configure the following:
●
Connection speed: Select the speed at which the thin client connects.
●
Desktop background: Select to allow a desktop background to display.
●
Show contents of window while dragging: Select to allow the contents of windows to
display when you drag the window.
●
Menu and window animation: Select to allow menu and window animation.
● Themes: Select to allow themes.
●
Bitmap caching: Select to allow bitmap caching, which places commonly used bitmaps in a
file on the thin client. This process improves performance by minimizing the amount of display
information that must be passed over a connection.
NOTE: Depending upon connection configuration, selecting Bitmap caching may
or may not improve performance.
●
Use persistent bitmap caching: Select to allow persistent bitmap caching, which stores
bitmaps that are sent from the server on permanent media, such as a hard disk. Upon
connection, the thin client informs the server of the bitmaps it has so that the server does not
have to resend them.
NOTE: Depending upon connection configuration, selecting Use persistent
bitmap caching may or may not improve performance.
●
Use protocol compression: Select to enable protocol compression, which makes
commumication between computers faster.
ENWW HP Connection Administrator window 49
Page 58

● Use BackingStore of X server if available: Select to enable BackingStore. A
BackingStore contains the set of operations that can be performed on a JNDI Attributes. Java
Naming and Directory Interface (JDNI) is a programming interface (API) that allows you to
connect Java programs to naming and directory services such as DNS, LDAP, and NDS.
●
Use these additional options: Select and populate to use additional rdesktop options.
For additional information, please visit the rdesktop Web site at:
http://www.rdesktop.org.
XDM connection
The X Display Manager (XDM) connection window allows you to create and configure an XDM
connection.
The following is a list of configuration options:
●
Hostname: Type the XDM server name or server IP address.
●
Display: Select the Linux display setting for this XDM connection to utilize. The display number
determines which display to use.
●
VT (Virtual Terminal): Select Automatic. Consoles 9 thru 12 are available, and you can enable
other consoles by editing /etc/inittab. For example, to select Automatic, press Ctrl+Alt+F9 to
access the first XDM display. To select VT 12, press Ctrl+Alt+F12 to access the fourth XDM display.
●
Keymap: Select whether to use the language based on the local thin client settings, the server
settings, or select a specific language.
50 Chapter 3 HP Connection Administrator ENWW
Page 59

● Query Mode: Select the type of XDM connection:
●
Broadcast: Uses the first host that replies.
●
Indirect: Provides a list of available hosts.
●
Direct: Uses a single host.
●
Name this connection: Type a name to associate with this XDM connection.
Other
NOTE: If a command is not properly interpreted by the shell, place commands in a script and
run the script as an “other” connection.
The Other connection dialog box allows The HP Connection Administrator to launch any other applications
or command lines that are available on the system. For example, to launch an Xterm and then execute
the command ls, enter xterm –hold –e ls in the Command to create process box.
NOTE: If you are using HP Connection Administrator, you need to use a command such as
xterm -hold -e ls, so the commands output is available in the xterm.
Advanced Configuration utility
You can configure and assign connections and configure the user interface for the terminal in the
Advanced Configuration utility. To access the utility, click the Advanced button on the HP Connection
Administrator window.
NOTE: You must log in with root permissions to access the Advanced Configuration utility.
ENWW HP Connection Administrator window 51
Page 60

Configuring available connections
The Available Connections area on the left side of the screen lists all connections that you can assign
to users. Use the following features to modify, add, or delete connections:
●
Ping First column: Allows you to enable Connection Administrator to ping the server before
attempting a connection. If the server name fails to resolve or the server fails to respond to the ping,
the thin client aborts the connection attempt. If you are having trouble establishing a connection,
disable Ping First.
●
Add: Click to create a new connection and add it to the list of available connections in the current
user's connection list. For more information, see
Adding, editing, and deleting connections
on page 38.
●
Edit: Click to edit a selected connection. For more information, see
Adding, editing, and deleting
connections on page 38.
●
Delete: Click to delete a selected connection. The connection is deleted from the lists of connections
assigned to all users. For more information, see
Adding, editing, and deleting connections
on page 38.
Configuring user connections
The User Connections area on the right side of the screen displays all connections currently assigned
to the user selected from the drop-down list at the top of the window. Select a user from the list and use
the following features to configure connections for the user:
●
Name: Displays the name of the connection. You cannot change the connection name.
●
Type: Displays the type of connection (Web, RDP, XDM, ICA, or other). You cannot change the
connection type from this column.
52 Chapter 3 HP Connection Administrator ENWW
Page 61

● Primary: Select to designate a connection as primary. The thin client attempts secondary
connections if the primary connection fails. If more than one secondary connection is associated with
a primary connection, the thin client prioritizes the secondary connections starting with the first
connection in the group.
●
Auto: Select to designate whether a user is automatically logged on when HP Connection
Administrator starts up. You must log in using the root account to enable or disable automatic
connections.
●
Persistent: Select to designate whether the system will attempt to reconnect when a connection
fails. You can only make primary connections persistent.
●
Prompt: Select to configure the system to determine whether a user is still using the thin client after
a group of connections fails. Clear this check box to allow the system to continue to cycle through
the connections in the group.
NOTE: The user must quit the current session to disable automatic connection.
●
Right arrow: Click to add a selected Available Connection (left list box) to the selected user’s
connection list (right list box).
●
Left arrow: Click to add a selected Available Connection (left list box) to the selected user’s
connection list (right list box).
●
Up arrow: Click to move a selected user connection up in the list.
●
Down arrow: Click to move a selected user connection down in the list.
●
Save: Click to save changes made to user connections and user interface settings.
●
Cancel: Click to cancel unsaved changes made to user connections and user interface settings and
exit the Advanced Configuration utility.
●
OK: Click to save changes made to user connections and user interface settings and exit the
Advanced Configuration utility.
Assigning connections to users
After creating a connection using the root account, you can assign it to users.
ENWW HP Connection Administrator window 53
Page 62

To assign a connection to users:
1. In the HP Connection Administrator, click the Advanced button to access the Advanced
Configuration utility.
2. Under User Connections, select the appropriate user.
3. Under Available Connections, select the connection in the list of available connections, and then
click the Right arrow button to copy the connection to the list of connections for the user.
4. Click Save to save the updated list of connections for the user.
Configuring connections as primary, secondary, or to auto connect
Use the following procedure to configure connections in the Advanced Configuration utility.
●
You can designate connections as primary or secondary. A primary connection is the first attempted
in a group of connections. Secondary connections are attempted if the primary connection fails, and
attempt to connect in their listed order. You can assign several primary connections, each with several
associated secondary connections.
●
You can set primary connections to automatically connect when HP Connection Administrator starts
up.
●
You can set primary connections to automatically reconnect if the connection is lost.
54 Chapter 3 HP Connection Administrator ENWW
Page 63

To configure connections:
1. In the HP Connection Administrator, click the Advanced button to access the Advanced
Configuration utility.
2. Under User Connections, select the appropriate user.
3.
Select the connection in the user's connection list that you want to modify.
4.
If you want to make a connection a primary connection:
a. In the Primary column, select the check box.
b.
To assign a secondary connection to the primary connection, clear the check box in the
Primary column that you want to be the secondary connection. The connection becomes a
secondary connection to the first primary connection directly above the secondary connection
in the list.
c.
To arrange the connections in the order that you want them to connect, select a connection and
click the Up arrow and Down arrow to move the connection. Secondary connections are
always associated with the first primary connection above them in the list.
d. Click Save to save your changes.
NOTE: Since each secondary connection must have an associated primary connection
listed above it, the connection at the top of the list must be a primary connection.
ENWW HP Connection Administrator window 55
Page 64

5.
If you want to set automatic connections:
a. In the Auto column, select the check box.
b. Click Save to save your changes.
NOTE: You can set only primary connections to automatically connect when HP Connection
Administrator is launched.
6.
If you want to set automatic reconnections:
a. In the Persistent column, select the check box.
NOTE: You cannot disable automatic connection unless the user quits the current
session.
b. Click Save to save your changes.
NOTE: You can set only primary connections to automatically reconnect.
GLOBAL UI (User Interface) in KIOSK Mode
Global UI Kiosk Settings allows you to change the way the user interface displays. The preview pane to
the right of the check box indicates how the user interface will display.
Show User Interface: Select to display the HP Connection Administrator. Clear this box to further lock
down the terminal by hiding the HP Connection Administrator window for users who are not in the root
group. You can use this feature for connections set to automatically start at boot up where the HP
Connection Administrator window is not needed.
NOTE: The user interface is always shown for users in the root group.
NOTE: You must reboot the terminal for changes to take effect.
Setting Citrix global settings
Click the Citrix Global Settings button to configure global Citrix settings.
Server Location
Use this tab to add or modify Citrix servers.
56 Chapter 3 HP Connection Administrator ENWW
Page 65

To add a server:
1.
Select the browser type from the list in the box at the bottom of the dialog box.
2. Click Add.
3.
Type the server address and port number.
4. Click OK.
5.
Select the appropriate browser from the pull-down menu at the bottom of the window.
6. Click Save.
Preferences
Use this tab to select the keyboard language.
Hotkeys
Use this tab to configure thin client hot keys.
ENWW HP Connection Administrator window 57
Page 66

Drive Mapping
Use this tab to assign drive numbers to drives and configure whether the drive is enabled, readable, and
writeable.
To configure a drive:
1.
Click the drive letter to configure.
2. Select the Enable, Read, or Write check boxes to assign those characteristics to the drive.
3. With the drive letter selected, click in the Path column.
4.
Type the drive path.
NOTE: The preferred method of forwarding in Citrix connections with the HP Linux image is to
redirect from /media/usb0 (where 0 = 1st device, 1= 2nd device, 2 = 3rd device, 3 = 4th device)
for hard drive and USB drive key. As devices are added and removed, links are automatically created
in this location. For USB CD-ROM drives, redirect from /media/cd. This setting will be in place for
all Citrix connections from this unit.
You can change device ownership and attributes by editing /etc/fstab. See “man fstab” and “man
mount” for details. You can type man fstab or man mount at a xterm session command line to
display the options and settings available for editing and configuring “fstab”.
COM ports
Use this tab to map devices to communication ports.
58 Chapter 3 HP Connection Administrator ENWW
Page 67

To map devices:
1. Click Add.
2. Under Folders, select the location of the device.
3. Under Files, select the device.
4. Fill in the Selection: /dev box.
5. Click OK.
ENWW HP Connection Administrator window 59
Page 68

60 Chapter 3 HP Connection Administrator ENWW
Page 69

4
Citrix
This chapter provides an overview of the Citrix (ICA) program. For more detailed help in configuring the
Citrix client, see the Clients for UNIX Administrator’s Guide at:
http://support.citrix.com/docs/
Introduction
The Linux thin client offers two different options you can use to establish an ICA connection:
●
Citrix ICA Connection Manager — software application developed by Citrix Corporation.
●
HP Connection Administrator — user interface developed by HP.
NOTE: Certain Citrix functions, such as Citrix ICA PNAgent capability, are not accessible
under HP Connection Administrator.
You can access Citrix ICA by clicking Start > Programs > Apps > Net > Citrix ICA Connection
Manager.
Citrix (ICA)
The Citrix (ICA) program allows you to set up and configure Citrix ICA client connections.
ICA Client Settings
To view or set the preferences for ICA, select Tools > Settings. From the Settings window, you can
select keyboard layouts and types, enable or disable sounds, configure audio input, and allow automatic
client updates.
ENWW Introduction 61
Page 70

Preferences
From the Settings window, you can configure Window color and size, determine server location, configure
hot keys, configure or clear disk cache, map drives, add COM ports, configure firewall, enable auto
reconnect, and configure PNA.
Connection View
In Connection View, you can create, modify, or launch connections, and begin a session on a Citrix server.
To access Connection View, click View > Connection View.
Program Neighborhood Agent (PNAgent)
In PNAgent View, you can view and activate the applications that have been published in the
“neighborhood” on a Citrix server or server farm. To access PNAgent View, click View > PNAgent
View.
62 Chapter 4 Citrix ENWW
Page 71

5
Support
If you require support for your Linux-based thin client, contact your region’s HP Technical Support Center.
While HP provides support for Linux-based thin clients, HP does not provide technical support for the Linux
operating system or application components that are obtained from the open source community.
Support contact information is available at the Contact HP link on the HP home page or at:
http://welcome.hp.com/country/us/en/contact_us.html
Hardware warranty
The hardware warranty is three years limited coverage and is upgradeable through the purchase of an
optional HP Care Pack.
Software warranty
The software warranty covers several features, including:
●
Altiris Remote Management Client
●
Citrix Client
●
Network Management Applet
Note that Altiris is supported directly by Altiris, Inc. All other services and features are from open source
community packages and are not supported by HP.
Image updates and add-ons
HP provides periodic updates to the image, as well as add-ons. Check the HP support site for important
documentation that provides specific information for your image version and for installing add-ons. You
can find support documentation at:
www.hp.com/support/
To search for support documentation, enter your country and product name, and then click Manuals.
Custom image requests
To obtain a custom image from HP, contact your HP Account Team, which will work through the HP
Specials Process to understand the opportunity, image requirements, schedule, and costs involved.
ENWW Hardware warranty 63
Page 72

Availability of Linux open source code
You can get the source code for Open Source components contained in the HP t5725 in three ways:
●
Go to
http://www.debian.org or the Debian stable repositories, locate the specific file you are
interested in, and then download the source files.
●
Download the source file package from the HP Debian repository located at
ftp://ftp.hp.com/pub/
tcdebian.
●
On media by mail: Source code is available only on recordable media. To obtain the media, contact
your local HP Customer Support Center. HP may charge a nominal fee for the media.
64 Chapter 5 Support ENWW
Page 73

6
Frequently Asked Questions
Linux operating system
Question Answer
How do I tell what the image version/build number is?
To obtain the image version, from the desktop click Settings >
System info tab > OS Kernal. The dialog box provides
system information, including the image version.
How and where is the Linux image stored in flash memory? The image is stored in various formats. The boot up process
decompresses and loads certain portions of the image in RAM.
Some features and aspects of the image are not loaded until
they are needed. The image is stored in the following three
partitions (both are formatted as ext2):
/dev/hda1 - /
/dev/hda5 - /mnt, /root, /home, /opt
System Administration
Question Answer
How are users managed? A system administrator creates new user accounts and assigns
users to groups. The image provides the system administrator
with two different methods to manage users:
●
The User Management utility, accessible from the desktop
by clicking Settings > User Manager.
●
Standard command-line tools to manage users. Letter case
matters when using command line names and option
switches.
System Management
Question Answer
How do you configure the system hardware clock? Set the system hardware clock using the BIOS setup utility:
1.
Reboot the system and press F10.
2.
After the Setup utility displays, press Esc.
ENWW Linux operating system 65
Page 74

Question Answer
3.
Select the standard CMOS features option and press
Enter.
4.
Set the date and time using Page Up and Page Down.
5.
To save the changes, press F10 and Enter.
How do you configure the date and time? The Date and Time management GUI applet provides an easy
method for managing the date and time. You can configure the
date, time, time zone, and network time protocol (NTP). The
Applet is launched from the desktop by clicking Settings >
Date/Time.
How do you change the boot order? Run the BootOrder utility to alter the order of the boot up device.
The utility is installed with the standard image.
To run the BootOrder utility, perform the following steps:
1.
Click the XTerm icon from the toolbar.
2.
To use the BootOrder utility, execute cd /usr/share/
hp, then type ./hpbootorder and follow the listed
options.
To use the RepSet utility, execute ./ hprepset (without
parameters) and follow the listed options.
How do you synchronize the BIOS and system time? To synchronize the BIOS and system time, use the hwclock
command. This command allows you to either synchronize the
BIOS time to the system time, or synchronize from system time
to BIOS time. This command without any parameters displays
the current date and time.
hwclock [-r|--show] [-s|--hctosys] [-w|-systohc] [-l|--localtime] [-u|--utc]
Query and set the hardware clock (RTC).
Options
●
-r: Read hardware clock and print result
●
-s: Set the system time from the hardware clock
●
-w: Set the hardware clock to the current system time
●
-u: The hardware clock is kept in coordinated universal
time
●
-l: The hardware clock is kept in local time
General
Question Answer
Are there any hot keys? Yes, see the following:
●
Ctrl+Alt+F2 to Ctrl+Alt+F6: Starts the different gettys.
●
Ctrl+Alt+F7: Default X server.
66 Chapter 6 Frequently Asked Questions ENWW
Page 75

Question Answer
● Ctrl+Alt+F8: Syslog (configure with /etc/syslog.conf).
●
Ctrl+Alt+F9: Default first XDM session.
●
Ctrl+Alt+Backspace: Logs off the current session and
displays the login dialog. If the client is set to auto logon,
the auto logon completes.
●
Ctrl+Alt+Delete: Locks the screen. Entering any character
displays the locked screen dialog and requests the
password for the user that locked the screen. Other options
that you can set include:
● Lock workstation
●
Logout
●
Restart
●
Reboot
●
Shutdown
●
Alt+Tab: Switches the active application focus.
●
Alt+F9: Minimize a window.
●
Alt+F10: Maximize a window.
For more information about hot keys, see /etc/X11/icewm/
keys.
The wrong characters display when I use the keyboard?
From the desktop, click Settings > Keyboard. Make sure the
correct keyboard is selected in the Keyboard Layout list.
ENWW General 67
Page 76

Auto-logon/Auto-launch
Question Answer
How do I disable auto-logon for a non-root user account?
NOTE: There are many ways to accomplish this. The
suggested methods that follow are only a few
possibilities.
Example A
1.
Run a console, for example Ctrl+Alt+F2.
2.
Log on as root.
3.
Edit /etc/inittab by changing the following line:
1:12345:respawn:/sbin/getty —n —l /usr/
bin/autologin 38400 tty1
To:
1:12345:respawn:/sbin/getty 38400 tty1
4.
reboot and log on as root.
5.
From a console, run startx to start the XServer.
6.
Make changes as necessary and reconfigure the user's
account to auto-logon.
68 Chapter 6 Frequently Asked Questions ENWW
Page 77

Question Answer
How do I disable auto-logon for a non-root user account?
Example B
1.
Log on as root and enable auto-logon for the user's
account.
2.
Copy one of the following auto-logon shell script to /usr/
bin/autologin to provide a 2 second pause before X starts:
#1/bin/sh
read —n l —t 2 —p “Stop autologin (y/n)?
“ RESULT
if [ “$RESULT” = “y” ]; then
/usr/X11R6/bin/wdm
else
/bin/login —f user
fi
If you want it to be completely silent, do not use the -p
parameter.
If you want to use the left Shift, the following should work:
#!/bin/sh
echo “Press left Shift key now to stop
autologin.”
showkey —s —t 2 > /tmp/autologin; sync
if [ `grep 0x2a /tmp/autologin` ]; then
/usr/X11R6/bin/wdm
else
/bin/login —f user
fi
3.
Modify the auto-logon script for the user's name.
In a Kiosk environment where users have a local password even
though auto login is enabled on the client, you can also use
gksudo or sudo to run the hpusers_app from an xterm if users
have the “Access to system administration tasks” permission.
Users could then user their own password when they need to
use an administrative task. An example of what this allows could
be the ability to create an “Other” connection in Connection
Administrator with the following command:
`/usr/bin/gksudo /usr/share/hp/panel/
hpusers_app`
To discontinue auto-logon:
ENWW Auto-logon/Auto-launch 69
Page 78

Question Answer
How do I disable auto-logon for a non-root user account? To discontinue auto-logon:
1.
When booting and the Linux kernel is loading, press Esc
to see the glass window and kernel messages.
2.
Watch carefully, and when nearly completed, the system
prompts you to stop the auto-logon by pressing Y. You
have 2 seconds to press this key. If you press y, the system
bypasses auto-logon and enables the root to log on.
NOTE: You can modify the script to change the
prompt message, the two-second time delay, and
the key response to something other than y.
Example C
1.
Press Ctrl+Alt+F2.
2.
Log on as root.
3.
Type xinit /usr/share/hp/panel/
hpusers_app –– /usr/X11R6/bin/X :1
How do I launch Connection Administrator?
1.
Modify the following file: /home/user's_name/.xsession
with the vi editor.
2.
Add the following line between #!/bin/sh and exec
x-window-manager:
/usr/bin/cman &
How do I lock the desktop for users to resemble Kiosk mode? To configure the user's desktop settings:
1.
Log on as the user and delete any unwanted icons.
NOTE: If you do not want desktop icons and
wallpaper, comment out or remove the line that
starts rox in ~/.xsession.
2.
To configure the user's desktop, log on as root and copy
several files from /etc/x11/icewm to the user's profile to
control the display of the Windows Manager.
For example, copy three files (preferences, toolbar,
programs) from /etc/x11/icewm to /home/
user's_name/.icewm.
NOTE: The examples listed here use user as the
autologin account; therefore the path to the user's
home directory is /home/user
3.
Edit the files as necessary.
The preferences file controls aspects of the Windows
Manager such as taskbar and hotkeys, ShowTaskBar=0
to hide the taskbar. Set MinimizeToDesktop=1 to show
the desktop.
The toolbar file controls programs available on the toolbar.
70 Chapter 6 Frequently Asked Questions ENWW
Page 79

Question Answer
The programs file controls viewable programs on the
menus.
To disable the right-click menu, change ~/.icewm/
preferences and set the value
DesktopMenuButton=0.
Manageability
Question Answer
Are there any updates necessary for Altiris Deployment Server
to work on an HP Compaq Linux thin client?
Yes. There is a hot fix available from Altiris which includes
updates to the imaging process and the DOS agent
Bootwork.exe. This hot fix includes a sample script that allows
capture and deployment of images using Rdeployt.exe, as well
as a new Bootwork.exe file that recognizes the bootloader in
the image. This hot fix is available from the Altiris Web site
support page.
What are the steps to capture and deploy an image on an HP
Compaq Linux thin client?
The thin client supports the Linux version of the Altiris Remote
Management Client. Altiris management software allows you to
remotely capture and deploy Linux images. You can use the
Altiris Rdeployt tool, a text-base utility, to perform this function.
Capturing an Image:
HP Compaq Thin Client Actions (Required)
1.
Reboot the client and launch the F10 System Configuration
Setup Screen.
2.
Select the Advanced BIOS Features option and press
Enter.
3.
Select the First Boot Device option and press Enter.
4.
Select the Network option and press Enter.
5.
Press F10 to save the configuration.
6.
Press Enter to save and exit.
Altiris Deployment Server Console Actions
1. Double-click the Deployment Server Console icon
from the desktop to open the Deployment Server Console.
2. Right-click on the lower left window and select New
Job.
3.
In the empty box, type Image Capture and press
Enter.
4. From the upper right window, click Add.
5. From the drop-down menu, select Run Script.
6.
In the Run this Script window, type the following
command: rdeployt -mu -raw -f.\images
\test.img
ENWW Manageability 71
Page 80

Question Answer
NOTE: test.img is used for this example. You
may select any name for the.img file.
7. Select the DOS radio button from In which OS would
you like to run this script?
8. Click Finish.
You can drag and drop this job to any Linux unit to capture its
image.
How is an image deployed using Altiris? An image can be deployed by performing the following steps:
HP Compaq Thin Client Actions (Required)
1.
Reboot the client and launch the F10 System Configuration
Setup Screen.
2. Select the Advanced BIOS Features option and
press Enter.
3. Select the First Boot Device option and press Enter.
4.
Press F10 to save your configuration
5.
Press Enter to save and exit.
Altiris Deployment Server Console Actions
1. Double-click the Deployment Server Console icon
from the desktop to open the Deployment Server Console.
2. Right-click the lower left window and select New Job.
3.
From the empty box, type Image Deployment and
press Enter.
4. From the upper right window, click Add.
5. From the drop-down menu, select Run Script.
6.
From the Run this Script window, type the following
command: rdeployt -md -raw -f.\images
\test.img
NOTE: test.img is used for this example. You
may select any name for the .img file.
7. Select the DOS radio button from In which OS would
you like to run this script?
8. Click Finish.
9.
To deploy an image, you can drag and drop this job to
any HP Compaq Linux thin client.
How can a factory image be restored locally? A factory image can be restored locally using USB drive key or
USB CD-ROM. Instructions for this procedure are available on
the HP Compaq Thin Client Linux Image SoftPaq.
Can you capture and deploy settings separately from an image? Yes. HP has developed custom scripts for Altiris that capture
system settings and defined HP Connection Administrator
connections from a source HP Compaq Linux thin client system
72 Chapter 6 Frequently Asked Questions ENWW
Page 81

Question Answer
through the Altiris deployment console. You can then deploy
these captured system settings and connections out to a target
HP Compaq Linux thin client system through the Altiris
deployment console. For more information, see the white paper
entitled, “Altiris Manageability Scripts for HP Compaq Linux
Thin Clients” at
http://h20000.www2.hp.com/bc/docs/
support/SupportManual/c00448511/c00448511.pdf
Are there other management methods available from HP to
manage HP Linux thin clients?
Yes, you may update images using new HP FTP image update
and DHCP image update for HP Linux thin clients. For more
information, see the white paper entitled, "FTP/DHCP Image
Update for HP Linux Thin Clients" available on the
www.hp.com product support site.
ENWW Manageability 73
Page 82

74 Chapter 6 Frequently Asked Questions ENWW
Page 83

7
Troubleshooting
Altiris
ISSUE
Altiris fails to restore my Debian image from a USB storage device.
SOLUTION
This issue occurs with Altiris versions prior to 6.8.177. The issue does not occur with Altiris 6.8.177 or
higher. Update to a more recent version of Altiris.
HP Connection Administrator
ISSUE
Launching a connection changes the connection state to “active” then immediately back to “not connected”
without establishing a connection.
SOLUTION
There can be a variety of reasons for this behavior. If the connection is set to ping first and the host name
cannot be resolved, the target is behind a firewall or unable to successfully ping the target. As a
workaround, disable Ping first under Advanced settings for the connection. As a diagnostic step, try
pinging the host from a console.
Citrix ICA
ISSUE
After connecting to Adobe Acrobat as a Published Application and then shutting down the connection,
the Adobe process does not properly terminate and will not allow you to relaunch an Adobe session.
SOLUTION
HP Connection Administrator is designed to prevent multiple instances of the same connection to run. To
resolve this issue, update to a newer version of Adobe or contact Citrix for an alternative solution.
ISSUE
The Audio input feature is grayed out in Citrix ICA client and the microphone input does not work even
with this feature enabled in HP Connection Administrator.
ENWW Altiris 75
Page 84

SOLUTION
When there is no existing /etc/.hpconman/wfclient.ini, cman will use the one created by wfcmgr, but
there is an entry missing from the default wfclient.ini that only gets created after you enable it through
wfcmgr. If you have already run cman, you need to remove the version without AllowAudioInput=True
and enable audio in wfcmgr so cman will create a new version with the correct value.
ISSUE
USB storage devices that are automatically mounted and then mapped through an ICA connection with
enabled read and write options fail to save, edit or delete files on the USB device.
SOLUTION
One workaround for this Citrix ICA issue is to change /etc/fstab and /etc/hal/devices.d/50pmount.hal to umask-000. However, you should evaluate the security implications of this workaround
in your specific environment.
rdesktop
ISSUE
You add a rdesktop connection with the default settings, and then change the video size to 200 percent
or to full screen on Media Player, and no video displays.
SOLUTION
1. In HP Connection Administrator, select the connection, and then click Edit.
2.
Click the Experience tab.
3. Clear Bitmap caching and Use persistent bitmap caching.
Firefox
ISSUE
Firefox inside HP Connection Administrator is not recognizing the proxy settings from the desktop version
of Firefox.
SOLUTION
If behind a firewall, disable “ping first”, because most firewalls block ping.
ISSUE
When Auto is enabled in HP Connection Administrator for a Firefox connection with two Firefox
secondary connections, the error “Firefox is already running , but it is not responding” message displays.
SOLUTION
To open new Firefox windows, you must first close the existing Firefox process or restart the system. This
is a known Firefox issue for the shipping version. Please see
http://kb.mozillazine.org/Profile_in_use for
more information.
ISSUE
76 Chapter 7 Troubleshooting ENWW
Page 85

System intermittently hangs while running Firefox 2.x.
SOLUTION
This occurs because the flash file system has no available space, which may be caused by the Firefox 2.x
list of suspected forgery sites that are downloaded to the client by default. Try disabling this feature by
clearing the Tell me if the site I’m visiting is a suspected forgery check box under Firefox 2.x
> Tools > Security. If you install a version of Firefox that you did not obtain from HP, you may also
want to run the /usr/share/hp/firefoxtweaks script as root from an xterm or console to reduce
unnecessary writes to the flash disk.
XDM
ISSUE
You cannot run an X application to a local machine when you Telnet to a remote XDM.
SOLUTION
The default configuration disables this functionality because of security concerns. You can enable by
removing –nolisten TCP from /etc/X11/wdm/Xservers and restarting the X server.
ISSUE
Keyboard is dead/locks up when VT is set between 1 and 6 in an XDM connection.
SOLUTION
VT’s 1 through 6 are reserved as additional getty's by default. Press the power button to shutdown, then
either select a different VT or modify /etc/inittab and comment out the line that creates the getty you
would like to use. Reboot for the changes to take effect.
Kiosk
ISSUE
When you shut down or reboot while in Kiosk mode, you get a blank, blue screen and no connection.
SOLUTION
This occurs at logout when a non-root user is in Kiosk mode with no auto-connection and the user was not
granted rights from the administrator to reboot or shut down the system.
Printing
ISSUE
You cannot print a large job to local printers in rdesktop sessions.
SOLUTION
This issue may occur if a large volume of documents or an individually large document is sent to the local
printer. Try to send large documents to a printer that is not connected locally to the thin client. If you want
to print multiple documents, allow the print queue to clear before submitting the documents.
ENWW XDM 77
Page 86

ISSUE
You cannot print large jobs to local printers from an ICA session.
SOLUTION
The thin client has limited space available for the print spooler. This issue may occur if a large volume of
documents or an individually large document is sent to the local printer. Try to send large documents to
a printer that is not connected locally to the thin client. If you want to print multiple documents, allow the
print queue to clear before submitting the documents.
ISSUE
You set up a new printer using Printer Manager. When I test the printer I receive an error message “Printer
Test Failed!!!”
SOLUTION
The entry in the Printer Name box cannot contain spaces. Remove any spaces from the entry in this
field. You can use spaces for the description.
ELO Touch Monitor
ISSUE
While using an ELO Touch screen monitor, you log out by clickingStart > Window Manager > Log
Out, and the ELO Touch monitor stops accepting touch commands. After a power cycle the monitor
functions correctly.
SOLUTION
Log out by pressing the Ctrl+Alt+Backspace keys.
USB
ISSUE
Automount only supports the first partition of an external drive.
SOLUTION
Mount the other partitions manually or add entries for them to /etc/fstab.
Network
ISSUE
Attempts to ping a host result in message “unknown host” error in a mixed Windows and Linux
environment.
SOLUTION
78 Chapter 7 Troubleshooting ENWW
Page 87

One possible solution is to install the “winbind” package from the Debian repositories using Synaptic or
Aptitude and configure for the specific environment. After installed, edit from a command line /etc/
nsswitch.conf and add the word wins to the end of the hosts: line.
ISSUE
Attempts to ping the client result in message “unknown host” error.
SOLUTION
Ensure the host name is correct and includes a fully qualified domain name (FQDN) for the applicable
domain where the thin client is located. You may also need to add the FQDN in /etc/hosts.
Modify /etc/dhclient.conf and enter the option send host-name [FQDN].
Keyboard
ISSUE
The local keyboard settings do not match the actual characters on my keyboard.
SOLUTION
The characters used in the keyboard mappings are defined by the xserver provided by the Debian
repository and can be modified either by changing the source files in /etc/X11/xkb or by running the
xmodmap command from the users ~/.xsession script. This latter method is used by the hptc-keyboards
package available in the HP repository to customize the international keyboard provided by HP.
Multimedia
ISSUE
Attempting to play video with the default install of the mplayer package from
www.debian-multimedia.org will cause this message to appear: "Error opening/initializing the selected
video_out (-vo) device."
SOLUTION
Open the Preferences dialog, select the Video tab, and select a different driver. The xv or x11 drivers
seem to provide the best performance.
Miscellaneous
ISSUE
System intermittently hangs.
SOLUTION
Check available flash space with the command df –h from an xterm or console. You may need to delete
unnecessary files. One possible alternative is to install localepurge from the Debian repository or delete
documentation files by running the /usr/share/hp/cleandocs script from an xterm console.
ENWW Keyboard 79
Page 88

80 Chapter 7 Troubleshooting ENWW
Page 89

8
Useful information
See the following Web sites for information relevant to the Linux thin client.
Site URL
Linux Online www.linux.org
Linux.com www.linux.com
Linux on Laptops www.linux-laptop.net
Linux Security www.linuxsecurity.com
Linux Journal www.linuxjournal.com
Linux Gazette www.linuxgazette.com
HP white papers. To search for white papers, type your country,
product name, and then click Manuals.
www.hp.com/support/
Debian http://debian.org
Debian — Wikipedia definition http://en.wikipedia.org/wiki/Debian
Debian backports http://backports.org
Debian GNU/Linux System Administration Resources http://debian-administration.org
Debian Linux Kernel Handbook http://kernel-handbook.alioth.debian.org
Debian Security Information http://www.us.debian.org/security
Debian Help http://www.debianhelp.co.uk
Getting Help with XFree86 http://www.xfree86.org/sos
Synaptic Package Manager — Wikipedia definition http://en.wikipedia.org.wiki.synaptic
The Linux Documentation Project http://tldp.org
ENWW 81
Page 90

82 Chapter 8 Useful information ENWW
Page 91

Index
A
add-ons 63
adding
connections 38
groups 32
network printer 22
parallel printer 19
Samba printer 24
USB printer 21
user account 27
Advanced Configuration utility 51
ALSA Mixer 26
Altiris 71
Aptitude 1
assigning connections to users 53
Auto box 53
automatic connections 54
automatic logon 30
B
background 2
BackingStore 50
BIOS 9
BIOS/time synchronization 66
bitmap caching 49
boot order 66
Broadcast 51
build number 65
C
capturing images 34
changing
boot order 2, 66
Citrix
global settings 56
hot keys 57
Citrix ICA 61
Citrix ICA connection 40
clock 13, 65
code 64
COM ports, Citrix 58
configuring
clock 13
connections 52, 55
connections as primary,
secondary, automatic 54
date/time 12, 66
display settings 14
keyboard 15
mouse settings 15
network settings 16
printers 19
screen saver 14
sound 26
time 12, 66
users 27
Connection Administrator,
features 37
connection types 8, 39
Connections 2
connections
adding, editing, deleting 38
assigning to users 53
Citrix ICA 40
configuring 55
Firefox 44
other 51
rdesktop 44
XDM 50
Control Panel 11
CPU 9
custom image requests 63
D
date/time 12, 66
Debian 1
Debian Web sites 81
default
password 1
user account 1
deleting
connections 38
groups 33
user accounts 30
deploying images 35
desktop 2
desktop themes 4
display settings 14
DNS 18
DPMS 14
drive mapping 58
E
editing, connections 38
F
FAQs
general 66
Linux operating system 65
manageability 71
system administration 65
system management 65
Firefox 2, 4
Firefox connection 44
FTP update 36
G
general FAQs 66
Global UI 56
group shift/lock behavior 15
groups
adding 32
deleting 33
managing 31
modifying 33
H
hardware warranty 63
Home 2
ENWW Index 83
Page 92

hot keys
Citrix 57
list 66
HP Connection Administrator 37
I
image
location 9, 65
updates 63
version 65
installing
packages 6
software 6
K
keyboard 15
Keymap 50
Kiosk 56
L
launching Synaptic 5
Linux open source code 64
Linux operating system FAQs 65
Linux Web sites 81
location of image 9
logging on, automatically 30
M
manageability FAQs 71
managing
groups 31
user accounts 27
memory 9
mixer 4, 26
modifying
groups 33
user accounts 28
mouse 15
N
Network Manager 16
network printer 22
Network Time Protocol 12
NTP 12
O
open source code 64
Other connection 51
P
packages 5
parallel printer 19
password, default 1
Persistent box 53
persistent connection 56
Ping First 52
PNAgent 62
primary connection 53
primary connections 54
printers 19
privileges 30
Prompt box 53
protocol compression 49
R
rdesktop connection 44
S
Samba printer 24
screen saver 14
secondary connections 54
setting Citrix global settings 56
Settings 2
software warranty 63
software, installation 6
sound 4, 26
support 63
Synaptic 2, 5
synchronize BIOS/system time 66
system administation FAQs 65
system hardware clock 13, 65
system information 9
system management FAQs 65
system tools 11
T
taskbar 4
TeemTalk 2, 8
themes 4
thin client image 1
Thin State 34
Thin State capture 34
Thin State deploy 35
time 12, 66
Troubleshooting 75
U
updating images, FTP 36
URLs 81
USB printer 21
user accounts
adding 27
deleting 30
managing 27
modifying 28
users 27
V
version 9
VT 50
W
warranty
hardware 63
software 63
Web sites, list 81
workspaces 4
wrong character display 67
X
XDM connection 50
xterm 4
84 Index ENWW
 Loading...