

Page 1

Administrator's Guide
HP ThinPro
Page 2

© Copyright 2008–2009 Hewlett-Packard
Development Company, L.P. The
information contained herein is subject to
change without notice.
Windows is a trademark of Microsoft
Corporation in the U.S. and other countries.
The only warranties for HP products and
services are set forth in the express warranty
statements accompanying such products
and services. Nothing herein should be
construed as constituting an additional
warranty. HP shall not be liable for technical
or editorial errors or omissions contained
herein.
This document contains proprietary
information that is protected by copyright. No
part of this document may be photocopied,
reproduced, or translated to another
language without the prior written consent of
Hewlett-Packard Company.
Administrator's Guide
HP ThinPro
Fifth Edition (November 2009)
Fourth Edition (August 2009)
Third Edition (June 2009)
Second Edition (March 2009)
First Edition (October 2008)
Document Part Number: 509692-005
Page 3

About This Book
WARNING! Text set off in this manner indicates that failure to follow directions could result in bodily
harm or loss of life.
CAUTION: Text set off in this manner indicates that failure to follow directions could result in damage
to equipment or loss of information.
NOTE: Text set off in this manner provides important supplemental information.
ENWW iii
Page 4

iv About This Book ENWW
Page 5

Table of contents
1 Introduction ..................................................................................................................................................... 1
Using HP ThinPro ................................................................................................................................. 3
Easy Config Wizard .............................................................................................................................. 5
2 Installation ..................................................................................................................................................... 16
Connections ....................................................................................................................................... 17
Connect ............................................................................................................................. 18
Disconnect ......................................................................................................................... 18
General Settings ................................................................................................................ 18
Citrix ICA ........................................................................................................... 18
Options ............................................................................................. 19
Local Resources ............................................................................... 20
Window ............................................................................................. 21
Firewall ............................................................................................. 22
Server Location ................................................................................ 23
Keyboard Shortcuts .......................................................................... 24
Iceweasel .......................................................................................................... 24
RDP ................................................................................................................... 26
General ............................................................................................. 26
USB .................................................................................................. 27
Add .................................................................................................................................... 27
Citrix ICA ........................................................................................................... 28
Network ............................................................................................ 29
Connection ....................................................................................... 30
Window ............................................................................................. 31
Application ........................................................................................ 32
Firewall ............................................................................................. 33
Smart Ping ........................................................................................ 34
Common Settings ............................................................................. 35
RDP ................................................................................................................... 36
Network ............................................................................................ 36
Window ............................................................................................. 37
Options ............................................................................................. 38
Local Resources ............................................................................... 39
ENWW v
Page 6

Experience ........................................................................................ 40
Advanced .......................................................................................... 41
HP TeemTalk .................................................................................................... 41
Adding a TeemTalk Connection using the TeemTalk Creation
Wizard .............................................................................................. 42
Adding a TeemTalk Connection Manually ........................................ 44
Iceweasel .......................................................................................................... 46
Configuration .................................................................................... 46
Advanced .......................................................................................... 47
HP Remote Graphics Software (RGS) .............................................................. 47
RGS Connection ............................................................................... 48
Advanced .......................................................................................... 49
HP Session Allocation Manager (SAM) ............................................................ 49
HP SAM Client .................................................................................. 50
Advanced .......................................................................................... 50
XenApp ............................................................................................................. 51
Configuration .................................................................................... 51
Advanced .......................................................................................... 52
Leostream ......................................................................................................... 52
Network ............................................................................................ 53
Advanced .......................................................................................... 54
vWorkspace ...................................................................................................... 54
Editor ................................................................................................ 55
Network ............................................................................................ 56
Window ............................................................................................. 57
Options ............................................................................................. 58
Local Resources ............................................................................... 59
Experience ........................................................................................ 60
Advanced .......................................................................................... 61
VMware View .................................................................................................... 61
Network ............................................................................................ 62
Options ............................................................................................. 63
Advanced .......................................................................................... 64
Xdmcp ............................................................................................................... 64
Configuration .................................................................................... 65
Advanced .......................................................................................... 67
SSH ................................................................................................................... 67
Configuration .................................................................................... 68
Advanced .......................................................................................... 69
Telnet ................................................................................................................ 70
Configuration .................................................................................... 70
Advanced .......................................................................................... 71
Custom .............................................................................................................. 71
Configuration .................................................................................... 72
vi ENWW
Page 7

Advanced .......................................................................................... 73
Copy .................................................................................................................................. 73
Delete ................................................................................................................................ 73
Edit ..................................................................................................................................... 74
User View .......................................................................................................................... 74
Control Panel ...................................................................................................................................... 75
Peripherals ......................................................................................................................... 76
Client Aggregation ............................................................................................. 76
Client Aggregation Overview ............................................................ 77
Configuring Client Aggregation ......................................................... 78
Disabling Client Aggregation ............................................................ 83
Display Preferences .......................................................................................... 83
Keyboard Layout ............................................................................................... 85
Keyboard Preferences ...................................................................................... 86
Mouse ............................................................................................................... 87
Printers .............................................................................................................. 88
Printers Tab ...................................................................................... 88
Jobs Tab ........................................................................................... 90
SCIM Input Method Setup ................................................................................. 90
Sound ................................................................................................................ 91
ThinPrint ............................................................................................................ 92
Touch Screen .................................................................................................... 92
USB Manager .................................................................................................... 93
Setup ................................................................................................................................. 94
Date and Time ................................................................................................... 95
Global Network Settings .................................................................................... 95
Language .......................................................................................................... 96
Network Connections ........................................................................................ 96
Wired Connection ............................................................................. 97
Wireless Connection ......................................................................... 99
VPN Connection ............................................................................. 100
Security ........................................................................................................... 102
HP ThinPro Configuration ............................................................................... 103
Personalization ................................................................................................................ 104
Boot Logo ........................................................................................................ 105
Desktop Background ....................................................................................... 106
Screensaver .................................................................................................... 107
Window Manager ............................................................................................ 108
Management .................................................................................................................... 110
AD/DDNS Manager ......................................................................................... 111
Altiris Configuration ......................................................................................... 112
ezUpdate ......................................................................................................... 112
Factory Reset .................................................................................................. 114
Agent Configure Manager ............................................................................... 115
ENWW vii
Page 8

SSHD Manager ............................................................................................... 116
Synaptic Package Manager ............................................................................ 116
HP ThinState Utility ......................................................................................... 117
Manage the HP ThinPro Image ...................................................... 118
Manage the HP ThinPro Configuration ........................................... 122
VNC Shadow ................................................................................................... 127
Advanced ......................................................................................................................... 128
CDA Mode ....................................................................................................... 128
Mousepad ....................................................................................................... 129
X Terminal ....................................................................................................... 130
System Information .......................................................................................................................... 131
General ............................................................................................................................ 131
Network ............................................................................................................................ 132
Net Tools ......................................................................................................................... 133
Software Information ........................................................................................................ 134
Index ................................................................................................................................................................. 135
viii ENWW
Page 9

1 Introduction
This guide provides the network administrator with instructions for configuring the thin client and explains
the various configuration utilities.
The HP ThinPro operating system reinvents UI simplicity with a single console interface for dashboard
access to all user and administrative touch points. A default Connection Manager view integrates
traditional connection types with the latest VDI broker connections with shared access to settings.
Administrators are only one click away from the Easy Config setup wizard, Control Panel and System
Information layers.
Connectivity support may include access to Windows
®
, Citrix, mainframes, mid-range servers, Unix/
Linux backends, web hosts as well as various VDI brokers such as Citrix XenDesktop, VMware View,
Quest vWorkspace, LeoStream and HP SAM (Session Allocation Manager).
NOTE: Host access support may vary between different HP thin client models using the HP ThinPro
operating system.
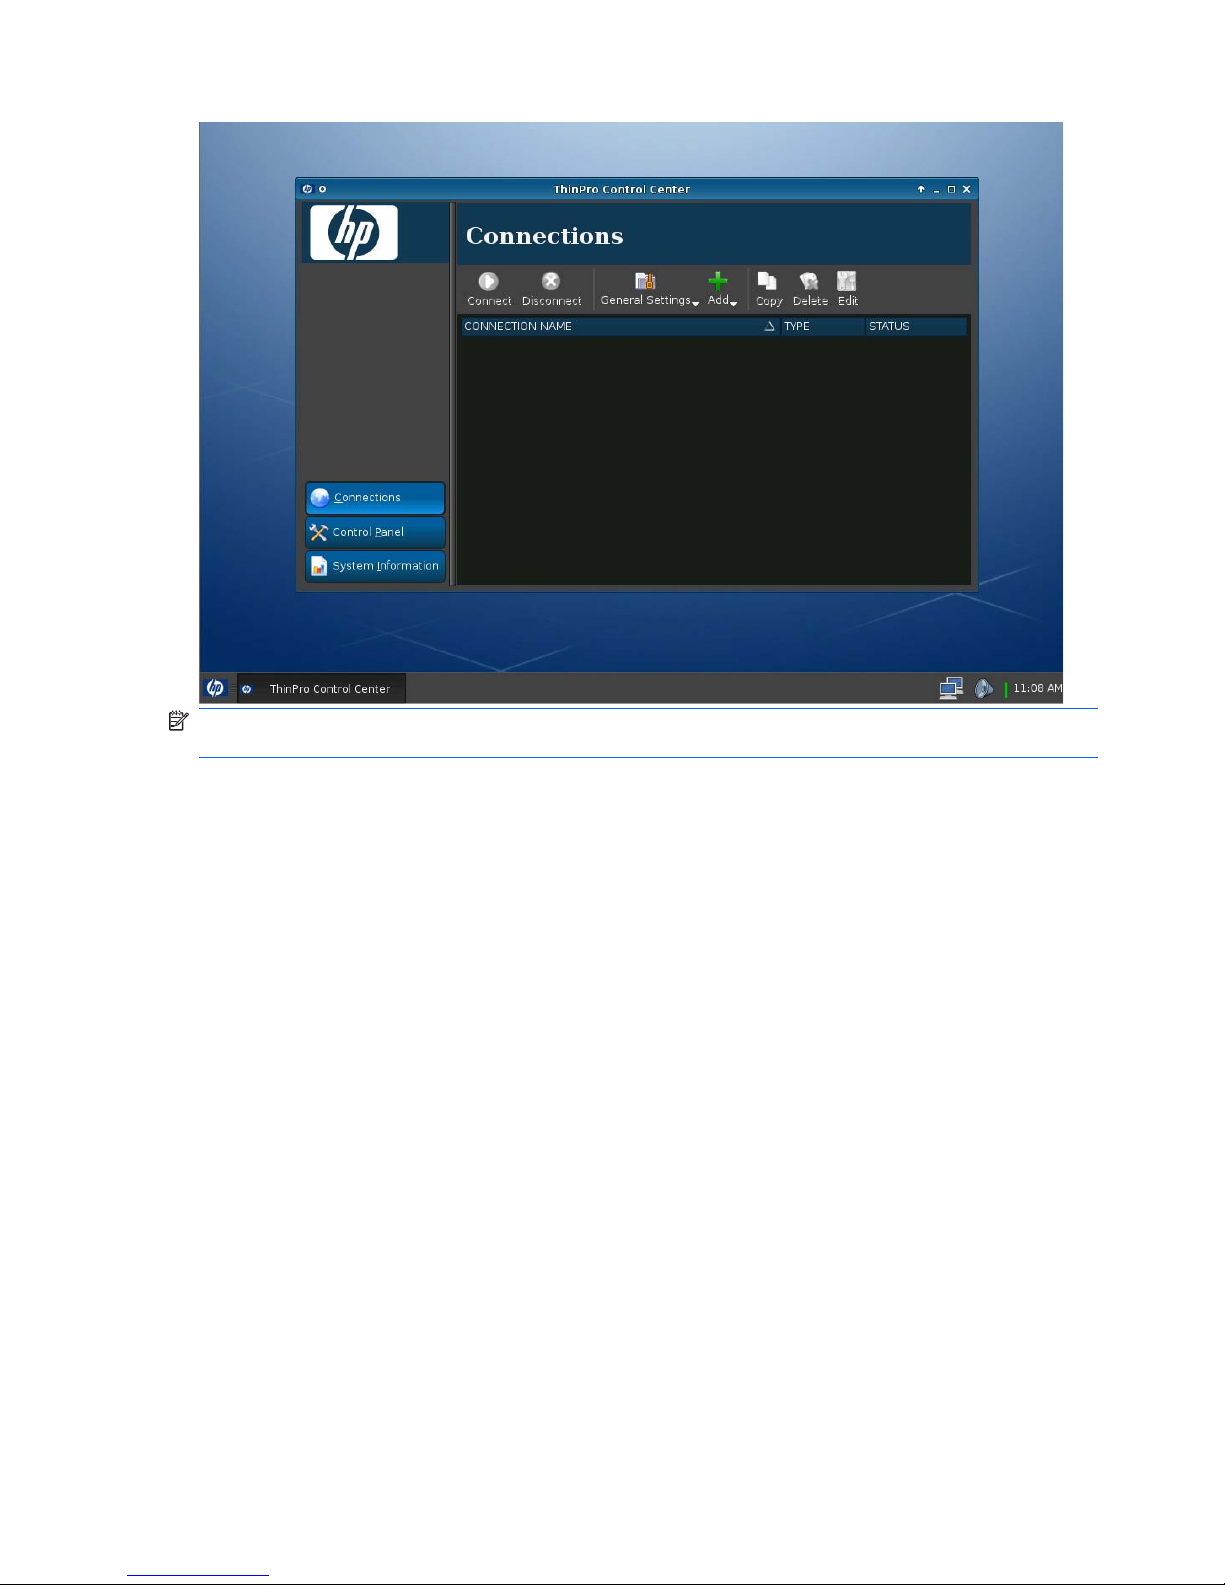
HP ThinPro interface is displayed by default when you turn on the thin client. The desktop includes a
taskbar that provides access to open applications, a volume icon, and a clock. Click on ThinPro Control
Center in the left side of the taskbar to open and close the ThinPro interface.
ENWW 1
Page 10
NOTE: Some ThinPro images may look different than those pictured in this guide. Not all features are
present on all models.
2 Chapter 1 Introduction ENWW
Page 11
Using HP ThinPro
HP ThinPro allows you to launch and manage host and remote application connections by creating an
ICA, XenApp, RDP, HP TeemTalk, Leostream, vWorkspace, VMware View, X Windows, or Iceweasel
connection. When logged in as Administrator, you can define which connections and connection types
are visible when in User mode. The Administrator can further restrict Users from deleting connections
or creating new ones.
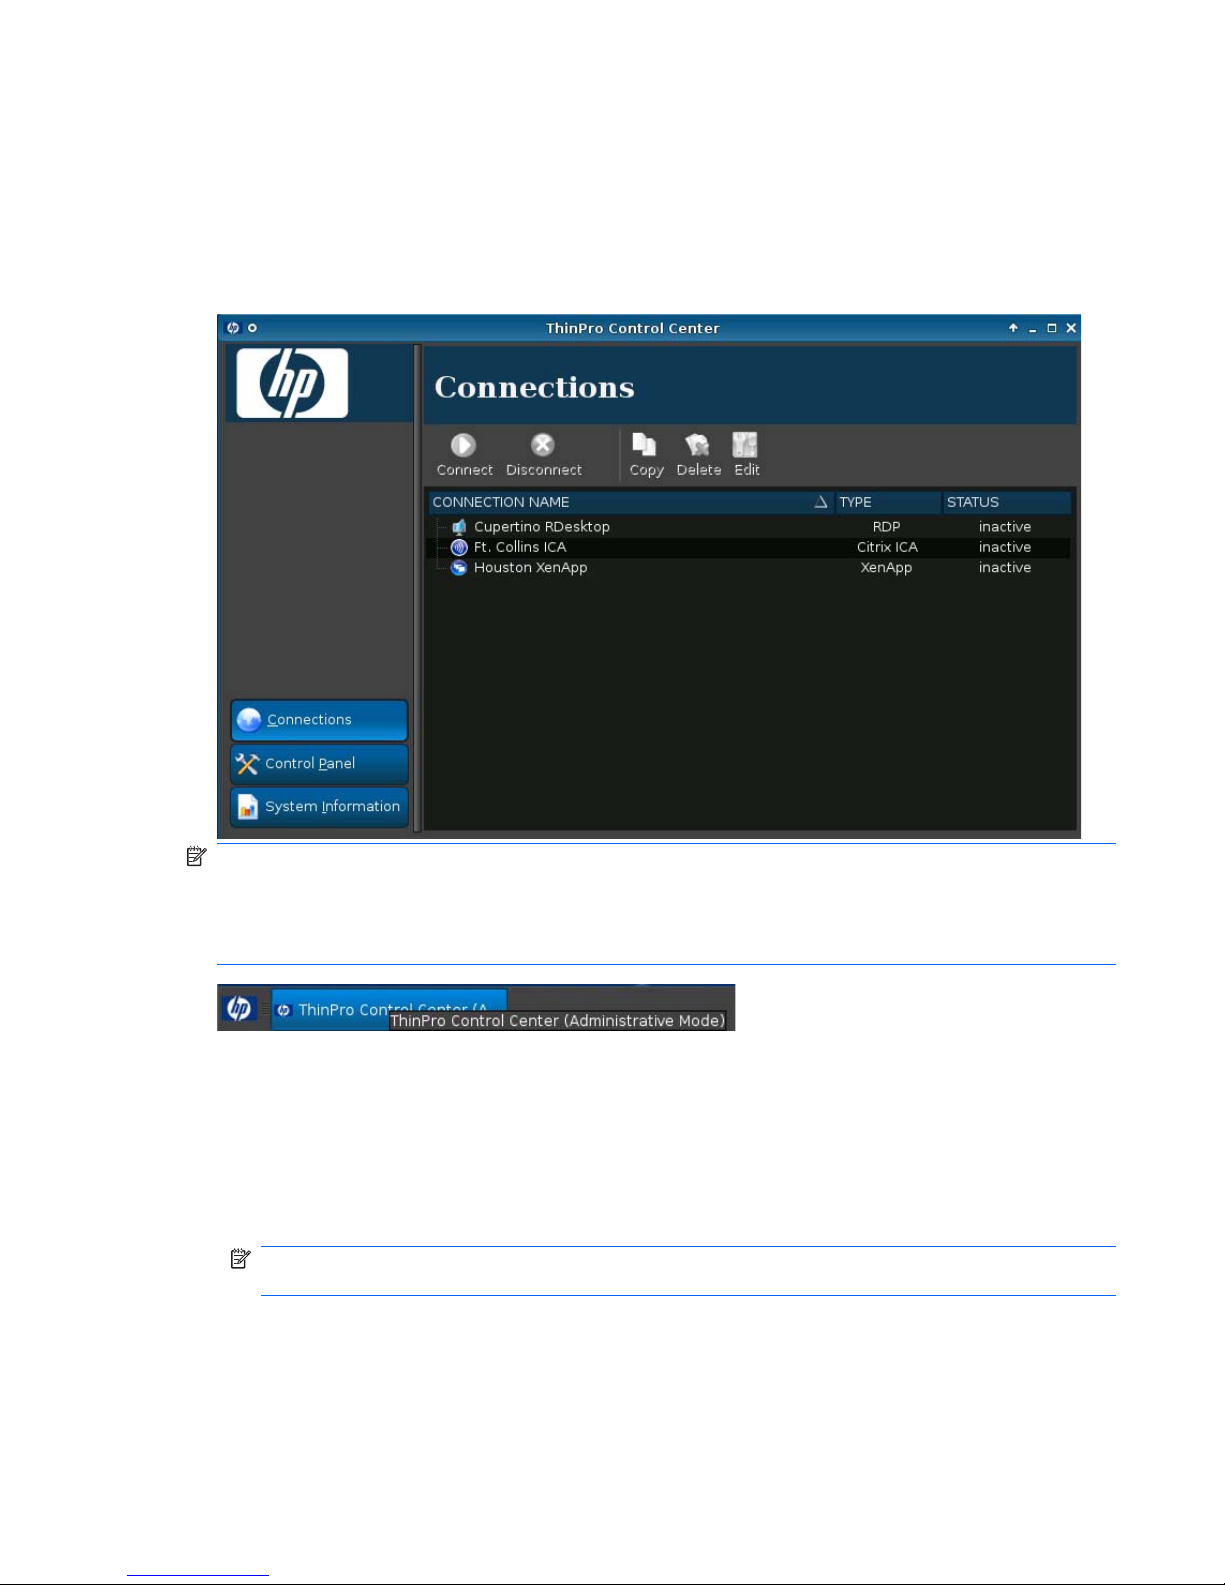
NOTE: You must log in with administrator permissions to access all components of the HP ThinPro
window. If you are in User Mode, when you position your cursor over the ThinPro Control Center in the
bottom left of the screen, a message describes this as ThinPro Control Center. If you are in
Administrative Mode, when you position your cursor over the ThinPro Control Center in the bottom left
of the screen, a message describes this as the ThinPro Control Center (Administrative Mode).
HP ThinPro opens by default in the User Mode. To switch to the Administrative Mode:
1. Open the ThinPro Control Center Menu and select Administrator/User Mode Switch.
You can open the ThinPro Control Center Menu in any of the following ways:
●
Click the HP logo in the bottom left of the screen.
●
Position your cursor in the screen background and right-click.
NOTE: Alternatively, you can press Ctrl+Alt+Shift+S, select Switch to Admin Mode, and click
OK.
ENWW Using HP ThinPro 3
Page 12
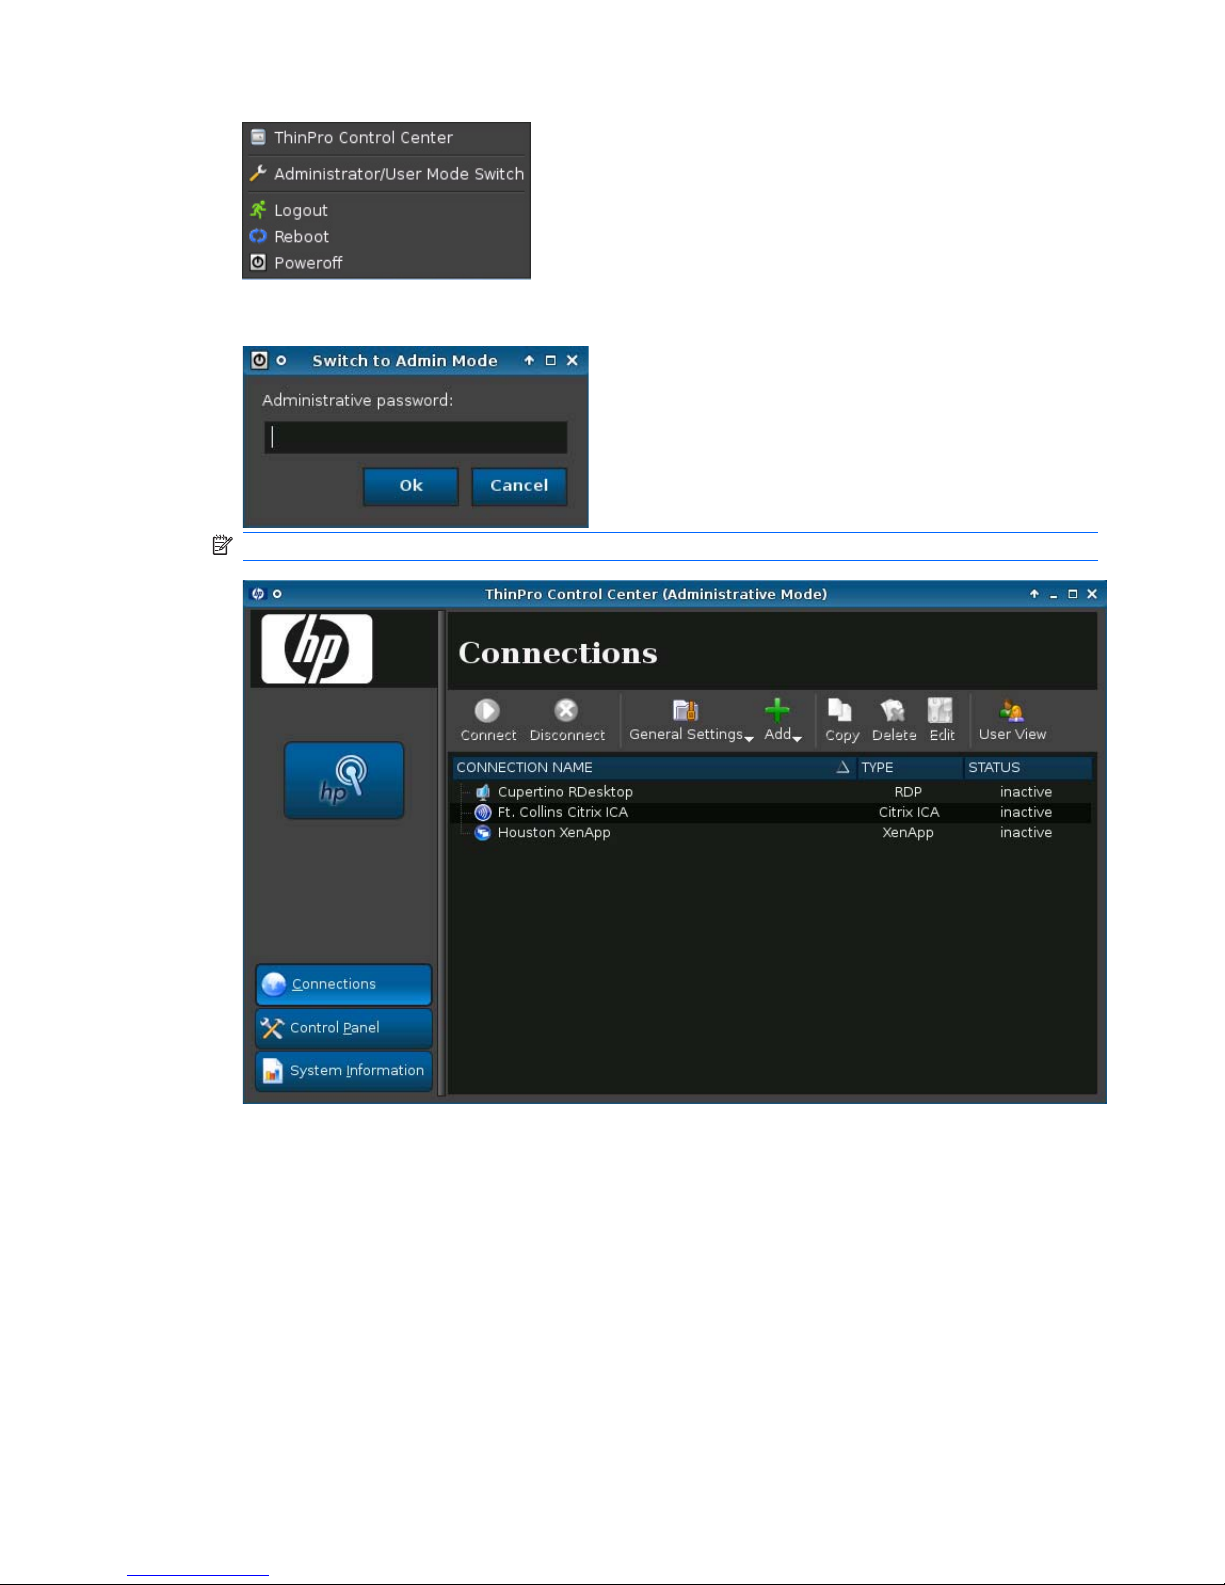
2. Type the Administrative password in the field and click OK.
NOTE: The default password for Administrative Mode is root.
4 Chapter 1 Introduction ENWW
Page 13

Easy Config Wizard
Easy Config Wizard simplifies the configuration process, allowing you to accomplish the following:
●
Select the language
●
Identify and configure peripherals
●
Change the Administrator password
●
Designate the thin client as single- or multipurpose
●
Select the user interface style
●
Set up the connection mode
●
Select the thin client management method
●
Save the thin client configuration
ENWW Easy Config Wizard 5
Page 14
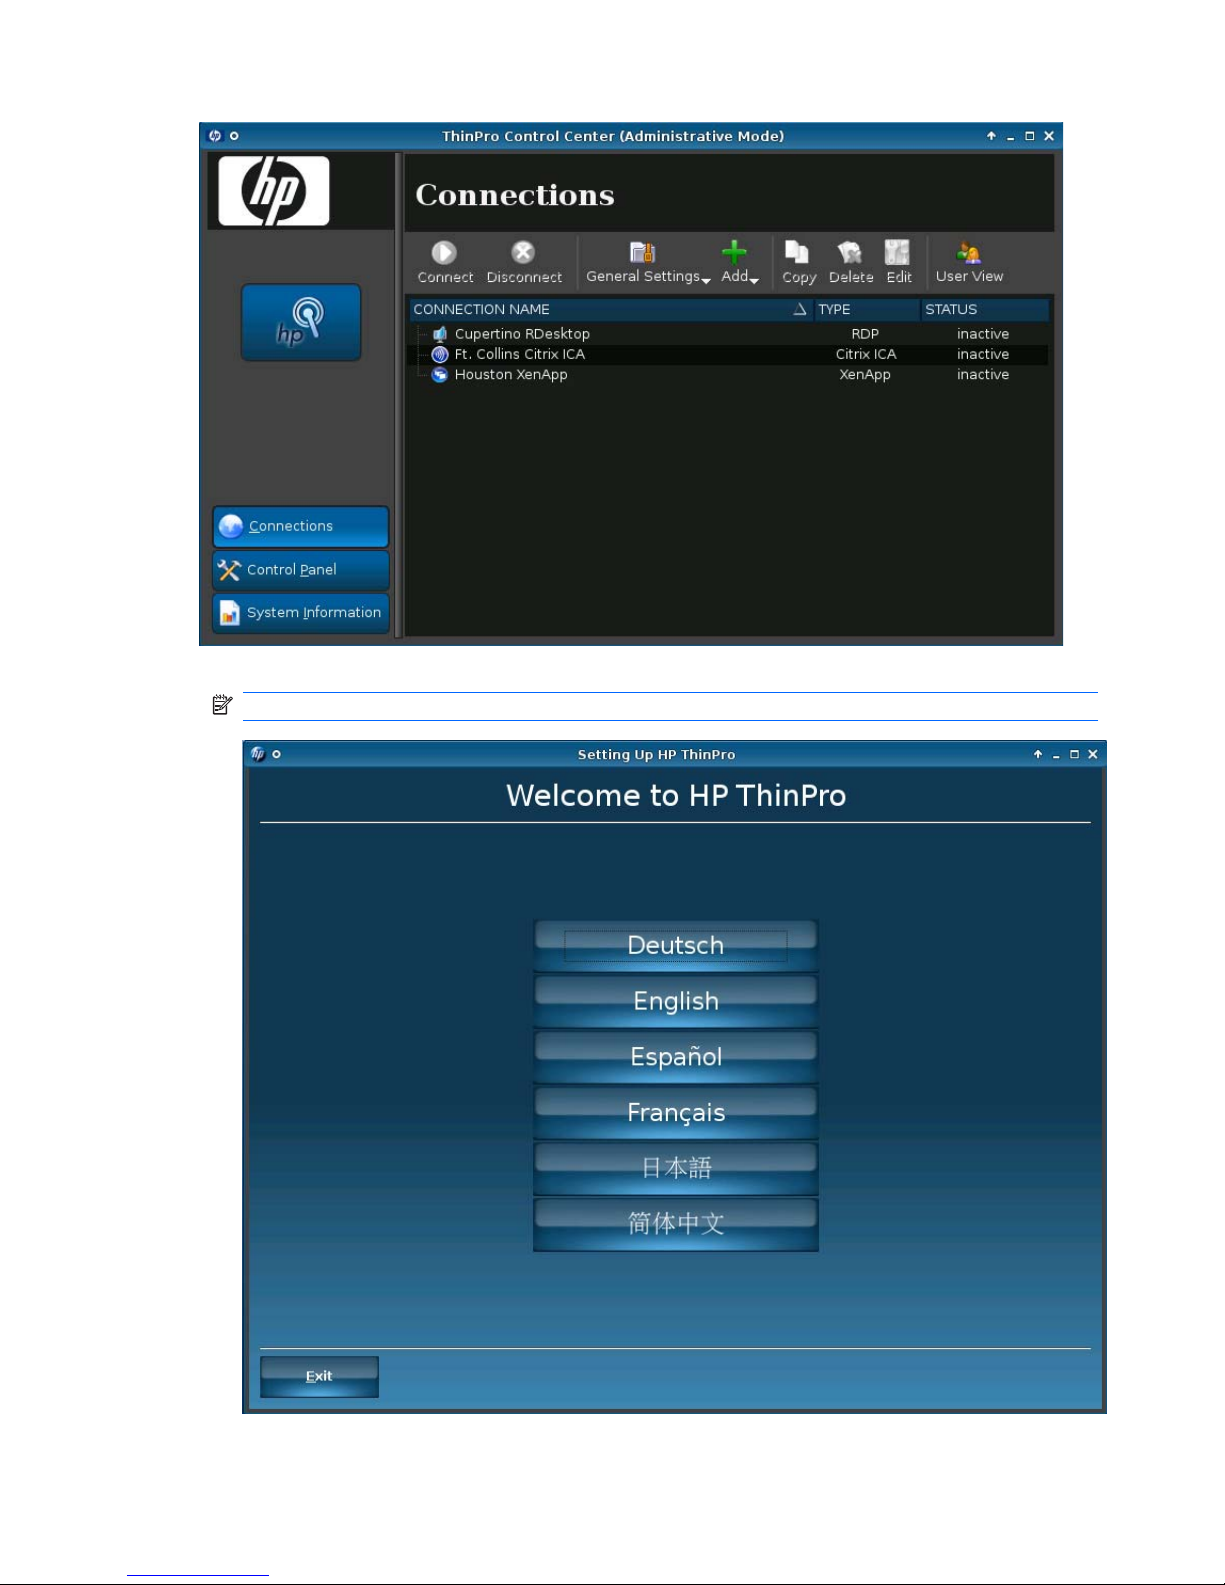
1. Click the hp switch in the left pane to open the Easy Config Wizard.
NOTE: The wizard opens automatically the first time you log into the Administrative Mode.
6 Chapter 1 Introduction ENWW
Page 15
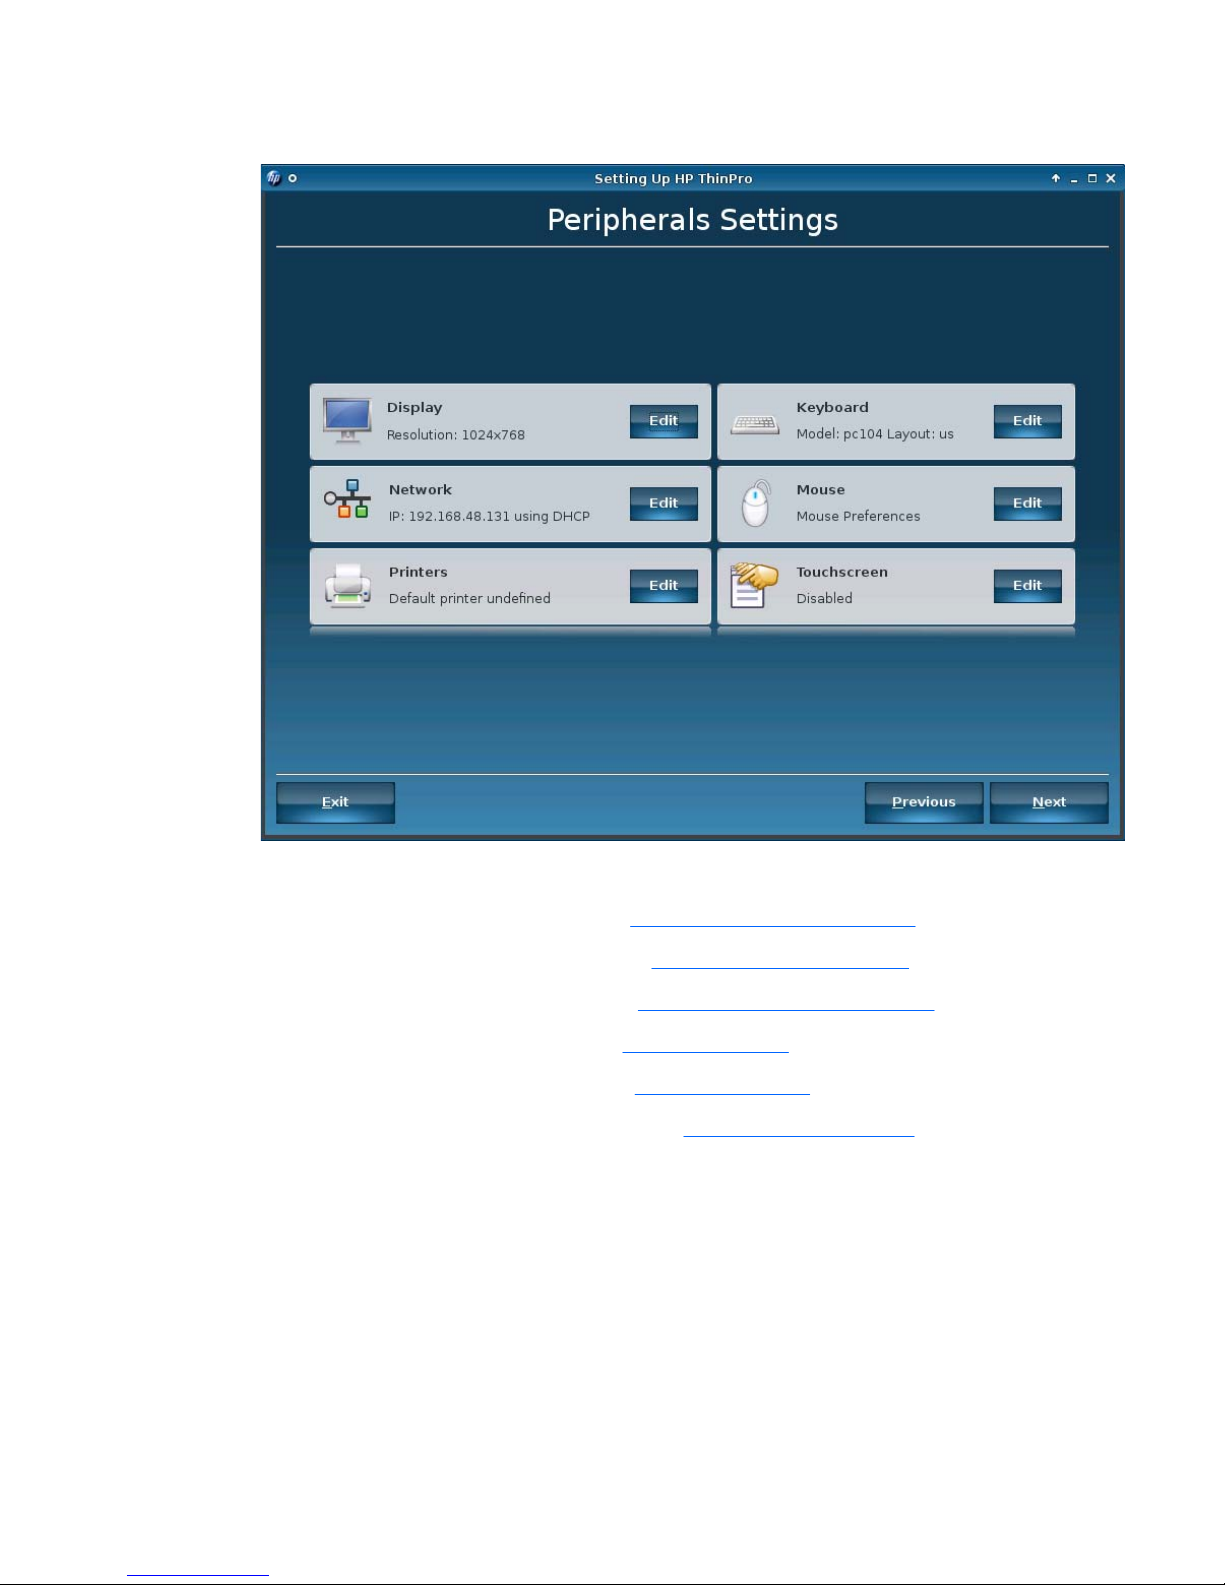
2. Select your language.
3. In the Peripherals Settings window, you can configure the settings for the following:
●
Display—For more information, see
Display Preferences on page 83.
●
Keyboard—For more information, see
Keyboard Layout on page 85.
●
Network—For more information, see
Network Connections on page 96.
●
Mouse—For more information, see
Mouse on page 87.
●
Printers—For more information, see
Printers on page 88.
●
Touchscreen—For more information, see
Touch Screen on page 92.
ENWW Easy Config Wizard 7
Page 16
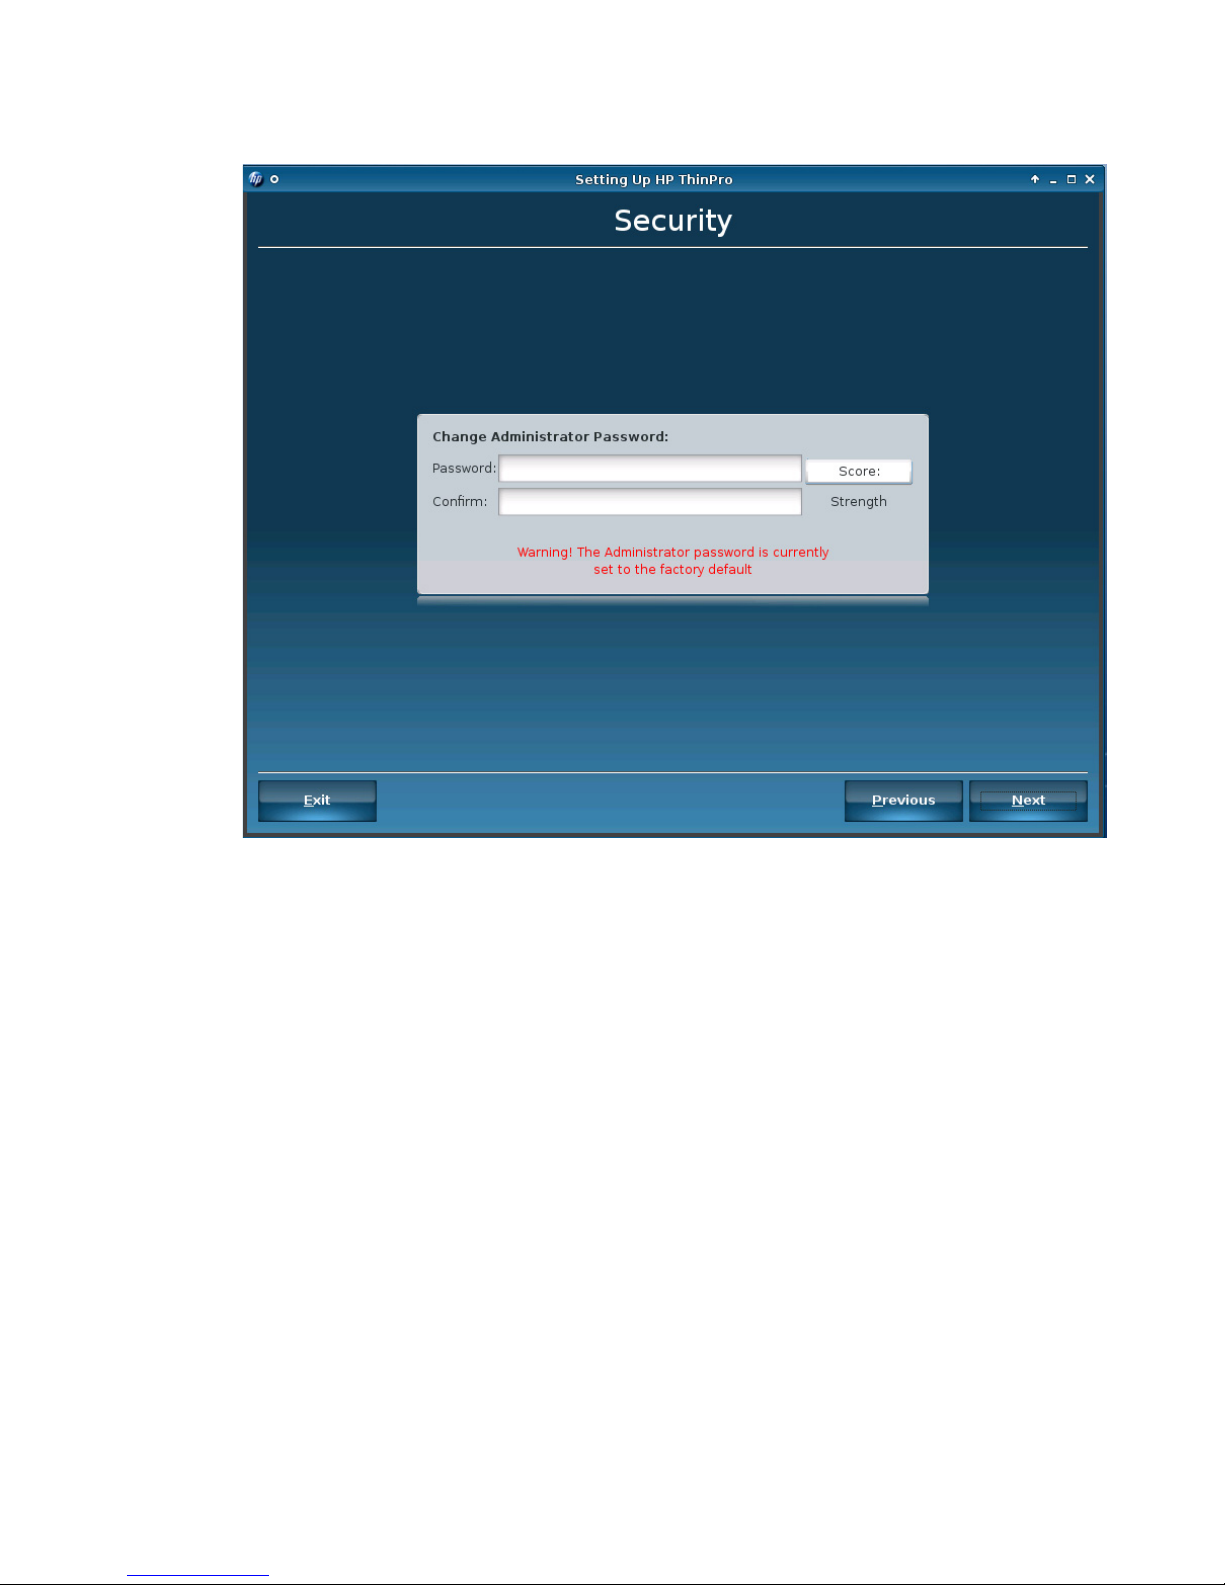
4. Click Next to advance to the next window.
5. The factory default password is root. HP strongly recommends that a new password be set. As
you type the password, the score rates the strength or weakness of the password. Characteristics
of a strong password include the following:
●
A password must contain a minimum of 6 to a maximum of 16 characters.
●
A password must contain a combination of uppercase and lowercase letters.
●
At least one of the first six characters in a password must be a number, a special character,
or an uppercase letter.
●
HP recommends that you use a combination of numbers and special characters in a password
such as the dollar sign ( $ ), the percent sign ( % ), the number sign ( # ), the period ( . ), the
hyphen ( - ), the underscore ( _ ), or the at sign ( @ ). If you do not use a special character or
number in the password, at least one of the first six characters should be an uppercase letter
or a number.
Click Next to advance to the next window.
8 Chapter 1 Introduction ENWW
Page 17
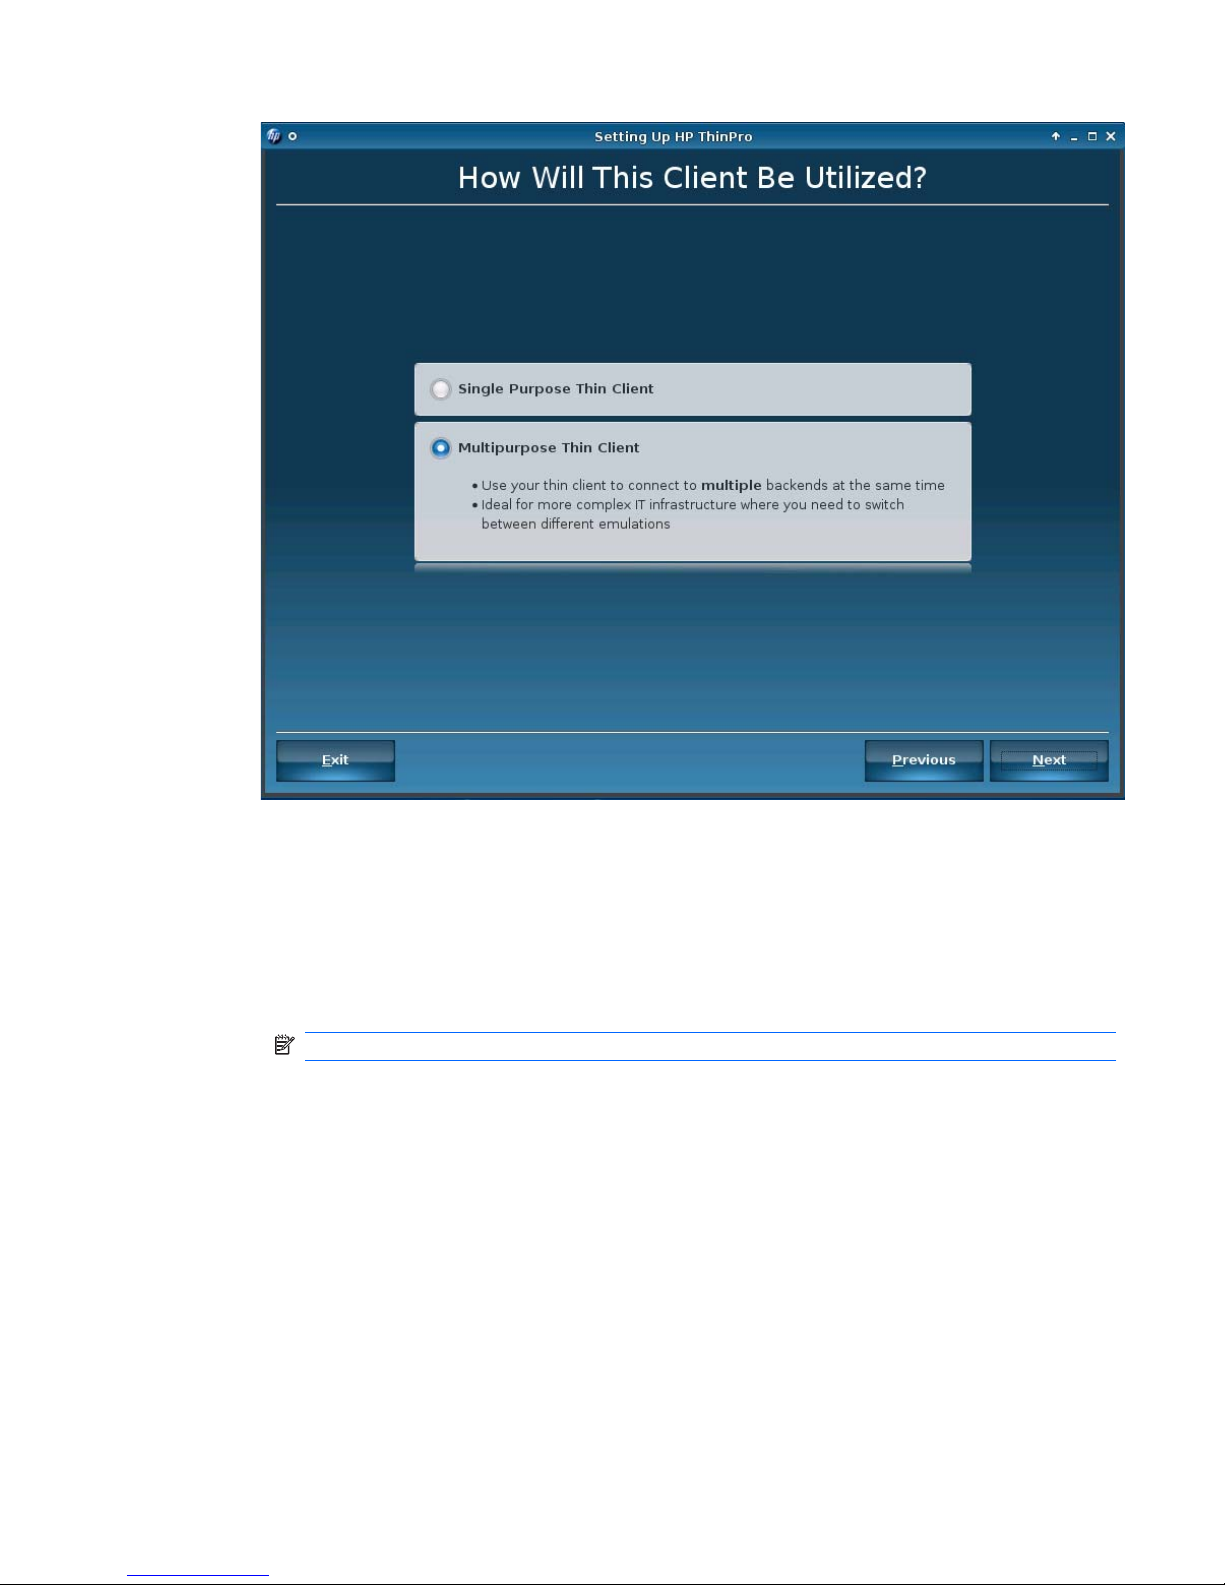
6. Set the intended use of this thin client:
●
Single Purpose Thin Client
◦
Use your thin client with only one server backend
◦
Ideal for Web kiosk
◦
VDI backend: XenDesktop, VmWare View, vWorkspace
NOTE: If you select this, existing connections will be deleted.
●
Multipurpose Thin Client
◦
Use your thin client to connect to multiple backends at the same time
◦
Ideal for more complex IT infrastructure where you need to switch between different
emulations
Click Next to advance to the next window.
ENWW Easy Config Wizard 9
Page 18
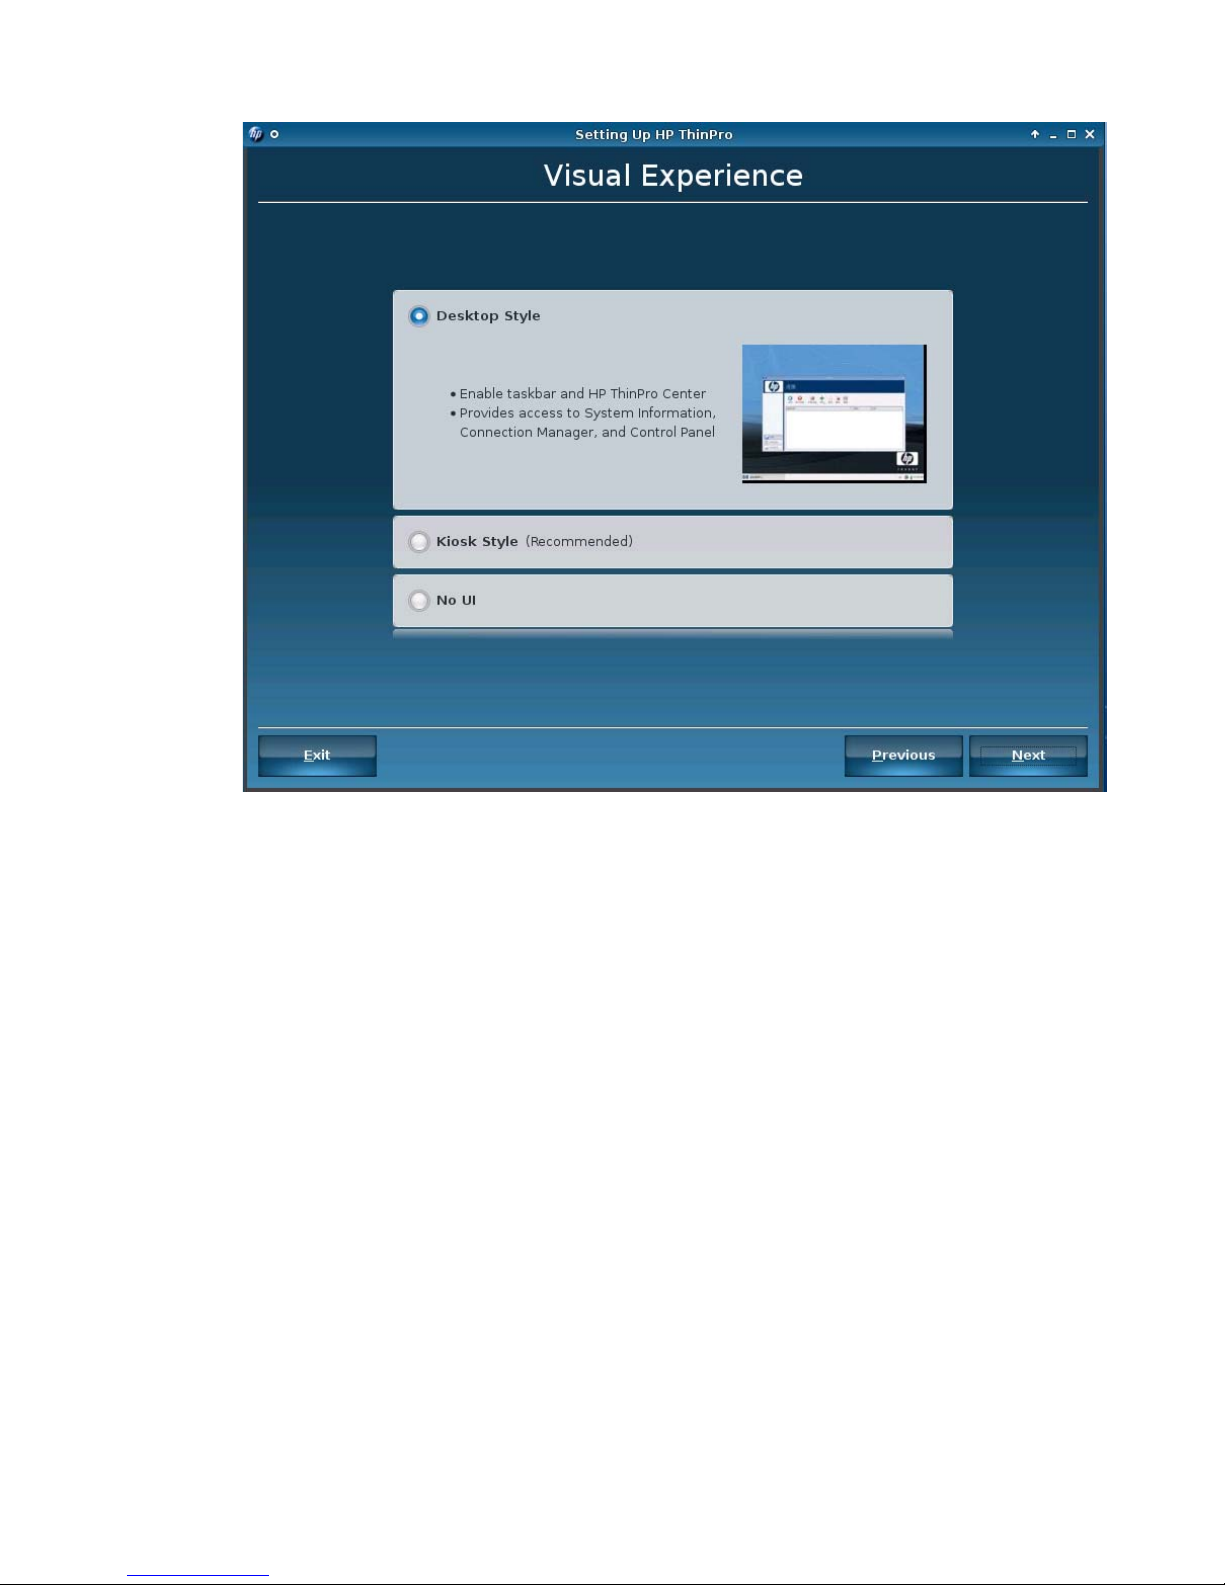
7. The Visual Experience window allows you to permit or limit the availability of certain features to
the user.
●
Desktop Style
◦
The taskbar and HP ThinPro Center are accessible.
◦
The Control Panel, Connection Manager, and System Information are accessible.
●
Kiosk Style (Recommended)
◦
Only the Connection Manager is accessible.
◦
The taskbar and Control Panel are not accessible.
●
No UI (No user interface)
◦
The Connection Manager and taskbar are not accessible.
◦
This style is recommended for an autostarting connection.
Click Next to advance to the next window.
8. This window allows you to set up the connection modes. Your choices depend upon whether you
are setting up a Single Purpose Thin Client or Multipurpose Thin Client.
●
Single Purpose Thin Client
10 Chapter 1 Introduction ENWW
Page 19
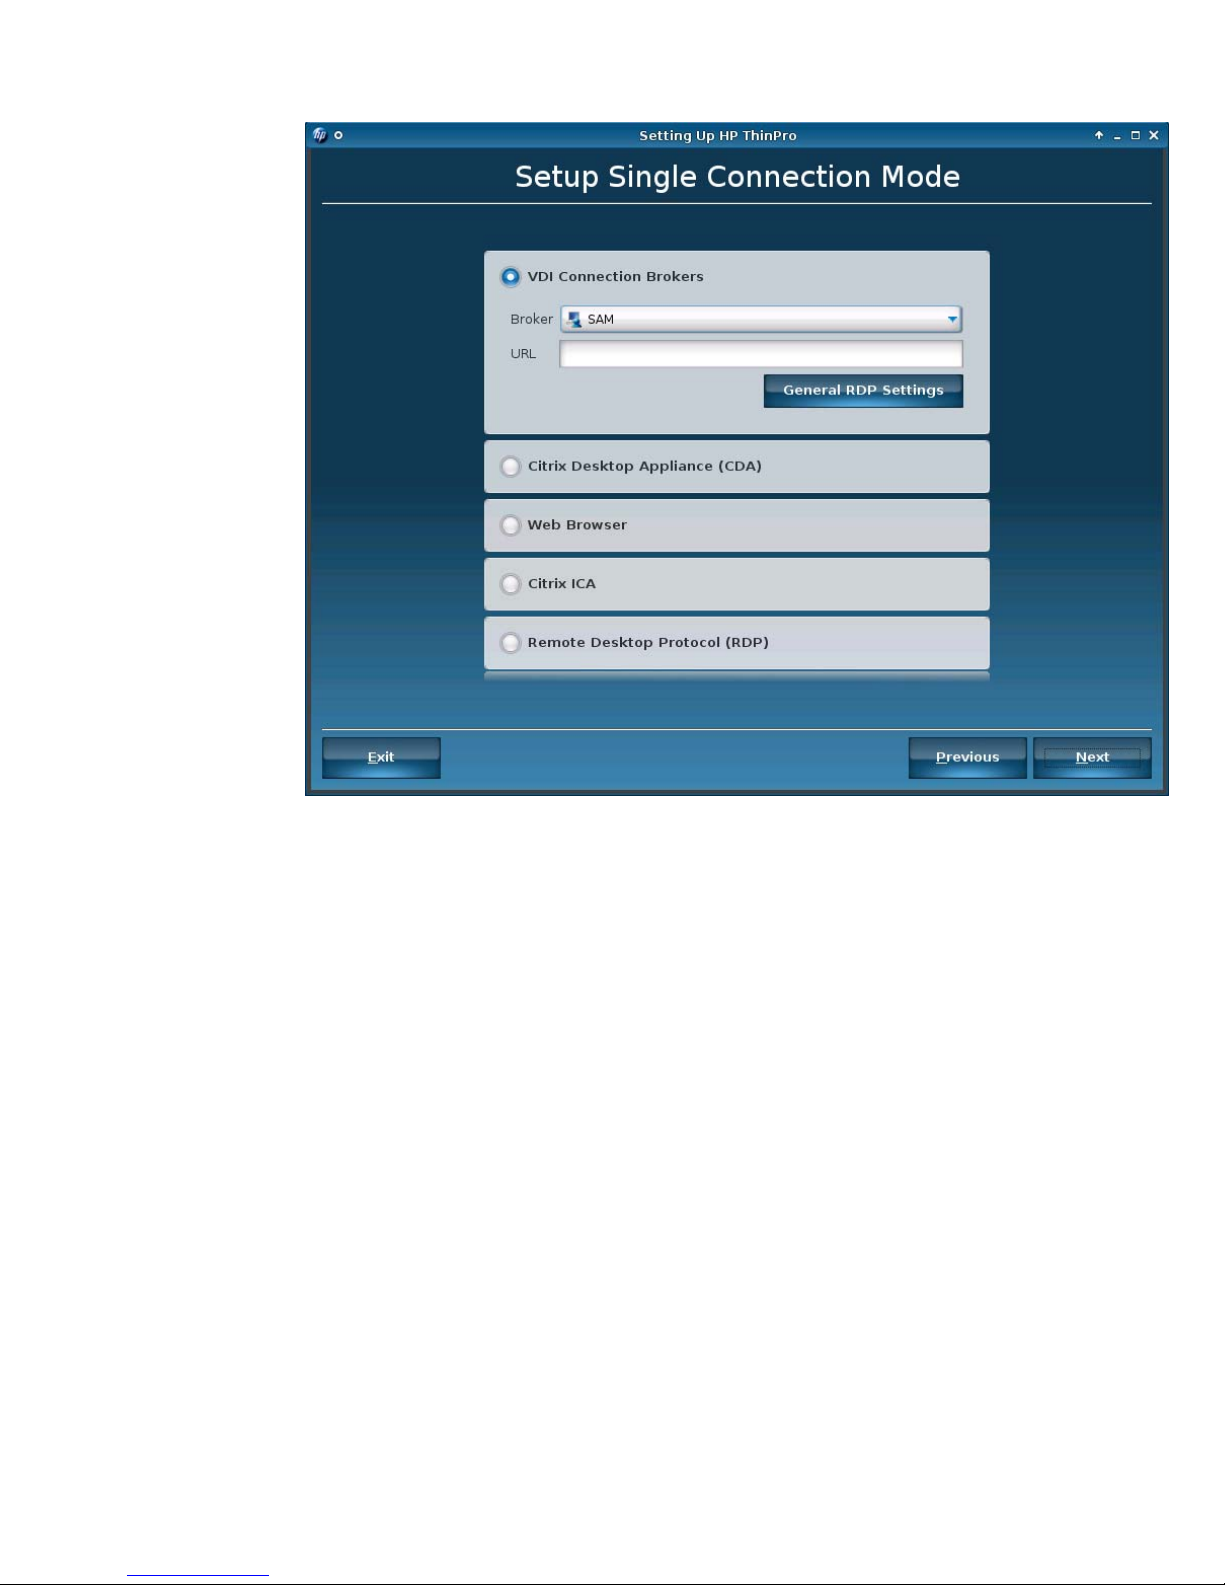
Choose the connection mode:
◦
VDI Connection Brokers
—SAM
—XenApp
—Leostream
—vWorkspace
—VMware View
◦
Citrix Desktop Appliance (CDA)
◦
Web Browser
◦
Citrix ICA
◦
Remote Desktop Protocol (RDP)
ENWW Easy Config Wizard 11
Page 20
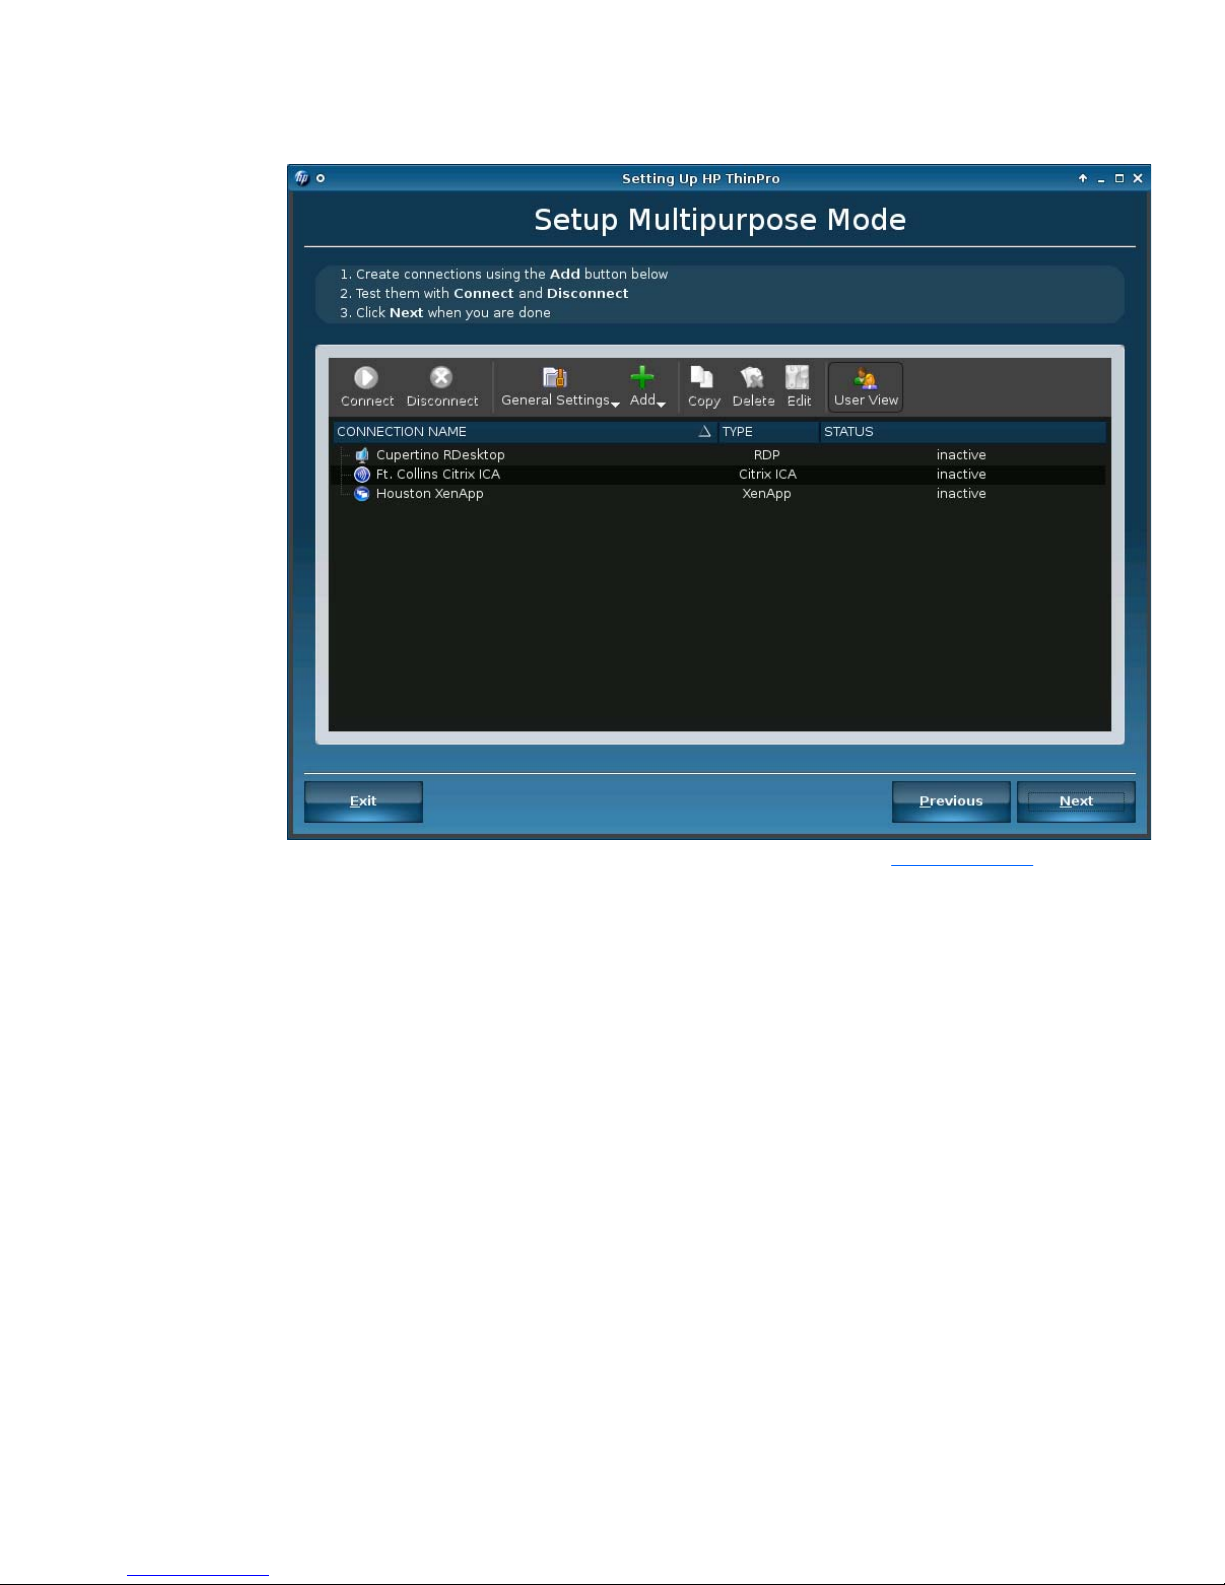
●
Multipurpose Thin Client
Click the Add icon to create connections. For more information, see Add on page 27.
12 Chapter 1 Introduction ENWW
Page 21
ENWW Easy Config Wizard 13
Page 22

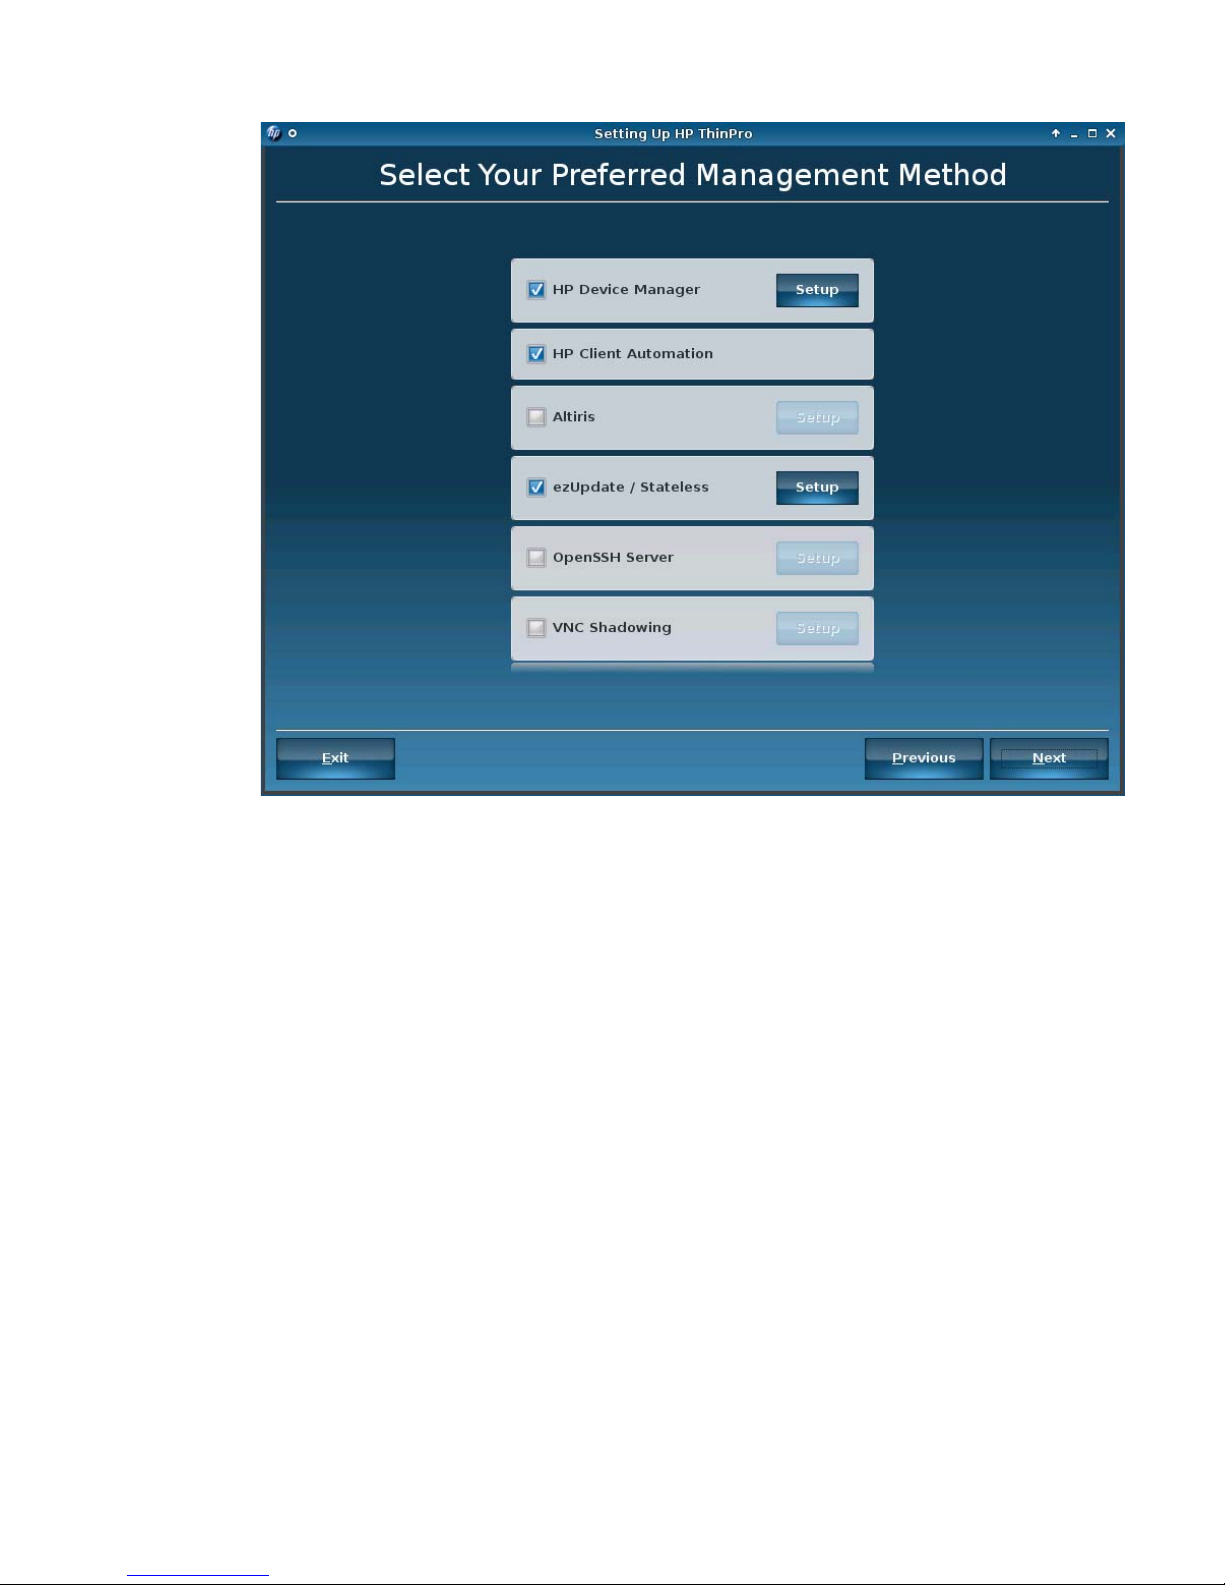
9. Select the thin client management software.
10. Click Save Configuration to open HP ThinState and save the configuration on an FTP server or
a USB drive key. For information on HP ThinState, see
HP ThinState Utility on page 117.
14 Chapter 1 Introduction ENWW
Page 23
11. Click Done to close the wizard and return to the User mode.
ENWW Easy Config Wizard 15
Page 24

2 Installation
HP ThinPro allows you to access and manage remote connections such as ICA, XenApp, RDP,
TeemTalk, Leostream, vWorkspace, VMware View, X Windows, Iceweasel, etc. To access all HP
ThinPro functionality, you must log in as an Administrator. As a User, you can run connections and have
limited access to HP ThinPro functionality.
The HP ThinPro display, when configured, lists all server and/or application connections assigned to
the user currently logged on to the terminal. For each connection, the display shows the name, type,
and status of the connection.
NOTE: Double-click any displayed connection to activate that connection.
16 Chapter 2 Installation ENWW
Page 25
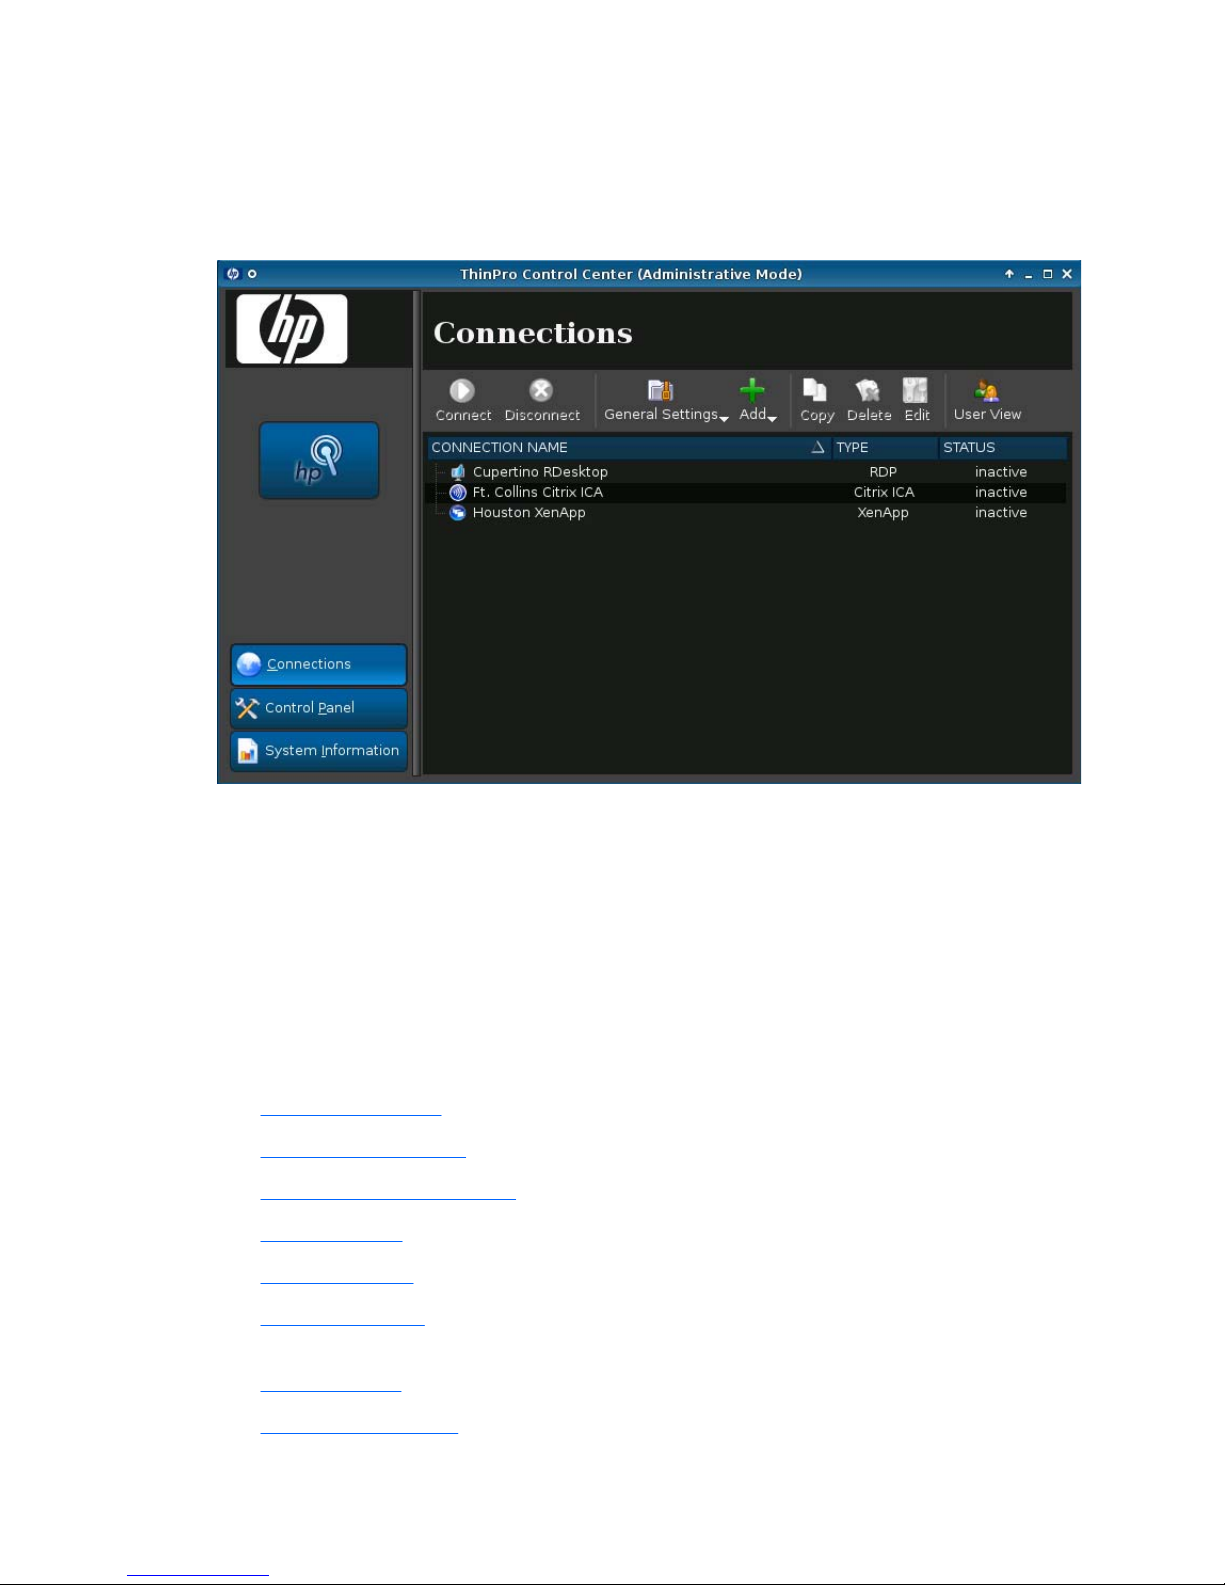
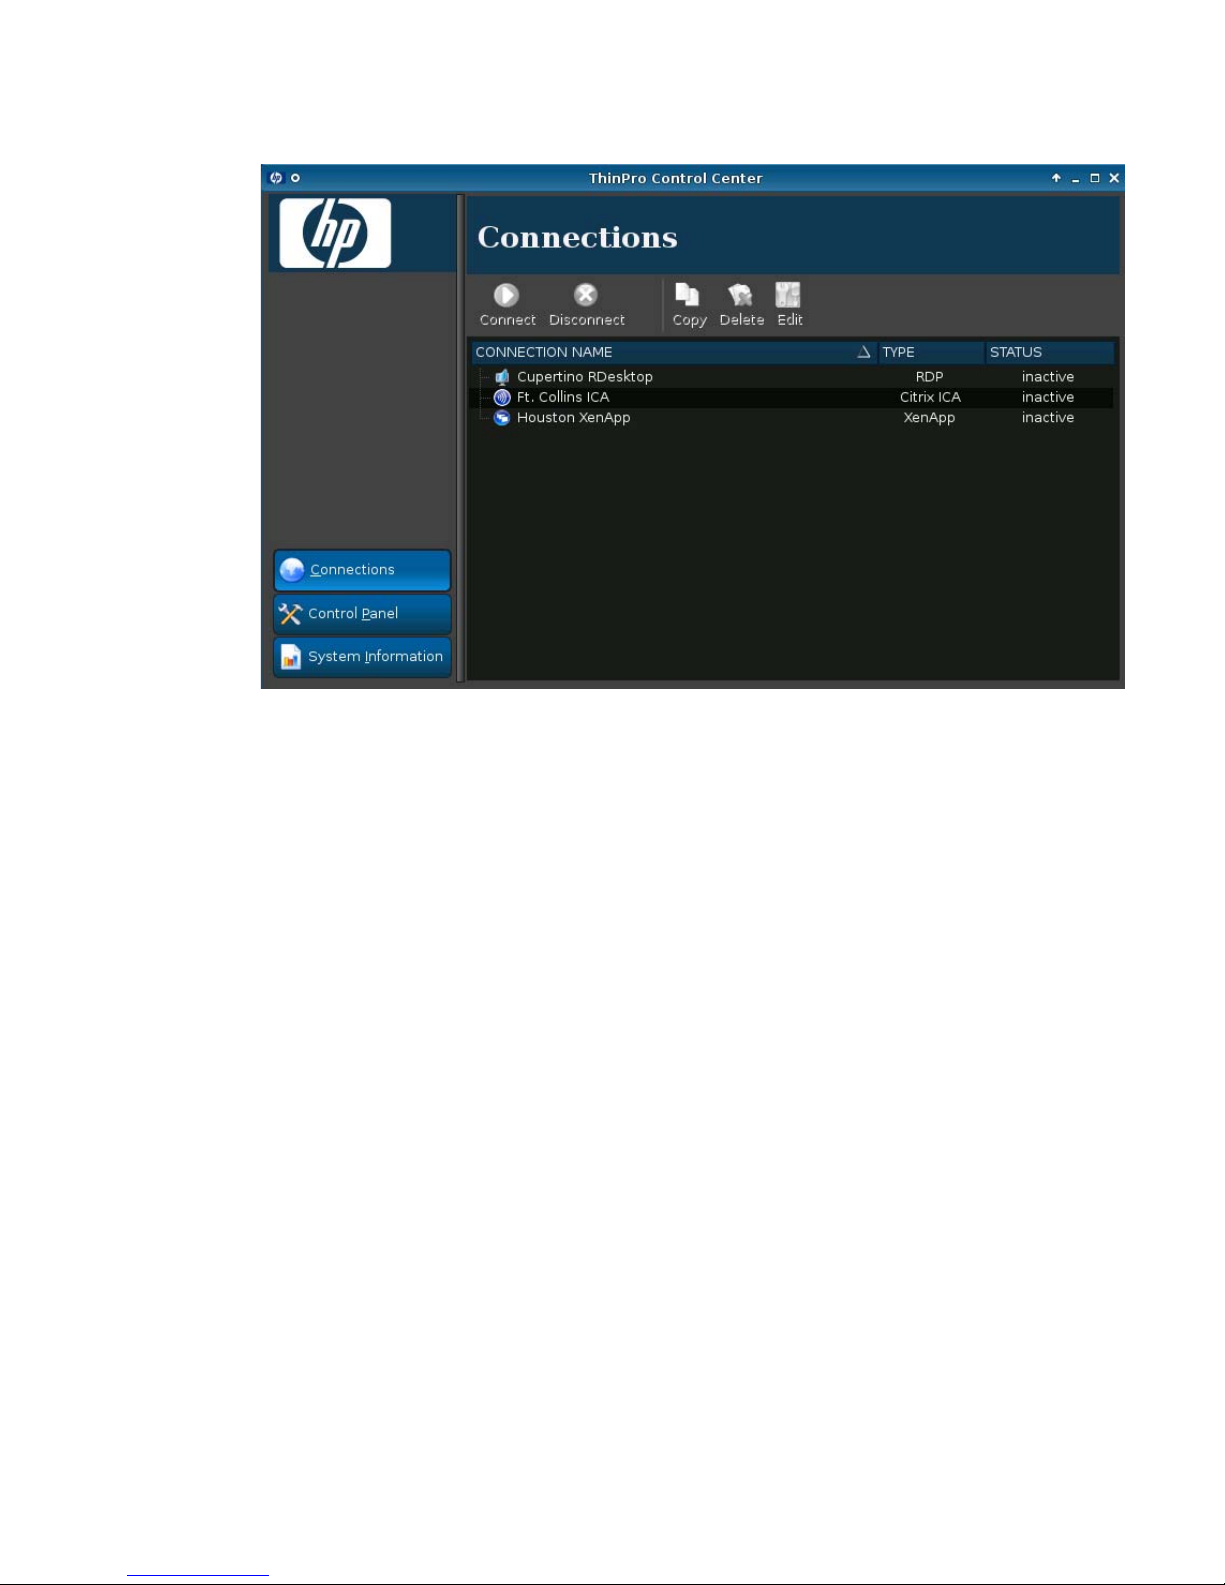
Connections
You can configure and assign connections using the Connections tab.
▲
In the Administrative Mode, click Connections.
The Connections window lists all connections that you can assign to users. You can add, edit, and
delete connections from this window.
●
Connection Name: Displays the name of the connection. You cannot change the connection name
from this column.
●
Type: Displays the type of connection (ICA, XenApp, RDP, TeemTalk, X Windows, Leostream,
vWorkspace, VMware View, Iceweasel, etc.). You cannot change the connection type from this
column.
●
Status: Displays the status, active or inactive, of the connection.
There are eight buttons across the top of the connection list:
●
Connect on page 18: Click to start a selected connection.
●
Disconnect on page 18: Click to disconnect a selected connection.
●
General Settings on page 18: Click to manage connection settings.
●
Add on page 27: Click to create a new connection and add it to the list of available connections.
●
Copy on page 73: Click to copy a connection and add it to the list of available connections.
●
Delete on page 73: Click to delete the selected connection. The connection is deleted from the
lists of connections assigned to all users, not just the user currently logged on to the terminal.
●
Edit on page 74: Click to edit the selected connection.
●
User View on page 74: Click to edit connections visible in User Mode.
ENWW Connections 17
Page 26

Connect
▲
To open a connection, select a selection under Connection Name that has a Status of inactive
and click Connect.
Disconnect
▲
To close a connection, select a selection under Connection Name that has a Status of active and
click Disconnect.
General Settings
General settings are shared by all connections of a given connection type.
Three types of connections are available:
●
Citrix ICA on page 18
●
Iceweasel on page 24
●
RDP on page 26
Citrix ICA
1. Go to Connections > General Settings.
2. Select Citrix ICA and set the following options:
●
Options on page 19
●
Local Resources on page 20
●
Window on page 21
●
Firewall on page 22
●
Server Location on page 23
●
Keyboard Shortcuts on page 24
18 Chapter 2 Installation ENWW
Page 27
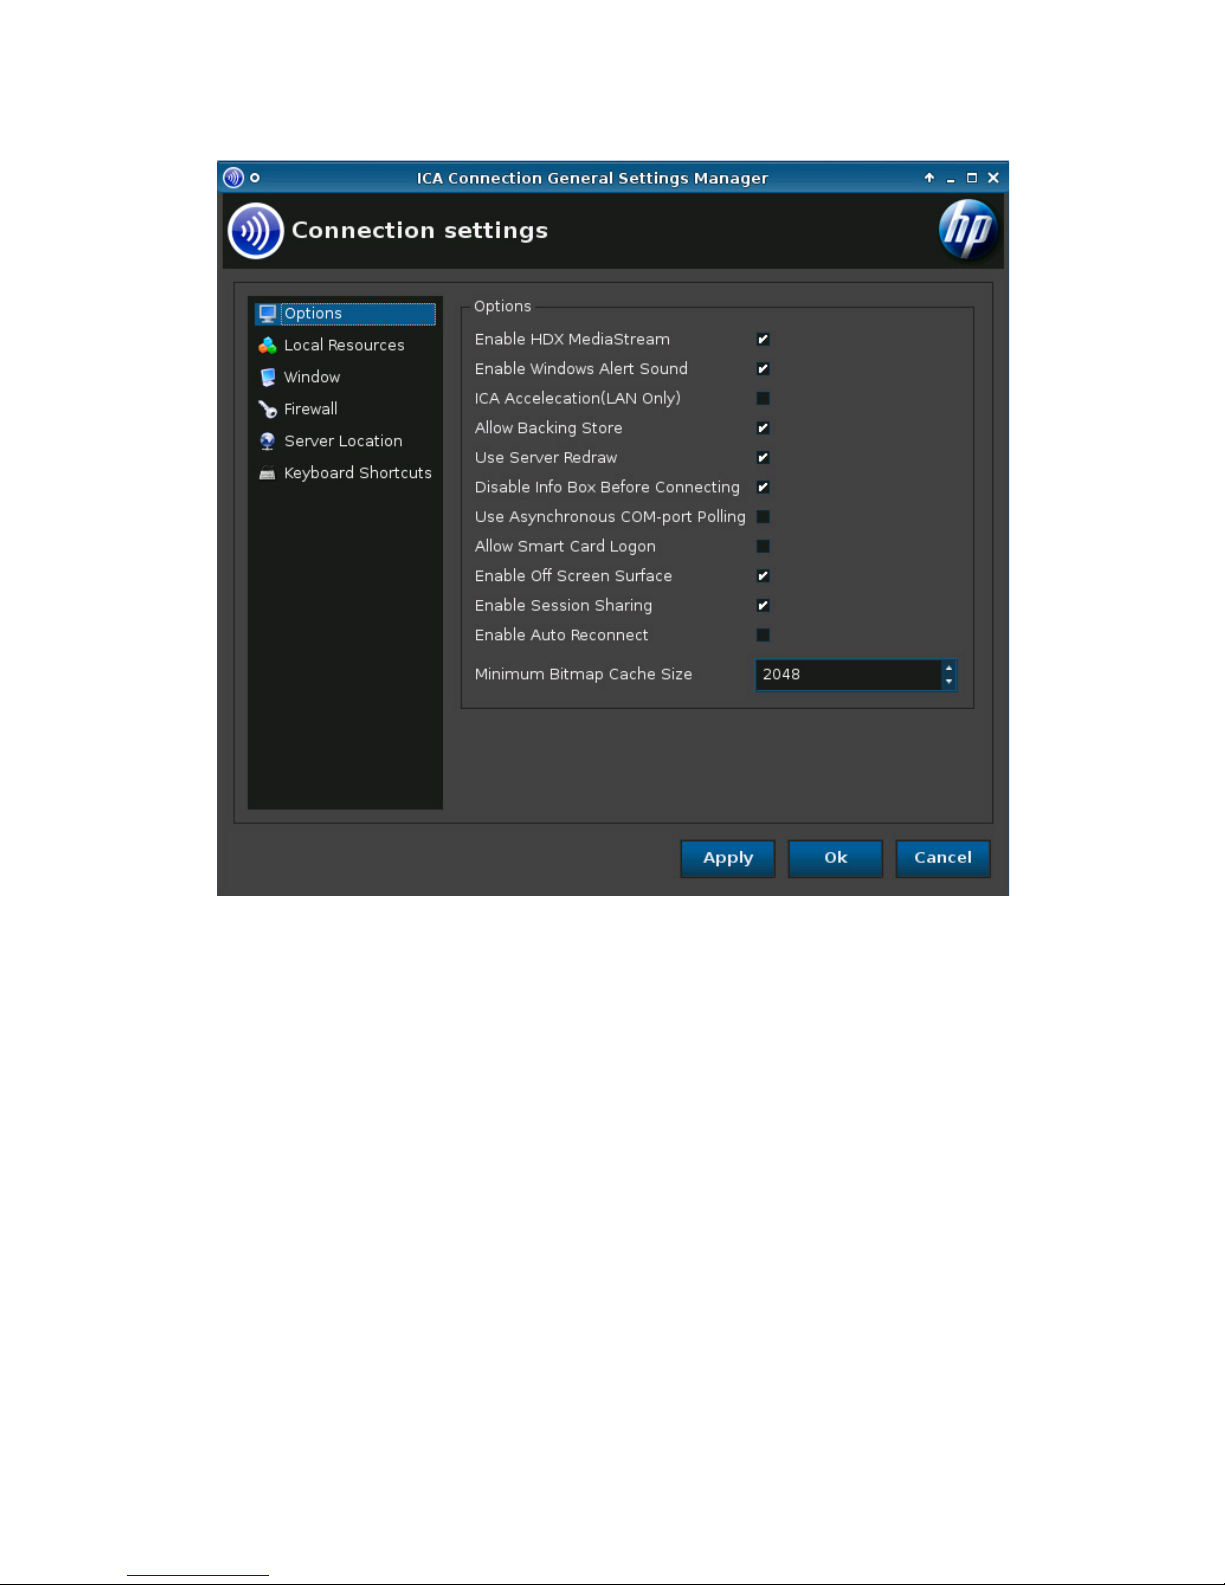
Options
1. Set the following options:
●
Options
◦
Enable HDX MediaStream
◦
Enable Windows Alert Sound
◦
ICA Acceleration (LAN Only)
◦
Allow Backing Store
◦
Use Server Redraw
◦
Disable Info Box Before Connecting
◦
Use Asynchronous COM-port Polling
◦
Allow Smart Card Logon
◦
Enable Off Screen Surface
◦
Enable Session Sharing
ENWW Connections 19
Page 28
◦
Enable Auto Reconnect
◦
Minimum Bitmap Cache Size
2. Click Apply to apply your settings.
3. Click OK when you have finished configuring connecting settings.
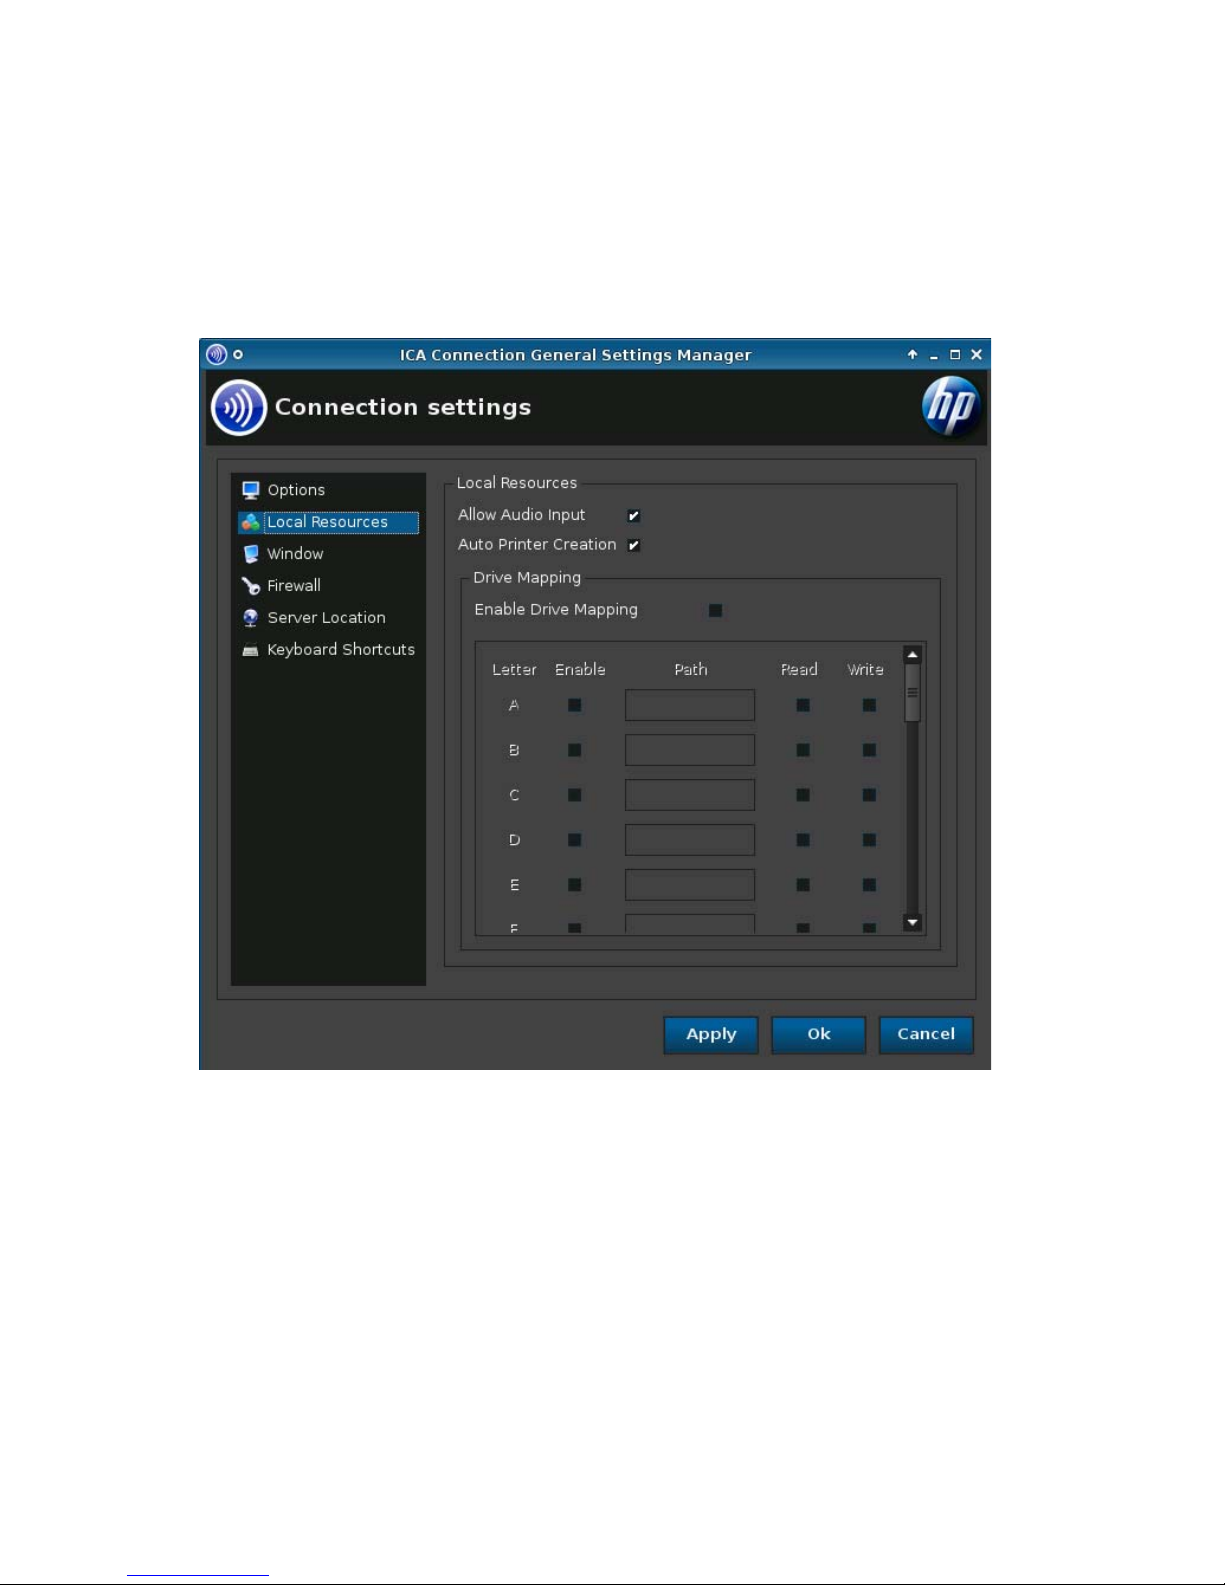
Local Resources
1. Set the following options:
●
Allow Audio Input
●
Auto Printer Creation
●
Drive Mapping
◦
Enable Drive Mapping
2. Click Apply to apply your settings.
3. Click OK when you have finished configuring connecting settings.
20 Chapter 2 Installation ENWW
Page 29
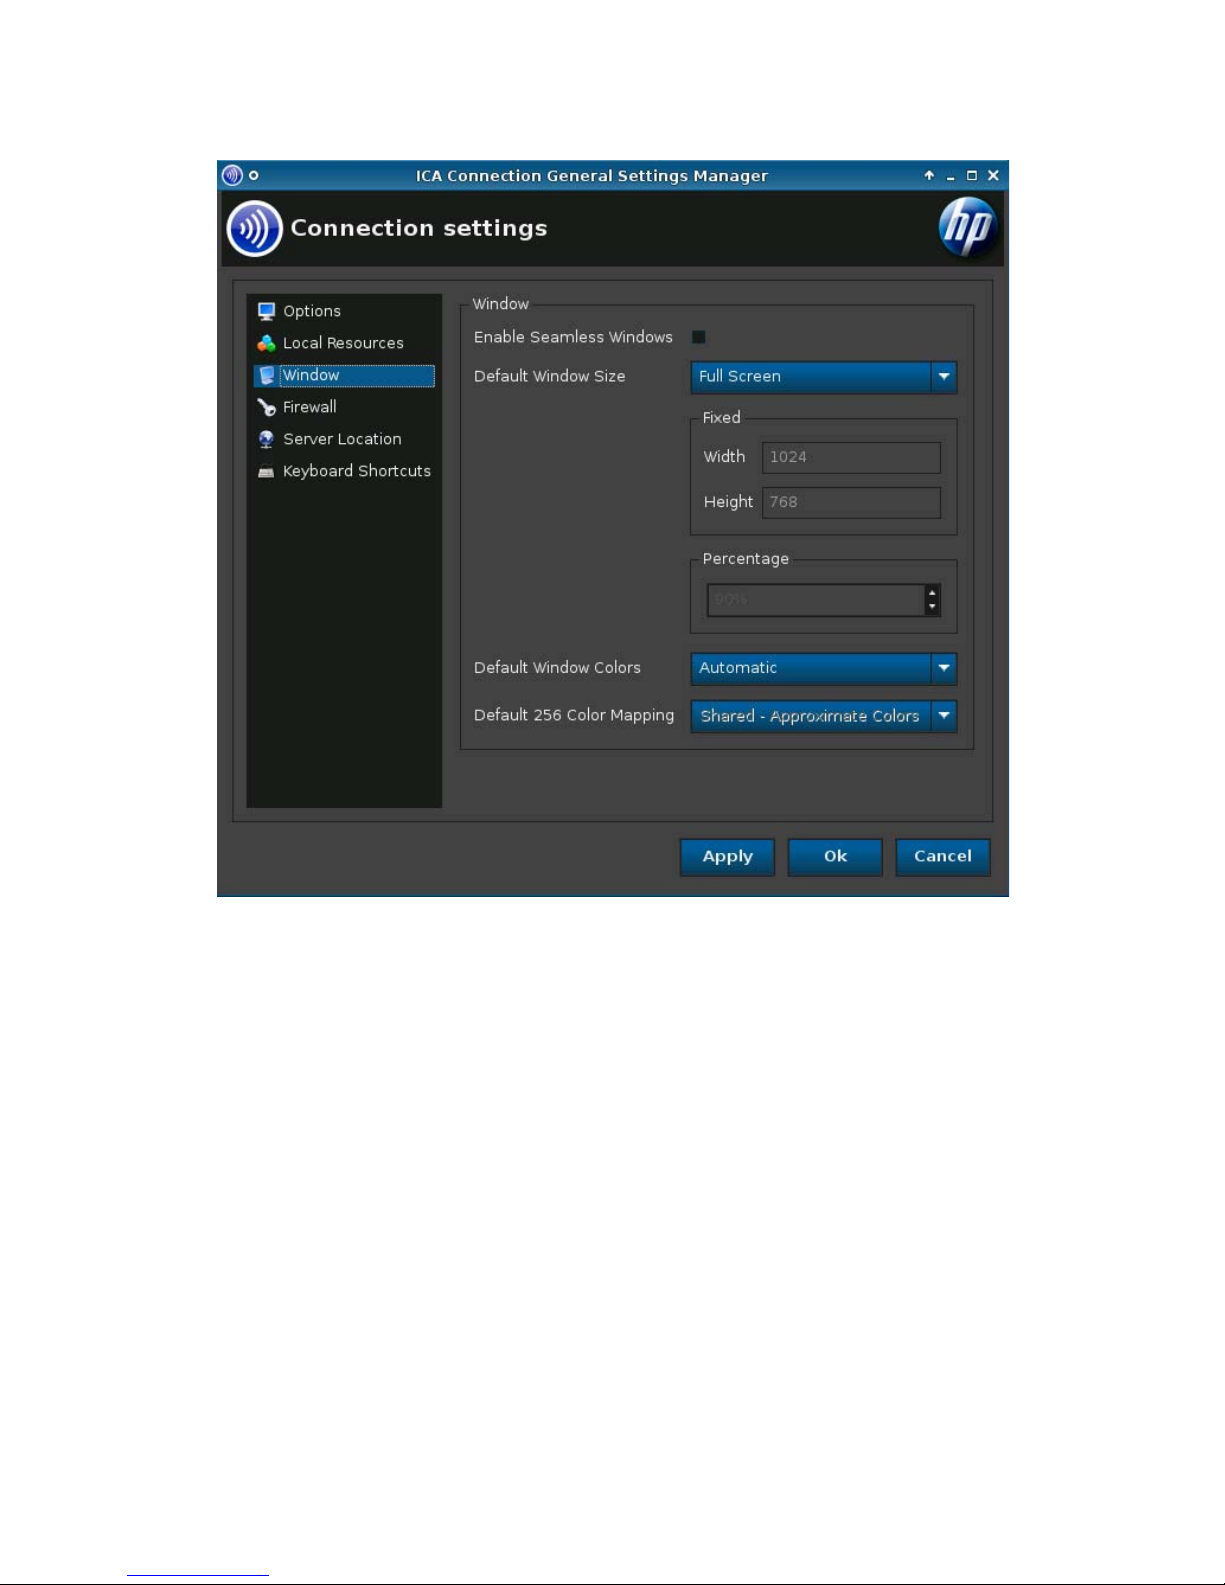
Window
1. Set the following options:
●
Enable Seamless Window
●
Default Window Size
●
Default Window Colors
●
Default 256 Color Mapping
2. Click Apply to apply your settings.
3. Click OK when you have finished configuring connecting settings.
ENWW Connections 21
Page 30
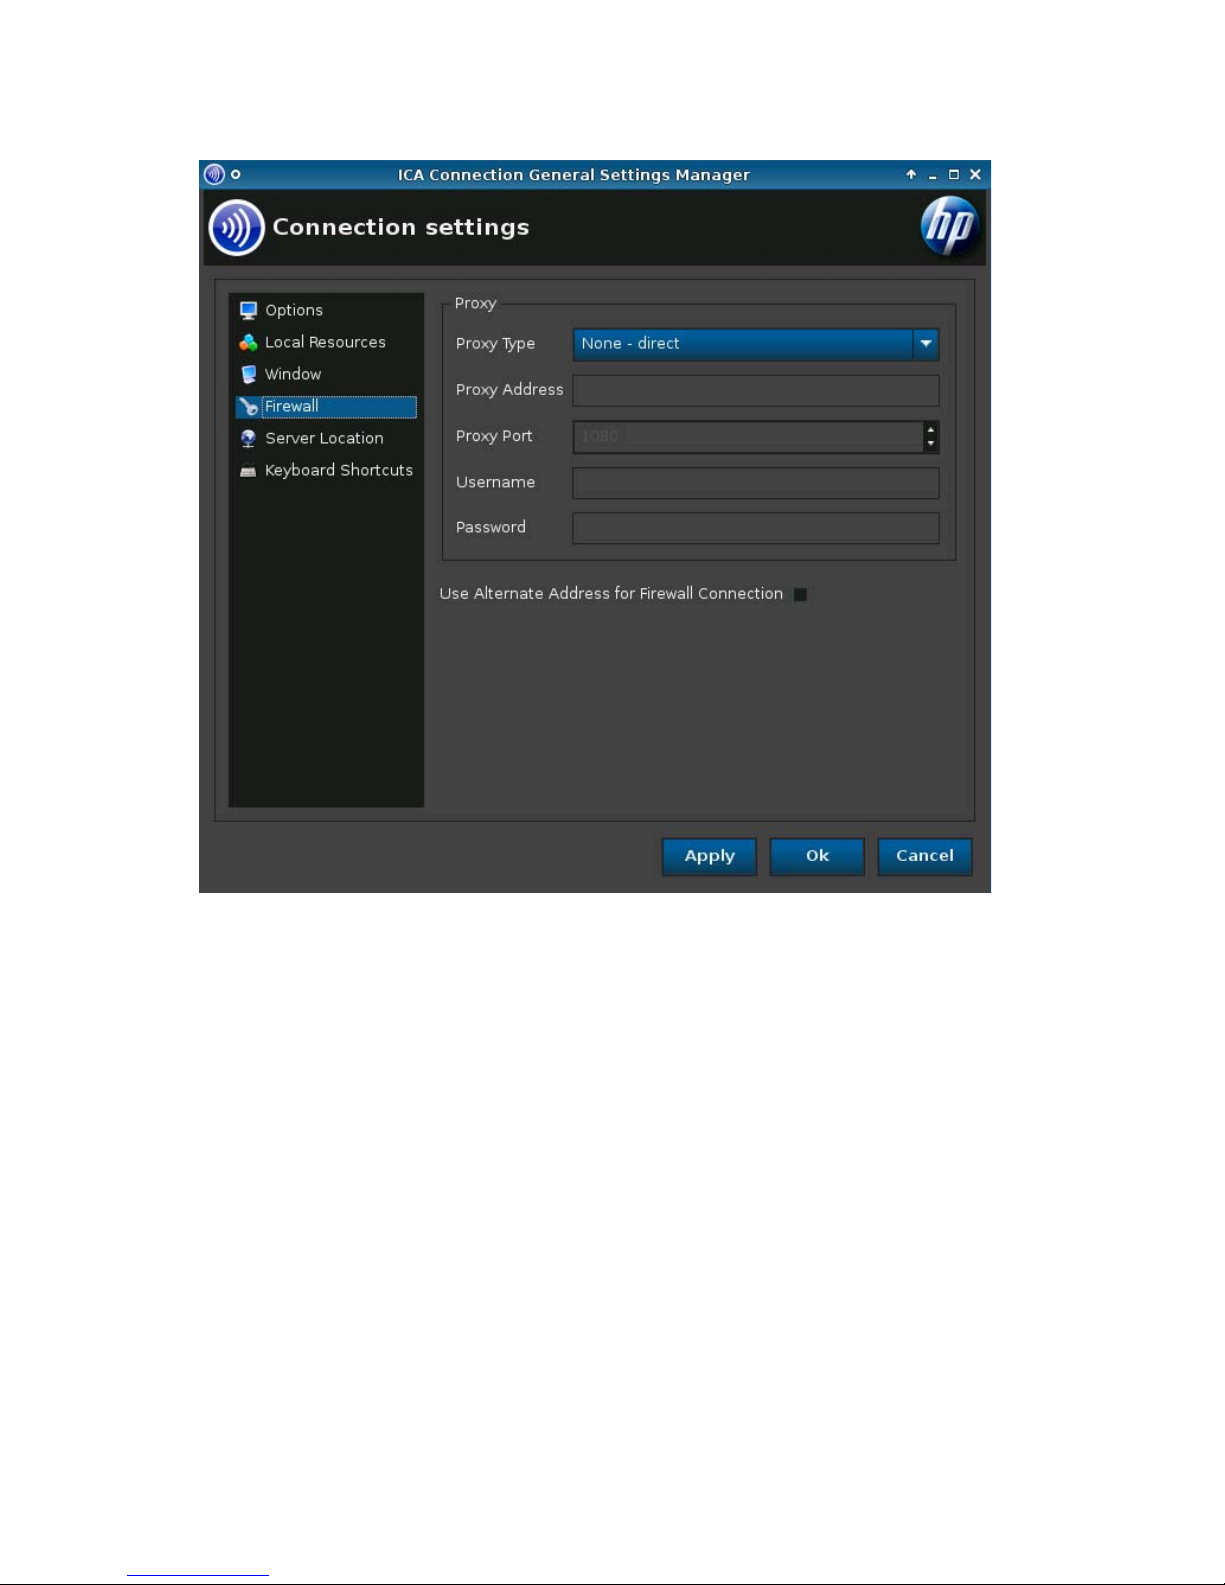
Firewall
1. Set the following options:
●
Proxy
◦
Proxy Type
◦
Proxy Address
◦
Proxy Port
◦
Username
◦
Password
●
Use Alternate Address for Firewall Connection
2. Click Apply to apply your settings.
3. Click OK when you have finished configuring connecting settings.
22 Chapter 2 Installation ENWW
Page 31

Server Location
1. Set the following options:
●
Default Protocol
●
TCP Address
●
HTTP Address
2. Click Apply to apply your settings.
3. Click OK when you have finished configuring connecting settings.
ENWW Connections 23
Page 32

Keyboard Shortcuts
1. Set the following options:
●
Handling of keyboard shortcuts
●
Stop Direct key handling
●
Alt+F1 through Alt+F12, Alt+Tab, Alt+Shift+Tab, and Toggle Speedscreen
2. Click Apply to apply your settings.
3. Click OK when you have finished configuring connecting settings.
Iceweasel
1. Go to Connections > General Settings.
24 Chapter 2 Installation ENWW
Page 33

2. Select Iceweasel.
3. Click Iceweasel preferences.
4. Configure your Iceweasel preferences on the following tabs:
●
Main
●
Tabs
●
Content
ENWW Connections 25
Page 34

●
Applications
●
Privacy
●
Security
●
Advanced
Click Close to save your changes and close the dialog box.
5. Select to Allow connections to manage their own settings, if desired.
If this option is checked, each connection will be able to change their settings and to have them
saved.
6. Click Apply to apply your settings.
7. Click OK when you have finished configuring connecting settings.
RDP
1. Go to Connections > General Settings.
2. Select RDP and set the following options:
●
General on page 26
●
USB on page 27
General
1. Set the following options:
●
Send hostname as
●
Enable Multimedia Redirection (MMR)
26 Chapter 2 Installation ENWW
Page 35

Select this option to enable and tune USB Redirection.
2. Click Apply to apply your settings.
3. Click OK when you have finished configuring connecting settings.
USB
These settings allow you to enable and tune USB Redirection.
1. Select the option to enable USB redirection.
2. Click Apply to apply your settings.
3. Click OK when you have finished configuring connecting settings.
Add
You have the option of adding the following connections:
●
Citrix ICA on page 28
●
RDP on page 36
●
HP TeemTalk on page 41
●
Iceweasel on page 46
●
HP Remote Graphics Software (RGS) on page 47
●
HP Session Allocation Manager (SAM) on page 49
●
XenApp on page 51
●
Leostream on page 52
●
vWorkspace on page 54
ENWW Connections 27
Page 36

●
VMware View on page 61
●
Xdmcp on page 64
●
SSH on page 67
●
Telnet on page 70
●
Custom on page 71
Citrix ICA
1. To add a Citrix ICA connection, click Connections > Add.
2. Select Citrix ICA and set the following options:
●
Network on page 29
●
Connection on page 30
●
Window on page 31
●
Application on page 32
●
Firewall on page 33
●
Smart Ping on page 34
●
Common Settings on page 35
28 Chapter 2 Installation ENWW
Page 37

Network
1. Set the following options:
●
Connection Name
●
Network
◦
Server Location
◦
Server Type
◦
Server
◦
Protocol
◦
Application
ENWW Connections 29
Page 38

●
Credentials
◦
Username
◦
Password
◦
Domain
●
Allow Smart Card Logon
2. Click Next to advance to the next window or click Finish save your settings and close the dialog
box.
Connection
1. Set the following options:
●
Enable Audio Input
●
Use Data Compression
●
Enable Middle Button Paste
●
Use Disk Cache for Bitmaps
30 Chapter 2 Installation ENWW
Page 39

●
Enable Drive Mapping
●
Sound
●
Speed Screen
●
Mouse Click Feedback
●
Local Text Echo
●
Encryption Level
2. Click Next to advance to the next window or click Finish save your settings and close the dialog
box.
Window
1. Set the following options:
●
Enable Seamless Window
●
Window Size
ENWW Connections 31
Page 40

●
Window Colors
●
256 Color Mapping
2. Click Next to advance to the next window or click Finish save your settings and close the dialog
box.
Application
1. Set the following options:
●
Application
●
Directory
2. Click Next to advance to the next window or click Finish save your settings and close the dialog
box.
32 Chapter 2 Installation ENWW
Page 41

Firewall
1. Set the following options:
●
Proxy
◦
Proxy Type: Select a proxy type
◦
Proxy Address: Type the proxy host name
◦
Proxy Port: Type the proxy host port
◦
Username: Type the proxy user name for the account to use to connect to a remote
computer.
◦
Password: Type a password for the account to use to connect to a remote computer.
●
Use Alternate Address for Firewall Connection
2. Click Next to advance to the next window or click Finish save your settings and close the dialog
box.
ENWW Connections 33
Page 42

Smart Ping
1. Set the following options:
●
Smart Ping: Allows you to enable HP ThinPro to ping the server before attempting a
connection. If the server name fails to resolve or the server fails to respond to the ping, the
thin client aborts the connection attempt.
●
Smart Ping Port: Allows you to specify a port for Smart Ping.
●
Smart Ping Timeout: Allows you to specify a time period for Smart Ping to keep pinging.
2. Click Next to advance to the next window or click Finish save your settings and close the dialog
box.
34 Chapter 2 Installation ENWW
Page 43

Common Settings
1. Set the following options:
●
Fallback Connection
●
Auto start priority
●
Auto reconnect
●
Allow the user to launch this connection
●
Allow the user to edit this connection
NOTE: 'Allow the user' options are available only in the Administrative Mode.
2. Click Finish save your settings and close the dialog box.
ENWW Connections 35
Page 44

RDP
1. To add an RDP connection, click Connections > Add.
2. Select RDP and set the following options:
●
Network on page 36
●
Window on page 37
●
Options on page 38
●
Local Resources on page 39
●
Experience on page 40
●
Advanced on page 41
Network
1. Set the following options:
●
Name
●
Address
●
Port
●
Application
●
Directory
●
Username
●
Password
36 Chapter 2 Installation ENWW
Page 45

●
Domain
●
Allow Smartcard Login
2. Click Next to advance to the next window or click Finish save your settings and close the dialog
box.
Window
1. Set the following options:
●
Enable Seamless Windows
●
Window Size
◦
Window size
◦
Fixed Size
◦
Percentage Size
●
Window Colors
2. Click Next to advance to the next window or click Finish save your settings and close the dialog
box.
ENWW Connections 37
Page 46

Options
1. Set the following options:
●
Enable motion events
●
Enable data compression
●
Enable encryption
●
Force bitmap updates
●
Use private colormap
●
System beep
●
Attach to console
●
Protocol level
●
Hostname to send
2. Click Next to advance to the next window or click Finish save your settings and close the dialog
box.
38 Chapter 2 Installation ENWW
Page 47

Local Resources
1. Set the following options:
●
Remote computer sound
●
Devices mapping
◦
Enable USB storage mapping
◦
Enable port mapping
◦
Enable printer mapping
2. Click Next to advance to the next window or click Finish save your settings and close the dialog
box.
ENWW Connections 39
Page 48

Experience
1. Set the following options:
●
Desktop background
●
Show contents of window while dragging
●
Menu and window animation
●
Themes
●
Bitmap caching
2. Click Next to advance to the next window or click Finish save your settings and close the dialog
box.
40 Chapter 2 Installation ENWW
Page 49

Advanced
1. Set the following options:
●
Fallback Connection
●
Auto start priority
●
Auto reconnect
●
Allow the user to launch this connection
●
Allow the user to edit this connection
NOTE: 'Allow the user' options are available only in the Administrative Mode.
2. Click Finish save your settings and close the dialog box.
HP TeemTalk
NOTE: This feature is neither present nor supported on the HP ThinPro image for the HP t5325 thin
client.
You can add a new HP TeemTalk connection in two ways:
●
Adding a TeemTalk Connection using the TeemTalk Creation Wizard on page 42
●
Adding a TeemTalk Connection Manually on page 44
For more information on HP TeemTalk, see HP TeemTalk Terminal Emulator 7.0 User Guide at
http://bizsupport.austin.hp.com/bc/docs/support/SupportManual/c01534810/c01534810.pdf.
ENWW Connections 41
Page 50

Adding a TeemTalk Connection using the TeemTalk Creation Wizard
1. To add a TeemTalk connection using the wizard, click Connections > Add.
2. Select Teemtalk and click Teemtalk creation wizard.
Connection Information
1. Select and configure the Connection Information:
●
Session Name
●
Transport type
●
Connection type
●
Emulation type
2. Click Next.
42 Chapter 2 Installation ENWW
Page 51

Advanced Options
1. Set the Advanced Options:
●
Preferences
●
Emulation Printer
●
Auto Logon
●
Key Macros
●
Mouse Actions
●
Soft Buttons
●
Attributes
2. Click Next.
ENWW Connections 43
Page 52

Finalization
1. Select whether or not to create an icon on the desktop and click OK.
2. Click Finish to save your settings and close the dialog box.
Adding a TeemTalk Connection Manually
1. To add a TeemTalk connection manually, click Connections > Add.
2. Select Teemtalk and set the following options:
●
Configuration
●
Advanced
44 Chapter 2 Installation ENWW
Page 53

Configuration
1. Set the following options:
●
Name
●
System beep
2. Click Next to advance to the next window or click Finish save your settings and close the dialog
box.
Advanced
1. Set the following options:
●
Fallback Connection
●
Auto start priority
●
Auto reconnect
●
Allow the user to launch this connection
●
Allow the user to edit this connection
ENWW Connections 45
Page 54

NOTE: 'Allow the user' options are available only in the Administrative Mode.
2. Click Finish save your settings and close the dialog box.
Iceweasel
1. To add a connection, click Connections > Add.
2. Select Iceweasel and set the following options:
●
Configuration on page 46
●
Advanced on page 47
Configuration
1. Set the following options:
●
Name
●
URL
●
Enable kiosk mode
●
Enable full screen
●
Enable print dialog
2. Click Next to advance to the next window or click Finish save your settings and close the dialog
box.
46 Chapter 2 Installation ENWW
Page 55

Advanced
1. Set the following options:
●
Fallback Connection
●
Auto start priority
●
Auto reconnect
●
Allow the user to launch this connection
●
Allow the user to edit this connection
NOTE: 'Allow the user' options are available only in the Administrative Mode.
2. Click Finish save your settings and close the dialog box.
HP Remote Graphics Software (RGS)
1. To add an RGS connection, click Connections > Add.
2. Select RGS and set the following options:
●
RGS Connection on page 48
●
Advanced on page 49
ENWW Connections 47
Page 56

RGS Connection
1. Set the following options:
●
Name
●
Mode
◦
Normal
◦
Directory
●
Warning Timeout
●
Error Timeout
●
Use global image updates
●
Borders
2. Click Next to advance to the next window or click Finish save your settings and close the dialog
box.
48 Chapter 2 Installation ENWW
Page 57

Advanced
1. Set the following options:
●
Fallback Connection
●
Auto start priority
●
Auto reconnect
●
Allow the user to launch this connection
●
Allow the user to edit this connection
NOTE: 'Allow the user' options are available only in the Administrative Mode.
2. Click Finish save your settings and close the dialog box.
HP Session Allocation Manager (SAM)
1. To add a SAM connection, click Connections > Add.
2. Select SAM and set the following options:
●
HP SAM Client on page 50
●
Advanced on page 50
ENWW Connections 49
Page 58

HP SAM Client
1. Set the following options:
●
Connection Name
●
Server Hostname
2. Click Next to advance to the next window or click Finish save your settings and close the dialog
box.
Advanced
1. Set the following options:
●
Fallback Connection
●
Auto start priority
●
Auto reconnect
●
Allow the user to launch this connection
●
Allow the user to edit this connection
50 Chapter 2 Installation ENWW
Page 59

NOTE: 'Allow the user' options are available only in the Administrative Mode.
2. Click Finish save your settings and close the dialog box.
XenApp
1. To add a XenApp connection, click Connections > Add.
2. Select XenAPP and set the following options:
●
Configuration on page 51
●
Advanced on page 52
Configuration
1. Set the following options:
●
Name
●
Server URL
●
Username
●
Password
●
Domain
2. Click Next to advance to the next window or click Finish save your settings and close the dialog
box.
ENWW Connections 51
Page 60

Advanced
1. Set the following options:
●
Auto start priority
●
Auto reconnect
●
Allow the user to launch this connection
●
Allow the user to edit this connection
NOTE: 'Allow the user' options are available only in the Administrative Mode.
2. Click Finish save your settings and close the dialog box.
Leostream
1. To add a Leostream connection, click Connections > Add.
2. Select Leostream and set the following options:
●
Network on page 53
●
Advanced on page 54
52 Chapter 2 Installation ENWW
Page 61

Network
1. Set the following options:
●
Name
●
Broker
●
Username
●
Password
●
Domain
2. Click Next to advance to the next window or click Finish save your settings and close the dialog
box.
ENWW Connections 53
Page 62

Advanced
1. Set the following options:
●
Auto start priority
●
Auto reconnect
●
Allow the user to launch this connection
●
Allow the user to edit this connection
NOTE: 'Allow the user' options are available only in the Administrative Mode.
2. Click Finish save your settings and close the dialog box.
vWorkspace
1. To add a vWorkspace connection, click Connections > Add.
2. Select vWorkspace and set the following options:
●
Editor on page 55
●
Network on page 56
●
Window on page 57
●
Options on page 58
●
Local Resources on page 59
●
Experience on page 60
●
Advanced on page 61
54 Chapter 2 Installation ENWW
Page 63

Editor
1. Set the following option:
●
Editors
2. Click Next to advance to the next window or click Finish save your settings and close the dialog
box.
ENWW Connections 55
Page 64

Network
1. Set the following options:
●
Name
●
Broker IP
●
Port
●
User name
●
Password
●
Domain
●
Retry attempts
●
Retry interval
●
Allow Smartcard login
2. Click Next to advance to the next window or click Finish save your settings and close the dialog
box.
56 Chapter 2 Installation ENWW
Page 65

Window
1. Set the following options:
●
Window Size
●
Width
●
Height
●
Percentage
●
Window Colors
2. Click Next to advance to the next window or click Finish save your settings and close the dialog
box.
ENWW Connections 57
Page 66

Options
1. Set the following options:
●
Enable motion events
●
Enable data compression
●
Enable encryption
●
Force bitmap updates
●
Use private colormap
●
System beep
●
Attach to console
●
Protocol level
●
Hostname to send
2. Click Next to advance to the next window or click Finish save your settings and close the dialog
box.
58 Chapter 2 Installation ENWW
Page 67

Local Resources
1. Set the following options:
●
Remote computer sound
●
Devices
◦
Enable USB storage mapping
◦
Enable port mapping
◦
Enable printer mapping
2. Click Next to advance to the next window or click Finish save your settings and close the dialog
box.
ENWW Connections 59
Page 68

Experience
1. Set the following options:
●
Desktop background
●
Show contents of window while dragging
●
Menu and window animation
●
Themes
●
Bitmap caching
2. Click Next to advance to the next window or click Finish save your settings and close the dialog
box.
60 Chapter 2 Installation ENWW
Page 69

Advanced
1. Set the following options:
●
Auto start priority
●
Auto reconnect
●
Allow the user to launch this connection
●
Allow the user to edit this connection
NOTE: 'Allow the user' options are available only in the Administrative Mode.
2. Click Finish save your settings and close the dialog box.
VMware View
1. To add a VMware View connection, click Connections > Add.
2. Select VMware View and set the following options:
●
Network on page 62
●
Options on page 63
●
Advanced on page 64
ENWW Connections 61
Page 70

Network
1. Set the following options:
●
Name
●
Server
●
Username
●
Password
●
Domain (case-sensitive)
●
Desktop
2. Click Next to advance to the next window or click Finish save your settings and close the dialog
box.
62 Chapter 2 Installation ENWW
Page 71

Options
1. Set the following options:
●
Login options
◦
Automatic login
◦
Allow Smartcard login
●
Sound redirection
◦
Enable sound redirection
●
Device mappings
◦
Enable USB storage mapping
◦
Enable port mapping
◦
Enable printer mapping
2. Click Next to advance to the next window or click Finish save your settings and close the dialog
box.
ENWW Connections 63
Page 72

Advanced
1. Set the following options:
●
Auto start priority
●
Auto reconnect
●
Allow the user to launch this connection
●
Allow the user to edit this connection
NOTE: 'Allow the user' options are available only in the Administrative Mode.
2. Click Finish save your settings and close the dialog box.
Xdmcp
NOTE: This feature is neither present nor supported on the HP ThinPro image for the HP t5325 thin
client.
1. To add an Xdmcp connection, click Connections > Add.
2. Select Xdmcp and set the following options:
●
Configuration on page 65
●
Advanced on page 67
64 Chapter 2 Installation ENWW
Page 73

Configuration
1. Set the following options:
●
Name
●
Type
●
Address (required if the Type is query)
●
Font Server
◦
Use font server
◦
Font server
ENWW Connections 65
Page 74

2. Click Configure display to set the display configuration for the Xdm connection. If you do not set
this configuration, the default configuration will be used.
For information on this screen, see Display Preferences on page 83.
3. Click Next to advance to the next window or click Finish save your settings and close the dialog
box.
66 Chapter 2 Installation ENWW
Page 75

Advanced
1. Set the following options:
●
Fallback Connection
●
Auto start priority
●
Auto reconnect
●
Allow the user to launch this connection
●
Allow the user to edit this connection
NOTE: 'Allow the user' options are available only in the Administrative Mode.
2. Click Finish save your settings and close the dialog box.
SSH
1. To add an SSH connection, click Connections > Add.
2. Select SSH and set the following options:
●
Configuration on page 68
●
Advanced on page 69
ENWW Connections 67
Page 76

Configuration
1. Set the following options:
●
Name
●
Network
◦
Address
◦
Port
◦
User name
◦
Run application
●
Options
◦
Compression
◦
XII connection forwarding
68 Chapter 2 Installation ENWW
Page 77

◦
Force TTY allocation
◦
Fork into background
●
Style
◦
Foreground color
◦
Background color
◦
Font
2. Click Next to advance to the next window or click Finish save your settings and close the dialog
box.
Advanced
1. Set the following options:
●
Fallback Connection
●
Auto start priority
●
Auto reconnect
ENWW Connections 69
Page 78

●
Allow the user to launch this connection
●
Allow the user to edit this connection
NOTE: 'Allow the user' options are available only in the Administrative Mode.
2. Click Finish save your settings and close the dialog box.
Telnet
1. To add a Telnet connection, click Connections > Add.
2. Select Telnet and set the following options:
●
Configuration on page 70
●
Advanced on page 71
Configuration
1. Set the following options:
●
Name
●
Address
●
Port
●
Style
◦
Foreground color
◦
Background color
◦
Font
2. Click Next to advance to the next window or click Finish save your settings and close the dialog
box.
70 Chapter 2 Installation ENWW
Page 79

Advanced
1. Set the following options:
●
Fallback Connection
●
Auto start priority
●
Auto reconnect
●
Allow the user to launch this connection
●
Allow the user to edit this connection
NOTE: 'Allow the user' options are available only in the Administrative Mode.
2. Click Finish save your settings and close the dialog box.
Custom
NOTE: This feature is neither present nor supported on the HP ThinPro image for the HP t5325 thin
client.
1. To add a Custom connection, click Connections > Add.
2. Select Custom and set the following option:
●
Configuration on page 72
ENWW Connections 71
Page 80

Configuration
1. Set the following options:
●
Name
●
Enter command to run
2. Click Nextto advance to the next window or click Finish save your settings and close the dialog
box.
72 Chapter 2 Installation ENWW
Page 81

Advanced
1. Set the following options:
●
Fallback Connection
●
Auto start priority
●
Auto reconnect
●
Allow the user to launch this connection
●
Allow the user to edit this connection
NOTE: 'Allow the user' options are available only in the Administrative Mode.
2. Click Finish save your settings and close the dialog box.
Copy
▲
To copy a connection, click a selection under Connection Name and then click Copy.
A copy of the connection appears in the list under Connection Name.
Delete
▲
To delete a connection, click a selection under Connection Name and then click Delete.
The connection is removed from the list under Connection Name.
ENWW Connections 73
Page 82

Edit
1. To edit a connection, click a selection under Connection Name and then click Edit.
The connection settings window for that connection opens.
2. Edit the connection and click Apply.
3. Click OK.
User View
NOTE: This feature is available only in the Administrative Mode.
1. To change what connections are visible in the User Mode, click User View.
The Allow and Deny buttons appear above the Connection Name bar.
2. Select one or more of the connections listed.
3. Click Allow to allow the connections to be visible in the User Mode or click Deny to make the
connection unavailable in the User Mode.
4. Click User View again when you have completed your changes.
74 Chapter 2 Installation ENWW
Page 83

Control Panel
Control Panel utilities are organized under five tabs:
●
Peripherals on page 76
●
Setup on page 94
●
Personalization on page 104
●
Management on page 110
●
Advanced on page 128
ENWW Control Panel 75
Page 84

Peripherals
These utilities allow you to configure your peripherals. The following utilities are available on this tab:
●
Client Aggregation on page 76
●
Display Preferences on page 83
●
Keyboard Layout on page 85
●
Keyboard Preferences on page 86
●
Mouse on page 87
●
Printers on page 88
●
SCIM Input Method Setup on page 90
●
Sound on page 91
●
ThinPrint on page 92
●
Touch Screen on page 92
●
USB Manager on page 93
Client Aggregation
NOTE: This feature is neither present nor supported on the HP ThinPro image for the HP t5325 thin
client.
The thin client supports up to four monitors. If you need additional screen real estate, Client Aggregation
allows up to four thin clients to be combined together, controlled by a single keyboard and mouse.
Because each thin client supports up to four monitors, Client Aggregation allows up to four computers
and 16 monitors to be controlled by a single keyboard and mouse, without the need for additional
hardware or software.
76 Chapter 2 Installation ENWW
Page 85

Client Aggregation Overview
Assume that you have four thin clients, each with 4 monitors. Using the Display Preferences dialog, the
thin clients and their monitors are configured as shown—each thin client is configured with a 2x2 array
of monitors.
Client Aggregation allows you to arrange the four thin clients on a 4x4 grid. The following illustration
shows one possible arrangement of the thin clients arranged in a rectangular array using the 4x4 grid.
In moving the mouse pointer off the right side of the thin client A monitors, for example, the pointer will
appear on the left side of the thin client C monitors. Likewise, keyboard input will be redirected from thin
client A to thin client C.
Following is another arrangement of the thin clients on the 4x4 grid, and the resulting arrangement of
the monitors.
ENWW Control Panel 77
Page 86

In this configuration, moving the mouse pointer off the right side of the thin client A monitors will cause
it to appear on the upper 1/3 of the left side of the thin client D monitors. Similarly, moving the mouse
pointer off the right side of the thin client B monitors will cause it to appear in the middle 1/3 of the left
side of the thin client D monitors. Finally, moving the mouse pointer off the right side of the thin client C
monitors will cause it to appear in the lower 1/3 of the left side of the thin client D monitors.
NOTE: Desktop windows cannot span the thin clients, or be moved between client computers.
Typically, each thin client will create windows based on its connection to an associated remote computer,
and there won’t be a need to move windows between thin clients.
The thin client physically connected to the keyboard and mouse is referred to as the Aggregation Server.
The other thin clients are referred to as Aggregation Clients. When the mouse pointer is on one of the
Aggregation Clients, the mouse and keyboard inputs (from the Aggregation Server thin client) are
encrypted, and sent over the network to the selected Aggregation Client. The Aggregation Client
decrypts the mouse and keyboard inputs, and passes the inputs to the local desktop of the Aggregation
Client.
Client Aggregation is based on an open source software package called Synergy, with encryption
provided by a package called stunnel.
NOTE: Because the Synergy and stunnel software is also installed on the HP dc72 Blade Workstation
Client and the HP dc73 Blade Workstation Client (running Embedded OS versions 9.xx and 10.xx),
these client computers can be interconnected to the HP gt7725 thin client in Client Aggregation
configurations.
Configuring Client Aggregation
NOTE: Client Aggregation must be configured individually on each thin client—on the Aggregation
Server and on each Aggregation Client.
Client Aggregation configuration is a two-step process:
1.
Configuring the Aggregation Clients on page 79—From one to three Aggregation Clients can be
configured.
2.
Configuring the Aggregation Server on page 79
78 Chapter 2 Installation ENWW
Page 87

Configuring the Aggregation Clients
Perform this procedure on each Aggregation Client:
1. Click Control Panel > Peripherals > Client Aggregation.
2. Click Client.
3. Type the server hostname or IP address of the Aggregation Server in the field.
4. Click Apply to apply the changes.
Configuring the Aggregation Server
To configure the Aggregation Server:
1. Click Control Panel > Peripherals > Client Aggregation.
ENWW Control Panel 79
Page 88

2. Click Server.
80 Chapter 2 Installation ENWW
Page 89

3. The Aggregation Server thin client is displayed in a purple box that contains its hostname. Click
and drag the Aggregation Server to the desired location in the 4x4 grid. In the following figure, the
Aggregation Server thin client is positioned in the first row, second column of the 4x4 grid.
ENWW Control Panel 81
Page 90

4. Click the location in the 4x4 grid where you want to place the first Aggregation Client, and enter its
hostname or IP address. In the following illustration, the Aggregation Client at IP address
16.125.19.91 is positioned in the first row, first column of the 4x4 grid. Press Enter when done—
Aggregation Clients are displayed in green boxes.
5. In this same manner, position up to two additional Aggregation Clients in the 4x4 grid, for a total
of up to three Aggregation Clients.
Placement of the Aggregation Server and the Aggregation Clients in the 4x4 grid can be modified
at any time by clicking and dragging a client computer to a new location.
Once the Aggregation Clients and the Aggregation Server have been configured, they automatically
attempt to establish encrypted communications with each other. Click Status to view the connection
status between computers.
82 Chapter 2 Installation ENWW
Page 91

Disabling Client Aggregation
To disable client aggregation:
1. Click Control Panel > Peripherals > Client Aggregation > Disabled.
2. Click Apply and Closed.
Display Preferences
NOTE: The Display Preferences window contents are different based on the actual hardware model.
Some models allow configuration of up to four monitors, some two, and some only one.
To add a profile:
1. Click Control Panel > Peripherals > Display Preferences.
2. Click New.
ENWW Control Panel 83
Page 92

3. Under Profile Settings, type a name in the Profile Name field.
4. Select the appropriate Resolution for your monitor.
5. Select the Depth
6. Select the appropriate Orientation for your monitor.
7. Click Save to keep your changes or Revert to discard them.
8. Under Display Configuration, select the Primary Display Profile and the Secondary Display
Profile.
9. Set the Mode.
10. Click Test Settings to check the profile.
11. Click Apply, and then click Close to save your changes and close the dialog box.
To edit a profile:
1. Click Control Panel > Peripherals > Display Preferences.
2. Select a profile in the Profiles list.
3. Edit the Profile Settings and Display Configuration as desired.
4. Click Test Settings to check the profile.
5. Click Apply, and then click Close to save your changes and close the dialog box.
To delete a profile:
1. Click Control Panel > Peripherals > Display Preferences.
2. Select a profile in the Profiles list and click Delete.
3. Click Apply, and then click Close to save your changes and close the dialog box.
84 Chapter 2 Installation ENWW
Page 93

Keyboard Layout
To set your keyboard layout:
1. Click Control Panel > Peripherals > Keyboard Layout.
2. Set the following options:
●
Standard Keyboard
●
keyboard Model
●
keyboard Layout
●
keyboard Variant
3. Click OK to save your changes and close the dialog box.
ENWW Control Panel 85
Page 94

Keyboard Preferences
To set keyboard preferences:
1. Click Control Panel > Peripherals > Keyboard Preferences.
2. Set your preferences on the three tabs:
●
Settings: set typing and cursor speeds
●
Shortcuts: add or remove keyboard shortcuts
●
Accessibility: enable and set parameters for sticky keys, slow keys, and bounce keys
3. Click Close to save your settings and close the dialog box.
86 Chapter 2 Installation ENWW
Page 95

Mouse
To set the mouse behavior and cursor size:
1. Click Control Panel > Peripherals > Mouse.
2. Set your preferences on the three tabs:
●
Behavior
●
Cursor
●
Accessibility
3. Click Close to save your settings and close the dialog box.
ENWW Control Panel 87
Page 96

Printers
Use this dialog box:
●
Printers tab: to add, modify, or delete printers
●
Jobs tab: to select printers or delete print jobs
Printers Tab
Use the Printers tab to add, modify, and delete printers from the thin client.
Add Printers
The following types of printers can be added:
●
Parallel Printer
●
Serial Printer
●
USB Printer
●
Network Printer
●
Samba Printer
88 Chapter 2 Installation ENWW
Page 97

To add a printer:
1. Click Control Panel > Peripherals > Printers.
2. On the Printers tab, click Add.
3. Select the Printer Type.
4. Type the Printer Info in the fields.
5. Select Use Form Feed if desired.
6. Select Make Default if you want this to be your default printer.
7. If you want to test your specifications, click Test.
8. Click OK to add the printer and close the Add New Printer dialog box.
Modify Printers
To modify a printer:
1. Select the printer from the list and click Modify.
2. Modify the printer attributes as desired.
3. Click OK to save the modifications and close the Modify Printer dialog box.
Delete Printers
To delete a printer:
1. Select the printer from the list and click Delete.
2. Click OK to confirm.
ENWW Control Panel 89
Page 98

Jobs Tab
To delete print jobs:
1. Select a printer from the Select Printer list.
2. Select a job from the list and click Delete.
3. To delete all jobs, click Delete All.
4. Click Refresh to refresh the view.
SCIM Input Method Setup
90 Chapter 2 Installation ENWW
Page 99

This is a GUI setup utility for the Smart Common Input Method platform. It is used to set up Chinese
and Japanese input methods. For more information on this open source program, go to the Smart
Common Input Method Platform Web site at
http://www.scim-im.org/.
▲
Click Control Panel > Peripherals > SCIM Input Method Setup.
Sound
This allows you to specify audio parameters.
1. Click Control Panel > Peripherals > Sound.
2. Click Show Switches to display additional settings.
3. Click File > Options to view additional device and control options.
4. Click View > Manage to view and manage volume control profiles.
5. Set your device and control parameters, and click File > Exit to save your preferences and close
the dialog box.
ENWW Control Panel 91
Page 100

ThinPrint
To use ThinPrint:
1. Click Control Panel > Peripherals > Thinprint.
2. Select the printer you want to use and click OK.
3. Reboot the computer so that the setting will become effective.
Touch Screen
Touch Screen allows you to operate the thin client by touching the display screen.
To enable touch screen:
1. Click Control Panel > Peripherals > Touch Screen and select Enable Touch Screen.
2. Select the Controller Type and Device Port, and elect to Swap X or Swap Y, if desired.
92 Chapter 2 Installation ENWW
 Loading...