

HP StorageWorks Ultrium 1760 SAS, StorageWorks Ultrium 920 SAS, StorageWorks Ultrium 448 SAS Start Here Manual
EH919-90901
Printed on at least 50% total recycled fiber with at least 10%
post-consumer paper
© 2007 Hewlett-Packard Development Company, L.P.
Printed in the EU
www.hp.com
IMPORTANT INFORMATION ABOUT YOUR NEW TAPE DRIVE
For the most up-to-date information about supported SAS HBAs and cabling
configurations, refer to www.hp.com/go/connect and be sure to check the details of
the specific tape drive and server combination that you require.
The most cost-effective way of connecting the tape drive to an HP ProLiant server is to
use the split cable supplied with the drive. However, be aware that installation
decisions require a clear understanding of your server’s current SAS configuration.
• With some servers you can connect to a spare SAS connector on the SAS controller.
This is a straightforward installation and recommended.
• With servers that do not have a spare connector, you will need to recable hard disk
drive bays. In a few instances, you may also lose the use of one of the hard disk
drive bays. Caution is advised for this installation. Do NOT use this cabling option,
if the hard disk drive bay is already occupied or will be required for future use.
The simplest way of connecting a tape drive to your HP server is to purchase and install
one of the supported HBAs, see www.hp.com/go/connect. This option may also be
used with non-HP servers as long as the third-party manufacturer supports the HP SAS
controller installed in their server and provides adequate airflow to cool the tape drive.
For information about airflow requirements and detailed, step-by-step installation
instructions, refer to the “User Guide” from the Documentation link on the HP
StorageWorks CD-ROM.
Option 1: Connect to a spare port on the host
HBA (some HP ProLiant servers only)
The following instructions are valid ONLY IF the host SAS controller on your HP ProLiant
server has a spare SAS connector.
TIP: The CD-ROM contains a driver install package for Windows. For ease of use
we recommend that you use the installer package to install the drivers BEFORE you
connect the tape drive.
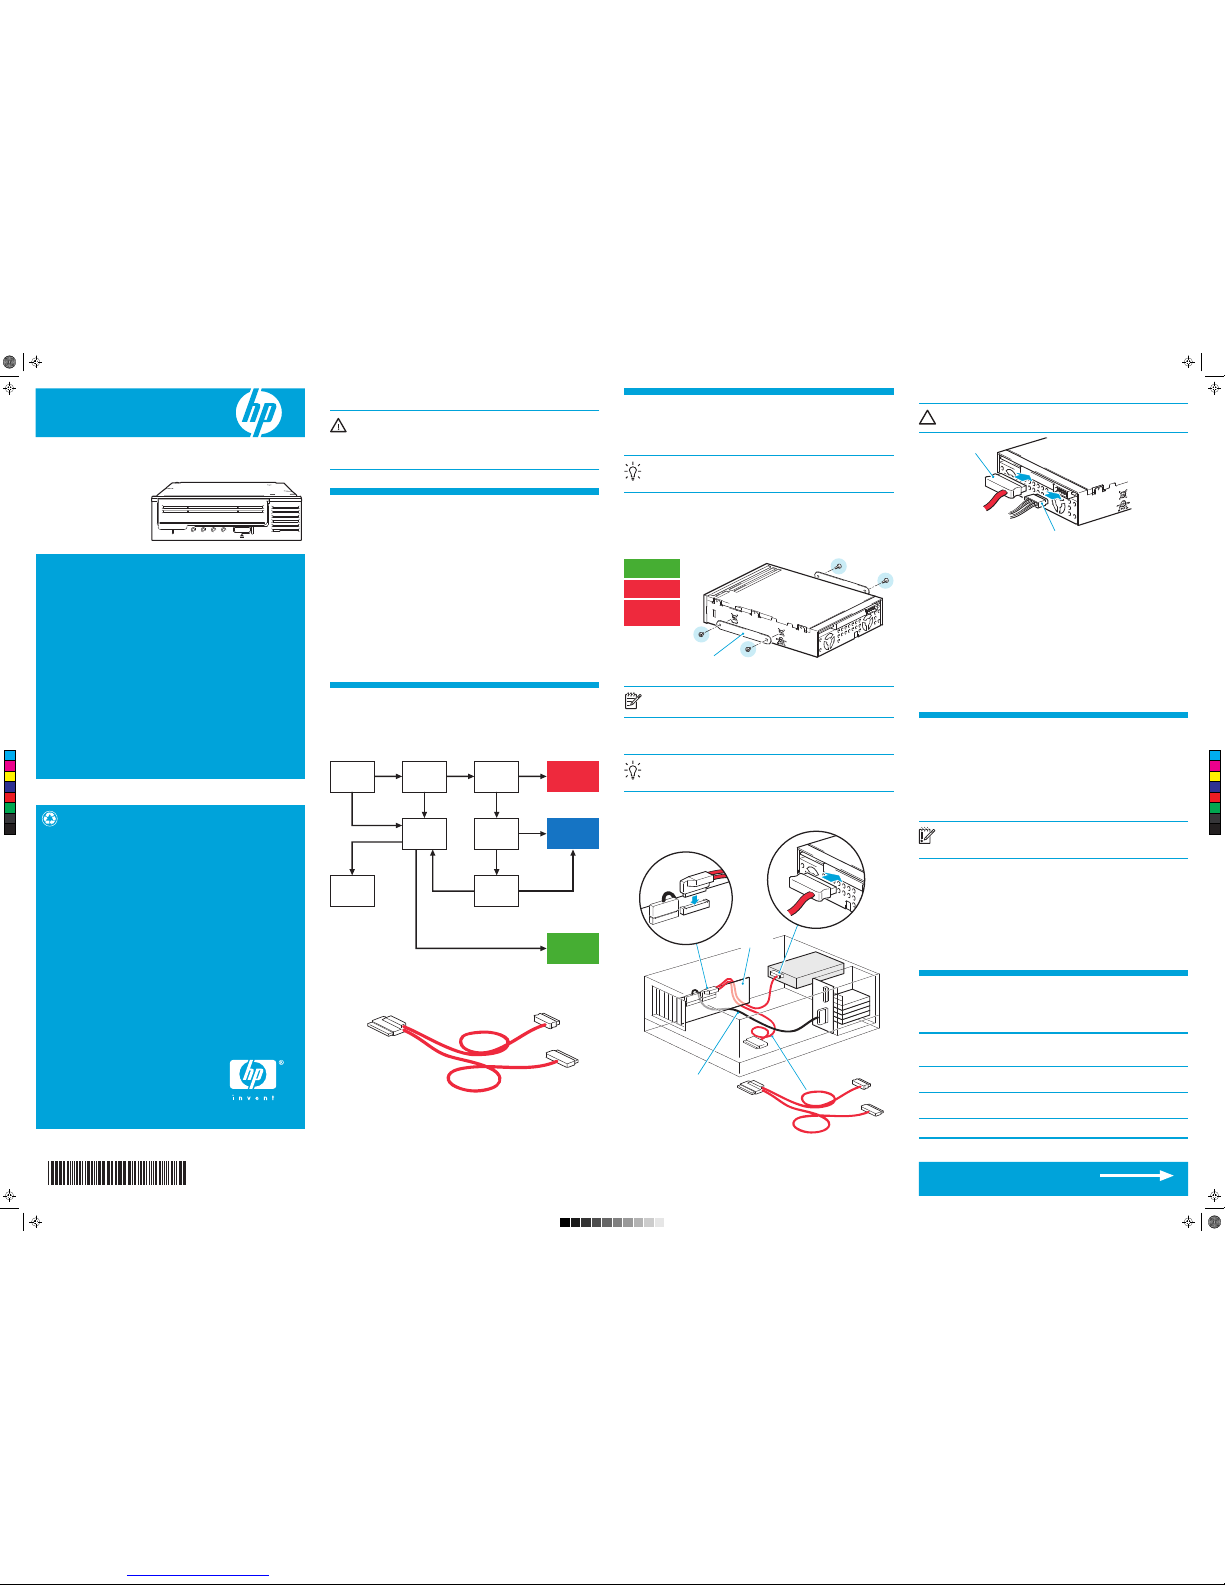
1. Attach the mounting hardware (some servers only)
Check your server documentation to find out if mounting hardware is required. If it is,
attach the appropriate mounting hardware. Screw packs are supplied with the tape drive
and labeled according to server type; always use the specific screws for your server.
Follow the instructions in the screw pack. You may damage your tape drive if you use
screws that are too long.
NOTE:
The illustration shows one method of mounting hardware; it does not apply to
all servers. Please refer also to the "User Guide" and your server documentation.
2. Install the tape drive
Install the tape drive, as described in the "User Guide" on the CD-ROM.
TIP:
If cable access for the tape drive bay is awkward, it may be easier to access
power and other connections if the tape drive is installed in the top bay. You may
need to move other devices to lower bays to achieve this.
3. Connect the SAS cable supplied with the tape drive to the
spare SAS port on the host SAS controller.
1 Refer to www.hp.com/go/connect
Before you install your tape drive, always refer to www.hp.com/go/connect to find out:
• Is connection to your SAS server supported?
• Can you connect to the host SAS controller or do you need to purchase an additional
HBA?
•
If you connect to the host SAS controller, does it have a spare SAS port to which you can
attach the supplied cable or must you use the supplied cable to replace one of the existing
cables? If so, will you lose the use of a hard disk drive bay and which one will it be?
• If you connect to a new HBA, can you use the supplied cable or must you purchase an
additional cable.
Not sure how to use go/connect?
Select tape backup and navigate down to the Hardware Compatibility table for your
make of server. The server/tape drive matrix shows top-level compatibility, but be sure to
click on the box for your combination of server and tape drive to display a further page
with detailed connectivity information.
2 Decide on your installation model
You may damage your server configuration, if you follow the wrong cabling instructions.
Use the following diagram to determine which instructions on this poster are appropriate
for your server.
The supplied split cable may be used to connect to the host controller on the SAS server
or to an additional SAS HBA. It has three connectors, as shown below.
• If you are connecting to a spare connector on the host HBA (Option 1) or to an
additional HBA (Option 3), you will use only two of the connectors. This will leave
unused cabling within the server, which should be coiled and secured tidily.
•
If you are connecting to the host controller by replacing an existing SAS cable (Option 2),
you will use all three connectors. Depending on server model, this may affect your hard
disk drive configuration.
4. Connect SAS cable and server power cable to the tape drive
CAUTION:
Never use a cable where power is supplied through the SAS connector.
Always use a spare power cable from the server's internal power supply.
5. Power up the server
Power up the server. Watch the boot screen carefully after installation. Check to see that
the new SAS tape drive is listed in the boot sequence. If there are any error or
unexpected messages go back and check the SAS cabling carefully.
6. Install drivers
Windows
The driver available from Microsoft update is acceptable, but the HP driver (available on
the CD-ROM or the web) provides better support for all the features of your new tape
drive. The CD-ROM contains a driver install package. You may install the driver before or
after connecting the tape drive.
Other Operating Systems
Patch to the latest version of the operating system, following the instructions in the patch
documentation. See also the “UNIX Configuration Guide” on the CD-ROM.
7. Upgrade backup software
Always upgrade your software application to ensure it works correctly with the tape drive.
We do NOT recommend native backup applications, such as Windows Backup, because
they do not support the full features of the tape drive and may cause performance problems.
This poster describes how to install an HP StorageWorks Ultrium 1760/920/448 SAS
tape drive on a SAS server.
WARNING:
To avoid personal injury or damage to the server or tape drive,
disconnect your server from the mains power supply before installing the tape drive.
To avoid damage to server or tape drive observe all recommended anti-static and
power-grounding precautions, as specified in your server and tape drive manuals.
For detailed safety information, see the Safety Booklet on the CD-ROM.
Options 2 & 3 are shown overleaf
Start Here
HP StorageWorks Ultrium
1760/920/448 SAS
Internal tape drive
Hardware encryption and your Ultrium 1760
tape drive
Your HP Ultrium 1760 tape drive provides the ability to hardware encrypt your data,
applying the strongest level of AES industry-standard encryption and protecting the data
from unauthorized access and use. Encryption is supported only on Ultrium 1.6 TB
media (C7974A and C7974W); media encrypted on an HP Ultrium 1760 drive can only
be read on a compatible Ultrium tape drive that supports hardware encryption.
Hardware encryption can be used with or without compression and without speed or
capacity penalties.
IMPORTANT:
Hardware encryption is a powerful feature, but should be used with
care. If you need to import your media onto another machine or to recover after
disaster you will be required to enter an encryption key.
• Hardware encryption is turned off by default and is switched on by settings in your
backup application, where you also generate and supply the encryption key.
• Your backup application must support hardware encryption for it to work. The software
supplied with the tape drive provides this support. See www.hp.com/go/connect for
an up-to-date list of backup software.
• You should keep a record or backup of your encryption keys and store them in a
secure place separate from the computer running the backup software.
• If you are unable to supply the key when requested to do so, neither you nor HP
Support will be able to access the encrypted data.
For more information see the White Papers on
h18006.www.hp.com/storage/tapewhitepapers.html.
Choosing media
Your high-performance tape drive works best with high-performance HP Ultrium media.
Always use the recommended cartridges (see table).
table: Ultrium data cartridge compatibility
* Capacity assumes 2:1 compression.
No
Write Once
Read Many
(Recommended)
No
Ultrium
400 GB*
(C7972A)
Ultrium
200 GB*
(C7971A)
Ultrium
800 GB*
(C7973A)
Ultrium
800 GB*
WORM
(C7973W)
Ultrium
1.6 TB*
(C7974A)
Ultrium
1.6TB*
WORM
(C7974W)
Ultrium 1760
drives
Read only Read/Write Read/Write
Write Once
Read Many
Read/Write
(Recommended)
Ultrium 920
drives
Read only Read/Write
Read/Write
(Recommended)
Write Once
Read Many
(Recommended)
No
Ultrium 448
drives
Read/Write
Read/Write
(Recommended)
No No No
Supplied SAS Cable
A = connector on host SAS controller
B = not used in this installation
C = connector for tape drive
OPTION 2:
Replace existing
SAS Cable
OPTION 3:
Install new
HBA
Connecting
to HP
server?
Host HBA
supports
tape drive?
Host HBA
has spare
port?
OPTION 1:
Connect to
spare port
Yes Yes Yes
Server has
spare PCI
slot(s)?
Cannot
install SAS
tape drive
OK to lose
disk bay?
Need to
disconnect
disk bay?
Yes
No No
Yes
No
No
No
Yes
No
Use screws supplied
with new tape drive
Do not use screws
attached to server
Do not use screws
attached to device
you are replacing
Use shims with Proliant ML350
and ML370 servers only.
B
B
SAS Cable
C
A
REAR
FRONT
Host SAS
controller (HBA)
C
A
Power connector
SAS cable
SAS cable to
hard disk bays
C
M
Y
CM
MY
CY
CMY
K
Ult1760 Int SAS Eng front.pdf 10/10/07 19:36:28
4 Other sources of information
• The HP StorageWorks Tape CD-ROM for HP StorageWorks Library & Tape Tools (L&TT)
and full Installation and User instructions' in English and 12 other languages.
• www.hp.com/support/tapetools for updates, compatibility information and the latest
version of L&TT.
• www.hp.com/support/ultrium for up-to-date product information.
• www.hp.com/go/connect for recommended products and configurations.
• www.hp.com/support/pat for further information about getting the best performance
from your tape drive.
•
www.hp.com/go/obdr for detailed information about HP One-Button Disaster Recovery.
• If necessary, specialist technical help can be obtained from the HP Customer Call
Centers. Contact details can be found at www.hp.com.
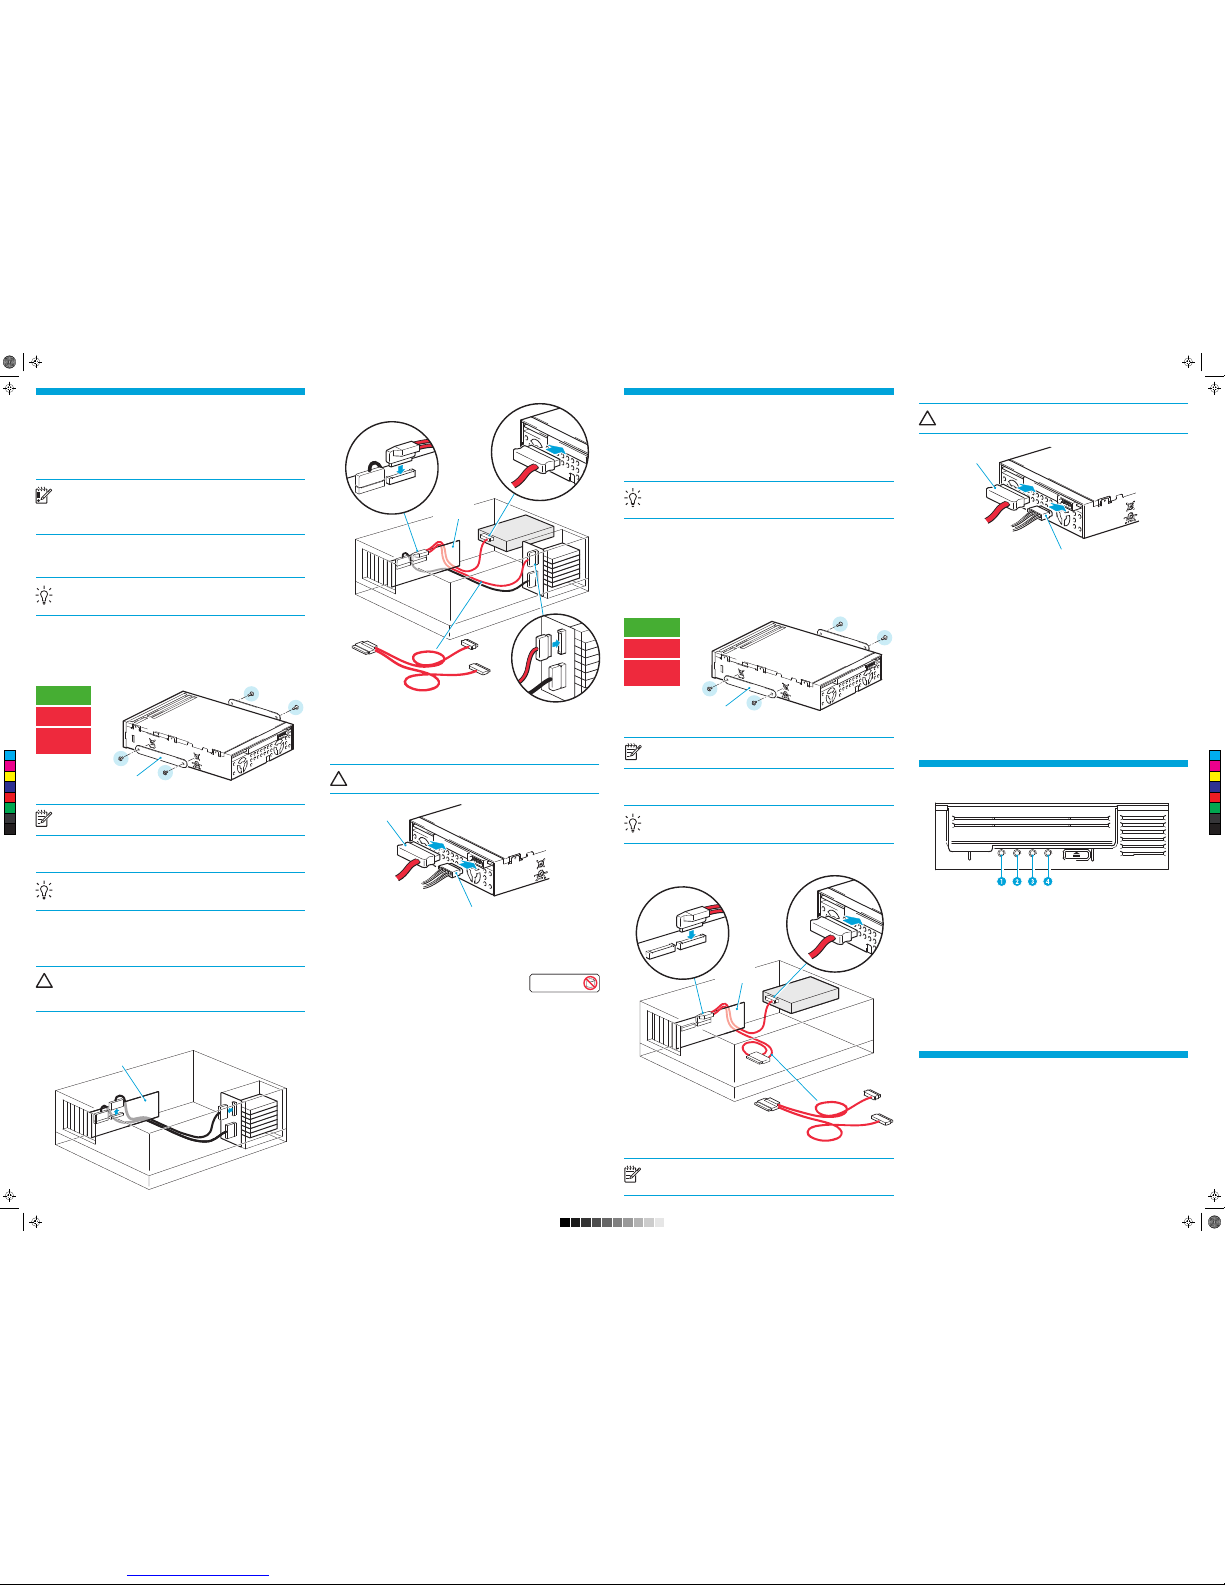
Option 2: Replace existing cable and connect to
port on the host HBA (some HP ProLiant servers
only )
The following instructions apply ONLY IF the host SAS controller on your HP ProLiant
server does not have a spare SAS connector and www.hp.com/go/connect advises that
connection is supported.
IMPORTANT:
Be aware that this option may also disconnect one of your hard disk
drive bays. You should always check
www.hp.com/go/connect
to find out whether
this is the case with your server and which hard disk drive bay is disconnected.
Caution is advised for this installation. Do not use this cabling option, if the hard disk
drive bay is already occupied or will be required for future use.
You may need to remove components, such as fan banks, while you work with the cable.
Cable routing varies from one server to another. Always refer to your server
documentation to identify the location and orientation of SAS connectors and for specific
advice on cable routing.
TIP: The CD-ROM contains a driver install package for Windows. We recommend
that you use the installer package to install the drivers BEFORE you connect the
tape drive.
1. Attach the mounting hardware (some servers only)
Check your server documentation to find out if mounting hardware is required. If it is,
attach the appropriate mounting hardware. Screw packs are supplied with the tape drive
and labeled according to server type; always use the specific screws for your server.
Follow the instructions in the screw pack. You may damage your tape drive if you use
screws that are too long.
NOTE:
The illustration shows one method of mounting hardware; it does not apply to
all servers. Please refer also to the "User Guide" and your server documentation.
2. Install the tape drive
Install the tape drive, as described in the "User Guide" on the CD-ROM.
TIP:
If cable access for the tape drive bay is awkward, it may be easier to access
power and other connections if the tape drive is installed in the top bay. You may
need to move other devices to lower bays to achieve this.
3. Locate existing SAS cable and determine whether a hard
disk drive bay will be lost
Refer to www.hp.com/go/connect to find out which cable must be removed and whether
you will lose the use of a hard disk drive bay.
CAUTION:
If the hard disk drive bay is in use,
STOP
. Even if other hard disk drive
bays are empty, the installation will not work. (Do not move a hard disk to create an
empty bay because you may damage your server configuration.) You must purchase
and install a new HBA.
Locate the cable that connects the hard disk drive bay to the SAS controller (HBA) and
remove it completely (the existing cable will be replaced by the supplied cable).
Option 3: Install and connect to a new host HBA
(some HP and all non-HP servers)
The following instructions are valid IF www.hp.com/go/connect advises that you cannot
connect to the host SAS controller on your server and and recommends the purchase of
an additional SAS HBA. This will be the case for some HP ProLiant servers and for all
non-HP servers. You may also choose this option if connection to your HP ProLiant server
would disconnect one of your hard disk drive bays.
TIP:
The CD-ROM contains a driver install package for Windows. We recommend
that you use the installer package to install the drivers
BEFORE
you connect the tape
drive.
1. Install the new HBA
Follow the instructions supplied with the HBA to install the new SAS HBA.
2. Attach the mounting hardware (some servers only)
Check your server documentation to find out if mounting hardware is required. If it is,
attach the appropriate mounting hardware. Screw packs are supplied with the tape drive
and labeled according to server type; always use the specific screws for your server.
Follow the instructions in the screw pack. You may damage your tape drive if you use
screws that are too long.
NOTE:
The illustration shows one method of mounting hardware; it does not apply to
all servers. Please refer also to the "User Guide" and your server documentation.
3. Install the tape drive
Install the tape drive, as described in the "User Guide" on the CD-ROM.
TIP:
If cable access for the tape drive bay is awkward, it may be easier to access
power and other connections if the tape drive is installed in the top bay. You may
need to move other devices to lower bays to achieve this.
4. Connect the SAS cable supplied with the tape drive to the
new HBA and the tape drive.
NOTE: This will leave unused cabling within the server because the ‘B’ connector
is not required in this configuration. Coil and secure the unused cabling so that it
does not interfere with other components inside the server.
4. Connect the SAS cable and the server power cable to the
tape drive
5. Connect the SAS and power cables to the tape drive.
CAUTION:
Never use a cable where power is supplied through the SAS connector.
Always use a spare power cable from the server's internal power supply.
6. Attach sticker to empty hard disk drive bay (if required)
If www.hp.com/go/connect advises that this option disconnects one of your hard disk
drive bay, you will not be able to use the disk bay after installation. If you install a hard
disk in this slot, the disk will not work. This does not mean there is a fault with either the
hard disk or the server.
Attach the supplied sticker to the blanking plate of the hard
disk drive bay to show that it is disconnected.
7. Power up the server
Power up the server. Watch the boot screen carefully after installation. Check to see that
the new SAS tape drive is listed in the boot sequence.
If there are any error or unexpected
messages go back and check the SAS cabling carefully.
8. Install drivers
Windows
The driver available from Microsoft update is acceptable, but the HP driver (available on
the CD-ROM or the web) provides better support for all the features of your new tape
drive. The CD-ROM contains a driver install package. You may install the driver before or
after connecting the tape drive, but for ease of installation we recommend that you use
the install package before connecting the tape drive.
Other Operating Systems
Patch to the latest version of the operating system, following the instructions in the patch
documentation. See also the “UNIX Configuration Guide” on the CD-ROM.
9. Upgrade backup software
Always upgrade your software application to ensure it works correctly with the tape drive.
We do NOT recommend native backup applications, such as Windows Backup, because
they do not support the full features of the tape drive and may cause performance problems.
5. Connect the SAS and power cables to the tape drive.
CAUTION:
Never use a cable where power is supplied through the SAS connector.
Always use a spare power cable from the server's internal power supply.
6. Power up the server
Power up the server. Watch the boot screen carefully after installation. Check to see that
the new SAS tape drive is listed in the boot sequence.
If there are any error or unexpected
messages go back and check the SAS cabling carefully.
7. Install drivers
Windows
The driver available from Microsoft update is acceptable, but the HP driver (available on
the CD-ROM or the web) provides better support for all the features of your new tape
drive. The CD-ROM contains a driver install package. You may install the driver before or
after connecting the tape drive, but for ease of installation we recommend that you use
the install package before connecting the tape drive.
Other Operating Systems
Patch to the latest version of the operating system, following the instructions in the patch
documentation. See also the “UNIX Configuration Guide” on the CD-ROM.
8. Upgrade backup software
Always upgrade your software application to ensure it works correctly with the tape drive.
We do NOT recommend native backup applications, such as Windows Backup, because
they do not support the full features of the tape drive and may cause performance problems.
3
Understanding the LEDs
1 Clean – amber
• On: cleaning cartridge in use
• Off: the drive does not require cleaning
• Flashing: the drive needs cleaning
2 Tape – amber
• Off: no fault has been detected
• Flashing: the cartridge currently in the drive is faulty (damaged or unsupported).
Discard the cartridge.
3 Drive – amber
• Off: no fault has been detected
• Flashing: the drive mechanism has detected a hardware error
4 Ready – green
• On: the drive is ready for use
• Off: the drive power is off or there was a failure during self-test
• Flashing: the drive is busy
• Flashing repeated pattern: the drive is in OBDR (One-Button Disaster Recovery) mode
Use screws supplied
with new tape drive
Do not use screws
attached to server
Do not use screws
attached to device
you are replacing
Use screws supplied
with new tape drive
Do not use screws
attached to server
Do not use screws
attached to device
you are replacing
A = connector on new HBA
B = not used in this installation
C = connector for tape drive
A = connector on host SAS controller
B = connector for highest-numbered disk bays (for example, slots 4-7)
C = connector for tape drive
Disk Bay
Disconnected
REAR
FRONT
SAS
controller (HBA)
B
B
SAS Cable
C
A
A
C
B
SAS Cable
C
A
REAR
FRONT
C
B
A
Host SAS
controller (HBA)
REAR
FRONT
Host SAS
controller (HBA)
Power connector
SAS cable
Power connector
SAS cable
Use shims with Proliant ML350
and ML370 servers only.
Use shims with Proliant ML350
and ML370 servers only.
C
M
Y
CM
MY
CY
CMY
K
Ult1760 Int SAS Eng back.pdf 10/10/07 19:43:28
 Loading...