

HP StorageWorks Ultrium 1760, StorageWorks Ultrium 920, StorageWorks Ultrium 448 Start Here Manual
Page 1
EH922-90909
© 2011 Hewlett-Packard Development Company, L.P.
Printed in the EU
www.hp.com
1 Introduction
This poster describes how to install your HP StorageWorks Ultrium half-height tape drive.
• Connect to an Ultra320 SCSI HBA for Ultrium 1760/920 or Ultra160 SCSI HBA
(or higher) for Ultrium 448.
• Use the supplied SCSI cable.
• Use the correct driver.
WARNING:
To avoid personal injury or damage to the server or tape drive,
disconnect your server from the mains power supply before installing the tape drive.
Always use the power cable supplied with the tape drive. See also Safety booklet on
the CD-ROM.
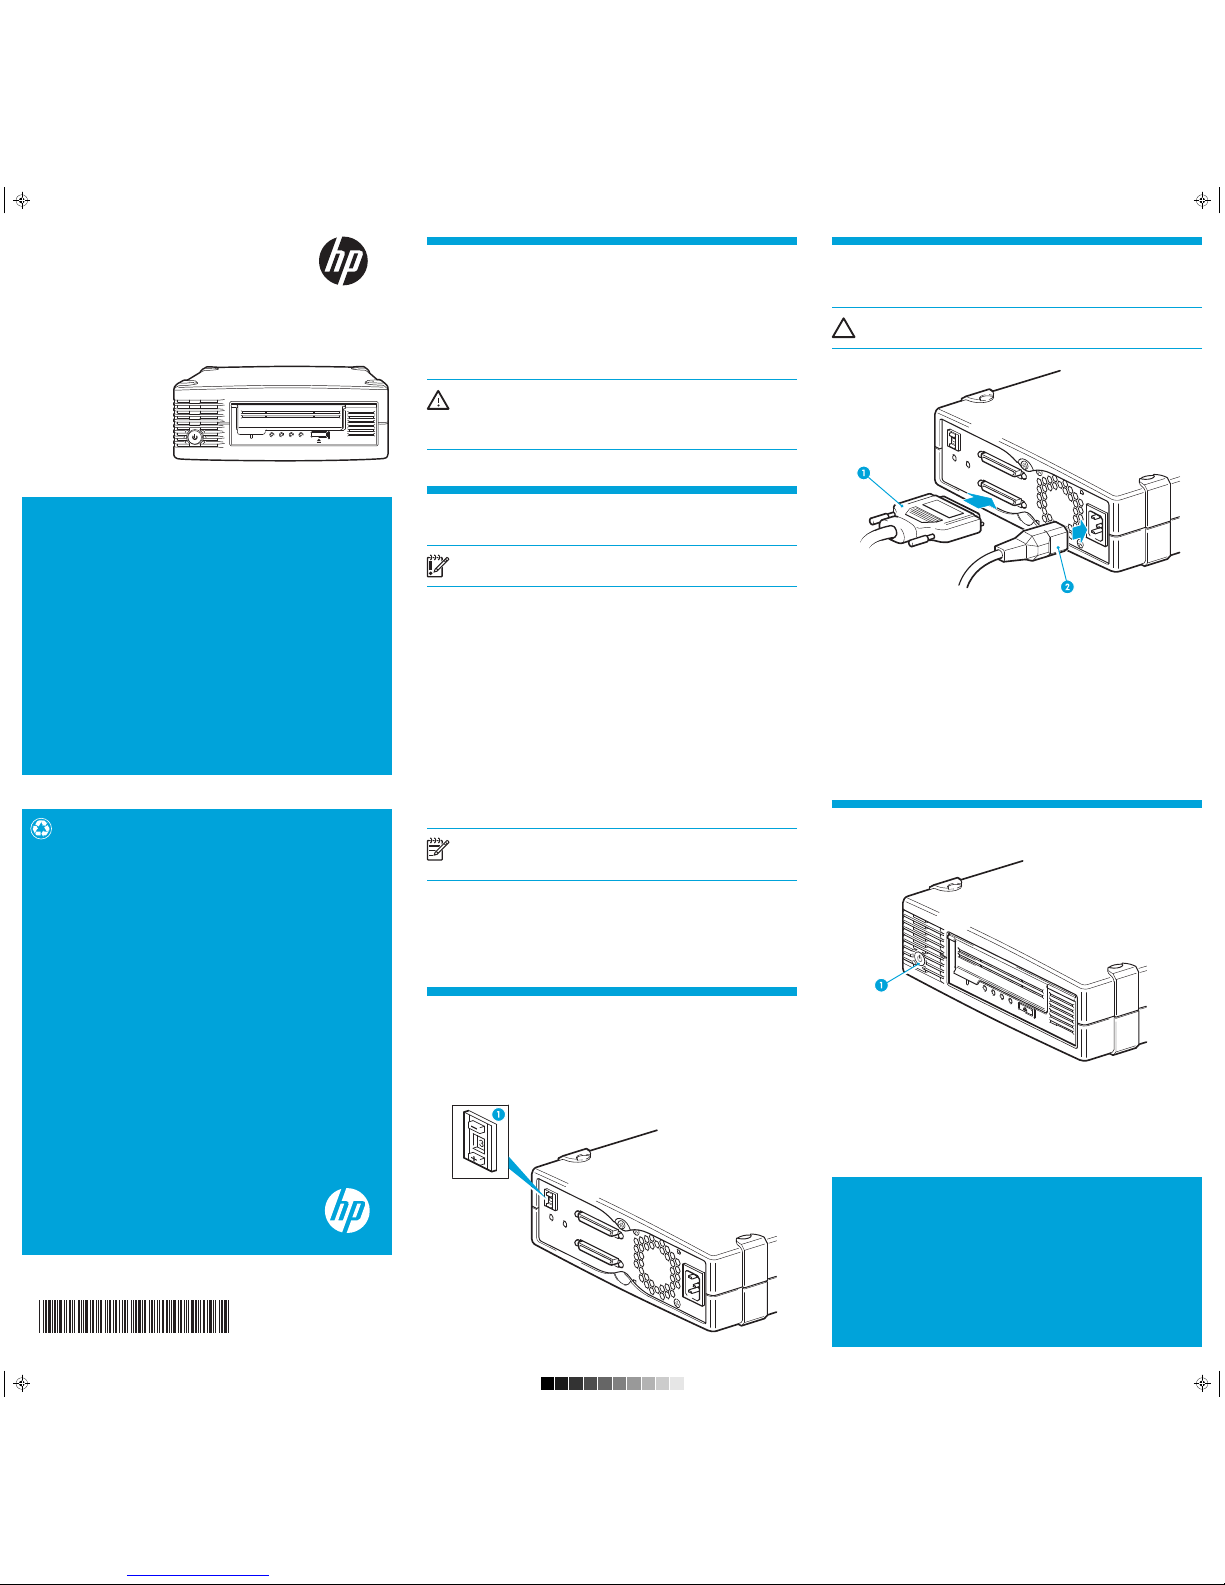
4 Connecting the tape drive
CAUTION:
Turn off and remove the power cords from the server and all attached
accessories.
1 SCSI cable 2 Power cable
SCSI cable and termination
Use the 68-pin, wide, VHDCI- to-HD SCSI cable (1) supplied with the tape drive. The tape
drive provides active termination; it does not require a terminator, if it is the only or the
last device on the SCSI bus. If not, use an LVD or multimode terminator on the last device.
Daisy-chaining multiple devices is not recommended. If you do so, do not mix drive
families (only daisy-chain with other Ultrium tape drives) and attach no more than two
devices to the same SCSI bus. The last device on the SCSI chain must be terminated
correctly.
Power cord
Use the supplied, HP approved power cord (2). This cord is appropriate for your specific
geographic region.
2 Preparing the host
IMPORTANT:
Refer to
www.hp.com/go/connect
for detailed compatibility
information about servers, operating systems, software applications and SCSI HBAs.
SCSI HBA
We recommend an Ultra320 host bus adapter for Ultrium 1760/920. We recommend an
Ultra160 or Ultra320 host bus adapter for Ultrium 448. If necessary, install a new HBA
before you connect the tape drive. Ensure that you are connecting to a supported HBA
running the recommended firmware version.
Your tape drive will work with lower-rated LVDS SCSI but performance may be degraded.
Single-ended SCSI will degrade performance and limit cable length. Do not attach to
narrow or HVD SCSI.
Drivers
For Windows systems, we recommend that you use the installer on the CD-ROM. Subsequent
updates are available from Windows Update or the HP web site. For other operating
systems, patch to the latest version of the operating system, following the instructions in the
patch documentation. See also the “UNIX Configuration Guide” on the CD-ROM.
Backup software
Always upgrade your software application to ensure it works correctly with the tape drive.
The in-box software provides full support for all the features of your tape drive.
NOTE
: The HP driver is suitable for use in most applications, but refer also
to the documentation of your software application to ensure you are using the
recommended driver.
Free diagnostic tool
HP StorageWorks Library & Tape Tools (L&TT) is the recommended diagnostic and
support tool for your HP tape drive. It is available free on your HP StorageWorks
CD-ROM or at www.hp.com/support/tapetools.
Use it to verify installation, upgrade firmware and to aid in troubleshooting.
5 Power on the tape drive and verify connection
1 Power button
• Plug in the host server or workstation and all attached devices.
• Power on the tape drive using the power button located at the front of the tape drive.
• Check the Ready LED on the front panel to make sure the tape drive is ready for use.
• Turn on any other devices you turned off earlier. Turn on the server.
• Verify the connection using HP Library & Tape Tools.
3 Checking the SCSI ID
Your HP StorageWorks Ultrium drive is shipped with a default SCSI ID of 3, but it can
beassigned any unused ID between 0 and 15. Do not use SCSI ID 7, which is reserved
for the SCSI controller, or SCSI ID 0, which is typically assigned to the boot disk.
1 SCSI ID
HP StorageWorks Ultrium
1760/920/448
Start Here
External tape drive
EH922-90909 Ult HH Ext Eng front.pdf 1 10/01/2011 08:49
Page 2
No
No
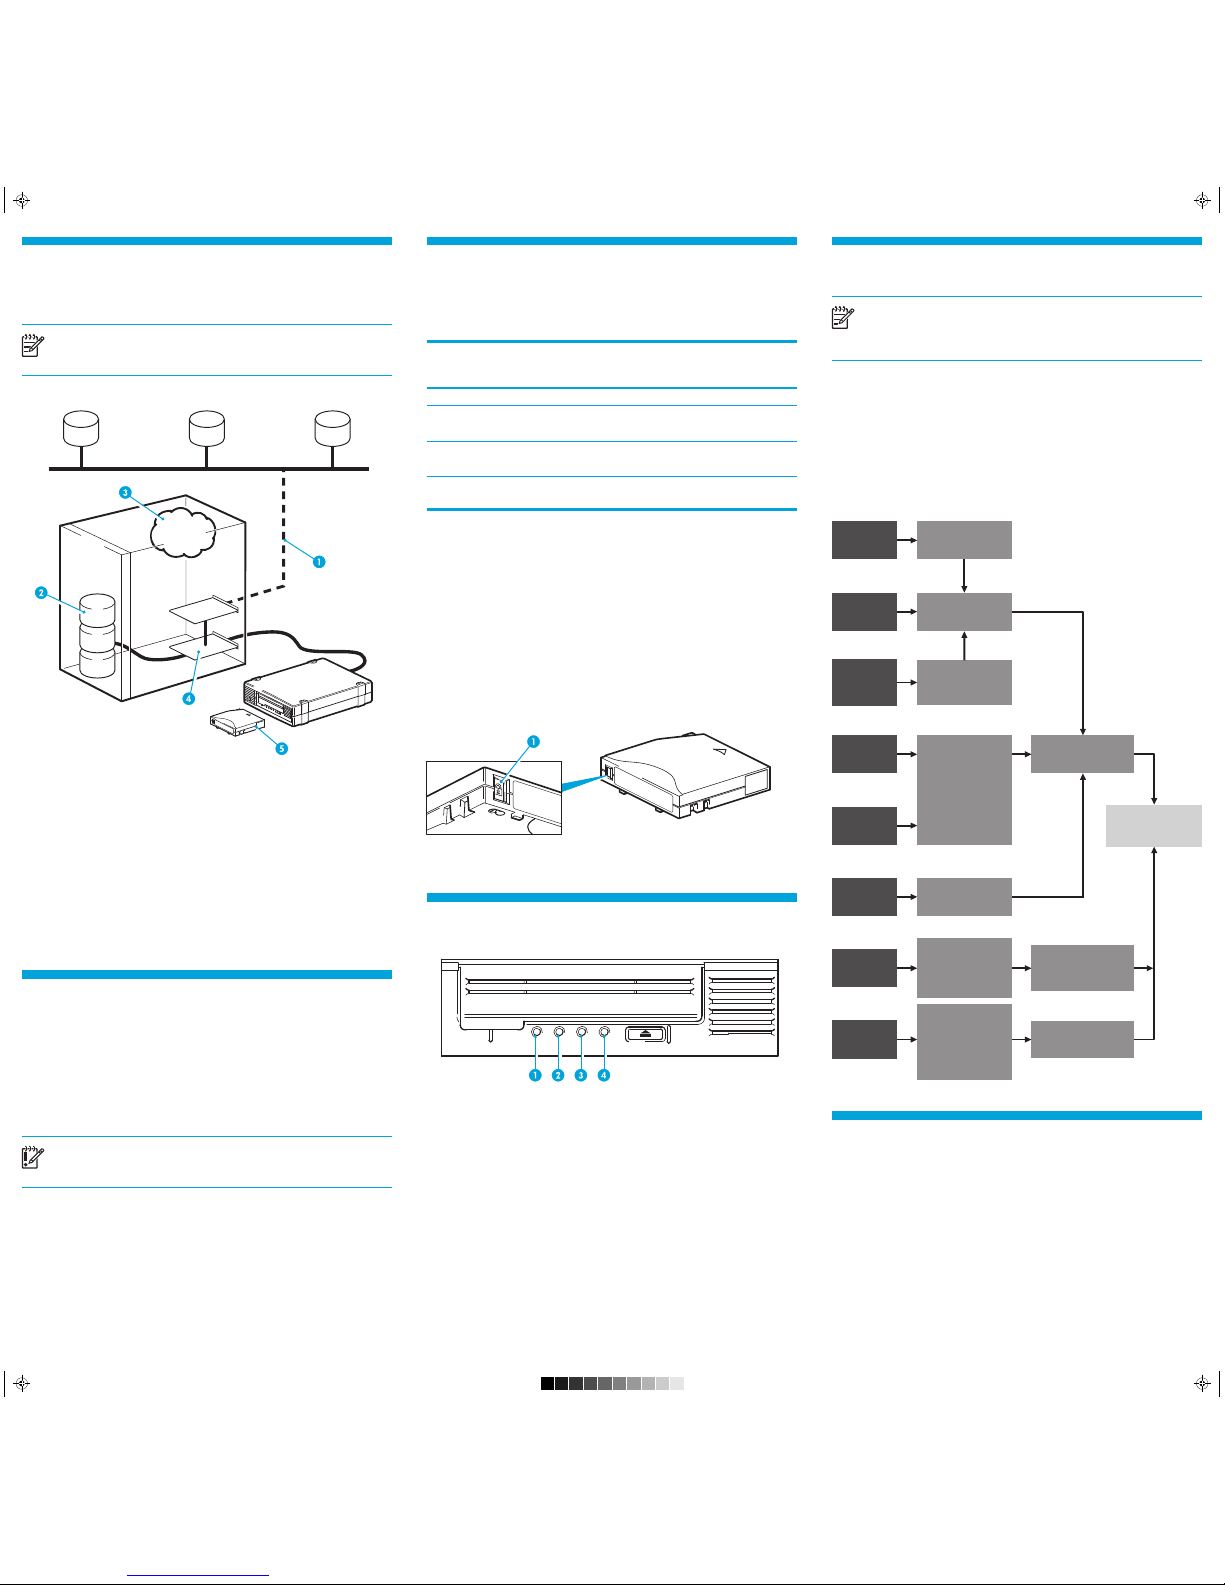
6 Checking the performance of your product
If performance is not meeting expectations and you are not meeting your backup
window, check for bottlenecks in your system architecture.
NOTE:
See
www.hp.com/go/connect
for recommended backup applications and
SCSI HBAs and
www.hp.com/support/pat
for software configuration and
performance advice.
What causes bottlenecks?
1. HP recommends direct attach for Ultrium 1760 and Ultrium 920 tape drives. If you
back up over a network, anything less than Gigabit Ethernet may limit performance.
2. A single disk may limit backup performance. Have disks in parallel (e.g. RAID5) if
possible or, if your backup application supports interleaving of data, back up streams
from multiple sources.
3. Use the latest version of your backup application. Native backup applications, such as
Windows backup, may limit performance.
4. Connect the tape drive to a dedicated SCSI bus.
SCSI card: Use a PCI-express or a 64-bit PCI expansion slot. Use an Ultra320 SCSI
HBA in a 64-bit/66MHz or better expansion slot for Ultrium 1760/920. Use an
Ultra160 or higher for Ultrium 448.
5.
For optimum performance use HP Ultrium 1.6 TB R/W and WORM for 1760,
HP Ultrium 800 GB and Ultrium 800 GB WORM with Ultrium 920, HP Ultrium 400 GB
cartridges with Ultrium 448.
8 Choosing and looking after media
Your high-performance tape drive works best with high-performance HP Ultrium media.
Always use the recommended cartridges (see table).
table1: Ultrium data cartridge compatibility
* Capacity assumes 2:1 compression.
The recommended cleaning cartridge is the HP Ultrium universal cleaning cartridge,
C7978A. This cartridge is designed to work with any Ultrium drive and may be used for
up to 50 cleans.
It pays to look after your media
Many tape drive and backup failures are caused by damaged or badly handled tape
media.
• Keep media in the case provided.
• Follow the temperature, humidity and acclimitization guidelines on the media
packaging.
• Avoid dropping it or rough handling, as this is likely to damage the cartridge.
• Inspect it regularly for damage.
• Do not exceed normal cartridge life (260 full volume backup or restore operations).
For detailed information on media care and best practice and to order online,
refer to www.hp.com/go/storagemedia/ultrium.
1 Write-protect switch
11 Other sources of information
• The HP StorageWorks Tape CD-ROM for HP StorageWorks Library & Tape Tools (L&TT)
and full Installation and User instructions' in English and 12 other languages.
• www.hp.com/support/tapetools for updates, compatibility information and the latest
version of L&TT.
• www.hp.com/support/ultrium for up-to-date product information.
• www.hp.com/go/connect for recommended products and configurations.
• www.hp.com/support/pat for further information about getting the best performance
from your tape drive.
• www.hp.com/go/obdr for detailed information about HP One-Button Disaster
Recovery.
• If necessary, specialist technical help can be obtained from the HP Customer Call
Centers. Contact details can be found at www.hp.com.
10 Troubleshooting
NOTE:
HP StorageWorks Library & Tape Tools (L&TT) is the free, recommended
diagnostic and support tool for your HP tape drive. It can be downloaded from
the HP StorageWorks CD-ROM or as a download from the HP website at
www.hp.com/support/tapetools
.
The detailed Troubleshooting Guide at www.hp.com/go/support contains the most
comprehensive and up-to-date troubleshooting information.
If your server or drive does not work after installation, or your server or application
cannot see the drive, check the physical cabling and configuration.
For most problems, use L&TT as a first step in identifying and resolving the problem.
General Troubleshooting
9 Understanding the LEDs
1 Clean – amber
• On: cleaning cartridge in use.
• Off: the drive does not require cleaning.
• Flashing: the drive needs cleaning.
2 Tape – amber
• Off: no fault has been detected.
• Flashing: the cartridge currently in the drive is faulty (damaged or unsupported).
Discard the cartridge.
3 Drive – amber
• Off: no fault has been detected.
• Flashing: the drive mechanism has detected a hardware error.
4 Ready – green
• On: the drive is ready for use.
• Off: the drive power is off or there was a failure during self-test.
• Flashing: the drive is busy.
• Flashing repeated pattern: the drive is in OBDR (One-Button Disaster Recovery) mode.
7 Hardware encryption and your Ultrium 1760
tape drive
Your HP Ultrium 1760 tape drive provides the ability to hardware encrypt your data,
applying the strongest level of AES industry-standard encryption and protecting the data
from unauthorized access and use. Encryption is supported only on Ultrium 1.6 TB media
(C7974A and C7974W); media encrypted on an HP Ultrium 1760 drive can only be
read on a compatible Ultrium tape drive that supports hardware encryption.
Hardware encryption can be used with or without compression and without speed or
capacity penalties.
IMPORTANT:
Hardware encryption is a powerful feature, but should be used with
care. If you need to import your media onto another machine or to recover after
disaster you will be required to enter an encryption key.
• Hardware encryption is turned off by default and is switched on by settings in your
backup application, where you also generate and supply the encryption key.
• Your backup application must support hardware encryption for it to work. The software
supplied with the tape drive provides this support. See www.hp.com/go/connect for
an up-to-date list of backup software.
• You should keep a record or backup of your encryption keys and store them in a
secure place separate from the computer running the backup software.
• If you are unable to supply the key when requested to do so, neither you nor HP
Support will be able to access the encrypted data.
For more information about AES encryption, encryption keys, and using hardware
encryption with your HP Ultrium 1760 tape drive, see the White Papers on
h18006.www.hp.com/storage/tapewhitepapers.html.
No
Read only
Read/Write
Read only
Ultrium
400 GB*
(C7972A)
Ultrium
200 GB*
(C7971A)
Ultrium 1760
drives
Type of Drive
Ultrium
800 GB*
(C7973A)
Ultrium
800 GB*
WORM
(C7973W)
Ultrium
1.6 TB*
(C7974A )
Ultrium
1.6TB*
WORM
(C7974W )
Read/Write
Write Once
Read Many
Read/Write
(Recommended)
Write Once
Read Many
(Recommended)
Read/Write
Ultrium 920
drives
Read/Write
(Recommended)
Write Once
Read Many
(Recommended)
No
Read/Write
(Recommended)
Ultrium 448
drives
No No No
Softwa re
Server
Network
•
Run L&TT assessment test
• Run L&TT media validation
test
• Refer to detailed
troubleshooting guide at
www.hp.com/go/support
• Contact HP Support
400/800 GB and 1.6 TB
assumes 2:1 compression.
Your data may not
compress at this ratio
• Check media type
• Check media age
• Check drive/HBA/cabling
• Check backup application
is configured correctly and
upgraded to latest version
• Check application has not
locked media
• Power cycle drive
• Try another tape
• Check media type
•
Check media for damage
• Check media age
• Clean drive
• Try another tape
• Power cycle drive
• Check power
• Check SCSI cables
• Check SCSI ID
• Can OS see it? (eg in
Windows Device Manager
)
• Use L&TT to scan for it
• Clean drive
Cannot back up
as much data as
expected on a
400/800 GB or
1.6 TB cartridge
Drive will not
accept cartridge
Tape error LED
Drive error LED
Cartridge will not
eject from drive
Server or backup
application cannot
see drive
• Press the eject button.
Wait for up to 10 minutes.
• If ejected check media
for damage and
frequency of use.
• If not ejected power cycle
drive and press eject
button upon power up.
Symptoms Action Further
Action
Problem not
resolved
Clean LED keeps
coming on
Read/Write errors
EH922-90909 Ult HH Ext Eng back.pdf 1 10/01/2011 08:53
 Loading...