

Page 1

addendum
© 2003 Hewlett-Packard Company AV–RU6YA–TE
Printed in the U.S.A. March 2003
Product names mentioned herein may be trademarks of their respective companies as reflected by an associated
footnote. The information in this document is subject to change without notice.
This addendum only applies to the following documents:
HP StorageWorks SAN Switch 2/32 Installation Guide, Version 4.0.x
AA–RTQVB–TE (February 2003)
HP StorageWorks SAN Switch 2/16 Installation Guide, Version 3.0.x
AA–RR84B–TE (February 2003)
HP StorageWorks SAN Switch 2/8 Installation Guide, Version 3.0.x
AA–RSB6B–TE (February 2003)
hp StorageWorks
SAN switch universal rack mount
kit installation
Product Version: V3.0.x/V4.0.x
Page 2

Pen-and-ink Changes
2 SAN Switch Universal Rack Mount Kit Installation Addendum
This addendum consists two parts:
■ Pen-and-ink Changes—provides instructions for locating specific text and
either deleting text, replacing text with new text, or adding new text at a
specific location.
■ Page Additions—identifies where to add a page at a specific place in the
document and recommends how to attach the replacement pages.
Note: If the changes within this addendum are not incorporated into the specified
documents and then used, problems might arise from using obsolete information.
Pen-and-ink Changes
There are no pen-and-ink changes in this addendum.
Page Additions
The following pages describe the installation of the SAN Switch 2/32, SAN
Switch 2/16, and SAN Switch 2/8 in an HP Series 9000 or comparable EIA rack,
or in an HP System/e rack using the SAN Switch Universal Rack Mount Kit, part
number 331148-B21.
For each document, insert the following sheets as shown here:
1. After page 30 in the HP StorageWorks SAN Switch 2/32 Installation Guide
2. After page 29 in the HP StorageWorks SAN Switch 2/16 Installation Guide
3. After page 32 in the HP StorageWorks SAN Switch 2/8 Installation Guide
Page 3
Installing the Switch in a Rack Using the SAN Switch Universal Rack Mount Kit
1
Addendum Pg
HP StorageWorks SAN Switch 2/8|16|32 Installation Guide
Installing the Switch in a Rack Using the SAN Switch Universal
Rack Mount Kit
This section provides instructions for installing the SAN Switch 2/32, SAN
Switch 2/16, or SAN Switch 2/8 in an HP System/e rack, or in an HP 9000 Series
or comparable EIA rack using the SAN Switch Universal Rack Mount Kit, part
number 331148-B21.
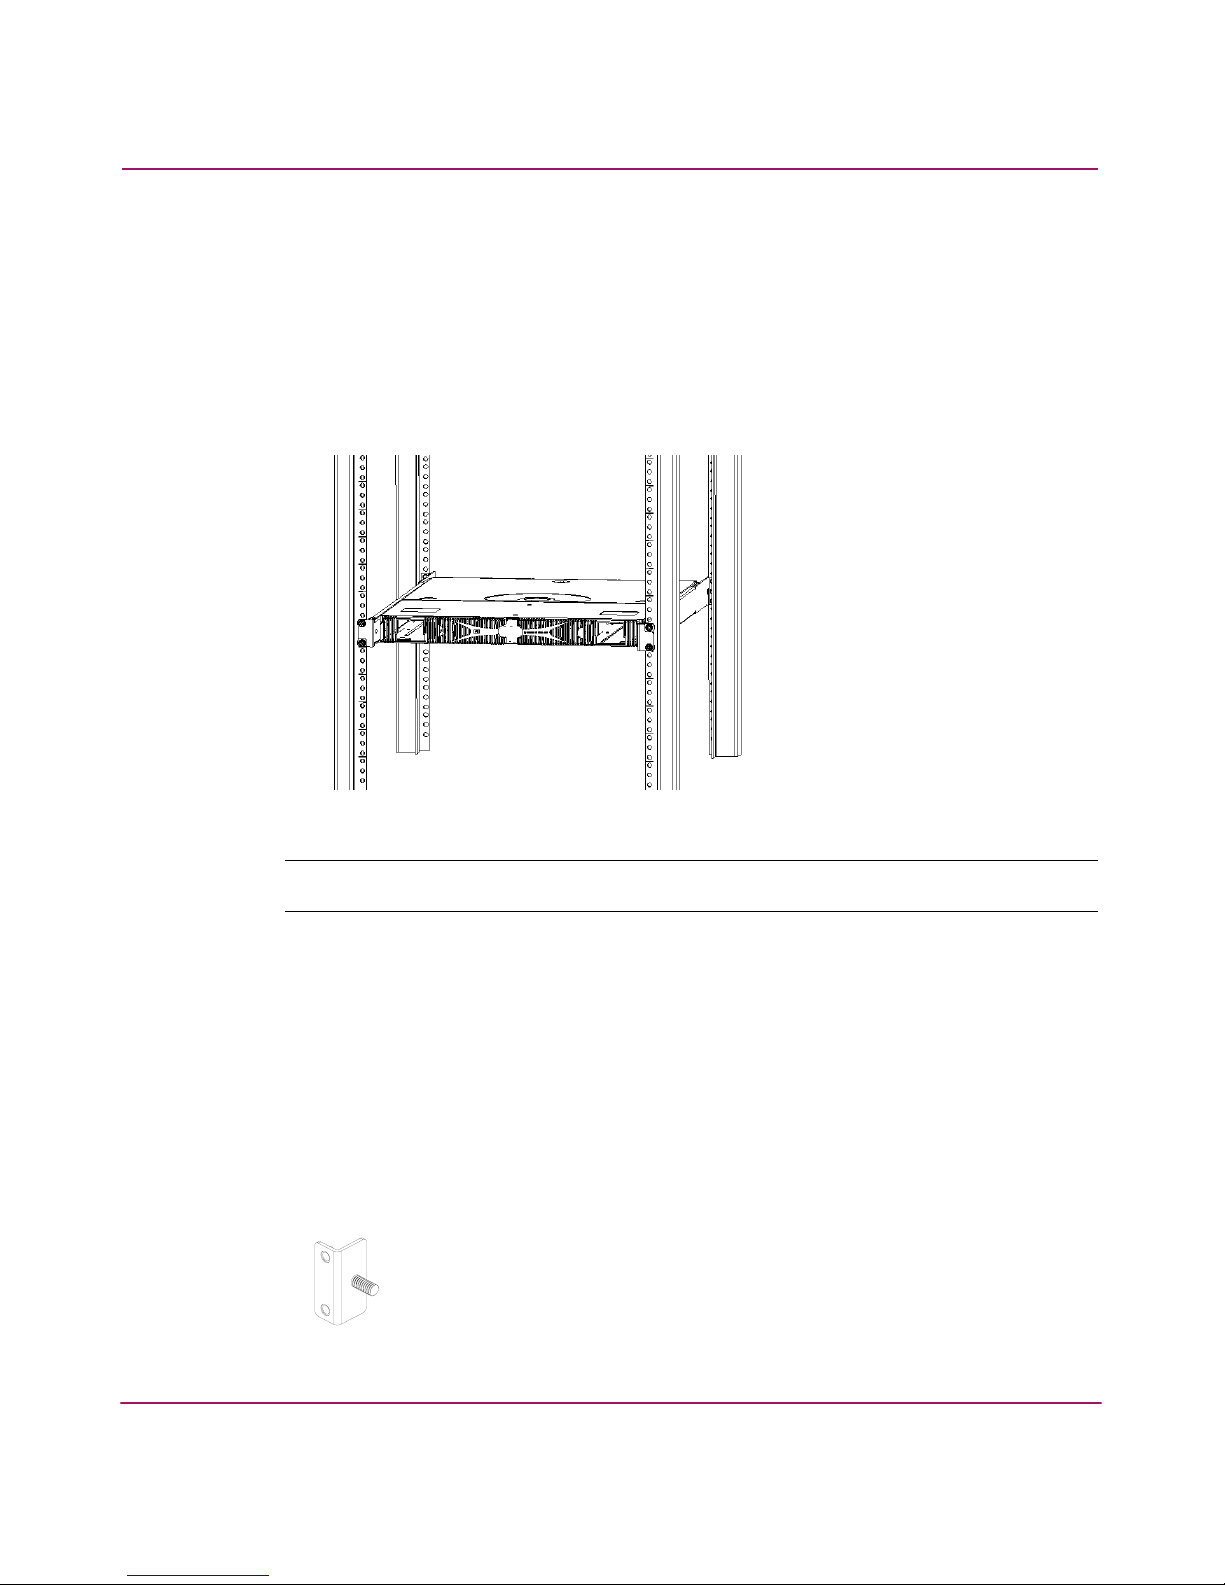
Figure 1: SAN Switch 2/16 rack-mounted switch
Note: The Universal Rack Mount Kit installation requires two technicians.
The following items are required to install the switch in a rack:
■ SAN Switch 2/32, SAN Switch 2/16, or SAN Switch 2/8
■ Power cables
■ #2 Phillips screwdriver
■ 7/16-inch wrench or socket
■ The SAN Switch Universal Rack Mount Kit rails and rail mounting hardware
listed below:
(2) Rear mounting brackets
Page 4

Installing the Switch in a Rack Using the SAN Switch Universal Rack Mount Kit
2
Addendum Pg
HP StorageWorks SAN Switch 2/8|16|32 Installation Guide
A right inner rail and a right outer rail
A left inner rail and a left outer rail
(14) #8-32 x 3/16-inch Phillips pan-head screw with captive
star lock washer
(10) #10-32 x 1/2-inch Phillips pan-head screw with captive
star lock washer
(8) #10 alignment washer
(8) #10 adapter washer
(2) 1/4-20 hex nut with captive star lock washer
(2) 1/4-inch flat washer
Page 5
Installing the Switch in a Rack Using the SAN Switch Universal Rack Mount Kit
3
Addendum Pg
HP StorageWorks SAN Switch 2/8|16|32 Installation Guide
Caution: For proper airflow, the SFP media side of the SAN Switch 2/32,
SAN Switch 2/16, or SAN Switch 2/8 must face the rear of the rack. This
mounting allows air to enter from the front of the rack and to exhaust at the
rear of the rack, similar to other rack-mounted equipment. This prevents switch
overheating, which may cause it to fail.
To install the switch in a rack:
1. Check contents of the shipping carton to verify all the required parts and
hardware are available.
2. Choose a mounting location in the rack for the switch.
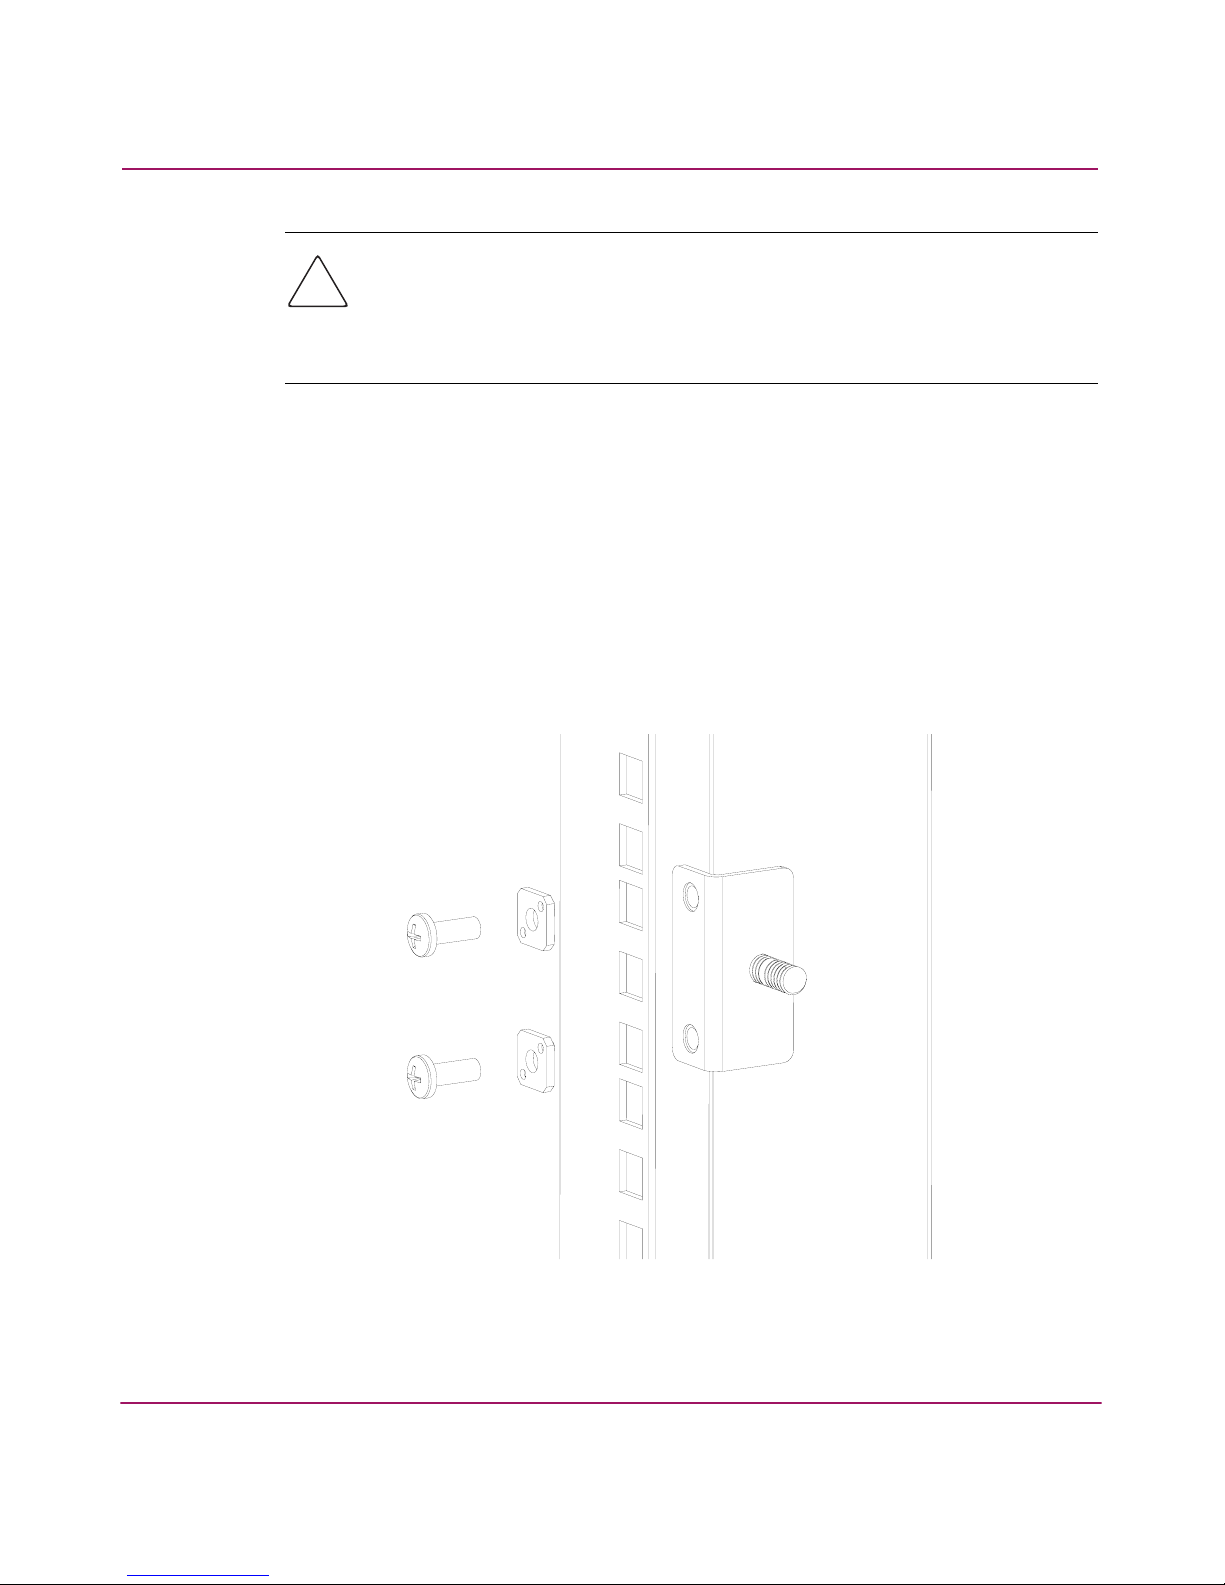
3. Attach the rear mounting brackets to the rear rack uprights by completing one
of the following steps:
— For an HP 9000 Series or comparable EIA rack, assemble each of the two
brackets with (2) #10-32 x 1/2-inch Phillips pan-head screws with captive
star lock washers and (2) #10 adapter washers as shown in Figure 2.
Figure 2: Installing the rear mounting brackets (HP 9000 Series or comparable EIA
rack)
Page 6

Installing the Switch in a Rack Using the SAN Switch Universal Rack Mount Kit
4
Addendum Pg
HP StorageWorks SAN Switch 2/8|16|32 Installation Guide
— For an HP System/e rack, install each of the two rear mounting brackets
with (2) #10-32 x 1/2-inch Phillips pan-head screws and (2) #10
alignment washers as shown in Figure 3.
Figure 3: Installing the rear mounting brackets (HP System/e rack-left rear upright)
Page 7

Installing the Switch in a Rack Using the SAN Switch Universal Rack Mount Kit
5
Addendum Pg
HP StorageWorks SAN Switch 2/8|16|32 Installation Guide
Note: This kit contains both left rails and right rails. The rails are marked with
Right
and
Left
to distinguish the rails from each other.
4. Assemble the outer rails by completing the following steps:
a. Attach the left outer rail and the right outer rails to the rear mounting
brackets using (2) 1/4-20 hex nuts with captive star lock washers attached
loosely as shown in Figure 4. Don’t tighten them. The nuts will be
tightened later in step 8.
Figure 4: Installing the outer rails (HP 9000 Series or comparable EIA rack)
Page 8

Installing the Switch in a Rack Using the SAN Switch Universal Rack Mount Kit
6
Addendum Pg
HP StorageWorks SAN Switch 2/8|16|32 Installation Guide
b. Depending on the rack you are using, complete one of the following tasks:
— For an HP 9000 Series or comparable EIA rack, install two #10-32 x
1/2-inch Phillips pan-head screws with captive star lock washers and two
#10 adapter washers in the upper and lower hole locations of the right rail.
Then install two #10-32 x 1/2-inch Phillips pan-head screws with captive
star lock washers and two #10 adapter washers in the upper and lower
hole locations of the left rail. See Figure 5.
Figure 5: Assembling the outer rails (HP 9000 Series or comparable EIA rack)
Page 9

Installing the Switch in a Rack Using the SAN Switch Universal Rack Mount Kit
7
Addendum Pg
HP StorageWorks SAN Switch 2/8|16|32 Installation Guide
— For an HP System/e rack, install two #10-32 x 1/2-inch Phillips pan-head
screws with captive star lock washers and two #10 alignment washers in
the upper and lower hole locations of the right rail. Then install two
#10-32 x 1/2-inch Phillips pan-head screws with captive star lock washers
and two #10 alignment washers in the upper and lower hole locations of
the left rail. See Figure 6.
Figure 6: Assembling the outer rails (HP System/e rack)
5. Determine the number of #8-32 x 3/16-inch Phillips pan-head screws with
captive star lock washers required to assemble the inner rails by referring to
Tabl e 1.
Table 1: Number of screws required to assemble the inner rails
Switch
Number of #8-32 x 3/16-inch
Screws
SAN Switch 2/32 12
SAN Switch 2/16 10
SAN Switch 2/8 14
Page 10

Installing the Switch in a Rack Using the SAN Switch Universal Rack Mount Kit
8
Addendum Pg
HP StorageWorks SAN Switch 2/8|16|32 Installation Guide
6. For the SAN Switch 2/32 and SAN Switch 2/16, perform step a. For the SAN
Switch 2/8, perform step b.
Caution: Do not use any other screws other than the fourteen that are
provided. Use of any longer lengths can cause damage to internal components
Note: The inner rails work for all three SAN switches—SAN Switch 2/32, SAN Switch
2/16, and SAN Switch 2/8. The mounting holes in the inner rails are marked with 32,
16, and 8. Use the appropriately labeled mounting holes when installing the inner rails
on a switch. For example, to install the inner rails on the SAN Switch 2/32, use the
mounting holes labeled with 32.
When viewing a rack from the front, the left rails are used in the left side of the rack and
the right rails are used in the right side of the rack. The rails must match up—right inner
with right outer and left inner with left outer. Note that the SAN switch mounts in the
rack with its front, the port side, facing the back of the rack. The rear of the switch, the
AC side, faces the front of the rack.
Page 11

Installing the Switch in a Rack Using the SAN Switch Universal Rack Mount Kit
9
Addendum Pg
HP StorageWorks SAN Switch 2/8|16|32 Installation Guide
a. Assemble the two inner rails (one on each side) to the switch using the
appropriate number (from step 5) of #8-32 x 3/16-inch Phillips pan-head
screws as shown in Figure 7.
Note: The rail kit provides fourteen #8-32 x 3/16-inch screws for assembling the
inner rails. Each switch requires a different number of these screws. For example,
Figure 7 shows the an inner rail being attached to the SAN Switch 2/16 with five
screws. Attaching both inner rails requires ten screws.
Figure 7: Assembling the inner rails
Page 12

Installing the Switch in a Rack Using the SAN Switch Universal Rack Mount Kit
10
Addendum Pg
HP StorageWorks SAN Switch 2/8|16|32 Installation Guide
b. For the SAN Switch 2/8, assemble the two inner rails (one on each side)
to the switch and plenum using the appropriate number (from step 5) of
#8-32 x 3/16-inch Phillips pan-head screws as shown in Figure 8.
Note: The plenum is only a required part of this installation when the SAN Switch 2/8
is installed in the HP System/e rack. The plenum is not needed if the switch is installed
in an HP 9000 Series or comparable EIA rack.
Verify that the plenum (part number A7346-00001) is preinstalled on the SAN Switch
2/8 before proceeding. The plenum is required for the SAN Switch 2/8 rack mount
only, as it allows air to dissipate at the rear of the rack, preventing overheating.
If the plenum is not preinstalled on the SAN Switch 2/8, refer to the HP StorageWorks
SAN Switch 2/8 Version 3.1.x Installation Guide for complete plenum installation
instructions.
Figure 8: Assembling the inner rails on a SAN Switch 2/8 with plenum
Page 13

Installing the Switch in a Rack Using the SAN Switch Universal Rack Mount Kit
11
Addendum Pg
HP StorageWorks SAN Switch 2/8|16|32 Installation Guide
7. Insert the switch with the attached inner rails into the outer rails.
Note: This step applies to both the HP System/e rack and the HP 9000 Series or
comparable EIA rack.
Figure 9: Installing the switch into a rack (HP 9000 Series or comparable EIA rack)
Insert the switch into the rack and install (2) #10-32 x 1/2-inch Phillips
pan-head screws with captive star lock washers with one on each side.
See
Figure 9 and Figure 10.
Page 14

Installing the Switch in a Rack Using the SAN Switch Universal Rack Mount Kit
12
Addendum Pg
HP StorageWorks SAN Switch 2/8|16|32 Installation Guide
Figure 10: Installing the switch into a rack (HP System/e rack)
8. Tighten the nuts installed in step a of step 4 on page 5. See Figure 4.
Note: To uninstall a switch, remove the middle #10-32 x 1/2-inch Phillips pan head
screw with captive star lock washer from either side of the rack uprights.
9. Continue the installation by returning to one of the following guides as
appropriate.
a. “Connecting AC Power” on page 45 in the HP StorageWorks SAN Switch
2/32 Installation Guide, Version 4.0.x.
b. “Connecting AC Power” on page 45 in the HP StorageWorks SAN Switch
2/16 Installation Guide, Version 3.0.x.
c. Connecting the power cord in step 8 on page 45 in the HP StorageWorks
SAN Switch 2/8 Installation Guide, Version 3.0.x.
 Loading...