

Page 1

installation
and user’s
guide
hp StorageWorks
NAS Data Path Manager
installation and user’s guide
Edition: March 2003
Part Number: A7423-96001
Page 2

© Hewlett-Packard Company, 2003.
Hewlett-Packard Company makes no warranty of any kind with regard to this material, including, but not limited to,
the implied warranties of merchantability and fitness for a particular purpose. Hewlett-Packard shall not be liable for
errors contained herein or for incidental or consequential damages in connection with the furnishing, performance,
or use of this material.
This document contains proprietary information, which is protected by copyright. No part of this document may be
photocopied, reproduced, or translated into another language without the prior written consent of Hewlett-Packard.
The information contained in this document is subject to change without notice.
Compaq Computer Corporation is a wholly-owned subsidiary of Hewlett-Packard Company.
Java® and all Java-based marks are trademarks or registered trademarks of Sun Microsystems, Inc.
Microsoft®, Windows®, and Windows NT® are trademarks of Microsoft Corporation.
UNIX® is a registered trademark of The Open Group.
All other product names mentioned herein may be trademarks of their respective companies.
Hewlett-Packard Company shall not be liable for technical or editorial errors or omissions contained herein. The
information is provided “as is” without warranty of any kind and is subject to change without notice. The warranties
for Hewlett-Packard Company products are set forth in the express limited warranty statements for such products.
Nothing herein should be construed as constituting an additional warranty.
Printed in the U.S.A.
hp StorageWorks NAS Data Path Manager Installation and User’s Guide
Edition March 2003
Part Number: A7423-96001
Page 3

contents
About this Guide. . . . . . . . . . . . . . . . . . . . . . . . . . . . . . . . . . . . . . . . . . . . . . . . . . . .5
Intended Audience . . . . . . . . . . . . . . . . . . . . . . . . . . . . . . . . . . . . . . . . . . . . . . . . . . . . . . . 5
Related Documentation . . . . . . . . . . . . . . . . . . . . . . . . . . . . . . . . . . . . . . . . . . . . . . . . . . . 5
Document Conventions . . . . . . . . . . . . . . . . . . . . . . . . . . . . . . . . . . . . . . . . . . . . . . . . . . . 6
Getting Help . . . . . . . . . . . . . . . . . . . . . . . . . . . . . . . . . . . . . . . . . . . . . . . . . . . . . . . . . . . . 6
HP Technical Support . . . . . . . . . . . . . . . . . . . . . . . . . . . . . . . . . . . . . . . . . . . . . . . . . 6
HP Storage Website. . . . . . . . . . . . . . . . . . . . . . . . . . . . . . . . . . . . . . . . . . . . . . . . . . . 7
HP Authorized Reseller . . . . . . . . . . . . . . . . . . . . . . . . . . . . . . . . . . . . . . . . . . . . . . . . 7
1 NAS Data Path Manager. . . . . . . . . . . . . . . . . . . . . . . . . . . . . . . . . . . . . . . . . . . . . .9
Product Overview . . . . . . . . . . . . . . . . . . . . . . . . . . . . . . . . . . . . . . . . . . . . . . . . . . . . . . . . . . . 9
Graphical User Interface . . . . . . . . . . . . . . . . . . . . . . . . . . . . . . . . . . . . . . . . . . . . . . . . . 10
System Requirements . . . . . . . . . . . . . . . . . . . . . . . . . . . . . . . . . . . . . . . . . . . . . . . . . . . 10
Product Components . . . . . . . . . . . . . . . . . . . . . . . . . . . . . . . . . . . . . . . . . . . . . . . . . . . . 11
Guide Overview . . . . . . . . . . . . . . . . . . . . . . . . . . . . . . . . . . . . . . . . . . . . . . . . . . . . . . . 11
Data Path Concepts. . . . . . . . . . . . . . . . . . . . . . . . . . . . . . . . . . . . . . . . . . . . . . . . . . . . . . . . . 12
Data Path Load Balancing . . . . . . . . . . . . . . . . . . . . . . . . . . . . . . . . . . . . . . . . . . . . . . . . 13
Data Path Failover . . . . . . . . . . . . . . . . . . . . . . . . . . . . . . . . . . . . . . . . . . . . . . . . . . . . . . 14
Automatic Failback . . . . . . . . . . . . . . . . . . . . . . . . . . . . . . . . . . . . . . . . . . . . . . . . . . . . . 14
Install NAS Data Path Manager . . . . . . . . . . . . . . . . . . . . . . . . . . . . . . . . . . . . . . . . . . . . . . . 15
Prerequisites . . . . . . . . . . . . . . . . . . . . . . . . . . . . . . . . . . . . . . . . . . . . . . . . . . . . . . . . . . . 15
Install the Software . . . . . . . . . . . . . . . . . . . . . . . . . . . . . . . . . . . . . . . . . . . . . . . . . . . . . 15
Enable and Disable the Software . . . . . . . . . . . . . . . . . . . . . . . . . . . . . . . . . . . . . . . . . . . 15
Monitor Data Paths . . . . . . . . . . . . . . . . . . . . . . . . . . . . . . . . . . . . . . . . . . . . . . . . . . . . . . . . 17
Use Performance Monitor to Monitor HBAs . . . . . . . . . . . . . . . . . . . . . . . . . . . . . . . . . 17
View and Change Performance Monitor Settings . . . . . . . . . . . . . . . . . . . . . . . . . . . 17
Observe Data Path Performance . . . . . . . . . . . . . . . . . . . . . . . . . . . . . . . . . . . . . . . . 19
View Volume Groups for Path Information . . . . . . . . . . . . . . . . . . . . . . . . . . . . . . . . . . 21
View Volume Group Information in Tree View . . . . . . . . . . . . . . . . . . . . . . . . . . . . 21
Create a New Volume Group . . . . . . . . . . . . . . . . . . . . . . . . . . . . . . . . . . . . . . . . . . 24
Contents
3hp StorageWorks NAS Data Path Manager Installation and User’s Guide
Page 4

Contents
Edit Selected Volume Group. . . . . . . . . . . . . . . . . . . . . . . . . . . . . . . . . . . . . . . . . . . 24
Delete Selected Volume Group . . . . . . . . . . . . . . . . . . . . . . . . . . . . . . . . . . . . . . . . . 25
Test Selected Path . . . . . . . . . . . . . . . . . . . . . . . . . . . . . . . . . . . . . . . . . . . . . . . . . . . 25
Repair Volume Group . . . . . . . . . . . . . . . . . . . . . . . . . . . . . . . . . . . . . . . . . . . . . . . 25
Reset LUN Paths to Factory Settings . . . . . . . . . . . . . . . . . . . . . . . . . . . . . . . . . . . . 26
Refresh the View . . . . . . . . . . . . . . . . . . . . . . . . . . . . . . . . . . . . . . . . . . . . . . . . . . . . 26
View Volume Group Information in Table View . . . . . . . . . . . . . . . . . . . . . . . . . . . 26
Decide Whether to Manage the Data Paths . . . . . . . . . . . . . . . . . . . . . . . . . . . . . . . . . . . 27
Manage the Data Paths . . . . . . . . . . . . . . . . . . . . . . . . . . . . . . . . . . . . . . . . . . . . . . . . . . . . . . 28
Learn to Perform Basic Data Path Manager Tasks . . . . . . . . . . . . . . . . . . . . . . . . . . . . . 28
Accept the Default Settings . . . . . . . . . . . . . . . . . . . . . . . . . . . . . . . . . . . . . . . . . . . . 28
Assign a LUN to a storage array . . . . . . . . . . . . . . . . . . . . . . . . . . . . . . . . . . . . . . . . 29
Take a path off-line or put it back on-line. . . . . . . . . . . . . . . . . . . . . . . . . . . . . . . . . 29
Change path behavior (from alternate to preferred or vice-versa) . . . . . . . . . . . . . . 29
Add Hardware . . . . . . . . . . . . . . . . . . . . . . . . . . . . . . . . . . . . . . . . . . . . . . . . . . . . . . . . . 30
Remove Hardware . . . . . . . . . . . . . . . . . . . . . . . . . . . . . . . . . . . . . . . . . . . . . . . . . . . . . . 30
Optimize Path Performance . . . . . . . . . . . . . . . . . . . . . . . . . . . . . . . . . . . . . . . . . . . . . . . 31
Troubleshoot Failed Paths . . . . . . . . . . . . . . . . . . . . . . . . . . . . . . . . . . . . . . . . . . . . . . . . 31
Restore to Default Settings. . . . . . . . . . . . . . . . . . . . . . . . . . . . . . . . . . . . . . . . . . . . . . . . 33
Recover from a Disaster. . . . . . . . . . . . . . . . . . . . . . . . . . . . . . . . . . . . . . . . . . . . . . . . . . 33
A Text API Commands for NAS Data Path Manager. . . . . . . . . . . . . . . . . . . . . . . . . . .35
Glossary. . . . . . . . . . . . . . . . . . . . . . . . . . . . . . . . . . . . . . . . . . . . . . . . . . . . . . . . .37
Index . . . . . . . . . . . . . . . . . . . . . . . . . . . . . . . . . . . . . . . . . . . . . . . . . . . . . . . . . . .39
4 hp StorageWorks NAS Data Path Manager Installation and User’s Guide
Page 5

about this
guide
This installation and user’s guide provides information to help you:
■ Install NAS Data Path Manager software on your HP StorageWorks NAS
8000 system.
■ Understand data path management concepts.
■ Monitor and manage data paths on your NAS 8000.
■ Reinstall and reconfigure NAS Data Path Manager after system Disaster
Recovery.
Intended Audience
This guide is written for system administrators, technicians, and HP on-site
service representatives who are experienced with HP StorageWorks NAS 8000
systems.
Related Documentation
In addition to this guide, HP provides corresponding information:
■ HP StorageWorks NAS 8000 on-line help system.
■ HP StorageWorks NAS 8000 1.6.0 Release Notes.
About this Guide
About this Guide
5hp StorageWorks NAS Data Path Manager Installation and User’s Guide
Page 6

About this Guide
Document Conventions
This document uses the following formatting conventions included in Tab le 1.
Table 1: Document Conventions
Cross-reference links Blue text: Figure 1
Key and field names, menu items,
buttons, and dialog box titles
File names, application names, and text
emphasis
User input, command and directory
names, and system responses (output
and messages)
Variables <monospace, italic font>
Website addresses Blue, underlined sans serif font text:
Element Convention
Bold
Italics
Monospace font
COMMAND NAMES are uppercase
monospace font unless they are case
sensitive
http://www.hp.com
Getting Help
If you still have a question after reading this guide, contact an HP authorized
service provider or access our website:
http://
HP Technical Support
In North America, call technical support at 1-800-652-6672, available 24 hours a
day, 7 days a week.
Note: For continuous quality improvement, calls may be recorded or monitored.
Outside North America, call technical support at the nearest location. Telephone
numbers for worldwide technical support are listed on the HP website under
support:
Be sure to have the following information available before calling:
■ Technical support registration number (if applicable)
■ Product serial numbers (NAS 8000 and arrays in question)
6 hp StorageWorks NAS Data Path Manager Installation and User’s Guide
http://thenew.hp.com/country/us/eng/support.html
www.hp.com/support/nas8000
.
.
Page 7

■ Product model names and numbers
■ Applicable error messages
■ Operating system type and revision level (from Command View NAS Identity
page)
■ Detailed, specific questions
HP Storage Website
The HP website has the latest information on this product, as well as the latest
drivers. Access storage at:
http://thenew.hp .c om /c ountry/us/eng/prodserv/stor age.html
From this website, select the appropriate product or solution.
HP Authorized Reseller
For the name of your nearest HP authorized reseller:
■ In the United States, call 1-800-345-1518
■ In Canada, call 1-800-263-5868
■ Elsewhere, see the HP website for locations and telephone numbers:
http://www.hp.com
About this Guide
.
.
hp StorageWorks NAS Data Path Manager Installation and User’s Guide
7
Page 8

About this Guide
8 hp StorageWorks NAS Data Path Manager Installation and User’s Guide
Page 9

NAS Data Path Manager
Product Overview
HP StorageWorks NAS Data Path Manager is an optional software product you
can purchase for the HP StorageWorks NAS 8000. It pro vides automatic path load
balancing and failover for NAS 8000 servers configured with multiple host bus
adapters (HBAs). The software allows you to customize your path settings, as
needed, to obtain optimum performance from your storage system. In addition,
Data Path Manager provides failover capability should all of the load balancing
(or optimal) paths fail.
HP NAS Data Path Manager provides:
■ Faster performance through dynamic load balancing over multiple paths from
the HBAs to the Storage controllers.
■ Automatic data path failover to an alternate path when a preferred path fails.
Using dynamic load balancing, NAS Data Path Manager balances the flow of data
through multiple paths to a specific storage location using a least-used algorithm.
It detects multiple paths to each device, identified b y a logical unit number (LUN),
and divides the data load among the designated preferred paths. See Data Path
Concepts on page 12.
NAS Data Path Manager failover allows access to storage to continue
uninterrupted, in the event of a failure of all preferred paths, by using available
alternate paths.
1
9hp StorageWorks NAS Data Path Manager Installation and User’s Guide
Page 10

NAS Data Path Manager
Note: Data Path Failover and failover packages are different NAS 8000 features.
■ Data Path Failover is the ability of your system to use alternate fibre-channel paths to
get information to your storage in case all of the preferred paths fail. Data Path
Failover can be installed and used on any NAS 8000 (version 1.6.0 or later) high
availability (HA) or non-HA system, with the correct firmware revision. Please
contact your HP Service Representative for firmware information or updates.
■ Failover packages appear only on NAS 8000 systems with high availability (HA).
Using failover packages, your system can transfer control of data, per failover
package, to a different NAS 8000 server if one server fails. For more information
on failover packages, please see the NAS 8000 User’s Guide.
Graphical User Interface
Once NAS Data Path Manager is installed on a NAS 8000 server, additional items
will appear in Command View NAS, the NAS 8000 graphical user interface. This
allows the administrator to view and manage NAS Data Path Manager
functionality on the NAS 8000 using the same interface used to perform all other
storage management tasks.
System Requirements
NAS Data Path Manager has the following system requirements.
■ HP StorageWorks NAS 8000 system, (hpNasOs) version 1.6.0 or later
■ Fibre-channel storage devices
■ Host bus adapters (HBAs) connected to your fibre-channel storage devices
■ HBA firmware v3.90a7 or later
■ VA710x, VA740x, VA741x, XP, EMA, and/or EVA storage arrays
10 hp StorageWorks NAS Data Path Manager Installation and User’s Guide
Page 11

Product Components
The NAS Data Path Manager product includes:
■ HP NAS Data Path Manager Installation and User’s Guide
■ NAS Data Path Manager Software CD
■ Software License Agreement
Note: This guide is also on the NAS 8000 Documentation CD in PDF format.
Guide Overview
This guide contains the following sections:
Product Overview Introduction to the features of NAS Data Path
Data Path Concepts Key concepts for understanding the software
Install NAS Data Path Manager Information needed to install and enable
Monitor Data Paths Tasks to perform to begin using NAS Data
Manage the Data Paths Tasks to customize data paths in different
Text API Commands for NAS Data
Path Manager
Glossary Definitions of important terms.
NAS Data Path Manager
Section Information
Manager
uses and capabilities
NAS Data Path Manager
Path Manager
conditions, to reset data paths to the default
values, and to recover from a disaster.
Text API commands you will need to install,
enable, disable, and restore NAS Data Path
Manager
11hp StorageWorks NAS Data Path Manager Installation and User’s Guide
Page 12
NAS Data Path Manager
Data Path Concepts
Data paths exist wherever there are physic al connections from an initiator (a NAS
server HBA) to a target (an array controller). Data Path Manager manages traffic
patterns among all available paths between the NAS server HBAs and the LUNs
in your arrays.
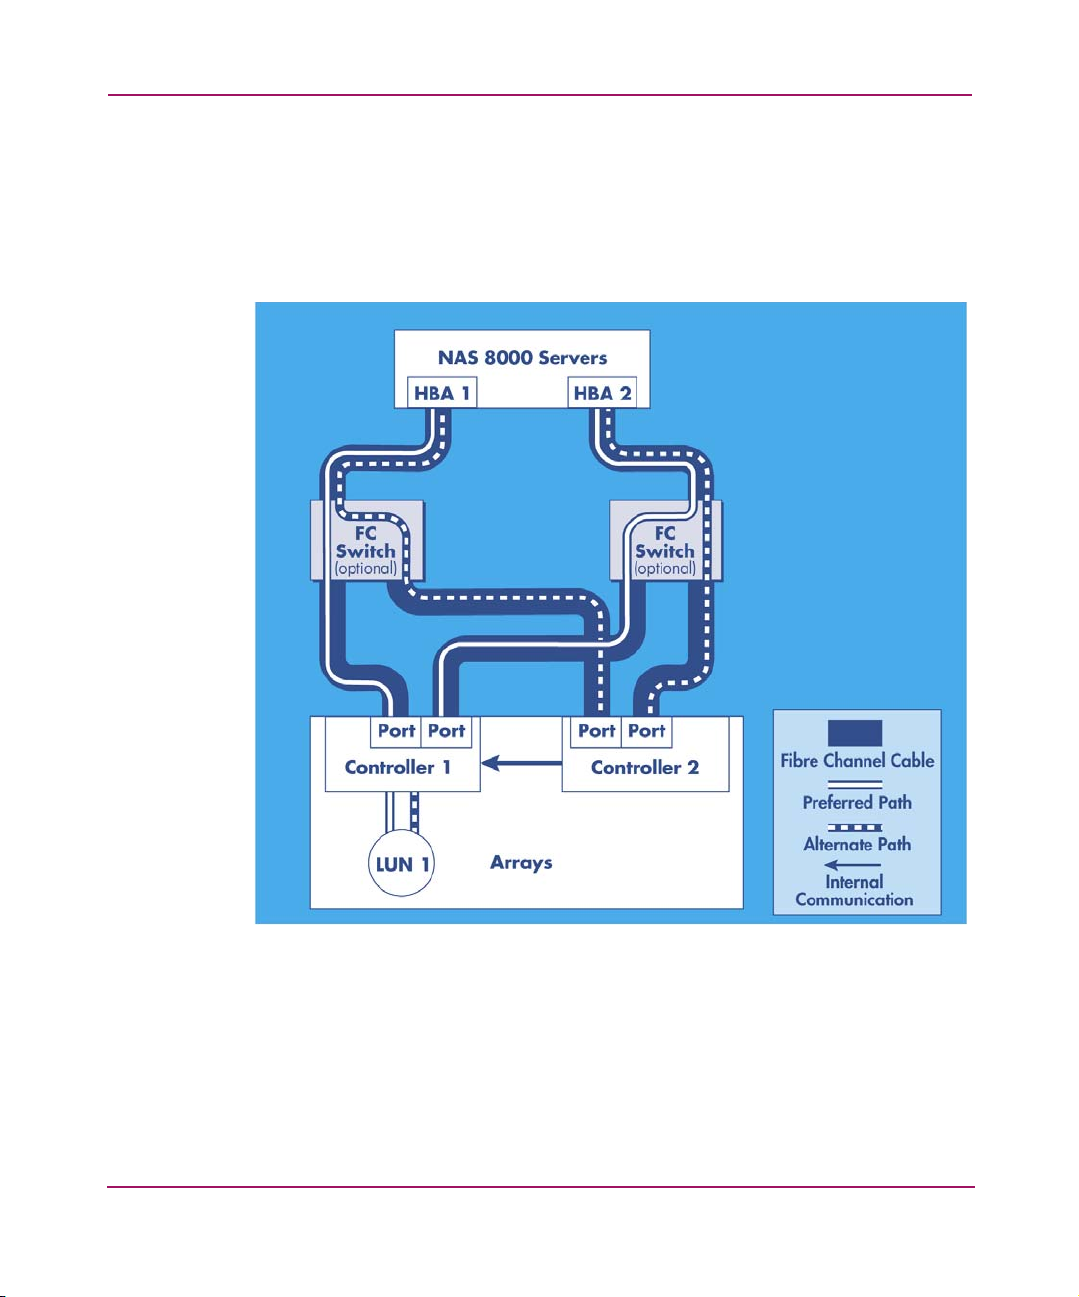
Figure 1: Preferred (optimal) and Alternate (non-optimal) Paths
Each path is comprised of the HBA, controller, and any necessary networking
hardware. NAS Data Path Manager evaluates the paths and determines which are
considered optimal and which are non-optimal. This is determined by looking at
the overhead associated with transferring data from the NAS 8000 to a specific
LUN on an associated storage device.
12 hp StorageWorks NAS Data Path Manager Installation and User’s Guide
Page 13

As a general rule, when a non-optimal path is used, the request is going from one
HBA through a controller that communicates with the controller of the target
LUN. Therefore, the data request goes through two controllers to get to the
specific LUN, instead of just one. (This is true for all except XP controllers, for
which all paths are considered optimal.) See paths to Controller 2 in Figure 1 on
page 12. The overhead is the slight increase in time required for the f irst controller
to talk to the second controller. In reality the time that it takes is quite small for
each data transfer; however, it becomes significant when you multiply the extra
time by the number of transfers requested.
By default, NAS Data Path Manager assign s optimal path s as preferred paths, and
non-optimal paths as alternate paths. For XP arrays and some VA arrays, there are
no non-optimal paths. In such a case, no paths are assigned as failover paths by
default, so you must set them manually.
Note: A path can be either preferred or alternate, but not both.
Data Path Load Balancing
Load balancing allows the greatest throughput of data from an HBA to a LUN by
using all available preferred paths, instead of just a single path. This allows users
to have faster access to the data on the specified LUN. Without load balancing,
you are restricted to sending data over a single path, ev en when it is more efficient
to send data over multiple data paths. Lengthy wait times can occur as all data
requests queue up on the same path.
NAS Data Path Manager
If one preferred data path fails, NAS Data Path Manager drops the failed path out
of the preferred path rotation, and continues to transfer data through other
preferred data paths without any loss of data. The switch-over is completely
transparent to applications, so normal operation continues without downtime.
All path events are logged in an Event Summary, allowing the administrator to
investigate and repair failed paths. A path monitoring daemon checks the health
and status of all paths every 10 minutes. If a failed path has been repaired, it will
be used again, according to the current load balancing policy.
Note: HA Package failover does not occur unless all preferred and alternate paths on a
single head fail.
13hp StorageWorks NAS Data Path Manager Installation and User’s Guide
Page 14

NAS Data Path Manager
Data Path Failover
Data path failover occurs when all designated preferred paths fail between the
NAS server and its storage device. NAS Data Path Manager splits data transfers
among “good” (non-failed) preferred paths in a least-used pattern, as long as there
are functioning preferred paths. If all preferred paths fail, NAS Data P ath Manager
directs the traffic to a designated alternate path so that normal operations continue
without interruption.
Without data path failover, if all preferred paths fail, there would be no
communication between the server and the LUN, and normal operations would
cease until any path is restored.
Note: For maximum data protection and uninterrupted service, NAS Data Path
Manager and High Availability configuration work together to provide the greatest
protection and stability. In an HA configuration where all preferred and alternate paths
have failed, the Failover Package will be moved to the second NAS server following the
HA configuration settings that the administrator has set up.
To disable data path failover, either disable the authorization to use the software
(see Enable and Disable the Software on page 15).
Automatic Failback
When a preferred path fails, the path is not used until it is restored. Automatic
Failback restores the path to use after it is back in operation. The operating system
tests the failed path to see if it is restored before it can be used again. Testing and
restoring the path can take up to 10 minutes.
14 hp StorageWorks NAS Data Path Manager Installation and User’s Guide
Page 15

Install NAS Data Path Manager
Prerequisites
See System Requirements on page 10.
Install the Software
Use the NAS Data Path Manager software CD and the command line interface to
install NAS Data Path Manager.
1. On the NAS 8000 server, insert the CD into the server’s CD-R OM drive.
2. On a computer on the network, access the command line interface:
a. On an MS Windows system, Select Start > Run. (This step is not
necessary for UNIX/Linux systems.)
b. Execute:
telnet <nas_8000_hostname_or_IP_address>
c. Log in as admin and use a password, if prompted.
3. Execute the following commands.
installSystemPackage
cdrom://hpNasOs-DataPathManager-1.0-0.i386.rpm
NAS Data Path Manager
installSystemPackage
cdrom://hpNasOs-DataPathManager-authorize-1.0-
0.i386.rpm
4. Remove the CD from the CD-ROM drive.
The software is installed, but not yet enabled.
Enable and Disable the Software
Enable and disable NAS Data Path Manager from Command View NAS.
1. If you had a browser open, close and re-open it, so that it finds the DPM
software.
2. Select the Applications tab.
3. Select NAS Data Path Manager.
15hp StorageWorks NAS Data Path Manager Installation and User’s Guide
Page 16

NAS Data Path Manager
4. Select Actions > Enable/Disable Application.
5. Click OK.
The sample configuration, below, shows a multi-server, multi-array system using
NAS Data Path Manager. Recommended connections from the fibre channel
switches to the arrays are represented by solid lines; optional connections are
represented by dashed lines.
Figure 2: Sample configuration using NAS Data Path Manager on a NAS 8000 high availability system
16 hp StorageWorks NAS Data Path Manager Installation and User’s Guide
Page 17

Monitor Data Paths
Check path configuration and performance using several methods.
■ Use Performance Monitor to Monitor HBAs
■ View Volume Groups for Path Information
These topics are discussed in detail below.
Use Performance Monitor to Monitor HBAs
Use HP NAS 8000 Performance Monitor to:
■ View and Change Performance Monitor Settings.
■ Observe Data Path Performance.
Note: Performance Monitor can show HBA, NFS, and CPU performance, depending
on what you enable. Information presented here is for HBA monitoring only. NFS and
CPU performance monitoring are discussed in the HP NAS 8000 User’s Guide.
View and Change Performance Monitor Settings
NAS Data Path Manager
Performance Monitor defaults to the disabled state. Metrics are not received and
no performance history is recorded. You can enable Performance Monitor to
receive data every 5 seconds for a particular HBA, and choose whether to
maintain the performance history for an enabled HBA.
To access and enable Performance Monitor:
1. From Command Vie w NAS menu bar, select Tools > Performance Monitor.
This opens a new window.
2. Select HBAs (not a specific HBA) from the tree in the left panel. (Figure 3
shows the Performance Monitor window and a sample tree.)
17hp StorageWorks NAS Data Path Manager Installation and User’s Guide
Page 18

NAS Data Path Manager
Figure 3: Performance Monitor window
1
2
1. Performance Monitor
Menu Bar
2. Metric Actions
Toolbar
3. Enable/Disable
Monitor
3
5
4
4. Open Chart for
Selected Item
5. Clear Monitor History
on Server
Figure 4: Performance Monitor Window Menu, Metric Actions Toolbar, and Icons
3. Click the Enable/Disable Monitor icon on the Metric Actions Toolbar to
display the Configure Metrics window.
4. In the Enable Monitoring box:
a. Check the box to enable monitoring.
b. To Enable Historical Data, check that box as well. (This option is not
available unless monitoring is enabled.)
c. Click OK to put these settings into effect.
18 hp StorageWorks NAS Data Path Manager Installation and User’s Guide
Page 19

You can also access the Performance Monitor Settings dialog box to change the
settings by either of the following methods.
■ From Command View NAS, select Configuration > Alerts/Logging >
Performance Monitor Settings, then Actions > Edit Perf ormance Monitor
Settings to view and change the monitoring settings.
■ From Command View NAS, select Configuration > Configurati on Wizard
> Actions > Launch Wi zard. Then select Next to get the What do y ou want
to configure? dialog box. Select only the Alert and Monitor Settings box,
then select Next until you get to the Performance Monitor Settings dialog
box. Make your enable/disable selections here.
To clear the monitoring history of an HBA, follow these steps.
1. From Command View NAS, select Tools > Performance Monitor from the
menu bar.
2. From the item tree, select the HBA you wish to clear.
3. Select the Clear Monitor History on Server icon on the Metric Actions
Toolbar.
Observe Data Path Performance
NAS Data Path Manager
Once the HBA metrics have been enabled, you can use Performance Monitor to
observe data path performance for the specified HBA(s).
1. Launch Performance Monitor by one of the following methods.
■ From Command View NAS, select Tools > Performance Monitor from
the menu bar. This opens a new window.
■ From the Configuration tab under Alerts/Logging, select Performance
Monitor Settings > Actions > Open Performance Monitor. This opens
a new window.
■ From the Status tab, select Actions > Performance Monitor.
2. Select the HBA you wish to view from the tree in the left panel.
3. Either double-click the HBA name or select the Open Chart for Selected
Item icon. This icon is available by right-clicking the HBA name, and is also
available on the Metric Actions Toolbar.
You can view data for several HBAs at a time by repeating this step for each
HBA you wish to observe.
19hp StorageWorks NAS Data Path Manager Installation and User’s Guide
Page 20

NAS Data Path Manager
Note: Since Performance Monitor runs in a separate window, you can keep it open
while you are making changes to your data path settings in Command View NAS, so
you can view the impact of a change without exiting the path management session.
You can view each chart in two modes; showing either real-time or historical data.
View Real-time chart is the def ault view. This view shows the read rate and write
rate (MB/sec) of the specified HBA. Measurements are taken every 5 seconds,
and appear on the chart as they are received. The View Real-time chart icon
appears on the Chart Toolbar. You can also switch to this mode from the
Performance Monitor Menu Bar by selecting View > Real-time Chart.
1. Real-time Chart icon
Figure 5: Real-time Chart Toolbar
1
View Historical chart allows you to see the HBA read rate and write rate for the
last 1 to 24 hours. Select the number of hours to display by using the slider in the
HBA Performance chart tool bar. Use the scroll bar at the bottom of the chart to
see all of the data for the selected time period. The View Historical chart icon is
on the Chart Toolbar. You can also switch to this mode from the Performance
Monitor Menu Bar by selecting View > Historical Chart.
1
1. Historical Chart icon 2. Time interval selection Slider
Figure 6: Historical Chart Toolbar
2
For instructions on printing charts, exporting chart data, or getting help on reading
charts, see “Performance Monitoring” in the HP NAS 8000 User’ s Guide.
20 hp StorageWorks NAS Data Path Manager Installation and User’s Guide
Page 21

View Volume Groups for Path Information
The V iew Volume Groups window allows you to manage the relationship between
system LUNs and volume groups to improve performance. You can:
■ View Volume Group Information in Tree View
■ Create a New Volume Group
■ Edit Selected Volume Group
■ Delete Selected Volume Group
■ Test Selected Path
■ Repair Volume Group
■ Reset LUN Paths to Factory Settings
■ Refresh the View
■ View Volume Group Information in Table View
View Volume Group Information in Tree View
Detailed path information is available in the tree view. From the Storage tab,
select Volume Groups, then the tree view (second icon to the right of Actions).
The tree view shows the following information for each volume group:
■ The list of volume groups, packages (HA systems only), LUNs, and paths
NAS Data Path Manager
■ The current state of packages, volume groups, and preferred paths. (LUNs do
not have a state.)
— Package states (HA systems only) are Running, Stopped, Failed Over,
Unknown, or Inactive.
If the package is being used by another node, you will see Running (on
<node name>) as the package state. To edit any volume group, LUN, or
path on that package, you must stop the package and make the package
local to your node.
— Volume group states are Active or Inactive
— Preferred path states are Active, Available, Failed, or Unknown
■ Current mode of the paths: Preferred, Alternate, Preferred Off-line, or
Alternate Off-line
■ Path initiator’s (HBA’s) world wide name
■ Path target’s (storage controller’s) world wide name
21hp StorageWorks NAS Data Path Manager Installation and User’s Guide
Page 22

NAS Data Path Manager
In the tree view, the volume groups are listed alphabetically by name unless you
are on an HA system. On an HA system, the tree view displays package names
first (listed alphabetically), then all volume groups that are not associated with a
package.
Figure 7: View volume group information in tree view
Note: Each initiator (HBA) and target (controller) is identified by its world wide name
(WWN) in the Volume Groups table. A WWN is a unique alpha-numeric identifier for
hardware.
22 hp StorageWorks NAS Data Path Manager Installation and User’s Guide
Page 23

NAS Data Path Manager
The relationship between the path modes and states provides you with important
status information in a simplified way. Some of this information is
self-explanatory; other mode/state combinations require explanation.
The following table explains these relationships.
Table 2: Path Modes and States Explained
Situation Mode State Action
All paths are
in good
condition
Preferred
Alternate
Active
*
Information is distributed (load is
balanced) among the active preferred
paths, alternate paths are available bu t
not being used.
Preferred path
fails
Preferred
Off-line
Failed You should repair the path as soon as
possible. When it is repaired it will be
used for the load balancing algorithm.
Preferred path
is set to
off-line by the
user
Preferred
Off-line
Failed You have taken the path off-line, so
the path does not necessarily need
repair. To restore the path, you must
put it back on-line. The path then
returns to it’s previous mode and state.
Alternate path
fails
Alternate * You must repair the failed path.
Automatic Failback will then restore
the path so it can be used for failover.
Alternate path
is set to
off-line by the
user
Alternate
Off-line
* You have taken the path off-line, so
the path does not necessarily need
repair. To restore the path, you must
put it back on-line. The path then
returns to it’s previous mode and state.
Preferred
path(s) have
failed over to
an alternate
Alternate Active Repair (or restore) the preferred
path(s) so normal operations will not
be interrupted if the alternate path
fails
path
* The state of alternate paths is not shown in this table, unless that path is currently being
used. You can find the current state of any path by selecting the path, then selecting
Actions > Test Selected Path. The test will take up to two minutes, then a dialog box will
report the status of the path.
23hp StorageWorks NAS Data Path Manager Installation and User’s Guide
Page 24

NAS Data Path Manager
Create a New Volume Group
To create a new volume group:
1. In Command View NAS, click the Storage tab.
2. Navigate to Volume Groups.
3. Select Actions > Create New Volume Group to bring up the Create New
Volume Group dialog box.
4. Enter a name for your new volume group in the Volume Group Name fie ld.
5. Select an appropriate LUN from the Available LUNs list and click OK to
move the name to the Allocated LUNs list.
6. Continue to select and move LUNs, as appropriate.
7. Click OK to create the volume group and return to the Volume Groups table
view.
Edit Selected Volume Group
To edit an existing volume group:
1. In Command View NAS, select the Storage tab
2. Select Volume Groups, then the View Volume Groups icon (first icon to the
right of Actions) to use the table view.
3. Select the volume group you want to rename by clicking the row.
4. Select Actions > Edit Selected Volume Group to bring up the Edit Volume
Group dialog box.
■ To change the volume group name, type in the corrected name in the
Volume Group Name field.
■ To add a LUN, select it from the Available LUNs field, click the Add
button. The LUN will move to the Allocated LUNs field.
To change your mind about adding a LUN, select it from the Allocated
LUNs field, click the Remove button. The LUN will move back to the
Available LUNs field.
Note: The Remove button will be inactive if there is only one array per volume group.
Also, you can not remove LUNs that are already part of the volume group.
5. Click OK to save changes and exit the dialog box.
24 hp StorageWorks NAS Data Path Manager Installation and User’s Guide
Page 25

Delete Selected Volume Group
To delete a volume group:
1. In Command View NAS, select the Storage tab, then select Volume Groups.
Use either the Table or Tree view for this action.
2. Select the volume group to delete.
3. Select Actions > Delete Selected Volume Group.
■ If the Volume Group contains data, an error dialog box will appear,
explaining what action must be taken before you can delete the volume
group. Click OK to exit the dialog box.
■ If the volume group is empty, the Confirm Volume Group Delete dialog
box will appear. Click OK to delete the volume group and exit the dialog
box.
Test Selected Path
At any time, you can test a specific path to find out whether it is working or f ailed.
1. From the Storage tab, select Volume Groups.
2. Click on the path you wish to test, then either right-click the path or select
Actions.
3. Select Test Selected Path. The test can take up to two minutes, and will
return the following results.
NAS Data Path Manager
— If the path passes the test, the Path test results box will appear and show a
— If the path fails the test, the Error box will appear and specify what is
Repair Volume Group
You must repair a volume group if:
■ You get an I/O error, the file system has shut down, and all data transfers
result in the same I/O error.
■ The file system is no longer visible from the share or mount point.
■ A path has been repaired but still appears to be in a failed State.
message stating “The test of the selected path was successful.”
wrong with the path. After you click OK, the Path test results box will
appear stating “The test of the selected path failed.”
25hp StorageWorks NAS Data Path Manager Installation and User’s Guide
Page 26

NAS Data Path Manager
To repair a volume group:
1. From the Storage tab, select Volume Groups.
2. Select the tree view.
3. Select the volume group to repair.
4. Select Actions.
— In a dedicated attach configuration, select Repair Volume Group.
— In an HA configuration, select Restart Failover Package for Selected
Vol u m e Grou p
5. Check the warning box and click OK.
As part of the repair process, CIFS and NFS connections may be disrupted. For a
dedicated system, the volume groups are then activated. For an HA system, the
package is stopped and then started again.
Reset LUN Paths to Factory Settings
1. From the Storage tab, select Volume Groups.
2. Select the volume group to reset.
3. Select Actions > Reset LUN Paths to Factory Settings. This will bring up
the Reset selected LUN Paths to factory settings dialog box.
4. Read the warning, and accept it by checking the box next to the warning, and
clicking OK.
Refresh the View
To refresh the view, select Actions > Refresh.
View Volume Group Information in Table View
From the Storage tab, select Volume Groups, then the V iew Volume Groups icon
(first icon to the right of Actions) to use the table view.
The table view shows the following information for each volume group:
■ Volume group name
■ Total capacity (GB)
■ Space allocated to file volume(s) and snapshot(s) (GB)
■ Space available for file volume(s) snapshot(s) (GB)
26 hp StorageWorks NAS Data Path Manager Installation and User’s Guide
Page 27

NAS Data Path Manager
The volume groups are listed alphabetically by volume group name. In this view,
you can create, edit, and delete volume groups; reset the LUN paths to factory
settings; and refresh the view.
Figure 8: Viewing volume groups
Decide Whether to Manage the Data Paths
If each of your HBAs is using less than half of its capacity or if your HBAs bear
about the same amount of traffic, it is best to continue using the default settings.
However, in some situations, you could improve performance by changing the
path settings. For example, there may be a high le vel of t raff ic on a particular LUN
because it contains a database. From the Performance Monitor, you can see that a
particular HBA has a high volume of traffic. Manage paths to make sure that this
LUN has all optimal paths configured.
27hp StorageWorks NAS Data Path Manager Installation and User’s Guide
Page 28

NAS Data Path Manager
Manage the Data Paths
NAS Data Path Manager needs very little attention t o function properly. Howev er,
to customize your paths to better meet your network and data transfer
requirements, you will want or need to take action. These actions include:
■ Add Hardware
■ Remove Hardware
■ Optimize Path Performance
■ Troubleshoot Failed Paths
■ Restore to Default Settings
■ Recover from a Disaster
WARNING: These actions will temporarily disrupt all client connections to the
volume group and its LUNs. NFS (UNIX) client operations will be temporarily
delayed. CIFS (Windows) clients will be disconnected and will need to be
reconnected.
To take any of the above actions, you must know how to perform the basic Data
Path Manager tasks.
Learn to Perform Basic Data Path Manager Tasks
When customizing paths, you will need to perform some basic tasks in NAS Data
Path Manager.
■ Accept the Default Settings
■ Assign a LUN to a storage array
■ Take a path off-line or put it back on-line
■ Change path behavior (from alternate to preferred or vice-versa)
Accept the Default Settings
When you scan for new storage, NAS Data Path Manager detects the new
hardware and discovers the associated paths. The default configuration is
assigned—optimal paths are designated as preferred paths; non-optimal paths are
designated as alternate paths. Initially, it is best to accept the default settings by
not making any changes.
28 hp StorageWorks NAS Data Path Manager Installation and User’s Guide
Page 29

To scan for new hardware from Command View NAS:
1. Select the Storage tab.
2. Select Storage Array Summary.
3. Select Action > Scan for New Storage.
Assign a LUN to a storage array
1. From the Storage tab, select Storage Array Summary.
2. Select the storage array to which you would like to add a LUN, or select a
LUN within that array.
3. Select Actions > Create New LUN. This will launch the Create New LUN
dialog box.
4. The first field provides the LUN number and defaults to the next available
number. You can cha nge it by selecting the correct number from the
pull-down menu.
5. The second field provides the LUN Size (GB), and defaults to 100.0 GB. The
information below the second field shows the available capacity for the LUN.
To change the LUN size, enter the size you want into the field.
6. Click OK to save that information and return to the Storage Array Summary.
NAS Data Path Manager
Take a path off-line or put it back on-line
1. From the Storage tab, select Volume Groups, and click the tree view ( )
icon.
2. Select either the LUN or the path you wish to change.
3. Select Actions > Edit Paths for Selected LUN, to bring up the Edit LUN
Path Configuration dialog box.
4. Click the Mode box of the path you wish to change.
5. Select the appropriate mode (off-line or not), then click OK.
Change path behavior (from alternate to preferred or vice-versa)
1. From the Storage tab, select Volume Groups, and use the tree view (second
icon to the right of Actions).
2. Select either the LUN or the path you wish to change.
3. Select Actions > Edit Paths for Selected LUN, to bring up the Edit LUN
Path Configuration dialog box.
29hp StorageWorks NAS Data Path Manager Installation and User’s Guide
Page 30

NAS Data Path Manager
4. Click the Mode box of the path you wish to change.
5. Select the desired mode for the path (alternate or preferred) from the available
options that appear, then click OK.
Add Hardware
After adding arrays or LUNs to your system, you can conf igu re the paths to them.
The recommended progression is as follows.
1. Accept the Default Settings.
2. Remove Hardware as described at on page 30.
3. Manage the Data Paths, if appropriate.
Continue making changes to your paths and monitoring performance until you
achieve improved performance.
Remove Hardware
When you add, maintain, remove, or exchange hardware (such as switches or
cables), you often know your paths will change. NAS Data Path Manager allows
you to plan the interruption of the normal flow of operations in order to make the
hardware change.
1. From the Storage tab, select Volume Groups, and use the tree view (second
icon to the right of Actions) to view path information. (You can go to either
the table view or tree view from the actions menu as well.)
2. Complete the hardware change.
3. Scan for new hardware, as discussed in the Accept the Default Settings
section on page 29.
4. Restore the paths you set to off-line, according to the section on page 29.
Note: Accept the default configuration and monitor performance before making any
changes to the path settings.
30 hp StorageWorks NAS Data Path Manager Installation and User’s Guide
Page 31

Optimize Path Performance
To improve network traffic across the paths, the mo st effective changes are to
either change preferred paths to alternate, or change alternate paths to preferred.
1. For each LUN involved, select it, then make changes as described at Learn to
Perform Basic Data Path Manager Tasks on page 28.
2. Monitor Data Paths as shown on page 17, to see the impact of the change.
3. Continue using this method until you achieve optimal system performance.
Troubleshoot Failed Paths
NAS Data Path Manager indicates a failure in several ways.
■ You receive an alert in the Event Summary. From the Status tab, select Event
Summary under System Status. Select the event, then open the Event Details
Window by one of the following methods to view details of the appropriate
alert.
— Click on the Event Details icon ( ) next to Actions.
— Right-click on the event listed under Status, then select Event Details.
— Select Actions > Event Details.
■ The failure is recorded in the System Log. From the Support tab, select
System Log under Diagnostics and Tools. View the appropriate log entry.
■ If Performance Monitor is enabled, the display for a failed HBA, or an HBA
with failed paths, shows that there is no traffic to the HBA. From the Tools
drop-down menu, select Performance Monitor. A new window will open.
From the HP NAS 8000 Performance Monitor window, select View > HBA
Performance, then the name of the HBA you wish to monitor.
NAS Data Path Manager
■ For preferred paths, the Volume Groups summary shows the status for that
path as failed. From the Storage tab, select Volume Groups. View the
summary as a tree by selecting the View Paths and LUNs for Volume Group
icon (the second icon to the right of Action).
31hp StorageWorks NAS Data Path Manager Installation and User’s Guide
Page 32

NAS Data Path Manager
■ For alternate (and preferred) paths, you can test a specific path from the
■ For paths that show as failed which hav e been repaired, you can test a specific
There are several actions you can take if a path fails.
Volume Groups summary page. From the Storage tab, select Volume
Groups. Click on the path you wish to test, then either right-click the path or
select Actions. Select Test Selected Path. The test can take up to two
minutes, and will return the following results.
— If the path passes the test, the Path test results box will appear and show a
message stating “The test of the selected path was successful.”
— If the path fails the test, the Error box will appear and specify what is
wrong with the path. After selecting OK, the Path test results box will
appear stating “The test of the selected path failed.”
path from the Volume Summary page. If the test of the path shows successful,
you should attempt to repair the volume group.
— In an stand-alone, dedicated NAS server and storage configuration, go to
the Storage tab, select Vo lu me Grou p s , then the volume group with the
path that shows as failed. From the Actions menu select Repair Volume
Group.
— In an HA environment, from the Storage tab, select the volume group
with the path that shows as failed. Select Actions > Restart Failover
Package for Selected Volume Group.
■ Check your hardware to be sure the connection itself did not loosen or fail.
■ If you have any unused alternate paths, change them to preferred paths using
the steps described under Change Path Behavior on page 29.
■ Remove paths to disk devices if you are unable to use the NAS server.
There are limits for the number of paths you can have for each NAS server.
You may have up to 256 total SCSI and SCSI fibre-channel paths per NAS
server. A maximum of 32 paths can be used for tape drives, up to 128 can be
assigned as disk paths to direct access LUNs, and any number of paths can be
used for changers (taking into account the 256 total SCSI path maximum).
WARNING: You can have a total of 128 devices - a device is a combination
of LUNs and paths. If you exceed the maximum 128 devices for the NAS
Server, you will not be able to use the NAS Server until you remove (not just
take off-line) as many paths to disk devices as necessary to equal no more
than 128 devices.
32 hp StorageWorks NAS Data Path Manager Installation and User’s Guide
Page 33

Restore to Default Settings
If you have customized your preferred and alternate paths, but are not satisfied
with the results, you can reset your data path management settings to the default
settings at the volume group level.
To reset volume group paths to default settings:
1. From the Storage tab, select Volume Groups, and use the tree view (second
icon to the right of Actions).
2. Select the LUN to reset.
3. Select Actions > Reset LUN Paths to Factory Settings. This will bring up
the Reset selected LUN Paths to factory settings dialog box.
4. Read the warning, then accept it by checking the box next to the warning and
selecting OK.
Recover from a Disaster
Performing disaster recovery for the NAS 8000 removes HP NAS Data Path
Manager from the system. When disaster recovery is required, perform the
following tasks.
1. Recover the N AS 800 0 system using the instruct ions under Disaster Reco very
in the hp StorageWorks NAS 8000 User’s Guide.
NAS Data Path Manager
2. Install NAS Data Path Manager, as discussed in the Install the Software
section on page 15 of this guide.
3. Re-configure any customized path settings as described at Manage the Data
Paths on page 28.
33hp StorageWorks NAS Data Path Manager Installation and User’s Guide
Page 34

NAS Data Path Manager
34 hp StorageWorks NAS Data Path Manager Installation and User’s Guide
Page 35

Text API Commands for NAS Data Path Manager
The text API commands documented here allow you to install NAS Data Path
Manager, enable and disable the software package, reactivate volume groups, and
restore data paths back to factory default settings. To perform other DPM
functions, use the graphical user interface.
installSystemPackage cdrom://hpNasOs-DataPathManager-1.0-0.i386.rpm
Installs Data Path Manager add-on software module from the specified URL.
installSystemPackage
cdrom://hpNasOs-DataPathManager-authorize-1.0-0.i386.rpm
Authorizes Data Path Manager add-on software.
getStorageDsdiScsiLunList
Returns a list of LUNs that are being used in volume groups.
■ outParam[0:N] = SCSI LUN name list
resetStorageDasdScsiLunCustomizedPaths
A
Restores the paths of the specified LUN back to factory default settings.
■ inParam[ ] = LUN name
reactivateStorageVolumegroup
On a dedicated attach system, puts any volume group changes into effect.
■ inParam[ ] = Volume group name
stopClusterPackage
On an HA system, use with startClusterPackage to put volume group
changes into effect.
■ inParam[ ]= Cluster package name
35hp StorageWorks NAS Data Path Manager Installation ad User’s Guide
Page 36

Text API Commands for NAS Data Path Manager
startClusterPackage
On an HA system, use after stopClusterPackage to put volume group
changes into effect.
■ inParam[ ]= Cluster package name
36 hp StorageWorks NAS Data Path Manager Installation ad User’s Guide
Page 37

glossary
This glossary defines terms used in this guide or related to this product and is not
a comprehensive glossary of computer terms.
Active state
A state in which a path is currently designated as a preferred or alternate path for data path
management.
Alternate path
A path that is used for LUN access only after all preferred paths to the device have failed.
Alternate paths are assigned by the software and are considered by the software to be non-optimal
paths. You may also designate preferred paths as alternate pa ths.
Automatic failback
Following the failover of a LUN path from a failed path to another path, the LUN automatically
returns to its original path when the path is restored.
Controller
The hardware device that facilitates communication between a host and one or more specified
LUNs.
Controller failover
For EVAs and EMAs in multibus controller failover mode, when you have more than one
controller, failover between the two controllers requires host intervention; it does not happen
automatically.
Critical state
The condition of a system where there are no more available physical paths; the system is currently
using the last available path for communication. Keep in mind that individual path failure
(warning) is only reported when all paths have failed for an activated volume group (critical).
Glossary
Glossary
Failed state
A state that indicates that all redundant components have failed and the system is not operational.
If you have an HA system and have set up package failover, associated packages have probably
already failed over.
37hp StorageWorks NAS Data Path Manager Installation and User’s Guide
Page 38

Glossary
High Availability (HA)
HA systems are designed to avoid a lo ss o f serv ice d urin g both pl an ned an d u nplanned downtime.
An HA system is based on clusters that have two NAS servers, a Quorum server, and storage that
may come from either a dedicated storage configuration or a SAN. The NAS servers share access
to the storage and provide failover capabilities for each other, but function as independent servers.
Host
The server that acts as a file server running the NAS 8000 software.
Host bus adapter (HBA)
A PCI or PCI-X card used to connect to SCSI or SCSI fibre-channel devices.
Load balancing
An algorithm that distributes data transfer across all preferred paths. The NAS 8000 uses a
least-used algorithm for optimizing performance.
Logical Unit Number (LUN)
A physical or virtual storage device referred to as a logical unit. A logical Unit Number (LUN) is a
value that identifies a specific logical unit with a target ID number.
Non-optimal path
Those data paths between an HBA and a specific LUN, evaluated by Data Path Manager and
determined to be less efficient than others. By default, Data Path Manager will assign non-optimal
paths as alternate paths—used for path failover.
Optimal path
Those data paths between an HBA and a specific LUN, evaluated by Data Path Manager and
determined to more efficient than others. By default, Data Path Manager will assign optimal paths
as preferred paths—used for path load balancing between the HBA and LUN.
Off-line
The state of a path that has been removed from service by failure or by being taken off-line
manually . If a path is taken off-line, it reverts to its previous mode when it is brought back on-line.
Preferred path
Preferred paths are those data paths between an HBA and a specific LUN, evaluated by Data Path
Manager and determined to be optimal paths. Preferred paths are used for path load balancing
between the HBA and LUN.
WWN
The World Wide Name of a device. A WWN is a unique alpha-numeric identifier for hardwa re.
When Data Path Manager is enabled, each initiator (HB A) and tar get (controller) is identif ied b y a
world wide name (WWN) in the Volume Groups table.
38 hp StorageWorks NAS Data Path Manager Installation and User’s Guide
Page 39

index
A
allocate space 26
alternate 9, 14, 23, 29, 30, 31, 33
arrays 9, 12, 29, 30
assign a LUN 29
audience 5
authorized reseller, HP 7
automatic 13
C
change 29
CIFS 28
CIFS connection 25
command line interface 15, 33
configuration drawing 15
connection
CIFS 25
NFS 25
conventions
document 6
create volume group 24
customize 28
customize paths 28
D
data paths 12, 13, 17, 30
failover 9, 14
manage 27
default 17, 30, 33
settings 28
delete volume group 25
device limits 31
disable 14, 15
disaster recovery 33
disrupt 25, 28
document
conventions 6
prerequisites 5
related documentation 5
E
edit volume group 24
enable 15, 17
error
I/O 25
event 13
F
factory settings 26
Index
failed 25
Index
failover packages 9
restart 25
failure
data path 13, 14
repair 13
fibre-channel 10
G
getting help 6
H
hardware
add 30
change 30
39hp StorageWorks NAS Data Path Manager Installation and User’s Guide
Page 40

Index
failure 31
new 30
remove 30
scan for 30
help, obtaining 6
HP
authorized reseller 7
storage website 7
technical support 6
I
initiator 12
install 9, 10, 15
L
limit, devices 31
load balancing 9, 13
log 31
login 15
LUN
allocate 24
assign 29
edit paths 29
path 29
reset 26
traffic 27
M
manage 27, 28
mode 29
modes 17
N
NFS 28
NFS connection 25
node 21, 26
non-optimal 9, 30
O
off-line 23, 29
on-line 23, 29
optimal 9, 30, 31
optimize 31
P
password 15
path
behavior 29
customize 28
edit 29
information 21, 26
initiator 21, 26
mode 23
repair 25
state 21, 23, 26
target 21, 26
test 25
performance 30, 31
policy 13
preferred 9, 23, 29
prerequisites 5
R
recover from a disaster 33
refresh 26
related documentation 5
repair 13
repair path 25
repair volume group 31
requirements, system 10
reset LUN paths 26
restore paths 14
restore to default 33
S
scan for new storage 28
settings
default 26, 28
factory 26
snapshots 26
state 21, 25, 26
status 17
40 hp StorageWorks NAS Data Path Manager Installation and User’s Guide
Page 41

Index
storage 9, 10, 30
system requirements 10
system status 31
T
target 12
technical support, HP 6
Test Selected Path 23, 25, 31
traffic 27
troubleshooting 31
V
volume group
create new 24
delete 25
edit 24
information 21, 26
W
websites
HP storage 7
world wide name 21, 26
hp StorageWorks NAS Data Path Manager Installation and User’s Guide 41
Page 42

Index
42 hp StorageWorks NAS Data Path Manager Installation and User’s Guide
 Loading...