

Page 1

EZPilot
Version 2.0
User Manual
™
EVA
Page 2

Copyright© 2007 Emulex Corporation. All rights reserved worldwide. No part of this document may be reproduced
by any means nor translated to any electronic medium without the written consent of Emulex Corporation.
Information furnished by Emulex Corporation is believed to be accurate and reliable. However, no responsibility is
assumed by Emulex Corporation for its use; or for any infringements of patents or other rights of third parties which
may result from its use. No licens e is grant ed by impl ication or oth erwise under any pa tent or paten t right s of Em ulex
Corporation.
Emulex, AutoPilot Installer, BlockGuard, cLAN, FabricStream, FibreSpy, Giganet, HBAnyw are, InSpeed, In traLink,
LightPulse, MultiPulse, SAN Insite, SBOD and Vixel are registered trademarks, and AutoPilot Manager, EZPilot,
SLI and VMPilot are trademarks of Emulex Corporation. All other brand or product names referenced herein are
trademarks or registered trademarks of their respective companies or organizations.
Emulex provides this manual "as i s " wi thout any warranty of any kind, either express ed o r i mp lie d , i nclud i ng but n ot
limited to the implied warranties of merchantability or fitness for a particular purpose. Emulex Co rpo ration may
make improvements and ch ang es t o t he pr odu ct des cribed in this manual at any tim e and w ith out an y n ot ice. Emulex
Corporation assumes no responsibility for its use, nor for any infringements of patents or other rights of third parties
that may result. Periodic changes are made to information contained herein; althou gh thes e chang e s will be
incorporated into new editions of this manual, Emulex Corporation disclaims any undertaking to give notice of such
changes.
EZPilot User Manual Page ii
Page 3

Installing EZPilot .....................................................................................1
Introduction.............................................................................................................. 1
Prerequisites .....................................................................................................1
Operating System Requirements ................................................................ 1
Hardware Requirements ............................................................................. 1
Installed Software Components.........................................................................2
Terminology.......................................................................................................2
Installing EZPilot to Create a Windows Management Server ..................................3
Prerequisites .....................................................................................................3
Procedure.......................................................................................................... 3
Installing EZPilot to Create a Windows Non-Management Server ........................... 8
Prerequisites .....................................................................................................8
Procedure.......................................................................................................... 8
Installing the Emulex Driver and Utilities for Linux.................................................10
Using EZPilot Manager.........................................................................11
Introduction............................................................................................................ 11
Starting EZPilot Manager.................................................................................12
The EZPilot Manager Window.........................................................................13
The Menu Bar ...........................................................................................13
The Toolbar............................................................................................... 14
The Discovery-Tree................................................................................... 15
Property Windows and Property Pages..................................................... 16
Status Bar.................................................................................................16
Discovering SAN Elements....................................................................................16
Modifying Discovery Properties .......................................................................17
Viewing Discovery Information ........................................................................ 18
Viewing Discovery Information (Storage View).......................................... 18
Viewing Discovery Information (Host View)............................................... 19
Viewing Discovery Information (Switch View)............................................ 20
Viewing Host Information....................................................................................... 21
Working with Logical Drives ................................................................................... 22
Renaming a Logical Drive ............................................................................... 23
Viewing a Logical Drive’s Disk Details............................................................. 24
Expanding a Logical Drive............................................................................... 24
Managing Host Bus Adapters ................................................................................27
Viewing an HBA’s General Information............................................................ 27
Resetting an HBA............................................................................................ 28
Editing an HBA’s Name ...................................................................................29
Reverting to an HBA’s Default Name ............................................................... 29
Viewing an HBA’s Firmware Information.......................................................... 30
Updating Firmware or BIOS on an HBA ......................................................... 31
Enabling or Disabling BootBIOS on an HBA....................................................32
Managing a Switch ................................................................................................ 33
Introduction ..................................................................................................... 33
Prerequisites.............................................................................................33
Viewing Fabric Information..............................................................................33
Renaming a Switch .........................................................................................34
EZPilot User Manual Page iii
Page 4

Using the Switch Mgmt. Tab............................................................................ 35
Changing the Switch’s IP Address................................................................... 35
Managing Storage Devices.................................................................................... 37
The Storage Management tabs.................................................................37
Viewing General Storage Information.............................................................. 37
Viewing a Controller’s Port Information .....................................................38
Viewing a Port’s Attached Logical Drive Information .................................39
Working with Logical Drives ............................................................................39
Viewing Logical Drive Details.................................................................... 40
Renaming a Logical Drive .........................................................................41
Expanding a Logical Drive......................................................................... 42
Deleting a Logical Drive ............................................................................43
Assigning a Logical Drive to a Host........................................................... 43
Adding a Logical Drive ..............................................................................45
Viewing Physical Disk Information................................................................... 49
Troubleshooting....................................................................................50
Introduction............................................................................................................ 50
EZPilot Manager Cannot See Other HBAs or Hosts........................................50
Cannot See New LUNs (Windows) .................................................................. 50
Cannot See New LUNs or Targets (Linux) ....................................................... 51
Appendix................................................................................................52
Introduction............................................................................................................ 52
Adding a Second Switch.................................................................................. 52
Adding a Second Disk Shelf............................................................................ 52
Adding New Disks to a New Disk Group ................................................... 52
Adding New Disks to the Existing Default Disk Group............................... 53
EZPilot User Manual Page iv
Page 5

Installing EZPilot
Introduction
EZPilot™ from Emulex enables you to c onfigure y our Storage Area Network (SAN).
This section describes how to:
• Install EZPilot for a Windows EVA management server.
• Install EZPilot for a Windows non-management s erver.
• Install the Emulex Linux driver and util itie s for a Linux non-management server.
Prerequisites
Operating System Requi rem en ts
For Windows Management and Non-Management Servers :
• x86 Windows Server 2003 Enterprise E dition Service Pack 2
• x64 Windows Server 2003 Enterprise E dition Service Pack 2
For Linux Non-Management Servers:
• Red Hat Enterprise Linux 4 (latest update)
• SUSE Linux Enterprise Server 9 (latest s ervic e pack)
• SUSE Linux Enterprise Server 10 (latest s ervic e pack)
Hardware Requirements
Note: All servers must boot from a loc al disk. SAN boot is not sup por ted by E ZPil ot .
Single Switch Configuration (Non-redundant)
• One Windows 2003 server configured as an EVA management server
• Up to three non-management servers
• One HP StorageWorks A8002A 4Gb PCI-e HBA per server
• One HP StorageWorks Enterprise Virtual Array (EVA) 4100 storage system
• One HP StorageWorks 4/8 Base SAN switch with eight licensed ports
Additional non-management servers may be add ed if add ition al swi tch po rt li cen ses are purchas ed.
Contact your HP representative for more information.
EZPilot - Installation Section Page 1
Page 6

High Availability (HA) configuration (Dual-switch)
The following configuration requires the pur chas e of an ad dition al s witch. It a llows the SA N to co ntinue
to function fully even if an HBA, switch, or stor age contr olle r fails.
• One Windows 2003 server configured as an EVA management server
• Up to five additional non-management ser vers
• Two HP StorageWorks A8002A 4Gb PCI-e HBAs per server
• One HP StorageWorks EVA4100 storage system
• Two HP StorageWorks 4/8 Base SAN switches with eight licensed ports each
Additional non-management servers may be add ed if add ition al swi tch po rt li cen ses are purchas ed.
Contact your HP representative for more information.
Installed Software Components
The following is a list of some of the EZPilot so ftware compon ents. All of thi s software is automatic all y
installed on Windows sytems (if necessar y) by the installation process.
• Emulex Storport Miniport driver
• Sun Java Runtime Environment (JRE) (EVA Management Servers only)
• Microsoft Multipath input/output (MPIO)
• HP MPIO Device Specific Module (MPIO DSM)
• HP Virtual Disk Service (VDS) HW Provider for the E VA (EVA Management Servers only)
• EZPilot SAN Setup Wizard
• EZPilot EVA Setup Wizard (EVA management servers only)
• EZPilot HBA Wizard
• EZPilot Switch Wizard (E VA Management Servers only)
• EZPilot Manager
• HP Command View EVA Software Suite (EVA Management Servers only)
• Adobe Acrobat Reader*
Note: *Acrobat Reader is not automati cally installed, but it is contained on the Emulex
Installation CD.
Terminology
The following Emulex and HP terms differ:
• The EZPilot GUI and documentation refer to LUNs (Logi cal Unit Numbe rs) as “logic al driv es”.
Logical drives are synonymous with HP’s terms “vir tual di sk” or “V Dis ks”.
• The Emulex phrase “Assigning a host” is synony mous with HP’s phrase “Presen ting a host”.
EZPilot - Installation Section Page 2
Page 7

Installing EZPilot to Create a Windows Management Server
Note: You must install one and only one management ser ver.
Prerequisites
• If older versions of Emulex, Brocade or HP StorageWorks software were previously installed on
the system you must remove them. Use the Windows Add/Remove Programs feature to remove
the software. If you are prompted to reinstall the Emulex HBA driv er during EZP ilot i nstallation ,
click Yes.
• To automatically obtain network settings for the switch during EZPilot installation, you must have
a DHCP server setup on the IP network and a switch with DHCP support that is enabled.
Otherwise, you must have an IP address available to assign to the switch and know the gateway
address and subnet mask.
Procedure
To create a management server:
1. Install the HBA(s) in the system. Refer to the HBA’s Installation Manual for instructions.
Caution: Do not install the driver from the CD that shipped with the HBA. EZPilot will install the
necessary driver automatically.
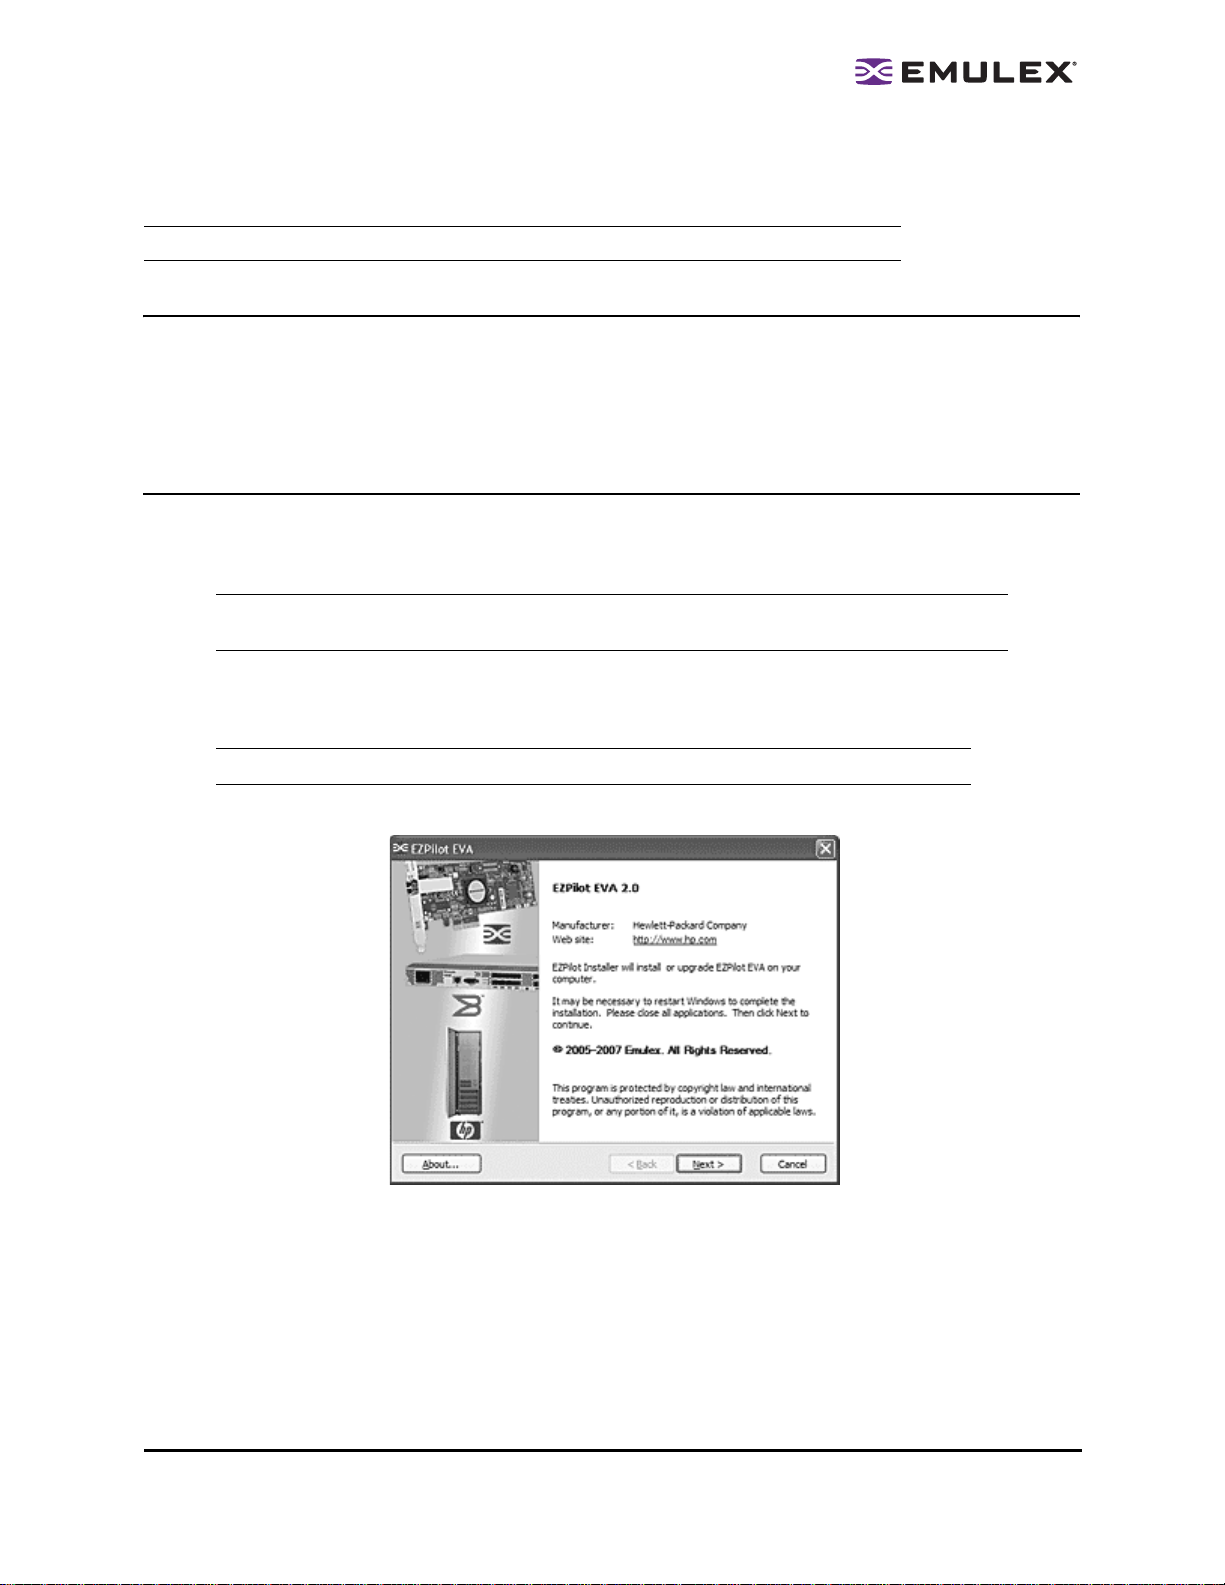
2. Insert the EZPilot CD into the system’s CD-ROM drive.
The EZPilot Installer verification window appears. The window closes automatically when the file
verification process is complete.
Note: Verification may take several minutes.
The EZPilot EVA Installer welcome page appears.
Figure 1: The EZPilot EVA Installer welcome page
3. Click Next. The EZPilot Installation Options dialog box appears.
EZPilot - Installation Section Page 3
Page 8

Figure 2: The EZPilot EVA Installation Options dialog box
4. Check HP EVA Management Server and click Install. The SAN Host box is checked by default.
Note: If a recent version of the Java Runti me E nviro nmen t is not alr eady instal le d, E ZPil ot
will install it as depicted in Figure 2. This option cannot be unchecked; it is required
for the management se rv er.
5. The License Agreement dialog boxes ap pear. Check I agree to these terms and conditions
and click Next for each dialog box.
The EZPilot EVA Operation in Progress dialog box appears. The dialog box c loses whe n the
necessary files are copied to th e sy stem.
The Welcome to EZPilot SAN Setup Wizard dialog b ox appears.
Figure 3: The Welcome to EZPilot SAN Setup Wizard dialog box
6. Click Next to perform SAN setup.
7. The EZPilot SAN Setup Prerequisites dialog box appear s. E nsure al l pr erequis ites are m et and
click Next. The HP EVA driver, Emulex HBA driver and HP MPIO DSM are installed.
HP’s StorageWorks Command View EVA Software Suite installation begins.
Note: This installation will take several mi nut es.
EZPilot - Installation Section Page 4
Page 9
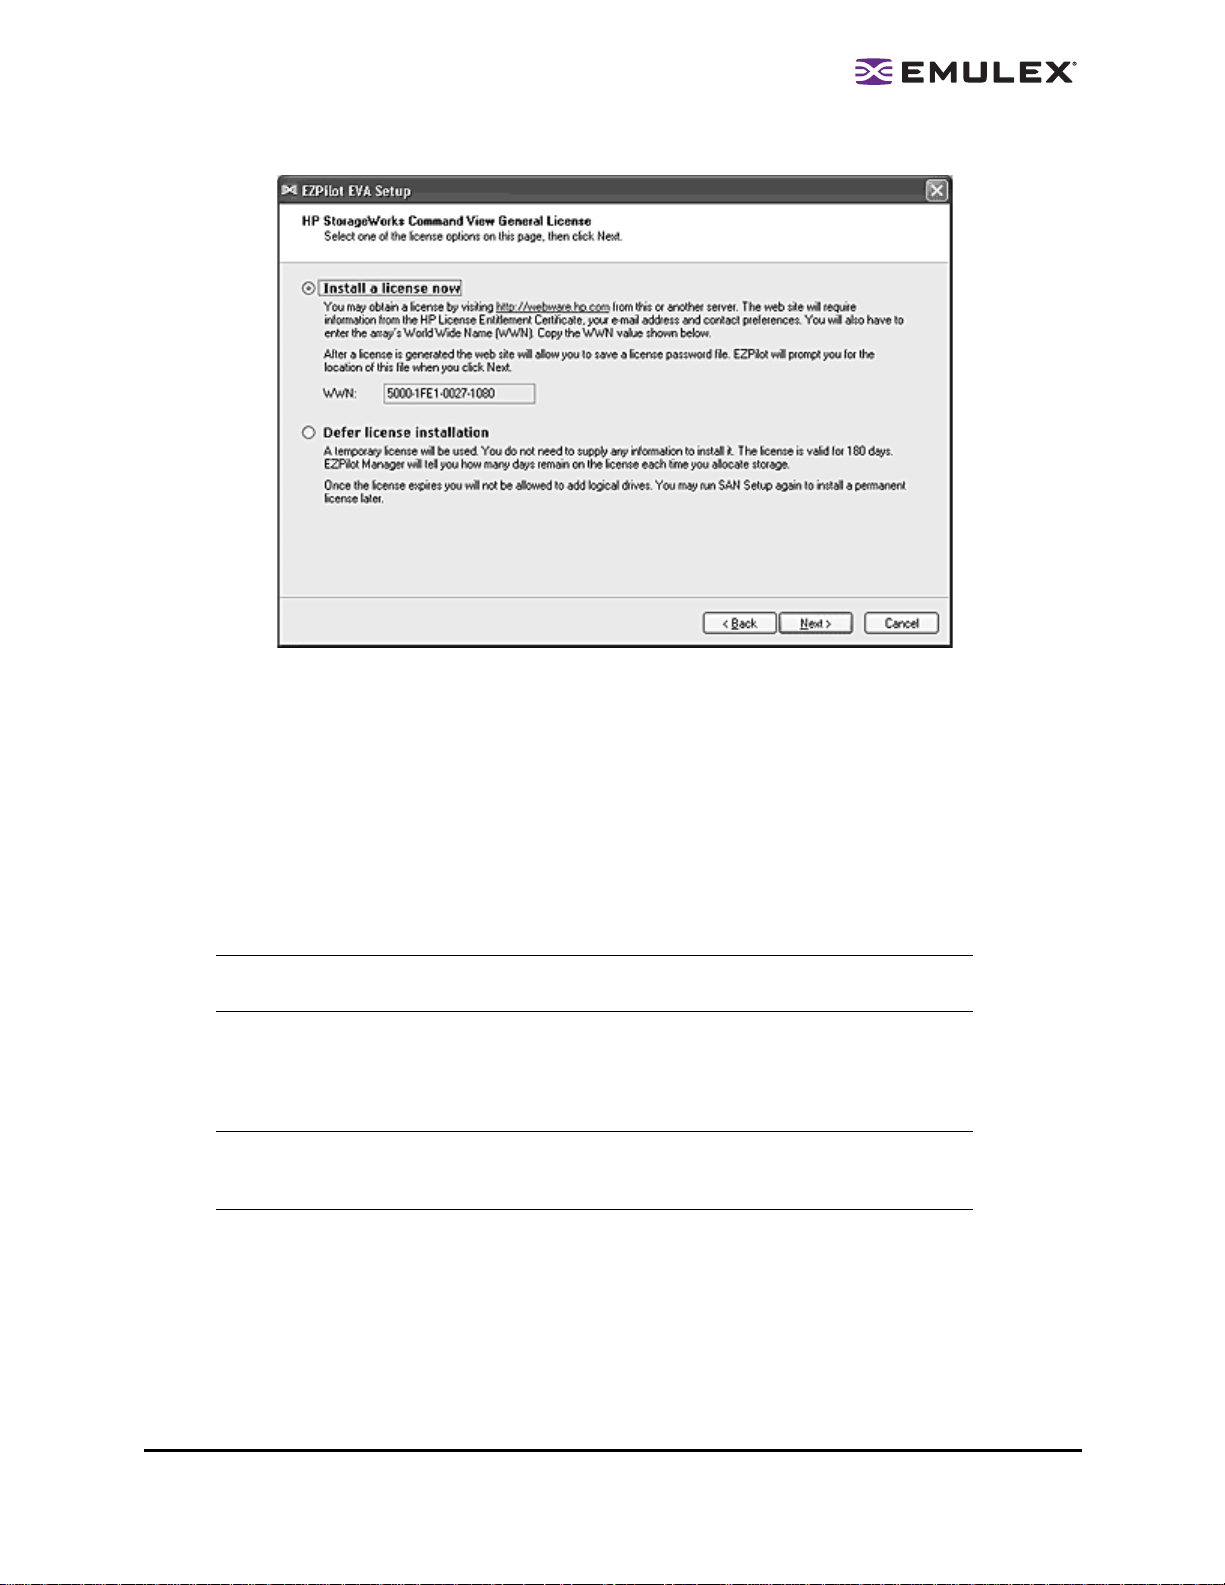
Figure 4: The EZPilot EVA Setup License dialog box
8. The EZPilot EVA Setup License dialog box appears enabling you to install a Command View
license. The license is obtained from the HP Webware password center. You may install a
license now or later. Emulex recommends that you install the license now. It will simplify using
EZPilot Manager.
• To obtain a Command View License:
a. From the EZPilot EVA Setup License dialog box, check Install a license now.
b. Select the WWN value and press Ctrl-C to copy it for use in step d .
c. Double-clic k the http://webware.hp.c om li nk on th e EZPi lot EVA Setup License dialog
box. The HP Password Delivery Service page appear s in a Web browse r.
Note: If the server does not have internet access, enter the URL into an Internet
browser on a computer with internet access and follow these instructions .
d. Enter your HP order number at the web site. Follow the instructio ns in the “HP Storage-
Works EV A4100 SAN Starter Kit quick installation” guide. T o type the WWN, press Ctrl-V
to paste the WWN you copied previously. Using the “paste” method ensures there are
no typing mistakes. However, you may also manually type in the WWN.
Note: The WWN is also displayed on th e oper at or contro l panel of th e EVA. This
enables you to obtain the li cen se be fo re instal ling EZ P ilo t. M ake sure you ty pe t he
WWN exactly as shown, including the dashes.
EZPilot - Installation Section Page 5
Page 10
e. The License/Password certificate page of the HP Webware site includes a li nk to save
the license key/password file. Click on the link to save the file. Make sure you remember
the name and path you assign to the file. Do not change the file’s .dat extension.
f. Exit the browser. If you are not accessing the Web site from the management server,
copy the file to the management server or place it on a network share that is accessible
from the management server.
g. Click Next in the EZPilot EVA Setup License dialog box. The Open License Password
File dialog box appears.
h. Navigate to the license password file you saved an d cl ick Op e n.
• To install a Command View License later:
a. From the EZPilot EVA Setup License dialog box, check Defer license installation and
click Next. If you choose this option you can create logical drives for 180 days. After 180
days you can no longer create logical drives without i nstalling a licens e.
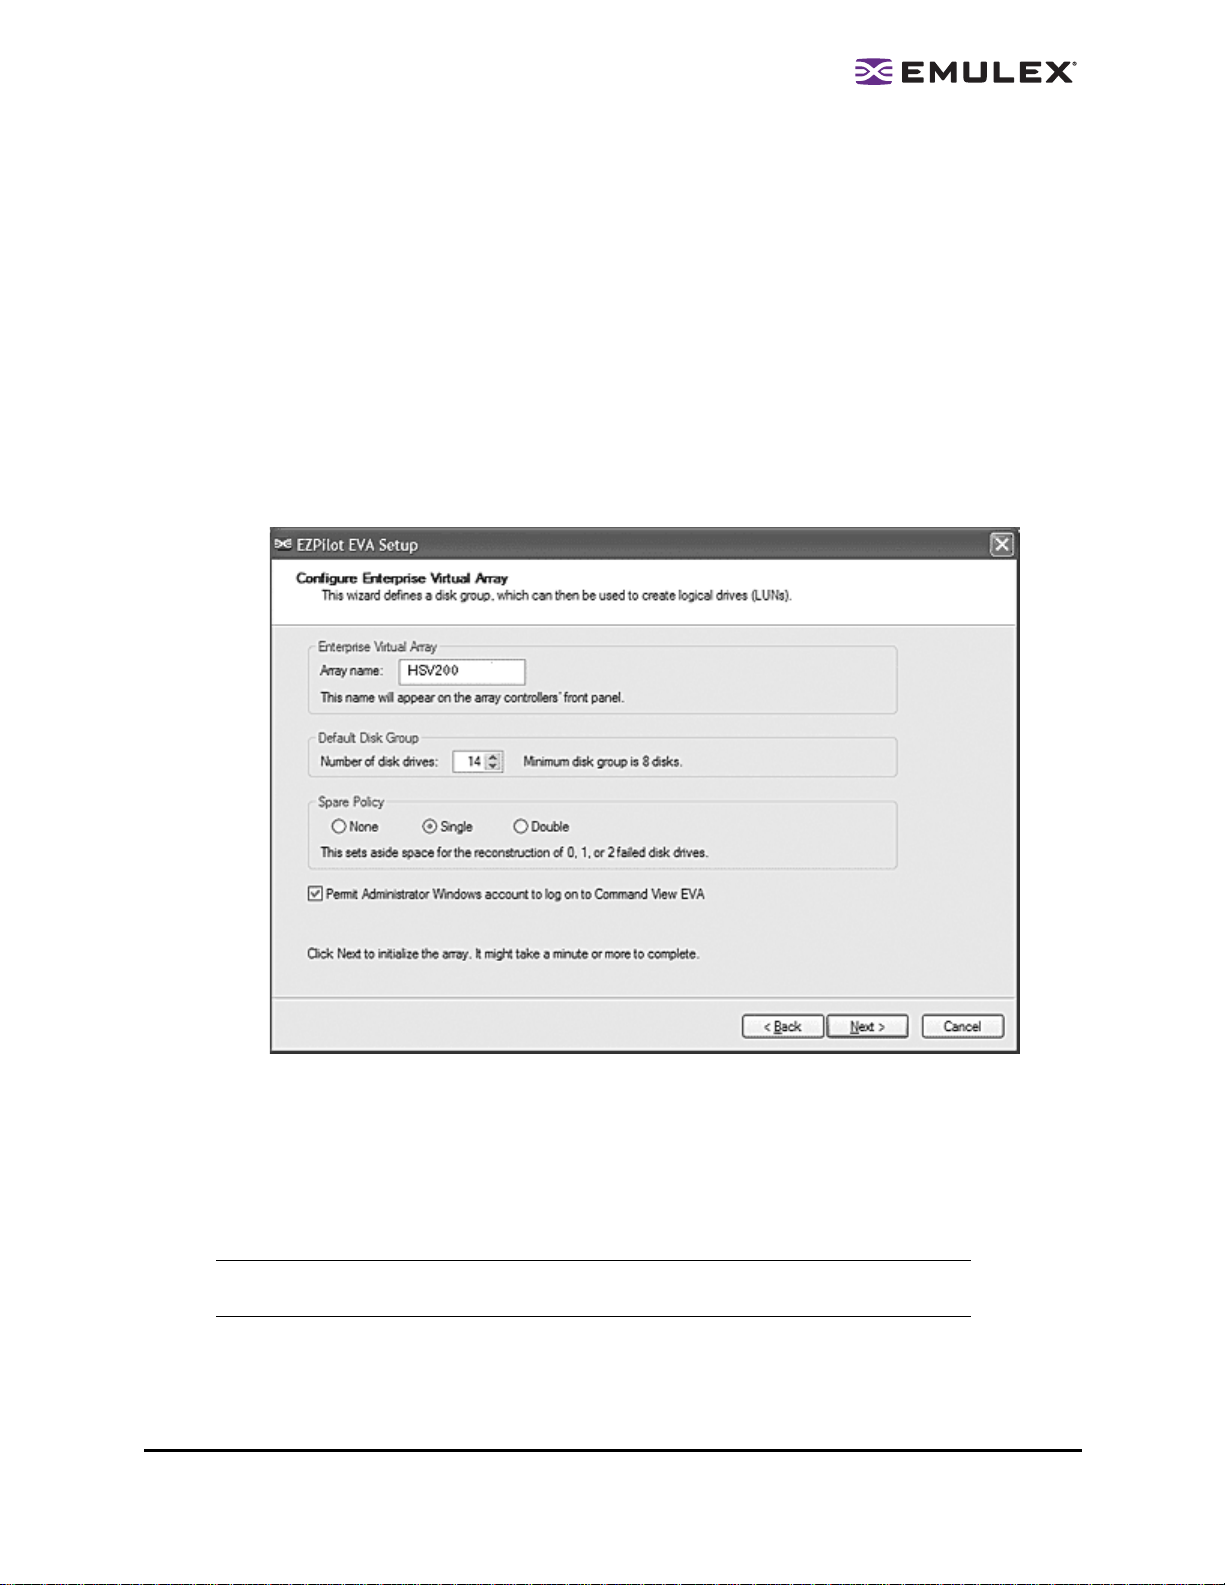
Figure 5: The EZPilot EVA Setup Configure dialog box
9. The EZPilot EVA Setup - Configure Enterprise Virtual Array dialog box appears. Enter the array
name as you want it to appear on the front panel of the two array c ontrolle rs. The array n ame
may contain a maximum of twenty characters. The Number of di sk d rives field d isp lay s the
number of disk drives discovered in the EVA. The Spare Policy feature enables you to set aside
storage space in case a disk drive fails . You can choose to set aside no space or to set aside
enough space to save data from one or two failed drives.
Note: When you set aside space for failed drives, you are reducing the space available for
storage.
Uncheck Permit <account name> Windows accoun t to log on to Comma nd V ie w EVA if you
don't want to allow your account to log on to Command View EVA. This does not affect the ability
EZPilot - Installation Section Page 6
Page 11
to use EZPilot Manager. See the Command View EVA documentation for the steps necessary to
grant permission to another account.
Note: The check box label in Figure 5 disp lay s your acco un t name. In th e exa mpl e, the
standard Windows Admini str ator acc oun t is be in g use d to install EZPi lot . T he
Command View password will be the same passwor d as the Wind ow s Admin ist rat or
account.
After making your selections, click Next. The EVA is initialized and the VDS provider is installed.
Note: This process may take a minute.
Figure 6: The EZPilot Switch Setup dialog box (Single switch configuration. DHCP supported and enabled)
10. If you have not previously configured a sw itch , the EZP ilot S witch Setup d ialog box ap pear s.
Enter the switch's name, IP address, subnet mask and gateway address. If DHCP is supported
and enabled, you can check Obtain network settings automatically. Click Next.
Note: Configuring the switch’s ne twor k sett ing s may take a min ute.
11. If there is another switch to configure, cli ck Next Switch when prompte d and ente r the s witc h's
name, IP address, subnet mask and gateway address .
12. You are notified when the switches are configured. Click Continue.
13. The Installing HP MPIO screen appears. When the installation is complete, you are prompted to
restart Windows. Click OK. After Windows is restarted, you will be notified that the installation is
complete.
EZPilot - Installation Section Page 7
Page 12
Installing EZPilot to Create a Windows Non-Management Server
Note: You must install EZPilot on all Windows no n-man ag emen t se rver s in th e SAN .
Prerequisites
• If older versions of Emulex, Brocade or HP StorageWorks software were previously installed on
the system you must remove them. Use the Windows Add/Remove Programs feature to remove
the software. If you are prompted to reinstall the Emulex HBA driv er during EZP ilot i nstallation ,
click Yes.
Procedure
To create a non-management server:
1. Install the HBA(s) in the system. Refer to the HBA’s Installation Manual for instructions.
Caution: Do not install the driver from the CD that shipped with the HBA. EZPilot will install the
necessary driver automatically.
2. Insert the EZPilot CD into the system’s CD-ROM drive.
The EZPilot Installer verification window appears. The window closes automatically when the file
verification process is complete.
Note: Verification may take several minutes.
The EZPilot EVA Installer welcome page appears.
Figure 7: The EZPilot EVA Installer welcome page
EZPilot - Installation Section Page 8
Page 13

3. Click Next.
Figure 8: The EZPilot EVA Installation Options dialog box
4. The EZPilot EVA Installation Options dialog box appears. Click Install.
Note: Do not check the HP EVA Management Server check box. You are creating a
Non-Management server.
5. The License Agreement dialog boxes ap pear. Check I agree to these terms and conditions
and click Next for each dialog box.
The EZPilot EVA Operation in Progress dialog box appears. The dialog box c loses whe n the
necessary files are copied to th e sy stem.
Figure 9: The Welcome to EZPilot SAN Setup Wizard dialog box
6. The Welcome to EZPilot SAN Setup Wizard dialo g box a ppear s. Click Next to perform EZPil ot
SAN setup.
7. The EZPilot SAN Setup Prerequisites dialog box appear s. E nsure al l pr erequis ites are m et and
click Next. The HP EVA driver and Emulex HBA driver are installed.
Note: This installation may take several min utes.
The HP MPIO DSM is installed. The Microsoft MPIO framewor k wil l autom atically be in stalled if
it is not already installed.
EZPilot - Installation Section Page 9
Page 14

8. When the installation is complete, EZPilot pr ompts you to res tart Windows. Clic k OK. After
Windows is restarted, you will be notified that the in stallation i s comple te.
Repeat steps 1-8 to install EZPilot on all Windows non-manag ement s erv ers in the SA N.
Installing the Emulex Driver and Utilities for Linux
Please refer to the manuals on the Emulex Linux Installation CD for instructions on installing the Emulex
drivers and utilities for Linux.
As an overview, to create a Linux non-management server:
1. Ensure a supported version of the Linux oper ating s ystem i s in stalled on the m achi ne.
2. Update with the Proliant Support Pack (for HP servers).
3. Install the Emulex driver for Linux.
4. Install the Emulex HBAnyware® utility to configure the HBAs with the c orrect fir mwar e/BIOS.
5. Install the Emulex MultiPulse® utility on your system to enable multipathing in a High Availability
(HA) environment.
EZPilot - Installation Section Page 10
Page 15

Using EZPilot Manager
Introduction
Emulex’s EZPilot Manager provides a simple confi guration an d manag ement tool for m anaging a
Storage Area Network (SAN).
The EZPilot Manager utility enables you to d isc ove r and chec k the status of loc al and remote Emul ex
HBAs, hosts, switches, storage devices and logic al dr ives ( LUNS) con tained in the SAN.
EZPilot Manager enables you to:
• Add, expand, rename or delete a logical drive.
• Assign a logical drive to a host.
• Create, initialize, format and assign a path to a logical dr iv e.
• Monitor the EVA.
• Configure and monitor switches.
• View an HBA’s attributes.
• Reset an HBA.
• Enable and disable an HBA’s BootBIOS.
• Update the BootBIOS on an HBA.
• Update the firmware on an HBA.
Note: Do not run EZPilot Manage r and Co mmand View con cur rent ly. Running both
applications concur rent ly may caus e ina ccu rate disco ver y in fo rmati on to be
displayed.
EZPilot - Management Section Page 11
Page 16

Starting EZPilot Manager
To start EZPilot Manager:
1. On your Management Server’s desktop, click Start.
2. Select Programs>Emulex>EZPilot Manager.
EZPilot Manager starts and the Discovery Information screen i s di spla yed. Storage View is the default
setting the first time you run EZPilot Manager.
If there are no logical drives configured, you will be prompted to configure them. If you want to configure
logical drives now, see “Adding a Logical Drive” on page 45 and begin at step 4. You can also configure
them later if you wish.
Note: If you did not obtain a Command View license wh en yo u ins talle d EZPi lo t Man age r
you will prompted to obtain one when you attempt to create logical drives. Refer to
“To obtain a Command View License:” on page 5 for instructions .
Figure 10: EZPilot Manager at startup with no logical drives configured (Storage View.)
Note: The illustrations in th is manua l ar e fo r in stru cti ona l pu rp ose s onl y. The actual
information displaye d by E ZPil ot Ma nager may var y.
EZPilot - Management Section Page 12
Page 17

The EZPilot Manager Window
The EZPilot Manager window contains five basic c ompon ents: the menu bar, the toolbar, the discoverytree, the property tabs and the status bar.
Figure 11: The EZPilot Window with Elem en t C a ll O uts ( Storage View wi th s to rag e d evi ce s ele c te d.)
Note: The element you select in the discovery-tree determines whether a menu item or
Toolbar icon is active. For example, if you select the local host or other system host,
the Reset Adapter it em on the Ada pt er menu is unav ail ab le. The Reset Ada pter
Toolbar button is unavailable as w ell.
The Menu Bar
The Menu bar contains command menus that enable you to perform a variety of tasks such as exiting
EZPilot Manager, resetting HBAs and sorting items in the discovery-tre e vi ew. Many of the Menu bar
commands are also available from the Toolbar.
• The File menu enables you to exit EZ Pil ot Manag er.
• The View menu enables you to turn off and on the Toolbar, Status Bar, and Item Help Tips. You
can also choose to display di scover ed el ements starting from the Storage Devices, Hosts,
Switches or Local HBAs Only options (see “ The Toolbar” on page 14). You can also enable or
disable Advanced Mode.
Note: You must be in Advanced Mode to see the Maintenance tab, update an HBA’s
firmware/BI OS an d to mana ge a swit ch.
• The Adapter menu enables you to reset a se lec ted adapte r (see “Res etting an HBA” on
page 28), edi t its name (see “ Editing an HB A’s Name” on page 29) or use i ts default name (see
“Reverting to an HBA’s Default Name” on page 29).
• The Discovery menu enables you to mod ify d iscove ry properti es (see “Mod ifyi ng Discov ery
Properties” on page 17) and to refresh the discovery.
EZPilot - Management Section Page 13
Page 18
• The Help menu displays the EZPilot Ma nager versi on as well a s tech supp ort an d sy stem
information.
The Toolbar
The Toolbar contains buttons that enable you to refresh the discovery-tree view, reset the selected HBA
and sort the discovery-tree view. Many of the Toolbar functions are also available from the Menu bar.
Figure 12: The EZPilot Toolbar (Host View with an adapter selected)
Note: If a Toolbar button does not apply to a sel ect ed disc ove ry-t re e elem en t, it is disa ble d.
The Toolbar is visible by default. Use the Toolbar item in the View menu to hide the Toolbar. If the item is
checked, the Toolbar is visible.
The Toolbar Buttons
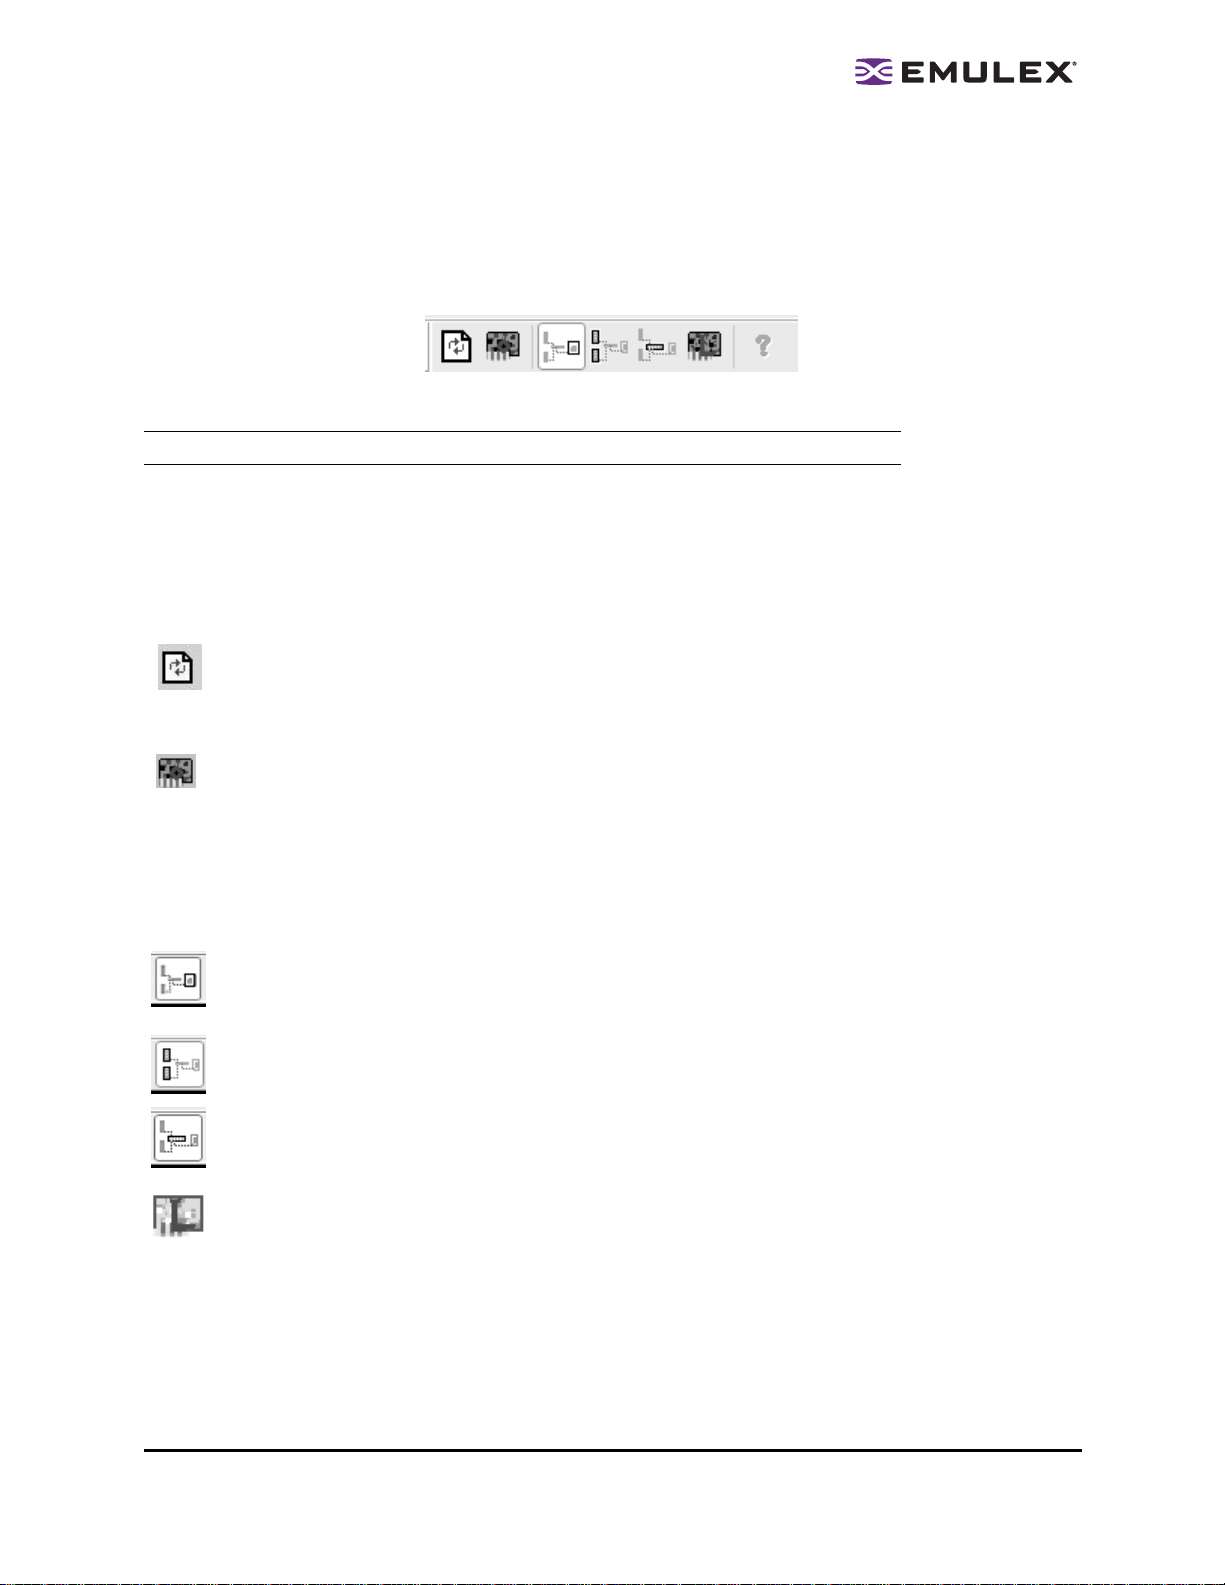
The Toolbar buttons perform the following tasks:
Click the Discovery Refresh button to refresh the dis covery-tree di spl ay.
Click the Reset button to reset the selected HBA. (You must select an HBA in the discovery-tree
to enable this button.)
SAN elements can be displayed in the discovery- tree by Storage View, Host View, Switch View and
Local HBAs Only View.
Click the Storage View button to view the discovery-tree starting with the storage eleme nt.
(This is the default view the first time EZ Pil ot Manag er is run.)
Click the Host View button to view the discovery-tree starting with the host element.
Click the Switch View button to view the discovery-tree starting with the fabric elemen t.
Click the Local HBAs Only button to view local only or both loca l and remote HB As in the
discovery-tree.
EZPilot - Management Section Page 14
Page 19

The Discovery-Tree
The discovery-tree (left pane) has icons representing disc ove red n etwork (SAN) elem ents such a s
arrays, switches, hosts, logical driv es and HBAs .
Figure 13: The EZPilot Discovery-Tree (Host View)
Discovery-Tree Icons
Discovery-tree icons represent the following:
The root of the discovery-tree in Storage View.
The root of the discovery-tree in Host View.
The root of the discovery-tree in Switch View.
The local host.
Other hosts connected to the fabric.
A green HBA icon with black descri ptiv e text represe nts an HBA that is onl ine.
An HBA icon with a red X represents an HBA that i s offline or otherwi se tem poraril y
inaccessible. Several situatio ns c ould c aus e the HBA to be offlin e or inacc es sib le:
• The HBA on a loc al ho st is not c onnected to the S AN, but i s st ill a vailabl e for l ocal
access.
EZPilot - Management Section Page 15
Page 20

• The HBA on a local host is malfunctioning and is inaccessible to the local host as well as
to the SAN.
• The HBA on a loc al ho st is bus y perfor ming a loc al firmwar e downl oad and i s temporarily inaccessible to the local host as well as to the SAN.
• The HBA is be ing r ese t or i ts firmware is being u pdated.
A grey HBA icon represents an HBA that was removed from the fabr ic. It wi ll remai n in the d iscovery-tree for thirty minutes after it is removed, unless y ou c hange the discov ery pro perties.
(See “Modifying Discovery Properties” on page 17 for more information.) The HBA will disappear
from the discovery-tree when EZPilot Ma nager is exite d and r estarted.
The Switch icon represents connections to the swi tch.
The Target icon represents connections to individual targets.
The Logical Drive icon represents connections to indi vidu al lo gical drives.
The Storage icon represents connections to individual storage devic es.
Property Windows and Property Pages
The property windows and pages display config uration, s tatistical and status info rmation for sel ected
SAN elements. The set of available property windows and pages is context-sensitive, depe nding on the
type of element selected in the discover y- tree and the mode i n whic h the util ity is runni ng.
Status B a r
The status bar is visible by default. Use the Status Bar item in the View menu to hide the status bar. If the
item is checked, the status bar is visible.
Discovering SAN E leme nts
Hosts, HBAs, switches, storage devices and log ica l drive s ar e dis cover ed automa tica lly by a d isc ove ry
server when you launch EZPilot Manager. Discovered SAN elements are displayed in th e dis coverytree.
EZPilot - Management Section Page 16
Page 21

Modifying Discovery Propertie s
You can modify the way discovery is performed using the HBA Discovery Properties dialog box. Y ou can
define when discovery is performed, how often the information is refreshed and when to remove expired
HBAs.
Figure 14: The HBA Discovery Properties dialog box
The HBA Discovery Properties d ialo g box d ispl ays the following infor matio n:
• Discovery Server Startup - The discovery server can be set to start when the syste m boots or
when EZPilot Manager is run for the first time after the system boo ts. If it is se t to start the first
time EZPilot Manager is run, there may be a sl ight d elay befor e the dis cover y-tree is p opulate d.
• Refresh Rate - The discovery server periodically runs discovery cycles to detect new HBAs and
targets. The refresh rate determines how often this should be done. If Manual Refresh is
enabled, you must click Discovery Refres h on the Toolbar to update the discovery-tree.
Note: Because of limitations with t he Storport driver, EZPilot Mana ger does not
automatically detect HBAs or targets that were removed from the SAN. In this case,
you must manually refresh the discovery-tree by clickin g Discovery Refresh on the
Toolbar.
• Expire Undiscovered HBAs - If the di scover y c ycle de tects that an HBA is no long er av ail able,
you may not want it to be removed from the disc ov ery-tree im medi ately. For example, the state
may be momentary , such as when an HBA is being reset or its firmware is being updated. In this
case you would check the Never Remove checkbox.
Note: The undiscovered HBA will be rem ove d fr om the di scov er y- tree if you exit and
restart EZPilot.
You can also set the number of seconds by which to delay re movi ng the HB A from the
discovery-tree. The default delay is 30 minutes (1800 s econd s) .
EZPilot - Management Section Page 17
Page 22

To modify discovery properties:
1. From the Discovery menu, select Modify Settings. The HBA Discovery Properties d ialog box
appears.
2. Change the desired discovery settings.
3. Click OK.
To return discovery properties to their default settings:
1. From the Discovery menu, select Modify Settings. The HBA Discovery Properties d ialog box
appears.
2. Click Defaults.
3. Click OK.
Viewing Discovery Information
The Discovery Information page contains a general summa ry of the dis cover ed ele ments contained in
the SAN. It is displayed when you click the r oot nod e of the disco ver y-tre e (Storage, Hosts, Switch or
Local HBAs depending on the selected view).
Viewing Discovery Information (Storage View)
In the Storage View, EZPilot Manager displays the storage devices, logical drives , hosts and HBAs tha t
are available to each storage device.
Figure 15: The EZPilot Discovery Information page (Storage View selected)
The Discovery Summary page (Storage View) displays the following information:
• Number of Hosts - The total number of discovered hosts whose HBAs can be manag ed by th is
host.
• Number of Fabrics - The total number of fabrics or st orage networ ks se en by th is ho st.
• Number of Adapters - The total number of discovered HBAs that c an be ma naged by this hos t.
EZPilot - Management Section Page 18
Page 23

The Managed Storage area of the Discovery Summary page displays the following infor mation :
• Number of Storage Devices - The number of manageable storage devices that were discovered.
• Number of Logical Drives - The total number of l ogic al driv es on all m anageab le s torag e
devices.
To view the HBAs, storage devices and the logical drives that are avail able to each s tor age dev ice:
1. Do one of the following:
• From th e Menu ba r, click View, then click Storage Devices.
• From th e Toolbar, click the Storage View button.
2. Select the Storage icon in the discovery-tree. The EZPilot Discovery Information page (Storage
View) is displayed.
Viewing Discovery Information (Host View)
In the Host View, EZPilot Manager displays the HBAs, storage devices and logical drives tha t are
available to each host.
Figure 16: The EZPilot Discovery Summary page (Host View)
The EZPilot Discovery Summary page (Host View) display s the followi ng infor mati on:
• Number of Hosts - The total number of discovered hosts whose HBAs can be manag ed by th is
host.
• Number of Fabrics - The total number of fabrics or st orage networ ks se en by th is ho st.
• Number of Adapters - The total number of discovered HBAs that c an be ma naged by this hos t.
• Number of Target Ports - The total number of discovered targets, including storage devices,
seen by this host.
EZPilot - Management Section Page 19
Page 24

The Managed Storage area of the Discovery Information page displays the following in form ation:
• Number of Storage Devices - The number of manageable storage devices that were discovered.
• Number of Logical Drives - The total numb er of logic al driv es o n all the manageable storage
devices.
To view the HBAs, storage devices and the logical drives that are avail able to each h ost:
1. Do one of the following:
• From th e Menu ba r, click View, then click Hosts.
• From th e Toolbar, click the Host View button.
2. Select the Hosts icon in the discovery-tree. The EZPilot Discovery Information page (Host View)
is displayed.
Viewing Discovery Information (Switch View)
In the Switch View, EZPilot Manager displays the HBAs, storage devices and the logic al dr iv es tha t are
available to each switch.
Figure 17: The EZPilot Discovery Information page (Switch View selected)
The Discovery Summary page (Switch View) displays the foll owing i nformation:
• Number of Hosts - The total number of discovered hosts whose HBAs can be manag ed by th is
host.
• Number of Fabrics - The total number of fabrics or st orage networ ks se en by th is ho st.
• Number of Adapters - The total number of discovered HBAs that c an be ma naged by this hos t.
• Number of Target Ports - The total number of discovered targets, including storage devices,
seen by this host.
EZPilot - Management Section Page 20
Page 25

The Managed Storage area of the Discovery Information page displays the following in form ation:
• Number of Storage Devices - The number of manageable storage devices that were discovered.
• Number of Logical Drives - The total numb er of logic al driv es o n all the manageable storage
devices.
To view the HBAs, storage devices and the logical drives that are avail able to each h ost:
1. Do one of the following:
• From th e Menu ba r, click View, then click Switches.
• From th e Toolbar, click the Switch View button.
2. Select the Switches i con in the di sc overy- tr ee. The EZ Pilot Dis co very S ummar y page (Switch
View) is displayed.
Viewing Host Information
The Host Information page displays informa tion abo ut attached devi ces vi sib le to the s elec ted ho st.
Figure 18: The Host Information page
The Host Information page displays the following infor mati on:
• Number of Adapters - The number of HBAs on the selec ted hos t that can be mana ged by the
local host. Depending on the configuration, this number may not include all of the physical HBAs
installed in the selected system.
• Number of Fabrics - The number of fabric s disc over ed to wh ich th is l ocal hos t is connec ted.
• Number of Targets - The number of targets, including storage devices, discovered by this loc al
host that are available to this host.
• Remote Management Server Version - The version of the remote management server runnin g
on the host.
EZPilot - Management Section Page 21
Page 26

• Operating System - The version of the operati ng sy stem running on th is host.
The Managed Storage area of the Host Information page displays the following information:
• Number of Storage Devices - The number of manageable storage devices visible to the selected
host.
• Number of Logical Drives - The total numb er of logic al driv es a ssi gned to th e host o n the
manageable storage devices.
To view host information:
1. Do one of the following:
• From th e Menu ba r, click View, then click Hosts.
• From th e Toolbar, click the Host View button.
2. From the discovery-tree select the host whos e info rmation y ou wis h to vi ew. The Host
Information page is displayed.
Working with Logical Drives
The Logical Drive Summary page contains informa tion ab out the s elec ted logical dri ve, incl uding the
logical drive’s name, identifier, type, size and so on.
Using the Logical Drive Summary page you can also name a lo gic al dr ive , view a logical drive’s disk
details and expand a logical drive.
Figure 19: The EZPilot Logical Drive Summary page
The Logical Drive Summary page displays the fol lowin g infor mation:
• Name - Displays the unique name of the sel ected logic al d rive in th e stor age de vic e. You can
also rename the logical drive. See “Rena ming a Logic al Driv e” on page 23 for more information.
• Identifier - The logical drive’s unique identifi er within the s tor age devic e.
• Type - The logical drive type. Possible types are striped, mirrored or st riped with parity.
EZPilot - Management Section Page 22
Page 27

• Size - The total storage size of the selected logic al d riv e.
• Status - The operational status of the selected logical drive. The status can be online, not ready
or failed.
• Health - The health of the selected logic al driv e. States are healthy, rebuilding or failing.
• Flags - The capabilities of the selected l ogic al driv e. Capabiliti es are checksum and writethrough.
• Transition State - The transition state of the selected logical dr ive. P ossibl e states ar e stable,
extending and reconfiguring.
• Rebuild Priority - The priority set for rebui ldin g a fail ed dis k ver sus handli ng I/O requests.
• Number of Physical Disks - The total numbe r of physi cal disks the sel ecte d logi cal drive uses.
• Maximum Expansion Size - The maximum amount of s tor age space that can be added to the
selected logical drive.
The Logical Drive Summary page buttons
• Apply - Type in a new name for the logical drive and click this button to assign a new name to
the selected logical drive. See “Renaming a Logi cal Drive” below fo r more in format ion.
• Disk Details - Click this button to view a logical dr iv e’s disk infor mation . See “ Viewing a Logical
Drive’s Disk Details” on page 24 for mo re inform ation.
• Expand - Click this button to extend the file syste m on the l ogic al di sk dri ve. See “ E xpanding a
Logical Drive” on page 24 for more information.
To view Logical Drive Summary information:
1. Do one of the following:
• From th e Menu ba r, click View, then click Storage Devices.
• From th e Toolbar, click the Storage View button.
2. From the discovery-tree, select the logical drive whose information you wish to view. The Logical
Drive Summary page is displayed.
Renaming a Logical Drive
You can rename a logical drive using the Logical Drive Summary page. The name can be up to 32 alphanumeric characters and the underscore , dash, p eriod and s pace characte rs .
To rename a logical drive:
1. Do one of the following:
• From th e Menu ba r, click View, then click Storage Devices.
• From th e Toolbar, click the Storage View button.
2. From the discovery-tree, select the logic al dr ive you wish to rename. The Logical Drive
Summary page is displayed.
Or
Right-click on the selected logical driv e in the dis covery -tree, s elect Rename and type the lo gi-
cal drive’s new name.
EZPilot - Management Section Page 23
Page 28

3. In the Name field, enter the new name you wish to assign to the logical drive. The name can be
up to 32 alpha-numeric characters and the unders core, dash, per iod and space cha racters.
4. Click Apply.
Viewing a Logical Drive’s Disk Details
Using the Logical Drive Summary page you can view the i nfor mation about the l ogical dr iv e’s disk. You
can view disk details such as the disk’s name, bus slot, s tatus, health, s ize and so on.
To view a logical drive’s disk details:
1. Do one of the following:
• From th e Menu ba r, click View, then click Storage Devices.
• From th e Toolbar, click the Storage View button.
2. From the discovery-tree, select the logical drive whose disk details you wish to view. The Logical
Drive Summary page is displayed.
3. Click Disk Details. The Logical Drive Disks page appears.
Figure 20: Th e Log ica l Dri ve Di sk s page
Expanding a Logical Drive
Using the Logical Drive Summary page you can expand a logic al dr ive.
To expand a logical drive:
1. Do one of the following:
• From th e Menu ba r, click View, then click Storage Devices.
• From th e Toolbar, click the Storage View button.
2. From the discovery-tree, select the l ogica l driv e you wish to expand. Th e Logic al Dr ive
Summary page is displayed. C lick Expand.
EZPilot - Management Section Page 24
Page 29

Or
Right-click on the selected logical driv e in the dis covery -tree and sel ect Expand.
The Expand Logical Drive dialog box appears.
Figure 21: The Expand Logical Drive dialog box
3. Enter the amount to increase the storage capacity on the driv e. T he maximum expansion
amount is displayed on the dialog box. T he un its drop down box ne xt to the E nter Ex pansion
Amount field can be used to change the siz e units. The siz e c an be di splayed i n giga bytes or
terabytes (if more than 1 terabyte is ava ilab le). Clic k OK.
Note: If there is already a file system def ine d on t he logic al dr iv e, expandi ng the logi cal
drive will no t exp and th e file s ystem. You must us e a disk manag ement tool to e xpa nd
the file system after the logical drive is expanded.
4. A dialog box appears informing y ou that the l ogica l driv e was e xpanded. Clic k OK.
Note: It may take several minutes for t he new lo gi cal drive size to appear on the Logica l
Drive Summary page.
EZPilot - Management Section Page 25
Page 30

Viewing Target Information
Selecting an unmanaged target (for example, a tape device) or selec ting a contr oll er port un der a
storage device in Host or Switch v iews d isp lays the Target Information page.
Figure 22: The Target Information page
The Target Information page displays the following information:
• FC ID - The FC identifier for the target which is assigned automati cal ly in the fir mwar e.
• SCSI Bus Number - The SCSI bus to which the target is connecte d.
• SCSI Target Number - The SCSI target number assigned to the selected target.
• Node WWN - The node World Wide Name of the selected port.
• Port WWN - The port World Wide Name of the selected port.
• OS Device Name - The name assigned by the oper ati ng system to the selected port (if
available).
To view target information:
1. Select Host or Switch view.
2. From the discovery-tree, select the target whose info rmation y ou wis h to vi ew.
EZPilot - Management Section Page 26
Page 31

Managing Hos t Bus Adap ter s
EZPilot Manager enables you to manage many asp ects of a selected HBA. Using EZPilot Manager you
can:
• View an HBA’s general information.
• Reset an HBA.
• Edit an HBA’s name or use its default name.
• Upgrade an HBA’s firmware and BootBIOS and enable or dis able the Boo tBIO S.
Viewing an HBA’s General Information
The HBA General tab displays relevant information about the selected HBA, such as the model number,
firmware version, driver version, link status and s o on.
Figure 23: The EZPilot HBA General tab (Host View) with Advanced Mode enabled
The Adapter Summary area of the General tab displa ys th e follo wing i nform ation:
• Model - The complete model name of the s elec ted HBA .
• Port WWN - The port World Wide Name of the HBA.
• Node WWN - The node World Wide Name of the selected HBA.
• Fabric Name - The host or fabric name to which the selected HBA belongs. The fabric name is a
64-bit worldwide unique identifier assign ed to the fab ric.
• Driver Version - The version of the driver installed for the selected HBA.
• Firmware Version - The version of Emulex firmware currently running on th e HBA.
• Driver Name - The executable file image name fo r the driv er as it a ppear s i n the Em ulex driver
download package.
• BootBIOS - The BootBIOS version running on the s elec ted HBA . If BootB IOS is n ot pre sent on
the HBA, the field displays the word “Disable d”.
EZPilot - Management Section Page 27
Page 32

The Adapter Status area of the General tab displays the following information:
• State - The current operational state of the HBA: “Up” or “Down”.
• Link Status - The current link status between the HBA and the fabric. There are several possible
states:
• The “O peration al” state indic ates tha t the HBA is c onnected to the network and o perating normally.
• All other states indicate that the HBA is not con nected to the networ k. Thes e offline
states are:
• “User offline” - The HBA is down or not connec ted to the ne twork .
• “Bypassed” - Th e HBA is i n Fibre Channel dis covery mode.
• “Diagnos tic Mode” - The HB A is con trolled by a dia gnosti c progr am.
• “Link Do wn” - T here is no acc ess to the netwo rk.
• “Port E rror” - T he HBA is i n an unk nown s tate; try resetting it.
• “L oopback” - The HBA is in a state in which infor mation is on ly looped be tween
the HBA transmitter and receiver. When an FC interface is in loopback mode,
the loopback signal overrides any exter nal signal detec ted by the re ceiv er.
• “Unknown” - The HBA i s offline for an unknown reason.
• Link Speed - The link speed of the HBA in gigabits per second.
To view the HBA General page:
1. From the discovery-tree, select the HBA whos e gene ral infor matio n you wi sh to view.
Resetting an HBA
EZPilot Manager enables you to reset a selec ted HB A.
To reset an HBA:
1. From the discovery-tree, select the HBA y ou want to reset.
2. Do one of the following:
• From th e Menu ba r, click Adapter, then click Reset Adapter.
• From th e Toolbar, click the Reset button.
A warning message about resetting a boot ad apter is di splayed.
3. Click Yes.
EZPilot - Management Section Page 28
Page 33

Editing an HBA’s Name
EZPilot Manager enables you to rename a selec ted HB A. The name is s tor ed on the ho st on whi ch
EZPilot Manager is running.
Note: If EZPilot Manager is run on a differe nt host , it will no t di spl ay th e new na me.
To edit an HBA’s name:
1. In the discovery-tree, select the HBA whose n ame y ou wish to cha nge.
2. From the Menu bar, select Adapter, and then select Edit Name.
or
Right-click on the selected HBA and choos e Edit Name.
3. Enter the new name.
Reverting to an HBA’s Default Name
EZPilot Manager enables you to revert to a s elec ted HBA’s default name.
Note: If the selected HBA’s name was not changed, this command is not availa bl e.
To revert to an HBA’s default name:
1. In the discovery-tree, select the HBA whose n ame y ou wish to cha nge.
2. From the Menu bar, select Adapter, and then select Default Name.
or
Right-click on the selected HBA and choos e Default Name.
EZPilot - Management Section Page 29
Page 34

Viewing an HBA’s Firmware Information
Use the Maintenance tab to view a selected HBA’s firmware information, update its firmware and enable
or disable its BootBIOS.
Note: You must select Advanced Mo de from the View menu to see the Maintenance tab for
a selected HBA.
Figure 24: The EZPilot HBA Maintenance tab (Host View) in Advanced Mode
The Firmware area of the Maintenance tab displays the follo wing in forma tion:
• Current Firmware Version - The Emulex firmware version number for the selected HB A.
• Operational Firmware Name - If visible, the name of the fir mware that is oper ationa l.
• Initial Firmware - The version of the firmware stub responsible fo r installing the SLI cod e into its
proper slot.
• SLI-1 Firmware Name - The name and version of S LI-1 firmware i nstalled in the se lec ted
adapter.
• SLI-2 Firmware Name - The name and version of S LI-2 firmware i nstalled in the se lec ted
adapter.
• SLI-3 Firmware Name - The name and version of S LI-3 firmware i nstalled in the se lec ted
adapter.
• Kernel Version - The version of the firmware responsible for starting the driver.
The BootBIOS area of the Maintenance tab displays the foll owing information :
• BootBIOS - The BootBIOS version running on the s elec ted HBA . If BootB IOS is n ot pre sent on
the HBA, the field displays the word “Disable d”.
The Maintenance tab buttons
• Update Firmware - Click this button to update firmware/B IOS on the s elected HB A. See
“Updating Firmware or BIOS on an HBA” on page 31 for instructions.
EZPilot - Management Section Page 30
Page 35

• Enable/Disable - Click this button to enable or disable the system BIOS for the HBA. This button
controls whether the system BIOS can read Emulex boot code off of the HBA. If this fiel d is
“Enabled”, the system BIOS can see bo ot code on the HBA and y ou ca n enable BIO S on th e
HBA using the BIOS utility. See “Enabling or Disabling BootBIOS on an HBA ” on page 32 for
instructions.
Note: If there is no BootBIOS prese nt , this bu tt on is not avai lab le .
To view the Maintenance tab:
1. From the View menu, enable Advanced Mode.
2. From the discovery-tree, select the HBA whos e maintenanc e info rmati on you wis h to vi ew.
3. Select the Maintenance tab.
Updating Firmware or BIOS on an HBA
EZPilot enables you to update firmware or BIOS on a sele cted HB A.
Prerequisites
• The Emulex driver is installed properl y.
• EZPilot Manager is installed properly.
• EZPilot Manager is operating in Advanc ed Mode to update fi rmware on a n HBA.
• The firmware/BIOS file has been downloaded fro m the Em ulex Web site and extra cted.
Procedure
To update firmware/BIOS on a selected HBA:
1. In the discovery-tree, select the HBA onto which you want to update the firmware or BIOS.
2. Select the Maintenance tab a nd clic k Update Firmware.
Figure 25: The EZPilot Manager warning dialog box
3. A dialog box appears warning you ab out re settin g HBAs . Cli ck Yes. The Firmware Download
dialog box is displayed.
EZPilot - Management Section Page 31
Page 36

Figure 26: The EZPilot Firmware Download dialog box
4. Navigate to the extracted firmware/BIOS file you wish to downloa d to the HBA . Sel ect the
firmware/BIOS file and click Start Dow nlo ad. A status bar disp lay s the progr ess of the
download and indicates when the download is compl ete. After the firmware /BIOS i s
downloaded, the HBA is automatically reset.
5. Click Close. The Maintenance tab displays the updated firmware/B IOS information for the
selected HBA.
If you are updating the firmware/BIOS on a dual- channel HB A, r epeat st eps 1 through 5 to update th e
firmware on the second port.
Enabling or Disabling BootBIO S on an HB A
Use the Maintenance tab to enable or disable the sele cted HB A’s BootBIOS.
Note: You do not need to enable BootBIOS if it was enabled at the time of
shipment.
To enable or disable BootBIOS:
1. In the discovery-tree, select the HBA whose B ootBIOS y ou wish to enable or disable.
2. Click the Maintenance tab.
3. Click Disable or Enable as appropriate.
EZPilot - Management Section Page 32
Page 37

Managing a Switch
Introduction
When you select a switch from the dis covery-tree i n Switc h View mode, the Fabric Inform ation tab and
Switch Mgmt. tab appear. The Fabric Information tab displays relevant information about the switch. The
Switch Mgmt. tab enables you to configure a switch on the netwo rk.
Prerequisites
• EZPilot is operating in Advanced Mode.
• The EZPilot host system is conn ected to a loc al ar ea network to manage th e swi tch.
Note: You cannot manage a switch using EZP il ot if the sw itch is on a differ ent sub ne t th an
the EZPilot Manag eme nt Ser ver and the re is a fi re wall betw e en the t wo subn ets.
Although you can configure t he switch's IP address, the rest of the switch setup
operation will fail and th e sw itch w il l not be man ageab le f ro m EZPi lot Mana ge r.
Therefore, Emulex recommends that the EZPilot Management Server and the switch
be on the same subnet to avoi d th is pote nt ial pro blem.
Viewing Fabric Information
When you select a switch in the discovery-tree in Switch View mode, the Fabric Information tab appears.
Figure 27: The EZPilot Fabric Informa tion tab
The Fabric Information tab displays the following i nformation:
• Number of Adapters - The number of adapter s discovered by this host on the selecte d fabric.
• Number of Hosts - The number of hosts discovered or se en by this h ost on th e sel ected fabric.
• Number of Targets - The number of targets, including storage devices, discovered by this host
on the selected fabric.
EZPilot - Management Section Page 33
Page 38

The Managed Storage area of the Fabric Information tab displays the following information:
• Number of Storage Devices - The number of storage devices discovere d by thi s host on the
selected fabric.
• Number of Logical Drives - The to tal number of l ogical dr iv es d isc ove red on all m anagea ble
storage devices connected to the switc h.
To view fabric information for a switch:
1. Do one of the following:
• From th e Menu ba r, select View, then click Switches.
• From th e Toolbar, click the Switch View button.
2. In the discovery-tree, select the switch whos e in forma tion y ou wish to vi ew. The Fabric
Information tab appears.
Renaming a Switch
Using EZPilot Manager you can rename a switc h.
To rename a switch:
1. Do one of the following:
• From th e Menu ba r, select View, then click Switches.
• From th e Toolbar, click the Switch View button.
2. In the discovery-tree, select the switch y ou wis h to rename, r ight-c lic k and sele ct Rename.
3. Type the switch’s new name into the discovery-tree.
EZPilot - Management Section Page 34
Page 39

Using the Switch Mgmt. Tab
The Switch Mgmt. tab enables you to configure the selected s witch .
Note: If you change the fabric zoning configuration, EZPilot Manager may no longer be able
to discover and manage remote hosts.
To configure a switch:
1. Do one of the following:
• From th e Menu ba r, select View, then click Switches.
• From th e Toolbar, click the Switch View button.
2. In the discovery-tree, select the switch you wis h to mana ge.
3. Select the Switch Mgmt. tab. Refer to the Brocade doc umentation for m ore information about
using this tab.
Figure 28: The Switc h Mg m t tab
Changing the Switch’s IP Address
Using the Switch Mgmt tab, you can change the IP ad dress o f the sel ected switc h.
1. Do one of the following:
• From th e Menu ba r, select View, then click Switches.
• From th e Toolbar, click the Switch View button.
2. In the discovery-tree, select the switch you wis h to mana ge.
EZPilot - Management Section Page 35
Page 40

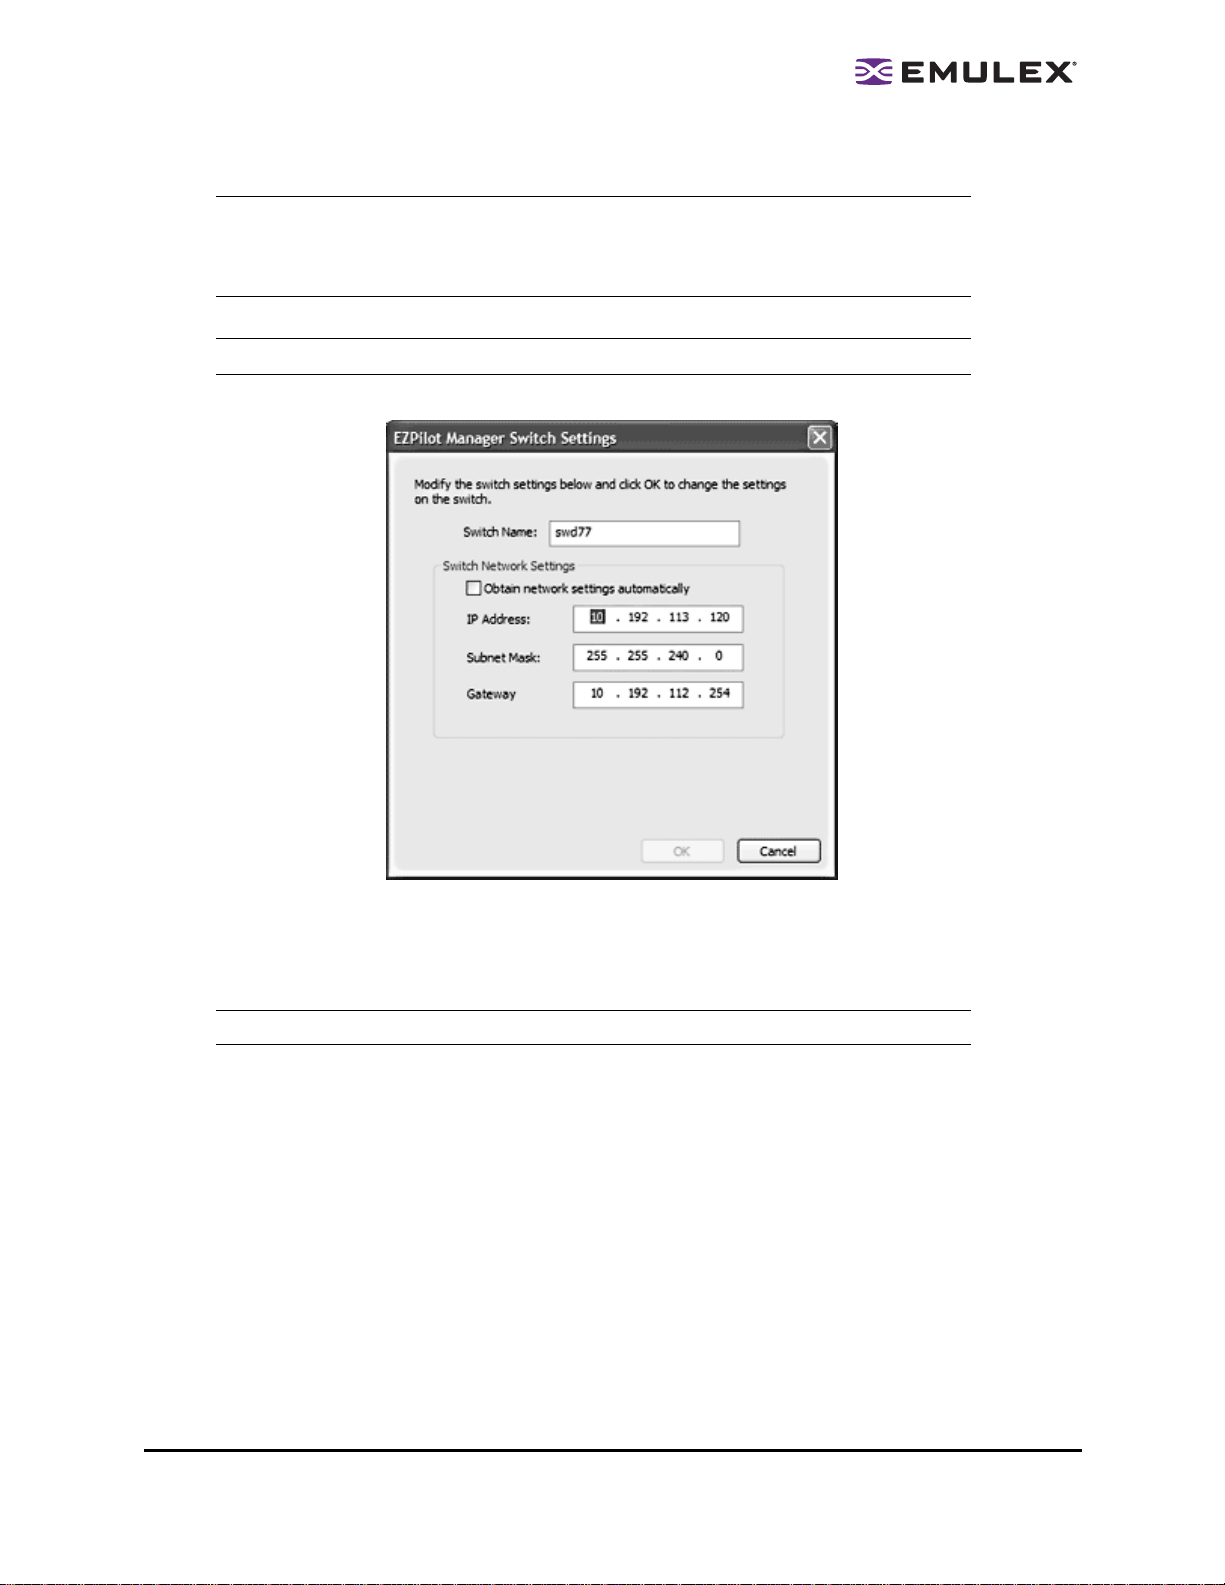
3. Select the Switch Mgmt. tab and click the Network icon.
4. The EZPilot Manager Switch Settings dialog box appear s. You may change the switch’s name,
IP Address, Subnet Mask and Gateway Addr ess fr om the v alue s entered i n the EZPi lot S AN
Setup Wizard. If DHCP is supported and enabled, you can check Obtain network settings
automatically. Click OK.
Note: The current IP address subnet mask and ga te way add re ss will be dis pla yed when
the dialog box appears even if the switch is configured to obtain the network set tings
automatically.
Figure 29: The EZPilot Manager Switch Network Settings dialog box (DHCP supported and enabled)
EZPilot - Management Section Page 36
Page 41

Managing Storage Devices
EZPilot Manager enables you to manage stor age d evic es on the S AN. Usi ng EZPi lot Ma nager you c an:
• Add logical drives.
• Rename logical drives.
• Remove logical drives.
• Expand logical drives.
• Assign or un-assign a logical drive to an HB A or gro up of HBA s.
The Storage Management tabs
EZPilot Manager contains three tabs that enable you to vi ew and c onfigu re stora ge device parameters:
• The General tab
• The Logical Drives tab
• The Physical Disks tab
Viewing General Storage Information
The General tab displays storage device parameters such as the device identifier, device status, device
health and so on.
To view the General tab:
1. From the discovery-tree, select the stor age devic e whose infor mation you wi sh to view. The
General tab is displayed.
Figure 30: The EZPilot Manager General tab (Storage devices)
EZPilot - Management Section Page 37
Page 42

The Storage Management Interface area of the General tab displays the following information:
• Name - The name of the storage management interfac e being use d to manage the selected
storage device.
• Version - The version of the of the storage management interface being used.
The Storage Device Summary area of the General tab displays the following information:
• Device Name - The name of the storage devic e.
• Device Identifier - The storage vendor’s unique device identifi er.
• Device Status - The current status of the selected storage device.
• Device Health - The health of the selected stor age d evi ce. States are healthy, rebuilding, failing
or failed.
• Rebuild Priority - The priority set for rebui ldin g a fail ed dis k versus handli ng I/O requests.
• Number of Logical Drives - The number of log ica l dr ives cu rr ently all ocated on the s elec ted
storage device.
• Number of Controllers - The number of contro llers i nstalled i n the se lec ted storage device.
• Number of Buses - The number of buses (or chan nels ) to the phys ic al disks in the stor age
device.
• Capacity - The total storage space on the selected storage de vice.
• Number of Physical Disks - The total number of physical disks (including spares) installed in the
selected storage device.
• Max. Number of Controllers - The maximum number of contr ollers that can be i nstalled on the
selected storage device.
• Maximum Slots Per Bus - The maxi mum nu mber of slots (one per physic al di sk ) avail able o n
each bus.
• Unallocated Space - The unallocated amount of storage space on the storage device.
Note: Not all of this space is necessarily avai lab le t o creat e or expand logical dri ves.
The Storage Device Controllers area of the General tab displays the following information:
• Controller Identifier - The controll er’s unique device identifier.
• Status - The current status being reported by the selected storage device.
• Health - The health of the selected storage dev ic e. States are healthy, rebuilding, failing or
failed.
• Number of Ports - The number of FC ports on the controller.
• Number of Logical Drives - The number of log ica l dr ives cu rr ently all ocated on the s elec ted
storage device.
General tab buttons
• Controller Ports - Click this button to view information about a s elec ted co ntroller por t. See
“Viewing a Controller’s Port Information” below for more info rmation.
Viewing a Controller’s Port Information
Using the General tab, you can also view a control ler’s port information, including the controlle r por t’s
name, identifier, WWPN, Status and so on.
To view a controller’s port information:
1. From the discovery-tree, select a st orage dev ice . The Gene ral tab is disp lay ed.
EZPilot - Management Section Page 38
Page 43

2. From the General tab, select a controller from the Storage Device Controllers list and c lic k
Controller Ports (see Figure 30 ). The Storage Device Controller Ports dialog box appea rs
displaying available con troller ports.
Figure 31: The EZPilot Manager Storage Device Controller Ports dialog box (The Show Target Information button does not appear
if you are accessing the menu from Storage View.)
Viewing a Port’s Attached Logical Drive Information
To view a controller port’s attached logical driv es:
1. From the discovery-tree, select a st orage dev ice . The Gene ral tab is disp lay ed.
2. From the General tab, select a controller from the Storage Device Controllers list and c lic k
Controller Ports. The Storage Device Controller Ports dialog box appears displaying availa ble
controller ports.
3. From the Storage Device Controller Ports dialog box, select the port whose information you wish
to view and click Show Attached Logical Drives. The Attached Logical Drives page appears
displaying the attached logical drive infor mation fo r the s ele cted po rt.
Figure 32: The EZPilot Manager Attached Logical Drives page
Working with Logical Drives
The Logical Drives tab displays all of the logical drives for a particular storage device (not just the logical
drives assigned to the particular host whose storage dev ic e has been selec ted in th e dis covery-tr ee).
The Logical Drives tab enables you to view each logical drive's properties as well as manage the logical
drives for all hosts connected to the storage devic e.
Note: In host or switch vi ew you will only see the logical drives assigned to the particular
host under which the storage device is selected in the discovery tree.
EZPilot - Management Section Page 39
Page 44

To view the Logical Drive tab:
1. From the discovery-tree, select the stor age devic e whose infor mation you wi sh to view an d
select the Logical Drives tab.
Figure 33: The EZPilot Manager Logical Drives tab
The Storage Usage area of the Logical Drive tab displays the following information:
• Total Capacity - The total storage space available in the s torag e device.
• Allocated Space - The amount of storage space already allocated to existing logical dr ives.
• Unallocated (raw) Space - The unallocated amount of storage space on the storage device.
Note: Not all of this space is necessarily available to create or expand logical drives. This
is a raw amount. Some of the unallocated space will be used as overhead to create
new logical drives and for the drive sparing that you set up when you installed EZPilot
Manager.
In the Logical Drives area, you can also view a l ist o f the logi cal drives ass ign ed to this storage d evi ce.
You can see the dr ive n ame, typ e, status, health, size and the hos t name to whic h the drive is assi gned.
Viewing Logical Drive Details
The Details button on the Logical Drives tab enables you to view log ical dr ive infor matio n inc luding, the
drive’s full name, identifier, flags, transition state, rebuild priority and so on.
To view logical drive infor mati on:
1. From the discovery-tree, select the stor age dev ice containing th e logi cal drive whos e
information you wish to view.
2. Select the Logical Drives tab and select the logical drive whose information you wi sh to view
from the Logical Drive list.
EZPilot - Management Section Page 40
Page 45

3. Click Details. The Logical Drive Details dialog box appears. Information about the logi cal drive
is displayed in this dialog box. The A ss igned Adapters list shows the worldwide port names of
the adapters assigned to the logical dr ive. Clic k Dis k Details to view information about the
logical disk drive, including its name, bu s, sl ot, status and so on.
Figure 34: The EZPilot Manager Logical Drive Details dialog box
Renaming a Logical Drive
The Rename button on the Logical Drives tab (see Figur e 33) enables you to re name the s ele cted
logical drive. The name can be up to 32 alpha-numeric characters and the underscore, dash, period and
space characters.
To rename a logical dri ve:
1. From the discovery-tree, select the stor age dev ice containing th e logi cal drive y ou wish to
rename.
2. Select the Logical Drives tab and select the logical drive you wi sh to r enam e from the Logi cal
Drive list. Click Rename. The Rename Logi cal Driv e Name d ialo g box a ppear s.
Or
EZPilot - Management Section Page 41
Page 46

Right click on the selected logical drive, select Rename and type the logical drive’s new name in
the discovery-tree.
Figure 35: The EZPilot Manager Rename Logical Drive dialog box
3. Enter the new name into the New Name field and click OK.
Expanding a Logical Drive
The Logical Drives tab (see Figure 33) also enables you to in cr ease the stor age space allo cated to the
selected logical drive.
To expand a logical driv e:
1. From the discovery-tree, select the stor age dev ice containing th e logi cal drive y ou wish to
expand.
2. Select the Logical Drives tab and select the lo gica l drive you wish to expand from the Logical
Drive list. Click Expand.
Or
Right-click on the selected logical driv e, and s elec t Expand.
The Expand Logical Drive dialog box appears.
Figure 36: The EZPilot Manager Expand Logical Drive dialog box
3. Enter the amount by which you wish to inc rease the s torage ca pacity on the dri ve. The
maximum expansion amount is displayed on the dialog box. The units drop down box next to the
Enter Expansion Amount field can be used to change the si ze uni ts. The size can be disp lay ed
in gigabytes or terabytes (if more than 1 terab yte is av aila ble).
4. Click OK.
EZPilot - Management Section Page 42
Page 47

Deleting a Logical Drive
The Delete Logical Drive button on the Logical Driv es tab (see Fi gure 33) enables y ou to delete a
logical drive.
WARNING: Deleting a logical drive should be done with extreme caution. The data on the logical drive
cannot be recovered after it is deleted. Stop all I/O to the logical drive before it is deleted or
system instability may occur.
To delete a logical dr ive:
1. From the discovery-tree, select the stor age dev ice containing th e logi cal drive y ou wish to
delete.
2. Select the Logical Drives tab and select the lo gica l drive you wish to delete from the Logical
Drive list. Click Delete.
Or
Right-click on the selected logical dr ive and s elec t Delete.
The following Warning dialog box appears.
Figure 37: The EZPilot Manager Delete Logical Drive Warning dialog box
3. Check It is OK to delete the logical drive.
4. Click OK to delete the logical drive.
Assigning a Logical Drive to a Host
EZPilot Manager enables you to assign a logi cal drive to a h ost or to c hange a l ogic al driv e’s host
assignment.
WARNING: Assigning a logical drive should be done with extr em e cau ti on. The data on t he lo gic al
drive may be corrupted if the dr ive is acce ssed by an appli cat io n dur ing r e- assign ment .
Stop all I/O to the logical drive before it is presented or system instability may occur.
The same logical drive cann ot be assi gn ed to bot h a Wi ndo ws and Linu x host at the same
time.
To assign or cha nge a lo gica l dr ive ’s host assignm ent:
1. From the discovery-tree, select the stor age dev ice containing th e logi cal drive whos e
assignment you wish to change.
EZPilot - Management Section Page 43
Page 48

2. Select the Logical Drives tab and select the lo gica l drive whose host assignment you wish to
change from the Logical Drive list. Clic k Host Assignment.
Or
Right-click on the selected storage devic e and s elec t Host Assignment.
The following Warning dialog box appears.
Figure 38: EZPilot Manager Logical Host Assignment Warning dial og box
3. Click Yes. The Assign Logical Drive dial og box appears.
Figure 39: The EZPilot Manager Assign Logical Drive dialog box
4. The currently assigned hosts and adapters ar e ch ecked. After che cki ng or unc hecking h osts
and/or adapters, click OK.
Note: If you uncheck al l hosts/adapters, t he logical drive is not assigned to any hosts.
EZPilot - Management Section Page 44
Page 49

Adding a Logical Drive
EZPilot Manager enables you to create a n ew logi cal dri ve. Click New Logical Drive on the Logi cal
Drive tab to create and assign a logical drive to the selec ted stor age d evi ce. The New Log ica l Drive
button is enabled when there is unallocated space left on the dri ve.
Note: If you did not obtain a Command View license wh en yo u ins talle d EZPi lo t Man age r
you will be prom pte d to ob ta in on e wh en yo u atte mpt to crea te lo gic al dri ves . Refe r to
“To obtai n a Comman d View Lice nse :” on page 5 for instruct ion s.
Note: You must be in stor age view to add a logical drive. You cannot add a logical
drive from the host or switch views.
To create and assi gn a lo gica l dr ive :
1. Do one of the following:
• From th e Menu ba r, click View, then click Storage Devices.
• From th e Toolbar, click the Storage View button.
2. From the discovery-tree, select the stor age dev ice to whic h you want to add a l ogic al driv e.
3. Select the Logical Drives tab and clic k New Logical Drive.
Or
Right-click on the selected storage devic e and s elec t New Logical Drive.
4. The EVA host configuration is automatically determined and updated if necessary. (If you have
not installed a Command View EVA license, the EZPilot EVA Configuration license dialog box
appears. This dialog box is identical to the EZPilot EVA Setup license dialog box. See “To obtain
a Command View License:” on page 5 for information on obtaining and installing a license. Click
Next after choosing a license option.)
The EZPilot Add Logical Drive Wi zard Welcome page appears .
Figure 40: The EZPilot Manager Add Logical Drive Wizard
EZPilot - Management Section Page 45
Page 50

5. Click Next. The EZPilot Add Logical Drive Wizard-- Logical Drive Properties dialog box appears.
Figure 41: The EZPilot Manager Add Logical Drive wizard - Logical Drive Properties dialog box
6. Choose the Logical Drive Type you wish to create and assign a size to the new logical drive. The
units drop down box next to the Size field can be used to change the size units. The size can be
displayed in gigabytes or terabytes ( if mo re than 1 terabyte is av ail able). You can also enter a
name for the logical drive into the Logi cal Driv e Name field. Cl ick Next to cr eate the the logi cal
drive.
Figure 42: The EZPilot Manager Add Logical Drive wizard- Local Drive Host Assignment dialog box
EZPilot - Management Section Page 46
Page 51

7. The EZPilot Logical Drive Wizard -- Logic al Dr ive Host A ss ignm ent dialog box appea rs. Select
the host (and its adapters) to which you want to assign the lo gic al dr ive . If Assign to this host
only is checked, only the local host and its adapters are displ aye d in the tr ee. Checki ng or
unchecking the root node of the tree selects or des elects all hos ts and adapters. Chec ki ng or
unchecking a host node in the tree sel ects or deselec ts all adapters for that host. No rmal ly a
logical drive is only assi gned to o ne one host.
Note: The same logical drive cannot be assigned to both a Linux and Windows host at the
same time.
Note: If you receive an MPIO warnin g when assig ni ng multi pl e HBA s on th e ho st to a
logical drive, click Yes. EZ Pi lo t alre ady in stall ed t he requ ir ed MPIO softwar e.
8. Click Next. The Logic al Drive Initial iz ation an d Volume Access dialog box appea rs. The Logic al
Drive Initialization and Volume Access dialog box enables you to in itial ize and for mat the n ew
logical drive as an NTFS volume , name the v olu me, as sign a vol ume s ize (the d efault s iz e is
recommended) and assign a drive to a driv e letter or folder.
Figure 43: The EZPilot Manager Logical Drive Initialization and Volume Access dialog box
EZPilot - Management Section Page 47
Page 52

9. Assign the parameters you want and click Next. The Log ica l Drive Creation dialo g box ap pears.
Figure 44: The EZPilot Manager Logical Drive Creation dialog box
10. Verify that the information you specified previously is correct and cli ck Create Logical Drive.
The list box displays the status of the logica l dr ive cr eation a nd assign ment.
Note: To change infor ma tion cl ick th e Back button.
Note: Creating a logical drive may take several moments.
You are notifi ed when the c reation p rocess is comp lete.
11. Click Next to continue. The Congratul ations dial og box appears.
• If you chos e to create a logi cal d riv e the firs t time you s tarted EZPilot Manage r ( see
Figure 10), you can create another logical drive. Check Create anoth er logic al drive
and click Next.
If you are finished creating logical drives , unc heck Create another logical drive and
click Finish. The EZPilot Logical Dr ive tab appears d isplayi ng the ne w logic al drive
information. The new logical drive als o appears i n the di sc over y-tr ee.
• If you chos e not to crea te a logi cal drive the first time you started EZPil ot Mana ger, or
you previously created logical dr iv es, c lic k Finish. The EZPilot Logi cal Drive tab
appears displaying the new logical drive information. The new logical drive also appears
in the discovery-tree. To create another logical drive, click New Logical Drive.
EZPilot - Management Section Page 48
Page 53
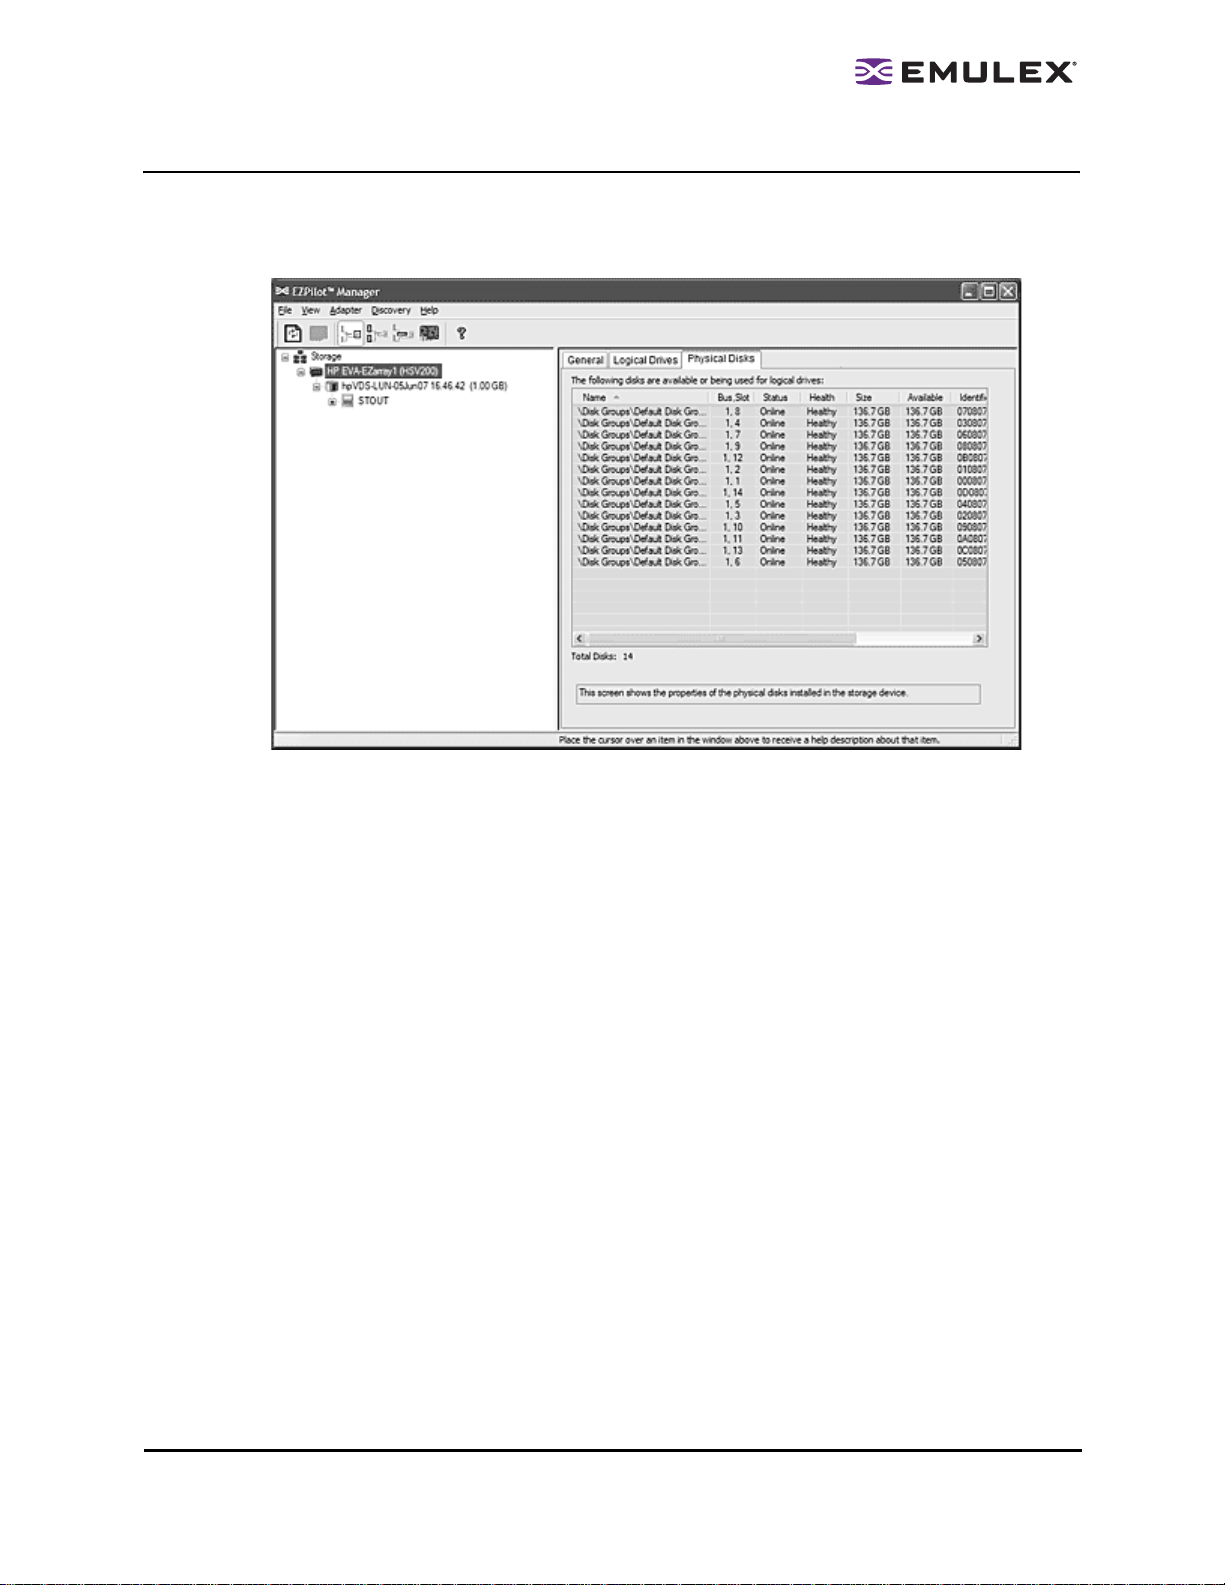
Viewing Physical Disk Information
The EZPilot Manager Physical Di sks tab displays all of the physical drives for a partic ular stor age
device. The tab enables you to view the physical drive proper ties.
Figure 45: The EZPilot Manager Physical Disks tab
The Physical Disks tab displays the following infor matio n:
• Name - Identifies the disk’s manufacturer.
• Bus, Slot - The bus and slot number in which the dis k is ins talled.
• Status - The online or offline status of the disk.
• Health - The health of the selected phys ica l dis k. States are healthy, rebuilding, failing or failed.
• Size - The total storage space on the disk.
• Available - The available space remaining on the disk.
• Identifier - The unique identifier assigned to a particular disk in the s tor age dev ice.
To view the Physical Di sks Dr ive tab:
1. From the discovery-tree, select the stor age dev ice whose physical disk information you wish to
view and select the Physical Disks tab.
EZPilot - Management Section Page 49
Page 54

Troubleshooting
Introduction
There are several circumstances in which your system may operate in an unexpected manne r. This
chapter provides information regarding these s ituatio ns.
If you have problems during or after installation, contact your suppli er.
EZPilot Manager Cannot See O ther HBAs or Ho sts
Situation:
Although EZPilot Manager is installed, only local HBAs are visible. The other HBAs and hosts in the SAN
cannot be seen.
Resolution:
The server running EZPilot Manager must have a physical FC connection to the SAN. All Emulex HBAs
in the SAN will be visible if:
1. The installation procedure described in the EZ P ilot User M anual was fol lowed.
2. The other HBAs are Emulex HBAs.
3. Full Remote or Local Plus management is enabled on the other hosts. (See the appropriate HBA
driver manual for information about Manage ment Mod e.)
Cannot See New LUNs (Windows)
Situation:
Although new LUNs were created on the storage array, they do not appear in EZPilot Manager.
Resolution:
Refresh the screen.
EZPilot - Troubleshooting Section Page 50
Page 55

Cannot See New LUNs or Targets (Linux)
Situation:
The HBAnyware utility does not see the targets or LUNs on the stor age arra y.
Resolution:
• Exit HBAnyware and restart the application.
• Ensure the lpfc driver module is loaded by running l smod from a terminal wi ndow. If the driver
module is not loaded, type:
#> insmod lpfc
to load the driver.
• If the lpfc driver is loaded and HBAnyware still does not see any targets, exit HBAn yware and
type:
#> killall elxdiscoveryd
Restart HBAnyware.
EZPilot - Troubleshooting Section Page 51
Page 56

Appendix
Introduction
The following procedures describe how to:
• Add a second switch to the EZPilot SAN
• Add a second disk shelf to the EVA4100 array
Adding a Second Switch
To add a second switc h:
1. Cable the new switch in an HA configuration an d add it to the EZPi lot S AN.
2. Open EZPilot Manager on the management hos t.
3. The discovery cycle will recog nize the new s witch and add i t to the dis co very tr ee.
4. Click on the new switch. You are prompted to set the switch's IP address, s ubnet mask a nd
gateway. Enter the required information and click OK. A dialog box appears confirming that the
switch has been successfully confi gured.
Adding a Second Disk Shelf
There are two ways to add a second disk shelf:
• Adding New Disks to a New Disk Group
• Adding New Disks to the Existing Default Disk Gr oup
Adding New Disks to a New Disk Group
All of the disks in a disk group must be of the same type (FC or FA TA). At least 8 disks must be added in
the second disk shelf to create a com plete ne w disk group.
To add new disks to a new d isk gr oup:
1. Close EZPilot Manager on the management ser ve r and power down the E VA4100.
2. Add the new shelf and associated disk s to the E VA and the controllers' drive loops. Follow the
instructions in the EVA User Guide, which can be found on the HP Web site.
3. Power on the EVA4100.
4. Modify a Windows account to make it a member of the HP Storage Admins group if this has not
already been done.
5. Run Command View on the management server. To do this, double-click on the desk top
Command View EVA icon and log in to Command View using the Win dows ac co unt that is a
member of the HP Storage Admins group.
6. In the left pane of the Command View Web page, click on the array name under Storage
Systems to expand the tree of array prope rtie s.
7. In the tree, click the Disk Groups folder to expand it. Then click the Ungrouped Disks folder.
You sh ould see al l of the ne wly ad ded dis ks from the s econd shel f.
8. Under Disk Groups click on Create Group in the righ t pane. Enter a na me and save it.
EZPilot - Appendix Page 52
Page 57

9. Click again on Ungrouped Disks. Click on each disk and then click Group in the right pane.
Select the new disk group that was just created to add that disk into it. Click Save after you have
done this for each disk.
10. Close Command View and open EZPilot Manager. Click on the storage array in the discov ery
tree and click Physical Disks in the right pane. All drives on both th e fir st and sec ond dis k
shelves will now be listed and avail able for LUN alloc ation.
Adding New Disks to the Existing Default Disk Group
All of the new disks must be of the sam e type (F C or FATA) as those in the default disk group. There is
no minimum number of disks to be added to the e xisting d efault di sk group whic h alr eady has the
minimum 8 disks that are needed.
To add the new disks to the exi sting default d isk gr oup:
1. Close EZPilot Manager on the management ser ve r and power down the E VA4100.
2. Add the new shelf and associated disk drives to the EVA and the controllers' drive loops. Follow
the instructions in the EVA User Guide, which can be found on the HP Web site.
3. Power on the EVA4100.
4. Modify a Windows account to make it a member of the HP Storage Admins group if this has not
already been done.
5. Run Command View on the management server. To do this, double-click on the desk top
Command View EVA icon and log in to Command View using the Win dows ac co unt that is a
member of the HP Storage Admins group.
6. In the left pane of the Command View Web page, click on the array name under Storage
Systems to expand the tree of array prope rtie s.
7. In the tree, click the Disk Groups folder to expand it. Then click the Ungrouped Disks folder.
You sh ould see al l of the ne w disk s from the second shelf.
8. Click on each drive in the left pane and then click Group in the right pane. Select the default disk
group to add that drive into the existing d efault di sk gro up. Clic k Save after you have d one this
for each drive.
9. In the left pane, click Default Disk Group again. In the right pane there is a status indicator
called Leveling Progress. Use the button provide d to re fresh this informati on until it reads
"100%" and is complete.
10. Close Command View and open EZPilot Manager. Click on the storage array in the discov ery
tree and click Physical Disks in the right pane. All drives on both th e fir st and sec ond dis k
shelves will now be listed and avail able for LUN alloc ation.
EZPilot - Appendix Page 53
 Loading...