

HP StorageWorks 4000s, StorageWorks NAS 9000s Administration Manual

hp StorageWorks
NAS 4000s and 9000s
First Edition (November 2003)
Part Number: 352405-001
Administration Guide
This guide provides information on performing the administrative tasks necessary to manage the HP
StorageWorks NAS 4000s or 9000s server. Overview information as well as procedural instructions are
included in this guide.

© Copyright 2003 Hewlett-Packard Development Company, L.P.
Hewlett-Packard Company makes no warranty of any kind with regard to this material, including, but not limited to, the implied
warranties of merchantability and fitness for a particular purpose. Hewlett-Packard shall not be liable for errors contained herein or for
incidental or consequential damages in connection with the furnishing, performance, or use of this material.
This document contains proprietary information, which is protected by copyright. No part of this document may be photocopied,
reproduced, or translated into another language without the prior written consent of Hewlett-Packard. The information contained in this
document is subject to change without notice.
Microsoft®, MS-DOS®, MS Windows®, Windows®, and Windows NT® are U.S. registered trademarks of Microsoft Corporation.
UNIX® is a registered trademark of The Open Group.
Hewlett-Packard Company shall not be liable for technical or editorial errors or omissions contained herein. The information is provided
“as is” without warranty of any kind and is subject to change without notice. The warranties for Hewlett-Packard Company products are
set forth in the express limited warranty statements for such products. Nothing herein should be construed as constituting an additional
warranty.
NAS 4000s and 9000s Administration Guide
First Edition (November 2003)
Part Number: 352405-001

Contents
About this Guide. . . . . . . . . . . . . . . . . . . . . . . . . . . . . . . . . . . . . . . . . . . . . . . . . . .13
Overview. . . . . . . . . . . . . . . . . . . . . . . . . . . . . . . . . . . . . . . . . . . . . . . . . . . . . . . . . . . . . . . . . 14
Intended Audience . . . . . . . . . . . . . . . . . . . . . . . . . . . . . . . . . . . . . . . . . . . . . . . . . . . . . . 14
Prerequisites . . . . . . . . . . . . . . . . . . . . . . . . . . . . . . . . . . . . . . . . . . . . . . . . . . . . . . . . . . . 14
Conventions . . . . . . . . . . . . . . . . . . . . . . . . . . . . . . . . . . . . . . . . . . . . . . . . . . . . . . . . . . . . . . 15
Document Conventions . . . . . . . . . . . . . . . . . . . . . . . . . . . . . . . . . . . . . . . . . . . . . . . . . . 15
Text Symbols . . . . . . . . . . . . . . . . . . . . . . . . . . . . . . . . . . . . . . . . . . . . . . . . . . . . . . . . . . 15
Equipment Symbols . . . . . . . . . . . . . . . . . . . . . . . . . . . . . . . . . . . . . . . . . . . . . . . . . . . . . 16
Rack Stability . . . . . . . . . . . . . . . . . . . . . . . . . . . . . . . . . . . . . . . . . . . . . . . . . . . . . . . . . . . . . 17
Getting Help . . . . . . . . . . . . . . . . . . . . . . . . . . . . . . . . . . . . . . . . . . . . . . . . . . . . . . . . . . . . . . 17
HP Technical Support . . . . . . . . . . . . . . . . . . . . . . . . . . . . . . . . . . . . . . . . . . . . . . . . . . . 17
HP Storage Website . . . . . . . . . . . . . . . . . . . . . . . . . . . . . . . . . . . . . . . . . . . . . . . . . . . . . 17
HP Authorized Reseller . . . . . . . . . . . . . . . . . . . . . . . . . . . . . . . . . . . . . . . . . . . . . . . . . . 17
1 System Overview . . . . . . . . . . . . . . . . . . . . . . . . . . . . . . . . . . . . . . . . . . . . . . . . . .19
Product Definition and Information . . . . . . . . . . . . . . . . . . . . . . . . . . . . . . . . . . . . . . . . . . . . 19
Server Hardware and Software Features . . . . . . . . . . . . . . . . . . . . . . . . . . . . . . . . . . . . . 19
Product Manageability . . . . . . . . . . . . . . . . . . . . . . . . . . . . . . . . . . . . . . . . . . . . . . . . . . . 19
Product Redundancy . . . . . . . . . . . . . . . . . . . . . . . . . . . . . . . . . . . . . . . . . . . . . . . . . 20
Deployment Scenarios . . . . . . . . . . . . . . . . . . . . . . . . . . . . . . . . . . . . . . . . . . . . . . . . . . . . . . 21
Configuration Options for the NAS Server . . . . . . . . . . . . . . . . . . . . . . . . . . . . . . . . . . . 21
NAS Server as a Single Device . . . . . . . . . . . . . . . . . . . . . . . . . . . . . . . . . . . . . . . . . 22
NAS Server as a Clustered Pair. . . . . . . . . . . . . . . . . . . . . . . . . . . . . . . . . . . . . . . . . 23
Multi Node Support Beyond Two Nodes . . . . . . . . . . . . . . . . . . . . . . . . . . . . . . . . . 23
Connecting NAS Servers to the Network . . . . . . . . . . . . . . . . . . . . . . . . . . . . . . . . . 23
NAS Server Single Device Deployment . . . . . . . . . . . . . . . . . . . . . . . . . . . . . . . . . . 24
NAS Server Cluster Deployment . . . . . . . . . . . . . . . . . . . . . . . . . . . . . . . . . . . . . . . 25
Environment Scenarios. . . . . . . . . . . . . . . . . . . . . . . . . . . . . . . . . . . . . . . . . . . . . . . . . . . . . . 26
Workgroup . . . . . . . . . . . . . . . . . . . . . . . . . . . . . . . . . . . . . . . . . . . . . . . . . . . . . . . . . . . . 26
Domain. . . . . . . . . . . . . . . . . . . . . . . . . . . . . . . . . . . . . . . . . . . . . . . . . . . . . . . . . . . . . . . 26
Contents
3NAS 4000s and 9000s Administration Guide

Contents
User Interfaces . . . . . . . . . . . . . . . . . . . . . . . . . . . . . . . . . . . . . . . . . . . . . . . . . . . . . . . . . . . . 27
NAS Server Web-Based User Interface. . . . . . . . . . . . . . . . . . . . . . . . . . . . . . . . . . . . . . 27
Menu Tabs . . . . . . . . . . . . . . . . . . . . . . . . . . . . . . . . . . . . . . . . . . . . . . . . . . . . . . . . . 27
Status. . . . . . . . . . . . . . . . . . . . . . . . . . . . . . . . . . . . . . . . . . . . . . . . . . . . . . . . . . 27
Network. . . . . . . . . . . . . . . . . . . . . . . . . . . . . . . . . . . . . . . . . . . . . . . . . . . . . . . . 28
Disks . . . . . . . . . . . . . . . . . . . . . . . . . . . . . . . . . . . . . . . . . . . . . . . . . . . . . . . . . . 28
Users . . . . . . . . . . . . . . . . . . . . . . . . . . . . . . . . . . . . . . . . . . . . . . . . . . . . . . . . . . 28
Shares . . . . . . . . . . . . . . . . . . . . . . . . . . . . . . . . . . . . . . . . . . . . . . . . . . . . . . . . . 28
Array Management . . . . . . . . . . . . . . . . . . . . . . . . . . . . . . . . . . . . . . . . . . . . . . . 28
Maintenance . . . . . . . . . . . . . . . . . . . . . . . . . . . . . . . . . . . . . . . . . . . . . . . . . . . . 28
HP Utilities . . . . . . . . . . . . . . . . . . . . . . . . . . . . . . . . . . . . . . . . . . . . . . . . . . . . . 28
Cluster . . . . . . . . . . . . . . . . . . . . . . . . . . . . . . . . . . . . . . . . . . . . . . . . . . . . . . . . . 28
Help. . . . . . . . . . . . . . . . . . . . . . . . . . . . . . . . . . . . . . . . . . . . . . . . . . . . . . . . . . . 28
Welcome Screen Contents. . . . . . . . . . . . . . . . . . . . . . . . . . . . . . . . . . . . . . . . . . . . . 28
Installation Overview . . . . . . . . . . . . . . . . . . . . . . . . . . . . . . . . . . . . . . . . . . . . . 28
Rapid Startup Wizard . . . . . . . . . . . . . . . . . . . . . . . . . . . . . . . . . . . . . . . . . . . . . 28
Set Administrator Password . . . . . . . . . . . . . . . . . . . . . . . . . . . . . . . . . . . . . . . . 28
Take a Tour . . . . . . . . . . . . . . . . . . . . . . . . . . . . . . . . . . . . . . . . . . . . . . . . . . . . . 28
Set Server Name . . . . . . . . . . . . . . . . . . . . . . . . . . . . . . . . . . . . . . . . . . . . . . . . . 29
Set Default Page . . . . . . . . . . . . . . . . . . . . . . . . . . . . . . . . . . . . . . . . . . . . . . . . . 29
NAS Server Desktop . . . . . . . . . . . . . . . . . . . . . . . . . . . . . . . . . . . . . . . . . . . . . . . . . . . . 29
NAS Management Console . . . . . . . . . . . . . . . . . . . . . . . . . . . . . . . . . . . . . . . . . . . . 30
NIC Team Setup . . . . . . . . . . . . . . . . . . . . . . . . . . . . . . . . . . . . . . . . . . . . . . . . . . . . 30
2 Basic Administrative Procedures and Setup Completion . . . . . . . . . . . . . . . . . . . . . .31
Basic Administrative Procedures . . . . . . . . . . . . . . . . . . . . . . . . . . . . . . . . . . . . . . . . . . . . . . 31
Setting the System Date and Time. . . . . . . . . . . . . . . . . . . . . . . . . . . . . . . . . . . . . . . . . . 32
Shutting Down or Restarting the Server . . . . . . . . . . . . . . . . . . . . . . . . . . . . . . . . . . . . . 33
Viewing and Maintaining Audit Logs . . . . . . . . . . . . . . . . . . . . . . . . . . . . . . . . . . . . . . . 34
Using Remote Desktop . . . . . . . . . . . . . . . . . . . . . . . . . . . . . . . . . . . . . . . . . . . . . . . . . . 35
Improper Closure of Remote Desktop. . . . . . . . . . . . . . . . . . . . . . . . . . . . . . . . . . . . 35
Setting up E-mail Alerts. . . . . . . . . . . . . . . . . . . . . . . . . . . . . . . . . . . . . . . . . . . . . . . . . . 36
Changing System Network Settings. . . . . . . . . . . . . . . . . . . . . . . . . . . . . . . . . . . . . . . . . 37
Setup Completion . . . . . . . . . . . . . . . . . . . . . . . . . . . . . . . . . . . . . . . . . . . . . . . . . . . . . . . . . . 38
Activating the iLO Port Using the License Key . . . . . . . . . . . . . . . . . . . . . . . . . . . . . . . 38
Setting up Ethernet NIC Teams (Optional) . . . . . . . . . . . . . . . . . . . . . . . . . . . . . . . . . . . 38
Installing the HP Network Teaming Utility . . . . . . . . . . . . . . . . . . . . . . . . . . . . . . . 39
Opening the HP Network Teaming Utility . . . . . . . . . . . . . . . . . . . . . . . . . . . . . . . . 40
Adding and Configuring NICs in a Team . . . . . . . . . . . . . . . . . . . . . . . . . . . . . . . . . 41
4 NAS 4000s and 9000s Administration Guide

Contents
Fault Tolerance . . . . . . . . . . . . . . . . . . . . . . . . . . . . . . . . . . . . . . . . . . . . . . . . . . 42
Load Balancing . . . . . . . . . . . . . . . . . . . . . . . . . . . . . . . . . . . . . . . . . . . . . . . . . . 42
Configuring the NIC Team Properties. . . . . . . . . . . . . . . . . . . . . . . . . . . . . . . . . . . . 44
Renaming the Teamed Connection. . . . . . . . . . . . . . . . . . . . . . . . . . . . . . . . . . . 44
Showing a Connection Icon on the Taskbar . . . . . . . . . . . . . . . . . . . . . . . . . . . . 45
Configuring the TCP/IP Protocol on the New Team . . . . . . . . . . . . . . . . . . . . . 45
Checking the Status of the Team. . . . . . . . . . . . . . . . . . . . . . . . . . . . . . . . . . . . . . . . 47
NIC Teaming Troubleshooting . . . . . . . . . . . . . . . . . . . . . . . . . . . . . . . . . . . . . . . . . 48
Using Secure Path . . . . . . . . . . . . . . . . . . . . . . . . . . . . . . . . . . . . . . . . . . . . . . . . . . . . . . 48
Clustering the NAS Server. . . . . . . . . . . . . . . . . . . . . . . . . . . . . . . . . . . . . . . . . . . . . . . . 49
Managing System Storage . . . . . . . . . . . . . . . . . . . . . . . . . . . . . . . . . . . . . . . . . . . . . . . . 49
Creating and Managing Users and Groups . . . . . . . . . . . . . . . . . . . . . . . . . . . . . . . . . . . 49
Creating and Managing File Shares. . . . . . . . . . . . . . . . . . . . . . . . . . . . . . . . . . . . . . . . . 49
3 Storage Management Overview . . . . . . . . . . . . . . . . . . . . . . . . . . . . . . . . . . . . . . .51
Storage Management Process. . . . . . . . . . . . . . . . . . . . . . . . . . . . . . . . . . . . . . . . . . . . . . . . . 51
Storage Elements Overview . . . . . . . . . . . . . . . . . . . . . . . . . . . . . . . . . . . . . . . . . . . . . . . . . . 53
Physical Hard Drives . . . . . . . . . . . . . . . . . . . . . . . . . . . . . . . . . . . . . . . . . . . . . . . . . . . . 53
Arrays. . . . . . . . . . . . . . . . . . . . . . . . . . . . . . . . . . . . . . . . . . . . . . . . . . . . . . . . . . . . . . . . 53
Logical Drives (LUNs) . . . . . . . . . . . . . . . . . . . . . . . . . . . . . . . . . . . . . . . . . . . . . . . . . . 55
Fault-Tolerance Methods . . . . . . . . . . . . . . . . . . . . . . . . . . . . . . . . . . . . . . . . . . . . . . . . . 56
RAID 0—Data Striping. . . . . . . . . . . . . . . . . . . . . . . . . . . . . . . . . . . . . . . . . . . . . . . 56
Advantages . . . . . . . . . . . . . . . . . . . . . . . . . . . . . . . . . . . . . . . . . . . . . . . . . . . . . 56
Disadvantages . . . . . . . . . . . . . . . . . . . . . . . . . . . . . . . . . . . . . . . . . . . . . . . . . . . 56
RAID 1+0—Drive Mirroring and Striping . . . . . . . . . . . . . . . . . . . . . . . . . . . . . . . . 57
Advantages . . . . . . . . . . . . . . . . . . . . . . . . . . . . . . . . . . . . . . . . . . . . . . . . . . . . . 57
Disadvantages . . . . . . . . . . . . . . . . . . . . . . . . . . . . . . . . . . . . . . . . . . . . . . . . . . . 57
RAID 5—Distributed Data Guarding . . . . . . . . . . . . . . . . . . . . . . . . . . . . . . . . . . . . 58
Advantages . . . . . . . . . . . . . . . . . . . . . . . . . . . . . . . . . . . . . . . . . . . . . . . . . . . . . 58
Disadvantages . . . . . . . . . . . . . . . . . . . . . . . . . . . . . . . . . . . . . . . . . . . . . . . . . . . 59
RAID ADG—Advanced Data Guarding and RAID 5DP—Double Parity. . . . . . . . 59
Advantages . . . . . . . . . . . . . . . . . . . . . . . . . . . . . . . . . . . . . . . . . . . . . . . . . . . . . 60
Disadvantages . . . . . . . . . . . . . . . . . . . . . . . . . . . . . . . . . . . . . . . . . . . . . . . . . . . 60
Online Spares . . . . . . . . . . . . . . . . . . . . . . . . . . . . . . . . . . . . . . . . . . . . . . . . . . . . . . . . . . 61
Physical Storage Best Practices . . . . . . . . . . . . . . . . . . . . . . . . . . . . . . . . . . . . . . . . . . . . 61
Logical Storage Elements Overview . . . . . . . . . . . . . . . . . . . . . . . . . . . . . . . . . . . . . . . . . . . 61
Partitions . . . . . . . . . . . . . . . . . . . . . . . . . . . . . . . . . . . . . . . . . . . . . . . . . . . . . . . . . . . . . 61
Volumes . . . . . . . . . . . . . . . . . . . . . . . . . . . . . . . . . . . . . . . . . . . . . . . . . . . . . . . . . . . . . . 62
Utilizing Storage Elements . . . . . . . . . . . . . . . . . . . . . . . . . . . . . . . . . . . . . . . . . . . . . . . 62
5NAS 4000s and 9000s Administration Guide

Contents
Volume Shadow Copy Service Overview . . . . . . . . . . . . . . . . . . . . . . . . . . . . . . . . . . . . 63
File System Elements . . . . . . . . . . . . . . . . . . . . . . . . . . . . . . . . . . . . . . . . . . . . . . . . . . . . . . . 63
File-Sharing Elements . . . . . . . . . . . . . . . . . . . . . . . . . . . . . . . . . . . . . . . . . . . . . . . . . . . . . . 63
Clustered Server Elements . . . . . . . . . . . . . . . . . . . . . . . . . . . . . . . . . . . . . . . . . . . . . . . . . . . 64
4 Disk Management. . . . . . . . . . . . . . . . . . . . . . . . . . . . . . . . . . . . . . . . . . . . . . . . . .65
WebUI Disks Tab . . . . . . . . . . . . . . . . . . . . . . . . . . . . . . . . . . . . . . . . . . . . . . . . . . . . . . . . . . 65
Storage Configuration Overview . . . . . . . . . . . . . . . . . . . . . . . . . . . . . . . . . . . . . . . . . . . . . . 67
Step 1: Create Disk Arrays . . . . . . . . . . . . . . . . . . . . . . . . . . . . . . . . . . . . . . . . . 67
Step 2: Create Logical Disks from the Array Space. . . . . . . . . . . . . . . . . . . . . . 67
Step 3: Verify newly created logical disks . . . . . . . . . . . . . . . . . . . . . . . . . . . . . 67
Step 4: Create a Volume on the new logical disk . . . . . . . . . . . . . . . . . . . . . . . . 68
Array Configuration Utility (MSA1000 and internal OS drives only). . . . . . . . . . . . . . . . . . 69
Using the ACU to Configure Storage . . . . . . . . . . . . . . . . . . . . . . . . . . . . . . . . . . . . . . . 69
ACU Guidelines. . . . . . . . . . . . . . . . . . . . . . . . . . . . . . . . . . . . . . . . . . . . . . . . . . . . . . . . 72
Managing Disks . . . . . . . . . . . . . . . . . . . . . . . . . . . . . . . . . . . . . . . . . . . . . . . . . . . . . . . . 73
Creating a New Volume via the WebUI. . . . . . . . . . . . . . . . . . . . . . . . . . . . . . . . . . . . . . . . . 74
Advanced Disk Management . . . . . . . . . . . . . . . . . . . . . . . . . . . . . . . . . . . . . . . . . . . . . . . . . 75
Guidelines for Managing Disks . . . . . . . . . . . . . . . . . . . . . . . . . . . . . . . . . . . . . . . . . . . . 76
Volumes Page . . . . . . . . . . . . . . . . . . . . . . . . . . . . . . . . . . . . . . . . . . . . . . . . . . . . . . . . . . . . . 77
Managing Volumes . . . . . . . . . . . . . . . . . . . . . . . . . . . . . . . . . . . . . . . . . . . . . . . . . . . . . 79
Dynamic Growth . . . . . . . . . . . . . . . . . . . . . . . . . . . . . . . . . . . . . . . . . . . . . . . . . . . . 80
Expanding a LUN . . . . . . . . . . . . . . . . . . . . . . . . . . . . . . . . . . . . . . . . . . . . . . . . 80
To extend a LUN where space is available in the array (MSA1000 only): . 80
To extend a LUN where space is not available in the array
(MSA1000 only): . . . . . . . . . . . . . . . . . . . . . . . . . . . . . . . . . . . . . . . . . . . . . 81
Extending a partition on a basic disk . . . . . . . . . . . . . . . . . . . . . . . . . . . . . . . . . 81
Extending a Volume on Dynamic Disks (non-clustered systems only) . . . . . . . 82
Extending using DiskPart . . . . . . . . . . . . . . . . . . . . . . . . . . . . . . . . . . . . . . . . . . 83
Scheduling Defragmentation . . . . . . . . . . . . . . . . . . . . . . . . . . . . . . . . . . . . . . . . . . . . . . 84
Managing Disks After Quick Restore . . . . . . . . . . . . . . . . . . . . . . . . . . . . . . . . . . . . . . . 85
Disk Quotas . . . . . . . . . . . . . . . . . . . . . . . . . . . . . . . . . . . . . . . . . . . . . . . . . . . . . . . . . . . . . . 87
Enabling Quota Management. . . . . . . . . . . . . . . . . . . . . . . . . . . . . . . . . . . . . . . . . . . . . . 87
Setting User Quota Entries. . . . . . . . . . . . . . . . . . . . . . . . . . . . . . . . . . . . . . . . . . . . . . . . 88
DiskPart . . . . . . . . . . . . . . . . . . . . . . . . . . . . . . . . . . . . . . . . . . . . . . . . . . . . . . . . . . . . . . . . . 90
Example of using DiskPart . . . . . . . . . . . . . . . . . . . . . . . . . . . . . . . . . . . . . . . . . . . . 91
5 Shadow Copies. . . . . . . . . . . . . . . . . . . . . . . . . . . . . . . . . . . . . . . . . . . . . . . . . . . .93
Overview. . . . . . . . . . . . . . . . . . . . . . . . . . . . . . . . . . . . . . . . . . . . . . . . . . . . . . . . . . . . . . . . . 93
6 NAS 4000s and 9000s Administration Guide

Contents
Shadow Copy Planning. . . . . . . . . . . . . . . . . . . . . . . . . . . . . . . . . . . . . . . . . . . . . . . . . . . . . . 94
Identifying the Volume . . . . . . . . . . . . . . . . . . . . . . . . . . . . . . . . . . . . . . . . . . . . . . . . . . 94
Allocating Disk Space . . . . . . . . . . . . . . . . . . . . . . . . . . . . . . . . . . . . . . . . . . . . . . . . . . . 94
Identifying the Storage Area . . . . . . . . . . . . . . . . . . . . . . . . . . . . . . . . . . . . . . . . . . . . . . 96
Determining Creation Frequency. . . . . . . . . . . . . . . . . . . . . . . . . . . . . . . . . . . . . . . . . . . 96
Shadow Copies and Drive Defragmentation . . . . . . . . . . . . . . . . . . . . . . . . . . . . . . . . . . . . . 97
Mounted Drives . . . . . . . . . . . . . . . . . . . . . . . . . . . . . . . . . . . . . . . . . . . . . . . . . . . . . . . . . . . 97
Managing Shadow Copies . . . . . . . . . . . . . . . . . . . . . . . . . . . . . . . . . . . . . . . . . . . . . . . . . . . 98
The Shadow Copy Cache File . . . . . . . . . . . . . . . . . . . . . . . . . . . . . . . . . . . . . . . . . . . . . 99
Enabling and Creating Shadow Copies . . . . . . . . . . . . . . . . . . . . . . . . . . . . . . . . . . . . . 101
Viewing a List of Shadow Copies . . . . . . . . . . . . . . . . . . . . . . . . . . . . . . . . . . . . . . . . . 101
Set Schedules . . . . . . . . . . . . . . . . . . . . . . . . . . . . . . . . . . . . . . . . . . . . . . . . . . . . . . . . . 102
Scheduling Shadow Copies . . . . . . . . . . . . . . . . . . . . . . . . . . . . . . . . . . . . . . . . . . . 102
Deleting a Shadow Copy Schedule . . . . . . . . . . . . . . . . . . . . . . . . . . . . . . . . . . . . . 102
Viewing Shadow Copy Properties . . . . . . . . . . . . . . . . . . . . . . . . . . . . . . . . . . . . . . . . . 102
Disabling Shadow Copies . . . . . . . . . . . . . . . . . . . . . . . . . . . . . . . . . . . . . . . . . . . . . . . 104
Managing Shadow Copies from the NAS Desktop . . . . . . . . . . . . . . . . . . . . . . . . . . . . . . . 105
Shadow Copies for Shared Folders. . . . . . . . . . . . . . . . . . . . . . . . . . . . . . . . . . . . . . . . . . . . 106
SMB Shadow Copies . . . . . . . . . . . . . . . . . . . . . . . . . . . . . . . . . . . . . . . . . . . . . . . . . . . 106
NFS Shadow Copies . . . . . . . . . . . . . . . . . . . . . . . . . . . . . . . . . . . . . . . . . . . . . . . . . . . 107
Recovery of Files or Folders . . . . . . . . . . . . . . . . . . . . . . . . . . . . . . . . . . . . . . . . . . . . . 108
Recovering a Deleted File or Folder . . . . . . . . . . . . . . . . . . . . . . . . . . . . . . . . . . . . . . . 109
Recovering an Overwritten or Corrupted File . . . . . . . . . . . . . . . . . . . . . . . . . . . . . . . . 110
Recovering a Folder . . . . . . . . . . . . . . . . . . . . . . . . . . . . . . . . . . . . . . . . . . . . . . . . . . . . 110
Backup and Shadow Copies. . . . . . . . . . . . . . . . . . . . . . . . . . . . . . . . . . . . . . . . . . . . . . 110
6 User and Group Management . . . . . . . . . . . . . . . . . . . . . . . . . . . . . . . . . . . . . . . .111
Domain Compared to Workgroup Environments. . . . . . . . . . . . . . . . . . . . . . . . . . . . . . . . . 111
User and Group Name Planning. . . . . . . . . . . . . . . . . . . . . . . . . . . . . . . . . . . . . . . . . . . . . . 112
Managing User Names. . . . . . . . . . . . . . . . . . . . . . . . . . . . . . . . . . . . . . . . . . . . . . . . . . 112
Managing Group Names . . . . . . . . . . . . . . . . . . . . . . . . . . . . . . . . . . . . . . . . . . . . . . . . 112
Workgroup User and Group Management . . . . . . . . . . . . . . . . . . . . . . . . . . . . . . . . . . . . . . 113
Managing Local Users . . . . . . . . . . . . . . . . . . . . . . . . . . . . . . . . . . . . . . . . . . . . . . . . . . 113
Adding a New User . . . . . . . . . . . . . . . . . . . . . . . . . . . . . . . . . . . . . . . . . . . . . . . . . 114
Deleting a User . . . . . . . . . . . . . . . . . . . . . . . . . . . . . . . . . . . . . . . . . . . . . . . . . . . . 115
Modifying a User Password . . . . . . . . . . . . . . . . . . . . . . . . . . . . . . . . . . . . . . . . . . 116
Modifying User Properties . . . . . . . . . . . . . . . . . . . . . . . . . . . . . . . . . . . . . . . . . . . 116
Managing Local Groups. . . . . . . . . . . . . . . . . . . . . . . . . . . . . . . . . . . . . . . . . . . . . . . . . 117
Adding a New Group. . . . . . . . . . . . . . . . . . . . . . . . . . . . . . . . . . . . . . . . . . . . . . . . 118
7NAS 4000s and 9000s Administration Guide

Contents
Deleting a Group . . . . . . . . . . . . . . . . . . . . . . . . . . . . . . . . . . . . . . . . . . . . . . . . . . . 118
Modifying Group Properties . . . . . . . . . . . . . . . . . . . . . . . . . . . . . . . . . . . . . . . . . . 119
General Tab. . . . . . . . . . . . . . . . . . . . . . . . . . . . . . . . . . . . . . . . . . . . . . . . . . . . 119
Members Tab . . . . . . . . . . . . . . . . . . . . . . . . . . . . . . . . . . . . . . . . . . . . . . . . . . 119
7 Folder, Printer, and Share Management. . . . . . . . . . . . . . . . . . . . . . . . . . . . . . . . .121
Folder Management . . . . . . . . . . . . . . . . . . . . . . . . . . . . . . . . . . . . . . . . . . . . . . . . . . . . . . . 121
Navigating to a Specific Volume or Folder . . . . . . . . . . . . . . . . . . . . . . . . . . . . . . . . . . 122
Creating a New Folder . . . . . . . . . . . . . . . . . . . . . . . . . . . . . . . . . . . . . . . . . . . . . . . . . . 123
Deleting a Folder . . . . . . . . . . . . . . . . . . . . . . . . . . . . . . . . . . . . . . . . . . . . . . . . . . . . . . 124
Modifying Folder Properties . . . . . . . . . . . . . . . . . . . . . . . . . . . . . . . . . . . . . . . . . . . . . 124
Creating a New Share for a Volume or Folder . . . . . . . . . . . . . . . . . . . . . . . . . . . . . . . 125
Managing Shares for a Volume or Folder . . . . . . . . . . . . . . . . . . . . . . . . . . . . . . . . . . . 126
Managing File Level Permissions . . . . . . . . . . . . . . . . . . . . . . . . . . . . . . . . . . . . . . . . . 127
Share Management . . . . . . . . . . . . . . . . . . . . . . . . . . . . . . . . . . . . . . . . . . . . . . . . . . . . . . . . 134
Share Considerations . . . . . . . . . . . . . . . . . . . . . . . . . . . . . . . . . . . . . . . . . . . . . . . . . . . 134
Defining Access Control Lists . . . . . . . . . . . . . . . . . . . . . . . . . . . . . . . . . . . . . . . . . . . . 134
Integrating Local File System Security into Windows Domain Environments. . . . . . . 135
Comparing Administrative (Hidden) and Standard Shares . . . . . . . . . . . . . . . . . . . . . . 135
Planning for Compatibility between File Sharing Protocols . . . . . . . . . . . . . . . . . . . . . 135
NFS Compatibility Issues . . . . . . . . . . . . . . . . . . . . . . . . . . . . . . . . . . . . . . . . . . . . 136
Managing Shares . . . . . . . . . . . . . . . . . . . . . . . . . . . . . . . . . . . . . . . . . . . . . . . . . . . . . . 136
Creating a New Share . . . . . . . . . . . . . . . . . . . . . . . . . . . . . . . . . . . . . . . . . . . . . . . 136
Deleting a Share. . . . . . . . . . . . . . . . . . . . . . . . . . . . . . . . . . . . . . . . . . . . . . . . . . . . 137
Modifying Share Properties. . . . . . . . . . . . . . . . . . . . . . . . . . . . . . . . . . . . . . . . . . . 138
Windows Sharing . . . . . . . . . . . . . . . . . . . . . . . . . . . . . . . . . . . . . . . . . . . . . . . 138
UNIX Sharing . . . . . . . . . . . . . . . . . . . . . . . . . . . . . . . . . . . . . . . . . . . . . . . . . . 139
Web Sharing (HTTP) . . . . . . . . . . . . . . . . . . . . . . . . . . . . . . . . . . . . . . . . . . . . 140
Protocol Parameter Settings . . . . . . . . . . . . . . . . . . . . . . . . . . . . . . . . . . . . . . . . . . . . . . . . . 141
DFS Protocol Settings . . . . . . . . . . . . . . . . . . . . . . . . . . . . . . . . . . . . . . . . . . . . . . . . . . 142
Deploying DFS . . . . . . . . . . . . . . . . . . . . . . . . . . . . . . . . . . . . . . . . . . . . . . . . . . . . 142
DFS Administration Tool. . . . . . . . . . . . . . . . . . . . . . . . . . . . . . . . . . . . . . . . . . . . . . . . 143
Accessing the DFS Namespace from other Computers . . . . . . . . . . . . . . . . . . . . . . . . . 143
Setting DFS Sharing Defaults . . . . . . . . . . . . . . . . . . . . . . . . . . . . . . . . . . . . . . . . . 144
Creating a Local DFS Root . . . . . . . . . . . . . . . . . . . . . . . . . . . . . . . . . . . . . . . . . . . 144
Deleting a Local DFS Root . . . . . . . . . . . . . . . . . . . . . . . . . . . . . . . . . . . . . . . . . . . 145
Publishing a New Share in DFS. . . . . . . . . . . . . . . . . . . . . . . . . . . . . . . . . . . . . . . . . . . 146
Publishing an Existing Share in DFS. . . . . . . . . . . . . . . . . . . . . . . . . . . . . . . . . . . . . . . 147
Removing a Published Share from DFS . . . . . . . . . . . . . . . . . . . . . . . . . . . . . . . . . . . . 147
8 NAS 4000s and 9000s Administration Guide

Contents
Storage Management . . . . . . . . . . . . . . . . . . . . . . . . . . . . . . . . . . . . . . . . . . . . . . . . . . . . . . 148
Directory Quotas . . . . . . . . . . . . . . . . . . . . . . . . . . . . . . . . . . . . . . . . . . . . . . . . . . . . . . 148
Establishing Directory Quotas . . . . . . . . . . . . . . . . . . . . . . . . . . . . . . . . . . . . . . . . . . . . 149
File Screening. . . . . . . . . . . . . . . . . . . . . . . . . . . . . . . . . . . . . . . . . . . . . . . . . . . . . . . . . . . . 151
Storage Reports. . . . . . . . . . . . . . . . . . . . . . . . . . . . . . . . . . . . . . . . . . . . . . . . . . . . . . . . . . . 152
Print Services . . . . . . . . . . . . . . . . . . . . . . . . . . . . . . . . . . . . . . . . . . . . . . . . . . . . . . . . . . . . 153
Configuring the Print Server . . . . . . . . . . . . . . . . . . . . . . . . . . . . . . . . . . . . . . . . . . . . . 153
Removing the Print Server Role . . . . . . . . . . . . . . . . . . . . . . . . . . . . . . . . . . . . . . . 155
Adding an Additional Printer. . . . . . . . . . . . . . . . . . . . . . . . . . . . . . . . . . . . . . . . . . . . . 155
Adding Additional Operating System Support . . . . . . . . . . . . . . . . . . . . . . . . . . . . . . . 156
Installing Print Services for UNIX. . . . . . . . . . . . . . . . . . . . . . . . . . . . . . . . . . . . . . . . . 156
8 Microsoft Services for NFS. . . . . . . . . . . . . . . . . . . . . . . . . . . . . . . . . . . . . . . . . . .157
Server for NFS . . . . . . . . . . . . . . . . . . . . . . . . . . . . . . . . . . . . . . . . . . . . . . . . . . . . . . . . . . . 157
Authenticating User Access . . . . . . . . . . . . . . . . . . . . . . . . . . . . . . . . . . . . . . . . . . . . . . 157
Indicating the Computer to Use for the NFS User Mapping Server . . . . . . . . . . . . . . . 158
Logging Events . . . . . . . . . . . . . . . . . . . . . . . . . . . . . . . . . . . . . . . . . . . . . . . . . . . . . . . 159
Server for NFS Server Settings . . . . . . . . . . . . . . . . . . . . . . . . . . . . . . . . . . . . . . . . . . . 160
Installing NFS Authentication Software on the Domain Controllers and
Active Directory Domain Controllers . . . . . . . . . . . . . . . . . . . . . . . . . . . . . . . . . . . . . . 162
Understanding NTFS and UNIX Permissions . . . . . . . . . . . . . . . . . . . . . . . . . . . . . . . . . . . 164
NFS File Shares . . . . . . . . . . . . . . . . . . . . . . . . . . . . . . . . . . . . . . . . . . . . . . . . . . . . . . . . . . 164
Creating a New Share. . . . . . . . . . . . . . . . . . . . . . . . . . . . . . . . . . . . . . . . . . . . . . . . . . . 164
Deleting a Share. . . . . . . . . . . . . . . . . . . . . . . . . . . . . . . . . . . . . . . . . . . . . . . . . . . . 166
Modifying Share Properties. . . . . . . . . . . . . . . . . . . . . . . . . . . . . . . . . . . . . . . . . . . 166
Anonymous Access to an NFS Share . . . . . . . . . . . . . . . . . . . . . . . . . . . . . . . . . . . 168
Encoding Types. . . . . . . . . . . . . . . . . . . . . . . . . . . . . . . . . . . . . . . . . . . . . . . . . . . . 169
NFS Only. . . . . . . . . . . . . . . . . . . . . . . . . . . . . . . . . . . . . . . . . . . . . . . . . . . . . . . . . 169
NFS Protocol Properties Settings . . . . . . . . . . . . . . . . . . . . . . . . . . . . . . . . . . . . . . . . . . . . . 169
NFS Async/Sync Settings . . . . . . . . . . . . . . . . . . . . . . . . . . . . . . . . . . . . . . . . . . . . . . . 170
NFS Locks. . . . . . . . . . . . . . . . . . . . . . . . . . . . . . . . . . . . . . . . . . . . . . . . . . . . . . . . 171
NFS Client Groups . . . . . . . . . . . . . . . . . . . . . . . . . . . . . . . . . . . . . . . . . . . . . . . . . . . . . . . . 173
Adding a New Client Group . . . . . . . . . . . . . . . . . . . . . . . . . . . . . . . . . . . . . . . . . . . . . 174
Deleting a Client Group . . . . . . . . . . . . . . . . . . . . . . . . . . . . . . . . . . . . . . . . . . . . . . . . . 174
Editing Client Group Information . . . . . . . . . . . . . . . . . . . . . . . . . . . . . . . . . . . . . . . . . 175
NFS User and Group Mappings . . . . . . . . . . . . . . . . . . . . . . . . . . . . . . . . . . . . . . . . . . . . . . 176
Types of Mappings. . . . . . . . . . . . . . . . . . . . . . . . . . . . . . . . . . . . . . . . . . . . . . . . . . . . . 176
Explicit Mappings . . . . . . . . . . . . . . . . . . . . . . . . . . . . . . . . . . . . . . . . . . . . . . . . . . 176
Simple Mappings. . . . . . . . . . . . . . . . . . . . . . . . . . . . . . . . . . . . . . . . . . . . . . . . . . . 176
9NAS 4000s and 9000s Administration Guide

Contents
Squashed Mappings. . . . . . . . . . . . . . . . . . . . . . . . . . . . . . . . . . . . . . . . . . . . . . . . . 177
User Name Mapping Best Practices. . . . . . . . . . . . . . . . . . . . . . . . . . . . . . . . . . . . . . . . 177
Creating and Managing User and Group Mappings . . . . . . . . . . . . . . . . . . . . . . . . . . . 178
General Tab . . . . . . . . . . . . . . . . . . . . . . . . . . . . . . . . . . . . . . . . . . . . . . . . . . . . . . . 178
Simple Mapping Tab . . . . . . . . . . . . . . . . . . . . . . . . . . . . . . . . . . . . . . . . . . . . . . . . 179
Explicit User Mapping Tab . . . . . . . . . . . . . . . . . . . . . . . . . . . . . . . . . . . . . . . . . . . 180
Explicit Group Mapping Tab. . . . . . . . . . . . . . . . . . . . . . . . . . . . . . . . . . . . . . . . . . 181
Backing up and Restoring Mappings . . . . . . . . . . . . . . . . . . . . . . . . . . . . . . . . . . . . . . . 183
Backing up User Mappings . . . . . . . . . . . . . . . . . . . . . . . . . . . . . . . . . . . . . . . . . . . 183
Restoring User Mappings . . . . . . . . . . . . . . . . . . . . . . . . . . . . . . . . . . . . . . . . . . . . 183
Creating a Sample NFS File Share. . . . . . . . . . . . . . . . . . . . . . . . . . . . . . . . . . . . . . . . . . . . 184
Remote Desktop . . . . . . . . . . . . . . . . . . . . . . . . . . . . . . . . . . . . . . . . . . . . . . . . . . . . . . . . . . 186
Using Remote Desktop . . . . . . . . . . . . . . . . . . . . . . . . . . . . . . . . . . . . . . . . . . . . . . . . . 186
9 NetWare File System Management . . . . . . . . . . . . . . . . . . . . . . . . . . . . . . . . . . . .187
Installing Services for NetWare . . . . . . . . . . . . . . . . . . . . . . . . . . . . . . . . . . . . . . . . . . . . . . 188
Managing File and Print Services for NetWare . . . . . . . . . . . . . . . . . . . . . . . . . . . . . . . . . . 190
Creating and Managing NetWare Users. . . . . . . . . . . . . . . . . . . . . . . . . . . . . . . . . . . . . . . . 191
Adding Local NetWare Users . . . . . . . . . . . . . . . . . . . . . . . . . . . . . . . . . . . . . . . . . . . . 191
Enabling Local NetWare User Accounts . . . . . . . . . . . . . . . . . . . . . . . . . . . . . . . . . . . . 192
Managing NCP Volumes (Shares) . . . . . . . . . . . . . . . . . . . . . . . . . . . . . . . . . . . . . . . . . . . . 193
Creating a New NCP Share . . . . . . . . . . . . . . . . . . . . . . . . . . . . . . . . . . . . . . . . . . . . . . 193
Modifying NCP Share Properties. . . . . . . . . . . . . . . . . . . . . . . . . . . . . . . . . . . . . . . . . . 195
10 Cluster Administration. . . . . . . . . . . . . . . . . . . . . . . . . . . . . . . . . . . . . . . . . . . . . .197
Cluster Overview . . . . . . . . . . . . . . . . . . . . . . . . . . . . . . . . . . . . . . . . . . . . . . . . . . . . . . . . . 197
Multi Node Support Beyond Two Nodes. . . . . . . . . . . . . . . . . . . . . . . . . . . . . . . . . . . . 197
Cluster Terms and Components . . . . . . . . . . . . . . . . . . . . . . . . . . . . . . . . . . . . . . . . . . . . . . 198
Nodes . . . . . . . . . . . . . . . . . . . . . . . . . . . . . . . . . . . . . . . . . . . . . . . . . . . . . . . . . . . . . . . 198
Resources . . . . . . . . . . . . . . . . . . . . . . . . . . . . . . . . . . . . . . . . . . . . . . . . . . . . . . . . . . . . 198
Virtual Servers . . . . . . . . . . . . . . . . . . . . . . . . . . . . . . . . . . . . . . . . . . . . . . . . . . . . . . . . 199
Failover . . . . . . . . . . . . . . . . . . . . . . . . . . . . . . . . . . . . . . . . . . . . . . . . . . . . . . . . . . . . . 199
Quorum Disk . . . . . . . . . . . . . . . . . . . . . . . . . . . . . . . . . . . . . . . . . . . . . . . . . . . . . . . . . 199
Cluster Concepts. . . . . . . . . . . . . . . . . . . . . . . . . . . . . . . . . . . . . . . . . . . . . . . . . . . . . . . . . . 200
Sequence of Events for Cluster Resources. . . . . . . . . . . . . . . . . . . . . . . . . . . . . . . . . . . 200
Hierarchy of Cluster Resource Components . . . . . . . . . . . . . . . . . . . . . . . . . . . . . . . . . 202
Cluster Planning . . . . . . . . . . . . . . . . . . . . . . . . . . . . . . . . . . . . . . . . . . . . . . . . . . . . . . . . . . 203
Storage Planning . . . . . . . . . . . . . . . . . . . . . . . . . . . . . . . . . . . . . . . . . . . . . . . . . . . . . . 203
Network Planning. . . . . . . . . . . . . . . . . . . . . . . . . . . . . . . . . . . . . . . . . . . . . . . . . . . . . . 204
10 NAS 4000s and 9000s Administration Guide

Contents
Protocol Planning. . . . . . . . . . . . . . . . . . . . . . . . . . . . . . . . . . . . . . . . . . . . . . . . . . . . . . 205
Preparing for Cluster Installation . . . . . . . . . . . . . . . . . . . . . . . . . . . . . . . . . . . . . . . . . . . . . 206
Before Beginning Installation . . . . . . . . . . . . . . . . . . . . . . . . . . . . . . . . . . . . . . . . . . . . 206
HP StorageWorks NAS Software Updates . . . . . . . . . . . . . . . . . . . . . . . . . . . . . . . . . . 206
Checklists for Cluster Server Installation . . . . . . . . . . . . . . . . . . . . . . . . . . . . . . . . . . . 207
Network Requirements . . . . . . . . . . . . . . . . . . . . . . . . . . . . . . . . . . . . . . . . . . . . . . 207
Shared Disk Requirements . . . . . . . . . . . . . . . . . . . . . . . . . . . . . . . . . . . . . . . . . . . 207
Cluster Installation . . . . . . . . . . . . . . . . . . . . . . . . . . . . . . . . . . . . . . . . . . . . . . . . . . . . . . . . 208
Setting Up Networks . . . . . . . . . . . . . . . . . . . . . . . . . . . . . . . . . . . . . . . . . . . . . . . . . . . 208
Configure the Private Network Adapter . . . . . . . . . . . . . . . . . . . . . . . . . . . . . . . . . 209
Configure the Public Network Adapter. . . . . . . . . . . . . . . . . . . . . . . . . . . . . . . . . . 209
Rename the Local Area Network Icons. . . . . . . . . . . . . . . . . . . . . . . . . . . . . . . . . . 209
Verifying Connectivity and Name Resolution . . . . . . . . . . . . . . . . . . . . . . . . . . . . 209
Verifying Domain Membership. . . . . . . . . . . . . . . . . . . . . . . . . . . . . . . . . . . . . . . . 209
Setting Up a Cluster User Account . . . . . . . . . . . . . . . . . . . . . . . . . . . . . . . . . . . . . 209
About the Quorum Disk . . . . . . . . . . . . . . . . . . . . . . . . . . . . . . . . . . . . . . . . . . . . . 209
Configuring Shared Disks . . . . . . . . . . . . . . . . . . . . . . . . . . . . . . . . . . . . . . . . . . . . 210
Verifying Disk Access and Functionality . . . . . . . . . . . . . . . . . . . . . . . . . . . . . . . . 210
Install Cluster Service Software . . . . . . . . . . . . . . . . . . . . . . . . . . . . . . . . . . . . . . . . . . . . . . 211
Creating a Cluster. . . . . . . . . . . . . . . . . . . . . . . . . . . . . . . . . . . . . . . . . . . . . . . . . . . . . . 211
Adding Nodes to a Cluster. . . . . . . . . . . . . . . . . . . . . . . . . . . . . . . . . . . . . . . . . . . . . . . 212
Geographically Dispersed Clusters . . . . . . . . . . . . . . . . . . . . . . . . . . . . . . . . . . . . . . . . 214
HP Storage Works NAS Software Updates . . . . . . . . . . . . . . . . . . . . . . . . . . . . . . . . . . 214
Cluster Groups and Resources, including File Shares . . . . . . . . . . . . . . . . . . . . . . . . . . . . . 214
Cluster Group Overview . . . . . . . . . . . . . . . . . . . . . . . . . . . . . . . . . . . . . . . . . . . . . . . . 215
Node Based Cluster Groups . . . . . . . . . . . . . . . . . . . . . . . . . . . . . . . . . . . . . . . . . . 215
Load Balancing . . . . . . . . . . . . . . . . . . . . . . . . . . . . . . . . . . . . . . . . . . . . . . . . . . . . 215
Cluster Resource Overview . . . . . . . . . . . . . . . . . . . . . . . . . . . . . . . . . . . . . . . . . . . . . . 216
File Share Resource Planning Issues . . . . . . . . . . . . . . . . . . . . . . . . . . . . . . . . . . . . . . . 216
Resource Planning. . . . . . . . . . . . . . . . . . . . . . . . . . . . . . . . . . . . . . . . . . . . . . . . . . 216
Permissions and Access Rights on Share Resources. . . . . . . . . . . . . . . . . . . . . . . . 217
NFS Cluster Specific Issues . . . . . . . . . . . . . . . . . . . . . . . . . . . . . . . . . . . . . . . . . . 217
Non Cluster Aware File Sharing Protocols . . . . . . . . . . . . . . . . . . . . . . . . . . . . . . . . . . 218
Creating a New Cluster Group. . . . . . . . . . . . . . . . . . . . . . . . . . . . . . . . . . . . . . . . . . . . 218
Adding New Storage to a Cluster. . . . . . . . . . . . . . . . . . . . . . . . . . . . . . . . . . . . . . . . . . 219
Creating Physical Disk Resources . . . . . . . . . . . . . . . . . . . . . . . . . . . . . . . . . . . . . . . . . 219
Creating File Share Resources . . . . . . . . . . . . . . . . . . . . . . . . . . . . . . . . . . . . . . . . . . . . 221
Setting Permissions for a SMB File Share . . . . . . . . . . . . . . . . . . . . . . . . . . . . . . . 222
11NAS 4000s and 9000s Administration Guide

Contents
Creating NFS Share Resources . . . . . . . . . . . . . . . . . . . . . . . . . . . . . . . . . . . . . . . . . . . 223
Setting Permissions for an NFS Share. . . . . . . . . . . . . . . . . . . . . . . . . . . . . . . . . . . 224
Creating IP Address Resources . . . . . . . . . . . . . . . . . . . . . . . . . . . . . . . . . . . . . . . . . . . 226
Creating Network Name Resources. . . . . . . . . . . . . . . . . . . . . . . . . . . . . . . . . . . . . . . . 227
Basic Cluster Administration Procedures. . . . . . . . . . . . . . . . . . . . . . . . . . . . . . . . . . . . . . . 228
Failing Over and Failing Back. . . . . . . . . . . . . . . . . . . . . . . . . . . . . . . . . . . . . . . . . . . . 228
Restarting One Cluster Node . . . . . . . . . . . . . . . . . . . . . . . . . . . . . . . . . . . . . . . . . . . . . 228
Shutting Down One Cluster Node . . . . . . . . . . . . . . . . . . . . . . . . . . . . . . . . . . . . . . . . . 229
Powering Down the Cluster . . . . . . . . . . . . . . . . . . . . . . . . . . . . . . . . . . . . . . . . . . . . . . 229
Powering Up the Cluster . . . . . . . . . . . . . . . . . . . . . . . . . . . . . . . . . . . . . . . . . . . . . . . . 230
Shadow Copies in a Clustered Environment . . . . . . . . . . . . . . . . . . . . . . . . . . . . . . . . . . . . 231
Creating a Cluster Printer Spooler . . . . . . . . . . . . . . . . . . . . . . . . . . . . . . . . . . . . . . . . . . . . 231
11 Remote Access Methods and Monitoring . . . . . . . . . . . . . . . . . . . . . . . . . . . . . . . .233
Web Based User Interface . . . . . . . . . . . . . . . . . . . . . . . . . . . . . . . . . . . . . . . . . . . . . . . . . . 234
Remote Desktop . . . . . . . . . . . . . . . . . . . . . . . . . . . . . . . . . . . . . . . . . . . . . . . . . . . . . . . . . . 234
Integrated Lights-Out Port . . . . . . . . . . . . . . . . . . . . . . . . . . . . . . . . . . . . . . . . . . . . . . . . . . 234
Features . . . . . . . . . . . . . . . . . . . . . . . . . . . . . . . . . . . . . . . . . . . . . . . . . . . . . . . . . . . . . 235
Security Features . . . . . . . . . . . . . . . . . . . . . . . . . . . . . . . . . . . . . . . . . . . . . . . . . . . 235
Manage Users Feature . . . . . . . . . . . . . . . . . . . . . . . . . . . . . . . . . . . . . . . . . . . . . . . 235
Manage Alerts Feature. . . . . . . . . . . . . . . . . . . . . . . . . . . . . . . . . . . . . . . . . . . . . . . 236
Integrated Lights-Out Port Configuration . . . . . . . . . . . . . . . . . . . . . . . . . . . . . . . . . . . 236
Using the Integrated Lights-Out Port to Access the NAS Server . . . . . . . . . . . . . . . . . 237
Telnet Server. . . . . . . . . . . . . . . . . . . . . . . . . . . . . . . . . . . . . . . . . . . . . . . . . . . . . . . . . . . . . 238
Enabling Telnet Server. . . . . . . . . . . . . . . . . . . . . . . . . . . . . . . . . . . . . . . . . . . . . . . . . . 238
Sessions Information . . . . . . . . . . . . . . . . . . . . . . . . . . . . . . . . . . . . . . . . . . . . . . . . 238
HP Insight Manager Version 7 . . . . . . . . . . . . . . . . . . . . . . . . . . . . . . . . . . . . . . . . . . . . . . . 238
Index . . . . . . . . . . . . . . . . . . . . . . . . . . . . . . . . . . . . . . . . . . . . . . . . . . . . . . . . . .239
12 NAS 4000s and 9000s Administration Guide

About This Guide
This administration guide provides information to help administrators:
■ Plan the storage configuration
■ Set up physical storage
■ Manage users and groups
■ Manage folders and shares
■ Manage a UNIX® file system
■ Manage a NetWare file system
■ Remotely access the NAS server
About this Guide
About this Guide
“About this Guide” topics include:
■ Overview, page 14
■ Conventions, page 15
■ Rack Stability, page 17
■ Getting Help, page 17
13NAS 4000s and 9000s Administration Guide

About this Guide
Overview
This section covers the following topics:
■ Intended Audience
■ Prerequisites
Intended Audience
This book is intended for use by system administrators who are experienced with setting up
and managing a network server.
Prerequisites
Before beginning, make sure you consider the items below.
■ Knowledge of Microsoft® Windows® NT® or Windows Storage Server 2003 operating
■ Knowledge of HP hardware
■ Location of all documentation shipped with your server
system
14 NAS 4000s and 9000s Administration Guide
Conventions
Conventions consist of the following:
■ Document Conventions
■ Text Symbols
■ Equipment Symbols
Document Conventions
The document conventions included in Tabl e 1 apply in most cases.
Table 1: Document Conventions
Cross-reference links Figure 1
Key and field names, menu items, buttons, and
dialog box titles
File names, application names, and text
emphasis
User input, command and directory names,
and system responses (output and messages)
Variables <monospace, italic font>
Website addresses Sans serif font text:
About this Guide
Element Convention
Bold
Italics
Monospace font
COMMAND NAMES are uppercase monospace
font unless they are case sensitive
http://www.hp.com
Text Symbols
The following symbols may be found in the text of this guide. They have the following
meanings:
WARNING: Text set off in this manner indicates that failure to follow directions in the
warning could result in bodily harm or death.
Caution: Text set off in this manner indicates that failure to follow directions could result in
damage to equipment or data.
Note: Text set off in this manner presents commentary, sidelights, or interesting points of
information.
15NAS 4000s and 9000s Administration Guide
About this Guide
Equipment Symbols
The following equipment symbols may be found on hardware for which this guide pertains.
They have the following meanings:
Any enclosed surface or area of the equipment marked with these symbols indicates
the presence of electrical shock hazards. Enclosed area contains no operator
serviceable parts.
WARNING: To reduce the risk of personal injury from electrical shock hazards, do
not open this enclosure.
Any RJ-45 receptacle marked with these symbols indicates a network interface
connection.
WARNING: To reduce the risk of electrical shock, fire, or damage to the equipment,
do not plug telephone or telecommunications connectors into this receptacle.
Any surface or area of the equipment marked with these symbols indicates the
presence of a hot surface or hot component. Contact with this surface could result in
injury.
WARNING: To reduce the risk of personal injury from a hot component, allow the
surface to cool before touching.
Power supplies or systems marked with these symbols indicate the presence of
multiple sources of power.
WARNING: To reduce the risk of personal injury from electrical shock, remove
all power cords to completely disconnect power from the power supplies and
systems.
Any product or assembly marked with these symbols indicates that the component
exceeds the recommended weight for one individual to handle safely.
WARNING: To reduce the risk of personal injury or damage to the equipment,
observe local occupational health and safety requirements and guidelines for
manually handling material.
16 NAS 4000s and 9000s Administration Guide

Rack Stability
Rack stability protects personnel and equipment.
Getting Help
If you still have a question after reading this guide, contact an HP authorized service provider
or access our website:
HP Technical Support
About this Guide
WARNING: To reduce the risk of personal injury or damage to the equipment, be sure that:
■ The leveling jacks are extended to the floor.
■ The full weight of the rack rests on the leveling jacks.
■ In single rack installations, the stabilizing feet are attached to the rack.
■ In multiple rack installations, the racks are coupled.
■ Only one rack component is extended at any time. A rack may become unstable if more
than one rack component is extended for any reason.
http://www.hp.com
.
Telephone numbers for worldwide technical support are listed on the following HP website:
http://www.hp.com/support/
Note: For continuous quality improvement, calls may be recorded or monitored.
Be sure to have the following information available before calling:
■ Technical support registration number (if applicable)
■ Product serial numbers
■ Product model names and numbers
■ Applicable error messages
■ Operating system type and revision level
■ Detailed, specific questions
HP Storage Website
The HP website has the latest information on this product, as well as the latest drivers. Access
storage at:
the appropriate product or solution.
HP Authorized Reseller
. From this website, select the country of origin.
http://www.hp.com/country/us/eng/prodserv/storag e.html
. From this website, select
For the name of your nearest HP authorized reseller:
■ In the United States, call 1-800-345-1518
■ In Canada, call 1-800-263-5868
■ Elsewhere, see the HP website for locations and telephone numbers:
http://www .hp.com
.
17NAS 4000s and 9000s Administration Guide

About this Guide
18 NAS 4000s and 9000s Administration Guide

System Overview
The HP StorageWorks NAS server can be used in many types of computing environments,
from basic Microsoft Windows workgroups to complicated multiprotocol domains using DFS,
NFS, FTP, HTTP, and Microsoft SMB. The corresponding varieties of clients that can be
serviced include any Windows, UNIX, Linux, Novell, or Macintosh variant.
This chapter provides an overview of these environments and deployments and includes brief
descriptions of system user interfaces, applications, and options.
Product Definition and Information
The business class NAS 4000s and the enterprise class NAS 9000s are solutions that provide
reliable performance, manageability, and continuous data availability through the fusion of
Network Attached Storage (NAS) and Storage Area Network (SAN) technologies.
Server Hardware and Software Features
1
Refer to the HP StorageWorks NAS 4000s/9000s Installation Guide for a listing of server
hardware and software features.
For specific software product recommendations, go to the HP website:
http://www .hp.com/go/nas
Product Manageability
The NAS server ships with the following utilities and features that ease the administration
tasks associated with managing the system:
■ The Rapid Startup Wizard is a user friendly configuration utility that ensures easy
configuration.
■ The WebUI is a simple, graphical user interface (GUI) that helps with administration
tasks.
19NAS 4000s and 9000s Administration Guide

System Overview
■ Insight Manager is a comprehensive tool designed to be a key component in the systems
■ The Integrated Lights-Out feature provides remote access, sends alerts, and performs other
Product Redundancy
The NAS server is specifically designed to perform file serving tasks for networks. Using
industry standard components, redundancy of power supplies, NICs, and fans ensures
reliability.
The clustering ability of the NAS device further ensures continuous data availability, because
data being processed by one server transitions over to the other server in a failover situation.
Other industry standard features, such as redundant array of independent drives (RAID) and
remote manageability, further enhance the overall dependability of the NAS server.
The server contains dual 36.4 GB hard drives preconfigured with the NAS operating system so
that the active system volume is mirrored (RAID 1+0) to the second drive. If one of the
internal drives fails, the integrity of the system is preserved, because the system will use the
copy of the operating system on the remaining healthy drive. The drives in the server are
hot-pluggable, so the failed drive can be replaced while the system is running. When the failed
drive is replaced, the system automatically uses the version of the operating system on the
healthy drive to rebuild the replacement.
management environment. It monitors the operations of HP servers, workstations, and
clients. Insight Manager provides system administrators more control through
comprehensive fault and configuration management, and industry leading remote
management.
management functions, even if the operating system of the host server is not responding.
The NAS server includes dual power supplies. A power supply can be replaced while the
server is running. To ensure redundancy, it is important to connect each power supply to a
separate power source. If one power source fails, the server remains operational through the
second power source.
Through a seamless, hardware-based, graphical remote console, the Integrated Lights-Out port
provides the administrator with full control of the server from a remote location. Using a client
browser, the administrator can remotely power up, power down, and operate the console. A
built in processor makes the port independent of the server and the operating system.
20 NAS 4000s and 9000s Administration Guide

Deployment Scenarios
Various deployment scenarios are possible. Typical application of NAS devices include:
■ File server consolidation
As businesses continue to expand their information technology (IT) infrastructures, they
must find ways to manage larger environments without a corresponding increase in IT
staff. Consolidating many servers into a single NAS device decreases the number of points
of administration and increases the availability and flexibility of storage space.
■ Multiprotocol environments
Some businesses require several types of computing systems to accomplish various tasks.
The multiprotocol support of the NAS server allows it to support many types of client
computers concurrently.
■ Protocol and platform transitions
When a transition between platforms is being planned, the ability of the NAS server to
support most file sharing protocols allows companies to continue to invest in file storage
space without concerns about obsolescence. For example, an administrator planning a
future transition from Windows to Linux can deploy the NAS server with confidence that
it can support both CIFS and NFS simultaneously, assuring not only a smooth transition,
but also a firm protection of their investment.
System Overview
■ Remote office deployment
Frequently, branch offices and other remote locations lack dedicated IT staff members. An
administrator located in a central location can use the WebUI of the NAS server, Microsoft
Terminal Services, and other remote administration methods to configure and administer
all aspects of the NAS server.
Configuration Options for the NAS Server
The NAS server can be deployed in two different configurations attached to a storage area
network (SAN): as a single NAS device or as a clustered pair. By default, the NAS server does
not ship with a standard HBA to allow for maximum flexibility in the SAN environment. For a
list of supported HBAs for the NAS servers, see the quick specs for the product.
21NAS 4000s and 9000s Administration Guide
System Overview
NAS Server as a Single Device
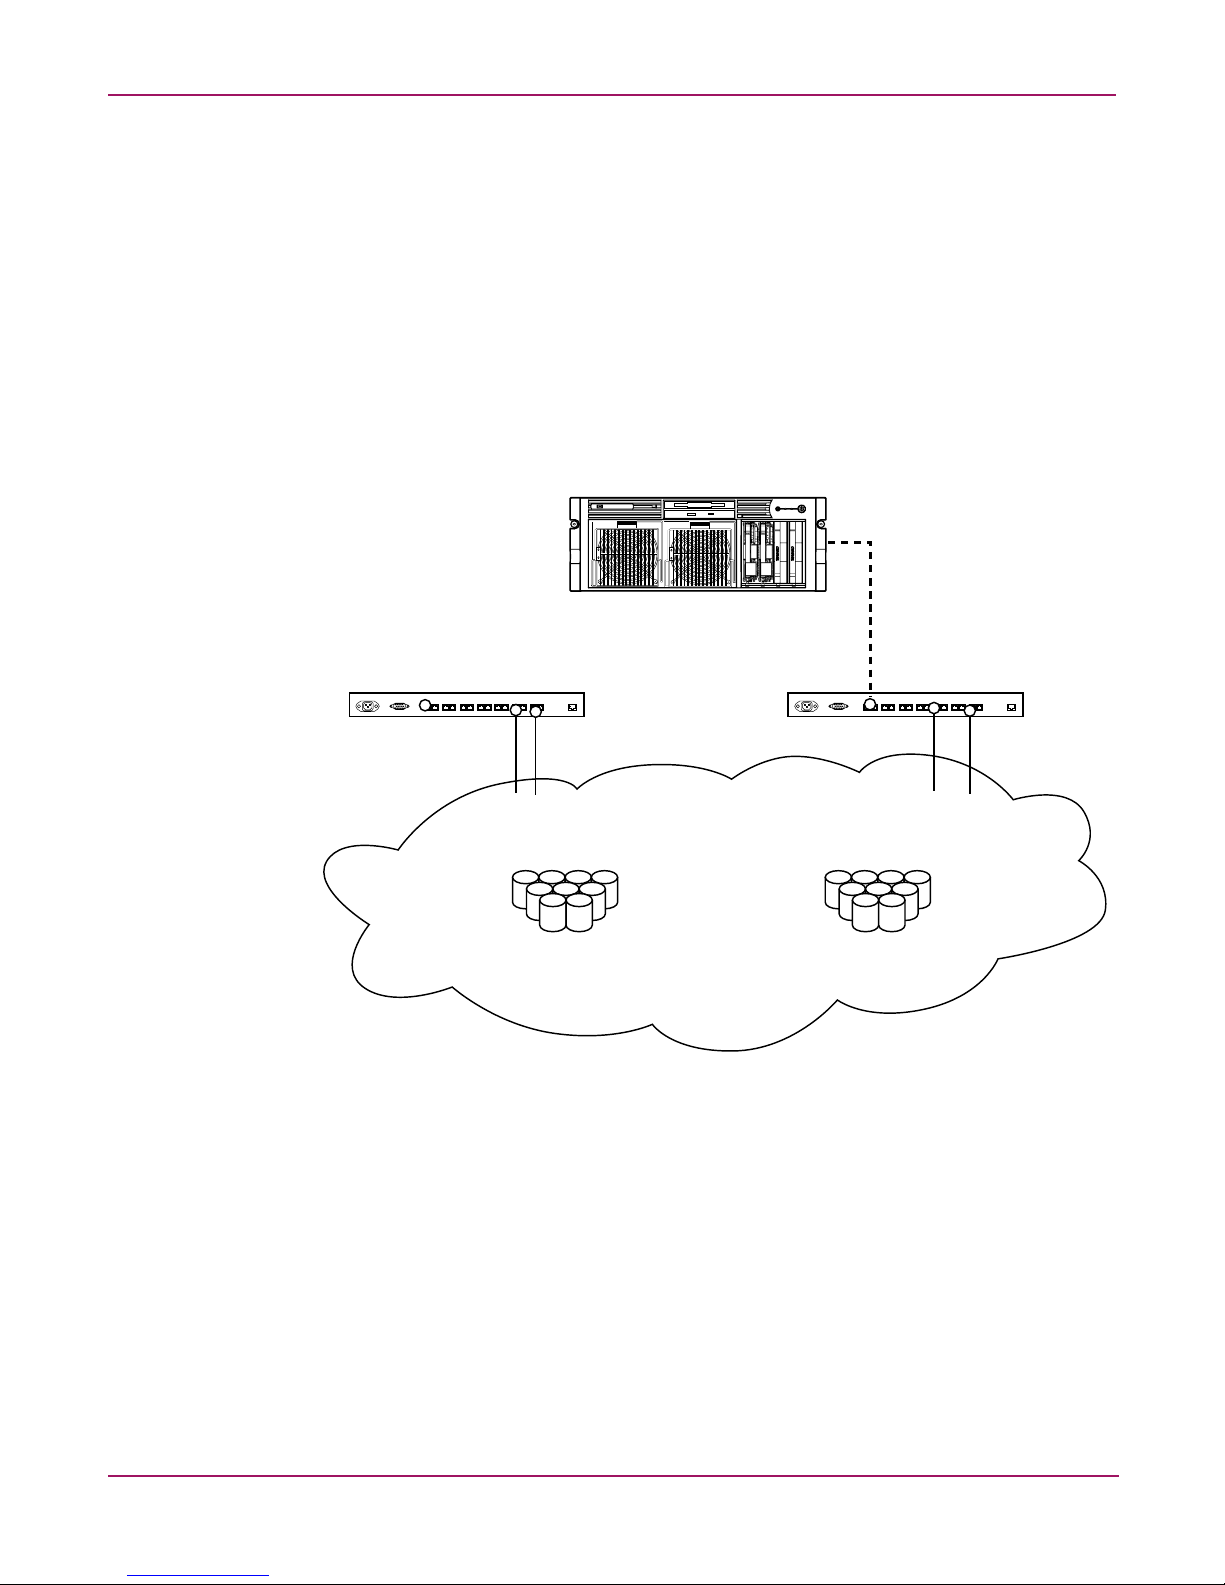
In the single NAS device configuration, a NAS server is attached to a SAN via a single or pair
of fiber channel host bus adapters (HBAs) and one or more SAN switches. In Figure 1, the
dual HBA approach is illustrated. Each HBA should be connected to a separate switch that has
access to the same controller pairs. This connection method allows redundant paths to the
same storage subsystem. Dual HBAs per NAS device is recommended but not required for
stand alone deployments, since dual HBAs allow for path failure while still providing access to
the data.
SAN storage is not managed by the NAS server and requires coordination between the NAS
administrator and the SAN administrator. LUN requests need to be made and assigned to the
NAS server using selective storage presentation from the SAN controller pairs. Naming of the
LUNs and the connections to the NAS server is important for tracking and identification
purposes. At least one LUN is required by the NAS server for the device to be functional.
HBA 1
SAN Switch
++++++++++++++++++++
+
+
+
+
+
+
+
+
+
+
+
+
+
+
+
+
HBA 2
SAN Switch
Data RAID set
LUN 1
Figure 1: NAS server as a single device
Storage Area Network
Data RAID set
LUN 2
22 NAS 4000s and 9000s Administration Guide

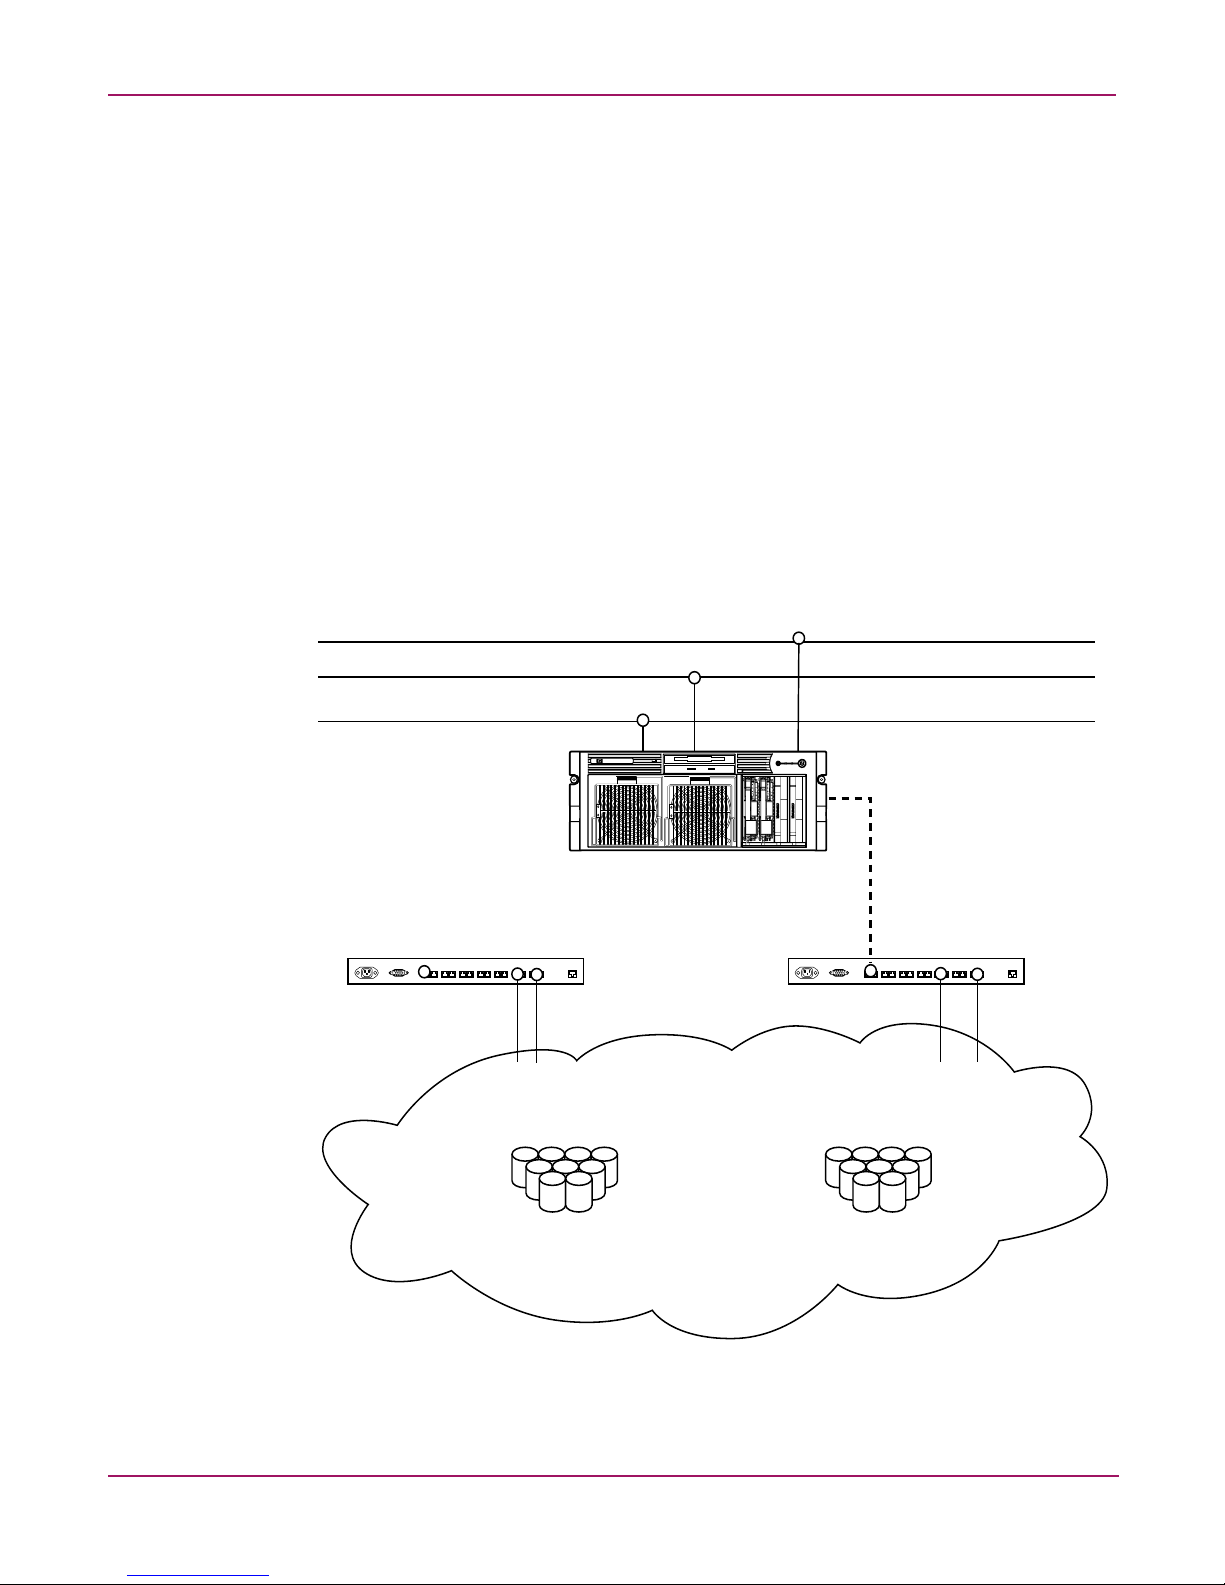
NAS Server as a Clustered Pair
In the clustered configuration, two NAS devices are linked via a private network and have
access to shared storage as illustrated in Figure 2. In clustered deployments, it is recommended
that each NAS device be attached to the SAN via a pair of fiber channel HBAs. Dual HBAs per
NAS device is recommended but not required for cluster deployments, since dual HBAs allow
for path failure without causing node failover in the cluster.
For the NAS server, cluster setup requires at least three LUNs. One LUN is required for the
quorum disk and two LUNs are required for data disks. Individual data disks specific to each
node are required for the proper setup of file sharing where both nodes participate in
file-sharing activities. Clustered NAS systems have the ability to provide redundant
active/active access to file shares on disk. However, as with all Microsoft-based clusters, the
unit of ownership among nodes is at the disk level. Therefore, individual fileshares can be
accessed by only one node at a time based on which node owns the disk.
System Overview
Cluster Node A
Private Network
Node A
HBA 2
Node A
HBA 1
+++++++++++++++++++++++++++++++++++++++++++++++++++
+
+
+
+
SAN Switch
Cluster
Quorum
Mirrorset
LUN 1
Node B
HBA 2
Storage Area Network
Data RAID set
Node A
LUN 2
Figure 2: NAS server as a clustered pair of devices
+
+
+
+
+
+
+
+
SAN Switch
Data RAID set
Node B
LUN 3
Node B
HBA 1
Cluster Node B
Multi Node Support Beyond Two Nodes
The NAS 4000s and 9000s devices may be deployed in multi node clustering beyond two
nodes. Refer to the associated Storage Array documentation to determine the number of nodes
supported by the array under Windows Storage Server 2003. While the discussion presented in
this guide addresses only two nodes, additional nodes may be added into the cluster.
Considerations for additional fiber path connections and the private network should be made.
In the case of the private network, a hub or switch is required since the cross over cable is no
longer applicable.
Connecting NAS Servers to the Network
The NAS server can be connected to the network as a single device or as a clustered pair.
23NAS 4000s and 9000s Administration Guide
System Overview
NAS Server Single Device Deployment
In a single device deployment, network connections are divided into two categories: client data
segments and management segments. The default shipping configuration contains a two-port
network interface controller (NIC) 10/100/100 that provides one port for management and one
port for client data. The management port is intended for use with the 3202 port of the device
to enable use of the WebUI that accompanies the product. It is from this WebUI that most
management and administrative procedures can be accomplished. An additional management
port for remote console and diagnostics is provided off the Integrated Lights-Out (iLO) port.
HP recommends that this connection be placed on a management LAN separate from the
corporate infrastructure.
The NAS server supports the use of NIC teaming. NIC teaming provides failover and load
balancing of network ports of the NAS server. NIC teaming requires the network cables to be
installed on the same subnet to enable it to work. For example in Figure 3, Eth1 and Eth2
would need to be on the same subnet to enable this functionality on those ports. However, it is
not recommended to assign IP addresses to the ports that will be teamed or load balanced prior
to the installation and setup of NIC teaming. For this reason, HP recommends that you set all
network ports to DHCP. For information concerning the configuration of NIC teaming after
setup is complete, see Chapter 2.
Integrated Lights-Out Port
Client Subnet 2 Eth 2
Management Subnet 1 Eth 1
++++++++++++++++++++
+
+
+
+
+
+
HBA 1
SAN Switch
+
+
+
+
+
+
+
+
+
+
Data RAID set
LUN 1
HBA 2
SAN Switch
Storage Area Network
Data RAID set
LUN 2
Figure 3: NAS server single device deployment
24 NAS 4000s and 9000s Administration Guide
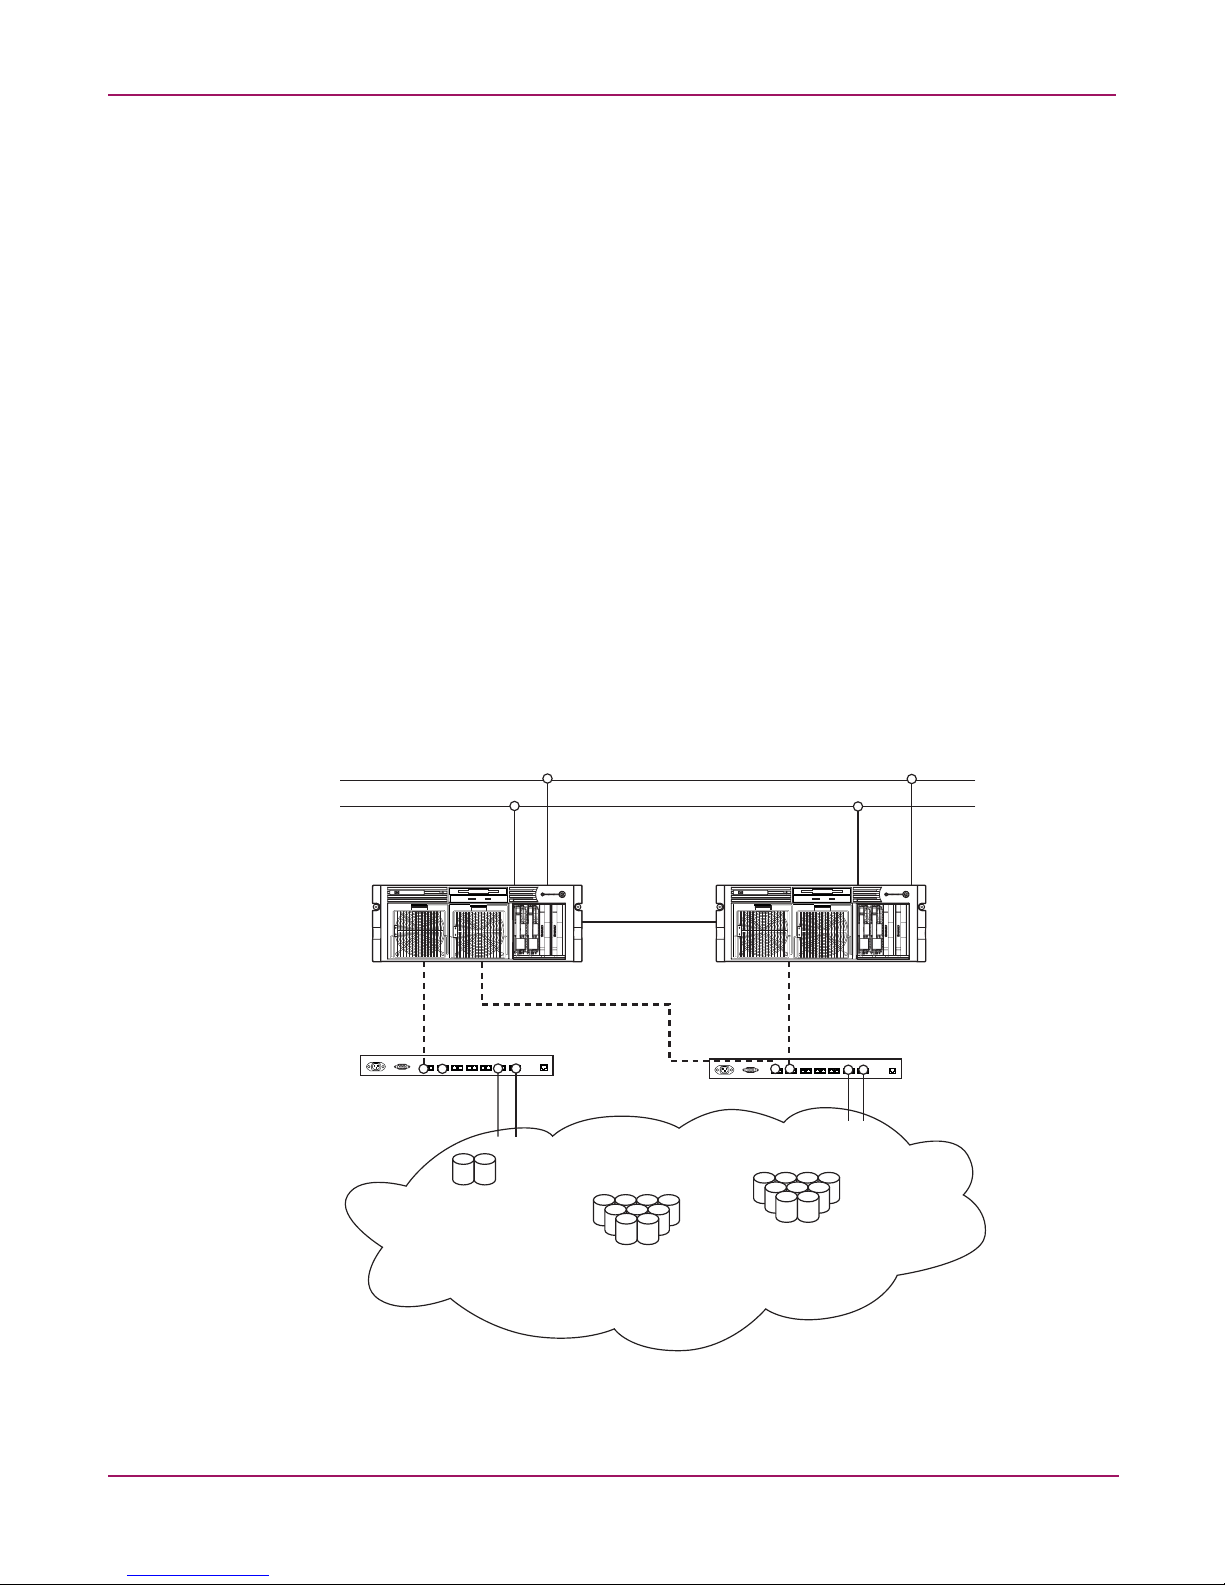
NAS Server Cluster Deployment
In a clustered deployment, network connections are divided into three categories: cluster
maintenance segments, client data segments, and management segments. The default shipping
configuration contains a two-port 10/100/1000 NIC that together provide one port for the
cluster maintenance and one port for management and client data. An additional management
port for remote console and diagnostics is provided off of the iLO port. HP recommends that
this connection be placed on a management LAN separate from the corporate infrastructure.
The cluster maintenance segment is also known as the heartbeat connection between the
nodes. In standard configurations, this connectivity is obtained by the use of a crossover
network cable. The same effect can be achieved by placing the heartbeat ports on its own
switch or VLAN, as illustrated in Figure 4 as Eth1. The purpose is to isolate and guarantee the
connectivity between the nodes without interruption. If interruption occurs, the remaining
cluster node will assume the other node has gone down and initiate a failover. A second cluster
heartbeat path is often recommended as a redundant path. The redundant path is often done
over one of the remaining network segments and is not dedicated.
The client data segments of a cluster must reside on identical network segments for each node.
As illustrated in Figure 4, Eth2 from both nodes is shown on the same segment. This
co-location on the same segment allows cluster resources such as file shares to failover to the
second node and continues to provide availability to the resources. The failed resource will
have the same IP address after the failover and therefore must have a port corresponding to the
identified subnet of the IP address present on both nodes.
The NAS server supports the use of NIC teaming in clustered configurations. All previous
caveats from the “NAS server single node deployment” on networks section still apply.
System Overview
Integrated Lights-Out Port
Management and
Client Data Network Eth 2
Cluster Node A
Node A
HBA 1
Cluster Heartbeat
Eth 1
Node A
HBA 2
+++++++++++++++++++++++++++++++++++++++++++++++++++
+
+
+
+
SAN Switch
Cluster
Quorum
Mirrorset
LUN 1
Node B
HBA 2
Storage Area Network
Data RAID set
Node A
LUN 2
+
+
+
+
+
+
+
+
SAN Switch
Data RAID set
Node B
LUN 3
Node B
HBA 1
Cluster Node B
Figure 4: NAS server cluster deployment
25NAS 4000s and 9000s Administration Guide

System Overview
Environment Scenarios
The NAS server is deployed in one of two security modes:
■ Workg rou p
■ Domain (Windows NT Domain or Active Directory Domain)
The NAS server uses standard Windows user and group administration methods in each of
these environments. For procedural instructions on managing users and groups, see Chapter 6
of this guide.
Regardless of the deployment, the NAS server integrates easily into multiprotocol
environments, supporting a wide variety of clients. The following protocols are supported:
■ Distributed File System (DFS)
■ Network File System (NFS)
■ Hypertext Transfer Protocol (HTTP)
■ File Transfer Protocol (FTP)
■ Microsoft Server Message Block (SMB)
Workgroup
Domain
In a workgroup environment, users and groups are stored and managed separately, on each
member server of the workgroup. Workgroups are typical for very small deployments where
little or no computing environment planning is required.
Note: In a clustered deployment, the clusters must be members of a domain. Therefore, workgroup
environments are supported only in non-clustered deployments.
When operating in a Windows NT or Active Directory domain environment, the NAS server is
a member of the domain and the domain controller is the repository of all account information.
Client machines are also members of the domain and users log on to the domain through their
Windows based client machines. The domain controller also administers user accounts and
appropriate access levels to resources that are a part of the domain. Additional information
about planning for domain environments can be found at:
http://www.microsoft.com/windowsse rver2003/technologies/directory/activedirectory/default .mspx
The NAS server obtains user account information from the domain controller when deployed
in a domain environment. The NAS server itself cannot act as a domain controller, backup
domain controller, or the root of an Active Directory tree as these functions are disabled in the
operating system.
26 NAS 4000s and 9000s Administration Guide
User Interfaces
There are several user interfaces that administrators can use to access and manage the NAS
server. Two of these interfaces are:
■ NAS server WebUI
■ NAS server Desktop
Each interface contains the same or similar capabilities, but presents them in a different
manner. Each of these interfaces are illustrated in the following sections.
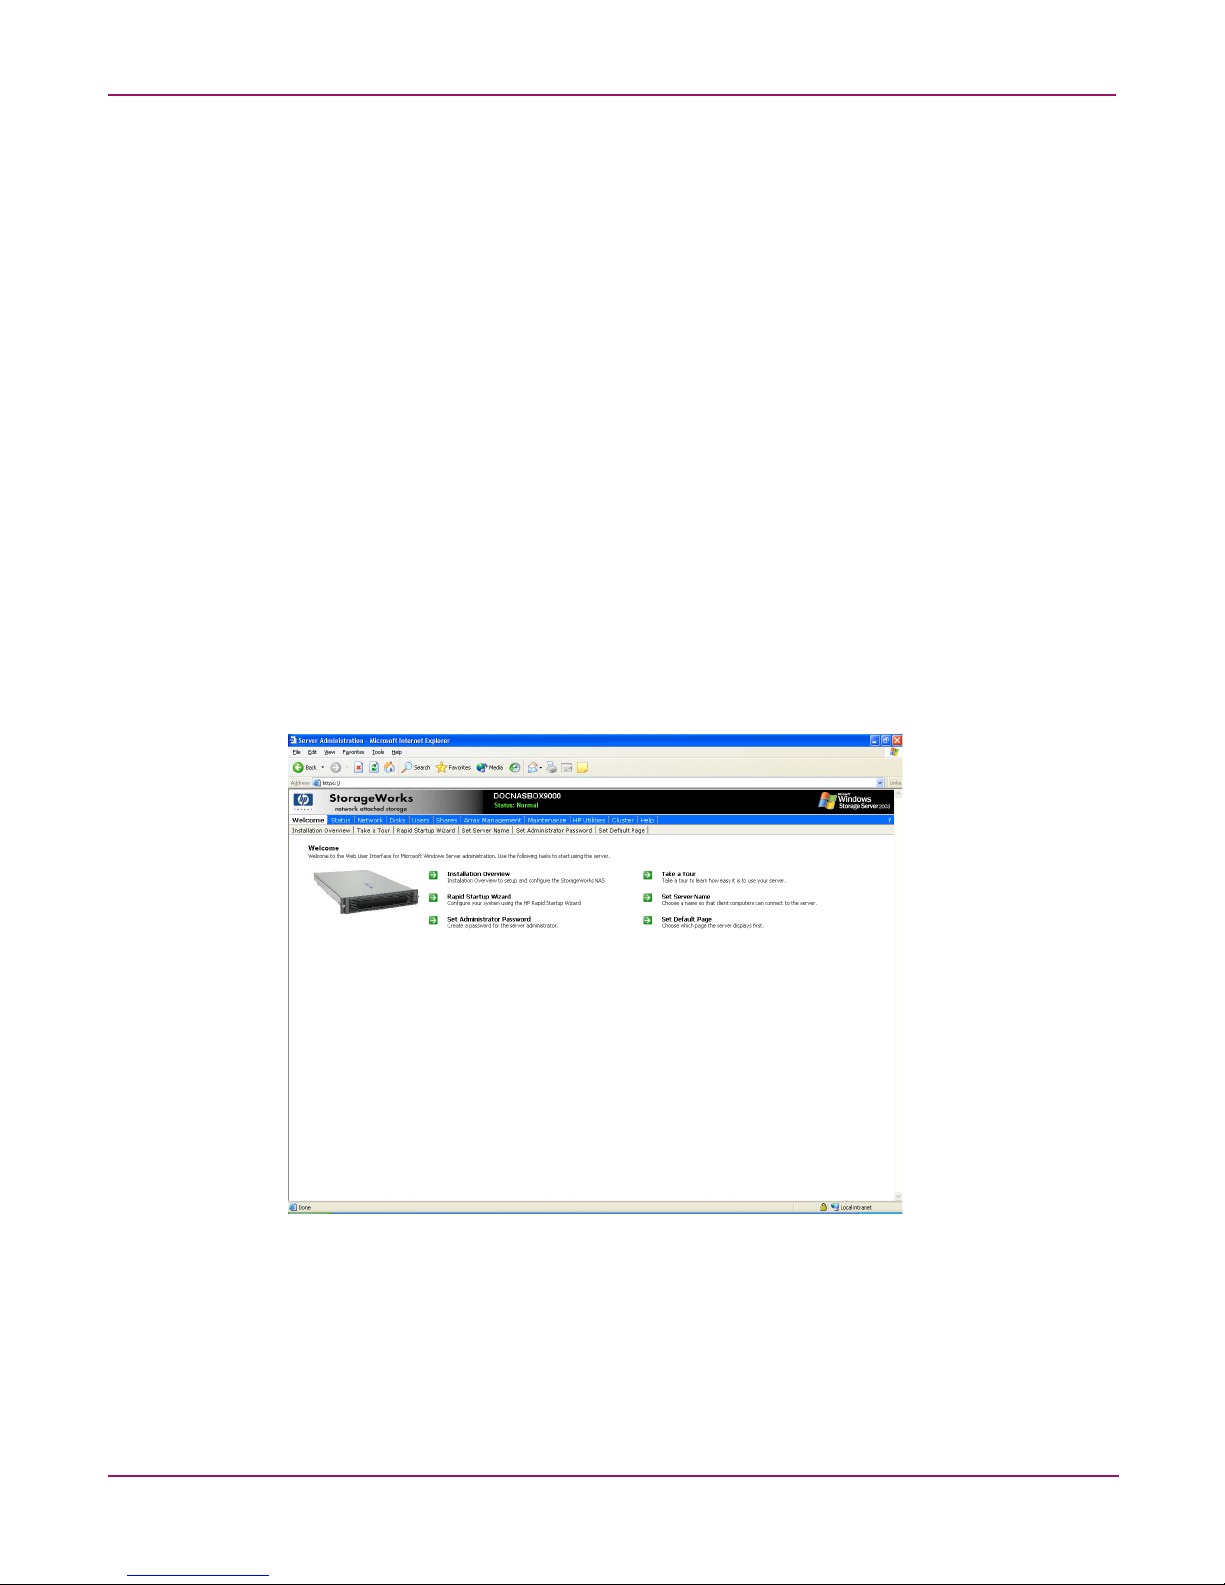
NAS Server Web-Based User Interface
The WebUI provides for system administration, including user and group management, share
management, and local storage management.
Refer to the HP StorageWorks NAS 4000s/9000s Installation Guide for detailed information
on using the Rapid Startup Wizard for initial setup.
To access the WebUI, launch a Web browser and enter the following in the address field:
https://<your NAS machine name or IP Address>:3202/
The default user name is Administrator. The default password is hpinvent. Online
help for the WebUI is available by clicking the Help tab on the primary WebUI screen.
The primary screen of the WebUI is shown in Figure 5.
System Overview
Figure 5: Primary WebUI screen
As shown in Figure 5, the following areas are administered through this interface:
Menu Tabs
Status
The Status option displays alerts generated by the WebUI.
27NAS 4000s and 9000s Administration Guide

System Overview
Network
The Network option contains system settings, including system identification, global settings,
interfaces settings, administration settings, Telnet settings, and SNMP settings.
Disks
Use this option to manage disks, volumes, disk quotas, and shadow copies.
Users
Use this option to manage local users and groups.
Shares
The administrator creates folders and shares to control access to files. When a share is created,
the administrator indicates the protocols that can be supported by that share as well as the
users and groups of users that have access. Protocol parameters are entered in this Shares
option. See Chapter 6 for additional information.
Array Management
Manage arrays and pathing software from this tab.
Maintenance
Maintenance tasks include setting date and time, performing system restarts and shutdowns,
viewing audit logs, setting up Email alerts, linking to remote management, and selecting and
configuring your UPS.
HP Utilities
Access HP system management utilities such as remote management, enable floppy boot, File
and Print Services for NetWare, and the HP System Management WebUI.
Cluster
Use this option to configure and manage the cluster.
Help
This option contains help information for the WebUI.
Welcome Screen Contents
Installation Overview
Use to set up and configure the NAS server. This is an online, supplemental guide. A more
comprehensive paper document is provided in the country kit that shipped with the server.
Rapid Startup Wizard
Use this utility to enter system setup and configuration information.
Set Administrator Password
Create a password for the server appliance administrator.
Take a Tour
Learn how to use the NAS server.
28 NAS 4000s and 9000s Administration Guide
Set Server Name
Choose a name so that client computers can connect to the server.
Set Default Page
Choose which page the server appliance displays first.
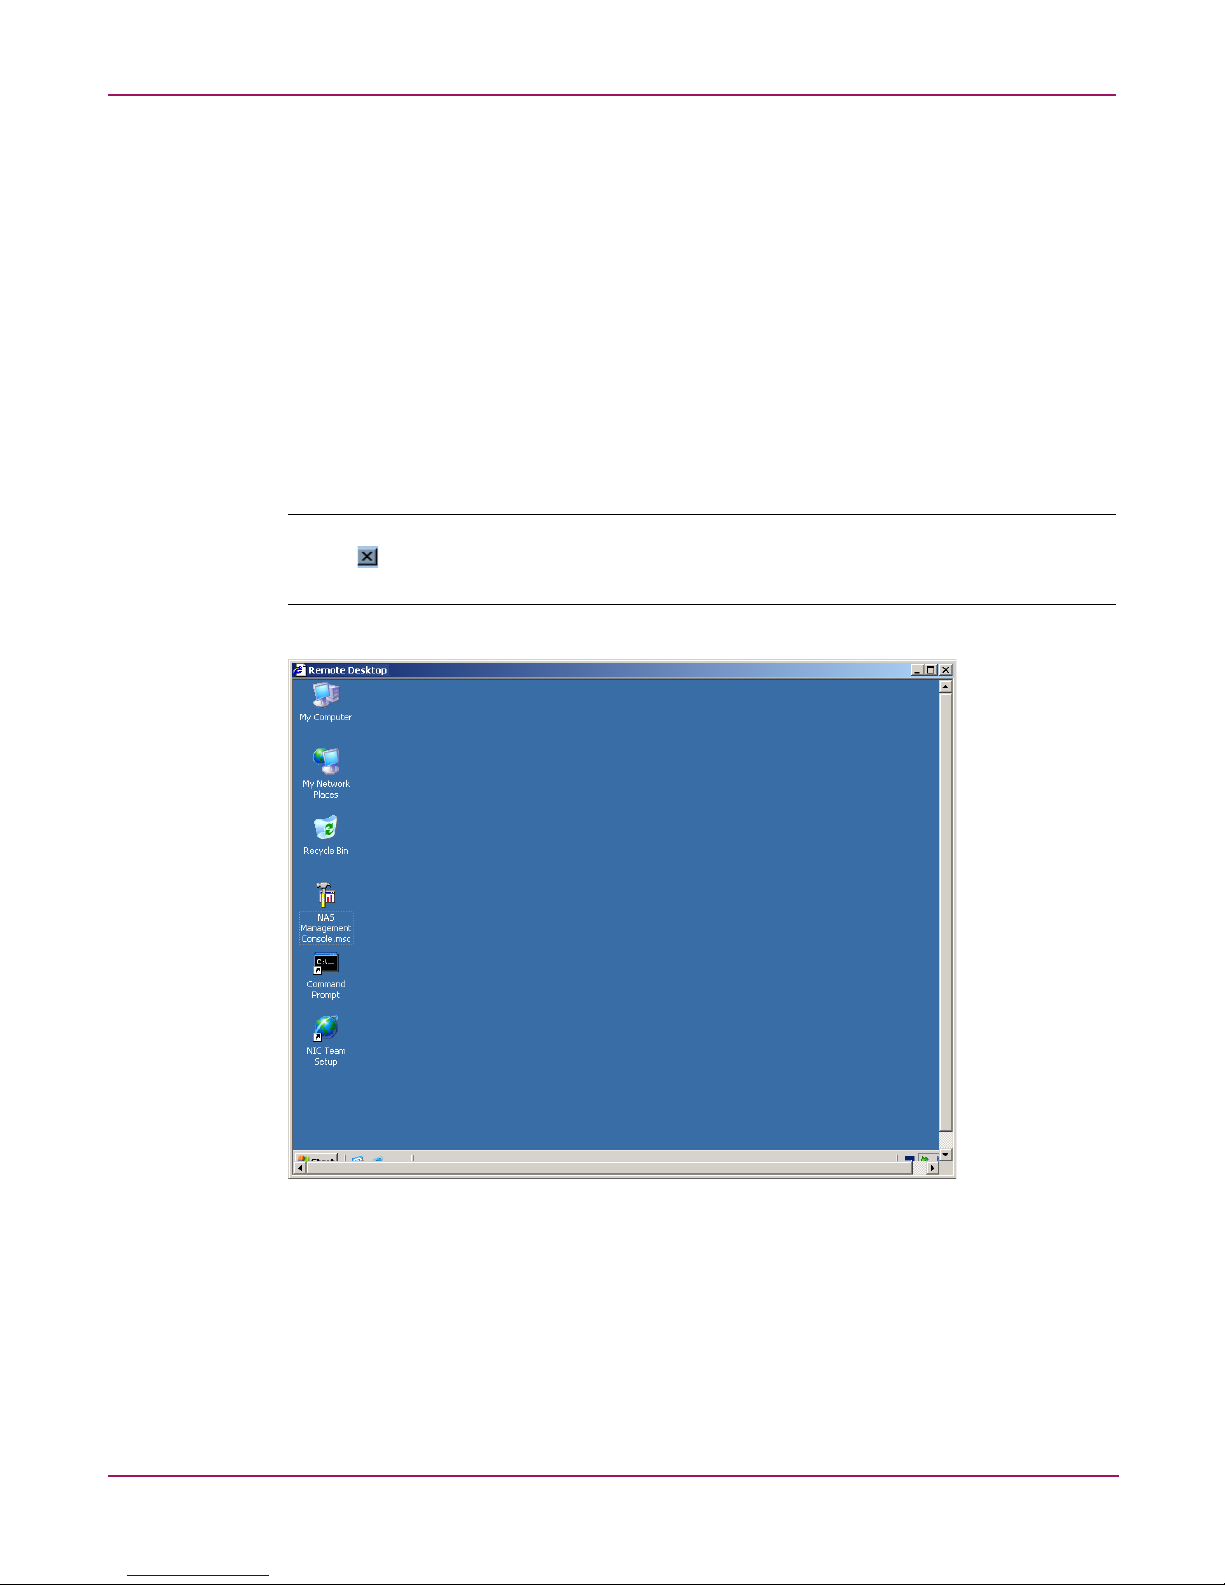
NAS Server Desktop
The NAS server desktop can be accessed by:
■ Directly connecting a keyboard, mouse, and monitor
■ Using the WebUI Maintenance tab and selecting Remote Desktop
■ Using the Integrated Lights-Out port
Note: When using Remote Desktop to connect to the NAS desktop do not use the window close
feature ( ). Click on Start/Log Off Administrator to exit Remote Desktop. See “Improper Closure of
Remote Desktop” in Chapter 2.
System Overview
Figure 6: NAS server desktop
The following icons are available from the Desktop:
■ NAS Management Console
■ NIC Team Setup
29NAS 4000s and 9000s Administration Guide

System Overview
NAS Management Console
Click this icon to access the following folders:
■ Core Operating System is used to manage local users and groups, access performance
logs and alerts, and manage the event viewer.
■ Disk System contains access to the HP Array Configuration Utility and local disk
management, including a volume list and a graphical view of the disks.
■ File Sharing contains modules for the configuration of file sharing exports. CIFS/SMB
(Windows) and NFS (UNIX) file shares are managed through this folder.
■ System contains system summary information.
NIC Team Setup
Click this icon to install the HP Network Teaming and Configuration utility. See Chapter 2 for
additional information on this feature.
30 NAS 4000s and 9000s Administration Guide
 Loading...